

Umarex USA U-RHKB-515 User Manual
Owner's Manual
CO2 Air Pistol
.177 cal. (4.5 mm)Pellet
Patent Pending
U-RHKB-515
WARNING:
injury or death. May be dangerous up to 350 yards (320 meters).
YOU AND OTHERS WITH YOU SHOULD ALWAYS WEAR SHOOTING GLASSES TO PROTECT YOUR
EYES. READ ALL INSTRUCTIONS BEFORE USING.
BUYER AND USER HAVE THE DUTY TO OBEY ALL LAWS ABOUT THE USE AND OWNERSHIP OF
THIS AIRGUN.
THIS AIRGUN IS INTENDED FOR USE BY THOSE 16 YEARS OF AGE OR OLDER.
Not a toy. Adult supervision required. Misuse or careless use may cause serious
10/2004 8.410.80.03
WARNING:
This product contains lead, a chemical known to the State of California to cause cancer and birth defects
(or other reproductive harm.)
Please read this owner's manual completely. And remember, this air pistol is not a toy. Treat it with the same
respect you would a firearm. Always carefully follow the safety instructions found in this owner's manual and
keep this manual in a safe place for future use.
If you have any questions, regarding your new air pistol, please contact Crosman Customer Service at 1800-724-7486, 585-657-6161 or www.crosman.com.
Lead pellets. Do not inhale dust or put pellets in mouth. Wash hands after handling.
OPERATING PROCEDURES
1. Learning the Parts of Your New CO2 Air Pistol
2. Operating the Safety
3. Insertion and Removal of CO
4. Loading and Unloading Pellets
5. Aiming and Firing Safely
6. Sights
7. Emergency sights
2 Cylinders
8. Battery change
9. Removing a Jammed Pellet
10. Maintaining Your Air Pistol
11. Reviewing Safety
Specifications
Problems
Warranty
1. Learning the Parts of Your New CO2 Air Pistol
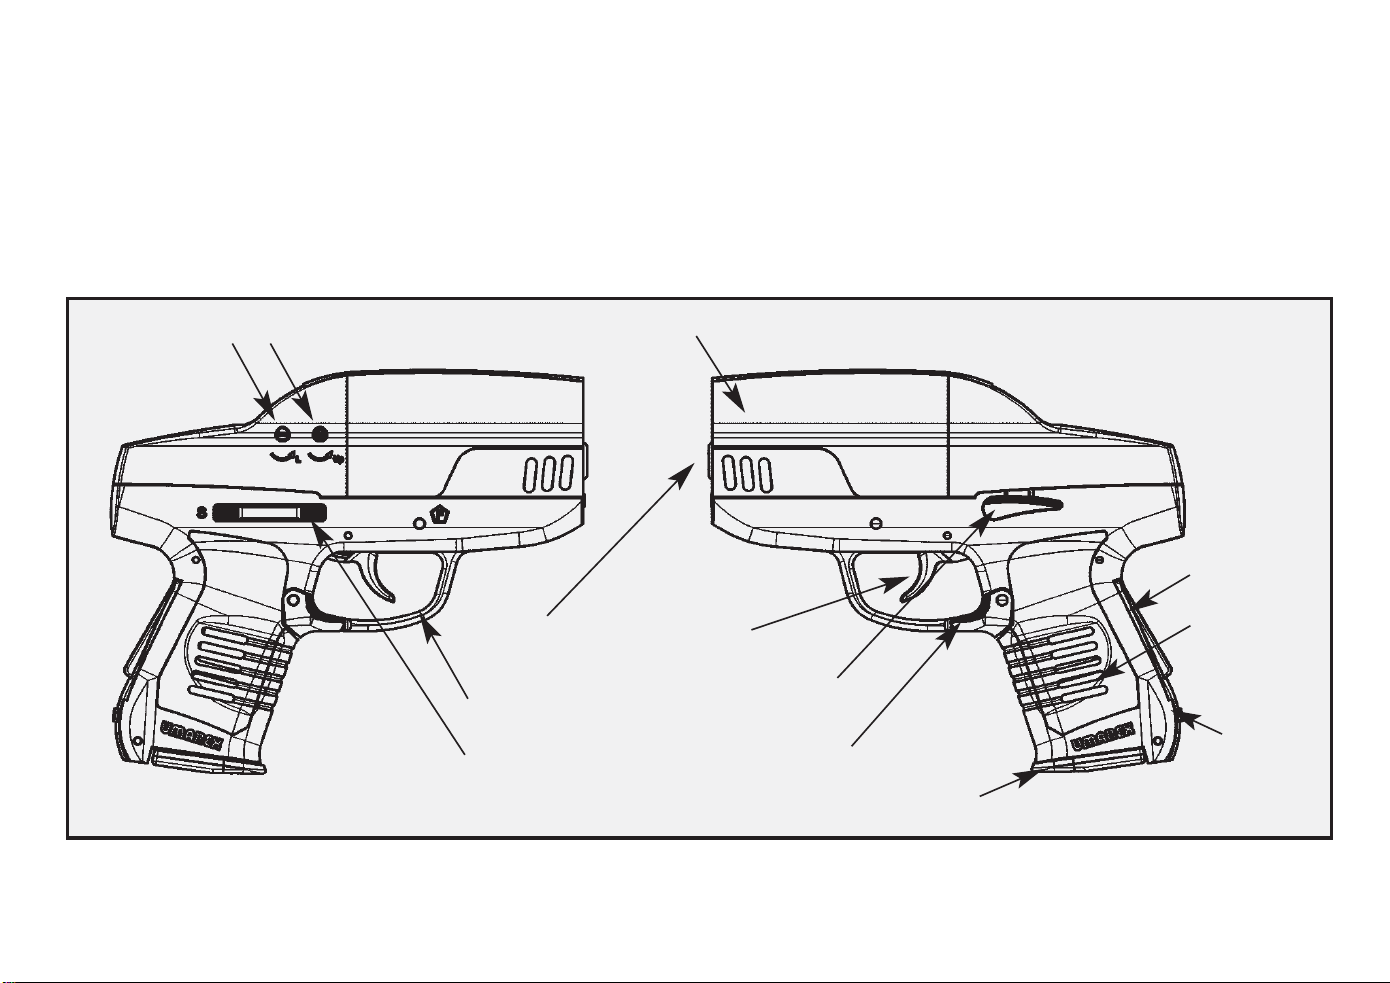
Learning the names of the parts of your new air pistol will help you to understand your owner's manual.
Use this manual to increase your enjoyment of this air pistol.
Windage and elevation adjustment
Muzzle
Frame
Safety
Slide (Red dot inside)
Trigger
Slide Release Lever
Magazine
release lever
Magazine
Red dot
On-button
Backstrap
Brightness
adjustment
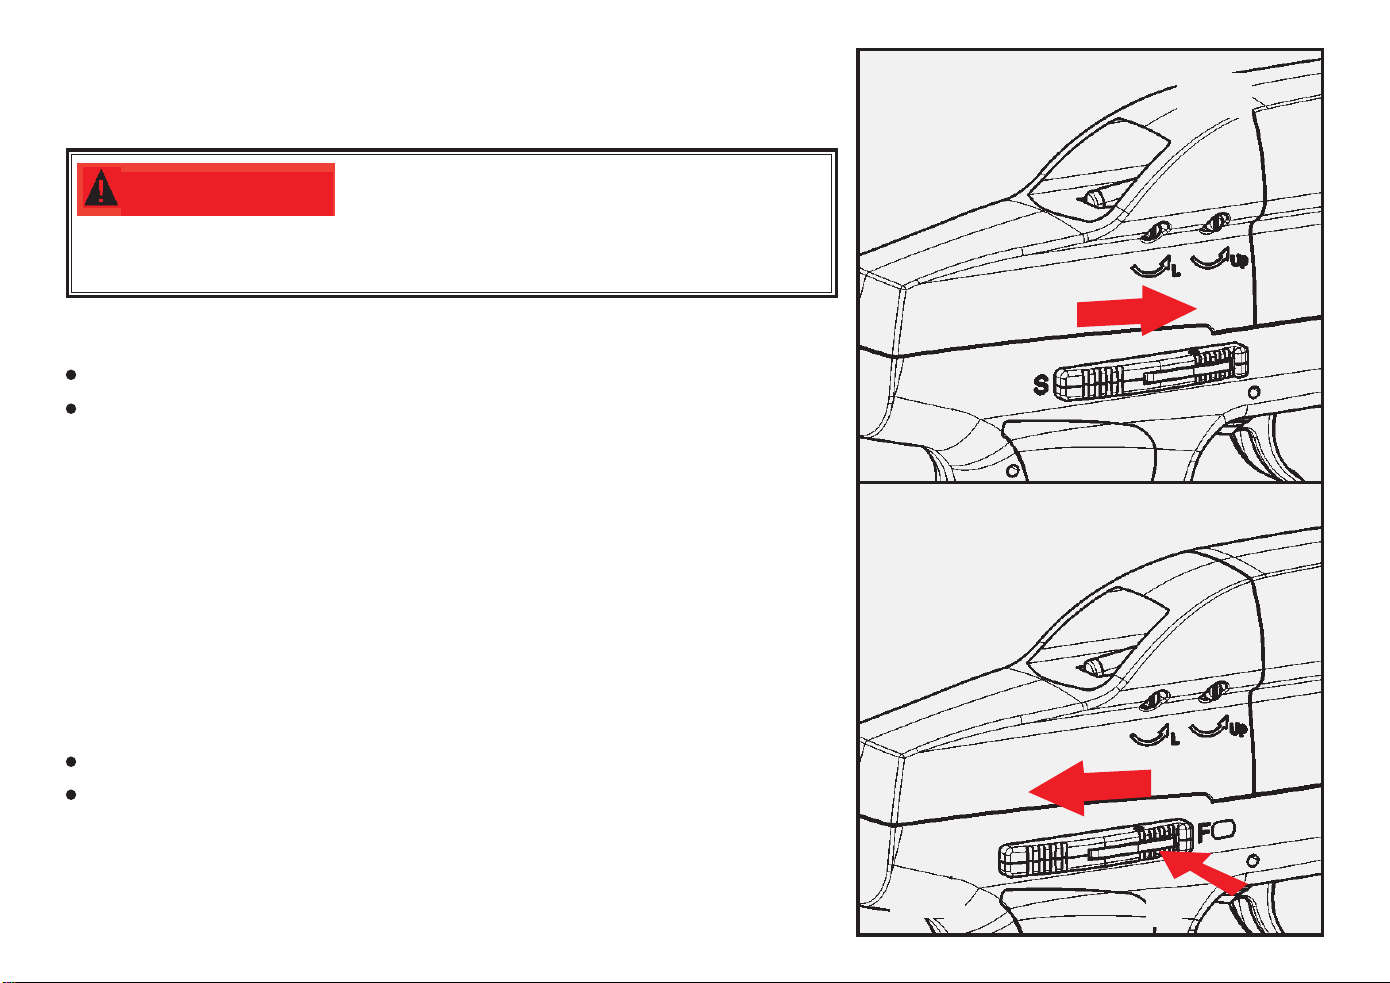
2. Operating the Safety
“On Safe”
Fig. 1
WARNING:
position until you are actually ready to shoot. Then push the
safety to the "OFF SAFE" position.
2.1 To Put The Air Pistol "ON SAFE:"
Locate the safety on the right hand side of the receiver.
Push the safety forward, toward the muzzle end of the air
pistol (Fig. 1). The safety is not "On Safe" unless it is pushed
forward all the way and the RED dot and the "F" on the
receiver are NOT showing.
Like all mechanical devices, an air pistol safety can fail. Even
when the safety is on “On Safe”, you should continue to
handle the air pistol safely. NEVER point the air pistol at
any person. NEVER point the air pistol at anything you do
not intend to shoot.
2.2 To Take The Air Pistol "OFF SAFE":
Locate the latch on the safety (Fig. 2)
Push in the latch on the safety (1.) and slide the safety
rearward (2.) toward the rear sight.
When you can see the RED dot and the "F" on the receiver,
the air pistol is "Off Safe" and can be fired.
Keep the air pistol in the "ON SAFE"
“Off Safe”
Fig. 2
2.
1.
3. Insertion and Removal of CO2 Cylinders
WARNING:
late or incinerate them. Do not expose them to heat or store CO2 cylinders at temperatures above 120°F
(48.9°C).
WARNING:
come in contact with skin.
3.1 Inserting the CO2 Cylinder
Make sure the air pistol is "On Safe" (See 2.1).
Make sure the air pistol is unloaded (See 4.2).
Point the air pistol in a SAFE DIRECTION.
Press the magazine release lever and slide the magazine out of the bottom of the grip (Fig. 3).
Turn the magazine shoe clockwise towards "OPEN" (Fig. 4).
If a CO
Insert the CO2 cylinder with the small neck of the cylinder pointing upward toward the top of the
magazine. (Fig. 5).
Tighten the cylinder into place by turning brass retaining screw as shown in Figure 6 (up) until secure and
close the magazine shoe by turning it towards "POWER" until it reaches the position shown in Figure 6.
Insert the magazine up into the bottom of the grip until it locks into place (Fig. 7).
With the air pistol unloaded (See 4.2) and pointed in a SAFE DIRECTION, take "Off Safe"
(See 2.2) and pull the trigger to fire. If your air pistol does not make a popping noise after pulling the
trigger, the CO
above steps until you hear the popping noise.
2 cylinder is already installed, See 3.2 - Removing the CO2 Cylinder.
2 is not being discharged. Return the safety to the “ON SAFE” position (see 2.1). Repeat
CO2 cylinders may explode at temperatures above 120° F (48.9° C). Do not muti-
Keep hands away from escaping CO2 gas. It can cause frostbite if allowed to

3.2 Removing the CO2 Cylinder
WARNING:
Keep hands away from escaping CO
Always make sure that the CO
2 cartridge is empty before attempting to remove it from the air gun.
2 gas. It can cause frostbite if allowed to contact with skin.
Make sure the air pistol is "On Safe" (See 2.1).
Make sure the air pistol is unloaded (See 4.2).
Point the air pistol in a SAFE DIRECTION.
Press the magazine release lever and slide the magazine out of the bottom of the grip (See Fig. 3).
Turn the magazine shoe towards "OPEN" (See Fig. 4)allowing CO
2 to ecape.
Slowly turn the brass cylinder retaining screw (down) to tighten; allowing any
remaining CO2 gas to escape (See Fig. 4).
Remove the CO2 cylinder by turning the magazine over and allowing cylinder to fall out.
NOTE: High temperatures may cause damage to the air pistol. The maximum temperature for the storage
or use of this air pistol should not exceed 120°F (48.9°C). This temperature can easily be reached when
the air pistol is exposed to direct sunlight.
FIRING THE AIR PISTOL WITH LOW GAS PRESSURE MAY CAUSE A PELLET TO GET STUCK IN
THE BARREL.
Never try to force any CO
2 cylinder into or out of place as it may result in injury to you or damage to your
air pistol. Do not store your air pistol with a CO2 cylinder in it. This is very important to remember, as it
will prolong the longevity of your air pistol seals.
Fig. 3
Fig. 4
magazine shoe
Fig. 5 Fig. 6
Fig. 7
 Loading...