


DuraMax
8.027.96.02.1 / Rev 05.07
GB
D
NL
F
DK
E
Bedienungsanleitung
Operating instructions
Gebruiksaanwijzing
Betjeningsvejledning
Mode d´emploi
Instrucciones para su uso
Käyttöohje
3-12
13-22
23-32
33-42
43-52
53-62
63-72
FIN

2
DuraMax

DuraMax
ENGLISH
Professional rotary laser in extremely rugged design –
horizontal levelling even under tough conditions
Automatic rotary laser 635 nm, self-levelling range ± 5° horizontal, precision
1 mm / 10 m, temperature-resistant sensor system (SLS). Ideal for horizontal
levelling – even under toughest conditions – e.g. in combination with the
optional machine receiver SensoPilot Pro. Highest reliability is guaranteed
through the ant-drift system (ADS): The electronics permanently monitor the
measuring process and switch the laser off in the case of any outside
interference or disturbance. Adjustable horizontal tilt, easy one-button
operation. Includes SensoCommander laser receiver and remote control all in
one unit.
General safety instructions
Caution:
Do not look directly into the beam. Lasers must be kept out of
reach of children. Never intentionally aim the
device at people. This is a quality laser measuring
device and is 100% factory adjusted within the
stated tolerance. For reasons of product liability,
we must also draw your attention to the following: Regularly check the calibration before use, after transport and after extended periods of storage. We
also wish to point out that absolute calibration is only possible in a specialist
workshop. Calibration by yourself is only approximate and the accuracy of
the calibration will depend on the care with which you proceed.
Warranty:
The warranty period is 2 years from the date of purchase. The warranty
covers all material or manufacturing defects occurring during this time. The
following are excluded from warranty: Damage due to improper use (e.g.
operation with wrong type of current/voltage, connection to unsuitable
power source, fall onto hard surface, etc.) or improper storage, normal wear
and tear, and defects which only insignificantly impair the value or suitability
for use. Any tampering by unauthorised persons will render this warranty
void. In the event that you need to claim warranty, please take the complete
device together with all information and the invoice to one of our dealers or
send it in to Umarex-Laserliner.
Note: This product is a precision instrument that must be handled and
treated with care. Avoid shocks and impact. Always keep and carry in the
case! Switch all lasers off and secure the pendulum. For cleaning, use a soft
cloth and glass cleaner.
13
Laser light !
Do not stare into the
beam or view directly
with magnifiers.
Class 2 laser
EN60825-1:2003-10

DuraMax
Deutsch 1
ENGLISH
A Prism head
B Control panel
C Tilt display
D Tilt button
E Y axis display
F Operating / Battery display
G ON / OFF button
H Receiver window for remote
control
A
B
F
G
I
J
I X axis display
J Auto/man button
K Battery compartment
L 5/8” thread (bottom)
M Battery charge display
N Charger socket
O Quick sighting
H
E
D
M K
C
H
14
L
N
O
(4 x Model 06.2007)

RoundLite Signal
Transmitter (optional)
This system is ingeniously
simple: RoundLite and
SensoCommander Pro
RF communicate with each
other via radio technology to form an
intelligent network. RoundLite thereby
acts as an extended display of the laser
receiver. With 6 extra-bright LEDs,
RoundLite shows the exact position of
the laser.
Note: For SensoCommander Pro RF
only.
DuraMax
ENGLISH
1 IR output signal
2 Receiver field for laser beam
3 SpotLite marking LED
4 LED display
5 Vial
6 Securing screw
7 Universal mount
8 Securing lever
9 Battery compartment (on back)
10 Control panel
11 LCD display (on back)
12 LCD display
13 All-round marking groove
SensoCommander (optional) - Accessory
The SensoCommander is an all-in-one remote control and laser receiver unit.
3
1
6
7
8
10
13
2
3
1
6
7
8
10
9
12
11
13
5
SensoCommander 120:
(Diodes also on the back)
SensoCommander Pro 310
SensoCommander Pro 200 / 300
2
4
9
(screwed)
15ENGLISH 15
2
3
1
6
7
8
10
9
11
12
13
5

DuraMax
ENGLISH
Self-Levelling-System (SLS)
The AutoControl-Master ACM is of the self-levelling kind. After it has been
put in the required basic position, fine adjustment is being effected
automatically. Horizontal and vertical orthogonal adjustments are effected by
the self-levelling system (SLS), while the X-axis and the Y-axis are scanned by
two electronic measuring sensors. The working angle is ± 5°.
Anti-Drift-System (ADS)
The Anti-drift system (ADS) prevents mismeasurements. Its principle of
function: 30 seconds after ADS has been activated, the laser is permanently
being checked for its correct adjustment. In case the instrument has been
moved by external influences or the laser has lost its frequency, the system
switches itself automatically off and the "tilt"-LED shows a permanent light.
After the instrument has been switched on, the ADS is not active. In order to
protect the instrument from position changes caused by external influences,
the ADS has to be activated by pressing the push-button "tilt"(D). Should the
instrument be moved by external influences, then the laser is switched off
and the "tilt"-LED (C) shows a permanent light. The instrument has to be
switched off and -on again if work is to be commenced. This is a simple and
reliable prevention of misreadings.
16
The laser switches
itself off for safety
reasons, the "tilt"LED shows a
permanent light.
ON
External
influence
Adjustment phase SLS
ADS
activated,
long blink
signals in tilt
display (C).
ADS in focus
after 30 sec.,
short blink signals
in tilt display (C).
Rotation
begins
Attention: The ADS-function will switch on the control of the laser 30 sec.
after the laser has completely been levelled (adjustment phase). Tilt display
(C) emits long blink signals during the adjustment phase and short blink
signals when ADS is activated

DuraMax
Deutsch 1
ENGLISH
Operation of the DuraMax
Charging the batteries
• Before using the DuraMax, fully charge
the batteries
• Open the battery compartment (K),
insert the batteries and connect the
plugs to the sockets. The plugs fit in the
sockets in one position only (see pictures
on right). Reclose the battery
compartment.
• Connect the battery charger/mains unit
to a mains source and plug into the sokket (N). Please only use the
charger/mains unit supplied with the
device. If a different one is used, the
warranty will become void.
• The device can also be operated with standard alkali batteries (4 x type D).
Insert the batteries as shown by the installation symbols. Ensure the
polarity is correct.
• If the LED (F) blinks constantly, either the batteries must be exchanged or
recharged.
Insertion of batteries in the SensoCommander:
• Remove the battery cover (9) and insert the batteries as shown by the
installation symbol, ensuring that the polarity is correct. Then replace the
cover.
• To extend battery life, the receiver switches off automatically after about
5 minutes if not used.
Note:
Do not expose batteries to excessive heat such as sunshine, fire, etc. Dry
batteries must not be recharged. Used batteries must not be disposed of as
household waste. Please take them to a collection point for used batteries or for
special waste. Ask your local authority for further details. Batteries with the
recycling symbol can also be returned to our dealerships or to our Technical
Service.
17

DuraMax
ENGLISH
Operation
Setting up:
Position the device on a level surface or on a tripod.
• Press the "ON/OFF" switch.
• The device automatically levels itself within a range of ± 5°. When levelling
has been completed, the laser rotates at maximum speed. The DuraMax is
in hand receiver mode. The operating display (F) is lit up. The laser beam
can now be received using the SensoCommander.
Slope mode:
• The SLS adjusts the X and Y axes. However, if it is intended to project an
incline, SLS must be switched off.
• To project an aincline, press the auto/man (J) button. The X axis can now
be adjusted, and the X axis display (I) lights up. To adjust the inclination of
the Y axis, press the tilt button (D); the Y axis display (E) lights up.
• Adjustment of the X and Y axes is done using the SensoCommander. To
do this, press buttons 15.
18
Note: If the device is too far off the horizontal (more than 5°), a warning
signal will sound and the rotor head will stop. In this case, the device must
be repositioned on a more level surface.
In one plane
In two planes
Note: The DuraMax is characterised by great ease of operation and is only
equipped with hand receiver mode and tilt mode. For this reason, not all the
buttons on SensoCommander 120 and Pro are used.

Universal mount (optional):
The receiver can be installed on levelling staffs with the aid of
the universal mount. To do this, insert the universal mount
into the laser receiver and secure on the levelling staff with
the aid of the screw. To release the universal mount from the
laser receiver, turn the quick release lock in the direction of the
arrow.
DuraMax
ENGLISH
Working with the SensoCommander (optional)
Volume
adjustment:
Volume adjustment feature on SC 120 and Pro.
Precision range:
Mode with smaller
tolerance for precise
alignment (e.g. with
measuring staff).
Free-hand range:
Mode with greater
tolerance for less precise
alignment by hand.
Control panel SC 120 / Pro
14 Switchover between
X and Y axes in tilt or
calibration mode
15 Sound volume /
axis adjustment in tilt
or calibration mode
16 Hand receiver mode
17 Save calibration
The SensoCommander can recognise the laser beam over
long distances. Set the device to hand receiver mode
(press button 16). Move the SensoCommander up and
down through the laser beam until the middle display
appears. Now mark the height on the all-round marking
groove. The Spotlite additionally shows the measured
height.
14
15
17
1
2
Note: The laser receiver has two tolerance settings: Precision and free-hand
setting. On the SensoCommander 120, the settings are indicated by LEDs:
precision setting: green; free-hand setting: orange. On the SensoCommander
Pro and Classic, changeover between the settings is done by the button.
19
16

DuraMax
ENGLISH
Preparing the calibration check:
It is possible for you to check the calibration of the laser. To do this, position
the device midway between 2 walls, which must be at least 5 metres apart.
Switch the device on. The best calibration results are achieved if the device is
mounted on a tripod. Switch on the device and determine the marking
points with the SensoCommander. To do this, set the SensoCommander Pro
to the fine adjustment range.
1. Mark point A1 on the wall. (Use spot mode.)
2. Turn the device through 180° and mark point A2. You now have a hori-
zontal reference between points A1 and A2.
Performing the calibration check:
3. Position the device as near as possible to the wall at the height of point
A1. Now adjust the device in the X axis.
4. Turn the device through 180° and mark point A3. The difference between
points A2 and A3 is the tolerance for the X axis.
5. To check the Y axis, repeat steps 3 and 4.
20
Note: If points A2 and A3 are more than 1 mm / 10 m apart on either the
X or Y axis, the device is in need of calibration. Contact your
authorised dealer or else the UMAREX-LASERLINER Service Department.
A3
A2
<
1 mm / 10 m = OK
A3
A2
A2
A1
A1
A2
4.
3.
2.
1.
A1

DuraMax
ENGLISH 21
Recalibration
1. To recalibrate the device, you need an additional remote control or an
additional SensoCommander (except SensoCommander Classic). Position
one SensoCommander at the height of reference point A2 (see the two
previous pages). Then perform calibration with the other.
2. During calibration, pay attention to the alignment of the DuraMax and
the displays for the X and Y axes (E, I). Always calibrate both axes. You
can switch between axes with button 14 of the additional remote control
or SensoCommander.
3. Set the device to calibration mode:
Switch off the DuraMax, and then, with the auto/man button (J) depressed, switch on again (briefly press ON/OFF button (G). Keep the auto/man
button (J) depressed until the tilt display (C) lights up. When this happens,
the auto/man button (J) can be released.
4. Correcting calibration:
Using button 15 of the additional remote control or SensoCommander,
move the laser from its present position to the height of reference point
A2.
5. Ending calibration:
Cancel: By switching off the DuraMax, the entire calibration is rejected
and the previous status restored.
Save: The new calibration can be saved by pressing button 17 of the
additional remote control or SensoCommander.
X
Y
X- / Y- axis
Note: Regularly check the calibration
before use, after transport and after
extended periods of storage. Always
make sure to control all axes. See
also "General safety information" on
page 13.
DuraMax
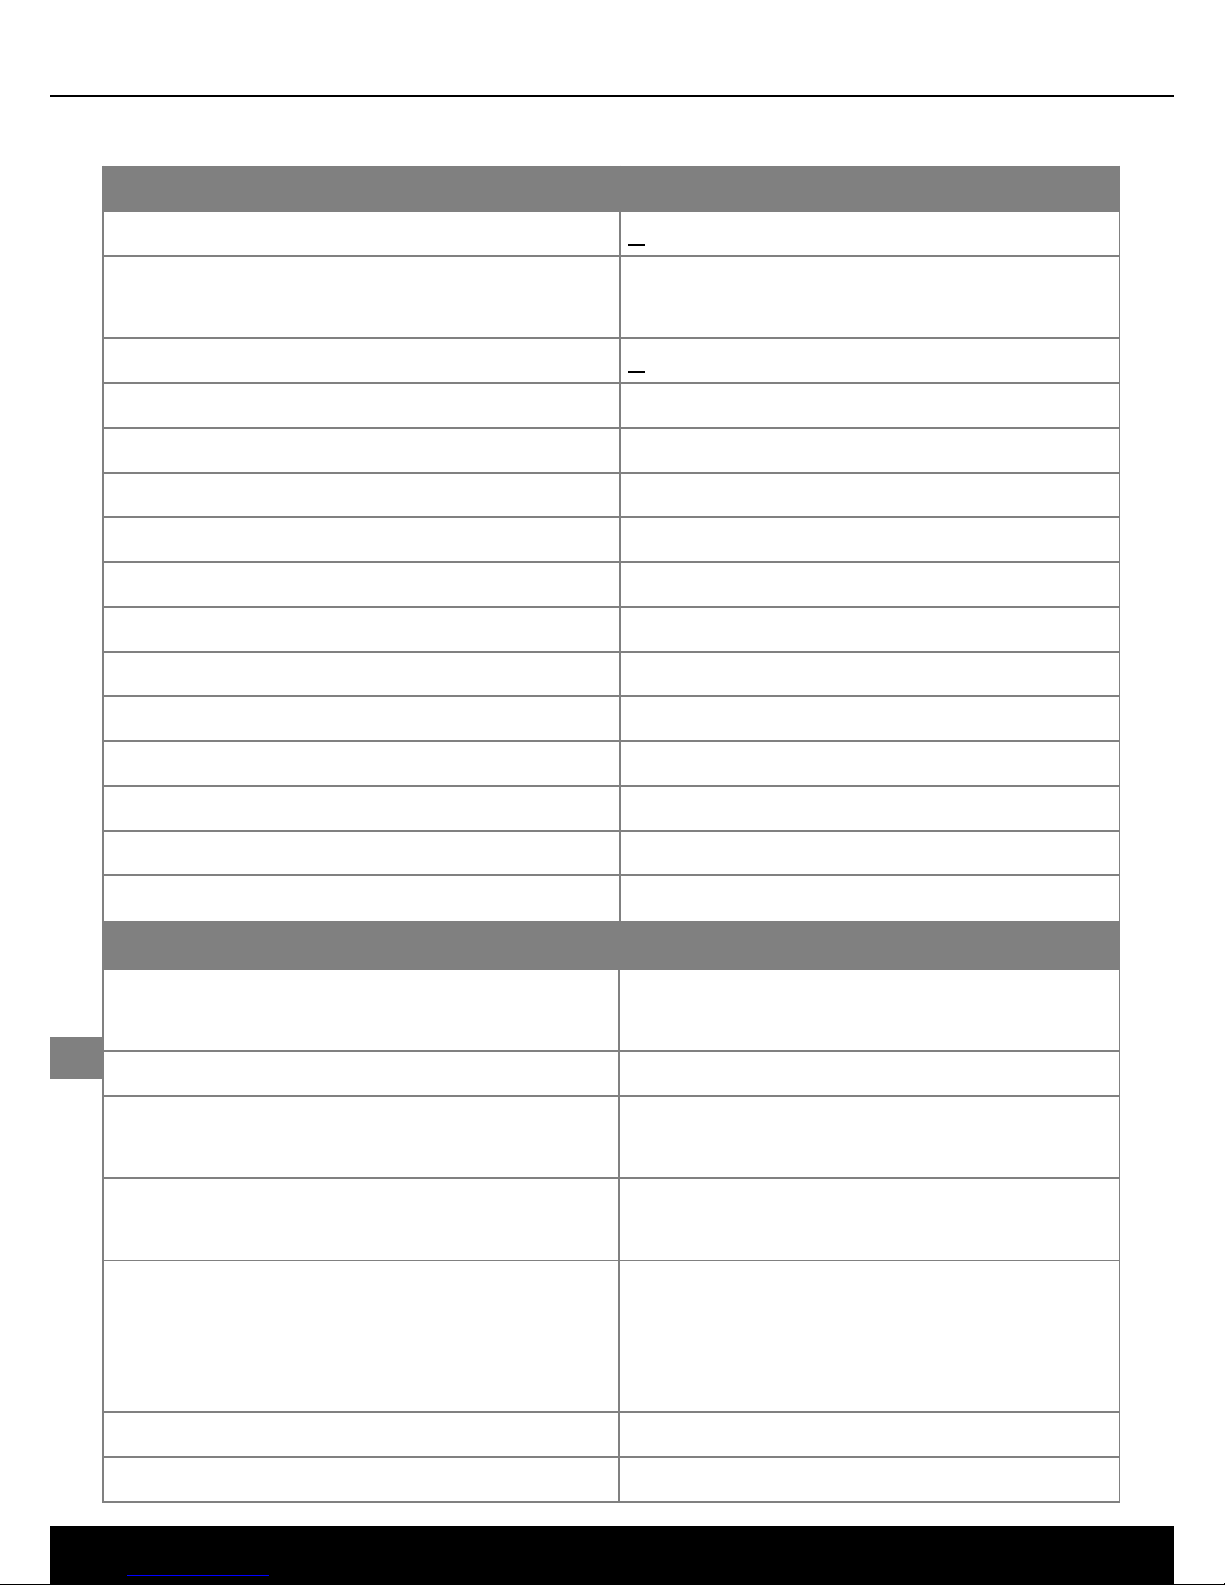
Technical Data (Subject to technical alterations).
ENGLISH
22
DuraMax
Self-levelling range
+ 5°
Adjustment speed
approx. 30 sec – on entire working
angle
Precision
+ 1 mm / 10 m
Sensor Electronic levelling device
Horizontal levelling
Automatic
Rotation speed
500 RPM
Remote control
Infrared IR
Laser wavelength
635 nm
Laser
Class 2 (EN60825-1:2003-10)
Laser output rating
< 1 mW
Rechargeable batt. operating time
approx. 60 h
Non-rechargeable battery life
approx. 90 h, 4 x Typ D (Mono 1,5V)
Battery recharging time
approx. 14 h
Battery recharging time
-10°C ... +50°C
Weight
3 kg
SensoCommander (Optional)
Batteries / Power supply:
SC Pro 200,300 / Pro 310 / SC120
4 x type AA / 1 x 9V block / 2 x type AAA
Battery life
approx. 70 h (mixed operation)
Remote control range IR-Control
RF-Control
up to 15 m
up to 50 m (only RF-version)
RF-Control (only RF-version)
Frequency / Specification 896 - 870 MHz (SRD Radio) / CE 0700!
Laser reception range 120
SensoCommander: Pro 310
Pro 200
Pro 300 / 300 RF
120 m
300 m
200 m
300 m
Operating temperature
-10°C ... + 50°C
Storage temperature
-10°C ... + 70°C

73
DuraMax

74
DuraMax

www.laserliner.com
75
Zubehör (optional)
Accessories (optional)
Accessoires (optioneel)
Tilbehør (flere typer)
Accessoires (en option)
E
I
PL
FIN
Accesorios (opcional)
Accessori (optional)
Akcesoria (opcja)
Lisämahdollisuuksia
valinnaisvarusteilla
Acessórios (opcional)
Art.-Nr: 080.50
Art.-Nr: 080.33
Art.-Nr: 035.00.A
Art.-Nr: 020.70A
Art.-Nr: 075.108 (8m)
Art.-Nr: 075.105 (5m)
Art.-Nr: 028.61
P
GB
D
NL
DK
F
Art.-Nr: 035.01

GmbH & Co KG
Donnerfeld 2
59757 Arnsberg, Germany
Tel.: +49 2932 638-300, Fax: -333
www.laserliner.com
Service- og Postadresse
Service-Telefon +49 2932 638-486
Fax +49 2932 638-489
Livraison et expédition:
Telefon: +49 2932 638-300
Fax +49 2932 638-333
Dirección de envío y de servicio
post-venta:
Telefon: +49 2932 638-300
Fax +49 2932 638-333
Service- und Versand-Anschrift:
Service-Telefon +49 2932 638-486
Fax +49 2932 638-489
Service- and Shipping Address:
Service phone +49 2932 638-300
Fax +49 2932 638-333
Service- en verzendadres:
Servicetelefoon +49 2932 638-300
Fax +49 2932 638-333
Umarex GmbH & Co KG
– Laserliner –
Möhnestraße 149,
59755 Arnsberg, Germany
laserliner@umarex.de
GB
D
NL
F
DK
E
DuraMax
Laserstrahlung!
Nicht in den Strahl blicken
oder direkt mit optischen
Instrumenten betrachten.
Laser Klasse 2
EN60825-1:2003-10
Huolto- ja lähetysosoite:
Puhelin +49 2932 638-300
Fax +49 2932 638-333
FIN
 Loading...