

Page 1

USING YOUR
SUPERPRINT
PRO80
™
305-013100
Page 2

Ultratec, Inc.
450 Science Drive
Madison,WI 53711
(608) 238-5400 (Voice/TTY)
Fax: (608) 238-3008
Email: service@ultratec.com
www.ultratec.com
First Edition
August 2002
First Printing
© 2002 Ultratec, Inc.
and Turbo Code are registered trademarks of Ultratec, Inc.
Superprint Pro80, E-Turbo and Auto ID are trademarks of Ultratec, Inc.
ACKNOWLEDGEMENT
In 1963, Dr. Robert H.Weitbrecht, an
American physicist who was deaf, developed an acoustic coupler that could
send and receive teletypewriter signals
over the telephone lines. His invention,
the Weitbrecht Modem, enabled people
who are deaf to use the telephone for
the first time.
While modern technology now makes it
possible to build advanced microcomputer devices like your new
Ultratec text telephone, the Weitbrecht
modem remains the major technological breakthrough that
began telecommunications for the deaf. Ultratec wishes to
acknowledge the importance of Dr.Weitbrecht’s contribution to
the welfare of people who are deaf the world over.
Dr. Robert H. Weitbrecht,
1920–1983, inventor of
the first TTY modem.
Page 3

TABLE OF CONTENTS • i
TABLE OF CONTENTS
Table of Contents . . . . . . . . . . . . . . . . .i
Safety Instructions . . . . . . . . . . . . . . .iii
CHAPTER 1 Introduction . . . . . . . . . . . . . . . . . . . .1
Features . . . . . . . . . . . . . . . . . . . . . . . . . . . . . . . . .1
Overview of the Superprint Pro80 . . . . . . . . . . . . .3
Special Function Buttons . . . . . . . . . . . . . . . . . . . .4
CHAPTER 2 Setup . . . . . . . . . . . . . . . . . . . . . . . .7
Connecting Power & Phone Line . . . . . . . . . . . . . .7
Installing Printer Paper . . . . . . . . . . . . . . . . . . . . . .9
Setting the Date & Time . . . . . . . . . . . . . . . . . . . .10
CHAPTER 3 Calling & Answering . . . . . . . . . . . . . .11
Placing a Call . . . . . . . . . . . . . . . . . . . . . . . . . . . .11
Answering a Call . . . . . . . . . . . . . . . . . . . . . . . . .16
Conversation Etiquette . . . . . . . . . . . . . . . . . . . . .16
Conversation Memory . . . . . . . . . . . . . . . . . . . . .17
Interrupting . . . . . . . . . . . . . . . . . . . . . . . . . . . . .18
CHAPTER 4 Advanced Calling . . . . . . . . . . . . . . . .19
Greeting . . . . . . . . . . . . . . . . . . . . . . . . . . . . . . . .19
The Voice Announcer . . . . . . . . . . . . . . . . . . . . . .20
The Relay Voice Announcer . . . . . . . . . . . . . . . . .20
Send Memo . . . . . . . . . . . . . . . . . . . . . . . . . . . . .21
Emergency Dial . . . . . . . . . . . . . . . . . . . . . . . . . .21
Relay Dial with E-Turbo . . . . . . . . . . . . . . . . . . . .22
Relay Dial (without E-Turbo) . . . . . . . . . . . . . . . .24
3-Way Calling . . . . . . . . . . . . . . . . . . . . . . . . . . . .25
Wait for Response . . . . . . . . . . . . . . . . . . . . . . . .25
Transferring Calls . . . . . . . . . . . . . . . . . . . . . . . . .25
CHAPTER 5 Using Memos . . . . . . . . . . . . . . . . . .27
Saving a New Memo . . . . . . . . . . . . . . . . . . . . . . .27
Using Memos . . . . . . . . . . . . . . . . . . . . . . . . . . . .27
Editing a Memo . . . . . . . . . . . . . . . . . . . . . . . . . .28
Printing a Memo . . . . . . . . . . . . . . . . . . . . . . . . . .28
Clearing a Memo . . . . . . . . . . . . . . . . . . . . . . . . .28
CHAPTER 6 Using the Directory . . . . . . . . . . . . . .29
Saving a New Telephone Number . . . . . . . . . . . . .29
Editing a Number . . . . . . . . . . . . . . . . . . . . . . . . .30
Printing a Directory Entry . . . . . . . . . . . . . . . . . .30
Clearing a Directory Entry . . . . . . . . . . . . . . . . . .30
Clearing the Dialing Directory . . . . . . . . . . . . . . .30
Page 4

ii • TABLE OF CONTENTS
CHAPTER
7 Using Auto-Answer . . . . . . . . . . . . . . .31
How Auto-Answer Works . . . . . . . . . . . . . . . . . .31
Auto-Answer Memory . . . . . . . . . . . . . . . . . . . . .31
Turning Auto-Answer On . . . . . . . . . . . . . . . . . . .32
Turning Auto-Answer Off . . . . . . . . . . . . . . . . . . .32
Reviewing Messages . . . . . . . . . . . . . . . . . . . . . . .32
Editing the Outgoing Message . . . . . . . . . . . . . . . .32
Setting the Number of Rings . . . . . . . . . . . . . . . .33
Turning Off the Auto-Answer Relay Voice
Announcer . . . . . . . . . . . . . . . . . . . . . . . . . . . . .33
The Remote Message Retrieval Option . . . . . . . .33
CHAPTER 8 Using Caller ID . . . . . . . . . . . . . . . . .35
About Caller ID . . . . . . . . . . . . . . . . . . . . . . . . . .35
Turning On Caller ID . . . . . . . . . . . . . . . . . . . . . .35
Viewing Caller ID Information . . . . . . . . . . . . . . .36
CHAPTER 9 Using Voice Carry Over (VCO) . . . . . . . .39
What is Required? . . . . . . . . . . . . . . . . . . . . . . . .39
How to Place a VCO Call . . . . . . . . . . . . . . . . . . .40
VCO Information . . . . . . . . . . . . . . . . . . . . . . . . .41
CHAPTER 10 Personalizing General Options . . . . . . .43
The Options Button . . . . . . . . . . . . . . . . . . . . . . .43
The Printer Button . . . . . . . . . . . . . . . . . . . . . . . .46
Sticky Keys . . . . . . . . . . . . . . . . . . . . . . . . . . . . . .48
CHAPTER 11 Using Codes . . . . . . . . . . . . . . . . . . .49
Communication Codes . . . . . . . . . . . . . . . . . . . . .49
Turbo Code . . . . . . . . . . . . . . . . . . . . . . . . . . . . .49
Baudot Code . . . . . . . . . . . . . . . . . . . . . . . . . . . .50
ASCII (Optional) . . . . . . . . . . . . . . . . . . . . . . . . .50
CHAPTER 12 Care & Repair . . . . . . . . . . . . . . . . . .53
Battery Care . . . . . . . . . . . . . . . . . . . . . . . . . . . .53
Clearing All Memory . . . . . . . . . . . . . . . . . . . . . .55
Resetting the Superprint Pro80 . . . . . . . . . . . . . .55
Cleaning . . . . . . . . . . . . . . . . . . . . . . . . . . . . . . . .55
Repair . . . . . . . . . . . . . . . . . . . . . . . . . . . . . . . . . .56
Troubleshooting . . . . . . . . . . . . . . . . . . . . . . . . . .56
CHAPTER 13 Specifications . . . . . . . . . . . . . . . . . .59
Index . . . . . . . . . . . . . . . . . . . . . . .61
Page 5

SAFETY INSTRUCTIONS • iii
General Precautions
● SAVE THESE INSTRUCTIONS!
● Read and understand all instructions.
● Follow all warnings and instructions
on the Superprint Pro80 .
● Unplug the Superprint Pro80 from the
wall outlet and refer servicing to
qualified service personnel under the
following conditions:
✔ When the power supply cord or
plug is damaged or frayed.
✔ If liquid has been spilled into the
TTY.
✔ If the TTY has been exposed to rain
or water.
✔ If the TTY does not operate
normally when the operating
instructions are followed.
✔ If the TTY has been dropped and/or
damaged.
✔ If the TTY exhibits a distinct
change in performance.
● Adjust only those controls that are
covered by the operating instructions.
Improper adjustment of other controls
may damage the Superprint Pro80 .
● To clean: Unplug the Superprint
Pro80 from the wall outlet. Use a
damp cloth. Do not use liquid or aerosol cleaners.
● Do not use the Superprint Pro80 near
water, for example, near a bath tub,
wash bowl, kitchen sink, laundry tub,
in a wet basement or near a swimming
pool.
● Always place the Superprint Pro80 on
a stable phone stand, table or other
secure surface. Dropping the
Superprint Pro80 can result in serious
damage to the equipment.
● The Superprint Pro80 should be
operated only from the type of power
source indicated on the label. If you
are not sure of the type of power
supply to your home, consult your
dealer or local power company.l
Do not allow anything to rest on the
power cord. Do not position the
Superprint Pro80 where people can
walk on the cord.
● Do not overload wall outlets and
extension cords. This overloading can
result in a fire or electric shock.
● Never attempt to open, disassemble or
service the Superprint Pro80 . All
repairs should be performed by an
authorized service center. Opening or
removing covers exposes you to the
risk of dangerous voltages and other
hazards. If reassembled incorrectly, the
Superprint Pro80 can become an
electrical shock hazard.
● Avoid using a telephone (other than a
cordless type) during an electrical
storm. There is a remote risk of
electric shock from lightning.
● Do not use the Superprint Pro80 to
report a gas leak in the vicinity of the
leak.
● Ultratec recommends plugging your
Superprint Pro80 into a surgeprotected outlet. This will protect the
TTY from damage caused by electrical
surges due to lightening or other
causes.
Battery Precautions
● Use only the type and size battery
specified in the instructions for your
unit. NEVER USE NiMH OR
ALKALINE RECHARGEABLE
BATTERIES.
● Do not dispose of the batteries in a
fire. Cells may explode. Check local
codes for possible special disposal
instructions.
● Do not open or mutilate the batteries.
Battery electrolyte is corrosive and
may cause damage to the eyes or skin.
It may be toxic if swallowed.
● Exercise care in handling batteries in
order not to short them with
conducting materials such as rings,
bracelets, and keys. The battery or
conductor may overheat and cause
burns.
CAUTION:
To reduce the risk of
fire, electrical shock
and personal injury,
always follow these
basic safety precautions
when using the
Superprint Pro80.
SAFETY INSTRUCTIONS
Page 6
iv • SAFETY INSTRUCTIONS
Page 7

INTRODUCTION
FEATURES
Ring Flasher
This bright light flashes to let you know when someone is calling.
Special Function Buttons
The Superprint Pro80 has 12 specially designed buttons that let you use
common functions quickly and easily. The labels on top of the buttons tell
you which function it performs. To use one of these functions, just press
the appropriate button.
Some of the functions can be personalized. For example, the Auto-Answer
function can be personalized with a message that you type in. To
personalize a function, hold down the key then press the special
function button. For more details on personalizing functions, see the
chapter for that function.
Turbo Code
®
Communication Protocol
The Superprint Pro80 uses this communication code to transmit what you
type through the phone line instantly. When your Superprint Pro80
connects to another TTY that uses Turbo Code, your conversation occurs
as fast as you type. This means that your conversation happens in “real
time” without annoying delays. For more information, see “Turbo Code” on
page 49.
Caller ID
If you have this optional service, which is available through your phone
company, you can view identification information about callers on the
Superprint Pro80 display. A record of calls, including hang-up calls, is
saved in your TTY while you are away. You can later review this record.
Auto ID
™
Alerting System
This audible signal is automatically sent to alert the person you are calling
that you are using a TTY.
E-Turbo
™
This technology makes calling through compatible relay services faster
and easier by automatically taking care of the details. For more
Program
INTRODUCTION • 1
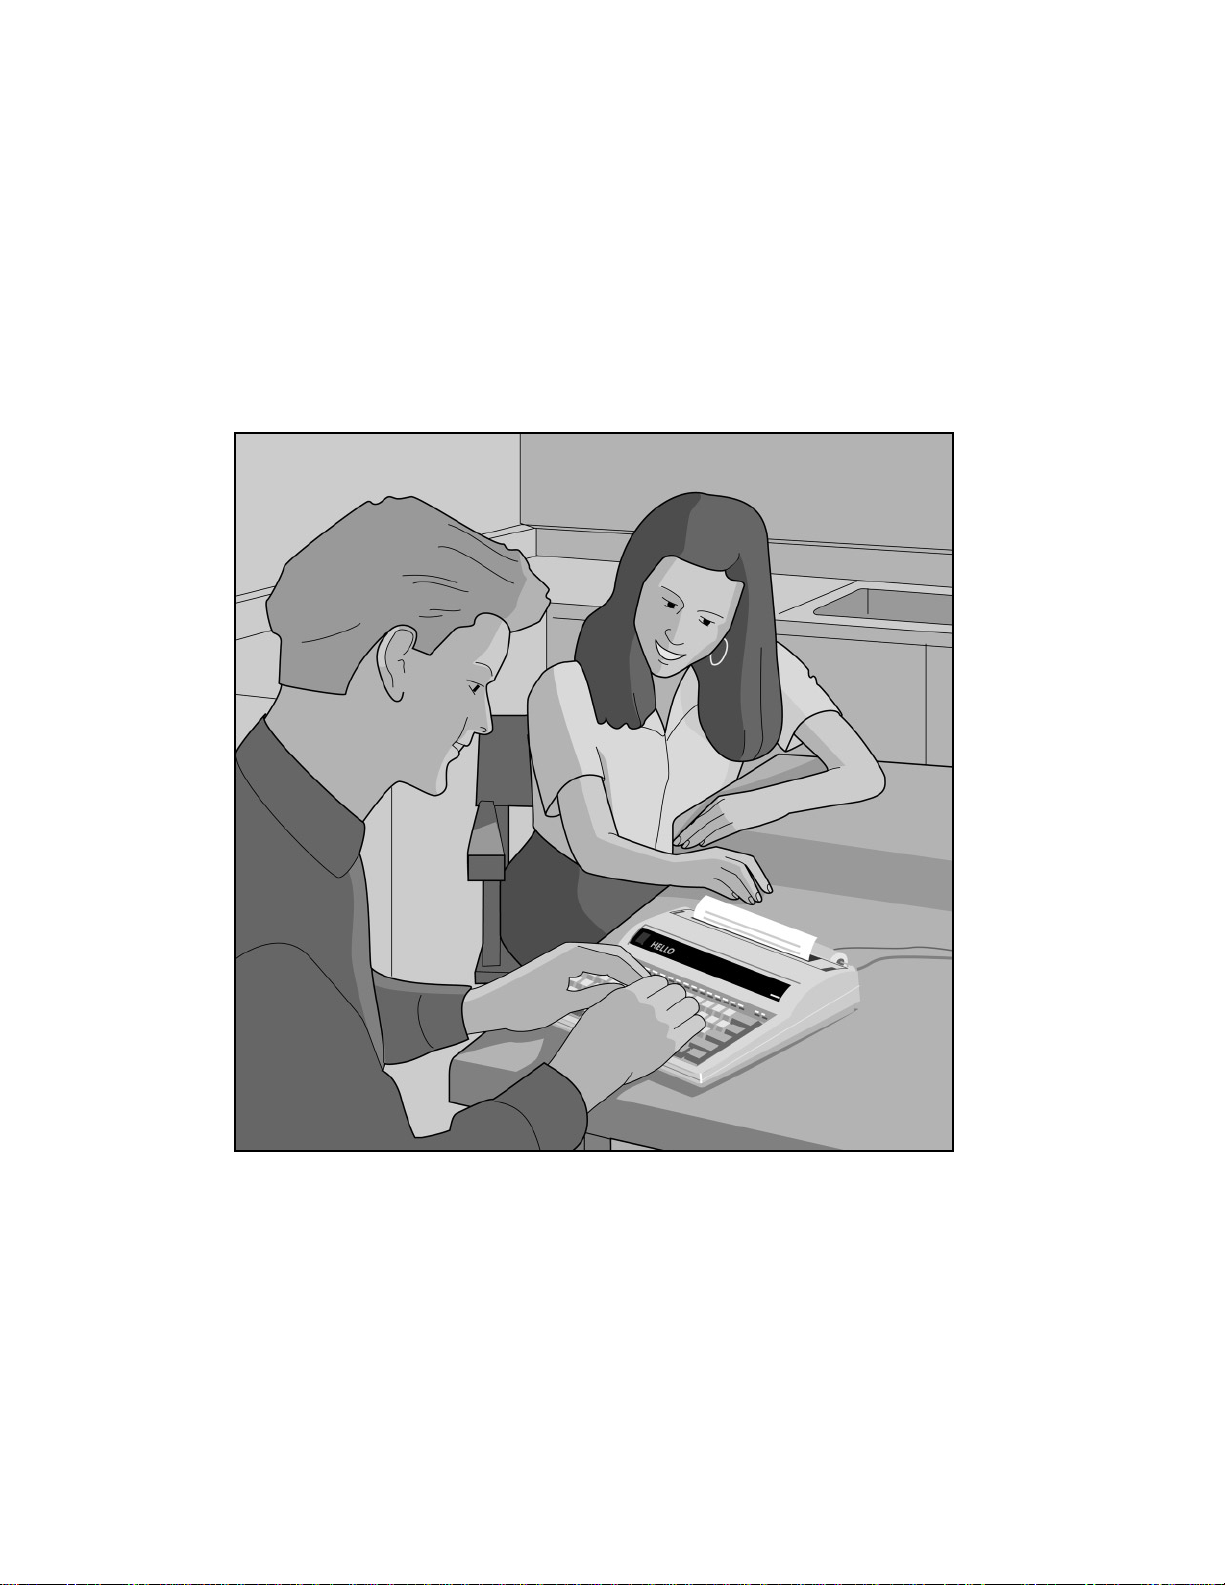
Congratulations!
Ultratec thanks you for
purchasing the
Superprint Pro80. Your
new TTY takes advantage of state-of-the-art
technology to bring you
a variety of useful features.
CHAPTER
1
TTY, TDD and text
telephone
Please note that, in this
manual, TTY, TDD
and text telephone all
refer to the same
device.
Take advantage of
Caller ID.
If you have Caller ID
service through your
phone company, you
can see who is calling
you right on the
Superprint Pro80 display. No separate
Caller ID box is needed!
Page 8

2 • INTRODUCTION
information about E-Turbo, see “Relay Dial with E-Turbo” page 22.
Relay Voice Announcer
This pre-recorded voice message says, “Please use text telephone or dial
relay,” and it can be programmed to also provide the telephone number of
your relay service.
Auto-Answer
This feature answers calls while you are away from your TTY and prints
and saves TTY messages. You can read your messages when you return or
access them with your password by calling from another TTY.
Call Progress
These messages, such as LINE IS RINGING, indicate the status of the call
you are placing.
Keyboard Dialing and Redialing
This feature allows you to dial using the TTY keyboard or the telephone
numbers you have saved in the Directory. You can also choose to
automatically redial the last number dialed.
Special Calling Options
These features include: Call Transfer, 3-Way Calling, and Credit Card
Calling.
Memory
With 32K of built-in memory, your TTY can store conversations,
hundreds of Memos and up to 99 telephone numbers.
Special Printing Options
These features include your choice of three print sizes (normal, bold or
wide) and the ability to print specific blocks of memory.
Extra Telephone Jack
This jack located on the back of the TTY allows you to share the phone
line with a voice telephone or to attach a signaler.
80-Column Printer
This wide printer means easier reading and handling of conversation
printouts. Even when printing in the largest print size, the text flows
naturally across the page.
Extra Wide Display
The bright letters and wide window display 32 characters at a time,
making your conversations easy to read.
Computer-Style Keyboard
This full-size keyboard makes typing comfortable.
I want to use my
own voice.
If you wish to speak to
the person on the other
end of the line using
your own voice but still
read his or her responses, you can with Voice
Carry Over (VCO). See
Chapter 9 for more
information on VCO.
Page 9
INTRODUCTION • 3
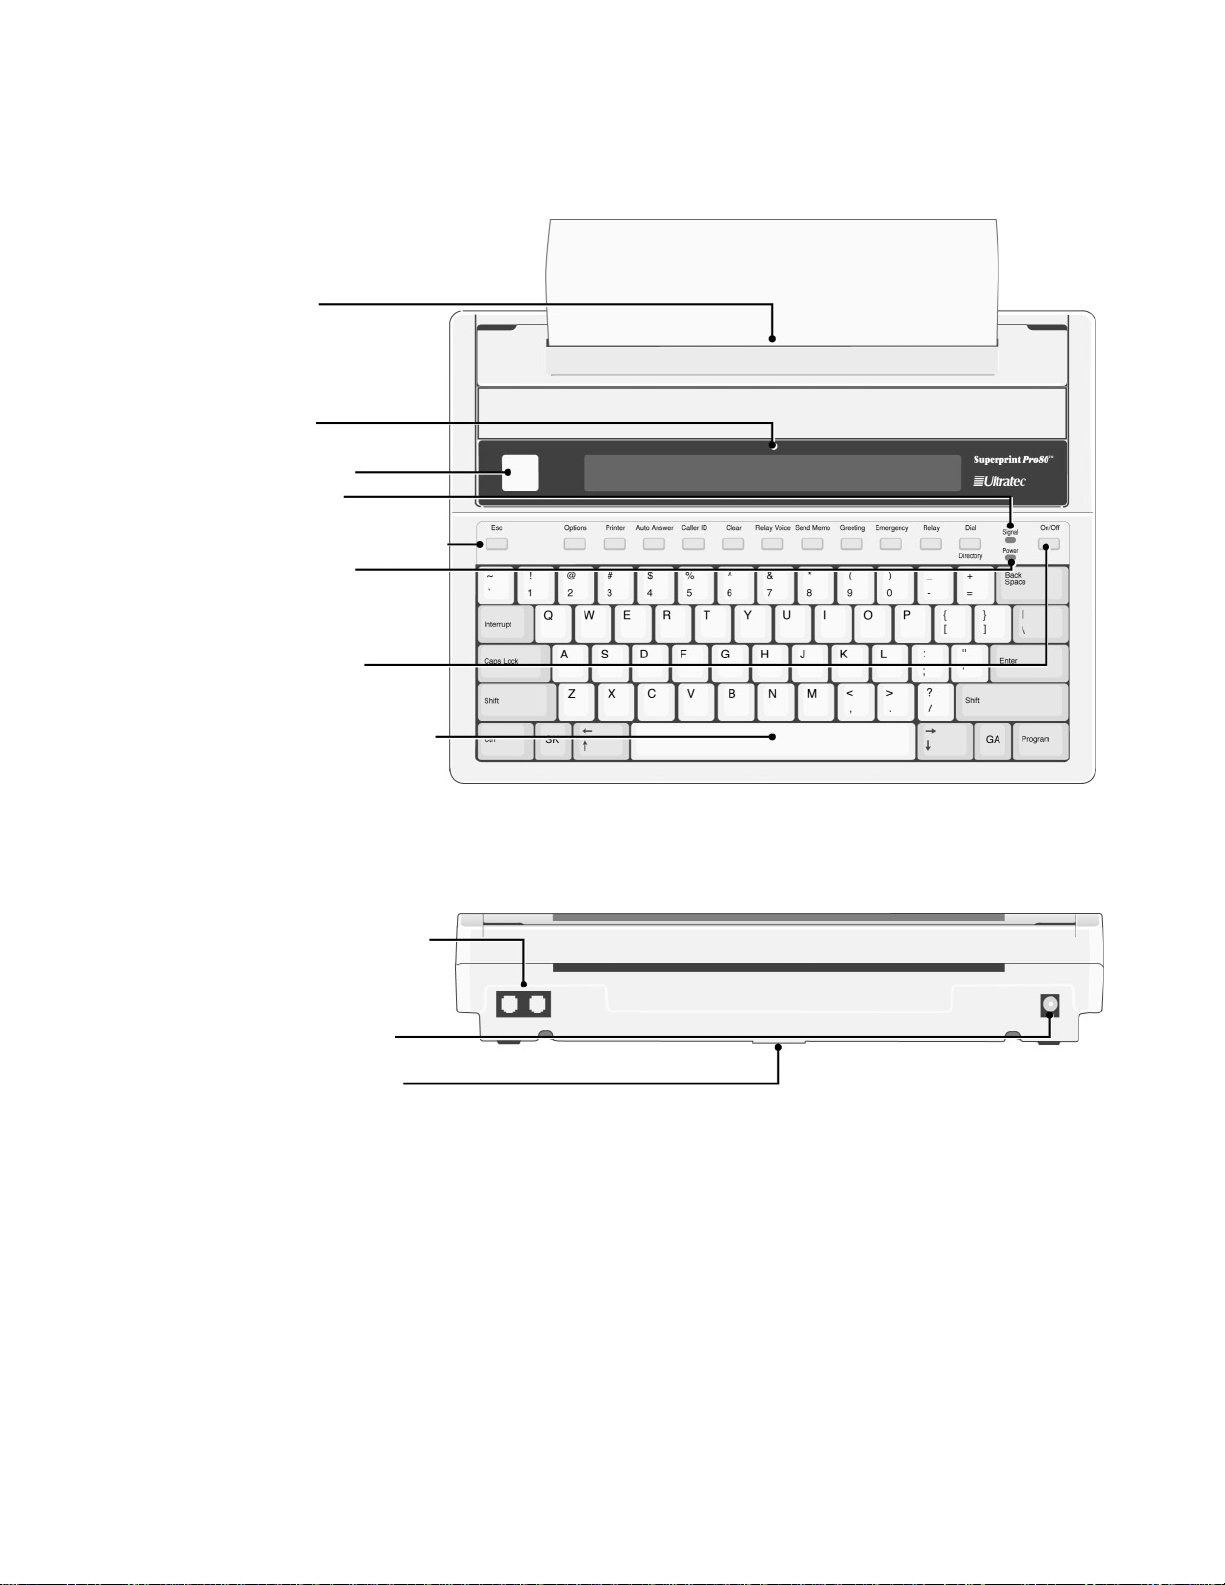
OVERVIEW OF THE SUPERPRINT PRO80
Front View
Back View
Printer
Display
Ring Flasher
Signal light
On/Off button
Spacebar (Announcer)
Telephone-line jacks
AC-Adapter jack
Battery compartment
(underneath)
Special-function row
Power light
Page 10
4 • INTRODUCTION
SPECIAL FUNCTION BUTTONS
Page 11
INTRODUCTION • 5
Page 12

6 • INTRODUCTION
Page 13
SETUP
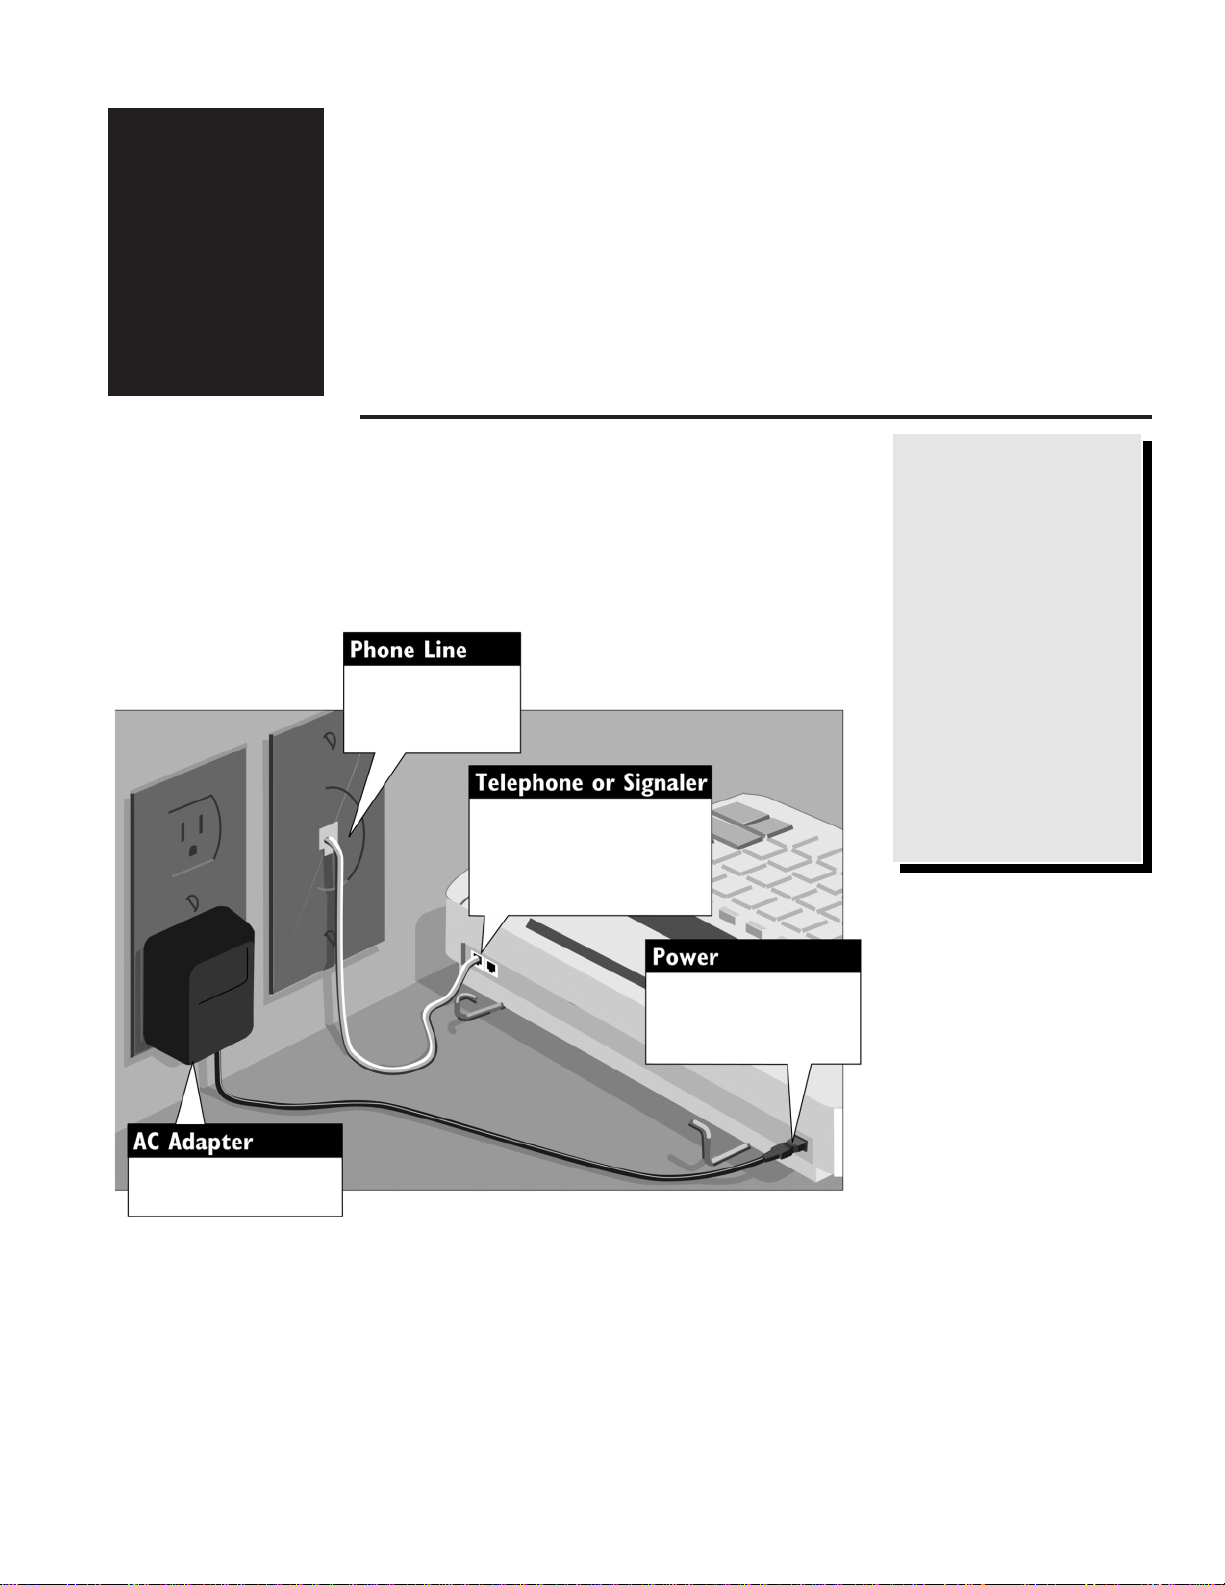
CONNECTING POWER & PHONE LINE
1. If you are setting up a new Superprint Pro80 for the first time, pull
the plastic tab out of the battery compartment and gently pull the
printer guard out of the printer compartment.
2. Plug the AC adapter into an electrical outlet.
SETUP • 7
CAUTION:
To avoid damaging
your TTY or telephone
system, plug the
Superprint Pro80 into
only a standard telephone line. Do NOT
plug the TTY into a
digital telephone system. Improper connection may damage the
TTY and void your
warranty.
CHAPTER
2
3. Plug the AC adapter into the round jack on the back of the TTY.
Leave the AC adapter plugged in at all times.
4. Plug one end of the cord into one of the telephone jacks on the back
of the TTY. (The second jack may be used for a telephone or
signaler).
5. Plug the other end of the telephone cord into a standard telephone
wall outlet.
Plug one end of the
telephone line into a
telephone wall outlet.
Plug the other end of the
telephone line into either
telephone jack on the back
of the Superprint Pro80.
Plug the AC adapter cord
into the jack on the back
of the Superprint Pro80.
Plug the AC adapter into
an electrical outlet.
Page 14

8 • SETUP
Determining Telephone Line Type
The Superprint Pro80 requires a standard (analog) telephone line with
either pulse or tone (also called touchtone) dialing. Some businesses use
digital telephone systems. To use the TTY in these businesses, some
modifications to the telephone line are required. If you are unsure of the
type of telephone line you are using, contact your telephone installer to
verify that your line supports a standard, single-line telephone. This is the
same kind of line required by many fax machines and computer modems.
Setting Pulse or Tone Dialing
The Superprint Pro80 is preset to use tone dialing because this is used by
most telephone lines. If your line uses pulse dialing, you can change this
setting (see “Dial Using” on page 45).
Connecting a Telephone
The Superprint Pro80 can share a telephone line with a voice telephone.
This allows for both voice and TTY calls on the same line. This feature is
also helpful for using Voice Carry Over (see Chapter 9). To connect a
telephone on the same line as your TTY, simply connect the telephone
cord into the second phone jack on the back of the Superprint Pro80.
Connecting a Signaler
A signaler can be used with the Superprint Pro80 to help alert you to
incoming calls. You can connect a signaler to the second phone jack on the
back of the TTY.
CAUTION:
✔ Do not use the
Superprint Pro80 near
water, for example, near
a bath tub, wash bowl,
kitchen sink, laundry
tub, in a wet basement
or near a swimming
pool.
✔ Always place the
Superprint Pro80 on a
stable phone stand,
table or other secure
surface. Dropping the
Superprint Pro80 can
result in serious damage
to the equipment.
✔ The Superprint Pro80
should be operated only
from the type of power
source indicated on the
label. If you are not
sure of the type of
power supply to your
home, consult your
dealer or local power
company.
✔ Do not allow any-
thing to rest on the
power cord. Do not
position the Superprint
Pro80 where people can
walk on the cord.
✔ Do not overload wall
outlets and extension
cords. This overloading
can result in a fire or
electric shock.
✔ Ultratec recommends
plugging your
Superprint Pro80 into a
surge-protected outlet.
This will protect the
TTY from damage
caused by electrical
surges due to lightening or other causes.
Page 15
SETUP • 9
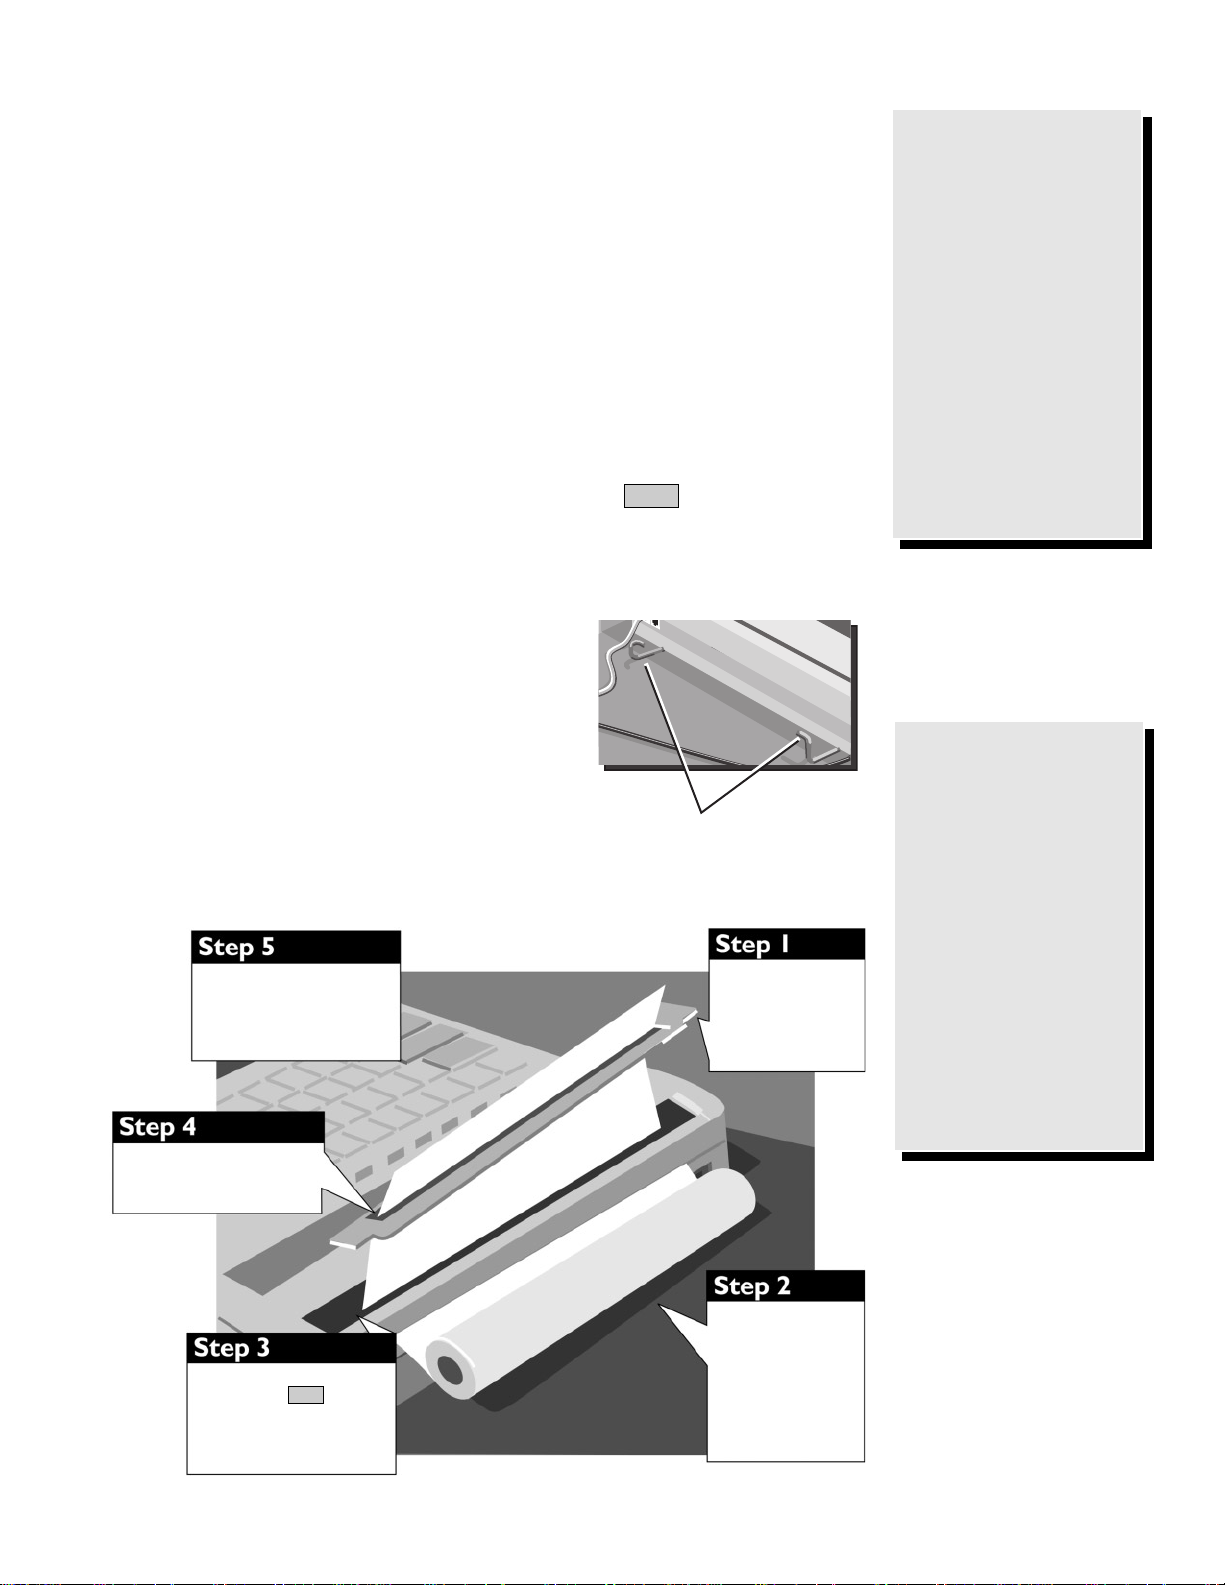
INSTALLING PRINTER PAPER
The printer uses high-quality thermal paper. Use the order card that
comes with the TTY to order more paper. If you do not have the card,
contact your dealer or Ultratec (the address is on the inside front cover of
this manual).
1. Take off the printer cover by lifting the back edge of the cover up
toward the keyboard then lifting the cover off. A new unit may not
have the cover installed, in which case you will find it elsewhere
inside the box.
2. With the paper coming off the bottom of the roll, facing the back of
the Superprint Pro80, feed the edge of the paper into the slot on the
back until it stops.
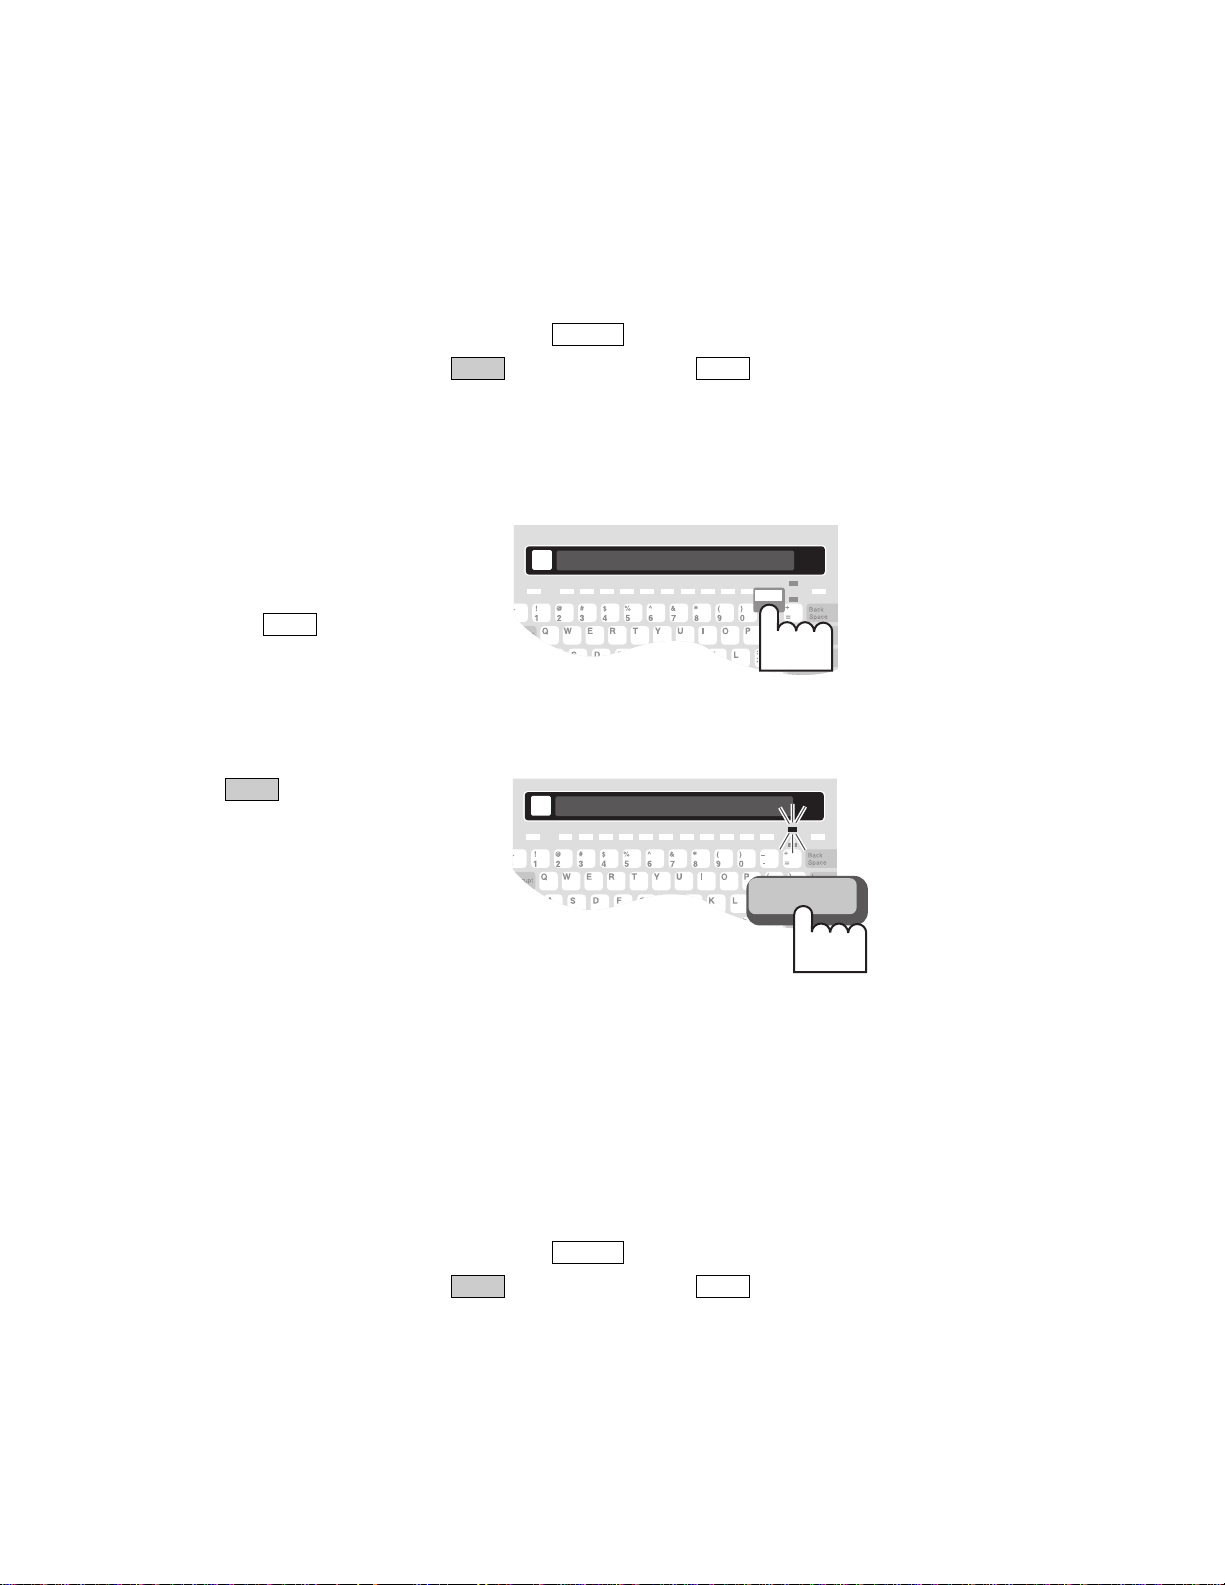
3. Turn the Superprint Pro80 on, then press the key several times
until the rollers grab the paper and feed it through the printer.
4. Feed the paper through the slot in the printer cover and replace the
printer cover.
5. The two open ends of the paper holder fit
into the holes on each side of the paper
roll. Pull the two ends apart in order to
fit the paper roll between them. The
spring action of the holder will keep the
paper on it. You may need to remove the
paper holder from the Superprint Pro80
in order to install the roll of paper. To
replace the paper holder, snap it back
onto the bottom of the TTY.
Enter
Before Loading
Paper:
First, notice how the
paper holder is
installed. This holder
may come off while
loading the paper.
Second, connect the
power and phone line
before attempting to
load the paper (see
“Connecting Power &
Phone Line” on page 7).
When opening a
new roll of paper.
New rolls of paper may
may have some glue on
the first few inches.
This glue, which helps
keep the paper rolled
during shipment, can
interfere with printing.
Make sure paper that
has glue on it is fed
past the printer and is
not used for printing.
Put the paper on the metal
holder and snap the holder
onto the bottom of the
Superprint Pro80.
Feed the paper through the
slot in the printer cover. Put
the cover back on.
With the paper coming
off the bottom of the
roll, facing the back of
the Superprint Pro80,
feed the edge of the
paper into the slot on
the back until it stops.
Turn on the Superprint Pro80
and press the key several times until the rollers
grab the paper and feed it
through the printer.
Enter
Take off the printer
cover: Lift the back
edge up toward the
keyboard.Then, lift the
cover off.
Paper Holder
Page 16
10 • SETUP
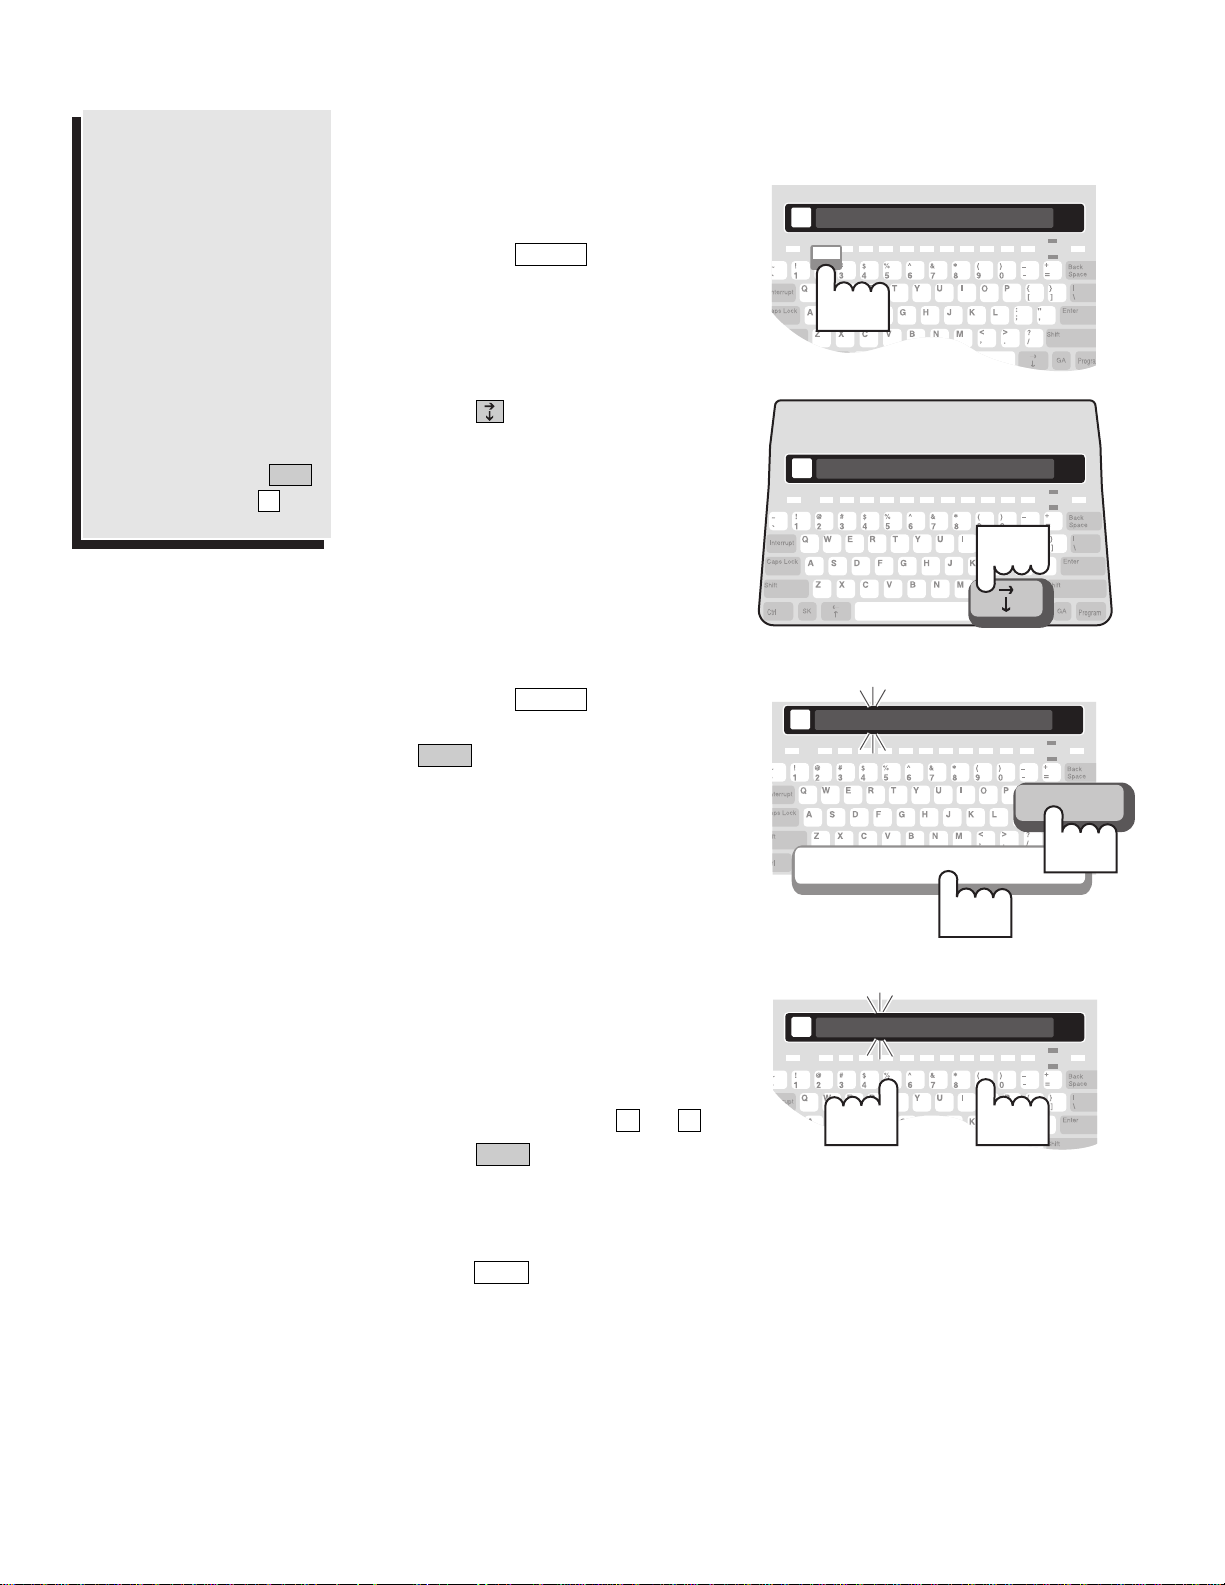
SETTING THE DATE & TIME
Why are Date &
Time important?
Date and time are
printed and saved at the
beginning of each
Conversation and AutoAnswer message. It
gives you a record of
when a call was placed
or received.
You can view and print
the date and time by
holding down the
key and pressing .
T
Ctrl
d
1. Make sure the Superprint Pro80
is on. The Power light is lit.
2. Press the button. The
first menu item is displayed.
Options
3. Press until SET THE
CLOCK <NO> is displayed.
d
w
4. Press the to change the
option to <YES>. Then, press
. The date and time are
displayed with the first number
flashing.
Enter
Spacebar
5. Type each number, it will
automatically advance to the next
number.
To change the AM or PM
setting, type either or .
6. Press when the date and
time are correct. ** TIME AND
DATE SAVED ** is displayed.
7. After saving the date and time,
press to exit the Options
menu.
Esc
Enter
PA
CODE < AUTOMATIC>
Options
SET THE CLOCK < NO >
Press
Hol
Hol
do
01/01/02 12:00 AM
Enter
Press
2nd..
Press
1st...
09/01/02 12:00 AM
Type
Page 17
CALLING & ANSWERING
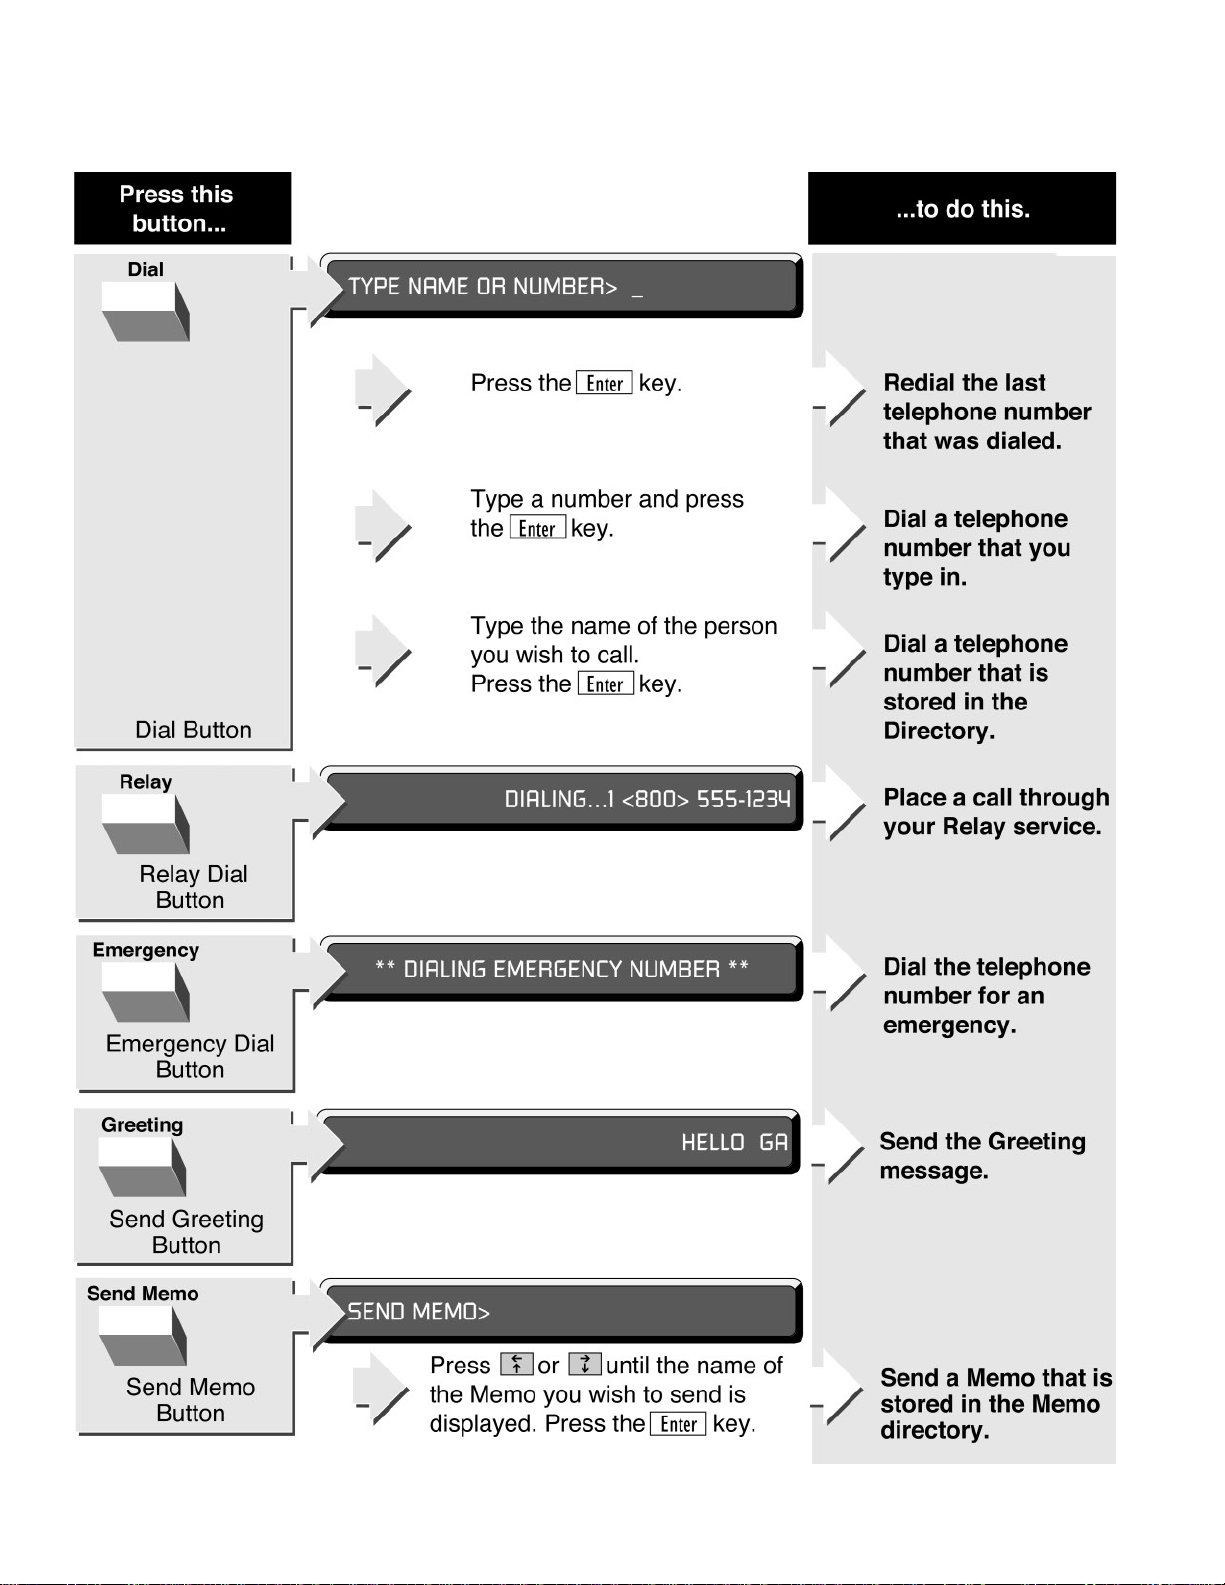
PLACING A CALL
Dial a Number that You Type
CALLING & ANSWERING • 11
You have three
options with the
Dial button:
• Type the number of
the person you are calling.
• Use a number that is
stored in the Directory.
• Redial the last number that was dialed.
CHAPTER
3
How do I use the
Emergency button?
See Chapter 4,
“Advanced Calling,” to
learn how to use the
button.
Program this button
now so that you will be
ready in an emergency
(see “Programming the
Emergency Number” on
page 22).
Emergency
1. Make sure the Superprint Pro80
is on. The Power light should be
lit.
2. Press the button. TYPE
NAME OR NUMBER is
displayed.
Dial
3. Type the number you are calling.
Use the key to correct
mistakes.
4. Press to dial the number.
DIALING... is displayed
followed by the telephone
number.
Enter
Back Space
5. When the other TTY starts
ringing, the Signal light flashes
slowly and LINE IS RINGING is
displayed.
If the other TTY is busy, LINE
IS BUSY is displayed. Try again
later to place the call or see
“Automatically Redial a Busy
Number” on page 14.
... LINE IS RINGING ...
TYPE NAME OR NUMBER> _
Dial
Type...
DIALING...5551234
Enter
...Then
press
Page 18

12 • CALLING & ANSWERING
Dial a Number that is Saved in the Directory
You must save numbers in the Directory before you can use this function.
To save numbers in the Directory, see Chapter 6.
What are “GA” and
“SK?”
There are some abbreviations and shortcuts
that are very common
in TTY conversations.
These are two of them.
“GA” is used for “Go
Ahead,” when a person
is done typing and
“SK” is used for “Stop
Keying” when a person
is ready to end a conversation. For a more
complete list of abbreviations, please see the
back cover of this manual.
6. When the other person answers
the call, his or her Greeting is
displayed on your TTY. Type a
reply to continue your
conversation.
7. When your conversation is over,
press . The screen is
blank.
You can also hold down the
key and press the
button. This will hang up the
call without turning off the
Superprint Pro80.
EscCtrl
On/Off
1. Make sure the Superprint Pro80
is on. The Power light should be
lit.
2. Press the button. TYPE
NAME OR NUMBER is
displayed.
Dial
3. Begin typing the first few letters
of the name for the number you
want. When you have typed
enough letters, the name is
displayed.
If you don’t remember what
name is used for the number, you
can use the keys to look
through the names in the
Directory.
4. Press to dial the number.
DIALING... is displayed
followed by the telephone
number.
Enter
How does the
Superprint Pro80
look up a number
in the Directory?
The Superprint Pro80
begins scanning the
Directory as soon as you
type the first letter of
the person’s name you
are calling. If a possible
match is found, the full
name is displayed. To
narrow the search and
locate the EXACT
match, you may need to
type a few more letters.
MAY I HELP YOU Q GA HI JIM HERE
Type
On/Off
TYPE NAME OR NUMBER> _
Dial
ULTRATEC, INC.> <608> 238-5400
DIALING...5551234
Enter
Page 19
CALLING & ANSWERING • 13
5. When the other TTY starts ringing, the Signal light flashes slowly
and LINE IS RINGING is displayed.
If the other TTY is busy LINE IS BUSY is displayed. Try again
later to place the call or see “Automatically Redial a Busy Number” on
page 14.
6. When the other person answers the call, his or her Greeting is
displayed on your TTY. Type a reply to continue your conversation.
7. When your conversation is over, press . The screen is blank.
You can also hold down the key and press the button.
This will hang up the call without turning off the Superprint Pro80.
Redial the Last Number
EscCtrl
On/Off
1. Make sure the Superprint Pro80
is on. The Power light should be
lit.
2. Press the button. TYPE
NAME OR NUMBER is
displayed.
Dial
3. Press to dial the number.
REDIALING... is displayed
followed by the telephone
number.
Enter
4. When the other TTY starts ringing, the Signal light flashes slowly
and LINE IS RINGING is displayed.
If the other TTY is busy, LINE IS BUSY is displayed. Try again
later to place the call or see “Automatically Redial a Busy Number” on
page 14.
5. When the other person answers the call, his or her Greeting is
displayed on your TTY. Type a reply to continue your conversation.
6. When your conversation is over, press . The screen is blank.
You can also hold down the key and press the button.
This will hang up the call without turning off the Superprint Pro80.
EscCtrl
On/Off
TYPE NAME OR NUMBER> _
Dial
REDIALING...5551234
Enter
Page 20
14 • CALLING & ANSWERING
Automatically Redial a Busy Number
When you place a call and reach a telephone that is “busy,” the Superprint
Pro80 lets you automatically redial the number. The Auto Redial function
dials the number up to 15 times and notifies you when the other phone
rings by flashing the Ring Flasher.
1. The number you have dialed is
“busy.”
** LINE IS BUSY **
2. Press . The message,
AUTOMATICALLY REDIAL
<YES> is displayed.
Enter
3. Press . ** AUTO REDIAL
ON ** is displayed briefly. Then,
AUTO REDIAL 00 is displayed.
Every minute, the Superprint
Pro80 redials the number. If the
other TTY starts to ring, the
Ring Flasher flashes.
If the other TTY is still busy
after 15 tries, Auto Redial quits.
You can also press at any
time to stop.
Esc
Enter
4. When the Ring Flasher starts
flashing, watch the display.
When the other person answers
the call by typing a greeting, you
can type a response and continue
the conversation.
AUTOMATICALLY REDIAL <YES>
Enter
** AUTO REDIAL ON **
Enter
Press
2nd.
Press
1st...
... LINE IS RINGING ...
Page 21
CALLING & ANSWERING • 15
Call Progress
Signal light The Display This is the
is... shows this... call progress...
Steadily on (blank) Dial tone
(phone line working)
Flashing slowly LINE IS RINGING Telephone/TTY
ringing
Flashing quickly LINE IS BUSY Telephone/TTY busy
(regular pattern)
Flickering (blank) Person picking up
(irregular pattern) handset or speaking.
Special Dialing Requirements
I need an “outside line.”
You may need to type a “9” or other number to reach an outside line if
you are calling from an office building (see “Dialing Prefix” on page 45).
The exact method of dialing will depend on the telephone system, but
will be the same as any other telephone used on that system.
I need to “pause” while dialing.
Type a comma ( , ) to pause for two seconds while dialing. For example (9,
222 5555). This might be used when dialing an outside line with some
office telephone systems.
I need to call long distance.
When dialing, type a “1,” the area code and the number before pressing
.
I need to dial special symbols.
In order to dial the pound sign ( # ) or the asterisk symbol ( * ), you must
be using tone dialing (see “Dial Using” on page 45). These might be used
with automated touchtone answering systems or with office telephone
systems. Be sure to hold down the key while pressing the number
key with the desired symbol.
I need to dial a “hook flash.”
Press the button then type an exclamation point ( ! ). This might be
used for transferring a call. If more numbers are required after the hook
flash, these should be typed while you are still in Dial mode, before
pressing .
Enter
Dial
Shift
Enter
How can I tell what
is happening with
the call?
The Superprint Pro80
shows you the “call
progress” using a combination of the Display
and the Signal light.
Most calls require two
rings before the
Superprint Pro80 displays call progress.
Page 22

16 • CALLING & ANSWERING
ANSWERING A CALL
1. The Ring Flasher flashes slowly
and the display says LINE IS
RINGING when the Superprint
Pro80 receives a call.
2. Type a greeting and wait for a
reply.
3. When your conversation is over,
press . The screen is
blank.
You can also hold down the
key and press the
button. This will hang up the
call without turning off the
Superprint Pro80.
EscCtrl
On/Off
CONVERSATION ETIQUETTE
Below are some procedures, shortcuts and abbreviations that are
commonly used in TTY conversations.
GA “go ahead.”
When you are done typing, type “GA” (or press ) to let
the other person know you are done and that they can start
typing.
GA OR SK “go ahead or stop keying”
When you are ready to end the conversation, “GA OR SK”
lets the other person know you are finished but that they can
add any last words before ending the conversation.
SKSK “stop keying, stop keying.”
Type “SKSK” (or press twice) and wait for the other
person to type “SK” before hanging up.
CD “could” PLS “please”
CUL “see you later” Q “?” (question mark)
CUZ “because” R “are”
HD “hold” SHD “should”
MTG “meeting” THX “thanks”
NBR “number” TMW “tomorrow”
OIC “oh, I see” U “you”
CA
“communication assistant” UR “your”
SK
GA
HELLO THIS IS JOHN MAY I HELP YO
Type
On/Off
Page 23

CALLING & ANSWERING • 17
CONVERSATION MEMORY
About Conversations
Everything typed during a call is automatically saved in memory. These
are called conversations. A conversation includes the date and time stamp
and everything sent and received during a call.
Reviewing Conversations
1. Turn on the Superprint Pro80, the Power light should be lit.
2. Press . The previous conversations are scrolled backwards across
the display. You can tell when you have reached the beginning of a
conversation because you will see five dashes
( - - - - - ) followed by the date and time that the conversation
started.
3. To scroll forward, press . To scroll faster, press and hold the
key while scrolling. Then, let go of the key.
4. Press to print the conversation you are currently reviewing.
5. Press the button when you are finished reviewing
Conversations.
Clearing Conversation Memory
To clear all conversations:
1. Turn on the Superprint Pro80, the Power light should be lit.
2. Press . CLEAR <CONVERSATION> is displayed.
3. Press . CLEAR CONVERSATION <NO> is displayed.
4. Press the to change the option to <YES>. Then,
press . ** CONVERSATION CLEARED ** is displayed.
Printing Conversations
If you have the printer on, all conversations are printed as they occur.
To print one conversation that is currently in memory, review it at a time
when you are not currently having a TTY conversation. Press to scroll
backward through the conversations that are in memory. Press to
print the conversation that is currently being reviewed on the display. The
printout begins back at the date and time and continues until the
beginning of the next conversation.
To print all conversations that are currently in memory, hold down the
key and press . The last five items in this menu allow you to
print “blocks” of memory (see “The Printer Button” on page 46).
PrinterProgram
Printer
Enter
Spacebar
Enter
Clear
Esc
Printer
Shift
How long is a
Conversation
stored?
The Superprint Pro80
stores up to 11,264
characters (letters,
spaces, punctuation
etc.). This memory
space is also used for
Auto-Answer messages.
When all of this space
is filled, the oldest
Conversations are deleted to make room for
new ones.
Page 24

18 • CALLING & ANSWERING
INTERRUPTING
Interrupting During a Conversation
1. Look for the Turbo Code dot on the display to verify that the TTYs
have connected using Turbo Code. This dot looks like a period and is
found on the left side of the display.
2. While the other person is
typing, press the key.
The Superprint Pro80 displays
INTERRUPT REQUESTED.
The other TTY displays
INTERRUPT and flashes the
Ring Flasher (this function may
vary on other TTYs).
3. The other person may stop typing and allow you to go ahead or may
choose to ignore your interruption.
Responding to an “INTERRUPT” Message
If INTERRUPT is displayed and the Ring Flasher flashes, the other
person wants to interrupt you. Come to a good stopping point and type
“GA” to allow the other person to type. You may also choose to ignore the
interruption.
Turning off Interrupt
Turning off Interrupt prevents the person you are calling from
interrupting you. You can still use the key to interrupt the other
person.
1. Press the button. CODE <AUTOMATIC> is displayed.
2. Press until INTERRUPT <ON> is displayed.
3. Press the to change the setting to <OFF>.
4. Press to save this setting. ** INTERRUPTS ARE OFF ** is
displayed.
Enter
Spacebar
Options
Interrupt
Interrupt
The Interrupt Function is made
possible by Turbo
Code
®
.
This function lets you
stop the other person
while they are typing.
This way, you can inject
a thought or make a
comment, just as you
can in a face-to-face
conversation.
To use this function,
both you and the person you are calling need
TTYs with Turbo Code.
For more information
on Turbo Code, see
Chapter 11.
Interrupt
Press
INTERRUPT REQUESTED
Page 25

ADVANCED CALLING
GREETING
Using the Greeting to Answer a Call
ADVANCED CALLING • 19
Personalize your
Greeting
Your TTY has a preprogrammed message that
is sent when you press
that says
“HELLO GA.”
You can edit this mes-
sage to include your
name or anything else
you want by holding
down the key
and pressing the
button.
Greeting
Program
Greeting
CHAPTER
4
1. When you receive a call the Ring
Flasher flashes slowly and the
display says LINE IS RINGING.
2. Press . HELLO GA is sent
as your Greeting. The time and
date is also displayed at the
beginning of every conversation.
Greeting
Editing the Greeting Message
1. Turn on the Superprint Pro80.
2. Hold down the key and
press . GREETING>
HELLO GA is displayed.
3. Press to delete the
preprogrammed message.
4. Type your Greeting.
5. Press to save the Greeting
and exit the menu. ** MEMO
SAVED ** is displayed.
Enter
Clear
Greeting
Program
HELLO GA
GREETING> HELLO GA
Press
Greeting
Greeting
Program
Hold
down
Page 26

20 • ADVANCED CALLING
THE VOICE ANNOUNCER
1. Turn on the Superprint Pro80.
2. Press . TYPE NAME OR NUMBER is displayed.
3. Type or select the number you wish to dial and press .
DIALING... followed by the number is displayed.
4. When the other person’s telephone starts ringing, the Superprint
Pro80 Signal light flashes slowly and LINE IS RINGING is
displayed.
5. Hold down the key
and press the key.
A voice recording that says,
“TTY CALL, PLEASE USE
TEXT TELEPHONE” is
played and repeats
continuously. This message
is also displayed on your
TTY.
If the person you are calling
answers with a telephone, he
or she will hear this message.
6. Watch the display. When the other person has answered by TTY, the
conversation can proceed and the announcer will stop.
THE RELAY VOICE ANNOUNCER
Answering a Call with the Relay Voice Announcer
1. When you receive a call the Ring Flasher flashes slowly.
2. Type a greeting or press .
3. Watch the Signal light. If the person who is calling is using a
telephone and is speaking into the handset, the Signal light blinks
erratically.
4. Press . A voice
recording that says,
“PLEASE USE TEXT
TELEPHONE OR DIAL
RELAY” is played and
repeats continuously. This
message is also displayed on
your TTY.
If you have programmed the
relay service’s phone
number, this will be spoken
as part of the message.
5. Let the message play a few times then press to hang up. This
allows the person to call back using a TTY or a relay service.
On/Off
Relay Voice
Greeting
Announcer
Ctrl
Enter
Dial
Help people
recognize a TTY
call.
The Voice Announcer is
helpful when you are
calling someone who
has both a telephone
and a TTY. If the person answers using the
telephone, this message
says that you are calling
from a TTY and asks
him or her to please use
a TTY.
Another way to
announce a TTY call is
with the Auto ID feature (see “Auto ID” on
page 44).
Tell voice callers to
call you through
Relay.
The Relay Voice
Announcer is helpful
when someone calls you
by voice. The Relay
Voice Announcer is a
message recorded in a
woman’s voice that let’s
the caller know that
you use a TTY.
You can also enter the
phone number of your
local relay service and
the voice will read this
as part of the message.
…
Ctrl
Hold
down...
TTY CALL, PLEASE USE TEXT TELEPH
ANNOUNCER
...and
press
PLEASE USE TEXT TELEPHONE OR DI
Relay Voice
Hold
down
Page 27

ADVANCED CALLING • 21
Programming the Relay Voice Announcer Phone
Number
1. Turn on the Superprint Pro80, the Power light should be lit.
2. Hold down the key and press . VOICE NUMBER
is displayed.
3. Type the number that a hearing person can call to reach your local
TRS.
4. Press . ** RELAY VOICE NUMBER SAVED ** is
displayed.
SEND MEMO
1. At any point during a
conversation when it is your
turn to type, press
. SEND MEMO is
displayed (see Chapter 5 for
more information on
Memos).
2. Begin typing the first few letters of the name of the Memo you want
to send. When you have typed enough letters, the whole Memo
name is displayed.
If you don’t remember what name is used for the Memo, you can use
the keys to look through the list of Memos.
3. Press when the name of the desired Memo is displayed.
The Memo is sent and displayed the same way it would be if you
were typing the message during the conversation.
4. Continue the conversation.
EMERGENCY DIAL
Calling an Emergency Number
1. Make sure the Superprint Pro80 is on. The Power light should
be lit.
2. Press the button. ** DIALING EMERGENCY NUMBER
** is displayed briefly. After a short pause, DIALING...911 is
displayed.
3. When the other TTY starts ringing, the Superprint Pro80 Signal
light flashes slowly and LINE IS RINGING is displayed.
4. When the other person answers the call, his or her Greeting is
displayed on your TTY. Type a reply to continue your conversation.
Emergency
Enter
Send Memo
Enter
Relay VoiceProgram
What is a Memo?
A Memo is a short message that you save in
the Superprint Pro80
memory and later send
to someone during a
conversation.
For information on saving and editing Memos,
see Chapter 5.
You may choose
what number is
saved for the
Emergency button.
You may choose to save
an emergency telephone
number for the
button.
However, this button is
provided only as a convenience. Ultratec
assumes no responsibility for customer reliance
upon this memory feature.
This button is preprogrammed with “911.”
Emergency
SEND MEMO> PIZZA
Send Memo
Page 28

22 • ADVANCED CALLING
Programming the Emergency Number
1. Turn on the Superprint Pro80, the Power light should be lit.
2. Hold down the key and press . EMERGENCY
NUMBER is displayed.
3. Press to clear the preprogrammed number.
4. Type the number you wish to call in an emergency such as the local
police or fire department.
5. Press . ** EMERGENCY NUMBER SAVED ** is displayed.
RELAY DIAL WITH E-TURBO
This section is for people whose Telecommunications Relay Service (TRS)
supports E-Turbo technology. Please refer to the next section, “Relay Dial
(without E-Turbo),” if E-Turbo is not available in your area.
Turning E-Turbo On
1. Press .
2. Press until E-TURBO is displayed.
3. Press the to select <ON>.
4. Press . **E-TURBO ON** is displayed briefly.
5. Press to exit the Options menu.
Programming the E-Turbo Relay Phone Number
1. Check with your TRS for the best number to use for E-Turbo calls.
2. Turn on the Superprint Pro80.
3. Hold down the key and
press . RELAY
NUMBER is displayed.
4. Type the access number of your
TRS. There is space for up to 22
characters. Use the key
to correct mistakes.
5. Press . ** RELAY
NUMBER SAVED ** is
displayed briefly.
Then, USER PREF is displayed.
6. Type the letter(s) of the relevant setting from the following chart.
Enter
Back Space
Relay
Program
Esc
Enter
Spacebar
Options
Enter
Clear
EmergencyProgram
E-Turbo calls are
more streamlined.
If your relay service is
E-Turbo compatible,
you can take advantage
of the most streamlined
way to call through
relay. With E-Turbo,
many of the details of a
relay call are automatically handled for you:
1. You dial the phone
number of the person
you are calling. Your
Superprint Pro80 automatically connects to
your TRS.
2. There is no need to
interact with the
Communications
Assistant (CA).
3. Your preferences are
automatically sent to
the TRS, such as your
preference for a male or
female CA or which
long distance carrier to
use.
RELAY NUMBER>
Relay
Press
Program
Hold
down
Page 29

ADVANCED CALLING • 23
Available User Preference Settings:
D Do not dial thru Z Do not type recordings verbatim
V VCO on H HCO on
M Male CA F Female CA
B Braille A Do not announce Relay
X Do not explain Relay C Request calling card
E English language G German language
R French language S Spanish language
2 2-line VCO
For example: If VCO will be used when placing calls through
Relay, type the letter, “V” in this menu. Then, the TRS will
recognize calls as being VCO calls.
5. Press to move to the next menu option. CARRIER is
displayed.
6. If you do not wish to specify a long distance provider, press .
USER ID is displayed.
If you wish to specify a long distance provider, you may fill in the
carrier-of-choice option. To do this, contact your TRS for the code for
your preferred long distance provider. Type this code and press
. USER ID is displayed.
You may also select a carrier of choice on a call-by-call basis by using
a 10-10-XXX number. Simply type the desired 10-10-XXX prefix
before the number of the person you are trying to call. This overrides
any preset carrier-of-choice setting.
7. Do NOT make any changes to the USER ID setting unless told to
do so by your TRS. Press the button to exit this menu.
Placing a Call Using Relay Dial with E-Turbo
1. Make sure the Superprint Pro80 is on. The Power light should be lit.
2. Press the button. TYPE NAME OR NUMBER is displayed.
3. Type the number of the person you wish to call and press .
4. DIALING RELAY... is displayed followed by the number of the TRS
that you have programmed for this button.
The call is automatically placed through the TRS. You may see some
messages such as the CA’s greeting or the status of your call being
dialed.
5. When the person you are calling answers the phone, continue your
conversation as you would with any relay call.
Enter
Relay
Esc
Enter
Enter
Enter
Page 30

24 • ADVANCED CALLING
Placing a Call Using Relay Dial
1. Make sure the Superprint Pro80 is on. The Power light should be lit.
2. Press the button. DIALING... is displayed followed by the
number of the TRS that you have programmed for this button.
3. When the Relay service TTY starts ringing, the Superprint Pro80
Signal light flashes slowly and LINE IS RINGING is displayed.
4. When the Communications Assistant (CA) answers the call, his or
her greeting is displayed on your TTY. Type instructions for the CA
such as the number and the name of the person you wish to call. The
CA will dial the number of the person you are calling and type
information such as whether the phone is ringing or busy.
5. When the person answers the phone, the CA will introduce the call
and begin typing everything that the other person says.
6. When the other person says GA, begin typing what you want to say.
The CA will read what you type to the person you are calling.
7. Continue your conversation.
Relay
4. Press . ** RELAY
NUMBER SAVED ** is
displayed.
Enter
1. Turn on the Superprint Pro80.
2. Hold down the key and
press . RELAY NUMBER
is displayed.
Relay
Program
3. Type the telephone number for
your local Telecommunications
Relay Service (TRS).
You may use punctuation such as
dashes. There is space for up to
20 characters. Use the
key to correct mistakes.
Back Space
RELAY DIAL (without E-Turbo)
Programming the Relay Phone Number
Place a Relay call
with one button.
When you program the
button, you save
time whenever you
place a relay call. With
one touch, you can
automatically dial the
phone number of your
relay service.
Relay
RELAY NUMBER>
Relay
Press
Program
Hold
down
RELAY NUMBER> 1 <800> 555-1234
Type
** RELAY NUMBER SAVED **
Enter
Press
Page 31

ADVANCED CALLING • 25
3-WAY CALLING
If your telephone service includes conference calling capabilities, the
Superprint Pro80 allows you to carry on a conversation with two other
people.
1. Call the first person you wish to talk to.
2. When the first person answers the call, ask him or her to hold.
3. Hold down the and keys then press . HOOK FLASH
is displayed briefly. Then, TYPE NAME OR NUMBER is
displayed.
4. Type the phone number of the second person and press .
5. When the second person answers the call, ask him or her to hold
while you reconnect the first person.
6. Hold down the and keys then press . You now have a
3-way conversation.
7. Take turns as you would during a two-person conversation.
WAIT FOR RESPONSE
1. When someone asks you to hold during a conversation, hold down
the key and the key then press . WAITING is
displayed.
2. The Ring Flasher flashes when the other person starts typing again.
Continue your conversation.
TRANSFERRING CALLS
Use the following steps as a guide for transferring calls. Telephone systems
can vary, so you may need to contact your system administrator for
additional instructions.
1. If you are talking to someone on the Superprint Pro80 and you need
to transfer the call press to go into Dialing mode. TYPE
NAME OR NUMBER is displayed.
2. Type an exclamation point ( + ) followed by the number of
the new extension to which you are transferring the call.
For example: ! 3333
3. Press to dial the number.
4. When the second person answers the call, inform him or her that you
are transferring a call and ask him or her to hold while you transfer
the call.
5. Press to hangup your Superprint Pro80 and complete the
transfer.
You can also hold down the key and press the button.
This will hang up the call without turning off the Superprint Pro80.
EscCtrl
On/Off
Enter
1
Shift
Dial
WShiftCtrl
FShiftCtrl
Enter
FShiftCtrl
Use Baudot code
for 3-way calling.
Whenever you use 3way calling, be sure
that all three TTYs are
using Baudot code (see
“Code” on page 43). To
change to Baudot, hold
down the and
keys then press
.
B
Shift
Ctrl
Most systems require a “hook
flash” to transfer
calls.
Office telephone systems vary widely but
most will require the
hook flash. To dial a
hook flash on the
Superprint Pro80, dial
an exclamation point
( ! ).
What is Wait for
Response?
This function frees you
from having to stare at
the display when the
person on the other end
of the line asks you to
hold. If someone asks
you to hold during a
conversation, turn on
Wait for Response.
Now, the Ring Flasher
will flash when the
other person starts typing again.
Page 32

26 • ADVANCED CALLING
Page 33

USING MEMOS
SAVING A NEW MEMO
1. Turn on the Superprint Pro80.
2. Hold down the key and press .
EDIT MEMO is displayed.
3. Type a name for your new Memo (8 characters maximum).
The name cannot be the same as any other Memo name already
stored.
4. Press . The name of the new Memo is displayed.
5. Type the message you want to save for this Memo.
You can use the keys to move around in the message and the
key to delete parts of the message.
6. Press . ** MEMO SAVED ** is displayed.
USING MEMOS
1. At any point during a conversation when it is your turn to type,
press . SEND MEMO is displayed.
2. Begin typing the first few letters of the name of the Memo you want
to send. When you have typed enough letters, the whole name is
displayed.
If you don’t remember what name is used for the Memo, you can use
the keys to look through the list of Memos.
3. Press when the name of the desired Memo is displayed.
The Memo is sent and displayed the same way it would be if you
were typing the message during the conversation.
4. Continue the conversation.
Enter
Send Memo
Enter
Back Space
Enter
Send MemoProgram
USING MEMOS • 27
What is a Memo?
A Memo is a short message that you save in
the Superprint Pro80
memory and later send
to someone during a
conversation.
This can save time typing durig a call because
you save Memos ahead
of time. Some examples
of Memos might be a
list of your favorite toppings for ordering pizza
or a message you need
to send to several different people.
CHAPTER
5
Page 34

28 • USING MEMOS
EDITING A MEMO
1. Hold down the key and press .
EDIT MEMO is displayed.
2. Begin typing the first few letters of the name of the Memo you wish
to edit. When you have typed enough letters, the whole name is
displayed.
If you don’t remember what name is used for the Memo, you can use
the keys to look through the list of Memos.
3. Press . The name of the Memo is displayed followed by the
message.
4. Edit the message as needed.
You can use the keys to move around in the message, the
key to delete parts of the message or the button to
delete the entire message.
5. Press . ** MEMO SAVED ** is displayed.
PRINTING A MEMO
1. Hold down the key and press .
EDIT MEMO is displayed.
2. Press to look through the list of Memos.
3. When the desired Memo is displayed, press . The Memo is
printed.
4. Press to leave the Memo menu.
CLEARING A MEMO
1. Hold down the key and press .
EDIT MEMO is displayed.
2. Press the keys to look through the list of Memos.
3. Press . CLEAR MEMO <YES> is displayed.
4. Press . ** MEMO CLEARED ** is displayed.
5. Press to leave the Memo menu.
Esc
Enter
Clear
Send MemoProgram
Esc
Printer
Send MemoProgram
Enter
ClearBack Space
Enter
Send MemoProgram
You can print all of
the Memos at once.
Hold down the
key and press .
Press to scroll
down. The last five
options allow you to
print all the items of a
particular type (see “The
Printer Button” on page
46).
Printer
Program
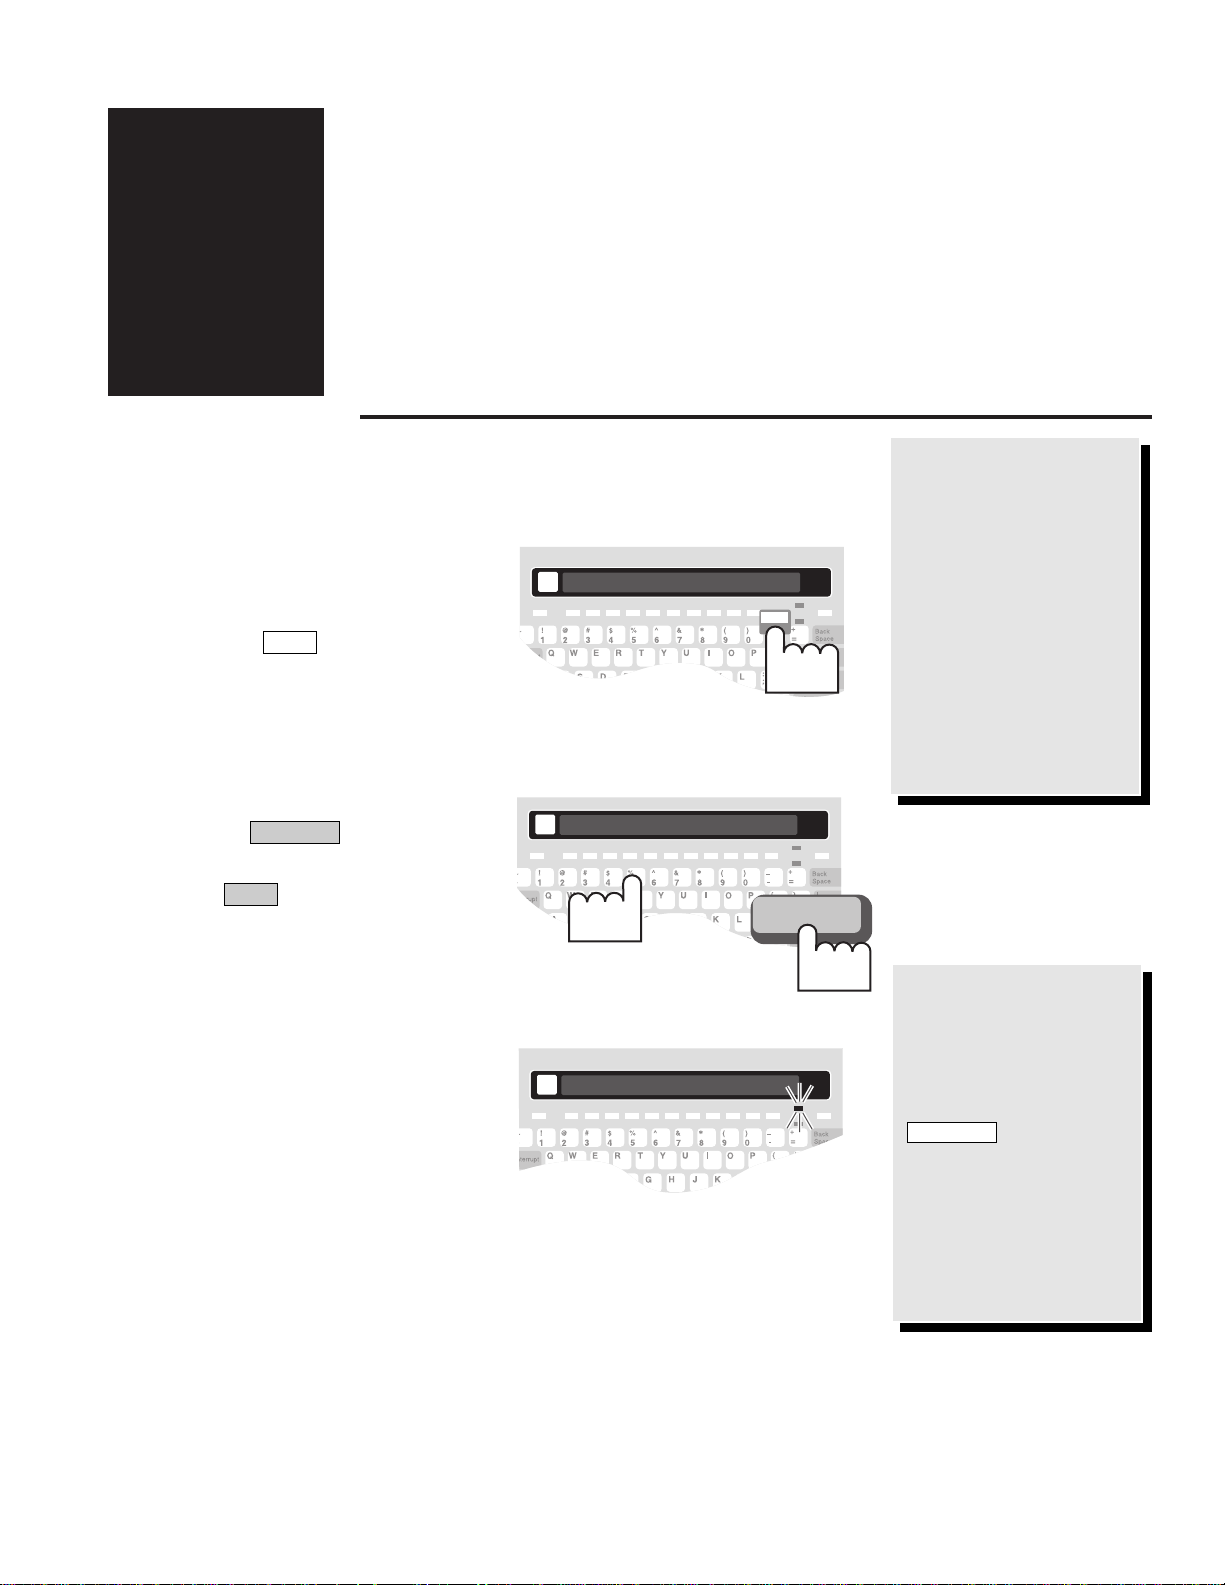
Page 35

USING THE DIRECTORY
SAVING A NEW TELEPHONE NUMBER
1. Hold down the key and press .
TYPE NAME, OR UP/DOWN TO SEARCH is displayed.
2. Type a new name and press . PHONE NUMBER is displayed
with a blinking cursor where you can begin to type the number.
A name can be up to 16 characters long including letters, spaces and
numbers.
3. Type the number. There is room for up to 20 characters.
You can insert dashes, parentheses or spaces, but they are not
required.
You can also use the corresponding letters from a standard telephone
keypad. For example, some company publishes its phone number as:
1 (800) 555-HEAR
When dialed on a telephone, the number turns out to be:
1 (800) 555-4327
You can type the number either way on the Superprint Pro80.
You can use the following keys while typing or editing numbers:
● The and keys to move through the number without
deleting.
● The key to erase characters.
● The button to erase the entire number.
4. Press . ** DIRECTORY ENTRY SAVED ** is displayed.
5. Press to exit the Directory.
Esc
Enter
Clear
Back Space
Enter
DirectoryProgram
USING THE DIRECTORY • 29
How many
telephone numbers
can I store in the
Directory?
The Superprint Pro80
will store 99 numbers.
When saving numbers
remember that each
entry must be given a
unique name.
CHAPTER
6
Page 36

30 • USING THE DIRECTORY
EDITING A NUMBER
1. Hold down the key and press .
TYPE NAME, OR UP/DOWN TO SEARCH is displayed.
2. Type the name for the number you want to edit. If you do not
remember what name is used for the number, you can use the
keys to look through the list of numbers in the Directory.
3. Press . The number is displayed.
4. Use the following keys while editing numbers:
The and keys to move through the number without deleting.
The key to erase characters.
5. Press to save the number or press to exit this menu.
PRINTING A DIRECTORY ENTRY
1. Press . TYPE NAME OR NUMBER is displayed.
2. Press to scroll through the list of numbers in the Directory.
3. When the desired entry is displayed, press . The name and
number are printed.
CLEARING A DIRECTORY ENTRY
1. Hold down and press . TYPE NAME, OR
UP/DOWN TO SEARCH is displayed.
2. Type the name for the number you want to clear. If you do not
remember what name is used for the number, you can use the
keys to look through the list of numbers in the Directory.
3. Press the button. CLEAR JOHN SMITH <YES> is
displayed.
4. Press . ** CLEARED ** is displayed.
5. Press to exit the menu without making any changes.
CLEARING THE DIALING DIRECTORY
1. Press the button. CLEAR <CONVERSATION> is displayed.
2. Press the key until CLEAR <DIRECTORY> is displayed.
3. Press . CLEAR DIRECTORY <NO> is displayed.
4. Press the to change the option to <YES>.
5. Press . ** DIRECTORY CLEARED ** is displayed.
Enter
Spacebar
Enter
Clear
Esc
Enter
Clear
DirectoryProgram
Printer
Dial
EscEnter
Back Space
Enter
DirectoryProgram
You can print all of
the Directory at
once.
Hold down the
key and press .
Press to scroll
down. The last five
options allow you to
print all the items of a
particular type (see “The
Printer Button” on page
46).
Greeting
Program
Important!
Are you sure you
want to clear
the Directory?
Clearing the Directory
will permanently delete
ALL the telephone
numbers that you have
saved into the
Directory. To be safe,
print out the entire
Directory first (see “The
Printer Button” on page
46).
Page 37

USING AUTO-ANSWER
HOW AUTO-ANSWER WORKS
You can turn on Auto-Answer when you are going to be away from your
Superprint Pro80 and unable to answer calls. It will answer the call and
record text messages for you. When the Superprint Pro80 answers calls, it
sends both the Relay Voice Announcer message and the Auto-Answer
memo.
The Relay Voice Announcer is a recording of a woman’s voice that says,
“Please use text telephone or dial relay.” If you programmed in the Relay
number, it also reads the telephone number for the local relay service. For
more information, see “The Relay Voice Announcer” on page 20.
Auto-Answer sends a message that reads, “YOU HAVE REACHED AN
ANSWERING MACHINE, PLEASE LEAVE A MESSAGE, GA.” To
change what is sent, see “Editing the Outgoing Message” on page 32.
After the outgoing message has been sent, the caller can type a message
for you to read. The Superprint Pro80 saves the message in memory, prints
the message and adds 1 to the number of calls which is displayed. The
Superprint Pro80 hangs up when nothing has been received for 45
seconds.
AUTO-ANSWER MEMORY
The Superprint Pro80 will store approximately 100 short messages. The
exact number of messages depends on the amount of space available in
shared memory. If the memory does get full, “MESSAGE MEMORY
FULL” is added to the last entry and the Superprint Pro80 stops saving
messages. However, it continues to answer calls as long as the printer is
on. The total number of calls is still counted and all messages are printed.
If the printer is off and the memory is full, then the Superprint Pro80
stops answering calls.
USING AUTO-ANSWER • 31
Auto-Answer does
not record voice
messages.
If a someone calls you
by voice and reaches
your Superprint Pro80
while Auto-Answer is
on, he or she will hear
the Relay Voice
Announcer message.
This message explains
that the caller should
either use a TTY or call
using a relay service.
CHAPTER
7
Page 38

32 • USING AUTO-ANSWER
TURNING AUTO-ANSWER ON
1. Press .
If a new message has been saved that has not been reviewed,
AA ON 1 NEW MSG is displayed. If there aren’t any new
messages, AA ON 0 NEW MSGS is displayed.
2. Leave the Superprint Pro80 on to answer calls while you are away.
3. If the Superprint Pro80 receives a call while you are away from home,
AA ON 1 NEW MSG will be displayed when you return.
TURNING AUTO-ANSWER OFF
Press . **AUTO ANSWER OFF** is briefly displayed.
You can also press to turn off the Superprint Pro80.
REVIEWING MESSAGES
1. When Auto-Answer is on, the AA ON message is displayed.
If a new message has been left for you that has not been reviewed,
AA ON 1 NEW MSG is displayed. If there aren’t any new
messages, AA ON 0 NEW MSGS is displayed.
2. Press to begin reviewing your messages.
The display will tell you how many messages are saved and how
much memory is remaining. Then, each Auto-Answer message
scrolls across the display. Each message begins with five dashes
( - - - - - ) and the date and time that it was received.
3. To pause at any time while reviewing messages, press the
. Press the again to continue reviewing the messages.
4. To stop reading messages, press . CLEAR MESSAGES
<NO> is displayed. Go to step 7.
5.
When finished, the Superprint Pro80 displays, <END OF MESSAGES>.
6. Press . CLEAR MESSAGES <NO> is displayed.
7. To clear messages, press to change the setting to <YES> and
press . ** MESSAGES CLEARED ** is displayed.
EDITING THE OUTGOING MESSAGE
1. Hold down the key and press . AUTO
ANSWER RINGS <2> is displayed.
2. Press until CHANGE AA GREETING <NO> is displayed.
3. Press the to change the option to <YES>. Then, press
. ANSWER> YOU HAVE REACHED AN ANS is displayed.
4. Edit the message as needed.
You can use the keys to move around in the message, the
key to delete parts of the message and the button to
delete the whole message and start over.
5. Press to save this message and exit this menu.
** MEMO SAVED ** is displayed.
Enter
ClearBack Space
Enter
Spacebar
Auto-AnswerProgram
Enter
Spacebar
Esc
Esc
SpacebarSpacebar
On/Off
Auto-Answer
Auto-Answer
Can I answer a call
even if AutoAnswer has already
answered?
Yes. If someone is calling you, interrupt the
Auto-Answer function
by pressing .
Then, begin typing to
answer the call.
Esc
Why does my
display look
different?
If you have Caller ID
on in addition to AutoAnswer, you will see
more information on
your display. The display might look like
this: AA ON 1 NEW
CALL 0 NEW MSGS.
For more information
on Caller ID, please see
Chapter 8.
Can I print all of
the Auto-Answer
Messages at once?
Hold down the
key and press .
Press to scroll
down. The last five
options allow you to
print all the items of a
particular type (see “The
Printer Button” on page
46).
Printer
Program
Page 39

USING AUTO-ANSWER • 33
SETTING THE NUMBER OF RINGS
1. Hold down the key and press . AUTO
ANSWER RINGS <2> is displayed.
2. Type the number of desired rings or “T” for Toll Saver. You can also
press the . The number of rings (<2> through <9>) or
<TS> is displayed.
3. Press to save this setting. ** AUTO ANSWER RINGS
SAVED ** is displayed.
TURNING OFF THE AUTO-ANSWER RELAY
VOICE ANNOUNCER
1. Hold down the key and press . AUTO
ANSWER RINGS <2> is displayed.
2. Press until AUTO ANSWER VOICE < ON> is displayed.
3. Press the to change the option to <OFF>. Then, press
. ** AUTO ANSWER VOICE OFF ** is displayed.
THE REMOTE MESSAGE RETRIEVAL OPTION
Saving a Password
1. Hold down the key and press . AUTO
ANSWER RINGS <2> is displayed.
2. Press until CHANGE AA PASSWORD < NO> is displayed.
3. Press the to change the option to <YES>. Then, press
. TYPE AA PASSWORD is displayed.
4. Type your password. Your password can be up to 8 characters long
and can include letters and numbers only. There is room for only one
password.
5. Press to save this setting. ** AA PASSWORD SAVED **
is displayed.
Reading Auto-Answer Messages Remotely
1. Before you leave, press to turn Auto-Answer on and
make sure you have saved a password.
2. Call your Superprint Pro80 from a different TTY.
3. Wait for the Superprint Pro80 to answer the call and send the Auto-
Answer message.
4. Type a slash followed by your password like this:
/MYPASS
5. Press . The Superprint Pro80 sends all of the Auto-Answer
information. When all of the messages have been sent, <END OF
MESSAGES> is briefly displayed followed by CLEAR
MESSAGES Y/N.
6. Press to clear messages. MESSAGES CLEARED is displayed
Y
Enter
Auto-Answer
Enter
Enter
Spacebar
Auto-AnswerProgram
Enter
Spacebar
Auto-AnswerProgram
Enter
Spacebar
Auto-AnswerProgram
What does Toll
Saver do?
Toll Saver saves you the
cost of a call when
checking your AutoAnswer messages
remotely. You can tell if
you have any new messages because AutoAnswer picks up the
call after two rings. If
you do not have new
messages, Auto-Answer
waits for five rings. So,
you can hang up after
three rings without
being charged for the
call.
Can I check
messages when I
am away from
home?
Yes, remote message
retrieval allows you to
use another TTY when
you are away from your
Superprint Pro80 to
check your AutoAnswer messages.
In order to use this
function you must first
save a password in your
Superprint Pro80. You
will be able to read
your messages from
another TTY location
only if a password has
been saved.
Page 40

34 • USING AUTO-ANSWER
and the Superprint Pro80 hangs up.
Press to skip clearing messages. REPLAY MESSAGES Y/N? is
displayed.
7. Press to replay messages. Go to step 5.
Press to skip replaying messages. PLEASE HANG UP is
displayed and the Superprint Pro80 hangs up.
HERE IS A SAMPLE:
N
Y
N
John calls from another TTY and
waits for his Auto-Answer message
to finish
He types his password.
When John typed his password, it
counted as another message.
He decides not to clear his
messages.
He ends the call by deciding not to
read his messages again.
Page 41

USING CALLER ID
ABOUT CALLER ID
If you have subscribed to Caller ID service from your telephone company,
you can view the information right on the Superprint Pro80 display. No
additional hardware is required!
When you subscribe to Caller ID service, information about the people
who call you is displayed while the Superprint Pro80 ring flasher flashes,
before you answer a call. Then, this information is saved along with the
date and time of the call so you can review it later. Up to 99 Caller ID
entries are saved. When more calls are received, the oldest entries are
erased to make room for the new ones.
Caller ID information includes the phone number of the caller. Phone
companies offer different options for Caller ID. Some Caller ID services
provide the caller’s name. The Superprint Pro80 is compatible with both
options. Because different Caller ID services are available, check with your
telephone company if you have questions about what is included with
your service.
TURNING ON CALLER ID
Once you have subscribed to Caller ID service, turn on Caller ID to begin
displaying and saving Caller ID information.
USING CALLER ID • 35
Caller ID is
available from your
telephone company.
The Superprint Pro80
allows you to view
Caller ID information
only if you subscribe to
the service through
your telephone
company.
CHAPTER
8
Why does my
display look
different?
If you have AutoAnswer on in addition
to Caller ID, you will
see more information
on your display. The
display might look like
this:
AA ON 1 NEW
CALL 0 NEW MSGS
.
For more information
on Auto-Answer, please
see Chapter 7.
1. Hold down the key and
press the button.
CALLER ID <OFF> is
displayed.
2. Press the to change the
option to <ON>. Then, press
. ** CALLER ID IS
ON ** is displayed.
Enter
Spacebar
Caller ID
Program
CALLER ID <OFF>
Caller ID
Press
Program
Hold
down
Page 42

36 • USING CALLER ID
VIEWING CALLER ID INFORMATION
When Receiving Calls
Press the Caller ID
button when AutoAnswer is also on.
If you have AutoAnswer on in addition
to Caller ID, you will
need to press
before reviewing Caller
ID entries.
For more information
on Auto-Answer, please
see Chapter 7.
Caller ID
1. The Ring Flasher flashes slowly
when the Superprint Pro80
receives a call. LINE IS
RINGING is displayed one time.
2. While the line is ringing, the
Caller ID information is
displayed. If you choose to
answer the call, you may do so.
If your Caller ID service includes
both name and number, both are
displayed. If your service
includes number only, the
number is displayed along with
the date and time of the call.
3. The Caller ID information is
displayed for eight seconds after
the line stops ringing. If you do
not pick up the call, 1 NEW
CALL is displayed.
Reviewing Caller ID Entries
1. Make sure Caller ID is on. X NEW CALLS should be displayed.
You can still review previous Caller ID entries even if 0 NEW
CALLS is displayed.
2. Press to begin reviewing Caller ID entries.
The Caller ID information from
the most recent call is displayed.
Each call is numbered on the left
side of the display.
... LINE IS RINGING ...
ULTRATEC INC 2385400
2385400 11/03 9:30AM
1 NEW CALL
1 ULTRATEC INC 2385400
Page 43

USING CALLER ID • 37
You can print all of
the Caller ID
entries in memory.
Hold down the
key and press .
Press to scroll
down. The last five
options allow you to
print all the items of a
particular type (see “The
Printer Button” on
page 46).
Printer
Progra
If your Caller ID service includes
both name and number, both are
displayed. If your service
includes number only, the
number is displayed along with
the date and time of the call.
3. With name and number service,
you can view the date and time
on a second display. Press the
to view the date and
time of the call. Press the
again to view the name
and number.
Spacebar
Spacebar
4. Continue to press to scroll
backwards through the Caller ID
entries. To view an entry that is
more recent, press .
5. To print a Caller ID entry, press
.
Printer
6. To clear a Caller ID entry, press
the button. CLEAR 238-
5400 <NO> is displayed.
Clear
7. Press the to change the
option to <YES>. Then, press
. **CLEARED** is
displayed.
Enter
Spacebar
1 2385400 11/03 9:30AM
1 11/03 9:30AM
PRINTING IN PROGRESS ...
Printer
CLEAR 238-5400 <NO>
Clear
** CLEARED **
Enter
Press
2nd.
Press
1st...
Page 44

38 • USING CALLER ID
Caller ID Displays
The Display This is the
shows this... meaning...
TTY ON Caller ID is not on. To turn it on,
hold down the key and
press the button.
... LINE IS RINGING ... Incoming call. If Caller ID is on,
this is displayed only for the
first rings.
CALLER NAME 6085551234 Caller ID display for name and
number service. This is the
caller’s name followed by the
caller’s phone number.
Displayed while line is ringing.
6085551234 11/03 9:30AM Caller ID display for number only
service. This is the caller’s phone
number followed by the date and
time of the call. Displayed while
line is ringing.
NUMBER UNAVAILABLE The telephone company does not
have Caller ID information for this
caller.
NUMBER BLOCKED The caller has used Caller ID
blocking when placing this call.
2 NEW CALLS There are two Caller ID entries
that have not been reviewed.
1 ULTRATEC INC 2385400 The number of the call and the
name and number of caller. This
the first of two possible displays
when reviewing Caller ID entries
with both name and number. The
second shows the date and time.
1 2385400 11/03 9:30AM The number of the call, the phone
number of the caller, and the date
and time the call was received.
This display is seen when
reviewing Caller ID entries with
number only.
Caller ID
Program
Page 45

USING VOICE CARRY
OVER (VCO)
WHAT IS REQUIRED?
You will need:
✔ Superprint Pro80 connected to a telephone (see “Connecting Power &
Phone Line” on page 7).
The person you are calling (or who calls you) will need one
of the following:
✔ A telephone if the call is placed through a Telecommunications
Relay Service (TRS).
✔ Other TTY and a telephone both directly connected to the same
phone line.
✔ Other TTY with acoustic cups and a telephone.
USING VOICE CARRY OVER (VCO) • 39
What is VCO?
VCO stands for “Voice
Carry Over.” Ultratec
developed this technology to allow you to use
your own voice during
a conversation. You
speak using a telephone
and read responses
using your Superprint
Pro80.
VCO calls can be made
directly between two
TTY users or placed
through your Relay
service.
CHAPTER
9
Page 46

40 • USING VOICE CARRY OVER (VCO)
HOW TO PLACE A VCO CALL
Using the Telecommunications Relay Service (TRS)
If the following is true, use these instructions.
The person I am calling does not have a TTY.
1. Press to dial the TRS number (to program this button, see
“Programming the Relay Phone Number” on page 24).
2. Wait for the Communication Assistant (CA) to answer. Then, type
the message, “VCO PLS GA” on the keyboard.
3. Pick up the telephone handset.
4. When you see the message VCO ON on the Superprint Pro80
display, tell the CA by voice the number you want to call. The CA
dials the number of the person you are calling.
5. When the person answers, the CA types the person’s greeting so that
you can read it on your Superprint Pro80.
6. When you see “GA,” you can begin speaking directly into the
telephone handset and read the replies that the CA types.
Calling Directly
If the following is true, use these instructions.
The person I am calling is a hearing person who has a
phone/TTY combination.
1. Dial the phone number of the person you are calling on the
Superprint Pro80.
2. Wait for the person to answer and look at your Signal light and
display to determine if he or she is speaking or using a TTY.
3. If the person is speaking, pick up the telephone handset and speak
into it to tell him or her that you would like to use VCO.
If the person is typing on a TTY, type on your Superprint Pro80 that
you would like to use VCO.
4. When the other person is ready to use VCO, you can begin your
conversation by speaking into the phone and reading what the other
person types on your Superprint Pro80 display.
Relay
Page 47

USING VOICE CARRY OVER (VCO) • 41
VCO INFORMATION
This section contains answers to frequently asked questions about VCO.
How does the Telecommunications Relay Service (TRS) relay
my VCO call?
Every state in the U.S. has a TRS which links TTY users with those who
do not have TTYs. With the TRS, VCO calls are made with the help of an
operator called a Communications Assistant (CA). You can speak directly
to the person you are calling. That person speaks his or her reply which
the CA types for you to read on your TTY. This service is available 24
hours, 7 days a week.
By law, all relay calls are kept strictly confidential. You may find your
state’s toll-free TRS number in the front of your local telephone book.
Does VCO automatically translate between voice and text?
No. VCO requires the use of a TTY or TRS. During a VCO call through
the TRS, the CA types the other person’s spoken words and you can read
what is said on your display. During a direct VCO call, the other person
types the message on a TTY.
Is there an additional charge for using VCO and TRS?
No. VCO does not cost anything! The TRS service is provided toll-free.
Local calls are free. Long distance calls incur the same charges as standard
voice conversations of the same duration, distance and time of day. Some
TRS providers also offer reduced rates for long distance.
Where can I learn more about VCO?
Contact your state’s TRS and ask them about the specific VCO options
available to you, such as 2-line VCO and user profiles. Your state’s TRS
number can be found in the front of your local telephone directory.
What is HCO?
Hearing Carry Over (HCO) is similar to VCO, in that it combines voice
telephone calling with TTY calling. The difference is that instead of
speaking for yourself and reading the reply, HCO lets you hear for yourself
and then type the reply.
Page 48

42 • USING VOICE CARRY OVER (VCO)
Page 49

PERSONALIZING GENERAL
OPTIONS
THE OPTIONS BUTTON
Code
TTYs communicate with each other using a “language” which is called a
“code.” The Superprint Pro80 uses three different communication codes:
Turbo Code, Baudot and ASCII (optional). Please see Chapter 11, “Using
Codes” for more information.
1. Press . CODE < AUTOMATIC> is displayed. This is the
default setting which allows the Superprint Pro80 to automatically
determine the best code to use for each call. With this setting, the
Superprint Pro80 detects which codes the other TTY uses and selects
the most appropriate one.
2. Press the to change the setting to the code you prefer.
3. Press to save this setting or press to exit the Options
menu without making any changes.
Depending on the code that you select, other options may become
available. For more information on these settings, see Chapter 11.
Set the Clock
1. Press . CODE < AUTOMATIC> is displayed.
2. Press until SET THE CLOCK <NO > is displayed.
3. Press the to change the option to <YES>. Then, press
. The date and time are displayed with the first number flashing.
4. Type each number, it will automatically advance to the next number.
5. Press when the date and time are correct, or press to
exit the Options menu without making any changes.
EscEnter
EnterSpacebar
Options
EscEnter
Spacebar
Options
PERSONALIZING GENERAL OPTIONS • 43
There are several
features
programmed by the
Options button.
The button lets
you customize certain
features of the
Superprint Pro80 to
your preferences. There
are several features listed in this menu.
Directions for customizing them are
given in this chapter.
Option
CHAPTER
10
Page 50

44 • PERSONALIZING GENERAL OPTIONS
Turbo Code
®
For this option, it is recommended that you leave the setting as TURBO
CODE < ON>. This allows the Superprint Pro80 to use Turbo Code when
it connects to another TTY that has this capability. Remember that when
the Code option is set to CODE <AUTOMATIC>, the Superprint Pro80
will automatically select the best code to use for each call. For more
information on Turbo Code, please see Chapter 11.
If you do choose to turn off Turbo Code follow these steps:
1. Press . CODE < AUTOMATIC> is displayed.
2. Press to scroll through the options until TURBO CODE < ON>
is displayed.
3. Press the to change the option to <OFF>.
4. Press to save this setting and move to the next option in the
menu, or press to exit the Options menu without making any
changes.
E-Turbo
™
Enhanced Turbo Code (or E-Turbo)
technology enables your TTY and your
relay service to work together, streamlining your relay calls. Relays that offer
E–Turbo provide calls that are more “functionally equivalent” to traditional
voice calls than ever before. With E-Turbo, many of the details of a relay call are
automatically handled for you:
● You dial the phone number of the person you are calling. Your
Superprint Pro80 automatically connects to your TRS.
● Your interaction with the CA is reduced.
● Your preferences are automatically sent to the TRS such as your
preference for a male or famale CA.
To turn E-Turbo on:
1. Press . CODE < AUTOMATIC> is displayed.
2. Press until E-TURBO is displayed.
3. Press the to select <ON>.
4. Press . **E-TURBO ON** is displayed briefly.
5. Press to exit the Options menu.
You will also need to program the access telephone number for your
E-Turbo compatible TRS. Please see page 22 for more information about
setting up and using E-Turbo.
Auto ID
™
The Auto ID feature alerts a hearing person that you are calling from a
TTY. It automatically sends a series of audible tones over the telephone
line every few seconds. This helps people like 911 operators quickly
recognize a TTY call.
Esc
Enter
Spacebar
Options
Esc
Enter
Spacebar
Options
Leave Auto ID on
all the time.
If you choose to turn
Auto ID off, the
Superprint Pro80 will
not automatically alert
people that you are
using a TTY.
Without Auto ID, you
will need to type in
order to send TTY
tones or use the Voice
Announcer to alert
other people to your
TTY call.
Page 51

PERSONALIZING GENERAL OPTIONS • 45
The tones are sent if someone picks up your call but no one begins typing.
SENDING AUTO ID is displayed each time the tones are sent. Tones are
also sent if no one types for a few minutes during a conversation. Auto ID
turns off whenever you start typing.
NOTE: If the message, SENDING AUTO ID appears on your display,
you may still do any of the Superprint Pro80’s functions.
It is recommended that you leave Auto ID on all the time so it will always
be available in the event of an emergency. To turn off the Auto ID feature:
1. Press . CODE < AUTOMATIC> is displayed.
2. Press to scroll through the options until AUTO ID < ON> is
displayed.
3. Press the to change the setting to <OFF>.
4. Press to save this setting and move to the next option in the
menu, or press to exit the Options menu without making any
changes.
Dial Using
The Superprint Pro80 is set for touchtone dialing, which is correct for
almost all telephone lines. With the Dial option, you can change the
setting to pulse dialing if needed.
1. Press . CODE < AUTOMATIC> is displayed.
2. Press to scroll through the options in the Setup menu until DIAL
USING < TONE> is displayed.
3. To change the setting to <PULSE>, press the .
4. Press to save this setting and move to the next option in the
menu, or press to exit the Options menu without making any
changes.
Dialing Prefix
A dialing prefix can be handy if you frequently have to type a series of
numbers before dialing a phone number. This is common in office settings
where a code such as “9” is required to obtain an “outside line.” When a
Dialing Prefix is saved, the Superprint Pro80 will always dial the prefix
before dialing a number from the Dialing Directory. The Dialing Prefix is
not used when dialing from the keyboard.
1. Press . CODE < AUTOMATIC> is displayed.
2. Press to scroll through the options until EDIT DIALING
PREFIX <NO> is displayed.
3. Press the to change the setting to <YES>.
4. Press . DIALING PREFIX is displayed.
5. Type the prefix. There is room for up to 29 characters.
6. Press to save this setting and move to the next option in the menu,
or press to exit the Options menu without making any changes.
Esc
Enter
Enter
Spacebar
Options
Esc
Enter
Spacebar
Options
Esc
Enter
Spacebar
Options
Page 52

46 • PERSONALIZING GENERAL OPTIONS
Interrupt
If you turn Interrupt off, you will not receive Interrupt request messages.
Your key will still send the interrupt message while someone else
is typing.
1. Press . CODE < AUTOMATIC> is displayed.
2. Press to scroll through the options until INTERRUPT <ON> is
displayed.
3. Press the to change the setting to <OFF>.
4. Press to save this setting and move to the next option in the
menu, or press to exit the Options menu without making any
changes.
THE PRINTER BUTTON
Print Font
Usually, the Superprint Pro80 prints everything in bold letters. With the
Print Font option you can choose between normal, wide or bold letters.
1. Hold down the key and press . PRINT FONT
<BOLD> is displayed.
2. Press the to change the setting.
3. Press to save this setting and move to the next option in the
menu, or press to exit the Print Setup menu without making
any changes.
Print Case
Usually, what you type is printed in all lower case letters and what is
typed by the person on the other end of the line is printed in upper case
letters. With the Print Case option you can choose to have all printing
appear in upper case.
1. Hold down the key and press . PRINT FONT
<BOLD> is displayed.
2. Press to scroll through the options until PRINTER CASE
<UPPER/LOWER> is displayed.
3. Press the to change the setting to <ALL UPPER>.
4. Press to save this setting and move to the next option in the
menu, or press to exit the Print Setup menu without making
any changes.
Print all Auto-Answer Messages
1. Hold down the key and press . PRINT FONT
<BOLD> is displayed.
2. Press to scroll through the options until PRINT ALL AA
MESSAGES <NO> is displayed.
PrinterProgram
Esc
Enter
Spacebar
PrinterProgram
Esc
Enter
Spacebar
PrinterProgram
Esc
Enter
Spacebar
Options
Interrupt
What items are
programmed by the
Printer button?
All of the settings that
affect how your printouts look are programmed with the
button. You
have choices about the
size of the font and the
way conversations are
printed.
With this button, you
can also choose to print
all the items of a particular type such as all the
Auto-Answer messages
currently in memory.
Printer
Page 53

PERSONALIZING GENERAL OPTIONS • 47
3. Press the to change the option to <YES>. Then, press
. A list of every Auto-Answer message and the time it was
received is printed.
4. Press to stop printing, if needed.
Print all Caller ID Entries
1. Hold down the key and press . PRINT FONT
<BOLD> is displayed.
2. Press to scroll through the options until PRINT CALLER-ID
MESSAGES <NO> is displayed.
3. Press the to change the option to <YES>. Then, press
. A list of every Caller ID entry is printed.
4. Press to stop printing, if needed.
Print Dialing Directory
1. Hold down the key and press . PRINT FONT
<BOLD> is displayed.
2. Press to scroll through the options until PRINT DIALING
DIRECTORY <NO> is displayed.
3. Press the to change the option to <YES>. Then, press
. A list of all the names and numbers in the Directory is
printed.
4. Press to stop printing, if needed.
Print all Conversations
1. Hold down the key and press . PRINT FONT
<BOLD> is displayed.
2. Press to scroll through the options until PRINT ALL
CONVERSATIONS <NO> is displayed.
3. Press the to change the option to <YES>. Then, press
. All the conversations in memory are printed.
4. Press to stop printing, if needed.
Print all Memos
1. Hold down the key and press . PRINT FONT
<BOLD> is displayed.
2. Press to scroll through the options until PRINT ALL MEMOS
<NO> is displayed.
3. Press the to change the option to <YES>. Then, press
. A list of every Memo name and the contents is printed.
4. Press to stop printing, if needed.
Esc
Enter
Spacebar
PrinterProgram
Esc
Enter
Spacebar
PrinterProgram
Esc
Enter
Spacebar
PrinterProgram
Esc
Enter
Spacebar
PrinterProgram
Esc
Enter
Spacebar
Page 54

48 • PERSONALIZING GENERAL OPTIONS
STICKY KEYS
There are some characters and functions that require you to hold down one
key while pressing another button or key. For example, in order to type
the “$” symbol, you need to hold down the key while pressing the
key. Other examples are the Special Function buttons. In order to
program some of the Special Function buttons, you need to hold down the
key then press the desired Special Function button.
If you wish to use just one hand to type symbols or to use the Special
Function buttons, you can turn on “Sticky Keys” mode. When Sticky
Keys mode is on, you can type special symbols like the question mark by
pressing and then pressing the desired key. In this mode you can
program the Special Functions by pressing and then pressing the
desired Special Function button.
To turn on Sticky Keys mode, press the key 5 times. ** STICKY
KEYS ON ** is briefly displayed.
You can also lock down the or key by pressing the
key twice while Sticky Keys mode is on. Now every key or button press is
affected by the locked down key. To unlock the key, press the key
again.
To turn off Sticky Keys mode, press the key 5 times again.
** STICKY KEYS OFF ** is briefly displayed.
Sticky Keys mode stays on even if you press the button.
On/Off
Shift
Shift
ShiftProgramShift
Shift
Program
Shift
Program
4
Shift
Page 55

USING CODES
COMMUNICATION CODES
TTYs communicate with each other using a kind of “language” which is
called a “communication protocol” or “code.” The Superprint Pro80 uses
three different communication codes: Turbo Code
®
, Baudot and ASCII
(optional).
The Superprint Pro80 automatically decides which code to use while
communicating with other TTYs. It can tell what codes the other TTY
uses and selects the most appropriate code.
For various reasons, you can set the Superprint Pro80 to use only the code
that you tell it to.
TURBO CODE
About Turbo Code
When your Superprint Pro80 connects to another TTY that uses Turbo
Code, your conversation occurs as fast as you type. This means that your
conversation happens in “real time” without annoying delays. Plus, Turbo
Code allows you to interrupt the other person.
USING CODES • 49
CHAPTER
11
You can tell when the TTY has connected using Turbo Code because a
small dot, like a period, is displayed on the left side of the display.
Turbo Code also allows you to use the special “shift” characters on the top
row of your TTY (example: @ # % ^ & * _ < >). If your call is
connected in Baudot, these characters cannot be received or printed at the
other end of the line. This is yet another example of why Turbo Code is
better for TTY communication than Baudot—especially in the day of
sharing your email address.
If you need to turn off Turbo Code, see “Turbo Code” on page 44.
S.O NICE TO HERE FROM YOU
The Turbo Code Dot
Page 56

50 • USING CODES
Selecting Turbo Lock
To make sure that you are using Turbo Code with a call, select Turbo
Lock:
1. Press . CODE < AUTOMATIC> is displayed.
2. Press the to change the option to <TURBO LOCK>. Then,
press . TURBO LOCK <OFF> is displayed.
3. Press the to change the option to <ON>. Then, press
. ** TURBO LOCK ON ** is displayed.
4. Press to exit the Options menu.
BAUDOT CODE
1. Press . CODE < AUTOMATIC> is displayed.
2. Press the to change the setting to <BAUDOT>.
3. Press . ** BAUDOT CODE ON ** is displayed briefly. Then,
the Baudot baud rate option is displayed.
4. Press the to select either <45> or <50>. Then, press
to save it.
Select <45> to use only 45.5 baud Baudot. Most Baudot TTYs use
this setting.
Select <50> to use only 50 baud Baudot. TTYs purchased in
Australia, New Zealand or South Africa use 50 baud.
5. Press to exit this menu.
ASCII (OPTIONAL)
About ASCII
ASCII stands for American Standard Code for Information Interchange.
Some TTYs and all computers in the United States and Canada use ASCII.
If your Superprint Pro80 has ASCII, you may need to change some
options.
Changing ASCII Options
1. Press . CODE < AUTOMATIC> is displayed.
2. Press the to change the setting to <ASCII>.
3. Press . ** ASCII CODE ON ** is displayed briefly. Then, the
first of the ASCII options is displayed.
4. Press to scroll through the options. These described in the next
section, “ASCII Options.”
5. For each option, you can press the to change the setting.
Then, press to save it. The next option will be displayed.
6. Press to exit the ASCII Options at any time.
Esc
Enter
Spacebar
Enter
Spacebar
Options
Esc
EnterSpacebar
Enter
Spacebar
Options
Esc
Enter
Spacebar
Enter
Spacebar
Options
Page 57

USING CODES • 51
ASCII Options
ASCII (ORIGINATE/ANSWER)
Determines which machine is calling and which one is answering. This
usually happens automatically. However, if you are manually setting up
ASCII, select ORIGINATE if you are going to be the person placing the
call and select ANSWER if you are going to be receiving ASCII calls.
The default is ORIGINATE.
Baud Rate (110/300)
Determines how fast the signals travel through the phone lines. You can
choose 110 or 300 baud, but 110 is rarely used. The default baud rate is
300.
Duplex (HALF/FULL)
Controls how characters are displayed. If you get double characters
(lliikkee tthhiiss) or none at all, change the option between half duplex
and full duplex. The default is half duplex.
Parity (8N1/7E1)
Controls error-checking. You can choose 8N1 or 7E1. The first number is
data bits. The middle letter means: “N” for No parity or “E” for Even
parity. The last number is stop bits. The default is 8N1 parity.
Return Sequence (CR/CR + LF)
Determines what the Superprint Pro80 sends when you press the key. You
can choose CR or CR + LF. CR stands for “carriage return” and CR + LF
stands for “carriage return plus line feed.” A carriage return goes to the
beginning of the current line. A carriage return plus a line feed goes to
the beginning of the next line. The default is CR + LF.
To connect your Superprint Pro80 to a computer, the other person should
have the computer set to use 300 baud, half duplex, 8N1 parity and CR.
ASCII Seek Time (3)
Sets the length of time during which the Superprint Pro80 sends out an
ASCII seek tone. The normal TTY seek time is 3 seconds. You may need
more time if you often connect to computers. Six seconds is recommended.
Selecting 0 turns off ASCII code and your Superprint Pro80 will
not try to use it even if the other TTY is using ASCII.
Page 58

52 • USING CODES
Troubleshooting ASCII Calls
If you do not receive a clear message during an ASCII call, try:
● Changing the parity setting to correct garbled strings of text.
● Changing the duplex setting to correct no characters or double
characters appearing when you type.
● Changing the baud rate (110 or 300).
● Changing the ASCII (ORIGINATE/ANSWER) setting.
If the code option is set to automatic and your Superprint Pro80 loses the
ASCII connection, NO ASCII CONNECTION is displayed and Baudot is
used.
If the code option is set to ASCII and your Superprint Pro80 loses the
ASCII connection, it waits until the other person changes to ASCII or
until you change the code option setting to automatic or Baudot.
If you are unable to make an ASCII connection, check to make sure your
ASCII seek time is set to at least 3. You can also try increasing the seek
time.
Page 59

CARE & REPAIR
Ordinary care of your Superprint Pro80 includes replacing the printer
paper and replacing the batteries. If you have any other problems, you
may be able to solve them by reading the Troubleshooting section of this
manual.
Besides the printer paper and batteries, the Superprint Pro80 has no other
user-serviceable parts. Any repair work should be done by a qualified
service person. If you try to repair the TTY yourself, you may damage the
Superprint Pro80 and you will void your warranty.
BATTERY CARE
The Superprint Pro80 will run on batteries for short periods of time such
as if the power fails or if the power adapter is unplugged. Fully-charged,
the six, AA rechargeable NiCad batteries will provide approximately 15
minutes of normal use.
When the Power light blinks, you have about 5 minutes of battery power
left. The batteries will last longer if you turn off the printer when you use
battery power.
Checking the Batteries
Over time, with normal use, the batteries lose their ability to hold a full
charge. To be sure that the batteries are fully charged, check them once a
month.
1. Unplug the AC adapter.
2. Turn on the Superprint Pro80 for 15 minutes (you can still use it for
calls during this time).
3. If the Power light still glows steadily after 15 minutes, then the
batteries are fine. If the Power light begins to blink during this
time, it is time to “exercise” the batteries (see the next section).
CARE & REPAIR • 53
CAUTION:
✔ Adjust only those con-
trols that are covered by
the operating instructions. Improper adjustment of other controls
may damage the
Superprint Pro80.
✔ To clean: Unplug the
Superprint Pro80 from
the wall outlet. Use a
damp cloth. Do not use
liquid or aerosol cleaners.
✔ Never attempt to
open, disassemble or
service the Superprint
Pro80. All repairs should
be performed by an
authorized service center.
Opening or removing
covers exposes you to the
risk of dangerous voltages and other hazards.
If reassembled incorrectly, the Superprint Pro80
can become an electrical
shock hazard.
✔ Avoid using a tele-
phone (other than a
cordless type) during an
electrical storm. There is
a remote risk of electric
shock from lightning.
✔ Do not use the tele-
phone to report a gas
leak in the vicinity of
the leak.
CHAPTER
12
Page 60

54 • CARE & REPAIR
Exercising the Batteries
1. Unplug the Superprint Pro80 and turn it on.
2. Leave the Superprint Pro80 this way until the Power light flashes.
3. Turn the power off and plug the Superprint Pro80 back in for at least
24 hours.
4. Unplug the Superprint Pro80 and turn it on.
5. Leave the Superprint Pro80 this way for 15 minutes.
6. Repeat steps 1 through 5 until the Power light does not blink after
15 minutes of being on without the power adapter plugged in.
7. Plug in the Superprint Pro80. It is now ready for use.
Replacing the batteries
Replace the batteries every two or three years, or when they run down in
less than 15 minutes and exercising them does not help.
Use only AA, NiCad rechargeable batteries. NiMH and alkaline
rechargeable batteries will damage the Superprint Pro80 if it is plugged
in. These batteries require their own recharger.
If you unplug the Superprint Pro80 and remove the batteries for more
than 12 hours, all memory will be erased. The Greeting, Auto-Answer
message and other personalized settings will go to the factory default
values.
CAUTION!
✔ Use only the type
and size battery specified in the instructions
for your unit. NEVER
USE NiMH OR
ALKALINE
RECHARGEABLE
BATTERIES.
✔ Do not dispose of the
batteries in a fire. Cells
may explode. Check
local codes for possible
special disposal instructions.
✔ Do not open or muti-
late the batteries.
Battery electrolyte is
corrosive and may cause
damage to the eyes or
skin. It may be toxic if
swallowed.
✔ Exercise care in han-
dling batteries in order
not to short them with
conducting materials
such as rings, bracelets,
and keys. The battery
or conductor may overheat and cause burns.
Remove the cover: Slide
cover in the direction of
the arrow.Then, lift it off.
Take out the old batteries
and put in new ones. Be
sure that the + and - ends
match the symbols on the
bottom of the TTY.
Release the cover: Press the
release tab with the point of
a pen through the small hole.
Put the battery
cover back on.
Page 61

CARE & REPAIR • 55
CLEARING ALL MEMORY
You can clear all conversations, memos, Directory entries, and AutoAnswer messages at one time. Follow these steps to clear all memories:
1. Press . CLEAR <CONVERSATION> is displayed.
2. Press to change the option to <ALL>.
3. Press . CLEAR ALL <NO> is displayed.
4. Press to change the option to <YES>.
5. Press . ** ALL MEMORY CLEARED ** is displayed.
RESETTING THE SUPERPRINT PRO80
Resetting the Superprint Pro80 returns all options to their original
settings. It also clears all Conversations, Auto-Answer messages, Memos
and Directory entries.
Follow these steps to reset the Superprint Pro80:
1. Press the left key, the right key, and the key
( + + ) all at the same time. You will see a version
number and RESET Y/N? on the display.
2. Press to reset. ** RESET ** is displayed briefly.
Press if you change your mind and decide not to reset the
Superprint Pro80.
CLEANING
To clean:
1. Unplug the Superprint Pro80 from the wall outlet.
2. Use a damp cloth. Do not use liquid or aerosol cleaners.
N
Y
CtrlShiftShift
CtrlShiftShift
Enter
Spacebar
Enter
Spacebar
Clear
Important!
Are you sure you
want to clear the
memory?
Cleared memory cannot
be retrieved. You may
want to print out the
Directory or other saved
items first (see “The
Printer Button” on page
46).
Important!
Are you sure you
want to reset your
Superprint Pro80?
Resetting the
Superprint Pro80
deletes all your personalized settings and
everything stored in
memory. There is no
way to get the contents
back after you reset.
You may wish to print
out the Directory or
other saved items first.
Page 62

56 • CARE & REPAIR
REPAIR
If your Superprint Pro80 is not working, we may be able to help you solve
the problem over the telephone. Call Ultratec at the number on the inside
front cover.
Follow these steps if you need to send the Superprint Pro80 to our repair
center:
1. Pack it in the original shipping carton or a similar sturdy box.
2. Include a note that describes the problem. The note will help our
technicians find the problem.
3. Insure the Superprint Pro80 for shipment. Ultratec or an authorized
Ultratec repair center is not responsible for damage during shipping
to the center.
4. Send the Superprint Pro80 to the Ultratec National Service Center
at:
Ultratec National Service Center
5901 Research Park Blvd.
Madison, WI 53719
(608) 238-5400 (V/TTY)
email: service@ultratec.com
TROUBLESHOOTING
Dialing Problems
Dialing does not work.
Make sure you have the right tone or pulse setting for your telephone
system (see “Dial Using” on page 45).
The display says ** NO DIRECT CONNECT **.
The Superprint Pro80 is not properly connected to the telephone line or
the line may be in use. Be sure the cord is firmly plugged into the
Superprint Pro80 and the telephone wall jack. You can also try using a
different telephone cord or wall jack.
Display/Connection Problems
The display shows all numbers, symbols, or unreadable
characters instead of words.
Press the . If that does not help and you have a Turbo Code
connection, try changing from Turbo Code to Baudot code. Hold down
the and keys and press the key to change to Baudot code.
If the symbols are scrolling across the display very fast, hang up the call
and try again. This could be a bad connection.
Some characters are not being sent.
Because Baudot code does not support special characters, it does not
BShiftCtrl
Spacebar
WARNING:
Unplug the Superprint
Pro80 from the wall
outlet and refer servicing to qualified service
personnel under the following conditions:
✔ When the power sup-
ply cord or plug is
damaged or frayed.
✔ If liquid has been
spilled into the TTY.
✔ If the TTY has been
exposed to rain or
water.
✔ If the TTY does not
operate normally when
the operating instructions are followed.
✔ If the TTY has been
dropped and/or damaged.
✔ If the TTY exhibits a
distinct change in
performance.
Page 63

CARE & REPAIR • 57
recognize some of the “shift” characters on the top row of a TTY
(example: @ # $ % ^ & *_<>). To type these characters (such as in an
email address) make sure your call is connected in Turbo Code (see “About
Turbo Code” on page 49).
Printer Problems
The printer does not work.
Be sure the printer is on by pressing . If it is, try resetting the
printer by turning the Superprint Pro80 off and on again.
The printer works, but it prints too lightly or not at all.
Make sure you have high-grade thermal printer paper and it is correctly
installed. (See “Installing Printer Paper” on page 9).
The printer only prints the bottom half of characters.
The print head should be replaced. Contact your dealer or Ultratec.
On battery power, the printer prints too slowly or lightly.
The batteries are low. Connect the AC adapter for 24 hours to recharge the
batteries. The Superprint Pro80 is not designed for continued use on
battery power.
The printer prints over the same line so the print is not
readable.
The paper may be sticking. Make sure the roll of paper on the paper
holder is pulled out away from the Superprint Pro80 as far as it can go.
The paper holder should snap into place when it is fully extended. Also,
make sure that no cords or other item is touching the paper.
Power Problems
The batteries run down too soon.
You may not be regularly using your Superprint Pro80 on battery power,
or the batteries are old (see “Battery Care” on page 53).
The Superprint Pro80 does not turn on when you press the
On/Off switch, or the Power light blinks even when the AC
adapter is plugged in.
Be sure the electrical outlet is working. Be sure you are using the correct
AC adapter—it should be a 10VDC, 1500 mA adapter. If you still have a
problem, contact your dealer or Ultratec.
The Superprint Pro80 works fine in the evening, but does
not work during the day.
You may have plugged the AC adapter into a switch-controlled outlet. Try a different outlet that you are sure is not controlled by a switch.
Printer
Page 64

58 • CARE & REPAIR
Page 65

SPECIFICATIONS
Physical Dimensions
Size - 12.25" x 9.25" x 2.5"
Weight - 3.5 lbs. with batteries
Power
AC adapter - 10VDC, 1500 mA
AC adapter is UL/CSA listed
The six, AA NiCad rechargeable batteries
are user-replaceable. They power the unit
for approximately 15 minutes.
Keyboard
Full size, computer style
11 special, one-touch function buttons
Sticky keys for single-handed typists
Character set: A-Z, 0-9, Backspace,
Enter/LF, Space, +=-$’()”/:;?,.*#%
Display
Blue/green vacuum-fluorescent
Bidirectional
32 characters
Character Height - 0.25" (6 mm)
Direct Connect
Pulse or tone dialing
Communication Codes
Automatic code detection on outgoing
calls (Turbo Code, ASCII or Baudot)
Baudot Code:
45.5 and 50 baud
Sensitivity: -45 dbm
Output: -10 dbm
Turbo Code:
100 baud (average)
7 data bits
ASCII Code (optional):
7N1, 8N1, 7E1, and 7O1
110 and 300 baud
Answer and originate
Full and half duplex
Compatible with Bell 103 modems
Memory
32K total
Memory edit functions: insert, clear
Memo/Directory Memory:
9,500 characters
Stores and sends over 100 named memos
Stores and dials up to 99 Directory entries
Auto-Answer/Conversation Memory:
22,000 characters maximum capacity
Stores recent TTY conversations
Stores over 100 Auto-Answer messages
Printer
Prints 80 characters per line
Uses 8.5" (216mm) thermal paper
Automatically divides long words
Auto-Answer
Saves and prints messages
Personalizable message
Selectable number of rings before answer
Remote message retrieval
Caller ID
Demodulates Bell 202 and V.23 1200
Baud PSK asynchronous data as specified
in the CLASS (Customer Local Area
Signalling Service) specification.
Approvals
FCC approved. FCC Registration No.
(Part 68): D8KUSA-40006-DT-E
REN: 0.6B
CSA certified: LR 80395
SPECIFICATIONS • 59
CHAPTER
13
Page 66

60 • SPECIFICATIONS
NOTICE:
This equipment meets the applicable
Industry Canada Terminal Equipment Technical
Specifications. This is confirmed by the registration
number. The abbreviation, IC, before the registration
number signifies that registration was performed based on
a Declaration of Conformity indicating that Industry
Canada technical specifications were met. It does not
imply that Industry Canada approved the equipment.
NOTICE: The Ringer Equivalence Number (REN) for
this terminal equipment is 0.6B. The REN assigned to
each terminal equipment provides an indication of the
maximum number of terminals allowed to be connected to
a telephone interface. The termination on an interface may
consist of any combination of devices subject only to the
requirement that the sum of the Ringer Equivalence
Numbers of all the devices does not exceed five.
Industry Canada Information
The Superprint Pro80 has been tested and found to comply
with the specifications for a Class B digital device
pursuant to Part 15 of the FCC Rules. These limits are
designed to provide reasonable protection against harmful
interference in a residential installation. This equipment
generates and uses radio frequency energy and if not
installed and used in accordance with the instructions,
may cause harmful interference to radio communications.
However, there is no guarantee that interference will not
occur in a particular installation. If this equipment does
cause harmful interference to radio or television reception,
which can be determined by turning the equipment off
and on, the user is encouraged to try to correct the
interference by one or more of the following measures:
• Reorient or relocate the receiving antenna.
• Increase the separation between the Superprint Pro80
and the receiver.
• Connect the Superprint Pro80 to an outlet on a circuit
different from that to which the receiver is connected.
• Consult the dealer or an experienced radio/TV
technician for help.
This equipment complies with Part 68 of the FCC rules
and the requirements adopted by the ACTA. A label is
located on the underside of the Superprint Pro80
containing, among other information, an FCC registration
number, D8KUSA-40006-DT-E. If requested, this
number must be provided to the telephone company.
A plug and jack used to connect this equipment to the
premises wiring and telephone network must comply with
the applicable FCC Part 68 rules and requirements
adopted by the ACTA. A compliant telephone cord and
modular plug is provided with this product. It is designed
to be connected to a compatible modular jack that is also
compliant. See installation instructions for details.
The REN is used to determine the quantity of devices
which may be connected to the telephone line. Excessive
RENs on the line may result in the devices not ringing in
response to an incoming call. In most, but not all, areas
the sum of RENs should not exceed five (5.0). To be
certain of the number of devices that may be connected to
a line, as determined by the total RENs, contact the local
telephone company. The REN for this product is 0.6B.
Should you experience trouble with this telephone
equipment, please contact:
Ultratec National Service Center
5901 Research Park Blvd.
Madison, WI 53719
email: service@ultratec.com
For repair or warranty information, please contact Ultratec
Inc. Customer Service at (608) 238-5400 (V/TTY). If the
equipment is causing harm to the telephone network, the
telephone company may request that you disconnect the
equipment until the problem is resolved.
This equipment cannot be used on public coin phone
service provided by the telephone company. Connection to
party line service is subject to state tariffs.
If the Superprint Pro80 causes harm to the telephone
network, the telephone company will notify you in
advance that temporary discontinuance of service may be
required. But, if advance notice is not practical, the
telephone company will notify you as soon as possible.
Also, you will be advised of your right to file a complaint
with the FCC if you believe it is necessary.
Occasionally, your telephone company may make changes
in its facilities, equipment, operation, or procedures that
could affect the operation of your equipment. If so, you
will be given advance notice of the change to give you an
opportunity to maintain uninterrupted service.
If your home has specially wired alarm equipment
connected to the telephone line, ensure the installation of
the Superprint Pro80 does not disable it. If you have
questions about what will disable alarm equipment,
consult your telephone company or a qualified installer.
Other than replacing the batteries, the Superprint Pro80
does not have any user-serviceable parts. Modification or
changes to the Superprint Pro80 not expressly approved by
Ultratec, Inc. can void your authority to operate the TTY.
FCC Information
Page 67

INDEX • 61
CHAPTER
1
INDEX
3-Way Calling ...2, 25
A
AC Adapter ...7, 54, 57, 59
jack ...3, 7
Adapter. See AC Adapter
Address
repair center ...56
Ultratec, Inc. ...inside front cover
Announcer. See Voice Announcer or
Relay Voice Announcer
Answering a call ...16
ASCII code
about ...50
options ...50, 51
seek time ...51
troubleshooting ...52
turning on and off ...43
Auto ID
about ...1, 44-45
turning on and off ...45
Auto-Answer
about ...2, 31
button ...5, 32-34
clearing ...32
memory for ...31, 55, 59
outgoing message ...32
password ...33
printing messages ...31, 46
Relay Voice Announcer ...31, 33
remote message retrieval ...33
reviewing messages ...32, 33
rings ...33
turning on and off ...32
B
Batteries
about ...53-54
checking ...53
compartment ...3
exercising ...54
how long they last ...53
problems ...57
replacing ...54
safety. See Safety instructions
type ...54
Baud Rate ...51, 59
Baudot code ...43, 50, 59
C
Call Progress
about ...2, 15
displays ...15
Caller ID
about ...1, 35
button ...5, 35
displays ...38
printing entries ...37, 47
reviewing entries ...36
turning on and off ...35
Calling, long distance ...15
Cleaning ...55
Clear button ...5
Clock. See Date & time
Codes ...43, 49-52
Computer, connecting with a ...50
Control (Ctrl) key ...20, 55
Conversation
about ...17
clearing ...17
etiquette ...16
memory for ...17, 59
printing ...17, 47
reviewing ...17
D
Date & time ...10, 17, 32, 37, 43
Dial button ...4, 11-12, 13. See also
Dialing
Dial Using ...45
Dialing. See also Dial button
E-Turbo. See Relay, E-Turbo
emergency ...21
from keyboard ...2, 11-12
from the Directory ...12-13
prefix ...45
pulse ...8, 45, 59
Relay. See also Relay
special requirements ...15-17
tone ...8, 45, 59
touchtone ...8, 45
troubleshooting ...56
Directory
adding to ...29
clearing ...30, 55
dialing from ...12
editing ...30
looking up entries in ...12
memory for ...2
number of entries stored ...2, 29,
59
printing entries ...30, 47
Duplex ...51
E
E-Turbo. See Relay, E-Turbo
Emergency button ...4, 21-22
Esc. See Escape (Esc) button
Escape (Esc) button ...5
Etiquette. See Conversation etiquette
F
Flasher. See Ring Flasher or Signaler
G
GA. See Conversation etiquette
Greeting
button ...4, 19
editing ...19
using ...19
H
Hook Flash ...15
I
Interrupt ...18, 46, 49
L
Light. See Power light or Signal light
Page 68

62 • INDEX
LINE IS RINGING ...2, 15, 38
M
Maintenance. See Cleaning, Batteries,
or Repair
Manners. See Conversation etiquette
Memory
Auto-Answer ...59
clearing ...17, 55
Conversation ...17, 59
Directory ...2, 29, 59
Memo ...2, 59
Memos. See also Send Memo button
clearing ...28, 55
editing ...28
memory for ...2, 59
printing ...28, 47
saving ...27
using ...21, 27
Message. See Auto-Answer or Memos
N
NO DIRECT CONNECT ...56
Number. See Directory
NUMBER BLOCKED ...38
NUMBER UNAVAILABLE ...38
O
Options button ...5, 43-46, 50
P
Paper ...9, 57, 59
Parity ...51
Password. See Auto-Answer
Phone. See Telephone
Power
battery ...53-54
button ...3
connecting ...7, 59
safety ...iii
troublesshooting ...57
Power light ...3, 53
Printer button ...5, 46-47. See also
Printing
Printing. See also Paper or Printer
button
Auto-Answer messages ...46-47
Caller ID entries ...47
case ...46
Conversations ...47
Directory entries ...47
font size ...46
Memos ...28, 47
options ...2, 46-47
print size ...2
setup ...9, 46-47
troubleshooting ...57
turning on and off ...53
Program key ...1
Pulse. See Dialing
R
Redial ...2, 13, 14
Relay
button ...4, 22-23, 24, 40-42
E-Turbo ...1, 22-23, 44
number ...22, 24
Relay Voice Announcer. See also
Relay Voice button
about ...2, 20, 31, 33
number ...2, 21
Relay Voice button ...5, 20, 21
Remote message retrieval. See Auto-
Answer, remote message retrieval
Remote polling. See Auto-Answer,
remote message retrieval
Repair ...53, 56, 60
Resetting ...55
Ring Flasher ...1, 3
S
Safety instructions ...iii
Send Memo button ...4, 21, 27-28.
See also Memos
Service. See Repair
Signal light ...3, 15
Signaler ...2, 8
SK. See Conversation etiquette
Special characters {! @ " # $ % ‘ - ()
*} ...49, 57
Special Function buttons ...1, 3. See
also specific buttons
Sticky Keys ...48
T
TDD ...1
Telephone
connecting ...2, 3, 8
line ...7, 8, 15, 56, 60
Telephone number. See Directory or
Dialing
Time. See Date & time
Toll Saver ...33
Tone. See Dialing
Touchtone. See Dialing
Transferring a call ...2, 15, 25-27
Troubleshooting ...56-57
TS. See Toll Saver
TTY ...1
Turbo Code
about ...1, 49, 59
interrupt ...18
Turbo Code dot ...49
Turbo Lock ...50
turning on and off ...43, 44, 56
Turbo Lock ...50
V
VCO. See Voice Carry Over
Voice Announcer ...20
Voice Carry Over ...39-42
W
Wait for Response ...25
Weitbrecht ...inside front cover
Page 69

Page 70

QUICK REFERENCE
GA “go ahead.”
When you are done typing, type
“GA” (or press ) to let the other
person know you are done and that
they can start typing.
SKSK “stop keying, stop keying.”
Type “SKSK” (or press twice) and
wait for the other person to type “SK”
before hanging up.
GA OR SK “go ahead or stop keying”
When you are ready to end the
conversation, this lets the other
person know you are finished but that
they can add any last words before
ending the conversation.
SK
GA
CONVERSATION ETIQUETTE
Below are some procedures, shortcuts and abbreviations that are commonly
used in TTY conversations.
CA “communication
assistant”
CD “could”
CUL “see you later”
CUZ “because”
HD “hold”
MSG “message”
MTG “meeting”
NBR “number”
OIC “oh, I see”
OPR “operator”
PLS “please”
PPL “people”
Q “?” (question mark)
R “are”
SHD “should”
THX “thanks”
TMW “tomorrow”
U “you”
UR “your”
THE PROGRAM KEY
Use the key with the Special Function buttons to personalize your Superprint Pro80. Most of
the Special Function buttons at the top of the keyboard have special menus for programming. You
access these menus with the key:
Program
Program
RELAY NUMBER>
Relay
Press
Program
Hold
down
 Loading...