

Page 1
305-018110 12/17
CapTel® 840i
How-to Guide
Page 2

Physical Dimensions
Size: 9" × 6.5" × 7.5"
Weight: 2 lb. 10 oz.
Power
AC Adapter: 5.9-6.0V, 2Amps
(barrel is negative)
Adapter is UL listed.
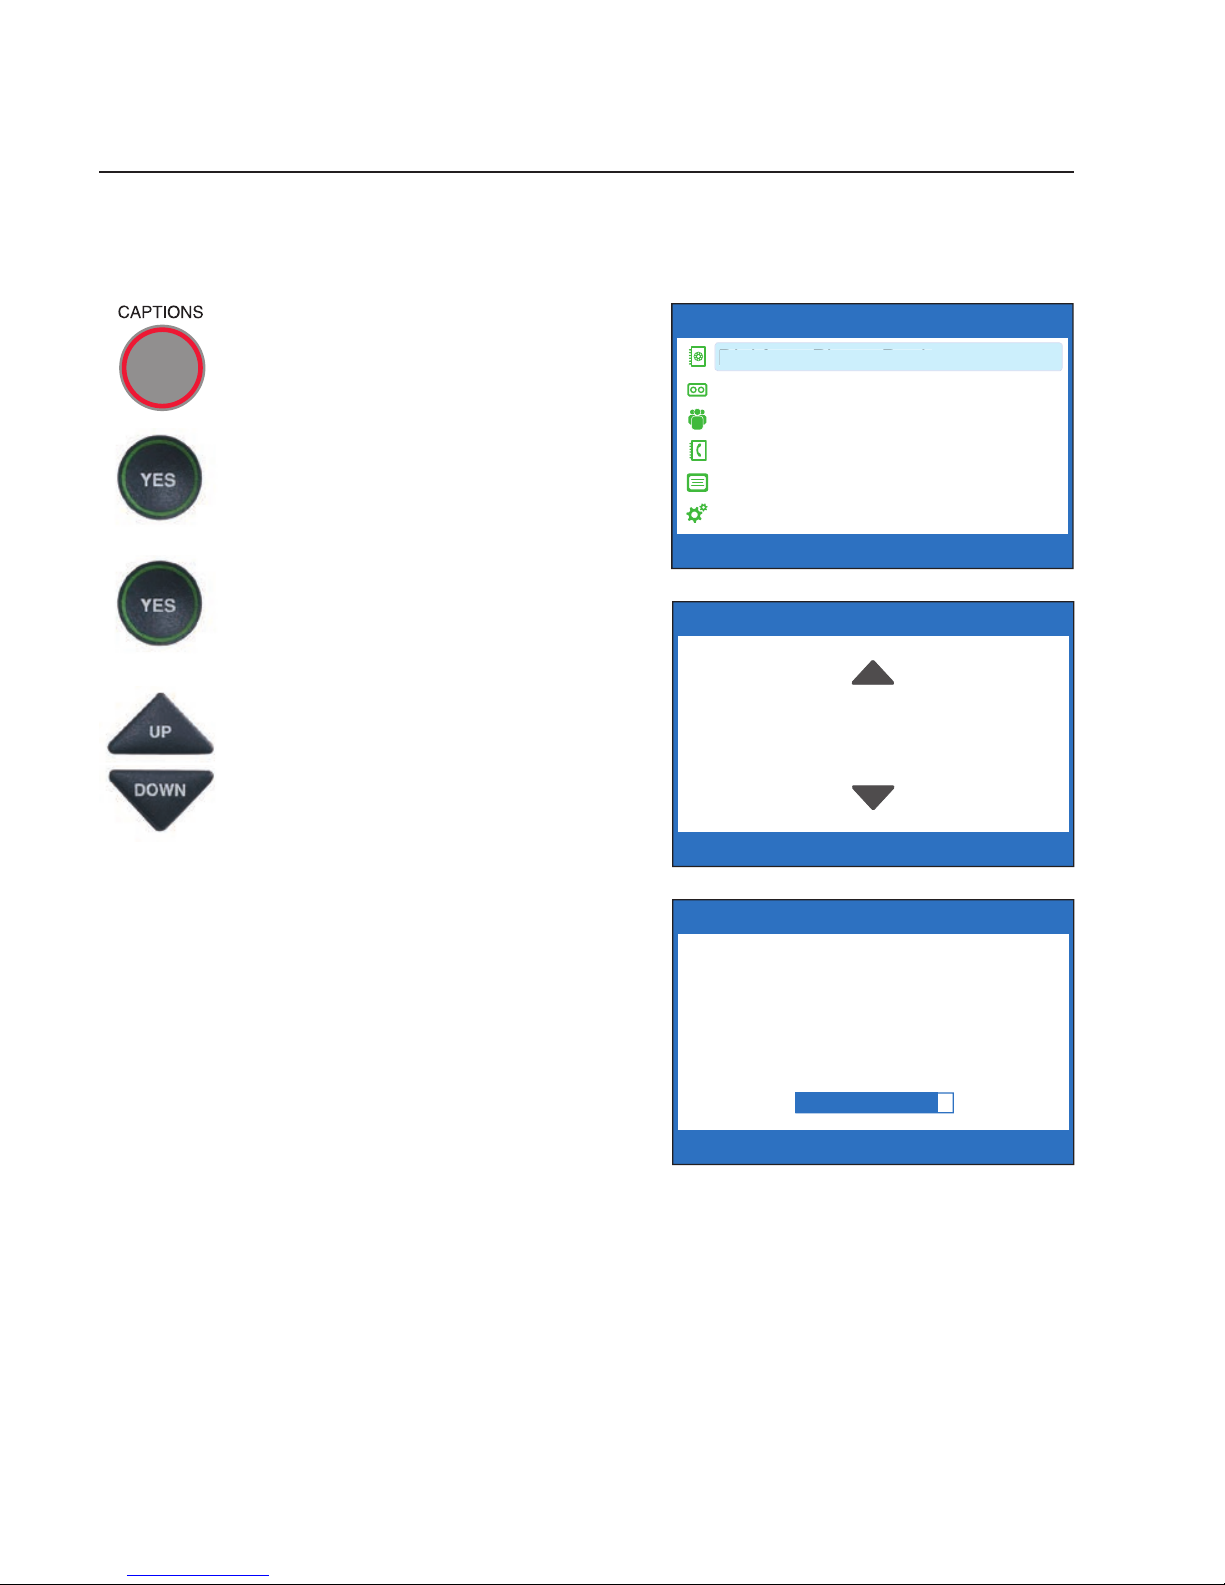
Dial Pad
Large Keys: 0.75" × 0.70"
Display
7" Backlit, graphical LCD
color display
840 × 480 pixels
Function Buttons
3 Programmable Speed Dial
1 Customer Service Speed Dial
Redial
Flash
Mute
Tone
Caption
Volume
Up/Down/Yes/No
Controls
Conversation: Amplification
when Captions on: 0-40 dB gain
when Captions off: 0-18 dB gain
Tone
Ringer: off, low, medium, high
(0-87 dB at 1 meter)
Indicator Lights
Mute
Volume Levels (1 through 12)
Captions On/Off
Handset
Type: HAC (Hearing Aid
Compatible)
Dialing
Phone Book (97 entries)
Speed Dial (3 entries)
Redial (Last 10 dialed numbers)
Captions
4 Caption font sizes
• Small 0.15"
(14 lines of text)
• Medium 0.20"
(10 lines of text)
• Large 0.25"
(8 lines of text)
• Extra Large 0.33"
(6 lines of text)
Adjustable colors for
background and captions font
Connections
Telephone line: requires RJ11
connection (can be standard
analog line, VOIP, DSL with
filter, Fiber Optic. Does not
support digital PBX system
unless analog port available).
3.5 mm Neckloop/Headset
2.5 mm Headset with microphone
Ethernet or WiFi wireless network
AC power
Approvals
FCC approved
ACTA Product-Labeling Number:
US:D8KTE00BCAPTEL840
REN: 0.0B
Conversation Memory
Up to 50 conversations (or
62,000 characters) saved in
memory
Caller ID History
Up to 50 entries
Answering Machine
63 Recordable messages
(2 minute max per message)
Recordable greeting
Selectable number of rings
before answer
Ability to caption messages left on
an external answering machine
Remote access to Answering
Machine messages from another
phone
CapTel 840i Specifications
Action Needed – Registration
The Federal Communications Commission (FCC) requires that all CapTel 840i
users register. As you set up your new phone, please follow the registration
directions on the screen. The Captions feature cannot be activated until
registration is complete. For directions, please see Registering Your CapTel
phone on page 22.
Need help registering? Call 1-888-269-7477
NOTE: Your CapTel phone will periodically connect to the Captioning Service through the Internet
and/or phone line connection to report its status and check for software updates.
Page 3

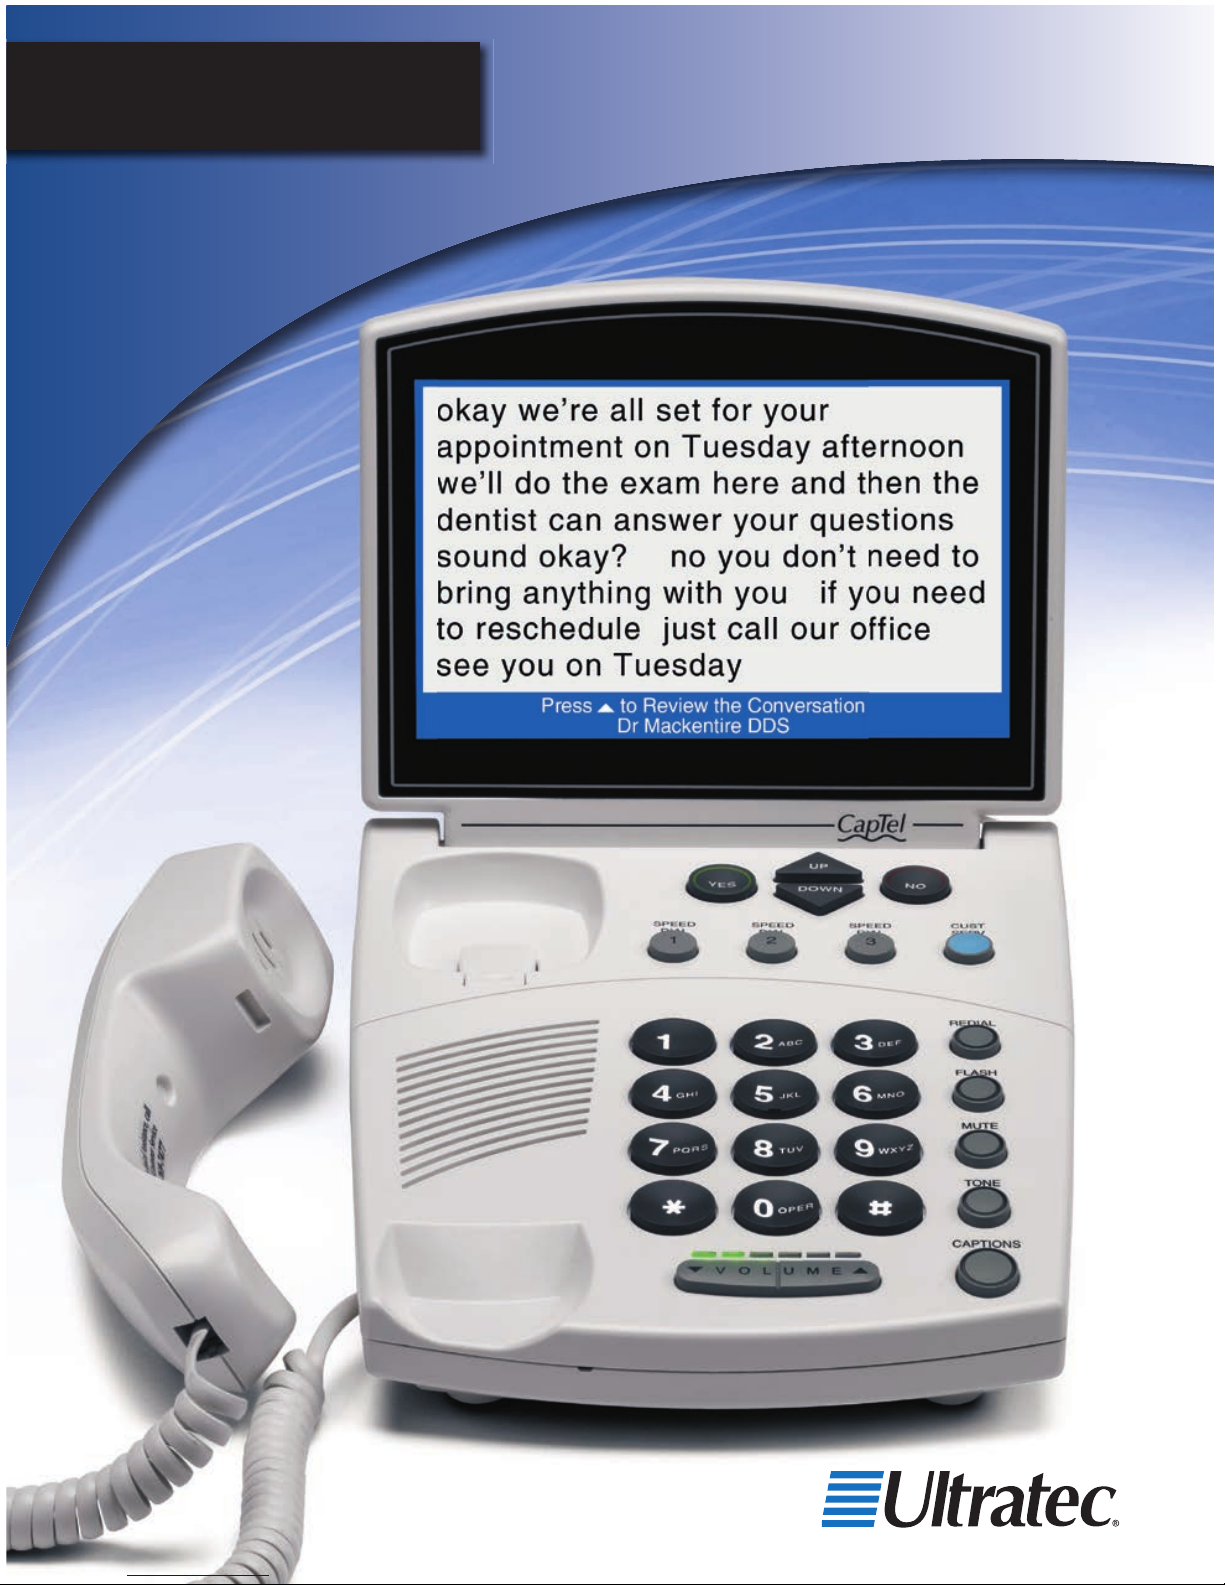
Customer Service: 888-269-7477 CONGRATULATIONS • 1
Congratulations on
Choosing CapTel!
Welcome to the Captioned Telephone – CapTel! With CapTel, you can see
captions of everything people say over the phone, letting you enjoy calls
with confi dence.
Please take a moment to read this guide and learn:
• How to start using your CapTel phone
• How your CapTel phone works
• How to get help when you have questions
We want the CapTel phone to be enjoyable and convenient for you.
As you use your new phone, we welcome your questions and comments.
If we can help, please call!
Thanks again for choosing CapTel.
Sincerely,
CapTel Customer Service
1-888-269-7477
www.CapTel.com
Page 4

Overview – How CapTel Works ................................. 4
Section 1: Getting Started ........................................ 5
What is in the box ............................................................. 5
Overview of CapTel 840i phone ......................................... 6
Using a headset or neckloop (optional) ........................... 11
Setting up your CapTel 840i ............................................. 12
Registering your CapTel phone ........................................ 22
Getting help .................................................................... 24
Section 2: Making and Answering Calls ................. 25
Dialing a phone number directly .................................... 26
Calling using the Speed Dial buttons ............................... 27
Calling a number in the Phone Book .............................. 28
Answering an incoming call ............................................ 29
Adjusting the volume ...................................................... 30
Adjusting the sound – TONE ............................................ 31
Knowing what sounds are on the line ............................. 32
Section 3: Viewing Captions .................................. 33
Turning captions on/off during a call .............................. 34
Viewing corrections ......................................................... 34
Reviewing captions during a call ..................................... 35
Reviewing captions after hanging up .............................. 36
Saving conversations ....................................................... 38
Erasing all conversations ................................................. 40
Changing the caption font size ........................................ 41
Setting the color of the captions ..................................... 43
Setting how captions scroll across the Display Screen ..... 45
Adjusting the brightness of the Display Screen ............... 47
Section 4: Call History ........................................... 49
About Caller ID ................................................................ 49
Using Call History to see recent calls ............................... 50
Adding a Call History entry to the Phone Book ............... 52
Clearing all Caller ID entries ............................................ 54
2 • TABLE OF CONTENTS Customer Service: 888-269-7477
TABLE OF CONTENTS
Page 5

Customer Service: 888-269-7477 TABLE OF CONTENTS • 3
Section 5: Using the Answering Machine ............... 55
Turning Answering Machine on/off ................................. 56
Playing your Answering Machine messages ..................... 57
Clearing all messages ...................................................... 60
Recording a personal greeting message .......................... 61
Setting the number of rings before answering ................ 63
Making incoming messages audible/silent ...................... 65
Remote access to Answering Machine messages ............. 67
To access your Answering Machine messages remotely
.... 69
Captioning external Answering Machine messages ......... 70
Section 6: Using the Phone Book ........................... 72
Adding a new contact to your Phone Book ..................... 73
Dialing a phone number from the Phone Book .............. 75
Editing an existing contact in the Phone Book ................ 76
Removing a contact from your Phone Book .................... 78
Section 7: Using Speed Dial Buttons ...................... 79
About the Speed Dial buttons ......................................... 79
Saving phone numbers in the Speed Dial buttons .......... 80
Editing phone numbers in the Speed Dial buttons ......... 81
Dialing with the Speed Dial buttons ............................... 82
Section 8: Settings ................................................. 83
Setting the Captions button to on/off.............................. 84
Turning Spanish captions on/off ..................................... 86
Adjusting the volume of the Ringer................................. 88
Setting the pitch of the Ringer ........................................ 89
Turning keypad lights on/off ........................................... 90
Saving the captions volume ............................................ 92
Setting your CapTel phone for Tone/Pulse dialing ........... 94
Knowing when the phone line is already in use ............. 95
Changing the network settings ........................................ 97
Removing saved networks ............................................... 99
Setting the Time and Date ............................................ 100
Using Call Waiting ......................................................... 102
Dialing 911 with your CapTel 840i ................................. 103
Updating your CapTel phone ......................................... 104
Problem Solving................................................... 105
Index .................................................................... 108
Page 6

The CapTel 840i connects to both your telephone service and to
your Internet service. Every time you make a telephone call, the
phone uses the Internet connection to access a free Captioning
Service. An operator at the Captioning Service uses speech
recognition technology to generate captions of everything your
caller says, and sends the captions back to your CapTel 840i phone.
You can enjoy conversations over the phone with the added help
of written captions in case you miss anything.
NOTE: The CapTel 840i phone does not generate captions of the
phone call on its own. The phone works with the Captioning Service
(over the Internet) to display captions during your calls.
4 • HOW CAPTEL WORKS Customer Service: 888-269-7477
Captioning Service
Captions
show you
everything
the caller
says!
You
Caller
(captions)
(voice)
Telephone
Connection
Internet
Connection
Captions are provided by a free Captioning Service that connects
automatically (over the Internet) to every telephone call.
(CapTel CA#1234) (F) Hi mom
how are you I am fine the
weather is so nice outside and I
amgetting the garden ready
what have you been up to oh
that is nice did you have fun
P
ress NO to exit
OVERVIEW
How CapTel Works
Page 7
Customer Service: 888-269-7477 GETTING STARTED • 5
This section explains how to start using your
new CapTel 840i phone.
TOPICS:
What is in the Box
Overview of CapTel 840i Phone
Using a Headset or Neckloop (Optional)
Setting up your CapTel 840i
Registering your CapTel 840i Phone
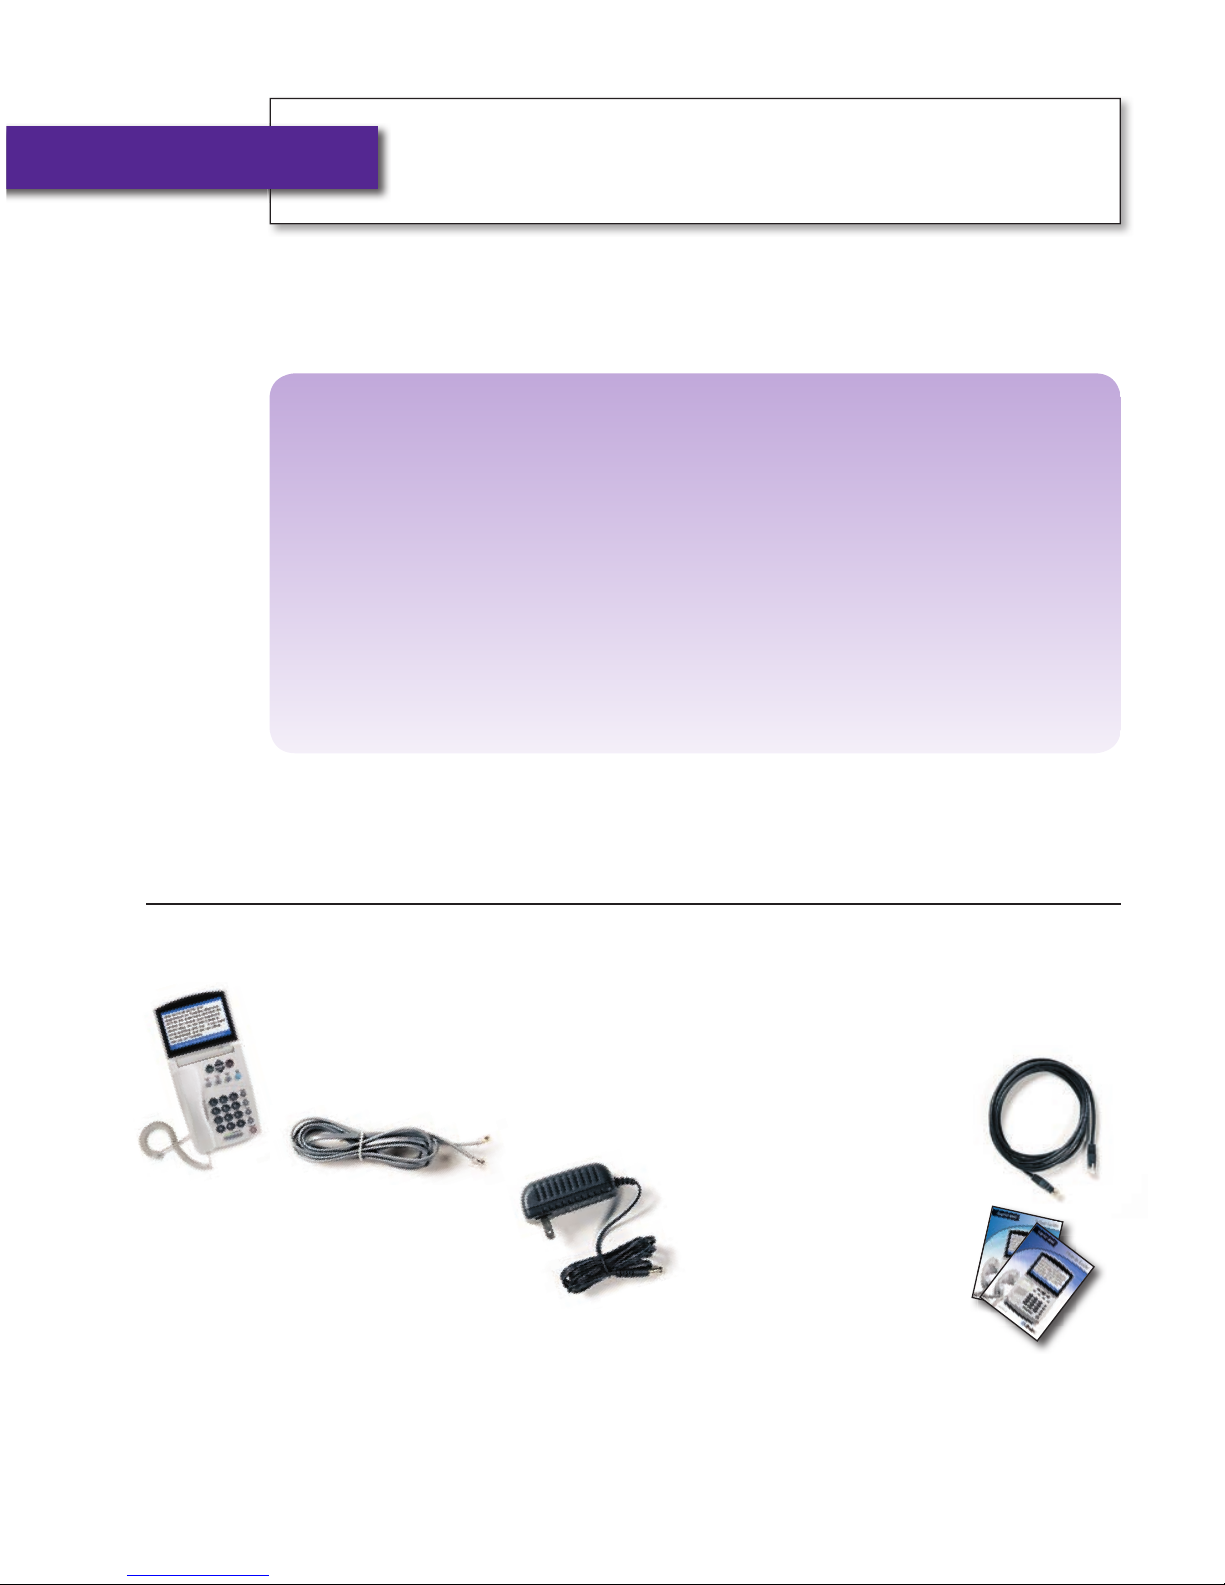
What is in the Box?
Your CapTel 840i includes the following parts:
• CapTel 840i Phone
• Telephone Cord
• Power Adapter –
to plug into a
wall outlet
Important! Use only the power adapter that
came in the box with your CapTel 840i
• Ethernet Cable – to connect
to Internet service
(not necessary for
WiFi installations)
• CapTel Setup
Guide and CapTel
How-to Guide
SECTION 1
Getting Started
Page 8
Overview of CapTel 840i Phone
1
2
3
4
5
6
7
8
9
10
11
12
13
14
6 • GETTING STARTED Customer Service: 888-269-7477
Page 9

Customer Service: 888-269-7477 GETTING STARTED • 7
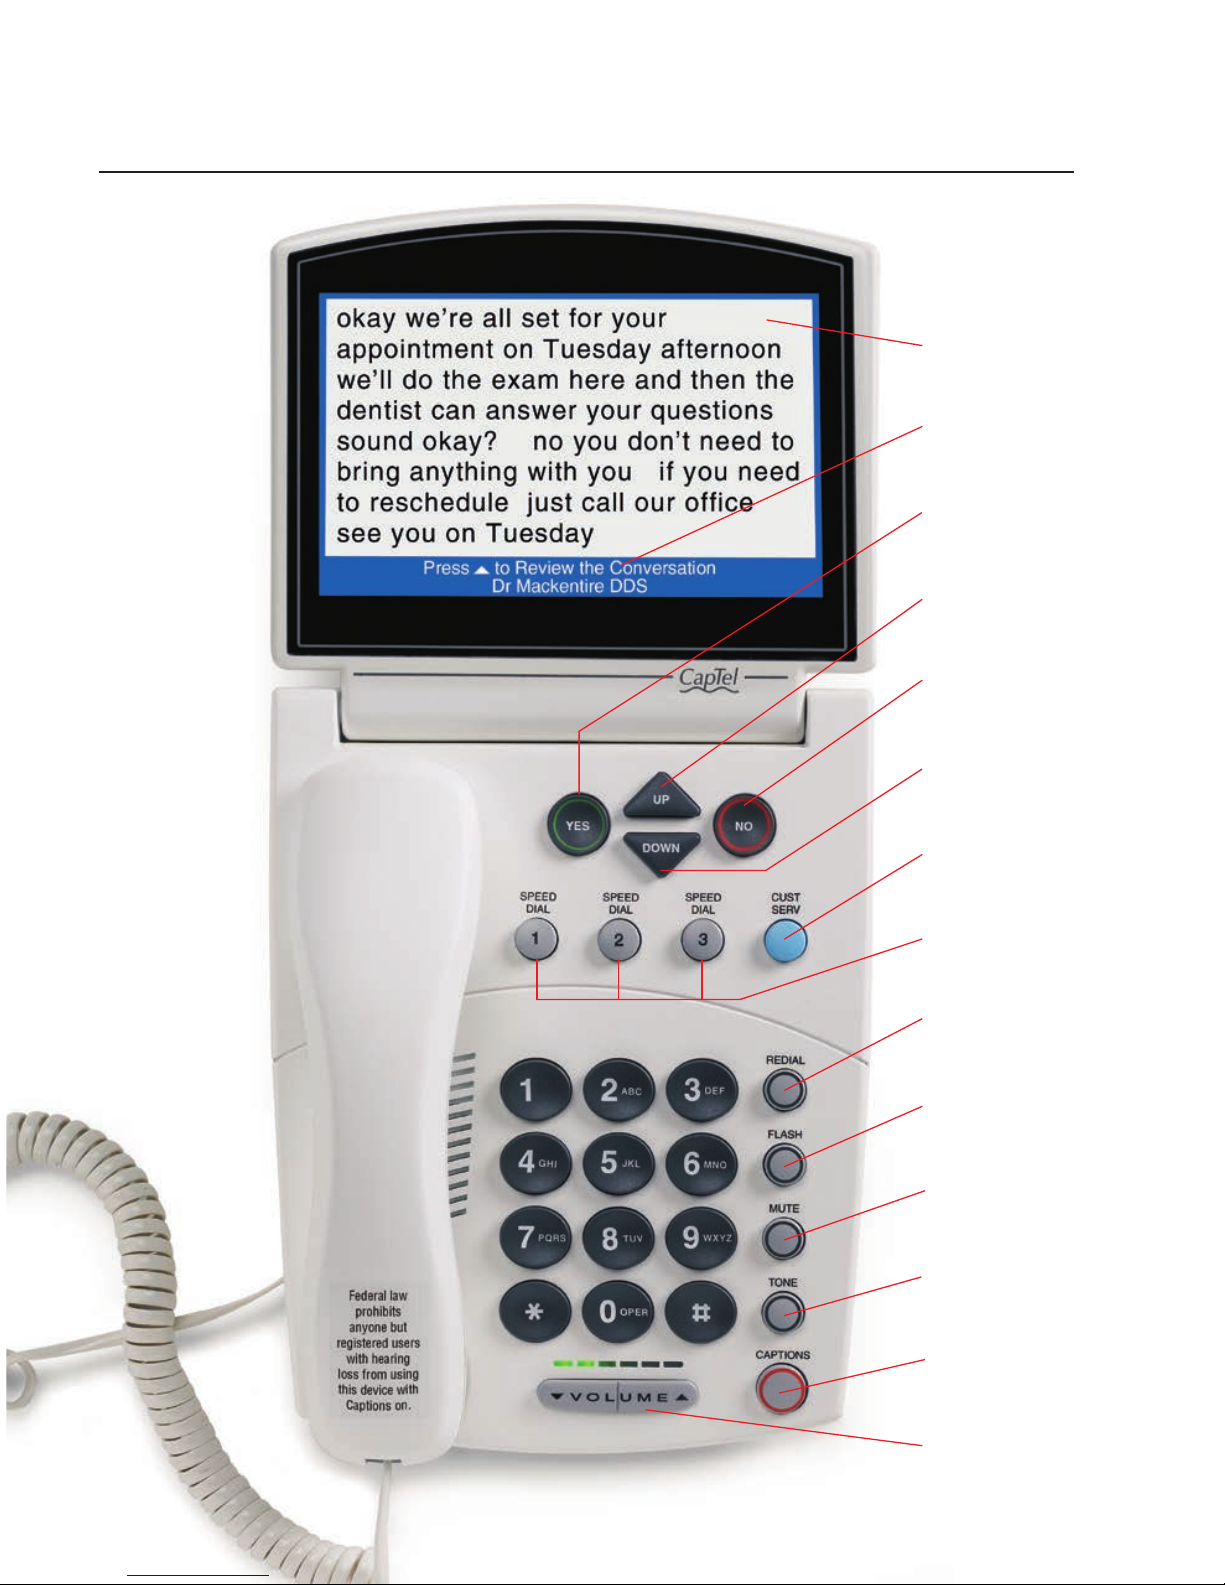
1. Display Screen
Shows captions, Caller ID, Answering Machine messages, Phone
Book entries and more.
2. Information Bar
Gives you instructions and helpful tips.
3. YES Button
Allows you to select items that are highlighted in the Options list,
and respond “Yes” to questions or commands on the display screen.
4. UP Arrow Button
Allows you to move up through items in the Options list and move
through entries in your Phone Book, Answering Machine messages,
or Call History. Also lets you go back during a call to review
captions that have already scrolled off the display screen.
5. NO (Exit) Button
Allows you to respond “No” to questions or commands on the
display screen and to Exit out of the Options list.
6. DOWN Arrow Button
Allows you to move down through items in the Options list and
move through entries in your Phone Book, Answering Machine
messages, or Call History. Also lets you scroll down through
captions when reviewing calls.
TIP: If you hold down the UP arrow button, it will continue scrolling up
automatically until you release the button.
TIP: If you hold down the DOWN arrow button, it will continue scrolling down
automatically until you release the button.
Page 10

8 • GETTING STARTED Customer Service: 888-269-7477
7. CUSTOMER SERVICE Button
Our helpful customer service team is happy to help you set up and
use your CapTel 840i telephone – we’re only a button push away.
Pressing the CUST SERV button will automatically dial the CapTel
help line. In an office, you may need to dial 9 first.
NOTE: Help is available 24 hours a day, 7 days a week (closed on major
holidays).
Help materials are also available online at www.CapTel.com
8. SPEED DIAL Buttons
You can quickly dial up to three frequently-called phone numbers,
just by pressing a speed dial button.
9. REDIAL Button
Lets you dial up to 10 most-recently called phone numbers. Lift the
handset and press REDIAL button to dial the last phone number
called. Leave the handset down and press the REDIAL button to
review/dial up to the last 10 numbers called.
10. FLASH Button
Some telephone service features like Call Waiting require a “hook
flash.” The hook flash is a very brief interruption of the connection
like hanging up the phone for one second. There is a brief click or
silence on the line.
11. MUTE Button
Silences the sound from your end of the conversation. When the
MUTE button is pressed (red light around the button is ON), the
person on the other end of your call will not be able to hear you.
You will still be able to hear the caller and get captions of
everything they say. To turn the Mute feature off, press the MUTE
button again (red light around the button is OFF).
Page 11

Customer Service: 888-269-7477 GETTING STARTED • 9
12. TONE Button
Allows you to adjust the sound settings of the call, letting you
enhance LOW, MED, or HIGH frequency tones to find the range that
you hear best.
13. CAPTIONS Button
Whenever the red light is on around the CAPTIONS button, your
calls will automatically be connected over the Internet to the free
Captioning Service, and you will get captions during the call.
Captions can be turned on or off at any time. To turn the captions
off, just press the CAPTIONS button to turn the red light off.
14. VOLUME Bar
Lets you adjust the volume to a comfortable level, up to a 40 dB
gain from min/max for captioned calls. To increase the volume,
press the
right side of the VOLUME bar. To decrease the volume,
press the
left side of the VOLUME bar. There are 12 volume
levels. Watch the light panel above the VOLUME bar to know what
the current volume setting is.
To prevent your CapTel phone from returning to a mid-range volume setting
whenever
the phone is hung up, see “Saving the Captions Volume” on page 92.
WA RNING: The maximum volume setting on captioned calls is very loud.
People who do not need amplification should not use the phone at the highest
volume setting. The volume level automatically returns to a mid-range setting
whenever the phone is hung up.
NOTE: Per FCC requirements, your CapTel handset includes a reminder that no
one other than the registered CapTel user should use your phone with the
Captions feature turned ON. As long as the CAPTIONS button is turned OFF,
others are welcome to use your CapTel phone.
Page 12
10 • GETTING STARTED Customer Service: 888-269-7477
Back (top) edge view of CapTel 840i
1 2 3 4
Features
1. Telephone Line
Plug the telephone cord here (RJ11 jack). Phone cord can be
for analog, VOIP, fiber optic, Digital Cable service, or analog
with DSL service. CapTel 840i should not be used with a PBX
system unless an analog port is available, otherwise it will
cause damage to the phone or PBX system.
2. Ethernet Jack
Plug the Ethernet cable (provided) here to connect to your
Internet Service.
NOTE: If you are connecting to the Internet using a WiFi
network, you do not need to connect the Ethernet cable.
3. Ethernet Status Light
Lets you know if your Ethernet cable is connected to the
Internet and whether activity is on the line.
NOTE: The LNK/ACT indicator does not light up when using a
WiFi connection.
4. Pow er Jack
Plug the AC power adapter here. Use only the AC power
adapter that came with your CapTel phone.
Page 13

Customer Service: 888-269-7477 GETTING STARTED • 11
Using a Headset or Neckloop (Optional)
Audio Jacks (2.5 mm/3.5 mm)
You can use earphones, a headset, neckloop, or other type of listening device
with the CapTel 840i to maximize the audio quality or to enjoy your new phone
hands-free. Simply plug the headset/assistive device into the appropriate
2.5 mm or 3.5 mm audio jack located on the right edge of the CapTel 840i
phone. Open the protective cover to reach the jacks.
2.5 mm jack –
incoming/outgoing audio
3.5 mm jack –
incoming audio only
Page 14

12 • GETTING STARTED Customer Service: 888-269-7477
Setting up Your CapTel 840i
For complete instructions, please see the Setup Guide.
Requirements
1. High-speed Internet access using a DSL or Digital Cable modem (the CapTel
840i connects either via a WiFi network or with an Ethernet cable).
Depending on your Internet setup, a router may also be required to allow
you to connect more than one device to your Internet service.
2. Telephone service (can be analog line, DSL with filter, VOIP, fiber optic, or
Digital Cable phone service). CapTel does not work with digital Private Branch
Exchange (PBX) systems found in some office environments, residential facilities,
and hotels, unless an analog port is available. Using CapTel with a PBX system
without an analog port may damage the phone and the PBX system.
3. Standard electrical power (AC adapter plugs into standard wall outlet).
Select a location
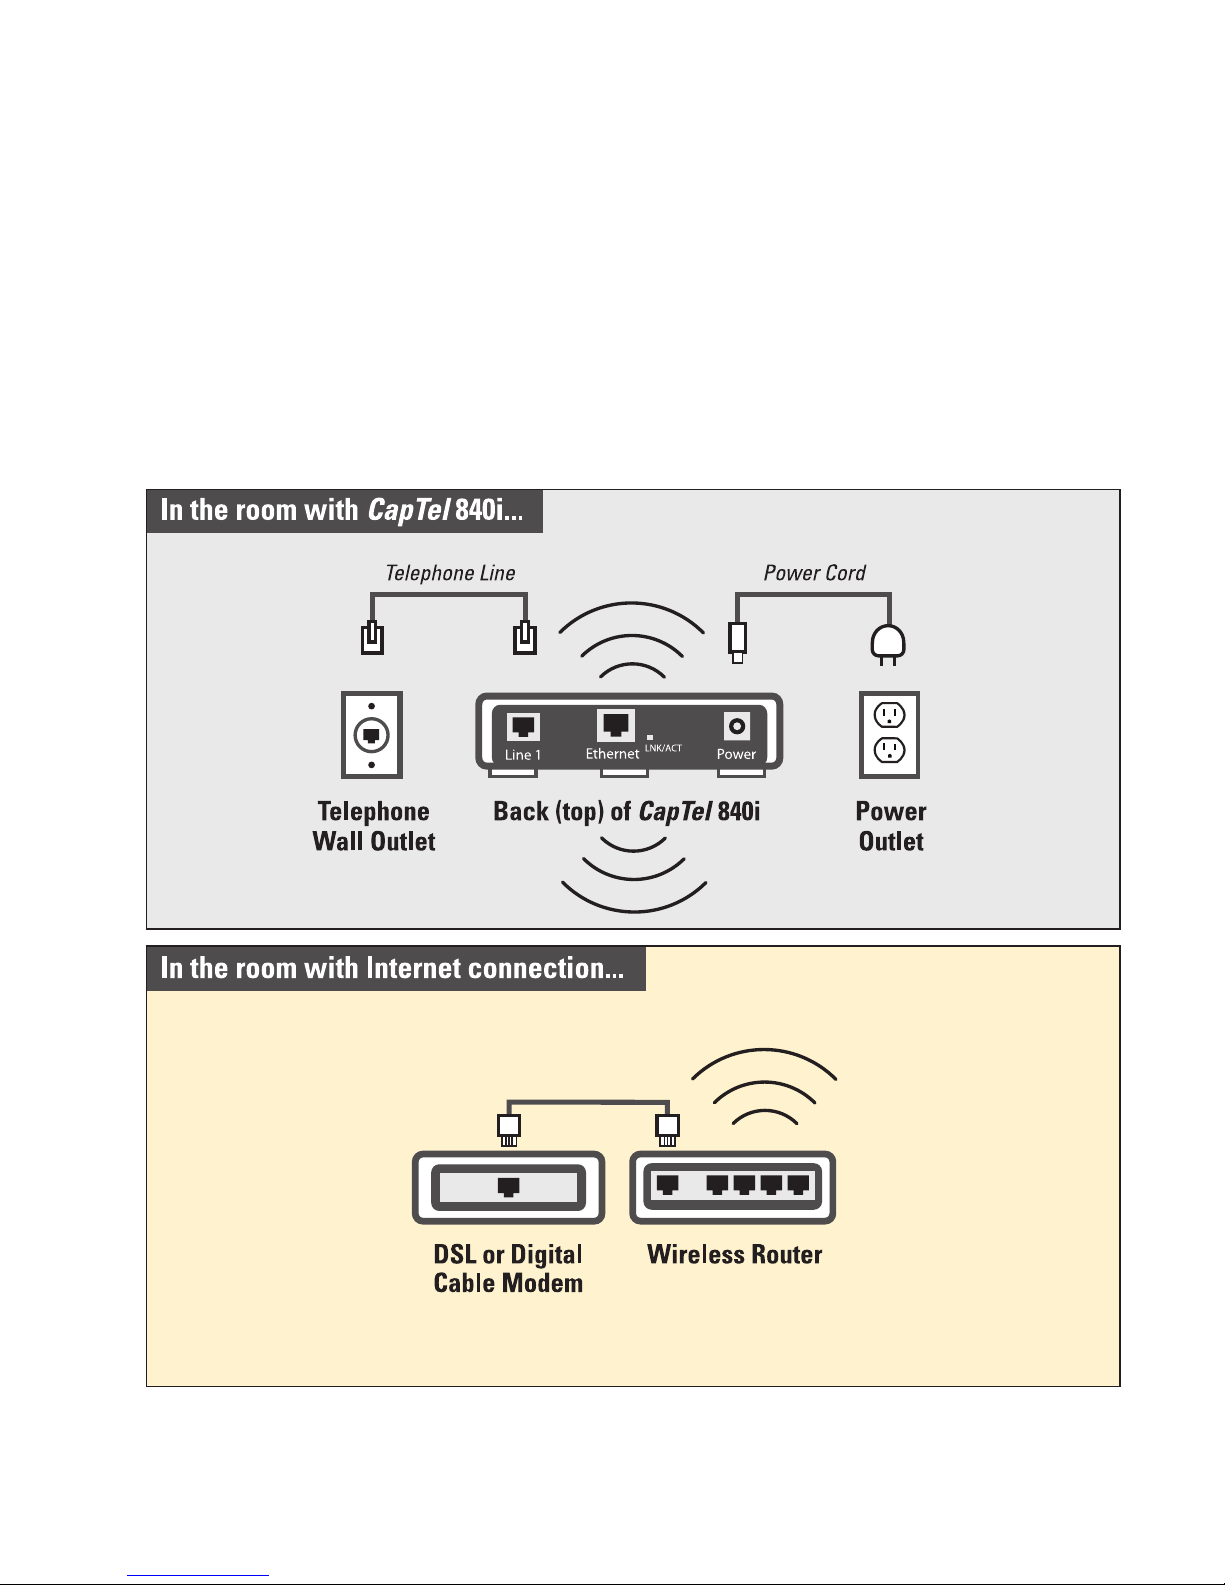
Set up the CapTel 840i in a place where:
• There is a high-speed Internet (Ethernet) jack or your wireless
router is located nearby.
• There is a telephone jack nearby (can be analog line, DSL with
filter, VOIP, fiber optic, or Digital Cable phone service).
• There is an electrical outlet nearby.
• The surface it will be set on, or mounted to, is stable and secure.
• The area is protected from excessive heat or humidity.
NOTE: The outlets for power, the phone line, and the Ethernet connection
should all be located nearby, as each cord needs to plug into your CapTel 840i.
If your Internet access is located in a different room than where you plan to use
the CapTel 840i, a WiFi setup is recommended. Please see the Setup Guide or
contact CapTel Customer Service for help setting everything up.
Page 15
Customer Service: 888-269-7477 GETTING STARTED • 13
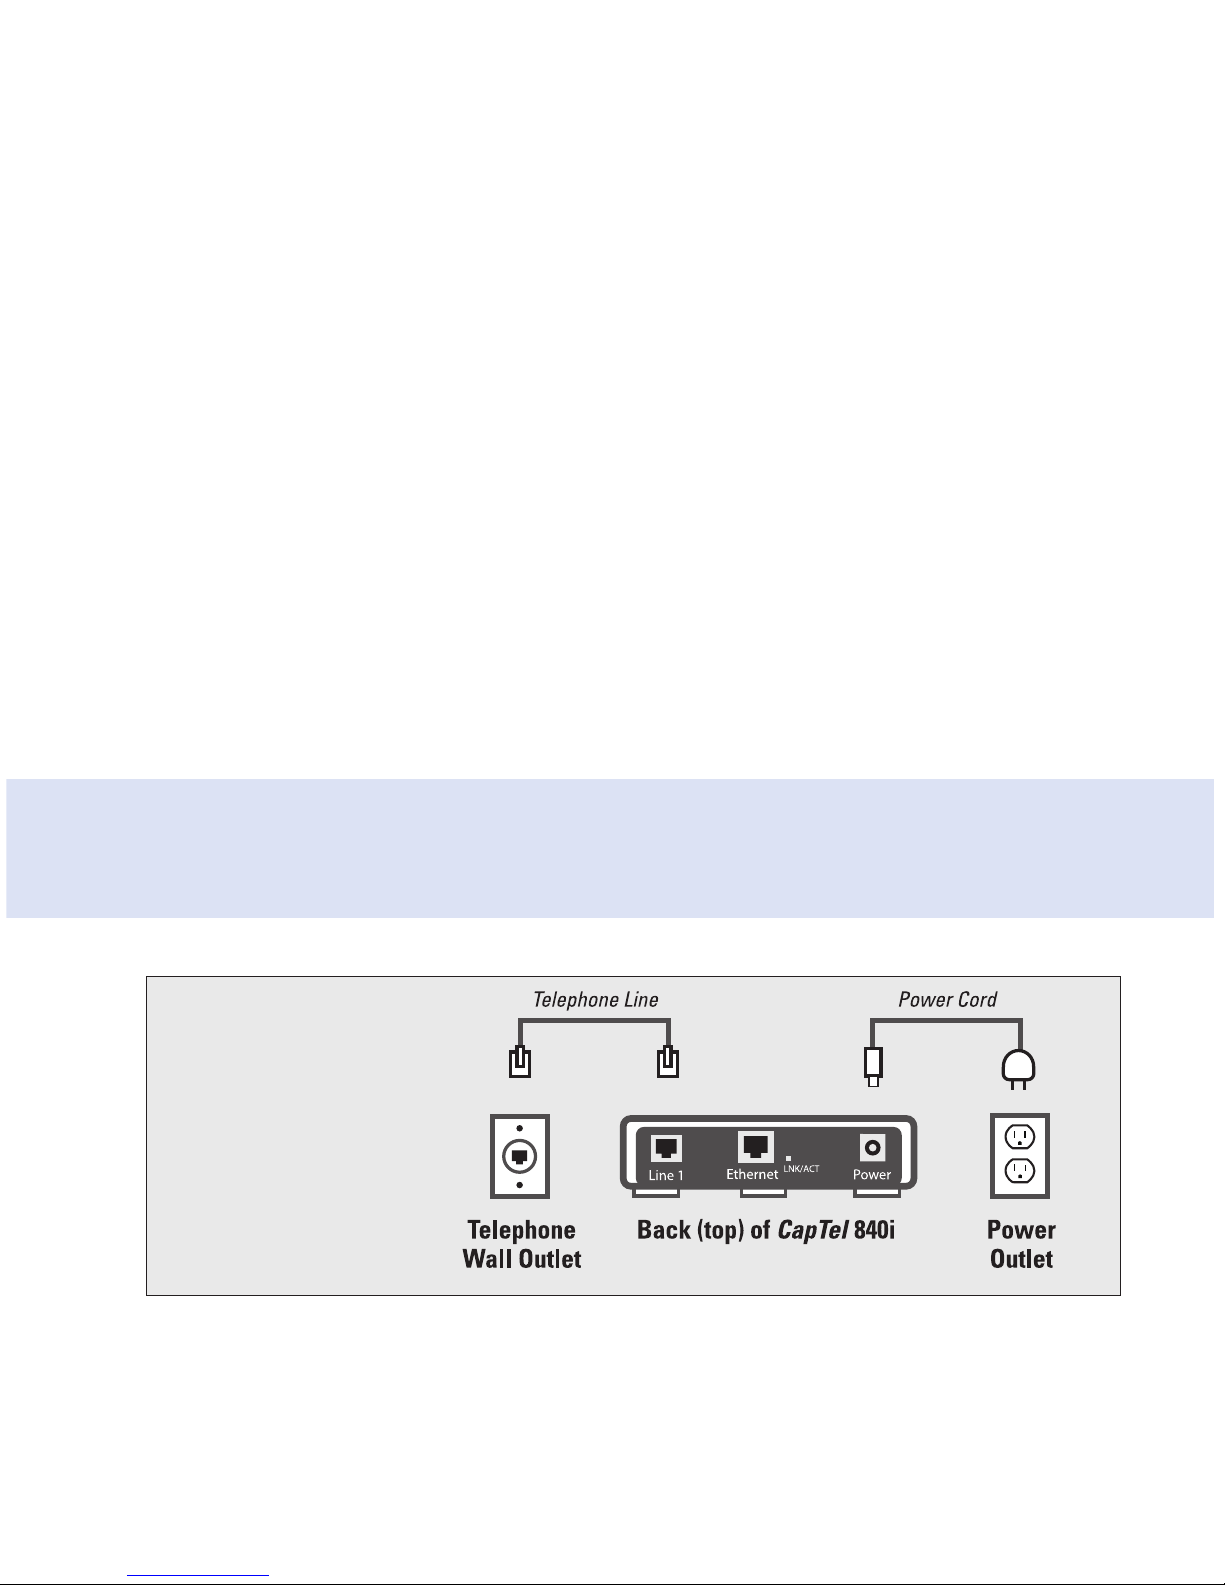
Connect to a power outlet
1. Plug the power adapter cord into the socket labeled “Power”
located on the back (top) edge of the CapTel 840i.
2. Plug the power adapter into a wall outlet or power strip.
The CapTel display screen will light up to let you know power
is connected.
TIP:
Plug your power adapter into an electrical power surge protector to protect
your CapTel 840i from damage caused by unspecified electrical voltage or
damage caused by lightning.
Connect to your telephone service
1. Plug one end of the telephone cord into the telephone jack
labeled “Line 1” located on the back (top) edge of the CapTel 840i.
Use the telephone cord included with your new CapTel 840i phone.
2. Plug the other end of the telephone cord into a telephone
wall outlet.
NOTE: If you need to connect more than one device to the same telephone line,
please see “Sharing a Telephone Line Jack” on page 107.
WAR NING: Be sure to use only
the power adapter that came
with your CapTel 840i. Using
any other power adapter may
damage your phone.
Once you plug in the power, your CapTel phone will automatically check
that everything is connected and working properly. You can follow along
on the CapTel display screen, which will tell you what is happening during
the setup process.
Page 16

14 • GETTING STARTED Customer Service: 888-269-7477
Select a Language
You can set the CapTel 840i for either English or Spanish language. The
CapTel menu options and conversation captions will appear in whichever
language you select.
1. When the CapTel screen lights
up, select which language you
would like. Press the UP arrow
or DOWN arrow until the
language you want is
highlighted.
2. Press the
YES
button to accept.
NOTE: You can change the Language setting at a later time. Please see
“Turning Spanish Captions On/Off” on page 86.
Please Select Language
English
Español
Press YES to Accept
Page 17

Customer Service: 888-269-7477 GETTING STARTED • 15
Connect to your Internet service
There are two ways to connect to your Internet service:
Option 1: Wired – use an Ethernet cable to connect to the Internet.
Please follow instructions for “Wired Installations” below.
Option 2: Wireless – use your home/office WiFi network to reach the
Internet. Please follow instructions for “Wireless/WiFi Installations”
on page 17.
For Wired Installations
1. Plug one end of the Ethernet cable into the jack labeled “Ethernet”.
Located on the back (top) edge of the CapTel 840i. Be sure to use the
Ethernet cable that came with your new CapTel 840i phone.
2. Connect the other end of the Ethernet cable into the jack you use to access
your Internet service.
Depending on how your Internet service is set up for your home/office,
you could be plugging into any of the following:
• An available Ethernet jack on a digital cable modem
• An available Ethernet jack on a DSL modem
• An available Ethernet jack on a router in your home
• An available Ethernet jack in a wall outlet
NOTE: When connected properly, LNK/ACT
indicator light will glow. The LNK/ACT indicator
light is located next to the Ethernet jack on
the back (top) edge of the CapTel 840i.
Use the examples on the following pages to match your setting with the
correct installation method.
Page 18
16 • GETTING STARTED Customer Service: 888-269-7477
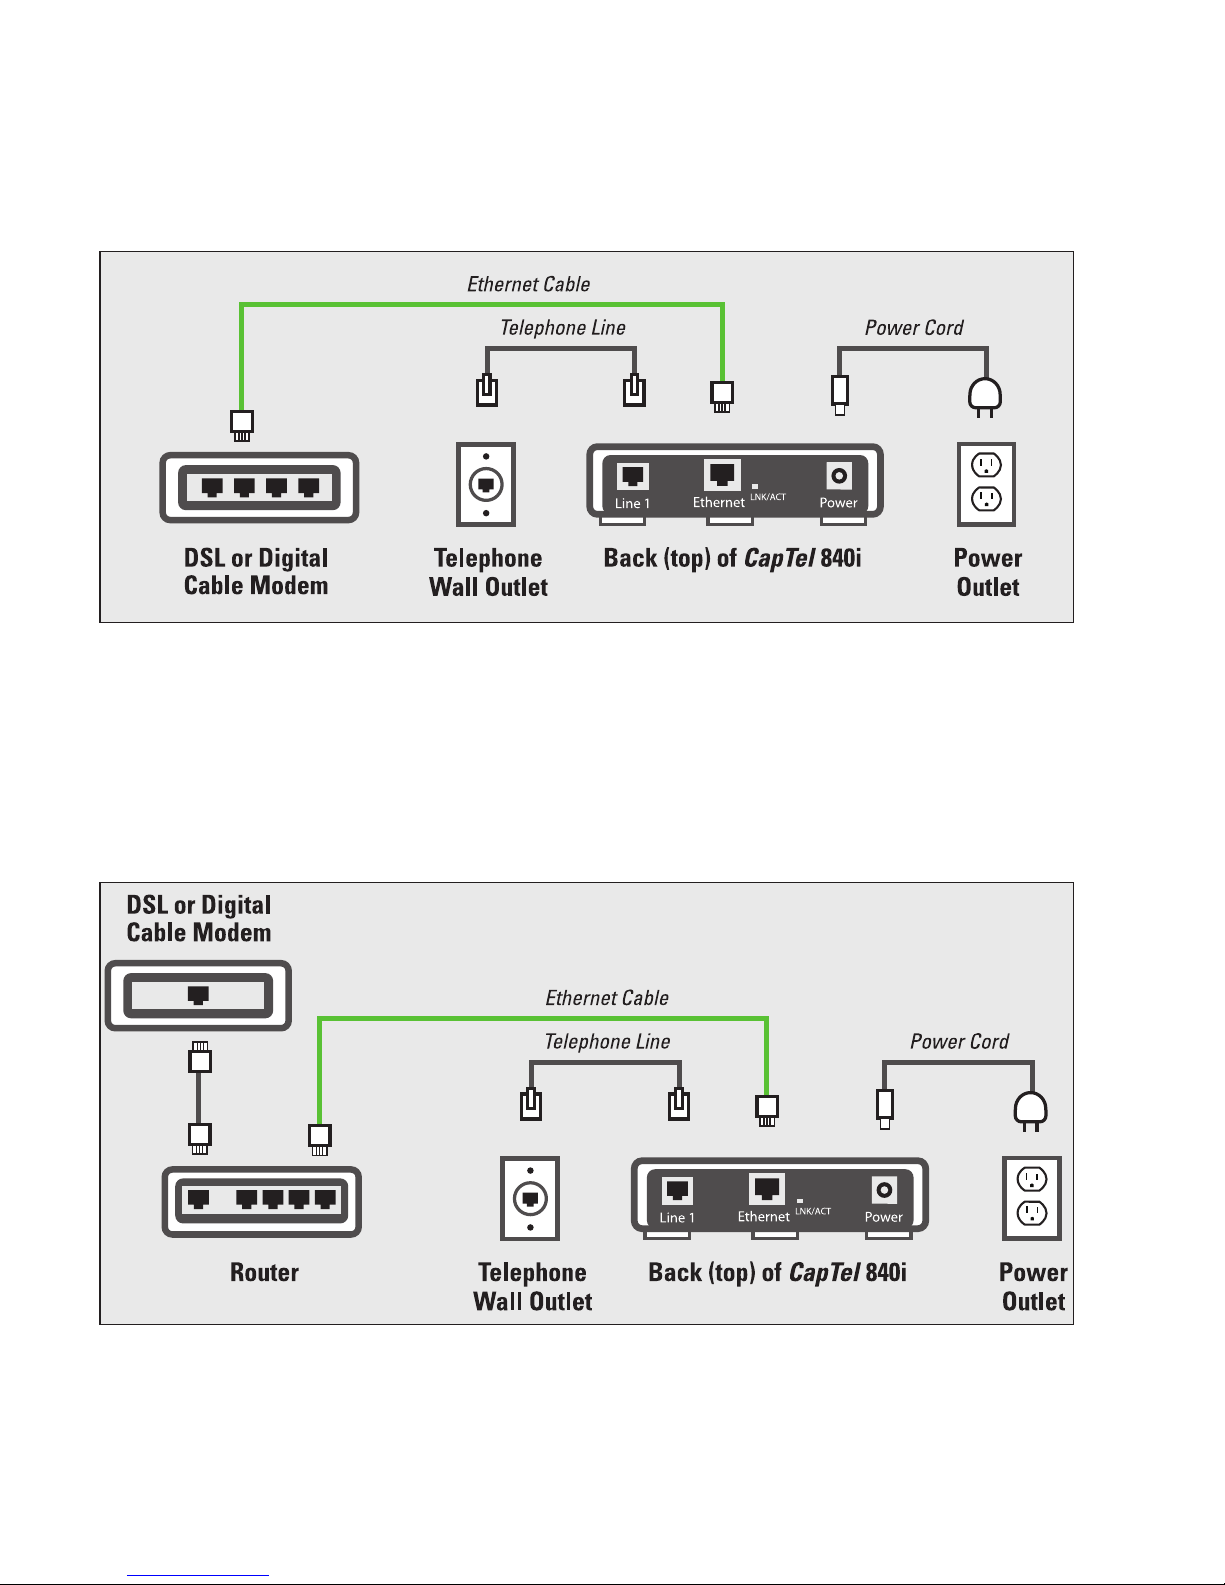
Example 2: If there is not an available Ethernet jack in your DSL or Cable
Modem, you will need a router or switch that lets you connect more than
one device to the Internet. Contact your Internet Service Provider to learn
what
router or switch will work with your modem. The router should support
DHCP.
Connect the router to your DSL/Cable Modem. Then connect the
CapTel 840i to the router or switch using the Ethernet cable as shown below.
If your Internet outlet is in a different room from where you plan to use
CapTel, see the Setup Guide for instructions.
All Outlets Located Together (Wired Setup)
Example 1: All of the connection outlets (telephone, Internet, and power) are
available in the same room that you are planning to use the CapTel 840i.
Page 19
Customer Service: 888-269-7477 GETTING STARTED • 17
For Wireless/WiFi Installations
If you have a wireless (“WiFi”) network in your home or office, your CapTel
phone can connect to the Internet using the WiFi network. You do not need
to plug in an Ethernet cable.
To set up your CapTel for WiFi use, you will need to know the name of your
wireless network (also called the SSID) as well as any passwords that may be
necessary to access the network. The way you access your WiFi network with
CapTel will be very similar to how you access the network from a computer
or mobile device.
Page 20
18 • GETTING STARTED Customer Service: 888-269-7477
NOTE: If someone helped install the wireless network in your home or offi ce,
it may be helpful to consult with them as you set up your CapTel phone.
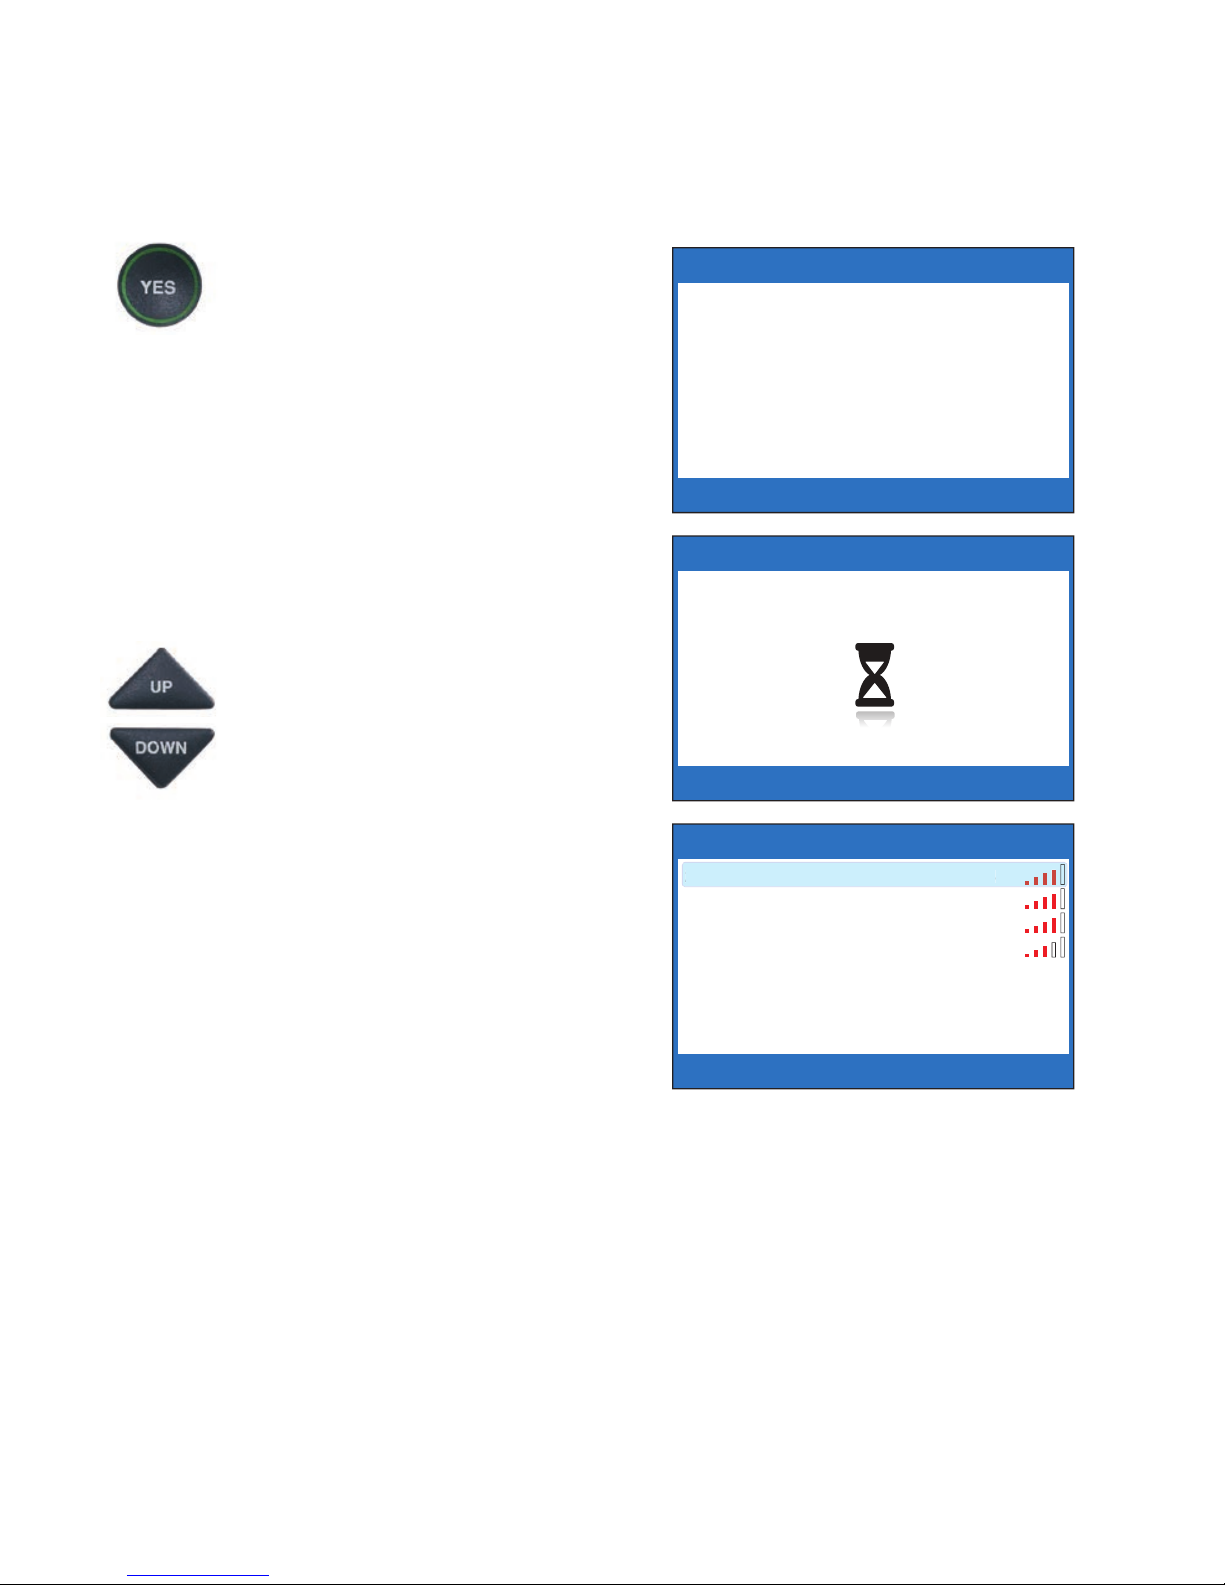
To set up your WiFi connection:
1. The display asks, Press
YES for WiFi Setup.
Press the YES button.
2. Your CapTel checks if any
wireless networks have been
used previously and are already
saved in memory. If no previous
networks are detected, CapTel
scans for available networks in
your location.
3. CapTel lists any WiFi networks
detected, in order of the
strongest signal strength to the
weakest signal strength.
Use the UP/DOWN arrows to
highlight the wireless network
you want to use. Press the YES
button to select.
NOTE:
CapTel may detect wireless networks
in your location that you do not recognize –
such as a wireless network from a neighbor
or nearby offi ce. Be sure to select the SSID
that matches your WiFi network.
If you do not see the network you want listed, try moving your CapTel
phone to an area closer to your wireless router and selecting “Refresh
Network List”. CapTel will re-scan for available networks. See the Setup
Guide for additional directions.
SETUP - CONNECT TO INTERNET
Please plug in Ethernet Cable.
Or
Press YES for WiFi Setup
Press YES for WiFi Setup
SETUP - WIFI
Scanning for WiFi Networks
Press YES to accept or NO to exit
SSID Security Ch. Signal
2WIRE269 WPA 08
Offi ceNet WPA 06
ACBRDBAND WPA 06
NETWORK1 WPA 04
Refresh Network List
Enter Network Manually
Press YES to Select a Wireless Network
Press NO to exit WiFi Setup
2WIRE269 WPA 08
Page 21

Customer Service: 888-269-7477 GETTING STARTED • 19
4. If required, CapTel asks for the password to access your WiFi network.
NOTE: Where to find your WiFi password? This is the same password you need
to access the WiFi network from any computer or mobile device. The password
(sometimes called a “pass phrase” or “network key”) is assigned by your Internet
Service Provider or by whomever set up your wireless network. In some cases,
the password may be listed directly on your wireless router.
Use the dialing pad to enter the letters
or numbers of your password. Look for
the letters listed on the number keys to
know which number key to press. For
some letters/numbers, you will need to
press the number key several times until
the correct letter/number appears on
the display screen. For special characters
(i.e., %, &, #) press the 1 key repeatedly.
NOTE:
Depending on the type of security on your wireless network, you may
not be asked to enter a password.
5. After you have entered the password, press the YES button to
accept. CapTel will save your network settings, and connect to
your wireless network.
TIP: Some passwords are case-sensitive. Press the UP arrow button to shift lock
for capital letters. Press the UP arrow button again to return to lower case.
Example: To enter the letter “R”, press the UP arrow key to set shift-lock to
capital letters, then press the number 7 key three times until you see “R” on
the display screen.
TIP: After you have typed your password, double-check that you have all the
letters and numbers listed correctly, and that any capital/lower case letters are
entered properly. If the password is not correct, CapTel will not be able to
connect to your WiFi network.
Please Enter WPA Password:
7547534933_
Press YES to Accept
for Shift, for Backspace, # for Space
SETUP - WiFi
Page 22
20 • GETTING STARTED Customer Service: 888-269-7477
Set Time and Date
1. Use the UP or DOW N arrow
buttons to highlight the
Time Zone that your new
CapTel phone is located in.
Once the correct Time Zone
is highlighted, press the YES
button to select.
2. Do you live in an area that
observes Daylight Savings
Time? If so press the YES
button. If not, press the NO
button.
3. CapTel shows you the current
time and date setting. If you
want to make changes, use the
UP or DOW N arrow buttons
to move the blue highlight
over the number that you
want to change.
4. On the dialing pad, press the
key that lists the number you
want to use.
Example: To set the time for
11:30, press the “1” key twice,
then press the “3” key followed
by the “0” key.
NOTE:
Once your CapTel phone connects to the Internet, it automatically
checks to make sure that you have the most current software version. If needed,
your phone will automatically update its software over the Internet connection.
Watch the display screen to follow the progress. Your CapTel phone may reboot
as part of the update process. Once the entire process is completed, you will be
able to continue with the installation.
SET THE TIME AND DATE
12:13 AM
01/01/2018
Use 2 for AM
Use 7 for PM
Use the keypad to enter the Time and Date
Press YES to accept or NO to exit
SETUP - DAYLIGHT SAVINGS
Do You Observe Daylight Savings?
Press YES or NO to answer
SETUP - TIMEZONE
Eastern
Central
Mountain
Pacifi c
Alaskan
Hawaiian
Press or to Change the Selection
Press YES to Accept
Page 23

Customer Service: 888-269-7477 GETTING STARTED • 21
NOTE: When you enter the date setting,
only the last two numbers in the year can
be changed.
5.
When you have set the time
and date, press the YES button
to save.
SET THE TIME AND DATE
12:13 AM
10/15/2018
Use 2 for AM
Use 7 for PM
Use the keypad to enter the Time and Date
Press YES to accept or NO to exit
TIP: To change the time from AM to PM,
make sure the AM/PM section is highlighted,
then press the 2 key for “AM” and the 7 key
for “PM”.
Page 24
22 • GETTING STARTED Customer Service: 888-269-7477
Registering Your CapTel Phone
The first time that you set up your CapTel 840i, you will be asked to register
your phone and agree to the Terms & Conditions for using CapTel. Registration
is required by the FCC before the Captions feature can be activated.
Once you complete this step, you will not need to register again, even if you
move your phone to a new location.
NOTE: If your phone display shows different directions than the instructions
below, please follow the directions on your CapTel phone display screen to
complete your registration.
To register:
In some cases, the display screen may ask
you to register your CapTel phone by going
online or calling CapTel Customer Service.
Follow the directions on the screen to register.
Register online at: www.CapTel.com/register
Or, press the blue Customer
Service button to reach an
Installation Help Specialist.
Once you’ve registered, press the
CAPTIONS button to clear the
registration screen and continue.
1. The display screen alerts you
that you should read and agree
to the Terms & Conditions for
using CapTel.
2. The display screen lists the
Terms & Conditions for using
the CapTel phone.
**************** Terms & Conditions ****************
Before using the CAPTIONS feature,
please register your phone at
www.CapTel.com or
Contact CapTel Customer Service.
This phone’s ESN is 424C5500146
Press NO to exit
Please register your phone at www.CapTel.com
or Contact CapTel Customer Service.
After registering your ESN (424C5500146)
press the CAPTIONS button to continue.
Press YES for Options
Before using CAPTIONS feature,
please read and agree to the following
Terms & Conditions
Downloading – Please Hold
Page 25
Customer Service: 888-269-7477 GETTING STARTED • 23
3. Follow the directions on the
display screen to review each
of the Terms & Conditions.
Press the YES button to accept
each statement.
Once you’ve agreed to all the Terms &
Conditions, the process is complete.
Congratulations! You can begin making
and answering calls with captions.
If you do not agree with the Terms &
Conditions, press the NO button. The
CAPTIONS feature will remain off during
your calls. You can still use CapTel as a
standard telephone, but you will not
receive captions during your calls.
Captions will not be activated on your phone
until the Terms & Conditions are accepted.
To review the Terms & Conditions wording again, press the
CAPTIONS button. The Terms & Conditions information will
appear again, and you will have another opportunity to accept the
Terms & Conditions by pressing the YES button.
If you have any questions about the Terms & Conditions or how to
register your CapTel phone, please press the blue Customer
Service button for assistance.
Terms & Conditions were not accepted.
Press CAPTIONS button to review
terms & conditions.
Press YES for Options
12:53 PM
*************** Registration Terms ****4 of 5***
I understand that the cost of captioning each
internet protocol captioned telephone call is
funded through a federal program.
Press YES to accept or press NO to deny
*************** Registration Terms **************
Your phone is now registered.
Thanks for choosing CapTel.
Press any key to exit
Page 26

24 • GETTING STARTED Customer Service: 888-269-7477
Getting Help
If you have any questions, comments, or concerns as you use your new
CapTel 840i, we’re here to help. Use any of these ways to contact us:
CUST SERV Button
Pick up the handset and press the CUST SER V button to
automatically speed dial directly to our helpful Customer Service
team. If you are in an office setting, you may need to dial “9” first
and then press the CUST SER V button. (Available 24 hours a day,
7 days a week. Closed on major holidays.)
Help materials are also available online at our website.
Phone: 1-888-269-7477 (Available 24 hours a day, 7 days a week)
FAX: (608) 204-6167
Mail: CapTel Customer Service
450 Science Drive
Madison, WI 53711
Email: CapTel@CapTel.com
Online: www.CapTel.com
(Live Chat help available at our website)
Page 27

Customer Service: 888-269-7477 MAKING AND ANSWERING CALLS • 25
This section explains how to place outgoing calls and
how to answer incoming calls with your CapTel 840i.
TOPICS:
Dialing a Phone Number Directly
Calling Using the Speed Dial Buttons
Calling a Number in the Phone Book
Answering an Incoming Call
Adjusting the Volume
Adjusting the Sound – TONE
Knowing What Sounds are on the Line
SECTION 2
Making and
Answering Calls
Page 28

26 • MAKING AND ANSWERING CALLS Customer Service: 888-269-7477
Dialing a Phone Number Directly
1. Lift the handset.
2. Make sure the CAPTIONS
button is on (red light on). You
can turn captions on/off at any
time during your call by
pressing the CAPTIONS button.
3. Dial the phone number of the
person you wish to call.
NOTE: If you need to dial a 9 or other
number to get an “outside” line, enter that
number first, then dial the phone number.
4. As you dial, the display screen
shows the status as your CapTel
phone connects to the
captioning service, letting you
know when captions are ready.
NOTE: It is okay if the captioning service
connects before you finish dialing the phone
number, just keep dialing.
5.
Listen or watch the signal meter
to know when someone answers.
Watch the display screen for
captions. Begin your conversation
as you normally would.
When you are done with your
call, hang up the handset.
TIP:
Remember to dial 1+ area code if the number you are calling is long distance.
TIP:
Need more time dialing? You can leave the CapTel handset down (hung up) and
press the phone number buttons on the dial pad. When you are ready to place your call,
pick up the CapTel handset. CapTel will dial the phone number you entered.
Dialing:
555
Waiting for Captions
Stage 7 of 8
(CapTel CA# C1234) (Tones)
Ringing 1 2 3 (M) Hello this is
John who is calling please
5557685
Dial a Number
or Press Speed Dial
Page 29
Customer Service: 888-269-7477 MAKING AND ANSWERING CALLS • 27
Calling Using the Speed Dial Buttons
NOTE: You must save telephone numbers in the Speed Dial buttons before they
can be used to dial. Please see page 80 for directions.
1. Make sure the CAPTIONS
button is on (red light on).
2. Press the SPEED DIAL button
with the number that you
want to call.
3. Lift the handset. Your CapTel
phone will dial the phone
number for you automatically.
As you dial, the display screen
shows the status as your CapTel
phone connects to the
captioning service, letting you
know when captions are ready.
4. Listen or watch the signal
meter to know when someone
answers. Watch the display
screen for captions. Begin
your conversation as you
normally would.
When you are done with your
call, hang up the handset.
Dialing:
Mary
5551234
Waiting for Captions
Stage 7 of 8
(CapTel CA# C1234) (Tones)
Ringing 1 2 3 (F) Hello this is
Mary who is calling please
Mary
5551234
Signal
Meter
Dial a Number
or Press Speed Dial
Page 30
28 • MAKING AND ANSWERING CALLS Customer Service: 888-269-7477
Calling a Number in the Phone Book
NOTE: Phone numbers must already be saved in the Phone Book before you
can use the Phone Book to dial. Please see page 73 for directions.
1. Make sure the CAPTIONS
button is on (red light on).
2. With the handset hung up,
press the YES button to see the
Options menu.
3. Check that Dial from Phone
Book is highlighted. Press the
YES button to select.
4. Press the UP arrow or DOWN
arrow buttons to fi nd the
person you want to call.
5. Pick up the handset. Your
CapTel phone dials the number
for you automatically.
6. Listen or watch the signal
meter to know when someone
answers. Watch the display
screen for captions. Begin
your conversation as you
normally would.
When you are done with your
call, hang up the handset.
OPTIONS
Dial from Phone Book
Answering Machine
Call History
Edit Phone Book
Conversations
Settings
?
Press YES to select or press NO to exit Options
PHONE BOOK (3 of 3)
Name: Mary
Number: 555-1234
Please lift handset to dial this number or
Press NO to exit
UP
DOWN
Dialing:
Mary
5551234
Waiting for Captions
Stage 7 of 8
Page 31

Customer Service: 888-269-7477 MAKING AND ANSWERING CALLS • 29
Answering an Incoming Call
1. When your CapTel phone rings,
the display will light up to alert
you to an incoming call.
NOTE: If you have Caller ID service,
you will see the name and/or the
phone number of the person calling.
2. Make sure the CAPTIONS
button is on (red light on).
3. Pick up the handset, and
answer the call as you
normally would.
4. Listen or watch the signal
meter for a response. Watch
the display screen for captions.
TIP: If you answer on an extension telephone and want to get captions, just
pick up the CapTel handset and press any of the number keys. Your CapTel
phone will connect to the Captioning Service, and you will be able to view
captions of the call on the CapTel display screen. For more options, see “Line in
Use” on page 95.
(CapTel CA# C1234) (F) Hi
mom it’s Mary calling
Mary
5551234
Page 32

30 • MAKING AND ANSWERING CALLS Customer Service: 888-269-7477
Adjusting the Volume
You can increase the volume of the person’s voice coming through the
handset, up to a 40 dB gain from min/max on captioned calls (when the
CAPTIONS button is off, the maximum amplification is 18 dB gain). Watch
the lights above the VOLUME bar to see what level the volume is set to.
To increase the volume (make sounds louder) during a call,
press the
right side of the VOLUME bar.
To decrease the volume (make sounds softer) during a call,
press the
left side of the VOLUME bar.
To save your volume setting so that it will be used during every captioned
call, see Saving the Captions Volume on page 92.
WA RNING: The maximum volume setting on captioned calls is very loud.
People who do not need amplification should not use the phone at its highest
volume setting. The volume level automatically returns to a mid-range setting
whenever the phone is hung up.
Page 33

Customer Service: 888-269-7477 MAKING AND ANSWERING CALLS • 31
Adjusting the Sound – TONE
You can adjust the Tone setting to a frequency range that works best for your
hearing level – to emphasize HIGH, MEDIUM, or LOW frequency sounds. The
Tone setting can be adjusted during, before, or after a call. The setting will
remain in effect until you change it again.
If you hear low-frequency tones
better, press the TONE button
repeatedly until you see “Tone is
Low” on the display screen.
If you hear mid-range frequency
tones better, press the TONE
button repeatedly until you see
“Tone is Medium” on the display
screen.
If you hear high-frequency tones
better, press the TONE button
repeatedly until you see “Tone is
High” on the display screen.
NOTE: You can also use a headset
or neckloop to enhance the sound
quality. Please see page 11 for
instructions.
Tone is
Low
Tone is
Medium
Tone is
High
Page 34

32 • MAKING AND ANSWERING CALLS Customer Service: 888-269-7477
Knowing What Sounds Are on the Line
The display screen tells you what sounds are occurring during your call with
two visual indicators: the Signal meter and the Outgoing Volume meter.
These meters only appear during captioned calls.
The Signal Meter
This helpful meter lights up to indicate
sounds on the handset, such as the caller’s
voice or a busy signal. It shows whenever a
sound is coming through the handset, even
if the sound is not loud enough for you to
hear. The size of this meter expands and
contracts with the volume of the sound.
Very loud sounds cause the meter to
completely light up the whole box. Quiet
sounds may cause just a single dot on the
display to light up. This meter can help you
gauge when a person is finished speaking
or initially answers a call.
The Outgoing Volume Meter
This meter helps you see how loudly you
are speaking. More of the bar lights up if
you speak loudly. Less of the bar lights up
if you speak quietly. You can use the
volume meter to gauge the volume of your
own voice during a call.
NOTE: If the Outgoing Volume meter is
filling completely or consistently turns
red, you may be speaking too loudly or
are holding the telephone handset too
close to your mouth.
Signal
Meter
Outgoing
Volume
Meter
(CapTel CA# C1234) (Tones)
Ringing 1 2 3 (M) Hello this is
John who is calling please
18004822424
(CapTel CA# C1234) (Tones)
Ringing 1 2 3 (M) Hello this is
John who is calling please
18004822424
Page 35

Customer Service: 888-269-7477 VIEWING CAPTIONS • 33
This section explains how to adjust and review
conversation captions.
SECTION 3
Viewing Captions
TOPICS:
Turning Captions On/Off During a Call
Viewing Corrections
Reviewing Captions During a Call
Reviewing Captions After Hanging Up
Saving Conversations
Erasing All Conversations
Changing the Caption Font Size
Setting the Color of the Captions
Setting how Captions Scroll Across the
Display Screen
Adjusting the Brightness of the Display Screen
Page 36

34 • VIEWING CAPTIONS Customer Service: 888-269-7477
Turning Captions On/Off During a Call
You can turn captions on at any time during your call by pressing
the CA PTIONS button. When the red light around the CAPTIONS
button is lit, you will see captions of everything the other party
says. When the light is off, you will not receive captions.
If you turn captions on in the middle of a call, there will be a brief
delay as your CapTel 840i phone connects to the Captioning Service.
Then, captions will begin. During this time, you may still talk/listen
to the other party. You do not need to wait for captions to begin if
you can hear the other party well enough to carry on the conversation.
You can speak at any time even if captions are not present.
Viewing Corrections
On occasion, word errors may appear in
the captions due to the voice recognition
system the Captioning Service uses. The
Captioning Service will try to correct any
word errors as they occur. The corrected
word appears in [brackets] to let you know
a correction has been made.
There may be a slight delay before
the word error is corrected. If you are
unclear about what was said, ask your
caller to clarify.
(CapTel CA# 1234) (F) we’re
looking forward to seeing you
tonight let’s meet at the
restaurant lever on should be
there by 8 o’clock
16082385400
Word
Error
(CapTel CA# 1234) (F) we’re
looking forward to seeing you
tonight let’s meet at the
restaurant lever on should be
there by 8 o’clock [everyone]
16082385400
Correction
Page 37

Customer Service: 888-269-7477 VIEWING CAPTIONS • 35
Reviewing Captions During a Call
While on a call, press the UP
arrow button to scroll back
through captions that appeared
earlier in the conversation. You
can continue talking or listening
while you review captions.
Everything the other party says
will continue to be captioned,
even while you are looking back
at earlier captions.
When you are ready to return to the live conversation captions, press the NO
button. Anything the other party said during the time you were reviewing
captions will appear, and the live captions will continue as usual.
You can go back, again, at any time during the call to review what was said.
Just press the UP arrow button.
NOTE: Your CapTel phone holds up to 50 conversations (or 62,000 characters)
in conversation memory. If the conversation memory fills up entirely, older
captions will be erased as new captions come in.
(CapTel CA# 1234) (F) Hi mom
how are you I am fine the weather is
so nice outside and I am getting the
garden ready what have you been up
to oh that is nice did you have fun oh
he’s fine he’s getting bigger mom
he grew another inch
***Press NO to return to Conversation***
Page 38

36 • VIEWING CAPTIONS Customer Service: 888-269-7477
Reviewing Captions After Hanging Up
To review captions after your conversation is ended and the phone is hung up:
1. With the handset hung up,
press the YES button to see the
Options menu.
2. Press the DOWN arrow button
repeatedly until Conversations
is highlighted. Press the YES
button to select.
3. Check that Review
Conversations is highlighted.
Press the YES button to select.
You will see a list of your calls,
with the most recent call on the
top of the screen. Previous calls
appear further down the list.
4. Press UP or DOWN arrow
button to scroll through the list
of calls. When the call you
want is highlighted, press the
YES button to select.
5. You will see captions of the
selected conversation. Use the
UP or DOWN arrow buttons to
scroll through the conversation.
OPTIONS
Dial from Phone Book
Answering Machine
Call History
Edit Phone Book
Conversations
Settings
Press YES to select or press NO to exit Options
?
CONVERSATIONS
Review Conversations
Save Conversations
Erase All Conversations
Press YES to select or press NO to exit
CONVERSATIONS
2/6 1:03 PM, Mary
2/3 11:50 AM, Julie
2/2 2:30 PM, CapTel Customer Service
1/30 4:32 PM, 18004822424
1/29 3:30 PM, 18004822424
1/27 2:35 PM, 18004822424
Press or to Change the Selection
Press YES to select or press NO to exit
2/3 11:50 AM, Julie
(CapTel CA# 1234) (F) Hi mom
how are you I am fi ne the weather is
so nice outside and I am getting the
garden ready what have you been up
to oh that is nice did you have fun oh
he’s fi ne he’s getting bigger mom
he grew another inch
Press YES to Erase or NO to exit
2/3 11:50 AM, Julie
Page 39

Customer Service: 888-269-7477 VIEWING CAPTIONS • 37
6. When you are done, press YES
to Erase or press NO to exit.
7. Press the NO button repeatedly
to exit out of the menu system.
NOTE: Your CapTel phone comes with the
Save Conversations feature enabled,
letting
you view conversation captions after you’ve
hung up the phone. To turn off
this feature,
please see page 38. If you turn off the Save
Conversations feature, all conversation
captions will be erased every time you hang
up the phone.
he grew another inch we can’t wait
to see you this weekend does 9:00
work for you? I’ll bring that recipe I
told you about okay sounds good
see you then bye mom
Press YES to Erase or NO to exit
2/3 11:50 AM, Julie
Page 40

38 • VIEWING CAPTIONS Customer Service: 888-269-7477
Saving Conversations
You can set your CapTel phone to Save Conversations after the call has ended
and the phone is hung up. This allows you to go back and review what was
said after you’ve hung up. You can review up to 50 conversations (or 62,000
characters). Or, you can have captions erased every time the phone is hung
up. The default setting is to Save Conversations after the call is ended.
To change the Save Conversations setting:
1. With the handset hung up,
press the YES button to see the
Options menu.
2. Press the DOWN arrow button
repeatedly until Conversations
is highlighted. Press the YES
button to select.
3. Press the DOWN arrow button
until Save Conversations is
highlighted. Press the YES
button to select.
4. Press UP or DOWN arrow
button to turn SAVE
CONVERSATIONS on or off.
Save Conversations On saves
conversation captions after the
call is fi nished and the phone is
hung up.
Save Conversations Off erases
the conversation captions after
every call.
OPTIONS
Dial from Phone Book
Answering Machine
Call History
Edit Phone Book
Conversations
Settings
Press YES to select or press NO to exit Options
?
CONVERSATIONS
Review Conversations
Save Conversations
Erase All Conversations
Press YES to select or press NO to exit
SAVE CONVERSATIONS CURRENTLY ON
Save Conversations On
Save Conversations Off
Press YES to accept or NO to exit
Page 41

Customer Service: 888-269-7477 VIEWING CAPTIONS • 39
5.
After you’ve made your selection,
press the YES button to accept
or the NO button to exit out of
Conversation Options.
6.
Press the NO button repeatedly
to exit out of the menu system.
NOTE: This setting will remain On/Off until you change it again.
NOTE: Your CapTel phone holds up to 50 conversations (or 62,000 characters)
in conversation memory. If the conversation memory fi lls up entirely, older
captions will be erased as newer captions come in.
SAVE CONVERSATIONS CURRENTLY ON
Save Conversations On
Save Conversations Off
Press YES to accept or NO to exit
Page 42

40 • VIEWING CAPTIONS Customer Service: 888-269-7477
Erasing All Conversations
You can erase all conversation captions stored in memory. To delete your
saved conversations:
1. With the handset hung up,
press the YES button to see the
Options menu.
2. Press the DOWN arrow button
repeatedly until Conversations
is highlighted. Press the YES
button to accept.
3. Press the DOWN arrow button
until Erase All Conversations
is highlighted. Press the YES
button to accept.
4. The display screen asks Would
You Like to Erase All
Conversations? Press the YES
button to erase captions. Or,
press the NO button to exit.
5. Press the NO button repeatedly
to exit out of the menu system.
Would You Like to
Erase All Conversations?
Press YES to erase or NO to exit
CONVERSATION OPTIONS
Conversation Memory is Empty
OPTIONS
Dial from Phone Book
Answering Machine
Call History
Edit Phone Book
Conversations
Settings
Press YES to select or press NO to exit Options
?
CONVERSATIONS
Review Conversations
Save Conversations
Erase All Conversations
Press YES to select or press NO to exit
Page 43

Customer Service: 888-269-7477 VIEWING CAPTIONS • 41
Changing the Caption Font Size
You can adjust the font size of the conversation captions to be larger or
smaller, making the captions easier to read. You need to change the font
size before or after a call; you cannot change the font size during a live
captioned call.
NOTE: Changing the font size applies only to conversation captions. The font
size and style for your CapTel 840i Options menu always remains the same.
To change the caption font size:
1. With the handset hung up,
press the YES button to see the
Options menu.
2. Press the DOWN arrow button
repeatedly until Settings is
highlighted. Press the YES
button to select.
3. Press the DOWN arrow button
repeatedly until Display
Settings is highlighted.
Press the YES button to select.
4. Press the DOW N arrow button
until Set Conversation Font
Size is highlighted. Press the
YES button to select.
OPTIONS
Dial from Phone Book
Answering Machine
Call History
Edit Phone Book
Conversations
Settings
Press YES to select or press NO to exit Options
?
SETTINGS
Caption Settings
Phone Settings
Display Settings
Network Settings
Set the Time and Date
Update Phone
Press YES to select or press NO to exit
DISPLAY SETTINGS
LCD Brightness
Set Conversation Colors
Set Conversation Font Size
Conversation Smooth Scroll
Press YES to select or press NO to exit
Page 44

42 • VIEWING CAPTIONS Customer Service: 888-269-7477
5. The display screen shows what
the current font size setting is.
6. Press UP or DOWN arrow
buttons to select the font size
you want: SMALL, MEDIUM,
LARGE or EXTRA LARGE.
7. Once you’ve selected the font
size, press the YES button to
accept or press the NO button
to exit.
8. Press the NO button repeatedly
to exit out of the menu system.
NOTE: You need to adjust/select the caption
font size before or after a call. You cannot
adjust the caption font size during a live call.
SET CONVERSATION FONT SIZE
Conversation Font is:
SMALL
Use or to select Conversation Fonts
Press YES to accept Font or NO to exit
SET CONVERSATION FONT SIZE
Conversation Font is:
Medium
Use or to select Conversation Fonts
Press YES to accept Font or NO to exit
SET CONVERSATION FONT SIZE
Conversation Font is:
LARGE
Use or to select Conversation Fonts
Press YES to accept Font or NO to exit
SET CONVERSATION FONT SIZE
Conversation Font is:
EXTRA LARGE
Use or to select Conversation Fonts
Press YES to accept Font or NO to exit
Page 45

Customer Service: 888-269-7477 VIEWING CAPTIONS • 43
Setting the Color of the Captions
You can change the color of the caption font and the background
color on
the display screen to a color combination that you prefer. You need to set
the conversation colors before or after a call. You cannot change the caption
colors during a live captioned call.
NOTE: Changing the font colors applies only to conversation captions. The font
size and style for your CapTel 840i menu options always remains the same.
To change the caption font or background colors:
1. With the handset hung up,
press the YES button to see the
Options menu.
2. Press the DOWN arrow button
repeatedly until Settings is
highlighted. Press the YES
button to select.
3. Press the DOWN arrow button
repeatedly until Display
Settings is highlighted.
Press the YES button to select.
4. Press the DOWN arrow button
repeatedly until Set
Conversation Colors is
highlighted. Press the YES
button to select.
OPTIONS
Dial from Phone Book
Answering Machine
Call History
Edit Phone Book
Conversations
Settings
Press YES to select or press NO to exit Options
?
SETTINGS
Caption Settings
Phone Settings
Display Settings
Network Settings
Set the Time and Date
Update Phone
Press YES to select or press NO to exit
DISPLAY SETTINGS
LCD Brightness
Set Conversation Colors
Set Conversation Font Size
Conversation Smooth Scroll
Press YES to select or press NO to exit
Page 46

44 • VIEWING CAPTIONS Customer Service: 888-269-7477
5. The display screen shows what
the current text color and
background color are set to,
with an
pointing toward the
Text Color setting. Press the
YES button to select Text
Color.
6. A color palette appears on the
bottom of the display. Use the
UP and DOWN arrow keys to
move through the various font
color choices. When you find a
font color you prefer, press the
YES button to accept.
7. The display
moves down to
indicate Background Color.
Press the UP and DOWN arrow
keys to move through the
various background color
choices. When you find a
background color you prefer,
press the YES button to accept.
8. Press the NO button repeatedly
to exit out of the menu system.
NOTE: Whichever color you select for
text will not be available as a background
color choice.
SET CONVERSATION COLORS
Text Color: BLUE
Background Color: WHITE
or to select Text or Background Colors
Press YES to change Colors or NO to exit
SET CONVERSATION COLORS
Text Color: BLACK
Background Color: WHITE
Use or to select Conversation Colors
Press YES to accept Colors or NO to exit
SET CONVERSATION COLORS
Text Color: BLACK
Background Color: WHITE
Use or to select Conversation Colors
Press YES to accept Colors or NO to exit
Page 47

Customer Service: 888-269-7477 VIEWING CAPTIONS • 45
Setting How Captions Scroll Across the
Display Screen
You can control how the captions appear on your display screen: either appear ing
word-by-word as each word is captioned or by scrolling line-by-line in a
continuous movement. The default setting is word-by-word. To turn on scrolling:
1. With the handset hung up,
press the YES button to see the
Options menu.
2. Press the DOWN arrow button
repeatedly until Settings is
highlighted. Press the YES
button to select.
3. Press the DOWN arrow button
repeatedly until Display
Settings is highlighted. Press
the YES button to select.
4. Press the DOWN arrow button
repeatedly until Conversation
Smooth Scroll is highlighted.
Press the YES button to select.
OPTIONS
Dial from Phone Book
Answering Machine
Call History
Edit Phone Book
Conversations
Settings
Press YES to select or press NO to exit Options
?
SETTINGS
Caption Settings
Phone Settings
Display Settings
Network Settings
Set the Time and Date
Update Phone
Press YES to select or press NO to exit
DISPLAY SETTINGS
LCD Brightness
Set Conversation Colors
Set Conversation Font Size
Conversation Smooth Scroll
Press YES to select or press NO to exit
Page 48

46 • VIEWING CAPTIONS Customer Service: 888-269-7477
5. Press the UP or DOWN arrow
button to highlight
CONVERSATION SMOOTH
SCROLL on or off.
Conversation Smooth Scroll
On rolls captions across the
display screen line-by-line in a
continuous movement.
Conversation Smooth Scroll
Off displays captions word-by-
word as each word is captioned.
6. After making your selection,
press the YES button to accept
or press the NO button to exit.
7. Press the NO button repeatedly
to exit out of the menu system.
NOTE: This setting will remain On/Off until
you change it again.
CONVERSATION SMOOTH SCROLL CURRENTLY OFF
Conversation Smooth Scroll On
Conversation Smooth Scroll Off
Press YES to accept or NO to exit
Page 49

Customer Service: 888-269-7477 VIEWING CAPTIONS • 47
Adjusting the Brightness of the
Display Screen
You can adjust the brightness of your CapTel 840i display screen to make it
easier to read in well-lit or dimly-lit environments.
NOTE: You need to adjust the brightness of the Display Screen before or after a
call. You cannot set the display screen brightness during a live captioned call.
To adjust the brightness of the Display Screen:
1. With the handset hung up,
press the YES button to see the
Options menu.
2. Press the DOWN arrow button
repeatedly until Settings is
highlighted. Press the YES
button to select.
3. Press the DOWN arrow button
repeatedly until Display
Settings is highlighted. Press
the YES button to select.
4. Check that LCD Brightness is
highlighted. Press the YES
button to select.
OPTIONS
Dial from Phone Book
Answering Machine
Call History
Edit Phone Book
Conversations
Settings
Press YES to select or press NO to exit Options
?
SETTINGS
Caption Settings
Phone Settings
Display Settings
Network Settings
Set the Time and Date
Update Phone
Press YES to select or press NO to exit
DISPLAY SETTINGS
LCD Brightness
Set Conversation Colors
Set Conversation Font Size
Conversation Smooth Scroll
Press YES to select or press NO to exit
Page 50

48 • VIEWING CAPTIONS Customer Service: 888-269-7477
5. The display screen shows what
the current brightness level is
set to: Minimum, Medium, or
Maximum. Use the UP and
DOWN arrows to highlight
the level of brightness you
would like. Press the YES
button to select.
NOTE: The display screen will
change brightness levels as you
select the options.
6. Press the NO button repeatedly
to exit out of the Options menu.
LCD BRIGHTNESS CURRENTLY MAXIMUM
Minimum
Medium
Maximum
Press YES to accept or NO to exit
Page 51

Customer Service: 888-269-7477 CALL HISTORY • 49
This section explains how to use Call History to see
who has called you and to see any incoming calls that
you may have missed.
SECTION 4
Call History
TOPICS:
About Caller ID
Using Call History to See Recent Calls
Adding a Call History Entry to the
Phone Book
Clearing All Caller ID Entries
NOTE: Call History requires Caller ID service from your phone
company. If your phone service does not include Caller ID, you will
not be able to view Call History with your CapTel 840i.
About Caller ID
If an incoming call is from someone whose information is already saved in
your CapTel Phone Book, the Caller ID listing that appears on the display
screen will show the name of the caller as it appears in your Phone Book.
For example, if you saved a nickname in the CapTel Phone Book, the caller’s
nickname will appear in the Caller ID information.
Page 52

50 • CALL HISTORY Customer Service: 888-269-7477
Using Call History to See Recent Calls
Your CapTel 840i phone keeps a list of the most recent incoming phone calls,
including calls you may have missed. Your CapTel phone stores Call History
information for up to 50 incoming phone calls.
The CapTel display screen automatically shows you the phone number of the
person who called you most recently, even if you were not there to answer
the call. Depending on your Caller ID service, the display screen may also list
the name of the caller. To see other callers’ information saved in Call History
,
press the DOWN arrow button to scroll back through recently received calls.
Missed Calls
Any unanswered calls appear as New Calls
in the display screen.
1. To review calls, press the
DOWN arrow button.
2. Use the UP and DOWN arrow
buttons to move backwards
and forwards through previous
call listings.
NOTE: You can call the phone number
shown in Call History by lifting the handset.
Your CapTel phone will dial the number
automatically.
CALL HISTORY (1 OF 2)
Please lift handset to dial this number or
Press YES for more options, press NO to exit
DOWN
SMITH AUTO SHOP
321-555-9876
07/02 08:38 AM
Press YES for Options
2 New Calls to view
12:53 PM
DOWN
Page 53

Customer Service: 888-269-7477 CALL HISTORY • 51
Previous Calls
You can review Call History information from previous calls at any time.
To review recent calls in Call History:
1. With the handset hung up
press the YES button to see the
Options menu.
2. Press the DOWN arrow button
repeatedly until Call History is
highlighted. Press the YES
button to accept.
3. Make sure View Caller ID
History is highlighted. Press
the YES button to accept.
4. The CapTel display screen
will show you a list of phone
numbers of calls to your
CapTel 840i, listing the most
recent call fi rst and going
back in chronological order.
5. Use the UP and DOWN arrow
buttons to move backward
and forward through previous
call listings.
NOTE: You can call the phone
number shown in Call History by
lifting the handset. Your CapTel
phone will dial the number
automatically.
6. When you are done, press the
NO button repeatedly to exit
out of Call History.
OPTIONS
Dial from Phone Book
Answering Machine
Call History
Edit Phone Book
Conversations
Settings
Press YES to select or press NO to exit Options
?
CALL HISTORY (2 OF 3)
Please lift handset to dial this number or
Press YES for more options, press NO to exit
TRI-STATE DENTAL
321-555-8563
07/15 09:45 AM
UP
DOWN
CALL HISTORY (3 OF 3)
Please lift handset to dial this number or
Press YES for more options, press NO to exit
JOE’S DRY CLEANING
321-555-4422
08/06 10:15 AM
UP
CALLER ID
Press YES to Select Press NO to exit Options
View Caller ID History
Clear All Caller ID
View Caller ID History
—
TIP: You can delete Call History entries individually as you review them. When
you see the entry you want to delete, press the Yes button for more options.
Make sure Delete Entry is highlighted, then press Yes to accept.
Page 54

52 • CALL HISTORY Customer Service: 888-269-7477
Adding a Call History Entry to the Phone Book
You can add the phone number and contact information from a Call History
entry to your CapTel Phone Book, letting you save that caller’s information to
dial easily.
To add a Call History entry in the Phone Book:
1. With the handset hung up
press the YES button to see the
Options menu.
2. Press the DOWN arrow button
repeatedly until Call History is
highlighted. Press the YES
button to accept.
3. Make sure View Caller ID
History is highlighted. Press
the YES button to accept.
4. The CapTel display screen
will show you a list of phone
numbers of calls to your
CapTel 840i, listing the most
recent call fi rst and going
back in chronological order.
5. Use the UP and DOWN arrow
buttons to move through the
call list until you fi nd the entry
you want to save to the Phone
Book. Press the YES button for
more options.
6. Press the DOWN arrow button
to highlight Add Entry to
Phone Book. Press the YES
button to select.
OPTIONS
Dial from Phone Book
Answering Machine
Call History
Edit Phone Book
Conversations
Settings
Press YES to select or press NO to exit Options
?
CALL HISTORY ENTRY
Delete Entry
Add Entry to Phone Book
Peterson, Julia
321-555-2354
08/03 10:33 AM
Press YES to select or press NO to exit
Add Entry to Phone Book
CALLER ID
Press YES to Select Press NO to exit Options
View Caller ID History
Clear All Caller ID
View Caller ID History
—
CALL HISTORY (2 OF 3)
Please lift handset to dial this number or
Press YES for more options, press NO to exit
Peterson, Julia
321-555-2354
08/03 10:33 AM
UP
DOWN
Page 55

Customer Service: 888-269-7477 CALL HISTORY • 53
7. The display shows different
options for the telephone
number format to save. For
example, if the phone number
is local, you do not need to save
the area code with the phone
number. If the phone number
is long distance, you may need
to save “1” plus the area code
with the phone number.
Use the UP and DOWN arrow
buttons to highlight the correct
telephone number format.
Press the YES button to accept.
8. The display shows the name
and phone number that will be
saved in the CapTel Phone
Book. If needed, you can edit
the Name listed by using the
UP and DOWN arrow keys and
the CapTel dialing pad to make
changes. Press the YES button
to accept.
9. If needed, you can edit the
phone Number by using the
UP and DOWN arrow keys and
the CapTel dialing pad to make
changes. Press the YES button
to accept.
10. When you are done, press the
NO button repeatedly to exit.
SELECT NUMBER FORMAT
555-2354
321-555-2354
1-321-555-2354
Press YES to select or press NO to exit
Press number to add dial prefi x
EDIT PHONE BOOK
Name: Peterson, Julia_
Number: 555-2354
Press YES to edit number or NO to Cancel
for Shift, for Backspace, # for Space
Name: Peterson, Julia
Number: 555-2354_
** Saved **
Page 56

54 • CALL HISTORY Customer Service: 888-269-7477
Clearing All Caller ID Entries
You can delete individual Caller ID entries as you review them (see page 48)
or you can erase all Caller ID listings at one time.
To clear (delete) all Caller ID entries at one time:
1. With the handset hung up,
press the YES button to see the
Options menu.
2. Press the DOWN arrow button
repeatedly until Call History is
highlighted. Press the YES
button to select.
3. Use the DOWN arrow button
to highlight Clear All Caller
ID. Press the YES button to
select.
4. The display asks Would You
Like to Clear All Caller ID?
Press YES to erase all Caller ID
listings.
5. Press the NO button repeatedly
to exit out of the Options menu.
OPTIONS
Dial from Phone Book
Answering Machine
Call History
Edit Phone Book
Conversations
Settings
Press YES to select or press NO to exit Options
?
CLEAR CALLER ID
Would You Like to
Clear All Caller ID?
CALLER ID
Press YES to Select Press NO to exit Options
View Caller ID History
Clear All Caller ID
—
Press YES to accept NO to exit
Page 57

Customer Service: 888-269-7477 USING THE ANSWERING MACHINE • 55
Using the
Answering Machine
This section explains how to use the built-in Answering
Machine to see messages that people leave for you. You
can hear the voice recording and press the CAPTIONS
button to read captions of the message.
Using the
SECTION 5
TOPICS:
Turning Answering Machine On/Off
Playing Your Answering Machine Messages
Clearing All Messages
Recording a Personal Greeting Message
Setting the Number of Rings Before
Answering
Making Incoming Messages Audible/Silent
Remotely Accessing Your Answering
Machine Messages
To Access Your Answering Machine
Messages Remotely
Captioning External Answering Machine
Messages
Page 58

56 • USING THE ANSWERING MACHINE Customer Service: 888-269-7477
Turning Answering Machine On/Off
Your CapTel phone comes with a built-in answering machine that will
answer calls and take messages for you when you are unavailable. The
Answering Machine records the voice message and lets you play it back
with captions. Up to 63 recordable messages can be saved, each message
can be up to 2 minutes long.
To turn the Answering Machine On:
1. With the handset hung up,
press the YES button to see the
Options menu.
2. Press the DOWN arrow button
until Answering Machine is
highlighted. Press the YES
button to select.
3. Check that Answ ering
Machine On/Off is
highlighted. Press the YES
button to select.
4. Use the UP or DOW N arrow
buttons to highlight Answ ering
Machine On or Off. Press the
YES button to select.
5. Press the NO button repeatedly
to Exit.
The Answering Machine will stay on or off
until you change this setting.
OPTIONS
Dial from Phone Book
Answering Machine
Call History
Edit Phone Book
Conversations
Settings
Press YES to select or press NO to exit Options
Answering Machine
?
ANSWERING MACHINE CURRENTLY ON
Answering Machine On
Answering Machine Off
Press YES to accept or NO to exit
Answering Machine On
TIP: When the phone is not in use, the Answering Machine icon ( ) appears
in the CapTel display screen whenever the Answering Machine is turned on,
letting you quickly check at a glance if the Answering Machine is turned on or off.
ANSWERING MACHINE
Answering Machine On/Off
Play/Erase Messages
Clear All Messages
Greeting Message
Answering Machine Settings
Caption External Ans Machine
Press YES to select or press NO to exit
Answering Machine On/Off
Page 59

Customer Service: 888-269-7477 USING THE ANSWERING MACHINE • 57
Playing your Answering Machine Messages
You can listen to your Answering Machine messages over the
CapTel
handset,
while at the same time reading captions of what the messages say. There are
two ways to play your Answering Machine messages:
Option 1: From
CapTel
Display Screen
1.
The CapTel display lets you know
when there are new messages
waiting for you. Press the
UP
button to listen to new messages.
2. Follow the directions on the
display screen to lift the
CapTel
handset and listen to your
messages.
3.
The CAPTIONS light will go off
and captions of the recorded
message will appear on the
display screen.
4.
When you are finished listening
to each message, you can:
Press YES to erase the message;
Press
NO
to replay the
current message;
Press UP arrow button to
review previous messages;
Press
DOWN
arrow button to
move to the next message
5.
Hang up the handset when you
are finished playing your messages.
NOTE: If you need to, you can have the message re-captioned. This is helpful if
you notice a word error in the captions. Just press the CAPTIONS button, and
the answering machine message will play over again – with new captions.
Press YES for Options
2 New Messages to view
12:53 PM
UP
PLAY ANSWERING MACHINE MESSAGES
Please Lift Handset to Listen to
Answering Machine Messages
2 New Messages
3 Old Messages
Press NO to exit
(CapTel CA# C3280) (F) Hi jackie
calling I just wanted to check in
and see if we are still on for dinner
tonight ? we are really looking
forward to it give me a call back
and let me know thanks bye
Press Captions Button to Re-caption this Message
Press YES to Erase, NO to Replay,
Previous, Next
Page 60

58 • USING THE ANSWERING MACHINE Customer Service: 888-269-7477
Option 2: From the Options Menu
1. With the handset hung up,
press the
YES
button to see the
Options menu.
2. Press the
DOWN
arrow button
until
Answ ering Machine
is
highlighted. Press the
YES
button to select.
3. Press the
DOWN
arrow button
to highlight
Play/Erase
Messages
. Press the
YES
button to select.
4. Follow the directions on the
display screen to lift the
CapTel
handset and listen to your
messages.
5. The CAPTIONS light will go off,
and captions of the message
will appear on the display screen
while the message is playing.
doing a little shopping after
the kids get done with school
so if you want to meet me
please go ahead and give me
a call back and we will set
something up alright
MARY SMITH 321-555-1234 5/16 10:30 AM
Press YES to Erase or Press NO to Skip Message
OPTIONS
Dial from Phone Book
Answering Machine
Call History
Edit Phone Book
Conversations
Settings
Press YES to select or press NO to exit Options
Answering Machine
?
PLAY ANSWERING MACHINE MESSAGES
Please Lift Handset to Listen to
Answering Machine Messages
2 New Messages
3 Old Messages
Press NO to exit
ANSWERING MACHINE
Answering Machine On/Off
Play/Erase Messages
Clear All Messages
Greeting Message
Answering Machine Settings
Caption External Ans Machine
Press YES to select or press NO to exit
Page 61

Customer Service: 888-269-7477 USING THE ANSWERING MACHINE • 59
6.
When you are finished listening
to each message, you can:
Press YES to erase the message;
Press
NO
to replay the
current message;
Press UP arrow button to
review previous messages;
Press
DOWN
arrow button to
move to the next message
NOTE: If you need to, you can
have the message re-captioned.
This is helpful if you notice a
word error in the captions. Just
press the CAPTIONS button, and
the answering machine message
will play over again – with new
captions.
7. When you are finished playing
your messages, hang up the
CapTel
handset.
NOTE: The CapTel display screen
stays ON whenever there is a new
answering machine message that
has not been reviewed, alerting
you to new messages (unless the
Keypad Light Timeout feature is
set – then the display screen will go
off after 60 seconds of non-use).
FINISHED PLAYING MESSAGES
Hang Up the Phone to Exit
so if you want to meet me
please go ahead and give me
a call back and we will set
something up alright I hope
you can make it looking
forward to seeing you bye
Press Captions Button to Re-caption this Message
Press YES to Erase, NO to Replay,
Previous, Next
Page 62

60 • USING THE ANSWERING MACHINE Customer Service: 888-269-7477
Clearing All Messages
In addition to erasing messages one at a time as you play them, you can also
erase all your saved Answering Machine messages at one time.
To clear all your Answering Machine messages:
1. With the handset hung up,
press the YES button to see the
Options menu.
2. Press the DOWN arrow button
until Answering Machine is
highlighted. Press the YES
button to select.
3. Press the DOWN arrow button
repeatedly to highlight Clear
All M essages. Press the YES
button to select.
4. Press the YES button to erase
all saved Answering Machine
messages. If you don’t want to
erase all messages, press the
NO button to exit.
5. CapTel confi rms that your
Answering Machine messages
have been erased.
NOTE: The display screen indicates when Answering Machine memory is close
to fi lling up, letting you clear messages before the memory is completely full. If
Answering Machine memory becomes full, CapTel will not be able to record
new messages until older messages are cleared from memory.
OPTIONS
Dial from Phone Book
Answering Machine
Call History
Edit Phone Book
Conversations
Settings
Press YES to select or press NO to exit Options
Answering Machine
?
CLEAR MESSAGES
Press YES to Erase All
Answering Machine Messages
Press NO to exit
Press YES to accept or NO to exit
ANSWERING MACHINE
Answering Machine On/Off
Play/Erase Messages
Clear All Messages
Greeting Message
Answering Machine Settings
Caption External Ans Machine
Press YES to select or press NO to exit
Page 63

Customer Service: 888-269-7477 USING THE ANSWERING MACHINE • 61
Recording a Personal Greeting Message
Before you begin making/receiving calls, you may want to record a personal
greeting message for the CapTel 840i Answering Machine. If you do not want
to record a personal greeting, the Answering Machine will use a pre-recorded
greeting that says, “Hello. No one is available to take your call. Please leave a
message after the tone.”
To record a personal greeting message:
1. With the handset hung up,
press the YES button to see the
Options menu.
2. Press the DOWN arrow button
to highlight Answ ering
Machine. Press YES to select.
3. Press the DOWN arrow button
to highlight Greeting
Message. Press YES to select.
4. Press the DOWN arrow button
to highlight Record New
Greeting. Press YES to select.
OPTIONS
Dial from Phone Book
Answering Machine
Call History
Edit Phone Book
Conversations
Settings
Press YES to select or press NO to exit Options
?
Answering Machine
GREETING MESSAGE
Play Current Greeting
Record New Greeting
Use Default Greeting
Press YES to select or press NO to exit
ANSWERING MACHINE
Answering Machine On/Off
Play/Erase Messages
Clear All Messages
Greeting Message
Answering Machine Settings
Caption External Ans Machine
Press YES to select or press NO to exit
Page 64

62 • USING THE ANSWERING MACHINE Customer Service: 888-269-7477
5. Lift the CapTel handset and
watch the display screen to
know when to start speaking.
When you see the REC
message, begin speaking into
the handset to record your
greeting message. Your
personalized greeting message
may be up to 1 minute long.
6. When you are finished, press
the YES button to stop. Your
new message will be played
back over the handset for you
to review.
If you’d like to re-record your
greeting, press the NO key to
begin recording again.
7. When you are satisfied with
your new greeting, hang up
the telephone handset. CapTel
will send out your personal
greeting whenever the
Answering Machine picks up
a call.
RECORD NEW GREETING
Lift Handset to
Record Greeting or
Press NO to exit
RECORD NEW GREETING
Message Is Recording
Speak Into the Handset
Press YES to End Recording
Page 65

Customer Service: 888-269-7477 USING THE ANSWERING MACHINE • 63
Setting the Number of Rings
Before Answering
You can set the approximate number of times the CapTel will ring before the
Answering Machine answers the call. The default setting is four (4) rings, but
you can set it to be any number of rings between three and twenty (3–20).
NOTE: The ring count may be slightly different in telephone systems that use
“distinctive” ring patterns. Please experiment with this setting as needed for
your specifi c phone system.
To set the number of rings before answering:
1. With the handset hung up,
press the YES button to see the
Options menu.
2. Press the DOWN arrow button
until Answering Machine is
highlighted. Press the YES
button to select.
3. Press the DOWN arrow button
repeatedly until Answ ering
Machine Settings is
highlighted. Press the YES
button to accept.
4. Check that Answ er Ring
Count is highlighted. Press the
YES button to accept.
OPTIONS
Dial from Phone Book
Answering Machine
Call History
Edit Phone Book
Conversations
Settings
Press YES to select or press NO to exit Options
Answering Machine
?
ANSWERING MACHINE
Answering Machine On/Off
Play/Erase Messages
Clear All Messages
Greeting Message
Answering Machine Settings
Caption External Ans Machine
Press YES to select or press NO to exit
Answering Machine Settings
ANSWERING MACHINE SETTINGS
Answer Ring Count
Incoming Messages
Remote Access
Press YES to select or press NO to exit
Answer Ring Count
Page 66

64 • USING THE ANSWERING MACHINE Customer Service: 888-269-7477
5.
Use the UP or DOWN
arrow
buttons
to select the number of
rings, from 3 rings up to 20 rings.
Press the YES button to select.
6. Press the NO button
repeatedly to exit.
On incoming calls, your CapTel phone will
ring this number of times before the
Answering Machine picks up the call.
NUMBER OF RINGS BEFORE ANSWERING: 4
10 Rings
Press YES to accept or NO to exit
Page 67

Customer Service: 888-269-7477 USING THE ANSWERING MACHINE • 65
Making Incoming Messages Audible/Silent
Just like with other Answering Machines, you can “screen” callers by having
incoming messages played aloud on the CapTel phone for you to hear before
you answer the call. While this is a convenient feature, there may be times
when you do not want incoming messages to be played aloud, but instead
taken silently for you to review at a later time. The default setting is for
incoming messages to be muted (silent).
To make incoming calls audible or set them to be silent:
1. With the handset hung up,
press the YES button to see the
Options menu.
2. Press the DOWN arrow button
until Answering Machine is
highlighted. Press the YES
button to select.
3. Press the DOWN arrow button
repeatedly until Answ ering
Machine Settings is
highlighted. Press the YES
button to accept.
4. Press the DOWN arrow button
so that Incoming Messages is
highlighted. Press the YES
button to accept.
OPTIONS
Dial from Phone Book
Answering Machine
Call History
Edit Phone Book
Conversations
Settings
Press YES to select or press NO to exit Options
Answering Machine
?
ANSWERING MACHINE
Answering Machine On/Off
Play/Erase Messages
Clear All Messages
Greeting Message
Answering Machine Settings
Caption External Ans Machine
Press YES to select or press NO to exit
Answering Machine Settings
ANSWERING MACHINE SETTINGS
Answer Ring Count
Incoming Messages
Remote Access
Press YES to select or press NO to exit
Page 68

66 • USING THE ANSWERING MACHINE Customer Service: 888-269-7477
5. Press the UP or DOWN arrow
button to highlight Incoming
Messages A udible or Muted.
Press the YES button to accept
the setting you want.
Incoming Messages Audible: will play
incoming messages aloud on the CapTel
phone as the message is being taken for you
to listen to/screen as they are recorded.
Incoming Messages Muted: will take
incoming messages silently, you will not be
able to hear the message as it is being taken.
You will be able to listen to and review the
message after it has been recorded.
INCOMING MESSAGES CURRENTLY MUTED
Incoming Messages Audible
Incoming Messages Muted
Press YES to accept or NO to exit
Page 69

Customer Service: 888-269-7477 USING THE ANSWERING MACHINE • 67
Remote Access to Your Answering
Machine Messages
CapTel lets you call in to play your Answering Machine messages when you
are away from your home or offi ce. This feature must be turned on and you
must set a personal identifi cation number (PIN) for security before this
feature will work.
The default setting for Remote Access is OFF.
NOTE: If possible, use a different CapTel phone when calling in to retrieve your
messages, in order to be able to see captions of the messages. If you call using any
other phone, you will be able to listen to the voice part of the Answering Machine
messages but you will not be able to read captions at your remote location.
To turn Remote Access ON and set a personal identifi cation number (PIN):
1. With the handset hung up,
press the YES button to see the
Options menu.
2. Press the DOWN arrow button
until Answering Machine is
highlighted. Press the YES
button to select.
3. Press the DOWN arrow button
repeatedly until Answ ering
Machine Settings is
highlighted. Press the YES
button to accept.
OPTIONS
Dial from Phone Book
Answering Machine
Call History
Edit Phone Book
Conversations
Settings
Press YES to select or press NO to exit Options
Answering Machine
?
ANSWERING MACHINE
Answering Machine On/Off
Play/Erase Messages
Clear All Messages
Greeting Message
Answering Machine Settings
Caption External Ans Machine
Press YES to select or press NO to exit
Answering Machine Settings
Page 70

68 • USING THE ANSWERING MACHINE Customer Service: 888-269-7477
4. Press the DOWN arrow button
until Remote Access is
highlighted. Press the YES
button to accept.
5. Press the UP arrow button to
highlight Remote Access On.
Press the YES button to accept.
6.
CapTel shows the default 4-digit
Remote Access PIN. This is the
number you need to enter when
calling in remotely to play your
Answering Machine messages.
You should change the PIN to
a different number for your
own use. Use the DOWN arrow
button to backspace over the
existing PIN. Then, press the
numbers on the CapTel keypad
to set your own personal PIN.
Be sure to write the PIN down
for your own reference!
7. When you have the number
that you want, press the YES
button to save. Or press the
NO button to exit.
8. CapTel displays the commands
you may use when calling to
access your messages remotely.
When you have reviewed the
commands, press the NO
button to exit.
9. Press the NO button repeatedly to exit.
NOTE: When Remote Access is ON, you can review/change your PIN number
and review the Remote Access commands in the Answering Machine Settings
menu. These menu options do not appear when Remote Access is turned OFF.
ANSWERING MACHINE SETTINGS
Answer Ring Count
Incoming Messages
Remote Access
Press YES to select or press NO to exit
REMOTE ACCESS PIN
Remote Access PIN:
1234_
Press YES to save PIN or NO to exit
for Backspace
REMOTE ACCESS COMMANDS
Press 1 to Replay Message
Press 2 For Next Message
Press 3 to Delete Message
Press 4 to Quit
Press NO to exit
REMOTE ACCESS
Remote Access On
Remote Access Off
Press YES to select or press NO to exit
Page 71

Customer Service: 888-269-7477 USING THE ANSWERING MACHINE • 69
To Access Your Answering Machine
Messages Remotely
1. From a different phone, call your own CapTel phone number and let it
ring until the Answering Machine greeting begins.
2. Once you hear/read the BEEP, enter your 4-digit PIN by pressing keys on
the dial pad of the phone that you are using to call in.
3. Your CapTel 840i will start playing aloud any recorded messages (starting
with the most recent one). If you are calling from a different CapTel phone,
you will be able to see captions of the messages while they are played.
After each message is played, there is a pause that lets you enter one of the
following commands on the phone’s dial pad:
1 = Replay message
2 = Skip to the next message and start playing it
3 =
Delete the message you just heard, start playing the next message
4 = Quit, which hangs up the phone.
If you do not press any of the dial pad keys, after 30 seconds your CapTel
840i will automatically hang up.
4. When you are done, hang up the phone you are calling from.
NOTE: If possible, use a different CapTel phone when calling in to retrieve
your messages, in order to be able to see captions of the messages. If you call
using any other phone, you will be able to listen to the voice part of the
Answering Machine messages but you will not be able to read captions at
your remote location.
Page 72

70 • USING THE ANSWERING MACHINE Customer Service: 888-269-7477
Caption External Answering Machine Messages
Your CapTel 840i can also show captions of messages that callers leave on
your external voice answering machine. External answering machines are
separate devices that you connect to your CapTel by a telephone line.
To get captions of your external answering machine messages:
1. With the handset hung up,
press the YES button to see
Options.
2. Press the DOWN button until
Answ ering Machine is
highlighted. Press the YES
button to select.
3. Press the DOWN button
repeatedly until Caption
External Ans. Machine is
highlighted. Press the YES
button to accept.
4. The display shows that CapTel
is ready to caption messages.
Press the YES button to accept.
5. Lift the CapTel 840i handset,
and place it next to your
answering machine speaker.
Make sure the mouth-piece of
the handset is next to the
speaker of your answering
machine. While you do this,
your CapTel 840i connects to
the captioning service.
OPTIONS
Dial from Phone Book
Answering Machine
Call History
Edit Phone Book
Conversations
Settings
Press YES to select or press NO to exit Options
Answering Machine
?
CAPTION EXTERNAL ANS MACHINE
Caption External
Answering Machine
Messages
Press YES to accept or NO to exit
Place Handset
Mouthpiece Next To
Answering Machine
Speaker
ANSWERING MACHINE
Answering Machine On/Off
Play/Erase Messages
Clear All Messages
Greeting Message
Answering Machine Settings
Caption External Ans Machine
Press YES to select or press NO to exit
Page 73

Customer Service: 888-269-7477 USING THE ANSWERING MACHINE • 71
6. The display shows you when
captions are ready. Press the
“PLAY” button on your
answering machine to play
the messages aloud.
Your CapTel 840i will show you
captions of the answering
machine messages as they are
played. During this time, you
may operate your answering
machine the same way you
normally do, using the
answering machine features
such as play, re-play, delete, or
save messages.
7. When you are done listening
to your messages/reading
captions, hang up the CapTel
840i handset.
(CapTel CA# 1234) (F) Hi
mom it’s Mary calling sorry
I missed you when you get
a chance please call me back
can’t wait to talk with you bye
Press to Review the Conversation
Page 74

72 • USING THE PHONE BOOK Customer Service: 888-269-7477
This section explains how to save frequently-called
phone numbers into your phone book for easy dialing.
SECTION 6
Using the
Phone Book
TOPICS:
Adding a New Contact to your Phone Book
Dialing a Phone Number from the
Phone Book
Editing an Existing Contact in the Phone Book
Removing a Contact from your Phone Book
Page 75

Adding a New Contact to your Phone Book
You can save 97 names and phone numbers in the CapTel 840i Phone Book.
To add a new contact to the Phone Book:
1. With the handset hung up,
press the YES button to see the
Options menu.
2. Press the DOWN arrow button
repeatedly until Edit Phone
Book is highlighted. Press the
YES button to select.
3. Press the DOWN arrow button
until Add a New Contact is
highlighted. Press the YES
button to select.
4. Use the dialing pad to enter
the letters of the name of the
person you wish to add. Look
for the letters listed on the
number keys to know which
number key to press. For some
letters, press the number key
several times until the correct
letter appears on the display
screen.
Example: To enter the letter “L”, press the number 5 key three
times until you see “L” on the display screen.
Customer Service: 888-269-7477 USING THE PHONE BOOK • 73
OPTIONS
Dial from Phone Book
Answering Machine
Call History
Edit Phone Book
Conversations
Settings
Press YES to select or press NO to exit Options
?
PHONE BOOK
Edit Existing Contact
Add a New Contact
Remove a Contact
Press YES to select or press NO to exit
Add a New Contact
EDIT PHONE BOOK
Name: Mary_
Number:
Press YES to edit number or NO to Cancel
for Shift, for Backspace, # for Space
Page 76

74 • USING THE PHONE BOOK Customer Service: 888-269-7477
Example: To enter the name “Mary”, press the 6 key for the letter “M”, the
2 key for the letter “a”, the 7 key three times for the letter “r”, then the 9 key
three times for the letter “y”. You may need to wait for the cursor to change
from | to _ when entering letters that are on the same number key.
5.
Once you have entered the contact
name, press the YES button to
advance to the Number section.
6. Enter in the phone number by
using the dialing pad. Use the
DOWN arrow button to
backspace. CapTel automatically
inserts a hyphen as you enter
the phone number.
NOTE: If a dialing prefix is
required to get an outside line,
enter in the dialing prefix first, then
the phone number. Use the UP
button to add a 2-second delay.
7. When you are done entering
the phone number, press the
YES button to save your new
contact information.
Press the YES button to enter
more contact names/phone
numbers, or press the NO button
repeatedly to exit the menu
system.
TIP: Press the DOWN arrow button for a backspace. Press the # button to add
a space. Press the UP arrow button to shift lock for capital letters. Press UP
again to return to lower case.
NOTE: Phone book entries are stored alphabetically by the first letter
of the name.
EDIT PHONE BOOK
Name: Mary
Number: 555-1234_
Press YES to accept or NO to exit
for Backspace, for 2 second delay
EDIT PHONE BOOK
Name: Mary
Number: _
Press YES to accept or NO to exit
for Backspace, for 2 second delay
Page 77

Customer Service: 888-269-7477 USING THE PHONE BOOK • 75
Dialing a Phone Number from the
Phone Book
To quickly dial any phone number listed in your Phone Book:
1. With the handset hung up,
press the YES button to see the
Options menu.
2. Make sure Dial from Phone
Book is highlighted. Press the
YES button to select.
3. The display screen shows you
the fi rst contact name and
number listed in your Phone
Book. Use the UP and DOWN
arrows to move through the
contacts in your Phone Book.
4. When you see the contact
listing you want to dial, simply
lift the handset. The CapTel
phone will dial the number for
you automatically.
5. Make sure the CAPTIONS
button is on (red light on). You
can turn captions on/off at any
time in your conversation.
6. Listen or watch the signal
meter to know when someone
answers. Watch the display
screen for captions. Begin
your conversation as you
normally would.
When you are done with your
call, hang up the handset.
OPTIONS
Dial from Phone Book
Answering Machine
Call History
Edit Phone Book
Conversations
Settings
?
Press YES to select or press NO to exit Options
PHONE BOOK (3 of 4)
Name: Mary
Number: 555-1234
Please lift handset to dial this number or
Press NO to exit
UP
DOWN
Dialing:
Mary
5551234
Waiting for Captions
Stage 6 of 8
(CapTel CA# 1234) Ringing
1 2 3 (F) Hello this is Mary
Oh hi mom I’m so glad you
called
Press to Review the Conversation
Page 78

76 • USING THE PHONE BOOK Customer Service: 888-269-7477
Editing an Existing Contact in the
Phone Book
To make changes to an existing contact in the Phone Book:
1. With the handset hung up,
press the YES button to see the
Options menu.
2. Press the DOWN arrow button
repeatedly until Edit Phone
Book is highlighted. Press the
YES button to accept.
3. Check that Edit Existing
Contact is highlighted.
4. Press the YES button to select.
5. The display screen will show
you the fi rst listing in your
Phone Book. Use the UP and
DOWN arrow buttons to move
through the various contacts in
your Phone Book. When you
fi nd the contact you wish to
change, press the YES button
to select it.
OPTIONS
Dial from Phone Book
Answering Machine
Call History
Edit Phone Book
Conversations
Settings
Press YES to select or press NO to exit Options
?
PHONE BOOK
Edit Existing Contact
Add a New Contact
Remove a Contact
Press YES to select or press NO to exit
PHONE BOOK (1 of 7)
Name: Mary
Number: 555-1234
Press YES to edit name or NO to exit
UP
DOWN
Page 79

Customer Service: 888-269-7477 USING THE PHONE BOOK • 77
6. To edit the name, use the
DOWN arrow button as a
backspace to erase letters. You
can enter new/different letters
using the dialing pad. Look for
the letters listed on the
number keys to know which
number key to press. For some
letters, press the same number
key several times until the
correct letter appears on the
display screen.
7. When you are done editing the
name, press the YES button to
move to the Number.
To edit the phone number, use
the DOWN arrow button as a
backspace to erase numbers. You
can enter new/different numbers
using the dialing pad. Use the
UP arrow button to insert a
2-second delay.
NOTE: If a dialing prefix is
required to get an outside line,
enter in the dialing prefix first,
then the phone number.
8. When you are done editing the
phone number, press the YES
button to save your changes.
9. Press the YES button to edit
more contacts in your Phone
Book, or press the NO button
repeatedly to exit the menu
system.
EDIT PHONE BOOK
Name: Mary at Home
Number: 555-1234_
Press YES to accept or NO to exit
for Backspace, for 2 second delay
Name: Mary at Home
Number: 777-4321
**Saved**
EDIT PHONE BOOK
Name: Mary at Home_
Number: 555-1234
Press YES to edit number or NO to exit
for Shift, for Backspace, # for Space
EDIT PHONE BOOK
Page 80

78 • USING THE PHONE BOOK Customer Service: 888-269-7477
Removing a Contact from your Phone Book
To remove a contact from your Phone Book:
1. With the handset hung up,
press the YES button to see the
Options menu.
2. Press the DOWN arrow button
repeatedly until Edit Phone
Book is highlighted. Press the
YES button to select.
3. Press the DOWN arrow button
repeatedly until Remove a
Contact is highlighted. Press
the YES button to select.
4. The display screen will show
you the fi rst listing in your
Phone Book. Use the UP and
DOWN arrow buttons to move
through the various contacts
in your Phone Book until you
see the contact listing you wish
to delete.
5. Press the YES button to
remove the contact listing. The
name and phone number of
the contact person will be
deleted from the Phone Book.
6. Press the NO button repeatedly
to exit out of the Options menu.
OPTIONS
Dial from Phone Book
Answering Machine
Call History
Edit Phone Book
Conversations
Settings
Press YES to select or press NO to exit Options
?
PHONE BOOK
Edit Existing Contact
Add a New Contact
Remove a Contact
Press YES to select or press NO to exit
PHONE BOOK (1 of 7)
Name: Mary
Number: 555-1234
Press YES to delete name or NO to exit
UP
DOWN
Page 81

Customer Service: 888-269-7477 USING SPEED DIAL BUTTONS • 79
About the Speed Dial Buttons
You can set up three speed dial buttons on your CapTel phone to easily dial
your most frequently-called phone numbers. You may want to use these
buttons for emergency speed dial buttons to call the fi re department or
police, or to quickly reach the phone numbers you call most often.
This section tells you how to set up and use the three
Speed Dial buttons on your CapTel phone.
SECTION 7
Using Speed
Dial Buttons
TOPICS:
About the Speed Dial Buttons
Saving Phone Numbers in the Speed
Dial Buttons
Editing Phone Numbers in the Speed
Dial Buttons
Dialing with the Speed Dial Buttons
Page 82

80 • USING SPEED DIAL BUTTONS Customer Service: 888-269-7477
Saving Phone Numbers in the Speed
Dial Buttons
1. With the handset hung up,
press the SPEED DIAL button
you want to program.
2. Press the YES button to edit.
3. Use the dialing pad to enter
the
letters of the name of the
person
you wish to add. Use
the letters on the number keys
to know which key to press.
4. Press the YES button to
advance the selection to the
Number section.
5. Enter in the phone number by using the dialing pad. (NOTE: If a
dialing prefix is required to get an outside line, enter in the dialing
prefix then the numbers.) Use the DOWN arrow button to backspace.
Use the UP arrow button to insert a 2-second delay. CapTel will
automatically insert a hyphen as you enter the phone number.
6. Press the YES button to save it.
Example: To enter the name “Mary”,
press the 6 key for the letter “M”, the
2 key for the letter “a”, the 7 key three
times for the letter “r”, then the 9 key
three times for the letter “y”. You may
need to wait for the cursor to change
from | to _ when entering letters that
are on the same number key.
SPEED DIAL 3
Name:
Number:
Press YES to edit or NO to exit
EDIT SPEED DIAL
Name: _
Number:
Press YES to edit number or NO to exit
for Shift, for Backspace, # for Space
EDIT SPEED DIAL
Name: Mary
Number: _
Press YES to accept or NO to exit
for Backspace, for 2 second delay
Page 83

Editing Phone Numbers in the Speed
Dial Buttons
1. Press the SPEED DIAL button
you wish to edit.
2. Press the YES button to edit
the name.
3. Use the DOWN arrow button
to backspace/erase letters in
the current name. Use the
number pad keys to enter a
new letter or name. Press the
YES button when you are done
editing the name.
4. The cursor moves to the
Number entry. Use the DOWN
arrow button to backspace/erase
numbers in the current listing.
Use the number pad key to
change/enter a new phone
number. Use the UP arrow
button to insert a 2-second
delay.
5. When you are finished making
changes, press the YES button
to accept.
Customer Service: 888-269-7477 USING SPEED DIAL BUTTONS • 81
SPEED DIAL 1
Name: Mary
Number: 555-1234
Please lift handset to dial this number
Press YES to edit or NO to exit
EDIT SPEED DIAL
Name: Mary Cell_
Number: 555-1234
Press YES to edit number or NO to exit
for Shift, for Backspace, # for Space
EDIT SPEED DIAL
Name: Mary Cell
Number: 789-3456_
Press YES to accept or NO to exit
for Backspace, for 2 second delay
Page 84

82 • USING SPEED DIAL BUTTONS Customer Service: 888-269-7477
Dialing with the Speed Dial Buttons
1. Make sure the CAPTIONS
button is on (red light on).
2. Press the SPEED DIAL key with
the number that you want
to call.
3. Lift the handset. Your CapTel
phone will dial the phone
number for you automatically.
4. Listen or watch the signal
meter to know when someone
answers. Watch the display
screen for captions. Begin
your conversation as you
normally would.
When you are done with your
call, hang up the handset.
(CapTel CA# 1234) (F) Hello
this is Mary Oh hi Mom how
are you
Press to Review the Conversation
SPEED DIAL 1
Name: Mary Cell
Number: 789-3456
Please lift handset to dial this number
Press YES to edit or NO to exit
Dialing :
Mary Cell
7893456
Page 85

Customer Service: 888-269-7477 SETTINGS • 83
SECTION 8
Settings
This section explains how to adjust settings on your
phone to fi t your preferences.
TOPICS:
Setting the Captions Button to On/Off
Turning Spanish Captions On/Off
Adjusting the Volume of the Ringer
Setting the Pitch of the Ringer
Turning Keypad Lights On/Off
Saving the Captions Volume
Setting your CapTel Phone for
Tone/Pulse Dialing
Knowing When the Phone Line is Already
in Use
Changing the Network Settings
Removing Saved Networks
Setting the Time and Date
Using Call Waiting
Dialing 911 with Your CapTel 840i
Updating your CapTel Phone
Page 86

84 • SETTINGS Customer Service: 888-269-7477
Setting the Captions Button to On/Off
You can change the default setting of your CapTel 840i to always have the
CAPTIONS button set to ON or to always have the CAPTIONS button set to
OFF. Your CapTel 840i comes with the Captions button default set to ON.
NOTE: No matter how you set the Captions button default, you can always
turn the captions ON or OFF by pressing the CAPTIONS button at any point in
the conversation.
Captions Button Default On
When the Captions button default is set to ON, every call (incoming
or outgoing) is automatically connected to the Captioning Service.
The light around the CAPTIONS button remains lit. You will
receive captions on every call. You can still turn the captions off by
pressing the CAPTIONS button at any time during the call.
Captions Button Default Off
When the Captions button default is set to OFF, calls are not
automatically connected to the Captioning Service. The light
around the CAPTIONS button stays off. Calls are treated exactly
like any regular telephone call, with you and the other party
talking over the telephone line and no captions involved. Even with
the Captions button default set to off, you can turn captions on by
pressing the CAPTIONS button at any time during the call.
NOTE: When the CAPTIONS button is off (red light is off) the
maximum amplification level is not available.
Page 87

Customer Service: 888-269-7477 SETTINGS • 85
To change the Captions button setting:
1. With the handset hung up,
press the YES button to see the
Options menu.
2. Press the DOWN arrow button
repeatedly to highlight
Settings.
3. Press the YES button to select.
4. Check that Caption Settings is
highlighted. Press the YES
button to select.
5. Check that Captions Button is
highlighted. Press the YES
button to select.
6. Press the UP or DOWN arrow
button to select Captions On
or Captions Off.
Captions On: Captions will automatically
be on every call.
Captions Off: You will need to press the
CAPTIONS button to turn the Captions
feature on and off for each call.
7. Press the YES button to accept.
8. Press the NO button repeatedly
to exit out of the Options menu.
OPTIONS
Dial from Phone Book
Answering Machine
Call History
Edit Phone Book
Conversations
Settings
Press YES to select or press NO to exit Options
?
SETTINGS
Caption Settings
Phone Settings
Display Settings
Network Settings
Set the Time and Date
Update Phone
Press YES to select or press NO to exit
CAPTION SETTINGS
Captions Button
Spanish Captions
Press YES to select or press NO to exit
CAPTIONS BUTTON CURRENTLY ON
Captions On
Captions Off
Press YES to accept or NO to exit
Page 88

86 • SETTINGS Customer Service: 888-269-7477
Turning Spanish Captions On/Off
Your CapTel 840i phone can display captions in Spanish for Spanish-to-Spanish
conversations. Setting the captions to Spanish language also changes the
Options menu to display in Spanish.
NOTE: Spanish captioning is available for Spanish-to-Spanish conversations
only. The CapTel 840i phone does not translate from English conversations to
Spanish captions.
To turn Spanish captions on:
1. With the handset hung up,
press the YES button to see the
Options menu.
2. Press the DOWN arrow button
repeatedly until Settings is
highlighted. Press the YES
button to select.
3. Check that Caption Settings is
highlighted. Press the YES
button to select.
4. Press the DOWN arrow button
to highlight Spanish Captions.
Press the YES button to select.
OPTIONS
Dial from Phone Book
Answering Machine
Call History
Edit Phone Book
Conversations
Settings
Press YES to select or press NO to exit Options
?
SETTINGS
Caption Settings
Phone Settings
Display Settings
Network Settings
Set the Time and Date
Update Phone
Press YES to select or press NO to exit
CAPTION SETTINGS
Captions Button
Spanish Captions
Press YES to select or press NO to exit
Page 89

5. Press the UP or DOWN arrow
button
to select Spanish
Captions On
or Spanish
Captions Off.
6. Press the YES button to accept.
7. Press the NO button to exit out
of the Options menu.
You are now ready to make and
receive calls with captions in
Spanish. To make a call with
Spanish language captions, lift
the handset and dial the number
you want to call.
Customer Service: 888-269-7477 SETTINGS • 87
Spanish-to-Spanish captioning available every day from
7:00 a.m. – 11:00 p.m. CST
For Spanish-language Customer Support: 1-866-670-9134
NOTE: Spanish captions must be turned on in order for you to receive captions
in Spanish. If Spanish captions are turned off and a Spanish-speaking person
calls you, their captions will not appear in Spanish. You will need to ask them
to call you back in a few minutes, after you’ve had a chance to turn Spanish
captions on.
SPANISH CAPTIONS CURRENTLY OFF
Spanish Captions On
Spanish Captions Off
Press YES to accept or NO to exit
PROGRAMACIÓN DE SUBTÍTULOS
Botón de Subtítulos
Subtítulos en Español
Presione YES para seleccionar o presione NO para salir
OPCIONES
Marcar Desde Contactos
Contestador Automático
Historial de Llamadas
Editar Libreta de Contactos
Conversaciones
Programación
Presione YES para seleccionar o presione NO para salir
?
Page 90

88 • SETTINGS Customer Service: 888-269-7477
Adjusting the Volume of the Ringer
You can set the volume of the CapTel 840i ringer to the volume that you hear
best: Choose from minimum volume (105 dB), medium volume (111 dB),
maximum volume (117 dB), or Mute (turns Ringer off).
To set the Ringer volume:
1. With the handset hung up,
press the YES button to see the
Options menu.
2. Press the DOWN arrow button
until Settings is highlighted.
Press the YES button to select.
3. Press the DOWN arrow button
to highlight Phone Settings.
Press the YES button to select.
4. Check that Ringer Volume is
highlighted.
5. Press the YES button to select.
6. Press the UP or DOWN arrow
button to select your desired
Ringer Volume level. To turn the
Ringer off entirely, select Mute.
7. When the volume setting you
want is highlighted, press the
YES button to accept.
8. Press the NO button repeatedly
to exit out of the Options menu.
OPTIONS
Dial from Phone Book
Answering Machine
Call History
Edit Phone Book
Conversations
Settings
Press YES to select or press NO to exit Options
?
SETTINGS
Caption Settings
Phone Settings
Display Settings
Network Settings
Set the Time and Date
Update Phone
Press YES to select or press NO to exit
RINGER VOLUME CURRENTLY MINIMUM
Mute
Minimum
Medium
Maximum
Press YES to accept or NO to exit
PHONE SETTINGS
Ringer Volume
Ringer Pitch
Keypad Lights
Save Captions Volume
Tone or Pulse Dialing
Line In Use
Press YES to select or press NO to exit
ABC
Page 91

Customer Service: 888-269-7477 SETTINGS • 89
Setting the Pitch of the Ringer
You can select the Ringer Pitch that helps you hear best, selecting from Low,
Medium, or High frequency pitch.
To set the Ringer pitch:
1. With the handset hung up,
press the YES button to see the
Options menu.
2. Press the DOWN arrow button
until Settings is highlighted.
Press the YES button to select.
3. Press the DOWN arrow button
to highlight Phone Settings.
Press the YES button to select.
4. Press the DOWN arrow button
until Ringer Pitch is
highlighted. Press the YES
button to select.
5. Press the UP or DOWN arrow
button to select your desired
Ringer Pitch level. The ringer
will ring briefl y as you switch
levels.
6. When the Ringer Pitch level
that you want is highlighted,
press the YES button to accept.
7.
Press the NO button repeatedly
to exit out of the Options menu.
OPTIONS
Dial from Phone Book
Answering Machine
Call History
Edit Phone Book
Conversations
Settings
Press YES to select or press NO to exit Options
?
RINGER PITCH CURRENTLY LOW
Low
Medium
High
Press YES to accept or NO to exit
SETTINGS
Caption Settings
Phone Settings
Display Settings
Network Settings
Set the Time and Date
Update Phone
Press YES to select or press NO to exit
PHONE SETTINGS
Ringer Volume
Ringer Pitch
Keypad Lights
Save Captions Volume
Tone or Pulse Dialing
Line In Use
Press YES to select or press NO to exit
ABC
Page 92

90 • SETTINGS Customer Service: 888-269-7477
Turning Keypad Lights On/Off
The CapTel 840i dialing keypad is lit to make
it easier to see the number keys.
The lights on the number keypad can be turned off in the CapTel Options
menu. When Keypad Lights Timeout is selected, the lights on the number
keypad go off automatically after approximately 60 seconds of non-use.
To turn the lights on the number keypad off:
1. With the handset hung up,
press the YES button to see the
Options menu.
2. Press the DOWN arrow button
until Settings is highlighted.
Press the YES button to select.
3. Press the DOWN arrow button
to highlight Phone Settings.
Press the YES button to select.
4. Press the DOWN arrow button
repeatedly until Keypad
Lights is highlighted. Press
the YES button to select.
OPTIONS
Dial from Phone Book
Answering Machine
Call History
Edit Phone Book
Conversations
Settings
Press YES to select or press NO to exit Options
?
SETTINGS
Caption Settings
Phone Settings
Display Settings
Network Settings
Set the Time and Date
Update Phone
Press YES to select or press NO to exit
PHONE SETTINGS
Ringer Volume
Ringer Pitch
Keypad Lights
Save Captions Volume
Tone or Pulse Dialing
Line In Use
Press YES to select or press NO to exit
ABC
Page 93

4. Press the UP or DOWN arrow
button
to turn Keypad Lights
Always On or Keypad Lights
Timeout.
NOTE: When Keypad Lights Timeout
is selected, the dialing keypad lights
will go off whenever the display is
blank (after approximately 60
seconds of non-use). The lights will
remain on when the phone is in use.
5. Press the YES button to select
your option, or press the NO
button to exit.
6. Press the NO button repeatedly
to exit out of the Options menu.
NOTE: The CapTel display screen
typically stays on whenever you
have new answering machine
messages that have not been
reviewed. If you set Keypad Light
Timeout, however, the CapTel
display screen will also turn off
after approximately 60 seconds of
non-use.
Customer Service: 888-269-7477 SETTINGS • 91
KEYPAD LIGHTS CURRENTLY TIMEOUT
Keypad Lights Always On
Keypad Lights Timeout
Press YES to accept or NO to exit
ABC
ABC
Page 94

92 • SETTINGS Customer Service: 888-269-7477
Saving the Captions Volume
The volume level automatically returns to a mid-range setting each time you
hang up the CapTel phone. You can set the CapTel to remember and use your
preferred volume level on every captioned call. The saved volume only applies
when the CAPTIONS button is on. When the CAPTIONS button is off, your
CapTel phone will return to a mid-range volume every time you hang up.
To save your volume setting for captioned calls:
1. With the handset hung up,
press the YES button to see the
Options menu.
2. Press the DOWN arrow button
repeatedly until Settings is
highlighted. Press the YES
button to select.
3. Press the DOWN arrow button
until Phone Settings is
highlighted. Press the YES
button to select.
4. Press the DOWN arrow button
repeatedly until Save
Captions Volume is
highlighted. Press the YES
button to select.
OPTIONS
Dial from Phone Book
Answering Machine
Call History
Edit Phone Book
Conversations
Settings
Press YES to select or press NO to exit Options
?
SETTINGS
Caption Settings
Phone Settings
Display Settings
Network Settings
Set the Time and Date
Update Phone
Press YES to select or press NO to exit
PHONE SETTINGS
Ringer Volume
Ringer Pitch
Keypad Lights
Save Captions Volume
Tone or Pulse Dialing
Line In Use
Press YES to select or press NO to exit
ABC
Page 95

Customer Service: 888-269-7477 SETTINGS • 93
5. Use the UP or DOWN arrow
buttons to highlight Save
Captions Volume or Do Not
Save Captions Volume. Press
YES to select.
6. Press the NO button repeatedly
to exit.
Now, during your next call with captions,
experiment with the volume button to fi nd
a level that works best for you. Whatever
volume setting you choose will be saved in
CapTel memory, and will be used for every
call that has the CAPTIONS button lit.
During non-captioned calls (CAPTIONS
button off), the volume will automatically
start at a mid-range setting, and will have
to be adjusted manually.
NOTE: This setting will remain in effect
until you go through the process again to
select Do Not Save Captions Volume.
CURRENTLY NOT SAVING CAPTIONS VOLUME
Save Captions Volume
Do Not Save Captions Volume
Press YES to accept or NO to exit
Page 96

94 • SETTINGS Customer Service: 888-269-7477
Setting your CapTel Phone for
Tone/Pulse Dialing
The dialing mode of your CapTel 840i phone is set to Tone dialing.
To set the dialing mode to Pulse dialing:
1. With the handset hung up,
press the YES button to see the
Options menu.
2. Press the DOWN arrow button
repeatedly until Settings is
highlighted. Press the YES
button to select.
3. Press the DOWN arrow button
to highlight Phone Settings.
Press the YES button to select.
4. Press the DOWN arrow button
repeatedly until Tone or
Pulse Dialing is highlighted.
5. Press the YES button to select.
6. Press the UP or DOWN arrow
button to select Tone Dialing
or Pulse Dialing.
7. When the dialing mode you
want is highlighted, press the
YES button to accept.
8. Press the NO button to exit out
of the Options menu.
OPTIONS
Dial from Phone Book
Answering Machine
Call History
Edit Phone Book
Conversations
Settings
Press YES to select or press NO to exit Options
?
SETTINGS
Caption Settings
Phone Settings
Display Settings
Network Settings
Set the Time and Date
Update Phone
Press YES to select or press NO to exit
CURRENTLY TONE DIALING
Tone Dialing
Pulse Dialing
Press YES to accept or NO to exit
Tone Dialing
PHONE SETTINGS
Ringer Volume
Ringer Pitch
Keypad Lights
Save Captions Volume
Tone or Pulse Dialing
Line In Use
Press YES to select or press NO to exit
Tone or Pulse Dialing
ABC
Page 97

Customer Service: 888-269-7477 SETTINGS • 95
Knowing When the Phone Line is
Already in Use
When the Line in Use feature is on, the CapTel display lets you know when
an extension phone, connected to the same telephone number, is being
used. This is helpful in environments where there are multiple phones on the
same telephone line, to alert you so that you do not accidentally pick up and
dial when a different call is already in progress. To join the call in progress,
simply pick up the CapTel handset. The call will automatically connect to the
Captioning Service, and you will see captions on the CapTel display. The
default setting for Line in Use is ON.
To turn Line in Use off:
1. With the handset hung up,
press the YES button to see the
Options menu.
2. Press the DOWN arrow button
repeatedly until Settings is
highlighted. Press the YES
button to select.
3. Press the DOWN arrow button
to highlight Phone Settings.
Press the YES button to select.
4. Press the UP or DOWN arrow
button repeatedly until Line
in Use is highlighted. Press
the YES button to select.
OPTIONS
Dial from Phone Book
Answering Machine
Call History
Edit Phone Book
Conversations
Settings
Press YES to select or press NO to exit Options
?
SETTINGS
Caption Settings
Phone Settings
Display Settings
Network Settings
Set the Time and Date
Update Phone
Press YES to select or press NO to exit
PHONE SETTINGS
Ringer Volume
Ringer Pitch
Keypad Lights
Save Captions Volume
Tone or Pulse Dialing
Line In Use
Press YES to select or press NO to exit
ABC
Page 98

96 • SETTINGS Customer Service: 888-269-7477
5. Use the UP arrow button to
highlight Line In Use Off.
Press the YES button to select.
6. Press the NO button to exit out
of the Options menu.
NOTE: When Line in Use is OFF, you cannot
join a call in progress by simply picking up
the CapTel handset. You must fi rst press one
of the dial pad keys to connect the call to
the Captioning Service. Once connected, you
will see captions of the call in progress.
LINE IN USE CURRENTLY ON
Line In Use Off
Line in Use On
Press YES to accept or NO to exit
Page 99

Customer Service: 888-269-7477 SETTINGS • 97
Changing the Network Settings
If you are connected to the Internet using a WiFi network and if you want to
move your CapTel 840i to a different location, you may need to change the
network settings.
1. With the handset hung up,
press the YES key to see the
Options menu.
2. Press the DOWN arrow button
repeatedly until Settings is
highlighted. Press the YES
button to select.
3. Press the DOWN arrow button
repeatedly until Network
Settings is highlighted. Press
the YES button to select.
4. To view your current
Network Settings, check that
View Current Netw ork is
highlighted. Press YES to
select.
OPTIONS
Dial from Phone Book
Answering Machine
Call History
Edit Phone Book
Conversations
Settings
Press YES to select or press NO to exit Options
?
SETTINGS
Caption Settings
Phone Settings
Display Settings
Network Settings
Set the Time and Date
Update Phone
Press YES to select or press NO to exit
NETWORK SETTINGS
View Current Network
Change Network Connection
Remove Saved Networks
Press YES to select or press NO to exit
View Current Network
Page 100

98 • SETTINGS Customer Service: 888-269-7477
CapTel shows you your current
network confi guration. Press the
NO button to exit.
5. Press the DOWN arrow button
to highlight Change Network
Confi guration. Press the YES
button to select.
6. CapTel asks Are Y ou Sure
You Want To Leave This
Network? Press the YES
button to leave current
network. Or, press the NO
button to exit.
NOTE: If you leave the current network
setting, all saved information about your
network will be erased. The CapTel will go
through the Network Setup process again to
re-establish a connection over the Internet.
See the CapTel 840i Setup Guide for details
about re-setting up a network confi guration.
CURRENT NETWORK INFORMATION
SSID: 2WIRE269
Security: WPA-PERSONAL
Channel: 8
Power: -56dBm
Press NO to exit
NETWORK SETTINGS
Are You Sure You Want To
Leave This Network?
Press YES to accept or NO to exit
NETWORK SETTINGS
Leaving Network
Press YES to accept or NO to exit
NETWORK SETTINGS
View Current Network
Change Network Connection
Remove Saved Networks
Press YES to select or press NO to exit
 Loading...