

Page 1
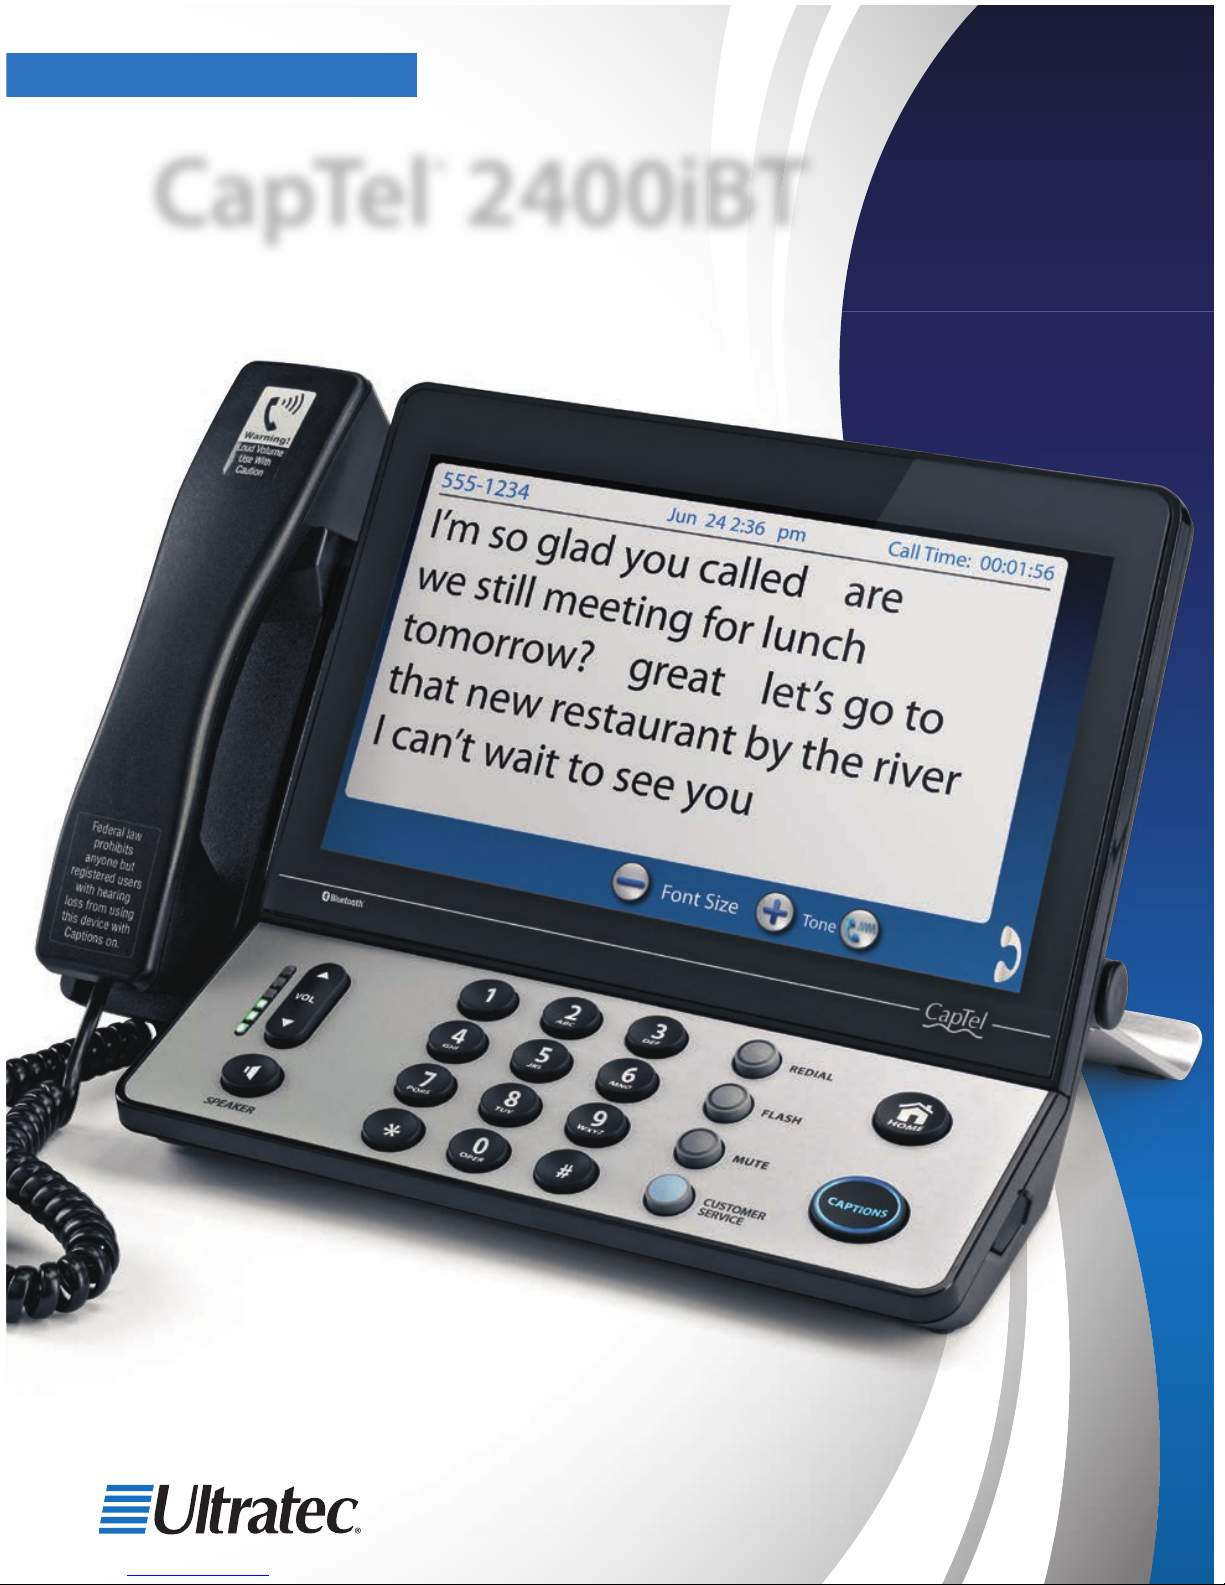
CapTel® 2400iBT
USER MANUAL
305-020553 4/17
Page 2

Physical Dimensions
Size: 12.56" wide × 9.54" tall ×
3.64" deep (Dimensions with the
stand folded against the phone.)
Weight: 3 lbs. 2.3 oz.
Power
AC Adapter: 5.9-6.0V 2Amps
(barrel is negative)
Adapter is UL listed.
Dial Pad
Large keys: 0.67" × 0.56"
Display
10.1" Backlit, graphical LCD
color display
1024 × 600 pixels
Resistive touch panel
Function Buttons
Volume
Speaker
Redial
Flash
Mute
Customer Service speed dial
Home
Captions
Controls
Conversation: Ampli cation
when Captions on: 0–40dB gain
when Captions o : 0–18dB gain
Tone: low, medium, high
Customizable to match
personal audiogram
Ringer
Ringer Volume: o , low, medium,
high (0–90dB at 1 meter)
Ringer Tone: low, medium, high
Indicator Lights
Mute
Volume Levels (1 through 12)
Captions on/o
Ring Flasher
Handset
Type: HAC (Hearing Aid
Compatible)
Dialing
Phone Book (100 entries)
Favorites (10 entries)
Speed Dial (4 entries)
Redial (Last number dialed)
Captions
Nine (9) Caption font sizes:
Small
1 – 0.20" (5 mm)
2 – 0.23" (6 mm)
3 – 0.25" (6.5 mm)
Medium
4 – 0.30" (7 mm)
5 – 0.33" (9 mm)
6 – 0.48" (10.5 mm)
Large
7 – 0.51" (12 mm)
8 – 0.54" (13.5 mm)
9 – 0.90" (22 mm)
Adjustable colors for captions
font and background
Five (5) font style options
Connections
Telephone line: requires RJ11
connection (can be standard
analog line, VOIP, DSL with
lter, FIOS. Does not support
digital PBX system unless
analog port available).
3.5 mm Headset with
microphone
Bluetooth® connectivity
Ethernet or WiFi wireless
network
AC Power
Approvals
ACTA Product-Labeling
Number:
US:D8KTE00BCAP2400
FCC ID: D8K-CAPTEL2400
FCC approved: Part 15B
REN = 0.0B
Conversation Memory
360,000 characters (minimum
of 10 hours of conversation)
per call
Caller ID History
Info saved for last 100 calls
Answering Machine
100 recordable messages
Default or personalized
greeting
Selectable number of rings
before answer
Max message length: 90 seconds
CapTel 2400iBT Speci cations
CapTel Acceptable Use Policy
The CapTel phone is intended for use by people with hearing loss.
People who do not need captioning support should only use CapTel
with the CAPTIONS feature turned o .
NOTE: Your CapTel phone will periodically connect to the Captioning Service through the
Internet and/or phone line connection to report its status and check for software updates.
Page 3

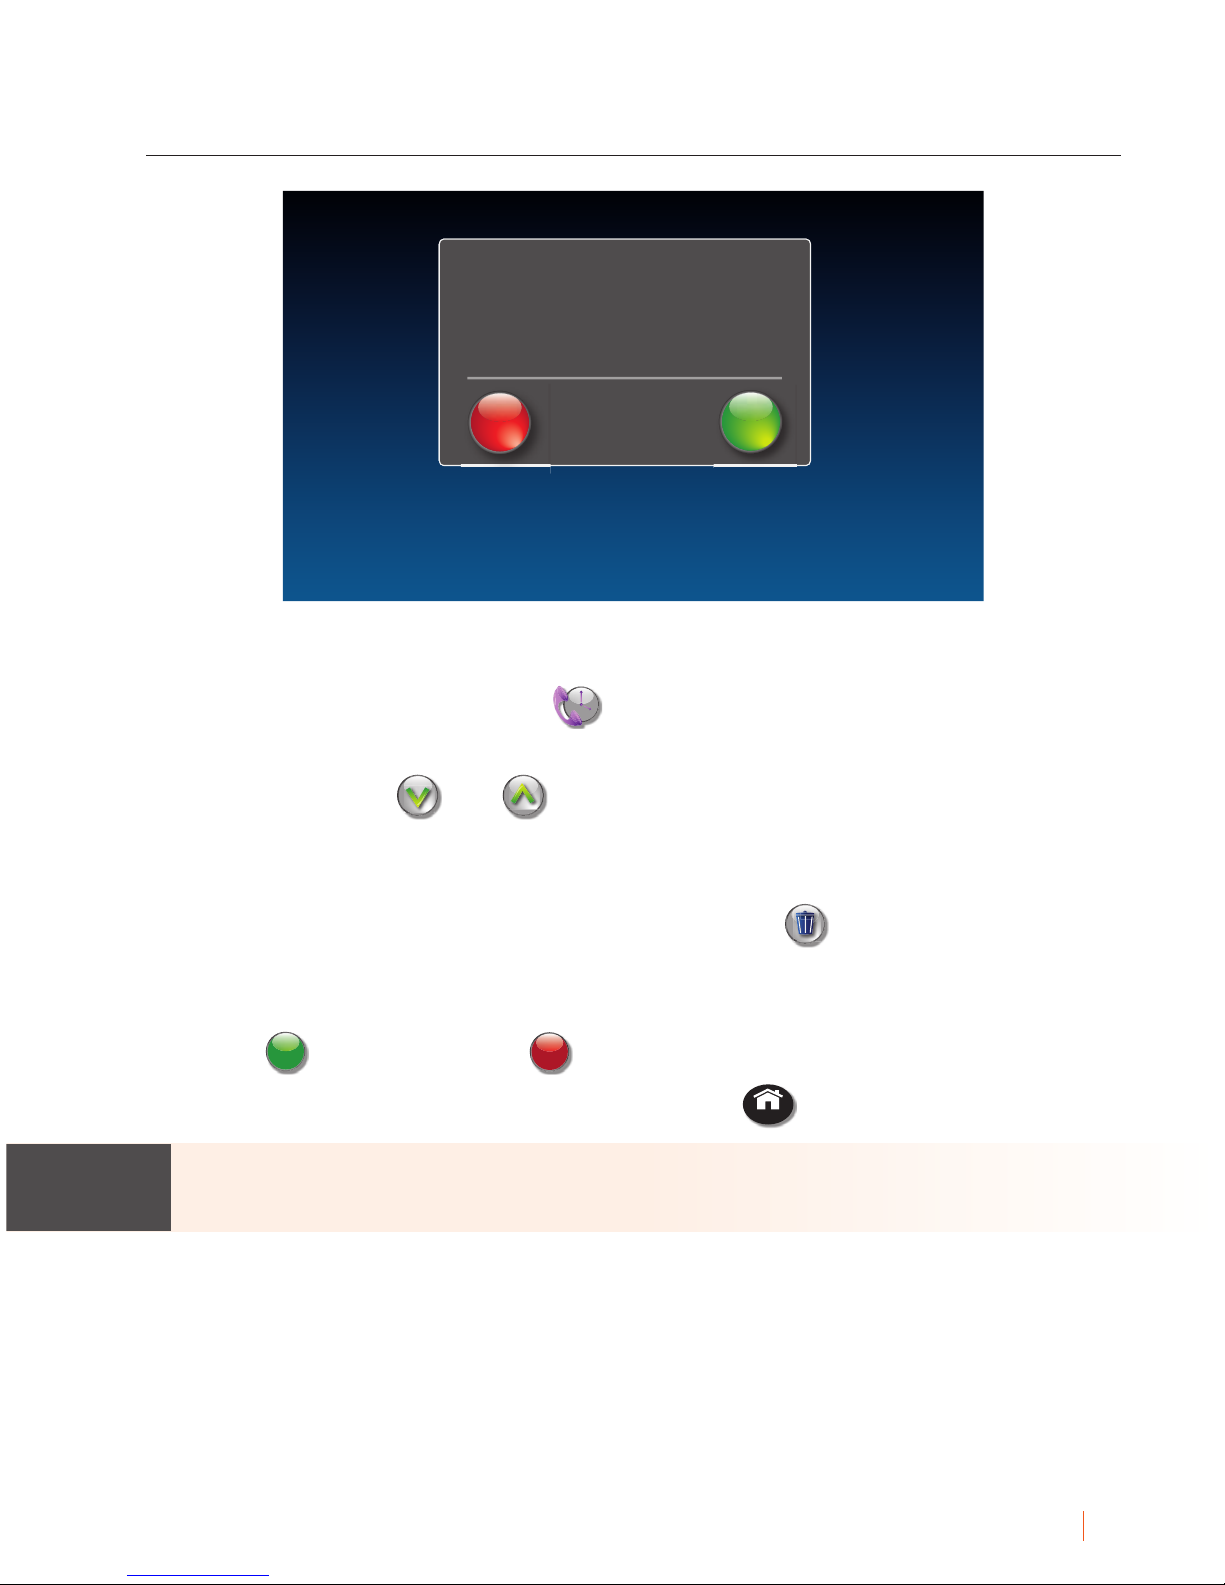
Customer Service: 888-269-7477 CONGRATULATIONS 1
Congratulations on
Choosing CapTel!
Welcome to the Captioned Telephone – CapTel! With CapTel, you can
see captions of everything people say over the phone, letting you
enjoy calls with con dence.
Your CapTel phone is designed to be easy to use. It works just like any
other phone. You can dial on the number keypad and listen on the
handset. Or, you can use the easy touch screen display to make and
answer calls. Whatever works best for you.
If you ever have any questions, please refer to this guide to learn:
• How to start using your CapTel 2400iBT
• How your CapTel 2400iBT works
• How to get help when you have questions
We want the CapTel phone to be enjoyable and convenient for you.
As you use your new phone, we welcome your questions and
comments. If we can help, please call.
Thank you for choosing the CapTel captioned telephone.
Sincerely,
CapTel Customer Service
1-888-269-7477
www.CapTel.com
Page 4

2 TABLE OF CONTENTS Customer Service: 888-269-7477
Overview – How CapTel Works ...........................................4
Section 1: Getting Started ...................................................5
What is in the box ..............................................................................................5
Overview of CapTel 2400iBT phone ........................................................... 6
Setting up your CapTel 2400iBT ................................................................11
Using a headset or neckloop (optional) ..................................................22
Connecting a Bluetooth headset/neckloop (optional) .....................23
Section 2: Making and Answering Calls ..................... 25
Dialing a phone number directly ..............................................................26
Answering an incoming call ........................................................................28
Answering a call on a Bluetooth headset/neckloop ..........................29
Ending a call on a Bluetooth headset/neckloop ..................................30
Turning captions on/o during a call ......................................................31
Adjusting the volume ....................................................................................31
Adjusting the Tone Control ..........................................................................32
Customizing the Tone setting .....................................................................33
Using the Speakerphone ..............................................................................34
Knowing what sounds are on the line .....................................................36
Section 3: Viewing Captions ............................................ 37
Turning captions on/o during a call ......................................................38
Viewing corrections ........................................................................................39
Reviewing captions during a call ...............................................................40
Reviewing captions after hanging up ......................................................41
Saving conversation captions .....................................................................42
Erasing captions ...............................................................................................43
Changing the color of the captions ..........................................................44
Changing the captions font size and style .............................................46
Setting how captions scroll across the Display Screen
..........................47
Adjusting the brightness of the Display Screen ...................................48
Getting help ......................................................................................................49
Section 4: Call History ......................................................... 50
Reviewing previous calls ..............................................................................51
Reviewing captions from a previous call ................................................52
Dialing from Call History ...............................................................................53
Erasing previous calls .....................................................................................54
TABLE OF CONTENTS
Page 5
Customer Service: 888-269-7477 TABLE OF CONTENTS 3
Section 5: Answering Machine ....................................... 55
About the Answering Machine ..................................................................56
Turning Answering Machine on/o .........................................................56
Playing your Answering Machine messages .........................................57
Erasing Answering Machine messages ...................................................58
Deleting all messages ....................................................................................59
Recording a personal greeting ...................................................................60
Seeing captions of voice mail messages ................................................61
Remote Message Retrieval ...........................................................................62
Captioning messages from an external answering machine
................65
Setting the ring count ...................................................................................66
Playing incoming messages aloud/silent ...............................................67
Section 6: Contacts ............................................................... 68
Adding a new contact ...................................................................................69
Dialing a phone number in your Contact List .......................................70
Editing an existing contact ..........................................................................71
Removing a contact .......................................................................................72
Adding a photo to a contact .......................................................................73
Adding a contact to Speed Dial .................................................................85
Section 7: Favorites .............................................................. 86
About Favorites ................................................................................................87
Adding a contact to Favorites .....................................................................88
Dialing Favorites ..............................................................................................89
Removing a contact from Favorites ..........................................................89
Section 8: Settings ................................................................ 90
Setting Display Brightness ....... 91
Screen timeout ............................. 91
Night mode ...................................91
Connections ..................................91
WiFi settings ..................................92
Bluetooth ........................................ 92
Saving captions after hang up
...92
Captions button ...........................93
Ring asher ....................................93
Saving conversation volume ... 93
Keypad lights ................................94
Language .......................................94
Setting the ringer volume ........ 94
Adjusting the ringer pitch ........94
Tone control ..................................95
Time & date ....................................95
About your CapTel phone ........95
Updating your software ............95
Advanced settings ......................96
Troubleshooting .................................................................... 98
Index ........................................................................................... 99
Page 6
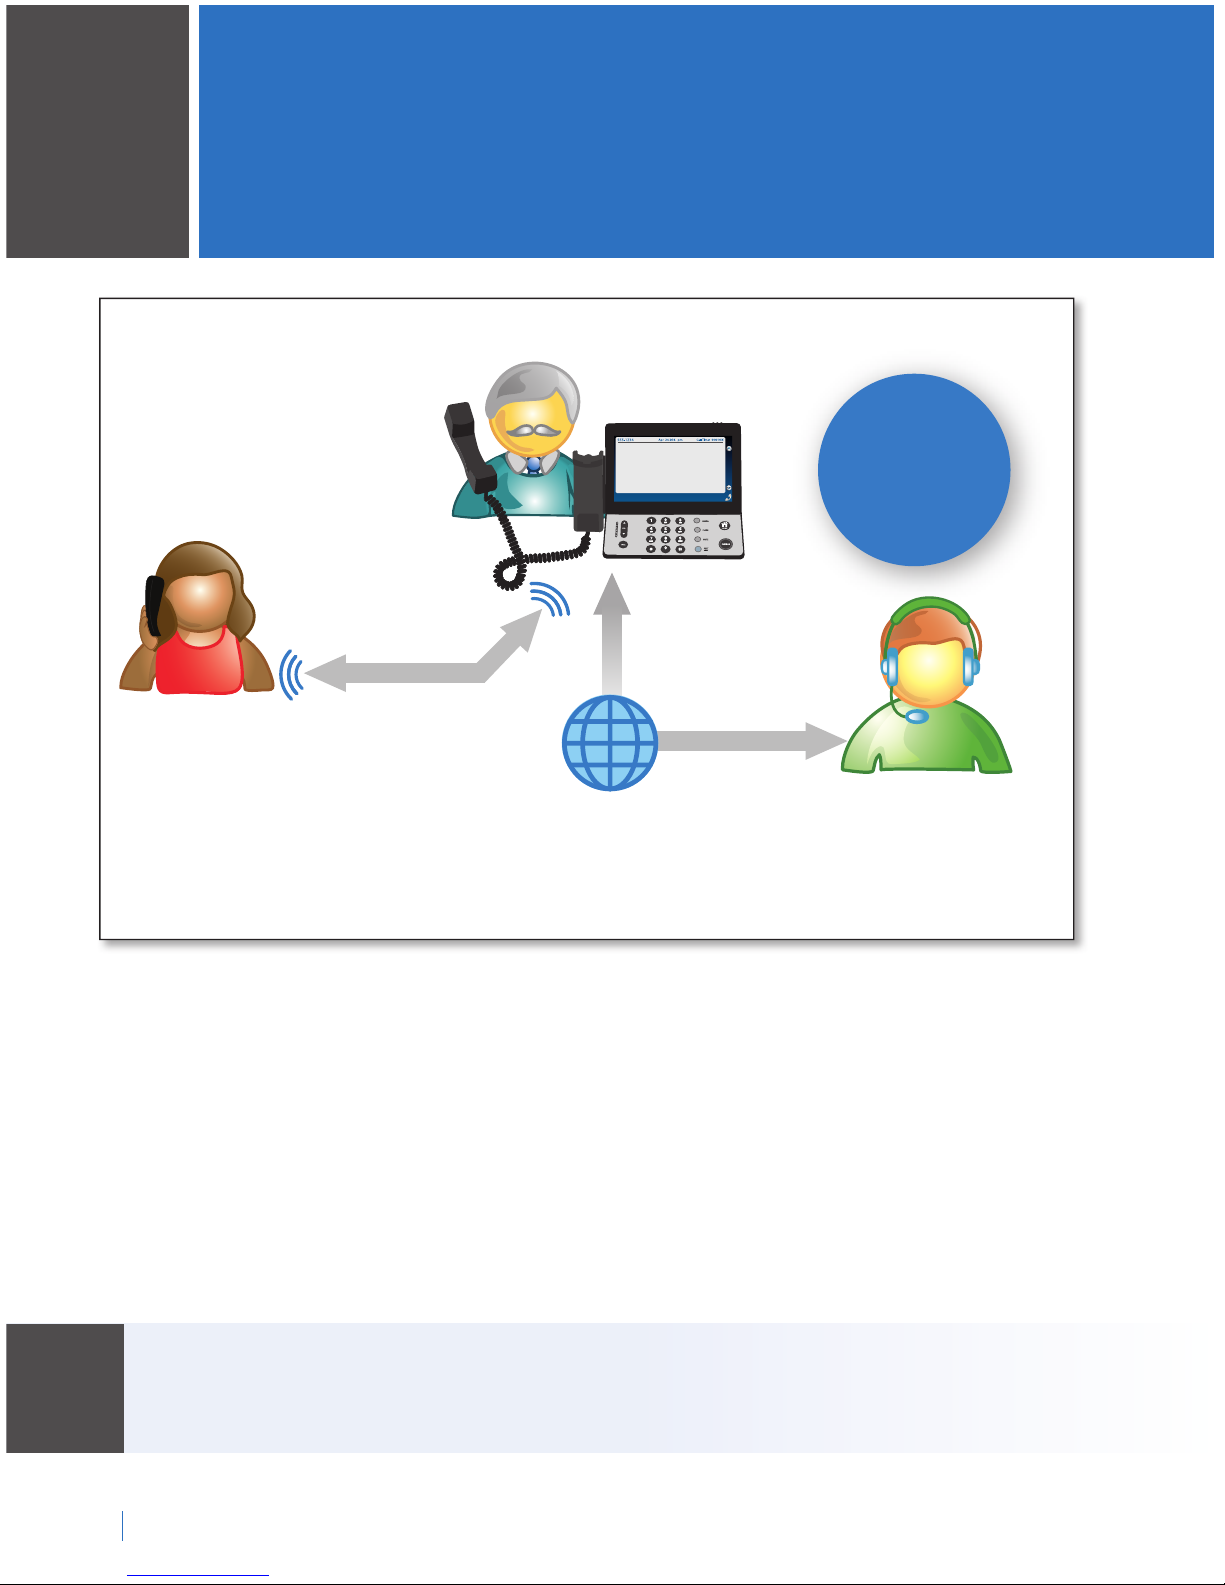
4 OVERVIEW Customer Service: 888-269-7477
Your new CapTel 2400iBT works like any other phone – just pick up the
handset and dial the person you want to call on the dialing keypad. Every
time you make a call, the phone also connects over the Internet to a free
Captioning Service. An operator (Captioning Assistant) at the Captioning
Service uses speech-recognition technology to create captions of
everything your caller says. The captions appear on your CapTel 2400iBT
display screen for you to read.
You can enjoy conversations over the phone, with the added help of
written captions.
The CapTel 2400iBT phone does not generate captions of the phone call on
its own. The phone works with the Captioning Service (over the Internet
connection) to display captions during your calls.
NOTE
Captioning Service
Captions
show you
everything
the caller
says!
You
Caller
(captions)
(voice)
Telephone
Connection
Internet
Connection
Captions are provided by a free Captioning Service that connects
(over the Internet) to your telephone call.
hid dad this is Julie
how are you feeling?
we are good we’re
still planning to bring
OVERVIEW
How CapTel Works
Page 7

Customer Service: 888-269-7477 GETTING STARTED 5
This section explains how to start using your new
CapTel 2400iBT phone.
What is in the Box?
Your CapTel 2400iBT includes the following parts:
• CapTel 2400iBT Phone
• Telephone Cord
• Power Adapter –
to plug into a
wall outlet
Important! Use only the power
adapter that came in the box with
your CapTel 2400iBT
• Ethernet Cable –
to connect to
Internet service
(not necessary for
WiFi installations)
• CapTel Setup
Guide and CapTel
User Manual
SECTION
1
Getting Started
TOPICS
What is in the Box
Overview of CapTel 2400iBT
Setting up Your CapTel 2400iBT
Using a Headset or Neckloop (Optional)
Connecting a Bluetooth Headset/Neckloop
(Optional)
Page 8

6 GETTING STARTED Customer Service: 888-269-7477
Overview of CapTel 2400iBT Phone
Please see the descriptions that correspond with the
matching numbers on the next few pages to help explain
what each feature is.
15
16
18
17
1
3
6
11
12
13
14
7
10
4
8 95
2
Page 9

Customer Service: 888-269-7477 GETTING STARTED 7
1
Touch Screen Display
Shows captions, Caller ID, Answering Machine messages,
Contacts, and more. You can touch an item on the Display
Screen to select it.
2
Time & Date
3
Ring Flasher
Bright lights blink to alert you to any incoming calls and new
answering machine messages.
4
Settings
Lets you control and adjust the features of your phone.
5
Contacts
Allows you to store and quickly dial people you call often.
Saves up to 100 contacts.
6
Favorites
Saves the phone number of people you call most often for quick
and easy dialing.
7
Bluetooth® Connectivity
You can listen to conversations using a Bluetooth headset or
neckloop (sold separately).
8
Call History
Shows your most recent incoming and outgoing calls, plus lets
you read captions from previous phone calls.
9
Answering Machine
Turns the Answering Machine on/o and lets you check
messages – with captions.
Allows you to store and quickly dial people you call often.
1
5
Monday
Page 10
8 GETTING STARTED Customer Service: 888-269-7477
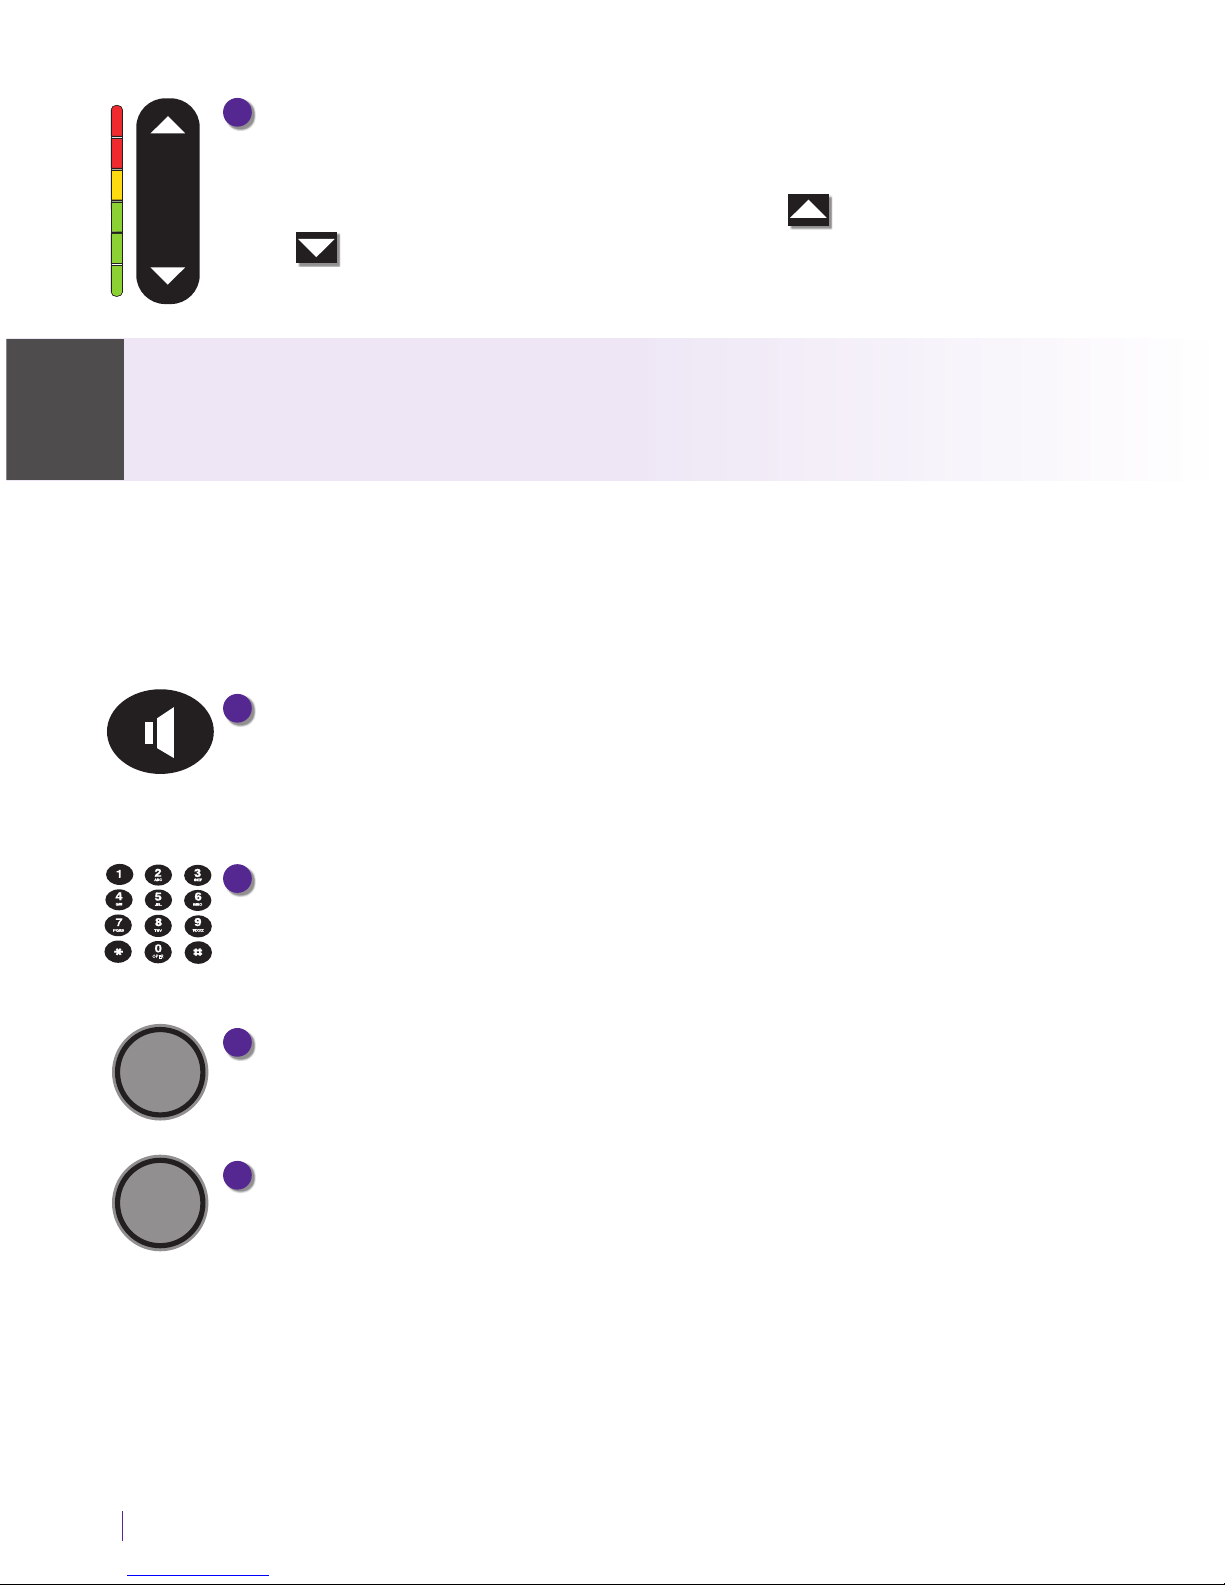
10
Volume Button
Lets you adjust the volume to a comfortable level, up to a 40dB gain
from min/max. To increase the volume, press on the VOL button.
Press on the VOL button to decrease the volume. The indicator
lights next to the volume bar indicate the volume setting.
The maximum volume setting on captioned calls is extremely loud.
People who do not need ampli cation should not use the phone at the
highest volume level.
The volume returns to a mid-range setting every time you hang
up the handset. To save your volume setting so that it will be
used during every captioned call, see “Saving Conversation
Volume” on page 93.
11
SPEAKER Button
Lets you talk/listen over the built in speaker, to enjoy hands-free
conversations.
12
Dialing Keypad
Use to dial telephone numbers – just like with any other phone.
13
REDIAL Button
Lets you dial the most recently called number.
14
FLASH Button
Some telephone services like Call Waiting require a “hook ash”.
The hook ash is a very brief interruption of the connection, like
hanging up the phone for one second. There is a brief click or
silence on the line.
VOL
OPER
WARNING
Page 11

Customer Service: 888-269-7477 GETTING STARTED 9
15
MUTE Button
Silences the sound from your end of the conversation. When the
MUTE button is pressed (blue light around the button is ON), the
person on the other end of your call will not be able to hear you.
You will still be able to hear the caller and get captions of
everything they say. To turn the Mute feature o , press the MUTE
button again (light around the button is OFF).
16
CUSTOMER SERVICE Button
Pressing the CUSTOMER SERVICE button will automatically dial
the CapTel help line. Our helpful Customer Service team is happy
to help you set up and use your CapTel 2400iBT phone – we’re
only a button push away.
Help is available 24 hours a day, 7 days a week (closed on major holidays).
Help materials are also available online at www.CapTel.com
17
HOME Button
Press the HOME button at any time to return to the main menu
screen. The HOME button is your easy way to go back to the
beginning and start again.
If you are ever “lost” in the menu system, press the HOME button to return
to the main screen.
18
CAPTIONS Button
When the CAPTIONS button is on (blue light around button is lit)
you will see word-for-word captions of everything the other party
says. Press the CAPTIONS button at any time during a call to turn
captions on or o .
CAPTIONS
HOME
NOTENOTE
Page 12
10 GETTING STARTED Customer Service: 888-269-7477
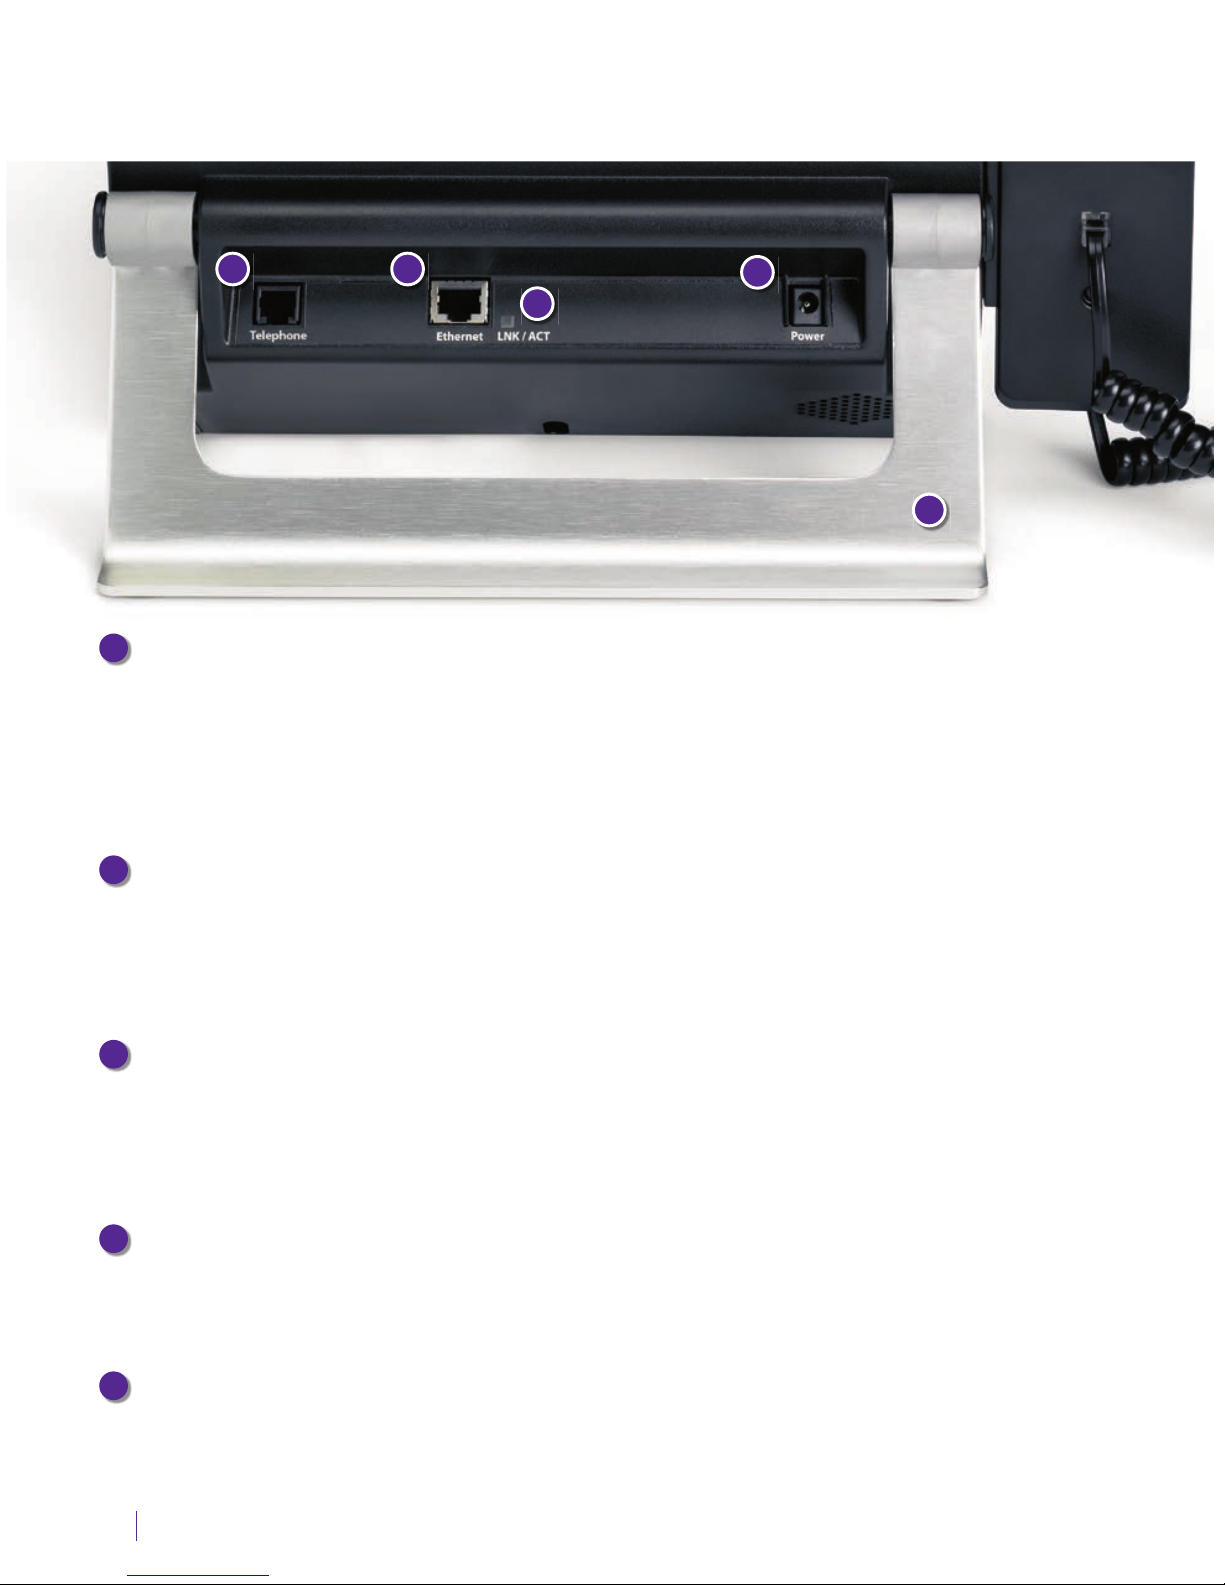
Back view of CapTel 2400iBT
1
Telephone Jack
Plug the telephone cord (provided) in here (RJ11 jack). Telephone cord can
be for most types of telephone service, including: analog, VOIP, ber optic,
digital cable service, or analog with DSL service. CapTel does NOT work
with PBX systems unless an analog port is available.
2
Ethernet Jack
Plug the Ethernet cable (provided) here to connect to your Internet service.
If you connect to the Internet using a WiFi network, you do not need to
plug in the Ethernet cable.
3
LNK/ACT – Status Light
Lets you know if your Ethernet cable is connected to the Internet and
whether activity is on the line. NOTE: the LNK/ACT indicator does not light
up when connected via WiFi.
4
Power Jack
Plug the AC power adapter here. Use only the AC power adapter that came
with your CapTel 2400iBT phone. Any other adapter may damage the phone.
5
Kickstand
Pull out and position the kickstand to nd the most convenient angle for
reading the CapTel display screen.
1
3
4
5
2
Page 13

Customer Service: 888-269-7477 GETTING STARTED 11
Setting up Your CapTel 2400iBT
For complete instructions, please see the Setup Guide.
Requirements
1. High-speed Internet access. Your CapTel 2400iBT can connect to your
Internet service either with an Ethernet cable or through a wireless (WiFi)
network. Depending on your Internet setup, a router may also be
required to allow you to connect more than one device to your
Internet service.
2. Telephone Service. Can be analog line, DSL with lter, VOIP, ber optic,
or Digital Cable phone service. CapTel does NOT work with digital Private
Branch Exchange (PBX) systems found in some offi ce environments,
residential facilities, and hotels – unless an analog port is available.
3. Standard electrical power (AC adapter plugs into standard wall outlet).
Step 1: Select a Location
Pull out the kickstand in the back, then set up the CapTel 2400iBT in a
place where:
• A high-speed Internet (Ethernet) jack or your wireless router is
located nearby.
• A telephone jack is located nearby (can be analog line, DSL with
lter, VOIP, ber optic, or Digital Cable phone service).
• There is an electrical outlet nearby.
• The surface it will be set on is stable and secure.
• The area is protected from excessive heat or humidity.
The outlets for power, the phone line, and the Ethernet connection should all
be located nearby, as each cord needs to plug into your CapTel 2400iBT. If
your Internet access is located in a di erent room than where you plan to
use the CapTel 2400iBT, a WiFi setup is recommended. Please see the Setup
Guide or contact CapTel Customer Service for help setting everything up.
NOTE
Page 14
12 GETTING STARTED Customer Service: 888-269-7477
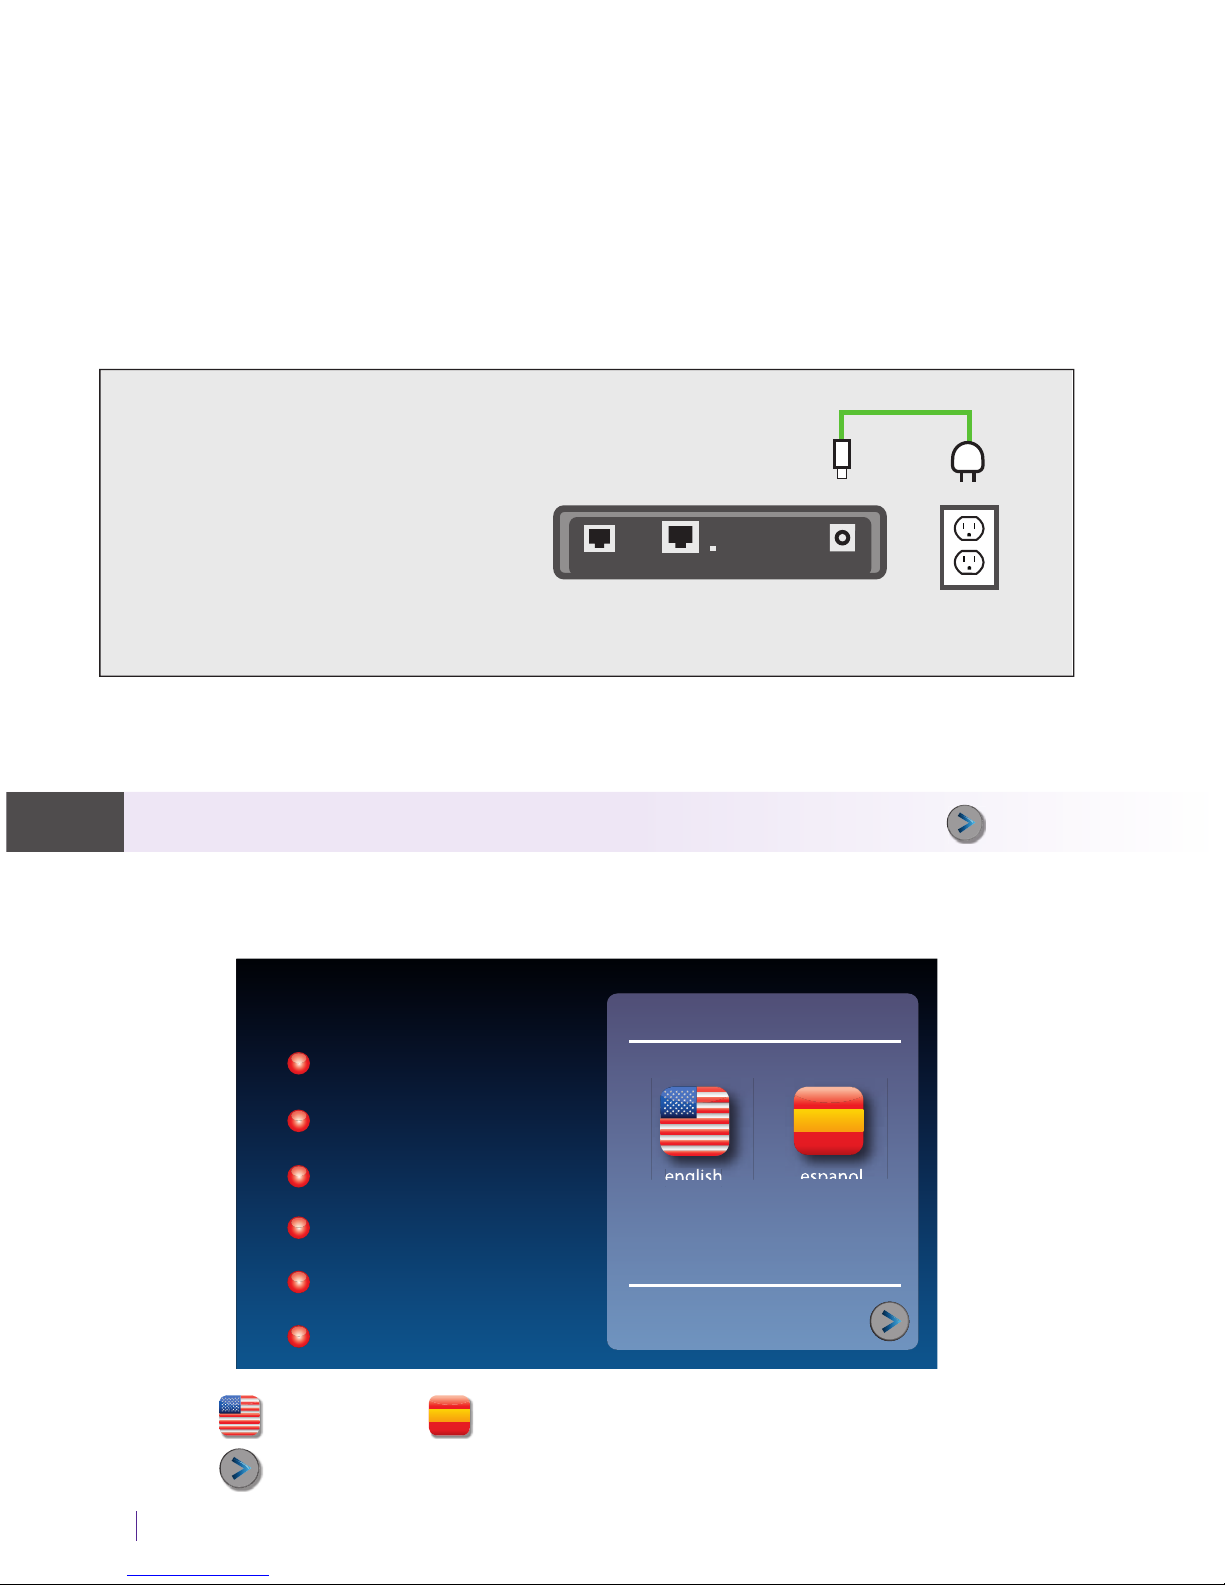
Step 2: Plug in the Power Adapter
1. Plug the power cord into the jack labeled “Power” on the back of the
CapTel 2400iBT phone.
2. Plug the power adapter into a wall outlet or power strip. The display
screen and Volume indicator lights will light up to let you know the
power is connected.
After a moment, the Initial Setup screen will appear. Follow the instructions
on the display screen.
To choose an option, touch the icon on the screen and then touch
(next).
Step 3: Select Language
1. Touch (English) or (Espanol) for the language you want.
2. Touch
(next) to continue.
Power
Outlet
Back of CapTel 2400iBT
Telephone
Ethernet
Power
LNK/ACT
Power Cord
WARNING:
Be sure to use only the
power adapter that
came with your CapTel
2400iBT. Using any other
power adapter may
damage your phone.
TIP
Initial Setup
select language
language
telephone line
network connection
time and date
software
terms and conditions
next
touch ag icon to select language
english espanol
Page 15
Customer Service: 888-269-7477 GETTING STARTED 13
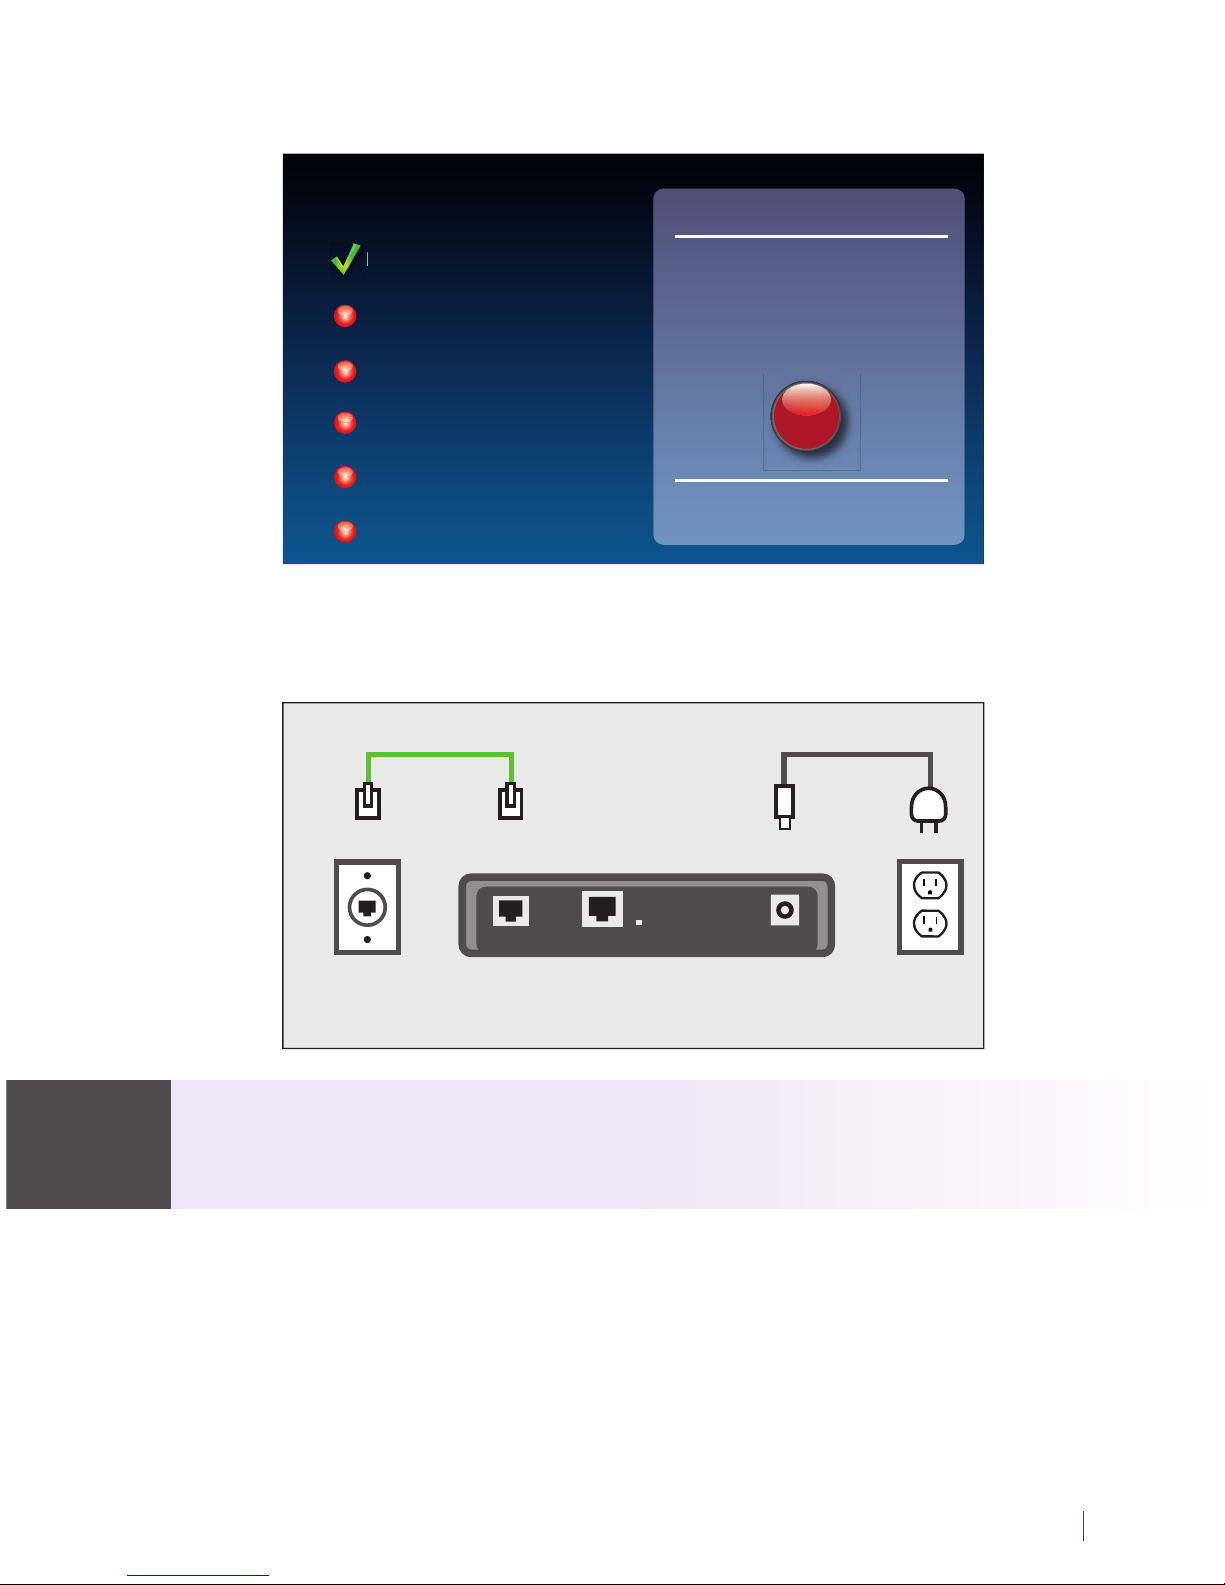
Step 4: Telephone Line
1. Plug your telephone line into the back of the CapTel phone.
2. Plug the other end of the line into your telephone wall jack.
Telephone service can be analog, VOIP, ber optic, digital cable phone
service, or analog with DSL lter. CapTel does not work with digital PBX
o ce phone systems unless an analog port is available.
Initial Setup
no phone line detected
connect phone line
or
press cancel to ignore
language
telephone line
network connection
time and date
software
terms and conditions
cancel
NOTE
Power
Outlet
Back of CapTel 2400iBTTelephone
Wall Outlet
Telephone
Ethernet
Power
LNK/ACT
Power CordTelephone Line
Page 16
14 GETTING STARTED Customer Service: 888-269-7477
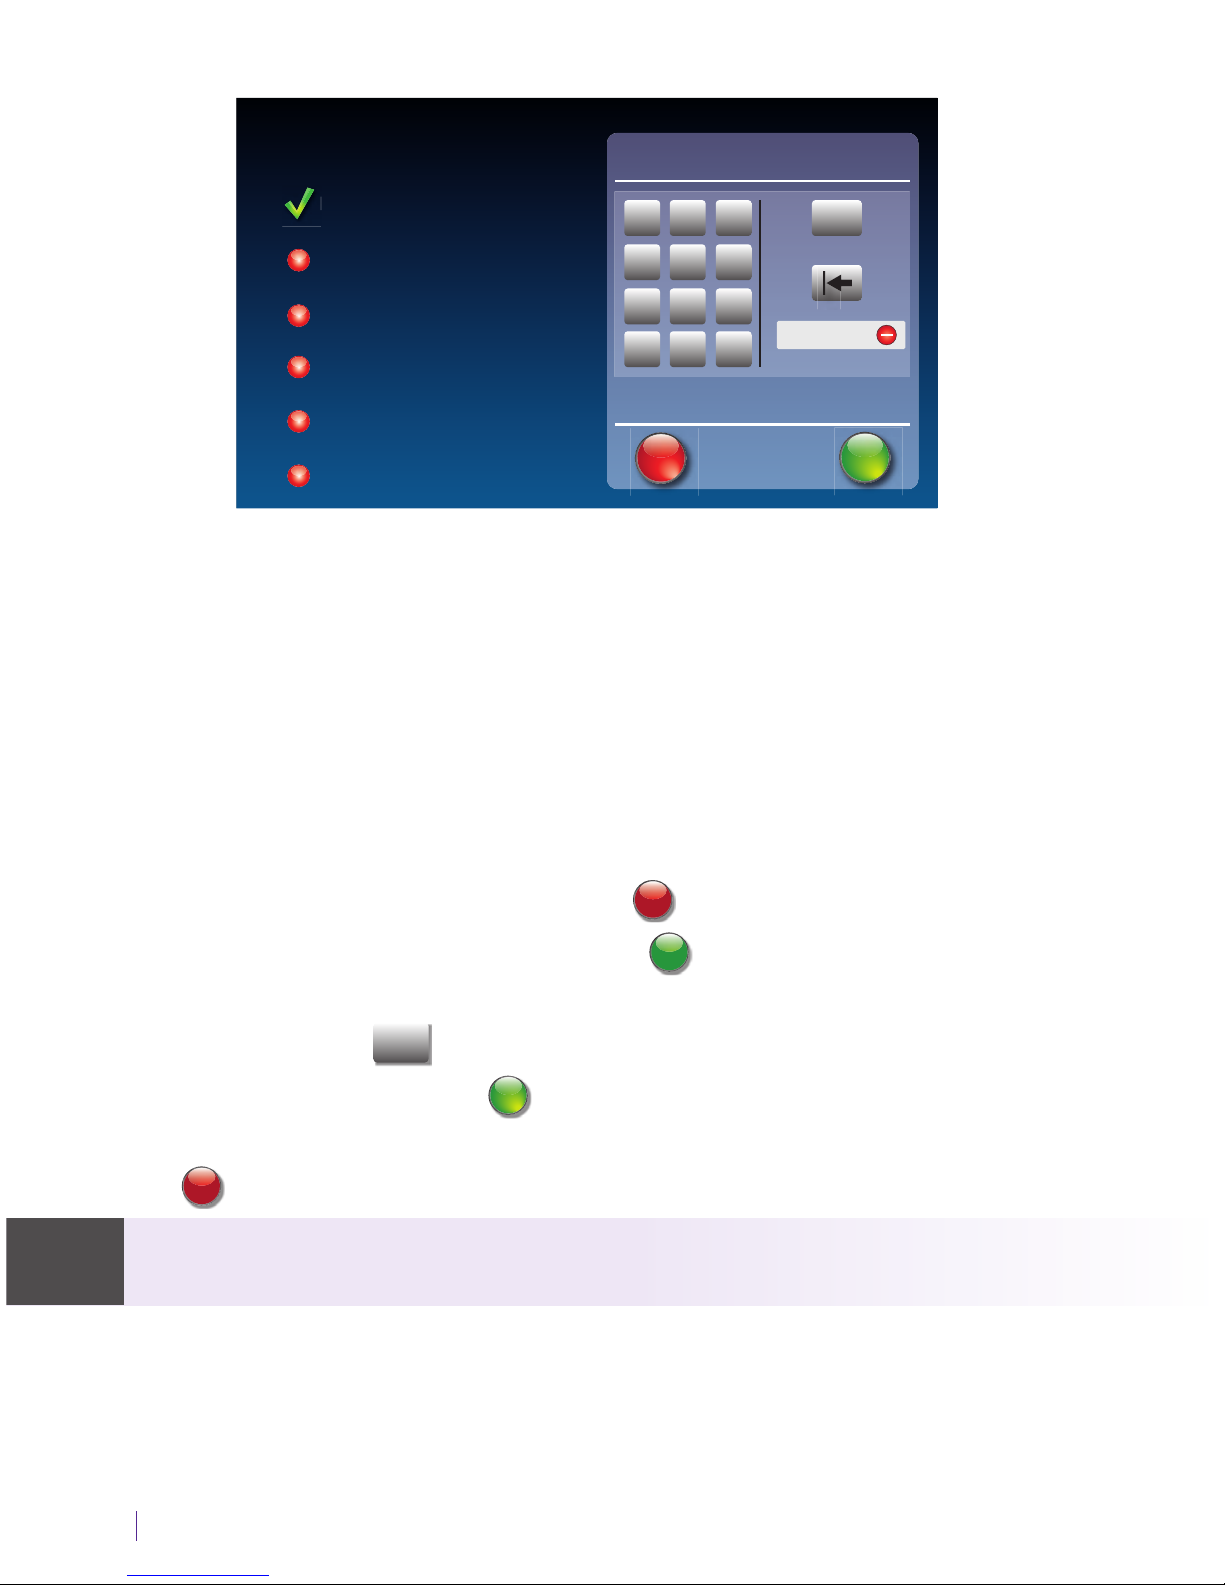
3. Use dialing pre x?
Some offi ce environments require you to dial a number in order to get an
outside line. For example, you may need to dial a 9 or another number
sequence to get an outside line. CapTel 2400iBT lets you add the dialing
pre x here, and will dial it for you automatically each time you place a call
from your Contact list, or when using the Speed Dial, Call History, or
Answering Machine history. If you dial the phone number directly, you will
need to enter the Dialing Pre x at the time you dial.
If you do not need a dialing pre x, touch
no
(no).
If you want to enter a dialing pre x, touch
yes
no
(yes).
Use the on-screen dial pad to enter the dialing pre x. To include a two
second pause, touch
Pause
(Pause).
When you are satis ed, touch
save
cancel
(save).
If you would like to exit without changing the dialing pre x,
touch
cancel
(cancel).
If you are unsure whether your o ce requires a dialing pre x to get an
outside line, you probably do NOT need to enter one.
Initial Setup
Enter Dialing Prex
Enter a dialing prex, touch save to save the dialing prex
or cancel to exit without changing the dialing prex
language
telephone line
network connection
time and date
software
terms and conditions
1
2 3
4
5 6
7
8 9
*
0 #
Pause
2 sec pause
save
cancel
NOTE
Page 17

Customer Service: 888-269-7477 GETTING STARTED 15
Step 5: Network Connection
For Wired Connections:
1. Plug the Ethernet cable that came with your phone into the jack on
the back labeled “Ethernet”.
2. Plug the other end of the Ethernet cable into the jack you use to
access your Internet service. Depending on how your Internet service
is set up, you could be plugging into an available Ethernet jack on
any of the following:
• On a digital cable modem
• On a DSL modem
• On a router in your home
• In an Ethernet wall outlet
Use the examples on the following page to match your setting with the
correct installation method.
Initial Setup
setup network
plug in ethernet cable
or press button below for wi
language
telephone line
network connection
time and date
software
terms and conditions
Use WiFi Network
Page 18
16 GETTING STARTED Customer Service: 888-269-7477
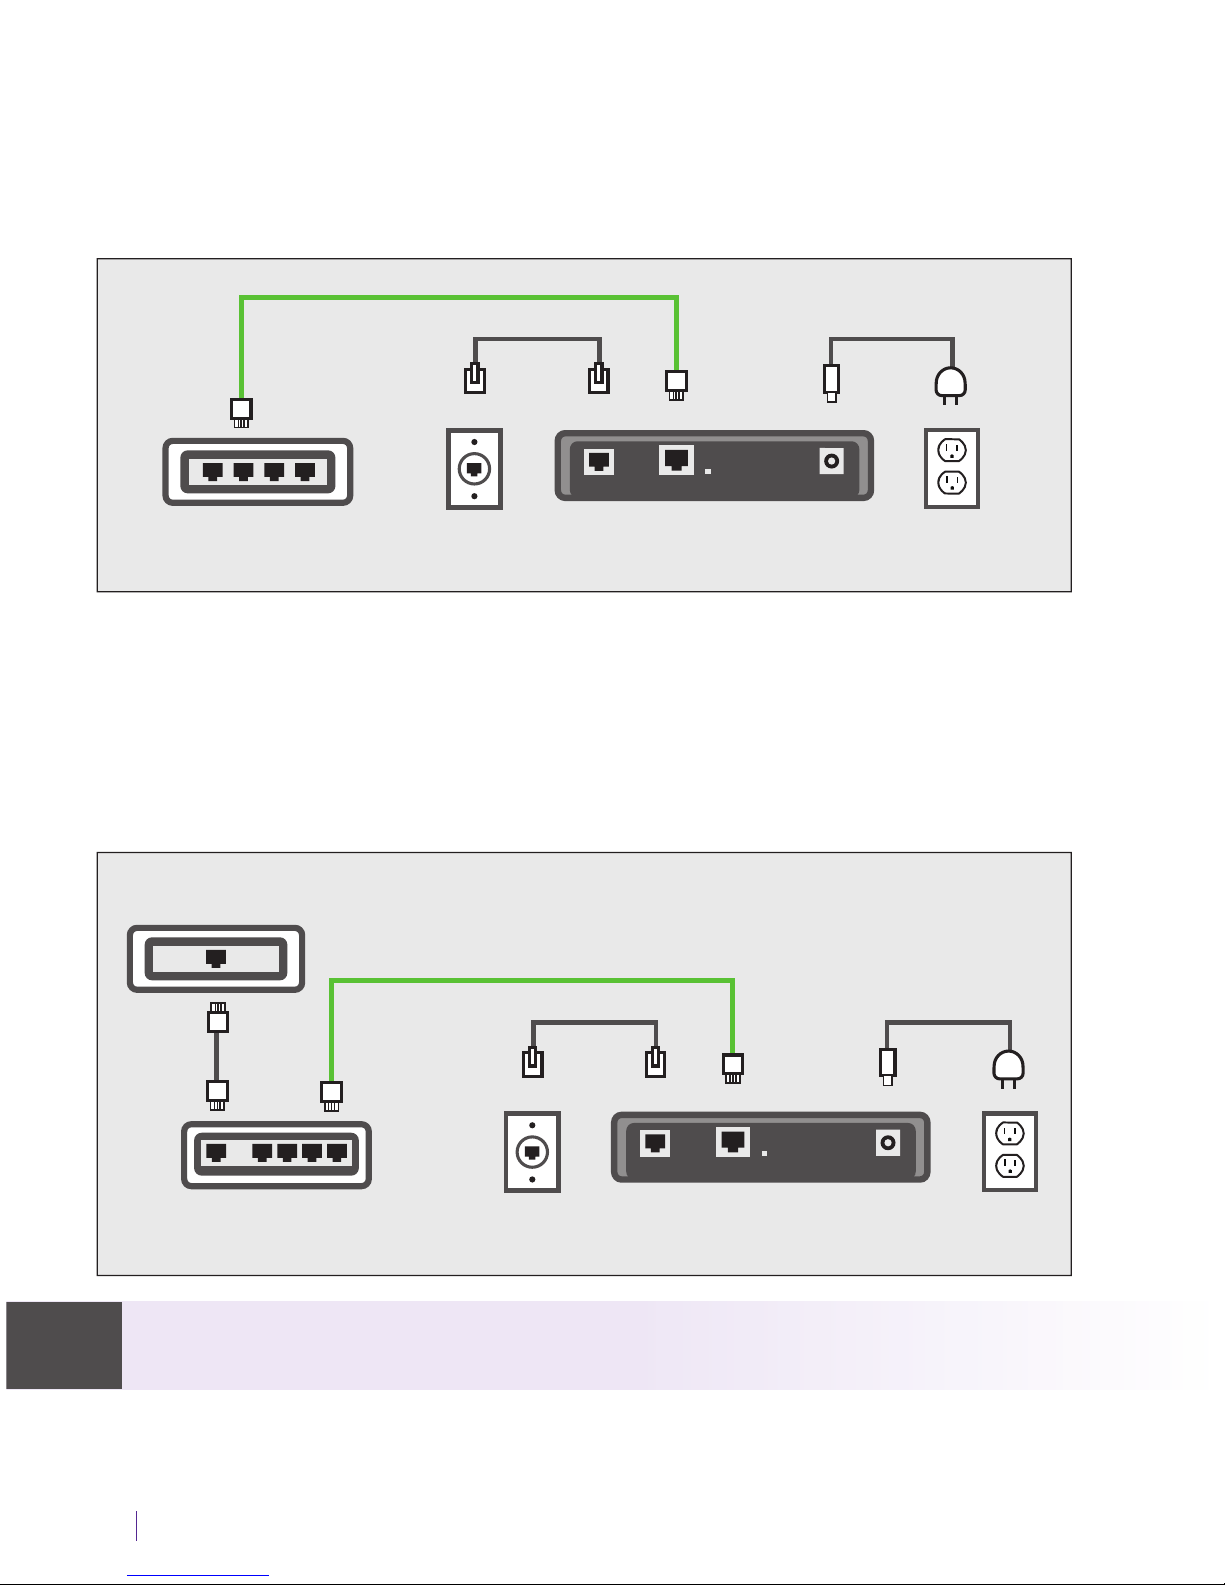
Example 2: If there is not an available Ethernet jack in your DSL or cable
modem, you will need a router or switch that lets you connect more than
one device to the Internet. Contact your Internet Service Provider to learn
what router or switch will work with your modem. The router should
support DHCP. Connect the router to your DSL/cable modem. Then connect
the CapTel 2400iBT to the router or switch using the Ethernet cable.
If your Internet outlet is in a di erent room from where you plan to use
CapTel, see the Setup Guide for instructions.
Power
Outlet
Telephone
Wall Outlet
Router
DSL or Digital
Cable Modem
Power Cord
Telephone Line
Ethernet Cable
Back of CapTel 2400iBT
Telephone
Ethernet
Power
LNK/ACT
Power
Outlet
Telephone
Wall Outlet
DSL or Digital
Cable Modem
Power Cord
Telephone Line
Ethernet Cable
Back of CapTel 2400iBT
Telephone
Ethernet
Power
LNK/ACT
All outlets located together (Wired Setup)
Example 1: All of the connection outlets (telephone, Internet, and power) are
available in the same room that you are planning to use the CapTel 2400iBT.
NOTE
Page 19

Customer Service: 888-269-7477 GETTING STARTED 17
For Wireless (WiFi) Connections:
If you have a wireless (“WiFi”) network in your home or offi ce, your CapTel
phone can connect to the Internet using the WiFi network. You do not
need to plug in an Ethernet cable.
To set up your CapTel for WiFi use, you will need to know the name of your
wireless network as well as any passwords that are needed to access the
network. The way you access your WiFi network with CapTel will be very
similar to how you access the network from a computer or mobile device.
If someone helped install the wireless network for you, it may be helpful to
consult with that person as you set up your CapTel phone.
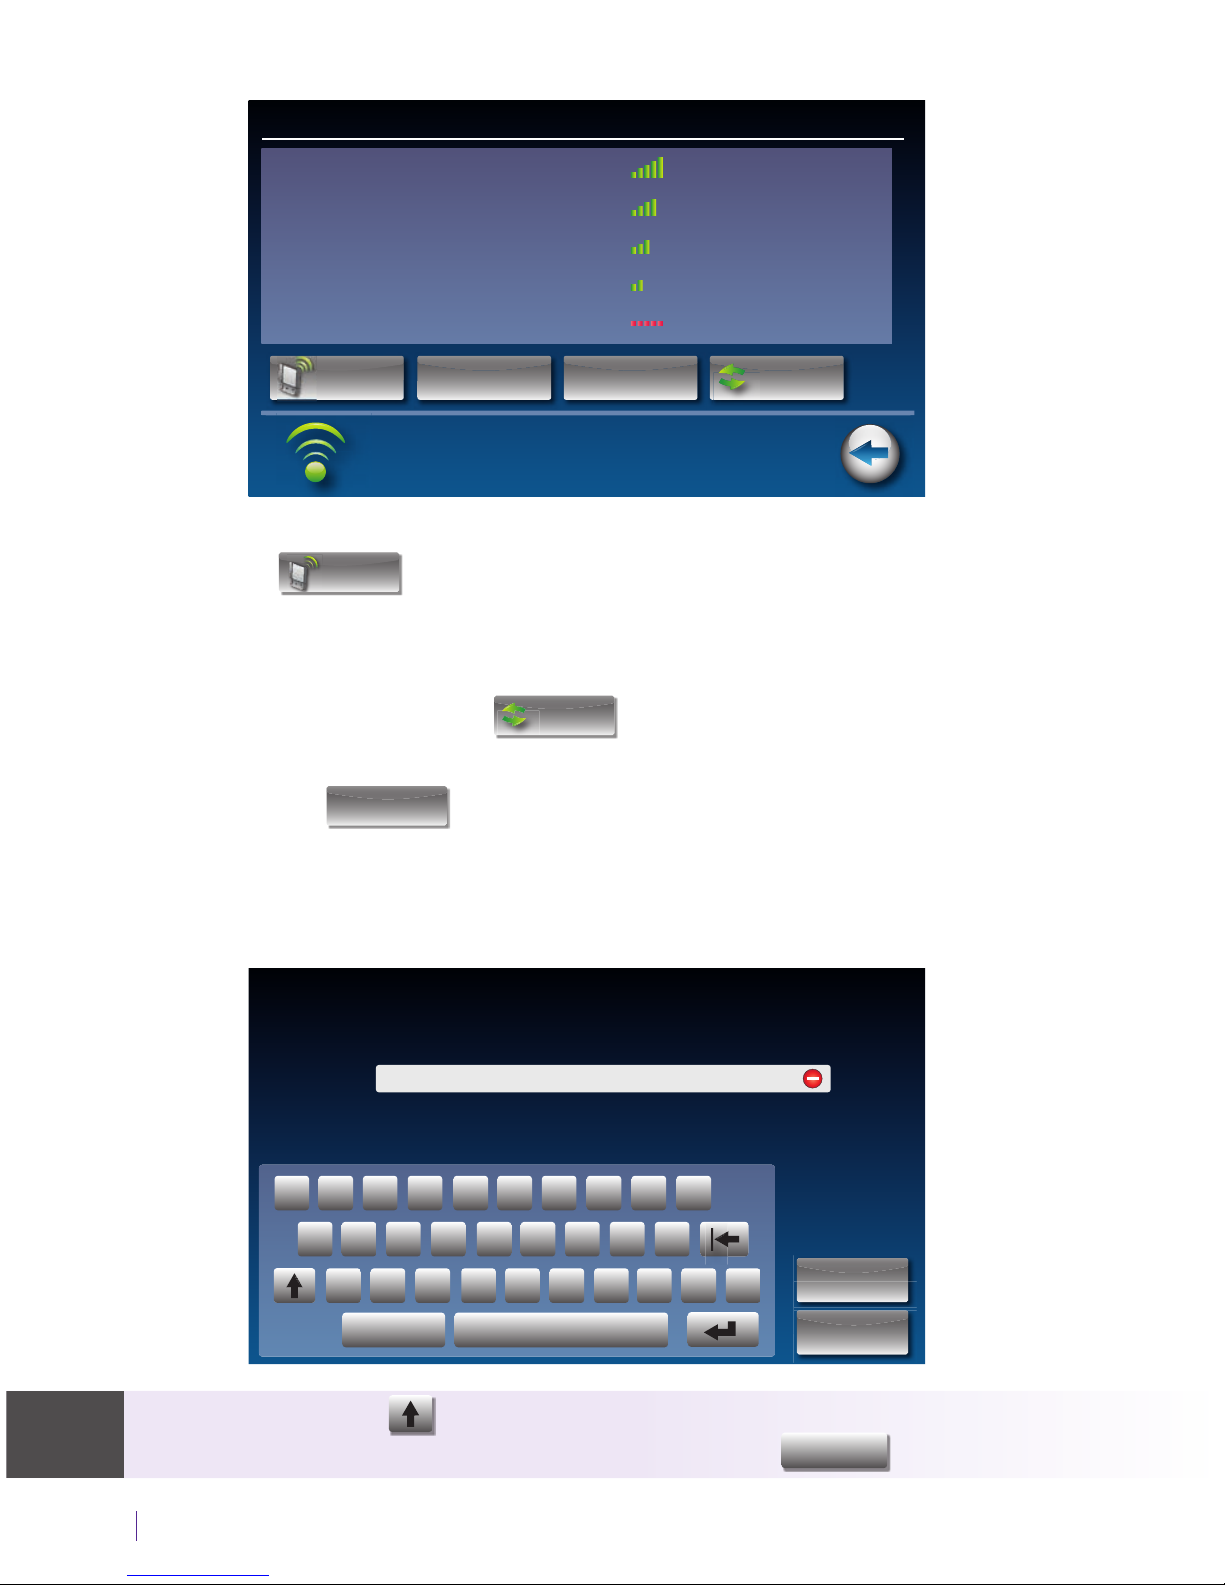
1. Touch
Use WiFi Network
(Use WiFi Network) on the display screen. CapTel scans
for wireless networks within range of your phone.
2. The display lists any WiFi networks detected, in order of strongest signal
strength to the weakest signal strength.
CapTel may detect wireless networks in your location that you do not
recognize – such as a wireless network from a neighbor or nearby o ce.
Be sure to select the name that matches your own network.
NOTENOTE
Initial Setup
setup network
plug in ethernet cable
or press button below for wi
language
telephone line
network connection
time and date
software
terms and conditions
Use WiFi Network
Page 20
18 GETTING STARTED Customer Service: 888-269-7477
3.
Touch the name of the network that you want to use.
Then touch
Connect
(Connect).
If you do not see the network you want to use:
• Try moving your CapTel phone to an area closer to your wireless
router. Then, touch
Refresh
(Refresh). CapTel will re-scan for
available networks.
• Touch
Enter Manually
(Enter Manually). CapTel will ask you to enter
information about your wireless network, then it will try to connect.
4. Enter WiFi Password: On the display, use the onscreen keyboard to
enter the password for your WiFi network.
Remember to use the (shift) key for capital letters when needed. Passwords
are case-sensitive. To enter special characters, touch
Numbers
(Numbers).
Joined Available Networks Signal Saved Security Chan
Network Settings
Back
2WIRE269
My Home Network
SSID for Network 3
Charlie’s Home Network
Corner Cafe Network
WPA
WPA-2
WPA
WPA
WPA
09
11
06
01
11
Connect Enter Manually View Saved Refresh
Enter WiFi Password
SSID Name: 2WIRE269
Password:
save
cancel
Q
W E
R
T Y
U
I
O
P
Numbers
Space
A
S D
F
G H
J
K
L
Z
X
C
V
B
N
M
,
.
@
TIP
Page 21
Customer Service: 888-269-7477 GETTING STARTED 19
When you are done, review your password carefully. If it does not exactly
match the password for your network, CapTel will not be able to connect.
Use the
key to correct any errors.
When you are satis ed the password is correct, touch
save
(save).
Step 6: Time and Date
Touch the Time Zone on the display screen that you live in. Touch (next)
to continue.
Your CapTel phone will ll in the date and time based on the time zone
you indicated. If you need to adjust the time and date, touch the eld on
the display screen that you want to change. Use
(arrows) on the
display screen to scroll to the correct number. Then touch the next eld
that you want to change.
When the date and time are set, touch
(next) to continue.
Initial Setup
set time and date
language
telephone line
network connection
time and date
software
terms and conditions
next
10 44
am
touch white box to adjust time and date
hours minutes am/pm
May
2
month day year
2016
Initial Setup
select time zone
language
telephone line
network connection
time and date
software
terms and conditions
next
Use DST?
Page 22

20 GETTING STARTED Customer Service: 888-269-7477
Step 7: Software
Your new phone checks to make sure that you have the most current
software available. If needed, CapTel will automatically download the
most recent software version. Please be patient, the download may take a
few moments. Watch the progress on the CapTel display screen to know
the status.
Do not interrupt the power supply during a software download.
It may damage your CapTel phone.
Once the software download is complete, your CapTel phone will re-boot
as part of the update process. It will automatically run through the setup
steps again, using the settings that you’ve already chosen.
Once the update process is completed, you will be able to continue with setup.
NOTE
Initial Setup
updating software
downloading new software
100%
language
telephone line
network connection
time and date
software
terms and conditions
conf iguring internal memory
15 %
installing new software
** do not remove power **
0 %
Page 23

Customer Service: 888-269-7477 GETTING STARTED 21
Step 8: Registration Terms and Conditions
The very rst time you set up CapTel, you may be asked to review the
Registration Terms and Conditions on the CapTel display. Follow the
directions on the screen.
If your CapTel 2400iBT is already registered, your phone will not show the
following registration screen.
Per requirements from the Federal Communications Commission (FCC),
the Captions feature on your phone will not be activated until you accept
the Registration Terms & Conditions. If you need assistance, press the blue
CUSTOMER SERVICE button for help. Details about the FCC requirements
can be found at www.CapTel.com.
Congratulations you are ready to go!!
Contacts
Favorites
Call HistoryHeadset Ans Machine
Settings
11:35 am
Monday June 24
o
NOTE NOTE
Welcome to CapTel Registration
There are three easy ways to register your phone.
1. Touch the “Register Now” button below.
2. Register online at www.captel.com/register
3. Contact Customer Service – press the blue button
Per FCC requirements, the Captions feature on your CapTel phone cannot be
activated until the phone is registered.
Register Now Register Later
Page 24
22 GETTING STARTED Customer Service: 888-269-7477
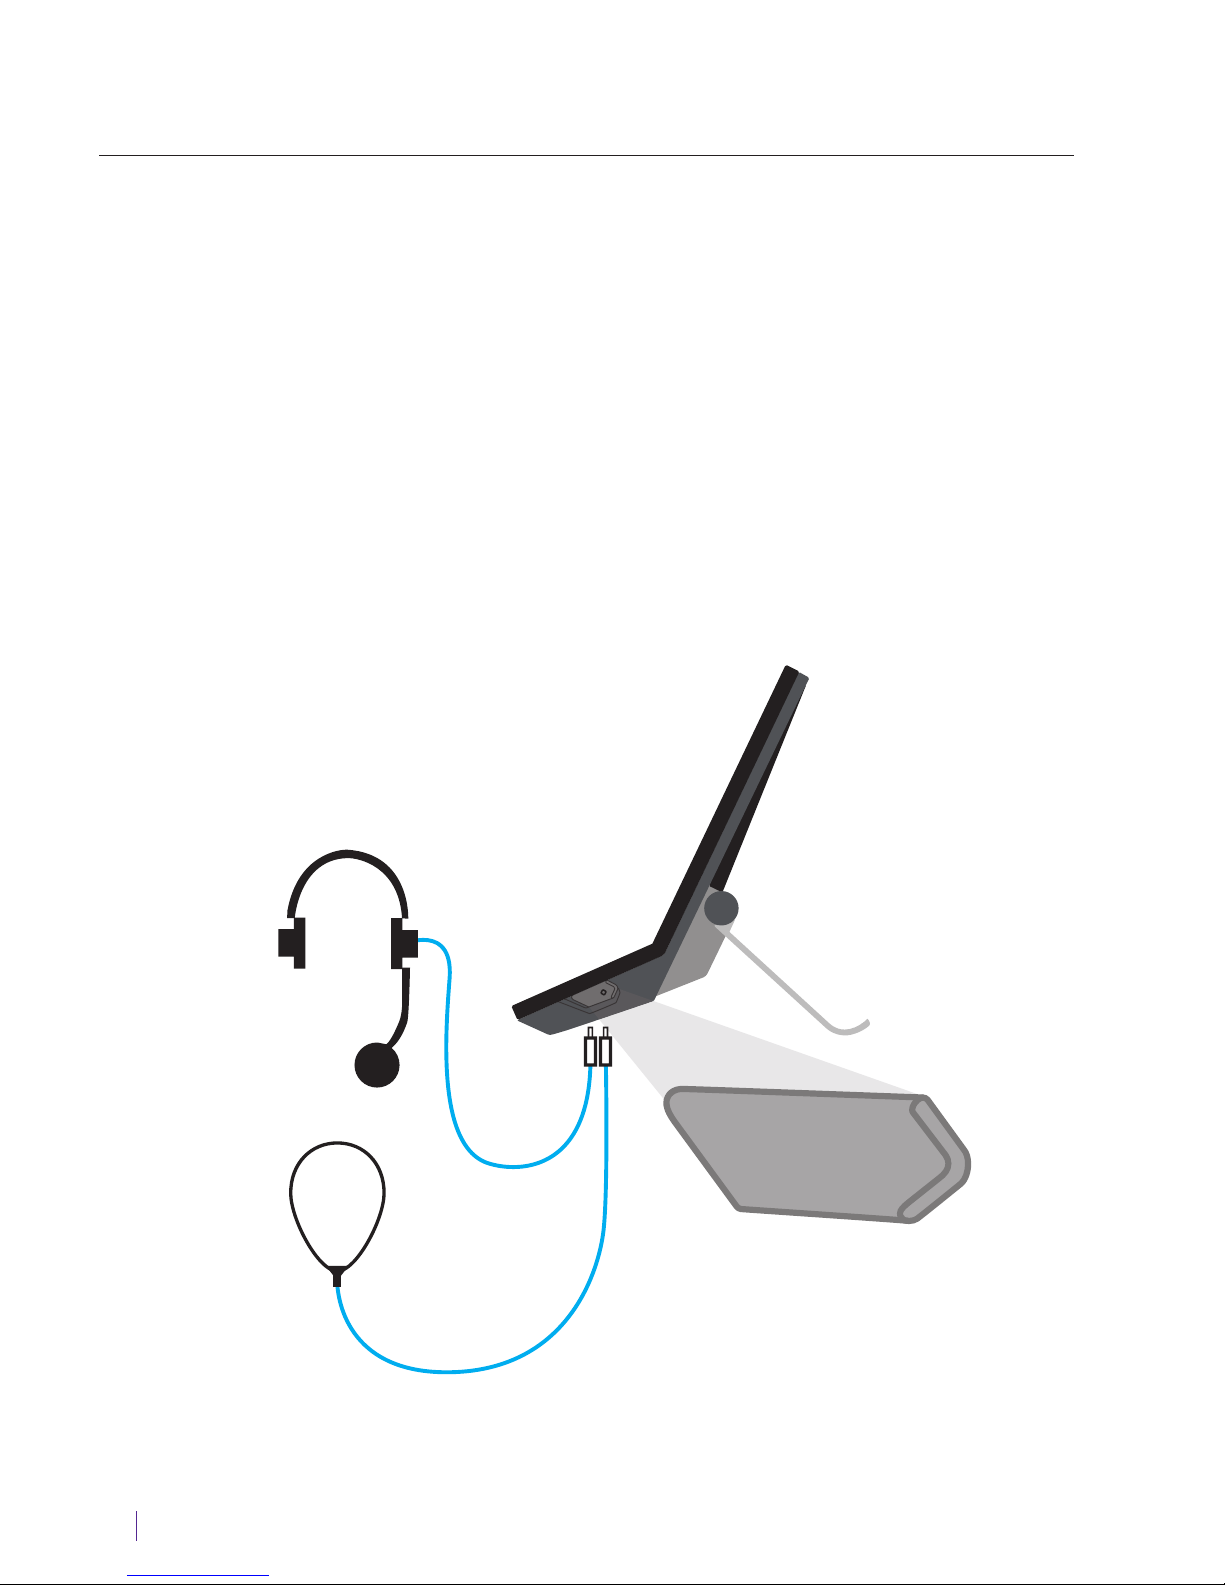
Using a Headset or Neckloop (Optional)
You can use earphones, a headset, a neckloop or another type of listening
device with the CapTel 2400iBT to maximize the audio quality. CapTel
works with Bluetooth devices, giving you cordless connectivity to
Bluetooth headsets and neckloops. Or, you can simply plug a headset/
assistive device into the audio jack located on the right side of the CapTel
phone. Headsets/devices sold separately.
Connecting Headset/Neckloop with Audio Jack (3.5 mm)
Simply plug the headset/assistive device into the 3.5 mm audio jack
located on the right side of the CapTel 2400iBT (open the protective cover
to reach the jack).
AUDIO
Neckloop
Headset
or
Page 25

Customer Service: 888-269-7477 GETTING STARTED 23
Connecting a Bluetooth® Headset/Neckloop
(Optional)
The instructions may vary depending on what type of Bluetooth device you
have. It’s important to be familiar with how your Bluetooth device works
before you get started.
Things to know about your Bluetooth device before you start:
• How to turn your Bluetooth device on and o
• How to set your Bluetooth device in “pairing” mode
(make it able to be discovered)
• What “name” is assigned to your Bluetooth device
To connect a Bluetooth device:
1. Make sure your Bluetooth device is turned on and set in “pairing” mode.
2. On the CapTel display screen, touch
(Settings).
3. Touch
(Connections).
4. Touch
(Bluetooth) to go to Bluetooth settings.
5. Touch
on
(on) to turn Bluetooth on.
The display shows a Status list of any devices that are already paired with
your CapTel phone.
NOTE
Status Paired Devices
Bluetooth Settings
Back
Bluetooth Device #1 for Hearing Aid
Acme Headset Model 205
Hatis Wireless Neckloop
Pair Connect Paired Devices Scan
o
on
Bluetooth
touch o to disable
bluetooth connections
Page 26
24 GETTING STARTED Customer Service: 888-269-7477
6. Touch
Scan
(Scan).
Your CapTel phone will scan for any available Bluetooth devices within
range. A list of available Bluetooth devices will appear in the Status screen
on the CapTel display.
If you do not see the name of your device listed, make sure that your
Bluetooth device is turned on and set to “pairing” mode. Then touch
Scan
(Scan) again.
7. On the CapTel display screen, touch the name of your Bluetooth device
in the list so that the device name is highlighted.
8. Touch
Pair
(Pair). Your Bluetooth device is now connected and can
be used when making/answering calls.
9. Press
HOME
(HOME button) to leave the Bluetooth menu.
While you may have multiple Bluetooth devices paired to your CapTel
2400iBT, only one Bluetooth device can be used at a time. The name of
the “active” Bluetooth device is listed in the top left corner of the CapTel
display screen.
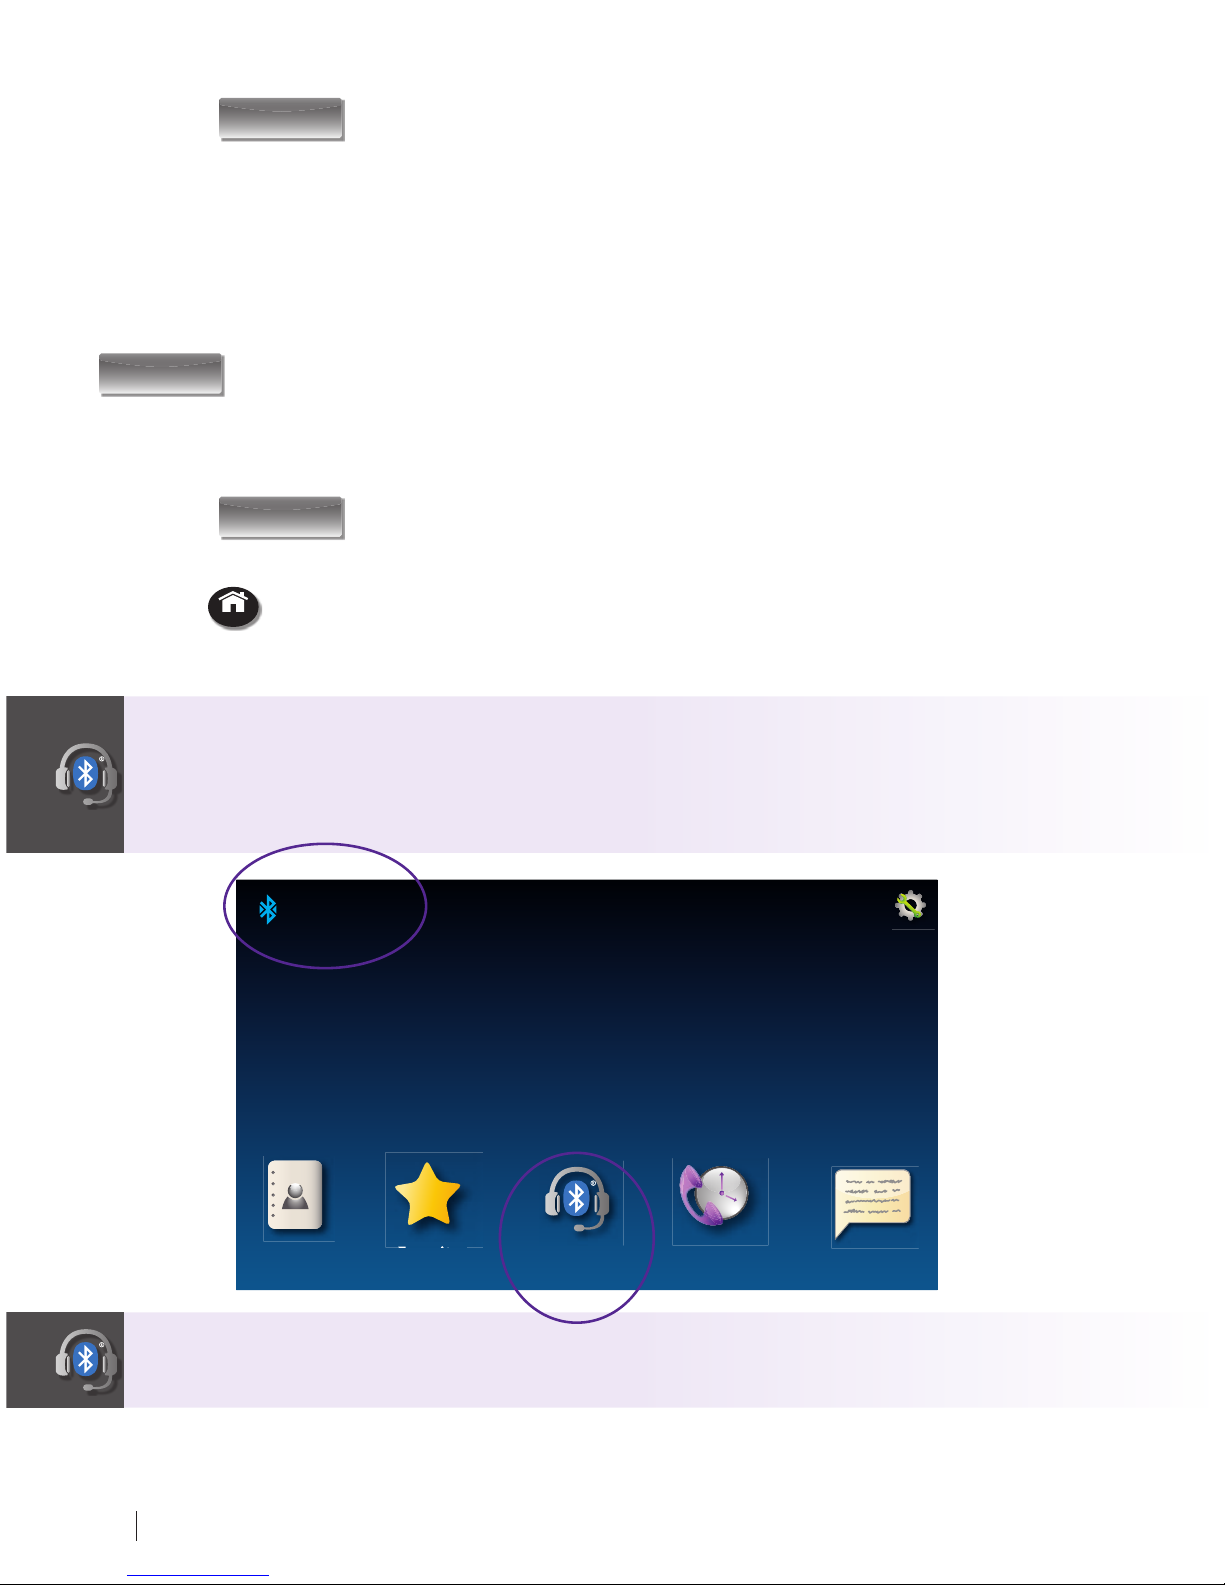
Contacts
Connected
ACME Headset Model 205
Favorites
Call HistoryHeadset Ans Machine
Settings
11:35 am
Monday June 24
Bluetooth icon turns blue when Bluetooth option is ON.
Page 27

Customer Service: 888-269-7477 MAKING AND ANSWERING CALLS 25
This section explains how to place outgoing
calls and how to answer incoming calls.
SECTION
2
Making and Answering Calls
TOPICS
Dialing a Phone Number Directly
Answering an Incoming Call
Turning Captions On/Off during a Call
Adjusting the Volume
Adjusting the Tone Control
Customizing the Tone Setting
Using the Speakerphone
Knowing What Sounds are on the Line
Page 28
26 MAKING AND ANSWERING CALLS Customer Service: 888-269-7477
Dialing a Phone Number Directly
Like with any other phone, you can dial the phone number of the person
you want to call.
1. Before you dial, check that the blue light around the
CAPTIONS
(CAPTIONS
button) is on. If not, press the CAPTIONS button to turn captions on.
2. Lift the handset. Or, to make a call using the speakerphone,
press
(SPEAKER button).
If you are using a Bluetooth headset, touch
(Headset) to turn on
your Bluetooth device.
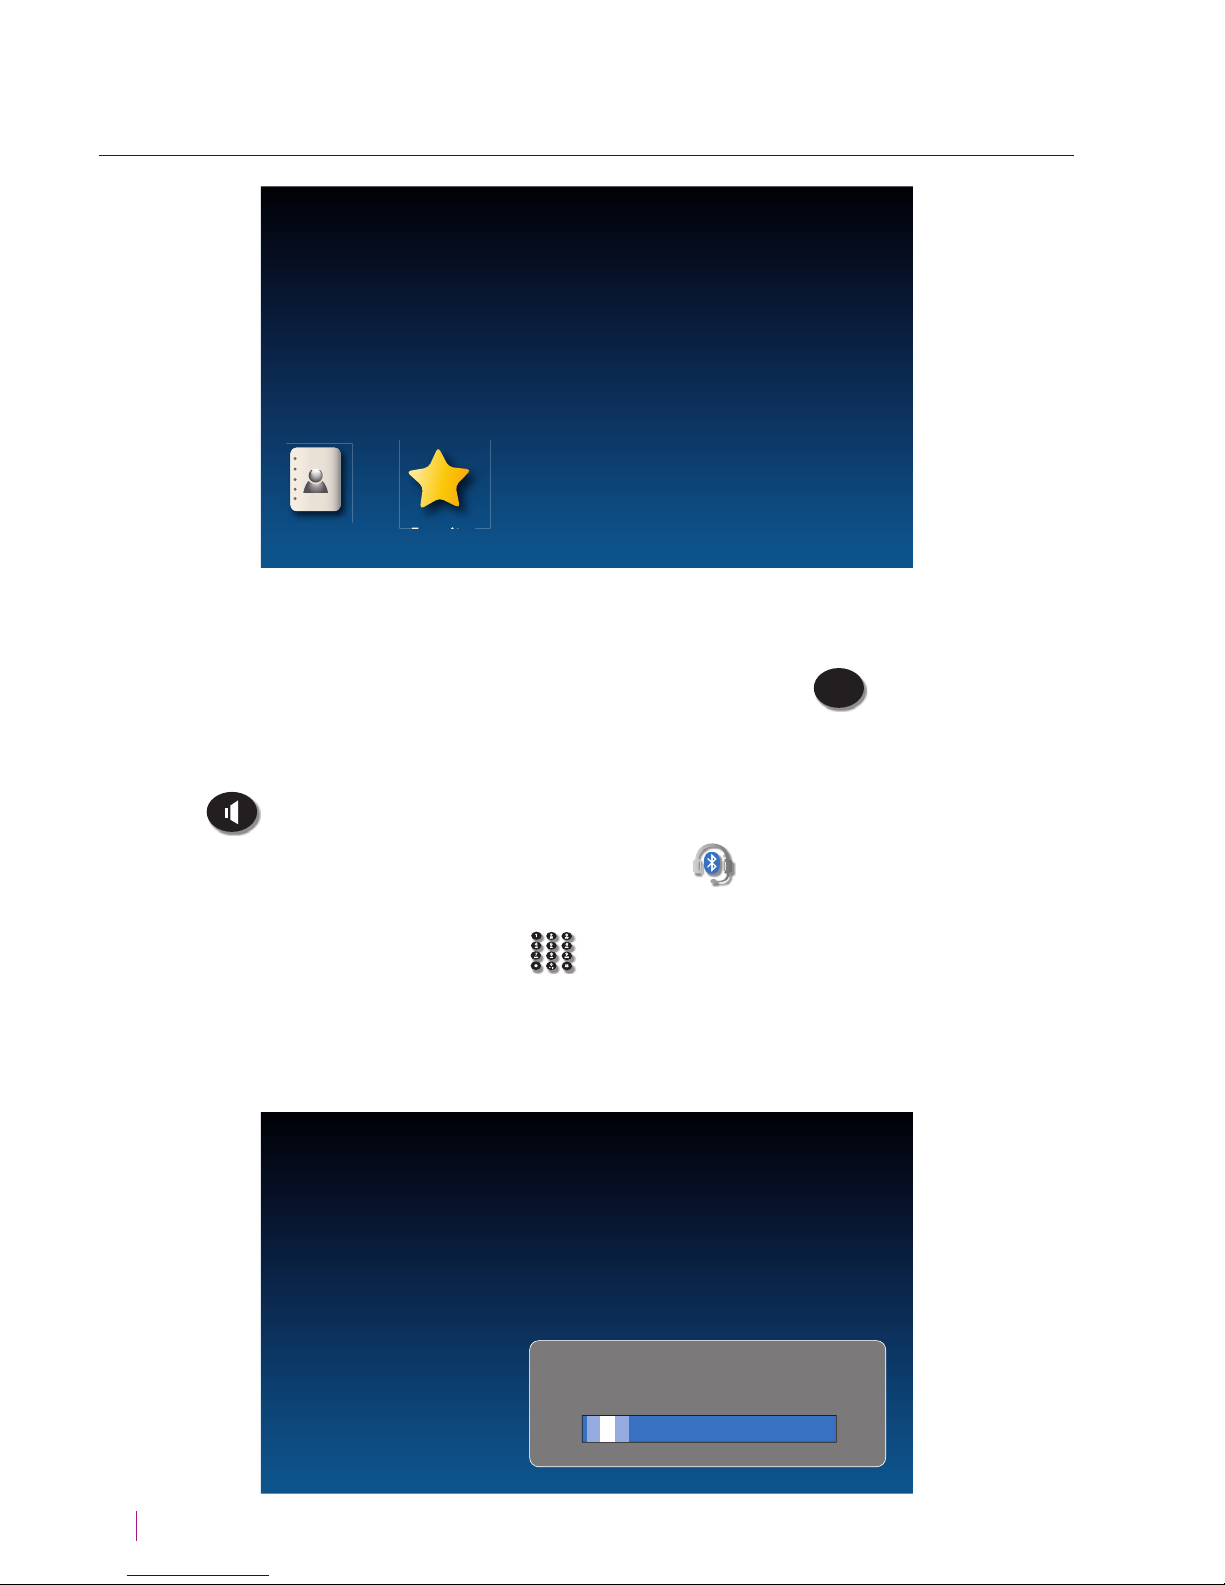
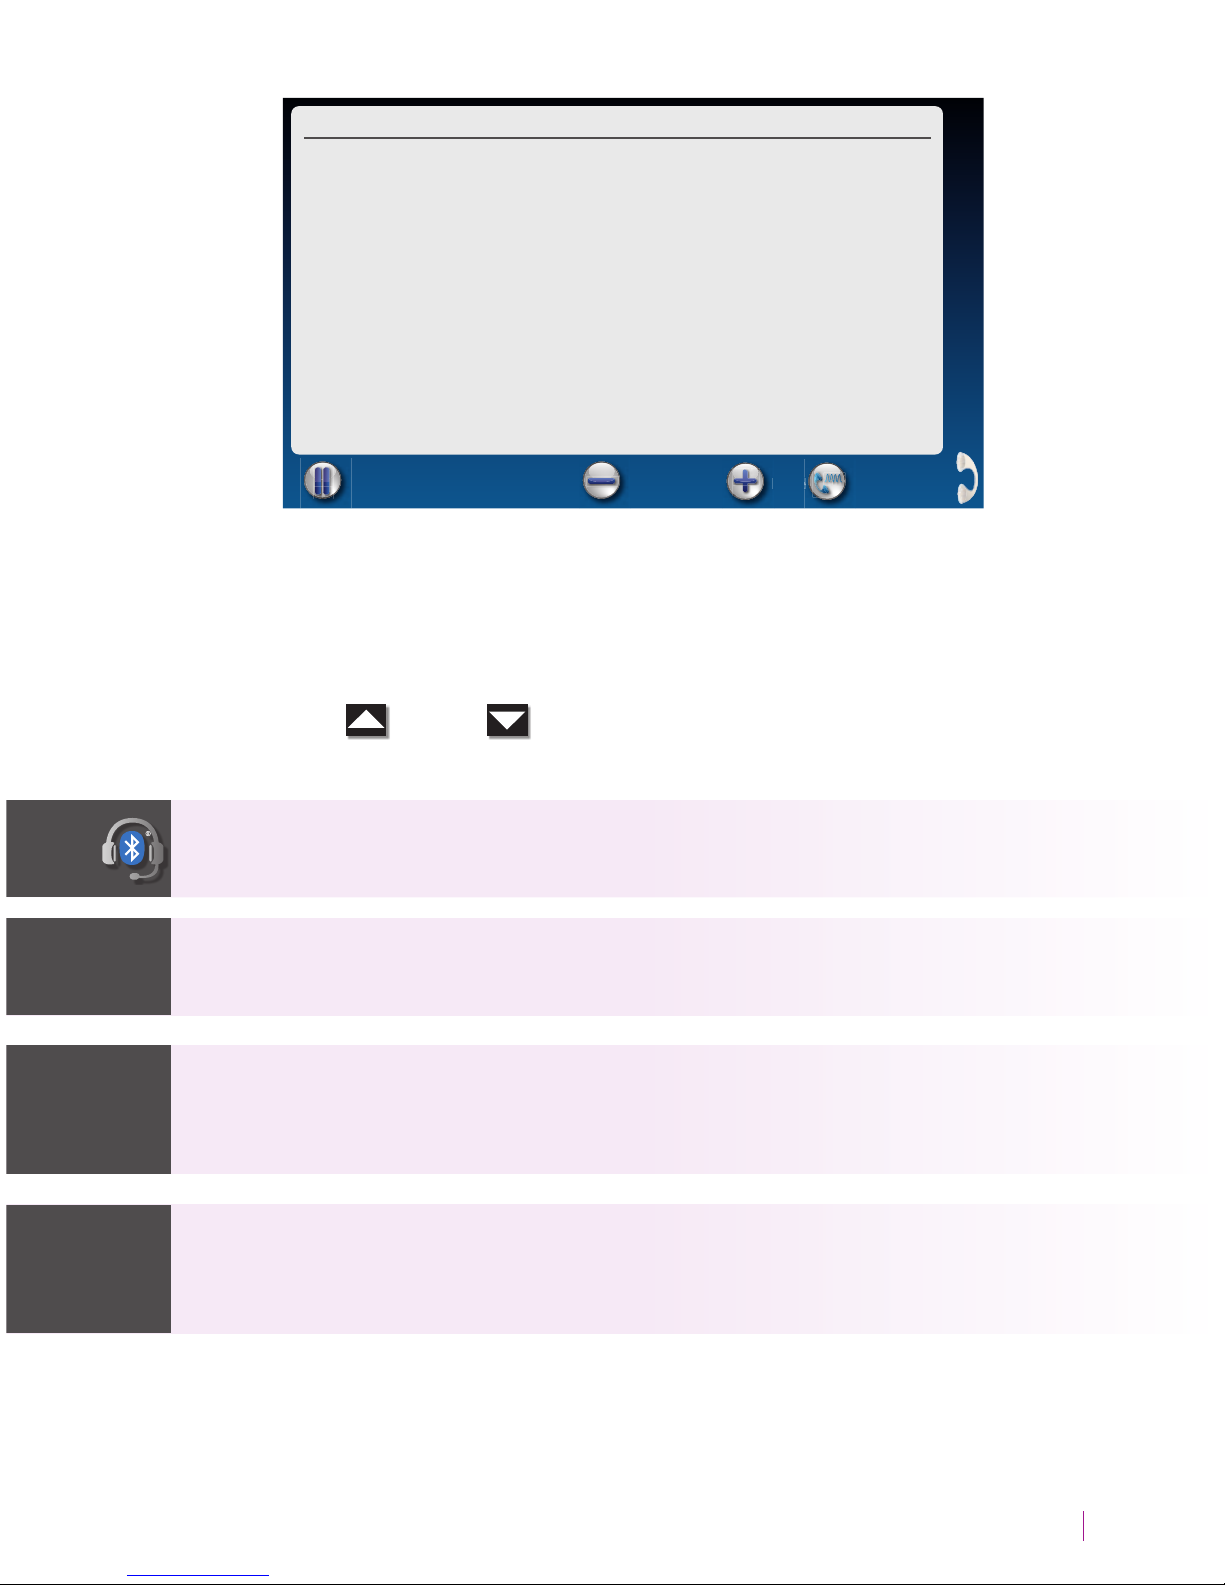
3. Use the CapTel dialing keypad
OPER
to dial the phone number of the
person you wish to call.
4. As you dial, the display screen shows the status as your CapTel phone
connects to the captioning service.
Dial Number
Contacts
Favorites
Dial: 1-333-555-6852
CA is ready to caption your call
(CapTel CA# C1234)
Page 29
Customer Service: 888-269-7477 MAKING AND ANSWERING CALLS 27
555-8539
Call Time: 00:02:56May 13 1:36 pm
hello this is Tina's ower shop
how may I help you? okay and
where would you like them
delivered? great you said you
wanted roses any particular
color?
Pause Captions Font Size
Tone
5. Listen or watch the display screen to know when someone answers.
Begin your conversation as you normally would. Captions will appear
on the display screen as the other party speaks.
You can adjust the volume during the call to a level you hear best by
pressing the
(
up) or
(
down) arrows on the VOL button.
When you are nished with your call, hang up the handset.
If you are using a Bluetooth headset, you may need to adjust the volume
directly on your Bluetooth device.
You can turn captions on/o at any point in the call. Just press the
CAPTIONS button. When the blue light is on, you will get captions.
Talk back and forth as you normally would, reading the captions as you go.
You don’t have to wait for the captions to nish appearing on screen before
you answer.
You can also place a call to someone listed in your Contacts, Favorites, Call
History, or Speed Dial settings. You need to have entries saved in Contacts
before you can use these features. See Contacts on page 68 for instructions.
TIPNOTE TIP
Page 30
28 MAKING AND ANSWERING CALLS Customer Service: 888-269-7477
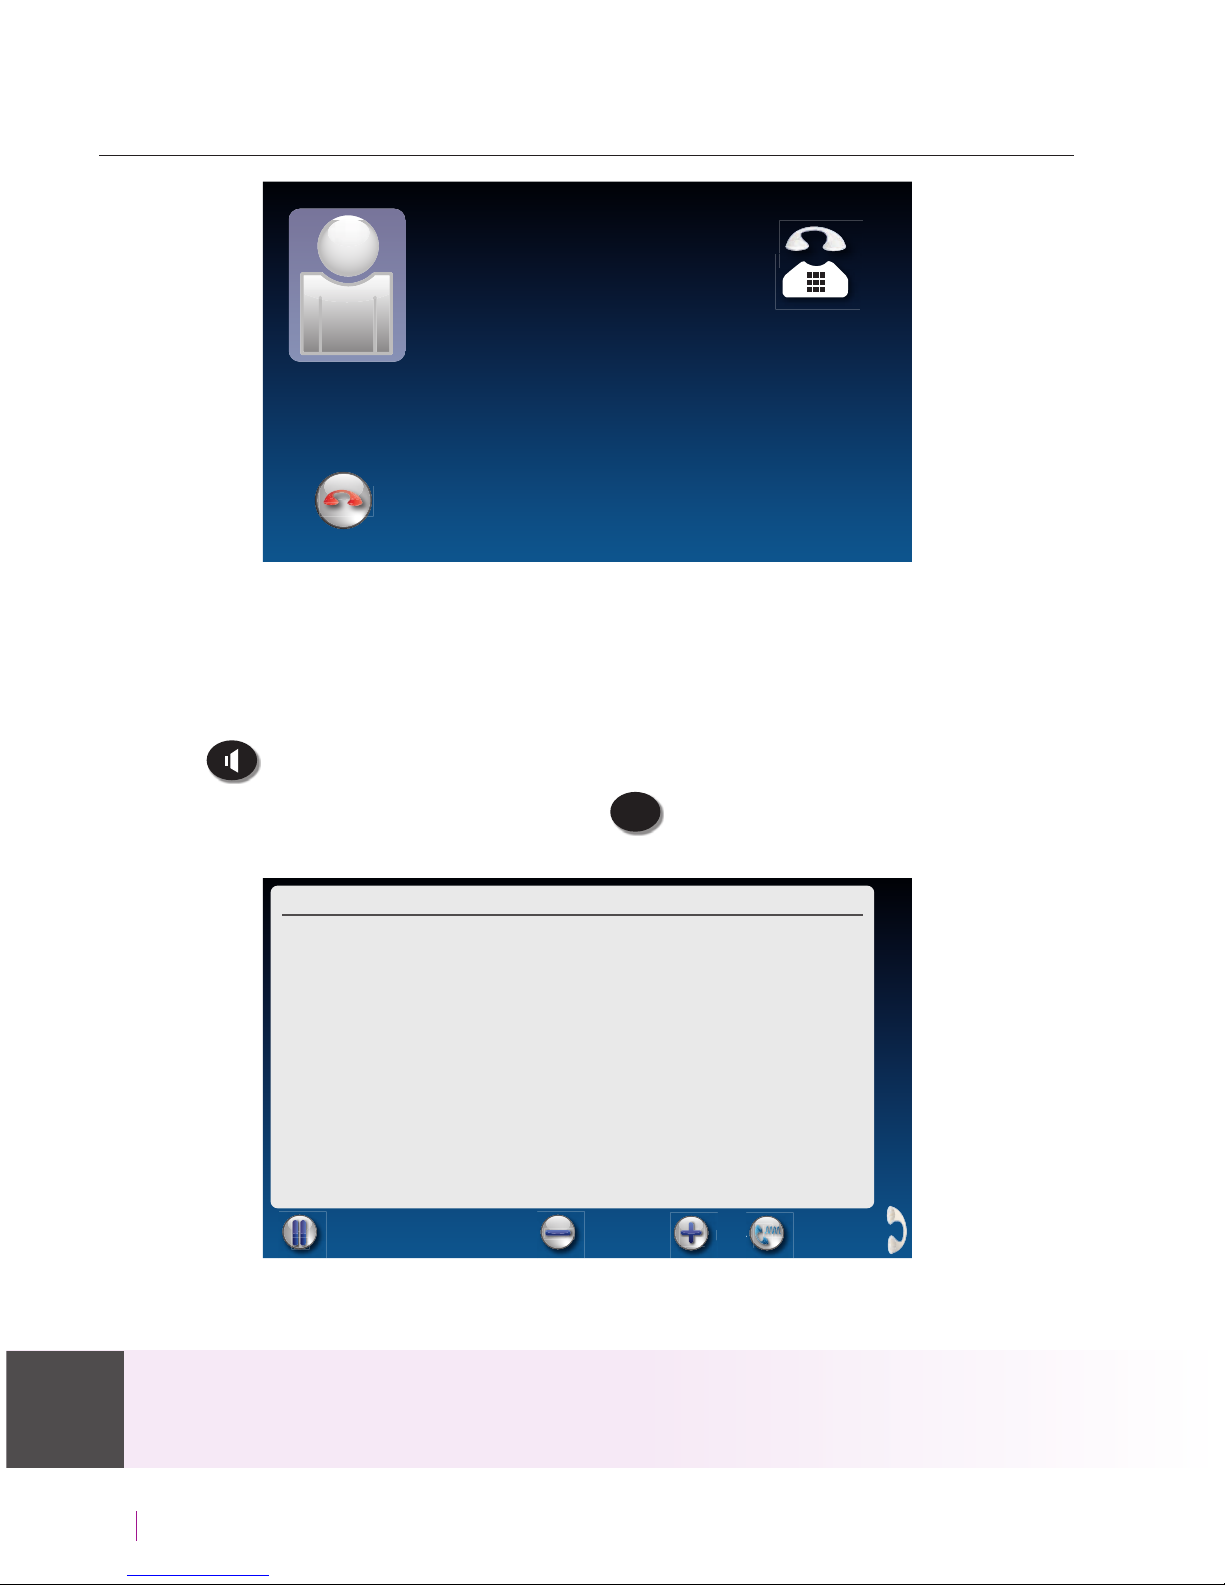
Answering an Incoming Call
1. When the phone rings, the display lights up to let you know there is an
incoming call. (If you have Caller ID service, the caller’s name and phone
number will appear.)
2. Lift up the handset to answer the call. Or, to answer on speakerphone,
press
(SPEAKER button).
3. Check that the blue light around the
CAPTIONS
(CAPTIONS button) is on. If
not, press the CAPTIONS button to turn captions on.
When you are nished with your conversation, hang up the phone as you
normally would.
If you answer on an extension telephone and want to get captions, just pick up the
CapTel handset. As long as the CAPTIONS button is on, your CapTel phone will connect to
the Captioning Service and you will see captions. For details see Line in Use on page 97.
send to ans machine
Incoming Call
13335552652
Corner Pharmacy
C Pharmacy
Call Time: 00:00:16June 22 10:49 am
(CapTel CA# C6430) (F) Hello
this is corner pharmacy calling
your prescription is ready to be
picked up
Pause Captions Font Size
Tone
TIP
Page 31

Customer Service: 888-269-7477 MAKING AND ANSWERING CALLS 29
Answering a Call on a Bluetooth®
Headset/Neckloop
Your Bluetooth device must be paired and active with the CapTel 2400iBT
before you can make/answer calls with it. Please see “Connecting a
Bluetooth Headset/Neckloop” on page 23 for instructions.
To Answer a Call:
1. Check that your Bluetooth device is connected by con rming that the
name of your device is listed in the upper left corner of CapTel display
screen.
2. When the phone rings, the CapTel display lights up to let you know
there is an incoming call.
3. On the CapTel display, touch
(answer by Bluetooth).
You will be able to hear the caller’s voice over your Bluetooth device.
Captions of the conversation will appear in the CapTel display screen.
You may be able to answer the call directly on your headset/neckloop.
The answering process will vary depending on the type and style of your
Bluetooth device. Check the instructions that came with your Bluetooth
device for details.
NOTE
send to ans machine
to answer lift the handset,
press the Speaker button, or
press the Headset button
Headset
Incoming Call
13335552652
Corner Pharmacy
Page 32

30 MAKING AND ANSWERING CALLS Customer Service: 888-269-7477
Ending a Call using a Bluetooth®
Headset/Neckloop
When you are ready to end your call:
1.
On the CapTel display, touch (END CALL). The call will “hang up”.
Or,
you can pick up the handset brie y and hang it up again to end the call.
You may be able to end the call directly on your headset/neckloop. The end
call process will vary depending on the type and style of your Bluetooth device.
Check the instructions that came with your Bluetooth device for details.
C Pharmacy
Call Time: 00:01:53June 25 8:33 am
you can stop by and pick your
prescription up any time before
6:00 tonight oh that’s no
problem can you come by any
time this week? see you then
thanks bye
Pause Captions Font Size
Tone
End
Call
Tone
Page 33

Customer Service: 888-269-7477 MAKING AND ANSWERING CALLS 31
Turning Captions On/O During a Call
You can turn captions on/o at any time during your call by pressing
CAPTIONS
(CAPTIONS button). When the blue light around the CAPTIONS button is
lit, you will see captions of everything the other party says.
To turn captions o , press
CAPTIONS
(CAPTIONS button) again. The blue light
around the CAPTIONS button goes o .
Adjusting the Volume
You can increase the volume of the person’s voice coming through the
handset or speakerphone, up to a 40dB gain from min/max when the
CAPTIONS button is on. (If captions are turned o , the maximum volume is
18dB gain). Watch the lights next to the VOL bar to see what level the
volume is set to.
• To increase the volume, press
on the VOL button.
• To decrease the volume, press
on the VOL button.
The maximum volume setting on captioned calls is very loud. People who
do not need ampli cation should not use the phone at its highest volume
setting. The volume level automatically returns to a mid-range setting
whenever the phone is hung up.
To save your volume setting so that it will be used during every captioned
call, see Saving Conversation Volume on page 93.
If you are using a Bluetooth headset, you may be able to control the
volume directly on your Bluetooth device. See instructions that came
with your Bluetooth device for directions.
NOTE
Page 34

32 MAKING AND ANSWERING CALLS Customer Service: 888-269-7477
Adjusting the Tone Control
You can adjust the Tone of the handset sound to a frequency range that is
better to hear. Use the Tone setting to emphasize HIGH, MEDIUM, or LOW
frequency sound ranges. You can even customize the sound frequency to
match your own audiogram. The setting will remain in e ect until you
change it again.
You can adjust the Tone setting before, during, or after a call.
To adjust the Tone setting:
1. On the display screen, touch
(Settings).
2. Touch
(Sounds).
3. Touch
(Tone).
4.
The display shows what the current setting is: LOW, MED, HIGH, or CUSTOM.
5. Touch the Tone setting you wish to use.
To test how the Tone setting will sound, lift the handset and press
on the
display screen. You will hear a recording of rst a man’s and then a woman’s
voice, letting you check if the setting makes it easier to hear. Experiment
with the di erent Tone settings to nd the range that works best.
During a call: touch
(Tone) repeatedly to toggle between settings to
the level that you hear best.
accept
cancel
lift the handset and
press play button to test the tone setting
Tone Control
Touch low, med, or high to select desired tone
low medium high
custom
This tone setting will help you
hear medium-pitched voices
Back
TIPNOTE
Page 35

Customer Service: 888-269-7477 MAKING AND ANSWERING CALLS 33
Customizing the Tone Setting
CapTel 2400iBT lets you personalize the Tone setting to enhance the
frequency ranges that you hear best. For example, you can adjust the tone
settings to match your own personal audiogram. CapTel lets you listen to
test each setting as you make changes, to nd the optimal customized
hearing level.
To customize the Tone setting:
1. On the display screen, touch
(Settings).
2. Touch
(Sounds).
3. Touch
(Tone).
4. On the display screen, touch
custom
(Custom).
5. Touch and drag the blue circles on the frequency chart to adjust the
various sound levels.
As you make changes, test the sound quality by touching
(play) while
listening over the handset.
If you have a personal audiogram, adjust the blue circles to match the shape
of your audiogram to give you optimal sound levels for your personal
hearing level.
6. When you are nished, hang up the handset and touch
accept
cancel
(Accept) to
save your changes or
cancel
(Cancel) to exit.
250 Hz 500 Hz 1kHz 2kHz 4 kHz
30 dB
40 dB
50 dB
60 dB
70 dB
80 dB
90 dB
Custom Tone
Touch and Drag
the blue dots
to match the shape
of your audiogram
accept
cancel
lift the handset and
press play button to test the tone setting
Back
TIP
Page 36

34 MAKING AND ANSWERING CALLS Customer Service: 888-269-7477
Using the Speakerphone
Turning the Speakerphone On
At any point before or during a call, press the (SPEAKER button) on
the CapTel dialing pad to turn the Speakerphone on (light on Speaker
button goes ON). The CapTel handset will turn o , and any sounds on the
line will be ampli ed out loud over the CapTel speaker.
When the Speakerphone is on, you can talk as you normally would directly
facing the front your CapTel 2400iBT phone. You do not need to speak into
the CapTel handset. The CapTel 2400iBT microphone will pick up your
speech for your caller to hear.
When the Speakerphone is on (light on Speaker button is ON) you can set
down or hang up the CapTel handset without ending the call. The
conversation will be carried on over
the Speakerphone and captions of your
call will appear on the display screen.
Turning the Speakerphone Off
You can alternate between using the Speakerphone or using the CapTel
handset during your calls, by turning the Speakerphone on and o . The
way you turn the Speakerphone o depends on whether the CapTel
handset is hung up or not.
If the CapTel handset is not hung up:
Press the
(SPEAKER button) on the CapTel dialing pad to turn the
Speakerphone o . The light on the Speakerphone will go o and the sound
will be directed to the CapTel handset for you to continue the call.
If the CapTel handset is hung up and you’d like to continue the call:
Lift the CapTel handset. The Speakerphone will go o (light on Speaker
button goes OFF) and the sound will be directed to the CapTel handset for
you to continue the call.
If the CapTel handset is hung up and you’d like to end the call:
Press the
(SPEAKER button) on the CapTel dialing pad. The
Speakerphone will go o and the call will end.
TIP
Page 37

Customer Service: 888-269-7477 MAKING AND ANSWERING CALLS 35
Ending a Call when the Speakerphone is On
The way to end a call when the Speakerphone is on depends on whether
the CapTel handset is hung up or not.
If the CapTel handset is hung up:
Press the
(SPEAKER button) on the CapTel dialing pad. The
Speakerphone will turn o (light on the Speaker button goes OFF) and the
call will end.
If the CapTel handset is not hung up:
Hang up the handset, as you would end with any other call. If needed,
press the
(SPEAKER button) to turn the Speakerphone o (light on
the Speaker button goes OFF). The Speakerphone will turn o and the call
will end.
Adjusting the Sound on the Speakerphone
Use the volume key to adjust the volume of the sound coming out of the
Speakerphone.
Page 38

36 MAKING AND ANSWERING CALLS Customer Service: 888-269-7477
Knowing What Sounds are on the Line
The handset graphic on the display screen tells you what
incoming and outgoing sounds are occurring during your
call with
two visual indicators: the Signal meter (yellow
waves) and the Outgoing Volume meter (green waves).
Signal Meter – Sounds on the Line
Shows when there is sound coming over the line, even if the sound is not
loud enough for you to hear. The more sound waves coming out of the
handset, the louder the sound.
Outgoing Volume Meter
Helps you to see how loudly you are speaking. The more lines going into
the handset/MIC graphic, the louder your voice is. If the lines become red,
you may want to lower the volume of your own voice during a call.
The display shows whether sound is coming over the CapTel headset
,
speakerphone
, or over a Bluetooth® headset .
These meters only appear during calls that have captions.
C Pharmacy
Call Time: 00:00:16June 22 10:49 am
(CapTel CA# C6430) (F) Hello
this is corner pharmacy calling
your prescription is ready to be
picked up
Pause Captions Font Size
Tone
TIPNOTE
Page 39

Customer Service: 888-269-7477 VIEWING CAPTIONS 37
This section explains how to adjust and
review conversation captions.
TOPICS
Turning Captions On/Off During a Call
Viewing Corrections
Reviewing Captions During a Call
Reviewing Captions After Hanging Up
Saving Conversation Captions
Erasing Captions
Changing the Color of the Captions
Changing the Captions Font Size and Style
Setting how Captions Scroll Across the
Display Screen
Adjusting the Brightness of the Display Screen
SECTION
3
Viewing Captions
Page 40

38 VIEWING CAPTIONS Customer Service: 888-269-7477
Turning Captions On/O During a Call
You can turn captions on/o at any time during your call by pressing
CAPTIONS
(CAPTIONS button). When the blue light around the CAPTIONS button is
lit, you will see captions of everything the other party says.
To turn captions o , press
CAPTIONS
(CAPTIONS button). The blue light around
the CAPTIONS button goes o .
You can increase/decrease the size of the captions font by touching or
at the bottom of the screen.
You can press the CAPTIONS button at any time during the call. If captions
are
not on at the start of your call, don’t worry. Captions will appear
approximately 3–5 seconds after the CAPTIONS button is turned on.
C Pharmacy
Call Time: 00:00:16June 22 10:49 am
(CapTel CA# C6430) (F) Hello
this is corner pharmacy calling
your prescription is ready to be
picked up
Pause Captions Font Size
Tone
NOTETIP
Page 41

Customer Service: 888-269-7477 VIEWING CAPTIONS 39
Viewing Corrections
On occasion, word errors may appear in the captions due to the speech
recognition system the Captioning Service uses. The Captioning Service
will try to correct word errors as they occur. The corrected word appears in
[brackets] to let you know a correction has been made.
There may be a slight delay before the word error is corrected. If you are
unclear about what was said, ask your caller to clarify.
555-6295
Call Time: 00:00:37May 11 12:42 pm
(CapTel CA# C7005) Ringing 1
(F) Hi Debra sure she is not at her
desk Debra do you want her
voicemail? sure colon while I
transfer you
Pause Captions Font Size
Tone
555-6295
Call Time: 00:00:46May 11 12:42 pm
(CapTel CA# C7005) Ringing 1
(F) Hi Debra sure she is not at her
desk Debra do you want her
voicemail? sure colon while I
transfer you [hold on]
Pause Captions Font Size
Tone
Word
Error
Correction
Page 42

40 VIEWING CAPTIONS Customer Service: 888-269-7477
Reviewing Captions During a Call
To review captions during a call:
1. Touch
(Pause Captions).
2. Then:
A: Touch and move the slide bar at the right up to scroll back through
previous captions.
– OR –
B: Place your nger on the captions screen and swipe downward to
review previous captions.
When you are nished reviewing captions, touch
(Back to Live
Captions) to return to the current conversation. Anything the other party
said during the time you were reviewing captions will appear, and the live
captions will continue as usual.
Your CapTel phone holds captions for up to 100 di erent conversations in
memory (approximately 10 hours of conversations). If the conversation
memory lls up entirely, older captions will be erased as new captions come in.
C Pharmacy
Call Time: 00:00:16June 22 10:49 am
this is corner pharmacy calling
your prescription is ready to be
picked up yes please bring your
insurance card with you as well
as a valid ID we are open until
8:00 pm we’d be happy to help
Pause Captions Font Size
Tone
Touch and
slide up
to move
backwards
to review
previous
captions
NOTE
Page 43

Customer Service: 888-269-7477 VIEWING CAPTIONS 41
Reviewing Captions After Hanging Up
To review captions after your conversation is ended and the phone is hung up:
1. On the display screen, touch (Call History).
2. From the Call History listing on the left, touch the call that you wish to
review. If needed, use the scroll bar or touch
and to scroll
through the list of calls.
3. Once the call you want is highlighted, information about the call appears
on the right. Touch
(review captions) to review captions of the call.
When reviewing captions: Touch and drag the scroll bar on the right to
move backwards and forwards through captions. Touch
and to
see captions from a previous/later call.
4.
When you are done reviewing captions, press
HOME
(HOME button) to exit.
The Call History listing lets you know whether a call was incoming
or
outgoing.
Your CapTel phone comes with the Save Captions feature enabled, letting you
view conversation captions after you’ve hung up the phone. You can turn
this feature o so that CapTel will not save conversation captions after every
call. Please see Saving Captions after Hang up on page 92 for instructions.
call
review
captions
Call History
Mary Cell
today
11:38 AM
today
11:32 AM
2/15/15
4:23 PM
2/15/15
2:56 PM
2/14/15
6:42 PM
1-321-555-9876
1-321-555-9876
John S.
Mary Cell
555-2369
1-321-555-6712
previous delete
next
2/15/15
2:56 PM
0:01:14
Back
TIPNOTE
Page 44

42 VIEWING CAPTIONS Customer Service: 888-269-7477
Saving Conversation Captions
You can set your CapTel phone to save captions after the call is ended.
This allows you to go back and review what was said after you’ve hung up.
You can review captions from up to 100 di erent conversations in memory.
The default setting is Save Captions – ON.
To change the Save Captions setting:
1. On the display screen, touch
(Settings).
2. Touch
(General Settings).
3. Touch
(Save Captions On).
4. Touch
on
o
(On) or
o
(Off ) to select.
Save Captions On saves conversation captions after the call is
nished and the phone is hung up.
Save Captions Off erases the conversation captions after every call.
5. Once you have made your selection, press
HOME
(HOME button) to exit.
Save Captions On Line by Line Scrolling Flasher SettingsCaptions Button on
Advanced Settings
Save Volume On
Keypad Lights On
Language
General Settings
Back
CAPTIONS
Page 45
Customer Service: 888-269-7477 VIEWING CAPTIONS 43
Erasing Captions
To erase captions of a single conversation after the call has ended:
1. On the display screen, touch
(Call History).
2. From the Call History listing, touch the call that you wish to erase.
If needed, touch
and or touch and drag the scrollbar to scroll
through the list of calls.
3. Once you have the call you want highlighted, information about the call
appears on the right side of the display. Touch
(Delete) to erase
captions of the call.
4. The display asks you to con rm that you want to delete the call.
Touch
yes
no
(yes) to erase or
no
(no) to exit.
5. When you are done erasing captions, press
HOME
(HOME button) to exit.
Erasing captions of your call will also delete the call from your
Call History.
1-321-555-6712
2/15/13
2:56 PM
0:01:14
delete call history entry?
(2/16/15 2:56 PM)
touch yes to delete the captions
and caller id information
no yes
NOTE
Page 46

44 VIEWING CAPTIONS Customer Service: 888-269-7477
Changing the Color of the Captions
You can change the color of the captions font and background color on
the display screen to a color combination that you prefer. You need to set
the conversation colors before or after a call. You cannot change the
captions colors during a live captioned call.
Changing the font color applies only to conversation captions. The font size
and style for your CapTel 2400iBT menu options always remains the same.
To change the font and background colors:
1. On the display screen, touch
(Settings).
2. Touch
(Display).
3. Touch
(Display Colors).
Background
Captions
Color Options
EXAMPLE CAPTIONS
This is a Captioned
Telephone. It is designed
accept
cancel
NOTE
Page 47

Customer Service: 888-269-7477 VIEWING CAPTIONS 45
4. The display screen shows you an example of how the colors are
currently set.
To change the Captions color:
1. Make sure
Captions
(Captions) is highlighted (blue).
2. In the Color Options table, touch the color that you would like
the captions to appear. As you select your color, CapTel shows
you an example of how the captions will look.
To change the Background color:
1. Touch
Background
(Background) to highlight (blue).
2. In the Color Options table, touch the color you that you would
like the background to appear. As you select your color, CapTel
shows you an example of how the background will look.
5. When you have selected the color combination that you prefer, touch
accept
cancel
(Accept) to save or
cancel
(Cancel) to exit.
6. When you are done, press
HOME
(HOME button) to exit.
If you have di culty reading the captions, you may try di erent color
combinations to create higher contrast between the captions color and the
background color.
TIP
Page 48

46 VIEWING CAPTIONS Customer Service: 888-269-7477
Changing the Captions Font Size and Style
You can adjust the font size and style of the conversation captions to make
them easier to read.
Changing the font size or style only applies to conversation captions. The
font size and style for your CapTel 2400iBT menu options always remains
the same.
To change the font size of the captions:
1. With the handset hung up, touch (Settings).
2. Touch
(Display).
3. Touch
(Font Settings).
4. The display shows you what the current font size and style setting is.
To change the font style, touch one of the ve (5) style options available.
To change the font size, touch
or .
5. When you have selected the font size and style that you prefer, touch
accept
cancel
(Accept) to save your change or
cancel
(Cancel) to exit.
6. When you are done, press
HOME
(HOME button) to exit.
EXAMPLE CAPTIONS
This is a Captioned
Telephone. It is designed
Style 1 Style 2 Style 5Style 4Style 3
Font Size
accept
cancel
NOTE
Page 49

Customer Service: 888-269-7477 VIEWING CAPTIONS 47
Setting how Captions Scroll Across the
Display Screen
You can control how the captions appear on the display screen: either
appearing word-by-word across the screen as each word is captioned or by
smooth scrolling one line at a time in a continuous movement. The default
setting is smooth scrolling.
To change the way captions scroll across the screen:
1. On the display screen, touch
(Settings).
2. Touch
(General Settings).
3. Touch
(Smooth Scrolling).
4. Touch the scrolling option that you prefer.
Line-by-Line Scrolling: captions appear word-by-word across
the screen as they are captioned
Smooth Scrolling: captions appear one line at a time in a
continuous motion
5. Once you have made your selection, press
HOME
(HOME button) to exit.
Save Captions On Line by Line Scrolling Flasher Settings
Save Volume On
Keypad Lights On
English
General Settings
Back
select scrolling style
smooth scrollingline by line
Page 50

48 VIEWING CAPTIONS Customer Service: 888-269-7477
Adjusting the Brightness of the Display Screen
You can adjust the brightness of your CapTel 2400iBT display screen to
make it easier to read in well-lit or dimly-lit environments.
You need to adjust the brightness of the Display Screen before or after a call.
You cannot set the display screen brightness during a live captioned call.
To adjust the brightness of the Display Screen:
1. On the display screen, touch
(Settings).
2. Touch
(Display).
3. Touch
(Brightness)
4. Touch and drag the slide bar to adjust the brightness to the setting that
you would like. Sliding left makes the display screen dimmer. Slide right
to make the display screen brighter.
5.
When the brightness is set, touch
accept
cancel
(Accept) to save or
cancel
(Cancel) to exit.
6. Press
HOME
(HOME button) to exit.
After 60 seconds of non-use, the CapTel display screen will start becoming
more dim and gradually go completely dark as an energy-saving measure.
To re-illuminate the screen, simply touch the display screen or any button on
the dialing keypad.
Brightness Line by Line Scrolling Font Size
Screen Timeout
Night Mode
Display Settings
Back
adjust display brightness
min max
accept
cancel
NOTENOTE
Page 51

Customer Service: 888-269-7477 VIEWING CAPTIONS 49
Getting Help
If you have any questions as you use your new CapTel 2400iBT, we’re here
to help. Use any of these ways to contact us:
Pick up the handset and press
(CUSTOMER SERVICE button) to
automatically speed dial directly to our helpful Customer Service team. If
you are in an offi ce setting, you may need to dial a number such as “9” rst
to get an outside line rst and then press
(CUSTOMER SERVICE
button). (Available 24 hours a day, 7 days a week. Customer Service is closed
on major holidays.)
Help materials are also available online at our website.
Phone: 1-888-269-7477 (Available 24 hours a day, 7 days a week)
FAX: (608) 204-6167
Mail: CapTel Customer Service
450 Science Drive
Madison, WI 53711
Email: CapTel@CapTel.com
Online: www.CapTel.com
(Live Chat help available at our website)
Spanish Language Customer Service: 1-866-670-9134
Page 52

50 CALL HISTORY Customer Service: 888-269-7477
SECTION
4
Call History
TOPICS
Reviewing Previous Calls
Reviewing Captions from a Previous Call
Dialing from Call History
Erasing Previous Calls
This section explains how to use Call History to
see who has called you, to review captions of
past conversations, and to see information
about any incoming calls you may have missed.
Page 53

Customer Service: 888-269-7477 CALL HISTORY 51
Reviewing Previous Calls
Your CapTel 2400iBT keeps a list of information about recent calls, including
calls that you may have missed. You can review captions from the call, the
date and time of the call, and any Caller ID information if available. CapTel
can even show you a picture of the caller if it is someone in your Contact list.
call
review
captions
Call History
Unavailable
today
11:38 AM
today
11:32 AM
2/15/15
4:23 PM
2/15/15
2:56 PM
2/14/15
6:42 PM
1-321-555-9876
1-321-555-9876
John S.
Mary Cell
555-2369
555-2369
previous delete
next
2/14/15
6:42 PM
0:00:36
Back
add to
contacts
➊ Previous calls: Touch the call you want information about.
➋ Information about the call shows up here.
➌ Indicates whether call was incoming, outgoing, or unanswered.
➍ Date and time of the call.
➎ Use the scroll bar to review entries further down the list.
➏ Next/Previous: Lets you move up/down through entries in the list.
➐ Delete: Erases the selected call from Call History.
➑ Review captions: Review captions of the call.
➒ Call: Places a call to this person.
➓ Add to Contacts: Adds caller to your Contacts list.
Remember to rst touch the call listed in Call History on the left side of display
that you want to review. Once you touch the call listing, more information
about the call will appear on the right of your screen, including a picture of
the caller if you have added a picture for him/her in your Contacts list.
➊
➋
➌
➏
➐
➑ ➒
➓
➍ ➎
TIP
Page 54

52 CALL HISTORY Customer Service: 888-269-7477
Reviewing Captions from a Previous Call
You can look back and see captions from any call in your Call History.
To review captions from a previous call:
1. From the display screen, touch
(Call History).
2. From the list on the left, touch the call that you want to review.
Touch and drag the scroll bar to see calls further up or down the list.
You can use
(Next/Prev) to move up or down the list.
3. Information about the call that you selected appears in the right of
the screen.
4. Touch
(Review Captions) to review captions of the call.
5. Touch and drag the scroll bar at the right to move backwards and
forwards through the captions.
6. When you are nished, press
HOME
(HOME button) to exit.
You can increase/decrease the size of the captions font by touching or
at the bottom of the display.
Touch
prev next
(<<prev / next>>) to view captions from a
previous/later call.
Joe Smith
5/28/152:16 PM
(CapTel CA# C6562) Ringing 1 2
(M) Hello Hello ~ OK well I was
wondering if you are coming to
Jimmys game oh great it’s at
Back
deletecall
prev next
Font Size
TIPNOTENOTE
Page 55

Customer Service: 888-269-7477 CALL HISTORY 53
Dialing from Call History
You can use Call History to quickly re-dial someone that has called you
before. This is especially helpful if you notice you’ve missed a call –
you can call the person back directly from Call History.
To dial a number from Call History:
1. From the display screen, touch
(Call History).
2. From the list on the left, touch the call that you want to review.
Touch and drag the scroll bar to see calls further up or down the list.
You can use
(Next/Previous) to move up or down the list.
3. Information about the call that you selected appears in the right of
the screen.
4. Touch
(Call) to place a call to this person.
If you are calling this number for the rst time, the display asks you to
con rm which number to call. For example, if you need to dial a 1 or the
area code rst, or if a dialing pre x (such as “9”) is required.
5. Lift the handset. CapTel dials the number automatically.
call
review
captions
Call History
Mary Cell
today
11:38 AM
today
11:32 AM
2/15/15
4:23 PM
2/15/15
2:56 PM
2/14/15
6:42 PM
1-321-555-9876
1-321-555-9876
John S.
Mary Cell
555-2369
1-321-555-6712
previous delete
next
2/15/15
2:56 PM
0:01:14
Back
TIP
Page 56

54 CALL HISTORY Customer Service: 888-269-7477
Erasing Previous Calls
To erase a single call from Call History:
1. From the display screen, touch
(Call History).
2. From the list on the left, touch the call that you want to review.
Touch and drag the scroll bar to see calls further up or down the list.
You can use
(Next/Prev) to move up or down the list.
3.
Information about the call you selected appears in the right of the display.
4. Touch (Delete) to erase this call from your Call History.
5. The display asks you to con rm if you want to delete the call.
Touch
yes
no
(yes) to erase or touch
no
(no) to exit.
6. When you are nished, press
HOME
(HOME button) to exit.
1-321-555-6712
2/15/13
2:56 PM
0:01:14
delete call history entry?
(2/16/15 2:56 PM)
touch yes to delete the captions
and caller id information
no yes
TIP
Page 57

Customer Service: 888-269-7477 ANSWERING MACHINE 55
This section explains how to use the built-in
Answering Machine and see captions of messages
that people leave for you. You can hear the voice
recording and read captions of the message. You
can retrieve your Answering Machine messages
remotely from a di erent phone, and CapTel can
also show you captions of messages that are left
on an external answering machine.
SECTION
5
Answering Machine
TOPICS
About the Answering Machine
Turning Answering Machine On/Off
Playing Your Answering Machine Messages
Erasing Answering Machine Messages
Deleting All Messages
Recording a Personal Greeting
Seeing Captions of Voice Mail Messages
Remote Message Retrieval
Captioning Messages from an External
Answering Machine
Setting the Ring Count
Playing Incoming Messages Aloud/Silent
Answering Machine and see captions of messages
Page 58

56 ANSWERING MACHINE Customer Service: 888-269-7477
About the Answering Machine
Your CapTel 2400iBT can take messages for you when you are unavailable,
for you to play back later. When checking your messages, you can listen to
the messages as well as see captions. The CapTel Answering Machine saves
up to 100 messages. Each message can be up to 90 seconds long. If you
have more than one answering machine in your home or offi ce, make sure
only one answering machine device is turned on/active at a time. If you
rely on voice mail service for messages, the CapTel Answering Machine
should be turned o .
Turning Answering Machine On/O
1. On the display screen, touch (Ans Machine). The rst time you
set up your Answering Machine, the display tells you there are no
messages available.
2. Touch
(setup internal answering machine).
3. The display screen shows you the current setting (on or o ).
Touch
(Answering Machine Off ) and select on or o .
4. When you are nished, press
HOME
(HOME button) to exit.
A green
on
3
on indicator appears on the Answering Machine icon to let you
know at a glance whenever the Answering Machine is turned on.
No Messages Available
touch the button(s) below to setup your built-in answering
machine or caption your external answering machine
setup internal
answering machine
caption external
answering machine
Back
TIP
Page 59

Customer Service: 888-269-7477 ANSWERING MACHINE 57
Playing Your Answering Machine Messages
1.
The display screen lets you know when you have
unread messages waiting.
2. Touch (Ans Machine).
3. Select and touch the call you want to review from the Answering
Machine list on the left of the display.
4.
Information about the call you selected appears on the right of the display.
5. Touch (PLAY), then lift the CapTel handset to listen to your message.
Or touch
(speaker) to play messages aloud.
6. When you are done listening/reading messages, you can:
• Touch
(Call) to place a call to this person.
• Touch
(Delete) to erase the Answering Machine message
and captions.
• Touch
re-caption
(re-caption) to get new captions of this message.
• Touch
play
(PLAY) to play the message/captions again.
If you play your message and there are no captions, press the CAPTIONS
button (blue light on). The voice message will play again, this time showing
captions on the display.
If you are playing your Answering Machine messages, and an incoming call
occurs, you can send the call directly to the Answering Machine to listen to it later.
Jim Mobile
5/27/15 Msg: 3 of 32:42 PM
(Recording) Hi dad sorry I missed
you please give me a call back
when you get home talk to
you soon
Back
0:20 0:27
re-caption
play
Font
deletecall
on
3
Message
indicator
TIP
Page 60

58 ANSWERING MACHINE Customer Service: 888-269-7477
Erasing Answering Machine Messages
To erase an individual Answering Machine message:
1.
The display screen lets you know when you have unread messages waiting.
2. Touch (Ans Machine).
3. Select and touch the call you want to review from the Answering
Machine list on the left side of the display.
4. Information about the call you selected appears on the right side of
the display.
5. Touch
(PLAY) to listen to your message and see the captions.
6. To delete the message, touch
(Delete). The display asks you to
con rm you want to delete the message. Touch
yes
no
(yes) to delete or
touch
no
(no) to cancel.
When you are nished erasing your messages, press
HOME
(HOME button)
to exit.
Answering Machine
today
11:38 AM
today
11:32 AM
2/15/15
4:23 PM
2/15/15
2:56 PM
2/14/15
6:42 PM
555-4681
1-321-555-9876
John S.
Mary Cell
555-2369
previous
next
callplay
delete
Mary Cell
1-321-555-6712
2/15/15
2:56 PM
0:01:14
Page 61

Customer Service: 888-269-7477 ANSWERING MACHINE 59
Deleting All Messages
In addition to erasing Answering Machine messages one at a time as you
play them, you can also erase all your saved Answering Machine messages
at one time.
To delete all your Answering Machine messages:
1. From the display screen, touch
(Settings).
2. Touch
(Answering Machine).
3. Touch
(Delete All Messages).
4. The display asks you to con rm you want to delete ALL messages.
Touch
yes
no
(yes) to delete or touch no (no) to cancel.
5. Press
HOME
(HOME button) to exit.
Back
Answering Machine
Answering Machine on Greeting Message
Delete All Messages Ext Ans MachineSet Ring Count
External Speaker o Remote Access o
Page 62

60 ANSWERING MACHINE Customer Service: 888-269-7477
Recording a Personal Greeting
You can record a personal greeting for the CapTel 2400iBT to use whenever
the Answering Machine takes messages. If you do not want to record a
personal greeting, the Answering Machine will use a pre-recorded greeting
that says: “Hello. No one is available to take your call. Please leave a message
after the tone.”
To record a personal greeting:
1. From the display screen, touch
(Settings).
2. Touch
(Answering Machine).
3. Touch
(Greeting Message).
To hear the greeting that is currently being used, lift the handset and
touch
(play greeting message). You will be able to hear the greeting
in the CapTel handset.
4. Touch (record new greeting) to record your personal message.
Back
Answering Machine
answering machine on Greeting Message
no saved messagesset ring count
external speaker o
greeting message
play greeting message
record new greeting
use default greeting
Back
TIP
Page 63

Customer Service: 888-269-7477 ANSWERING MACHINE 61
Back
Answering Machine
answering machine on Greeting Message
no saved messagesset ring count
external speaker o
record new greeting message
press to stop recording
recording your greeting message
Back
5. Lift the CapTel handset and touch (press to start recording).
6. Speaking into the CapTel handset, record the personal greeting you
would like the Answering Machine to use. When you are nished
recording, touch
(press to stop recording).
7. If you are not satis ed with your personal greeting, you can re-record it.
Just repeat steps 4–6 above.
8. When you are satis ed with your personal greeting, touch
accept
cancel
(Accept).
Hang up the CapTel handset.
9. Press
HOME
(HOME button) to exit.
Seeing Captions of Voice Mail Messages
If you use voice mail to get phone messages instead of the built-in
answering machine, your CapTel 2400iBT can show captions of your voice
mail messages. Simply use the CapTel dial pad to call into your voice mail
system and “log in” the same way you would with any other telephone.
Make sure the CAPTIONS light is on. As your voice mail messages are
played, you will see captions on the display screen. Use the CapTel dial pad
to select options in your voice mail menu system.
Page 64

62 ANSWERING MACHINE Customer Service: 888-269-7477
Remote Message Retrieval
CapTel lets you call in to play your Answering Machine messages when you
are away from your home or offi ce. This feature must be turned on and you
must set a personal identi cation number (PIN) for security before this
feature will work.
The default setting for Remote Access is OFF.
If possible, use a di erent CapTel phone when calling in to retrieve your
messages, in order to be able to see captions of the messages. If you call
using any other phone, you will be able to listen to the voice part of the
Answering Machine messages but you will not be able to read captions at
your remote location.
To turn Remote Message Retrieval on:
1. From the display screen, touch
(Settings).
2. Touch
(Answering Machine).
3. Touch
(Remote Access off ).
4. Touch
on
o
(On) or
o
(Off ) to select.
Back
Remote Access Setup
Answering Machine Remote Access
This feature allows you to remotely manage (play or
delete) your answering machine messages. A 4 digit
PIN will be required to access your messages.
touch the buttons below to turn remote access on or o
o on
NOTE
Page 65

Customer Service: 888-269-7477 ANSWERING MACHINE 63
5. CapTel shows the default 4-digit Remote Access PIN. This is the number
you need to enter when calling in remotely to play your Answering
Machine messages.
You should change the PIN to a di erent number for your own use. Touch
the four digits on the display screen that you want to use. The selected PIN
appears on screen to con rm your selection.
Be sure to write your PIN down for your own reference.
6. When you have the PIN that you want, touch
save
cancel
(save).
7. CapTel con rms the PIN number you have saved and shows a list of
remote access commands. Use these commands when calling in to get
your messages remotely.
8. When you are nished, press
HOME
(HOME button) to exit.
TIP
Back
Remote Access Setup
Enter a 4 digit Remote
Access PIN and touch save,
or touch cancel to turn o
Remote Access and exit.
Enter Remote Access PIN
1
2 3
4
5 6
7
8 9
0
1234
save
cancel
Back
Remote Access Setup
Remote Access PIN Saved
The PIN above will be needed to
remotely access your CapTel answering
machine messages
• Press 1 to Play Message
• Press 2 for Next Message
• Press 3 to Delete Message
• Press 4 to Exit Remote Access
0228
touch to go back to answering machine menu
In Remote Access mode, use the
commands below to remotely manage
your answering machine messages
Remote Access Commands
ans. machine
Page 66

64 ANSWERING MACHINE Customer Service: 888-269-7477
To Access Your Answering Machine
Messages Remotely
1. From a di erent phone, call your own CapTel phone number and let it
ring until the Answering Machine greeting begins.
2. Once you hear/read the BEEP, enter your 4-digit PIN by pressing keys on
the dial pad of the phone that you are calling from.
3. Your CapTel 2400iBT will start playing aloud any recorded messages
(starting with the most recent one) for you to hear. If you are calling
from a di erent CapTel phone, you will be able to see captions of the
messages while they are played.
After each message is played, there is a pause that lets you enter one of the
following commands on the phone’s dial pad:
Press 1 – Play Message
Press 2 – Go to Next Message
Press 3 – Delete Message
Press 4 – Exit Remote Access
If you do not press any of the dial pad keys, after 30 seconds your
CapTel 2400iBT will automatically hang up.
4. When you are done, hang up the phone you are calling from.
If possible, use a di erent CapTel phone when calling in to retrieve your
messages, in order to be able to see captions of the messages. If you call
using any other phone, you will be able to listen to the voice part of the
Answering Machine message but you will not be able to read captions at
your remote location.
TIP
Page 67

Customer Service: 888-269-7477 ANSWERING MACHINE 65
Captioning Messages from an External
Answering Machine
In addition to the built-in answering machine that comes with your CapTel
phone, you can also see captions of voice messages that are left on an
external answering machine (a separate answering machine you may own,
not the one built into the CapTel phone).
To get captions of your external answering machine messages:
1. From the display screen, touch
(Settings).
2. Touch
(Answering Machine).
3. Touch
(Ext Ans Machine).
4. Lift the CapTel handset and place it next to your external answering
machine speaker. Make sure the mouth-piece of the handset is next to
the speaker of your answering machine. While you do this, your CapTel
phone connects to the captioning service.
5. Press the PLAY button on your external answering machine, so that the
messages are played aloud.
The display will show captions of the messages as they are played.
While checking messages, you may operate your external answering
machine the same way you normally do, using features such as play,
re-play, delete, or save messages.
When you are done listening/reading captions, hang up the CapTel handset.
NOTE
caption external ans machine
** lift handset to start **
place handset microphone next to
your answering machine speaker
Back
Page 68

66 ANSWERING MACHINE Customer Service: 888-269-7477
Setting the Ring Count
You can set the approximate number of times the CapTel will ring before the
Answering Machine answers the call. The default setting is four (4) rings, but
you can set it to be any number of rings between two (2) and twenty (20).
The ring count may be slightly di erent in telephone systems that use
“distinctive” ring patterns. Please experiment with this setting as needed for
your speci c telephone system.
To set the number of rings before answering:
1. From the display screen, touch (Settings).
2. Touch
(Answering Machine).
3. Touch
(Set Ring Count).
4. Touch the
(arrows) to select the number of rings you’d like to
use, then touch
accept
cancel
(Accept).
5. Press
HOME
(HOME button) to exit.
Back
Answering Machine
Answering Machine on Greeting Message
Delete All Messages Ext Ans MachineSet Ring Count
External Speaker o Remote Access o
select answering machine rings
accept
cancel
4
Rings
NOTE
Page 69

Customer Service: 888-269-7477 ANSWERING MACHINE 67
Playing Incoming Messages Aloud/Silent
Just like with other Answering Machines, you can “screen” callers by having
incoming messages played aloud on the CapTel phone for before you
answer the call. While this is a convenient feature, there may be times
when you do not want incoming messages to be played aloud, but instead
recorded silently for you to review at a later time. The default setting is for
incoming messages to be muted (silent).
To make incoming calls audible or set them to be silent:
1. From the display screen, touch (Settings).
2. Touch (Answering Machine).
3. Touch (External Speaker Off ).
4. The display asks if you want to (turn on) or (turn off ) the
answering machine speaker. Touch the option you want.
5. Press
HOME
(HOME button) to exit.
You can “screen” incoming Answering Machine messages by listening to the
caller and reading the captions while the message is recorded. Make sure
that the Answering Machine Speaker is set to “On”. If you choose to answer
the call, just pick up the handset and begin talking.
You can also send an incoming call directly to the answering machine to take
a message if you are busy.
Just touch
ignore
(Send
to Ans Machine).
TIPTIP
Alice Walton
(CapTel CA# C6070) (F) Hi Oh sorry I missed
you I was hoping to catch you before you
left I wanted to check and see if you’re going
to the game tonight? please give me a call
back when you get this message
5/21/15 Msg: 1 of 13:23 PM
Back
0:20 0:27
re-caption
play
Font
deletecall
Page 70

68 CONTACTS Customer Service: 888-269-7477
This section explains how to save frequently
called numbers in your contact list for easy and
quick dialing.
SECTION
6
Contacts
TOPICS
Adding a New Contact
Dialing a Phone Number in Your Contact List
Editing an Existing Contact
Removing a Contact
Adding a Photo to a Contact
Adding a Contact to Speed Dial
Page 71

Customer Service: 888-269-7477 CONTACTS 69
Adding a New Contact
You can save up to 100 names in your contact list for quick and easy dialing.
To add a new contact:
1. From the display screen, touch
(Contacts).
2. Touch
(add new contact).
3. Use the on-screen keyboard to type in the First Name of the person you
want to add.
4. Touch the eld next to “Last” to move down, then use the on-screen
keyboard to enter the last name of the person.
5. You can be speci c about which number(s) you are adding:
(Mobile),
(Home), or
(Work). Touch the eld(s) next to the number(s)
you’d like to add to begin entering.
6. When you are nished entering the Contacts information, touch
save
(save). The new contact appears on the left side of your Contacts list.
7. When you are nished, press
HOME
(HOME button) to exit.
You can add a photograph of your contact person to each entry.
Pictures can be entered at the MyContacts website, then synced to your
phone. See Adding a Photo to a Contact on page 73 for instructions.
You can add contacts to your Speed Dial or Favorites list.
See pages 85 and 88 for instructions.
Contacts
William
Best Buy
Corner Pharmacy
John S.
Movie Line
William
1-321-555-5896
edit
Home
previous sync delete
next
1-321-555-4212
Work
Back
TIPTIP
Page 72

70 CONTACTS Customer Service: 888-269-7477
Dialing a Phone Number in Your Contact List
To easily dial someone in your contact list:
1. From the display screen, touch
(Contacts).
2. Under the Contacts list on the left side of the display, nd and touch the
name of the contact you wish to call. To see contacts further down the
list, touch and drag the scroll bar.
Touch
(Next/Previous) to move up/down through entries in your
Contacts list.
3. On the right side of the display, touch the phone number of the person
you want to call:
(Mobile), (Home), or (Work). CapTel will dial
the number automatically for you.
4. Lift the handset to dial.
You can identify any contact person as a “favorite” for easy dialing. At the
Add/Edit Contacts page, touch
(favorite). See page 88 for instructions.
Contacts
John S.
Best Buy
Corner Pharmacy
John S.
1-321-555-8967
edit
Mobile
previous sync delete
next
1-321-555-4324
Work
1-321-555-8967
Home
Back
Movie Line
William
TIP TIP
Page 73

Customer Service: 888-269-7477
CONTACTS
71
Editing an Existing Contact
To make changes to a contact in your list:
1. From the display screen, touch (Contacts).
2. Under the Contacts list on the left side of display, nd and touch the
name of the contact you wish to edit. To see contacts further down the
list, touch and drag the scroll bar. Information about the contact you
selected appears on the right side of the display.
Touch (Next/Prev) to move up/down through entries in your
Contacts list.
3. On the right side of the display, touch (Edit) to go to the Add/Edit
Contact screen.
4. Touch the eld that you want to change, then use the on-screen
keyboard to type in the new information. Touch the next eld you want
to edit, or move between elds by touching (return) or
Tab
(Tab).
Touch to erase the entire contents of a eld.
5. When you are nished editing the contact, touch
save
(save). The
new contact information will be saved in your contact list.
6. When you are nished, press
HOME
(HOME button) to exit.
You can add a photograph of your contact person to each entry.
Pictures can be entered at the MyContacts website, then synced to your
phone. See Adding a Photo to a Contact on page 73 for instructions.
Add / Edit Contact
First:
Last:
favorite
speed dial
save
cancel
Home:
Work:
Mobile:
Mary
Johnson
1-608-238-5400
<touch to enter home number>
<touch to enter work number>
Q
W E
R
T Y
U
I
O
P
Numbers
Space
A
S D
F
G H
J
K
L
Z
X
C
V
B
N
M
,
.
@
TIP TIP
Page 74

72 CONTACTS Customer Service: 888-269-7477
Removing a Contact
To remove a single contact from your list:
1. From the display screen, touch
(Contacts).
2. Under the Contacts list on the left side of the display, nd
and touch the
name of the contact you wish to remove
. Touch and drag the scroll bar to
see contacts further down the list.
Touch (Next/Prev) to move up/down through entries.
3. On the left side of the display, touch
(Delete) to remove the person
from your contacts.
4. CapTel asks you to con rm you want to delete the contact.
Touch
yes
no
(yes) to remove the contact or
no
(no) to exit.
5. When you are nished, press
HOME
(HOME button) to exit.
Contacts
Mary Cell
Best Buy
Corner Pharmacy
John S.
Mary Cell
Movie Line
1-321-555-6712
remove
favorite
add to
speed dial
edit delete
Work
previous sync contacts add new
next
delete contact?
Mary Cell
press accept to
delete this contact
no yes
TIP
Page 75

Customer Service: 888-269-7477 CONTACTS 73
Adding a Photo to a Contact
Using your computer, you can add photos to your Contact List to make it
easy to dial by picture on your CapTel 2400iBT. You can also add, change,
or delete Contacts on your computer, then download the changes directly
your CapTel 2400iBT phone.
Managing your Contact List is easy to do, but it takes two steps. First, go
online and make changes at the MyContacts website. Then, “sync” with
your CapTel 2400iBT to download the changes directly to your phone.
Please see pages 73–84 for full instructions.
If someone helped set up your CapTel 2400iBT phone, you may want to
consult with them as you manage Contact Lists on your computer.
If you do not have computer access, you can still add, delete, and change
entries in your Contact List by using the touchscreen menu on the CapTel
2400iBT. Access to the MyContacts website is required, however, to add
photos to your Contact List.
TIPNOTE
Add photos and manage
your contact list online at
https://MyContacts.CapTel.com
your contact list online at
Page 76

74 CONTACTS Customer Service: 888-269-7477
Managing Your Contacts List
The MyContacts website helps manage the Contacts List on your CapTel
phone. You can add new contacts, phone numbers, and even photos, then
“sync” them with your CapTel 2400iBT.
Because both the CapTel phone and the MyContacts website need to be set in
sync mode, the sync process is easiest when the computer you are using and
the CapTel phone are located close together. If the phone is in a di erent
location than the computer, it may be helpful to have two people – one by
the phone, one at the computer – to help the sync process go smoothly.
To manage your Contacts List:
1. On a computer that has Internet access, go to the website:
https://MyContacts.CapTel.com
2. The website asks “Would you like to create a new Contact List or load a
previously saved Contact List?“ Click on
(Create New).
NOTE
Page 77

Customer Service: 888-269-7477 CONTACTS 75
3. Enter the name you would like to use for your new Contact List, then
click on
(Create).
4. Click on
(Add Contact).
Page 78

76 CONTACTS Customer Service: 888-269-7477
5. Enter the rst and last name of your contact, then click on (Save).
6. Add the phone number information for your contact. Use the tab key to
move between elds. Click on
(Save Contact) when
information is entered.
To add a photo to this contact: click on
(Add Photo).
Page 79

Customer Service: 888-269-7477 CONTACTS 77
The website lets you browse your computer to select and save an existing
photo. The photo les can be in jpg, png, or gif format.
Click on
(Select Photo), nd and select the photo that you
want to add.
Once your photo is selected, you may re-size or crop the image to t nicely
in the CapTel display window. Only the part of the image inside the green
shaded box will appear on your CapTel display.
To resize your image, click and drag on the slidebar to make the image
bigger or smaller. Click and drag the shaded box area to position it around
your picture.
When you have a photo selected and sized, click on (Save).
TIP
Page 80

78 CONTACTS Customer Service: 888-269-7477
When you are nished entering information for this contact, click on
(Save Contact). The new entry appears in your Contact List on
the left side of the MyContacts website (in alphabetical order by rst name).
Making your contact a Speed Dial number lets you quickly dial-by-picture
on your CapTel phone. Click on
(speed dial) to add this contact to your
Speed Dial list. You may have up to 4 Speed Dial entries.
You can also add this number to your Favorites list for easy dialing.
To add this contact to Favorites, click on
(favorite).
7. Repeat steps 4–6 to add as many contacts as you’d like – up to 100
entries total.
NOTE
Page 81

Customer Service: 888-269-7477 CONTACTS 79
8. When you are satis ed with your Contact List, you must Sync Contacts in
order to save the list to your CapTel phone. Click on
(Sync Contacts), then select (Save Contacts to Phone).
9. The website asks you to select the Electronic Serial Number (ESN) for
your CapTel phone. The ESN can be found on your CapTel phone by
touching
(Contacts), then touching (sync).
On your CapTel display screen:
Contacts
Mary Cell
Best Buy
Corner Pharmacy
John S.
Mary Cell
Movie Line
1-321-555-6712
remove
favorite
add to
speed dial
edit delete
Work
prev sync add new
next
sync your contacts?
Note: your saved contacts may be
changed during the sync process
press accept to start
the sync process
Your CapTel Phone ESN is: 42089600102
accept
cancel
Page 82

80 CONTACTS Customer Service: 888-269-7477
At the MyContacts website:
Click on (Add new ESN), then enter the ESN from the CapTel
display screen into the eld labeled “ESN”. Enter
a name for the ESN in the
eld labeled “ESN Name”. Click on
(Add).
On your CapTel display screen:
10. At the window on your CapTel phone that says, “sync your contacts?”
touch
accept
cancel
(Accept)
.
Contacts
Mary Cell
Best Buy
Corner Pharmacy
John S.
Mary Cell
Movie Line
1-321-555-6712
remove
favorite
add to
speed dial
edit delete
Work
prev sync add new
next
sync your contacts?
Note: your saved contacts may be
changed during the sync process
press accept to start
the sync process
Your CapTel Phone ESN is: 42089600102
accept
cancel
Page 83

Customer Service: 888-269-7477 CONTACTS 81
At the MyContacts website:
Entries from your online Contact List are added to any contacts you may
already have saved on your phone. If you would like to erase the existing
contacts on your phone and replace them with the new Contact List from
your computer, click on “Yes, Erase” on the MyContacts website before you
start the sync process.
The website lets you know when the phone is ready to sync. Make sure
the ESN you want is selected, then click on
(Start Sync) to begin
the process.
NOTE
Page 84

82 CONTACTS Customer Service: 888-269-7477
Your Contact List is saved from the computer onto your CapTel phone.
Watch on your CapTel phone display as the sync completes.
sync is complete
sync summary added deleted changed
contacts 10 0 0
photos 5 0 0
favorites 1 0 –
speed dials 3 0 –
favorites
speed dials 3 0 –
Back
Page 85

Customer Service: 888-269-7477 CONTACTS 83
11. Once your Contact List is synced with your CapTel phone, you have the
option to save your Contacts on your computer.
Saving a Contact List to your computer allows you to keep a back up and
edit your list at a later time. You do not have to save your list on your
computer – once the sync is nished, the Contact List is saved on your
CapTel phone.
If you choose to save your Contact List, make note of where the xml le is
saved on your computer for future reference.
Once the sync process is complete, your Contact List is saved on your CapTel
phone. It will not change until you make changes on the phone or sync
again with a di erent Contact List.
12. Exit the MyContacts website by clicking on
(Contact List),
then selecting
(Exit MyContacts).
TIPNOTE
Page 86

84 CONTACTS Customer Service: 888-269-7477
Other options available at MyContacts.CapTel.com
Under “Contact List”
Manage Favorites – Lets you add or delete contacts in your
Favorites list. You can drag & drop any name from your Contact
List on the left into your Favorites list.
Manage Speed Dials – Lets you add or delete contacts in your
Speed Dial.
Manage ESN(s) – Lets you add or delete the Electronic Serial
Number (ESN) of each CapTel phone.
Create a New Contact List – Lets you create a new Contact List.
You can have multiple Contact Lists (i.e., one for business
contacts, one for personal numbers, etc.).
Rename this Contact List – Lets you rename the current
Contact List.
Exit MyContacts – To leave the MyContacts website. If any
changes have been made, you can save the current Contact List
to your computer. If you do not save, all information will be lost
for security purposes. If the Contact List was already synced to
your CapTel 2400iBT, however, the information will already be
saved on your phone.
Under “File”
Load Contacts from Computer – Opens any Contact Lists that
you may have already saved on your computer, for you to edit or
add new entries to.
Save Contacts to Computer – Lets you save a backup copy of
the current Contact List to your computer. You can access the
saved copy again at a later time to edit or add new entries.
Under “Sync Contacts”
Load Contacts from Phone – Brings the contacts you already
have on your CapTel phone into the MyContacts website for you
to edit or add photos to.
Save Contacts to Phone – Saves the current Contact List on the
MyContacts website directly to your CapTel phone.
Page 87

Customer Service: 888-269-7477
CONTACTS
85
Adding a Contact to Speed Dial
You can set up to four (4) Contacts to be added to Speed Dial. Speed Dial entries
appear every time you lift the CapTel handset, for quick one-touch dialing.
You can even add photos to your Speed Dial entries for easy dialing by picture.
To add a Contact to Speed Dial:
1. From the display screen, touch
(Contacts).
2. In the Contacts list on the left side of the display, nd and touch the
name of the person you want to add to Speed Dial. To see contacts
further down the list, touch and drag the scroll bar.
Touch
(Next/Prev) to move up/down through entries.
3. On the right side of display, touch
(Edit). Touch (Speed Dial).
4.
If there are multiple phone numbers for this contact, the display asks which
phone number (mobile, home, or work) you want to make a speed dial. Touch
the number(s) you want, then touch
accept
cancel
(Accept). A little graphic appears
by the appropriate phone number to indicate it is added to Speed Dial.
5. Touch
save
(save).
6. When you are nished, press
HOME
(HOME button) to exit.
Now, when you pick up the handset, this contact will appear automatically
on the display screen. Simply touch the person’s name or image to dial.
You can add a photograph of your contact person to each Speed Dial entry.
See instructions on page 73.
TIPTIP
Mary Johnson Joe Smith
Veronica Corner Pharmacy
Dial Number
Speed Dials
Contacts
Favorites
Page 88

86 FAVORITES Customer Service: 888-269-7477
SECTION
7
Favorites
This section tells you how to set your most frequently
called Contacts as “favorites”, for quick dialing and
dialing by photo.
TOPICS
About Favorites
Adding a Contact to Favorites
Dialing Favorites
Removing a Contact from Favorites
Page 89

Customer Service: 888-269-7477 FAVORITES 87
About Favorites
Favorites let you dial select numbers quickly and easily from the display
screen. You can select any entries in your contact list to be included in your
favorites list. You can save up to 10 favorites.
To add someone to your Favorites list, they must rst be entered into your
Contacts list. If you want to edit one of your Favorite’s information, you must
edit their entry in your Contacts list. See Adding a New Contact on page 69.
NOTE
Favorites
Mary Cell
1-321-555-6712
Mobile
prev delete
next
Church
Fred Taylor
Mary Cell
Movie Line
Sally Morgan
call
Back
Page 90

88 FAVORITES Customer Service: 888-269-7477
Adding a Contact to Favorites
To add a person from your Contact list to Favorites:
1. From the display screen, touch
(Contacts).
2. In the Contacts list on the left of the display, nd and touch the name of
the person you want to add to Favorites. To see contacts further down
the list, touch and drag the scroll bar or touch
(Next/Prev) to
move up/down through entries.
3. Touch
(edit).
4. Touch
(favorite).
5. If there are multiple phone numbers for this contact, the display asks
which phone number (mobile, home, or work) you want to make a
favorite. Touch the number(s) you want, then touch
accept
cancel
(Accept). A little
star appears by the appropriate phone number to indicate it is a favorite.
If your Favorites list is full (10 entries), you need to remove a Favorite rst to
make room in memory. See page 86 for instructions.
6. Touch
save
(save).
7. When you are nished, press
HOME
(HOME button) to exit.
Favorites
Mary Cell
1-321-555-6712
Mobile
prev delete
next
Church
Fred Taylor
Mary Cell
Movie Line
Sally Morgan
call
Back
NOTE
Page 91

Customer Service: 888-269-7477
FAVORITES
89
Dialing Favorites
To dial a person in your Favorites list:
1. From the display screen, touch
(Favorites).
2.
Under the Favorites list on the left of display, nd and touch the name of
the person you wish to call.
3. On the right side of the display, touch (Call). CapTel dials the phone
number automatically.
4. Lift the handset to dial.
Removing a Contact from Favorites
You can remove a person from your Favorites list. Deleting a person from
Favorites does NOT delete them from your Contacts list.
To delete a person in your Favorites list:
1. From the display screen, touch
(Favorites).
2. On the left side of the display, nd and touch the name of the person
you wish to delete.
3. Touch
(Delete).
4. CapTel asks you to con rm that you want to remove this contact from
Favorites. Touch
yes
no
(yes)
to remove the Favorite or
no (no)
to exit.
5. When you are nished, press
HOME
(HOME button) to exit.
Removing a person from your Favorites list does NOT remove them from
your Contacts list.
NOTE
Page 92

90 SETTINGS Customer Service: 888-269-7477
This section explains how to adjust settings on
your CapTel 2400iBT to t your preferences.
SECTION
8
Settings
TOPICS
Setting the Display
Brightness
Screen Timeout
Night Mode
Connections
WiFi Settings
Bluetooth
Saving Captions After
Hang up
Captions Button
Ring Flasher
Saving Conversation
Volume
Keypad Lights
Language
Setting the Ringer
Volume
Adjusting the Ringer
Pitch
Tone Control
Time & Date
About Your CapTel
Phone
Updating Your
Software
Advanced Settings
Directions for some settings are found in other chapters of this user manual.
NOTE
Page 93
Customer Service: 888-269-7477
SETTINGS
91
Setting the Display Brightness
You can adjust the brightness of the display screen for easy reading in
well-lit or dimly-lit areas. The display screen brightness changes as you
move the setting so you can see what it will look like.
Settings → Display → Brightness
Screen Timeout
As an energy-saving measure, your CapTel screen will start becoming more
dim and gradually go complete dark after 60 seconds of non-use. Touching
the display screen restores it to its original brightness. You can set how
much time you want the screen to wait before becoming dim.
Settings → Display → Screen Timeout
Night Mode
There may be times that you want your CapTel display to be at a darkened
setting, called Night Mode. This is helpful, for example, in a bedroom at
night when you don’t need the bright display screen. You can set how long
Night Mode stays on before the screen goes dark.
Settings → Display → Night Mode
Connections
Allows you to connect your CapTel 2400iBT to various networks and
devices, including to your WiFi network or to a Bluetooth assistive device
such as a headset or neckloop.
Settings → Connections
Page 94

92 SETTINGS Customer Service: 888-269-7477
WiFi Settings
If you use CapTel in a WiFi environment, the Network Settings shows you a
listing of all available WiFi networks within range, in order of the strongest
signal strength to the weakest. You can change between WiFi networks or
save common settings that you use most often.
Settings → Connections → Network
Bluetooth®
You can set up your CapTel 2400iBT to work with a Bluetooth device,
giving you the convenience of wireless (cord-free) use of Bluetooth
headphones or neckloops. Bluetooth devices sold separately. The
Bluetooth Settings lets you “pair” your device to the CapTel phone, and
shows you a list of the available Bluetooth devices within range of your
phone.
Settings → Connections → Bluetooth
Saving Captions After Hang Up
You can set CapTel to save conversation captions after the call is over for
later review, or to erase all captions each time the telephone is hung up.
The default setting is Save Captions On.
Settings → General Settings → Save Captions On
Page 95

Customer Service: 888-269-7477 SETTINGS 93
Captions Button
You can set the CAPTIONS button to automatically stay on or to
automatically stay o at the beginning of every call. The default setting is
Captions ON. If the CAPTIONS button is set to OFF, captions will not come
on automatically. You must press the CAPTIONS button manually in order
to turn captions on.
Settings → General Settings →
CAPTIONS
Captions Button on
Ring Flasher
CapTel includes a bright Ring Flasher that lights up to alert you every time
a call comes in or whenever you have answering machine messages
waiting. You can adjust the ash rate of the Ring Flasher for di erent
indicators. For example, the Ring Flasher can blink evenly to indicate an
answering machine message and can pulse to indicate an incoming call.
To adjust the Ring Flash patterns:
Settings → General Settings → Flasher Settings
Saving Conversation Volume
Your CapTel phone ampli es the voice of the caller up to 40dB. Every time
you hang up the phone, the volume returns to a mid-range setting. You
can set CapTel to remember the conversation volume setting so that it
always stays at your desired volume level. The default setting is Save
Volume O .
Settings → General Settings → Save Volume
Page 96

94 SETTINGS Customer Service: 888-269-7477
Keypad Lights
The CapTel keypad lights up for easy dialing in dark environments. You can
set the keypad lights to go o when your CapTel is not in use. When set to
“o ” the keypad lights will go o after approximately 30 seconds of non-use.
The default setting is Keypad Lights On.
Settings → General Settings → Keypad Lights On
Language
You can set CapTel menus and captions to be in Spanish or English.
The default setting is English.
Settings → General Settings → English or Spanish
Setting the Ringer Volume
You can turn the Ringer Volume up to a setting you hear best. The default
setting is ve (5). To turn the ringer o , select setting level zero (ringer muted).
Settings → Sounds → Ringer Volume
Adjusting the Ringer Pitch
You can adjust the frequency of the CapTel ringer to a High, Medium, or
Low range that you hear best. The default setting is Med.
Settings → Sounds → Ringer Pitch
Page 97

Customer Service: 888-269-7477
SETTINGS
95
Tone Control
You can adjust the frequency of the sound coming through the CapTel
handset to a frequency range that you hear best. Select from Low, Medium,
High, or Customizable Frequency Ranges. To customize the frequency
range, see page 33 for instructions.
Settings → Sounds → Tone
Time & Date
You can adjust the time and date displayed on your CapTel phone screen.
Touch the white area around the date/number that you want to change.
Settings →
1
5
Monday
Time and Date
About Your CapTel Phone
Provides details about how your CapTel phone is set up to help with
troubleshooting issues.
Settings → About
Updating Your Software
You can download the most current version of CapTel software to your phone.
Once the download is complete, your CapTel phone will re-boot as part of
the update process. Software downloads are encrypted for optimal security.
Settings → About →
Update
Update
Page 98

96 SETTINGS Customer Service: 888-269-7477
Advanced Settings
Dialing Pre x
Some offi ce environments require you to dial a number in order to get an
outside line. For example, you may need to dial a 9 or another number
sequence before you can place a call. CapTel 2400iBT lets you add a dialing
pre x, then will dial it for you automatically for every call placed from your
Contact list, or when using the Speed Dial, Call History, or Answering
Machine history. If you dial the phone number directly, you will need to
enter the Dialing Pre x at the time you dial. The default setting is no
dialing pre x.
Settings → General Settings → Advanced Settings
→
1 2 3
4 5 6
7 80 9
+
Dialing Pre x.
Dynamic or Static IP
Using a Dynamic IP address (DHCP) is recommended to avoid IP con icts.
Some networks do not allow DHCP. In those cases, a Static IP address may
be used. The default setting is Dynamic IP.
Settings → General Settings → Advanced Settings
→
Dynamic or Static IP
Review Captions on Hang Up
You can set your CapTel phone to automatically go to conversation review
mode after you hang up. This allows you to review the previous
conversation(s) immediately after every call without using the Menu
system. The default setting is o .
Settings → General Settings → Advanced Settings
→
Review Captions on Hang Up
Page 99

Customer Service: 888-269-7477 SETTINGS 97
Line in Use Detector
CapTel can help detect when another telephone in your home or offi ce is
o -hook (for example, if someone is talking on another line or another
telephone line in your home is not hung up). This can be helpful if multiple
people/devices share your telephone line.
When Line in Use is on: you can join a call in progress that has been
answered on an extension line by simply picking up the CapTel handset
and you will get captions. The default setting is on.
When Line in Use is o : If the call was answered on an extension line, you
can join by picking up the CapTel handset and pressing one of the keys on
the number keypad. The captioning service will connect to the call and you
will get captions.
Settings → General Settings → Advanced Settings
→
Line in Use Detector
Voice Activity Detector
The built-in answering machine allows one minute for your callers to leave
a message. In some cases, your callers’ messages may be shorter than one
minute. You can set the answering machine to hang up the telephone line
once the incoming caller stops talking (stops leaving their message)
instead of waiting the full one minute. The default setting is o .
Settings → General Settings → Advanced Settings
→
Voice Activity Detector
Page 100

98 TROUBLESHOOTING Customer Service: 888-269-7477
Troubleshooting
Power Reset
On occasion, issues with your Internet connection may impact your CapTel
2400iBT. For example, you may have experienced times when your Internet
seems to get “hung up” or things don’t look correct on your computer
screen. These cases can sometimes impact how your CapTel phone operates.
To correct, you need to “reset” your CapTel phone, the same way you
might “reset” your computer.
To Reset: Briey unplug CapTel 2400iBT from the power adapter, wait
10 seconds, then plug it back in. The display screen lights up while the
phone powers up. Then the display automatically takes you through the
set-up steps again, asks you to conrm your language choice, checks your
Internet connection, and conrms your time/date zone. CapTel will also
check to make sure you have the most current software, and download any
updates as needed.
 Loading...