

Page 1
USING YOUR
SUPERPRINT 4425
™
305–002705
Page 2
Acknowledgement
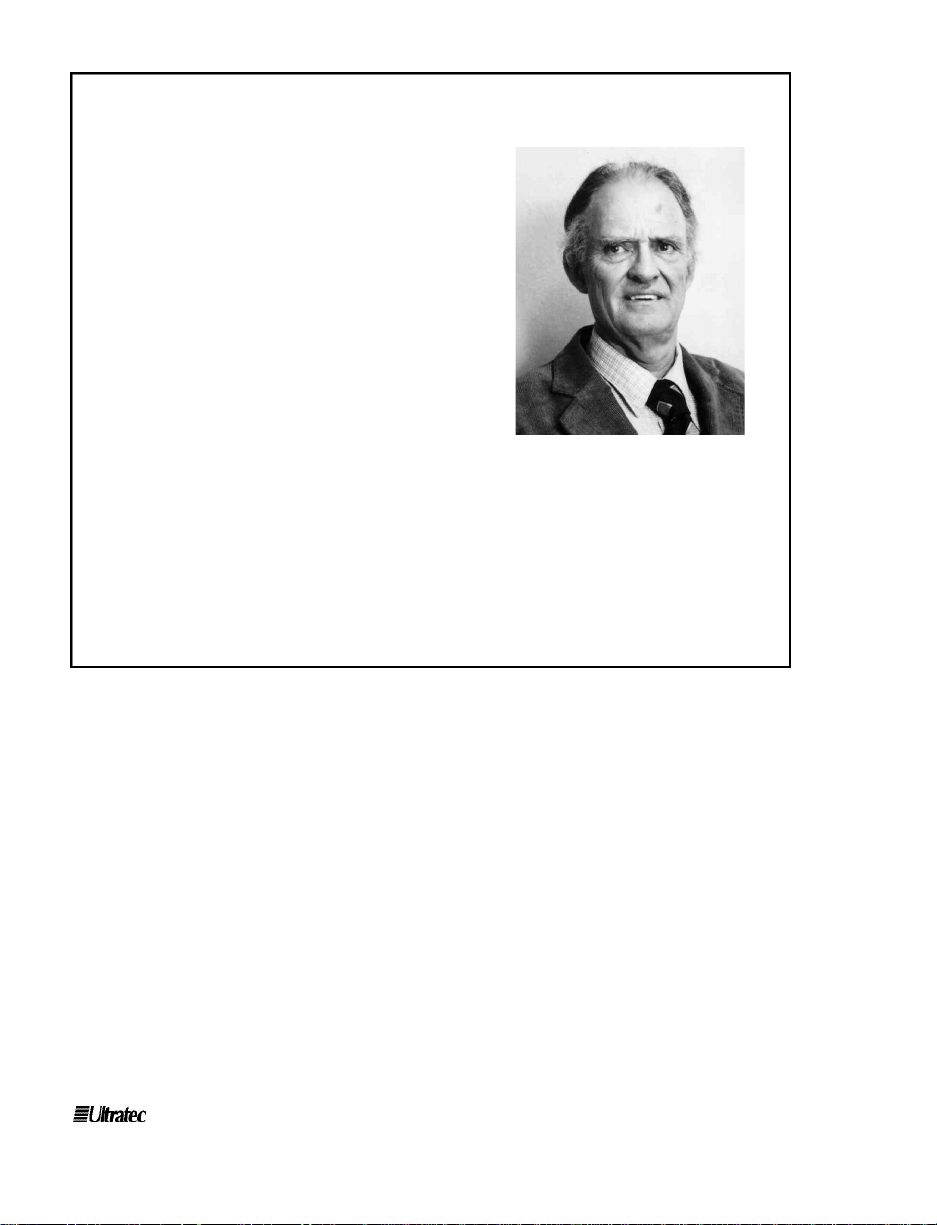
In 1963, Dr. Robert H. Weitbrecht, an
American physicist who was deaf, developed an
acoustic coupler that could send and receive
teletypewriter signals over the telephone lines.
His invention, the Weitbrecht Modem, enabled
people who are deaf to use the telephone for
the first time.
While modern technology now makes it
possible to build advanced microcomputer
devices like your new Ultratec text telephone,
the Weitbrecht modem remains the major
technological breakthrough that began
telecommunications for the deaf. Ultratec wishes to acknowledge the importance
of Dr. Weitbrecht’s contribution to the welfare of people who are deaf the
world over.
Dr. Robert H. Weitbrecht,
1920-1983, inventor of the
first text telephone modem.
Ultratec, Inc.
450 Science Drive
Madison, WI 53711
(608) 238-5400 (Voice/TTY)
Fax: (608) 238-3008
Email: service@ultratec.com
www.ultratec.com
Sixth edition
February 2002
First printing
© 1995-2002 Ultratec, Inc.
and Turbo Code are registered trademarks of Ultratec, Inc.
Superprint 4425, TTY Announcer and Auto ID are trademarks of Ultratec, Inc.
Page 3
CONTENTS
Important safety instructions p. 4
Introduction p. 6
Ctrl
™
™
TCtrl
9Ctrl
3Ctrl
HCtrl
1Ctrl
2Ctrl
BShiftCtrl
ICtrl
Shift
4Ctrl
SpacebarCtrl
+ 33
WShiftCtrl
VCtrl
Ctrl
9
ReturnShiftCtrl
17
27
Overview of the Superprint 4425
Chap. 1 Set-up p. 9
Plugging in power and a telephone line 10
About the control key 12
About the clock + 12
Setting the clock + 13
Superprint 4425 function keys 14
About Auto ID
™
About the printer + 18
About the built-in help feature + 19
Chap. 2 Calling p. 21
Making a call in direct connect + 22
Dialing tips 23
Using the hangup key + 24
Answering a call in direct connect 25
Acoustic calling and answering 26
About Turbo Code
®
Turning off Turbo Code + + 27
Using Turbo Code interrupt + 27
Reading conversation memory + 29
Chap. 3 Advanced calling p. 31
Using the greeting memo + 32
Using the TTY Announcer
Wait for response + + 34
Using the relay voice announcer + 34
Saving a relay voice announcer number + 35
Auto busy redial + + 36
7
CONTENTS • 1
Page 4

Change to other TTY + + 36
ShiftCtrl
Three-way calling + + 37
1
Transferring a call + 37
Ctrl
C
FShiftCtrl
Chap. 4 Auto-answer p. 39
How auto-answer works 40
+
Turning on auto-answer + 41
Turning off auto-answer 41
Interrupting auto-answer 41
Reading auto-answer messages 42
Changing the contents of the pre-programmed auto-answer memo + 43
Changing to a different auto-answer memo + 44
Ctrl
Esc
Esc
Esc
=
6Ctrl
+
Ctrl
=
Auto-answer options 44
Remote message retrieval 46
Chap. 5 Memos p. 49
Saving a memo + 50
Sending a memo + 51
6Ctrl
5Ctrl
Editing or clearing a memo 52
Printing memos + 53
Saving a conversation as a memo + 54
6Ctrl
7Ctrl
Chap. 6 Directory p. 55
Saving a telephone number + 56
BackspaceCtrl
Editing or clearing a telephone number 58
Printing directory numbers + 59
BackspaceCtrl
Chap. 7 Options p. 61
Setting the print case + 62
Setting the print size + 62
Setting the display mode + 62
Setting pulse dialing + 63
Setting the number of auto-answer rings + 63
Setting the out-going auto-answer memo + 64
Changing the auto-answer password + 64
9Ctrl
9Ctrl
9Ctrl
9Ctrl
9Ctrl
9Ctrl
9Ctrl
2 • CONTENTS
Page 5

Changing the greeting memo + 65
Turning off printing of the date and time + 65
Setting the date and time + 66
Saving a relay voice announcer number + 66
Turning off Turbo Code + 67
Turning off Auto ID + 67
9Ctrl
Turning off interrupt + 68
Changing ASCIIseek time + 68
Turning off the auto-answer relay voice announcer + 68
9Ctrl
9Ctrl
9Ctrl
9Ctrl
9Ctrl
9Ctrl
9Ctrl
9Ctrl
Chap. 8 Care & repair p. 71
Replacing the printer paper 72
About the batteries 73
Replacing the batteries 74
Troubleshooting 75
Repair 78
Chap. 9 Codes p. 79
Setting the Baudot code baud rate + 80
Optional ASCIIcode + 80
0Ctrl
0Ctrl
Sticky keys p. 84
Specifications p. 85
Other TTYs available from Ultratec p. 88
Index p. 90
Conversation Etiquette Back cover
CONTENTS • 3
Page 6

Important safety instructions
When using your Superprint 4425, basic safety precautions should
always be followed to reduce the risk of fire, electric shock, and
injury to persons.
1. Read and understand all instructions.
2. Follow all warnings and instructions on the Superprint 4425.
3. Unplug the Superprint 4425 from the wall outlet before
cleaning. Do not use liquid or aerosol cleaners. Use a damp
cloth for cleaning.
4. Do not use the Superprint 4425 near water, for example, near
a bath tub, wash bowl, kitchen sink, laundry tub, in a wet
basement, or near a swimming pool.
5. Do not place the Superprint 4425 on an unstable cart, stand,
or table. The Superprint 4425 may fall, causing serious damage
to the Superprint 4425.
6. The Superprint 4425 should be operated only from the type of
power source indicated on the marking label. If you are not
sure of the type of power supply to your home, consult your
dealer or local power company.
7. Do not allow anything to rest on the power cord. Do not
locate the Superprint 4425 where people can walk on the
cord.
8. Do not overload wall outlets and extension cords. This overloading can result in a fire or electric shock.
9. To reduce the risk of electric shock, do not disassemble the
Superprint 4425, but take it to a qualified service person when
service or repair work is required. Opening or removing
covers may expose you to dangerous voltages or other risks.
Incorrect re-assembly can cause electric shock when the
Superprint 4425 is subsequently used.
10.Avoid using a telephone (other than a cordless type) during an
electrical storm. There is a remote risk of electric shock from
lightning.
4 • SAFETY INSTRUCTIONS
Page 7

11.Unplug the Superprint 4425 from the wall outlet and refer
servicing to qualified service personnel under the following
conditions:
a. When the power supply cord or plug is damaged or frayed.
b. If liquid has been spilled into the Superprint 4425.
c. If the Superprint 4425 has been exposed to rain or water.
d. If the Superprint 4425 does not operate normally by
following the operating instructions. Adjust only those
controls that are covered by the operating instructions.
Improper adjustment of other controls may result in damage
and will often require extensive work by a qualified technician
to restore the Superprint 4425 to normal operation.
e. If the Superprint 4425 has been dropped and/or damaged.
f. If the Superprint 4425 exhibits a distinct change in
performance.
12.Do not use the Superprint 4425 to report a gas leak in the
vicinity of the leak.
13.Ultratec recommends plugging your Superprint 4425 into a
surge-protected outlet. This will protect the TTY from damage
caused by electrical surges due to lightening or other causes.
Battery safety
Caution: To reduce the risk of fire or injury to persons, read and
follow these instructions:
1. Use only the type and size battery specified in the battery
instructions for your unit.
2. Do not dispose of the batteries in a fire. Cells may explode.
Check local codes for possible special disposal instructions.
3. Do not open or mutilate the batteries. Released electrolyte is
corrosive and may cause damage to the eyes or skin. It may be
toxic if swallowed.
4. Exercise care in handling batteries in order not to short them
with conducting materials such as rings, bracelets, and keys.
The battery or conductor may overheat and cause burns.
Save these instructions
SAFETY INSTRUCTIONS • 5
Page 8

INTRODUCTION
Welcome to the Superprint 4425™TTY from Ultratec. Your new
TTY has the following special features:
A ring flasher that tells you when someone is calling.
Turbo Code®communication protocol. This feature transmits
signals to other Turbo Code TTYs as fast as you type. Turbo Code
also lets you interrupt the other person’s typing.
Auto ID™alerting system. Auto ID automatically alerts the
answering party that you are calling by TTY.
A relay voice announcer that sends a voice message saying, “Please
use text telephone or dial relay,” followed by the number of your
relay service.
Other features that make calling quick and easy are:
• Auto-answer answers calls while you are gone and plays back
messages when you return or when you call from another TTY.
• Call progress displays ringing or busy status of the telephone
line.
• Keyboard dialing from the keyboard or memory, and redialing
of the last number called.
• Call transfer, conference calling, and credit card calling.
• 32k memory—enough to save hundreds of memos and
telephone numbers.
• Normal, bold, or wide print sizes.
• Automatic printing of the date and the time on conversations.
• An extra telephone jack for a signaler or telephone.
• Sticky keys, a feature that allows typing with only one finger if
necessary.
Please note that in this manual TTY, TDD, and text telephone all
refer to the same device.
6 • INTRODUCTION
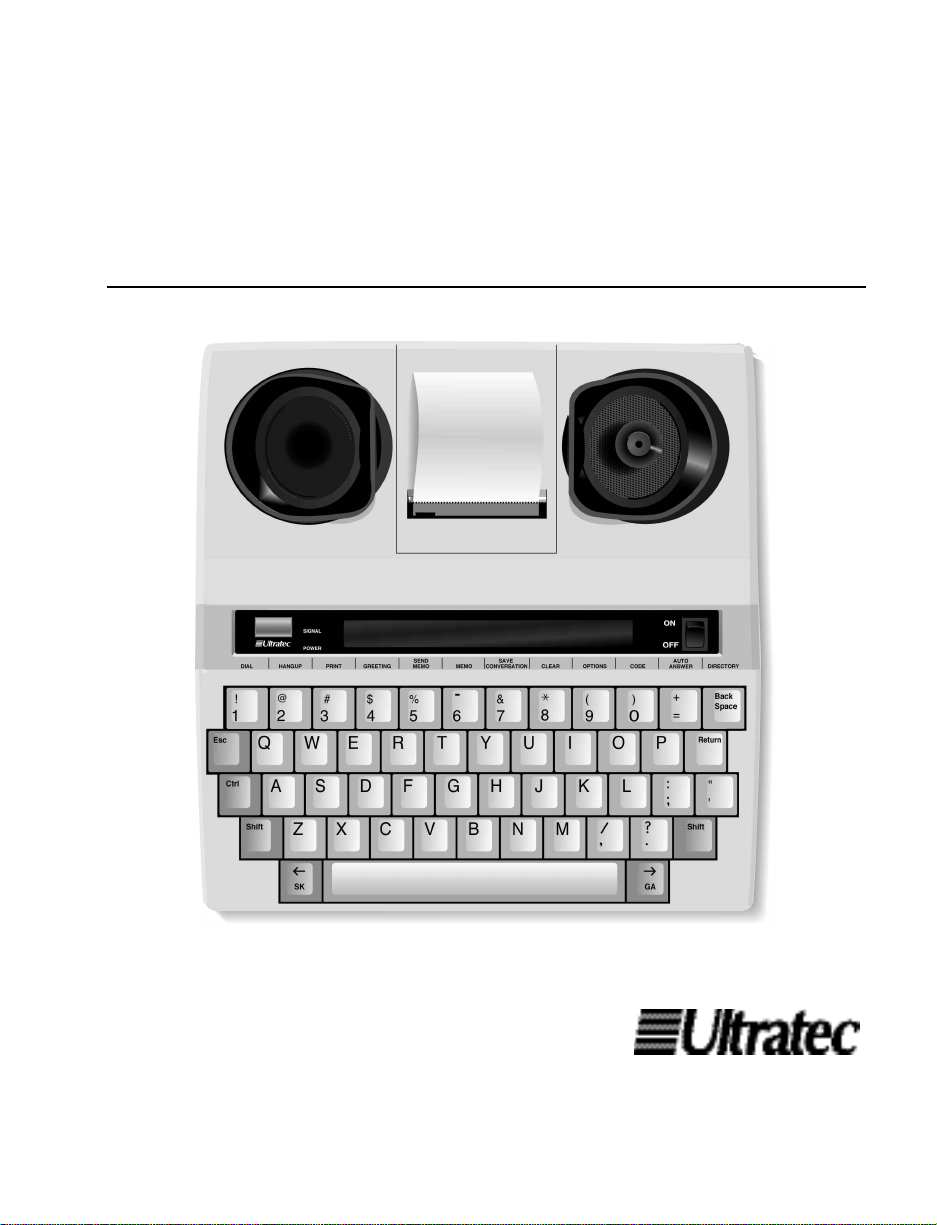
Page 9

Overview of the Superprint 4425
™
INTRODUCTION • 7
Page 10
8 • INTRODUCTION
Page 11

C H A P T E R
1
All you need to do to set up the Superprint 4425 is plug it in! You
have to plug in the AC adapter for 24 hours to charge the
batteries. The ring flasher will not work properly until the
batteries are fully charged. After that, leave the AC adapter
plugged in all the time unless you need to use the batteries during
a power outage or while traveling.
The best way to use the Superprint 4425 is to plug in a telephone
line. This is called direct connect. But if you cannot plug in a
telephone line, you can also make and answer calls by putting a
telephone handset in the Superprint 4425 acoustic cups.
Plugging in power and a telephone line p. 10
About the control key p. 12
About the clock + p. 12
Setting the clock + p. 13
Superprint 4425 function keys p. 14
About Auto ID
About the printer + p. 18
About the built-in help feature + p. 19
SET-UP
Ctrl
TCtrl
9Ctrl
™
3Ctrl
HCtrl
p. 17
SET-UP • 9
Page 12
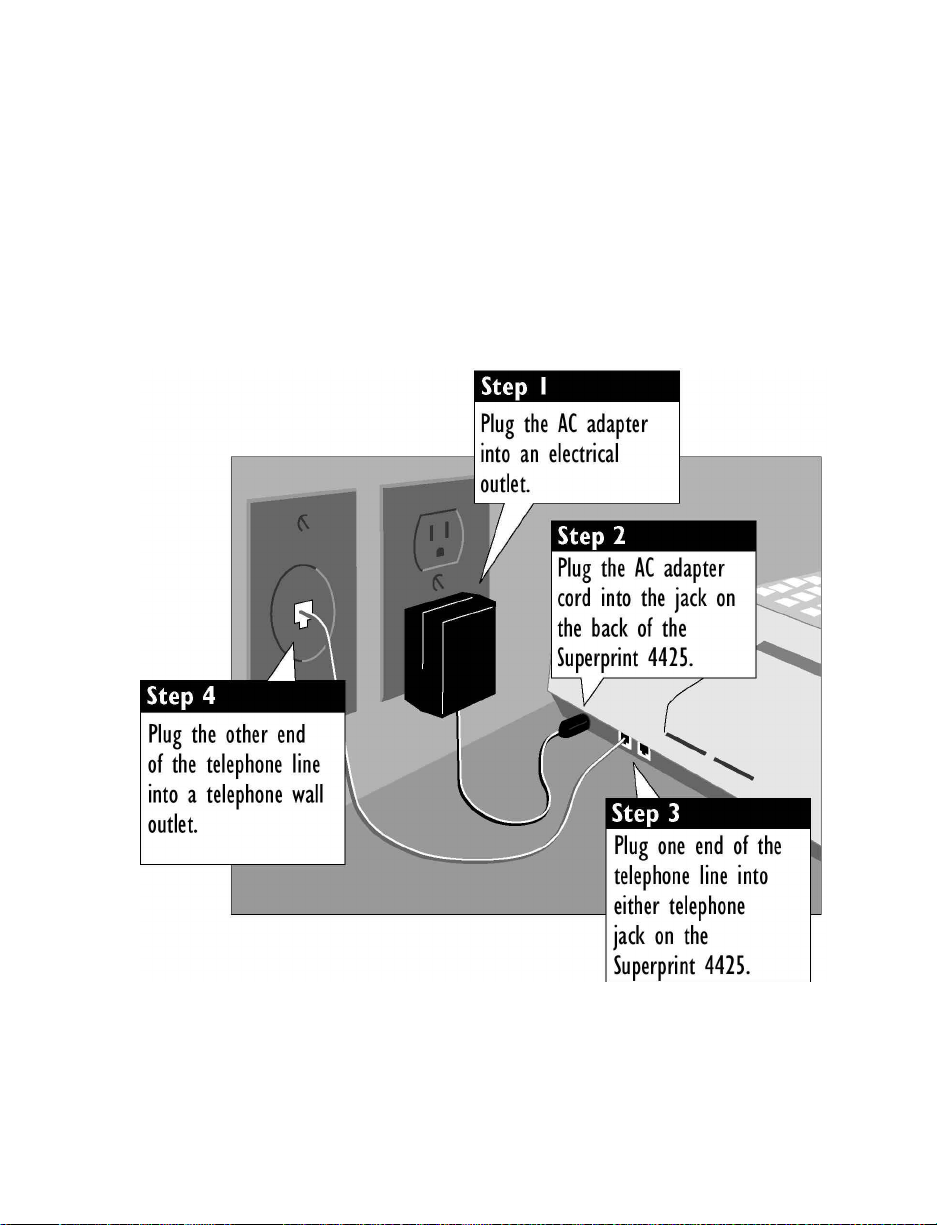
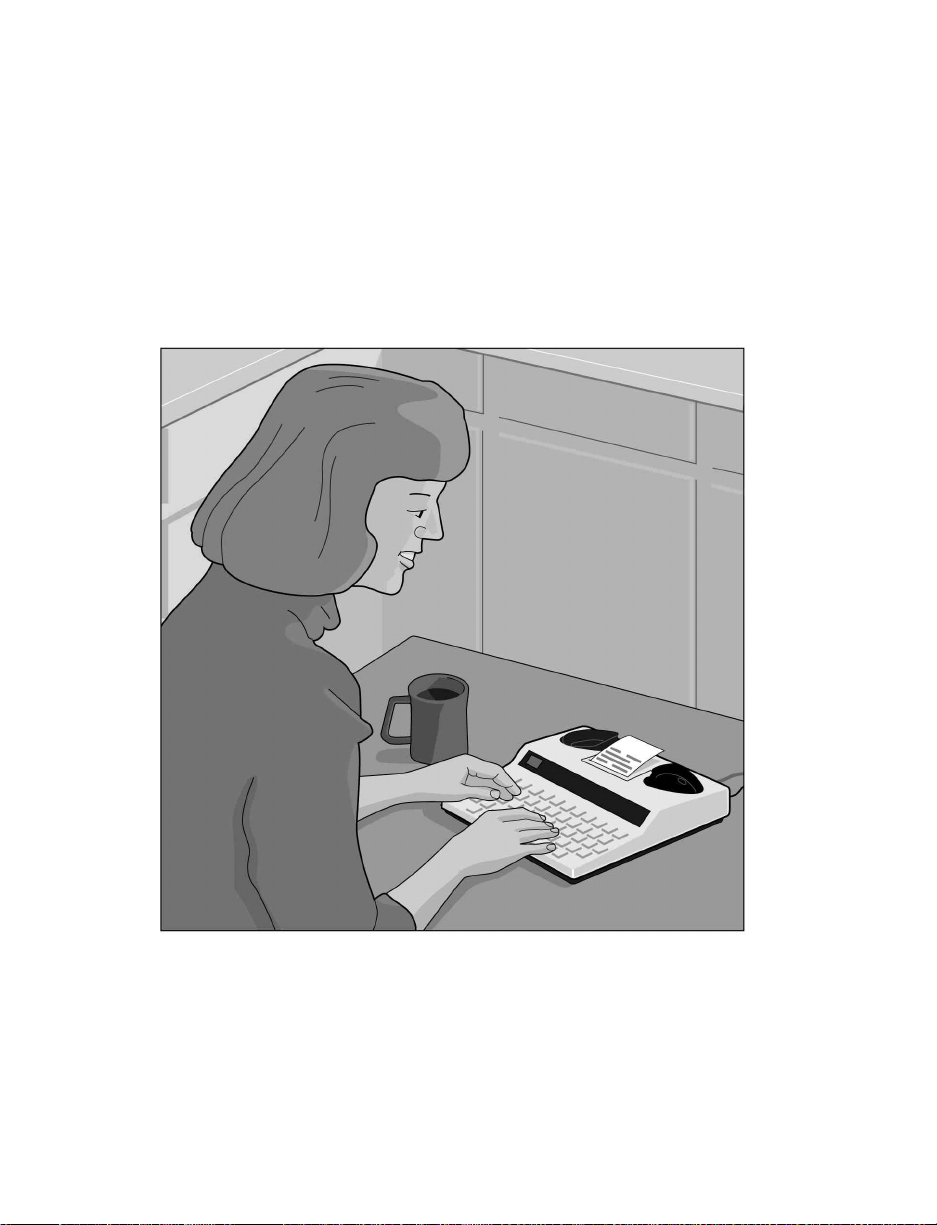
Plugging in power and a telephone line
Be sure to pull the plastic tab out of the battery compartment on
the bottom of the Superprint 4425 before you plug in the AC
adapter.
Caution! Do not plug the Superprint 4425 into any line other than
a standard telephone line. If you do, you may damage your
telephone system or the Superprint 4425, and you will void your
warranty.
The picture above shows how to set up for direct connect use.
Direct connect means that the telephone line is plugged directly
into the Superprint 4425. You do not need a telephone. When you
use direct connect, you can dial directly from the keyboard and
use auto-answer.
10 • SET-UP
Page 13

You can also connect by putting a telephone handset in the
acoustic cups if for some reason you cannot plug a telephone line
into the Superprint 4425. See Acoustic calling and answering on
page 26 for more information.
Charging the batteries
The AC adapter supplies electricity to the Superprint 4425 and
charges the batteries. Leaving the AC adapter plugged in will not
harm the Superprint 4425 or the batteries.
Leave the AC adapter plugged in for 24 hours to charge the
batteries when you set up your Superprint 4425. You can use the
Superprint 4425 at the same time. Fully-charged batteries will
provide 45 to 60 minutes of normal use. For more information on
using battery power, see About the batteries on page 73.
What kind of telephone line?
When the telephone line is directly connected to the Superprint
4425, you need a standard (analog) telephone line with either
pulse or tone dialing. If you plan to use the Superprint 4425 in an
office, the line may need modification because many offices have
digital telephone systems. Contact your telephone installer to
insure your line supports a standard single-line telephone. This is
the same kind of line you need for many fax machines or
computer modems.
Setting pulse or tone dialing
Your Superprint 4425 comes set for tone dialing, which is used by
most telephone lines. If your line uses pulse dialing, make sure the
Superprint 4425 is set to use pulse dialing. For more information,
see Setting pulse dialing on page 63.
Connecting a signaler or telephone
The Superprint 4425 has an extra jack for a telephone or a
signaler. You can use either jack for the telephone line.
SET-UP • 11
Page 14
About the control key
Ctrl
The control key gives instructions to the Superprint 4425
when you hold it down and press a function key. Most of the
function keys are on the top row of the Superprint 4425. See
Superprint 4425 function keys on pages 14-16 for a complete list.
You must hold down the key and then press the other key.
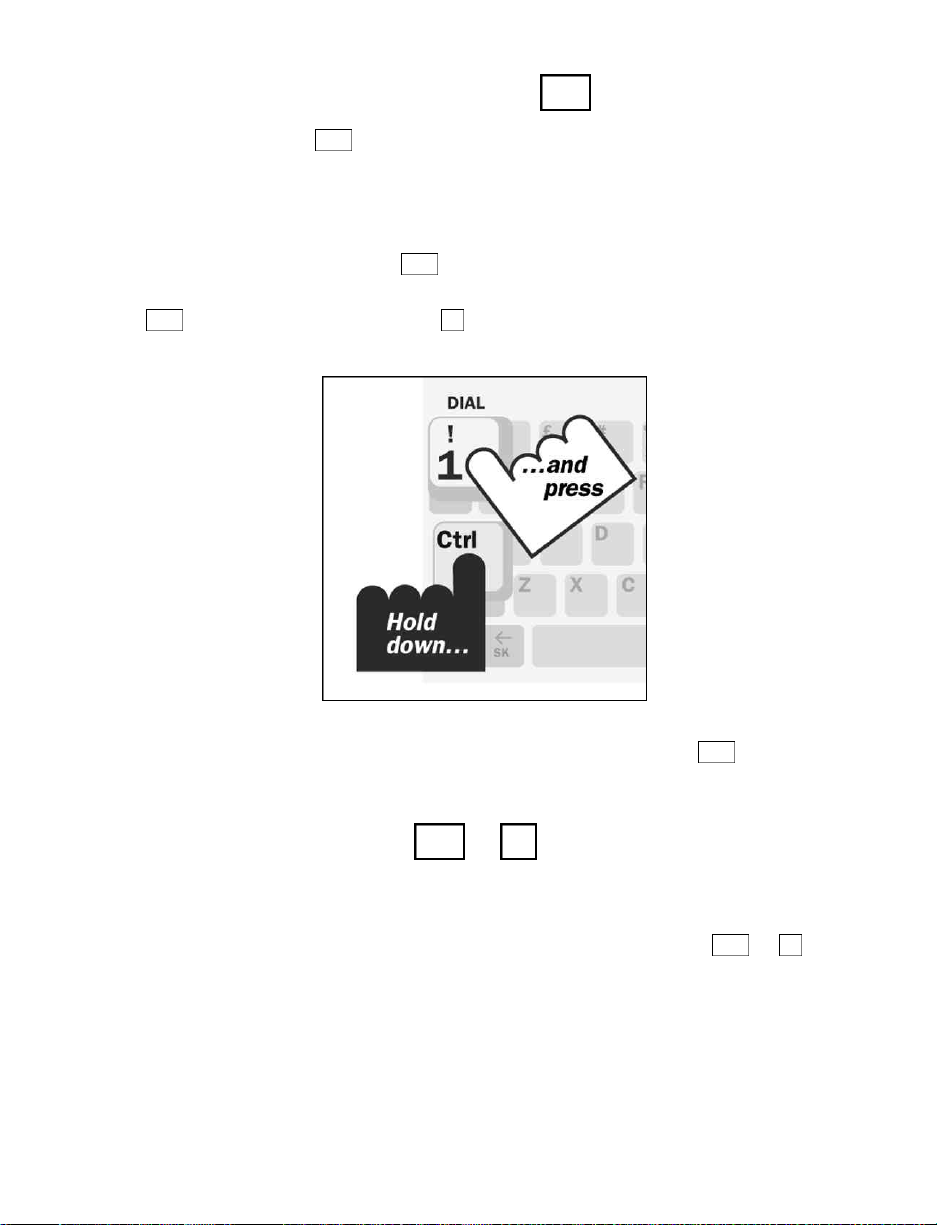
For example, to dial a telephone number you must hold down the
Ctrl
key while you press the key.
Ctrl
Ctrl
1
When you use a function, you can use the escape key to quit
whatever you are doing and save changes.
About the clock +
The clock feature displays and prints the date and time at the
beginning of each conversation, at the beginning of each autoanswer message, and whenever you press the time key + .
You must set the clock after you plug in the Superprint 4425 to
display and print the correct date and time.
12 • SET-UP
Esc
TCtrl
TCtrl
Page 15
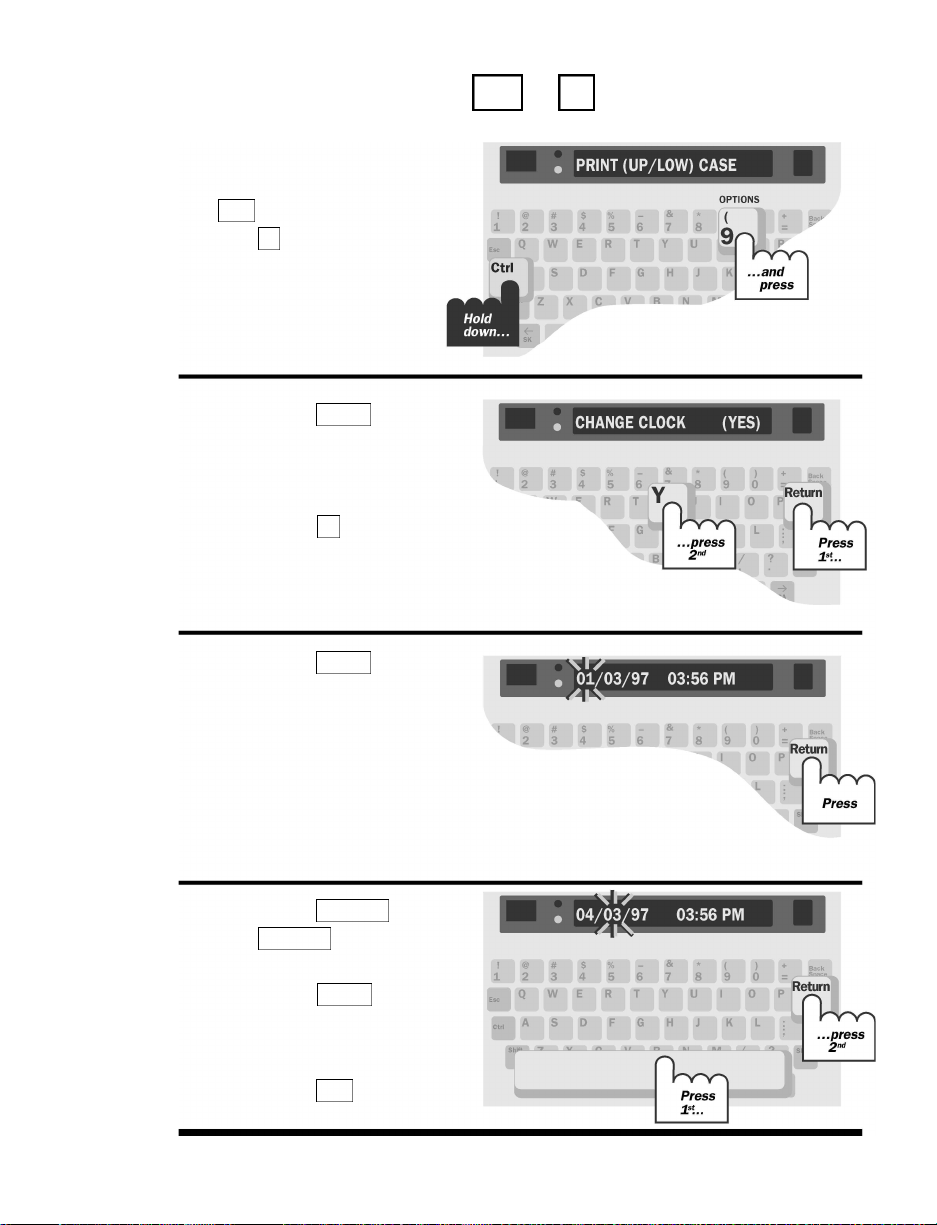
Setting the clock +
1. Press the options
key (hold down the
Ctrl
key and press
9
the key).
9Ctrl
2. Press the key
Return
until you see the
change clock option
on the display, then
press the key to
Y
change the display
to YES.
3. Press the key.
Return
The display shows
the date and time
with the month
flashing.
4. Press the or
Backspace
the key to
Spacebar
set the month, then
press the key
Return
to move to the next
setting.
Press the key
Esc
when you finish.
SET-UP • 13
Page 16

Superprint 4425 function keys
This diagram shows the most important Superprint 4425
functions. Functions tell the Superprint 4425 to do something or
change a setting. For example, the auto-answer function turns on
auto-answer. Or, use the options function to change the print size.
2Ctrl
+
dials a
telephone
number
(page 22).
+
hangs up the
telephone
line
(page 24).
1Ctrl
turns the
printer on
and off
(page 18).
3Ctrl
+
sends the
greeting
memo
(page 32).
4Ctrl
+
+
sends a
memo
(page 51).
5Ctrl
saves or
edits a
memo
(page 50).
6Ctrl
+
Hold down
this key
before
pressing a
function
key.
14 • SET-UP
VCtrl
+
turns on the
relay voice
announcer
(page 34).
Page 17

All functions begin by pressing and holding the key. The
Ctrl
chart on the next page lists all of the Superprint 4425 functions.
Use the page numbers to find more information about each
function.
8Ctrl
+
clears all or
part of
memory
(page 30).
+
tells how to
use
functions
(page 19).
HCtrl
+
changes
settings
(page 61).
9Ctrl
changes
codes
(page 79).
0Ctrl
+
SpaceCtrl
+
turns on
the TTY
Announcer
(page 33).
+
Ctrl
+
=
turns on
auto-answer
(page 41).
BckspCtrl
+
saves
telephone
numbers
(page 56).
SET-UP • 15
Page 18
Complete list of function keys
D i a l + Dials a telephone number p. 22
H a n g u p + Hangs up the telephone line p. 24
P r i n t + Turns the printer on and off p. 18
G r e e t i n g + Sends the greeting memo p. 32
Send memo + Sends a memo p. 51
M e m o + Saves, edits, or clears a memo p. 50
Save + Saves a conversation as a memo. p. 54
1Ctrl
2Ctrl
3Ctrl
4Ctrl
5Ctrl
6Ctrl
7Ctrl
c o n v e r s a t i o n
Ctrl
8Ctrl
9Ctrl
0Ctrl
+
=
BackspaceCtrl
HCtrl
VCtrl
SpacebarCtrl
ICtrl
TCtrl
ReturnShiftCtrl
C l e a r + Clears all or part of memory p. 30
O p t i o n s + Changes settings p. 61
C o d e + Changes codes p. 79
A u t o - a n s w e r + Turns on auto-answer p. 41
D i r e c t o r y + Saves telephone numbers p. 56
H e l p + Explains how to use functions p. 19
Relay voice + Turns on the relay voice announcer p. 34
A n n o u n c e r + Turns on the TTY Announcer p. 33
I n t e r r u p t + Interrupts the other person’s typing p. 27
Ti m e + Displays/prints the date and time p. 12
Auto busy + + Redials a busy number up p. 36
r e d i a l to 15 times
Wait for + + Flashes ring flasher when p. 34
WShiftCtrl
r e s p o n s e on-hold ends
Three-way + + Uses three-way calling telephone p. 37
FShiftCtrl
c a l l i n g s e r v i c e
Change to + + Changes from Turbo Code to p. 27
BShiftCtrl
B a u d o t Baudot code
R e m a i n + Shows space in memo or directory p. 51
RCtrl
m e m o r y
S e n s i t i v i t y + Improves reception (Baudot only) p. 75
Change to + + Puts call on hold to change to p. 36
SCtrl
CShiftCtrl
other TTY other TTY
16 • SET-UP
Page 19

About Auto ID
The Auto ID™feature alerts a hearing person that you are calling
from a TTY. It alerts the person by sending several audible tones
over the telephone line every few seconds. Auto ID helps
emergency services such as 911 detect that you are calling by
TTY.
Auto ID comes on when you turn on your Superprint 4425 and
continues until you start a conversation. If you are on-line, you
will see SENDING AUTO ID on the display every time the
Superprint 4425 sends out tones.
Auto ID will also begin sending tones whenever no one types for
a few minutes during a conversation. It continues until someone
starts typing.
™
Turning off Auto ID +
You can turn off Auto ID by following these steps:
1. Press the options key ( + ). You will see PRINT
(UP/LOW) CASE on the display.
2. Press the key until you see AUTO ID (ON) on the
display.
3. Press the to change the setting to OFF.
4. Press the key to save the new setting and leave options.
Note: When you turn off Auto ID, it stays off and will not send
tones until you turn it on again. This means that an emergency
service center such as 911 cannot use Auto ID tones to detect
your TTY call.
Return
Spacebar
Esc
9Ctrl
9Ctrl
SET-UP • 17
Page 20

About the printer
The printer is on when you turn on your Superprint 4425 for the
first time. Press the print key ( + ) to turn off the printer.
The display says PRINTER OFF. Press the print key again to turn
the printer back on. You can turn the printer on or off at any
time, including during a call.
The printer starts a new line after 24 characters are typed. If a
word is too long to fit at the end of a line, the printer divides it
with a dash. You can also start a new line yourself by pressing the
Return
key. Often the last line will not be printed at the end of a
conversation unless you press the key before you turn off
the machine.
+
Return
3Ctrl
3Ctrl
Setting the print case +
The Superprint 4425 prints everything you type in lowercase
(small) letters and everything the other person types in uppercase
(CAPITAL) letters. You can change this setting so that everything
is printed in uppercase letters by following these steps:
1. Press the options key ( + ). The display says PRINT
(UP/LOW) CASE.
2. Press the to change the setting to UPPER.
3. Press the key to save the setting and leave the options.
This option stays changed until you change it again or you reset
the Superprint 4425.
S p a c e b a r
Esc
9Ctrl
Setting the print size +
Your Superprint 4425 is set to print 24 characters on each line
(normal). You can change this setting and print 19 characters
(bold) or 14 characters (wide) per line. Follow these steps to
change the print size:
1. Press the options key ( + ). You will see PRINT
(UP/LOW) CASE on the display.
9Ctrl
9Ctrl
9Ctrl
18 • SET-UP
Page 21
2. Press the key until you see PRINT SIZE (NORMAL) on
Return
the display.
3. Press the to change the setting to BOLD or WIDE.
4. Press the key to leave the options.
Spacebar
Esc
The print size stays set until you change it again or reset the
Superprint 4425.
Turning off printing of the date and time
9Ctrl
+
You can stop the Superprint 4425 from printing the date and time
on conversations and messages by following these steps:
1. Press the options key ( + ). You will see PRINT
9Ctrl
(UP/LOW) CASE on the display.
2. Press the key until you see PRINT DATE/TIME
Return
(ON) on the display.
3. Press the to change the setting to OFF.
4. Press the key to save the new setting and leave options.
Spacebar
Esc
About the built-in help feat u re +
HCtrl
Hold down the key and press the key for short
HCtrl
descriptions of how to use different functions.
P ress + to display a list of help messages. After the list is
finished, hold down the key and press the function key yo u
want help with. For example, press + to find out how to
HCtrl
Ctrl
Ctrl
+
=
t u rn on auto-answe r.
P ress the key when you finish reading the help message .
Esc
SET-UP • 19
Page 22
20 • CALLING
Page 23
C H A P T E R
2
This chapter covers the basics of making and receiving TTY calls
and how to review a conversation after you finish a call. It also
explains Turbo Code and how Turbo Code allows you to interrupt
the other person while he or she is typing.
Making a call in direct connect + p. 22
Dialing tips p. 23
Using the hangup key + p. 24
Answering a call in direct connect p. 25
Acoustic calling and answering p. 26
About Turbo Code
Turning off Turbo Code + + p. 27
Using Turbo Code interrupt + p. 27
Reading conversation memory + p. 29
CALLING
2Ctrl
®
1Ctrl
p. 27
BShiftCtrl
ICtrl
Ctrl
CALLING • 21
Page 24
Making a call in direct connect +
1. Turn on the
Superprint 4425.
2. Press the dial key
(hold down the
key and press the
key).
3. Type the telephone
number you are
calling. Use the
Backspace
correct mistakes.
Press the key
to dial the number.
key to
Return
Ctrl
1
Ctrl
1
4. When you see an
answer on the
display, type a
greeting.
Turn off the
Superprint 4425
when you finish.
22 • CALLING
Page 25

Signal light and display
The signal light (and display in direct connect) show what is
happening on the telephone line in the following ways:
Signal light Display Telephone line
Steadily on Dial tone
Flashing slowly RINGING Telephone ringing
Flashing quickly BUSY Telephone busy
Flickering Person picking up
Dialing tips
You may need to type a 9 or other number to reach an outside
line if you are using the Superprint 4425 in an office. The exact
method of dialing will depend on your local telephone system.
Dialing a TTY call should be the same as dialing a voice call.
Use a comma to put in a one-second pause. For example: 9,222
5555.
For long distance, include a 1 and the area code.
telephone or speaking
Use an ! for a hook flash. A hook flash is used in a voice mail
system or to transfer a call.
You cannot use * and # with pulse dialing.
Redialing the same number +
Follow these steps to redial the last number you dialed:
1. Press the dial key (hold down the key and press the
key).
You will see TYPE NAME, NUM, OR CR on the display.
2. Press the key.
Return
Ctrl
Ctrl
1
CALLING • 23
1
Page 26
Dialing from the directory +
You can dial from the directory if you have numbers saved. Follow
these steps to dial from the directory:
Ctrl
1
1. Press the dial key (hold down the key and press the
key).
You will see TYPE NAME, NUM, OR CR on the display.
2. Type a name or press the to review the list of
directory names.
3. Press the key when you find the name you want.
Return
Spacebar
Using a telephone to dial
If you have a telephone connected to the telephone line along
with your Superprint 4425, you can use the telephone to dial by
following these steps:
1. Dial the number on the telephone.
2. Turn on the Superprint 4425.
3. Press any key on the Superprint 4425 to go on-line.
4. Hang up the telephone.
Using the hangup key +
1Ctrl
2Ctrl
Follow these steps to hang up and make another call without
turning off the Superprint 4425:
1. Press the hangup key (hold down the key and press the
2. Press the key to hang up. Press the the key if you decide
not to hang up.
24 • CALLING
Ctrl
2
key). You will see HANG UP PHONE Y/N on the display.
NY
Page 27
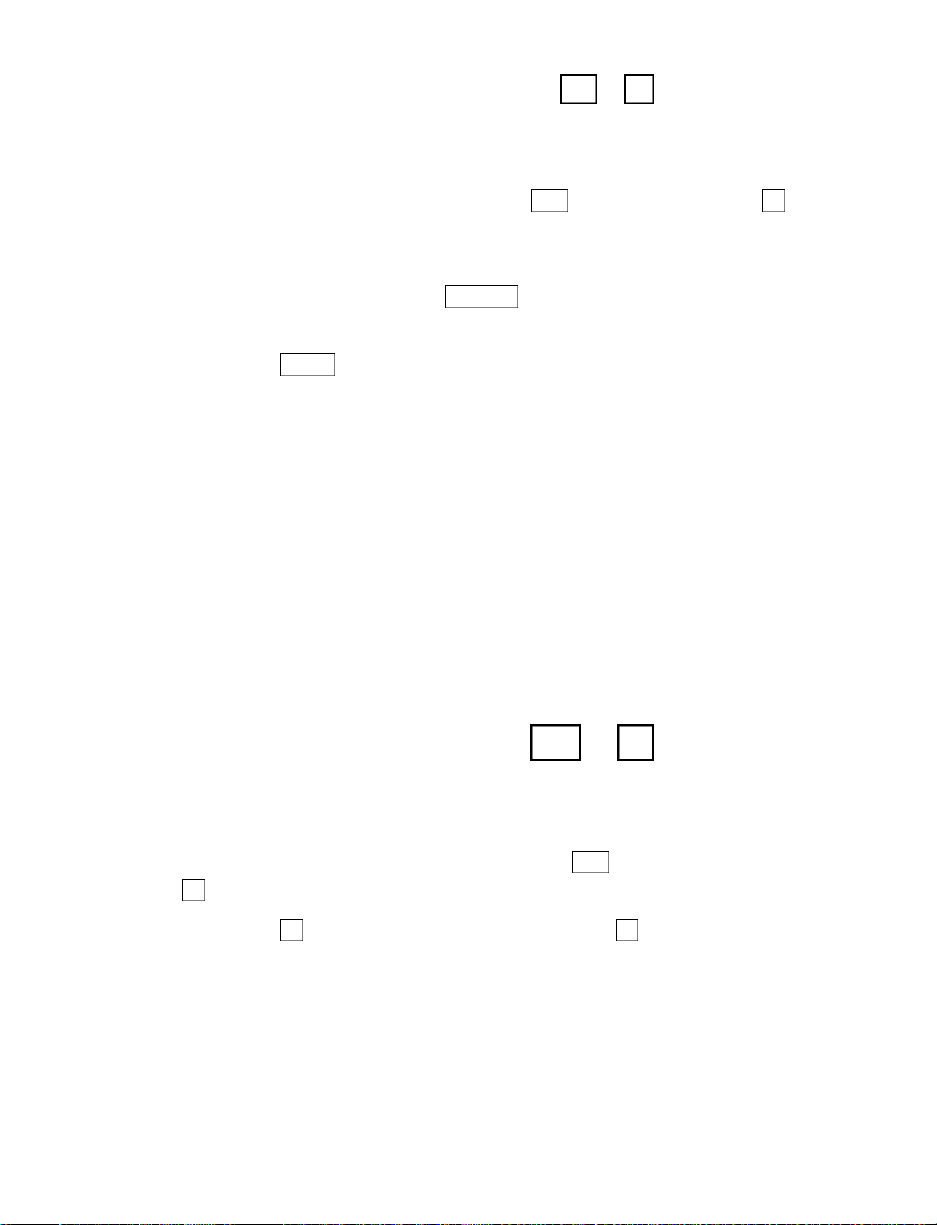
Answering a call in direct connect
1. The ring flasher
flashes when the
telephone rings.
2. Turn on the
Superprint 4425.
You will see RING
on the display.
3. Type a greeting and
wait for an answer.
4. Turn off the
Superprint 4425
when you finish.
CALLING • 25
Page 28
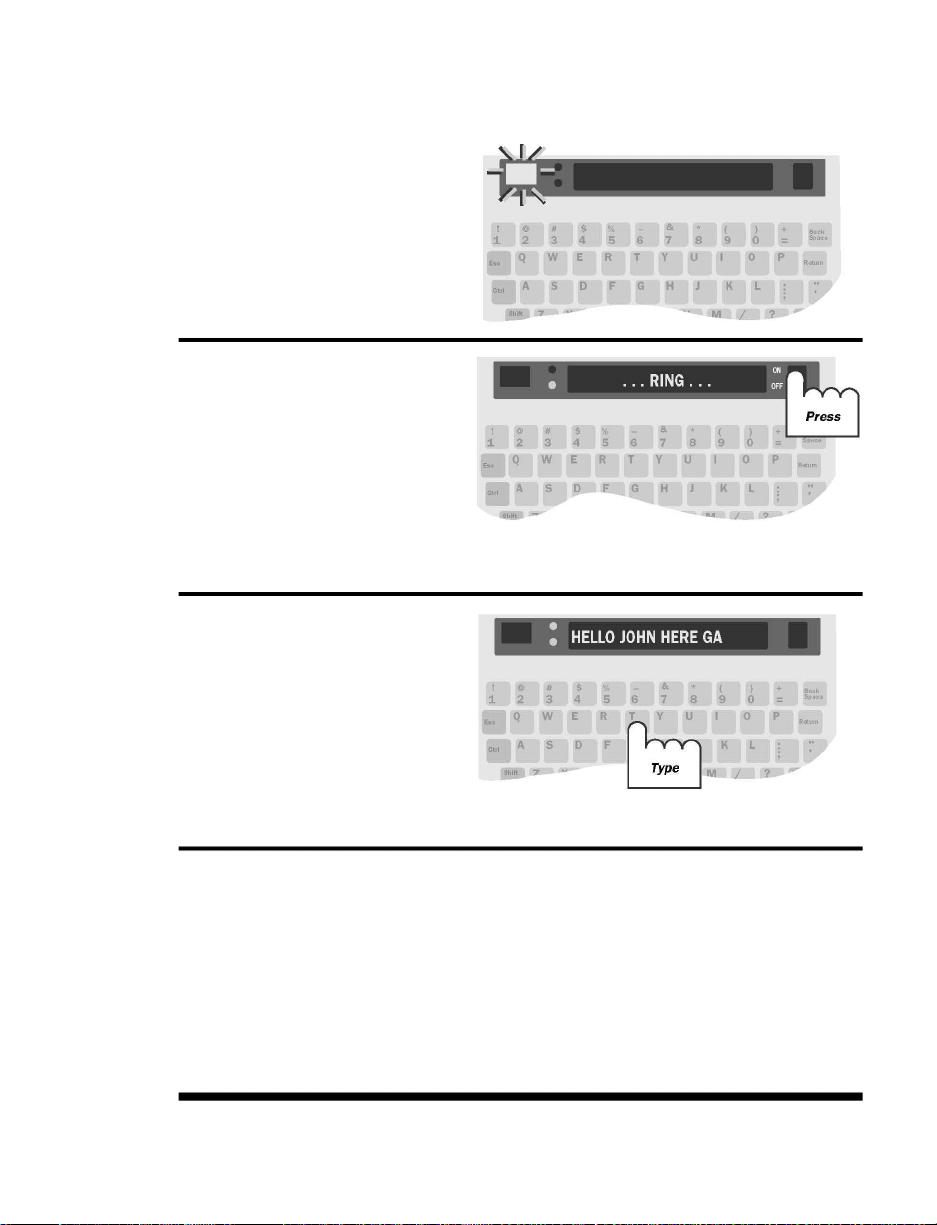
Acoustic calling and answering
1. Put the telephone
handset in the acoustic
cups on the Superprint
4425. Make sure the
telephone cord is on
the left side.
2. Turn on the Superprint
4425. If you are
answering a call, type a
greeting. If you are
making a call, go on to
Step 3.
3. Dial the number on the
telephone.
4. When you see an
answer on the display,
type a greeting.
Hang up the telephone
and turn off the
Superprint 4425 when
you finish.
26 • CALLING
Page 29

About Turbo Code
Turbo Code is an improved version of Baudot code. It sends
signals to other Turbo Code TTYs as fast as you type and allows
you to interrupt the other person at any time during a
conversation. The Superprint 4425 takes care of connecting in
Turbo Code or Baudot code, depending on which code the other
TTY is using. It only uses Turbo Code when you connect with
another Turbo Code TTY.
You know you are connected in Turbo Code if a dot appears in
the lower left corner of the display.
This is how the Turbo Code dot looks on the display.
®
Turning off Turbo Code + +
You can switch to Baudot code at any time by pressing
+ + . The Superprint 4425 will return to using either
Turbo Code or Baudot code when you turn the unit off.
Using Turbo Code interrupt +
You can interrupt the other person when he or she is typing by
following these steps:
1. Be sure you see the Turbo Code dot in the lower left corner of
your display.
2 . P ress the interrupt key ( + ) while the other person is
typing. You will see INTERRUPT REQUESTED on the display.
3. The other person will see “Interrupt” on their display. He or
she can choose to stop typing and let you go ahead or ignore
your interruption and continue.
BShiftCtrl
Ctrl
ICtrl
CALLING • 27
BShiftCtrl
I
Page 30

If you see INTERRUPT on your display while the ring flasher
flashes, it means that the other person wants to interrupt you and
start typing. You can choose to stop and let the other person go
ahead or continue typing yourself. You may also see INTERRUPT
on your display even when you are not connected in Turbo Code
if the other person taps the spacebar a few times.
Turning off Turbo Code interrupt +
9Ctrl
You can turn off interrupt so that the other person cannot send an
interrupt to you. Turning off interrupt does not affect outgoing
interrupts. You can still send an interrupt to the other person.
Follow these steps to turn off interrupt:
1. Press the options key ( + ). You will see PRINT
9Ctrl
(UP/LOW) CASE on the display.
2. Press the key until you see INTERRUPT (ON) on the
Return
display.
3. Press the to change the setting to OFF.
4. Press the key to save the new setting and leave options.
Spacebar
Esc
28 • CALLING
Page 31

Reading conve r s ation memory +
A conversation is everything you and the other person type
during a call. Conversations are saved one after another in the
conversation memory until the memory fills up. When the
memory is full, the Superprint 4425 starts clearing the oldest
conversations to make room for new ones.
1. Press the left arrow key
(hold down the key
and press the key)
to move back in memory. To move faster, hold
down the key and
press the key.
2. Press the right arrow key
(hold down the key
and press the key)
to read forward. If you
do not want to print
what you read, turn off
the printer before pressing the right arrow key.
Shift
Shift
Shift
Shift
3. Press any key to return to
the end of memory when
you finish.
If necessary, turn the
printer back on.
CALLING • 29
Page 32

Clearing conversations
If, for some reason, you do not want to leave a conversation in
memory, you can clear the conversation memory yourself. This
erases all conversations, but does not clear memos, directory
entries, or auto-answer messages.
Follow these steps to clear all conversations:
1. Press the clear key ( + ). You will see CLEAR
(CONVERSATION) on the display.
2. Press the key.
3. Press the key when you see CLR CONVERSATION Y/N.
Press the key if you decide not to clear.
Return
Y
N
8Ctrl
30 • CALLING
Page 33

C H A P T E R
ADVANCED
3
This chapter describes Superprint 4425 features that can make
your calling easier and more enjoyable. Several of these features
enable you to take advantage of your telephone’s advanced calling
features. For the basics of making and answering calls, see
Chapter 2.
Using the greeting memo + p. 32
Using the TTY Announcer
Wait for response + + p. 34
Using the relay voice announcer + p. 34
Saving a relay voice announcer number + p. 35
Auto busy redial + + p. 36
Change to other TTY + + p. 36
Three-way calling + + p. 37
Transferring a call + p. 37
CALLING
™
ReturnShiftCtrl
1Ctrl
4Ctrl
SpacebarCtrl
+ p. 33
WShiftCtrl
VCtrl
9Ctrl
CShiftCtrl
FShiftCtrl
ADVANCED CALLING • 31
Page 34

Using the greeting memo
Your Superprint 4425 comes with a greeting memo already saved
in the list of memos. The memo says HELLO GA. Follow these
steps to answer a call with the greeting memo:
1. Turn on the Superprint 4425.
+
4Ctrl
2. Press the greeting key (hold down the key and press the
4
key). You will see HELLO GA on your display while the
memo is sent over the telephone line.
Ctrl
Changing the contents of the greeting
memo +
You can change what the greeting memo says by following these
steps:
1. Press the memo key ( + ). You will see EDIT MEMO> on
the display.
2. Type GREETING and press the key. This tells the
Superprint 4425 that you want to edit the memo named
“Greeting.”
3. Press the clear key ( + ). You will see CLEAR
CONTENTS Y/N on the display.
4. Press the key to erase the contents of the memo.
5. Type the new message you want to send as a greeting.
6Ctrl
6Ctrl
Return
8Ctrl
Y
6. Press the key to save the new message.
If you want to test your new message, press the greeting key
( + ).
You can also change the memo you send when you press the
greeting key to any other memo you have saved in the list of
memos by following the steps on page 65. See the Memos chapter
for information on how to create a memo.
32 • ADVANCED CALLING
4Ctrl
Esc
Page 35

Using the TTY Announcer
The TTY Announcer message is a recording of a woman’s voice
that says, “TTY call, please use text telephone.” Each time the
voice speaks, the message is also displayed. Use the TTY
Announcer when you think the person you are calling is
expecting a voice call and may hang up if no one responds after
they say hello.
1. Dial a number (see
pages 22, 23, and 26 for
more information on
dialing). If you are using
direct connect, watch
the signal light and
display for a ring signal.
2. Press the Announcer
key (hold down the
Ctrl
key and press
Spacebar
the ).
™
+
SpacebarCtrl
3. The announcer
stops when you
start your
conversation. You
can also turn it off
by pressing any key.
ADVANCED CALLING • 33
Page 36

Wait for response
Use the wait for response feature when the other person tells you
to hold. The Superprint 4425 will flash the ring flasher when the
other person starts typing again. Follow these steps to turn on
wait for response:
1. When the other person types, “Hold please,” or something
similar, hold down the and keys and press the key
( + + ). The display says WAITING.
2. When you see the ring flasher flashing, the other person is
typing. Continue your conversation. The ring flasher will stop
when you start typing.
WShiftCtrl
+ +
WShiftCtrl
WShiftCtrl
Using the re l ay voice announcer
The relay voice announcer is a recording that tells a hearing
person you are answering with a TTY and that the call should go
through a relay service.
When the signal light flickers, telling you that someone is
speaking instead of typing,
press + to turn on the relay voice announcer.
A woman’s voice repeats “Please use text telephone or dial relay.”
You will see the message on the display at the same time. The
message stops when someone starts typing.
The relay voice announcer is programmable. It will tell the caller
what number to dial if you type in your relay service’s telephone
number by following the instructions on the next page.
VCtrl
+
VCtrl
34 • ADVANCED CALLING
Page 37

Saving a relay voice announcer
number +
1. Press the options
key (hold down the
Ctrl
key and press
9
the key).
2. Press the key
until you see the
relay option on the
display, then press
the to
change the setting
to YES.
3. Press the key
and type the relay
service telephone
number. Use the
Backspace
correct mistakes.
Return
Spacebar
Return
key to
9Ctrl
4. Press the key to
save the number.
Esc
ADVANCED CALLING • 35
Page 38

Auto busy redial
When a number is busy, the Superprint 4425 can redial the
number by itself up to 15 times. It will let you know when it
makes a connection by flashing the ring flasher. You must be
using direct connect to use this feature. Follow these steps to turn
on auto busy redial:
1. Dial a number. If the number is busy, the display says BUSY.
+ +
ReturnShiftCtrl
2. Hold down the key and the key and press the
key
( + + ). The display says AUTO REDIAL 01. The
Superprint 4425 will redial each minute. The display shows
how many times the Superprint 4425 has redialed.
3. The ring flasher flashes when the line is ringing. When you
see an answer message on the display, type a greeting.
Press the key to stop auto busy redial.
ReturnShiftCtrl
Esc
Change to other TTY
If you want to change TTYs in the middle of a conversation, you
can put the call on hold, go to another TTY, and tell the
Superprint 4425 to hang up. You must be using direct connect to
use this feature.
1. Hold down the and keys and press the key
( + + ) to put the call on hold. Leave the Superprint
4425 on.
2. Go to another TTY connected to the same telephone line
(either direct connect or acoustic), turn the TTY on and type
three periods. The Superprint 4425 will hang up.
CShiftCtrl
+ +
CShiftCtrl
ReturnShiftCtrl
CShiftCtrl
3. Continue your conversation from the second TTY.
Note: This feature is useful for changing telephone extensions in
your home. It is not meant to be used to transfer calls in an office.
Follow these steps to use the change to other TTY feature.
36 • ADVANCED CALLING
Page 39

Three-way calling + +
If your telephone service includes three-way calling, the
Superprint 4425 three-way calling feature lets you put one call on
hold, call another number, and carry on a conversation among
three people. Follow these steps to use the three-way calling
feature:
1. Call the first number and begin your conversation.
FShiftCtrl
2. Place the first person on hold by pressing the key, the
key, and the key
( + + ).
You will see HOOK FLASH on the display followed by TYPE
NAME, NUM, OR CR.
3. Dial the second number and begin your conversation.
4. Press + + to reconnect to the first person. You
now have a three-way calling conversation.
If the second number is busy, press + + to reconnect
with the first person.
You must have three-way calling service from your telephone
company to use this feature.
Note: If someone calls you to set up a three-way conversation, you
should press + + to be sure that you are using Baudot
(45) code. You may have originally connected in Turbo Code and
all three people in a three-way conversation must be using Baudot
(45) code.
F
FShiftCtrl
FShiftCtrl
FShiftCtrl
BShiftCtrl
ShiftCtrl
Transferring a call
Office telephone systems vary widely and specifics of how to
transfer a call will be different for each system. Most telephone
systems require a hook flash to transfer a call. On the Superprint
4425, typing an ! when you are dialing sends a hook flash. Here is
an example of the steps required to transfer a call while you are
on the line with another person:
Ctrl
+
1
ADVANCED CALLING • 37
Page 40

1. Press the dial key ( + ). You will see TYPE NAME, NUM,
Ctrl
1
OR CR on the display.
2. Type an ! (hold down the key and press the key).
Shift
1
3. Type the number of the extension to which you are
transferring the call.
4. Press the key.
5. Press the hangup key ( + ) or turn off your Superprint
Return
2Ctrl
4425 to hang up when you see the last number you dialed
appear on the display.
The exact steps you need to follow will depend on your local
telephone system. Transferring a TTY call will require the same
steps as transferring a voice call.
38 • ADVANCED CALLING
Page 41

C H A P T E R
4
Use auto-answer when you want the Superprint 4425 to answer
TTY calls and take messages when you are busy or away. You can
also use auto-answer when you are working around your home or
office to make sure you do not miss calls. You must be using
direct connect to turn on auto-answer.
How auto-answer works p. 40
Turning on auto-answer + p. 41
Turning off auto-answer p. 41
Interrupting auto-answer p. 41
Reading auto-answer messages p. 42
Changing the contents of the pre-programmed
Changing to a different auto-answer memo + p. 44
Auto-answer options p. 44
Remote message retrieval p. 46
AUTO-ANSWER
+
Ctrl
=
Esc
Esc
Esc
auto-answer memo + p. 43
6Ctrl
Ctrl
+
=
AUTO-ANSWER • 39
Page 42

How auto-answer works
The Superprint 4425 answers a call by sending the relay voice
announcer message and the out-going auto-answer memo.
The relay voice announcer message says, “Please use text
telephone or dial relay.” It also adds a relay number if you have
saved one. See Using the relay voice announcer on pages 34
and 35 for more information about the relay voice announcer
message.
The out-going auto-answer memo is a short text message which
says, “You have reached an answering machine, please leave a
message, GA.” You can change this message to say anything else
you want or you can choose any of your other memos to use as
your out-going auto-answer memo.
If the caller leaves a TTY message, the Superprint 4425 saves the
message, prints it if the printer is on, and adds 1 to the number of
messages. The Superprint 4425 hangs up after 45 seconds of
silence.
Note:
Auto-answer cannot record voice messages.
About auto-answer memory
Auto-answer memory has enough room for at least 100 short
messages. The only limit to the number of auto-answer messages
that can be saved is the size of auto-answer memory, which is
22,000 characters.
If the memory does fill up, MESSAGE MEMORY FULL is added to
the last message and no more messages are saved. The Superprint
4425 will still answer the telephone when memory is full if the
printer is on. It will still count messages and print them. If autoanswer memory fills up and the printer is off, the Superprint 4425
stops answering the telephone.
40 • AUTO-ANSWER
Page 43

Turning on auto-answer +
Ctrl
1. Press the auto-answer key
(hold down the key
and press the key). If
you see REVIEW
MESSAGES Y/N on the
display, press the key
to read messages or press
N
the key if you decide
not to read them.
Ctrl
+
=
Y
+
=
2. Press the key.
Return
Auto-answer is on.
Be sure to leave the
Superprint 4425 on.
Turning off auto-answer
Press the key or turn off the Superprint 4425 to turn off auto-
Esc
Esc
answer. If you see REVIEW MESSAGES Y/N on the display when
you press the key, press the key to read your messages or
press the key if you decide not to read them.
N
YEsc
Interrupting auto-answer
If you see the Superprint 4425 sending your out-going autoanswer memo or receiving a message and you want to answer the
call yourself, press the key. Auto-answer will go off. If you see
REVIEW MESSAGES Y/N on the display, press the key. You will
be in conversation mode and you can start typing.
Esc
Esc
N
AUTO-ANSWER • 41
Page 44

Reading auto-answer messages
When auto-answer is
on, the display shows
how many messages
you have received.
Esc
1. Press the key to
Esc
turn off auto-answer.
2. Press the key to read
Y
your messages. Each
message begins with 5
dashes and the date and
time of the call. Press
Spacebar
the to pause.
Press the again
Spacebar
to continue.
3. To stop reading
messages, press the
Esc
key.
42 • AUTO-ANSWER
Page 45

4. Press the key to
Y
clear your autoanswer messages.
Press the key if
N
you decide not to
clear them.
Hold down the key and the key to read messages at normal
speed. Keep holding down the key but let go of the key to
Shift
Shift
go faster. Hold down the key again to return to normal speed.
Hold down the key and the key to read back through
Shift
messages.
If you do not want to read messages when you turn off auto-answer,
you can do so later. Messages stay in memory until you clear them.
The Superprint 4425 will ask again if you want to read messages the
next time you turn off auto-answer.
Changing the contents of the pre p ro grammed auto-answer memo +
You can change what the p re - p ro grammed auto-answer memo says
by following these steps:
1. Press the memo key ( + ). You will see EDIT MEMO on
the display.
2. Type ANSWER and press the key to tell the Superprint
4425 that you want to edit the memo named “Answer.”
6Ctrl
Return
6Ctrl
3. Press the clear key ( + ). You will see CLEAR CONTENTS
8Ctrl
Y/N on the display.
4. Press the key to erase the contents of the memo.
Y
5. Type the new message you want to send as your outgoing auto-
answer message.
6. Press the key to save the new message.
Esc
AUTO-ANSWER • 43
Page 46

Changing to a different auto-answer
memo +
Ctrl
+
=
You can change to a different auto-answer memo by typing a new
memo name (and contents if necessary) when you turn on autoanswer. Follow these steps to change your auto-answer memo:
1. Press the auto-answer key ( + ). You will see ANSWER
Ctrl
MEMO and the name of your answer memo on the display.
2. Type a new name and press the key.
3. If the new memo does not already exist, type the contents of
the memo and press the key. Auto-answer is on.
Esc
4. If you do not want auto-answer on right away, press the
key again or turn off the Superprint 4425.
Note: An auto-answer memo is the same as any other memo. It is
saved in memo memory and and you will see its name when you
read through the list of memos. See the Memos chapter on pages
49-54 for more information about memos.
Auto-answer options
Setting the number of telephone rings +
+
=
Return
Esc
9Ctrl
You can set the Superprint 4425 so that it waits between 2 and 9
rings before answering, or you can use the TS (Toll Saver) setting.
The TS setting tells the Superprint 4425 to answer after 2 rings if
you have messages or 5 rings if you do not. This saves the cost of a
call when you call from another TTY to read your messages,
because you can hang up after 3 rings if you have none. Follow
these steps to change the number of rings:
1. Press the options key ( + ).
2. Press the key until the display says auto-answ RINGS (2).
The original setting is 2.
3. Press the to choose a number between 2 and 9 or TS.
4. Press the key to leave options.
44 • AUTO-ANSWER
9Ctrl
Return
Spacebar
Esc
Page 47

Turning off the auto-answer relay
voice announcer +
9Ctrl
When the Superprint 4425 answers the telephone, it sends out
the relay voice announcer message before it sends your autoanswer memo. If you do not want the Superprint 4425 to send the
message, follow these steps to turn it off:
1. Press the options key ( + ). You will see PRINT
9Ctrl
(UP/LOW) CASE on the display.
2. Press the key until you see AUTO ANSW VOICE (ON) on
Return
the display.
3. Press the to change the setting to OFF.
4. Press the key to leave options.
Clearing auto-answer messages +
Spacebar
Esc
8Ctrl
Most of the time you will clear messages after you read them, but
you can also clear them by following these steps:
1. Press the clear key ( + ). You will see CLEAR
8Ctrl
(CONVERSATION) on the display.
2. Press the to change the setting to AA MESSAGES.
3. Press the key. You will see CLEAR MESSAGES Y/N.
4. Press the key. You will see MESSAGES CLEARED on the
display. (Press the key if you decide not to clear messages.)
Spacebar
Return
Y
N
AUTO-ANSWER • 45
Page 48

Remote message retrieval
Remote message retrieval allows you to use another TTY when
you are away from home or work to call your Superprint 4425 and
read your auto-answer messages. You must enter and save a
password before you can use remote message retrieval. The
password prevents others from reading your messages. You can
only have one password per household or office.
Saving a password +
Follow these steps to save a password:
1. Press the options key ( + ).
2. Press the key until you see CHANGE AA PSWD (NO) on
the display.
3. Press the to change the setting to YES.
4. Press the key. You will see:
5. Type a password using up to 8 characters (you cannot use @ #
% & or * symbols).
The / character is part of your password.
6. Press the key.
7. Press the key to leave the options.
Return
Spacebar
Return
Return
Esc
9Ctrl
9Ctrl
PASSWORD: /
Changing your password
To change your password, choose a new one. If you forget your
password, the Superprint 4425 cannot show it to you. You must
enter a new one by following the steps above.
Reading messages while you are away
Follow these steps to use remote message retrieval:
1. Call your Superprint 4425. Your Superprint 4425 must have
auto-answer turned on when you call.
46 • AUTO-ANSWER
Page 49

2. Wait for the auto-answer memo to end.
3. Press the key.
Return
4. Type / and your password, like this:
/PASSWORD
5. Press the key again.
Return
Your Superprint 4425 sends the number of messages you have
and the number of free characters in auto-answer memory.
After a pause, it sends the first message. The Superprint 4425
pauses briefly after each message. It sends (END OF
MESSAGES) at the end.
6. When your Superprint 4425 asks CLEAR MESSAGES Y/N, press
Y
the key to clear them. Your Superprint 4425 sends
MESSAGES CLEARED and hangs up to wait for the next call.
If you decide not to clear your messages, press the key.
N
Your Superprint 4425 will ask REPLAY MESSAGES Y/N? Press
the key to replay messages. Press the key if you decide
not to replay them. If you press the key, the Superprint
NY
N
4425 sends PLEASE HANG UP and hangs up.
Here is a sample call:
AUTO-ANSWER • 47
Page 50

48 • AUTO-ANSWER
Page 51

C H A P T E R
5
A memo is a short message that you save in the Superprint 4425
memory and later send to someone during a conversation.
Examples of memos are:
• The auto-answer memo that the Superprint 4425 sends out
when you are away.
• The greeting memo that you can send when you answer the
telephone.
• The memo that you create when you save a conversation.
• A memo that contains a message, perhaps about an upcoming
meeting, that you want to send to several people.
There is no limit to the number of memos you can save as long as
the total number of characters in all memos and directory entries
is less than 9,500. Each memo must have a different name.
Saving a memo + p. 50
Sending a memo + p. 51
Editing or clearing a memo p. 52
Printing memos + p. 53
Saving a conversation as a memo + p. 54
MEMOS
6Ctrl
5Ctrl
6Ctrl
7Ctrl
MEMOS • 49
Page 52

Saving a memo +
1. Press the memo key
(hold down the
key and press the
key). The display
will ask for a memo
name.
2. Type a name and press
Return
the key. Names can
be up to 8 letters,
numbers, or spaces. The
display shows the memo
name with space to type
the memo. (This example
uses the name “Hello.”)
3. Type the memo.
Ctrl
6
6Ctrl
4. Press the key
50 • MEMOS
Esc
when you finish.
Page 53

Use these function keys when you type your memo:
• The left arrow key ( + ) and the right arrow key
Shift
( + ) move the memo back and forth across the display.
• The key erases characters.
• The key starts a new line when the memo is printed.
Backspace
Return
• The remain key ( + ) shows free space in memory.
• The clear key ( + ) erases the memo contents.
Shift
RCtrl
8Ctrl
Sending a memo +
1. Press the send
memo key (hold
down the key
and press the
key).
2. Press the until
you see the name of the
memo you want to
send.
Ctrl
5
Spacebar
5Ctrl
You can type the name
instead of pressing the
Spacebar
3. Press the key. The
if you wish.
Return
Superprint 4425 sends
the memo.
Press the key if you
Esc
want to stop sending
the memo before it
ends.
MEMOS • 51
Page 54

Editing or clearing a memo
Editing a memo +
1. Press the memo key ( + ). You will see EDIT MEMO on
6Ctrl
6Ctrl
the display.
2. Press the until you see the memo name on the display.
3. Press the key. Use these function keys to edit the memo:
• The left arrow key ( + ) and the right arrow key
Shift
( + ) move the memo back and forth across the
Spacebar
Return
Shift
display.
• The key erases characters.
• The key starts a new line when the memo is printed.
• The remain key ( + ) shows the amount of free space
Backspace
Return
RCtrl
in memory.
• The clear key ( + ) clears the memo contents.
4. Press the key when you finish.
Esc
Clearing a memo +
1. Press the memo key ( + ). You will see EDIT MEMO on
8Ctrl
6Ctrl
6Ctrl
the display.
2. Press the until you see the memo name on the display.
3. Press the clear key ( + ). You will see REMOVE MEMO
4. Press the key to clear the memo. (Press the key if you
5. Press the key to leave the list of memos.
Clearing all memos +
1. Press the clear key ( + ). You will see CLEAR
52 • MEMOS
Spacebar
8Ctrl
Y/N on the display.
NY
decide not to clear it.)
Esc
8Ctrl
8Ctrl
(CONVERSATION) on the display.
Page 55

2. Press the to change the setting to MEMOS.
Spacebar
3. Press the key. You will see CLEAR MEMOS Y/N on the
Return
display.
4. Press the key to clear all memos. (Press the key if you
decide not to clear all memos.)
Printing memos +
Printing one memo
1. Press the memo key ( + ). You will see EDIT MEMO on
the display.
2. Type the name of the memo or press the to read
through the list of memos.
3. Press the key when you see the name of the memo you
Return
want to print.
4. Press the print key ( + ). The Superprint 4425 prints the
memo. Press any key to stop printing before the end of the
memo.
If you move the cursor before you press the print key, you will
only print from the cursor position to the end of the memo.
6Ctrl
3Ctrl
NY
6Ctrl
Spacebar
Printing a list of memo names
1. Press the memo key ( + ). You will see EDIT MEMO on
the display.
2. Press the The display shows the first memo name. If
Spacebar
you only want to print part of the list, keep pressing the
Spacebar
until you see the first name you want to print.
3. Press the print key ( + ).
4. Press the print key again to stop printing before the end of the
list.
5. Press the key to leave the list of memos.
Esc
6Ctrl
3Ctrl
MEMOS • 53
Page 56

S aving a conve r s ation as a memo +
You can save your conversation as a memo at any time during or
after a call, but you must do it before you turn off your Superprint
4425. The conversation is recorded from the beginning of the
conversation until you hang up or tell the Superprint 4425 to
stop. The memo stays in memory until you clear it. The memo can
be edited, sent, or printed in the same way as any other memo.
Follow these steps to record a conversation:
7Ctrl
1. Press the save conversation key ( + ).
2. Type a new memo name and press the key. The display
returns to the conversation. You are now recording.
3. To stop recording at any time, press the key. The display
returns to the conversation.
Your conversation is now saved in memo memory and you will
see the name of the memo in the list of memos. Even if you clear
conversation memory, you will still be able to read the
conversation in the memo memory.
Note: If memo memory does not have room for the whole
conversation, it saves as much of the most recent part as it can
and stops recording.
7Ctrl
Return
Esc
54 • MEMOS
Page 57

C H A P T E R
6
The directory lets you dial a number by typing the name of an
entry. This makes dialing the number much faster and easier.
There is no limit to the number of telephone numbers you can
save as long as the total number of characters in all directory
entries and memos is less than 9,500.
Saving a telephone number + p. 56
Editing or clearing a telephone number p. 58
Printing directory numbers + p. 59
DIRECTORY
BackspaceCtrl
BackspaceCtrl
DIRECTORY • 55
Page 58

Saving a telephone number +
You can save as many telephone numbers as memory will allow—up
to 9,500 total characters for telephone numbers and memos.
1. Press the directory
key (hold down the
Ctrl
key and press
Backspace
the key).
2. Type a name and press
Return
the key. Names
can be up to 8 letters,
numbers, or spaces, but
must start with a letter.
The name is displayed with
space for a number.
BackspaceCtrl
3. Type the number.
56 • DIRECTORY
Page 59

4. Press the key
Esc
when you finish.
Use these function keys when you type the number:
• The key erases characters.
• The key starts a new line when the memo is printed.
• The remain key ( + ) shows free space in memory.
• The clear key ( + ) erases the whole number.
• The left arrow key ( + ) and the right arrow key ( +
Backspace
Return
RCtrl
8Ctrl
ShiftShift
) move the number back and forth across the display.
Dialing tips:
• In an office, you may need a 9 or other number at the
beginning to reach an outside line.
• Use a comma to add a one-second pause.
• Use a 1 and an area code for long distance.
• Use spaces, parentheses, and dashes to make numbers easier
to read.
• Use an ! to put a hook flash into numbers you dial during a
call. A hook flash is used in a voice mail system or to transfer a
call.
• You cannot use the * and # symbols with pulse dialing.
• Here is an example of an entry for calling Ultratec long
distance from an office telephone:
ULTRATEC>9,1 608 238-5400
DIRECTORY • 57
Page 60

Editing or clearing a telephone number
Editing a number +
1. Press the directory key ( + ). You will see DIR NAME
BackspaceCtrl
BackspaceCtrl
on the display.
2. Press the until you see the number you want to change
Spacebar
on the display.
3. Press the key. Use the following function keys to make
Return
your changes:
• The left arrow key ( + ) and the right arrow key
Shift
( + ) move the number back and forth across the
Shift
display.
• The key erases characters.
• The remain key ( + ) shows the amount of free space
Backspace
RCtrl
in memory.
• The clear key ( + ) clears the whole number.
4. Press the key twice to leave the directory list.
Esc
Clearing a number +
8Ctrl
BackspaceCtrl
1. Press the directory key ( + ). You will see DIR NAME
on the display.
2. Press the until you see the number you want to clear
on the display.
3. Press the clear key ( + ). You will see REMOVE DIR
ENTRY Y/N on the display. Press the key to clear the entry.
Press the key if you decide not to clear it.
4. Press the key to leave the directory.
Clearing all telephone numbers +
1. Press the clear key ( + ). You will see CLEAR
(CONVERSATION) on the display.
58 • DIRECTORY
BackspaceCtrl
Spacebar
8Ctrl
Y
N
Esc
8Ctrl
8Ctrl
Page 61

2. Press the to change the setting to DIRECTORY.
Spacebar
3. Press the key. You will see CLEAR DIRECTORY Y/N on
the display.
4. Press the key to clear all entries. Press the key if you
decide not to clear them.
Return
Printing directory numbers
BackspaceCtrl
+
Printing one number
1. Press the directory key ( + ). You will see DIR NAME
on the display.
2. Press the until you see the number that you want to
print on the display.
3. Press the key.
4. Press the print key ( + ) The entry is printed.
Spacebar
Return
Printing a list of numbers in the directory
BackspaceCtrl
3Ctrl
NY
1. Press the directory key ( + ). You will see DIR NAME
on the display.
2. Press the The display shows the first number in the
directory. If you only want to print part of the directory, keep
pressing the until you see the first number you want to
print.
3. Press the print key ( + ).
4. Press the print key again to stop printing before the end of the
list.
5. Press the key to leave the directory.
Spacebar
Spacebar
Esc
BackspaceCtrl
3Ctrl
DIRECTORY • 59
Page 62

60 • DIRECTORY
Page 63

C H A P T E R
7
This chapter describes all of the settings you can change with the
options key. They are listed in the order they appear on the
display when you press the options key ( + ) and then the
option. Use the key to select a setting.
Setting the print case + p. 62
Setting the print size + p. 62
Setting the display mode + p. 62
Setting pulse dialing + p. 63
Setting the number of auto-answer rings + p. 63
Setting the out-going auto-answer memo + p. 64
Changing the auto-answer password + p. 64
Changing the greeting memo + p. 65
Turning off printing of the date and time + p. 65
Setting the date and time + p. 66
Saving a relay voice announcer number + p. 66
Turning off Turbo Code + p. 67
Turning off Auto ID + p. 67
Turning off interrupt + p. 68
Changing ASCII seek time + p. 68
Turning off the auto-answer
OPTIONS
9Ctrl
key. Use the to show the different settings for each
relay voice announcer + p. 68
SpacebarReturn
Return
9Ctrl
9Ctrl
9Ctrl
9Ctrl
9Ctrl
9Ctrl
9Ctrl
9Ctrl
9Ctrl
9Ctrl
9Ctrl
9Ctrl
9Ctrl
9Ctrl
9Ctrl
9Ctrl
OPTIONS • 61
Page 64

Setting the print case +
Follow these steps to print in all uppercase letters:
1. Press the options key ( + ). You will see PRINT (UP/LOW)
CASE on the display.
2. Press the to change the setting to UPPER.
3. Press the key to save the setting and leave options or press
Return
the key to save the setting and go to the next option.
Spacebar
Esc
9Ctrl
9Ctrl
Setting the print size +
Follow these steps to print either 14 or 19 characters on a line
instead of 24 characters:
1. Press the options key ( + ). You will see PRINT (UP/LOW)
CASE on the display.
2. Press the key until you see PRINT SIZE (NORMAL) on the
display.
3. Press the to change the setting to BOLD or WIDE.
4. Press the key to save the setting and leave options or press
the key to save the setting and go to the next option.
Return
Spacebar
Esc
Return
9Ctrl
9Ctrl
Setting the display mode +
The display mode sets the direction in which text moves across the
display. When you turn on your Superprint 4425, the display mode
is always right to left. This is the best mode for TTY conversations.
You can also set the display mode to left to right. In this mode, a
small circle appears at the left side of the display and leads text
from left to right across the display. When the display fills up, the
circle returns to the left side and starts a new line. Follow these
steps to change the display mode:
1. Press the options key ( + ). You will see PRINT (UP/LOW)
CASE on the display.
2. Press the key until you see DISPLAY (RT TO LFT) on the
display.
3. Press the to change the setting to LFT TO RT.
Return
Spacebar
9Ctrl
9Ctrl
62 • OPTIONS
Page 65

4. Press the key to save the setting and leave options or
press the key to save the setting and go to the next
option.
Esc
Return
Setting pulse dialing +
The Superprint 4425 is set for tone dialing, which is correct for
almost all telephone lines. You can, however, change the setting
to pulse dialing if your line does not accept tone dialing. This
setting remains changed until you change it again or reset the
Superprint 4425 or lose power. Follow these steps to set pulse
dialing:
1. Press the options key ( + ). You will see PRINT (UP/LOW)
CASE on the display.
2. Press the key until you see USING (TONE) DIAL on the
display.
3. Press the to change the setting to PULSE.
4. Press the key to save the setting and leave options or
press the key to save the setting and go to the next
option.
Return
Spacebar
Esc
Return
9Ctrl
9Ctrl
Setting the number of auto-answer
rings +
9Ctrl
Follow these steps to change the auto-answer rings setting to any
number between 2 and 9 or TS:
1. Press the options key ( + ). You will see PRINT (UP/LOW)
CASE on the display.
2. Press the key until you see AUTO ANSWER RING (2) on
the display.
3. Press the to change the setting to a number between 2
and 9 or TS.
4. Press the key to save the setting and leave options or
press the key to save the setting and go to the next
option.
Return
Spacebar
Esc
Return
9Ctrl
OPTIONS • 63
Page 66

Setting the out-going auto-answer
memo +
Follow these steps to choose any memo as your out-going autoanswer memo:
1. Press the options key ( + ). You will see PRINT (UP/LOW)
CASE on the display.
2. Press the key until you see ANSWER MEMO on the
display.
3. Type a memo name or press the to read through the
list of memos. Use the key to move back through the
list.
4. Press the key when the display shows the name of the
memo you want to use.
5. Press the key to leave options or press the key to go
to the next option.
9Ctrl
9Ctrl
Return
Spacebar
Backspace
Return
Changing the auto-answer
password +
9Ctrl
ReturnEsc
Follow these steps to change your password:
1. Press the options key ( + ). You will see PRINT (UP/LOW)
CASE on the display.
2. Press the key until you see CHANGE AA PSWD (NO) on
the display.
3. Press the to change the setting to YES.
4. Press the key.
5. Type a password. You can use up to 8 characters. You cannot
use the @ # % & or * symbols.
6. Press the key to save the new password.
7. Press the key to leave options.
64 • OPTIONS
9Ctrl
Return
Spacebar
Return
Return
Esc
Page 67

Changing the greeting memo +
Follow these steps to change the memo that the Superprint 4425
sends when you press the greeting key ( + ):
4Ctrl
9Ctrl
1. Press the options key ( + ). You will see PRINT (UP/LOW)
CASE on the display.
2. Press the key until you see GREET MEMO>GREETING
on the display.
3. Either type a new name or press the to find the name
of a different memo in the list of memos.
4. Press the key to save the setting.
5. Press the key to leave options.
Return
Return
Esc
9Ctrl
Spacebar
Turning off printing of the date and
time +
Follow these steps to turn off printing of the date and time on
conversations or auto-answer messages:
1. Press the options key ( + ). You will see PRINT (UP/LOW)
CASE on the display.
2. Press the key until you see PRINT DATE/TIME (ON) on
the display.
9Ctrl
9Ctrl
Return
3. Press the to change the setting to OFF.
4. Press the key to save the setting and leave options or
press the key to save the setting and go to the next
option.
Spacebar
Esc
Return
OPTIONS • 65
Page 68

Setting the date and time +
Follow these steps to set the clock:
1. Press the options key ( + ). You will see PRINT (UP/LOW)
9Ctrl
CASE on the display.
2. Press the key until you see CHANGE CLOCK (NO) on
Return
the display.
3. Press the key to change the setting to YES, then press
Return
the key. The display shows the date and time, with the
Spacebar
month blinking.
4. Press the or the key to change the month.
5. Press the key to move to the day.
Return
BackspaceSpacebar
6. Repeat steps 4 and 5 to change the day, year, and time.
If you only want to change part of the setting, you can press the
Esc
key twice at any time to leave options.
Saving a relay voice announcer
9Ctrl
number +
Follow these steps to add your relay service telephone number to
the relay voice announcer message:
1. Press the options key ( + ). You will see PRINT (UP/LOW)
CASE on the display.
2. Press the key until you see EDIT RELAY NUM (NO) on
the display.
3. Press the to change the setting to YES.
4. Press the key. You will see RELAY on the display.
5. Type your relay service telephone number. Use the
key to correct typing mistakes.
6. Press the key. You will see RELAY NUMBER SAVED on
the display.
7. Press the key to leave options.
66 • OPTIONS
Return
Spacebar
Return
Return
Esc
9Ctrl
9Ctrl
Backspace
Page 69

Turning off Turbo Code +
Follow these steps to turn off Turbo Code:
9Ctrl
1. Press the options key ( + ). You will see PRINT (UP/LOW)
9Ctrl
CASE on the display.
2. Press the key until you see TURBO CODE (ON) on the
Return
display.
3. Press the to change the setting to OFF.
4. Press the key to save the setting and leave options or
press the key to save the setting and go to the next
Spacebar
Esc
Return
option.
Turning off Auto ID +
Follow these steps to turn off Auto ID:
1. Press the options key ( + ). You will see PRINT (UP/LOW)
CASE on the display.
2. Press the key until you see AUTO ID (ON) on the
Return
display.
3. Press the to change the setting to OFF.
4. Press the key to save the setting and leave options or
press the key to save the setting and go to the next
Spacebar
Esc
Return
option.
9Ctrl
9Ctrl
OPTIONS • 67
Page 70

Turning off interrupt +
Follow these steps to turn off incoming interrupts:
9Ctrl
1. Press the options key ( + ). You will see PRINT (UP/LOW)
CASE on the display.
2. Press the key until you see INTERRUPT (ON) on the
display.
3. Press the to change the setting to OFF.
4. Press the key to save the setting and leave options or
press the key to save the setting and go to the next
option.
Return
Spacebar
Esc
Return
9Ctrl
Changing ASCII seek time +
This option is available only if you have ASCII code. Follow these
steps to change the ASCII seek time:
1. Press the options key ( + ). You will see PRINT (UP/LOW)
CASE on the display.
2. Press the key until you see ASCII SEEK TIME (3) on the
display.
3. Type a number to change the setting to 0 or any number
between 2 and 9.
Return
9Ctrl
9Ctrl
4. Press the key to save the setting and leave options or
press the key to save the setting and go to the next
option.
Esc
Return
Turning off the auto-answer
relay voice announcer +
Follow these steps to stop auto-answer from sending out the relay
voice announcer message:
1. Press the options key ( + ). You will see PRINT (UP/LOW)
CASE on the display.
68 • OPTIONS
9Ctrl
9Ctrl
Page 71

2. Press the key until you see AUTO ANSW VOICE (ON) on
Return
the display.
3. Press the to change the setting to OFF.
4. Press the key to save the setting and leave options or
press the key to save the setting and go to the next
Spacebar
Esc
Return
option.
OPTIONS • 69
Page 72

70 • OPTIONS
Page 73

C H A P T E R
8
Ordinary care of your Superprint 4425 requires changing the
printer paper when the paper runs out and replacing the batteries
when they no longer hold a full charge. If you have any other
problems, you may be able to solve them by reading the troubleshooting section.
Besides the printer paper and battery compartments, the
Superprint 4425 has no other user-serviceable parts. Any repair
work should be done by a qualified service person. If you try to
repair the unit yourself, you may damage the Superprint 4425 and
you will void your warranty. The repair section explains how to
get help.
Replacing the printer paper p. 72
About the batteries p. 73
Replacing the batteries p. 74
Troubleshooting p. 75
Repair p. 78
CARE & REPAIR
CARE & REPAIR • 71
Page 74

Replacing the printer paper
The printer uses high-quality thermal paper. Use the order card
that comes with the Superprint 4425 to order paper. If you do not
have a card, contact your dealer or Ultratec (the Ultratec address
is on the inside front cover of this manual).
Turn the Superprint 4425 on and be sure the printer is on, then
follow these steps to put in a new roll of paper:
72 • CARE & REPAIR
Page 75

About the batteries
The Superprint 4425 runs on batteries when you unplug the AC
adapter or when the power fails. Fully-charged, the six AA
rechargeable NiCad batteries will provide 45 to 60 minutes of
normal use.
When the power light blinks, you have about 5 minutes of battery
power left. The batteries will last longer if you turn off the printer
when you use battery power.
Checking the batteries
The batteries lose their ability to hold a full charge if you keep the
Superprint 4425 plugged in all the time. If you want to be sure the
batteries stay fully-charged, check them once a month. Follow
these steps to check the batteries:
1. Unplug the AC adapter.
2. Turn on the Superprint 4425 for 30 minutes. (You can still use
it for calls during this time).
3. The batteries are fine if the power light still glows steadily
after 30 minutes. If the power light blinks within 30 minutes,
exercise the batteries.
4. Plug the AC adapter back in and turn off the Superprint 4425.
Exercising the batteries
1. Leave the Superprint 4425 on with the AC adapter unplugged
until the power light flashes.
2. Turn the unit off and plug in the AC adapter for 24 hours (you
can use the Superprint 4425 for calls during this time).
3. Unplug the AC adapter and leave the Superprint 4425 on for
30 minutes.
4. Repeat steps 1 to 3 until the power light glows steadily after
30 minutes without the AC adapter.
CARE & REPAIR • 73
Page 76

Replacing the batteries
Replace the batteries every two or three years, or when they run
down in less than 30 minutes and exercising them does not help.
Use only AA NiCad rechargeable batteries. Turn over the
Superprint 4425 and follow these steps to change batteries:
CAUTION!
The rechargeable batteries contain nickel and cadmium. Do not burn
or puncture them. If you do, they could release toxic material that
could injure you. Do not dispose of them in household trash. For
information about recycling or proper disposal, consult your local
trash collection or disposal organization.
74 • CARE & REPAIR
Page 77

Troubleshooting
Direct connect
Dialing does not work.
Make sure you have the right tone or pulse setting for your
telephone system.
The display says NO DIRECT CONNECT.
The Superprint 4425 is not properly connected to the telephone
line. Be sure the cord is firmly plugged into the Superprint 4425
and the telephone wall jack. You can also try using a different
telephone cord or wall jack.
Poor reception
The display shows all numbers, symbols, or unreadable
characters instead of words.
Press the . If that does not help and you have a Turbo Code
connection, try changing from Turbo Code to Baudot code. Hold
down the and keys and press the key to change to
Baudot code.
Spacebar
BShiftCtrl
An incoming message does not make sense.
If you have a handset in the acoustic cups, press it firmly. The
telephone connection may be weak or the other TTY may be
sending the wrong signals. If you are using Baudot code, press the
sensitivity key (hold down the key and press the key). The
display says HIGH SENSITIVITY. Sensitivity returns to normal
when you press the sensitivity key again or when you turn off the
Superprint 4425.
CARE & REPAIR • 75
SCtrl
Page 78

Printer
The printer does not work.
Be sure the printer is on. If it is, try resetting the printer by turning
the Superprint 4425 off and on again.
The printer works, but it prints too lightly or not at all.
Make sure you have high-grade thermal printer paper and it is
correctly installed. See Replacing the printer paper on page 72.
The printer only prints the bottom half of characters.
The print head should be replaced. Contact your dealer or Ultratec.
On battery power, the printer prints too slowly or lightly.
The batteries are low. Connect the AC adapter for 24 hours to
recharge the batteries.
Power
The ring flasher does not work.
Be sure the plastic tab has been pulled out of the battery
compartment and that you have plugged in the Superprint 4425 for
at least 14 hours.
The batteries run down too soon.
You may not be regularly using your Superprint 4425 on battery
power, or the batteries are old. See About the batteries on page 73.
The Superprint 4425 does not turn on when you press the
On/Off switch, or the power light blinks even when the AC
adapter is plugged in.
Be sure the electrical outlet is working. Be sure you are using the
correct AC adapter—it should be a 9VDC, 650 mA adapter. If you
still have a problem, contact your dealer or Ultratec.
The Superprint 4425 works fine in the evening, but does not
work during the day.
You may have plugged the AC adapter into a switch-controlled
outlet. Try a different outlet that you are sure is not controlled by a
switch.
76 • CARE & REPAIR
Page 79

Clearing all memories
You can clear all conversations, memos, directory entries, and
auto-answer messages at one time. Follow these steps to clear all
memories:
1. Press the clear key ( + ). You will see
8Ctrl
CLEAR (CONVERSATION) on the display.
2. Press the to change the setting to ALL MEMORY.
3. Press the key.
4. Press the key to clear all memories. Press the key if you
Spacebar
Return
NY
decide not to clear them.
Resetting the Superprint 4425
Resetting the Superprint 4425 returns all options to their original
settings and clears all conversations, auto-answer messages,
memos, and directory entries. Follow these steps to reset the
Superprint 4425:
1. Press the left key, the right key, and the key
( + + ) all at the same time. You will see a version
ShiftShift
Ctrl
ShiftShift
number and RESET Y/N on the display.
Important! After the next step, everything in all memories will
be cleared. There is no way to get the contents back after you
reset the Superprint 4425.
Ctrl
2. Press the key to reset. The display says SUPERPRINT 4425
IS RESET! Press the key if you change your mind and decide
Y
N
not to reset the Superprint 4425.
CARE & REPAIR • 77
Page 80

Repair
If your Superprint 4425 is not working, we may be able to help
you solve the problem over the telephone. Call Ultratec at the
number on the inside front cover.
Sending the Superprint 4425 for repair
Follow these steps if you need to send the Superprint 4425 to our
repair center:
1. Pack it in the original shipping carton or a similar sturdy box.
2. Include a note that describes the problem. The note will help
the technicians find the problem.
3. Insure the Superprint 4425 for shipment. Ultratec or an
authorized Ultratec repair center is not responsible for damage
during shipping to the center.
4. Send the Superprint 4425 to the Ultratec National Service
Center at the address below.
Ultratec National Service Center
5901 Research Park Blvd.
Madison, WI 53719
78 • CARE & REPAIR
email: service@ultratec.com
Page 81

C H A P T E R
9
ASCII code is an optional part of the Superprint 4425. To find out
if your Superprint 4425 has ASCII code, press the code key
( + ), then press the . If the display says CODE
(ASCII), you have ASCII code. Press the key.
Setting the Baudot code baud rate + p. 80
Optional ASCII code + p. 80
CODES
Spacebar0Ctrl
Esc
0Ctrl
0Ctrl
CODES • 79
Page 82

Setting the Baudot code
baud rate +
The Superprint 4425 is set to use whichever code it needs to
answer a call, but you can set the unit so that it will only use
Baudot code. When you do, the Superprint 4425 will not try to
use other codes. Follow these steps:
1. Press the code key ( + ). You will see CODE
(AUTOMATIC) on the display.
2. Press the to change the setting to BAUDOT.
3. Press the key. You will see BAUDOT (AUTO) BAUD on
the display.
4. Press the to choose one of the following settings:
• AUTO to automatically use either 45.5 baud or Turbo Code.
This setting will use Turbo Code if the other machine is
equipped with Turbo Code.
• 45 to use only 45.5 baud Baudot. Most Baudot TTYs use 45.
• 50 to use only 50 baud Baudot. TTYs purchased in Australia,
New Zealand, or South Africa use 50 baud.
5. Press the key. You will see BAUDOT CODE ON on the
display.
Both the code and the Baudot baud rate return to automatic when
you hang up or turn off the Superprint 4425.
Spacebar
Return
Spacebar
Return
0Ctrl
0Ctrl
Optional ASCII code +
ASCII stands for American Standard Code for Information
Interchange. Some TTYs and all computers in the United States
and Canada use ASCII code. If you use ASCII, you may need to
change some options. The options you can change are as follows:
Originate/answer determines which machine is calling and which
one is answering. This usually happens automatically. If the
connection is difficult to make, you can change the option
yourself. The default is originate.
80 • CODES
0Ctrl
Page 83

Baud rate is how fast characters travel. You can choose 110 or
300 baud, but 110 is rarely used. The default baud rate is 300.
Duplex controls how characters are displayed. If you get double
characters (lliikkee tthhiiss) or none at all, change the option
between half duplex and full duplex. The default is half duplex.
Parity controls error-checking. You can choose 7N1, 8N1, 7E1, or
7O1. The first number is data bits. The middle letter means (N)o
parity, (E)ven parity, or (O)dd parity. The last number is stop bits.
8N1 and 7E1 are used most often. The default is 8N1 parity.
Return determines what the Superprint 4425 sends when you
press the key. You can choose CR or CR/LF. CR (carriage
Return
return) goes to the beginning of the current line. CR/LF (carriage
return plus line feed) goes to the beginning of the next line. The
default is CR.
To connect your Superprint 4425 with a computer, the other
person should use 300 baud, half duplex, 8N1 parity, and CR
settings.
Turning on ASCII code and changing options
The Superprint 4425 is set to automatically use the code it needs
to answer a call, but you can set the unit to only use ASCII code at
any time. When you do, the Superprint 4425 will not try to use
other codes. Follow these steps to turn on ASCII code:
1. Press the code key ( + ). The display says CODE
0Ctrl
(AUTOMATIC).
2. Press the to change the setting to ASCII.
3. Press the key to use the current ASCII options or press the
Return
Spacebar
Esc
key to change options.
Use the following keys to change settings:
The chooses a setting.
The key continues to the next setting.
The key saves the option and returns to your
Spacebar
Return
Esc
conversation.
The code always returns to automatic when you hang up or turn
off the Superprint 4425.
CODES • 81
Page 84

Changing ASCII seek time +
This option sets the length of time during which the Superprint
4425 sends out an ASCII seek tone. The normal TTY seek time is
three seconds. You may need more time if you often connect to
computers. Six seconds is recommended. Follow these steps to
change the setting:
9Ctrl
1. Press the options key ( + ). You will see PRINT
(UP/LOW) CASE on the display.
2. Press the key until you see ASCII SEEK TIME (3) on the
display.
3. Type a number to change the setting to 0 or any number of
seconds between 2 and 9.
4. Press the key to leave options.
Note: Selecting zero will turn off ASCII code and your Superprint
4425 will not try to use it even if the other TTY is using ASCII
code.
Return
Esc
9Ctrl
Making an ASCII call
An ASCII conversation begins when your TTY’s code option is set
to ASCII originate, and the person you call answers in ASCII code.
If you are having problems connecting in ASCII code, see Turning
on ASCII code and changing options on page 81 or Changing
ASCII seek time on page 82 for more information.
Answering an ASCII call
When the code setting is automatic and someone calls using ASCII
code, your Superprint 4425 answers in ASCII code. If it cannot
make an ASCII connection, it changes to Baudot.
82 • CODES
Page 85

During an ASCII call
If you do not receive a clear message during an ASCII call, try:
• Changing the parity setting
• Changing the duplex option.
• Using the other baud rate (110 or 300).
If the code option is set to automatic and your Superprint 4425
loses the ASCII connection, the Superprint 4425 will display NO
ASCII CONNECTION! and change to Baudot code. To return to
ASCII code, you must turn on ASCII yourself. See Turning on
ASCII code and changing options on page 81.
If the code option is set to ASCII and your Superprint 4425 loses
the connection, it waits until the other person changes to ASCII or
you change the code option setting to automatic or Baudot with
the code key ( + ).
0Ctrl
CODES • 83
Page 86

STICKY KEYS
Ordinarily, when you use the or keys, you must hold
ShiftCtrl
down either key while you press another key. If you have trouble
pressing two keys at one time, the sticky keys feature lets you use
the and keys by pressing one key at a time.
Press either key five times to turn on sticky keys. You will see
ShiftCtrl
Shift
STICKY KEYS ON on the display.
Now you can dial by pressing the key and then pressing the
key. You do not need to hold down the key. Or, you can
1
type a $ by pressing the key and then the key.
Shift
When sticky keys is on, you can also lock down the key or
Shift
the key so that it affects every key you press after that until
you unlock it. To lock the key or the key, press the key
Ctrl
Ctrl
4
Ctrl
ShiftCtrl
twice. To unlock, press the key one more time.
For example, to read conversation memory, press the key
Shift
twice to lock it. Press the key to move backward through
memory. Press the key to move forward. Press the key
Shift
once more to unlock it.
Press either key five more times to turn off sticky keys. The
Shift
display says STICKY KEYS OFF.
If you use sticky keys all the time, you do not need to turn it on
each time you turn on the Superprint 4425. After you turn on the
sticky keys feature, it stays on until you turn it off or reset the
unit.
84 • STICKY KEYS
Page 87

SPECIFICATIONS
Physical Dimensions
Size–10" x 9.5" x 3" (25.4 cm x 24.1 cm x 7.6 cm)
Weight–3.6 lbs (1.7 Kg) with batteries
Power
AC adapter–9VDC, 650 mA (barrel is positive)
AC adapter is UL/CSA listed
The six AA NiCad rechargeable batteries are user-
replaceable. They power the unit for 45 to 60
minutes.
Keyboard
50 ergonomic keys in 5 rows
Control key plus 24 function keys
Sticky keys for single-handed typists
Character set: A-Z, 0-9, Backspace, Return/LF,
Space, += - $’()”/:;?,.*#%
Display
Blue/green vacuum-fluorescent
Bidirectional
20 characters
0.25" (6mm) character height
Acoustic Coupler
Accepts both circular and square telephone
handsets
Communication Codes
Automatic code detection on outgoing calls
(Turbo Code, ASCII or Baudot)
Baudot Code:
45.5 and 50 baud
Sensitivity: -45 dbm, 67 dBSPL (min)
Output: -10 dbm
Turbo Code:
100 baud (average)
7 data bits
ASCII Code (optional):
7N1, 8N1, 7E1, and 7O1
110 and 300 baud
Answer and originate
Full and half duplex
Compatible with Bell 103 modems
Memory
32K total, non-volatile
Memory edit functions: insert, clear
Memo/Directory Memory:
9,500 characters
Stores and sends over 100 named memos
Stores and dials as many named directory numbers
as memory will hold
Auto-answer/Conversation Memory:
22,000 characters
Stores recent TTY conversations
Stores over 100 auto-answer messages
Printer
Prints 24, 19, and 14 characters per line
Uses 2.25" (58mm) thermal paper
Automatically divides long words
Direct Connect/Auto-answer Module
Plugs into standard (analog) telephone line
Automatically answers calls
Changeable answer message
Pulse or tone keyboard dialing
Approvals
FCC approved.
FCC Registration No. (Part 68): D8KUSA-18408-
DT-E
Verified to comply with FCC Part 15, Class B
Operation
REN: 1.2B
CSA Certified: LR80395
IC: 721 4085A
SPECIFICATIONS • 85
Page 88

FCC Information
The Superprint 4425 has been tested and found to
comply with the specifications for a Class B digital
device pursuant to Part 15 of the FCC Rules. These
limits are designed to provide reasonable protection
against harmful interference in a residential
installation. This equipment generates and uses
radio frequency energy and if not installed and used
in accordance with the instructions, may cause
harmful interference to radio communications.
However, there is no guarantee that interference
will not occur in a particular installation. If this
equipment does cause harmful interference to radio
or television reception, which can be determined by
turning the equipment off and on, the user is
encouraged to try to correct the interference by one
or more of the following measures:
• Reorient or relocate the receiving antenna.
• Increase the separation between the Superprint
4425 and the receiver.
• Connect the Superprint 4425 to an outlet on a
circuit different from that to which the
receiver is connected.
• Consult the dealer or an experienced radio/TV
technician for help.
This equipment complies with Part 68 of the FCC
rules and the requirements adopted by the ACTA.
A label is located on the underside of the
Superprint 4425 containing, among other
information, an FCC registration number,
D8KUSA-18408-DT-E. If requested, this number
must be provided to the telephone company.
A plug and jack used to connect this equipment to
the premises wiring and telephone network must
comply with the applicable FCC Part 68 rules and
requirements adopted by the ACTA. A compliant
telephone cord and modular plug is provided with
this product. It is designed to be connected to a
compatible modular jack that is also compliant. See
installation instructions for details.
The REN is used to determine the quantity of
devices which may be connected to the telephone
line. Excessive RENs on the line may result in the
devices not ringing in response to an incoming call.
In most, but not all, areas the sum of RENs should
not exceed five (5.0). To be certain of the number of
devices that may be connected to a line, as
determined by the total RENs, contact the local
telephone company. The REN for this product is
1.2B.
Should you experience trouble with this telephone
equipment, please contact:
Ultratec National Service Center
5901 Research Park Blvd.
Madison, WI 53719
email: service@ultratec.com
For repair or warranty information, please contact
Ultratec Inc. Customer Service at (608) 238-5400
(V/TTY). If the equipment is causing harm to the
telephone network, the telephone company may
request that you disconnect the equipment until
the problem is resolved.
This equipment cannot be used on public coin
phone service provided by the telephone company.
Connection to party line service is subject to state
tariffs.
If the Superprint 4425 causes harm to the telephone
network, the telephone company will notify you in
advance that temporary discontinuance of service
may be required. But, if advance notice is not
practical, the telephone company will notify you as
soon as possible. Also, you will be advised of your
right to file a complaint with the FCC if you
believe it is necessary.
Occasionally, your telephone company may make
changes in its facilities, equipment, operation, or
procedures that could affect the operation of your
equipment. If so, you will be given advance notice
of the change to give you an opportunity to
maintain uninterrupted service.
If your home has specially wired alarm equipment
connected to the telephone line, ensure the
installation of the Superprint 4425 does not disable
it. If you have questions about what will disable
alarm equipment, consult your telephone company
or a qualified installer.
Other than replacing the batteries, the Superprint
4425 does not have any user-serviceable parts.
Modification or changes to the Superprint 4425 not
86 • SPECIFICATIONS
Page 89

Industry Canada Information
NOTICE: This equipment meets the applicable
Industry Canada Terminal Equipment Technical
Specifications. This is confirmed by the registration
number. The abbreviation, IC, before the
registration number signifies that registration was
performed based on a Declaration of Conformity
indicating that Industry Canada technical
specifications were met. It does not imply that
Industry Canada approved the equipment.
NOTICE: The Ringer Equivalence Number (REN)
for this terminal equipment is 0.5B. The REN
assigned to each terminal equipment provides an
indication of the maximum number of terminals
allowed to be connected to a telephone interface.
The termination on an interface may consist of any
combination of devices subject only to the
requirement that the sum of the Ringer
Equivalence Numbers of all the devices does not
SPECIFICATIONS • 87
Page 90

Other TTYs available from Ultratec
Miniprint 425
™
Simple, yet sophisticated printing TTY with direct connect and some
advanced calling features.
• Built-in 24-character
printer
(3 print sizes)
• Turbo Code
• Auto ID
• Direct connect
®
™
Supercom 4400
• Auto-answer (preprogrammed message)
• Built-in ring flasher
• Two telephone jacks
• Advanced calling features
™
The most sophisticated non-printing TTY.
• Turbo Code
• Auto ID
• Direct connect
• ASCII option
• Built-in ring flasher
• Two telephone jacks
• Advanced calling features
®
™
• 32k memory with 9500
characters for memos and
telephone numbers
• Printer port to connect
with your external printer
• Auto-answer with remote
message retrieval
Uniphone 1140
™
Combination telephone and TTY with amplified
handset and VCO capabilities with 8k memory
and some advanced features.
• Turbo Code
• Auto ID
• Auto-answer
• VCO request key
®
™
• 8k memory for
conversation review and
auto-answer messages
• Ten Fastdial numbers
• Built-in ring flasher
88 • OTHER TTYS AVAILABLE FROM ULTRATEC
Page 91

EZ
com
Pro
™
• Turbo Code
• Direct Connect
• Auto ID
• Relay dial key
Compact
®
™
™
• VCO request key
• 2-line, 48-character backlit
display
• 20-name dialing directory
Pocket-sized, personal TTY to carry in purse,
briefcase, or backpack.
• Portable
• 2-line, 80-character LCD
display
• 8k memory
Minicom IV
™
• ASCII/32k memory option
• 7-10 hour rechargeable
batteries
• Weighs only 1 lb.
Basic, non-printing TTY with no memory and
acoustic use only
• Printer port to connect with your external printer
OTHER TTYS AVAILABLE FROM ULTRATEC • 89
Page 92

INDEX
AC adapter, 9, 10, 11, 73, 76
jack, 7, 10
Acoustic cups, 7
using, 9, 26
Adapter, see AC adapter
Address, Ultratec, inside front
cover
Announcer, see TTY Announcer
Announcer key, 7, 15, 16, 33
Answer setting, for ASCII code,
81
Answering calls, 25
automatically, see Auto-answer
with acoustic cups, 26
with ASCII code, 83
ASCII code option, 80
answering a call using, 83
making a call using, 82
options for, 80–81
seek time, 68, 82
turning on, 81
Auto-answer, 39–47
direct connect and, 10, 39
interrupting, 41
memo, 40, 41, 43, 44, 47
memory for, 40
running out of, 40
messages, see Messages, auto-
answer
number of rings, 44–45,
63–64
password, 46
relay voice announcer,
turning off, 45, 68–69
remote message retrieval,
46–47
turning on and off, 41
Auto-answer key, 15, 16, 41
Auto busy redial, 36
Auto ID, 6, 17
turning off, 17, 67
Batteries, 11, 73–74
charging, 11
checking, 73
disposing of, 5, 74
exercising, 73
how long they last, 11, 73
low power in, 73
replacing, 74
Battery compartment, 7, 10, 74
Baud rate
for ASCII code, 81
for Baudot code, 80
Baudot code
auto setting, 80
baud rates, 80
Calling, Three-way, 37
Change to other TTY, 36
Cleaning, 4
Clear key, 15, 16, 30, 77
Clock, 12
setting date and time of the,
13, 66
turning off printing of the,
19, 65–66
Code key, 15, 16, 79, 80, 81
Computer, connecting with a, 80,
81, 82
Conversations
abbreviations in, back cover
clearing, 30, 77
erasing, see Conversations,
clearing
printing, 18, 29
reading, 29
recording, 54
saving, 29, 54
Control key, 12
Date, see Clock
Dial key, 14, 16, 22, 23, 24
Dialing
from the directory, 24, 55
pulse, 11, 63
tone, 11, 63
with a telephone and acoustic
cups, 26
with a telephone and direct
connect, 24
with the keyboard, 22, 23
Direct connect, 9, 10
and auto-answer, 39
and auto-busy redial, 36
and change to other TTY, 36
problems, 75
Directory entries, 55–59
adding, see Directory entries,
saving
changing, see Directory entries,
e d i t i n g
clearing, 58–59
dialing from, 24, 55
editing, 58
erasing, see Directory, entries,
c l e a r i n g
memory for, 55
printing, 59
saving, 56–57
Directory key, 15, 16, 56, 58, 59
Display mode, 62–63
Duplex option, for ASCII code, 81
Electrical power, see Power
Erasing memory, see Memory,
clearing
Escape key, 12
Flasher, see Ring flasher
Function keys, 12, 14–15, 16
90 • INDEX
Page 93

GA, back cover
Greeting key, 14, 16, 32
Greeting Memo, 32, 49, 65
Hangup key, 14, 16, 24, 38
Hanging up,
after answering a direct
connect call, 25
after making a direct connect
call, 22
after an acoustic call, 26
and auto-answer, 40, 47
by using the hangup key, 24
Help key, 15, 16, 19
Hook flash, 23, 38, 57
Interrupt key, 16, 27
Lightning danger, 4
Light, power, 7
blinking, 73
Light, signal, 7, 23
Memo key, 14, 16, 50, 52, 53
Memory
auto-answer, 40, 85
clearing, 30, 47, 52, 58–59,
77
conversation, 29, 30, 85
directory, 55, 85
erasing, see Memory, clearing
memo, 49, 85
running out of, 40, 54
showing free space in, 52, 57
Memos, 49–54
auto-answer and, see Auto-
answer memo
changing, see Memos, editing
clearing, 52–53
editing, 52
erasing, see Memos, clearing
memory for, 49
printing, 53
saving, 50–51, 54
sending, 51
Messages, auto-answer, 40
clearing, 45, 47
erasing, see Messages,
auto-answer, clearing
reading, 42–43, 46–47
Mistakes, correcting typing, 22,
52, 57
NO DIRECT CONNECT prompt,
75
Options key, 15, 16, 45, 46, 61–69
Originate setting, for ASCII code,
81
Paper
replacing, 72
type needed, 72
Parity setting, for ASCII code, 81
Password, see Auto-answer, password
Phone, see Telephone
Phone line, see Telephone line
Phone numbers, see Dialing or
Directory entries
Power
connecting, 10
jack, see AC adapter jack
light, 7, 73
problems, 76
Print key, 14, 16, 53, 59
Printer
last line of conversation and,
18
paper, 72
resetting, 75
print size, 18–19, 62
print case, 18, 62
problems, 76
turning on and off, 18
Pulse dialing, 11, 63
Reception problems, 75
Redialing, 23
Redial, auto busy, 36
Relay number, saving a, 35, 66–67
Relay voice announcer, 34
message, 34, 40, 66–67,
68–69
Relay voice announcer key, 14, 16,
34
Remain key, 16, 51, 57
Remote polling, see Auto-answer,
remote message retrieval
Repair, 78
Resetting the Superprint 4425, 77
Return setting, for ASCII code, 81
Return key, 18, 51, 61
Ring flasher, 7, 9, 25, 34, 36, 76
Safety instructions, 4–5
Save Conversation key, 16, 54
Send memo key, 14, 16, 51
Sensitivity key, 16, 75
Signal light, see Light, signal
Signaler, 11
SK, back cover
Spacebar, 7, 61
Specifications, 85
Sticky Keys, 84
INDEX • 91
Page 94

TTY Announcer, 33
TTY Announcer key, 7, 15, 16,
33
Telephone, 9
connecting a, 11
dialing with a, 24, 26
jack, 10
Telephone line
connecting a, 10, 11
Three-way calling, 37
Time, see Clock
Time key, 12, 16
Toll saver setting, 44
Tone dialing, 11, 63
Troubleshooting, 75–77
TS, see Toll saver setting
TTY Announcer, 33
Turbo Code, 6, 27–28
turning off, 28, 37, 67, 75
Wait For Response, 34
92 • INDEX
Page 95

Page 96

Conversation Etiquette
GA When you talk with another person by TTY, you
type while the other person reads. When you want
the other person to respond, type GA for “Go
ahead.”
GA OR SK To say goodbye, type GA OR SK. This gives the other
person a chance to say any last words before ending
the conversation.
SKSK Type SKSK to end the conversation.
Q Some people prefer to type Q instead of a question
mark because it saves time and is easier to type.
You can use punctuation marks such as commas and periods,
although many people choose to omit them. You may also
abbreviate words,
such as:
GA go ahead OPR operator
SK stop keying PLS please
CD could Q question mark
CUL see you later R are
CUZ because SHD should
HD hold THX thanks
MTG meeting TMW tomorrow
NBR number U you
OIC oh, I see UR your
 Loading...