

ULTRA STEEL
1 8
VOLT
Cordless Power Tool Combo Kit
INSTRUCTION MANUAL
4 PIECE
CAUTION: Before using this product, read this manual and follow all Safety Rules
and Operational Instructions.
Go to www.ultrasteeltools.com to register your product.
Please read before returning this product to store for any reason.
If you have questions or experience a problem with your Ultra Steel purchase,
go to http://www.ultrasteeltools.com for instant answers 24 hours a day.
If you can’t nd the answer or don’t have internet access, call 1-800-8407856 from 8 a.m. to 5 p.m. Eastern time Monday through Friday.
AP00973S
15
The RBRCTM Seal (Rechargeable Battery Recycling Corporation) on the
nickle-cadmium battery (or battery pack) indicates that the cost of
recycling the battery or battery pack have already been paid by Ultra
Steel. In some areas, it is illegal to place spent nickle-cadmium batteries in
the trash or municipal solid waste stream and the RBRC program provides an environmentally conscious alternative.RBRC in cooperation with Ultra Steel and other battery
users, has established programs in the United States and Canada to facilitate the
collection of spent nickle-cadmium batteries. Help protect our environment and
conserve natural resources by contacting your local recycling center for information on
where to drop o the spent battery, or call 1-877-2-RECYCLE.
THE RBRC TM SEAL
FULL ONE YEAR HOME USE WARRANTY
Ultra Steel warrants this product for one year against any defects in material or
workmanship. The defective product will be replaced or repaired at no charge in
either of two ways:
1) Return the product to the store in which it was purchased - this will result in an
exchange only.
Returns should be made within the time frame of the retailer’s policy for exchanges
(usually 30 to 90 days after the sale). Proof of purchase is required. Please check with
the store from which your purchase was made to determine policy regarding returns
2) Send the product to Ultra Steel for repair or replacement (whichever Ultra Steel
determines is the best option) and include your proof of purchase.
legal rights and you may have other legal rights which vary from state to state
or province to province. For questions, call Ultra Steel at 1-800-840-7856.
This product is not intended for commercial use.
SERVICE INFORMATION:
For technical advice, repair, or genuine replacement parts,
call 1-800-840-7856 or visit www.UltraSteeltools.com
FREE WARNING LABEL REPLACEMENT:
If your warning labels become illegible or are missing, call 1-800-840-7856 for free
replacement.
Ultra Steel is a registered trademark of and distributed by Test Rite Products
Corporation, 1900 S. Burgundy Place, Ontario, CA. 91761, U.S.A.,
Made in China
READ ALL INSTRUCTIONS BEFORE USING THIS TOOL
1. KEEP WORK AREA CLEAN. Cluttered areas invite injuries.
2. CONSIDER WORK AREA ENVIRONMENT. Don’t use power tools in damp, wet, or
poorly lit locations. Don’t expose your tool to rain. Keep the work area well lit.
Don’t use tools in the presence of flammable gases or liquids.
3. KEEP CHILDREN AWAY. All children should be kept away from the work area.
Don’t let them handle machines, tools or extensions cords.
4. STORE IDLE EQUIPMENT. Store equipment in a dry area to inhibit rust. Equipment
also should be in a high location or locked up to keep out of reach of children.
5. DON’T FORCE THE TOOL. It will do the job better and operate more safely at the
rate for which it was intended.
6. USE THE RIGHT TOOL. Don’t force a small tool or attachment to do the work of
a larger industrial tool. Don’t use a tool for a purpose for which it was not intended.
7. DRESS PROPERLY. Don’t wear loose clothing or jewelry, they can be caught in
moving parts. Protective, non-electrically conductive gloves and non-skid footwear
are recommended when working. Wear protective hair covering to contain long
hair and keep it from harm.
8. USE EYE PROTECTION. Use a full face mask if the work you’re doing produces
metal filings, dust or wood chips. Goggles are acceptable in other situations. Wear a
clean dust mask if the work involves creating a lot of fine or coarse dust.
9. DO NOT TOUCH BIT WITH HANDS AFTER DRILLING. Bit can become extremely
hot after job is completed.
10. SECURE WORK. Use clamps or a vise to hold the work if possible. It’s safer than
using your hands and it frees both hands to operate the tool.
11. DON’T OVERREACH. Keep proper footing and balance at all times. Do not reach
over or across machines which are running.
12. MAINTAIN TOOLS WITH CARE. Keep tools bits & blades sharp and clean for better
and safer performance. Follow instructions for lubricating and safe performance.
Follow instructions for lubricating and changing accessories. Keep handles dry,
clean and free from oil and grease.
13. REMOVE ADJUSTING KEYS AND WRENCHES. Although your cordless drill has a
convenient keyless chuck, make it a habit to check that keys and adjusting
wrenches are removed from any rotating tool before using.
14. AVOID UNINTENTIONAL STARTING. Don’t carry tool with a finger on the switch.
Be sure the direction switch is in the NEUTRAL position when not in use or when
changing bits.
15. STAY ALERT. Watch what you are doing & use common sense. Don’t operate any
tool when you are tired.
16. CHECK FOR DAMAGED PARTS. Before using a tool, any part that is damaged
should be carefully checked to determine that it will operate properly and perform
its intended function. Check for alignment of moving parts, binding of moving
operation. Check bits to make sure they are sharp and not chipped. Inspect screws
and tighten any ones that are loose. Any part that is damaged should be properly
repaired or replaced by an authorized service center unless otherwise indicated
elsewhere in the instruction manual. Have defective switches replaced by an
authorized service center.
17. GUARD AGAINST ELECTRIC SHOCK. Prevent body contact with grounded surfaces:
pipes, radiators, ranges, and refrigerator enclosures. When drilling into walls,
floors, or wherever “live” electrical wires may be encountered, try to ascertain
whether there is a danger of shock. Even so, DO NOT TOUCH THE CHUCK OR ANY
METAL PARTS OF THE DRILL. Hold the tool only by the plastic handle or the side
grip to prevent electric shock if you hit a live wire.
18. REPLACEMENT PARTS. When servicing, use only identical replacement parts.
19. USE EAR PROTECTION. Use hearing protection, particularly during extended
periods of operation of the tool, or if the operation is noisy.
20. USE AUXILIARY HANDLES SUPPLIED WITH THE TOOL. Loss of control can cause
personal injury.
IMPORTANT SAFETY INSTRUCTIONS
1 2
WARNING: When using electric tools, machines or equipment, basic safety
precautions should always be followed to reduce the risk of re, electric shock,
and personal injury.
PRECAUTIONS FOR BATTERY AND CHARGER
CHARGE BATTERIES FULLY before inital use.
1. CHARGE AT ROOM TEMPERATURE. Room temperature must be higher than 0°C
(32°F) and lower than 50°C (122°F).
2. DO NOT CHARGE IF CHARGER’S CORD OR PLUG IS DAMAGED. Charging with
damaged cord may result in fire or electrical shock. If charger is damaged in any way,
have it repaired by a qualified serviceman.
3. DO NOT SHORT ACROSS TERMINALS OF BATTERY. Take care that metal such as
paper clips, nails, the sides of a metal tool box do not cause a short in your battery.
Extremely high temperatures and fire can result.
4. DO NOT INCINERATE BATTERY.
WARNING: Repairs should be made by an authorized repair center. Do not open or
disassemble this power tool.
CALIFORNIA PROP 65 AND OTHER WARNINGS
WARNING: Some dust created by power sanding, sawing, grinding, drilling and other
construction activities contains chemicals known to the state of California to cause
cancer, birth defects or other reproductive harm. Some examples of these chemicals are:
• Lead from lead-based paints,
• Crystalline silica from bricks and cement and other masonry products, and
• Arsenic and chromium from chemically-treated lumber.
WARNING:
Your risk from these exposures varies, depending on how often you do this type of work.
To reduce your exposure to these chemical: work in a well ventilated area, and work with
approved safety equipment, such as those dust masks that are specially designed to
lter out microscopic particles.
The power cord on this product contains lead, known to the State of California to cause
cancer, and birth defects or other reproductive harm. Wash hands after handling!
This product contains lead, a chemical known to the State of California to cause cancer,
and birth defects or other reproductive harm. Wash hands after handling!
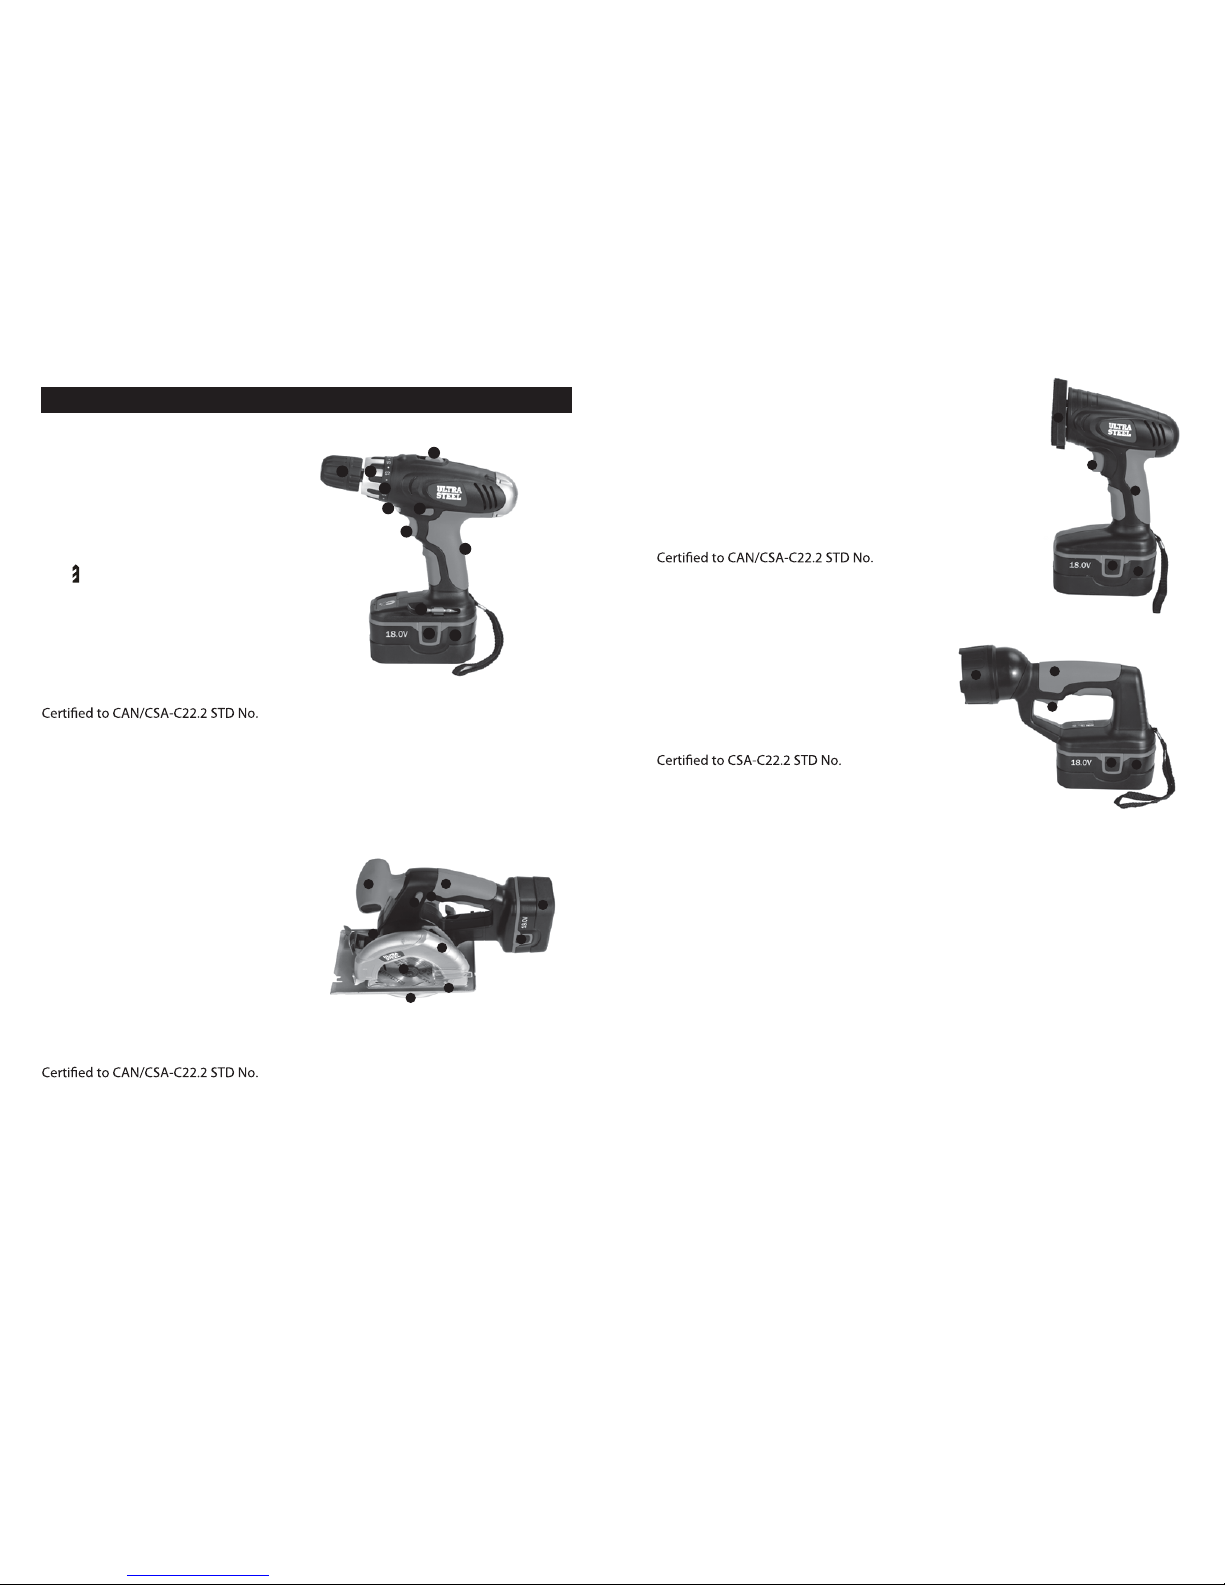
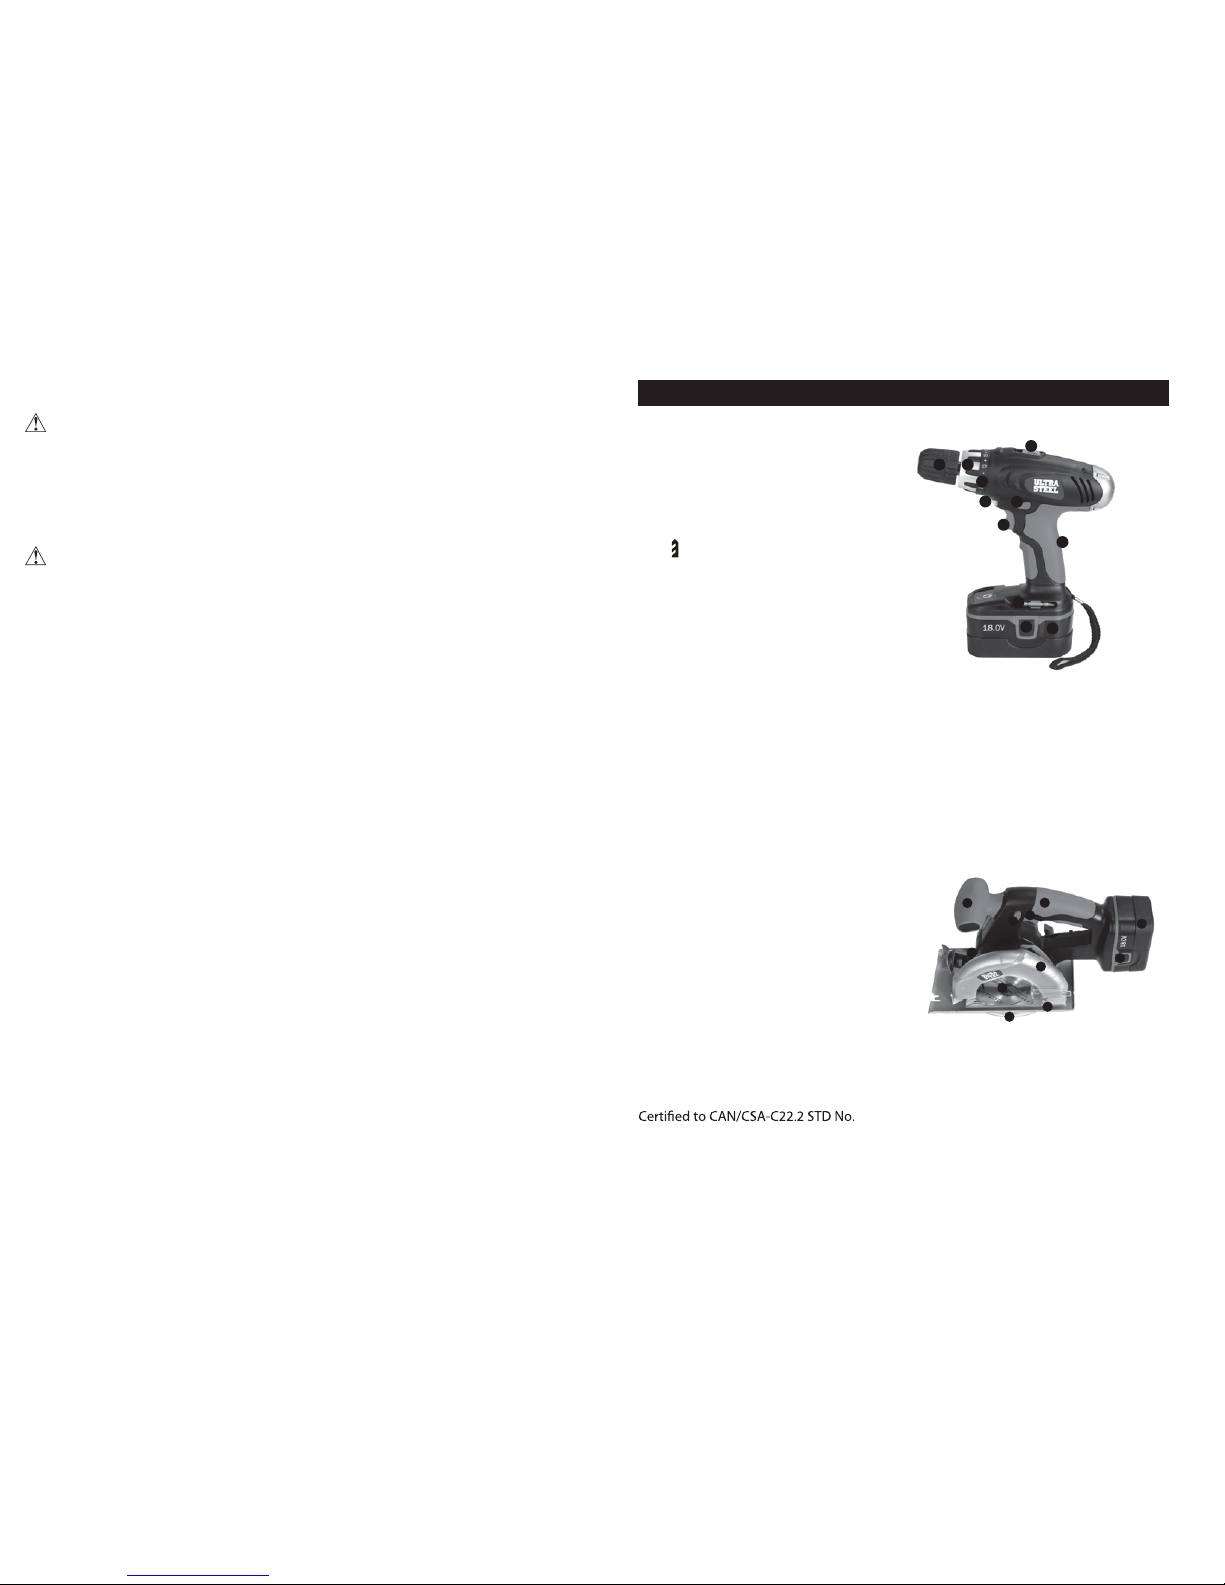
SPECIFICATIONS
3 4
Cordless Drill
Model No.: AP00965G
Voltage: 18 volts DC
No Load Speed 0-350/0-1100 RPM
Variable Speed Trigger
With Electric Brake
3/8 In. Keyless Chuck
22 + Position Adjustable
Torque Clutch
Built-in LED Work Light Built-in
Magnetic Holder
Conforms to UL STD No. 60745-1,
UL STD No. 60745-2-1, UL STD No.
60745-2-2
60745-1-07, CAN/CSA-C22.2 STD
No. 60745-2-1-04, CAN/CSA-C22.2
STD No. 60745-2-2-04
A B
C
D
E
F
G
H
I
J
K
Cordless Circular Saw
Model No.: AP00964G
Voltage: 18 volts DC
No Load Speed 4500 RPM
Safety Lock Trigger Switch
5-3/8 in. 24-tooth carbide blade
3/8 In. Arbor Size
Adjustable Bevel Range Up To 50 Degrees
Adjustable Cutting Depth - Up To 1-1/2 In.
@ 90 Degrees, Up To 1 In. @ 45 Degrees
Conforms to UL STD No. 60745-1, UL STD No.
60745-2-5
60745-1-07, CAN/CSA-C22.2 STD No.
60745-2-5-12
A Auxiliary Handle
B Lock Off Button
C Main Switch
D Rubber-covered Handle
E Battery Pack
F Upper Guard
G Base Plate
H Lower Guard
I Flanges
J Spindle Lock Button
K Battery Lock Button
A 3/8in.(10mm) Chuck
B Torque Regulation Ring
C Torque Indicator Scale
D Mechanical Gear Switch
E Led Work Light
F Forward/reverse Switch
G Variable Speed Trigger
H Rubber-covered Handle
I Battery Pack
J Battery Lock Button
K Double-ended Driver Bit
Cordless Sander
Model No.: AP00963G
Voltage: 18 volts DC
No Load Speed 4400 RPM Trigger
Switch
3-1/2 In. Sanding Pad
Conforms to UL STD No. 60745-1, UL
STD No. 60745-2-4
60745-1-07, CAN/CSA-C22.2 STD No.
60745-2-4-04
A
B
C
D
E
A Pivoting Light Head
B Switch
C Rubber-covered Handle
D Battery Pack
E Battery Lock Button
Cordless Flashlight
Model No.: AP00962G
Voltage: 18 volts DC 8W Halogen
Bulb Pivoting Light Head
Conforms to ANSI/UL STD No. 73
12-1982
Battery charger
Charger input: 100-240V~, 50/60Hz, 0.5A;
Charger output: 24.0V, DC, 0.35A;
Charger type: 4 hour, Class 2, stand charger;
Will charger battery type: 18V, Ni-cd, AP00965G -B.
Accessories:
2 - 18V. Ni-cd battery packs (1.3Ah)
2 - Double-ended screwdriver bits (Equipped in Drill)
1 - Magnetic bit holder
6 - Screwdriver bits: PH1, PH2, PZ1, PZ2, 5/32", 3/16"
6 - Drill bits: 3/32", 1/8", 5/32",3/16",7/32",1/4"
1 - Circular saw rip fence
1 - 5-3/8 In. 24-Tooth saw blade (Equipped in circular saw)
1 - Circular saw blade wrench (Equipped in circular saw)
9 - Sanding paper: 3pcs 60 grit, 3pcs 80 grit, 3pcs 120 grit
1 - Storage case
NOTE: This equipment has been tested and found to comply with the limits for a
Class B digital device, pursuant to Part 15 of the FCC Rules.
A
B
C
D
E
A Sanding Base
B Switch
C Rubber-covered Handle
D Battery Pack
E Battery Lock Button
A
B
D
F
J
I
G
H
C
E
K
OPERATING NOTES FOR BATTERY PACK
5 6
1. Battery must be fully charged before the first use. Batteries will reach full
performance after about five charge/discharge cycles.
2. Always have drill rotation switch in neutral position when removing or inserting
battery to avoid unintentional starting.
3. To remove battery pack, press the lock spring buttons and pull out.
4. To insert, simply push pack in until lock spring clicks.
5. To charge, plug the charger’s AC input plug into a 120V 60Hz household current.
The step of the battery pack has positive and negative terminal marking on it. Align
these with the identical markings on the top of the charger base and insert pack
into base (Pack will not insert properly if reversed)
6. When the charger is plugged into the wall receptacle and NO battery is on the
charger stand, the green indicator light will turn ON indicating the charger is “live”.
When a discharged battery is installed on the charger, the red indicator light will
turn on indicating the battery is charged. If the red indicator light does not come
ON, check to make sure battery pack is slid fully onto the charger and the electrical
outlet is working properly.
7. Normal charging time is approximately 4 hours. The red charging indicator light will
8. When charging more than one pack in succession, allow 15 minutes between
charges.
9. The battery discharges slowly overtime, even when not used, and may require
recharging before you use the tool.
10. After many charge/discharge cycles, your batteries will lose their ability to hold a
charge. They should then be replaced. Dispose of batteries at an appropriate waste
disposal facility. They contain cadmium, so do not throw batteries away in common
trash receptacles.
11. For use only with Ultra Steel AP00965G -B Ni-cd battery.
OPERATING NOTES FOR DRILL
OPERATING NOTES FOR CIRCULAR SAW
VARIABLE SPEED
1. You can vary the spindle rotation speed by modulating finger pressure on the
trigger.
2. Selecting high or low gear.
• Move the gear selector switch forward, exposing the ‘HI’ legend, to work in the
high-speed range.
• Move the gear selector switch backward, exposing the ‘LO’ legend, to work in the
low speed range.
• In the low gear (low-speed range), the drill turns with more torque, especially good
for operations that require more power than speed, such as driving screws.
ROTATION DIRECTION
Your drill is equipped with a 3-position forward/reverse switch through the housing
above the trigger.
1. When it is pushed toward the right, rotation is forward (clockwise).
2. When pushed in from the right to the left side, rotation is reversed
(counter-clockwise).
3. When in center position, it is locked in neutral and the trigger is blocked.
4. Do not push the rotation direction switch until the chuck stops turning.
TORQUE REGULATOR
This is a 22+ position dial situated just before the chuck.
1. When dial indicator reads 1, torque is at minimum before the clutch disengages the
chuck from the drive; when indicator is just past 22, output is at maximum before it is
disengaged.
screw deeper into material; less torque will prevent it stripping. Larger screws require
more torque to drive than small ones. A little trial and error will show you which is the
optimum setting for the situation.
3. Release the trigger when the clicking sound indicates the chuck will not turn further.
4. For drilling, always use the drill setting, indicated by a drill bit. At this setting, the
drive does not disengage from the chuck.
KEYLESS CHUCK
1. Center the rotation direction switch to prevent the motor accidentally starting.
2. Note there are two rings on the chuck. Turning the endmost knurled ring of the
chuck clockwise by hand while with the other hand, holding the second ring (closer
to the rear of the tool) to prevent the motor turning; closes the jaws of the chuck.
Turning that same endmost knurled ring counter-clockwise opens the jaws.
3. Open the jaws to accept a bit and then close the jaws so they clamp the bit tightly.
WARNING: Hold power tools by insulated gripping surfaces when performing
an operation where the cutting tool may contact hidden wiring or
its own cord.
WARNING:
serious problems if:
• The miter housing gets hot
• Sparks or odors emit from the casing
CAUTION: Do not put hands directly in front of, behind, or below the saw
blade when cutting.
7 8
1. Always grasp the saw with both hands on the handles and push the saw through
the material.
2. Be sure there are no nails or any other foreign objects in, on the work piece, or in the
path of the blade. They could cause damage to the saw blade, injury from kickback
or even injury from flying debris.
3. Make sure the work piece is properly supported at all times. Plan so that it is
properly supported during the cut.
4. Whenever possible, secure the work piece with clamps or in a vise. Do not hold
short pieces by hand while cutting.
5. When making cuts parallel to existing straight edges, whenever possible, insert the
rip fence into the slots at the front of the saw. Fasten it in place at the desired
distance, with the screw clamp provided, and use it to help keep the cut as straight
and parallel as possible.
6. Mark the line of the cut clearly. Adjust the cutting depth to the thickness of the
workpiece.
7. Make sure you are fully prepared to begin your cut before squeezing the trigger
switch. Do not reach underneath the workpiece.
8. Set the base plate against the work piece.
9. Hold the tool firmly. Motor torque will cause the tool to twist, so a firm grip is
imperative. Check to make sure that saw blade travel is not obstructed. Squeeze the
trigger switch.
10. Allow the saw blade to reach full speed before pushing it into the work piece.
11. Do not force the saw blade into the work piece. Apply moderate pressure, allowing
the blade to cut without being forced.
12. Never hold piece being cut in your hands or across your leg. Secure the workpiece
to a stable platform.
13. When ripping always use a rip fence or straight edge guide.
14. This tool is designed to make straight cuts only. Do not attempt to cut curves with it.
Twisting the saw to either side while cutting will cause the blade to bind in the work
piece, perhaps causing kickback, personal injury, damage to the work piece, and /or
damage to the saw.
15.
to come to a stop before putting the tool down.
DANGER – Keep hands and body away from and to the side of the blade. Contact
with blade will result in serious injury.
WARNING – To reduce the risk of injury, check guarding system. It must cover the
blade instantly! Hold saw with both hands. Support and clamp work.
Wear eye protection.
DANGER – Keep hands away from cutting area and the blade. Keep your second
hand on auxiliary handle, or motor housing.
CHANGING THE BLADE
1. Use the wrench that is included with the kit.
2. Press the spindle lock button.
3.Turn the nut clockwise to loosen.
4. Remove the blade and replace with the new blade.
5. Place nut back on and turn counterclockwise to tighten.
NOTE:
1. Always use blades with correct size and shape (diamond versus round) of arbour holes.
2. Never use damaged or incorrect blade washers or bolt.
1. Remove the battery from the sander
2. Turn the tool upside down
3. Place the paper, fuzzy side down, on the sanding pad so that the paper aligns with
the pad.
4. Press down on the paper in the pad.
can shorten the life of the small plastic hooks on the sanding pad and result in the
6. The sandpaper tends to wear fastest at the front point. Rotate the paper from time to
time to allow it to wear more evenly.
7. During use, check the sandpaper regularly for tears, cracking, and other damage.
Damaged paper can allow the pad beneath to be damaged, particularly the hooks.
NOTE: Because of the operator vigilance required in this respect, the pad is considered
a consumable part and is not covered under warranty.
CAUTION: Do not put hands directly in front of, behind, or below the saw
blade when cutting.
WARNING: Always remove the battery pack from your cordless tools when you
are assembling parts, making adjustments, assembling or removing blades,
cleaning or when not in use. Removing the battery pack will prevent accidental
starting that could cause serious personal injury.
OPERATION NOTES FOR DETAIL SANDER
ON/OFF
To turn the light ON / OFF, insert the battery pack and press the trigger with your finger.
TO SWIVEL THE WORKLIGHT
1. Hold the worklight with two hands. One hand should be around the body of the light;
the other hand should be around the head of the worklight.
2. Using the hand that is holding the head of the worklight, twist the head clockwise.
Continue to adjust the light until it is adjusted to the angle that works for your job.
3. To return the worklight to its original position, twist the worklight in a counter-clock
wise direction.
OPERATION NOTES FOR LIGHT
MAINTENANCE
WARNING: Some of the following symbols may appear on the tool. Study these
symbols and learn their meaning. Proper interperetation of these symbols will
NOTE: Due to continuous product improvement, we reserve the right to change
9 10
• Keep the tool clean using a soft damp (not wet) cloth. Do not use solvents on the
plastic parts.
• Lubrication is not necessary. After long use, have an authorized service center
maintain and lubricate the tool.
• Should the chuck require replacement:
1. Keep the tool housing and handle clean and free of oil and grease using mild soap
petroleum-based products, etc., contact plastic parts of the housing.
Cleaning with these substances can harm the plastic and compromise the integrity of
the double insulating system.
2. Keep the vents clear of dust and debris. This will help prevent possible electric
shorts and ensure proper cooling.
3. Avoid overloading your tool. Do not force the tool, otherwise it will become hot and
normal temperature.
4. Lubrication for these tools is done at the factory and should not be necessary again
under normal use.
5.
that involve opening or disassembling tools.
6. Any damage to the tools should be corrected at an authorized repair center.
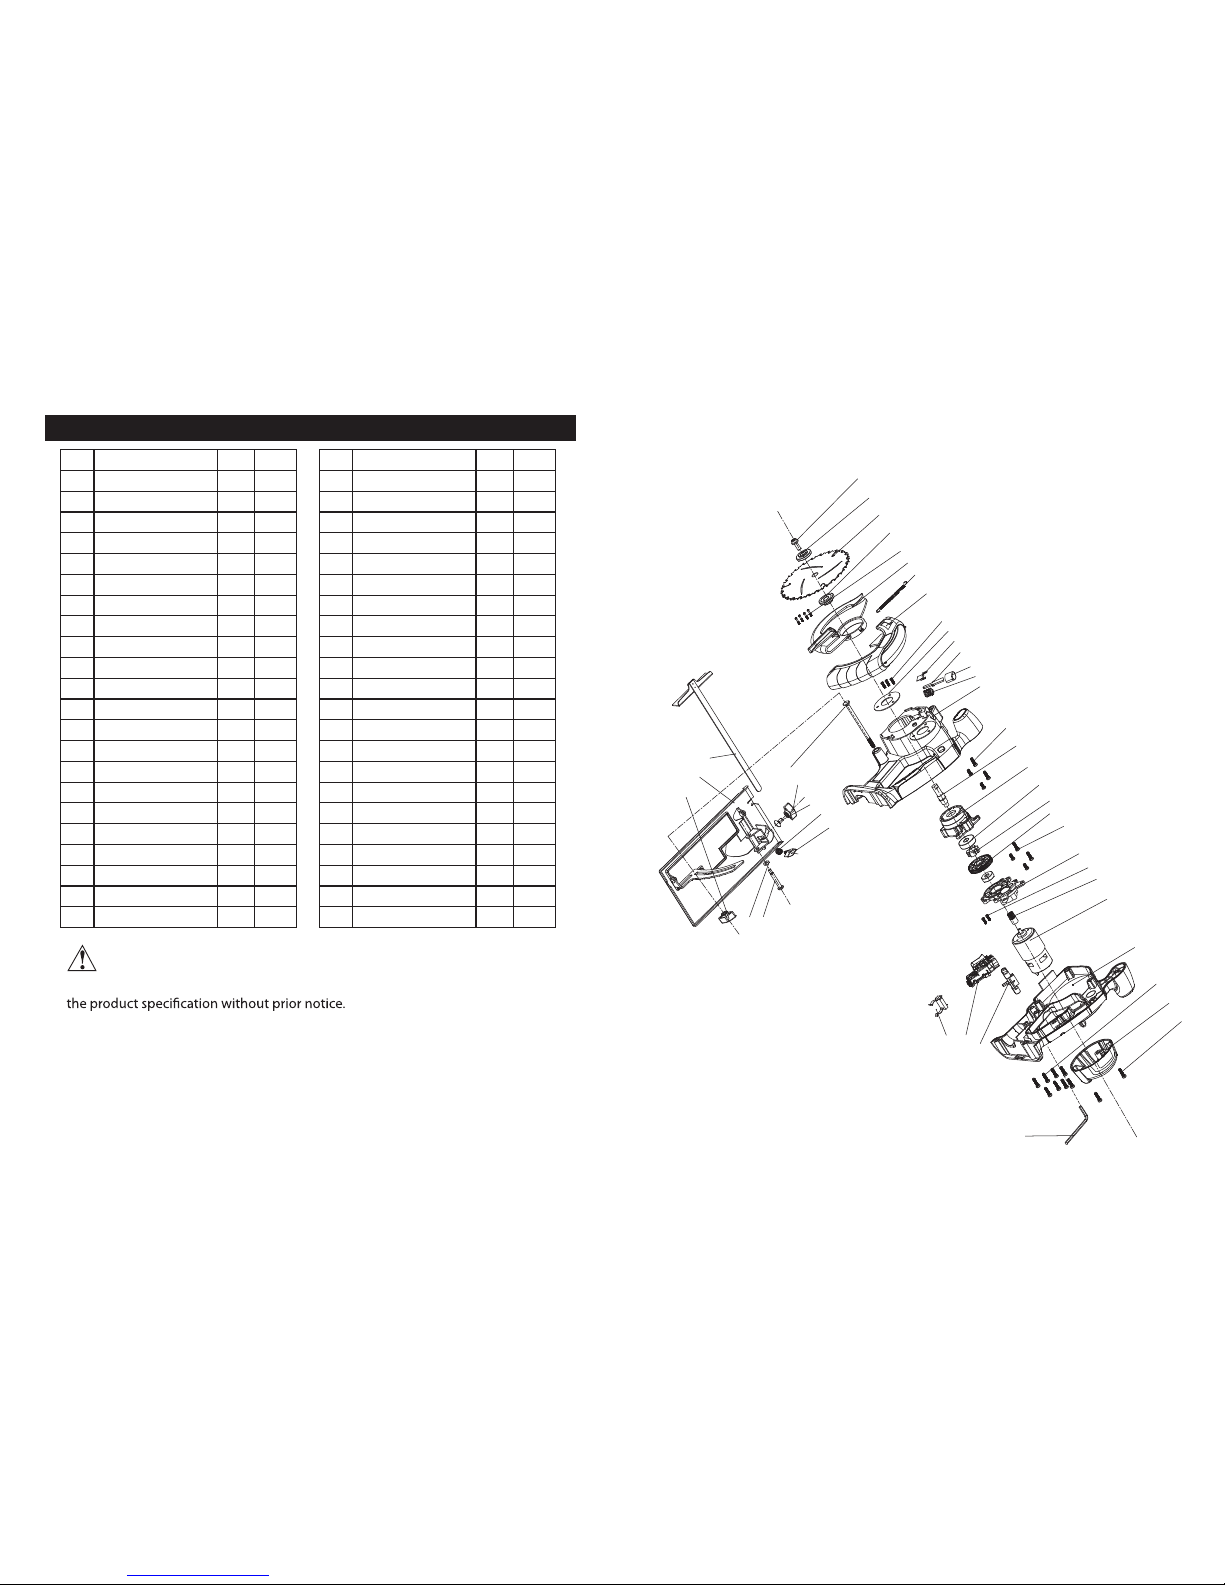
PARTS LIST FOR CORDLESS DRILL
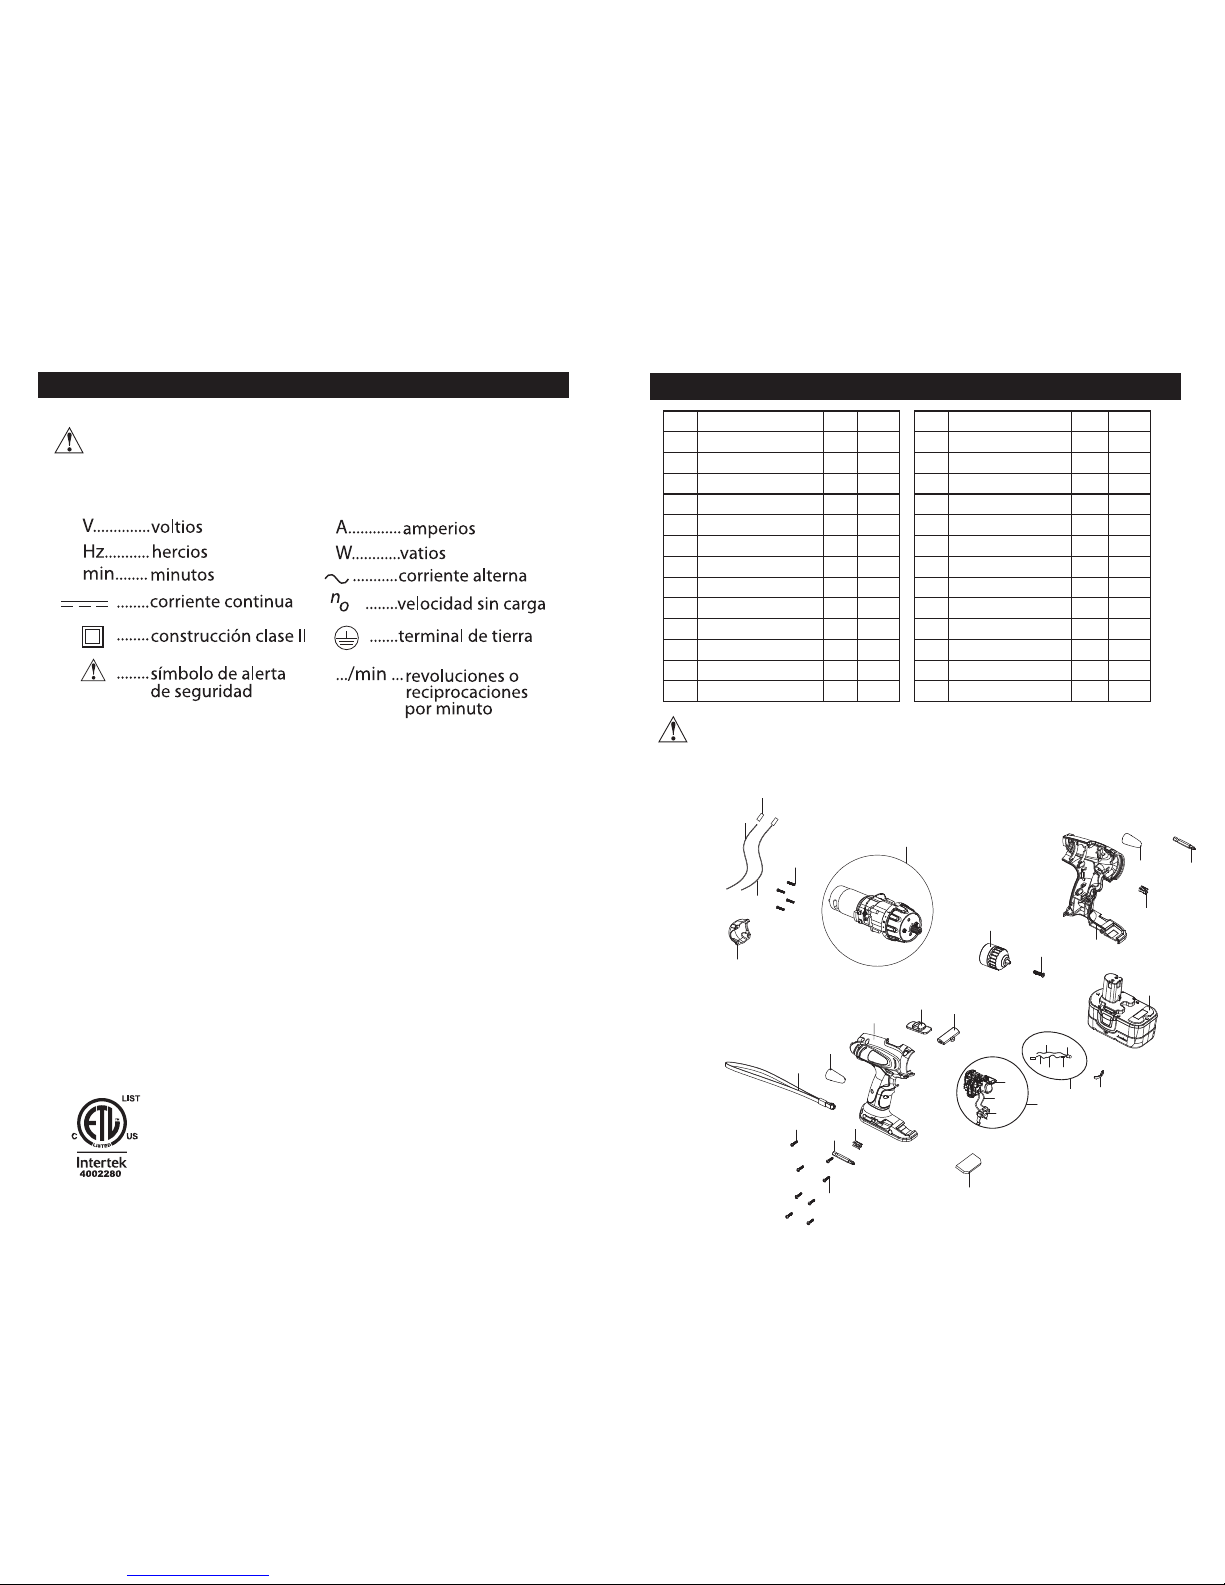
SYMBOLS
This symbol designates that this tools listed with U.S. requirements by
ETL Testing Laboratories, Inc.
Conforms to UL Std.
Item
1
2
3
4
5
6
7
8
9
10
11
12
13
Qty
2
2
1
1
1
1
1
1
1
1
1
1
1
Unit
PCS
PCS
PCS
PCS
PCS
PCS
SET
PCS
SET
PCS
PCS
PCS
SET
English Name
Double-ended bit
Bit clip
Logo label
Housing support
Chuck retaining screw
Chuck
Gear box assembly
Transparent cover
Working light assembly
F/R button
Shift button
Housing cover
Switch assembly
Item
13.1
13.2
13.3
14
15
16
17
18
19
20
21
22
23
Qty
1
2
1
1
5
1
1
2
1
1
1
7
1
Unit
PCS
PCS
PCS
SET
PCS
PCS
PCS
PCS
PCS
PCS
PCS
PCS
SET
English Name
Switch
Line
Battery clip assembly
Back cover
Screw
Wire
Wire
Heat shrink pvc tube
Magnet
Data label
Belt
Screw
Battery assembly
WARNING: Repairs should be made by an authorized repair center.
Opening this tool could invalidate your warranty.
1
2
3
4
5
6
7
8
9
13
19
15
22
21
20
23
12
14
16
15
18
17
11
10
1
2
9.1
13.1
13.2
13.3
9.2
9.3
9.4
9.5
NOTE: Due to continuous product improvement, we reserve the right to change
11 12
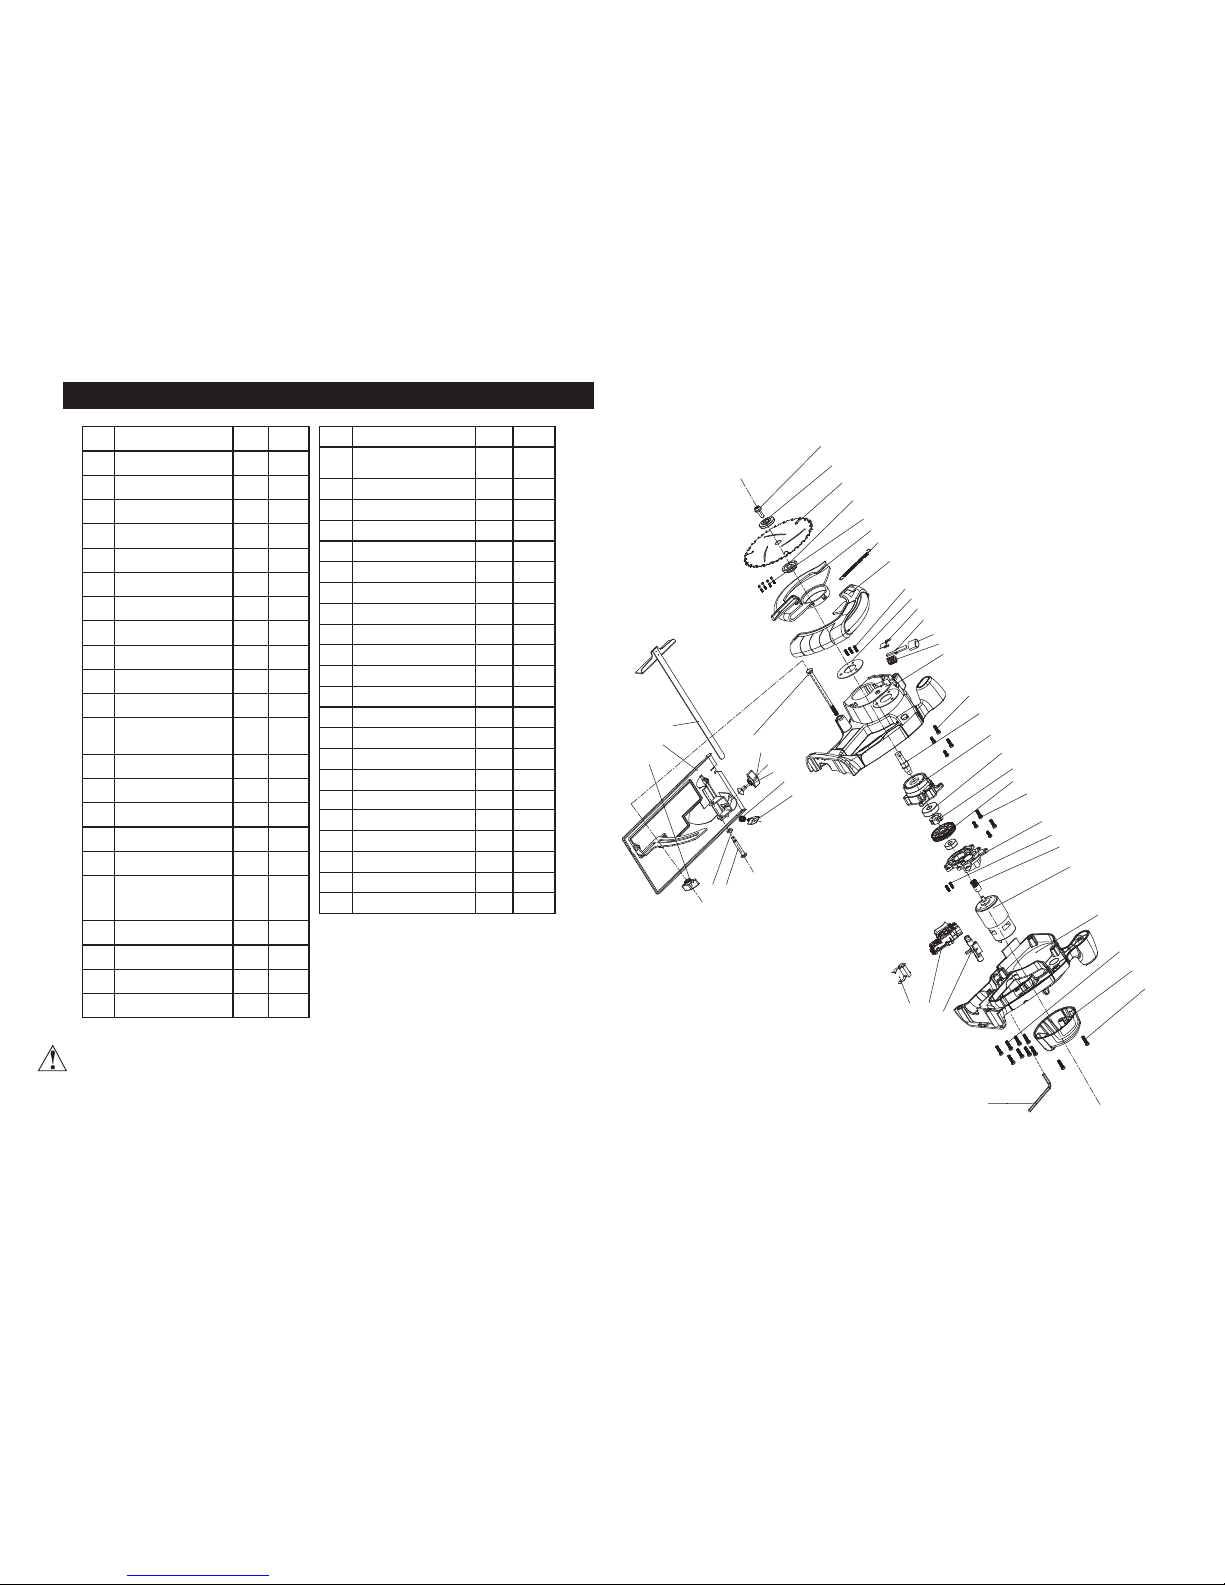
PARTS LIST FOR CIRCULAR SAW
Item
1
2
3
4
5
6
7
8
9
10
11
12
13
14
15
16
17
18
19
20
21
22
Qty
1
1
1
1
3
1
1
1
3
1
1
1
1
1
1
4
1
1
1
1
1
6
Unit
PCS
PCS
PCS
PCS
PCS
PCS
PCS
PCS
PCS
PCS
PCS
PCS
PCS
PCS
PCS
PCS
PCS
PCS
PCS
PCS
PCS
PCS
English Name
Screw M6x16
Upper platen
Saw blade
Lower platen
Screw M4x12
Adjustable guide
Spring
Fixed guide
Screw M4x12
Active shield plate
Dustproof plate
Self locking pole
Self-locking knob
Spring
Left Housing
Screw M4x12
Shaft
Gear box(front)
Bearing
Self-locking
Big gear
Screw M4x12
Item
23
24
25
26
27
28
29
30
31
32
33
34
35
36
37
38
39
40
41
42
43
44
Qty
1
2
1
1
1
12
1
2
1
1
1
1
1
1
1
1
1
1
1
1
1
1
Unit
PCS
PCS
PCS
PCS
PCS
PCS
PCS
PCS
PCS
PCS
PCS
PCS
PCS
PCS
PCS
PCS
PCS
PCS
PCS
PCS
PCS
PCS
English Name
Gear box(rear)
Screw M4x12
Small gear
Motor
Right housing
Screw ST3.9x16
Motor cover
Screw ST3.9x16
Wrench
Switch
Switch lock button
Battery connector
Screw M6x100
Knob
Screw M6x100
Spring
Knob
Rip fence
Base
Knob
Screw M5
Pin
WARNING: Repairs should be made by an authorized repair center.
Opening this tool could invalidate your warranty.
1
2
3
4
5
6
7
8
9
10
11
12
13
14
15
16
17
18
19
20
22
23
24
25
26
27
28
29
30
31
32
3334
36
37
38
39
40
41
42
35
21
43 44

13 14
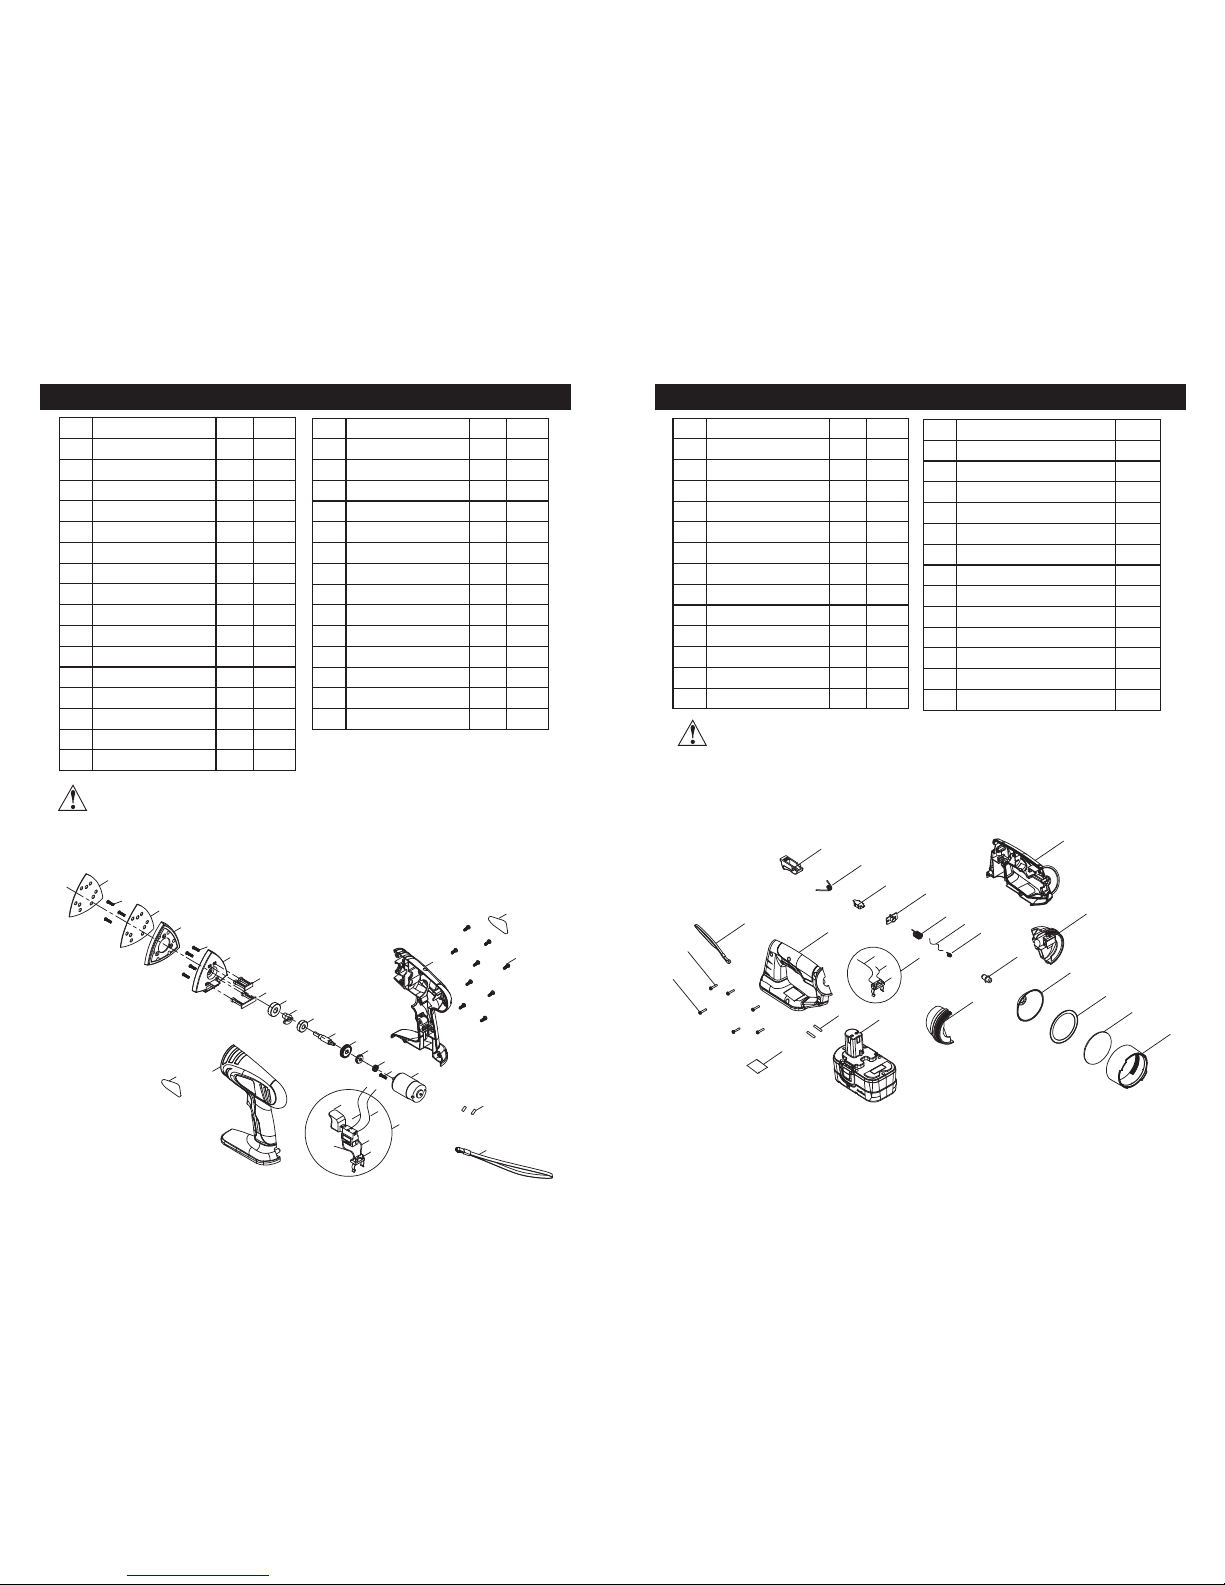
PARTS LIST FOR CORDLESS DETAIL SANDER
Item
1
2
3
4
5
6
7
8
9
10
11
12
13
14
15
16
Qty
1
9
1
1
7
1
1
1
1
1
1
1
1
1
1
1
Unit
PCS
PCS
PCS
PCS
PCS
PCS
PCS
PCS
PCS
PCS
PCS
PCS
PCS
PCS
PCS
PCS
English Name
Logo label
Screw
Housing cover
Sand paper
Screws
Magic sticker
Rubber pad
Plastic bracket
Deection block
Small nylon beam
Big nylon beam
Bearing
Bearing
Main shaft
Driven gear
Powder metal brush
Item
17
18
19
20
21
21.1
21.2
21.3
21.4
21.5
21.6
22
23
24
Qty
1
1
1
1
1
1
1
1
1
1
1
2
1
1
Unit
PCS
PCS
PCS
SET
SET
PCS
PCS
PCS
PCS
PCS
PCS
PCS
PCS
PCS
English Name
Driving gear
Motor
Housing support
Logo label
Switch assembly
Switch
Wire
Wire
Wire
Wire
Battery clip
Heat shrink pvc tube
Belt
Screws
NOTE: Due to continuous product improvement, we reserve the right to change
WARNING: Repairs should be made by an authorized repair center.
Opening this tool could invalidate your warranty.
1
2
4
5
6
7
5
8
9
10
11
12
13
14
15
16
17
18
24
22
23
21
21.1
21.2
21.3
21.4
21.5
21.6
19
20
3
PARTS LIST FOR CORDLESS LIGHT
Item
1
2
3
4
5
6
7
8
9
10
11
12
13
Qty
1
1
1
1
1
1
2
1
1
1
1
1
1
Unit
PCS
PCS
PCS
PCS
PCS
PCS
PCS
PCS
PCS
PCS
PCS
PCS
PCS
English Name
Housing (support )
Left head cover
Light head
Transparent cover
Rubber pad
Bulb
Anode spring
Cathode spring
Stent
Switch
Spring
Switch button
Item
14
15
15.1
15.2
15.3
16
17
18
19
20
21
22
23
Qty
1
1
1
1
1
1
1
5
2
2
1
1
1
Unit
PCS
SET
PCS
PCS
PCS
PCS
PCS
PCS
PCS
PCS
SET
PCS
PCS
English Name
Right middle cover
Battery clip assembly
Battery clip
Wire
Wire
Housing cover
Hang belt
Screws
Heat shrink tube
Data Label
Battery pack
Screw
Wire
NOTE: Due to continuous product improvement, we reserve the right to change
WARNING: Repairs should be made by an authorized repair center.
Opening this tool could invalidate your warranty.
1
2
3
4
5
6
7
8
9
10
11
12
13
23
14
15
15.2
15.1
15.3
21
20
19
16
17
18
22

ULTRA STEEL
1 8
VOLT
Cordless Power Tool Combinado
MANUAL DE INSTRUCCIONES
4 PIEZAS
AP00973S
15
EL SELLO RBRC
TM
La Junta RBRCTM (Rechargeable Battery Recycling Corporation) en el
níquel-cadmio (ni a la batería) indica que el costo de reciclaje la batería o la batería
ya han sido pagados por Ultra Steel
En algunas áreas, es ilegal poner pasó hidruro de cadmio las baterías usadas a la basura
o desechos sólidos municipales y el programa de RBRC proporciona un ambiente mental
consciente alternativa.RBRC en cooperación con Ultra acero y otros los usuarios de pilas,
ha establecido programas en los Estados Unidos y Canadá, para facilitar la recogida de
baterías níquel-cadmio. Ayudar a proteger el medio ambiente y conservar los recursos
naturales poniéndose en contacto con su centro de reciclaje local para obtener
información sobre los puntos de las pilas usadas, o llame al 1-877 -2-RECICLAR.
UN AÑO COMPLETO USO DOMÉSTICO
Ultra Steel garantiza este producto por un año contra cualquier defecto de material
o de mano de obra. El producto defectuoso será sustituido o reparado de forma
gratuita en cualquiera de los dos métodos siguientes:
1) Devolver el producto a la tienda en la que se adquirió, el resultado será en un
intercambio.
Devuelve debe hacerse dentro del marco de tiempo del minorista la política de intercambios (generalmente de 30 a 90 días después de la venta). Se requiere comprobante de
compra. Por favor, consulte con la tienda de la que su compra se hizo para determinar la
política relativa al regreso
2) enviar el producto a Ultra acero para la reparación o sustitución (según Acero
Ultra determina es la mejor opción) y que incluyen la prueba de compra.
Esta garantía no se aplica a los accesorios derechos legales y usted puede tener otros
derechos legales que varían de un estado a otro o de una provincia a otra. En caso de
dudas, llamada Ultra Acero al 1-800 -840-7856.
Este producto no está diseñado para uso comercial.
INFORMACIÓN DE SERVICIO:
asesoramiento técnico, reparación o reemplazo Las piezas originales, llame al
1-800-840-7856 o visite www.UltraSteeltools.com
ETIQUETA DE ADVERTENCIA SIN REEMPLAZO:
Si las etiquetas de advertencia su vuelto ilegible o están desaparecidos, llame al 1-800840-7856 para reemplazo de manera gratuita.
Ultra Steel es una marca registrada de y distribuido por prueba Rito Products Corporation,
1900 S. Borgoña, Ontario, CA. 91761, EE.UU.,
Hecho en China
PRECAUCIÓN: Antes de utilizar este producto, lea este manual y siga todas las
reglas de seguridad e instrucciones de funcionamiento.
Ir a www.ultrasteeltools.com para registrar su producto.
Por favor, lea antes de devolver el producto a almacenar por cualquier motivo.
Si usted tiene preguntas o problemas con el Ultra Acero compra, ir a
http://www.ultrasteeltools.com para obtener respuestas inmediatas 24 horas al día.
Si usted no puede encontrar la respuesta o no se tiene acceso a internet, llame al
1-800-840-7856 8 am- 5 p. m hora del Este de Lunes a Viernes.

1 2
INSTRUCCIONES
ADVERTENCIA: Al usar herramientas eléctricas, máquinas o equipos, siempre
se deben seguir precauciones básicas de seguridad para reducir el riesgo de
incendio, choque eléctrico, y lesiones personales.
LEA TODAS LAS INSTRUCCIONES ANTES DE UTILIZAR ESTA HERRAMIENTA
1. MANTENGA LIMPIA EL ÁREA DE TRABAJO. Zonas saturadas invitar a las lesiones.
2. CONSIDERAR ÁREA DE TRABAJO MEDIO AMBIENTE. No utilice herramientas eléctricas
en lugares húmedos o mal iluminados. No exponga el instrumento a la lluvia. Mantenga el
área de trabajo bien iluminada. No use las herramientas en la presencia de gases o líquidos
inamables.
3. MANTENER FUERA DEL ALCANCE DE LOS NIÑOS. Todos los niños deben mantenerse
alejados de la zona de trabajo.
No te dejes manipular máquinas, herramientas o cables extensiones.
4. ALMACENAR EL EQUIPO. Guarde el equipo en un lugar seco para inhibir oxidación.
Equipo también debe estar en una ubicación elevada o bloqueado para mantener fuera
del alcance de los niños.
5. NO FUERCE LA HERRAMIENTA. Lo hará el trabajo mejor y más seguro de la tarifa en la
que se destina.
6. USE LA HERRAMIENTA CORRECTA. No fuerce una herramienta pequeña o de un archivo
adjunto para realizar el trabajo de
un gran herramienta industrial. No use la herramienta para un propósito para el cual no
estaba previsto.
7. VESTIRSE ADECUADAMENTE. No use ropa suelta o joyas, que pueden ser atrapados en
las piezas móviles. Protección de conductores de la electricidad guantes y calzado
antideslizante se recomienda durante el trabajo. Desgaste cubierta protectora para
contener el cabello largo y que no se daño.
8. USE PROTECCIÓN PARA LOS OJOS. Utilizar una máscara de cara completa si el trabajo
que estás haciendo produce virutas de metal, polvo o virutas de madera. Gafas son
aceptables en otras situaciones. Usar una máscara de polvo limpia si el trabajo implica la
creación de una gran cantidad de polvo no o grueso.
9. NO TOCAR CON LAS MANOS DESPUÉS DE LA SIEMBRA. Poco puede ser muy caliente
después trabajo completado.
10. TRABAJO SEGURO. Usar las abrazaderas o un tornillo de banco para celebrar el trabajo si
es posible. Es más seguro que usar las manos y libera las dos manos para operar la
herramienta.
11. NO ESTIRE DEMASIADO. Mantener una adecuada estabilidad y equilibrio en todo
momento. No llegan a más o a través de las máquinas que se están ejecutando.
12. MANTENIMIENTO DE LAS HERRAMIENTAS CON CUIDADO. Mantenga las herramientas
bits & las hojas aladas y limpias para un mejor y más seguro. Siga las instrucciones para la
lubricación y desempeño seguro. Siga las instrucciones para la lubricación y cambie los
accesorios. Mantenga las manijas secas, limpias y libres de aceite y grasa.
13. TECLAS DE AJUSTE Y RETIRE LAS LLAVES. A pesar de que el taladro inalámbrico
dispone de un cómodo portabrocas sin llave, el hábito de vericar que las claves y llaves
de ajuste se quitan de cualquier herramienta de rotación antes de usar.
14. EVITAR QUE EL MOTOR ARRANQUE. No llevar herramienta con un dedo en el
interruptor. Asegúrese de que el interruptor de dirección está en la posición de PUNTO
MUERTO cuando no estén en uso o Al cambiar bits.
15. MANTÉNGASE ALERTA. Fíjese en lo que está haciendo y usar el sentido común. No
utilice ninguna herramienta, cuando estás cansado.
16. VERIFICAR LA PRESENCIA DE LAS PIEZAS DAÑADAS. Antes de usar una herramienta,
cualquier parte que esté dañado debe ser controlado cuidadosamente para determinar
que funcionan correctamente y realizar La función a la que está destinado. Revise la
alineación de las partes móviles, el enlace de operación de transferencia. Comprobar bits
para asegurarse de que son alados y astillados. Inspeccionar los tornillos y apriete
cualquier que estén sueltos. Cualquier parte que esté dañada debe ser adecuadamente
reparado o sustituido por un centro de servicio autorizado a menos que se indique lo
contrario en el manual de instrucciones. Interruptores defectuosos han sustituido por un
centro de servicio autorizado.
17. PROTECCIÓN CONTRA DESCARGAS ELÉCTRICAS. Evitar el contacto con supercies con
conexión a tierra: tubos, radiadores, rangos y refrigerador gabinetes. Al taladrar las
paredes, los pisos, o donde quiera que los "vivos" los cables eléctricos pueden ser
encontradas, tratar de averiguar si hay un peligro de choque. A pesar de ello, NO SE DEBE
TOCAR EL CHUCK O ALGUNA DE LAS PIEZAS METÁLICAS DE LA BROCA. Sujetar la
herramienta únicamente por el asa de plástico o el agarre lateral para evitar el riesgo de
descargas eléctricas si golpea un cable.
18. LAS PIEZAS DE RECAMBIO. Cuando se realiza el servicio, utilice sólo las piezas de
recambio.
19. UTILICE PROTECCIÓN PARA LOS OÍDOS. Utilizar protección auditiva, especialmente
durante períodos prolongados de operación de la herramienta, o si el funcionamiento es
ruidoso.
20. UTILIZAR IDENTIFICADORES AUXILIAR SUMINISTRADO CON LA HERRAMIENTA. La
pérdida de control puede causar lesiones personales.
PRECAUCIONES PARA LA BATERÍA Y EL CARGADOR
CARGUE LAS BATERÍAS COMPLETAMENTE antes empleo inicial.
1. CARGA A TEMPERATURA AMBIENTE. Temperatura de la habitación debe ser superior a
0 °C (32 °F) y menor de 50 °C (122 °F).
2. SI NO CARGA DEL CARGADOR CABLE O ENCHUFE ESTÁ DAÑADO. Carga con cable
dañado puede provocar un incendio o una descarga eléctrica. Si cargador está dañado de
alguna forma, que será reparado por un técnico cualicado.
3. TENGA CUIDADO DE NO PROVOCAR UN CORTOCIRCUITO ENTRE LOS TERMINALES DE
LA BATERÍA. Tenga cuidado de que metal, tales como clips de papel, las uñas, los lados de
un cuadro de metal no provocar un cortocircuito en la batería. Temperaturas
extremadamente altas y puede producir un incendio.
4. NO INCINERE LA BATERÍA.
ADVERTENCIA: Las reparaciones deben ser realizadas por un centro de reparaciones
autorizado. No abra o desmonte esta herramienta eléctrica.
3 4
Conforms to UL STD No. 60745-1,
UL STD No. 60745-2-5
60745-1-07, CAN/CSA-C22.2 STD No.
60745-2-5-12
A
B
D
F
J
I
G
H
C
E
K
ESPECIFICACIONES
A B
C
D
E
F
G
H
I
J
K
CALIFORNIA PROP 65 Y OTRAS ADVERTENCIAS
ADVERTENCIA: Algunos polvo creado al lijar, serrado, esmerilado, taladrado y otras
actividades de construcción contiene sustancias químicas conocidas en el estado de
California como causantes de cáncer, defectos de nacimiento u otros daños reproductivos. Algunos ejemplos de estos productos químicos son los siguientes:
• Plomo de pinturas a base de plomo,
• Sílice cristalina de los ladrillos y el cemento y otros materiales de albañilería, y
• Arsénico y cromo de madera tratada químicamente.
ADVERTENCIA:
El riesgo de estos riesgos varía, dependiendo de la frecuencia con la que realizar este tipo
de trabajo. Para reducir la exposición a estas sustancias químicas: el trabajo en un área
bien ventilada y trabajar con equipos de seguridad, tales como las máscaras de polvo que
están especialmente diseñados paraFiltrar las partículas microscópicas.
El cable de alimentación de este producto contiene plomo, conocido en el Estado de
California como causa de cáncer y defectos de nacimiento u otros daños reproductivos.
Lávese las manos después de la manipulación.
Este producto contiene plomo, un producto químico conocido en el Estado de California
como causantes de cáncer y defectos de nacimiento u otros daños reproductivos. Lávese
las manos después de la manipulación.
Taladro Inalámbrico
Modelo Número.: Ap00965g
Tensión: 18 Voltios Cc
Velocidad Sin Carga 0-350/0-1100 Rpm
Disparador Velocidad Variable
Con Freno Eléctrico
3/8 Pulg. Portabrocas Sin Llave
22 + Posición Ajustabletorque Clutch
Led Luz De Trabajo Intergrada
Sorporte Magnetico
Conforms to
UL STD No. 60745-1,
UL STD No. 60745-2-1,
UL STD No.60745-2-2
Certied to
CAN/CSA-C22.2
STD No. 60745-2-1-04,
CAN/CSA-C22.2
STD No. 60745-2-2-04
A 3/8in.(10mm) Chuck
B Anillo Regulacion del par
C Escala indicador de par
D Interruptor de marcha mecánico
E Luz de trabajo Led
F Interruptor de avance/retroceso
G Disparador Velocidad Variable
H Empuñadura revestida de goma
I Pack de batería
J Botón de bloqueo de la batería
K Doble extremo de puntas de
destornillador
Sierra Circular Inalámbrica
Modelo Número.: AP00964G
Tensión: 18 voltios DC
Velocidad sin carga 4500 RPM
Bloqueo de seguridad Interruptor
de activación
5-3/8 In. 24- Diente Hoja de carburo
3/8 In. Tamaño de mandril
Cónico ajustable de hasta 50 grados
Profundidad de corte ajustable
- Up To 1-1/2 In.
@ 90 Grados, Up To 1 In. @ 45 Grados
A Auxiliar Asa
B Botón de bloqueo
C Interruptor principal
D Empuñadura revestida
de goma
E Pack de batería
F Protección superior
G Placa Base
H Protección inferior
I Brida
J Botón de bloqueo del eje
K Botón de bloqueo de
la batería

Conforms to UL STD No. 60745-1, UL
STD No. 60745-2-4
60745-1-07, CAN/CSA-C22.2 STD No.
60745-2-4-04
A
B
C
D
E
Conforms to ANSI/UL STD No. 73
12-1982
A
B
C
D
E
ESPECIFICACIONES
5 6
Sander Inalámbrico
Modelo Número.: AP00963G
Tensión: 18 voltios CC
Velocidad sin carga 4400 RPM
Interruptor de activación
3-1/2 in. Zapata lijadora
A Base de lijado
B Interruptor
C Empuñadura revestida
de goma
D Pack de batería
E Botón de bloqueo de
la batería
Linterna Inalámbrico
Modelo Número.: AP00962G
Tensión: 18 voltios CC
DC 8W Halógeno
Lámpara de luz de giro
A Articulación Light Head
B Interruptor
C Empuñadura revestida
de goma
D Bateríay Pack
E Bateríay Pack Lock
Cargador de batería
Entrada del cargador: 100-240V~, 50/60Hz, 0.5A;
Salida del cargador: 24.0V, DC, 0.35A;
Tipo de cargador: 4 Hora, Clase 2, Soporte cargador;
Cargador de batería, tipo: 18V, Ni-cd, AP00965G -B.
Accesorios:
2 - 18V. Ni-cd Los paquetes de baterías (1.3Ah)
2 - De destornillador con dos bits (Equipados de taladrar)
1 - Portapuntas magnético
6 - Puntas de destornillador: PH1, PH2, PZ1, PZ2, 5/32", 3/16"
6 - Brocas: 3/32", 1/8", 5/32",3/16",7/32",1/4"
1 - Valla rip sierra circular
1 - 5-3/8 In. 24- Hoja de sierra de dientes (Equipados de sierra circular)
1 - Llave hoja de sierra circular (Equipados de sierra circular)
9 - Papel de lija: 3pcs 60 Arena, 3pcs 80 Arena 3pcs 120 Arena
1 - Caja de almacenamiento.
NOTA: Este equipo ha sido probado y se ha encontrado que cumple con los límites
para un Class B digital device, pursuant to Part 15 of the FCC Rules.
NOTAS SOBRE EL FUNCIONAMIENTO DE LA BACTERIA
1. La batería debe estar completamente cargada antes del primer uso. Las baterías
lleguen a pleno rendimiento después de cinco ciclos de carga/descarga.
2. Siempre tienen rotación interruptor en posición de punto muerto al desmontar o
colocar la batería para evitar que el motor arranque.
3. Para quitar la batería, pulse la tecla de bloqueo de los botones y tirar.
4. Para insertar, basta con pulsar en resorte de bloqueo hasta que encaje.
5. Para cargar, enchufe el cargador del conector de entrada de CA en un 120V 60Hz
corriente de una casa.
El paso de la batería tiene positivo y negativo en el terminal marcado. Alinear estos
con las marcas idénticas en la parte superior de la base del cargador y paquete de
inserción en la base (Pack no se inserta correctamente si está invertido)
6. Cuando el cargador está conectado a la toma de pared y NO hay ninguna batería en
el cargador, la luz verde se encienda, lo que indica que el cargador está "vivo".
Cuando la batería está descargada instalado en el cargador, el indicador luminoso de
color rojo se encienda, lo que indica que la batería está cargada. Si el indicador de luz
roja no se enciende, compruebe para asegurarse de que la batería está
completamente deslizado en el cargador y la toma de corriente funciona
correctamente.
7. Tiempo de carga normal es de aproximadamente 4 horas. La luz indicadora de carga,
apaga cuando la carga está completa
8. Cuando la carga más de un pack en sucesión, esperar 15 minutos entre las cargas.
9. La batería se descarga lentamente las horas extraordinarias, incluso cuando no se
usa, y puede que haya que recargar antes de utilizar la herramienta.
10. Después de muchos ciclos de carga y descarga, las baterías pierden su capacidad
para mantener la carga. A continuación, deberá ser sustituido. Deshágase de las
baterías en una instalación de eliminación de residuos apropiado. Contienen cadmio,
así que no tire las pilas de basura común.
11. Para uso únicamente con acero Ultra AP00965G -B Ni-cd batería.
NOTAS SOBRE EL FUNCIONAMIENTO
DE LA SEMBRADORA
VELOCIDAD VARIABLE
1. Usted puede variar la velocidad de rotación del eje mediante la modulación de
presionar con el dedo en el gatillo.
2. Selección de marcha alta o baja.
• Mueva el interruptor de selección de marchas hacia adelante, exponiendo la leyenda
"HI" para trabajar en elhigh-speed range.
• Move the gear selector switch backward, exposing the ‘LO’ legend, to work in the
Gama de baja velocidad
Por encima de la activación.
1Cuando se empuja hacia la derecha, la rotación es hacia delante (a la derecha).

7 8
ADVERTENCIA: Mantener pulsado el botón de encendido herramientas aisladas
de supercies de agarre al realizar una operación donde la
herramienta de corte eléctrico oculto puede ponerse en contacto
con su propio cable o.
ADVERTENCIA: Apague la sierra a la vez, retire la batería y revísela para problemas
graves si:
• Las piezas móviles se atascan
• La velocidad se reduce a un nivel anormalmente bajo
• La caja de ingletes se calienta
• Las chispas o emiten olores de la carcasa
PRECAUCIÓN: No coloque las manos directamente en frente de, detrás de, o por
debajo de la hoja de sierra para cortar.
NOTAS SOBRE LA OPERACIÓN DE SIERRA
1. Siempre sujete la sierra con ambas manos sobre las empuñaduras y empuje la sierra a
través del material.
2. Asegúrese de que no hay clavos o cualquier otros objetos extraños, en la pieza de
trabajo, o en el camino de la cuchilla. Que podría causar daño a la hoja de sierra,
lesión de contragolpe o incluso lesiones por la suciedad que salga disparada.
3. Asegúrese de que la pieza de trabajo está debidamente apoyada en todo momento.
Plan para que esté correctamente apoyado durante el proceso de corte.
4. Siempre que sea posible, asegurar la pieza de trabajo con abrazaderas o en un tornillo
de banco. No tienen piezas cortas con la mano durante el corte.
5. Al hacer cortes paralelos a los bordes rectos, siempre que sea posible, inserte el tope
paralelo en las ranuras en la parte delantera de la sierra. Fijar en su lugar a la distancia
deseada, con la abrazadera de tornillo, y utilizarlo para ayudar a mantener el corte
como rectas y paralelas como sea posible.
6. Marcar la línea de corte claramente. Ajustar la profundidad de corte con el espesor de
la pieza de trabajo.
7. Asegúrese de que está totalmente preparado para empezar el corte antes apretando
el disparador del interruptor. No llegan por debajo de la pieza de trabajo.
8. La placa base en la pieza de trabajo.
9. Sujetar la herramienta. Par motor hará que la herramienta de giro, de modo que un
agarre rme es imprescindible. Asegúrese de que la hoja de sierra no está obstruido.
Presione el interruptor de disparo.
10. Permitir que la hoja de la sierra llega a la velocidad máxima antes de empujar en la
pieza de trabajo.
11. No fuerce la hoja de sierra en la pieza de trabajo. Aplicar una presión moderada, lo
que permite que la cuchilla de corte sin ser forzados.
12. Nunca mantenga pieza cortada en las manos o en la pierna. Fijar la pieza de trabajo
a una plataforma estable.
13. Cuando utilice siempre un rip cerco o guía de borde recto.
14. Esta herramienta está diseñada para realizar cortes rectos. No intente cortar curvas
con ella. Torcer la sierra en ambos lados mientras corte hará que la hoja para enlazar
en la pieza de trabajo, quizás causando contragolpe, daños personales, a la pieza de
trabajo, y/o daños en la sierra
15. Si es necesario salir de un corte incompleto, apague la sierra.
16. Para desactivar la sierra, liberar la presión sobre el interruptor de disparo. Siempre
espere a que el módulo de alta densidad se detiene antes de poner la herramienta
hacia abajo.
PELIGRO - Mantenga las manos y el cuerpo alejados de y hacia el lado de
la hoja. Contacto con nlade podría provocar lesiones graves.
ADVERTENCIA - Para reducir el riesgo de lesiones, vericar sistema de protección.
Debe cubrir la hoja al instante! Mantenga sierra con ambas manos.
Soporte y abrazadera. Usar protección para los ojos.
PELIGRO - Mantenga las manos alejadas del área de corte y la hoja.
Mantener la otra mano en mango auxiliar, o caja del motor.
2. Cuando se presiona hacia dentro de la derecha a la izquierda, la rotación es inverso
(Contrario a las agujas del reloj).
3. Cuando en la posición central, esté bloqueado en posición neutra y la activación está
bloqueado.
4. No empuje el sentido de rotación hasta que el chuck deja de girar
REGULADOR PAR
Este es un 22+ posición dial situado antes de la jación.
1. Indicador de cuadrante indique cuando 1, torque is at minimum before the clutch
disengages the
chuck from the drive; when indicator is just past 22, output is at maximum before it is
disengaged.
Tornillo más en material; menos par evitar que pelar. Tornillos grandes requieren más
par a la unidad que los pequeños. Un pequeño ensayo y error le mostrará que es la
conguración óptima para la situación.
3. Suelte el gatillo cuando el sonido de "clic" indica que el mandril no gire más.
4. . Para taladrar, utilice siempre el ajuste de taladro, indicado por una broca. En este
ajuste, la unidad no se desenganche de la jación.
PORTABROCAS SIN LLAVE
1. El Centro de dirección de rotación para evitar que el motor arranque accidentalmente
2. Tenga en cuenta que hay dos anillos en el portabrocas. Girar el extremo del anillo
moleteado chuck en sentido horario con la mano mientras que con la otra mano, por lo
que mantiene la segunda corona (más cercato La parte trasera de la herramienta) para
evitar que el motor gire; cierra las fauces del chuck. En cuanto ese mismo extremo
estriado anillo en sentido contrario al de las agujas se abre las mandíbulas
3Abra las quijadas a aceptar un poco y, a continuación, cierre las mandíbulas para que
sujete el poco bien.

9 10
MANTENIMIENTO
CAMBIO DE LA CUCHILLA
PRECAUCIÓN: no coloque las manos directamente en frente de, detrás de, o
por debajo de la hoja de sierra para cortar.
1. Use la llave que se incluye con el kit.
2. Pulse el botón de bloqueo del eje
3. Gire la tuerca hacia la derecha para aojar.
4. i Extraiga el módulo de alta densidad y sustituirla por la nueva hoja.ga el módulo de
alta densidad y sustituirla por la nueva hoja.
5. Volver a colocar la tuerca y gire a la izquierda para apretar.
NOTA:
1. Utilice siempre las cuchillas con forma y tamaño correcto (diamante frente redondo)
de arbour agujeros.
2. Nunca utilice hoja dañada o incorrecta las arandelas o tornillo.
NOTAS DE OPERACIÓN PARA MÁS DETALLES
SANDER
1. Retire la batería de la lijadora
2. Gire la herramienta hacia abajo
3. Coloque el papel, difusa hacia abajo, en la almohadilla de lijar para que el papel
quede alineado conel pad.
4. Presione hacia abajo en el papel de la almohadilla.
5. Al extraer lija hacerlo despacio y con suavidad. Rasgar el papel rápidamente pueden
acortar la vida de los pequeños ganchos de plástico sobre la almohadilla de lijar y dar
lugar a la caída de lija discos en uso.
6. El papel de lija tiende a desgaste más rápido en la parte delantera. Girar el papel de
vez en cuando para permitir un desgaste más uniforme.
7. Durante el uso, compruebe periódicamente el papel de lija de lágrimas, grietas y
otros daños. Papel dañado puede permitir que la almohadilla debajo de daños, sobre
todo los ganchos.
NOTA: Debido a la vigilancia necesaria en este sentido, el pad es considerada como una
referencia de los consumibles y no está cubierto por la garantía.
LISTA DE PIEZAS PARA EL CORDLESS LUZ
ON/OFF
Para encender la luz /, inserte la batería y, a continuación, pulse el disparador con el
dedo.
PARA GIRAR EL FARO
1. El faro con las dos manos. Una mano debe estar alrededor del cuerpo de la luz;
la otra parte debe ser alrededor de la cabeza del faro.
2. Con la mano que sujeta la cabeza de el faro, gire la cabeza en sentido horario.
Seguir para ajustar la luz hasta que se ajusta al ángulo que trabaja para su trabajo.
3. El faro para volver a su posición original, gire el faro en un sentido contrario a las
agujas del reloj sentido.
ADVERTENCIA: Siempre hay que quitar la batería de sus herramientas
sin cable cuando se están armando las piezas, la realización de ajustes,
montaje o desmontaje las hojas, la limpieza o cuando no esté en uso.
Extracción de la batería, evitar el arranque accidental que podrían
causar lesiones personales graves.
• Mantenga la herramienta limpiar con un suave paño húmedo (no mojado). No utilice
disolventes en elkit de piezas.
• Lubricación no es necesario. Después de un uso prolongado, un centro de servicio
autorizado
mantener y lubricar la herramienta.
• En caso de que la chuck requieren la sustitución:
1. Mantener el alojamiento de herramienta y manejar limpios y libres de aceite y grasa,
usando un jabón suave húmedo (no mojado ) paño. No deje que los disolventes,
como líquido de frenos, gasolina, productos a base de petróleo, etc. , contactar con
piezas de plástico de la carcasa. Limpieza con estas sustancias pueden dañar el
plástico y comprometer la integridad dela doble sistema aislante.
2. Mantener limpios los oricios de polvo y suciedad. Esto ayudará a prevenir posibles
cortocircuitos eléctricos y asegurar el correcto enfriamiento.
3. Evite sobrecargar su herramienta. No fuerce la herramienta, de lo contrario, se
convertirá en caliente y pierden ecacia. Funcionando, libre de la carga durante un
minuto o dos para que se enfríe a temperatura normal.
4. Lubricación de estas herramientas se realiza en la fábrica y no debe ser necesario
volver en condiciones normales de uso.
5. Un centro autorizado de reparación debe hacer las reparaciones, modicaciones o
mantenimiento que implican disassmnling apertura o herramientas.
6. Cualquier daño a las herramientas deben ser corregidas en un centro autorizado
de reparación.
1211
SÍMBOLO
ADVERTENCIA: Algunos de los siguientes símbolos pueden aparecer en la
herramienta. Estudio estos símbolos y aprender sus contempladas.
Interoeretation adecuada de estos símbolos para permitir más eciente y
segura de esta herramienta.
Este símbolo indica que este las herramientas de la lista de
LISTA DE PIEZAS PARA EL TALADRO INALÁMBRICO
Item
Nombre en Inglés
Qty Unit
1 de dos bits
2 PCS
2
clip 2 PCS
3
etiqueta con el logotip
o
1 PCS
4
de apoyo
1
PCS
5 Chuck tornillo de
1 PCS
6
Chuck 1 PCS
7
caja de cambios
1
SET
8
tapa transparente
1 PCS
9
luz de trabajo asamblea 1 SET
10
F/botón R
1
PCS
11
botón de cambio
1 PCS
12 Tapa de la caja
1 PCS
13
de cubierta de la Caja
asamblea
1 SET
Item
Nombre en Inglés
Qty Unit
13.1 Interruptor
1 PCS
13.2
Línea 2 PCS
13.3
Clip de la batería
1 PCS
14
Cubierta Posterior
1
SET
15 Tornillo
5
PCS
16
Cable
1
PCS
17
Cable
1
PCS
18
Tubo de pvc
Termoencogible
2 PCS
19
Imán
1
PCS
20
Etiqueta de datos
1
PCS
21
Correa
1 PCS
22 Tornillo
7
PCS
23 Conjunto de batería 1 SET
ADVERTENCIA: Las reparaciones deben ser realizadas por un centro de reparaciones
autorizado. Esta herramienta podría invalidar la garantía
NOTE: Debido a la continua mejora de los productos. nos reservamos el derecho de cambiar
las especicaciones del producto sin previo aviso
1
2
3
4
5
6
7
8
9
13
19
15
22
21
20
23
12
14
16
15
18
17
11
10
1
2
9.1
13.1
13.2
13.3
9.2
9.3
9.4
9.5
13 14
LISTA DE PIEZAS PARA SIERRA CIRCULAR
1
2
3
4
5
6
7
8
9
10
11
12
13
14
15
16
17
18
19
20
22
23
24
25
26
27
28
29
30
31
32
3334
36
37
38
39
40
41
42
35
21
43 44
ADVERTENCIA: Las reparaciones deben ser realizadas por un centro de reparaciones
autorizado. Esta herramienta podría invalidar la garantía
NOTE: Debido a la continua mejora de los productos. nos reservamos el derecho de cambiar
las especicaciones del producto sin previo aviso
Item
Nombre en Inglés
Qty
Unit
1
Tornillo M6x16
1
PCS
2
Upper platen
1
PCS
3
Hoja de sierra
1
PCS
4
Lower platen
1
PCS
5
Tornillo M4x12
3 PCS
6
Guía ajustable
1 PCS
7
Primavera
1 PCS
8
Guía Fija
1
PCS
9
Tornillo M4x12
3
PCS
10
Placa de protección
activa
1 PCS
11
Placa antipolvo
1
PCS
12
Polo de bloqueo
automático
1
PCS
13
La perilla de bloqueo
1 PCS
14
Primavera
1 PCS
15
Vivienda izquierda 1 PCS
16
Tornillo M4x12
4
PCS
17
Eje
1
PCS
18
Caja de engranajes
(Parte delantera)
1 PCS
19
Bearing
1
PCS
20
Bloqueo automático
1
PCS
21
Engranaje grande
1 PCS
22
Tornillo M4x12
6
PCS
Item
Nombre en Inglés
Qty
Unit
23
Caja de engranajes
Parte trasera)
1
PCS
24
Tornillo M4x12
2 PCS
25
Engranaje pequeño
1
PCS
26
Tornillo del Motor
1
PCS
27
Caja Derecha
1 PCS
28
Tornillo ST3.9x16
12 PCS
29
Cubierta del motor
1 PCS
30
Tornillo ST3.9x16
2
PCS
31
Llave
1
PCS
32
Interruptor
1 PCS
33
Botón de bloqueo del
interruptor
1
PCS
34
Conector de la batería
1
PCS
35
Tornillo M6x100
1 PCS
36
Mando
1
PCS
37
Tornillo M6x100
1 PCS
38
Primavera
1
PCS
39
Mando
1
PCS
40
Valla Rip
1 PCS
41
Base
1
PCS
42
Mando
1
PCS
43
Tornillo M5
1 PCS
44
Clavija
1
PCS
15
16
LISTA DE PIEZAS PARA CORDLES DETALLE SANDER
1
2
4
5
6
7
5
8
9
10
11
12
13
14
15
16
17
18
24
22
23
21
21.1
21.2
21.3
21.4
21.5
21.6
19
20
3
LISTA DE PIEZAS PARA LUZ INALÁMBRICO
1
2
3
4
5
6
7
8
9
10
11
12
13
23
14
15
15.2
15.1
15.3
21
20
19
16
17
18
22
ADVERTENCIA: Las reparaciones deben ser realizadas por un centro de reparaciones
autorizado. Esta herramienta podría invalidar la garantía
NOTE: Debido a la continua mejora de los productos. nos reservamos el derecho de cambiar
las especicaciones del producto sin previo aviso
ADVERTENCIA: Las reparaciones deben ser realizadas por un centro de reparaciones
autorizado. Esta herramienta podría invalidar la garantía
NOTE: Debido a la continua mejora de los productos. nos reservamos el derecho de cambiar
las especicaciones del producto sin previo aviso
Item
Nombre en Inglés
Qty
Unit
1
Etiqueta
1 PCS
2
Tornillo
9
PCS
3
Tapa de la caja
1
PCS
4
Papel de lija
1 PCS
5 Tornillo
7
PCS
6
Magic adhesivo
1 PCS
7
Almohadilla de goma 1 PCS
8
Soporte de plástico
1
PCS
9
Haz pequeño de nailon
1 PCS
10
Haz Grande de nylon 1 PCS
11
Rodamiento
1
PCS
12
Bloque deexión
1 PCS
13 Rodamiento
1 PCS
14
Eje
1
PCS
15
Engranaje de
transmisión
1 PCS
16
Bush polvo de metal
1
PCS
Item
Nombre en Inglés
Qty Unit
17 Engranaje de
1 PCS
18
Motor
1
PCS
19
Apoyo de la caja
1 PCS
20
1 SET
21 Conjunto de
1 SET
21.1
Interruptor
1 PCS
21.2
Cable
1
PCS
21.3
Cable
1 PCS
21.4
Cable
1
PCS
21.5
Cable
1
PCS
21.6
Clip de la batería
1 PCS
22
Tubo de pvc
Termoencogible
2 PCS
23 Correa
1
PCS
24
Tornillo
1
PCS
Etiqueta
Item
Nombre en Inglés
Q
Unit
14 Cubierta intermedia derecha
1
PCS
15
Ensamblaje de la abrazadera
de la batería
1
SET
15.1
Clip de la batería
1
PCS
15.2 Cable
1
PCS
15.3 Cable 1 PCS
16
Tapa de la caja
1
PCS
17
Coloque la correa
1
PCS
18
Tornillos
5
PCS
19
Tubo termocontraíble
2
PCS
20
Etiqueta de datos
2
PCS
21
Pack de batería
1
SET
22 Tornillo
1
PCS
23 Cable
1
PCS
Item
Nombre en Inglés
Qty Unit
1 Apoyo de la caja
1 PCS
2
Tapa de culata
1 PCS
3
Cabezal de luz
1 PCS
4 Tapa transparente
1 PCS
5
Almohadilla de goma
1
PCS
6
Reector
1 PCS
7
Bombilla
2
PCS
8
Ánodo primavera
1 PCS
9
Primavera cátodo
1 PCS
10
Stent
1
PCS
11
Interruptor
1 PCS
12 Primavera
1
PCS
13 Botón interruptor
1 PCS
izquierda
 Loading...