

Page 1
Reverse Transfer
ID Card Printer
Magicard Prima Printer Driver Manual Page 1 of 2
PRIMA DRIVER MANUAL
Page 2

Welcome to the new high performance printer driver for the IDX380 printer. This manual will help
you to install, set up and handle the driver to get the best results for your prints.
The driver runs on all 32 bit Windows platforms and was successfully tested under Windows 98
ME, Windows 2000 and the new Windows XP professional.
The driver was designed for best performance and stability. Additional, all the needed features
referring to the different used card materials, colour ribbons etc., are included.
All setting parameters can be controlled by the printer driver settings from the PC.
Table of contents
TECHNICAL SUPPORT ..................................................................................................................3
LEGAL AND COPYRIGHT INFORMATION..............................................................................3
PRINTER INSTALLATION ............................................................................................................3
P
REPARATION OF
WINDOWS ME INSTALLATION ..................................................................................................3
WINDOWS 2000 PROFESSIONAL AND XP PROFESSIONAL INSTALLATION ................4
PC .........................................................................................................................3
D
RIVER SET-UP FOR SINGLE PRINTER
D
RIVER SET-UP FOR SEVERAL PRINTERS
PRINTER POOLING ......................................................................................................................10
IDX380 P
Retransfer ...................................................................................................................................36
Bend Remedy ..............................................................................................................................36
Card Size ....................................................................................................................................37
Buzzer .........................................................................................................................................37
Color Ink ....................................................................................................................................37
Special Ink ..................................................................................................................................37
MG..............................................................................................................................................37
Power Saving..............................................................................................................................37
Managing and operations ..........................................................................................................38
E
XTERNAL DEVICES
P
RINTER PASSWORD
A
DVANCED
ROPERTIES
......................................................................................................................................41
TROUBLE SHOOTING
U
PGRADING YOUR PRINTER DRIVER FROM A PREVIOUS VERSION
K
NOWN BUGS AND LIMITATIONS
.......................................................................................................................35
........................................................................................................................40
........................................................................................................................41
..........................................................................................................42
...............................................................................................10
..........................................................................................10
:....................................................42
: ....................................................................................................42
IDX380 Printer Driver Manual Page 2 of 42
Page 3

Technical Support
For technical assistance, please contact your printer vendor.
Legal and Copyright Information
This product is provided on an “as is” basis, without any other warranties, or conditions, express or
implied, including but not limited to warranties of merchantable quality, merchantability or fitness
for a particular purpose, or those arising by law, statute, usage of trade or course of dealing. The
entire risk as to the results and performance of the Software is assumed by you. Neither we nor
our dealers or suppliers shall have any liability to you or any other person or entity for any indirect,
incidental, special or consequential damages whatsoever, including but not limited to loss of
revenue or profit, lost or damaged data or other commercial or economic loss, even if we have
been advised of the possibility of such damages or they are foreseeable; or for claims by a third
party. Our maximum aggregate liability to you, and that of our dealers and suppliers, shall not
exceed the amount paid by you for the Product. Some jurisdictions do not allow the exclusion or
limitation of liability for consequential or incidental damages so the above limitation may not apply
to you.
Copyright © 1996-2003 ImageWare Systems, Inc. All rights reserved.
Printer Installation
Preparation of PC
1. Follow the installation instructions of the printer manual
2. Turn off the PC and the printers. Remove the power cable from all hardware and the
connection cables between PC and printer
3. Install the SCSI card in your PC as described by the manufacturer´s manual
4. After the card is installed, turn on the PC
5. After rebooting the machine, Windows should detect a new hardware device. Follow now
the installation wizard or install the needed driver to your machine manually. After the
installation is finished, reboot the machine.
6. Run the ASPI check program (ASPICHK.EXE) on your machine to make sure, that the
ASPI layer is up to date. If this check fails, run the ASPI32.EXE program for updating the
ASPI layer. Reboot your machine again.
7. Inside the Hardware Manager check the existing SCSI Card, that the card has been
installed properly without errors and conflicts in your system.
8. Turn off your machine.
Windows Me Installation
1. Open the Windows "Add New Hardware" control panel, and install the SCSI adapter driver
by following the instructions on your screen.
2. Run ASPICHECK program. If check fails, follow the steps under "Preparation of PC" (see
above).
3. Make sure your printer is properly connected and powered on, then restart your computer.
4. Open the Windows System control panel, and select the Device Manager tab. Make sure
your SCSI printer appears under “Other Devices.”
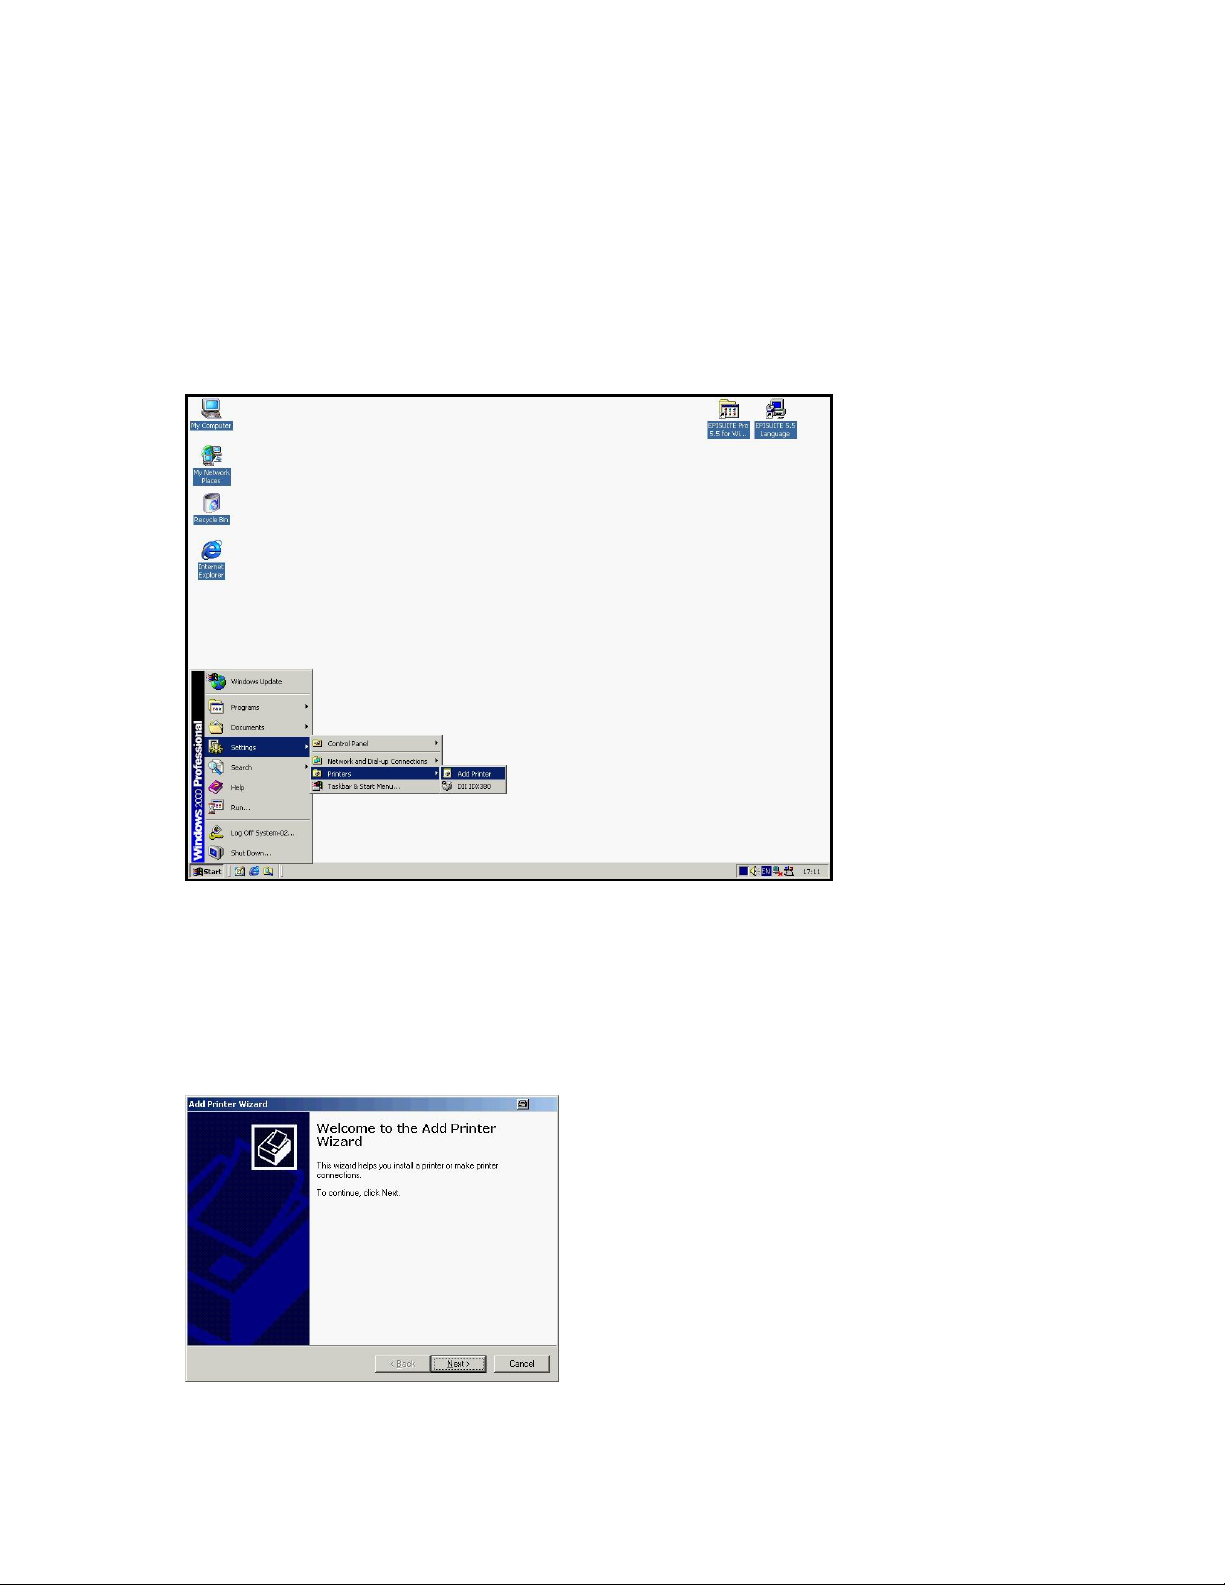
5. Open the Printers folder from the Windows Start menu. Choose "Add Printer".
6. Follow the instructions in the Add Printer wizard to install your new SCSI device as a local
printer. When prompted, click the "Have Disk" button and enter the location of the INF file
(found on the Printer Driver CD). When prompted for a printer port, select "FILE".
7.
Complete the installation, restart your computer.
8. Change the port from "FILE" to "GACP1"
and print a test page.
IDX380 Printer Driver Manual Page 3 of 42
Page 4
Windows 2000 Professional and XP Professional Installation
1. Log onto Windows as an administrator.
2. Open the Windows SCSI Adapters control panel, and install the SCSI adapter driver by
following the instructions on your screen.
3. Make sure your printer is properly connected and powered on, then reboot your computer.
4. Open the Windows SCSI Adapters control panel again, and expand the device list. Make
sure your SCSI printer appears.
5. Run ASPICHECK program. If the check failes, follow the steps "Preparation of PC" (see
above).
6. Open the Printers folder from the Windows Start menu. Choose Add Printer.
Follow the instructions in the Add Printer wizard to install your new SCSI device as a local
7.
printer with a FILE port. When prompted, click the "Have Disk" button and enter the
location of the INF file (found on the Printer Driver CD).
time! (See the following screen shots)
Click on "
" to continue.
Next
Do not print a test page at this
IDX380 Printer Driver Manual Page 4 of 42
Page 5
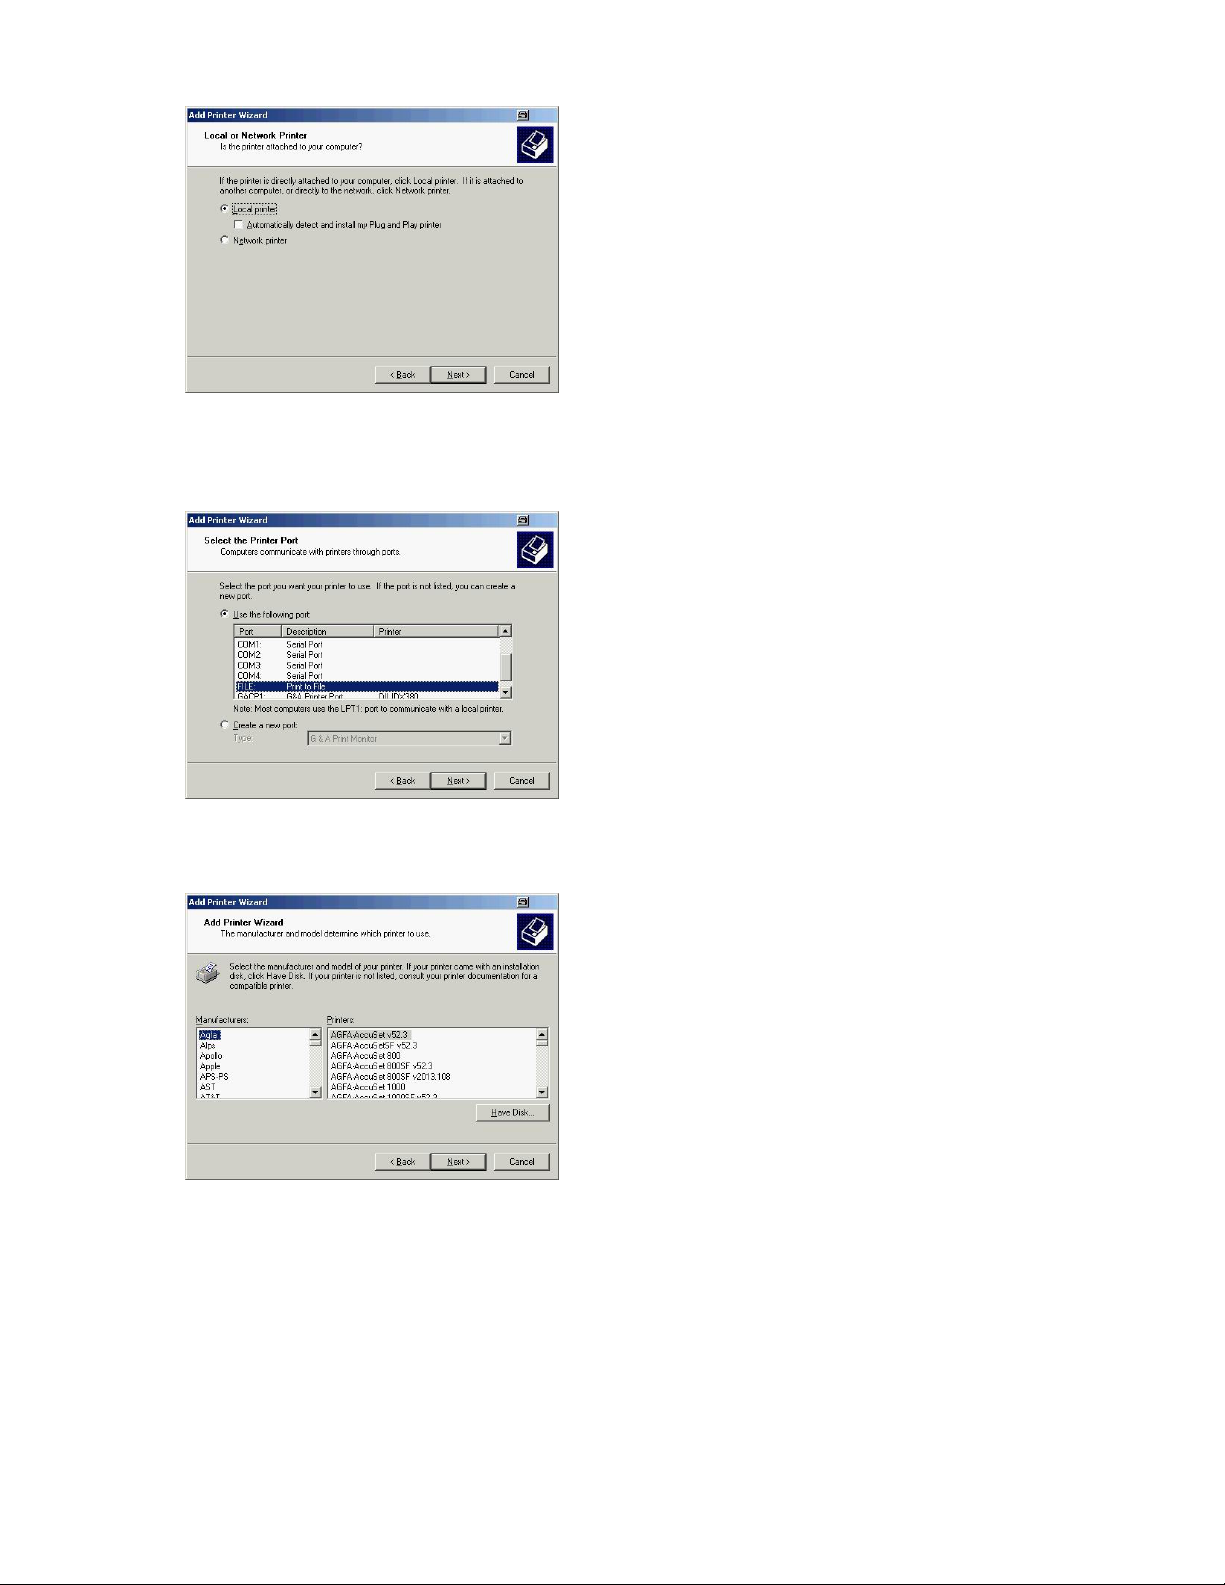
Click on "Next" to continue.
Choose "FILE" as port and click on "Next" to continue.
Click on "Have Disk" to choose the location of the driver and then on "Next".
IDX380 Printer Driver Manual Page 5 of 42
Page 6
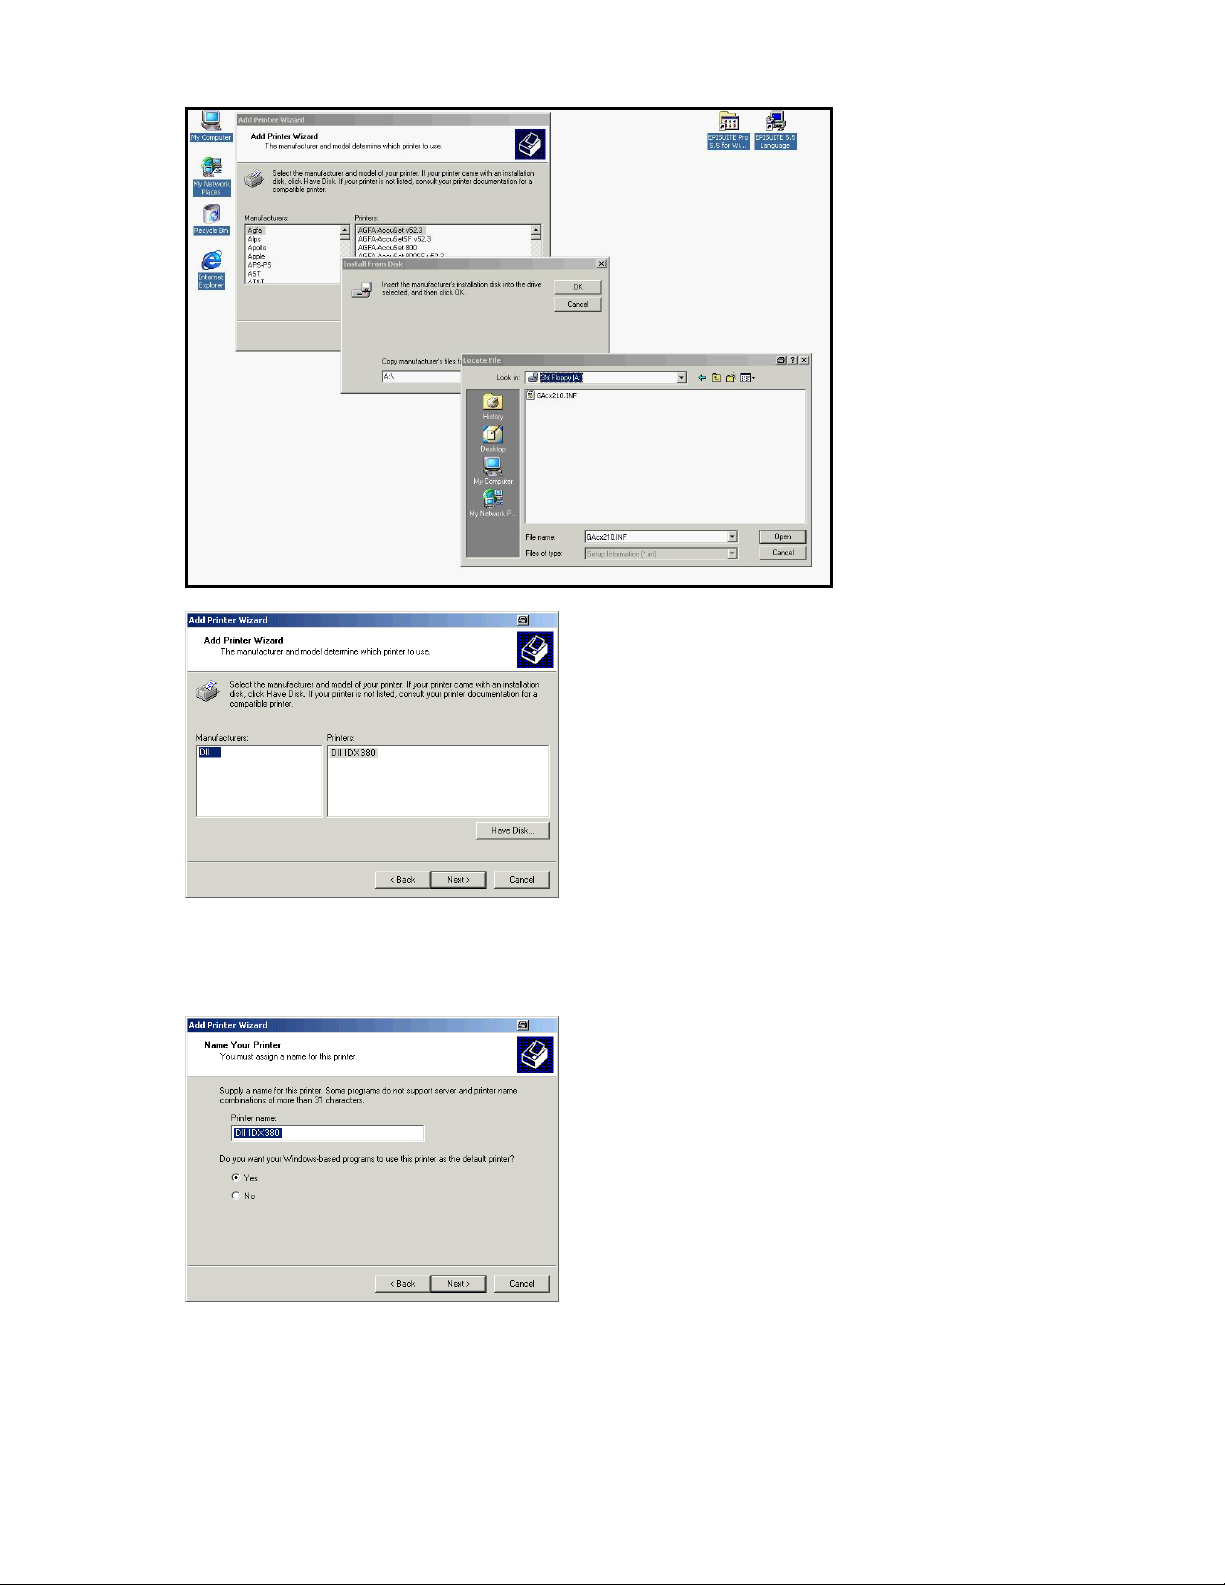
Please choose from the manufacturers list "DII" and the related printer "DII IDX380".
Click on "Next" to continue.
IDX380 Printer Driver Manual Page 6 of 42
Page 7
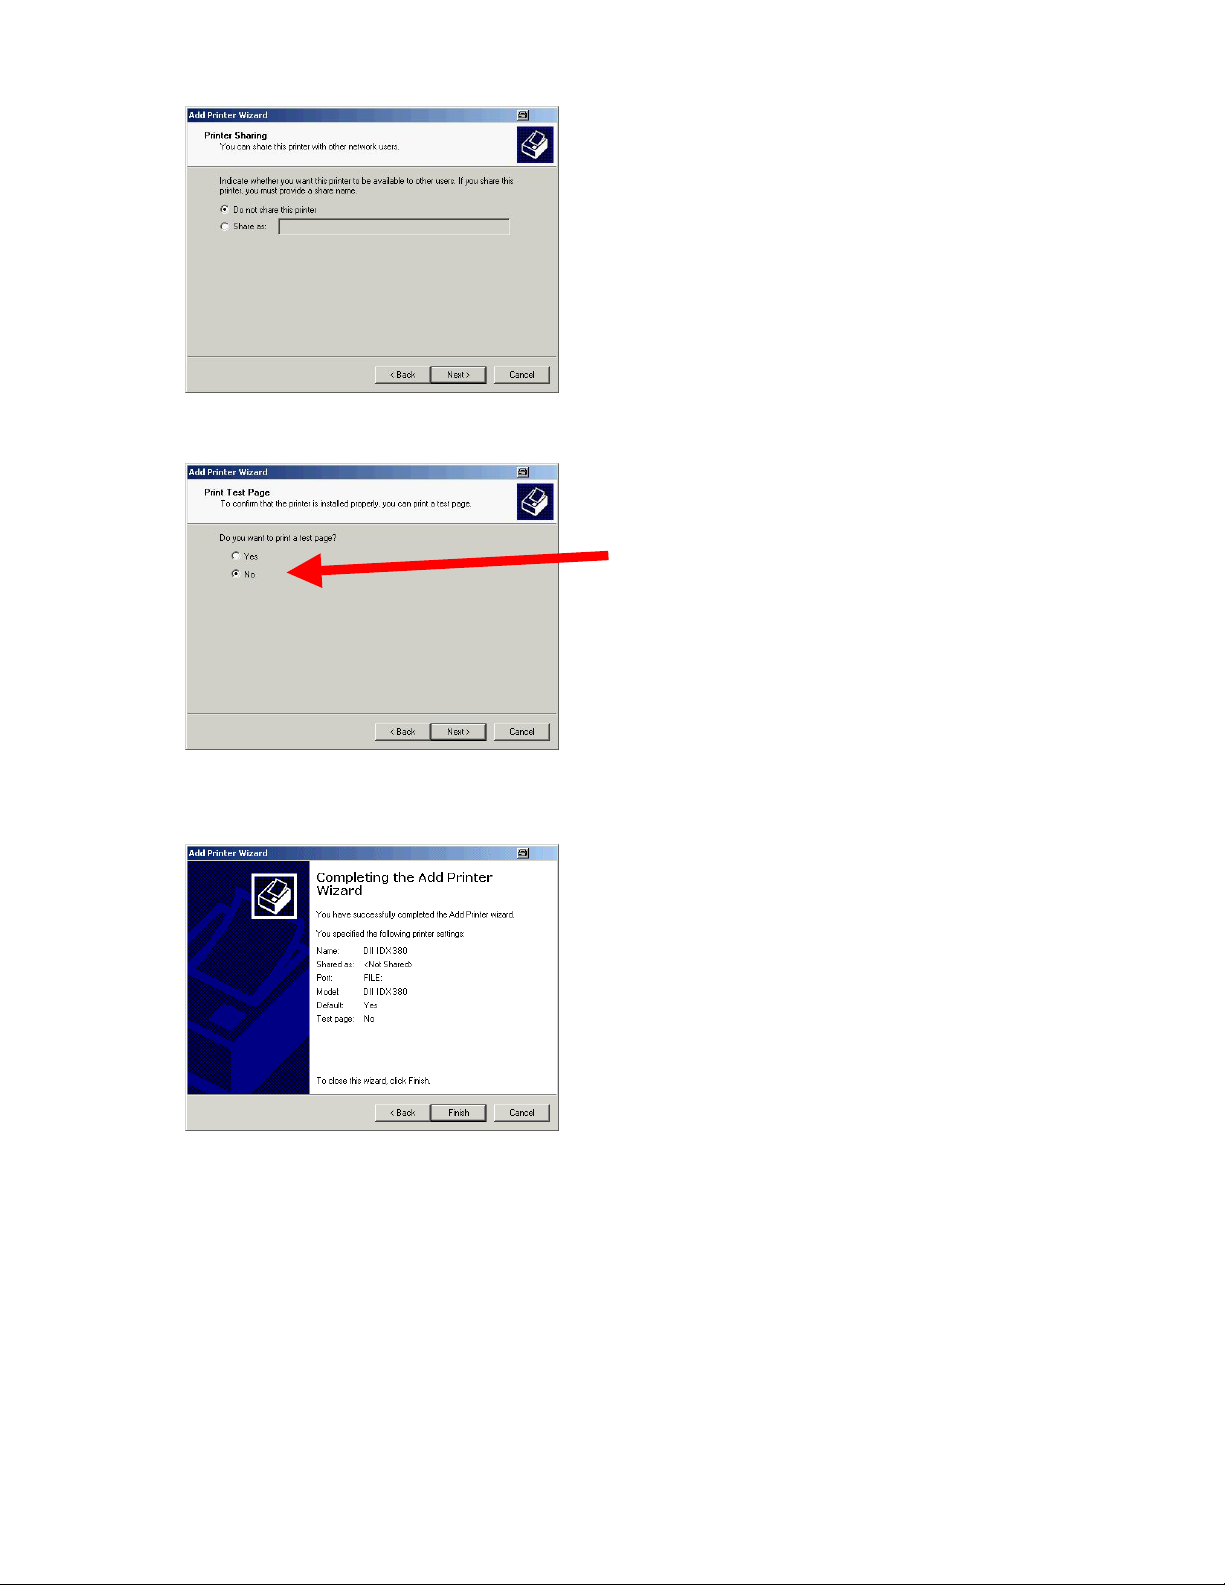
At this time don´t print a test page and click on "
Click on "Finish" to complete the installation.
t" to continue.
Nex
IDX380 Printer Driver Manual Page 7 of 42
Page 8
Click on "
" to continue the installation.
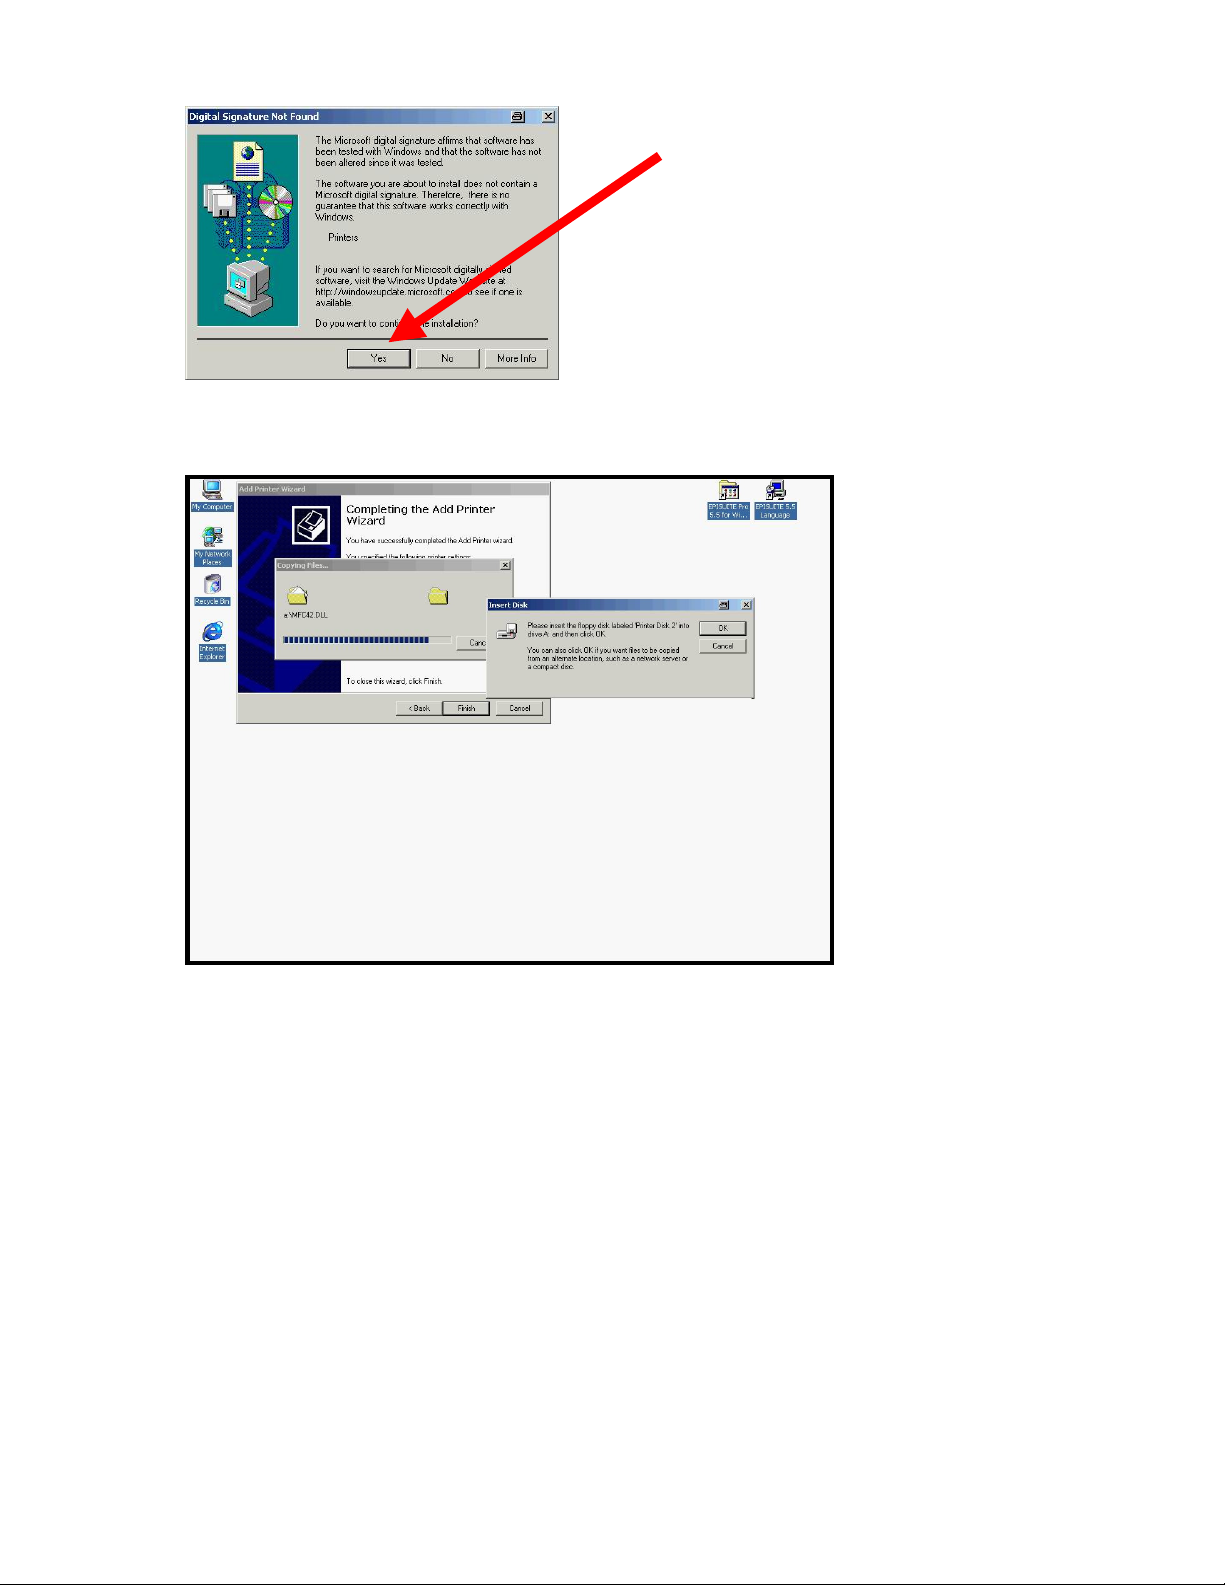
Yes
Follow the instructions on the screen.
IDX380 Printer Driver Manual Page 8 of 42
Page 9
Please wait until the driver installation is completed.
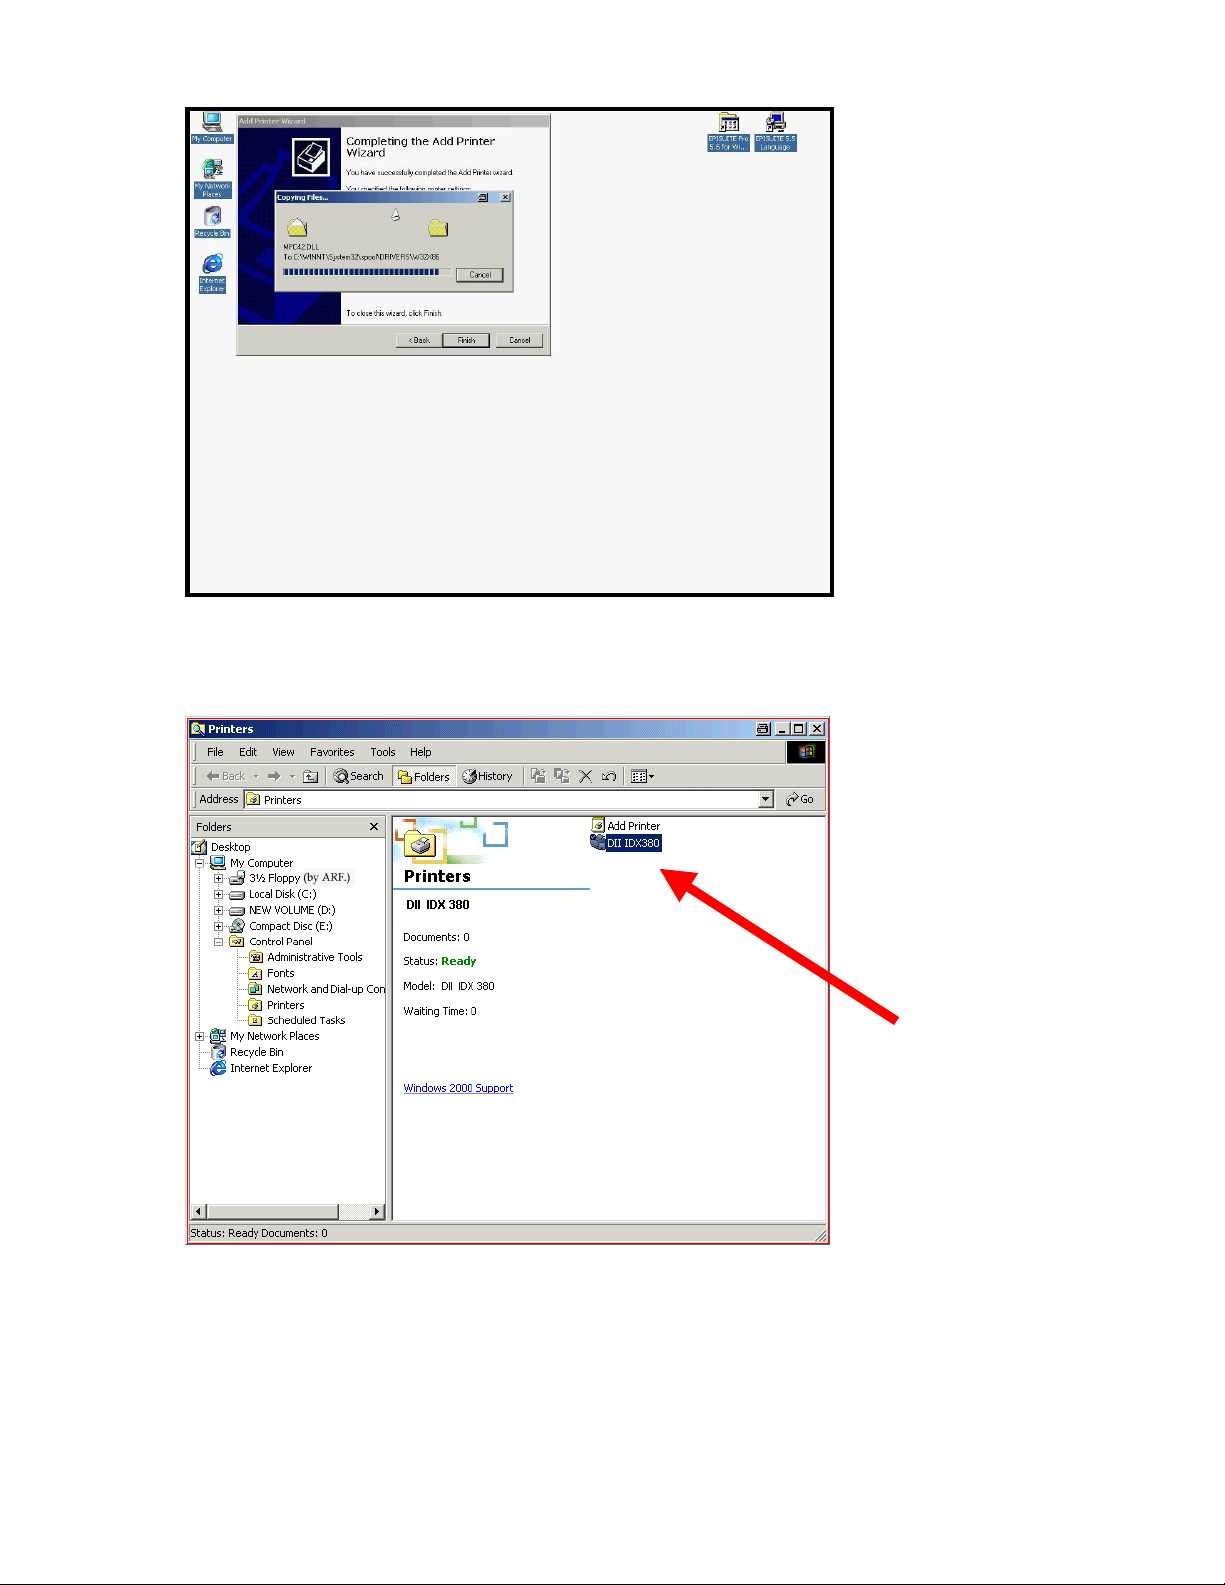
The selected printer should appear here (see arrow):
8. After the installation has been completed, right-click on the new printer in the Printers
folder, and choose Properties from the popup menu.
9. In the Properties dialog box, click the Ports tab and change the printer port from "FILE" to
"GACP1".
10.
Print a test page.
IDX380 Printer Driver Manual Page 9 of 42
Page 10

Driver set-up for single printer
a) Click under \ Start \ Settings \ Printer \ Add new printer
b) Follow the instructions on screen
c) Choose "
Connection to File
“
d) Choose the location of the driver
e) Choose the "DII IDX380" driver
f) Rename it to e.g.: DII IDX380 #1
g) Under \ Printer \ Properties look for connection. Change from "FILE“ to "GACP1“
h) Under
\ Printer \ Devices
: enable the printer Id
Driver set-up for several printers
a) Click under
\ Start \ Settings \ Printer \ Add new printer
b) Follow up the instructions
c) Choose "
Connection to File
“
d) Choose the location of the driver
e) Choose the "DII IDX380" driver
f) Rename it to e.g.: "
DII IDX380 ALL"
g) Under \ Printer \ Properties look for connection. Change from „FILE“ to „GACP1“
h) Under \ Printer \ Devices : enable both printer Ids
Printer Pooling
A new Port Monitor is installed during the print driver setup. It permits job pooling and network
printing to SCSI devices by virtualizing the bi-directional SCSI communication as a normal printer
port.
The printer driver supports the addition and deletion of multiple GACP ports (GACP1, GACP2, etc.)
through the Properties > Ports page. You can access this by going to Start > Printers, right-clicking
the printer icon and selecting Properties from the popup menu.
IDX380 Printer Driver Manual Page 10 of 42
Page 11
Advanced Printer Configuration
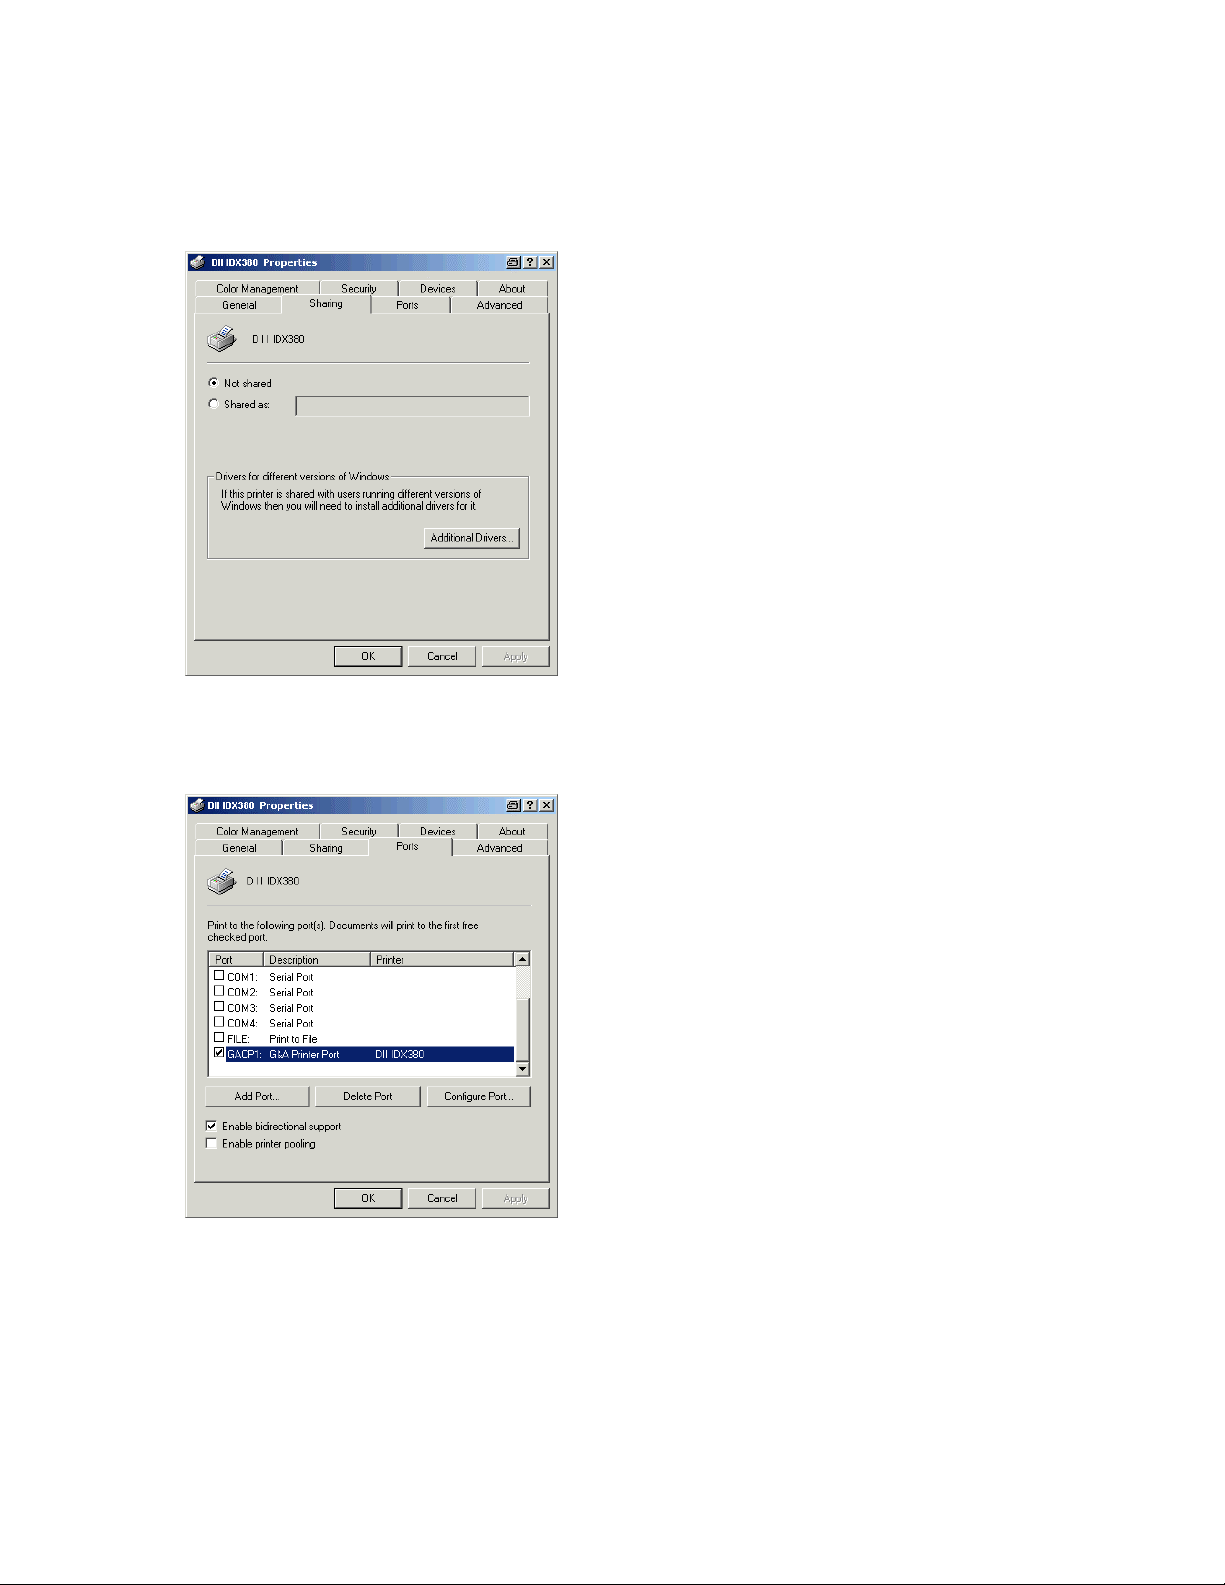
If the printer is used in a network environment and should be shared with other users then
click on "Shared as:" and give the printer a name. So other users then can select this
printer within the network environment.
The printer requires to be assigned to an GACPx port.
IDX380 Printer Driver Manual Page 11 of 42
Page 12
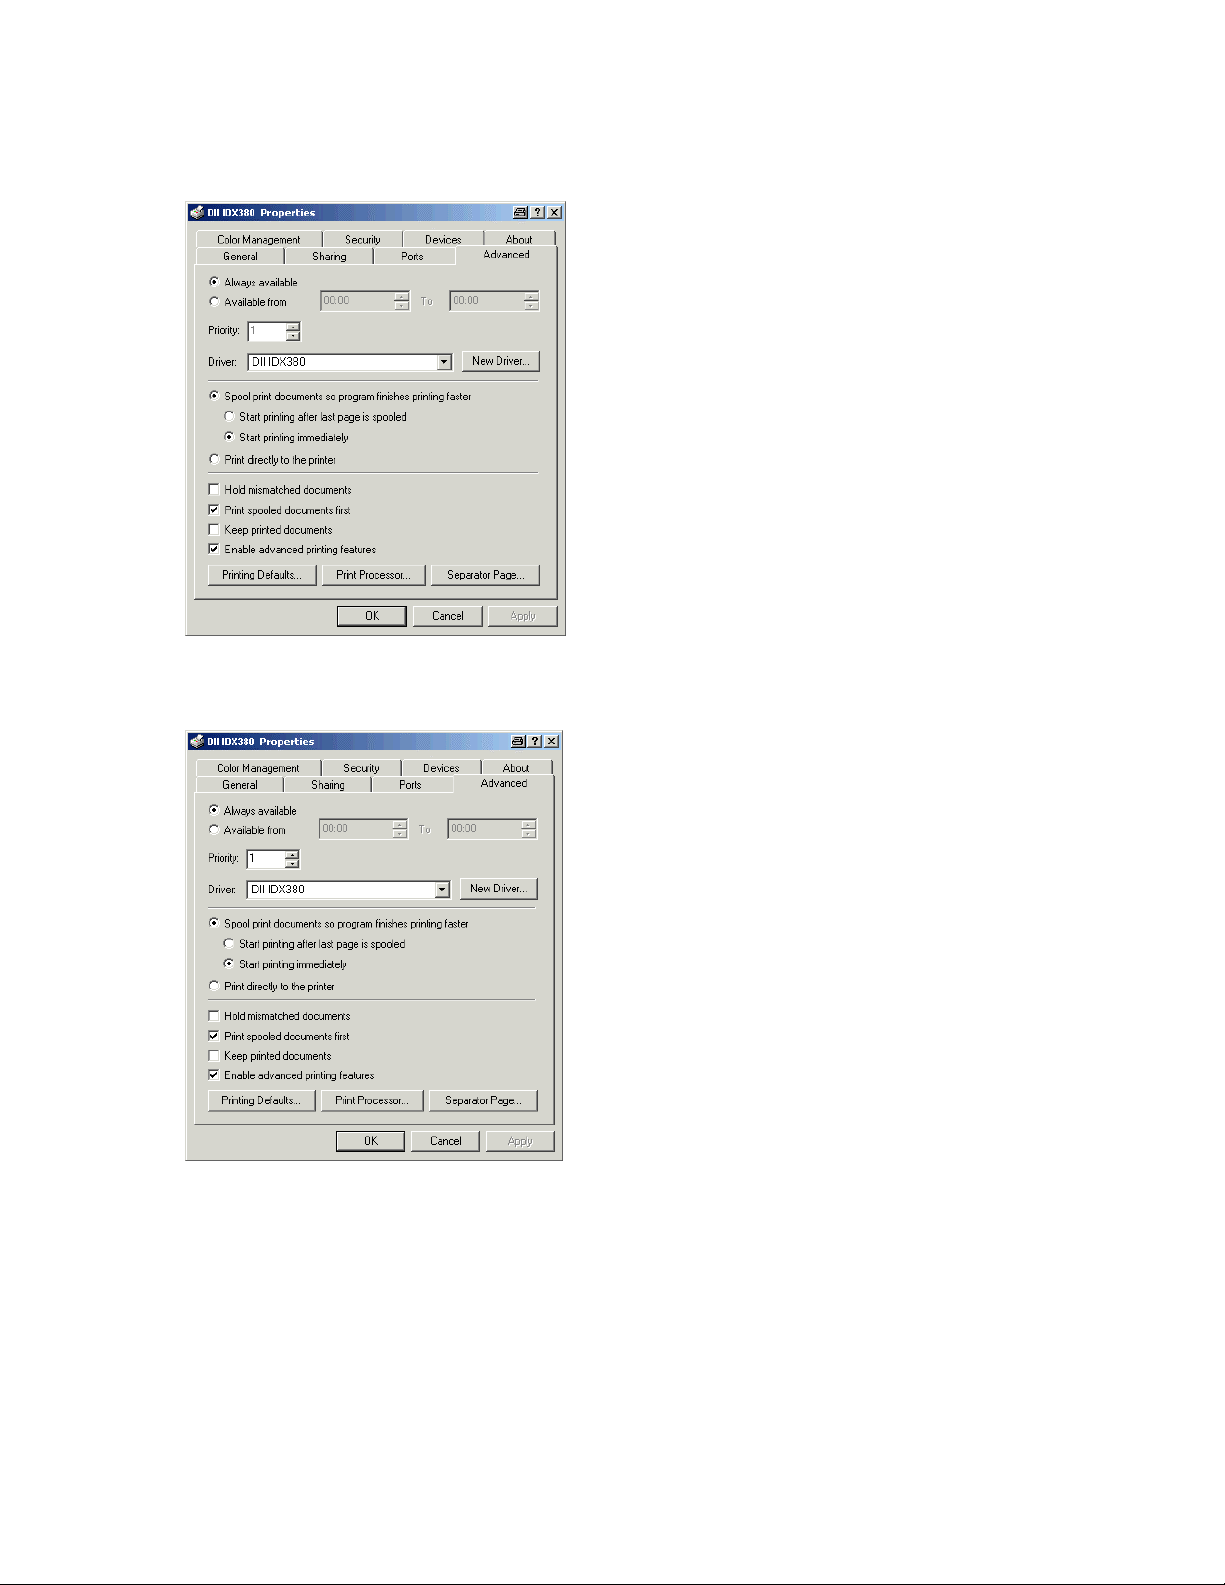
Don´t change the following default settings unless you are an advanced user.
Don´t change the following default settings unless you are an advanced user.
IDX380 Printer Driver Manual Page 12 of 42
Page 13
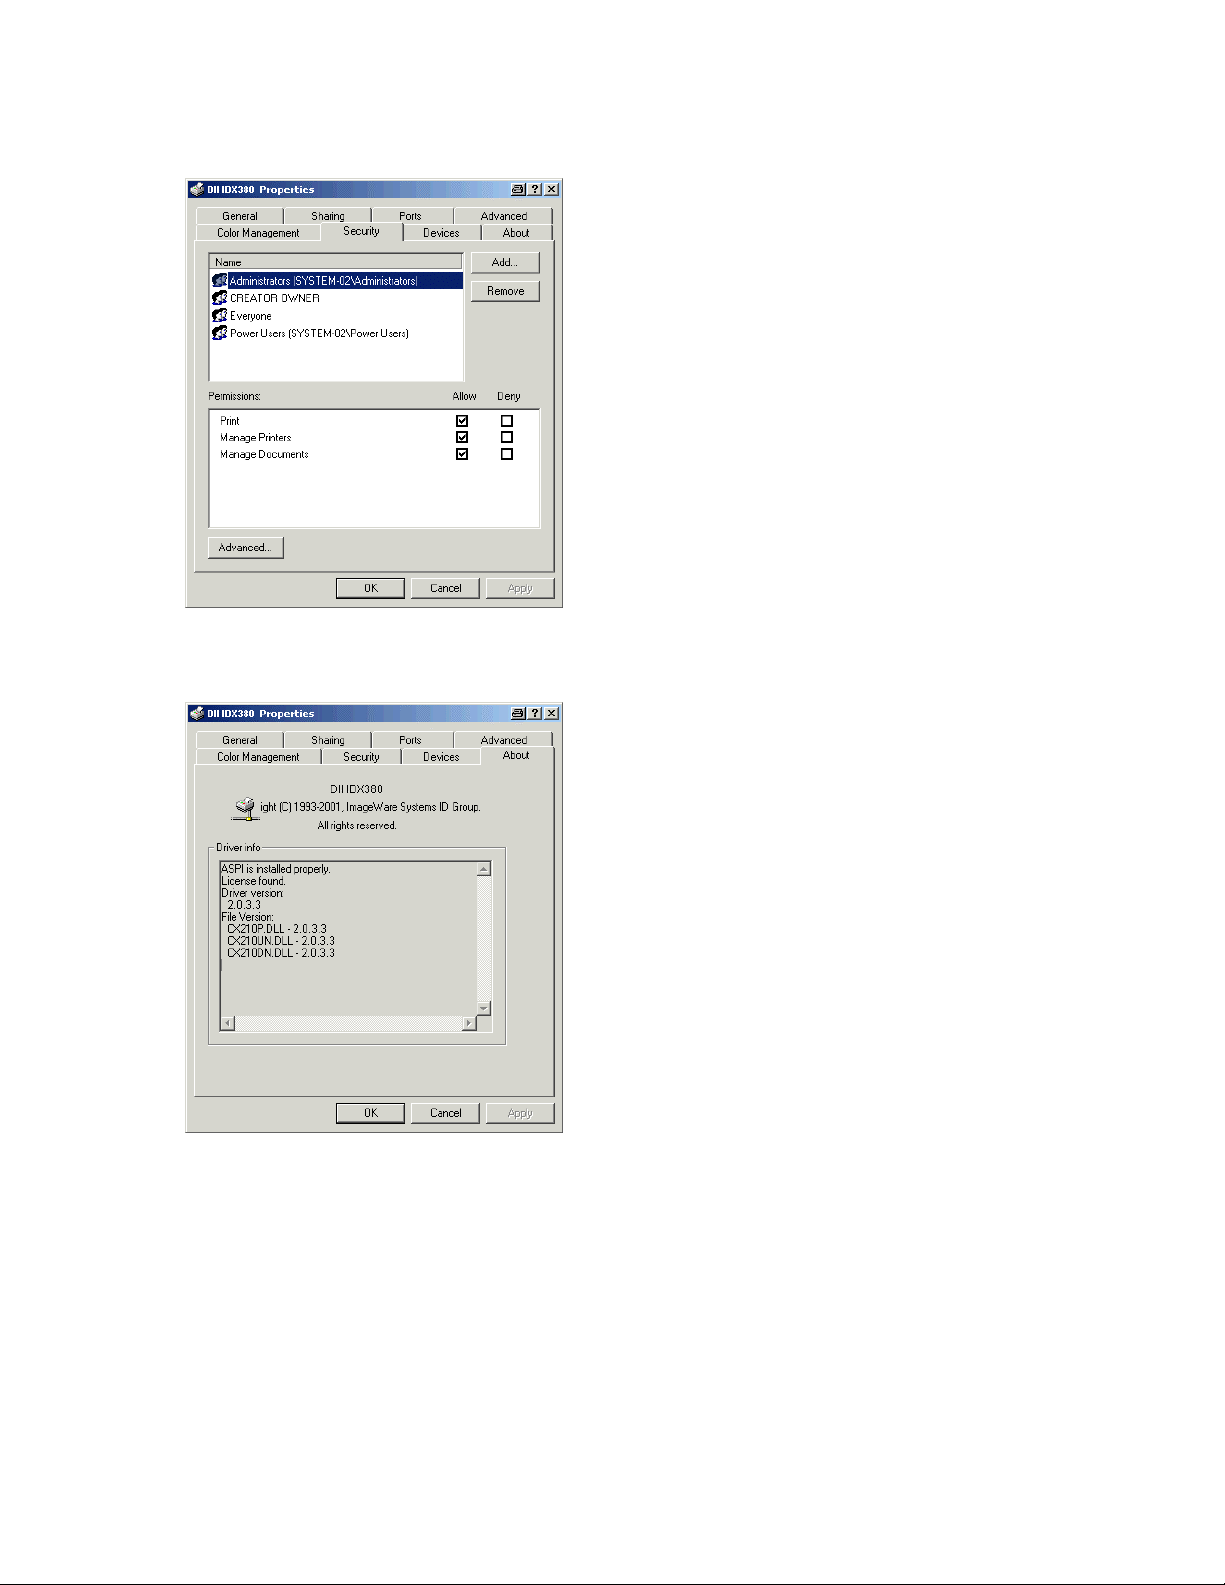
Don´t change the following default settings unless you are an advanced user.
Here you can see the version of the installed printer driver.
IDX380 Printer Driver Manual Page 13 of 42
Page 14

List of all installed IDE/SCSI devices
Printer Setup Properties
The following are descriptions of the various properties tabs and their respective settings.
These tab settings are printer-dependent and may not necessarily be available to you.
Note:
Printing Preferences
IDX380 Printer Driver Manual Page 14 of 42
Page 15

Paper
The Paper tab options controls paper size, source and orientation.
IDX380 Printer Driver Manual Page 15 of 42
Page 16

Paper Size
Select one of the standard card sizes supported by your printer.
IDX380 Printer Driver Manual Page 16 of 42
Page 17

Paper Source
Select the card feeder tray. Currently there is only the Default card feeder tray available.
IDX380 Printer Driver Manual Page 17 of 42
Page 18

Media
Specify the different card media type required for printing.
Changing the media type from “Default” to “ABS”, “PVC” or “PET” will cause the printer driver to
search for an appropriate Look UP Table (LUT) file in the installation path of the driver. If a Look
UP Table (LUT) with a valid file name is found the printer driver will download this new Table with
the next print job. Valid Look UP Table (LUT) file names are:
Default = CX210LDE.DAT
ABS = CX210LAB.DAT
PVC = CX210LPV.DAT
PET = CX210LPE.DAT
Installation path of the driver depends on the Operating System i.e. MS Windows XP
C:\WINDOWS\system32\spool\drivers\w32x86\2\
Note: loading a Look UP Table (LUT) with different colour values than the default values will
cause different print results in terms of colour density and colour shades. This option
should be used by operators who understand colour management and colour reproduction
only.
A downloaded Look UP Table (LUT) will be active in the printer memory as long as the
printer is powered on. Power off and on will cause the printer to reload it´s internal default
Look UP Table again. To reload a custom Look UP Table (LUT) after printer power off
change media type, print a card and change media type back to it´s previous setting. This
will force downloading the custom LUT.
IDX380 Printer Driver Manual Page 18 of 42
Page 19

Orientation
Choose either Portrait or Landscape. “Portrait” means that the card prints from left to right across
its shortest dimension. “Landscape” means that the card prints from left to right across its longest
dimension.
IDX380 Printer Driver Manual Page 19 of 42
Page 20

Printing
The Printing tab options controls print modes, card rotation and print control. You may enable or
disable printing from this tab by selecting the "
Through)" option from either the Print Mode: Front or Print Mode: Back lists. This is useful if you
want to encode a card’s magnetic stripe without printing on the card.
Enable Printing
" option the "
No Printing (Pass
Enable Printing
Print Mode: Front
Allows you to determine how the front of the card will be printed. Select one of the following
options from the dropdown list:
No Printing (Pass-Through)
Passes the card through without printing. This option is useful if you want to encode the card
without printing this side or print on front only but not on the backside of the card.
Monochrome (K)
Prints cards in black and white.
3-Color (CMY)
Prints cards using three process colors (cyan, magenta and yellow).
4-Color (CMYK)
Prints card using four process colors (cyan, magenta, yellow, and black).
IDX380 Printer Driver Manual Page 20 of 42
Page 21

Print Mode: Back
See above for details.
Image Orientation
These options are useful if you need to rotate either the front or the back of the card, in 180 degree
steps, when printing simultaneously on both sides. Check the option that best suits your needs, or
clear both check boxes to avoid rotation.
IDX380 Printer Driver Manual Page 21 of 42
Page 22

Printer Control
This options are useful to control the order of flipping of the card in the print process as well as
“save mode printing”.
Print Back First
Forces the printer to print the back side of a card first than flip the card and print the front side. This
ensures that the front side of the card leaves the printer face-up. The option is useful when an
Inline Laminator is connected to the printer and only the front-side of the card should be laminated.
Flip After Magnetic Encoding
Forces the printer to print the magnetic stripe side of a card first than flip the card and print the
front side. This ensures that the front side of the card leaves the printer face-up. The option is
useful when an Inline Laminator is connected to the printer and only the front-side of the card
should be laminated.
The process of printing a card with magnetic stripe encoding is as follows:
1.
Card is loaded and magnetic stripe is encoded
2.
After encoding the card is flipped and the opposite side to the magnetic stripe is printed.
IDX380 Printer Driver Manual Page 22 of 42
Page 23

3.
In case of a front-backside layout the card is flipped again and the side with the magnetic stripe
is printed.
4.
Card leaves printer with magnetic stripe side face-up.
Flip After IC Encoding
Forces the printer to flip the card after a contact smart chip is encoded. This option should be used
when a contact smart chip is encoded but the opposite side of the card should be printed.
Wait Card Leaves the Printer
In this “save mode option” a print-job will remain in the windows spooler queue as long as the card
is still in the printer. After the card has left the printer the print job will disappear from the windows
spooler. The option does slow down the overall productivity in batch print mode by approximately 6
sec. per job but it ensures that error recovery is possible in all error situations.
Image Correction
The Image Correction settings allow you to predefine color settings for all the CMY elements of
your card design prior to printing. Note: These settings will be applied to ALL CMY elements on
the design.
Preview Image
Display changes made to a sample image and how it will be stored, displayed or printed (output
bitmap). The sample image will show up only if the graphic board in your computer is set to 24-bit
colours.
IDX380 Printer Driver Manual Page 23 of 42
Page 24

Reset button
Click this button to revert your Preview Image (output bitmap) to its original appearance. Any
adjustments you have made over the Image Correction settings, prior to closing the dialog box will
be discarded.
Brightness & Contrast
Use the slider bars to adjust the exposure and contrast levels of the image. A higher exposure
level will result in a brighter image with less detail (overexposed). A higher contrast level will result
in darker shadows and brighter highlights.
Tip: If the light in your area is very bright or harsh, or if you cannot turn off the flash on your
camera, the resulting image will possibly be overexposed. To correct this problem, increase the
Contrast level and decrease the Brightness level. This brings out the facial features by deepening
IDX380 Printer Driver Manual Page 24 of 42
Page 25

the existing shadows, and reduces the brightness of the highlights by darkening the whole image.
Adjust these levels in small steps at a time to avoid over adjusting the image.
Hue Shift
Use the slider bars to adjust the color balance of the image for more or less red, green or blue.
Tip: Fluorescent lighting affects color images by creating a greenish tinge. This affect can be
reduced by adjusting the green level.
Gamma
When color is produced on an electronic device, the eye perceives it differently than if it was
printed on paper. The gamma correction factor compensates for that perceived difference. Use
slider bars to adjust the colors
IDX380 Printer Driver Manual Page 25 of 42
the
Page 26

Exclusions
The Exclusions tab allows you to precisely define the areas of the card that will not receive an
additional ribbon panel layer during the printing process. Use this option to specify up to eight
rectangular areas on the front and/or back of the card where the additional ribbon panel will not be
printed. Leave the excluded areas list blank, or deselect any check boxes for predefined areas, if
you want to apply the additional layer across the entire surface of the card.
IDX380 Printer Driver Manual Page 26 of 42
Page 27

Add Exclusion
Click this button to add an area or areas that will not receive an additional layer during the
printing process. By default, the new area coordinates will be set to zero and the card side will be
“Front” (see “How to Measure Exclude Area Coordinates” below for details). Click on the
coordinate and type in a new number or select the required side from the "Side" dropdown list.
Remove
Click this button to delete the highlighted area coordinate.
Set Predefined
This feature has been disabled.
IDX380 Printer Driver Manual Page 27 of 42
Page 28

Measurement System
Select either centimeters (metric) or inches (US) as your units of measurement.
Preview
Click this button to preview your selected exclusion areas. A preview screen appears. Select either
Front or Back to preview all selected exclusion areas. If no areas have been selected, the
"Preview" button will not be available.
IDX380 Printer Driver Manual Page 28 of 42
Page 29

Preview of excluded area
How to Measure Exclude Area Coordinates
Coordinates are always relative to the upper left-hand corner of a portrait card, even if you are
printing in landscape mode. The Left coordinate (that is, where the left side of the rectangle begins)
is measured in inches from the left-hand side of the card; the Right coordinate (that is, where the
rectangle ends on its right-hand side) is also measured from this position. The Top and Bottom
coordinates (that is, where the top of the rectangular area begins and where the bottom ends) are
both measured from the top of the card.
K Plane
These features allow you to print some or all black elements of your card design on the K plane,
resulting in a very dark, crisp representation (for example, text and bar codes). They are designed
to work with the 4-color (CMYK) print mode (Front or Back) of the Printing tab (see description
above). Some colour printers have ribbons or cartridges to print cyan (C), magenta (M) and yellow
(Y), and a separate one for pure black (K); this is considered “4-color” printing. A printer that
supports only CMY, does not produce pure black when printing, but “process” black—a
combination of 100% each of cyan, magenta and yellow to make a near black. To determine if your
printer supports 4-color printing, please refer to your hardware documentation.
It is recommended to print all bar codes in pure black (K) because some types of bar code
Note:
readers cannot read process black (for example, infrared bar code readers).
IDX380 Printer Driver Manual Page 29 of 42
Page 30

Extraction method
The printer driver can use the following extraction methods to find elements of the type indicated,
and move them to the K plane to be printed in pure black.
By pixel
Searches the card for all elements within a preset range from process black, and moves them to
the K plane.
Note: This method could cause some odd results with elements such as black hair in a photograph. Because the K plane is monochromatic, there will be no highlights or gradations in the
black, leaving black hair looking unnatural, as if it was hand-drawn.
K Plane on Second page
Moves all true black elements to the K plane and keeps all process black elements with the color
elements. Depending on your printer driver, your drawing program may need to generate 2 pages
per card side to properly execute this command.
Text
Moves all text elements to the K plane. Note: also colour text elements are printed to the K plane.
If this is not wanted use extraction method “by pixel” or “K Plane on Second page”.
Dithering
This is a method of simulating the halftone dots used in traditional printing. On black and white
devices, dithering produces simulated grayscale. It is also referred to as Halftoning. There is
currently only one setting (default).
IDX380 Printer Driver Manual Page 30 of 42
Page 31

K Plane adjust
Use these adjustments to enhance the extraction methods above.
K Plane offset
Some printers tend to print the K plane slightly offset from the CMY planes, resulting in a white
space showing around part of the K plane elements. To correct this, use these adjustments to
compensate for the difference.
Horizontal & Vertical - Type in or scroll to the number of pixels you want the K plane to be offset
either horizontally or vertically. You may need to experiment to find the correct adjustment for your
printer, or it may be indicated in your hardware documentation.
Remove CMY under black
Removes the process black pixels from the proximity of the pure black elements. This could result
in a white space showing around the K plane elements.
Magnetic Encoding
These settings determine how the cards’ magnetic stripes will be encoded. For details on which
settings are best for your encoder, please refer to your hardware documentation.
instructions on sending track information to your encoder, please refer to “Sending Track
Information” later in this document.
For complete
IDX380 Printer Driver Manual Page 31 of 42
Page 32

Enable Magnetic Stripe Encoding
Check this option (if it is not already checked) to enable magnetic stripe encoding during the
printing process.
Encoder Setup Mode
Select either JIS Standard (Japanese Industry Standard) or ISO Standard (International Standards
Organization).
IDX380 Printer Driver Manual Page 32 of 42
Page 33

Track Format
These options enable you to define how each of the three magnetic stripe tracks will be encoded.
Please note that the options available will vary in dependent on your printer model and which
encoder set up mode you select.
Please refer to your encoder documentation for details.
IDX380 Printer Driver Manual Page 33 of 42
Page 34

TR-1, TR-2 and TR-3/NTT
Defines the maximum number of characters allowed on track one, two and three.
Sending Track Information
Magnetic track data are sent in the form of text strings from the application software to the printer
driver, along with all of the other printable objects within your card design. For the printer driver to
differentiate between magnetic track data and the rest of the printable objects, the magnetic track
data strings must be uniquely “tagged” and be formatted using the “System” font. In other words,
specific characters must be added to the magnetic track data for the printer driver to know which
data are to be encoded, which tracks to encode, when the track data stops and starts and so on.
When using the Generic Printer Driver, you must manually add these characters to the string of
magnetic track data. If these characters are not added to the track data, the text intended for the
magnetic track will most likely appear as printed text on the card. To avoid this, track information
must be entered as described below.
When entering track data, the “~” character is entered first, followed by the track number (1, 2, or
3) on which you intend to encode the data. The data to be encoded should then follow. The first
character of this data string must be the track’s specific SS (Start Sentinel), and the last character
must be the specific ES (End Sentinel). The characters or data in between the SS and the ES can
include all of the valid characters specific to each track. The number of these characters, however,
is limited by each track’s maximum character capacity. When segmenting track data, the
appropriate FS (Field Separator) must be used. The following table shows the SS, ES, FS, and
valid characters defined for each track. (Track character limits are enforced by the TR-1, TR-2, and
TR-3/NNT format options selected in the Magnetic Encoding properties.)
Note: This data must always appear on page one of your document.
IDX380 Printer Driver Manual Page 34 of 42
Page 35

The following example illustrates how track data should be entered for tracks 1, 2, and 3 under
following Windows OS:
Windows 98ME / XP:
Track Start
Sentinel
~1 % ? ^ 0-9, A-Z, Punct., ASCII 32-95
;
~2;
~3; ; ? = ASCII 48-63
Windows 2000:
Track Start
Sentinel
~1 % ? ^ 0-9, A-Z, Punct., ASCII 32-95
~2; ; ? = ASCII 48-63
~3; + ? = ASCII 48-63
Sample for Windows 98ME / XP:
Sending Data to Track 1 : ~1%JULIE ANDERSON^623-85-1253?
Sending Data to Track 2 :
Sending Data to Track 3 : ~3;012345…89?
Print Errors
If an error occurs during the print job, you will receive a message in a popup dialog box. To restart
the failed print job, click the Restart Job button. If the error persists, write down the message that
appears and contact our Technical Support Center.
End
Sentinel
=
?
End
Sentinel
~2;012345…89?
Field
Separator
Field
Separator
Valid Characters
ASCII 48-63
Valid Characters
IDX380 Properties
IDX380 Printer Driver Manual Page 35 of 42
Page 36

Retransfer
• Media Film Type: Standard
Temperature Level: from "-5" (Low) to "+4" (High)
•
• Speed (Front Side): from "-2" (Low) to "+2" (High)
• Speed (Back Side): from "-2" (Low) to "+2" (High)
Please refer to chapter "Retransfer mode setting" of the printer manual for detailed
description of the parameters.
Bend Remedy
• "Off" or "On"
If "On“: Temperature Level: from "-5" (Low) to "+4" (High)
•
Speed: from "-2" (Low) to "+2" (High)
Cooling Time (sec): from "none" to "15"
Please refer to chapter "Setting the bend remedy mode" of the printer manual for detailed
description of the parameters.
IDX380 Printer Driver Manual Page 36 of 42
Page 37

Card Size
a) "Normal"
b) "Cybernetic"
Please refer to chapter "Card size setting mode " of the printer manual for detailed
description of the parameters.
Buzzer
a) "On"
b) "Off"
Please refer to chapter "Buzzer mode setting " of the printer manual for detailed
description of the parameters.
Color Ink
Ink Ribbon Type : YMCK (Type1)
•
• Resin Bk Level: from "-3" (Thin) to "+3" (Thick)
• Resin Bk Mode : "Normal" or "Fine"
Please refer to chapter "Ink mode setting" of the printer manual for detailed description of
the parameters.
Special Ink
A0 Level : from "-3" (Thin) to "+3" (Thick)
•
• A1 Level : from "-3" (Thin) to "+3" (Thick)
These settings are reserved for future use only.
MG
• ISO Type : "Hi-Co" or "Lo-Co"
Please refer to chapter "Antimagnetic setting mode" of the printer manual for detailed
description of the parameters.
Power Saving
IDX380 Printer Driver Manual Page 37 of 42
Page 38

• "On" or "Off"
• If "On", Off Time (min) from "5" to "60"
Please refer to chapter "Power saving mode settings" of the printer manual for detailed
description of the parameters.
Managing and operations
• Print Test : Print of a single card with a test pattern
• Print Status : Shows the actual status of the ribbons and cards
• Get : Get the settings from the printer and shows in the screen
• Set :
• Save : Save the settings to system registry under a new screen name
• Manage : Manage different setting scripts with following options:
Add -> add new settings from the list
Remove -> remove settings from the list
Rename -> rename settings from the list
Export -> setting to a file for later usage or import on another
computer
Import -> imports setting file from local hard disk or floppy disk
Download the settings from the mask to the printer
IDX380 Printer Driver Manual Page 38 of 42
Page 39

IDX380 Printer Driver Manual Page 39 of 42
Page 40

External Devices
COM port assignment and activation/deactivation for every printer device # from "1" to "6"
a specified COM port from "1" to "4".
It allows assigning a COM port to a specific SCSI ID. This option is used for Smart chip
encoding only. Up to four printers and COM ports on one computer can be configured.
IDX380 Printer Driver Manual Page 40 of 42
Page 41

Printer Password
Printer password management for creation, modifying and removing of the printer
password. This function is for future use. It will be available on the IDX390 printer.
Advanced
IDX380 Printer Driver Manual Page 41 of 42
Page 42

Printer control options
a) Reset printer
Causes a reset of the printer.
b) Maintenance
These settings are reserved for future use only.
Trouble Shooting
Upgrading your printer driver from a previous version:
Always use the PDU.EXE program on your printer driver CD to uninstall previous driver
versions in a save way. Reboot your computer before installing the new driver version.
Known bugs and limitations:
- No more than 2 printer on 1 PC are supported when magnetic strip encoding is used in
conjunction with batch printing.
- Image correction in the printer properties tab sometimes creates unpredictable results.
Image correction does effect white parts of the printout as well.
Workaround: Image correction should be done either in the layout or during image
capture in the application software.
- Multiple printer management (connecting more than 1 printer to a PC) does not work
correctly under Windows ME.
Workaround: Use Win 2000 or Win XP for multiple printer management
- Copy print (n copies of one card) – all print jobs go to one printer, even there are multiple
printers connected to your computer
- When an error occurs during overlapped (batch) printing (if door opened during
retransfer) two error messages appear.
What to do ?
Clear print path, reset printer and confirm both error messages. After that restart print
job.
IDX380 Printer Driver Manual Page 42 of 42
 Loading...