

Page 1

Ultimaker 2+
Installation and user manual
Original manual v2.0 2019
Page 2

2
Disclaimer
Please read and understand the contents of this installation and user manual carefully. Failure to read the manual
may lead to personal injury, inferior results or damage to the Ultimaker 2+. Always make sure that anyone who
uses the 3D printer knows and understand the contents of the manual and makes the most out of the Ultimaker 2+
or Ultimaker 2 Extended+.
The conditions or methods used for assembling, handling, storage, use or disposal* of the device are beyond our control
and may be beyond our knowledge. For this and other reasons, we do not assume responsibility and expressly disclaim
liability for loss, injuries, damage, or expense arising out of or in any way connected with the assembly, handling, storage,
use or disposal of the product.*
The information in this document was obtained from sources which we believe are reliable. However, the information is
provided without any warranty, express or implied, regarding its correctness.
Intended use Ultimaker 2+
Ultimaker 3D printers are designed and built for fused deposition modeling with Ultimaker engineering thermoplastics
within a commercial/business environment. The mixture of precision and speed makes the Ultimaker 3D printers the
perfect machine for concept models, functional prototypes and the production of small series. Although we achieved a
very high standard in the reproduction of 3D models with the usage of Ultimaker Cura, the user remains responsible to
qualify and validate the application of the printed object for its intended use, especially critical for applications in strictly
regulated areas like medical devices and aeronautics. While being an open material platform the best results will be
achieved with Ultimaker certified material, while effort has been made to match material properties with machine settings.
* We comply to the WEEE-directive.
Copyright © 2019 Ultimaker. All rights reserved worldwide.
This language version of the manual is verified by the manufacturer (Original manual).
No part of this publication, including pictures may be reproduced and/or made public, whether by printing, photocopying, microfilm or by
any other means whatsoever, without the prior written permission of Ultimaker.
Page 3

3
Table of Contents
1. Safety and compliance 6
Safety messages 7
Hazards 8
2. Introduction 9
Main components Ultimaker 2 or Ultimaker 2 Extended+ 10
Specifications 11
3. Unpack and install the hardware 12
Unboxing 13
Installing the hardware accessories 15
4. Set up for rst use 17
Build plate leveling 18
Loading material 19
Installing Ultimaker Cura 20
5. Operation 21
Control and display 22
Material 23
Preparing a print with Ultimaker Cura 24
Starting a print 25
Removing the print 26
Changing the material and nozzle 27
6. Maintenance 28
Update the firmware 29
Build plate calibration 30
Storage and handling of materials 31
Hardware maintenance 32
Clean the printer 33
Lubricate the axles 36
Check for play on axles 37
Check for tension of short belts 38
Lubricate the lead screw of the Z motor 39
Retighten the hot-end isolator 40
Clean the feeder and replace the Bowden tube 41
7. Troubleshooting 42
Error messages 43
Clogged nozzle 44
Print quality issues 46
Page 4

4
Preface
This is the installation and user manual for your Ultimaker 2+ or Ultimaker 2 Extended+. This manual contains chapters
about the installation and use of the 3D printer.
The manual contains important information and instructions on safety, installation and use. Please read all information and
follow the instructions and guidelines in this manual carefully. This ensures that you will obtain great quality prints and
that possible accidents and injuries will be prevented.
Make sure that everyone who uses the Ultimaker 2+ or Ultimaker 2 Extended+ has access to this manual.
Every effort has been made to make this manual as accurate and complete as possible. The information is believed to be
correct but does not aim to be all inclusive and shall be used only as a guide. Should you discover any errors or omissions,
please bring this to our attention, so that we can make amendments. This will enable us to improve our documentation and
service to you.
Page 5

5
Certications
Page 6

6
Safety and
compliance
1
It is very important to work safely with your
Ultimaker 2+ or Ultimaker 2 Extended+.
This chapter is about safety and hazards.
Please read all information carefully to prevent
possible accidents and injuries.
Page 7

7
Safety messages
This manual contains warnings and safety notices.
Provides additional information that is helpful to do a task or to avoid problems.
Warns of a situation that may cause material damage or injuries if one does not follow the safety instructions.
General Safety Information
The Ultimaker 2+ or Ultimaker 2+ Extended generates high temperatures and has hot moving parts that can cause injury.
Never reach inside of the Ultimaker 2+ or Ultimaker 2 Extended+ while it is in operation. Always control the printer with
the button at the front or the power switch at the back. Allow the Ultimaker 2+ or Ultimaker 2 Extended+ to cool down for 5
minutes before reaching inside.
The Ultimaker 2+ or Ultimaker 2 Extended+ generates high temperatures and has hot moving parts that can cause injury.
Never reach inside the Ultimaker 2+ or Ultimaker 2 Extended+ while it is in operation. Always control the printer with the
button at the front or the power switch at the back. Allow the Ultimaker 2+ or Ultimaker 2 Extended+ to cool down for 5
minutes before reaching inside.
Do not change or adjust anything on the Ultimaker 2+ unless the change is authorized by the manufacturer.
Do not store items in the Ultimaker 2+ or Ultimaker 2 Extended+.
The Ultimaker 2+ or Ultimaker 2 Extended+ is not intended for use by persons with reduced physical and/or mental
capabilities, or lack of experience and knowledge, unless they have been given supervision or instruction concerning
the use of the appliance by a person responsible for their safety.
Children should be under constant supervision when using the printer.
Intentional radio
This device may not cause harmful interference, and this device must accept any interference received, including
interference that may cause undesired operation.
Page 8

8
Hazards
Electromagnetic Compatibility (EMC)
This equipment has been tested and found to comply with the limits for a Class A digital device, pursuant to part 15 of the
FCC Rules. These limits are designed to provide reasonable protection against harmful interference when the equipment is
operated in a commercial environment.This equipment generates, uses, and can radiate radio frequency energy and, if not
installed and used in accordance with the instruction manual, may cause harmful interference to radio communications.
Operation of this equipment in a residential area is likely to cause harmful interference in which case the user will be
required to correct the interference at his own expense.
Electrical Safety
The Ultimaker 2+ has been tested according to the IEC 60950-1, which falls under the low voltage directive.
The Ultimaker 2+ must be used in conjunction with the Meanwell power supply GST220AX and delivered
power cord. In combination, they guarantee safe use in relation to short-circuit, overload, over-voltage and over
temperature. An earthed mains socket must be used. Be sure that the building installation has dedicated means
for overcurrent and short-circuiting. For more information, please look at our website for the CB-report.
Always unplug the printer before doing maintenance or modifications.
Mechanical Safety
The Ultimaker 2+ contains moving parts. No damage to the user will be expected from the drive belts. The force
of the build plate is big enough to give some damage, so keep hands out of the reach of the build plate during
operation.
Always unplug the printer before doing maintenance or modifications.
Risk of Burns
There is a potential risk of burns: the print head can reach temperatures up to 260 °C, while the heated bed can
reach temperatures of 120 °C. Do not touch both with your bare hands.
Always allow the printer to cool down for 30 minutes before performing maintenance or modifications.
Health and Safety
The Ultimaker 2+ is designed for Ultimaker material. These materials can be printed safely if the recommended
temperatures and settings are used. We recommend printing all Ultimaker materials in a well-ventilated area.
Please check the SDS of each specific material for more information.
Third-party materials can release VOCs (volatile organic compounds) above regulated threshold limit values when
processed in Ultimaker 3D printers (not covered by warranty). These can cause headaches, fatigue, dizziness, confusion,
drowsiness, malaise, difficulty in concentration, and feelings of intoxication. Usage of a fume hood is recommended. Look
at the SDS of these materials for more information.
Page 9

9
Introduction
2
Meet your Ultimaker 2+ and learn what
the possibilities of this 3D printer are.
Page 10
10
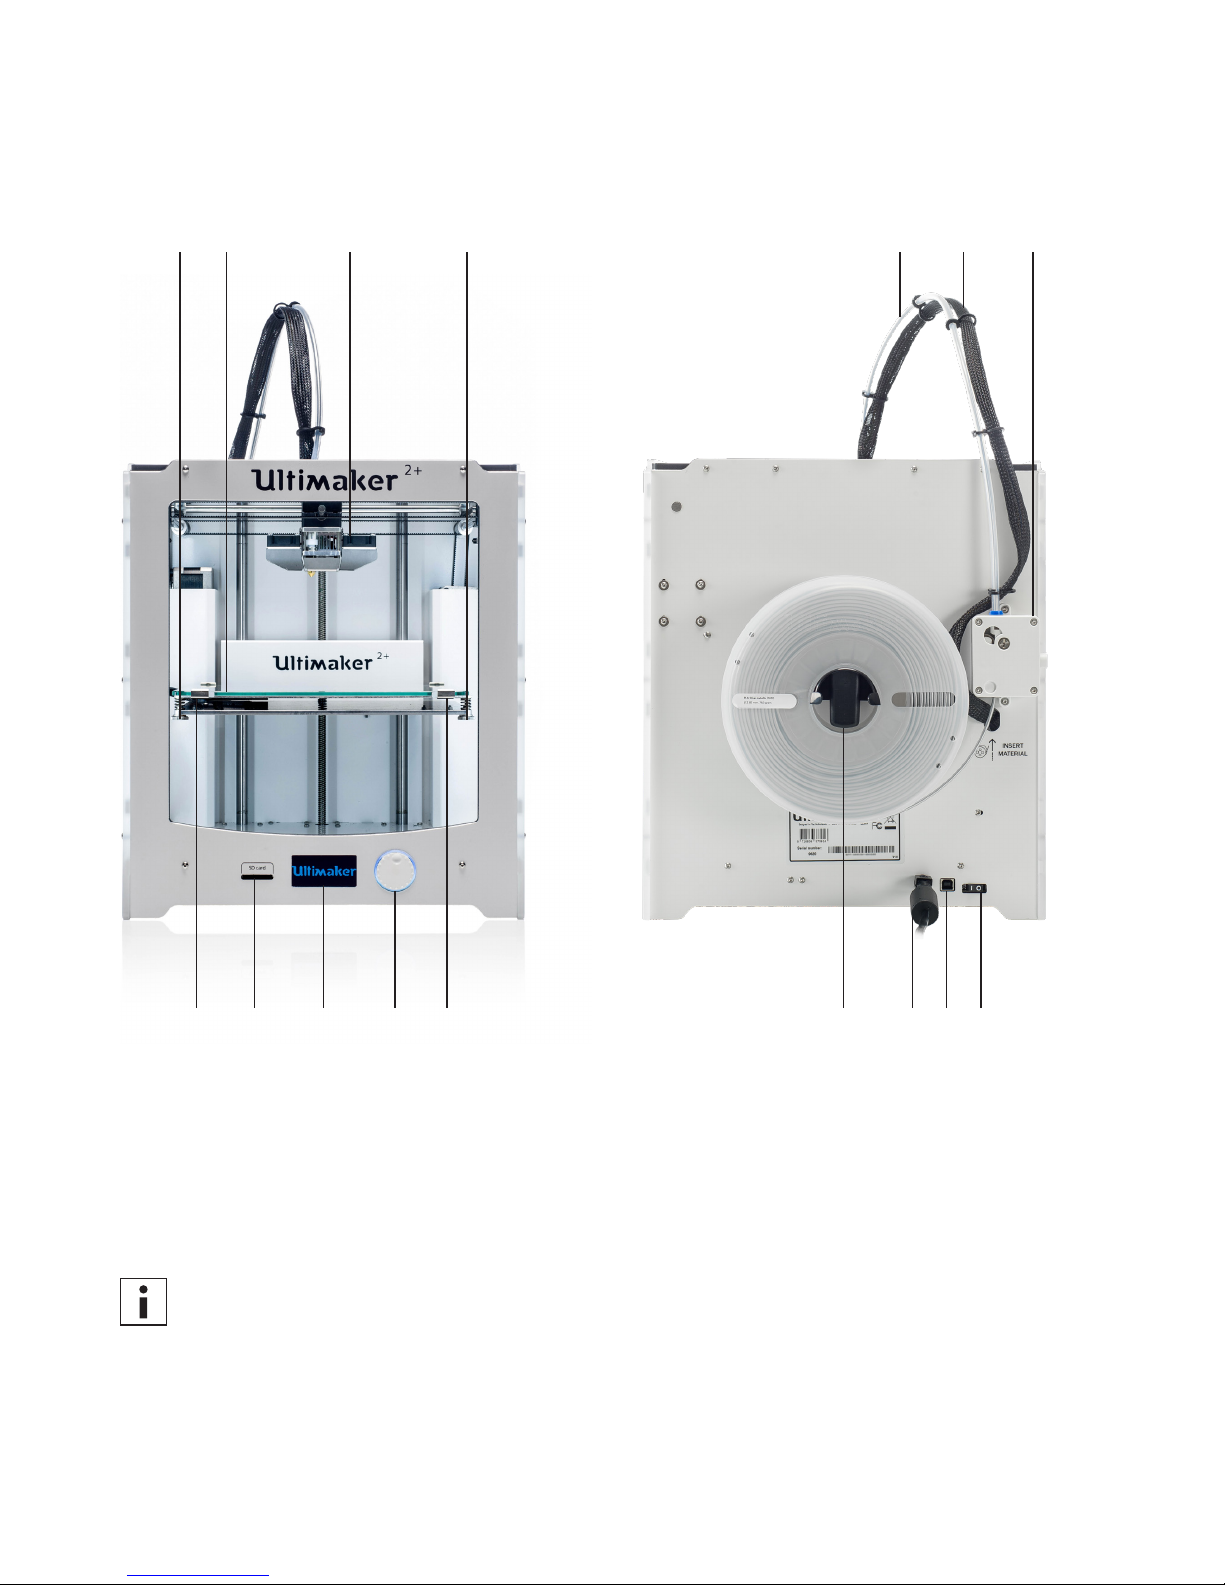
Main components Ultimaker 2+ or Ultimaker 2 Extended+
The model exposed is the Ultimaker 2+. The main components of the Ultimaker 2 Extended+ are the same
and on the exact same position. The only difference between the two printers is the height of the housing. See
Specifications for the different dimensions.
1. Build plate
2. Print head
3. Knurled nuts
4. Build plate clamps
5. Push/rotate button
6. Display
7. SD card slot
8. Bowden tube
9. Print head cable
10. Feeder
11. Power switch
12. USB port (only for updating firmware)
13. Power socket and cable
14. Spool holder
1
2
45674
3
3 8
13
9
111214
10
Page 11

11
Specications
Technology
Print head
Build volume
Filament diameter
Layer resolution
XYZ accuracy
Print head travel speed
Build speed
Build plate
Build plate temperature
Build plate leveling
Supported materials
Nozzle diameter
Nozzle temperature
Nozzle heat up time
Build plate heat up time
Operating sound
Connectivity
Power requirements
Software
Ambient conditions
Dimensions
Dimensions (with Bowden tube and spool holder)
Nett weight
Shipping weight
Shipping box dimensions
Required input
Maximum output
Operating ambient temperature
Non-operating temperature
Supplied software
Supported OS
Plugin integration
File types
Printer and printing properties
Physical dimensions
Fused filament fabrication (FFF)
Single extrusion print head with swappable nozzles
223 x 223 x 205 mm
2.85 mm
0.25 mm nozzle: 60 - 150 micron
0.4 mm nozzle: 20 - 200 micron
0.6 mm nozzle: 20 - 400 micron
0.8 mm nozzle: 20 - 600 micron
12.5, 12.5, 5 micron
30 - 300 mm/s
0.25 mm nozzle: < 8 mm³/s
0.4 mm nozzle: < 16 mm³/s
0.6 mm nozzle: < 23 mm³/s
0.8 mm nozzle: < 24 mm³/s
Heated glass build plate
20 - 100 ºC
Assisted leveling
PLA, ABS, Nylon, CPE, CPE+, PC, PP, TPU 95A
Included are 0.25, 0.4, 0.6 and 0.8 mm nozzles
180 - 260 ºC
~ 1 min
< 4 min (20 - > 60 ºC)
50 dBA
Standalone 3D printing from SD card (included)
342 x 357 x 388mm
342 x 493 x 588 mm
11,3 kg
18,5 kg
390 x 400 x 565 mm
100 - 240V / 50 - 60 Hz
221 W
15 - 32 ºC
0 - 32 ºC
Ultimaker Cura, our free print preparation software
MacOS, Windows, and Linux
SolidWorks, Siemens NX, Autodesk Inventor
Ultimaker Cura: STL, OBJ, X3D, 3MF, BMP, GIF, JPG, PNG
Printable formats: GCODE
Page 12

12
Unpack and install
the hardware
3
Carefully unpack your Ultimaker 2+ or
Ultimaker 2 Extended+ and set up the hardware
according to the instructions in this chapter.
Page 13
13
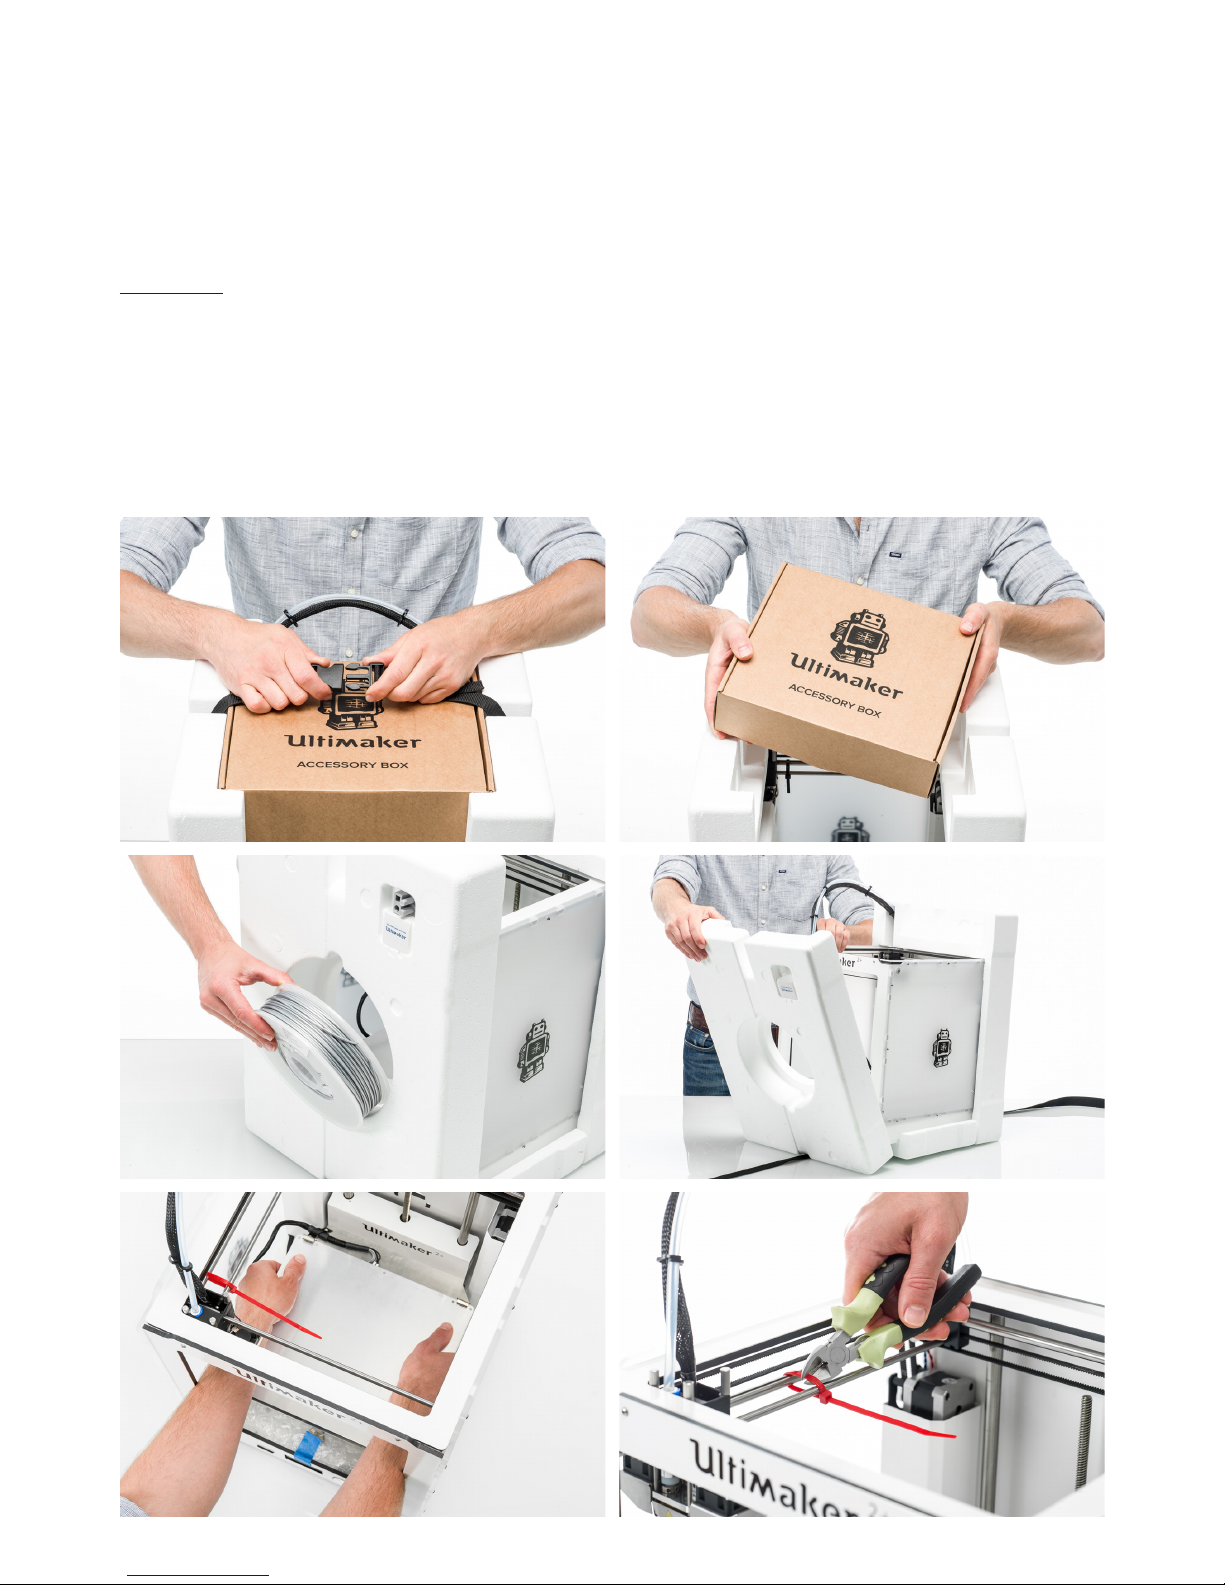
The Ultimaker comes in reusable, durable packaging, specially designed to protect your Ultimaker 2+.
Unpacking
Follow the steps below properly to unpack your Ultimaker 2+.
1. Take the Ultimaker 2+ out of the cardboard box.
2. Loosen the strap by opening the buckle.
3. Take out the accessory box.
4. Take the spool with PLA filament and factory test print out of the styrofoam.
5. Remove the styrofoam packaging, take the Ultimaker 2+ and place it on a flat surface.
6. Manually lift the build plate and remove the packaging material under the build plate.
7. Cut the zip tie that secures the print head.
Unboxing
Page 14

14
This in the box
The Ultimaker 2+ is supplied with several hardware accessories. Check if all these accessories are included before
continuing.
1. Material spool PLA (750 g)
2. Nozzle kit
3. Power adapter and cable
4. Glass plate
5. Calibration card
6. Hex wrenches (2 mm, 2.5 mm)
7. Spool holder
8. Glue stick
9. Magnalube (for lead screw Z motor)
10. USB cable (only for updating firmware)
5
3
4
2
9
10
8
1
6
7
Page 15

15
Installing the hardware accessories
Placing the spool holder
1. Take the spool holder and insert the top part into the hole in the back panel of the Ultimaker 2+.
2. Push the spool holder until it snaps into place.
Placing the glass plate
1. Open the two build plate clamps at the front of the build plate.
2. Gently slide the glass plate onto the build plate and ensure that it snaps into the build plate clamps at the back.
3. Close the two build plate clamps at the front to secure the glass plate.
Page 16

16
Connecting the power supply
1. Connect the power cable to the power adapter.
2. Plug the power cable into the wall socket.
3. Connect the other side of the power supply to the Ultimaker 2+. The flat side of the connector needs to face upwards.
Before you push the cable firmly into the socket, you have to pull the sliding mechanism back. When the cord is in the
printer you can let go to lock it into place.
Page 17

17
Set up for rst use
4
After installing the accessories, you have to set
up the printer for the first use. In this chapter you
find the steps to be taken for build plate leveling,
loading the material and installing Ultimaker Cura
software.
Page 18

18
Build plate leveling
To perform the setup steps, turn on the printer with the power switch at the back. The first run wizard appears on the
display. Rotate the button to navigate through the menus and press the button to confirm your selection.
Leveling the build plate
To get the correct distance between the build plate and the nozzle, you need to level the build plate. This must be done
before using the Ulitmaker 2+ for the first time and then periodically.
The first run wizard will automatically guide you through the steps to level the build plate:
1. Wait for the Ultimaker 2+ to do its homing procedure and continue when the print head is in the center at the back of
the build plate.
2. Rotate the button at the front until there is approximately 1 mm distance between the nozzle and the build plate. Make
sure that the nozzle is close to the build plate without touching it.
3. Adjust the front right and front left knurled nut to roughly level the build plate at the front side. Again there should be a
distance of approximately 1 mm between the nozzle and build plate.
4. Place the calibration card in between the nozzle and build plate when the print head is in the center back of the build
plate.
Do not push on the build plate while fine-tuning with the calibration card. This will lead to inaccuracies.
5. Adjust the knurled nut in the middle back until you feel slight friction when moving the card.
6. Press “Continue”. The print head moves to the second point.
7. Repeat step 5 “place the calibration card” and step 6 “adjust the build plate”.
8. Press “Continue” again. The print head moves to the third point.
9. Repeat step 5 “place the calibration card” and step 6 “adjust the build plate”.
You can always re-level the build plate by navigating to Maintenance g Build plate.
Page 19

19
Loading material
Before you can start printing on the Ultimaker 2+, you need to load material into the printer. For the first use it is
recommended to use the spool of PLA that came with the Ultimaker 2+.
Loading the material
Take the following steps to load the material:
1. Place the spool with the material on the spool holder. Make sure to put it with the material in counter-clockwise
direction, so that the material can enter the feeder from the bottom.
2. Wait for the Ultimaker 2+ to heat up the nozzle.
3. Insert the material into the feeder and gently push it until the material is grabbed by the feeder and is visible in the
Bowden tube. Select confirm to continue.
Straighten the end of the material a bit so it can easily enter the feeder.
4. Confirm when the new material extrudes from the nozzle.
Page 20

20
Installing Ultimaker Cura
For the Ultimaker 2+, we recommend our free slicer software Ultimaker Cura to prepare your 3D print files. Ultimaker Cura
can accurately convert 3D models into 3D print files and preview the objects you want to print.
System requirements
Accepted platforms
• Windows Vista or higher (64 bit)
• Mac OSX 10.7 or higher (64 bit)
• Linux Ubuntu 14.04, Fedora 23, OpenSuse 13.2, ArchLinux or higher (64 bit)
For Windows 32 bit is supported until Ultimaker Cura 2.3.
System requirements
• OpenGL 2 compatible graphics chip
• Intel Core 2 or AMD Athlon 64 or newer
• At least 4Gb of RAM (8Gb or more is recommended)
Compatible file types
• STL
• OBJ
• 3MF
Installation
The Ultimaker Cura software can be found at www.ultimaker.com/software. After downloading, open the installer and run
the installation wizard to complete the installation. When opening Ultimaker Cura for the first time, you will be asked to
select your 3D printer, the Ultimaker 2+. No other configuration is required and you can directly start using Ultimaker Cura.
Page 21

21
Operation
5
After installation, it is time to start printing
with your Ultimaker 2+. This chapter provides
information about the display, using Ultimaker
Cura, starting a print, materials that can be used,
changing and calibrating the print cores and
calibrating the build plate.
Page 22

22
Control and display
Control
After switching the Ultimaker 2+ on with the power switch at the back, the printer can easily be controlled with the
push/rotate button at the right side of the display. The button allows the following actions:
• Rotate to scroll through a menu or to select an option.
• Push to confirm a selection or action.
When pushing the button you will hear a “beeping” sound to confirm the action. A blinking button means the Ultimaker 2+
is waiting for user input.
Display and menus
The display at the front side of the Ultimaker 2+ shows all the necessary information for setting up and using your
Ultimaker 2+. When turning on the Ultimaker 2+ for the first time you will be guided through the first run wizard. When
turning on your Ultimaker 2+ after the first use, you will always see the Ultimaker logo first after which the main menu
appears. The main menu offers three options: Print, Material and Maintenance.
Print
The Print menu allows you to select a print, when using an SD card. While printing, the menu also allows you to tune the
print, and change the settings for instance.
Material
With the Material menu you can either change the material or change the settings of the material profiles.
Maintenance
The Maintenance menu offers various options. In this menu you will find the option to level the build plate and an
Advanced menu with options to control the build plate, print head and LED lights in the frame.
These are the options in the Advanced menu:
• LED settings Change the settings of the LED lights in the frame
• Heatup nozzle Set custom temperature to manually heat up the nozzle
• Heatup buildplate Set a custom temperature to manually heat up the heated bed
• Home head Homes the head in the left back corner of the Ultimaker 2+
• Lower buildplate Move the build plate to the bottom
• Raise buildplate Move the build plate up
• Insert material Heat up the nozzle after which you can insert filament
• Move material Use the button to manually forward the material
• Set fan speed Set the speed of the two fans at the sides of the print head
• Retraction settings Customize the settings for retraction
• Version Shows the current firmware version on the Ultimaker 2+
• Runtime stats Shows for how much time the Ultimaker 2+ has been on and printing
• Factory reset A complete reset of your Ultimaker 2+
Page 23

23
Materials
Compatible materials
The Ultimaker 2+ comes with one spool of PLA material, but does support the use of various materials.
The following Ultimaker materials are officially supported on the Ultimaker 2+:
• PLA
• ABS
• Nylon
• CPE
• CPE+
• PC
• PP
• TPU 95A
Although the Ultimaker 2+ has an open material system, the use of Ultimaker material on the printer is recommended. All
Ultimaker materials have been tested extensively and have optimized profiles in Ultimaker Cura to ensure the best print
result.
How to print
Each material requires different settings for optimal results. For detailed information on how to print with Ultimaker
materials it is recommended to take a look at the material guides on the Ultimaker website.
For all materials that are supported on the Ultimaker 2+ it is recommended to apply an adhesive the glass plate before
starting a print. In the accessory box of the Ultimaker 2+ is a glue stick, of which a thin layer should be applied to the glass
plate. This will not only enhance good adhesion, but it will also work as a protective layer for the glass plate. The prefered
adhesion method for CPE+ and PC is an adhesion sheet, which is part of the Advanced 3D Printing Kit. Alternatively you
can also use glue for these materials.
Furthermore, it is advised to print all materials with a ‘brim’ or ‘raft’ as platform adhesion type. A brim will print some extra
lines of plastic around the object on the first layer to let the model adhere well and to minimize warping. A raft will put a
grid structure between the print and build plate that allows or better adhesion. These settings are selected by default in all
the Ultimaker Cura profiles for the materials on the Ultimaker 2+.
Page 24

24
Interface
After you have added the Ultimaker 2+ in Ultimaker Cura, the main interface will become visible. Here is an overview of the
interface.
Slicing the model
To slice a model for the Ultimaker 2+, take the steps described below.
1. Load the model into Ultimaker Cura by clicking the “Open File” folder icon (top left corner).
2. Use the Adjustment Tools to position, scale and rotate the object if desired.
3. In the Sidebar, select the nozzle size and material you want to use. Make sure it matches the setup on the printer.
4. Select a profile on the Sidebar.
5. Select “Helper Parts” on the Sidebar. Set the desired strength and enable or disable support and build plate adhesion.
6. To view the result of the selected profile and support settings, go to the “View mode” and select “Layers”.
7. In the bottom right corner, select “Save file” or “Save to SD card” to save the print file.
For more instructions on how to use Ultimaker Cura take a look at the Ultimaker Cura manual on our website.
Preparing a print with Ultimaker Cura
Page 25

25
Starting a print
Printing from the SD card
Prints on the Ultimaker 2+ are started from the SD card. To start a print, take the following steps:
1. Place the SD card in your computer.
2. Slice your 3D model in Ultimaker Cura. Ensure that the nozzle size and material configuration in Ultimaker Cura match
the configuration on your Ultimaker 2+.
3. Save the print file (.gcode) via the “Save to removable drive” button to the SD card.
4. Eject the SD card in Ultimaker Cura and remove it from your computer.
5. Place the SD card in the SD card slot on Ultimaker 2+.
6. Go to “Print” and select the file you want to print.
Page 26

26
Removing the print
Once your 3D print is finished it must be removed from the build plate. There are several methods to use, depending on
how the print is adhered to the build plate.
Wait for cool down
If you printed directly on the glass plate without using an adhesive and if the build plate was not leveled too tight, the print
may easily be removed once it is cool. Simply allow the build plate and the print to cool down after printing. The material
will contract as it cools and you can easily remove the print from the build plate.
Use a spatula
If your print doesn’t remove from the build plate after cooling, you will need to apply a small amount of force to remove
the print. This can be done with a spatula. Place the spatula under the print and apply a small amount of force to remove
the print.
Use water
If neither of these methods works, remove your print using water. Remove the glass plate and print from the Ultimaker 2+.
Be careful not to burn your fingers if the glass plate is still warm. Run cool tap water on the back side of the plate to cool
quickly. The print material will contract more than with normal cool down. Once cool, the print can be popped off.
If glue was used on the glass plate, run lukewarm water over the print side of the plate to dissolve the glue. Once the glue
is dissolved, it is easier to remove the print.
Page 27

27
Changing the material and nozzle
Changing material
Materials can be changed easily on the Ultimaker 2+ by using the procedure from the menu.
1. Go to the menu Material g Change.
2. Wait for the nozzle to heat up and reverse the material.
3. Remove the material from the feeder and spool holder.
4. Place the new material spool on the spool holder. Make sure to put it with the material in counter-clockwise direction,
so that the material can enter the feeder from the bottom. Straighten the material a bit so it can easily enter the feeder.
5. Insert the material into the feeder and push it until the feeder grabs it and the material is visible in the Bowden tube.
Confirm to continue.
The Ultimaker 2+ will now automatically load the filament through the Bowden tube into the print head.
6. Confirm when the new material extrudes from the nozzle.
Changing the nozzle
A Nozzle Kit is supplied with the Ultimaker 2+. This kit contains three nozzle sizes (0.25 mm, 0.6 mm and 0.8 mm) and tools
to change the nozzle. The 0.4 mm nozzle is already installed on the Ultimaker 2+.
Removing the current nozzle
1. Go to Material g Change to remove the material from the Ultimaker 2+.
2. Clean the nozzle by performing the Atomic Method. See page 44 for instructions.
This minimizes the amount of leftover plastic that is locking down the nozzle and makes removal easier. It also
cleans out that nozzle prior to storage, ensuring that no filament residue remains in the nozzle that may affect
future prints.
3. Leave the temperature set to the last temperature that was used for pulling out the filament during the Atomic Method.
4. Use the wrench to unscrew the nozzle from the heater block. To unscrew it, you have to turn it counter-clockwise.
Be careful, the nozzle is hot.
Installing the new nozzle
1. Select the desired nozzle and screw it manually into the heater block until hand-tight.
Be careful, the heater block is still warm.
2. Use the wrench to tighten the nozzle completely. Turn it clockwise and do not use too much force to avoid damage.
Setting up in Ultimaker Cura
Before being able to print with the newly installed nozzle, the setting in Ultimaker Cura needs to be changed. Select the
correct nozzle size from the list in Ultimaker Cura, next to Nozzle & Material.
Page 28

28
Maintenance
6
In order to have a smoothly working
Ultimaker 2+ it is important to maintain it correctly.
In this chapter the most important maintenance
tips are described. Read them carefully in order
to achieve the best results with your Ultimaker 2+.
Page 29

29
Update the rmware
Periodically, a new version of the Ultimaker 2+ firmware is released. To ensure that your Ultimaker 2+ is equipped with the
latest features it is recommended to update the firmware regularly.
Updating via USB
Firmware can be updated via the USB cable by taking the following the steps:
1. Connect the Ultimaker 2+ to your computer with the USB cable.
2. Turn the Ultimaker 2+ on.
3. Start Ultimaker Cura and go to Settings g Printer g Manage printers and select “Upgrade Firmware”. Ultimaker Cura
will now upload the latest firmware to the Ultimaker 2+.
Make sure the Ultimaker 2+ is selected in Ultimaker Cura before installing the firmware.
Page 30

30
Build plate calibration
While using your Ultimaker it is necessary to periodically calibrate the build plate for good adhesion of the print to the
build plate. If the distance between the nozzle and build plate is too big, the print will not stick properly to the glass plate.
On the other hand, if the nozzle is too close to the build plate, it can prevent the material extruding from the nozzle.
To start the leveling procedure, navigate Maintenance g Build plate in the menu.
Take a look at page 18 “Build plate leveling” for detailed instructions on how to level the build plate.
Page 31

31
When you have multiple spools of material in use, or do not print with a material, it is very important that you store them
properly. If material is stored incorrectly, it may affect its quality and usability.
To keep your materials in optimal condition it is important that you keep them:
• Cool and dry
• Out of direct sunlight
• In a resealable bag
The optimal storage temperature for PLA, Nylon, CPE, CPE+, PC, PP, and TPU 95A is between -20 to +30° C. For ABS the
advised temperature is between 15 and 25° C. A relative humidity of below 50% is recommended for PP and TPU 95A. If
these materials are exposed to a higher humidity the quality of the material can be affected. You can store the material in a
resealable bag, including the supplied desiccant (silica gel).
Storage and handling of materials
Page 32

32
Hardware maintenance
To keep your Ultimaker 2+ in optimal condition we recommend the following maintenance schedule, based on 1,500
printing hours per year.
Every month Every 3 months Every year
Clean printer Check for play on axles Clean feeder and replace Bowden tube
Lubricate axles Check tension of short belts
Lubricate lead screw Z motor
Retighten hot-end isolator
If the usage frequency is higher, please increase the frequency of maintenance on your machine to maintain
optimal printing results.
The next pages describe how to perform these maintenance actions. More detailed instructions can be found on
ultimaker.com/mk2.
Additionally, you can purchase the Ultimaker 2+ Maintenance Kit. The Ultimaker 2+ Maintenance Kit contains the most
commonly used replacement parts for the Ultimaker 2+ or Ultimaker 2 Extended+ and can used as an overall maintenance
kit, or for spare parts.
Page 33

33
Clean the printer
For the best print results, it is important to keep the Ultimaker 2+ clean while using it. It is not advised to use the Ultimaker
2+ in a room where it can easily be covered with dust. It is also important to regularly remove small pieces of material that
might be in the printer. Some parts of the Ultimaker 2+ might require more regular cleaning.
Glass plate
After printing, there might be excess glue stuck to the glass plate, which can cause an uneven print surface. Alternatively,
removing a print may reduce the adhesion quality of the layer of glue. Therefore it is advised to regularly clean the glass
plate and re-apply glue.
Before starting a new print, always check the surface of the glass plate. At least once a month, clean the plate thoroughly
by following these steps:
1. Manually position the build plate at the bottom Ultimaker 2+.
2. Remove the glass plate from the build plate.
3. Clean the glass plate using lukewarm water and a sponge to remove any glue layers. If necessary, you can also use
some soap or detergent.
4. Dry the glass plate with a clean cloth.
5. Place the glass plate back onto the build plate and close the build plate clamps at the front to secure it in place.
Nozzle
While using the Ultimaker 2+, material can accumulate around the nozzle. Although this will not damage your printer, it is
recommended to try keeping the nozzle clean, in order to achieve the best print results.
Before starting a new print, always check the nozzle. At least once a month, remove the plastic from the outside of the
nozzle by taking the following steps:
1. Navigate to Maintenance g Advanced g Heatup nozzle and rotate the button to set the temperature to 150 °C.
2. When the nozzle is hot, carefully remove the material with tweezers.
Do not touch the nozzle and be careful while cleaning it as it will become hot.
Page 34

34
Feeder and Bowden tube
After extended use, or when material has been ground down by the feeder gears, small filament particles can accumulate
in the feeder. These can end up in the Bowden tube or nozzle, which can impact print quality.
Clean the feeder and Bowden tube at least once a month, or after experiencing an issue with filament grinding.
Clean the feeder
1. On the Ultimaker 2+, navigate to Material g Change. Remove the filament from the feeder and turn off the printer.
2. Blow into the feeder to get the filament particles out. If necessary, use an air compressor.
Clean the Bowden tube
If the particles are already stuck in the Bowden tube, clean these as well. To do so, the Bowden tubes have to be removed
from the printer.
1. On the Ultimaker 2+, navigate to Material g Change. Remove the filament from the feeder and turn off the printer.
2. Place the print head in the front-right corner and remove the clamp clips from the tube coupling collets at the print
head and feeder.
3. Press down on the tube coupling collet in the print head and pull the Bowden tube out. Repeat this for the feeder.
4. Cut off a small piece of sponge or roll a piece of tissue paper into a small ball. Insert it into the feeder end of the
Bowden tube and push it all the way through the tube with a length of filament.
5. Insert the Bowden tube into the feeder by pressing down on the tube coupling collet and pushing the Bowden tube all
the way in. Secure the Bowden tube with the clamp clip.
6. Insert the Bowden tube into the print head in the same way.
7. Let go of the tube coupling collet and gently pull the Bowden tube, along with the tube coupling collet, approximately
2 mm upwards. Hold the tube coupling collet up with your fingernail and push the Bowden tube down again.
8. Place the clamp clip around the tube coupling collet to secure the Bowden tube.
Page 35

35
Inside of the printer
Small pieces of material can gather inside the printer, including the initial extrusions. Remove these from the inside of the
printer with a cloth or vacuum cleaner. Pay extra attention to the area around the Z limit switch.
Leaving larger objects on the bottom panel can lead to errors, as they can obstruct the build plate when homing.
Page 36

36
Lubricate the axles
To make sure that your print head and Z stage are moving smoothly at all times, it is advised to periodically lubricate the
axles. If the axles feel dry, this can show in your prints as small ridges on the print’s surfaces. It is recommended to apply
lubrication to the axles at least once a month.
It is advised to use machine oil for lubricating the axles. This oil is specifically for the smooth axles of the Ultimaker 2+.
Only use machine oil, as using other oils or Magnalube may affect the coating of the axles, which will affect the
quality of your prints.
X and Y axles
Apply a small drop of machine oil to each of the X and Y axles as well as both print head shafts. Manually move the print
head around to evenly distribute the oil.
Do not apply too much oil to the axles. Doing so will increase the risk of oil dripping on to the glass plate, which
will affect build plate adhesion. If any oil drops fall on to the glass, make sure to clean them thoroughly.
Z axles
Apply a small drop of machine oil to the two Z axles. In the Ultimaker menu, go to Maintenance g Advanced. Select “Raise
build plate” and then “Lower build plate” to move the build plate up and down in order to evenly distribute the oil.
Page 37

37
Check for play on axles
The four X and Y axles are locked in place by pulleys. It is possible that one or more of the pulleys will loosen over time,
which can alter their position. If this is the case, there could be play on the X and/or Y axles which in turn will lead to issues
with print quality.
It is recommended to check for play on the axles at least once every three months.
Start with the right Y axle. Place the print head in the back-left corner to keep it out of the way. Hold the frame of the
Ultimaker 2+ with one hand and firmly grab the right Y axle with the other. Attempt to move the axle forwards and
backwards; do not be afraid to apply too much force.
Repeat this for the other axles; move the X axles side to side and the Y axles forwards and backwards. Make sure to move
the print head to the opposite side each time.
The axles should not move at all. If one of the axles does move, you can observe a ticking noise of the pulleys hitting the
frame. In this situation, it is recommended to calibrate the print head. Take a look at this page for instructions on how to
calibrate the print head.
Page 38

38
Check tension of short belts
Maintaining proper tension on the short belts is important to ensure good print quality. The short belts transfer the
movements of the X and Y motors to the print head. If the belts are too loose, the movements of the print head and the
dimensions of the final print may not be accurate.
Over time, the belts may become loose. It is recommended to check the tension of the short belts at least once every three
months.
Using your finger, pluck the two short belts to check their tension. They should slightly resonate, like a guitar string. It
should not be possible to press the belt against itself. Furthermore, the tension of the two belts should be equal.
Restoring the short belt tension
1. Use the 2 mm hex wrench to loosen the four bolts that hold the Y motor to the left panel. Do not remove the bolts loosen them enough so that the motor can slide up and down.
2. Firmly press down on the motor with one hand. This ensure maximum tension on the short belt.
3. While still pressing the motor down, tighten the four bolts of the Y motor in a cross pattern. First tighten the top-left
bolt, then the bottom-right, then the bottom-left and end with the top-right. This ensures that the motor is attached
straight.
4. Repeat the steps above for the X motor that is attached to the back panel. Afterwards, check the tension of both belts
again.
Page 39

39
Lubricate the lead screw of the Z motor
The lead screw is connected to the Z motor and controls the movements of the Z stage. To ensure smooth movement of
the Z stage, it is recommended to periodically apply Magnalube to the lead screw.
Over time, the Magnalube may need to be reapplied to maintain consistent and accurate movement of the Z stage. Do this
once every three months. A tube of Magnalube is included in the accessory box of the Ultimaker 2+.
Lubricate the lead screw
1. Make sure that the build plate is positioned at the bottom of the Ultimaker 2+.
2. Apply a small amount of Magnalube to the lead screw of the Z motor.
3. In the Ultimaker menu, navigate to Maintenance g Advanced.
4. Select “Raise build plate” and then “Lower build plate” to move the build plate up and down to evenly distribute the
Magnalube.
Page 40

40
Retighten the hot-end isolator
The hot-end isolator connects the separate parts of the hot-end. It is important that the hot-end isolator is properly screwed
onto the heater block to prevent any material from gathering between these parts. If material does gather between these
parts, it can lead to print quality issues or blockages.
It is recommended to re-tighten the hot-end isolator every three months to ensure the parts are connected securely.
1. On the Ultimaker 2+, navigate to Material g Change. Remove the filament and select “Cancel”.
2. Navigate to Maintenance g Advanced g Heatup nozzle and rotate the button to set the temperature to 150 °C.
3. Take the 2 mm hex wrench and insert it into one of the holes of the hot-end isolator. Turn the screwdriver clockwise to
tighten the hot-end isolator until it can’t turn any further.
4. Exit the “Heat up nozzle” screen and scroll down to “Insert filament.” Insert the filament in the feeder and load as
usual.
Page 41

41
Clean the feeder and replace the Bowden tube
Clean the feeder
The feeder forwards filament to the print head. To make sure that exactly the right amount of material is extruded, it is
important that the feeder gears are able to turn smoothly.
After many hours of printing, or when material has been ground down by the gears, there is a chance that there are small
filament particles in the feeder. In addition to blowing out the particles once a month, it is recommended to clean the
inside of the feeder after one year of printing. In order to do this, the feeder has to be removed from the printer.
It is also recommended to replace the Bowden tube after one year. While cleaning the feeder, follow the
instructions for replacing the Bowden tube simultaneously.
Detailed instructions for cleaning the inside of the feeder can be found on the Ultimaker website.
Replace the Bowden tube
The Bowden tube guides filament from the feeder to the print head.
Forwarding improperly cut or ground down filament through the Bowden tube could scratch or damage the inside of the
tube. If this happens, the filament can no longer be forwarded to the print head smoothly. This can lead to under-extrusion
or other print quality issues. Also, after removing the Bowden tube multiple times, for example for cleaning the tube or
nozzle, the section which is gripped by the tube coupling collet can wear out. If this happens, the tube coupling collet will
not have a firm hold on the Bowden tube, which will allow the Bowden tube to move during a print, which can negatively
impact print quality.
Before completely replacing the Bowden tube, it can help to cut a small section of approximately 2-3 mm from the end of
the Bowden tube. This allows the tube coupling collet to grip an undamaged part of the tube in order to keep it in place.
This only works for the print head side of the Bowden tube; make sure it is a straight cut. Avoid cutting the
Bowden tube more than once: a shorter length increases the stress on the tube and may impact print quality.
If the Bowden tube is permanently damaged, it will need to be replaced. The steps here describe how to correctly replace
the Bowden tube.
Page 42

42
Troubleshooting
7
There are a few printer specific issues that
could occur while using your Ultimaker 3.
In you run into one of these issues, you can
troubleshoot the issue yourself with the help
of the information on the next pages.
Page 43

43
Error messages
This is the complete list of error messages that can show up on the Ultimaker 3. For more information on troubleshooting
these error messages please go to the error specific page on the Ultimaker website.
Error - Stopped Temp Sensor
(ultimaker.com/ER01)
This refers to a problem with the PT100 B sensor, which is the sensor that
measures the temperature of the nozzle. It means that the sensor registers
incorrect values and due to safety reasons it will prevent the nozzle from heating
up. The most likely reason for this is connection problem, which could either
happen due to a bad connection at the main board or damage of the sensor itself.
Error - Stopped Temp Sensor BED
(ultimaker.com/ER02)
This error refers to a problem with the sensor of the heated bed. It means that
the sensor registers incorrect values and due to safety reasons it will prevent
the heated bed from heating up. The most likely reason for this is connection
problem, which could happen due to a bad connection on the heated bed or main
board, or damage of the sensor itself.
Error - Heater Error
(ultimaker.com/ER03)
The heater error can appear when the sensor doesn’t register a steady (increase
in) temperature. This could mean that the heater cartridge is not connected
properly and to prevent overheating of the nozzle it will therefore turn the heater
cartridge off.
Z-Switch Broken or Z-Switch Stuck
(ultimaker.com/ER05)
If you get one of these errors it means that there is a problem with the Z limit
switch. It either tells you that the Z limit switch can’t be pressed or that something
is preventing the lever of the switch from switching back.
X or Y Switch Broken
(ultimaker.com/ER07)
This error occurs when either the X or Y limit switch is not activated while the
print head is homing.
Page 44

44
Clogged nozzle
If there is no material flowing from the nozzle for at least 10 minutes it could suggest that there is some burnt material in
the nozzle, leading to a nozzle clog. In this case, the nozzle should be cleaned by performing the below described method.
Preparing
1. Remove the material from your Ultimaker by navigating to Material g Change. Select Cancel after you have removed
the material.
2. Place the print head in the front right corner to avoid bending of the XY axles when applying pressure to the material.
3. Remove the clamp clip from the top of the print head.
4. Remove the Bowden tube by pushing down on the tube coupling collet while pulling the Bowden tube upwards, out of
the print head.
Cold pull
1. Go to Maintenance g Advanced g Heatup nozzle and set the temperature to 260 °C.
2. Cut off approximately 20 cm of filament with a straight cut and try to straighten the material as much as possible.
3. When the nozzle reaches the target temperature of 260 °C insert the piece of filament into the print head until you feel
some resistance.
4. Hold the filament with pliers and gently apply pressure to extrude some material or until the filament cannot be
pushed any further.
The use of pliers is required to prevent injuries on your hands in case the material breaks.
5. Lower the temperature to 90 °C and maintain pressure on the filament until the nozzle reaches 150 °C.
The slight pressure on the material while cooling down is required to prevent air from entering the nozzle.
6. Release the filament and wait until the target temperature of 90 °C is reached.
7. Grab the filament with pliers and pull it out with a quick, firm pull.
Page 45

45
8. Take a look at the tip of the filament and compare it with the examples below. The goal is to have a clean, cone-shaped
tip. Repeat the cold pull steps until the filament comes out as clean as the tip at the bottom.
Reassembly
1. Reinsert Bowden tube into the print head, all the way down into the TFM coupler.
2. Secure the Bowden tube with the clamp clip. Keep pressure on the Bowden tube while attaching the clamp clip.
Page 46

46
Print quality issues
Print not sticking to the build plate
When you experience problems with the adhesion of a print to the build plate, the following things can be done:
• Ensure that the correct material settings and adhesion method were used (see chapter 5 Operation).
• Re-level the build plate to ensure the distance between the nozzle and build plate is correct (see chapter 4 Set up for
first use).
• Check the Ultimaker Cura settings that were used and try printing with one of the default Ultimaker Cura profiles.
Under-extrusion
In its simplest form, under-extrusion is when the printer is unable to supply the
right amount of material. Your Ultimaker 2+ is under extruding when you see
missing layers, very thin layers, or layers that have random dots and holes in
them.
Under-extrusion can have several causes:
• Use of low quality material or wrong material settings
• Feeder tension not set correctly
• Friction in the Bowden tube
• Small particles of material in the feeder or Bowden tube
• A partial clog in the nozzle
When your Ultimaker 2+ is suffering from under-extrusion, it is advised to take a
look at this page for detailed troubleshooting instructions.
Warping
Warping occurs due to material shrinkage whilst 3D printing, which causes the
corners of the print to lift and detach from the build plate. When plastics are
printed, they firstly expand slightly but contract as they cool down. If material
contracts too much, this causes the print to bend up from the build plate.
When your print is warping, make sure you have done the following:
• Level the build plate correctly
• Apply a thin layer of glue to the glass plate or use an adhesion sheet
• Use the correct temperature settings
• Use one of the default Ultimaker Cura profiles
To troubleshoot this issue in more detail, take a look at the Ultimaker website.
 Loading...