

Page 1

®
INSTALLATION GUIDE
3000 Series: Flange Kit Requirements and Instructions for Custom
36 inch and 90 cm Models
U-3000FLANGE-KIT-ICE U-3000FLANGE-KIT
ALL MODULAR 3000 MODELS ARE INTENDED FOR BUILT-IN INSTALLATIONS ONLY
The American Built-In Undercounter Leader Since 1962
U-LINE.COM
Page 2

DANGER
!
WARNING
!
CAUTION
!
1 Safety Precautions 2 Guide Coverage
Safety Alert Definitions
Throughout this guide are safety items labeled with a Danger,
Warning or Caution based on the risk type:
Danger means that failure to follow this safety statement will
result in severe personal injury or death.
Warning means that failure to follow this safety
statement could result in serious personal injury or
death.
Caution means that failure to follow this safety statement
may result in minor or moderate personal injury, property
or equipment damage.
This guide covers the following kits:
U-3000FLANGE-KIT
U-3000FLANGE-KIT-ICE
NOTICE
U-3000FLANGE-KIT is required when pairing (1) lefthand and (1) right-hand 3018/3045 units OTHER THAN a
3018CLR/3045CLR.
U-3000FLANGE-KIT-ICE is required when paring (1) lefthand 3018/3045 unit with (1) right-hand 3018CLR/
3045CLR.
Note: Use of the U-3000FLANGE-KIT-ICE requires that the 3018/
3045 Ice Machine MUST be a right-hand door swing (-00 model)
and installed on the right side only.
u-line.com 1
Page 3

CAUTION
!
3 Remove the Door and Frame
A
B
Cord Catcher
Barbed Push
Rivet
Grille and Hardware Removal:
1. Loosen (2) 7/64" Allen wrench screws from the grille.
Figure 1 Grille Screw Locations
2. Slide grille forward, pushing tabs in, to remove grille.
3. Pull down on the cord catcher to remove both the catcher and
its barbed push rivet.
Figure 2 Grille Removal
To avoid damage to the cord catcher, use care when
removing.
2 u-line.com
Figure 3 Pulling Down on the Cord Catcher
Page 4
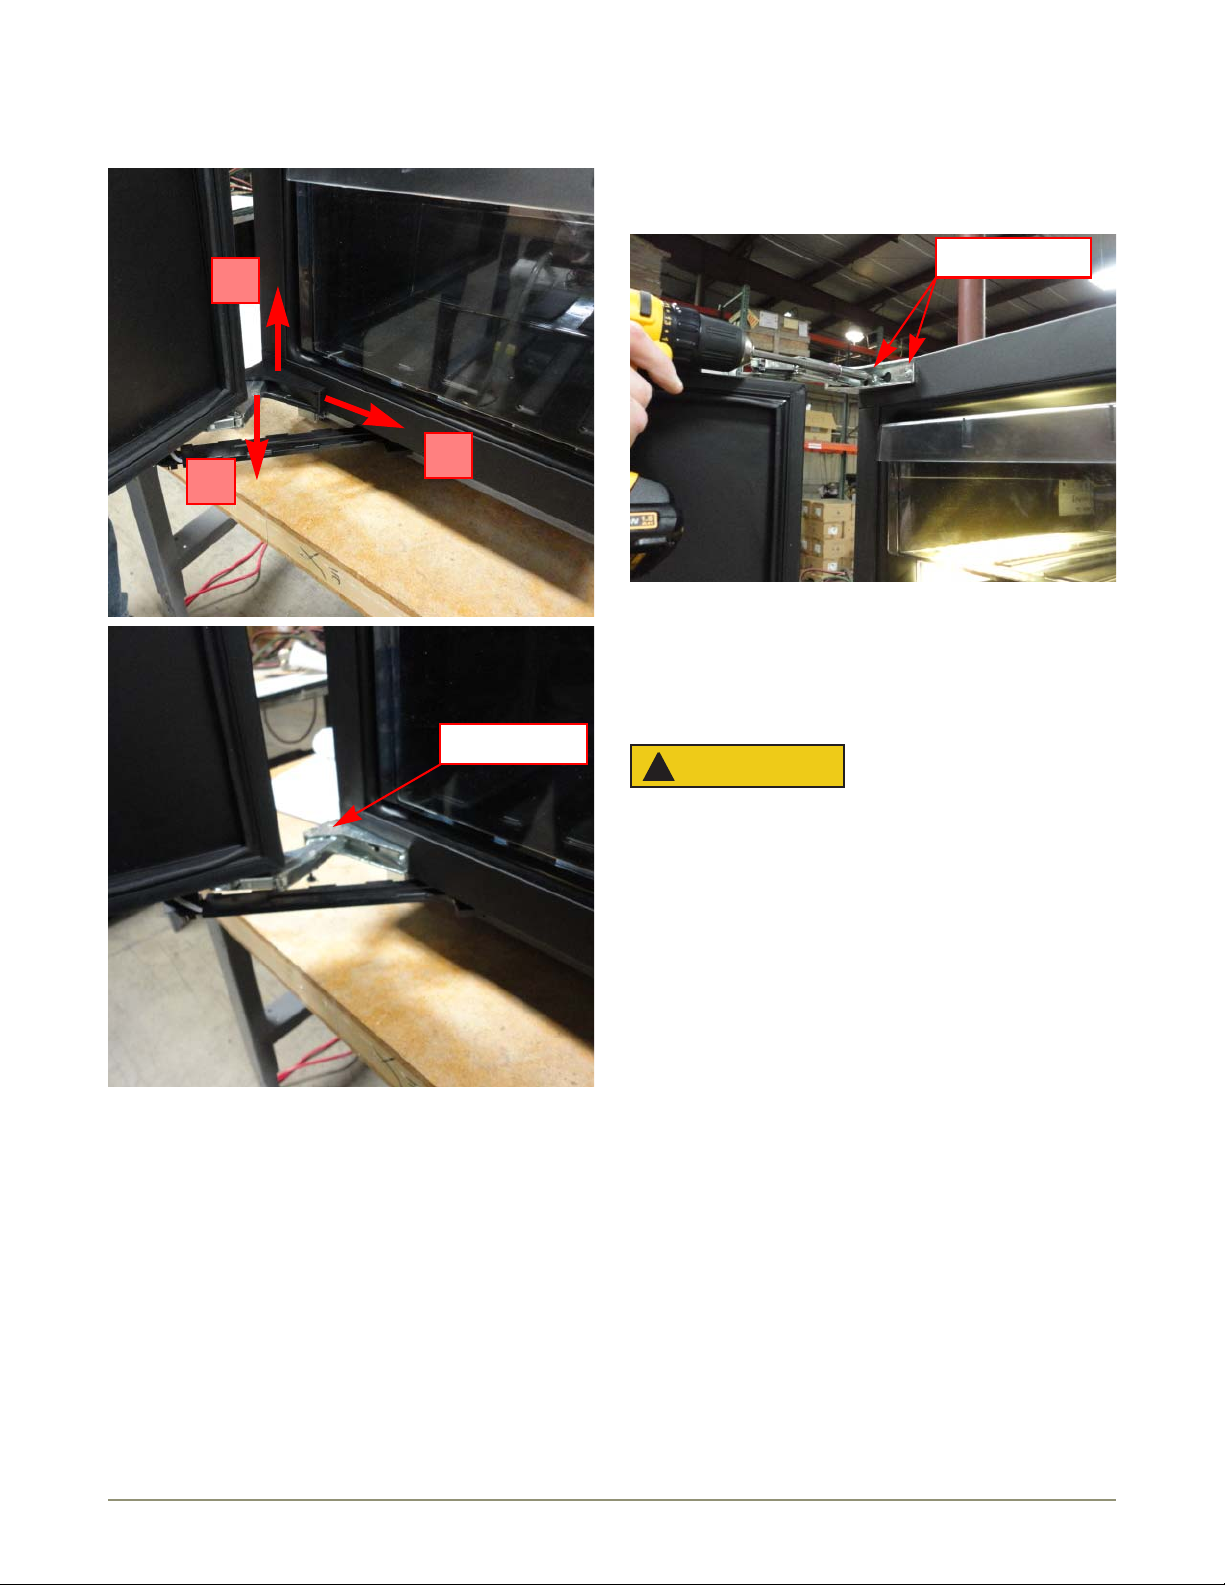
4. Remove (2) hinge covers. Pushing top tab upward and bottom
A
B
C
Bare Hinge
Hinge Screws (2)
tab downward, slide the cover off the hinge.
Door Removal:
1. Loosen, but do not remove, the slotted hinge screw with a
T-25 Torx. (Slotted hinge screw is located closest to the unit
exterior.) Repeat for other hinge.
Figure 5 Removing Hinge Screws
2. Remove the non-slotted screw completely. (The non-slotted
screw is located closest to the unit interior.) Repeat for other
hinge.
3. Slide door so slotted hinges disengage.
CAUTION
!
To avoid damage to the unit, place the door near the unit.
The door is connected to the unit with a cord. Use care
when moving.
4. Place door by unit.
5. Completely remove (2) previously loosened slotted screws.
Figure 4 Hinge Cover Removal
u-line.com 3
Page 5
Middle Panel Removal
Cover Screws (2)
Rivets (4)
(U-3000FRAME-KIT-ICE ONLY):
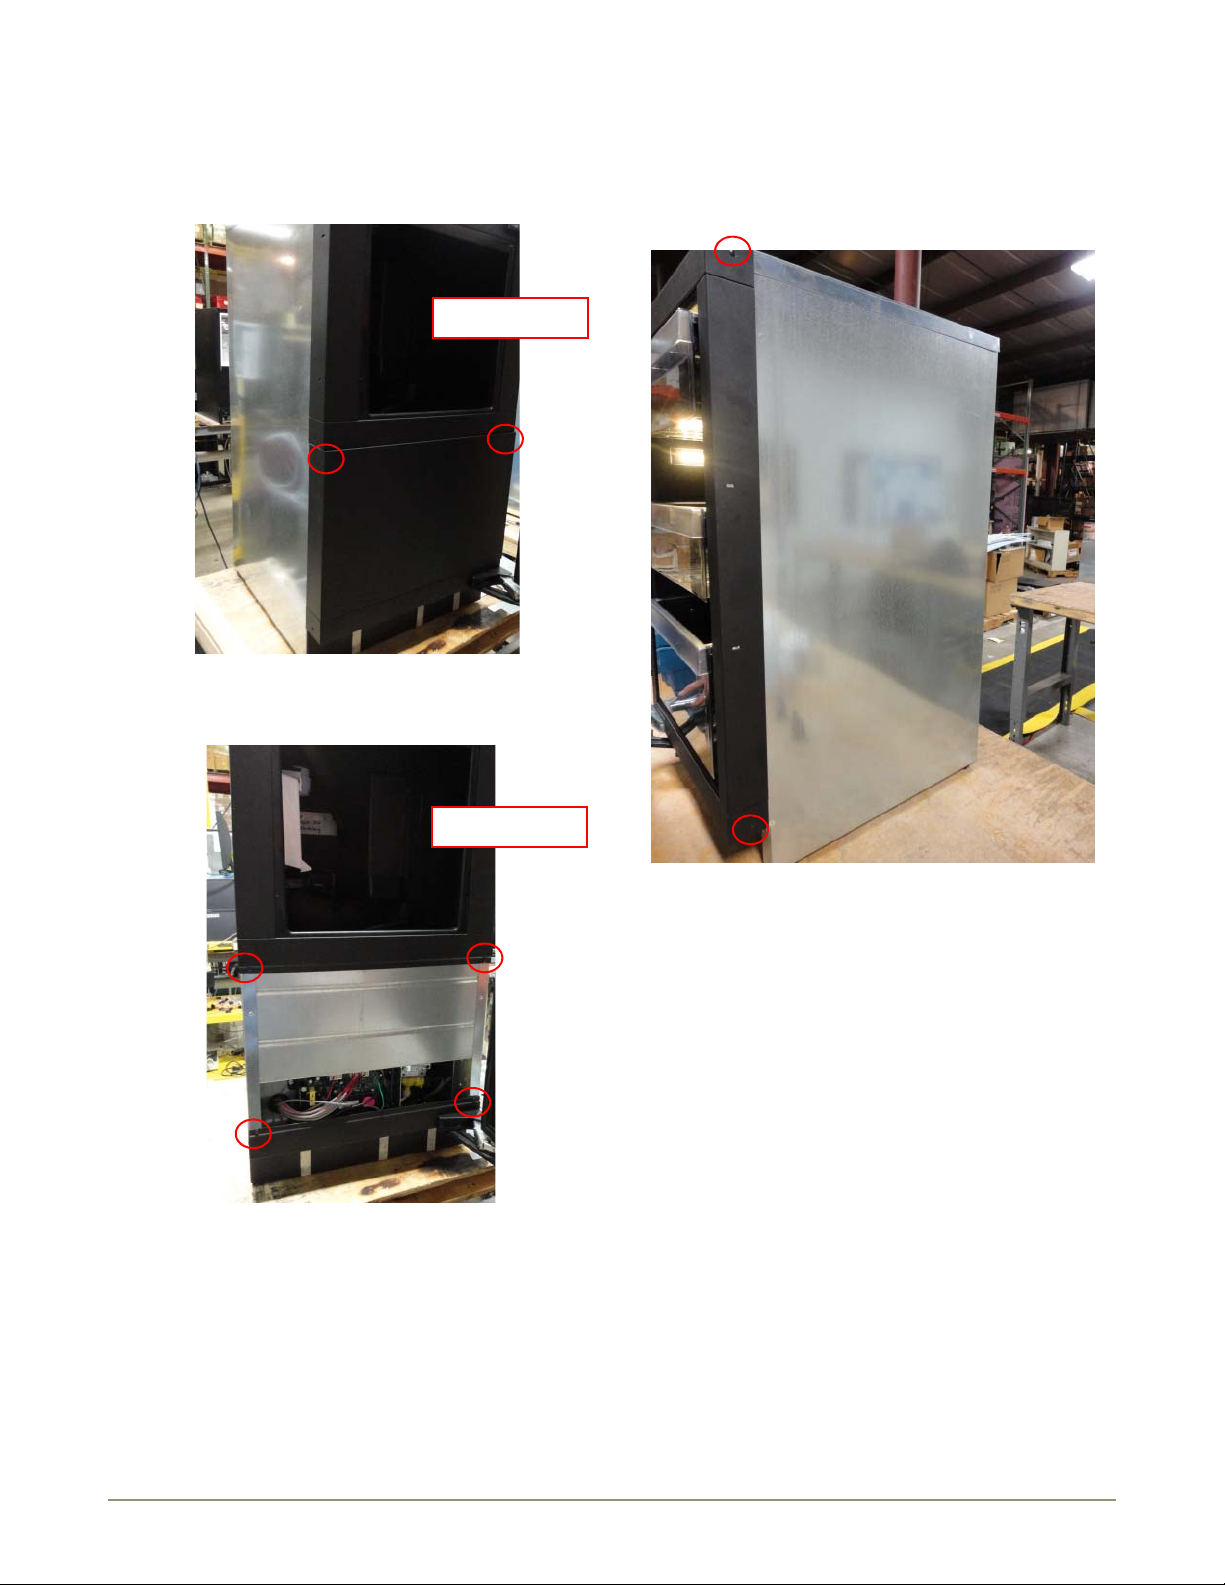
1. Remove (2) cover screws.
Figure 6 Middle Panel Cover Screw Locations
Frame Removal:
1. Drill out (2) rivets on opposite side from the hinge, which hold
the frame on. NOTE: Clear Ice unit will only have (1) rivet on
top flange.
2. Drill out (4) rivets with #30 (0.1285") drill bit.
Figure 7 Middle Panel Rivet Locations
3. Remove panel by pulling forward.
Figure 8 Frame Rivet Locations
2. Remove frame by pulling forward.
3. Use these same instructions (3 – Remove the Door and Frame
2
starting on page
unit.
) to remove the door and frame of the other
4 u-line.com
Page 6
CAUTION
!
4 Install the 36" (90 cm) Frame
“L” Shaped bracket
Adhesive tape
Positioning the Units:
Use caution when moving and handling the units. Use
gloves to prevent personal injury from sharp edges.
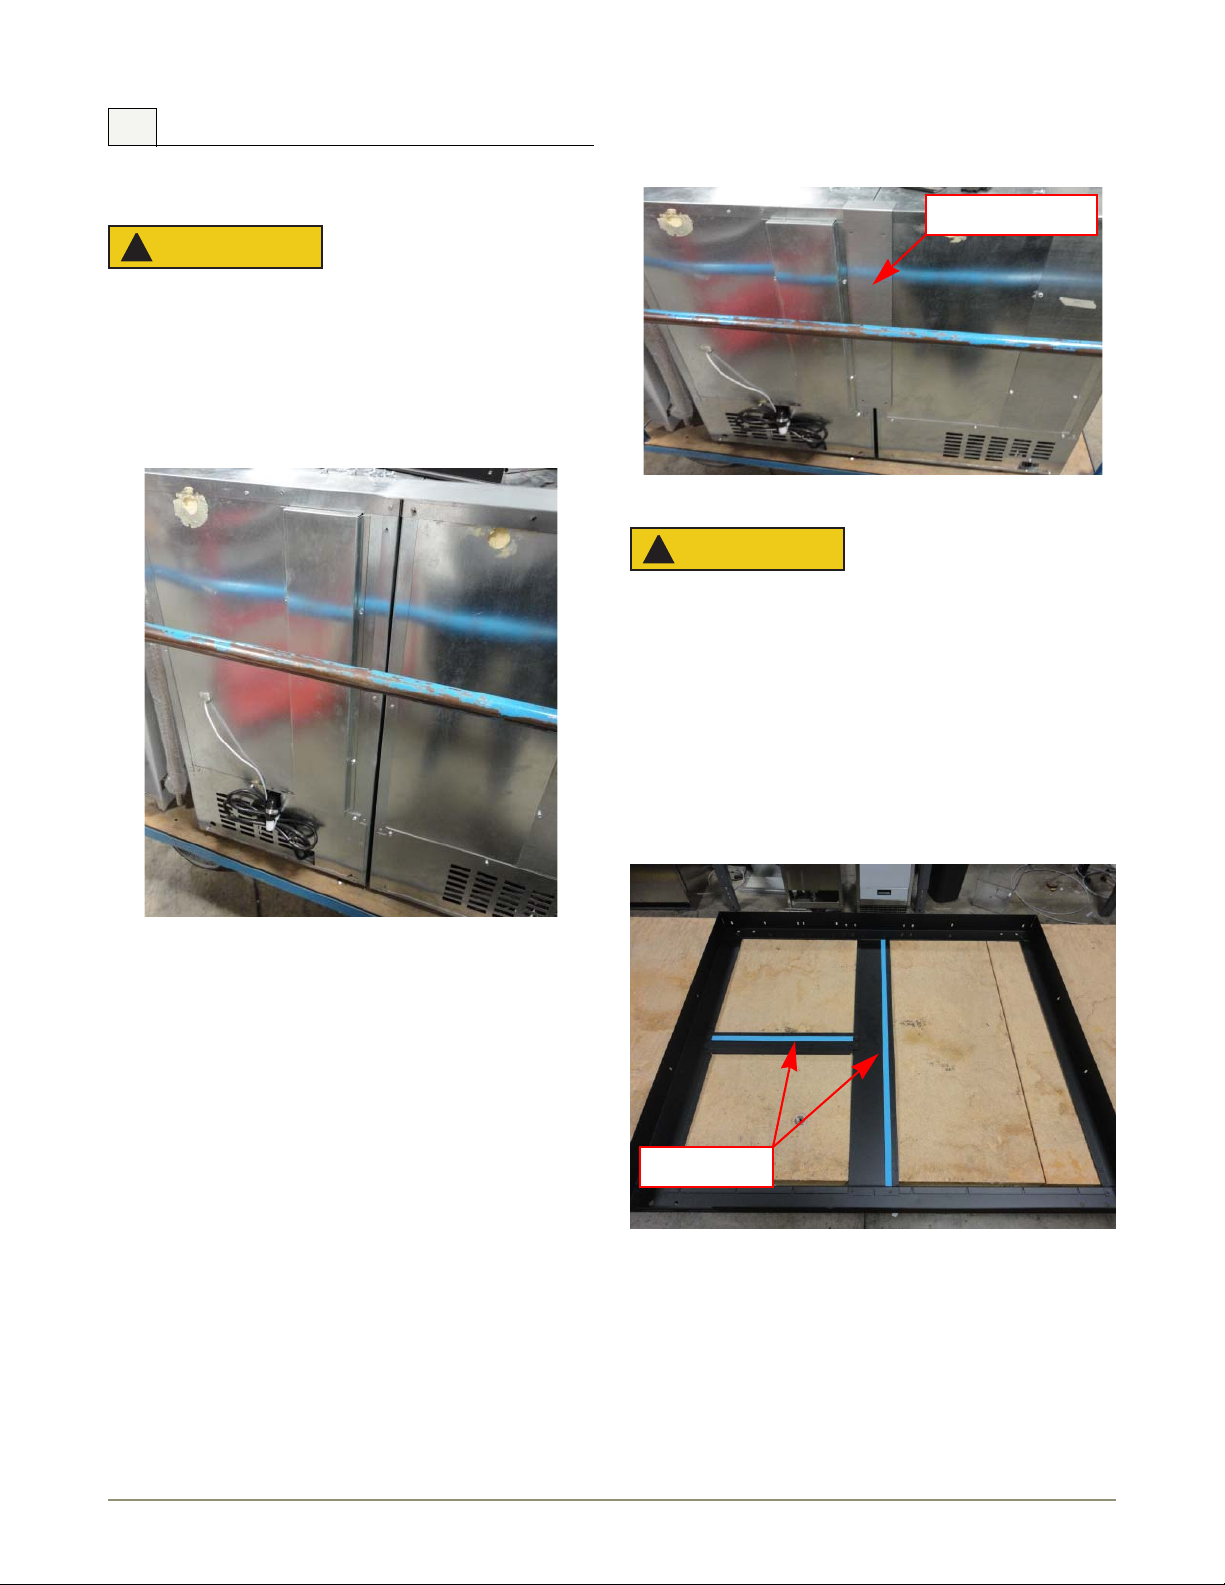
1. Place units side-by-side on a flat/level surface with leveling feet
retracted completely.
2. Ensure mating sides of the units are flush, and adjust feet to
maintain a constant gap between the units. NOTE: Use of a bar
clamp is recommended for best alignment.
Installing “L”-Shaped Bracket:
1. Place steel bracket on units.
Figure 10 “L”-Shaped Bracket Placement
CAUTION
!
When drilling holes for the bracket, do not exceed the
maximum drill depth of 1/2" (12.7 mm).
2. Using the bracket as a template, drill (6) holes with a #30 drill
bit.
3. Install (6) Phillips sheet-metal screws supplied.
Figure 9 Units Placed Side-by-Side
Preparing the Surfaces:
1. Wipe down unit to remove any grease that may prevent the
double sided tape (pre-installed) to adhere.
2. Peel back adhesive tape backing from Flange Kit.
Figure 11 Adhesive Tape
(U-3000FLANGE-KIT-ICE shown)
u-line.com 5
Page 7
Frame Installation:
CAUTION
!
Screws (2)
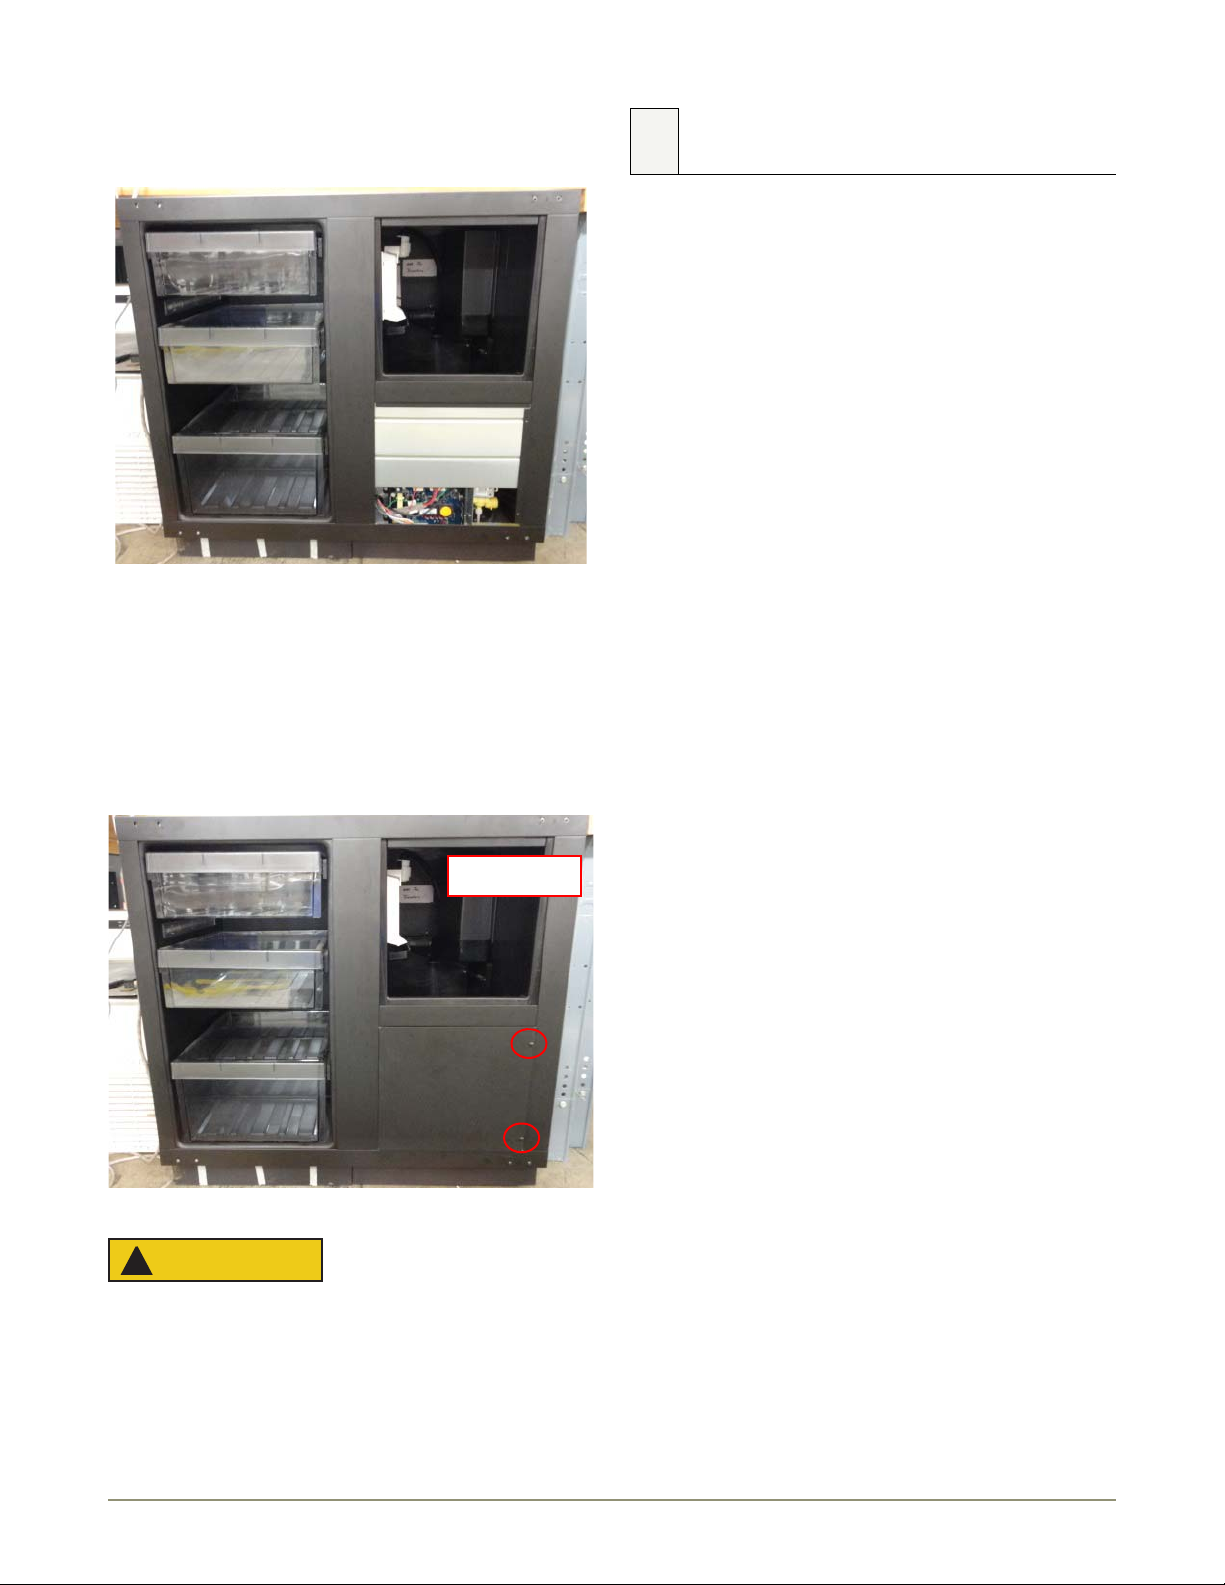
1. Rest the top of the frame on the (2) units. Align as required.
Figure 12 Sliding the Frame into Place
2. Slide the frame into place, working your way down.
3. Visually inspect the unit. Ensure the liner and the frame are flush
with one another.
Front Panel Installation
(U-3000FLANGE-KIT-ICE ONLY):
1. Locate (2) holes in the front of the frame.
5 Reinstall the Door, Hardware and
Grille
Door Installation:
1. For the left door, install the (2) slotted hinge screws leaving
approximately a 5/32" (4 mm) gap between the frame and the
screw head.
2. Slide door so slotted hinges engage.
3. Install the (2) non-slotted hinge screws completely.
4. Tighten the (2) slotted hinge screws.
5. Repeat procedure for the right door.
6. Ensure proper alignment, fit and function.
Hardware Installation:
1. Install hinge covers. Slide cover onto the hinges, pinching the
top and bottom tabs together. A click can be heard when
seated properly.
2. Push the cord catchers and their barbed push rivets into place
using the supplied fasteners.
3. Ensure magnet/reed-switch alignment for doors.
Grille Installation:
1. Install front grilles. Pushing tabs in, slide each grille into its unit.
2. Tighten (2) 7/64" Allen wrench screws into each grille.
Figure 13 Front Panel Screw Locations
When drilling holes for front panel, do not exceed the
maximum drill depth of 1/2" (12.7 mm).
2. Using the located holes as a template, drill (2) holes with a #30
drill bit.
3. Slide tongue (left side) of panel under the new frame and align
stamped holes with drilled holes.
4. Install (2) Phillips sheet-metal screws supplied.
6 u-line.com
Page 8

®
INSTALLATION GUIDE
PRODUCT INFORMATION
Complete Installation Guides, Use and Care Guides, Specifications & Features and Benefits, CAD Drawings,
Overlay Panel/Frame and Toe-Kick Specifications and Instructions, Compliance Documentation and Applicable
Energy Guides are available for reference and download at u-line.com.
SERVICE INFORMATION
Please consult your Use and Care Guide for troubleshooting information. Answers to Customer Frequently Asked
Questions are available at u-line.com under Customer Service. You may contact U-Line directly:
GENERAL INQUIRIES:
U-Line Corporation
P.O. Box 245040
Milwaukee, Wisconsin 53224-9540 U.S.A.
Phone 1-414-354-0300
FAX 1-414-354-7905
Email: [email protected]
u-line.com
SERVICE ASSISTANCE:
Phone 1-800-779-2547
FAX 1-414-354-5696
Email: [email protected]
u-lineservice.com
PARTS ASSISTANCE:
E-mail: [email protected]
BUILDING ON THREE GENERATIONS OF INNOVATION
For over five decades and through three generations, U-Line continues to be the leader in innovation, quality and
performance in the premium built-in undercounter ice making, refrigeration and wine preservation market. U-Line
has captivated those with an appreciation for the finer things with exceptional functionality, style, inspired
innovation and attention to even the smallest details. We are known and respected for our unwavering dedication
to product design, quality and selection.
In 1962, Henry Uihlein founded U-Line Corporation as an outgrowth of Ben-Hur Freezer Company and was the first
to develop and patent an automatic stand-alone undercounter residential ice maker. His foresight and determination
to develop new ideas and to succeed when there were no clear guidelines or solutions are evident today. The newest
Uihlein generation continues to build upon the family’s innovative legacy at the Milwaukee, Wisconsin based business
by providing continuity and vision from which new designs and technology continue to be born.
Today the complete U-Line product collection includes Ice Makers, Ice Machines, Wine Captain® Models, Combo®
Models, Refrigerator / Freezers, Refrigerators, Drawer Models and Beverage Centers. The U-Line brand offers
products in the 1000 Series, 2000 Series and the Modular 3000 Series. The 1000 Series offers a more targeted
priced product with appropriate features, while the 2000 Series offers upscale features, advanced technology and
specialized product families. Our Modular 3000 Series provides sleek design and versatile temperature settings with
our U-Select® control. U-Line’s approach to its breadth of products, multiple price points and features allows a
choice and product that will fit any lifestyle.
DESIGNED, ENGINEERED AND ASSEMBLED IN WISCONSIN, USA
The American Built-In Undercounter Leader Since 1962
U-LINE.COM
Publication Number 30402 04/2013 Rev.B
©2013 U-Line Corporation
 Loading...