

Page 1
π H-2603, H-2604
SHOP-VAC
®
WET/DRY
VACUUM
1-800-295- 5510
uline.com
Para Español, vea páginas 9-17.
Pour le français, consulter les pages 18-25.
IMPORTANT SAFETY INSTRUCTIONS
ATTENTION: Read all safety rules carefully
before attempting to operate. Retain for future
reference.
CAUTION: Never operate this unit when
flammable materials or vapors are present
because electrical devices produce arcs
or sparks that can cause a fire or explosion.
NEVER OPERATE UNATTENDED.
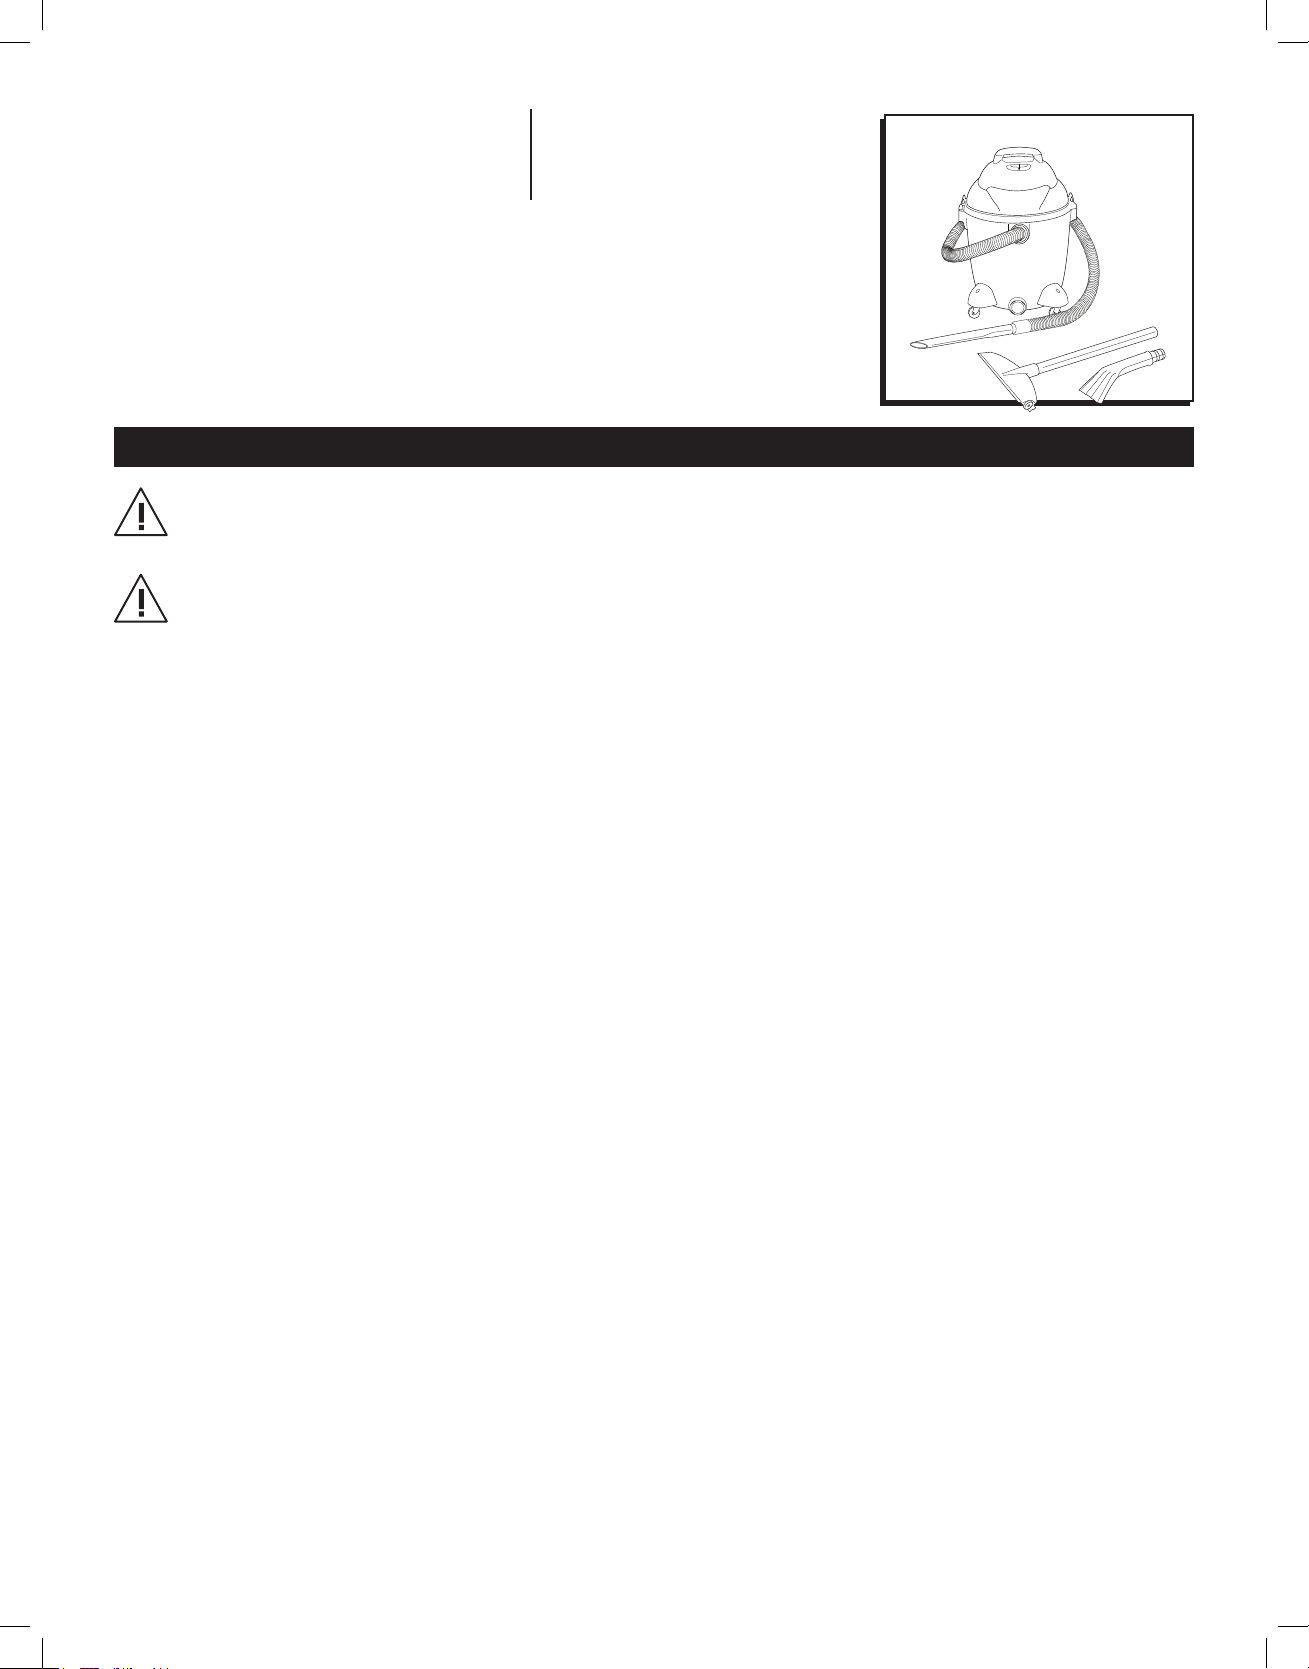
H-2603 AND H-2604 SHOP VACS
The Shop-Vac® Wet/Dry vacuum cleaners are for
vacuuming wet and dry nonvolatile materials. Equipped
with powerful, permanently lubricated motors and
standard filtration systems. Double filtration is available
for most Shop-Vac® models and is standard on ShopVac® commercial vacuums. Equipped with easy roll
caster system. Automatic float shut off prevents overflow
during wet pick-up. Includes versatile 1½" (3.81cm)
diameter accessories and rugged dent resistant
polypropylene tank. UL listed.
TO REDUCE THE RISK OF FIRE, ELECTRIC SHOCK
OR INJURY:
1. Do not leave appliance unattended when plugged
in. Unplug from outlet when not in use and before
servicing. Connect to a properly grounded outlet
only. See Grounding Instructions on page 2.
2. Do not expose to rain—store indoors.
3. Do not allow to be used as a toy. Close attention is
necessary when used by or near children.
4. Use only as described in these instructions. Use only
manufacturer's recommended attachments.
5. Do not use with damaged cord or plug. If appliance
is not working as it should, has been dropped,
damaged, left outdoors or dropped into water,
contact Uline Customer Service for assistance.
6. Do not: Pull or carry by cord, use cord as a handle,
close a door on cord, pull cord around sharp edges
or corners or run appliance over cord.
PAGE 1 OF 25 0115 IH -2603
7. Keep cord away from heated surfaces.
8. Do not unplug by pulling on cord. To unplug, grasp
the plug, not the cord.
9. Do not handle plug or appliance with wet hands.
10. Do not put any object into openings. Do not use with
any openings blocked; keep free of dust, lint, hair
and anything that may reduce air flow.
11. Keep hair, loose clothing, fingers and all parts of
body away from openings and moving parts.
12. Do not pick up anything that is burning or smoking,
such as cigarettes, matches or hot ashes.
13. Do not use without dust bag and/or filters in place.
14. Turn off all controls before unplugging.
15. Use extra care when cleaning on stairs.
16. Do not use to pick up flammable or combustible
liquids, such as gasoline, or use in areas where they
may be present.
17. Do not use as a sprayer of flammable liquids such as
oil-base paints, lacquers, household cleaners, etc.
18. Do not vacuum toxic, carcinogenic, combustible or
other hazardous materials such as asbestos, arsenic,
barium, beryllium, lead, pesticides or other healthendangering materials. Specially designed units are
available for these purposes.
19. Do not pick up soot, cement, plaster or drywall dust
without cartridge filter and collection filter bag in
place. These are very fine particles that may pass
through the foam and affect the performance of the
motor or be exhausted back into the air. Additional
collection filter bags are available.
20. Do not leave the cord lying on the floor after
cleaning. It can become a tripping hazard.
21. Use special care when emptying heavily loaded tanks.
22. To avoid spontaneous combustion, empty tank after
each use.
IH-2603-SPFR.indd 1 9/16/19 2:47 PM
Page 2
23. The operation of a utility vac can result in foreign
objects being blown into eyes, which can result in
eye damage. Always wear safety goggles when
operating vacuum.
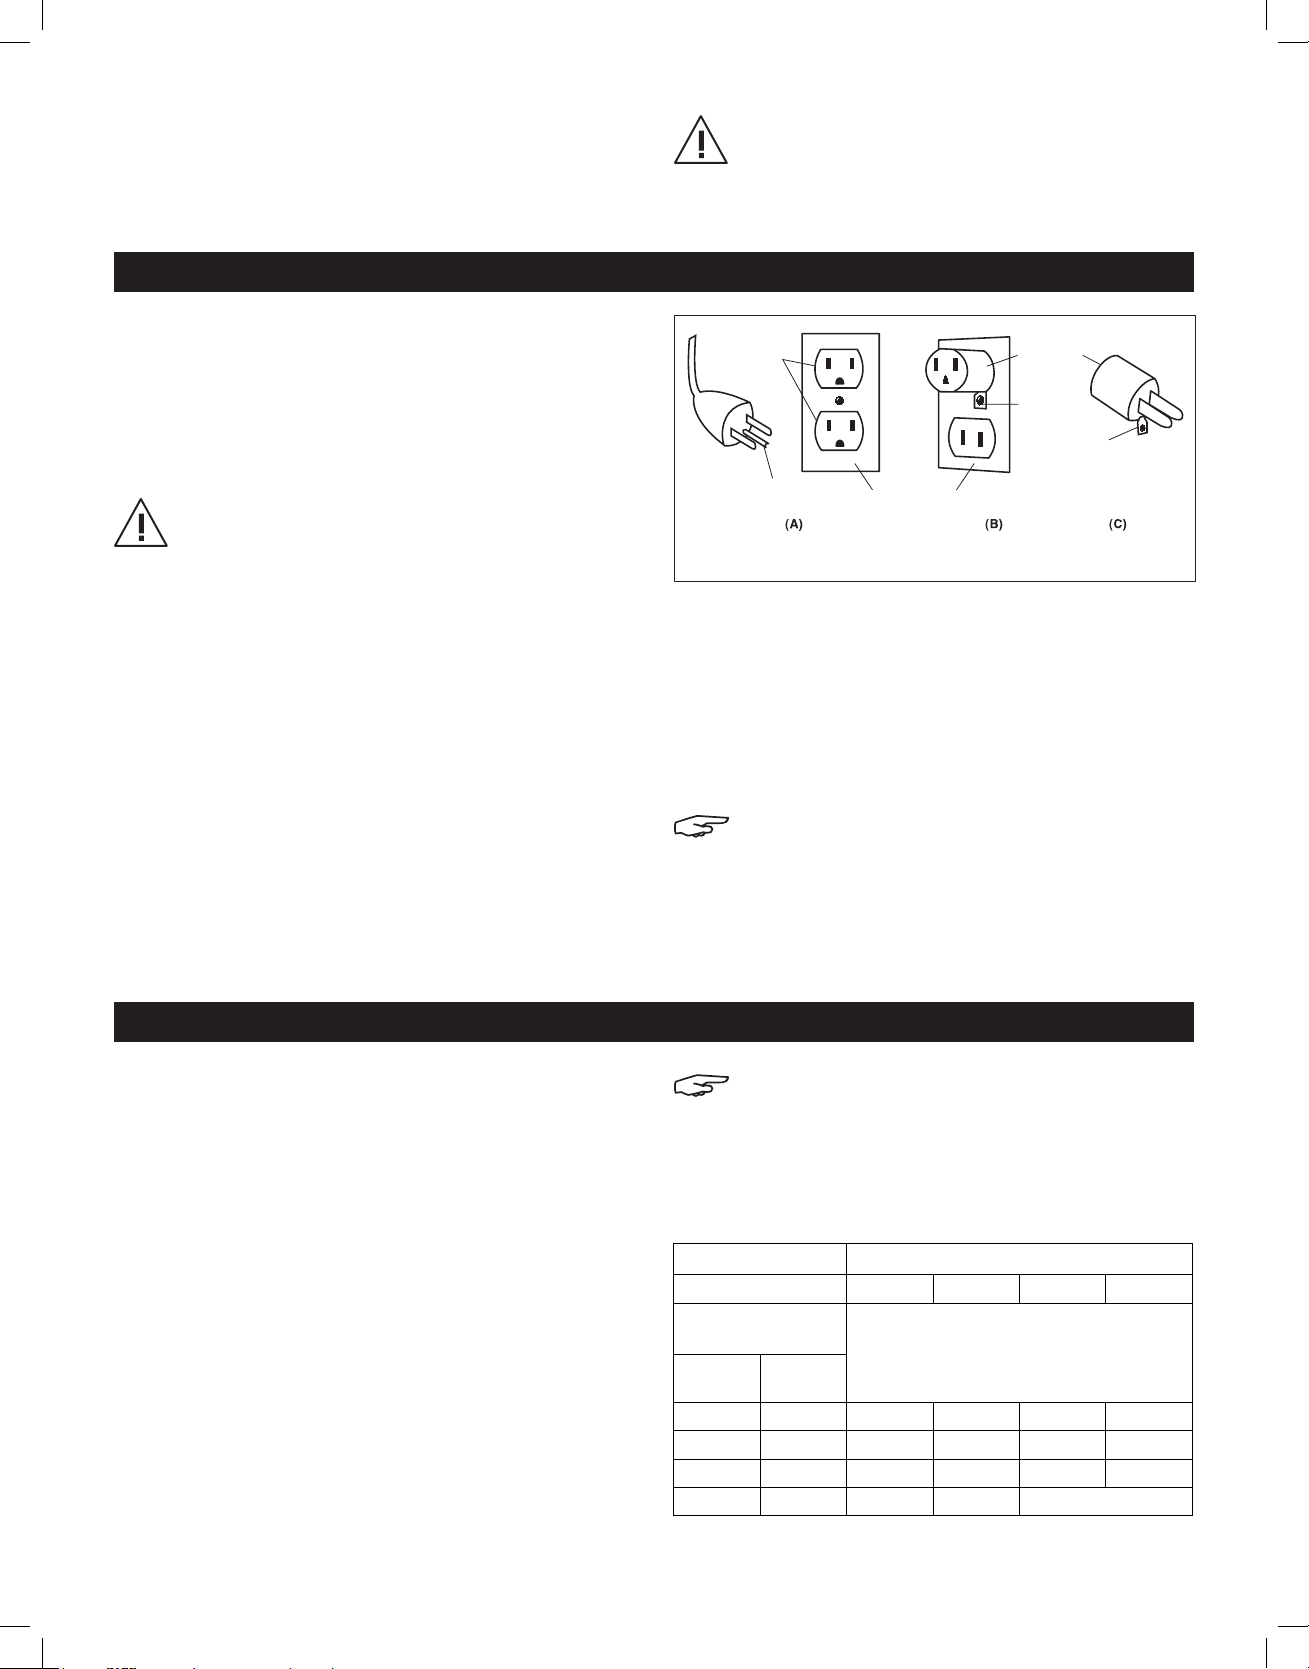
GROUNDING INSTRUCTIONS
STAY ALERT! Watch what you are doing and use
common sense. Do not use vacuum cleaner
when you are tired, distracted, or under the
use of drugs, alcohol or medication causing
diminished control.
This appliance must be grounded. If it should
malfunction or breakdown, grounding provides a path
of least resistance for electric current to reduce the
risk of electric shock. This appliance is equipped with
a cord having an equipment-grounding conductor
and grounding plug. The plug must be inserted into
an appropriate outlet that is properly installed and
grounded in accordance with all local codes and
ordinances.
WARNING: Improper connection of the
equipment-grounding conductor can result in
a risk of electric shock. Check with a qualified
electrician or service person if you are in
doubt as to whether the outlet is properly
grounded. Do not modify the plug provided
with the appliance—if it will not fit the outlet,
have a proper outlet installed by a qualified
electrician.
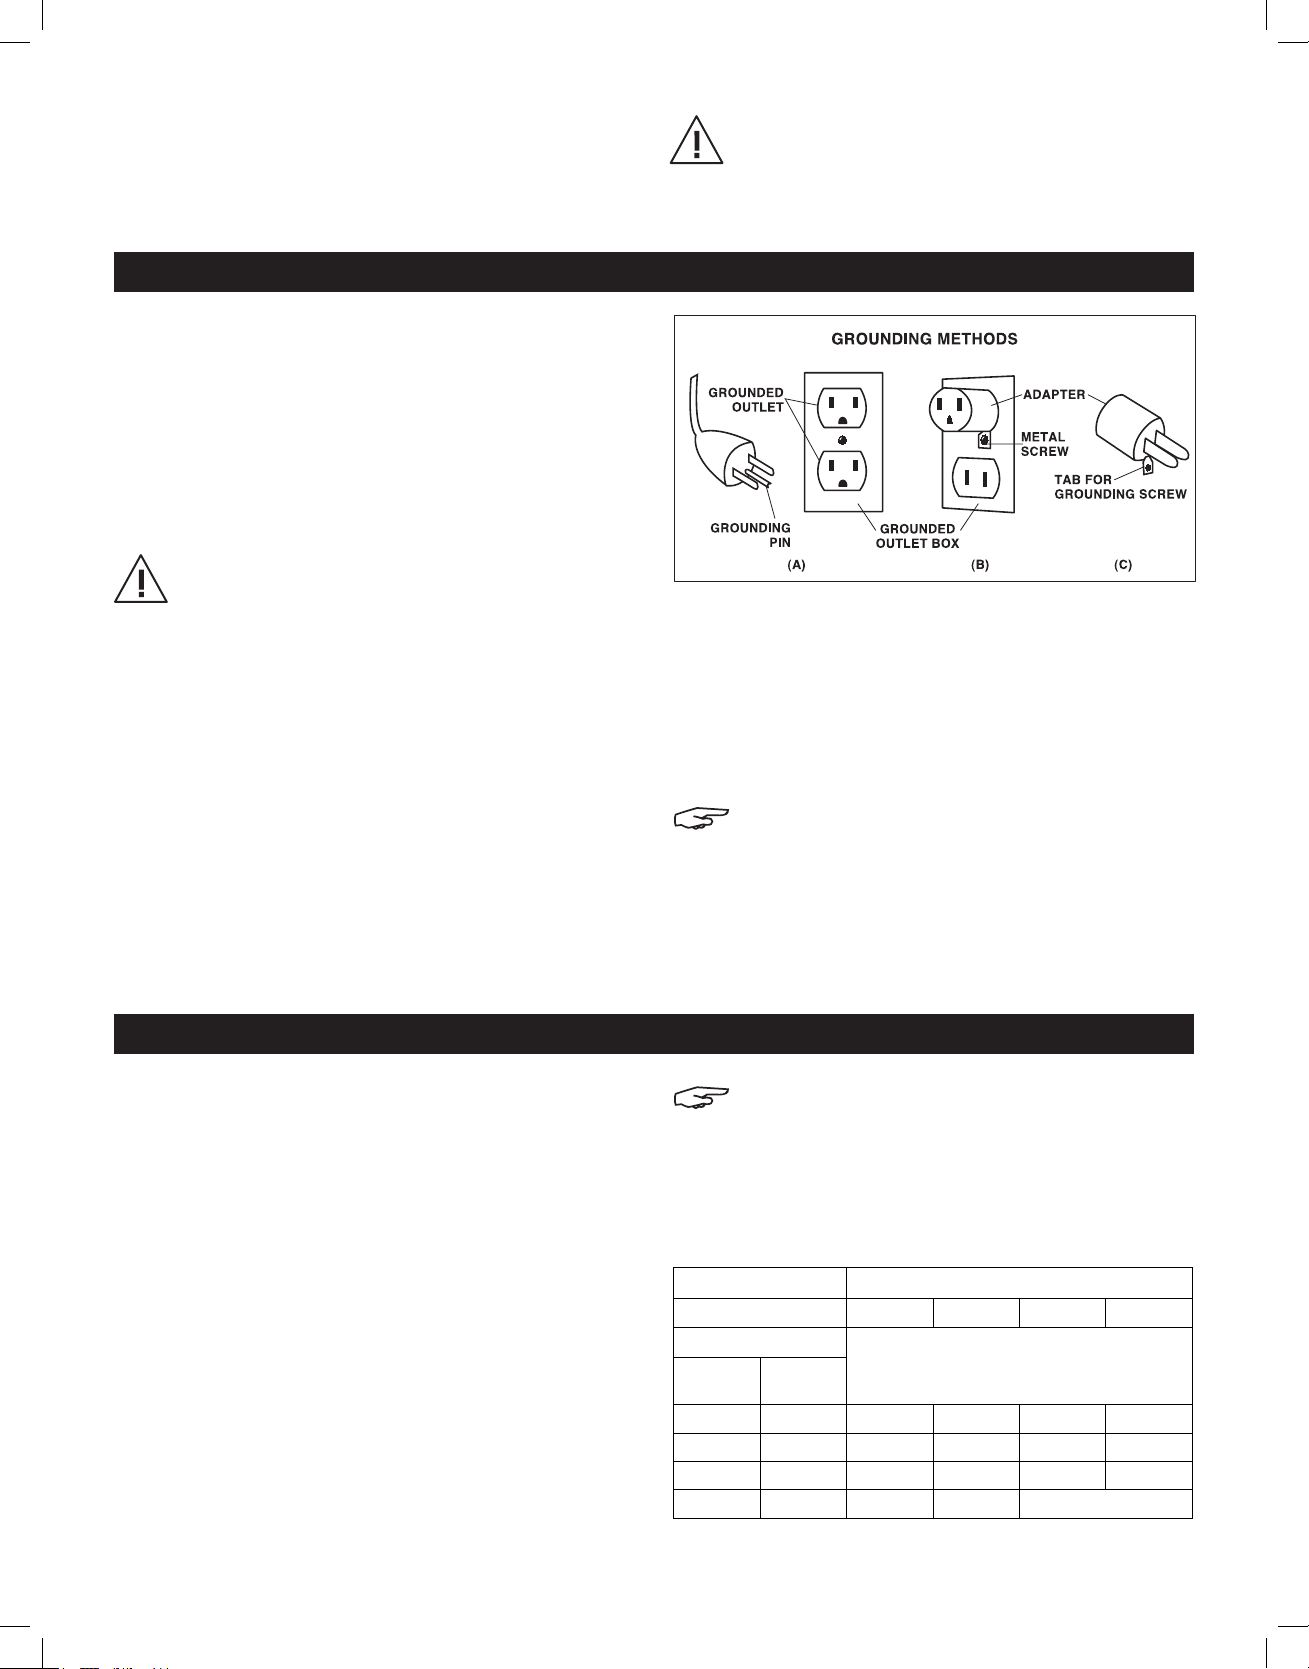
1. This appliance is for use on a nominal 120-volt
circuit, and has a grounded plug that looks like the
plug illustrated in sketch A. (See Figure 1)
2. A temporary adapter, like the adapter illustrated
in sketches B and C, may be used to connect this
plug to a 2-pole receptacle (as shown in sketch B)
if a properly grounded outlet is not available. (See
Figure 1)
Figure 1
3. The temporary adapter should be used only until a
properly grounded outlet (sketch A) can be installed
by a qualified electrician. The green colored rigid
ear, lug or the like extending from the adapter must
be connected to a permanent ground such as a
properly grounded outlet box cover. Whenever the
adapter is used, it must be held in place by a metal
screw. (See Figure 1)
NOTE: In Canada, the use of a temporary
adaptor is not permitted by the Canadian
Electrical Code. Make sure that the appliance
is connected to an outlet having the same
configuration as the plug. No adapter should
be used with this appliance.
EXTENSION CORDS
When using the appliance at a distance where an
extension cord becomes necessary, a 3-conductor
grounding cord of adequate size must be used for
safety and to prevent loss of power and overheating.
Use the table below to determine A.W.G. wire size
required. To determine ampere rating of your vacuum,
refer to nameplate located on rear of motor cover.
Before using appliance, inspect power cord for loose
or exposed wires and damaged insulation. Make any
needed repairs or replacements before using your
appliance. Use only three-wire outdoor extension cords
that have three-prong grounding-type plugs and three-
pole receptacles that accept the extension cord's plug.
When vacuuming liquids, be sure the extension cord
connection does not come in contact with the liquid.
PAGE 2 OF 25 0115 IH -2603
NOTE: Static shocks are common in dry areas
or when the relative humidity of the air is low.
This is only temporary and does not affect the
use of the appliance. To reduce the frequency
of static shocks in your home, the best remedy
is to add moisture to the air with a console or
installed humidifier.
VOLTS TOTAL LENGTH OF CORD IN FEET
120V 25 50 100 150
AMPERE RATING
More
Than
10 12 16 16 14 12
12 16 14 12 Not recommended
Not More
Than
0 6 18 16 16 14
6 10 18 16 14 12
AMERICAN WIRE GAUGE (AWG)
IH-2603-SPFR.indd 2 9/16/19 2:47 PM
Page 3

UNPACKING
1. Remove vacuum cleaner and all accessories from
the carton.
2. IMPORTANT: Open tank cover by pushing latches
or clamps outward with thumbs and remove any
accessories that may have been shipped in the tank.
3. Assemble caster system following the instructions
below.
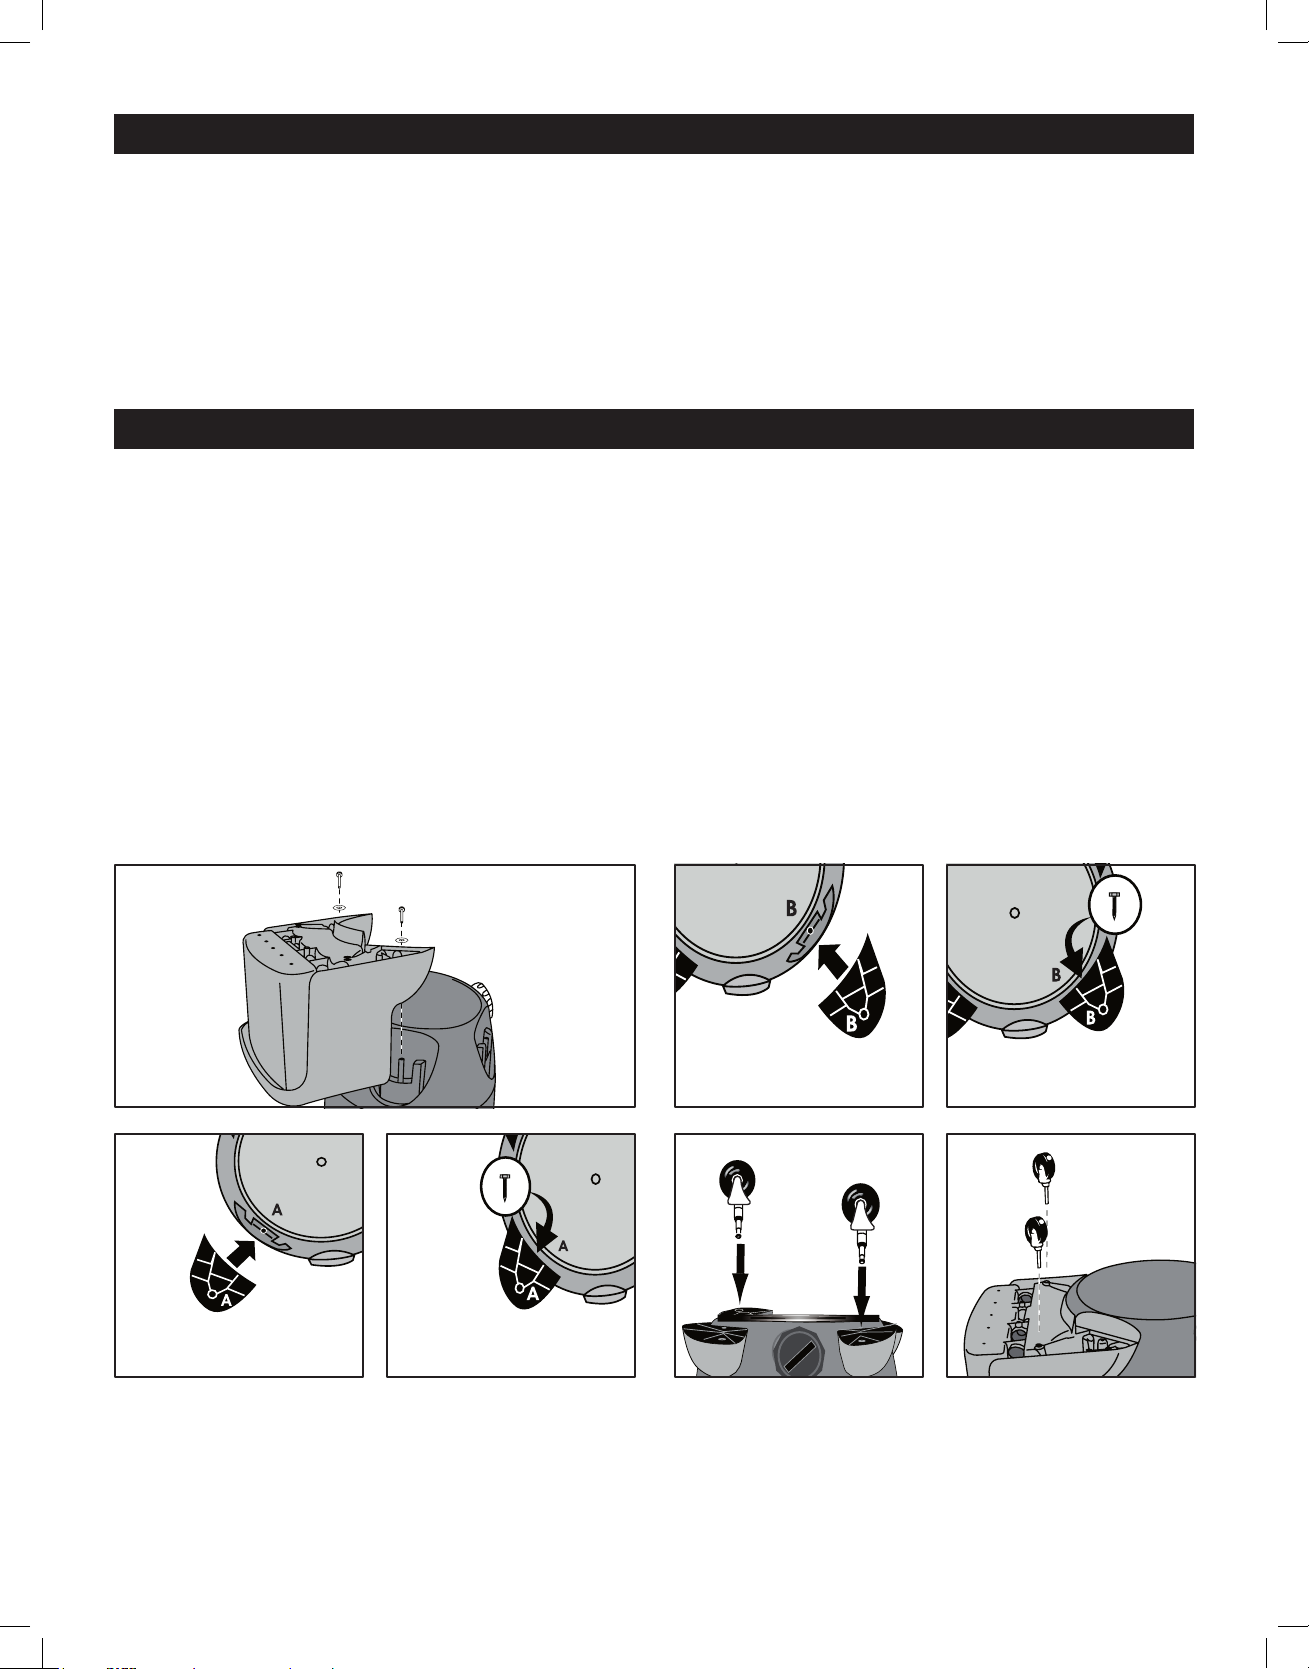
ASSEMBLY
REAR CASTER ACCESSORY CADDY AND FRONT
CASTER FEET ASSEMBLY
1. With cord disconnected from receptacle and
tank cover removed, turn tank upside down so the
bottom is facing up. (See Figure 2)
2. Take accessory caddy and place into slots (on rear
of tank opposite of drain). Secure with screws and
washers provided. (See Figure 2)
3. With tank drain facing you, take caster foot marked
with the letter A and place in slot on left side of tank
also marked with the letter A. (See Figure 3)
4. Secure with screw provided. (See Figure 4)
4. Depending on dry pick-up or wet pick-up operation,
install proper filter. (See page 4 for filter guide)
5. Replace cover and make sure latches or clamps
are secured over raised area of tank cover.
5. Take caster foot marked with the letter B and place
in slot on right side of tank also marked with the
letter B. (See Figure 5)
6. Secure with screw provided. (See Figure 6)
7. Install casters into caster feet by inserting the caster
stems into the holes provided. Apply pressure and
twisting motion until casters snap into place. (See
Figure 7)
8. Install casters into accessory caddy by inserting the
caster stems into the holes provided. Apply pressure
and twisting motion until casters snap into place.
(See Figure 8)
Figure 2
Figure 3
Figure 4
A
Figure 5 Figure 6
Figure 7
Figure 8
PAGE 3 OF 25 0115 IH -2603
IH-2603-SPFR.indd 3 9/16/19 2:47 PM
Page 4
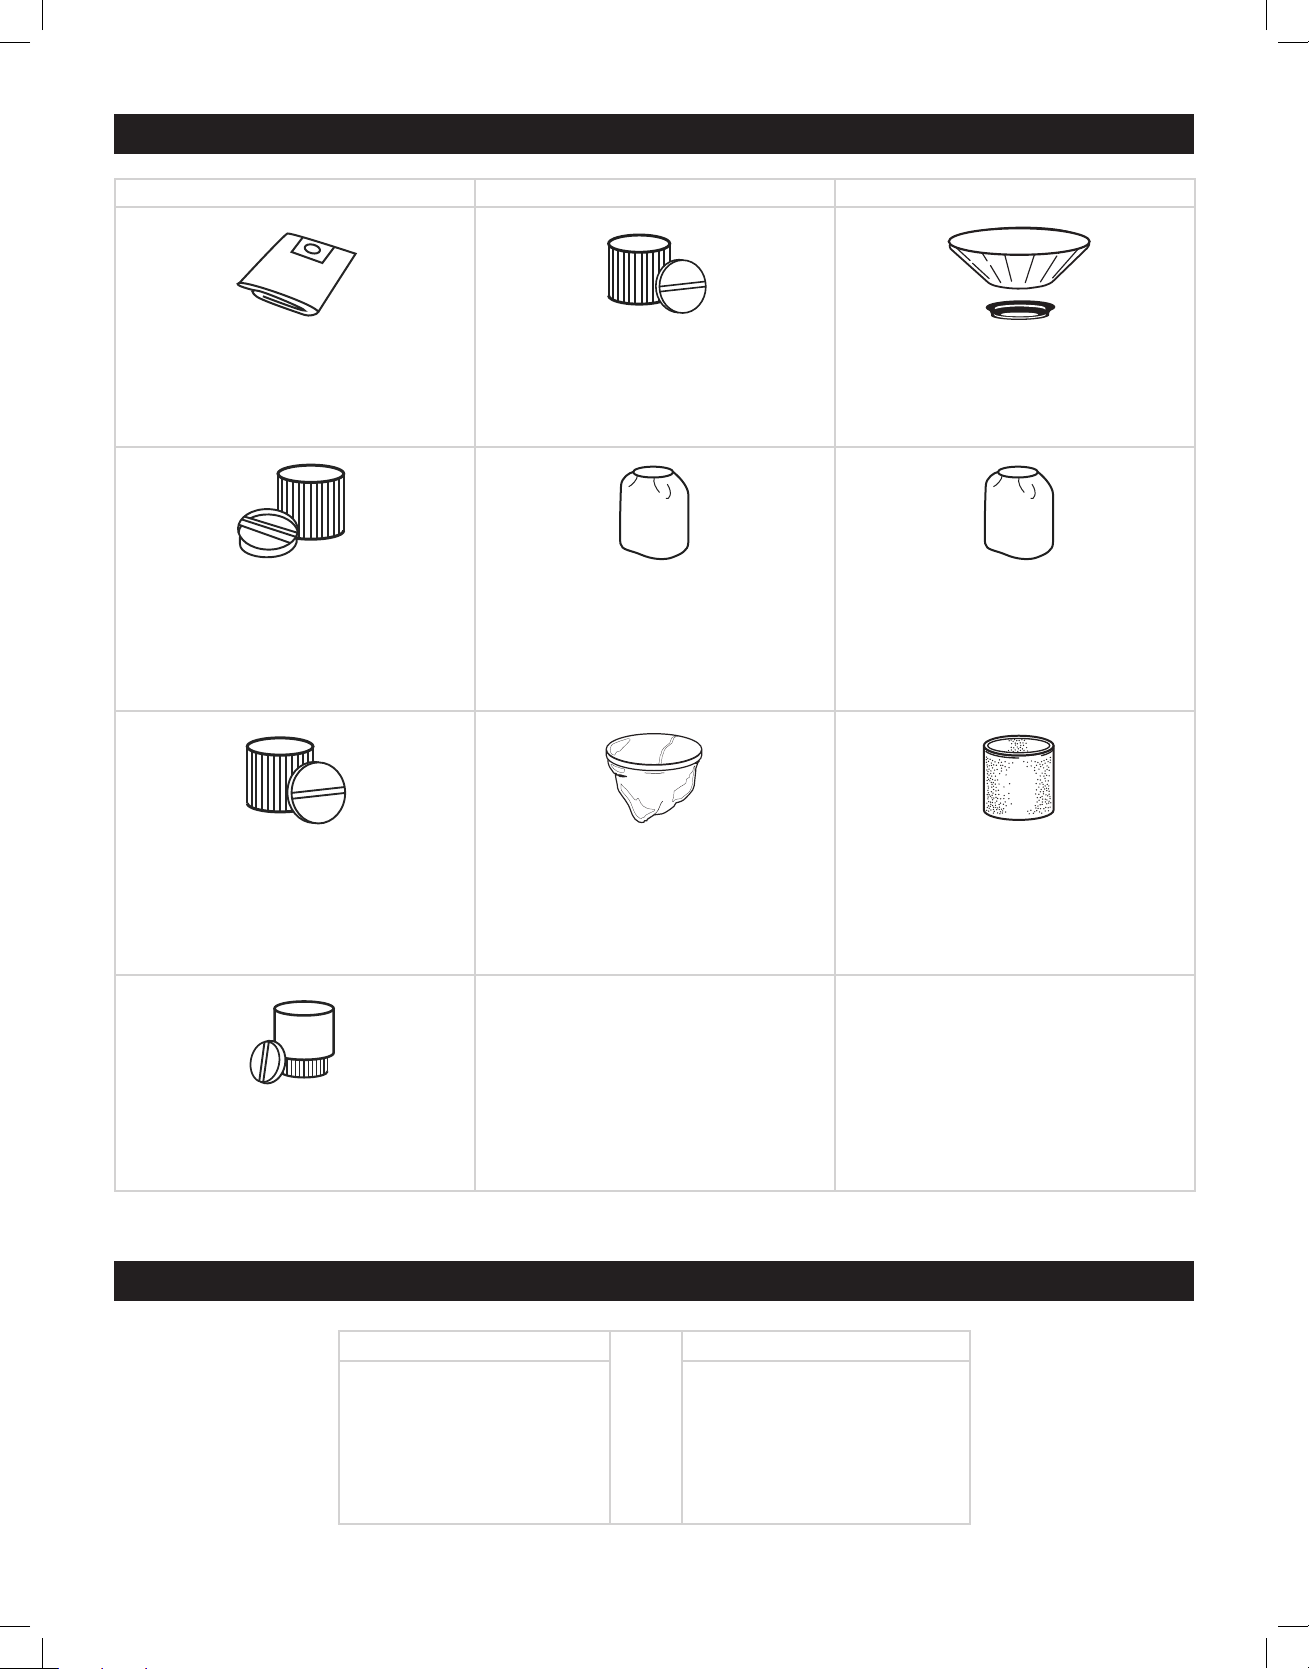
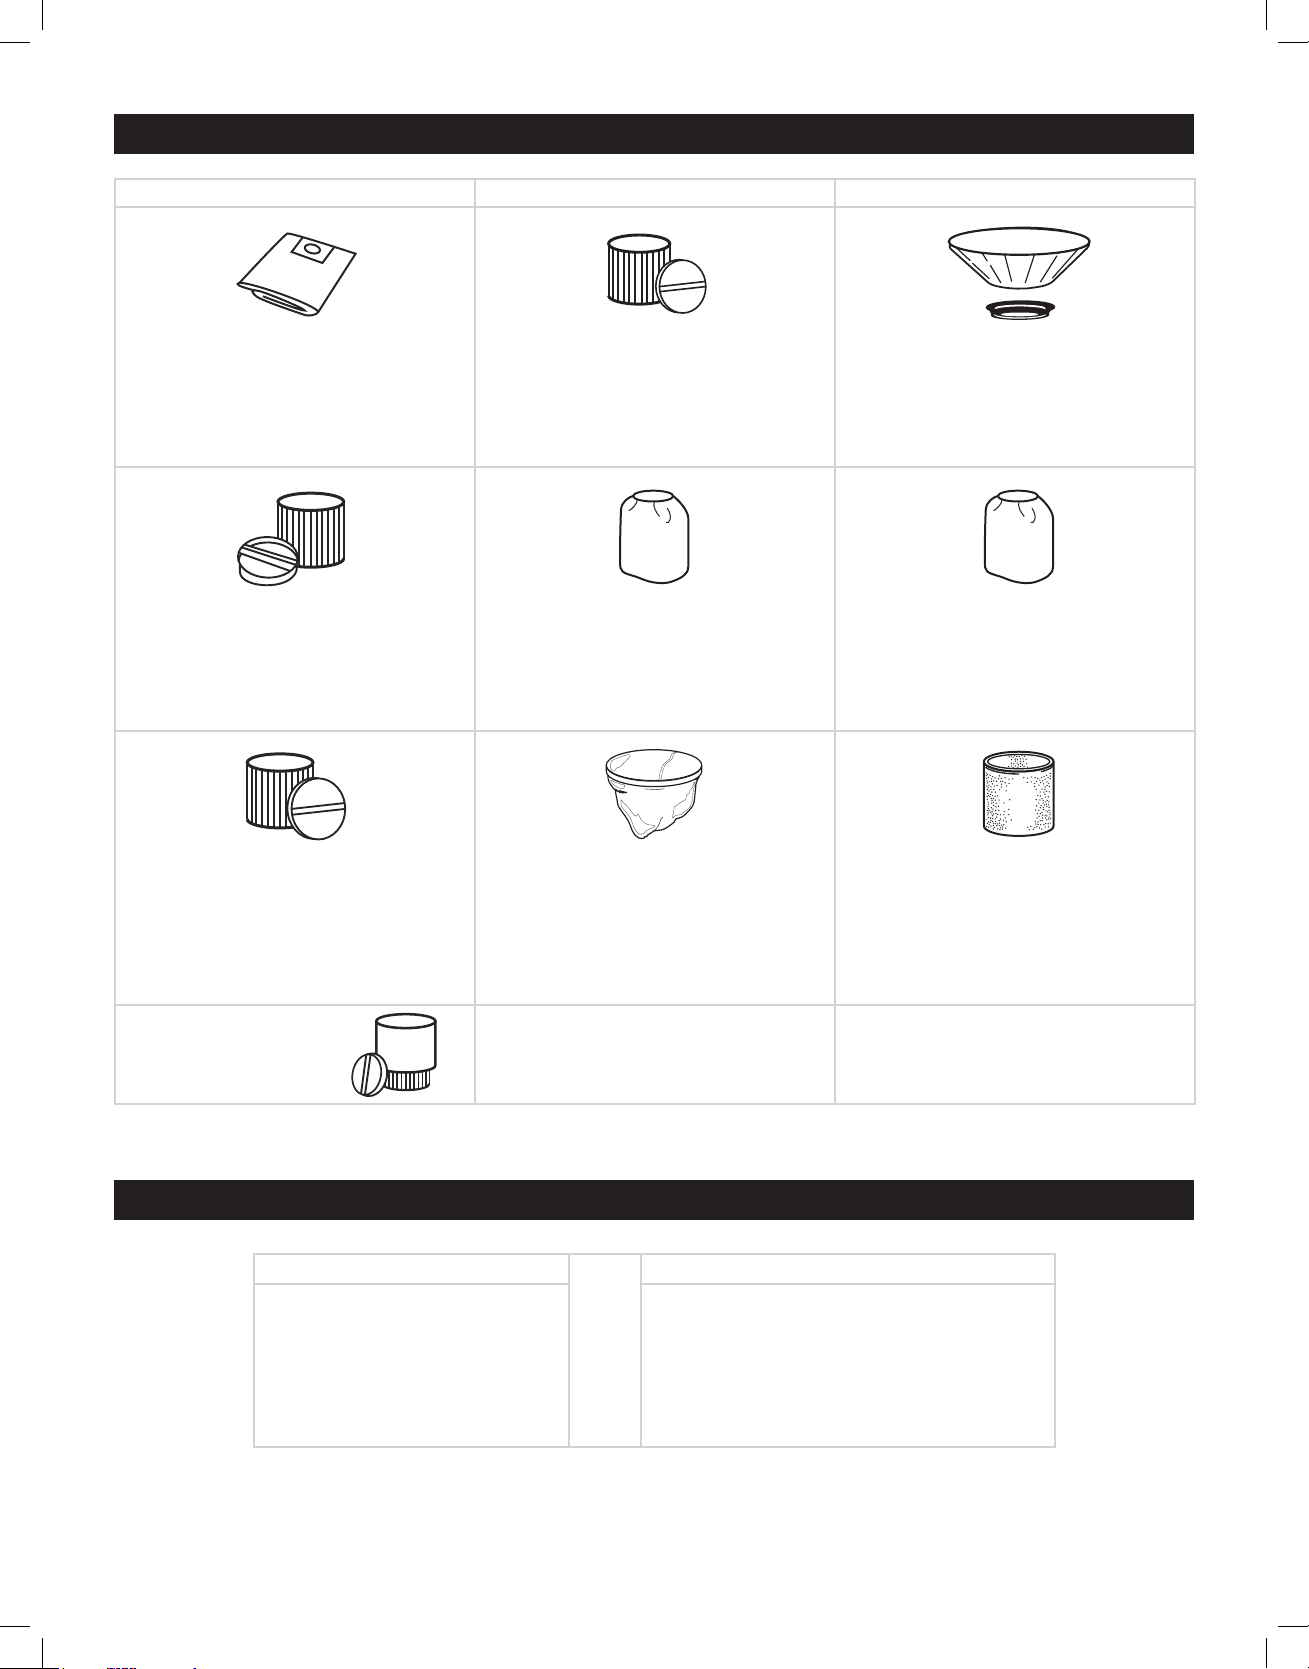
FILTERS
BEST BETTER GOOD
High Efficiency Collection Filter Bags
• Dry pick-up only
• Fine dust and particles
• Easy to install and use
• Reduces loss of suction
HEPA CleanStream® Cartridge Filter*
• Wet or dry pick-up
• Non-stick surface
• Easy cleanup
• Efficient, easy to use
• Fine dust and particles
HEPA Abrasion Resistant Cartridge Filter
• Wet or dry pick-up
• Non-stick surface
• Easy cleanup
• Efficient, easy to use
• Fine dust and particles
Ultra Web® Cartridge Filter**
• Wet or dry pick-up
• Easy cleanup
• Fine dust and particles
Super Performance Polyester Filter
• Dry pick-up only
• General purpose
• Reusable cloth filter
Full Polyester Filter
• Dry pick-up only
• Full circumference tank filter
• Durable, reusable, economical
Reusable Disc Filter
• Dry pick-up only
• General purpose
• Reusable disc
Cloth Filter
• Dry pick-up only
• General purpose
• Reusable cloth filter
Foam Sleeve
• Wet pick-up only
• Use as a secondary filter with all other
Shop-Vac® filters except Cartridge and
HEPA Cartridge filters
• Reusable foam
HEPA Cartridge Filter
• Dry pick-up only
• Efficient, easy to use
• Fine dust and particles
*CleanStream, Gore and designs are trademarks of W.L. Gore & Associates, Inc. **Ultra Web is a registered trademark of Donaldson Co., Inc.
FILTER COMBINATIONS
CAGE FILTERS
Cartridge Filters
Foam Sleeve
Reusable Disc
Cloth Filter
Super Performance Polyester Filter
PAGE 4 OF 25 0115 IH -2603
IH-2603-SPFR.indd 4 9/16/19 2:47 PM
PLUS
High Efficiency Collection Filter Bags
Full Polyester Filter
TANK FILTERS
Page 5
OPERATION
WET PICK-UP
See the Shop-Vac® vacuum filter guide on page 4 to
determine which type of wet filtration is best for your
needs. Remove the dry filters plus all dirt and debris
found in the tank assembly. Wet pick-up requires only
the foam sleeve OR cartridge filter to be in place.
Do not use dry filters for wet pick-up. When picking
up several tanks full of liquid, the filter will become
saturated and misting may appear in the exhaust air.
At this time, you should dry the filter or change to a dry
filter to eliminate the misting and possible dripping of
liquid around the lid. After completing a wet pick-up
job, raise the hose to drain into tank before shutting off
the vac. The interior of the tank should be periodically
rinsed clean.
NOTE: Wet pick-up accessories should be
washed periodically with soap and water,
especially after picking up wet, sticky liquids.
DRY PICK-UP
See the Shop-Vac® vacuum filter guide on page 4 to
determine which type of dry filtration is best for your
needs. Better quality filtration is required for finer dry
materials. Collection filter bags are recommended for
very fine materials such as dry wall dust.
NOTE: When using the vacuum to pick up very
fine dust, such as sawdust or dry wall dust, it
will be necessary to empty the tank and clean
the filter at more frequent intervals to maintain
maximum pick-up power or upgrade to
collection filter bags.
KEEP FILTERS CLEAN
installing it. Check the filter for tears or small holes. Even
a small hole can cause dust to be exhausted. Do not
use a filter with holes or tears. Replace it immediately.
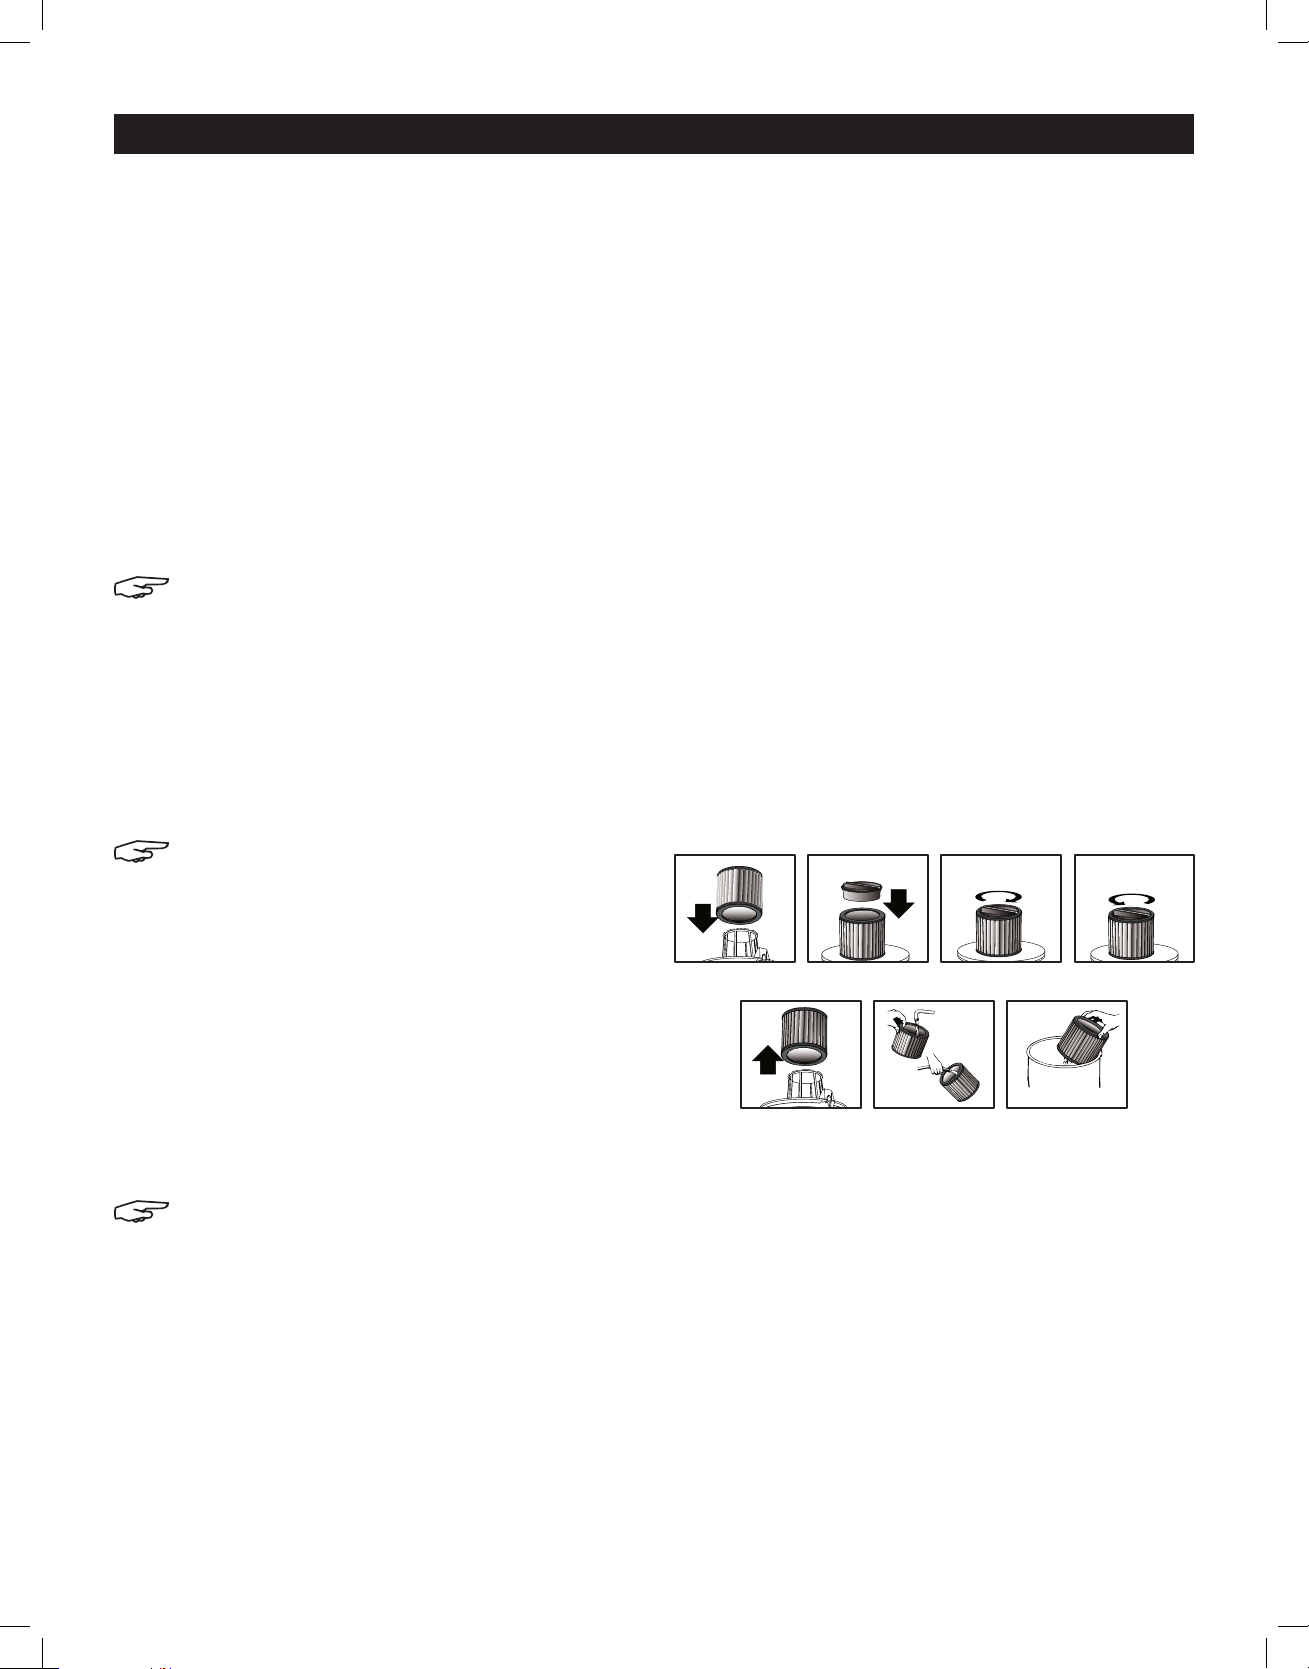
INSTALLING AND CLEANING THE CARTRIDGE
1. Slide cartridge filter down over filter cage.
(See Figure 9)
2. Place filter retainer on top of cartridge filter.
(See Figure 10)
3. Hold onto base of lid cage with one hand and turn
retainer clockwise to tighten. (See Figure 11)
4. To remove filter for cleaning, hold onto base
of lid cage with one hand and turn retainer
counterclockwise to loosen. (See Figure 12)
5. Slide cartridge filter off filter cage. (See Figure 13)
6. Clean wet filter by rinsing from the inside. (See Figure 14)
7. Clean dry filter by tapping it on inside of waste can.
(See Figure 15)
8. When wet (to prevent mold and/or mildew buildup), the cartridge filter should be removed and
allowed to air dry for a 24-hour period before being
re-installed back onto the filter cage.
Figure 9 Figure 10
Figur e 13 Figur e 14 Figure 15
Figure 11
TIGHTEN
Figure 12
LOOSEN
The efficiency of these vacuum cleaners is largely
dependent on the filter. A clogged filter can cause
overheating and possibly damage the vacuum
cleaner. Clean or replace filters regularly. Do not use
the vacuum or filters for collecting hazardous or other
health endangering materials.
NOTE: Never machine wash or dry filters.
BLOWER USE
The H-2603 and H-2604 Shop-Vacs® can be used as
powerful blowers by inserting the hose into the motor
housing exhaust port. To use as a blower:
CARTRIDGE FILTER MAINTENANCE
This filter is made of high-quality paper designed to stop
small particles of dust. The filter can be used for wet
or dry pick-up. A dry filter is necessary to pick up dry
material. If you use your vac to pick up dust when the
filter is wet, the filter will clog quickly and be very difficult
1. Clear hose of any obstructions.
2. Insert hose end into blower port on rear of unit. Twist
slightly to tighten.
3. Caution should be used when using attachment
due to the powerful force of air.
to clean. The filter may become saturated when picking
up large quantities of liquid, causing misting to appear
in the exhaust air. At this time, you should dry or change
the filter to eliminate this occurrence. Please handle the
filter carefully when removing it for cleaning or when
PAGE 5 OF 25 0115 IH -2603
IH-2603-SPFR.indd 5 9/16/19 2:47 PM
Page 6
OPERATION CONTINUED
AUTOMATIC SHUTOFF
The vacuum cleaner is equipped with an automatic
shutoff that operates when picking up liquids. When the
liquid in the tank reaches a certain level, an internal
float will seat itself against a seal at the intake of the
motor, shutting off suction. When this happens, the
motor will develop a higher than normal pitch noise
indicating that you need to shut off the vacuum and
empty the liquid.
NOTE: If accidentally tipped over, the float
shutoff device could seat against the seal and
shut off suction. If this happens, simply place
the vacuum cleaner in upright position and
turn off the switch until the float returns to its
normal position.
EMPTYING THE TANK
CAUTION: Use special care when emptying
heavily loaded tanks.
The wet/dry vacuum may be emptied of liquid waste
by removing the tank cover. To empty, switch off the
vacuum and remove the plug from the wall receptacle.
Remove the tank cover and empty the tank.
NOTE: Tank can also be emptied by removing
drain cap and draining liquid waste into a
suitable drain.
STORAGE
Before storing the vacuum cleaner, always empty and
clean the tank. Never allow liquids to sit in the tank for
any extended period of time.
NOTE: Always store the vacuum cleaner indoors.
LUBRICATION
No lubrication is necessary as the motor is equipped
with lifetime lubricated bearings.
MAINTENANCE
WARNING: Be sure to disconnect power supply
before attempting to service or remove any
components.
SERVICE
Do not attempt to service your Shop-Vac® wet/dry
vacuum cleaner beyond that described in these
instructions. Refer all other servicing to Uline Customer
Service.
WARNING: If any of the motor housing parts
should become detached or broken, exposing
the motor or any other electrical components,
operation should be discontinued immediately
to avoid personal injury or further damage to
the vacuum. Repairs should be made before
reusing the vacuum.
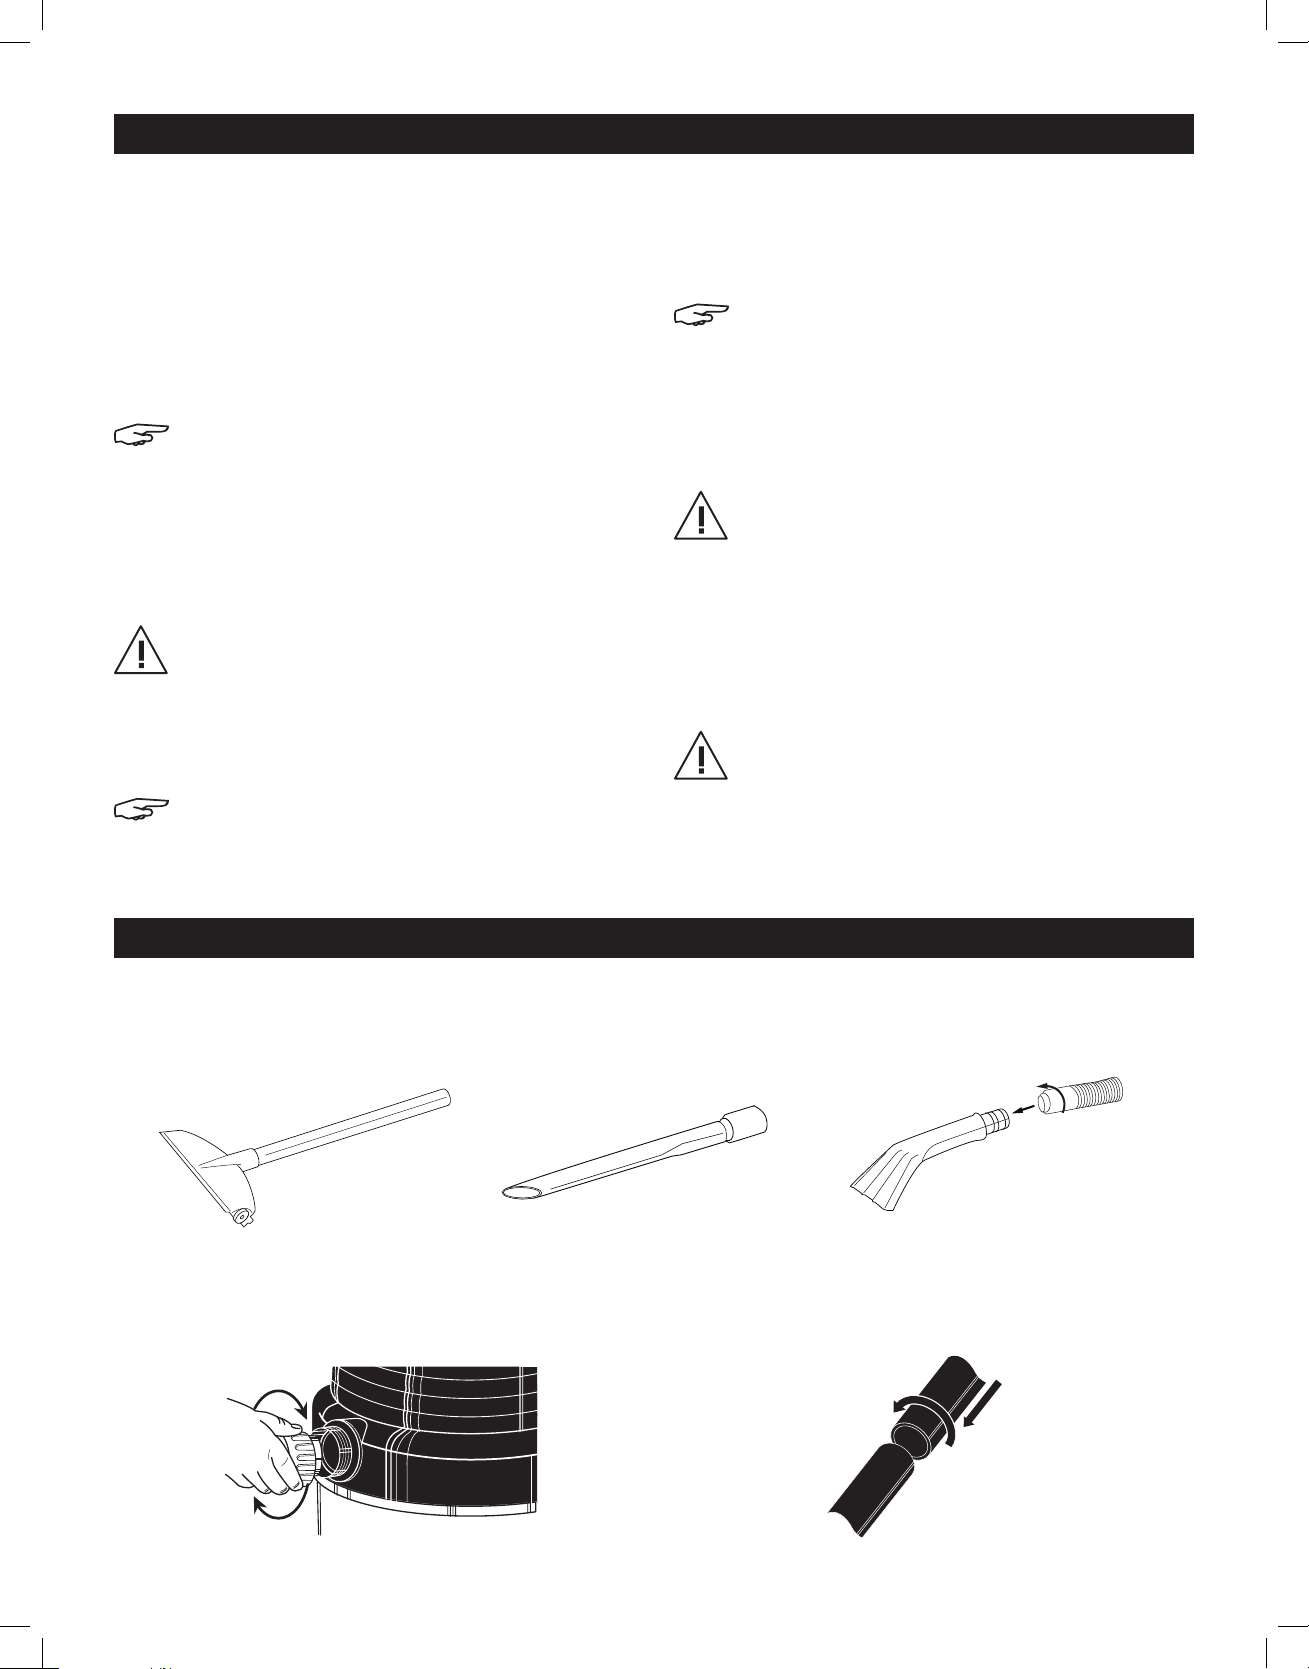
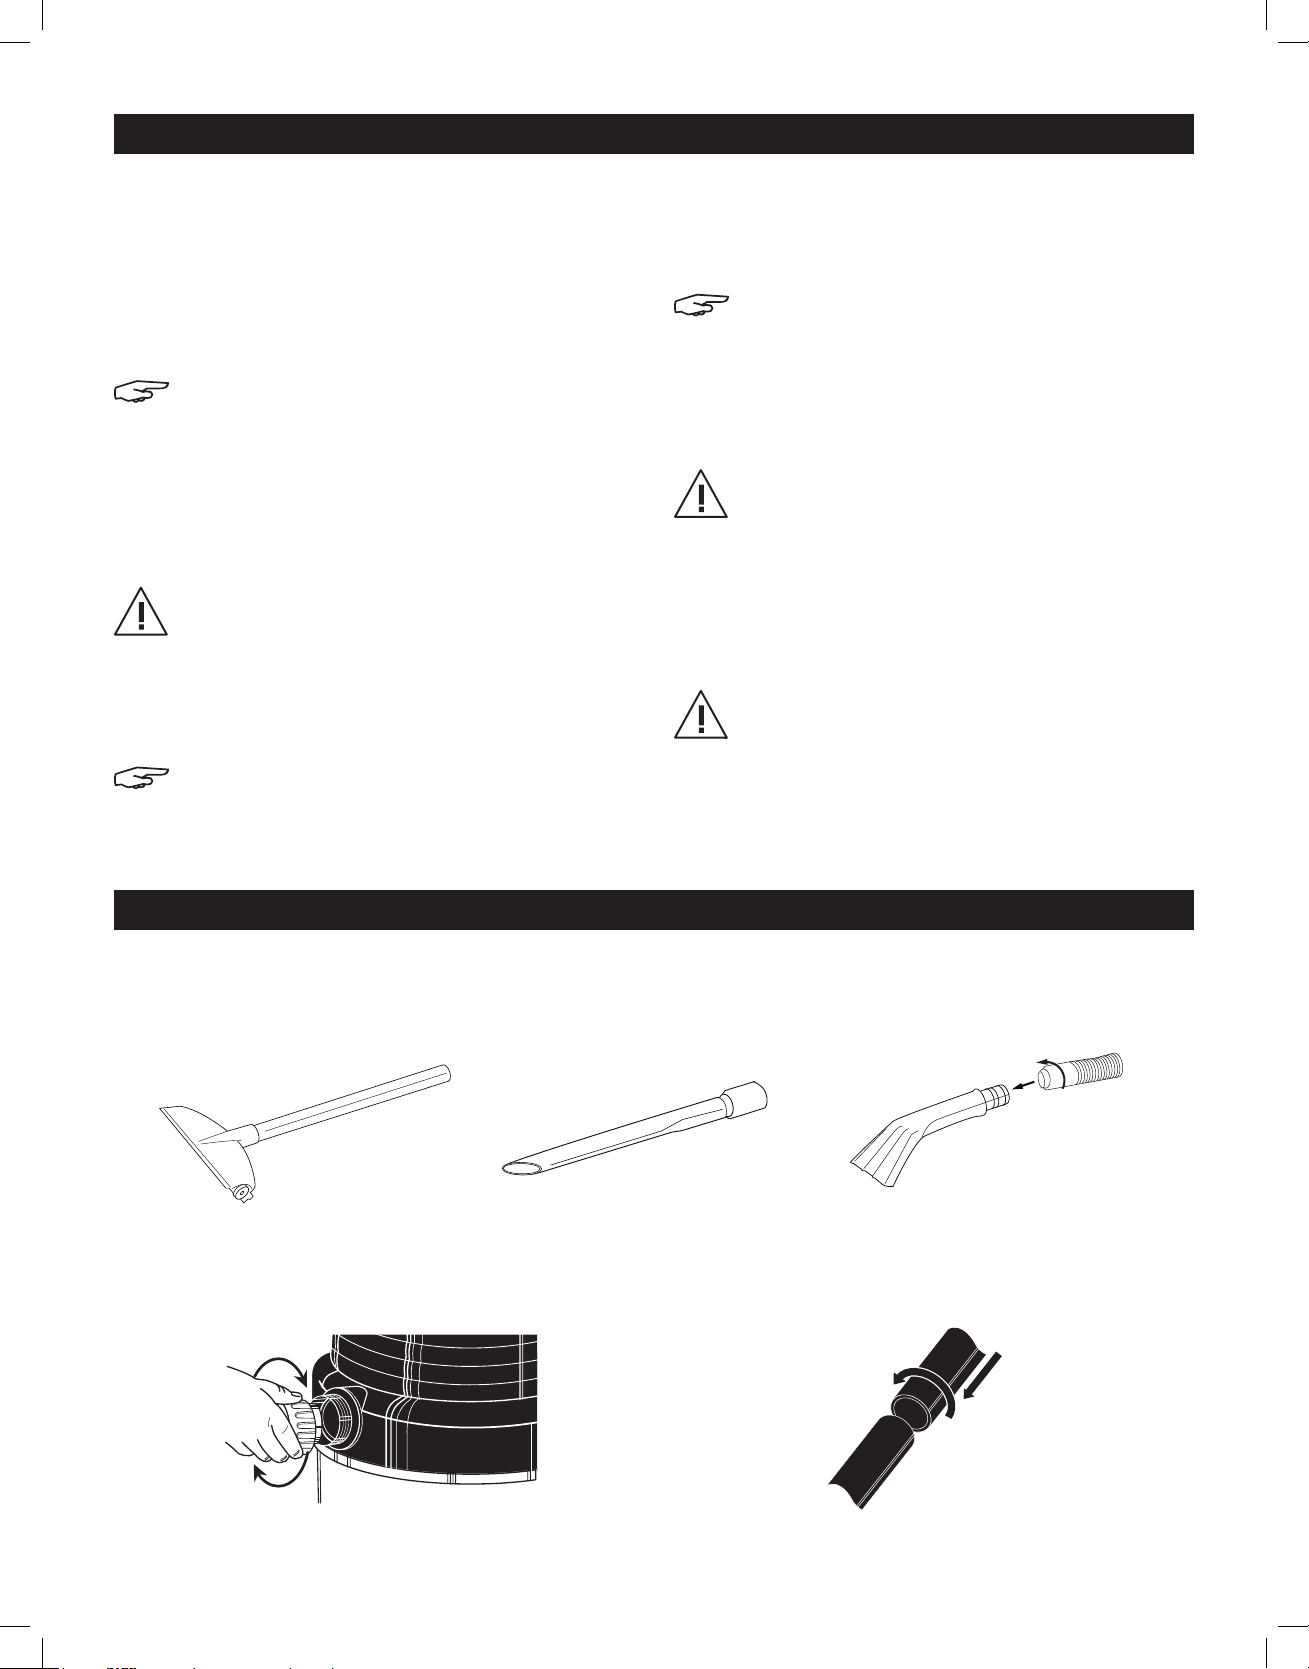
ACCESSORIES, HOSES AND WANDS
NOZZLES AND ACCESSORIES
All friction fit accessories - Insert wand end or hose into
accessory and twist to form a tight fit. (See Figure 16)
Wet/Dry Floor Nozzle Crevice Tool Claw Utility Nozzle
HOSES
Lock-On® Hoses - Insert hose collar onto threaded tank
inlet and tighten. (See Figure 17)
Figure 17
Figure 16
WANDS
Friction fit wands - Insert wand ends together and twist
to form a tight fit. (See Figure 18)
Figure 18
PAGE 6 OF 25 0115 IH -2603
IH-2603-SPFR.indd 6 9/16/19 2:47 PM
Page 7

SHOP-VAC® VACUUM FILTER CLEANING REFERENCE
Foam Sleeve Full Polyester Sleeve Super Performance Filter Reusable Disk Filter
FILTER CLEANING INSTRUCTIONS
Foam Sleeve Rinse with water, dry and reinstall.
Full Polyester Filter Brush off dirt and reinstall; if filter gets wet, rinse with water, dry and
Super Performance Filter Dispose of after filter develops rips or tears.
Reusable Disk Filter Rinse with water, dry and reinstall. Important: do not machine wash.
CleanStream® Abrasion
Resistant Cartridge Filter
Cartridge Filter & Ultra Web®
Cartridge Filter
All Collection Bags Dispose of bag when full.
reinstall.
Clean installed filter by tapping or shaking the vacuum unit. To restore
optimum airflow, remove filter and tap end cap against a hard
surface to loosen debris. Additional debris can be removed by rinsing
outside surface of filter with running water. Avoid dampening inside of
filter. Completely air dry filter after washing. Important: DO NOT brush.
DO NOT clean filter media with abrasive materials. DO NOT scrub to
clean between pleats. This will permanently damage the filter's ability
to stop dust.
From inside of filter, rinse with water, dry completely and reinstall.
CleanStream® Abrasion
Resistant Cartridge Filter
Cartridge Filter &
Ultra Web® Cartridge Filter
ROUTINE MAINTENANCE
DAILY
1. Filter - Check cartridge filter for clogs or heavy
soiling and replace if necessary. Ensure that correct
filters are being used for the task – see Filters section
of instruction manual.
2. Collection Bag - If using collection filter bag, check
to ensure that there are no rips or tears in the bag
and that the bag is not full.
3. Tank – If vacuuming up wet or damp material,
empty the tank after use, as musty odors may occur
if debris is left inside.
4. Extension Cord and Plug – Check extension cord
and plug for any cuts or damage. If damaged,
replace motor housing unit.
5. Motor – If there are unusual sounds or if poor
performance occurs, the motor should be inspected
immediately by the Uline service team.
All Collection Bags
WEEKLY
1. Wands/Tools – Inspect wands and tool attachments
for any damage. Replace if necessary.
2. Hose – Inspect hose for any damage and replace if
necessary.
MONTHLY
1. Cleaning – Inspect and clean all areas of the
vacuum, including the inside of the tank.
PAGE 7 OF 25 0115 IH -2603
IH-2603-SPFR.indd 7 9/16/19 2:47 PM
Page 8

TROUBLESHOOTING
ISSUE POSSIBLE CAUSE(S) CORRECTIVE ACTION
Parts/accessories missing 1. Packed in tank 1. Check in tank
Vacuum cleaner will not start 1. No power at receptacle
2. Defective switch
3. Defective motor
Dust discharging from exhaust 1. Filter not installed or installed improperly
2. Filter damaged
3. Filter clogged or dust is too fine
4. Filter not functional
Loss of suction 1. Loose hose connection
2. Filter clogged
3. Full tank
4. Hole in hose
Static shock 1. Dry environment
2. Relative humidity of air is low
1. Check for power
2. Replace switch
3. Replace motor
1. Properly install filter
2. Replace filter
3. Use more efficient filter
4. Clean and replace filter
1. Tighten hose connection
2. Clean or replace filter
3. Empty tank
4. Replace hose
1. Add moisture to air (if practical, use a
console or installed humidifier)
2. This situation is temporary and does not
affect the use of the vacuum cleaner
π
CHICAGO • ATLANTA • DALLAS • LOS ANGELES • MINNEAPOLIS • NYC/PHILA • SEATTLE • MEXICO • CANADA
1-800-295-5510
PAGE 8 OF 25 0115 IH -2603
IH-2603-SPFR.indd 8 9/16/19 2:47 PM
uline.com
Page 9

π H-2603, H-2604
ASPIRADORA SHOP-VAC
®
EN SECO/MOJADO
800-295- 5510
uline.mx
INSTRUCCIONES IMPORTANTES DE SEGURIDAD
ATENCIÓN: Lea todas las reglas de seguridad
antes de intentar ponerla en funcionamiento.
Conserve para futuras consultas.
PRECAUCIÓN: Nunca ponga esta unidad en
funcionamiento cuando haya materiales
o vapores inflamables presentes, ya que
los dispositivos eléctricos producen arcos o
chispas que pueden causar un incendio o
una explosión. NUNCA DEJE LA ASPIRADORA EN
FUNCIONAMIENTO DESATENDIDA.
ASPIRADORAS SHOP-VAC H-2603 Y H-2604
Los aspiradoras Shop-Vac® en seco / mojado son para
aspirar materiales mojados y secos no volátiles. Están
equipadas con potentes motores con lubricación
permanente y sistemas de filtración estándar. Hay
filtración doble disponible para la mayoría de los
modelos Shop-Vac® y vienen de forma estándar en las
aspiradoras comerciales Shop-Vac®. Equipadas con un
sistema de ruedas para fácil desplazamiento. El apagado
automático por flotador evita el desbordamiento durante
la absorción en húmedo. Incluye accesorios versátiles de
3.81 cm (1½") de diámetro y un tanque de polipropileno
resistente a abolladuras. Con clasificación UL.
PARA REDUCIR EL RIESGO DE INCENDIO,
DESCARGA ELÉCTRICA O LESIONES:
1. No deje el electrodoméstico desatendido mientras
esté conectado a la electricidad. Desenchufe la
máquina del contacto cuando no esté en uso y
antes de darle mantenimiento. Conecte sólo a un
contacto aterrizado de forma adecuada. Vea las
instrucciones de Aterrizado en la página 10.
2. No lo exponga a la lluvia—guárdelo en interiores.
3. No permita que se use como un juguete. Preste
especial atención cuando sea utilizado por o cerca
de niños.
4. Utilícela sólo tal como se describe en estas
instrucciones. Utilice sólo los accesorios
recomendados por el fabricante.
5. No use si el cordón o el enchufe están dañados. Si
el electrodoméstico no funciona como debiera, se
ha caído, dañado, dejado en exteriores o caído
en el agua, póngase en contacto con Servicio a
Clientes de Uline para obtener ayuda.
6. No debe: jalar ni sostener por el cordón, usar el
cordón como asa, cerrar la puerta sobre el cordón,
jalar el cordón alrededor de bordes o esquinas
cortantes o pasar el electrodoméstico sobre el
cordón.
7. Mantenga el cordón lejos de superficies calientes.
8. No desenchufe el aparato jalando del cordón. Para
desenchufar, agarre el enchufe, no el cordón.
9. No toque el enchufe ni el electrodoméstico con las
manos mojadas.
10. No coloque ningún objeto en las aberturas. No lo
use con las aberturas bloqueadas; manténgalo
libre de polvo, pelusa, pelo y cualquier cosa que
pueda reducir el flujo de aire.
11. Mantenga el cabello, la ropa suelta, los dedos
y todas las partes del cuerpo alejados de las
aberturas y piezas móviles.
12. No aspire nada que esté ardiendo o humeando,
como cigarrillos, fósforos o cenizas calientes.
13. No use si la bolsa y/o los filtros de polvo no están en
su lugar.
14. Apague todos los controles antes de desenchufar.
15. Tenga especial cuidado al limpiar sobre escaleras.
16. No lo use para aspirar líquidos inflamables o
combustibles, tales como gasolina, ni la use en
áreas donde estos puedan estar presentes.
17. No lo use como atomizador de líquidos inflamables,
tales como pinturas a base de aceite, lacas,
productos de limpieza, etc.
PAGE 9 OF 25 0115 IH -2603
IH-2603-SPFR.indd 9 9/16/19 2:47 PM
Page 10

18. No aspire materiales tóxicos, cancerígenos,
combustibles u otros materiales peligrosos como el
asbesto, arsénico, bario, berilio, plomo, pesticidas
ni otros materiales peligrosos para la salud. Hay
unidades de diseño especial disponibles para estos
fines.
19. No aspire hollín, cemento, yeso o polvo de
mampostería si el filtro de cartucho y la bolsa de
filtro de recolección no están en su lugar. Estas son
partículas muy finas que pueden pasar a través de
la espuma y afectar el rendimiento del motor o ser
expulsadas de vuelta al aire. Hay bolsas de filtro de
recolección adicionales disponibles.
20. No deje el cordón tendido en el suelo después de
la limpieza. Puede ser un peligro de tropiezo.
INSTRUCCIONES PARA ATERRIZAR
21. Tenga mucho cuidado al vaciar los tanques muy
cargados.
22. Para evitar combustión espontánea, vacíe el
tanque después de cada uso.
23. El funcionamiento de una aspiradora de uso
general puede dar lugar a que se soplen objetos
extraños hacia los ojos, lo cual puede resultar en
daño a los ojos. Utilice siempre gafas de protección
al poner la aspiradora en funcionamiento.
¡MANTÉNGASE ALERTA! Fíjese en lo que está
haciendo y emplee el sentido común. No use
la aspiradora cuando esté cansado, distraído
o bajo la influencia de drogas, alcohol o
medicamentos que reduzcan su control.
Este electrodoméstico debe estar aterrizado. Si llegase
a funcionar mal o se descompone, el aterrizado
proporciona la ruta de menor resistencia para la
corriente eléctrica, para reducir el riesgo de descarga
eléctrica. Este electrodoméstico está equipado con
un cordón que tiene un conductor de aterrizado de
equipos y un enchufe de aterrizado. El enchufe debe
insertarse en un contacto instalado apropiadamente
y aterrizado de acuerdo con todos los códigos y
ordenanzas locales.
ADVERTENCIA: La conexión incorrecta del
conductor de aterrizado de equipos puede
ocasionar un riesgo de choque eléctrico.
Consulte a un electricista o técnico de
servicio calificado si tiene dudas acerca de
si el contacto este aterrizado correctamente.
No modifique el enchufe que viene con
el electrodoméstico—Si no encaja en el
contacto, pídale a un electricista calificado
que instale un contacto adecuado.
1. Este electrodoméstico es para uso en un circuito
de corriente de 120 voltios y tiene un enchufe con
aterrizado que se parece al enchufe ilustrado en el
dibujo A. (Vea Diagrama 1)
2. Se puede utilizar un adaptador temporal, como
el adaptador ilustrado en los dibujos B y C, para
conectar este enchufe a un receptáculo de 2
polos (como se muestra en el dibujo B) si no hay un
contacto aterrizado de forma adecuada.
(Vea Diagrama 1)
Diagrama 1
ENCHUFE
CON TOMA
DE TIERRA
CLAVIJA CON
TOMA DE TIERRA
MÉTODOS DE TOMA DE TIERRA
CUBIERTA DEL ENCHUFE
CON TOMA DE TIERRA
ADAPTADOR
TORNILLO
DE METAL
PESTAÑA PARA
TORNILLO
DE TOMA
DE TIERRA
3. El adaptador temporal debe utilizarse solamente
hasta que un contacto debidamente aterrizado
(dibujo A) pueda ser instalado por un electricista
calificado. La pestaña, lengüeta, etc., rígida de
color verde que sobresale del adaptador se debe
conectar a un contacto aterrizado permanente,
tal como una cubierta de contacto aterrizado
de manera adecuada. Siempre que se utilice el
adaptador, éste se debe sujetar en su sitio con un
tornillo metálico. (Vea Diagrama 1)
NOTA: En Canadá, el uso de un adaptador
temporal no está permitido por el Código
Eléctrico Canadiense. Asegúrese de que el
aparato esté conectado a un contacto que
tenga la misma configuración que el enchufe.
No deben utilizarse adaptadores con este
electrodoméstico.
PAGE 10 OF 25 0115 IH -2603
IH-2603-SPFR.indd 10 9/16/19 2:47 PM
Page 11

EXTENSIONES ELÉCTRICAS
Al utilizar el electrodoméstico a una distancia en la
que se hace necesaria una extensión eléctrica, se
debe usar un cordón de aterrizado de 3 conductores
de tamaño adecuado por seguridad y para evitar la
pérdida de potencia y el sobrecalentamiento. Utilice
la siguiente tabla para determinar el calibre AWG
necesario del alambre. Para determinar el amperaje
de su aspiradora, consulte la placa de datos ubicada
en la parte posterior de la cubierta del motor.
Antes de utilizar el electrodoméstico, inspeccione el
cordón de potencia por si tiene alambres sueltos o
expuestos y el aislamiento dañado. Efectúe todas las
reparaciones o reemplazos necesarios antes de utilizar
su electrodoméstico. Utilice sólo extensiones eléctricas
de tres hilos para exteriores que tengan enchufes tipo
aterrizado de tres puntas y receptáculos de tres polos
que acepten el enchufe de la extensión eléctrica. Al
aspirar líquidos, asegúrese de que la conexión de la
extensión eléctrica no entre en contacto con el líquido.
DESEMPAQUE
NOTA: Las descargas de estática son comunes
en áreas secas o cuando la humedad relativa
del aire es baja. Esto es sólo temporal y no
afecta a la utilización del electrodoméstico.
Para reducir la frecuencia de las descargas
de estática en su casa, el mejor remedio
es agregar humedad al aire con un
humidificador de consola instalado.
VOLTIOS LONGITUD TOTAL DEL CORDÓN EN PIES
120V 25 50 100 150
CLASIFICACIÓN
DE AMPERAJE
Más de
0 6 18 16 16 14
6 10 18 16 14 12
10 12 16 16 14 12
12 16 14 12 No se recomienda
No más
de
AMERICAN WIRE GAUGE (AWG)
1. Retire la aspiradora y todos los accesorios de la
caja.
2. IMPORTANTE: Abra la cubierta del tanque
empujando los cerrojos o abrazaderas hacia afuera
con los pulgares y retire todos los accesorios que
puedan haber sido enviados en el tanque.
3. Ensamble el sistema de ruedas siguiendo las
instrucciones a continuación.
4. Instale el filtro apropiado dependiendo de si el
funcionamiento de recolección es mojado o seco.
(Vea la página 4 para consultar la guía de filtros).
5. Vuelva a colocar la cubierta y asegúrese de que
los cerrojos o abrazaderas estén bien sujetas en el
área elevada de la cubierta del tanque.
PAGE 11 OF 25 0115 IH -2603
IH-2603-SPFR.indd 11 9/16/19 2:47 PM
Page 12

ENSAMBLE
ENSAMBLE DE LAS PATAS DE LAS RUEDAS
DELANTERAS Y DEL PORTA ACCESORIOS
DE LAS RUEDAS TRASERAS
1. Con el cordón desconectado del receptáculo y la
tapa del tanque retirada, ponga el tanque al revés
de modo que la parte inferior apunte hacia arriba.
(Vea Diagrama 2)
2. Agarre el porta accesorios y colóquelo en las
ranuras (en la parte posterior del tanque, opuesto
de drenaje). Asegúrelo con los pernos y arandelas
suministrados. (Vea Diagrama 2)
3. Con el drenaje del tanque frente a usted, agarre la
pata de rueda marcada con la letra A y colóquela
en la ranura en el lado izquierdo del tanque,
también marcado con la letra A. (Vea Diagrama 3)
4. Asegúrela con el perno suministrado. (Vea Diagrama 4)
Diagrama 2
5. Agarre la pata de rueda marcada con la letra B
y colóquela en la ranura en el lado derecho del
tanque, también marcado con la letra B. (Vea
Diagrama 5)
6. Asegúrela con el perno suministrado. (Vea Diagrama 6)
7. Instale las ruedas en las patas correspondientes
insertando los vástagos en los orificios provistos.
Aplique presión con movimiento giratorio hasta que
las ruedas encajen en su lugar. (Vea Diagrama 7)
8. Instale las ruedas en el porta accesorios insertando
los vástagos en los orificios provistos. Aplique
presión con movimiento giratorio hasta que las
ruedas encajen en su lugar. (Vea Diagrama 8)
Diagrama 3
Diagrama 4
A
Diagrama 5 Diagrama 6
Diagrama 7
Diagrama 8
PAGE 12 OF 25 0115 IH -2603
IH-2603-SPFR.indd 12 9/16/19 2:47 PM
Page 13
FILTROS
ÓPTIMO MEJOR BUENO
Bolsas de Filtro de Recolección de Alto
Rendimiento
• Sólo succión en seco
• Polvo y partículas finas
• Fácil de instalar y usar
• Reduce la pérdida de succión
Filtro de Cartucho HEPA CleanStream®*
• Succión en seco o en mojado
• Superficie antiadherente
• De fácil limpieza
• Eficiente, fácil de usar
• Polvo y partículas finas
Filtro de Cartucho HEPA Resistente a la Abrasión
• Succión en seco o en mojado
• Superficie antiadherente
• De fácil limpieza
• Eficiente, fácil de usar
• Polvo y partículas finas
Filtro de Cartucho HEPA
• Sólo succión en seco
• Eficiente, fácil de usar
• Polvo y partículas finas
*CleanStream, Gore y sus diseños son marcas comerciales de W.L. Gore & Associates, Inc.
** Ultra Web es una marca registrada de Donaldson Co., Inc.
Filtro de Cartucho Ultra Web®**
• Succión en seco o en mojado
• De fácil limpieza
• Polvo y partículas finas
Filtro de Poliéster de Súper Rendimiento
• Sólo succión en seco
• Uso general
• Filtro de tela reutilizable
Filtro de Poliéster Completo
• Sólo succión en seco
• Filtro del tanque de circunferencia
completa
• Duradero, reutilizable, económico
Filtro de Discos Reutilizable
• Sólo succión en seco
• Uso general
• Disco reutilizable
Filtro de Tela
• Sólo succión en seco
• Uso general
• Filtro de tela reutilizable
Funda de Espuma
• Sólo succión mojado
• Utilice como filtro secundario con todos
los demás filtros Shop-Vac®, excepto los
filtros de Cartucho y filtros de Cartucho
HEPA
• Espuma reutilizable
COMBINACIONES DE FILTROS
FILTROS DE LA JAULA
Filtros de Cartucho
Funda de Espuma
Disco Reutilizable
Filtro de Tela
Filtro de Poliéster de Súper Rendimiento
PAGE 13 OF 25 0115 IH -2603
IH-2603-SPFR.indd 13 9/16/19 2:47 PM
MÁS
Bolsas de Filtro de Recolección de Alto Rendimiento
Filtro de Poliéster Completo
FILTROS DEL TANQUE
Page 14

FUNCIONAMIENTO
SUCCIÓN MOJADA
Consulte la guía de filtros de la aspiradora Shop-Vac®
en la página 15 para determinar qué tipo de filtración
mojada es la mejor para lo que usted necesita. Retire los
filtros secos, además de toda la suciedad y desechos
que se encuentren en el ensamble del tanque. La
succión en mojado sólo requiere que la funda de
espuma O el filtro de cartucho esté en su lugar. No
utilice filtros secos para succionar en mojado. Después
de recoger varios tanques llenos de líquido, el filtro se
saturará y podría aparecer humedad en la salida de aire.
En ese momento debe secar el filtro o cambiarlo por un
filtro seco para eliminar la humedad y el posible goteo de
líquido alrededor de la tapa. Después de completar un
trabajo de succión en mojado, levante la manguera para
drenar en el tanque antes de apagar la aspiradora. El
interior del tanque debe ser enjuagado periódicamente.
NOTA: Los accesorios de succión en mojado
deben ser lavados periódicamente con agua
y jabón, especialmente después de succionar
líquidos pegajosos.
SUCCIÓN EN SECO
Consulte la guía de filtros de la aspiradora Shop-Vac®
en la página 13 para determinar qué tipo de filtración
en seco es la mejor para lo que usted necesita. Se
requiere una filtración de mejor calidad para los
materiales secos más finos. Se recomienda usar bolsas
de filtro de recolección para materiales muy finos,
como el polvo de mampostería.
El filtro debe estar seco para succionar material seco.
Si utiliza la aspiradora para succionar polvo cuando
el filtro está mojado, el filtro se atascará rápidamente
y será muy difícil de limpiar. El filtro se puede saturar
al recoger grandes cantidades de líquido, haciendo
que aparezca humedad en la salida de aire. En ese
momento debe secar o cambiar el filtro para eliminar
este fenómeno. Manipule cuidadosamente el filtro al
quitarlo para limpiarlo o al instalarlo. Revise que el filtro
no tenga rasgaduras ni agujeros pequeños. Incluso un
agujero pequeño puede causar que se expulse polvo. No
utilice un filtro con agujeros o rasgaduras. Reemplácelo
inmediatamente.
CÓMO INSTALAR Y LIMPIAR EL CARTUCHO
1. Ponga el filtro de cartucho sobre la jaula para filtros.
(Vea Diagrama 9)
2. Coloque el retenedor del filtro en la parte superior
del filtro de cartucho.
(Vea Diagrama 10)
3. Agarre la base de la tapa de la jaula con una
mano y gire el retenedor en sentido de las agujas
del reloj para apretarlo. (Vea Diagrama 11)
4. Para quitar el filtro para limpiarlo, agarre la base
de la tapa de la jaula con una mano y gire el
retenedor en dirección contraria a las agujas del
reloj para aflojarla. (Vea Diagrama 12)
5. Retire el filtro de cartucho de la jaula para filtros.
(Vea Diagrama 13)
NOTA: Al usar la aspiradora para succionar
polvo muy fino, como aserrín o polvo de
6. Limpie el filtro mojado enjaguándolo desde el interior.
(Vea Diagrama 14)
mampostería, será necesario vaciar el tanque
y limpiar el filtro a intervalos más frecuentes
para mantener la máxima potencia de
succión o cambiar a las bolsas de filtro de
recolección.
MANTENGA LOS FILTROS LIMPIOS
El rendimiento de estas aspiradoras depende en
gran medida del filtro. Un filtro obstruido puede
causar sobrecalentamiento y posiblemente dañar la
aspiradora. Limpie o sustituya los filtros regularmente.
7. Limpie el filtro seco dándole golpecitos dentro de la
lata para residuos. (Vea Diagrama 15)
8. Cuando el filtro de cartucho esté mojado (para
evitar el moho y/o acumulación de hongos) debe
quitarlo y dejar que se seque al aire durante un
período de 24 horas antes de colocarlo de nuevo
en la jaula para filtros.
Diagrama 9
Diagrama 10
Diagrama 11
APRETAR
Diagrama 12
AFLOJAR
No use la aspiradora ni los filtros para recoger
materiales peligrosos o riesgosos para la salud.
NOTA: Nunca lave ni seque los filtros a
máquina.
Diagrama 13 Diagrama 14
Diagrama 15
MANTENIMIENTO DE LOS FILTROS DE CARTUCHO
Este filtro está hecho de papel de alta calidad diseñado
para retener las partículas pequeñas de polvo. Este filtro
puede ser usado para succión en seco/mojado.
PAGE 14 OF 25 0115 IH -2603
IH-2603-SPFR.indd 14 9/16/19 2:47 PM
Page 15

CONTINUACIÓN DE FUNCIONAMIENTO
USO DEL SOPLADOR
Las Shop-Vacs® H-2603 y H-2604 pueden utilizarse
como sopladores de gran alcance mediante la
inserción de la manguera en el orificio de escape de
la carcasa del motor. Para utilizar la aspiradora como
soplador:
1. Elimine cualquier obstrucción en la manguera.
2. Inserte el extremo de la manguera en el puerto del
soplador en la parte posterior de la unidad. Gire
ligeramente para apretarlo.
3. Se debe tener precaución al utilizar el accesorio
debido a su poderosa fuerza de aire.
APAGADO AUTOMÁTICO
La aspiradora está equipada con apagado
automático que entra en funcionamiento al succionar
líquidos. Cuando el líquido dentro del tanque alcanza
cierto nivel, un flotador interno entrará en contacto con
un sello en la entrada del motor, apagando la succión.
Cuando esto sucede, el motor producirá un sonido de
tono más alto de lo normal, lo que indica que necesita
apagar la aspiradora y vaciar el líquido.
NOTA: Si se vuelca accidentalmente, el
dispositivo de apagado del flotador podría
entrar en contacto con el sello y apagar la
succión. Si esto sucede, simplemente coloque
la aspiradora en posición vertical y apague
el interruptor hasta que el flotador vuelva a su
posición normal.
VACÍE EL TANQUE
PRECAUCIÓN: Tenga mucho cuidado al vaciar
los tanques muy cargados.
Puede vaciar los desechos líquidos de la aspiradora
en seco/mojado quitando la cubierta del tanque.
Para vaciarlo, apague la aspiradora y desenchufe
del receptáculo de pared. Retire la tapa del tanque y
vacíelo.
NOTA: El tanque también puede vaciarse
quitando la tapa de drenaje y el drenando los
residuos líquidos en un desagüe adecuado.
ALMACENAMIENTO
Antes de guardar la aspiradora, siempre vacíe y limpie
el tanque. Nunca permita que queden líquidos dentro
del tanque por tiempo prolongado.
NOTA: Siempre guarde la aspiradora en
interiores.
LUBRICACIÓN
No se requiere lubricación, ya que el motor está
equipado con cojinetes lubricados de por vida.
MANTENIMIENTO
ADVERTENCIA: Asegúrese de desconectar
el suministro de energía antes de dar
mantenimiento o retirar cualquiera de los
componentes.
SERVICIO
No intente reparar su aspiradora Shop-Vac® en
seco/mojado más allá de lo descrito en estas
instrucciones. Para cualquier otro tipo de reparación,
consulte a Servicio a Clientes de Uline.
ADVERTENCIA: Si alguna de las partes de la
carcasa del motor se desprende o se rompe,
dejando al descubierto el motor o cualquier
otro componente eléctrico, la operación se
debe suspender de inmediato para evitar
lesiones personales o daños mayores a la
aspiradora. Se debe reparar la aspiradora
antes de volver a usarla.
PAGE 15 OF 25 0115 IH -2603
IH-2603-SPFR.indd 15 9/16/19 2:47 PM
Page 16

ACCESORIOS, MANGUERAS Y TUBOS
BOQUILLAS Y ACCESORIOS
Todos los accesorios son de ajuste por fricción Introduzca el extremo del tubo o manguera en el
accesorio y gírelo para lograr un ajuste seguro.
(Vea Diagrama 16)
Diagrama 16
Boquilla Seco/Mojado
para Piso
MANGUERAS
Mangueras Lock-On® - Inserte el cuello de la
manguera en la entrada roscada del tanque y apriete.
(Vea Diagrama 17)
Diagrama 17
Herramienta para
Hendiduras
TUBOS
Tubos con ajuste por fricción - Introduzca ambos
extremos del tubo y gírelos para lograr un ajuste seguro.
(Vea Diagrama 18)
Diagrama 18
Boquilla Utilitaria de
Garra
GUÍA DE REFERENCIA PARA LIMPIEZA DE FILTROS DE LA ASPIRADORA SHOP-VAC
®
Funda de Espuma Funda de Poliéster
Completo
FILTRO INSTRUCCIONES DE LIMPIEZA
Funda de Espuma Enjuague con agua, seque y vuelva a instalar.
Filtro de Poliéster Completo Retire la suciedad con un cepillo y vuelva a instalar; si el filtro se
Filtro de Súper Rendimiento Deseche el filtro cuando presente rasgaduras o roturas.
Filtro de Disco Reutilizable Enjuague con agua, seque y vuelva a instalar. Importante: no lavar
Filtro de Cartucho
CleanStream® Resistente a la
Abrasión
Filtro de Cartucho y Filtro de
Cartucho Ultra Web®
Todas las Bolsas de
Recolección
PAGE 16 OF 25 0115 IH -2603
moja, enjuáguelo con agua, séquelo y vuelva a instalarlo.
en lavadora.
Limpie el filtro instalado dando golpecitos o sacudiendo la aspiradora.
Para restaurar el flujo de aire óptimo, retire el filtro y de golpecitos
a la tapa contra una superficie dura para aflojar los desechos. Los
desechos adicionales pueden ser eliminados al enjaguar la superficie
exterior del filtro con agua corriente. Evite mojar el interior del filtro. Deje
que el filtro se seque después de lavarlo. Importante: NO los cepille.
NO limpie el medio filtrante con materiales abrasivos. NO restriegue
para limpiar entre los pliegues. Esto dañará permanentemente la
capacidad del filtro de retener el polvo.
Enjuague con agua desde el interior del filtro, seque completamente
y vuelva a instalar.
Deseche la bolsa cuando esté llena.
Filtro de Súper
Rendimiento
Filtro de Disco
Reutilizable
Filtro de Cartucho CleanStream®
Resistente a la Abrasión
Filtro de Cartucho y
Filtro de Cartucho Ultra Web®
Todas las Bolsas de Recolección
IH-2603-SPFR.indd 16 9/16/19 2:47 PM
Page 17

MANTENIMIENTO DE RUTINA
DIARIO
1. Filtro - Revise que no haya obstrucciones o
un exceso de polvo en el filtro del cartucho y
reemplace si fuera necesario. Asegúrese que los
filtros adecuados están siendo utilizados - vea la
sección de Filtros en el manual de instrucciones.
2. Bolsa de Recolección - Si está utilizando bolsas
de filtro de recolección, revise la bolsa para
asegurarse que no tenga desgarraduras o roturas y
que no esté llena.
3. Tanque - Si pasa la aspiradora sobre material
húmedo o mojado, vacíe el tanque después
de utilizarla, ya que podría desprender olor a
humedad si se dejan materiales adentro.
4. Cable de Electricidad y Enchufe - Revise el cable
de electricidad y enchufe en busca de muestras
de deterioro o daños. Si hubiera daños, deje de
utilizarla.
5. Motor - Si escucha sonidos extraños o nota un
servicio deficiente, el motor debe ser revisado
inmediatamente por el equipo de servicio de Uline.
SEMANAL
1. Tubos/Accesorios - Revise que no haya daños en los
tubos y accesorios complementarios. Reemplace si
fuera necesario.
2. Manguera - Revise que no haya daños en la
manguera y reemplace si fuera necesario.
MENSUAL
1. Limpieza - Revise y limpie todas las partes de la
aspiradora, incluyendo el interior del tanque.
SOLUCIÓN DE PROBLEMAS
PROBLEMA POSIBLE(S) CAUSA(S) ACCIÓN CORRECTIVA
Faltan partes / accesorios 1. Empacados dentro del tanque 1. Revise dentro del tanque
La aspiradora no arranca 1. No hay corriente en el receptáculo
2. Interruptor defectuoso
3. Motor defectuoso
Descarga de polvo por el tubo de escape 1. El filtro no está instalado o se ha
instalado incorrectamente
2. Filtro dañado
3. Filtro obstruido o el polvo es demasiado
fino
4. Filtro no es funcional
Pérdida de succión 1. Conexión floja de la manguera
2. Filtro obstruido
3. Tanque lleno
4. Orificio en la manguera
Choque estático 1. Ambiente seco
2. La humedad relativa del aire es baja
1. Compruebe si hay electricidad
2. Reemplace el interruptor
3. Reemplace el motor
1. Instale el filtro adecuadamente
2. Reemplace el filtro
3. Utilice un filtro más eficiente
4. Limpie y vuelva a colocar el filtro
1. Apriete la conexión de la manguera
2. Limpie o sustituya el filtro
3. Vacíe el tanque
4. Reemplace la manguera
1. Agregue humedad al aire (si es posible,
utilice un humidificador de consola o
instalado)
2. Esta situación es temporal y no afecta a
la utilización de la aspiradora
π
CHICAGO • ATLANTA • DALLAS • LOS ANGELES • MINNEAPOLIS • NYC/PHILA • SEATTLE • MEXICO • CANADA
800-295-5510
PAGE 17 OF 25 0115 I H- 2603
IH-2603-SPFR.indd 17 9/16/19 2:47 PM
uline.mx
Page 18

π H-2603, H-2604
SHOP-VAC
MD
–
ASPIRATEUR POUR
SURFACES SÈCHES ET
HUMIDES
1-800-295- 5510
uline.ca
CONSIGNES DE SÉCURITÉ IMPORTANTES
MISE EN GARDE! Lire toutes les consignes
attentivement avant d'utiliser l'appareil. Conserver
ce manuel pour référence ultérieure.
MISE EN GARDE! Ne jamais faire fonctionner cet
appareil lorsque des matériaux inflammables
ou des vapeurs sont présents, car les appareils
électriques produisent des arcs et des étincelles qui
peuvent provoquer un incendie ou une explosion.
NE JAMAIS LAISSER FONCTIONNER L'APPAREIL SANS
SURVEILLANCE.
ASPIRATEURS SHOP-VAC H-2603 ET H-2604
Les aspirateurs Shop-Vac® sont conçus pour aspirer des
déchets solides et humides non volatils. Ils sont dotés d'un
puissant moteur lubrifié en permanence et d'un système de
filtration de série. Un système à double filtration est offert en
option pour la plupart des modèles Shop-Vac® et de série
sur les modèles commerciaux. Ils sont dotés de roulettes
facilitant leur déplacement. Un système d'arrêt automatique
à flotteur empêche tout débordement lors d'une utilisation
pour des déchets humides. Comprend un robuste réservoir
en polypropylène résistant aux bosselures et des accessoires
polyvalents de 3,8cm (1½po). Homologués UL.
POUR RÉDUIRE LE RISQUE D'INCENDIE,
D'ÉLECTROCUTION OU DE BLESSURE:
1. Ne laissez pas l'appareil sans surveillance lorsqu'il est
branché. Débranchez l'appareil lorsqu'il n'est pas utilisé
et avant son entretien. Ne branchez l'appareil qu'à une
prise correctement mise à la terre. Reportez-vous aux
instructions de mise à la terre à la page19.
2. N'exposez pas l'appareil à la pluie et rangez à l'intérieur.
3. L'aspirateur ne doit pas être utilisé comme jouet. Soyez
particulièrement attentif lorsque l'appareil est utilisé par
des enfants ou à proximité de ceux-ci.
4. Utilisez l'aspirateur uniquement selon ces instructions.
N'utilisez que les accessoires recommandés par le
fabricant.
5. N'utilisez jamais l'aspirateur si le cordon ou la fiche est
endommagé. Si l'appareil ne fonctionne pas comme il
le devrait, s'il est tombé, s'il est endommagé, s'il est laissé
à l'extérieur ou s'il est tombé dans l'eau, communiquez
avec le service à la clientèle Uline.
6. Ne tirez pas ou ne transportez pas l'appareil par son
cordon, n'utilisez pas le cordon comme poignée, ne
fermez pas une porte sur le cordon, ne tirez pas le
cordon sur des arêtes ou angles affûtés ou ne passez pas
l'appareil sur son cordon.
7. Gardez le cordon à l'écart des surfaces chaudes.
PAGE 18 OF 25 0115 IH -2603
8. Ne débranchez pas l'aspirateur en tirant sur le cordon.
Pour le débrancher, tirez sur la fiche, pas sur le cordon
d'alimentation.
9. Ne manipulez pas la fiche ou l'appareil lorsque vos mains
sont mouillées.
10. N'insérez pas d'objets dans les ouvertures. N'utilisez pas
l'appareil lorsque l'une ou plusieurs des ouvertures sont
obstruées; maintenez-les exemptes de poussière, de
peluche, de cheveux et de tout autre élément pouvant
entraver la circulation d'air.
11. Maintenez les cheveux, les vêtements amples, les
doigts et toutes les autres parties du corps à l'écart des
ouvertures et des pièces mobiles.
12. N'aspirez aucun élément qui brûle ou produit de la fumée,
tel que cigarettes, allumettes ou cendres chaudes.
13. N'utilisez pas l'aspirateur si aucun sac à poussière ou filtre
n'est installé.
14. Désactivez toutes les commandes avant de débrancher
l'aspirateur.
15. Soyez particulièrement prudent lorsque vous passez
l'aspirateur dans des escaliers.
16. N'utilisez pas l'aspirateur pour aspirer des liquides
inflammables ou combustibles, tels que de l'essence, et
n'utilisez pas l'aspirateur dans les zones où ces produits
peuvent être présents.
17. N'utilisez pas l'appareil comme un pulvérisateur de liquides
inflammables tels que des peintures à base d'huile, des
laques, des produits de nettoyage domestiques, etc.
18. N'aspirez pas de matières toxiques, cancérogènes,
combustibles ou autres matières dangereuses tels que
l'amiante, l'arsenic, le baryum, le béryllium, le plomb, les
pesticides ou autres matières nuisibles à la santé. des
appareils spécialement conçus à ces fins existent.
19. Ne ramassez pas de suie, de ciment, de plâtre ou de
poussière de cloison sèche sans utiliser une cartouche
filtrante et un sac-filtre. Ces particules très fines peuvent
passer à travers la mousse et affecter la performance
du moteur ou être évacuées dans l'air. Des sacs-filtres
supplémentaires sont offerts.
20. Ne laissez pas le cordon sur le sol après
le nettoyage. Il pourrait présenter un risque
de trébuchement.
21. Faites preuve d'une attention particulière lorsque vous
vidangez un réservoir lourdement chargé.
22. Pour éviter toute combustion spontanée, videz le réservoir
après chaque utilisation.
IH-2603-SPFR.indd 18 9/16/19 2:47 PM
Page 19
23. Lorsqu'un aspirateur est utilisé, des corps étrangers
PRISE MISE À
peuvent être projetés dans les yeux, ce qui peut entraîner
des lésions oculaires. Portez toujours des lunettes de
sécurité lorsque vous utilisez un l'aspirateur.
INSTRUCTIONS DE MISE À LA TERRE
DEMEUREZ VIGILANTS! Soyez prudent et faites preuve
de jugement. N'utilisez pas l'aspirateur quand
vous êtes fatigué, distrait ou sous l'influence de
drogues, d'alcool ou de médicaments causant une
diminution de contôle..
Cet appareil doit être mis à la terre. En cas de défaillance
ou de panne, la mise à la terre fournit un chemin de
moindre résistance pour le courant électrique et réduit le
risque d'électrocution. Cet appareil est équipé d'un cordon
d'alimentation muni d'un conducteur de protection et d'une
fiche de mise à la terre. La fiche doit être insérée dans une
prise correctement installée et mise à la terre, conformément
aux codes et ordonnances locaux.
AVERTISSEMENT: Un raccordement incorrect du
conducteur de mise à la terre peut entraîner un
risque d'électrocution. Consultez un électricien ou
un technicien qualifié en cas de doutes quant à
la mise à la terre correcte de la prise. Ne modifiez
pas la fiche fournie avec l'appareil. Si la fiche ne
convient pas à la prise, faites-en installer une qui est
appropriée par un électricien qualifié.
1. Cet appareil est conçu pour utilisation sur un circuit à
tension nominale de 120V et est doté d'une fiche de mise
à la terre qui ressemble à celle illustrée dans le dessinA.
(Voir Figure1)
2. Un adaptateur temporaire qui ressemble à celui illustré
aux dessinsB et C peut être temporairement employé
pour raccorder cette fiche à une prise bipolaire, tel
qu'illustré au dessinB, si aucune prise mise à la terre n'est
disponible. (Voir Figure1)
Figure 1
LA TERRE
BROCHE DE MISE
À LA TERRE
BOÎTE DE
COURANT AVEC PRISE
MISE À LA TERRE
ADAPTATEUR
VIS EN
MÉTAL
PATTE POUR
VIS DE MISE À LA
TERRE
3. L'adaptateur temporaire ne devrait être utilisé qu'en
attendant l'installation par un électricien qualifié d'une
prise correctement mise à la terre (dessinA). La languette,
l'oreille ou tout autre composant de couleur verte qui
sort de l'adaptateur doit être raccordé(e) à une mise à la
terre permanente, telle que le couvercle d'une boîte de
prise de courant correctement mise à la terre. Lorsque
l'adaptateur est employé, le raccordement de mise à la
terre doit être maintenu en position au moyen d'une vis
en métal. (Voir Figure1)
REMARQUE: Au Canada, l'utilisation d'un
adaptateur temporaire n'est pas autorisée par le
Code canadien de l'électricité. Assurez-vous que
l'appareil est raccordé à une prise possédant
la même configuration que la fiche. Aucun
adaptateur ne doit être utilisé avec cet appareil.
RALLONGES ÉLECTRIQUES
Lorsqu'une rallonge est nécessaire, un cordon avec mise à
la terre à troisfils d'un calibre adéquat doit être utilisé pour
assurer la sécurité et prévenir une perte de puissance et
une surchauffe. Reportez-vous au tableau ci-dessous pour
déterminer le calibre AWG requis. Pour déterminer l'intensité
nominale de votre aspirateur, reportez-vous à la plaque
signalétique située à l'arrière du couvercle du moteur.
Avant d'utiliser l'appareil, examinez le cordon d'alimentation
pour toute présence de fils lâches ou exposés et d'une
isolation endommagée. Effectuez toute réparation ou tout
remplacement nécessaire avant d'utiliser l'appareil. Utilisez
seulement des rallonges à trois fils munies d'une fiche à trois
broches et d'une prise tripolaire correspondant à la fiche de
la rallonge. Lors de l'aspiration de liquides, veillez à ce que le
branchement du cordon d'extension n'entre pas en contact
avec le liquide.
PAGE 19 OF 25 0115 IH -2603
REMARQUE: Les décharges statiques sont
communes dans les endroits secs ou lorsque
l'humidité relative de l'air est faible. Cela n'est que
temporaire et n'affecte pas le fonctionnement
de l'appareil. La meilleure façon de réduire la
fréquence des décharges statiques dans votre
maison consiste à humidifier l'air ambiant à l'aide
d'une console ou d'un humidificateur.
VOLTS
120V 25 50 100 150
LONGUEUR TOTALE DU CORDON EN PIEDS
INTENSITÉ
NOMINALE
Plus de Non plus
de
0 6 18 16 16 14
6 10 18 16 14 12
10 12 16 16 14 12
12 16 14 12 Non recommandé
CALIBRAGE AMÉRICAIN NORMALISÉ
DES FILS (AWG)
IH-2603-SPFR.indd 19 9/16/19 2:47 PM
Page 20
DÉBALLAGE
1. Retirez l'aspirateur et tous les accessoires de la boîte.
2. IMPORTANT: Ouvrez le couvercle du réservoir en poussant
les loquets ou les attaches vers l'extérieur avec les pouces
et retirez tous les accessoires s'y trouvant.
3. Assemblez les roulettes en suivant les instructions
ci-dessous.
ASSEMBLAGE
ASSEMBLAGE DES ROULETTES DU CHARIOT
D'ACCESSOIRES ARRIÈRE ET DES PIEDS AVANT
1. Débranchez le cordon d'alimentation et retirez le
couvercle du réservoir, puis tournez le réservoir à l'envers
de sorte que bas vise le haut. (Voir Figure2)
2. Insérez le chariot d'accessoires dans les rainures (à
l'arrière du réservoir, du côté opposé de l'orifice de
vidange). Fixez-le à l'aide des vis et des rondelles fournies
(Voir Figure2)
3. Mettez l'orifice de vidange face à vous et insérez le pied
de la roulette portant la marque «A» dans la fente située
sur le côté gauche du réservoir identifiée par la même
lettre. (Voir Figure3)
4. Installez le filtre approprié au type de substance à aspirer,
qu'elle soit sèche ou humide. (Consultez la page20 pour
un guide relatif aux filtres.)
5. Replacez le couvercle et assurez-vous que les loquets
ou les attaches sont bien fixés sur la partie élevée du
couvercle du réservoir.
5. Insérez le pied de la roulette portant la marque «B» dans
la fente située sur le côté droit du réservoir identifiée par
la même lettre. (Voir Figure5)
6. Fixez le pied à l'aide d'une vis fournie. (Voir Figure6)
7. Installez les roulettes dans les pieds en insérant leur tige
dans le trou prévu à cet effet. Appliquez une pression tout
en tournant jusqu'à ce que les roulettes s'enclenchent.
(Voir Figure7)
8. Installez les roulettes dans le chariot à accessoires en
insérant leur tige dans le trou prévu à cet effet. Appliquez
une pression tout en tournant jusqu'à ce que les roulettes
s'enclenchent. (Voir Figure8)
4. Fixez le pied à l'aide d'une vis fournie. (Voir Figure4)
Figure 2
Figure 3
Figure 4
A
Figure 5 Figure 6
Figure 7
Figure 8
PAGE 20 OF 25 0115 IH -2603
IH-2603-SPFR.indd 20 9/16/19 2:47 PM
Page 21

FILTRES
LE MEILLEUR MIEUX BON
Sacs-filtres à haut rendement
• Déchets secs seulement
• Particules et poussières fines
• Faciles à installer et à utiliser
• Réduisent la perte de puissance
d'aspiration
Cartouche filtrante HEPA CleanStream®*
• Déchets secs ou humides
• Surface antiadhésive
• Nettoyage facile
• Efficace, facile à utiliser
• Particules et poussières fines
Cartouche filtrante HEPA résistante à l'usure
• Déchets secs ou humides
• Surface antiadhésive
• Nettoyage facile
• Efficace, facile à utiliser
• Particules et poussières fines
Cartouche filtrante Ultra Web®**
• Déchets secs ou humides
• Nettoyage facile
• Particules et poussières fines
Filtre en polyester haute performance
• Déchets secs seulement
• Tout usage
• Filtre en tissu réutilisable
Filtre complet en polyester
• Déchets secs seulement
• Circonférence complète du réservoir
• Durable, réutilisable et économique
Filtre disque réutilisable
• Déchets secs seulement
• Tout usage
• Disque réutilisable
Filtre en tissu
• Déchets secs seulement
• Tout usage
• Filtre en tissu réutilisable
Housse en mousse
• Déchets humides seulement
• Utilisez comme filtre secondaire avec
tous les autres filtres shop-vac®, sauf
avec les cartouches filtrantes et les
cartouches filtrantes HEPA.
• Mousse réutilisable
Cartouche filtrante HEPA
• Déchets secs seulement
• Efficace, facile à utiliser
• Particules et poussières fines
*CleanStream, Gore et les dessins sont des marques de commerce de W.L. Gore & Associates, Inc. **Ultra Web est une marque de commerce de Donaldson Co., Inc.
COMBINAISONS DE FILTRES
FILTRES DE CAGE
Cartouches filtrantes
Housse en mousse
Disque réutilisable
Filtre en tissu
Filtre en polyester haute performance
PAGE 21 OF 25 0115 IH -2603
IH-2603-SPFR.indd 21 9/16/19 2:47 PM
PLUS
FILTRES DE RÉSERVOIR
Sacs-filtres à haut rendement
Filtre complet en polyester
Page 22

FONCTIONNEMENT
DÉCHETS HUMIDES
Consultez la page20 du guide des filtres à aspirateurs ShopVac® pour déterminer le type de filtre humide qui correspond
le mieux à vos besoins. Retirez les filtres secs ainsi que toute
la saleté et tous les débris se trouvant sur l'assemblage du
réservoir. Seules une housse en mousse OU une cartouche
filtrante sont nécessaires pour les déchets humides. N'utilisez
pas de filtre pour déchets secs en présence de déchets
humides. Après avoir aspiré plusieurs réservoirs de liquide,
le filtre deviendra saturé et une brume peut apparaître à la
sortie d'air. Lorsque cela se produit, vous devriez assécher
le filtre ou en mettre un sec pour éliminer la brume et éviter
que du liquide ne s'écoule autour du couvercle. Après avoir
ramassé des déchets humides, élevez le tuyau afin qu'il se
vide dans le réservoir avant d'éteindre l'aspirateur. L'intérieur
du réservoir doit être nettoyé périodiquement.
REMARQUE: Les accessoires ayant servi à
ramasser des déchets humides doivent être lavés
régulièrement avec du savon et de l'eau, surtout si
ces déchets étaient mouillés et collants.
DÉCHETS SECS
Consultez la page21 du guide des filtres à aspirateurs ShopVac® pour déterminer le type de filtre sec qui correspond
le mieux à vos besoins. Une filtration de meilleure qualité est
nécessaire pour les matières sèches plus fines. Les sacs-filtres
à haut rendement sont recommandés pour les matières très
fines, comme la poussière de cloison sèche.
INSTALLATION ET NETTOYAGE DE LA CARTOUCHE
1. Faites glisser la cartouche filtrante vers le bas par-dessus
la cage du filtre. (Voir Figure9)
2. Placez le support du filtre au sommet de la cartouche
filtrante. (Voir Figure10)
3. Retenez la base de la cage de couvercle d'une main et
tournez le dispositif de retenue dans le sens horaire pour
le serrer. (Voir Figure11)
4. Pour retirer le filtre, retenez la base de la cage de
couvercle d'une main et tournez le dispositif de retenue
dans le sens antihoraire pour le desserrer. (Voir Figure12)
5. Faites glisser la cartouche filtrante pour la retirer de la
cage du filtre. (Voir Figure13)
6. Nettoyez le filtre humide en le rinçant de l'intérieur.
(Voir Figure14)
7. Nettoyez le filtre sec en le tapant sur l'intérieur
d'une poubelle. (Voir Figure15)
8. Pour éviter les moisissures, la cartouche filtrante doit être
retirée et asséchée à l'air libre pendant 24heures avant
d'être réinstallée sur la cage du filtre
Figure 9 Figure 10
Figure 11
TIGHTEN
Figure 12
LOOSEN
REMARQUE: Lorsque vous ramassez des poussières
très fines, comme de la sciure de bois ou de
la poussière de cloison sèche, il est nécessaire
de vider le réservoir et de nettoyer le filtre plus
fréquemment afin de maintenir une puissance
maximale de ramassage; vous pouvez aussi plutôt
utiliser des sacs-filtres à haut rendement.
LES FILTRES DOIVENT RESTER PROPRES
L'état du filtre influence grandement l'efficacité de ces
aspirateurs. Un filtre encrassé peut provoquer une surchauffe
et endommager l'aspirateur. Nettoyez ou remplacez les filtres
régulièrement. N'utilisez pas l'aspirateur ou les filtres pour
collecter des matières dangereuses ou qui présentent un
danger pour la santé.
REMARQUE: Ne lavez et ne séchez jamais les filtres
à la machine.
ENTRETIEN DES CARTOUCHES FILTRANTES
Ce filtre en papier de haute qualité est conçu pour absorber
les petites particules de poussière. Ce filtre peut être utilisé
pour les déchets secs ou humides. Un filtre sec est nécessaire
pour ramasser les matières sèches. Ramasser de la poussière
quand le filtre est humide aura pour effet d'obstruer
rapidement ce dernier et il sera très difficile à nettoyer. Le
filtre peut se saturer lors du ramassage de grandes quantités
de liquide et une brume peut apparaître à la sortie d'air.
Lorsque cela se produit, vous devriez assécher le filtre ou le
changer pour corriger la situation. Veuillez manipuler le filtre
avec précaution lorsque vous l'enlevez pour le nettoyer et
lorsque vous l'installez. Vérifiez que le filtre ne comporte ni
déchirure ni trous, car la poussière peut s'échapper même
par les petits trous. N'utilisez pas de filtre comportant des trous
ou des déchirures. Remplacez-le immédiatement.
Figur e 13 Figur e 14 Figure 15
UTILISATION EN TANT QUE SOUFFLEUR
Les aspirateurs Shop-Vacs® H-2603 et H-2604 peuvent être
utilisés comme de puissants souffleurs en insérant le tuyau
dans l'orifice d'échappement du boîtier du moteur. Pour les
utiliser comme souffleurs:
1. Dégagez toute obstruction du tuyau.
2. Insérez l'extrémité du tuyau dans l'orifice de soufflerie à
l'arrière de l'appareil. Tournez-le légèrement pour le serrer.
3. Faites preuve de prudence lorsque vous utilisez
l'accessoire en raison de la grande force du jet d'air.
PAGE 22 OF 25 0115 IH -2603
IH-2603-SPFR.indd 22 9/16/19 2:47 PM
Page 23
FONCTIONNEMENT SUITE
ARRÊT AUTOMATIQUE
L'aspirateur est équipé d'un dispositif d'arrêt automatique qui
fonctionne lors de l'aspiration de liquides. Quand le liquide
atteint un certain niveau dans le réservoir, un flotteur est
poussé contre un sceau à l'entrée d'air du moteur, arrêtant
ainsi l'aspiration. Lorsque cela se produit, le moteur émet
un son plus aigu que la normale, indiquant que vous devez
mettre l'appareil hors tension et vider le liquide.
REMARQUE: Si l'appareil est accidentellement
renversé, le dispositif d'arrêt (flotteur) pourrait
s'appuyer contre le sceau et arrêter l'aspiration.
Dans ce cas, il suffit de replacer l'aspirateur en
position verticale et mettre l'interrupteur en position
d'arrêt jusqu'à ce que le flotteur reprenne sa
position normale.
VIDER LE RÉSERVOIR
MISE EN GARDE! Faites preuve d'une attention
particulière lorsque vous vidangez un réservoir
lourdement chargé.
Les déchets liquides peuvent être vidés de l'aspirateur en
enlevant le couvercle du réservoir. Pour vider l'aspirateur,
éteignez-le et débranchez-le de la prise de courant. Retirez le
couvercle du réservoir et videz-le.
REMARQUE: Le réservoir peut aussi être vidé en
enlevant le bouchon de purge et en vidangeant
les déchets liquides dans une canalisation
d'évacuation appropriée.
RANGEMENT
Avant de ranger l'aspirateur, videz et nettoyez toujours le
réservoir. Ne laissez jamais de liquides dans le réservoir
pendant une période prolongée.
REMARQUE: Rangez toujours l'aspirateur à l'intérieur.
LUBRIFICATION
Aucun graissage n'est nécessaire, car le moteur est doté de
roulements lubrifiés pour sa durée de vie.
ENTRETIEN
MISE EN GARDE! Veillez à débrancher l'alimentation
avant de réparer l'appareil ou d'enlever tout
composant.
ENTRETIEN
Ne tentez pas d'effectuer d'entretiens sur votre aspirateur
Shop-Vac® pour déchets secs ou humides autres que
ceux décrits dans ces instructions. Confiez toutes les autres
réparations au service à la clientèle Uline.
MISE EN GARDE! Si une pièce du boîtier du moteur
se détache ou se casse, exposant le moteur ou
tout autre composant électrique, cessez d'utiliser
l'appareil immédiatement pour éviter des blessures
ou d'autres dommages. Les pièces concernées
doivent être réparées avant de réutiliser l'appareil.
ACCESSOIRES, TUYAUX ET TUBES-RALLONGES
EMBOUTS ET ACCESSOIRES
Tous les accessoires à ajustement par friction – Insérez
l'extrémité du tube-rallonge ou du tuyau dans l'accessoire
et tournez pour serrer davantage. (Voir Figure16)
Buse pour plancher
(sec/humide)
TUYAUX
Tuyaux Lock-On® – Insérez le collet du tuyau sur l'entrée
filetée du réservoir et serrez. (Voir Figure17)
Figure17
Figure16
Suceur plat Embout-griffe
TUBES-RALLONGES
Tubes-rallonges à ajustement par friction – Insérez les
extrémités des tubes-rallonges l'une dans l'autre et
tournez pour serrer davantage. (voir Figure 18)
Figure18
PAGE 23 OF 25 0115 IH -2603
IH-2603-SPFR.indd 23 9/16/19 2:47 PM
Page 24

RÉFÉRENCE POUR LE NETTOYAGE DES FILTRES DES ASPIRATEURS SHOP-VAC®
Housse en
mousse
FILTRE INSTRUCTIONS DE NETTOYAGE
Housse en mousse Rincez à l'eau, laissez sécher et réinstallez.
Filtre complet en polyester Éliminez la saleté à l'aide d'une brosse et réinstallez; si le filtre est
Filtre haute performance Jetez le filtre s'il comporte des déchirures.
Filtre disque réutilisable Rincez à l'eau, laissez sécher et réinstallez. Important: Ne le lavez
Cartouche filtrante
CleanStream® résistante à
l'usure
Cartouche filtrante et
cartouche filtrante Ultra Web®
Tous les sacs-filtres à haut
rendement
Filtre complet en
polyester
mouillé, rincez-le à l'eau, laissez sécher et réinstallez.
pas et ne le séchez pas à la machine.
Nettoyez le filtre installé en tapant ou en secouant l'appareil. Pour
restaurer un flux d'air optimal, retirez le filtre et frappez doucement
l'embout contre une surface dure pour libérer les débris. Des
débris supplémentaires peuvent être enlevés en rinçant la surface
extérieure du filtre à l'eau courante. Évitez de mouiller l'intérieur du
filtre. Laissez-le sécher complètement à l'air libre après l'avoir nettoyé.
Important: N'utilisez PAS de brosse. Ne nettoyez PAS les filtres à
l'aide de substances abrasives. NE frottez PAS pour nettoyer l'espace
entre les plis. Cela endommagerait le filtre de façon permanente et
l'empêcherait ainsi de bloquer la poussière.
De l'intérieur du filtre, rincez à l'eau, laissez sécher complètement et
réinstallez.
Jetez le sac lorsqu'il est plein.
Filtre haute performance Filtre disque
réutilisable
Cartouche filtrante
CleanStream® résistante à
l'usure
Cartouche filtrante et cartouche
filtrante Ultra Web®
Tous les sacs-filtres à haut
rendement
ENTRETIEN RÉGULIER
QUOTIDIEN
1. Filtre - Vérifiez le filtre à cartouche pour toute
obstruction ou fort encrassement et remplacez le si
nécessaire. Assurez-vous que les filtres appropriés
sont utilisés pour la tâche - voir la section « Filtres »
du manuel d'instructions.
2. Sac de collecte - Si vous utilisez sac -filtre, vérifiez
qu'il n'y ait pas de déchirures dans le sac et que le
sac ne soit pas plein.
3. Réservoir - Si vous aspirez un matériel mouillé ou
humide, videz le réservoir après utilisation parce
que les odeurs de moisi peuvent se produire si des
débris sont laissés à l'intérieur.
4. Rallonge et fiche - Vérifiez la rallonge et la
fiche pour des coupures ou des dommages. Si
endommagées, remplacez le boîtier du moteur.
5. Moteur - S'il y’a des bruits inhabituels ou en cas de
mauvaise performance, le moteur doit être inspecté
immédiatement par l'équipe de service Uline.
HEBDOMADAIRE
1. Tubes-rallonges/outils - Inspectez les tubes-rallonges
et outils pour tous dommages. Remplacer si
nécessaire.
2. Boyau - Inspectez le boyau pour tous dommages et
remplacez si nécessaire.
MENSUEL
1. Nettoyage - Inspectez et nettoyez tous les secteurs
de l'aspirateur, y compris l'intérieur du réservoir.
PAGE 24 OF 25 0115 IH -2603
IH-2603-SPFR.indd 24 9/16/19 2:47 PM
Page 25

DÉPANNAGE
NATURE DU PROBLÈME CAUSE(S) POSSIBLE(S): MESURE CORRECTIVE
Pièces ou accessoires manquants 1. Emballées dans le réservoir 1. Vérifiez dans le réservoir
L'aspirateur ne démarre pas 1. Pas d'alimentation électrique dans
la prise
2. Interrupteur défectueux
3. Moteur défectueux
De la poussière s'échappe par la sortie d'air 1. Filtre non installé ou mal installé
2. Filtre endommagé
3. Filtre encrassé ou la poussière
est trop fine
4. Le filtre ne fonctionne pas
Perte de puissance d'aspiration 1. Raccordement des tuyaux lâche
2. Filtre encrassé
3. Réservoir plein
4. Tuyau perforé
Décharge statique 1. Environnement sec
2. Faible humidité relative de l'air
1. Vérifiez la présence de courant
2. Remplacez l'interrupteur
3. Remplacez le moteur
1. Installez correctement le filtre
2. Remplacez le filtre
3. Utilisez un filtre plus efficace
4. Nettoyez et replacez le filtre
1. Resserrez les raccordements du tuyau
2. Nettoyez ou remplacez le filtre
3. Videz le réservoir
4. Remplacez le tuyau
1. Humidifiez l'air (lorsque cela est possible,
utilisez une console ou un humidificateur)
2. Cela n'est que temporaire et n'affecte
pas le fonctionnement de l'appareil.
π
CHICAGO • ATLANTA • DALLAS • LOS ANGELES • MINNEAPOLIS • NYC/PHILA • SEATTLE • MEXICO • CANADA
1-800-295-5510
PAGE 25 OF 25 0115 IH -2603
IH-2603-SPFR.indd 25 9/16/19 2:47 PM
uline.ca
 Loading...