


Full Overlay Door Panel
To Convert 2075, 2015 and CLR2060
Panels for Use on the New
2175, 2115, CLR2160 Models
Service & Parts Tech Lines Phone (800) 779-2547 • FAX (414) 354-5696
Publication No. 30163
www.U-LineService.com
Phone (414) 354-0300 • FAX (414) 354-7905
OnlineService@U-Line.com
©2006 U-Line Corporation
04/2006
Installation Instructions
Removing Existing Door
1. Remove the door shelves by first pulling shelves up at
a 45° angle, then straight out.
2. Remove top hinge screw pin (Phillips screwdriver).
Remove the door by tilting forward and lifting off the
bottom hinge pin.
3. Pull door gasket out of the groove (top edge of door
only). Start in the middle and pull outward, moving
toward the edge (see
force.
Figure 1
). This may take some
1"
Figure 4
3/4"
1/8"
ULIN_0363_A
Attaching the Full Overlay Panel
1. Place and tape the existing door panel on the back of
the overlay panel (see Figure 5) and drill holes
through both panels according to Figure 6. Remove
tape adjoining the panels and enlarge the six holes in
the overlay panel using a 0.201" (#7) drill.
2. If a user-supplied cabinet handle will be used, attach its
hardware to the overlay panel at this time.
Old Handle
New Handle
Figure 1 Figure 2
ULIN_0403_A
4. Remove the two screws located on both sides of the
handle.
5. Remove the door panel from the door.
6. Discard the old door.
Preparing the old panel for the new door:
1. Remove the existing metal panel backer.
2. Remove the existing L-shaped angle bracket in the top
corner.
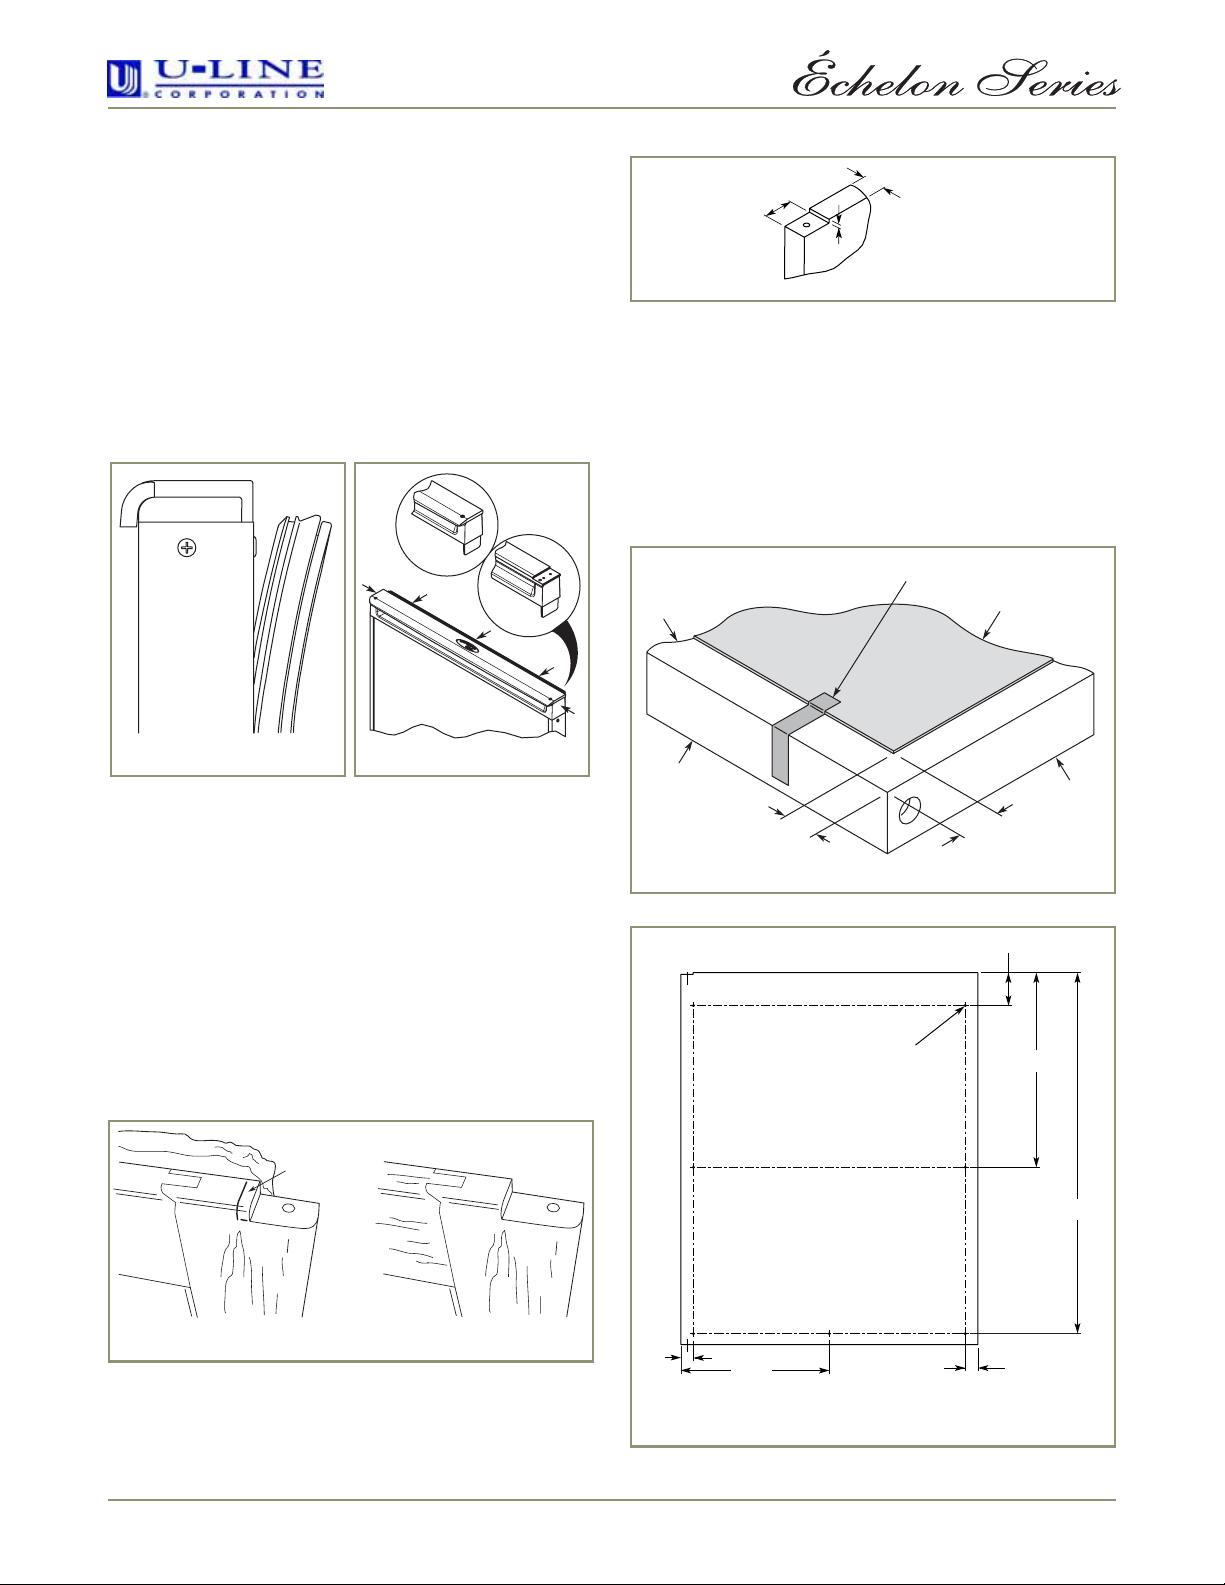
3. Modify the notch in the top corner of the door. The
width needs to be changed to 1" (see
Figure 3
).
Back of
Wood
Panel
Side of
Wood Panel
Figure 5
Tap e
7/16"
Bottom
Drill ø 5/32" x 3/8" Deep
6 places Model 2115 and CLR2160
7 Places Model 2175
For use with #10 x 5/8"
Wood Screw and Nylon Spacer
Removed
Door Panel
3/8"
Both Sides
3"
Bottom of
Wood Panel
16"
Remove this
Material
±
28-7/8"
1/4"
Old New
Figure 3
4. Create an identical notch in the bottom corner of the
door, directly under this notch - 1" wide by 1/8" high by
3/4" deep (see
Figure 4
).
ULIN_0358_A
1.5"
Figure 6
12.25
"
For use on
Model 2175 Only
1.5"
ULIN_0365 _A
www.U-LineService.com 2 04/2006

3. Attach the door panel to the overlay panel using #10 x
A
5/8" wood screws and nylon spacers. The nylon spacers
fit between the overlay panel and the door panel as
shown in
door panel to slide back into the
Figure 7
. The spacers
allow the original
1/4"-thick door
reveal (channel).
Drill here
Figure 7
Typical
Wood Panel
Plastic Spacer
Seven Required
Door Panel
#10x 5/8"
Round Head Screw
Seven Required
ULIN_0404_A
4. Remove the existing bottom pivot plate and replace
with the Full Overlay pivot plate (see
Existing
Door
Existing Bottom Pivot Plate
(Remove and Discard)
Figure 8
Wood Panel Bottom Pivot Plate
(5/8" Longer Than
Existing Bottom Pivot Plate,
Flush Side Facing Out)
#8-32 x 3/8" SEMS Hex Screw
).
Two Places
Figure 8
Figure 9
ULIN_0359_A
2. Using a 5/16" bit, follow the same procedure with the
lower pivot pin/closer clearance hole (see
Figure 10
Figure 10
Drill here
ULIN_0360_
).
3. Insert the hinge hole plug into the opposite side of the
door hinge plate (see
Figure 11
and
Figure 12
).
IMPORTANT
Door panel and overlay panel must be aligned properly or
the door will not operate correctly.
Assembling the Door
1. Install the assembled panel by sliding the original door
panel back into the doorframe.
2. Replace the Overlay Handle and secure with the two
screws removed in Step 4 under Removing Existing
Door.
3. Starting at the corners and working toward the center,
push the door gasket back into place.
Pivot Post Clearance:
1. Using the upper pivot plate as a guide, use a #16 drill
and drill into the wood panel approximately 3/4"
through the pivot pin hole to provide clearance for the
pin in the door panel
(see
Figure 9).
Figure 11
Figure 12
ULIN_0361_A
ULIN_0362_A
04/2006 3 www.U-LineService.com

Installing the Door
5. Place the modified door onto the pivot post.
1. If the cabinet already used an overlay door, there is no
need to change the hinges.
2. Install the new Replacement Top Hinge onto the unit
(see
Figure 13
Wood Panel Top Hinge Plate
(5/8" Longer than Existing Top Hinge Plate)
Figure 13
).
Pivot Post
Door Panel
#8-32x 1/2"
Flat Head Screw
Three Places
Top Pivot Plate
ULIN_0405
3. Install the pivot post into the new Replacement Bottom
Hinge (using the Phillips screwdriver) and install the
hinge onto the unit.
4. Replace the door closure assembly onto the bottom
pivot post (see
Figure 14
). Be sure that bosses on
closers align with holes in hinge and hinge plate.
6. Position door and install the pivot post into the top
hinge (using the Phillips screwdriver).
7. Adjust door as needed for proper closure.
8. Check to see that light goes off when the door closes.
9. Reinstall the door shelves by lining up the bosses and
first pushing straight in, then down at a 45° angle.
Checking Door Alignment
The unit’s door is aligned at the factory before shipment.
However, its alignment could have been disturbed during
shipment or during door panel installation.
IMPORTANT
Properly aligned, the door should be 1/8" below the top of
the unit’s cabinet, NOT flush with the top (see
1/8"
Figure 15
1. Compare the top edge of the door to the top edge of
the cabinet.
Figure 15
).
Existing
Door
Door Closure Top
Door Closure Bottom
Boss
Pivot Post
Boss
#8-32 x 1/2" Flat Head Screw
Three Places
Wood Panel Bottom Hinge Plate
(5/8" Longer than Existing Bottom Hinge Plate)
Figure 14
IMPORTANT
Pivot posts must be cleaned. Closers must also be clean
and greased to ensure proper operation.
2. If the door edge is 1/8" below and parallel to the top of
the cabinet, the door is aligned. If it is not, note
whether the side opposite the hinge needs to be moved
UP or DOWN, and use the following procedure.
Note: If door is adjusted correctly, but panel is not square
with the adjacent cabinets, slight adjustments can be
made by drilling the holes in the vinyl coated steel panel
slightly oversized. See Figure 6 on Page 2.
www.U-LineService.com 4 04/2006

Adjusting Door Alignment
1. Remove top hinge screw
pin (Phillips screwdriver,
see Figure 16). Remove
door by tilting forward
and lifting off bottom
hinge pin.
2. With door upside-down,
loosen but do not remove
the two screws on the
door’s bottom hinge plate.
Slotted
Mounting
Holes
Figure 16
Notch
(must face toward
center of door)
3. See
Figure 17
. If the top far edge of the door needs to
move UP, move the hinge plate toward the outside of
the door and retighten screws. If the top far edge of the
door needs to move DOWN, move the hinge plate
toward the inside of the door and retighten screws.
4. Mount the door to recheck alignment and repeat Steps
2 and 3 if further adjustment is necessary.
5. When top edge of door is parallel to top edge of
cabinet, remove the door and ensure the two screws
are secure.
6. Remove the door closers from the bottom hinge, clean
thoroughly and lubricate the mating surfaces with
petroleum jelly.
7. Reinstall the closers, lining
up the bosses with holes in
hinge and hinge plate (see
Figure 18
8. Mount the door and install
top hinge pivot pin.
).
Door
Closer
Inserts
Raise
Outside
Door Edge
Figure 17
Lower
Outside
Door Edge
Boss
Figure 18
04/2006 5 www.U-LineService.com

Who to Call
Service Information
If the need for service arises, contact the dealer from
whom the unit was purchased. State the Model Number
and Serial Number and explain the problem. The Model
and Serial Number plate is located inside unit at upper
right hand corner.
If you need to locate a service company, you can go online
at www.U-LineService.com and search for a service
company by zip code.
 Loading...