

Page 1
Para Español, vea página 2.
Pour le français, consulter la page 3.
H-3129
5/8" HIGH PERFORMANCE
GLUE GUN
TOOL INCLUDED
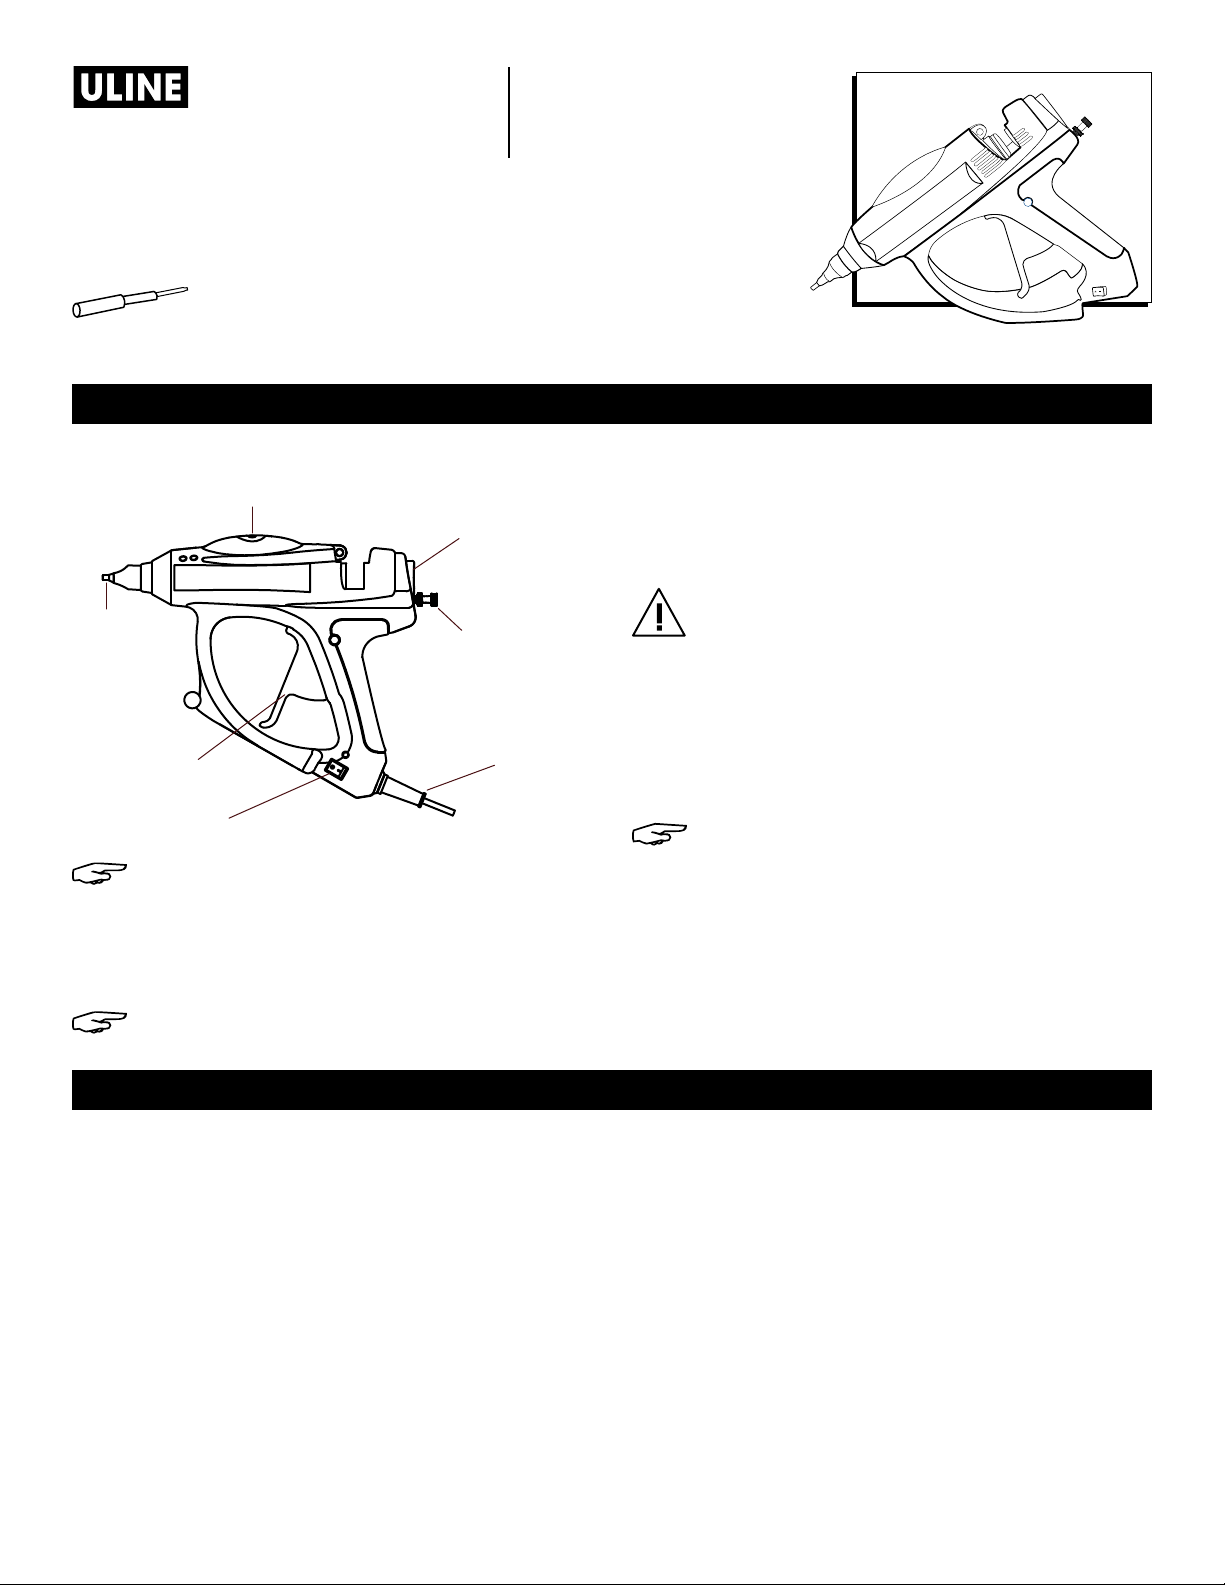
Screwdriver (Built Into Base)
Temperature Control
Glue Feed
Nozzle
Stroke Adjuster
1-800 -295-5510
uline.com
OPERATION
2. Plug the glue gun into a 120 volt AC outlet; when red
light illuminates on/off switch, the power is on.
3. Insert 5/8" glue stick into glue feed. Allow the glue
gun to heat for approximately 3 to 5 minutes.
CAUTION! Once glue gun heats up, the nozzle
and melted glue are extremely hot. Avoid
touching.
Trigger
Power Input
On/Off Switch
NOTE: The glue gun should be unplugged
after each use. The adhesive can be stored
indefinitely in the unheated gun and re-melted
by heating up the tool.
1. Use built-in screwdriver to adjust temperature control.
NOTE: The glue gun comes pre-set at 375°F.
SAFETY
1. Keep out of reach of children.
2. Never touch the gun's nozzle or the melted glue.
Operating temperatures reach 450°F and can cause
severe burns. Immediately immerse any accidental
burns in cold water and seek medical attention.
3. Do not use within 10 feet of flammable materials.
4. When the gun is fully heated, squeeze trigger slowly.
The melted glue will begin to flow from nozzle.
Release the trigger to stop the glue flow.
5. The output volume of the glue can be adjusted by
turning the stroke adjuster clockwise.
NOTE: Use short nozzle for general use or long
nozzle for harder to reach areas.
6. If glue drips excessively, replace the nozzle. To
change, heat the gun for a minute until glue is
softened enough to remove the nozzle. While
wearing gloves, use a wrench to remove the old
nozzle. Flush glue through the gun and attach the
new nozzle.
6. Never use with materials other than recommended
glue sticks.
7. Always wear protective safety equipment such as gloves,
glasses, and long sleeve shirts and pants when using.
8. When inserting glue sticks in glue gun, avoid using too
much force.
4. Not for outdoor use or in areas that may be wet or
damp.
5. Keep all work areas clean and well lit.
PAGE 1 OF 3
9. If the supply cord is damaged, it must be replaced by
the manufacturer or its service agent to avoid a hazard.
10. Always follow basic safety precautions when operating.
04 21 IH -3129
Page 2
H-3129
PISTOLA DE SILICÓN DE
ALTO RENDIMIENTO DE 5/8"
HERRAMIENTA INCLUIDA
Desarmador (Integrado en la Base)
FUNCIONAMIENTO
800 -295-5510
uline.mx
Control de Temperatura
Alimentación de Pegamento
Boquilla
Gatillo
Interruptor de Encendido/Apagado
NOTA: La pistola de silicón debe desenchufarse
después de cada uso. El pegamento puede
almacenarse indefinidamente en la pistola fría
y volverse a fundir al calentarse la herramienta.
1. Use el desarmador integrado para ajustar el control
de temperatura.
NOTA: La pistola de silicón viene con una
temperatura preestablecida de 190.5 °C (375 °F).
2. Enchufe la pistola de silicón a una entrada de AC de
120 voltios. Cuando una luz roja ilumine el interruptor
On/Off (encendido y apagado), está encendida.
Ajustador de Bombeo
Entrada de Energía
3. Inserte una barra de pegamento de 5/8" en el
compartimento de alimentación de pegamento.
Deje que la pistola de silicón se caliente durante
aproximadamente 3-5 minutos.
¡PRECAUCIÓN! Una vez que la pistola de silicón
se calienta, la boquilla y el pegamento están
extremadamente calientes. Evite tocarlos.
4. Cuando la pistola se haya calentado
completamente, apriete el gatillo lentamente. El
pegamento caliente empezará a fluir a través de
la boquilla. Suelte el gatillo para detener el flujo de
pegamento.
5. El volumen de salida de pegamento se puede
ajustar girando el ajustador de bombeo en
dirección de las manecillas del reloj.
NOTA: Utilice la boquilla corta para uso
general o la boquilla larga para alcanzar
áreas difíciles.
6. Si el silicón gotea excesivamente, reemplace la boquilla.
Para cambiar, caliente la pistola por un minuto para
suavizar el silicón lo suficiente como para remover la
boquilla. Mientras usa guantes, utilice una llave de
tuercas para remover la boquilla gastada. Descargue
el silicón por la pistola y coloque la nueva boquilla.
SEGURIDAD
1. Mantenga el artículo fuera del alcance los niños.
2. No toque nunca la boquilla de la pistola o el
pegamento derretido. Las temperaturas de
funcionamiento alcanzan los 450 °F y pueden
ocasionar quemaduras graves. En caso de sufrir
quemaduras accidentales, sumerja la zona afectada
de inmediato en agua fría y busque atención médica.
3. No use la unidad en un radio de 3 m (10 pies) de
materiales inflamables.
4. No use la unidad en exteriores ni en zonas que
puedan estar húmedas o mojadas.
5. Mantenga todas las áreas de trabajo limpias y bien
iluminadas.
PAGE 2 OF 3
6. No use nunca la unidad con materiales que no sean
las barras de pegamento recomendadas.
7. Siempre use equipo de protección, como guantes,
lentes, camisas de manga larga y pantalones cuando
utilice la unidad.
8. Al insertar barras de pegamento en una pistola de
silicón, evite ejercer mucha fuerza.
9. Si el cable que se incluye se daña, debe ser
reemplazado por el fabricante o por su agente de
servicio para evitar peligros.
10. Siga siempre las precauciones de seguridad básicas
al hacer funcionar la unidad.
04 21 IH -3129
Page 3

H-3129
Bouton de réglage de course
Buse
PISTOLET À COLLE HAUTE
PERFORMANCE DE 5/8 PO
OUTIL INCLUS
Tournevis (intégré à la base)
1-800 -295-5510
uline.ca
FONCTIONNEMENT
Contrôle de la température
Entrée du bâton de colle
Détente
Interrupteur marche/arrêt
REMARQUE: Le pistolet à colle doit être
débranché après chaque utilisation. L'adhésif
peut être laissé indéfiniment dans le pistolet non
chauffé et fondu de nouveau en chauffant l'outil.
1. Utilisez le tournevis intégré pour régler la commande
de température.
REMARQUE: Le pistolet à colle est préréglé à
190,5 °C (375 °F).
2. Branchez le pistolet à colle dans une prise secteur
de 120 volts; lorsque l'interrupteur marche/arrêt
s'illumine en rouge, l'appareil est en marche.
Entrée d’alimentation
3. Insérez un bâton de colle de 5/8 po dans le
chargeur à colle. Laissez le pistolet à colle chauffer
pendant environ 3à 5minutes.
MISE EN GARDE! Lorsque le pistolet à colle est en
train de chauffer, la buse et la colle fondue sont
extrêmement chaudes. Évitez de les toucher.
4. Lorsque le pistolet est bien chaud, pressez la
détente lentement. La colle fondue commencera
à s'écouler de la buse. Relâchez la détente pour
interrompre l'écoulement de la colle.
5. Le volume de sortie de la colle peut être réglé en tournant
le bouton de réglage de course dans le sens horaire.
REMARQUE : Utilisez la buse courte pour un
usage général ou une longue buse pour des
endroits un peu plus difficile à atteindre.
6. Si la colle s'égoutte excessivement, remplacez la
buse. Pour changer, rechauffer le pistolet jusqu'à ce
que la colle se soit ramollie suffisamment pour retirer
la buse. Tout en portant des gants, utilisez une clé
pour démonter l'ancienne buse. Vidangez la coller
à travers le pistolet et fixez la nouvelle buse.
SÉCURITÉ
1. Tenir hors de la portée des enfants.
2. Ne touchez jamais la buse du pistolet ou la colle
fondue. Les températures de fonctionnement atteignent
232,2 °C (450 °F) et peuvent causer des brûlures graves.
Immergez immédiatement dans l'eau froide toute brûlure
accidentelle et demandez une assistance médicale.
3. N'utilisez pas le pistolet à moins de 3m (10pi) de
matériaux inflammables.
4. Ne l'utilisez pas à l'extérieur ou dans des zones qui
peuvent être mouillées ou humides.
5. Gardez les zones de travail propres et bien éclairées.
PAGE 3 OF 3
6. N'utilisez jamais ce pistolet avec des matériaux
autres que les bâtons de colle recommandés.
7. Lorsque vous utilisez le pistolet, portez toujours de
l'équipement de protection et de sécurité, tel que des
gants, des lunettes, un chandail à manches longues et
un pantalon.
8. Lorsque vous insérez des bâtons de colle dans un
pistolet à colle, évitez d'employer une trop grande force.
9. Si le cordon d'alimentation est endommagé, il doit être
remplacé par le fabricant ou son représentant pour
éviter tout danger.
10. Suivez toujours les consignes de sécurité lorsque vous
utilisez le pistolet.
04 21 IH -3129
 Loading...