

Page 1

Ulead DVD Menu Plug-in User Guide 1
Ulead DVD Menu Plug-in
Ulead DVD Menu Plug-in is a plug-in that allows you to export
PhotoImpact-designed DVD menu templates to Ulead’s DVD
authoring software. Create your menu templates using
PhotoImpact tools then use the plug-in to make the menu
template elements interactive when the selection menu is viewed
on DVD players.
Creating a menu template
Create your menu template using the variety of tools available in
PhotoImpact. Each menu template must contain certain elements
(objects) for it to be recognized as a menu template by Ulead DVD
authoring software. The necessary elements for a menu template
are listed below.
The following conditons must be followed for the template to be
valid:
• The canvas size must be 768x576.
• All template objects must fall within the boundaries of the
canvas.
• There must be at least one object in the template.
• All objects created using the Outline Drawing Tool or the
Line and Arrow Tool must be converted to an image object
first before saving the template.
• The template must be saved in the UFO file format.
Note: The Ulead DVD Menu Plug-in is only compatible with PhotoImpact 8
and later versions.
Page 2
2 Ulead DVD Menu Plug-in User Guide
When you finish creating the menu template, save the template
first as as a UFO file then select Effect: DVD Menu - DVD Menu
Plug-in to open the DVD Menu Plug-in.
When DVD Menu Plug-in opens, you will see three tabs. These 3
tabs are the steps that you need to take to customize and then
export the menu template to Ulead DVD authoring software. The 3
tabs are: Set Up Template Properties, Assign Object Name
and Preview and Export.
Component Quantity Object Type Required
Background Image 1 Image Yes
Template Thumbnail* 1ImageYes
Scene Button 1-32 Image Yes
Scene Highlight Image Same as Scene Button Image/Path/
Tex t
Optional
Scene Frame Same as Scene Button Image/Path Optional
Scene Text Same as Scene Button Text Optional
Scene Number Same as Scene Button Text Yes
Navigation Buttons 4 Image/Path/
Tex t
Yes
Navigation Highlight
Image
Same as Navigation
Button
Image/Path/
Tex t
Optional
Title 1 Text Optional
Page Number 1 Text Yes
Decoration No limit Image/Path/
Tex t
Optional
Menu Overlay No limit Image/Path Optional
*The template thumbnail (120x90 pixels) is a visual representation of the
template. It must be set as a hidden object in PhotoImpact. It is
recommended that you do not create your own template thumbnail. If you
want a custom template, have the DVD Menu Plug-in create the template
thumbnail first (Preview and Export tab) before customizing it.
Page 3
Ulead DVD Menu Plug-in User Guide 3
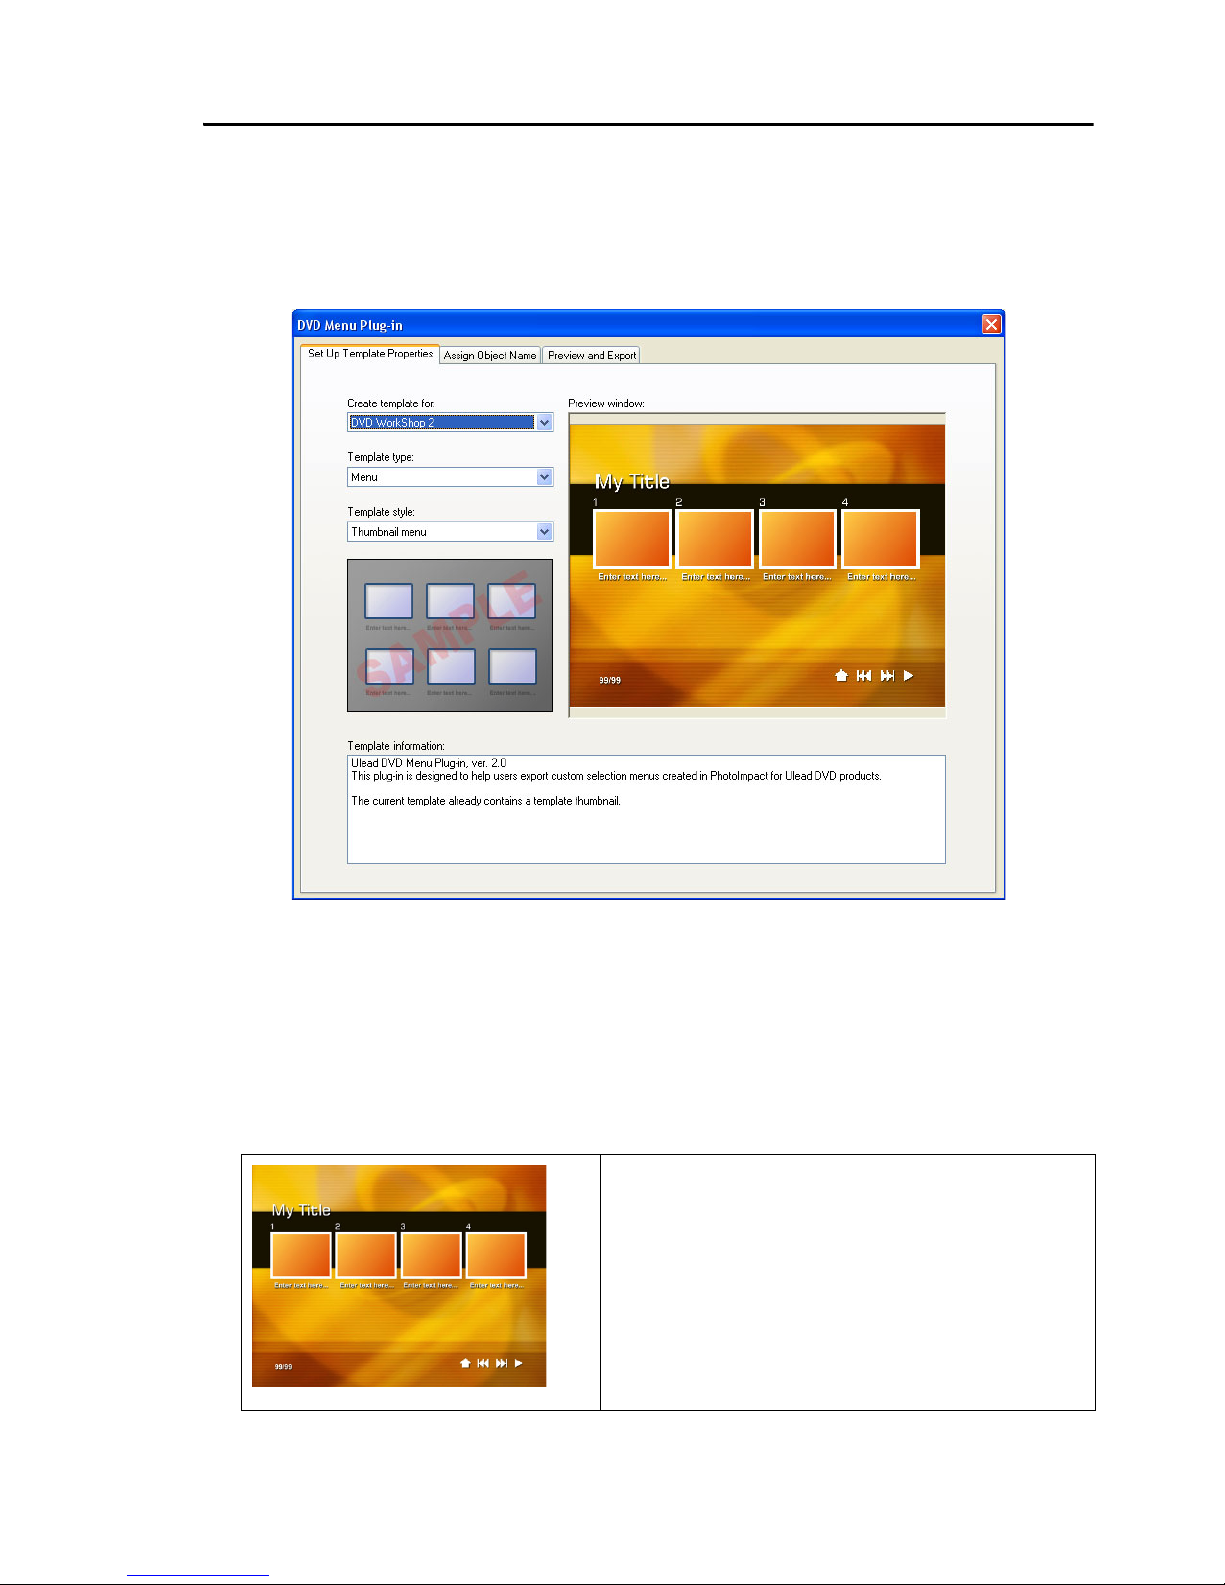
Step 1: Setting up template properties
Select which Ulead DVD authoring software you want to export the
menu template to. Select also the type and style of your template.
• Create template for Select the Ulead DVD software where
you want to export the template to.
• Template type Select the type of template you want to create.
• Template style Select the style for the template type you
selected. The available styles depend on the template type
selected.
Thumbnail menu
A template style that contains both
thumbnail placeholders and text.
This style is ideal when you have
several videos on your disc or you
are creating chapter menus for
your video.
Page 4
4 Ulead DVD Menu Plug-in User Guide
• Preview window Displays the menu template you are
currently working on.
• Template information Displays template properties like which
DVD authoring software the template was designed for and
what template style the template is using.
Step 2: Assigning object names
An Object name identifies whether a menu object is a background
image, button, decoration, or other. Assign an Object name to
your menu objects using the Assign Object Name tab. Basically,
the purpose of assigning Object names is to make menu objects
interactive when the DVD menu is viewed on the DVD player.
To assign an Object name to a menu object:
1. Select a menu object from the Preview Window.
2. From the Object class list, choose how the object will be used
in the menu template. (For instance, for a DVD Workshop menu
template, you can customize an object to be used for
navigation, or for use as a background image or scene.)
3. Choose an Item that you want to customize, then specify the
desired properties. To customize all of the items under the
selected Object class, choose each item one at a time and
customize its properties.
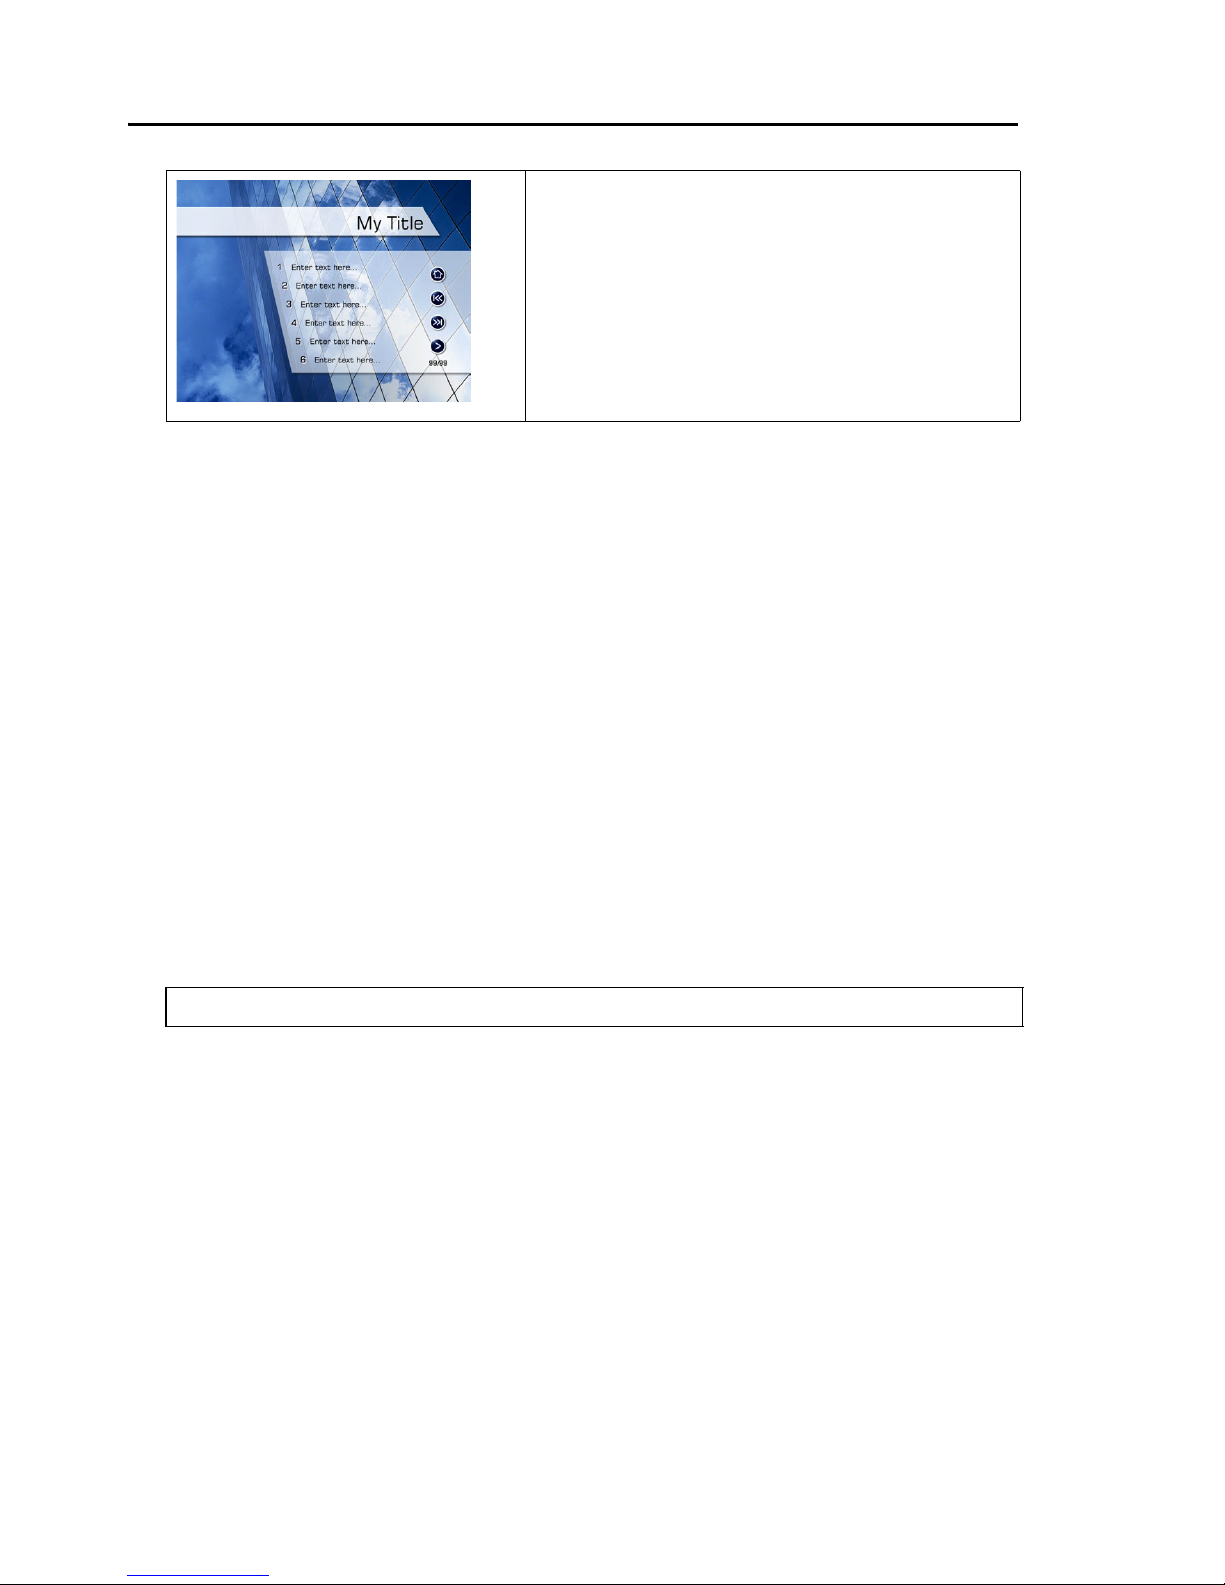
Text menu
A template style that only contains
text. This style is ideal when you
are creating a template for subtitle
or language options for your DVD
videos.
Tip: You can also select the object in the Objects list.
Page 5

Ulead DVD Menu Plug-in User Guide 5
4. Click Assign to apply the specified properties to the object.
• Preview window Displays a preview of the menu template.
Click an object to assign an Object name to it.
• Object list Visual list of all objects in the menu template. It
also displays the original and assigned object names of your
objects in the template. Click an Object list heading to sort the
list according to that particular heading.
Object Displays an image of the object. Click to
arrange the objects according to their Zorder. The Z-order determines which
objects lie on top of other objects.
Type Displays whether the object is a path, text
or image object.
Media files used Displays the associated media file linked, if
any, to the object.
Original object name Name of the object when it was created in
PhotoImpact or after you have clicked Apply
in the Preview and Export tab.
Assigned object name Designated Object name for the object. Click
Assign to designate the specified properties
to the object.
Page 6

6 Ulead DVD Menu Plug-in User Guide
• Current object Displays a preview of the selected object.
• Object name and properties Displays the Object name as
well as the settings assigned to the selected object.
• Display object properties Select to display the current
settings of the selected object.
• Object class Select how you want the selected object to be
used in the template. (For instance, in a DVD Workshop menu
template, an object can be used as a navigation, background
image, or scene.)
• Item Specify the template element type of the selected object.
(For instance, if the Object class is Navigation, you can specify
the selected object as a Navigation button or Navigation
highlight image.)
• Assign Designates the specified properties to the selected
object.
• Clear Removes the selected object’s Object name.
• Clear All Removes all Object names from the template.
• Reset All Reverts all assigned object names back to the names
under the Original object name column in the Object list.
Object class and items
Object class: Background
Items:
• Background image Indicates that the selected object is used
as a background image for the menu template. This is also
where you specify the 3 color pairs (color mapping) for the
menu template. Color mapping indicates that a button in the
menu is either selected or activated. Click a color box to open
Ulead Color Picker and specify a color. You can also adjust
each color’s transparency by entering a value beside the color
box.
Page 7

Ulead DVD Menu Plug-in User Guide 7
Also, a menu template can use a video file as its background
with background music. To use a video file, select Background
video and/or Background audio then browse for the file to
use.
• Global settings Specifies the template’s name and the default
color mapping settings for the navigation buttons, scene
selection buttons, text buttons, numbers, and frames.
• Menu overlay Indicates that the selected object will be used
as a frame for the menu template.
Object class: Scene
Items:
• Scene button Indicates that the selected object will be used as
a scene placeholder. You can specify the scene button’s button
number as well as the default color mapping settings.
If you have a placeholder that is rotated to a certain degree,
use Rotation angle to correct the orientation of the video or
image link to make it conform to the angle of the placeholder.
Rotation angle does not rotate the placeholder.
Note: Make sure that the background object does not contain any masks.
DVD Menu Plug-in disregards any mask applied on the image. Also the
background image size must be the same as the canvas size.
Note: Color mapping settings of template objects can still be changed in
their respective object properties.
Page 8

8 Ulead DVD Menu Plug-in User Guide
• Scene highlight image Indicates that the selected object will
be used instead of color mapping to show that an object is
selected. Instead of color mapping, the shape of the designated
image appears when a button is selected. This is only available
when creating a thumbnail menu. (See “Thumbnail menu” on
page 3).
• Scene frame Indicates that the selected object will be used as
a frame for a scene button.
• Scene text When creating a thumbnail menu, this indicates
that the selected object will be used as a caption for a scene
button. When creating a text menu, a scene text is used as a
selection button. (See “Text menu” on page 4).
• Scene number Indicates the order of the scenes in the menu.
Object class: Navigation
Items:
• Navigation button Indicates that the selected object will be
used as the menu’s navigation buttons. In Object name,
specify the button’s action when activated such as go to main
menu, next menu, or previous menu.
• Navigation highlight image Indicates that the selected
object will be used as a navigation button’s highlight image.
Instead of the usual color mappings, a designated image
appears when a button is selected.
Note: A scene text can be edited when creating a menu using Ulead DVD
authoring products.
Note: The Button number of a scene frame, scene text, scene number, or
scene highlight image must be the same as the scene button it is associated
with. For example, if the scene button button number is 1 and you want a
particular highlight image to be used when the scene button is selected, you
must also set the highlight image button number to 1.
Tip: Select Use animation to use an animated GIF file as a navigation
button.
Page 9

Ulead DVD Menu Plug-in User Guide 9
Object class: Others
Items:
• Title Indicates that the selected object will be used as the title
for the menu template.
• Page number Indicates the selected object will be used as a
page counter.
• Decoration Indicates that the selected object will be used as a
decoration. These objects have no assigned links and no
particular function in the menu. You can use an animated GIF
file as a decoration by selecting Use animation.
Step 3: Previewing and exporting the menu
template
After assigning all Object names and customizing properties for
your menu template, click the Preview and Export tab to
simulate the behavior of the menu template. This tab also checks
if all template objects’ properties are properly defined and all
objects necessary in a template are present. If you see an object
that is not properly defined in Template details check, click the
Assign Object Name tab and set up the missing template
objects.
When the template objects are all properly defined, you can then
export the template to the contents folder of the Ulead DVD
authoring software you specified in the Set Up Template
Properties tab.
Tip: A title can be edited when creating a menu using Ulead DVD
authoring products.
Note: When creating a page number object, it is recommended that you
use this format: 99/99 (current page/total page).
Page 10

10 Ulead DVD Menu Plug-in User Guide
To export a menu template:
1. Click Export in the Preview and Export tab.
2. In the Export dialog box, specify where the menu template will
be saved in Destination folder.
3. Click OK to export the menu template.
Tip: Select Copy associated media files to export all media files used,
such as video, audio, and animated images, to the destination folder.
Page 11

Ulead DVD Menu Plug-in User Guide 11
• Preview window Displays the menu template that you are
currently working on.
• Template details check Displays a report stating if the
template is ready to be exported or if there are template
objects that are not properly defined.
• Template structure Displays the structure of the menu
template. This allows you to view the current Object classes
and Items that are assigned to the various objects in the menu
template.
• Media files used Displays names of media files that are linked
to the menu such as video, audio, and animated images.
• Template thumbnail Displays the thumbnail image to use to
represent the template.
• Update thumbnail Select to use the current image in the
Preview window as the template thumbnail for your template.
• Export Opens a dialog box for exporting your menu template
to the content folder of your Ulead DVD authoring software.
• Apply Saves all settings and Object names.
• Close Exits the program and returns to PhotoImpact. If there
are changes applied, a message will prompt you if you want to
save the changes first before closing the program.
Note: If you do not have an object in your template set as a template
thumbnail and you click Apply or Export, DVD Menu Plug-in automatically
creates a template thumbnail. This template thumbnail is a visual
representation of your template. The thumbnail will appear in the Ulead DVD
authoring software that the template is created for.
Tip: If you already have a template thumbnail object that you want to
use in the template, it is recommended that you clear this option.
Note: When you select this option and click Apply or Export, you cannot
revert back to the template thumbnail before this option was selected.
 Loading...