

Page 1

User Guide
Ulead Systems, Inc.
November 2001
Page 2

First English edition for Ulead VideoStudio version 6.0, November 2001.
© 1992-2002 Ulead Systems, Inc.
All rights reserved. No part of this publication may be reproduced or transmitted in any form or by any
means, electronic or mechanical, including photocopying, recording or storing in a retrieval system, or
translated into any language in any form without the express written permission of Ulead Systems,
Inc.
Software license
The software described in this document is furnished under a License Agreement, which is included
with the product. This Agreement specifies the permitted and prohibited uses of the product.
Licenses and trademarks
ICI Library © 1991–1992 C-Cube Microsystems.
Ulead Systems, Inc., Ulead, the Ulead logo, and Ulead VideoStudio are trademarks of Ulead Systems,
Inc. All other product names and any registered and unregistered trademarks mentioned in this
manual are used for identification purposes only and remain the exclusive property of their respective
owners.
Sample files
Files provided as samples on the program CD can be used for personal demonstrations, productions
and presentations. No rights are granted for commercial reproduction or redistribution of any sample
files.
North & South America: International:
Ulead Systems Inc. Ulead Systems, Inc.
http://www.ulead.com http://www.ulead.com
E-mail: info@ulead.com http://www.asiapac.ulead.com
http://www.ulead.com.tw
E-mail: info@ulead.com.tw
Europe: Japan:
Ulead Systems GmbH Ulead Systems, Inc.
http://www.ulead.de http://www.ulead.co.jp
E-mail: info@ulead.de E-mail: info@ulead.co.jp
Page 3

Table of Contents
The big picture ................................................................................ 6
An introduction to digital video .......................................................................................6
Key features of DV.........................................................................................................7
Analog to digital.............................................................................................................7
An introduction to MPEG ...............................................................................................8
MPEG-1 ...............................................................................................................................8
MPEG-2 ...............................................................................................................................8
How VideoStudio works .................................................................................................9
Whats new? ................................................................................. 10
System requirements ....................................................................... 12
Hardware checkup before using VideoStudio ........................................... 13
DV IEEE 1394 capture card.........................................................................................13
Analog capture card.....................................................................................................15
USB port......................................................................................................................1 5
Installing and running VideoStudio ....................................................... 16
Configuring VideoStudio .................................................................... 17
DV (IEEE 1394 capture card) ......................................................................................1 7
Analog capture card.....................................................................................................18
USB input device .........................................................................................................1 8
Getting around VideoStudio ............................................................... 19
The Library...................................................................................................................23
Library Manager ................................................................................................................24
Steps to create your movie ................................................................. 25
Start.............................................................................................................................27
Creating a new project .....................................................................................................27
Selecting a template ......................................................................................................... 2 9
Page 4

Capture ........................................................................................................................31
Checklist for successful video capture ............................................................................ 31
Capturing DV video ...........................................................................................................3 2
Capturing analog video .................................................................................................... 32
Direct capturing MPEG video............................................................................................33
Scene Detection / Split by Scene .....................................................................................3 4
Capturing still images ...................................................................................................... 3 5
Captured video file size in Windows................................................................................ 3 5
Batch Capture ...................................................................................................................36
Storyboard ...................................................................................................................38
Storyboard Mode ...............................................................................................................38
Timeline Mode .................................................................................................................. 3 9
The Options Panel ............................................................................................................ 4 0
SmartRender and Play Project button .............................................................................4 1
Preview Files Manager ..................................................................................................... 4 2
Inserting a clip into the Timeline...................................................................................... 4 2
Trimming a clip .................................................................................................................43
Working with clips ............................................................................................................. 44
Capturing still images in the Storyboard Step .................................................................4 6
Using color clips ............................................................................................................... 4 6
Using video filters .............................................................................................................47
Effect ...........................................................................................................................49
Creating effects ................................................................................................................. 49
Customizing effects .......................................................................................................... 5 0
Overlay ......................................................................................................................... 51
Inserting video/image in the Overlay track.......................................................................5 1
Customizing overlays ....................................................................................................... 52
Title .............................................................................................................................. 53
Creating text titles .............................................................................................................54
Rolling & scrolling ............................................................................................................ 5 6
Fading in & out ..................................................................................................................5 7
Putting it all together .........................................................................................................57
Audio ...........................................................................................................................58
Creating voiceover narration ............................................................................................ 60
Creating background music ............................................................................................. 6 1
Customizing background music ...................................................................................... 6 2
Mixing it together ...............................................................................................................62
Fade...................................................................................................................................63
Page 5

Finish...........................................................................................................................64
Creating and saving a video file.......................................................................................6 4
Video Save Options ..........................................................................................................6 6
Creating a DVD / VCD / SVCD Title ..................................................................................71
Project Playback................................................................................................................71
Creating an audio file ....................................................................................................... 7 1
Exporting your movie........................................................................ 72
Burning DVD/VCD/SVCD.............................................................................................72
Compressing video
for the Web ........................................................................................................................74
Putting a movie on the Web.........................................................................................74
Posting your video on a Web page ..................................................................................7 5
Sending a movie by E-mail ..........................................................................................7 6
Electronic greeting cards .............................................................................................77
Recording back to a DV camcorder .............................................................................78
Shortcuts ..................................................................................... 79
Need more help? ............................................................................ 80
Glossary ....................................................................................... 81
Index ........................................................................................... 83
Page 6
6 VIDEOSTUDIO USER GUIDE
The big picture
Digital video editing used to be dominated only by professionals. Advances in technology,
however, made it possible for almost anyone to create desktop video productions even at
home. As personal computers become increasingly powerful, video editing software also
become smarter.
Ulead VideoStudio puts you at the cutting edge of video technology by providing a complete
set of tools to cut, mix, run titles, add special effects, and do almost anything digitally possible
with your work. Even novices achieve professional results as VideoStudio turns the complex
process of video editing into a simple and fun affair.
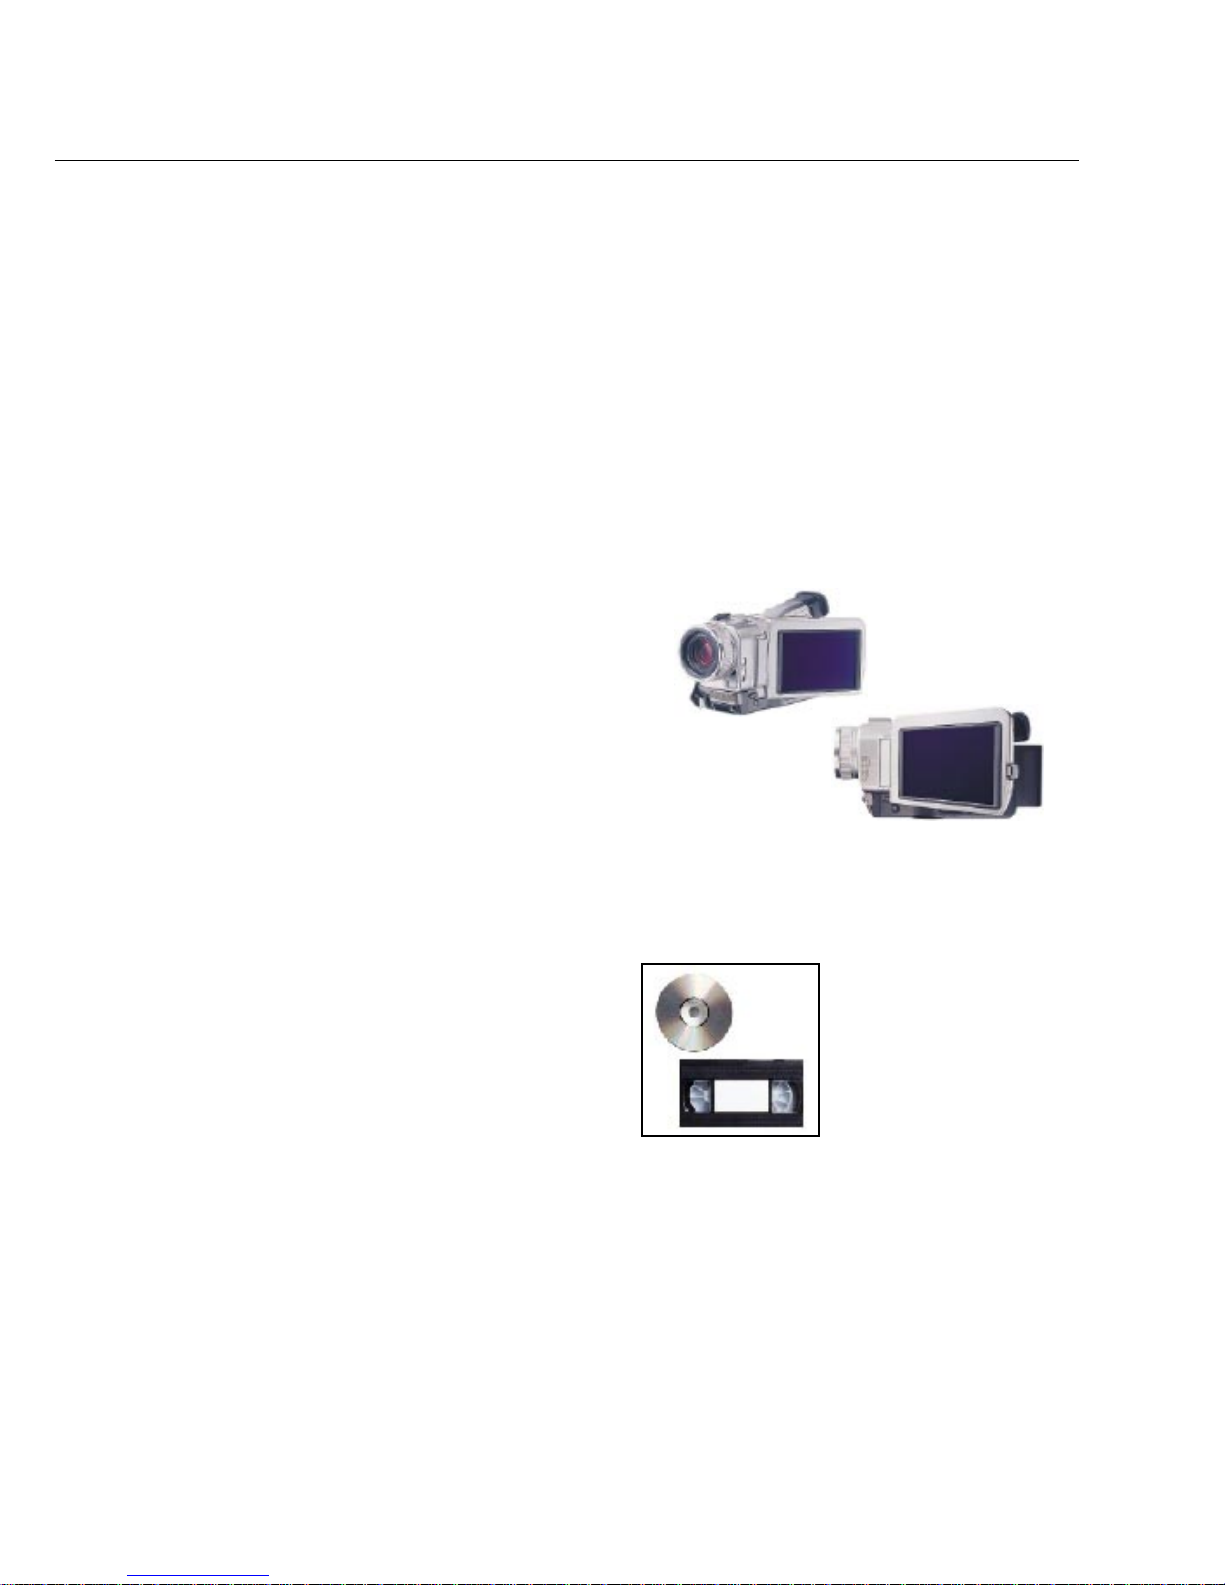
An introduction to
digital video
Tens of millions of camcorders and personal
computers have been sold around the world
and video capture cards serve as the connection between the two. These cards allow the
transfer of video data from the camcorder to
the computer hard disk.
The introduction of the IEEE 1394 interface
technology also known as FireWire or i.Link
and the emergence of a generation of entirely
digital camcorders and a new format to
emerged - digital video (DV).
V ideoStudio fully supports digital video (DV)
editing and puts all the advantages of working
with this format in your hands.
DV camcorders are
compact and simple
to operate
VideoStudio lets you output
your video projects in a wide
range of storage media
Page 7
THE BIG PICTURE 7
Key features of DV
Digital video boasts of excellent lossless
quality since its data is processed in purely
digital form. Its viewing area is large at
720x480 pixels, with more than 500 lines of
horizontal resolution and PCM 16 / 12 -bit
stereo sound. This means sharper images,
more vibrant colors, and crisp CD quality
audio.
Digital video data can be controlled and
manipulated more accurately than analog
signals. This makes it easier for you to apply
modifications, transitions, and special effects
to specific segments or even to a single
frame.
And of course, portability is a major advantage of digital video as DV camcorders and
tapes are more compact and lightweight to
carry around compared to their analog
counterparts.
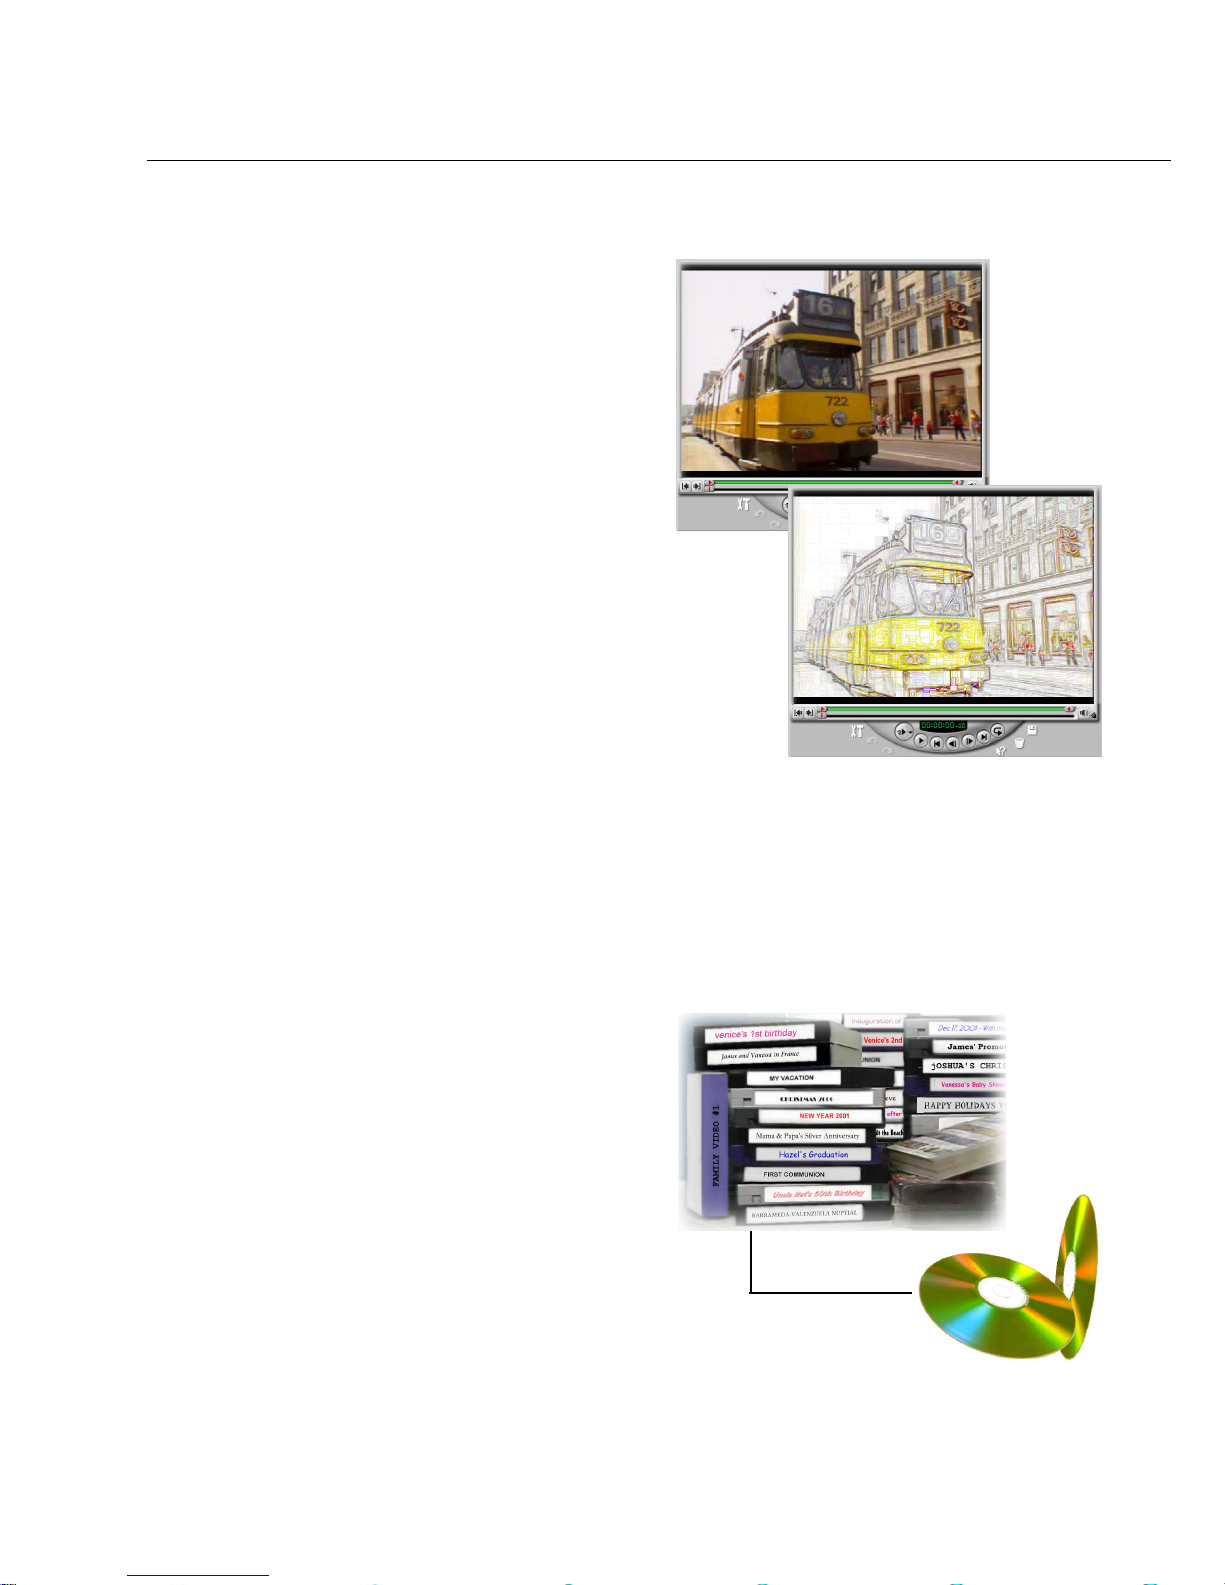
Analog to digital
V ideoStudio also supports analog video to
allow you to convert video from old High-8,
8 mm, VHS, and S-VHS tapes to digital
compact discs.
Use an analog capture card to digitize footage
from analog devices. Once digitized, you can
edit these footage in your computer and
output them in a format of your choice.
Apply digital effects in VideoStudio
with one click of a button
Page 8
8 VIDEOSTUDIO USER GUIDE
An introduction to MPEG
The Moving Picture Experts Group (MPEG)
defined a series of standards for compressing
or reducing the file size of video to make it
easier for computers to handle.
VideoStudio allows you to work with both
MPEG-1 and MPEG-2 formats to create VCD
and DVD movies with amazing frameaccurate technology.
MPEG-1
Also known as the White Book standard,
MPEG-1 gives you VHS quality video which
you can burn to a CD and play back using a
regular CD player. Popularly known as the
VCD format, MPEG-1 enables more than 70
minutes of good quality video and audio to be
stored on a single CD-ROM disc.
MPEG-2
A standard for coding video at higher data
rates and in an interlaced format, MPEG-2
allows multi-channel sound recording and
enables a resolution four times greater than
MPEG-1. It is optimized for higher-end
applications such as satellite broadcast and
DVD.
Note: MPEG-4, a more recent development, allows video
and sound recorded by cameras and microphones to
work smoothly with their computer-generated
counterparts.
Page 9
THE BIG PICTURE 9
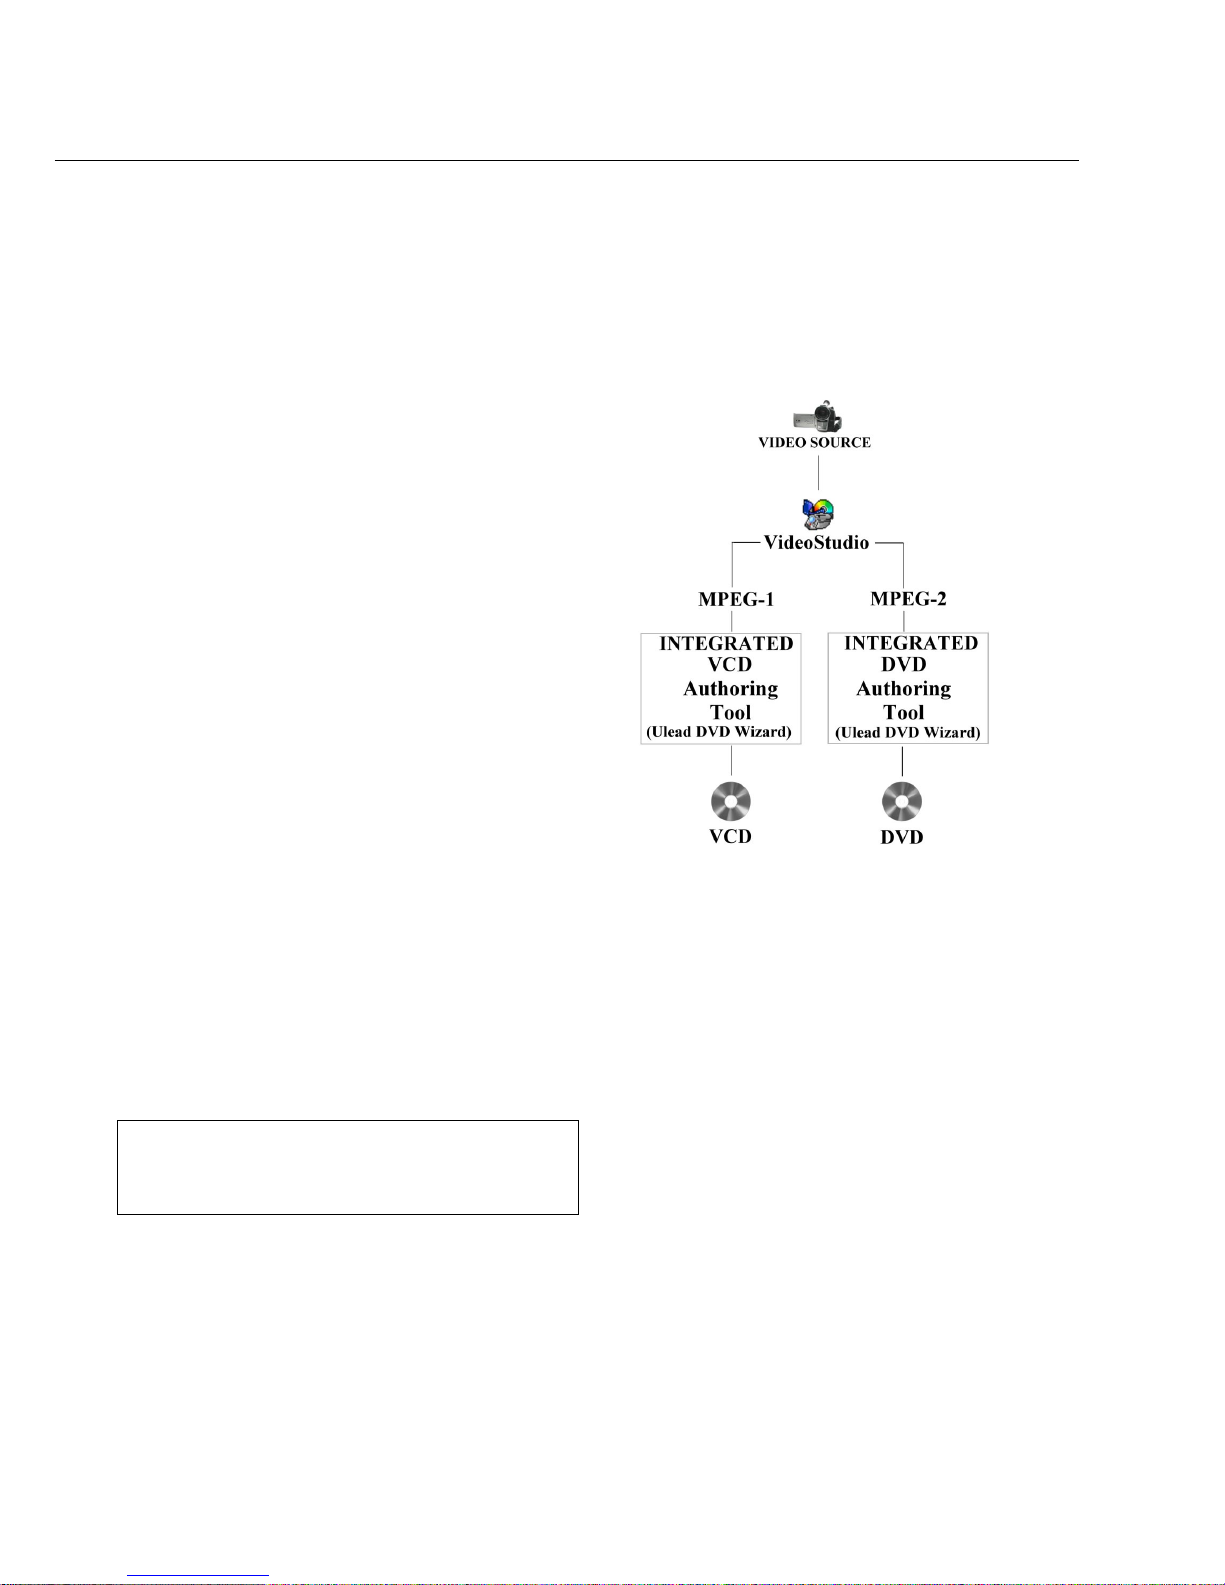
How VideoStudio works
V ideoStudio follows a step-by-step paradigm
so that editing tasks remain uncomplicated
from start to finish. VideoStudio also offers
more than a hundred transition effects,
professional titling capabilities and simple
soundtrack creation tools. Learn in seconds,
create in minutes.
V ideoStudio breaks up your movie into
separate tracks, giving you broad creative
freedom. Changes to one track do not affect
others.
After transferring footage from your
camcorder, you can arrange scenes, apply
special effects, overlay images, add animated
titles, sync in a voiceover narration, and use
background music from your favorite CDs in
formats such as WAV and MP3. All these can
be done using drag-and-drop, cut-and-paste,
or select-and-apply operations.
All the tracks in your movie are then organized into a video project file (*.VSP), which
contains all the video and audio information
on how your movie is put together.
When everything is all set to go, your
computer collects all information needed to
create your final movie file. This process is
called rendering.
You can then output and distribute your
movie as a DVD/VCD/SVCD title, streaming
Web page video, or an e-mail attachment.
You can also record your movie back to your
camcorder or VCR.
Components of a finished project as displayed in
Timeline Mode
The VideoStudio workspace
Footage can be captured
from your camcorder and
digitized for editing in
your PC
Page 10
10 VIDEOSTUDIO USER GUIDE
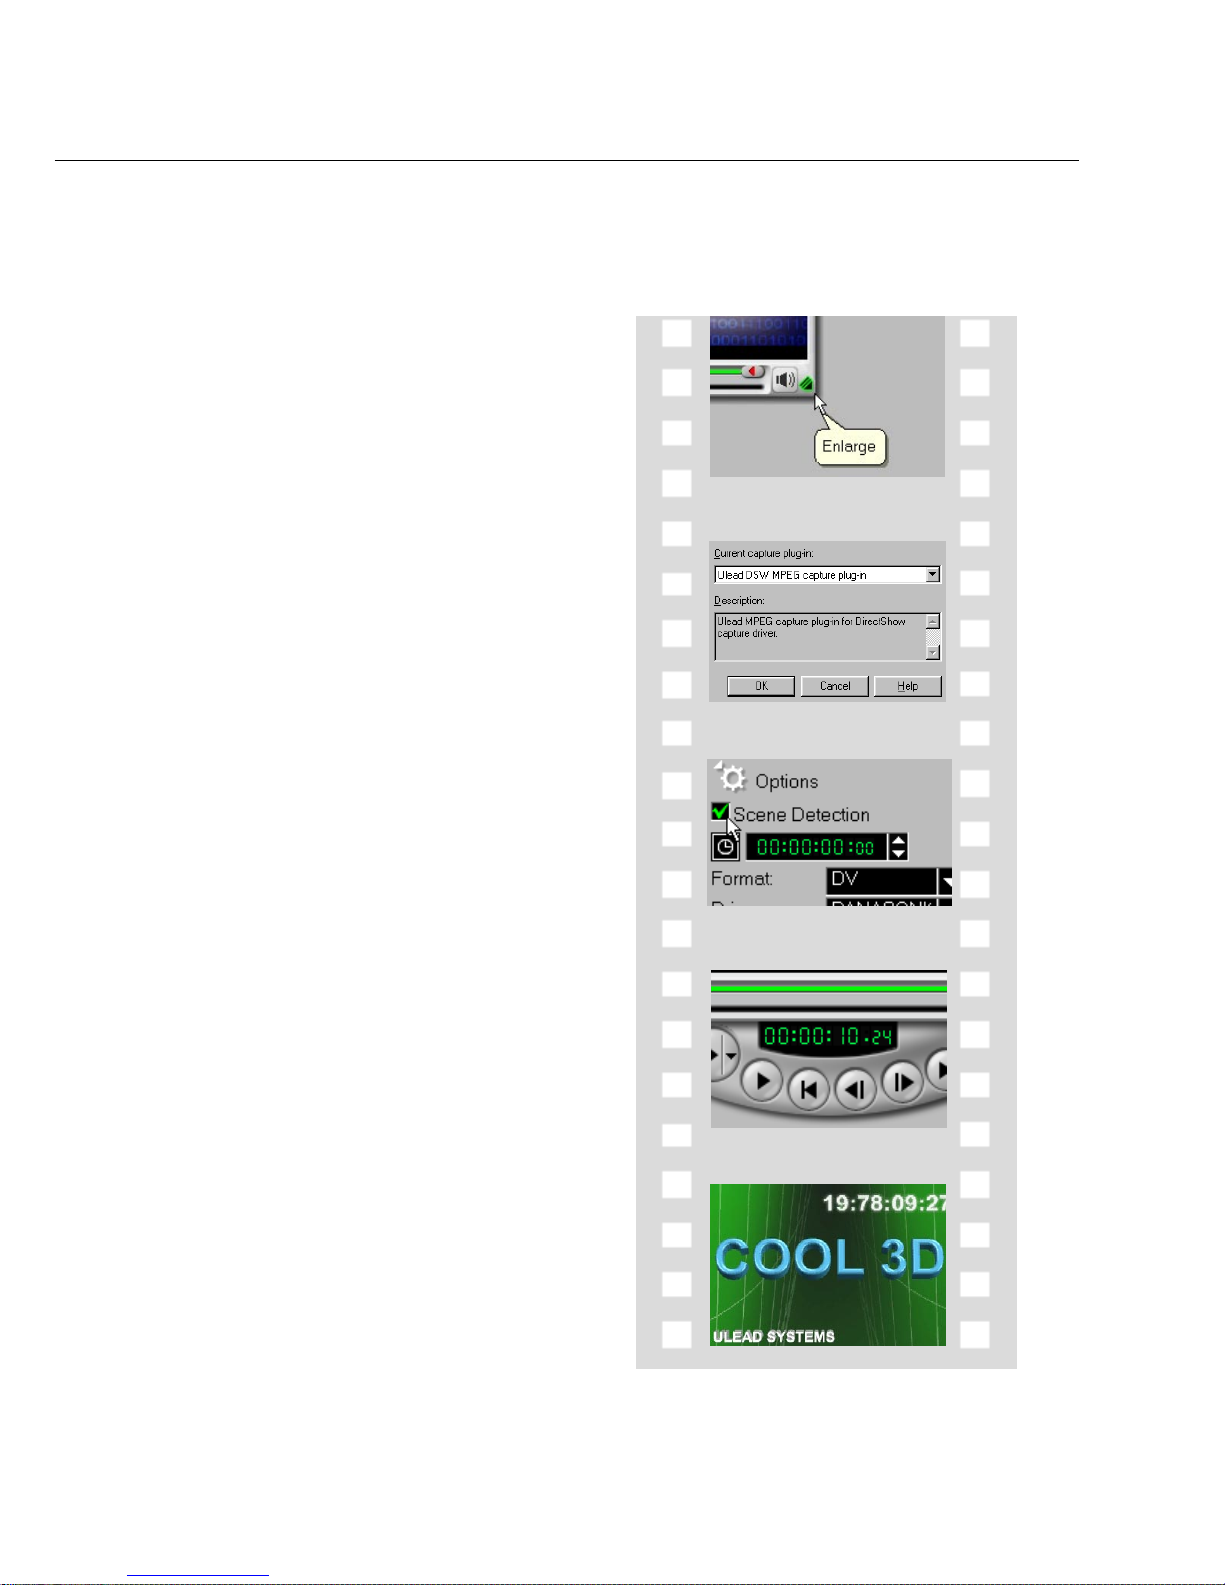
Whats new?
Take advantage of VideoStudio’s latest features and enhancements:
• Advanced interface design - Enjoy working
with a responsive task-based interface. The
Preview Window can even be enlarged to let
you analyze color, texture, or motion in
greater detail while making full use of display
space even at a resolution of 1024 x 768 or
higher.
• MPEG capture from IEEE 1394 - Capture
MPEG directly from your DV camcorder
with the IEEE 1394 interface. Save a lot of
hard disk space and skip the task of having to
convert files to MPEG. A must for those
who plan to output movies in VCD or DVD!
• Scene detection while capturing to
multiple files - Manage your files better!
During capture, break your video into several
files automatically based on changes in
recording date and time. This applies to DV
format video.
• SMPTE time code editing - For editing jobs
that require precise timing, such as animation,
the SMPTE (Society for Motion Picture and
Television Engineers) time code lets you
work faster and more efficiently . By having a
number assigned to each frame representing
hours, minutes, and seconds, you get frameaccurate control of your editing task.
• Ulead COOL 3D animations - Generate
animated graphics with amazing special
effects in Ulead COOL 3D and simply insert
it in the Video or Overlay Track. Ulead’s
hottest 3D titling package, Ulead COOL 3D
even allows you specify frame rate or size
and codecs.
Page 11
WHAT’S NEW? 11
• Enhanced title motions - A wide range of
motion style presets in the Animation
Library folder allows you to produce an
impressive choreography of eye-catching
titles to match the look and feel of your
video.
• Video and image overlays - Put together
dynamic compositions of overlapping videos
and images. Transparency controls remove
the usual bounding box so you can create
animated logos, cartoon clips over live
footage, and a lot of other interesting effects.
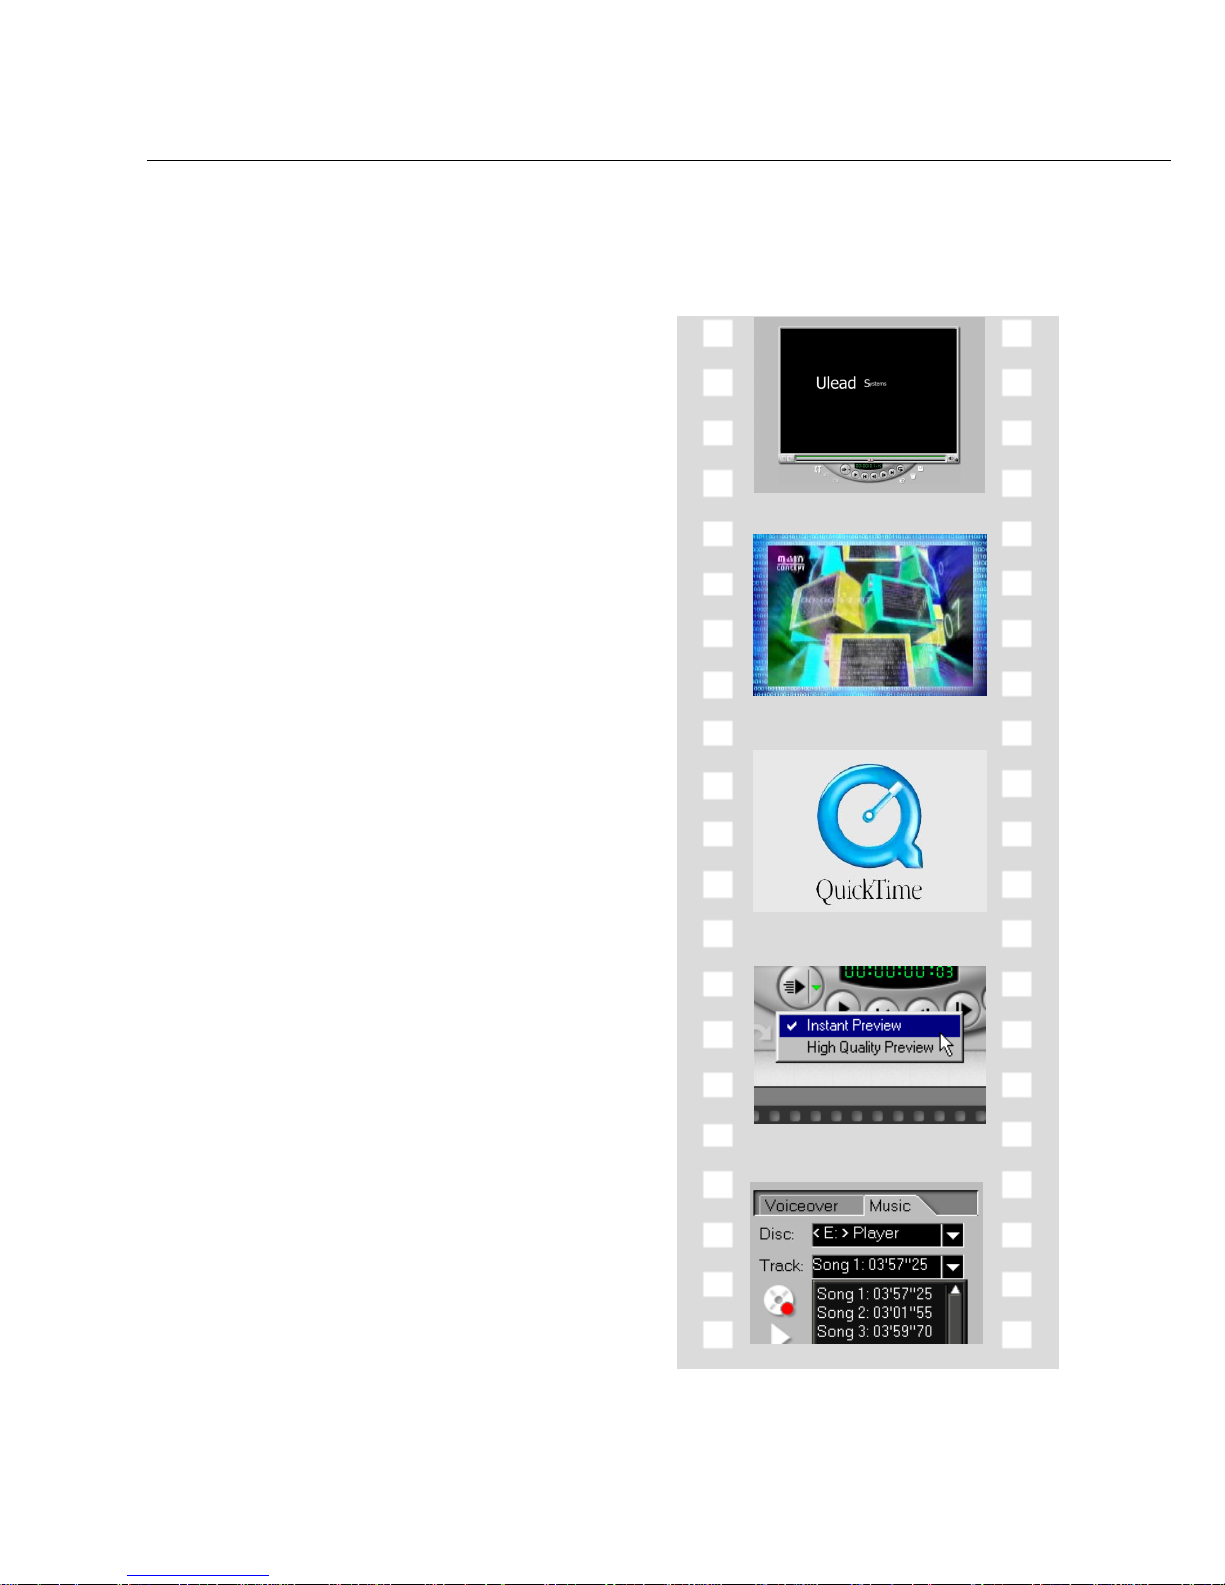
• QuickTime streaming - Stream your video
over the W eb in QuickT ime for full-frame
(640 x 480), full-motion (30 fps) quality.
QuickTime is a cross-platform standard that
supports many file formats and codecs.
• Instant preview - Preview your video
without having to create a temporary file.
Select Instant preview to save hard disk
space and rendering time.
• Multiple CD-ROM support - Hook up
several CD-ROM drives to your PC and
music tracks can be acquired from any
selected drive.
Page 12

12 VIDEOSTUDIO USER GUIDE
Tip: Follow the installation instructions of your hardware
components carefully, particularly your capture card
and consult the operating manual of your camcorder
or capture device.
System requirements
Video demands a lot from your computer. When setting up your system for video editing,
the basic factors to consider are the size and speed of your hard drive, RAM, and processor.
These determine how much video you can store and how quickly you can process or render
your files. If you can afford a bigger hard drive, higher RAM, and faster chip, go with it.
Just remember that technology is changing so rapidly and by evaluating first the kind of
video editing projects you plan to do, you can better determine the setup that works best for
you.
Following are the system requirements for setting up VideoStudio:
• Microsoft Windows 98, Windows 98 SE,
Windows Me, Windows 2000, Windows XP
• 450 MHz above CPU speed is recommended
• 64 MB of RAM (128 MB or above for
editing)
• 500 MB of available hard disk space or
above; 4 GB is recommended (best results can
be achieved with a 30 GB Ultra-DMA/66
72000 rpm. hard disk)
• V ideo for Windows and DirectShow compatible video capture card
• Windows compatible sound card
• CD-ROM or DVD-ROM drive
Page 13
HARDWARE CHECKUP BEFORE USING VIDEOSTUDIO 13
Hardware checkup before using
VideoStudio
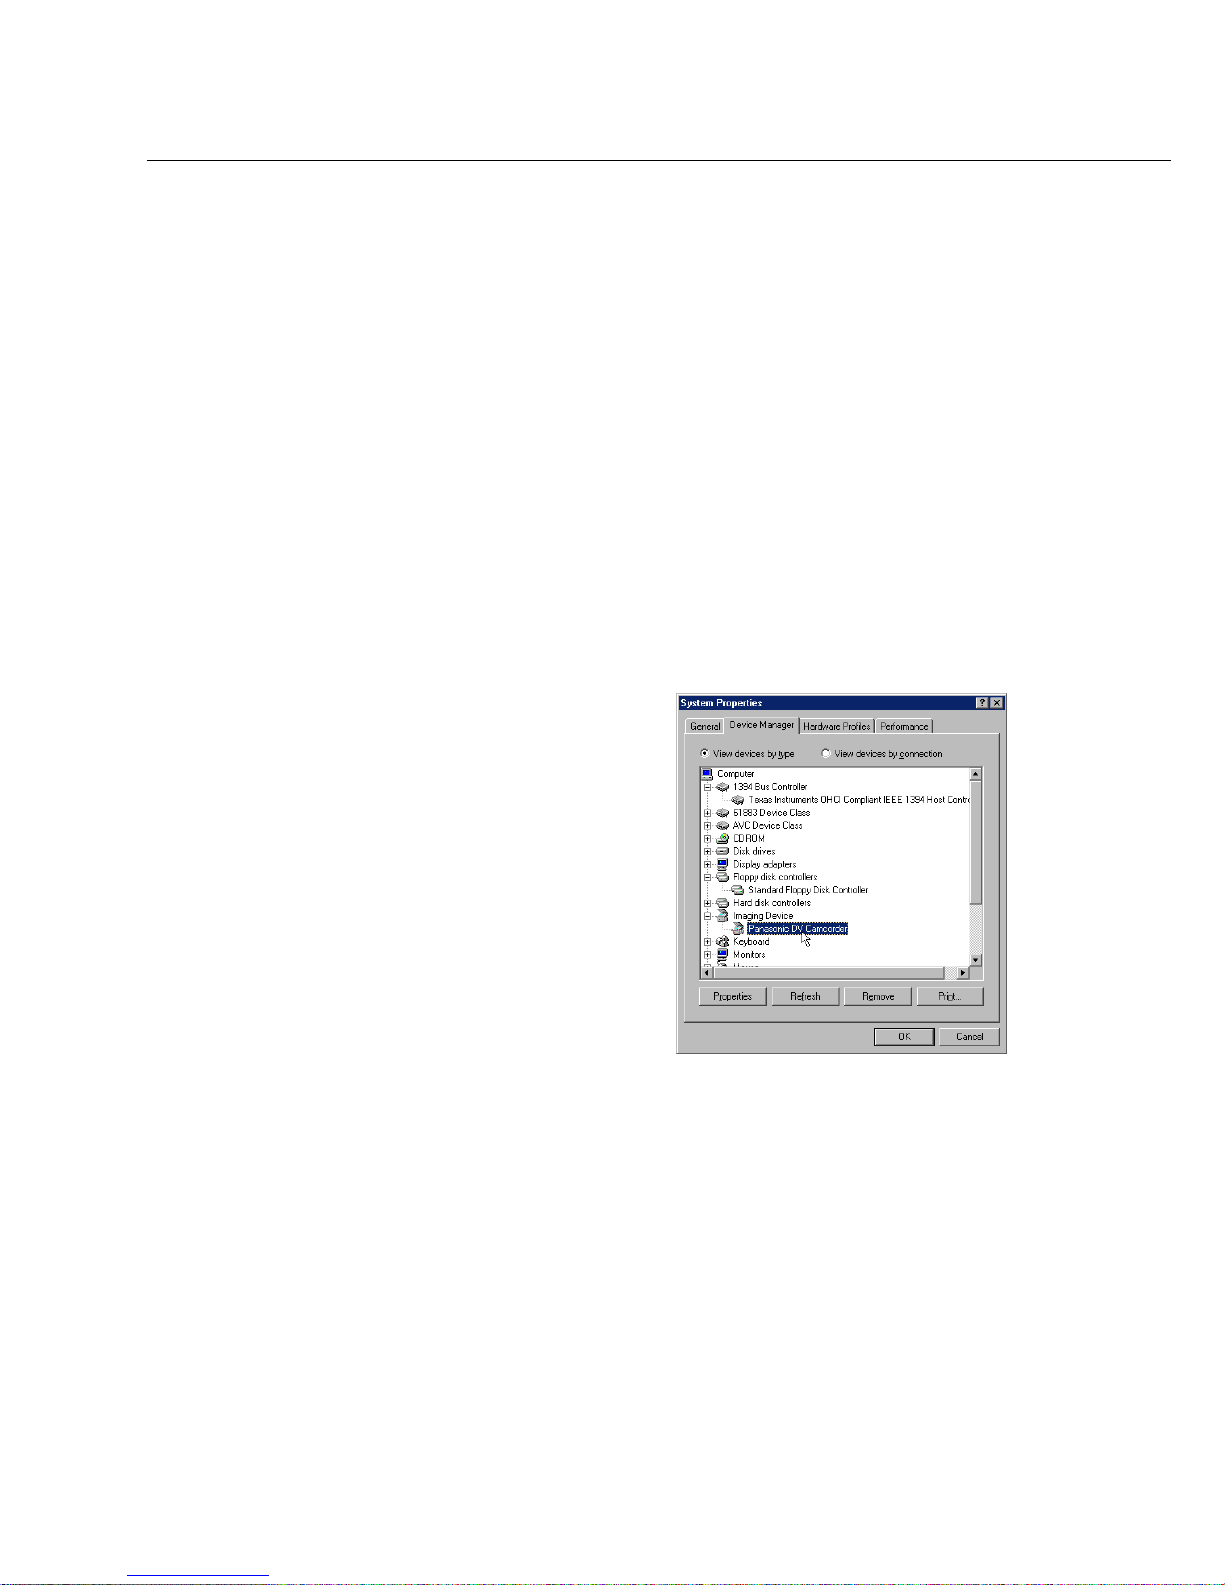
To ensure that your video production runs smoothly and trouble-free, click Control Panel:
Systems - Device Manager and check if your devices are working properly in accordance
with your Operating System (O/S).
DV IEEE 1394 capture card
The following Windows operating systems support the IEEE 1394 capture card. Always
remember to turn on your DV camcorder or VCR connected to the IEEE 1394 interface so
that it can be detected as image device or sound, video and game controller.
A device list on the Device Manager in the Systems
Properties dialog box, Windows Me.
Windows 98
Windows 98 supports the Texas Instruments
DV driver only but does not provide it.
Search the drivers (if bundled) that come
with the IEEE 1394 card. Check that the
following devices are working properly:
• 1394 Bus Controller
• Sound, video and game controllers: 1394
camcorder
Windows 98 Second Edition /
Windows 2000
Windows 98 Second Edition and Windows
2000 include the Microsoft DV driver and still
support the Texas Instruments DV driver.
Check that the following devices are working
properly:
• 1394 Bus Controller
• Image Device: Microsoft DV Camera and
VCR (For Microsoft DV driver only.)
• Sound, video and game controllers: 1394
camcorder (For T exas Instruments DV driver
only.)
Page 14
14 VIDEOSTUDIO USER GUIDE
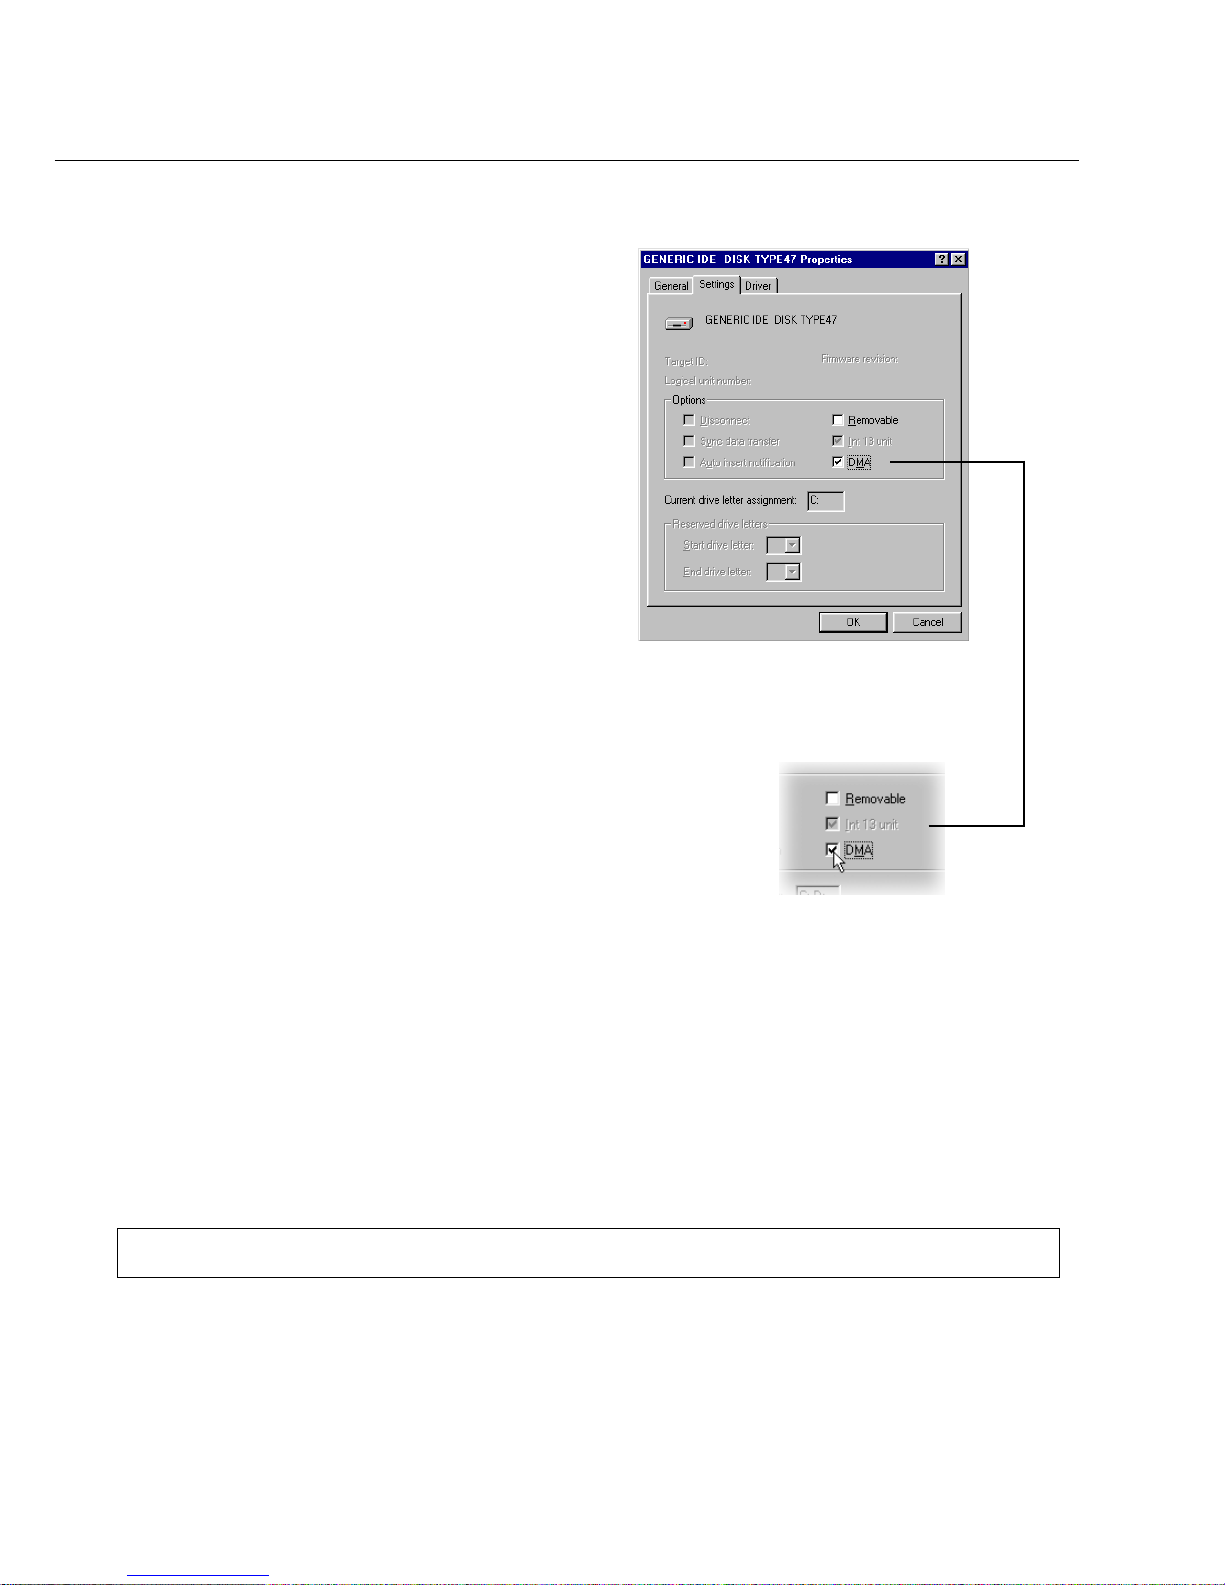
Settings Tab after clicking Properties
when a hard drive is selected from
Control Panel: System - Device Manager
Windows Millennium Edition (Me)
Windows Me fully supports the IEEE 1394
card. Check that the following devices are
working properly:
• 1394 Bus Controller
• 61883 Device Class
• AVC Device Class
• (Brand name) DV Camcorder: The brand
name depends on the DV camcorder connected to the IEEE interface card.
Windows XP
Windows XP fully supports IEEE 1394 and is
also the only PC O/S that offers wireless
access to cameras and other devices over a
network. On a wireless IEEE 802.11 home
network, attach an IEEE 1394-enabled laptop
to a Windows XP-based PC and instantly
access all other connected devices.
To run VideoStudio under Windows XP,
check that the following devices are working
properly:
• 1394 Bus Controller
• 61883 Device Class
• AVC Device Class
• (Brand name) DV Camcorder: The brand
name depends on the DV camcorder connected to the IEEE interface card.
For Windows 98 and Windows Me, select the DMA option in Device Manager: Disk drive
Settings Tab. In Windows 2000, the DMA option is hidden but it is always enabled. DMA
avoids possible drop frame problems later when you are capturing video.
Note: In addition to commonly used Texas Instruments and Microsoft DV drivers, there are other drivers available.
Consult your camcorder’s manual for suitable drivers.
Page 15

HARDWARE CHECKUP BEFORE USING VIDEOSTUDIO 15
Analog capture card
Windows 98, 2000, Me, and XP supports analog capture cards. Remember to turn on the
camcorder or VCR and connect it to your computer. Then check that the following devices
are working properly:
• Sound, video and game controllers
USB port
The Universal Serial Bus (USB) connector lets you attach a wide array of devices to your
computer quickly and easily. These devices include digital cameras, Webcams, and just about
every computer peripheral. Since Windows 98, 2000, Me, and XP fully support USB, installing
the driver for this device is quick and easy too. Check that the following device is working
properly:
• Universal serial bus controller
Page 16
16 VIDEOSTUDIO USER GUIDE
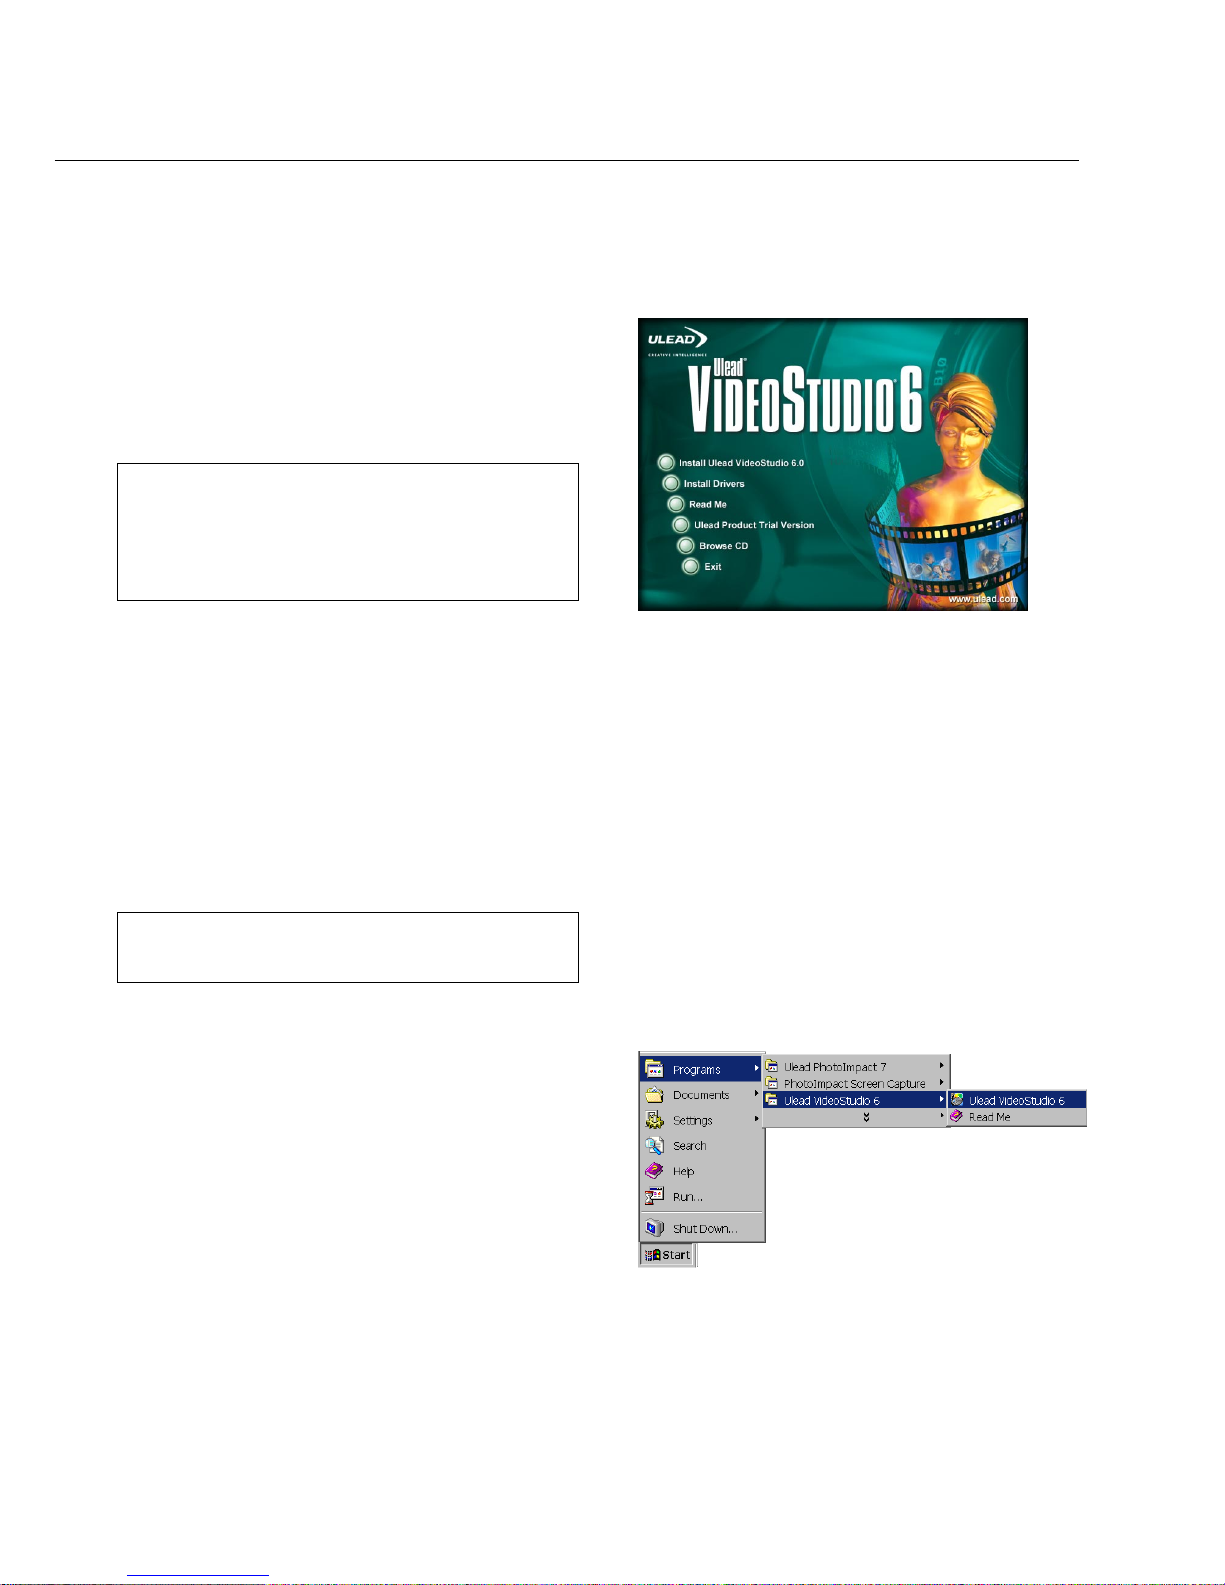
To install VideoStudio:
1 . Place the V ideoStudio CD into your CD-ROM
drive.
2. When the Setup screen appears, follow the
instructions to install VideoStudio onto
your computer .
Note: If the Setup screen does not appear after loading the
CD, then you can manually start it by doubleclicking the My Computer icon on your desktop,
then double-clicking the icon for the CD-ROM
drive. When the CD-ROM window opens, doubleclick the Setup icon.
Note: Skip this step if you already have newer versions of
the above supporting applications installed in your
PC.
To run VideoStudio:
• Double-click the V ideoStudio icon on your
Windows desktop.
OR
• Select the V ideoStudio icon from the
V ideoStudio program group on the Windows
Start menu.
Installing and running VideoStudio
VideoStudio installation screen
Please install also the following applications, because they are very important in making digital
video work well on your computer. The installation program will walk you through installing:
• QuickTime
• Windows Media Format
• RealPlayer
• Acrobat Reader
Running VideoStudio from Windows Start menu
Page 17
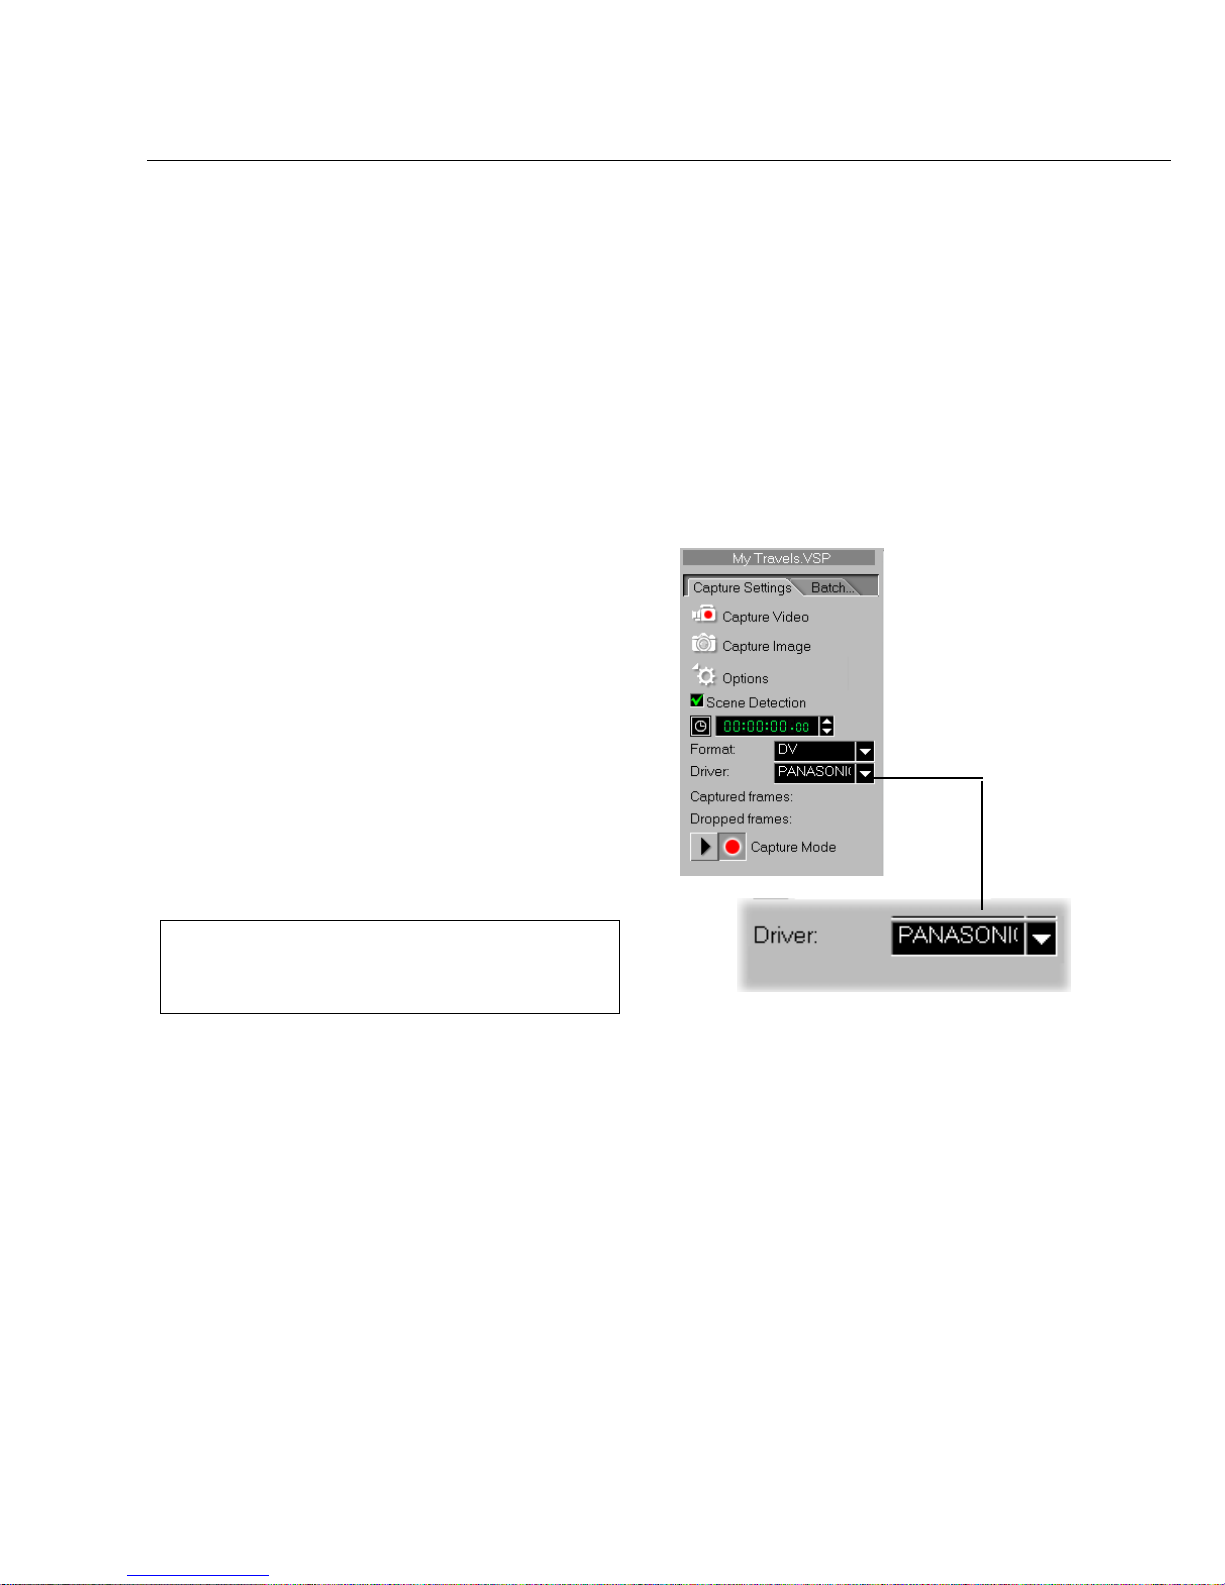
CONFIGURING VIDEOSTUDIO 17
To check the setup of VideoStudio for DV
interface:
1 . Connect your camcorder to your IEEE
1394 capture card.
2. Insert your video tape into the camcorder
and switch it on. Make sure it is in playback
mode (usually named VTR or VCR). Check
your camcorder’s manual for specific
instructions.
3 . Y our Capture plug-in and Device control will
be detected automatically based on your
selected template.
4 . Click Capture Step and check if your device
is displayed in the Options Panel under
Driver.
Note: When your camcorder is in Record mode (usually
named CAMERA or MOVIE), you can still capture
real-time video directly in VideoStudio, even if
there’s no video tape inserted.
Configuring VideoStudio
Camcorders, VCRs, and VCD/DVD players are common sources of video footage. To ensure
a smooth interaction between these video sources and your computer, make sure that the
settings of VideoStudio are configured properly depending on the capture device you are using.
DV (IEEE 1394 capture card)
Check that your device is listed under Driver
Page 18
18 VIDEOSTUDIO USER GUIDE
Analog capture card
To check the setup of VideoStudio for analog
interface:
1 . Connect your camcorder, VCR, or other video
source device to your analog capture card.
2. Insert your videotape into the capture device
and switch it on. Make sure it is in the
playback mode (usually named VTR or
VCR). See your machine’s manual for
specific instructions.
3. Your Captur e plug-in will be detected
automatically.
4 . Click Capture Step and check if your device
is displayed in the Options Panel under
Driver.
Note: If your capture device supports multiple video
sources, the Input Source dialog box allows you to
select your desired video source such as Composite,
Tuner, or S-Video. Likewise, if you have multiple
audio sources, this dialog box allows you to select
your desired audio source.
USB input device
To check the setup of VideoStudio for USB
interface:
1. Connect your video source device to your
USB port using a standard USB cable and
switch it on.
2 . Your Captur e plug-in will automatically be
detected.
3 . Click Capture Step and check if your device
is displayed in the Options Panel under
Driver.
Page 19
GETTING AROUND VIDEOSTUDIO 19
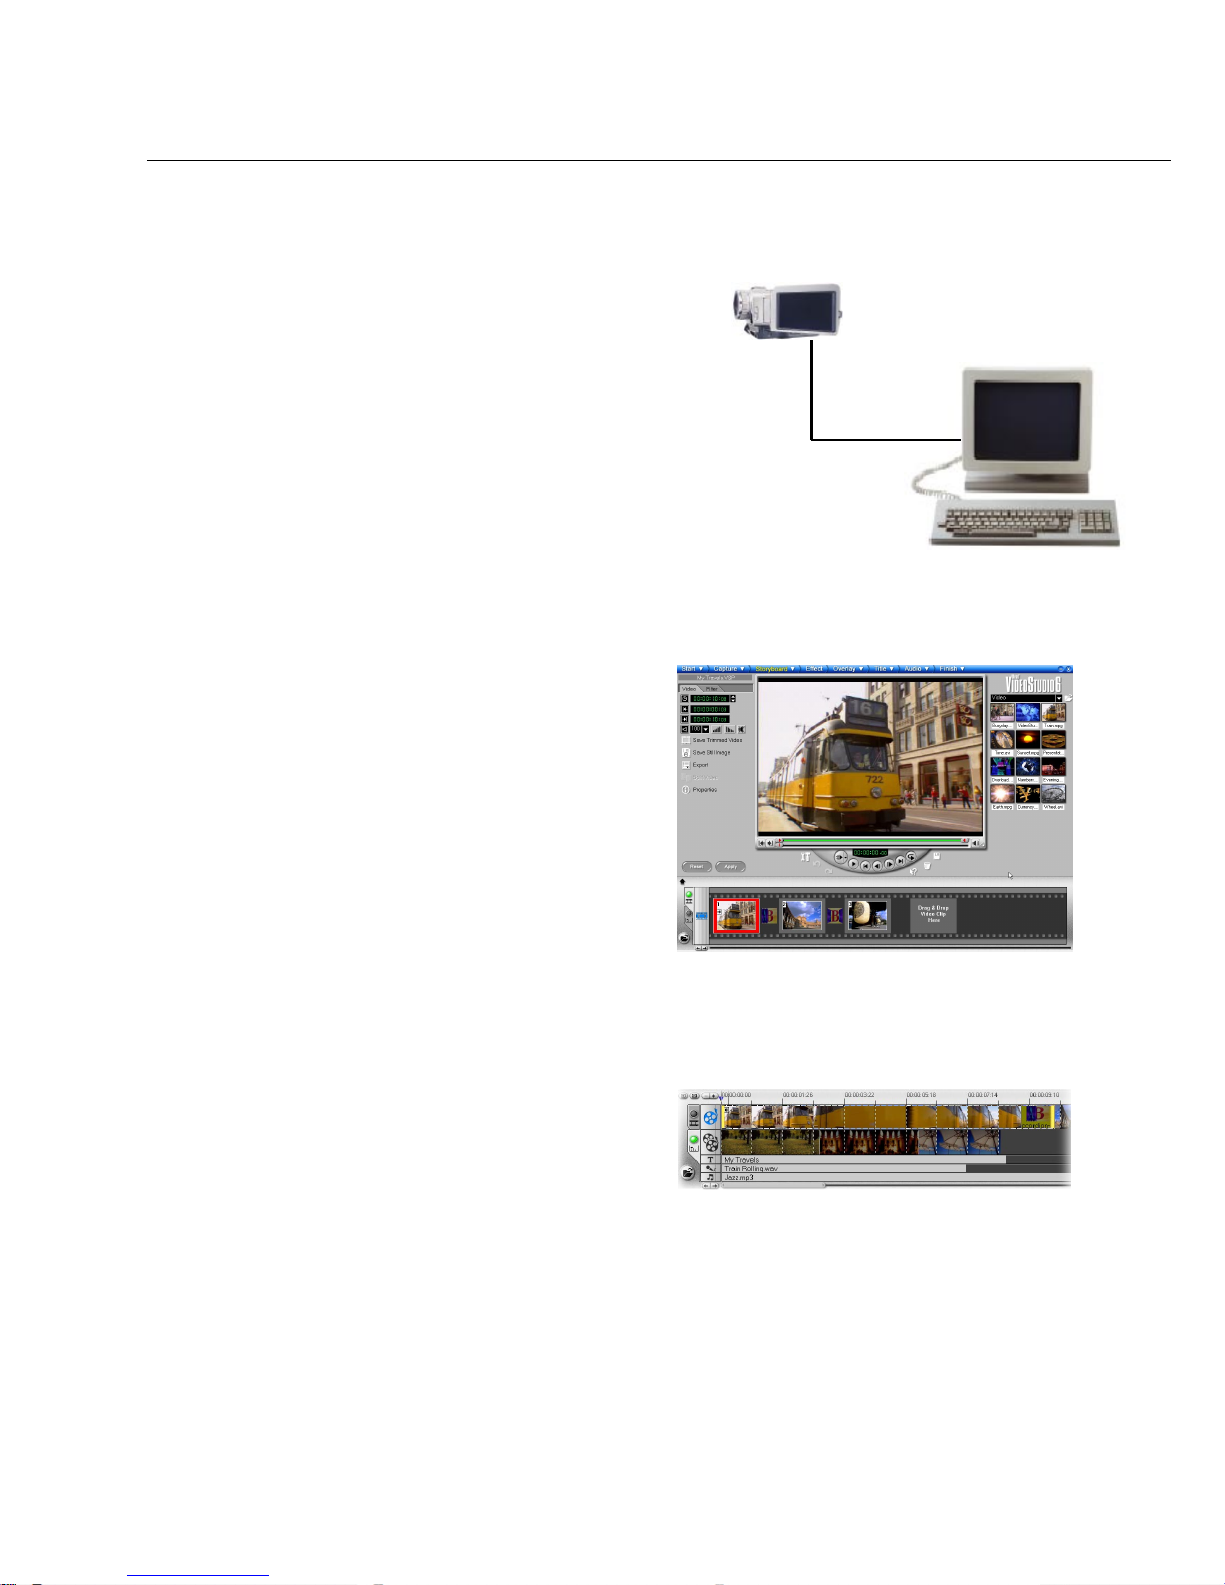
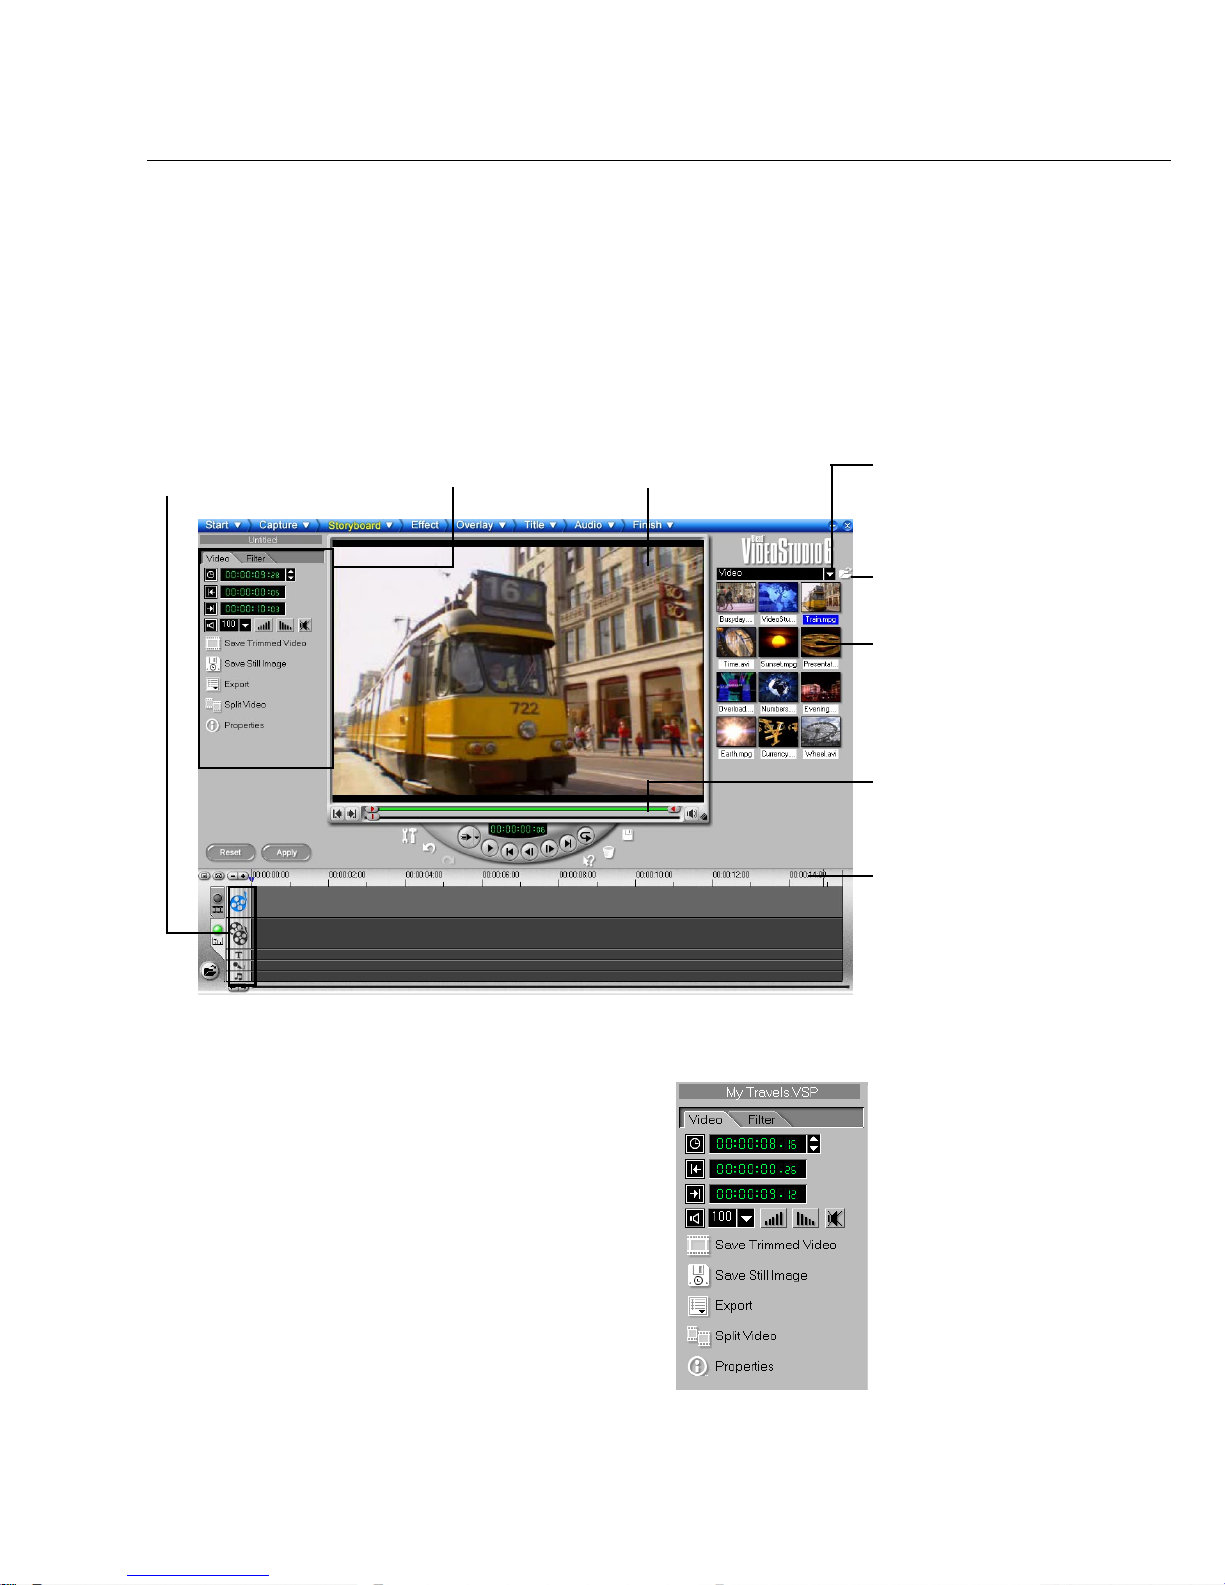
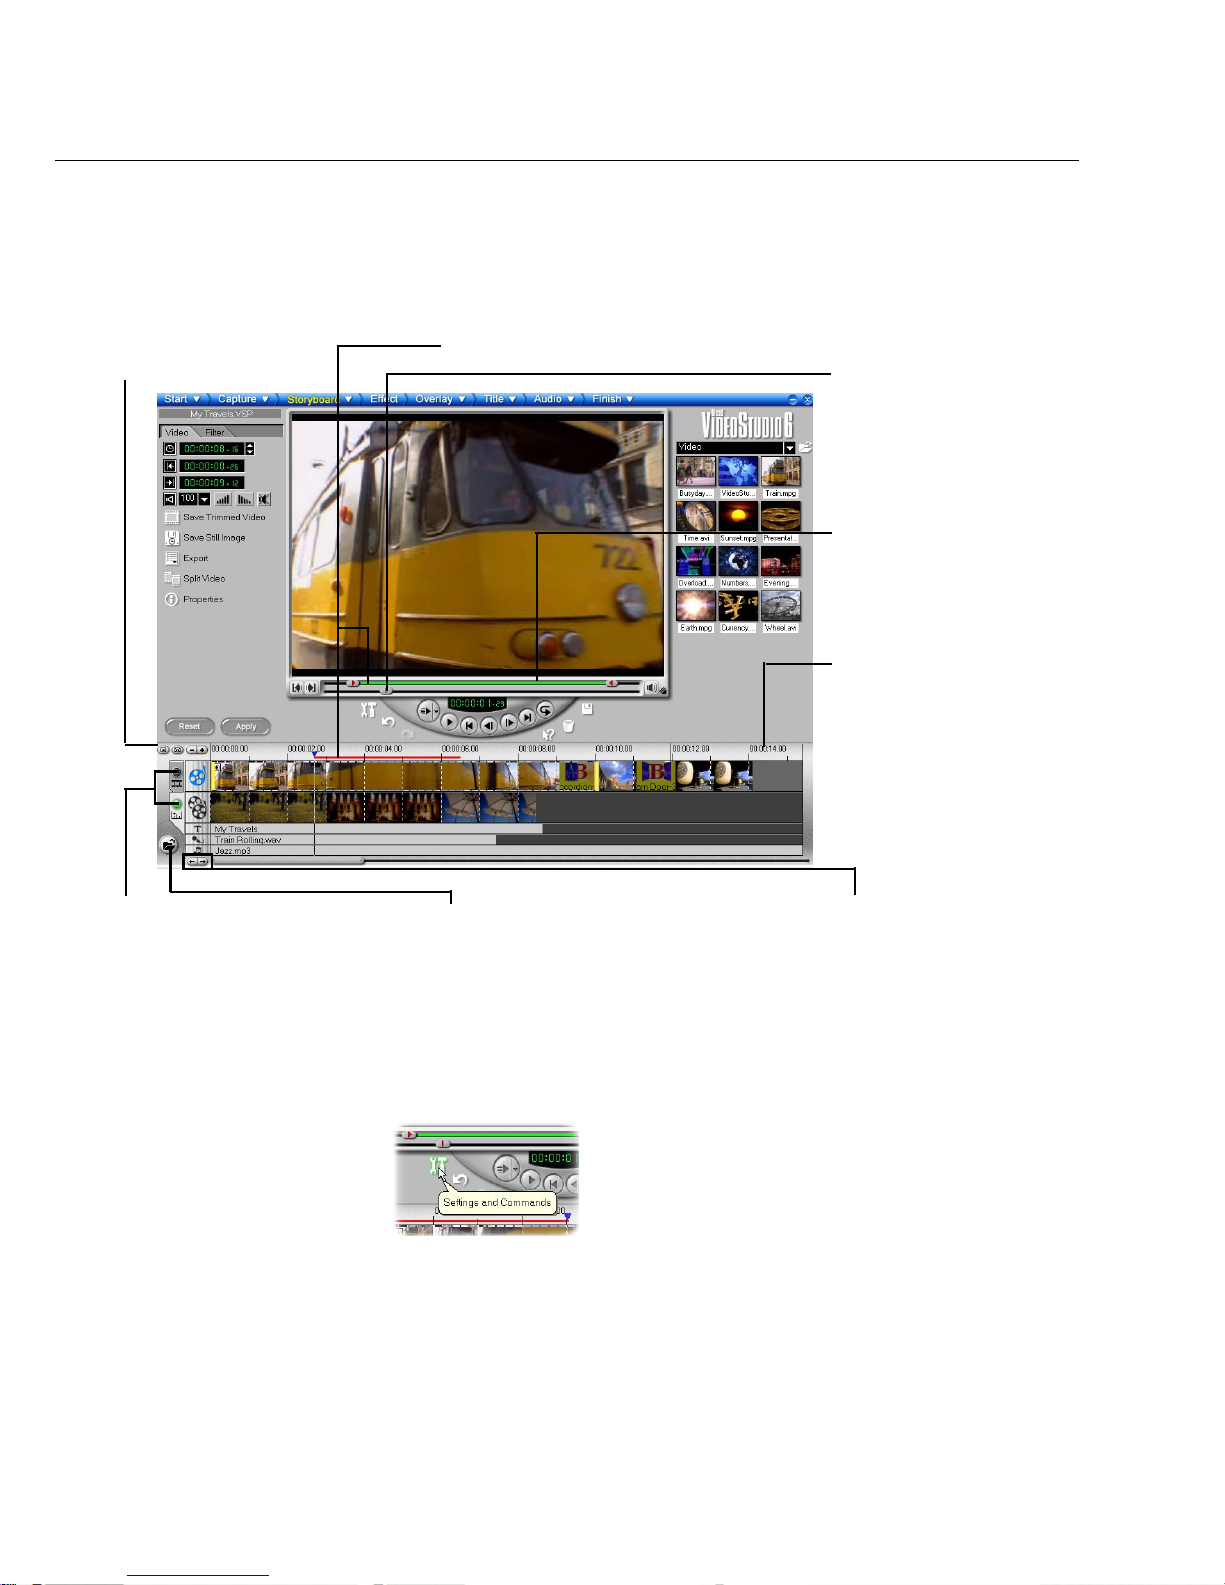
Getting around VideoStudio
The VideoStudio interface has been designed to make the sometimes complicated task of
editing movies on your PC intuitive and enjoyable. The illustration on this page shows an
overview of the entire program, while the next few pages detail more specific features.
Track buttons
Each activates a track to edit.
Click a button to change the
Preview Window and available
options accordingly.
Trim Bar
Used for trimming,
editing, and cropping
video clips.
Timeline
Represents the period
of time that a clip
appears in your movie.
Library
Stores and organizes all
of your media clips.
Load media button
Click to add video or
audio files to the
Library.
Folder button
Click to switch between
various library folders.
Preview Window
Shows the current clip,
video filter, effect, or
title.
Options Panel
Contains controls,
buttons, and other
information.
The Options Panel
The Options Panel changes depending on the
program’s mode and the step or track you are
working on. The Options Panel may contain
one or two tabs. Information in each tab vary
depending on the selected clip.
Options Panel in
Storyboard Step
Page 20
20 VIDEOSTUDIO USER GUIDE
ToolTips
Place the mouse over a button or object to display a
balloon which identifies the item.
Zoom controls
Increase or decrease the
number of frames
displayed in the
Timeline.
Selected range
These color bars represent the
trimmed or selected part of a clip
or project.
Trim handle
Click and drag to trim
a clip.
Time units
Represents the timing
of clips in hours :
minutes, seconds, and
milliseconds
Project scroll
controls
Use the left and right
buttons or grab the
Scroll Bar to move
around your project.
Insert media files
Displays a menu allowing you
to place video, audio or image
clips directly on the project.
Storyboard and Timeline
Click tabs to switch between
Storyboard Mode and
Timeline Mode.
Preview Bar
Click and drag these
controls to scroll
through a clip. The
position is shown in
the Preview Window’s
content.
Page 21
GETTING AROUND VIDEOSTUDIO 21
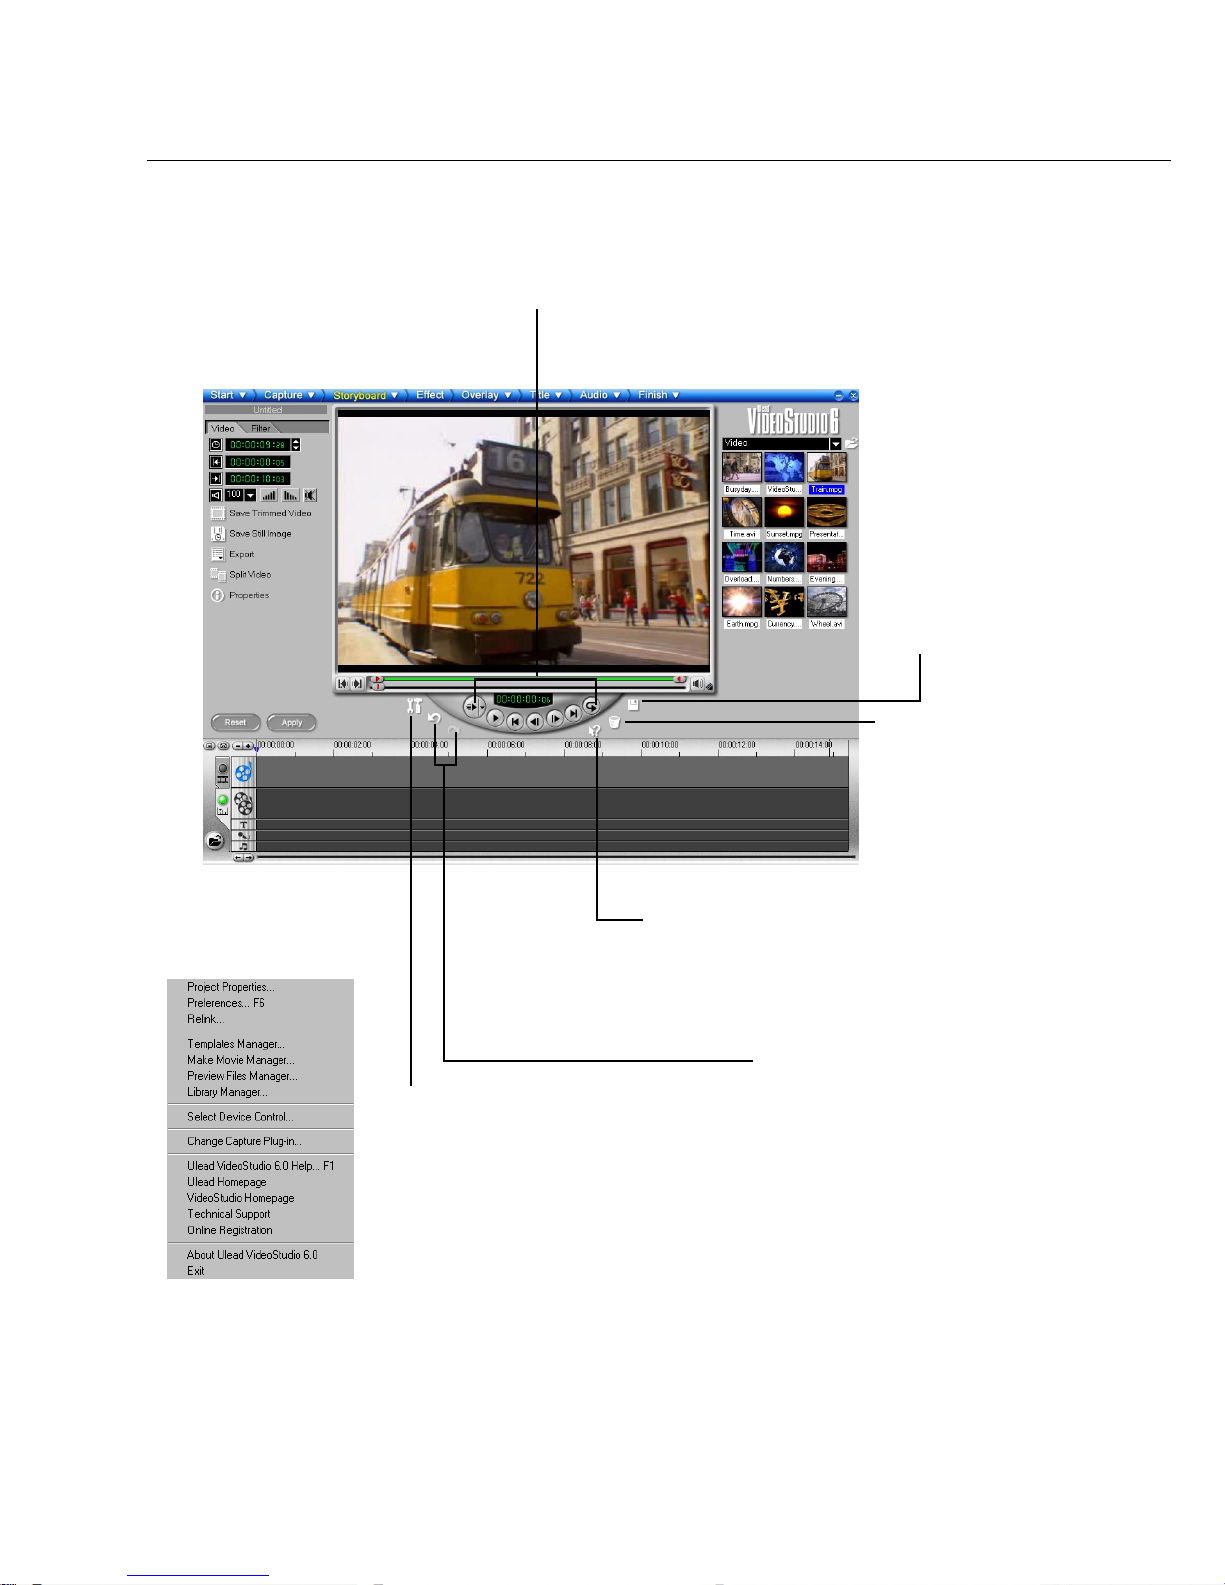
Settings and Commands
This button pops up a menu that
contains many useful tools such as
online Help and Preferences. You
can also setup Device control and
Capture plug-in from here.
Navigator buttons
These can be used to move around a
project or a selected clip. See page 22.
Trash Can
Drag and drop clips
here to delete them
from the project. You
can also select a clip
and press the Delete
key on your keyboard.
Context Sensitive Help
This button activates the Context
sensitive help feature. After you
click on it, your cursor changes to a
question mark. Move over an object
in the program and click again.
Undo and Redo
Any changes you make that you
don’t like can be instantly fixed or
undone by clicking the left button.
And if you change your mind,
simply click Redo.
Settings and Commands
pop-up menu
Save Project
Displays the Save As
dialog box to save the
VSP file in a folder of
your choice.
Page 22
22 VIDEOSTUDIO USER GUIDE
Home
Returns to the starting point of a
project, clip, or selected area.
Previous
Moves to the preceding point of
a project, clip, or selected area.
Next
Moves to the point right after the
present point of a project, clip, or
selected area.
End
Moves to the ending point
of a project, clip, or selected
area.
Repeat
Plays a project, clip, or
selected area continually.
Play Clip
Click to play a video or audio clip. Hold down
the [Shift] to play only the selected duration
(between Mark in and Mark out) on the Trim
Bar. During playback, click the button again to
stop.
System Volume
Click and drag the slider to
adjust the volume of a clip’s
audio output or music. This
adjusts the volume of your
speakers at the same time.
Play Project
Provides options to select between Instant
Preview or High Quality Preview. Choose
Instant Preview for a quick preview
without rendering. To render your project,
choose High Quality Preview.
Mark in / out
Use these buttons to mark the point
where you want a clip to start and end.
Page 23
GETTING AROUND VIDEOSTUDIO 23
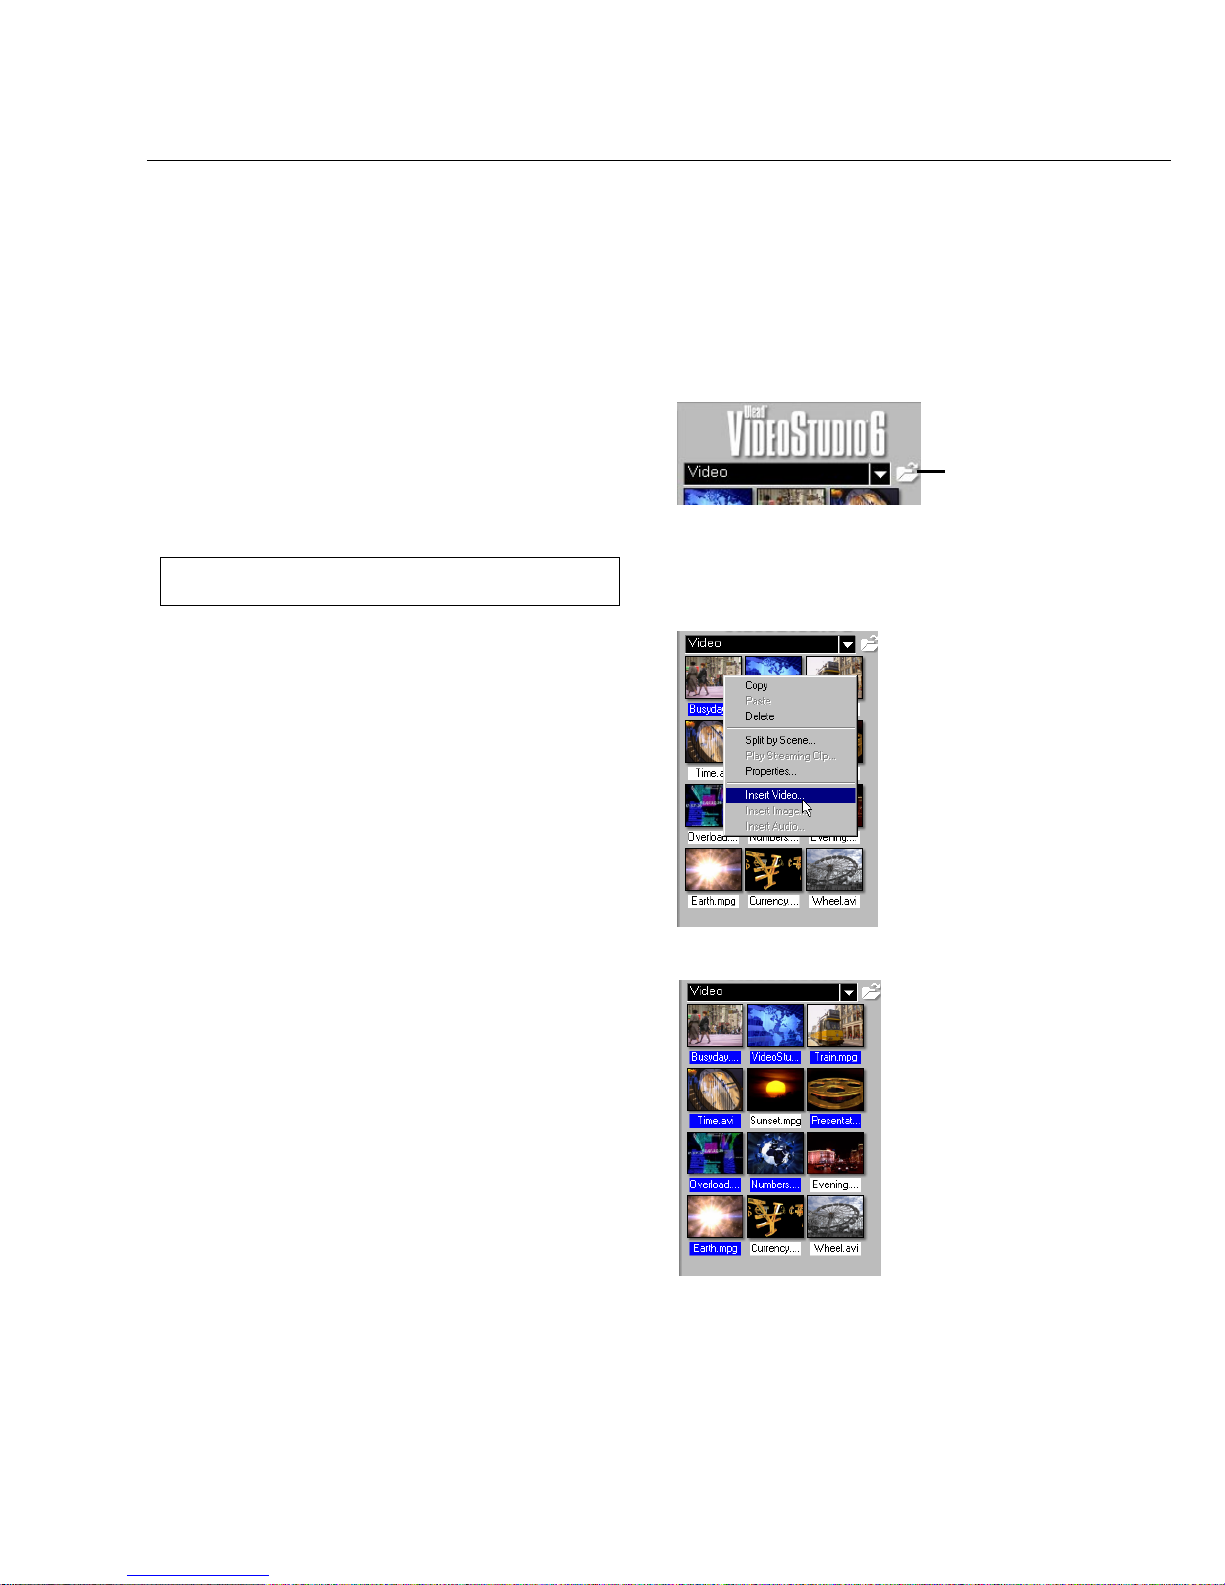
Load media allows
you to locate the
clip you want to add
to the Library.
To add media clips to the Library:
1. Click Load media to open a dialog box for
locating the media clip to insert in the
Library .
2 . Select the desired file.
3 . Click Open when you are finished.
Note:You can also drag and drop files from Windows
Explorer straight to the Library.
The type of clip you can insert depends on
which step you are working on (such as Title
or Audio). Use your mouse to drag and drop
single or multiple clips from the Library to its
destination.
In the Storyboard Step, you can drag and
drop clips simultaneously from the Library to
the Timeline whether you are in Timeline
Mode or Storyboard Mode.
The Library
The Library is a storage depot for everything you need to create a movie: video clips, video
filters, audio clips, still images, transition effects, music files, titles and color clips. These are
collectively known as media clips.
Hold [Ctrl] or [Shift] to
select multiple clips.
Right-click a clip in the
Library to view the clip’s
properties as well as copy,
delete, or split by scene.
Page 24
24 VIDEOSTUDIO USER GUIDE
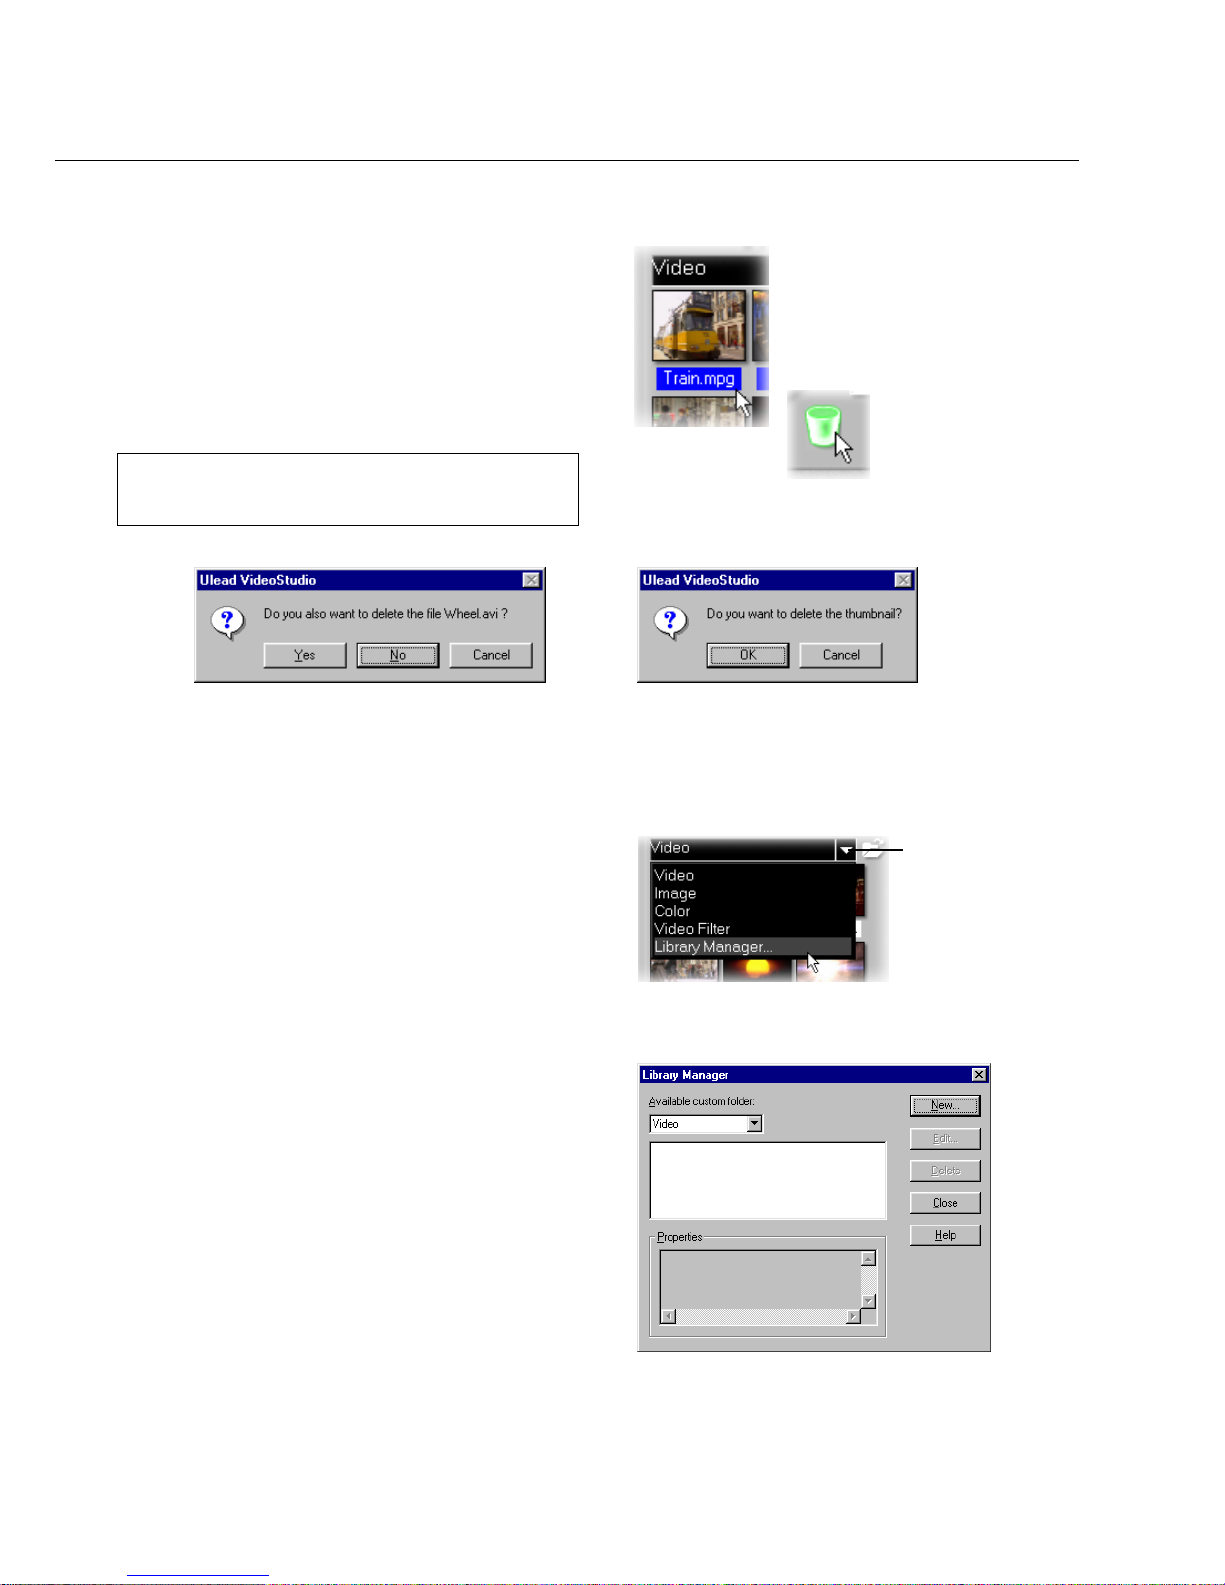
To delete media clips from the Library:
1 . Select the clip to remove from the Library.
2 . Drag the selected clip to the Trash Can or
press [Delete]. Y ou can also right click the
clip in the Library and select Delete .
3. When prompted, verify whether you also
want to delete the source file from your
hard disk.
Note: Deleting source files from your hard disk perma-
nently removes them from your computer. You may
not be able to recover them.
Library Manager dialog box
The Folder
arrow button
Library Manager
The Library Manager organizes your
custom Library folders. These folders help
you store and manage all kinds of media files.
To use the Library Manager:
1 . Click Settings and Commands then select
Library Manager. Y ou can also click the
Folder arrow.
2 . Select a media type from the A vailable
custom folder list.
3. Click New to display the New custom folder
dialog box and create a new folder. Enter a
name under Folder name and a description
under Properties. Click OK.
Click Edit to rename or modify the description
of a selected custom folder.
Click Delete to remove a selected custom
folder from the Library.
4 . Click Close.
Deleting thumbnail dialog box
(Source file will not be deleted.)
Deleting source file dialog box
(Source file will be deleted.)
Trash Can
Page 25
STEPS TO CREATE YOUR MOVIE 25
Steps to create your movie
VideoStudio is laid out in a step-by-step format, following the items on the Menu Bar at the top
of the program, from left to right. Click a step on the Menu Bar to move directly to it. The
step you are currently in is highlighted in yellow.
It is not necessary to work through every step every time, but these steps can serve as a guide
to creating a complete movie. These steps do not necessarily need to be followed in the order
that they are presented.
Your work is saved in a small project file (*.VSP) that organizes all of your media files
together. A project file is NOT the same as a movie and changes made to it do not affect your
media clips. It is possible to have a number of different projects using the same clips.
The Start Step is for creating a new project file or opening an existing one. This is
the very first and required step whenever you want to work in VideoStudio. See
page 27.
Once a project is opened in VideoStudio, video can be recorded directly to your
computer’s hard disk in the Capture Step. Footage from a videotape can be captured
as a single file or automatically divided into multiple files. This step allows you to
record video files and still images. See page 31.
The Storyboard Step and the Timeline are the heart of VideoStudio. This is where
you arrange, edit, and trim your video clips. Video filters can also be applied to your
video clips in this step. See page 38.
Transition effects between scenes are fun and easy. Thumbnail animations and dragand-drop operations put dozens of cool effects at your fingertips. See page 49.
Page 26
26 VIDEOSTUDIO USER GUIDE
Notes:
• When moving between steps, VideoStudio Guide - a real-time online Help - is displayed to give you quick reference
and tips. You can enable or disable it in the Preferences dialog box which you can access by clicking Settings and
Commands: Preferences or by pressing [F6].
• Since video rendering usually requires large hard disk space, use the Preview Tab in the Preferences dialog box to assign
proper space and folders in your hard disk(s). This should be done before opening a project in VideoStudio to ensure
enough there is space for rendering and previewing.
This feature allows you to superimpose one clip over another as an added effect to
your movie. On top of what you can do using Effects, you can use Overlay feature
to add a professional touch to your work. See page 51.
No movie would be complete without opening and closing titles. You can design and
animate your text title in any Windows True Type font, color and size, or choose
from various presets in the Library. See page 53.
Background music sets the mood of your movie. VideoStudio lets you select and
record music files from one or several CD-ROM drives attached to your computer.
You can also dub over your video in this step. See page 58.
The final cuts have been made and the music has been synchronized with care. Now
it’s time to put it all together and make a master copy of your newest movie. See
page 64.
Page 27

START 27
Creating a new project
When you run V ideoStudio, it automatically
opens a new project and lets you start
composing your video production. If this is
your first time to use VideoStudio, the new
project uses V ideoStudio’ s initial default
settings. Otherwise, the new project reuses
the project settings which you have last used.
To check what these settings are, click
Settings and Commands and select Project
Properties.
Project settings determine how your video
project is rendered when you preview the
project. Rendering is the process by which
VideoStudio converts raw video, titles,
sounds, and effects into a continuous stream
of data which can be played back in your
computer. You can modify the project
settings in the Project Properties dialog box.
When you capture or insert your first video
clip into the project, V ideoStudio automatically checks the properties of the clip and
your project. If properties such as file
format, frame size, etc. are not identical,
V ideoStudio displays a message and gives you
the option to have the project settings automatically adjusted to match the clip’s properties. Changing the project settings allows
VideoStudio to perform the SmartRender
function. See page 41 for more information
on SmartRender.
Start
The Start Step is where you create a new project file (*.VSP), or open an existing project. A
project file is a small file used by VideoStudio to store all of the information about your movie
such as clips used, trimming information, duration of movie, size of frames, and type of movie
to make. A project file is not the finished movie and can only be opened in VideoStudio. The
actual process of creating a movie from a project file is performed in the Finish Step.
Page 28

28 VIDEOSTUDIO USER GUIDE
You can also begin by creating an empty
project file using New Project.
To create a new project using New Project:
1. Click New Project in the Options Panel or the
Start menu arrow and select New Project.
2 . Click Browse to select a working folder where
all your captured/project files will be located.
Y ou can also click Settings and Commands:
Preferences. Enter a folder name to create a
subfolder in this location.
3 . Choose a template from Available pr oject
templates which includes all templates you
created previously. See page 29.
Select the one that most closely matches the
type of movie you want to create.
4. Click OK.
To open an existing project:
1. Click Open Project or the Start menu arrow
and select Open Project.
2 . Select the project file (*.VSP) you want to
open. If you are not sure where the file is,
use Browse and then click Scan. This finds
all *.VSP files under your assigned folder or
drive.
3. Click Open.
Note: A faster way to open an existing project is to click it
in the Recent file list. VideoStudio, however, cannot
open a project that has been moved or removed.
OR
Page 29

START 29
Selecting a template
Templates provide settings that can get you started as quickly as possible. When choosing a
template, first know the attributes of the sources you are going to use in the project. Video
sources can be already existing video files in your hard drive or still to be captured scenes
from your capturing device. Remember that the template you’re going to choose here does not
restrict you from changing the output format of your final movie. Templates are more directly
related to your video source.
To get the best quality and rendering time,
choose a project template that has the same
frame size, frame rate, and other attributes as
your capture settings.
• Template from the capture settings uses
the same frame size, frame rate, and other
attributes as your capture device’s settings.
VideoStudio allows you to reuse the settings
of previously created video files. This makes
it easier to create several projects with
exactly the same properties.
• Template from an existing video file
allows you to create a template based on the
settings of previously created AVI and
MPEG video files.
• Previous template reuses the settings of the
last project template used.
Video is displayed on NTSC or PAL devices,
the most common of which is the television.
Although many devices now work with both,
it is helpful to select the standard that suits
your specific need.
• NTSC is predominant in North America and
many Asian countries.
• PAL is the standard in Europe and South
Pacific.
If you select your country when installing
VideoStudio, the appropriate TV standard is
selected by default.
Select from Available project templates depending on
the settings required by your project
Select a video file as a template dialog box is
displayed upon selecting Template from an
existing video file
Page 30

30 VIDEOSTUDIO USER GUIDE
The output video file format determines the
media type by which your project can be
distributed. See page 69.
• MPEG-1 lets you output in VCD.
• MPEG-2 lets you output in DVD.
• DV lets you record back to the DV
camcorder.
• The widely-used Microsoft AVI is ideal for
videos intended for viewing on most PCs.
• Streaming formats such as MOV, RM, and
WMV are used in creating video for sharing
over the Internet.
VideoStudio also allows you to create new templates with your custom settings. This means
you can set precise values for frame rate, frame size, video data rate, audio bit rate, compression, and other attributes.
To create a new template:
1 . Click Settings and Commands: T emplates
Manager to display the T emplates Manager
dialog box.
2 . Then click New to display the New T emplate
dialog box.
3 . Select a file format and enter a template name
and its description. This will be displayed
automatically in the New Project dialog box.
4. Click OK.
5 . The T emplate options dialog box is dis-
played. Specify the settings of your template.
6. Click OK.
Note: To modify clips in Templates Manager, select from
Available movie templates and click Edit.
Page 31

CAPTURE 31
Capture
The process of transferring video from your camcorder or other video sources to your
computer is called capturing. When everything is ready to go, the video feed from your source
device should be visible in the Preview Window. If your card supports a television monitor,
you should also be able to watch your video on it.
Checklist for successful video capture
Capturing video is one of the most demanding tasks you will ever ask of your computer. It
involves high data rates and requires huge amounts of disk space. Here are a few things you
can do to ensure success:
• Shut down ALL other programs that are running except Windows Explorer and VideoStudio. Remove
the Screen Saver to avoid possible interruption.
• Best results can be achieved by using a dedicated video hard disk, preferably with the capabilities of at
least Ultra-DMA/66, 7200 rpm and more than 30 GB space.
• For better manipulation of batch capture and camcorder device control, correct timecode on the DV
tape is a must. To do this, before shooting your video, use the standard playback (SP) mode and shoot
a blank video (for example, leaving the lens cover on while recording) without interruption from start
to end of a tape.
Capture Video
Transfers video from your source
to your hard disk.
Capture Image
Captures a single frame as a still
image from your source to your
hard disk.
Capture duration
Sets the length of time for the
capture.
Captured frames
The total number of captured
video frames.
Dropped frames
The total number of lost video
frames while capturing.
Switch to playback mode
Click to work in Playback
Mode for instant previews.
Options
Displays a menu allowing you
to modify your capture settings.
Driver
Displays the detected capture
device and lists other capture
device drivers installed in your
computer.
Scene Detection
Automatically separates captured
video into several files based on
changes in recording date and
time.
Switch to capture mode
Click to work in Capture Mode
and perform capturing tasks.
Format
Allows you to easily select a file
format to use for saving
captured videos.
Page 32

32 VIDEOSTUDIO USER GUIDE
Capturing analog video
To capture video using an analog capture card
with audio / video jacks or S-video:
1. Connect your video source device to your
capture card. On some cards, you may also
need to connect the audio cables.
2 . Open a project and click the Capture Step.
3 . Select a capture file format (MPEG or AVI)
from the Format list.
4. Scan your video to search the part to
capture.
5. When you get to the point you want to
record, click Capture Video on the Capture
Settings Tab in the Options Panel.
6 . Click Capture Video again or press [Esc] to
stop capturing.
If a confirmation dialog box appears, click OK to
start the capture process. To disable this, click
Settings and Commands and select Preferences. In
the Preferences dialog box, click the Capture Tab
and clear Enable pressing OK to capture.
Capturing DV video
To capture DV video:
1 . Connect your camcorder to the IEEE 1394
capture card. Turn it on and set it to Play (or
VTR / VCR) mode. Check your device manual
for specific instructions.
2 . Open a new project.
3 . In the Capture Step, click Play in Navigator.
4. When you get to the part of the video you
want to record, click Capture Video on the
Capture Settings T ab in the Options Panel.
5 . Click Capture Video again or press [Esc] to
stop capturing.
Tips:
• Capture menu items are grayed out in the Playback Mode. If this happens in the Capture Mode, check if your video
capture devices are correctly installed.
• A delay in capture may be due to the confirmation dialog box or connection between devices.
It is better to rewind your tape to an earlier point before capturing and just trim the video later.
• The normal number of dropped frames is zero. If any frames are dropped, check if the DMA setting is enabled. See
page 14.
Page 33

CAPTURE 33
To capture video in MPEG format:
1 . Connect your camcorder or VCR to your
capture card. Switch it on and set it to Play
(or VTR / VCR) mode. Check your device
manual for specific instructions.
2 . In the Capture Step, select MPEG from the
Format list.
3. Ulead DSW MPEG Capture Plug-in will be
detected automatically. Use this capture
plug-in when capturing MPEG from a DV
camcorder.
Otherwise, if you have a USB camera or
analog capture device which does not
support this capture plug-in, click Settings
and Commands then select Change Capture
Plug-in and choose Ulead VFW Capture
Plug-in.
4 . Click Options and select MPEG Settings.
Choose the type of MPEG you would like to
capture and set other attributes.
If you are capturing from a USB device or
analog source, also select Video format from
the Options menu to specify the desired
frame size.
5 . Click Capture Video to start capturing.
6 . Click Capture Video again or press [Esc] to
stop capturing.
Note: This feature is only available if the analog capture card supports RGB 24 or YUV capture. (Please see the manual of
your capture card.)
Direct capturing MPEG video
Capturing video directly from your camcorder straight to MPEG format is one of the most
exciting developments in computer video. Capture straight to MPEG-1 or MPEG-2, depending
on your needs and skip the task of having to capture in other formats only to convert it later.
And with the much smaller size of MPEG files, you save on hard disk space. Both the IEEE
1394 and analog capture cards support direct capturing of MPEG video.
Page 34

34 VIDEOSTUDIO USER GUIDE
To use Scene Detection option in Capture Step:
1. Select Scene Detection on the Capture
Settings T ab in the Options Panel.
2. Click Capture Video.
Scene Detection / Split by Scene
Scene Detection and Split by Scene divide DV into multiple files or clips based on recording
date and time. This feature is useful when you have several video sessions recorded on the
same DV tape at different times and you want to separate them into different clips or files. You
can divide footage during capture or after being captured.
Note: This splits the footage into multiple files based on
the date and time of recording. The captured files
are inserted into the Video Track.
To use Split by Scene on captured DV AVI files:
1 . Load the DV formatted AVI file into the
Library.
2 . Right-click its thumbnail, and select Split by
Scene.
3 . The Scenes & Recording Cuts dialog box is
displayed. Click Scan.
Note: This splits the video file into multiple clips based
on recording date and time. Physically, there is still
one file.
Page 35

CAPTURE 35
Captured video file size in Windows
VideoStudio runs on Windows operating systems and is subject to limitations in file size when
capturing or rendering video. VideoStudio automatically performs seamless capture, saving
video into a new file every time the maximum allowable file size for a single video file has been
reached.
Seamless capture will be performed only when capturing DV from a DV camcorder through
the IEEE 1394 capture card. The maximum captured file size per video file is 4 GB in Windows operating systems (such as Windows 98 and Me) that use the FAT 32 partition file
system. Captured video data in excess of 4 GB are automatically saved to a new file. In
Windows 2000, which uses the NTFS file system, there is no limit in the captured file size.
Seamless capture is not available in VFW (Video For Windows) capture.
Note: VideoStudio automatically detects your file system and performs seamless capture only in a FAT 32 partition file
system. The NTFS system does not have the 4GB limitation.
Capturing still images
In addition to video, VideoStudio also allows you to capture still images. The image format can
be BMP or JPEG, and the size spends on its source video. To choose your image format, click
Settings and Commands: Preferences. In the Preferences dialog box click the Capture
Tab and set the format.
To capture still images:
1 . Connect your camcorder or VCR to your
capture card. Switch it on and set it to Play
(or VTR / VCR) mode. Check your device
manual for specific instructions.
2 . Open a new project.
3 . In the Capture Step, click Play in Navigator.
4. When you get to the part of the video you
want to record, click Capture Image on the
Capture Settings T ab in the Options Panel.
Page 36

36 VIDEOSTUDIO USER GUIDE
Batch Capture
Overburdened by immense amounts of footage to capture from your DV tape? You can get
peace of mind through VideoStudio’s Batch Capture. This feature captures only the video
clips you want with just one click and saves you a considerable amount of time.
To Batch capture, simply watch the video. At any time, press [F3] to mark in the task and
[F4] to mark out. Press [F3] and [F4] as often as required.
Note: Batch capturing can be achieved only when you are using a DV tape and the IEEE 1394 card for computer
connection.
Capture Video
Captures the listed tasks all at
once.
Play Selected Tasks
Allows you to preview selected
tasks before capturing.
Modify a task
Changes the timecode of either
the starting or the ending point.
Deletes all tasks
Removes all tasks on the list.
Tasks list
Displays all the tasks created in
the timecode format. Click to
select a task. Multiple selections
can be made by holding down
[Ctrl] or [Shift].
Current mark in
Displays the current starting
timecode.
Delete the selected task(s)
Removes the selected task(s).
Page 37

STORYBOARD 37
To use Batch Capture:
1. Switch on your camcorder and set it to Play
(or VTR / VCR) mode. Refer to your
camcorder’s manual for specific instructions.
2 . Open a project.
3 . In the Capture Step, click the Batch Capture
Tab in the Options Panel. Y ou can also click
the Capture menu arrow and select Batch
Capture.
Note:The videotape automatically plays once you click the
Batch Capture Tab. Rewind or forward you
videotape first to cue it.
4. When you get to the part of the video you
want to record, press [F3]. Then press [F4]
to mark out the task.
5. Continue to play the video, and then repeat
step 4 as needed.
6. Click Play Selected Tasks to view the
selected segments on tape. Click Modify a
task to change a marked segment. You can
also double-click a task and enter a new
timecode.
7. Click Capture Video.
8. Batch capture starts based on all or selected
(if any) tasks. The process stops when the
last task is captured. A report is displayed
for your reference.
Note:It is up to you whether to click Stop before starting
Batch capture. However, if you need to modify some
tasks, click Stop first to help VideoStudio prioritize
capturing tasks.
Page 38

38 VIDEOSTUDIO USER GUIDE
Storyboard
A storyboard is an outline for a movie. It contains a chronological order of the events that
occur in your story. The bottom half of the VideoStudio interface is simply an electronic
storyboard. You can edit your project either in the Storyboard Mode or Timeline Mode.
Storyboard Mode
Storyboard Mode is the fastest and simplest way to add clips to your movie. Clips can be
moved around by simply dragging them. You may find that starting out in the Storyboard
Mode is the easiest way to get your project rolling. Each picture represents an event in your
movie, an event being a video clip or a transition. Thumbnails show at a glance the chronological order of events in your project.
You can drag and drop clips to insert and arrange them. Transition effects can be inserted
between clips. Selected clips can be trimmed in the Preview Window. See page 43 for more
information on trimming.
Click Minimize to switch back to the
normal Storyboard Mode display.
Larger storyboard display
The storyboard display can be maximized to
enjoy a bigger workspace. Click Enlarge to
divide the entire display area between the
storyboard display and the Library. With a
larger workspace, you can arrange clips and
apply effects and transitions more easily.
Page 39

STORYBOARD 39
Timeline Mode
The Timeline Mode allows you to fine tune effects and perform frame accurate trimming and
editing. The Timeline Mode shows exactly when and where events in your story occur based
on the position of clips in each track. Clips are simply dragged from the Library to the
Timeline. They are displayed here as short sequences.
The length of a clip accurately represents its duration in your project. The ruler units, represented by timecodes, can be adjusted to give you precise control over trimming and editing.
Use the Zoom controls or click the Ruler menu to adjust the ruler units.
Click Fit in window to see the entire project displayed on one screen. If you have a mouse
with a scroll button, the scroll button can be used to scroll through the timeline.
Tracks
The Timeline is divided horizontally into the Video, Overlay, Title, Voice, and Music Tracks.
To switch to different tracks:
• Click the Step menu item that corresponds to
the track.
• Click the track’ s icon.
• Double-click the track or the clip.
Video
Title
Voice
Music
The tracks
Ruler units
Fit in window button
Zoom control
Storyboard Mode
Selected clip
Timeline Mode
Transition effect
Overlay
Zoom to
Page 40

40 VIDEOSTUDIO USER GUIDE
The Options Panel
In the Storyboard Step, the Options Panel contains the Video and Filter Tabs. The Video Tab
shown below is displayed when a video clip is selected. Here, you can monitor the length of
your clip, control its volume, save a trimmed clip as a new file, or save a selected frame as an
image file. In the Video Tab, you can also export video clips in various media. When you click
the Filter Tab, the Options Panel displays the list of video filters which have been applied to a
selected video clip and allows you to modify filter settings.
Video duration
Displays the length of time of
the clip. Click a value or an
arrow button for modification.
Fade in / out
Gradually increases / decreases
the volume of the clip for a
smooth transition. Click Settings
and Commands: Preferences to
set the fade in / fade out
duration.
Export
Displays a drop-down menu
that allows you to output your
clip to Ulead DVD Wizard or as
a Web page, E-mail attachment, DV recording or Greeting
Card.
Video mark in / out
Displays the starting / ending
point of a video clip (after
trimming).
Volume
Click the arrow or enter a
value directly to adjust volume.
Save Still Image
Saves the currently selected
frame to an image file in the
Library.
Save Trimmed Video
Applies any trimming
modifications to a clip and
saves it to a new video file.
Properties
Click to display specific
information about a clip.
Split Video
Breaks a selected video clip in
two.
Mute
Disables audio of the selected clip.
Page 41

STORYBOARD 41
SmartRender and Play Project button
SmartRender technology allows “changes-only” rendering which eliminates the need to rerender entire video sequences when only slight changes have been made. This is especially
useful for rendering across transitions, title sequences, or to check the timing of audio clips in
relation to the associated video. It is advisable that projects are rendered regularly to reduce
overall render times.
While editing, you will want to preview your
work frequently to see how your project is
progressing. Play Project allows you to
select between Instant Preview and High
Quality Preview. The first allows you to
preview changes in your project without the
need to create a temporary preview file. The
latter renders a preview file and provides a
quick preview right after.
Play Project in Navigator
For faster previews, you may choose to play
only a part of your project. The selected
range of frames to preview is referred to as
the preview area, and it is marked as a red
bar in the Ruler Panel.
To play the preview area only:
1 . Use the Trim Bar or the Mark in/out
buttons to select the preview area.
The Preview range mark in and Preview
range mark out timecodes will then be
displayed in the Options Panel.
2. To preview the selected range of frames, hold
[Shift] and select a preview option (Instant
Preview or High Quality Preview).
Or, when the desired preview option is
already selected, hold [Shift] and click Play
Project.
Page 42

42 VIDEOSTUDIO USER GUIDE
Preview Files Manager
Use Preview Files Manager to free hard disk space occupied by temporary preview files
used in your project.
To delete temporary preview files:
1. Click Settings and Commands: Preview
Files Manager to display the Preview Files
Manager dialog box. Y ou can also click
Preview Files Manager in the Start Step
Options Panel.
2 . Select the VSP project under Project file
name where the temporary preview files you
want to remove are located and click Delete.
This removes only the temporary preview
files and not the actual VSP project.
3 . Click Delete All to remove all temporary
preview files of all VSP projects.
4 . Click Close.
Insert Media Files
Inserting a clip into the Timeline
To add video clips to the Timeline, you can use drag and drop or browse and select, depending
on where your clips are located.
To insert a video clip into the Timeline:
• Select a clip in the Library and drag and drop
it to the Timeline. Multiple clips can be
selected by pressing [Shift] or [Ctrl].
• To insert a clip from a file folder directly to
the Timeline, click Insert Media Files,
located to the left of the Timeline.
Tip: Press [Ctrl + S] to quickly save your project from time to time. This ensures that all project settings and file links
are always updated.
Page 43

STORYBOARD 43
For precise control, click on a Trim handle, hold it, and use the left or right arrow keys on
your keyboard to trim one frame at a time. Check the Video mark in / out timecodes in the
Options Panel to monitor your trimming. The Mark in / out points can also be set by pressing
[F3] and [F4], respectively.
You can also use Zoom controls to display each frame of your video in the Timeline and trim
one frame at a time. The Scroll Bar makes navigating through your project quicker and easier.
A wheel mouse can also be used to scroll, and to zoom by pressing [Ctrl].
Trimming a clip
The best part of editing your movie on your computer is the ease with which you can snip and
trim with frame by frame accuracy.
To trim a clip from the Timeline:
1 . Click a clip in the Timeline to select it.
2 . Drag the yellow T rim handles on either side
of the clip to change its length. The Preview
Window reflects the position of the Trim
handle in the clip.
3 . T o trim frame by frame, refer to the Video
mark in / out timecodes in the Options
Panel. These represent precise positions of
frames in the Timeline.
4 . Other clips in your project automatically
reposition themselves according to changes
made.
It is most convenient to use the Trim Bar in adjusting your clips. This is the green bar beneath
the Preview Window which represents the selected portion of a clip. If the clip has not been
trimmed, the green bar extends along the entire length.
To trim a clip with the Trim Bar:
1 . Select a clip from the Timeline or the Library .
2 . Click and drag a T rim handle to set the trim
position.
3. When you have selected the area you want
to trim, click Apply.
4 . Hold down [Shift] and click Play Clip to
selectively play only the trimmed portion of
the clip.
Page 44

44 VIDEOSTUDIO USER GUIDE
To create multiple copies of a single clip:
1 . Select a clip from the Library.
2 . Click and drag a Trim handle to set the trim
position.
3. Click Apply.
4 . Click Load video to reinsert the original video
file into the Library . Therefore, there are now
two copies of a single clip in the Library .
Repeat steps 1 to 4 to add more copies as
needed.
Note: In step 1, if you want to use an existing clip in the
current project, drag a clip from the Timeline into
the Library first.
To trim a clip in the Options Panel:
1 . Select a clip from the Timeline or the Library .
2 . Click the time in Video duration and the
numbers will blink.
3 . Enter a length of time for the clip. Mark in
shows the timecode representing the first
frame of the clip and Mark out shows the
timecode for the last frame.
4. Click Apply.
Note:Changes made in the Video duration box only affect
the Mark out point. The Mark in point remains
unchanged.
Video duration
Displays and sets the
length of time of the
clip.
Arrow buttons
Use these to fine tune
your trimming.
Video mark in / out
Displays the points in
the original clip where
the trimming takes
place.
Reset sets all values
back to defaults.
Apply renders the new
settings made in the
Options Panel to the
selected clip.
Working with clips
Your original video file can be used as a source for creating a number of different clips in the
Library. This type of editing allows you to trim different segments of a video file without
affecting its source file.
Page 45

STORYBOARD 45
This clip is the trimmed version of
the original video file. You can see
that a selected clip was trimmed by
checking the Options Panel or the
Trim Bar. Once a clip is trimmed,
rename the thumbnail in the
Library to distinguish it from the
original. (See detail on renaming in
the notes below.)
This Library contains five
copies of the same clip.
Selected clips are highlighted
in blue.
Then the original clip is reinserted
into the Library, the Mark in point
is zero and the Mark out point is
the last frame. The duration is the
entire clip. The Trim Bar clearly
shows that the clip has not been
trimmed.
Frequently, when you make changes, you may wish to make a permanent change to the clip
and save the edited file. Again, VideoStudio gives you a margin of safety in that it saves the
trimmed video to a new file and does not alter the original file. You can press [Delete] or drag
the thumbnail to remove it from the Library, or even remove the original file to recover disk
space.
To break a clip into multiple files:
1 . Select a clip from the Library or Timeline.
2 . Click and drag a T rim handle to set the trim
position.
3. Click Save T rimmed Video.
4. You now have two different physical video
files on your hard disk, the original file and a
trimmed copy .
Notes:
• To rename a thumbnail, click the name of the thumb-
nail to modify.
• Dragging a clip from the Timeline to the Trash only
removes the thumbnail. The original video file is not
affected.
Page 46

46 VIDEOSTUDIO USER GUIDE
Capturing still images in the Storyboard Step
A still image can be captured in the Storyboard Step by selecting a specific frame in the
Timeline and saving it as an image file. In this manner, possible distortions are avoided since
the image is not acquired from a running video, unlike in the Capture Step.
To capture still images:
1 . Select a clip in your project.
2 . Drag the Preview Bar to the frame you want
to capture.
3 . Switch to an image folder in the Library . The
folder can be the default Image folder, or the
one created by yourself.
4. Click Save Still Image in the Options Panel.
The new image file is saved to the hard disk
and is represented as a thumbnail in the
image folder you assigned.
Using color clips
Color clips are simply solid colored backgrounds that are useful for titles and transitions. For
example, black clips can be used for an effective fade to black transition. Place your opening
credits over the top of the color clip and then use a cross fade effect to create smooth
transition into your movie. See page 49.
You can insert a new color to the Color Library and control its duration just like an image clip.
Once a color clip has been inserted into the Library, you can drag it to the Timeline to put it
into your movie project.
To insert a color clip in the Color Library:
1. Select Color from the folder list or click the
Storyboard menu arrow and select Color.
2 . Click Load color to display the New Color
Clip dialog box.
3 . Here, click the color box to select a color
either from the Ulead Color Picker or the
Windows Color Picker .
4. Adjust the RGB values if needed.
5 . Set Duration.
6. Click OK.
Page 47

STORYBOARD 47
Titles set against solid backgrounds are often easier to see than against an image,
especially a moving one
Using video filters
Video filters are effects which you can apply to video clips in order to change their style or
appearance. For example, you can improve the color balance of a clip, or make the video look
like a painting. Filters are applied over each frame in a clip. By specifying the different start
and end values, you can control the intensity and speed of a filter as it moves from the first
frame to the last.
To apply a video filter to a clip in the
Timeline:
1 . Select a video clip in the Timeline.
2 . Select the Video Filter folder in the Library
or click the Storyboard menu arrow and select
Video Filter.
3 . Click a video filter in the Library to apply to
the selected clip.
4 . T o customize a filter, click Options on the
Filter T ab in the Options Panel. A vailable
options depend on the selected filter.
5 . Preview the result.
6. Click Apply.
Page 48

48 VIDEOSTUDIO USER GUIDE
To apply a video filter to a clip when no clip is
selected:
1. Select Video Filter from the folder list or
click the Storyboard menu arrow and select
Video Filter.
2 . While there is no video clip selected, click
the video filter you want to use. It is then
displayed in the Preview Window. Click Play
Clip to closely observe its behavior.
3 . There are two ways to apply the filter:
• Follow a prompt in the Options Panel
asking you to drag and drop the selected filter
to a video / image / color clip on the Timeline.
• Click Add and select the video / image / color
clip in the Timeline to apply the filter on.
4. Click Options for filter customization.
Available options depend on the selected
filter.
5 . You may also preview the result through
Navigator. If you want to change the filter,
click another thumbnail.
Shift up / down
video filter
buttons
Add to Timeline
button
Advanced options
button
Clicking Options displays a dialog box which allows you to fine tune your filter. Advanced
options can be applied to the first and the last frames only in a video clip. So, drag the slider to
either of these two points to adjust.
Example of a dialog box after clicking Options
Notes:
• VideoStudio allows you to apply a maximum of five
filters to a single video clip.
• When there is more than one video filter applied to a
video clip, you can change the order of filters by
clicking the Shift up / down video filter buttons.
However, the order change affects the whole appearance
or style of the video clip.
Page 49

EFFECT 49
To add a transition:
1 . Select a category of effects from the Folder
list.
2. Scroll through the effects thumbnails in the
Library. Select and drag an effect to the
Timeline, roughly between two video clips.
Drop your effect and it will snap into place.
You can only drag and drop one clip at a
time.
Effect
Transition effects offer creative ways to shift from one scene to the next. They are applied
between clips in the Video Track and their attributes can be modified in the Options Panel to
suit a specific purpose. VideoStudio studio allows you to mix and match a variety of preset
effects while editing your project. Effective use of this feature can add a professional touch to
your work.
Creating effects
The Library provides a wide range of preset transitions from cross fades to explosions. We
will deal with the details of these effects later. For now, you just need a project with two video
clips in it.
Drag and drop transition effects right onto the tracks in both Storyboard Mode and Timeline Mode
Note:Transitions work the same way in both the
Storyboard Mode and Timeline Mode. But you may
find it easier to work on transition effects in the
Storyboard Mode.
Page 50

50 VIDEOSTUDIO USER GUIDE
Customizing effects
If you’ve tried a few simple transitions as outlined on the previous page, you really have
mastered all you need to know. VideoStudio pretty much takes care of all the details to make
your transitions smooth and professional. You can, however, further customize your effects
after adding them to your project. The Options Panel displays the settings of your selected
effects so that you can change their various parameters. This gives you complete control of
exactly how your effects will behave in your movie.
Duration
Sets the length of time of the
transition. You can also modify
the duration by using the yellow
Trim handles in the Timeline.
Border / Color
Select a size for the border (in
pixels) on the left and choose a
color by clicking the color box.
Soft edge
Soft edge applies to the border of
the effect to blend two clips
together more smoothly. The
soft edge buttons are unavailable
if there no border on the clip.
Direction
These buttons control the
direction of motion in the
transition effect. In this
transition, the two doors can
move in eight different ways.
Add
Click to apply a selected
transition effect. Then click
between two clips in the
Timeline where you want to
add the effect.
Apply
Click to apply changes made
to a selected effect in the
Timeline.
Reset
Click to return to previous
settings if changes have not
been applied. If Apply has
already been clicked, use
Undo to return to previous
settings.
Page 51

OVERLAY 51
Overlay
The Overlay Step provides an additional track where you can place videos and images to
enhance introductions and credits. An alpha-channel is automatically applied to clips placed in
this track for transparency. By using an animation style such as fade-in and fade-out, you can
interweave two clips, one in the Storyboard Track and another in the Overlay Track, in one
timeline. You can even have three separate clips playing simultaneously by adding a clip in the
Title Track.
Inserting video/image in the Overlay track
Working in the Overlay Track is similar to working in the Storyboard Track. You can drag and
drop clips and images (color clips are not available in Overlay) to arrange their order. You can
also apply a motion style effect, that controls the way the overlay clip “blends” with the clips
in the Video Track.
To insert a clip to the Overlay Track:
1. Select Video/Image in the Folder list or click
Load video / Load image to browse and select
a file.
2. Drag and drop the selected clip from the
Library to the Overlay T rack in the
Timeline.
3 . Click Motion, and apply a motion style to
create a blending effect between the selected
clip and the clip simultaneously running in
the Storyboard T rack. See page 52.
In Overlay, you can only use the video and
image galleries. Just like in the Title Step, this
step does not support drag and drop of
multiple clips.
Page 52

52 VIDEOSTUDIO USER GUIDE
Note: Settings here can be applied to the whole clip or just
part of it.
Note:These settings are applied to the whole clip.
Customizing overlays
Fine tune the attributes and behavior of your overlay clips in the Options Panel.
Duration
Sets the length of time of the
overlay clip. You can also
modify the duration by using the
two yellow Trim handles in the
Timeline.
Mark in / Mark out
Displays the starting / ending
point of the overlay clip after
trimming.
Clip volume
Click the arrow or enter a value
to adjust volume.
Mute
Disables audio for the selected
clip.
Fade in / out
Gradually increases / decreases
the volume of the clip for a
smooth transition. Click Settings
and Commands: Preferences to
set the fade in / fade out duration.
Motion style
Click the arrow to display all
available motion styles.
Choosing Static superimposes
the clip over the storyboard
clip.
Position
Sets the placement of the video
clip/image with reference to the
window. You can choose from 9
set positions, or adjust the clip/
image manually.
Zoom ratio
Magnifies or reduces the video
clip/image accordingly. Click the
arrow or enter a value to adjust the
size.
Transparency
Sets the opacity of the video
clip/image. Click the arrow or
enter a value to adjust transparency.
To make Overlay clips with transparent backgrounds, you can also create a 32-bit alpha
channel AVI or Image file with an alpha channel. You can further achieve your desired effects
by using the Motion Tab. Here, you can apply motion styles, set the position of your clip on
the screen, magnify or reduce it, and control its transparency level.
Properties
Displays the attributes of a
selected clip.
Page 53

TITLE 53
Duration
Sets the length of time for the
title clip. You can also modify
the duration by using the two
yellow Trim handles on the
Timeline.
Alignment
Aligns horizontal text to the
left, center, or right. Or, aligns
vertical text to the top, center,
or bottom.
Font style
Bold, italic and underline.
Line spacing
Sets the spacing, or leading,
between lines of text.
Font size
Sets the size of the text in
points.
Font face
Use any True Type font
installed on your computer.
Create Title
Click to create a new title clip of
modify an existing one.
Reset
Reverts to original settings.
Apply
Applies new settings to the title
clip.
Character color
Sets the color of the selected
text.
Border & Shadow
Applies or removes text border
and shadow effects.
Title
While a picture may be worth a thousand words, text effects in your video productions add
clarity and comprehensibility. Besides, what production-quality movie would be complete
without opening and closing credits? With VideoStudio’s Title Step, professional-looking titles
complete with animation effects can be done in minutes. Use these settings to create the look
of your selected title.
Editing Tab
Each option here applies to the whole text or part of it.
Vertical title
Makes the orientation of the
title vertical or horizontal.
Page 54

54 VIDEOSTUDIO USER GUIDE
Creating text titles
Titles determine best what your production is all about. They can be used throughout your
project as opening and closing credits, introduction to chapter points, scene captions, and
many more. VideoStudio ensures that creating your title clips is as easy as clicking a few
buttons and dragging a few clips.
To add a text title:
1. Use the Navigator buttons to scan your
video and select the frame you want to add a
title to.
2 . In the Editing T ab in the Options Panel, click
Create Title or click directly in the Preview
Window .
Note: Remember that you cannot create a new title over an
existing title clip.
3 . Type in your title in the Preview W indow and
use the style buttons to customize fonts.
Options are available in the Editing T ab.
4. To add effects to your title, switch to the
Animation T ab. Then, select an effect from
the Type drop-down list, and choose the
desired animation options in the Options
Panel.
5. Click Add.
Animation Tab
Each option here applies to the whole text title.
Enable animation
Applies or removes animation
attribute from a title clip.
Animation options
Determine how the title enters
and exits the scene. The available
options vary, depending on the
type of effect that is selected.
Type
Provides a list of animation
effects to choose from.
The blue triangle represents
the position of the title clip in
the Timeline.
Page 55

TITLE 55
When entering a text title, a faint rectangle is visible in the Preview Window. This is the Title
safe area, and it is the recommended maximum size for your text. Along with the rectangle,
you should see a blinking cursor that indicates the starting point for text entry.
When entering text, you can press [Backspace] to correct mistakes and press [Enter] to start
a new line. Move around the text with the arrow keys as needed. To change the attributes of
text, first highlight the text by selecting it with your mouse and then make revisions.
To modify a text title:
1 . Click a title clip in the Timeline.
2 . Click Create Title or click directly in the
Preview Window to change the text.
3 . Click Apply or move to the next step. T o
change the text back to its original state, click
Reset.
Notes:
• Once a title clip has been inserted onto the Timeline,
you can adjust its duration by either dragging the
handles, or entering a duration value on the Editing
Tab .
• To see how the title appears on the underlying video
clip, select the title clip and then click Play Clip or drag
the Preview Bar handle.
• The Library can also be used to store title clips. To add
a title clip to the Library, drag it from the Timeline to
the Library.
Creating vertical text titles
For added flexibility in your text layout, V ideoStudio allows you add vertical text titles.
To create a vertical text title:
1. Click Create Title or click directly in the
Preview Window to enter the text.
2 . Select V ertical title in the Editing T ab.
3. Use the Alignment buttons to align the text
to the top, center or bottom.
4. Click Add.
A text title being
edited. Note the
Title safe area
around the center
of the window.
To change the orientation of the title back to
horizontal, clear the Vertical title option.
Alignment buttons
Page 56

56 VIDEOSTUDIO USER GUIDE
Rolling & scrolling
One of the most common and effective techniques for presenting closing credits is the rolling
or scrolling credits. With VideoStudio, this is simply a matter of specifying a direction and a
duration for your text. After you have entered some text and inserted it in the Timeline, click
the title clip you have created and click the Animation Tab.
To scroll a text title:
1 . Select a text title in the Timeline or create a
new one.
2 . On the Animation T ab in the Options Panel,
select Fly from the T ype drop-down list.
3. Specify how to scroll the title by choosing
these animation options:
• Start and End units Determine whether the
whole title (Text) moves, or parts of the title
(Char, Word, or Line) scroll one at a time.
To add a title from the Library:
1. Select Title from the Folder list. Then, drag a
preset title thumbnail from the Library into
the Title T rack.
2 . Click the Preview Window to edit the
selected preset text title. Use the Editing T ab
to enter new text or modify font styles. Use
the Animation T ab to add animation effects
to the title.
3. Click Apply.
Using the Library
There are various ready-to-use titles in the Library which you can add to your project and
preset animation effects which you can apply to your text titles.
Preset titles
Preset motions
To apply a preset animation effect:
1 . Select a title in the Timeline or create a new
one.
2 . Select Animation from the Folder list.
Double-click a preset motion thumbnail in the
Library.
3. Click Apply.
Page 57

TITLE 57
Putting it all together
To create a long list of credits in a production, it is necessary to insert a series of title clips
into the Timeline.
To create extended credits:
1 . Start by creating one clip with multiple lines
of text.
2. Drag a copy of the Title clip from the
Timeline to the Library. This is the easiest
way to maintain consistency on each title’s
attributes.
3. Drag title copies from the Library back to
the Timeline to create new titles.
4. Modify the text in the copied title.
5. Repeat this procedure until all credits have
been added.
Fading in & out
Another incredibly useful, easy, and effective method of displaying your titles is to fade your
text in from invisible to crisp and clear and then back to invisible again. This works especially
well for opening credits with a slow fade, or as captions with a quicker fade.
To create fading titles:
1 . Select a text title or create a new one.
2 . On the Animation T ab in the Options Panel,
select Fade from the T ype drop-down list.
3 . Select a fading option. (Cross fade makes the
title gradually appear and then disappear.)
4 . Specify a Pause setting (No Pause, Short,
Medium, or Long).
5. Click Apply.
• Start and End positions Determine from
what position the title starts to move in and
the final destination where it scrolls out.
4 . Specify a Pause setting (No Pause, Short,
Medium, or Long). This makes the title move
into the scene, pause for a moment, and then
scroll out of the scene.
5. Click Apply.
Page 58

58 VIDEOSTUDIO USER GUIDE
Audio
Audio in the form of music, running narration, and even a sound effect is a critical part of any
video project. VideoStudio provides you with the tools to make sure your audio is as great and
easy to prepare as working with video.
The Audio Step consists of two tracks: Voiceover and Music. Insert your narrations in the
Voice Track and your background music or sound effects on the Music Track. You can even
access your music files from multiple CD-ROMs simultaneously.
Click Insert media files to browse, select
and insert WAV, MP3, and CD audio files
stored in your hard disk. You can also store
your audio clips in the Library and drag and
drop them to and from the Timeline. To add
additional clips, click Load audio.
Incidentally , the VideoStudio CD also comes
with several audio clips ready for you to use.
These clips are mostly short sound effects
clips and can be very humorous when used in
your movies, or can be used to create
additional ambience.
Details of the Timeline showing the two audio tracks with WAV and MP3 file clips
Insert media files
Voice Track
Music Track
Load audio
Note: You’ll end up with a number of separate, sequential title clips in the Timeline. Try adding a small space between
clips for a brief pause. Anyway you do it, test your titles to ensure that they are readable in the final version of your
movie. (See page 65 for information about previewing parts of a movie.)
An Autotrim function also allows you to
insert a title clip between two existing clips.
If the space between these clips is not
enough to fit your chosen clip, it will be
automatically trimmed to fit the available
space.
Page 59

AUDIO 59
Music Tab
Voiceover Tab
Play/Stop
Plays the selected audio CD
track. Clicking it again stops
playback.
Duration
Sets the length of time of the
narration clip. You can also
modify the duration by moving
the two yellow Trim handles on
the Timeline.
Video mark in / out
Displays the start / end point of
a narration clip after trimming.
Volume
Click the arrow or enter a
value to adjust the volume.
Fade in / Fade out
Gradually increases / decreases
the volume of the clip for a
smooth transition. Click
Settings and Commands:
Preferences to set the fade in /
fade out duration.
Record
Starts the narration recording
process. Clicking it again stops
recording.
Record with Preview
Plays the video clip when you
click Record. This allows you
to accurately synchronize the
voiceover with the video.
Duration
Sets the length of time of the
music clip. You can also modify
the duration by moving the two
yellow Trim handles on the
Timeline.
Video mark in / out
Displays the start / end point of
an audio clip after trimming.
Record
Records the audio track
currently playing.
Volume
Click the arrow or enter a
value to adjust volume.
Disc
Displays the Compact Disc
name currently loaded in the
CD Drive.
Track
Displays the audio track
currently playing.
Fade in / Fade out
Gradually increases / decreases
the volume of the clip for a
smooth transition. Click
Settings and Commands:
Preferences to set the fade in /
fade out duration.
Page 60

60 VIDEOSTUDIO USER GUIDE
Narrating a movie:
1. Use the Preview Bar to move to the section
of the video you want to narrate.
Note: You cannot record over an existing clip, so make
sure none is selected by clicking on a blank section
in the Voice Track.
2. Select Record with Preview and click Record.
A small meter appears.
3. Speak into the microphone and check if the
meter responds accordingly. Use the Windows audio mixer to adjust the level of the
microphone.
4 . Click Start and begin speaking. W atch your
video play in the Preview Window to
synchronize the narration with the action.
5. Click Record again or press [Esc] to stop.
Note: To record a new narration, make sure that tan audio
clip is not currently selected in the Audio Track.
Otherwise, the Record function is disabled.
Creating voiceover narration
Explaining exactly what is going on in your movie can really help your viewers understand and
enjoy it better. This technique is often used in television documentaries and news stories.
Before recording a narration, always check the audio settings in Windows. For example, in
Windows 98, click Start: Programs - Accessories - Entertainment - Volume Control. In
the Volume Control dialog box, click Options: Properties. In the Properties dialog box,
select Recording and in the volume controls list, select Microphone. Click OK. Make sure
the Select option in Microphone Balance is checked. Adjust the microphone volume level.
The easiest method of recording a narration for a video is to record in short ten or fifteen
second sessions. This allows you to prepare what you are going to say more easily and to
quickly fix mistakes. When you have misspoken and recorded a bad clip, just select the clip on
the Timeline and delete it. Some people are comfortable doing impromptu narrations, some
people prefer just an outline, and others like to have the complete text of what they want to
say written out beforehand.
Adjust Volume level meter
The red circle of the Record button turns into a black
square when recording
Page 61

AUDIO 61
T o record music from a CD:
1 . Insert an audio CD to your CD-ROM.
2 . Click Audio and select Music.
3 . Check if both Disc name and T rack are
enabled to make sure that a disc is loaded.
4. Select the audio track you want to capture
using Track.
5. Click Record to begin recording. T o stop,
click Record again.
6. A copy of the recorded audio will be displayed in the Music T rack. You can edit and
rename its thumbnail like any other clip.
Note:To record a new clip, make sure that there is no
selected audio clip in the Audio Track. Otherwise,
the Record function is disabled.
Creating background music
The mood of your movie is determined as much by your video as it is by the background
music you use. Whether you choose Classical, Country, or Chinese folk music, the decision is
entirely up to you. The source of this music can be any CD in your collection.
To use the audio from a CD in your movie, you first have to record the music you want with
your computer. This creates a WAV file, which is the digital audio data from your CD.
VideoStudio now supports a number of additional file formats, including MP3. MP3s are an
exciting new way to share music over the Internet and there are thousands of songs available
for you to download.
Recording audio from a CD
V ideoStudio’s audio versatility allows you to acquire music from virtually any popular audio
source: WAV files, MP3s, and CD audio. Importing sounds is as easy as inserting a disc. You
can choose to record a whole audio track, or you can just copy sound bites.
After recording a clip, the controls in the
Options Panel change. The top numbers
now represent the total Duration of the
inserted clip. You can now trim audio clips
to better fit your movie or drag and drop
them from one audio track to another.
Selected WAV file with
Trim handles
WAV file trim
information
The red circle of the
Record button turns
into a black square when
recording
Play changes to Stop
when playing a CD
CD track information in
the Options Panel
Page 62

62 VIDEOSTUDIO USER GUIDE
Mixing it together
VideoStudio has two separate sound tracks, one for voice and one for music. If you captured
your video with sound, then in fact, you also have a third sound track that is included with the
video file. This really gives you a lot of creative freedom. Vacation shots, scenery and nature
videos, and movies of parties all lend themselves very well to music video style productions.
Or you can combine this format with a voiceover. And when someone talks to the camera,
you may want to eliminate the music altogether. The key to making this all work smoothly is
to control the volume of the various clips. This is done through the Options Panel.
Customizing background music
You can drag and drop audio clips to move them or add them to the Library. From the
Timeline, a selected audio clip has two yellow handles that can be used for trimming. Again,
just grab a handle and drag it to shorten a clip, either from the beginning or end.
To trim an audio clip:
1 . Click an audio clip in the Library or in the
Timeline.
2 . Click and drag a Trim handle to set the trim
position.
3. Click Apply.
4 . Y ou can selectively play only the trimmed
portion of the clip by holding [Shift] and
clicking Play.
Trim handles beneath the Preview Window
Play button
Apply changes button
An Autotrim function also allows you to
insert an audio clip between two existing
clips. If the space between these clips is not
large enough to fit your chosen clip, it will be
automatically trimmed to fit the available
space.
Page 63

AUDIO 63
Note:VideoStudio provides a separate Voice Track and Music Track which you can edit separately and then mix together.
You can insert any Windows audio file onto either track. Music clips can be inserted on the Voice Track and
voiceover clips can be inserted on the Music Track.
Audio controls
for a video clip
Volume amplification
control
The control of your audio tracks is found in
the Options Panel. The first control is the
volume control, expressed as a percentage of
the original recorded volume. Click the
control to select from a range of audio
amplification options: 0 to 500% (where
100% is no change and 0% will completely
silence the clip). If you want a completely
silent part, it is probably easiest to just delete
the clip from one of the audio tracks. Any
changes made with this control applies to the
entire clip.
Fade
Background music that starts and ends gradually is commonly used to create smooth transitions. If you record an entire musical piece, this is probably not a problem since most of them
have a beginning and ending. However, if you only want to use a portion of a musical piece,
you can still seamlessly blend by using Fade in / out in VideoStudio.
Volume
Sets the volume for the entire length
of a clip. Use this control to lower the
volume of the audio on a video clip so
that your voiceover narration can be
heard clearly above the background.
Fade in / Fade out
Gradually increases / decreases the
volume of the clip for a smooth
transition. Click Settings and
Commands: Preferences to set the
fade in / fade out duration.
Detail of an audio clip in the Options Panel
Page 64

64 VIDEOSTUDIO USER GUIDE
Tip: Having the same settings for source video files and project saves on rendering time whenever you use Play Project
and select High Quality Preview. However, the best arrangement is to use the same format and settings for source
video (both captured and inserted), project, and movie template.
Finish
In the Finish Step, you can render your project into a movie file format most suitable for your
audience or purpose. This section provides added information on choosing formats. Learn the
procedure of creating a movie in preparation for exporting to various media. Find out also how
easy it is to author a DVD title using the Ulead DVD Wizard, which is fully integrated in
VideoStudio. And finally, you can preview how your final output will exactly look.
You can go directly to the Finish Step without even opening a project. That is, if you simply
want to save a project file which you can work on later.
Creating and saving a video file
Click Play Project and select High Quality Preview to save or render your project at any
time. But if you want to save your project as a new file with the same properties, you need to
click the Finish Step and click Save Project in the Options Panel.
If everything has already been fine tuned, however, and you are ready to finalize your work,
then you can start making your movie.
To render a movie:
1 . Click Create Video File in the Options Panel.
The Create Video dialog box appears.
2 . Enter a file name for your movie. It will be
saved in the format specified in your project
template settings.
3. Click Save.
Create Video
dialog box for
creating a video
Create Video File button
VideoStudio’s SmartRender technology allows “changes-only” rendering which eliminates the
need to re-render entire video sequences when only slight changes have been made.
Page 65

FINISH 65
Video clip with selected preview area in red
Sometimes, you just need to render a part of your project for a quick preview. This is usually
done when fine tuning effects, titles, and synchronizing audio in your projects. VideoStudio
lets you select a portion or range of your project to render as a preview video.
To render partially:
1. Make sure that no clips are selected
(a selected clip has a broken line around it).
Click the ruler at the top of the Timeline to
deselect a clip.
2 . The T rim Bar now acts on the entire project.
Use the T rim handles to select a Preview
range. A red line should appear in the
Timeline representing the selected range.
(Another way of selecting a preview range is
to drag the blue triangle along the red line.
Then, press [F3] and [F4] for start and end
points respectively.)
3. Click Create Video File in the Options Panel.
4 . In the Create Video File dialog box, enter a
file name and then select Preview range
instead of Entire project. (For more information on Video Save Options dialog box and
recommendations, see page 66.)
5. Click Save.
Another way to render partially is to click Play Project and select High Quality Preview
while holding down [Shift], even if you’re not in the Finish Step. The selected range will be
rendered and then played in the Preview Window. This method creates a temporary video file
under the folder specified in the Preview Tab of the Preferences dialog box. To free up hard
disk space, delete these from time to time by selecting Setting and Commands: Preview
Files Manager.
Page 66

66 VIDEOSTUDIO USER GUIDE
Tip: To maintain the highest possible quality and keep render times to a minimum, it is best to create your video using
the same properties as when they were captured. Thus, you will need to check your captured clip’s properties from
time to time when choosing Video save options. To do this, right-click the clip and select Properties. You can also
select a video clip and click Properties in the Options Panel.
Video Save Options
In the Finish Step, you can apply a different format and new set of attributes when saving a
movie file. Click Finish: Create Video File-Custom to display the Create Video File dialog
box. Here, select Options. This will display the Video Save Options dialog box where you
can set your preferences.
When selecting an option, always remember to watch out for possible incompatibility problems. Available options depend on your file format. The following can help you choose options
and set values for files in AVI format.
Note: You can also click Help for further information in the Video Save Options dialog box.
Video Save Options: Ulead VideoStudio
Ulead VideoStudio Tab
Select Preview range to render only a
section of your project. Otherwise, Entire
project is selected by default.
For computer video, a Frame-based frame
type is commonly used.
Select Play after creating to watch your
movie immediately after rendering your
project. You can of course play your movie at
any time after rendering with Windows Media
Player.
Select Perform SmartRender to render only
the most recent changes. This saves you time
and hard disk space.
Page 67

FINISH 67
General Tab
If you have a sound track/s in your project,
select Audio and Video for the Data track.
Frame rate can be set anywhere between 15
and 30 frames per second. Higher frame rates
result in better quality, but larger file sizes.
Check your capture card manual for possible
frame rate recommendation.
It is common to use 29.97 fps for NTSC
video meant for viewing in a VCR in North
America.
As with Frame rate, a larger Frame size
yields a larger file size. Check your captured
clip’s properties and try to use the same
settings.
AVI Tab
Under Compression, choose the codec or
type of compression software you will use to
create your video. All digital video is compressed in some way, and video clips captured to your computer are already using
some kind of codec. Check your captured
clip’s properties, and if possible, use the same
settings.
Some video capture cards record
“uncompressed” video, in which case you
should select None as the compression type
(this, however, will create a very large file).
Many codecs allow you to select output
Quality as a percentage. Some codecs allow
you to set Keyframe for every X Frames.
Lower numbers result in higher quality but
longer render times.
Video Save Options: General
Video Save Options: AVI
Page 68

68 VIDEOSTUDIO USER GUIDE
The Data type is usually set by default to
match your captured clips.
Audio compression can also be set, independent of video compression. Data rates are
listed, so you can easily see the impact on
your completed movie. Your best option is to
select the audio compression used in your
highest quality audio clip (usually music).
Video Save Options: Advanced
Advanced options
Click Advanced in the AVI Tab to specify a
specific medium for playback.
If you have a Target playback device in
mind right now, select it from the list.
Data rate is calculated in kilobytes per
second (KBps). This is the speed at which
your computer can move data to and from
CD-ROMs and disk drives.
You can set the Tolerance to let the data vary
a little, otherwise V ideoStudio will stop and
warn you if the data rate is too high. It may
well be impossible to compress 640x480 at
30 fps video down to a data rate of 150
KBps, but this depends on your video (e.g.
whether it has a lot of action) and how much
quality you feel you can sacrifice.
Page 69

FINISH 69
MPEG-1 file for VCD
A VCD is simply a special version of a CDROM. The exciting thing about this format is
that it can be read by CD-ROMs, VCD
players, or even DVD players.
Just about any format: AVI, MPEG-1, or
MPEG-2, can be played back on a computer.
When you want to create a VCD file, however, you need to use a special WhiteBook
standard MPEG-1 file that has very technical
specifications. Fortunately, creating such a
file is easy with Ulead V ideoStudio.
To create an MPEG-1 file for VCD:
1 . Open your project and click the Finish Step.
2 . Click Create Video File arrow to display a
submenu of file types.
3. Choose NTSC VCD or P AL VCD, depending
on your TV standard. The Create Video File
dialog box is displayed. Enter a file name and
click Save to render your movie.
Note:MPEG-1 is a highly compressed format that maintains very good quality. Once the file is created, you can use Ulead
DVD Wizard to write (burn) the CD on your CD writer. Simply follow the instructions to write your movie to the
correct location on the CD. Keep in mind that the quality of your blank CD can affect the quality of your final
output. Remember also that not all stand-alone players can play VCDs created on your computer.
Create Video File
submenu displays a
list of file types
Page 70

70 VIDEOSTUDIO USER GUIDE
MPEG-2 file for DVD
MPEG-2 is used on DVDs and digital satellite
television and yields highly compressed files
of extremely high quality .
MPEG-2 files and Digital V ideo files are of
the same video resolution. NTSC MPEG-2
(DVD) is 720x480 pixels, while PAL MPEG-2
(DVD) is 720x576 pixels. Thus, MPEG-2
results in bigger file sizes compared to
MPEG-1.
MPEG-2 is excellent for any type of movie.
VideoStudio lets you capture directly from
your camcorder to the MPEG-2 format,
perform frame-accurate editing, and create a
final movie in the same format. You can
further use the Ulead DVD Wizard to create a
DVD that can be played directly on a home
DVD player or your PC’s DVD-ROM.
T o create an MPEG-2 file for DVD:
1 . Open your project and click the Finish Step.
2 . Click Create Video File arrow to display a
submenu of file types.
3 . Choose NTSC DVD or P AL DVD, depending
on your TV standard. The Create Video File
dialog box is displayed. Enter a file name and
click Save to render your movie.
An AVI video clip displayed in the
Preview Window
An MPEG-2 video clip as displayed in the
Preview Window
Page 71

FINISH 71
Creating an audio file
Sometimes, you want to save the audio track of your captured clips or entire video project in a
separate audio file. This is especially useful when you want to use the same sound with
another set of images, or when you want to convert the audio of a captured live performance
into sound files. VideoStudio makes it easy for your to create an audio file of your project in
MPA, RM, WAV, or MPA format.
To create an audio file:
1 . Open your project and click the Finish Step.
2 . Click Create Sound File to display the
Create Sound File dialog box.
3 . From the Save as type list, select the audio
format you want to use and select Options to
display the Audio Save Options dialog box.
4 . Fine tune your audio attributes and click OK.
5 . Enter a file name and click Save.
Project Playback
Project Playback is used to output your entire project or part of it to a DV camcorder or a
video monitor. This also gives you a full screen preview of your movie either on a PC or TV
monitor. Click Project Playback in the Options Panel of the Finish Step.
Creating a DVD / VCD / SVCD Title
In the Finish Step, you can create a DVD / VCD / SVCD compliant MPEG file and directly
output it to Ulead DVD Wizard. Click Create DVD / Create VCD / Create SVCD and
choose between PAL and NTSC standards. The Create Video File dialog box will be displayed. Enter a file name and click Save. After the MPEG file is generated, Ulead DVD Wizard
automatically launches and walks you through the process of creating a DVD / VCD / SVCD
title from the MPEG video file.
Page 72

72 VIDEOSTUDIO USER GUIDE
To burn your DVD/VCD/SVCD title in Ulead
DVD Wizard:
1 . Launch Ulead DVD Wizard either in the
Storyboard Step or Finish Step.
In the Storyboard Step, click the Video T ab
in the Options Panel. Then click Export and
select Ulead DVD Wizard.
In the Finish Step, click Export in the
Options Panel and select Ulead DVD
Wizard.
2 . Select Create scene selection menu in the
Start dialog box. This will give your viewers
instant access to specific scenes in your
video. Click Next.
Note:If this option is not selected, you automatically go
to the Playback Simulation.
Exporting your movie
VideoStudio allows you to export your video files in various media formats. You can output
your work in formats like DVD/VCD/SVCD, send it as an e-mail attachment, upload it to your
Web page, convert it to an electronic greeting card, and even record it back to your camcorder
or VCR. Exporting the output can be done by clicking Export in either the Storyboard Step or
Finish Step.
Burning DVD/VCD/SVCD
DVD has become the standard format in producing multimedia files because of its excellent
quality. VideoStudio is fully integrated with the Ulead DVD Wizard to enable you to output
your projects to DVD or VCD and SVCD complete with scene selection menus. The wizard
type workflow will walk you through all the essential elements needed in DVD authoring.
Page 73

EXPORTING YOUR MOVIE 73
3. Select scenes to use in the scene selection
menu in the Add Scenes dialog box. Use the
preview buttons to browse for scenes and
click Add to place them in the Scenes list.
You can select up to 99 scenes. Select Locate
scene frames to search for I-frames only.
Select Add introduction video to insert a
video clip that will be played automatically
when the disc is inserted into the player.
Click Next.
4 . Browse and select the DVD / VCD / SVCD
compliant file you want to use for your
introduction video in the Add Introduction
Video dialog box. Click Next.
5. Select a preset template layout in the Select
Menu T emplate dialog box. You can also
customize the background and enter text
captions. Click Next.
6. Use the remote control to observe the
behavior of your DVD/VCD/SVCD project in
the Playback Simulation dialog box. Click
Next.
7. Select the folder location where to output
files in the Determine Output Options
Settings dialog box. Determine also the
settings of your CD burner. Click Next .
8. Determine the output options you want for
the video file in the Finish dialog box.
9 . Click Create DVD/VCD/SVCD to start the
burning process.
Page 74

74 VIDEOSTUDIO USER GUIDE
Compression Tab in Video Save Options dialog box
Putting a movie on the Web
The Internet is an exciting place to share your movies, but there are a few things you need to
watch out for. A short three minute vacation video can easily take up 60 MB of disk space and
many hours of download time. But at a reasonable file size, viewers can download your
movies on the Internet. Effective use of video on the Internet requires very high compression
ratios that usually result in very low quality movies. This means your movie should use a small
window (320x240 or preferably smaller), low frame rate (15 fps), and radio quality mono
audio (8 bit). Videos with a lot of motion or action are not well suited to this medium.
Compressing video
for the Web
When putting video on the Web, you have to
consider that it is going to be played on
someone else’s computer. It is therefore
advisable to use codecs found on many
computers. Cinepak and Indeo are good
choices.
MPEG-1 is the de-facto format for video on
the Web. It is currently used in VCDs and
provides high compression ratios without loss
of quality. This is an excellent choice not only
for the Internet, but for all movies that you
plan to play on your PC.
Streaming video is also a good way to
display video on the Internet. This allows
your video to begin playing while still downloading. VideoStudio supports RealNetwork’s
RealVideo (*.RM), Microsoft’s Advanced
Streaming format (*.WMV, previously
named *.ASF or *.ASX), and Apple’s
QuickTime (*.QT or *.MOV). These are the
formats popularly used on the Internet.
Page 75

EXPORTING YOUR MOVIE 75
Your default browser will now open, displaying your page. When you upload this page to
your Web server, you need to change one line
of code to reflect the relative links to the
associated movie file.
Posting your video on a Web page
After you have created a movie that is suitable for posting to the Internet, VideoStudio can
assist with the task of coding the HTML document. Your default browser now opens, showing how your page looks. You can, of course, enhance this page by using your favorite HTML
editor or even Windows NotePad. When you upload this page to your Web server, you need to
change one line of code to reflect the relative links to the associated movie file.
To export your video on a Web page:
1 . Select a video clip from the Library. If you
want to use a project, make sure you have
already rendered it using Create Video File.
2 . Click the Storyboard Step or Finish Step.
In the Storyboard Step, click the Video T ab in
the Options Panel. Then click Export and
select W eb Page.
In the Finish Step, click Export in the
Options Panel and select W eb Page.
3. In the prompting message, choose how the
video file will be played back from the W eb
page.
ActiveMovie is a small plug-in for your
Internet browser (standard with IE 4.0 or
above) which your viewers need to install. If
you choose No, the page will be set up with a
simple link to the movie.
4 . Enter a name and location for the new HTML
file.
5. Click OK.
Samples of a simple hyperlink and ActiveMovie
controls when displayed on a Web page
Page 76

76 VIDEOSTUDIO USER GUIDE
Sending a movie by E-mail
When you select E-mail, V ideoStudio automatically opens your default e-mail client and inserts
the selected video clip into a new message as an attachment. As with regular e-mail, enter a
recipient, a subject and a message and then send your message.
If your e-mail program was not previously configured as the default e-mail client, follow the
instructions below to set up your e-mail program. In MAPI-compliant programs such as
Netscape Mail and Eudora, you need to enable their MAPI (Messaging Application Programming Interface) option.
To set up Microsoft Outlook Express as your
default e-mail program:
1 . Select T ools: Options.
2 . Click the General Tab in the Options dialog
box.
3 . Under Default Messaging Programs, click
the Make Default button after the This
application is NOT the default Mail handler
option.
4. Click Apply.
To enable MAPI in Netscape Mail:
1. Select Edit: Preferences.
2 . Select Mail & Newsgroups in the Category
list.
3 . Select Use Netscape Messenger from MAPI-
based applications.
4. Click OK.
To enable MAPI in Eudora:
1. Select Tools: Options.
2 . Select MAPI in the Category list.
3 . Select Always under Use Eudora MAPI
server.
Page 77

EXPORTING YOUR MOVIE 77
Electronic greeting cards
Share your video with friends and relatives by creating multimedia greeting cards. VideoStudio
packs the movie into an executable (*.exe) file that automatically plays the video. In addition,
you can even display your video using your choice of background.
To create a greeting card:
1 . Select a video clip from the Library. If you
want to use a project, make sure you have
already rendered it using Create Video File.
2 . Click either the Storyboard Step or the Finish
Step.
If you choose the former, click Export in the
Video Tab and select Greeting Card.
You can also click Export in the Options
Panel of the Finish Step.
3. Your video appears in a bounding box in the
Multimedia Greeting Card dialog box.
Double-click an image from the Background
template to select it.
4. Drag the thumbnail to adjust the position.
Another way is to enter X and Y axis values.
You can also resize the image using the black
controls around the thumbnail, or enter
Width and Height values directly.
5 . Enter a file name for the card in the Greeting
card file entry box.
6 . Click OK to create the card.
The background templates that are provided with VideoStudio are JPG image files. You can
create your own templates in any graphics editor, or even use still frames captured from your
movies. To do this, search for images using Browse next to the Background template file
name entry box.
Page 78

78 VIDEOSTUDIO USER GUIDE
Recording back to a DV camcorder
The most exciting thing about DV is that it can be copied from your camcorder to your
computer, and then back to your camcorder (after editing) without any loss of quality.
VideoStudio offers comprehensive support for DV in all of its manifestations on the market.
This includes, but is not limited to, Type-1, Type-2, PAL, NTSC, and even the device control
of your camcorder.
DV Recording - Preview Window dialog box
To record a movie to your DV camcorder:
1. Turn on your camcorder and set it to Play
mode (or VTR / VCR mode). See your
camcorder’s manual for specific instructions.
2 . Select a compatible DV A VI file from the
Library . If you want to use a project, make
sure you have already rendered it using
Create Video File.
3 . Click the Storyboard Step or the Finish Step.
4. Click Export: DV Recording.
5 . The DV Recording - Preview Window dialog
box opens. Click Next.
6 . In the DV Recording - Record Window
dialog box, click DV recording to begin
recording to the DV camcorder.
7 . Click Finish.
Note: Before recording a video file back to your DV camcorder, make sure the video is saved with the correct codec. For
example, the codec DV Video Encoder - Type 1 usually works well for most NTSC DV camcorders. You can select
it from the Compression Tab in the Video Save Options dialog box.
DV Recording - Record Window dialog box
Page 79

SHORTCUTS 79
Shortcuts
Use the following keyboard shortcuts to perform commonly used operations.
Start Step [Ctrl + N] Starts a new video project
[Ctrl + O] Displays the Open dialog box
Finish Step [Ctrl + S] Saves the current project using the same project
name and overwrites the existing one.
Settings and
Commands [F6] Displays the Preferences dialog box
[F1] Starts the online help
[Ctrl + Z] Undoes the last command
[Ctrl + Y] Reapplies the last undone command
Library [Ctrl + C] Copies the selected clip on the timeline or Library
[Ctrl + V] Pastes the copied clip into the Library.
You can only paste a clip to a media type library
similar to it. (e.g. image clip to image library)
Pressing [Ctrl] while
selecting clips Allows you to select multiple clips
Double-clicking on Track Invokes the corresponding step
Double-clicking on Clip Invokes the corresponding step and selects the clip
Pressing [Shift] while selecting clips Allows you to select multiple clips in the same track
or in the Library
Pressing [Shift] while clicking
Play project - Instant playback
in Navigator Plays the trimmed part of the clip
Clicking Play projectInstant playback in Navigator Plays the preview selection within the whole project
Del Deletes the selected area
Esc Stops capturing, recording, rendering,
or closes dialog boxes without making any changes
Page 80

80 VIDEOSTUDIO USER GUIDE
Need more help?
For technical support on VideoStudio, visit the following Web sites:
America http://support.ulead.com/
Germany http://www.ulead.de/tech/tech.htm
Japan http://www.ulead.co.jp/tech/tech.htm
Taiwan http://www.ulead.com.tw/tech/tech.htm
Page 81

GLOSSARY 81
Glossary
Analog
A signal that is not digital. Most VCRs, radio/
television broadcasting, AV in/out, S-VIDEO, and
stereos are analog. Computers are digital, dealing in
ones and zeros. Information from an analog source
must be digitized to be used on a computer.
Capture
The recording of video or images to a computer
hard disk.
Clip
A short section or part of a movie. A clip can be
audio, video, still images or a title.
Codec
COmpress and DECompress. All video on a
computer uses a special algorithm or program to
process video. This program is called a codec.
Color Clip
A simple background color used in a movie. It is
often used for titles and credits since they stand
out clearly against the solid color.
Compression
Making a file smaller by removing redundant data.
Nearly all digital video is compressed in some way
or another. Compression is achieved through a
codec.
Data Rate
The amount of data per second that is transferred
from one part of your computer to another. In digital
video, the data rate of your source is very
important: CD-ROMs have lower data rates than
hard disks. The data rate of the Internet is very low.
Digital
Computer data consisting of ones and zeros.
Contrast digital information with analog.
Driver
A software program that controls the connection
between a specific device and a computer.
Effect
In VideoStudio, an effect is a special computer
generated transition between two video clips.
Frame
A single image in a movie.
Frame Rate
The number of frames per second in a video. NTSC
video is commonly 29.97 frames per second (fps),
but smaller video files can be created on the
computer by using lower frame rates, like 15 fps
(not suitable for VCD or DVD).
Library (Ulead VideoStudio)
The Library is the repository for all of your media
clips. You can store video, audio, titles, or color
clips in the Library and instantly retrieve them for
use in a project.
Mark In/Out
Points in a clip that have been marked for editing
and trimming purposes. A section can be selected
from a longer clip by setting its beginning (Mark in)
and ending (Mark out).
MP3
Abbreviation of MPEG Audio Layer-3. MP3 is an
audio compression technology that produces near
CD audio quality at a very small file size, making it
transfer quickly over the Internet.
MPEG-1
A standard for video and audio compression used
in many products like VCD. For NTSC, its video
resolution is 352x240 pixels at 29.97 fps. For PAL,
it works at 352x288 pixels at 25 fps.
MPEG-2
A subset of MPEG-1. It’s a standard for video and
audio compression used in products like DVD. For
NTSC DVD, its video resolution is 720x480 pixels at
29.97 fps. For PAL DVD, it works at 720x576 pixels
at 25 fps.
Page 82

82 VIDEOSTUDIO USER GUIDE
NLE
Non Linear Editing. Conventional editing on a VCR is
necessarily linear because you must access clips
on a video tape in order. Computer editing can be
done in any order that is convenient.
NTSC/PAL
NTSC is the video standard in North America,
Japan, Taiwan, and some other regions. Its frame
rate is 29.97 fps. PAL is common in Europe,
Australia, New Zealand, China, Thailand, and some
other Asian places, which has a frame rate of 25
fps. There are other differences. In the world of
DV and DVD, NTSC has the video resolution of
720x480 pixels, while PAL has 720x576 pixels.
Plug-ins
Plug-ins are small utilities in a program that add
special functions or effects. In Ulead VideoStudio,
there are a few output functions that let you send
videos by e-mail, create Web pages or send
multimedia greeting cards.
Project File
In VideoStudio, a project file (*.VSP) contains the
required information to link all associated image,
audio, and video files. You need to open a project
file first before starting video-editing in VideoStudio.
Render
Rendering is the process of making a finished
movie from the source files in a project.
SmartRender
SmartRender technology renders only project
changes, eliminating the need to re-render whole
projects and enabling fast previewing.
Source
The source or origin of your media, usually a
camcorder or VCR. Audio CDs are great sources
for music clips.
Storyboard
A storyboard is a visual representation of your
movie. Individual clips are represented as image
thumbnails on the timeline.
Streaming
This is a relatively new Internet technology that
allows large files to be played as they are being
downloaded. Streaming is commonly used for large
video and audio files.
Template
A work pattern in a software program. It includes
predefined formats and settings to save user’s
efforts and reduce risks of making mistakes.
Timecode
The timecode of a video file is a numerical way of
representing the position in a video. Timecodes can
be used to make very accurate edits.
Timeline
The timeline is a graphic representation of your
movie in chronological order. The relative size of
clips on the timeline gives you an accurate idea of
the length of your media clips.
Title
A title can be a movie title, a caption or credit. Any
text, image, or video file that overlays in your movie
can be referred to as titles.
T ransition Effect
A transition is a method of sequencing between
two video clips, like fading from one into another. In
Ulead VideoStudio, there are a large variety of
special transitions available, and they are called
Effects.
Trim
The process of editing or cropping a movie clip.
Computer video can be trimmed frame by frame.
Video Filters
A video filter is a method of changing the
appearance of a video clip, like mosaic and ripple.
Voiceover
The narration of a video or movie is commonly
called the voiceover. This is most notable in
documentaries such as nature shows.
Page 83

INDEX 83
Index
A
Adding text titles 54
Adding titles 54
Adding transition effects 49
Advanced Streaming format 74
Analog capture 18, 32
Animated titles 56
Applying a video filter 47
Audio clips 58
Audio mixing 62
Audio Step 26, 58
B
Background music 61, 62
Batch capture 36
Burning CDs
DVD/VCD/SVCD 71, 72
C
Capture Step 25, 31
Capturing images 46
Capturing video
Analog 18, 32
Batch capture 36
Checklist 31
DV 32
MPEG video 33
USB device 18
Video file size 35
Clips
Audio clips 58
Color clips 46
Overlay clips 51
Title clips 53
Transition effects 49
Video clips 42
Closing credits 53, 56
Codec 67
Color clips 46
Configuring Ulead VideoStudio 17
Create Video File 64
Creating a color clip 46
Creating audio files 71
Creating CDs
DVD/VCD/SVCD 71, 72
Creating video files 64
MPEG-1 for VCD 69
MPEG-2 for DVD 70
Video Save Options 66
D
Data rate 68
Deleting clips in Library 24
Digital Video 7
DV 7, 17, 32, 36
DV Recording 78
DVD 8, 70, 71, 72
E
Effect Step 25, 49
Electronic greeting cards 77
Exporting movies
DV recording 78
DVD/VCD/SVCD 72
Electronic greeting cards 77
For the Web 74
On Web pages 75
Sending by e-mail 76
Extended credits 57
Page 84

84 VIDEOSTUDIO USER GUIDE
F
Fade in / out
Background music 63
Titles 57
Volume, audio clip 59
Volume, overlay clip 52
Volume, video clip 40
Finish Step 26, 64
FireWire 6, 17
Frame rates 67
Frame size 67
I
i.Link 6
IEEE 1394 card 6, 17
Inserting a video clip 42
Inserting overlay clip 51
Installing Ulead VideoStudio 16
L
Library 23, 56
Library Manager 24
Loading clips to Library 23
M
Modifying text titles 55
Movie making 64
MP3 58, 61
MPEG 8
MPEG capture 10, 33
MPEG-1 8, 69
MPEG-2 8, 70
Music 58, 61, 62
N
Narrating a movie 60
O
Opening and closing credits 53
Options Panel
Audio Step
Music Tab 59
Voiceover Tab 59
Capture Step
Batch Capture Tab 36
Capture Settings Tab 31
Effect Step 50
Overlay Step
Editing Tab 52
Motion Tab 52
Storyboard Step
Filters Tab 48
Video Tab 40
Title Step
Animation Tab 54
Editing Tab 53
Overlay clips
Customizing overlays 52
Inserting video/image clip 51
Overlay Step 26, 51
P
Play Project 41
Preview Files Manager 42, 65
Preview range 65, 66
Previewing a project
High Quality Preview 41
Instant Preview 41
Project
Creating a project 27, 28
Opening a project 28
Play Project button 41
Recording to DV camcorder 71
Selecting a template 29
Project Playback 71
Project template
Creating a template 30
Selecting a template 29
Page 85

INDEX 85
Q
QuickTime 74
R
RealVideo 74
Recording audio from CD 61
Recording movie to your DV camcorder
78
Recording project to DV camcorder 71
Rendering partially 65
Running Ulead VideoStudio 16
S
Scene Detection 10, 34
Scrolling credits 56
Sending movies by e-mail 76
Setting up analog capture 18
Setting up DV capture 17
Setting up USB device 18
SmartRender 41, 64
Sound tracks 62
Split by Scene 34
Start Step 25, 27
Step by step 25
Storyboard
Storyboard Mode 38
Timeline Mode 39
Storyboard Step 25, 38
Streaming video 74
SVCD 71, 72
System requirements 12
T
Templates Manager 30
Timeline 39
Title safe area 55
Title Step 26, 53
Titles
Adding a title 54
Animated titles 56
Autotrim 58
Fade in / out 57
Modifying a title 55
Vertical titles 55
Tolerance 68
Tracks 39
Transition effects
Creating effects 49
Customizing effects 50
Trim Bar 43
Trimming audio clips 62
Trimming video clips
From the Timeline 43
In the Options Panel 44
Save Trimmed Video 45
With the Trim Bar 43
U
Ulead VideoStudio user interface 19
USB device 18
User interface 19
V
VCD 8, 69, 71, 72
Vertical titles 55
Video clips
Creating multiple copies of a clip 44
Inserting a clip 42
Trimming a clip 43
Video filters 47
Video Save Options 66
Voice and Music Tracks 58
Voiceover narration 60
W
Web video formats 74
White Book standard 8
 Loading...