

Page 1
User Guide
Ulead Systems, Inc.
April 2003
Page 2

First English edition for Ulead COOL 3D Production Studio, April 2003. © 2003 Ulead Systems, Inc.
All rights reserved. No part of this publication may be reproduced or transmitted in any form or by any means,
electronic or mechanical, including photocopying, recording, or storing in a retrieval system, or translated into
any language in any form without the express written permission of Ulead Systems, Inc.
Software License
The software described in this document is furnished under a License Agreement which is included with the
product. This Agreement specifies the permitted and prohibited uses of the product.
Licenses and Trademarks
Ulead, Ulead Systems logo, EasyPalette and Ulead COOL 3D Production Studio are registered trademarks and/or
trademarks of Ulead Systems, Inc. Intel and Pentium are registered trademarks and/or trademarks of Intel
Corporation. Microsoft, Windows, DirectX, DirectX Media, and/or other Microsoft products referenced herein
are either trademarks or registered trademarks of Microsoft Corporation. QuickTime and the QuickTime logo are
trademarks used under license. QuickTime is registered in the U.S. and other countries. Adobe, the Adobe logo,
Illustrator, and Acrobat are trademarks of Adobe Systems Incorporated. 3D Production Studio is a registered
trademark of Autodesk, Inc. RealText and RealPlayer are either registered trademarks or trademarks of
RealNetworks, Inc. in the United States and/or other countries. The RealPlayer is included under license from
RealNetworks, Inc. ©1999-2001. RealNetworks, Inc. All rights reserved. Macromedia, Flash and Macromedia
Flash are trademarks or registered trademarks of Macromedia, Inc. in the United States and internationally. All
other product names and any registered and unregistered trademarks mentioned are used for identification
purposes only and remain the exclusive property of their respective owners.
3D Studio File Toolkit © Copyright 1997 by Autodesk, Inc.
Free Form Deformation Patent License: The copy of COOL 3D Production Studio provided with this documen-
tation is licensed to practice the Free Form Deformation method under United States Patent No. 4,821,214
owned by Viewpoint Corporation. The licensed user of that copy may use the copy to practice the patented
Free Form Deformation method in accordance with a license granted by Viewpoint Corporation. For information
on additional patent licenses contact: Viewpoint Corporation. 498 7th Avenue, Suite 1810, New York, NY 10018
Sample Files
Files provided as samples on the program CD-ROM can be used for personal demonstrations, productions, and
presentations. No rights are granted for commercial reproduction or redistribution of any sample files.
North & South America
Ulead Systems, Inc.
http://www.ulead.com
Support: http://www.ulead.com/tech
Japan
Ulead Systems, Inc.
http://www.ulead.co.jp
Support: http://www.ulead.co.jp/tech
Germany
Ulead Systems GmbH
http://www.ulead.de
Support: http://www.ulead.de/tech
International
Ulead Systems, Inc.
http://www.ulead.com
http://www.asiapac.ulead.com
http://www.ulead.com.tw
Support:
http://www.ulead.com/tech
http://www.asiapac.ulead.com/tech
http://www.ulead.com.tw/tech
China
Ulead Systems, Inc.
http://www.ulead.com.cn
Support: http://www.ulead.com.cn/tech
Page 3

3
Contents
Welcome to Ulead COOL 3D Production Studio ................................................6
Getting help............................................................................................................................................... 7
Installation ................................................................................................................................................. 7
Running Ulead COOL 3D Production Studio............................................................................................ 8
Getting updates......................................................................................................................................... 8
Workspace ...........................................................................................9
Getting started ..................................................................................... 12
Using the EasyPalette ............................................................................................................................ 12
Using Composition presets ...........................................................................................................................12
Using Objects presets ....................................................................................................................................13
Dimensions......................................................................................................................................................14
Creating and editing objects .................................................................... 15
Adding and editing text............................................................................................................................ 15
Adding and editing 3D graphics and shapes.......................................................................................... 16
Using the Path Editor .....................................................................................................................................16
Creating basic 3D objects .............................................................................................................................19
Creating lathe objects ....................................................................................................................................20
Importing 3D models .............................................................................................................................. 21
Selecting and grouping objects............................................................................................................... 22
Using the Object Manager ............................................................................................................................22
Editing object style .................................................................................................................................. 24
Color.................................................................................................................................................................24
Texture.............................................................................................................................................................25
Transparency..................................................................................................................................................28
Bevel.................................................................................................................................................................28
Modifying individual faces of an object........................................................................................................30
Object precision and quality..........................................................................................................................30
Wireframe display ...........................................................................................................................................31
FreeForm ............................................................................................................................................... 31
3D scene basics ................................................................................... 33
Camera .................................................................................................................................................. 33
Lens type and distance..................................................................................................................................34
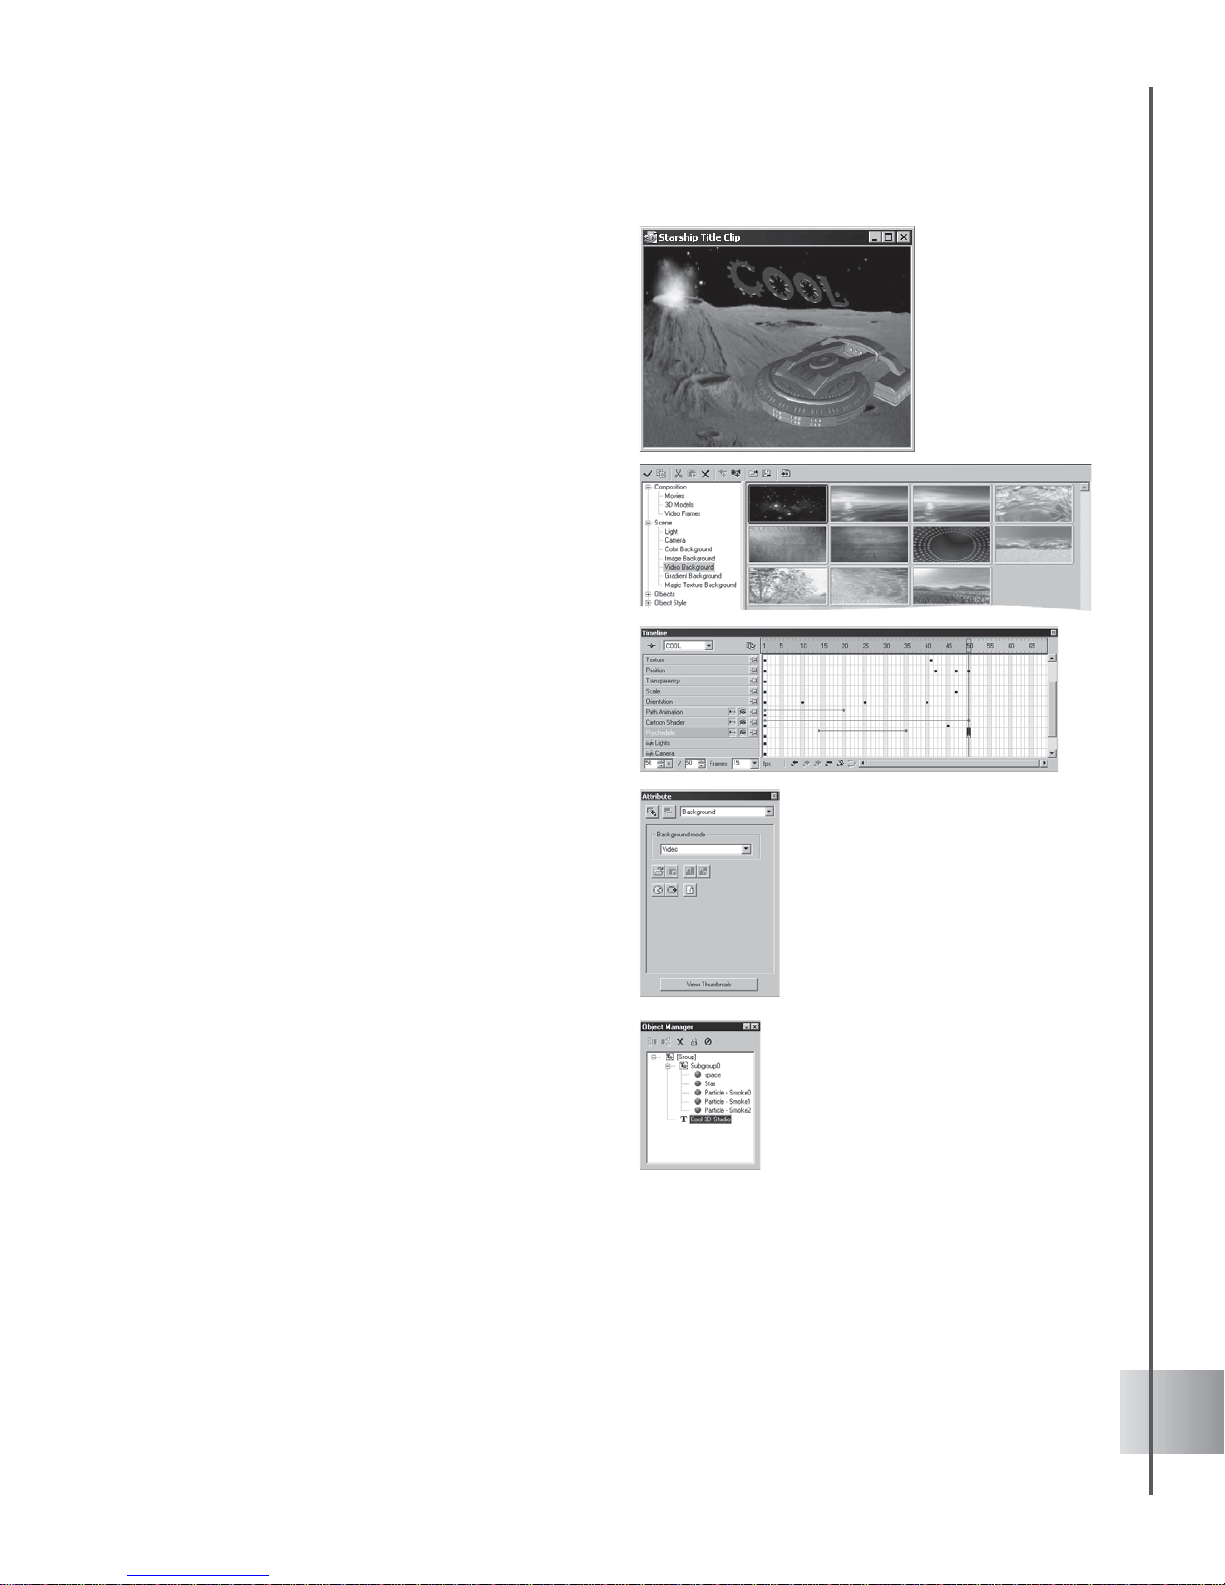
Background............................................................................................................................................ 35
Color Background...........................................................................................................................................35
Image Background .........................................................................................................................................36
Video Background ..........................................................................................................................................37
Background Audio.................................................................................................................................. 38
Understanding the 3D coordinate system............................................................................................... 39
Light ........................................................................................................................................................ 40
Page 4

Ulead COOL 3D Production S tudio
Animation basics .................................................................................. 42
Working with key frames and timelines..................................................................................................43
Advanced timeline mode........................................................................................................................ 45
Creating a simple animation ................................................................................................................... 47
Animating color....................................................................................................................................... 49
Animating background............................................................................................................................ 49
Showing and hiding objects ....................................................................................................................50
Animating position ..........................................................................................................................................52
Animating with multiple attributes .................................................................................................................54
Plug-in effects ..................................................................................... 55
Key frames and plug-ins ........................................................................................................................ 55
Understanding global and key attributes.................................................................................................56
Background effects................................................................................................................................. 56
Gradient Background .....................................................................................................................................57
Magic Texture Background ...........................................................................................................................58
Object Effects..........................................................................................................................................59
Bend .................................................................................................................................................................60
Cartoon Shader ..............................................................................................................................................61
FreeForm ........................................................................................................................................................61
Object Explosion.............................................................................................................................................62
Stylized Outline ...............................................................................................................................................63
Twist..................................................................................................................................................................64
T ext Effects............................................................................................................................................. 65
Blast..................................................................................................................................................................65
Bump ................................................................................................................................................................66
Dance ...............................................................................................................................................................67
Distort...............................................................................................................................................................68
Explosion ..........................................................................................................................................................69
Jump.................................................................................................................................................................70
Path Animation ................................................................................................................................................71
Surface Animation ...........................................................................................................................................72
Text Wave........................................................................................................................................................73
Token Skew (G) ..............................................................................................................................................74
Token Size (G) ................................................................................................................................................75
Token Move (G) .............................................................................................................................................. 76
Token Rotate (G) ............................................................................................................................................77
Particle Effects........................................................................................................................................ 78
Smoke ..............................................................................................................................................................78
Fire ...................................................................................................................................................................79
Snow.................................................................................................................................................................81
Bubble..............................................................................................................................................................82
Page 5

User Guide
Global Effects..........................................................................................................................................83
Fire ...................................................................................................................................................................83
Glow..................................................................................................................................................................84
Lightning ..........................................................................................................................................................85
Motion Blur ......................................................................................................................................................86
Shadow ............................................................................................................................................................87
Natural Paint ...................................................................................................................................................88
Project output ...................................................................................... 89
Saving your project ................................................................................................................................89
Export Video Overlay ............................................................................................................................. 89
Export 3D Models ..................................................................................................................................89
Creating video files.................................................................................................................................. 90
Creating image files ................................................................................................................................ 90
Creating animation for the Web............................................................................................................... 91
GIF animation ..................................................................................................................................................91
Flash animation ..............................................................................................................................................93
RealText 3D .....................................................................................................................................................93
Main Program........................................................................................................................................94
Shortcut Keys ...................................................................................... 94
Path Editor .............................................................................................................................................. 95
Index ................................................................................................ 96
Page 6

6
Welcome to Ulead COOL 3D Production Studio
Welcome to Ulead® COOL 3DTM Production Studio, a professional 3D text and graphics
software for use with video and multimedia. COOL 3D Production Studio is a radical change
from earlier COOL 3D versions because it offers a host of new tools and control-set additions
specifically designed for video production, yet retains innovative pre-set options for quick 3D
project generation. The result is a new breed of professional 3D animation software that is
specifically suited to the video production and multimedia creation.
Cutting edge 3D art
With COOL 3D, you can conveniently convert text and shapes into
dazzling 3D figures as well as import/export *.X and *.3DS files, work
with lathe objects, do freeform deformation, and achieve any 3D titling
goal in minutes. Create and edit your work like a pro without the hassle.
All you have to do is click away .
Video support like nothing else
You don't have to edit your video clips outside COOL 3D. User-friendly
and powerful, COOL 3D allows you to use video files as scene
background or object texture and edit the clips right there. It's video
support like you've never seen before. COOL 3D gives you the power of
many programs, saving you both time and money .
Increased usability
Edit your work per key frame and have better timeline control with COOL
3D's Timeline W indow . You will also find it easy to work around the
interface by using the attribute panel, selection indicator, light guide, axis
indicator, visual open and many other usability enhancing features.
These make creating and editing your projects easier and much more
enjoyable.
Page 7
7
User Guide
Getting help
The best way to familiarize yourself with COOL 3D is to experiment with all of the options
provided. To help you get started, this manual offers basic tutorials as well as a glimpse into
advanced techniques. If you should get stuck at any time, you can use one of the following
methods for more assistance:
• Click Help, then move the cursor to the object in question, and click again to find
out more on that feature.
• Go to the Help: Help Topics menu command to get more detailed information on
specific subjects.
• If you are a registered user, you are entitled to Ulead technical support. This can be
accessed through Help: Ulead on the Web - Technical Support, or go to our Web
site by clicking Ulead Homepage on the Standard Toolbar.
Installation
It’s easy to install Ulead COOL 3D Production Studio. The Installation Wizard will guide you
through the process.
To install Ulead COOL 3D Production Studio:
1 Place the COOL 3D CD into the CD-ROM
drive.
2 When the Setup screen appears, follow the
instructions to install Ulead COOL 3D onto
your computer.
3 If the Setup screen doesn’t appear after
loading the CD, by double-click the My
Computer icon on your desktop.
4 Double-click the CD-ROM drive icon.
When the CD-ROM window opens, doubleclick the Setup icon.
Page 8
8
Ulead COOL 3D Production S tudio
Running Ulead COOL 3D Production Studio
There are two ways to run the program:
• Double-click the Ulead COOL 3D
Production Studio icon on your
Windows desktop, or click the icon on
the Quick Launch Toolbar.
• Select the COOL 3D icon from the
program group on the Windows Start
menu.
Getting updates
Keep apace with the latest in COOL 3D news and updates - the program automatically detects
and notifies you of any new events in the COOL 3D homepage. You can also click Ulead
Homepage to read about other Ulead news and products.
Page 9
9
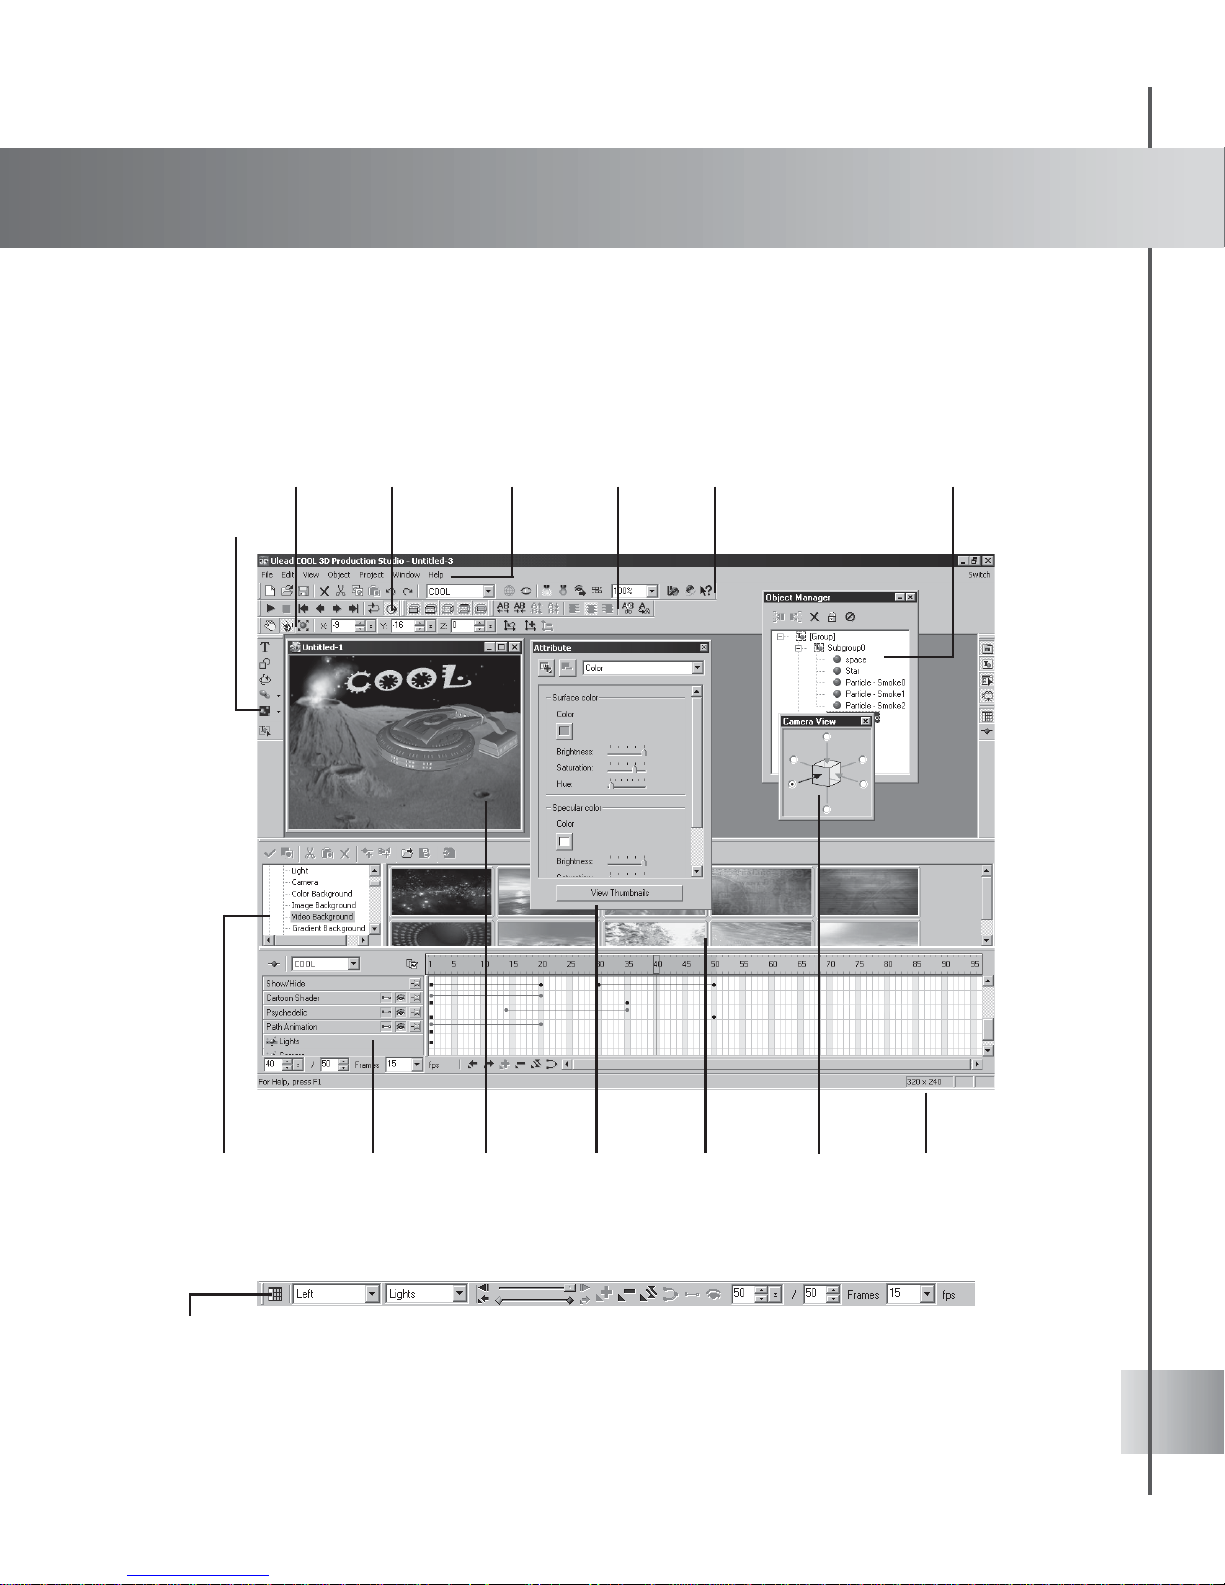
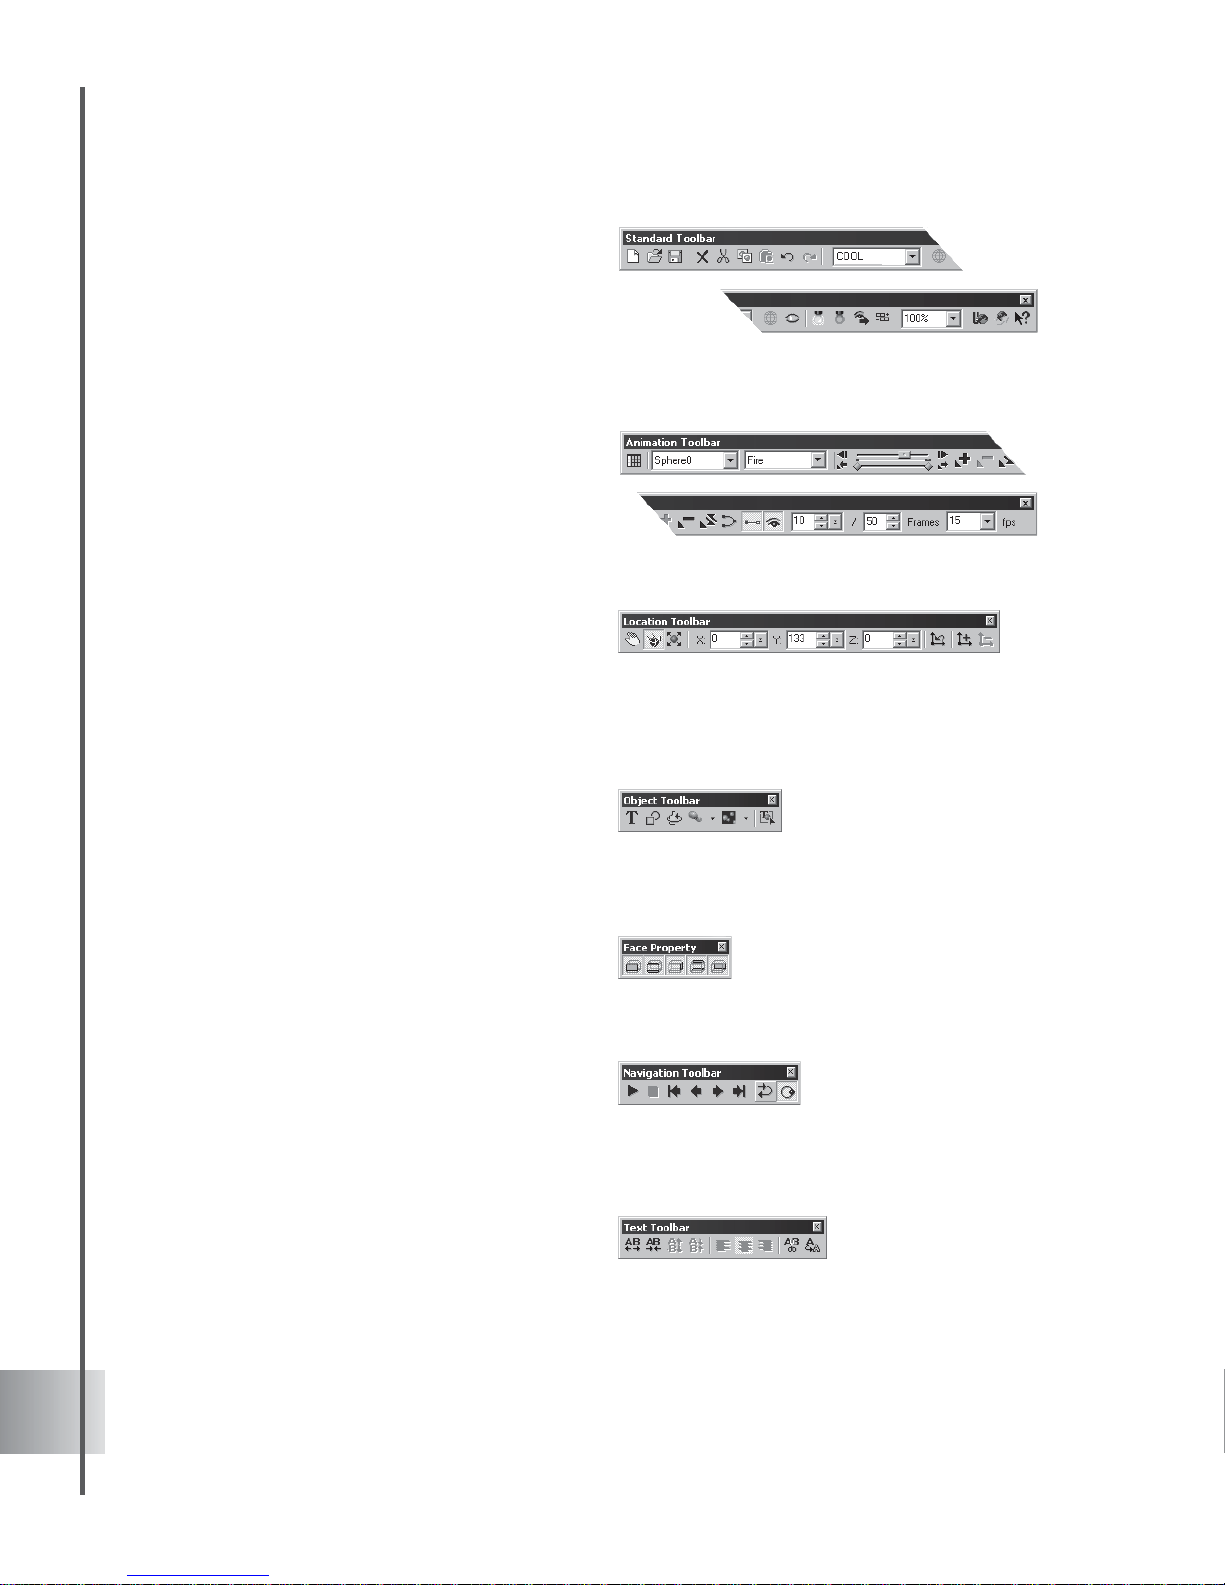
Workspace
COOL 3D intuitive design makes it easy for you to find and use the tools that you need.
Toolbars, graphic editing tools, and Attribute Panel have been placed in a manner for you to
really take advantage of all the program’s features and plug-ins. The following section should
help you become familiar with the different areas of the COOL 3D environment.
Toggle between the Animation Toolbar
and the Timeline Window
EasyPalette
file directory
Attribute
Panel
Timeline
Window
Standard
Toolbar
Text
Toolbar
Navigation
Toolbar
Object
Manager
Location
Toolbar
Edit
Window
EasyPalette
Object
Toolbar
Menu
Bar
Status BarCamera
View Panel
Page 10
10
Ulead COOL 3D Production S tudio
• S tandard T oolbar Contains all of the
most commonly used functions and
commands. In addition to the typical file
commands, it also has the Object List,
as well as Wireframe Rendering, Show/
Hide objects, and ambience control
buttons.
• Animation Toolbar Displays all the
controls you need to manipulate an
animated project, including extensive
key frame and timeline controls,
animation looping modes, frame
numbers, and frame rate. See page 43.
• Location Toolbar Shows the position,
size, rotation, light, and texture
coordinates of the selected 3D object.
Allows you to enter values yourself, or
displays the changing values of the
object as you drag it in the Edit
Window.
• Object Toolbar Allows you to place
and edit text, graphics, lathe objects,
basic 3D geometric shapes, and particle
effects objects in your project. This is
where you really begin your project.
• Face Property Toolbar Allows you to
choose which side of the object to edit.
A handy tool to have around for
accurate modeling of intricate shapes.
• Navigation Toolbar Allows user to
view and manipulate the object's
animation through Play, Rewind,
Previous, Next, Last, Loop Mode and
Ping Mode.
• Text Toolbar Allows you to adjust the
alignment of the text within a text
object, as well as the spacing between
lines and characters.
Page 11
11
User Guide
• Edit Window Lets you preview the 3D
project as you work. You can also drag
objects directly within the window to
customize basic aspects, such as
position, rotation, and size, among
others.
• EasyPalette Contains a file directory of
all the aspects that you can apply to
your 3D object, including plug-in
effects. Click on any item within each
category to access dozens of preset
effects in the thumbnail pane. These
can be quickly and easily applied to
your project. See page 12.
• Timeline Window Enables you to
specify key frames and have full control
over the timing of multiple object
attributes. A superb tool in
choreographing your entire project!
• Attribute Panel Lets you customize
many aspects of your projects,
including plug-in effects. Once you
understand the available options, you
have the potential to create projects like
a pro!
• Object Manager A floating panel that
lets you group two or more objects in a
subgroup, allowing you to position or
edit them as a single object. The Object
Manager contains features such as
Group/Ungroup, Lock/Unlock, Enable/
Disable, Rename, and Delete. See page
22.
Page 12
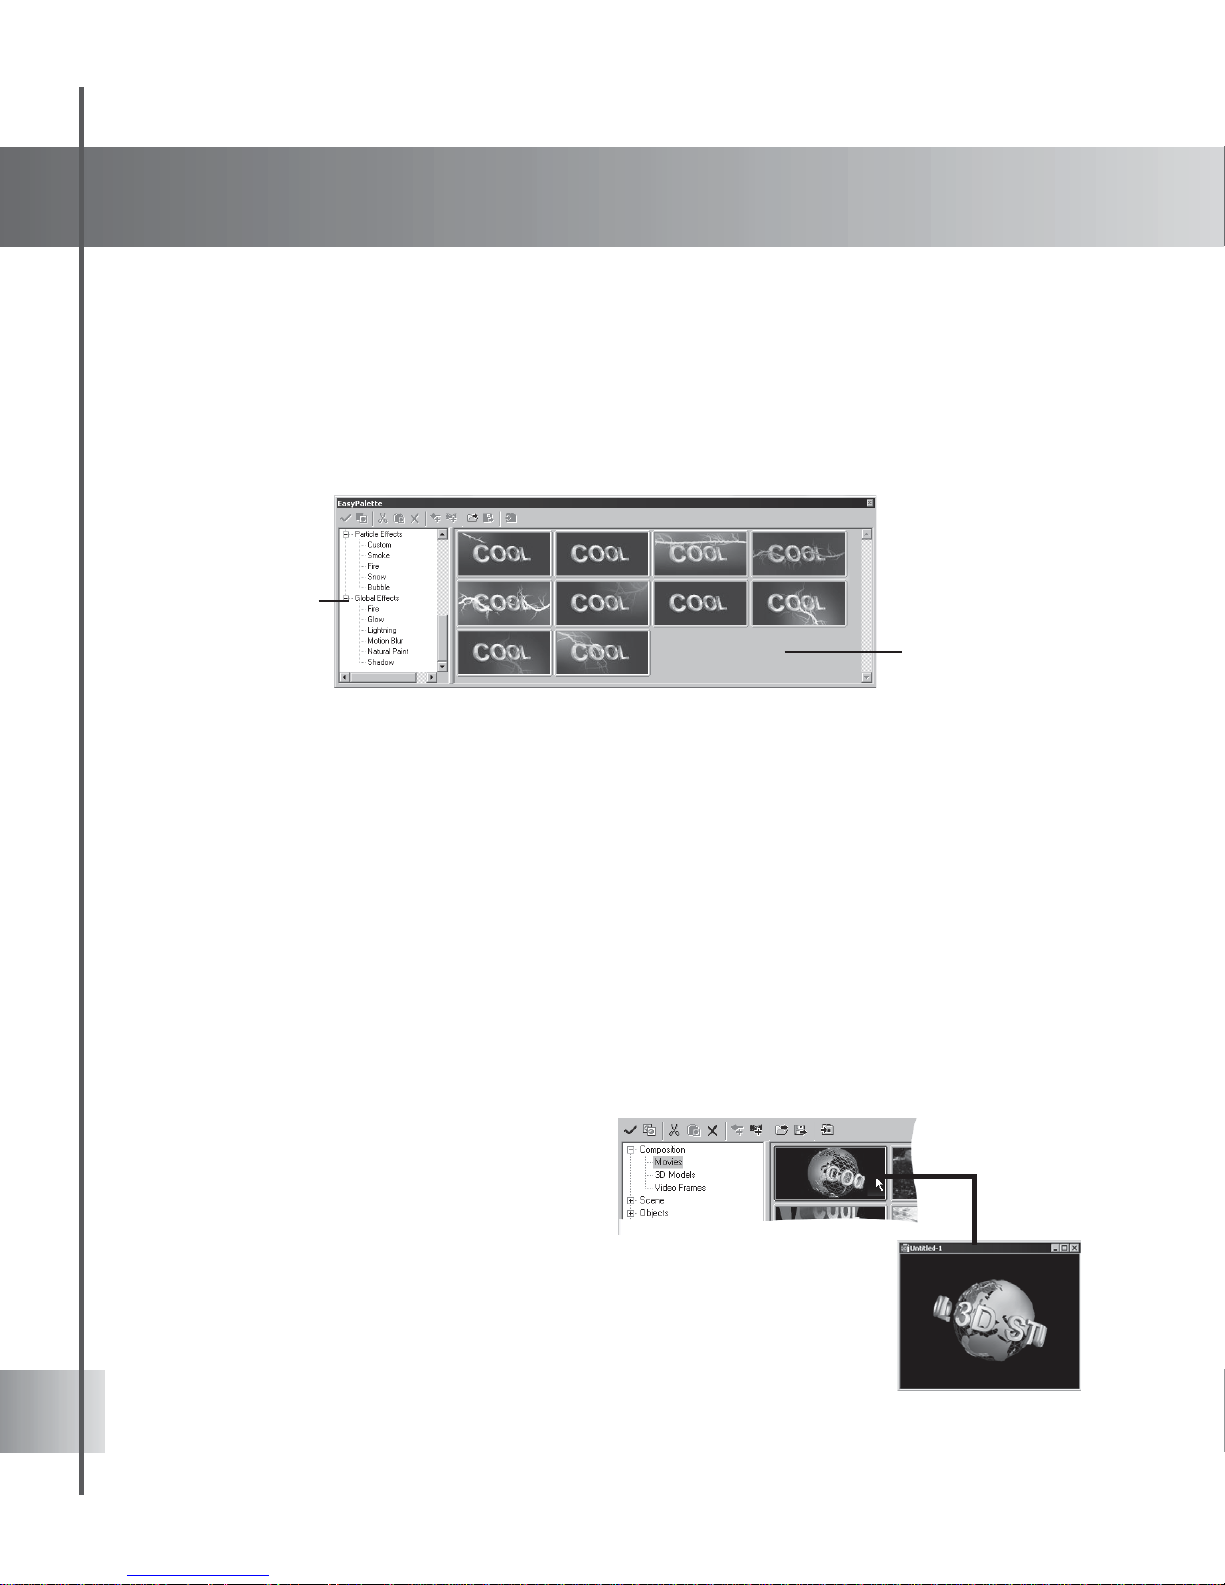
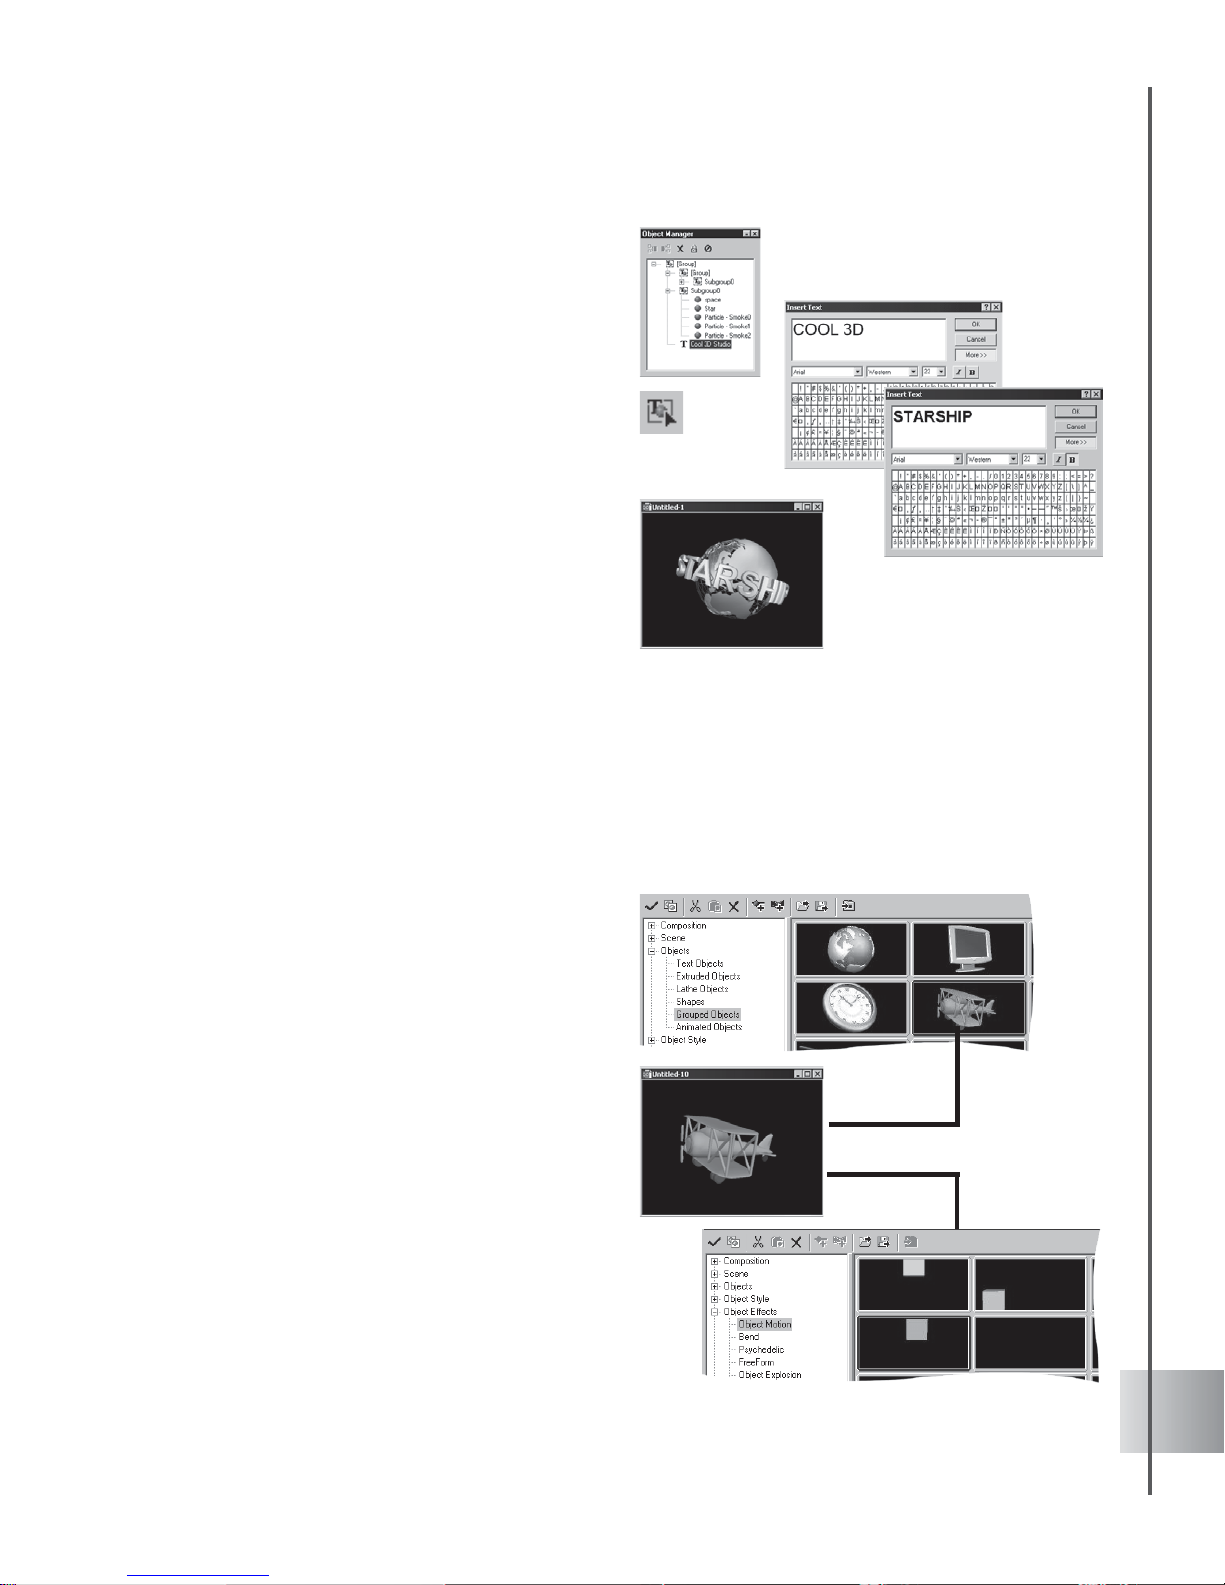
12
The EasyPalette file directory lists all of the objects and effects that you can apply to your
project. When you click on a category or a specific plug-in name, the thumbnail presets for that
particular item appear in the thumbnail pane. To apply a preset, use one of these methods:
• Drag and drop the preset into the Edit Window.
• Double-click the preset.
• Click Apply on the EasyPalette Toolbar.
Using Composition presets
Composition is the first category of presets in the EasyPalette file directory. It offers a
collection of ready-to-use Movies, 3D Models, and Video Frames that you can custom edit to
fit your project.
To create animation using Composition
presets:
1 Select Movie under Composition in the
EasyPalette file directory, then drag a
thumbnail containing a text object to your
current Edit Window (or double-click it to
open in a new Edit Window.)
Getting started
Starting a project in COOL 3D is simple. The following section takes you through the steps of
beginning a first project.
Using the EasyPalette
The EasyPalette provides you with the fastest way to create astounding titles and graphics.
With its vast number of presets, this is where you can add color and life to your project with
just a few clicks.
EasyPalette
file directory
EasyPalette
thumbnail
pane
Page 13
13
User Guide
2 Click the text object or select it on the
Object List on the Standard T oolbar; you
can also use the Object Manager. (See
Using the Object Manager on page 22.)
3 Then click Edit Object on the Object
Toolbar. The Insert T ext dialog box appears,
displaying the text object that you selected.
4 Change the text as desired, then click OK.
The new text appears in the project,
replacing the original text.
5 You can also select other objects in the
document and modify their attributes and
behavior.
6 Click Play on the Navigation Toolbar to
preview the animated project.
Using Objects presets
The Objects category in the EasyPalette file directory provides still and animated objects that
you can arrange and modify on the Edit Window to fit your needs in creating your original 3D
compositions. You can work with a single object to create a simple animated clip, or use multiple
animated objects which you can easily choreograph to create a more complex composition.
To create animation using Objects and Object
Effects presets:
1 Open a new document and select Grouped
Objects under Objects in the EasyPalette
file directory.
2 Drag a preset object to the Edit Window.
3 Select Object Motion under the Object
Effects in the EasyPalette file directory.
4 Drag a preset motion to the Edit Window to
apply it to your object.
5 Click Play on the Navigation T oolbar, to
preview the animated project.
Try placing other objects on the Edit
Window and animate them in the same way
using the above steps.
Page 14
14
Ulead COOL 3D Production S tudio
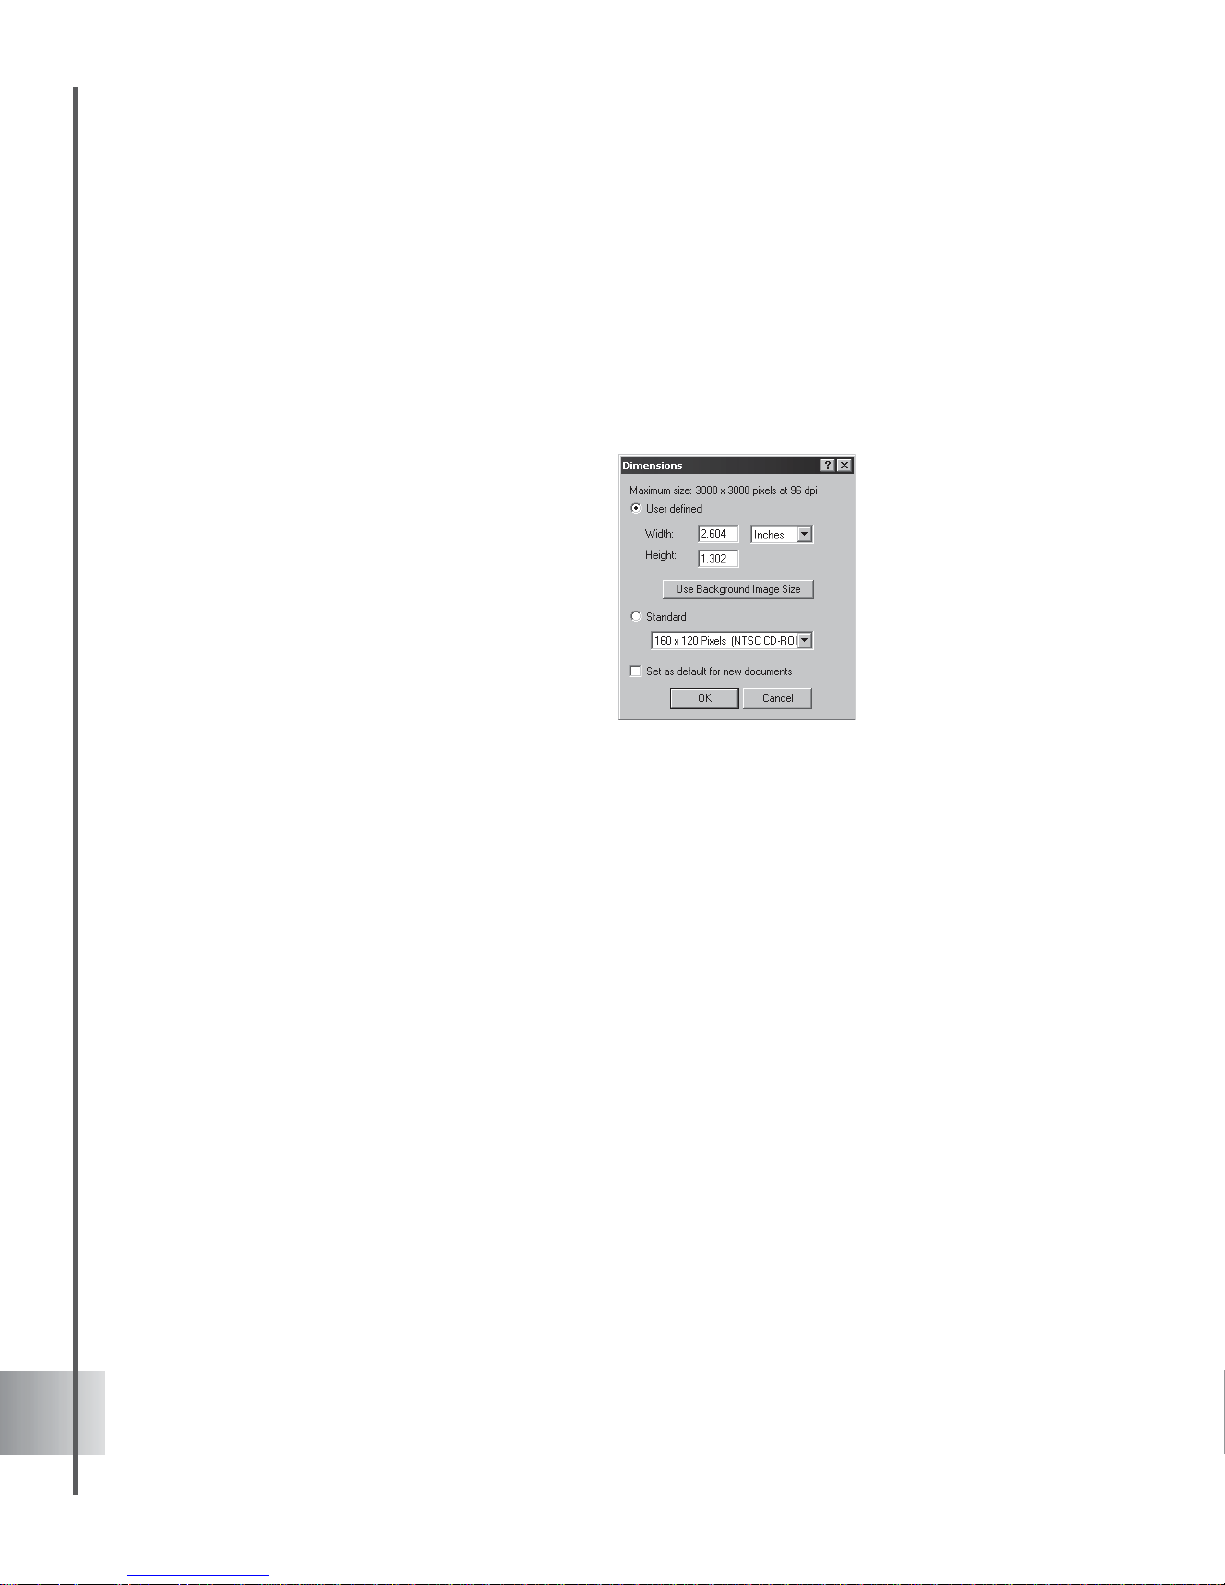
Dimensions
When you set up a 3D project, the dimension settings of the project will differ depending on
how you plan to use the end product. You might want to use it as part of a video, include it as a
GIF animation on a Web site, or save it as a still 3D image. Regardless of your plans, when you
are experimenting with different effects and settings, try using smaller dimensions to allow your
computer to render the project at a faster rate. When you have exactly what you want, increase
the dimensions of the project.
Click Project: Dimensions to open the
Dimensions dialog box. The User-defined
option lets you customize the dimensions. If
you have inserted your own image or video as
the background, click Use Background
Image Size to have the dimensions of the
project match the background. See Image
Background and Video Background on
pages 36 and 37.
If you plan to output your project for the
video or the Web, the Standard list has a
range of commonly used dimensions.
Page 15
15
Creating and editing objects
If you can imagine it, you can create it in Ulead COOL 3D. Generate and modify text and
graphic objects with ease using high-precision modeling and image editing tools at your
fingertips.
Adding and editing text
Choose from a wide range of preset Text Objects under Objects in the EasyPalette file
directory. You can also use text objects found in Composition presets and modify them as
individual text objects as discussed in the previous chapter.
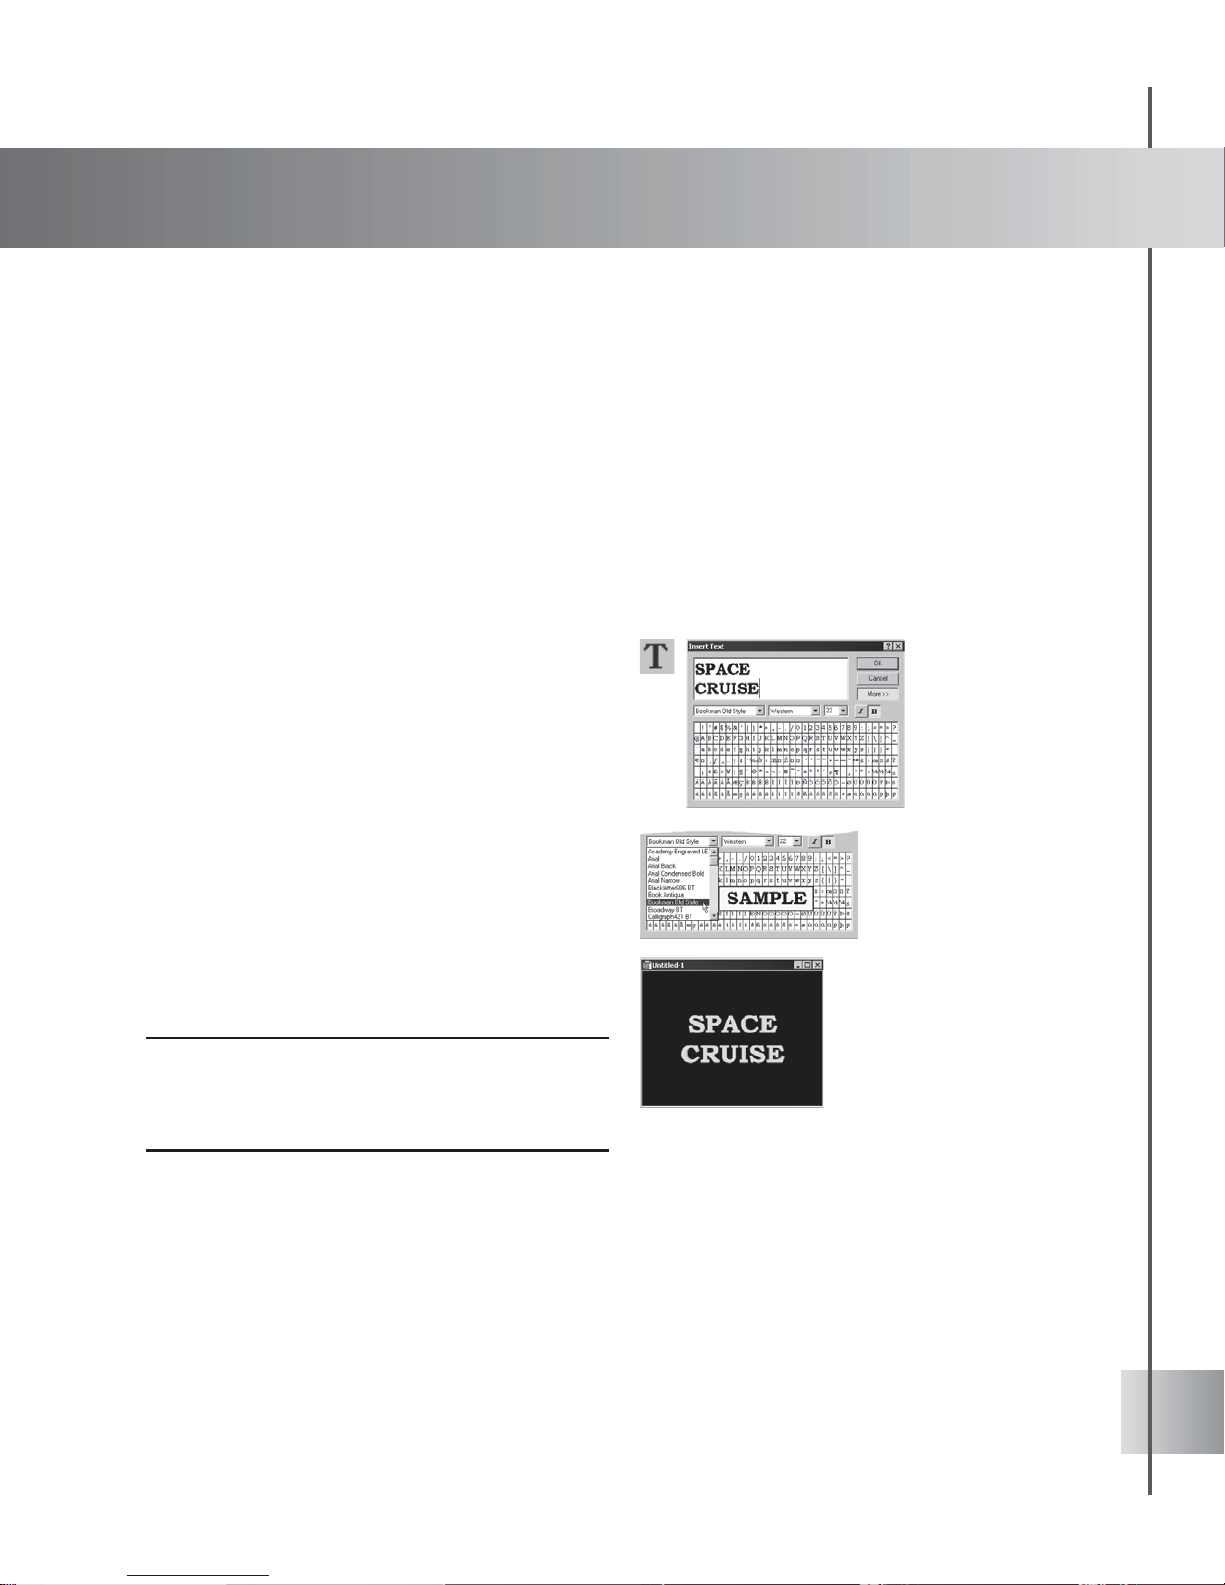
It’s a breeze to create and edit original text objects using the Insert Text tool. You can set font
face, script for character sets, style, and size as easily as you would in a word processor. For
information on adding and editing graphic objects, see page 16.
To insert a text object:
1 Click Insert Text on the Object T oolbar. The
Insert T ext dialog box appears.
2 Select a font from the list. When searching
for a font, a ToolTip appears to give you a
preview of the font currently highlighted.
After selecting your font, set the script,
size, and style of your text, and then enter
the actual text in the text box.
3 Click OK. The text appears in the Edit
Window.
4 If you want to insert another text object,
click Insert Text again. T o edit the existing
text, see the following tutorial.
Note: Create a text string of multiple lines by creating a
line break in a string of text. In the Insert Text dialog
box, simply press [Enter] where you want a line break
to occur.
Page 16
16
Ulead COOL 3D Production S tudio
To edit a text object:
1 Click Edit Object on the Object T oolbar. The
Insert T ext dialog box appears with the
selected text object.
2 Edit the text in the text box, then click OK
once you’ve made your changes. The
edited text appears in the Edit Window.
You can also adjust the character spacing
as well as the line spacing and alignment
with functions on the T ext T oolbar.
Note: If you have added more than one text object, be
sure to first select the one you want to edit from the
Object List on the Standard Toolbar, or select it
from the Object Manager. See page 22.
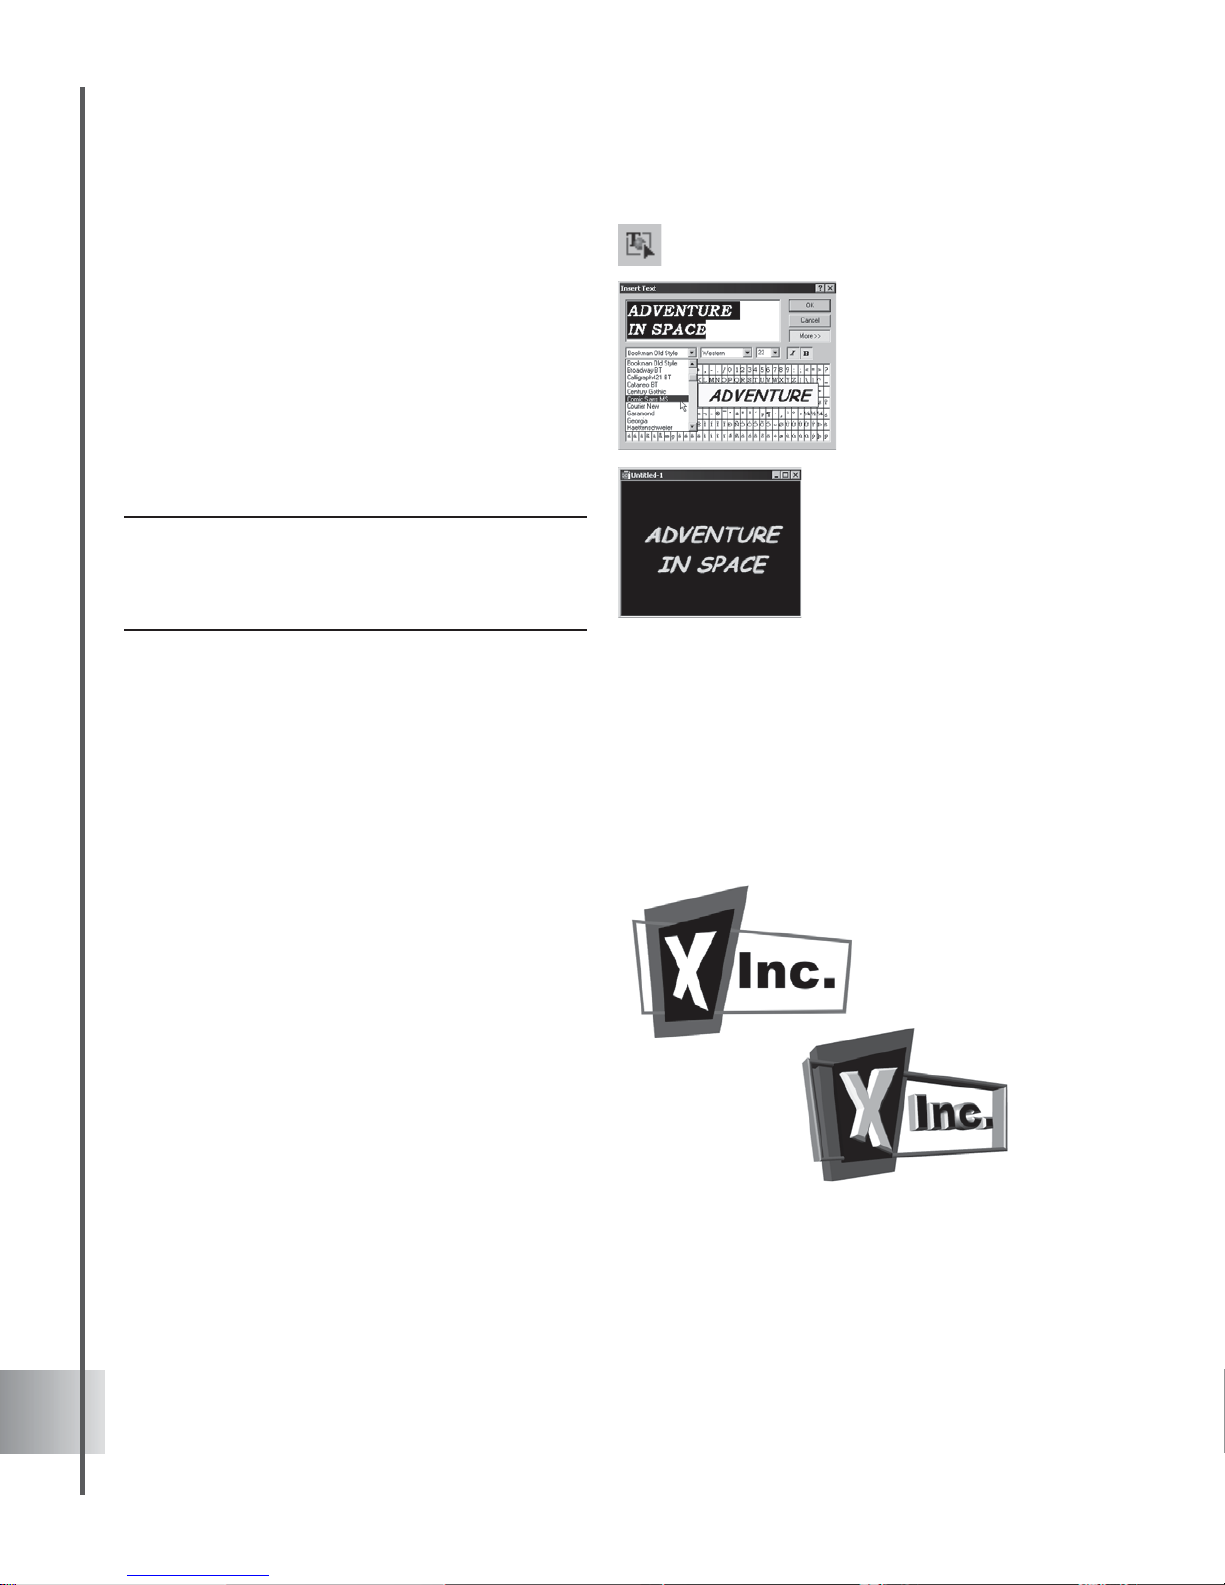
Adding and editing 3D graphics and shapes
Create outstanding 3D logos and images by customizing graphic objects. In COOL 3D,
importing, creating, and modifying highly complex models are tasks that are rendered elementary
because of its powerful set of modeling tools.
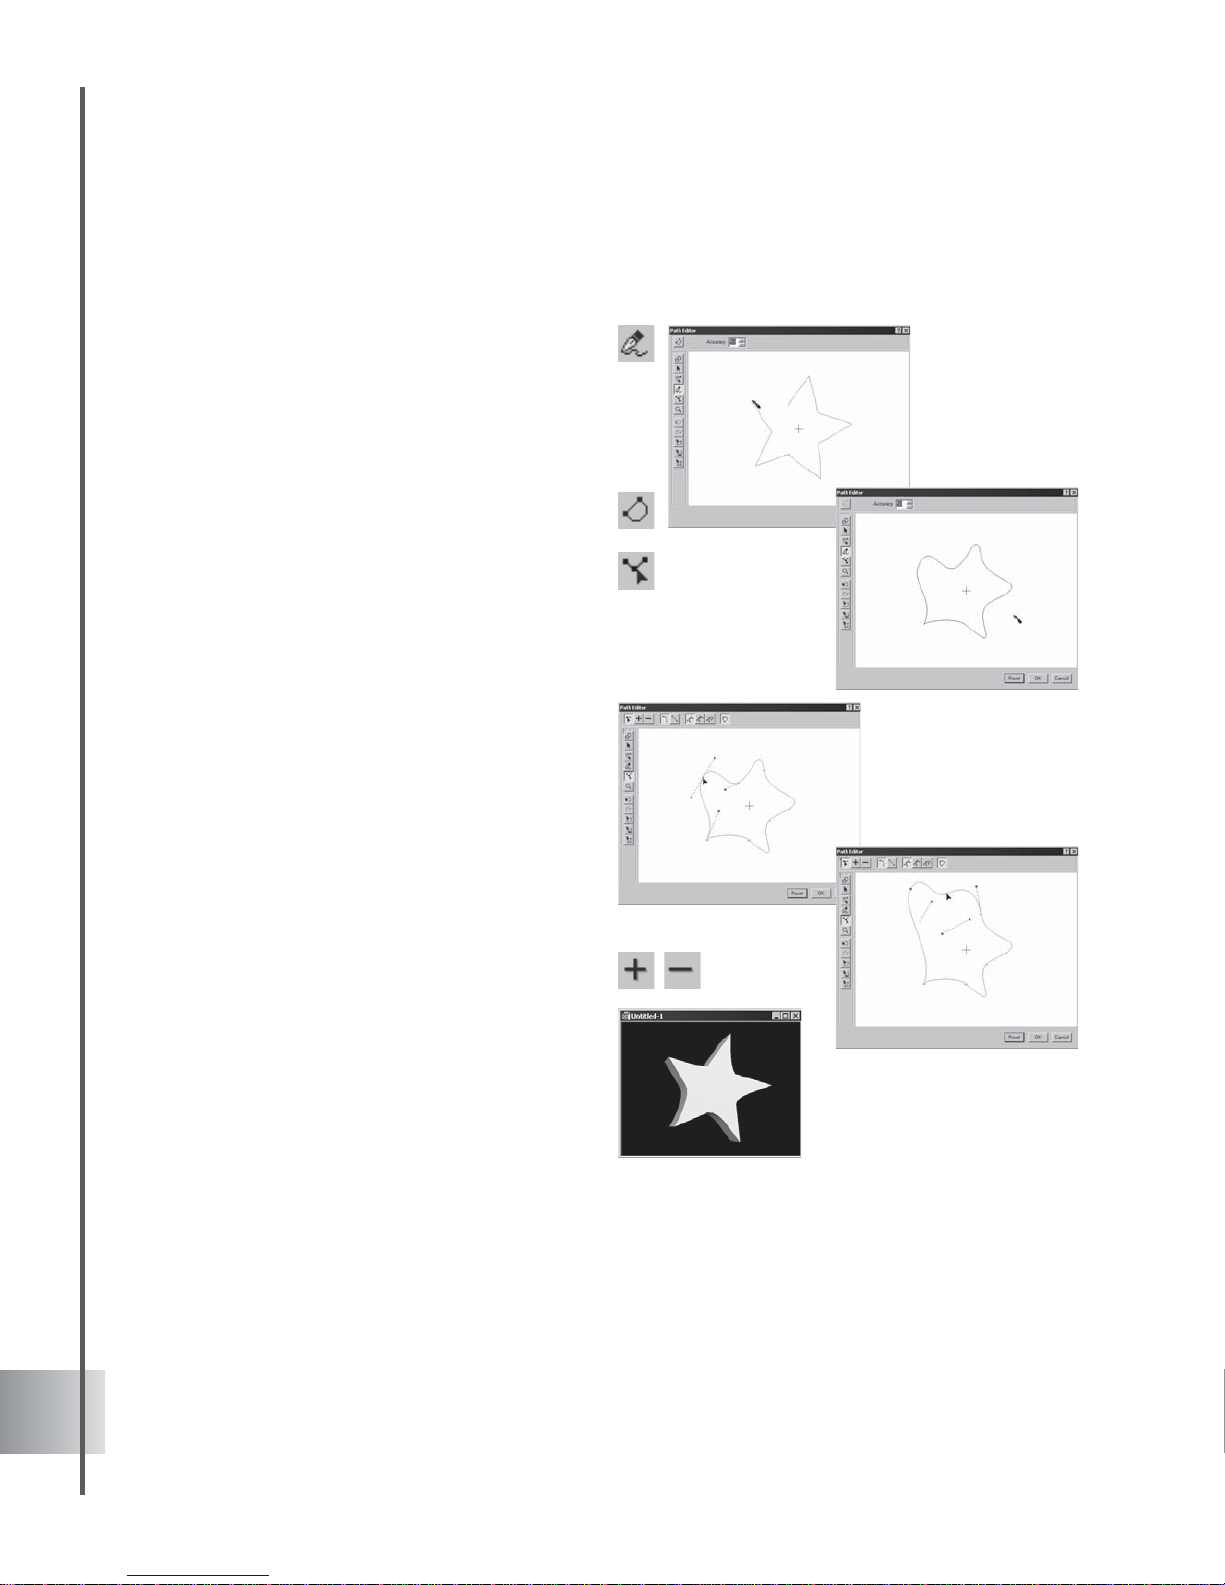
Using the Path Editor
A vector graphic is different from the bitmap
graphics that are most widely known (for
example, those in BMP, JPEG, and GIF
formats). Vector graphics are composed of
paths and often stored in Adobe Illustrator
(*.AI), Window Metafiles (*.WMF) or
Enhanced Metafiles (*.EMF) formats. The
easiest way to create these graphics is to use
Path Editor, accessed by clicking the Insert
Graphics on the Object Toolbar.
Bitmap of a logo (top), and the same logo
converted to 3D with Path Editor
(bottom).
Page 17
17
User Guide
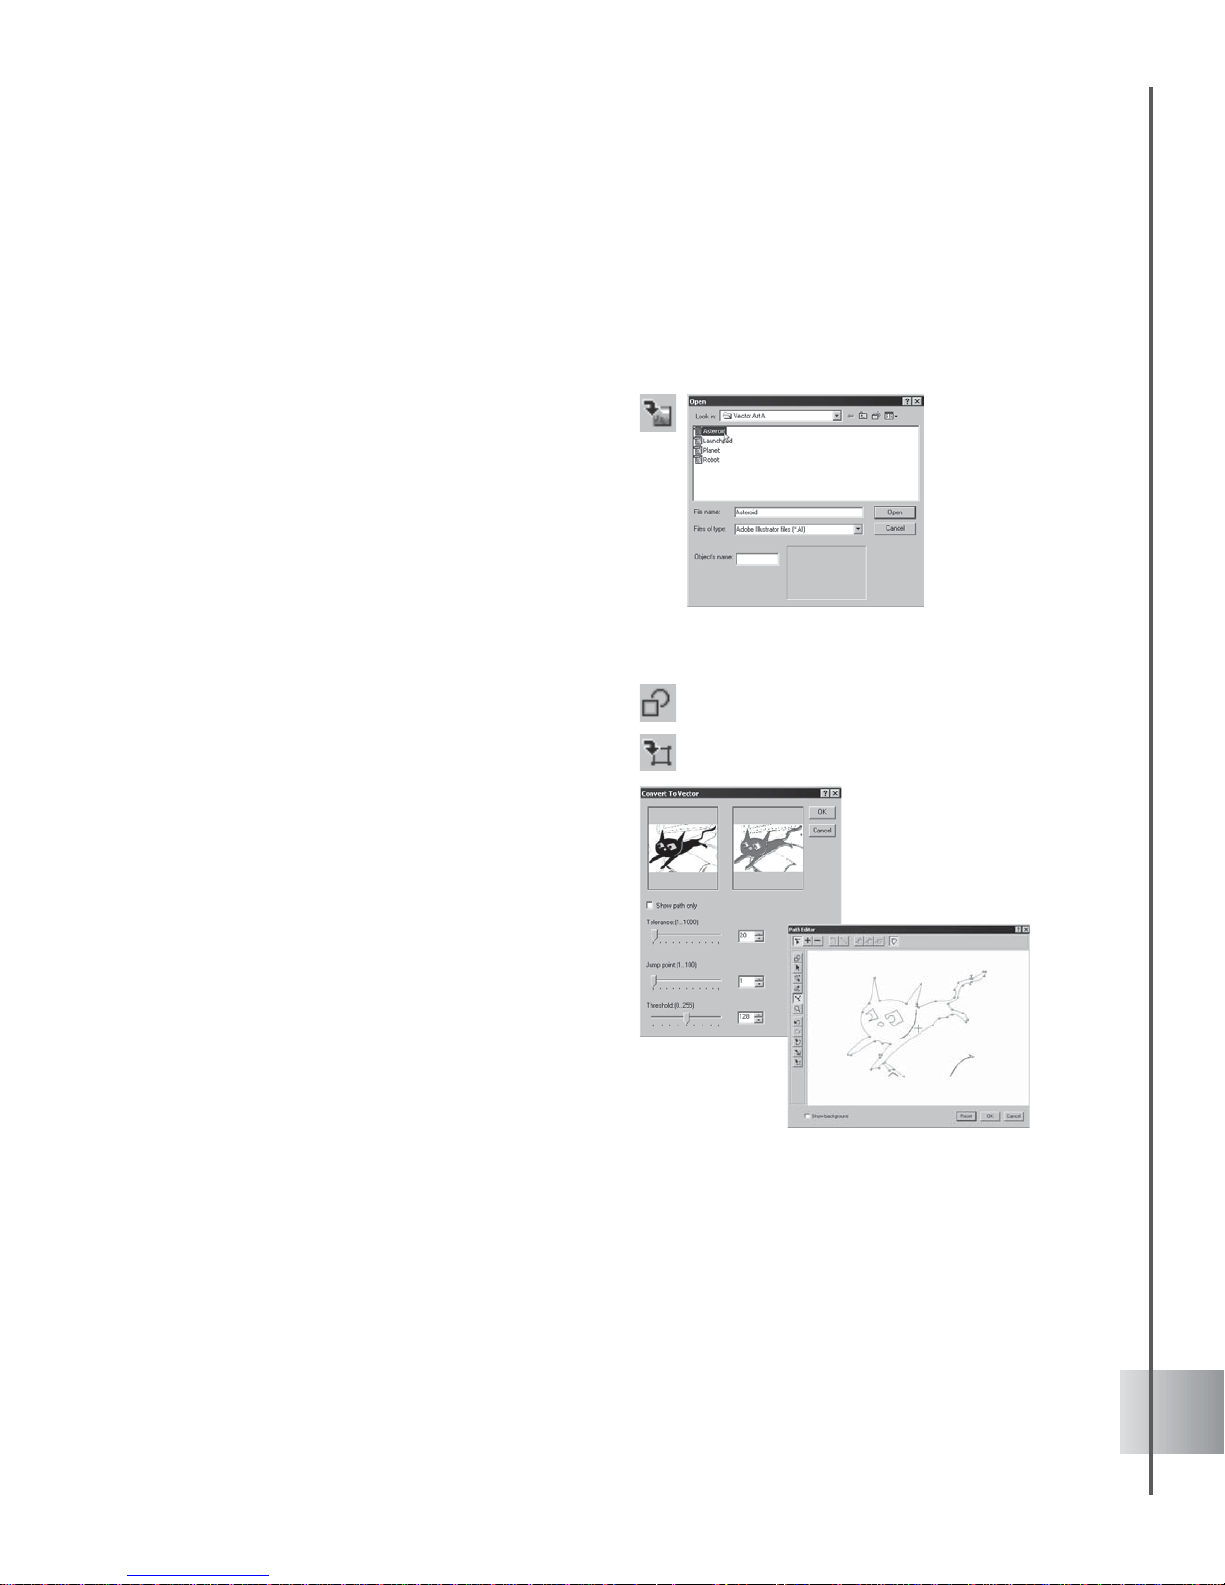
The simplest way to add a vector graphic object is to draw the paths yourself using the Path
Editor tools. COOL 3D, however offers other options to work on vector graphics to your
project by importing vector graphic files.
To import a vector graphic object:
1 Click Import Graphics in the Path Editor
dialog box. In the Open dialog box select
your file in Adobe Illustrator (*.AI),
Window Metafiles (*.WMF) or Enhanced
Metafiles (*.EMF) formats that you would
want to work on.
2 Click Open and the object is placed in the
Path Editor dialog box.
You can also acquire paths from your JPEG or
BMP image files and convert them to vector.
To convert a bitmap graphic object to vector:
1 Click Insert Graphics to open the Path
Editor dialog box.
2 Click Convert to Vector and the Open dialog
box will come into view. Select the image file
you want to convert and click Open.
3 The Convert to V ector dialog box is
displayed. Modify the Tolerance; Jump
point and Threshold values of the paths to
your preference and click OK.
Page 18
18
Ulead COOL 3D Production S tudio
Whether you have selected pre-existent vector graphics, rendered paths on bitmap images or
utilized the freehand tool, you can modify your paths just as easily.
To edit a graphic object:
1 Now , you can select or deselect multiple
nodes at one time. To do this, let us make an
example using the Freehand T ool. Select
this tool and render a shape on the
workspace of the Path Editor.
2 Close the path by clicking Close Path.
Notice the path has closed smoothly by
default.
3 Click Adjust and the nodes will appear. Left
click while simultaneously pressing [Ctrl].
4 Click on the nodes you want to select or
deselect. While holding down [Ctrl], drag
the entire group of nodes the same time.
5 When using the mouse, drag the pointer
and draw a selection box across the nodes.
Release the button and the nodes will be
selected or deselected. Dragging multiple
nodes will also apply .
6 When removing or adding nodes, click Add
Node or Remove Node. Apply the selection
process above to automatically delete the
multiple nodes or quickly press [Del].
Page 19

19
User Guide
Creating basic 3D objects
COOL 3D lets you insert basic 3D geometric objects into your project with just a click of the
mouse. Use them with text and graphics to create unique 3D animations and stills. You can use
several 3D shapes together to create an eccentric object, or just a few as props for an animated
title. In this tutorial, learn how to edit a cylinder.
To insert and edit a geometric shape:
1 Click the Insert Geometric Object drop-
down arrow on the Object T oolbar and
select a 3D shape. The object appears in the
Edit Window.
2 In the Attribute Panel, select 3D Shape in
Property List and enter values to adjust the
attributes of the object.
3 Then select presets under Object Styles,
Object Effects, Text Effects, Global Effects,
and other plug-ins in the EasyPalette file
directory and apply them to your geometric
shape.
4 You can also use the basic animation
buttons on the Animation T oolbar to create
an animated sequence.
Note: Bevel attributes and plug-ins cannot be applied
to geometric shapes.
Other things you can do with geometric objects
Page 20
20
Ulead COOL 3D Production S tudio
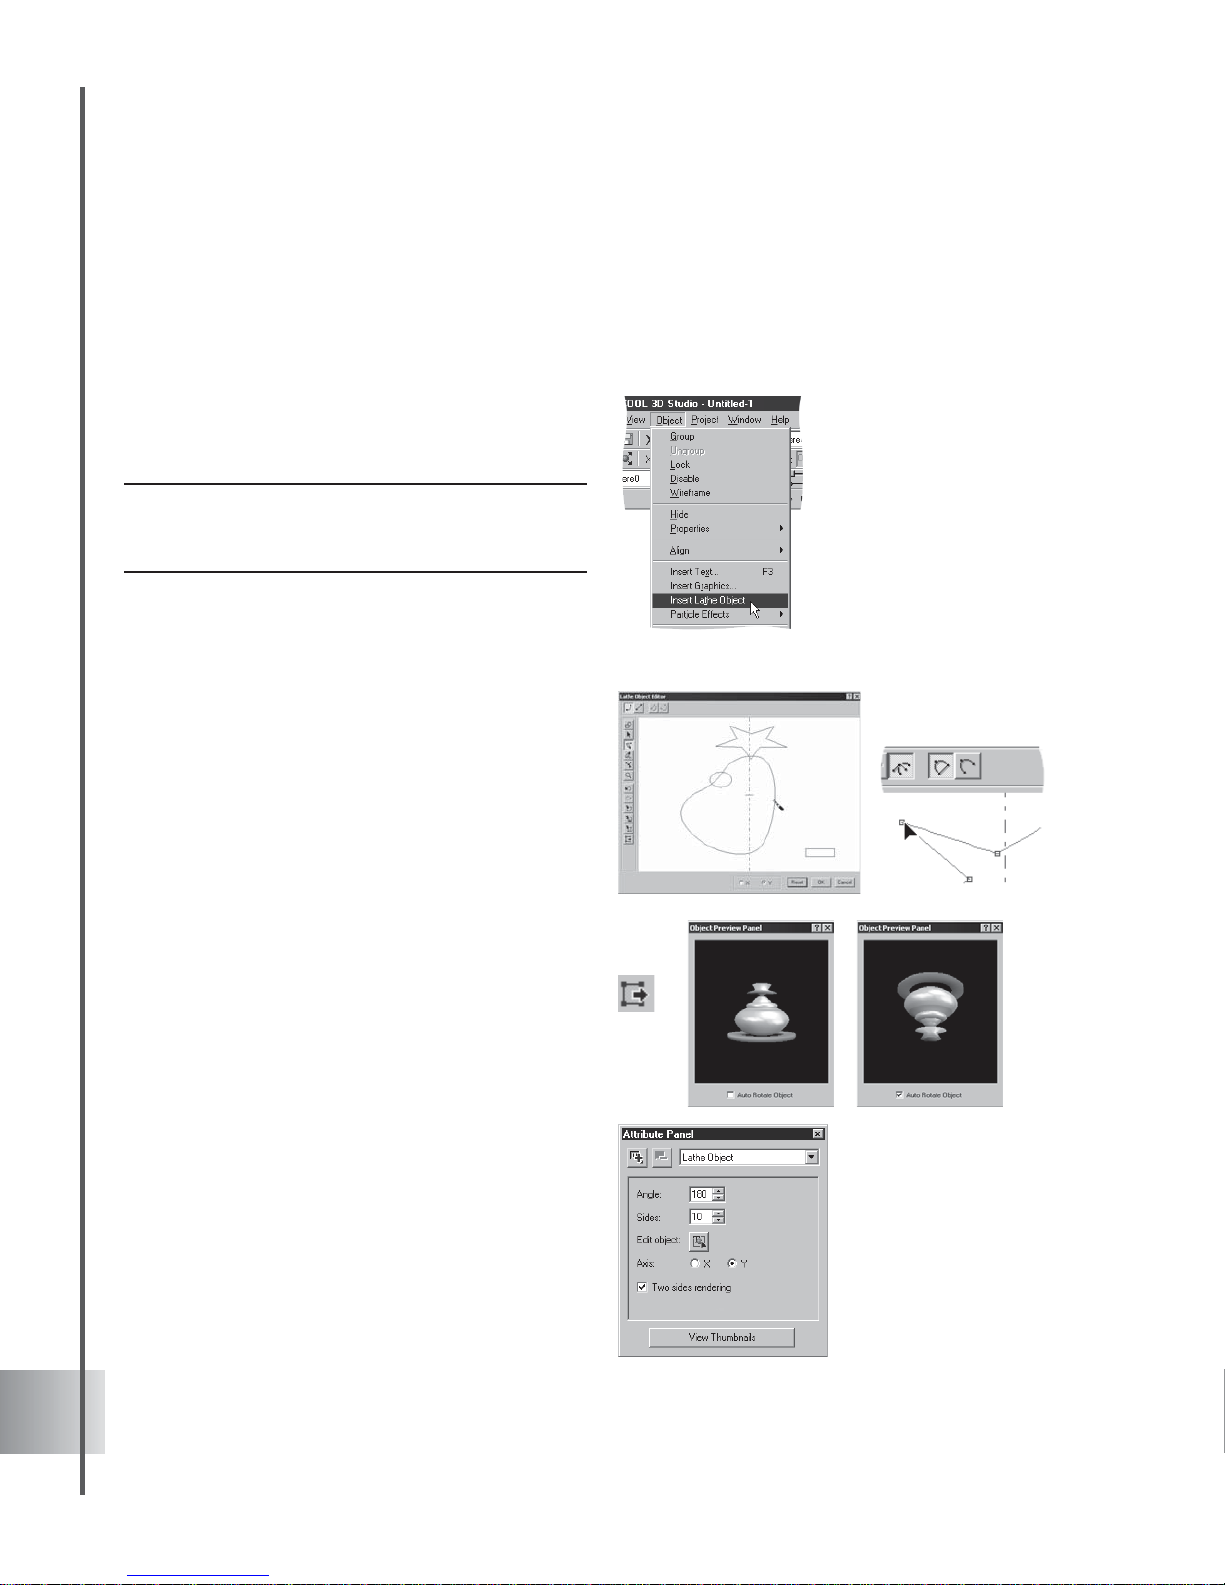
Creating lathe objects
Lathe objects are easier to generate or render with COOL 3D. Simple and irregular shapes or
paths can be instantly transformed into amazing symmetrical objects using the Lathe Object
Editor and Object Preview Panel for real-time editing.
To create a Lathe object:
1 Click Insert Lathe Object on the Object
Toolbar and the Lathe Object Editor dialog
box is displayed.
Note: To recall the dialog box, double-click the object
you created or select Edit Object on the Object
Toolbar.
2 Click on the Shape T ool, Path T ool and
Freehand T ool and render a variety of paths
and shapes.
3 To start modifying your paths, click the
Object T ool and Adjust T ool. Y ou have the
option of rendering your paths or shapes
across or beside the Lathe axis, according
to your desired output of the object. Click
on X-axis or Y-axis to change the
orientation of the default axis.
4 Increase the modification of your paths by
choosing from the Open Path or Close
Path.
5 Click Launch object preview panel in the
Lathe Object Editor to preview your
objects. You can rotate your object by
selecting Auto rotate object .
6 Experiment further using the Attribute
Panel. Manipulate Angle and Sides spin
slider controls to produce the desired
degree of angle or number of sides for your
object. It is possible to render 2 sides by
selecting Two-sides rendering .
Page 21
21
User Guide
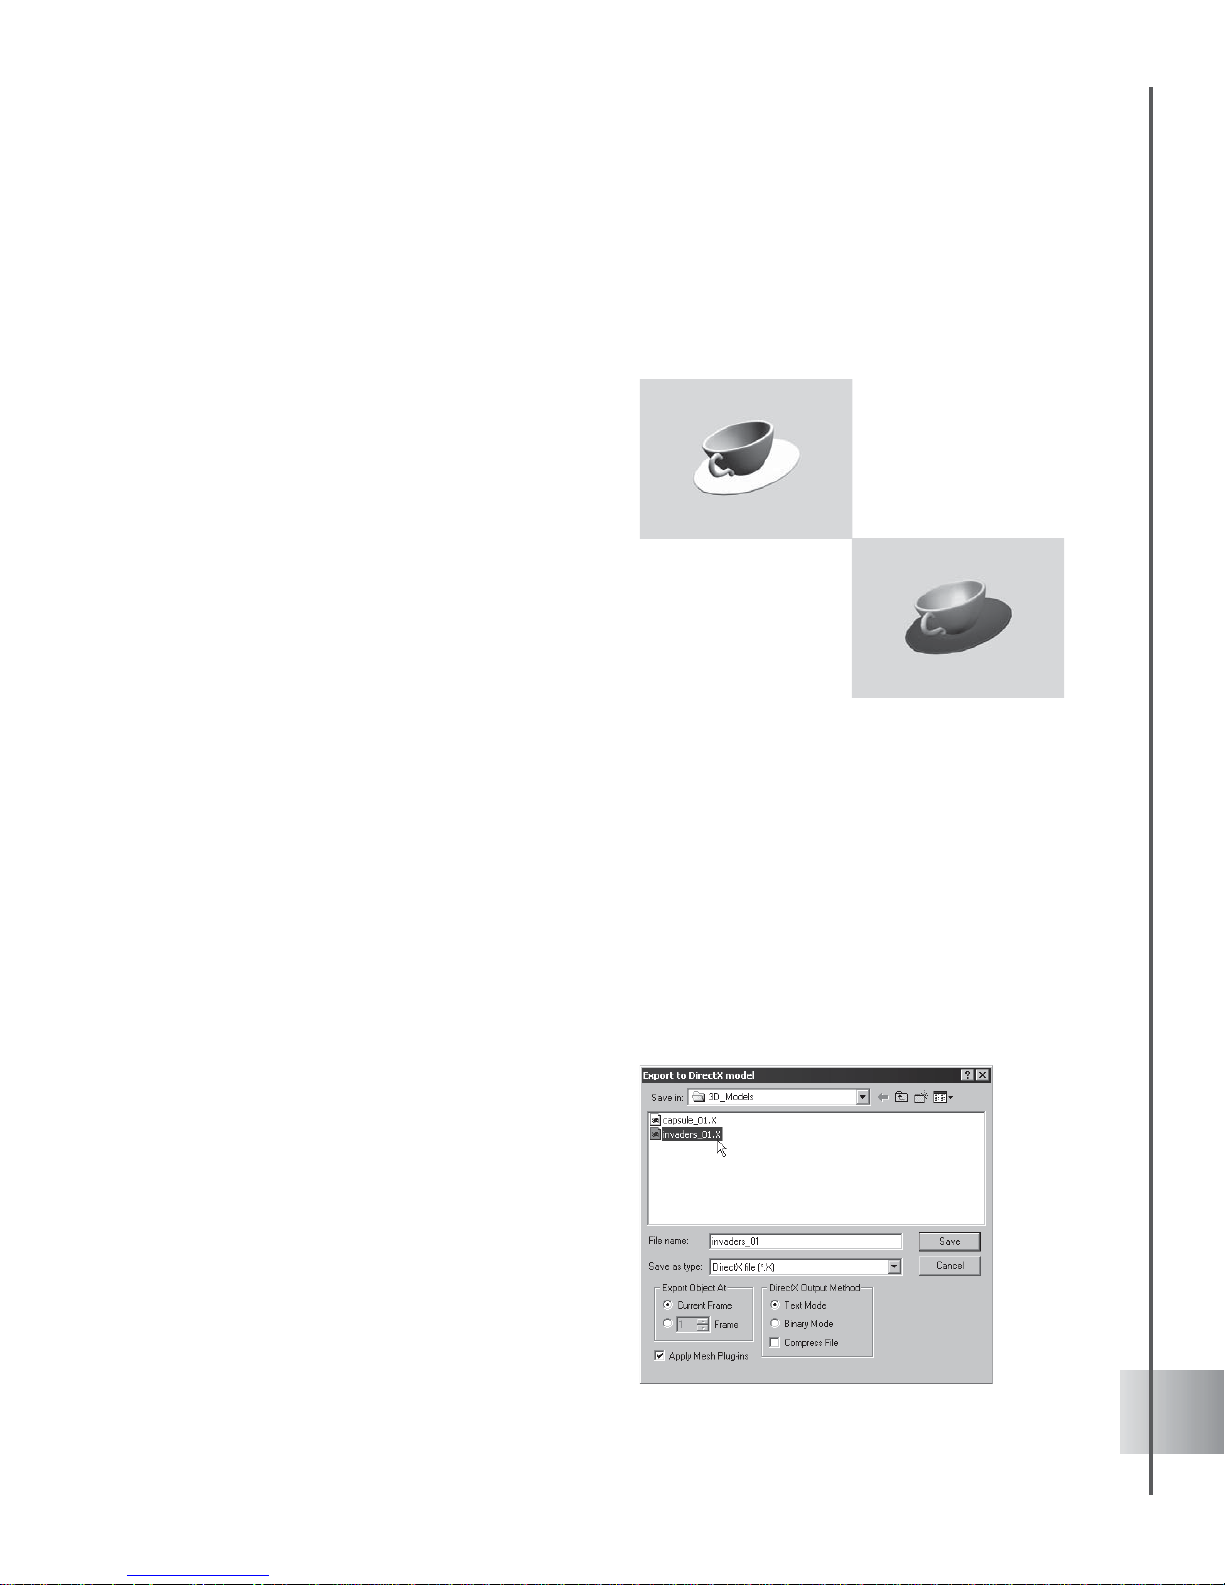
Importing 3D models
Import DirectX (*.X) and 3D Studio (*.3DS) models for immediate use in your project or for
further editing in COOL 3D.
To import 3D models:
1 Select File: Import 3D Model.
2 Then select the 3D model type DirectX
Model or 3D Studio Model.
3 The Open dialog box is displayed for you to
select your file.
4 Select C3D data type to import the model
without color or texture attributes, if you
prefer to customize these later. Or select
D3D data type to import the model with its
inherent color and texture attributes intact.
5 Select Scale to proper size so that the
height and width of the 3D model will be
adjusted properly to fit your window .
Otherwise, it will be imported in its original
size.
6 Click Preview to view your selected file. The
model preview should be shown in the
Information Area.
7 Click Open.
You can also export COOL 3D models as Direct X (*.X) and 3D Studio (*.3DS) files and work
on them in other modeling environments. To export a 3D model, select File: Export 3D Model
and select DirectX Model or 3D Studio Model.
The Open dialog box is displayed for you to
select your file. Under Export object at,
choose whether to export at the current frame
or other frames ranging from 1 to 10. Click
Apply mesh plug-ins to include the mesh
plug-ins. In the case of DirectX, you need to
choose between Text mode and Binary mode
as the DirectX output method. Select
Compress to decrease the size of your output
file.
Objects in the X file format, as C3D data
type (top), and as D3D data type
(bottom)
Page 22

22
Ulead COOL 3D Production S tudio
Selecting and grouping objects
COOL 3D allows you to insert more than one object into your project, whether it be text or
graphics. After you have created the individual objects, you can edit and animate each one
individually just by first clicking on it in the Edit Window to select it. You can also use the
Object List on the Standard Toolbar to select the object that you want to edit. An even more
convenient way to keep track of objects is to use the Object Manager (see the following
section).
A text object and a graphic objectMultiple text objects
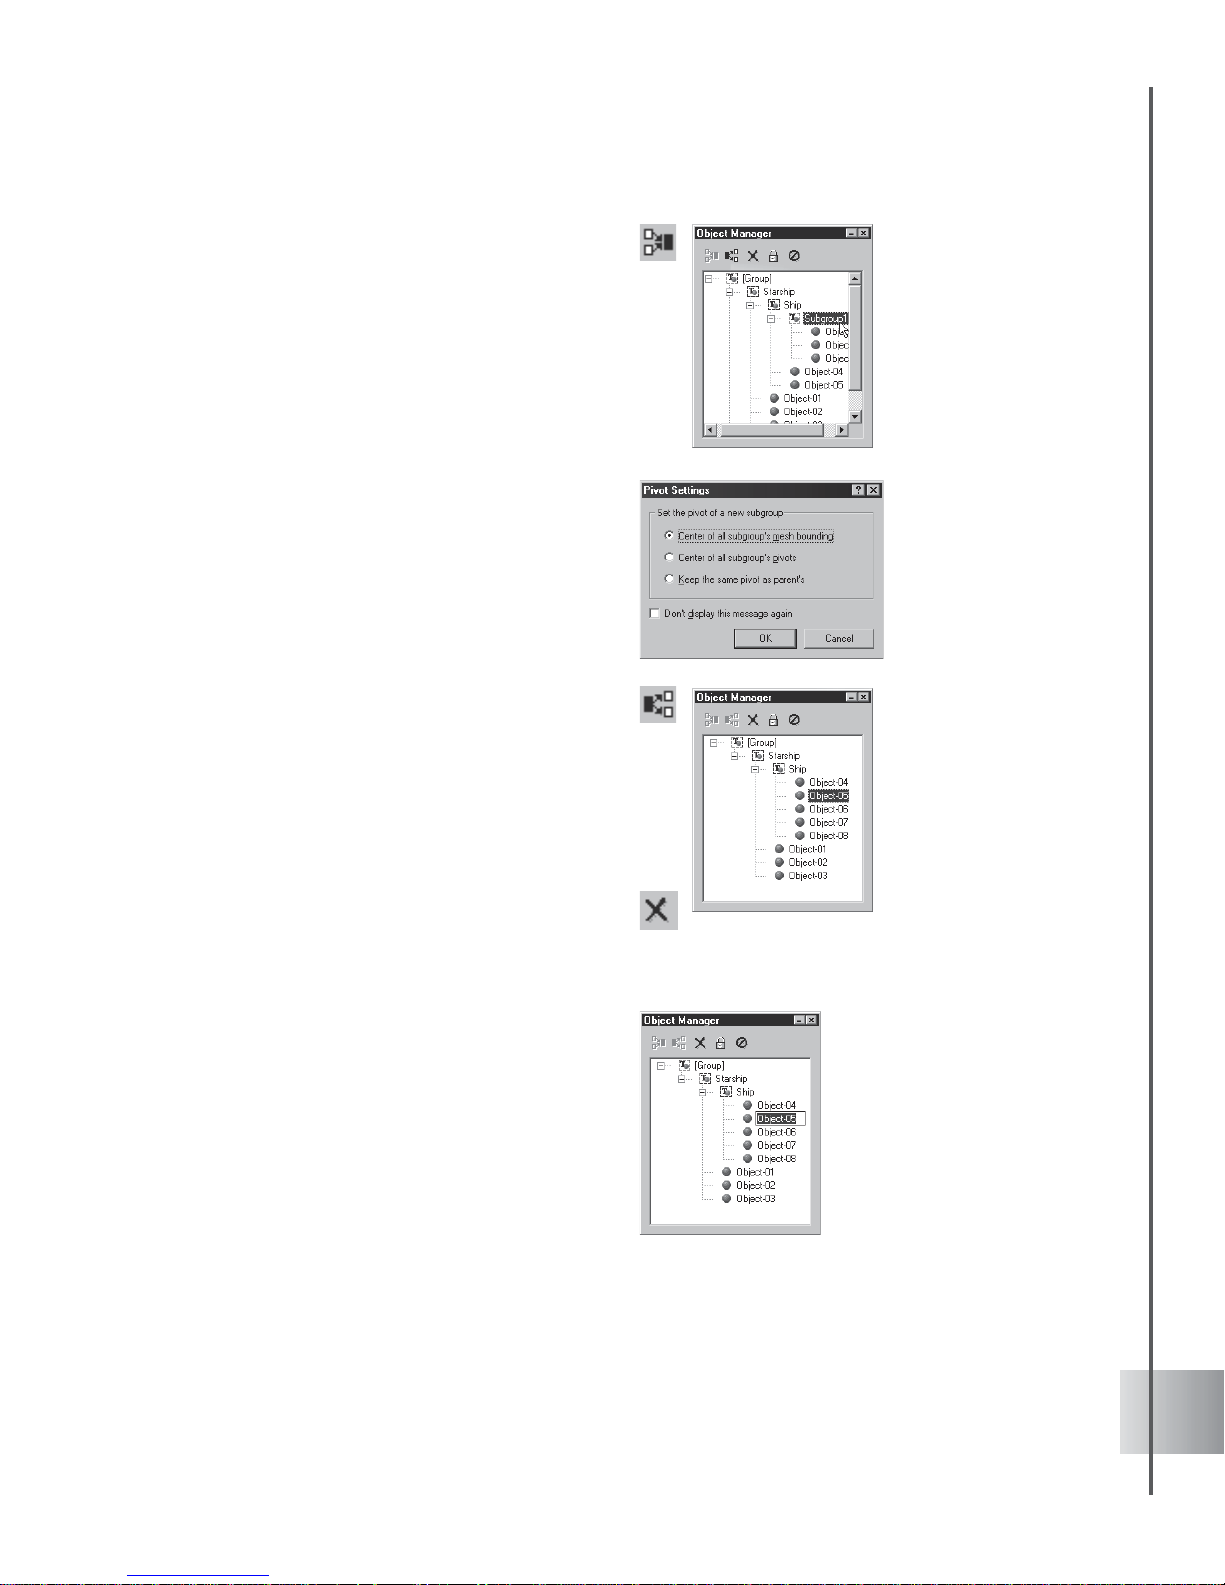
Using the Object Manager
The more objects you create, the more of a challenge it can be to keep track of them. The
Object Manager makes it easier for you to organize and edit your objects. To open it, click
View: Toolbars Manager - Object Manager. Here are some of the basic functions:
• Select objects When you create a text
or graphic object, it appears as an
individual item in the directory . Click on
that item in the Object Manager to
select it. This allows you to edit only
that object.
You can also select multiple objects by
clicking them with the mouse while
pressing either [Shift] for a row of
items or [Ctrl] for individual items.
This allows you to group, align and
apply plug-ins to all the selected items
simultaneously.
Page 23
23
User Guide
• Group multiple objects Objects
belonging to the same parent can be
grouped and arranged into multiple
levels of subgroups.
To group objects, select them and click
Group objects. The selected items
form a subgroup. To see which objects
are in the subgroup, click the + symbol.
The Pivot Setting dialog box is also
displayed to set the rotation behavior of
the new subgroup. Choose to place the
pivot at the center of the subgroup
objects' mesh bounding box, at the
center of their original pivot points, or
use the current parent group’s pivot.
• Ungroup objects To have a group of
objects form separate objects again,
select that subgroup from the list, then
click Ungroup objects. All motions
applied to these objects while grouped
are retained even after they are
ungrouped.
• Delete selected objects or groups
simply select the desired object or
group of objects, and click Delete
object(s).
• Rename objects Do this by selecting
the object in Object Manager, and then
clicking it again to edit the name. This is
convenient when you want to do the
following:
- Change the name of an object to keep
track of all objects; objects receive a
generic name by default.
- Differentiate between two or more of
the same text or graphic objects in a
project. Multiple objects receive the
same name by default.
You can create as
many subgroups and
subgroup levels as
you want. Each
subgroup is treated
as a distinct object.
Page 24
24
Ulead COOL 3D Production S tudio
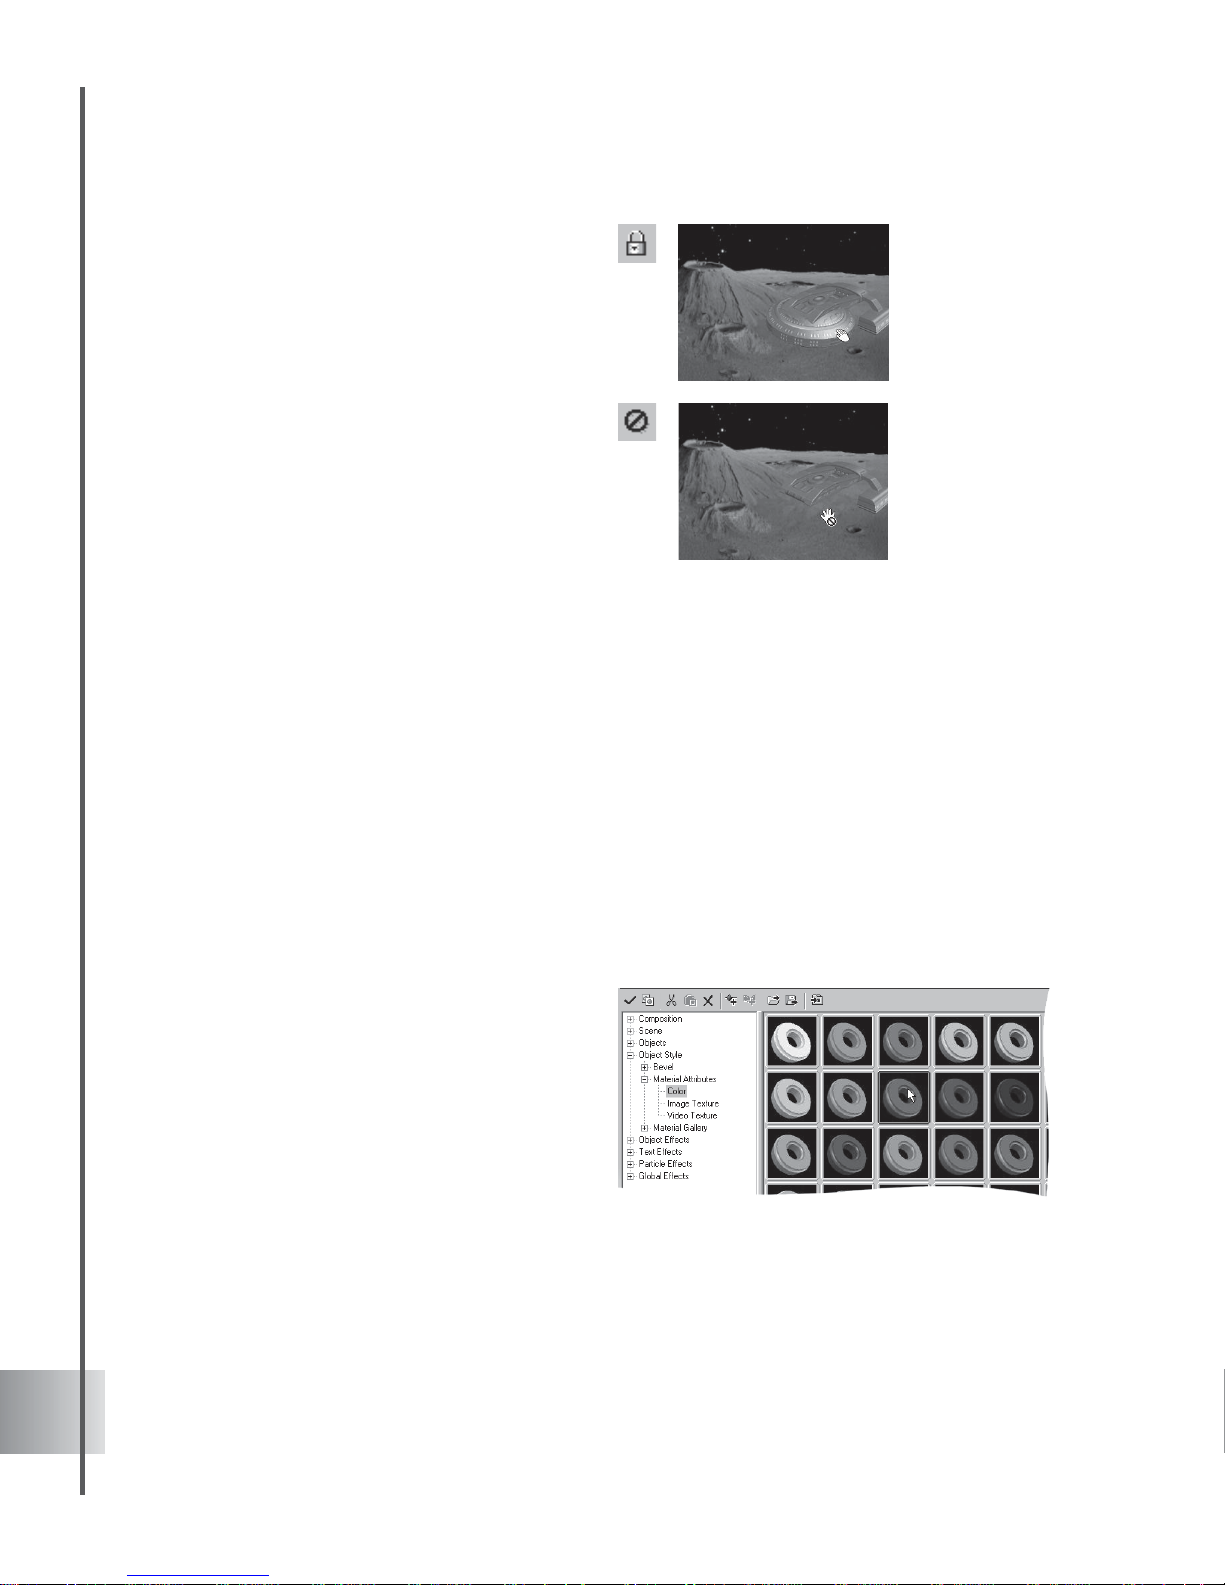
• Lock/Unlock objects Individual objects
or entire subgroups can be locked to
prevent further modifications of their
attributes. To lock/unlock objects or
subgroups, simple select them and click
Lock/Unlock objects.
• Enable/Disable objects Individual
objects or entire subgroups can be
disabled. Disabled objects are not visible
on the Edit Window and their attributes
cannot be modified. To disable/enable
objects, click Enable/Disable objects.
Editing object style
There are many ways to customize the physical appearance of your object in COOL 3D. The
controls are accessed in the EasyPalette file directory, under the Object Style category. The
easiest way to style an object is to use one of the presets in Object Style: Material Attributes
or Material Gallery, all of which combine many attributes. Or you can control each attribute
individually with extensive options on the Attribute Panel. This section shows you how to
customize color, texture, bevel, and transparency attributes.
Color
It’s easy to apply color to your object. You can use one of the presets that include both light and
color settings, or customize the color yourself.
To apply color to an object:
1 In the EasyPalette file directory,
select Object Style: Material
Attributes - Color.
Drag the color thumbnail from the
EasyPalette to the object.
Page 25

25
User Guide
2 In the Attribute Panel, select Color in
Property List. You can modify both
the surface and specular colors of your
object by clicking the Color square
under Surface or Specular. This opens
a standard Windows Color dialog box
where you can select a color.
3 To the right of the Color square, adjust
the Brightness, Saturation, and Hue
of the color until you have the effect
that you want. Under Specular, you can
also use the Property Controls to
adjust Luster.
Texture
By applying a texture map to your 3D object, you can give it the appearance of being made from
a specific material, such as wood or metal, or you can apply a pattern or design to it. A texture
map is a *.JPG or *.BMP image that is wrapped around the surface of a 3D object.
You can also create more dynamic compositions by wrapping your object in full motion video.
COOL 3D allows you to use an *.AVI or *.MOV file as texture that will play within the
boundaries of the 3D object where it is applied. A project with a video background can also
contain multiple objects with video textures. Imagine the effect of all video clips in such a
project playing simultaneously .
To apply an image texture to an object:
1 In the EasyPalette file directory, select
Object Style: Material Attributes - Image
T exture.
Drag the preset image texture thumbnail
from the EasyPalette to the object.
2 T o use your own image file, select Image
and click Load texture image file in the
Attribute Panel. Select the image file that
you want to use for your texture (*.BMP or
*.JPG) in the Open dialog box and click
Open. The image will be applied to the
object.
Page 26
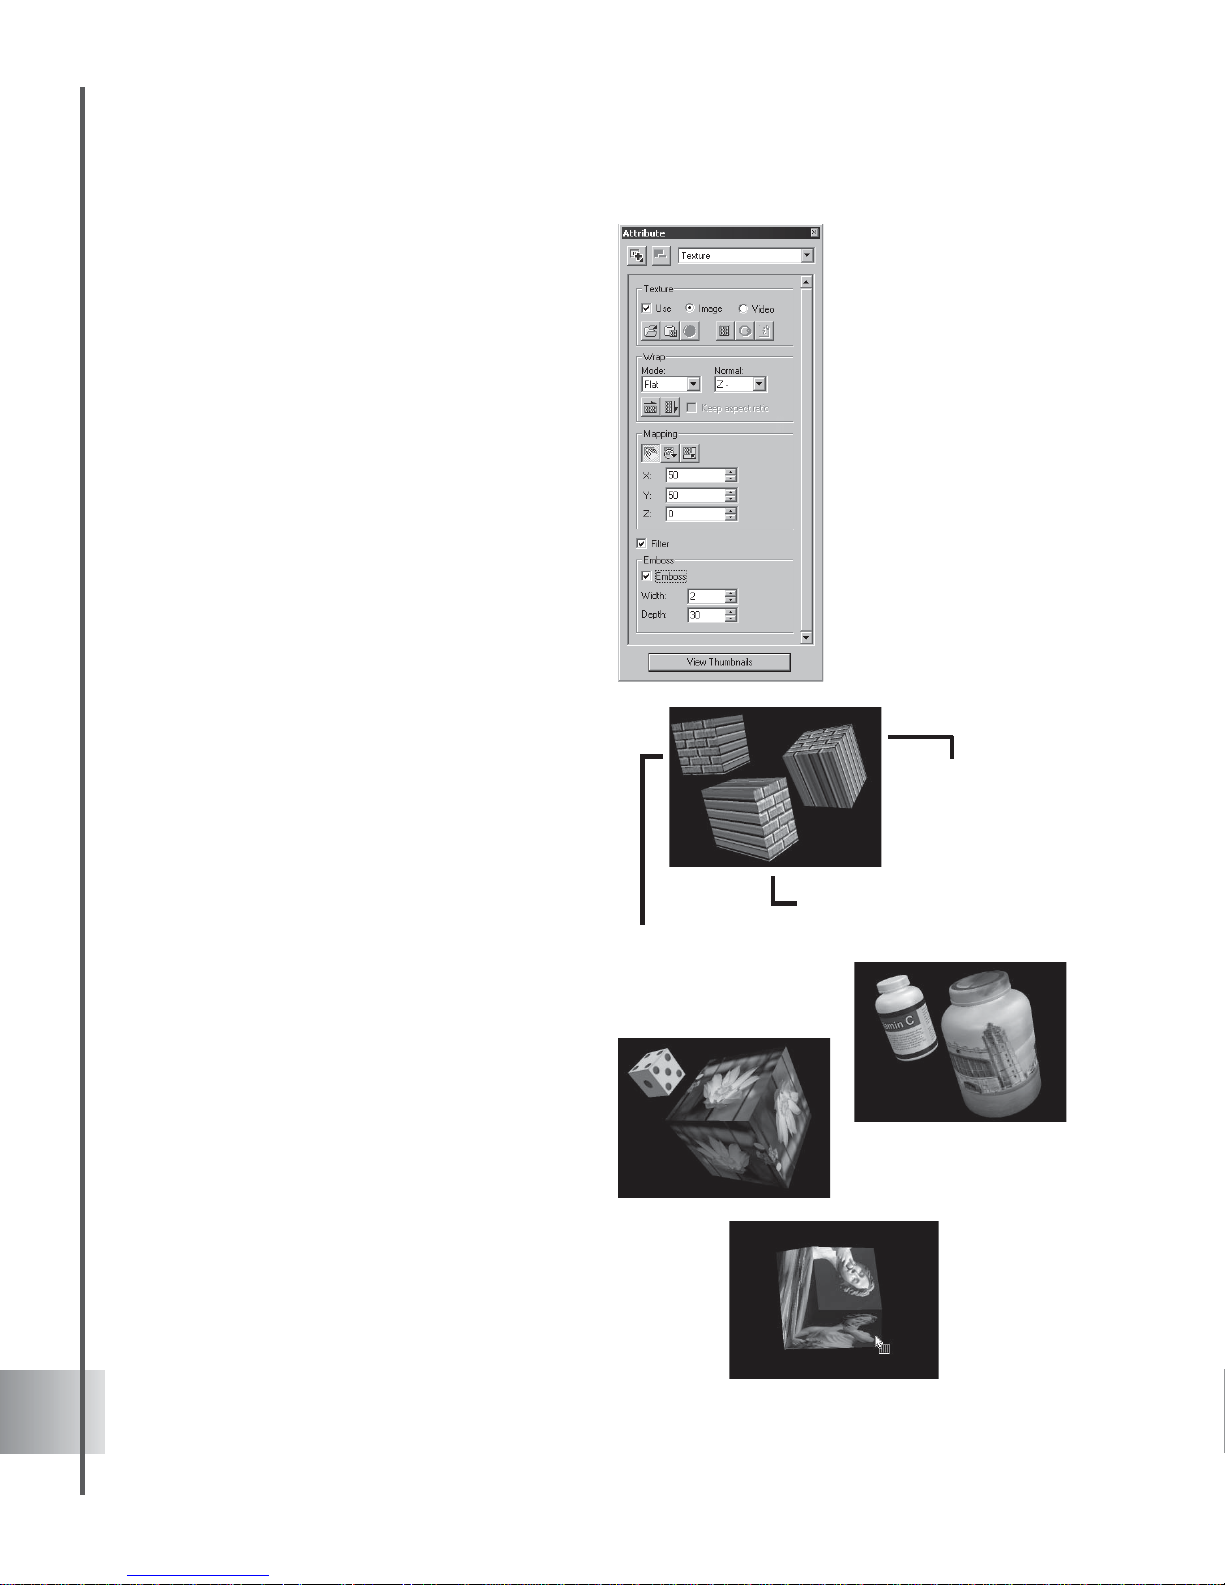
26
Ulead COOL 3D Production S tudio
3 Click Show texture color only to remove
any color that was previously applied to the
3D object, leaving you with just the color in
the texture map itself.
4 Select a Wrap mode for your texture. This
determines how the image is applied to the
object. For instance, if you have an object
with a cylindrical shape, you might want to
choose Cylindrical. For shiny or metallic
textures, using Reflection often produces
best results.
T extures are fitted around the object
depending on the Normal vector that you
select.
T extures are initially applied around the Z-
direction. If you have a cube, this results in
the texture wrapping from the front to the
back of the cube towards the back.
Choose X- or X+ if you want the texture to
wrap around from the sides going left or
right. Choose Y- or Y+ if you want the
texture to wrap around from top to bottom.
5 If you selected Flat mode, you can click Fit
to width or Fit to height to resample the
texture to fit the object's horizontal or
vertical dimension. You can also use the Fit
to height feature for Cylindrical mode.
Select Keep aspect ratio to maintain the
image’s proportion when fitted to the
object's dimensions. Keep this option clear
if you want to separately modify the width
or height values of the object.
6 Use the Mapping tools to place the image
exactly where you want on the 3D object.
Position, Rotate, and Resize the image by
clicking the desired button, then drag the
mouse in the Edit Window until the image is
the way you want it, or enter values on the
Attribute Panel under T exture property.
Texture
applied in the
Y- direction.
Texture applied in
the X- direction.
Texture applied in
the Z- direction.
Page 27
27
User Guide
7 Select the Filter option to create a softer,
more blurred effect.
8 Textures in Object S tyle also feature the
Emboss function which gives the image a
more tactile and raised texture. Select
Emboss then adjust the following settings:
- Width The horizontal offset of the texture.
The greater the value, the more stretched
out it will appear.
- Depth The appearance of the thickness of
the texture. A higher value will result in the
texture having a greater raised appearance.
To apply a video texture to an object:
1 In the EasyPalette file directory, select
Object Style: Material Attributes - Video
T exture.
Drag the preset video texture thumbnail
from the EasyPalette to the object.
2 T o use your own video file, select Video and
click Load texture video file in the Attribute
Panel. Select the video file that you want to
use for your texture (*.MOV or *.AVI) in the
Open Video File dialog box.
3 Click Duration to set the Mark In/Out
points on your video/audio file.
4 Click Info to view properties of your video/
audio file. You can also preview your
selection by clicking Preview.
5 Click Open and the video will be applied to
the object.
To run your video continuously, simply click
Loop video playing in the Attribute Panel.
Select the wrap mode and method, map your
video texture, and apply Emboss the way you
would with an image file.
Emboss is applied
to the sphere in
lower right.
Page 28
28
Ulead COOL 3D Production S tudio
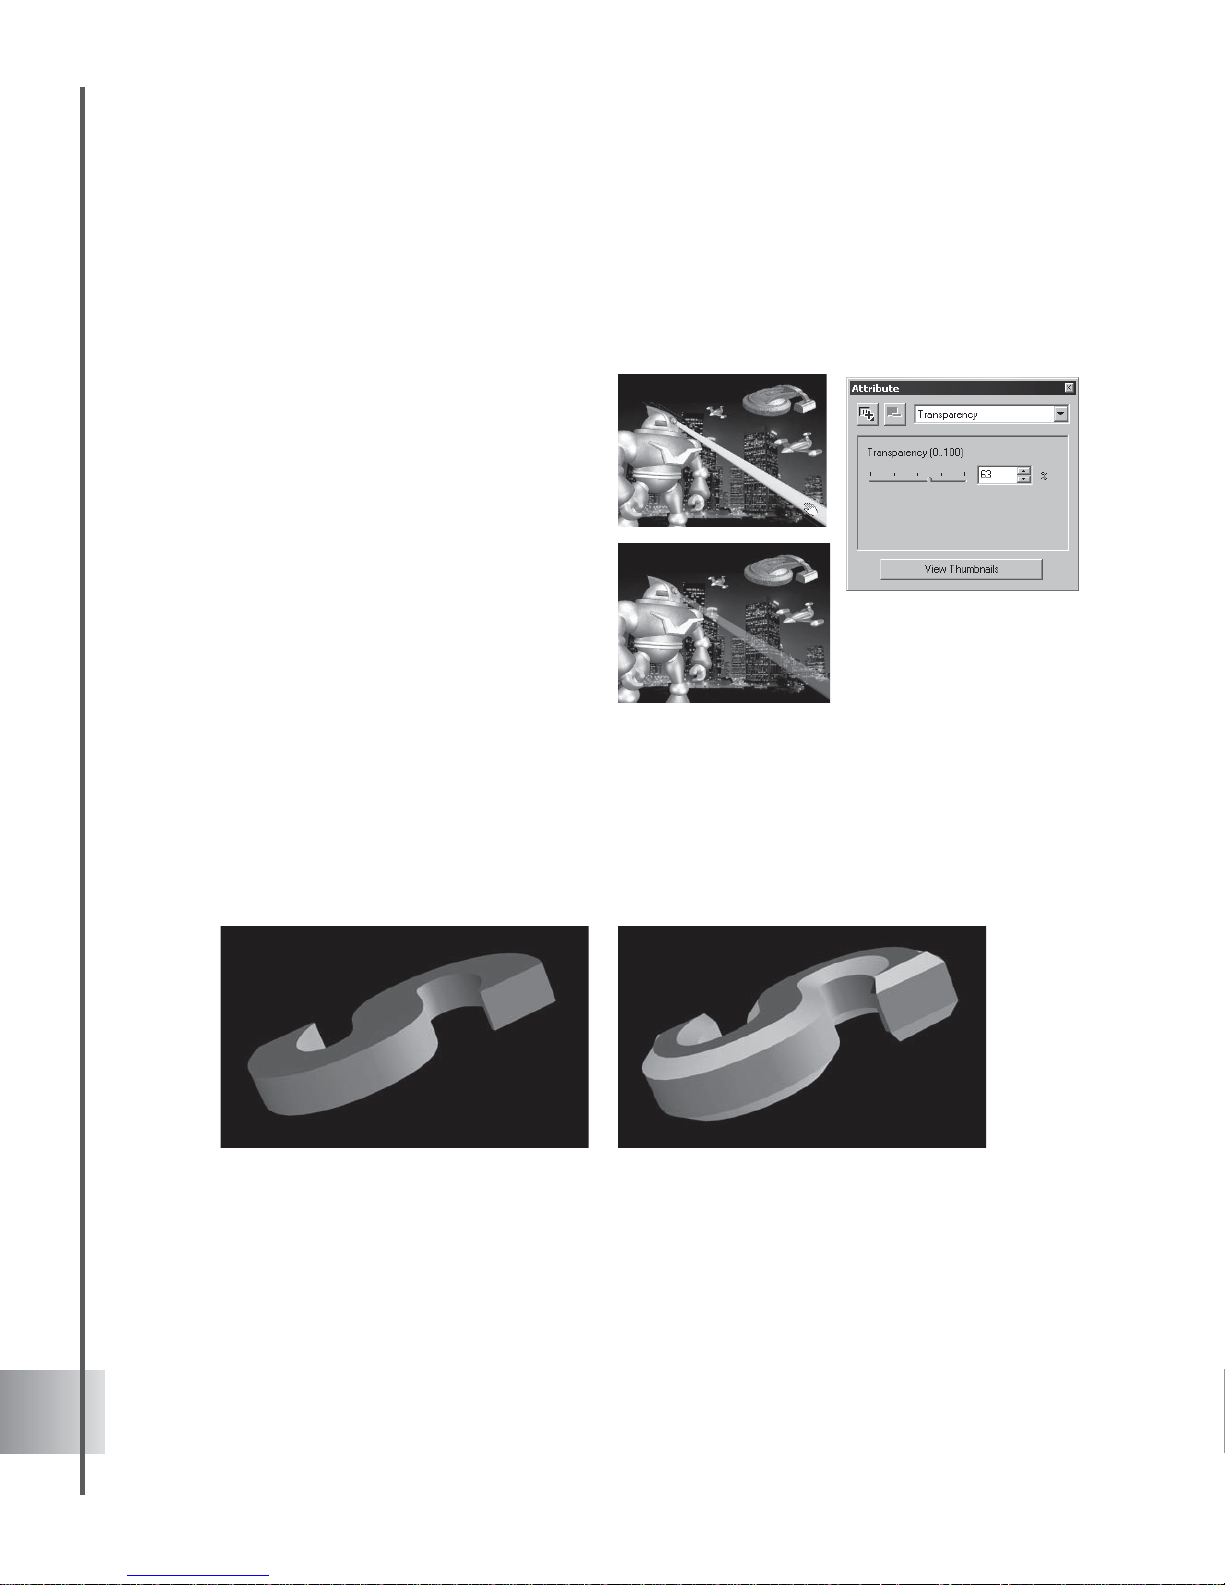
Transparency
Creative manipulation of transparency levels among objects can create dramatic effects
especially when integrated with a play of light and motion. You can control the opacity of
individual, multiple items, or entire subgroups by modifying Transparency property.
Select the object you want to render
transparent and open the Attribute Panel.
Select Transparency in Property List. Drag
the slider to control the opacity or
transparency of your selection - you can also
enter a specific value for percentage of
transparency.
The actual transparency level of an object
within a subgroup is the combined value of its
own transparency and that of its parent group.
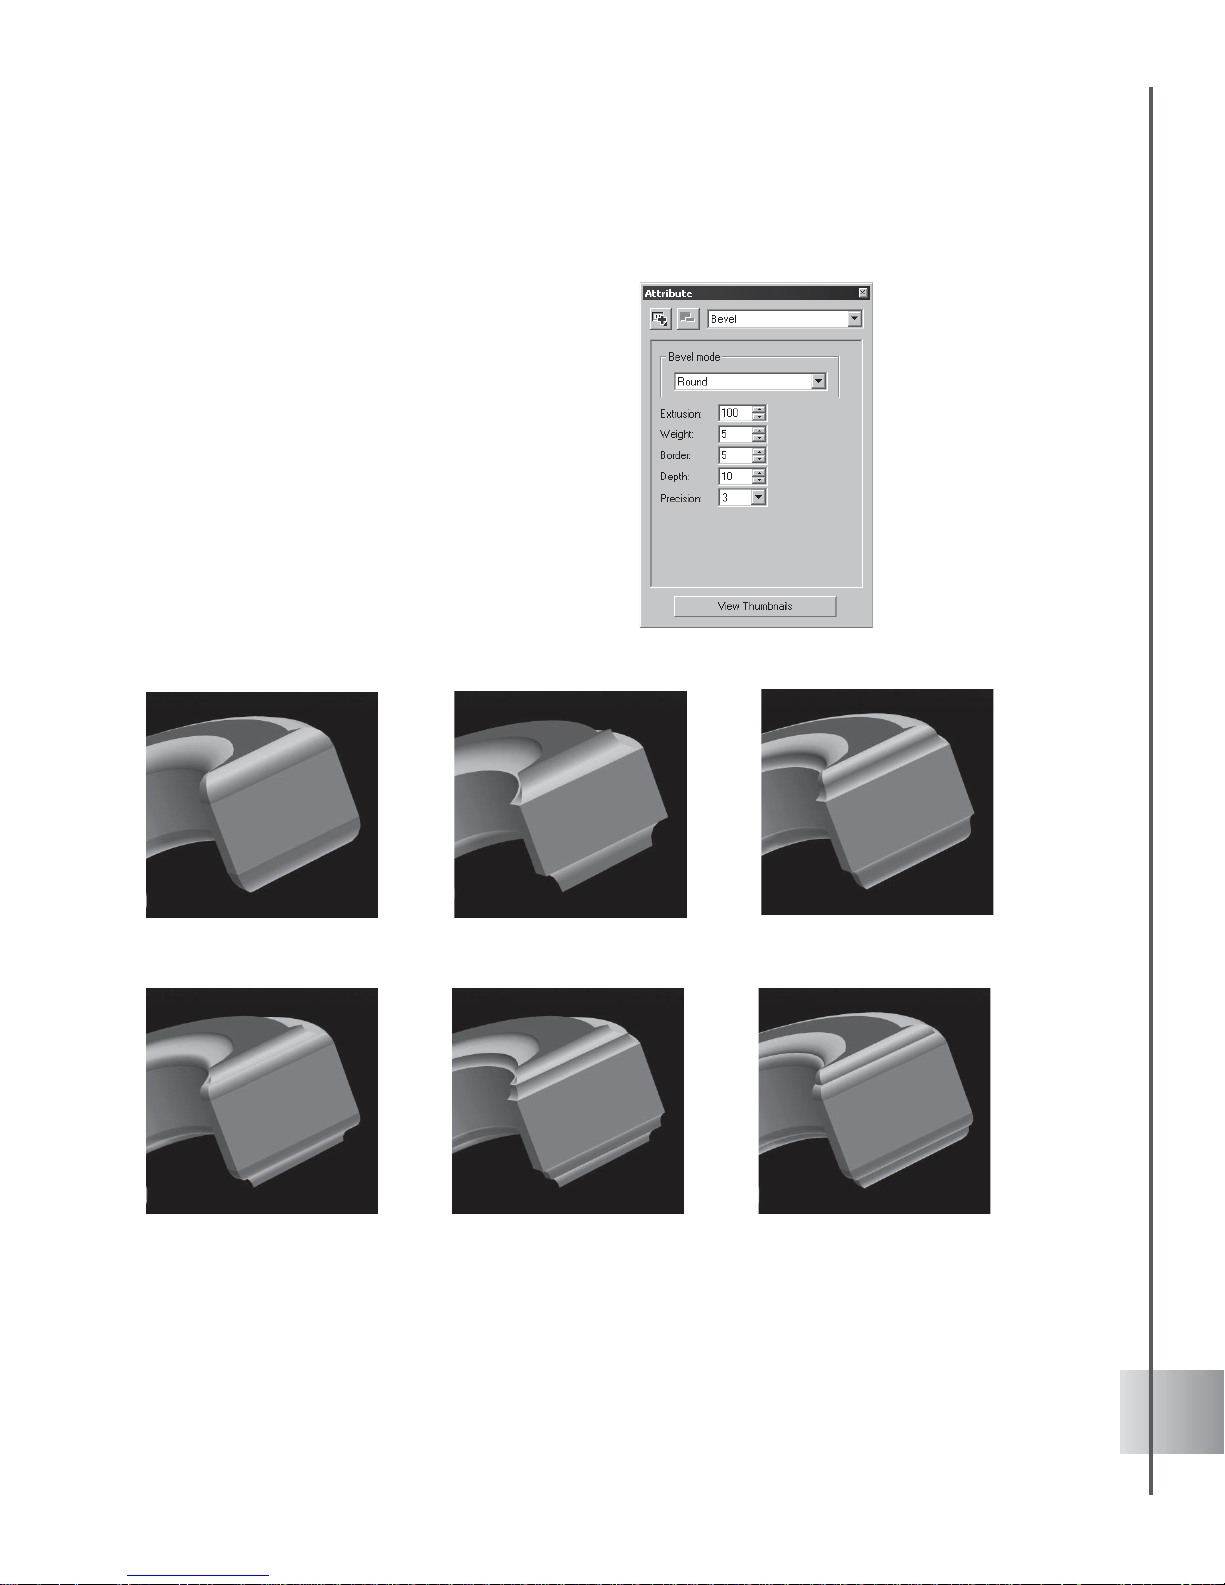
Bevel
A bevel refers to the edge of a 3D object. You can add depth and character to your text and
graphics objects by applying bevel styles. You can select from EasyPalette presets or
customize your own by selecting Bevel in the Attribute Panel Property List and adjusting its
characteristics. Once you become familiar with bevel attributes, you can even animate them.
This section gives you a glimpse into the anatomy of a bevel as well as basic bevel styles.
An object with no bevel (left) and the same object with a flat bevel (right)
Page 29
29
User Guide
To apply a bevel style to text and graphic
objects:
1 Insert a text or graphic object into the
workspace.
2 Select Object Style: Material Gallery -
Extruded Objects. Drag a bevel style to
your object in the Edit Window to apply it.
3 T o customize your bevel style, select Bevel
in the Property List in the Attribute Panel.
4 Change the settings for Extrusion, Weight,
Border, Depth or Precision until you get
the effect that you want.
Basic Board Bevel Styles
Round-Round
Chiseled-ChiseledChiseled-Round
Round-Chiseled
ChiseledRound
Page 30
30
Ulead COOL 3D Production S tudio
Object precision and quality
Adjust the smoothness of your 3D objects by selecting Precision & Quality in the Property
List in the Attribute Panel. A higher Precision value increases the mesh density of the object.
This way you can deform objects to create smoother surfaces. Click Wireframe to observe
this.
Keep in mind, however, that higher precision
means slower rendering time, therefore it is a
good idea to wait until you’re finalizing your
project before setting this.
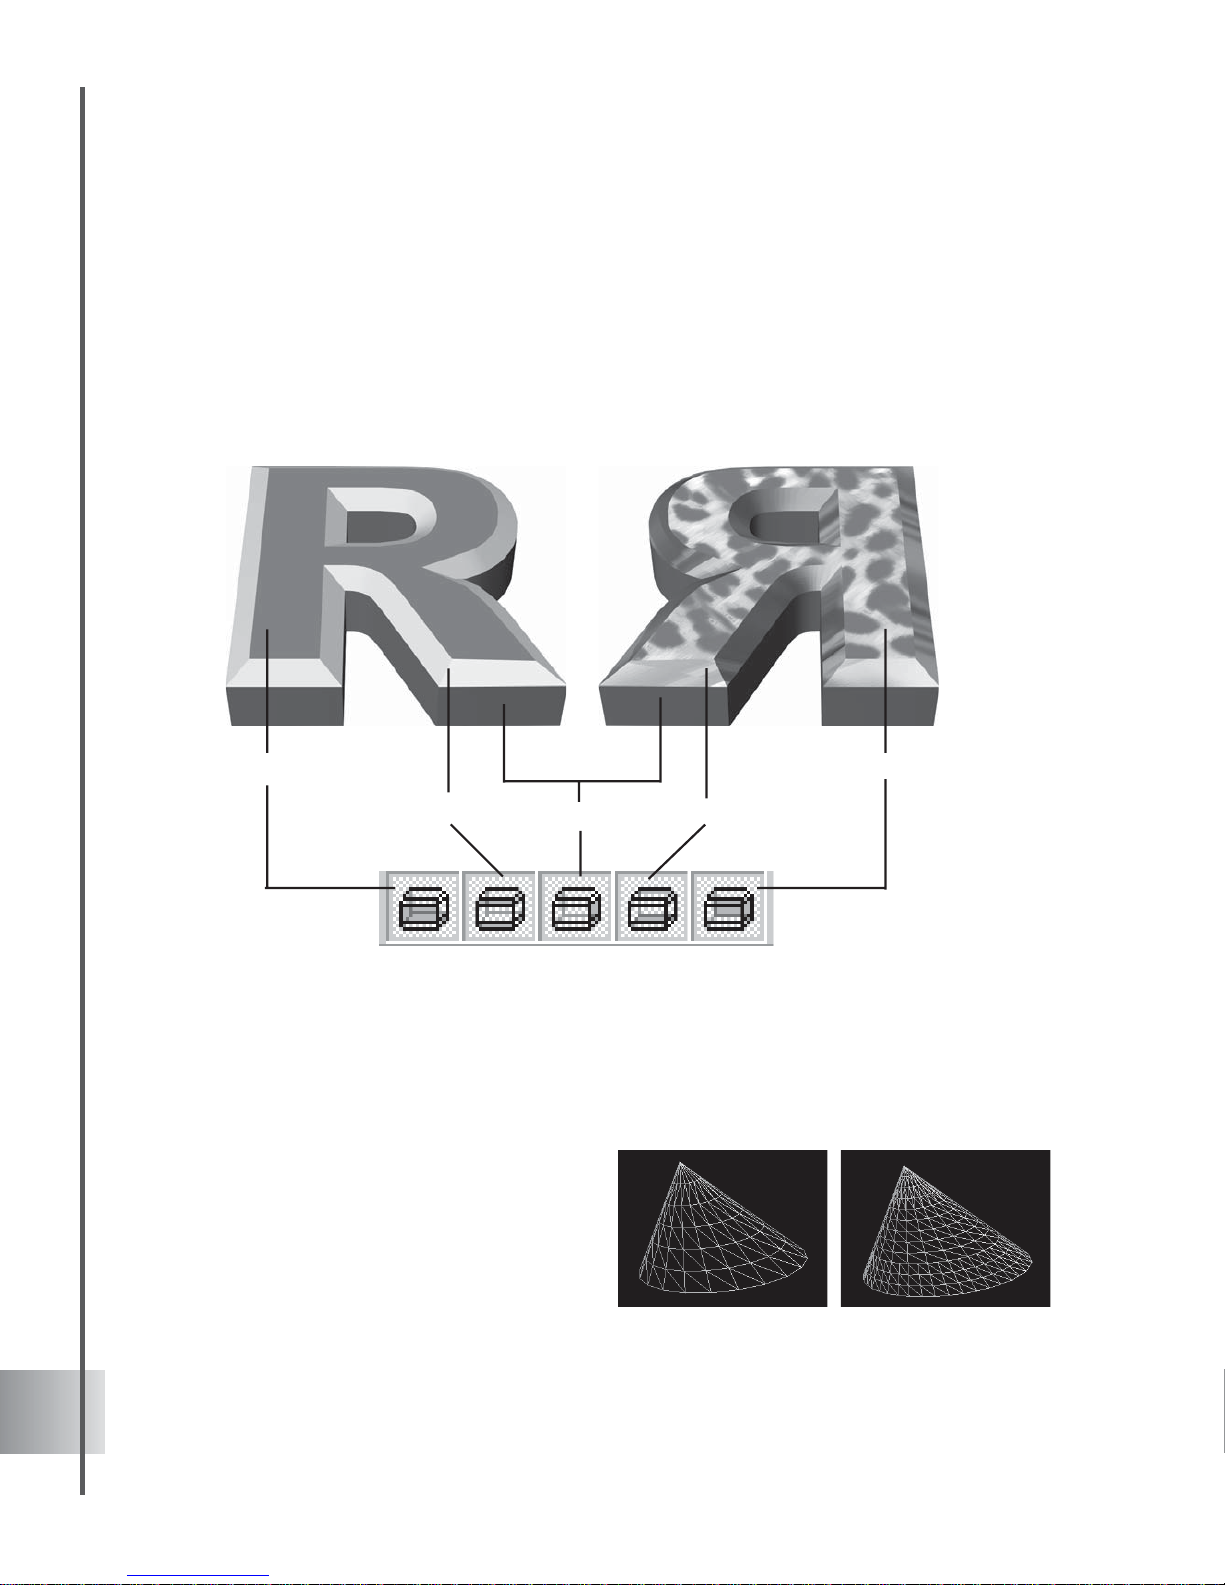
Modifying individual faces of an object
The great thing about applying texture and color in COOL 3D is that you can apply them to
individual faces of your object. Click a Bevel Face option on the Face Property Toolbar to
select the side of the object to edit. Then, drag a color or texture from the presets to the Edit
Window. Try applying different colors and textures to the different bevel faces of an object. The
illustration below shows you this effect when applied to an object with a Flat bevel style (see the
following section for more on bevel styles).
Lower object precision (left) and higher object
precision (right)
Front Face
Front Bevel
Side Face
Back Face
Back Bevel
Page 31
31
User Guide
Wireframe display
COOL 3D allows you to display objects as
wireframes.
Wireframe mode renders your objects as
geometric models, displaying them as
structures made up of straight and curved
lines, and giving them an architectural quality.
Objects can also be exported in all the available
formats as wireframes.
The display mode can be toggled from the
Standard Toolbar.
FreeForm
The FreeForm feature allows you to modify the shape of any object by changing the form of its
mesh and create morphing animation. You can choose the transformation type to move selected
control points as well as transform the preview window to operate the tool from any angle.
To use FreeForm:
1 Select an object.
2 Click Object: FreeForm to invoke the
FreeForm Editor dialog box.
3 Set the grid number for each plane (X, Y, or
Z). The values range from 2 to 11.
4 Under Selection, pick control points then
drag them to deform the shape of the object
or pick the type of deformation to apply to
the object (e.g. move, rotate, and scale)
under Transform.
Note: Should the Rotate option be chosen, the user
should choose an axis (X, Y, or Z) to move the object
toward to.
5 V iew by opting to click Rotate or Distance.
Page 32

32
Ulead COOL 3D Production S tudio
6 Select Axis-indicator to view the X, Y, and Z
planes.
Click Reset View to return to the original
view settings.
7 Click Wireframe to view the object's mesh
structure.
8 Click Reset Mesh to revert to the original
structure of the object.
9 Click OK when done.
Grid There are 3 editing boxes with spin
buttons to set the grid number of bounding
control points found on the right side of the
FreeForm Editor dialog box. The values
range from 2 to 11.
Selection Allows you to use the selection
mode to choose control points (Point, Line-
X, Line-Y, Line-Z, Face-XZ, Face XY, and
Face YZ). To do multiple selection, press
[Ctrl].
Transform Select the type of transformation
(move, rotate, and scale) by clicking the
option on the right side of the FreeForm
Editor dialog box, under Transform, right
below Grid.
Note: When using the Rotate or Scale mode, you
should select at least 2 control points to define the
rotation center or scaling relative center.
Select Fixed to drag nodes only on the
selected axis. Clear Fixed to be able to drag
nodes on all axes.
Page 33

33
3D scene basics
A three-dimensional scene shows objects the way the human eye would perceive them. Unlike a
flat two-dimensional image, a 3D composition gives you an enhanced sense of depth and space,
and makes it easier for you to comprehend scales and distances between objects.
Experimenting with various elements that
create depth in the 3D environment can help
you deliver powerful 3D compositions.
Geometric perspective evokes depth in a 3D
scene. By scaling objects using mathematical
algorithms, they are made to appear as if they
are receding into vanishing points.
Light and color also create depth. If an object
is farther, its colors are less intense because
the atmosphere absorbs and scatters light
from them. This changing of color and
contrast is called attenuation. This is often
achieved by adding a soft sheen to distant
objects.
There are various creative and enhancing
features that let you experience the excitement
or working with 3D objects and space.
Camera
If you want to view different sides of an object without manually rotating it, use the Camera
View Panel to select different perspectives of the object. In COOL 3D, the virtual camera
roams around your 3D space to show you all sides the object in relation to the position that the
object is in.
This feature provides options for viewing your work from six different vantage points: front,
back, top, bottom, left, and right. This comes in handy when trying to figure out how a
complex composition was put together.
Select View: Toolbars Manager - Camera
View Panel to open the Camera View Panel
and choose the camera position that offers the
best perspective. It displays the six vantage
points depending on the origin (0, 0, 0) of the
object as seen in the Edit Window.
Page 34

34
Ulead COOL 3D Production S tudio
Lens type and distance
Choose from presets that simulate the specific lens type of a real-world camera and its motion
of zooming in and out of the workspace. Select Camera, under the Scene category of the
EasyPalette file directory to display the preset thumbnails. To modify the camera angle and
distance, show the Attribute Panel and select Camera in the Property List.
Drag the Camera lens slider to the left to
increase the focal length of the camera and
simulate a zoom lens. This shows a tighter
view of a scene but renders clearer details of
distant objects.
Drag the slider to the right to decrease the
focal length of the camera and simulate a
wide-angle lens. This shows a wider view of
the scene and makes objects look as if they
are moving towards you.
The Distance slider increases and decreases
the distance between the camera and the
objects in the scene.
By changing lens and distance values, you can
emphasize distortion, width, height and other
characteristics of objects in your scene and
direct the viewer to focus on them.
Page 35

35
User Guide
Background
Choosing a background is one of the most important design decisions you will make in your
project. Background and the way it is used give a unique identity to your title. Readability should
be your foremost consideration. Try to test the clarity of your foreground objects to make sure
that they are identifiable against whatever color, image video, or effect you choose. Since older
computers may be able to display only 256 colors, testing your combinations in monitors with
lower color depths is also good idea.
COOL 3D allows you to use Color, Image, or Video as background for your title or apply
effects such as Gradient and Magic Texture. You can select presets in the EasyPalette or use
your own file.
Color Background
Colors greatly affect the "look" of your title. Certain colors are generally considered to be warm
or cool. Greens and yellows, for example, suggest nature, while pastels give a light, airy feel.
COOL 3D makes it easy for you to create color schemes and pick their actual shades and hues.
Keep in mind that a colorful background can obscure foreground objects. In such a case, a plain
background color might serve your needs better.
To apply a solid color background:
1 Select the Scene: Color Background
category in the EasyPalette file directory
and drag the color thumbnail to the Edit
Window.
2 Adjust the predefined color or customize
your own by using the Attribute Panel.
3 Select Background in the Property List of
the Attribute Panel .
4 Under Backgr ound Mode, select Color.
5 Click the Color square to open the
Windows standard Color dialog box.
Customize your color then click OK.
6 To fine tune your selection, adjust the
controls for Brightness, Saturation, and
Hue.
Page 36

36
Ulead COOL 3D Production S tudio
Image Background
An image background provides a setting for your project. You can use it to simulate a real world
environment or to create a scenery that is based in fantasy. Select from the EasyPalette or use
your own JPG and BMP file.
To apply an image background:
1 Select the Scene: Image Background
category in the EasyPalette file directory
and drag the image thumbnail to the Edit
Window. Modify the predefined image or
apply your own image file by using the
Attribute Panel.
2 Select Background in the Property List of
the Attribute Panel .
3 Under Background mode, select Image.
4 Click Load background image file and
select an image file (*.JPG or *.BMP) in the
Open dialog box, then click Open.
5 You can adjust the dimensions of your
project to match the size of the image that
you are using by clicking Resize dimension
to background image size.
6 Click Tile background image to render your
background image into seamless individual
tiles.
7 If there is an image stored in the clipboard
which you want to use, simply click Paste
background from clipboard.
Page 37

37
User Guide
Video Background
COOL 3D allows you to use videos in MOV and AVI formats as background for your project.
By using EasyPalette presets or importing your own movies through the Attribute Panel, you
can easily create powerful compositions of object or particle effects set against a moving
background.
You do not need a video editing program to do this. You can modify the dimension, duration and
other properties of your video file right within the COOL 3D interface.
To apply a video background:
1 Select the Scene: Video Background
category in the EasyPalette file directory
and drag the video thumbnail to the Edit
Window. Modify the preset video or apply
your own video file by using the Attribute
Panel.
2 Select Background in the Property List of
the Attribute Panel .
3 Under Background Mode, select Video.
4 Click Load Background Image File and
select a video file (*.MOV or *.AVI) in the
Open Video File dialog box, then click
Open.
If you need to view the properties of your
selected file, click Info in the Attribute Panel
or in the Open Video File dialog box.
Imported video files should have the same
duration, dimension, and frame rate as your
COOL 3D project.
Adjust dimension by clicking Resize
Dimension to Background Image Size. To
modify duration, click Duration to open the
Duration dialog box and set Mark In/Out
points on your video file.
Page 38

38
Ulead COOL 3D Production S tudio
The duration, dimension, and frame rate of the
imported video files will be adjusted
automatically to fit your COOL 3D project.
Note: When importing video, make sure that the file
size is not too large for loading especially on the Web.
Background Audio
Your title can be outfitted with sound effects, music, and voice. COOL 3D allows you to
separately load *.WAV, *.MP3, *.AIFF, *.AVI, and *.MOV audio files into your 3D title.
To apply an audio background:
1 Open the Attribute Panel and select
Background Audio in Property List.
2 Click Load Audio File to display the Open
Audio File dialog box. Select the audio file
you want to use and click Open.
Note: Click Use audio if you want to use a previously
selected audio file in your project.
If your sound file is too long for your title,
you can trim it by clicking Duration in the
Attribute Panel or Open Audio File dialog
box. The Duration dialog box is displayed for
you to set Mark In/Out points.
If the file is too short, you have the option of
selecting Loop audio playing in the Attribute
Panel to allow the sound to repeat
continuously until the title is finished. You can
also view properties of your audio file by
clicking Info either in the Attribute Panel or
Open Audio File dialog box.
Page 39
39
User Guide
Understanding the 3D coordinate system
The coordinate system can help you keep track of objects in 3D space. The X- and Y-axes
define a coordinate plane or a two-dimensional world. To work in a three-dimensional space, the
Z-axis, which represents depth, is added.
The three axes are perpendicular to each other and intersect in the point of origin. Each one is
like a number line with the point of origin designated as 0,0,0, because it is located on the 0
point on all three axes. Thus, a point in 3D space is described by giving three numbers. The first
one is the distance of the point from the origin in the X-axis. The second one is the offset of the
point from the origin along the Y-axis, and the third on distance away from 0 along the Z-axis.
3D coordinate systems are imaginary and can represent anything you want. When creating a 3D
scene, keep in mind the proportion of objects with respect to each other. You can do this by
establishing well your viewpoint or position and orientation.
COOL 3D then automatically calculates the
movement of the origin, your point of view, or
the object's center of gravity.
When transforming objects or applying
effects, you work with both the object’s own
coordinates and the world coordinates.
For example, when doing freeform
deformation, you adjust the shape of the
object by dragging nodes in its own X-, Y-,
and Z-axes.
But when you are lighting an object in a scene,
the values are based on world coordinates.
X=0, Y=0, Z=0 X=30, Y=30, Z=300
Page 40

40
Ulead COOL 3D Production S tudio
Light
Various materials or textures respond to light differently. Add realism to your titles by simulating
the way light sources illuminate objects in the real world. COOL 3D not only allows you to
direct various light sources but also adjust surface and ambient lighting.
To apply light to a scene, select Scene: Light category in the EasyPalette file directory and
drag a preset thumbnail from the EasyPalette to the Edit Window. You can customize or adjust
your lighting by using the Attribute Panel.
To adjust lighting in a scene:
1 Select Lights in the Property List of the
Attribute Panel.
2 Click a Light Source to activate it. Then
click the radio button above it to edit its
properties.
3 Click the Color square to open the Color
dialog box and change the color of the
currently selected light.
Adjust Brightness, Saturation, and Hue by
dragging their sliders.
4 Select a Mode for the light:
Directional Shines a direct beam of parallel
light rays with a constant strength. The
light source orientation is based on the
angle of rotation around the X- and Y-axes.
Point Shines diffused light with variable
strength on the object. The further the light
is from objects, the weaker the light
appears. The light source position is based
on its location along the X-, Y-, and Z-axes.
Spot Shines a focused, cone-shaped beam
like a theater spotlight. The light source
position is based on its location along the
X-, Y-, and Z-axes and its orientation is
based on the angle of rotation around the
X- and Y-axes. Because the beam is cone
shaped, moving the source closer to the
object reduces the area of illumination.
Directional mode often
creates more vivid
highlights and shadows.
Point shines a diffused,
variable strength light
similar to the sun.
You can either set
the light position or
select a target
object to apply the
Spot mode.
Page 41

41
User Guide
5 Click Position to move the location of your
light source or Orientation to adjust the
direction towards which the light is
projected. Orientation can be adjusted in
Directional and Spot modes. Position can
be adjusted in Point and Spot modes. Drag
your mouse in the Edit Window until you
have reached the desired effect using the
Lighting Guide. These images (right)
illustrates the position of the light sources
and orientation of light beams on a scene.
6 Click Select target object to launch a dialog
box where you can select the object to
which the new light settings will be applied.
This function is available when you are
working in Spot mode.
7 In Attenuation mode, set the degree of light
reflected from the object with relation to the
specified light source distance. 0 value
means that the distance will not affect the
light attenuation. Select 1 to set the
attenuation according to the distance
specified, and 2 to set the attenuation in
proportion to the square of the specified
distance.
8 Adjust the distance between the light
source and the object in Light range. For
Spot mode, you can adjust the angle of light
by specifying a value in Spotlight angle.
The general light that surrounds the object or
ambient light can also be adjusted in COOL
3D. Ambient light is a result of illumination
coming from direct sources and those
reflected on the surface of other objects. Click
the Color square to modify the color of the
ambient light. Adjust Brightness, Saturation,
and Hue by dragging their sliders.
Page 42

42
Animation basics
After familiarizing yourself with three-dimensional space, you’re ready to start making fun
animations. While there are many factors you have to take into consideration when creating an
animated project, it’s definitely worth taking the time to learn some basic ideas. From there, it
will be easy for you to advance to creating stunning and complex animation sequences. The
Animation Toolbar and its enhanced Timeline provide highly versatile functions for animating
your objects. Brief descriptions of the Animation Toolbar functions are listed below.
• View: Timeline Toggles between displaying and hiding the Timeline Window in the
workspace.
• Object List Allows you to select an active object that you can modify from the list
box. The first on the list is always labeled as Group which merges all the objects
and subgroups you’ve added as a single object. Only when you split the text will the
characters be displayed separately, allowing you to work on the objects individually.
• Properties Menu Lists all of the basic properties of the 3D object. If you have
applied a plug-in effect to the object, this will be listed as well. The Timeline
Control, just to the right of it, shows the timeline and key frames that are related to
the property that you have selected from the list.
• Timeline Control Allows you to choreograph your animation with key frames. The
top line represents the frame-by-frame position, while the bottom line displays key
frames. Key frames are those frames in which you specify an attribute or behavior
of an object. For plug-in effect timelines, an additional Control Line (in red)
appears between these two lines when you enable Plug-in Mask.
• Add/Delete Key Frame Lets you add or remove a key frame from the Timeline
Control. Each time you add a key frame, you can change the attributes or behavior
of an object. When you remove a key frame, all attributes associated with that key
frame are also removed.
Plug-in Mask
Number of
Frames
Current
Frame
Frame RateSmooth
Motion Path
Properties
Menu
Timeline
Control
Add/Delete
Key Frame
Object
List
View:
Timeline
Reverse
Plug-in
Enable
Page 43

43
User Guide
• Reverse Allows you to reverse the sequence of key frames on the Timeline
Control, so that the animation starts with the last frame and ends with the first.
• Smooth Motion Path Plays the animation smoothly, where the transition from one
frame to the next becomes less noticeable.
• Plug-in Mask Allows you to set the start and end points of a plug-in effect in the
animation sequence.
• Plug-in Enable Toggles between showing and hiding a plug-in effect.
• Current Frame Denotes the frame number that is currently displayed.
• Number of Frames Sets the total number of frames in the animation sequence.
• Frame Rate Sets the speed in frames per second (fps) at which the animation
plays.
Working with key frames and timelines
When you start to create an animation, you begin with a timeline. The timeline represents a
number of frames in the animation. In COOL 3D, you use the Timeline Control to edit the
attributes of timelines. Many properties of the 3D object (such as size, position, color, and any
plug-in effects) have individual timelines that you can edit independently. These are listed in the
Properties Menu.
Key frames let you choreograph your animation sequence as you work with the timeline. By
adding key frames and editing attributes in those key frames, you can, for instance, set your
object to move from left to right, and then rotate. Any adjustments you make to your object at a
given key frame determines the state of the object at that frame of the animation (for example,
the position, size, color, etc.). The following describes some basic controls of the Timeline
Control:
• Properties Menu Use this to select the timeline for a specific property that you
want to edit. By default, the basic attributes are listed (i.e. Position, Orientation,
Color, etc.). If you apply a plug-in effect to the object, that will be added to the list.
Once you select a property, the timeline for that property will appear.
Properties Menu
Slider
Move to
Next Frame
Move to
Previous
Frame
Jump to Next
Key Frame
Jump to Previous
Key Frame
Key Frames
Object List
Page 44
44
Ulead COOL 3D Production S tudio
• Object List Use this to select an active object to modify.
• Slider Drag this to move to any frame in the animation, or click Move to Next/
Previous Frame.
• Jump to Next/Previous Key Frame Click these buttons to move from one key
frame to the next, or directly select a key frame by clicking it.
Here is a simplified diagram of the default timeline for an object’s color. It contains 10 frames
and always has a key frame at frame 1 of the animation. At this key frame, the object is set to be
red. When you preview the animation, the object remains red in all frames.
In the next diagram, two key frames have been added to the color timeline. At key frame 1, the
object is red, at key frame 5 it is blue, and at key frame 10 the object is green. When previewing
the animation, you see the object’s color start out at red, gradually transform to blue and finally
to green.
Because each property has its own timeline, you can control multiple timelines in your animation,
as shown in the following illustration. Not only can you set the timing within each timeline, but
you can also control the timing of events between the many timelines by coordinating their key
frames, as if you were a director telling your various actors what to do and when to do it. After
you familiarize yourself with timelines and key frames, you can also work with multiple objects
that have multiple key frames.
Frame 1 Frame 5 Frame 10
Red Blue Green
Frame 1 (Frame 10)
Red
Frame 1 Frame 10 Frame 30Frame 20
Start at far
left
Move to far right Move to center
Red Red Green
No rotation No rotation Rotate 360º
Position
Orientation
Color
Page 45

45
User Guide
Advanced timeline mode
COOL 3D’s advanced timeline mode gives you greater control in choreographing the behavior of
objects with multiple attributes. Click View: Toolbars Manager - Timeline or Timeline
Window in the Animation Toolbar to display the Timeline Window . In the Timeline Window,
each attribute is represented by a timeline which you can edit independently. Every change you
make on an attribute will be reflected as a key frame. Any adjustment you make to an object at a
given key frame determines the object’s state at that frame. Brief descriptions of the Timeline
Window functions are listed below.
• View: Animation T oolbar Toggles between showing and hiding the Animation
Toolbar.
• Modify Frames Displays a drop-down menu that enables you to edit the number of
frames in the animation sequence.
• Thumbtack Allows you to mark attributes where you assigned key frames. You can
use these marked properties as reference while you work on other objects in the
animation. The attribute where the thumbtack is enabled remains on top of the
Attribute List even if you might already be working on a different object.
Ruler
Bar
Key Frame
Window
Modify Frames
View:
Animation
Toolbar
Object
List
Thumbtack
Plug-in Mask
Plug-in Enable
Next/
Previous
Key
Frame
Attribute
List
Current
Frame
Scroll Bar
Number of
Frames
Frame
Rate
Add/
Delete
Key Frame
Reverse
Smooth Motion Path
Page 46

46
Ulead COOL 3D Production S tudio
• Key Frame Window Displays all the frames in the animation sequence. Dots
indicate key frames. Since each object contains a different set of timelines, the
frames reflected in this window change depending on which object you are
currently working on.
• Ruler Bar Indicates the frame you are currently working on. Click anywhere in the
Ruler Bar to go to a frame within the specified duration.
• Add/Delete Key Frame Lets you add or remove a key frame. Each time you add a
key frame, you can change the attributes or behavior of an object. When you
remove a key frame, all attributes associated with that key frame are also removed.
This shows the Timeline for an object with
changing color, position, and texture
attributes. It contains 10 frames and always
has a key frame at frame 1 of the animation.
You will notice changes in color at frames 5
and 10.
Page 47

47
User Guide
Creating a simple animation
The best way to understand key frames is to actually create an animation. The following section
shows you how to create simple animated sequences with a single object and a single timeline,
as well as some more complicated sequences involving multiple objects and timelines.
To create a simple animation using the
Animation Toolbar:
1 Insert an object to the Edit Window. On the
Animation T oolbar, the default frame
number should be 10, and set the default
fps to 15. Change the frame number to 15.
Notice that the current frame is 1, and that
the timeline already contains a key frame.
2 On the Location T oolbar, click Move Object.
In the Edit Window, drag the object to the
left side of the window . On the Location
Toolbar, the coordinates change to show
the object’s position at the first key frame.
3 Drag the Timeline Control slider to the last
frame of the timeline, or type 15 as the
current frame number. Click Add Key Frame
to add a key frame.
4 Drag the object to the right side of the Edit
Window. The coordinates on the Location
Toolbar change to reflect the position of the
object at frame 15 of the animation.
5 Click Play to view the animation. The object
should move from the left to right in the Edit
Window.
6 Save the project by clicking Save on the
Standard Toolbar. This allows you to save it
in the COOL 3D file format (*.C3D). Y ou can
open this file later within the program to edit
the project.
Page 48

48
Ulead COOL 3D Production S tudio
To create a simple animation using the
Timeline Window:
1 Open the project that you created on the
previous page (part I). Switch to advanced
timeline mode by clicking View: Timeline
on the Animation T oolbar.
2 Select Position in the Attribute List and
frame 7 on the Ruler Bar.
3 Add a key frame by clicking the Add Key
Frame.
4 On the Location T oolbar, click Move Object
and drag the object in the Edit Window so
that it is at the top and center of the
window .
5 Click Play, and notice how the object now
moves in a triangular path.
6 Now you have key frames at frames 1, 7,
and 15 of the animation. If you want to
change the position of the object at any of
these key frames, click the key frame on the
Timeline Window and drag the object to
another position. Click Play to view the
animation.
7 Increase the number of frames to 30 by
clicking Modify Frame and selecting
Change Duration. Notice how the motion of
the object becomes smoother.
8 On the Standard T oolbar , click Save to save
the animation. Your project will be saved in
the COOL 3D format (*.C3D).
Page 49
49
User Guide
Animating color
The most obvious thing to do when you want to animate an object is to make it move. To
animate the color of an object itself is less obvious, but can result in interesting effects. In this
tutorials, learn how to make color change on a stationary object. Try animating texture as well.
To animate the color of an object:
1 Insert an object, and apply a color at key
frame 1.
2 Add a key frame control at the last frame of
the animation, then apply a different color
to the object. Remember that you can also
apply different colors to individual bevel
faces.
3 Click Play to preview the animation.
Animating background
Just like with foreground objects, you can animate your background to create an effect of varied
shifting colors. The result can be smooth or jerky, depending on the mood you want to evoke.
Arrange an upbeat display of fast changing, highly contrasting colors. Or work with a single
color and, by modifying some of its properties, come up with a gradually fading monochromatic
display .
To animate your background:
1 Create a new document and set your frame
number to 20 by clicking Modify Frame and
selecting Change Duration.
2 Select Background in Attribute List.
3 In the Attribute Panel, select Color in
Background mode.
4 Add a key frame control at frame 5. Click the
Color square and select a different color .
Add other key frame controls at frames 10,
15, and 20. Apply a different color in each
key frame.
5 Click Play to preview the animation.
Page 50
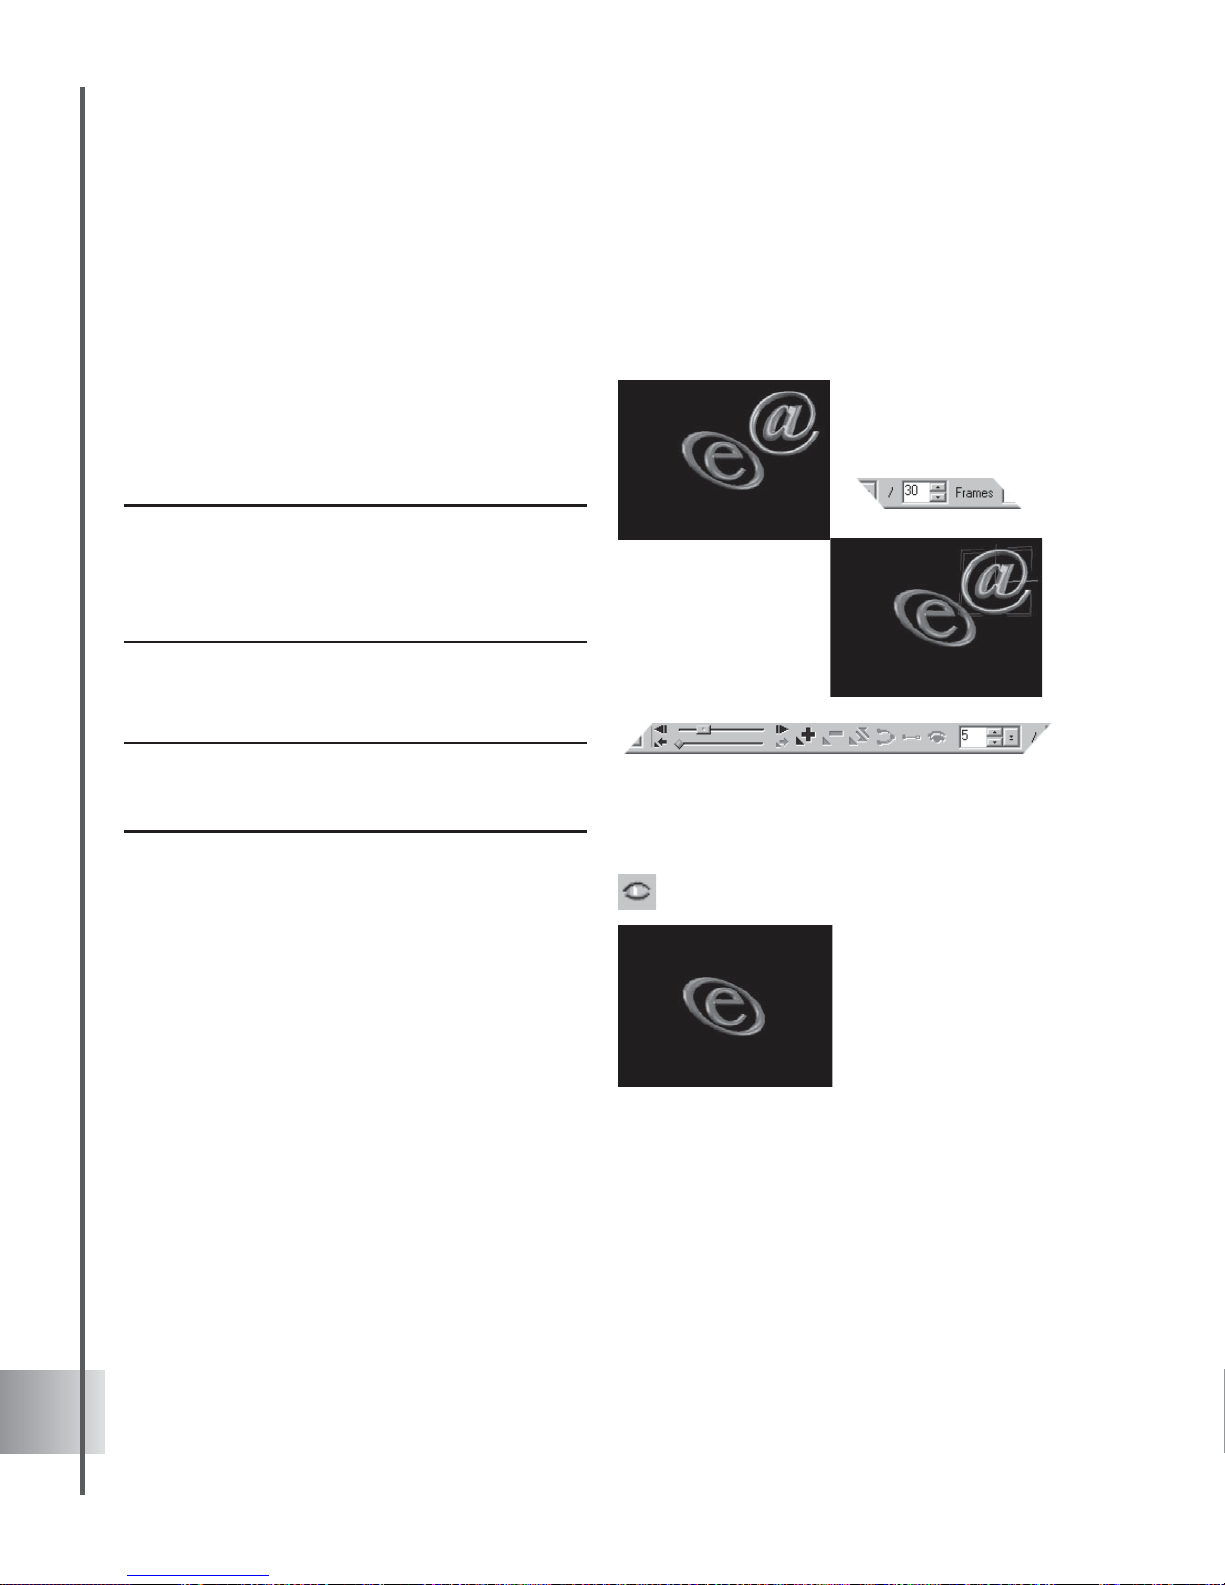
50
Ulead COOL 3D Production S tudio
Showing and hiding objects
You can control when an object in a project appears or disappears. Showing and hiding text and/
or images can be done per key frame.
To show and hide an object:
1 Insert two objects, then set the total number
of frames to 30.
2 Select the object that you would like to
hide.
Note: Having the Object Manager visible may help give
you an idea as to what object or text is currently being
edited. Click View: Toolbars Manager: Object
Manager. Or you may use the selection indicator by
clicking View: Selection Indicator.
3 Move the Timeline Control slider to
frame 5.
Note: If you do not want the object to be seen at the
start of the presentation, move the Timeline Control
slider to key frame 1.
4 Click Show/Hide on the Standard Toolbar to
hide the object.
5 Move the Timeline Control slider to frame
10.
6 Click Show/Hide on the Standard Toolbar to
show the object again.
7 Click Play to preview the animation.
Page 51
51
User Guide
Working with more than one object can result in a stunning project. The next tutorial shows you
how to coordinate two objects. Make a second object appear after the first one completes its
action.
To show and hide two objects :
1 Insert an object, then set the total number
of frames to 30.
2 At frame 1 click Move Object on the
Location T oolbar and set the Y coordinate
to 50.
3 Click Rotate Object. The Properties Menu
displays Orientation. On the Location
Toolbar, make sure that all coordinates are
set to 0.
4 Move the Timeline Control slider to frame
25 or enter 25 as the current frame. Click
Add Key Frame.
5 Set the X coordinate to -720, then click Play
to preview the animation.
6 Insert a new object. At frame 1, click Move
Object. Enter -100 for the Y coordinate on
the Location T oolbar.
7 At frame 1, click Show/Hide on the
Standard Toolbar to make the object
disappear.
8 At frame 30, add a key frame and click
Show/Hide to make the text object appear .
9 Click Play. The second object should appear
just after the first object has completed its
rotation.
Page 52

52
Ulead COOL 3D Production S tudio
Animating position
When you want to spice up a project by animating an object’s position, the Animation Toolbar
and Timeline Control bar allow you to work on multiple timelines as well as make the proper
adjustments on the image’s current position per key frame.
To animate position:
1 Insert an object, then set the total number
of frames to 30.
2 Move the Timeline Control slider to frame
25 or enter 25 as the current frame. Click
Add Key Frame.
3 Click Move Object on the Location T oolbar.
4 Drag the object to a desired location or set
the coordinates to your preferred position
on your desired plane (be it X, Y or Z) for
that particular frame.
Note: Displaying the Axis Indicator might give you a
better idea on which plane to locate your object. Click
View: Axis Indicator.
5 Click Play to preview the animation.
To animate the position of two objects:
1 Insert an object into the project and set the
total number of frames to 30.
2 Select Position in Properties. On the
Timeline Control, add key frames at frames
10 and 20.
3 Click key frame 1 of the animation to select
it.
4 On the Location T oolbar, click Move Object
and set the values of X and Z coordinates
to -350 and -200 respectively. The object
disappears off the screen.
5 At frame 10, set the X coordinate to 0. Do
not adjust the Z coordinate. At frame 20, set
the X and Z coordinates to 100 and 3000.
The Y coordinate should remain at 0.
Page 53

53
User Guide
6 Click Play to preview the animation. The
object should move to the right and away
from you.
7 Insert a second object into the project, then
select Position in Properties. Add key
frames at frames 10, 20, and 30.
8 Click Move Object on the Location T oolbar
and at frames 1 and 10, set the X and Z
coordinates to -350 and -200 respectively.
At frame 20, set the X coordinate to 0, and
do not adjust the Z coordinate. At frame 30,
set the X and Z coordinates to 100 and
3000.
9 Click Play to preview the animation. The
second object should chase after the first
one, following the same motion path.
Page 54

54
Ulead COOL 3D Production S tudio
Animating with multiple attributes
Inevitably, you will want to animate more than one aspect of your object. This means that you
must work with multiple timelines. When using the Animation Toolbar, you always need to
keep an eye on Properties to know which attribute or timeline you are currently editing. This
makes it more advisable to switch to the advance timeline mode and use the Timeline Window
which simultaneously displays all attributes or timelines of your object. This example shows you
how to make a basic animations with two timelines.
To animate position and color in the Timeline
Window:
1 Insert an object in a blank project (with a
black background).
2 On the Attribute List, select Color. At
frame 1, set the object color to be black.
3 Add a key frame at the last frame of the
animation. Set the color to red.
4 Click Play on the Navigation T oolbar to
preview the color animation.
5 Click Move Object on the Location T oolbar
or the Position thumbtack in the Attribute
List.
6 On the Position timeline, select the first key
frame, then on the Location T oolbar, enter
200 for the Z coordinate.
7 Add a key frame at the end of the Position
timeline, and then enter -200 for the Z
coordinate.
8 Preview the animation. The object should
emerge from the background color and
come straight towards you.
Page 55

55
Plug-in effects
Plug-in effects are what can make your still or animated title extra special. In COOL 3D, you
can give objects a unique backdrop by applying a variety of Background effects under the
Scene category. You can also create astonishing 3D text titles with Text Effects and Bevel,
make objects move in special patterns with Object Effects, enhance a whole scene using
Particle Effects, and give your titles a unique flair with Global Effects.
The various categories are located in the
EasyPalette file directory. Click a category
or plug-in name to view and apply the presets
that come with it for instant results. If you
have a specific effect you want to achieve, try
applying different presets, and see how the
attributes change in the Attribute Panel. This
gives you a better idea of how the variables
affect the object.
Key frames and plug-ins
Most plug-in effects have a special red Control Line that appears on the Timeline Control in
the Animation Toolbar and Key Frame Window if in the Timeline mode. This is a special
feature that lets you move the first and last frames of the timeline, so that you can determine
exactly when the plug-in effect is applied within the animation sequence. To adjust the length of
the Control Line, click and drag on either end until you have reached the desired length.
Control Line in
Animation Toolbar
The example (right) shows the Control Line
of the FreeForm plug-in in the Key Frame
Window. This means the plug-in is applied
from frames 5 to 20.
Page 56

56
Ulead COOL 3D Production S tudio
Understanding global and key attributes
When you are working with the Attribute Panel to make an animated project, it is a good idea
to take note of the ToolTip that pops up when you move the cursor over each variable. This
contains a brief description of the variable in question, followed by a (G) or (K) which stands
for Global or Key attribute.
A Global attribute is valid for the entire
duration of the animation. For instance, if you
set a Global attribute to have the value “x” at
frame 1, the value “x” will be applied
throughout the animation. If you change this
value at frame 5, then this new value will be
changed accordingly in all frames of the
animation.
A Key attribute can vary with individual key
frames. For example, Color is a Key attribute
because at frame 1, you can have an object be
red, then at frame 5 you can set the same
object to be green, and at frame 10, you can
make the object change to red again.
Background effects
The Gradient and Magic Texture features provide a collection of animated background effects
of gradually shifting colors and patterns. You can apply these effects to simulate movement of
natural elements such as sunlight and whirlpools.
Global and Key attributes as
indicated in the EasyPalette file
directory.
Gradient (top) and
Magic Texture (right)
background effects
Page 57

57
User Guide
Gradient Background
Gradient is a feature that helps create complex gradient patterns that serve as a colorful
animated backdrop for your projects. This feature is fully customizable, so you can create your
own color patterns.
To apply a Gradient Background:
1 Create a new document and select
Background from the Property List in the
Attribute Panel.
2 Select Gradient under Background mode.
3 Set the pattern color by adjusting the
Palette Ramp. Click Edit to open the Palette
Ramp Editor. Select a different color ring or
create a new one.
4 In the Attribute Panel, specify Hue shift,
Ring, and Repeat number settings. Hue
shift adjusts the hue in the ring palette
without changing the saturation and
brightness, while Ring rotates the color ring
changing the first color of the set. Enter the
degree of turn. Repeat number defines the
number of times to repeat the ring palette in
the pattern.
5 Select a Pattern type by clicking on an
image in Mode. This indicates how your
texture would initially appear. Move the
slider to view more patterns. A
corresponding number is assigned to each
pattern type.
6 For some modes, you can set Slope,
Frequency, and Amplitude values. Slope
specifies the pattern's direction and is
measured in degrees. Frequency allows you
to specify the number of times to apply the
pattern in the magic gradient effect, while
Amplitude allows you to specify the length
and width of the pattern.
Page 58
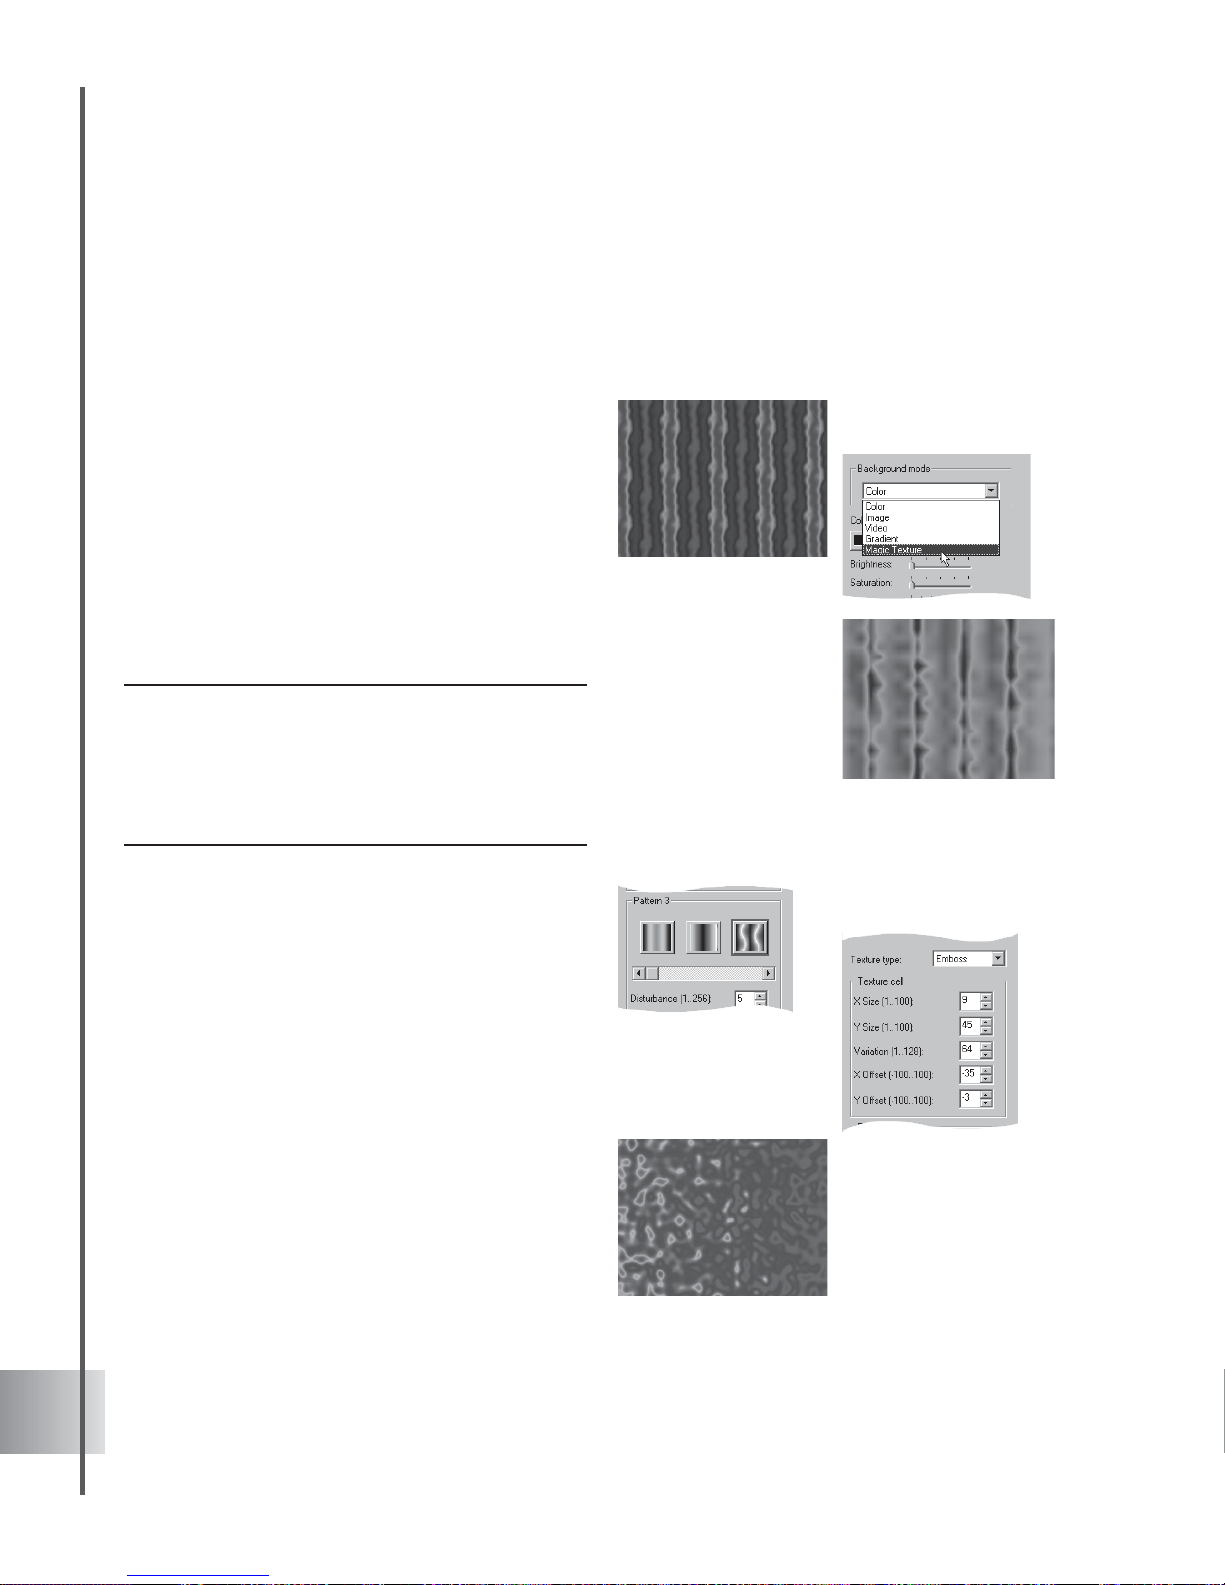
58
Ulead COOL 3D Production S tudio
Magic Texture Background
Magic Texture is a feature that helps create complex gradient patterns that serve as a colorful
animated backdrop for your projects. This feature is fully customizable, so you can create your
own color patterns.
To apply a Magic Texture Background:
1 Create a new document and select
Background from the Property List in the
Attribute Panel.
2 Select Magic Textur e under Background
mode.
3 Choose the look of your pattern in Texture
Type. Emboss makes the background appear
stamped or imprinted on a solid surface.
Turbulence gives your selected pattern a
wild, disorderly appearance.
Note: Each texture is three-dimensional with sections
along the X-, Y-, and Z-axes. Only the XY plane are
shown. Variation is the Z-value that determines which
XY plane of the selected background will be displayed.
The degree of variation is therefore affected by the X
and Y values that you set.
4 Click the thumbnail of the pattern to use as
background.
5 Under Texture Cell, set the extent by which
the pattern is stretched or compressed
horizontally or vertically in X Size or Y Size.
In X Offset or Y Offset, enter how far along
the horizontal or vertical plane you want to
shift the image in pixels.
6 Disturbance computes the final cell size
that will be used for generating the pattern.
Set a higher value to have a closer look at
the selected pattern’s details.
7 Change the hue value of each pixel in Shift.
You can modify this attribute when the
texture type you are using is Turbulence.
A high Disturbance
value of 250 shows the
pattern’s details (left)
Page 59
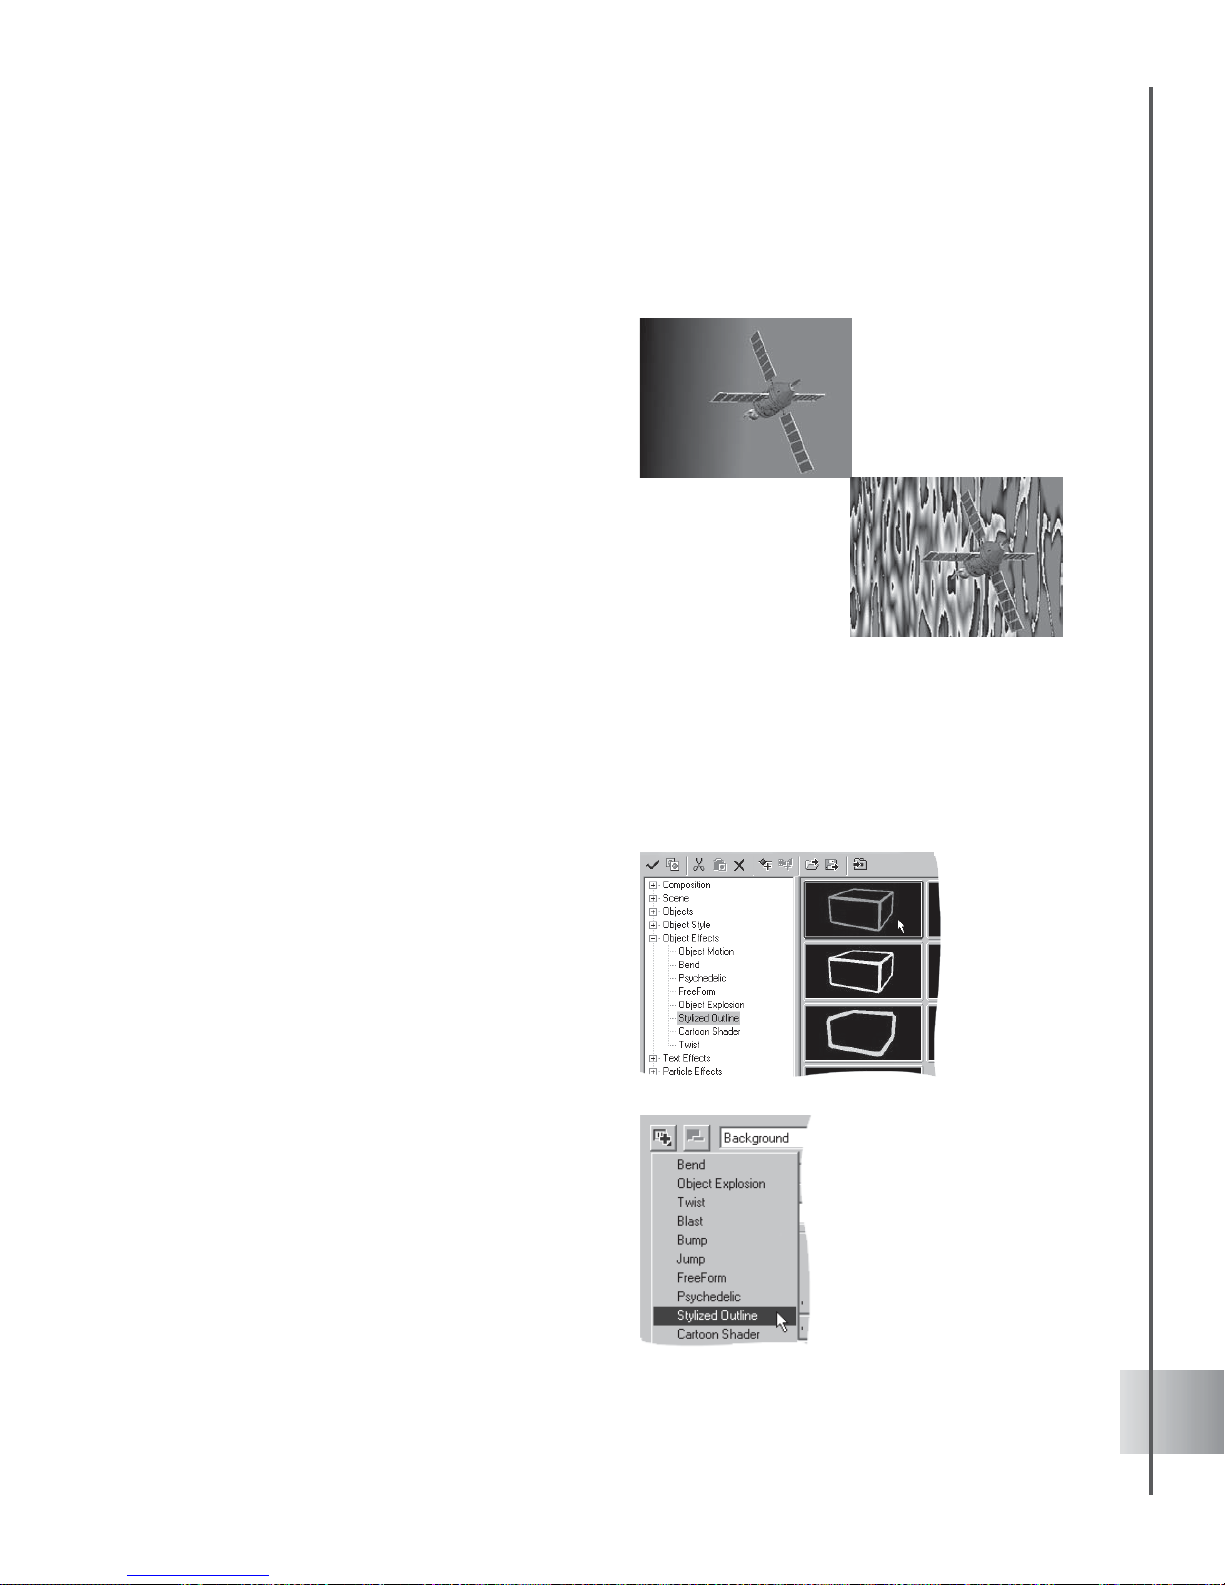
59
User Guide
8 Select Edit to display the Palette Ramp
Editor. This shows the ring palette
containing the set and order of colors used
in the current magic gradient effect. Adjust
the hue in the ring palette without changing
the saturation and brightness. Set the hue
value in Hue Shift and the degree of turn of
the color ring in Ring.
9 Increase the Amplitude to make your
pattern more irregular. Set also a higher
value in Frequency to increase the degree
of disarray in the selected pattern.
10 Click Random to readjust the texture settings
to random numbers. To revert the image to
its original form, click Reset.
Object Effects
The control you have in animating individual objects is one of the things that make COOL 3D
remarkable. The Object Effects category in the EasyPalette file directory allows you to apply
motion, cartoon shading, bending, twisting, explosion, stylized outlines, freeforms, and
psychedelic presets to your objects.
You can also use the Attribute Panel to
create custom object effects. This section
shows you basic projects for each plug-in.
For detailed information on all plug-in
attributes, please refer to the Help Topics.
Amplitude at 1 (top)
and at 200 (right)
To apply your own
effects, click Add
plug-in and select the
effects to customize in
the Attribute Panel
Page 60

60
Ulead COOL 3D Production S tudio
Bend
Use this plug-in effect to bend your object in any direction, then animate the bending movement
to attract special attention. In this tutorial, learn how to combine this effect with basic rotation
settings. (Settings: 30 frames, 15 fps.)
To apply the Bend effect to an object:
1 Insert a text object in the Edit Window . Click
Add plug-in and select Bend in the
Attribute Panel.
2 At frame 1, set the Direction of the bend to
Y-Z and select Asymmetric under Type. Set
the Level to 100 to completely bend the
object, and set the Cutting Point to 50 so
that the object bends at the center.
3 At frame 30, set the Level to 0. This allows
the object to unbend.
4 Click Rotate Object on the Location
Toolbar. At frame 1, the rotation
coordinates should all be 0. At frame 30, set
the Z coordinate to -720. This rotates the
object twice in a clockwise direction.
5 Click Play to preview the animation.
Page 61

61
User Guide
Cartoon Shader
Cartoon Shader is an non-photo realistic (NPR) effect that renders your 3D animation into
simplistic cartoons. Based on classic movie/TV animation shading techniques, Cartoon Shader
"simplifies" your 3D objects by applying flat colors and shades. This effect reduces the
complexity of the object and lessens the bulkiness often seen in 3D objects. Cartoons are known
for having basic colors, with a dominant color as the highlight, and a secondary color as the
shadow. You may choose to render objects in a finished project, or render them beforehand.
(Settings: 30 frames, 15 fps.)
To apply the Cartoon Shader:
1 Insert a text object in the Edit Window. Click
Add plug-in and select Cartoon Shader in
the Attribute Panel .
2 At frame 1, choose Smooth in Style.
3 Set Shadow settings by adjusting the Factor
and Luminance values. A higher value in
Factor increases shadow size, while
increasing the value in Luminance
brightens the object.
4 Do the same for the Highlight settings.
5 Click Play to preview the animation.
FreeForm
The Object Effects category in the EasyPalette file directory also allows you to apply
animated deformations to your object by selecting the FreeForm option. To customize your
freeform effect, select Object: FreeForm in the main menu. You can also click Add plug-in,
select FreeForm, and click Open FreeForm Editor in the Attribute Panel. This opens the
FreeForm Editor. For a detailed explanation on using this feature, see FreeForm in page 31.
Page 62
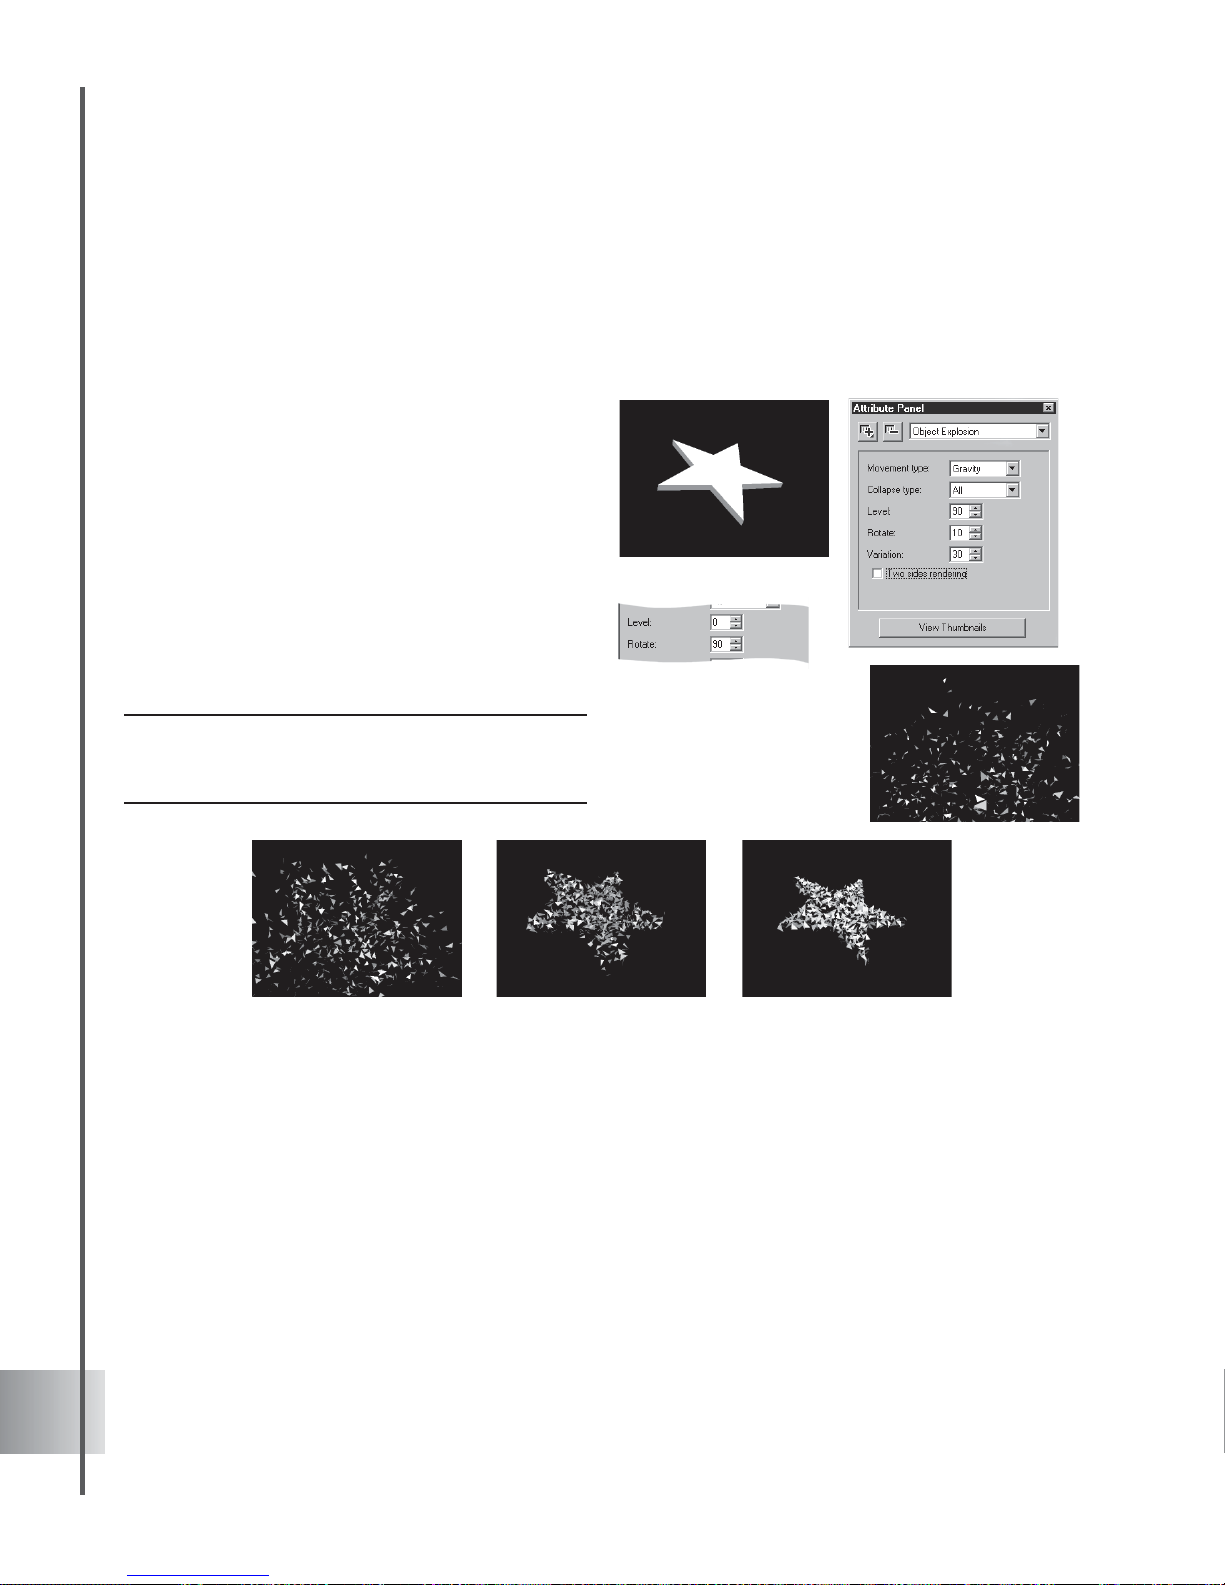
62
Ulead COOL 3D Production S tudio
Object Explosion
Blasting an object creates a fascinating and eye-catching impact in your animation. Equally
stunning is reversing the effect to integrate an object from tiny bits. We will be doing this
reverse explosion in this tutorial. (Settings: 30 frames, 15 fps.)
To create a reverse Object Explosion effect:
1 Insert an object in the Edit Window. Click
Add plug-in and select Object Explosion in
the Attribute Panel .
2 Set the Movement type to Gravity at frame
1. Set also the Collapse type to All and
Level to 90 to disintegrate your object. Set
Rotate value to 10.
3 At frame 30, set the Level to 0 for a
complete formation of your object. Enter 90
for the Rotate value.
4 Click Play to preview the effect.
Note: Experiment with different values for Variation.
Each number you enter produces a slightly different
variation of the explosion effect.
Page 63

63
User Guide
Stylized Outline
Non-photo realistic (NPR) effects are a collection of enhancers that transform your 3D objects
into simple, artistic shapes. Ideal for short animation strips such as cartoons, these effects are
great to transform your 3D objects into fluid, streamlined animation. Stylized Outline is one of
COOL 3D's NPR effects that enhance your 3D objects by simplifying them. Stylized Outline
simplifies the object into visible edges. These edges are then rendered as stylized paint strokes.
(Settings: 30 frames, 15 fps.)
To apply Stylized Outline:
1 Insert an object in the Edit Window . Click
Add plug-in and select Stylized Outline in
the Attribute Panel.
2 At frame 1, choose Brush for Style in the
Attribute Panel.
3 Specify the outline width by entering 3 in
Width. This will give you a thin outline. The
maximum Width value is 50, which creates
the thickest outline.
4 Choose an outline color by clicking the
color box. Select Crease to include smaller
lines and folds within the object when
making stylized outlines.
5 Click Play to preview the animation.
Page 64

64
Ulead COOL 3D Production S tudio
Twist
This effect lets you coil up a title in a number of different directions and styles. Twist the object
beyond recognition along the X- or Y-axis, or make the title coil out towards you along the Zaxis. In this project, learn how to combine the Twist effect with a basic Size animation for extra
impact. (Settings: 30 frames, 15 fps.)
To twist an object:
1 Insert a text object in the Edit Window and
rotate it slightly on the Y-axis. Click Add
plug-in and select Twist in the Attribute
Panel.
2 At frame 1, select Left only as the twist
Type. This twists the object starting with its
left side. Select also Z as the Axis so that
the depth of the object is twisted, and set
the Skew Angle to 0.
3 At frame 30, set the Skew Angle to
-360.
4 On the Location T oolbar, click Resize. At
frame 1, the Size coordinates on the
Location T oolbar should be 100 (default).
At frame 30, set the Z coordinate to 1000.
5 Click Play to preview the animation. The
title should twist clockwise and coil towards
you.
Page 65

65
User Guide
Text Effects
Make your text and graphic objects behave in a variety of entertaining ways using Text Effects
plug-ins. Choose from a range of presets in the EasyPalette, or design your own using the
Attribute Panel, and create animated text titles for your video clips in a few easy steps. Not
only for letters, some of the effects under this category produce interesting results when applied
to 3D objects.
Blast
Have fun exploding an object, and then have the pieces come back together to form something
new. The easiest way to apply this effect is to apply a Blast preset from the EasyPalette. For
more advanced users, the many variables on the Attribute Panel allow you to control the effect
to amazing detail. In the following tutorial, we’ll explode a graphic and have it turn into text.
(Settings: 30 frames, 15 fps.)
To apply a Blast transition:
1 Insert a graphic object in the Edit Window.
Click Add plug-in and select Blast in the
Attribute Panel.
2 At frame 1, clear the Use Original option in
the Attribute Panel. Click Text Object
Target under Target. In the dialog box that
appears, enter the text object that you want
to replace the original object with.
3 Set the Shape to Sphere, and the Collapse
to All.
4 Set the Size of the pieces to 5 and the
Action to All. The Level should be 100 by
default.
5 Select Swirl as the Movement T ype.
6 Click Play to preview the animated
sequence.
Page 66

66
Ulead COOL 3D Production S tudio
Bump
Bump allows objects to shove each other off the screen. This effect can emphasize statements
by having text push other objects away. In this example, have the main text bump a graphic
object out of the way. (Settings: 30 frames, 15 fps.)
To apply a Bump transition:
1 Insert a graphic object in the Edit Window.
Click Add plug-in and select Bump in the
Attribute Panel.
2 At frame 1, clear the Use Original option in
the Attribute Panel. Click Text Object
Target under Target to insert an object that
will replace the original.
3 Make sure that the Level is 0, and set the
Compress value to 50.
4 If the target object appears on the screen,
set the Initial Position of the target object
to 300, or until it disappears off the screen.
5 Select From Left as the Direction in which
you want the transition to take place.
6 At frame 30, set the Level to 100.
7 Click Play to preview the transition.
Page 67

67
User Guide
Dance
This effect brings out the buoyancy in your title. Choose from several dance styles - Shake,
Scatter, Wave, and Bounce. The following tutorial shows you how to make a bouncing project.
(Settings: 30 frames, 15 fps.)
To make a title bounce:
1 Insert a text object in the Edit Window. Click
Add plug-in and select Dance in the
Attribute Panel.
2 At frame 1, select Bounce as the Dance
Mode in the Attribute Panel and select
Random for Sequence.
3 Set Ground to 1. This is the minimum
distance that the letter will fall in order to
bounce. Specify 100 for Rebound, which
makes the letters bounce highest.
4 Specify 10 as the Tempo for fastest
bouncing speed. Set the Variation to 0.
This means that the letters will start out in
their normal stationary position - standing
up and facing forward.
5 At frame 30 of the animation, set the
Variation to 50. This means that by the last
frame, the letters will be facing in widely
differing directions, as if they were
bouncing out of control.
6 Click Play to preview your project. Try
using different values for Seed. This
generates a slightly different variation of
the Dance effect.
Variation value at 0
(top) and 50 (right).
Page 68

68
Ulead COOL 3D Production S tudio
Distort
Put a new perspective on your title by using the Distort plug-in. You can either distort the
perspective of the entire object, or distort the letters individually. When applied in an animated
sequence, this can be useful for emphasis. Create a basic Distort animation in this tutorial.
(Settings: 30 frames, 15 fps.)
To distort an object:
1 Insert a text object in the Edit Window. Click
Add plug-in and select Distort in the
Attribute Panel.
2 Add a key frame at frame 15 on the Distort
timeline.
3 At frame 1, select Individual for Action
sequence in the Attribute Panel so that
each letter is treated as an individual object.
4 Select Y-Z as the Plane along which the
perspective will be distorted. Leave all other
distortion variables at their default values
(100).
5 At frame 15, set the Y1 and Z1 values to
50, and set the Y2 and Z2 values to 300.
Frame 30 should have the same values as
frame 1.
5 Click Play to preview the animation.
Page 69

69
User Guide
Explosion
The power you have when blasting a title to pieces makes this plug-in a favorite. The effect ends
in a confetti shower that you can use when working with celebration or party themes. Reversing
an explosion effect, on the other hand, can have all the small pieces come together to form a
whole. In this tutorial, learn how to disintegrate your title. (Settings: 30 frames, 15 fps.)
To disintegrate your title:
1 Insert a text object in the Edit Window. Click
Add plug-in and select Explosion in the
Attribute Panel.
2 Click the Plug-in mask to display the
Control Line. Drag the leftmost end point
of the Control Line to frame 5. This ensures
that the explosion effect will not take place
right away .
3 At the first frame of the plug-in effect (frame
5), set the Movement T ype to Left in the
Attribute Panel. Set also the Collapse T ype
to Ascending, Action Sequence to Forward,
Level to 0, and Rotate value to 30.
4 At frame 30, set the Level to 100 for a
complete explosion. Enter 100 for the
Rotate value.
5 Select Position from the Property List in
the Animation Toolbar and add a key frame
at frame 25.
6 At frames 1 and 25 for Position, all
coordinates on the Location T oolbar should
be 0. At frame 30, set the Y value to -300.
7 Click Play to preview the effect. Experiment
with different values for Variation. Each
number you enter produces a slightly
different kind of explosion effect.
Page 70

70
Ulead COOL 3D Production S tudio
Jump
Stomp out one text object with another using the Jump effect. You can also give it a realistic
bounce and rebound as one text falls on the other. This example shows you how to combine this
effect with the Show/Hide function so that a second message shows up at the end of the
transition. (Settings: 30 frames, 15 fps.)
To make one object stomp on another:
1 Insert a graphic object in the Edit Window.
Click Add plug-in and select Jump in the
Attribute Panel.
2 At frame 1, clear the Use Original option in
the Attribute Panel. Click Text object target
under Target to insert an object that will
replace the original. The object above the
original changes in the Edit Window.
3 Set the Bounce value to 30. If the target
object is visible, set the Initial Position to
about 300, or so that it disappears off the
screen.
4 Move to frame 30 and set the Level to 100.
5 Insert a new object. Select None as the
transition Style on the Attribute Panel.
Adjust the object’s position at frame 1 so
that it does not overlap with the first object.
6 Choose Show/Hide from the Properties
List.
7 At frame 1, click Show/Hide so that the
object disappears. At frame 30, click it again
so that the object reappears.
8 Click Play to preview the animation.
Page 71

71
User Guide
Path Animation
This plug-in lets your text move in ways that simulate the laws of gravity in the real world. You
can let your object get caught in a tornado, ripple on water, or swing like a pendulum. In this
tutorial, learn how to toss your object in an arc, and then change it into another object upon
impact. (Settings: 30 frames, 15 fps.)
To throw an object in an arc:
1 Insert a text object in the Edit Window. Click
Add plug-in and select Path Animation in
the Attribute Panel .
2 At frame 1, select Arc as the Path and enter
25 as the value for Speed.
3 Set the Ground to 0 (default), and enter 75
for the Level to start the object at mid-
throw. Enter 40 as the value for the Angle of
the arc.
4 At frame 30, set the Level to 0.
5 Click Play to preview the Arc animation.
The object should be thrown in from the
right of the screen.
6 Insert a new object into the project. Enlarge
the object to emphasize it. At frame 1, click
Show/Hide to hide the object, and at frame
30, click it again to make the object appear .
7 Click Play to preview the animation.
Page 72

72
Ulead COOL 3D Production S tudio
Surface Animation
With this plug-in, you can let your object move and wrap itself around the form of different
three-dimensional shapes. This tutorial shows you how to wrap your object around a small
sphere, have it travel twice around the sphere, and then unwrap at the end. (Settings: 30 frames,
15 fps.)
To animate an object around a sphere:
1 Insert a text object in the Edit Window. Click
Add plug-in and select Surface Animation
in the Attribute Panel.
2 At frame 1, select Sphere as the Surface
around which the object is wrapped in the
Attribute Panel. Set the Path to V Line to
make the object travel vertically , then set
the Wrap Style to Mesh to mold the object
to the surface of the sphere.
3 Enter 10 for all Size coordinates so that the
text is wrapped around a small sphere. Set
the Level to 0.
4 At frame 25, enter 10 for all Size
coordinates, and enter 200 as the Level so
that the object travels twice around the
sphere’s surface.
5 At frame 30, set all Size coordinates to 100
so that the size of the ball increases
drastically. Set the Level to 200 so that the
object does not move from the previous key
frame.
6 Click Play to preview the animation.
Tip: Try using the Surface Animation plug-in with the
Board bevel effect, as in this example. This allows
you to actually see the shape or surface around which
your text object wraps.
Page 73

73
User Guide
Text Wave
The Text Wave plug-in provides templates to create complex wave animations with text objects.
Animate them through three-dimensional planes, character by character: with variable
acceleration, scale, loop frequency and more.
To create a Text Wave animation:
1 Insert a text object in the Edit Window. Click
Add plug-in and select T ext W ave in the
Attribute Panel.
2 Select Forward in Action Sequence. This is
the initial direction of the animation.
3 Select Normal in Acceleration. This is the
way characters speed up and slow down
while starting and completing a wave.
4 Set Length at 5. A higher setting creates a
more expansive wave where characters
move more closely in tandem together. A
lower setting creates a more compact wave
where characters move more disjointedly in
relation to each other.
5 Adjust also the following attributes:
• Scaling To focal point from which the
characters are expanded and compacted.
• X, Y & Z Scale The dimensions of
the characters in each axis. These
settings are percentages of the text
object’s native dimensions.
• X, Y & Z Loops The number of
loops completed between key frames.
• X, Y & Z Amplitude The amplitude, or
extent, of the waves in each axis. A
negative amplitude will cause the wave
to move in the opposite direction.
Note: Settings applied to a key frame will take effect
until the following key frame.
Page 74
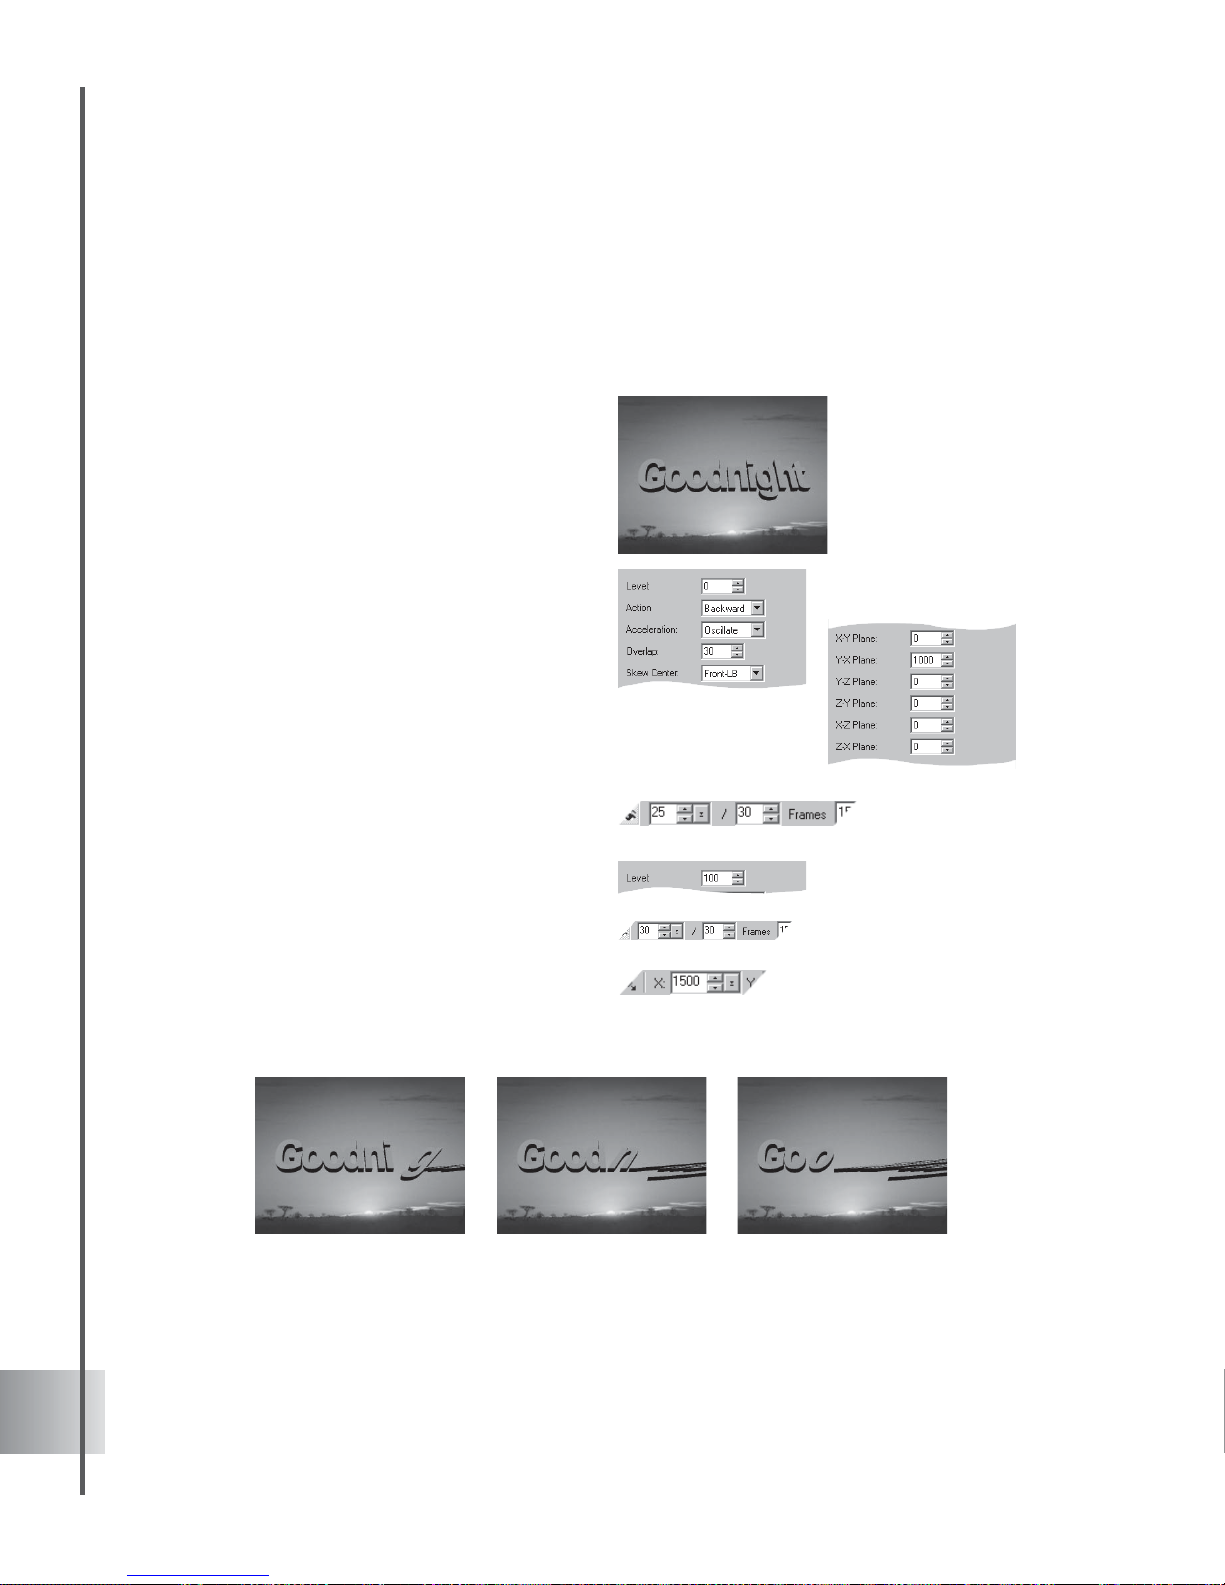
74
Ulead COOL 3D Production S tudio
Token Skew (G)
You can stretch text and objects in any direction with this plug-in effect. In this tutorial,
combine the Skew effect with a simple Position animation to make an object appear as if it were
being sucked off the screen. (Settings: 30 frames, 15 fps.)
To apply the Token Skew (G) effect:
1 Insert a text object in the Edit Window. Click
Add plug-in and select T oken Skew (G) in
the Attribute Panel .
2 Add a key frame at frame 25.
3 At frame 1, set the Level to 0 in the
Attribute Panel. Select also Backward as
the Action sequence. Set the Acceleration
to Oscillate.
4 Enter 30 as the Overlap value. Choose
Front-LB as the Skew Center to fix a point
from which letters skew .
5 These are the planes along which objects
can be skewed. Under Y-X Plane, enter
1000, and leave all the others at 0.
6 At frame 25, set the Level to 100.
7 Next, animate the position of the object.
Select Position from the Property List, and
add key frames at frames 20 and 30.
8 At frames 1 and 20, view the coordinates in
the Location T oolbar for Position. They
should all be set to 0. At frame 30, set the X
coordinate to 1500.
9 Click Play to preview the animation.
Page 75
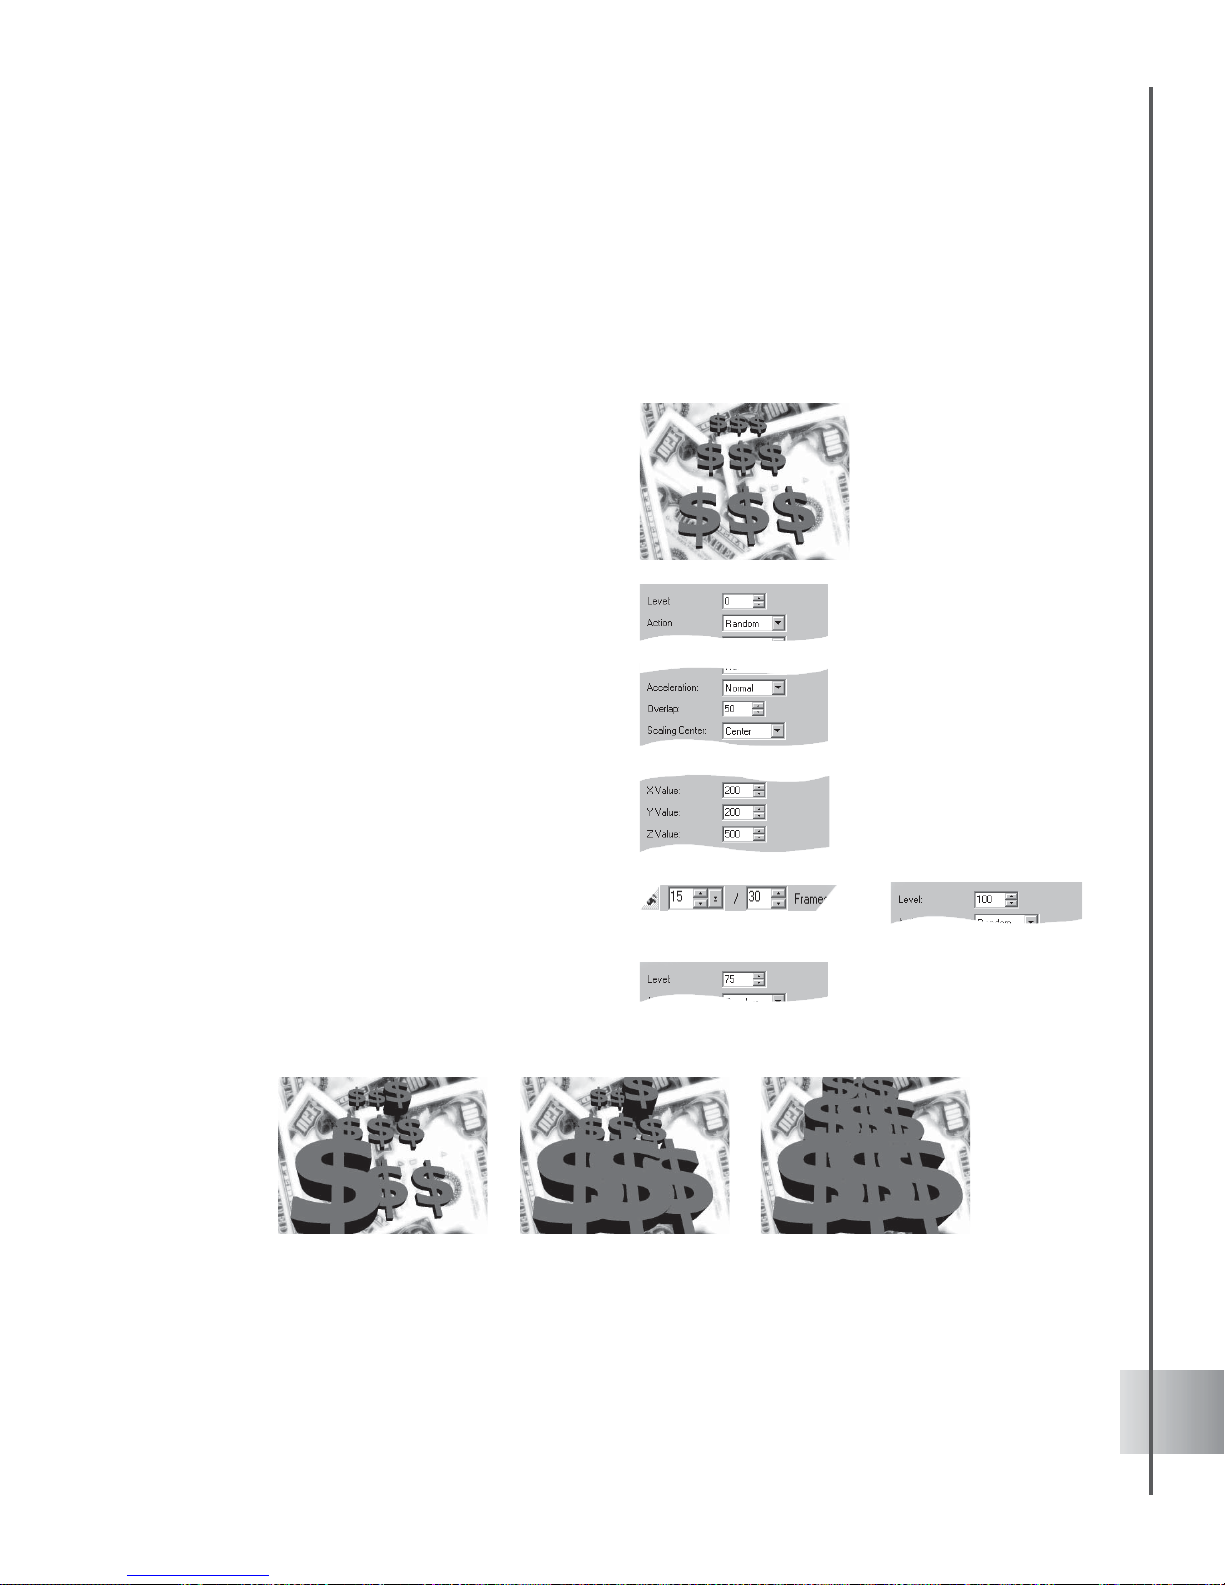
75
User Guide
Token Size (G)
The Token Size (G) effect is especially easy to use because you only have to make most of the
settings once, and then all you have to change in the key frames is the value for Level. Learn to
make your money grow in this tutorial. (Settings: 30 frames, 15 fps.)
To apply the Token Size (G) effect:
1 Insert 3 rows of dollar signs in the Edit
Window. Rotate the group slightly on the
X-axis to tilt it backwards.
2 Click Add plug-in and select Token Size (G)
in the Attribute Panel.
3 Add a key frame at frame 15.
4 At frame 1, set the Level to 0 in the
Attribute Panel. Select also Random for the
Action sequence.
5 Under Acceleration, select Normal. Set the
Overlap to 50, which makes each object
begin moving after each previous object
has completed half of its motion. Select
Center as the Scaling Center.
6 Specify how large and in which direction
your objects grow . For X and Y Values,
enter 200. For Z Value, enter 500.
7 At frame 15, set the Level to 100, and at
frame 30, set the Level to 75.
8 Click Play to preview the animation. The
dollars will grow fully to the specified size in
random order, and then some of them
should shrink again.
Page 76

76
Ulead COOL 3D Production S tudio
Token Move (G)
It’s easy to choreograph individual letters to move sequentially. This plug-in lets you do this in
any direction and in just a few steps. This tutorial shows you how to make individual letters
seem to leap out at you. (Settings: 30 frames, 15 fps.)
To apply the Token Move (G) effect:
1 Insert a text object in the Edit Window. Click
Add plug-in and select T oken Move (G) in
the Attribute Panel.
2 At frame 1, set the Level of the animation to
0 in the Attribute Panel. Set also Action
sequence to Forward, Acceleration to
None, and Overlap to 30. Select the To
Origin option to make individual characters
return to their original positions upon
completing the specified action.
3 Set the coordinates for position. To make
the title come towards you, enter -500 for Z
Value.
4 At frame 30, set the Level of the animation
to 100.
5 Click Play to preview the animation.
Page 77

77
User Guide
Token Rotate (G)
With this effect, you can make letters and objects spin and twirl, either all at once or in an
elegant sequence. Here, learn how to make a simple wave effect. (Settings: 30 frames, 15 fps.)
To apply the Token Rotate (G) effect:
1 Insert a text object in the Edit Window and
adjust its Orientation so that the Y
coordinate is approximately 45.
2 Click Add plug-in and select T oken Move
(G) in the Attribute Panel.
3 At frame 1, set the Level of the animation to
0 in the Attribute Panel. Set also the Action
to Forward and Acceleration to None.
4 Set the Overlap to 90 so that the individual
letters move almost immediately one after
the other. Under Rotation Center, select
Front-LT (the front left top of each
character).
5 For the axis around which your title can
rotate, enter -360 in X Angle.
6 At frame 30, set the Level of the animation
to 100.
7 Click Play to preview the animation.
Page 78

78
Ulead COOL 3D Production S tudio
Particle Effects
Among the other three-dimensional effects, the particle effect is one of the hardest to simulate
because these are animated elements of nature. With COOL 3D, the four elements of Snow,
Fire, Smoke, and Bubble can be created in a snap. Not only can you click and drag from an
available roster of presets, you can also modify the settings to your preference. From the
movement and direction to the speed and intensity, accentuate your scene compositions with
moving Particle Objects and add a touch of realism.
Smoke
This effect is usually applied on an image of a fire, steam ship, train or anything that enits
smoke. COOL 3D can simulate this perfectly. Versatile and easy-to-use, COOL 3D’s attribute
settings allow you to control the motion and strength of emission. For this tutorial we will make
thin smoke come out of an image. (Settings: 10 frames, 6 fps.)
To create thin smoke:
1 For this example, select a house image or a
cigarette in the EasyPalette.
2 Click the Particle Effects down arrow on
the Object T oolbar and select Smoke.
3 Set the Max. density to 20 and the Emitting
rate to 300 in the Attribute Panel.
4 Select Point for the Emitter type. This
indicates that you like to have one source
of emission.
5 Under the Dragging force, set 60 for the Y-
axis to drag the motion upward making the
smoke more straight and slim.
6 To control the size of the particles, set the
Initial to End sizes to 0, 20 and 5
respectively.
7 Click Play to preview your project.
Page 79
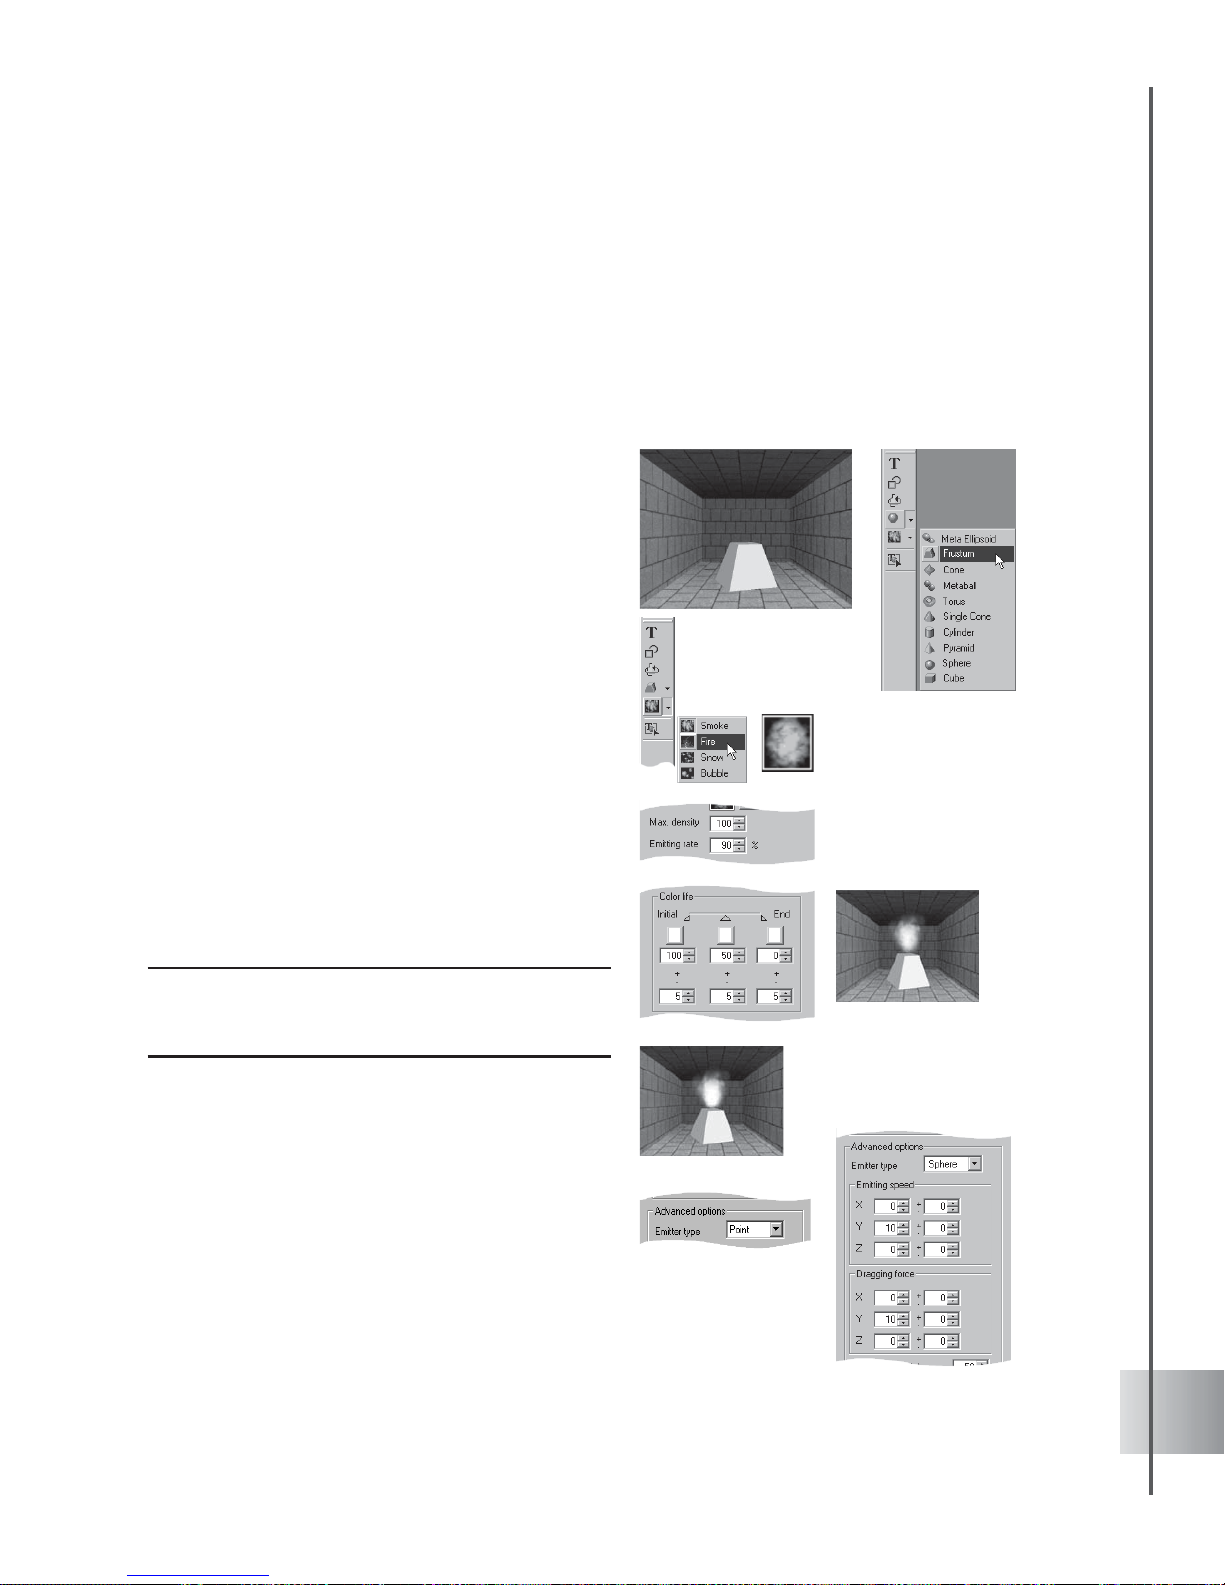
79
User Guide
Fire
Rendering images of flames in COOL 3D is as easy as lighting a match. You can instantly light
up a dark outdoor setting with a bonfire. Adding to the realism is the radiance of the image
reflected on its surroundings, which you can control through the color, density and emission
settings. To demonstrate this effect, the following tutorial will guide you to create a dungeon
scene. (Settings: 40 frames, 10 fps.)
To simulate Fire in a dungeon setting:
1 Select Scene: Image Background in the
EasyPalette file directory and double-click
the brick wall image.
2 Click Insert Geometric Object and select
Frustum. Move the object to rest it on the
floor then rotate it to give it depth.
3 T o start simulating fire, click the Particle
Effects down arrow on the Object Toolbar
and select Fire.
4 Click Texture in the Attribute Panel and
select an image file to apply your own
texture to the particles.
5 Set the Max. density to 100 and the
Emitting rate to 90.
6 Under Color life, set the colors of the
particle from Intial to End by using the color
boxes. The combination of colors allows a
gradual change of color .
Note: Initial color is the color at the time the particle is
emitted. End color is the color at the time the particle
disappears.
You can also control the color differences
between particles from Initial to End by
editing the values in the spin boxes.
7 For the Advanced options, choose Point as
the Emitter type .
Adjust the emitting speed and initial
acceleration of particles along the X-, Y-,
and Z-axes by editing Emitting speed and
Dragging force.
Page 80
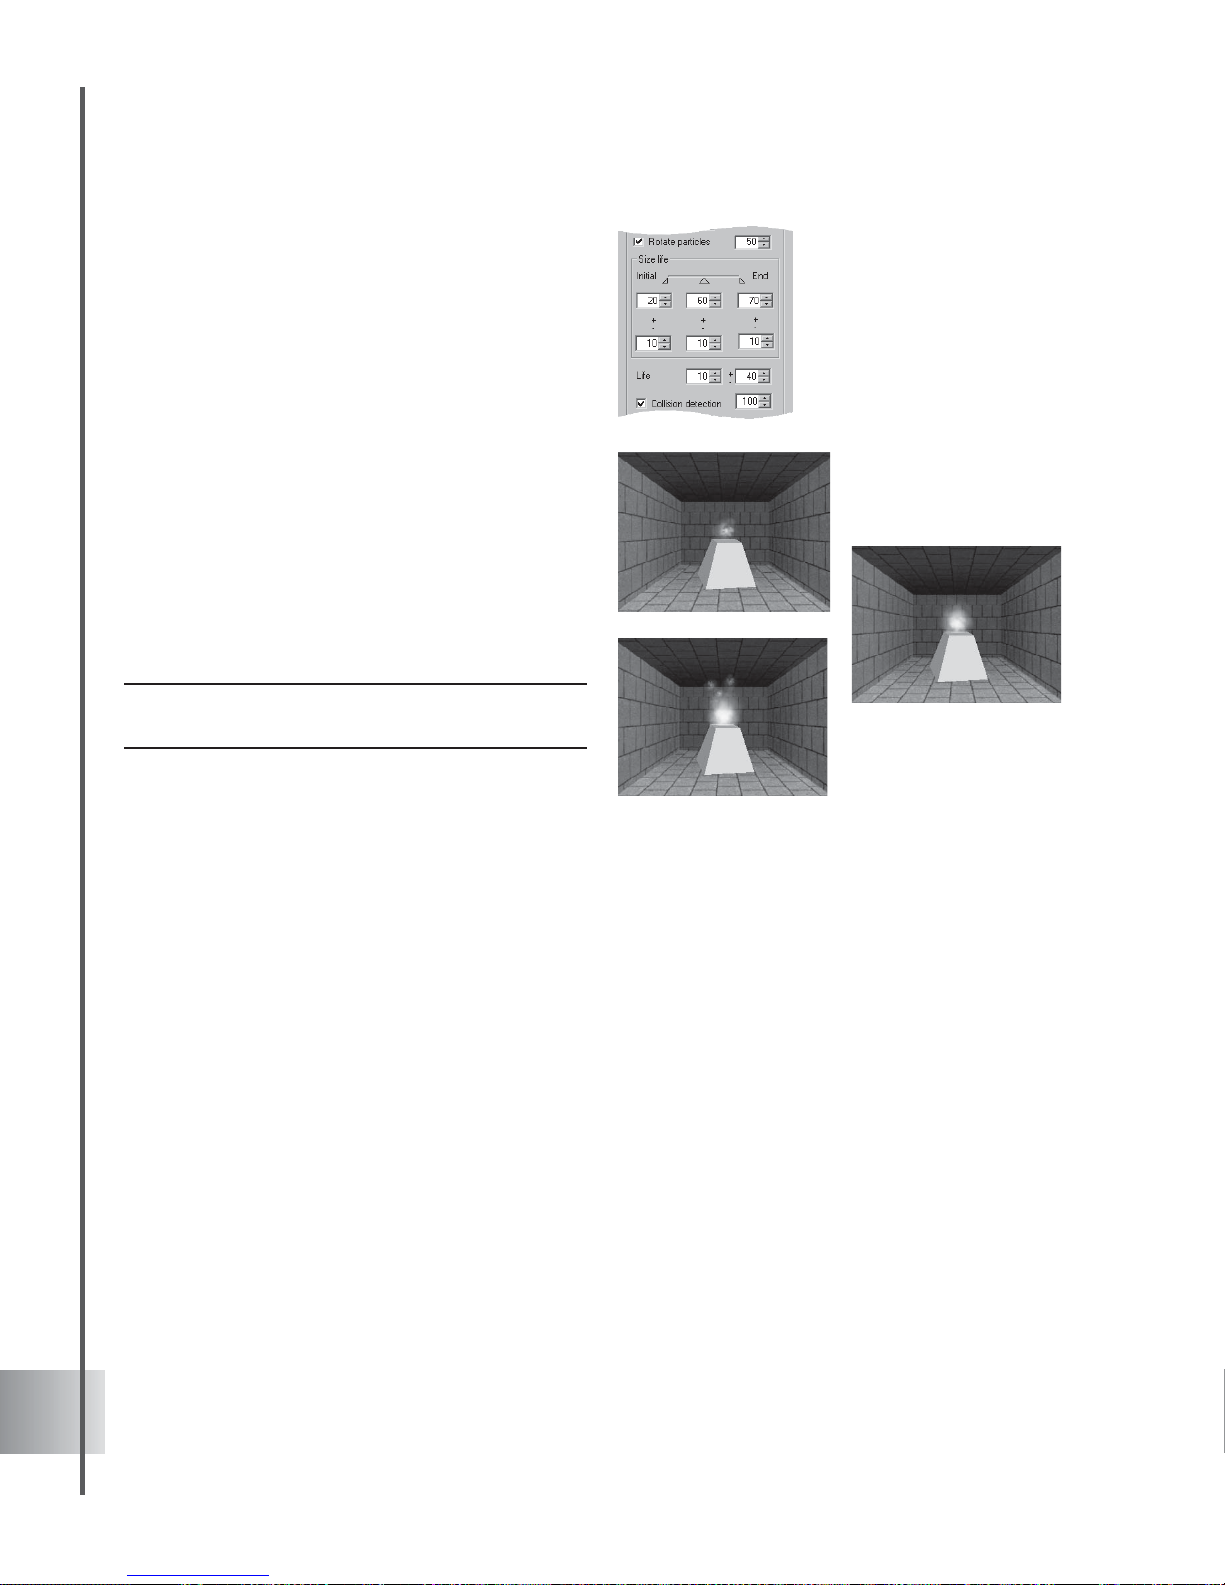
80
Ulead COOL 3D Production S tudio
8 Select Rotate particles to rotate them as
they are emitted.
9 Under Size life, set the dimensions the
particle from Initial to End by using the spin
boxes. You can also control the size
differences between particles from Initial to
End by editing the values in the spin boxes.
10 Life allows you to control the lifetime of the
particle.
11 Select Collision detection and adjust the
behavior of the bouncing particles in the
spin box.
12 Click Play to preview your project. Notice
the varying radiance reflected on the walls,
giving a touch of realism to the intensity of
the fire.
Note: To reverse the particle lifetime from end to initial,
select Reverse.
Page 81
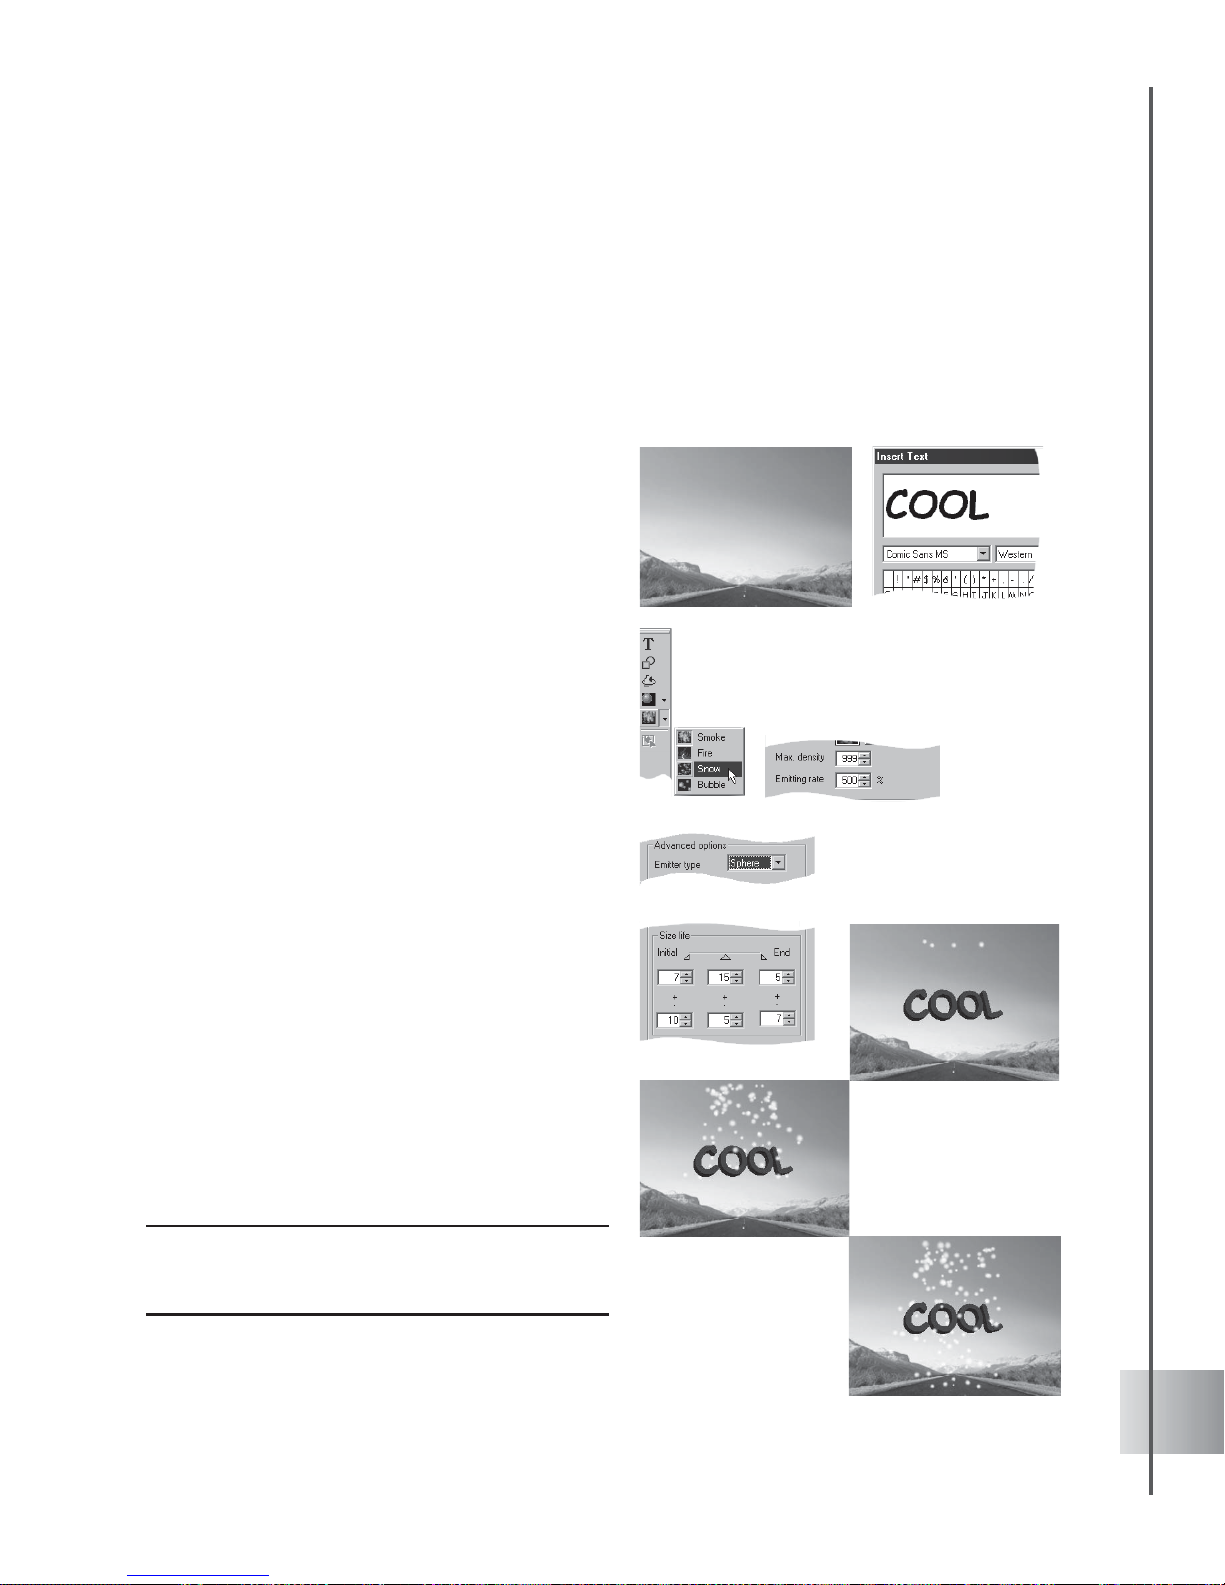
81
User Guide
Snow
Simulate winter right on your desktop. With this effect, you can produce a harsh snowstorm or
give a calm ambience to your ski holiday setting. Create snow-covered rooftops and snow-filled
streets. The effect is so real you can actually see snow particles settle on top of your objects
and slowly roll down. To learn how to modify the distance, emission and speed of the particles,
just execute these simple steps in the following tutorial. (Settings: 55 frames, 8 fps.)
To simulate snow on a text object:
1 Select Scene: Image Background in the
EasyPalette file directory . Choose a
landscape image fit for snow .
2 Click on Insert T ext and create the word
"cool". Rotate your object slightly to show
the three-dimensional quality of the text.
3 Click the Particle Effects down arrow on
the Object T oolbar and select Snow.
4 Set the Max. density to 999 and the
Emitting rate to 500 in the Attribute Panel.
This will control the number of particles you
would want to appear per frame.
5 Select Sphere as the initial source of
emission for your particle, under Emitter
type.
6 Control the size of your particles under Size
life. Set Initial size to 7, Transition size to
15 and End size to 5.
7 Set Initial size variance to 10, Transition
size variance to 5, and End size variance to
7. W e will execute this tutorial with the
easiest settings possible and retain the
remaining parameters of the Attribute Panel
under their default settings.
8 To control the speed of the particles, make
sure you set Frames to 55 and the fps to 8.
9 Click Play to preview your project.
Note: To achieve a different angle of the particles, click
Rotate or alter the Distance by selecting Camera in
the Attribute Panel.
Page 82

82
Ulead COOL 3D Production S tudio
Bubble
Create a playful stream bubbles on a hot summer beach or accentuate a sparkling glass or a
newly opened bottle of wine. In whichever scenario you wish to use this effect, the modifying
rate of the setting is limitless. Simply change the motion and position and you can surround your
background with bubbles. Let us create a stream of bubbles with the following tutorial.
(Settings: 45 frames, 4 fps.)
To simulate a stream of bubbles:
1 Double-click an image background in the
EasyPalette that would bring out the color
of the bubbles.
2 Click the Particle Effects down arrow on
the Object T oolbar and select Bubble.
3 In the Attribute Panel set the Max. density
and Emitting rate to 100.
4 Under Dragging force, set the X-axis at 50,
Y-axis at 60, and Z-axis at 50.
This will make the bubbles move upward
diagonally towards the right hand corner of
your screen yet spreading outward as they
go.
5 Retain the rest of the settings on the
Attribute Panel. Click Play to preview the
results.
6 Change the direction of the bubbles further,
modify the Dragging force or simply click a
timeline on a frame then move, rotate or
resize your object. The timeline will
instantly record the adjustments.
7 Click Play and see the change in the motion
of the object per frame.
Page 83

83
User Guide
Global Effects
This category of effects can enhance the quality of your text or graphic object. A wide variety of
options let you give your 3D objects an eerie aura, set them on fire, or cast a shadow, among
others. These effects are different from Object Effects in that when you apply any one of them
to your project, it is applied to all of the objects in it.
Fire
Make red hot titles that burn and mesmerize. Make cool titles with icicles, or even make titles
ooze with neon green goo - all with the Fire plug-in. In this tutorial, learn how to make a basic
fire effect. (Settings: 30 frames, 15 fps.)
To burn an object:
1 Insert a graphic object in the Edit Window.
Click Add plug-in and select Fire in the
Attribute Panel.
2 At frame 1, set the Strength to 10 and the
Amplitude to 10 in the Attribute Panel.
3 Set also the Direction to 90 to make the
flames go straight up, and enter 2 for the
Soft Edge value.
4 Enter 10 for Length and 1 for Opacity. Then
customize the colors of the flame by clicking
on the color boxes.
5 At frame 30, set the flame to full blast by
entering 200 for Strength and 100 for
Amplitude.
6 Set the Length of the flames to 50, and
increase the Opacity to 75.
7 Click Play to preview the animation.
Page 84

84
Ulead COOL 3D Production S tudio
Glow
Make your object radiate with the glow of the nuclear age, or give it a halo of goodness--it’s
your call! One of the things you might want to try with your object is to have it shine like light.
The following tutorial demonstrates how to make an object blink. (Settings: 30 frames, 15 fps.)
To make a blinking title:
1 Make a bright-colored title against a dark
background in the Edit Window. Click Add
plug-in and select Glow in the Attribute
Panel.
2 At frame 1, set the Width of the glow to 2 in
the Attribute Panel . Set also the
Transparency to 0, and the Soft Edge to 6.
Select a bright Color for the glow.
3 Add key frames at frames 5, 15, and 20.
These should all have the same attributes
as those in frame 1.
4 Add key frame controls to frames 7, 13, 22,
and 28. At these key frames, set the Width
of the glow to 0. This makes the glow
disappear.
5 Click Play to preview the animation.
Page 85

85
User Guide
Lightning
The Lightning plug-in is a Global Effect that throws bolts of lightning all over your objects.
Either use presets included with the plug-in, or create your own effects with precise control
using the Attribute Panel. (Settings: 30 frames, 15 fps.)
To use the Lightning effect:
1 Insert an object in the Edit Window. Click
Add plug-in and select Lightning in the
Attribute Panel.
2 Adjust the following settings which apply
to the entire lightning bolt in the Attribute
Panel:
• Opacity The extent to which the
background can be seen through
the lightning bolt.
• Length The percentage of the
length of the lightning bolt to be
shown.
• Width The overall width of the
lightning bolt.
3 Click Edit Path to tweak the outline of the
lightning bolt. Increase the number of
segments for greater variance, then move
the green nodes around to adjust the
overall shape. Use the blue handles to
change the curvature of each segment. Click
OK.
Note: There cannot be more segments than forks.
4 Specify the color of the glow effect around
the spine.
5 Adjust fork color, width, amount, length,
and sub-fork quantity settings as required
in the Attribute Panel.
Page 86
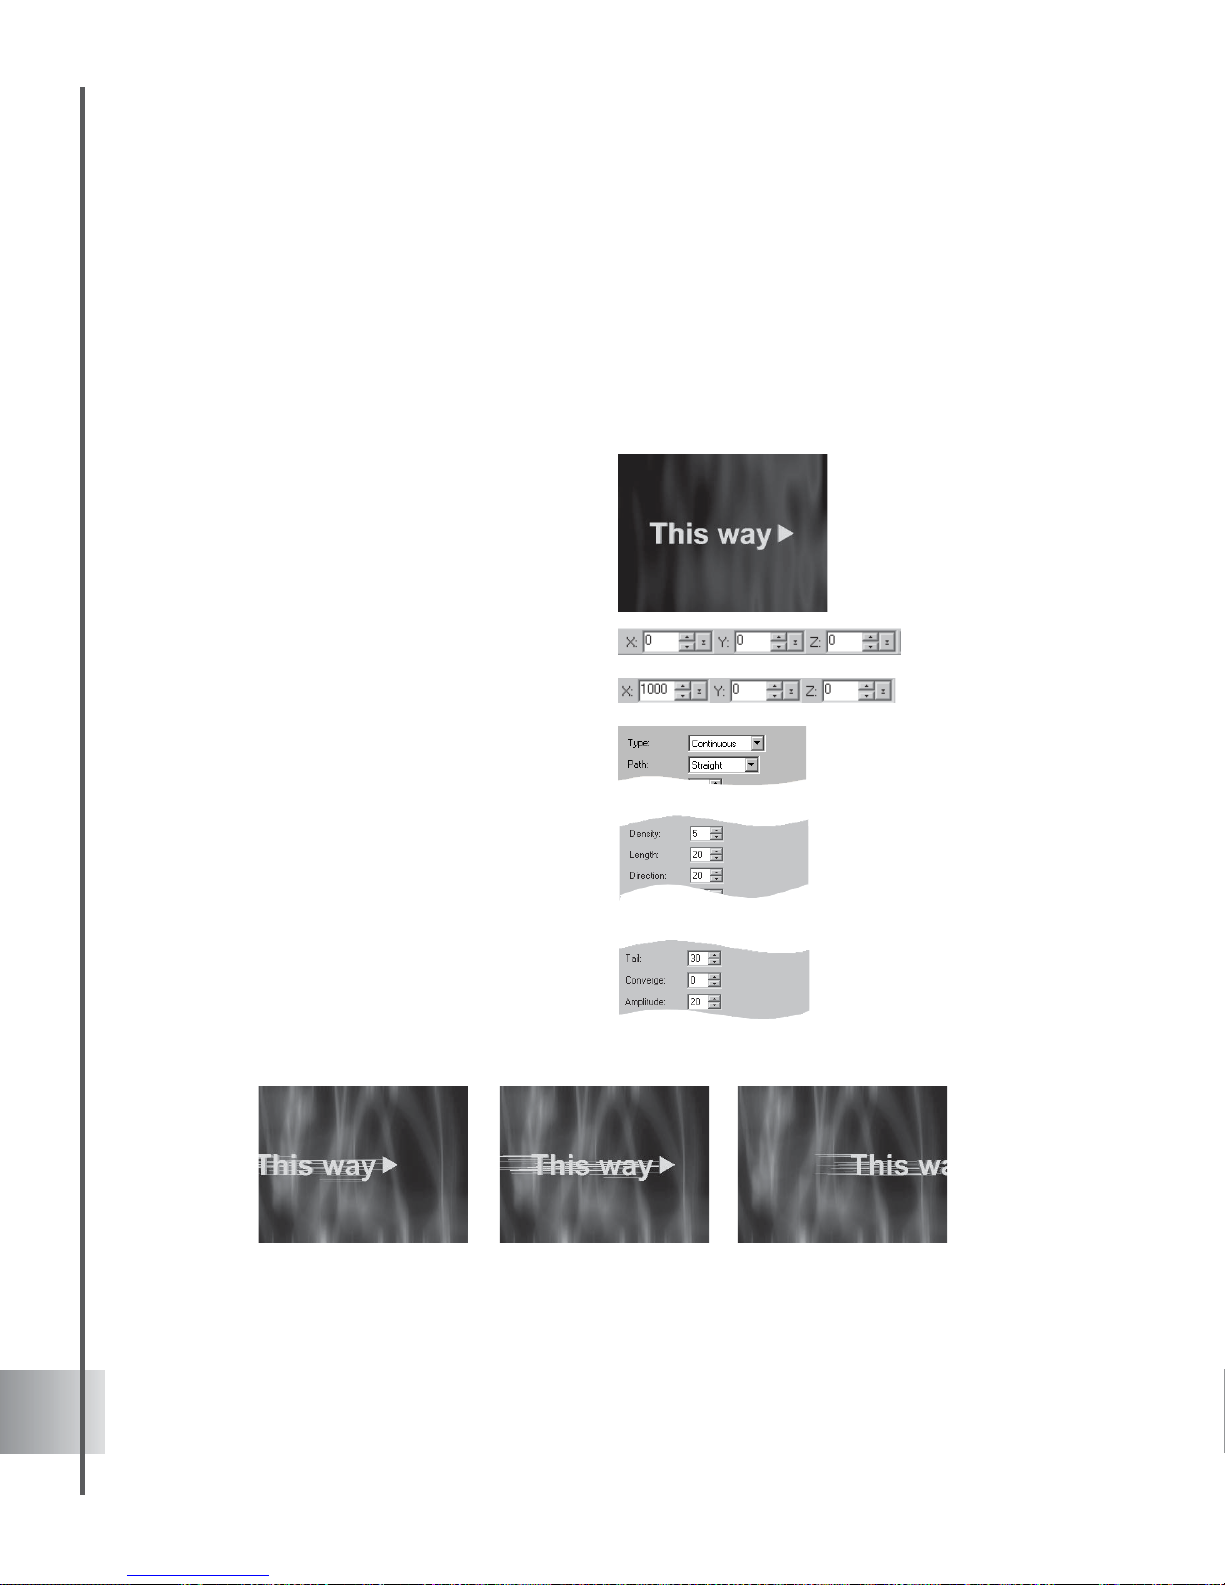
86
Ulead COOL 3D Production S tudio
Motion Blur
With this effect, you can make an object speed across the screen, bouncing with energy. It’s so
easy. You can also try this with an animated object (for this particular type of procedure, it is
recommended that you use the simplest settings for the animation). The following tutorial takes
a look at combining object position with the Motion Blur effect. (Settings: 30 frames, 15 fps.)
To apply Motion Blur to an object:
1 Make a bright-colored title against a dark
background in the Edit Window. Click Add
plug-in and select Motion Blur in the
Attribute Panel.
2 At frame 1, set the X coordinate to
-600 on the Location T oolbar. The Y and Z
values should be 0. At frames 12 and 18,
change the X coordinate to 0. At frame 30,
change the X coordinate to 1000.
3 In the Attribute Panel, select Continuous
as the Type, and set the Path to Straight.
4 Set Density to 5, and Length to 20. Set the
Direction to 180, which makes the lines
horizontal.
5 Set Tail to 30 and the Converge value to 0.
6 Add key frames at frames 10, 12, 18, 20,
and 30. They should all have the same
attributes as in frame 1.
7 For frames 12 and 18, change the Tail
length to 0.
8 Click Play to preview the animation.
Page 87

87
User Guide
Shadow
You can give your object a shadow, then animate it easily after making just a few adjustments in
the settings. In addition to making gray shadows seem realistic, you can also make colorful
shadows. You can even have an object cast a negative shadow on a dark background. In the
following tutorial, make an object float away, leaving its shadow behind on the ground. (Settings:
30 frames, 15 fps.)
To animate an object and its shadow:
1 Insert a title against a dark background in
the Edit W indow. Click Add plug-in and
select Shadow in the Attribute Panel.
2 Click Move Object on the Location T oolbar.
3 At frame 1, the X, Y, and Z coordinates
should remain 0. At frame 30, enter 270 for
the Y coordinate, or enter any other value
that makes the object move off the screen.
4 At frame 1, enter 5 for X Offset and Y
Offset on the Attribute Panel. Enter 3 for
Soft Edge.
5 At frame 30, enter 600 for Y Offset. Enter
40 for Soft Edge.
6 Click Play to preview the animation. The
object should float up and off the screen,
while the shadow remains. If it looks like the
shadow is moving up and down, adjust the
Y Offset value for the last key frame.
Page 88

88
Ulead COOL 3D Production S tudio
Natural Paint
Add elegance to picture your objects, text and background using the Natural Paint effect.
Three handsomely created styles can be made to your texts, objects and even backgrounds.
Artful touches of Color Pen, Charcoal, and Watercolor can be used for your effects.
To create a Natural Paint effect:
1 Open a blank document and change the
background by selecting Background in
the Attribute Panel Property List .
2 Select Image as Background mode.
3 Select an image in the Open dialog box and
click Open .
4 Insert an object in the Edit Window. Click
Add plug-in and select Natural Paint in the
Attribute Panel.
5 Set the specifications of your effect in the
Attribute Panel:
In Type, specify the material or painting
technique to be applied on your project.
Set a value in Level. A higher level
produces a more vivid effect and makes
your object looks abstract or stylized.
For W atercolor type, select Large to
generate long strokes, and select Small to
produce short strokes.
If using Charcoal, select a higher Stroke
value to produce longer charcoal lines.
Set a higher value for Balance to add more
charcoal to the image and make your object
appear more like a hand-painted illustration.
Clear Background to
apply Natural Paint
to your object only
without affecting the
background
Page 89

89
Project output
Ulead COOL 3D offers you a wide range of possibilities on how you can output your project.
With its features, you can choose to either use your project on a Web page, in a video, or simply
as a graphical element on a document.
Saving your project
When you have finished editing your work, you can save it in the Ulead COOL 3D format
(*.c3d). You can reopen the project for further editing and revision. If you want to output your
project as an image, Web animation, or video file, take a look at the following pages for more
information.
Export Video Overlay
Using Alpha Channels is one of the most effective ways of creating transparent overlays. An
alpha channel allows you to block out an entire image except the 3D object.
A TGA file supports Alpha channel
transparency. Click File: Export Video
Overlay- TGA to launch a dialog box where
you can save your project as TGA file which
you can use as a video overlay.
Click File: Export Video Overlay- AVI to
launch a dialog box where you can save your
project as an AVI file. This can be used to
superimpose your projects while retaining
your background.
Export 3D Models
Exporting COOL 3D objects as Direct X (*.X) and 3D (*.3DS) file formats enables you to use
them in other modeling/animation programs. See Import 3D Models in page 21.
Page 90
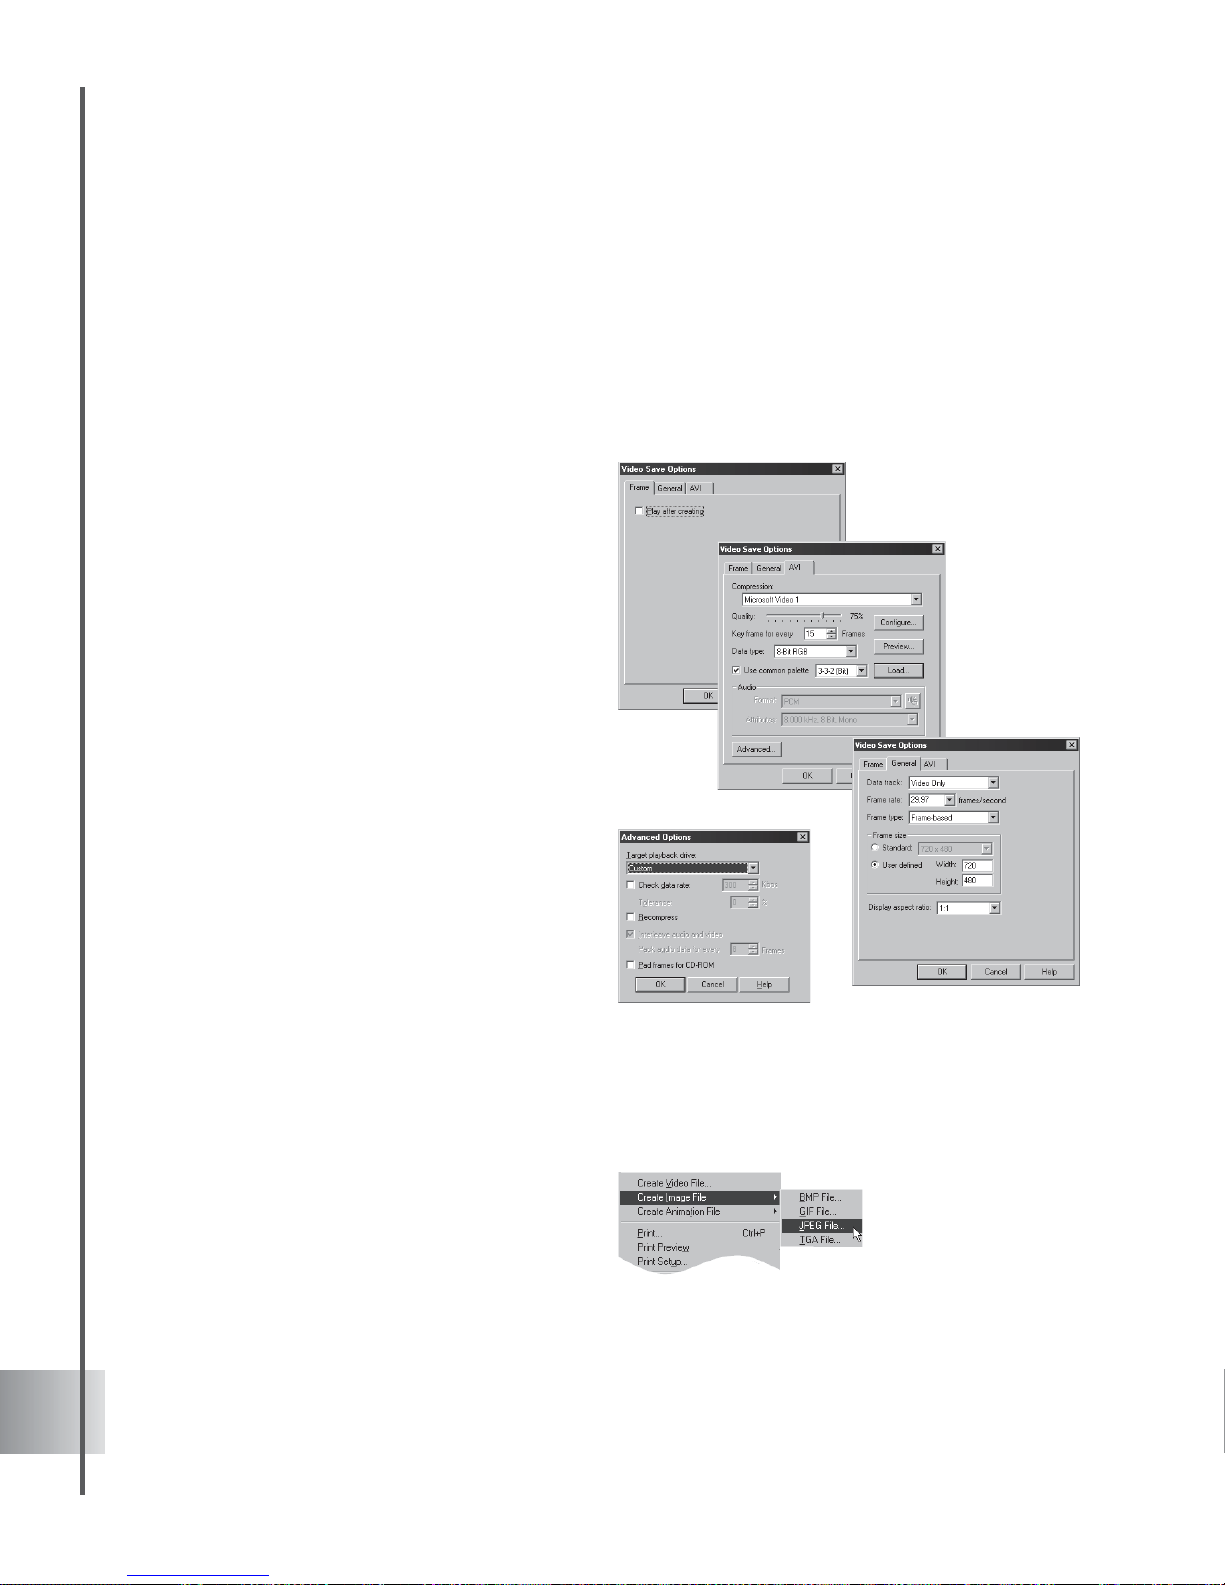
90
Ulead COOL 3D Production S tudio
Creating video files
One of the great things you can do with Ulead COOL 3D is to output projects in AVI, MOV, and
RM formats to add to your collection of digital videos. To save your project as a video file, click
File: Create Video File. New extended video output options allow you to tailor exactly how
you want to output your project in the video format of your choice. These are accessed in the
Save As Video File dialog box by clicking Options. The following gives you a brief description
of the three categories.
• Frame This gives you the option to
automatically preview the video after it
has been generated.
• General Lets you specify key aspects
of your video, such as frame rate,
frame size, and frame type.
• AVI Lets you specify options particular
to the selected video codec such as
quality, number of key frames, and data
rate. Select Preview to set compression
ratio and view the video using the frame
size specified in the General tab.
Select Advanced to display the
Advanced Options dialog box. This
contains options to optimize the
playback of the video file, based on the
intended output device.
Creating image files
You can output your saved project to a variety of image formats: BMP, GIF, JPEG, and TGA.
The following section will give you an idea of what quality you can expect with each file type,
along with some of the options you have for the respective formats.
• BMP saves your image with high
quality and no data loss. However, the
trade-off is that you end up with a large
file size. Generally, this is the most
appropriate format if you want to make
high quality and high resolution
graphics.
Page 91

91
User Guide
• GIF saves the image to a smaller file size than a BMP. This is the format most
commonly used for Web pages and is most appropriate for graphics and illustrations
that are relatively small and do not contain a lot of tonal nuances. When saving an
image in this format, you can choose how many colors you want the engine to
recognize. A lower number of colors generally results in smaller file size, but in some
cases might compromise the quality of the image. You can also set the background to
be transparent, so that when you place the image on a Web page, the background of the
Web page will appear as the backdrop for the image.
• JPEG saves the image to a small file size and also offers very good compression for
True Color images. This format is commonly used for Web pages. One minor
disadvantage of the JPEG format is that some data are lost when compressing the file.
In most cases, the changes are barely noticeable to the naked eye and you can control
how much is actually changed.
Creating animation for the Web
Ulead COOL 3D lets you output your animated projects in formats appropriate for viewing on
Web pages: GIF, SWF, and RealText 3D. If used wisely, these can be a good way to attract the
attention of Internet surfers or simply to enliven your Web pages.
GIF animation
Many animations that you see on the Web are animated GIFs. Ulead COOL 3D provides you
with extra controls to create a GIF animation that suits your needs. Here’s an introduction to
some of the new features that you can find, all of which are accessed by clicking File: Create
Animation File - Animated GIF File. These options are located in the Save As Animated GIF
File dialog box.
• Colors Specifies the number of colors
to create in the global palette of each
frame, based on the colors in that
image. A lower number of colors helps
to reduce file size, but sometimes at the
cost of image quality.
• Dither Select to simulate True Color by
mixing the existing colors in the palette
for the optimize image.
• Interlace Select to create an interlaced
GIF image when you save the optimized
image. This increases file size but
displays better quality .
Page 92

92
Ulead COOL 3D Production S tudio
• Transparent background Removes the background of the GIF so that only the 3D
objects can be seen. When the GIF image is placed on a Web page, the background of
that page shows through instead.
• Looping Select to repeat the animation continuously or for a specific number of times.
• Launch Ulead SmartSaver Lets the program automatically detect and run Ulead
SmartSaver, a program that helps you create and optimize animations saved in JPEG,
GIF, and PNG formats.
Clicking Optimize opens the GIF Animation Option dialog box where you can select
other options.
• Preview after saving Gives you a preview of the animation in your default browser
after saving.
• Create global palette Builds a global palette, based on the colors of all of the images in
the animation combined. Doing this can reduce size although it may not produce the
best quality .
• Remove redundant pixels Takes away pixels that are common to all frames in the
animation. This also helps to reduce file size.
• Show status report Displays file size and other vital data of the animation before and
after optimization.
Page 93

93
User Guide
Flash animation
COOL 3D projects can be exported as
Macromedia Flash (*.SWF) files.
To export a Flash file:
1 Select File: Create Animation File -Export
to Macromedia Flash (SWF) - with Bitmap.
2 This opens the Save as Macromedia Flash
(SWF) File dialog box with BMP options
for working with a transparent background.
3 Input a name for the export file and click
Save.
Note: Select Create Animation File: Export to
Macromedia Flash (SWF) - with JPEG to open the
Save as Macromedia Flash (SWF) File dialog box
with JPEG options.
RealText 3D
You can output your animations in the
RealText 3D file format (*.r3t). This new
format stores your animation while
maintaining small file sizes, thus making it
optimal for display on a Web page. To output
an animation in this format, use the File:
Export To RealText 3D . Once you’ve saved
it, you can preview it in your default browser.
Note: Exporting your project to this file format can
result in the loss of the following attributes: texture,
bevel, light, color, background image, and camera.
Page 94

94
Shortcut Keys
Main Program
noitcnuF
syektuctrohS noitpircseD
weN:eliF
lrtC + N
tnemucodwenasnepO
nepO:eliF
lrtC + O
)D3C.*(eliftcejorpgnitsixenasnepO
evaS:eliF
lrtC + S
)tamrofD3C.*ni(eliftnerrucehtsevaS
tropmI:eliF
scihparG
5F
)IA*ro,FME.*,FMW.*(scihpargrotcevstropmI
tnirP:eliF
lrtC + P
tnemucodtnerrucehtstnirP
odnU:tidE
lrtC + Z
noitcasuoiverpehtseodnU
odeR:tidE
lrtC + Y
enodnusawtahtnoitcasuoiverpehtseodeR
tuC:tidE
lrtC + X
RO
tfihS + eteleD
nitisecalpdnatnemucodtnerrucehtmorftcejbodetcelesehtstuC
draobpilCswodniW
etsaP:tidE
lrtC + V
RO tfihS + snI
tnemucodtnerrucehtotnidraobpilCswodniWmorftcejbonasetsaP
eteleD:tidE
lrtC + leD
tcejbodetcelesehtseteleD
txeTtresnI:tcejbO
3F
swodniWmorftxetstresnidnaxobgolaidtxeTtresnIehtsnepO
draobpilC
tidE:tcejbO
tcejbO
4F
detcelesehtfotxetehtgniniatnocxobgolaidtxeTtresnIehtsnepO
.tcejbo
tuptuO:weiV
weiverP
8F
ytilauQtuptuOdetcelesehttaemarftnerrucehtsredneR
tcejbOevoM
A
rablooTnoitacoLehtmorflooTtcejbOevoMehtstceleS
tcejbOetatoR
S
rablooTnoitacoLehtmorflooTtcejbOetatoRehtstceleS
tcejbOeziS
D
rablooTnoitacoLehtmorflooTtcejbOeziSehtstceleS
ecaFtnorFtceleS
Q
tcejboehtfoecaftnorfehtstceleseD/stceleS
ecaFtnorFtceleS
ylevisulcxe
lrtC + Q
RO tfihS + Q
llastceleseddnatcejboehtfoecaftnorfehtstceleS
secafrehto
Page 95

95
User Guide
Path Editor
leveBtnorFtceleS
ecaF
W
tcejboehtfoecaflevebtnorfehtstceleseD/stceleS
leveBtnorFtceleS
ylevisulcxeecaF
lrtC + W
RO
tfihS + W
secafrehtollastceleseddnatcejboehtfoecaflevebtnorfehtstceleS
ecaFediStceleS
E
tcejboehtfoecafedisehtstceleseD/stceleS
leveBkcaBtceleS
ecaF
R
tcejboehtfoecaflevebkcabehtstceleseD/stceleS
leveBkcaBtceleS
ylevisulcxeecaF
lrtC + R
RO
tfihS + R
rehtollastceleseddnatcejboehtfoecaflevebkcabehtstceleS
secaf
ecaFkcaBtceleS
T
tcejboehtfoecafkcabehtstceleseD/stceleS
ecaFkcaBtceleS
ylevisulcxe
lrtC T+
RO
tfihS T+
secafrehtollastceleseddnatcejboehtfosecafkcabehtstceleS
noitaminapotS
csE
ecneuqesnoitaminatnerrucehtgniyalpspotS
pleH
1F
smetiunemrofscipotpleHoidutSD3looCdaelUehtsyalpsiD
evitisneStxetnoC
pleH
tfihS + 1F
ehtniserutaefehtfoenoynagnikcilcnopucipotplehfeirbsyalpsiD
margorp
tcejbotimiL
ottnemevom
sixaelgnis
tfihS +
eziS/etatoR/evoM
nigniggardybtcejbO
wodniwtide
laitiniehtfosixaehttpecxesexallanonoitisops'tcejboehtsexiF
noitom
noitcnuF syektuctrohS noitpircseD
htapeteleD
lrtC +
leD
htapdetcelesehtseteleD
odnU
lrtC + Z
dnUoitcasuoiverpehtseon
deRo
lrtC + Y
enodnusawtahtnoitcasuoiverpehtseodeR
nimooZ
lrtC + "+"
capskrowehtniegamirohtapehtnonismooZe
tuomooZ
lrtC + "-"
capskrowehtniegamirohtapehtfotuosmooZe
Page 96

96
Index
Axis indicator 32
B
Background 35
Color 35
Gradient 57
Image 36
Magic Texture 58
Video 37
Bend 60
Bevel 28
apply a bevel style 29
Modifying individual faces 30
Blast 65
BMP 90
Bubbles 82
Bump 66
C
Camera 33
Camera lens slider 34
Distance slider 34
Camera Panel 33
Cartoon 61
Color 24
apply color to an object 24
Color Background 35
Composition 12
Control Line 55
Convert to Vector 17
Coordinate system 39
D
Dance 67
depth
Geometric perspective 33
Light and color 33
Dimensions 14
Direct X 89
Symbols
3D models 21
Export 3D Model 21
Import 3D Model 21
3D scene basics 33
A
Adjust 18
Advance timeline mode 45
Alpha Channels 89
Amplitude 57, 59
Animating with multiple attributes 54
Animation basics 42
Animating background 49
Animating color 49
Animating position 52
Showing and hiding objects 50
Animation for the Web 91
Flash animation 93
GIF animation 91
RealText 3D 93
Animation Toolbar 10, 42
Add/Delete Key Frame 42
Current Frame 43
Frames per second (fps) 43
Jump to Next/Previous Key Frame 44
Number of frames 43
Object List 42, 44
Plug-in Enable 43
Plug-in Mask 43
Properties Menu 42
Slider 44
Smooth Motion Path 43
Timeline Control 42
View: Timeline 42
Attenuation mode 41
Attribute Toolbar 11
AVI 90
axes, three dimensional space 39
Page 97

97
User Guide
Distort 68
Disturbance 58
E
EasyPalette 11
EasyPalette file directory 12
Edit Window 11
Emboss 27
Explosion 69
Export Video Overlay 89
F
Face Property Toolbar 10, 30
file formats
3D Studio 89
AVI 90
BMP 90
Direct X 89
GIF 90
JPEG 90
MOV 90
RM 90
SWF 93
TGA 89
Fire 79, 83
Flash animation 93
Frames per second (fps) 43
FreeForm
Grid 32
Selection 32
Transform 32
FreeForm editor 31
Frequency 59
G
Geometric Object 19
Insert Geometric Object 19
Geometric perspective 33
GIF 90
GIF animation 91
Global attribute 56
Global Effects 83
Fire 83
Glow 84
Lightning 85
Motion Blur 86
Natural Paint 88
Shadow 87
Glow 84
Gradient Background 57
H
Help
Technical Support 7
Hue Shift 57, 59
I
Image Background 36
Image Texture 25
Cylindrical 26
Emboss 27
Fit to height 26
Flat mode 26
Keep aspect ratio 26
Load Texture Image File 25
Mapping 26
Reflection 26
Show Texture Color Only 26
Wrap Mode 26
Import Graphics 17
installation 7
J
JPEG 90
Jump 70
Page 98

98
Ulead COOL 3D Production S tudio
K
Key attribute 56
Key Frame Window 46
Key Frames
Control Line 55
Key attribute 56
Key frames 43
Global attribute 56
L
Lathe objects 20
Light 40
ambient 41
Mode 40
orientation 41
position 41
Lighting Guide 41
Lightning 85
Opacity 85
Location Toolbar 10
Loop Mode 10
Loop Video Playing 27
M
Magic Texture Background 58
Disturbance 58
Random 59
Shift 58
Texture Cell 58
Texture Type 58
Turbulence 58
Mapping 26
Modify Frames 45
Motion Blur 86
MOV 90
N
Natural Paint 88
Navigation Toolbar 10
nodes
Add Node 18
Remove Node 18
Number of frames 43
O
Object Effects 59
Bend 60
Blast 65
Cartoon 61
Stylized Outline 63
Twist 64
Object Manager 11, 22
Delete 23
Enable/Disable objects 24
Group multiple objects 23
Lock/Unlock objects 24
Pivot Setting 23
Rename objects 23
Select objects 22
Ungroup objects 23
Object Toolbar 10
Objects 13
presets 13
Opacity 85
Output project 89
Creating animation for the Web 91
Creating image files 90
Export 3D Models 89
Export Video Overlay 89
P
Palette Ramp Editor 57, 59
Particle Effects 78
Bubbles 82
Fire 79
Smoke 78
Snow 81
Path Animation 71
Path Editor 16
Page 99

99
User Guide
Add Node 18
Freehand Tool 18
Import Graphics 17
Remove Node 18
plug-in effects
overview 55
Plug-in Enable 43
Plug-in Mask 43
plug-ins, categories
Background Effects 56
Global Effects 83
Object Effects 59
Particle Effects 78
plug-ins, individual
Bend 60
Blast 65
Bubble 82
Bump 66
Cartoon 61
Dance 67
Distort 68
Explosion 69
Fire 79, 83
Glow 84
Gradient Background 57
Jump 70
Lightning 85
Magic Texture Background 58
Motion Blur 86
Natural Paint 88
Path Animation 71
Shadow 87
Smoke 78
Snow 81
Stylized Outline 63
Surface Animation 72
Text Wave Animation 73
Token Move (G) 76
Token Rotate (G) 77
Token Size (G) 75
Token Skew (G) 74
Twist 64
Precision & Quality 30
presets
Background 35
Camera 34
Composition presets 12
Objects presets 13
Properties Menu 42
R
RealText 3D 93
Ring 57
RM 90
Ruler Bar 46
running Ulead COOL 3D 8
S
Saving 89
Scene
Camera 33
Color Background 35
Coordinate system 39
Gradient Background 57
Image Background 36
Light 40
Magic Texture Background 58
Video Background 37
Shadow 87
Showing and hiding objects 50
Slope 57
Smoke 78
Smooth Motion Path 43
Snow 81
Standard Toolbar 10
Stylized Outline 63
Surface Animation 72
SWF 93
Page 100

Ulead COOL 3D Production S tudio
T
Text Effects
Bump 66
Dance 67
Distort 68
Explosion 69
Jump 70
Path Animation 71
Surface Animation 72
Text Wave Animation 73
Token Move (G) 76
Token Rotate (G) 77
Token Size (G) 75
Token Skew (G) 74
text object
Adding and editing text 15
Text Toolbar 10
Text Wave Animation 73
Texture 25
applying 25
Image Texture 25
Magic Texture Background 58
Video Texture 27
TGA 89
Thumbtack 45
Timeline Control 42
Timeline Window 11, 45
Key Frame Window 46
Modify Frames 45
Ruler Bar 46
Thumbtack 45
View: Animation Toolbar 45
Token Move (G) 76
Token Rotate (G) 77
Token Size (G) 75
Token Skew (G) 74
toolbars
Animation Toolbar 10
Attribute Toolbar 11
Face Property Toolbar 10
Location Toolbar 10
Navigation Toolbar 10
Object Toolbar 10
Standard Toolbar 10
Text Toolbar 10
Transparency 28
Turbulence 58
Twist 64
U
Ulead homepage 7
updates 8
Use Background Image Size 14
V
vector graphics
convert a bitmap graphic to vector 17
import a vector graphic 17
Video Background 37
video files, creating 90
Video Texture 27
Duration 27
Emboss 27
Loop Video Playing 27
W
Web
Ulead Homepage 7
Wireframe display 31
 Loading...