

Page 1
User Guide
Ulead Systems, Inc.
May 2004
Page 2

First English edition for Ulead Burn.Now version 1.5, May 2004.
Copyright © 2003-2004 Ulead Systems, Inc.
All rights reserved. No part of this publication may be reproduced or transmitted in any
form or by any means, electronic or mechanical, including photocopying, recording or
storing in a retrieval system, or translated into any language in any form without prior
written permission of Ulead Systems, Inc.
Software license
The software described in this document is furnished under a License Agreement which
is included with the product. This Agreement specifies the permitted and prohibited
uses of the product.
Licenses and trademarks
ICI Library © 1991- 1992 C-Cube Microsystems.
Ulead Systems, Inc. the Ulead logo, and Ulead Burn.Now are trademarks of Ulead
Systems, Inc.
Manufactured under license from Dolby Laboratories. “Dolby" and the double-D symbol
are trademarks of Dolby Laboratories.
Confidential unpublished works. Copyright 1998–1999 Dolby Laboratories. All rights
reserved.
All other product names and any registered and unregistered trademarks mentioned in
this manual are for identification purposes only and remain the exclusive property of
their respective owners.
© 2003-2004 Ulead Systems. This software is based in part on the work of the
independent JPEG Group. Portions of this program are licensed under U.S. Patent No.
4,558,302 and foreign counterparts.
North & South America
Ulead Systems Inc.
http://www.ulead.com
Support: http://www.ulead.com/tech
International
Ulead Systems, Inc.
http://www.ulead.com
http://www.asiapac.ulead.com
http://www.ulead.com.tw
Support:
http://www.ulead.com/tech
http://www.asiapac.ulead.com/tech
http://www.ulead.com.tw/tech
Japan
Ulead Systems Inc.
http://www.ulead.co.jp
Support: http://www.ulead.co.jp/tech
China
Ulead Systems, Inc.
http://www.ulead.com.cn
Support: http://www.ulead.com.cn/tech
Germany
Ulead Systems GmbH
http://www.ulead.de
Support: http://www.ulead.de/tech
United Kingdom
http://www.ulead.co.uk
Support: http://www.ulead.co.uk/tech
France
http://www.ulead.fr
Support: http://www.ulead.fr/tech
Page 3

ULEAD BURN.NOW USER GUIDE 3
Table of Contents
Welcome to Ulead Burn.Now .................................... 5
Things you can do in Burn.Now ................................. 5
What’s new ............................................................ 7
System requirements .............................................. 8
Basics ....................................................................... 9
The user interface: an overview ................................ 9
Setting preferences ................................................12
Choosing a disc burner ...........................................13
About file systems ..................................................14
Making a data disc .................................................. 16
Compiling a data disc ..............................................17
Burning the data disc ..............................................18
Making an audio disc .............................................. 20
Compiling an audio disc ..........................................22
Adding CD-Text (Audio CD only) ..............................24
Burning the audio disc ............................................25
Making an MP3 disc ................................................ 27
Compiling an MP3 disc ............................................28
Burning the MP3 disc ..............................................29
Converting audio files ............................................. 31
Convert Audio Files dialog box .................................31
Ripping CD audio .................................................... 33
Disc burning options ............................................... 35
Close disc .............................................................35
Direct burn ............................................................35
Perform test before burning .....................................36
Buffer underrun protection ......................................36
Editing a disc .......................................................... 37
Modifying disc contents ...........................................37
Burning the edited disc ...........................................39
Copying a disc ......................................................... 40
Making a disc to disc copy .......................................41
Page 4

4 ULEAD BURN.NOW USER GUIDE
Creating a disc image file ........................................42
Burning a disc from a disc image file ........................43
Handling rewritable discs ....................................... 44
Erase ...................................................................45
UDF Format ..........................................................45
UDF Certify ...........................................................46
Checking burner and disc information .................... 47
Checking burner capabilities ....................................47
Checking disc properties .........................................48
Appendix A: Menus and commands ......................... 50
Appendix B: Troubleshooting .................................. 52
Appendix C: Glossary .............................................. 55
Index ...................................................................... 59
Page 5

ULEAD BURN.NOW USER GUIDE 5
Welcome to Ulead Burn.Now
In an increasingly technologically demanding world, file sizes are
getting larger and the need for storage space to keep up with the
pace is high. Burning CDs enables you to free up valuable space on
your computer and retain important backups. Moreover DVDs,
which have superior data storage capacity, are ideal for burning
very large files, such as video footage and multimedia files.
If you've ever felt overwhelmed by the thought of burning your own
discs, Ulead Burn.Now offers the solution you've been looking for. It
is easy to use, yet versatile enough to handle a wide range of tasks
and media without requiring you to make tricky technical decisions.
All you really need to decide is what kind of discs you want to use,
and what you want to burn on them.
Things you can do in Burn.Now
Make a data disc
There is no limit to the type of information you can burn to disc with
Burn.Now. Whether you need to back up important word-processed
documents, spreadsheets, presentations and projects, or compile
photos, video footage, sound clips and more to share with your
family and friends, Burn.Now has all the options you need.
Burn.Now supports both ISO and UDF file systems for writing data
to discs. Furthermore, if you are working with rewritable discs,
whether CD or DVD, Burn.Now enables you to edit the contents of
discs that have already been burned. There is no need to wipe the
whole disc and start over, if you only wish to remove or add files, or
simply to reorganize your folders and files.
Make an audio disc
With Burn.Now you can also make your own audio discs. You can
collect all types of sound files, and create an Audio CD, DVD-Audio
disc, or “Audio-only” DVD-Video disc.
Page 6

6 ULEAD BURN.NOW USER GUIDE
Make an MP3 disc
In addition to audio discs, you can also collect MP3 files and compile
them into an MP3 disc. MP3 files are a very popular format, and are
primarily played back on personal computers, although they can
also be played on CD players that support the format. Since they
are relatively small files, the total play time of MP3s for the same
amount of disc space is far greater than that of traditional audio
formats, although there is a slight compromise in sound quality.
Copy discs
One of the simplest ways that you can distribute and share discs is
by burning copies of them. Burn.Now offers several ways of copying
discs.
The fastest and most convenient method is by directly duplicating
an existing disc. This enables you to burn an exact replica straight
to another disc without requiring any step in between. This is a
speedy method that has the further advantage of not requiring a
large amount of space on your computer if you copy on-the-fly.
Alternatively, you can burn an image of the contents of the disc and
store the image on your computer. A disc can be burnt directly from
the image file. This takes a little longer, but is more stable and
allows you the flexibility of creating the image file on one occasion,
and burning at a later date, as well as being more convenient for
burning multiple copies and for backup purposes.
Page 7

ULEAD BURN.NOW USER GUIDE 7
What’s new
Create DVD-Audio discs
Burn stereo-quality music on DVD that can be played on DVD-Audio
capable players.
Create “Audio-only” DVD-Video discs
An “Audio-only” DVD-Video disc is the same as the regular DVDVideo disc except that there is no video content recorded on the
disc. Burn stereo-quality music on DVD that can be played on your
computer, home or car DVD player.
MP3 encoding
Rip and convert audio files to MP3 using the Rip CD Audio and
Convert Audio Files functions.
Convert audio files
Convert your audio files to other popular audio formats.
Rip tracks from audio CDs
Easily extract your files from your audio CDs and convert them to
popular formats such as MPA, WAV, and WMA.
Double-layer DVD burning support
Burn a double-layer DVD up to 8.5GB of video, audio, image, or
data files.
UDF system driver for a wide range of Windows O/S
UDF system driver is now compatible with Windows XP, 2000, Me,
and 98.
UDF defect management (DRT-DM)
Distributed Real-Time Defect Management (DRT-DM) improves
writing reliability for DVD-RW and CD-RW.
Page 8

8 ULEAD BURN.NOW USER GUIDE
System requirements
To run Ulead Burn.Now, you must have the following minimum
requirements:
• Microsoft Windows 98 SE, ME, 2000, XP
• DirectX 8.0 driver or above
• Intel Pentium III processor or above (at least 500 MHz CPU)
• 128 MB RAM (256 MB or higher recommended)
• 30 MB of available hard disk space for installation
• CD or DVD-ROM drive
• Windows compatible DVD-R/-RW, DVD+R/+RW, DVD-RAM, or
CD-R/RW burner drive that supports MMC (Multimedia
Command) standard
Page 9
ULEAD BURN.NOW USER GUIDE 9
Basics
Burn.Now has a simple, straightforward user interface that frees
you from the task of configuring complex settings. All you need to
do is choose the type of disc to create, compile and then burn the
disc. This section introduces you to the Burn.Now interface.
The user interface: an overview
Select a Task dialog box
The easiest way to make sure you are heading in the right direction
when compiling a new disc is by beginning with the Select a Task
dialog box. This is displayed each time you launch Burn.Now, but
can also be opened again by selecting Disc: Create Disc [Ctrl +
N] or by clicking on the Toolbar.
Page 10
10 ULEAD BURN.NOW USER GUIDE
The Select a Task dialog box displays the four available task types
on the left side. When a task type on the left is selected, all the
options available for that task are displayed on the right. A brief
description of the selected option is displayed in the lower half of
the Options Panel.
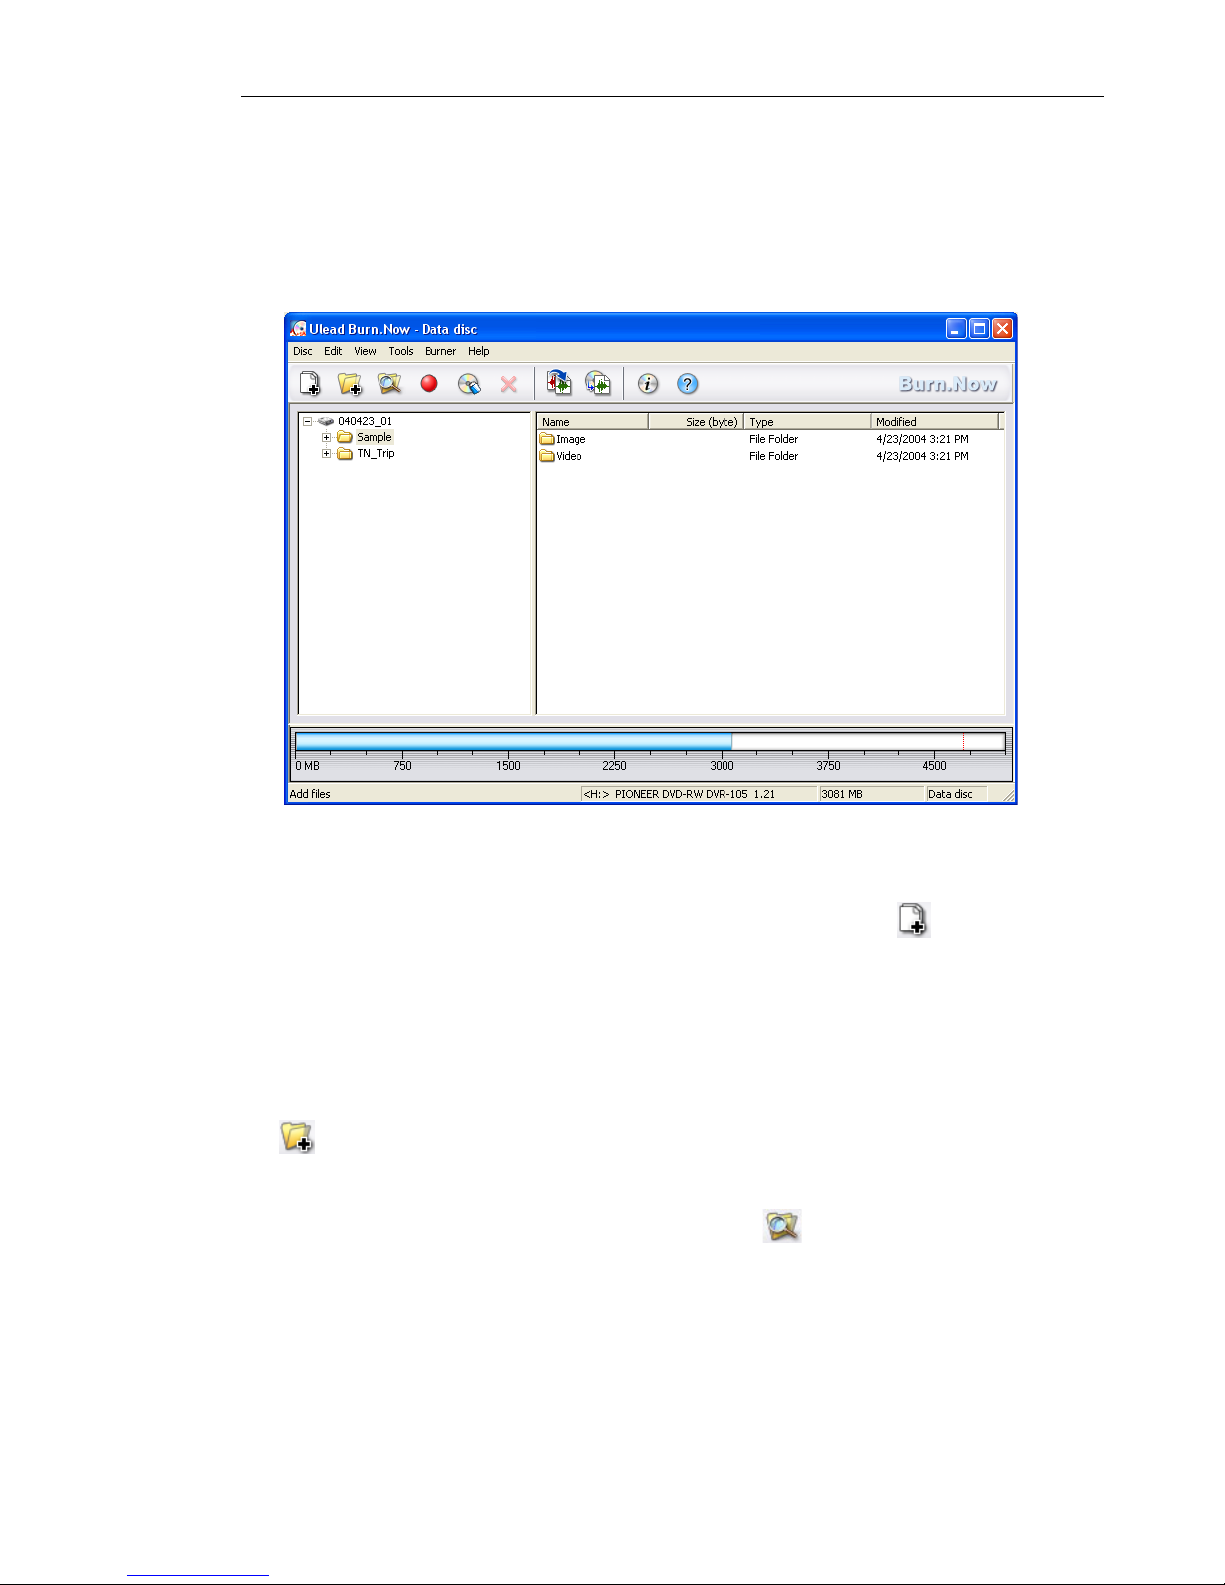
Disc Layout Window
The Disc Layout Window is the area where you add and organize
the data to burn to disc.
The appearance of the Disc Layout Window depends on the type
of task chosen. When compiling data discs and MP3 discs, the Disc
Layout Window of Burn.Now displays two window panes beneath
the Toolbar, similar to the panes in Microsoft Windows Explorer.
The pane on the left displays, and also enables you to create, a
folder system for organizing your files, while the pane on the right
displays all subfolders and files contained within the selected folder
(shown highlighted) on the left. You can sort your files and folders
on the right by clicking on the column header.
Note: If you click Exit, Burn.Now will be closed.
Page 11
ULEAD BURN.NOW USER GUIDE 11
When compiling audio discs, the Disc Layout Window displays a
single pane listing selected audio tracks and displaying their file
information.
Below the Disc-space Meter is the Status Bar, which displays
information about the current device name, project size, and task
type.
Toolbar and Menus
The Toolbar enables you to access the most commonly used
functions easily. All of the buttons on the Toolbar are available
through the menus, and some are also available through the
context menu in the Disc Layout Window.
Disc-space Meter
The Disc-space Meter is located underneath the two panes. The
measurement markings on the meter indicates how much space is
available on the target CD or DVD. A progress bar on the Discspace Meter starting from the left side indicates the amount of
space to be occupied on the disc; or the total time of tracks when
compiling an audio CD. The progress bar extends to the right as
more data are added.
Safety markers (colored dotted lines) on the right running vertically
down the meter indicate capacity limits. The blue marker indicates
the recommended maximum capacity, while the red one indicates
the absolute maximum limit. Increasing the quantity of data
beyond the blue marker is risky, and is not recommended.
Page 12
12 ULEAD BURN.NOW USER GUIDE
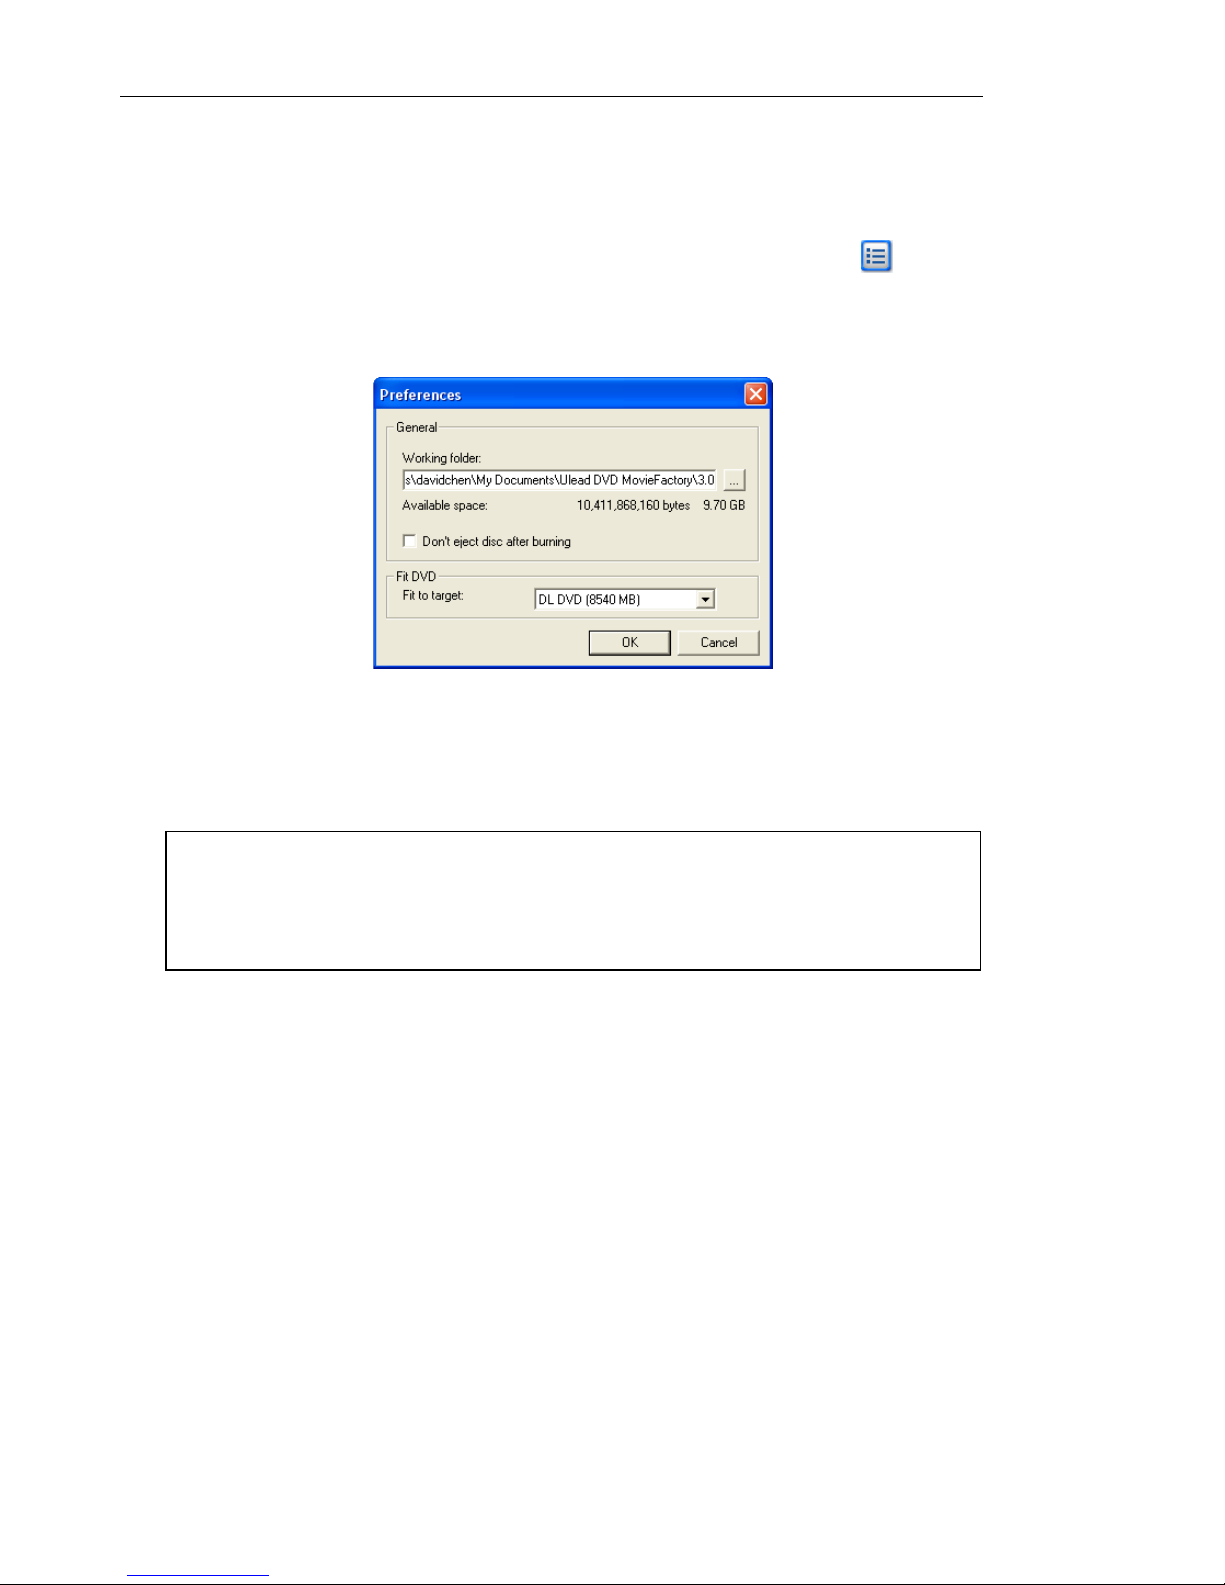
Setting preferences
You can specify the folder where you want Burn.Now to store
temporary files created during the burning process. Click in the
Select a Task dialog box or select Disc: Preferences in the
program window to specify the working folder.
By default, Burn.Now automatically ejects the disc after burning is
complete. To disable auto-eject, select Don’t eject disc after
burning.
Burn.Now supports various DVD disc formats that differ in terms of
disc capacity. You can specify the disc size of your project in Fit to
target under Fit DVD. Once you change the disc size of your
project, the Meter Bar will adjust to the size you selected.
Note: Some burners do not refresh the disc contents after writing,
and thus, the new disc contents may not be read properly by other
applications. Such burners have to be forced to do a refresh by
ejecting and closing the disc tray.
Page 13
ULEAD BURN.NOW USER GUIDE 13
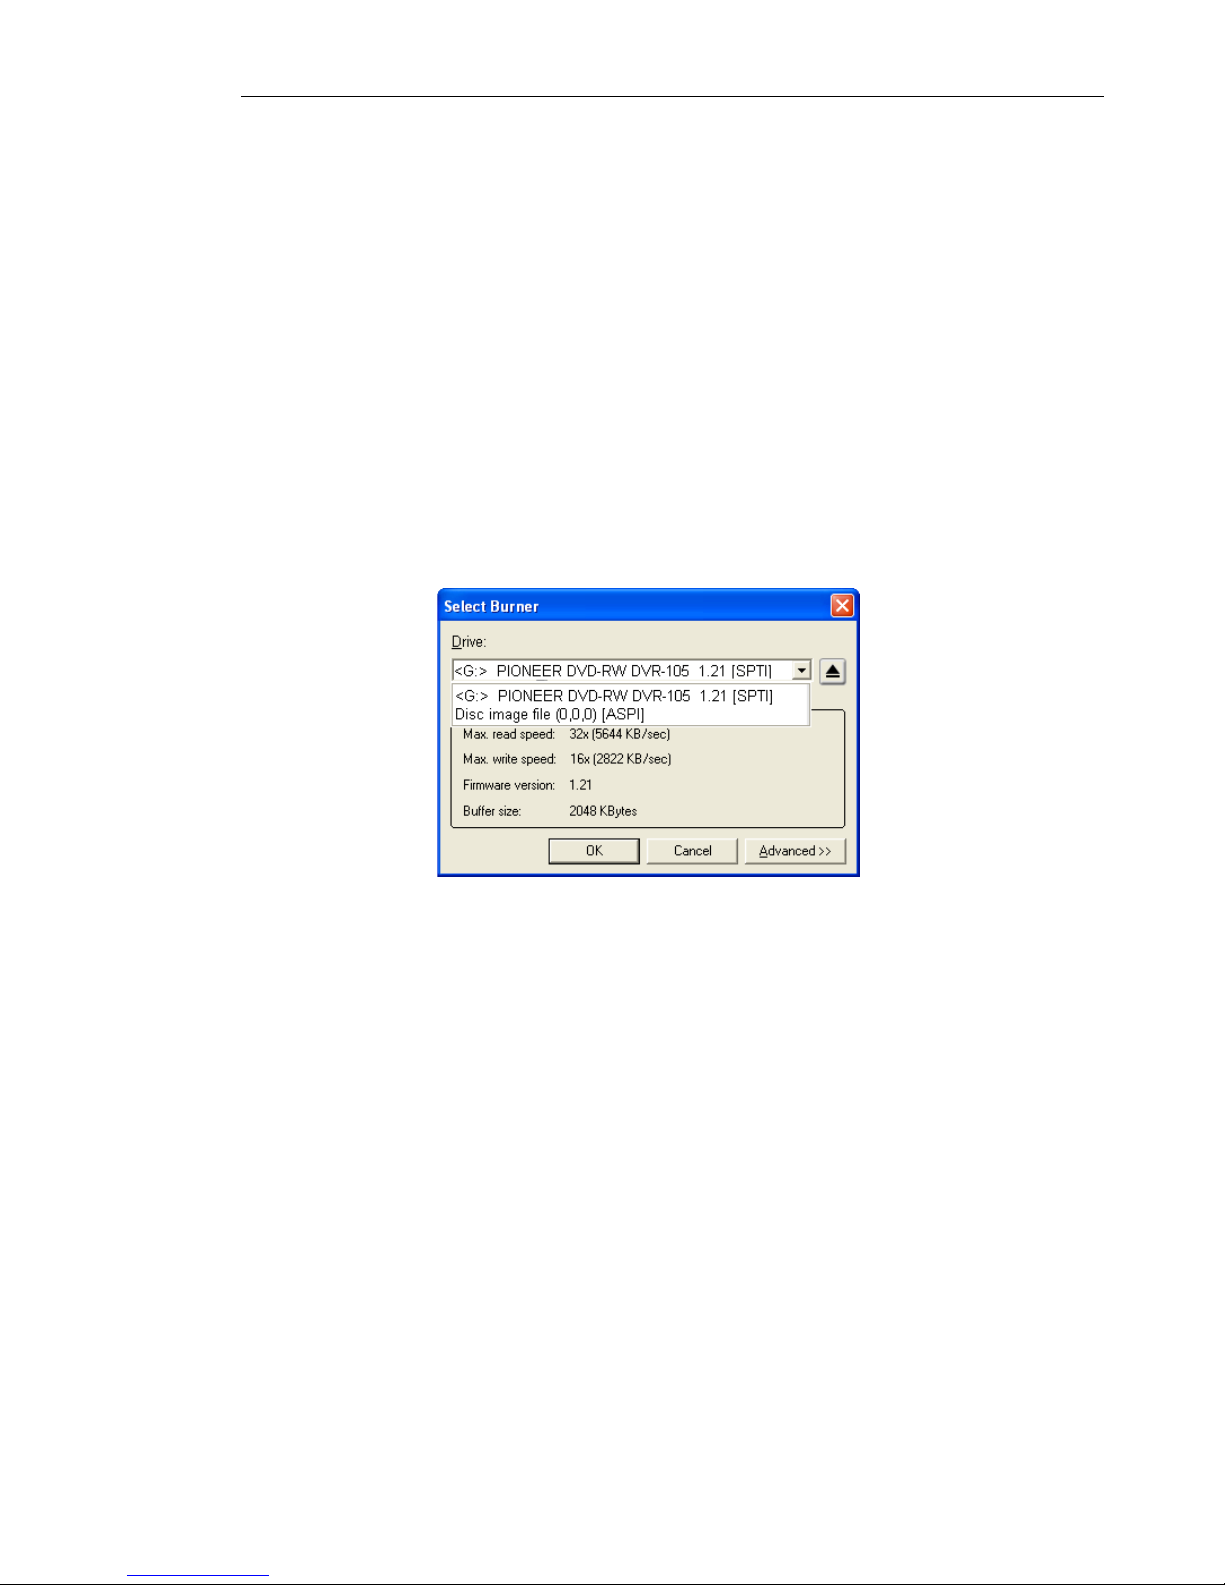
Choosing a disc burner
When creating discs, you would usually specify a physical burner
drive with which to burn the disc. However, instead of directly
recording to a burner, Burn.Now provides an alternative method.
When compiling a new disc, it is not necessary to burn it
immediately to a disc. Instead, you can save it as a disc image file
on your computer, and store it there to be burnt to disc later.
Choose Burner: Select Burner. You can then choose a physical
burner if you want to burn directly to disc. Click Advanced to view
your burner’s read and write capabilities.
To burn a disc image file, select Disc image file from the drop-down
list. When you start the burning process, you will be prompted to
specify where to save the image file and what file format to use.
The files can be saved as an .ixb file which is the Ulead native
format and is readable only in Burn.Now. You can also save it as an
Page 14
14 ULEAD BURN.NOW USER GUIDE
.iso file which is the industry standard format and is compatible
with all burning software. You will need sufficient space on your
hard disk to store the disc image file.
About file systems
When creating a new disc, you need to select an appropriate file
system that will make the disc readable on the device or operating
system where the disc will be viewed or played. Choose the file
system in the Burn Disc dialog box before burning the disc. (Click
Burn Disc in the Toolbar.) The file systems that are available
include:
Note: Burn.Now can create ISO 9660 and UDF/ISO 9660 disc image
files only. For UDF 1.5 file system or above, the program can only
directly burn to disc. (See “About file systems” for more information
on file systems.)
Page 15

ULEAD BURN.NOW USER GUIDE 15
• ISO 9660
ISO 9660 is a cross-platform file system that is readable on
Windows, Macintosh, and Unix. When you create an ISO 9660
disc with Joliet extensions, names of files/folders burned onto
discs can have up to 64 characters in length.
Burn.Now only allows ISO 9660 to be used as the file system for
audio discs and MP3 discs.
• UDF 1.5, 2.0 and 2.01
UDF (Universal Disc Format) is a file system developed by OSTA
(Optical Storage Technology Association). There are various UDF
versions. UDF 1.5 (readable on Windows 2000 and above) and
higher versions (readable on Windows XP and above) support
random packet writing and allows over 4 GB of data to be burnt
onto a DVD disc. (See “Appendix C: Glossary” for information on
random packet writing.)
• UDF/ISO 9660
UDF/ISO 9660 (also known as UDF Bridge) is a combination of
two file systems: UDF 1.02 and ISO 9660. Discs burned with this
file system can be read by Macintosh and Windows.
Page 16

16 ULEAD BURN.NOW USER GUIDE
Making a data disc
A data disc is a disc that contains computer files. Computer files can
include a wide variety of data including word-processed documents,
spreadsheets, multimedia files including music, video clips, images,
and much, much more. Discs are extremely convenient for storing
data as they can hold large quantities. CDs can hold up to 700MB of
data, while DVDs can hold gigabytes of data. Since recordable/
rewritable discs are relatively inexpensive, they are quick and
convenient way of backing up computer systems. As an added
bonus, their compactness allows for easy storage and
transportation.
Ulead Burn.Now streamlines the process of putting together a
data disc, taking care of all the complicated decisions for you. All
you need to do is decide the kind of disc to use and what data to
write onto your disc.
To create a data disc:
1. In the Select a Task dialog box, select Create Disc and then
select Data disc.
2. Select the disc type (CD or DVD), and then click OK.
3. Choose Burner: Select Burner to select whether to burn to a
physical disc burner or create a disc image file. (See “Choosing a
disc burner” for details.)
4. Collect folders and files, and add them to the Disc Layout
Window.
5. When you are ready to burn the data disc, click Burn Disc
on the Toolbar.
Page 17
ULEAD BURN.NOW USER GUIDE 17
Compiling a data disc
The Disc Layout Window is where you compile and organize
folders and files to burn to a data disc.
To compile a data disc:
1. To select files from your computer, click Add Files on the
Toolbar. Once the navigation box is opened, select a file, (or
multiple files by holding down [Shift] for consecutive files, or
[Ctrl] for individual selection), then click Open. The selected
files will be displayed in the right panel.
2. To insert a whole folder into your compilation, click Add Folder
on the Toolbar. The Browse for Folder dialog box will be
displayed. Navigate to the folder, then click OK.
3. Alternatively, click Add from Explorer on the Toolbar,
which will launch Windows Explorer. Navigate directly to the
folders/files to copy, then select and drag across to either pane.
The folders/files will be added to the folder selected in the left
pane.
Page 18

18 ULEAD BURN.NOW USER GUIDE
4. To reorganize data, click on any file or folder in either pane, and
drag it to its new location, up or down the folder structure in the
left pane, or directly across to a different folder from the left
pane to the right.
5. To create a new folder, right-click in the right pane then select
New Folder from the context menu.
6. To rename a selected folder or file, right-click in the right pane
and select Rename. The selected folder/file name will be
highlighted and show a flashing cursor, and a new name can be
entered.
7. To delete any file or folder, select it then click Delete on the
Toolbar.
Burning the data disc
1. Click Burn Disc on the Toolbar. The Burn Disc dialog box
will be displayed.
Page 19

ULEAD BURN.NOW USER GUIDE 19
2. In the top half of the dialog box, the disc Volume can be
renamed and a File system can be selected. The volume name
can have up to 16 characters in length.
If ISO 9660 is selected as the file system, the Joliet option will
be available. Joliet is an industry standard extension of ISO
9660 which supports Unicode in file names and permits
extended file names of up to 64 characters in length, including
spaces.
3. In the Disc burner area, you can specify whether to create a
disc image file or burn directly to disc. (See “Choosing a disc
burner” for details.)
If you are burning directly to a physical burner, the write Speed
can also be selected. If there is a disc inserted in the burner, the
program will check the write speed of the burner and the disc,
and by default, will choose the highest speed that both can
handle.
4. Click Burn to start the burning process.
Note: For details on the other options available in this dialog box,
see “Disc burning options”.
Page 20

20 ULEAD BURN.NOW USER GUIDE
Making an audio disc
An audio disc is a disc that holds songs or music. Burn.Now makes
the audio disc production process easy for you. Simply compile your
audio files, then create your audio disc.
To create an audio disc:
1. In the Select a Task dialog box, select Create Disc and then
select Audio disc.
2. Choose a data format that will allow your disc player to
recognize and play the disc:
• Audio CD - Records audio in Compact Disc-Digital Audio
(CD-DA) format on CD-R or CD-RW media. A disc may
contain up to 99 tracks or songs. Audio CD can be played on
any CD or DVD player, such as portable units or the CD-ROM/
DVD-ROM drive in your PC.
Page 21

ULEAD BURN.NOW USER GUIDE 21
• DVD-Audio - Records audio in LPCM stereo (44.1 kHz, 16-bit
stereo) on DVD. A DVD disc can contain up to 99 tracks or
songs. Audio are saved as .aob files in the AUDIO_TS folder
on the DVD.
DVDs burned in this format can be played in DVD-Audio-only
players. When you play the DVD, use the player’s controls or
its remote control to select and playback tracks.
• Audio-only DVD-Video - Records audio in DVD-Video
format. A DVD burned in this format is the same as a regular
DVD movie disc which can be played on your computer, home
or car DVD player, except that the DVD does not contain
video content.
Audio is recorded in LPCM stereo at 48 kHz 16-bit stereo. A
DVD disc, or each side of a dual-sided DVD, is divided into a
maximum of 99 titles, and each title may contain up to 99
tracks or songs. Audio are saved as .vob files in the
VIDEO_TS folder on the DVD. When you play the DVD, a
playlist selection menu with a still background image will be
displayed on-screen where you can select tracks to play.
3. Click OK. The Disc Layout Window will then appear where you
can collect audio files to be burned onto the disc. (See
“Compiling an audio disc” for details.)
4. Choose Burner: Select Burner to decide whether to burn
directly to a disc burner or create a disc image file. (See “Disc
burning options” for details.)
5. Collect audio files and add them to the Disc Layout Window.
6. When you are ready to burn the audio disc, click Burn Disc
in the Toolbar.
Page 22

22 ULEAD BURN.NOW USER GUIDE
Compiling an audio disc
The Disc Layout Window is where you assemble and organize the
audio tracks you want to burn to disc.
Note: When adding audio tracks, check the Disc-space Meter to
ensure that you are not exceeding the capacity of the disc.
If you chose to create an Audio CD, the Disc-space Meter will
display the CD capacity in units of minutes. If you chose to create a
DVD-Audio or Audio-only DVD-Video disc, the Disc-space Meter
will display the DVD capacity in units of megabytes.
Page 23

ULEAD BURN.NOW USER GUIDE 23
To compile tracks for your audio disc:
1. If you chose to create an Audio-only DVD-Video formatted
disc in the Select a Task dialog box, select the audio format for
encoding audio on DVD.
2. To select individual files from your computer, click Add Files
on the Toolbar. Once the navigation box is opened, select a file,
(or multiple files by holding down [Shift] for consecutive files,
or [Ctrl] for individual selection), then click Open.
Alternatively, click Add from Explorer on the Toolbar to
add files using Windows Explorer. Navigate to the folder where
your audio files are kept, and drag them to the Disc Layout
Window.
3. To add all audio files from a specific folder, click Add Folder
on the Toolbar. Navigate to the folder, then click OK.
4. Audio files will be added as tracks in the Disc Layout Window.
To rearrange tracks, select the track(s) then, select Edit: Move
Track-Up/Down or drag the selected tracks to the desired
position.
5. To delete a track, select it then click Delete on the Toolbar.
6. By default, each track has the same name as the audio file. To
rename a track, select the track then click the track title.
You can select LPCM audio
or Dolby Digital audio.
Note: You can add video files such as AVI, QuickTime, and
Windows Media Video files. Audio will be extracted from the video
files and added as audio tracks to the Disc Layout Window.
Page 24

24 ULEAD BURN.NOW USER GUIDE
Adding CD-Text (Audio CD only)
The CD-Text feature lets you store track and CD information onto
the Audio CD. To display this information, the disc must be played
on a CD player that supports CD-Text features.
To add track and album information:
1. To add track information, first select a track then click CD-Text
Track Information on the Toolbar.
To add CD information, click CD-Text Album Information
on the Toolbar.
2. Enter information as prompted, then click OK.
Note: CD-Text can be written to the Audio CD only when the disc is
to be closed.
CD-Text Track Information
CD-Text Album Information
Page 25

ULEAD BURN.NOW USER GUIDE 25
Burning the audio disc
1. To burn an Audio CD, insert a blank CD-R or CD-RW into the
burning device.
To burn a DVD-Audio or Audio-only DVD-Video disc, insert a
blank DVD-R, DVD+R, DVD-RW, or DVD+RW.
2. Click Burn Disc on the Toolbar. The Burn Disc dialog box
will be displayed.
3. For an Audio CD, select Write CD-Text information and Close
disc if you want to add CD-Text (that is, track and album
information) on the disc. (CD-Text cannot be added if the disc is
not closed.)
Burn Disc dialog box (Audio CD) Burn Disc dialog box
(DVD-Audio and Audio-only DVD-Video)
Notes:
• If the Audio CD is closed, you will not be able to add additional
content to the CD at a later stage.
• DVDs are always closed.
Page 26

26 ULEAD BURN.NOW USER GUIDE
4. In the Disc burner area, you can confirm whether to save as a
disc image file or burn directly onto a disc. (See “Choosing a disc
burner” for details.)
If you are burning directly to a physical burner, the write Speed
can also be selected. If there is a disc inserted in the burner, the
program will check the write speed of the burner and the disc,
and by default, will choose the highest speed that both can
handle.
5. Click Burn to start the burning process.
Notes:
• For details on the other options available in this dialog box, see
“Disc burning options”.
• Since the audio size to be burned onto DVD is enormous, DVD
folders and files will first be created on your hard drive which
will then be burned onto the DVD. Before burning a DVD-Audio
or Audio-only DVD-Video disc, make sure that your hard drive
has available space that is equivalent to, or higher than, the
DVD disc capacity. The temporary DVD folders and files will be
deleted from your hard drive after burning is complete.
Page 27

ULEAD BURN.NOW USER GUIDE 27
Making an MP3 disc
MP3 is a popular audio file format that compresses sound files so
that they take up only about 1/10th of their original size. Even
though it is highly compressed, its sound quality is not noticeably
compromised, except on extremely hi-fidelity sound systems. MP3
is ideal for playback on your computer, and for traveling, since
compression enables a large number of MP3 files to be stored on
disc for playback on a small portable MP3 player or CD player. (A
CD player that supports MP3 playback is required for playing MP3.)
Burn.Now lets you easily collect your favorite MP3 files and burn
them to disc.
To create an MP3 disc:
1. In the Select a Task dialog box, select Create Disc then select
MP3 disc.
2. Select the disc type (CD or DVD) that you will be burning to,
then click OK.
3. Choose Burner: Select Burner to select whether to burn
directly onto a disc or create a disc image file. (See “Choosing a
disc burner” for details.)
4. Collect MP3 files and add them to the Disc Layout Window.
5. When you are ready to burn the MP3 disc, click Burn Disc
on the Toolbar.
Page 28

28 ULEAD BURN.NOW USER GUIDE
Compiling an MP3 disc
The Disc Layout Window is where you compile and organize MP3
folders and files to burn onto a disc.
To compile MP3s for your MP3 disc:
1. To select MP3 files from your computer, click Add Files on
the Toolbar. Once the navigation box is opened, select an MP3
file, (or multiple MP3 files by holding down [Shift] for
consecutive MP3 files, or [Ctrl] for individual selection), then
click Open. The selected MP3 files will be displayed in the right
pane.
2. To insert a whole folder into your compilation, click Add Folder
on the Toolbar. The Browse for Folder dialog box will be
displayed. Navigate to the folder, then click OK.
3. Alternatively, click Add from Explorer on the Toolbar,
which will launch Windows Explorer. Navigate directly to the MP3
Page 29

ULEAD BURN.NOW USER GUIDE 29
folder or files to copy, then select and drag across to either
pane.
4. To reorganize data, select any MP3 file or folder in either pane,
and drag it to its new location, up or down the folder structure in
the left pane, or directly across to a different folder from the left
pane to the right.
5. To create a new folder, right-click in the right pane then select
New Folder from the menu.
6. To rename a selected folder or file, right-click in the right pane
and select Rename.
7. To delete any MP3 file or folder, select it then click Delete on
the Toolbar.
Burning the MP3 disc
1. Click Burn Disc on the Toolbar. The Burn Disc dialog box
will be displayed.
2. In the top half of the dialog box, you can rename the disc
Volume, which can have up to 16 characters in length.
Only the ISO 9660 file system can be used for MP3 discs. To
ensure that complete MP3 folder and file names will be retained,
you can select the Joliet option. Joliet is an industry standard
extension of ISO 9660 file system which supports Unicode in file
names and permits extended file names of up to 64 characters
in length, including spaces.
Page 30

30 ULEAD BURN.NOW USER GUIDE
3. In the Disc burner area, you can specify whether to create a
disc image burn directly onto a disc. (See “Choosing a disc
burner” for details.)
If you are burning directly to a physical burner, the write Speed
can also be selected. If there is a disc inserted in the burner, the
program will check the write speed of the burner and the disc,
and by default, will choose the highest speed that both can
handle.
4. Click Burn to start burning the disc.
Note: For details on the other options available in this dialog box,
see “Disc burning options”.
Page 31

ULEAD BURN.NOW USER GUIDE 31
Converting audio files
Burn.Now allows you to convert audio files to five audio file
formats: au, mp3, mpa, wav, and wma.
Convert Audio Files dialog box
Add Adds audio files to the list for conversion.
Delete Removes the selected audio file(s) from the list.
Remove All Deletes all audio file(s) from the list.
Play Plays back the selected audio file.
File Info Displays the properties of the selected audio file.
Audio file list Displays the audio files to be converted.
Page 32

32 ULEAD BURN.NOW USER GUIDE
Output folder Displays the location of the converted audio files.
Click Browse to locate a folder where the converted audio files will
be saved.
File type Specifies the output format for the converted audio files.
Options Opens a dialog box where you can specify additional
settings for the selected audio encoding format.
Information Displays additional information about the selected
encoding format.
Convert All Converts all audio files in the list to the specified audio
encoding format.
To convert audio files:
1. Select Tools: Convert Audio Files (or click on the
Toolbar).
2. Click Add to browse for the audio files to be converted.
3. Click Browse to specify the output folder for the converted
audio files.
4. Select an audio file format from File type.
5. Select the audio files as you would in Windows Explorer and click
Convert, or directly click Convert All to start the conversion
process.
Note: Click Options to specify additional settings for the selected
audio encoding format.
Page 33

ULEAD BURN.NOW USER GUIDE 33
Ripping CD audio
The process of copying an audio track from an audio CD is
commonly referred to as ripping. Burn.Now allows you to rip Audio
CD files and convert them to file formats compatible with most
multimedia software.
To rip files from an Audio CD:
1. Insert an Audio CD into your CD-ROM drive.
2. Select Tools: Rip CD Audio, or click on the Toolbar.
Page 34

34 ULEAD BURN.NOW USER GUIDE
3. Select the track from the list and then browse for the folder
where the audio files will be stored. To select multiple tracks,
hold down [Ctrl] or [Shift] and then select the tracks.
4. Specify the audio encoding format for the audio files in File type.
5. Click Rip to start ripping the audio tracks.
Tip: You can click to preview the selected track or to view its
properties.
Tip: To copy all the tracks in the disc, click Rip All.
Page 35

ULEAD BURN.NOW USER GUIDE 35
Disc burning options
Burn.Now features a number of options to determine how your
discs are burnt.
Close disc
Closing a disc prevents additional data to be written onto the disc
after the burning process is finished.
The following guidelines should be followed when deciding whether
to close a disc or leave it open:
• A data disc can be left open. CD-ROM and DVD-ROM drives will
be able to read open data discs.
• Leave an MP3 disc open to keep adding more MP3 files. CD-ROM
drives, MP3 players and CD players that support MP3 playback
will be able to play open MP3 discs.
• If an Audio CD is left open, it can be appended with data files
and used as a data disc as well. An Audio CD that contains both
audio tracks and data tracks is known as a CD-Extra disc.
Close an Audio CD when writing CD-Text onto the disc. Closing
an Audio CD also makes the disc more compatible with CD
players that may not be able to play open discs.
Direct burn
Direct burn is a quick way of burning discs since it allows data to
be written directly onto the disc. When this feature is disabled, a
temporary disc image file will first be created on the hard drive
before the disc is burnt.
Note: Burn.Now burns a disc in ‘Disc-at-Once’ mode when you
close the disc, and ‘Track-at-Once’ mode when the disc is left open.
Page 36

36 ULEAD BURN.NOW USER GUIDE
Direct burn must be selected when burning a disc with UDF 1.5
file system or above since Burn.Now does not allow the creation
of disc image files with these file systems. You can also select this
option if you have a fast computer and fast burner device.
You can clear the Direct burn option when burning a disc with ISO
9660 or UDF/ISO 9660 file system, or if you have a slow computer
and faster burner device (with a write speed of higher than 8X) to
prevent burning errors.
Perform test before burning
Selecting this option simulates the recording process before
burning data to disc. This helps in checking if the system speed or
CD-ROM/DVD-ROM speed is fast enough to send data to the burner
device at the specified write speed. However, this doubles the
burning time.
Buffer underrun protection
If the burning device has buffer underrun protection capability, this
feature is enabled in the Burn Disc dialog box. Selecting this
option ensures an uninterrupted flow of data to minimize the risk of
errors in the burning process.
Note: It is recommended that multiple programs are not running
while directly burning to disc, to prevent burning errors and to
increase your computer’s performance.
Note: If your burning device has buffer underrun protection and this
function is enabled, you can clear the Perform test before burning
option to save time when burning discs.
Note: DVD+R/+RW burners always perform buffer underrun
protection when burning discs and do not allow this option to be
disabled. If you are using such a burner, this option will be grayed
out in the Burn Disc dialog box.
Page 37

ULEAD BURN.NOW USER GUIDE 37
Editing a disc
Burn.Now harnesses the versatility of rewritable discs by allowing
you to edit the contents of a data disc or MP3 disc without needing
to erase or format it first.
Modifying disc contents
To add and edit data on a disc:
1. Insert the rewritable disc to be edited into the disc burner.
2. In the Select a Task dialog box, select Edit Disc and then
specify the disc burner.
Tip: Detailed information about both the burner and the disc can
be viewed by clicking then selecting Drive Information and
Disc Information respectively.
Page 38

38 ULEAD BURN.NOW USER GUIDE
3. Select the type of disc (Data disc or MP3 disc) to be edited and
then click OK.
The contents of the disc will be displayed in the Disc Layout
Window. Existing files and folders will be shown in grayed-out
text, but can be moved, deleted, renamed and reorganized in
the same way as when compiling a new disc. Once existing files
are edited, they are no longer shown as grayed text, but black.
4. To add more files or folders, click Add Files , Add Folder
or Add from Explorer on the Toolbar.
New files and folders are also shown in black.
Note: If a file name (or folder name) that you want to add already
exists on the disc, you will be prompted to confirm whether or not to
overwrite the existing files.
Page 39

ULEAD BURN.NOW USER GUIDE 39
Burning the edited disc
1. Click Burn Disc on the Toolbar. The Burn Disc dialog box
opens.
2. In the top half of the dialog box, you can rename the disc
Volume, which can have up to 16 characters in length. The file
system cannot be changed. The disc will be burned using the
existing file system.
3. In the lower half of the dialog box, you can change the write
Speed.
If a disc is already inserted in the burner, the program
will check the write speed of the burner and the disc, and by
default, will choose the highest speed that both can handle.
4. Click Burn to start the burning process.
Note: For details on the other options available in this dialog box,
see “Disc burning options”.
Page 40

40 ULEAD BURN.NOW USER GUIDE
Copying a disc
Burn.Now’s Copy Disc feature lets you duplicate any type of disc,
including VCDs, SVCDs and DVDs, as long as it is not copy
protected. You can make direct disc to disc copies, or copy a disc as
a disc image file. You can also duplicate a disc from a disc image
file.
To use the Copy Disc feature, select Copy Disc in the Select a
Task dialog box or select Disc: Copy Disc on the Toolbar.
Page 41

ULEAD BURN.NOW USER GUIDE 41
Making a disc to disc copy
Burn.Now allows you to copy ‘on-the-fly’, that is, to directly copy
the contents from a source disc to a new disc.
To make a disc to disc copy:
1. Insert the source disc into your CD-ROM or DVD-ROM drive and
a blank disc into your disc burner.
2. In the Select a Task dialog box, select Copy Disc.
3. Under Source, select Disc then choose your source drive.
Under Destination, choose your burner drive.
4. Click to see more burning options.
5. Set the Read speed. If there is a disc inserted in the source
CD-ROM/DVD-ROM drive, the program will check the read speed
of the drive and the disc, and by default, will choose the highest
speed that both can handle.
Note: Your disc burner can both be your source drive and
destination drive. While copying, Burn.Now will prompt you to
insert the source disc and then the blank disc.
Tip: When copying Audio CDs, choose a low read speed to
preserve the audio quality. When copying data discs or other
types of discs, choosing a high read speed minimizes buffer
underrun errors.
Page 42

42 ULEAD BURN.NOW USER GUIDE
6. Set the Write speed. If there is a disc inserted in the burner
drive, the program will check the write speed of the burner and
the disc, and by default, will choose the highest speed that both
can handle.
7. Specify the number of disc Copies to burn.
8. Select On-the-fly to directly copy from the source disc.
9. Select Buffer underrun protection to prevent interruptions in
the flow of data from the source disc to the burner and ensure a
safe burn.
10.Click OK to start copying.
Creating a disc image file
A disc image file is a single file that has captured the entire
contents and file structure of a disc. Creating a disc image file on
your hard disk allows you to archive the source disc contents for
backup or future burning.
To create a disc image file:
1. Insert the source disc into your CD-ROM or DVD-ROM drive.
2. In the Select a Task dialog box, select Copy Disc.
3. Under Source, select Disc then choose your source drive.
4. Under Destination, select Disc image file.
5. Click OK. The Save As dialog box will be displayed.
6. Select a file format. The disc image file can be saved in .iso
which is a standard disc image format or .ixb which is Ulead’s
native format.
Note: If you encounter a buffer underrun error even with the Buffer
underrun protection option selected, choose a lower write speed
or clear On-the-fly and try copying the disc again. Disabling on-thefly copying allows a temporary disc image file of the source disc
contents to be saved first in the hard drive before burning the disc.
This reduces the risk of copying failure.
Page 43

ULEAD BURN.NOW USER GUIDE 43
7. Specify a file name for the disc image file, and click Save to
create the disc image file.
Burning a disc from a disc image file
If you created a disc image file from a source disc, or if you
previously saved a disc image file for a data, MP3, or audio disc
created in Burn.Now, you can easily burn multiple disc copies using
the image file.
To burn a disc from a disc image file:
1. Insert a blank disc in your disc burner.
2. In the Select a Task dialog box, select Copy Disc.
3. Under Source, select Disc image file then click Browse to
open an image file.
4. Under Destination, choose your burner drive.
5. Click Advanced to see more burning options.
6. Set the Write speed. If there is a disc inserted in the burner
drive, the program will check the write speed of the burner and
the disc, and by default, will choose the highest speed that both
can handle.
7. Specify the number of disc Copies to burn.
8. Select Buffer underrun protection to prevent interruptions in
the flow of data from the hard disk to the burner and ensure a
safe burn.
9. Click OK to start the burning process.
Page 44

44 ULEAD BURN.NOW USER GUIDE
Handling rewritable discs
Rewritable discs such as CD-RW, DVD-RW, DVD+RW, and DVD-RAM
are often used for regular backups, and they can be easily erased
or reformatted to be written over again using Burn.Now’s Disc
Tools.
To access the tools, select Disc Tools in the Select a Task dialog
box or select them from the Disc menu in the program window.
Page 45

ULEAD BURN.NOW USER GUIDE 45
Erase
Erasing a rewritable disc removes the disc contents. There are two
ways to erase a disc:
• Quick erase - Deletes only the Table of Contents of the disc.
The file system, tracks and sectors on the disc are not physically
removed. This method simply allows the disc to be overwritten.
• Full erase - Deletes all the information, including the file
system, tracks and sectors from the disc.
UDF Format
UDF Format writes the UDF (Universal Disc Format) file system to
a rewritable disc to enable random packet writing. Random packet
writing allows disc space to be used more efficiently when burning
data onto the disc. It allows data to be written onto the disc in the
same way as the hard disk, freeing disc space as data are deleted,
and reusing freed space. A disc can be formatted with UDF 1.5 or
above. There are two options for formatting a disc:
Page 46

46 ULEAD BURN.NOW USER GUIDE
• Quick format - Provides a fast way of reformatting a CD-RW
that has previously been full formatted. It simply removes the
file system table from the disc without checking for defects (that
is, bad sectors) and writes the selected UDF file system to the
disc.
Burn.Now provides only the Quick format option for DVD+RW
and DVD-RW discs. These types of discs do not require full
formatting, since in the process of writing data to these discs,
they are also simultaneously formatted.
• Full format - Completely formats a CD-RW using the selected
UDF file system, and writes new tracks and sectors onto the
disc. This formatting method takes a longer time to complete,
but it makes the disc error-free.
UDF Certify
For a UDF formatted DVD-RW and CD-RW, you can apply disc
certification to scan the disc and check if there is any problem. The
certification process marks bad sectors to improve future writing
reliability. On DVD-RW and CD-RW burners that support DRT-DM
(Distributed Real-Time Defect Management), the certification
process also moves the data in the recoverable defected sectors
(DRT-DM Level-1 and Level-2 defects, if any) to healthy sectors for
further improvement in data reliability.
Page 47

ULEAD BURN.NOW USER GUIDE 47
Checking burner and disc
information
Before burning a disc, check the burner information to find out the
capabilities of your burner. It is also recommended that you check
disc status and other information before overwriting its contents.
Checking burner capabilities
To find out about the capabilities of your burner, select Burner:
Select Burner and choose the burner drive. The dialog box will
show the read and write speeds of your burner.
Page 48

48 ULEAD BURN.NOW USER GUIDE
Click Advanced to see more information about the burner. A list of
disc formats and write methods will then be displayed. Items with
check marks indicate the disc formats that your burner can read
from and write to as well as the different write and error-handling
methods that your burner uses when burning a disc.
Checking disc properties
Select Burner: Disc Information to check how much information
has already been written to the disc. The dialog box will show the
disc media type, its capacity, and the number of tracks and sessions
that have been written onto the disc.
Note: You can also check burner information in Edit Disc, Copy
Disc, or Disc Tools. Click in the Select a Task dialog box then
select Drive Information.
Page 49

ULEAD BURN.NOW USER GUIDE 49
Click Advanced to see more information about your disc. Items
with check marks indicate the current status of your disc (for
instance, whether it is blank or a UDF formatted disc), and the
types of operations that can be performed on your disc.
Note: You can also check disc information in Edit Disc, Copy Disc,
or Disc Tools. Click in the Select a Task dialog box then select
Disc Information.
Page 50

50 ULEAD BURN.NOW USER GUIDE
Appendix A: Menus and
commands
Disc menu
Create Disc
[Ctrl+N]
Creates a new data, audio, or MP3 disc.
Edit Disc Modifies the contents of a disc.
Copy Disc Copies disc to disc, disc to image file, or
image file to disc.
Burn Disc
[Ctrl+R]
Writes information to a disc.
Erase Disc Removes the contents of a disc.
Format Disc Formats a rewritable disc with the UDF file
system.
Preferences
[F6]
Opens the Preferences dialog box.
Exit Closes Ulead Burn.Now.
Edit menu
Cut Cuts a selection to the clipboard.
Copy Copies a selection to the clipboard.
Paste Pastes a selection from the clipboard.
Delete Removes selected folders/files.
Select All Selects all folders/files.
Select None Clears all selections.
Inverse Selection Reverses the selection to the unselected
folders/files.
Sort by Arranges folders/files in a specified order.
Move Track Moves a selected track up or down.
Play Plays a selected audio file.
Page 51

ULEAD BURN.NOW USER GUIDE 51
Pause Pauses playback.
Stop Stops playback.
View menu
Toolbar Shows or hides the Toolbar.
Disc-space Meter Shows or hides the Disc-space Meter.
Status Bar Shows or hides the Status Bar.
Tools menu
Find Finds a file in your computer.
Convert Audio
Files
Opens a dialog box where you can change
an audio file's format and then save it as
another file.
Rip CD Audio Opens a dialog box where you can copy
files from an audio CD and then store them
in your hard drive.
Add Files Adds files to the Disc Layout Window.
Add Folder Adds a folder or files from a folder to the
Disc Layout Window.
Add from Explorer Allows you to drag and drop folders/files
from Windows Explorer to the Disc Layout
Window.
Burner menu
Select Burner Selects the disc burner.
Disc Information Displays disc status and other information.
Edit menu
Page 52

52 ULEAD BURN.NOW USER GUIDE
Appendix B: Troubleshooting
Q. When I insert a data disc in the burner drive and select Edit
Disc, the program prompts this message: "Please insert a disc
and make sure the disc is editable."
A. If the disc is closed or write-protected, it cannot be edited.
Q. I created a data disc with the ISO 9660 file system. Why did
parts of file names and folder names on the disc changed to
underscore '_' characters?
A. ISO 9660 file names and folder names are limited to characters
A-Z, numbers 0-9, and an underscore '_'. Other special
characters are not allowed, and they will be replaced with an
underscore '_'. To retain special characters in file names and
folder names, select the Joliet option in the Burn Disc dialog
box.
Q. Why doesn’t the write speed combo box enumerate all the
available speeds for my burner device?
A. Some burner device drivers cannot report all available write
speeds completely, and Burn.Now can only display the
information obtained from the burner device.
If you find that the program does not list all available write
speeds for your burner device, contact Ulead technical support.
Provide us with the following information: device vendor name,
model number, and write speeds that your burner device
supports.
Q. I compiled 4651MB of data files to create a data DVD, which has
not exceeded the DVD disc capacity of 4.7GB. However, when I
tried to burn the disc, a message is displayed saying that the
disc does not have enough space.
A. Aside from the data files, additional information will be written to
the disc: lead-in area (storing the table of contents); lead-out
area (marking the end of a burning session); and file system
information. The actual size to be burned to disc may therefore
Page 53

ULEAD BURN.NOW USER GUIDE 53
be larger than the data size shown in the Disc-space Meter or
the Burn Disc dialog box.
Q. I added .WMA files to create an audio disc but the program does
not accept these files.
A. Check and make sure that the .WMA files are not content-
protected.
Q. The program displays a disc error or disc type error message
when I try to view the disc information. When I try to create a
data disc, the program shows the following message: "The
program cannot perform the task you selected using the current
disc. Please check your disc and try again."
A. Check the disc's write speed to ensure that it is within the speed
capability of your burner. Some burner drives write data on CDRW using 4X speed only. If a higher speed disc (such as 10X or
12X) is used, such burner devices will not be able to properly
recognize the disc and may treat it as a CD-ROM or corrupted
disc.
Q. When burning a data disc, the error message "Failed to open
file" is displayed and the burning process is aborted.
A. The message appears when files to be burnt are open or when
you rename/delete files while burning the disc. Do not access or
make changes to the files during the burning process.
Q. I am having problems burning discs with an external burner
drive that uses a USB 2.0 connection.
A. If burner devices using a USB 2.0 connection do not function
well with Ulead Burn.Now in Windows XP, update your system to
Windows XP Service Pack 1 and then update the USB driver.
For details, visit Microsoft Web site at the following URL
addresses:
http://www.microsoft.com/whdc/hwdev/bus/usb/
XSLTsection125121120120
http://support.microsoft.com/default.aspx?scid=KB;ENUS;Q329632&
Page 54

54 ULEAD BURN.NOW USER GUIDE
Q. I am using an IDE burner drive enclosed in a USB 2.0 external
box. When I try to burn discs, the program does not respond for
a long time during the burning process.
A. Problems in performance and stability may occur with some IDE
burners when they are externally connected to the computer
through a USB 2.0 or IEEE-1394 adapter box. If the program is
not responding during the burning process, try connecting the
burner drive internally (that is, directly to the IDE interface).
Q. How do I check if a disc is compatible with my burner?
A. Some burner drives, especially DVD burners, are selective with
certain CD/DVD media brands. When purchasing blank media
discs, check the disc's compatibility with your burner drive.
One way to check the read/write compatibility of a disc with the
burner is to select Recorder: Disc Information in Burn.Now. A
disc error, disc not readable, or disc type error message may be
displayed if the inserted disc is incompatible with your burner.
The following message may also indicate that your disc is
incompatible with the burner: "The program cannot perform the
task you selected using the current disc. Please check your disc
and try again." If you encounter any of these messages, try
using another media.
Q. On Windows 2000 or XP, it only reads the first session of a multi-
session DVD.
A. At the time of publication, on Windows 2000 (earlier than SP4)
or XP, only the first session can be read from a multi-session
DVD with more than 4GB data. Please install the latest patches
from Microsoft to update your Windows system.
Page 55

ULEAD BURN.NOW USER GUIDE 55
Appendix C: Glossary
Audio-only DVD-Video
A DVD burned in this format using Ulead Burn.Now is the same as
the regular DVD-Video disc, except that the DVD is recorded with
audio data only (without any video content). Similarly, recordings
are stored as .vob files in the VIDEO_TS folder on the DVD.
CD-Text
Disc and track-related information on Audio CDs. CD-Text can only
be read and displayed by CD-ROM drives and CD players that
support the feature.
Disc-At-Once
A writing mode that allows data to be written continuously on the
disc, without any interruptions. This mode closes the disc after the
writing process.
DVD-Audio (DVD-A)
A format that allocates most of the DVD disc space to audio and is
primarily used for recording high-quality songs and music on DVD.
Audio can be recorded on DVD in a wide range of sampling
frequencies between 44.1 kHz to 192 kHz and resolutions of 16, 20
or 24 bits, with up to six discrete channels.
A DVD-Audio disc contains two folders: AUDIO_TS and VIDEO_TS.
AUDIO_TS stores high-quality audio as .aob files along with still
images (for use as menu backgrounds), navigation, and text. A
limited amount of conventional DVD-Video data can be recorded in
the VIDEO_TS folder.
DVD-Audio discs can only be played in DVD-Audio capable players.
Page 56

56 ULEAD BURN.NOW USER GUIDE
DVD-Video (DVD-V)
The standard format used for recording movies on DVD. MPEG-2 is
the dominant video encoding method used in recording movies for
its superlative video quality, although MPEG-1 may also be used.
The audio part of the video can be encoded in formats such as PCM,
Dolby Digital, or DTS (Digital Theater Sound). DVD-Video provides
standard 4:3 and widescreen 16:9 aspect ratios, up to 9 camera
angles, up to 8 languages, up to 32 subtitle tracks, fully interactive
menus, and instant search of titles, chapters, music tracks, and
timecode. DVD-Video discs can be played on standalone DVD
players or on computers equipped with a DVD-ROM drive.
Incremental Write
A writing mode that sequentially appends data to the disc until the
disc is full.
Joliet
A Microsoft extension to the ISO 9660 file system that handles long
file names (up to 64 characters in length, including spaces).
Linear Pulse Code Modulation, Linear PCM (LPCM)
An uncompressed audio format that is similar to CD audio but with
higher sampling frequencies and resolutions. It encodes audio on a
DVD with a sampling frequency of 48 or 96kHz, resolution of 16, 20
or 24 bits per sample, and with up to eight channels. LPCM’s
maximum bit rate is 6.144 Mb/s, which is higher than Dolby Digital
or MPEG-2.
Mount Rainier
A storage format for CD-RW media that is developed by the Mount
Rainier Technical Group. It intends to make the use of CD-RW discs
a lot easier by allowing drag-and-drop file copying. Unlike
conventional CD-RW burners, Mount Rainier capable burners
provide background formatting and defect management features.
Page 57

ULEAD BURN.NOW USER GUIDE 57
On-the-fly
A writing process that allows direct disc-to-disc copying without
saving a temporary disc image file on the hard disk.
Random Packet Write
A writing process where small amounts of data can be written and
deleted in one action. This writing method allows disc space to be
used more efficiently when burning data onto the disc. It allows
data to be written onto the disc in the same way as the hard disk,
freeing disc space as data are deleted and reusing freed space.
Raw Mode
A disc writing process which reads and writes data as is. In this
mode, the disc burner does not correct or repair errors before
burning data onto the disc. If this method is used, errors on the
original source will also be present on the disc.
Restricted Overwrite
A writing method for DVD-RW that allows random overwriting of
data. This method can only be used on pre-formatted DVD-RW
discs.
Session-At-Once
A method that writes data in one uninterrupted sequence, that is,
by session. A session is an area on the disc that contains one or
more tracks depending on the amount of data burnt at a time. This
writing method always closes each session but leaves the disc
open.
Test Write
A simulation of the burning process before actually writing data to
the disc.
Page 58

58 ULEAD BURN.NOW USER GUIDE
Track-At-Once
A writing mode that writes data to a disc by track. When burning a
disc in this mode, the burner’s laser turns on and off in between
tracks, creating a gap between tracks. (This is equivalent to twosecond gaps of silence between audio tracks on an Audio CD.)
Page 59

ULEAD BURN.NOW USER GUIDE 59
Index
A
Audio CD 20
adding CD-Text 24
audio disc
burning 25
compiling 22
creating 20
data format 20
Audio CD 20
Audio-only DVD-Video
21
DVD-Audio 21
audio files 31
Audio-only DVD-Video 21, 55
B
Burn Disc dialog box 25
audio CD 25
data disc 18
edited disc 39
MP3 disc 29
burner 13
Burner menu 51
burning 25
audio disc 25
data disc 18
edited disc 39
from a disc image file 43
MP3 disc 29
options 35
C
CD audio 33
CD-Text 24, 25, 55
checking 47
burner capabilities 47
disc properties 48
commands 50
converting audio files 31
copy 40
copying a disc 40
burning a disc from a disc
image file 43
creating a disc image file 42
making a disc to disc copy 41
D
data disc 16
burning 18
compiling 17
creating 16
editing 37
disc burner 13
choosing a disc burner 13
disc burning options 35
Buffer underrun protection 36
Close disc 35
Direct burn 35
Perform test before burning
36
Disc image file 13
disc image file
.iso 14
.ixb 13
creating 42
Disc Information dialog box 48
Disc Layout Window 10
Disc menu 50
Disc Tools 44
Disc-At-Once 55
Disc-space Meter 11
Page 60

60 ULEAD BURN.NOW USER GUIDE
Dolby Digital 23
DVD-Audio 21, 55
DVD-Video 56
E
Edit menu 50
editing a disc 37
eject 12
Erase 45
Full erase 45
Quick erase 45
F
file systems 14
ISO 9660 15
UDF 1.5, 2.0 and 2.01 15
UDF/ISO 9660 15
format 45
I
Incremental Write 56
ISO 9660 15
J
Joliet 56
L
LPCM 23, 56
M
menus 50
Mount Rainier 56
MP3 disc 27
burning 29
compiling 28
creating 27
editing 37
O
On-the-fly 57
P
Preferences dialog box 12
R
Random Packet Write 57
Raw Mode 57
Restricted Overwrite 57
rewritable discs 44
erasing 45
formatting 45
ripping 33
S
Select a Task dialog box 9
Session-At-Once 57
T
Test Write 57
Toolbar 11
Tools menu 51
Track-At-Once 58
troubleshooting 52
U
UDF 15
UDF 1.5, 2.0 and 2.01 15
UDF Certify 46
UDF Format 45
Full format 46
Quick format 46
UDF/ISO 9660 15
user interface 9
V
View menu 51
 Loading...