

Page 1

BD DiscRecorder USER GUIDE 1
BD DiscRecorder
Table of Contents
Welcome to Ulead BD DiscRecorder . . . . . . . . . . . . . . . . . . . 2
System Requirements . . . . . . . . . . . . . . . . . . . . . . . . . . . . . 2
Hardware checkup and configuration . . . . . . . . . . . . . . . . . 3
Running BD DiscRecorder . . . . . . . . . . . . . . . . . . . . . . . . . . 3
Preferences . . . . . . . . . . . . . . . . . . . . . . . . . . . . . . . . . . . . . 4
General . . . . . . . . . . . . . . . . . . . . . . . . . . . . . . . . . . . . . . . . . . .4
Capture . . . . . . . . . . . . . . . . . . . . . . . . . . . . . . . . . . . . . . . . . . .5
New/Append Disc . . . . . . . . . . . . . . . . . . . . . . . . . . . . . . . . 5
Introduction to the workspace . . . . . . . . . . . . . . . . . . . . . . . . . . . .6
Capturing videos . . . . . . . . . . . . . . . . . . . . . . . . . . . . . . . . . . . . .7
Adding video files . . . . . . . . . . . . . . . . . . . . . . . . . . . . . . . . . . . 10
Importing DVD video . . . . . . . . . . . . . . . . . . . . . . . . . . . . . . . . . 11
Editing a program with Multi-trim video . . . . . . . . . . . . . . . . . . . . 12
Setting a name for a program . . . . . . . . . . . . . . . . . . . . . . . . . . . 13
Exporting video . . . . . . . . . . . . . . . . . . . . . . . . . . . . . . . . . . . . . 13
Burning your disc . . . . . . . . . . . . . . . . . . . . . . . . . . . . . . . . . . . 15
Formatting a disc . . . . . . . . . . . . . . . . . . . . . . . . . . . . . . . . . . . . 16
Straight to Disc . . . . . . . . . . . . . . . . . . . . . . . . . . . . . . . . . 16
Index . . . . . . . . . . . . . . . . . . . . . . . . . . . . . . . . . . . . . . . . . 18
Page 2

2 BD DiscRecorder USER GUIDE
Welcome to Ulead BD DiscRecorder
With Ulead BD DiscRecorder, users can capture, edit, and save videos in the BDAV
format for use with Blu-ray discs.
BDAV (Blu-ray Disc Audio-Visual) is the next-generation video format, making the
future of High Definition videos a reality. It was created by the Blu-ray Disc
Association (BDA) to bring HD technology and higher storage capacity to video
editing.
System Requirements
To run BD DiscRecorder on your computer, make sure the following minimum
requirements are met:
• Intel® Pentium® 4 2.8GHz CPU or higher
• Microsoft® Windows® XP Service Pack 2 or Media Center Edition
•512MB of RAM
• 200MB of available hard disk space for program installation
• 4GB or more of hard disk space for video capture and editing
• Windows-compatible display with at least 1024x768 resolution
• Power BD drive (supporting recordable or re-writable Blu-ray discs)
• BD-R/RE single or double layer disc
• Windows-compatible mouse, display card, and sound card
To utilize the full capabilities of BD DiscRecorder, the following additional
components are recommended:
• Capture devices such as DV or HDV camcorders
• OHCI compliant IEEE-1394 card for use with DV or HDV camcorder
Page 3
BD DiscRecorder USER GUIDE 3
BD DiscRecorder
Hardware checkup and configuration
To make sure your video production runs smoothly and trouble free, click Control
Panel: System - Hardware - Device Manager and check if your devices are
working properly with your Operating System (OS).
In general, as long as the device can be seen and working properly in the Device
Manager (this applies to all Windows versions), BD DiscRecorder will be able to
detect it and work with it.
Also make sure that a burner that supports Blu-ray discs is properly connected and
configured and that you have the appropriate BD-R or BD-RE media for recording.
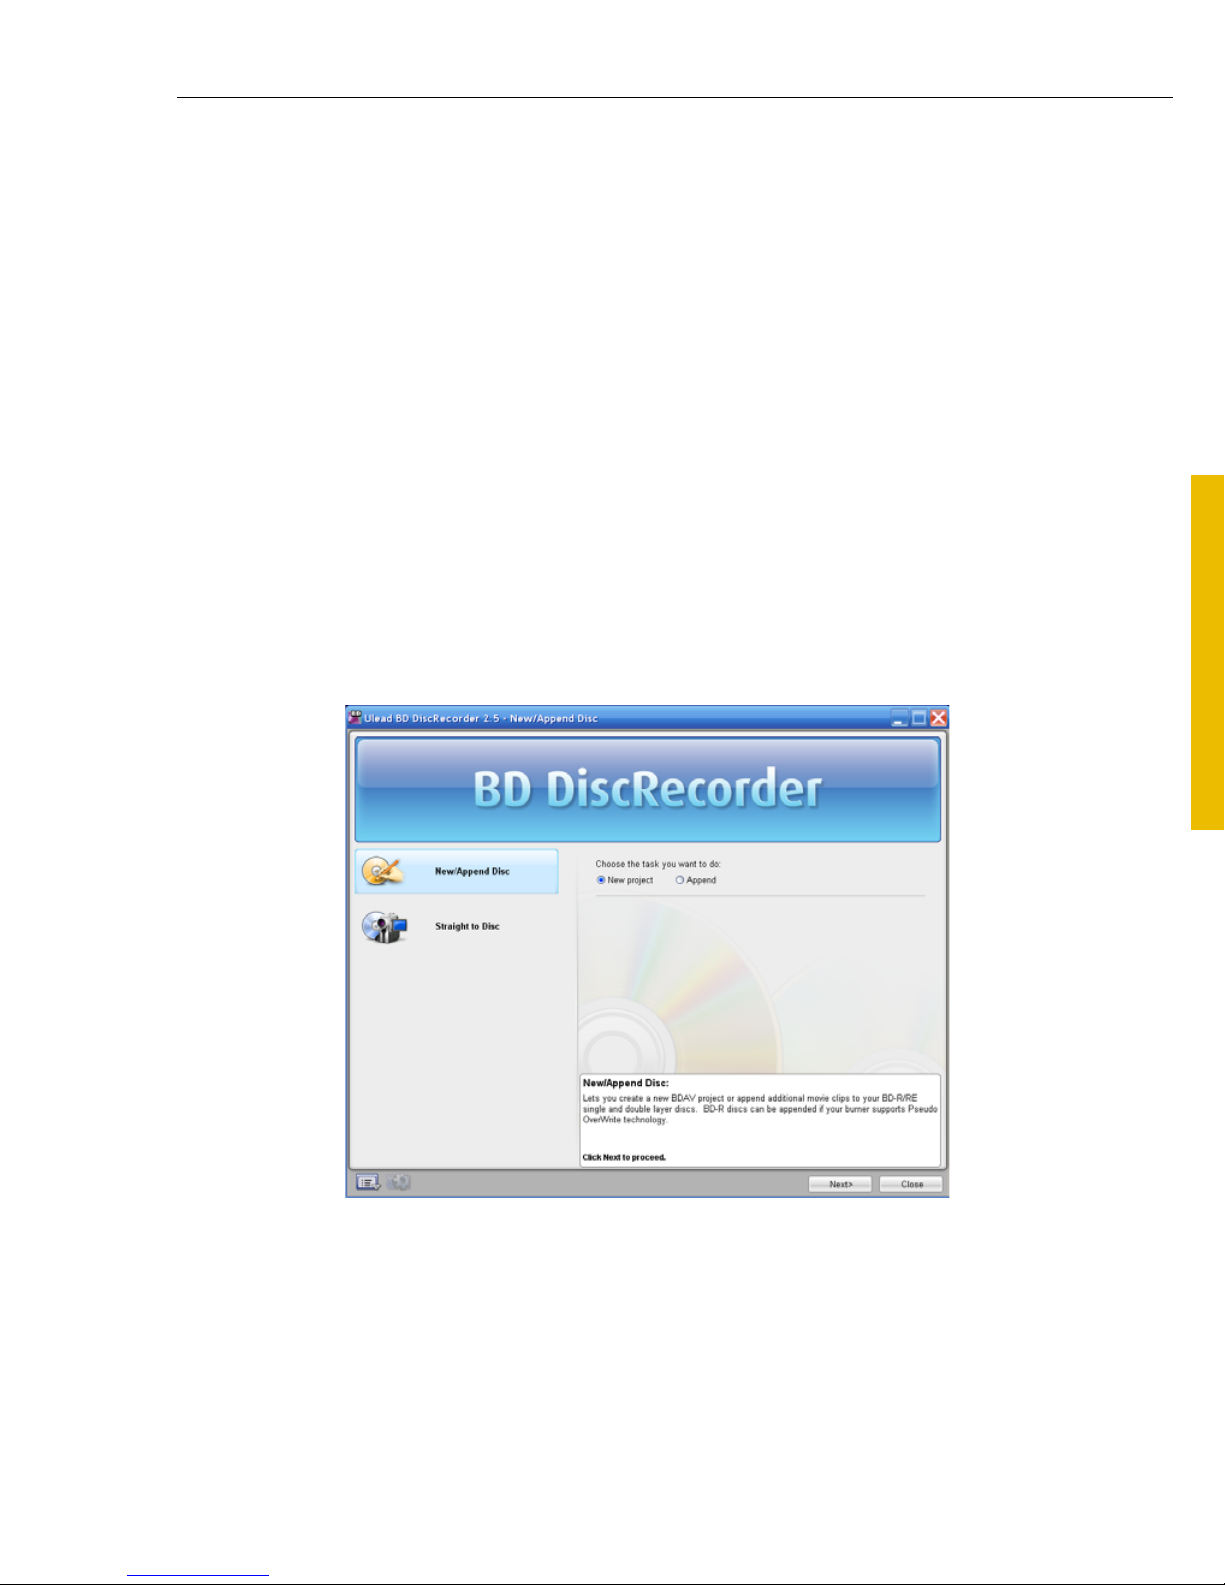
Running BD DiscRecorder
Run BD DiscRecorder from the program folder. Here, you can create a new video
project (New/Append Disc) or capture and burn videos directly on a disc
(Straight to Disc).
Page 4
4 BD DiscRecorder USER GUIDE
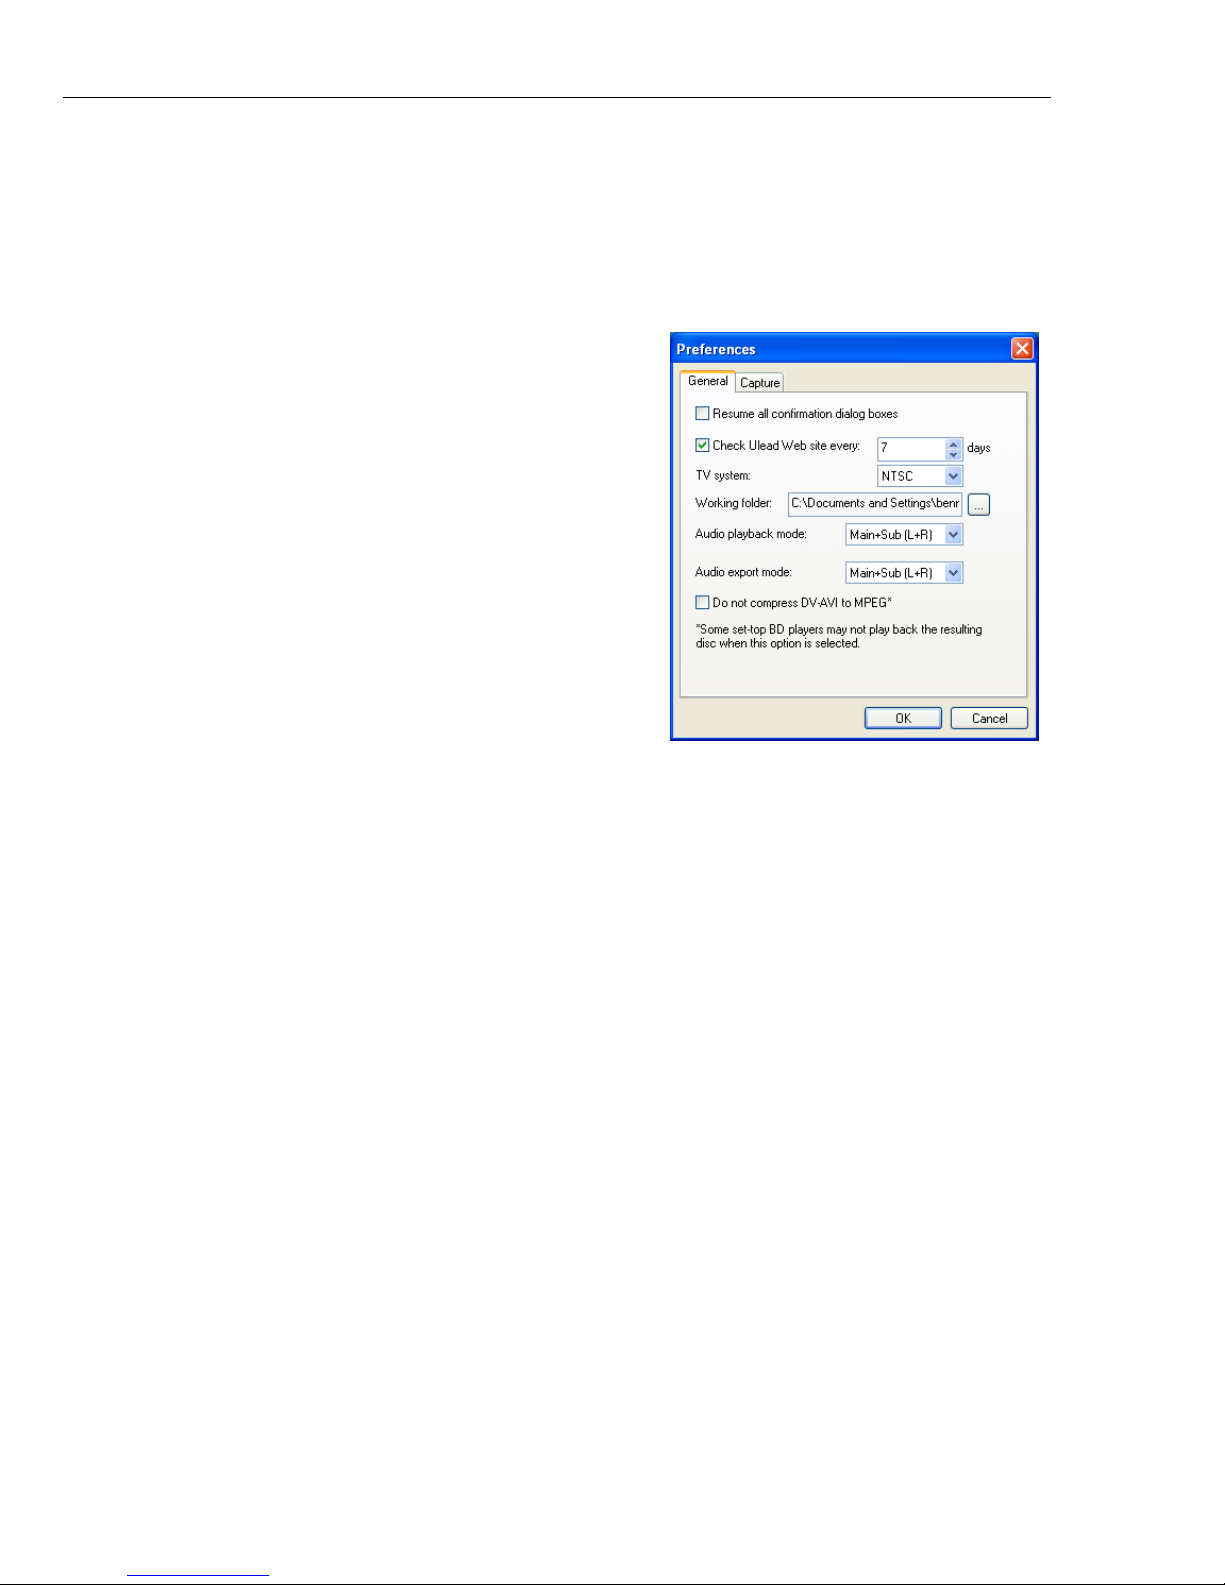
Preferences
The Preferences dialog box lets you determine most of the program settings. To
open the Preferences dialog box, click Settings and Options and select
Preferences or press [F6].
General
• Resume all confirmation dialog boxes
Overrides the “Do not show again” option
and makes all confirmation dialog boxes
appear.
• Check Ulead Web site every XX days
Specifies how frequently the program checks
the Ulead Web site for news and updates.
• TV system Select the type of your TV
system (NTSC or PAL/ SECAM).
• Working folder Enter or locate a folder for
temporary files.
• Audio playback mode Determines how the
audio streams of the video are played.
• Audio export mode Determines how the audio streams of the video are
exported.
• Do not compress DV-AVI to MPEG Uses DV-AVI format to ensure best quality
in capturing and burning instead of converting videos to MPEG format.
Note: Some set-top BD players may not play the resulting disc when this option is
selected.
Page 5
BD DiscRecorder USER GUIDE 5
BD DiscRecorder
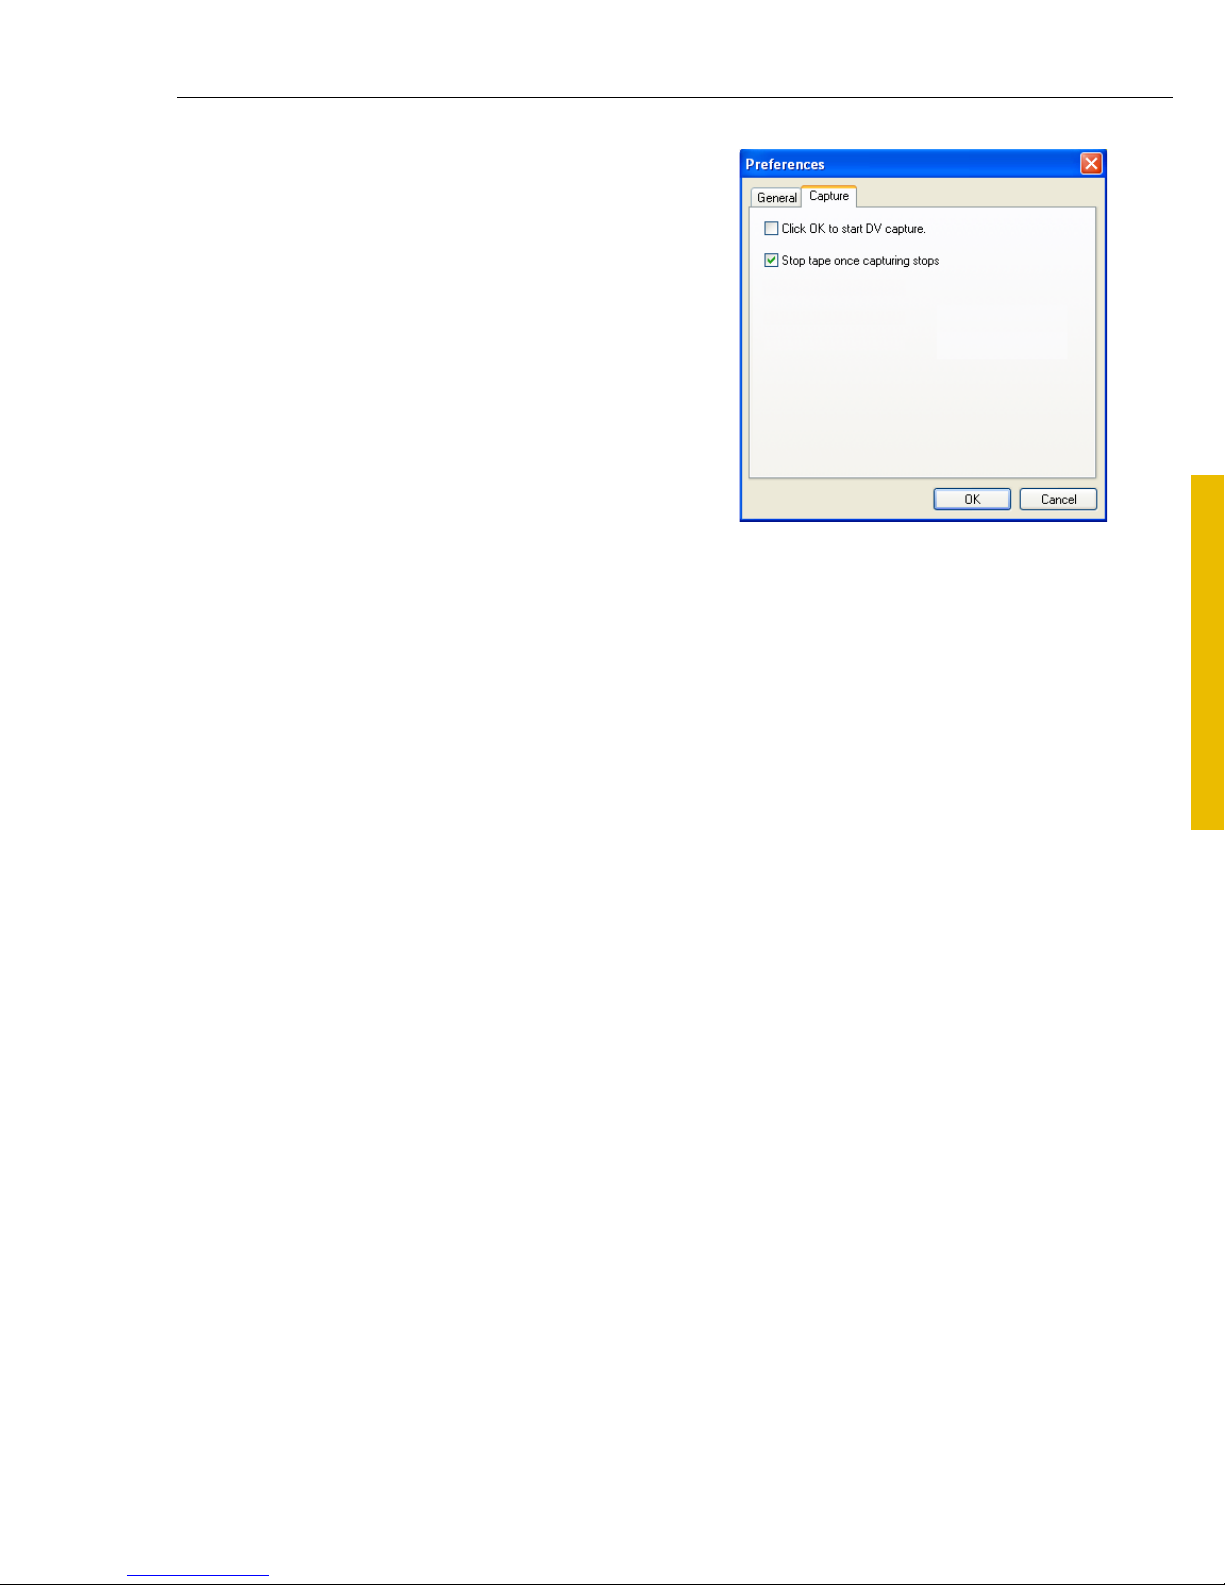
Capture
• Click OK to start DV capture Launches a
confirmation message before performing the
actual capturing process.
• Stop tape once capturing stops
Automatically stops the connected capture
device in your computer once the program
stops capturing.
New/Append Disc
BD DiscRecorder gives you an easy way to add or edit programs by capturing
videos, adding video files, and importing DVD into your BDAV project.
A program is a video clip recorded by a set-top Blu-ray recorder, captured from a
video source, or imported from a DVD video folder. A program can also be an
existing video file.
You cannot capture copyrighted sources or videos protected by recognized
protection schemes such as Copy Generation Management System for Analog
(CGMS-A) and for Digital (CGMS-D), Content Scrambling System (CSS),
Theatermark and Macrovision.
To create a new video project:
1. Click New/Append Disc.
2. Choose the burning mode for your new project. Click New to burn your project
onto a new disc or Append to insert and burn new programs onto your BD disc.
When appending a disc, select your BD drive from the Select Drive list.
Note: BD-R discs can be appended if your burner supports Pseudo OverWrite technology.
3. Click Next.
Note: When appending, the light gray colored area on the BD Capacity bar indicates the
disc space already used by the current disc content.
Page 6

6 BD DiscRecorder USER GUIDE
Introduction to the workspace
1. Add/Edit media buttons Use these buttons to add/edit videos.
2. Preview window Use this to view your videos.
3. Program list Select a program (video clip) to display in the Program video clip
list.
4. Remove and Info Use these buttons to remove programs or view program
properties.
1. Add/Edit media buttons 6. Project settings
2. Preview window 7. Show BD capacity
3. Program list 8. Program video clip list
4. Remove and Info 9. Navigation controls
5. Settings and Options
1
2
4
3
856 7 9
Page 7

BD DiscRecorder USER GUIDE 7
BD DiscRecorder
5. Settings and Options Click to open a menu where you can customize
preferences, or view information about BD DiscRecorder.
6. Project settings Click to view information about the project and customize its
output settings.
7. Show BD capacity Displays the total file size and video length to be used in the
disc.
8. Program video clip list Shows the selected or all program thumbnails.
9. Navigation controls Use these buttons to preview your video clips.
Capturing videos
BD DiscRecorder lets you capture videos from DV and HDV camcorders.
To capture video from a DV camcorder:
1. Click Capture .
2. Select the device to capture from Source.
3. Select a capture mode and video format.
Note: You can only choose a video format with Dolby Digital 5.1 channel surround sound
encoding if your DV camcorder uses 4-channel audio.
4. Use the navigation controls to locate the starting point of the video to capture.
5. Click Capture video .
6. Press [Esc] to stop. Repeat steps 2 to 7 as needed to capture more videos.
7. Click OK.
Page 8

8 BD DiscRecorder USER GUIDE
Capturing High-Definition video (HDV)
Before capturing your HDV or HD video into BD DiscRecorder, make sure that your
camcorder (or deck) is properly detected by your computer. Also check the
following:
On Sony HDV camcorder:
If you have connected your Sony HDV camcorder before to your computer, check
the Device Manager to see if your camcorder is detected as a DV device or AV/
C tape device. If the camcorder is detected as a DV device, you can capture DV
footage. If your camcorder is detected as an AV/C tape device, you can capture
HDV footage.
Page 9

BD DiscRecorder USER GUIDE 9
BD DiscRecorder
Note: The Sony HDV camcorder can be detected only under Windows XP Service Pack 2.
To capture video from an HDV camcorder:
1. Connect your HDV camcorder to your computer’s IEEE-1394 port using the
IEEE-1394 cable.
2. Turn on your camcorder and switch it to Play mode.
3. If you have a Sony HDV camcorder, make sure it is switched to HDV mode.
4. Click Capture .
5. Select the device to capture from Source.
6. Click Advanced Settings and select Capture Options. In the Device Control
dialog box, select HDV 1394 Device Control in Current Device drop-down
list. Click OK.
7. After defining your capture options, click Advanced Settings and select
Change Capture Plug-in. Choose Ulead HDV Capture Plug-in from the
Current Capture Plug-in list, and then click OK.
8. Use the navigation controls to preview your project or move around your
programs.
9. Click Capture Video to start capturing. Press [Esc] to stop
capturing.
DV mode
HDV mode
Page 10

10 BD DiscRecorder USER GUIDE
10.Repeat steps 8 and 9 to add more clips. Click OK after capturing to go back to
the Add/Edit Media page.
Adding video files
You can add video files of different formats such as AVI, MPEG, WMV, and others
to your movie.
To add a video file to your project:
1. Click Add Video to open the Select Files dialog box.
2. Browse for videos on your computer and select video files(s). Use [Ctrl] or
[Shift] to select multiple files or click Select All to add all video files to your
project.
Note: When adding MPEG-2 Transport Stream (*.m2t) videos, BD DiscRecorder converts it
into MPEG-2 Program Stream (PS) for editing, then back to *.m2t when burning project
onto disc.
3. Click Open.
4. When adding multiple clips, drag the clips according to your desired sequence in
the Change Clip Sequence dialog box, and then click OK.
Page 11

BD DiscRecorder USER GUIDE 11
BD DiscRecorder
Importing DVD video
You can also import DVD videos (non-copyrighted videos only) into your movie.
To import DVD video:
1. Click Import DVD Video .
2. Locate the folder that contains the video files. Specifically, find the VIDEO_TS
folder on a disc (DVD+R/RW or DVD-R/RW) or hard drive, or the DVD_RTAV
folder for DVD-VR files on a disc (DVD-RW or DVD-RAM) or hard drive.
3. Select the video clip, and then click Import.
Page 12

12 BD DiscRecorder USER GUIDE
Editing a program with Multi-trim video
Multi-trim video lets you select multiple segments from a video and extract these
segments to the Program video clip list.
To use Multi-trim Video:
1. Select the video to be trimmed in Program video clip list.
2. Click to open the Multi-trim Video dialog box.
3. Drag the Jog Slider to locate the start of the segment to retain/delete, and then
click Mark-in or press [F3].
4. Drag the Jog Slider to locate the end of the segment to retain/delete, and then
click Mark-out or press [F4]. The extracted segment will be added to the
Program video clip list.
5. To select more segments, repeat steps 3 and 4.
6. To remove any extracted segment from the list, select it in the Program video
clip list and click Remove selected clips .
7. To preview all extracted clips, click Play.
8. Click OK.
Page 13

BD DiscRecorder USER GUIDE 13
BD DiscRecorder
Tips:
• To move the Jog Slider at a fixed interval, use or . Set the time interval at
Quick search interval.
• Click Invert Selection to select or deselect selected video segments.
Note: Applying Multi-trim Video will replace the original program with the trimmed video
(program).
Setting a name for a program
You can assign names to programs in order to easily identify them.
To set a program name:
1. Select a program from the Program list.
2. Click Set program name .
3. Enter the name, and then click OK. The new name is shown in the Program list.
Exporting video
BD DiscRecorder lets you easily export your video clips in a program into other
video formats (AVI, MPEG, WMV, etc.). To speed up the workflow, you can also
create templates for video settings that you frequently use.
Note: You can decide which audio channels to export by adjusting the Audio export
mode on the General tab of the Preferences dialog box.
To export video files:
1. Select the video clip you want to export from the Program video clip list.
2. Right-click the video clip. Select Export Video.
3. Select a file type (and the following settings if needed).
Page 14

14 BD DiscRecorder USER GUIDE
• To use a template, click Template and select the one to be used. Select Add
Template to create a new template using the current video settings. Select
Delete Template to delete templates.
• To change the video settings, click Options to open the Video Save Options
dialog box. Click OK when finished.
4. Select the folder to save the file and enter the file name.
5. Click Save.
Page 15

BD DiscRecorder USER GUIDE 15
BD DiscRecorder
Burning your disc
After creating the contents of your BDAV project, click Next to move to the
Preview and Finish page. You are now ready to burn it onto a disc.
To burn your disc:
1. Use navigation controls to preview your movie.
2. Click Burning Options and specify the following settings:
• Volume Label The disc label name as seen in Windows Explorer.
• Disc name The disc name as seen in set-top Blu-ray recorder.
• Disc burner The burning device that contains the disc.
3. Click Burn to begin the burning process.
Page 16

16 BD DiscRecorder USER GUIDE
Formatting a disc
You can also choose to format your disc first before burning. A BDAV disc must be
formatted using UDF 2.5 (Universal Disc Format) for rewritable discs. To format a
disc, click and then click OK to start.
Notes:
• BD-R discs can be appended if burner supports UDF 2.6 file system.
• Format Disc is also available on the Straight to Disc page.
Straight to Disc
BD DiscRecorder provides a fast way to capture videos and then burn them directly
onto a disc in the BDAV format. When this task is selected, BD DiscRecorder will
initially check both your burner and disc to ensure that there are no problems with
your output device and media.
Note: If you want to capture and burn in the DV-AVI format, select Do not compress
DV-AVI to MPEG in Preferences. You must set this before
choosing the Straight to
Disc task.
Page 17

BD DiscRecorder USER GUIDE 17
BD DiscRecorder
To capture video directly onto a disc:
Make sure your video source is switched on and properly connected to your
computer.
1. Insert a disc into the burner. Then click Straight to Disc and click Next.
2. Select the device to capture from Source.
3. Select a capture mode (for example, select fixed duration, marked duration, or
full DV tape if capturing from DV camcorder). Click Show/Hide Options Panel
to view additional settings as needed.
4. Select the capture format.
Note: If you are capturing in the DV-AVI format, you must set the Capture format to
AVI.
5. Click Burning Options to set the volume name and disc burner to use.
6. Locate the starting point of your video to capture, and click Start capture. Click
Pause capture to pause the capturing process. Click Stop capture to end the
capturing process.
Page 18

18 BD DiscRecorder USER GUIDE
Index
A
Add/Edit media buttons 6
Adding video files 10
B
Burning your disc 15
C
Capturing videos 7
E
Edit and info 6
Exporting video 13
F
Formatting a disc 16
H
Hardware checkup and configuration 3
I
Importing DVD video 11
Introduction to the workspace 6
M
Multi-trim video 12
N
New/Append Disc 5
P
Preferences 4
Program list 6
Program video clip list 7
Project settings 7
R
Running BD DiscRecorder 3
S
Setting names 13
Settings and options 7
Show BD capacity 7
Straight to Disc 16
System Requirements 2
 Loading...