

Page 1

User’s Guide for
SpruceUp
Personal DVD Authoring
Version 1.0
Page 2

Copyright Notice
This user’s guide and its contents is copyrighted ©2000 Spruce Technologies, Inc. All rights
reserved. Under copyright laws, it may not be duplicated in whole or in part without the
written consent of Spruce Technologies, Inc.
SpruceUp is a trademark of Spruce Technologies, Inc. All other trademarks in this manual
are the property of their respective owners.
"Dolby" and "AC-3" are trademarks of Dolby Laboratories.
All features and specifications subject to change without notice.
Rev 1.0, November 30, 2000
ii SpruceUp User’s Guide
Page 3

Table of Contents
Chapter 1: Introduction
Welcome to SpruceUp! ................................................................ 1—2
SpruceUp User Forum .............................................................................1—2
SpruceUp's ReadMe ................................................................................1—2
About This Manual ....................................................................... 1—2
Using SpruceUp’s Help................................................................. 1—3
Printing Help .......................................................................................1—3
Updating Help .....................................................................................1—3
SpruceUp Support ....................................................................... 1—4
24/7 Support Resources (free to trial version and full version users) .............1—4
Mon-Fri 8 AM - 5 PM PST .........................................................................1—4
General Information................................................................................ 1—4
Introduction ................................................................................ 1—5
SpruceUp Trial Version ............................................................................1—5
Learning to Use SpruceUp........................................................................ 1—5
Minimum System Requirements .................................................. 1—6
SpruceUp .............................................................................................. 1—6
Operating System ................................................................................1—6
CPU ...................................................................................................1—6
System RAM........................................................................................ 1—6
Video Card ..........................................................................................1—6
Hard Drive Size ...................................................................................1—6
Removable Media Drives.......................................................................1—7
Syzygy DVD Player .................................................................................1—7
Chapter 2: Creating DVDs
What is a DVD Title? .................................................................... 2—2
Movies................................................................................................ 2—2
Menus ................................................................................................2—2
What Else is Needed to Make a DVD?........................................... 2—3
Movie Sources ........................................................................................2—3
Video and Audio Capture Cards ................................................................2—3
Editors ..................................................................................................2—3
MPEG Encoders ......................................................................................2—4
Ulead Media Studio Pro® 6.0 ........................................................ 2—5
Creating a DVD Title Overview..................................................... 2—9
Gather Your Sources ...............................................................................2—9
Movies................................................................................................ 2—9
Backgrounds .......................................................................................2—9
Buttons ..............................................................................................2—9
Edit Your Sources ...................................................................................2—10
SpruceUp’s User’s Guide iii
Page 4

Encode for SpruceUp ............................................................................... 2—10
Author the Title ...................................................................................... 2—11
Simulate the Title ...................................................................................2—11
Export the Title ......................................................................................2—12
Set-Top DVD Players ............................................................................2—12
Playing Titles on PCs ............................................................................2—12
The Syzygy Player ...............................................................................2—12
Playing Titles on an Apple Macintosh ......................................................2—13
DVD Basics .................................................................................. 2—14
DVD Introduction....................................................................................2—14
DVD-Video ..........................................................................................2—14
DVD-Audio ..........................................................................................2—14
DVD-ROM ...........................................................................................2—14
DVD-RAM............................................................................................2—14
DVD+RW and DVD-RW .........................................................................2—15
Video CD (VCD) and Super Video CD (SVCD) ..........................................2—15
Distributing SpruceUp Titles .....................................................................2—15
Set-Top DVD Players ............................................................................2—15
PC DVD-ROM Drives .............................................................................2—15
CD-ROM Drives.................................................................................... 2—15
Other Drive Technologies ...................................................................... 2—16
Replicators and DVD-R .........................................................................2—16
DVD-Video File Details ............................................................................2—16
Video_ts Files ...................................................................................... 2—16
Audio_ts Files ......................................................................................2—17
Other Files ..........................................................................................2—17
General Information.............................................................................2—17
Chapter 3: Getting Started
Registering SpruceUp .................................................................. 3—2
The Registration ID ..............................................................................3—2
The Software Enabling Key ...................................................................3—2
What is the Trial Version? .....................................................................3—2
Is Mine a Full Version?.......................................................................... 3—2
The Welcome to SpruceUp Dialog ..........................................................3—2
Upgrading to or Enabling the Full Version ..................................................3—3
If You Entered a Serial Number .............................................................3—5
If You Do Not Have a Serial Number....................................................... 3—5
Launch Window ........................................................................... 3—7
Preferences ................................................................................. 3—9
NTSC/PAL Selection .............................................................................3—9
Simulation Preview Decoder Selection ....................................................3—9
Display Project Size..............................................................................3—9
Adding a Custom Entry ...................................................................... 3—10
Video Standards of the World ...................................................... 3—11
Africa........................................................................................... 3—11
PAL.......................................................................................................3—11
SECAM (use PAL setting) .........................................................................3—11
iv SpruceUp User’s Guide
Page 5

Asia ............................................................................................. 3—12
NTSC ....................................................................................................3—12
PAL.......................................................................................................3—12
SECAM (use PAL setting) .........................................................................3—12
Caribbean .................................................................................... 3—12
NTSC ....................................................................................................3—12
SECAM (use PAL setting) .........................................................................3—12
Central America........................................................................... 3—12
NTSC ....................................................................................................3—12
Europe......................................................................................... 3—13
PAL.......................................................................................................3—13
SECAM (use PAL setting) .........................................................................3—13
Middle East .................................................................................. 3—13
PAL.......................................................................................................3—13
SECAM (use PAL setting) .........................................................................3—13
North America ............................................................................. 3—13
NTSC ....................................................................................................3—13
PAL.......................................................................................................3—14
Oceania ....................................................................................... 3—14
NTSC ....................................................................................................3—14
PAL.......................................................................................................3—14
SECAM (use PAL setting) .........................................................................3—14
South America ............................................................................. 3—14
NTSC ....................................................................................................3—14
PAL.......................................................................................................3—14
SECAM (use PAL setting) .........................................................................3—14
SpruceUp User Interface ............................................................. 3—15
Main Window .........................................................................................3—15
Menu Bar ............................................................................................3—15
Main Control ....................................................................................... 3—15
Media Gallery ...................................................................................... 3—16
Along the Top ................................................................................... 3—16
The Main Area ..................................................................................3—16
At the Bottom ................................................................................... 3—16
Menu Gallery .......................................................................................3—17
Menu Gallery .......................................................................................3—17
First Play..........................................................................................3—17
Work Area .......................................................................................... 3—18
Work Area .......................................................................................... 3—18
Work Area Toolbar ............................................................................... 3—18
Default Tools ....................................................................................3—18
Text Tools ........................................................................................3—19
Alignment and Sizing Tools ................................................................3—19
Quickstart.................................................................................... 3—20
Creating a Simple Title ............................................................................ 3—20
Start a New Project ...........................................................................3—20
Loading Background and Movie Assets .................................................3—20
SpruceUp’s User’s Guide v
Page 6

Select the Opening Menu Background..................................................3—20
Add a Button to the Menu ..................................................................3—20
Add a Target to the Button................................................................. 3—21
Add Some Text ................................................................................. 3—21
Saving the Project............................................................................. 3—21
Something to Simulate! .....................................................................3—21
Something to Export! ........................................................................3—22
Working with Movie Assets....................................................................3—22
Keyboard Shortcuts ..................................................................... 3—23
File Functions ......................................................................................3—23
General Functions ................................................................................3—23
Edit Commands ...................................................................................3—23
To Open Dialogs ..................................................................................3—23
Main Control Modes.............................................................................. 3—23
Work Area Display ...............................................................................3—24
Text Properties .................................................................................... 3—24
Button Resizing ...................................................................................3—24
Media Gallery Shortcuts........................................................................ 3—24
Alignment Tools ...................................................................................3—24
Clip Properties .....................................................................................3—25
Pull Down Menus ......................................................................... 3—26
File Pull Down ........................................................................................3—26
Edit Pull Down ........................................................................................3—27
View Pull Down....................................................................................... 3—30
View Pull Down....................................................................................... 3—30
Help Pull Down ....................................................................................... 3—31
Chapter 4: Assets
Assets.......................................................................................... 4—2
Assets in SpruceUp Projects ..................................................................4—2
Asset Properties...................................................................................4—2
Important Differences Between Asset Types...............................................4—2
Understanding the Style Gallery ............................................................4—2
Importing Differences...........................................................................4—3
Deleting Within SpruceUp .....................................................................4—3
General Asset Information .......................................................................4—4
Parsed File ..........................................................................................4—4
Using the Style Gallery ................................................................ 4—5
Usage Hints ...........................................................................................4—6
The "Add Media Asset" Dialog ..................................................... 4—7
Video Assets ................................................................................ 4—9
Introduction ...........................................................................................4—9
General Quality Issues ............................................................................4—9
Start at the Source ..............................................................................4—9
Noisy Video ......................................................................................... 4—9
Transcoding Artifacts............................................................................ 4—9
What is MPEG? .......................................................................................4—9
Elementary and Multiplexed MPEG Files ..................................................4—9
MPEG-1 and MPEG-2 ............................................................................ 4—10
vi SpruceUp User’s Guide
Page 7

Bit-Rates ............................................................................................4—10
Video Resolution..................................................................................4—10
MPEG-1 ...........................................................................................4—10
MPEG-2 ...........................................................................................4—11
Picture Frame Rate ..............................................................................4—11
Aspect Ratio ........................................................................................ 4—11
Chroma Format ...................................................................................4—11
What’s a GOP?..................................................................................... 4—11
GOP Length ...................................................................................... 4—11
GOP Pattern .....................................................................................4—12
Open or Closed GOPs.........................................................................4—12
Supported Video Formats ........................................................................4—12
What Happens Exactly When Importing Video?...........................................4—12
Movie Properties ..................................................................................4—13
MPEG Settings Summary ............................................................. 4—14
MPEG Type .........................................................................................4—14
MPEG Structure ...................................................................................4—14
Bit-Rates ............................................................................................4—14
Audio Sample Rate...............................................................................4—14
Video Resolution..................................................................................4—14
MPEG-1 ...........................................................................................4—14
MPEG-2 ...........................................................................................4—14
Frame Rate ......................................................................................... 4—14
Aspect Ratio ........................................................................................ 4—14
Chroma Format ...................................................................................4—14
GOP Size (maximum) ........................................................................... 4—14
Audio Assets................................................................................ 4—15
Compressed vs. Uncompressed ................................................................4—15
Dolby® Digital AC-3 ...............................................................................4—15
SpruceUp Supported Audio Formats .......................................................... 4—16
Disc Space Math ..................................................................................... 4—16
Uncompressed.....................................................................................4—16
Compressed ........................................................................................ 4—16
Background Assets ...................................................................... 4—17
Supported Formats ................................................................................. 4—17
What Happens When Importing? ..............................................................4—17
Background Properties..........................................................................4—18
Button Assets .............................................................................. 4—19
Button Properties.................................................................................4—19
Chapter 5: Tutorial
SpruceUp Tutorial Introduction ................................................... 5—2
Tutorial Assets .......................................................................................5—2
Tutorial Sections.....................................................................................5—2
Things to Know While Going Through the Tutorial ....................................5—2
Tutorial Step One ........................................................................ 5—4
SpruceUp Introduction ............................................................................5—4
User Interface Orientation .......................................................................5—4
SpruceUp’s User’s Guide vii
Page 8

Tutorial Step Two ........................................................................ 5—5
Loading Assets .......................................................................................5—5
The Style Gallery ....................................................................................5—5
Style Gallery Notes ..............................................................................5—5
Loading Tutorial Assets ...........................................................................5—6
Tutorial Step Three...................................................................... 5—7
Creating Menus ......................................................................................5—7
Naming Your Project ............................................................................5—7
Creating the Menus .............................................................................. 5—7
Creating the First Menu .....................................................................5—7
Creating the Second Menu .................................................................5—7
Putting Text on the Menu ................................................................... 5—7
Putting a Button on the Menu .............................................................5—8
Assigning a Default Button ................................................................. 5—9
To Align the Button with the Text ........................................................5—9
Tutorial Step Four........................................................................ 5—10
Using Clip Properties ...............................................................................5—10
Clip Properties Dialog Introduction .........................................................5—10
Clip Properties Tutorial .........................................................................5—10
Opening the Clip Properties Window .................................................... 5—10
Using the Scrub Bar ..........................................................................5—10
Setting a Chapter Point......................................................................5—10
Changing the EyeFrame ..................................................................... 5—11
Making Chapter Buttons..................................................................... 5—11
Changing the Menu Background..........................................................5—11
Adding Frames to the Background Assets.............................................5—11
Exiting the Clip Properties Dialog ........................................................5—11
Tutorial Step Five ........................................................................ 5—13
Finishing the Menus ................................................................................5—13
Tutorial Step Six .......................................................................... 5—14
Simulating the Title.................................................................................5—14
Using the Simulator ................................................................................5—14
Exiting Simulation Mode ..........................................................................5—14
Tutorial Step Seven ..................................................................... 5—15
Exporting the Title ..................................................................................5—15
Choose the Write Device.......................................................................... 5—16
If You Selected a CD-R/RW or DVD-R Drive.............................................5—16
If You Selected Title Set... ....................................................................5—16
Choose the Items to Include ....................................................................5—16
Start the Write .......................................................................................5—16
Chapter 6: Creating Menus
Creating Menus Basics................................................................. 6—2
Introduction ........................................................................................6—2
Menu Backgrounds ............................................................................... 6—2
Buttons ..............................................................................................6—2
Text ................................................................................................... 6—2
Drop Shadows ..................................................................................... 6—2
Overlapping Buttons.............................................................................6—2
viii SpruceUp User’s Guide
Page 9

Creating a Menu .....................................................................................6—2
Setting the Background ........................................................................6—2
Adding and Assigning a Button ..............................................................6—3
Adding Text ........................................................................................6—4
Using the Alignment and Sizing Tools .....................................................6—4
Simulating the Menu ............................................................................6—5
A Movie as First Play ................................................................... 6—6
What is First Play? .................................................................................. 6—6
A Movie as First Play ............................................................................... 6—6
Movie as First Play Considerations ............................................................6—6
Right-Clicking on Buttons ............................................................ 6—7
The Button Properties Dialog .................................................................... 6—7
Overlapping Buttons.................................................................... 6—9
Introduction ...........................................................................................6—9
Setting Button Priorities ..........................................................................6—9
Different Kinds of Overlap........................................................................6—9
Using the Alignment and Sizing Tools.......................................... 6—11
Surprising Results!...............................................................................6—11
Selecting Multiple Items .......................................................................6—11
The Alignment Buttons ............................................................................6—11
Edge Alignment Buttons .......................................................................6—11
Center Alignment Buttons ..................................................................... 6—11
Evenly Spaced Alignment Buttons ..........................................................6—12
Other Alignment Buttons ......................................................................6—12
The Size Buttons ....................................................................................6—12
Adding Drop Shadows ................................................................. 6—13
Turning Drop Shadows On and Off ............................................................ 6—13
Setting Default On/Off Status ................................................................ 6—13
Setting Drop Shadow Properties ...............................................................6—13
Default Versus Custom ......................................................................... 6—14
The Drop Shadow Settings.......................................................................6—15
Drop Shadow X/Y Position.....................................................................6—15
Drop Shadow Color ..............................................................................6—15
Drop Shadow Opacity ........................................................................... 6—15
Drop Shadow Blur ................................................................................6—15
How Do I Get One Button's Shadow to Match Another's? .............................6—15
Using the Shadow as a Glow ....................................................................6—15
Layering Priorities ....................................................................... 6—16
Changing an Item's Priority......................................................................6—16
Square Pixel Issues ..................................................................... 6—17
What is a "Square Pixel"? ........................................................................6—17
Video Pixels ...........................................................................................6—17
What Does This Really Mean? ................................................................6—17
Menus as Simple Slide Shows ...................................................... 6—18
Slide Show Tips......................................................................................6—18
Resources ...........................................................................................6—18
Actually Building the Title .....................................................................6—18
SpruceUp’s User’s Guide ix
Page 10

Chapter 7: Custom Buttons
Custom Button Introduction ........................................................ 7—2
Using SpruceUp's Button Maker................................................... 7—3
General Usage........................................................................................7—3
Creating Photoshop Buttons ........................................................ 7—4
Introduction ...........................................................................................7—4
The Button File.......................................................................................7—4
Basic File Settings................................................................................ 7—5
Background.........................................................................................7—5
Mask .................................................................................................. 7—5
Subpicture ..........................................................................................7—5
Thumbnail...........................................................................................7—6
General Information................................................................................ 7—6
Chapter 8: Typing Text
Typing Text ................................................................................. 8—2
How To Start .......................................................................................8—2
Setting the Color .................................................................................8—2
Setting the Font and its Attributes .........................................................8—2
Some Font Considerations.....................................................................8—3
Overlapping Text .................................................................................8—3
Modifying Existing Text.........................................................................8—3
Typing Text on a Button .......................................................................8—3
Applying Global Changes .........................................................................8—3
Making Text Entries Match ....................................................................8—3
Aligning Multiple Text Entries ................................................................8—4
Chapter 9: Clip Properties
Clip Properties Dialog .................................................................. 9—2
Opening and Closing the Clip Properties Dialog...........................................9—2
Playing the Movie ...................................................................................9—3
Setting and Naming Chapter Points........................................................... 9—4
The URL Setting .....................................................................................9—5
Setting the EyeFrame™ ...........................................................................9—5
Exporting Thumbnails of Chapter Points ....................................................9—6
Manual Mode ....................................................................................... 9—6
Automatic Mode...................................................................................9—6
Exporting Frames as Backgrounds or Stills.................................................9—7
Clip Properties Keyboard Shortcuts ............................................. 9—8
Chapter 10: The Author Mode
Using the Author Mode .............................................................. 10—2
Using This Help .................................................................................... 10—2
Basic Operations................................................................................... 10—2
Assets ................................................................................................. 10—2
Creating a Menu ................................................................................... 10—2
x SpruceUp User’s Guide
Page 11

Working With Movies............................................................................. 10—2
Chapter 11: Simulation Mode
Simulation ................................................................................. 11—2
Using the Simulator .............................................................................. 11—2
Button Navigation .............................................................................. 11—3
Movie End Action ...............................................................................11—3
Simulating Titles with a First Play Movie ............................................... 11—3
Exiting Simulation Mode ........................................................................ 11—3
Chapter 12: Export Mode
Export Interface ........................................................................ 12—2
SpruceUp Trial Version .......................................................................... 12—2
Opening the Export Interface .................................................................12—2
Export Summary........................................................................ 12—3
Project Info Section............................................................................ 12—3
Export Size Section ............................................................................ 12—4
Export Dialog............................................................................. 12—5
Basic Options ....................................................................................... 12—5
Export Properties ............................................................................ 12—5
Output Destination .......................................................................... 12—6
Advanced Options ................................................................................. 12—7
Source Options ............................................................................... 12—7
Write on CD/DVD Media ................................................................... 12—7
Working Directory ........................................................................... 12—7
Include .......................................................................................... 12—7
Post Export Action ........................................................................... 12—9
Restore Original Settings ................................................................. 12—9
Test Write ...................................................................................... 12—9
What Happens During an Export? .............................................. 12—10
Output To: CD-R/RW or DVD-R .............................................................. 12—10
The Auto Insert Notification................................................................. 12—10
Writing to the Disc ............................................................................. 12—11
The Source Type Setting..................................................................... 12—11
Output To: Title Set .............................................................................. 12—11
The Source Type Setting..................................................................... 12—11
Output To: Disc Image .......................................................................... 12—12
The Source Type Setting..................................................................... 12—12
How Long Should the Export Take? ........................................... 12—13
Compiling ............................................................................................ 12—13
Writing to CD-R/RW or DVD-R Disc ......................................................... 12—13
Writing a Disc Image............................................................................. 12—13
Drive Names .............................................................................. 12—14
Manually Copying Files to CD-R ................................................. 12—15
Introduction ......................................................................................... 12—15
What Makes a Valid Title? ................................................................... 12—15
Creating the Files to Copy...................................................................... 12—15
SpruceUp’s User’s Guide xi
Page 12

Copying the Files with Adaptec's Easy CD Creator..................................... 12—15
Copying the Basic Files ....................................................................... 12—15
Copying the Syzygy Player .................................................................. 12—16
Copying the SpruceUp Trial Version...................................................... 12—16
Actually Making the Disc ..................................................................... 12—17
The Syzygy Player ..................................................................... 12—18
What is "Syzygy"?.............................................................................. 12—18
What is the Syzygy™ Player? .............................................................. 12—18
Installation Issues.............................................................................. 12—18
Syzygy Playback ................................................................................ 12—18
Bypassing Autorun ............................................................................. 12—19
Syzygy Playback Problems ..................................................................... 12—19
Skips the First Menu........................................................................... 12—19
Playing on Systems with Two Drives .................................................... 12—19
Other Players Cause Conflicts .............................................................. 12—19
Playing on an Apple OS.............................................................. 12—20
Playing on Linux OS................................................................... 12—20
Export Issues ............................................................................ 12—21
CD-R and CD-RW Media ........................................................................ 12—21
DVD-RAM and DVD+RW ........................................................................ 12—21
Creating Simple Title Sets ................................................................... 12—21
Creating DVD-ROM Discs .................................................................... 12—21
Video and Audio Quality ........................................................................ 12—21
Includes Items and the Working Directory ............................................... 12—22
Chapter 13: General Information
SpruceUp's "URL" Entry............................................................. 13—2
Finding the URL Entry ........................................................................... 13—2
Chapter Points................................................................................... 13—2
Buttons ............................................................................................ 13—2
The URL Entry is Not Just for URLs! ........................................................ 13—2
The URL Entry in Action......................................................................... 13—2
Using the Color Dialog ............................................................... 13—3
NTSC/PAL Colors .................................................................................. 13—4
Video Basics .............................................................................. 13—5
MPEG Video ......................................................................................... 13—5
Horizontal Pixels ................................................................................ 13—5
Vertical Lines .................................................................................... 13—5
MPEG-1 ......................................................................................... 13—5
MPEG-2 ......................................................................................... 13—5
Why NTSC’s 29.97 Frame Rate? ............................................................. 13—6
What is 4:2:0 Component Video? ........................................................... 13—6
xii SpruceUp User’s Guide
Page 13

Chapter 14: Problems
Error Messages.......................................................................... 14—2
A ........................................................................................................ 14—2
C ........................................................................................................ 14—3
D........................................................................................................ 14—4
E ........................................................................................................ 14—5
F ........................................................................................................14—6
G........................................................................................................ 14—6
H........................................................................................................ 14—6
I......................................................................................................... 14—6
L ........................................................................................................ 14—8
M........................................................................................................ 14—8
N ........................................................................................................ 14—9
O........................................................................................................ 14—9
P ........................................................................................................ 14—10
R ........................................................................................................ 14—10
S ........................................................................................................ 14—11
T ........................................................................................................ 14—12
U ........................................................................................................ 14—14
W ....................................................................................................... 14—15
Y ........................................................................................................ 14—15
General Troubleshooting ........................................................... 14—16
Display Troubleshooting ........................................................................ 14—16
Video Playback ..................................................................................14—16
Audio Playback .................................................................................. 14—16
Disc/Tape Writing Problems ...................................................................14—16
Syzygy Player Issues ............................................................................ 14—17
SCSI Issues ............................................................................... 14—18
SpruceUp’s User’s Guide xiii
Page 14

xiv SpruceUp User’s Guide
Page 15

Chapter 1: Introduction
About This Manual
Using SpruceUp’s Help
SpruceUp Support
Welcome
SpruceUp Introduction
Minimum System Requirements
SpruceUp User’s Guide 1—1
Page 16

Welcome to SpruceUp!
Welcome to SpruceUp! We trust you will find SpruceUp an easy to use but powerful tool for
creating DVD titles.
Suggested places to go from here are:
• To learn how to get the best from SpruceUp's help, see the Using This Help topic.
• See the Introduction topic for general information about SpruceUp.
• See the Main Window topic for an overview of the GUI.
• For a quick run-through of SpruceUp, see the Quickstart topic.
• The Tutorial topic provides a detailed tour of SpruceUp, walking you through the
process of creating a title.
• The Creating Menus topic covers the details of building menus.
• The Assets topic covers the asset types that SpruceUp supports and how to import
them.
• If you are new to DVDs, then the What is a DVD Title and the Creating a DVD Title
Overview topics would be useful.
SpruceUp User Forum
It is also highly recommended you take the time to visit the SpruceUp User Forum at:
www.spruceuserforums.com/SpruceUp
You will need to register to get a password, but it is worth it (and it is free). You can post
suggestions and questions and look over other posts. There are also a lot of links there to
download additional SpruceUp assets and other goodies.
SpruceUp's ReadMe
We recommend you take some time and go through the ReadMe file included with this
release. It contains late-breaking information and issues relating to specific configurations.
Open the ReadMe from SpruceUp's folder on the Start menu (Start – Programs – Spruce
Technologies – SpruceUp – ReadMe).
About This Manual
This manual is based on the SpruceUp help file - they each contain virtually the same
content. Certain areas are organized a bit differently in an effort to make the manual flow a
bit better. You will also notice a lot of references to “topics” throughout this manual. These
equate to sections in this manual.
When possible, we strongly encourage you to use SpruceUp’s help. It is structured with links
to provide quick access to the information you are looking for. As a note, the help file
(SpruceUp.chm) can be run as a standalone file, without the SpruceUp application.
1—2 SpruceUp User’s Guide
Page 17

Using SpruceUp’s Help
SpruceUp's help provides you with easy access to topics covering all aspects of using
SpruceUp. It is in the familiar HTML help style, providing navigation and search features for
locating the desired information. Feel free to reposition and resize the help window – any
changes you make are saved for the next time you use SpruceUp's help.
There are a number of places within SpruceUp where you can launch help, either by clicking
on the "?" or the word "Help", depending on the menu you are in. Most are context sensitive
and display the topic relating to your current mode. You can also launch help using the
toolbar's Help pull down menu or by pressing the F1 keyboard button.
Embedded in the text are links to related topics and popup windows. Simply click on any
underlined words to use its link. Click on the help dialog's Back button to return to the page
you jumped from.
You will also find links embedded in some of the graphics. The cursor changes from its
default arrow to a hand when passing over a link - clicking at that time follows the link.
You have four choices when deciding how to navigate through help:
• Contents – This is the default mode, providing the help topics in a table-of-contents
style. A question mark icon indicates an actual topic – click the question mark or the
topic's name to view the topic. A book icon indicates a chapter containing multiple
topics. Click the "+" in front to open the chapter and display the topics. Alternatively,
double-click the chapter's name to open it.
• Index – The index is built of the common names that you might want to search on. As
you type the word(s), help scrolls to the closest match. Double-click the index entry
that best fits what you are after – the appropriate topic then opens.
• Search – Use this to find which topics contain a specific word or phrase. This is
particularly handy when you are unable to find what you want with the Index. Simply
type in the word or phrase and click on List Topics. All topics containing the phrase
display in the lower window. Double-click a topic's name to view it. The word or
phrase you searched for is highlighted, making it easier to locate.
• Favorites – Use this to keep a list of topics you find yourself going back to often. The
current topic's name displays at the bottom – click Add to add it to the favorites list.
Printing Help
You can print help topics by clicking on the Print icon of the help window's toolbar.
Updating Help
Updated help is periodically available at:
http://www.spruceuserforums.com/SpruceUp
SpruceUp User’s Guide 1—3
Page 18

SpruceUp Support
There are several options should you require information beyond what is covered in this
manual, SpruceUp's help, or the ReadMe file.
24/7 Support Resources (free to trial version and full version users)
SpruceUp Support Web Site – Please visit our support web site for up to date technical
information about SpruceUp. Here you'll find:
• Technical bulletins covering the latest known problems and solutions.
• FAQ's covering the most frequently asked questions about SpruceUp.
• Tutorials explaining how to use various aspects of SpruceUp.
• The latest revision of the SpruceUp manual, help file, and other documentation.
User forums – The SpruceUp User Forum is the place to go to hear from other SpruceUp
users, exchange information, problems, solutions, feedback, and find the latest tips & tricks.
This is a free service provided by Spruce, and is moderated regularly by Spruce support
staff. The site is at:
http://www.spruceuserforums.com/SpruceUp
Other Video & DVD resources site – We have put together a collection of web sites,
1—4 SpruceUp User’s Guide
Page 19

Introduction
Congratulations on getting your hands on SpruceUp™, a powerful, intuitive, and exciting
DVD authoring application. SpruceUp makes creating DVD titles easy while still providing
powerful tools, including the ability to have thousands of custom menus and up to 99
movies within a title. You can create everything from a simple looping single movie title to a
complex title with nested menus and Internet interactivity.
SpruceUp is a software program designed to run on systems with the Microsoft's Windows
98 SE, Millennium (ME), NT 4.0, and 2000 operating systems. It imports MPEG video and
audio files from third party equipment such as video capture applications and non-linear
editors. SpruceUp provides the tools to design a DVD title by allowing you to add menus and
chapter points, and finally to compile the project into a finished title suitable for playback on
set-top DVD players and the DVD-ROM and CD-ROM players in personal computers.
Spruce Technologies pioneered putting DVD titles on standard CD-R media using our
DVDonCD™ technology. Spruce also has a royalty-free DVD player called Syzygy™ that,
when included with a title, allows it to be played back on systems otherwise not able to play
video titles. Taking it a step further, SpruceUp users can take advantage of Spruce
Technologies’ Convergence™ technology that allows you to place URLs within your title,
enabling them to open a web browser to a related site, perhaps to provide up-to-date
information or e-commerce opportunities.
All of this is included with SpruceUp – there is nothing else to buy! Spruce Technologies
pioneered intuitive yet powerful DVD authoring. We have a complete line of DVD authoring
solutions suitable for everything from Hollywood titles to industrial applications to creating
easily distributable home videos.
SpruceUp Trial Version
A freely distributable trial version of SpruceUp is available. You may choose to include a
copy of it when you export your titles. The trial version on SpruceUp is full featured with the
following exceptions:
• There is a two export limit (including Test Write).
• Cannot simulate AC-3 audio.
• All menus have a "SpruceUp Trial" watermark.
See the Registering SpruceUp topic for details on upgrading to a full version.
Learning to Use SpruceUp
SpruceUp provides a number of opportunities for you to learn how to use it, including:
• A Tutorial guiding you step-by-step through the process of creating a DVD title.
Assets, including a movie, can be downloaded for use with the tutorial.
• Extensive on-line help allowing you to quickly find the answers you need. See the
Using This Help topic for information.
• An on-line version of the SpruceUp manual in Adobe Acrobat PDF format.
• The resources of the SpruceUp User Forum web site
(www.SpruceUserForums.com/SpruceUp) providing FAQs and up-to-date information.
SpruceUp User’s Guide 1—5
Page 20

Minimum System Requirements
SpruceUp
There are a number of factors that determine whether SpruceUp will run on your system. It
is difficult to define an exact set of minimum requirements due to the huge variety of
devices available. Following is a description of the various components used in a typical
system and their suggested minimum configurations.
Operating System
SpruceUp supports Windows' 98SE, Millennium (ME), NT 4.0, and 2000 operating systems.
Please ensure that you have the latest Service Pack for your corresponding OS.
A current version of Internet Explorer or Netscape Navigator is required to view SpruceUp's
Help. An Internet connection is not required, but recommended to ease upgrading and
accessing additional information.
CPU
Suggested minimum CPUs are the Intel Pentium II 300Mhz, Intel Celeron 333Mhz (with L2
cache), and AMD K6. Faster CPUs (Intel Pentium IIIs for example) provide for faster
refreshing when working with lots of menus. They also help when using a software MPEG
decoder (such as the one supplied with SpruceUp), providing smoother playback.
System RAM
While 64MB RAM is minimum, 128MB is much more realistic, and more than that is even
better. The more complicated the title you are creating, the more you will notice
performance improvements with additional RAM.
Video Card
A video card with a minimum of 8MB of RAM is required. Using AGP slot cards with more
memory is suggested. The display size must be a minimum of 1024 by 768 pixels using a
minimum of 65,536 colors (16-bit). Please ensure that the card is Direct X 6 or later
compatible, and make sure you are using the WHCL certified driver for your card. Video
cards that support hardware overlay are recommended.
DVD Player issues (stuttering and skipping) occur when the display size or number of colors
is higher than can be refreshed in real-time. Try lowering these settings to the minimum
settings mentioned above or increasing the video card's RAM.
Tip: If you get a black screen when simulating using the WinDVD
preview decoder, check your system's Display Properties. Set your
system's Color Palette setting to 16-bit (65,536 colors), and depending on
your Graphic's card, set your Resolution to 1600x1200 or below.
Dual monitors are supported as long as they meet the following requirements. Problems
show up when playing a movie in the Clip Properties or Simulation modes, and when using
the Syzygy player to play a title.
• The Video Card used for dual monitor supports overlay.
• Typically, the overlay is with primary window. Thus, the user must move SpruceUp to
the primary window - the overlay is required to play movie clips.
• Make sure to download the latest video drivers.
Hard Drive Size
The SpruceUp application requires approximately 20MB to 50MB of drive space, depending
1—6 SpruceUp User’s Guide
Page 21

on styles and examples loaded.
The real issue is with the movies you will be using – these will be large files. The following
explains how they end up being used while creating a DVD title.
Let's say you want to create a DVDonCD title using a 600MB MPEG movie. (Note that the
movie most likely did not start out as MPEG, so you may have AVI or other format version
files of the movie also present.) When the title is finished and you export it to your CDR/RW drive, SpruceUp needs to first compile the MPEG file into the DVD format. This
compiled file (the video title set) will be roughly the same size as the original movie, with
additional files supporting the menus you have added. This must be written to your hard
drive prior to the title actually being written to the CD-R/RW disc. In this case you should
allow about 650MB of additional drive space.
Our project has now used 1.25GB of drive space. Larger projects using DVD-RAM or DVD-R
drives require much more drive space (a 4.7GB title requires at least 10GB free drive
space).
It is a good idea to have two large hard drives – one to hold the assets and a different one
to compile to. This allows simultaneous read/writes, speeding up the compile process.
Archiving these files should be a consideration as well - your hard drive will quickly fill up if
you intend to leave older projects on it.
Removable Media Drives
SpruceUp can directly export to most CD-R/RW and DVD-R/RAM/RW drives. You are also
able to manually copy the compiled DVD video title to the drive. See the DVD Basics topic
for more information.
Syzygy DVD Player
There are a lot of factors that determine whether a PC will be able to play a title using the
Syzygy player. Following is a list of general requirements:
• Windows' 98SE, Millennium (ME), NT 4.0, and 2000 operating systems
• Intel CPU with MMX, or AMD CPU with 3Dnow!
• 8X (read) CD-ROM or faster
– or –
• 2nd Generation or Newer DVD-ROM Drive
• AGP Graphics Card (PCI may perform up to 30% slower) with Hardware Overlay
Support
• 32 MB System Memory minimum
• 20 MB Available Hard Drive Space
• Audio Subsystem that supports up to 48Khz stereo playback (PCI desirable)
SpruceUp User’s Guide 1—7
Page 22

Blank Page
(mostly)
1—8 SpruceUp User’s Guide
Page 23

Chapter 2: Creating DVDs
What is a DVD Title?
What Else is Needed to Make a DVD?
Ulead Media Studio Pro 6.0
Creating a DVD Title Overview
SpruceUp User’s Guide 2—1
Page 24

What is a DVD Title?
Simply put, a DVD (not really an acronym though several are mentioned occasionally) title
is one or more video/audio movies with menus that the viewer uses to customize what they
see. DVD titles take advantage of the high storage capacity of DVD discs and the high
quality compression that the MPEG standard provides. It also provides for instant scene
access, as opposed to the linear experience you get with VHS and other tape formats.
A DVD title is most recognizable as a disc you play on a set-top DVD player. The definition
of a DVD title is broadening though. PCs with DVD-ROM drives can take advantage of other
material on the disc, such as text and other files. A DVD title can have web site URLs
embedded so that while watching a title on a PC, the viewer can be presented with
additional or updated information from a related web site. See the SpruceUp's "URL" Entry
topic for more information.
Additionally, you can put DVD information onto a CD-R disc, allowing you to make low cost
specialized titles that play on almost all PCs with a CD-ROM drive. New storage media is
constantly being developed that may also be used to distribute a DVD title.
There are three general types of DVD titles:
• Simple titles with a single movie that automatically plays when inserted into the
player. These titles typically loop back to the beginning when they reach the end (such
as at a sales kiosk), providing continuous playback.
• Hollywood-type titles that cstr55.9(i)-111.5(tl)-11.7(e78.3( mo)1.5(tl)-1wtype)8.5( wi)m5(tl)-nu1.4(o4 that cr7(k)5.jump-0.6(r55.2.1(8(i)tthat c)-16(t)p7.7(o)5(tl)-c16(t)-0.6(r55.4(o4 -0.6(r55c16(t)5( the)8.3( )]TJ1.4458 --1.2169 TD0 Tc-0.ce18.7)5(ki))-14(ayback. )]TJ-1.4458 -1.8193 TD0.0032 Tc-0.0054 TwCthat c Si)-111.5(tl)-x(-type)8.5( ti)-11.5(tl)-11.5(e)u-16(t)-0.6(r55.2.1(8(i)mu ti)-11.t7.7(o)-0.6(r55p7.7(o)(i)-111.5(tl)-11.7(e78.3( mo)1.5(tl)-11.5(e) te)m5(tl)-nu11.5(e,4(o)73(n be3 that cv5(l)-3( mo)1.d7.7(o)-0.6(r55.2.1(8(i)a bn be3 that c11.7)-2.n be3 11.7)-ng5(tl)-1that c.4(o4 1that cp-type)8.5that cs2.1(8(s16(t)5( the)8.3( )]TJ)]TJ0 -1.207 TTD0.0031 Tc-0.4(o( that(w)2.-2.7(to)2.4( the)88((to)2.11.((to)2.)2.-,( the) the)88(n2.1(i)c3.6(klthe)88(ud the)88(n2.1(i)g.5(te)2(b-lthe)88( the)88(n2.1(i)k the)88(ng) te)that(w11.7(s)h(to)2.)2.- gthat(wthat(wd1.7(s) the)88((to)2.s3.6(k.a i)-12.4(s)8.62ry)]TJ/T1690909/T169 )T37.9(7969 m3.9036 29 TD0 Tc-0Mov)-4o4 -014(oesform)- " En)-7(try)]TJ9.96909099.969 )T36 i)89 m3-1.2089 TD0.003 Tc-0T5(l)-TD[(n)-2.78.3(as3.67) the)89)c3.677(h .78.lthe)89)h .78.)7.2(4)h .78.nD[(n)t the)89)nD[(n)(d that 9.lthe)89)789ds3.67toe38.3( mo)9o( c3.677.7(e38s)5.8 M2 9)n.8 M2 9 moe38e38.4(o( T5(l)-TD[(n)-2.78.37.5(" En)T* -1.2169 TD0.003 Tc-01.7(n)p8.3(r)8.1(t)c11.7(th a s)5f1.2(e)7.67.5(mati)-1auto)7.5(Tw[(c)) te)Speu( i)-1c.7(n)-2.7(sUp 1(e)8.3( thrquuto)7.5(.1(e)8.3( ar)8.(ngl)-11.7(e)8.3( mo)7.5(vi)-1111.7(s)5.9(o)7..7(y)4.4( be)88.(ngl)-.1(e)8 MPE1(e8(G7(e38-1)8.3(s).1(e)8 MPE1(e8(G7(e38-2 f1.2(e8.3(s).1(e)8)7.2(2-1a,1.7(e)8.3(s)5.9( w" En)T* 0.00219 TD0036 7 Tc-0sp8.ge)7ec.3(s(e8(f.1( e).3(s(e8(c6.8(s)5set8.ge)7t8.ge)7.3(s(e8(18.7(i)g8.ge)7s.1(8.ge-12.[(s)5e t8.ge)7h8.7(i)e12.4(s)8.60ry)]TJ1(i55690958 -1.81669 TD0.008 Tc-0Vidh .75.2( l)8 As16(8(s16(r)8.1(n)ts" En)-7(try)]TJth 61690958 -1.1469 TD0.0)]TJc-0 t81w s)5.19 s)p81w s)i)0(c61ge)7)81w8.417) S)e)8.5i)0(n)9(c61ge)75(k08) )12 9.lt08)7e)8.5th19 s)s61ge)7t81w sth19 stk08th19 steE(k08.5Gh19.,417) yt ll-14(ayba9J)]TJ]TJ1.4458 --1.2219 TD0036 7 Tc-018.7(i)eed8.ge4i s383s5(383)s, regform(su1-7)7.l3(s6t c11-3m)-r aform(si3(s6t cmform2-h 3838d.rm(s)i3(s6t cn1-7)7.tform(s5(383)rval3(s6t cs, or an1-7)7.ypform(sl3(s6t c11-3m)-ce el3(s6t cse aform)7h8.7)7.aaform(s)a .3( m6t cewer mform2-11-3m)-y wan1-7)7.tform6( aform(so)[((s)j1-7)2su1-7)7.mform2-pform(s(" En)T* -1.21169 TD0.003 Tc-06.7ge)7.4(o41 Sp)5.92eu( i)6 )6.)8.1(4sUp p)5.92e.7gel54.4( be6wd1.7(4)8.1(4ss9.r)an .4( be6wn( i)6 tu.4( be6wt1.7(4).4( be6wv5(l548.1(4s)8.3(s)56wnd.7ge)7w)[(27)fl)-3e.7ge)7)5.92e 4stt.4( be6wn( i)6 g)Chapteh1(4s)5.92e be6wn( i)6 ts9.r be6w.4( be6wn( i)6 k.4( be6wng)8.(ngl48)7.2(2- 6.7ge)7)14(ay09]TJ1.4458 0.04469 TD0.066Jc-0but6.7(k9.ns1(e38 .7(k9.n.[(3)wi)mh tt cnu)fl6(6 oto)e)r79m(s(h tt ca)i)6 s1(e38yl)-8) v.3(s07(eehtt cw 38.5ehtt cr79m(s(s1(e38ehtt cl3(s07(eehtt cc1(e38t82(9(.3(s07(e.7(k9.n)9.t c)14(ay)8.62ry)]TJs1.069090ry1.06972 2s(e75969 m 0.0499 TD0 Tc-0M)7.5(rm9(1us " En)-7(try)]TJ7(969090r7(96972 206(289 m 0.03469 TD0.056Jc-0Al4( be3(l4( be3( but)8.(ngl7c)-16()4.4( be3.m Si)-17(eeh8t cs16e38t8D01e 7.5 t.4( be3.tSi)-17(eeh8t cs16e38 hav(ngl7c)5(sSi)-17(eeh8t cas16e38t)8.3(9wn( i)(eeh8t c)mh 8t cnu,1.77r)and .4( be3.t8D01e .4( be3.s16e38 gh 8t cnh 8t c)5.95 11.76(l4( be3(l4( be3(y5(l)- 1(ac8t c)f4(o61.4( be3.)5.95 s16e38t)1(.3(s)e38s)-i)(eg(" En)T* -1.1469 TD0.0)]TJc-0d81w s)i)0(s61ge)7p81w s)l )12 9.y)16(t)5(k08d81w s).7)1388(h tw5(k08n)9( p81w s)l)0( )12 9.y)16(t)in)9(g81w s).t81w s)h tw5(k08.t81w s)i)0(t81w s)l)0(5(k08.417) A7e)8.5 )7e)8.55(k08n)9(u)11.h tw )12 9.s61ge)7) )12 9. s61ge)7t81w s) ll-v)16(t)-00wd11w s)5(k08th19 s) b81w s) )12 9.c61ge)7ktk08.7 t81w 1k08xtay09]TJ
2—2 SpruceUp User’s Guide
Page 25

What Else is Needed to Make a DVD?
SpruceUp plays a crucial role is the DVD title creation process, but it can't do it alone. What
other bits you need depends on the types of titles you intend to create, as well as the
sources you will use.
Note: The equipment listed below is not by any means complete – it
is intended to provide examples of products that have been successfully
used with SpruceUp.
Movie Sources
The typical reason for making a DVD title is to present one or more movies, typically
containing both video and audio. These may come from a VCR, camcorder, or a live feed
from elsewhere. It is important that the source provides the video and audio in formats that
the video capture card is designed to handle.
It is also important to get the highest quality possible. Starting with a digital source, for
example a DV camera with an IEEE-1394 ("FireWire") output provides very good results.
Among analog sources, component is preferred over S-Video (Y/C), which is far preferred
over composite.
Avoid generational losses as much as possible – capturing video from a VHS dub will provide
disappointing results. Once video has been converted to digital, avoid converting it back to
analog only to have to digitize it again later. Try to correct any video problems (lighting and
such) at the source.
Video and Audio Capture Cards
Video Capture Cards provide the means of getting a movie source converted into a file and
stored on your hard drive. This device must be able to support the source, preferably at the
highest quality output the source provides.
This is typically a PCI card that plugs into your PC's motherboard, although newer external
versions using IEEE-1394 (also known as FireWire, DV, or i.LINK) or USB interfaces are also
available.
Use care to select one that provides the output formats you need - MPEG outputs are great
if you are going straight into SpruceUp, but there are not many of these and other formats
are required if you are going to use an NLE (Non-Linear Editor) to edit the video before
authoring.
Capturing audio suitable for DVD authoring must also be carefully approached. All DVD
audio must be sampled at 48Khz, not the more common 44.1Khz rate used for audio CDs.
SpruceUp supports uncompressed PCM (WAV and AIFF files), MPEG-1 layer II, and Dolby
Digital AC-3 (2 and 5.1 channel) audio.
Editors
Unless you are making a very simple title or are very efficient when shooting the video, you
will need to edit the video and audio to create the finished movie. This could involve
trimming in and out points, cutting different scenes together, adding dissolves and other
effects, adding credits, and many other things. SpruceUp cannot cut directly from one
movie to a different one or alter the audio. This means each movie must be complete as you
wish it to be seen.
There are a wide variety of non-linear editors available that make it easy to create the final
movie. See the Ulead Media Studio Pro 6.0 topic for information on it.
SpruceUp User’s Guide 2—3
Page 26

MPEG Encoders
This is a critical part of the DVD creation process – a bad MPEG encode can result in a poor
quality final product or in SpruceUp refusing to accept the movie. What makes it tough is
the wide variety of settings found on typical MPEG encoders (and the cryptic names they are
often given). See the MPEG Settings Summary topic for specifications and the Video Assets
topic for general information.
There are two types of encoders to choose from – real-time hardware encoders and nonreal-time software encoders. Choosing which is appropriate depends on the other
components you use and the types of titles you intend to create.
2—4 SpruceUp User’s Guide
Page 27
Ulead Media Studio Pro® 6.0
Ulead Systems' Media Studio Pro® 6.0 is a popular video editing program that can provide
DVD compliant video and audio outputs. The following procedure describes how to ensure
your exports will import into SpruceUp.
1 Launch the Video Editor. From the start bar choose Programs/Ulead Media Studio Pro
6.0/Video Editor 6.0.
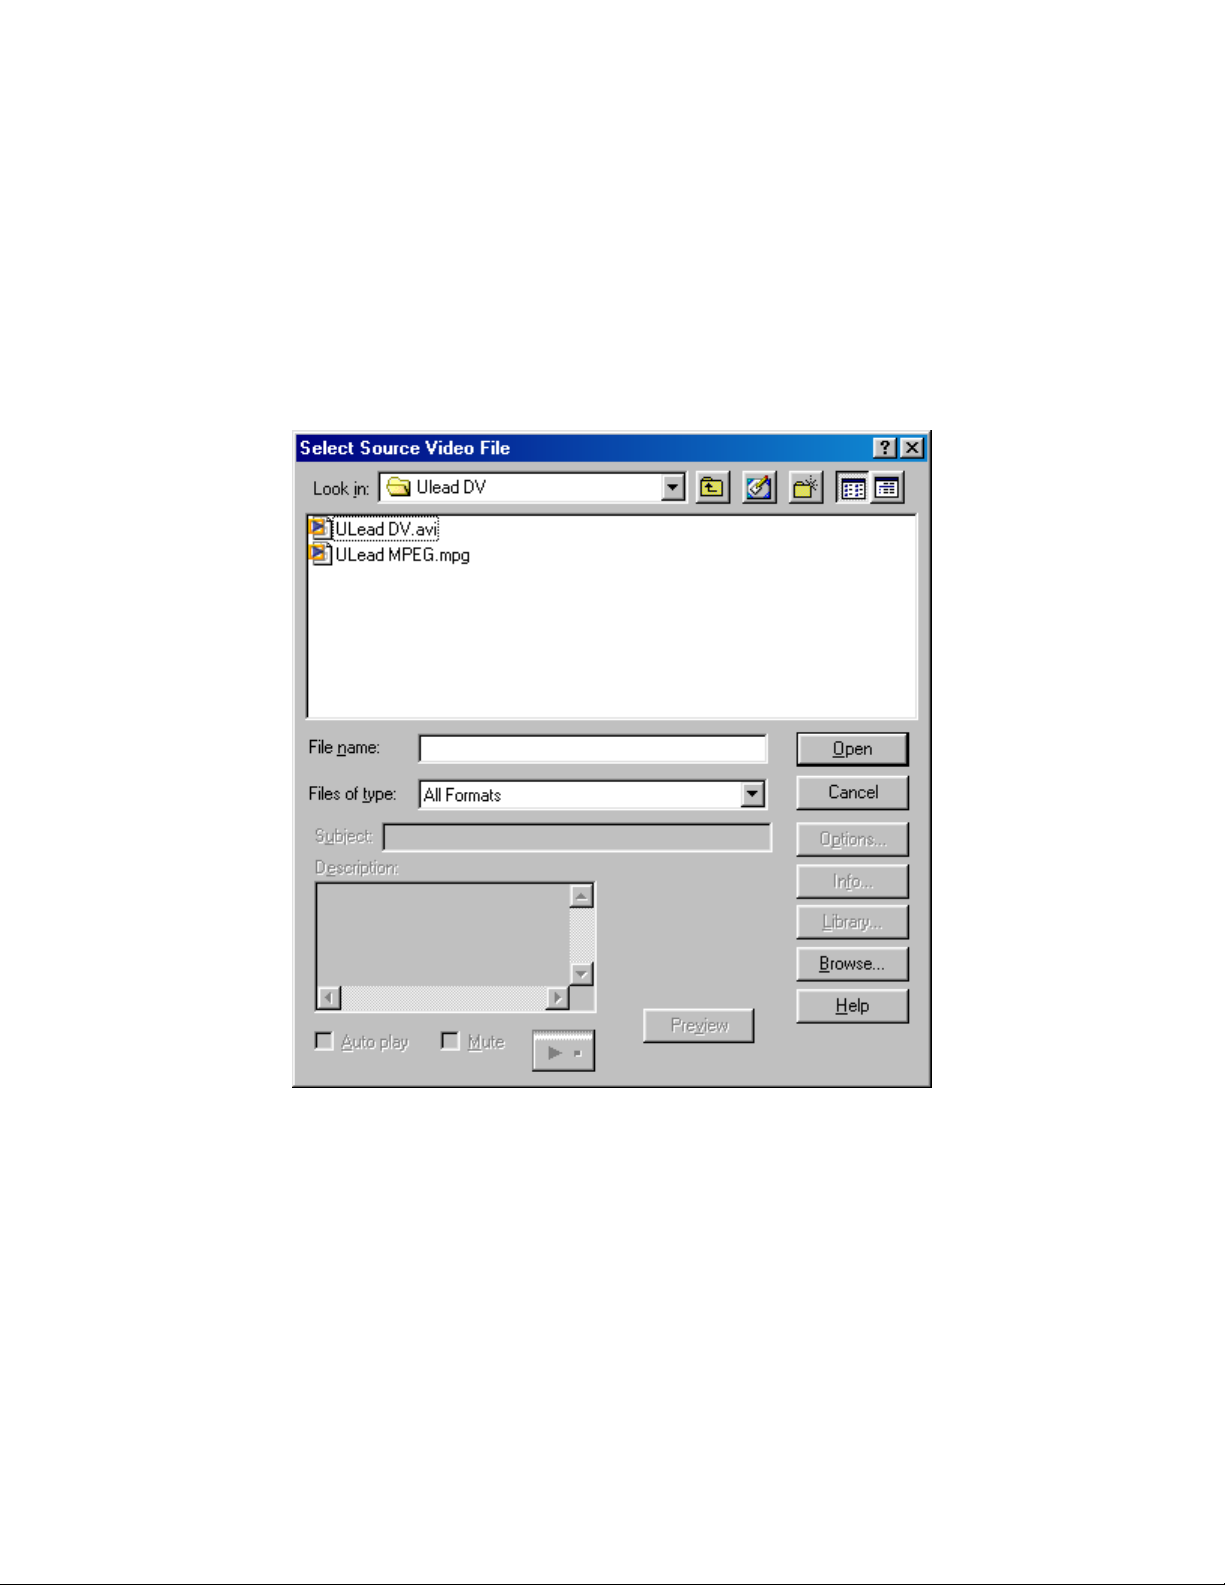
2 From the File menu choose File/Convert/Video File...
3 In the Select Source Video File dialog box choose All Formats for the Files of
Type option.
4 In the dialog window navigate to the file you wish to convert to a DVD complaint MPEG
file for use with SpruceUp and choose Open.
5 In the Select Video Destination File dialog box choose MPEG Files (*.mpg) for
Save as Type.
SpruceUp User’s Guide 2—5
Page 28
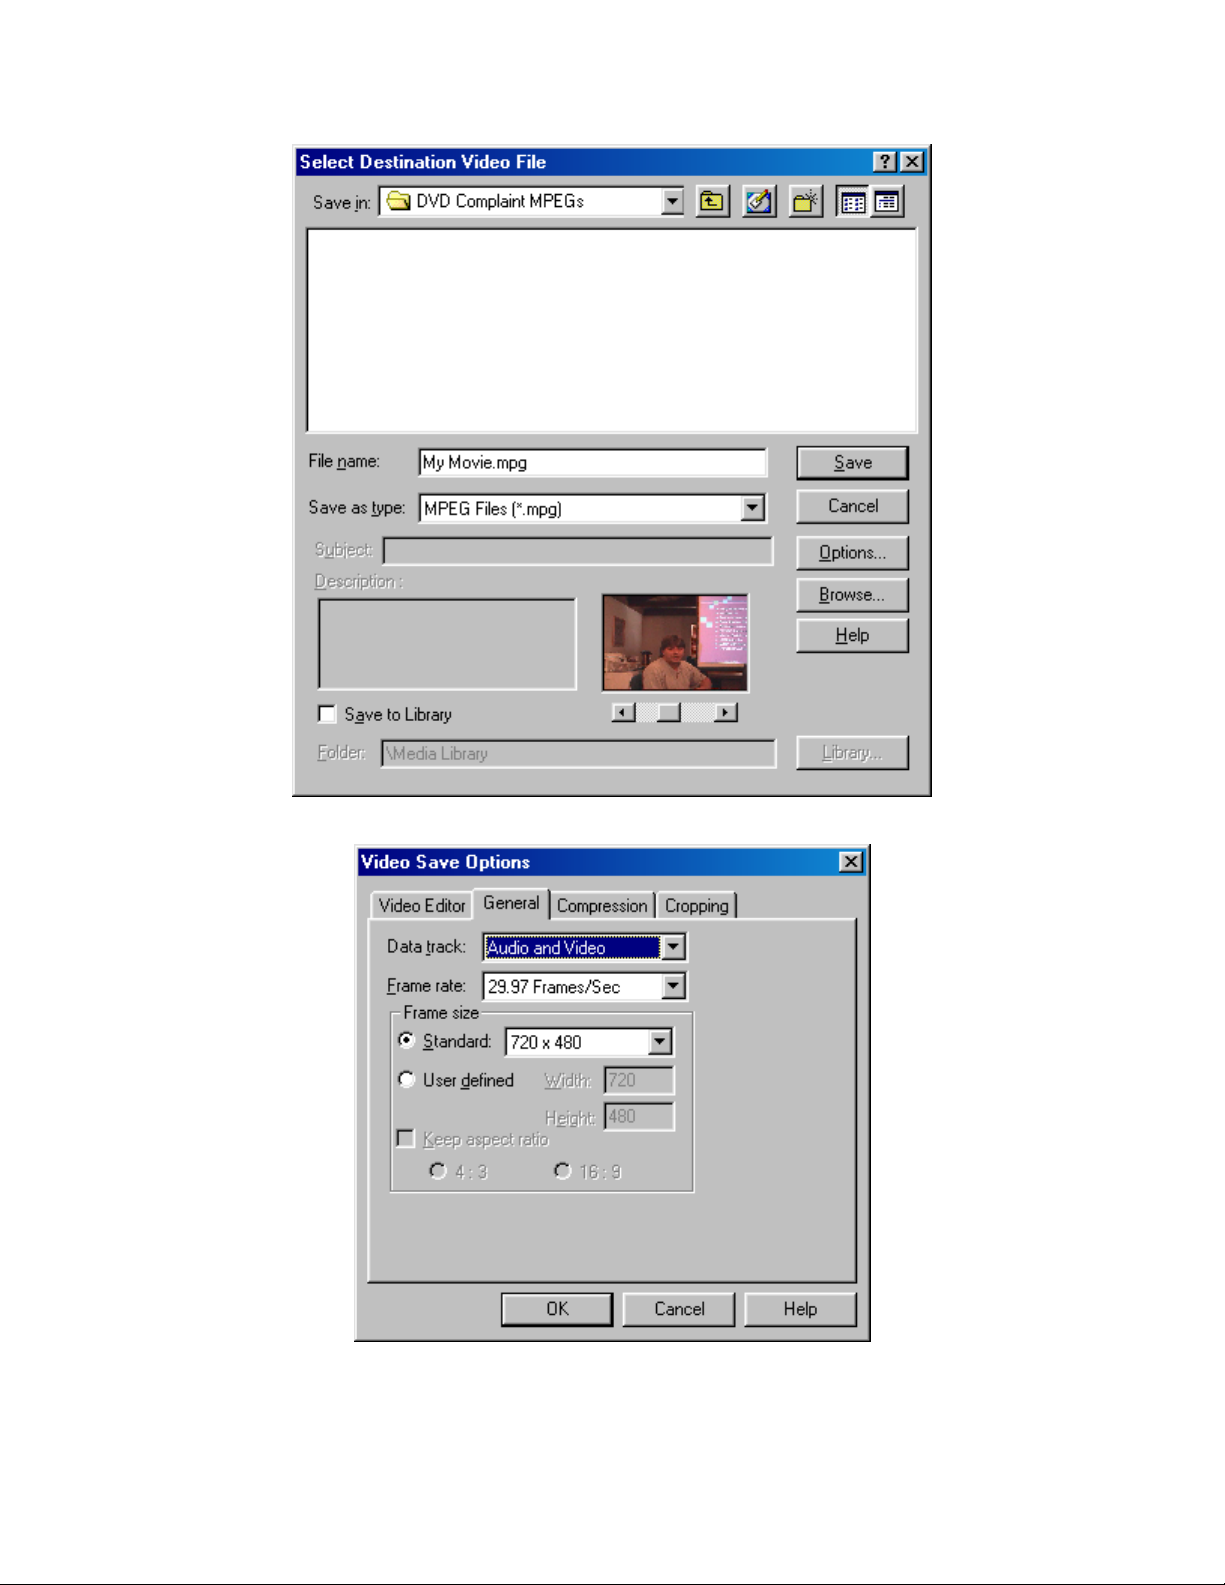
6 Choose the Options... button to bring up the Video Save Options dialog.
7 In the General tab choose Audio and Video (assuming your video file includes
audio).
8 The Frame rate should be set to 29.97 Frames/Sec for NTSC or 25 Frames/Sec
2—6 SpruceUp User’s Guide
Page 29
for PAL. See the Video Standards of the World topic if you do not know your standard.
9 Frame size should be 720x480 for NTSC and 720x576 for PAL for full screen
resolution. If you wish to use the half resolution MPEG1 size you will need to set the
frame size to 352x240 for NTSC and 352x288 for PAL.
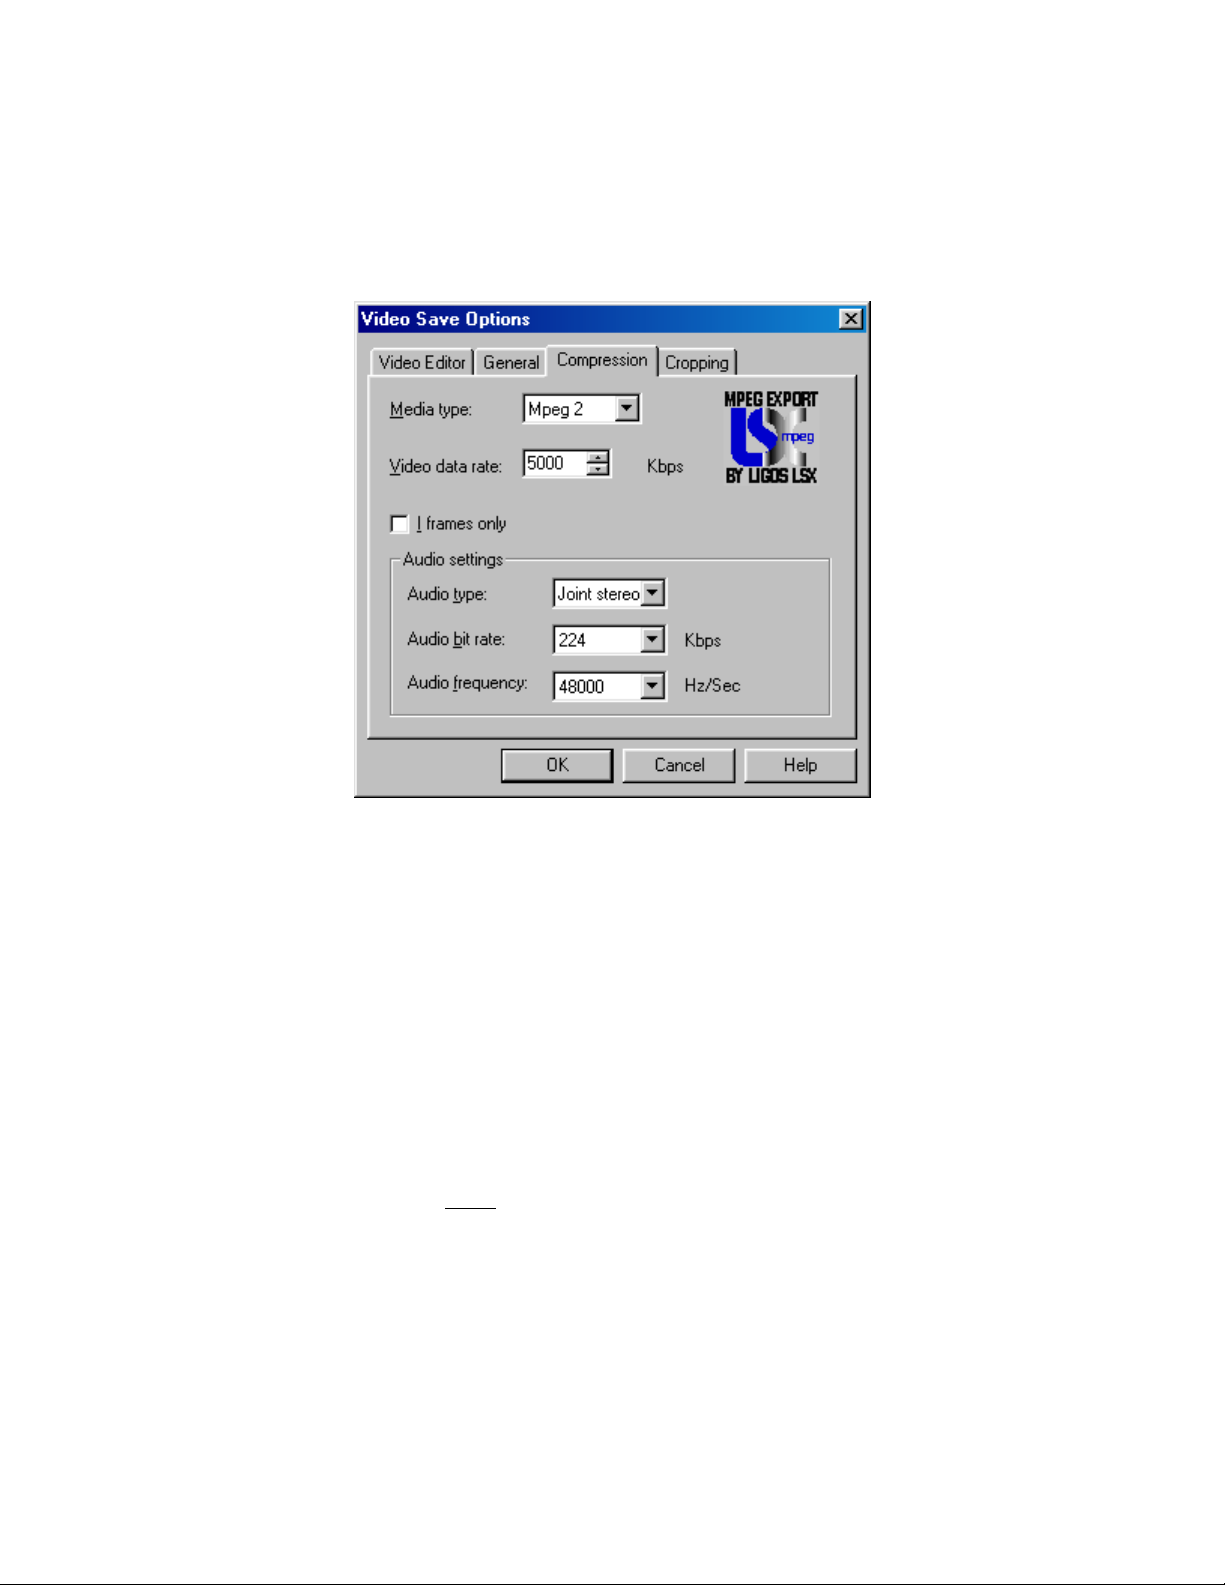
10 Select the Compression tab.
11 In the Compression tab set Media Type to MPEG2 for full screen video or MPEG1
for half the video resolution, which SpruceUp will scale to full screen.
12 The Video Data Rate should be set high enough to preserve the quality of the
original video. Higher settings result in large files however. Normal full screen DV AVI
files using MPEG-2 encoding should be kept at 4000 kbps or higher. DVD data rates
cannot go above 9800 kbps. MPEG-1 maximum data rate is 1856 kbps, with 1150
kbps as typical.
13 Do not select I frames only as this leads to large files with little of the compression
benefit of MPEG encoding.
14 Set Audio Type to Joint Stereo.
15 Set the Audio bit rate to 192, 224, or 384 kbps. As with the video, higher rates
make better quality with the trade off of larger files. See the Audio Assets topic for
details.
16 The Audio Frequency must
17 Choose
be set at 48000 Hz/Sec.
SpruceUp User’s Guide 2—7
Page 30
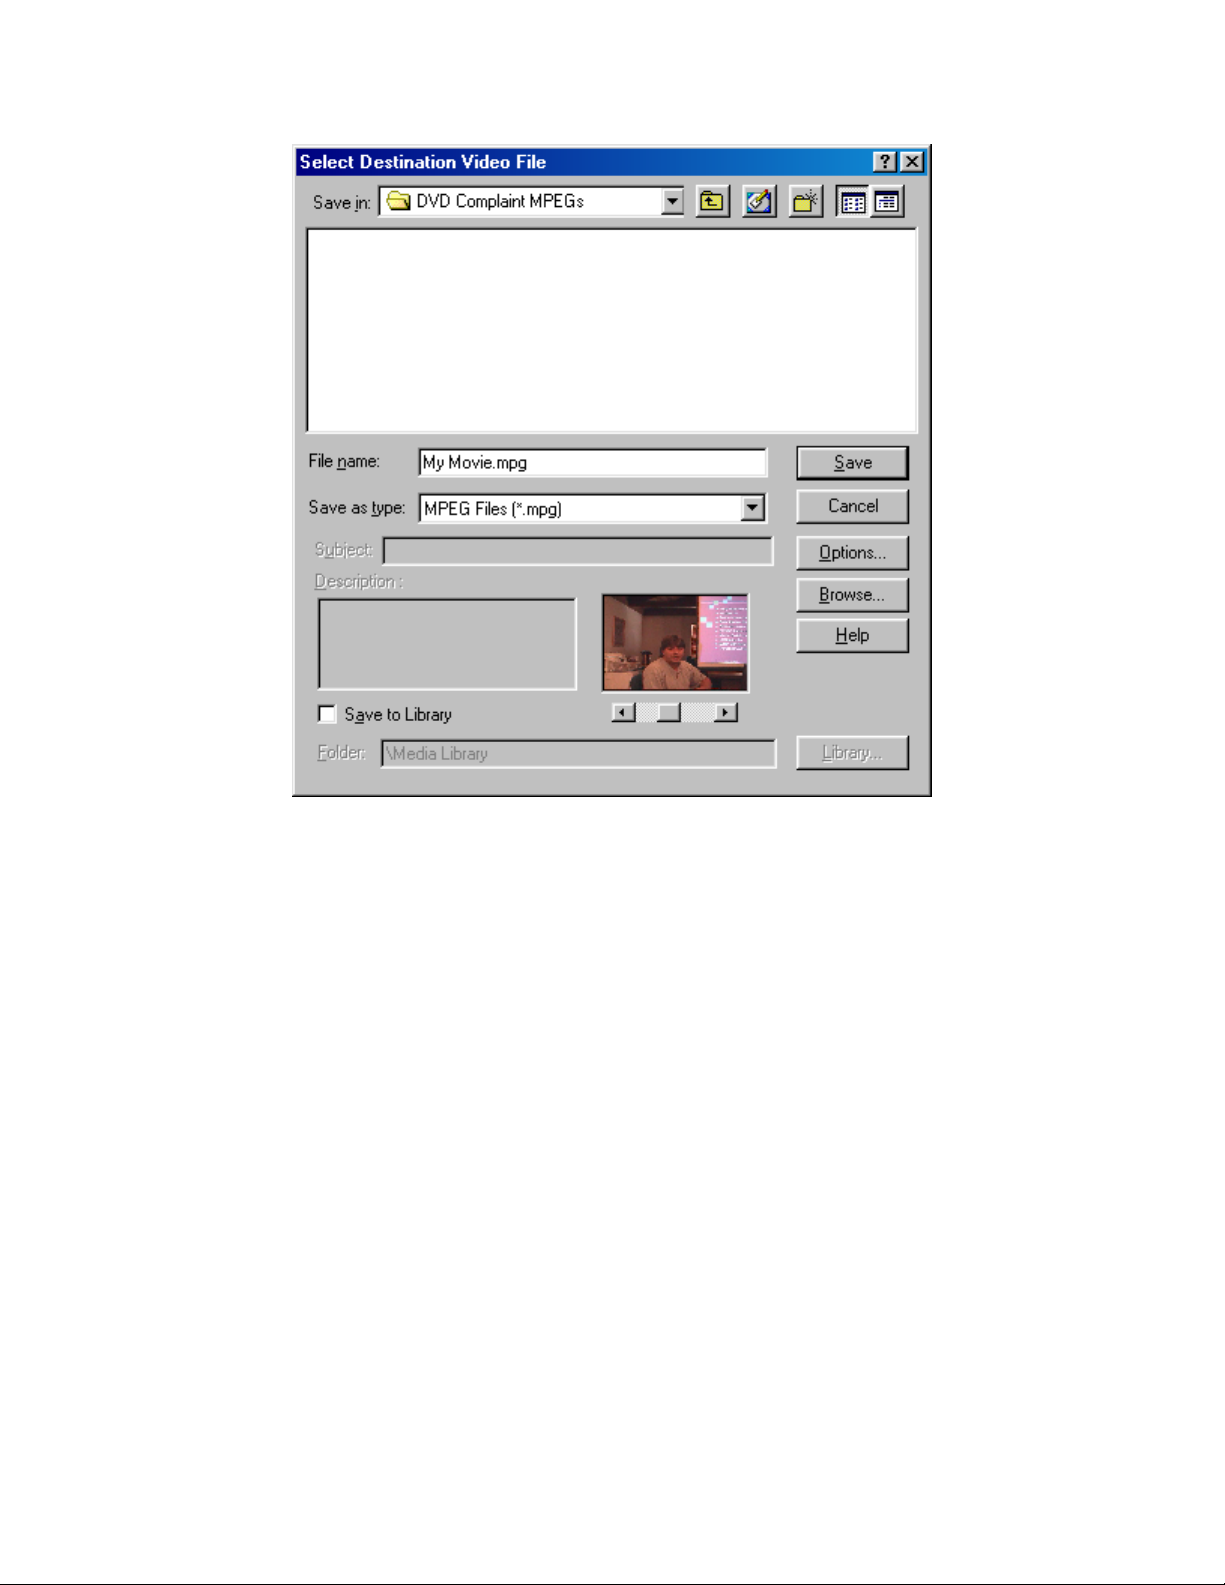
18 Name the MPEG file and choose Save.
2—8 SpruceUp User’s Guide
Page 31

Creating a DVD Title Overview
This topic provides general information on what is involved in creating a DVD title. We’ve
broken the process into six steps.
Gather Your Sources
SpruceUp uses three different source types: Movies, Backgrounds, and Buttons.
Movies
Movies contain the video and audio that make up the bulk of a DVD title. Generally, VCRs
and camcorders supply the content. These movies must be DVD compliant MPEG encoded to
be used with SpruceUp (see the Encode for SpruceUp step). They also must match your
video standard – NTSC or PAL. See the Video Standards of the World topic to determine
your format.
Backgrounds
Backgrounds are still video images used when creating menus. SpruceUp can grab
backgrounds from a movie or you can create your own. SpruceUp directly imports TIFF
(non-compressed), JPEG, and BMP files. Common sources are digital cameras or film
pictures converted to digital, and scanned photos or artwork. As with movies, the video
standard must be taken into account. See the Background Assets topic for details.
Note: Adobe Photoshop files (.PSD extension) are assumed to be
buttons. To use a Photoshop file as a background you need to use its Save
a Copy function and save as a flattened (single layer) TIFF, BMP, or JPEG
file.
Buttons
Buttons come in two types: Solid and Thumbnail Frame.
Solid buttons look the same no matter what is assigned to them. They rely on their shape
(an arrow for example) or text typed next to them to indicate what happens when they are
pushed.
Thumbnail Frame buttons have a window that displays the video thumbnail frame of the
asset or menu assigned to them. This provides a visual indication of what pushing the
button does.
SpruceUp supplies a set of buttons and includes a button-making tool for creating simple
custom buttons. You can also make custom buttons using Adobe Photoshop – SpruceUp
directly imports multi-layer PSD files. See the Creating Buttons topic for details.
SpruceUp User’s Guide 2—9
Page 32

Edit Your Sources
There are several things you may need to do to a movie before you can use it as part of the
DVD title:
• Edit the movie to select just the parts to use with the DVD title.
• Put scenes in the correct order
• Add transitions between the scenes (fades, wipes, etc.)
• Make video adjustments, such as changing the brightness or chroma levels
• Alter the audio by mixing additional tracks or editing its content
SpruceUp cannot directly link (edit) multiple movies together or change the audio. Use an
NLE (Non-Linear Editor) or video editing application such as Adobe Premiere or those from
Ulead Systems to perform these functions.
Encode for SpruceUp
This is the most critical step in preparing the video for use with SpruceUp – professional
DVD producers often employ people whose sole job is to MPEG encode video. MPEG
encoding presents a large number of choices of settings, some with strange names. DVDs
have their own requirements – MPEG encoders often have one or more "DVD" settings. Be
sure to read the information provided with your encoder to become familiar with the
settings. See the MPEG Settings Summary topic for SpruceUp requirements. See the Video
Assets topic for details on MPEG encoding requirements for DVD.
You need to balance two contradictory goals: Get the best quality possible with as small a
file as possible. File size is particularly important when you intend to distribute your title on
CD-R.
Tip: It is very important to know that SpruceUp just passes on the
video – it does not process it at all. For example, it cannot adjust the
colors or convert from MPEG-1 to MPEG-2.
Always try to have the best quality source possible. MPEG encoding requires finding
redundant material in the video so that it can be removed and reinserted later. Noisy video
leads to poor encodes, since the noise is interpreted as motion and is carefully encoded and
retained.
If you run into problems with the encode and must fix the video, be sure to go back to the
source and re-export a new MPEG file as opposed to trying to fix the MPEG file directly.
2—10 SpruceUp User’s Guide
Page 33

Author the Title
Authoring your DVD title can be a very quick process, involving simply loading an asset or
two and creating a simple menu, or it can be the longest and most creative part of creating
the title, using multiple menus and movies with links to specific scenes and even to web
pages.
The first step is to load your assets (MPEG movies, backgrounds, and buttons). See the
Assets topic for details.
Next you need to create your menus. Menus allow the viewer to choose what they want to
see – as the author, you assign links to buttons, providing the choices. A button can play an
entire movie or take you to a specific Chapter Point in a movie or to a different menu
providing even more choices. A button can even launch a web browser and display a
specified web site.
Create a menu by:
• Selecting a still background, either from a supported file format or by using the Clip
Properties to grab a frame from a movie, then dragging it onto the Work Area.
• Adding buttons to it using either the provided SpruceUp buttons, simple buttons
created with the Button Maker tool, or buttons you create on your own.
• Adding links to the buttons, either to movies, other menus, or URLs.
• Typing text on the menu. SpruceUp includes a titler for typing and formatting text on
menus. Use this to add text to your menus, including menu titles and naming buttons.
See the Background Assets and Button Assets topics for more information on backgrounds
and buttons. See the Creating Menus topic for details on building menus.
Simulate the Title
SpruceUp has the ability to simulate your project, either once you are finished or while you
are building it. Use this as an error checking and proofing tool to verify playback and
navigation. It allows you to verify menu and button functionality before committing the title
to disc. It is very easy to build traps into a title – places where a viewer can go but has no
obvious way out. See the Simulation topic for details.
Warning: Do not have other DVD players (including the Syzygy
player) running on your system while in Simulation mode. This causes
conflicts within the system.
Do not confuse Simulation with Emulation. Simulation works with a title prior to it being
compiled, whereas Emulation uses the DVD player on your system to verify the compiled
title prior to burning a disc. This requires you to export a video title set.
SpruceUp User’s Guide 2—11
Page 34

Export the Title
The final step is to export the title by writing it to a DVD-R drive (for playback in set-top
DVD players and computer-based DVD-ROM drives), to a CD-R/RW drive (for computerbased playback in most DVD-ROM and CD-ROM drives), to a DLT (Digital Linear Tape) drive
for mass-replication, or to your hard drive.
The title can be configured with the Syzygy DVD player. Adding the Syzygy player allows
the title to play in most Windows-based PCs equipped with a DVD-ROM or CD-ROM drive.
The player loads in software only - nothing is written to the system’s hard drive. See the
Export Interface topic for details on exporting.
Set-Top DVD Players
It is a typical goal of a DVD title that it be playable in the average set-top DVD player.
In addition to mass-replicated DVD discs, most current set-top DVD players can play discs
from a DVD-R drive. Older players may not play these discs, or may play the 3.95 GB discs
but not the 4.7 GB versions.
Most set-top DVD players can also play audio CDs, but almost all except the very latest will
reject a disk from a CD-R/RW drive, no matter what is on it.
This means that the current foolproof method of making a DVD title that is playable on all
set-top DVD players is to mass-replicate it. This requires you to export to a DLT (Digital
Linear Tape) drive (since this is the only format replicators currently accept) and send it to a
mass-replicator.
The other option is to export to a DVD-R drive and try out the disc on the players you wish
to use.
Playing Titles on PCs
Most PCs with only a CD-ROM or CD-R/RW drive do not have DVD player software or
hardware. It is for these systems that the Syzygy DVD player is intended. These systems
can typically play CD-R/RW discs, but not any form DVD discs.
PCs with DVD-ROM, DVD-R, DVD-RAM, and other versions of DVD drive can typically play
most DVD discs, including DVD-R, and most CD-R/RW discs. These systems also typically
have DVD player software included.
See the DVD Media Basics topic for details on the various media types.
The Syzygy Player
Even on systems that already have DVD player software, the Syzygy player may be worth
using since it works well with WebDVD™ titles, with links entered in the URL field of a
movie's Chapter Points and a menu's buttons.
There are a lot of factors that determine whether a PC will be able to play a title using the
Syzygy player. Following is a list of general requirements:
• Windows' 98SE, Millennium (ME), NT 4.0, and 2000 operating systems
• Intel CPU with MMX, or AMD CPU with 3Dnow!
• 8X (read) CD-ROM or faster
– – or – –
• 2nd Generation or Newer DVD-ROM Drive
• AGP Graphics Card (PCI may perform up to 30% slower) with Hardware Overlay
Support
2—12 SpruceUp User’s Guide
Page 35

• 32 MB System Memory minimum
• 20 MB Available Hard Drive Space
• Audio Subsystem that supports the DVD required 48Khz stereo playback (PCI
desirable)
Playing Titles on an Apple Macintosh
DVD drives are available for Power Mac G4, Power Mac G4 Cube, PowerBook G3 and iMac
computers. They can play titles burned to a DVD-R disc and CD-R/RW discs. They cannot
use the Syzygy player and do not process web links. See the Playing on an Apple OS topic
for more information.
SpruceUp User’s Guide 2—13
Page 36

DVD Basics
DVD Introduction
The following information is by no means complete, and may be out of date by the time you
are reading this. Visit the Spruce Technologies web site at www.sprucetechnologies.com for
links to sites with updates and more detailed information. A good resource for general DVD
information is the FAQ at:
www.dvddemystified.com.
DVD (not actually an acronym, but often referred to as Digital Versatile Disc) is a format
designed to take advantage of the high storage capacity of optical discs developed in 1995.
To avoid a Beta vs. VHS style battle, a group was formed to define a standard. The result
was the DVD Specification. There are a number of different DVD formats, each aimed at a
specific task. These include DVD-Video, DVD-Audio, DVD-ROM, and DVD-RAM.
DVD-Video
A DVD-Video title contains a file structure and files following the DVD Specification and is
universally supported. The DVD Specification describes in detail all facets of creating and
playing back a DVD-Video title. The goal was to create a standard that allows a consumer to
take any DVD title and play it back in any set-top DVD player. For the most part this has
worked, although there has been lots of growth in areas such as connecting to the Internet.
A DVD-Video title can be very simple; insert the disk in a player and it starts playing. It can
also be hugely complicated. There are provisions for multiple soundtracks, video angles, and
subtitles with menus to help control it all. Added to this are copy protection, regional
management, and parental control provisions.
In addition to set-top DVD Players, DVD-Video titles play in virtually all DVD-ROM and DVDRAM drives within PCs with proper playback software.
DVD-Audio
DVD-Audio titles are not widely available, mostly due to copy protection issues. They
promise stunning audio playback quality. DVD-Audio titles require special playback devices
that are just now coming to market.
DVD-ROM
A DVD-ROM is similar to a CD-ROM in that it can contain just about any kind of files – just
more of them! A DVD-ROM disc stores data in the same file structure as DVD-Video titles
(UDF Bridge format), and can also contain the elements of a DVD-Video title. A lot of DVDVideo titles are actually DVD-ROMs, since they include files in addition to those specified by
the DVD-Video format. When you add URLs and the Syzygy™ player to SpruceUp titles you
are creating a DVD-ROM with DVD-Video content.
Set-top DVD players are able to play DVD-ROM video titles just like DVD-Video titles,
however they cannot access any files outside of the video title.
DVD-RAM
DVD-RAM is a standard that stores data on media that is not compatible with DVD-Video.
DVD-RAM discs can typically only be used with other DVD-RAM drives. They function as a
large rewritable disc, allowing you to read, write, and delete files as needed. DVD-RAM
drives can typically play DVD-Video and DVD-ROM discs.
2—14 SpruceUp User’s Guide
Page 37

DVD+RW and DVD-RW
The DVD+RW and DVD-RW standards are both very new, and as of this writing, not
available in the U.S. They both promise the ability to write discs readable in set-top DVD
players and all other DVD drives. Both are being looked at as video recorders that can
replace VHS tape recorders.
Video CD (VCD) and Super Video CD (SVCD)
The Video CD (VCD) format uses MPEG-1 video at DVD compliant bit-rates and resolutions.
There is the ability to author limited menus, but these are not DVD compliant. Many set-top
DVD players can play VCDs. The Super Video CD (SVCD) format uses non-DVD compliant
MPEG-2 resolutions with low bit-rates to provide better quality than a VCD but still not up to
DVD standards. Almost no DVD players can play these discs.
SpruceUp cannot create VCD or SVCD format titles.
Distributing SpruceUp Titles
SpruceUp is designed to create DVD-Video titles. It provides the most popular features of
the DVD specification in a simple-to-use environment. Embedding web-based URLs within a
title adds the ability to enhance your titles with up-to-date information from web sites.
There are a number of options for distributing the SpruceUp titles you create. The choice is
primarily driven by how you want the titles to be played back.
Set-Top DVD Players
Playback on set-top DVD players generally requires you to create a DVD-Video disc using
one of the standard DVD media sizes. Currently there are two options for this: Use a DVD-R
drive to create the disc or write to a DLT (Digital Linear Tape) drive and have a replicator
make the discs for you.
Currently there is only one DVD-R drive model available – the Pioneer DVR-S201. A number
of companies are working on DVD-RW and DVD+RW drives which should also be able to
create standard DVD-Video titles. Older set-top players may not play DVD-R discs.
Set-top DVD players ignore any extra data on a DVD-Video disc, such as URLs and text files
that a DVD-ROM might contain.
Set-top DVD players cannot play DVDonCD titles. Most set-top DVD players can play audio
CDs, and assume any CD media is an audio CD. They will typically eject the disc rather than
check to see if it contains DVD video files. New generation DVD players are constantly being
developed, so there is some hope for the future.
PC DVD-ROM Drives
PCs with DVD-ROM drives can play DVD-Video titles, provided the PC is equipped with a
suitable DVD player. They can also take advantage of any non-DVD Video data on the disc,
such as URLs embedded in the title. DVD-ROM drives can also play CD-R discs with a DVDVideo title, as well as audio CDs.
The obvious disadvantage of a DVD-ROM drive is its inability to record data. New
combination DVD-ROM drives with CD-RW capabilities are now being released.
CD-ROM Drives
CD-ROM, CD-R, and CD-RW drives cannot play DVD media. Spruce Technologies created
DVDonCD™ technology to allow you to create titles using standard CD media that plays on
CD-ROM, CD-R, and CD-RW drives. DVDonCD titles have three primary advantages: They
are much less expensive than DVD discs, burning your own discs is easy and fast, and the
finished title can be played back in most of the millions of CD-ROM and DVD-ROM equipped
PCs that exist.
SpruceUp User’s Guide 2—15
Page 38

Spruce Technologies has a freely distributable DVD player called Syzygy™ that can be
included with the titles. Based on InterVideo Inc’s WinDVD™2000, this player allows
systems without video playback capabilities to play the title. The player loads into RAM only
– nothing is written to your hard disc, and the whole process is transparent to the person
playing the disc. Find more information on DVDonCD by visiting www.webdvd.org and
clicking on the DVDonCD link.
SpruceUp interfaces with a number of CD-RW drives, allowing titles to be written directly to
a disc without using a third party’s software. Check our web site for updates if SpruceUp
does not recognize your device.
Other Drive Technologies
A DVD title can actually be distributed on almost any disc drive technology. The
requirements are that it be fast enough to read the data in real-time, big enough to hold the
files, and that whoever you want to play the title back has a compatible drive. These can be
hard drives, Iomega Jaz drives, etc.
Replicators and DVD-R
DVD replication houses require you to provide the title on DLT (Digital Linear Tape). There is
a wide variety of DVD media available to the replicators, ranging from a single-sided singlelayer disc with 4.7GB of storage to a dual-sided dual-layer disc with 17.08GB of storage.
Separate tapes are required for each layer and/or side of a disc.
DVD-R drives currently have 3.95GB and 4.7GB media available. Titles made on a DVD-R
drive typically work in both set-top DVD players and computer DVD-ROM drives. Even when
the final title is to be duplicated at a replication house, being able to make test DVDs can be
very useful.
DVD-Video File Details
The following gets pretty detailed, but can be useful when trying to understand exactly what
files are required to make a DVD-Video disc. This is especially important when making a
DVD-ROM title where you add extra files to the disc.
The heart of a DVD-Video title is the Video_ts folder, which is at the root level of most DVD
titles. This folder contains all assets for the title, including the encoded video and audio,
menus, subtitles, and other pieces. The DVD compile process creates the files found in the
Video_ts folder.
Video_ts Files
The DVD Specification defines the file names found in the Video_ts folder; they are
(mostly) the same on every title, and always follow an "8.3" naming convention.
Video_ts.ifo – Contains the major information for the disk, such as its capacity.
Video_ts.bup – A backup of the .ifo file.
Vts_01_0.ifo – Contains the major information for the title, such as its name. A disc can
have multiple titles. The “01” in this file name indicates it is title one.
Vts_01_0.bup – A backup of the .ifo file.
Vts_01_0.vob – This file contains the menus (including the URL entries) for title one.
Vts_01_1.vob – This file contains the media (video, audio, and subtitles) for title one. The
DVD Specification sets 1GB as the maximum file size. Since the media information often
exceeds this limit, you will find multiple files with the same name but with the last digit
incremented (Vts_01_2.vob and so on).
2—16 SpruceUp User’s Guide
Page 39

Note: SpruceUp treats each movie as a separate title.
Tip: Many PC DVD players can play back individual .vob files.
Audio_ts Files
Compiling also creates an Audio_ts folder. This folder is always empty, and is not actually
required to be on the final disc, but is usually placed there anyway. It will be used for the
DVD-Audio specification.
Other Files
Other files and folders can be on the disc (outside of these two folders), creating a “Hybrid
DVD” or DVD-ROM. Set-top DVD players currently ignore these extra files and folders, but
DVD-ROM players on personal computers can use these files for a wide variety of exciting
things.
General Information
When you export a project, SpruceUp "muxes" the MPEG movies, menu, navigation, and
URL settings into a title set containing the Video_ts .vob files.
On Hollywood created DVDs, these files are also encrypted. SpruceUp does not encrypt
these files, and users can use 3rd party programs to "demux" the .vob files back into MPEG
data.
SpruceUp User’s Guide 2—17
Page 40

Blank Page
(mostly)
2—18 SpruceUp User’s Guide
Page 41

Chapter 3: Getting Started
Registering SpruceUp
The Launch Window
Setting Preferences
SpruceUp User Interface
Quickstart
Keyboard Shortcuts
Pull Down Menus
SpruceUp User’s Guide 3—1
Page 42
Registering SpruceUp
SpruceUp is distributed in two forms: a full bundled or retail version and a trial version.
Both versions must be registered to enable full functionality – only the trial version requires
a payment to be made.
The Registration ID
SpruceUp creates a unique Registration ID each time you install SpruceUp. This ID is based
on the SpruceUp version being installed, the serial number you enter (if you have one), and
certain aspects of the PC you are installing on. This ID is valid only for this installation on
this PC – if you must re-install SpruceUp on this or any other PC, SpruceUp creates a new
Registration ID.
The Software Enabling Key
The software enabling key is generated specifically for the current SpruceUp installation on
this PC only, based on the Registration ID. Reinstalling SpruceUp requires you to get a new
enabling key (at no cost as long as you know the serial number). The key cannot be used
on other PCs, even with the same SpruceUp version.
What is the Trial Version?
The Trial Version mode has the complete functionality of the full version with the following
restrictions:
• You are limited to two exports.
• All menus contain the "SpruceUp Trial" watermark.
• The Simulation and Clip Properties modes will not play Dolby Digital AC-3 audio.
Feel free to let others install your trial copy of SpruceUp. In fact, there is an option in the
Export Dialog to include a copy with exported discs.
Is Mine a Full Version?
Full versions of SpruceUp will have a 13-digit serial number sticker on or in the CD's case.
Note: The above number is a sample, and will not actually work.
This number must be entered twice to enable the full version:
• In the Welcome to SpruceUp dialog displayed when you start SpruceUp the first
time. SpruceUp uses this number to generate a Registration ID unique to that
installation on that PC.
• At the registration web site (as covered later on).
The Welcome to SpruceUp Dialog
The Welcome to SpruceUp Dialog (as shown following) appears only once – the first time
you start SpruceUp after installing the software.
3—2 SpruceUp User’s Guide
Page 43

• If you have a serial number, enter it then select OK. SpruceUp's Preferences menu
displays next, followed directly by the SpruceUp Registration dialog.
• If you have a serial number but need to first locate it, select Exit to halt starting
SpruceUp so that you can find the serial number and restart SpruceUp to get to this
dialog again.
Warning: If you choose to not enter the serial number and instead
select Trial, you can only get back to this dialog by first removing then reinstalling SpruceUp and entering the serial number when this dialog
displays again.
• Select the Trial button if you do not have a serial number.
Upgrading to or Enabling the Full Version
There is no cost to enable a full version of SpruceUp – the only requirement is that you have
Internet access and the serial number.
The cost to upgrade from the trial version to a full version of SpruceUp is displayed on the
registration site. Upgrading requires you to have Internet access and a credit card.
Important: Windows NT 4.0 and 2000 users must log on as
Administrator to install and upgrade/enable SpruceUp. Once SpruceUp is
installed, has been run the first time, and upgraded/enabled, it can be run
under other log ons.
To upgrade to or enable the full version:
1 Start SpruceUp (if not already running it).
2 Select Register from the Launch Window. If the Launch Window is not displayed,
select Help from the Menu Bar then Registration/Upgrade. Alternatively, press Ctrl
+ 4 to open the Launch Window.
SpruceUp User’s Guide 3—3
Page 44

Note: The Register button is replaced with an Upgrade button
once SpruceUp is registered. Pressing this launches your browser to the
SpruceUp upgrade site where you can find information on the current
release.
3 This displays the SpruceUp Registration dialog as shown below. The Registration ID is
a value generated specific to this installation of SpruceUp and this PC.
3—4 SpruceUp User’s Guide
Page 45

4 Click on Go To Web to have SpruceUp launch your browser, directing it to the
address displayed. Alternatively, you can note the Registration ID and the web
address and manually go to the site. This can even be on a different computer if
necessary.
Tip: To avoid the possibility of mis-typing the Registration ID, use the
Windows copy and paste functions. Highlight the text to copy, then rightclick on it and select Copy from the pop-up menu. Now place your cursor
where you would like the text to go, right-click, and select Paste.
The web site (which is secure) is:
https://SpruceRegistration.com/SpruceUp
5 The form will already have the Registration ID, name, and e-mail address portions
filled out (all based on entries made while installing). If you are manually entering the
information, copy the Registration ID to the Registration ID field (note that this is
case-sensitive.).
Note: It is critical that the email address is valid. It authenticates
you and is used to deliver your Enabling Key.
6 If you have a full version, enter the serial number in its field. A box is provided for you
to check if you have misplaced the serial number since the last time you registered.
7 Click Submit.
If You Entered a Serial Number
8 The serial number is verified and a page displaying your Enabling Key information
displays.
9 Copy the Enabling Key to its corresponding field in SpruceUp's Registration dialog.
10 Press OK. A message displays confirming that SpruceUp will be fully enabled the next
time it starts. Congratulations!
If You Do Not Have a Serial Number
8 The credit card page displays. Enter your billing and credit card information. This must
be filled out completely for card verification.
9 Once the form is filled out, click on Submit.
10 After a few moments, a window appears confirming your order and displaying your
new serial number and the Enabling Key. It is highly recommended that you print or
save this page and keep it for future reference.
Note: If for any reason you must re-register (due to hard drive
failure or purchasing a new computer), SpruceUp will require the serial
number to avoid billing you again. It is your proof of payment.
11 Copy the Enabling Key to its corresponding field in SpruceUp's Registration dialog.
Tip: To avoid the possibilty of mis-typing the Enabling Key, use the
Windows copy and paste functions. Highlight the text to copy, then right-
SpruceUp User’s Guide 3—5
Page 46

click on it and select Copy from the pop-up menu. Now place your cursor
where you would like the text to go, right-click, and select Paste.
12 Press OK. A message displays confirming that SpruceUp will be fully enabled the next
time it starts. Congratulations!
3—6 SpruceUp User’s Guide
Page 47
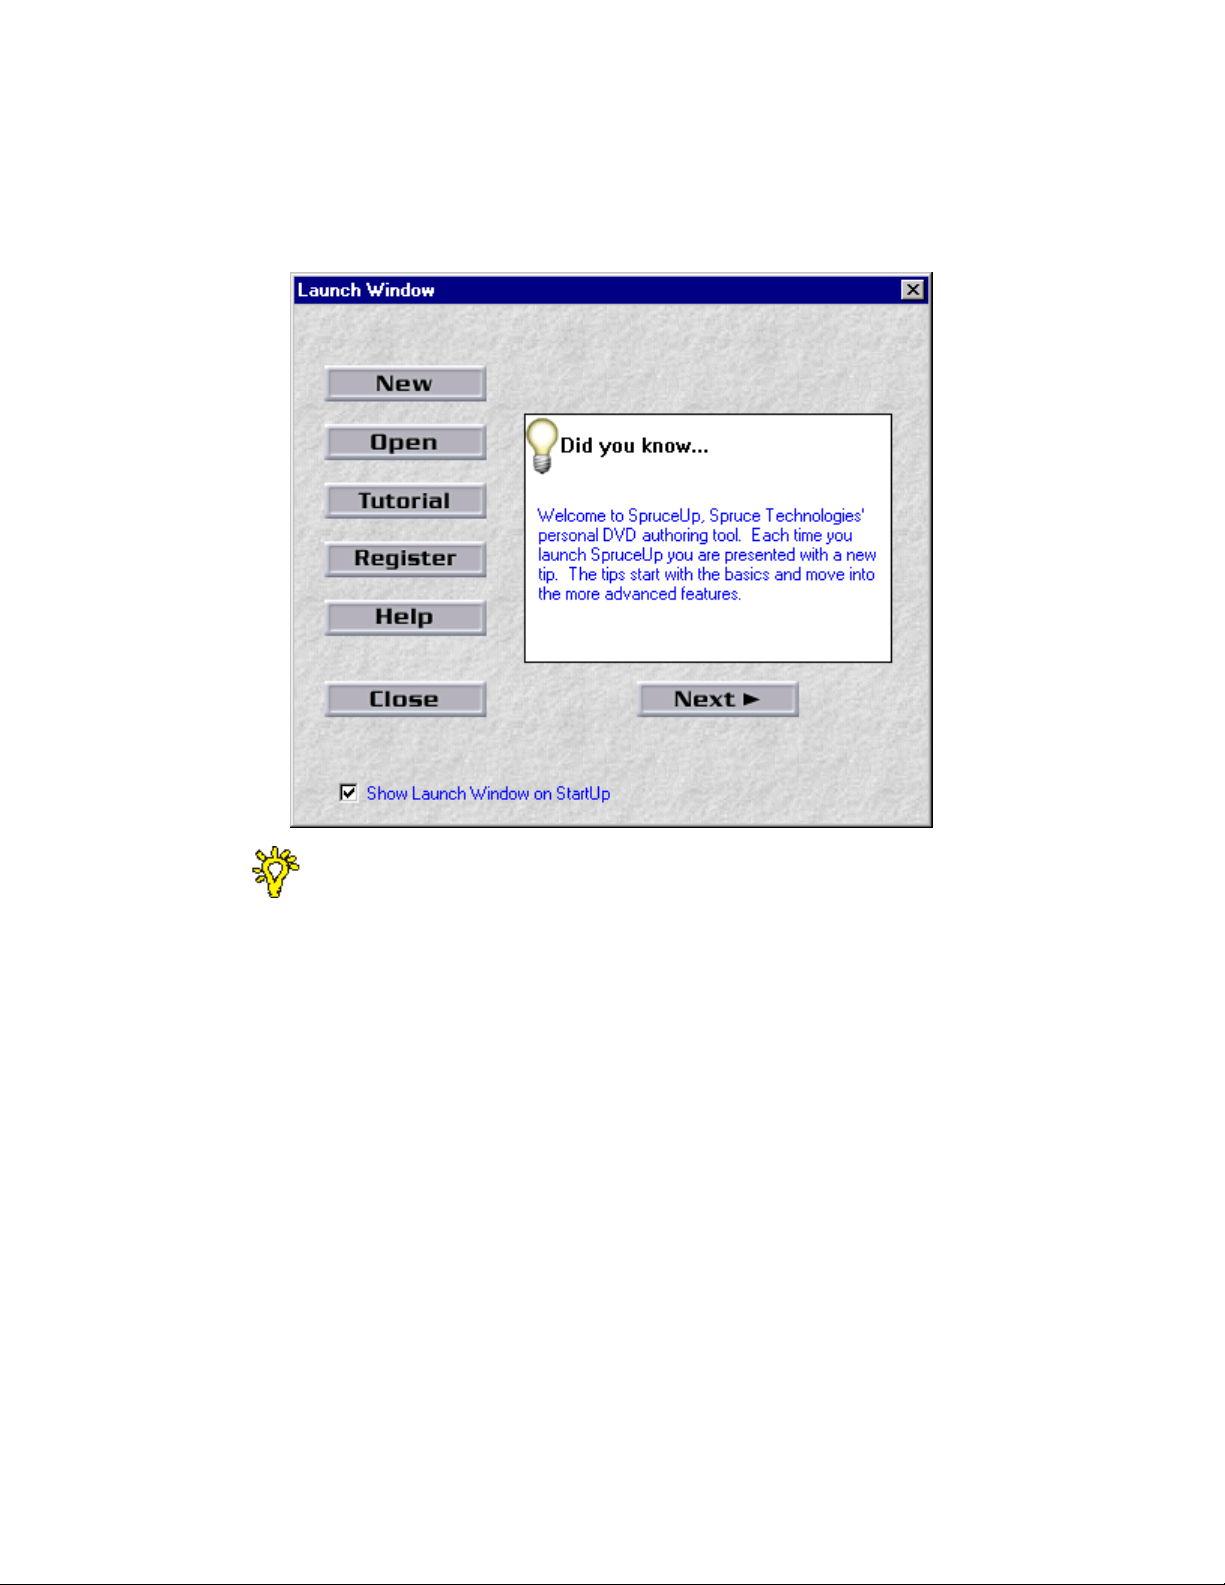
Launch Window
The Launch Window generally appears each time SpruceUp starts. Open it at anytime by
opening the View pull down menu and selecting Launch Window or using the keyboard
shortcut of Ctrl + 4.
The bottom of the dialog contains a checkbox allowing you to disable this dialog from
automatically appearing when SpruceUp starts. Select Launch Window in the View pull
down menu to open it at any time.
The Launch Window provides quick access to the functions needed to start a new project or
open an existing one, plus additional functions useful to new users. The specific functions
include:
• New – Prepares SpruceUp for a new project. Behaves exactly like New in the File pull
down menu.
• Open – Displays a dialog where you can choose to browse to find a SpruceUp project
or template to open, or to choose from a list of the eight most recent projects.
• Tutorial – Starts the SpruceUp tutorial. The tutorial provides selections for either
viewing a short demo movie or running the tutorial. The tutorial provides the assets to
build the demo movie yourself.
• Register – This indicates that SpruceUp is running in the trial mode. Press this to
register this copy of SpruceUp. See the Registering SpruceUp topic for additional
information.
– – or – –
First time SpruceUp users may want to go to the Introduction topic.
• Upgrade – This indicates that SpruceUp has already been registered and is running
SpruceUp User’s Guide 3—7
Page 48

the full version. Press this to launch your browser to the SpruceUp web site and find
out if upgrades are available.
• Help – Press this to access this topic in SpruceUp's on-line help.
• Close – Closes this dialog, allowing you to use SpruceUp in its current configuration.
The Launch Window also displays a "Tip of the Day". These are brief bits of information
about common issues with SpruceUp, and can provide helpful ideas. Press the Next button
to select the next tip.
3—8 SpruceUp User’s Guide
Page 49

Preferences
The Preferences dialog displays the first time you run SpruceUp, and can be opened at any
time by opening the File pull down menu and selecting Preferences or using the keyboard
shortcut of Ctrl + 7.
Use the Preferences dialog to set several SpruceUp parameters. These are not typically
project specific, but apply to all projects created with the system. For this reason, you
generally need to set these up only once.
NTSC/PAL Selection
The NTSC/PAL selection is very important, as it must match the video standard of the assets
you will use with SpruceUp. Once set, this setting will not change in most instances. An
exception is if you create projects in both formats.
Important: This setting only applies to projects created after it is set.
It does not affect the current project or any previously saved projects.
Currently SpruceUp allows you to build a project using assets that do not
match the selected standard, however it will not compile the project.
Selecting NTSC or PAL typically requires you to match the standard used in your country.
See the Video Standards of the World topic to find out your country's video standard. As a
general guide, if your country uses 60Hz AC power you are probably NTSC; if you use 50Hz
power then you should select PAL (even if your country is actually a SECAM country). See
the Video Basics topic for more information on video standards.
Simulation Preview Decoder Selection
The Simulation Preview Decoder is used when simulating your title, as well as when you
play a movie in the Clip Properties dialog. You have three choices:
None – The movie sits on its first frame of video and does nothing when started with
the Simulator or Clip Properties.
Ravisent Cinemaster – Uses the Cinemaster hardware or software DVD player to play
movies in Simulator and Clip Properties modes. This player is not provided by
SpruceUp and must be purchased separately.
InterVideo WinDVD – Uses the SpruceUp provided WinDVD player from InterVideo.
This is the normal setting.
Note: Due to licensing agreements, the WinDVD player used with
the trial version of SpruceUp cannot play the audio from movies using
Dolby Digital AC-3 encoding. Upgrading to SpruceUp's full version enables
AC-3 audio playback to work.
Display Project Size
SpruceUp provides the ability to have a Media Size Indicator displayed on the bottom of the
Media Gallery. It provides a graphic indication of how large your project is becoming, letting
you anticipate how full your disc will be when exported. This is for display only though –
SpruceUp does not in any way change the project based on what this indicator displays.
The disc media available to export your projects to is constantly changing. New formats and
larger sizes are frequently being released. For this reason SpruceUp provides you the ability
to customize the Media Size Indicator on the bottom of the Media Gallery.
SpruceUp User’s Guide 3—9
Page 50

SpruceUp supplies the following settings:
• None – No disc icon.
• CD-R/RW 650 MB
• CD-R/RW 700 MB
• DVD-R/RW 4.7 GB
• DVD-R 3.95 GB
• DVD+RW 4.7 GB
• DVD-RAM 2.6 GB
• DVD-RAM 4.7 GB
Adding a Custom Entry
Select Add Entry to open the User Defined Device dialog. This dialog has two settings:
Name and Capacity.
Type in a Name that makes it easy for you to recognize the device - this name is for display
purposes only and does not have to match the device itself (for example, "Middle Drive" or
"Shmoopy" is fine).
The Device Capacity should reflect the actual storage of the drive. Select either GB
(gigabytes) or MB (megabytes) and then type in the number. Once again, this setting is for
display purposes only.
3—10 SpruceUp User’s Guide
Page 51

Video Standards of the World
SpruceUp needs to know the video standard your movies will be. The two options are NTSC
(525 lines) and PAL (625 lines). See the Preferences topic for making the setting. See the
Video Basics topic for general video information.
Warning: This list is subject to change; use it as a guide only. A lot of
the information came from the CIA, so beware!
Africa
PAL
Algeria
Angola
Botswana
Cameroon
Cape Verde
Egypt
Eritrea
Ethiopia
Gambia
Ghana
SECAM (use PAL setting)
Benin
Burkina Faso
Central African
Republic
Chad
Congo
Djibouti
Guinea
Kenya
Lesotho
Liberia
Malawi
Mozambique
Namibia
Nigeria
Seychelles
Sierra Leone
Equatorial Guinea
Gabon
Libya
Madagascar
Mali
Mauritania
Mauritius
Somalia
South Africa
Sudan
Swaziland
Tanzania
Uganda
Zambia
Zimbabwe
Morocco
Niger
Rwanda
Senegal
Togo
Tunisia
Zaire
SpruceUp User’s Guide 3—11
Page 52

Asia
NTSC
Burma
Japan
Korea (South)
Philippines
Taiwan
Vietnam
PAL
Bangladesh
Brunei
China
Hong Kong
India
Indonesia
Laos (PAL-M; use
NTSC setting)
Macao
Malaysia
Maldives
Nepal
Pakistan
Papua New Guinea
Singapore
Sri Lanka
Thailand
SECAM (use PAL setting)
Afghanistan
Azerbaijan
Cambodia
Georgia
Kazakhstan
Korea (North)
Kyrgyzstan
Mongolia
Caribbean
NTSC
Antigua
Aruba
Bahamas
Barbados
Barbuda
British Virgin
Islands
Cayman Islands
Cuba
Dominica
Dominican Republic
Grenada
Haiti
SECAM (use PAL setting)
Guadeloupe
Martinique
Central America
Russia
Tajikistan
Turkmenistan
Uzbekistan
Jamaica
Montserrat
Puerto Rico
Trinidad
Tobago
Virgin Islands
NTSC
Belize
Costa Rica
El Salvador
Guatemala
3—12 SpruceUp User’s Guide
Honduras
Mexico
Nicaragua
Panama
Page 53

Europe
PAL
Albania
Andorra
Austria
Belgium
Bosnia Herzegovina
Croatia
Czech Republic
Denmark
Faroe Islands
Finland
Germany
Gibraltar
Greece
SECAM (use PAL setting)
Belarus
Bulgaria
Estonia
France
Monaco
Ukraine
Holland
Hungary
Iceland
Ireland
Italy
Latvia
Liechtenstein
Lithuania
Luxembourg
Macedonia
Malta
Netherlands
Norway
Poland
Portugal
Romania
Serbia
Slovakia Republic
Slovenia
Spain
Sweden
Switzerland
Turkey
United Kingdom
Middle East
PAL
Bahrain
Cyprus
Gaza & West Bank
Israel
Jordan
Kuwait
Lebanon
Oman
SECAM (use PAL setting)
Iran
Iraq
Syria
North America
NTSC
Bermuda
Canada
United States of
America
Qatar
Saudi Arabia
United Arab
Emirates
Yemen
SpruceUp User’s Guide 3—13
Page 54

PAL
Greenland
Oceania
NTSC
American Samoa
Guam
Marshall Islands
PAL
Australia
Cook Island
Fiji
SECAM (use PAL setting)
New Caledonia
Wallis Island
Micronesia
Midway Islands
Palau
Kiribati
New Zealand
Norfolk Island
Samoa
Solomon Islands
Tonga
Vanuatu
South America
NTSC
Bolivia
Chile
Columbia
PAL
Argentina
Brazil (PAL-M, use
SECAM (use PAL setting)
Guyana (French)
Ecuador
Guyana (Republic)
Peru
NTSC setting)
Falkland Islands
Surinam
Venezuela
Paraguay
Uruguay
3—14 SpruceUp User’s Guide
Page 55

SpruceUp User Interface
The SpruceUp user interface provides easy and intuitive access to the tools needed to create
DVD titles. This topic explains the Main Window.
Main Window
The Main Window is where the largest part of your time will be spent while creating menus.
The following graphic shows the names of the major parts. These names are used
throughout this document.
Menu Bar
This contains the pull-down menus providing standard Windows-style access to most
SpruceUp functions. See the Pull Down Menus topic for details.
The Status bar along the top shows the project's name and contains the standard window
controls (min/max/exit) on the right edge.
Main Control
These buttons select the step in the authoring process you are currently in: Authoring
(creating the title), Simulation (trying the title out before writing to disc), and Exporting
(writing the title to CD-R/RW, DVD-R/RW/RAM, or the hard drive).
See the Creating Menus topic for authoring information. See the Simulation topic for
information on the Simulate mode. See the Export Interface topic for information on the
Export mode.
SpruceUp User’s Guide 3—15
Page 56

Media Gallery
The Media Gallery is where you manage your assets, which can be still backgrounds,
buttons, or movies. It has three primary sections: The asset-type selection tabs, the asset
view area, and the disc space display.
Additionally, the question mark selects help relevant to the mode you are in, and the file
cabinet selects the Style Gallery dialog, used to choose the directory supplying the
backgrounds and buttons.
Below is an example of the Media Gallery.
Along the Top
Clicking on the Help icon (the question mark) opens the Help
dialog to the topic relevant to your current mode.
The three tabs along the top select which asset type to display
in the Media Gallery. The left one is for backgrounds (used to
create menus), the center one is for buttons (placed on the
backgrounds to create menus), and the right tab is for movies.
Click on the file cabinet to open the Style Gallery dialog. Use
this to select the directory to supply the backgrounds and
buttons. You can have several of these to organize your assets
based on themes (vacation, business, sports etc.) See the Style
Gallery topic for details.
The Main Area
The main area displays thumbnails of the assets for the current
Media Gallery tab (Backgrounds, Buttons, Movies). Double-click
on any empty area to open the Add Media Asset dialog. Rightclick on any asset's thumbnail to get options for it – these vary
depending on the asset type. See the Assets topic for details.
The slider appears only when the number of asset thumbnails is
greater than can be displayed on a single screen.
At the Bottom
The disc icon shows approximately how much disc space has
been used for the current project. A green color indicates you
are within safe limits, yellow indicates you are coming close to
filling the disc, and red indicates you have over-filled the disc.
Placing your cursor over the indicator momentarily displays the
actual project size. Use the Preferences menu to customize the
icons to match your actual media.
3—16 SpruceUp User’s Guide
Page 57
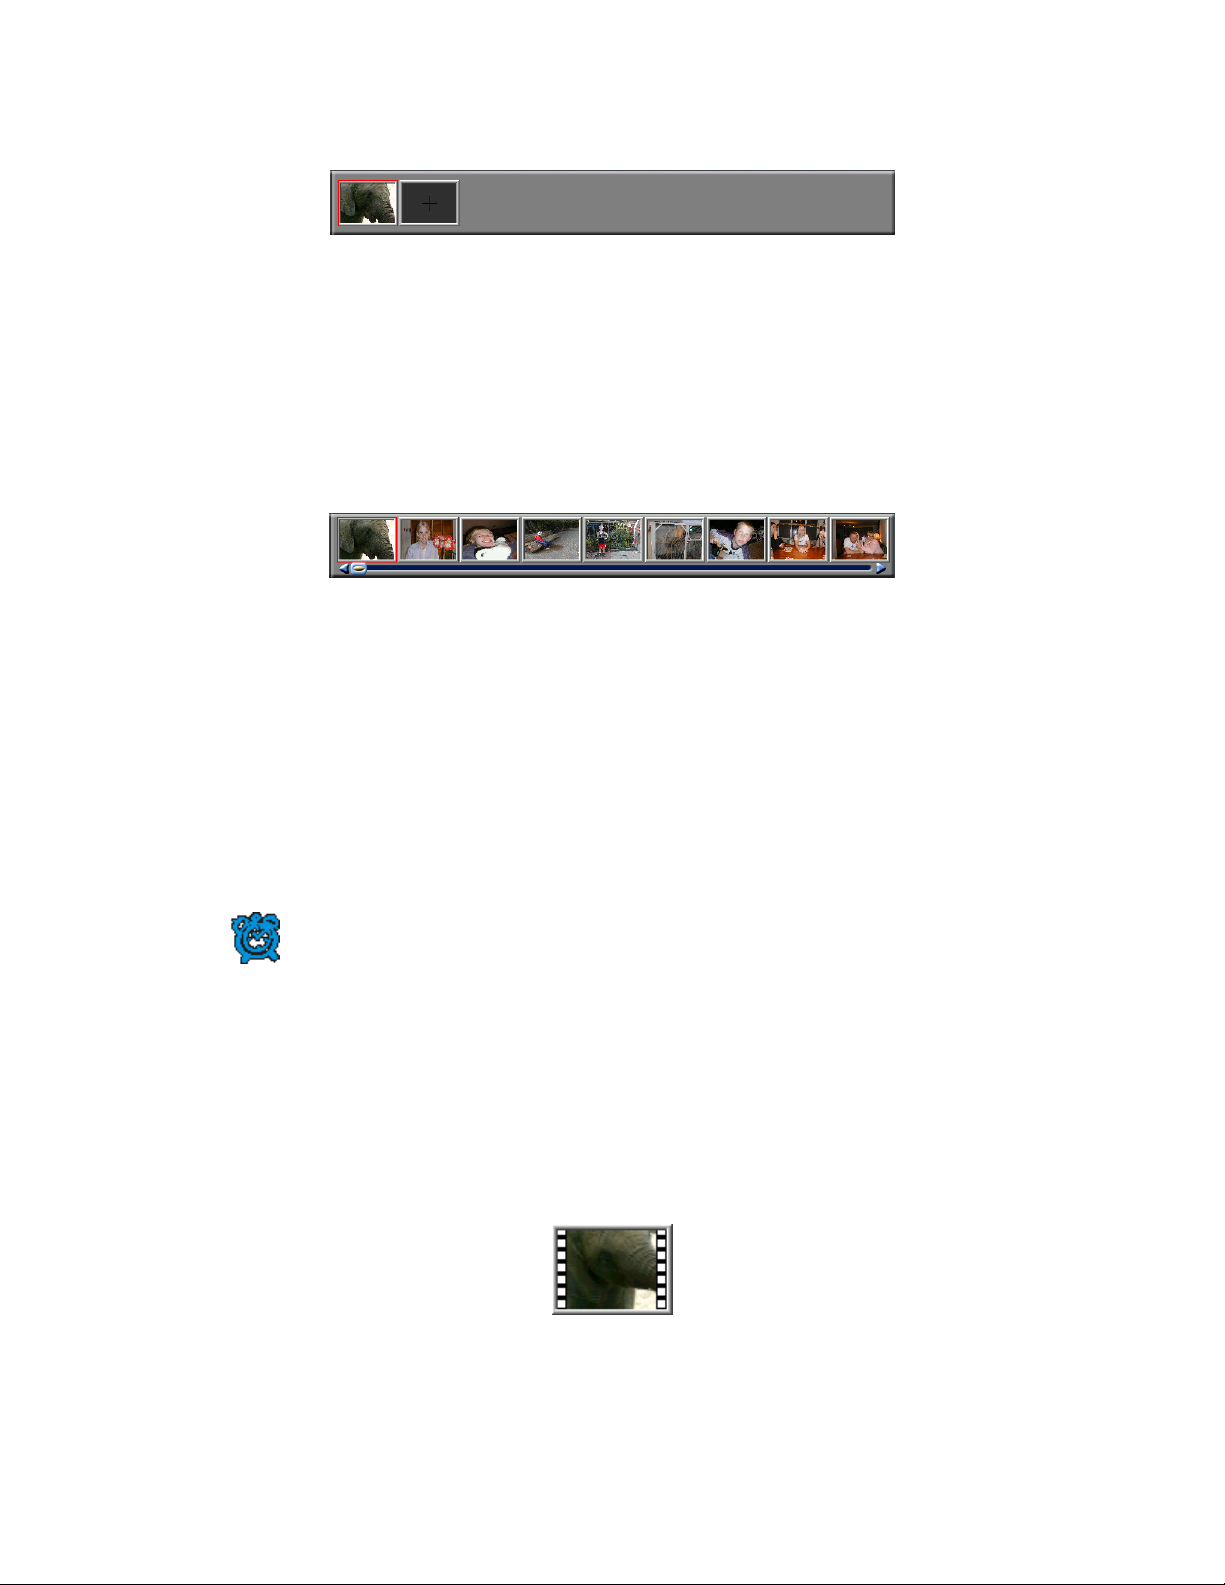
Menu Gallery
The Menu Gallery displays a thumbnail for each menu you create. It indicates the currently
selected menu by placing a red line around it. Holding the cursor over a menu displays a
tool tip showing the menu's number. This can be useful with projects containing many
menus and you are trying to link buttons to them.
This area contains a single gray box with a crosshair when you start a new project. When
you select a background for the first menu, either by dragging it to the Work Area or
directly to the gray box, or by double-clicking on it, a thumbnail of that background gets
placed in that box, and a new gray box is created next to it. Create additional menus by
dragging backgrounds to the gray box, which is always to the right of the last menu
created.
Once you have created nine menus, a slider-bar appears along the bottom, allowing you to
access any of the menus. Note that you can have several thousand menus! The practical
limit is the memory and disc space required to hold them all.
Right-clicking on a menu provides two options: Delete Menu and Duplicate Menu.
• Delete Menu removes it from the Menu Gallery (its background remains in the Media
Gallery). All menus to the right of it shift over to fill its spot. The deleted menu's
number is not rippled to following menus however. The number assigned a menu
when it is created remains with that menu, and is "retired" if that menu is deleted.
• Duplicate Menu makes a copy of the menu and places it at the end of the current
menus. The duplicated menu is an exact copy, maintaining all buttons, text, and links
of the original.
Important: It is important to realize that the Menu Gallery is not a
timeline display of the title; it simply shows the menus in the order they
were created. Any menu can link to any other menu.
First Play
The first menu in the list is significant in that it is the "First Play" item - it is the first thing
that displays when the title is played. It is also what displays when you press the Title
Menu button on a DVD player. (A player's Root Menu button takes you to the last menu
you were at.)
The first menu is the only place that a movie can be dragged to directly, making it the first
play item. It is indicated by placing sprocket holes along its sides.
A first play movie is not a menu – you cannot place buttons or text on it. See the A Movie as
First Play topic for details.
SpruceUp User’s Guide 3—17
Page 58
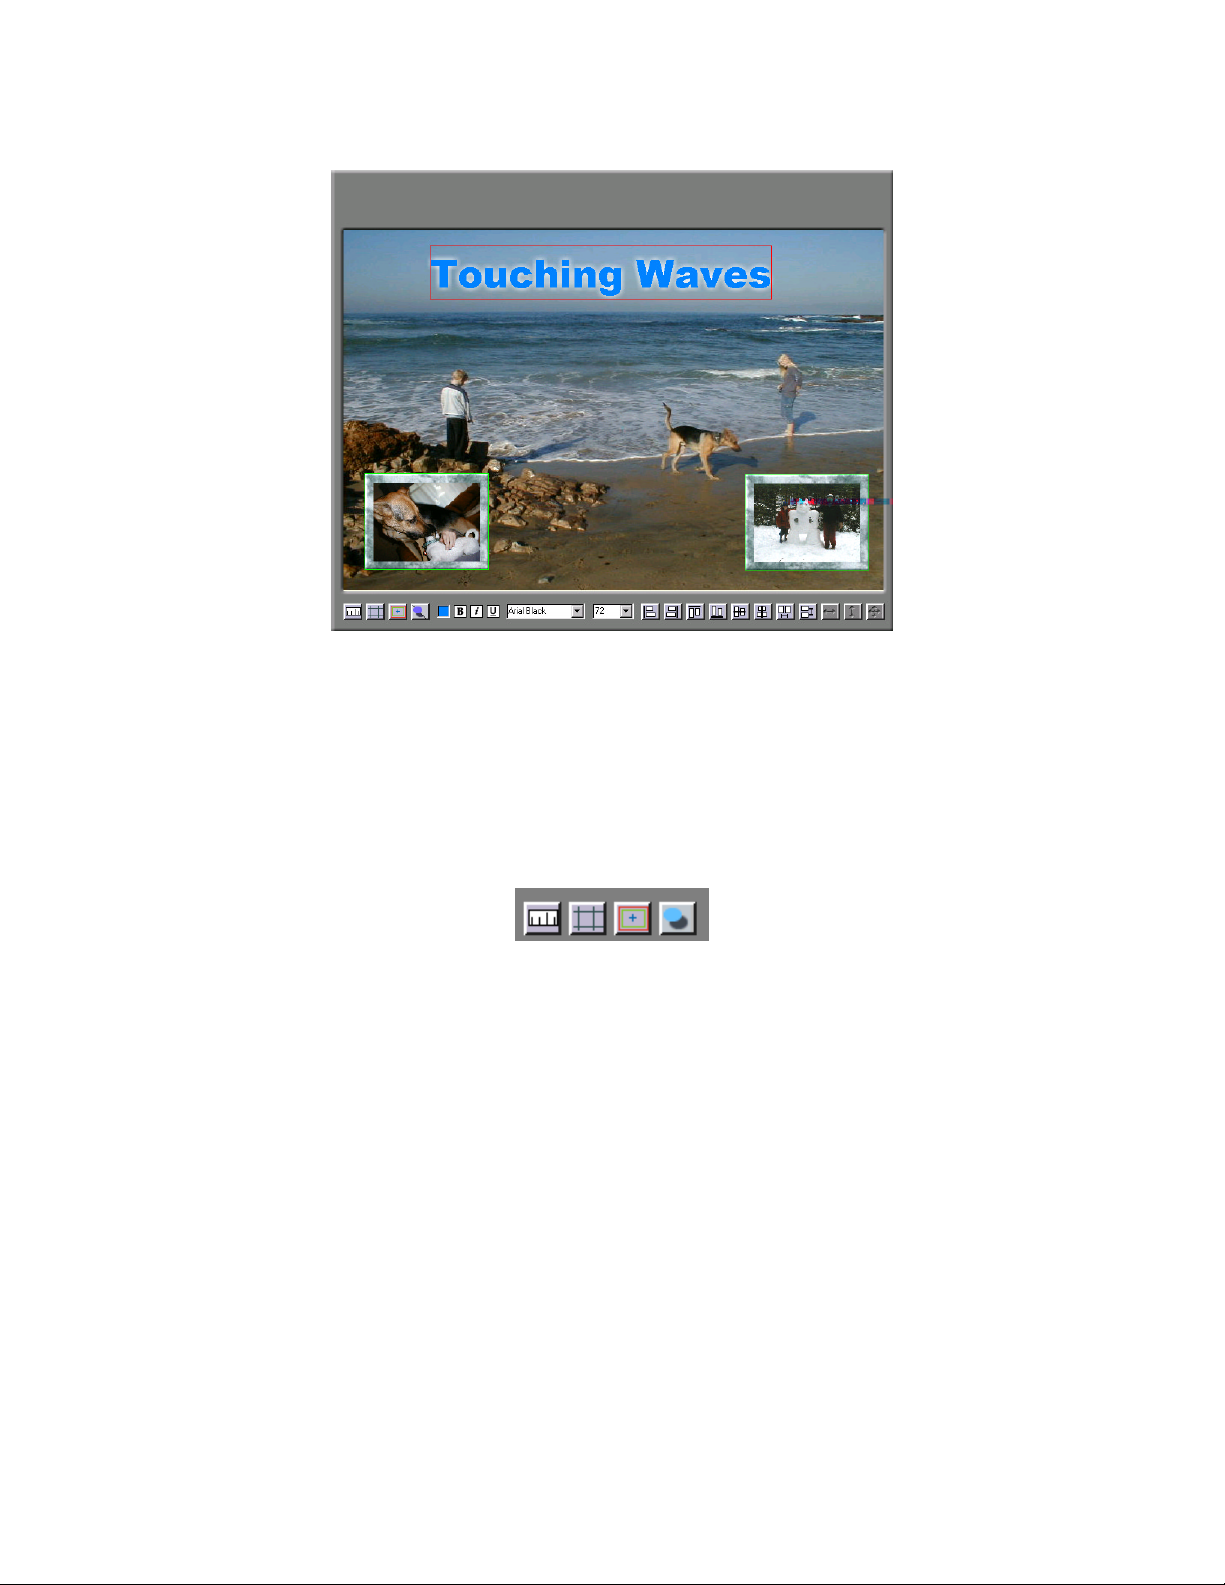
Work Area
The Work Area is where you create the menus. Along its bottom is the Work Area Tool Bar.
Its contents changes depending on what you are currently doing. See the Work Area
Toolbar topic following for details.
The main display of the Work Area changes size depending on the video standard set in
SpruceUp's Preferences dialog (NTSC or PAL) and whether you are in Simulate mode. This is
due to the different shapes of pixels being used. For more information, see the Square Pixel
Issues topic.
Work Area Toolbar
Default Tools
The left four buttons always display: Ruler, Grid, Safe Area and Drop Shadow (respectively).
Click these buttons to toggle their functions on and off.
Ruler
The ruler displays on the left and top edges. When you select an item, red lines appear on
the ruler to indicate the item's boundaries.
Grid
The grid provides a "snapping" function, making it easy to line up multiple items.
Safe Area
The safe area provides a guide for when you are running the risk of placing buttons and text
too close to the edge of the menu. It is common for TVs and monitors to overscan the
image, effectively chopping off its edges. Placing buttons and text too close to the edges
could result in them not being visible in some situations.
Drop Shadow
The Drop Shadow button toggles the state of the selected items. See the Drop Shadow topic
for details.
3—18 SpruceUp User’s Guide
Page 59

Text Tools
These display whenever you click in the Work Area, placing the text cursor at the location
you wish to type. They set the text color, bold, italics, underline, font and font size
attributes. See the Typing Text topic for details.
Alignment and Sizing Tools
These display whenever a button or text entry is selected within the work area. Some are
grayed out depending on how many and what sort of items are selected.
Use the first eight to align the selected buttons or text (the last selected item is outlined in
red, and is the reference).
The last three are to make the selected buttons all match in size, either horizontally,
vertically, or both. These do not apply to text entries.
See the Using the Alignment and Sizing Tools topic for details.
SpruceUp User’s Guide 3—19
Page 60

Quickstart
The following provides a guide for those who wish to start using SpruceUp without spending
a lot of time reading manuals or going through the tutorial. (The tutorial takes about 20
minutes to complete.)
The following assumes you will use the SpruceUp-provided default backgrounds and
buttons, and either your own MPEG movie or the tutorial movie you can download (if not
already installed on your system). To use your own assets, make sure you have the right
types available before you start. See the Assets topic for details. Visit:
http://www.spruceuserforums.com/SpruceUp
for information on downloading additional assets and the tutorial movie. See the Main
Window topic for general information on the SpruceUp window.
Creating a Simple Title
Start a New Project
The following assumes you are starting a new project. If anything is displayed in the Menu
Gallery (other than a default gray rectangle) then a project is already underway and needs
to be closed. Select File then New to start a new project. SpruceUp asks if you want to
save changes to the current project - click No if you don't need to or Yes to save the
current status.
Loading Background and Movie Assets
To display the default or tutorial backgrounds and buttons, click on the file cabinet icon
the top of the Media Gallery. Press the
TutorialStyle directory, typically located in the C:\Program
Files\SpruceTechnologies\SpruceUp directory.
Load other backgrounds and buttons, as well as movies, by:
1 Right-clicking anywhere in the gallery and selecting Add Media Asset.
2 Using the Import dialog to locate and select the file(s).
3 Selecting Open to add them to the Media Gallery.
SpruceUp processes the file(s) as necessary, determining whether they are backgrounds,
buttons, or movies, then shows them as thumbnails in the gallery's display. See the Import
Window topic for details.
Select the Opening Menu Background
Select a background from the Media Gallery and simply drag it to the Work Area, or
alternatively you can just double-click on it. It fills the Work Area and appears as a
thumbnail in the Menu Gallery at the bottom of the window. Create the next menu by either
dragging a background directly to the gray rectangle in the Menu Gallery or holding down
the keyboard's Ctrl button and double-clicking on the background. (Dragging a background
to an existing menu replaces the current background.) See the Creating Menus topic for
details.
button to browse to the DefaultStyle or
at
"Next Menu" Gray Rectangle
3—20 SpruceUp User’s Guide
Page 61

Add a Button to the Menu
Add a button to the menu by selecting the Button tab in the Media Gallery, clicking on one
of the buttons, and dragging it to the Work Area. Notice that some buttons have a window
for displaying a video thumbnail while others are solid. For our purposes, use one with the
video window. For now, the video on the button matches the video in the background.
Once a button is on the background, it can be moved and sized using normal Windows style
methods. For example, to make the button taller, move the cursor to the bottom edge and
watch for the cursor to change to a vertical line with arrows on each end. Now press the left
mouse button down and drag the bottom edge. Once the mouse button is released, the
menu button is drawn to fit the new size. Position the button by clicking inside it and
dragging. You can also use the keyboard's arrow keys to nudge its position.
Remove a button from the Work Area by selecting it (a red outline appears around it) and
pressing the keyboard's Delete button.
Assign a button as default by right-clicking on it and selecting Set as Default. The default
button is used anytime you drag a movie or menu directly to a menu.
Add a Target to the Button
To have a button start a movie playing back, simply drag the movie from the Media Gallery
and drop it on the desired button. The button's video window changes to the movie's
EyeFrame™ image.
Dragging the movie to the background directly also works; SpruceUp assigns the default
button to the movie.
To target a different menu, you must first create it. Do this by dragging a background from
the Media Gallery to the gray rectangle in the Menu Gallery. The work area changes to the
new menu and a new Menu Gallery gray box is created.
To have a button from the first menu select this new menu, switch to the first menu by
clicking on its thumbnail in the Menu Gallery, and add a button to it. Set the target to the
second menu by now dragging its thumbnail from the Menu Gallery to the new button.
Alternatively, target buttons by right-clicking on them and selecting the menu or movie to
link to. See the Creating Menus topic for more button details, such as adding URLs to them.
Add Some Text
SpruceUp lets you type text onto the background menu. Click with the mouse on an empty
part of the Work Area to place a blinking text cursor. You can now type the desired text.
Click on an empty area to exit the text entry mode - a red box outlines the new text item.
Size and position it as with buttons.
The Work Area Toolbar adds standard text attribute control icons, allowing you to control
the color, font and size, as well as toggle bold, italics, and underline on/off. See the Typing
Text topic for details.
Saving the Project
Save the project by clicking on File then Save As. Saving a project does not copy any
assets – it simply saves the details of how to create the project.
Tip: An asterisk displays next to the file name on SpruceUp's Title Bar
if changes have been made to the project since it was last saved (or has
never been saved). You cannot export an unsaved project.
SpruceUp User’s Guide 3—21
Page 62

Something to Simulate!
You now have a title that can be simulated. Simulate the title by clicking on button 2 in the
Main Control area (lower left part of the window) or using the keyboard shortcut of Ctrl +
2. After a few moments, the simulation controls appear along the bottom of the Work Area,
and your opening menu displays in the Work Area.
Use the simulation controls to highlight the button you assigned the movie to, and click on
the simulator's Enter button
Menu button to return to the menu.
The simulator is a quick way to find any linking problems, such as buttons with nothing
assigned to them or a menu with no way out. See the Simulation topic for details.
Something to Export!
If so desired, you can now export your title to hard drive, CD-ROM, or other storage media.
Click on button 3 in the Main Control area. This opens the Export dialog, where you set all
aspects of writing the title. See the Export topic for details.
Note: SpruceUp's trial version limits you to two exports.
. The movie now starts playing. Press the simulator's Root
Working with Movie Assets
There are a number of things you can do to or with a movie:
• Change its EyeFrame™.
• Add Chapter Points.
• Add web links to chapter points.
• Capture a frame to use as a background.
• Make buttons of the Chapter Points.
All of this is done within the Clip Properties dialog. Open Clip Properties by using the mouse
to double-click on the movie. See the Clip Properties topic for details.
3—22 SpruceUp User’s Guide
Page 63

Keyboard Shortcuts
SpruceUp provides a number of keyboard shortcuts to help speed the authoring process.
See the SpruceUp support web site (www.spruceXXX.com) for a printer friendly list of these
shortcuts.
File Functions
New File Ctrl + N
Open File Ctrl + O
Close File Ctrl + W
Save File Ctrl + S
Save As File Ctrl + Shift + S
Import File Ctrl + Shift + I
General Functions
Open Help F1
Undo Ctrl + Z
Redo Ctrl + Y
Exit Alt + F4
Edit Commands
Cut Ctrl + X
Copy Ctrl + C
Paste Ctrl + V
Duplicate Ctrl + D
Select All Ctrl + A
Delete Delete
Send to Front Ctrl + ]
Send to Back Ctrl + [
To Open Dialogs
Launch Window Ctrl + N
Clip Properties Ctrl + O
Drop Shadow Properties Ctrl + W
Preferences Ctrl + S
Style Gallery Ctrl + Shift + S
Main Control Modes
Author (1) Ctrl + 1
Simulate (2) Ctrl + 2
Export (3) Ctrl + 3
SpruceUp User’s Guide 3—23
Page 64

Work Area Display
Rulers Ctrl + R
Grids Ctrl + G
Safe Area Ctrl + T
Drop Shadow On/Off Ctrl + H
Text Properties
Bold Ctrl + B
Italic Ctrl + I
Underline Ctrl + U
Text Color Dialog Ctrl + K
Button Resizing
Conform Size H and V Ctrl + Shift + R
Conform Size Vertical Only Ctrl + Shift + G
Conform Size Horizontal
Only
Maintain Proportions While
Dragging
Ctrl + Shift + T
Shift + Left Click/Drag
Media Gallery Shortcuts
Switch Between Tabs Ctrl + Tab
Assign Background to This
Menu
Assign Background to Next
Menu
Double-Click It
Ctrl + Double-Click It
Alignment Tools
Left Nudge Selected Item Left Arrow
Right Nudge Selected Item Right Arrow
Up Nudge Selected Item Up Arrow
Down Nudge Selected Item Down Arrow
Left Align to Master Ctrl + Left Arrow
Right Align to Master Ctrl + Right Arrow
Top Align to Master Ctrl + Up Arrow
Bottom Align to Master Ctrl + Down Arrow
Left Align to Safe Area Ctrl + Shift + Left Arrow
Right Align to Safe Area Ctrl + Shift + Right Arrow
Top Align to Safe Area Ctrl + Shift + Up Arrow
Bottom Align to Safe Area Ctrl + Shift + Down Arrow
Horizontal Center Ctrl + Home
Vertical Center Ctrl + Alt + Home
3—24 SpruceUp User’s Guide
Page 65

Clip Properties
(These are active only when the Clip Properties dialog is open and is selected.)
Jump to Clip End End
Jump to Clip Start Home
Scrub Towards Clip Start Left Arrow (in GOP steps)
Scrub Towards Clip Start Right Arrow (in GOP steps)
Play Space Bar
Stop Space Bar
Set Chapter Point + (on numeric keypad)
-- or -- Ctrl + Shift + C
Delete Chapter Point Delete
Delete All Chapter Points Ctrl + Delete
Go To Next Chapter Point Ctrl + Right Arrow
Go To Previous Chapter
Point
Move EyeFrame Towards
Clip End
Move EyeFrame Towards
Clip Start
Set EyeFrame at Scrub Bar
Position
Set EyeFrame Back to
Chapter Point
Capture Frame to Menu
Background
Capture Frame to
Background Gallery
Make Buttons of Chapter
Points
Ctrl + Left Arrow
Ctrl + Alt + Right Arrow
Ctrl + Alt + Left Arrow
\
Ctrl + \
Ctrl + Shift + M
Ctrl + Shift + B
Ctrl + Shift + I
SpruceUp User’s Guide 3—25
Page 66

Pull Down Menus
The Menu Bar along the top of the SpruceUp window contains the pull down menus for
accessing many of its features and settings. Access these by:
• Using the mouse to click on them.
• Using the keyboard equivalents.
• Using the keyboard shortcuts.
Use the keyboard equivalents by holding the Alt button down and typing the underlined
letter of the pull down you want (the letter's case, upper or lower, does not matter). Once a
pull down opens, you no longer need to use the Alt button – simply press the letter of the
desired function. For example, press Alt + h then h again to open this help dialog.
Use the keyboard shortcuts by pressing the buttons displayed along the right of menu
items. For example, press F1 to access this help, or Ctrl + 4 to open the Launch Window.
Note that some items are grayed out depending on the mode you are in and what is
selected. For example, the Preferences selection of the File menu is active only when in the
Author mode. This avoids problems that making Preference changes might cause while in
the other modes.
File Pull Down
The File pull down menu contains functions relating to a project (from creating a new one to
saving it), the system preferences dialog, and the program's exit function.
• New – Ctrl + N
Select this to start a new project. You are prompted to save the current project (if one
is open).
• Open... – Ctrl + O
Select this to open an existing project. A standard Windows file location dialog opens,
allowing you to browse to the project. All SpruceUp projects have an ".sup" extension
and templates have an ".sut" extension. Use the recent file area of this pull down to
quickly access the last four projects created.
• Close – Ctrl + W
Use this to close the current project and set SpruceUp to a blank starting state. You
are prompted to save the current project before it is closed.
• Import – Ctrl + Shift + I
This opens the Add Media Asset dialog for adding assets to the Media Gallery.
• Save – Ctrl + S
Use this to save the current project. If it already has been named and saved, then
Save changes the existing file's extension to ".bak" (removing the previous ".bak" file
if it exists) and writes a new file with the ".sup" extension. You cannot open the ".bak"
file directly with SpruceUp – change the file's extension to ".sup" if you need to open
it.
If this is a new project ("Untitled" displayed in the upper-left of the window),
SpruceUp prompts you to name it and select the folder to keep it in.
Tip: An asterisk displays next to the file name on SpruceUp's Title Bar
3—26 SpruceUp User’s Guide
Page 67

if changes have been made to the project since it was last saved (or has
never been saved). You cannot export an unsaved project.
• Save As... – Ctrl + Shift + S
Use this to name and save the current project. SpruceUp prompts you to name it and
select the folder to keep it in. Use this for new projects and existing projects where
you need to have a second project, either for a backup or as a different version.
• Preferences... – Ctrl + 7
Use this to access the Preferences dialog. This dialog includes settings for the video
standard you use (NTSC/525 or PAL/625), customizing the Media Size Indicator, and
the DVD decoder to use while simulating projects.
• Style Gallery – Ctrl + E
Opens the Style Gallery dialog. This is where you select the Style Gallery, defining
where SpruceUp looks for background and button assets. See the Style Gallery topic
for details.
• Recent File List –
This area lists the eight most recent projects created on SpruceUp. Use Open to
locate projects not on this list.
• Exit – Alt + F4
Select this to close the current project and exit SpruceUp. You are prompted to save
the project if you have not already done that.
Edit Pull Down
The Edit pull down contains the following functions:
• Undo – Ctrl + Z
Use this to go back a step, undoing the last action. There are 30 levels of undo
available.
• Redo – Ctrl + Y
Use this to go forward a step, redoing what you just undid.
• Cut – Ctrl + X
Use this to delete the currently selected item. The item is placed in a buffer that is
read from with the Paste function. Note that this differs from Delete, which does not
write to the Paste buffer. All items are cut with multiple items selected.
• Copy – Ctrl + C
Use this to make a copy of the currently selected item. It is placed in a buffer read
from with the Paste function. This is most useful when you need to duplicate an item
in a different menu. All items are copied with multiple items selected.
• Paste – Ctrl + V
Use this to read the item(s) from the cut/copy buffer, placing the item within the
current menu. You can paste an item multiple times.
• Duplicate – Ctrl + D
Use this to make a copy of the currently selected item, placing it as close to the upper
left-hand corner of the menu as possible. This is useful when duplicating items within
the same menu. With multiple items selected, only the item outlined in red is
duplicated.
• Select All – Ctrl + A
Use this to select all items in the current menu.
SpruceUp User’s Guide 3—27
Page 68

• Delete – Delete
Performs the same function as the keyboard's Delete button. The difference between
this and Cut is that Delete does not copy the deleted item to the Paste buffer. All
items are deleted with multiple items selected.
• Send to Front – Ctrl + ]
Use this when items overlap and you wish to control which has the highest priority.
Send to Front forces the selected item to have the highest priority (as if it was just
created). Note that text always has a higher priority than buttons. Also note that
overlapping buttons can cause navigation problems when playing the title – see the
Overlapping Buttons topic for details. With multiple items selected, only the item
outlined in red is sent.
• Send to Back – Ctrl + [
Identical to Send to Front, except it forces the item to have the lowest priority (as if
it was the first item created). With multiple items selected, only the item outlined in
red is sent.
Text Properties –
This opens a submenu with toggle selections for the following Work Area Toolbar text
functions:
• Bold – Ctrl + B
Toggles bold on and off.
• Italic – Ctrl + I
Toggles italics on and off.
• Underline – Ctrl + U
Toggles underline on and off.
• Text Color – Ctrl + K
Opens the text color dialog.
Alignment Properties –
This opens a submenu with selections for the following Work Area Toolbar alignment
functions (plus some that are not on the toolbar):
• Left Align – Ctrl + Left Arrow
Active when any two or more items are selected. Aligns the left edge of all items with
the last item selected (outlined in red).
• Right Align – Ctrl + Right Arrow
Active when any two or more items are selected. Aligns the right edge of all items with
the last item selected (outlined in red).
• Top Align – Ctrl + Up Arrow
3—28 SpruceUp User’s Guide
Page 69

screen.
With multiple items selected, pressing this horizontally aligns the green outlined items
to the master (red outlined) item.
To horizontally align multiple items to the center of the screen, first align one of items,
then use it as a master and align the others to match it.
• Vertical Center – Ctrl + Alt + Home
This button behaves differently depending on whether one or multiple items are
selected.
With one item selected, pressing this aligns the item vertically to the center of the
screen.
With multiple items selected, pressing this vertically aligns the green outlined items to
the master (red outlined) item.
To vertically align multiple items to the center of the screen, first align one of items,
then use it as a master and align the others to match it.
• Left Align to Safe Zone – Ctrl + Shift + Left Arrow
Active when any one or more items are selected. Aligns the left edge of all items with
the left edge of the Safe Zone.
• Right Align to Safe Zone – Ctrl + Shift + Right Arrow
Active when any one or more items are selected. Aligns the right edge of all items
with the right edge of the Safe Zone.
• Top Align to Safe Zone – Ctrl + Shift + Up Arrow
Active when any one or more items are selected. Aligns the top edge of all items with
the top edge of the Safe Zone.
• Bottom Align to Safe Zone – Ctrl + Shift + Down Arrow
Active when any one or more items are selected. Aligns the bottom edge of all items
with the bottom edge of the Safe Zone.
• Conform Size – Ctrl + Shift + R
Active when any two or more buttons are selected – this does not apply to text items.
Horizontally and vertically resizes all selected buttons to match the last one selected
(outlined in red).
• Conform Vertical – Ctrl + Shift + V
Active when any two or more buttons are selected – this does not apply to text items.
Vertically resizes all selected buttons to match the last one selected (outlined in red).
• Conform Horizontal – Ctrl + Shift + H
Active when any two or more buttons are selected – this does not apply to text items.
Horizontally resizes all selected buttons to match the last one selected (outlined in
red).
SpruceUp User’s Guide 3—29
Page 70

View Pull Down
The View pull down provides settings to choose the way SpruceUp displays on your
computer.
1-Author – Ctrl + 1
Switches SpruceUp into the Author mode. This is the same as selecting button 1 in the Main
Control Area.
2-Simulate – Ctrl + 2
Switches SpruceUp into the Simulate mode. This is the same as selecting button 2 in the
Main Control Area.
3-Export – Ctrl + 3
Switches SpruceUp into the Export mode. This is the same as selecting button 3 in the Main
Control Area.
Launch Window – Ctrl + 4
Use this to open SpruceUp's Launch Window. Normally this window opens only when
starting SpruceUp. Access it at any time you want to use its features, such as starting the
Tutorial or viewing the "Tips of the Day". See the Launch Window topic for details.
Clip Properties – Ctrl + 5
Use this to open the Clip Properties dialog for the currently selected Media Gallery movie.
Alternative ways to open it are to double-click on the movie or right-click on the movie and
select Clip Properties. See the Clip Properties topic for details.
Drop Shadow Properties – Ctrl + 6
Use this to open the Drop Shadow Properties dialog. This does not turn drop shadows
on/off, it just allows you access to the properties dialog.
Gallery View – Ctrl + Tab to cycle through these
Use this to select which of the three media types to display in the Media Gallery. It has the
following submenus:
• Backgrounds – Same as clicking on the Backgrounds tab.
• Buttons – Same as clicking on the Buttons tab.
• Movie Clips – Same as clicking on the Movies tab.
Show –
Opens a submenu allowing you to toggle the following Work Area Toolbar functions:
• Rulers – Ctrl + R
Toggles the display of rulers on the left and top edges of the display. When an item is
selected and moved, red marks on the ruler indicate its position.
• Grid – Ctrl + G
Toggles the display of a grid. Items automatically snap to the grid lines when released
after being moved while the grid is enabled.
• Safe Zone – Ctrl + T
Toggles the display of the Safe Area overlay. Use this to ensure menu items display on
the screen on monitors and televisions that overscan the display, chopping off the
edges.
• Drop Shadow – Ctrl + H
Toggles the drop shadow status on the currently selected item(s).
3—30 SpruceUp User’s Guide
Page 71

Help Pull Down
The Help pull down provides access to the following functions:
SpruceUp Help – F1
Opens this help window.
User Forum Support –
Connects you to the SpruceUp User Forum Support web site. This requires an Internet
connection to function. You can connect manually to the site by setting the browser to:
www.SpruceUserForums.com/SpruceUp
SpruceUp News –
Connects you to the SpruceUp News web site. This requires an Internet connection to
function. You can connect manually to the site by setting the browser to:
www.SpruceDVD.com/SpruceUp
Registration/Upgrade –
This opens the Registration dialog. Use this to register your SpruceUp version on this PC.
See the Registering SpruceUp topic for details.
About... –
Displays a splashscreen containing information regarding the version of SpruceUp currently
installed.
SpruceUp User’s Guide 3—31
Page 72

Blank Page
(mostly)
3—32 SpruceUp User’s Guide
Page 73

Chapter 4: Assets
Using the Style Gallery
The Add Media Asset Window
Assets
Video Assets
MPEG Settings Summary
Audio Assets
Background Assets
Button Assets
Disc Assets
SpruceUp User’s Guide 4—1
Page 74

Assets
SpruceUp uses three types of assets: movies (video and audio), backgrounds, and buttons.
These assets are managed in the Main Window’s Media Gallery, each with its own tab along
the top.
Assets in SpruceUp Projects
When you save a SpruceUp project, it creates a ".SUP" file. This is a small file that does not
actually contain the actual assets – it contains the information on where the assets were
and how they were used. It knows the details of the menus and any properties applied to
the movies.
When you open a SpruceUp project, it looks for all the assets in the same places as they
were when the project was saved, and prompts you to manually locate the any missing
files.
Tip: Use great care in handling assets used in SpruceUp projects. Do
not rename their folders or move them without taking the impact on
previous projects into consideration.
Asset Properties
Right-click on any background or button asset to open a pop-up menu with a Properties
item. For movies, select File Properties from the pop-up menu. Selecting Properties (or
File Properties for movies) opens a menu displaying details about the asset. These include
its file name, size, location, and type. There is also an Explore... button that starts
Window's Explorer.
Important Differences Between Asset Types
It is important to understand that SpruceUp handles each asset type differently, even
though they may appear similar on the surface.
Understanding the Style Gallery
First you must understand the concept of the Style Gallery. The Style Gallery is a very
useful tool when creating projects, in that it makes it easy to select theme-based assets
before starting. It provides an easy way to create categories of assets.
Style Galleries only apply to Background and Button assets. The Style Gallery determines
what is shown in the Media Gallery when their tabs are selected, and thus controls what
backgrounds and buttons can be used in a project. You can use different Style Galleries
while creating a project with no problem; once a background or button has been used as
part of a menu it is retained there u-18.ge (a)2(n8.9(u)9( t)11.2.9(d)0.6.4( ar)e)20(d)11.nu it c(-18.g.2.9(d)0.6.4,(-1.n)9(u)9( it)1g*0.0147 Tc-0.0169 d)0.6.4.9(u)99(-18.g9(-18.ge1.2(a)12.9(r)19w)1369 (in)ic(-18.g(in))-1 o)19( t)e tnes
4—2 SpruceUp User’s Guide
Page 75

Style Gallery).
The Clip Properties dialog has the ability to grab backgrounds from a movie. These
backgrounds are added to the Backgrounds tab of the Media Gallery, and written as files to
the current Style Gallery. See the Clip Properties topic for more information.
SpruceUp remembers the Style Gallery last used and loads it when started the next time.
Opening an existing project does not change the current Style Gallery, since Style Galleries
are not saved with Projects.
See the Style Gallery topic for more information on its usage.
Importing Differences
As mentioned above, when you import a background or button, it is actually copied to the
Style Gallery. In addition, the file is converted to MPEG, with the MPEG converted file
(.m2v) and a parsed (.m2v.PRV) file written to the Style Gallery's MPEG Converted folder.
Background and button assets can be imported from any media the PC supports (including
read-only media).
When you import a movie though, it is not copied anywhere – SpruceUp uses the original
movie. (Since movies can be very large files, you could quickly run out of disc space, and
SpruceUp projects can contain up to 99 movies.) Importing a movie does require a parsed
file to be written to the movie's location though. For this reason the movie must be located
on writable media (CD-ROM or DVD-ROM will not work).
See the Import topic for details on other aspects of importing assets.
Deleting Within SpruceUp
Right-clicking on a movie within the Media Gallery presents the option of Delete Reference
to Movie. Selecting this does not actually affect the movie – it simply removes it from the
list of assets.
Note: If the movie had been linked to menu buttons in this project,
those links no longer work.
Right-clicking on a background or button within the Media Gallery presents the option to
Delete Background or Delete Button. In this case, the background or button's file is
really deleted.
Warning: You cannot delete a background or button currently being
used by the project. An error message mentioning a "sharing violation"
displays.
Note: If you load a project that used a background or button you
deleted, you are prompted to locate the file manually or cancel opening the
project.
SpruceUp User’s Guide 4—3
Page 76

General Asset Information
See the Video Assets, Audio Assets, Background Assets, and Button Assets topics for details
on each type.
Note: It is critical that movies imported into SpruceUp be DVD
compliant. The most common problem with audio is improper sample rate
– it must be sampled at a 48Khz rate. With video, most problems are
improper aspect ratios and bit-rates. See the MPEG Settings Summary
topic for general details.
There are several programs available that can verify a movie's MPEG settings. PixelTools'
MpegRepair (www.pixeltools.com) and Interra's MProbe (www.interra-video.com) are both
well suited for this.
Parsed File
Whenever you import backgrounds and movies into SpruceUp, a parsing operation must
occur. Parsing creates the ".PRV" (for video) and ".PRA" (for audio) files that contain
information about the basic MPEG structure of its parent file, such as encoding rate, GOP
structure, and such.
For example, importing a background named “Flowers.bmp” causes the “Flowers.m2v” and
a “Flowers.m2v.PRV” files to be created and written to that Style Gallery’s MPEG Converted
folder.
4—4 SpruceUp User’s Guide
Page 77
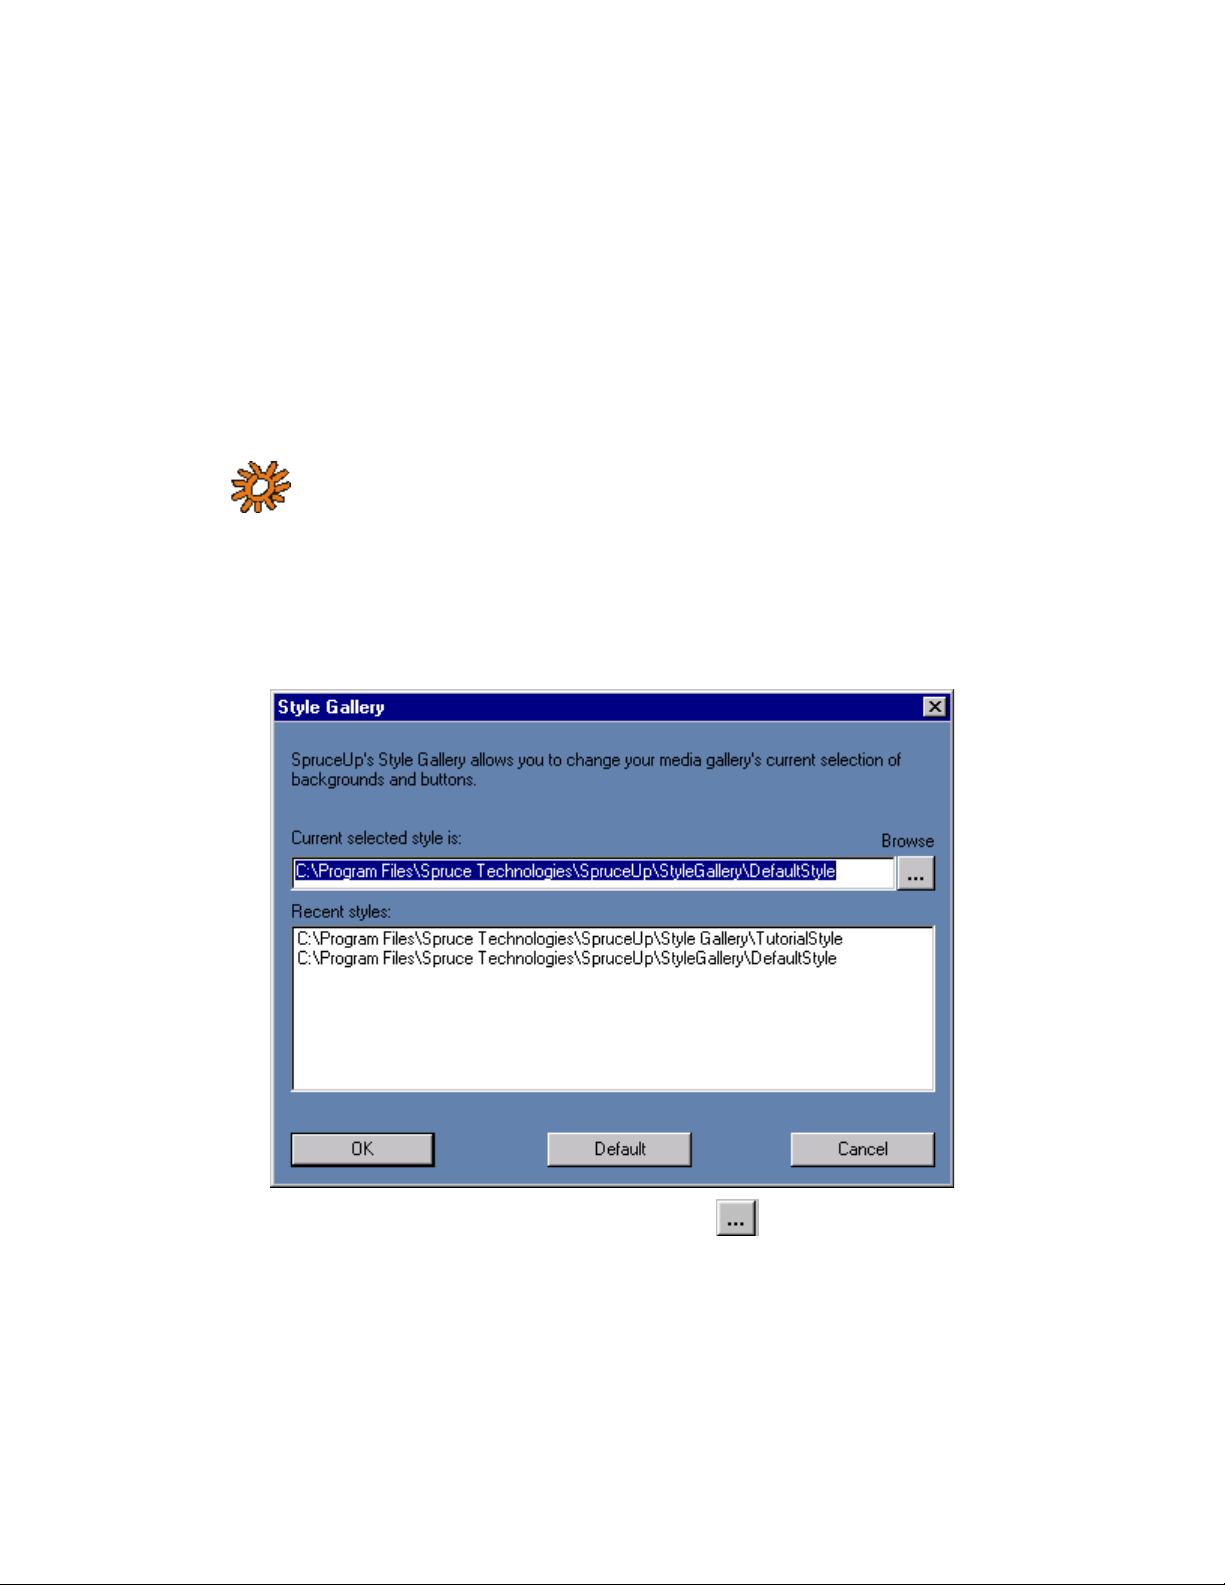
Using the Style Gallery
SpruceUp contains a Style Gallery setting that defines the drive location SpruceUp looks to
for background and button assets. You can set up several of these galleries, based on
themes or clients, and simply select the one to use for the current project. Selecting a new
Style Gallery causes the existing buttons and backgrounds to be replaced with those from
the new gallery. SpruceUp remembers the last Style Gallery used and automatically loads it
when started.
You can switch the Style Gallery while creating a project. Buttons and backgrounds within
the project do not have to be displayed at all times in the Media Gallery. The actual files
must, however, still reside in the Style Gallery used when they were originally added to the
project.
Note: When loading projects, SpruceUp does not load the Style
Gallery used when the project was created. It loads the Style Gallery in use
the last time the SpruceUp ran, or the current one if SpruceUp is already
running.
Select the Style Gallery by either clicking the file cabinet icon in the upper right corner of
the Media Gallery, or clicking the menu bar's File then Style Directory. Either method
opens the Style Gallery dialog.
Either type in the directory you want to use or press the
directory.
Once you have selected the directory, SpruceUp looks for two sub-directories:
Backgrounds and Buttons. If they do not exist, SpruceUp creates them.
SpruceUp User’s Guide 4—5
button to browse to the
Page 78

SpruceUp imports a wide variety of background and button asset types, and creates an
MPEG-2 file (.m2v) for the backgrounds. These are stored in its MpegConverted subdirectory, also created by SpruceUp.
Usage Hints
• Keep your Style Galleries in the same general location. This makes switching between
them easy.
• Include the word "Style" (or something else easy for you to recognize) in the
directory's name.
• Be aware that selecting the wrong directory creates the Backgrounds and Buttons subdirectories in the wrong place. Doing this several times leads to a lot of extra
directories scattered on your drive.
4—6 SpruceUp User’s Guide
Page 79
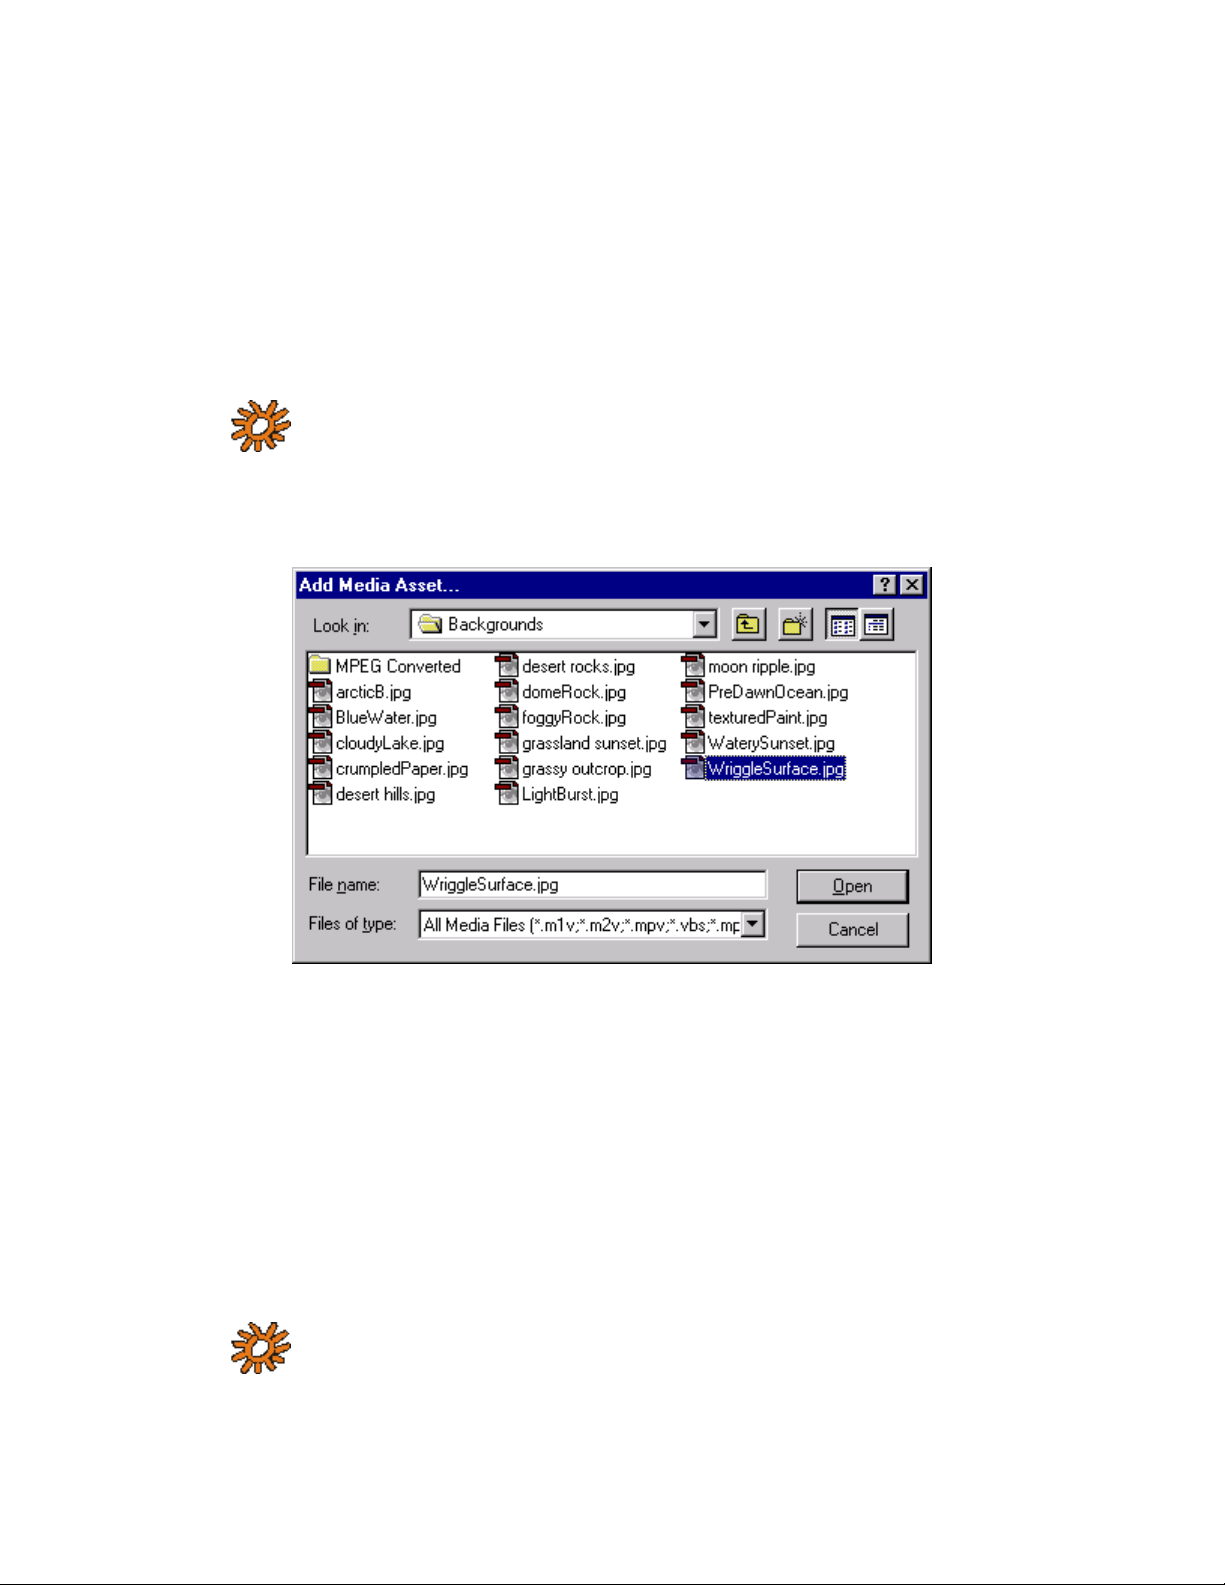
The "Add Media Asset" Dialog
Use the Add Media Asset dialog to add assets to the Media Gallery. Activate the dialog by
double-clicking in the Media Gallery. Optionally, open the dialog by right-clicking in the
Media Gallery then selecting Add Media Asset...
SpruceUp automatically determines the type of each asset and places it in the correct group
(Backgrounds, Buttons, or Movies).
You can import a group of items at one time by using the Shift button to select a range or
the Ctrl button to select specific items with your mouse.
Note: If you import a large number of items, and they all have a
common problem (for example, movies with incorrect resolution), they will
each have their own error dialog that you will have to cancel out of. When
unsure, try importing one of the items first, and if successful, then import
the rest as a group.
It is a standard Windows file dialog. The Files of type: pull down allows you to select
extension filters for:
• All Media Files – This includes all files with the extensions of: *.m1v; *.m2v; *.mpv;
*.vbs; *.mpg; *.mpe; *.mpeg; *.mp2; *.m2p; *.avi (MPEG); *.bmp; *.psd; *.tif;
*.jpg; *.tga
• Video Files – This includes all files with the extensions of: *.m1v; *.m2v; *.mpv;
*.vbs; *.mpg; *.mpe; *.mpeg; *.mp2; *.m2p; *.avi (MPEG)
• Background Files – This includes all files with the extensions of: *.bmp; *.tif; *.jpg;
*.tga
• Button Files – This includes all files with *.psd extensions.
• All Files – All files display, regardless of extensions.
Note: SpruceUp does not support true AVI (Audio Video Interleave)
files, but does support MPEG files with the .AVI extension.
SpruceUp User’s Guide 4—7
Page 80

Note: Adobe Photoshop files (.PSD extension) are assumed to be
buttons. To use a Photoshop file as a background you need to use its Save
a Copy function and save as a TIFF, BMP, or JPEG file. See the Creating
Photoshop Buttons topic for more information.
For background and button files, SpruceUp copies them to the current Style Gallery.
SpruceUp does not copy movie (video) files, but it does need to be able to write a parsed
file in the same directory as the movie file. This means movies cannot be imported directly
from a read-only source (CD-ROM for example) and you must have read/write privileges at
its location. There is a limit of 99 movies within the Media Gallery.
Warning: If you import a MPEG movie using elementary streams with
non-DVD compliant audio, a warning is displayed and SpruceUp continues
to import the video by itself. If using multiplexed streams, neither the
video nor the audio will import.
4—8 SpruceUp User’s Guide
Page 81

Video Assets
Introduction
SpruceUp requires the video movies to be a DVD compliant MPEG format. There are a
number of methods for transcoding video from its current format to MPEG.
For analog sources, you need a hardware video capture card to digitize the video.
Depending on the card's output format, you may then need a transcoder to convert it into
MPEG.
For sources that are already digital, such as QuickTime, DV and AVI files, you will typically
use a software transcoder to convert into MPEG.
The quality of the MPEG encoding is what determines the quality of the title. It is well worth
putting some effort into getting the best MPEG encoding environment possible.
General Quality Issues
Start at the Source
Get the best MPEG encoding environment you can. For example, start with the best quality
source material you can – a digital source is the best. Of the analog formats, component is
preferred, followed by S-Video (Y/C), and as a last resort, composite. See the Video Basics
topic for more information.
Noisy Video
Since a large portion of MPEG’s compression power depends on its ability to locate areas of
the image that do not change between successive frames, noisy video can be a real
problem. While the actual video may be identical between two frames, if there is a noise
spot on one and not on the other, it is detected as a change in video requiring more bits to
encode. Lots of noise causes poor encodes, with the encoding resources being tied up trying
to faithfully reproduce the noise!
Transcoding Artifacts
Every time video is transcoded from one format to another, for example from analog to
digital, or QuickTime to MPEG-2, artifacts are introduced into it. How noticeable they are
depends on the quality of the transcoding device and the content. While transcoding cannot
be avoided, its affects can be minimized. Use the highest quality equipment and software
you can, and choose products that work well together, supporting each other's formats.
What is MPEG?
MPEG (Motion Picture Experts Group) is a family of video and audio compression formats
that make possible high quality titles on DVD and CD mediums. There are a wide variety of
MPEG types and settings – use care to select those that are DVD compliant as explained in
the following and covered in the MPEG Settings Summary topic. SpruceUp imports MPEG
assets created on a wide variety of third party products. The following is to provide an
overview of MPEG in general, with details relating specifically to SpruceUp.
Elementary and Multiplexed MPEG Files
There are two types of MPEG file structures SpruceUp supports: Elementary and
Multiplexed.
Elementary files contain only one stream of data, either the video or the audio. Elementary
MPEG-2 video files typically have a “.vbs” or “.m2v” extension; MPEG-1 files have a “.m1v”
extension. Corresponding MPEG-1 layer 2 audio files have an identical name, but with a
“.abs” or “.m1a” extension. The DVD specification also supports AC-3 Dolby® Digital audio
files, which typically have a “.ac3” extension. For uncompressed audio, files will have
SpruceUp User’s Guide 4—9
Page 82

“.pcm”, “.wav”, or “.aiff” extensions.
Multiplexed MPEG files, also known as “system” or “program” files, have the video and audio
combined into a single file, typically with an “.mpg” extension. A complication is that there
can be several video and audio streams within a multiplexed file. SpruceUp supports
multiplexed MPEG files with one video and one audio mono or stereo stream.
MPEG-1 and MPEG-2
The DVD Specification allows for the use of either MPEG-1 or MPEG-2 encoded video. In
general, MPEG-1 provides for smaller file sizes but with reduced picture quality (using a half
screen image scaled to full screen), while MPEG-2 provides for better quality but with larger
file sizes. There are many technical aspects to these two standards that are not covered
here.
Generally, MPEG-1 is used for titles where file size is critical (such as with DVDonCD titles
using 650MB disc vs. a typical DVD with 4.7GB), and playback will be on a computer as
opposed to a set-top DVD player.
MPEG-2 is the normal video format for DVD titles on DVD media.
SpruceUp works with both MPEG-1 and MPEG-2 video assets, as long as they are DVD
compliant. See the MPEG Settings Summary topic for a quick overview of SpruceUp
requirements.
Bit-Rates
The bit-rate directly determines the file sizes, and thus how many minutes you can fit onto
a CD or DVD. DVD players support combined bit-rates up to 10.08mbps, but this must
include the audio and other overhead as well. The maximum video bit-rate is 9.8mbps.
Typical maximum bit-rates used for video are around 8mbps. The maximum MPEG-1 bitrate is 1.856mbps with 1.15mbps typical.
The actual video content determines how low a bit-rate you can get by with and still have
acceptable quality. Video with little movement works well at lower bit-rates, while lots of
movement (a quick camera pan for example) shows the artifacts that higher bit-rates are
best at handling.
There are three common methods of encoding video - CBR (Constant Bit-Rate), 1-pass VBR
(Variable Bit-Rate), and 2-pass VBR. With CBR, you choose a bit-rate and it is used for the
entire video movie, regardless of its content. The VBR modes monitor the video content and
adjust the bit-rate to best fit the amount of motion occurring. 2-pass VBR provides more
efficient encodes since it uses one pass to first examine the video and then encodes it on
the second pass, with rates adjusted in anticipation of the video. SpruceUp supports video
encoded with any of these methods.
Video Resolution
The resolution determines the number of pixels processed within a frame. More pixels lead
to sharper details in the image. When you need to encode at a low bit-rate however, lower
resolutions will show fewer noticeable encode errors, since the bit-rate is being used for
fewer pixels, effectively resulting in a higher bit-rate (with the trade-off of reduced detail,
which is typically a less noticeable artifact). Depending on video content, it can be a good
idea to use MPEG-2 1/2 D-1 (which halves the horizontal resolution and leaves the vertical
at full) when you must use bit-rates less than 3mbps. Better MPEG encoders provide more
options with regards the video resolution. Note that regardless of the resolution picked,
most DVD players plays back at full screen. Following is a list of common resolutions used
with SpruceUp.
MPEG-1
• SIF (Standard Interface Format): 352x240 NTSC, 352x288 PAL
4—10 SpruceUp User’s Guide
Page 83

MPEG-2
• Full D-1: 720x480 NTSC, 720x576 PAL
• Cropped D-1: 704x480 NTSC, 704x576 PAL (matches analog blanking)
• 1/2 D-1: 352x480 NTSC, 352x576 PAL
• SIF (Standard Interface Format): 352x240 NTSC, 352x288 PAL
Picture Frame Rate
SpruceUp supports NTSC (29.97fps) and PAL (25fps) frame rates. Be sure the video frame
rate matches the frame rate set for SpruceUp in the Preferences dialog.
Warning: You cannot mix NTSC and PAL MPEG assets in a project –
compile errors will result.
Aspect Ratio
DVD supports 4:3 (conventional TV) and 16:9 (widescreen) aspect ratios. 16:9 video is
anamorphic, meaning it is compressed horizontally (things look skinny). A flag setting on
the title triggers the end user’s player to expand the picture out to a real 16:9 aspect ratio.
SpruceUp supports 4:3 only, but will import 16:9 video and process it as if it was 4:3
(playback will be as 4:3, not 16:9).
Chroma Format
The DVD specification requires a 4:2:0 chroma format. There are several component
standards, most dealing with how many chroma samples there are for each luma sample. A
and CR sample is taken for every other luma sample on every other horizontal line. This
C
B
leads to 2:1 chroma downsampling both horizontally and vertically.
What’s a GOP?
A major function of MPEG encoding is to identify redundancy not only within a frame, but
also among a group of frames. A scene with no movement except a car driving by has a lot
of redundancy over time. In this case, a single complete frame could provide the majority of
the video; subsequent frames only need to provide for the areas that changed. MPEG uses
three frame types to define the video, with a GOP (Group Of Pictures) setting to define the
size of the group and its order.
An MPEG video stream is composed of Intra (I) frames, Bi-directional (B) frames, and
Predicted (P) frames. An I-frame, also known as a reference or “key” frame, contains the
complete image of the current frame, without reference to frames that precede or follow it.
P-Frames are encoded from a “predicted” picture based on preceding frames, and B-Frames
are encoded based on an interpolation from other frames that come before and after.
Therefore the I-frame is the only type of frame that can stand by itself, without requiring
information from other frames in the GOP. Every GOP contains one I-frame.
Chapter points in a DVD Movie can be entered only at GOP boundaries. Otherwise, the
picture could not be reproduced when the chapter point is accessed at random. Likewise,
MPEG editing functions such as the EyeFrame setting can be done only at GOP boundaries.
There are three aspects to choosing a GOP setting: Length of GOP, the GOP pattern, and
whether the GOP is “open” or “closed”.
GOP Length
Longer GOP lengths produce efficient encodes, but are less desirable during short duration
effects such as quick fades and quick camera pans. DVD defines the maximum lengths to be
18 frames for NTSC or 15 frames for PAL.
SpruceUp User’s Guide 4—11
Page 84

GOP Pattern
Larger GOP patterns produce more efficient encodes, with B- and P-frames being much
smaller than I-frames. A typical pattern is IBBP with a length of 15 frames. The actual GOP
pattern used in this case would be BBIBBPBBPBBPBBP.
Open or Closed GOPs
An open GOP allows the B-frames from one GOP to look at the reference frame from an
adjacent GOP. This is more efficient, but causes issues with multi-angle titles. A closed GOP
keeps all references within itself - it stands alone with respect to other GOPs. SpruceUp
works with either type.
Supported Video Formats
Following is a list of extensions SpruceUp looks for when importing movies. These are all
MPEG compressed files – applications tend to choose file extension variations as best suits
them.
• .m1v
• .m2v
• .mpv
• .vbs
• .mpg
• .mpe
• .mpeg
• .mp2
• .m2p
• .avi (MPEG only)
What Happens Exactly When Importing Video?
As opposed to backgrounds and buttons, video movies are not copied to the Style Gallery –
they are used where they are. Video MPEG files must be parsed while being imported, and a
file with the same name is created, with an added ".PRV" extension. This small file is written
to the same folder that contains the MPEG file. Additionally, a ".PRA" file is created for audio
files. Because of this parsed file, SpruceUp cannot import video files directly from read-only
sources (CD-ROMs for example) – copy these to a read/write volume to make them
accessible.
Note: Parsing can take several minutes for longer movies. Due to
the amount of processing required, pressing Cancel while importing a
movie will not instantly stop the import. SpruceUp continues until the
current movie is done and then stops the import.
SpruceUp verifies the MPEG file is DVD compliant and monitors it for errors while parsing.
Any problems encountered are reported as error messages. Typical problems involve noncompliant files – 44.1Khz audio and inappropriate video bit-rates and aspect ratios are the
most common errors. Check the transcode settings used when the file was converted and
correct any that are improper.
SpruceUp creates a thumbnail video frame, based on the first frame of video, and uses that
to display the movie within the Movies tab of the Media Gallery. See the Clip Properties topic
4—12 SpruceUp User’s Guide
Page 85

for details on changing the thumbnail video frame.
The Media Gallery shows a number of details about the movie, including its name, length,
and format.
For NTSC systems, a semi-colon between the seconds and frames length values indicates
the video uses drop frame timecode; a colon indicates non-drop frame timecode. The flag
indicates the number of Chapter Points assigned. The speaker indicates audio is present,
and the film icon indicates video is present.
Movie Properties
Access a movie's properties by right-clicking on the movie (in the Media Gallery) and then
selecting File Properties from the pop-up menu. This opens a menu displaying details
about the movie's video and audio. These include its file name, size, location, and type.
There is also an Explore... button that starts Window's Explorer.
SpruceUp User’s Guide 4—13
Page 86

MPEG Settings Summary
This topic lists the MPEG settings required by SpruceUp. See the Video Assets topic for
details on any of these settings.
Note: All assets within a project must use the same Frame Rate (all
PAL or all NTSC). You can mix assets where the other settings are
different, such as MPEG-1 and MPEG-2, resolutions, and bit-rates.
MPEG Type
Both MPEG-1 and MPEG-2 types are supported, at the resolutions listed below.
MPEG Structure
Both Elementary and Multiplexed (System or Program) streams are supported (Multiplexed
must have no more than one stereo audio stream).
Bit-Rates
MPEG-1 Video
Up to 1.856mbps (1.15mbps typical)
MPEG-2 Video
Up to 9.8 mbps (typical maximum used is 8mbps)
MPEG-1 Layer 2 Audio
64kbps to 384kbps; 192 kbps and 224 kbps are typical
Dolby® Digital AC-3
64kbps to 448kbps; 192 kbps 224kbps and 448 kbps (for 5.1) are typical
Audio Sample Rate
16 bit 48Khz only
Video Resolution
MPEG-1
SIF (Standard Interface Format): 352x240 NTSC, 352x288 PAL
MPEG-2
Full D-1: 720x480 NTSC, 720x576 PAL
Cropped D-1: 704x480 NTSC, 704x576 PAL (matches analog blanking)
1/2 D-1: 352x480 NTSC, 352x576 PAL
SIF (Standard Interface Format): 352x240 NTSC, 352x288 PAL
Frame Rate
NTSC/525 lines (29.97fps)
PAL/625 lines (25fps)
Aspect Ratio
SpruceUp supports 4:3 only.
Chroma Format
The DVD specification requires a 4:2:0 chroma format.
GOP Size (maximum)
18 frames NTSC, 15 frames PAL
4—14 SpruceUp User’s Guide
Page 87

Audio Assets
SpruceUp requires the audio assets to be associated with the video assets, either as an
elementary file with the same name and in the same directory as the video file but with a
different extension, or as part of a multiplexed (also referred to as system or program)
MPEG file. The audio is treated as being inseparable from the video; it cannot be trimmed or
in any other way handled independently of the video.
Compressed vs. Uncompressed
The supported audio formats include some with compression and some without.
Compressed formats, including MPEG-1 Layer 2 and Dolby Digital's AC-3, have the
advantage of being much smaller files, yet still having very good quality. Typically used bitrates vary from 192kbps to 448kbps. The MP3 format, while part of the MPEG family, is not
supported by the DVD specification.
Uncompressed formats, such as PCM, WAV, and AIFF, have excellent quality, but with large
file sizes. These are often generically referred to as PCM files – similar to what is used on
audio CDs. The DVD specification requires WAV, PCM, and AIFF audio to be 16, 20, or 24
bits sampled at a 48Khz (1,536kbps for two channels) or 96Khz rate (as opposed to the
more common CD rate of 44.1Khz).
Important: SpruceUp supports 16 bits at 48Khz only.
See the Disc Space Math topic for details on how the above values were arrived at.
Choosing a format may in large part depend on the media the title will be distributed on.
Dolby® Digital AC-3
Dolby Digital audio, commonly referred to as AC-3, is a compressed format suitable for DVD
titles. It can be from a single channel up to six, supporting 5.1 surround sound. In other
words, not all AC-3 audio is 5.1 – most often it is a simple 2-channel arrangement.
The WinDVD player included with SpruceUp supports playing Dolby Digital audio, however
Dolby requires a licensing fee for each player. For this reason, the WinDVD player on trial
versions of SpruceUp cannot play AC-3 audio – you must upgrade to the full version (or
register your full version if you have not already done so). Playing back AC-3 audio, either
with the Simulate mode or by using the Clip Properties dialog, results in a muted output.
The Syzygy DVD player that can be freely exported along with your titles is not able to play
AC-3 files for the same licensing reasons.
SpruceUp User’s Guide 4—15
Page 88
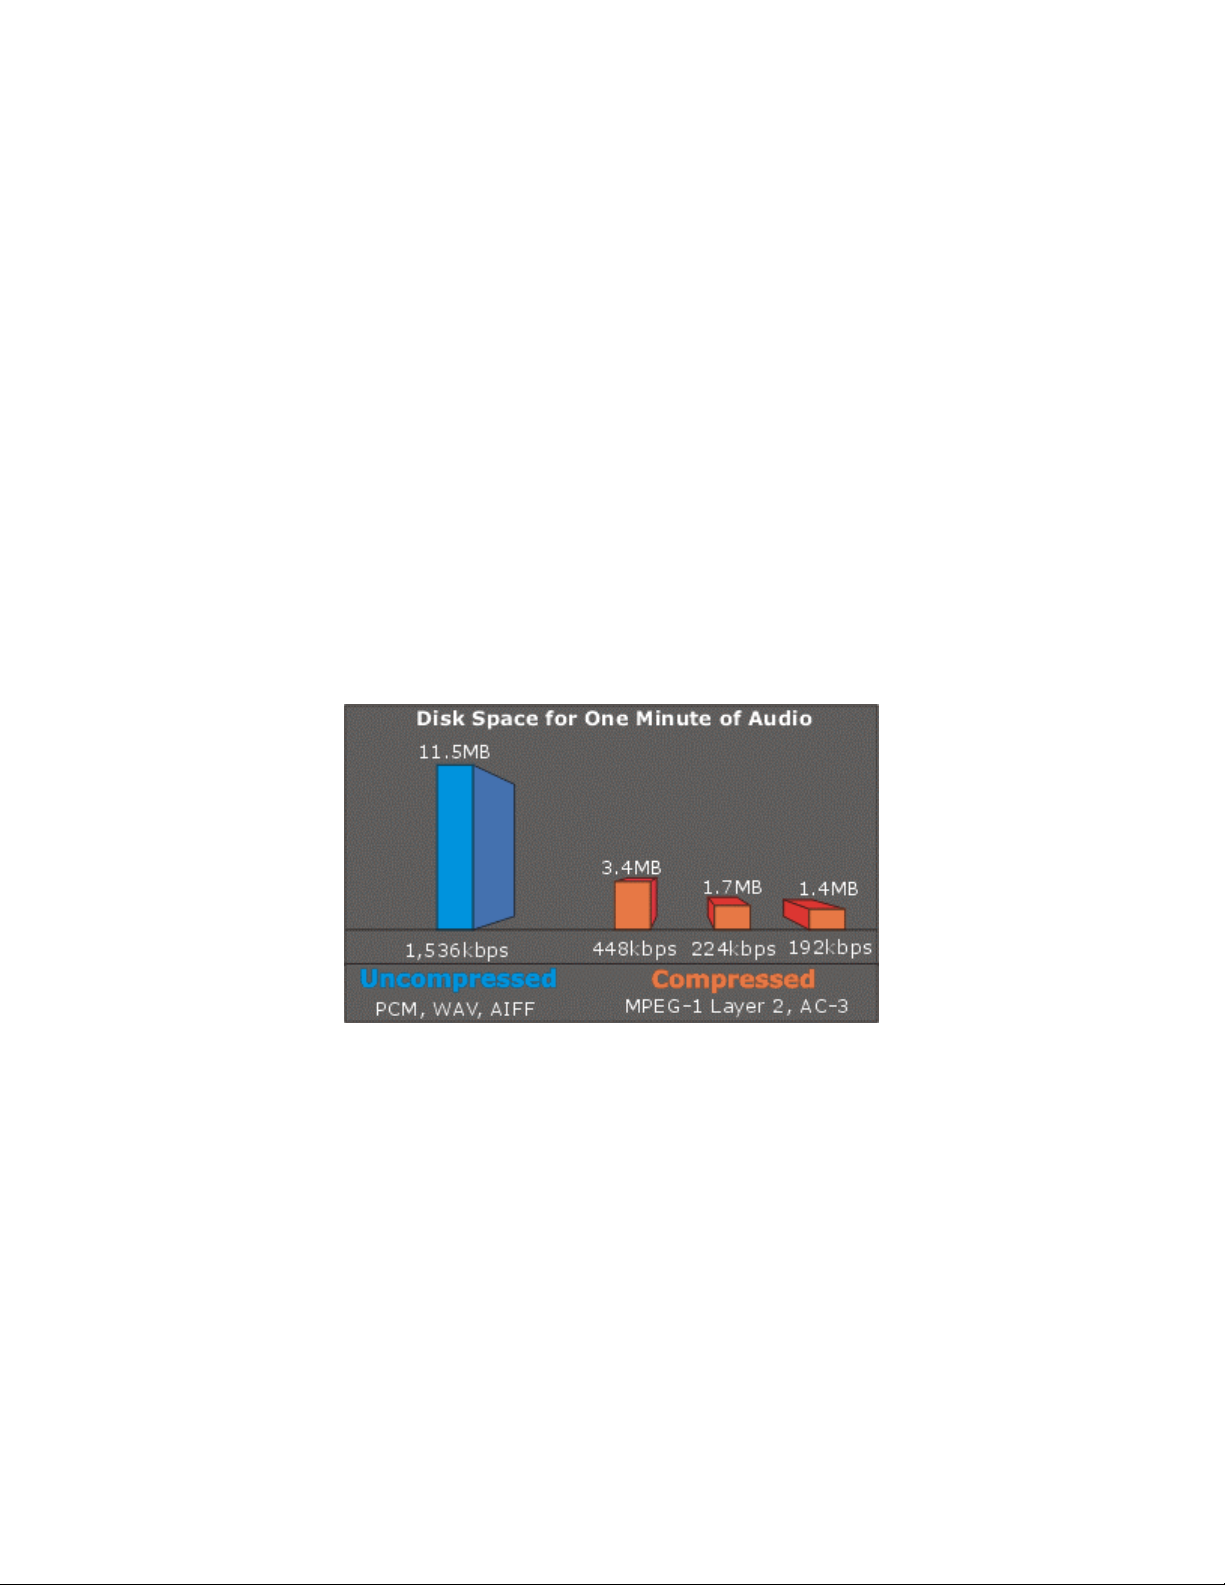
SpruceUp Supported Audio Formats
Following is a list of SpruceUp supported audio file types:
• MPEG-1 Layer 2 audio (.m1a, .mpa, or .abs) with bit-rates of 64kbps to 384kbps; 192
kbps and 224 kbps are typical.
• Dolby Digital (AC-3) audio (.ac3 — mono up to six channels) with bit-rates of 64kbps
to 448kbps; 192 kbps 224kbps and 448 kbps (for 5.1) are typical.
• WAV audio (.wav — Windows uncompressed PCM audio; the most common Windows
audio format), 16 bit 48Khz only.
• PCM audio (.pcm — “raw” pulse code modulation audio; similar to WAV, but without
“header” and other file information), 16 bit 48Khz only.
• AIFF audio (.aif — Audio Interchange File Format uncompressed PCM audio; the most
common Macintosh audio format), 16 bit 48Khz only.
Be aware that the WAV, PCM, and AIFF uncompressed audio formats, while providing
excellent quality, require large file sizes. This can be very important if your goal is to write
to CD-R.
Disc Space Math
This is to explain a bit about the math used to create the graph comparing the various audio
bit-rates.
Uncompressed
SpruceUp supports only 16-bit audio sampled at 48Khz.
First you need to convert the 48Khz sample rate to kbps (kilo bits per second) by
multiplying 48Khz by 16 (the number of bits), giving a 768kbps rate. This is for one channel
– double this for two channels, making it 1,536kbps.
Now multiply this times the number of seconds; in the example 60 seconds was used. This
leaves 92,160kbs. Since we are used to thinking of disc space in terms of bytes and not
bits, divide this number by 8 (the number of bits in a byte) and you get the final disc space
amount required, 11.52MB.
Compressed
Use the same process as above, skipping the multiplying the bits times the sample rate. For
the 448kbps rate, multiply 448kbps by 60 seconds. This gives 26,880kbs. Divide this by 8,
and the file size is 3.36MB.
4—16 SpruceUp User’s Guide
Page 89

Background Assets
Background assets, together with buttons, are stored in Style Galleries. Changing to a
different Style Gallery replaces the current backgrounds and buttons with the ones from the
new gallery. Since you can switch Style Galleries as often as you want while creating a
project, there is no reason to have duplicate assets.
When you import a background, it is placed in the current Style Gallery. When you delete a
background by right-clicking on it and selecting Delete Background, its file is deleted from
the drive. See the Assets and Style Gallery topics for more information.
Supported Formats
You can import a wide range of still image formats for use as background images in DVD
Menus:
• Bitmapped images (.bmp)
• TIFF images (.tif — Tagged Image File Format)
Note: Compressed TIFF files (e.g. LZW) are not supported.
• JPEG images (.jpg — Joint Photographic Experts Group)
• Targa images (.tga files)
Note: Adobe Photoshop files (.PSD extension) are assumed to be
buttons. To use a Photoshop file as a background you need to use its Save
a Copy function and save as a flattened (single layer) TIFF, BMP, or JPEG
file. See the Creating Photoshop Buttons topic for more information.
Note that due to the nature of JPEG, highly compressed JPEG images may suffer from
unwanted artifacts when imported. Since SpruceUp scales images that do not fit the
selected TV standard, these artifacts can be made worse. JPEG files also take longer to
import since they must be decompressed first.
You also have the ability to grab background stills from any of the loaded movies using the
Clip Properties dialog. See the Clip Properties topic for details.
What Happens When Importing?
SpruceUp menus conform to standard video resolutions:
NTSC: 720 pixels x 480 lines
PAL: 720 pixels x 576 lines
Any image imported as a background is scaled to fit within these constraints. If you import
a bitmap that is 600 pixels wide by 100 lines high, SpruceUp stretches the width by 120
pixels and the height by 380 (assuming NTSC/525). Things are going to look tall and
skinny, and probably very pixilated.
It is a good idea to make sure your images are the correct size when you create them,
assuring they will look as you had intended.
Backgrounds must be converted to an MPEG-2 format to be useful for SpruceUp. When you
select a background as an asset, SpruceUp copies it to the current Style Gallery and creates
two files. Both files have the same name as the original file. The MPEG-2 file has a ".m2v"
extension, and its companion parsed file has a ".m2v.PRV" extension.
SpruceUp User’s Guide 4—17
Page 90

Background Properties
Access a background's properties by right-clicking on the background (in the Media Gallery)
and then selecting Properties from the pop-up menu. This opens a menu displaying details
about the background file. These include its file name, size, location, and type. There is also
an Explore... button that starts Window's Explorer.
4—18 SpruceUp User’s Guide
Page 91

Button Assets
Buttons are used when creating menus. They allow the viewer to select from viewing
options that you assign the buttons, such as jumping to a specific scene in the movie.
SpruceUp supplies several sets of standard buttons for you to use, grouped in the Style
Galleries. See the Assets and Style Gallery topics for details on working with them.
Also supplied is a Button Maker function for creating simple custom buttons. You are also
able to import buttons created with Adobe Photoshop, with layer support for thumbnails and
the action states of a button (selected and not-selected). See the Custom Button
Introduction topic for details on creating your own custom buttons.
Button Properties
Access a button's properties by right-clicking on the button (in the Media Gallery) and then
selecting Properties from the pop-up menu. This opens a menu displaying details about
the button file. These include its file name, size, location, and type. There is also an
Explore... button that starts Window's Explorer.
SpruceUp User’s Guide 4—19
Page 92

Blank Page
(mostly)
4—20 SpruceUp User’s Guide
Page 93

Chapter 5: Tutorial
Tutorial Introduction
Tutorial Step One: SpruceUp Introduction
Tutorial Step Two: Loading Assets
Tutorial Step Three: Creating Menus
Tutorial Step Four: Clip Properties
Tutorial Step Five: Finishing the Menus
Tutorial Step Six: Simulating the Title
Tutorial Step Seven: Exporting the Title
SpruceUp User’s Guide 5—1
Page 94

SpruceUp Tutorial Introduction
Welcome to the SpruceUp Tutorial. The tutorial takes you through the process of creating a
DVD title using provided assets. It covers all major SpruceUp features.
Anyone new to DVD authoring or wanting to learn about SpruceUp's features and workflow
is strongly encouraged to take the time to go through the tutorial. On average it takes
about 20 minutes to complete the tutorial.
Tutorial Assets
All SpruceUp installations include default backgrounds and buttons. Full version installations
(from a CD-ROM) may include additional assets and an MPEG movie to use as well.
Due to the movie's file size, SpruceUp versions that have been downloaded through the
Internet or exported from someone else's copy of SpruceUp do not have a movie or the
tutorial style included. You can either download the movie from the SpruceUp web site:
http://www.spruceuserforums.com/SpruceUp
or use a movie that you may already have. The tutorial does not require specific assets, just
some examples of backgrounds, buttons, and a movie.
Important: The tutorial movie is NTSC. You must make sure
SpruceUp’s Preferences are set to NTSC prior to starting the tutorial if you
are using this movie. If PAL is your normal standard, be sure to set this
back to PAL once you are through with the tutorial.
Tutorial Sections
The tutorial has the following sections:
Note: Each section assumes you have been through the previous
ones.
• SpruceUp Introduction – This is a brief overview of SpruceUp, providing some insight
into what it can and cannot do.
• Loading Assets – This describes how to load assets (video clips, buttons, and
backgrounds) in general, and for this tutorial specifically.
• Creating Menus – How to select a background and add buttons and text to it. Also
covered is linking buttons to movies and other menus.
• Using Clip Properties – How to select a video asset and open it in the Clip Properties
dialog. Covered here is adding Chapter Points, modifying the EyeFrame, and exporting
stills and buttons directly to a menu.
• Finishing the Menus – Now that you've added Chapter Point buttons, it is wise to
regroup and see what you've got.
• Simulating the Title – This step has you simulate the title you have created, verifying
the button links work as planned.
• Exporting the Title – This step explains what is involved in creating a disc that can be
played by others.
5—2 SpruceUp User’s Guide
Page 95

Things to Know While Going Through the Tutorial
This tutorial is intended to introduce you to SpruceUp and its major features. It does not
cover every situation you may run into, but should give you a good foundation to work out
any issues you may run into.
In making SpruceUp easy to use, some duplicate functionality has been added. For
example, there are a number of ways to add a movie to the asset bin:
• Double-clicking in an empty part of the bin
• Right-clicking and selecting Add Media Asset
• Selecting File – Import from the menu
• Using the keyboard shortcut Control + Shift + I
• Simply dragging the movie in from Windows Explorer
All of these work well, but not all are covered in the tutorial. It does present a variety of
methods in order to get you familiar with their concepts. With time you will become
comfortable with the methods best suited to you.
SpruceUp User’s Guide 5—3
Page 96

Tutorial Step One
SpruceUp Introduction
SpruceUp is a DVD authoring application designed to take DVD compliant MPEG video and
audio movies, combine them with menus, and create DVD titles that can be played back on
PCs and (with appropriate hardware) set-top DVD players. Movie sources can be from a
wide variety of non-linear editors, video capture cards, and MPEG encoders.
SpruceUp provides tools to add Chapter Points, providing the viewer quick access to scenes
you define.
SpruceUp is not an editor, though. It cannot directly link the end of one movie to the start
of another. Any effects you might want, such as transitions between scenes or text graphics
(for example for credits) must be added using a video editing application, such as from
Adobe or Ulead.
User Interface Orientation
It is important to be able to identify the four major areas of SpruceUp's User Interface.
Below is a drawing identifying the areas. See the Main Window topic for more information.
5—4 SpruceUp User’s Guide
Page 97

Tutorial Step Two
Loading Assets
SpruceUp uses three types of assets: Video movies (with audio), backgrounds, and buttons.
These assets are managed in the Main Window’s Media Gallery, each with its own tab along
the top.
The Style Gallery
SpruceUp's goal is to make creating DVDs as easy and efficient as possible. Towards this
end, SpruceUp uses Style Galleries to allow you to categorize your background and button
assets. Examples of styles include weddings, sports, business, and many more. SpruceUp
supplies several Style Galleries for you to start with, including the Default one.
Style Gallery Notes
• Selecting a different Style Gallery causes the current backgrounds and buttons to be
replaced with those from the new style.
• When launched, SpruceUp loads the last Style Gallery used.
• Since multiple Style Galleries can be used within a project, SpruceUp does not change
Style Galleries when they are loaded.
• The Style Gallery does not contain movie assets.
For more information on Style Galleries, please see the Style Gallery topic.
SpruceUp User’s Guide 5—5
Page 98

Loading Tutorial Assets
Note: The following assumes you have installed the TutorialStyle
in the Style Gallery. If the TutorialStyle is not present, either use the
DefaultStyle or a style you have created.
To set the Style Gallery to TutorialStyle:
1 Click the file cabinet icon shown above.
2 Select the TutorialStyle directory. This is in the Style Gallery directory located in the
same directory containing the SpruceUp application (typically C:\Program Files\Spruce
Technologies\SpruceUp).
3 Click OK to confirm it.
You should now see the tutorial's backgrounds and buttons in the Media Gallery (click the
Background and Button tabs to see them).
To load the tutorial movie:
1 Select the Movies tab.
2 Double-click in an empty part of the Media Gallery to open the Add Media Asset
dialog.
3 Browse to the TutorialStyle directory and select the movie Tutorial.m1v.
Note: If this is not an install from a CD-ROM, then select the
downloaded tutorial movie or any other movie you would like to use.
4 Click Open to load the movie.
The tutorial movie now appears in the Media Gallery.
5—6 SpruceUp User’s Guide
Page 99

Tutorial Step Three
Creating Menus
Most DVD titles contain at least one menu, and it is typically the first thing to appear when
the title starts playing. A menu is made up of a background image, one or more buttons
linked to the movie(s), and optionally some text explaining what to do.
For details on creating menus, please see the Creating Menus topic. For details on what can
be used as a background, see the Background Assets topic. For button details, see the
Button Assets topic
Naming Your Project
Before creating the menus, it is a good idea to name and save the project. This provides a
clean slate to start with and allows you to save versions of your project as backup.
First, to provide a clean start:
1 Select File – New. Optionally, press Ctrl + N. Any existing menus and movies are
removed.
Next, to name your project:
1 Select File – Save As. This opens the Save As dialog. Select the directory you wish
to save the project in and type in the desired name.
2 Select Save to confirm the project creation.
Creating the Menus
For this tutorial step we will create two menus. The first will be the opening title menu, and
the second will contain buttons linking to Chapter Points in the movie.
Creating the First Menu
1 Select the Backgrounds tab in the Media Gallery. This displays the backgrounds in
this Style Gallery you have to choose from.
2 Select one of the backgrounds and drag it onto the Work Area.
You now have the first menu's background. At any time, you can drag a different
background onto the Work Area to replace the current one. You can also just double-click on
a background to make it the current menu's background.
Note that the background also appears in the first slot of the Menu Gallery. The gray
rectangle with the crosshairs has moved to the right – it is the location of the next menu.
Creating the Second Menu
1 Select a different background from the Media Gallery and drag it to the gray rectangle
on the Menu Gallery. You can also hold the keyboard's Ctrl button and double-click a
background to make it the next menu.
SpruceUp User’s Guide 5—7
Page 100

 Loading...