

Page 1

Bedienungsanleitung
Sonnenschirm
Operation manual
giant umbrella
Page 2

Page 3

Inhaltsverzeichnis
Index
Bedienungsanleitung auf Deutsch
Detailübersicht ............................................................................................. 4
Service-Information ...................................................................................... 5
Zu dieser Bedienungsanleitung ................................................................... 6
Wichtige Sicherheitshinweise und Vorschriften .......................................... 6
Umgang mit dem Sonnenschirm & Lieferumfang ....................................... 7
Kontrollieren des Standorts der Bodenhülse,
des Standrahmens oder der Bodenplatte .................................................... 8
Aufstellen des Sonnenschirms in einer Bodenhülse,
Standrahmen oder auf einer Bodenplatte "mit Aufstellscharnier" ............. 9
Aufstellen des Sonnenschirms in einer Bodenhülse, in einem
Standrahmen oder auf einer Bodenplatte "ohne Aufstellscharnier" ........ 10
Öffnen und Ausrichten des Sonnenschirms............................................... 11
Schließen des Sonnenschirms ....................................................................12
Zubehör ....................................................................................................... 13
Operation manual in English
Detailed overview ........................................................................................ 14
Service information ..................................................................................... 15
About this operation manual ..................................................................... 16
Important safety notes and regulations ..................................................... 16
Handling the umbrella & contents of shipment ........................................ 17
Location of the in-ground sleeve,
Portable stand or base plate ...................................................................... 18
Installation of the umbrella with the in-ground sleeve/
base plate or portable stand "with hinge" .................................................. 19
Installation of the umbrella with the in-ground sleeve/
base plate or portable stand "without hinge" ............................................ 20
Open and aligning the umbrella ................................................................. 21
Closing the umbrella ...................................................................................22
Optional equipment .................................................................................... 23
Page 4

Detailübersicht
Dachteller mit Gewindekugel
1
Teleskopteller
2
Obere Augenschraube
3
Anschlagsschraube
4
5
Teleskop
Oberer Teleskopgleitring
6
Anschlagring
7
Mastteller
8
Untere Augenschraube
9
Stützstrebe
10
U-Stück, Bolzen, Unterlegscheibe,
11
Sicherungsringe
Gestänge: Eckstrebe, Mittelstrebe kurz / lang
12
13
Endstück gefedert
Kurbel
14
Mast
15
Getriebe-Ankerbolzen
16
4
Page 5

Service-Information
Bitte füllen Sie die folgenden Felder aus, damit Sie im Bedarfsfall jederzeit kurzfristig darauf zurückgreifen können.
Sonnenschirm Typ / Größe*:
Seriennummer*:
*Die Informationen können Sie dem Mastaufkleber am Kurbelloch entnehmen.
5
Page 6

Sonnenschirm Typ T, TS, TX, TXS, TLX, TXV, MMA
Zu dieser Bedienungsanleitung:
Ihre Sicherheit und die Sicherheit anderer Personen liegen uns am Herzen. Bitte lesen Sie die
Ihnen vorliegende Bedienungsanleitung aufmerksam und vollständig durch und bewahren Sie
diese für den späteren Bedarf auf. Die Bedienungsanleitung enthält wichtige Informationen zur
Aufstellung, Montage und Inbetriebnahme Ihres Sonnenschirms. Beachten und befolgen Sie alle
Hinweise und Warnungen, um mögliche Personen- und Sachschäden zu vermeiden.
Die Einhaltung der Sicherheitsvorschriften bilden die Grundlage für den gefahrlosen Gebrauch
des Sonnenschirms!
Der Hersteller schließt jede Haftung oder Gewährleistung aus, die
durch unsachgemäßen Gebrauch oder Missachtung der vorliegenden Bedienungsanleitung resultieren.
Wichtige Sicherheitshinweise und Vorschriften:
Verwendungszweck:
Uhlmann Sonnenschirme sind ausschließlich als Sonnenschutz bestimmt. Die Windfestigkeit
des aufgespannten Sonnenschirms ist, je nach Größe und Typ, auf eine bestimmte Windstärke
begrenzt und setzt eine Verankerung in der fest montierten Bodenhülse gemäß Einbetonieranweisung voraus! Durch die Befestigung im mobilen Standrahmen wird die Standfestigkeit unter
Umständen erheblich herabgesetzt. Fundamentgrößen und Standrahmenbeschwerungen entnehmen Sie bitte der dem Produkt beiliegenden Anleitungen oder unter:
www.uhlmann-sonnenschirme.de.
Sonnenschirm schließen:
Bei aufkommendem, insbesondere böigem Wind, ist der Sonnenschirm zu schließen. Auch
der Starkwindschirm sollte bei aufkommendem, starkem Wind sicherheitshalber geschlossen
werden, um Schäden an Personen oder Gegenständen zu verhindern. Das nachträgliche Schließen
des Sonnenschirms, bei hohen Windgeschwindigkeiten, ist unter Umständen nicht mehr möglich!
Bei auffrischendem Wind oder nahenden Sturmböen ist der Schirm
zu schließen! Unbeaufsichtigte Schirme dürfen nicht geöffnet sein!
Ausnahme Starkwindschirm im Rahmen der maximal zulässigen
Belastungsgrenzen.
Elektroinstallation:
Uhlmann Sonnenschirme mit elektrischer Ausstattung müssen durch einen ausgewiesenen
Elektro-Fachmann nach der Elektrik-Montageanleitung und unter Einhaltung der örtlichen
Vorschriften an das Stromnetz angeschlossen
werden.
Verankerung:
Die Bodenhülse oder Bodenplatte ist gemäß
der dem Produkt beiliegenden Montageanleitung einzubauen. Der Einbau hat durch eine
Person mit entsprechenden Baufachkenntnissen zu erfolgen. Die örtlichen Vorschriften sind
unbedingt zu beachten!
6
Page 7
Umgang mit dem Sonnenschirm:
• Lehnen Sie den Schirm nie ungesichert an eine Wand, er könnte ins Rutschen
geraten und Personen sowie Gegenstände durch Umfallen verletzen / schädigen.
• Der Sonnenschirm darf nicht abgeändert oder mit fremdem Material behangen /
befestigt werden. Standfestigkeit sowie Schließfunktionen könnten beein trächtigt werden. Die Garantie erlischt!
• Verwenden Sie den Sonnenschirm nur in unbeschädigtem Zustand und achten Sie
auf Störungen und Defekte. Veranlassen Sie deren fachmännische Instandsetz-
ung mit Uhlmann Originalteilen vor weiterem Gebrauch.
• Stellen Sie sicher, dass sich vor dem Öffnen und Schließen des Sonnenschirms
keine Hindernisse im Öffnungsbereich befinden.
• Sonnenschirm bei aufkommendem Wind, Gewitter, Schnee, starkem Regen
und Hagel vollständig schließen.
• Kinder vom Öffnungs- und Schließmechanismus fernhalten.
• Kein offenes Feuer in der Nähe des Sonnenschirms.
• Lehnen Sie keine Gegenstände an den Sonnenschirm!
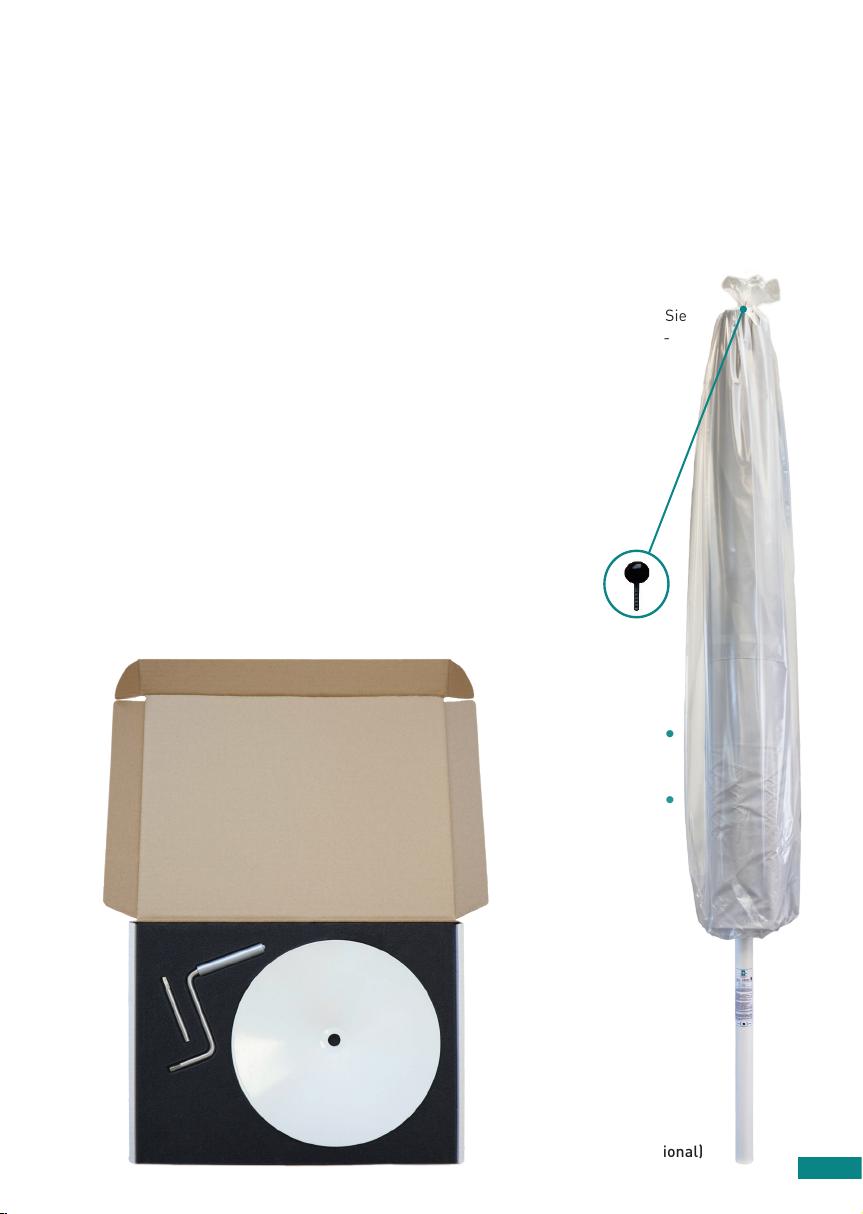
Lieferumfang:
Dachteller Gewindekugel
(bereits am Schirm
vormontiert)
•
Sonnenschirm
in Folie verpackt
Schutzhülle (optional)
Dachteller
•
Handkurbel
•
Kurbelstift (optional)
•
Weiteres Zubehör (optional)
•
•
•
7
Page 8

Sonnenschirm Typ T, TS, TX, TXS, TLX, TXV, MMA
Kontrollieren des Standorts der Bodenhülse,
des Standrahmens oder der Bodenplatte:
Der Standort der Bodenbefestigung sollte so
gewählt sein, dass der Sonnenschirm ringsum
einen Sicherheitsabstand von mindestens
20 cm zu Gebäuden, anderen Sonnenschirmen
oder sonstigen Gegenständen hat.
Sollten Sie als Befestigung eine Bodenhülse
mit Aufstellscharnier gewählt haben, achten
Sie darauf, dass die Bodenhülse in Richtung
einer Freifläche klappt damit der Sonnenschirm im geschlossenen Zustand problemlos
Standrahmen BodenplatteBodenhülse
Aufstellen des Sonnenschirms:
eingeschoben werden kann. Der Standrahmen
ist mit der vorgegebenen Anzahl und Größe
Betonplatten zu beschweren welche Sie der separat zugesandten Tabelle entnehmen können.
Eine Nichteinhaltung dieser Vorgaben verringert die Sicherheit und Stabilität Ihres Sonnenschirms, die Garantie erlischt!
Den sicheren Stand bekommt der Sonnenschirm durch eine der 3 möglichen untenstehenden Befestigungsvarianten:
Der Sonnenschirm ist kopflastig! Um Unfälle und Beschädigungen des Sonnenschirms sowie anderen Gegenständen zu vermeiden, werden für das Aufrichten und Befestigen des Sonnenschirms
mindestens zwei oder mehr Personen (abhängig von der Größe des Sonnenschirms) benötigt.
Den Sonnenschirm mit Hilfe von mind. 2 Personen oder mehr aufstellen! Lassen Sie den Sonnenschirm nicht fallen! Lehnen Sie den Sonnenschirm nicht an!
Ziehen Sie den Sonnenschirm in keinem Fall über unebene oder scharfkantige
Flächen! Der Sonnenschirm darf nur durch Heben/Tragen bewegt werden!
8
Page 9

Aufstellen des Sonnenschirms in einer Bodenhülse,
Standrahmen oder auf einer Bodenplatte mit Aufstellscharnier:
(Schritt 1)
Lockern Sie die Klemm- und die Fixier-
a
schraube soweit, dass der Mast ungehindert
eingeschoben werden kann.
b
Entfernen Sie die Ankerschrauben und
klappen Sie das Bodenhülsenoberteil um.
Legen Sie das Bodenhülsenoberteil auf
einer weichen Unterlage mit leicht positivem
Winkel ab.
c
Schieben Sie den Schirmmast bis zum
Anschlag in die Bodenhülse ein.
d
Ziehen Sie die Klemm- sowie die Fixier schraube handfest an.
Bitte öffnen Sie die Verpackung nicht mit einem Messer oder sonstigen spitzen Gegenständen! Es besteht die Gefahr, die Schutzhülle und
die Schirmbespannung durch Einschneiden stark zu beschädigen.
Nutzen Sie den Verpackungskarton als schützende Unterlage!
d
a
b
c
(Schritt 2)
Bitte beachten Sie, dass der Sonnenschirm
nicht mehr abgelegt werden darf!
e
Entfernen Sie die Folie und die Schutzhülle.
Montieren Sie den Dachteller am Schirmkopf.
f
Richten Sie den Sonnenschirm nun mit min-
g
destens zwei weiteren Personen senkrecht auf.
Befestigen Sie das Bodenhülsenoberteil umge hend mit den Ankerschrauben an dem Boden hülsenunterteil. Während dieser Zeit muss der
Sonnenschirm durch eine zweite Person gegen
Umfallen gesichert werden! Achtung: Der
Sonnenschirm darf nach der Montage nicht
mehr auf den Dachteller gelegt werden!
g
9
Page 10

Sonnenschirm Typ T, TS, TX, TXS, TLX, TXV, MMA
Aufstellen des Schirms in einer Bodenhülse, in einem
Standrahmen oder auf einer Bodenplatte ohne Aufstellscharnier:
(Schritt 1)
• Lockern Sie die Klemm- und die Fixierschrau be soweit, dass die Bodenhülse ungehindert
eingeschoben werden kann.
• Schieben Sie das Bodenhülsen-Oberteil auf
den Schirmmast auf und ziehen Sie die
Klemm- sowie die Fixierschraube handfest an.
(Abbildung a)
• Erst nach dem Öffnen und Ausrichten des
Schirms werden die Klemm- und die Fixier schraube endgültig angezogen
• Entfernen Sie die Folie und die Schutzhülle.
• Montieren Sie den Dachteller am Schirmkopf.
Bitte beachten Sie, dass der Schirm nicht
mehr abgelegt werden darf!
Verpackungskarton
als Unterlage
aufrichten
(Schritt 2)
• Richten Sie den Sonnenschirm nun senkrecht
auf. Zum Aufstellen mit einer Bodenhülse
ohne Aufstellscharnier empfehlen wir zwei
bis drei Personen. (Abbildung b)
Wichtig: Lehnen Sie keine Gegenstände an
den Sonnenschirm!
• Befestigen Sie das Bodenhülsenoberteil
umgehend mit den Ankerschrauben an dem
Bodenhülsenunterteil. Während dieser Zeit
muss der Sonnenschirm durch mindestens
eine zweite Person gegen Umfallen gesichert
werden! Achtung: Der Sonnenschirm darf
nach der Montage nicht mehr auf den Dach teller gelegt werden!
Abbildung a
10
aufrichten
aufrichten
Bodenhülsen Unterteil
Sicherheits-
schuhe
fixieren
Abbildung b
Page 11

Öffnen des Sonnenschirms:
• Entfernen Sie den Gummispanner und lockern
Sie die umschlungene Bespannung.
• Öffnen Sie den Sonnenschirm mit der Hand kurbel oder mit einem Akkuschrauber bei
mäßiger Geschwindigkeit mit dem optional
verfügbaren Sechskant-Kurbelstift so weit,
dass alle Stoffsegmente unter Spannung
stehen und die im Teleskop befindliche An schlagschraube an der Mastspitze andockt.
Sollten Sie den Sonnenschirm per Akku-
• Entfernen Sie bei halb geöffnetem Sonnen schirm die blauen Schaumstoffteile die
als Transportschutz angebracht sind.
Ausrichten des Sonnenschirms:
schrauber öffnen, benutzen Sie diesen bitte
nicht in der Bohrstellung, sondern mit einge stellter Drehkraftbegrenzung (höchtens maxi male Stufe).
• Beim Öffnen und Schließen des Sonnen schirms sollten die letzten 3-4 Umdrehungen
manuell, per Handkurbel getätigt werden (dar an zu erkennen, dass die im Teleskop befindli che Anschlagsschraube kurz vor der Mastspit ze steht).
(Abbildung c)
• Die Klemm- und Fixierschrauben müssen
gelockert sein. Richten Sie den Sonnen schirm bei Bedarf, an einer nahe gelegenen
Geraden (z.B. Gebäudekante) oder mit Hilfe
einer Wasserwaage aus. Dazu drehen Sie
den Sonnenschirm in der Bodenhülse, in die
gewünschte Position.
• Nun können die Klemm- und Fixierschraube
fest angezogen werden.
Anziehdrehmoment: Klemmschraube ca.
40-50 Nm / Fixierschraube ca. 10 Nm
Abbildung c
Den Schirm nur bei keinem bis wenig Wind aufstellen!
Achten Sie darauf den Schirm niemals mit gelockerten / geöffneten Klemmund Fixierschrauben stehen zu lassen!
11
Page 12

Sonnenschirm Typ T, TS, TX, TXS, TLX, TXV, MMA
Schließen des Schirms:
(Abbildung d)
• Sollte Ihr Sonnenschirm mit Elektrik ausge stattet sein, vergewissern Sie sich dass
die Stromzufuhr abgeschaltet wurde und
die Infrarotheizstrahler vollständig
ausgekühlt sind.
• Schließen Sie den Sonnenschirm komplett,
mittels der im Lieferumfang enthaltenen
Handkurbel oder per Akkuschrauber mit dem
optional verfügbaren Sechskant-Kurbelstift
bis zum Anschlag.
• Ziehen Sie die Stoffsegmente vollständig
zwischen, hinter und unter den Schirmstreben
heraus und wickeln Sie diese außen um den
Sonnenschirm herum (Abbildung f).
• Anschließend muss die Bespannung mit dem
Gummispanner gegen Flattern gesichert wer den. Bei Nichteinhaltung kann es zu über mäßigem Stoffverschleiß oder sogar zu Flat terschäden und Lochbildung kommen!
1 2 3 4
• Sollten Sie Ihren Sonnenschirm für längere
Zeit nicht benutzen, empfiehlt sich die
Verwendung einer Schutzhülle. Bitte achten
Sie darauf, dass die Bespannung vorher
vollständig ausgetrocknet ist, um Schim melbildung durch Feuchtigkeit zu vermeiden.
Bei stärkerem Wind oder nahender Sturmböen ist
der Schirm umgehend zu schließen! Unbeaufsichtigte Schirme dürfen nicht geöffnet sein! Ausnahme
Starkwindschirm im Rahmen der maximal zulässigen
Belastungsgrenzen.
Um Schimmelbildung zu vermeiden, muss die
Bespannung vollständig trocken sein, bevor die
Schutzhülle aufgebracht wird!
12
Abbildung d)
• Über die Winterzeit sollte der Sonnenschirm
in einem trockenen Raum eingelagert wer den. Falls der Sonnenschirm aufgebaut blei ben sollte, empfiehlt sich der Einsatz einer
Schutzhülle, in der der Sonnenschirm trocken
und sicher verpackt ist.
Page 13

Zubehör:
Seitenwände und Regenrinnen:
• Die Nutzung von Seitenwänden und Regen rinnen setzt bei Sonnenschirmen mit Volant
die Montage von Gewindehülsen in den End stücken voraus. Grundsätzlich werden zu
diesem Einsatzzweck Sonnenschirme mit
Volant empfohlen, um einen idealen Über gang zu schaffen. Bei Sonnenschirmen ohne
Volant werden zur Befestigung sogenannte
Regenrinnen- / Seitenwandhalter (nach innen
versetzt) verwendet.
• Zur Montage von Seitenwänden und Regen rinnen lesen Sie bitte die Montagehinweise,
die dem Zubehör beiliegen.
• Seitenwände und Regenrinnen müssen vor
dem Schließen des Sonnenschirms komplett
entfernt werden.
Heizungsvorrichtung:
• Bevor Sie die Heizungsvorrichtung abklappen, achten Sie darauf, dass die Heizstrahler ausge schaltet und vollständig ausgekühlt sind! Führen Sie bitte folgende Schritte für das Abklappen
aus (Aufklappen in umgekehrter Reihenfolge):
Schritt 1
Heizungshalter
leicht anheben
Heizungshalter nach oben
aus der Arretierung ziehen
Schritt 2
Schritt 3 Schritt 4
Heizung umlegen (darauf
achten, dass der Schutz-
ring an der richtigen Stel-
le sitzt um Beschädigun-
Heizungshalter nach unten
klappen und Heizer abdrehen
Verbrennungsgefahr! Achten Sie darauf, dass die Heizstrahler am Sonnenschirm vor dem Abklappen ausgeschaltet und vollständig ausgekühlt sind!
gen des Masten und des
Heizers zu vermeiden)
13
Page 14

Detailed overview
Top plate with ball
1
Telescope plate
2
Upper hinge bolt
3
Stop Screw
4
Telescope
5
Upper telescope bearing ring
6
14
Distance ring
7
Mast plate
8
Bottom hinge bolt
9
Support arm
10
U-piece, Bolt, safety washers,
11
heavy galvanized circlips
12
Corner arm, long middle / short middle arm
Spring loaded end piece, mounted
13
Winding handle
14
Mast
15
Gear-anchor bolt
16
Page 15

Service information
Please fill out the following information so you have access to it when needed.
Umbrella type / size*:
Serial number*:
*You will find this information on the mast label around the winding handle hole.
15
Page 16

Umbrella Type T, TS, TX, TXS, TLX, TXV, MMA
About this operation manual:
Both your safety and the safety of others are paramount. Please read the following safety and
installation instructions carefully before installation and use of your new umbrella. Keep them in
a safe place for later reference. The installation instructions include important information regarding mounting, installation and implementation of the umbrella. Please notice all instructions and
warnings to avoid unnecessary damage to people or property.
To ensure a safe use of your Uhlmann umbrella, it is important to adhere to these safety instructions.
The manufacturer excludes any warranty or liability for damage
caused by improper use or non-adherence to these safety and installation instructions.
Safety note and regulations:
Designated use:
Uhlmann umbrellas are designed exclusively for sun protection. The wind resistance of each
umbrella in its opened state is limited to a certain wind force, depending on the type and size of
umbrella and requires the fixing with the in-ground sleeve as per installation instruction. The
stability of the umbrella might be substantially reduced when using a portable stand. Please refer
to the instructions enclosed with the goods for recommended foundation dimensions for the
in-ground sleeves and weights for the use of portable stands or check on www.uhlmann-online.de
Closing the umbrella:
We recommend closing your umbrella in windy and especially gusty conditions before they appear.
The Strongwind umbrella should be closed when wind speeds are expected before these high wind
speeds are reached to prevent damage of people or property. Closing the umbrella at high wind
speeds is not possible!
In windy and especially in gusty conditions the umbrella needs
to be closed! Unsupervised umbrellas must not be opened! Except
strong wind umbrellas within the maximum permissible load limit.
Electrical installation:
Uhlmann umbrellas with electrical equipment
must be connected up to the main supply
by a qualified electrical engineer in accordance
with the installation instructions and local
regulations.
Ground fixing:
The in-ground sleeve and the base plate need
to be installed as described in the installation
instructions enclosed with the goods. The installation must be carried out by a qualified
engineer in accordance with local regulations.
16
Page 17

Handling the umbrella:
• Do not leave the umbrella leaning unsecured against a wall. It could fall down
and cause damage or injury to people or property.
• The umbrella must not be modified or equipped with components other than
those recommended by Uhlmann. The stability and the functionality of the
umbrella could suffer and the warranty expires.
• Only use the umbrella after you have ensured that the umbrella is in perfect tech-
nical condition at all times. Check regularly for possible defects. Ensure that any
defects are rectified by a qualified engineer using original Uhlmann components.
• Prior to opening and closing the umbrella, ensure that any obstructions
are removed.
• Close the umbrella prior to gales, thunderstorms, heavy snowfall, strong rain,
or hail.
• Keep children away from the opening and closing mechanism.
• Avoid any open flame near the umbrella.
• Do not lean any other objects against the umbrella
Contents of shipment:
Top plate ball
(already mounted on
the umbrella)
•
Umbrella packed in foil
Protective cover (optional)
Top plate
•
Crank handle
•
Straight drive winder (optional)
•
Additional components (optional)
•
•
•
17
Page 18

Umbrella Type T, TS, TX, TXS, TLX, TXV, MMA
Location of the in-ground sleeve,
portable stand or base plate:
Carefully select the exact location where you
intend to install the in-ground sleeve, portable
stand or base plate for the umbrella. Ensure
that the erected umbrella will have at least 20
cm clearance in every direction to buildings,
trees, fences, or any other objects.
If you are intending to use an in-ground sleeve
with hinge, ensure that the hinge opens in the
correct direction, i.e. towards an open space, so
that the closed umbrella can be easily inserted.
Portable stand Base plateUpper and in-
ground sleeve
Installing the umbrella:
The portable stand needs to be weighted with
the layers and size of slabs mentioned in the
instruction for this kind of fixing. It is absolutely
necessary to comply with these, otherwise the
stability of the umbrella is reduced and may
harm people or property. The warranty expires!
The safe fixing of the umbrella can be guaranteed with one of the three ground fixings shown
below:
The umbrella is top-heavy. To avoid damage to both the umbrella and property we strongly advise
the installation with at least two or more persons (depending on the type and size of umbrella).
Install the umbrella with 2 or more persons. Do not drop the umbrella!
Do not leave the umbrella leaning on any objects.
Do not pull the umbrella over rough, uneven or sharp edged surfaces!
The umbrella should only be moved by lifting/carrying!
18
Page 19

Installation of the umbrella with the in-ground sleeve/
base plate or portable stand with hinge:
(Step 1)
Loosen both fixing- and clamping screw on
a
the upper sleeve just enough so that the mast
can easily slide in.
b
Remove the sleeve screw that fixes the in ground and upper sleeve together and flip
the upper sleeve around. Place the upper
sleeve on a soft bedding with a positive angle.
c
Carefully insert the umbrella mast horizontal ly into the upper sleeve as far as possible.
Fasten both fixing- and clamping screws
d
hand-tight.
Do NOT cut the foil with a sharp knife or any other pointed object!
You might cause damage to the protective cover and the membrane.
Use the packaging carton as a protective underlay.
d
a
b
c
(Step 2)
Please note that the umbrella must not be
laid down anymore.
e
Remove the foil and the protective cover.
Mount the top plate to the top of the umbrella.
f
Now straighten up the umbrella vertically
g
with at least two other or more persons.
Fix the upper sleeve to the in-ground sleeve
with the sleeve screws. While doing so, the
umbrella needs to be secured by a second
person. The umbrella must never lie on the
top plate when uninstalled.
g
19
Page 20

Umbrella Type T, TS, TX, TXS, TLX, TXV, MMA
Installation of the umbrella with the in-ground sleeve/
base plate or mobile base without hinge:
(Step 1)
• Loosen the fixing- and clamping screw on the
upper sleeve just enough so that the mast can
easily slide in.
• Slide the upper sleeve over the umbrella mast
and tighten the fixing- and clamping screw
hand-tight (Picture a)
• Only after opening and aligning the umbrella
you can fasten the fixing- and clamping screw.
(see next steps)
• Remove the foil and the protective cover.
• Mount the top plate to the top of the umbrella.
Please note that the umbrella must not be
laid down anymore.
packaging carton as
protective underlay
straighten
(Step 2)
• Bring the umbrella to an upright position.
For setting up with a in-ground and upper
sleeve without hinge we recommend 2-3
persons. (Picture b)
Important: Do not lean the umbrella against
any objects!
• Fix the upper sleeve immediately to the
in-ground sleeve with the sleeve screws.
While doing so, the umbrella needs to be
secured by a second person.
Important: The umbrella must never lie
on the top plate when uninstalled!
Picture a
20
straighten
safety shoes
straighten
fix
Picture b
inground sleeve
Page 21

Open the umbrella:
• Remove the securing strap and loosen the
membrane.
• Use the winding handle or the electrical drill
with the optional available straight drive win der at moderate speed to open the umbrella
until all segments of the membrane are tight
and the stop screw which is fixed on the teles
cope docks on the top of the mast. In case you
are using an electrical drill with the optional
• When the umbrella is half open remove the
blue foam parts which were attached to pro tect during transportation.
Aligning the umbrella:
available straight drive winder, do not use the
“Drill” position. Use the torque limiter of the
drill to prevent damage.
• When opening and closing the umbrella the
last 3-4 rotations should be operated manual
with the winding handle (this is when the stop
screw on the telescope approaches the top of
the umbrella mast).
(Picture c)
• Align the umbrella with a spirit level or with
vertical lines of the surroundings (e.g.buil dings, lamp posts, etc.). Turn the umbrella
within the upper sleeve till you have reached
the desired position (the fixing and clamping
screw need to be loose to do so).
• Once aligned, the clamping- and fixing
screw must be tightened.
Drill force: clamping screw 40-50 N m and
fixing screw approx. 10 N m
Only install the umbrella with no or low wind forces!
Never leave the umbrella with loose fixing or clamp screw.
Picture c
21
Page 22

Umbrella Type Typ T, TS, TX, TXS, TLX, TXV, MMA
Closing the umbrella:
(Picture d)
• If your umbrella is equipped with electrics,
ensure that the power supply is turned
off and the infrared heaters have cooled down
completely.
• Fully close the umbrella with the winding
handle provided or with an electric drill using
the optional available straight drive winder.
• Pull out the membrane fabric between the
arms of the closed umbrella completely,
1 2 3 4
• If the umbrella is not to be used for some
time, we recommend using a protective cover
(optional available). Please ensure that the
membrane is absolutely dry before fitting
the protective cover, to avoid the formation
and wrap it around the umbrella (picture f).
Then use the securing strap to secure the
membrane against fluttering.
• The membrane needs to be secured with the
securing strap against fluttering.
Please note that if the membrane is not secu red properly it can reduce the longevity of the
membrane or even cause damages such as
holes or flutter damages.
(Picture d)
of mould.
• For storage during winter, we recommend
a dry place. If the umbrella is to be left
installed when not used, a protective cover
must be used so the umbrella stays dry.
22
In windy and especially in gusty conditions, the
umbrella needs to be closed immediately!
Unsupervised umbrellas must not be opened!
Except strong wind umbrellas within the maximum
permissible load limit.
To avoid the formation of mould the umbrella needs
to be completely dry before the securing strap and
the protective cover are fitted!
Page 23

Optional equipment:
Side sheets and rain gutters:
• For the installation of side sheets and rain
gutters, the endpieces of umbrellas with
valances need to be equipped with threaded
inserts. In principle umbrellas with valances
are recommended for this purpose, in order
to create an ideal transition. Umbrellas wi thout valances need to be equipped with gut-
ter/side sheet holders, which are pushed over
the arms.
• For the correct installation of side sheets and
gutters, please follow the installation instruc tions for them.
• Side Sheets and gutters need to be removed
prior to closing the umbrella.
Heater instructions:
• Before you fold down the heaters, please ensure that they are switched off and completely cooled
down. Please follow the steps below to fold the heaters (to unfold them, follow the steps in the
opposite sequence):
Step 1
Slightly lift
heater arm.
Pull the heater arm of the
lock and out to the top
Step 2
Step 3 Step 4
Fold the heater arm down
and shift the heater.
Risk of burns! Please ensure that the heaters are switched off
and completely cooled down before the heater arm is put down!
Carefully put the heater arm
completely down (please
check that the protection ring
around the mast is placed
correctly to avoid damage to
the heaters and mast.
23
Page 24

Wir bedanken uns für das entgegengebrachte Vertrauen
und wünschen Ihnen viel Freude mit unseren Produkten.
We would like to thank you for your trust in us
and wish you many years of joy with our products.
Ihr Uhlmann Sonnenschirme Team
The Team of Uhlmann Giant Umbrellas
Uhlmann Sonnenschirme e.K.
Langer Rain 3-5
D-88524 Uttenweiler-Dentingen
Tel.: +49 (0) 73 74 - 920 57 0
Fax: +49 (0) 73 74 - 920 57 50
info@uhlmann-online.de
www.uhlmann-sonnenschirme.de
Änderungen im Zuge der Weiterentwicklung vorbehalten · Keine Haftung bei Druckfehlern · © 1.0/2018 by Uhlmann Sonnenschirme e.K.
Changes in the course of further developments reserved. No liability for print errors. © 1.0/2018 by Uhlmann Sonnenschirme e.K.
 Loading...