

u-he Bazille User Manual

bazille
Modular PD & FM Synthesizer
user guide
version 1.1
u-he • Heckmann Audio GmbH • BERLIN

date 21/09/2017
Introduction 4
..............................................................................Installation 4
.............................................................................Resources 5
...................................................................................History 5
Synth Overview 6
...................................................................GUI Components 7
........................................................................Context Menu 8
....................................................................MIDI Specialities 9
...................................................................The Control Bar 10
......................................................................Multicore / HQ 11
........................................................................Oscilloscope 11
Patch Browser 12
Oscillators 14
.....................................................................................Pitch 15
..........................................................................Phase / FM 16
..................................................................Phase Distortion 17
..............................................................Fractal Resonance 18
................................................................................Outputs 18
LFOs 19
Filters 21
Envelopes 23
Outputs 24
Processors 25
MIDI & More 26
...................................................................................Noise 26
..........................................................MIDI Control Sources 26
.....................................................Internal Control Sources 27
............................................................................CV Inputs 27
Multiplex 28
Modulation Sequencer 30
.....................................................Divide, Time and Trigger 30
........................................................Snapshot Dial / Rotate 31
.................................................................Snapshot Values 32
...................................................How to Trigger Envelopes 33
!

Tweak s 34
.............................................................................Overview 34
....................................................................................Voice 35
.....................................................................................Pitch 36
....................................................................................Glide 36
..............................................................Stack Voice Tuning 37
..........................................................................Microtuning 37
...........................................................Mapping Generators 38
..................................................................Envelope Extras 40
......................................................................Filters 3 and 4 41
................................................................Ramp Generators 41
Effects 42
...........................................................................FX Control 42
.............................................................................Distortion 42
.................................................................................Phaser 44
...................................................................................Delay 45
......................................................................Spring Reverb 46
Configuration 47
...........................................................................MIDI Learn 47
...........................................................................MIDI Table 48
.........................................................................Preferences 49
Tips & Tricks 51
........................................................................General Tips 51
...................................................................Oscillator Tricks 52
...........................................................................LFO Tricks 54
..........................................................................Filter Tricks 54
....................................................................Stacking Tricks 55
....................................................................Mapping Tricks 55
..................................................................Processor Tricks 56
....................................................................Multiplex Tricks 57
.................................................................Sequencer Tricks 57
...............................................................More Experiments 58
Glossary 59
!
INTRODUCTION
Introduction
To follow this user guide, it helps if you already know a thing or two about patching modular synths,
as well as FM and PD (phase distortion) synthesis. If you have any questions the ‘interwebs’ can’t
answer, please feel free to post a message in our user forum at KVR!
Installation
Go to the Bazille product page at u-he.com, download the appropriate installer (for Mac OSX or
Windows) and unzip the compressed file. Open the Bazille folder and start the installer app.
The only demo restriction is a crackling that occurs at irregular intervals after about two minutes of
use – the demo is otherwise fully functional. The crackles disappear after you have entered a serial
number. For more information, please refer to the ReadMe file included with the installer.
About CPU usage
Bazille is rather demanding. Monophonic presets without voice stacking should be no problem,
even on older computers. If your computer is fairly new, use the Multicore option (which distributes
voices evenly between the CPU cores) as well as the HQ (higher quality) option.
About the oscillators
Due to inherent limitations of the synthesis technology used, Bazille’s oscillators are more prone to
aliasing than oscillators in our other synths (e.g. Diva). Such artifacts are less noticeable than in
the original hardware, however, and we believe that the compromise between CPU usage and
aliasing is close to optimum.
TOC INTR PATCH OSC LFO FILT ENV PROC MIDI+ MULT SEQ TWEAK--MAP EFFX CONF TRIX GLOS! 4

INTRODUCTION
Resources
File locations (default)
Mac
Patches MacHD/Library/Audio/Presets/u-he/Bazille/
Preferences ~/Library/Application Support/u-he/com.u-he.Bazille... (*.* files)
Windows
Patches ...\VstPlugins\Bazille.data\Presets\Bazille\
Preferences ...\VstPlugins\Bazille.data\Support\ (*.txt files)
Note: Patch folder or file locations can be opened in system windows by right-clicking in Bazille’s
browser and selecting ‘reveal in Explorer’ (PC) or ‘reveal in Finder’ (Mac) from the context menu.
u-he online
For downloads, news articles and support, go to the u-he website
•
For lively discussions about u-he products, go to the u-he forum
•
For friendship and informal news updates, go to our facebook page
•
For u-he presets (payware and free), go to u-he patch library
•
For video tutorials and more, go to our youtube channel
•
u-he team 2016
Urs Heckmann (code, strategy, discipline)
•
Sascha Eversmeier (code, tenacity)
•
Howard Scarr (HS presets, manuals, grump)
•
Rob Clifton-Harvey (databases, support)
•
Sebastian Greger (GUI design, 3D vision)
•
Jan Storm (more code, framework)
•
Michael Pettit (video, marketing)
•
Viktor Weimer (support, TUC presets)
•
Thomas Binek (QA, TAS presets)
•
Alexandre Bique (all things Linux)
•
William Rodewald (even more code)
•
Oddvar Manlig (everything else!)
•
u-he special thanks
Clemens Heppner, Thomas Helzle and Fritz Hildebrandt for help during early development
•
Everyone who contributed presets, Brian Rzycki for maintaining PatchLib
•
History
[ shortened musings about Berlin Modular and Bazille – Urs Heckmann, 2013 ]
Several years ago I started working on a new synth – a virtual modular system, much like the first
synth I ever played in 1986: a hilariously out of tune Roland System 100M. I loved that thing! It
belonged to my school, and I spent many long hours patching it up...
I always kept the idea of a software modular system in the back of my mind. Recently, some other
ideas nicely aligned with that concept, and the ‘Berlin Modular’ project experienced a massive
boost. Of course the name ‘Berlin Modular’ is reminiscent of the ‘Berlin School’ of electronic music,
the bands and artists I listened to when I was a teenager. Those guys inspired me to make
electronic music my hobby, which ultimately inspired me to develop synthesizers.
A couple of years ago I demonstrated a prototype of what I thought would become the very first
‘rack’ within Berlin Modular. I called it ‘Bazille’, which is German for bacterium and should be
pronounced something like ‘Batzilla’. Bazille turned out to be quite a monster! It combines FM and
Phase Distortion synthesis with the flexibility that only modular patching can provide.
TOC INTR PATCH OSC LFO FILT ENV PROC MIDI+ MULT SEQ TWEAK--MAP EFFX CONF TRIX GLOS! 5
SYNTH OVERVIEW
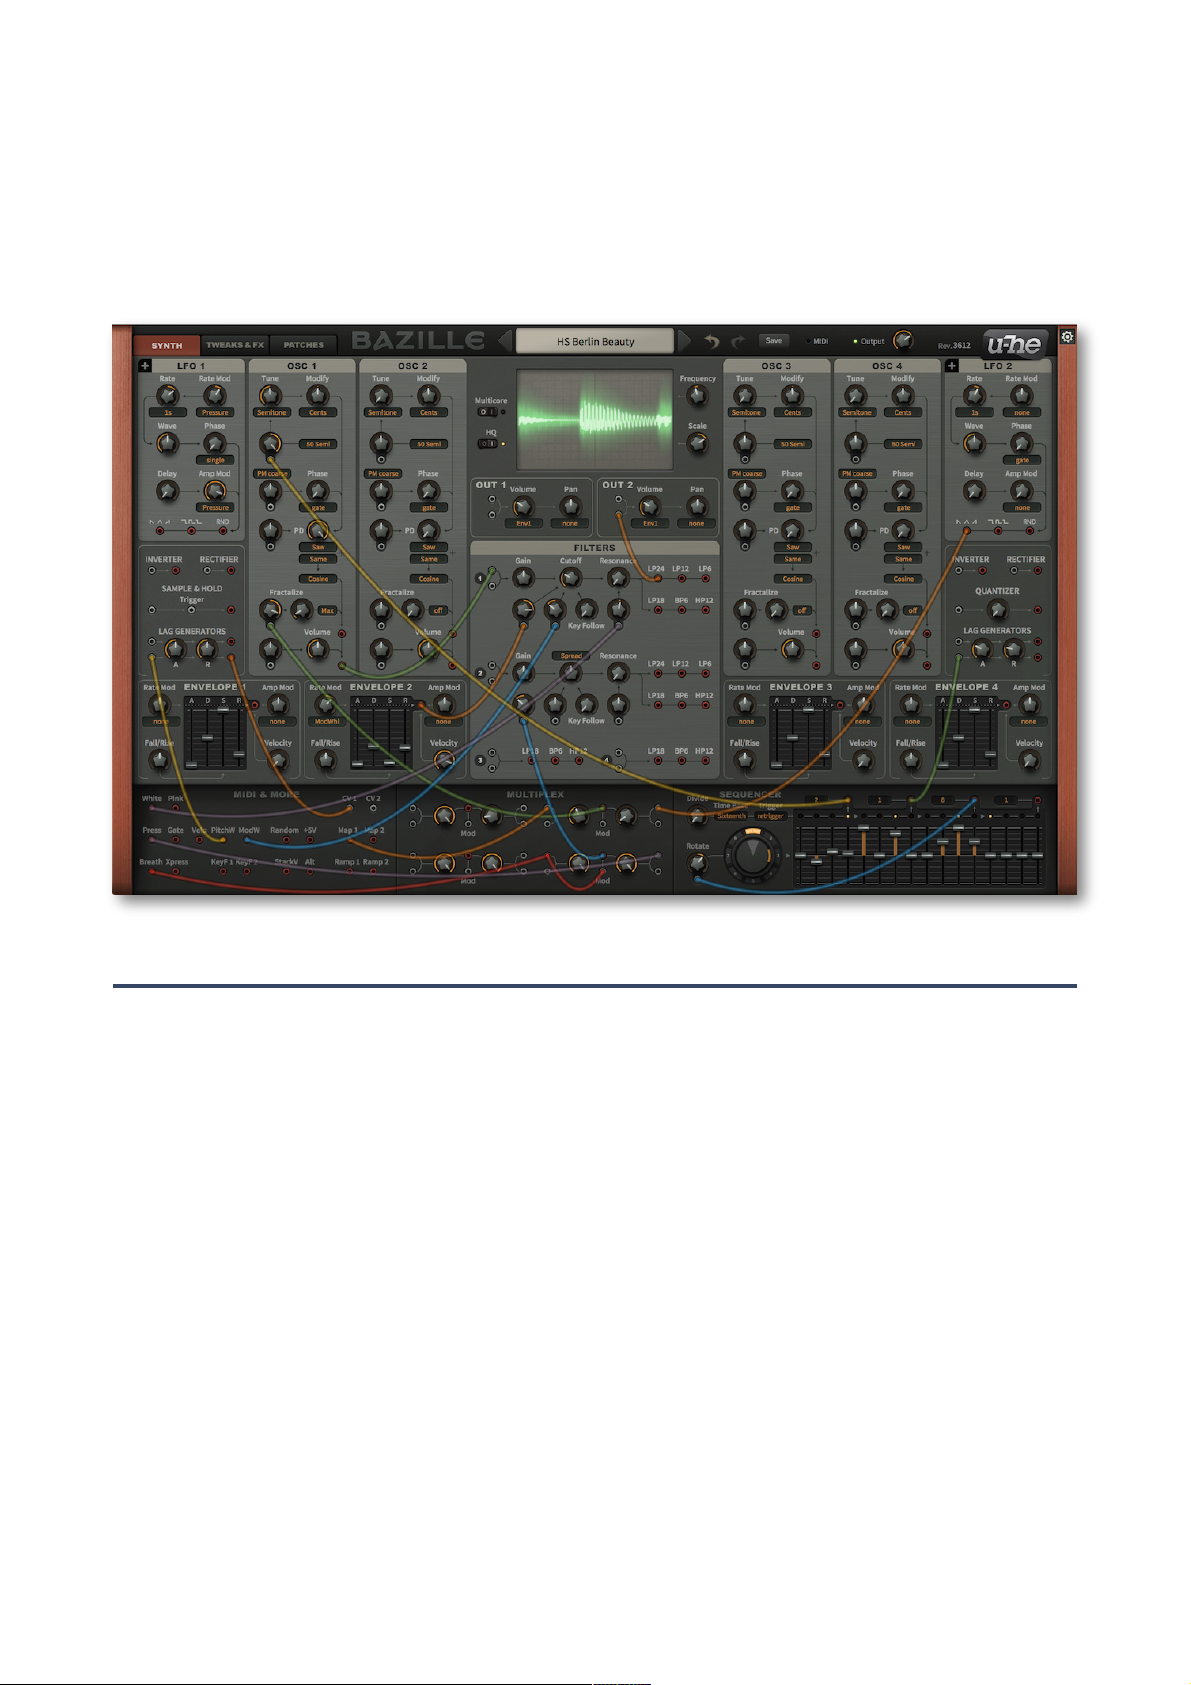
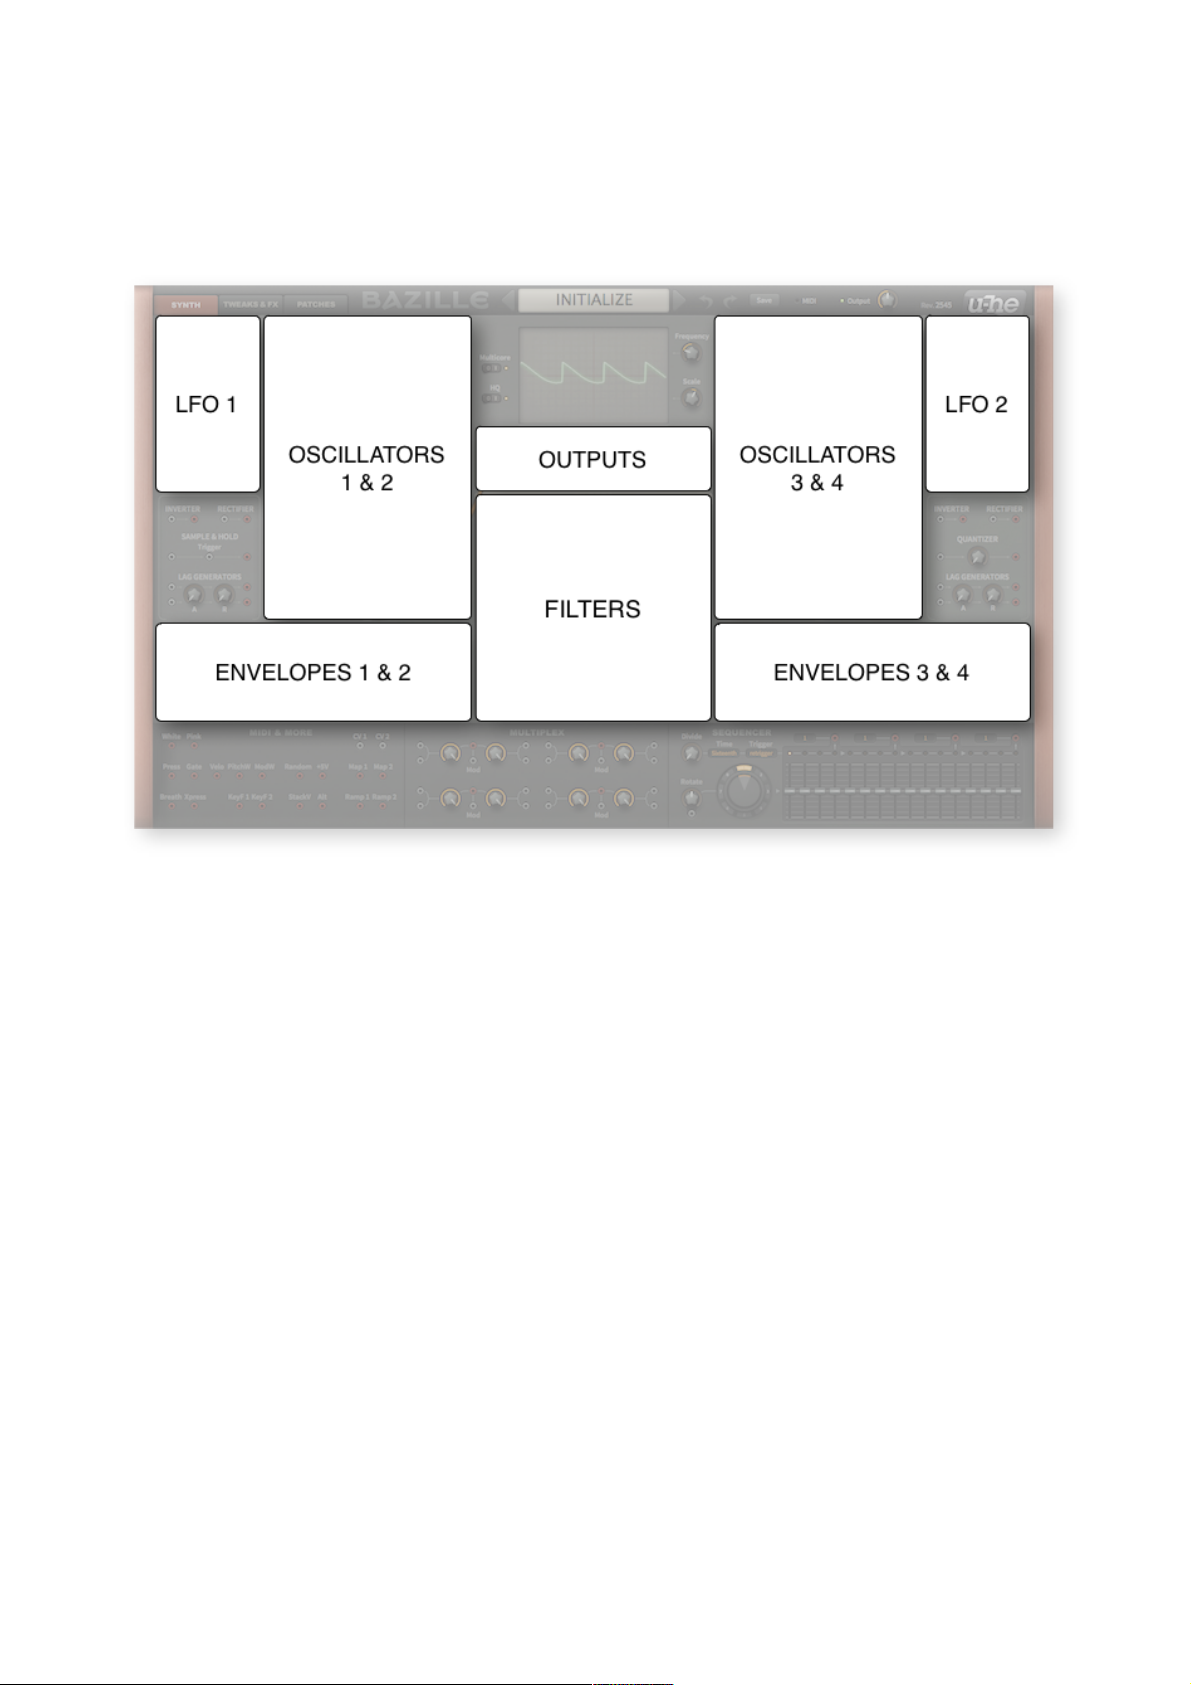
Synth Overview
Click on the SYNTH tab at the top left. This arrangement of modules was designed to minimize the
lengths of patch cords required for two independent layers of 2 oscillators → filter → output:
Basic synthesis modules in the SYNTH window
Please take a few moments to familiarize yourself with the positions of each module...
The upper central area is dominated by the Oscilloscope, above which is the Data Display and
below which are the Output and main Filter panels.
Either side of the oscilloscope are four audio Oscillators, flanked by the two LFOs (low frequency
oscillators). Beneath each LFO is an unlabeled panel containing a selection of signal Processors:
1 x sample & hold (left panel only)
•
1 x quantizer (right panel only)
•
4 x lag processors (in pairs, with shared attack and release times)
•
2 x inverters, 2 x rectifiers
•
Below the oscillators and processors are the four Envelope Generators.
At the bottom left is a panel called MIDI & MORE containing several modulation sources (wheels,
key velocity etc.) plus two noise outputs. There is also a pair of CV (‘control voltage’) inputs –
anything you connect to a CV socket can modulate the LFOs, envelopes, mapping generators and
extra filters: Although most of the patching is achieved with virtual cables, some parameters have a
fixed set of modulation sources available in drop-down menus. See Selectors on the next page.
The MULTIPLEX panel In the centre of the lower area contains four identical ‘multiplex’ units.
Unlike the simple ‘multiples’ found in analogue modular systems, they can be used as mixers, ring
modulators (RM), amplitude modulators (AM) and much more. Owners of Bazille’s little cousin ACE
should be in familiar territory here.
At the bottom right is the mighty MODULATION SEQUENCER with which you can morph or step
through up to 8 snapshots of 16 steps each (splittable however you like via the 4 taps).
TOC INTR PATCH OSC LFO FILT ENV PROC MIDI+ MULT SEQ TWEAK--MAP EFFX CONF TRIX GLOS! 6
SYNTH OVERVIEW
GUI Components
This section is an introduction to the basic components of Bazille’s GUI.
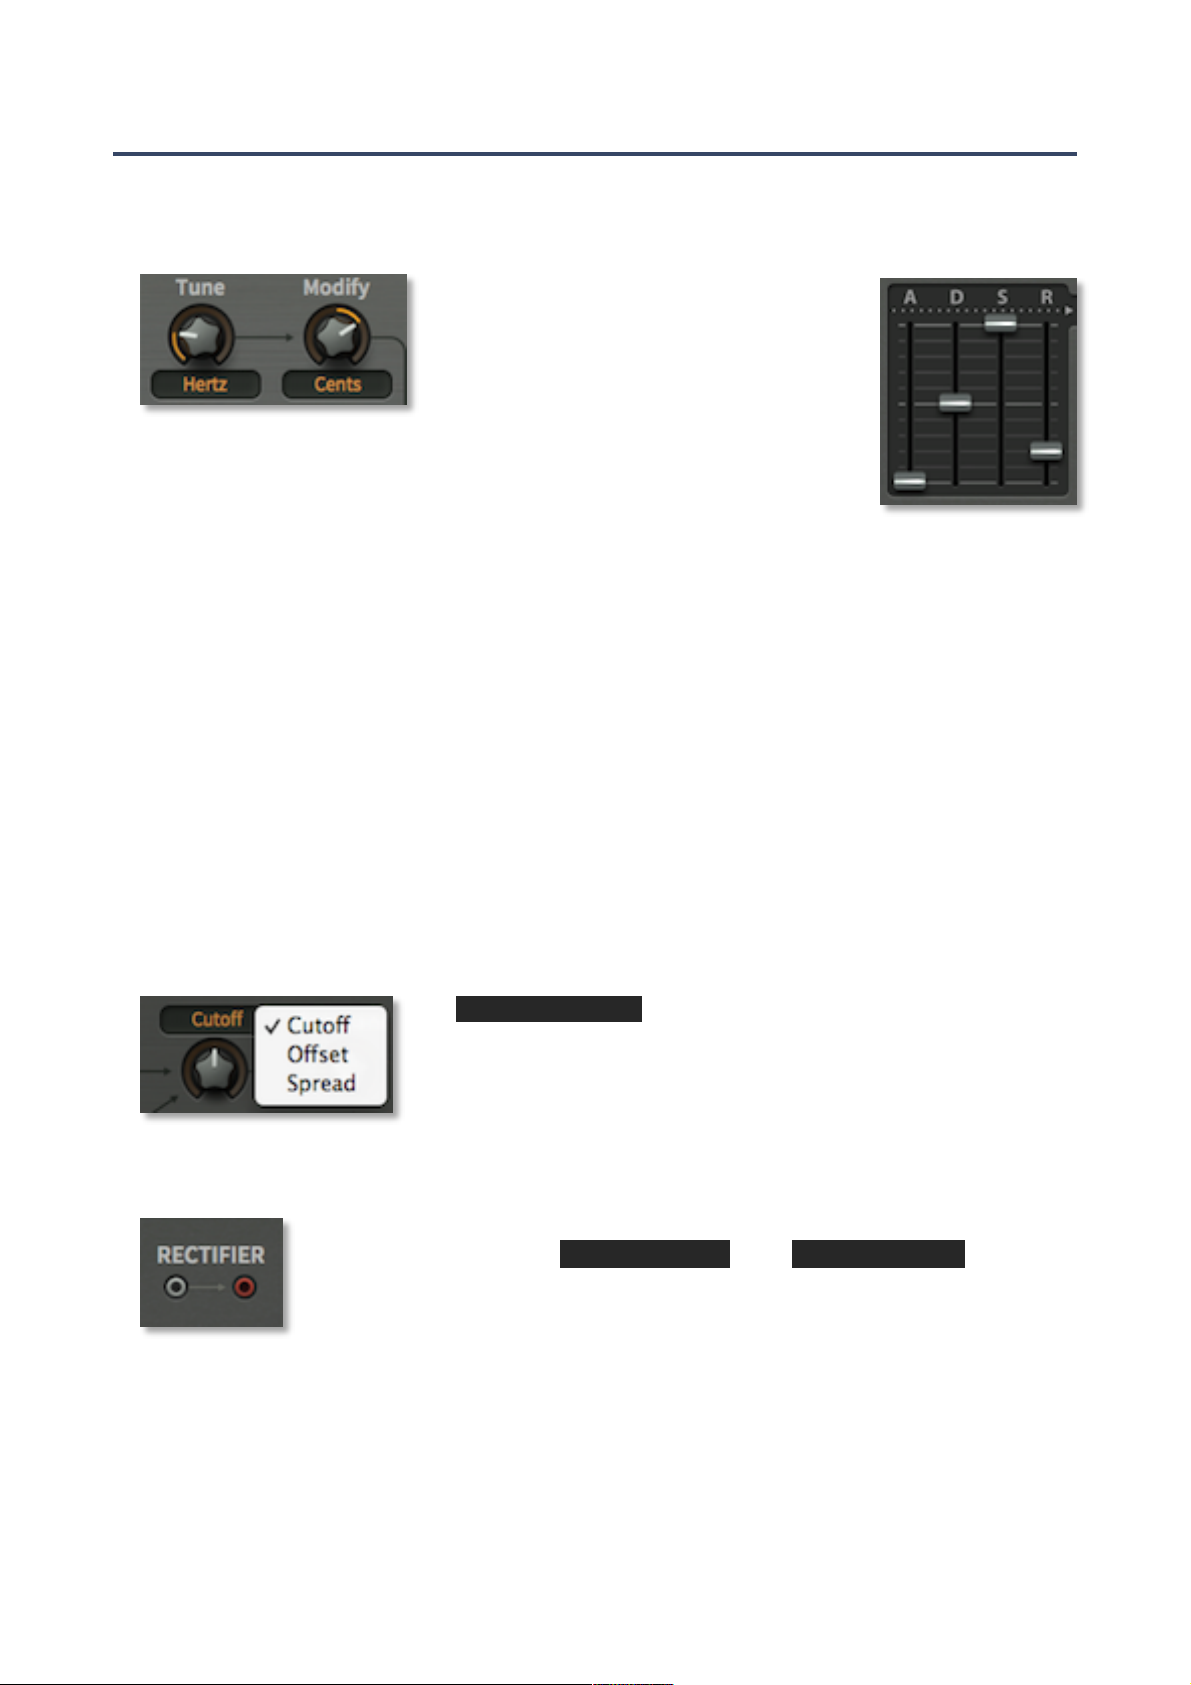
Knobs and sliders
There are two types of controls: unipolar and
bipolar. Unipolar knobs and sliders only allow
positive values, while the bipolar knobs and
sliders allow negative values, often within a
range of -100 to +100.
The image above shows the two oscillator tuning controls – you should be
able to recognize that the Tune knob is unipolar, while the Modify knob is
bipolar. Note: envelope sliders are unipolar, sequencer sliders are bipolar.
All knobs and sliders allow the following:
Coarse control: Click+hold with the left mouse button, then drag up or down.
•
Fine control: For 0.01 steps, hold down one of the SHIFT keys beforehand.
•
Mouse wheel: If your mouse has a scroll wheel, you can hover over the knob/slider and roll
•
the wheel. For finer control, hold down a SHIFT key. If your mouse wheel has ‘clicks’ i.e. is
rastered, right-click on any knob and activate the MouseWheel is rastered option.
Reset to default value: Double-clicking a knob reverts to a useful default value, often zero.
•
MidiLearn: Right-click any control and select MidiLearn from the context menu. Moving any
•
knob/slider on a connected hardware MIDI controller will create a ‘link’, after which you can
remote control that parameter. To remove the link again, right-click and select MidiUnLearn.
Note: Accidental MidiLearn is the number one reason for false bug reports at u-he. If values are
being reset for no apparent reason, try MidiUnLearn before contacting us - thanks!
Selectors
orange-on-black
The
some of them also serve as labels for the accompanying knob.
Click on a selector to open the list, or roll your mouse wheel to scroll
through the options.
text fields contain a list of options. Note that
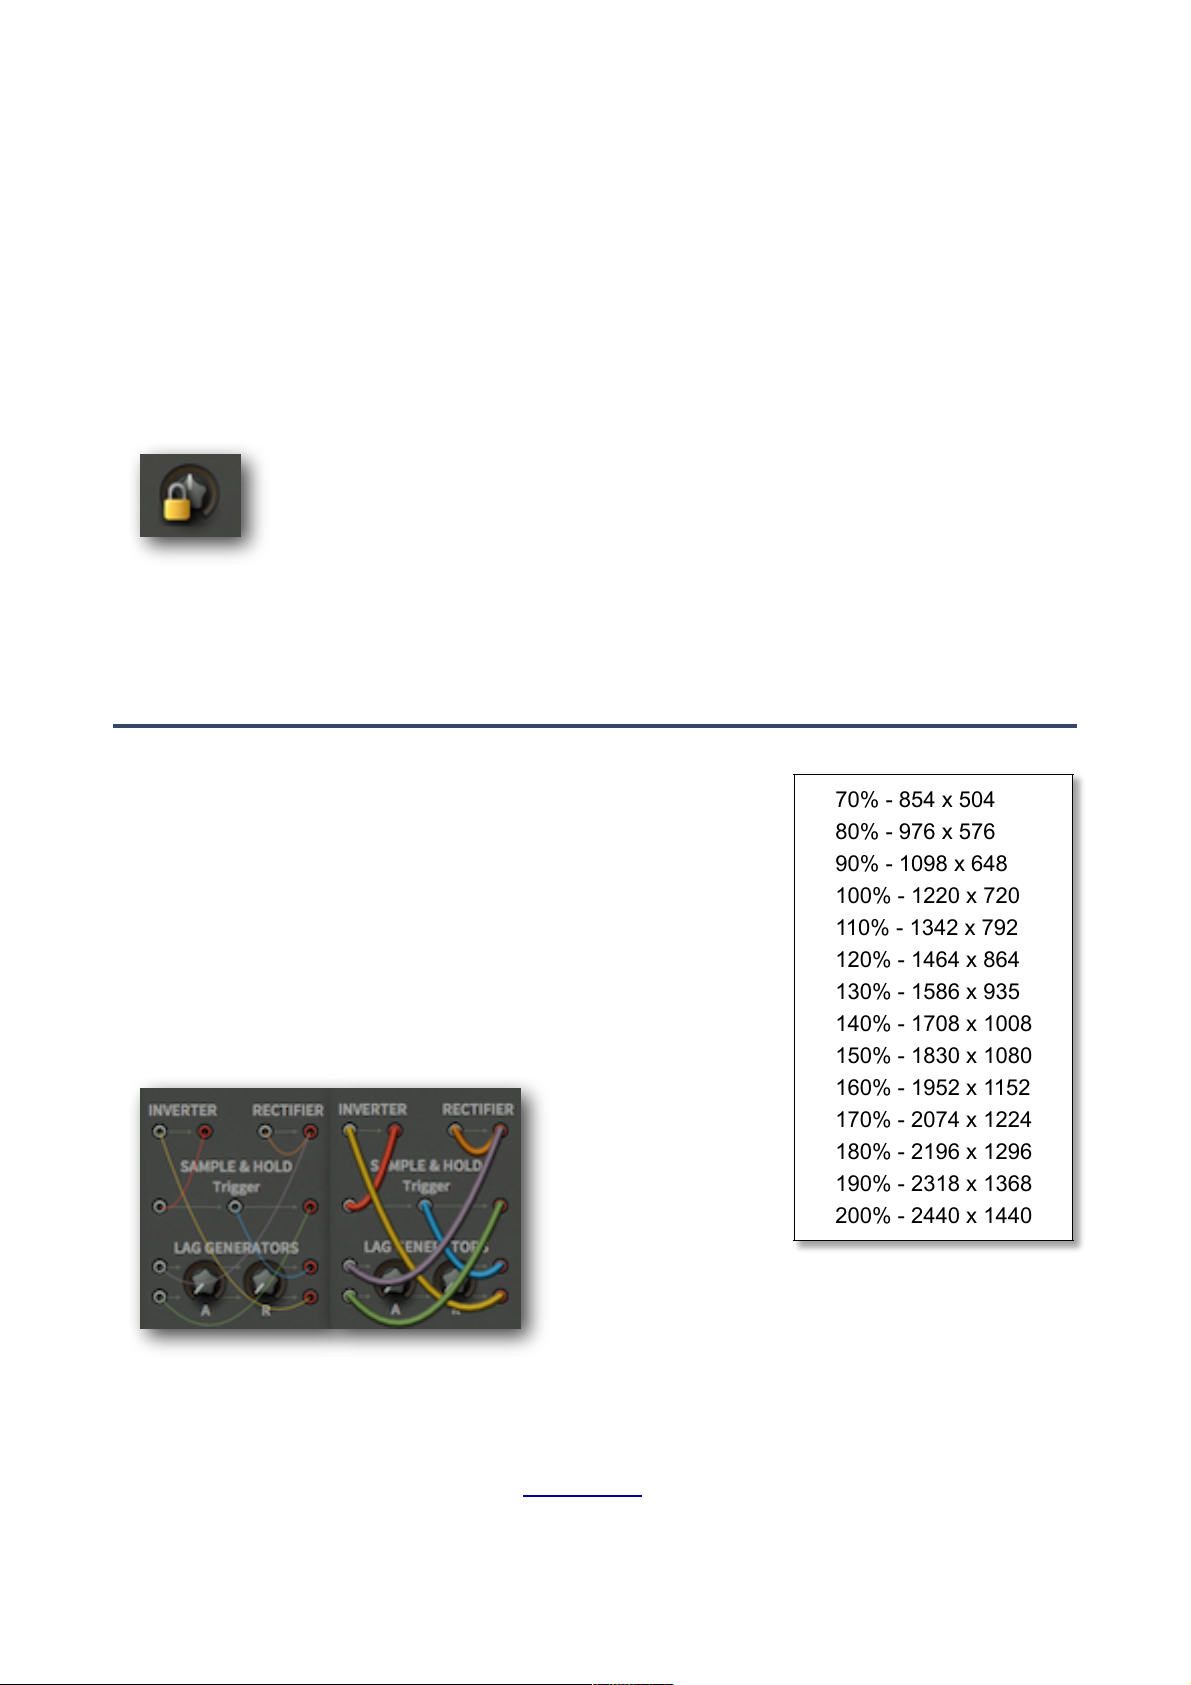
Sockets and cables
Bazille’s modules are connected together (‘patched’) using virtual cables. The
sockets are colour-coded:
To make a connection, drag and drop between output and input sockets (either
direction should work). Outputs will happily accommodate several cables, while
inputs will accept just one – the previous connection is simply replaced.
inputs are grey
while
outputs are red
.
As a rule, you can’t connect two inputs together, but there’s actually one exception: Dragging a
cable from an unused input to another that‘s already in use creates a ‘daisy-chain’. The source
will be patched to both inputs. Try it!
TOC INTR PATCH OSC LFO FILT ENV PROC MIDI+ MULT SEQ TWEAK--MAP EFFX CONF TRIX GLOS! 7
SYNTH OVERVIEW
70% - 854 x 504
80% - 976 x 576
90% - 1098 x 648
100% - 1220 x 720
110% - 1342 x 792
120% - 1464 x 864
130% - 1586 x 935
140% - 1708 x 1008
150% - 1830 x 1080
160% - 1952 x 1152
170% - 2074 x 1224
180% - 2196 x 1296
190% - 2318 x 1368
200% - 2440 x 1440
Here’s what you can do by clicking on active sockets:
move inputs – drag+drop the input end to a different input socket.
•
duplicate cables – shift+drag the input end to create another cable from the same output.
•
move outputs – right-click on the output end, drag+drop onto a different output.
•
remove cables – either double-click the input end, or drag+drop away from the socket.
•
change cable colour – click on the input end of the cable until it appears in the desired
•
colour. If you double-click by mistake (removes the cable), use the UNDO function.
Parameter locking
Right-clicking on any knob, slider or selector lets you Lock the parameter. You can
still adjust the value, but it won’t change when you switch presets. To unlock again,
right-click and untick ‘Locked’.
While the current implementation of parameter locking is useful for retaining e.g. Microtuning or
Fine tuning while changing presets, it is less suitable e.g. for sequencer values, as locking these
individually (currently the only option) means working with up to 8 x 16 = 128 locks!
Context Menu
GUI size
Right-click anywhere in the background to open the user
interface size options, which are shown in percentages and
pixels (width x height). Temporarily switching the size to larger
than your screen can be useful e.g. if you need the best
possible precision while editing the Mapping Generators.
Note that the setting here is temporary. To set the default i.e.
permanent GUI size, see Preferences.
Wires
Tastes in virtual cables can differ, so…
hair + ghosted natural + solid
Style: Choose between the thick, slim, line, hair and natural options.
Opacity: Each style comes in solid, see-thru, x-ray and ghosted variations.
These options are also available in the Preferences page.
TOC INTR PATCH OSC LFO FILT ENV PROC MIDI+ MULT SEQ TWEAK--MAP EFFX CONF TRIX GLOS! 8

SYNTH OVERVIEW
MIDI Specialities
The following features are fairly ‘niche’…
Multichannel MIDI
This feature supports a growing class of expressive ‘performance’ instruments (e.g. Haken
Continuum, Eigenharp, Roli Seaboard, Linnstrument) that can send each note via a separate
MIDI channel. For Bazille to respond correctly, your host application must be able to route
multiple MIDI channels to a single instance of a plug-in. Each voice/note will then react
individually to the following performance controls:
Pitch bend, Channel Pressure (aftertouch), Modulation (MIDI CC #01), Breath control (MIDI
CC #02), Expression pedal (MIDI CC #11)
The voice modes Poly, Mono and Legato become practically identical while multichannel MIDI
is being received. In each case, Bazille behaves like several (up to 16) mono synths set to the
same sound. The Max. Voices setting in the TWEAKS / VOICE panel still applies as voices can
be ‘stolen’ across multiple channels. Note that the Duo voice mode is not channel-aware i.e. the
MIDI channels are merged.
‘Single trigger’ type modulation sources listen to the channel used by the first played voice.
(Caveat: Implementing single triggers in a multichannel context is quite tricky – we might have
to spend some time working out how to improve this feature!)
Poly pressure (polyphonic aftertouch)
As well as the more common channel aftertouch, Bazille recognizes and reacts appropriately to
polyphonic aftertouch – each note (e.g. within a chord) will receive separate aftertouch data.
TOC INTR PATCH OSC LFO FILT ENV PROC MIDI+ MULT SEQ TWEAK--MAP EFFX CONF TRIX GLOS! 9
visit u-he.com
user guide
support forum
u-he on Twitter
u-he on Facebook
u-he on YouTube
SYNTH OVERVIEW
The Control Bar
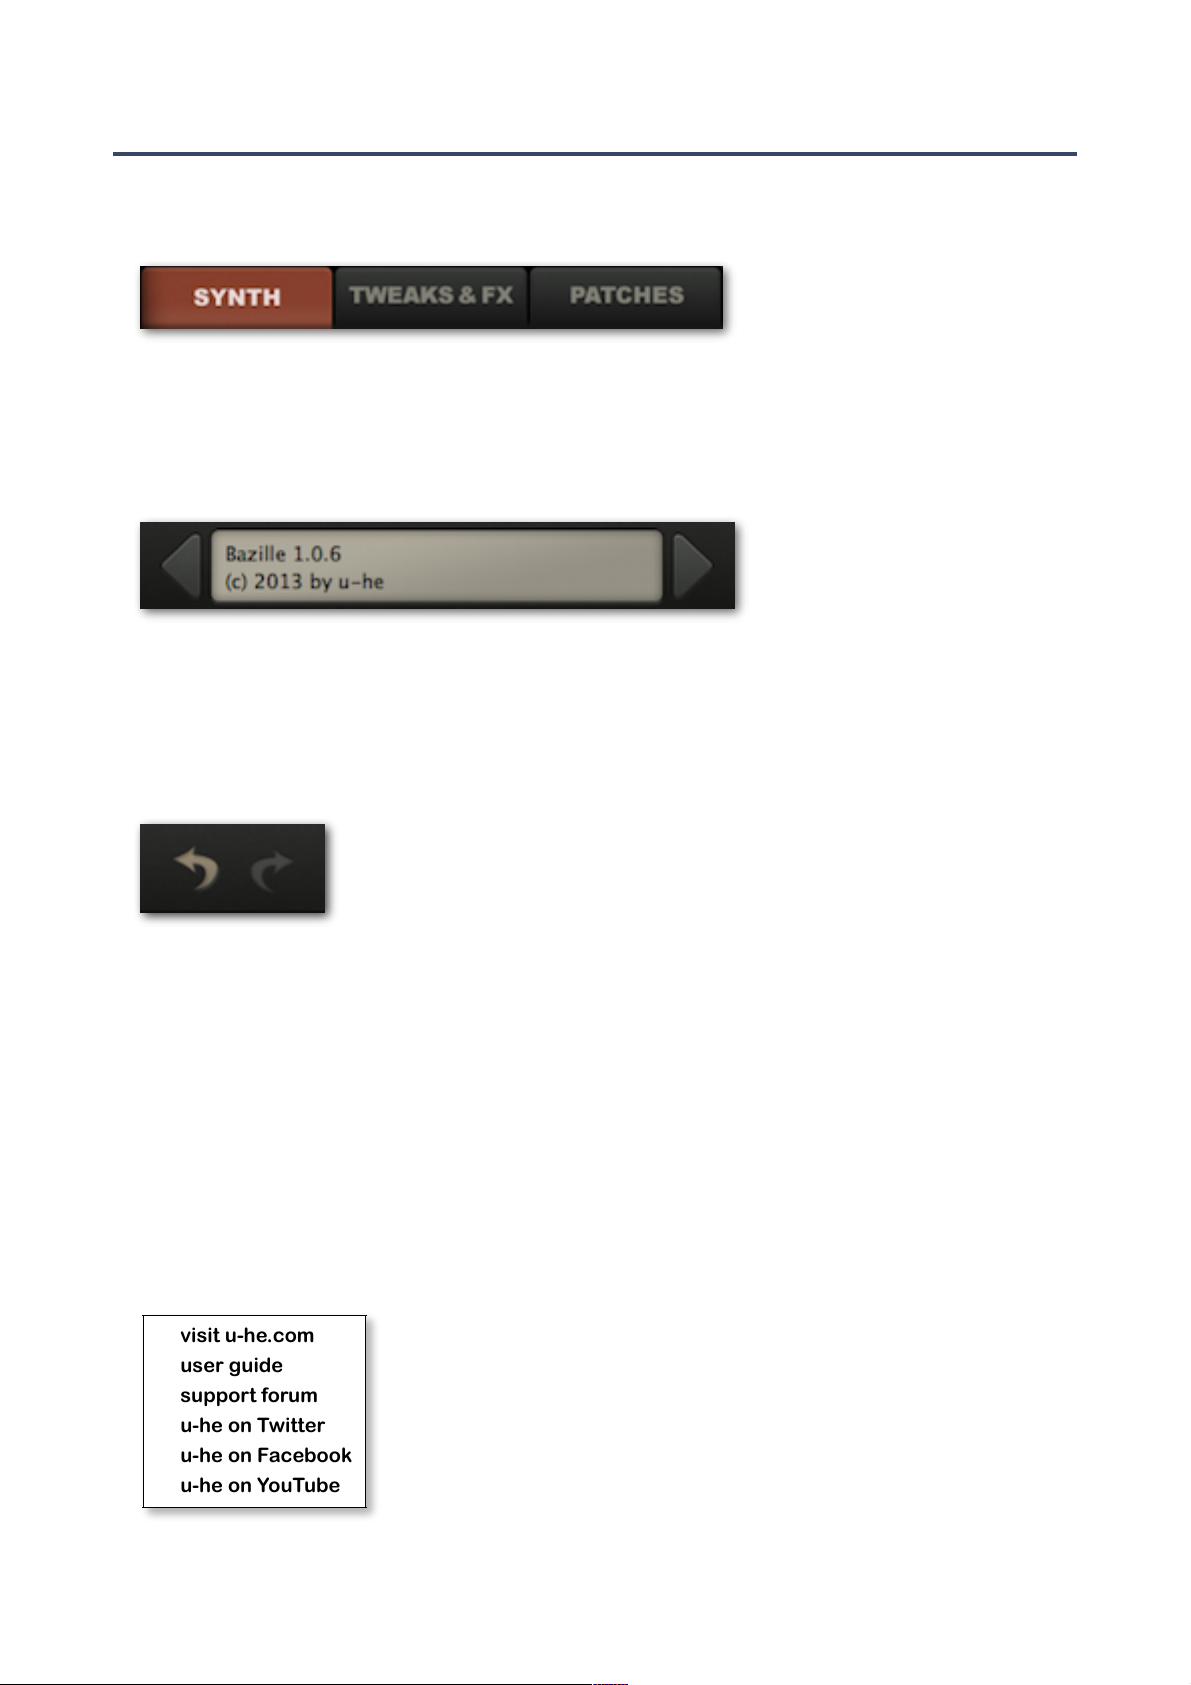
Along the top is a bar containing page switches, the data display plus a few global elements:
Page switches
To the left are three large buttons which select one of the following pages:
....................SYNTH patching, access to all the most commonly used panels and parameters
........TWEAKS & FX filters 3 and 4, maps, extra envelope settings, global settings, effects...
................PATCHES the preset browser / librarian
Data display
The data display has several duties: First, it shows the name of the current patch. Second,
clicking on the triangles to the left and right steps through patches, and clicking on the patch
name itself lets you select from all patches in the current directory.
Third, while you are editing your patch, it displays the parameter name and its value. After about
two seconds, it reverts to showing the patch name again.
Undo / redo
To the right is a pair of buttons for Bazille’s undo and redo functions.The
number of steps in the buffer is limited, but you can undo a change of
preset and recall edits made to the previous one!
Save
See Save in the section about the preset browser (two pages down).
MIDI
To the left of this label is an indicator which flashes whenever MIDI data is received.
Output
The main volume control and signal / overload indicator (glows red if you overload the output).
The u-he badge
Clicking on the u-he badge at the top right opens a popup menu containing direct links to this
user guide, to our homepage, to our support forum, and to various social networks:
TOC INTR PATCH OSC LFO FILT ENV PROC MIDI+ MULT SEQ TWEAK--MAP EFFX CONF TRIX GLOS! 10

SYNTH OVERVIEW
Multicore / HQ
To the left of the oscilloscope are two switches:
Multicore causes voices to be distributed across multiple CPU cores, which usually allows more
voices to be played simultaneously. This works well on recent processors such as the Intel i5 and
i7, but please note that performance can even be reduced if your CPU is older. Note: Some hosts
already offer multicore support, and this can lead to poorer performance for Bazille. In such cases,
please switch one of them off (either Bazille’s or the host's multicore option).
HQ switches various algorithms to higher quality versions, at the expense of more CPU power. The
two options as they appear in the data display are ‘Good’ and ‘High’!
Note: There’s no particular reason why these two elements were put inside the oscilloscope panel
except that there wasn’t enough room in the control bar where they (arguably) belong.
The Multicore and HQ switches are in the oscilloscope panel
Oscilloscope
Oscilloscopes were always very useful tools for synthesizer sound design, and that’s a good
enough reason to include one in Bazille. You can check and adjust waveforms, monitor the effects
of audio-rate modulation or filtering, view envelope shapes etcetera. Or just watch it purely for the
entertainment value.
The oscilloscope shows a mono sum of the output, pre-effects. The trigger is synchronized to MIDI
notes as well as to zero-crossings, and is also updated whenever a longer scan finishes.
As synchronization is automatic, Bazille’s oscilloscope needs very few controls: The Frequency
knob adjusts horizontal resolution, and Scale adjusts vertical resolution.
Note: Perfect synchronization is not always possible, try playing a different note.
eco, fast, glow, fire, wind
Right-clicking in the oscilloscope window lets you switch
the style: glow, fire and wind add different fade-out effects
at the cost of extra CPU. These modes are also a bit more
sluggish than eco or fast.
Tip: If you want to minimize CPU-usage, choose the eco
(economical) option. The selection here is temporary – to
make it permanent, set a default in the Preferences page.
TOC INTR PATCH OSC LFO FILT ENV PROC MIDI+ MULT SEQ TWEAK--MAP EFFX CONF TRIX GLOS! 11
PATCH BROWSER
Patch Browser
Bazille presets are called patches, a term borrowed by the modular synthesizer world from the
19th century telephone exchange. Phone calls were manually connected (patched) using large
socket matrices disconcertingly called switchboards.
Caution: As the effects in Bazille can contribute considerably to the volume of a patch, it is always
a good idea to let the sound of one patch fade out before loading another.
Load
To browse through the available patches in Bazille, click on the PATCHES tab at the top left of
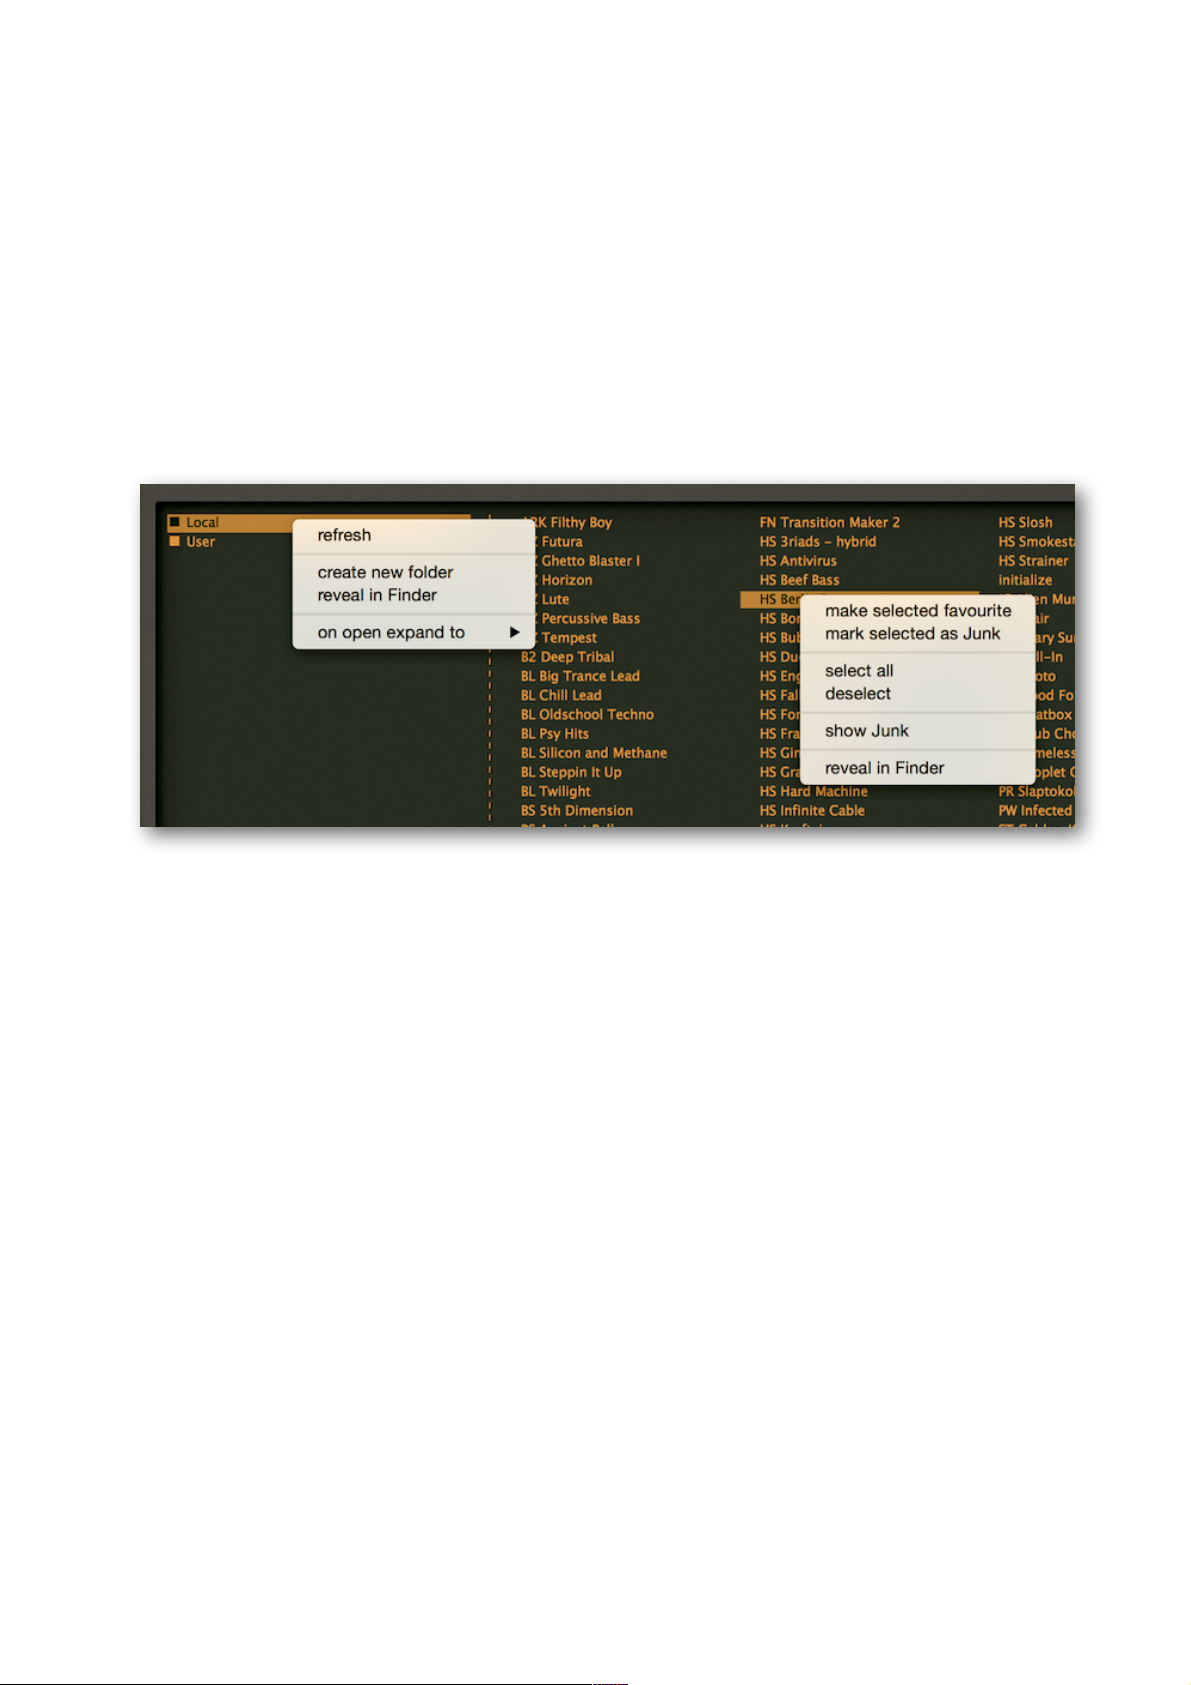
Bazille’s window. Most of the GUI is replaced by a simple set of panes...
the folders and files areas, showing both context menus (via right-click)
Folders are listed in the left pane, with patches immediately to the right. If Local is closed (as in
the above image), click on it to open the list of folders and patches. After having loaded a patch
by clicking on one of the names, you can use your computer’s cursor keys to step through the
others. Note: The User folder pictured above is only available in Mac OSX.
You can also step through patches directly from the SYNTH or TWEAKS & FX pages by clicking
on the triangles either side of the data display. Alternatively, you can load any patch from the
current folder by clicking on the data display.
The factory presets
The root folder of the browser only displays a small selection of presets from the categories
(sub-folders of Local). If you can’t see the FX, Basses, Leads, Keys, Pads etc., click on the
small square to the left of Local.
Below the ten main categories is a folder called COMPETITION PRESETS. This contains all
patches entered into three competitions we organized over a few months before release – plus
a few sounds kindly donated by beta testers. COMPETITION PRESETS is a treasure-trove of
extra sounds, including a few true gems!
The final folder in Local is called TIPS & TRICKS. The patches in the subfolders are not meant
to sound great, they are just examples of tricks mentioned in the final chapter of this user guide.
Tip: If there’s a preset called default in the local root, it will be loaded instead of the regular
demo sound. Try this: Get --INIT-- from the root folder (Local), save immediately under the
name ‘default’ and start a new instance of Bazille.
TOC INTR PATCH OSC LFO FILT ENV PROC MIDI+ MULT SEQ TWEAK--MAP EFFX CONF TRIX GLOS! 12

PATCH BROWSER
Save
Of course you will want to save your creations...
In the patch browser, make sure that the folder where you want to store your patch is already
selected. If not, select it. Then click on the Save button to the right of the data display, give your
patch a name and enter any other details (patch description, playing tips etc.) you would like to
appear in Patch Information – the pane on the right of the patch browser.
Refresh
Whenever you need to refresh the list (which is always necessary after folders or patches have
been added or moved using Explorer / Finder), right-click in the folder list and select the first
entry from the menu. Note that clicking on any folder name will also refresh the list.
Create new folder
Does exactly that – creates a new folder!
Reveal in Finder / Explorer
Bazille’s browser is used mainly for loading patches, and is otherwise fairly limited. Right-click
and select Reveal in Finder (Mac) or Reveal in Explorer (Win). Selecting Reveal in... opens a
system window for the current folder, so you can use the regular OS file functions instead.
Always Refresh (see above) after making changes to the contents of any Bazille folders.
On open expand to
The submenu contains options which govern how deeply the browser will open subdirectories
whenever the GUI is opened or the Refresh function (see above) is applied. Note: The branch
containing the current patch will always be opened.
Favourite or Junk?
Right-clicking on a patch in the browser will open a context menu in which you can classify
patches as Favourite or Junk. Junked files will disappear immediately, but can be made visible
again by selecting show Junk from the same context menu.
Selection, drag & drop
Files can be moved from one folder to another via drag & drop. Use the SHIFT etc. keys on
your computer keyboard to highlight the files you want to move, then click and drag them from
the files area onto a different folder. To deselect, either click on a patch or choose “deselect”
from the context menu. See also Reveal in Finder / Explorer above.
The MIDI Programs folder
Local also contains a special folder called MIDI Programs, which is initially empty. If you put a
bunch of patches (up to 128) in there, they will all be loaded into memory (for performance
reasons) when the very first instance of Bazille starts. Important: Changes only take affect after
you have restarted the host software – unlike regular patches, MIDI Program patches cannot be
added, removed or renamed on the fly.
Individual patches in MIDI Programs are selected via MIDI Program Change messages. As they
are accessed in alphabetical order, it is a good idea to put a number at the beginning of each
name e.g. ‘000 rest-of-name’ to ‘127 rest-of-name’ or similar.
Banks: The MIDI Programs folder can contain up to 127 sub-folders of 128 patches each, and
these are switchable via MIDI Bank Select messages 1-127 (the MIDI Programs ‘root’ folder is
bank 0). The bank select message is CC#0. Send a Bank Select message first, then a Program
Change message. Note that MIDI Programs itself is bank 0, while any sub-folders are
addressed in alphabetical order starting with bank 1.
TOC INTR PATCH OSC LFO FILT ENV PROC MIDI+ MULT SEQ TWEAK--MAP EFFX CONF TRIX GLOS! 13

OSCILLATORS
Oscillators
Bazille is highly unusual for a modular synth. Although the filters are traditional analogue models,
the oscillators are unashamedly digital: They combine the two technologies that made digital
synthesis affordable (and analogue synths suddenly unfashionable) in the 1980s – FM (frequency
modulation, more correctly ‘phase modulation’) and PD (phase distortion).
Also included is another unusual process we call Fractalize (fractal resonance), which can create
very ‘cutting’ sounds from tame waveforms, with a similar result to the classic sync effect.
Bazille’s oscillators are unique, but the underlying technology means that they are more prone to
aliasing than those in our other synths. The amount is noticeably less than in the original hardware,
however, and we believe the compromise between CPU usage and aliasing is close to optimum.
5 different types of modulation, one for each of the 5 sections
The main oscillators are very powerful signal generators which can even be used as LFOs (as the
frequency range starts at zero Hertz). It can take a good while to get comfortable with them, but
that’s the price we’re prepared to pay for such flexibility – right?
The oscillator panel has five distinct sections, each with a modulation input. The next few pages
deal with each of these sections separately – let’s start at the top, with PITCH...
TOC INTR PATCH OSC LFO FILT ENV PROC MIDI+ MULT SEQ TWEAK--MAP EFFX CONF TRIX GLOS! 14
OSCILLATORS
Pitch
Together, the knobs labeled Tune and Modify control the oscillator’s basic pitch. Both have mode
selectors that make the oscillators suitable for a wide variety of functions e.g. as FM operators,
undertone generators or even as host-synchronized LFOs...
Tune
A value between 0.00 and 24.00 – the selector determines how this value is interpreted. The
first 3 modes are for generating regular notes, as they automatically switch ‘key follow’ on:
Semitone........ maximum 24 semitones above standard pitch.
Overtone........ the first 24 harmonics in the overtone series. Note that octaves are not evenly
spaced, they are at precisely 1.00, 3.00, 7.00 and 15.00.
Undertone...... the first 24 undertones (often called ‘subharmonics’). Again, octaves aren’t
evenly spaced but are at -1.00, -3.00, -7.00 and -15.00. For details about the
undertone series, go here: http://en.wikipedia.org/wiki/undertone_series.
In the last two modes, the oscillator frequency isn’t affected by which MIDI notes you play, as
‘key follow’ is disabled. Tip: Whenever you need an LFO with plenty of modulation options, use
one of the main oscillators in Hertz or Clocked mode instead of a regular LFO:
Hertz .............. 0 to 24Hz, but can be greatly extended via multiply (see modify below). Note
that the rate can be doubled, depending on the PD and Fractalize settings.
Clocked.......... sync-to-host ‘division factor’. 1.00 means a whole note, 4.00 a quarter note
etc.. For technical reasons the synchronization isn’t 100% perfect, so you
might have to retrigger the notes every now and again.
Modify
A value between -50.00 and 50.00. Again, the selector specifies how this is interpreted. The
Modify knob can affect oscillator tuning in one of four ways:
Cents ............. detune by +/- 100 cents (each integer step is actually 2 cents).
5 Hz ............... detune by +/- 5 Hertz (tuning is independent of the MIDI note).
Beats ............. similar to 5 Hz, but host-synced e.g. +4.00 = one extra cycle per quarter note.
Multiply........... multiply or divide by a constant (e.g. -8.00 will divide the frequency by 8).
All values between -1.00 and -0.01 are interpreted as 1.00.
Tune modulation (unlabeled)
The amount of pitch modulation from a signal connected to the socket. Often called ‘cross
modulation’ when the modulator is also an audio-rate oscillator. The range of the modulation
knob is selectable, with the following options:
Cents ............. +/- 50 x 2 cents i.e. plus or minus a semitone
5 Semi ........... +/- 5 semitones
50 Semi ......... +/- 50 semitones
TOC INTR PATCH OSC LFO FILT ENV PROC MIDI+ MULT SEQ TWEAK--MAP EFFX CONF TRIX GLOS! 15

OSCILLATORS
Phase / FM
Bazille’s oscillators are capable of all kinds of ‘FM’ sounds by plugging an audio-frequency source
into the phase modulation input. ‘FM synthesis’ is a bit of a misnomer, as this technology was
actually based on phase modulation (see Wiki articles about FM synthesis and Yamaha DX7).
Phase
The righthand knob adjusts the basic phase position i.e. where in its cycle the waveform will
start whenever a note is played. The range is usually 720° i.e. 2 cycles, but this is reduced to
360° when different waves are combined (the pitch drops an octave). The value of Phase is
irrelevant when the mode is set to random, as in the above image.
The oscillators in most analogue synths are free running i.e. the phase is never reset. Because
the oscillators in digital synths aren’t computed until a note is played (otherwise the CPU would
be busy computing inaudible sounds), the initial phase needs to be defined:
random................ Resets the oscillator to a random phase each time a note is played.
gate .................... Resets to the value of Phase each time a note is played so that all notes
will start with the same phase (if Phase isn’t being modulated).
catch................... Each oscillator gets its phase from where the most recent voice left off – for
a better ‘free running’ effect despite voice rotation (‘round robin’).
Phase modulation (with mode selector)
The bipolar knob on the left adjusts the amount of phase modulation (or frequency modulation,
depending on the modes) from a signal connected to the socket. Connect another audio-rate
oscillator here for classic ‘FM’ sounds (both should be sine waves).
The first 3 options are for regular phase modulation with different depth ranges. As modulation
in these modes only affects phase, the overall pitch of the oscillator is preserved:
PM fine ............... for subtle phase modulation
PM medium ........ for typical ‘FM’ uses, including self-modulation (‘operator feedback’)
PM coarse .......... for maximum phase modulation
The next two options offer linear FM in two frequency ranges. With linear FM, modulation adds
to the frequency – the overall pitch is only preserved if the modulating waveform is symmetrical:
lin 100Hz ............ linear FM, 0 to 100Hz
lin 1kHz .............. linear FM, 0 to 1000Hz
The last two options offer relative FM. In this mode, modulation multiplies the frequency. Again,
the overall pitch is only preserved if the modulating waveform is symmetrical:
rel fine................. relative FM: oscillator frequency * ( 1 +/- 0.5 * modulation)
rel coarse............ relative FM: oscillator frequency * ( 1 +/- 5 * modulation)
The linear and relative modes are unusual in that they offer ‘through-zero FM’. Hardware
modules with this feature (e.g. Cynthia Zeroscillator) are quite popular in the modular synth
community, as the wave can run backwards. Example: if a 100Hz oscillator is linear frequency
modulated with -1000Hz, it will run ‘backwards’ at 900Hz.
TOC INTR PATCH OSC LFO FILT ENV PROC MIDI+ MULT SEQ TWEAK--MAP EFFX CONF TRIX GLOS! 16
OSCILLATORS
Phase Distortion
Like FM, Phase Distortion (PD) is another method of skewing sine waves developed during the
1980s. If you’re interested in the technical details, you could start by reading these articles:
http://en.wikipedia.org/wiki/Phase_distortion_synthesis
http://en.wikipedia.org/wiki/Casio_CZ_synthesizers
Whenever you start a fresh instance of Bazille, the initialize patch is automatically loaded. In this
patch, oscillator 1 is already connected to one of the outputs so you can at least hear a sound.
Oscillator 1’s PD knob is set to maximum, resulting in a bright sawtooth-like wave. Try turning this
all the way down for a pure sine wave, then modulate the phase distortion amount by connecting
e.g. envelope 2 to the socket and turning the amount up.
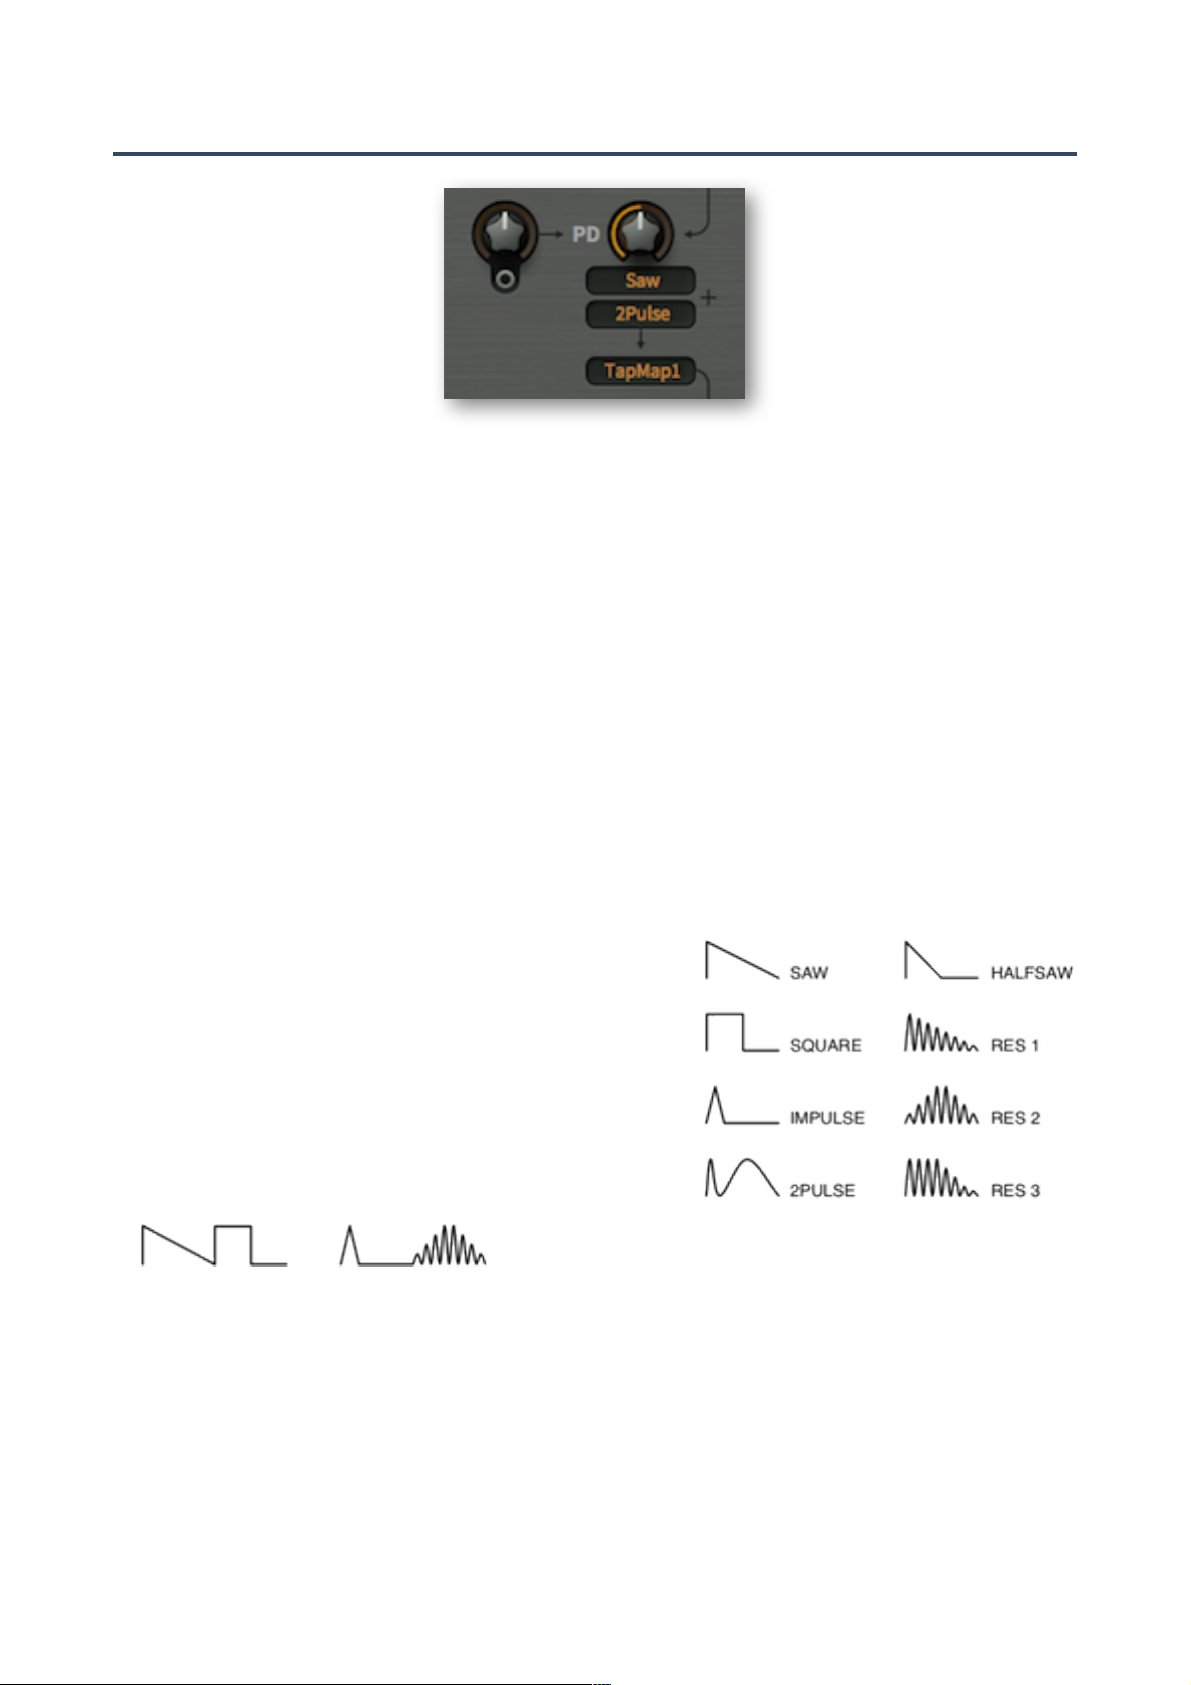
PD
The PD knob controls the basic amount of phase distortion.
PD modulation (unlabeled knob)
The bipolar knob on the left adjusts the modulation depth from a signal connected to the socket.
Wave selectors (upper 2 selectors)
The selectors below the PD knob specify a pair of
alternating (see below) non-linear phase functions.
The first five modes (Saw, Square, Impulse, 2pulse,
Halfsaw) are simple, they need no explanation.
In the three ‘Res’ modes, multiple sine waves are
packed into one of 3 differently-shaped ‘windows’.
The number of cycles in the window is controlled by
the PD parameter.
Here are two of the many possible combinations:
Saw + Square Impulse + Res 2
Shape (lower selector)
Sets the basic oscillator waveform before phase distortion:
Cosine............ for regular phase distortion i.e. the above waves
TapMap1/2..... one of the mapping generators as waveform – note that low notes can get
gritty due to the lower resolution, and high notes can alias more than Cosine
TOC INTR PATCH OSC LFO FILT ENV PROC MIDI+ MULT SEQ TWEAK--MAP EFFX CONF TRIX GLOS! 17
OSCILLATORS
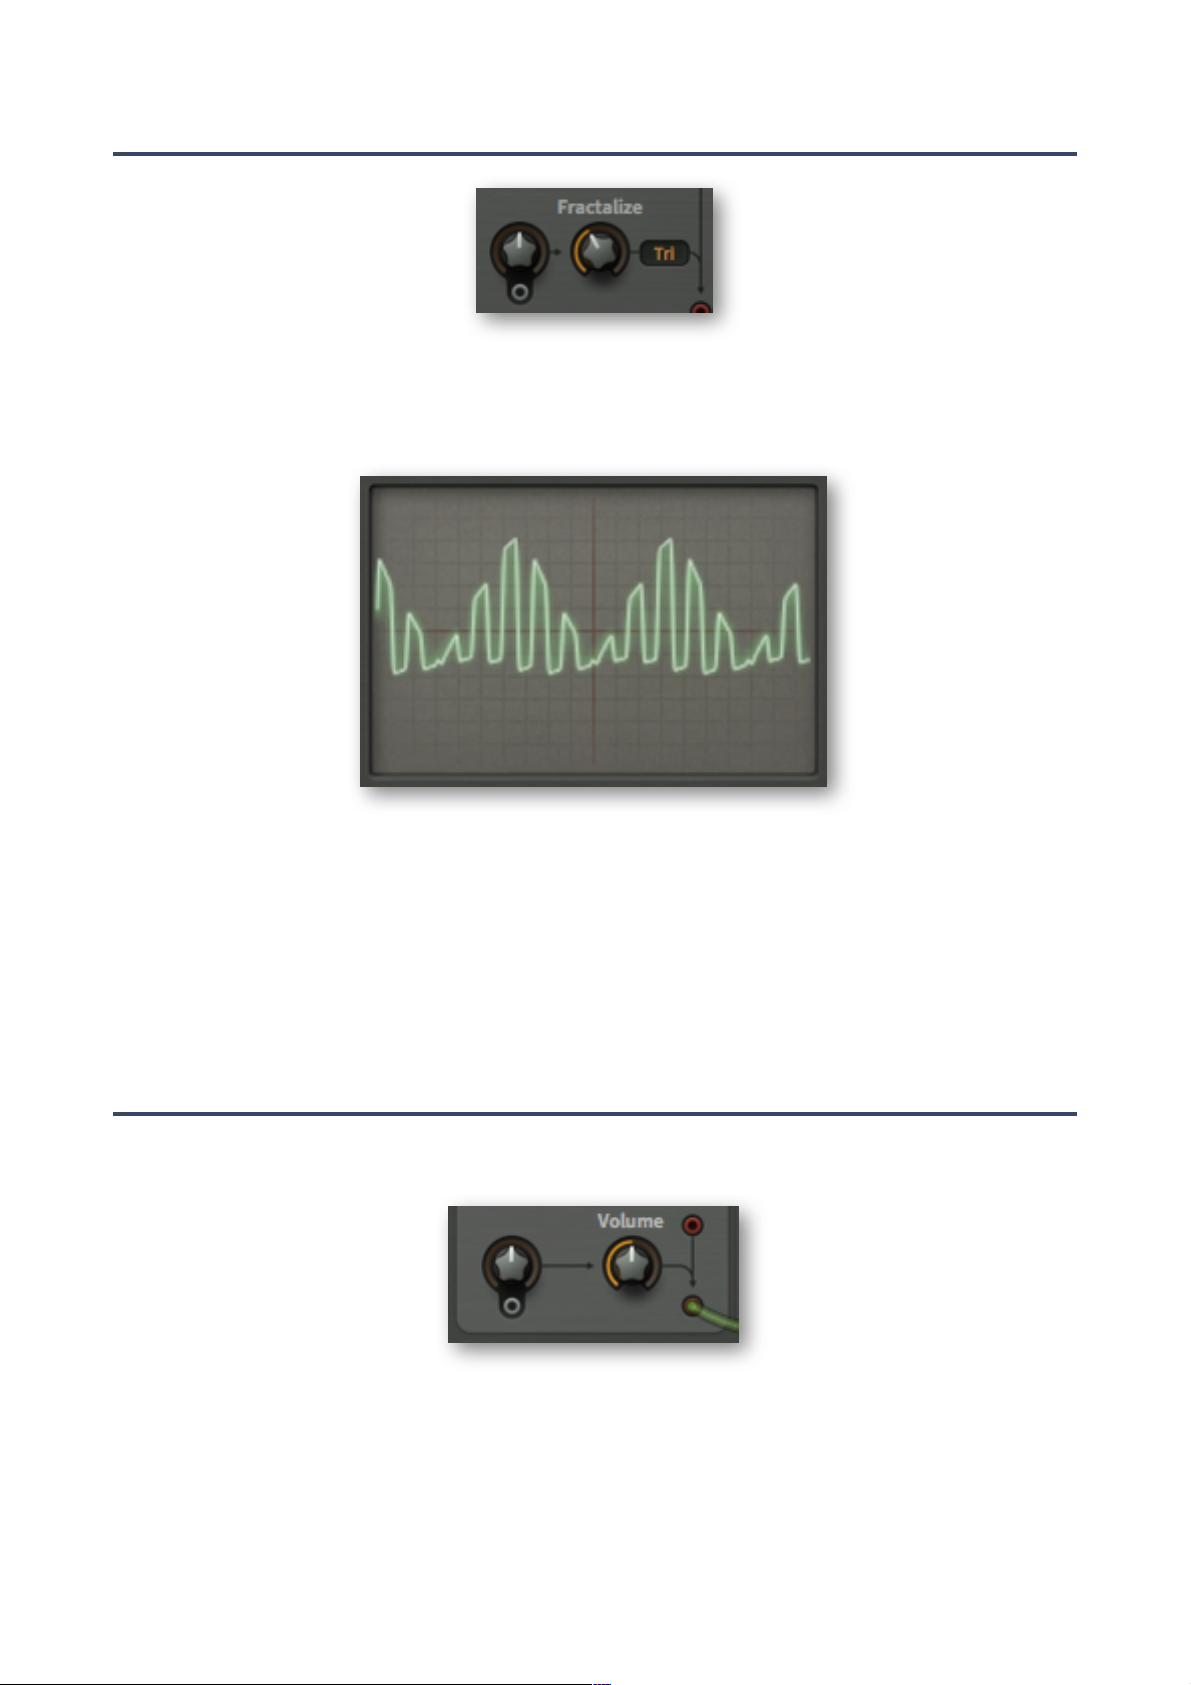
Fractal Resonance
Fractal resonance is similar to Res (see Wave Selectors above), but acts on the composite wave.
Multiple cycles of the waveform are ‘packed’ into another wave (specified by the selector) which
serves as a ‘window’. Watch the effect of fractal resonance in Bazille’s oscilloscope. For example,
here is a square wave packed into a triangular window:
Fractalize
The righthand knob controls the number of cycles (of the original wave) in the window. The
selector to the right specifies the shape of the window. Off, Saw, Tri or Max roughly correspond
to none, Res1, Res2 and Res3 respectively (see the previous page).
Fractalize modulation (unlabeled)
The bipolar knob on the left sets the modulation depth of a signal connected to the socket.
Outputs
There are two signal outputs at the bottom of the oscillator. The upper one is always at full volume,
while the lower one can be attenuated and modulated...
Volume
The righthand Volume knob controls the nominal level of the lower output, before modulation...
Volume modulation (unlabeled)
The bipolar knob controls the modulation depth of a signal connected to the socket.
TOC INTR PATCH OSC LFO FILT ENV PROC MIDI+ MULT SEQ TWEAK--MAP EFFX CONF TRIX GLOS! 18
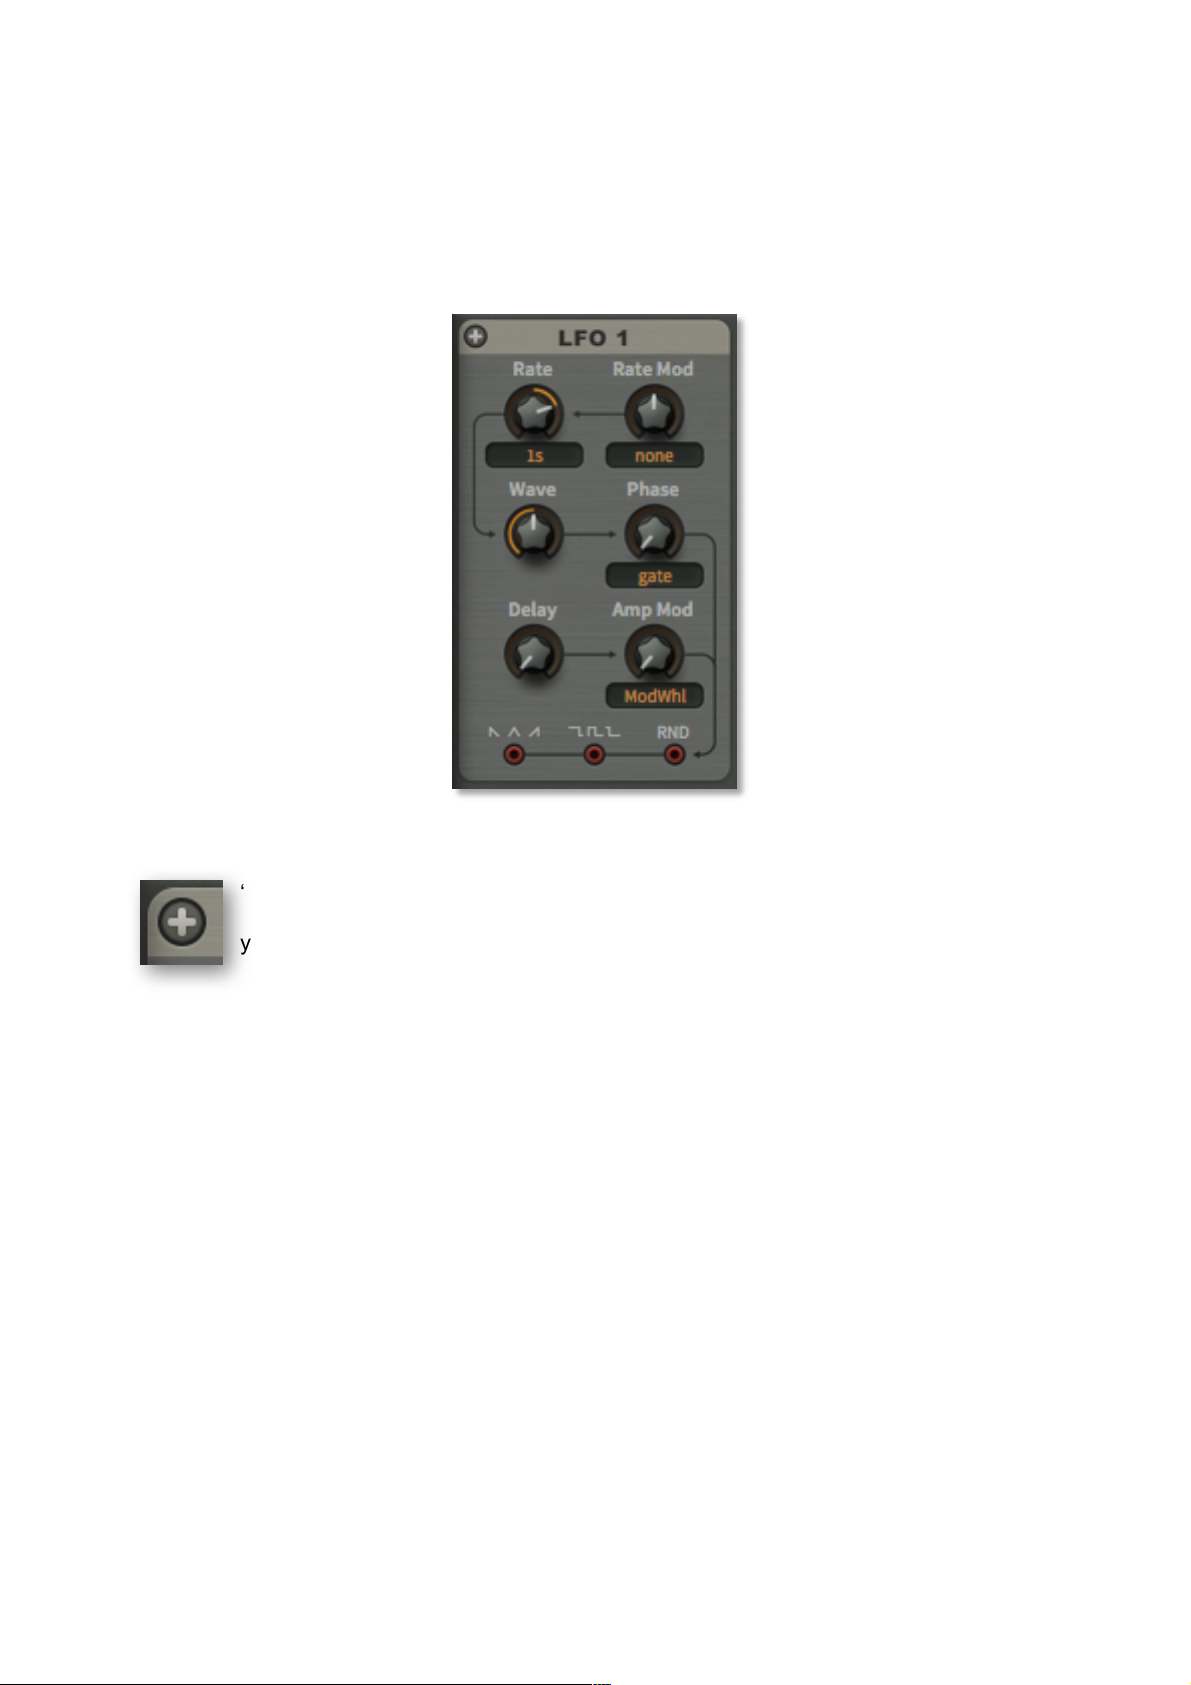
LFOs
LFOs
At the top left and top right of Bazille’s window are two dedicated low frequency oscillators. Each
LFO has 3 parallel outputs at the bottom of the panel. Note that LFO 1 is also responsible for
vibrato.
Unipolar (+)
‘Unipolar’ causes the LFO’s waveform to be shifted upwards so that it only delivers
positive values instead of oscillating around zero. The LFO amplitude is halved. Tip: If
you are using LFO1 for vibrato, you would normally want this switched off.
Rate
A value between -5.00 and 5.00 – the selector specifies how this value is interpreted. The first 3
options are absolute times measured in seconds (0.1, 1 or 10), all the others are synchronized
to host tempo. The five options with ‘dot’ in the name are dotted (50% is added to the cycle
length), and those with ‘trip’ in the name are triplet times (3 cycles occupy the space of 2).
0.1s to 10s ..... absolute times: 1/10th, 1 or 10 seconds at Rate = 0.00.
1/64 to 8/1...... synchronized to host tempo
To set up a vibrato rate of 5Hz, for instance, use ‘1s’ mode with Rate at 2.50. Or ‘0.1s’ with the
Rate set to -1.00. It’s not worth thinking about a conversion formula here – just use your ears!
Note that Bazille’s LFOs can be forced well into the audio range via Rate Mod ‘trickery’...
Rate Mod
The depth of rate modulation from a source chosen in the selector.
TOC INTR PATCH OSC LFO FILT ENV PROC MIDI+ MULT SEQ TWEAK--MAP EFFX CONF TRIX GLOS! 19
 Loading...