

Page 1
ACE
any cable everywhere
user guide
for version 1.4.1
15. December 2019!
HECKMANN AUDIO GMBH - BERLIN
Page 2

Introduction 4
Installation 4 ...........................................................
ACE Concept and Features 5 ................................
User Interface 6
Default Signal Flow 6 .............................................
Control Bar 7 ..........................................................
GUI Elements 8 ......................................................
Multichannel MIDI 10 .............................................
Patch Browser 11
Overview 11 ...........................................................
Directory Panel 12 .................................................
Presets Panel 14 ...................................................
Drag & Drop functions 15 ......................................
Preset Tagging 16 ..................................................
Search by Tags 17 .................................................
Search by Text 18 ..................................................
Modules 20
VCO common parameters 20 ................................
VCO1 21 ................................................................
VCO2 22 ................................................................
LFO common parameters 23 .................................
LFO1 24 .................................................................
LFO2 26 .................................................................
MIX 27 ....................................................................
VCF 28 ...................................................................
ADSR 30 ................................................................
Ramp Generator 31 ...............................................
Multiplex 31 ............................................................
VCA 33 ...................................................................
Signal Sources 34 ..................................................
Page 3

General Settings 35
Polyphony and Quality 35 ......................................
Pitch Settings 36 ....................................................
Effects 37
Chorus 37 ..............................................................
Delay 39 .................................................................
Tone controls 40 ....................................................
Effects On/Off 40 ...................................................
Tweak Page 41
Mapping Generator 41 ...........................................
Stacked Voice Tuning 44 .......................................
Circuit Bending 44 .................................................
Envelope Tweaks 45 ..............................................
Microtuning 45 .......................................................
Configuration 46
MIDI Control 46 ......................................................
Preferences 48......................................................
Page 4

INTRODUCTION
Introduction
Installation
Go to the ACE webpage at www.u-he.com, download the appropriate installer for your
system, and unzip the compressed file. Open the “ACE” folder and start the installer
application. The only demo restriction is a mild crackling sound at irregular intervals after about two minutes of use. This disappears after you enter a valid serial number.
For more information, including our terms of use, please refer to the ReadMe file that
comes with the installer. By default, ACE uses the following directories:
Win
presets (local) C:\Users\*YOU*\Documents\u-he\ACE.data\Presets\ACE\"
presets (user) C:\Users\*YOU*\Documents\u-he\ACE.data\UserPresets\ACE\ "
preferences C:\Users\*YOU*\Documents\u-he\ACE.data\Support\ (*.txt files)"
alternative skins C:\Users\*YOU*\Documents\u-he\ACE.data\Support\Themes\ "
microtuning C:\Users\*YOU*\Documents\u-he\ACE.data\Tunefiles\
Mac
presets (local) Macintosh HD/Library/Audio/Presets/u-he/ACE/"
presets (user) *YOU*/Library/Audio/Presets/u-he/ACE/"
preferences *YOU*/Library/Application Support/u-he/com.u-he.ACE... (*.* files)"
alternative skins Macintosh HD/Library/Application Support/u-he/Themes/"
microtuning Macintosh HD/Library/Application Support/u-he/Tunefiles/
online resources
For downloads, news articles and support, go to the u-he website
For lively discussions about u-he products, go to the u-he forum
For friendship and informal news updates, go to the u-he facebook page
For countless presets (commercial and free), go to the u-he preset library
For video tutorials and more, go to the u-he youtube channel
u-he team 2020
in no particular order…
Urs Heckmann (boss, concepts, original GUI); Thomas Binek (QA, bug-hunting, presets); Sebastian Greger (GUI design, 3D stuff); Rob Clifton-Harvey (IT admin, backend
development); Viktor Weimer (support, presets, the voice); Howard Scarr (user guides,
presets, necessary grump); Jan Storm (framework, more code); Sascha Eversmeier
(code, bad puns); William Rodewald (student life-support code); Frank Hoffmann (more
framework, new browser); Alexandre Bique (all things Linux); Henna Gramentz (office
supervision); Jayney Klimek (office management); Alf Klimek (tagging & repairs, studio);
Melina Garbisch (studio attendant); Oddvar Manlig (everything else!)
Special thanks to Brian Rzycki for maintaining the original preset library!
TOC GUI PTC VCO MIX LFO VCF ENV MLT GEN EFX TWK CNF 4
Page 5

INTRODUCTION
ACE Concept and Features
modular ultrasound
Most digital synths handle audio signals and modulation signals separately. Audio is
usually evaluated at a rate between 44100 and 96000 Hertz, while modulation signals
update at 1000 Hz or slower (often called the "control rate" of the synthesizer).
ACE is different in this respect. While the oscillators have more than 500 times oversampling, all signals (including modulation) run at least twice as fast as the host application's sample rate... and this is just the lowest of ACE's quality settings.
ACE does not differentiate between audio signals and modulation/control signals. You
can plug any signal output into any signal inputs and expect it to work just like vintage
modular hardware. So any modulation can function beyond the limits of human hearing.
For instance, the LFOs (low frequency oscillators) can be sent above 20 kHz and still
modulate e.g. the pulse width of another oscillator. This gives you a sonic freedom previously reserved for expensive analogue hardware. Both LFOs can be used as audio
oscillators e.g. for FM (frequency modulation) sounds. Conversely, the VCOs (voltage
controlled oscillators) can be used as alternative LFOs. Note: Any DC (direct current) is
removed from VCO outputs, so when used as LFOs their shapes may not be precisely
as you might expect.
analogue modeling
Wherever necessary, the non-linear characteristics of analogue circuitry has been programmed directly into the code. For instance, the filter algorithm is built around a very
precise mathematical model of a hardware analogue filter – as are the basic components of the oscillators and envelope generators.
Only the LFOs, mixer, ramp generator and control-signal conversions are not analogue
models. You will soon hear why: unlike its analogue ancestors, ACE is not susceptible
to instabilities, and all the oscillators can be synchronized to song tempo. In ACE, even
perfect host-synchronized beating between two oscillators is possible.
Non-linear distortion in the self-oscillating filters, extremely fast envelopes and modulation channels (as well as other unique details such as "Glide2" and “Tap Map”) open up
a myriad of sound-sculpting techniques unavailable in other software synths.
If you really want to compare ACE to a classic modular synth (or three), think of it as a
pimped-up ARP 2600 using modules from a Roland SH-7 with (almost) the patching
flexibility of an EMS VCS3 / Synthi A – but polyphonic. Just like the ARP 2600, ACE is
pre-patched so that it will work out-of-the-box, but these default connections can be
overridden by plugging in patch cables.
Many of the modules were designed to carry out a number of seemingly unrelated
tasks. For instance the ramp generator can be used as an LFO, the multiplexes as ring
or amplitude modulators, LFO1 as a waveshaper, or the filters as slew limiters…
TOC GUI PTC VCO MIX LFO VCF ENV MLT GEN EFX TWK CNF 5
Page 6
INTRODUCTION
User Interface
You should feel very comfortable with ACE – it was designed to pack a lot of functionality
into a compact but clear user interface:
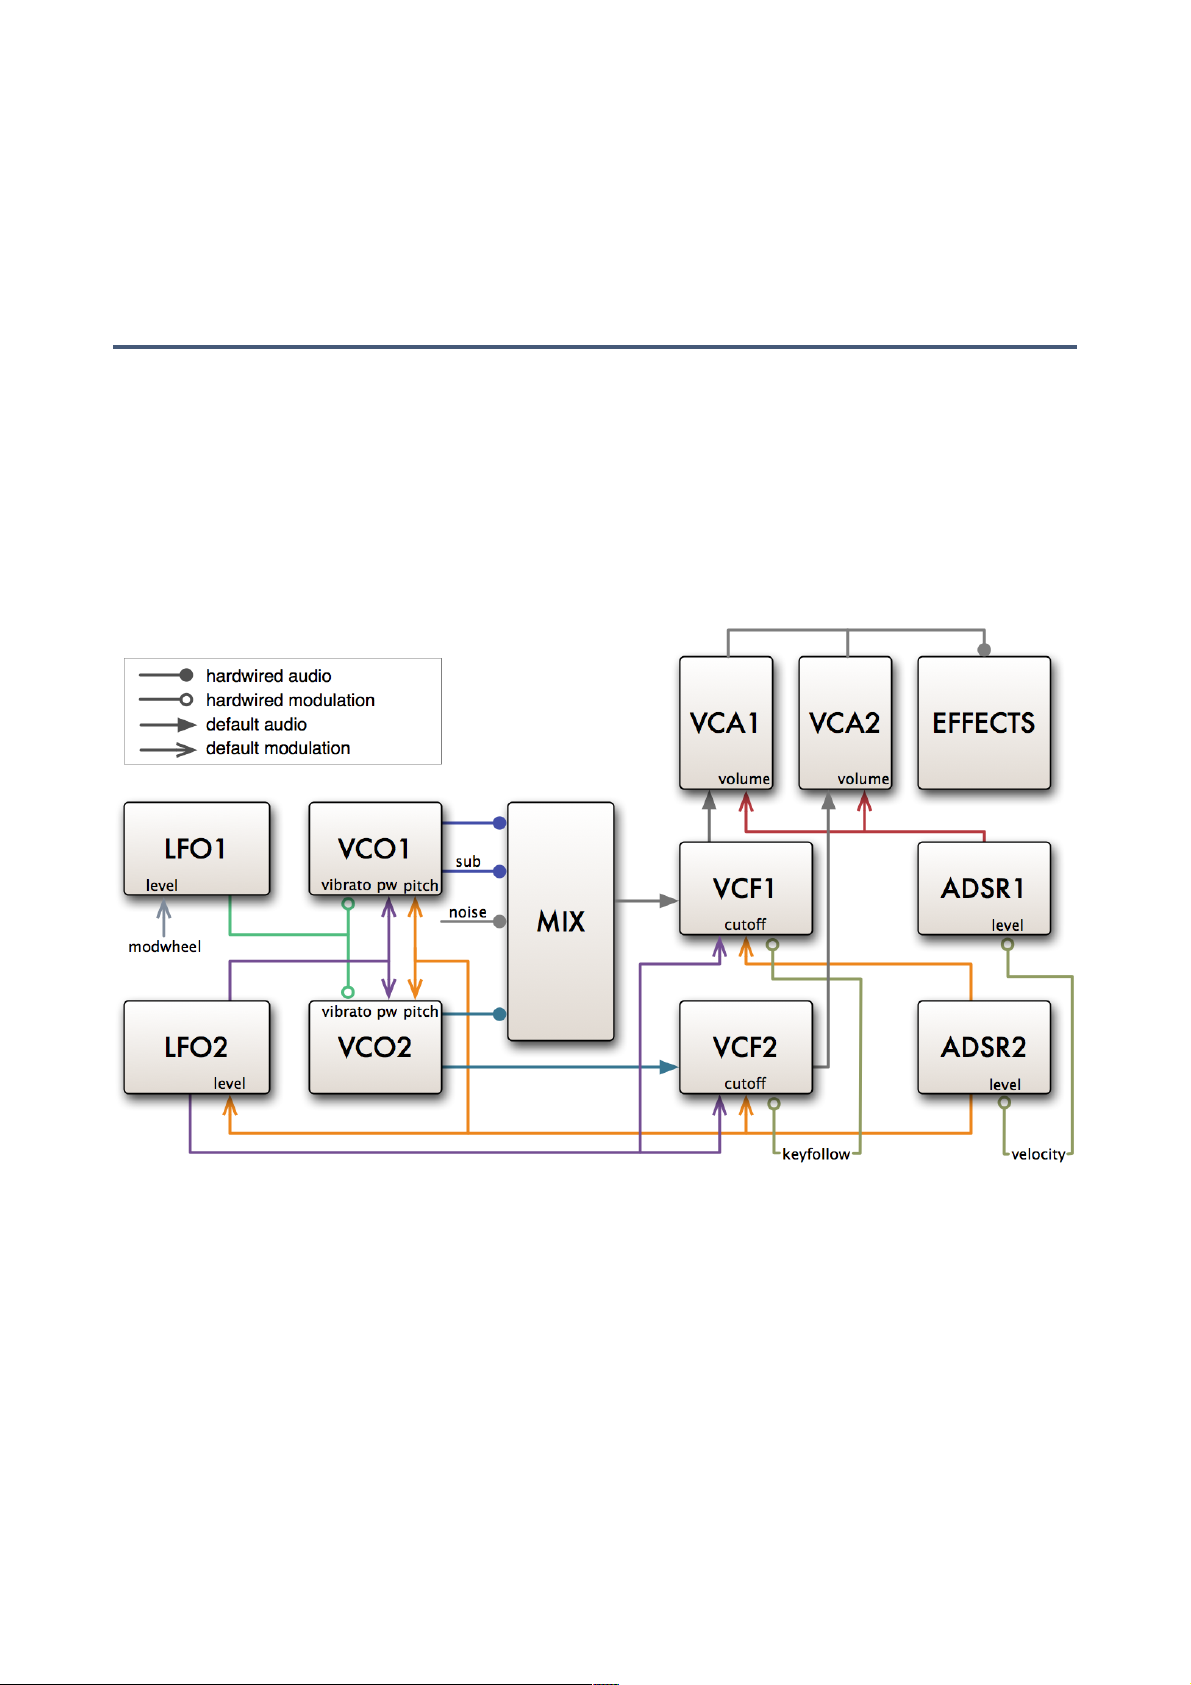
Default Signal Flow
Like e.g. the ARP 2600 but unlike most other real modular systems, you don’t need to plug
any cables in before you can get a humble squeak out of ACE. That’s because the modules are already connected in the typical configuration of a fixed architecture synth by default. Of course the real fun begins when you dip into your infinite supply of cables and
start overriding those defaults, connecting modules together any way you like...
ACE signal flow when no patch cables are connected
VCO1 and sub-oscillator, VCO2 and white noise are MIXed and routed to VCF1, which is
in turn routed to VCA1 (to right of the oscilloscope, unlabeled). VCO2 is also sent through
VCF2 to VCA2.
LFO1 is hardwired as the source of vibrato for both VCOs. The output level of LFO1 and
therefore vibrato depth is controlled by the modulation wheel (MIDI CC#1). LFO2 (violet)
modulates both VCO pulse widths and both VCF cutoffs.
ADSR1 (red) is used as the envelope generator for both VCAs. ADSR2 (orange) modulates both VCO frequencies, both VCF cutoffs and the output level of LFO2.!
TOC GUI PTC VCO MIX LFO VCF ENV MLT GEN EFX TWK CNF 6
Page 7

INTRODUCTION
Control Bar
The strip along the top is home to several indicators and controls:
synth / tweak / patch
Select the the synthesis page, the so-called Tweak page or the patch (preset) browser.
MIDI
A MIDI activity indicator. This flashes whenever ACE is receiving MIDI data.
save
Right-click on the Save button to check the format in which patches will be saved. The
default is u-he’s cross-platform .h2p format. To save patches in the host-specific native
format, select native before saving. We recommend using the standard .h2p so you can
exchange patches directly between the various computer worlds. The .h2p extended
format is the same but also allows per-line comments.
Important: If you have set the Save Presets To preference from the default user folder to
selected folder, make sure that the folder where you want to store your preset is already
selected before saving – if not, click on it first.
Click on the [save] button, give your preset a name and enter any other details. Preset
description, playing tips etc. – anything you would like to appear in the PRESET INFO
panel of the browser. Finally, confirm by clicking on the apply button.
Whenever you need to create a new folder or refresh the list (e.g. if folders or patches
have been added from Explorer / Finder), right-click in the left pane of the browser.
Simply clicking on a folder should also refresh the list.
Tip: If there’s a preset called default in the local root, it will be loaded instead of the
regular demo sound. Try this: Right-click on the data display and select ‘init’. Save the
patch under the name ‘default’ and start a fresh instance of ACE.
data display
The central display shows the name of the selected patch or the value of any parameter
as it is being edited. Click on the triangles either side of the display to step through
patches. Click on the name in the the display to open a drop-down list of all patches in
the current directory.
undo / redo
To the right of the data display is a pair of undo and redo buttons.The
number of steps in the undo buffer is limited, but you can even undo a
change of preset to recall edits made to the previous one!!
TOC GUI PTC VCO MIX LFO VCF ENV MLT GEN EFX TWK CNF 7
Page 8
INTRODUCTION
multicore
Switching this on causes ACE to distribute voices across available CPU cores, which
will usually allow more voices to be played without overloading the CPU. This mode appears to work well on relatively recent processors such as the Intel i5 and i7, but please
note that performance can even be reduced if your CPU is older. Note: Some hosts already offer multicore support, and this can lead to poorer performance for ACE. In such
cases, please switch one of them off (either ACE’s or the host's multicore option).
u-he badge
Click on the badge to open a menu containing links to this document, to our website, to
our user support forum and to our social network pages
GUI Elements
knobs
ACE has two types of knob: unipolar and bipolar. Unipolar knobs
only allow positive values, usually within a range of 0.00 to
100.00. Bipolar knobs also allow negative values, usually within a
range of -100.00 to +100.00 with zero in the central position.
coarse control: Click+hold with the lefthand mouse button, then drag up or down.
fine control: for steps of 0.01, hold down either SHIFT key before moving the knob.
mouse wheel: If your mouse has a scroll wheel, you can hover over a knob and roll the
wheel for coarse adjustment. Fine control via SHIFT.
If your mouse wheel is rastered (you can feel it clicking slightly as you roll the wheel),
right-click on any knob and select MouseWheel is rastered from the context menu. Each
little click will then increment or decrement with a more ‘sensible’ step!
default reset: Double-clicking a knob reverts to a sensible default value, usually 0.00.
Note: All the above also applies to the envelope faders.!
visit u-he.com"
user guide"
support forum"
u-he on Twitter"
u-he on Facebook"
u-he on YouTube
TOC GUI PTC VCO MIX LFO VCF ENV MLT GEN EFX TWK CNF 8
Page 9
INTRODUCTION
switches
All orange text elements and icons are switches. Many of them
also serve as labels for the associated knobs.
Values can be incremented via left-click, a right-click opens the
list, and mouse wheel movement scrolls through all values.
parameter locking
To guarantee that the value of a parameter doesn’t change when you
switch presets, use the Lock function. Right-click on a control and select
‘Lock’ from the context menu. Please remember this: You are still free to adjust the value of a locked parameter at any time!
sockets and cables
In most hardware modular synthesizers, standard jack sockets and leads are used to
connect modules together. ACE’s virtual cables always connect outputs with inputs:
the OUTPUT sockets have darker rims
the INPUT sockets have lighter rims
To create a connection in ACE, drag and drop between the sockets. Outputs will happily
accommodate several patch cables, while inputs will only accept one. Most of the modulation inputs have controls for setting the modulation amount. For instance below
LFO1‘s Phase knob is an input socket and control for phase modulation.
daisychains: Although you normally can’t connect two inputs together, try dragging a
cable from an unused input socket to one that is already in use – it works, the source
signal is passed on to all inputs in the chain. The main advantage of daisychain patching is that it can appear clearer.
to change inputs, drag+drop from the current input to another input.
to change opacity and style, right click on any input socket (even an unused one) and
select the two properties: Opacity = solid, see-thru, x-ray or ghosted and Style = thick,
slim, line, hair or natural. Default options can be set in the preferences panel.
to change outputs, right-click on the output and drag it to a different output. A straight
line will appear. Several cables connected to one output can only be moved together.
to remove cables, double-click (or drag away) the input end.
to change colour, click on the input end. Take care not to double-click, as this would
remove the cable. Colours are initially selected more or less at random so that overlapping cables can be differentiated easily.!
TOC GUI PTC VCO MIX LFO VCF ENV MLT GEN EFX TWK CNF 9
Page 10
INTRODUCTION
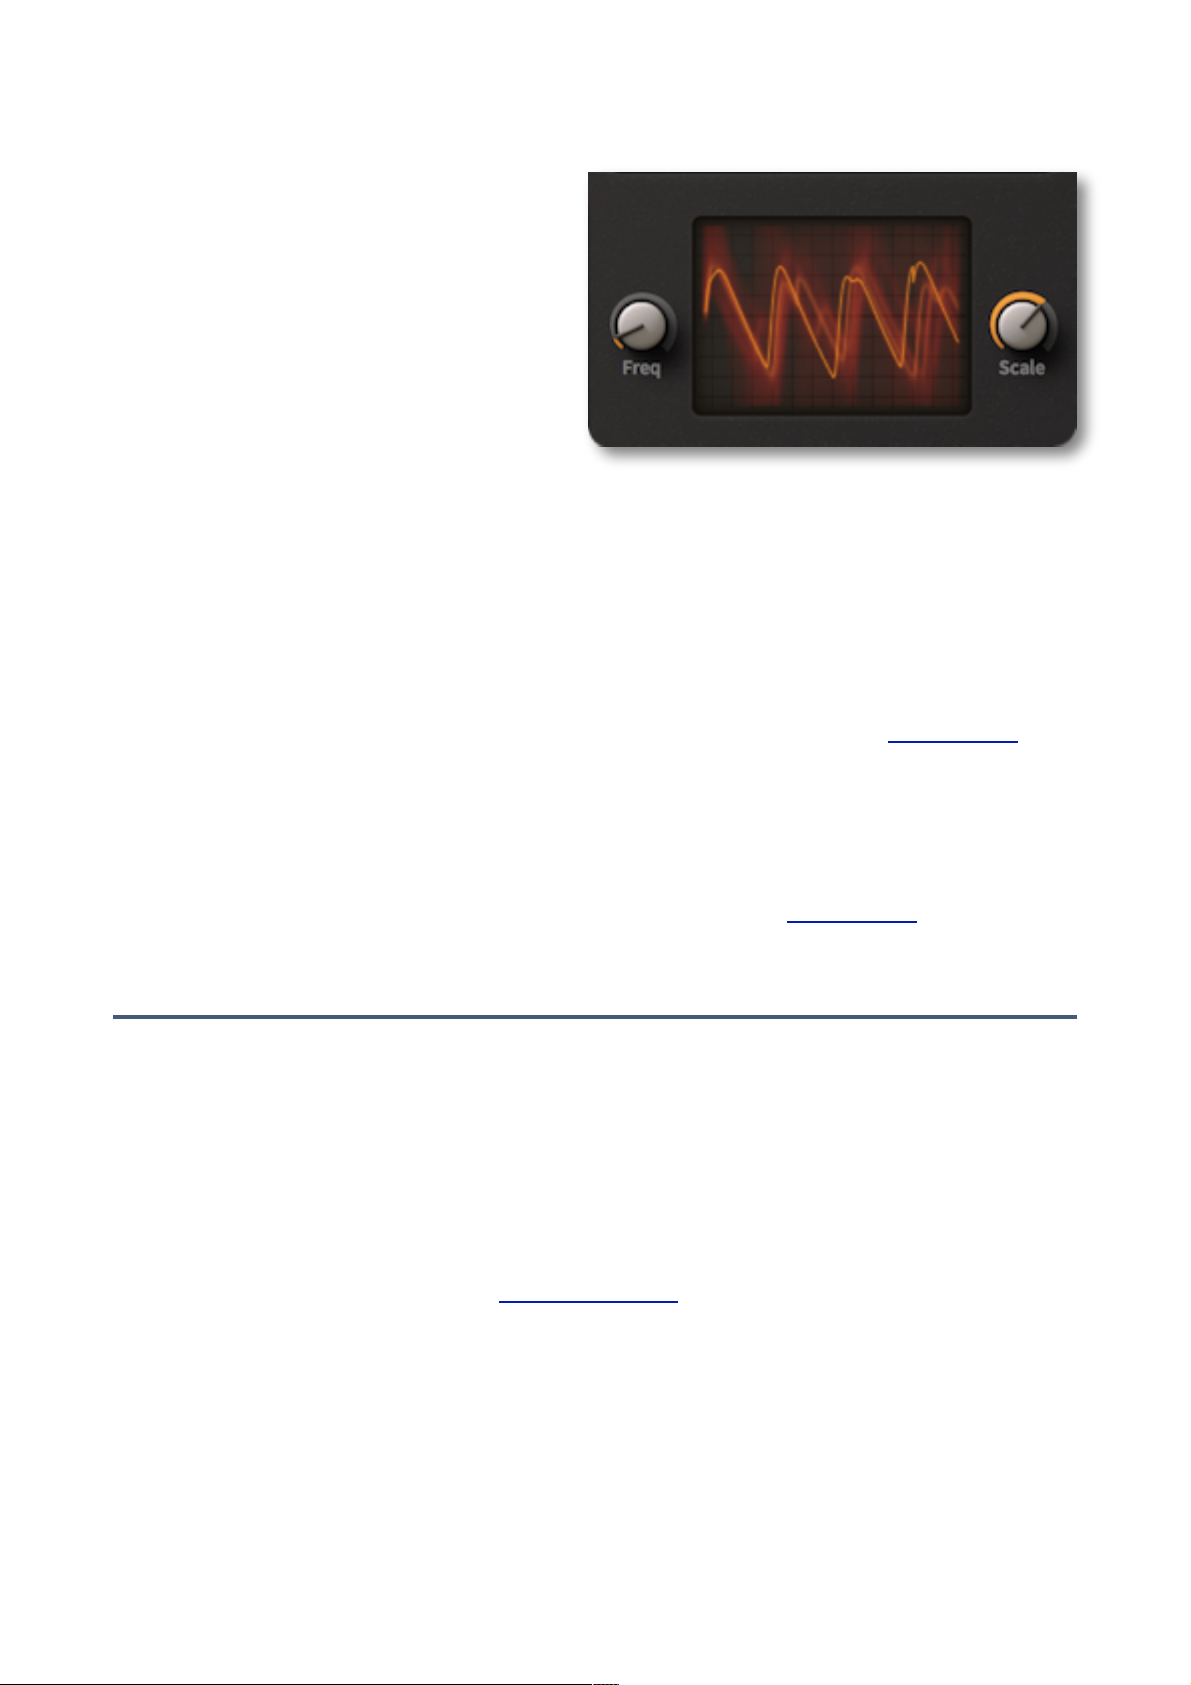
oscilloscope
The oscilloscope displays a mono sum
of the output, pre-effects. It is used for
e.g. fine adjustments to waveforms, for
checking the effects of audio-rate modulation or filtering on the waveform, for
viewing envelope shapes etc.. Or simply for its entertainment value!
Oscilloscopes have proved very useful
while creating sounds. Especially if the
synth has audio-rate modulation – like
classic modular systems... and ACE.
ACE’s oscilloscope is synchronized to MIDI notes as well as to zero-crossings (negative
to positive transitions). The display is updated whenever a longer scan is completed.
As synchronization is automatic, the oscilloscope only requires two controls: Freq adjusts the horizontal resolution while Scale adjusts the vertical resolution.
Right-clicking in the window lets you switch the drawing mode: glow, fire and wind add
different fade-out effects at the cost of extra CPU. These modes are also a bit slower
than eco or fast. Tip: If you need to keep CPU-usage down, use eco (economical)
mode. The setting is temporary. To specify a default ‘scope effect, see Preferences.
GUI size
Right-click anywhere in the background. The size options are measured in percentages
and pixels (width x height), and increment in 10% steps from 70% to 200%.
This setting is temporary – to specify a default GUI size, see Preferences.
Multichannel MIDI
ACE now supports a growing class of expressive ‘performance’ instruments (e.g. Haken
Continuum, Eigenharp, Roli Seaboard, Linnstrument) that can send each note on a
separate MIDI channel. For ACE to respond correctly your host must be able to route
multiple MIDI channels to a single instance of a plug-in. Each voice should then react
individually to performance controls (pitchbend, pressure, mod wheel, Control A and
Control B).
The voice modes poly, mono and legato become practically identical while multichannel
MIDI is received. In each case, ACE behaves like several mono synths set to the same
sound. The value of voices in the General Settings panel still applies as the voices can
be ‘stolen’ across multiple channels. The duo voice mode is not channel aware – the
MIDI channels are simply merged. ‘Single trigger’ type modulation sources react to the
channel used by the first played voice.!
TOC GUI PTC VCO MIX LFO VCF ENV MLT GEN EFX TWK CNF 10
Page 11
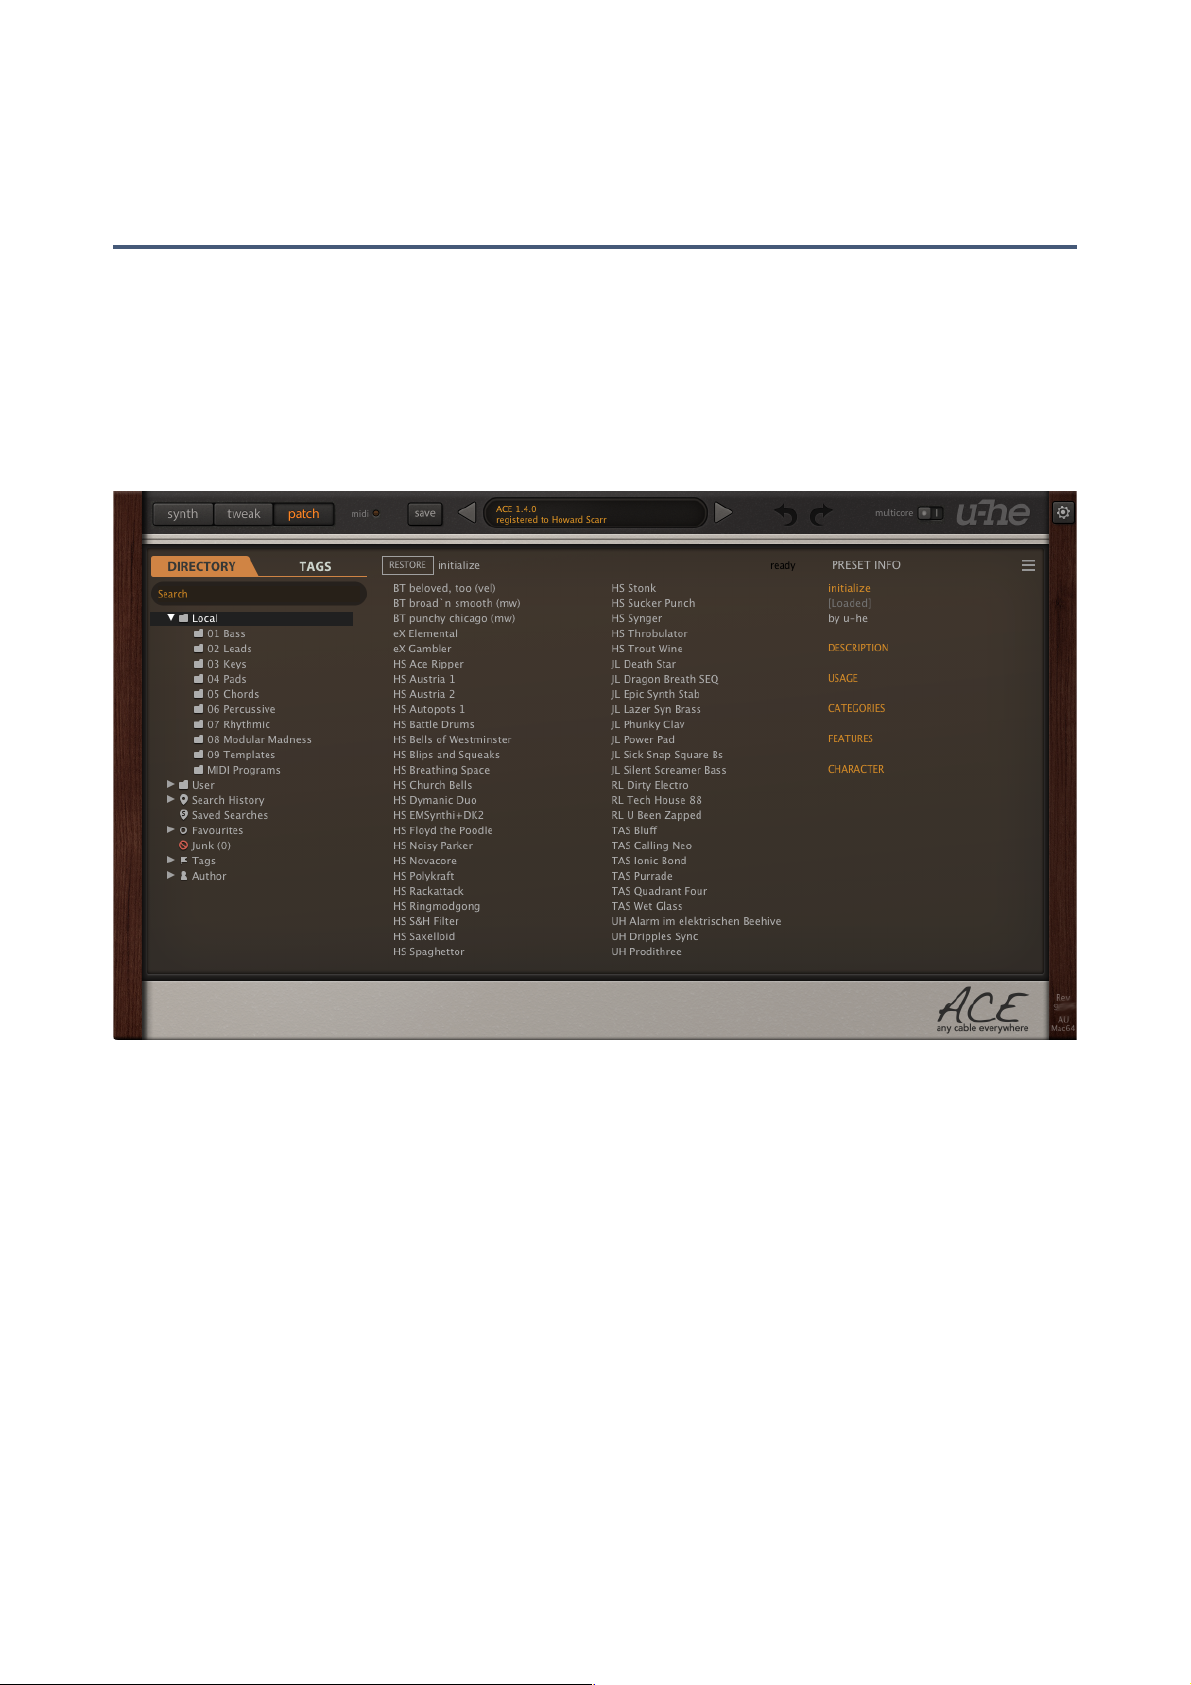
PATCHES
Patch Browser
Overview
ACE presets are sometimes called patches, a term borrowed by the modular synth community from the telephone world where calls used to be connected via jack cords.
You can load any preset in the current folder by clicking on the data display, or step
through them by clicking on the arrow symbols either side of the data display.
Of course ACE also includes a browser. Clicking on the [patch] button at the top left will
open this set of panels:
Folders appear on the left, patches in the centre and information about the currently active
one appear on the right. If you can’t see any, click on Local. If there is no PRESET INFO
panel, click on the [≡] button (top right) and select Show Preset Info.
The Local root directory contains a representative selection of presets copied from the
sub-folders. After loading a preset by clicking on its name you can step through all others
using your computer’s cursor keys.
That’s all you need to know for now!
If you want to dig deeper, however, read the rest of this chapter. ACE’s browser has many
more features including drag&drop functions and a powerful search engine.
Default preset
When ACE starts it checks whether the Local root contains a preset called default, which is
then loaded instead of the demo sound. Note that default will not appear in the browser.
TOC GUI PTC VCO MIX LFO VCF ENV MLT GEN EFX TWK CNF 11
Page 12
PATCHES
Directory Panel
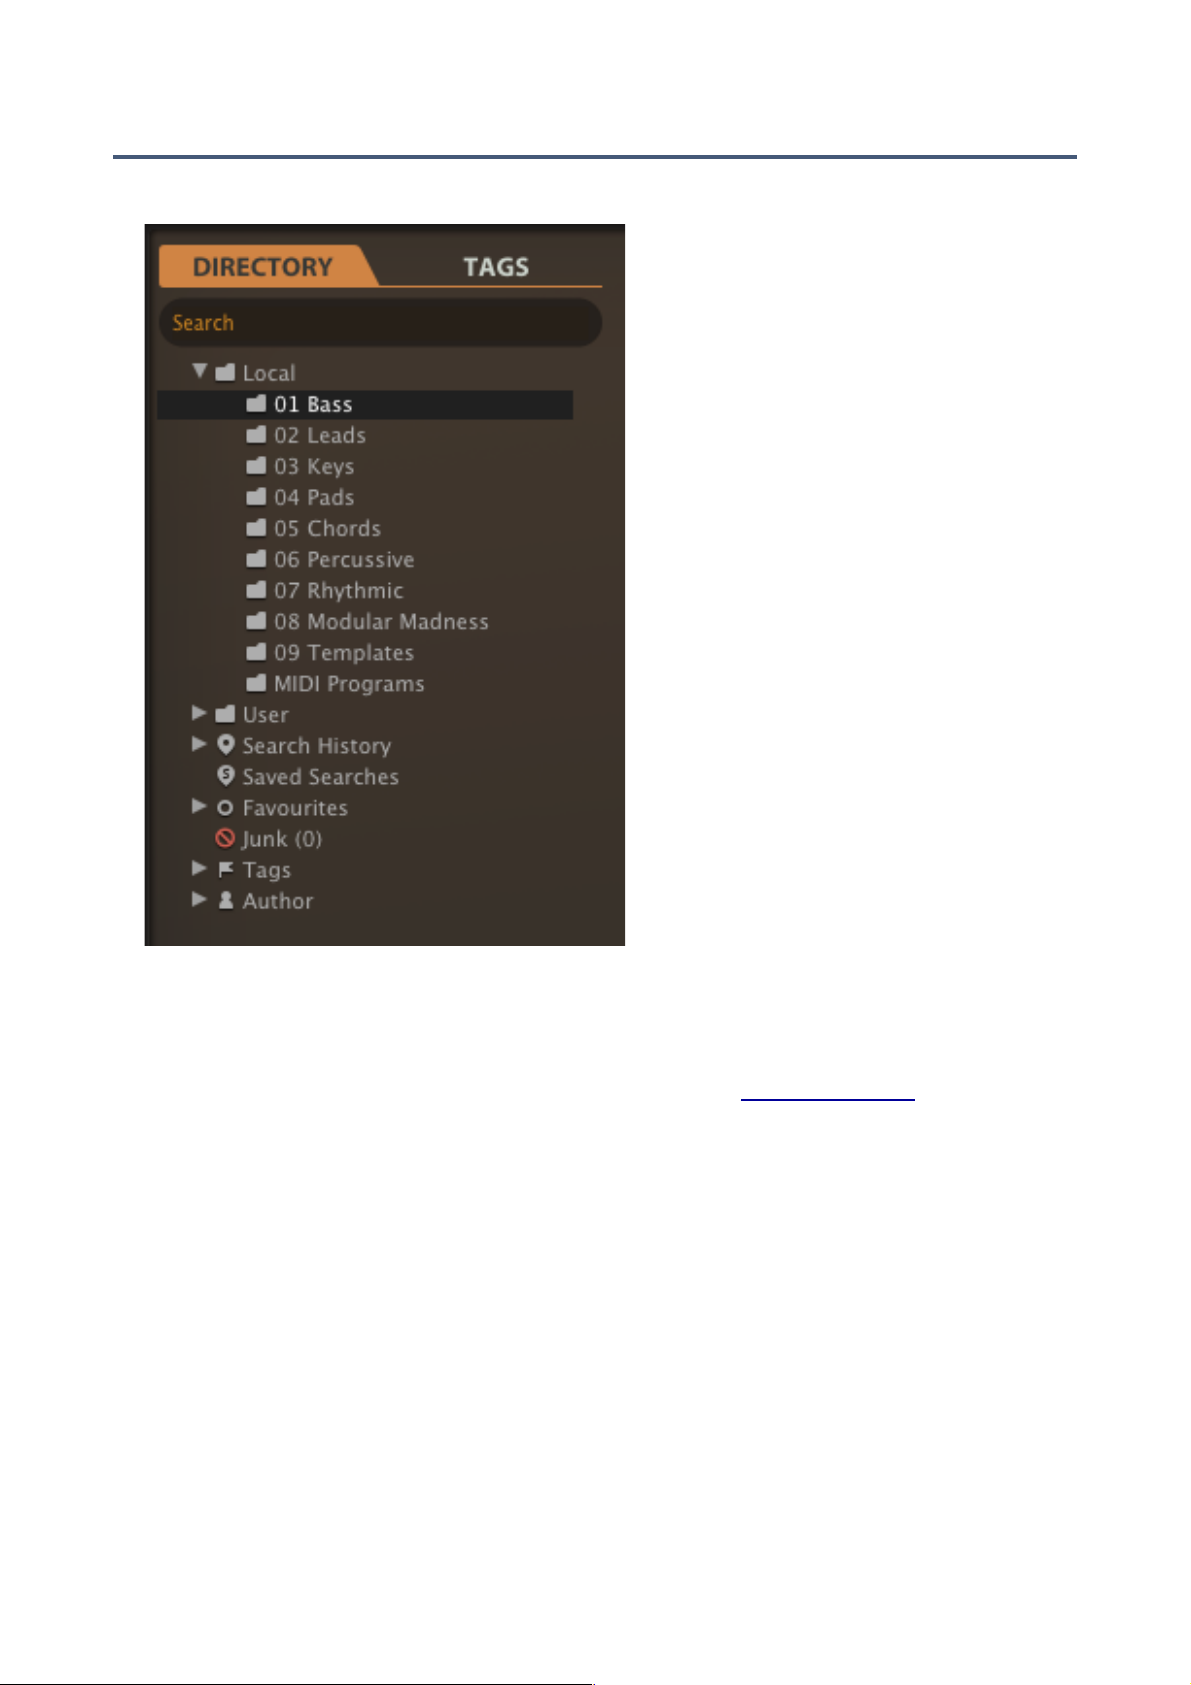
On the left of the patch browser is the DIRECTORY panel:
Local
ACE’s factory presets are sorted into folders 01 through 09. We recommend that you do
not add or remove presets here, but save all your creations and any third party soundsets in the ‘User’ folder (see below). See the preference Save Presets To.
MIDI Programs
As well as the categorized factory presets, Local also contains a special folder called
‘MIDI Programs’, which is initially empty. When the first instance of ACE starts, all presets in that folder will be loaded into memory. These presets (up to 128) are selected
directly via MIDI Program Change messages. As they are accessed in alphabetical order, it’s probably best to put a number at the beginning of the name e.g. ‘000 rest-ofname’ to ‘127 rest-of-name’. But that’s not all…
‘MIDI Programs’ can contain up to 127 sub-folders, each holding up to 128 presets. The
sub-folders are switched via MIDI Bank Select messages (CC#0). Send Bank Select
first, then Program Change. ‘MIDI Programs’ is bank 0, sub-folders are addressed in
alphabetical order, starting with bank 1.
TOC GUI PTC VCO MIX LFO VCF ENV MLT GEN EFX TWK CNF 12
Page 13

PATCHES
Important: ‘MIDI Programs’ presets cannot be added, removed or renamed on the fly –
any changes to that directory will only take affect after you have restarted the host.
User Folder
The best address for your own creations as well as soundsets from other sources. You
can either select ‘User’ immediately before saving the preset, or set a global preference
which ensures that it will always be saved here – see the Save Presets To preference.
Tip: It’s worth finding out where the ‘User’ folder actually resides on your computer.
Right-click on ‘User’ and select reveal in Finder (Mac) or open in Explorer (Win).
Smart Folders
These folders do not contain files, but display the results of querying a database. The
content is dynamic i.e. it will change whenever the underlying data changes.
Search History
Click on this folder to display the results of past searches (maximum 10). Whenever you
need to make the results of a search more permanent, right-click and select save
Search... The entry will be moved to the Saved Searches folder – see below. To remove
all searches from the list, right-click on the Search History folder and select clear.
Saved Searches
This folder contains searches that have been saved via right click from Search History.
To remove individual saved searches, right-click on the search and select delete.
Tip: Entries dragged from Saved Searches and dropped onto real folders within Local or
User will create a folder containing copies of all found presets!
Favourites
8 smart folders, one for each Favourite colour. See Presets context menu on the next
page. Presets dropped onto one of the Favourites folders will be marked as such.
Junk
A smart folder pointing to all junked presets. See Presets context menu on the next
page. Presets dropped onto this folder will disappear from the rest of the browser unless made visible (see show junk in the Presets context menu).
Tags
Smart folders for each Category/Subcategory, Features and Character tag. Presets
dropped onto these folders will adopt the corresponding tag. Presets dropped onto the
Untagged folder will have all Category, Features and Character tags removed.
Author
Smart folders for each Author. Tip: Instead of signing each of your creations, you could
sign just one of them, select them all and drag onto Author/*YOU*/. This process cannot
be undone, so to avoid setting wrong authorship please use this feature with caution!
See also the section Drag & Drop functions a few pages down…!
TOC GUI PTC VCO MIX LFO VCF ENV MLT GEN EFX TWK CNF 13
Page 14
PATCHES
Directory context menu
Right-clicking on any folder within Local or User will open this menu:
refresh: Update the browser contents, which is necessary for
Windows users after altering any files in Explorer.
create new: Insert an empty subdirectory.
rename: Edit the folder name.
reveal in Finder / open in Explorer: Opens a system window for
the clicked folder. After adding, removing or renaming presets
or folders outside of ACE’s own browser, Windows users
should always refresh (see above).
on open expand to: Specifies how deeply the browser will open subdirectories whenever
the GUI is reopened or the refresh function is called.
show folder icons: Lets you hide all icons in the directory (except the Junk symbol).
Presets Panel
The central, unlabelled area of the browser is where you click to load presets...
Presets context menu
Right-click to open a menu containing functions that can be applied to individual presets.
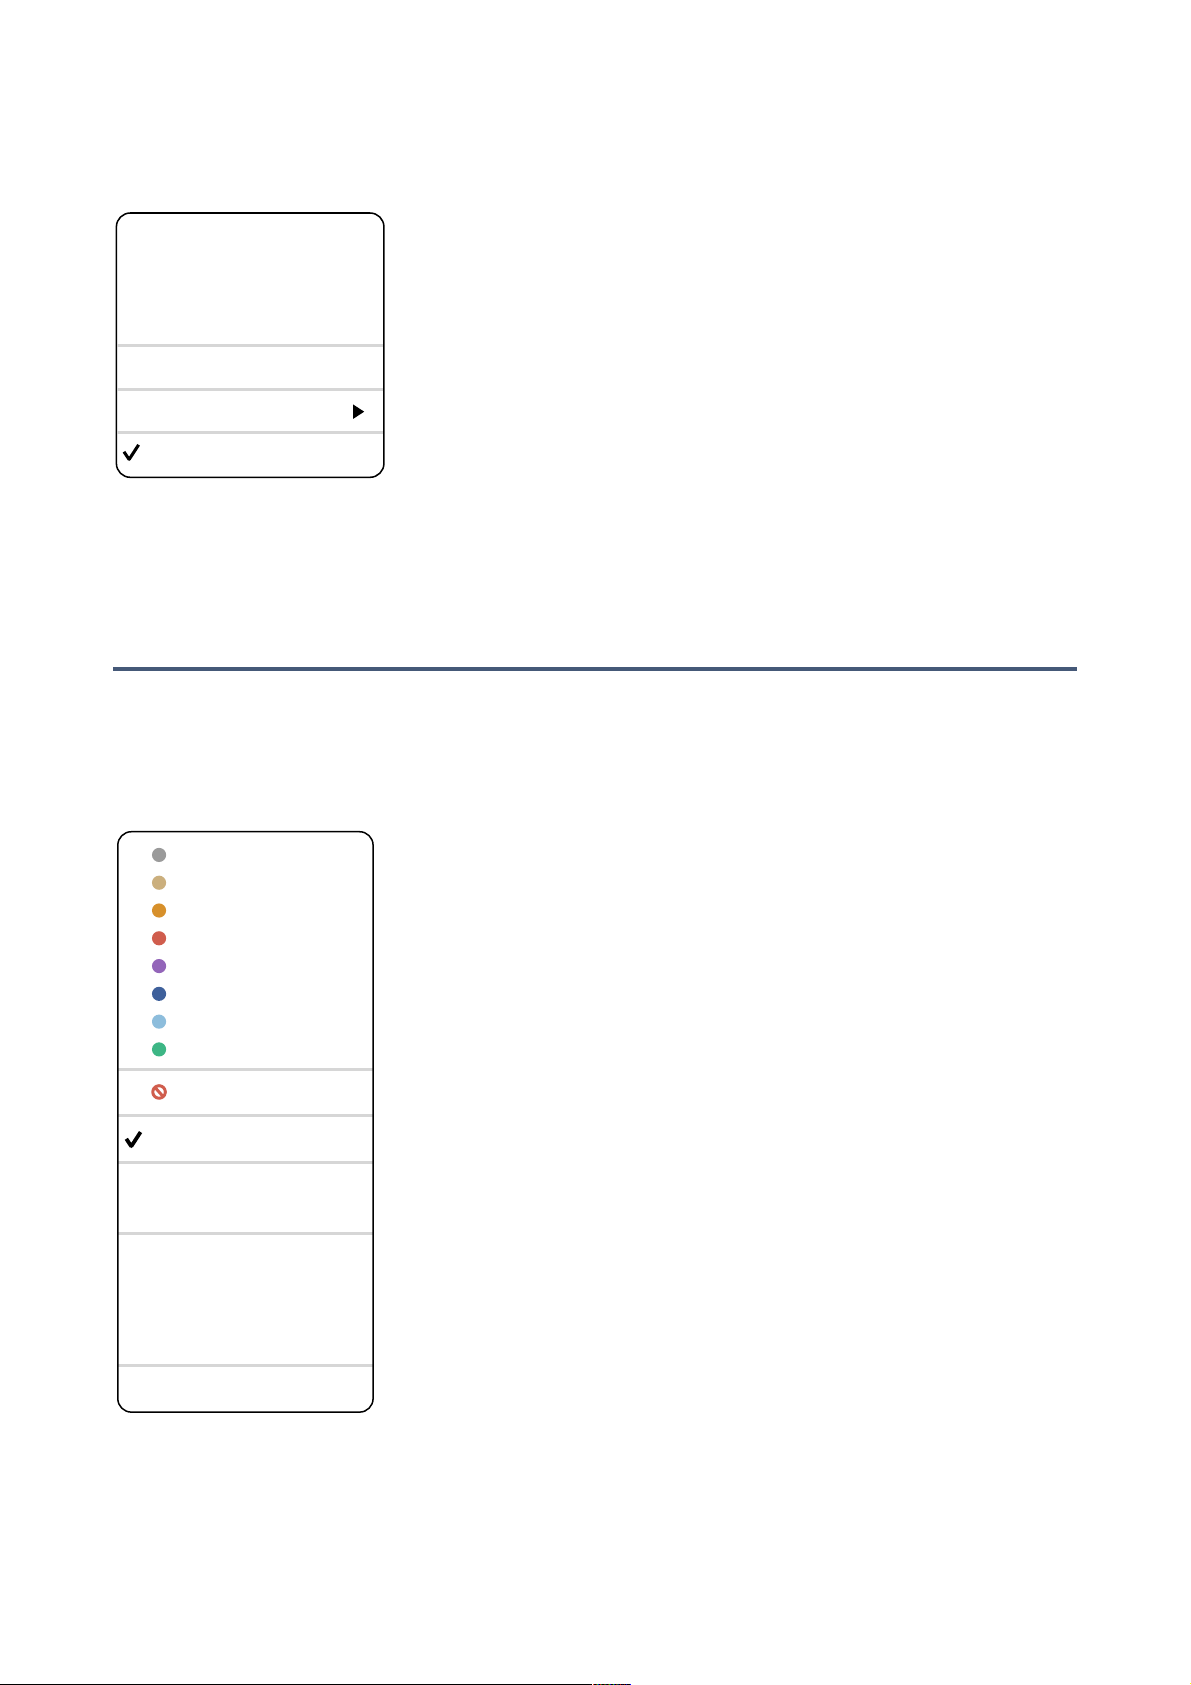
mark as favourite: Choose one of eight ‘favourite’ marks. The
selected entry will be replaced with unmark as favourite.
mark as junk: Instead of deleting any unloved presets, you can
mark them as ‘junk’ so that they disappear from the browser…
show junk: Activate this option to display junked files (see
above) instead, but mark them with a STOP symbol.
select all, deselect: See Multiple Selection below.
rename: You can change the names of presets using this func-
tion. Note that only the most recently selected preset can be
renamed i.e. you can’t rename multiple files at once.
copy to User Folder / duplicate: The function here depends on
the status of the Save Presets To preference as well as on the
location of the source preset(s) i.e. whether they are in Local or
User. Selected presets are copied with a number appended to
the name, which is incremented so that presets cannot be
overwritten by mistake.
reveal in Finder / open in Explorer: Opens a system window for
the selected preset. After manipulating any files in Explorer,
Windows users should always refresh the directory.
convert to native / h2p / h2p extended: Converts the selected preset(s) into the format previously selected via right-click on the [SAVE] button.
move to Trash / Recycle Bin: Moves the selected preset(s) to the system trash.
TOC GUI PTC VCO MIX LFO VCF ENV MLT GEN EFX TWK CNF 14
refresh
create new…
rename…
reveal in Finder *
move to Trash
on open expand to
show folder icons
mark as favourite
select all
deselect
show junk
rename…
copy to User folder
reveal in Finder *
convert to h2p
move to Trash
mark as junk
mark as favourite
mark as favourite
mark as favourite
mark as favourite
mark as favourite
mark as favourite
mark as favourite
Page 15

PATCHES
Restore
While in the browser you can audition as many presets as you like in any folders without
losing the one that was previously loaded: Clicking the [Restore] button will always get
you back to where you started.
Scan / ready
In the top right of the presets panel is a dark rectangle normally labelled ‘ready’. Upon
refresh this turns into a progress indicator showing how much of the preset database
has been refreshed. The process should only take a few seconds.
Multiple selection
A block of adjacent presets can be selected via shift+click, and individual presets can be
added to the selection via cmd-click (Mac) / alt+click (Win). Presets can be moved to a
different folder via drag & drop (see below). To deselect, either click on an unselected
preset or choose deselect from the context menu.
Drag & Drop functions
To manage your preset library more comfortably you can drag presets and folders between ACE’s browser and your desktop (or elswhere). Examples: To install new soundsets, drag them from your desktop directly into the User folder. Dragging a search result
folder onto the desktop will create a new folder containing the presets from that search.
Import / export favourites: You can import/export a single favourite ‘colour’, or all at
once. Shift-click and drag the favourites smart folder(s) out of the browser to create a
Favourite (n).uhe-fav favourites file. To import, drag this file into the favourites area.
Note: Importing favourite status from another computer will only work correctly if the
names and locations of those presets are identical on both computers.
Mac: Most Finder operations should automatically update the browser. This might not
update instantly when using multiple instances of different formats, or multiple hosts at
the same time, but all it usually takes is a click on the GUI or in the directory tree, which
sets the focus to the plug-in instance.
Win: A manual refresh is often required. We plan to improve this in future versions.!
TOC GUI PTC VCO MIX LFO VCF ENV MLT GEN EFX TWK CNF 15
Page 16

PATCHES
Preset Tagging
“Tags” are elements of metadata, information that you can add to presets so that they can
be found according to certain attributes.
IMPORTANT: Clicking on [SAVE] isn’t required, as tags are updated automatically. The
advantage is that presets don’t have to be saved each time you edit tags. The main drawback is that you should only edit tags after saving your preset. If you edit tags while creating a new version of something, you would also be changing the tags in the original!
The Tagging Window
Right-click on the [SAVE] button and select Tag this preset:
CATEGORY describes a preset by analogy to instrument types or classic synth genres.
Each one has its own set of subcategories. FEATURES are technical classifications, and
CHARACTER tags are pairs of opposites from which you can choose only one.
Tagging via PRESET INFO
In the PRESET INFO panel, right-click on CATEGORY, FEATURES or CHARACTER
and select / unselect tags 7. Note: This method only works for individual presets. If you
right-click on an existing tag, the first option in the menu becomes remove tag...
The function create Search from Tags searches for presets with ALL the same tags.
Tagging via Tags smart folder
You can tag presets by drag & drop onto one of the Tags smart folders. To remove all
tags, drag the presets onto the Tags/Untagged/ smart folder.!
TOC GUI PTC VCO MIX LFO VCF ENV MLT GEN EFX TWK CNF 16
Pads
Leads
Keys
FX
Drums
Seq
Other
Bass Acoustic
Analogue
Digital
E-Bass
FX Bass
Plucks
Vocal
Sub
Dist+LoFi
RingMod
Chord
Mono
BPM
CrossMod
OscSync
Natural
Phat
Soft
Constant
Bright
Clean
Aggressive
Moving
Dirty
Thin
Dark
Synthetic
Poly
Duo
Modulated
Synth
Sync
CHARACTERFEATURESCATEGORY
Slow Release
Glide
Soft Attack
Percussive
Page 17

PATCHES
Search by Tags
Click on the TAGS tab to open this view. The buttons here let you set up search criteria
according to existing tags with just a few mouseclicks:
There are four sets of buttons. The first three correspond to the tags in the tagging window (see the previous page), and the bottom row lets you find any presets tagged as
Favourites. Clicking on the [^] icon to the right of each heading hides the options for that
set of tags.
Categories and Subcategories
Each Category has its own set of subcategories. Not selecting any subcategory here
means “show me presets tagged with any subcategory”. Click on [Leads]...
You can select multiple categories without specifying any subcategory if you hold cmd
(Mac) or alt (Windows) while clicking on the category. Try that with the [Keys] button.
Selecting the subcategory with the same name as the category means “show me presets tagged without a subcategory”. You will not find any in the factory presets.
Completed category+subcategory tags appear below the subcategories as buttons with
‘off’ switches [X] so you can add other main categories by simply clicking on them.
Features, Character and Favourites
Unlike multiple Category tags, which expand the search, selecting these types restrict
the search. Let’s find all thin sounding presets with a slow release:
Click on the TAGS tab. If any Categories are highlighted, click on them. Then select
FEATURES = [Slow Release] and CHARACTER = [Thin].
TOC GUI PTC VCO MIX LFO VCF ENV MLT GEN EFX TWK CNF 17
Search
CATEGORIES
FEATURES
CHARACTER
Bass
Bright Dark
Mono Poly Duo Chord
Glide
Constant Moving
Soft Aggressive Phat Thin
Clean Dirty
FAVOURITES
1 2 3 4 5 6 7 8
Soft Attack
Pads Leads Keys FX Drums Seq Other
Slow Release
Percussive
Modulated
Natural Synthetic
BPM
OscSync RingMod
TAGS
CrossMod
Page 18

PATCHES
Summary / Recap
In the DIRECTORY panel, specify a search path via double-click. In the TAGS panel,
select category tags. Add others if required to extend the search, but remember to hold
down cmd (Mac) or alt (Windows) if you want to retain category tags that don’t specify
a subcategory. Select Features, Character and/or Favourites tags to refine the search.
Exit any search path by clicking on the [X] to the right. You’ll soon get the hang of it!
Search by Text
The Search field lets you find presets according to a string of characters i.e. text. Here’s
an easy example: If you remember that the preset you’re looking for has the word
“clock” in its name or description, enter “clock” into the Search field and hit Return.
The search normally looks into the preset name, author, DESCRIPTION and USAGE
(see the PRESET INFO panel). Searches are not case-sensitive, and quotes are not
required unless you need to include spaces.
To restrict the search to a particular path, for instance Local/04 Pads, double click on a
folder. This path will appear beneath the Search field instead of the preset folders, and
you will only see smart folders (unless the specified path contains sub-folders).
See the image below. The [^] button to the left moves the Search path up one level, in
this case to /Local. The [X] button to the right sets the search path to the default Local
plus User (i.e. all ACE presets), and the preset folders become visible again.
Try a text search: Enter three or four letters then hit Return. For instance, star will find
all files containing the text string star (e.g. mustard or starters). Entering "star
wars" (with the quotes) would find e.g. Battlestar Warship, if such existed in the presets.!
TOC GUI PTC VCO MIX LFO VCF ENV MLT GEN EFX TWK CNF 18
Search History
Saved Searches
Favourites
Junk (0)
Tags
Author
/Local/04 Pads
Search
DIRECTORY
s
Page 19

PATCHES
Syntax
Scope
You can limit the scope of the search to just the preset name or specific parts of PRESET INFO by using name (preset name), author, desc (description) or use (usage) followed by a colon. For instance, author:the finds all presets by sound designers whose
author names contain ‘the’. Similarly, desc:space will find all presets with the word
space in the description.
Logic
IMPORTANT: The following logical operators can only be used between text elements.
AND requires that presets contain both words. It can be written explicitly if you prefer,
but is not necessary. For example, star AND wars (or simply star wars) will find presets
that contain both star and wars.
OR means that presets can contain just one of the words or both. For example, star OR
wars will find presets that contain star as well as presets that contain wars.
NOT excludes presets containing the word. To find all presets that contain star but don’t
contain wars, enter star NOT wars.
Including Tags
Note: In the current version of the browser, tags must appear after any text items.
Regular tags can also be entered into the search field if preceded with a ‘#’. For example, name:"hs " #bass:* will find all presets with "hs " in the name that are tagged as
Bass with any or no subcategory. The colon separates Category and Subcategory, and
the star (*) means “any subcategory, even none”. Between multiple tags of the same
type is an implicit OR, while between different types is an implicit AND.!
TOC GUI PTC VCO MIX LFO VCF ENV MLT GEN EFX TWK CNF 19
Page 20

MODULES
Modules
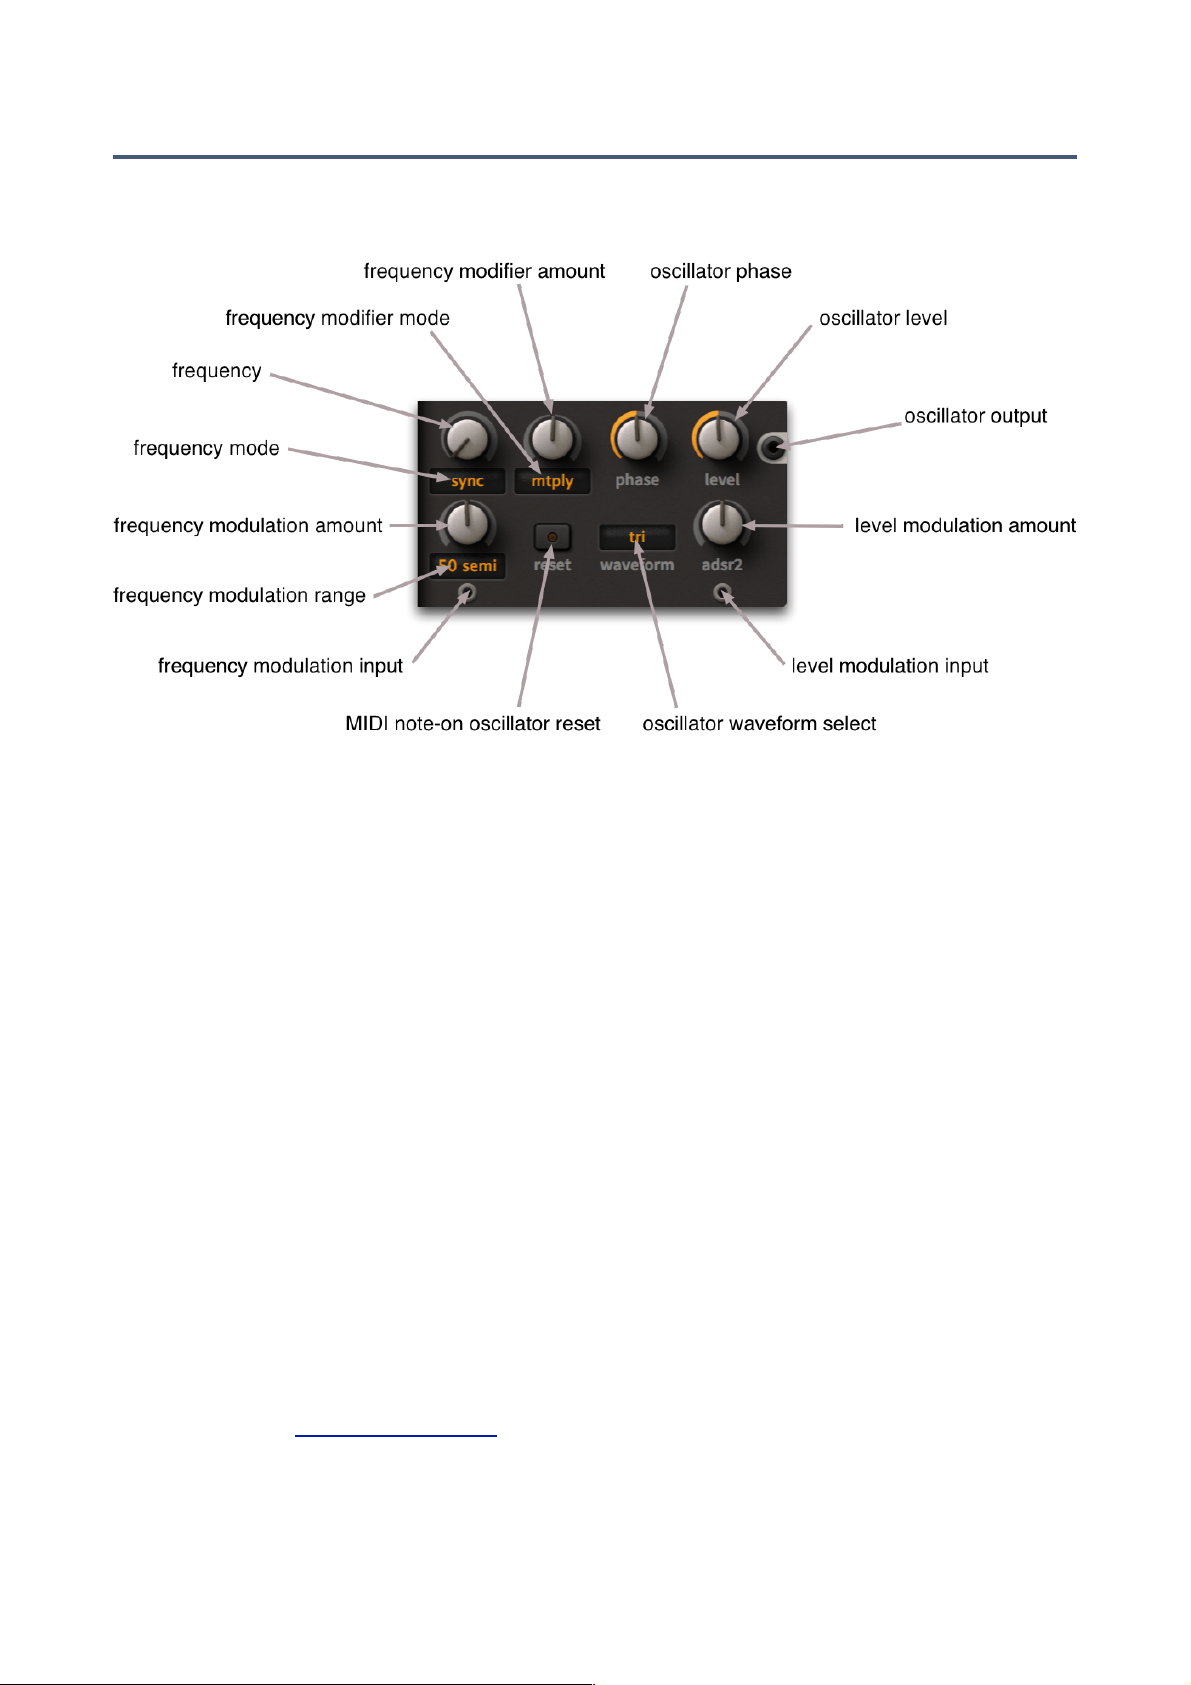
VCO common parameters
The two VCOs are ACE’s main sound-generation modules, with a frequency range of 0 Hz
to 20 kHz. All oscillators (VCOs and LFOs) include the same set of frequency parameters:
Three knobs with associated switches that also serve as labels:
frequency
The frequency control has a range of 0.00 to 24.00. The frequency modes are:
semi maximum 24 semitones above the current pitch. .........
partial the first 24 overtones – octaves are at 1.00, 3.00, 7.00, 15.00 .......
subhrm the first 24 subharmonics – look up "Trautonium" on the web .....
hertz 0Hz to 24Hz. 0.00Hz is no signal because DC components are removed .........
sync sync to song tempo, divider – 1.0 is a whole note, 4.0 a quarter note etc. .........
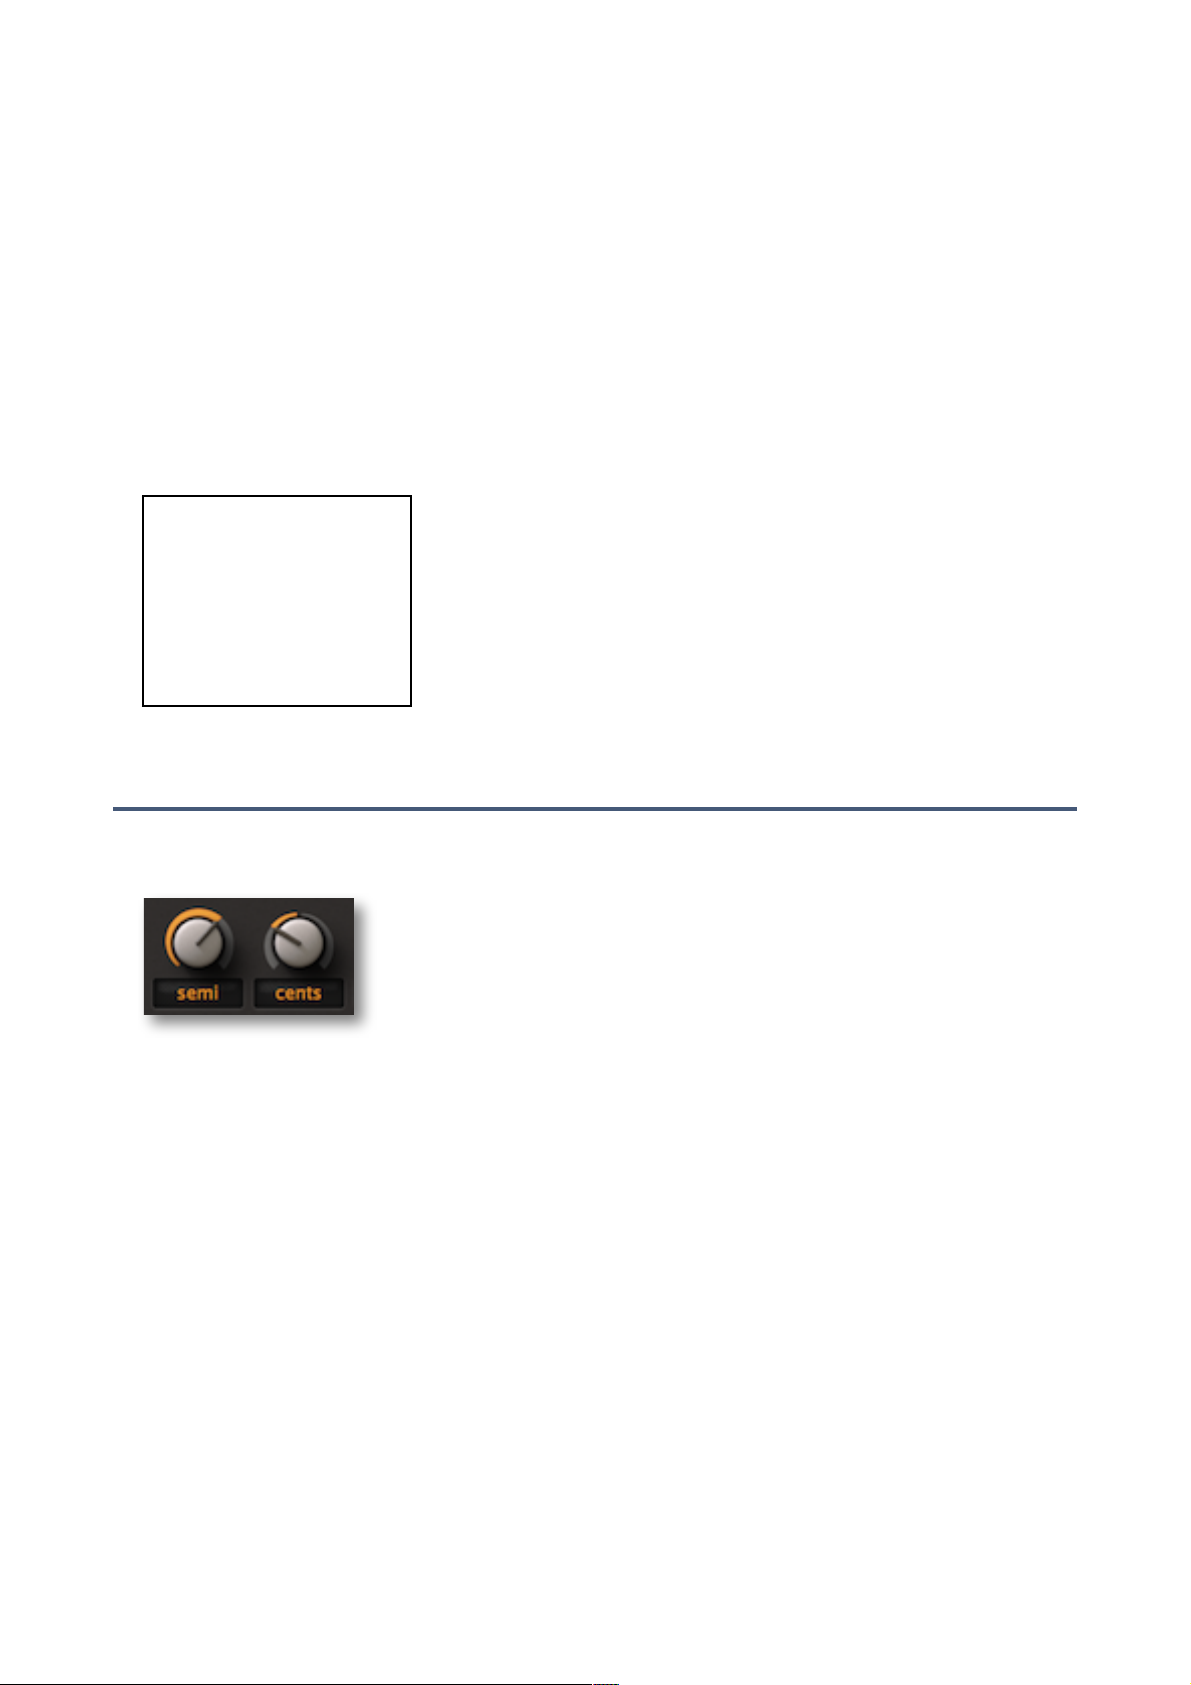
modifier
The modifier control range is -50.00 to +50.00 (bipolar). The modifier modes are:
cents detunes the oscillator by +/- 100 cents i.e. 1 semitone ........
5 Hz detunes the oscillator by +/- 5 Hertz .........
beats detune in sync with song tempo. +4.00 = one extra cycle per quarter note ........
mtply frequency is multiplied (from 0 to 50) or divided (from 1/1 at -1.00 to 1/50th) ........
FM amount
The amount of frequency modulation from the FM input. Available FM ranges are:
cents +/- 100 cent i.e. 1 semitone ........
5 semi +/- 5 semitones ......
50 semi +/- 50 semitones!....
TOC GUI PTC VCO MIX LFO VCF ENV MLT GEN EFX TWK CNF 20
Page 21

MODULES
reset
The oscillators in analogue synths run continuously, they never stop. In digital synths,
oscillators are not computed until a note is played. This means they either start at a
random phase (most similar to analogue) or at the same phase every time (for consistent attack). The VCOs in ACE have a switch offering both options:
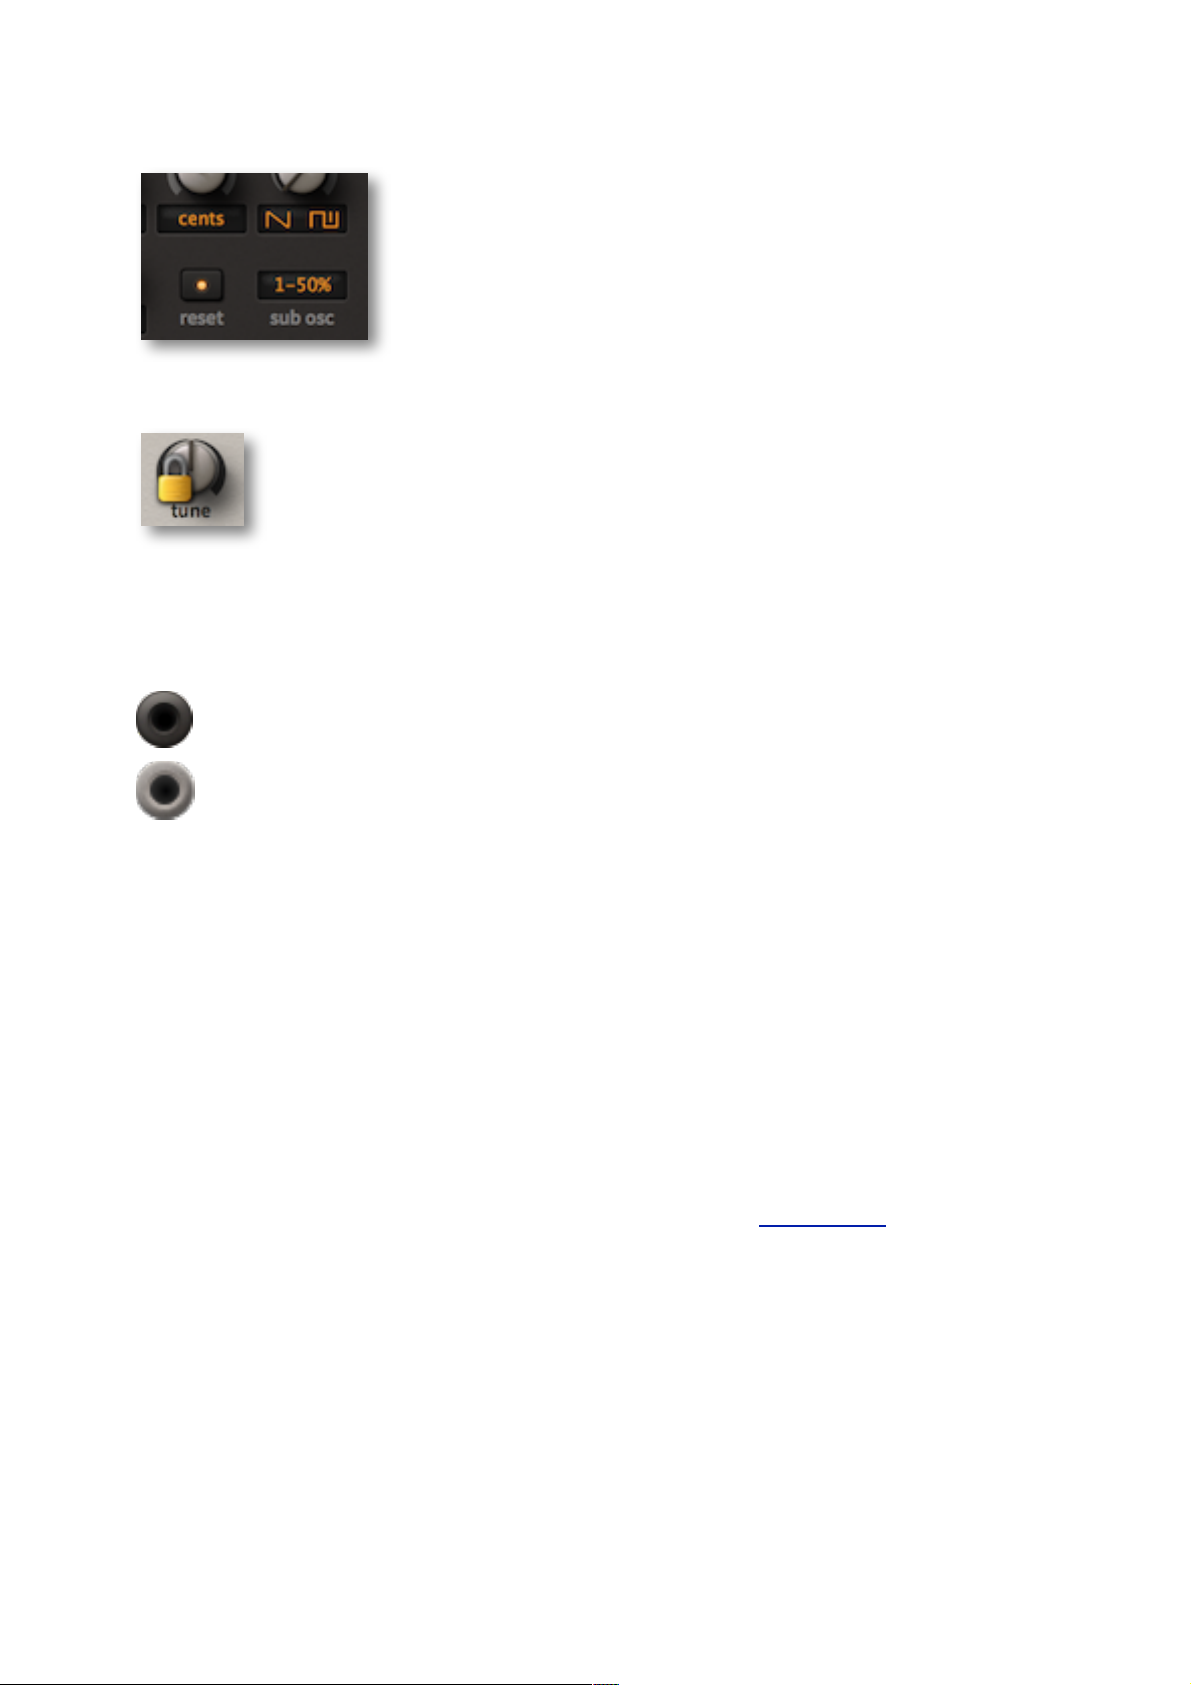
off random phase .........
on fixed phase .........
waveform blend
Crossfades between the sawtooth and pulse waves (or peak and triangle in VCO1).
pulse width (pw)
The width of the pulse wave is variable from 0% to 100%. Any signal can be used for
pulse width modulation (PWM), even an audio oscillator. The default source is LFO2.
VCO1
waveform mode
As mentioned above, both VCOs can blend between sawtooth and pulse waves. VCO1
also lets you switch to the mellower peak / triangle (click on the waveform icon).
sub-oscillator
VCO1 includes a sub-oscillator with its own separate output socket. Click on the subosc switch to select a 50% pulse wave (perfect square) pitched 1 or 2 octaves below
the main oscillator, or a 75% pulse wave 2 octaves below.
TOC GUI PTC VCO MIX LFO VCF ENV MLT GEN EFX TWK CNF 21
Page 22

MODULES
VCO2
vibrato
Frequency modulation for both VCOs from LFO1, hardwired. Although it also affects
VCO1, placing this knob in the VCO2 panel was a necessary compromise.
ring
Ring modulation. Cross-fades between pure VCO2 and ring modulation between VCO1
and VCO2. Depending on the waveform and interval between the two oscillators, ring
modulation can create metallic sounds, nasal sounds… or even rhythms if VCO1 is set
to e.g. sync mode.
sync
The phase of VCO2 is not only reset when it completes its normal cycle, but also whenever VCO1 completes a cycle (turn sync up to maximum for the standard ‘hard sync’).
The pitch of VCO2 is normally set higher than VCO1, and VCO2 is often modulated by
an envelope or LFO to sweep the effect. Hard sync can deliver sounds that are very rich
in harmonics without losing the fundamental pitch (of VCO1).
Set lower values for a special kind of ‘soft sync’: Again, the phase of VCO2 is reset by
VCO1 – but not to 0°! The phase of VCO2 moves by a proportion of its current value
(e.g. 50%), which lets you create pure-interval overtones. Experiment with the sync
knob and the interval between the two oscillators – you should quickly discover some
very interesting overtones and quasi-chaotic effects.
Connecting a cable to the sync modulation socket effectively replaces a +5V default
modulator. Tip: Try patching velocity or an envelope into the sync input.
TOC GUI PTC VCO MIX LFO VCF ENV MLT GEN EFX TWK CNF 22
Page 23

MODULES
cross
Short for “cross modulation”. In ACE this means analogue FM (frequency modulation),
with VCO1 modulating VCO2. Connecting a cable to the cross modulation socket effectively replaces a +5V default modulator.
LFO common parameters
The label LFO only describes the default function of these modules, as they are actually
full range (0Hz–20kHz) i.e. from static to inaudibly high! All oscillators have the same set of
frequency parameters – three knobs with associated switches that also serve as labels:
frequency
The frequency control has a range of 0.00 to 24.00. The frequency modes are:
semi maximum 24 semitones above the current pitch. ...........
partial the first 24 overtones – octaves are at 1.00, 3.00, 7.00, 15.00 ........
subhrm the first 24 subharmonics – look up "Trautonium" on the web ......
hertz 0Hz to 24Hz. 0.00Hz is no signal because DC components are removed ..........
sync sync to song tempo, divider – 1.0 is a whole note, 4.0 a quarter note etc. ...........
modifier
The modifier control range is -50.00 to +50.00 (bipolar). The modifier modes are:
cents detunes the oscillator by +/- 100 cents i.e. 1 semitone ..........
5 Hz detunes the oscillator by +/- 5 Hertz ...........
beats detune in sync with song tempo. +4.00 = one extra cycle per quarter note .........
mtply frequency is multiplied (from 0 to 50) or divided (from 1/1 at -1.00 to 1/50th) ..........
TOC GUI PTC VCO MIX LFO VCF ENV MLT GEN EFX TWK CNF 23
Page 24

MODULES
FM amount
The amount of frequency modulation from the FM input. Available FM ranges are:
cents +/- 100 cent i.e. 1 semitone ........
5 semi +/- 5 semitones ......
50 semi +/- 50 semitones ....
LFO1
LFO1 normally generates a pure sine wave. The LFO1 specialities are vibrato, phase
modulation i.e. classic FM, sample & hold... and even waveshaping.
phase
The phase knob adjusts the phase position i.e. where in its cycle the waveform will start
whenever the LFO is reset (see below). LFO1 has a phase modulation input – connecting another oscillator here gives you classic FM sounds (all so-called “FM” synths
were actually using phase modulation, and should have been called “PM” synths). Of
course the phase modulation source can be LFO1 itself, which skews the sine wave towards something very similar to a sawtooth.
Note: The phase knob has a very different role in sample & hold mode (see below).
TOC GUI PTC VCO MIX LFO VCF ENV MLT GEN EFX TWK CNF 24
Page 25

MODULES
level
LFO1 output level. Both LFOs have amplitude modulation inputs, and the default source
for LFO1 is the modulation wheel (m-wheel) for e.g. quick “vibrato via mod wheel”.
reset
This switch determines whether the LFO phase is reset by MIDI note-on events. Note: If
the frequency mode is sync, LFOs are also reset in sync with the host program.
free not reset, runs continuously (“monophonic”) ......
gate per-voice reset whenever a note is played (“polyphonic”) .....
sample & hold
If anything is connected to the s&h input, LFO1 switches into sample & hold mode,
and samples the input at its own “clock speed". For vintage random effects, connect
noise here.
In s&h mode the phase knob becomes a lag processor, smoothing out jumps between
successive values. At very high LFO1 rates, the phase parameter acts like the cutoff
control of a lowpass filter (but in the opposite direction). If you find LFO1 strangely silent
in s&h mode, set its phase closer to zero.
some LFO1 tricks
random modulation: Connect white noise ("white") to the s&h input and use LFO1 to
modulate e.g. VCO frequency or VCF cutoff.
sample rate reduction effects: Start with the default patch and drag a cable from LFO1
output directly to one of the VCAs. Connect an audio signal (e.g. a VCO) to LFO1’s s&h
input. Set the frequency mode to semi and the modifier to mtply. Set LFO1 phase to
around zero or you won't hear anything. Now try different multiplication factors (modifier
values) between 1.50 and around 30. LFO1 adopts the pitch of the sampled oscillator
and delivers a “rougher” version of same. To see the steps in the waveform, turn the oscilloscope frequency way down.
waveshaping: Although the VCFs can deliver plenty of distortion, especially when connected in series, you can also use LFO1 as an extra waveshaper – try this: Start with
the default patch and drag a cable from LFO1 output directly to one of the VCAs. Set
semi and mtply modes, and a multiplication factor of 0.00. Switch the reset to gate
(LFO1 doesn't oscillate now) and set the phase to 0.00 (LFO1 always resets to 0° now).
Then patch the signal you want to process (e.g. VCO1) into LFO1's phase modulation
input. Turn up the amount – there’s your sine waveshaper! Change the phase to make
the effect asymmetrical. By the way, the sampled signal doesn’t have to be a VCO –
you can use this method to alter the shape of any signal: try waveshaping an envelope.!
TOC GUI PTC VCO MIX LFO VCF ENV MLT GEN EFX TWK CNF 25
Page 26
MODULES
LFO2
Instead of phase modulation and s&h, LFO2 offers a much wider variety of waveforms
than LFO1... which makes LFO2 easy to use as a third audio oscillator.
phase
The phase knob adjusts the phase position i.e. where in its cycle the waveform will start
whenever the LFO is reset (see below).
level
LFO2 output level. Both LFOs have level/amplitude modulation (AM) inputs and associated amount controls, and the default source for LFO2 is ADSR2.
reset
This switch determines whether the LFO phase is reset by MIDI note-on events. Note: If
the frequency mode is sync, LFOs are also reset in sync with the host program.
free not reset, runs continuously (monophonic) ............
gate per-voice reset whenever a note is played (polyphonic) ...........
waveform
The first four LFO2 waveforms are standards, but the last in the list is very special:
sine sine wave, pure ............
tri triangle wave, pure ................
saw sawtooth wave, bright ............
square square wave, hollow .......
tap map the mapping generator interpreted as a waveform. Note that setting the LFO2 ....
waveform to tap map doesn’t prevent the mapping generator from being
used in its other role as a modulation source at the same time.
TOC GUI PTC VCO MIX LFO VCF ENV MLT GEN EFX TWK CNF 26
Page 27
MODULES
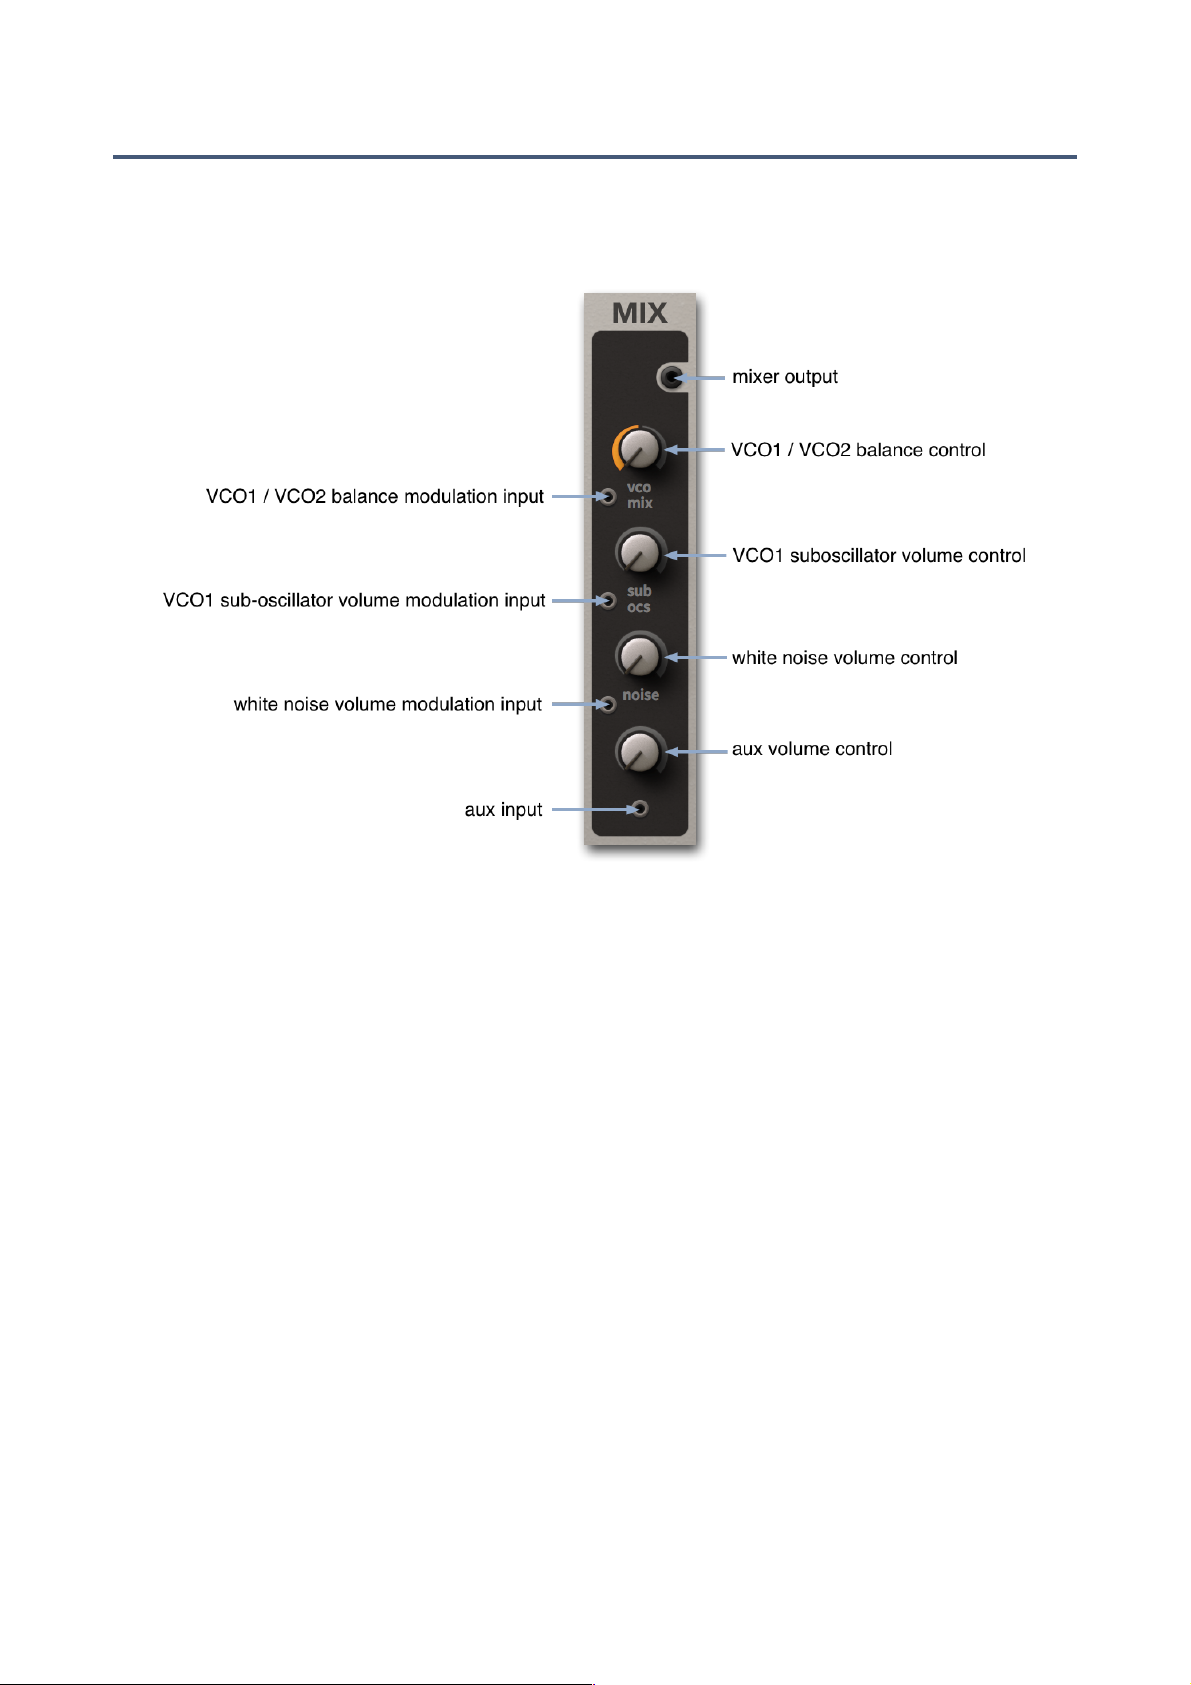
MIX
In the middle of the window is a mixer that serves as the default link between the main
sound generators and the sound processing in ACE. The MIX module also includes amplitude modulation inputs. Note that its output is sent to VCF1 by default.
vco mix
The upper knob controls the relative levels between VCO1 and VCO2. The central position (0.00) is a 50-50 mix of both VCOs.
Of course the balance modulation input will also accept audio rate signals: remember
any cable everywhere! Tip: For bipolar modulation sources (LFO, VCO) set the mix
knob to the centre, for unipolar sources (e.g. mod wheel, ramp) set it to maximum.
sub osc
VCO1’s sub-oscillator.
noise
White noise. Tip: A small amount of white noise mixed into a pad patch can give the filters and chorus more frequencies to work with, making the sound fuller.
aux
The unlabelled knob is the level control for the auxiliary input at the bottom of the mixer.
Connect anything you like here: pink noise, a pitched LFO – or even VCF1 for instant
filter feedback.!
TOC GUI PTC VCO MIX LFO VCF ENV MLT GEN EFX TWK CNF 27
Page 28

MODULES
VCF
ACE’s two filters are almost (but not quite) identical. The screenshot here shows VCF2,
with its cutoff mode selector and bipolar cutoff knob...
The filters in ACE have several properties normally associated with analogue hardware
only. For instance, they can easily be overdriven without sounding harsh. Unlike classic
hardware filters, strong overdrive in ACE won’t necessarily kill the resonance. Just turn it
up – there’s plenty of headroom there.
Especially around the self-oscillation threshold, where the resonance appears to struggle
with the oscillators for control over pitch, there are surprising opportunities for organic/
chaotic sound design. Depending on the input signal and its gain, it can even sound as if
the input is actually modulating cutoff. Experimentation is the name of the game here!
The underlying cascade filter architecture gives you different filter types in parallel, just like
hardware multimode filters. In ACE however, all types are capable of resonance and even
self-oscillation.
Tip: if a single filter still sounds too tame for your evil purposes, you could try patching the
filters in series i.e. one after the other, and increasing the gain of the second filter. This is a
great way to make very bold, biting sounds similar to hardware filter units.
gain
VCF input level (negative values) and overdrive (positive values).
Tip: for typical screaming distortion (TB303 etc.), use another VCF in series. Set it to
LP1 mode, with maximum cutoff and very high gain.!
TOC GUI PTC VCO MIX LFO VCF ENV MLT GEN EFX TWK CNF 28
Page 29

MODULES
cutoff
VCF1: Cutoff frequency is measured in semitones from 0.00 to 150.00 (12 octaves) and
the modulation range is +/-150 semitones. Note: the input / knob at the bottom left of the
VCF panel also modulates cutoff, not gain.
VCF2: Instead of a simple positive-only cutoff, VCF2 has 3 modes and bipolar control:
cutoff like VCF1, but bipolar .........
offset VCF2 cutoff follows VCF1 – including any modulation – but shifted negative .........
or positive. This means that VCF2 cutoff can be modulated directly by up to
four sources: two within the VCF2 panel and two adopted from VCF1.
spread like offset, but also affects VCF1 cutoff in the opposite direction. .......
keyfollow
Keyfollow causes cutoff to follow the MIDI note. If keyfollow is set to maximum, cutoff
follows MIDI notes 100%, like the VCOs.
resonance
The res range is 0.00 to 100.00. Although self-oscillation can start around 50.00, the
actual amount of resonance depends on the level of the input signal (see gain above),
so a generous range was necessary here. Resonance can be modulated by connecting
a signal to the socket to the left of the res label (effectively replacing a +5V default).
outputs
Each filter has two parallel outputs. The upper one offers four grades of lowpass...
LP1< 6dB/octave (1-pole lowpass) ..........
LP2 12dB/octave (2-pole lowpass) ............
LP3 18dB/octave (3-pole lowpass) ............
LP4 24dB/octave (4-pole lowpass) ............
...and the lower one has three other types:
HP high pass ..............
BP band pass ..............
BR band reject (notch)!..............
TOC GUI PTC VCO MIX LFO VCF ENV MLT GEN EFX TWK CNF 29
Page 30
MODULES
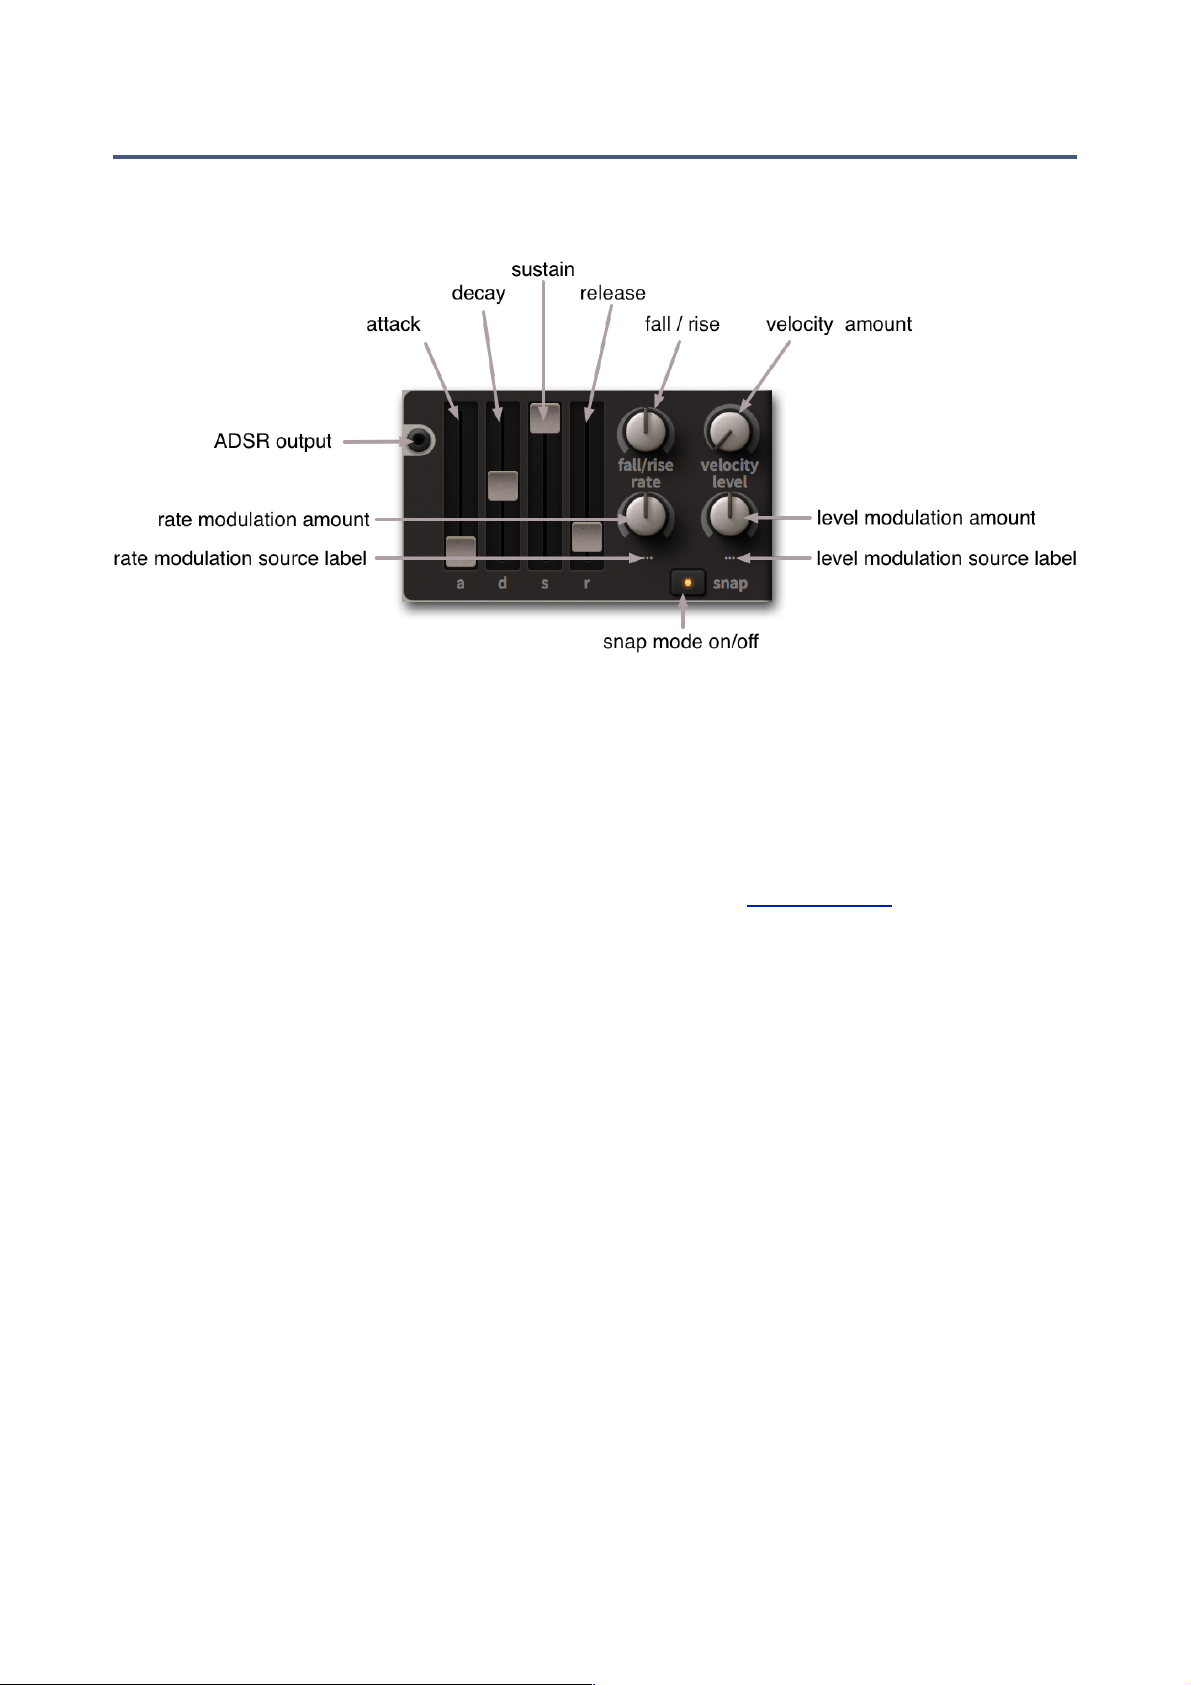
ADSR
What would a synthesizer be without envelopes to control the ebb and flow of levels? ACE
has two identical envelope generators:
a, d, s, r
Like the vast majority of synthesizers, the main envelope parameters are Attack time,
Decay time, Sustain level and Release time. But ACE also has a few extras...
fall/rise
Firstly, the bipolar fall/rise knob causes the normally flat sustain to fall or rise at a defined rate. There’s a parameter in the Tweak page called fall/rise range that limits how
far towards zero / maximum the sustain level will fall / rise.
rate modulation (...)
The lower lefthand knob is user-definable (hence the ‘...’ default label). This parameter
lets you modulate the envelope rates (attack, decay and release). Right-click on the
knob to select a modulation source. For instance, selecting KeyFollow and setting a
negative value here will make higher notes shorter, simulating the characteristics of
plucked or struck instruments.
velocity amount (vel)
Envelope levels can be scaled via MIDI velocity (vel), as well as via a source selected
by right-clicking on the lower righthand knob ("..." means none yet i.e. undefined).
level modulation (...)
The lower righthand knob is user-definable (hence the ‘...’ default label). Lets you modulate the overall ADSR level. Right-click on the knob to select a modulation source.
snap
This switch makes the decay and release more extreme, more "snappy" if the envelope
stages are relatively short.
TOC GUI PTC VCO MIX LFO VCF ENV MLT GEN EFX TWK CNF 30
Page 31
MODULES
Ramp Generator
If you find that two envelopes and two LFOs aren't quite enough for a complex patch, you
could take a look at the ramp generator – it can fill either of these roles quite well. The
ramp is not a simple decay, it is a linear attack-hold-decay (AHD) envelope with an off time
– so its closest relative is the trapezoid of classic EMS synthesizers Synthi A and VCS3.
up attack time ...............
hold time at maximum ...........
down release time .........
rest time before repeat ............
Unlike standard envelopes, the ramp generator will stay at maximum for the period set by
hold. If rest is set to maximum, the ramp is a one-shot envelope i.e it does not repeat.
Note: the Tweak page includes a parameter called ramp clock that sets the ramp segments to either seconds or one of two different sync values.
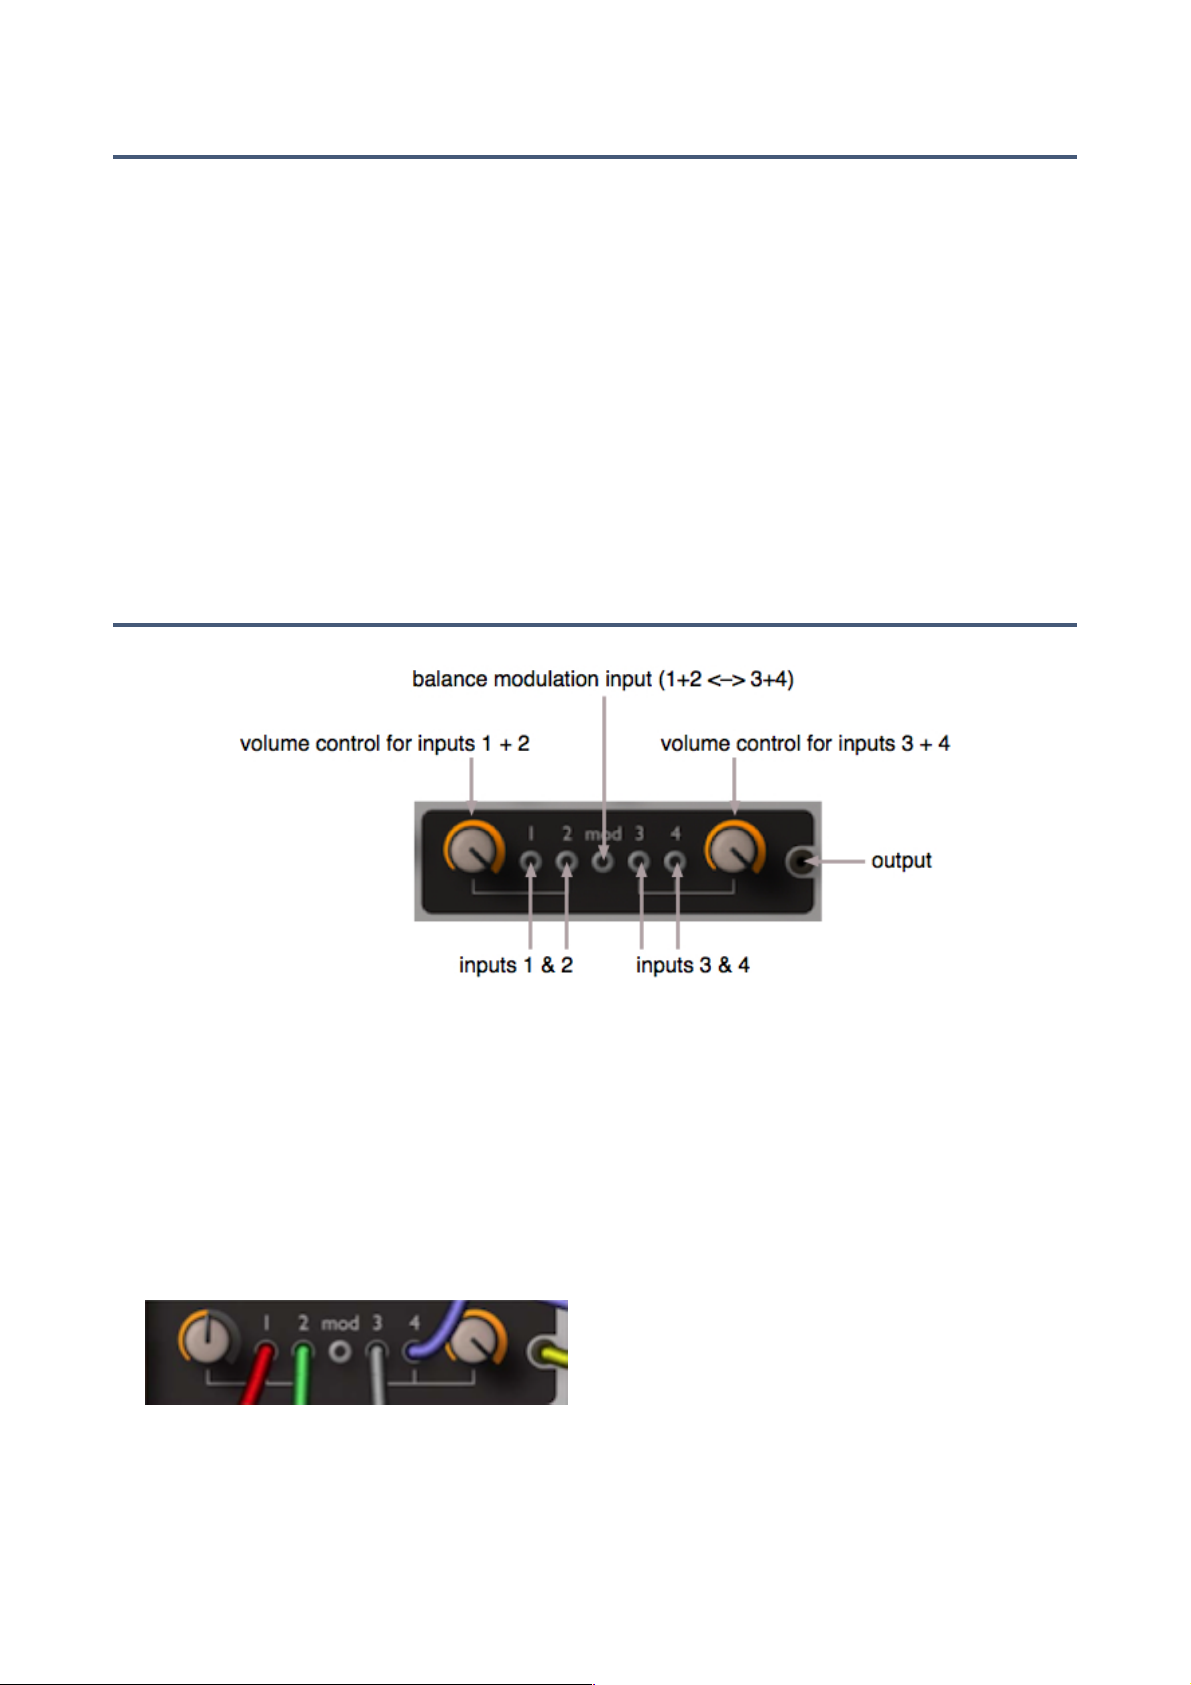
Multiplex
The multiples you will find in most analogue modular systems are simple mix/split devices,
often just four sockets bridged together. As most modular synthesizers have a very limited
number of inputs and outputs per module, multiples are important – without them it would
be impossible to modulate more than one parameter at a time from e.g. an envelope generator, or plug more than one or two audio sources into a filter.
The humble multiple underwent a serious redesign for ACE (and Bazille), finally emerging
as something much more useful than a multiple: a multiplex.
simple mixing
In this example, four signals are connected to each of the inputs. The lefthand knob is
around 50% while the righthand knob is at maximum – the sum of the signals in inputs 1
and 2 is lower than the sum of the signals in 3 and 4. You can mix up to 4 signals,
arranged in pairs with a common level control for each pair.
TOC GUI PTC VCO MIX LFO VCF ENV MLT GEN EFX TWK CNF 31
Page 32

MODULES
ring modulation (RM)
In this example, the signal connected to input 1 is ring modulated (i.e. multiplied) with
the signal in the mod (modulation) input. If another cable was connected to input 2, the
sum of both inputs would be ring modulated with the mod signal.
Whenever a cable is connected to the mod input, the lefthand knob crossfades from the
"dry" sum of inputs 1 and 2 to the ring modulated signal. In the above image, the lefthand knob is at maximum, meaning that the output (yellow cable) is the ring modulated
signal only. The value of the righthand knob is irrelevant here, as inputs 3 and 4 are not
in use.
Because ring modulation is actually multiplication, the multiples can be used to scale
control signals from another source. For instance, if you connect an LFO to input 1 and
velocity to the mod socket, you will get LFO level x velocity value from the output – the
harder you play a note, the more LFO signal will appear at the multiplex's output.
amplitude modulation (AM)
Another classic effect is amplitude modulation (AM). This is like ring modulation except
that, as well as the side bands, the output also contains the modulated original signal.
While RM could be written as y = a x mod, AM is normally y = a x (1 + mod). However,
AM in ACE's multiplex is defined as y = a x (1 - mod). There's a very good reason for
this departure from the norm, as you will see shortly...
Amplitude modulation is achieved by using inputs 3 and/or 4 in conjunction with the
mod input. Similar to ring modulation, the righthand knob crossfades from only the original(s) to only the amplitude modulated signal.
Again (like in ring modulation), the level of a signal can be controlled via another, but in
this case control is inverted – the "minus" symbol in y = a x (1 - mod). If we took the
previous example but used input 3 instead, the harder you played a note, the less LFO
signal would appear at the output.
TOC GUI PTC VCO MIX LFO VCF ENV MLT GEN EFX TWK CNF 32
Page 33

MODULES
balance processing
The RM and AM features can be used at the same time. In this example, the mod signal
(green) controls the mix between inputs 1 and 3. If an envelope was connected to the
mod input, the envelope would crossfade smoothly between inputs 1 and 3. Please note
that some signals are bipolar (e.g. oscillators) while others are not (e.g. envelopes). If
you use a bipolar signal to crossfade between two other signals, you may get unexpected results due to the natures of the algorithms. In such cases, you might have to
e.g. bridge inputs 1 and 2 to double the level and set the lefthand knob to 50.00.
signal inversion
To invert a signal, connect it to the mod input of a multiplex, then +5v to input 3 or 4.
VCA
At the end of the synthesis chain there is always an amplifier unit, otherwise you
wouldn't hear anything! In analogue synthesizers this is usually called a VCA (Voltage
Controlled Amplifier). VCAs often have their own dedicated envelopes to control transient volumes. As stereo is the de facto standard for software synthesizers, ACE has
two amplifiers with associated pan controls.
The default inputs to the VCAs are filters 1 and 2 so that whenever you open a fresh
instance of ACE, all you have to do to get a wide sound is to pan the two amplifiers
apart and detune one (or both) of the oscillators. Such a feature would be unthinkable in
older analogue synths but, despite its simplicity, this tweak can have a dramatic effect.
The knobs in the VCA section are self-explanatory: volume and pan position. Above the
input socket is a switch for selecting which envelope will be used – ADSR1, ADSR2 or
Gate. The latter is an instantaneous on/off, and is useful if you want to free up an extra
envelope (e.g. for classic sync sounds with separate oscillator and filter sweeps).
Why does ACE only let you use envelopes to control the final volume? In the "real"
modular systems, you could use any signal (or none) to modulate VCAs, and even
leave the system droning or bubbling away for hours without you having to play a note.
Most of these old synthesizers were monophonic – all the early polyphonic synths had
envelope-controlled VCAs at the end of the signal chain. ACE tries to span both worlds,
but you do have to play a MIDI note somehow... not too much to ask, really!!
TOC GUI PTC VCO MIX LFO VCF ENV MLT GEN EFX TWK CNF 33
Page 34

MODULES
Signal Sources
Along the bottom of the panel is a row of signal sources:
white white noise output (brighter, great for percussion sounds) ............
pink pink noise output (good for classic wind and wave effects) .............
+5V a constant "voltage" which can be used e.g. to create DC (direct current) ..............
offsets or to modulate parameters beyond their normal ranges
gate +1 while a note is being played, otherwise 0 .............
velocity MIDI note velocity output .......
m-wheel modulation wheel (CC#01) output ......
p-wheel pitch bender output .......
ctrl-a breath control (CC#02) output by default, but assignable in Preferences ............
ctrl-b expression pedal (CC#11) output by default, but assignable in Preferences ............
pressure aftertouch output: both polyphonic and channel pressure are recognized ......
keyf-1 note number. Unlike the dedicated filter ‘keyfollow’, keyf-1 pivots around ..........
E3 (MIDI note 64) so that lower notes can deliver negative values.
keyf-2 same as keyf-1 but includes the glide2 offset (see below) ..........
random a random value per note ........
alternate toggles between +1 and -1, per note ......
stack the stack index – for creating any kind of offsets between stacked voices ............
(note: for pitch offsets, use the dedicated stacked voice tuning controls)
mapper the mapping generator output!........
TOC GUI PTC VCO MIX LFO VCF ENV MLT GEN EFX TWK CNF 34
Page 35

GENERAL SETTINGS
General Settings
The top left panel contains parameters that are not specific to individual modules:
output
The knob at the top right of the panel is ACE’s master volume control.
Polyphony and Quality
mode
Determines the polyphony and how MIDI notes are interpreted.
poly polyphonic ..........
mono monophonic, retrigger .......
legato monophonic, no retrigger .......
duo duophonic ..........
voices
Only relevant for poly mode, this parameter sets the maximum number of notes that can
be played before voice-stealing occurs.
few 4 voices ...........
medium 8 voices ....
many 16 voices ........
quality
draft, standard, good, accurate
The quality switch is mostly for controlling CPU load, an important consideration in ACE.
Tip: start with good and compare the sound with other quality settings. Depending on
modulation rates, filter distortion and/or whether the sound of high notes is important,
standard or draft can be used without compromising the result.!
TOC GUI PTC VCO MIX LFO VCF ENV MLT GEN EFX TWK CNF 35
Page 36

GENERAL SETTINGS
stack
The number of voices played in unison. Up to 8 voices can be stacked for a very powerful unison effect like a few classic polyphonic synths e.g the Oberheim OBXa. However,
ACE can still be played polyphonically. This is not a "supersaw", it is true unison i.e. the
entire voice is multiplied.
Of course this feature eats a lot of CPU power, but we think it is worth it. For instance,
multiple filter distortion on one note is more lively than a single filter could possibly be.
Using the stacked voice tuning knobs in the Tweak page, the 8 voices can be detuned
within a range of +/- 24 semitones.
Pitch Settings
pb up / down
Separate pitchbend ranges, 0 to +/- 24 semitones, 36 (3 octaves) or 48 (4 octaves).
drift
If on, voices are slightly detuned against each other for a fuller, more lively sound.
transpose / tune
Transpose adjusts the overall pitch over a +/- 2 octave range."
Tune also adjusts the overall pitch over a +/- 100 cent range (+/- one semitone).
glide controls
Glide or ‘portamento’ is a smooth pitch transition between consecutive notes. In ACE it
also affects the ‘Key Follow’ modulator.
glide controls either the time or the rate, depending on the state of the glide .................
mode switch (see below)
glide2 offset relative to the glide value, applied to LFO2, VCO2 and VCF2 only. ...............
Careful use of this parameter can really bring static sounds to life!
range In classic polysynths, polyphonic portamento was seldom used except ................
for special effects. In ACE, the range parameter can shift the initial position (where the glide starts) closer to the target note. This means that
the glide can start "already half way there" for a more subtle effect.
Tip: for natural intonation effects, set the range to very low values.
glide mode time: the glide will take exactly the same time, however close together .......
or far apart the notes are. rate: the glide is proportionally slower for
notes thet are further apart.
TOC GUI PTC VCO MIX LFO VCF ENV MLT GEN EFX TWK CNF 36
Page 37

EFFECTS
Effects
The upper-right panel controls ACE’s three post-VCA effects: Chorus, Delay and Tone…
Chorus
Traditionally, chorus is a simple very fast delay periodically shortened and lengthened by a
dedicated LFO. The pitch of the delayed signal rises and falls like the Doppler Effect you
hear when a fast car (or the classic example: an ambulance) passes by.
Mixing the delayed signal with the original dry signal results in a warm comb-filter effect
similar to slightly detuned oscillators. As the delays are under 50 milliseconds, they blend
well with the dry signal i.e. they aren't perceived as individual echoes.
Chorus can be made richer by using more than one delay line with different modulation
depths and LFO phases. Most of today’s chorus units are stereo, using two delay lines fully panned apart. The one in ACE has four different models – 3 varieties of chorus (4 or 8
voices) plus a classic phaser:
mode
Chorus 1 is a 4-voice chorus with triangle LFO. Triangle modulation keeps the detuning
effect fairly constant and therefore more subtle than Chorus 2....
Chorus 2 is also 4-voice, but has a sine LFO for more dramatic movement.
Chorus 3 is an 8-voice chorus for lush ensemble effects – of course without the high
noise floor typical of the original hardware units.
Phaser is a classic phaser with a more subtle comb-filter effect than the chorus models.
The phaser includes a variable feedback instead of the mix parameter. Higher feedback
values result in a very dramatic resonant or metallic (due to atonal phase shifting) effect.
Tip: Set the depth to minimum for strong tonal coloration but no movement.
One special feature of ACE's chorus is that the low bass content of the signal bypasses
the effect, which helps preserve the body of the sound – adding chorus in other synthesizers usually means losing a lot of "oomph".
TOC GUI PTC VCO MIX LFO VCF ENV MLT GEN EFX TWK CNF 37
Page 38

EFFECTS
TOC GUI PTC VCO MIX LFO VCF ENV MLT GEN EFX TWK CNF 38
Page 39

EFFECTS
rate
Speed of the effect’s own modulation LFOs
mix
In all chorus modes, this knob controls the amount of delayed signal (0 to 50%), in
phaser mode it controls the amount of resonance
center
Nominal delay time before modulation, affects the overall tone of the effect
depth
LFO modulation depth
Delay
Delay is another traditional effect often used in for synthetic sounds. Unlike chorus, the delay times are long enough for repeats to be perceived as individual echoes.
The first delay units used magnetic tape while the next (solid state) generation was made
of bucket brigades – a large number of capacitors each provided a short delay, which were
arranged in series to produce a single long delay. Both techniques had major drawbacks,
the most serious of which were noise and lack of synchronization capability. However,
these units do have their own special charm, which is why digital emulations of tape and
bucket brigade delays are still available, as hardware or plugin effects.
In the '80s, when the price of memory dropped considerably, digital delays quickly displaced analogue – they were cheaper to manufacture, they were more precise and the
sound quality was deemed better. However, most people in the 1980s were convinced that
the early digital synths sounded much better than analogue... how times change!
ACE’s delay is a simple low-noise digital type with two taps and synchronized timing...
times
Click on the button to select delay times/patterns:
off, 8th + 8th, 8th groove, 8th dotted,
4th + 4th, 4th groove, 4th dotted, slap
mix
Dry/wet mix for the delay.
spread
The spread knob controls stereo width: at 100 the taps are panned 100% to the left and
right channels, at 0.00 both taps are in the centre (mono), and at -100 the left and right
taps are swapped.
TOC GUI PTC VCO MIX LFO VCF ENV MLT GEN EFX TWK CNF 39
Page 40

EFFECTS
feedback
The amount of delayed signal fed back into the delay input, which ultimately affects the
number of echoes. As the delay is synchronized to the host application’s clock, it’s easy
to set up precise rhythmic effects, and feedback can accentuate this.
damp
Reduces the high frequency content of successive echoes, emulating real spaces: high
frequencies are more readily absorbed (by carpets, trees etc.) than low frequencies.
Tone controls
ACE doesn’t have a classic EQ, but the pair of tone controls offer enough high and low
boost for most purposes. In an attempt to achieve a bigger sound (often to make up for deficiencies in other areas), many digital synthesizers include a kind of "loudness contour". In
contrast, ACE's basic sound is principally the same as analogue synthesizers: its filters do
not deliver irritating treble or lifeless bass...
bass
As some analogue filters (notably classic Moog models) are famous for bass sounds,
ACE lets you boost sub-bass frequencies by several decibels.
treble
Modern mixes often demand ultra-crisp highs from synthesizers. Analogue synths don't
deliver these frequencies, but VA (virtual analogue) synths, with their purely digital filters, can. The treble control in ACE compensates for any possible losses due to the
analogue-modeled oscillators and lowpass filters. ACE can sound as crisp as you like.
Effects On/Off
In the top righthand corner of the effects panel is a button that switches all effects on or off globally, so you can temporarily browse through the raw patches
without any effects. Just remember to switch it back on afterwards!!
TOC GUI PTC VCO MIX LFO VCF ENV MLT GEN EFX TWK CNF 40
Page 41

TWEAK
Tweak Page
The Tweak Page is where you will find the thoroughly digital mapping generator plus
anything else that doesn’t fit on the main synth panel or is of secondary importance...
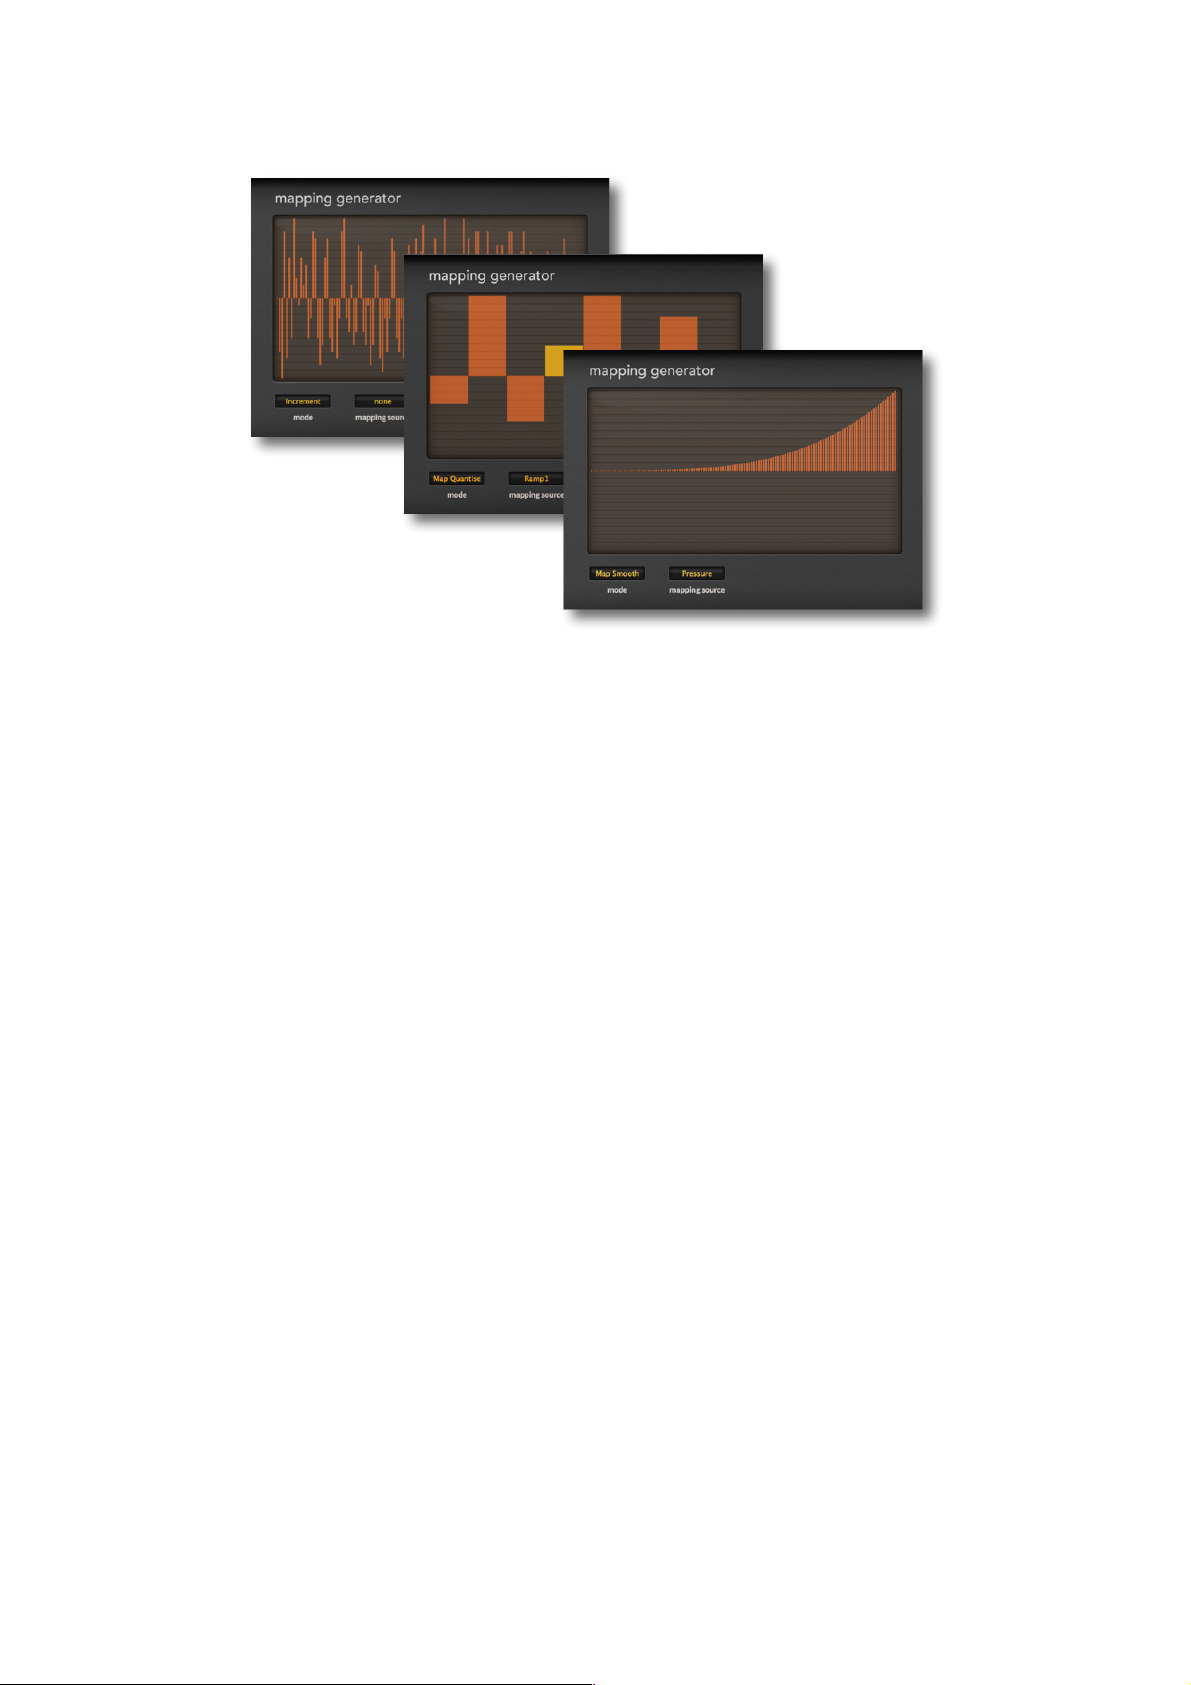
Mapping Generator
Mapping generators are alien to analogue synthesizers, and the mapping generator is the
only “digital” type module implemented in ACE. Paradoxically, it is great for adding some of
the important characteristics of analogue synthesizers – per-note tuning irregularities, nonlinear modulation curves etc..
The mapping generator is a list of 128 editable values that can be used for various modulation purposes. For instance you can assign a separate value to every MIDI note (0 to
127) so that each one sounds consistently different, you can emulate a classic round-robin
architecture or pan stacked voices apart etc..
The mapping generator actually has two outputs: Firstly, the socket at the bottom of the
synth page labelled mapper. Secondly, the LFO2 output when in tap map mode.!
TOC GUI PTC VCO MIX LFO VCF ENV MLT GEN EFX TWK CNF 41
Page 42
TWEAK
map modes
Typical uses for ACE’s mapping generator: quasi-random, sequencer, modulation-shaper
map smooth and map quantized – both these modes take a selectable source (including wheels and envelopes) to scan through the map. For instance, to transform a simple
envelope into a complex one with hills and valleys, or make abrupt timbral changes via
velocity etc.. In map smooth mode, the values are interpolated for softer transitions. In
map quantize mode the values are not interpolated, so this is usually the better choice
for e.g. sequencer-type effects or sharp transitions.
Note: A mapping source is only used in the map smooth and map quantize modes. It is
ignored in increment and key modes...
increment – successive notes step through the map (play a few keys and watch the
highlighted bar move from left to right). The default map is a list of 128 quasi-random
values, but even a two-value map can be useful.
Example: To pan stacked voices apart, connect the mapping generator to VCA pan
modulation, set stack to 2 and the number of mapping generator steps to 2, set the map
values to maximum and minimum and the mode to increment.
key – selects a position within the map according to which notes are being played. If the
map contains 128 values, these correspond directly to MIDI notes 0 to 127. If the numbers of steps is less than 128, the list is repeated. For instance, setting 12 steps will let
you tune each note (C, C#...) in all octaves at the same time.
Drawing and Selection
To edit the map, simply draw in the window. For straight lines, hold down ctrl (Win) or
alt (Mac) while drawing. To make a selection, hold down the SHIFT key: the functions
(see below) are restricted to the selection. To deselect, either click in the background
i.e. away from the selection, or choose ‘deselect’ from the selection sub-menu.
TOC GUI PTC VCO MIX LFO VCF ENV MLT GEN EFX TWK CNF 42
Page 43

TWEAK
Context menu
Right-clicking on the Mapping Generator’s edit window gives
you access to various map editing tools. This newly expanded
version is provisional – selecting tools will be much easier in
future. For the time being, remember the following: holding
down the SHIFT key lets you select a subset of the values in
the window, and the ALT (Win) or CMD (Mac) key lets you ap-
ply the functions. Experiment with all these functions:
copy / paste – copies the current map to the clipboard, or replaces the current map with a previously copied one
shapes – ready-made ramp, triangle, sine, cosine, root,
quadric. The spectralize function (see below) interprets the map
as a harmonic series and replaces it with the actual waveform
alt-draw or cmd-draw – sets the drawing mode to erase (zero),
scale (multiply), shift (2D move) or warp (2D bend).
selection – deselect, invert, shift left, shift right, every 2nd,
every 3rd, or every 4th. If nothing is selected, only the ‘every’
options will appear in the submenu.
reverse – flips the current window or selection horizontally
invert – flips the current window or selection vertically
randomize – a random variation based on current values
soften – removes abrupt transitions
normalize – scales all values in the current window or selection
so that the lowest and highest are at the bottom and top.
straighten – draws a straight line between the first and last
values in the current window or selection
reset – sets all values in the current window or selection to zero
quantize 4, 6, 8, 12, 16, 24 – quantizes all values to the speci-
fied number of levels. Tip: the 12 and 24 settings are useful for
setting up little sequences: connect the mapper output to a
pitch input, set the amount to 12 or 24 semitones then use the
ramp generator (with minimum rest) as mapping source. Simpler still: use LFO2 with the tap map waveform!
2 to 12, 16, 24, 32, 48, 64, 96 or 128 – sets the number of visible steps in the mapping generator. Note that the original data
is retained when the number of steps is reduced.
Spectralize
Especially useful for LFO2 tap map mode, the spectralize function in the shapes submenu interprets the map data as the levels of individual partials in the harmonic series.
With random phases set per partial, these are transformed into the corresponding
waveform and the number of values automatically set to maximum (128).
TOC GUI PTC VCO MIX LFO VCF ENV MLT GEN EFX TWK CNF 43
copy
shapes
cmd-draw
selection
reverse
invert
randomize
soften
normalize
make unipolar
straighten
reset
Quantise 4
Quantise 6
Quantise 8
Quantise 12
Quantise 16
Quantise 24
2
3
4
5
6
7
8
9
10
11
12
16
24
32
48
64
96
128
Lock
Page 44

TWEAK
Stacked Voice Tuning
This block of knobs is used for tuning the individual voices within a stack. The total range for
each voice is +/- 24 semitones, so as well as
setting up mild detuning you can even create
massive one-finger chords. For fine tuning, hold
down the SHIFT key on your computer keyboard.
Important: Stacking voices will significantly increase the CPU-hit per played note.
Circuit Bending
slop
Attributed to Dave Smith of Sequential Circuits and DSI, this has recently become the
term of choice for tuning instabilities. The
Slop parameter in ACE adds slow random detuning.
crosstalk
Once considered an even less desirable feature of analogue synths than tuning instability, even crosstalk has its own special charm in this digital age. Quoting from Wikipedia:
Crosstalk is any phenomenon by which a signal transmitted on one circuit or channel of
a transmission system creates an undesired effect in another circuit or channel.
osc cap failure
Finally, let’s make sure the capacitors in your emulated analogue synth sound like they
will need replacing very soon. No joke, that’s what this parameter emulates... try it!
filter reset
none quasi ‘free-running’, transients may have a little analogue randomness ...............
full reduces randomness by flushing the filter at the beginning of each note – ...................
presets with self-oscillating filters will fade in more slowly
full+click the same as full, but with an extra strong transient at the start of each note ......
– use this mode for filter ‘self-oscillation’.
TOC GUI PTC VCO MIX LFO VCF ENV MLT GEN EFX TWK CNF 44
Page 45

TWEAK
Envelope Tweaks
fall/rise range
These two knobs affect the level after fall/rise for each of the two ADSRs. Normally this
would be either maximum (positive fall/rise) or zero (negative fall/rise). The range knob
sets a percentage of the difference (from the sustain level) instead of always 100%.
singing envs
Switching singing envs on causes the envelope of a new voice to start at the current
level of the stolen voice’s envelope instead of at zero, emulating the typical behaviour of
classic analogue envelopes more closely.
ramp clock
This switch sets the maximum of the ramp generator stages to either absolute time or
host-synchronized values: 0-20 sec is absolute time with maximum 20 seconds per
stage, while 1/1 and 4/4 are synchronized to song tempo. Note: The ramp generator
scaling is absolutely linear, so setting e.g. an attack time of 25 will divide the maximum
by four (i.e. it will be 5 seconds, 1/16 or 1/4 long)
Microtuning
ACE supports standard .TUN microtuning tables. Hundreds (or even thousands?) of tuning
tables are available online, most of them free. Put any .tun files into the following folder:
Win C:\Users\*YOU*\Documents\u-he\ACE.data\Tunefiles\
Mac Macintosh HD/Library/Application Support/u-he/Tunefiles/
The location will differ if you selected non-standard paths during installation.!
TOC GUI PTC VCO MIX LFO VCF ENV MLT GEN EFX TWK CNF 45
Page 46
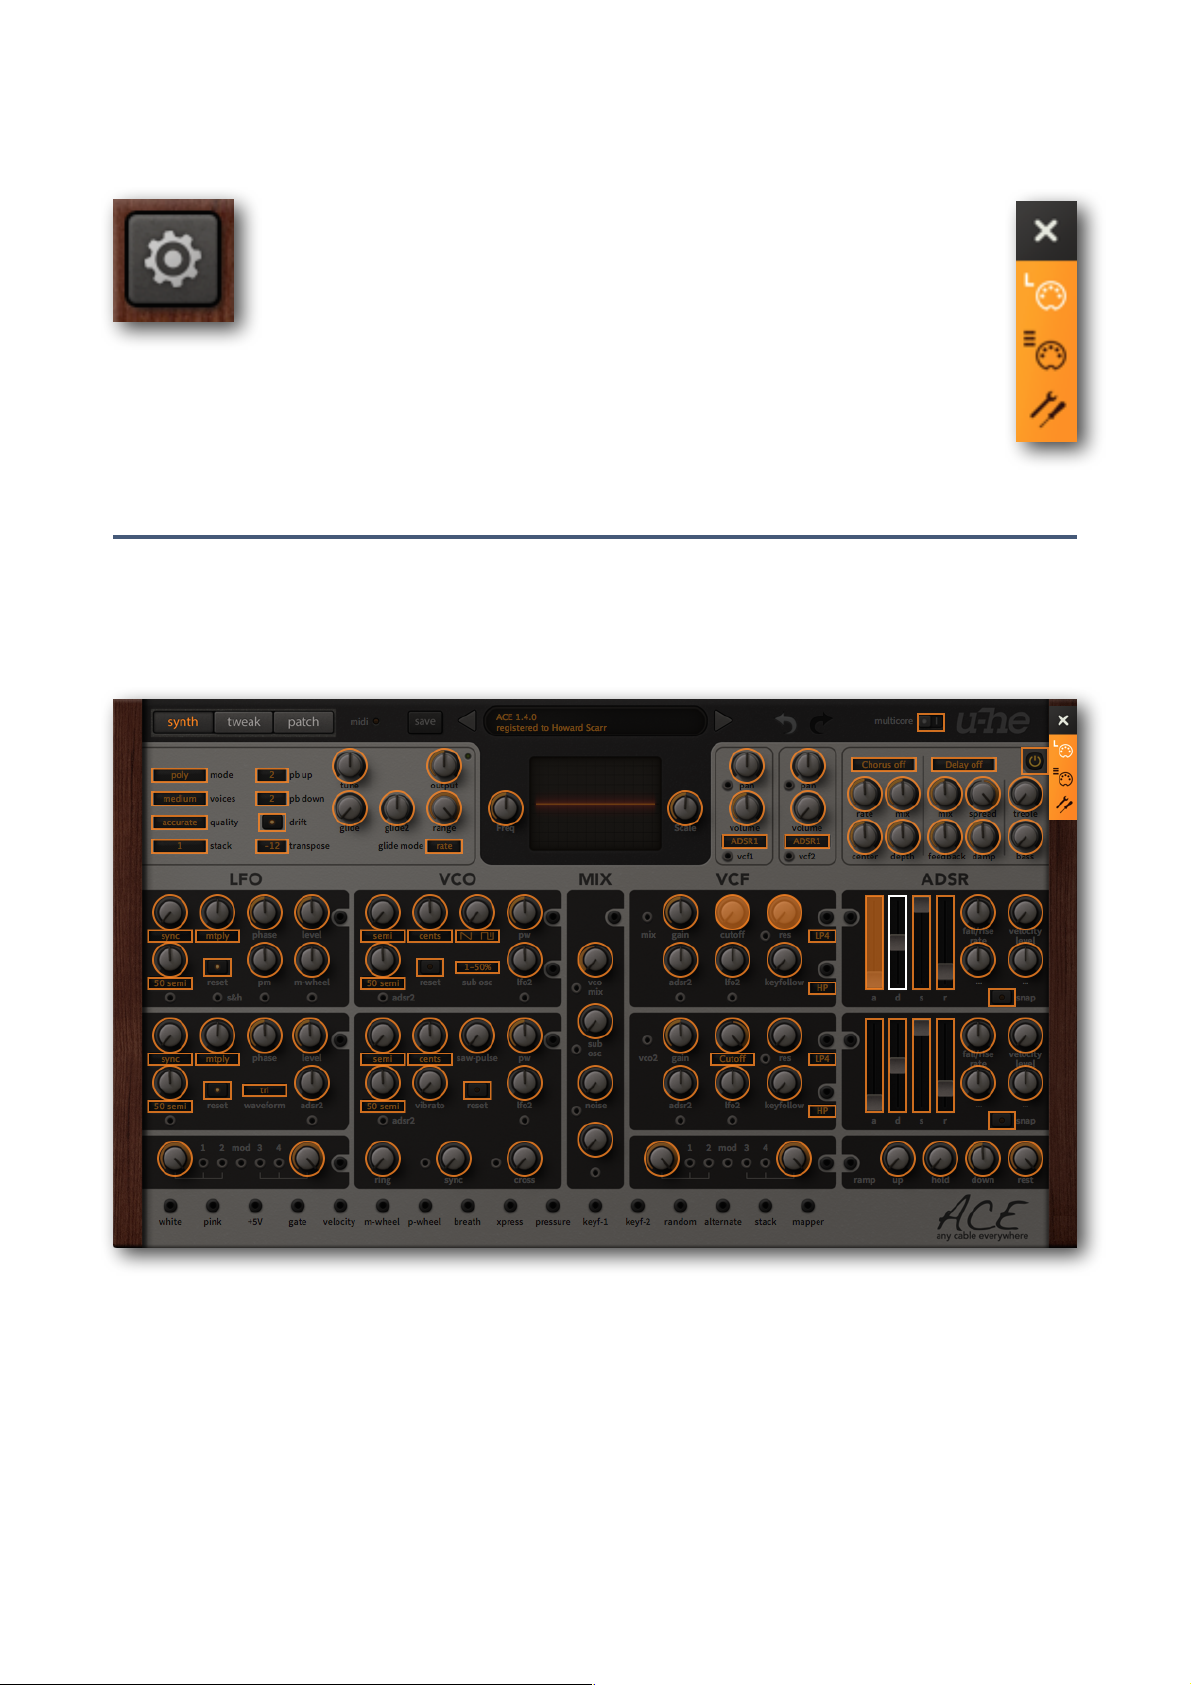
CONFIGURATION
Configuration
New in version 1.3.1 – click on the cogwheel icon at the top right to
open the global configuration pages where you can connect ACE parameters to MIDI continuous controllers as well as specify several
global preferences.
A vertical row of buttons appears instead of the cogwheel:"
Close [X], MIDI Learn [L], MIDI Table [≣] or Preferences [tools].
Tip: Right-click within the row of buttons to set the current page as default.
MIDI Control
MIDI Learn
ACE can be remote-controlled / automated via MIDI messages from a hardware controller
unit or from your host sequencer. Click on the configuration button and select the ‘L’ icon…
The MIDI Learn window is an overlay with all MIDI-learnable elements appearing as selectable outlines. Controls that are already assigned appear filled (like a few of the controls in
this image), and the currently active control is highlighted.
Try it: Click on the Filter 1 cutoff knob and send ACE some MIDI CC (continuous controller)
data i.e. move a knob or slider on your MIDI controller. The connection is made instantly,
and applies to all instances of ACE.
Note that the SYNTH and TWEAKS buttons remain active while the MIDI Learn page is
open, so you don’t have to exit the configuration pages to access all parameters.
TOC GUI PTC VCO MIX LFO VCF ENV MLT GEN EFX TWK CNF 46
Page 47

CONFIGURATION
MIDI Table
Click on the configuration button and select the ‘≣’ MIDI icon button to open an editable list
of all current MIDI CC assignments…
Parameter
The first field displays/selects one of ACE’s many parameters, sorted into sub-menus.
Click on the ‘Add’ button at the bottom and experiment with this option. Delete any unwanted assignments by clicking on the small [x] to the right of each line.
Here’s an experimental feature... At the very bottom of the Parameter menu are two extra options. Select Last Clicked Control, enter a Controller number and exit the configuration pages. The most recently clicked knob or switch will now respond to that CC! The
Last Clicked Control Fine option is similar, but with a significantly reduced range.
Channel / Controller
The next two fields are for MIDI channel and CC number. ACE is channel-sensitive, so
you can map up to 16 channels for… let’s say “lots” of control assignments.
Mode
Specifies the range and/or resolution of values.
normal full range, continuous .........
integer full range, whole numbers only .........
fine 0.01 steps between the two integers closest to the current value ..............
TOC GUI PTC VCO MIX LFO VCF ENV MLT GEN EFX TWK CNF 47
Page 48

CONFIGURATION
Type
Specifies the type of hardware (by far the most common is Continuous 7-bit).
Encoder 127 unipolar encoder (“relative”) ...............
Encoder 64 bipolar encoder (“relative”) .................
Continuous 7-bit 7-bit MIDI CC (normal resolution, common) ........
Continuous 14-bit 14-bit MIDI CC (high resolution, rare) ......
Delete
To remove individual assignments, click on the [x] to the right of each line. To remove all
assignments, click on the Delete All button at the bottom.
Preferences
Click on the ‘tools’ icon to open the global preferences window:
CONTROL
Mouse Wheel Raster
If your mouse wheel is rastered (you can feel it clicking slightly as you roll the wheel),
set to ‘on’. Each click should now increment / decrement by a more sensible step.
TOC GUI PTC VCO MIX LFO VCF ENV MLT GEN EFX TWK CNF 48
Page 49

CONFIGURATION
APPEARANCE
Cable Opacity
4 options (solid to ghosted).
Cable Style
5 options (thick to natural).
Default Size (UI)
The window size for each new instance of ACE. Note that you can temporarily change
the size without entering the Preferences page – right-click in the background.
Default Skin
This option will only appear if ACE finds at least one alternative skin when it loads.
Change this to set the global default.
Gamma
Brightness control.
Oscilloscope
How the oscilloscope wave is drawn, 5 options (eco uses the least CPU).
Text Antialiasing
Smoothing of all text elements. In rare cases, switching this off improves readability.
AUDIO
Base Latency
If you are certain that your audio system – hardware as well as software – uses buffers
that are a multiple of 16 samples in size (please refer to the respective documentation),
you can disable ACE’s base latency. Otherwise leave it set to the default ‘16 samples’ to
prevent crackles. Note that a new Base Latency setting will only take effect when the
host allows e.g. on playback or after switching the sample rate. Reloading ACE will always work.
MORE ABOUT BUFFERS
Internally, ACE processes audio in chunks of n x 16 samples. This ‘block processing’
method significantly reduces the CPU load and memory usage of all our plug-ins.
If the number of samples to be processed is say 41, ACE processes the first 32 and
keeps the remaining 9 in a small buffer (16 samples is enough). Those 9 samples are
then processed at the start of the next call… and so on.
The extra buffer is only necessary if the host or audio driver processes ‘unusual’ buffer
sizes. In the many host applications that process buffers of e.g. 64, 128, 256 or 512
samples (all multiples of 16), try switching it off so that ACE can process latency-free.
TOC GUI PTC VCO MIX LFO VCF ENV MLT GEN EFX TWK CNF 49
Page 50

CONFIGURATION
Control A/B Default
The list of modulation sources in previous ACE versions included the fixed MIDI controls
Breath (CC#02) and Xpress (CC#11). While retaining backwards compatibility, we replaced these with the user-definable Control A and Control B sources.
MIDI Control Slew
This option lets you change performance control smoothing (pitch bend, modulation
wheel, breath, expression and aftertouch). The default setting is ‘fast’.
PRESETS
Auto Versioning
If switched on, an index is appended to the preset name and automatically incremented
each time you save it. For instance, saving ‘Space’ three times in a row would give you
three files: ‘Space’, ‘Space 2’ and ‘Space 3’
Save Presets To
The default user folder option causes all saved presets to land in the User folder (or a
selected subdirectory). If you prefer to have complete control, change this to selected
folder – but always remember to select a folder before saving your patch.
Scan On Startup
Whether the preset library should be scanned and the database recreated when the first
instance of ACE is started, e.g. when you reopen a project.
TOC GUI PTC VCO MIX LFO VCF ENV MLT GEN EFX TWK CNF 50
 Loading...