

Page 1

Version 1.5
www.ugoaudio.com
Page 2
Metallurgy Users Guide
Overview
Thank you for purchasing Metallurgy. Your support is greatly appreciated.
Metallurgy is a PC VST multi effect that is capable of providing sounds ranging from some basic,
subtle, filter tweaks to twisted, complex, walls of sound that have virtually no resemblance to the
original audio.
Metallurgy offers 3 filters with multiple modulation options, 2 digital distortions, 2 downsamplers, dual
delay, an envelope follower, a gate sequencer, and a Metal effect that, in addition to flanging and
metallic effects, also provides the ability to produce pitched sequences, and can even be played in
real time via your MIDI controller or sequencer...nearly turning Metallurgy into an synth on its own.
Metallurgy is useful for many styles of music and is effective with a wide variety of input material.
I always encourage experimentation with all my VST’s but it’s especially so with this one since, by
virtue of being an effect, you can run anything you want through it. You’ll find that some features of
Metallurgy work better with certain types of sounds than others, so just feed it lots of different stuff,
see what it spits out, and have fun!
Installation
Open the zip and extract the Disturbance folder into your host’s VST folder. Yup, that’s it. No annoying copy protection, no tricky registration and no troublesome installers.
Signal Path
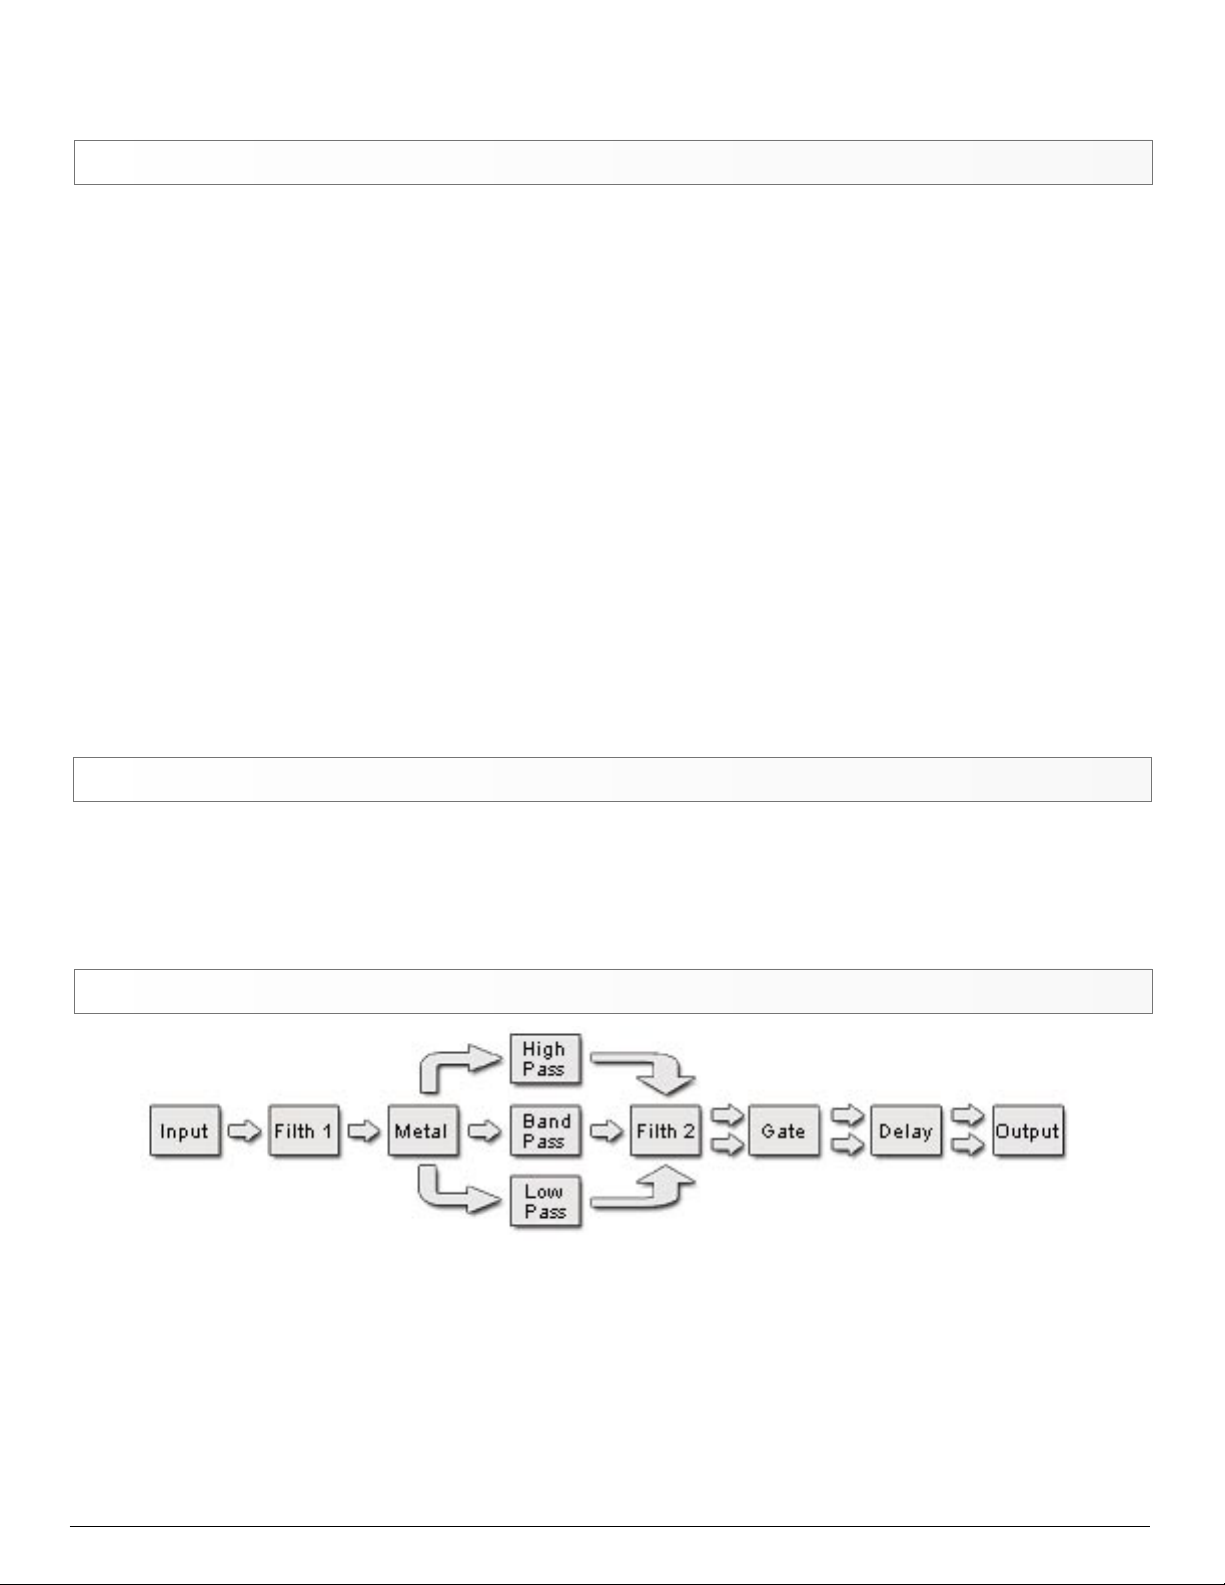
Metallurgy is a mono effect up until the second filth section. Because of this, your stereo input signal
will be merged nearly as soon as it enters. The signal flow is essentially fixed and most parts run in
series, except the three filters which run in parallel and can be panned.
Each section has it’s own on/off switch so you can use it on its own or in combination with others.
For example, If you just want the Metal and the Gate, turn them on and you’ll hear the Metal running
into the Gate without the rest of the effects.
Metallurgy Users Guide
2
Page 3

Patches / Getting Started
For some, all these controls might look a bit daunting, but Metallurgy is actually a relatively easy
VST to use. You just need to get acquainted with each section. The best way to do that is to turn off
all but one section and start tweaking it. As you get a feel for how it sounds and works, move on to
another section. Once you’ve got the basic feel for each section, start trying out some combinations.
You’ll probably start to get the hang of Metallurgy pretty quickly.
Additionally, to help you find out what all those abbreviated controls are...for most of them, if you
hover your mouse of the control, a pop up will appear that will tell you the full name of the control.
Where applicable, it will also tell you it’s MIDI CC number.
Of course, if you are feeling less inclined to “roll your own,” Metallurgy comes loaded with a wide
variety of patches...from basic effects, to serious sonic manglers. The patches are all labeled
according to what the designers feel they are most useful for, or what they feel is the defining
functions are. Consider these suggestions rather than rules. The vast majority of these patches are
useful for far more than what they are labeled as.
Here’s what those labels stand for:
(DRM) - Drums
(PAD) - Pads, drones, atmospheres and other sustained floaty stuff
(BAS) - Bass...bass guitar, synth bass, etc.
(LED) - Leads...guitar, synth leads, etc.
(GSQ) - Gate sequenced
(FSQ) - Filter sequenced
(PSQ) - Pitch sequenced (Metal sequencer)
(SFX) - Totally weird stuff
(VOX) - Vocals
(KEY) - Piano, clav, etc.
(GEN) - General purpose...includes basic filtering, simple delay, basic overdrive, etc. and are likely to
be useful on lots of stuff.
Important Note: Watch your volume when checking out the patches. It can vary widely depending
on the volume and type of the incoming audio.
MIDI
The majority of Metallurgy’s performance controls can be tweaked via MIDI. All controls that have
CC’s assigned to them have their number displayed in their tool tip pop up. Just hover your mouse
over a control to see it. In most cases, this will also show you the control’s full name.
Metal Sequencer’s Octave and Note switches, however, have been assigned NRPN’s instead of
CC’s. The Octave row uses 1-16 and the Note row uses 17-32.
Metallurgy Users Guide
3
Page 4
Metallurgy’s Controls
Main
This is the master input / output section controls what you would expect it to: input level, output level,
and mix. As mentioned above, Metallurgy accepts stereo input, but is a mono effect. However one
item of note is that the more dry your Mix setting, the more of the original stereo sound is retained.
So with all the effects off, the Mix control can actually be used as an adjustable stereo-to-mono
merge. Also, the Mix slider has been assigned to CC#1, which is the default for most keyboard mod
wheels, so you can easily tweak the wet/dry (or mono/stereo) mix in real-time.
IN
Input level.
MIX
Sets the wet / dry mix.
OUT
Output level.
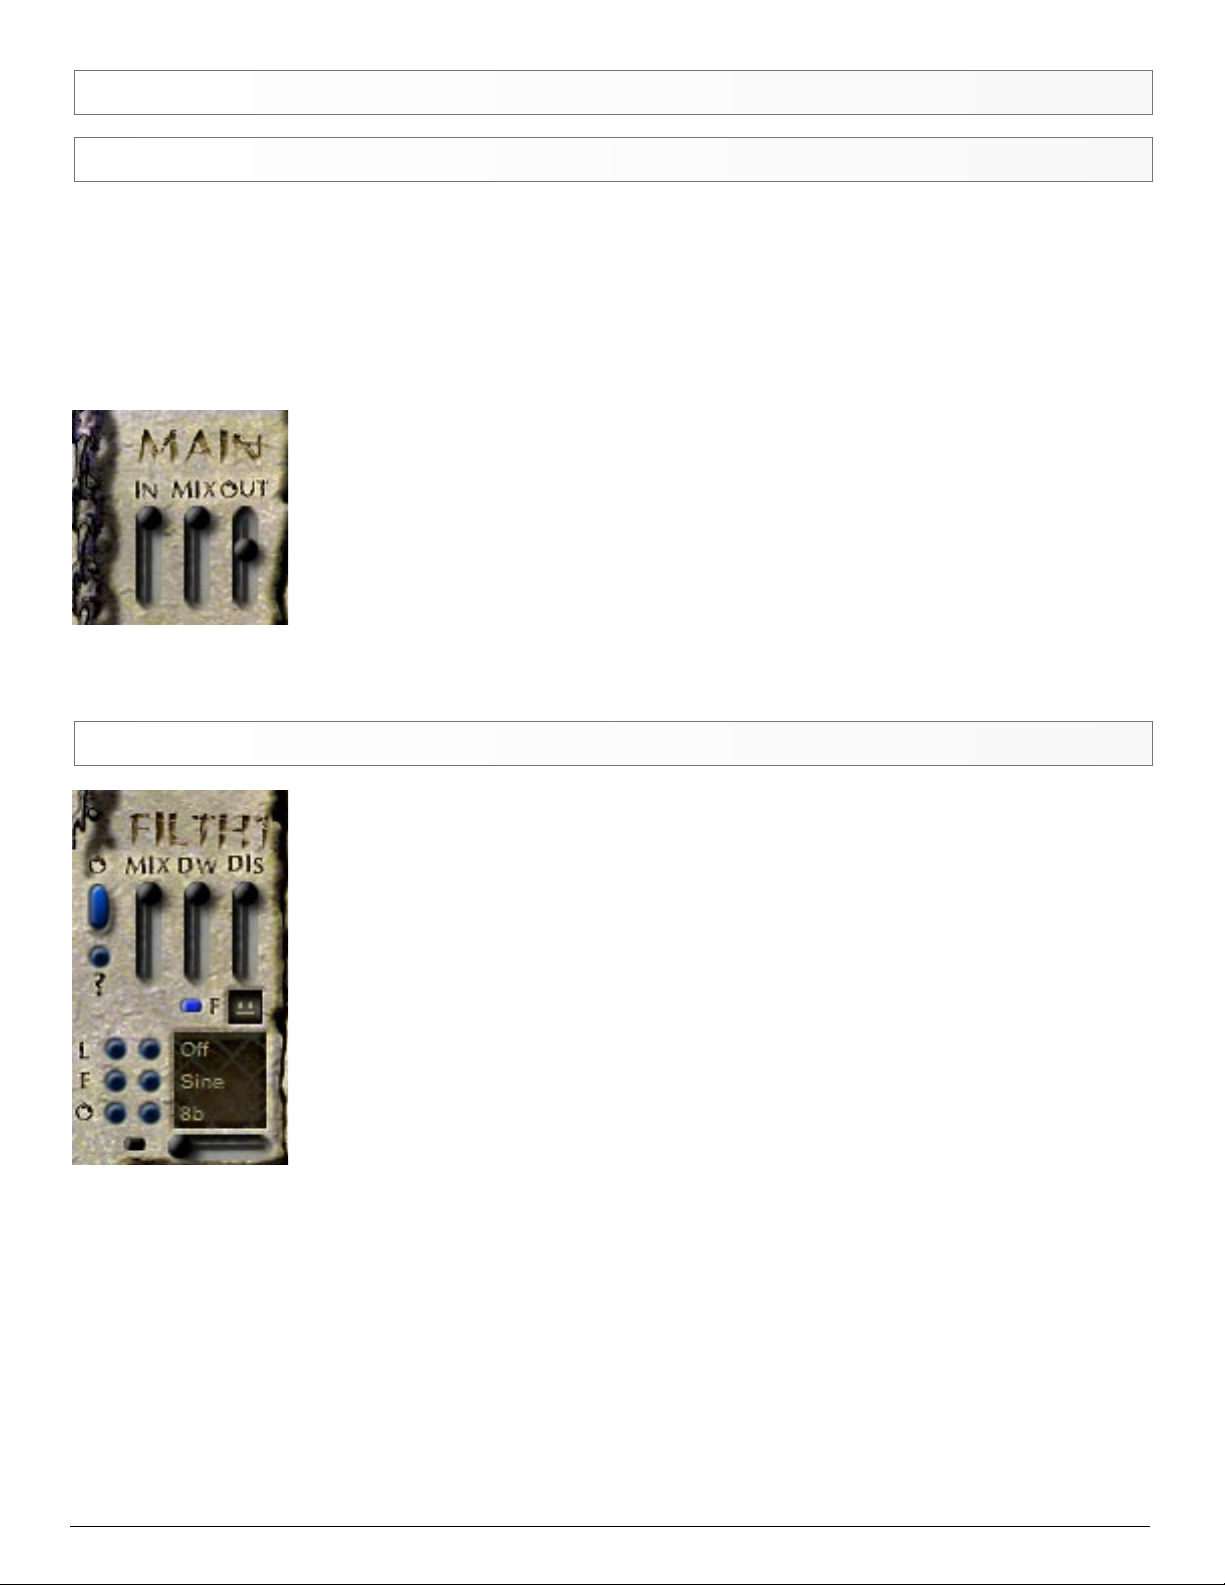
Filth 1
Right below the Main section is Filth 1. This consists of a downsampler (DW)
and a distortion (DIS), and gets quite filthy.
O
On / off switch for Filth 1.
MIX
Adjusts the mix between the clean signal and the filth.
DW
In it’s upper most position, the downsampler is off. As you lower it, you’ll hear
the sample rate decrease...creating a really nasty digital distortion. Also, the
LED indicator below it will light up to show that the effect is active.
DIS
When you turn the Filth on, you’ll already get some low level distortion. As you crank up this
distortion slider, the signal will get louder and more distorted. All things considered, It’s actually a
pretty mild distortion, more of an overdrive than anything else. However, see that little round switch
below it?...
F
This switches between 3 distortion modes. The filthier things get, the more angry the face.
Metallurgy Users Guide
4
Page 5
LFO
Can modulate the downsampler for both Filth 1 and Filth 2.
– Top switches turn the LFO on and select which downsampler gets modulated.
Combinations are also possible. The options are as follows:
– Off...no modulation
– DW1+...provides positive modulation of the downsampler in Filth 1
– DW1-...negative modulation
– DW+/-...both positive and negative modulation
– DW2+...positive modulation for Filth 2’s downsampler
– DW2-...negative modulation
– DW2+/-...both positive and negative modulation
– DW1+ 2-...alternating modulation...postive for downsampler 1, negative for
downsampler 2
– DW1+/- 2+...positive and negative for downsampler 1, positive for downsampler 2.
– Middle switches set the waveform of the LFO.
– Bottom switches set the speed of the LFO.
?
You’ll see these all over Metallurgy. They are the randomizers and they will tweak out most controls
for that specific section. This one randomizes the downsamplers, distortions, F switches, LFO
waveform, and LFO speed for both filth sections.
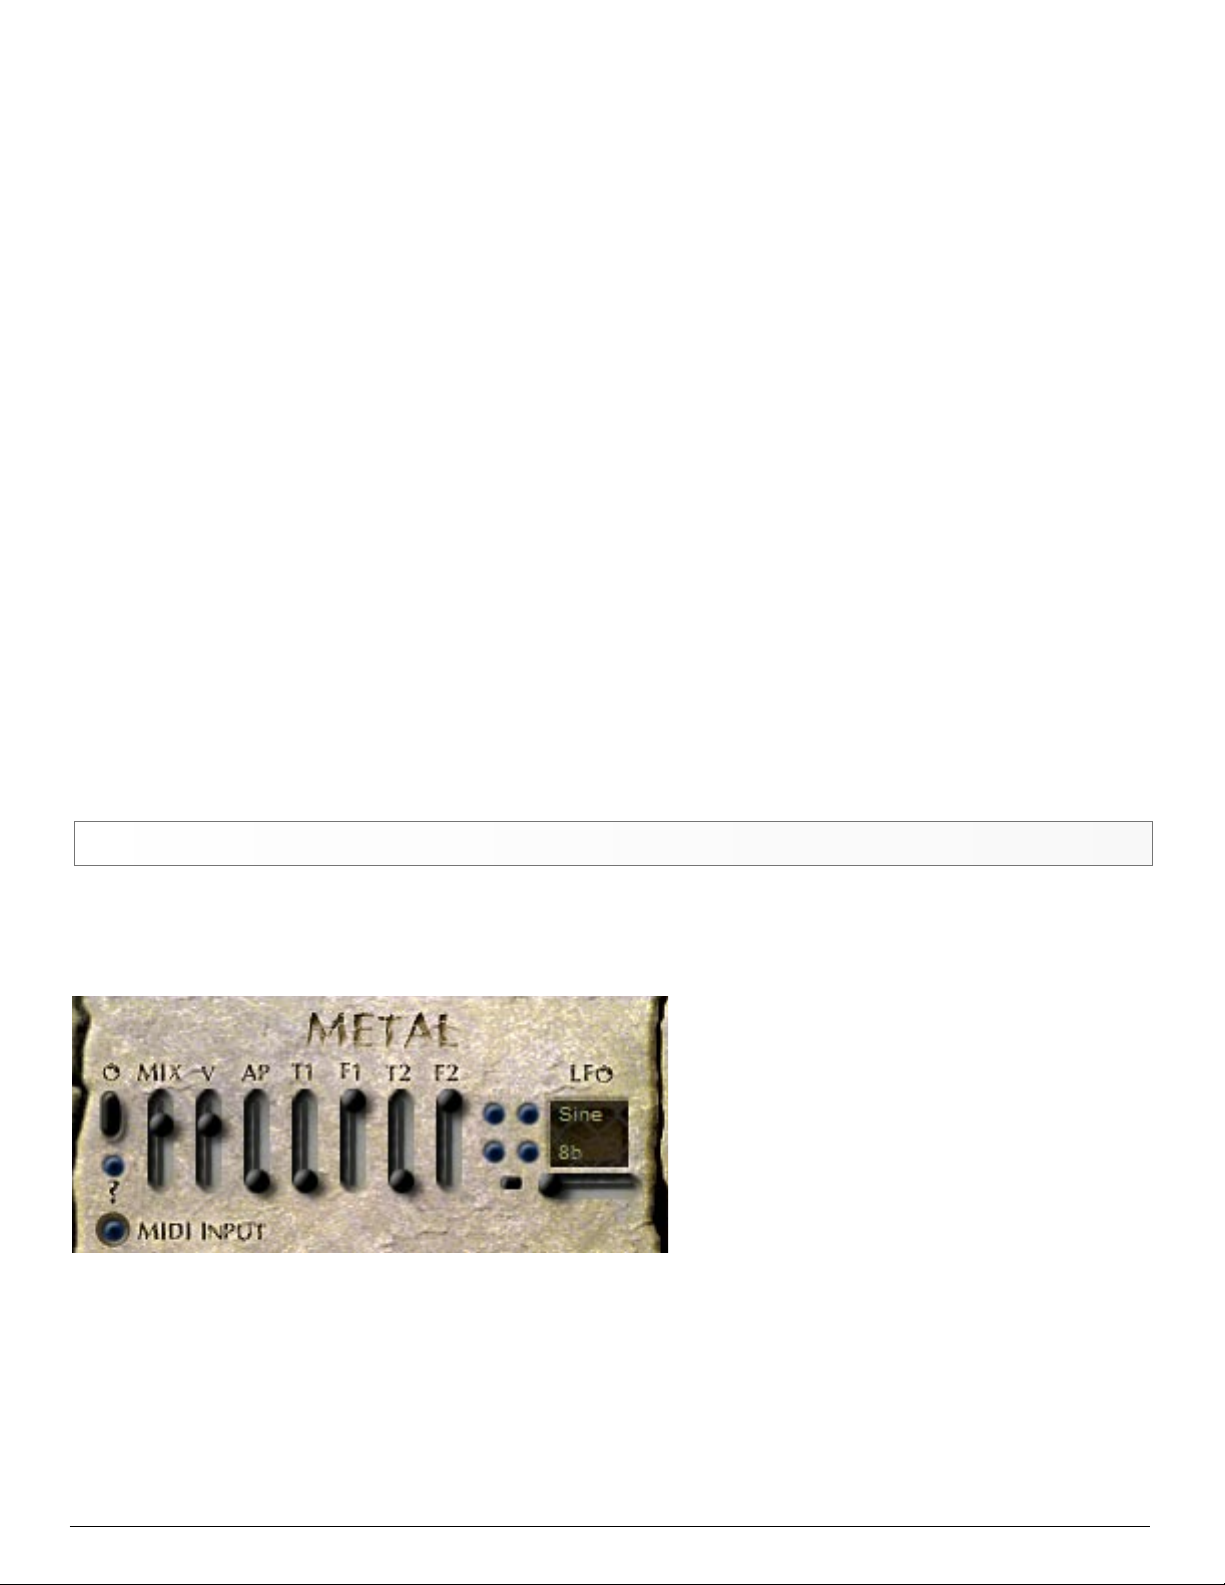
Metal
Those familiar with my synths Texture and String Theory will recognize this effect, and it has been
tweaked and expanded once again. The metal effect is built from high speed delays and its used for
creating metallic, clangerous sounds, flanging effects, and now even for creating pitched notes!
O
On / off.
MIX
Adjusts the mix of the non Metal to Metal
sound. Note that unlike the main mix, this
doesn’t adjust the full stereo dry signal,
only the mono signal or the signal coming
from Filth 1.
V
Volume of the Metal effect.
AP
This is an all pass filter which tweaks the sound made by the Metal effect (not what goes into the
effect.)
Metallurgy Users Guide
5
Page 6

T1
Adjusts the time of the first of two Metal effects. The lower the setting, the shorter the delay time.
Generally speaking, the lower settings give you a tighter, more resonant sound, and the higher
settings can give you a kind of ‘trash can reverb’ type of sound.
F1
This sets the feedback. Extreme positive (up) or negative (down) positions give the most metallic
resonances, with the top being a brighter, higher ‘clang’ and the bottom being a darker, lower, hollow
‘bong’. The mid range positions are good for basic flanging. However, around dead middle is kind of
boring and doesn’t do much. It’s best to have the feedback set somewhere more in the positive or
negative positions.
When going for those strong metallic resonances (the extreme feedback settings), the pitch of
the Metal sound can be altered by adjusting the time controls. With the feedback in an up/positive
position, the pitch of the time controls will be from low (bottom) to high (top). When the feedback is
in a down/negative position, the effect is reversed. Yeah, I know it’s a little weird. All I can say is play
with it and you’ll get used to it pretty quick.
T2
Time for the second Metal.
F2
Feedback for the second Metal.
LFO
The upper switches set the waveform of the LFO, the lower switches set the
speed based on the BPM of your host, and the slider on the bottom sets the
depth/level of the LFO. The led next to the slider will light up whenever the LFO
is active.
Note: The LFO modulates the two Metal Times (in reverse of each other) as well
as modulates the all pass filter.
?
Randomizes the following controls: AP, T1, F1, T2, F2, LFO waveform, LFO speed, and LFO level.
MIDI Input
Remember when I mentioned that Metallurgy can almost be synth in its own
right? Here’s why. When this is activated, the Metal effect will switch into
pitched mode allow you to actually play it from a MIDI controller. So turn this
on, feed Metallurgy some audio, and you’ve got yourself another instrument to work with.
Hint: To really bring this sequenced effect to life, use extreme F1 and F2 settings and feed
Metallurgy a drum loop.
Metallurgy Users Guide
6
Page 7

Metal Sequencer
When you use this 16 step sequencer, it takes over the Metal Time controls and let’s you set notes
for each step, turning the Metal effect into a easy to control source of metallic melodic sequences.
Note 1: When the sequencer is active, the Metal Time controls are deactivated so the note and
octave switches can do their job.
Note 2: When the MIDI Input switch is on, the Metal sequencer is bypassed.
O
On / off.
GLIDE
Adjust a glide (portamento) effect between notes/steps. Turning the control towards the right
increases the effect.
DIR
Sets the direction the sequencer will play in. Options are forwards, backwards, bounce 1, and
bounce 2. Bounce 1 is just forwards, then backwards. Bounce 2 is almost the same except that the
first and last steps are played twice, thus extending the length of the sequence by 2.
SPD
Sets the speed of the sequencer based on the BPM of your host.
LENGTH
Lets you set the number of steps the sequencer goes to. Range from 1-16.
OCT
This upper row of square indicators set which octave the note of that step will be in. You’ve got a 5
octave range to pick from. Click in the box and drag your mouse up or down to adjust the setting.
NOTE
Sets the note of the step, ranging from C to B.
?
Randomizes the Octave and Note buttons. Think of it as a melodic slot machine.
Metallurgy Users Guide
7
Page 8

Filters
Low pass, high pass and band pass. All three can be active at the same time and they all run in
parallel. The controls are the same for each of them.
O
Turns that particular filter on / off.
V
Volume of each filter output.
C
Adjusts the cutoff.
R
Adjusts the resonance.
?
Randomizes the cutoff, resonance, and the LFO controls for all three filters. (By the way, the switch
is beneath the low pass filter’s on/off switch.
P
This is a pan control, allowing you to set the placement of the filter’s output in the stereo field.
I
Switching this on inverts the pan modulation signal that can be received from the LFO.
LFO
Upper switches - set whether the LFO modulates the filter’s cutoff, pan, or both.
Middle switches - set the waveform of the LFO.
Lower switches - set the speed based on the BPM of your host, and the slider on the bottom sets
the depth/level of the LFO. The LED next to the slider will light up whenever the LFO is active.
Metallurgy Users Guide
8
Page 9

Filter Sequencer
More modulation fun. Sequence the cutoff level for the filter of your choice, or for all 3 filters at once.
O
On / off.
LP MOD
Adjusts how much the sequencer will affect the low pass cutoff.
BP MOD
Adjusts how much the sequencer will affect the band pass cutoff.
HP MOD
Adjusts how much the sequencer will affect the high pass cutoff.
GLIDE
Sets the amount of the glide effect between the steps. The more to the right you turn the control, the
more glide you get.
DIR
Sets the sequencer’s direction. Options are forwards, backwards, bounce 1, and bounce 2. Bounce
1 is just forwards, then backwards. Bounce 2 is almost the same except that the first and last steps
are played twice, thus extending the length of the sequence by 2.
SP
Sets the speed based on the BPM of your host.
LENGTH
Lets you set the number of steps the sequencer goes to. Range from 1-16.
16 Sliders
These adjust the level for each step.
?
Randomizes the 16 sliders.
Metallurgy Users Guide
9
Page 10

Filth 2
Same as the first Filth, but having two allows you to work with both pre and
post filter distortions. You can also have both Filth’s on at once. Yup...up to 2
downsamplers and two seriously nasty distortions, with one running into the
other...or with Metal and/or three filters in between.
Reminder: The randomizer in the first Filth section will randomize this one too.
Gate / Pan Sequencer
For the benefit of those who may have been out of the current electronic music scene for the last
bunch of years, a gate sequencer (or trance gate) effect cuts the sound in or out with each step,
giving you a rhythmic chopped up effect.
This one has another trick up it’s sleeve though. In addition to sequencing the gate, it can also let
you set the pan of each of the 16 steps, allowing you great control over how your sound sweeps and
bounces around the stereo field.
O
On / off.
MIX
Sets the mix of the non gated signal to the gated signal.
GATE
Adjusts the length of the gate. Turning the control to the right will increase the length.
DIR
Sets the sequencer direction. Options are forwards, backwards, bounce 1, and bounce 2. Bounce
1 is just forwards, then backwards. Bounce 2 is almost the same except that the first and last steps
are played twice, thus extending the length of the sequence by 2.
SPD
Sets the speed based on your host’s BPM.
Metallurgy Users Guide
10
Page 11

LENGTH
Lets you set the number of steps the sequencer goes to. Range from 1-16.
MODE
Lets you select whether the sequencer effects the gate, pan, or both.
16 Switches
When a switch is lit, it will let the signal pass...when its off, it wont.
16 Knobs
These adjust the pan for each step. They are only active when the mode selector is set to either Pan
or G+P (gate plus pan.)
?
Randomizes the 16 switches.
Delay
A simple, but always useful, feature...dual delays.
O
On / off for both delays.
MIX
Sets the mix of the non delayed signal to delayed signal.
V
Volume of the delays.
F
Adjusts the feedback level for the delays.
ST
Sets the stereo width of the delays. You’ll only hear this effect when the delays are set to different
times, or if one uses a dotted note.
TIME
These set the speed of the delays based on your host’s BPM.
Metallurgy Users Guide
11
Page 12

DOT
These give you dotted versions of the times.
?
Randomizes the following controls: F, ST, TIME, DOT.
Envelope Follower
An envelope follower modulates a parameter based on the volume of
the input signal. So to really get the most out of it, use audio that has
a lot of dynamic variation in it...like drums, or guitar or bass lines with
some space between the notes and variations in velocity.
MT
Sets whether or not the Metal will be modulated by the Envelope Follower. When active, this
modulates both Metal times and the all pass filter.
Note: When the Metal sequencer is on, the envelope follower won’t work on the Metal Times, but it
will work on the all pass.
MX
Sets whether or not the envelope follower will modulate the master mix. To use this feature, it is
recommended that you set the envelope follower’s level all the way up, and the master mix slider all
the way down. This way your signal will be clean until the follower receives a signal loud enough to
bring in the sound of Metallurgy.
IV
This allows the envelope follower to modulate the volume of the input signal. The usefulness of this
effect can vary greatly depending on the source material and experimentation will help you find the
best settings, but when everything is set as needed you will be able to achieve a volume swell when
you play louder notes. I find this sounds especially cool with the delay.
HP / BP / LP - Sets whether or not each filter’s cutoff will be modulated by the Envelope Follower.
You can have all of these destinations active at the same time, if you want.
L - Sets the level of the effect. The higher the slider, the more pronounced the effect.
A – Attack speed of the envelope.
D – The decay of the envelope.
Metallurgy Users Guide
12
Page 13

Extra Sequencer Controls
I have included a few other controls that may come in handy, which you will find in the lower right
hand corner of the interface.
SR
Pressing this button will force the sequencers to reset to the first step. This can be
useful for musical purposes, and also as a backup in case you find your host is not
triggering Metallurgy’s auto reset fast enough.
CL + Numeric Display
This allows you to switch Metallurgy’s clock source from external/host (off) to an internal clock (on.)
By default, Metallurgy is in the off mode and therefore syncs with your hosts clock. In most situations
this would be the desired setting, and the display will show the current BPM of your host.
However, some hosts do not transmit their BPM information to effects. If you happen to be working
in one of those hosts, you can use this function to set Metallurgy to the desired BPM. To do so,
switch the function on, click in the display and type in the BPM you want, then press enter.
Fine Tuning
Holding down the CTRL key while adjusting a slider will allow you to fine tune your setting.
Metallurgy Users Guide
13
Page 14

Known Bugs
FLStudio / Live - muting / soloing
Muting / soloing the effect channel that metallurgy is loaded on will cause a momentary stutter of the
audio.
FL Studio Lag
When Metallurgy is loaded you may experience a lag between when you press play and when the
sequencer starts. A lag also occurs when pressing the rewind button. This problem is caused by an
incompatibility between Metallurgy and the reset procedure FL runs every time you play/rewind.
To fix this problem:
1. Press the options button in FL studio (at the top of the screen)
2. Choose the Audio Settings from the drop down menu
3. Turn off “Reset plugins on transport”
Project5
Disturbance will not render in sync within Project5. I have yet to find the cause for this, but I am
working on it. Becuse of this, I cannot recommend using Disturbance in this host. Additionally, during
playback Disturbance may not reset correctly unless you use Project5’s “always reset on stop” function.
Cubase SX/SL
Due to an unfortunate conflict between Disturbance’s clock and Cubase’s own clock, a few workarounds are needed to get Disturbance to play and render in sync. Thankfully they are easy ones.
This may also affect Cubase 4.
1. For proper playback timing, set Cubase to use a preroll. 0.0.0.100 seems to work fine but just to
be on the safe side you may want to give it something longer. Note that a preroll is also necessary
during recording. As a result, you will also have to turn off “start recording at left marker” since that
would override the preroll.
2. To get Disturbance to render correctly when using offline (non-real time) exporting, set your playback point so that the time ends in anything other than a zero. For example, instead of starting at
1.01.01.000, start it at 0.01.01.001.
Sound Forge
Metallurgy does not work well with Sound Forge, and may even cause it to crash. However, if
you happen to own energyXT, using it as a wrapper for Metallurgy seems to avoid the crashing
problems.
Dual core processors + multiple instances
Unfortunately VSTs built with SynthEdit are not properly compatible with dual core processors. Single instances work fine, but multiple instances can cause crashes in hosts that have multi processor
support activated. Jeff McClintock, SynthEdit’s creator, is aware of the problem and has mentioned
that the fix for it will be in the next update (1.1) of SynthEdit. As soon as Jeff releases this fix, I will
release an update to Metallurgy to solve this problem. In the meantime, there are a few workarounds
for this issue.
Metallurgy Users Guide
14
Page 15

1. Make additional copies of the Metallurgy dll for each extra instance you expect to need, and give
each a new name. (eg: Metallurgy2.dll, Metallurgy3.dll, etc.) Hosts consider each an individual instance, and therefore do not run into the multiple instance conflict.
2. Freeze each instance before loading another one, especially if your host has an “unload while
frozen” option.
3. Turn off multi processing in your host. Of course this is the least desirable of the three options
since it negates the benefit of having a dual core, but it does work.
Credits
Metallurgy - created by Ugo (Chris Sciurba)
www.ugoaudio.com
ugo@ugoaudio.com
Metallurgy was built with Synthedit. VST plugin technology by Steinberg.
This VSTi features modules and prefabs by:
Dave Haupt - www.dehaupt.com
Chris Kerry - www.chriskerry.f9.co.uk
e-phonic - www.e-phonic.com
Kelly Lynch - www.rubidiumhexafluorosilicate.com/synthedit/
Lance Putnum - www.uweb.ucsb.edu/~ljputnam/synthedit.html
Rick Jelliffe - http://extra.schematron.com
Scoofster Modules - http://scp.web.elte.hu/synthedit/
Tweakbench - www.tweakbench.com
Dan Worrall
Patches By
CH - Canned Heat / Hootan Farzad
dB - Darrell Burgan - www.spiritcanyonaudio.com
DEK – dystonia_ek - http://dystoniaek.org
HGF – H.G. Fortune - www.hgf-synthesizer.de/
JJ – Jeremy Janzen - Nucleus Soundlab - www.nucleus-soundlab.com
SM - rsmus7 / Stephan Muesch - http://rsmus7.panicnow.net/index2.htm
TC – Tim Conrardy / AlgoMusic - http://www.algomusic.nl
WR – WaveRider - www.soundclick.com/waverider
RB – Roben Stobenz
WN – White Noise Audio / Dave Wallin - www.whitenoiseaudio.com
ToTc – Frank Genus - www.pro-sounds.net
Sickle – Donovan Stringer
FPI - Anke Scheffler
Koo - Highkoo
PS - Jeff Rhodes of Perimeter Sound Arts
Ugo
Metallurgy Users Guide
15
Page 16

Special thanks
- All the beta testers
- Jeff McClintock, for creating SynthEdit.
- Steinberg, for inventing VST
- The Yahoo SynthEdit users group
- KVR www.kvraudio.com
...and Extra Special thanks to Sickle for inspiring me to finally build Metallurgy and assisting with
the initial design concept.
License Info
1.Do not distribute this VST or install it on other people’s computers. This is a single user license so
if you know someone who might like this product, please encourage them to buy copy of their own.
So feel free to spread the word about how great Metallurgy is, but just don’t spread the VST itself.
2.You are using this software at your own risk. While I do what I can to prevent trouble, I claim no
responsibility for damage to your hardware, software, income, reputation, sleep habits, hat size, or
person should something go wrong.
3.You may transfer your license if you wish, but you must arrange it with me first so the new owner
can get tech support and updates.
Metallurgy Users Guide
16
 Loading...