

Page 1
AC4922
ES INSTRUCCIONES DE USO
GB OPERATING INSTRUCTIONS
FR MODE D'EMPLOI
PT INSTRUÇÕES DE USO
GEBRAUCHSANLEITUNG
DE
HU HASZNÁLATI UTASÍTÁS
РУKОВОДСТВО ПО ЭКСПЛУАТАЦИИ
RU
CZ NÁVOD K POUÎITÍ
УКАЗАНИЯ ЗА УПОТРЕБА
BU
RO INSTRUCTIUNI DE FOLOSIRE
AR
ﻞﻴﻐﺸﺘﻟا تادﺎﺷرإ
Page 2
Page 3
Page 4
Page 5
Page 6
Page 7

ESPAÑOL
DESCRIPCIÓN DEL APARATO
1. Boquilla universal con dos posiciones
2. Cepillo para suelos duros Para aspirar sobre revestimientos de
suelos duros (baldosas, parqué, etc.)
3. Tubo telescópico
4. Botón de enclavamiento
5. Empuñadura del tubo
6. Tubo flexible de aspiración
7. Boquilla para tapicería
8. Boquilla larga
9. Cable de alimentación de red
10. Tecla de Encendido / Apagado con regulador electrónico de
la potencia de aspiración
11. Soporte para el tubo en posición horizontal
12. Filtro de entrada de aire
13. Soporte para el tubo en posición vertical (en la parte inferior
del aparato)
14. Contenedor de polvo
15. Tapa del aparato
16. Asa de transporte
17. Rejilla de salida
18. Indicador de cambio de filtro
ADVERTENCIAS IMPORTANTES
• Lea atentamente estas instrucciones. Consérvelas para futuras
consultas.
• En caso de entregar el aspirador a una tercera persona, adjuntar
las instrucciones de uso.
• Usar este aspirador exclusivamente de acuerdo con las indica-
ciones descritas en estas instrucciones de uso.
• El fabricante no se responsabiliza de los posibles daños deri-
vados de un uso que no se ajuste a las especificaciones o por un
manejo erróneo.
• Antes de conectar el aparato a la red eléctrica, asegúrese de que
la tensión corresponde a la indicada en la placa de características.
• Tanto al introducir como al sacar la clavija del enchufe, el aparato
debe no debe estar en funcionamiento.
• No haga funcionar el aspirador con el cable enrollado.
• Extraer completamente el cable de alimentación de red si el apa-
rato está funcionando durante varias horas.
• No desconecte la clavija tirando del cable.
• Desconecte el aspirador de la red cuando no se use y antes de
proceder a su limpieza o al cambio de bolsa y filtros.
• No se debe utilizar este aspirador sin el colector de polvo, o la
bolsa filtrante o sin los filtros correctamente colocados
• Este aparato está diseñado exclusivamente para uso doméstico.
NO ASPIRE POLVO DE OBRA , SERRÍN O SIMILARES. Al aspira r polvo
de obra o similares, se taponan los poros de la bolsa de aspiración
y por consiguiente se bolquea la entrada de aire de mismo.
• El aspirador deberá usarse sólo con bolsas filtrantes originales.
• El aspirador no es adecuado para:
– utilizarlo en personas o animales
– aspirar:
- insectos (p. ej., moscas, arañas, ...),
- sustancias nocivas para la salud, calientes o incandescentes ni
materiales cortantes,
- sustancias húmedas o líquidas,
- materiales o gases inflamables o explosivos.
- ceniza, hollín de hornos de baldosa e instalaciones de calefacción central
• Proteger el aspirador de las condiciones meteorológicas, la humedad y las fuentes de calor.
• No utilice el aspirador si tiene alguna abertura obstruida, ya que
se reduciría el paso del aire, provocando sobrecalentamientos que
pueden dañar el aparato.
• No coja el aspirador ni la clavija con las manos mojadas. No sumerja el aparato en agua.
• No desplazar el aspirador tirando del cable o del tubo de aspiración. Utilice el asa de transporte.
• Evite que los niños manipulen el aparato.
• Este aparato no debe ser utilizado por personas (incluyendo niños) con capacidades físicas, sensoriales o mentales disminuidas o
falta de experiencia y conocimiento a menos que hayan sido instruidas respecto a su uso por una persona responsable.
• Los niños deberán ser vigilados para asegurar que no juegan con
el aparato.
• Evitar aspirar con la empuñadura, boquillas o tubo a la altura de
la cabeza.
- Riesgo de lesiones.
• No utilice el aparato con el cable o la clavija dañada.
• Cuando cierre una puerta, cerciórese de que ésta no pilla el cable.
• No ponga en marcha el aspirador si el cordón o el enchufe están
dañados o si observa que el aparato no funciona correctamente
• Desconectar el aparato cuando no se esté utilizando.
• Inutilizar inmediatamente los aparatos usados para poder eliminarlos según la normativa.
• Las reparaciones y cambios de cable deberán ser efectuadas
exclusivamente por un Servicio Técnico Autorizado.
PRIMERA UTILIZACIÓN
Figura 1
Introducir la empuñadura en la manguera de aspiración hasta que
encaje.
PUESTA EN MARCHA
Figura 2
a) Encajar el racor de la manguera de aspiración en la abertura de
aspiración.
b) Para extraer la manguera de aspiración, presionar las dos lengüetas de retención y extraer el tubo.
Figura3
Unir la empuñadura y el tubo de aspiración.
Figura 4
Unir la boquilla universal y el telescópico.
Figura 5
Desenclavar el tubo telescópico moviendo el botón de ajuste en la
dirección de la flecha y ajustar la longitud deseada.
Figura 6
Tirar de la clavija de enchufe para sacar el cable de alimentación de
red hasta la longitud deseada y enchufarla.
Page 8

Figura 7
Encender / apagar el aspirador accionando la tecla de conexión y
desconexión en la dirección de la flecha.
Figura 8
Regular la potencia de aspiración girando la tecla de conexión y
desconexión en la dirección de la flecha.
ASPIRADO
Figura 9
Ajustar el cepillo universal:
a) Alfombras y moquetas
b) S uel os li so s
Figura 10
Acoplar las boquillas al tubo de aspiración o a la empuñadura según las necesidades:
a) Boquilla larga para aspirar en ranuras y esquinas, etc.
b) Boquilla para tapicería para aspirar muebles tapizados, cortinas,
etc.
Figura 11
Si se interrumpe brevemente el trabajo se puede utilizar el sopor te
para el tubo en la parte posterior del aparato.
Introducir el gancho de sujeción del cepillo universal en la ranura
situada en la parte posterior del aparato.
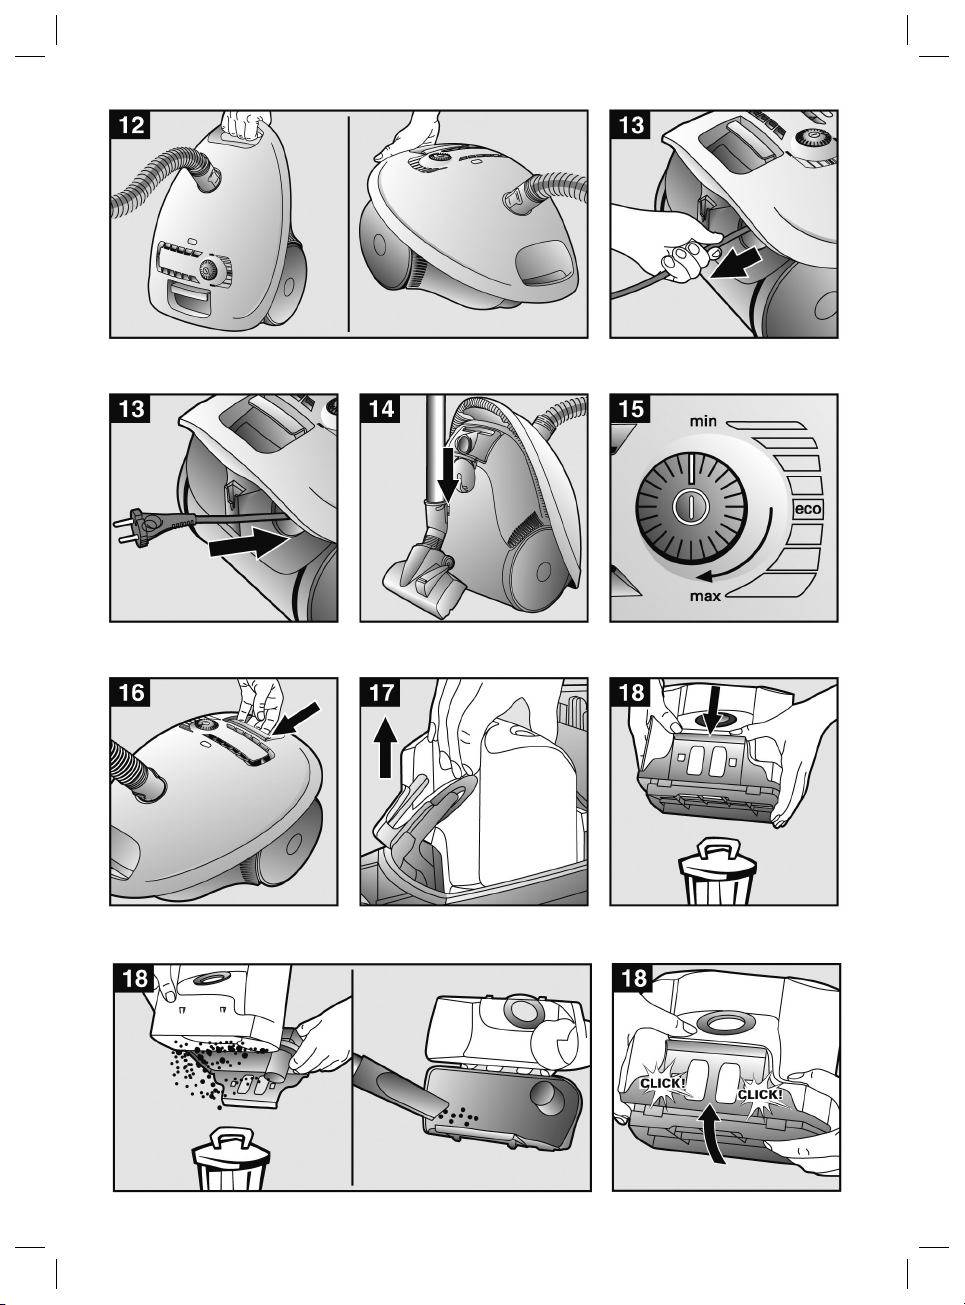
Figura 12
Las dos asas se pueden utilizar para transportar el aparato cuando
se utiliza en escaleras, por ejemplo
TRAS EL TRABAJO
Figura 13
Retirar el enchufe.
Tirar ligeramente del cable de alimentación de red y soltarlo (el ca-
ble se enrolla automáticamente).
Figura 14
Para guardar / transportar el aparato se puede utilizar el soporte
para el tubo en posición vertical situado en el lado inferior del
aparato.
Colocar el aparato en posición vertical. Introducir el gancho de sujeción del cepillo universal en la ranura situada en el lado inferior
del aparato.
Usted ha adquirido un aspirador trineo con el que podrá aspirar
todo tipo de suciedad seca, utilizando tanto el colector de polvo
como la bolsa filtrante.
Recomendamos utilizar
- el colector de polvo sobre todo p. ej., para aspirar serrín, etc.
etc.
- la bolsa filtrante sobre todo en las tareas domésticas habituales.
TRABAJAR CON EL COLECTOR DE POLVO
Figura 15
Para obtener resultados de aspiración óptimos, ajustar el regulador
de potencia en la posición máxima.
Recomendamos reducir la potencia sólo cuando se trate de materiales muy delicados.
!Atención: El indicador de cambio de filtro sólo funciona correcta mente si está colocada una bolsa filtrante.
¡Atención! la tapa del aparato no pod rá cerrarse cuando no
haya colector de polvo o bolsa filtrante en su interior. No
fuerce su cierre y com pruebe la colocación del sistema de
recogida de suciedad deseado
Vaciar el colector de polvo
Para conseguir una máxima eficacia de aspiración es conveniente
vaciar el colector de polvo después de cada aplicación.
Figura 16
Abrir la tapa del compartimento general accionando la pestaña de
cierre en la dirección de la flecha.
Figura 17
Sacar el colector de polvo del aparato.
Figura 18
- Soltar los dos cierres de resorte de la tapa en la dirección de
la flecha, abrir la tapa hasta que se enganche en el tope, vaciar la
suciedad del depósito hacia abajo.
- En caso de que la tapa esté muy sucia (suciedad gruesa), limpiarla antes de cerrarla, p. ej. al aspirar con una boquilla para juntas.
(Para ello es imprescindible colocar la bolsa f iltrante en el
aparato, ver la figura 23)
- Cerrar la tapa y encajarla de forma audible.
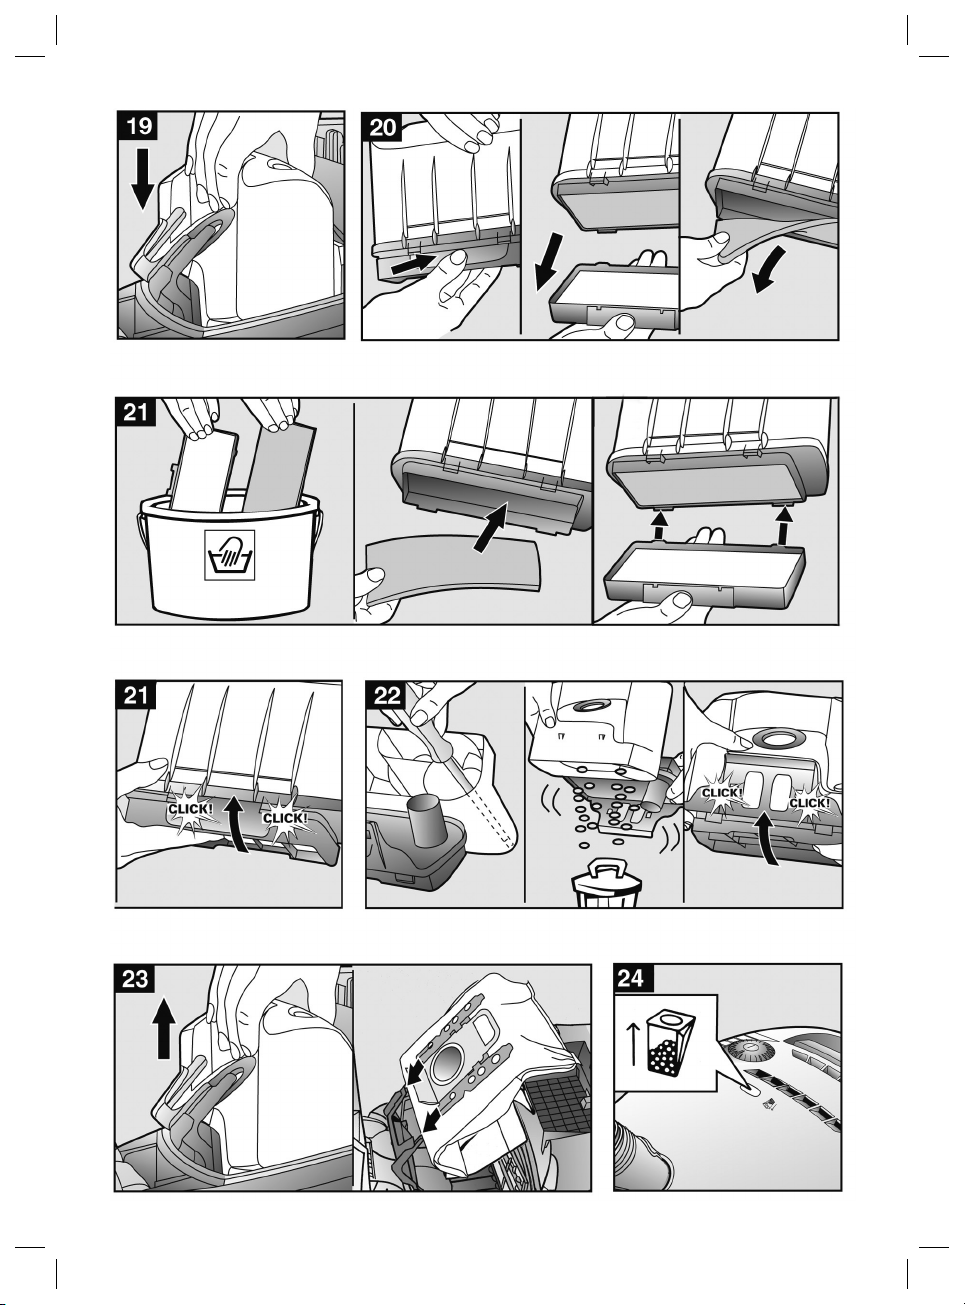
Figura 19
Volver a colocar el colector de polvo en el aparato y cerrar la tapa
del compartimento general.
!Atención: Debido al uso continuado del aspirador, el contenedor de polvo puede sufrir arañazos en su interior y adoptar
un aspecto mate. Esto no afecta en modo alguno la función
del aspirador, es decir, el aparato sigue funcionando per fectamente.
LIMPIAR EL FILTRO PERMANENTE Y EL MICROFILTRO
DEL CONTENEDOR DE POLVO
Cuándo deben limpiarse:
- Siempre que se registre un fallo de funcionamiento, es decir,
cada vez que se elimine una obstrucción.
- Cada seis meses, como mínimo.
Figura 20
- Presionar la pestaña de cierre de la parte posterior del depósito
hacia dentro y quitar el microfiltro del depósito.
- Retirar el filtro permanente de la base del recipiente.
Figura 21
- Lavar el microfiltro y el filtro permanente. A continuación, se ha
de poner a secar un mínimo de 24 horas.
- Tras la limpieza, colocar el filtro permanente en la base.
Colocar el microfiltro en el depósito y cerrar en la dirección de las
flechas. Encajar la pestaña de cierre de forma audible.
FALLO DE FUNCIONAMIENTO
Eliminar una obstrucción en el colector de polvo.
Figura 22
- Vaciar el depósito (ver la figura 18)
- Eliminar la obstrucción, p. ej. con ayuda de un destornillador o
sacudiendo y aspirando el colector.
(Para aspirar es imprescindible colocar la bolsa filtrante en el
aparato, ver la figura 23)
- Cerrar la tapa y encajarla de forma audible.
Page 9
!Atención: Después de cada funcionamiento erróneo el microfiltro y el filtro per manente deben limpiarse (ver las figuras
20 y 21).
ASPIR AR CON LA BOLSA FILTRANTE
Si es necesario, también puede utilizarse una bolsa filtrante en lugar
del colector de polvo.
Denominación del paquete de filtros de recambio: FA-0130.
Figura 23
- Abrir la tapa del aparato (ver la figura 16).
- Extraer el depósito para el polvo e insertar la bolsa filtrante.
- Cerrar la tapa del aparato.
Usted ha adquirido un aparato muy potente y con un gran rendi-
miento de aspiración. Por tanto, se recomienda utilizar la potencia
máxima solamente en moquetas de pelo corto muy sucias o en
suelos resistentes.
Accionando el regulador de potencia de aspiración (ver la figura
8) puede programarse la potencia de aspiración deseada sin escalonamiento.
– Gama baja de potencia:
Para aspirar tejidos delicados, p. ej. cortinas.
– Gama media de potencia:
Para la limpieza diaria con poca suciedad.
– Gama alta de potencia:
Para limpiar revestimientos robustos, suelos resistentes y cuan-
do hay mucha suciedad.
SUSTITUCIÓN DE LA BOLSA FILTRANTE
Figura 24
Si cuando la boquilla universal no toca el suelo y estando ajustada
la má xima inte nsid ad de aspi raci ón el indicad or de camb io de f iltro
en la tapa se ilumina completamente en amarillo, debe cambiarse la
bolsa filtrante, aun cuando ésta no estuviese completamente llena.
En tal caso es el tipo de contenido de la bolsa lo que hace necesario el cambio.
La boquilla, el tubo de aspiración y el tubo flexible de aspiración
no deben estar obstruidos, ya que esto comportaría la iluminación
del indicador de cambio de filtro.
• No haga funcionar el aspirador sin bolsa ni intente vaciar una bolsa llena y volver a utilizarla.
• Para garantizar el perfecto funcionamiento, utilice exclusivamente
bolsas originales de Ufesa que encontrará en los establecimientos
autorizados. El uso de bolsas no originales puede dañar el producto y será causa de anulación de la garantía. Recambios: FA- 0130 .
!Atención: El indicador de cambio de filtro sólo funciona correcta mente si está colocada una bolsa filtrante.
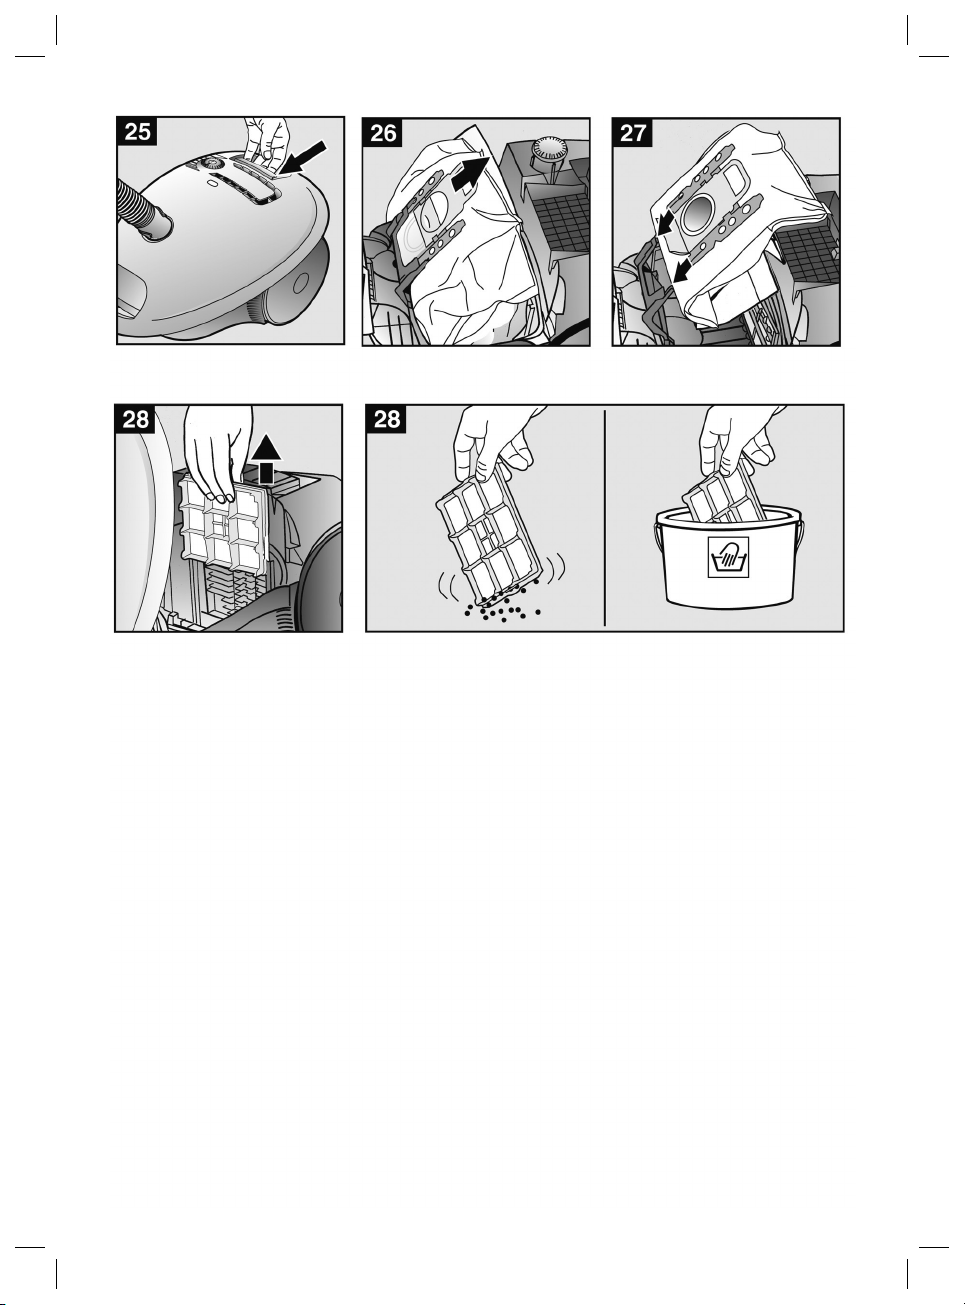
Figura 25
Abrir la tapa accionando la palanca de cierre en dirección de la
flecha.
Figura 26
Cerrar la bolsa filtrante tirando de la lengüeta de cierre y extraerla.
Figura 27
Insertar la bolsa filtrante nueva en el soporte y cerrar la tapa del
aparato.
!Atenc ió n: La t apa de l com par ti ment o c ol ecto r d e pol vo só lo
se ci erra c uan do est á colo cad a la b ols a f ilt rante o, en su cas o,
el depósito para el polvo.
Limpiar el filtro protector del motor
El filtro protector del motor debe limpiarse regularmente sacudiéndolo o enjuagándolo.
Figura 28
- Abrir la tapa del compartimento general (ver figura 16).
- Extraer el filtro protector del motor en el sentido que indica la
flecha.
- Limpiar el filtro protector del motor sacudiéndolo.
- Si el filtro está muy sucio, deberá enjuagarse.
A continuación, se ha de poner a secar un mínimo de 24 horas.
- Después de la limpieza, introducir el filtro en el aparato y cerrar
el compartimento colector de polvo.
CUIDADOS
La limpieza del aspirador sólo se realizará con el aparato apagado
y la clavija del enchufe a la red desenchufada.
El aspirador y las piezas de plástico de los accesorios pueden limpiarse con cualquiera de los productos habituales de limpieza para
plásticos disponibles en el mercado.
!No utilizar productos ab rasivos, limpiacristales ni productos
de limpieza de uso general.
No introducir nunca el aspirador dentro del agua.
El compartimento general se puede limpiar, en caso necesario, con
un segundo aspirador, o simplemente con un paño / cepillo del
polvo seco.
ADVERTENCIAS DE DEPOSICION/ELIMINACION
Para su transporte, nuestras mercancías cuentan con un
embalaje optimizado. Este consiste –por principio- en
materiales no contaminantes que deberían ser entregados
como materia prima secundaria al servicio local de eliminación de
basuras.
Este producto cumple la Directiva de la UE 2002/96/CE.
El símbolo del cubo de basura tachado sobre el aparato
indica que el producto, cuando finalice su vida útil, deberá
desecharse separado de los residuos domésticos, lleván-
dolo a un centro de desecho de residuos separado para
aparatos eléctricos o electrónicos o devolviénd olo a su distribuidor
cuando compre otro aparato similar. El usuario es el responsable de
llevar el aparato a un centro de desecho de residuos especiales al
finalizar su vida útil. De lo contrario, podrá ser sanciona do en virtud
de los reglamentos de desecho de residuos vigentes. Si el aparato inutilizado es recogido correctamente como residuo separado,
podrá ser reciclado, tratado y desechado de forma ecológica; esto
evita un impacto negativo sobre el medio ambiente y la salud, y
contribuye al reciclaje de los materiales del producto. Para obtener
más información sobre los servicios de desecho de residuos disponibles, contacte con su agencia de desecho de residuos local o
con la tienda donde compró el aparato. Los fabricantes e importadores se hacen responsables del reciclaje, tratamiento y desecho
ecológico, sea directamente o a través de un sistema público.
Su Ayuntamiento o Municipio le informará sobre posibilidades de
deposición/elimi nación para los aparatos en desuso.
Page 10

ENGLISH
YOUR VACUUM CLEANER
1 Adjustable floor tool
2 Hard-floor brush. For vacuuming hard floor coverings (tiles,
parquet flooring, etc.)
3 Telescopic tube
4 Locking button
5 Handle
6 Flexible hose
7 Upholstery nozzle
8 Crevice nozzle
9 Power cord
10 On/off button with electronic suction regulator
10 On/off button with electronic suction regulator
11. Tube support in horizontal position
13 Storage aid (on underside of unit)
14 Dust coll ec tor
15 Vacuum cleaner lid
16 Carr ying handle
17 Exha ust grille
18 Dust bag change indicator
IMPORTANT ADVICE
• Read these instructions carefully. Safeguard them for future reference.
• When passing the vacuum cleaner on to a third party, please also
pass on this instruction manual.
• This vacuum cleaner should only be used in accordance with
these instructions for use.
• The manufacturer will not accept any responsibility for damage
caused by improper use or incorrect operation.
• Before plugging the appliance into the mains, check that the voltage corresponds to that stated on the characteristics plate.
• The appliance should be switched off when plugging it in or
unplugging it.
• Do not operate the appliance with the cable still coiled.
• Fully extend the power cord when using the vacuum cleaner
continuously for several hours.
• Do not unplug the appliance by tugging on the cable.
• Unplug the vacuum cleaner from the mains supply when not in
use and before proceeding to clean it or change the bags or filters.
• This vacuum cleaner must not be used without the dust collector,
filter bag or filters correctly fitted.
• This appliance has been designed exclusively for domestic use.
DO NOT SUCK UP CEMENT DUST, SAWDUST OR SIMILAR Cement
dust and the like will block the pores on the suction bag and cut off
the air intake.
• The vacuum cleaner must only be operated with manufacturer’s
original dust bags.
• The vacuum cleaner is not to be used for:
– Vacuuming persons or animals
– Vacuuming up:
- Insects or spiders.
- Hazardous, sharp-edged, hot or burning substances.
- Damp or liquid substances.
- Highly flammable or explosive substances and gases.
- Ash, soot from tiled stoves and central heating systems
The vacuum cleaner should be protected from the weather, moisture and sources of heat.
• Do not use the vacuum if any of its openings are obstructed, given that this will reduce the air flow, causing it to overheat which
may damage the appliance.
• Do not handle either the vacuum or the plug with wet hands. Do
not immerse the appliance in water.
• Do not pull on either the cable or the suction tube to move the
vacuum. Use the carry handle.
• Do not let children handle the appliance.
• This appliance must not be used by persons (including children)
with phys ical, s enso ry or menta l imp airme nts un less the y have be en
instructed in its correct use by a responsible adult.
• Children must be supervised to ensure that they do not play with
the appliance.
• Keep suction away from your face when using the handle, nozzles or pipe.
– Risk of injury.
• Do not use the appliance if either the cable or plug are damaged.
• When closing doors, make sure that they do not pinch the cable.
• Switch off the vacuum cleaner when it is not in use.
• At the end of its life, the vacuum cleaner should be disposed of
in an appropriate manner.
• Do not switch the appliance on if the cable or plug are damaged
or if it can be detected that the appliance is not working correctly.
• Cable repairs and replacements must be carried out exclusively
by an Authorised Technical Service Centre.
BEFORE USING FOR THE FIRST TIME
Figure 1
Push the handle onto the flexible tube and
until it engages.
SETTING UP
Figure 2
a) Push the hose connector into the opening on the vacuum cleaner
until it engages.
b) To remove the flexible hose, press the two lugs together and pull
the hose out.
Figure 3
Connect the handle and the suction pipe together.
Figure 4
Connect the floor tool and telescopic tube together.
Figure 5
Disconnect the telescopic tube and adjust its length by moving the
adjusting button in the direction of the arrow.
Figure 6
Holding the power cord by the plug, pull out the required length
and plug it into the mains socket.
Figure 7
Press the on/off button in the direction of the arrow to switch your
vacuum cleaner on/off.
Page 11

Figure 8
Adjust the suction by turning the on/off button in the direction of
the arrow.
VACU UMING
Figure 9
Adjusting the floor tool:
a) Rugs and carpets
b) Hard floors
Figure 10
Attach the nozzles to the suction pipe or handle as required:
a) Crevice nozzle for vacuuming crevices and corners, etc.
b) Upholstery nozzle for vacuuming upholstered furniture, curtains,
etc.
Figure 11
You can use the parking aid on the back of the vacuum cleaner if
you wish to stop vacuuming for a short time.
Slide the catch on the floor tool into the groove at the rear of the
appliance.
Figure 12
The appliance can also be carried using the two handles when vacuuming steps, for example.
WHEN THE WORK IS DONE
Figure 13
Unplug the vacuum cleaner.
Tug the power cord briefly and let go. The cable then rewinds au-
tomatically.
Figure 14
To store or transport the vacuum cleaner, use the storage aid on the
underside of the vacuum cleaner.
Stand the vacuum cleaner up on its end. Slide the catch on the floor
tool into the groove on the underside of the appliance.
You have purchased a floor vacuum cleaner which can vacuum up
any type of dry dirt using the dust collector or dust bag.
We recommend that you use:
- the dust collector, in particular for your hobbies, e.g. to remove
wood shavings, etc.
- the dust bag principally for everyday household cleaning.
Figure 16
Turn the dust compartment locking lever in the direction of the
arrow to open the dust compartment cover.
Figure 17
Remove the dust container from the appliance.
Figure 18
– Release the two snap locks on the bottom flap in the direction of
the arrow, open the flap until it clicks into the stop position and the
container will then empty the dirt in a downwards direction.
– If the bottom flap is very dirty, (thick dirt) clean it before closing,
by vacuuming it with the crevice nozzle, for example. (You must
fit the dust bag in the vacuum cleaner when you do this - see
Figure 23)
– Close the bottom flap so that it can be heard snapping into position.
Figure 19
Put the dust bag back into the vacuum cleaner and close the dust
bag compartment lid.
! Caution: The inside of the dust container may become scratched with use and Stara to look opaque. This does not,
however, affec t the performance of the vacuum cleaner in
any way, i.e. it will continue to function as normal.
CLEANING THE PERMANENT FILTERS AND MICRO
FILTERS IN THE DUST CONTAINER
The filters m ust be cleaned:
– After any operating malfunctions, i.e. after a blockage is cleared.
At least ever y six months.
Figure 20
– Press the fastener on the rear side of the container and remove
the micro filter from the bottom of the container.
– Remove the permanent filter from the bottom plate of the container.
Figure 21
– Wash the micro- and permanent filters.
The filter must then be left to dr y for at least 24 hours.
– After cleaning, place the permanent filter on the bottom plate of
the container.
Put the micro filter onto the container and fix it in place by pushing
in the direction of the arrow. You will hear the flap snap shut.
USING THE DUST COLLECTOR
Figure 15
Set the power setting to maximum for the best results when vacuuming.
We recommend that you reduce the setting only when vacuuming
very delicate materials.
! Attention: The dust bag change indicador only functions correctly in conjunction with a dust bag.
Attention! The cover on this appliance cannot be closed if
the dust collector or f ilter bag are not present inside. Do not
force it shut and check that the desired dir t collec tion system
is fitted correctly.
Emptying the dust collector
To achieve an optimal result when vacuuming, the dust collector
should be emptied each time the vacuum cleaner is used.
BLOCKAGES
Removing a blockage in the dust container.
Figure 22
– Empty the container (see figure 18)
– Loosen the blockage, e.g. with a screwdriver, and tap or vacuum
it out.
(You must f it a dust bag in the vacuum cleaner before vacuuming it out – see Figure 23)
– Close the bottom flap so that it can be heard snapping into position.
!Caution: The micro- and permanent filtres m ust be cleaned
following any o perating problem (see Figure 20 and 21).
Page 12

USING DUST BAGS
If necessary, a dust bag may be used instead of the dust collector.
Part number on the spare filter packaging: FA -013 0
Figure 23
– Open the vacuum cleaner lid (see Figure 16)
– Remove the dust collector and insert a dust bag.
– Close the vacuum cleaner lid.
You have bought an extremely powerful device.
The highest suction setting is therefore only recommended for hea-
vily soiled, short-pile carpets and hard floors.
The required suction power can be selected by adjusting the suc-
tion regulator (see Figure 8).
– Low suction range:
For vacuuming delicate fabrics, e.g. curtains.
– Middle suction range:
For daily vacuuming of lightly soiled floors.
– High suction range:
For vacuuming durable floor coverings, hard floors and for
heavily soiled surfaces.
REPLACING THE DUST BAG
Figure 24
If the dust bag change indicator is completely yellow when the
floor tool is lifted from the floor and the highest suction power is
selected, the dust bag must be changed, eve n though it may not yet
be full. In this case it is essential to change the dust bag due to the
type of material it contains.
The nozzle, suction pipe and flexible tube must not be blocked, as
this would also lead to dust bag change indicator being triggered.
• Never use the vacuum without a dust bag fitted, nor try to empty
a full bag and reuse it.
• To ensure sound operation only use original Ufesa replacements,
which can be found at authorised establishments. The use of other
makes of bag may damage the appliance and make the guarantee
void. Replacements: FA013 0.
! Attention: The dust bag change indicator only fu nctions correctly in conjunction with a dust bag.
Figure 25
Open the lid by moving the locking lever in the direction of the
arrow.
Figure 26
Seal the dust bag by pulling the locking tab and then remove it.
Figure 27
Place a new dust bag in the holder and close the vacuum cleaner
lid.
!Caution: The dus t bag compartment lid Hill only close when
the dust bag, dust collector are inserted.
Cleaning the motor protection filter
The motor protection filter should be cleaned regularly by knocking
out the dirt and rinsing.
Figure 28
– Open the dust bag compartment lid (see Figure 16).
– Pull out the motor protection filter in the direction of the arrow.
– Clean the motor protection filter by tapping it.
– If it is very dirty, the motor protection filter should be rinsed.
The filter must then be left to dr y for at least 24 hours.
– After cleaning, slide the motor protection filter into the vacuum
cleaner and close the dust bag compartment lid.
CARE
Always switch off the vacuum cleaner and disconnect the power
cord from the mains befote cleaning the appliance.
The vacuum cleaner and plastic accessories can be cleaned with a
commercial plastic cleaner.
!Do not use a scourer, glass-cleaning agent or multipur pose
cleaning product.
Never immerse the vacuu m cleaner in water.
If necessary, the dust compartment can be cleaned with a second
vacuum cleaner or simple wiped with a dr y cloth or dusting brush.
ADVICE ON DISPOSAL:
Our goods come in optimised packaging. This basically
consists in using non-contaminating materials which should
be handed over to the local waste disposal ser vice as se-
condary raw materials.
This product complies with EU Directive 2002/96/CE. The
crossed wheelie bin symbol shown on the appliance indicates that when it comes to dispose of the product it must
not be included in with household refuse. It must be taken
to a special refuse collection point for electric and electronic appliances or returned to the distributor when purchasing a
similar appliance. Under current refuse disposal regulations, users
who fail to take discarded appliances to special refuse collection
points may be penalised. Correct disposal of discarded appliances
means that they can be recycled and processed ecologically, helping the environment and allowing materials used in the product
to be reused. For more information on available waste disposal
schemes contact your local refuse service or the shop where the
product was purchased. Manufacturers and importers are responsible for ecological recycling, processing and disposal of products,
whether directly or via a public system.
Your local town council can provide you with information about
how to dispose of obsolete appliances.
Page 13

FRANÇAIS
1. Brosse commutable pour sols
2. Brosse pour sols durs: pour aspirer sur des revêtements de
sols durs (carrelage, parquet, etc).
3. Tube télescopique
4. Bouton de verrouillage / manchon coulissant
5. Poignée de flexible
6. Flexible d’aspiration
7. Tête pour coussin
8. Suceur de joints
9. Cordon électrique
10. Bouton marche/arrêt avec régulateur électronique de la puissance d’aspiration
11. Support pour le tuyau en position horizontale.
12. Filtre entrée d’air
13. Dispositif de rangement (sur le dessous de l’appareil)
14. Collecteur de poussières
15. Couvercle de l’appareil
16. Poignée de transport
17. Grille de sortie d’air
18. Indicateur pour le changement du sac aspirateur
CONSIGNES IMPORTANTES
• Lire attentivement ces instructions Conservez-la pour de futures
consultations.
• Si l’aspirateur est remis à un tiers, lui remettre également la noti-
ce.
• Cet aspirateur est à utiliser uniquement selon les indications qui
figurent dans la notice.
• Le fabricant décline toute responsabilité quant aux dommages
découlant d’une utilisation non-conforme aux spécifications de la
notice ou d’une utilisation inadéquate.
• Avant de brancher l’appareil, vérifiez si la tension concorde bien
avec celle indiquée sur la plaque signalétique.
• Pour introduire ainsi que pour retirer la fiche de la prise, l’appareil
doit être éteint.
• Ne pas faire fonctionner l’appareil avec le cordon enroulé.
Si l’appareil a fonctionné pendant plusieurs heures, retirez complètement de cordon de branchement de la prise de courant.
• Ne jamais débrancher en tirant du cordon.
• L’appareil doit être débranché du courant si vous ne l’utilisez pas,
avant de le nettoyer et pour remplacer le sac à poussière et les
filtres.
• Ne pas utiliser cet appareil sans le bac à poussière, sans le sac
filtrant ni sans les filtres parfaitement posés.
• Cet appareil a été conçu po ur une utilisation domestique u nique-
ment. NE PAS ASPIRER LA POUSSIÈRE DE TR AVAUX (CHANTIER),
LA SCIURE OU SIMILAIRES. La poussière de travaux ou similaires
bouche les pores du sac d’aspiration et bouche par conséquent
l’entrée d’air de l’appareil.
• Seuls des sacs filtrants d’origine sont à utiliser.
• L’aspirateur ne peut:
– être utilisé sur des personnes ou des animaux.
– Il ne doit pas aspirer :
- d’insectes (mouches, araignées, etc).
- des substances nocives pour la santé, chaudes ou incandescen-
tes, ni des éléments coupants.
- des substances humides ou liquides.
- des matières ou des gaz inflammables ou explosifs.
- des cendres, de la suie de fours carrelés et des installations de
chauffage central.
• L’aspiration doit être à l’abri des intempéries, de l’humidité et des
sources de chaleur.
• Ne pas utiliser l’aspirateur si une des ouvertures est bouchée car
cela empêcherait l’air de passer provoquant ainsi une surchauffe
risquant d’endommager l’appareil.
• Ne pas prendre l’appareil ni la fiche avec les mains mouillées. Ne
pas immerger l’appareil dans l’eau.
• Ne pas déplacer l’aspirateur en tirant du cordon ou du tuyau
d’aspiration. Servez-vous de la poignée de transport.
• Les enfants ne doivent pas toucher l’appareil.
• Cet appareil ne doit pas être utilisé par des personnes (y compris
les enfants) handicapées physiques, sensorielles ou mentales ou
qui ne possèdent pas l’expérience et la connaissance requises à
moins d’avoir qu’une personne responsable leur ait montré la bonne façon d’utiliser l’appareil et qu’elle se soit assurée que les consignes ont bien été comprises.
• Être particulièrement vigilants avec les enfants pour qu’ils ne
jouent pas avec l’appareil.
• Ne pas aspirer en tenant la poignée, les embouts ou le tuyau
d’aspiration à hauteur de la tête.
- Risque de blessures.
• Ne pas utiliser l’appareil si le cordon ou la fiche sont endommagés.
• Si vous fermez une porte, veillez à ne pas coincer le cordon de
branchement.
• Ne pas faire fonctionner l’appareil si le cordon ou la prise
sont endommagés ou si vous remarquez que l’appareil ne fonctionne pas comme il se doit.
• Débranchez l’appareil si vous ne l’utilisez pas.
• Les appareils hors d’usage doivent être rendus inutilisables pour
pouvoir les éliminer selon le règlement en vigueur en la matière.
• Les réparations et remplacements de cordon doivent être obligatoirement réalisés par un Service Technique Agréé.
AVANT LA PREMIÈRE UTILISATION
Fig. 1
Emmancher la poignée sur le flexible d’aspiration et l’enclencher.
MISE EN SERVICE
Fig. 2
a) Enclencher l’embout du flexible d’aspiration dans l’orifice
d’aspiration.
b) Pour enlever le flexible d’aspiration, presser les deux nez
d’enclenchement et retirer le flexible.
Fig. 3
Assembler la poignée et le tube d’aspiration.
Figure 4
Accoupler l’embout universel et le tuyau télescopique.
Figure 5
Déverrouiller le tuyau télescopique en conduisant le bouton de réglage dans le sens de la flèche et ajuster la longueur souhaitée.
Fig. 6
Saisir le cordon électrique par le connecteur, le retirer à la longueur
souhaitée et connecter le connecteur.
Page 14

Fig. 7
Allumer / éteindre l’aspirateur en actionnant le bouton marche/arrêt
dans le sens de la flèche.
Fig. 8
Régler la puissance d’aspiration en tournant le bouton marche/arrêt
dans le sens de la flèche.
ASPIRATION
Fig. 9
Réglage de la buse pour sols:
a) Tapis et moquettes
b) Sols lisses
Fig. 10
Emmancher sur les suceurs sur le tube d’aspiration ou la poignée,
selon les besoins:
a) Suceur de joints pour aspirer dans les joints et les coins, etc.
b) Tête pour coussins pour aspirer sur des meubles capitonnés,
rideaux, etc.
Fig. 11
En cas de pauses d’aspiration, vous pouvez utiliser la position parking à l’arrière de l’appareil.
Glisser le crochet à la buse pour sols dans l’évidement à l’arrière
de l’appareil.
Fig. 12
Lors de l’aspiration, p.ex. sur des escaliers, l’appareil peut également être porté aux deux poignées.
APRÈS LE TRAVAIL
Fig. 13
Retirer le connecteur de la prise.
Tirer brièvement sur le cordon électrique et le relâcher (le câble
s’enroule automatiquement).
Fig. 14
Pour ranger/transporter l’appareil vous pouvez utiliser la position de
rangement sur la face inférieure de l’aspirateur.
Placer l’appareil debout. Glisser le crochet à la buse pour sols dans
l’évidement à la FACE inférieure de l’appareil.
Vous avez acquis un aspirateur qui vous permet d’aspirer toute sorte de saletés sèches, aussi bien avec le collecteur de poussières
qu’avec le sac aspirateur.
Nous recommandons d’utiliser
- le collecteur de poussières en particulier dans le domaine du bri-
colage, p.ex. pour éliminer de la sciure, etc.
- le sac aspirateur avant tout pour des travaux de nettoyage traditio-
nnels dans le ménage.
TRAVAUX AVEC LE COLLECT EUR D E P OUSSIÈRES
Fig. 15
Pour un résultat d’aspi ration op timal, ré gler le rég ulat eur d e puis sance sur la position maximale.
Un ique men t en c as d e mat ière s trè s dé lica tes, nous re comma ndo ns
de réduire la puissance.
! Attention: L’indicateur pour le changement du sac aspirateur fonctionne uniquement correctement si un sac aspirateur est en place.
Attention: si le bac à poussière ou le sac filtrant n’est pas placé à l’intérieur de l’appareil, il sera impossible de fermer le
couvercle. Ne forcer pas le couvercle et vérifiez la bonne mise
en place du dispositif de collecte de la poussière.
Vider le collecteur de poussières
Afin d’obtenir un résultat d’aspiration optimal, il est recommandé
de vider le collecteur de poussières après chaque utilisation.
Fig. 16
Ouvrir le couvercle du compartiment de poussière en actionna nt le
levier de fermeture dans le sens de la flèche.
Fig. 17
Enlever le collecteur de poussières de l’appareil.
Fig. 18
– Déverrouiller les deux verrouillages à enclenchement du volet
du fond en les poussant dans le sens de la flèche, ouvrir le volet
jusqu’à ce qu’il s’enclenche en butée, le collecteur évacue les saletés vers le bas.
– Si le volet du fond est fortement encrassé (grosses saletés),
nettoyer le volet avant de le fermer, p.ex. par aspiration avec le suceur de joints.
(Pour cela, mettre impérativement un sac aspirateur dans
l’appareil - voir f ig. 23)
– Fermer le volet du fond et l’enclencher audiblement.
Fig. 19
Replacer le collecteur de poussières dans l’appareil et fermer le
couvercle du compartiment de poussière.
!Attention: Après plusieurs aspirations, le collecteur de poussières peut être rayé à l’intérieur et se ternir. Cela n’a aucune
influence su r le fonctionnement de l’aspirateur, à savoir il reste pleinement efficace.
NETTOYAGE DU FILTRE PERMANENT ET DU
MICROFILTRE DU COLLECTEUR DE POUSSIÈRES
Quand dois-je les nettoyer:
– Après chaque dérangement, à savoir après chaque élimination
d’une obstruction.
– Au plus tard tous les six mois.
Fig. 20
– Pousser vers l’intérieur l’attache de fermeture à l’arrière du collecteur et enlever le microfiltre du collecteur.
Retirer le filtre permanent de la plaque du fond du collecteur.
Fig. 21
– Laver le micro-filtre et le filtre permanent.
Laisser ensuite sécher les filtres au moins 24 heures.
– Réinsérer le filtre permanent dans la plaque du fond après le
nettoyage.
Poser le microfiltre sur le collecteur et Ferrer dans le sens de la
flèche. Verrouiller audiblement l’attache de fermeture.
DÉRANGEMENT
Elimination d’une obstruction dans le collecteur de poussières.
Fig. 22
– Vider le collecteur (voir fig. 18)
– Détacher l’obstruction, p.ex. à l’aide d’un tournevis, et éliminer le
bouchon en frappant ou par aspiration.
(Pour aspirer, mettre impérativement un sac aspirateur dans
l’appareil - voir fig. 23)
– Fermer le volet du fond et l’enclencher audiblement.
Page 15

!Attention: Après chaque dérangement, vous devez nettoyer
le microfiltre et le filtre permanent (cf. fig. 20 et 21).
TRAVAUX AVEC LE SAC ASPIR ATEUR
En cas de besoin, vous pouvez utiliser un sac aspirateur au lieu du
collecteur de poussières.
Référence du paquet de sacs et de filtres de rechange : FA-0130
Fig. 23
– Ouvrir le couvercle de l’appareil (cf. fig. 16)
– Enlever le collecteur de poussières et mettre en place un sac
aspirateur.
– Fermer le couvercle de l’appareil.
Vous avez acquis un appareil puissant et à Aut. pouvoir
d’aspiration.
La position de puissance maximale est donc uniquement recom-
mandée en cas de moquettes à voile ras fortement encrassées ou
de sols durs.
Le régulateur de la puissance d’aspiration (cf. fig. 8) permet de régler en continu la puissance d’aspiration.
– Plage de faible puissance:
Pour aspirer sur des tissus délicats, p.ex. voilages.
– Plage de puissance moyenne:
Pour le nettoyage quotidien en cas de faible encrassement.
Plage de puissance élevée:
Pour le nettoyage de revêtements de sol robustes, sols durs et en
cas d’encrassement important.
REMPLACEMENT DU SAC ASPIRATEUR
Fig. 24
Si l ’indicateu r pou r le ch ange ment du sac aspi rateur da ns le cou vercle est complètement rempli en jaune, lorsque la brosse pour sols
durs est décollée du sol et la puissance d’aspiration est réglée au
maximum, il faut changer le sac aspirateur, même s’il n’est pas encore plein. Dans ce cas, la nature de la matière contenue dans le sac
rend le changement nécessaire.
La brosse, le tube d’aspiration et le flexible d’aspiration ne doivent alors pas éter bouchés, car ceci peut également déclencher
l’indication pour le changement du sac aspirateur.
• Ne pas faire fonctionner l’aspirateur sans sac et ne pas vider un
sac pour le réutiliser ensuite.
• Pour garantir un fonctionnement parfait de l’appareil, utiliser
des sacs d’origine “Ufesa” disponibles dans tous les établissements agréés. L’utilisation de sacs autres que ceux d’origine risque
d’endommager l’appareil et d’être un motif d’annulation de la garantie. Rechanges: FA013 0.
! Attention: L’indicateur pour le changement du sac aspirateur fonctionne uniquement correctement si un sac aspirateur est en place.
Fig. 25
Ouvrir le couvercle en actionnant le levier de fermeture dans le sens
de la flèche.
Fig. 26
Fermer le sac d’aspirateur en tirant sur l’attache de fermeture et
l’enlever.
Fig. 27
Mett re un sac asp irateur neuf d ans le su ppor t et fe rmer le cou vercle
de l’appareil.
At tenti on: Il ser a p oss ibl e de f erm er le c ouv ercle du l oge men t
du bac à poussière uniquement si le sac filtrant ou le bac à
poussière est parfaitement mis en place.
Nettoyer le filtre de protection du moteur
Le filtre de protection du moteur devrait éter régulièrement nettoyé
en le frappant ou le rinçant!
Fig. 28
– Ouvrir le couvercle du compartiment de poussière (voir fig. 16).
– Retirer le filtre de protection du moteur dans le sens de la
flèche.
– Nettoyer le filtre de protection du moteur en le frappant.
– Si le filtre d e protec tion du moteur est trè s encrassé, il e st recom-
mandé de le rincer.
Laisser ensuite sécher le filtre au moins 24 heures.
– Après le nettoyage, glisser le filtre de protection du moteur dans
l’appareil et fermer le couvercle du compartiment de poussière.
ENTRETIEN
Avant chaque nettoyage de l’aspirateur, il faut l’éteindre et retirer le
connecteur de la prise de secteur.
L’aspirateur et les accessoires en plastique peuvent être entretenus
avec un produit de nettoyage pour plastique usuel du commerce.
! Ne pas utiliser de produits récurants, nettoyants pour verre
ni de net toyant s universel s.
Ne jamais plonger l’aspirateur dans l’eau.
Si nécessaire, le compartiment de poussière peut être aspiré avec
un d euxième a spirateu r ou sim plement être nettoyé av ec un ch iffon
à poussière / pinceau à poussière sec.
REMARQUES CONCERNANT LE DÉPÔT/ ÉLIMINATION
DES DÉCHETS
Toutes nos marchandises sont conditionnées dans un em-
ballage optimisé pour le transport. En principe, ces emba-
llages sont composés de matériaux non polluants qui devront être déposés comme matière première secondaire au Service
Local d’élimination des déchets.
Produit aux normes de la Directive de l’UE 2002/96/CE.
Le logo “poubelle” apposé sur l’appareil indique que tout
appareil électroménager hors d’usage ne doit pas être jeté
dans les déchets ménagers mais être déposé dans un cen-
tre de collecte de déchets d’appareils électriques ou électroniques ou qu’il doit être remis à votre vendeur à l’occasion de
l’achat d’un nouvel appareil. Il incombe à l’utilisateur de déposer
lui-même l’appareil hors d’usage dans un centre de collecte spécialement prévu à cet effet, faute de quoi, celui-ci risque de se voir
sanctionné pour manquement au règlement en vigueur concernant
les déchets. Si l’appareil hors d’usage est correctement collecté
comme déchet trié, il pourra être recyclé, traité et éliminé écologiquement évitant ainsi tout impact négatif sur l’environnement tout
en contribuant au recyclage des matériaux qui composent le produit. Pour toutes informations relatives aux Services d’élimination
des déchet s, adressez-vous à la déchetterie de votre ville ou à votre
vendeur habituel. Les fabricants et les importateurs réalisent le recyclage, le traitement et l’élimination écologique, soit directement
soit par l’intermédiaire d’un système public.
Pour toute information concernant le dépôt et l’élimination des
appareils usagés, renseignez-vous auprès de la Mairie de votre
Commune ou de la Préfecture de votre Département.
Page 16

PORTUGUES
1. Bocal permutável
2. Escova para solos duros para aspirar sobre revestimentos de
solos duros (ladrilhos, parquê, etc.)
3. Tubo telescópico
4. Botão de bloqueio / Manga corrediça
5. Pega do tubo flexível
6. Tubo flexível de aspiração
7. Bocal para sofás
8. Bocal para cantos
9. Cabo de alimentação
10. Botão de ligar/desligar com regulador da potência de sucção
electrónico
11. Suporte para o tubo na posição horizontal
12. Filtro de entrada de ar
13. Dispositivo auxiliar de arrumação (na parte de baixo do aparelho)
14. Receptáculo de pó
15. Tampa
16. Pega de transporte
17. Grelha de saída do ar
18. Luz-piloto de mudança do filtro
ADVERTÊNCIAS IMPORTANTES
• Leia atentamente estas instruções. Conserve-as para futuras con-
sultas.
• No caso de entregar o aspirador a uma terceira pessoa, juntar as
instruções de uso.
• Utilizar este aspirador exclusivamente de acordo com as indi-
cações descritas nestas instruções de uso.
• O fabricante não se responsabiliza pelos possíveis danos deri-
vados de um uso que não esteja de acordo com as especificações
ou por um manuseamento errado.
• Antes de ligar o aparelho à electricidade, assegure-se de que a
tensão eléctrica corresponde à indicada na placa de características.
• Tanto ao introduzir como ao retirar a ficha da tomada, o aparelho
não deve estar em funcionamento.
• Não coloque o aspirador a funcionar com o cabo enrolado.
• Extrair completamente o cabo de alimentação se o aparelho es-
tiver a funcionar durante várias horas.
• Não desligue a ficha puxando o cabo.
• Desligue o aspirador da electricidade quando não estiver em
uso e antes de proceder à sua limpeza ou à mudança de bolsa e
filtros.
• Não se deve utilizar este aspirador sem o colector de pó, a bolsa
filtrante ou sem os filtros correctamente colocados
• Este aparelho está concebido exclusivamente para uso domés-
tico. NÃO ASPIRE PÓ DE OBRA, SERRIM OU SIMILARES. Ao aspirar
pó de obra ou similares, os poros da bolsa de aspiração entopem
e, consequentemente, a entrada de ar fica bloqueada.
• O aspirador deverá usar-se só com bolsas filtrantes originais.
• O aspirador não é adequado para:
– utilização em pessoas ou animais
– aspirar:
- insectos (ex: moscas, aranhas, ...),
- substância nocivas para a saúde, quentes ou incandescentes, ou
materiais cortantes,
- substâncias húmidas ou líquidas,
- materiais ou gases inflamáveis ou explosivos.
- cinza, fuligem de fornos de ladrilho e instalações de calefacção
central
• Proteger o aspirador das condiciones meteorológicas, da humidade e das fontes de calor.
• Não utilize o aspirador se tiver alguma abertura obstruída, pois
isso reduziria a passagem do ar, provocando aquecimentos excessivos que podem danificar o aparelho.
• Não pegue no aspirador ou na ficha com as mãos molhadas. Não
introduza o aparelho na água.
• Não mudar o aspirador de sítio puxando pelo cabo ou pelo
tubo de aspiração. Utilize a asa de transporte.
• Evite que as crianças usem o aparelho.
• Este aparelho não deve ser utilizado por pessoas (incluindo
crianças) com capacidades físicas, sensoriais ou mentais diminuídas ou falta de experiência e conhecimentos, a menos que tenham
sido instruídas relativamente ao seu uso por uma pessoa responsável.
• As crianças deverão ser vigiadas para assegurar que não brincam
com o aparelho.
• Evitar aspirar com o punho, boquilhas ou tubo à altura da cabeça.
- Risco de lesões.
• Não utilize o aparelho com o cabo ou a ficha danificada.
• Quando fechar uma porta, assegure-se de que esta não prende
o cabo.
• Não ponha o aspirador a funcionar se o fio ou a ficha estiverem
danificados ou se observar que o aparelho não funciona correctamente
• Desconectar o aparelho quando não estiver a ser utilizado.
• Inutilizar imediatamente os aparelhos usados para poder eliminá-los de acordo com a normativa.
• As reparações e mudanças de cabo devem ser realizadas exclusivamente por um Serviço Técnico Autorizado.
ANTES DA PRIMEIRA UTILIZAÇÃO
Figura 1
Encaixe e prenda a pega na mangueira de aspiração.
Colocação em funcionamento
Figura 2
a) Encaixe a tubuladura do tubo flexível de aspiração na abertura.
b) Para retirar a mangueira de aspiração, pressione os dois botões
laterais e puxe a mangueira.
Figura 3
Encaixe a pega no tubo de aspiração.
Figura 4
Unir a boquilha universal e o telescópio.
Figura 5
Para desencaixar o tubo telescópico, mover o botão de ajuste na
direcção da seta e ajustar a longitude desejada.
Figura 6
Pegue no cabo de alimentação pela ficha, puxe-o para fora até ao
comprimento desejado e ligue a ficha à tomada.
Figura 7
Ligue/desligue o aspirador, premindo o botão de ligar/desligar no
sentido da seta.
Page 17

Figura 8
Regulação da potência de sucção rodando o botão de ligar/desligar no sentido da seta.
ASPIRAR
Figura 9
Ajustar o bocal:
a) Tapetes e alcatifas
b) Pavimentos lisos
Figura 10
Conforme necessário, encaixar os bocais no tubo de aspiração ou
na pega:
a) Bocal para cantos para aspirar cantos e arestas, etc.
b) Bocal para estofos para aspirar mobiliário
estofado, cortinados, etc.
Figura 11
No caso de interromper por pouco tempo a aspiração, pode utilizar o dispositivo auxiliar de repouso localizado na parte de trás
do aparelho.
Insira o gancho localizado no bocal na reentrância existente na parte de trás do aparelho.
Figura 12
Quando aspirar escadas, por exemplo, também pode transportar
o aparelho pela duas pegas.
APÓS O TRABALHO
Figura 13
Desligue a ficha da tomada.
Pu xe lig eira men te o ca bo d e alime ntaçã o, sol tan do- o de s eguid a (o
cabo enrola-se automaticamente).
Figura 14
Para guardar/transpor tar o aparelho pode utilizar o dispositivo auxiliar de arrumação na parte de baixo do aparelho.
Coloque o aparelho ao alto. Insira o gancho localizado no bocal na
reentrância existente na parte de baixo do aparelho.
Este aspirador permite aspirar todo o tipo de sujidade seca, tanto
com o receptáculo de pó como com o saco de pó.
Recomendamos o uso
- do receptáculo de pó especialmente a nível da bricolagem, por
ex., para remover serradura, etc.
- do saco de pó sobretudo para a limpeza normal da casa.
UTILIZAÇÃO DO RECEPTÁCULO DE PÓ
Figura 15
Para resultados de aspiração optimizados regule o regulador da
potência para o nível máximo.
A potência só deve ser regulada para um nível mais baixo quando
forem aspirados materiais muito sensíveis.
!Atenção: a indicação de mud ança d e filtro só funciona correcta mente com um filtro
Atenção ! A tampa do aparelho não poderá ser fechada
quando não existir colector de pó ou bolsa filtrante no seu
interior. Não force o seu fecho e verifiq ue a colocação do
sistema de recolha de sujidade desejado.
Esvaziar o recept áculo de pó
Para obter um resultado de aspiração optimizado, o receptáculo
de pó deve ser esvaziado sempre que se acabar de aspirar.
Figura 16
Abra a tampa do compartimento do saco de pó, accionando a
alavanca de fecho no sentido da seta.
Figura 17
Retire o recipiente de pó do aparelho.
Figura 18
– Accione os dois fechos de encaixe do compartimento inferior
no sentido da seta e abra o compar timento totalmente, o recipiente
esvazia a sujidade para baixo.
– Se o compartimento inferior estiver muito sujo (sujidade grosseira), limpe-o antes de o fechar, por exemplo, aspirando-o com o
bocal para fendas.
(Para tal, coloque sempre o saco de pó no aparelho - ver
figura 23)
– Feche o compartimento inferior de modo a ouvir-se o seu encaixe.
Figura 19
Insira o recipiente de pó novamente no aparelho e feche a tampa
do compartimento do saco de pó.
! Atenção: Depois de se ter aspirado várias vezes, é possível
que o recipiente de pó fique riscado no interior e baço. No
entanto, isto não tem qualquer efeito sobre o funcionamento
do aspirador, ou seja, o mesmo continua plenamente funcional.
LIMPAR O FILTRO PERMANENTE E O MICROFILTRO
DO RECIPIENTE DE PÓ
Quando devo li mpar:
– Depois de cada anomalia, ou seja, depois da eliminação de obstruções.
– O mais tardar semestralmente.
Figura 20
– Pressionar a lingueta de fecho na par te traseira do recipiente para
dentro e retirar o microfiltro do recipiente.
– Tirar o filtro permanente da placa de fundo do recipiente.
Figura 21
– Lavar microfiltro e filtro permanente.
Deixar o filtro secar durante pelo menos 24 horas.
– Depois da lavagem inserir o filtro permanente na placa de fun-
do.
Colocar o microfiltro no recipiente e fechar no sentido da seta.
Deixar encaixar a lingueta de fecho de modo a ouvir o encaixe.
ANOMALIA
Eliminação de uma obstrução no recipiente de pó.
Figura 22
– Esvaziar o recipiente (ver Fig. 18)
Solte a obstrução, por ex., com a ajuda de uma chave de parafusos,
e elimine-a sacudindo levemente ou aspirando.
(Para aspirar, coloque sempre o saco de pó no aparelho - ver
figura 23)
– Fechar o compartimento inferior e encaixar a tampa de modo a
ouvir-se o encaixe.
Page 18

!Atenção: Após cada anomalia, o microfiltro e o filtro permanente têm de ser limpos (v. figuras 22 e 23).
UTILIZAÇÃO DO SACO DE PÓ
Em caso de necessidade, pode utilizar-se, no lugar do receptáculo
de pó, um saco de pó.
Referência do filtro de substituição: FA-0130
Figura 23
– Abra a tampa do aparelho (v. figura 18)
– Retire o receptáculo de pó e coloque o saco de pó.
– Feche a tampa do aparelho.
Adquiriu um aspirador de elevado poder de sucção e potência.
Recomenda-se a utilização da máxima potência apenas com alcati-
fas de pêlo curto ou soalhos rijos muito sujos.
O regulador da potência de sucção (v. figura 9) permite regular de
forma gradual a potência de sucção.
– Gama de baixa potência:
Para aspirar tecidos delicados, por ex., cortinados.
– Gama de potência média:
Para a limpeza diária de pouca sujidade.
– Gama de potência elevada:
Para a limpeza de pavimentos resistentes, soalhos rijos e muita su-
jidade.
TROCAR O SACO DE PÓ
Figura 24
Se com o bocal levantado do chão e a máxima regulação de potência, a luz-piloto de mudança do filtro na tampa apresentar-se
totalmente amarela, o saco de filtro tem de ser mudado, mesmo
que não deva estar ainda completamente cheio. Neste caso, o tipo
de lixo aspirado torna necessária a mudança do saco.
Quando efectuar esta verificação, certifiquese de que o bocal , o
tubo de aspiração e o tubo flexível não estão entupidos, já que isto
também fará com que a luz-piloto de mudança do filtro acenda.
• Não ponha o aspirador em funcionamento sem saco nem tente
esvaziar um saco já cheio para voltar a utilizá-lo.
• Para garantir um funcionamento perfeito, utilize exclusivamente
sacos originais de Ufesa, que poderá encontrar nos estabelecimentos autorizados. O uso de sacos não originais pode danificar o produto e será causa de anulação da garantia. Recambios: FA0130 .
!Atenção: a indicação de mud ança d e filtro só funciona correcta mente com um filtro
Figura 25
Abra a tampa, actuando a alavanca de fecho no sentido da seta.
Figura 26
Fechar o saco de pó puxando a lingueta de fecho e retirá-lo.
Figura 27
Coloque um novo saco de pó no porta-filtro e feche a tampa do
aparelho.
Atenção: A tampa do compartimento colector de pó só se
fecha quando estiver colocada a bolsa filtrante ou o depósito
para o pó.
Limpe o filtro de protecção do motor
O filtro de protecção do motor deve ser limpo, em intervalos regulares, por meio de lavagem ou sacundindo-o!
Figura 28
– Abrir a tampa do compartimento do saco de pó (ver Figura 18).
– Extrair o filtro de protecção do motor no sentido da seta.
– Limpar o filtro de protecção do motor sacundindo-o.
– Se estiver muito sujo, o filtro de protecção do motor deve ser
lavado.
Deixar o filtro secar durante pelo menos 24 horas.
– Após a limpeza, inserir o filtro de protecção do motor no aparel-
ho e fechar a tampa do compartimento do saco de pó.
MANUTENÇÃO
Antes de limpar o aspirador, deverá desligá-lo e retirar a ficha da
tomada.
O aspirador e os acessórios de plástico podem ser limpos com os
produtos normalmente utilizados para a limpeza de plásticos.
!Não deverá utilizar produtos abrasivos, limpa-vid ros ou produtos lava-tudo.
Jamais introduza o aspirador na água.
Em caso de necessidade, o compartimento do saco de pó pode
ser aspirado com um outro aspirador ou ser simplesmente limpo
com um pincel do pó.
ADVERTÊNCIAS DE DEPOSIÇÃO / ELIMINAÇÃO
Para o seu transporte, as nossas mercadorias contam com
uma embalagem optimizada. Esta consiste - em principio-
em materiais não contaminantes que deveriam ser entregues como matéria prima secundaria ao serviço local de eliminação
de lixos.
Este produto cumpre a Directiva da UE 2002/96/CE.
O símbolo de um caixote de lixo riscado sobre o aparel-
ho indica que o produto, quando finalize a sua vida útil,
deverá deitar-se fora separado dos resíduos domésticos,
levando-o a um centro de materiais residuais com separação de aparelhos eléctricos e electrónicos ou devolvendo-o ao
seu fornecedor ao comprar outro aparelho similar. É ao usuário que
lhe corresponde a responsabilidade de levar o aparelho a um centro de materiais residuais especiais ao finalizar a sua vida útil. Caso
contrário, poderá ser sancionado em virtude dos regulamentos de
materiais residuais vigentes. Se o aparelho inutilizado for recolhido
correctamente como resíduo separado, poderá ser reciclado, tratado e eliminado de forma ecológica; isto evita um impacto negativo
sobre o meio ambiente e a saúde, e contribui á reciclagem dos
materiais do produto. Para obter mais informação sobre os serviços
de materiais residuais disponíveis, contacte com a sua agência de
materiais residuais local ou com a loja onde comprou o aparelho.
Os fabricantes e os importadores tornam-se responsáveis pela reciclagem, tratamento e eliminação ecológica, seja directamente ou
através de um sistema público.
A sua Câmara ou Município informar-lhe-á sobre as possibilidades
de deposição/eliminação para os aparelhos que já não se usam.
Page 19

DEUTSCH
1. Umschaltbare Bodendüse
2. Bürste für harte Böden. Zum Saugen auf harten Bodenbelägen
(Fliesen, Parkett, etc.).
3. Teleskoprohr
4. Verriegelungsknopf / Schiebemuffe
5. Schlauchhandgriff
6. Saugschlauch
7. Polsterdüse
8. Fugendüse
9. Netzanschlusskabel
10. Ein-/Austaste mit elektronischem Saugkraftregler
11. Halterung für das Rohr in horizontaler Position
12. Lufteingangsfilter
13. Abstellhilfe (an der Geräteunterseite)
14. Staubbehälter
15. Gerätedeckel
16. Tragegr if f
17. Ausblasgitter
18. Filterwechselanzeige
WICHTIGE HINWEISE
• Lesen Sie diese Anleitungen aufmerksam. Bewahren Sie sie zum
späteren Nachschlagen auf.
• Sollte der Staubsauger an eine dritte Person weitergegeben wer-
den, fügen Sie bitte diese Anleitungen hinzu.
• Der Staubsauger darf ausschließlich gemäß der Hinweise in der
Gebrauchsanleitung benutzt werden.
• Der Hersteller übernimmt keine Haftung für mögliche Schäden,
die auf unsachgemäße oder den Anleitungen nicht entsprechende
Benutzung zurückzuführen sind.
• Bevor Sie den Staubsauger ans Netz schließen, vergewissern
Sie sich bitte, dass die Netzspannung den Angaben auf dem
Typenschild des Geräts entspricht.
• Beim Einstecken des Steckers in die Netzdose sowie beim
Herausziehen muss das Gerät ausgeschaltet sein.
• Der Sauger darf nicht mit aufgerolltem Kabel in Betrieb genom-
men werden.
• Ziehen Sie das Kabel vollständig heraus, wenn das Gerät mehrere
Stunden in Betrieb ist.
• Ziehen Sie den Stecker nicht am Kabel aus der Steckdose.
• Wenn Sie den Sauger nicht benutzen, sowie vor der Reinigung
oder beim Austausch des Staubbeutels und der Filter, unterbrechen Sie bitte den Netzanschluss.
• Dieser Sauger darf nicht benutzt werden, ohne dass der
Staubbehälter bzw. der Filterbeutel und die Filter korrekt eingesetzt
sind.
• Dieses Gerät ist ausschließlich für den häuslichen Gebrauch
vorgesehen. KEINEN BAUSTAUB, SÄGEMEHL ODER ÄHNLICHES
AUFSAUGEN. Beim Aufsaugen von Baustaub oder ähnlichen
Materialien, setzen sich die Poren des Saugbeutels zu. Folglich wird
der Eintritt von Luft in diesen Beutel blockiert.
• Der Sauger darf nur mit Original-Filterbeuteln benutzt werden.
• Benutzen Sie den Staubsauger nicht
– an Personen oder Tieren
– zum Aufsaugen von:
- Insekten (z.B. Fliegen, Spinnen, etc.),
- gesundheitsschädlichen, heißen oder glühenden Substanzen
oder scharfen Objekten,
- feuchten oder flüssigen Substanzen,
- brennbaren oder explosiven Materialien oder Gasen,
- Asche, Ruß von Kachelöfen oder Zentralheizungsanlagen.
• Schützen Sie den Sauger vor Witterungseinflüssen, Feuchtigkeit
und Wärmequellen.
• Wenn eine der Öffnungen des Saugers verstopft ist, benutzen
Sie ihn bitte nicht. Durch diese Verstopfung wird der Luftstrom verhindert und es kommt zu Überhitzungen, die das Gerät beschädigen können.
• Berühren Sie den Sauger und den Stecker niemals mit feuchten
Händen. Tauchen Sie das Gerät nicht in Wasser.
• Bewegen Sie den Sauger nicht durch Ziehen am Kabel oder am
Saugrohr. Benutzen Sie den Transportgriff.
• Kinder dürfen das Gerät nicht handhaben.
• Dieses Gerät darf nicht von Personen verwendet werden
(Kinder eingeschlossen), die physische, sensorielle oder geistige
Behinderungen oder mangelnde Erfahrung und Kenntnisse aufweisen, außer sie wurden von einer verantwortlichen Person über den
Umgang mit dem Gerät unterrichtet.
• Kinder müssen beaufsichtigt werden, um zu verhindern, dass sie
das Gerät als Spielzeug benutzen.
• Saugen Sie weder mit dem Griff noch mit Düsen oder Rohr in der
Nähe des Kopfes.
- Es besteht Verletzungsgefahr.
• Benutzen Sie das Gerät nicht, wenn Kabel oder Stecker beschädigt sind.
• Achten Sie darauf, dass das Kabel nicht eingeklemmt wird, wenn
Sie eine Tür schließen.
• Schalten Sie das Gerät nicht ein, wenn das Kabel oder der
Stecker beschädigt sind, oder wenn Sie feststellen, dass das Gerät
nicht einwandfrei funktioniert.
• Unterbrechen Sie den Netzanschluss, wenn das Gerät nicht in
Benutzung ist.
• Zum vorschriftsmäßigen Entsorgen des Geräts machen Sie es bitte unnutzbar.
• Reparaturen und der Austausch des Kabels dürfen ausschließlich von einem zugelassenen Technischen Kundendienst ausgeführt
werden.
VOR DEM ERSTEN GEBRAUCH
Bild 1
Handgriff auf Saugschlauch stecken und verrasten.
Inbetriebnahme
Bild 2
a) Saugschlauchstutzen in die Saugöffnung einrasten.
b) Beim Entfernen des Saugschlauches beide Rastnasen zusam-
mendrücken und Schlauch herausziehen.
Bild 3
Handgriff und Saugrohr zusammenstecken.
Abbildung 4
Setzen Sie die Unversaldüse auf das Teleskoprohr.
Abbildung 5
Entriegeln Sie das Teleskoprohr, indem Sie den Einstellknopf in
Pfeilrichtung schieben. Danach stellen Sie die gewünschte Länge
ein.
Page 20

Bild 6
Netzanschlusskabel am Stecker greifen, auf die gewünschte Länge
herausziehen und Netzstecker einstecken.
Bild 7
Staubsauger durch Betätigen der Ein- /Austaste in Pfeilrichtung ein-/
ausschalten.
Bild 8
Saugkrafteinstellung durch Drehen der Ein-/ Austaste in
Pfeilrichtung.
SAUGEN
Bild 9
Bodendüse einstellen:
a) Teppiche und Teppichboden
b) glatte Böden
Bild 10
Düsen je nach Bedarf auf Saugrohr oder Handgriff stecken:
a) Fugendüse zum Absaugen von Fugen und Ecken, etc.
b) Polsterdüse zum Absaugen von Polstermöbeln, Vorhängen, etc.
Bild 11
Bei kurzen Saugpausen können Sie die Parkhilfe an der
Geräterückseite benutzen. Haken an der Bodendüse in die
Aussparung an der Geräterückseite schieben.
Bild 12
Beim Saugen, z. B. auf Treppen, kann das Gerät auch an beiden
Griffen transportiert werden.
NACH DER ARBEIT
Bild 13
Netzstecker ziehen.
Kurz am Netzanschlusskabel ziehen und loslassen (Kabel rollt sich
automatisch auf).
Bild 14
Zum Abstellen /Transportieren des Gerätes können Sie die
Abstellhilfe an der Geräteunterseite benutzen. Gerät aufrecht
hinstellen. Haken an der Bodendüse in die Aussparung an der
Geräteunterseite schieben.
Sie haben einen Bodenstaubsauger er worben, mit dem Sie jegliche
Art von Trockenschmutz sowohl mit dem Staubbehälter als auch
mit dem Filterbeutel aufsaugen können.
Wir empfehlen den Einsatz
- des Staubbehälters besonders im Hobbybereich, z.B. zum
Entfernen von Sägespänen, usw.
- des Filterbeutels vor allem für herkömmliche Reinigungsarbeiten
im Haushalt.
ARBEITEN MIT DEM STAUBBEHÄLTER
Bild 15
Für optimale Sauge rgebnisse den Leistu ngssteller auf Maximals tellung
bringen. Nur bei sehr empfindlichen Materialien empfehlen wir, die
Leistung zurückzuregeln.
!Achtung: Die Filter wechselanzeige funktioniert nur in
Verbindung mit einem Filterbeutel korrekt.
Achtung! Der Deckel des Geräts kann nicht geschlossen werden, wenn der Staubbehälter bzw. der Filterbeutel nicht eingesetzt sind. Versuchen Sie nicht, ihn mit Gewalt zu schließen
und üb erprüfe n Sie, dass d as gewüns chte Staub auffa ngsystem
korrekt eingesetzt ist.
LEEREN DES STAUBBEHÄLTERS
Um ein optimales Sau gergebnis zu erzielen, sollte der Staubbe hälter
nach jedem Saugvorgang entleert werden.
Bild 16
Staubraumdeckel durch Betätigung des Verschlusshebels in
Pfeilrichtung öffnen.
Bild 17
Staubbehälter aus dem Gerät nehmen.
Bild 18
– Beide Schnappverriegelungen der Bodenklappe in Pfeilrichtung
lösen, die Klappe bis zum Verrasten im Anschlag öffnen, Behälter
entleert Schmutz nach unten.
– Bei starker Verschutzung der Bodenklappe (grober Schmutz),
diese vor dem Schliessen reinigen, z. B. durch Absaugen mit der
Fugendüse.
(Dazu unbedingt Filterbeutel in das Gerät einlegen - siehe Bild
23)
– Bodenklappe schließen und hörbar verrasten.
Bild 19
Staubbehälter wieder in das Gerät einsetzen und Staubraumdeckel
schließen.
!Achtung: Nach mehrmaligem Saugen kann der Staubbehälter
innen zerkratzt werden u nd milchig anlaufen. Dies hat jedoch
keinerlei Einwirkung auf die Funktion des Staubsaugers, d.h.
er ist weiterhin voll funktionsfähig.
DAUER- UND MICROFILTER DES STAUBBEHÄLTERS
REINIGEN
Wann muss ich reinigen:
– Nach jedem Störbetrieb, d.h. nach jeder Beseitigung einer
Vers topfung.
– Spätestens halbjährlich.
Bild 20
– Die Verschlusslasche an der Behälterrückseite nach innen drücken und Microfilter vom Behälter abnehmen.
– Dauerfilter aus Bodenplatte des Behälters entnehmen.
Bild 21
– Micro- und Dauerfilter auswaschen. Die Filter anschließend mindestens 24 Stunden trocknen lassen.
– Nach der Reinigung Dauerfilter in die Bodenplatte einsetzen.
Microfilter auf den Behälter aufset zen und in Pfeilrichtu ng schließen.
Die Verschlusslasche hörbar verrasten.
STÖRBETRIEB
Beseitigen einer Verstopfung im Staubbehälter.
Bild 22
– Behälter entleeren (siehe Bild 18)
– Verstopfung lösen, z. B. mit Hilfe eines Schraubendrehers, und
durch Ausklopfen bzw. Aussaugen beseitigen.
(Zum Aussaugen unbedingt Filter beutel in das Gerät einlegen
- siehe Bild 23)
– Bodenklappe schließen und hörbar verrasten.
Page 21

ARBEITEN MIT FILTERBEUTEL
Bei Bedarf kann auch an Stelle des Staubbehälters ein Filterbeutel
verwendet werden.
Die Bezeichnung der Ersatzfilterpackung: FA-0130.
Bild 23
– Gerätedeckel öffnen (s. Bild 16)
– Staubbehälter entnehmen und Filterbeutel einsetzen.
– Gerätedeckel schließen.
Sie haben ein sehr leistungs- und saugstarkes Gerät erworben.
Die max. Leistungsstellung empfielt sich deshalb nur bei stark vers-
chmutzten Niedrigflor-Teppichböden oder Hartböden.
Durch Betätigen des Saugkraftreglers (s. Bild 8) kann die gewünsch-
te Saugkraft stufenlos eingestellt werden.
– Niedriger Leistungsbereich:
Für das Absaugen empfindlicher Stoffe, z. B. Gardinen.
– Mittlerer Leistungsbereich:
Für die tägliche Reinigung bei geringer Verschmutzung.
– Hoher Leistungsbereich:
Zur Reinigung robuster Bodenbeläge, Hartböden und bei starker
Verschmut zung.
FILTERBEUTEL AUSTAUSCHEN
Bild 24
Ist bei vom Boden abgehobener Bodendüse und höchster
Saugleistungseinstellung die Filterwechselanzeige im Deckel vollständig gelb ausgefüllt, muss der Filterbeutel gewechselt werden,
auch wenn er noch nicht voll sein sollte. In diesem Fall macht die
Art des Füllgutes den Wechsel erforderlich.
Düse, Saugroh r und Saugschlauch dürfen dabei nicht verstopft sein,
da dies auch zum Auslösen der Filterwechselanzeige führt.
• Nehmen Sie das Gerät nicht ohne Staubbeutel in Betrieb und
versuchen Sie nicht, einen vollen Beutel zu leeren und erneut zu
benutzen.
• Um einen einwandfreien Betrieb zu garantieren, ver wenden Sie
bitte ausschließlich Originalbeutel von Ufesa, die bei den zugelassenen Verkaufsstellen erhältlich sind. Die Verwendung anderer
Staubbeutel kann zu Schäden an dem Gerät führen und Grund für
die Aufhebung der Garantie sein.
Ref. der Austauschbeutel: FA0130.
!Achtung: Die Filter wechselanzeige funktioniert nur in
Verbindung mit einem Filterbeutel korrekt.
Bild 25
Deckel durch Betätigung des Verschlusshebels in Pfeilrichtung öffnen.
Bild 26
Filterbeutel durch Ziehen an der Verschlusslasche verschließen und
herausnehmen.
Bild 27
Neuen Filterbeutel in die Halterung einlegen und Gerätedeckel
schließen.
Achtung: Die Abdeckung des Staubbehälter-Fachs kann
nur geschlossen werden, wenn der Filterbeutel bzw. der
Staubbehälter eingeset zt ist.
Motorschutzfilter reinigen
Der Motorschutzfilter sollte in regelmäßigen Abständen durch
Ausklopfen bzw. Auswaschen gereinigt werden!
Bild 28
– Staubraumdeckel öffnen (siehe Bild 16).
– Motorschutzfilter in Pfeilrichtung herausziehen.
– Motorschutzfilter durch Ausklopfen reinigen.
– Bei starker Verschmutzung sollte der Motorsch utzfilter ausgewas-
chen werden.
Den Filter anschließend mindestens 24 Stunden trocknen lassen.
– Nach der Reinigung, Motorschutzfilter in das Gerät einschieben
und Staubraumdeckel schließen.
PFLEGE
Vor jeder Reinigung des Staubsaugers, muss dieser ausgeschaltet
und der Netzstecker gezogen werden.
Staubsauger und Zubehörteile aus Kunststoff können mit einem
handelsüblichen Kunststoffreiniger gepflegt werden.
!Keine Scheuermittel, Glas oder Allzweckreiniger verwenden.
Staubsauger niemals in Wasser tauchen.
Der Staubraum kann bei Bedarf mit einem z weiten Staubsauger ausgesaugt, oder einfach mit einem trockenen Staubtuch / Staubpinsel
gereinigt werden.
ANMERKUNG ZUR ENTSORGUNG/BESEITIGUNG
Unsere Waren sind für den Transport mit einer optimierten
Verpackung versehen. Diese besteht prinzipiell aus umweltfreundlichen Materialien, die als sekundäre Rohstoffe bei den örtlichen Entsorgungsunternehmen abzugeben sind.
Dieses Produ kt entspricht den Vorschrif ten der EU-Richtlinie
2002/96/CE.
Das Symbol der durchgestrichenen Mülltonne auf dem
Gerät weist darauf hin, dass das Produkt nicht im Hausmüll
sondern getrennt entsorgt werden muss. Geben Sie es zum
Entsorgen in einem Zentrum zur Entsorgung elektrischer oder
elektronischer Haushaltsgeräte ab oder geben Sie es bei Ihrem
Vertriebshändler ab, wenn Sie ein ähnliches Gerät erwerben. Der
Benutzer haftet für die Entsorgung des Geräts in einem Zentrum für
Sonderm üll. Anderenf alls kann er gemäß der geltenden Vors chriften
zur Abfallbeseitigung bestraft werden. Wird das nicht mehr benutzte Gerät korrekt der getrennten Entsorgung zugeführt, kann es recycled, behandelt und ökologisch entsorgt werden. Damit werden
negative Auswirkungen auf Umwelt und Gesundheit vermieden
und das Recycling der Materialien des Produktes gefördert. Nähere
Informationen zu den bestehenden Entsorgungssystemen erhalten Sie bei Ihren örtlichen Entsorgungsunternehmen oder in dem
Geschäft, in dem Sie das Gerät erworben haben. Hersteller und
Importeure übernehmen die Verantwortung für das Recycling, die
Behandlung und die ökologische Entsorgung, entweder direkt oder
über öffentliche Einrichtungen.
Ihre Stadt- oder Gemeindeverwaltung wird Sie gern über die
Möglichkeiten der Entsorgung nicht mehr benutzter Geräte informieren.
Page 22

MAGYAR
1 Átkapcsolható padlószívófej
2. Kefe kemény padlóhoz Kemény felületı padlók porszívózására
(padlócsempe, parketta stb.)
3 TeleszkópcsŒ
4 ReteszelŒgomb / tolókarmantyú
5 PorszívócsŒ-fogantyú
6 SzívótömlŒ
7 SzŒnyegtisztító fej
8 Keskeny szívófej
9 Hálózati csatlakozókábel
10 Be-/kikapcsoló gomb elektronikus szívóerŒ szabályzóval
11. PorszívócsŒ tartó vízszintes helyzetben
12. LevegŒ-bemeneti szırŒ
13 PorszívócsŒ tartó (a készülék alsó oldalán)
14 Po rta rtály
15 Készülék-fedŒlap
16 Fogant yú
17 Kif úvó rác s
18 szırŒcsere-jelzŒ
FONTOS TANÁCS
• Olvassa el figyelmesen ezeket az utasításokat. Œrizze meg késŒb-
bi hivatkozásul.
• Ha átadja valakinek a porszívót, kérjük, adja vele a kezelési útmu-
tatót is.
• A porszívót kizárólag a kezelési útmutató alapján kell használni.
• A gyártó nem vállal felelŒsséget a helytelen vagy hibás üzemelte-
tésbŒl eredŒ károsodásokért.
• MielŒtt a készüléket a hálózatra csatlakoztatná, ellenŒrizze, hogy
a tápfeszültség megegyezik-e a mıszaki adatos lapon feltüntetett
feszültséggel.
• A készüléket ki kell kapcsolni csatlakoztatáskor vagy lecsatlakoz-
tatáskor.
• Ne mıködtesse a készüléket feltekert kábellel.
• Ha több órán keresztül üzemelteti a porszívót, teljesen tekerje le
a tápkábelt.
• A készüléket ne a hálózati kábel megrántásával csatlakoztassa le.
• Ha nincs használatban a porszívó és tisztítása elŒtt, illetve a por-
zsák vagy szırŒk kicserélése elŒtt csatlakoztassa le a hálózatról.
• A porszívót ne használja porzsák, szırŒ, illetve a szırŒk helyes
beillesztése nélkül.
• Ezt a készüléket kizárólag háztartási alkalmazásra ter vezték. NE
SZÍVJON CEMENTPORT, FÙRÉSZPORT VAGY HASONLÓKAT A cementpor és a hasonlók eltömíthetik a porzsák pórusait, és elzárják a
levegŒbemenetet.
• A porszívót kizárólag a gyártó eredeti porzsákjával mıködtesse.
• A porszívót ne használja:
– Személyek vagy állatok porszívózására
– A következŒk felszívására:
- Rovarok vagy pókok.
- Veszélyes, éles, forró vagy égŒ anyagok.
- Nedves vagy folyékony anyagok.
- Nagyon gyúlékony vagy robbanékony anyagok gázak.
- Hamu, cserépkályhából és fıtŒrendszerekbŒl származó korom.
A porszívót tárolja védve az idŒjárási viszonyoktól, nedvesség- és
hŒforrásoktól.
• Ha a porszívó bármely nyílása tömítŒdött, ne használja azt, mivel
ez lecsökkenti a levegŒáramlást, és a készülék károsodását okozó
túlhevüléshez vezet.
• A porszívót, illetve a dugaszt ne kezelje nedves kézzel. A készüléket ne merítse vízbe.
• A porszívó mozgatásához ne rántsa meg a kábelt, illetve a szívócsövet. Használja erre a fogantyút.
• A gyerekek ne használják a készüléket.
• A készüléket ne használják fizikailag, érzékszervileg vagy mentálisan sérült személyek (beleértve a gyerekeket is), hacsak nem tanítja
meg Œket a használatra egy felelŒs felnŒtt.
• A gyerekekre figyeljen, hogy ne játszanak a készülékkel.
• A fogantyú, szívócsövek vagy csŒ használatakor ne tegye azokat
közel az arcához.
– Sérülési veszély.
• A készüléket ne használja, ha a kábel vagy a dugasz meghibásodott.
• Az ajtók becsukásakor vigyázzon, hogy ne csípje be velük a kábelt.
• Ha nem használja a porszívót, kapcsolja ki azt.
• Ha elhasználódik a porszívója, hulladékmentesítse megfelelŒ
módon.
• A készüléket ne kapcsolja be, ha a kábel vagy a dugaszoló meghibásodott, vagy ha a készülék üzemzavargyanús.
• A kábelcserét és egyéb javításokat kizárólag egy MinŒsített
Javítóközpontban végeztessen.
AZ ELSŒ HASZNÁLAT ELŒTT ELVÉGZENDŒ
TENNIVALÓK
Ábra 1
Húzza rá a fogantyút a szívótömlŒre és reteszelje.
ÜZEMBEHELYEZÉS
Ábra 2
a) Kattintsa be a szívótömŒ csonkját a szívónyílásba.
b) A szívótömlŒ kivételéhez nyomja össze a két rögzítŒ pecket és
húzza ki a tömlŒt.
Ábra 3
Dugja össze a kézi fogantyút és a szívócsövet.
4 ábra
Illessze össze a padlókefét és az összetolható csövet.
5 ábra
Vegye le az összetolható csövet, és állítsa be a hosszát az állítógomb segítségével a nyíl irányába.
Ábra 6
A hálózati csatlakozókábelt a dugónál fogva húzza a kívánt hosszúságra, majd dugja be az aljzatba.
Ábra 7
Kapcsolja be, illetve ki a porszívót a be-/ kikapcsoló gombnak a nyíl
irányába történŒ nyomásával.
Ábra 8
A szívóerŒ beállítása a be-/ kikapcsoló gomb nyíl irányába történŒ
elfordításával történhet.
Page 23

PORSZÍVÓZÁS
Ábra 9
A padlószívófej beállítása:
a) szŒnyeg és szŒnyegpadló
b) sima padló
Ábra 10
Dugja fel a használni kívánt szívófejet a szívócsŒre vagy a kézi fogantyúra:
a) a keskeny szívófejet a keskeny rések, sarkok és szık helyek porszívózásához használja.
b) a szŒnyegtisztító fejet a kárpitozott bútorok, függönyök és hasonlók porszívózásához használja.
Ábra 11
Rövid porszívózási szüneteknél használhatja a készülék alján található leállító segédeszközt.
Tolja a padló-szívófejnél lévŒ horgot a készülék hátoldalán található
nyílásba.
Ábra 12
Szívásnál, pl. a lépcsŒkön, a készüléket mindkét fogantyúval szállíthatja.
Ábra 16
Nyissa ki a porkamra fedelét úgy, hogy a zárókart a nyíl irányába
tolja.
Ábra 17
Vegye ki a portartályt a készülékbŒl.
Ábra 18
– Nyissa ki az alsó fedél mindkét csapózárát nyílirányba, a billenŒ
fedelet nyissa ki az ütközŒ kattanásáig, a tartály kiüríti a szennyezŒdést lefelé.
A z a ls ó f ed el et er Œs els ze nn ye zŒ dé se es e tén (d ur v a sz en ny ez Œd és )
lezárás elŒtt tisztítsa meg, pl. a réstisztító fejjel porszívózza le.
(Ehhez feltétlenül helyezze be a szırŒzacskót a készülékbe
- lásd: 23. ábra)
– Az alsó fedelet zárja le, és hallhatóan kattintsa be.
Ábra 19
A portartályt helyezze ismét vissza a készülékbe, és zárja le a porkamra fedelét.
! Figyelem: Többszöri porszívózás után a portartály belül felkarcolódik és tejszerıvé válik. Ennek semmilyen hatása a nincs a porszívó mıködésére, vagyis az továbbra is
mıködŒképes.
A MUNKA UTÁN
Ábra 13
Húzza ki a hálózati csatlakozódugót.
Kicsit húzza meg a hálózati csatlakozókábelt, m ajd engedje vissza (a
kábel automatikusan feltekeredik).
Ábra 14
A készülék leállításához / szállításához használhatja a készülék alján
lévŒ porszívócsŒtartót.
Állítsa fel a készüléket. Tolja a padló-szívófejnél lévŒ horgot a készülék alján található nyílásba.
Ön olyan kerekes porszívót vásárolt, amely a száraz szennyezŒdések minden fajtáját fel tudja szívni akár a portartállyal akár
szırŒzacskóval.
A portartály használatát az alábbiak szerint javasoljuk:
- fŒként a ház körüli munkáknál, pl. fırészforgács stb. eltávolításá-
hoz
- a szırŒzacskót a hagyományos háztartási porszívózáshoz.
MUNKAVÉGZÉS A PORTARTÁLLYAL
Ábra 15
Az optimális szívási eredmény érdekében állítsa a teljesítményszabályozót a maximális állásba.
Csak különösen kényes anyagok esetén ajánlott a teljesítmény
csökkentése.
!Figyelem: a szırŒcsere-jelzŒ csak szırŒzacskóval együtt
mıködik megfelelŒen.
Figyelem! A készülék fedelét nem lehet lecsukni, ha a porzsákot vagy a szırŒzsákot nem nyomta be. Ne kényszerítse
be, ellenŒrizze, hog y a kívánt porg yıjtŒ rendszer helyesen
van-e behelyezve.
A portartály kiürítése
Az optimális szívási teljesítmény eléréséhez a portartályt minden
használat után ki kell üríteni.
A PORTARTÁLY TARTÓS ÉS MIKROSZIRŒJÉNEK
TISZTÍTÁSA
Mikor kell megtisztítani:
– Minden zavar után, vagyis minden eltömŒdés elhárítása után.
– LegkésŒbb félévente.
Ábra 20
– A zárókapcsot a tartály hátlapján nyomja befelé, és a mikroszırŒt
vegye le a tartályról.
– A tartós szırŒt vegye ki a tartály fenéklapjából.
Ábra 21
– Mossa ki a mikro- és tartós szırŒt.
A szırŒt a mosás után legalább 24 óráig aguija száradni.
– A tisztítás után helyezze a tartós szırŒt a fenéklapba.
Helyezze a mikroszırŒt a tartályra, és zárja le a nyíl irányába. A zá-
rókapcsot kattintsa be hallhatóan.
Üzemzavar
A portartály eltömŒdésének megszüntetése.
Ábra 22
– Ürítse ki a tartályt (lásd 18. ábra)
– Szüntesse meg pl. egy csavarhúzó segítségével az eltömŒdést,
és odaütögetéssel vagy kiszívással távolítsa el a szennyezŒdést.
(A kiporszívózáshoz feltétlenül helyezze be a szırŒzacskót
készülékbe - lásd 23. ábra)
– Az alsó fedelet zárja le, és hallhatóan kattintsa be.
!Figyelem: A mikro- és tartósszırŒt minden üzemzavar után ki
kell tisztítani (lásd a 20 és. 21 ábrát).
MUNKAVÉGZÉS A SZIRŒZACSKÓVAL
Szükség esetén a portartályba a szırŒzacskót is be lehet helyezni.
A tartalék szırŒcsomag jelzése: FA-0130.
Ábra 23
– Nyissa ki a készülék-fedŒlapot (lásd: 16. ábra).
– Vegye ki a portartályt és helyezze bele a szırŒzacskót.
Page 24

– Zárja le a készülék-fedŒlapját.
Ön egy nagy teljesítŒképességı és nagy szívóerejı készüléket vá-
sárolt.
A maximális teljesítmény-beállítást ezért csak a nagyo n erŒsen szen-
nyezett, alacsony szálú
padlószŒnyegeknél és kemény padlóknál használja.
A szívóerŒ szabályzó (lásd a 8 ábrát) mıködtetésével a szívóerŒ
fokozatmentesen szabályozható.
– Alacsony teljesítmény (szívóerŒ):
Kényes anyagok, pl. függönyök porszívózásához.
– Közepes teljesítmény (szívóerŒ):
Enyhe szennyezŒdések napi tisztításához.
– Magas teljesítmény (szívóerŒ):
Robusztus padlóborítások, kemény padló és erŒs szennyezett-
ség esetén.
A szırŒzacskó cseréje
Ábra 24
Ha padlóról felemelt padlószívófejnél és legmagasabb szívóteljesítmény-beállításnál a fedélen lévŒ szırŒcsere-jelzŒ teljesen sárgát mutat, akkor szırŒbetétet ki kell cserélni még akkor is, ha az még
nem lenne tele. Ebben az esetben a beszívott anyag fajtája teszi a
cserét szükségessé.
A szívófejnek, a szívócsŒnek és a szívótömlŒnek ilyenkor nem
szabad eltömŒdve lennie, mert ezek eltömŒdése is kiváltja a
szırŒcsere-jelzést.
• Ne használja a készüléket porzsák nélkül, és ne próbálja a már
megtelt és kiürített porzsákot még egyszer használni.
• A porszívó tökéletes mı ködésének érdekében cs ak eredeti UFESA
porzsákokat és szırŒket használjon, amelyeket megtalál a felhatalmazott üzletekben. A nem megfelelŒ porzsák használata során a készülék meghibásodhat, és ez a garantia megszüntetéséhez vezet.
CsereszırŒ: FA0113.
!Figyelem: a szırŒcsere-jelzŒ csak szırŒzacskóval együtt
mıködik megfelelŒen.
Ábra 25
Nyissa fel a fedelet a zárókar nyíl irányába történŒ tolásával.
Ábra 26
Húzza ki a szırŒzacskót a zárókapocsnál fogva, és vegye ki.
Ábra 27
Az új szırŒzacskót helyezze be a tartóba, és zárja le a készülékfedŒlapját.
Vigyázat! A porzsák tartórekeszt csak akkor csukja le, ha a
porzsákot, textilszırŒt vagy porgyıjtŒt behelyezte.
ÁPOLÁS
A porszívó minden tisztítása elŒtt a készüléket ki kell kapcsolni, és a
hálózati csatlakozódugót ki kell húzni.
A porszívó és a mıa nyagból készült tartozékok ápolás ához szokványos mıanyagtisztítót lehet használni.
!A tisztításhoz ne használjon súrolószert, üvegvag y általános
tisztítószert.
A porszívót soha ne tegye vízbe!
A porkamrát szükség esetén egy másik porszívóval ki lehet porszívózni, vagy egyszerıen egy száraz portörlŒvel / porecsettel meg
lehet tisztítani.
FIGYELMEZTETÉS A KÉSZÜLÉK MEGSEMMISÍTÉSÉT
ILLETÃEN
Az árucikkeink optimalizált csomagolásban kerülnek kiszá-
llításra. Ez alapjában a nem szennyezŒ anyagok használatában nyilvánul meg, amelyek leadhatók a helyi hulladékŒrlŒ központban másodlagos nyersanyagként.
Ez a termék megfelel a 2002/96/CE EU elŒírásoknak. A ké-
szüléken lévŒ áthúzott szemetes szimbólum jelzi, hogy,
amikor a termék hulladékrendelkezésre kerül, nem szabad
a háztartási hulladékok közé számítani. El kell szállítania
egy különleges, elektronikai és elektromos készülékeknek
szánt hulladékgyıjtŒ ponthoz, vagy vissza kell küldenie a forgalmazóhoz egy hasonló készülék beszerzésekor. Az érvényben lévŒ
hulladékgyıjtŒ rendelkezések szerint, azok a felhasználók, akik kiselejtezett készülékeket nem adják le egy speciális gyıjtŒpontnál,
büntetendŒk. A kiselejtezett készülékek helyes hulladékrendelkezése azt jelenti, hogy újrahasznosíthatóak és ökológiailag feldolgozhatóak, vigyáz va a környezetre és lehetŒvé téve a termé khez felhasznált
anyagok újra használhatóságát. További információkért az elérhetŒ
hulladékgyıjtŒ pontokról forduljon a helyi hulladék központjához,
vagy az üzlethez, ahol a terméket vásárolta. A gyártók és importŒrök
felelŒsek a termékek ökológiai újra hasznosításáért, feldolgozásáért
és hulladékrendelkezéséért, akár közvetlenül vagy egy nyilvános
rendszeren keresztül.
A helyi városi tanácsa információkkal szolgál az elavult készülékekkel
kapcsolatos rendelkezésrŒl.
A motorvédŒ szırŒ megtisztítása
A motorvédŒ szırŒt rendszeres idŒközönként ütögetéssel meg kell
tisztítani illetve ki kell mosni!
Ábra 28
– Nyissa ki a porkamra fedelét (lásd: 16. ábra).
– Húzza ki a motorvédŒ szırŒt a nyíl irányában.
– A motorvédŒ szırŒt ütögetéssel tisztítsa meg.
– ErŒs szennyezettség esetén mossa meg a motorvédŒ szırŒt.
A szırŒt a mosás után legalább 24 óráig aguija száradni.
– A tisztítás után a motorvédŒ szırŒt tolja vissza a készülékbe, és
zárja le a porkamra fedelét.
Page 25

РУССКИЙ
ОПИСАНИЕ УСТРОЙСТВА
1. Универсальная насадка с двумя положениями
2. Щетка для твердых полов для сборки мусора на покрытиях
твердых полов (облицовочной плитки, паркета и т.д.)
3. Телескопическая трубка
4. Кнопка защелкивания
5. Ручка трубки
6. Шланг
7. Насадка для ковров
8. Длинная насадка
9. Провод питания
10. Кнопка Включения / Выключения с электронным
регулятором силы всасывания
11. Опора для трубки в горизонтальном положении
12. Фильтр воздушного входа
13. Опора для трубки в вертикальном положении (в нижней
части устройства)
14. Пылесборник
15. Крышка устройства
16. Переносная ручка
17. Решетка выхода
18. Индикатор замены фильтра
ВАЖНЫЕ ПРЕДУПРЕЖДЕНИЯ
• Прочитайте внимательно эти инструкции. Сохраните их для
будущих консультаций.
• В случае когда вы передаете пылесос третьему лицу, приложите
инструкции по использованию.
• Используйте этот пылесос исключительно согласно указаниям,
описанными в этих инструкциях по использованию.
• Изготовитель не несет ответственности за возможный вред,
причиненный во время исполь зования, которое не соответсвовало
спецификациям или из-за неправильного управления.
• Перед тем, как подсоединять устройство к электросети,
убедитесь в том, что напряжение соответствует тому, которое
указано на табличке характеристик.
• Как при подключении, так при отключении штепсельной вилки,
устройство не должно функционировать.
• Пылесос не должен работать со смотанным кабелем.
• Полностью извлеките кабель из сети, если устройство
функционирует в течение нескольких часов.
• Не отсоединяйте штепсельную вилку, потянув за кабель.
• Отсоедините пылесос от сети, когда вы им не пользуетесь
и перед тем, как совершать его чистку или при замене мешка и
фильтров.
• Нельзя использовать этот пылесос без пылесборника, или
фильтрующего мешка, или без правильно установленных
фильтров.
• Это устройство разработано исключительно для домашнего
использования. НЕ СОБИРАЙТЕ ПЫЛЬ РЕМОНТНЫХ РАБОТ ИЛИ
ТОМУ ПОДОБНЫХ. При собирани и пыли ремонтных работ или том у
подобных, затыкаются поры мешка всасывания и следовательно
блокируется проход воздуха.
• Пылесос должен использоваться только с фильтрующими
мешками Ufesa.
• Пылесос не предназначен для:
– использования на людях или животных
– всасывания:
- насекомых (например: мух, пауков...),
- веществ, вредных для здоровья, горячих или раскаленных
ни режущих материалов,
- влажных или жидких веществ,
- легковоспламеняющиеся или взрывчатых газов или
материалов.
- пепла, сажи печей из облицовочной плитки и устройств
центрального отопления
• Защищайте пылесос от метеорологических условий, влажности
и источников тепла.
• Не используйте пылесос, если у него закупорилось отверстие,
так как может сократится поток воздуха, вызывая перегрев, что
может нанести вред устройству.
• Не беритесь за пылесос ни за вилку влажными руками. Не
погружайте устройство в воду.
• Не перемещайте пылесос, потянув за кабель или за трубку
всасывания. Используйте переносную ручку.
• Избегайте того, чтобы дети пользовались устройством.
• Это устройство не должно использоваться людьми
(включая детей) с физическими, сенсорными или умственными
недостатками или при отсутствии опыта и знаний, если только они
не были обучены относительно его использования ответственным
лицом.
• Дети должны находиться под присмотром, чтобы удостоверится,
что они не играют с устройством.
• Избегайте пылесосить с рукояткой, насадками или трубой на
уровне головы.
- Риск травмирования.
• Не используйте устройство с поврежденной штепсельной
вилкой или проводом.
• Когда вы закрываете дверцу, удостоверьтесь в том, что она не
захватила кабель.
• Не включайте пылесос, если шнур или штепсельная
вилка повреждены или если вы заметили, что устройство не
функционирует правильно.
• Отсоединяйте устройство, когда вы им не пользуетесь.
• Немедленно прииводите в негодность использованные
устройства, чтобы удалить их согласно нормативу.
• Ремонт и замена кабеля должны осуществляться исключительно
Уполномоченной Технической Службой.
ПЕРВОЕ ИСПОЛЬЗОВАНИЕ
Рисунок 1
Вставьте ручку в шланг всасывания до тех пор, пока она не
встанет на место.
ВКЛЮЧЕНИЕ
Рисунок 2
a) Вставьте шланг всасывания в отверстие всасывания.
б) Для извлечения шланга всасывания нажмите на два язычка
задержания и достаньте трубку.
Рисунок 3
Соедините ручк у и трубку всасывания.
Рисунок 4
Соедините универсальную насадку с трубкой.
Рисунок 5
Достаньте трубку, поворачивая кнопку регулирования в
направлении стрелки и отрег улируйте желаемую длину.
Page 26

Рисунок 6
Потяните за штырь штепсельной вилки, чтобы достать провод
питания до желаемой длины, и вставьте вилку в розетку.
Рисунок 7
Включите / выключите пылесос, приводя в действие кнопку
подключения и отключения в направлении стрелки.
Рисунок 8
Отрегулируйте силу всасывания, поворачивая кнопку
подключения и отключения в направлении стрелки.
ВСАСЫВАНИЕ
Рисунок 9
Наденьте универсальную щетку:
a) Ковры и ковровые ткани
б) Гладкие покрытия
Рисунок 10
Вставьте насадку в трубку вдыхания или при необходимости в
ручку:
a) Длинная насадка для всасывания в канавках и углах, и т.д.
б) Насадка для ковров, чтобы пылесосить задрапированную
мебель, занавески, и т.д.
Рисунок 11
Если вы ненадолго прерываете работу, можно использовать опору
для трубки в задней части устройства.
Введите крючок крепления универсальной щетки в канавку,
расположенную в задней части устройства.
Рисунок 12
Для переноса устройства можно использовать две ручки,
например, когда вы используете аппарат на лестнице.
ПОСЛЕ РАБОТЫ
Рисунок 13
Достаньте штепсельную вилку.
Слегка потяните за шнур питания и отпустите его (кабель
свернется автоматически).
Рисунок 14
Для хранения / транспортировки устройства возможно
использовать опору для трубки в вертикальном положении,
расположенной в нижней части устройства.
Расположите устройство в вертикальном положении. Введите
крючок крепления универсальной щетки в канавку, расположенную
в нижней части устройства.
Вы приобрели пылесос-сани, которыми можно собирать все виды
сухой грязи, используя как пылесборник, так и фильтрующий
мешок.
Мы рекомендуем использовать
- пылесборник, например для удаления пыли от ремонтных работ
и т.д.
- фильтрующий мешок прежде всего для обычных работ по дому.
РАБОТА С ПЫЛЕСБОРНИКОМ
Рисунок 15
Чтобы получить оптимальные результаты всасывания, поставье
регулятор силы всасывания в максимальное положение.
Мы рекомендуем уменьшить силу всасывания только, когда речь
идет об очень тонких материалах.
Внимание: Индикатор замены фильтра функционирует правильно
только, если размещен фильтрующий мешок.
Внимание! Крышка устройства не будет закрываться при
отсутствии пылесборника или фильтрующего мешка. Не старайтесь
закрыть крышку, применив усилия, а проверьте наличие желаемой
системы собирания грязи.
Опустошение пылесборника
Чтобы достичь максимальной эффективности всасывания, нужно
опустошать пылесборник после каждого использования.
Рисунок 16
Откройте крышку основного отделения, повернув язычок
закрытия в направлении стрелки.
Рисунок 17
Достаньте пылесборник устройства.
Рисунок 18
- Отпустите два пружиных закрытия крышки в направлении
стрелки, откройте крышку до тех пор, пока она не остановится
ввверху, опустошите депозит для грязи вниз.
- В случае, если крышка будет очень грязной (сильное
загряз нение), поч истите ее пер ед тем, как закрыв ать ее, например,
с помощью насадки для плинтуса. (Для этого необходимо
поместить фильтрующий мешок в устройство, см. рисунок 23)
- Закройте крышку, защелкнув ее.
Рисунок 19
Вновь поместите пылесборник в устройство и закройте крышку
основного отделения.
Вниман ие: Ввиду д лительно го исполь зования пы лесоса, ко нтейнер
пыли может вн утри слегк а поцарапать ся и немного по тускнеть. Эт о
никаким образом не сказывается на функционировании пылесоса,
а именно, устройство продолжает прекрасно функционировать.
ЧИСТК А ПОСТОЯННОГО ФИЛЬТРА И
МИКРОФИЛЬТРА КОНТЕЙНЕРА ПЫЛИ
Когда нужно их чистить:
- Каждый раз, когда было замечено плохое функционирование, а
именно, каждый раз, когда было удалено препятствие.
- Как минимум каждые шесть месяцев.
Рисунок 20
- Нажмите на язычок закрытия в задней части депозита по
направлению вовнутрь и достаньте микрофильтр депозита.
- Дочтаньте постоянный фильтр основания резервуара.
Рисунок 21
- Помойте микрофильтр и постоянный фильтр. Затем нужно
сушить их минимум 24 часа.
- После чистки разместите постоянный фильтр в основании.
Разместите микрофильтр в депозите и закройте в направлении
стрелки. Вставьте язычок закрытия, защелкнув его.
ПЛОХОЕ ФУНКЦИОНИРОВАНИЕ
Удалите препятствие в пылесборнике.
Рисунок 22
- Опустошите депозит (см. рисунок 18)
- Удалите препятствие, например, с помощью отвертки или
вытряхивая или чистя сборник.
(Чтобы пылесосить пылесборник, необходимо поместиь
фильтрующий мешок в устройство, см. рисунок 23)
Page 27

- Закройте крышку, защелкнув ее.
Внимание: После каждого плохого функционирования нужно
чистить микрофильтр и постоянный фильтр ( см. Рисунок 20 и 21).
ПЫЛЕСОСИТЬ С ПОМОЩЬЮ ФИЛЬТРУЮЩЕГО
МЕШКА
Если необходимо, также можно использовать фильтрующий
мешок вместо пылесборника.
Название фильтров для замены: FA- 013 0.
Рисунок 23
- Откройте крышку устройства (см. Рисунок 16).
- Извлеките пылесборник и вставьте фильтрующий мешок.
- Закройте крышку устройства.
Вы приобрели очень мощное устройство и с большой отдачей
всасывания. Следовательно, рекомендуется использовать
максимальную силу только на очень грязных коротковорсных
ковровых покрытиях или на прочных поверхностях.
Приводя в действие регулятор силы всасывания (см. Рисунок
8) вы можете программировать желаемую силу всасывания без
переключения.
– Низкая гамма мощности:
Для чистки тонких материалов, например, занавесок.
– Средняя гамма мощности:
Для ежедневной чистки небольшого загрязнения.
– Высокая гамма мощности:
Для чистки крепкой облицовки, устойчивых покрытий и
сильного загрязнения.
Внимание: Крышка отделения пылесборника закрывается только,
когда присутствует фильтрующий мешок или, в данном случае,
пылесборик.
Чистка защитного фильтра мотора
Нужно регулярно чистить защитный фильтр мотора, вытряхивая
эго или полоща.
Рисунок 28
- Откройте крышку основного отделения (см. Рисунок 16).
- Извлеките защитный фильтр мотора в направлении, которое
показывает стрелка.
- Почистите защитный фильтр мотора, вытряхивая эго.
- Если фильтр очень загрязнен, помойте его.
Затем сушите фильтр минимум 24 часа.
- После чистки вставьте фильтр в устройство и закройте
отделение пылесборника.
УХОД
Чистите пылесос только при вык люченном устройстве и достав
штепсельную вилку из розетки.
Пылесос и пластмассовые предметы аксессуаров можно чистить
любым обычным чистящим средством для пластмассовых
изделий, доступным на рынке.
Не используйте абразивные чистящие средства, ни средства для
чистки стекол, ни чистящие средства общего использования.
Никогда не погружайте пылесос в воду.
Основное отделение можно чистить при необходимости с помощью
другого пылесоса, или просто тряпкой / сухой щеткой для пыли.
ЗАМЕНА ФИЛЬТРУЮЩЕГО МЕШК А
Рисунок 24
Когда универсальная насадка не касается пола и отрегулирована
максимальная мощность всасывания, индикатор замены
фильтра на крышке загорится желтым цветом, нужно поменгять
фильтрующий мешок, даже если он не заполнен полностью. В
данном случае тип содержания мешка вызывает необходимость
его замены.
Насадка, трубка всасывания и шланг не должны быть закупорены,
так как это могло вызвать освещение индикатора замены
фильтра.
• Не вынуждайте пылесос функционировать без мешка, не
старайтесь опустошить заполненнный мешок и вновь использовать
его.
• Для прекрасного функционирования используйте
исключительно мешки Ufesa, которые вы найдет е в специальных
учреждениях. Использование других мешков может повредить
продукт и может стать причиной аннулирования гарантии. Мешки
для замены: FA-0130.
Внимание: Индикатор замены фильтра правильно
функционирует только при наличии фильтрующего мешка.
Рисунок 25
Откройте крышку, повернув ручку закрытия в направлении
стрелки.
Рисунок 26
Закройте фильтрующий мешок, потянув за язычок закрытия, и
извлеките его.
Рисунок 27
Вставьте новый фильтрующий мешок в основание и закройте
крышку устройства.
РЕКОМЕНДАЦИИ ПО СДАЧЕ/ВЫБРОСУ УПАКОВКИ И
СТАРЫХ АППАРАТОВ
Наши товары поставляются в оптимизированной упаковке.
В ней в основном использованы экологически чистые
материалы, которые должны сдаваться в местную службу
утилизации отходов в качестве вторичного сырья.
Данное изделие соответствует нормам директивы ЕС
2002/96/CE. Символ перечеркнутого контейнера для мусора
на колесиках, имеющийся на приборе, означает, что, когда
наступит время избавиться от ненужного прибора, он не
должен помещаться вместе с бытовыми отходами. Он
должен быть доставлен в специальное место утилизации отходов
электрических и электронных приборов или возвращен продавцу при
покупке нового подобного прибора. В соответствии с действующими
нормами утилизации отходов пользователи, не доставившие
ненужные приборы в специальные места утилизации отходов, могут
быть оштрафованы. Правильная отдельная утилизация выброшенных
прибо ров означает, что они мог ут быть рециклир ованы, перераб отаны
или уничтожены экологически чистым способом, не загрязняющим
окружающую среду, не оказывающим негативное воздействие на
здоровье людей и позволяющим повторно использовать материалы,
из которых был изготовлен прибор. Для получения более подробной
информации об имеющихся программах утилизации отходов
обращайтесь в местную службу утилизации отходов или в магазин, в
котором был приобретен прибор. Производители и импортеры несут
ответственность за экологически чистую утилизацию, переработку
и уничтожение выброшенных приборов напрямую или посредством
государственной системы.
Местные муниципальные власти могут предоставить информацию
о порядке сдачи/уничтожения ненужных приборов.
Page 28

âESKY
1. Nastaviteln˘ nástroj na podlahu
2. Kartáã na tvrdou podlahu. Pro vysávání tvrd˘ch podlah
(dlaÏdice, parkety atd.)
3. Teleskopická trubice
4. Zaji‰Èovací tlaãítko
5. RukojeÈ
6. PruÏná hadice
7. Nástavec na ãalounûní
8. Úzk˘ nástavec
9. Napájecí kabel
10. Vypínaã s elektronickou regulací sání
11.. Podpûra trubice ve vodorovné pozici
12. Filtr vstupního vzduchu
13 Skladovací nástroj (na dolní stranû jednotky)
14 Sbûraã prachu
15 Víko v ys avaãe
16 DrÏadlo pro pfiená‰ení
17 MfiíÏka v ˘fu ku
18 Indikátor pro v˘mûnu prachového pytle
DÒLEÎITÉ POKYNY
• Pfieãtûte si pozornû tyto pokyny. Uchovejte je, abyste je mohli
v budoucnosti pouÏít.
• Pfii pfiedávání vysavaãe tfietí stranû pfiedejte také tuto pfiíruãku.
• Tento vysavaã musí b˘t pouÏíván pouze podle tûchto pokynÛ.
• V˘robce nebude zodpovûdn˘ za Ïádné ‰kody zpÛsobené
nesprávn˘m pouÏitím pfiístroje.
• Pfied zapojení pfiístroje k napájení zkontrolujte, zda napûtí odpo-
vídá údajÛm uveden˘m na v ˘robním ‰títku.
• Pfii pfiipojování pfiístroje k zásuvce a pfii jeho odpojování by mûl
b˘t pfiístroj vypnut˘.
• NepouÏívejte pfiístroj, kdyÏ je kabel svinut˘.
• Pfii souvislém nûkolikahodinovém pouÏívání vysavaãe zcela vytá-
hnûte napájecí kabel.
• Neodpojujte pfiístroj taháním za kabel.
• Odpojte v ysavaã ze zásuvky, kdyÏ jej nepo uÏíváte, pfied ãi‰tûním
a pfied v˘mûnou pytle nebo filtru.
• Tento vysavaã nesmí b˘t pouÏíván bez správnû nainstalovaného
sbûraãe prachu, pytle a filtrÛ.
• Tento pfiístroj je urãen jen pro domácí pouÏití. NEVYSÁVEJTE
CEMENTOV¯ PRACH, PILINY A PODOBNÉ MATERIÁLY. Cementov˘
prach a podobné materiály mohou zablokovat otvory v sacím pytli
a zablokovat nasávání vzduchu.
• Vysavaã smí b˘t pouÏíván jen s originálními prachov˘mi pytli od
v˘robce.
• Vysavaã nesmí b˘t pouÏíván k tûmto úãelÛm:
– Vysávání lidí nebo zvífiat
– Vysávání:
- Hmyzu nebo pavoukÛ.
- Nebezpeãn˘ch, ostr˘ch, hork˘ch nebo hofiících pfiedmûtÛ
nebo látek.
- Vlhk˘ch pfiedmûtÛ nebo tekutin.
- Vysoce hofilav˘ch nebo v˘bu‰n˘ch látek nebo plynÛ.
- Popelu, sazí z kachlov˘ch kamen a ústfiedního topení
Vysavaã musí b˘t chránûn pfied povûtrnostními vlivy, vlhkostí a
zdroji tepla.
• NepouÏívejte vysavaã, kdyÏ jsou zablokovány jeho otvor y. Bylo
by omezeno proudûní vzduchu a do‰lo by k pfiehfiátí pfiístroje, které by mohlo vést k jeho po‰kození.
• Nemanipulujte s vysavaãem nebo se zástrãkou mokr˘ma rukama.
Neponofiujte zafiízení do vody.
• Nepohybujte vysavaãem taháním za kabel nebo za hadici.
PouÏívejte drÏadlo pro pfiená‰ení.
• Pfiístroj nesmûjí pouÏívat dûti.
• Tento pfiístroj nesmí b˘t pouÏíván osobami (vãetnû dûtí)
s fyzick˘m, smyslov˘m nebo mentálním handicapem, pokud nebyly pouãeny o správném pouÏívání zodpovûdnou dospûlou osobou.
• Nedovolte dûtem hrát si s pfiístrojem.
• Pfii pouÏívání rukojeti, nástavcÛ nebo trubky udrÏujte sání mimo
svÛj obliãej.
– Hrozí riziko zranûní.
• NepouÏívejte pfiístroj, kdyÏ jsou kabel nebo zástrãka po‰kozeny.
• Dávejte pozor, aby pfii zavírání dvefií nedo‰lo ke skfiípnutí kabelu.
• KdyÏ vysavaã nepouÏíváte, vypnûte jej.
• Po skonãení Ïivotnosti musí b˘t v ysavaã zlikvidován fiádn˘m zpÛsobem.
• Nezapínejte pfiístroj, kdyÏ jsou kabel nebo zástrãka po‰kozeny,
nebo kdyÏ vidíte, Ïe pfiístroj nefunguje správnû.
• Opravy a v˘mûny kabelu smí provádût jen autorizované servisní
stfiedisko.
P¤ED PRVNÍM POUÎITÍM
Obrázek 1
Zatlaãte rukojeÈ na pruÏnou hadici, dokud se nezajistí.
P¤ÍPRAVA
Obrázek 2
a) Zatlaãte konektor hadice do otvoru ve vysavaãi, dokud se nezajistí.
b) PruÏnou hadici mÛÏete odpojit stisknutím dvou v˘ãnûlkÛ a
vytaÏením hadice.
Obrázek 3
Spojte rukojeÈ a v ysávací hadici.
Obrázek 4
Spojte nástroj na podlahu a teleskopickou trubici.
Obrázek 5
Odpojte teleskopickou trubici a upravte její délku posunutím
sefiizovacího tlaãítka ve smûru ‰ipk y.
Obrázek 6
DrÏte napájecí kabel za zástrãku, vytáhnûte poÏadovanou délku a
zapojte zástrãku do zásuvky.
Obrázek 7
Vysavaã zapnete nebo v ypnete posunutím v ypínaãe ve smûru
‰ipky.
Obrázek 8
Sání sefiídíte otoãením vypínaãe ve smûru ‰ipky.
Page 29

VYSÁVÁNÍ
Obrázek 9
Nastavení nástroje na podlahu:
a) Koberce
b) Tvrdá podlaha
Obrázek 10
Podle potfieby pfiipojte k vysávací trubce nástavce nebo rukojeÈ:
a) Úzk˘ nástavec pro vysávání úzk˘ch míst, rohÛ atd.
b) Nástavec pro ãalounûní pro vysávání ãalounûného nábytku, zá-
vûsÛ atd.
Obrázek 11
KdyÏ chcete na chvíli pfiestat vysávat, mÛÏete po uÏít parkovací nástroj na zadní stranû vysavaãe.
ZasuÀte záchytku na nástroji na podlahu do dráÏky na zadní stranû
pfiístroje.
Obrázek 12
Napfiíklad pfii vysávání schodÛ, lze pfiístroj pfiená‰et pomocí dvou
rukojetí.
PO DOKONâENÍ PRÁCE
Obrázek 13
Odpojte vysavaã.
Mírnû zatáhnûte za napájecí kabel a pusÈ te jej. Kabel se automaticky
navine zpût.
Obrázek 14
Pfii skladování a pfiepravû vysavaãe pouÏijte skladovací nástroj na
dolní stranû v ysavaãe.
Postavte v ysavaã na zadní stranu. ZasuÀte záchytku na nástroji na
podlahu do dráÏky na dolní stranû pfiístroje.
Zakoupili jste vysavaã, kter˘ vysává v‰echny typy such˘ch neãistot
pomocí prachového sbûraãe nebo prachového pytle.
Doporuãujeme pouÏívat:
- sbûraã na prach hlavnû pro koníãky, napfiíklad pfii uklízení
dfievûn˘ch hoblin atd.
- prachov˘ pytel pro kaÏdodenní úklid domácnosti.
POUÎÍVÁNÍ PRACHOVÉHO SBùRAâE
Obrázek 15
Abyste dosáhli nejlep‰ích v˘sledkÛ, nastavte maximální v˘kon.
SníÏit nastavení doporuãujeme jen v pfiípadû, Ïe vysáváte velmi
choulostiv˘ materiál.
! Upozornûní: Indik átor pro v˘mûnu prachového pytle funguje sprá-
vnû jen s prachov˘m pytlem.
Upozornûní! Kryt pfiístroje nelze zavfiít, pokud uvnitfi není
prachov ˘ sbûraã nebo pytel. Nezavírejte jej silou a zkontrolujte, zda je správnû nainstalován poÏadovan˘ sbûrn˘ prvek.
Vyprázdnûní prachového sbûraãe
Aby byly pfii vysávání zaji‰tûny optimální v˘sledky, mûl by b˘t
prachov˘ sbûraã vyprázdnûn po kaÏdém pouÏití vysavaãe.
Obrázek 16
Otoãte zaji‰Èovací páku prostoru pro prachov˘ py tel ve smûru ‰ipky
a otevfiete kryt.
Obrázek 17
Vyndejte sbûraã prachu z pfiístroje.
Obrázek 18
– Uvolnûte dva zaji‰Èovací prvky na dolní chlopni ve smûru ‰ipk y,
otevfiete chlopeÀ, dokud nedosáhne zaráÏky; sbûraã potom
vyprázdní neãistotu dolÛ.
– Pokud je dolní chlopeÀ silnû zneãi‰tûná, pfied zavfiením ji oãistûte, napfiíklad v ysáním pomocí úzkého nástavce. (Pfiitom musíte do
vysavaãe nainstalovat prachov˘ pytel – viz obrázek 23)
– Zavfiete dolní chlopeÀ a nechte ji zajistit na místû.
Obrázek 19
VloÏte prachov ˘ pytel zpût do vysavaãe a zavfiete kryt prostoru
pro prachov˘ pytel.
!V˘straha: Vnitfiek prachového sbûraãe se mÛÏe pouÏíváním
po‰krábat a nemusí b˘t prÛhledn˘. To ov‰em nemá Ïádn˘ vliv
na v˘kon vysavaãe, ten bude nadále fungovat normálnû.
âI·TùNÍ TRVAL¯CH FILTRÒ A MIKROFILTRÒ VE
SBùRAâI PRACHU
Filtry je nutné ãistit:
– Po jak˘chkoli poruchách, napfiíklad po odstranûní ucpání.
– Minimálnû kaÏd˘ch ‰est mûsícÛ.
Obrázek 20
– Stisknûte drÏák na zadní stranû sbûraãe a vyndejte mikrofiltr
z dolní ãásti sbûraãe.
– Vyndejte tr val˘ filtr z dolní desky sbûraãe.
Obrázek 21
– Omyjte mikrofiltr a tr val˘ filtr.
Filtr je nutné nechat oschnout alespoÀ po 24 hodin.
– Po ãi‰tûní vloÏte trval˘ filtr do dolní desky sbûraãe.
VloÏte mikrofiltr do sbûraãe a upevnûte jej na místû zatlaãením ve
smûru ‰ipky. Usly‰íte, jak se chlopeÀ zajistí.
UCPÁNÍ
Odstranûní ucpání v prachovém sbûraãi.
Obrázek 22
– Vyprázdnûte sbûraã (viz obrázek 18)
– Uvolnûte ucpané místo, napfiíklad ‰roubovákem, a vyklep ejte ma-
teriál nebo jej vysajte.
(Pfied vysátím musíte do vysavaãe nainstalovat prachov˘
pytel – viz obrázek 23)
– Zavfiete dolní chlopeÀ a nechte ji zajistit na místû.
!V˘straha: Mikrofiltr a trval˘ filtr je nutné vyãistit po kaÏdé poru‰e
(viz obrázek 20 a 21).
POUÎÍVÁNÍ PRACHOV¯CH PYTLÒ
V pfiípadû potfieby je moÏné namísto prachového sbûraãe pouÏít
prachov˘ pytel.
âíslo dílu náhradního balení filtrÛ: FA-0130
Obrázek 23
– Otevfiete víko vysavaãe (viz obrázek 16)
– Vyndejte sbûraã prachu a vloÏte prachov ˘ pytel.
– Zavfiete víko vysavaãe.
Zakoupili jste velmi v˘konn˘ pfiístroj.
Nejvy ‰‰í nastavení sání se proto dopo ruãuje jen pro silnû zneãi‰tûné
koberce s krátk˘m vlasem a pro tvrdé podlahy.
Page 30

PoÏadovan˘ sací v˘kon lze vybrat nastavením regulace sání (viz
obrázek 8).
– Nízké nastavení sání:
Pro vysávání choulostiv˘ch textilií, napfi. závûsÛ.
– Stfiední nastavení sání:
Pro denní v ysávání mírnû zneãi‰tûn˘ch podlah.
– Vysoké nastavení sání:
Pro v ysávání odoln˘ch podlah, tvrd˘ch podlah a pro silnû
zneãi‰tûné povrchy.
V¯MùNA PRACHOVÉHO PYTLE
Obrázek 24
Pokud je indikátor pro v˘mûnu pytle zcela Ïlut˘, kdyÏ je nástroj na
podlahu zvednut˘ ze zemû a je vybrán nejvy‰‰í sací v˘kon, je nutné vymûnit prachov˘ pytel, i kdyÏ je‰tû není zcela pln˘. V tomto
pfiípadû je dÛleÏité vymûnit prachov˘ pytel kvÛli materiálu, kter˘
obsahuje.
Nástavec, vysávací trubice a pruÏná trubice nesmûjí b˘t blokovány,
protoÏe to by také zpÛsobilo aktivaci indikátoru pro v˘mûnu pytle.
• Neuvádûjte v ysavaã do chodu bez sáãku ani do nûho nevkládejte
jiÏ pouÏité a vyprázdnûné sáãky.
• Za úãelem kvalitního chodu vysavaãe pouÏívejte v˘hradnû pÛvodní sáãky znaãky Ufesa, které zakoupíte v autorizovan˘ch prodejnách. Pfii pouÏívání sáãkÛ od jin˘ch v˘robcÛ mÛÏe vzniknout na
spotfiebiãi závada, na kterou se nevztahuje poskytovaná záruka.
Náhradní ãásti: FA0130.
! Upozornûní: Indikátor pro v˘mûnu prachového pytle funguje správnû jen s prachov˘m pytlem.
Obrázek 25
Otevfiete víko posunutím zaji‰Èovací páky ve smûru ‰ipky.
Obrázek 26
Uzavfiete prachov ˘ pytel v ytaÏením zaji‰Èovací chlopnû a potom
jej vyndejte.
Obrázek 27
VloÏte do drÏáku nov˘ prachov˘ pytel a zavfiete víko vysavaãe.
!V˘straha: Víko prostoru pro prachov˘ pytel lze zavfiít pouze tehdy,
kdyÏ je vloÏen prachov˘ pytel, textilní filtr nebo prachov˘ sbûraã.
âi‰tûní ochranného filtru motoru
Ochrann˘ filtr motoru je nutné ãistit pravidelnû vyklepáním neãistot
a opláchnutím.
Obrázek 28
– Otevfiete víko prostoru pro prachov˘ pytel (viz obrázek 16).
– Vytáhnûte ochrann˘ filtr motoru ve smûru ‰ipky.
– Oãistûte ochrann˘ filtr motoru v yklepáním.
– Pokud je ochrann˘ filtr motoru silnû zneãi‰tûn, opláchnûte jej.
Filtr je nutné nechat oschnout alespoÀ po 24 hodin.
– Po oãi‰tûní zasuÀte ochrann˘ filtr motoru do vysavaãe a zavfiete
víko prostoru pro prachov˘ pytel.
!NepouÏívejte drátûnku, prostfiedky na mytí oken nebo univerzální ãisticí prostfiedky.
Nikdy neponofiujte vysavaã do vody
V pfiíp adû potfieby lze prostor pro prachov ˘ pytel vyãistit jin˘m vy savaãem nebo jednodu‰e otfiít such˘m hadfiíkem nebo prachovkou.
UPOZORNùNÍ PRO UÎIVATELE
Na‰e v˘robky jsou baleny do optimalizovaného obalu,
urãeného pro pfiepravu. Tento obal je tvofien pfieváÏnû
ekologicky nezávadn˘mi materiály, které by mûly b˘t odloÏeny jako
druhotná surovina do pfiíslu‰né sbûrny odpadÛ.
Tento v˘robek splÀuje poÏadavky Normy EU 2002/96/CE.
Na spotfiebiãi je umístûn symbol pfie‰krtnuté popelnice.
Tento symbol upozorÀuje spotfiebitele na povinnost odlo-
Ïit pfii likvidaci tento v˘robek mimo domácí odpad. K to-
muto slouÏí sbûrny elek trick˘ch a elektronick˘ spotfiebiãÛ ãi
je moÏnost vrátit jej do prodejny pfii koupi nového spotfiebiãe.
Spotfiebitel je povinen pfii likvidaci odloÏit tento spotfiebiã do
sbûrny. V pfiípadû neplnûní tohoto nafiízení mÛÏe podle platn˘ch
nafiízení dojít k postihu spotfiebitele. Spotfiebiã urãen˘ k likvidaci,
kter˘ byl odevzdán jako tfiídûn˘ odpad, mÛÏe b˘t recyklován ãi
odstranûn ekologick˘m zpÛsobem. Tato aktivita zabraÀuje negativnímu dopadu na Ïivotní prostfiedí a podporuje recyklaci
pouÏit˘ch materiálÛ.
Informace o místech, které poskytují tyto sluÏby vám poskytnou
místní organizace ãi obchod, ve kterém byl spotfiebiã zakoupen.
V˘robci a dovozci tûchto v˘robkÛ jsou zodpovûdûni za jejich recyklaci a ekologickou likvidaci (pfiímo ãi prostfiednictvím místních
sluÏeb).
Informace o moÏn ostech odloÏení /odstranûní spot fiebiãÛ urãen˘ch
k likvidaci do vhodn˘ch sbûren obdrÏíte na radnici ãi na mûstském
úfiadû.
PÉâE
Pfied ãi‰tûním vysavaãe jej vÏdy vypnûte a odpojte napájecí kabel
ze zásuvky.
Vysavaã a plastové pfiíslu‰enství lze ãistit bûÏn˘mi ãisticími
prostfiedky pro plastov˘ materiál.
Page 31

БЪЛГАРИЯ
ВАШАТА ПРАХОСМУКАЧКА
1 Регулируема приставка за пода
2 Четка за твърд под За почистване на твърди подови
настилки (плочки, паркет и т.н.)
3 Телескопична тръба
4 Заключващ бутон
5 Дръжка
6 Подвижен маркуч
7 Приставка за тапицерии
8 Приставка за пролуки
9 Захранващ кабел
10 Бутон за включване /изключване с електронен регулатор на
всмукването
11. Опора за тръбата в хоризонтално положение
12. Филтър на всмукателния отвор за въздух
13 Приспособление за съхраняване (от долната страна на
уреда)
14 Пра хоуло вител
15 Капак на прахосмукачката
16 Дръжка за носене
17 Изпускателна решетка
18 Индикатор за смяна на торбата за прах
ВАЖНИ СЪВЕТИ
• Прочетете инструкциите внимателно. Запазете ги за бъдеща
справка.
• При предаване на прахосмукачката на трето лице, моля,
предайте също и настоящите инструкции за работа.
• Прахосмукачката трябва да се използва само в съответствие с
тези инструкции.
• Производителят не носи никаква отговорност за вреди и щети,
причинени от неправилно или неподходящо използване на уреда.
• Преди да включите уреда, проверете дали напрежението в
електрическата мрежа отговаря на посоченото върху табелката
на уреда.
• При включване и изключване на уреда от контакта,
прахосмукачката трябва да е на позиция “ИЗКЛ.”.
• Не включвайте уреда, ако кабелът е все още навит.
• Изтеглете напълно захранващия кабел при непрекъснато
използване на прахосмукачката в продължение на няколко часа.
• Никога не дърпайте захранващия кабел, когато го изваждате от
контакта.
• Изключвайте прахосмукачката от електрическата мрежа,
когато не я използвате и преди да преминете към почистването
й.
• Не използвайте прахосмукачката без да са поставени правилно
прахоуловителя, филтърната торба и филтрите.
• Този уред е предназначен изключително и само за домашна
употреба. НЕ ИЗСМУКВАЙТЕ ПРАХ ОТ ЦИМЕНТ, СТЪРГОТИНИ И
ДР. ПОДОБНИ. Прахът от цимент и др. подобни ще блокира порите
върху торбата за прах и ще прекъсне всмукването на въздух.
• Използвайте прахосмукачката само с оригинални торби за прах
на производителя.
• Не използвайте прахосмукачката за:
– почистване на хора и животни
– изсмукване на:
- насекоми и паяци
- опасни, с остри ръбове, горещи или горящи материали
- влажни или течни материали
- лесно възпламеняеми или експлозивни материали и газове
- пепел, сажди от камини и централни отоплителни системи
Защитете прахосмукачката от природни явления, влага и
източници на топлина.
• Не използвайте прахосмукачката, ако някой от отворите е
блокиран, тъй като това ще намали въздушния поток, довеждайки
до прегряване на прахосмукачката, което може да я повреди.
• Никога не боравете с уреда или щепсела с мокри ръце. Не
потапяйте уреда във вода.
• Не местете прахосмукачката, дърпайки кабела или
смукателната тръба. Използвайте дръжката за носене.
• Не позволявайте на деца да работят с уреда.
• Този уред не трябва да се използва от лица (включително деца)
с понижени физически, психически и сетивни способности освен
ако не са инструктирани от отговорно възрастно лице как да
използват уреда правилно .
• Не позволявайте на деца да играят с уреда.
• При използване на дръжката, приставките или тръбата за
изсмукване, ги дръжте далеч от лицето си.
– Опасност от нараняване!
• Не използвайте уреда, ако кабелът или щепселът са
повредени.
• При затваряне на врати се уверявайте, че няма да притиснат
кабела.
• Изключвайте прахосмукачката, когато не я използвате.
• В края на полезния живот на прахосмукачката я изхвърлете по
подходящ начин.
• Не включвайте уреда, ако кабелът или щепселът са повредени
или ако забележите, че уредът не работи правилно.
• Поправките и смяната на кабел трябва да се извършват
изключително и само от лицензиран технически сервизен център.
ПРЕДИ ДА ИЗПОЛЗВАТЕ УРЕДА ЗА ПЪРВИ ПЪТ
Фигура 1
Пъхнете дръжката към подвижната тръба,
докато захване.
НАСТРОЙВАНЕ
Фигура 2
a) Пъхнете съединителния детайл на маркуча в отвора на
прахосмукачката, докато захване.
b) За да извадите маркуча, натиснете двете стяги заедно и
издърпайте маркуча.
Фигура 3
Съединете дръжката и смукателната тръба.
Фигура 4
Съединете приставката за под и телескопичната тръба.
Фигура 5
Разединете телескопичната тръба и настройте дължината,
движейки бутона за регулиране по посока на стрелката.
Фигура 6
Държейки захранващия кабел за щепсела, издърпайте до
желаната дължина, след което вкарайте щепсела в контакта.
Page 32

Фигура 7
Натиснете бутона за включване/изключване по посока на
стрелката, за да включите/изключите прахосмукачката
Фигура 8
Настройте всмукването, завъртайки бутона за включване/
изключване по посока на стрелката.
ЧИСТЕНЕ С ПРАХОСМУКАЧКАТА
Фигура 9
Настройване на приставката за под:
a) черги и килими
b) твърди подови настилки
Фигура 10
Прикрепете приставките към смукателната тръба и дръжката
според нуждите:
а) Приставка за пролуки за почистване на пролуки и ъгли и т.н.
б) приставка за тапицерии за почистване на тапицирани мебели,
пердета и т.н.
Фигура 11
Можете да използвате приспособлението за паркиране отзад
на прахосмукачката, ако желаете да спрете чистенето с нея за
кратко време.
Плъзнете захващащия елемент върху приставката за пода в
жлеба отзад на уреда.
Фигура 12
Можете да носите уреда и с помощта на двете дръжки при
почистване на стъпала напр.
СЛЕД ПРИКЛЮЧВАНЕ НА РАБОТА
Фигура 13
Извадете щепсела от контакта.
Дръпнете леко захра нващия кабел и го пуснете. След това ка белът
ще се навие автоматично.
Фигура 14
За съхраняване или транспортиране на прахосмукачката
използвайте приспособлението за съхраняване от долната страна
на прахосмукачката.
Изправете прахосмукачката върху края й. Плъзнете захващащия
елемент върху приставката за пода в жлеба от долната страна
на уреда.
Заку пили сте прахосмукачка за под, която може д а чисти всякак ъв
вид суха мръсотия, използвайки прахоуловител или торба.
Препоръчваме Ви да използвате:
- прахоуловителя, особено когато се касае за хобитата Ви, напр. за
отстраняване на дървени стърготини и т.н.
- торбата за прах, предимно за всекидневно домакинско
почистване.
ИЗПОЛЗВАНЕ НА ПРАХОУЛОВИТЕЛЯ
Фигура 15
Настройте мощността на максималната степен за постигане на
най-добри резултати при чистене с прахосмукачката.
Препоръчваме Ви да намалите степента само при почистване на
много деликатни материали.
! Внимание: Индикаторът за смяна на торбата за прах
функционира правилно само заедно с торба за прах.
Внимание! Капакът на уреда не може да се затвори, ако
прахоуловителят или филтърната торба не са сложени вътре.
Не се опитвайте да го затваряте със сила и проверете дали
желаната система за събиране на мръсотията е поставена
правилно.
Изпразване на прахоуловителя
За постигане на оптимален резултат, прахоуловителят трябва да
се изпразва след всяко чистене с прахосмукачката.
Фигура 16
Завъртете застопоряващия лост на отделението за прах по посока
на стрелката, за да отворите капака на отделението за прах.
Фигура 17
Извадете контейнера за прах от уреда.
Фигура 18
– Освободете двете стяги върху долния капак по посока на
стрелката, отворете капака, докато изщрака на позиция за
спиране, след което контейнерът ще изпразни мръсотията
надолу.
– Ако долният капак е много мръсен, (плътна мръсотия) го
почистете, преди да го затворите, като използвате приставката
за пролуки, напр. (Трябва да поставите торбата за прах в
прахосмукачката, когато правите това - вж. фигура 23).
– Затворете долния капак, докато изщрака на позиция.
Фигура 19
Постав ете обратно тор бата за прах в пр ахосмукачкат а и затворете
капака на отделението за прах.
! Внимание: Вътрешността на контейнера за прах може
да се надраска с времето и да започне да изглежда
непрозрачен. Това не се отразява на производителността на
прахосмукачката по никакъв начин, т.е. тя ще продължи да
работи, както обикновено.
ПОЧИСТВАНЕ НА ПОСТОЯННИТЕ ФИЛТРИ И МИКРО
ФИЛТРИ В КОНТЕЙНЕРА ЗА ПРАХ
Филтрите трябва да се почистват:
– след неизправност при работа, т.е. след отстраняване на
запушване.
поне на всеки шест месеца.
Фигура 20
– Натиснете стягащия елемент от задната страна на контейнера
и извадете микро филтъра от дъното на контейнера.
– Извадете постоянния филтър от долната плоча на контейнера.
Фигура 21
– Измийте микро филтъра и постоянния филтър.
След това оставете филтъра да съхне поне 24 часа.
– След почистване, поставете постоянния филтър върху долната
плоча на контейнера.
Поставете микро филтъра към контейнера и го закрепете,
бутайки по посока на стрелката. Ще чуете затварянето на стягата
на капака.
ЗАПУШВАНИЯ
Отстраняване на запушване в контейнера за прах.
Фигура 22
– Изпразнете контейнера (вж. фигура 18).
– Разрохкайте запушването, напр. с отвертка, и го изтупайте или
го изсмучете с прахосмукачка.
Page 33

(Трябва да поставите торба за прах в прахосмукачката, преди
да го изсмучете с прахосмукачката - вж. фигура 23).
– Затворете долния капак, докато изщрака на позиция.
!Внимание: Почиствайте микро филтъра и постоянния
филтър след проблем при работата (вж. фигура 20 и 21).
ИЗПОЛЗВАНЕ НА ТОРБИ ЗА ПРАХ
Ако е необходимо, може да се използва торба за прах вместо
контейнера.
Номер на опаковката с резервен филтър: FA- 013 0
Фигура 23
– Отворете капака на прахосмукачката (вж. фигура 16).
– Извадете контейнера за прах и вкарайте торбата за прах.
– Затворете капака на прахосмукачката.
Закупили сте изключително мощен уред.
Поради това максималната степен на всмукване се препоръчва
само за силно замърсени килими с къс косъм и твърди подове.
Можете да изберете смукателната сила, настройвайки регулатора
на всмукването (вж. фигура 8).
– Нисък смукателен обхват:
За чистене на деликатни тъкани, напр. пердета.
– Среден смукателен обхват:
За ежедневно почистване на леко замърсени подове.
– Висок смукателен обхват:
За почистване на здрави подови настилки, твърди подове и
силно замърсени повърхности.
СМЯНА НА ТОРБАТА ЗА ПРАХ
Фигура 24
Ако индикаторът за смяна на торбата за прах е напълно жълт,
когато приставката за пода е повдигната от пода
и е избрана максималната степен на всмукване, тогава торбата
трябва да се смени, дори и ако не е съвсем пълна. В този случай
е важно да смените торбата за прах поради вида материал, който
съдържа.
Приставката, смукателната тръба и подвижната тръба не трябва
да са блокирани, тъй като това също би довело до задействане на
индикатора за смяна на торбата за прах.
• Никога не използвайте прахосмукачката без торбичка за прах,
и никога не се опитвайте да изпразвате пълна торбичка и да я
използвате отново.
• За да осигурите безпроблемна работа на уреда, използвайте
само оригинални торбички и филтри на Ufesa, които можете да
закупите в оторизирани магазини.
- Резервни части FA-0130
!Внимание: Индикаторът за смяна на торбата за прах
функционира правилно само заедно с торба за прах.
Фигура 25
Отворете капака, движейки застопоряващия лост по посока на
стрелката.
Фигура 26
Затворете плътно торбата за прах, като издърпате
застопоряващото картонче, след което я извадете.
Фигура 27
Поставете нова торбичка за прах в държача и затворете капака
на прахосмукачката.
!Внимание: Капакът на отделението за прах може да се
затвори само, когато торбата за прах, текстилният филтър
или контейнерът за прах са поставени.
Почистване на филтъра за защита на двигателя
Филтърът за защита на двигателя трябва да се почиства редовно,
като се изтупва и изплаква.
Фигура 28
– От воре те к апа ка н а отд еле ние то з а то рбат а за пра х (в ж. ф игур а
16).
– Изтеглете филтъра за защита на двигателя по посока на
стрелката.
– Изтупайте филтъра за защита на двигателя.
– Ако филтърът за защита на двигателя е много мръсен, го
изплакнете.
След това оставете филтъра да съхне поне 24 часа.
– След като го почистите, плъзнете филтъра за защита на
двигателя в прахосмукачката и затворете капака на отделението
за торбата за прах.
ГРИЖА
Винаги изключвайте прахосмукачката и изваждайте щепсела от
контакта, преди да почиствате уреда.
Можете да почиствате прахосмукачката и пластмасовите
принадлежности с търговски почиствател за пластмаса.
!Не използвайте тел за чистене, почистващ агент за стъкло
или универсален почистващ продукт.
Никога не потапяйте прахосмукачката във вода.
Ако е необходимо, можете да почистите отделението за прах с
втора прахосмукачка или просто да го забършете със суха кърпа
или четка за прах.
ПРЕДУПРЕЖДЕНИЕ ЗА СКЛАДИРАНЕ / ИЗХВЪРЛЯНЕ
Опаковките на нашите продукти са висококачествени.
Това по-същество означава, че се използват безвредни
за околната среда материали, които е препоръчително да се
предадат на пункт за вторични суровини.
Този продукт отговаря на директивата на ЕС 2002/96/CE.
Зачеркнатият символ, изобразяващ кофа за боклук на
колелца, означава, че този продукт не трябва да се изхвърля
заедно с отпадъците от домакинството. Трябва да се предаде
на специален пункт за събиране на изхвърлени от употреба
електрически и електронни уреди или да се върне на дистрибутора,
когато купувате подобе н уред. Според сега действащите разпо редби
за изхвърляне на отпадъци, потребителите, които не предадат
изхвърлени от употреба уреди на някой от специалните пунктове
за събиране на отпадъци, могат да бъдат глобени. Правилното
изхвърляне на излезли от употреба уреди означава, че те могат
да бъдат рецик лирани и преработени екологично. Това помага за
опазването на околната среда и позволява повторната употреба
на материали, използвани в уреда. За повече информация относно
съществуващите пр ограм и за изх върляне на отпадъци се свържете с
местната служба по отпадъци или с магазина, откъдето сте закупили
продукта. Производителите и вносителите отговарят за екологичното
рециклиране, преработване и изхвърляне на продуктите, пряко или
посредством обществената система.
Информация за това, как да изхвърлите уред, излязъл вече от
употреба, можете да получите от местния Градски съвет.
Page 34

ROMÂN
1 Perie ajustabilã pentru podea
2 Perie pentru podele tari. Pentru învelitori tari de pardosealã
(gresie, parchet etc.)
3 Tub telescopic
4 Buton de blocare
5 Mâner
6 Furtun flexibil
7 Duzã pentru tapiterie
8 Duzã pentru crãpãturi
9 Cablul de alimentare
10 Buton de pornire/oprire cu regulator electronic de aspiratie
11. Suport pentru tub în pozitia orizontalã
12. Filtru de admisie aer
13 Ajutor pentru depozitare (pe partea inferioarã a unitãtii)
14 Colector de praf
15 Capac aspirator de praf
16 Mâner de transport
17 Grilã pentru evacuare
18 Indicator pentru înlocuirea sacului de praf
RECOMANDAR ORTANTÃ
• Cititi cu atentie aceste instructiuni. Pãstrati-le pentru consultãri
ulterioare.
• Atunci când dati aspiratorul de praf unei terte pãrti, vã rugãm sã
dati si acest manual de utilizare.
• Acest aspirator de praf poate fi folosit doar în conformitate cu
aceste instructiuni de utilizare.
• Producãtorul nu preia nici o responsabilitate pentru deteriorãrile
cauzate de folosirea necorespunzãtoare sau functionarea incorectã.
• Înainte de a conecta aparatul la prizã, verificati ca tensiunea retelei sã corespundã cu cea specificatã pe plãcuta cu caracteristici a
aparatului.
• Aparatul trebuie oprit atunci când se introduce sau scoate din
prizã.
• Nu utilizati aparatul când cablul este încã strâns în colac.
• Desfãsurati complet cablul de alimentare atunci când folositi aspiratorul de praf în mod continuu câteva ore.
• Nu scoateti aparatul din prizã trãgând de cablu.
• Scoateti aspiratorul de praf din prizã când nu este în functiune si
înainte de a începe curãtarea acestuia sau schimbarea sacilor sau a
filtrelor.
• Acest aspirator de praf nu poate fi folosit fãrã colectorul de praf,
sacul filtru sau filtre montate în pozitia corectã.
• Acest aparat a fost proiectat în exclusivitate pentru uzul casnic. NU ASPIRATI PRAF DE CIMENT, RUMEGUS SAU ALTELE
ASEMÃNÃTOARE. Praful de ciment si altele asemãnãtoare vor astupa porii sacului de aspiratie si vor întrerupe admisia aerului.
• Aspiratorul de praf poate fi folosit doar cu sacii de praf originali
ai producãtorului.
• Aspiratorul de praf nu poate fi folosit pentru:
– Aspirarea persoanelor sau animalelor
– Aspirarea de:
- insecte sau pãianjeni
- substante periculoase; cu muchii ascutite, fierbinti sau arzând
- substante umede sau lichide
- substante si gaze foarte inflamabile sau explozive
- cenusã, funingine de pe sobe si sisteme centrale de încãlzire
Aspiratorul de praf trebuie protejat de intemperii, umezealã si surse
de cãldurã.
• Nu folositi aspiratorul de praf dacã unele dintre deschizãturile
acestuia sunt obturate, deoarece acest fapt va reduce fluxul de aer,
cauzând supraîncãlzirea acestuia, fapt care poate deteriora aparatul.
• Nu manevrati nici aspiratorul, nici stecherul cu mâinile ude. Nu
imersati aparatul în apã.
• Nu trageti de cablu sau de tubul de aspiratie pentru a misca aspiratorul. Folositi mânerul pentru transport.
• Nu permiteti copiilor sã manevreze aparatul.
• Acest aparat nu trebuie folosit de persoane (inclusiv de copii)
cu deficiente fizice, senzoriale sau mentale cu exceptia cazului în
care aceste persoane au fost instruite de cãtre un adult responsabil
referitor la folosirea lui corectã.
• Copii trebuie supravegheati pentru a se asigura cã acestia nu se
joacã cu aparatul.
• Tineti aspiratorul la distantã de fata dvs. atunci când folositi mânerul, duzele sau tubul.
– Risc de vãtãmare.
• Nu folositi aparatul atunci când cablul electric sau stecherul sunt
deteriorate.
• Atunci când închideti usile, asigurati-vã cã acestea nu ciupesc
cablul.
• Opriti aspiratorul de praf dacã acesta nu este în uz.
• La finalul duratei sale de viatã, aspiratorul de praf trebuie eliminat
într-un mod corespunzãtor.
• Nu porniti aparatul atunci când cablul de alimentare sau stecherul sunt deteriorate sau dacã se observã cã aparatul nu f unctioneazã
corect.
• Repararea sau înlocuirea cablului trebuie realizatã numai de cãtre
un centru de ser vice autorizat.
ÎNAINTE DE A UTILIZA APARATUL PENTRU PRIMA
DATÃ
Figura 1
Împingeti mânerul în tubul flexibil pânã când se cupleazã.
REGLAREA
Figura 2
a) Împingeti conectorul furtunului în deschiderea aspiratorului de
praf pânã când se cupleazã.
b) Pentru scoaterea furtunului flexibil, apãsati cele 2 urechi una cãtre
cealaltã si trageti de furtun.
Figura 3
Cuplati mânerul si tubul de aspirare.
Figura 4
Cuplati peria pentru podea si tubul telescopic.
Figura 5
Decuplati tubul telescopic si ajustati lungimea acestuia prin miscarea butonului de ajustare în directia sãgetii.
Figura 6
Tinând cablul de stecher, desfãsurati lungimea necesarã si introduceti-l în prizã.
Figura 7
Apãsati butonul de pornire/oprire în directia indicatã de sãgeatã
pentru pornirea/oprirea aspiratorului de praf.
Page 35

Figura 8
Reglati aspirarea prin rotirea butonului de pornire/oprire în directia
sãgetii.
ASPIRAREA
Figura 9
Ajustarea periei pentru podea:
a) covoare si carpete
b) podele tari
Figura 10
Atasati duzele la tubul de aspirare sau mâner precum este indicat:
a) duza pentru spatii înguste pentru aspirarea crãpãturilor si colturi-
lor etc.
b) duza pentru tapiterie pentru aspirarea mobilei tapisate, a drape-
riilor etc.
Figura 11
Puteti folosi ajutorul de parcare din spatele aspiratorului de praf
dacã doriti sã opriti aspirarea pentru o scurtã perioadã de timp.
Glisati opritorul pe peria pentru podea în canalul din spatele aparatului.
Figura 12
Aparatul poate fi de asemenea transportat folosind cele douã mânere atunci când aspirati spre exemplu scãri.
CÂND ATI TERM INAT LUC RUL
Figura 13
Scoateti aspiratorul din prizã.
Smuciti scurt cablul de alimentare si lãsati-l liber. Cablul se va în-
fãsura automat.
Figura 14
Pentru depozitarea sau transportul aspiratorului de praf folositi ajutorul de depozitare de pe partea inferioarã a acestuia.
Asezati aspiratorul de praf pe partea lui dorsalã. Glisati opritorul pe
peria pentru podea în canalul de la partea inferioarã a aparatului.
Ati achizitionat un aspirator de praf care poate aspira orice fel de
murdãrie uscatã folosind colectorul de praf sau sacul de praf.
Vã recomandãm folosirea:
- colectorului de praf, în special pentru hobby-urile dvs., de exemplu pentru îndepãrtarea talasurilor.
- sacului de praf pentru curãtarea obisnuitã a casei.
FOLOSIREA COLECTORULUI DE PRAF
Figura 15
Când aspirati, reglati puterea la maxim pentru obtinerea celor mai
bune rezultate.
Vã reco mand ãm sã red uceti regla jul pute rii doa r atunci când a spirati materiale foarte delicate.
! Atentie : Indicatorul pentru schim barea s acul ui de praf functioneazã corect doar împreunã cu un sac de praf.
Atentie! Capacul acestui aparat nu poate fi închis dacã colector ul de praf sau s acul f iltr ului n u sunt înãuntru. Nu fort ati
înc hi derea s a si verificat i ca siste mu l dorit de colec ta re a murdãriei sã fie corect asezat.
Golirea colectorului de praf
Pentru obtinerea rezultatelor optime în timpul aspirãrii, trebuie ca
colectorul de praf sã fie golit de fiecare datã când este folosit aspiratorul de praf.
Figura 16
Rotiti maneta de blocare a compartimentului de praf în directia indicatã de sãgeatã pentru deschiderea capacului compartimentului
pentru praf.
Figura 17
Scoateti recipientul de praf din aparat.
Figura 18
– Deblocati cele douã zãvoare de la clapa de pe partea inferioarã
în directia indicatã de sãgeatã, deschideti clapa, pânã se aude un
clic, cãtre pozitia de oprire, iar recipientul va goli apoi murdãria în
directia spre jos.
– Dacã clapa inferioarã este foarte murdarã (strat gros de murdãrie),
curãtati-o înainte de închidere prin aspirarea ei, spre exemplu, cu
duza pentru spatii înguste. (Când faceti aceasta trebuie sã potriviti
sacul de praf în aspirator; ghidati-vã dupã figura 23).
– Închideti clapa inferioarã pânã când se poate auzi un clic de intrare în pozitie.
Figura 19
Introduceti sacul de praf în aspirator si închideti capacul compartimentului sacului de praf.
! Atentie: Par tea inte rioarã a reci pie ntu lui pentru praf se poate zgâria datoritã întrebuintãrii si poate deveni opacã. Acest
fap t nu influenteazã în n iciun fel performa nta as pi rator ul ui, el
va continua sã functioneze normal.
CURÃTAREA FILTRELOR PERMANENTE SI A
MICROFILTRELOR DIN RECIPIENTUL PENTRU PRAF
Filtrele trebuie curãtate:
– dupã fiecare remediere, de exemplu dupã deblocarea obturãrii
cel târziu la 6 luni.
Figura 20
– Apãsati brida de pe partea din spate a rezervorului si scoateti
microfiltrul din fundul recipientului.
– Scoateti filtrul permanent din placa de bazã a recipientului.
Figura 21
– Spãlati filtrul permanent si microfiltrul.
Dupã aceea, filtrul trebuie lãsat sã se usuce cel putin 24 de ore.
– Dupã curãtare, asezati filtrul permanent pe placa de bazã a reci-
pientului.
Introduceti microfiltrul în recipient si fixati-l în pozitie prin împinge-
rea în directia indicatã de sãgeatã. Veti auzi un clic atunci când se
închide clapa.
OBTURÃRI
Desfundarea unei obturãri din recipientul pentru praf.
Figura 22
– Goliti recipientul (vezi figura 18).
– Dislocati obturarea, de exemplu cu o surubelnitã si loviti-o sau
aspirati-o afarã.
(Trebuie sã potriviti sacul de praf în aspirator înainte de as pirarea ei în afarã, vezi figura 23).
Page 36

– Închideti clapa inferioarã pânã când se poate auzi un clic de intrare în pozitie.
!Atentie: Microf iltrul si filtrele permanente trebuie curãtate
dupã f iecare problemã de fu nctionare (vezi figurile 20 si 21).
FOLOSIREA SACILOR DE PRAF
În caz cã este necesar, se foloseste un sac de praf în locul colectorului de praf.
Nr. de piesã de pe ambalajul filtrului de rezervã: FA- 0130
Figura 23
– Deschideti capacul aspiratorului (vezi figura 16)
– Îndepãrtati colectorul de praf si introduceti un sac de praf.
– Închideti capacul aspiratorului.
Ati achizitionat un aparat extrem de puternic.
Reglajul cu cea mai puternicã aspiratie este din acest motiv reco-
mandat numai pentru parchete si covoare foarte murdare, covoare
cu tesãturã flausatã si podele tari.
Puterea de aspiratie doritã poate fi selectatã prin ajustarea regulatorului de aspirare (vezi figura 8).
– Putere scãzutã de aspirare:
pentru aspirarea materialelor delicate, de ex. a draperiilor.
– Putere medie de aspirare:
pentru aspirarea zilnicã a podelelor putin murdare.
– Putere ridicatã de aspirare:
pentru aspirarea învelitorilor durabile de podea, podele
tari si suprafete foarte murdare.
ÎNLOCUIREA SACULUI DE PRAF
Figura 24
Dacã indicatorul de schimbare a sacului de praf este complet galben atunci când este
ridicatã peria pentru podea de pe podea si este ales nivelul cu cea
mai puternicã aspirare, trebuie schimbat sacul de praf, chiar dacã
nu este încã plin. În acest caz este esentialã schimbarea sacului de
praf datoritã tipului de material continut în el.
Duza, tubul de aspirare si furtunul flexibil nu au voie sã fie blocate,
deoarece acest fapt ar conduce de asemenea la declansarea indicatorului de schimbare a sacului de praf.
• Nu puneti sã functioneze aspiratorul fãrã pungã, si nici nu încercati sã goliti punga plinã si apoi s-o folositi din nou.
• Pentru a garanta perfecta functionare, folositi numai pungi originale ale firmei UFESA pe care le veti gãsi la magazinele autorizate. Folosirea de pungi neoriginale poate dãuna aparatului si va fi o
cauzã a anulãrii garantiei. Piese de schimb: FA0130.
! Atentie : Indicatorul pentru schim barea s acul ui de praf functioneazã corect doar împreunã cu un sac de praf.
Figura 25
Deschideti capacul prin miscarea manetei de blocare în directia indicatã de sãgeatã.
Figura 26
Închideti sacul de praf prin tragerea de aripioara de blocare si apoi
scoateti-l.
Figura 27
Introduceti un nou sac de praf în suport si închideti capacul aspiratorului.
!Atentie: Capacul compartimentului sacului de praf se închide
doar atunci când sunt introduse sacul d e praf, filtrul de textile
sau colec torul de praf.
Curãtarea filtrului de protejare a motorului
Filtrul de protejare a motorului trebuie curãtat regulat prin scuturarea
murdãriei si prin clãtire.
Figura 28
– Deschideti capacul compartimentului pentru sacul de praf (vezi
figura 16).
– Trageti afarã filtrul de protejare a motorului în directia indicatã de
sãgeatã.
– Curãtati filtrul de protejare a motorului prin scuturare.
– Dacã este foarte murdar, filtrul de protejare a motorului trebuie
clãtit.
Dupã aceea, filtrul trebuie lãsat sã se usuce cel putin 24 de ore.
– Dupã curãtare, glisati filtrul de protejare a motorului în aspirator si
închideti capacul compartimentului pentru sacul de praf.
ÎNTRETINERE
Întotdeauna opriti aspiratorul si scoateti cablul din prizã înainte de
curãtarea aparatului.
Aspiratorul si accesoriile sale din plastic pot fi curãtate cu ajutorul
unui dispozitiv de curãtare comercial pentru plastic.
!Nu folositi bureti abrazivi, solutii de curãtare a sticlei sau produse de curãtare universale.
Nu scufundati niciodatã aspiratorul în apã.
Dacã este necesar, compartimentul pentru sacul de praf poate fi
curãtat cu un al doilea aspirator sau pur si simplu sters cu o cârpã
uscatã sau cu o perie de praf.
SFATURI PENTRU DEPOZITARE/ELIMINARE
Produsele noastre se livreazã în ambalaje optimizate. Acest
lucru înseamnã practic cã ambalajul este fabricat numai
din materiale care nu contamineazã si care trebuie predate
serviciului local de gestionare a deseurilor pentru a fi utilizate ca
materie primã secundarã.
Acest produs respectã Directiva UE 2002/96/CE. Simbolul
pubelei tãiate cu un X de pe aparat indicã faptul cã atun-
ci când aparatul nu mai este util, acesta nu trebuie aruncat
împreunã cu deseurile casnice. Aparatul trebuie dus la un
centru special de colectare a deseurilor electrice si electronice sau returnat distribuitorului atunci când cumpãrati un aparat
similar. Conform reglementãrilor în vigoare privind deseurile, utilizatorii care nu duc aparatele uzate la centrele speciale de colectare
pot fi sanctionati. Dezafectarea corectã a aparatelor electrocasnice
uzate înseamnã cã acestea pot fi reciclate si procesate ecologic,
ajutând la protejarea mediului si permitând reutilizarea materialelor. Pentru mai multe informatii contactati serviciul local de gestionare a deseurilor sau magazinul de la care ati cumpãrat aparatul.
Fabricantii si importatorii sunt responsabili pentru reciclarea, procesarea si dezafectarea în mod ecologic a produselor, fie direct, fie
prin intermediul unui sistem public.
Consiliul dvs. local vã poate furniza informatii despre modul în care
puteti dezafecta aparatele de care nu mai aveti nevoie.
Page 37

كﺮﺤﻤﻠﻟ ﺔﻴﻗاﻮﻟا ةﺎﻔﺼﳌا ﻒﻴﻈﻨﺗ
.ﺎﻬﻠﺴﻐﺑ وأ ﺎﻬﻀﻔﻨﺑ مﺎﻈﺘﻧﺈﺑ كﺮﺤﻤﻠﻟ ﺔﻴﻗاﻮﻟا ةﺎﻔﺼﳌا ﻒﻴﻈﻨﺗ ﺐﺠﻳ
28 ةرﻮﺼﻟا
.(16 ةرﻮﺼﻟا ﺮﻈﻧأ) مﺎﻌﻟا عدﻮﺘﺴﳌا ءﺎﻄﻏ ﺢﺘﻓإ -
.ﻢﻬﺴﻟا ﻪﻴﻟإ ﺮﻴﺸﻳ يﺬﻟا هﺎﲡﻹا ﻲﻓ كﺮﺤﻤﻠﻟ
.ﺎﻬﻀﻔﻨﺑ كﺮﺤﻤﻠﻟ ﺔﻴﻗاﻮﻟا ةﺎﻔﺼﳌا ﻒﻈﻧ -
.ﺎﻬﻠﺴﻏ ﺐﺠﻳ ,اﺪﺟ ﺔﺨﺴﺘﻣ ةﺎﻔﺼﳌا ﺖﻧﺎﻛ اذإ -
.ﻞﻗﻷا ﻰﻠﻋ ﺔﻋﺎﺳ 24 ةﺪﳌ ﻒﺸﻨﺗ ﺎﻬﻛﺮﺗ ﺐﺠﻳ ,ﻚﻟذ ﺪﻌﺑ
ﻊﻣﺎﺟ عدﻮﺘﺴﻣ ﻖﻠﻏأ ﻢﺛ زﺎﻬﳉا ﻲﻓ ةﺎﻔﺼﳌا ﻞــﺧدأ ,ﻒﻴﻈﻨﺘﻟا ﺪﻌﺑ -
ﺔﻴﻗاﻮﻟا ةﺎﻔﺼﳌا جﺮﺧأ -
.رﺎﺒﻐﻟا
تﺎﻃﺎﻴﺘﺣإ
ﻂﺑﺮﻟا ﺔﻠﻴﺻوو ﺎﺌﻔﻄﻨﻣ زﺎﻬﳉا نﻮﻜﻳ ﲔﺣ ﻂﻘﻓ ﻒﻴﻈﻨﺘﻟا ﺔﻴﻠﻤﻌﺑ مﺎﻴﻘﻟا ﺐﺠﻳ
.رﺎﻴﺘﻟا ﻦﻋ ﺔﻟﻮﺼﻔﻣ ﻲﺋﺎﺑﺮﻬﻜﻟا
داﻮﻣ يﺄﺑ ﺔﻴﻓﺎﺿﻹا تاﺪﻌﻤﻠﻟ ﺔﻴﻜﻴﺘﺳﻼﺒﻟا ءاﺰﺟﻷاو ﺔﺴﻨﻜﳌا ﻒﻴﻈﻨﺗ ﻦﻜﳝ
.قﻮﺴﻟا ﻲﻓ ةدﻮﺟﻮﳌا ﻚﻴﺘﺳﻼﺒﻠﻟ ﺔﻳدﺎﻋ ﺔﻔﻈﻨﻣ
ماﺪﺨﺘﺳﻹا تﺎﻔﻈﻨﻣ ﻻو جﺎﺟﺰﻟا تﺎﻔﻈﻨﻣ ,ﺔﻗرﺎﺣ تﺎﻔﻈﻨﻣ ﻞﻤﻌﺘﺴﺗ ﻻ
.مﺎﻌﻟا
.ءﺎﳌا ﻲﻓ ﺔﺴﻨﻜﳌا اﺪﺑأ ﻞﺧﺪﺗ ﻻ
ىﺮﺧأ ﺔﺴﻨﻜﻣ ﺔﻄﺳاﻮﺑ ,ةروﺮﻀﻟا
ﺔﻟﺎﺣ ﻲﻓ ,مﺎﻌﻟا عدﻮﺘﺴﳌا ﻒﻴﻈﻨﺗ ﻦﻜﳝ
.فﺎﳉا رﺎﺒﻐﻠﻟ ةﺎﺷﺮﻓ وأ بﻮﺜﺑ ﻂﻘﻓ وأ
زﺎﻬﳉا ﻦﻣ ﺺﻠﺨﺘﻟاو عاﺪﻳﻹا لﻮﺣ تﺎﻬﻴﺒﻨﺗ
ﻒﻴﻠﻐﺘﻟا .ﺎﻬﻠﻘﻧ ءﺎﻨﺛأ ﺔﺌﺒﻌﺗو ﻒﻴﻠﻐﺗ ﻦﺴﺣأ ﻰﻠﻋ ﺮﻓﻮﺘﺗ ﺎﻨﻌﺋﺎﻀﺑ
ﺔﺤﻠﺼﻤﻠﻟ ﺎﻬﻤﻴﻠﺴﺗ ﺐﺠﻳ ﺔﺛﻮﻠﻣ ﺮﻴﻏ داﻮﻣ ﻦﻣ ﲔﻋﻮﻨﺼﻣ ﺔﺌﺒﻌﺘﻟاو
.لﺎﺑزﻷا ﻦﻣ ﺺﻠﺨﺘﻠﻟ ﺔﻳﺪﻠﺒﻟا
.CE/96/2002 ﻲﺑورﻷا دﺎﲢﻹا ﺔﻤﻴﻠﻌﺗ ﻖﺒﻄﻳ جﻮﺘﻨﳌا اﺬﻫ
جﻮﺘﻨﳌا نأ ﻰﻟإ ﺮﻴﺸﻳ زﺎﻬﳉا ﻰﻠﻋ مﻮﺷﻮﳌا لﺎﺑزﻷا قوﺪﻨﺻ ﺰﻣر
لﺎﺑزﻷا ﻦﻋ ﻻﻮﺼﻔﻣ ،ﺔﻴﻠﻤﻌﻟا ﻪﺗﺎﻴﺣ ءﺎﻬﺘﻧإ ﺪﻌﺑ ،ﻪﻨﻣ ﺺﻠﺨﺘﻟا ﺐﺠﻳ
ﺔﻴﺋﺎﺑﺮﻬﻜﻟا ةﺰﻬﺟﻷﺎﺑ صﺎﳋا تﺎﻳﺎﻔﻨﻟا ﺰﻛﺮﻣ ﻰﻟإ ﻪﻠﻴﺻﻮﺘﺑ ﺔﻴﻟﺰﻨﳌا
ﻮﻫ ﻞﻤﻌﺘﺴﳌا .ﻞﺛﺎﳑ زﺎﻬﺟ ءاﺮﺷ ﺪﻨﻋ عزﻮﳌا ﻰﻟإ ﻪﺗدﺎﻋﺈﺑ وأ ﺔﻴﻧوﺮﺘﻜﻟﻹا وأ
ﻪﺗﺎﻴﺣ ءﺎﻬﺘﻧإ ﺪﻌﺑ ﺔﺻﺎﳋا تﺎﻳﺎﻔﻨﻟا ﺰﻛﺮﻣ ﻰﻟإ زﺎﻬﳉا ﻞﻴﺻﻮﺗ ﻦﻋ
ﺺﻠﺨﺘﻟا ﲔﻧاﻮﻗ ﻰﻠﻋ اءﺎﻨﺑ ﺔﺑﻮﻘﻌﻟ ضﺮﻌﺘﻳ ﺪﻗ اﺬﻬﺑ مﺎﻴﻘﻟا مﺪﻋ ﺔﻟﺎﺣ ﻲﻓ .ﺔﻴﻠﻤﻌﻟا
ﺔﻘﻳﺮﻄﺑ ﻞﻤﻌﺘﺴﳌا زﺎﻬﳉا ﻦﻣ ﺺﻠﺨﺘﻟا ﰎ اذإ .ﻞﻤﻌﻟا ﺎﻬﺑ يرﺎﳉا تﺎﻳﺎﻔﻨﻟا ﻦﻣ
يدﺎﻔﺗ ﻢﺘﻳ ﺚﻴﺤﺑ ،ﺔﻴﺌﻴﺑ ﺔﻘﻳﺮﻄﺑ ﻪﻟﻼﻐﺘﺳإ دﺎﻌﻳ ﺪﻘﻓ ،ﺔﻟﻮﺼﻔﻣ ﺔﻳﺎﻔﻨﻛ ﺔﻃﻮﺒﻀﻣ
ﻰﻠﻋ لﻮﺼﺤﻠﻟ .زﺎﻬﳉا ءاﺰﺟأ لﻼﻐﺘﺳإ دﺎﻌﻳو ﺔﺤﺼﻟاو ﺔﺌﻴﺒﻟا ﻰﻠﻋ ﻲﺒﻠﺳ ﻊﻗو
ﺰﻛﺮﲟ لﺎﺼﺗﻹﺎﺑ ﻢﻗ
ﲔﻌﻧﺎﺼﻟا .زﺎﻬﳉا ﻪﻨﻣ ﺖﻳﺮﺘﺷإ يﺬﻟا ﻞﶈﺎﺑ وأ ﻲﻠﶈا تﺎﻳﺎﻔﻨﻟا ﻦﻣ ﺺﻠﺨﺘﻟا
زﺎﻬﺠﻠﻟ ﻲﺌﻴﺒﻟا ﺺﻠﺨﺘﻟاو لﻼﻐﺘﺳﻹا ةدﺎﻋإ ﻦﻋ ﺔﻴﻟوﺆﺴﳌا نﻮﻠﻤﺤﺘﻳ ﻦﻳدرﻮﺘﺴﳌاو
.ﺔﻠﻤﻌﺘﺴﳌا ةﺰﻬﺟﻷا ﻦﻣ ﺺﻠﺨﺘﻟاو عاﺪﻳإ تﺎﻴﻧﺎﻜﻣإ ﻦﻋ كﺮﺒﺨﺘﺳ ﻚﺘﻳﺪﻠﺑ
تﺎﻳﺎﻔﻨﻟا ﻦﻣ ﺺﻠﺨﺘﻟا ﺰﻛاﺮﻣ لﻮﺣ ﺔﻴﻓﺎﺿإ تﺎﻣﻮﻠﻌﻣ
.ﻲﻣﻮﻤﻋ ﻖﻓﺮﻣ لﻼﺧ ﻦﻣ وأ ةﺮﺷﺎﺒﻣ ﺔﻘﻳﺮﻄﺑ ءاﻮﺳ
لوﺆﺴﳌا
.ﺪﳊا تﻮﺻ ﻊﻤﺴﺗ ﻰﺘﺣ ﻪﺗﺎﺒﺛإ ﻢﻜﺣأ ﻢﺛ ءﺎﻄﻐﻟا ﻞﻔﻗإ -
ةﺎﻔﺼﳌاو ةﺮﻴﻐﺼﻟا ةﺎﻔﺼﳌا ﻒﻴﻈﻨﺗ ﺐﺠﻳ ,ﺊﻃﺎﺧ لﺎﻤﻌﺘﺳإ ﻞﻛ ﺪﻌﺑ :!ﻪﻴﺒﻨﺗ
.(21 و 20 رﻮﺼﻟا ﺮﻈﻧأ) .ﺔﻤﺋاﺪﻟا
ﺔﻴﻔﺼﳌا ﺲﻴﻜﻟا ﺔﻄﺳاﻮﺑ صﺎﺼﺘﻣﻹا
ﻊﻣﺎﺟ ﻞﺤﻣ ﻲﻓ ﺔﻴﻔﺼﳌا ﺲﻴﻜﻟا لﺎﻤﻌﺘﺳإ ﻚﻟﺬﻛ ﻚﻨﻜﳝ ,ةروﺮﻀﻟا ﺪﻨﻋ
.رﺎﺒﻐﻟا
.FA-0130 :تﺎﻔﺼﳌا رﺎﻴﻏ ﻊﻄﻗ ﺔﺒﻠﻋ ﻒﻴﺻﻮﺗ
23 ةرﻮﺼﻟا
.(16 ةرﻮﺼﻟا ﺮﻈﻧأ) زﺎﻬﳉا ءﺎﻄﻏ ﺢﺘﻓإ -
.ﺔﻴﻔﺼﳌا ﺲﻴﻜﻟا ﺐﻛر ﻢﺛ رﺎﺒﻐﻟا ناﺰﺧ جﺮﺧأ -
.زﺎﻬﳉا ءﺎﻄﻏ ﻞﻔﻗإ -
ﺢﺼﻨﻧ ,اﺬﻬﻟ .اﺪﺟ لﺎﻋ صﺎﺼﺘﻣﻹا ﻲﻓ ءﺎﻄﻌﺑو اﺪﺟ ﺎﻳﻮﻗ ازﺎﻬﺟ ﺖﻳﺮﺘﺷإ ﺪﻘﻟ
ﺔﺨﺳﻮﻟا ﺮﻴﺼﻘﻟا ﺐﻏﺰﻟا ﻂﻴﻛﻮﻣ ﺔﻟﺎﺣ ﻲﻓ ﻂﻘﻓ ىﻮﺼﻘﻟا ةﻮﻘﻟا لﺎﻤﻌﺘﺳﺈﺑ
اﺪﺟ
ةﻮﻗ ﺔﺠﻣﺮﺑ ﻚﻨﻜﳝ (8 ةرﻮﺼﻟا ﺮﻈﻧأ) صﺎﺼﺘﻣﻹا ةﻮﻗ ﻂﺒﺿ دﻮﻘﻣ ﻞﻴﻐﺸﺘﺑ
.ﻼﺜﻣ ﺮﺋﺎﺘﺴﻟﺎﻛ ,ﺔﻔﻴﻫﺮﻟا ﺔﺠﺴﻧﻷا صﺎﺼﺘﻣﻹ
:صﺎﺼﺘﻣﻹا ةﻮﻘﻟ ﻂﺳﻮﺘﻣ ﻊﺿو -
.ﻞﻴﻠﻘﻟا خﺎﺴﺗﻺﻟ ﻲﻣﻮﻴﻟا ﻒﻴﻈﻨﺘﻠﻟ
.ﺪﻳﺪﺷ خﺎﺴﺗإ ﺔﻟﺎﺣ ﻲﻓو ةﺮﻴﺴﻋ تﺎﻃﻼﺑ ,يﻮﻗ ءﺎﺴﻛ ﻒﻴﻈﻨﺘﻟ
.ﺮﺴﻌﺘﳌا طﻼﺒﻟا ﻲﻓ وأ
.جرﺪﺗ نود ﺔﺑﻮﻏﺮﳌا صﺎﺼﺘﻣﻹا
:صﺎﺼﺘﻣﻹا ةﻮﻘﻟ ﻰﻧدأ ﻊﺿو -
:صﺎﺼﺘﻣﻹا ةﻮﻘﻟ ﻲﻟﺎﻋ
ﻊﺿو -
ﺔﻴﻔﺼﳌا ﺲﻴﻜﻟا ﺮﻴﻴﻐﺗ
24 ةرﻮﺼﻟا
ةﻮﻗ ﻰﺼﻗأ ﻰﻠﻋ ﺔﻃﻮﺒﻀﻣ نﻮﻜﺗو ضرﻸﻟ ﺔﻣﺎﻌﻟا ﺔﻫﻮﻔﻟا ﺲﳌ مﺪﻋ ﺔﻟﺎﺣ ﻲﻓ
,ﺮﻔﺻﻷا نﻮﻠﻟﺎﺑ ﺎﻣﺎﲤ ﻞﻌﺘﺸﻳ ءﺎﻄﻐﻟا ﻲﻓ ةﺎﻔﺼﳌا ﺮﻴﻴﻐﺗ ﺪﺷﺮﻣ ,صﺎﺼﺘﻣإ
,ﺔﻟﺎﳊا هﺬﻫ ﻲﻓ .ﺎﻣﺎﲤ ﺔﺌﻠﺘﳑ ﻦﻜﺗ ﻢﻟ ﻮﻟو ﻰﺘﺣ ,ﺔﻴﻔﺼﳌا ﺲﻴﻜﻟا ﺮﻴﻴﻐﺘﺑ ﻚﻴﻠﻋ
.ﺎﻫﺮﻴﻴﻐﺗ يروﺮﻀﻟا ﻦﻣ ﻞﻌﺠﻳ يﺬﻟا ﻮﻫ ﺲﻴﻜﻟا ىﻮﺘﺤﻣ عﻮﻧ
,ﻂﻄﻤﳌا بﻮﺒﻧﻷاو صﺎﺼﺘﻣﻹا بﻮﺒﻧأو ﺔﻫﻮﻔﻟا
ةدﻮﻌﻟا ﻢﺛ ةءﻮﻠﳑ ﺲﻴﻛ ﻎﻳﺮﻔﺘﺑ ﻢﻘﺗ ﻻو ,ﺲﻴﻛ نوﺪﺑ ﺔﺴﻨﻜﳌا ﻞﻴﻐﺸﺗ لوﺎﲢ ﻻ •
ﺔﻛﺮﺸﻟ ﺔﻴﻠﺻأ سﺎﻴﻛأ صﻮﺼﳋﺎﺑ ﻞﻤﻌﺘﺳإ ,زﺎﻬﺠﻠﻟ طﻮﺒﻀﻣ لﺎﻐﺘﺷإ نﺎﻤﻀﻟ •
.ﺔﺼﺧﺮﳌا ﺔﻳرﺎﺠﺘﻟا تﻼﶈا ﻲﻓ ﻚﺗرﺎﺷإ ﻦﻫر ﺖﲢ ﺎﻫﺪﲡ ﻲﺘﻟاو ,ﺎﺴﻴﻓوأ
ﻊﻄﻗ .ﺔﻧﺎﻤﻀﻟا
ﺔﻴﻔﺼﻣ ﺲﻴﻛ دﻮﺟو ﺔﻟﺎﺣ ﻲﻓ ﻂﻘﻓ ﻞﻐﺘﺸﻳ ,ةﺎﻔﺼﳌا ﺮﻴﻴﻐﺗ ﺪﺷﺮﻣ :!ﻪﻴﺒﻨﺗ
.ﺎﻬﺟﺮﺧأ ﻢﺛ لﺎﻔﻗﻹا ﻚﺒﺸﻣ ﺮﺟ لﻼﺧ ﻦﻣ ﺔﻴﻔﺼﳌا ﺲﻴﻜﻟا ﻞﻔﻗإ
.زﺎﻬﳉا ءﺎﻄﻏ ﻖﻠﻏأ ﻢﺛ
ﺲﻴﻜﻟا دﻮﺟو ﺔﻟﺎﺣ ﻲﻓ ﻂﻘﻓ ﻖﻠﻐﻨﻳ رﺎﺒﻐﻟا ﻊﻣﺎﺟ عدﻮﺘﺴﻣ ءﺎﻄﻏ :!ﻪﻴﺒﻨﺗ
.ةﺎﻔﺼﳌا ﺮﻴﻴﻐﺗ ﺪﺷﺮﻣ لﺎﻌﺘﺷإ ﻰﻟإ يدﺆﻳ ﻚﻟذ نﻷ
ﻞﻄﺒﻳو رﺮﻀﻠﻟ زﺎﻬﳉا ضﺮﻌﻳ ﺔﻴﻠﺻأ ﺮﻴﻏ سﺎﻴﻛأ لﺎﻤﻌﺘﺳإ
.ﻢﻬﺴﻟا هﺎﲡإ ﻲﻓ قﻼﻏﻹا ﺔﻌﻓار ﻚﻳﺮﺤﺘﺑ ءﺎﻄﻐﻟا ﺢﺘﻓإ
ﻲﻓ سﺎﺒﺤﻧإ دﻮﺟو مﺪﻋ ﺐﺠﻳ
.ﺎﻬﻟﺎﻤﻌﺘﺳإ ﻰﻟإ
.FA-0130 :رﺎﻴﻐﻟا
.مﺎﻛﺈﺑ ﺔﺒﻛﺮﻣ
25 ةرﻮﺼﻟا
26 ةرﻮﺼﻟا
27 ةرﻮﺼﻟا
ﺔﻣﺎﻋﺪﻟا ﻲﻓ ةﺪﻳﺪﺟ ﺔﻴﻔﺼﻣ ﺎﺴﻴﻛ ﻞﺧدأ
.رﺎﺒﻐﻟا ناﺰﺧ وأ ﺔﺒﻛﺮﻣ ﺔﻴﻔﺼﳌا
Page 38

وأ رﺎﺒﻐﻟا ﻊﻣﺎﺟ دﻮﺟو مﺪﻋ ﺔﻟﺎﺣ ﻲﻓ زﺎﻬﳉا ءﺎﻄﻏ قﻼﻏإ ﻦﻜﳝ ﻻ :!ﻪﻴﺒﻨﺗ
مﺎﻈﻧ ﺐﻴﻛﺮﺗ ﻦﻣ ﺪﻛﺄﺗو ﻪﻗﻼﻏإ ﻲﻓ ةﻮﻘﻟا ﻞﻤﻌﺘﺴﺗ ﻻ .
ﺪﻌﺑ رﺎﺒﻐﻟا ﻊﻣﺎﺟ ﻎﻳﺮﻔﺘﺑ ﺢﺼﻨﻧ ,صﺎﺼﺘﻣﻺﻟ ىﻮﺼﻗ ﺔﻴﻟﺎﻌﻓ ﻰﻠﻋ لﻮﺼﺤﻠﻟ
.ﻢﻬﺴﻟا هﺎﲡإ ﻲﻓ قﻼﻏﻹا حﺎﺘﻔﻣ ﻚﻳﺮﺤﺘﺑ مﺎﻌﻟا عدﻮﺘﺴﳌا ﺢﺘﻓإ
ﻰﺘﺣ ءﺎﻄﻐﻟا ﺢﺘﻓإ ,ﻢﻬﺴﻟا هﺎﲡإ ﻲﻓ ءﺎﻄﻐﻟا ﺾﺑﺎﻧ قﻼﻏإ ﻲﻜﺒﺸﻣ ﻚﻜﻓ -
ﻼﺜﻣ ,ﻪﻗﻼﻏإ ﻞﺒﻗ ﻪﻔﻈﻧ ,(ﻆﻴﻠﻏ خﺎﺴﺗإ) ءﺎﻄﻐﻠﻟ ﺪﻳﺪﺸﻟا خﺎﺴﺗﻹا ﺔﻟﺎﺣ ﻲﻓ يروﺮﻀﻟا ﻦﻣ اﺬﻬﻟ) .ﻞﺻﺎﻔﳌﺎﺑ ﺔﺻﺎﺧ ﺔﻫﻮﻓ ﺔﻄﺳاﻮﺑ صﺎﺼﺘﻣإ ﺔﻟﺎﺣ ﻲﻓ
مﺎﻌﻟا عدﻮﺘﺴﳌا ءﺎﻄﻏ ﻞﻔﻗأ ﻢﺛ زﺎﻬﳉا ﻲﻓ رﺎﺒﻐﻟا ﻊﻣﺎﺟ ﺐﻴﻛﺮﺗ ﻰﻟإ ﺪﻋ
.
رﺎﺒﻐﻟا ﻊﻣﺎﺟ ضﺮﻌﺘﻳ ﺪﻗ ,ﺔﺴﻨﻜﻤﻠﻟ ﺮﻤﺘﺴﳌا لﺎﻤﻌﺘﺳﻹا ﺐﺒﺴﺑ :!ﻪﻴﺒﻨﺗ
,زﺎﻬﳉ لﺎﻐﺘﺷإ ﻰﻠﻋ ﺎﻗﻼﻃإ ﺮﺛﺆﻳ ﻻ اﺬﻫ .ﻪﻧﻮﻟ ﺮﻴﻐﺘﻳو ﻪﻠﺧاﺪﺑ تﺎﺷﺪﺨﺘﻟ
.ﻞﻔﺳﻷا ﻰﺘﺣ ناﺰﳋا خﺎﺳوأ غﺮﻓأ ﻢﺛ هﺪﺣ ﻲﻓ ﺖﺒﺜﻳ
(23 ةرﻮﺼﻟا ﺮﻈﻧأ ,زﺎﻬﳉا ﻲﻓ ﺔﻴﻔﺼﳌا ﺲﻴﻜﻟا ﻊﺿو
.ﺪﳊا تﻮﺻ ﻊﻤﺴﺗ ﻰﺘﺣ ﻪﺘﻴﺒﺜﺗ ﻢﻜﺣأ ﻢﺛ ءﺎﻄﻐﻟا ﻖﻠﻏأ -
.ﺔﻃﻮﺒﻀﻣ ةرﻮﺼﺑ ﺎﻬﻟﺎﻐﺘﺷإ ﻲﻓ ﺮﻤﺘﺴﺗ ﺔﺴﻨﻜﳌا نأ يأ
ﻪﻠﺧاﺪﺑ ﺔﻴﻔﺼﳌا ﺲﻴﻜﻟا
.بﻮﻏﺮﳌا خﺎﺳوﻷا ﻊﻤﺟ
رﺎﺒﻐﻟا ﻊﻣﺎﺟ ﻎﻳﺮﻔﺗ
.لﺎﻤﻌﺘﺳإ ﻞﻛ
16 ةرﻮﺼﻟا
17 ةرﻮﺼﻟا
.زﺎﻬﳉا ﻦﻣ رﺎﺒﻐﻟا ﻊﻣﺎﺟ جﺮﺧأ
18 ةرﻮﺼﻟا
19 ةرﻮﺼﻟا
ﻊﻣﺎﳉ ةﺮﻴﻐﺼﻟا ةﺎﻔﺼﳌاو ﺔﻤﺋاﺪﻟا ةﺎﻔﺼﳌا ﻒﻴﻈﻨﺗ
رﺎﺒﻐﻟا
:ﺎﻬﻔﻴﻈﻨﺗ ﺐﺠﻳ ﺖﻗو يأ ﻲﻓ
ﻢﺘﻳ ةﺮﻣ ﻞﻛ ﻲﻓ يأ ,لﺎﻐﺘﺷﻹا ﻲﻓ ﺐﻄﻋ ثوﺪﺤﺑ ﺮﻣﻷا ﻖﻠﻌﺗ اذإ ﺎﻤﺋاد -
.سﺎﺒﺤﻧإ ﻦﻣ ﺺﻠﺨﺘﻟا ﺎﻬﻴﻓ
.ﻰﻧدأ ﺪﺤﻛ ,ﺮﻬﺷأ 6 ﻞﻛ -
20 ةرﻮﺼﻟا
ةﺎﻔﺼﳌا لزأ ﻢﺛ ﻞﺧاﺪﻟا ﻰﺘﺣ ناﺰﺨﻠﻟ ﻲﻔﻠﳋا ءﺰﳉا ﻚﺒﺸﻣ ﻰﻠﻋ ﻂﻐﺿإ -
.ناﺰﳋا ﻦﻣ ةﺮﻴﻐﺼﻟا
.ءﺎﻋﻮﻟا ةﺪﻋﺎﻗ ﻦﻣ ﺔﻤﺋاﺪﻟا ةﺎﻔﺼﳌا لزأ -
21 ةرﻮﺼﻟا
ﻒﺸﻨﺗ ﺎﻬﻛﺮﺗ ﺐﺠﻳ ,ﻚﻟذ ﺪﻌﺑ .ﺔﻤﺋاﺪﻟا ةﺎﻔﺼﳌاو ةﺮﻴﻐﺼﻟا ةﺎﻔﺼﳌا ﻞﺴﻏإ -
.ﻞﻗﻷا ﻰﻠﻋ ﺔﻋﺎﺳ 24 ةﺪﳌ
.ةﺪﻋﺎﻘﻟا ﻲﻓ ﺔﻤﺋاﺪﻟا ةﺎﻔﺼﳌا ﻊﺿو ﻰﻟإ ﺪﻋ ,ﻒﻴﻈﻨﺘﻟا ﺪﻌﺑ -
تﺎﺒﺛإ ﻢﻜﺣأ .ﻢﻬﺴﻟا هﺎﲡإ ﻲﻓ ﻪﻘﻠﻏأ ﻢﺛ ناﺰﳋا ﻲﻓ ةﺮﻴﻐﺼﻟا ةﺎﻔﺼﳌا ﻊﺿ
.ﺪﳊا تﻮﺻ ﻊﻤﺴﺗ ﻰﺘﺣ قﻼﻏﻹا ﻚﺒﺸﻣ
لﺎﻐﺘﺷﻹا ﻲﻓ ﺐﻄﻋ
.رﺎﺒﻐﻟا ﻊﻣﺎﺟ ﻲﻓ سﺎﺒﺤﻧإ ﺔﻟازإ
22 ةرﻮﺼﻟا
(18 ةرﻮﺼﻟا ﺮﻈﻧأ) ناﺰﳋا ﻎﻳﺮﻔﺘﺑ ﻢﻗ -
ﻊﻣﺎﺟ صﺎﺼﺘﻣإو ﻚﻳﺮﺤﺘﺑ وأ ﺐﻟاﻮﻠﻟا ﻚﻔﻣ ﺔﻄﺳاﻮﺑ ﻼﺜﻣ ,سﺎﺒﺤﻧﻹا لزأ -
.رﺎﺒﻐﻟا
ﺮﻈﻧأ ,زﺎﻬﳉا ﻲﻓ ﺔﻴﻔﺼﳌا ﺲﻴﻜﻟا ﻊﺿو يروﺮﻀﻟا ﻦﻣ ,صﺎﺼﺘﻣﻺﻟ)
(23 ةرﻮﺼﻟا
6 ةرﻮﺼﻟا
ﻰﺘﺣ ﻲﺋﺎﺑﺮﻬﻜﻟا ﻂﺑﺮﻟا ﻂﻴﺧ جاﺮﺧﻹ ﻲﺋﺎﺑﺮﻬﻜﻟا ﻂﺑﺮﻟا ﺔﻠﻴﺻو لﻼﺧ ﻦﻣ ﺪﺒﺟإ
.ﻲﺋﺎﺑﺮﻬﻜﻟا رﺎﻴﺘﻟﺎﺑ ﺎﻬﻄﺑرإ ﻢﺛ بﻮﻏﺮﳌا لﻮﻄﻟا ﻰﻟإ ﻞﺼﺗ
7 ةرﻮﺼﻟا
هﺎﲡإ ﻲﻓ ﻲﺋﺎﺑﺮﻬﻜﻟا ﻞﺼﻔﻟاو ﻂﺑﺮﻟا حﺎﺘﻔﻣ ﺔﻄﺳاﻮﺑ ﺔﺴﻨﻜﳌا ﺊﻔﻃأ / ﻞﻌﺷإ
.ﺔﻣﻼﻌﻟا ﻢﻬﺴﻟا
صﺎﺼﺘﻣﻹا
9 ةرﻮﺼﻟا
:ﺔﻣﺎﻌﻟا ةﺎﺷﺮﻔﻟا ﻂﺒﺿ
ﻂﻴﻛﻮﻣو ﻲﺑارز (أ
ءﺎﺴﻠﻣ ﺔﻴﺿرأ (ب
10 ةرﻮﺼﻟا
:ﺔﺟﺎﳊا ﺐﺴﺣ ﺾﺒﻘﳌا ﻲﻓ وأ صﺎﺼﺘﻣﻹا بﻮﺒﻧأ ﻲﻓ تﺎﻫﻮﻔﻟا ﺐﻛر
.ﺦﻟإ ,ﺎﻳاوﺰﻟاو ﺪﻳدﺎﺧﻷا صﺎﺼﺘﻣﻹ ﺔﻀﻳﺮﻌﻟا ﺔﻫﻮﻔﻟا (أ
.ﺦﻟإ ,ﺮﺋﺎﺘﺳ ,ﻮﺴﻜﳌا ثﺎﺛﻷا صﺎﺼﺘﻣﻹ ﺔﻫﻮﻓ (ب
11 ةرﻮﺼﻟا
ﻲﻓ بﻮﺒﻧﻷا ﺔﻣﺎﻋد لﺎﻤﻌﺘﺳإ ﻦﻜﳝ ﻞﻤﻌﻟا ﻦﻋ ﺮﻴﺼﻘﻟا ﻒﻗﻮﺘﻟا ﺔﻟﺎﺣ ﻲﻓ
.زﺎﻬﺠﻠﻟ ﻲﻔﻠﳋا ءﺰﳉا
ﻲﻔﻠﳋا ءﺰﳉا ﻲﻓ دﻮﺟﻮﳌا دوﺪﺧﻷا ﻲﻓ ﺔﻣﺎﻌﻟا ةﺎﺷﺮﻔﻟا ﺖﻴﺒﺜﺗ ﻚﺒﺸﻣ ﻞﺧدأ
.زﺎﻬﺠﻠﻟ
12 ةرﻮﺼﻟا
ﻢﻠﺴﻟا وأ جرﺪﻟا لﺎﻤﻌﺘﺳإ ﺪﻨﻋ زﺎﻬﳉا ﻞﻴﻘﻨﺘﻟ ﲔﻀﺒﻘﳌا لﺎﻤﻌﺘﺳإ ﻦﻜﳝ
.ﻼﺜﻣ
لﺎﻤﻌﺘﺳﻹا ﺪﻌﺑ
13 ةرﻮﺼﻟا
.ﺔﻴﺋﺎﺑﺮﻬﻜﻟا ﺔﻠﻴﺻﻮﻟا ﺔﻟازﺈﺑ ﻢﻗ
.(ﺎﻴﻜﻴﺗﺎﻣﻮﺗأ ﻒﺘﻠﻳ ﻂﻴﳋا) ﻪﻛﺮﺗأ ﻢﺛ ﻲﺋﺎﺑﺮﻬﻜﻟا ﻂﺑﺮﻟا ﻂﻴﺧ ﻼﻴﻠﻗ ﺪﺒﺟإ
14 ةرﻮﺼﻟا
يدﻮﻤﻋ ﻊﺿﻮﻣ ﻲﻓ بﻮﺒﻧﻷا ﺔﻣﺎﻋد لﺎﻤﻌﺘﺳإ ﻚﻨﻜﳝ ,زﺎﻬﳉا ﻞﻴﻘﻨﺗ وأ ﻦﻳﺰﺨﺘﻟ
.زﺎﻬﺠﻠﻟ ﻞﻔﺳﻷا ﺐﻧﺎﳉا ﻲﻓ ةدﻮﺟﻮﳌا
ﻲﻓ ﺔﻣﺎﻌﻟا ةﺎﺷﺮﻔﻟا ﺖﻴﺒﺜﺗ ﻚﺒﺸﻣ ﻞﺧدأ .يدﻮﻤﻋ ﻊﺿو ﻲﻓ زﺎﻬﳉا ﻊﺿ
.زﺎﻬﺠﻠﻟ ﻞﻔﺳﻷا ءﺰﳉا ﻲﻓ دﻮﺟﻮﳌا دوﺪﺧﻷا
خﺎﺳوﻷا عاﻮﻧأ ﻊﻴﻤﺟ صﺎﺼﺘﻣإ ﻦﻣ ﻚﻨﻜﲤ ةروﺮﺠﻣ ﺔﺴﻨﻜﻣ ﺖﻳﺮﺘﺷإ ﺪﻘﻟ
.ﺔﻴﻣﻮﻴﻟا ﺔﻴﻟﺰﻨﳌا لﺎﻤﻋﻷا ﻲﻓ ,صﻮﺼﳋﺎﺑ ﻞﻤﻌﺘﺴﺗ ﺔﻴﻔﺼﳌا ﺲﻴﻜﻟا -
ﻲﻓ ةﻮﻘﻟا ﻂﺒﺿ دﻮﻘﻣ ﻂﺒﻀﺑ ﻢﻗ ,ةﺪﻴﺟ صﺎﺼﺘﻣإ ﺞﺋﺎﺘﻧ ﻰﻠﻋ
ﺔﺒﻛﺮﻣ ﺔﻴﻔﺼﳌا ﺲﻴﻜﻟا نﻮﻜﺗ ﺎﻣﺪﻨﻋ ﻂﻘﻓ ﻖﻠﻐﻨﻳ رﺎﺒﻐﻟا ﻊﻣﺎﺟ ءﺎﻄﻏ :!ﻪﻴﺒﻨﺗ
.ﺔﻴﻔﺼﳌا ﺲﻴﻜﻟا مأ رﺎﺒﻐﻟا ﻊﻣﺎﺟ ءاﻮﺳ ﻼﻤﻌﺘﺴﻣ ,ﺔﻓﺎﳉا
:لﺎﻤﻌﺘﺳﺈﺑ ﺢﺼﻨﻧ
.ﺦﻟإ ,ةرﺎﺠﻨﻟا رﺎﺒﻏ صﺎﺼﺘﻣﻹ ,صﻮﺼﳋﺎﺑ رﺎﺒﻐﻟا ﻊﻣﺎﺟ -
رﺎﺒﻐﻟا ﻊﻣﺎﺟ لﺎﻤﻌﺘﺳﺈﺑ لﺎﻐﺘﺷﻹا
15 ةرﻮﺼﻟا
صﻮﺼﺤﻠﻟ
.ﻰﺼﻗﻷا ﺪﳊا ﻊﺿﻮﻣ
.اﺪﺟ ﺔﻔﻴﻫﺮﻟا داﻮﳌا ﺔﻟﺎﺣ ﻲﻓ ﻂﻘﻓ صﺎﺼﺘﻣﻹا ةﻮﻗ ﺾﻴﻔﺨﺘﺑ ﺢﺼﻨﻧ
.رﺎﺒﻐﻟا ناﺰﺧ وأ
Page 39

(ﺦﻟإ ,ﻞﳕ ,بﺎﺑذ) تاﺮﺸﺣ -
.ةدﺎﺣ داﻮﻣ ﻻو ﺔﺠﻫﻮﺘﻣ وأ ﺔﻨﺧﺎﺳ ,ﺔﺤﺼﻟﺎﺑ ةرﺎﺿ داﻮﻣ -
.ﻞﺋاﻮﺳ وأ ﺔﺒﻃر داﻮﻣ -
.تاﺮﺠﻔﺘﻣ وأ قاﺮﺘﺣﻺﻟ ﺔﻠﺑﺎﻗ تازﺎﻏ وأ داﻮﻣ -
.ﺔﻳﺰﻛﺮﳌا ﺔﺌﻓﺪﺘﻟا تاﺰﻴﻬﲡ ,دﺎﻣر -
ردﺎﺼﻣو ﺔﺑﻮﻃﺮﻟاو ﺔﻴﺟرﺎﳋا ﺔﻴﻌﻴﺒﻄﻟا ﺮﺻﺎﻨﻌﻟا ﻦﻣ زﺎﻬﳉا ﺔﻳﺎﻗﻮﺑ ﻢﻗ •
.ةراﺮﳊا
ﻦﻣ ﻞﻠﻘﻳ ﺪﻗ ﻚﻟذ نﻷ ,تﺎﺤﺘﻔﻟا ىﺪﺣإ سﺎﺒﺤﻧإ ﺔﻟﺎﺣ
.رﺮﻀﻠﻟ زﺎﻬﳉا ضﺮﻌﻳ ﺪﳊا ﻦﻋ ﺪﺋاز ﲔﺨﺴﺗ ثﺪﺤﻳو ,ءاﻮﻬﻟا روﺮﻣ
ﻞﺧﺪﺗ ﻻ .ﺔﻠﻠﺒﻣ يﺪﻳﻷﺎﺑ ﻲﺋﺎﺑﺮﻬﻜﻟا ﻂﺑﺮﻟا ﺔﻠﻴﺻو ﻻو ﺔﺴﻨﻜﳌا ﻚﺴﲤ ﻻ •
بﻮﺒﻧأ ﻦﻣ وأ ﻲﺋﺎﺑﺮﻬﻜﻟا ﻂﺑﺮﻟا ﻂﻴﺧ ﻦﻣ هﺮﺠﺑ زﺎﻬﳉا ﻞﻴﻘﻨﺘﺑ ﻢﻘﺗ ﻻ •
.ﻞﻴﻘﻨﺘﻟا ﺾﺒﻘﻣ ﻞﻤﻌﺘﺳإ .صﺎﺼﺘﻣﻹا
.زﺎﻬﳉا ماﺪﺨﺘﺳﺈﺑ لﺎﻔﻃﻸﻟ ﺢﻤﺴﺗ ﻻ •
ﻢﻬﺗارﺪﻗ (لﺎﻔﻃﻸﻟ ﺔﻓﺎﺿإ) صﺎﺨﺷأ فﺮﻃ ﻦﻣ زﺎﻬﳉا ماﺪﺨﺘﺳإ ﺐﺠﻳ ﻻ •
,ﲔﺘﻣزﻼﻟا ﺔﻓﺮﻌﳌاو ةﺮﺒﳋا ﻰﻠﻋ نوﺮﻓﻮﺘﻳﻻ وأ ,ﺔﺼﻗﺎﻧ ﺔﻴﻠﻘﻌﻟاو ﺔﻴﺴﳊاو ﺔﻴﻧﺪﺒﻟا
.لوﺆﺴﻣ ﺺﺨﺷ فﺮﻃ ﻦﻣ ﻢﻬﻨﻳﻮﻜﺗ ﰎ اذإ ﻻإ
.زﺎﻬﳉﺎﺑ ﻢﻬﺒﻌﻟ مﺪﻋ ﻦﻣ ﺪﻛﺄﺘﻠﻟ لﺎﻔﻃﻷا ﺔﺒﻗاﺮﻣ ﺐﺠﻳ •
.سأﺮﻟا ىﻮﺘﺴﻣ ﻰﻠﻋ بﻮﺒﻧﻷا وأ تﺎﻫﻮﻔﻟاو ﺾﺒﻘﳌﺎﺑ صﺎﺼﺘﻣﻹا ﺐﻨﲡ •
.ﻦﻳروﺮﻀﻣ
.ﻲﺋﺎﺑﺮﻬﻜﻟا ﻂﺑﺮﻟا ﻂﻴﺧ ﻰﻠﻋ ﺎﻬﻄﻐﺿ مﺪﻋ ﻦﻣ ﺪﻛﺄﺗ ,باﻮﺑﻷا قﻼﻏإ ﺪﻨﻋ •
,ﻲﺋﺎﺑﺮﻬﻜﻟا ﻂﺑﺮﻟا ﺔﻠﻴﺻﻮﺑ وأ ﻂﻴﺨﺑ راﺮﺿأ دﻮﺟو ﺔﻟﺎﺣ ﻲﻓ زﺎﻬﳉا ﻞﻐﺸﺗ ﻻ •
.عﻮﻧ يأ ﻦﻣ رﺮﻀﻟ ضﺮﻌﺗ وأ ﺔﻗﺪﺑ ﻞﻐﺘﺸﻳ ﻻ زﺎﻬﳉا نﺄﺑ ﺖﻈﺣﻻ اذإ وأ
ﺎﻬﻨﻣ ﺺﻠﺨﺘﻟا ﻦﻣ ﻦﻜﻤﺘﻠﻟ ﺔﻠﻤﻌﺘﺴﳌا ةﺰﻬﺟﻷا لﺎﻤﻌﺘﺳإ لﺎﻄﺑﺈﺑ ةﺮﺷﺎﺒﻣ ﻢﻗ •
نﻮﻌﺑﺎﺗ نﻮﻴﻨﻬﻣ ﺎﻬﺑ مﻮﻘﻳ نأ ﺐﺠﻳ ,ﻲﺋﺎﺑﺮﻬﻜﻟا ﻂﺑﺮﻟا ﻂﻴﺧ ﺮﻴﻴﻐﺗ و تﺎﺣﻼﺻﻹا •
ﺔﻠﻴﺻﻮﻟاو ﻲﺋﺎﺑﺮﻬﻜﻟا ﻂﺑﺮﻟا ﻂﻴﺨﺑ زﺎﻬﳉا ﻞﻤﻌﺘﺴﺗ ﻻ •
.ﻪﻟﺎﻤﻌﺘﺳإ مﺪﻋ ﺪﻨﻋ ﻲﺋﺎﺑﺮﻬﻜﻟا رﺎﻴﺘﻟا
ﻲﻓ ﺔﺴﻨﻜﳌا ﻞﻤﻌﺘﺴﺗ ﻻ •
.ءﺎﳌا ﻲﻓ زﺎﻬﳉا
.راﺮﺿﻷا ﺮﻄﺧ -
ﻦﻋ زﺎﻬﳉا ﻞﺼﻓإ •
.ﲔﻧاﻮﻘﻟا ﺐﺴﺣ
.ﺔﺼﺧﺮﳌا ﺔﻴﻨﻘﺘﻟا ﺔﻧﺎﻴﺼﻟا ﺔﺤﻠﺼﳌ
زﺎﻬﺠﻠﻟ ﻲﻟوﻷا لﺎﻤﻌﺘﺳﻹا
1 ةرﻮﺼﻟا
.مﺎﻜﺣﺈﺑ ﺐﻛﺮﺘﻳ ﻰﺘﺣ صﺎﺼﺘﻣﻹا مﻮﻃﺮﺧ ﻲﻓ ﺾﺒﻘﳌا ﻞﺧدأ
زﺎﻬﳉا ﻞﻴﻐﺸﺗ
2 ةرﻮﺼﻟا
.صﺎﺼﺘﻣﻹا ﺔﺤﺘﻓ ﻲﻓ صﺎﺼﺘﻣﻹا مﻮﻃﺮﺧ ﻞﺻاو ﺐﻛر (أ
لزأ ﻢﺛ ﺮﺼﳊا ﻲﻜﺒﺸﻣ ﻰﻠﻋ ﻂﻐﺿإ ,صﺎﺼﺘﻣﻹا مﻮﻃﺮﺧ ﺔــﻟازﻹ (ب
.بﻮﺒﻧﻷا
3 ةرﻮﺼﻟا
.صﺎﺼﺘﻣﻹا بﻮﺒﻧأ ﻰﻟإ ﺾﺒﻘﳌا ﻢﻀﺑ ﻢﻗ
4 ةرﻮﺼﻟا
ﺐﻛاﺮﺘﳌا بﻮﺒﻧﻷﺎﺑ ﺔﻣﺎﻌﻟا ﺔﻫﻮﻔﻟا ﻊﻤﺟإ
5 ةرﻮﺼﻟا
ﻂﺒﺿإ ﻢﺛ ﻢﻬﺴﻟا هﺎﲡإ ﻲﻓ ﻂﺒﻀﻟا رز ﻚﻳﺮﺤﺘﺑ ﺐﻛاﺮﺘﳌا بﻮﺒﻧﻷا ﻚﻜﻓ
.بﻮﻏﺮﳌا لﻮﻄﻟا
ﺔﻴﺑﺮﻌﻟا
زﺎﻬﳉا تﺎﻔﺻاﻮﻣ
ﲔﻌﺿﻮﲟ ﺔﻣﺎﻋ ﺔﻫﻮﻓ .1
ﺔﻴﺿرﻷا ﺔﻔﻴﻠﻐﺗ قﻮﻓ ﻦﻣ صﺎﺼﺘﻣﻺﻟ .ﺔﺒﻠﺼﻟا ﺔﻴﺿرﻸﻟ ةﺎﺷﺮﻓ .2
(.ﺦﻟإ ,ﺐﺸﺧ ,طﻼﺑ) ﺔﺒﻠﺼﻟا
ﺐﻛاﺮﺘﻣ بﻮﺒﻧأ .3
ﺖﻴﺒﺜﺘﻟا رز .4
بﻮﺒﻧﻷا ﺾﺒﻘﻣ .5
صﺎﺼﺘﻣﻺﻟ ﻂﻄﳑ بﻮﺒﻧأ .6
دﺎﺠﺴﻟﺎﺑ ﺔﺻﺎﺧ ﺔﻫﻮﻓ .7
ﺔﻀﻳﺮﻋ ﺔﻫﻮﻓ .8
ﻲﺋﺎﺑﺮﻬﻜﻟا ﻂﺑﺮﻟا ﻂﻴﺧ .9
صﺎﺼﺘﻣﻹا ةﻮﻗ ﻂﺒﻀﻟ ﻲﻧوﺮﺘﻜﻟإ دﻮﻘﲟ ءﺎﻔﻃﻹا / لﺎﻌﺘﺷﻹا حﺎﺘﻔﻣ
ﻲﻘﻓأ ﻊﺿو ﻲﻓ بﻮﺒﻧﻷا ةﺰﻴﻛر .11
ءاﻮﻬﻟا لﻮﺧد ةﺎﻔﺼﻣ .12
(زﺎﻬﺠﻠﻟ ﻞﻔﺳﻷا ءﺰﳉا ﻲﻓ) يدﻮﻤﻋ ﻊﺿو ﻲﻓ بﻮﺒﻧﻷا ةﺰﻴﻛر .13
رﺎﺒﻐﻟا ﻊﻣﺎﺟ .14
زﺎﻬﳉا ءﺎﻄﻏ .15
ﻞﻴﻘﻨﺘﻟا ﺾﺒﻘﻣ .16
جوﺮﳋا ﺔﻜﺒﺷ .17
ةﺎﻔﺼﳌا ﺮﻴﻴﻐﺗ ﺪﺷﺮﻣ .18
ﺔﻣﺎﻫ تﺎﻈﺣﻼﻣ
ﻲﻓ ﺔﺟﺎﳊا ﺖﻋد اذإ ﺎﻬﺘﻨﻳﺎﻌﳌ ﺎﻬﻴﻠﻋ ﻆﻓﺎﺣ .تﺎﻤﻴﻠﻌﺘﻟا هﺬﻫ ﻦﻌﻤﺘﺑ أﺮﻗإ •
تﺎﻤﻴﻠﻌﺗ ﺎﻬﻴﻟإ ﻒــﺿأ ,ﺮـــﺧآ ﺺﺨﺸﻟ ﺔﺴﻨﻜﳌا ﻢﻴﻠﺴﺗ ﺔــﻟﺎــﺣ ﻲــﻓ •
.تﺎﻤﻴﻠﻌﺘﻟا هﺬﻬﻟ ﺎﻌﺒﺗ ﻂﻘﻓ زﺎﻬﳉا ماﺪﺨﺘﺳإ ﺐﺠﻳ •
طﻮﺒﻀﻣ ﺮﻴﻏ لﺎﻤﻌﺘﺳإ ﻦﻋ ﺔﻤﺟﺎﻨﻟا راﺮﺿﻷا ﺔﻴﻟوﺆﺴﻣ ﻞﻤﺤﺘﻳ ﻻ ﻊﻧﺎﺼﻟا •
.ماﺪﺨﺘﺳﻹا تﺎﻤﻴﻠﻌﺘﻟ ﻒﻟﺎﺨﻣ وأ زﺎﻬﳉا اﺬﻬﻟ
ﻖﺑﺎﻄﻣ ﻲﺋﺎﺑﺮﻬﻜﻟا ﻂﻐﻀﻟا
نﻮﻜﻳ ﻻ نأ ﺐﺠﻳ ،ﻲﺋﺎﺑﺮﻬﻜﻟا ﻂﺑﺮﻟا ﺔﻠﻴﺻو جاﺮﺧإ وأ لﺎﺧدإ ﺪﻨﻋ ءاﻮﺳ •
ةﺪﻌﻟ زﺎﻬﳉا لﺎﻐﺘﺷإ ﺔﻟﺎﺣ ﻲﻓ ﺎﻣﺎﲤ ﻲﺋﺎﺑﺮﻬﻜﻟا ﻂﺑﺮﻟا ﻂﻴﺧ لزأ •
.ﻲﺋﺎﺑﺮﻬﻜﻟا ﻂﺑﺮﻟا ﻂﻴﺧ ﺮﺟ لﻼﺧ
ﻲﻓ عوﺮﺸﻟا ﻞﺒﻗو ﻪﻟﺎﻤﻌﺘﺳإ مﺪﻋ ﺪﻨﻋ ﻲﺋﺎﺑﺮﻬﻜﻟا رﺎﻴﺘﻟا ﻦﻋ زﺎﻬﳉا ﻞﺼﻓإ •
وأ ةﺎﻔﺼﳌا ﺲﻴﻜﻟا وأ رﺎﺒﻐﻟا ﻊﻣﺎﺟ نوﺪﺑ زﺎﻬﳉا اﺬﻫ لﺎﻤﻌﺘﺳإ ﺐﺠﻳ ﻻ •
صﺎﺼﺘﻣﺈﺑ ﻢﻘﺗ ﻻ .صﻮﺼﳋﺎﺑ ﻲﻟﺰﻨﳌا لﺎﻤﻌﺘﺳﻺﻟ زﺎﻬﳉا اﺬﻫ ﻢﻴﻤﺼﺗ ﰎ
ﻰﻟإ يدﺆﻳ داﻮﳌا هﺬﻫ صﺎﺼﺘﻣإ .ﺎﻬﻬﺑﺎﺷﺎﻣ وأ ةرﺎﺠﻨﻟا رﺎﺒﻏو ,ءﺎﻨﺒﻟا رﺎﺒﻏ
.ﺎﻬﻴﻟإ ءاﻮﻬﻟا لﻮﺧد ﺲﺒﺤﻨﻳ ﺔﻤﺛ ﻦﻣو ,صﺎﺼﺘﻣﻹا ﺲﻴﻛ بﻮﻘﺛ سﺎﺒﺤﻧإ
نأ ﻦﻣ ﺪﻛﺄﺗ ,ﻲﺋﺎﺑﺮﻬﻜﻟا رﺎﻴﺘﻟﺎﺑ زﺎﻬﳉا ﻂﺑر ﻞﺒﻗ •
.تﺎﻧﺎﻴﺒﻟا ﺔﺤﻴﻔﺻ ﻲﻓ ﲔﺒﻤﻠﻟ
.ﻼﻐﺘﺸﻣ زﺎﻬﳉا
.ﺎﻓﻮﻔﻠﻣ ﻲﺋﺎﺑﺮﻬﻜﻟا ﻂﺑﺮﻟا ﻂﻴﺨﺑ زﺎﻬﳉا ﻞﻐﺸﺗ ﻻ •
ﻦﻣ ﺔﻴﺋﺎﺑﺮﻬﻜﻟا ﺔﻠﻴﺻﻮﻟا ﻞﺼﻔﺗ ﻻ •
.ةﺎﻔﺼﳌاو ﺲﻴﻜﻟا ﺮﻴﻴﻐﺗ ﺔﻟﺎﺣ ﻲﻓ وأ ﻪﻔﻴﻈﻨﺗ
.مﺎﻜﺣﺈﺑ ﺔﺒﻛﺮﻣ تﺎﻔﺼﳌا نوﺪﺑ
.ﻂﻘﻓ ﺔﻴﻠﺻﻷا ﺔﻴﻔﺼﳌا سﺎﻴﻛﻷﺎﺑ زﺎﻬﳉا لﺎﻤﻌﺘﺳإ ﺐﺠﻳ •
:ﻢﺋﻼﻣ ﺮﻴﻏ زﺎﻬﳉا •
.تﺎﻧاﻮﻴﺣ وأ صﺎﺨﺷأ ﻰﻠﻋ ﻪﻟﺎﻤﻌﺘﺳﻹ -
:صﺎﺼﺘﻣﻹ -
.10
.ﻞﺒﻘﺘﺴﳌا
.لﺎﻤﻌﺘﺳﻹا
.تﺎﻋﺎﺳ
ﺪﻘﻟ •
Page 40

BSH PAE, S.L.
NIF B-01272368
Parque Tecnologico de Alava
C/ Albert Einstein, 44
Edifício E-6, Oficina 312
01510 Miñano Mayor (ALAVA)
Spain
100% recycled paper
25-07
 Loading...