

Page 1
DMG150
Digital Micron Gauge
INSTRUCTION MANUAL
ENGLISH
DMG150
Set Leak Rate Temp Run
mbar Pa mm-Hg Microns mTorr /sec
MENU
MODE
IMPORTANT SAFETY WARNINGS
WARNING
Read entire Safety Notes section regarding potential
hazard and proper instructions before using this meter.
In this manual the word “WARNING” is used to indicate
conditions or actions that may pose physical hazards
to the user. The word “CAUTION” is used to indicate
conditions or actions that may damage this instrument.
WARNING
To ensure safe operation and service of the tester, follow
these instructions. Failure to observe these warnings can
result in severe injury or death.
WARNING
This gauge is designed for trade professionals who
are familiar with the hazards of their trade. Observe all
recommended safety procedures that include proper use
of personal protective equipment that includes safety
glasses and gloves.
Find Quality Products Online at: sales@GlobalTestSupply.com
FEATURES
• Measures in microns, pascals, Millibar, mmHg, mTorr
• Range 0 to 15,000 microns
• Maximum over pressure 700 psi
• Instant warm-up time
• Instant response time
• Backlit display
• Compact and light weight
• Oil contamination detection
• Sleep mode
• Ambient temperature measurement
• 5 units of measurement
• Real time leak measurement
• Time period leak measurement
• Sensor fail detection
GENERAL SPECIFICATIONS
• Operating Temperature: 10˚ to 122˚F (-12˚ to 50˚C)
• Backlight: Yes
• Over-range: “OL” is displayed
• Dimensions: 4.3’ X 1.3’ X 1’
• Item Weight: 2.7 oz
• Calibration: Recommended annually
• Accuracy: 0 to 9,999 ±5%rdg ±5 microns
10,000 to 15,000 ±10% rdg
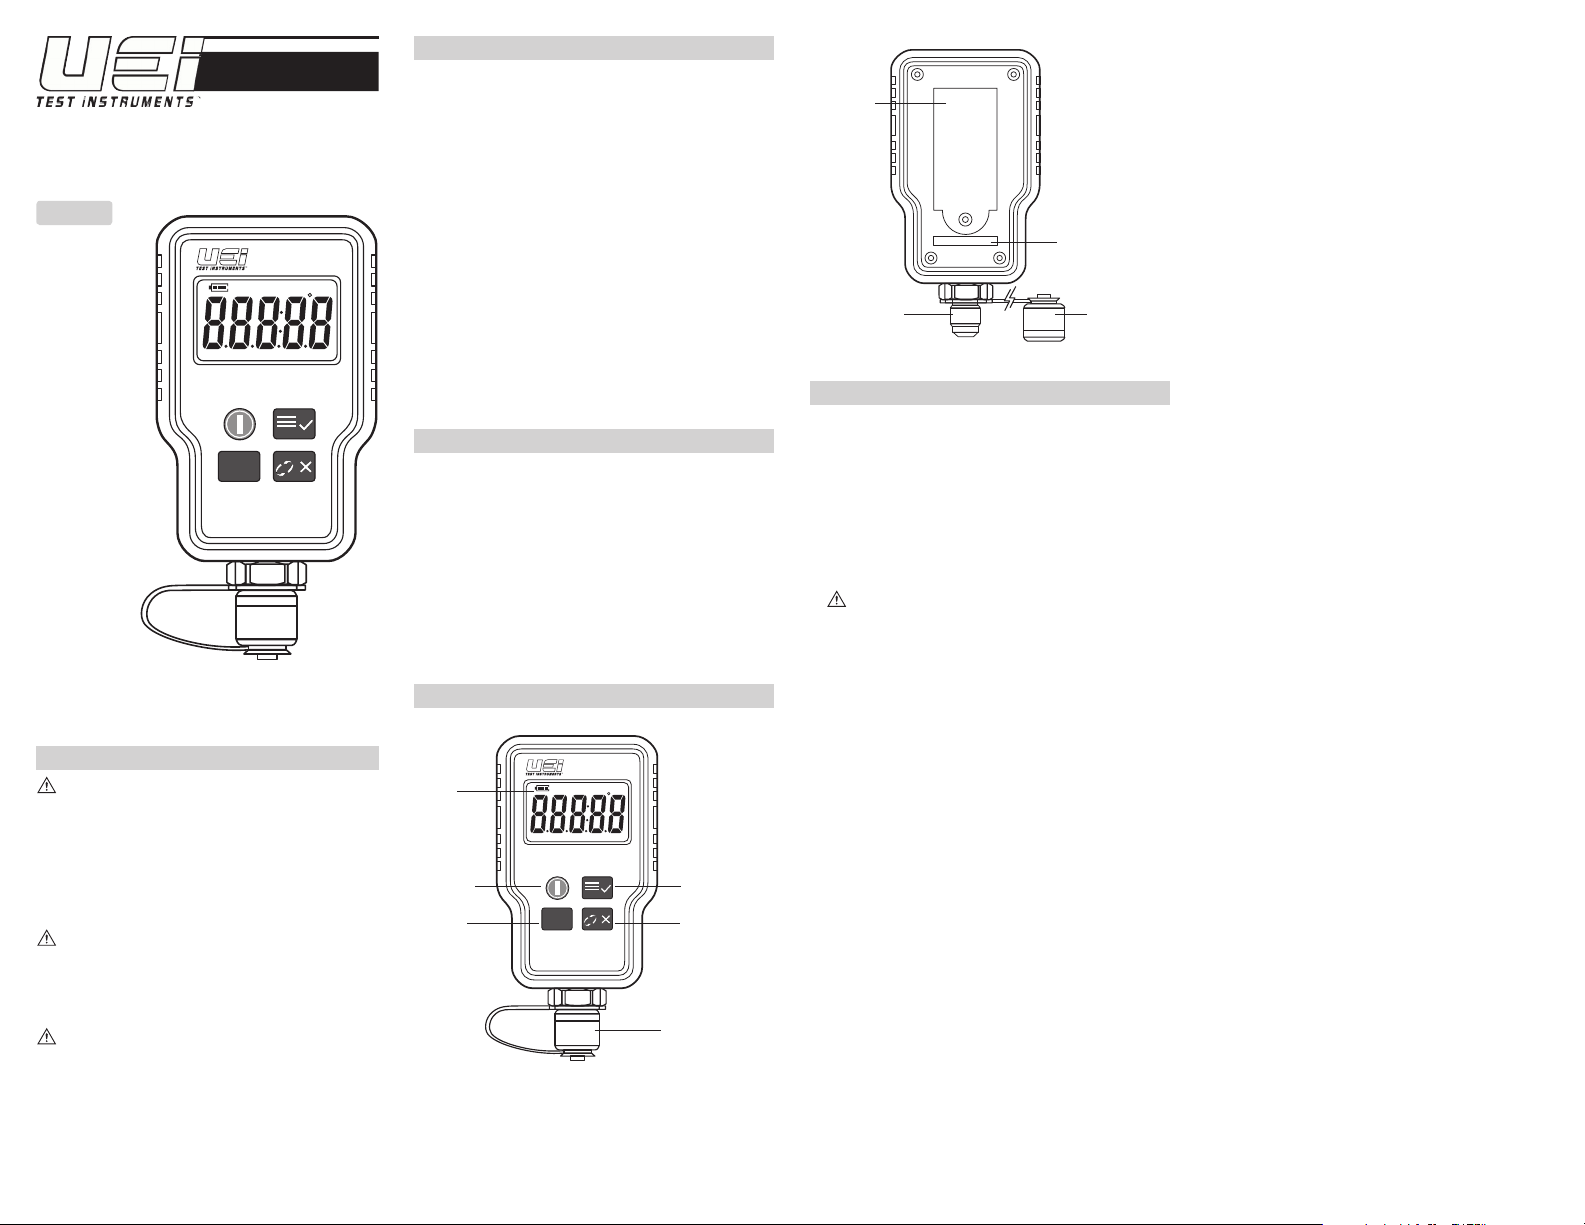
OVERVIEW
DMG150
A. LCD
Set Leak Rate Temp Run
Display
mbar Pa mm-Hg Microns mTorr /sec
B. Power/
Backlight
Button
C. Mode
Button
MENU
MODE
D. Menu/Check
Button
E. Change/X
Button
F. Dust Cap
www.GlobalTestSupply.com
G. Battery
Cover
I. Serial Number
H. Vacuum Port J. Dust
Cap Removed
OPERATING INSTRUCTIONS
Basic Operation Mode
1. Press Power button to power on the gauge.
2. Press Mode Button to change the operation to Vacuum
Reading, Temperature Reading, Leak Rate Test, Leak Test or
Run mode.
Vacuum Reading Mode
1. The Vacuum reading is shown on the display with Vacuum
unit.
CAUTION:
psi limit is exceeded (15,000 Micron/700 psi or unit reading
of equal value).
2. User may press Mode Button to skip Vacuum Reading mode
or enter Temperature Reading mode.
3. In Vacuum Reading mode, press Menu Button or Change
Button to select the unit to mBar, Pa, mmHg, mTorr or Micron.
The Vacuum indicator will be shown to indicate the Vacuum
unit selected.
Temperature Reading Mode
1. The Vacuum reading is shown on the display with
Temperature measurement unit.
2. User may press Mode Button to skip Temperature Reading
mode or enter Leak Rate Test mode.
3. In Temperature Reading mode, press Menu/Check Button
or Change/X Button to select temperature measurement
unit to ˚F or ˚C
Leak Rate Test Mode
1. In Leak Rate Test mode, the leak rate test time base is 1
second.
2. The indicator “Leak Rate” and “/sec” will be shown. The
real time leak rate is updated on the display once per second.
3. User may press Mode Button to skip Leak Rate Test mode
and enter Leak Test mode.
4. In Leak Rate Test mode, press Menu/Check Button or
Change/X Button to select vacuum.
“OL” will be shown if maximum Micron or
Leak Test Mode
1. In the Leak Test mode, the leak test time may be
programmed for a set duration. Only the icon “LEAK” will
be shown.
2. In Leak Test mode, press the Menu Button to change the
parameter to set in order. Vacuum unit, Minute, Second of
time duration can be set. 3 parameters are shown on the
display. The parameter flashes when it is selected to be
set. If there are no changes to the 3 parameters, user may
skip to step 6.
3. While the vacuum unit be set, press the Change/X
Button to select the vacuum unit.
4. While the Minute of time duration can set, press the
Change/X Button, to select the minute value.
5. While the Second of time duration can be set, press the
Change/X Button to select the second value.
6. When all 3 parameters are confirmed, Press and hold
the Menu/Check Button to start Leak Test. “Start” will
be shown on the display for 2 seconds and then the Leak
Test starts. During the Leak Test, the vacuum reading and
time left on test are shown on the display in order.
7. User may press Mode Button to interrupt Leak Test mode
before test time expires and go back to Vacuum Reading
Mode. “Quit?” will be shown on display to confirm
interrupting test. Press Menu/Check Button to end test
or Change/X button to continue test.
8. When the test time ends, “End”, the start vacuum reading,
end vacuum reading and vacuum drop value will be shown
on the display in order. User may press Menu/Check
Button or Change/X Button to scroll between 4
readings.
9. Press Mode button to go back to Vacuum Reading mode.
10. User may press Mode Button to skip Leak Test mode
and enter Programming mode before doing leak test.
Programming Set Mode
1. In Programming mode, user sets the target vacuum value
and time duration. The vacuum value and time duration
are shown on the display in order.
2. User may press Mode Button to enter Run mode without
setting in programming mode if the parameters are
confirmed before setting.
3. In Programming mode, press Menu/Check Button to
select the parameter to be set in order. Vacuum value,
unit, Minute, Second of time duration can be set. The
parameter flashes when it is selected to be set. If the
4 parameters are all set, user may press Mode Button at
anytime to leave Programming mode and enter
Run mode. “Save?” will be shown on display. Press
Menu/Check Button to save or press Change/X Button
to quit without saving.
4. User may press and hold Menu/Check Button to hold
and save and enter Run mode without “Save?”
5. While the target vacuum value can be set, press the
Change/X Button to select the vacuum value.
6. While the target vacuum unit can be set, press the
Change/X Button to select the vacuum unit.
7. While the minute of time can be set, press the Change/X
Button to select the minute value.
8. While the second of time can be set, press the
Change/X Button to select the second value.
Page 2
Run Mode
1. In Run mode, the elapsed time is accumulated when
vacuum reading is less than target vacuum value.
2. User may press Mode Button to enter Vacuum Reading
mode without changes in Run mode.
3. In Run mode the icon “Run” is shown on the display.
“Ready” is shown on the display after entering Run
mode.
4. User powers on the vacuum source and then presses
the Menu/Check Button to start monitoring the
vacuum. “Run” is shown on the display for 2 seconds
when monitoring begins. When the vacuum value is less
than target value, the vacuum gauge counts elapsed time
and accumulated. During the monitoring, the vacuum
value and the time count are shown on the display in
order.
5. Press the Mode Button to skip monitoring before
the elapsed time expires and go back to Vacuum Reading
mode. “Quit?” is shown on the display for confirming
the interrupt. Press Menu/Check Button to confirm
quit or press Change/X Button to cancel quit. When
the accumulated elapsed time is greater than the set
time duration, “End” flashes on the display. Press the
Mode Button to end monitoring and go back to Vacuum
Reading mode.
6. The Sleep mode is disabled in Run mode. User should
check battery life in before and during long monitoring
times.
Sleep Mode
1. The gauge will enter Sleep mode if the reading is over
limit and continues for 5 minutes. “Sleep” will be
shown on the display when the gauge is in Sleep mode.
After 5 minutes of Sleep mode, Auto power off powers
off the gauge. The down-count timer is shown on the
display to alert user of sleep mode and Auto power off
time.
Oil Detection
1. When the vacuum sensor has contamination like oil or
other material, “Oil” is shown on the display.
2. The gauge will Auto power off after 5 minutes.
Sensor Fail
1. If the sensor wire is broken or fails, “Fail” will be shown
on the display.
2. The gauge will Auto power off after 5 minutes.
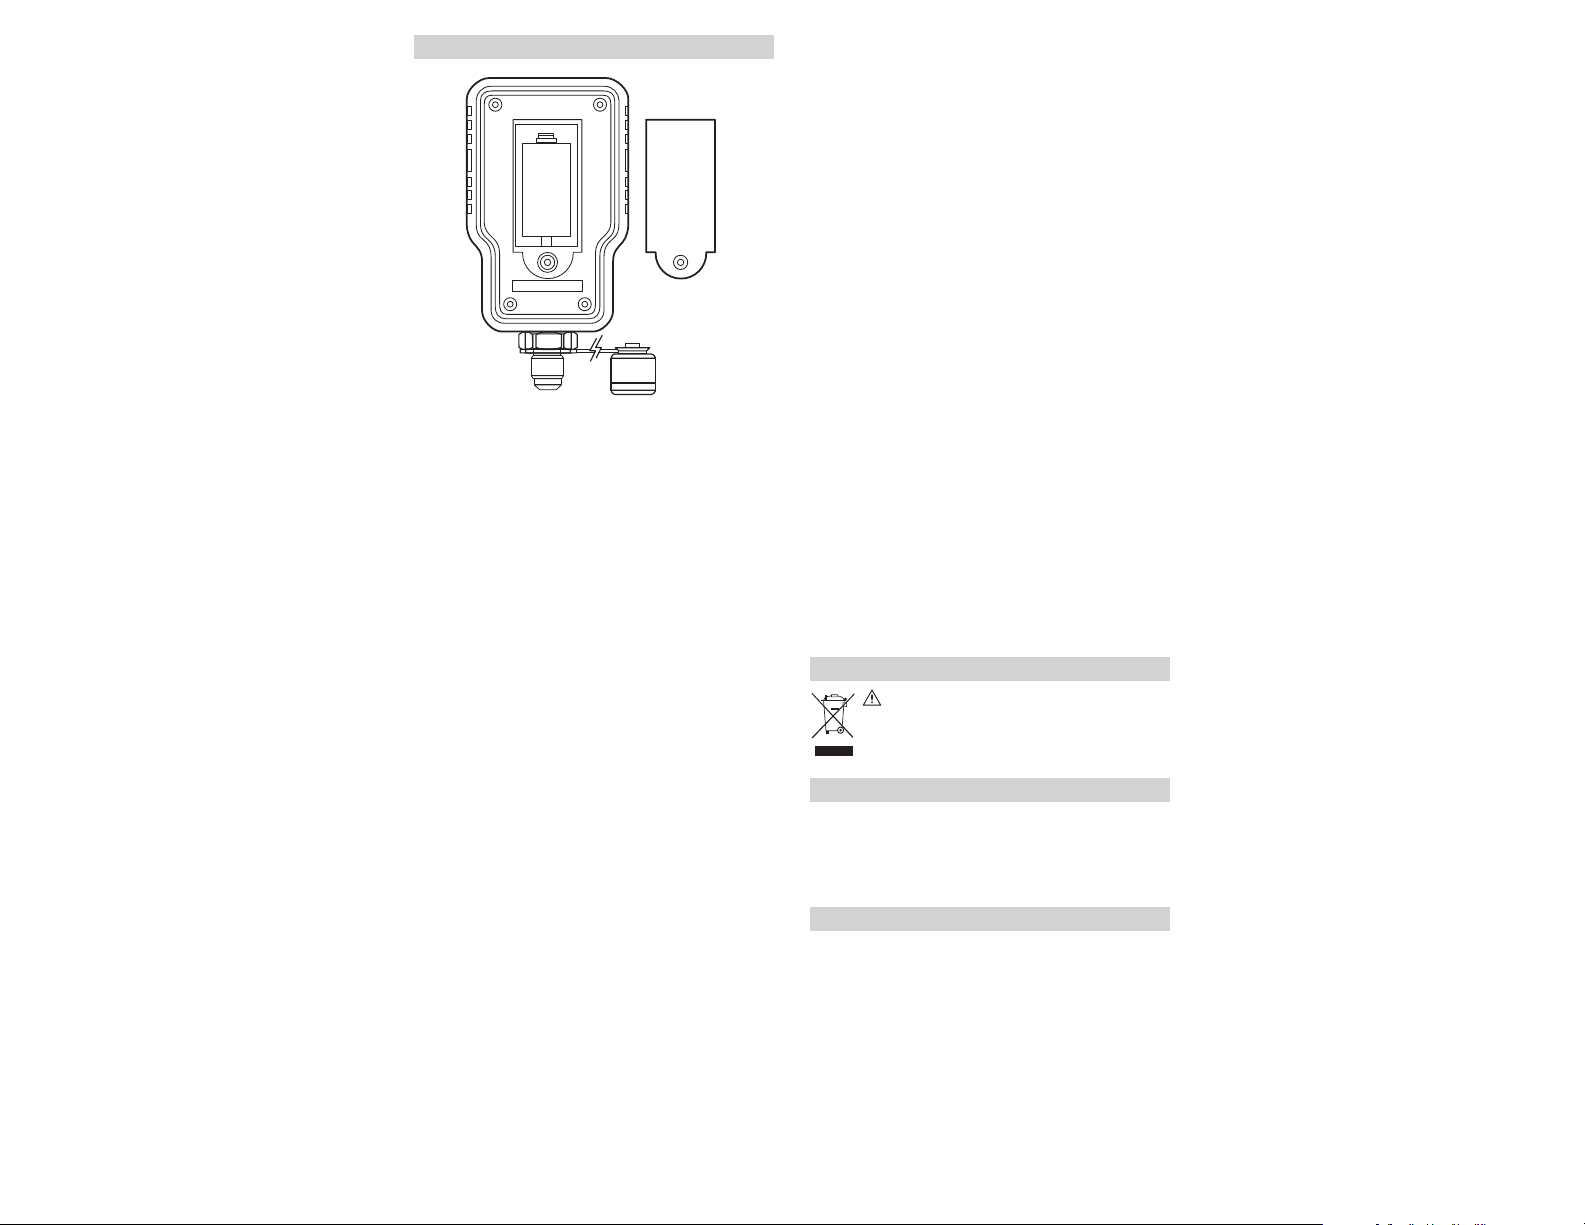
BATTERY REPLACEMENT
New
(CR123A)
battery
When the batteries are too low for safe operation, the Low
Battery indicator will display.
• Remove screw. Remove battery cover.
• Replace the old batteries with 1 new (CR123A) battery.
• Place the battery cover.
DISPOSAL
CAUTION: This symbol indicates that equipment
and its accessories shall be subject to separate collection
and correct disposal.
CLEANING
Periodically clean your meter’s case using a damp cloth. DO NOT
use abrasive, flammable liquids, cleaning solvents, or strong
detergents as they may damage the finish, impair safety, or affect
the reliability of the structural components.
STORAGE
Remove the batteries when instrument is not in use for a
prolonged period of time. Do not expose to high temperatures
or humidity. After a period of storage in extreme conditions
exceeding the limits mentioned in the General Specifications
section, allow the instrument to return to normal operating
conditions before using it.
Copyright © 2017 Kane USA Inc. All Rights Reserved.
Find Quality Products Online at: sales@GlobalTestSupply.com
www.GlobalTestSupply.com
 Loading...