

Page 1

Combustion Analyzer w/ EOS
CO2 Sensor Technology and
High-Altitude Compensation
INSTRUCTION MANUAL
ENGLISH
NAT GAS
Ra 0.0010
CO 80P
C165
C02 8.3%
XAIR 42.4%
PRS 0.03m
Flue 2
Flue1
Aux
Status
Menu Room CO
Com Test
Prs/Temp
Exch Test
C165
1
Find Quality Products Online at: sales@GlobalTestSupply.com
www.GlobalTestSupply.com
Page 2

2
Find Quality Products Online at: sales@GlobalTestSupply.com
www.GlobalTestSupply.com
Page 3

TABLE OF CONTENTS
Analyzer Overview ....................................4
C165 Overview ........................................5
Warnings .............................................6
Batteries .............................................6
Before Using The Analyzer Every Time ..................7
Fresh Air Purge .....................................7
Status Display .....................................7
Display Parameters ....................................8
Using The Four Function Buttons ........................9
Using the Analyzer ................................10-17
Combustion Test ................................10-11
Combustion Test - Optional Nitric Oxide Sensor .....12
Commissioning Test ...............................13
Pressure/Temperature Test .......................13-14
Heat Exchange Integrity Test ......................14-15
Room CO Test ..................................15-16
C165 Printouts .....................................17
Using The Menu ...................................18-19
Using The C165 as a Thermometer or Pressure Meter ....20
Measuring Flue Gases (CO Protection Pump Operation) ..21
Where to Test .....................................22-23
Analyzer Problem Solving .............................24
Frequently Asked Questions ...........................24
Product Registration ..................................24
Annual Service & Recertification ......................25
Recertification Services .............................25
Online Booking Procedure ............................25
Returning Your Analyzer .............................26
Where to Send Your Analyzer ........................26
Cold Weather Precautions ............................26
Analyzer Specification .............................27-28
Electromagnetic Compatibility ........................28
End of Life Disposal ..................................28
Product Registration ..................................29
Survey ..............................................30
EN50379 Regulated Instructions ........................31
Warranty Information .................................32
3
Find Quality Products Online at: sales@GlobalTestSupply.com
www.GlobalTestSupply.com
Page 4

ANALYZER OVERVIEW
The C165 has a dilution pump which helps to protect the CO sensor from high concentration that otherwise might damage the sensor and is designed
specifically for higher altitude applications and use.
The C165 Combustion Analyzer measures carbon dioxide (CO2), carbon monoxide (CO), differential temperature and differential pressure. The direct
measurement of CO2 is achieved using an infrared sensing system. Below 1% CO2 the readings of CO2 are displayed to two decimal places.
CO2 is set to zero in fresh air automatically after the initial countdown. The countdown varies between 90 and 60 seconds dependent on ambient
temperature.
If “RESET GAS ZERO” is indicated ensure that the unit is in outside fresh air before pressing the button with an “Enter” symbol.
It is important that re-zeroing is done in outside fresh air as indoor CO2 levels are affected by human breath.
It calculates oxygen (O2), CO/CO2 ratio, losses, combustion efficiency (Gross, Gross Condensing, Net or Net Condensing).
The C165 Combustion Analyzer can also measure CO levels in ambient air - useful when a CO Alarm is triggered. It can also perform a Room CO Test
for up to 30 minutes duration.
A structured Commissioning Test has been included for the installation of boilers.
The analyzer has a protective rubber cover with a magnet for “hands–free” operation and is supplied with a flue probe with integral temperature
sensor.
A low flow detection system warns of low flow and switches the pump off. This also helps to prevent water ingress from overfilled water traps.
Its LCD display is protected with a toughened screen.
The large display shows 6 readings at a time and all data can be printed via an optional infrared printer. The printed data can be 'live' data or ‘stored’
data.
The memory can store up to:
60 combustion tests
20 AUX tests
20 heat exchange tests
20 temperature & pressure tests
20 room CO tests
20 commissioning Tests
Two lines of 20 characters can be added to the header of printouts. Printouts can be made on the optional UEi printers with ‘fast print’ capability.
Alternatively, the analyzer can be equipped with optional wireless communications to either Android™ or Apple® devices.
The analyzer is controlled using 4 function buttons and a rotary dial.
The four buttons (from left to right) switch on and off the analyzer, switch on and off the worklight, switch on and off the pump and send data to a
printer or to the memory. The buttons with “UP”, “DOWN” and “ENTER” arrows also change settings such as date, time, fuel, etc. when in “MENU”
mode.
4
Find Quality Products Online at: sales@GlobalTestSupply.com
www.GlobalTestSupply.com
Page 5
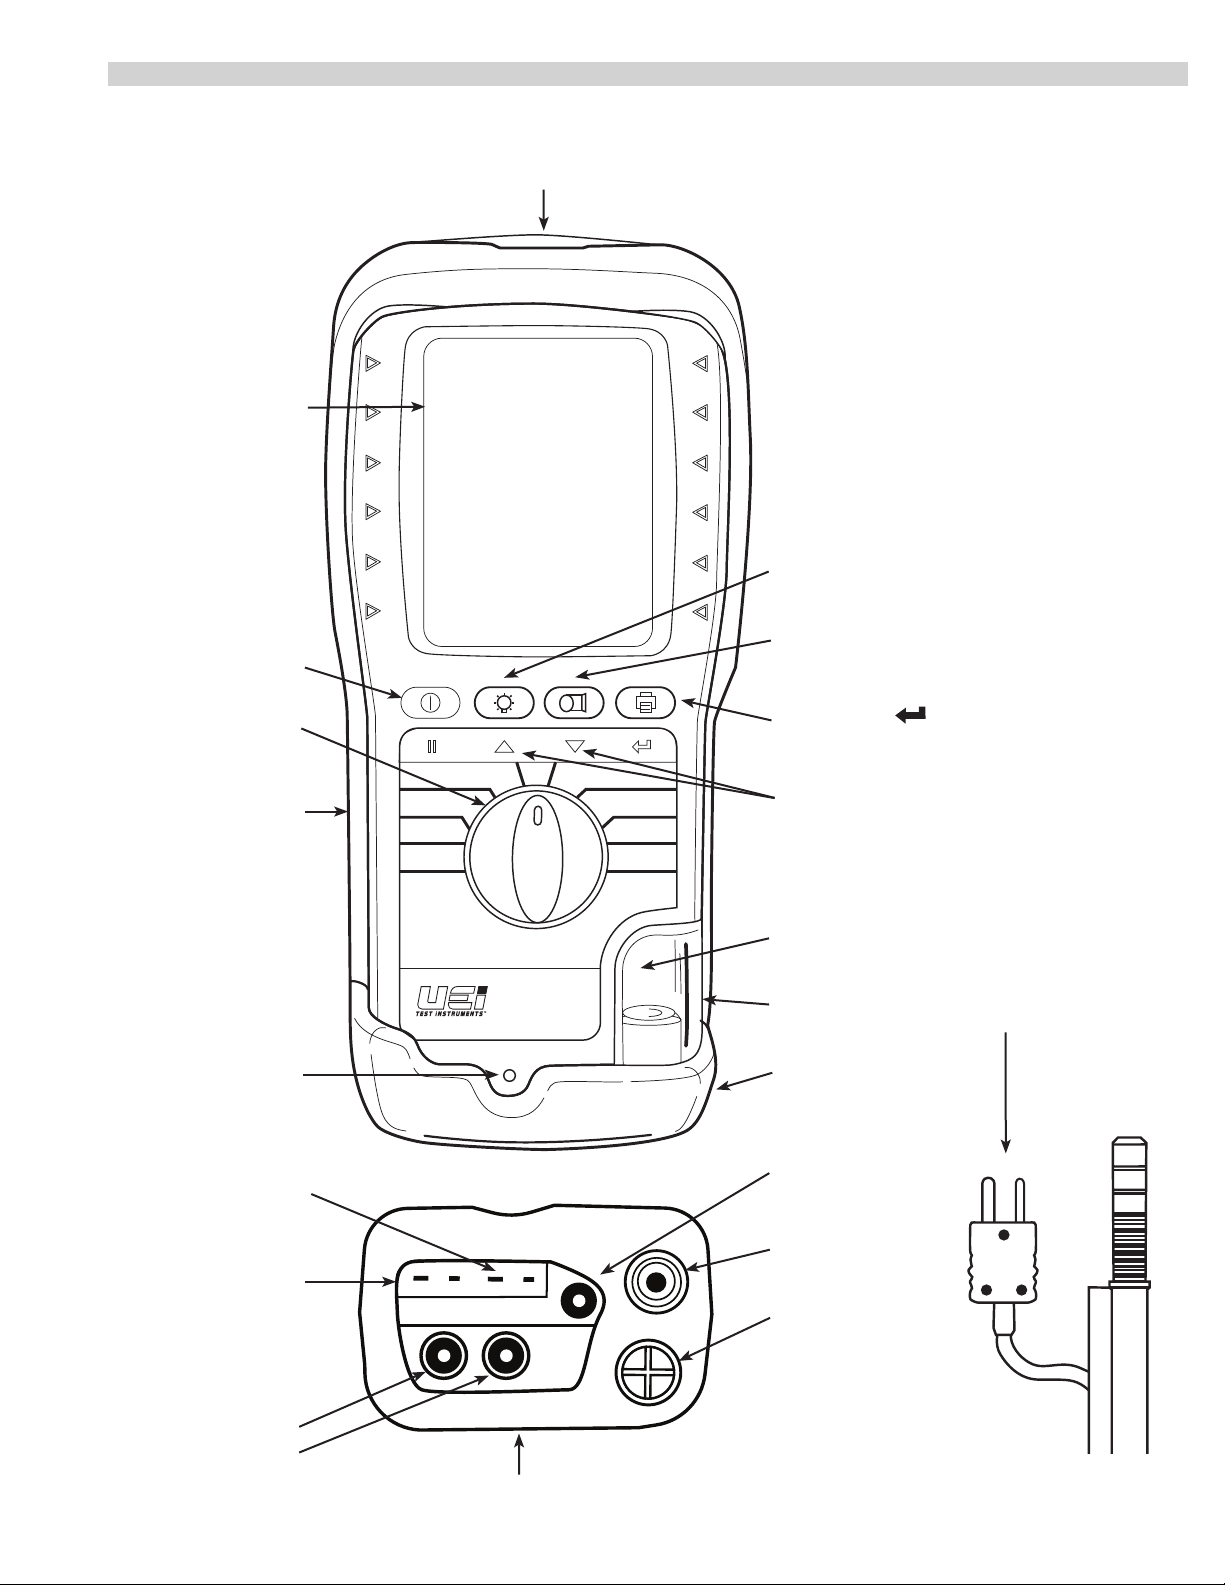
C165 OVERVIEW
Worklight & Infrared Emitter
NAT GAS
6 Line Backlit Display
On/Off Button
Rotary Test Selector Dial
Battery Compartment
in back under boot
Ra 0.0010
CO 80P
C02 8.3%
XAIR 42.4%
PRS 0.03m
Flue 2
Flue1
Aux
Status
Menu Room CO
Com Test
Prs/Temp
Exch Test
BACKLIGHT / “s“ UP Press to HOLD values
on display and navigate UP. Press and hold
to turn Backlight on/off.
PUMP / “t“ DOWN Press to turn
pump on/off and navigate DOWN
SEND/ENTER “
to Select and Print
Menu Controls
Scroll up/down
Particle Filter
Inside Water Trap
”
Flue Probe Temperature Plug
(Plugs into T1)
C165
Charge Indicator Light
Temperature
Connections
Flue Probe Temp: T1
Inlet Temperature: T2
Pressure Connections
P1
P2 (Differential)
Flue Gas Exhaust
(See Page 10)
Find Quality Products Online at: sales@GlobalTestSupply.com
www.GlobalTestSupply.com
Water Trap
Protective Rubber Boot
w/ built-in Magnets
Battery Charger
Connection
Flue Gas
Inlet
Water Trap
Drain with Red
Screw Plug
Narrow Pin MUST be on the
Right hand side.
Flue Probe
Gas Inlet Plug
5
Page 6
BATTERY TYPE
WARNINGS
SAFETY NOTES
Before using this meter, read all safety information carefully.
“WARNING” is used to indicate conditions or actions that may pose physical hazards to the user.
“CAUTION” is used to indicate conditions or actions that may damage this instrument.
WARNING!
This analyzer extracts combustion gases that may be toxic in relatively low concentrations. These gases are exhausted from
the back of the instrument. This analyzer must only be used in well-ventilated locations by trained and
competent persons after due consideration of all the potential hazards.
Users of portable gas detectors are recommended to conduct a “bump” check before relying on the unit to verify an atmosphere is free from hazard. A “bump” test is a means of verifying that an instrument is working within acceptable limits by
briefly exposing to a known gas mixture formulated to change the output of all the sensors present. (This is different from a
calibration where the instrument is also exposed to a known gas mixture but is allowed to settle to a steady figure and the
reading adjusted to the stated gas concentration of the test gas).
BATTERIES
This analyzer has been designed for use with disposable alkaline batteries or rechargeable Nickel Metal Hydride (NiMH) batteries. No other battery
types are recommended.
WARNING!
The battery charger unit must only be used when NiMH batteries are fitted. Do not mix NiMH cells of different
capacities or from different manufacturers. All four cells must be identical
REPLACING BATTERIES
Turn over the analyzer, remove its protective rubber cover and fit 4 “AA” batteries in the battery compartment. Take great care to ensure
they are fitted with the correct battery polarity. Replace the battery cover and protective rubber cover.
Note: When changing the batteries on the instrument the memory will store the date and time for up to one
minute, if outside this time it may be necessary to re-enter the details.
Date and time may also need to be reset if re-chargeable batteries are allowed to totally discharge.
Switch the analyzer on and check that the analyzer’s time and date are correct. To reset see USING THE MENU, Section 5.
CHARGING NIMH BATTERIES
Ensure that you use the correct charger. The part number is AACA4.
To fully charge NiMH batteries:
The charger must be connected and switched on.
When charging, the red Battery Charging Indicator will illuminate.
After a few seconds, the display will show “CHARGING BATTERY” if they need extra charge. If they are already fully charged this message
will not appear.
The first charge should be for 12 hours continuously. NiMH batteries are suitable for top up charging at any time, even for short periods.
BATTERY DISPOSAL
Always dispose of depleted batteries using approved disposal methods that protect the environment.
6
Find Quality Products Online at: sales@GlobalTestSupply.com
www.GlobalTestSupply.com
Page 7

BEFORE USING THE ANALYZER EVERY TIME
Check the water trap is empty and the particle filter is not dirty:
To empty water trap, unscrew the red screw plug and re-tighten once it is empty.
To change the particle filter, remove protective rubber cover, slide the water trap unit from the analyzer, remove the particle filter from its
spigot and replace. Reconnect the water trap unit and rubber protective cover.
Connect the flue probe hose to the analyzer’s flue gas inlet and connect the flue probe’s temperature plug to the T1 socket – check the plug’s
orientation is correct - see Page 5.
FRESH AIR PURGE
Position the flue probe in outside fresh air, then press . The analyzer’s pump starts and auto-calibrates. When complete:
Select “FLUE 1” on the dial. In fresh air the O2 reading should be 20.9% ± 0.3%.
Select “FLUE 2” on the dial. In fresh air the CO reading should be zero.
WARNING!
This message indicates that the analyzer needs to be reset in fresh air. To do so, ensure that the analyzer is in outside fresh air and press
To perform a manual “Gas Zero”, select “FLUE 2” on the dial, hold down the key and you will see the message above.
STATUS DISPLAY
Select “STATUS” on the dial to view the following:
Current fuel selection. Press up/down to change the fuel selection.
Current time. Can be re-set via the “Menu”
Current date. Can be re-set via the “Menu”
Ambient temperature of the analyzer
Shows number of days until next calibration is due
Shows the charge level of the batteries
7
Find Quality Products Online at: sales@GlobalTestSupply.com
www.GlobalTestSupply.com
Page 8

DISPLAY PARAMETERS
Here are the legends used and what they mean:
B AT: Displays the Battery power available. Readings may be affected if used with low power batteries.
CAL: Number of days left before recalibration is due
CO: Carbon monoxide (Measured) reading displayed in ppm (parts per million). If ‘- - - -’ is displayed there is a fault with the CO
sensor or the instrument has not set to zero correctly. Switch off instrument and try again.
COn: Carbon monoxide normalized
CO2: Carbon dioxide (Measured) reading in percentage (%).
CO/CO2: CO/CO2 Ratio: measured CO (ppm) divided by (CO2 (%) x 10,000).
DATE: Date shown as month, day and year, MM/DD/YY. Date is recorded when each combustion test is printed or stored.
EFF: Combustion efficiency calculation displayed in percentage either as Gross Ef(G), Net Ef(N), Gross Condensing EF(GC) or Net Condensing Ef(NC) -
Use MENU to change. The calculation is determined by fuel type and uses the calculation in British Standard BS845. The efficiency is displayed
during a combustion test, ‘- - - -’ is displayed while in fresh air.
EFG: Gross efficiency
EfCG: Gross condensing Efficiency
EfN: Net efficiency
EfCN: Net condensing efficiency
FULL: The maximum number of tests have been stored in the memory. To delete the stored memory, Select Reports then select the tests
to be deleted (see Page 19).
INT: Interval in seconds
LOSS: Losses calculated from oxygen and type of fuel. Displays reading during a combustion test. ‘- - - -’ is displayed while in fresh air.
mg/m3: Milligrams per meter cubed
mg/m3(n): Milligrams per meter cubed normalized
mg/kWh: Milligrams per kilowatt hour
mg/kWh(n): Milligrams per kilowatt hour normalized
N/F: Not fitted
O2: Oxygen (Calculated) reading in percentage (%)
O
++%: Calculated oxygen greater than 18% so calculation is disabled
2
O2 ref: reference level in % for normalization calculation
p: Parts per million
ppm: Parts per million
ppm(n): Parts per million normalized
-P-OFF: Pump off
PRS: Pressure reading, either single point or differential.
Ra: CO to CO2 ratio
Tf: Temperature measured by the flue gas probe in Fahrenheit (°F) and Centigrade (°C). It displays ‘- OC -’ if the flue probe is
disconnected or faulty.
Ta : If an inlet temperature probe (optional) is connected into the T1 socket during its countdown, the measured temperature from the
inlet probe will be used as the inlet temperature.
If an inlet temperature probe is not connected to the analyzer during countdown the measured temperature from the flue probe
will be used as the inlet temperature.
If neither probe is connected during countdown the analyzer’s internal ambient temperature will be used as the inlet temperature.
Δ T: Net temperature calculated by deducting the INLET temperature from the measured FLUE temperature. It displays ‘- OC -’ if the
flue probe is not connected or broken.
TIME: The time shown is expressed in “Military” time HH:MM:SS. Time is recorded when each test is printed or stored.
X - AIR: Excess air calculated from the calculated oxygen and type of fuel. Displays reading during a combustion test. ‘- - - -’ is displayed
while in fresh air.
Pressure units:
m: millibar
s: psi
h: hPa
P: Pa
g: mmHg
i: inH2O
w: mmH20
k: kPa
8
Find Quality Products Online at: sales@GlobalTestSupply.com
www.GlobalTestSupply.com
Page 9

USING THE FOUR FUNCTION BUTTONS
Switching ON the
Analyzer
Switching OFF the
Analyzer
Worklight
Rotate the dial to the mode you want to use before switching on. This may eliminate the need for a full countdown in
some of the modes and save you time.
Press
calibrates its sensors properly.
When switched on, the analyzer beeps and briefly displays software version, date and time. Its bottom line counts down
until the sensors are ready to use. If the analyzer will not auto calibrate, its sensors need to be replaced or recalibrated
by an authorized repair center.
If an inlet temperature probe (optional) is connected into the T2 socket during its countdown, the measured temperature
from the inlet probe will be used as the inlet temperature.
If an inlet temperature probe is not connected to the analyzer during countdown the measured temperature from the flue
probe will be used as the inlet temperature.
If neither probe is connected during countdown the analyzer’s internal ambient temperature will be used as the inlet
temperature.
Press & hold for 2 seconds to switch the analyzer OFF. The display counts down from 30 or less with the pump on
to clear the sensors with fresh air – If the probe is still connected, make sure analyzer and probe are in fresh air.
Press
Note: The analyzer will not switch off unless the CO reading is below 40ppm.
Press
NOTE: Use of the worklight significantly increases the current drain on the batteries.
button to switch the unit ON. This must be done in fresh air to ensure that the analyzer auto
if you want to stop the countdown and return to making measurements.
to switch the worklight on and off.
Switching PUMP
on / off
Zeroing the pressure
sensor
Printing Data
Storing a set of
readings
The analyzer normally operates with the pump on.
Press
When the pump is switched off “-PO-” is displayed instead of the O2, CO & CO2 readings. The analyzer also displays
“PUMP OFF” on the top line approx. every 30 seconds.
NOTE: The pump will automatically switch itself off when the rotary switch is set to Menu,
Status, Pressure, Exchange or Differential Temperature.
To re-zero the pressure sensor when “PRS/TEMP” is selected on the dial, press and hold
shows CAL ZERO.
Always disconnect the pressure hose before zeroing.
Press and quickly release
completed. Press and release the key again to abort printing.
Make sure the printer is switched on, ready to accept data and its infrared receiver is in line with the analyzer’s emitter
(on top of the analyzer).
Press and hold
The top line briefly displays the log number.
to switch the pump off and on.
until the top line display
to start the analyzer printing. The analyzer displays a series of bars until this is
for approx. 2 seconds.
Note: This STORE function is inhibited in normal operation if the pump is switched off.
◀
Using
Buttons
Find Quality Products Online at: sales@GlobalTestSupply.com
◀
/
/
The function buttons below the symbols
“MENU” – See USING THE MENU, Pg. 18.
www.GlobalTestSupply.com
◀
◀
/
/ are used to navigate through the menu when the rotary switch is set to
9
Page 10

COMBUSTION TESTS
XAIR 88.7
Tf 293.1F
Insert the tip of the flue probe into the center of the flue. The readings will stabilize within 60 seconds assuming the boiler conditions are stable.
The rotary switch can be used to display the following information:
FLUE 1
Fuel type can be changed via “MENU” or “STATUS” setting.
NAT GAS
Carbon Dioxide (%)
CO2 6.3%
Oxygen (%) left after combustion. Should be 20.9% ± 0.3% in fresh air.
O2 9.8%
Gross efficiency
EfG 81.1%
Flue temperature (°F).
Ta 73.5F
Inlet temperature (°F). Normally set by flue probe during fresh air purge.
Press
Hold
to print a full combustion test, (or send to PC via optional Wireless module).
for 2+ seconds to log a full combustion report.
FLUE 2
NAT GAS
Fuel type can be changed via “Menu” or “STATUS” setting.
Carbon monoxide (ppm).
CO 52p
COa 83p
Losses calculated
LOSS 17.8%
Excess air %
Pressure reading
PRS 0.04i
Press
Hold
to print a full combustion test, (or send to PC via optional Wireless module).
for 2+ seconds to log a full combustion report.
AUX display
The AUX (auxiliary) display can be customized via “MENU” / “SCREEN” / “AUX”.
The parameters displayed on lines 1, 2, 3, 4, 5 and 6 can be set by the user.
They remain the AUX parameters until changed by the user.
NO sensor not fitted
NO sensor not fitted
Press
Hold
10
Find Quality Products Online at: sales@GlobalTestSupply.com
to print a full combustion test, (or send to PC via optional Wireless module).
for 2+ seconds to log a full combustion report.
www.GlobalTestSupply.com
Page 11

The side lights on the display point to the active line.
◀
Use
◀
/
to change the pointer.
VIEWING/PRINTING OVERVIEW
Press
Use
Press
◀
to select a line. The side lights now flash.
◀
/
to scroll or change the selected line.
to exit a line.
TO VIEW/PRINT A LOGGED REPORT
Select “MENU” / “REPORT” / “COMBUSTION” / “VIEW”.
The side lights will point to the top line.
Press
◀
Use
Press
To view logged data press
Press
to select this line. The side lights will flash.
◀
/
to scroll or change the Log No. (If only one report is logged, number will not change).
to confirm a Log No. The side lights will stop flashing.
◀
◀
/
to move the pointer to another line.
. Sidelights will flash on that line.
◀
Use
To finish, press
Use
Press
◀
/
to scroll through data.
. Sidelights stop flashing.
◀
◀
/
to scroll down to “PRINT”
to print.
VIEWING/PRINTING A LONGED COMBUSTION TEST
Press to print the test, (or send to PC via optional Wireless module).
11
Find Quality Products Online at: sales@GlobalTestSupply.com
www.GlobalTestSupply.com
Page 12

COMBUSTION TEST - OPTIONAL NITRIC OXIDE SENSOR
Instructions for C165 Analyzers fitted with optional Nitric Oxide (NO) sensors
Displaying the Nitric Oxide (NO) reading
Select “Menu” on the rotary switch and navigate using the function buttons:
Select SCREEN and then select AUX
Choose a line to display the required readings as below
AUX display
The AUX (auxiliary) display can be customized via MENU / SCREEN / AUX.
The parameters displayed on lines 1, 2, 3, 4, 5 and 6 can be set by the user.
They remain the AUX parameters until changed by the user.
NOTE: To EXIT the MENU at any time simply move the rotary switch to any position other than MENU. Any changes that have not been “entered”
will be ignored.
◀
Use
/◀ to navigate to the main menu option SCREEN. Press .
◀
Use
/◀ to navigate to the sub menu option AUX. Press .
The display will show
Press and a third line will appear.
◀
Use
/◀ to navigate to the desired parameter to be displayed on line 1.
Press
from MENU to AUX to display all your chosen settings.
PRINTING and STORING
The NO readings are printed and stored in the same way as the other combustion gas readings. On the printouts the NO readings appear directly
below the flue CO readings.
The dial needs to be in the AUX, Flue 1 or Flue 2 positions to print or store flue combustion readings. When the dilution pump is operating to protect
the CO sensor the NO readings are also affected by an unspecified amount. The screen will typically show:
to select the parameter for Line 1 and repeat the process to select the display parameter for all four lines and then EXIT. Rotate the dial
12
Find Quality Products Online at: sales@GlobalTestSupply.com
www.GlobalTestSupply.com
Page 13

COMMISSIONING TEST
The Commissioning Test is based on TB143
Introduced in April 2013, Technical Bulletin 143 from the Heating and Hotwater Industry Council (HHIC), outlines a safer, clear and comprehensive
procedure for commissioning condensing boilers without airgas ratio valves.
Rotate the dial to “COM TEST” position and follow the instructions on the screen
TEST 1 check the boiler at High Fire rate.
The boiler is switched on at High Fire rate.
The analyzer is first zeroed in outside fresh air.
Once the boiler is stable at high fire rate the probe is inserted into the air inlet of the flue and the CO2 level is measured. The reading needs to be
stable and less than or equal to 0.20%.
TEST 2
The probe is then inserted into the exhaust outlet of the boiler and the Ratio, CO and CO2 levels are measured. These levels must be as per
manufacturers instruction. Where manufacturer’s instructions are not available the CO must be less than 350 ppm and the RATIO must be less than
0.0040.
TEST 3 checks the boiler at Low Fire flow rate where this is possible.
With the boiler operating stably at Low Fire rate the Ratio, CO and CO2 levels are measured.
These levels must be as per manufacturers instruction. Where manufacturers’ instructions are not available the CO must be less than 350 ppm and
the Flue 2 must be less than 0.0040.
TEST 4 Measures Flow and Return Temperatures from the boiler
All the measured readings are logged and can be printed or transmitted to PC if an optional wireless module is fitted.
PRESSURE/TEMPERATURE TESTING
WARNING!
NEVER ATTEMPT TO TAKE A PRESSURE READING WITHOUT KNOWING THE MAXIMUM PRESSURE THAT MIGHT BE PRESENT. THIS
INSTRUMENT’S PRESSURE TRANSDUCER IS RATED AT 1.1 PSI WITH A MAXIMUM OVER RANGE OF 5.8 PSI.
Select “PRS/TEMP”. The pump stops automatically. Press
connect to P1 for single pressure or P1 and P2 for differential pressure.
Normal response or smoothed (damped) response can be selected via “MENU”.
‘High’ or ‘Low’ resolution readings can be selected via “MENU”.
Pressure units can be selected via “MENU”.
Eg Flow Temp
Eg Return Temp
Differential Temp
to auto-zero the pressure sensor. Using the black connectors and manometer hose,
Press
Hold
Find Quality Products Online at: sales@GlobalTestSupply.com
to print a full pressure test, (or send to PC via optional Wireless module).
for 2+ seconds to log a pressure report.
13
www.GlobalTestSupply.com
Page 14

PRESSURE/TEMPERATURE TESTING CONT.
Viewing / printing a logged pressure/temp test
Select “MENU” / “REPORT” / “PRS-TEMP” / “VIEW”
◀
Use
◀
/
to select the log number to be printed.
Press
to print the test, (or send to PC via optional Wireless module).
WARNING!
Before using the C165 to measure the pressure of a gas/air ratio valve, read the boiler manufacturer’s instructions thoroughly. If in doubt contact the
boiler manufacturer. After adjusting a gas/air ratio valve it is essential that the CO, CO2 and CO/CO2 ratio readings are within the boiler
manufacturer’s specified limits.
If using larger bore tubing when performing pressure tests:
Push ‘orange’ tube over the rim of the spigot to ensure a gas tight seal.
This may not produce a gas tight seal.
HEAT EXCHANGE INTEGRITY TEST
There are many methods to test heat exchange integrity. One of these is to observe the Excess Air, O2 and CO readings both before and after the
blower turns on. If the heat exchanger is sealed, your O2 and CO readings should remain fairly stable. A breach in the heat exchanger may allow fresh
air to be forced into the flue after the blower turns on due to pressure increase in the plenum. The result may be a rise in the measured O2 in the
stack gas and an increase in Excess Air. In some sealed systems the fresh air drawn in through the breach may reduce the combustion air available
leading to an increase in the CO reading. If either of these situations are present it is probable there is a problem with the Heat Exchanger which may
require additional testing and inspections.
NOTE: Many cracks are invisible to borescopes or the naked eye, and only open or separate from pressure or temperature changes during operations.
Rotate dial to “EXCH TEST” Rotate test selector to “EXCH TEST”. Call for heat on the system. Observe and wait for O2 readings to stabilize.
14
Find Quality Products Online at: sales@GlobalTestSupply.com
www.GlobalTestSupply.com
Page 15

HEAT EXCHANGE INTEGRITY TEST CONT.
Prior to the blower turning on, and after readings have stabilized, press to store Pre-Blower test segment.
Carbon monoxide (ppm).
Oxygen (%).
Excess Air.
Press
Once the blower turns on press
The C165 will wait 60 seconds and then record the Post-Blower values for CO, O2 and Excess Air.
Test results will automatically be stored to exchange reports. Report includes both Pre and Post Blower test segments and differences.
for Pre-Blower readings
to start the Post- Blower test.
Viewing / printing a logged Heat Exchange test
Select “MENU” / “REPORT” / “EXCH” / “VIEW”
◀
Use
Press
Note: The analyzer’s memory can store up to 20 Heat exchange integrity tests. To clear heat exchange memory select “MENU” / “REPORT” /
“EXCH” / “DEL ALL” / “YES” then press
◀
/
toto select the log number to be printed.
to print the test, (or send to PC via optional Wireless module).
.
ROOM CO TESTING
Select “ROOM CO” to measure and record CO readings for up to 30 minutes. (Tests every 120 seconds, 15 total tests)
◀
Use
Press
◀
/
to select the test type from the following:
to start Room CO testing.
15
Find Quality Products Online at: sales@GlobalTestSupply.com
www.GlobalTestSupply.com
Page 16

ROOM CO TESTING CONT.
ROOM CO display
CO readings are recorded every 2 minutes for up to 30 minutes.
Test 00 = initial CO test in series.
Test Interval Time
Real time CO reading (ppm).
The user can stop the Room CO test at any time by pressing
If not stopped earlier, the Room CO test will automatically end after the designated time.
The CO test series is automatically stored in the memory as a log number.
When completed the log can be printed immediately by pressing
.
.
VIEWING/PRINTING A LOGGED ROOM CO TEST
Select “MENU” / “REPORT” / “ROOM CO” / “VIEW”
When LEDs are not flashing
◀
Use the
Press
With the LEDs flashing, press
Press
The LEDs stop flashing and
Use
◀
/
keys to change line.
to cause the LEDs on that line to flash.
◀
◀
/
to allow the parameter on that line to be changed.
to select that change.
◀
◀
/
◀
◀
/
to change the line again.
TEST TYPE
With no LEDs flashing
Use the
You can change the LOG number and the TEST number so that you can view individual test results.
Press
Now use the
Press
Sending to the printer or wireless device will only occur when you move the LEDs to the print line and press
Press
16
Find Quality Products Online at: sales@GlobalTestSupply.com
◀
/◀ keys to move the lit LEDs to the line you want.
to select the line you want, and the LEDs will start to flash.
◀
/◀ keys to change the number (the TEST number or the LOG number).
when you are happy with the changes. The LEDs will stop flashing. Now use the
to print the test, (or send to PC via optional Wireless module).
www.GlobalTestSupply.com
◀
◀
/
keys to move the LEDs to the PRINT line.
.
Page 17

PRINTOUTS
COMBUSTION COMMISSION TEST PRS/TEMP HEAT EXCHANGE AUX
17
Find Quality Products Online at: sales@GlobalTestSupply.com
www.GlobalTestSupply.com
Page 18

USING THE MENU
Select “Menu” on the rotary switch and navigate using the function buttons:
NOTE: To “EXIT” the “MENU” at any time simply move the rotary switch to any position other than “Menu”. Any changes that have not been
“entered” will be ignored.
As you scroll up or down the side LEDs illuminate to point to the active line
MAIN MENU SUB MENU OPTIONS / COMMENTS
SETUP LANGUAGE English
SET TIME HH:MM:SS format
e.g. 7 am = 07:00:00, 7pm = 19:00:00
SET DATE MM/DD/YY format
PRINTER KM IRP
KANE IRP-2
WIRELESS (if installed)
SERIAL
PASSKEY 1111 (wait 5 secs after entering last digit)
BACK
As you scroll up or down the side LEDs illuminate to point to the active line
NOTE: To “EXIT” the “MENU” at any time simply move the rotary switch to any position other than “Menu”. Any changes that have not been
“entered” will be ignored.
MAIN MENU SUB MENU OPTIONS / COMMENTS
UNITS FUEL TYPE NAT GAS, TOWN GAS, COKE GAS, PROPANE, BUTANE, LPG,
LIGHT OIL, BIO OIL, WOOD PELLETS, BIO GAS, USER 1 to 5
FUEL ORIGIN UK, FRANCE, SPAIN, N AMERICA, BELGIUM, NETHERLAND
EFFICIENCY GROSS, NET, GROSS COND, NET COND
PRESSURE See next table below
GAS ppm, ppm(n), mg/m3, mg/m3(n), mg/kWh, mg/kWh(n)
TEMP C, F
02 REF Up/down to set value (3% default)
NOx CALC Up/down to set value (5% default)
BACK
As you scroll up or down the side LEDs illuminate to point to the active line
NOTE: To “EXIT” the “MENU” at any time simply move the rotary switch to any position other than “Menu”. Any changes that have not been
“entered” will be ignored.
18
Find Quality Products Online at: sales@GlobalTestSupply.com
www.GlobalTestSupply.com
Page 19

USING THE MENU CONT.
MAIN MENU SUB MENU OPTIONS / COMMENTS
PRESSURE FILTER FILTER OFF = normal response.
ON = slower (damped) response
RESOLUTION LOW = e.g. 0.00i inH20 resolution.
HIGH = displays to an extra decimal place
UNITS mbar, Pa, PSI, mmHg, hPa, inH2O, mmH20, kPa, psi
BACK
As you scroll up or down the side LEDs illuminate to point to the active line
NOTE: To “EXIT” the “MENU” at any time simply move the rotary switch to any position other than “Menu”. Any changes that have not been
“entered” will be ignored.
MAIN MENU SUB MENU OPTIONS / COMMENTS
SCREEN CONTRAST Factory setting is 14
BACKLIGHT 0 to 300 secs
AUX Enables users to customize the parameters on the AUX display:
LINE 1, LINE 2, LINE 3, LINE 4, LINE 5, LINE 6, BACK
BACK
As you scroll up or down the side LEDs illuminate to point to the active line
NOTE: To “EXIT” the “MENU” at any time simply move the rotary switch to any position other than “Menu”. Any changes that have not been
“entered” will be ignored.
MAIN MENU SUB MENU OPTIONS / COMMENTS
REPORT AUX Stored AUX tests
VIEW, DEL ALL, BACK
COMBUSTION Stored combustion tests:
VIEW, DEL ALL, BACK
COMMISSION Stored commission tests:
VIEW, DEL ALL, BACK
PRS/TEMP Stored pressure tests:
VIEW, DEL ALL, BACK
EXCH Stored exchange tests:
VIEW, DEL ALL, BACK
ROOM CO Stored room CO tests:
VIEW, DEL ALL, BACK
HEADER LINE 1
LINE 2
BACK
BACK
As you scroll up or down the side LEDs illuminate to point to the active line
NOTE: To “EXIT” the “MENU” at any time simply move the rotary switch to any position other than “Menu”. Any changes that have not been
“entered” will be ignored.
MAIN MENU SUB MENU OPTIONS / COMMENTS
SERVICE CODE Password protected for authorized service
agents only. Leave set to 000000.
As you scroll up or down the side LEDs illuminate to point to the active line
NOTE: To “EXIT” the “MENU” at any time simply move the rotary switch to any position other than “Menu”. Any changes that have not been
“entered” will be ignored.
Find Quality Products Online at: sales@GlobalTestSupply.com
www.GlobalTestSupply.com
19
Page 20

USING THE C165 AS A THERMOMETER OR PRESSURE METER
Rotate the dial to the “PRS/TEMP” position.
The display will show:
Real time pressure reading.
Use the P1 connection for pressure sensor.
Use the T1 connection for the flow temperature sensor.
Use the T2 connection for the return temperature sensor.
Real time temperature difference.
If using larger bore tubing when performing pressure tests:
Push ‘orange’ tube over the rim of the spigot
to ensure a gas tight seal.
This may not produce a gas tight seal.
The standard printout for this mode is as follows:
20
Find Quality Products Online at: sales@GlobalTestSupply.com
www.GlobalTestSupply.com
Page 21

MEASURING FLUE GASES
After the countdown is finished and the analyzer is correctly set up, put its flue probe into the appliance’s sampling point. The tip of the probe should
be at the center of the flue. Use the flue probe’s depth stop cone to set the position.
With balanced flues, make sure the probe is positioned far enough into the flue, so no air can ‘back flush’ into the probe.
NOTE: Ensure that the flue probe handle does not get hot!
Make sure you do not exceed the analyzer’s operating specifications. In particular:
• Do not exceed the flue probe’s maximum temperature (1112°F)
• Do not exceed the analyzer’s internal temperature operating range
• Do not put the analyzer on a hot surface
• Do not exceed the water trap’s levels
• Do not let the analyzer’s particle filter become dirty and blocked
View the displayed data to ensure that stable operating conditions have been achieved and the readings are within the expected range.
Press and quickly release
to start the analyzer printing. The analyzer displays a series of bars until this is completed. Press and release the
key again to abort printing.
Make sure the printer is switched on, ready to accept data and its infrared receiver is in line with the analyzer’s emitter (on top of the analyzer).
CO PROTECTION PUMP OPERATION
CO Protection pump operation is totally automatic. When the analyzer measures a CO concentration of 2000ppm the pump is switched on. The main
pump is switched off and the display shows P-OFF until the gas in the sensor is below 2000ppm.
WOOD PELLS
Fuel type can be changed via “MENU” or “STATUS”
CO/CO
ratio.
2
Pump Off pump operating
Carbon dioxide (%).
Excess air %
Pressure reading
“DILUTE” flashes on the screen to indicate that the CO measurement has been diluted.
The time taken for the CO sensor to return to zero takes much longer after it has been exposed to high levels of CO.
The CO high warning still operates whenever the CO reading is above 400 ppm until the dilution pump operates.
21
Find Quality Products Online at: sales@GlobalTestSupply.com
www.GlobalTestSupply.com
Page 22

WHERE TO TEST
Air Conditioning / HeAt PumP
Suction Line:
• Temperature
Verify proper:
• Static Duct Pressures
• Temperature Differential
• Static Pressure Drop Across Coils
to condensing unit
Boiler & WAter HeAters & HigH effiCienCy modulAting Hot WAter systems
Boiler
Verify proper combustion:
• O2
• CO Air Free
• Stack Temp
• Stack Draft
• SSE
WAter HeAter
Draft
Verify proper combustion:
• O2
• CO
• Stack Temp
• Efficiency
He Boiler instAnt
W
Ater HeAters
Draft
Verify proper
combustion:
• O2
• CO
• Stack Temp
• Efficiency
Hi / Low fire Gas
Pressure
Send and Return
Water temp
furnACes: 80% furnACes: 90%
80% furnACe
Verify proper combustion:
• O2
• CO
• Stack Temp
• Vent Pressure
• Efficiency
Verify/Set Up
• Gas Pressure
90%+ furnACe
Verify proper combustion:
• O2
• CO
• Stack Temp
• Vent Pressure
• Efficiency
Verify/Set Up
• Gas Pressure
Test
• Limit Switch
• Pressure Switch
Verify proper operation:
• Static Duct Pressure
• Temperature Rise
• AC side Static Pressure
Drop across coils
22
Find Quality Products Online at: sales@GlobalTestSupply.com
www.GlobalTestSupply.com
Test
• Limit Switch
• Pressure Switch
Verify proper operation:
• Static Duct Pressure
• Temperature Rise
• AC side Static Pressure
Drop across coils
Page 23

furnACes (Continued): AtmosPHeriC, gAs & oil
AtmosPHeriC furnACe
Draft
Verify proper
• Temperature Rise
• AC side Static Pressure Drop across coils
Verify proper combustion:
• O2
• CO
• Stack Temp
• Efficiency
nAturAl gAs & ProPAne
Verify proper combustion:
• O2
• CO
• Stack Temp
• Vent Pressure
• Efficiency
Test
• Limit Switch
• Pressure Switch
Set Up
• Gas Pressure
Verify proper:
• Static Duct Pressure
• Temperature Rise
• AC side Static Pressure Drop across coils
oil furnACe
Verify proper combustion:
• O2
• CO
• Stack Temp
• Stack Draft
• Efficiency
Test & Verify:
• Smoke
Set Up
• Over Fire Draft
Verify proper
• Static Duct Pressure
• Temperature Rise
• AC side Static Pressure Drop across coils
23
Find Quality Products Online at: sales@GlobalTestSupply.com
www.GlobalTestSupply.com
Page 24

ANALYZER PROBLEM SOLVING
If any problems are not solved with these solutions, contact us or an authorized repair center.
FAULT SYMPTOM CAUSES / SOLUTIONS
Oxygen too high
CO2 too low
Batteries not holding charge
Analyzer not running on mains adapter.
Analyzer does not respond to flue gas Particle filter blocked.
Net temperature or Efficiency calculation incorrect. Ambient temperature set wrong during Automatic Calibration
Flue temperature readings erratic Temperature plug reversed in socket.
T flue or ΔT displays (-N/F-) Probe not connected.
EFF or X-Air displays (- O
Analyzer just continually beeps Turn dial back to “MENU” and press “ENTER”
2++-) CO2 reading is below 2%.
2
Air leaking into probe, tubing, water trap, connectors or internal to analyzer.
Batteries exhausted.
AC charger not giving correct output.
No fuse
Probe or tubing blocked.
Pump not working or damaged with contaminants.
Faulty connection or break in cable or plug.
Faulty connection or break in cable or plug.
02 > 18%
Turn dial back to “EXCH TEST” and press “ENTER”
FREQUENTLY ASKED QUESTIONS
Q: What is the countdown time on a C165
A: There are two levels of countdown (aka fresh air purge) on a C165.
From first switch on if ‘cold’ (more than 41°F from the temperature at which calibrated) = 90 secs.
From first switch on if ‘warm’ (within 41°F of the temperature at which calibrated) = 60 secs
Find Quality Products Online at: sales@GlobalTestSupply.com
www.GlobalTestSupply.com
Page 25

ANNUAL SERVICE & RECERTIFICATION
What You Get
Sensor replacement (or calibration)
30-point inspection by factory trained professionals
Firmware and software updates
Certificate of calibration
Another 12-month warranty on the analyzer
Return unit freight paid – within continental US and Canada
List of work performed, and parts replaced
RECERTIFICATION SERVICES
Turnaround
Before starting any service work, we stabilize your analyzer in ambient air
Our standard turnaround is 2 working days
If your unit arrives on Monday, and the recertification service is paid for, our aim is to ship it back to you no later than Wednesday. If your unit
requires extensive diagnostic or repair work, we will contact you with a quotation and estimated repair time.
Pre-authorizing payment for your repair on a credit card saves time. We will ask you for authority to charge the full cost of a service but if we only
calibrate your unit, we’ll only charge the calibration fee - no tricks!
Charges will be applied upon completion of the recertification service
Shipping time for most repairs is 1 to 3 days. UEi pays return freight.
25
Find Quality Products Online at: sales@GlobalTestSupply.com
www.GlobalTestSupply.com
Page 26

RETURNING YOUR ANALYZER
Before returning your analyzer to UEi Test Instruments, please ensure that you enclose:
- RMA label if you have used our online booking in process
- Your full contact details
- A daytime telephone number
- Details of faults you might have experienced
- Any relevant accessories (i.e. probe, printer, adaptor & leak detectors). Any accessories that are returned will be checked
Packing Your Analyzer
Put analyzer and probes back in their cases
The case should be put into a box with 1-2 inches of packing on each side for protection. When shipping an analyzer only, use a shoe-box size
container with enough packing to fill the empty space.
Print out the service paperwork sent to you and include it in the packaging.
NOTE: If you are having specific problems that you want evaluated, please add those comments on the paper work in detail.
Include any accessories that may be related to issues with the analyzer
Please be sure no personal items are packed with the return equipment
You pay to ship your analyzer to us and we’ll pay the return freight back to you – within continental US and Canada.
We advise the use of couriers that provide insurance and tracking services
WHEN WE RECEIVE YOUR ANALYZER:
Our Service Engineers will inspect the analyzer & accessories. If you haven’t booked and paid online, they will contact you to confirm the total
recertification cost.
Once accepted, the work will be carried out and on completion, returned to you.
COLD WEATHER PRECAUTIONS
It is important you keep your flue gas analyzer in a warm place overnight
Electronic devices that become really cold, by being left in a vehicle overnight, suffer when taken into a warm room the next morning. Condensation
may form which can affect the analyzer’s performance & cause permanent damage. See operating and storage temperature specifications.
Electrochemical sensors used in flue gas analyzers can be affected by condensation or water being sucked into the analyzer, as the small apertures
on top of sensors can become blocked with water, stopping sensors seeing flue gas. When this happens, oxygen or carbon dioxide reading will
display as “—” & sensors may be permanently damaged
If you think that your analyzer is affected by condensation or water ingress, it may be possible to rectify the problem yourself. Simple leave the
analyzer running in a warm place, with the pump ‘ON’ sampling fresh air for a few hours (use mains adapter/battery charger if needed). If, after
doing this, you still experience problems please contact our Service Centers.
26
Find Quality Products Online at: sales@GlobalTestSupply.com
www.GlobalTestSupply.com
Page 27

ANALYZER SPECIFICATION
PARAMETER RANGE RESOLUTION ACCURACY
Temp Measurement
Flue Temperature
Inlet Temperature
(Internal sensor)
Inlet Temperature
(External sensor)
Flue Gas Measurement
2
*
Oxygen
Carbon monoxide
Carbon dioxide
Efficiency (Net or Gross)
Efficiency High (C)
Excess Air
CO/CO2 ratio
1
*
1
*
2
*
2
*
2
*
2
*
32-1112°F
32-122°F
32-1112°F
0-21%
0-20ppm
21-2,000ppm
Above 2000ppm
Purge pump
operates
0-20%
0-99.9%
0-119.9%
0-250%
0-0.999
0.1°F
0.1°F
0.1°F
0.1%
1ppm
0.1%
0.1%
0.1%
0.1%
0.0001
±3.6°F
±0.3% reading
±1.8°C
±0.3% reading
±3.6°F
±0.3% reading
±0.3%
±3ppm
±5% reading
unspecified
±0.3% volume
±1.0% reading
±1.0% reading
±0.2% reading
±5% reading
1
Nitric Oxide Sensor
(optional)
0 to 100ppm
Overrange to 1500ppm
1ppm + 2ppm <30ppm
+5ppm <100ppm
+5% reading >100ppm
*
1
*
Pressure (differential)
Nominal range 32”
±0.2 mbar (±0.080 inWC)
±0.005 mbar (±0.002 inWC)
Maximum 0.001 mbar
Maximum over range without
damage to sensor is 60”
±1 mbar (±0.401 inWC)
±80 mbar (±32 inWC)
<25 mbar
(0.001 inWC < 10.016)
±0.03 mbar (±0.080 inWC)
±3% of reading: same
Pre-programmed Fuels Natural gas, Propane, Butane, LPG, Light Oils (28/35 sec), Wood Pellets, Town Gas, Coke Gas, Bio Oil, Bio Gas
User programmed Fuels 5 user defined fuels
Storage Capacity 60 Combustion tests
20 Pressure & Temperature tests
20 Heat Exchange tests
20 Temperature tests
20 Room CO tests
20 Commissioning tests
*1 Using dry gases at STP
*2 Calculated
27
Find Quality Products Online at: sales@GlobalTestSupply.com
www.GlobalTestSupply.com
Page 28

ANALYZER SPECIFICATION CONT.
Carbon Dioxide resolution is 0.01% below 1% measured value.
Ambient Operating Range 32°F to 113°F 10% to 90% RH non-condensing
Storage Temperature Range 0°F to 120°F (-18°C to 50°C)
Battery Type / Life 4 AA cells
>8 hours using Alkaline AA cells
Chargers (optional) 100-240v charger, for NiMH batteries only
Dimensions
Weight:
Handset:
Probe:
CO Protection Pump: Operates at 2000ppm measured CO.
0.8kg handset with protective rubber cover
7.87 x 1.77 x 3.5 in (200 x 45 x 90mm)
11.8 in (300mm) long including handle.
2.3 dia. x 9.4 in (6mm dia. x 240mm) long stainless-steel shaft with 6.5ft
(2m) long neoprene hose. Type K thermocouple
ELECTROMAGNETIC COMPATIBILITY
European Council Directive 89/336/EEC requires electronic equipment not to generate electromagnetic disturbances exceeding defined levels and
have adequate immunity levels for normal operation. Specific standards applicable to this analyzer are stated below.
As there are electrical products in use pre-dating this Directive, they may emit excess electromagnetic radiation levels and, occasionally, it may be
appropriate to check the analyzer before use by:
Use the normal start up sequence in the location where the analyzer will be used.
Switch on all localized electrical equipment capable of causing interference.
Check all readings are as expected. A level of disturbance is acceptable.
If not acceptable, adjust the analyzer’s position to minimize interference or switch off, if possible, the offending equipment during your test.
At the time of writing this manual (July 2018) UEi Test Instruments is not aware of any field-based situation where such interference has occurred,
and this advice is only given to satisfy the requirements of the Directive. This product has been tested for compliance with the following generic
standards and is certified to be compliant.
EN 61000-6-3 : 2011
EN 61000-6-1 : 2007
Specification EC/EMC/KI/KANE458 details the specific test configuration, performance and conditions of use.
END OF LIFE DISPOSAL
The Waste Electrical or Electronic Equipment (WEEE) Directive requires countries in the EU to maximize collection and environmentally responsible
processing of these items. Products are now labelled with a crossed out wheeled bin symbol to remind you that they can be recycled.
Note: Batteries used in this instrument should be disposed of in accordance with current legislation and local guidelines.
28
Find Quality Products Online at: sales@GlobalTestSupply.com
www.GlobalTestSupply.com
Page 29

EN 50379 REGULATED INSTRUCTIONS
EN 50379 Section 4.3.2 “Instructions” defines a number of specific points that must be included in the relevant instruction manuals.
The paragraph numbering below relates to that section of EN 50379.
a) The C165 is compliant the EN 50379 Part 2 and Part 3.
b) The C165 is intended to be used with the following fuels:
Natural gas, Propane, Butane, Light oil (28/35 sec), Wood pellets, Town Gas, Coke Gas, Bio Oil, Bio Gas
c) The C165 is designed for use with either non-rechargeable alkaline AA cells or rechargeable NiMH AA cells. Four cells are needed. Types
cannot be mixed. Under no circumstances should any attempt be made to recharge alkaline cells.
The battery charger supplied with the C165 is rated for indoor use only. Its voltage input must be in the range 100 – 240V AC at 50 – 60Hz
with a current capability of 0.3 A. The chargers output voltage is 9V DC at a maximum of 0.66A.
The charger has no user serviceable components.
Only a correctly specified and rated charger must be used with the C165.
d) The C165 is not designed for continuous use and is not suitable for use as a fixed safety alarm.
e) An explanation of all the symbols used on the analyzer’s display is given in Display Parameters Pg. 8 of this manual.
f) The recommended minimum time required to perform one complete measurement cycle and achieve correct indication of the measured
values in EN 50379 Part 2 is 110 seconds. This is based on the T90 times defined in the standard, always assuming that parameters being
measured have reached stability. This time is the summation of the times for a draught test (10 secs) and a combustion test (90 secs) plus
the time to move the hose connection from the pressure input to the water trap (10 secs)
g) The recommended minimum time required to perform one checking procedure in EN 50379 Part 3 is 110 seconds as described in section f)
above.
h) Some commonly occurring materials, vapor or gases may affect the operation of the C165 in the long or the short term though in normal
use UEi is not aware of any specific issues that have affected the product. The following list is included to satisfy the stated requirements
of EN 50379: Solvents, Cleaning fluids, Polishes, Paints, Petrochemicals, Corrosive gases
i) The C165 is fitted with an electrochemical CO sensor and an infra-red CO2 sensor which have an expected life of more than 5 years. The
calibration of these sensors must be confirmed on an annual basis. The batteries have an expected operational life of more than 500 re-
charge cycles.
j) The C165 is designed to operate at ambient temperatures in the range 32°F to 113°F with relative humidity of 10% to 90% non-condens-
ing. While it is recommended that the analyzer is given the protection of a carry case during transportation it is not required for normal
operation.
k) The C165 has an initial start-up delay following switch on of between 90 and 60 seconds dependent on ambient temperature. There is no
additional delay after battery replacement.
l) Most sensors used in combustion analyzers give a zero output when they fail, and it is widely recommended that analyzers are regularly
checked (also known as a bump test) using either a can of test gas or a known source of combustion products.
The C165 must have its calibration checked on an annual basis and be issued with a Certificate of Calibration.
The sensor within the C165 can only be replaced by UEi Test Instruments.
The water trap should be checked on a regular basis while the analyzer is in use (every few minutes) as the amount of condensate gener-
ated varies with the fuel type, atmospheric conditions and the appliances operating characteristics.
The particle filter should be checked at least on a daily basis when using ‘clean’ fuels and more often when using liquid or solid fuels.
Detailed instructions regarding the changing of the filter and the emptying of the water trap are given in “Before Using the Analyzer” Pg. 7
of this manual.
m) WARNING!
When using a C165 to test an appliance a full visual inspection of the appliance, in accordance with its manufacturer’s instructions, must
also be carried out.
31
Find Quality Products Online at: sales@GlobalTestSupply.com
www.GlobalTestSupply.com
Page 30

WARRANTY INFORMATION
The C165 combustion analyzer is warranted for one year including sensors. If within the warranty period your instrument should become inoperative
from such defects, the unit will be repaired or replaced at UEi’s option. This warranty covers normal use and does not cover damage which occurs
in shipment or failure which results from alteration, tampering, accident, misuse, abuse, neglect or improper maintenance (calibration). Batteries
and consequential damage resulting from failed batteries are not covered by warranty. Any implied warranties, including but not limited to implied
warranties of merchantability and fitness for a particular purpose, are limited to the express warranty. UEi shall not be liable for loss of use of the
instrument or other incidental or consequential damages, expenses, or economic loss, or for any claim or claims for such damage, expenses or
economic loss. A purchase receipt or other proof of original purchase date will be required before warranty repairs will be rendered. Instruments out
of warranty will be repaired (when repairable) for a service charge. Warranty only covers hardware and does not extend to software applications.
Contact UEi for specific warranty and service information.
This warranty gives you specific legal rights. You may also have other rights which vary from state to state.
17508 10/18
Find Quality Products Online at: sales@GlobalTestSupply.com
www.GlobalTestSupply.com
 Loading...