

Page 1
AK940
Digital Refrigerant System Analyzer
99 Washington Street
INSTRUCTION MANUAL
ENGLISH
Digital Refrigerant Analyzer
AK940
MAXMIN
Psi
kPa
Bar
LOW START PRS HIGH END PRS
VAPOR SAT
T-LOW
SUPERHEAT
MPa
°C
°F
MIN
PRS
LIQUID SAT
T-HIGH
SUBCOOL
MAX
TEST
R
°C
°F
TIME
P
T
UNITS
REFZERO
VAC REF
Visit us at www.TestEquipmentDepot.com
°C
°F
Melrose, MA 02176
Phone 781-665-1400
Toll Free 1-800-517-8431
Page 2

TABLE OF CONTENTS
FEATURES .......................................................................................................... 4
GENERAL SPECIFICATIONS
QUICK START INSTRUCTIONS
IMPORTANT SAFETY WARNINGS
SYMBOLS
OVERVIEW
OPERATING INSTRUCTIONS
DISPOSAL
CLEANING
STORAGE
WARRANTY
.......................................................................................................... 8
................................................................................................8 - 11
Min/Max Button ...........................................................................11 - 12
Zero Pressure Button ........................................................................... 12
Refrigerant Selection Button .............................................................. 13
Unit Selection Button ........................................................................... 14
Pressure Test/∆P (Delta Pressure) Button ........................................... 15
Superheat and Subcool ....................................................................... 16
Vapor/Liquid Saturation Temperatures .............................................. 17
T-Low and T-High/∆T (Delta Temperature) ..................................17 - 18
Recovering Refrigerant; Evacuating a System;
Adding Refrigerant to a System ......................................................... 18
Connecting AK940 ............................................................................... 19
Battery Replacement ........................................................................... 19
........................................................................................................ 20
....................................................................................................... 20
........................................................................................................ 20
.................................................................................................... 20
.......................................................................... 4
....................................................................... 5
.........................................................6 - 7
...................................................................... 11
3
Page 3

FEATURES
• Low and High Side Pressure
• Vapor and Liquid Saturation
• High and Low Side Temperatures
• Superheat
• Subcool
• Pressure Differential
• Tempearture Differential
• Digital Manifold w/ 4 valves
• Max/Min
• 12 Parameter Backlit display
• Reads in Psi, kPa, Bar, Mpa
• Bargraph (Relative)
• Zero to recalibrate
• 64 Refrigerant options
• Selectable ˚F or ˚C
• Over molded grip
• Thermistor temperature ports
GENERAL SPECIFICATIONS
• Operating Temperature: -4˚ to 122˚F (-20˚ to 50˚C)
• Storage Temperature -4˚ to 122˚F (-20˚ to 50˚C)
• Dimensions: 7 3/4” X 7 1/2” X 3 1/2”
• Item Weight: 2.97 lbs
• Calibration: Recommended annually
• Battery Type: 9V X 1
4
Page 4

QUICK START INSTRUCTIONS
• Install 1 (9V) battery into back of analyzer.
• Press Power (Green) button to turn on analyzer.
• Display: 12 Parameter screen:
1. Low Side Pressure value.
2. High Side Pressure value.
3. Vapor Saturation temperature.
4. Liquid Saturation temperature.
5. T-Low.
6. T-High.
Display will not show temperatures if sensors are NOT connected to the Temperature
Clamp Sensor ports.
7. Superheat.
8. Subcool.
9. Refrigerant selected.
10. Time: (HH:MM) Test Duration.
11. ∆P (Delta pressure).
12. ∆T (Delta temperature).
• Unit of Measurement.
• Low Side Relative Pressure Bargraph: Each segment is 0.25 Psi.
• High Side Relative Pressure Bargraph: Each segment is 1.0 Psi.
• The Relative Bargraph shows real time changes in pressure. The center bar is
stable. If the pressure is increasing, the bars will go to right. If the pressure is
decreasing, the bars will go to the left.
• Review and follow all Important Safety Warnings (see page 6).
• Connect the AK940 to the system to be tested.
• You are now ready to test.
NOTE: See diagram (page 19) – Connecting AK940 in Operating Instructions.
5
Page 5

IMPORTANT SAFETY WARNINGS
WARNING
Read entire Safety Notes section regarding potential hazard and proper instructions before
using this meter. In this manual the word “WARNING” is used to indicate conditions or
actions that may pose physical hazards to the user. The word “CAUTION” is used to indicate
conditions or actions that may damage this instrument.
WARNING
• WARNING: DO NOT exceed Maximum Pressure Range: 725 psi
This analyzer’s specified maximum pressure range.
• WARNING: Proof Pressure: 1000 psi
This is the pressure limit applied to the sensors without causing permanent damage.
Damage resulting from exceeding proof pressure level will void warranty and may cause
personal injury.
• WARNING: Burst Pressure: 1500 psi
This is the maximum overload pressure at which the analyzer sustains permanent
damage, seal leakage or fails entirely. Damage resulting from exceeding burst pressure
level will void warranty and may cause personal injury.
• Do not use the analyzer if it operates abnormally. Protection may be impaired.
• Do not operate this analyzer or service batteries around explosive gas, vapor or dust.
• Various refrigerants have been intentionally excluded for very significant reasons.
Never use refrigerants in this analyzer that are not listed in the Refrigerant Selection
menu or Operating Instructions.
• The refrigerant database in this analyzer may include refrigerants classified as
flammable. If such refrigerants are selected, the operator may need additional
certifications and/or training. Consult with your local and state governments and fully
comply with all requirements.
• Always inspect the sample hoses before each use. Replace the hoses if they appear
cracked, frayed, obstructed or fouled with oil.
• Always wear eye and skin protection when working with refrigerants. Escaping
refrigerants will present a freezing danger. Do not direct refrigerants vapors venting
towards the skin.
• Do not breathe refrigerant and lubricant vapor or mist. Exposure may irritate eyes, nose
and throat. If accidental system discharge occurs, immediately ventilate work area.
• Because this analyzer allows for various inputs including electrical and mechanical,
care must be taken to observe any ways that a shock hazard could develop. Wet or
humid conditions, along with damaged temperature sensor clamp could allow an
6
Page 6

electrical path across the analyzer and over wet hoses. Keep all interconnected
equipment clean, organized and in proper condition. Do not use the analyzer if you are not
qualified to recognize potential electrical faults.
CAUTION: To avoid damage to the analyzer, follow these guidelines:
• Do not allow pressures beyond what specifications are listed in this manual.
• Be aware that internal pressures can change unintentionally when equipment is
stored with pressure in the system during temperature changes. If subcooled liquid
refrigerant is trapped in a hose or manifold with no room for expansion, it may
result in dramatic pressure variations with seemingly small temperature changes.
Pressures can reach high enough levels to cause damage to the instrument’s
pressure sensors. Release liquid refrigerant from the hoses and manifold when
disconnecting from a system.
• Do not attempt to introduce liquid or samples heavily laden with oil into the analyzer.
• Do not use this analyzer on systems containing leak sealing chemicals.
These leak sealants can collect and harden in the analyzer, causing permanent
damage.
• Do not utilize any hose other than those supplied with the analyzer (or supplied by
UEi). The use of other hose types will introduce errors into the refrigerant analysis
and instrument calibration.
• Never obstruct the air intake, sample exhaust or case vent ports of the analyzer
during use.
WARNING
• The analyzer contains no internal user-serviceable parts other than batteries that
may be accessed through the battery cover. Do not open the analyzer other than
opening the battery cover.
WARNING
• To ensure safe operation and service of the analyzer, follow these instructions.
Failure to observe these warnings can result in severe injury or death.
• NOTE: It is unlawful to discharge or exhaust refrigerants into the atmosphere. It is
recommended to recycle or recover refrigerants. Check with your local government
agencies for refrigerant handling regulations.
WARNING
• This analyzer is designed for trained trade professionals who are familiar with the
hazards of their trade. Observe all recommended safety procedures and use of
personal protective equipment. For vapor compression refrigeration, air
conditioning and heat pump systems; servicing of refrigeration systems requires
special training to ensure the safety of the service person, building, occupants, local
and global environments.
7
Page 7

SYMBOLS
Maximum measured value displayed
Degrees Fahrenheit
Polarity
Eye Protection Recommended
Minimum measured value displayed
Degrees Celsius
Warning or Caution
High Voltage Risk
OVERVIEW
A
B
B-1
B-2
B-3
B-4
B-5
B-6
Digital Refrigerant Analyzer
AK940
LOW START PRS HIGH END PRS
VAPOR SAT
T-LOW
SUPERHEAT
C
F
I
J-1 J-4
VAC REF
J-2
MAXMIN
Psi
kPa
Bar
MPa
°C
°F
R
°C
°F
TIME
P
T
UNITS
REFZERO
MIN
PRS
LIQUID SAT
T-HIGH
SUBCOOL
MAX
TEST
°C
°F
B-7
B-8
B-9
B-10
B-11
B-12
D
E
H
G
J-3
K-1 K-3K-2 K-4
8
Page 8

L
TH
M-1
WARNING!
DO NOT apply pressure above 600 psi.
Doing so may result in injury and will
void the warranty.
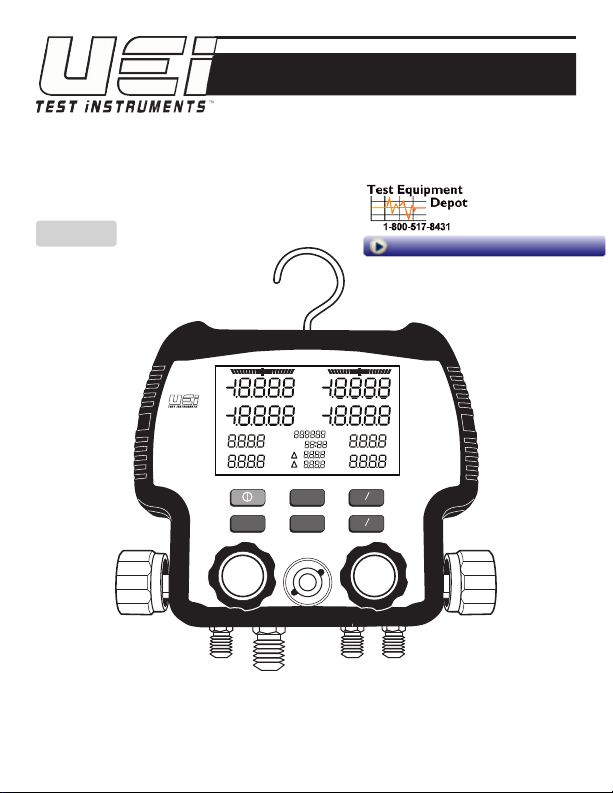
A. Hanger Hook: with 360˚ swivel.
B. Display: 12 Parameter screen:
1. Low Side Pressure value.
2. Vapor Saturation temperature.
3. Refrigerant.
4. T-Low.
5. Superheat.
6. ∆P (Delta pressure). Displayed numerically to right of ∆P.
7. High Side Pressure value.
9
TL
M-2
N
Page 9

8. Liquid Saturation temperature.
9. Time: (HH:MM) Test Duration. Time starts counting as soon as Analyzer is powered on.
Time (Test Duration) resets to zero when Pressure Test button is pressed. Time resets
to zero when Pressure Test mode is exited.
10. T-High.
11. Subcool.
12. ∆T (Delta temperature): Displayed numerically to right of ∆T.
• Unit of measurement.
• Temperature Scale.
• Low Side Relative Pressure Bargraph: Each segment is 0.25 psi.
• High Side Relative Pressure Bargraph: Each segment is 1.0 psi.
- The Relative Bargraph shows real time changes in pressure. The center bar is stable.
If the pressure is increasing, the bars will go to right. If the pressure is decreasing,
the bars will go to the left.
• Backlight: Backlight will stay on until turned off.
C. Power Button (Green):
• Press and hold to turn on analyzer. Press briefly when analyzer is on to turn on Backlight.
Press briefly to turn off Backlight. Press and Hold to turn analyzer off.
• Auto power off after 30 minutes.
D. Units Button: Changes unit of measurement for pressure and temperature scale.
E. Min/Max Button:
• Used to Capture Maximum and Minimum values.
F. Zero Button: Used to zero analyzer and compensate for ambient pressure changes or
sensor drift.
G. Refrigerant Button: Used to select desired refrigerant.
H. Pressure Test Button: Used to start and stop pressure test.
I. Site Glass: Monitor refrigerant flow.
J. Flow Valves:
1. Low Side Flow Valve (Blue): Controls flow through low side port.
2. Vacuum Flow Valve (Yellow): Controls the flow through the vacuum port.
3. Refrigerant Flow Valve (Green): Controls flow through the refrigerant port.
4. High Side Flow Valve (Red): Controls flow through high side port.
10
Page 10

K. Hose Connection Ports:
1. Low Side Pressure Port: left side, 1/4” Port.
2. Vacuum Port: left middle, 3/8” Port; used as a common connection to vacuum pump or
recovery unit.
3. Refrigerant Port: right middle, 1/4” Port; used as a common connection to refrigerant
supply tank.
4. High Side Pressure Port: right side, 1/4” Port.
L. Battery Cover: Easy access for replacing batteries.
M. Temperature Sensor Clamp Ports: Connect the temperature sensor clamps for
measurements.
1. T-High port.
2. T-Low port.
N. Maximum pressure Warning label
OPERATING INSTRUCTIONS
Min/Max Button:
MAXMIN
Psi
kPa
Bar
MPa
LOW START PRS HIGH END PRS
Digital Refrigerant Analyzer
AK940
VAC REF
VAPOR SAT
T-LOW
SUPERHEAT
°C
°F
LIQUID SAT
R
°C
°F
TIME
P
T
UNITS
REFZERO
°C
°F
T-HIGH
SUBCOOL
MIN
MAX
PRS
TEST
MIN
MAX
• Default = MAXMIN
• Press x1 = MAX
• Press x2 = MIN
11
Page 11

• Press MIN/MAX button to activate MAX/MIN on display.
• Press to toggle between MAX value and MIN value displayed.
• Press and hold to return to live readings.
Zero Pressure Button
Psi
LOW
ZERO
Digital Refrigerant Analyzer
AK940
PRS HIGH
VAPOR SAT
UNITS
REFZERO
PRS
ºF
LIQUID SAT
MIN
MAX
PRS
TEST
VAC REF
• NOTE: It is recommended to Zero Pressure by each time before using the analyzer.
• This operation should be performed especially if the analyzer has been dropped or
maximum pressure has been exceed.
• Press and hold the Zero button.
• The display will read zeros on both Low Side and High Side Pressures.
12
Page 12

Refrigerant Selection Button
• Change the refrigerant selected.
• To select another refrigerant other than the one displayed.
• Press the REF button to scroll slowly though available refrigerants.
Press and hold to scroll quickly through available refrigerants.
Psi
LOW
REF
Digital Refrigerant Analyzer
AK940
PRS HIGH
VAPOR SAT
UNITS
PRS
ºF
LIQUID SAT
MIN
MAX
PRS
TEST
REFZERO
VAC REF
• Refrigerants included in this analyzer:
R11 R12 R13 R14 R21 R22 R23 R32
R41 R114 R115 R123 R124 R134A R143A R176
R218 R236EA R236FA R245CA R290 R401A R401b R401C
R402A R402b R403A R403b R404A R406A R407A R407b
R407C R408A R409A R410A R410b R411b R412A R413A
R414A R416A R417A R420A R421A R422A R422b R422d
R423A R424A R427A R434A R437A R438A R501 R502
R503 R504 R507 R600A R601 R601A R718 R1234yF
13
Page 13

Unit Selection Button
• Change the measured unit for pressure and temperature.
• Press the UNITS button repeatedly to scroll the Unit options.
• Scrolling will display Scale in Fahrenheit with unit, then Scale in Celsius with unit.
MAXMIN
Psi
kPa
Bar
MPa
LOW START PRS HIGH END PRS
Digital Refrigerant Analyzer
AK940
VAPOR SAT
T-LOW
SUPERHEAT
°C
°F
LIQUID SAT
R
°C
°F
TIME
P
T
UNITS
REFZERO
°C
°F
T-HIGH
SUBCOOL
MIN
MAX
PRS
TEST
UNITS
VAC REF
• Scale and Units included in this analyzer (in order displayed):
- Degree F/Psi
- Degree F/kPa
- Degree F/Bar
- Degree F/MPa
- Degree C/Psi
- Degree C/kPa
- Degree C/Bar
- Degree C/MPa
• Selecting the Scale (Fahrenheit or Celsius), will display for: Vapor and Liquid
Saturation temperature, T- Low and T-High and ∆T.
14
Page 14

Pressure Test/∆P (Delta Pressure) Button
• NOTE: see diagram (page 19) – Connecting AK940 in Operating Instructions.
• Connect the analyzer to the system.
• Select appropriate refrigerant.
Psi
START
Digital Refrigerant Analyzer
AK940
PRS END
VAPOR SAT
UNITS
PRS
ºF
LIQUID SAT
PRS
MIN
MAX
PRS
TEST
REFZERO
TEST
VAC REF
• Press Pressure Test button to start pressure test. Press again to stop pressure test.
• When Pressure Test button is pressed, Start Pressure will appear on left side
of display (where Low Pressure appears); When Pressure Test button is
pressed again, End Pressure appears on the right side of the screen (where
High Pressure appears).
• Press and hold to return to live readings.
WARNING
: Maximum Pressure Range: 725 psi
WARNING: Proof Pressure: 1000 psi
WARNING: Burst Pressure: 1500 psi
While in Pressure Test mode the following options are not available:
• Unit Selection
• Refrigerant Selection
• Min/Max mode
• Superheat and Subcool
15
Page 15

Superheat and Subcool
Psi
kPa
Bar
MPa
LOW START PRS HIGH END PRS
VAPOR SAT
T-LOW
SUPERHEAT
InHg
°C
°F
LIQUID SAT
R
°C
°F
TIME
°C
°F
T-HIGH
P
T
SUBCOOL
MIN
MAX
UNITS
PRS
TEST
REFZERO
Digital Refrigerant Analyzer
AK940
VAC REF
• NOTE: see diagram (page 19) – Connecting AK940 in Operating Instructions.
• Connect the analyzer to the system.
• Select appropriate refrigerant.
• The AK940 can calculate and display both superheat and subcool simultaneously.
• Superheat: Attach the temperature sensor clamp on the suction line between the
evaporator and the compressor, no closer than 6 inches to the compressor.
• Subcool: Attach the temperature sensor clamp on the liquid line between the
condenser and the expansion valve (TXV), as close to the service port as possible.
• After the turning on the system or making any adjustments to the system, wait 15
minutes before charging by superheat or subcool to ensure the system is running
correctly.
• To add or remove refrigerant, follow charging or recovery practices from manufacturer
over those in this manual. Let system stabilize for 15 minutes.
• NOTE: If subcooling or superheat is calculated to be negative, the AK940 displays
“- - - - “ to indicate a problem in the same way as a UEi DMM displays “OL’ when
there is an over range. The negative value indicates a problem in the cooling
system requiring further diagnostic review.
16
Page 16

Vapor/Liquid Saturation Temperatures
Psi
kPa
Bar
MPa
LOW START PRS HIGH END PRS
VAPOR SAT
T-LOW
SUPERHEAT
InHg
°C
°F
LIQUID SAT
R
°C
°F
TIME
°C
°F
T-HIGH
P
T
SUBCOOL
MIN
MAX
UNITS
PRS
TEST
REFZERO
Digital Refrigerant Analyzer
AK940
VAC REF
• NOTE: see diagram (page 19) – Connecting AK940 in Operating Instructions.
• Connect the analyzer to the system.
• Select appropriate refrigerant.
• Displays Vapor Saturation (VSAT) and Liquid Saturation (LSAT) temperatures
calculated from the pressures measured and the refrigerant selected.
T-Low and T-High/∆T (Delta Temperature)
• NOTE: see diagram (page 19) – Connecting AK940 in Operating Instructions.
• Connect analyzer to the system.
• Select appropriate refrigerant.
• Attach the Low Side temperature sensor clamp on the suction line between the
evaporator and the compressor.
• Attach the High Side temperature sensor clamp on the liquid line between the condenser
and the expansion valve (TXV).
• Displays T-Low and T-High and ∆T.
17
Page 17

Psi
kPa
Bar
MPa
LOW START PRS HIGH END PRS
Digital Refrigerant Analyzer
AK940
InHg
°C
°F
LIQUID SAT
VAPOR SAT
R
°C
°C
°F
°F
TIME
T-LOW
SUPERHEAT
T-HIGH
P
T
SUBCOOL
MIN
MAX
UNITS
PRS
TEST
REFZERO
VAC REF
WARNING
• Display will not show temperatures if sensors are NOT connected to the temperature
sensor clamp ports.
Recovering Refrigerant; Evacuating a System; Adding Refrigerant to a System
• NOTE: see diagram (page 19) – Connecting AK940 in Operating Instructions.
• Connect the analyzer to the system.
• Select appropriate refrigerant.
• To add or remove refrigerant, follow charging or recovery practices from manufacturer
over those in this manual. Let system stabilize for 15 minutes.
18
Page 18

Connecting AK940
Digital Refrigerant Analyzer
AK940
Psi
kPa
Bar
MPa
LOW START PRS HIGH END PRS
InHg
°C
°F
VAPOR SAT
R
°C
°F
TIME
T-LOW
P
T
SUPERHEAT
UNITS
REFZERO
VAC REF
LIQUID SAT
°C
°F
T-HIGH
SUBCOOL
MIN
MAX
PRS
TEST
TL
TH
WARNING!
DO NOT apply pressure above 600 p
Doing so may result in injury and will
void the warranty.
Blue
1/4” 3/8”
Yellow
1/4”
Red
1/4”
A. Low Side Temperature Sensor Clamp
Input Port
A
B
C
K
B. Low Side Pressure Hose Connection
Port
L
C. Vacuum Hose Port
M
D. Vacuum Pump
E. Recovery Unit
F. Condenser Unit
D
E
F
G
H
I
J
N
G. Compressor
H. Suction Service Port
I. Low Side Temperature Sensor Clamp
J. Low Side Refrigerant Line
K. High Side Temperature Sensor Clamp
O
Input Port
L. High Side Pressure Hose Connection
P
Port
Q
M. Refrigerant Hose Port
R
N. Refrigerant Tank
O. Discharge Service Port
S
P. High Side Temperature Sensor Clamp
Q. High Side Refrigerant Line
R. TXV/Expansion Valve
S. Evaporator Coil
Battery Replacement
• Remove the screws (Phillips-head) from the battery cover.
• Replace the old battery with new; 1 (9V) battery.
• Replace battery cover and screws.
19
Page 19

DISPOSAL
CAUTION: This symbol indicates that equipment and its accessories shall be subject
to separate collection and correct disposal.
CLEANING
Periodically clean your meter’s case using a damp cloth. DO NOT use abrasive, flammable liquids,
cleaning solvents, or strong detergents as they may damage the finish, impair safety, or affect the
reliability of the structural components.
STORAGE
Remove the batteries when instrument is not in use for a prolonged period of time. Do not expose to
high temperatures or humidity. After a period of storage in extreme conditions exceeding the limits
mentioned in the General Specifications section, allow the instrument to return to normal operating
conditions before using it.
WARRANTY
The AK940 Analyzer (only, not accessories) is warranted to be free from defects in materials and
workmanship for a period of one year from the date of purchase. If within the warranty period
your instrument should become inoperative from such defects, the unit will be repaired or replaced
at UEi’s option. This warranty covers normal use and does not cover damage which occurs in
shipment or failure which results from alteration, tampering, accident, misuse, abuse, neglect or
improper maintenance. Batteries and consequential damage resulting from failed batteries are not
covered by warranty.
Any implied warranties, including but not limited to implied warranties of merchantability and
fitness for a particular purpose, are limited to the express warranty. UEi shall not be liable for loss
of use of the instrument or other incidental or consequential damages, expenses, or economic
loss, or for any claim or claims for such damage, expenses or economic loss.
A purchase receipt or other proof of original purchase date will be required before warranty
repairs will be rendered. Instruments out of warranty will be repaired (when repairable) for a
service charge
Test Equipment Depot - 800.517.8431 - 99 Washington Street Melrose, MA 02176
Copyright © 2016 UEi. All Rights Reserved.
TestEquipmentDepot.com
17226 • 0616
 Loading...