

UEBO S400 User Manual

UEBO S400 User Manual
United Information Technology Co., Ltd.

Copyright & Trademark Statement
Trademarks of the UEBO and other names of the UEBO products are possessed by
United Information Technology Co., Ltd. Trademarks of the Microsoft, Windows, and
Windows sign are possessed by the Microsoft Corporation. Trademarks of the Apple,
iTunes, and Apple OS are possessed by the Apple.Inc. All the trademarks and brand
names are possessed by their owners. Specifications are subject to the revised version
if no notification is given.
Copyright (C) 2010 United Information Technology Co., Ltd. All rights are reserved.
About This Document
All the information in this document is reviewed for its correctness. If any error exists,
please feed back to us. United Information Technology (UIT) Co., Ltd. reserves the
right to revise the contents contained in this document if no notification is given.
Product Name: UEBO S400
Manual Version: 1.0
Delivery Date: May, 2010
Limited Warranty
United Information Technology (UIT) Co., Ltd. ensures that all components of the
UEBO S400 pass the all-round test before delivery and function well under the
common conditions. If any system fault occurs within the warranty period when the
product is running normally, sub-regional representatives and authorized vendors of the
United Information Technology (UIT) Co., Ltd. are responsible to provide free
maintenance services for the customers. United Information Technology (UIT) Co.,
Ltd. is not responsible for any damage and loss of the data caused by the product. It is
recommended for you to back up the data if necessary.

Preface
About This Manual
As a 4-disk-slot storage device that features superior performance and strong RAID
management mechanism, the UEBO S400 provides an extensive array of functions and
is tailored for small and medium-sized enterprises, office and home applications. The
UEBO S400 serves as an IP server or a storage extension destination and backup
destination of the PC and supports centralized file storage, cross-platform file sharing,
and remote access. In addition, the UEBO backup software provides double-protection
for the user data. The humanized features such as embedded BT client software,
one-touch copy, and streaming service bring users a new storage experience. This
document describes the features, installation and hardware maintenance.
The delivery-attached guides of the UEBO S400 serial storage products are as follows:
Guide Name
Contents
UEBO S400 Hardware
Installation and
Maintenance
Describes the features, hardware structure, installation
and maintenance, and cable connection.
UEBO S400 User Manual
Provides the UEBO S400 configuration.
Conventions
This document provides conventions in symbols, keyboard operations, mouse
operations, and safety signs.
1. Symbols
Symbol
Description
< >
Indicates the key name, button name, and information entered in
the terminal by an operator, such as <Enter> that represents Enter
button and <a> for a letter, a.
[ ]
Indicates a man-machine interface, menu bar, data table, and field
name. Besides, the symbol, →, is used to separate the multi-level
menu. For example, [File→Create] indicates that [Create] is a
submenu under the [File] menu.
2. Keyboard operations
Format
Description
key 1+ key 2
Press the keys concurrently.For example, pressing
Ctrl+Alt+A means the three keys should be pressed
concurrently.

key 1, key 2
Press the keys in turn.For example, pressing Alt, F means
press Alt first and release, and then press F.
3. Mouse operations
Format
Description
Click
Press and release the left mouse button quickly.
Double-click
Press the left mouse button twice continuously and quickly
without moving the pointer.
Right-click
Press and release the right button quickly.
Drag
Press and hold the left mouse button and move the pointer to a
certain position.
Revision History
Product Version
Document Version
Document No.
Description
UEBO S400
V1.0
Initial draft.

-i-
Contents
Chapter 1 UEBO S400 Configuration Overview...........................................................1-1
1.1 overview............................................................................................................................................. 1-1
1.2 Product Overview............................................................................................................................... 1-1
1.3 Specifications ..................................................................................................................................... 1-2
1.4 Configuration Mode ........................................................................................................................... 1-3
Chapter 2 UEBO Web Manager Configuration............................................................. 2-1
2.1 Overview ............................................................................................................................................ 2-1
2.2 Initial Settings .................................................................................................................................... 2-1
2.3 Option Instructions............................................................................................................................. 2-3
2.3.1 Restart, Logout, and Close ........................................................................................................ 2-3
2.3.2 Home......................................................................................................................................... 2-4
2.3.2.1.System Installation 2-4
2.3.2.2.Shortcut 2-6
2.3.2.3.System Summary 2-33
2.3.3 System Options ....................................................................................................................... 2-34
2.3.3.1.Basic Options 2-34
2.3.3.2.Advanced Options 2-37
2.3.4 Devices.................................................................................................................................... 2-45
2.3.4.1.Disks 2-45
2.3.4.2.External Storage 2-57
2.3.4.3.External Wireless Interface 2-60
2.3.5 Applications ............................................................................................................................ 2-62
2.3.5.1.Network Storage (NAS) 2-62
2.3.5.2.Backup Volume 2-79
2.3.5.3.iSCSI 2-82
2.3.5.4.Download 2-86
2.3.5.5.DDNS 2-92
2.3.5.6.Media Server 2-93
2.3.5.7.UEBO Backup Applications 2-96
Chapter 3 Host Connection ............................................................................................... 3-1
3.1 Overview ............................................................................................................................................ 3-1
3.2 iSCSI Host Connection Cases ............................................................................................................ 3-1
3.2.1 Windows Host Scenarios .......................................................................................................... 3-1

-ii-
3.2.2 Linux Host Scenarios .............................................................................................................. 3-11
3.3 NAS Client Usage ............................................................................................................................ 3-14
3.3.1 Windows Client ...................................................................................................................... 3-14
3.3.2 Linux Client ............................................................................................................................ 3-21
3.3.3 Mac OS Client......................................................................................................................... 3-23
Appendix A Acronyms and Abbreviations ....................................................................... 1
Appendix B Guide for the Streaming File Production of the Darwin
Streaming Server.................................................................................................................... 2

UEBO S400 User Manual
1-1
Chapter 1 UEBO S400 Configuration
Overview
1.1 overview
Description
This document describes the installation process and features of the UEBO S400 to
guide users to configure and utilize the UEBO S400.
1.2 Product Overview
Description
As a 4-disk-slot storage device that features superior performance and strong RAID
management mechanism, the UEBO S400 provides an extensive array of functions and
is tailored for small and medium-sized enterprises, office and home applications. The
UEBO S400 serves as an IP server or a storage extension destination and backup
destination of the PC and supports centralized file storage, cross-platform file sharing,
and remote access. In addition, the UEBO backup software provides double-protection
for the user data. The humanized features such as embedded BT client software,
one-touch copy, and streaming service bring users a new storage experience.
Features
The UEBO S400 uses the Power PC 460EX processor and DDR2 memory.
Therefore, the product performance is improved.
The UEBO S400 is equipped with two 1-GB iSCSI host channels and transmits
SCSI instructions and data over the Ethernet.
The UEBO S400 is with a small size and high capacity. The UEBO S400 is
equipped with four SATA-II 3.5-inch disks and supports the NAS and storage
area network (SAN) connection with high utility, reliability, and maintainability.
Besides, the UEBO S400 provides the NAS services and supports data sharing
protocols of multi-system platforms such as CIFS, NFS, and AFP.
The UEBO S400 is multifunctional and can be configured flexibly. According to
actual requirements, configuring the application storage scenarios can achieve
digital home application and storage sharing of the small-sized offices. This
provides a low-cost storage solution for enterprises.
UEBO S400 User Manual
1-2
1.3 Specifications
The following table lists the technical specifications of the UEBO S400:
Product Model
UEBO S400
Controller
Processor
Power PC 460EX 800Hz
Cache
RAM DDR2 512MB
RAID Level
RAID 0, 1, 5, and JBOD
Host Connection
Host Channel
RJ45x2
Transmission
Protocol
Supports CIFS, NFS, iSCSI, and FTP.
Network File
System
Support CIFS and NFS protocols.
Network Client
Supports the Windows, Linux, Unix, and Mac OS.
Applicable
Platform
Windows, Linux, Unix, and Mac OS
Storage Media
Disk Extension
SATA channels
Disk Quantity
Up to four disks; hot swap is not supported
Storage Capacity
Up to 8 TB
Hard Disk
Specifications
See Hard Disk Compatibility List
Management Functions
Management
Software
UEBO Web Manager
Storage
Management
System monitoring, disk management, RAID management,
virtual volume management, NAS, iSCSI, FTP, warless
network support, HTTP/FTP/BT download, one-touch copy,
streaming medias server, DDNS, and data backup.
Normal Features
Heat Dissipation
PWM fan
Power System
120 W power adapter
UEBO S400 User Manual
1-3
Average Power
80 W
Power Supply
Requirements
Input:100~240 V 2.0 A 50~60 Hz
Output:12 V~10 A
Temperature
5°C~55°C
Humidity
8%~90%
Dimension
196 mm (W) x 198 mm (H) x 165 mm (D)
Weight
2.45 KG (excluding the hard disk)
1.4 Configuration Mode
Description
Due to the embedded management software of the UEBO S400, users can manage the
storage through the Internet Explorer and use all the provided functions.
Network Topology
UEBO S400 User Manual
2-1
Chapter 2 UEBO Web Manager
Configuration
2.1 Overview
Description
This chapter provides the methods for the UEBO S400 configuration through the
introduction to the UBOX Manager configuration.
2.2 Initial Settings
Default Setting
In the default setting, the actual IP address of the eth1 is 192.168.0.100 while the IP
address of the eth2 is set to be the IP address obtained by the system automatically.
Connect the first network port to the Ethernet and ensure that the IP addresses of the
client and UEBO S400 are at the same network port. Start the UEBO S400, enter
192.168.0.100, and then log in to the UEBO Web Manager.
Login Interface
The login interface of the UEBO Web Manager is as follows:
The default login name and password is admin and 123456. Presently, Chinese and
English version pages are available.

UEBO S400 User Manual
2-2
Caution:
4. The UEBO S400 does not support the Opera Internet Explorer (IE).
UEBO Finder Tool Search
Run the UEBO Finder.exe (it does not need to be installed) on the Client which is at
the same network segment with the UEBO S400. Then click Refresh. The following
interface shows IP addresses of all the UEBO S400 which are at the same network
segment with the client.
Choose an IP address in the interface and click access to access the login interface of
the UEBO S400.
UEBO S400 User Manual
2-3
Enter the login name and password and click Login to log into the system. Then the
following page is displayed.
2.3 Option Instructions
Objective
Introduce functions, usage, and precautions of the options in the UEBO Web
Manager page.
2.3.1 Restart, Logout, and Close
Restart
Click on the upper right of the management page. The UEBO S400 is restarted. It
costs one or two minutes.
UEBO S400 User Manual
2-4
Caution:
5. When restarting the UEBO S400, ensure that the running program or device on
the server does not use the UEBO S400. Otherwise, service interruption and data
loss may occur when the UEBO S400 is restarted.
Logout
Click on the upper right of the management page. The management page of the
UEBO S400 is logged out.
Close
Click on the upper right of the management page. The UEBO S400 is closed
normally.
Caution:
When closing the UEBO S400, ensure that the running program or device on the server
does not use the UEBO S400. Otherwise, service interruption and data loss may occur
when the UEBO S400 is closed.
2.3.2 Home
2.3.2.1. System Installation
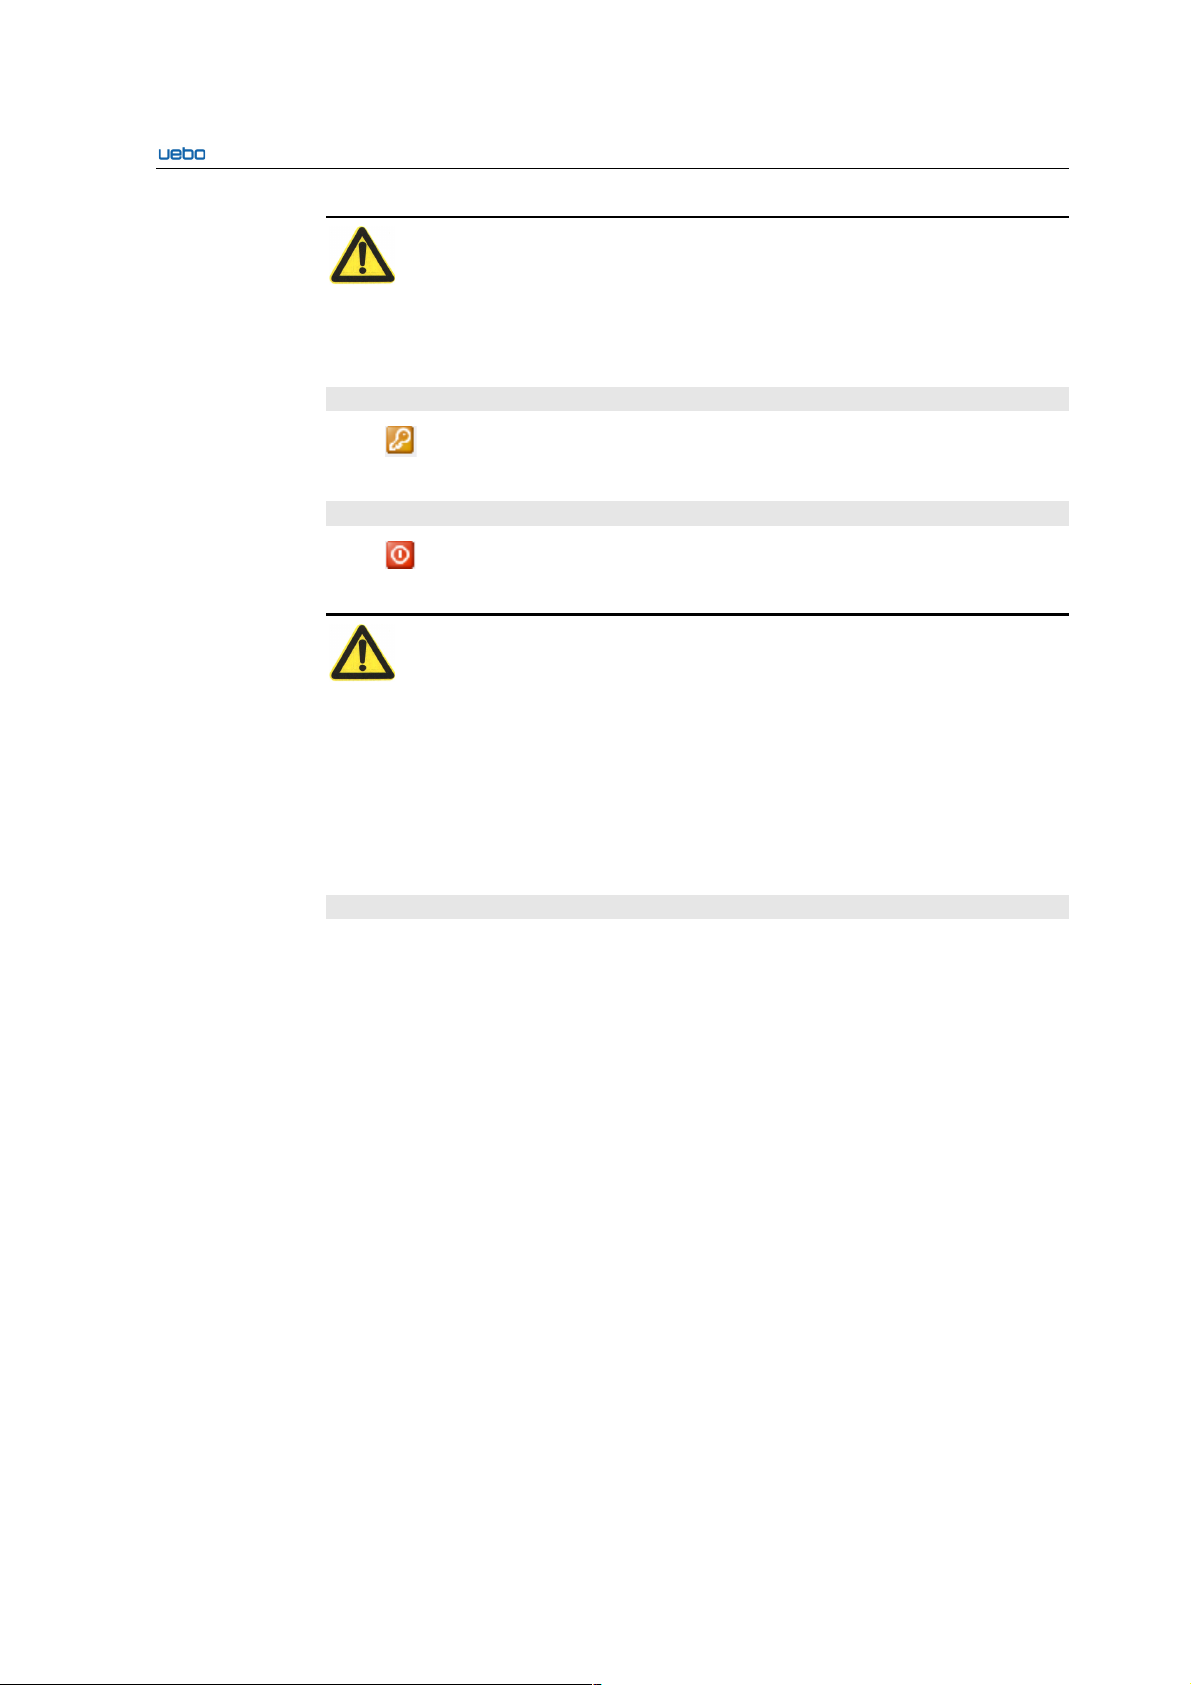
Disks Initialization
Plug the disk in the UEBO S400, connect the first port to the Ethernet, and enter
the 192.168.0.100 in the IE bar of the client after the UEBO S400 is restarted.
Log in to the UEBO Web Manager with the user name (admin) and password
(123456).
Choose Home > System install > Disks Initialization.
The Disk List interface is displayed.
Click Initialization to initialize the disks.
UEBO S400 User Manual
2-5
Caution:
6. A disk must be initialized before it is put into use.
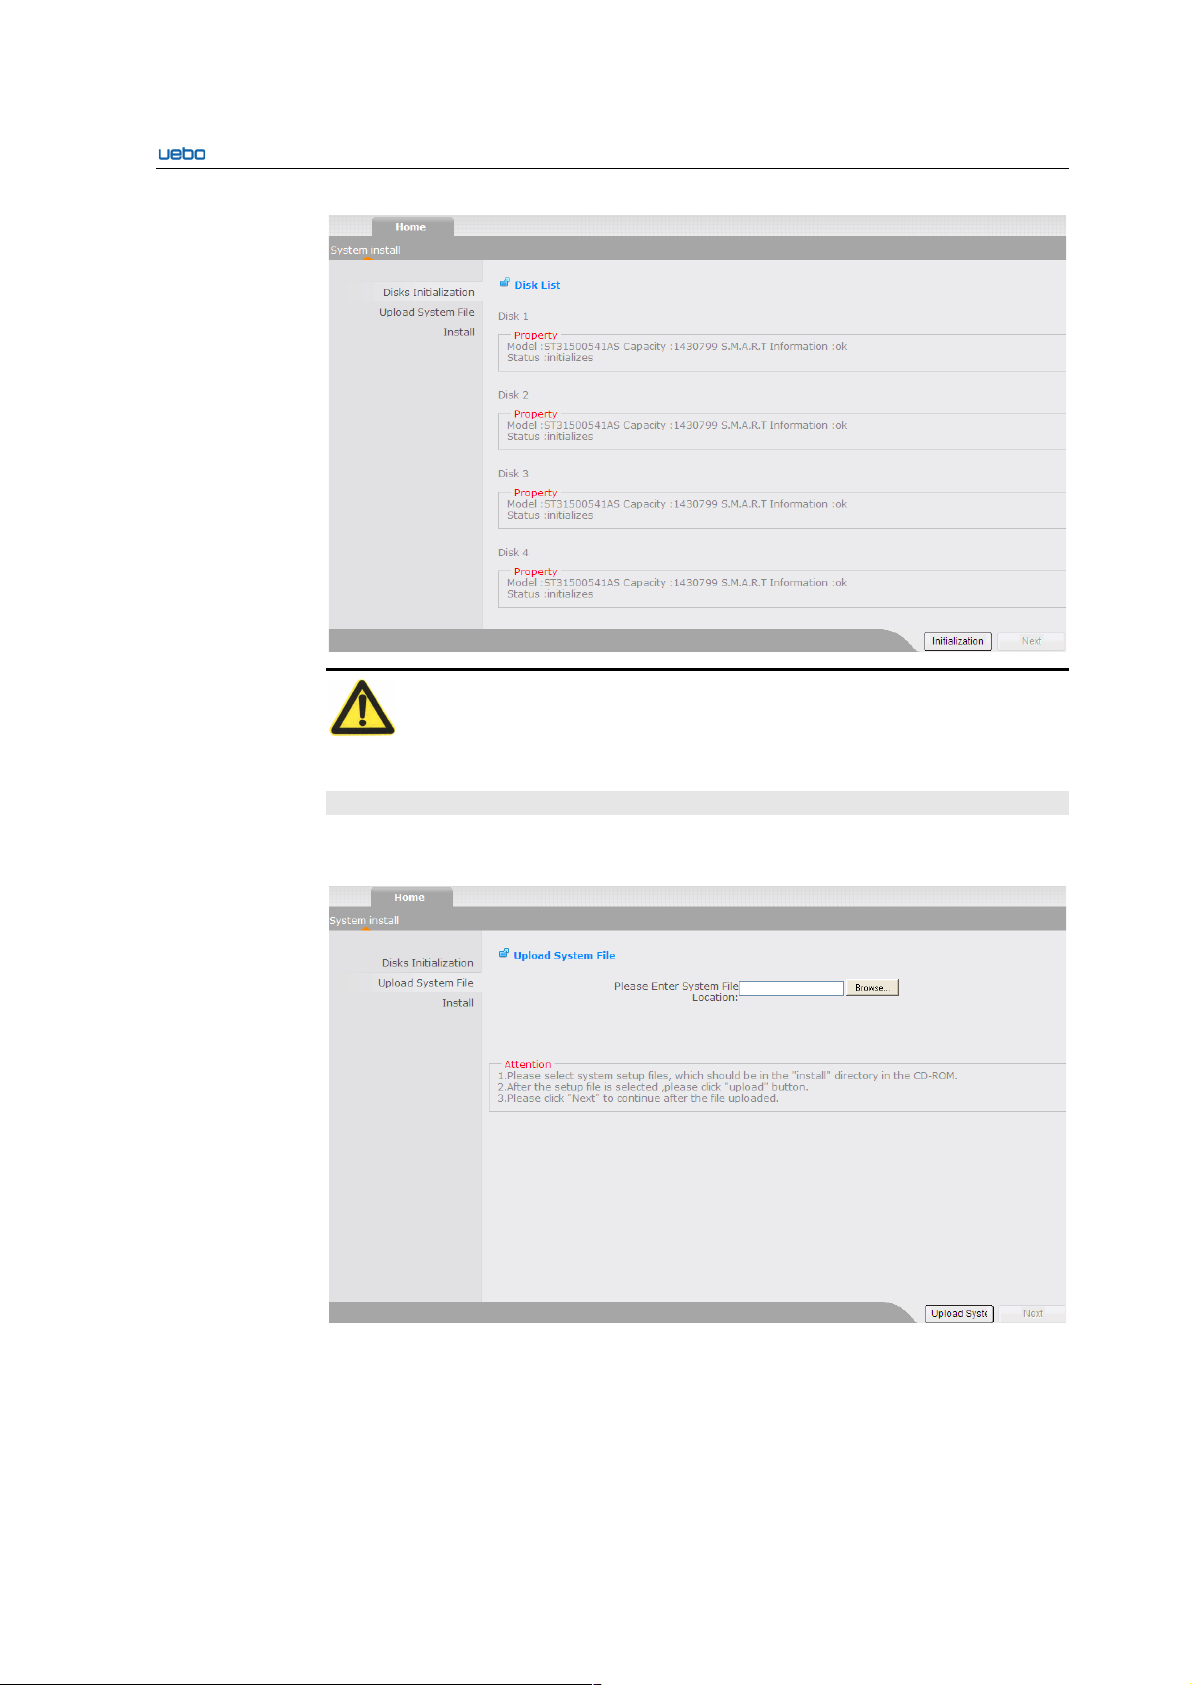
Upload System File
Click Next after the disk initialization is complete. The Upload System File
interface is displayed
Select the system setup file in the "setup" directory in the CD-ROM.
Click Upload System File“S400_SysOS_1.0.Build12817.tar.gz”after the setup
file is selected.
Click Next after the setup file is uploaded.
UEBO S400 User Manual
2-6
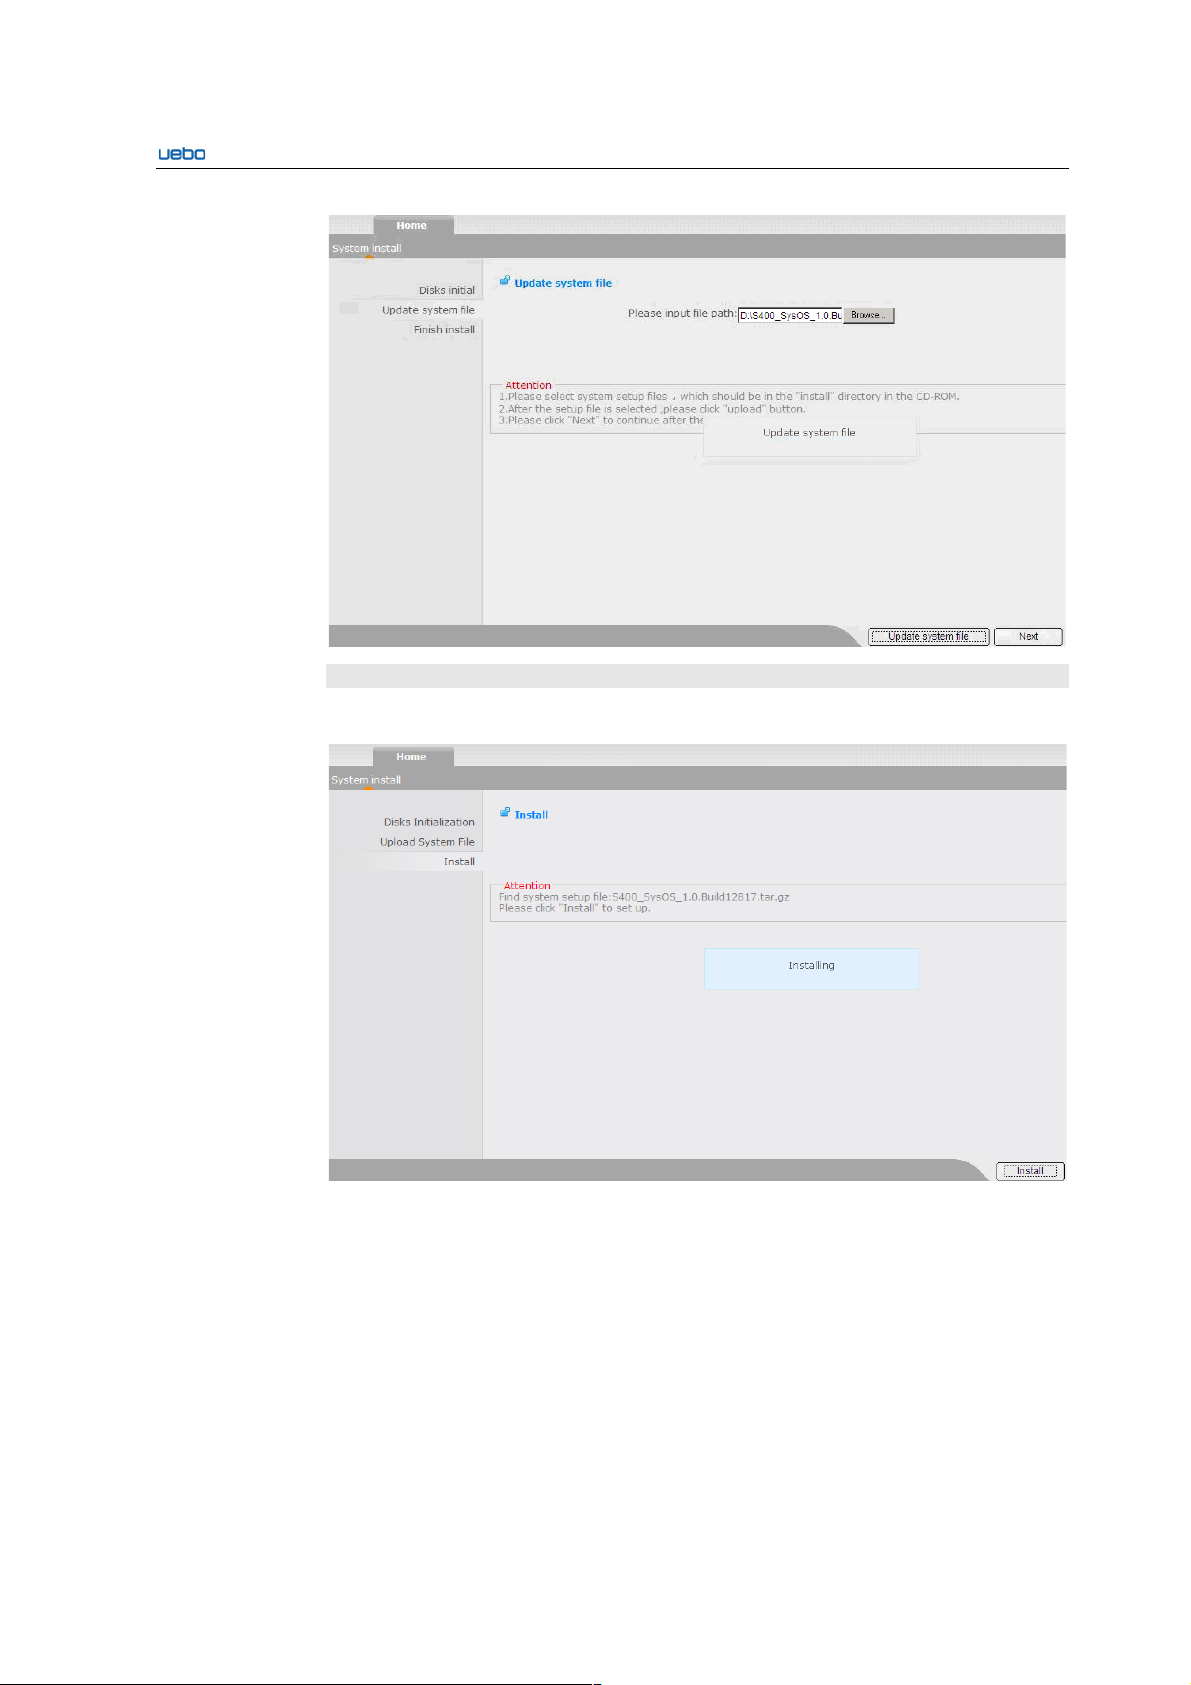
Finish Installation
Click install to set up the system.
The system is restarted after the installation is complete.
Enter 192.168.0.100 in the IE bar of the client.
Log in to the system with the user name (admin) and password (123456)
2.3.2.2. Shortcut
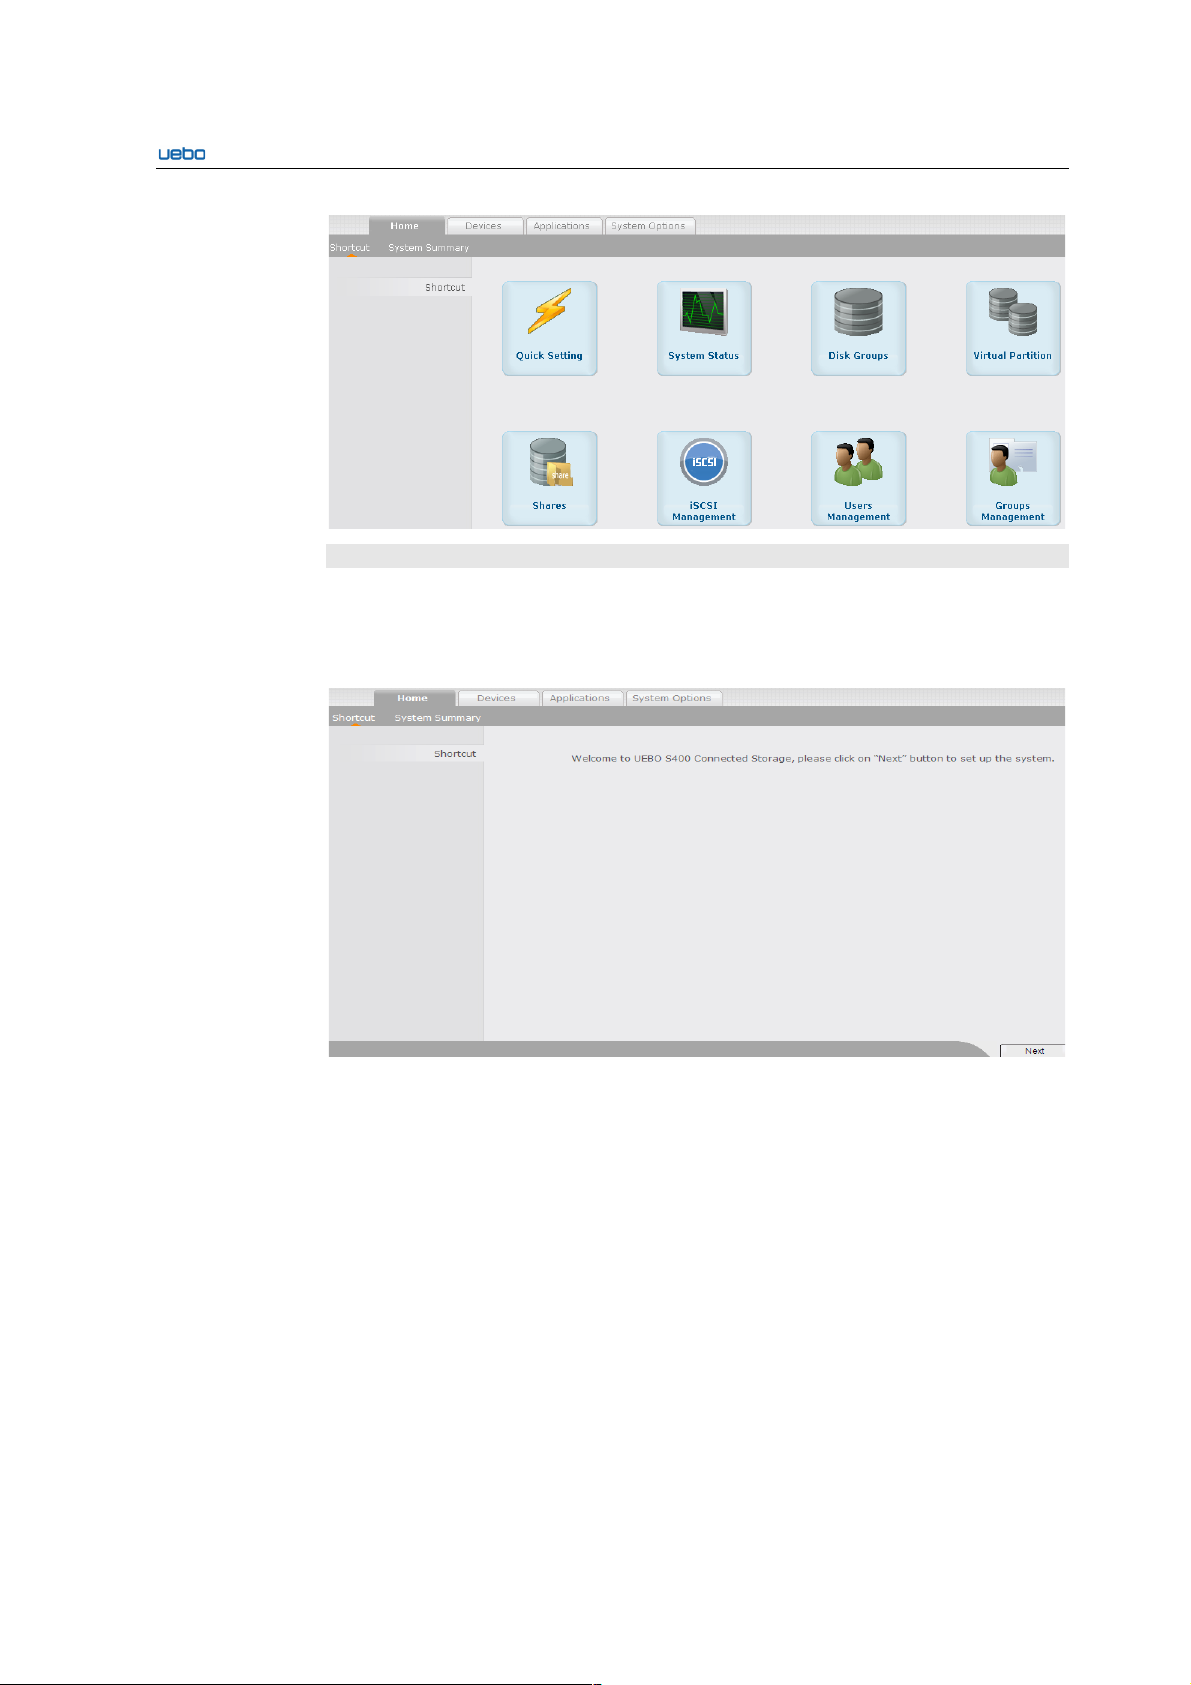
The Shortcut option provides the shortcut setting mode of the common functions. The
Shortcut option covers the following modules: Quick Setting, System Status, Disk
Groups, Virtual Partition, Shares, iSCSI Management, Users Management, and Groups
Management.
UEBO S400 User Manual
2-7
Quick Setting
This module provides a shortcut mode of setting the UEBO S400. You can finish the
setting based on the following method.
Click Quick Setting icon. The following interface is displayed.
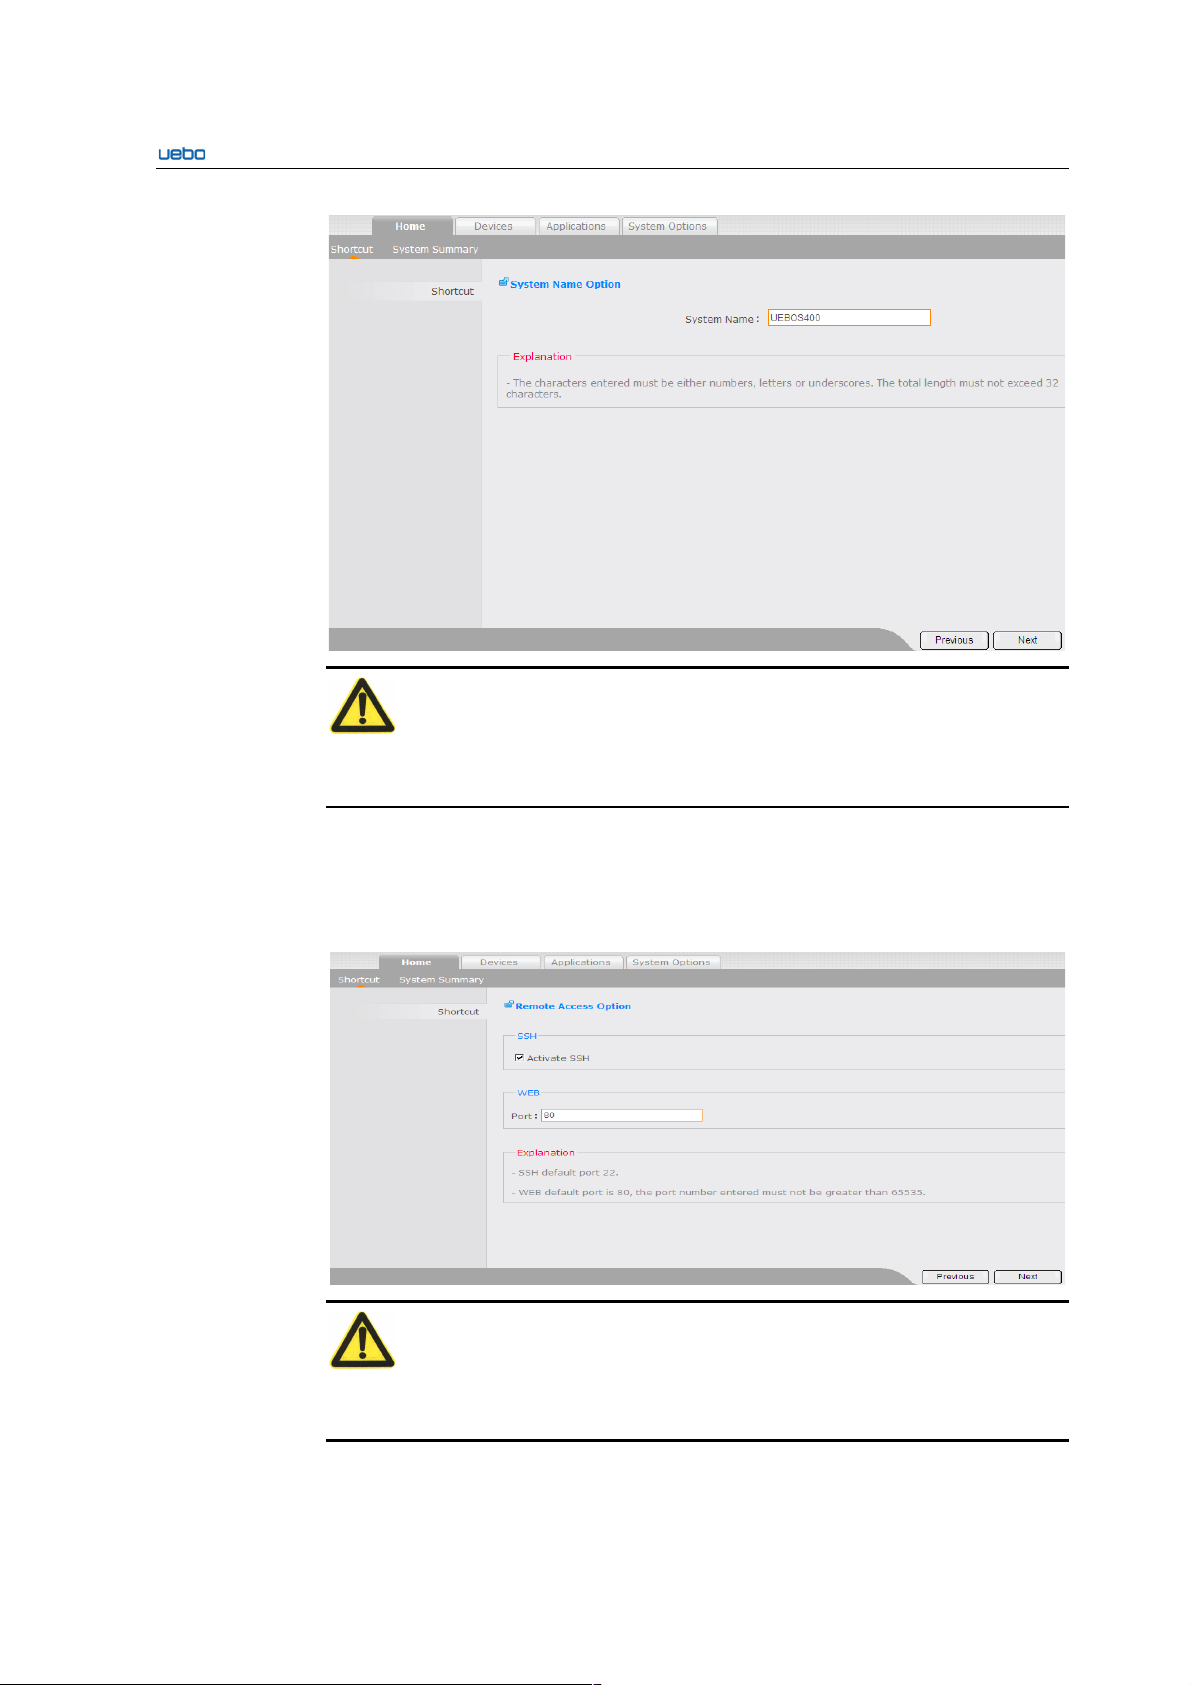
Click Next to set the system name. The System Name Option interface is
displayed.
UEBO S400 User Manual
2-8
Caution:
The characters entered must be numbers, letters or underscores. The length must not
exceed 32 characters.
Click Next after setting the system name. The Rote Access Option interface is
displayed. If you want to cancel the current settings, click Previous to go to the
upper-level interface.
Select Activate SSH and specify the Web port number.
Caution:
1. The default port number of the SSH is 22. The maximum port number entered
must not exceed 65535.
UEBO S400 User Manual
2-9
2. The default port number of the Web is 80. The maximum port number entered
must not exceed 65535.
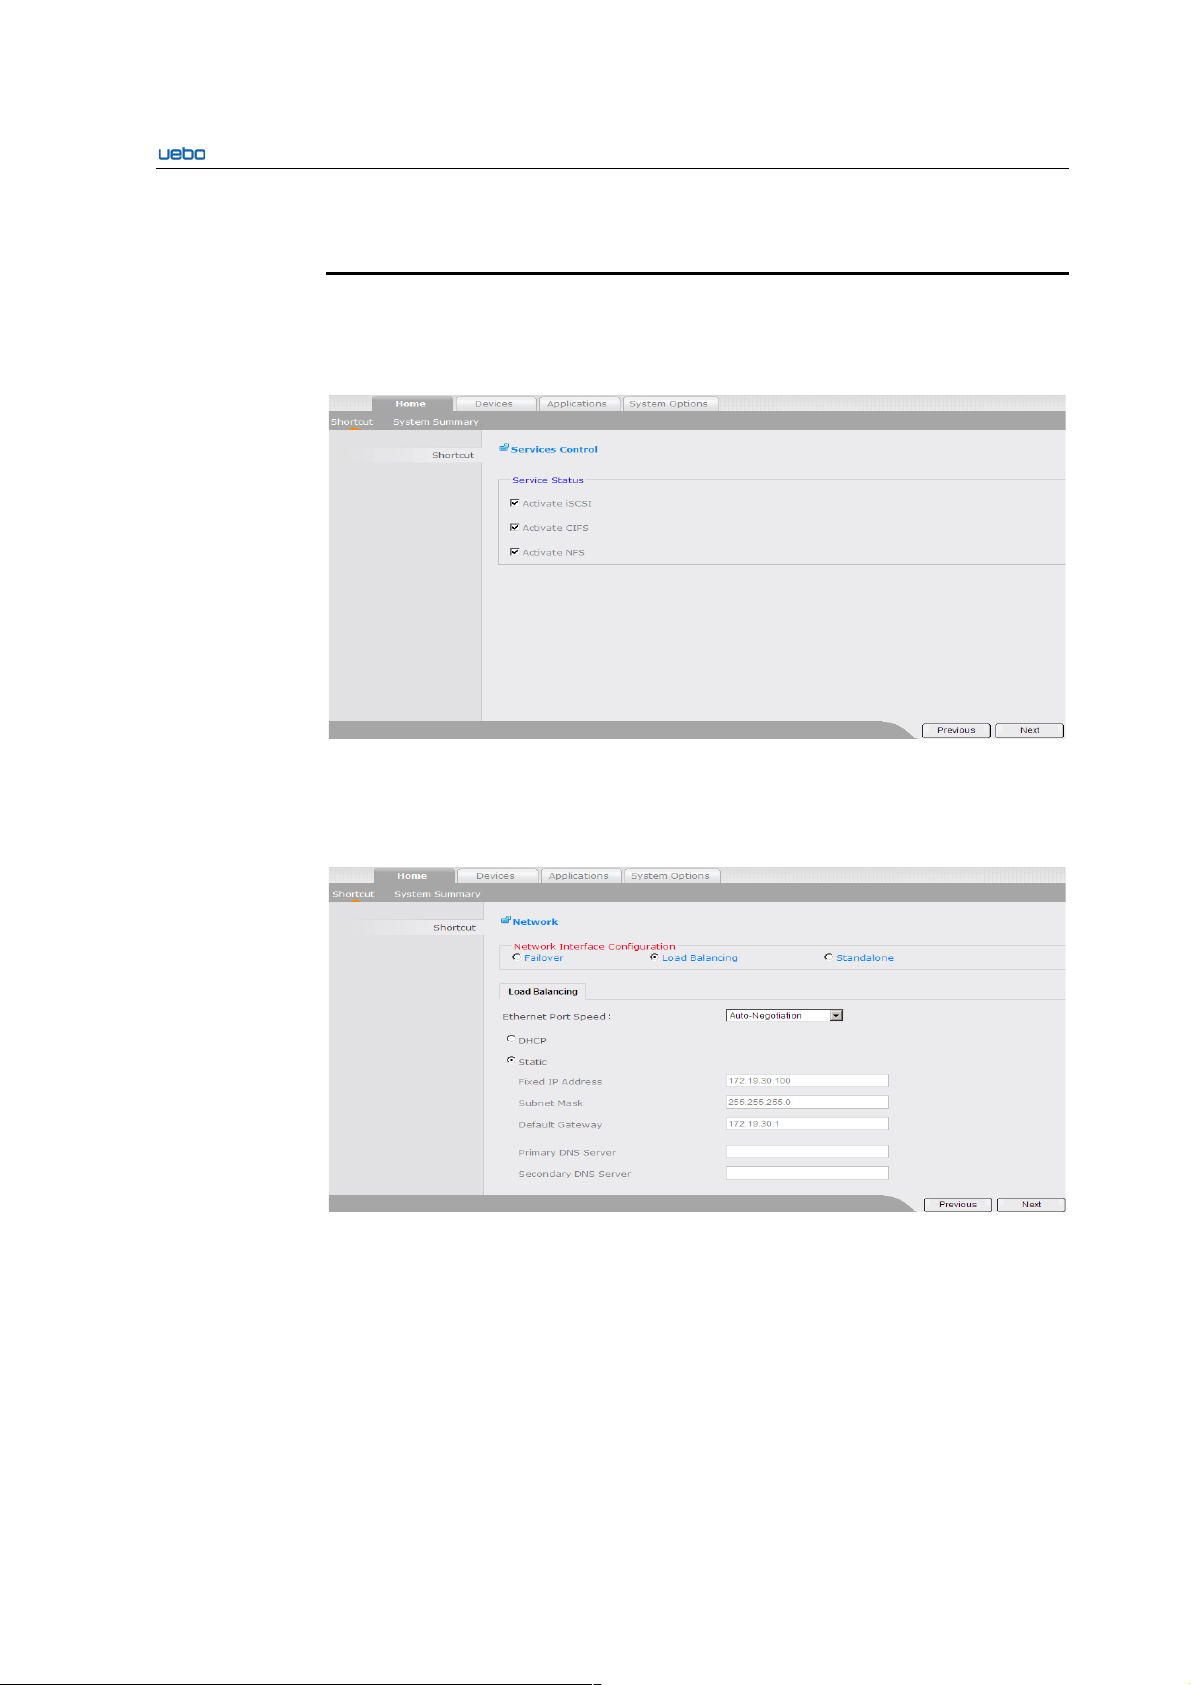
Click Next after setting the Remote Access Option. The Service Control
interface is displayed. On this interface, you can select the relevant services to
enable according to the actual requirements. If you want to cancel the current
settings, click Previous to go to the upper-level interface.
Click Next after setting the Service Control option. The Network interface is
displayed. On the Network interface, you can finish the network configuration. If
you want to cancel the current settings, click Previous to go to the upper-level
interface.
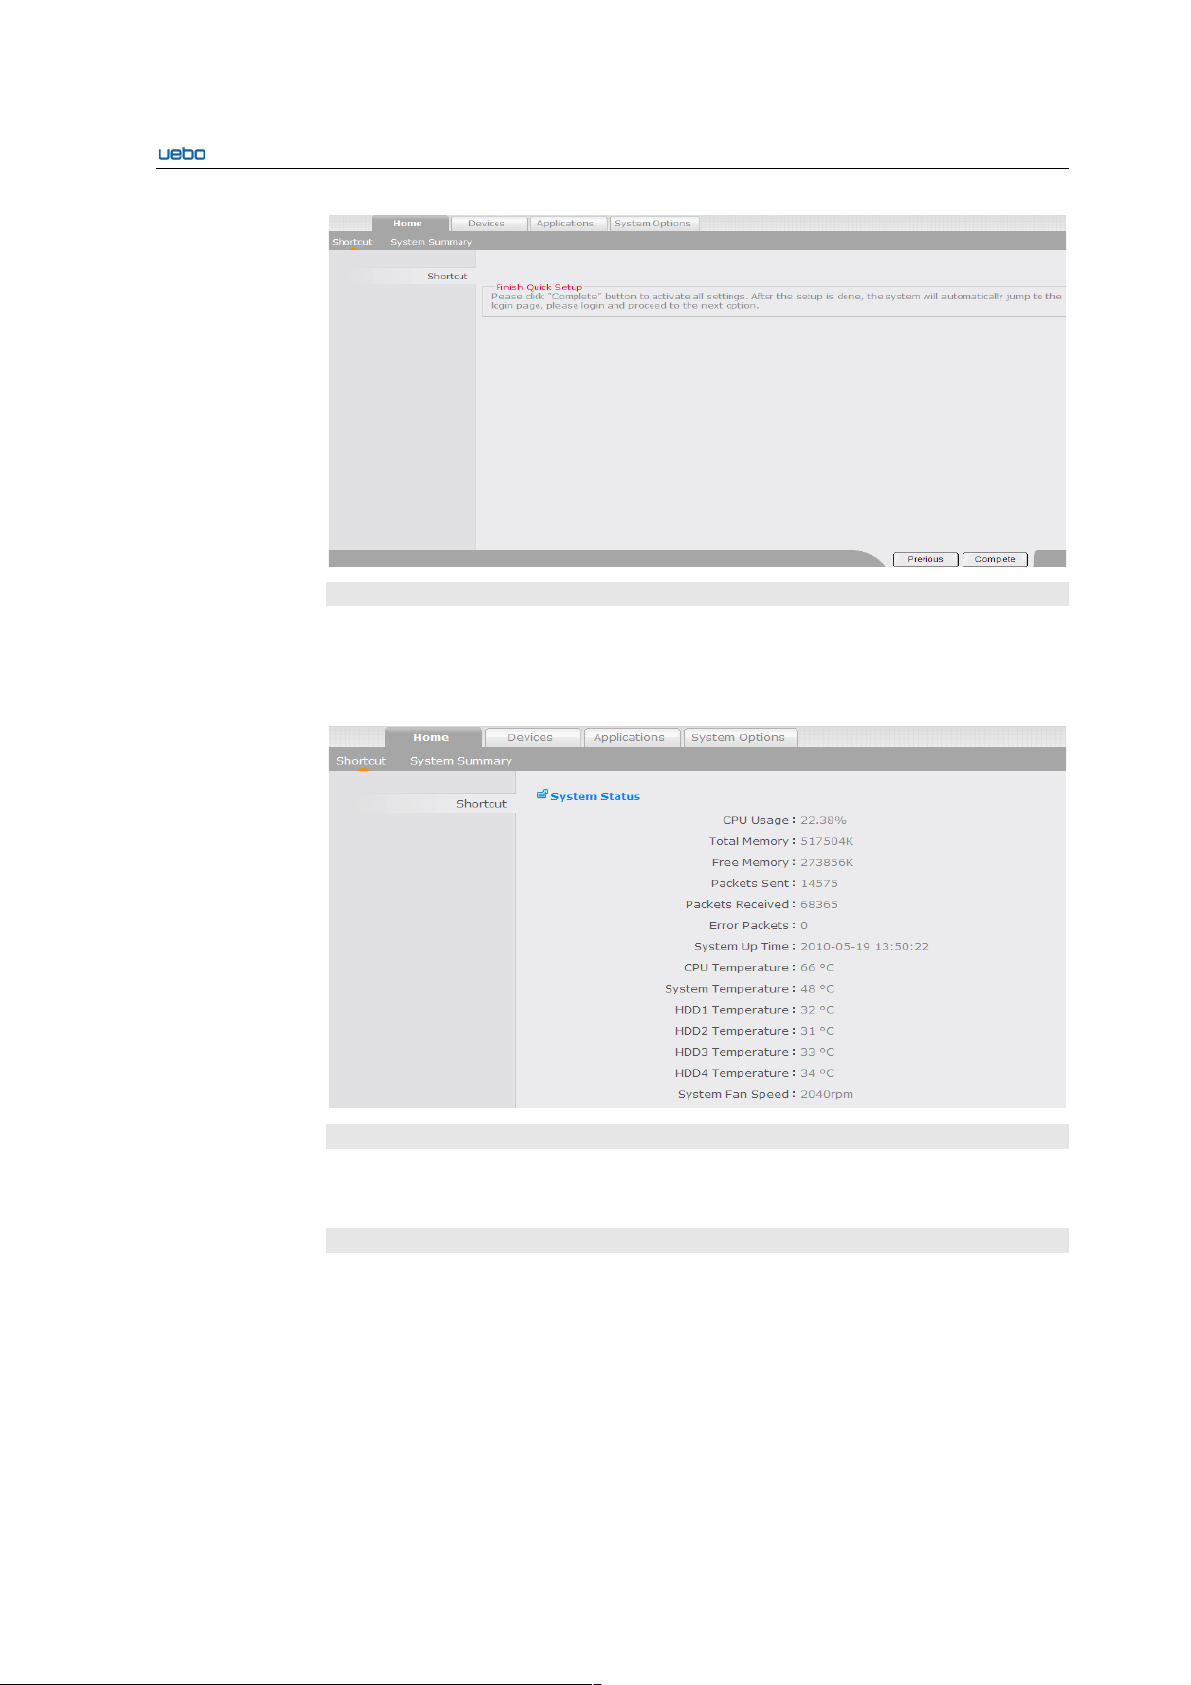
Click Next after setting the Network option. The Finish Quick Setup interface is
displayed.
Click Complete to validate all the settings.
After that, the Finish Quick Setup interface goes to the login page of the UEBO
Web Manager automatically.
UEBO S400 User Manual
2-10
System Status
The System Status module of the Shortcut Option provides the shortcut mode of
querying the status of the system in real time.
Click System Status. The System Status interface is displayed.
Disk Groups
The Disk Groups module provides a shortcut mode of the disk group management. On
this interface, you can create, expand, and delete the disk groups.
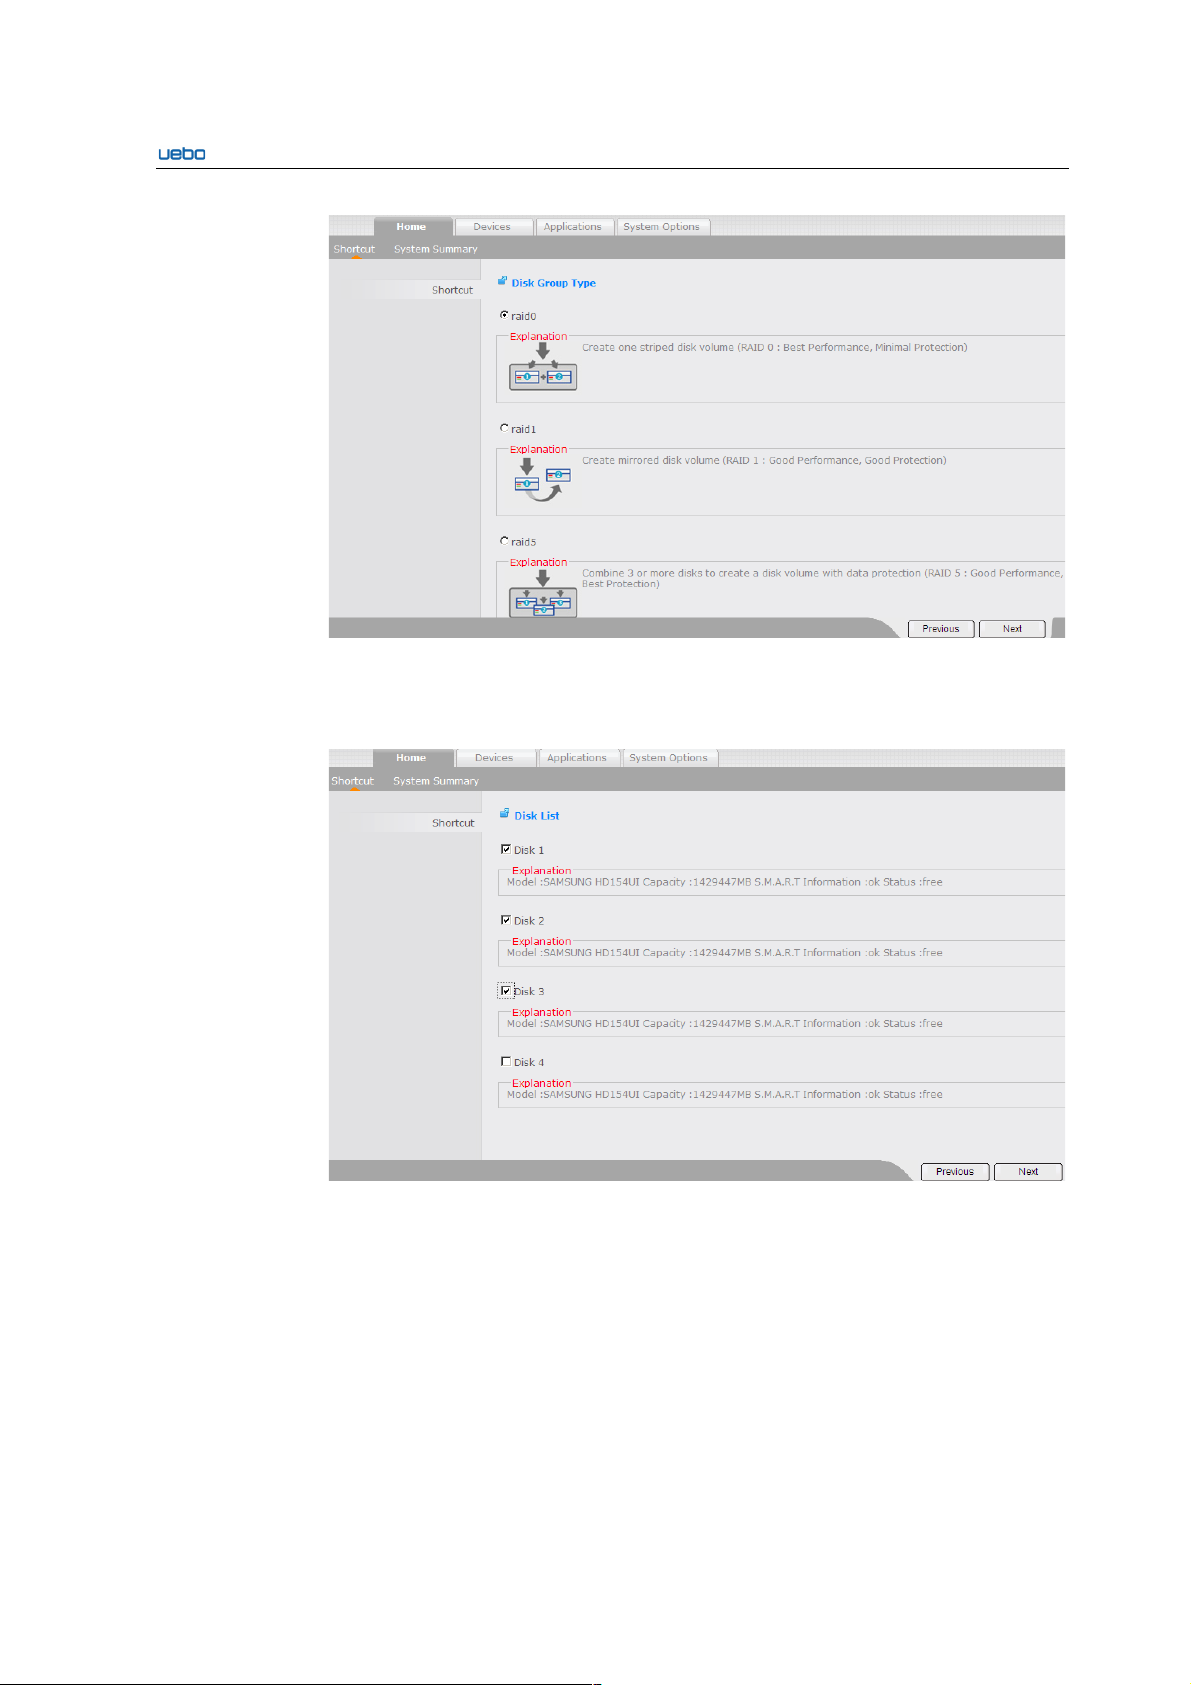
Create Disk Groups
Click Create . The Disk Group Type interface is displayed. Select the type of the disk
group to be created. The UEBO S400 supports the following types:
RAID0, RAID1, RAID5, and JBOD
UEBO S400 User Manual
2-11
Click Next after selecting the corresponding RAID type. The Disk List interface
is displayed.
Select the disks used for creating the disk group.
Click Next after selecting the disks. The Disk Group Creation Preview interface
is displayed.
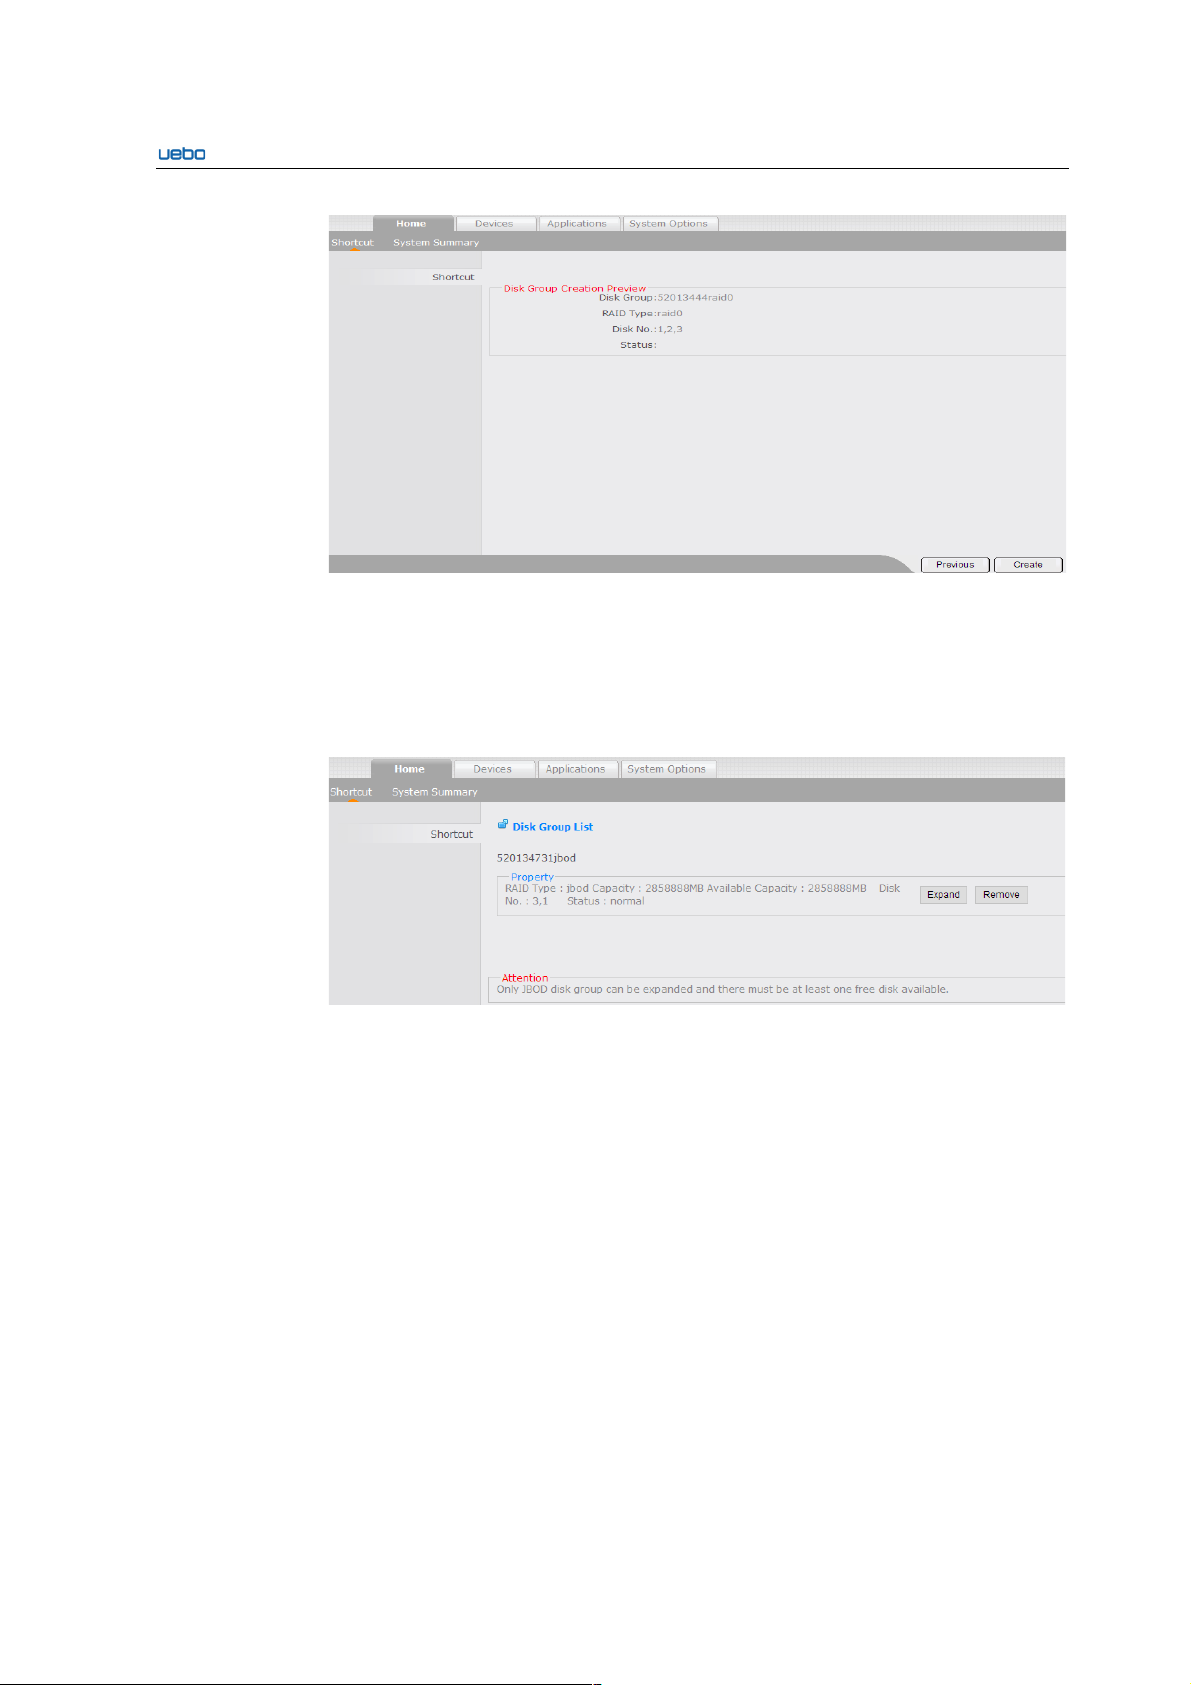
UEBO S400 User Manual
2-12
Click Create to finish the creation of the disk group.
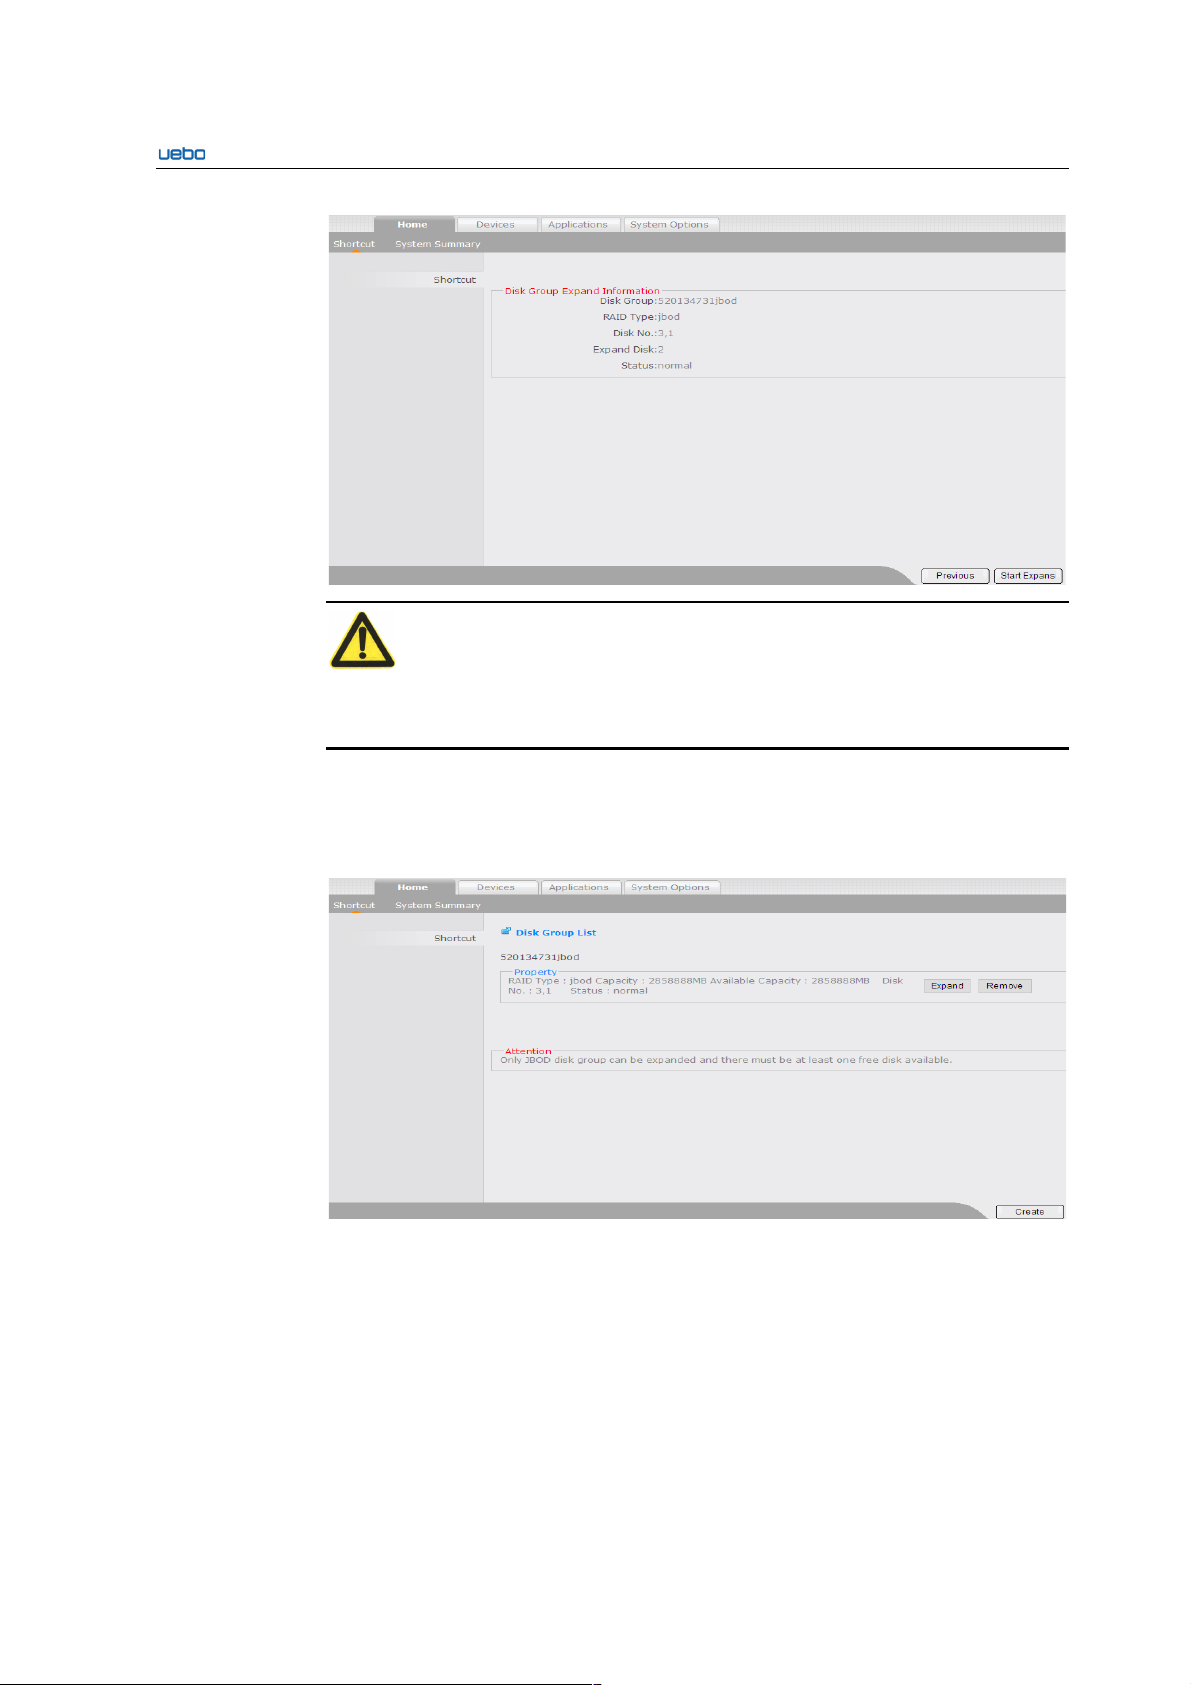
Expand Disk Groups
Click Expand beside the disk group to be expanded on the Disk Group List
interface.
The Disk Group Information interface is displayed.

UEBO S400 User Manual
2-13
Click Next. An interface of the disk list is displayed.
Select the free disks and click Next to expand the disk group.
The Disk Group Expand Information interface is displayed
Click Start expans to finish the expansion of the disk group.
UEBO S400 User Manual
2-14
Caution:
1. A free disk is selected for the disk group expansion at least.
2. At present, only the JBOD type supports the disk group expansion.
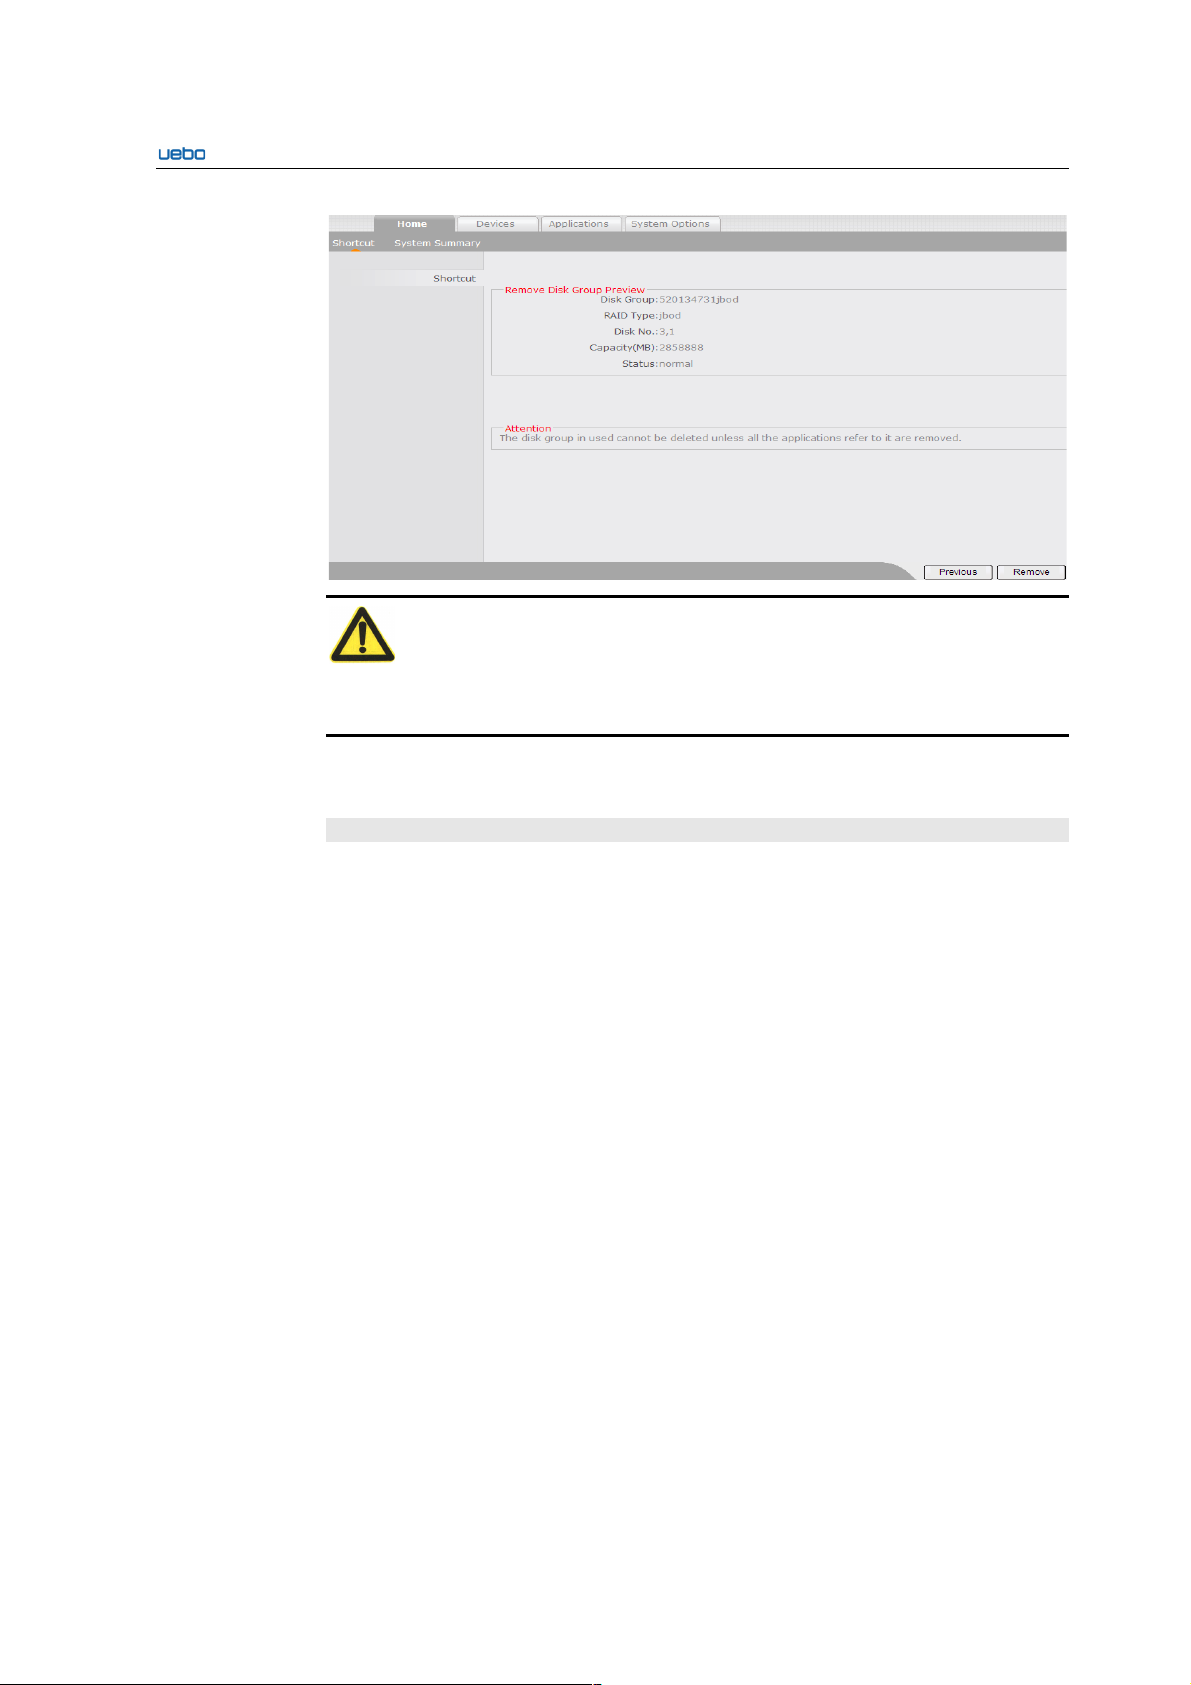
Remove Disk Groups
Click Disk Groups Management. The Disk Group List interface is displayed.
Click Remove beside the disk group to be removed.
The Remove disk group preview interface is displayed. The information about the
disk group to be removed is listed.
UEBO S400 User Manual
2-15
Caution:
To remove a disk group, remove all the applications from it. Otherwise, removing the
disk group fails.
If you want to remove the disk group, ensure that all the applications on it are removed.
Then click Remove to delete the disk group.
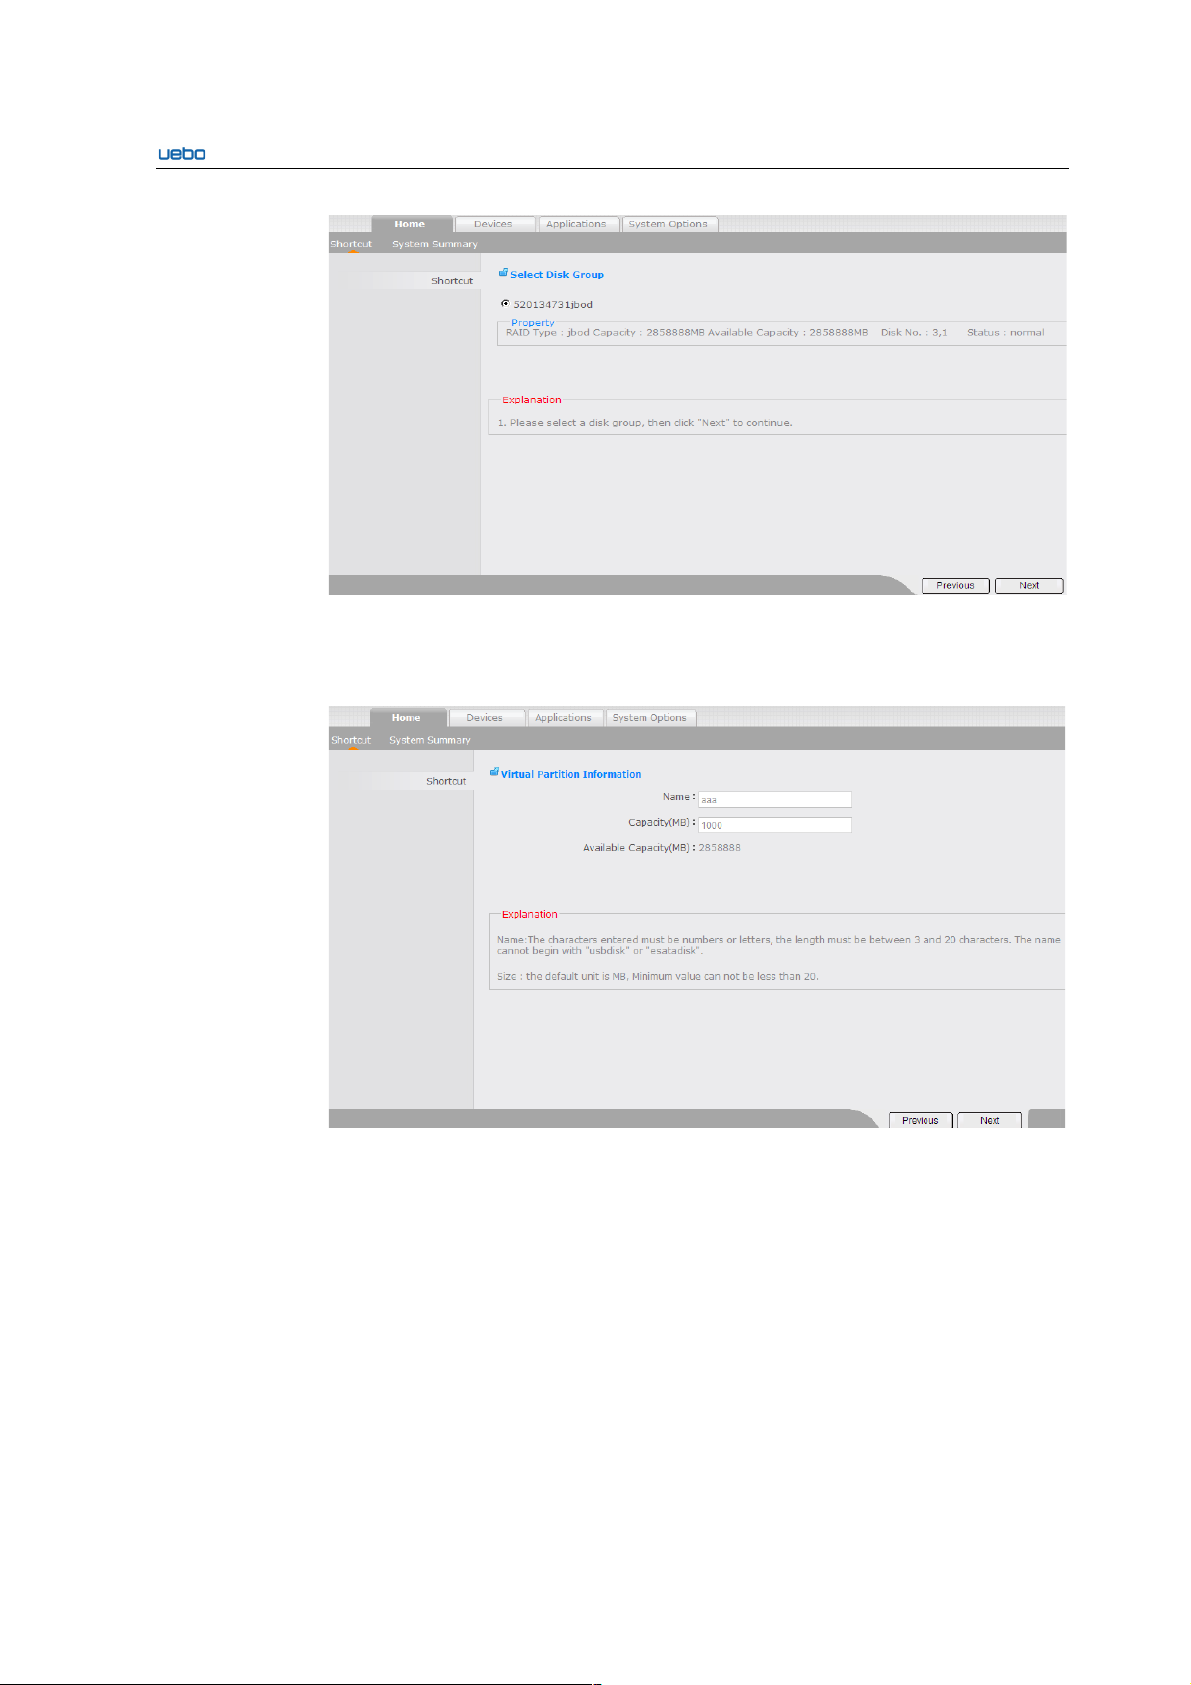
Virtual Partition
The Virtual Partition module provides a shortcut mode of the virtual partition
management. You can create, expand, and remove the virtual partition.
Click Virtual Partition icon. The Virtual Partition List interface is displayed.
Create Virtual Partitions
Click Create . The Select Disk Group interface is displayed.
Select the corresponding disk group.
UEBO S400 User Manual
2-16
Click Next after selecting the disk group. The Virtual Partition Information
interface is displayed.
Set the name and capacity.
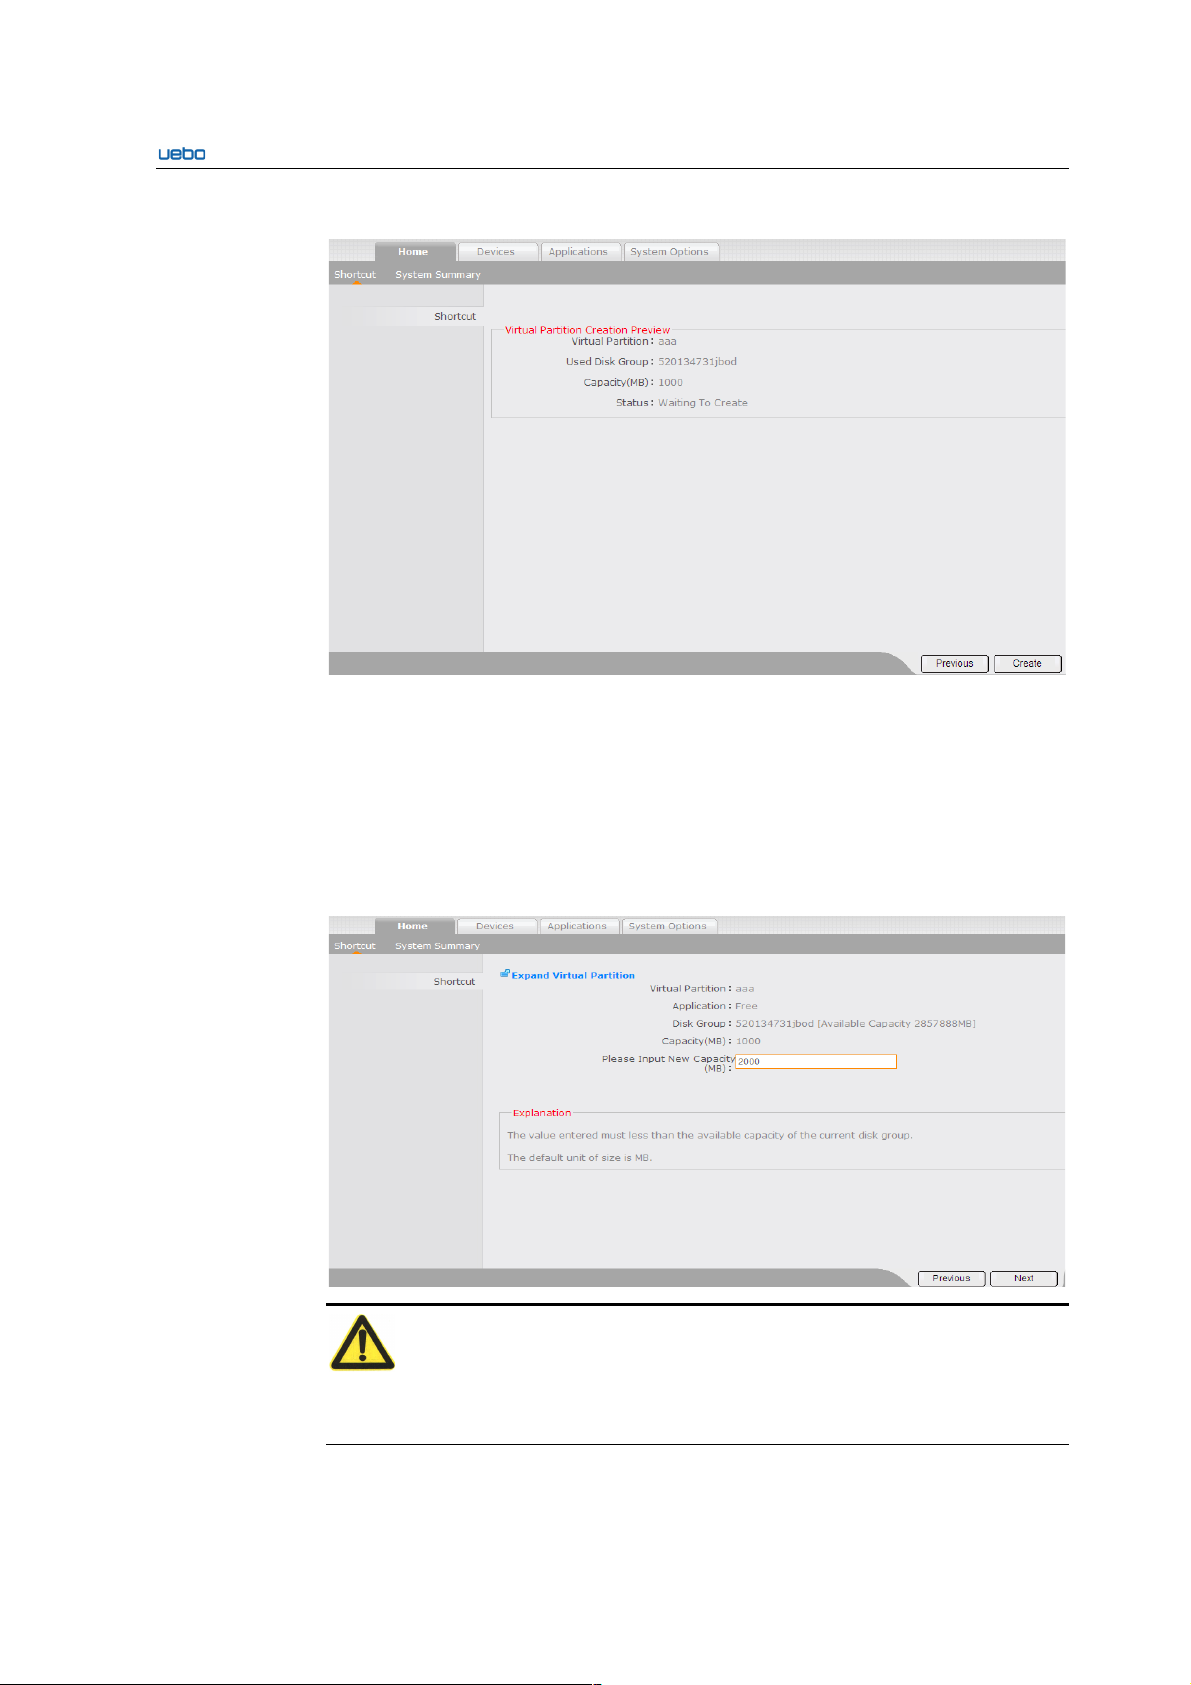
Click Next after setting the virtual partition information. The Virtual Partition
Creation Preview interface is displayed
UEBO S400 User Manual
2-17
● Specify whether the information about the created virtual partition is correct.
If the virtual partition information is correct, click Create. Then the virtual partition
creation starts.
Expand Virtual Partitions
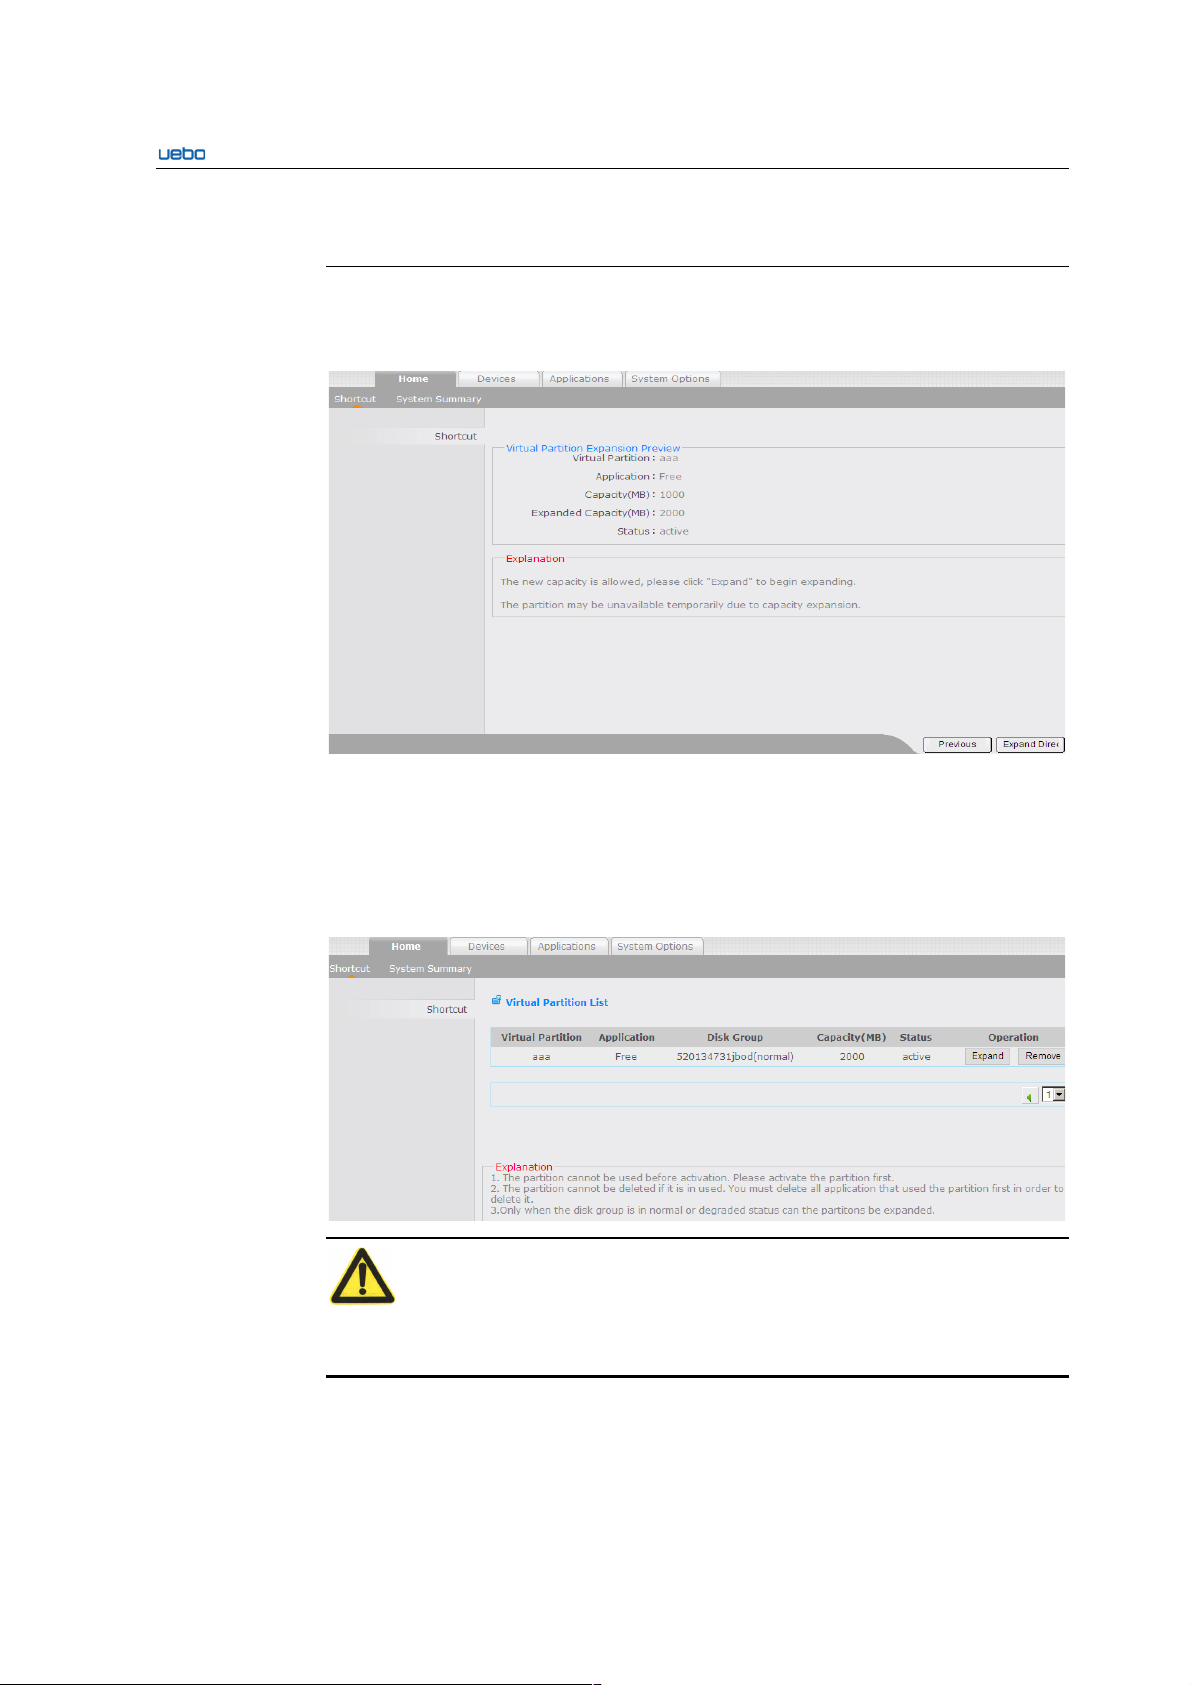
Click Expand beside the virtual partition to be expanded after the Virtual
Partition List interface is displayed. Then the Expand Virtual Partition
interface is displayed.
Click Next after entering the new capacity.
Caution:
1. The value entered must be less than the available capacity of the current disk
group.
UEBO S400 User Manual
2-18
2. The iSCSI virtual partition interrupts the iSCSI connection. Therefore, the iSCSI
must be connected to the client again.
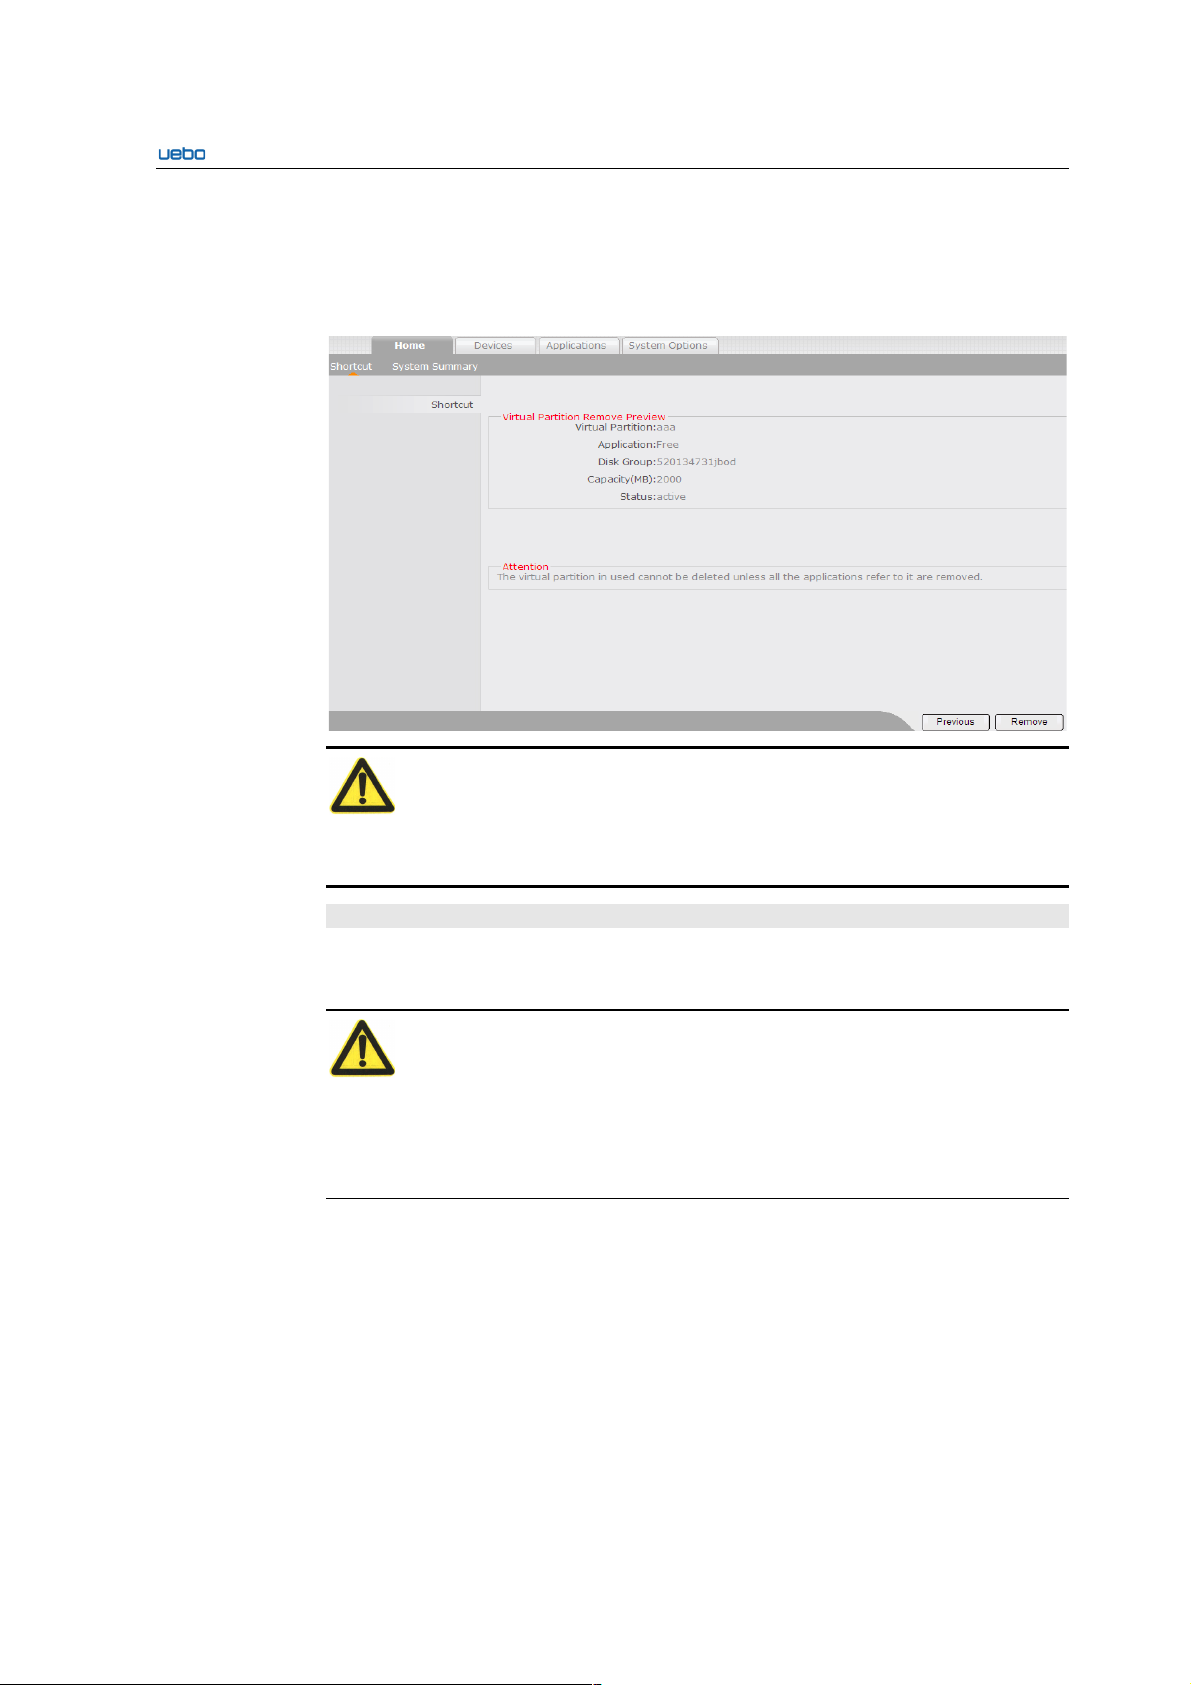
Click Next after entering the new capacity, and then the Virtual Partition
Expansion Preview interface is displayed.
Specify whether the expansion information about the virtual partition is correct.
If the expansion information about the virtual partition is correct, click Expand
Directory.
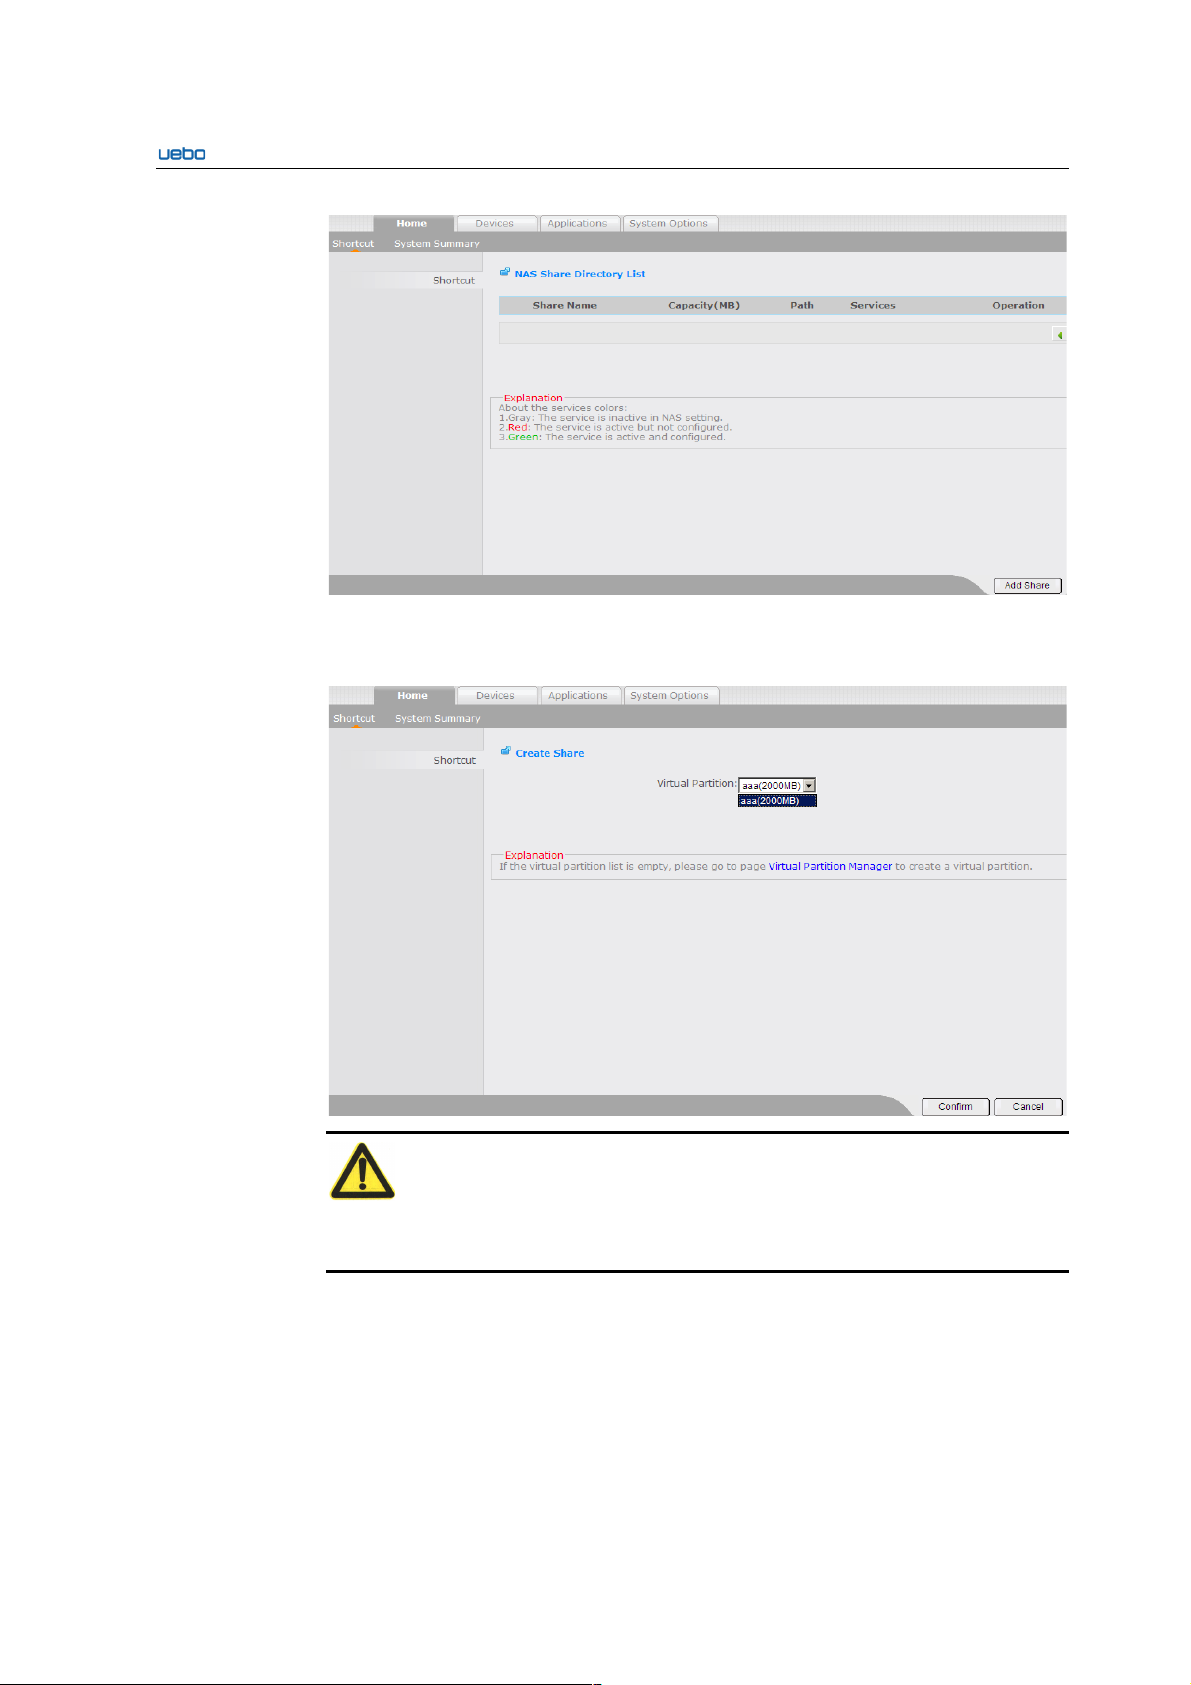
Remove Virtual Partitions
Click Remove beside the virtual partition after the Virtual Partition List
interface is displayed.
Caution:
If the virtual partition is active, you can not remove it unless all relevant applications
are removed.
The Virtual Partition Remove Preview interface is displayed.
UEBO S400 User Manual
2-19
Specify whether the information about the virtual partition to be removed is
correct.
Click Remove if the information is correct. Then the process of removing the
virtual partition starts.
Caution:
To remove the virtual partition, ensure that all relevant applications are removed.
Otherwise, the virtual partition cannot be removed.
Shares
This Shares module provides a shortcut mode for the directory sharing. In addition, the
module supports the following operations: create, format, remount, and delete shares.
Caution:
In the list, characters in different colors show different status of services in the NAS:
1. Gray: Services are unavailable.
2. Red: Services are activated without any configuration.
3. Green: Services are activated and configured.
Create Shares
Click Shares. The NAS Share Directory List interface is displayed.
UEBO S400 User Manual
2-20
Click Add Share. The Create share interface is displayed.
Select a virtual partition in the Virtual Partition drop-down list box.
Caution:
If the virtual partition list is null, go to the Virtual Partition Manager page to create a
virtual partition.
Click Confirm to create a share. If the share is created successfully, the NAS
Share Directory List interface is displayed. You can view the created share in the
NAS Share Directory List interface.
Format Shares
Click Shares. The NAS Share Directory List interface is displayed.
Click Format beside the share to be formatted. A dialog box is displayed.
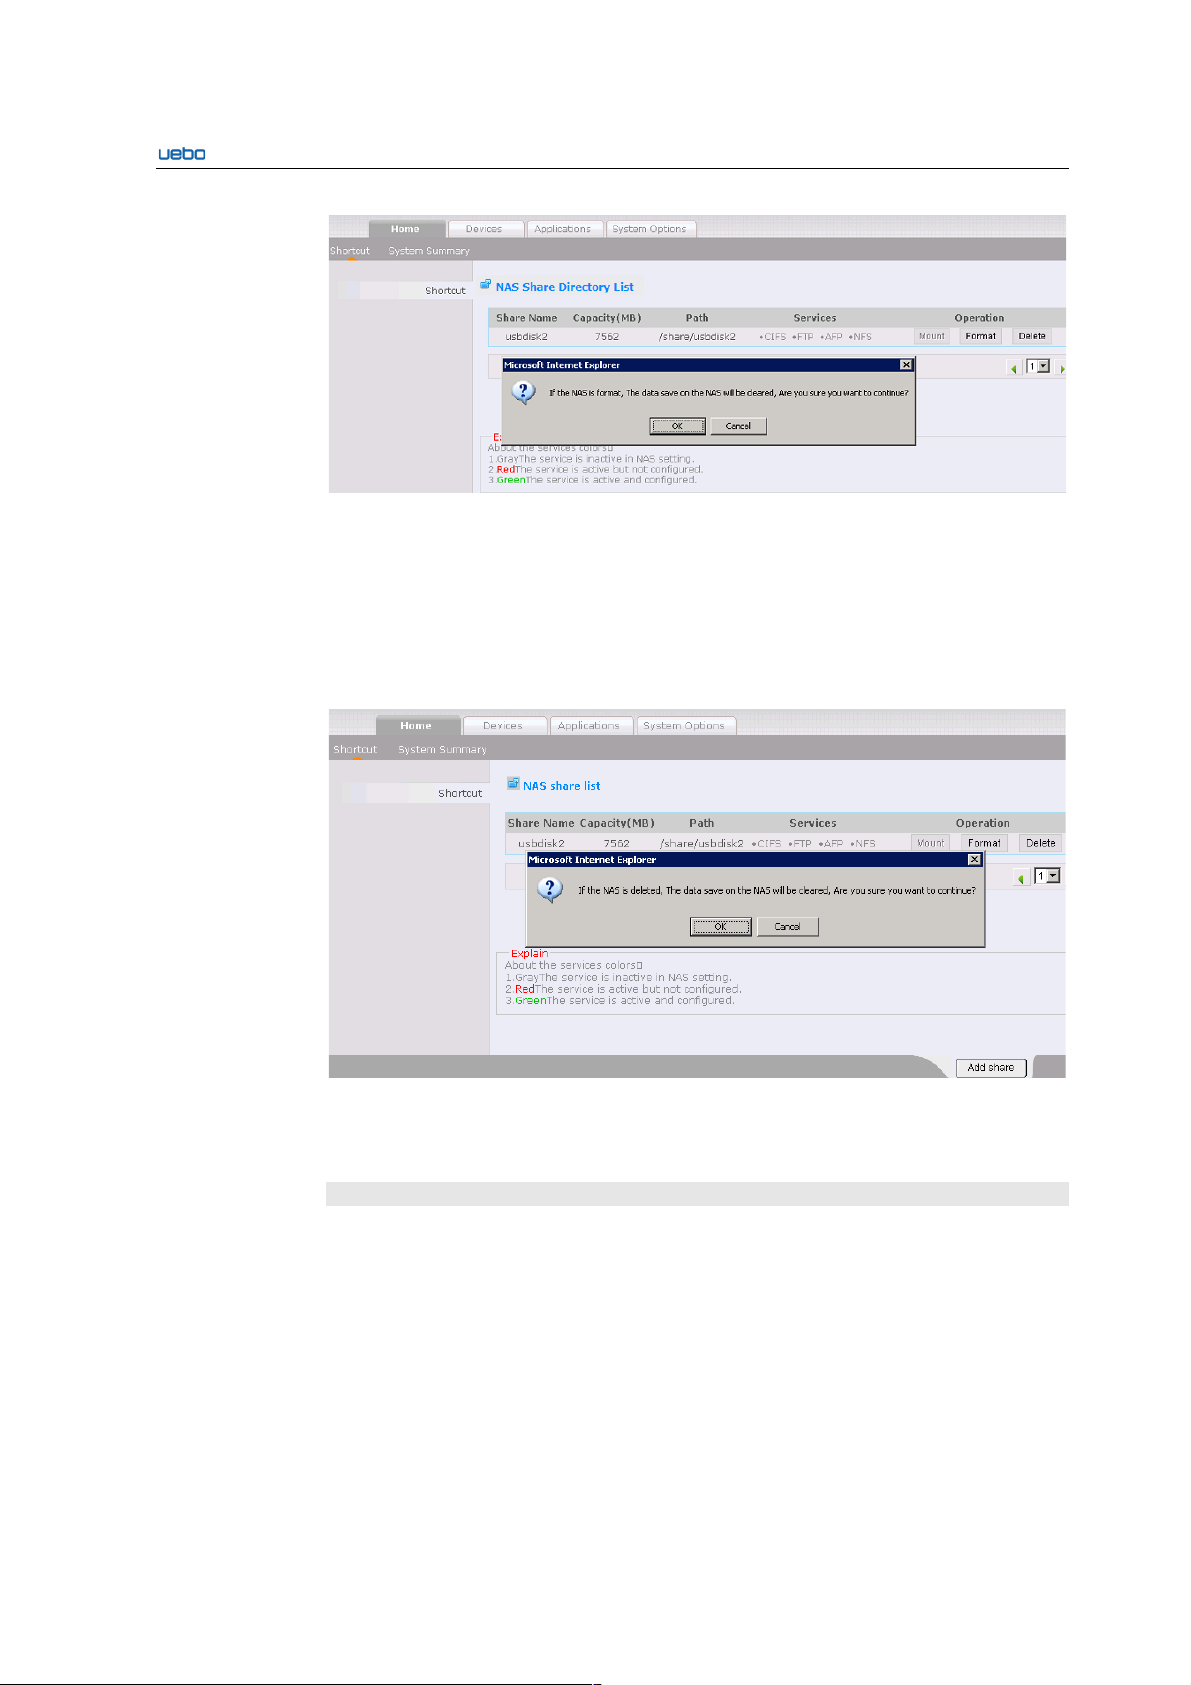
UEBO S400 User Manual
2-21
Click OK to format the share. The NAS Share Directory List interface is
displayed after the share is formatted. In addition, the data saved on the share is
deleted.
Delete Shares
Click Shares. The NAS Share Directory List interface is displayed.
Click Delete beside the share to be deleted. A dialog box is displayed.
Click OK to delete the share. The NAS Share Directory List interface is
displayed after the share is deleted. In addition, the relevant data saved on the
share is deleted.
iSCSI Management
This iSCSI management module provides a shortcut mode of the iSCSI management.
In addition the module supports the following operations: create, close, edit, and delete
an iSCSI.
Create an iSCSI
Click iSCSI Management. The iSCSI List interface is displayed.
 Loading...