

Page 1
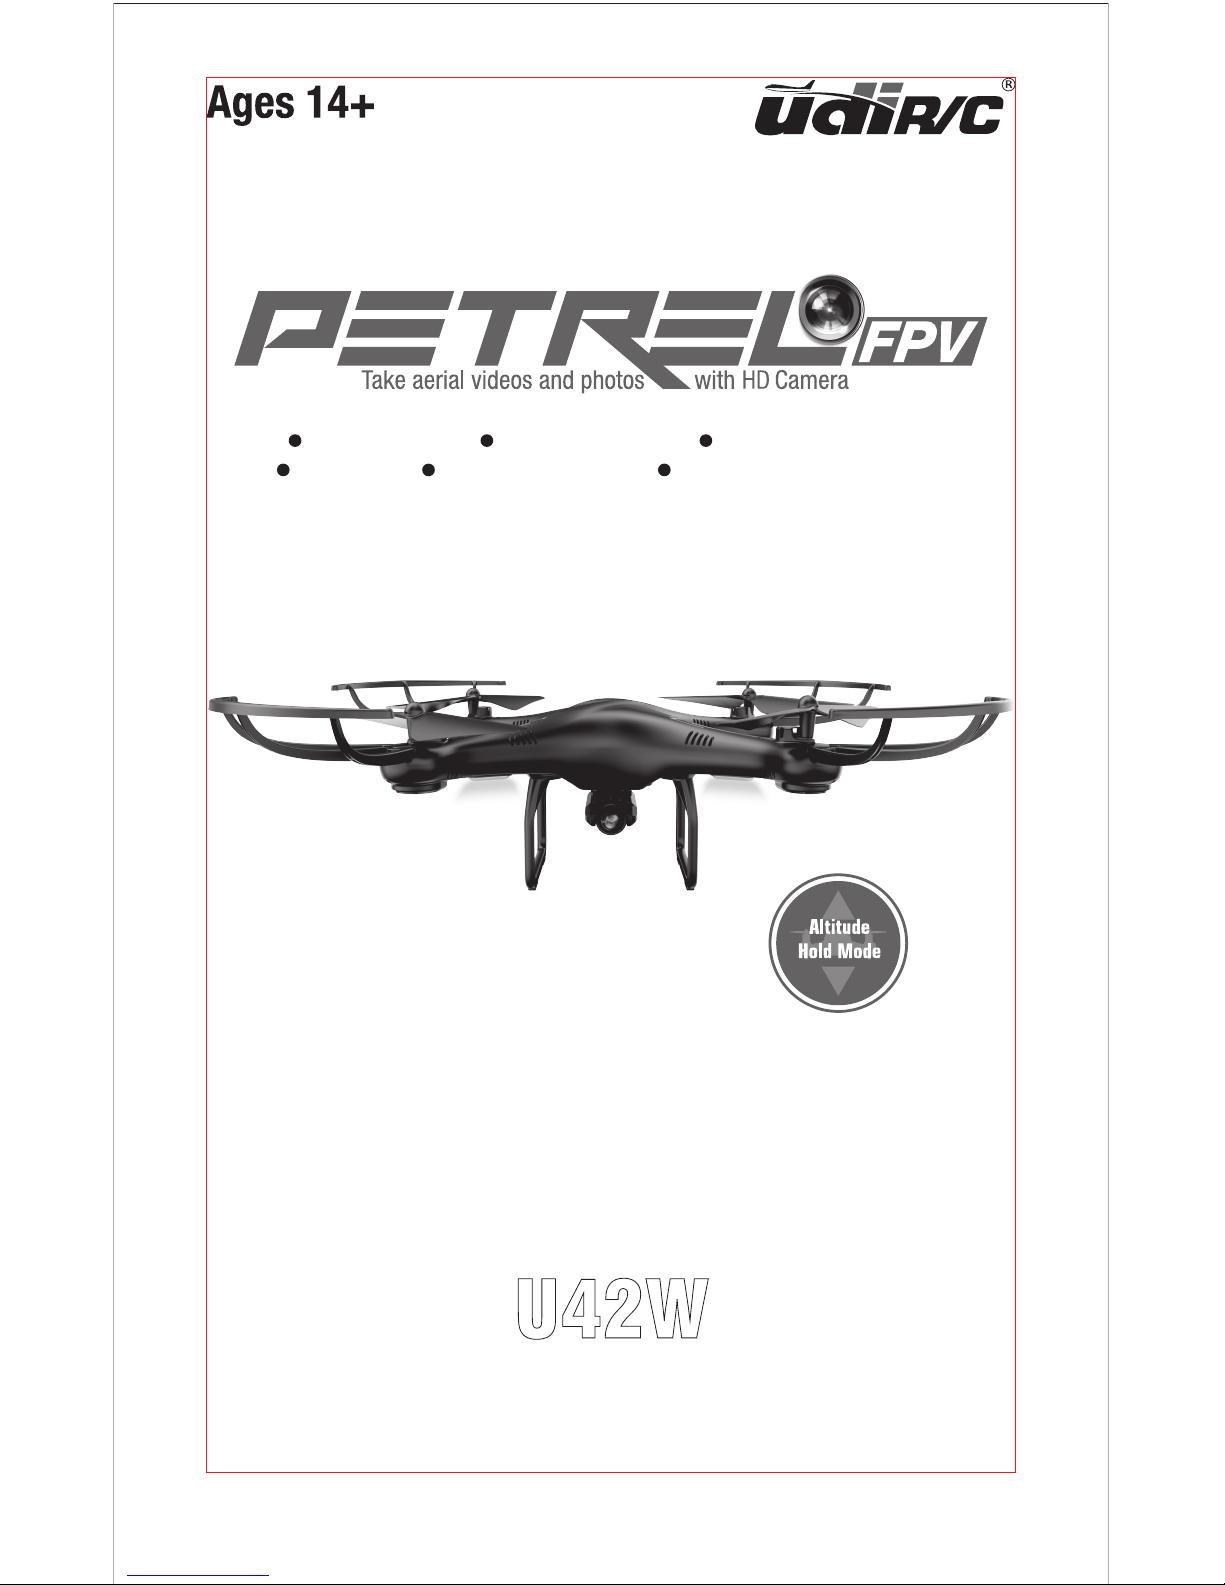
U42W
360° Flips Altitude Hold Mode One Button Take Off / Landing
Heading Hold
Low Battery Alarm
High / Low Speed Mode
User Manual
Page 2
2
Catalog
Important Statement
3
Safety Precautions
3
Safe Notice for Drone Battery
4
Charging Instruction for Drone Battery
5
Checklist before Flight
5
Instruction for Drone and Transmitter
6
Pre-flight Operation Instruction
9
Functions Introduction
12
Spare Parts Installation Instruction
14
To know your APP
15
Spare Parts
21
Troubleshooting Guide
22
Page 3
3
1. Important Statement
Thank you for buying UDIRC's product. People who under 14 years old must not
use the product. Please read this brochure carefully before using the product. You
are regarded as accepting all content in this user manual when using this drone.
This product is not an ordinary toy but a piece of complicated equipment which is
integrated with professional knowledge by mechanic, electronic, air mechanics,
high-frequency emission etc. The users promise to be responsible for their
behavior when using this product and relevant APP. The users promise to use the
drone and relevant APP for legal purpose, and agree to obey above rules and
local laws and regulations.
We undertake no liability for those accidents caused by environment, illegal
behavior, improper operation and refitting of the drone after sale of the product.
We have entrusted the distributor to provide technology support and after-sale
service. If you have any questions about use, operation, repair etc., please
contact the local distributor.
This drone is suitable for experienced RC drone user aged 14 years or above.
This product contains small parts, please put it out of child’s reach.
The flying field must be legally approved by your local government. Do not fly the
drone near the airport. Keep far away from the airport more than 5km when flying
a RC drone. Flying field must spacious enough and we suggest at least
8M (length)*8M (width)*5M (height).
(1) Flying Area
* Keep the packing and user manual so as to refer to the important information
whenever.
2. Safety Precautions:
(3) Keep away from obstacles and crowd
The speed and status of a flying RC drone is uncertain and it may cause potential
danger. So the user must keep away from crowd, tall building, power lines etc.
when operating a flying RC drone. Do not fly a RC drone in rainy, storm, thunder
and lighting weather for the safety of user, around people and their property.
(2) Use correctly
For safety elements, please only use UDIRC’s spare parts to replace the damaged
parts. Improper assembly, broken main frame, defective electronic equipment or
unskilled operation all may cause unpredictable accidents such as drone damage
or human injury. Please pay special attention to safety operation and have good
knowledge of accident responsibility that the user may cause.
Page 4
4
(4) Keep away from humid environment
The drone inside is consisted of precise electronic components. Humidity or water
vapor may damage electronic components and cause accident.
(5) Safe operation
Please operate the RC drone in accordance with your physical status and flying
skill. Fatigue, listlessness and improper operation may increase the rate of accident.
(6) Keep away from rotating parts
Rotating parts like propellers or motors may cause serious injury and damage.
Keep face and body away from rotating parts.
(7) Keep away from heat
(8) The drone should be controlled within max control distance. Do not
fly the drone near tall building, high voltage cable or other place with
signal interference. Or may cause signal interruption and the drone will
out of control, which may result of accident.
(9) Do not touch the hot motor to avoid being burnt.
(10) Please use the recommended charger only. Power off the drone
before cleaning the RC drone. Check the USB cable, charging plug etc.
regularly to ensure they can work well. If there is any damage, stop
using it immediately till it’s fixed well.
The RC drone is made of metal, fiber, plastic, electronic components etc.
Keep away from heat and sunshine to avoid distortion and damage.
3. Safe Notice for Drone Battery
* Do not put the battery on high temperature place, such as fire or heating device
to avoid damage or explode.
* Do not use the battery to crash or hit hard surface.
* Do not put the battery in water and keep it in dry place.
* Do not open the battery.
* Do not leave the battery without supervision when charging.
* Make sure that there is no short circuit of the power wire.
* Please use the recommended charger only.
* Check the charger’s wire, plug, surface regularly. Do not use any broken charger.
* If do not fly the drone more than one week, maintain the drone battery with
about 50% power to keep its performance and working life.
Page 5
5
5. Check List Before Flight
(1) Make sure the drone battery and transmitter battery are fully charged.
(2) Make sure the Left Stick of the transmitter in the middle position.
(3) Please strictly obey the order of turn on and turn off before operation. Turn on
the transmitter power first and then turn on the drone power before flying;
turn off the drone power first and then turn off the transmitter power when
finish flying. Improper turn on and turn off order may cause the drone out of
control and threaten people’s safety. Please cultivate a correct habit of turn on
and turn off.
(4) Make sure the connection is solid between battery and motor etc. The
ongoing vibration may cause bad connection of power terminal make the
drone out of control.
(5) Improper operation may cause drone crash, which may arouse motor defective
and noise, and then effect the flying status or even stop flying. Please go to
the local distributor to buy new parts for replacement so that the drone will
return to its best status.
Li-Po Battery Disposal & Recycling
Wasted Lithium-Polymer batteries must not be placed with household trash.
Please contact local environmental or waste agency or the supplier of your
model or your nearest Li-Po battery recycling center.
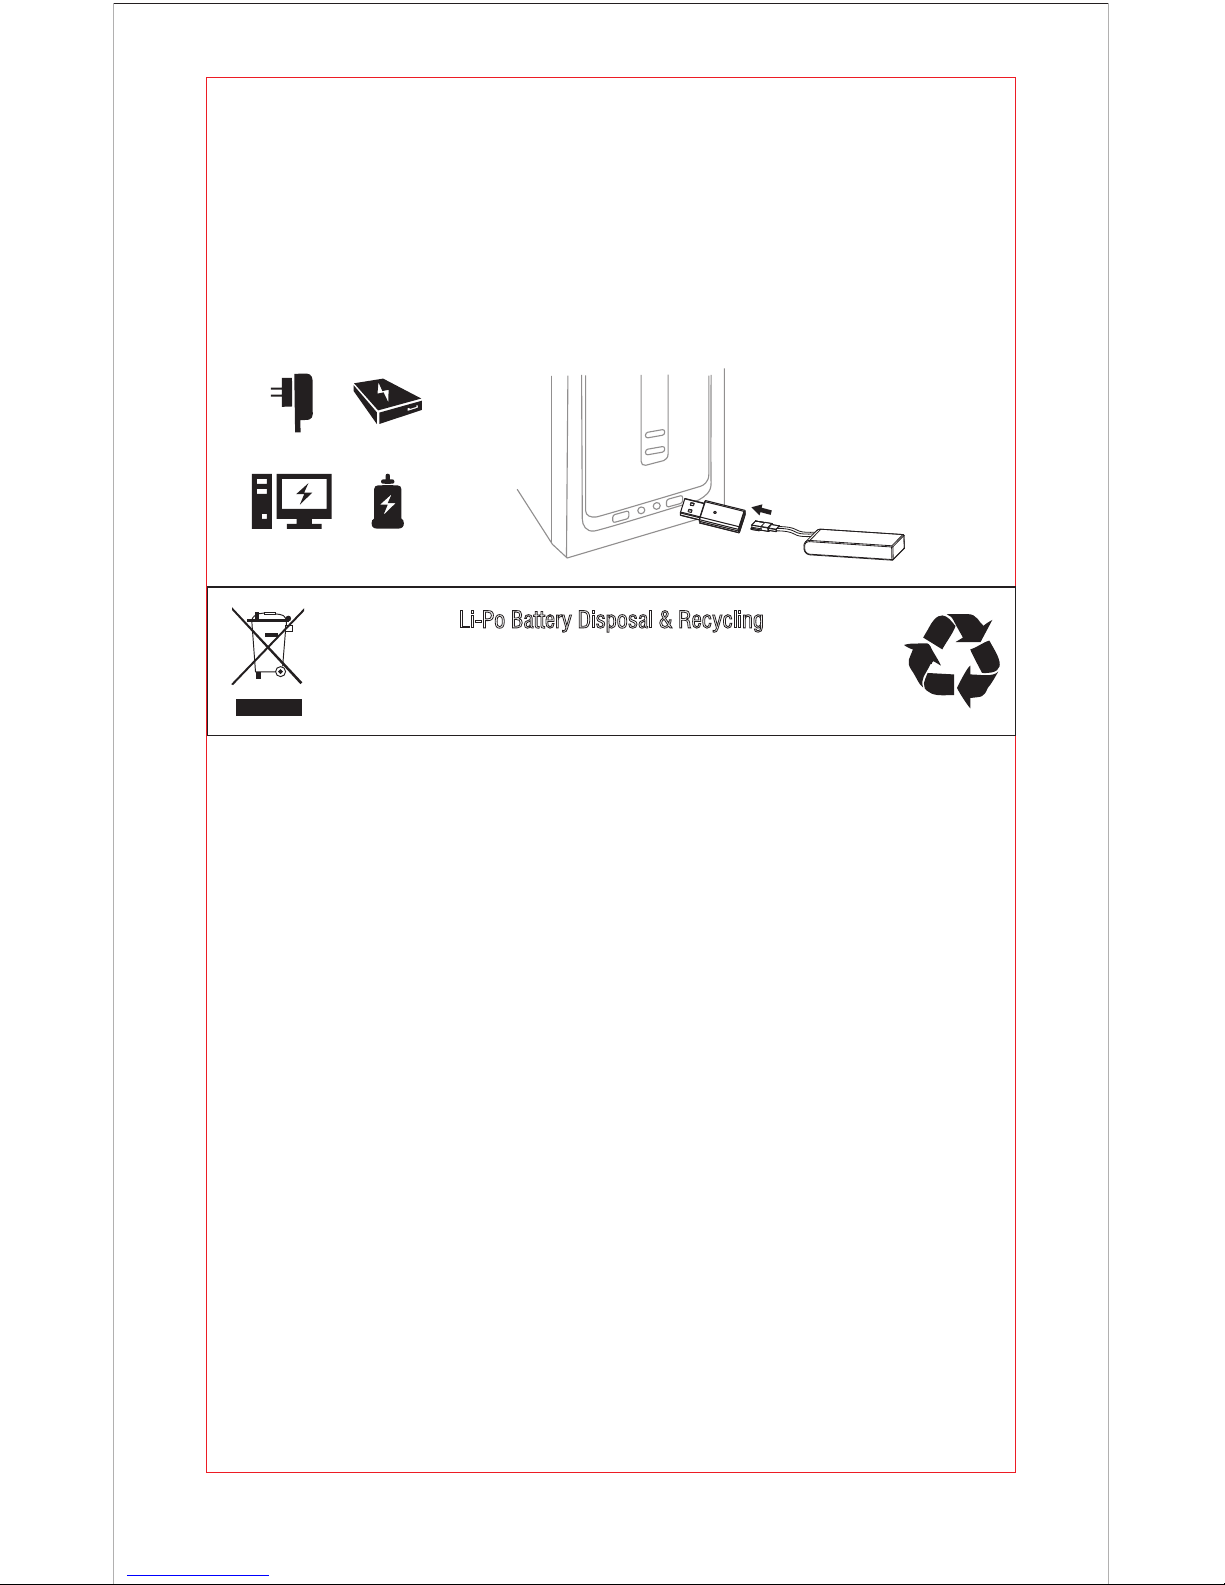
4. Charging Instruction for Drone Battery
Power BankPhone Charger
Computer Charging Car Charger
* For faster charging, it is recommended to use a adapter with 5V 2A output current (not included)
to charge the battery
Drone Battery
1. Connect the drone battery with USB cable first and then choose one of the
method as below picture shown to connect with USB plug.
2. The red USB indicator light keeps bright when charging. And the light turns
green when fully charged.
Page 6
6
6. Instruction for Drone and Transmitter
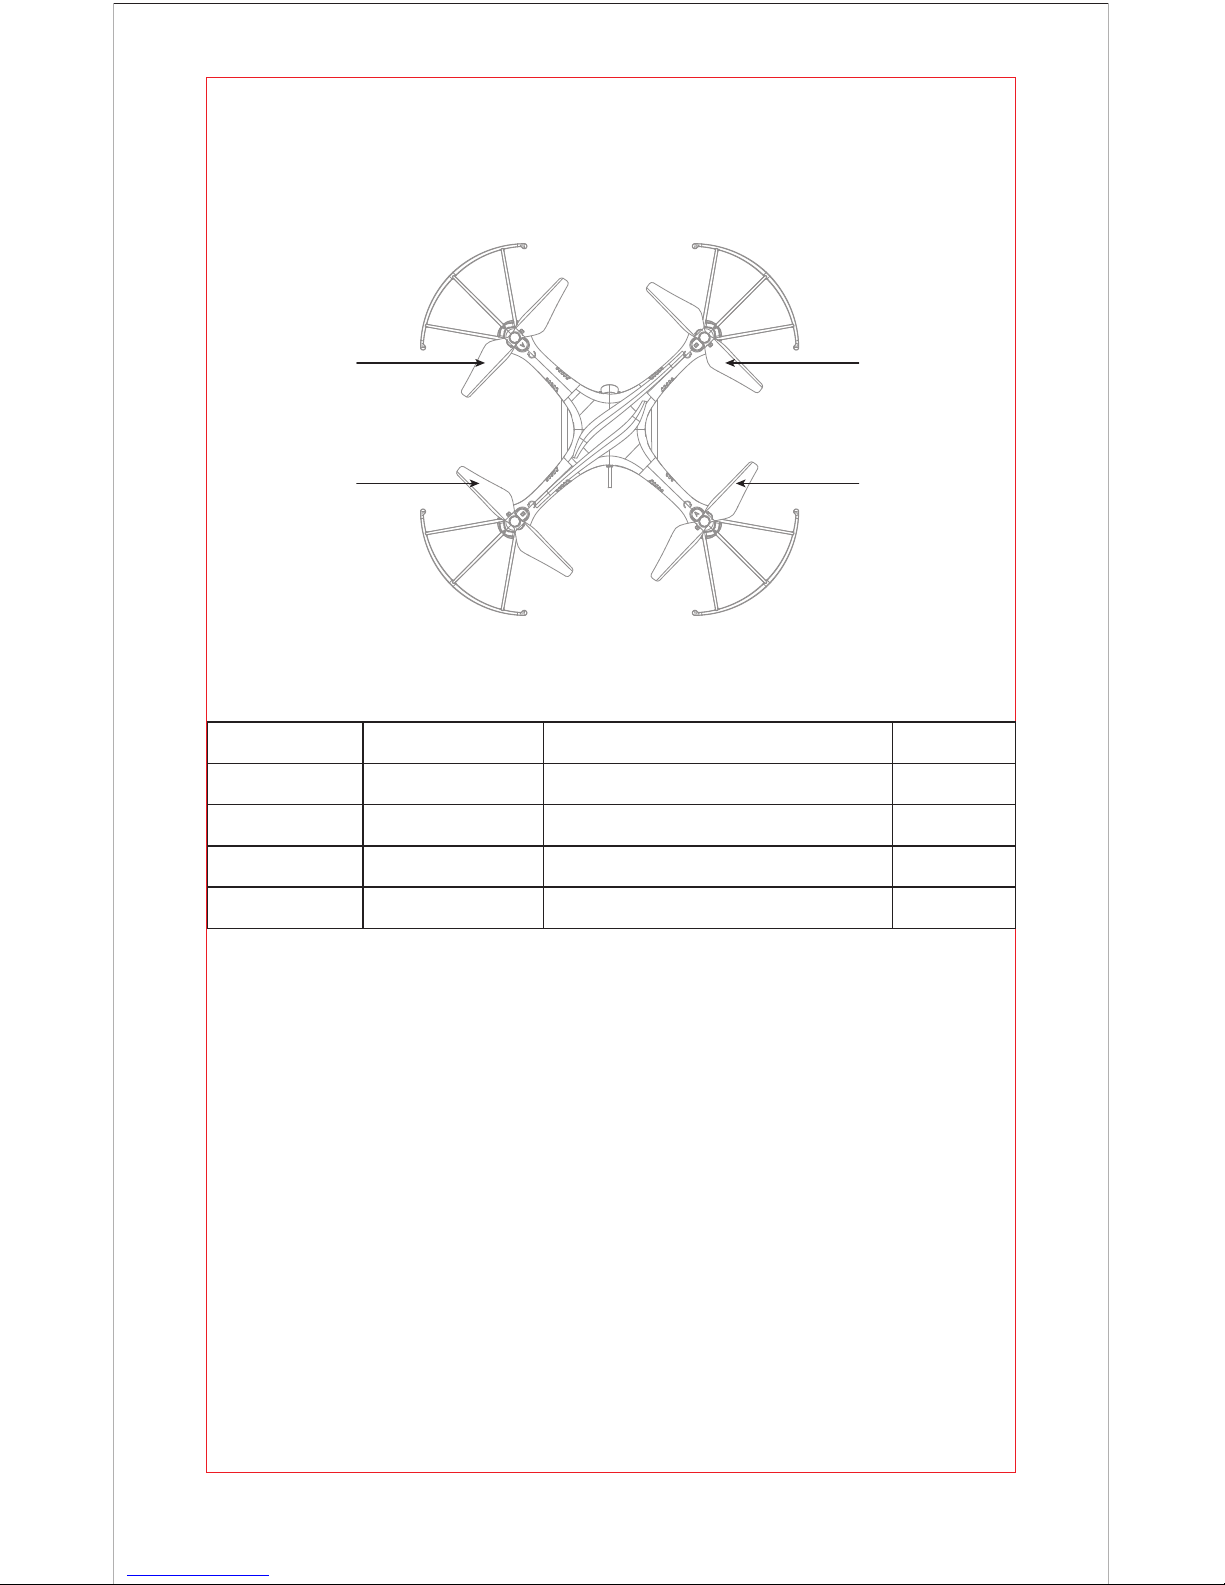
6.1 Drone
Specification
Drone Size
Drone Weight
Propeller Diameter
Flying Time
361*355*107mm
130g
146mm
7~8mins
Max Image Transmission Distance/Radius 40 m
100m
60~80 mins
Camera Resolution 1280x720P
Drone Battery 3.7V 500mAh
Charging Time for Drone Battery
Max Flying Distance/Radius
B Propeller
Counterclockwise
A Propeller
Clockwise
B Propeller
Counterclockwise
A Propeller
Clockwise
Front
Left Right
Rear
Page 7
7
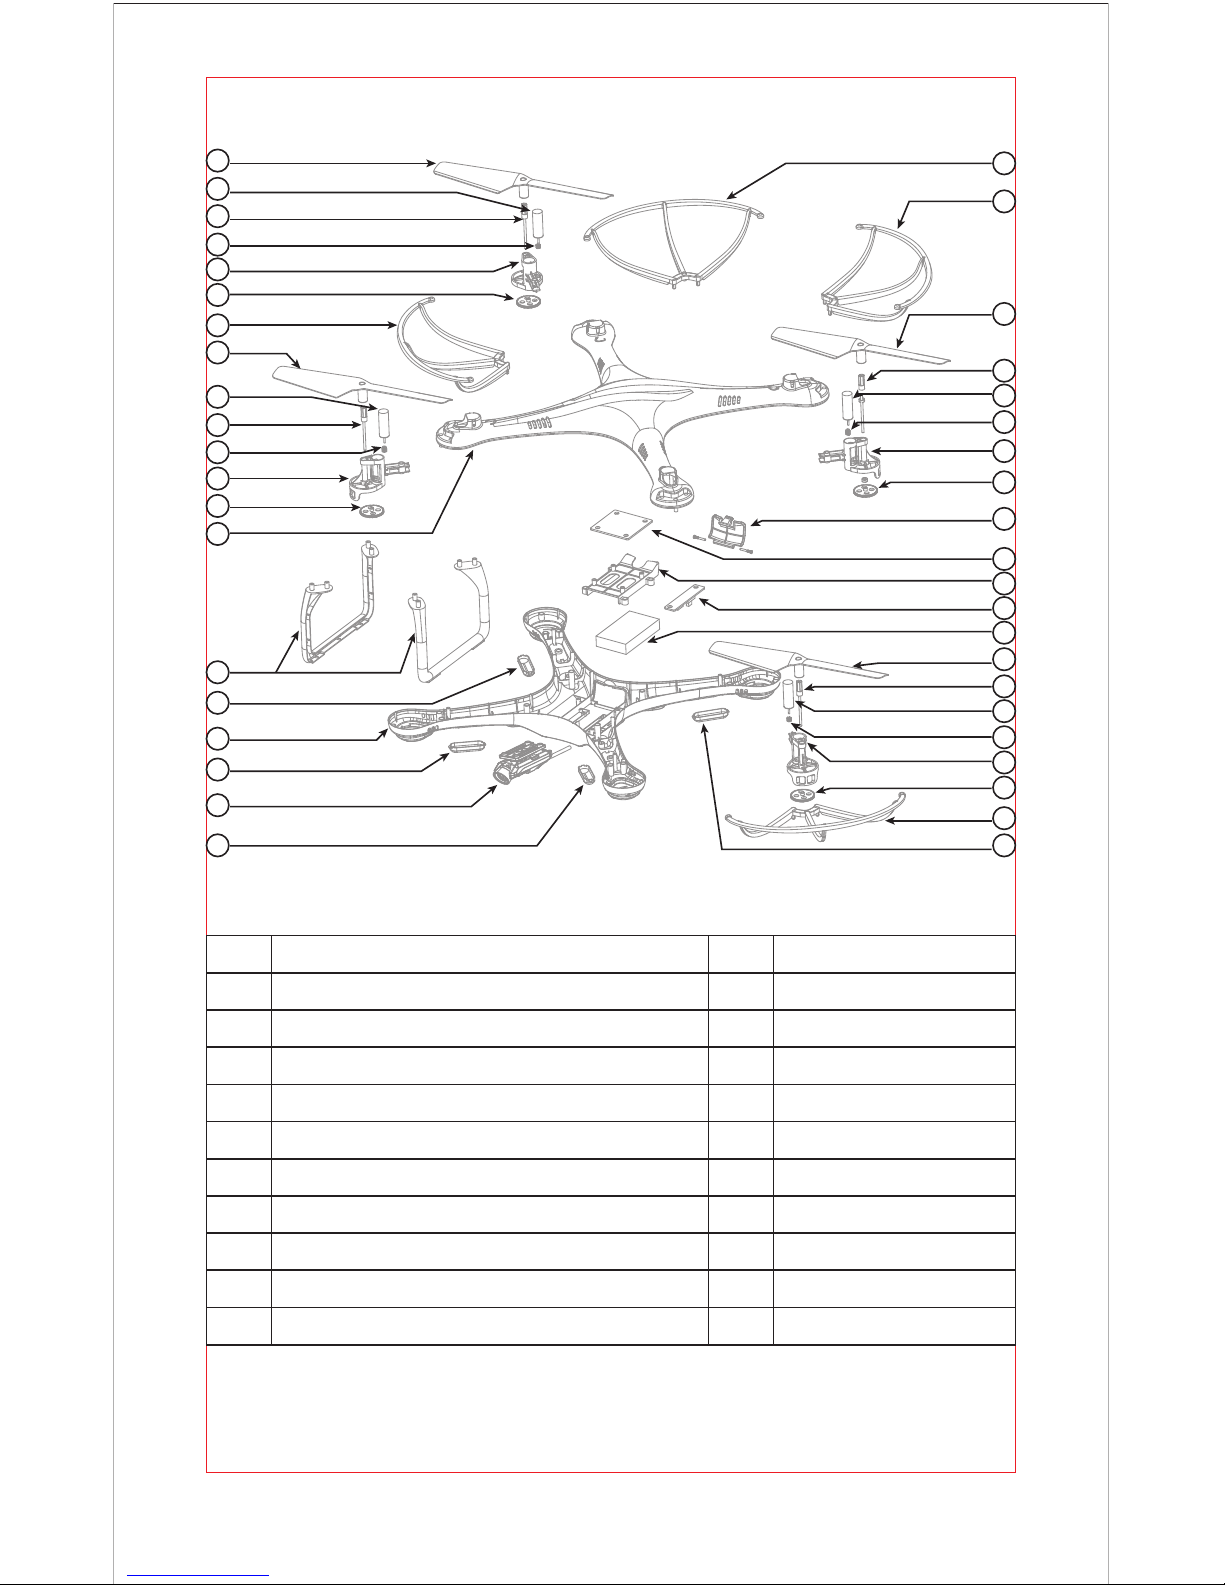
No. Name No. Name
1 A Propeller (Clockwise) 11 Landing Gear
2 Clockwise Motor (Red and Blue Wire) 12 Rear Lamp Cover (Orange)
3 Drive Shaft 13 Lower Cover
4 Motor Gear 14 Front Lamp Cover (Green)
5 Motor Holder 15 WiFi Camera
6 Drive Gear 16 Battery Cover
7 B Propeller (Counterclockwise) 17 Receiving Board
8 Counterclockwise Motor (Black and White Wire) 18 Main Casing
9 Propeller Guard 19 Switch Board
10 Upper Cover 20 Drone Battery
1
2
3
3
4
4
5
5
6
3
4
5
6
6
7
8
9
1
2
3
4
5
6
7
8
9
9
9
10
11
12
12
13
14
14
15
16
17
18
19
20
Exploded View
Page 8
8
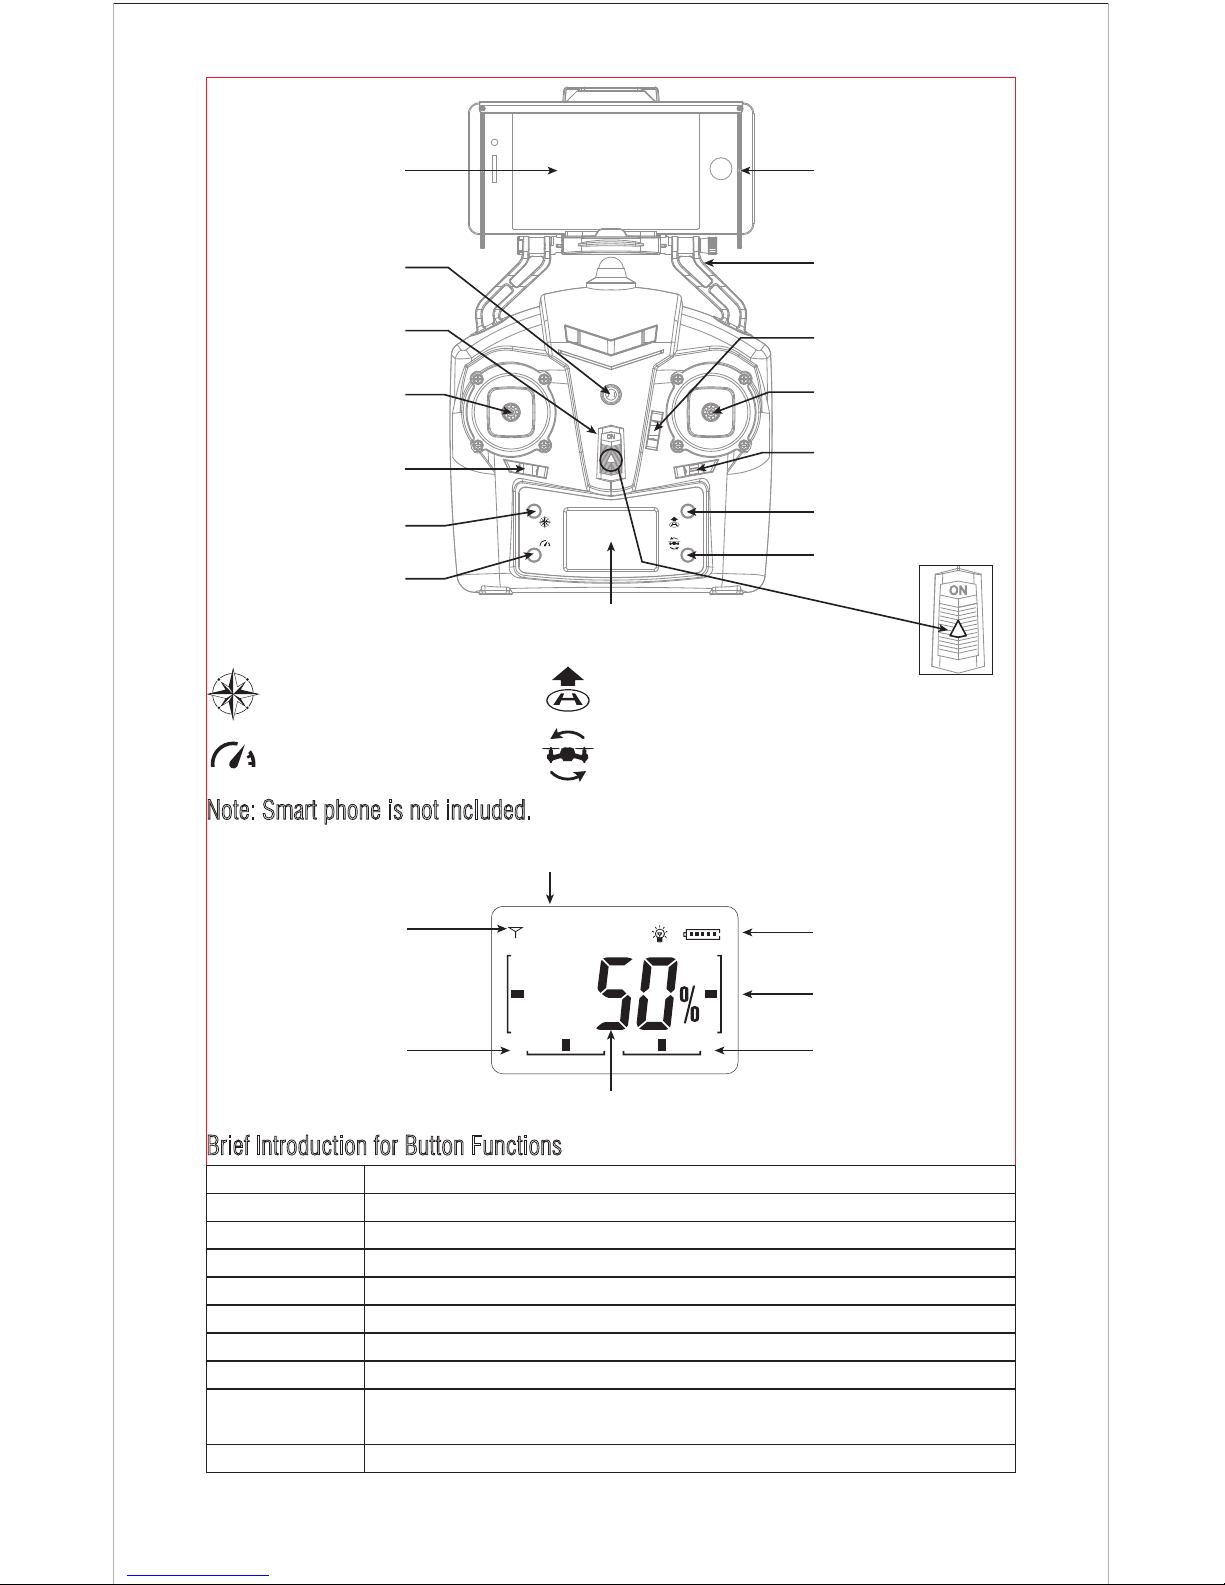
6.2Transmitter
Strong/Weak Emission
Signal
High / Low Speed Mode Indication
Note: Smart phone is not included.
Transmitter Battery
Indication
Forward / Backward
Trimming Indication
Left / Right Flying
Trimming Indication
Throttle Display
Left / Right Rudder
Trimming Indication
Brief Introduction for Button Functions
High / Low Speed Mode
Left Stick
Right Stick
Left / Right Rudder Trimmer
Forward / Backward Trimmer
Left / Right Flying Trimmer
Power Switch
Press this button to switch to High / Low Speed.
Move the Stick to forward / backward / left / right to fly the drone up / down / turn left / turn right.
Move the Stick to forward / backward / left / right to fly the drone forward / backward / left / right.
Move the button till the drone becomes balance if the drone rotates to the left or right.
Move the button till the drone becomes balance if the drone drifts forward or backward.
Move the button till the drone becomes balance if the drone tilts to the left or right.
Push up the power switch to turn on the transmitter, and pull down to turn off.
Heading Hold Mode
Press the button to enter heading hold mode, and press again to exit from heading hold mode.
Flip Mode
Press this button to do 360°flip.
Take Off / Landing /
Emergency Stop Button
Press the button and the drone will fly up automatically. Press the button again and the drone will landing on the ground
automatically. Press and hold the button more than 1s, the drone propellers will stop and fall down immediately.
Power Indicator Light
Mobile Phone Screen
Lens Hood
Power Switch
Right Stick (Forward /
Backward / Left / Right)
Forward / Backward
Trimmer
Left / Right Flying
Trimmer
Take Off / Landing /
Emergency Stop Button
Flip
Left Stick
(Throttle / Rudder)
Left / Right
Rudder Trimmer
Heading Hold Mode
High / Low Speed Mode
LCD Display
Turn On Direction
Mobile Phone Holder
Take Off / Landing / Emergency Stop Icon
Flip Mode Icon
Heading Hold Icon
High / Low Speed Mode Icon
MODE1
THRO
TRIM
Page 9
9
7. Pre-flight Operation Instruction
7.1 Frequency Pairing
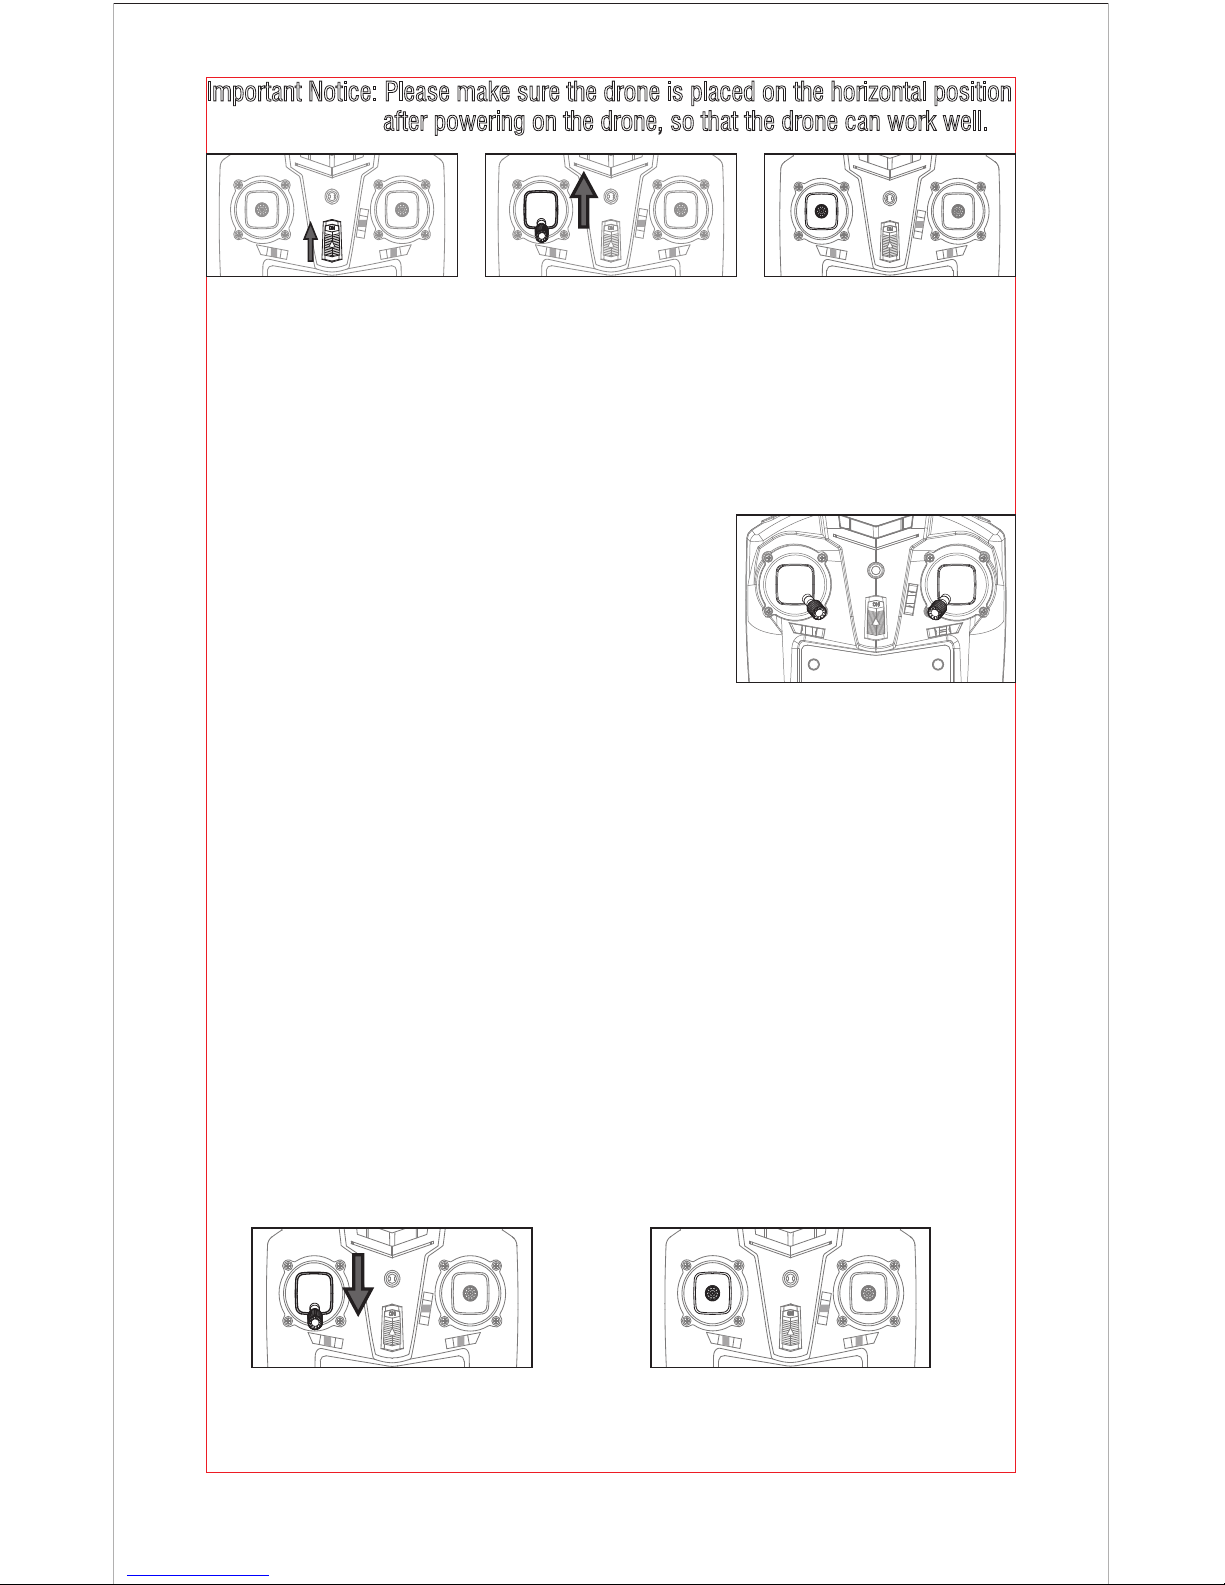
(1). Turn on the transmitter switch (Picture 4) and the power indicator light flashes
rapidly. Push the Left Stick all the way down to the lowest position and then
release. The Left Stick will back to the middle position automatically.
(Picture 5 / 6) The power indicator light flashes slowly, which indicates the
transmitter is ready for frequency pairing.
(2). Install the battery to the mounted box in the drone and then power on the drone.
(3). Put the drone on the flat surface, the drone body lights turn from flashing to
solid bright, which indicates successful frequency pairing.
Attaching your Mobile Phone to Transmitter
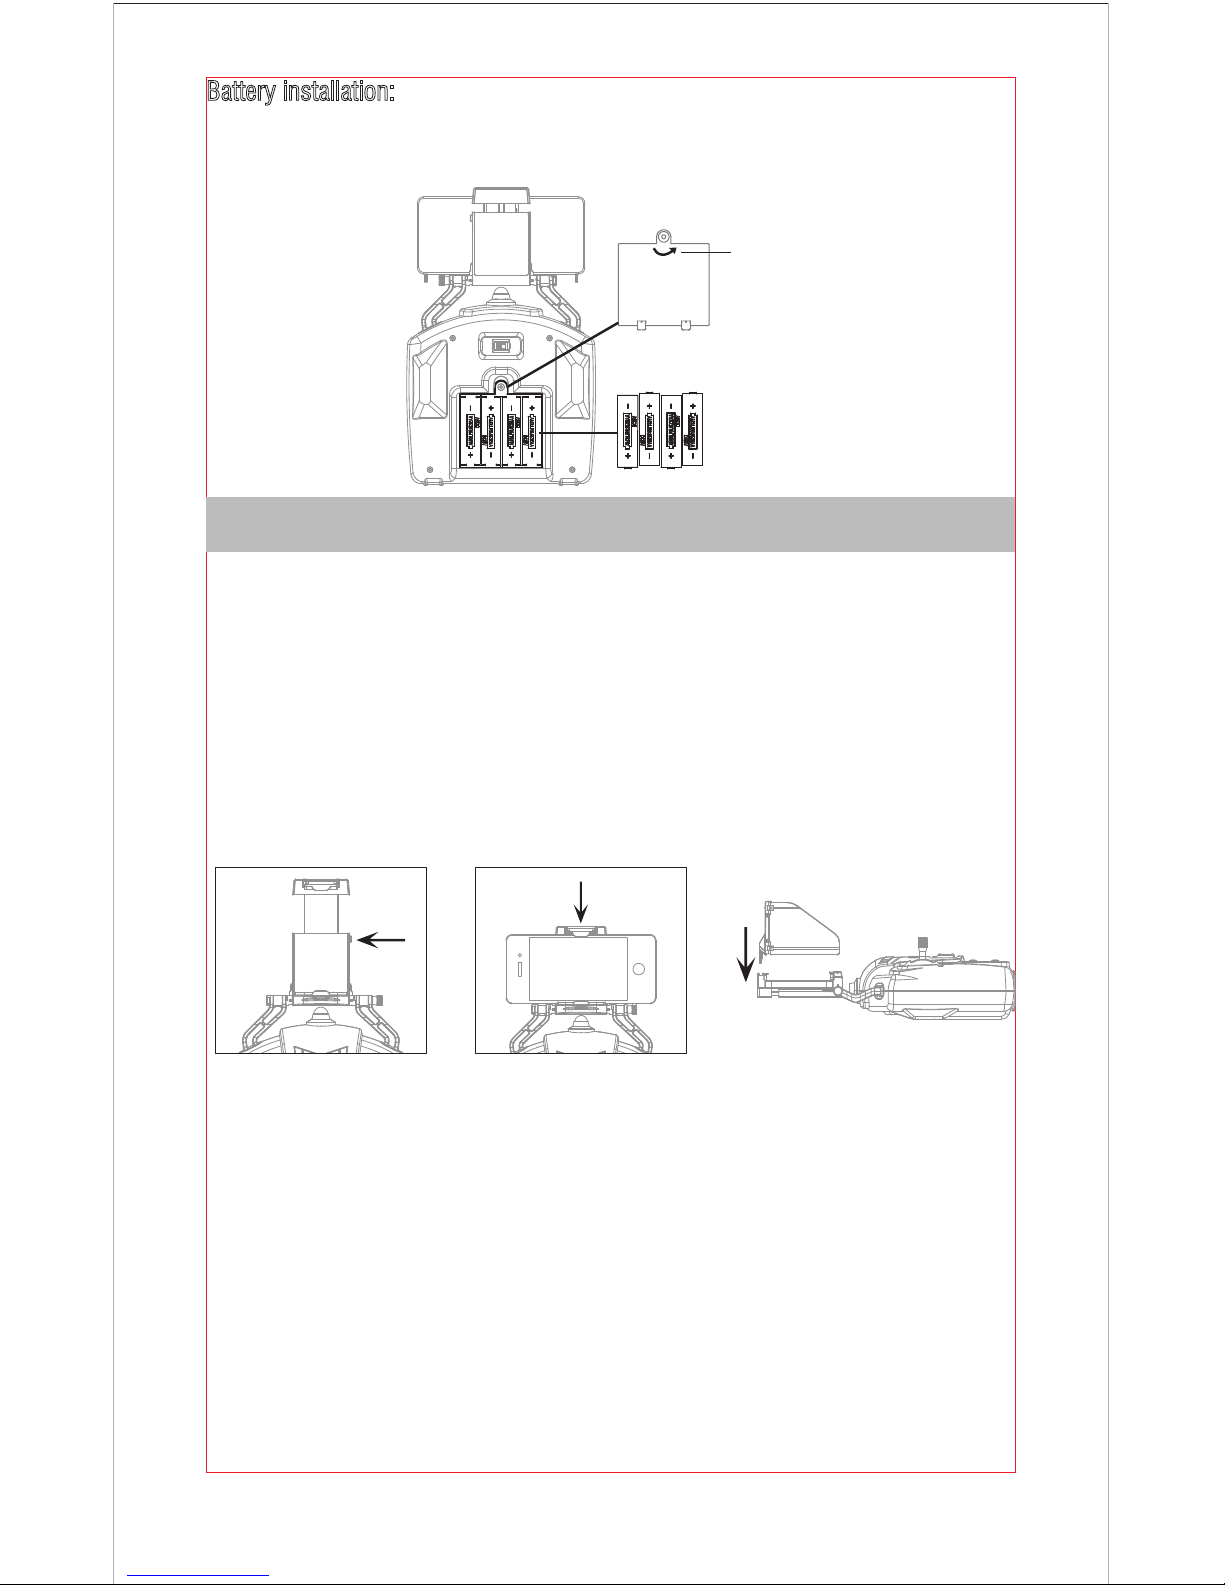
Battery installation: Open the battery cover on the back side of the transmitter and
put 4 alkaline batteries (AA, not included) into the box in accordance with
electrode instructions, as Picture shown.
Battery Cover
4X1.5V
Alkaline Batteries
Drive the screw according to the arrow
direction to loosen the screw to open
the battery cover. Tighten the screw by
driving it in opposite direction.
(1). Press the self-locking switch on the top right side of the mobile holder and
push the holder to a fully open position as Picture 1 shown.
(2). Place the mobile phone facing frontward position, pull the mobile phone holder
down and press tightly as possible to secure the mobile phone and transmitter
(please note that do not touch the mobile phone button) as Picture 2.
(3). Insert the lens hood into the slot and make sure the lower edge of the lens
hood is as close to the mobile phone as possible as Picture 3.
Picture 1 Picture 2 Picture 3
1. Make sure the electrodes are correct. 2. Do not mixed use new and old batteries.
3. Do not mixed use different kinds of batteries. 4. Do not charge the non rechargeable battery.
Notice:
Page 10
10
7.2 Checking
7.3 Calibration Instruction
(4). Push up the Left Stick slowly to fly up the drone,
and pull down the Left Stick slowly to the lowest
end, then the drone will land on the ground slowly.
(3). Move the Left Stick and Right Stick as Picture 7
shown to start the motor and then release.
Then push up the Left Stick to fly up the drone
to certain altitude and then release.
(5). It’s recommend to repeat Steps 4 above to practice.
(1). The camera is the drone front. Keep the drone front away from you.
(2). Power on the drone and check the direction of the rotating propellers. The left
front and right rear A propellers rotating clockwise while the right front and left
rear B propellers rotating counterclockwise.
(6). Adjust relative transmitter Trimmer button to adjust the rudder if the drone
tilts to one side when flying.
Please follow below steps to calibrate the drone if the drone becomes imbalance
after crashing during the flight, and can not be adjusted by trimmer button and
cause difficult operation.
(1). Power off the drone, then turn off the transmitter switch.
(2). Turn on the transmitter switch, push the Left Stick all the way down to the
lowest position (Picture 8) and then release. The Left Stick will back to the
middle position automatically (Picture 9). The transmitter is ready for
frequency pairing mode.
(3). Power on the drone and put it on a flat surface in a horizontal position. The
drone body lights change from flashing to solid bright, which indicates
successful frequency pairing.
Important Notice: Please make sure the drone is placed on the horizontal position
after powering on the drone, so that the drone can work well.
Picture 5Picture 4
Picture 7
Picture 6
Picture 8 Picture 9
Page 11
11
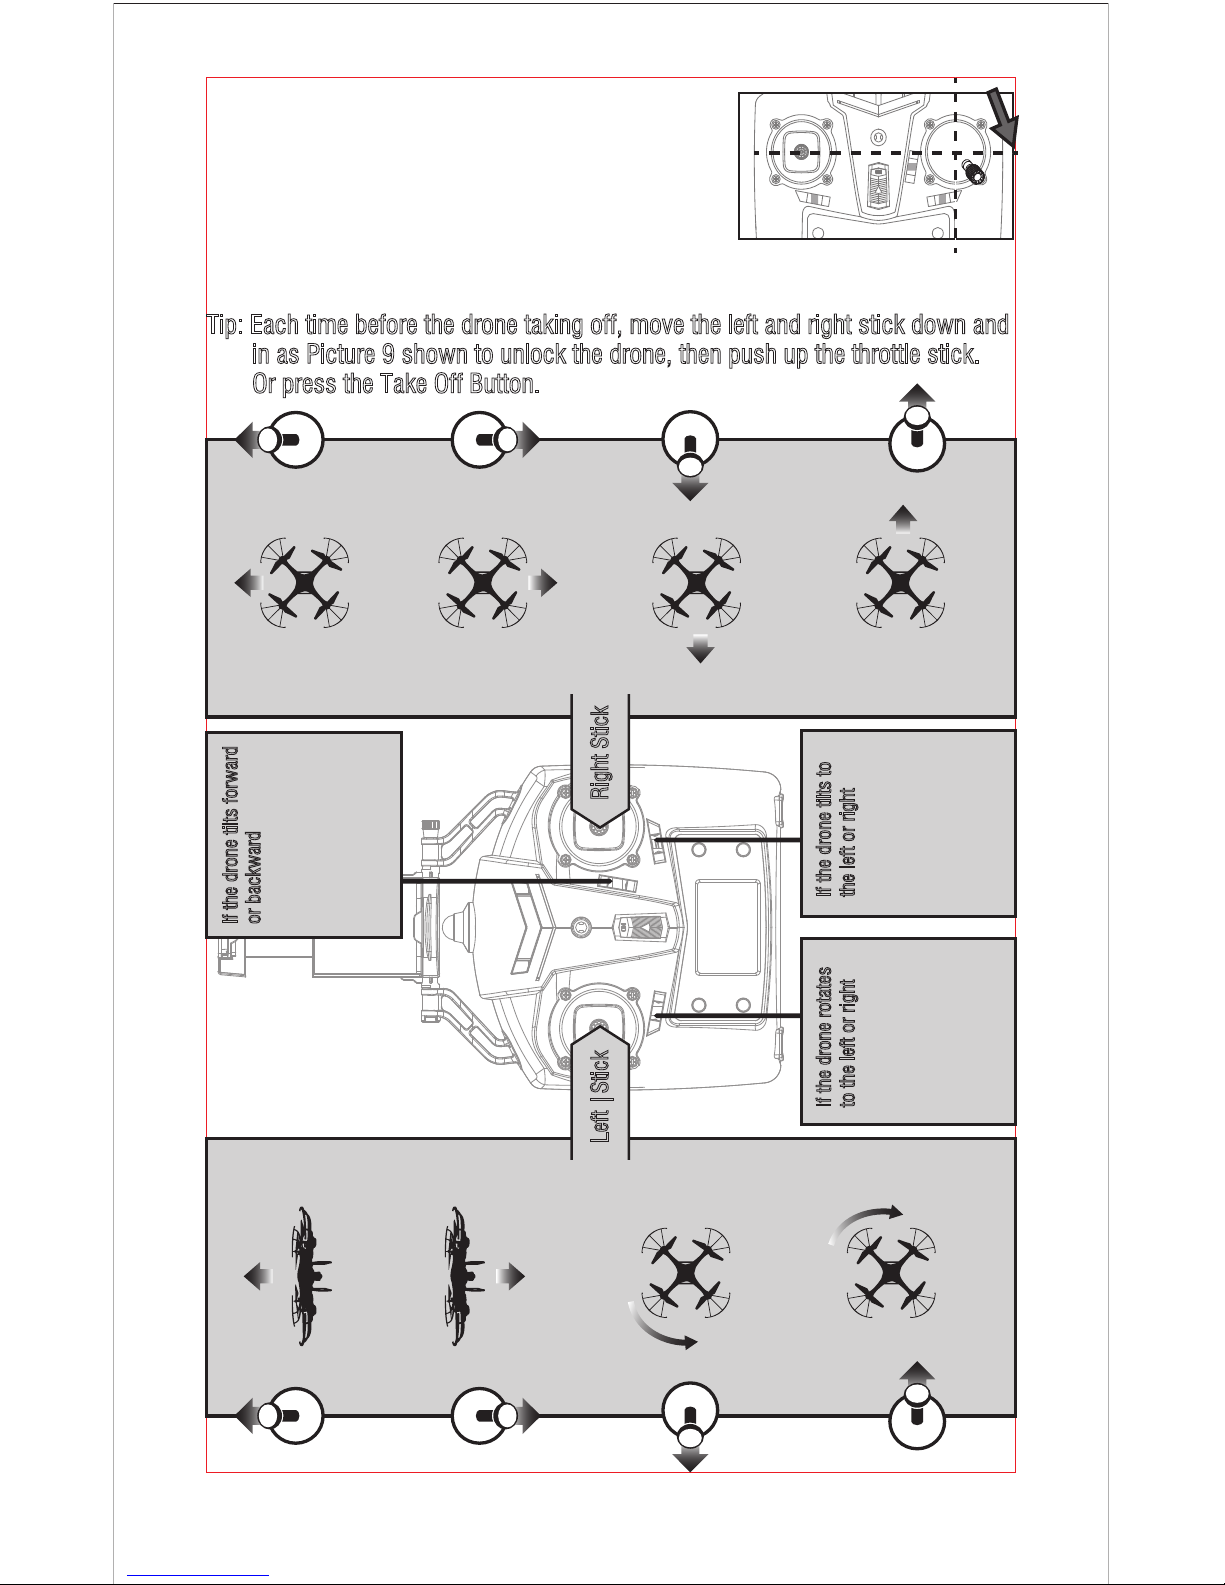
(4). Do not move the Left Stick before successful
calibration. Push the Right Stick as Picture 10
and then release. The drone body lights flash,
which indicates that the drone is calibrating.
When the drone body lights remain solid, which
indicates successful calibration.
Tip: Each time before the drone taking off, move the left and right stick down and
in as Picture 9 shown to unlock the drone, then push up the throttle stick.
Or press the Take Off Button.
Picture 10
7.4 Flying Control
Left |Stick
If the drone rotates
to the left or right
Press the Right Rudder
Trimmer till balance if
the drone rotates to the
left, and press the Left
Rudder Trimmer till
balance if the drone
rotates to the right.
If the drone tilts forward
or backward
Press the Backward Flying
Trimmer till balance if the
drone drifts forward, and
press the Forward Flying
Trimmer if the drone drifts
backward.
Right Stick
If the drone tilts to
the left or right
Press the Right Flying
Trimmer till balance if
the drone drifts to the
left, and press the Left
Flying Trimmer till
balance if the drone
drifts to the right.
Push the Right Stick up to
fly the drone forward.
Pull the Right Stick down to
fly the drone backward.
Move the Right Stick to the
left to fly the drone to the left.
Move the Right Stick to the right
to fly the drone to the right.
Move the Left Stick to the left
to rotate the drone to the left.
Move the Left Stick to the right
to rotate the drone to the right.
Push the Left Stick up to
fly the drone up.
Pull the Left Stick down
to fly the drone down.
Page 12
12
High / Low Speed Mode
High / Low Speed Mode
(Press Down)
1. Low Speed Mode is suitable for beginner.
2. High Speed Mode is suitable for expert to
experience aerial stunt in outdoor.
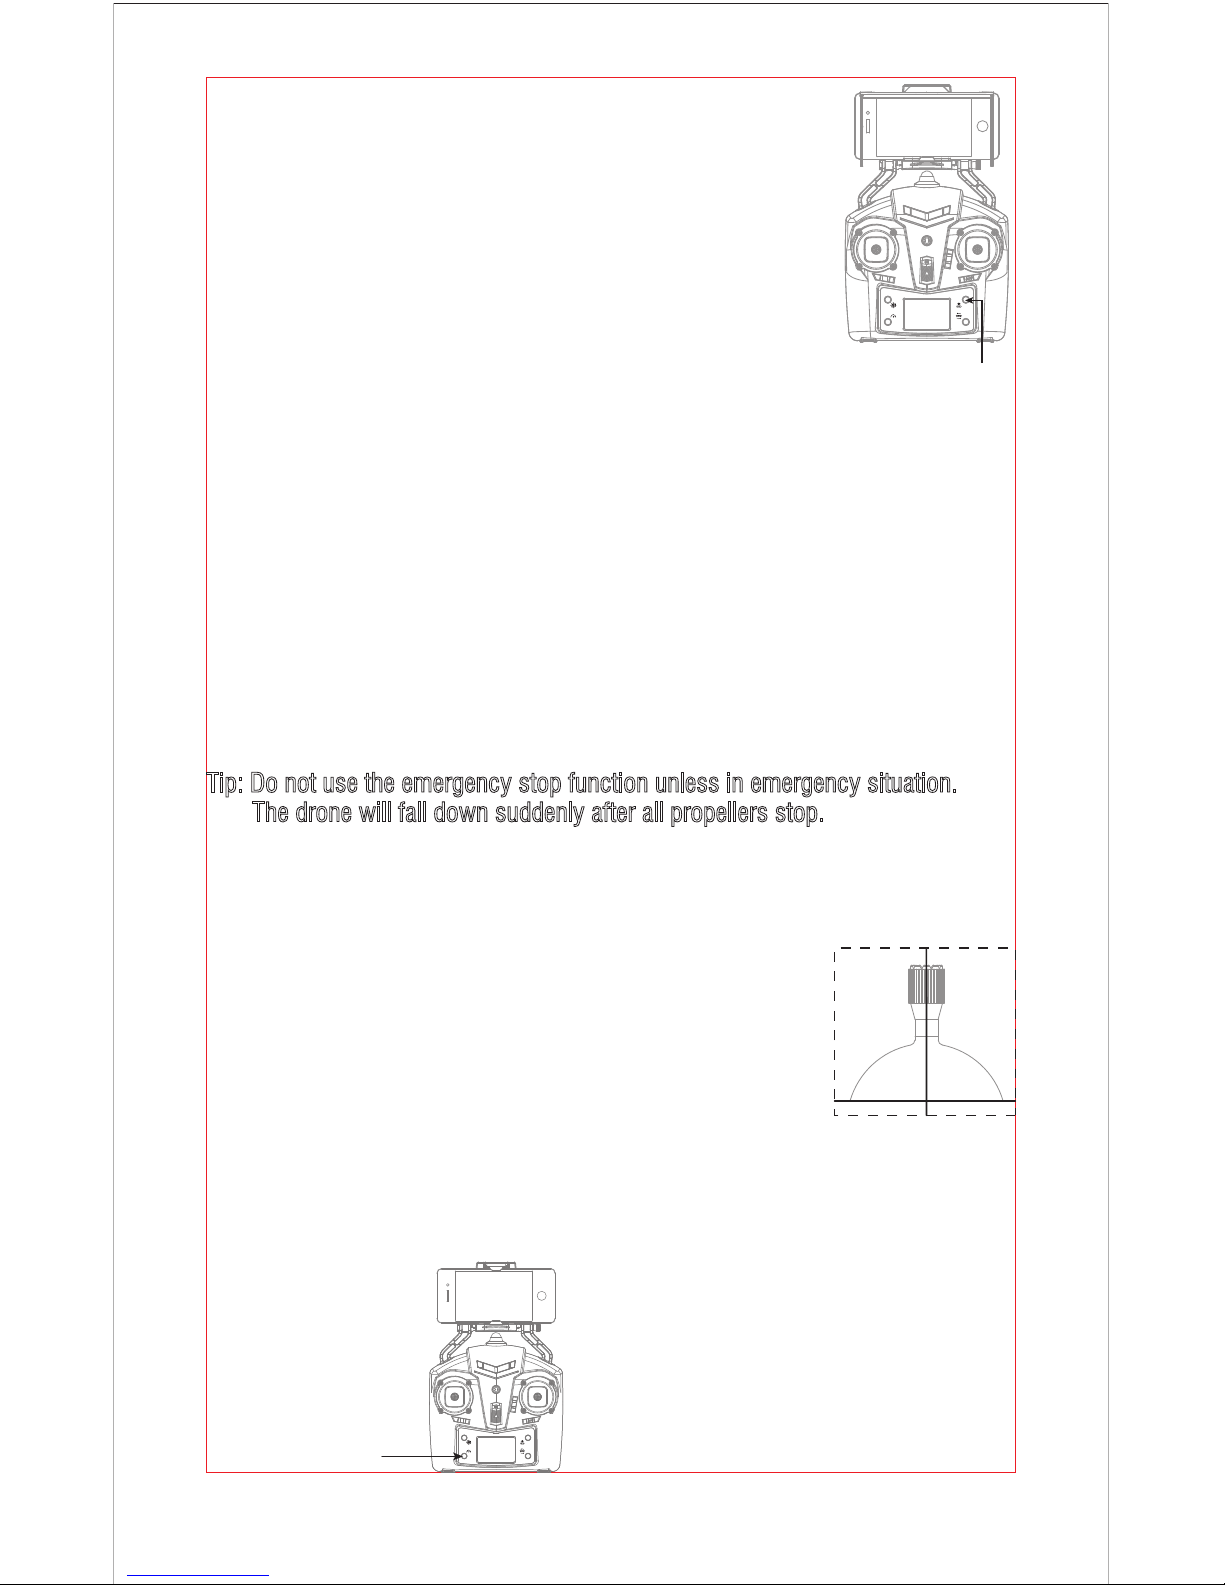
Two Take Off Methods
Take Off / Landing /
Emergency Stop Button
8. Functions Introduction
(2). Method 2 (One Button Take Off): Press the Button
(Picture 11) , the drone will fly up automatically and
keep flying at an altitude of 1.2 meters approximately.
(1). Method 1 (Take off): Push the Left Stick and Right Stick
as Picture 7 shown to start the motor and then release.
Then push up the Left Stick to fly up the drone to certain
altitude and then release the stick.
Picture 11
(2). Method 2 (One Button Landing): Press the Button (Picture 11) once shortly,
and the drone will land on the ground automatically.
▲Emergency Stop: When the drone in emergency situation and going to hit the
walking people or obstacle etc., press the Take Off / Landing / Emergency Stop
Button immediately and hold it for more than 1s. The propellers will stop
immediately.
Tip: Do not use the emergency stop function unless in emergency situation.
The drone will fall down suddenly after all propellers stop.
Two Landing Methods
(1). Method 1 (Landing): Push the Left Stick all the way down to the lowest
position and hold it till the motors stop and the drone landing on the ground.
Altitude Hold Mode
Altitude hold mode indicates that the drone maintains a consistent altitude while
allowing roll, pitch, and yaw to be controlled normally.
It makes it easier to control the drone for beginner and more
stable for aerial photography.
Push the Left Stick up (down) to fly the drone up (down) at
certain altitude and then release the Stick. The Stick will
back to the center position (Altitude Hold Center) as Picture
12 shown. And the drone will keep flying at current altitude.
Repeat above steps if you want to change the drone altitude.
Altitude Hold Center
Picture 12
Page 13
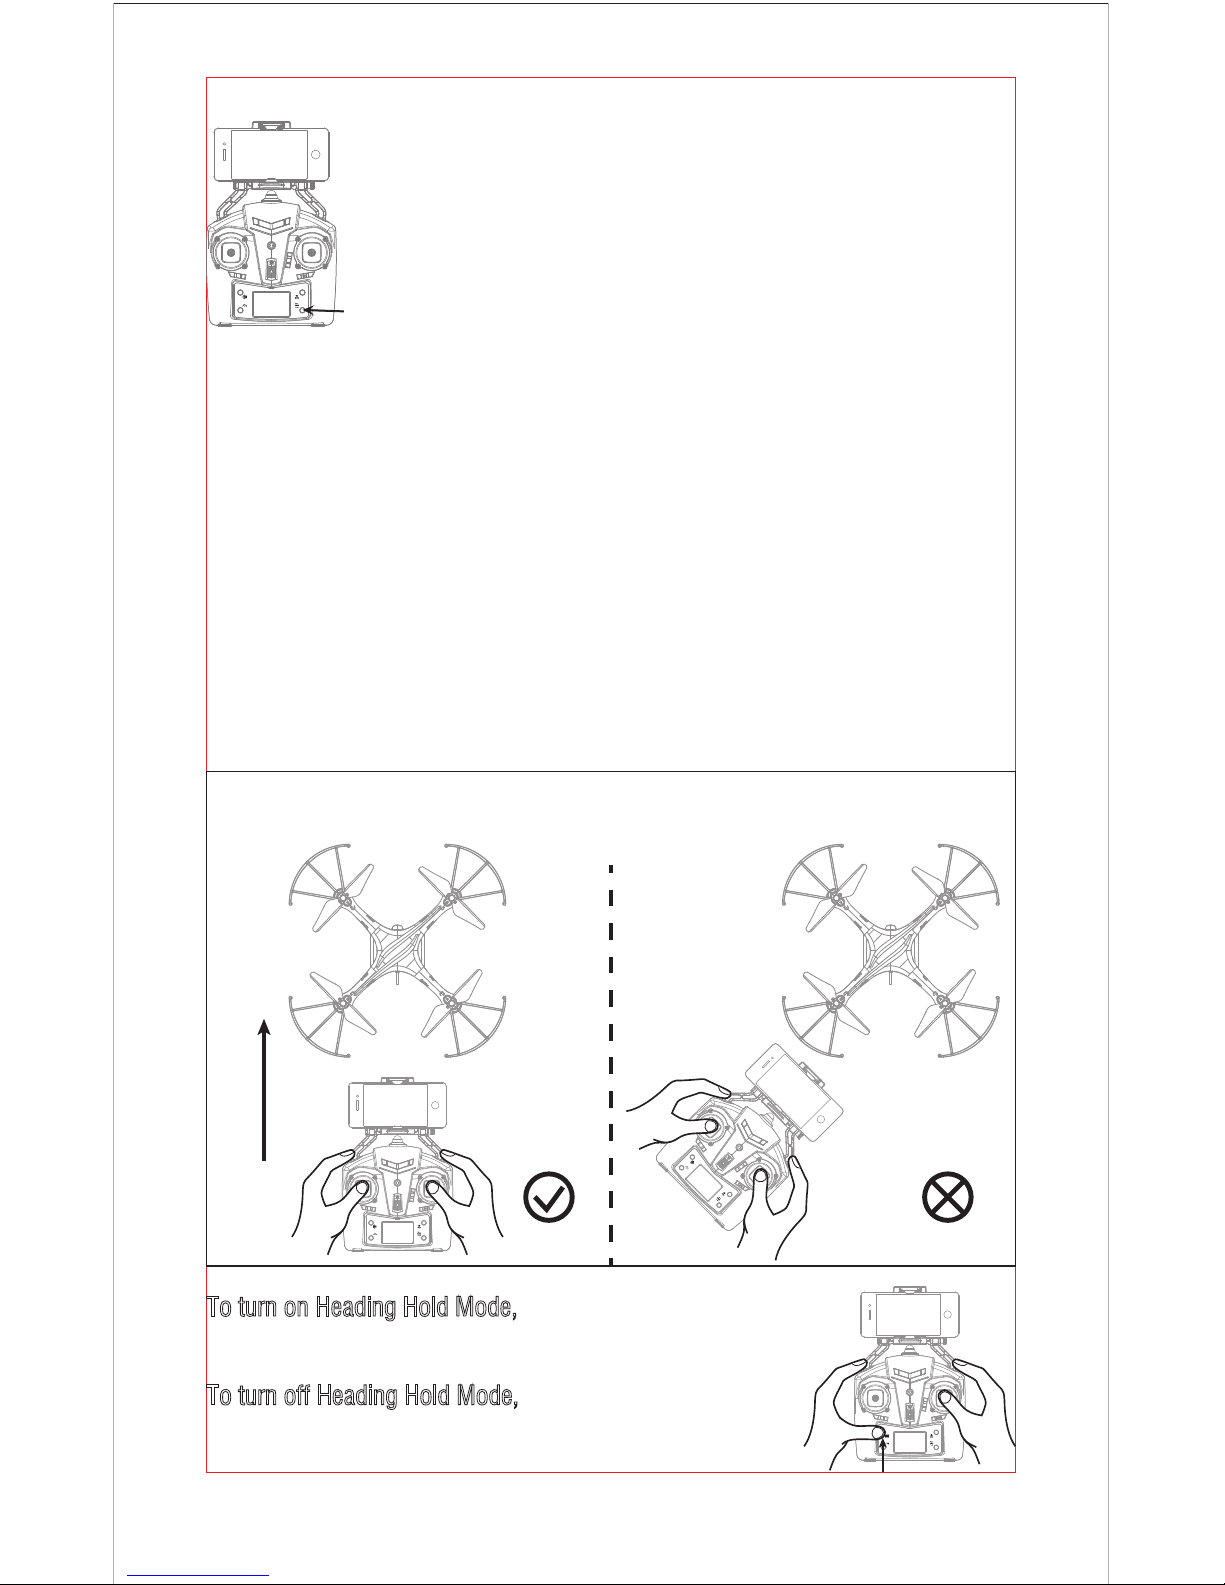
13
To turn on Heading Hold Mode, press Heading Hold Mode
button and the drone LED lights flash, which indicates the
drone enters heading hold mode.
To turn off Heading Hold Mode, press Heading Hold Mode
button again and the drone LED lights turn solid, which
indicates the heading hold mode is off.
* Drones generally have a front and rear indicated by LED lights or colored
propellers. By default, the users are required to tell the front and the rear of the
drone when flying. Under heading hold mode, the users can operate the drone
without worrying about the orientation (left is left and right is right all the time,
regardless of where your drone is pointing at).
Heading Hold Mode is designed for beginners and users who fly the drone in
daylight or at a far distance.
When the drone in heading hold mode, push the Right Stick to forward / backward /
left / right, and the drone will fly to forward / backward / left / right accordingly.
Heading Hold Mode
Prerequisite: Position the drone in such a way that its front is your front (see Picture 1).
Tip: Do not change the orientation of the transmitter (see Picture 2) after entering heading hold mode.
Picture 1 Picture 2
Front
(Green Light)
Rear
Left Right
Front
(Green Light)
Rear
Left Right
Flip Mode
Press the Flip Mode button when the drone is flying,
and you will hear constantly beep, which indicates
flip mode is ready. Push the Right Stick to forward /
backward / left / right to utmost and then release the
stick. The drone will do 360° flip in corresponding
direction. After that the drone will exit from flip mode
automatically.
Flip Mode
Page 14
14
Low Battery Alarm
When the drone in low battery, the transmitter will beep constantly to remind the
user to land the drone as soon as possible. The flip function will turn off
automatically when the drone in low battery.
When the transmitter in low battery, the transmitter will beep to remind the user to
land the drone to replace the batteries as soon as possible. Or the drone may out
of control.
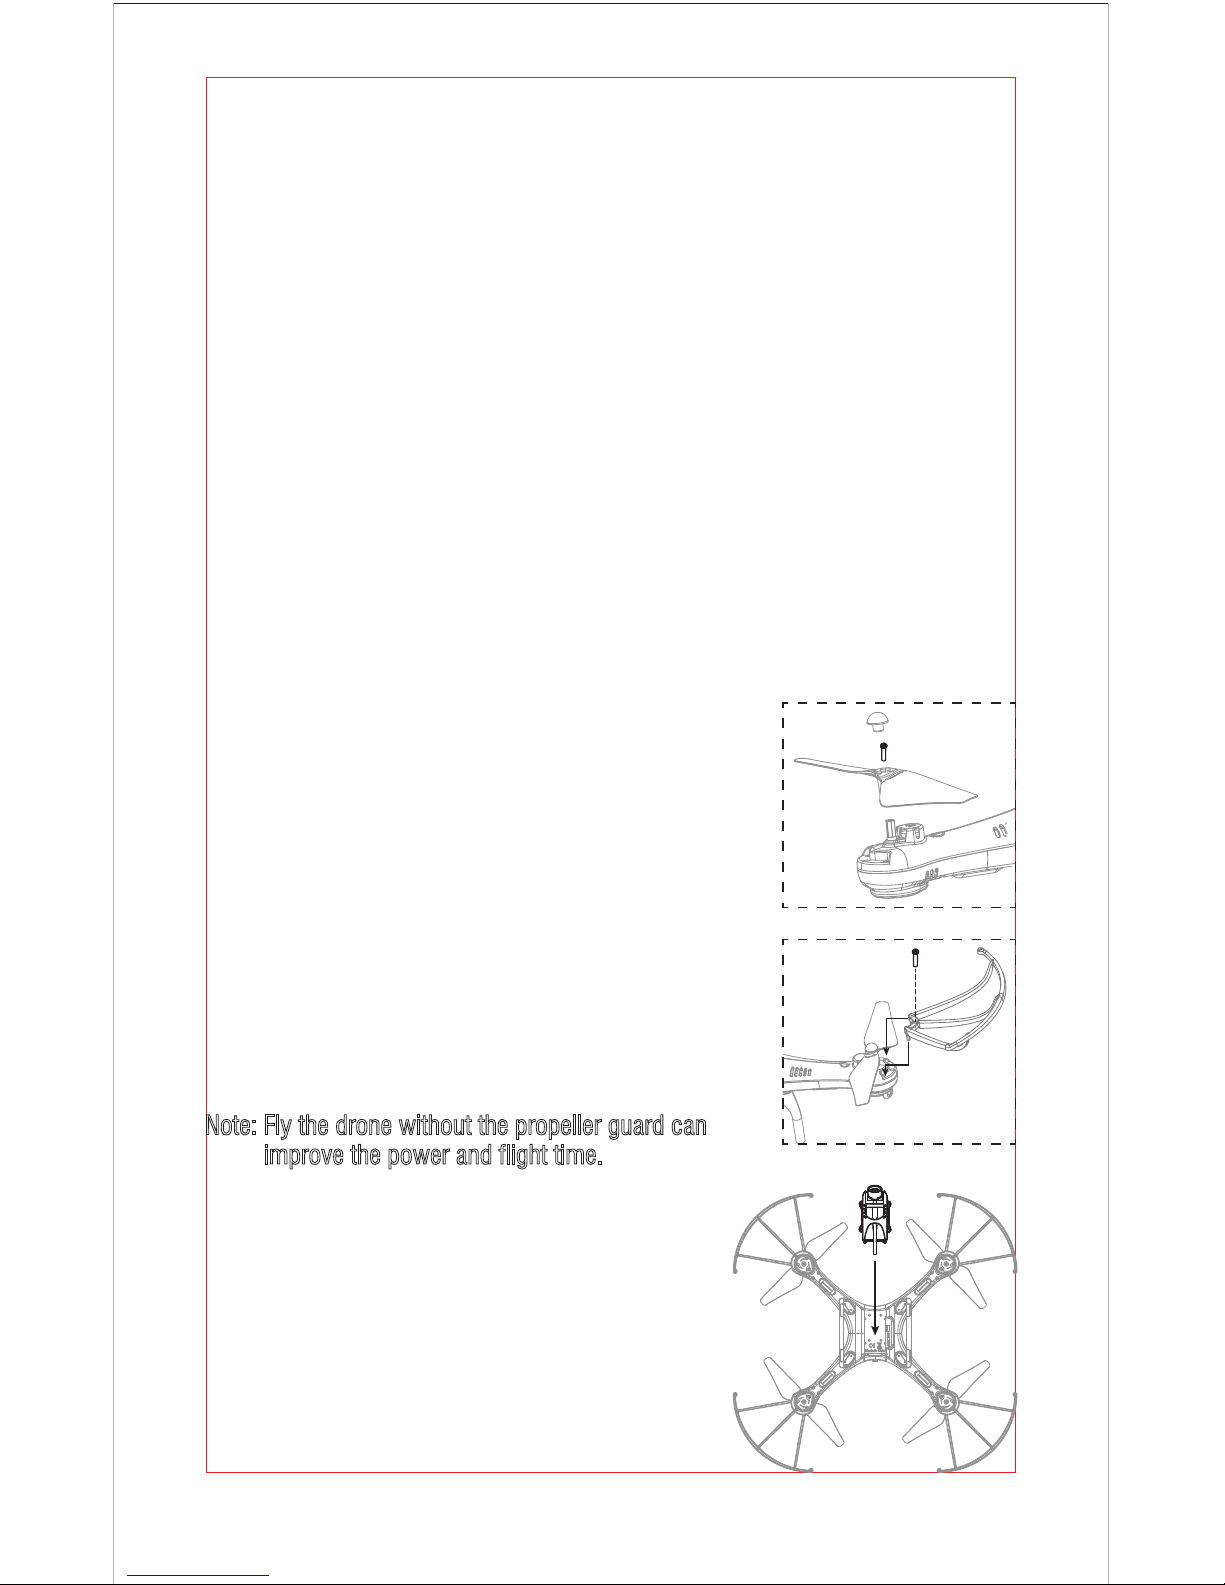
Propeller Installation Diagram
Out of Range Alarm
When the drone flying out of the max remote control distance, the transmitter will
beep to alarm the user to fly back the drone immediately. Or the drone may out of
control and fly away.
Propellers Stuck Protection
(1). When the drone propeller was stuck, the drone body lights flash rapidly and
the propellers stuck protection function turn on automatically. The motor will stop.
(2). Move the left stick to the lowest end to turn off propellers stuck protection
function. The drone body lights get solid bright and the drone is ready to fly.
Remove the propeller cap and screw from the propeller,
then remove the propeller.
To install the propeller, aim at the hole and press the
propeller down to the end, then lock the propeller by
attached screw. Press down the propeller cap.
Propeller Guard Installation Diagram
Install the propeller guard to the drone and lock the
propeller guard by attached screws.
Remove the screw from the propeller guard and pull
out the propeller guard with moderate force.
Note: Fly the drone without the propeller guard can
improve the power and flight time.
Camera Installation Diagram
To install the camera, aim at the buckle in the
drone and push the camera with moderate force.
To remove the camera, pull out the camera from
the buckle with moderate force.
9. Spare Parts Installation Instruction
Front
Rear
Page 15
15
10.2 Frequency Pairing between Mobile Phone and Drone WiFi:
(2). Enter “Settings” of the mobile phone, turn on WiFi (WLAN) and choose
udirc-***, return to desktop after successful connection.
(1). Install the battery to the mounted box and power on the drone. Put the drone
on the flat surface in horizontal position.
(3). Click on the icon Flyingsee and click on to enter remote control
interface to experience real time transmission.
10.1 Download and Install the APP: Flyingsee
The APP is suitable for mobile phone with iOS and Android
system, please download from the mobile phone software store:
(1). For mobile phone with iOS system, please search Flyingsee
in APP Store.
(2). For mobile phone with Android system, please search
Flyingsee in Google Play.
(3). Scan the QR code on the right or the QR code in the box to
download Flyingsee.
10. To know your APP
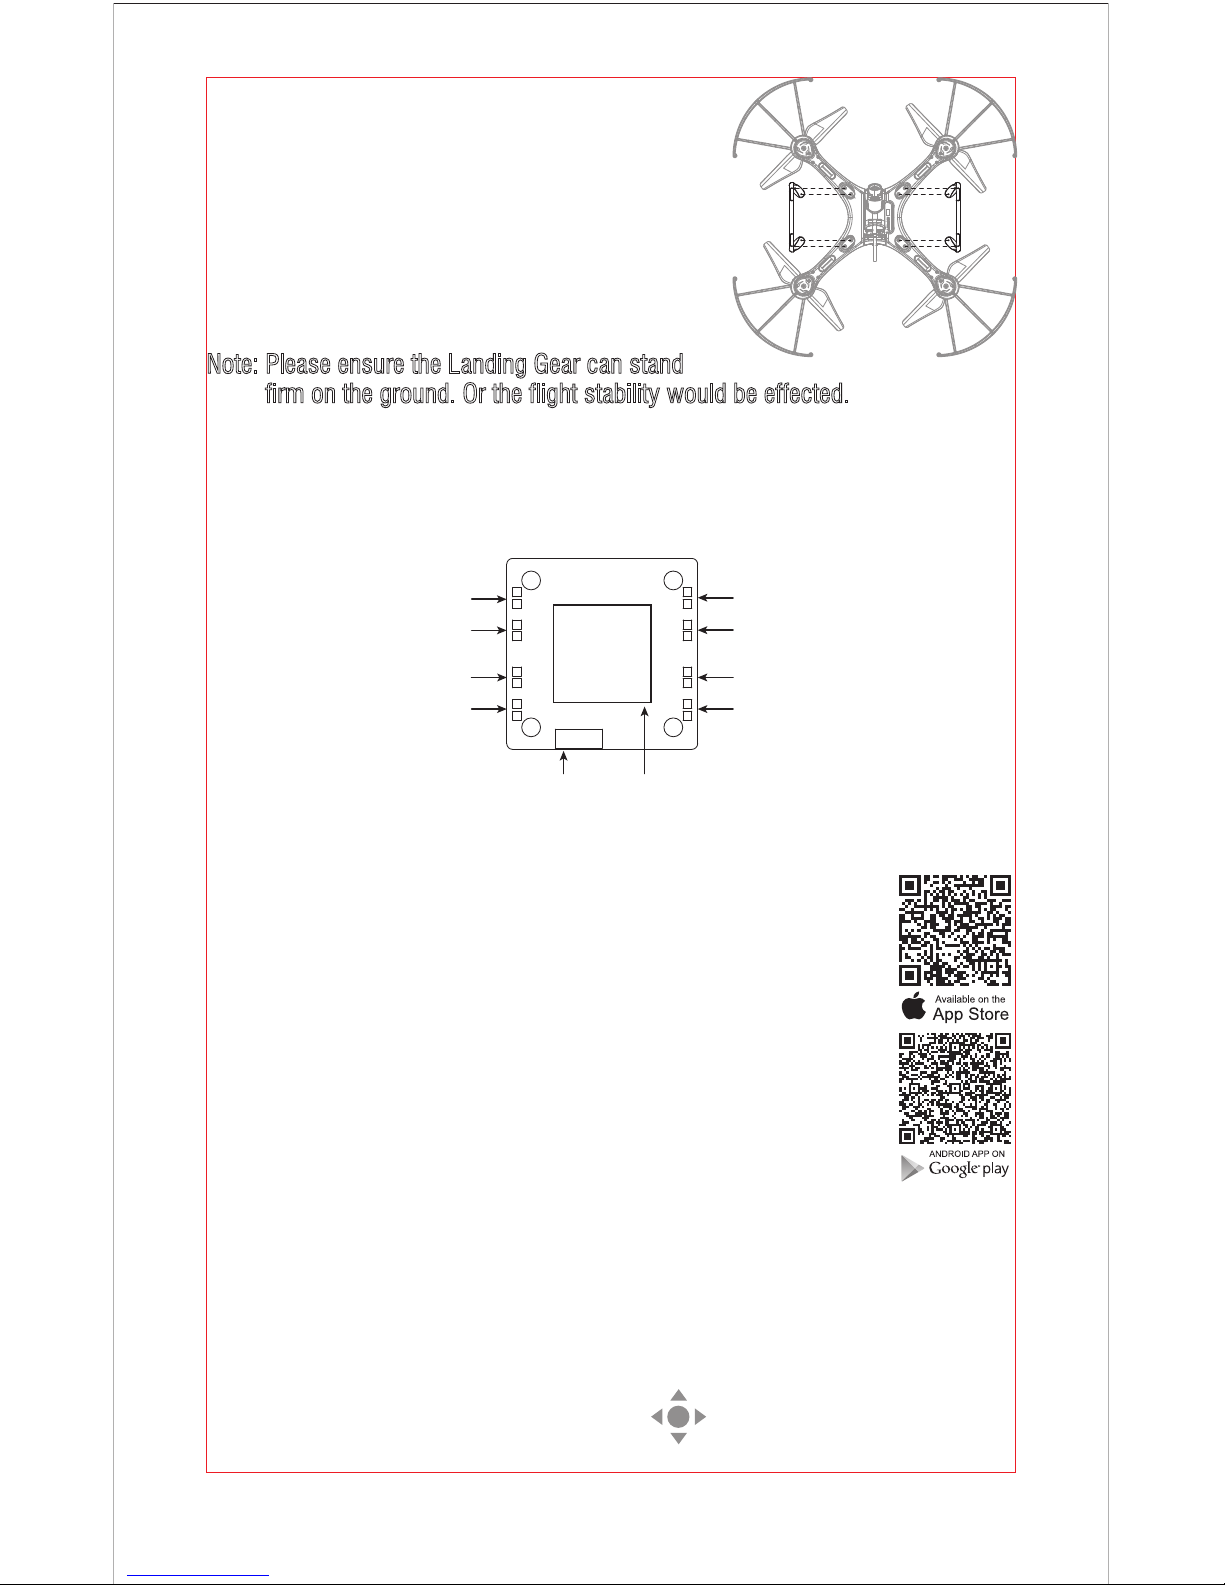
Landing Gear Installation Diagram
To install the Landing Gear, insert the Landing
Gear’s pillars into the drone body holes with
moderate force as the diagram shown. Then
lock the Landing Gear by attached screw.
To remove the Landing Gear, remove the screw
first and then pull out the Landing Gear with
moderate force.
Note: Please ensure the Landing Gear can stand
firm on the ground. Or the flight stability would be effected.
Instruction for Receiving Board
The drone works well only when the installation direction of the receiving board
and the connection position of the wires the same as below picture:
Left Right
Front
Rear
1
2
3
4 8
7
6
5
9
Switch Wire Barometer
Left-front light wire
Left-rear light wire
Left-front motor wire
(red and blue wire)
Blue wire
Red wire
White wire
Black wire
Black wire
White wire
Red wire
Blue wire
Left-rear motor wire
(black and white wire)
Right-rear motor wire
(red and blue wire)
Right-front motor wire
(black and white wire)
Right-front light wire
Right-rear light wire
Page 16
16
100%
EMERGENCY
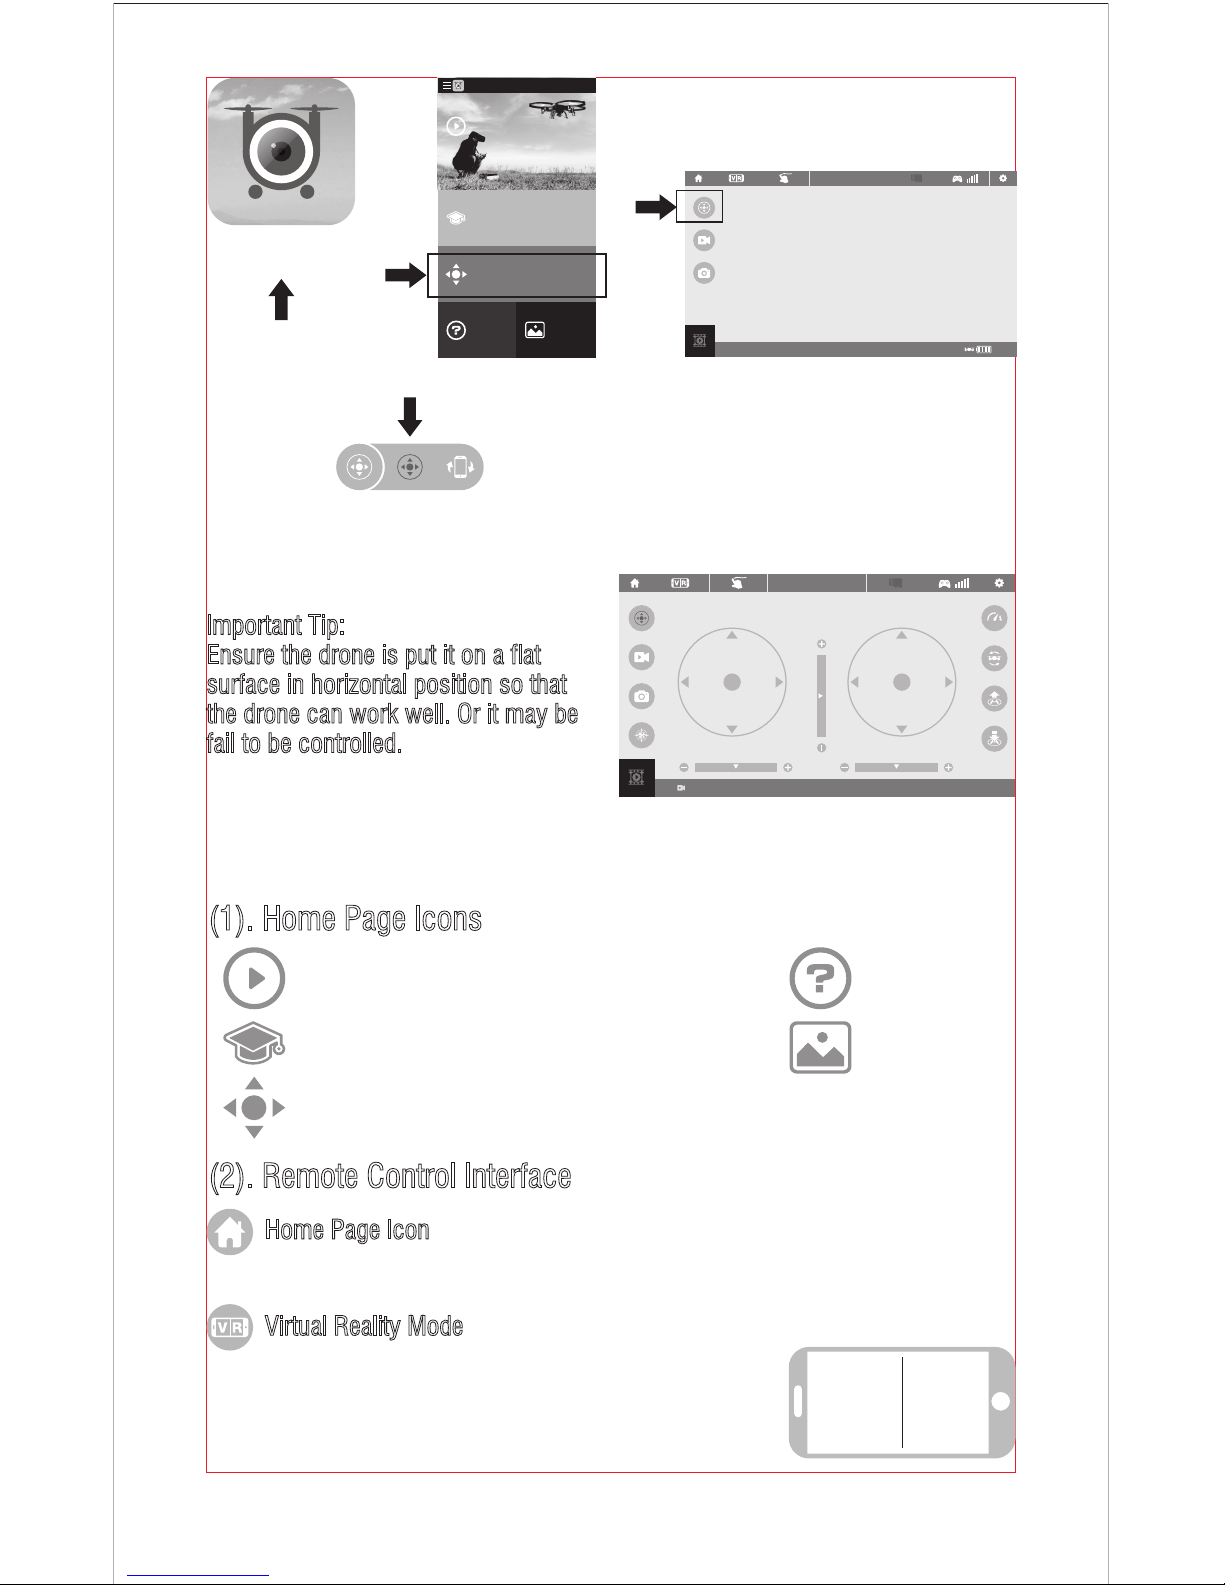
Click on the icon Home Page Real time Transmission Interface
Flyingsee
Learn the operation
of drone
Remote control interface
Media
Help
Explore UDIRC Drone
HOME
(4). Click on to enter Virtual Control Interface. At this time the
drone LED lights change from flash to solid bright, which indicates
successful frequency pairing and the drone is ready to be controlled via APP.
Important Tip:
Ensure the drone is put it on a flat
surface in horizontal position so that
the drone can work well. Or it may be
fail to be controlled.
Virtual Control Interface
00:00
EMERGENCY
10.3 Introduction for APP Icons
(1). Home Page Icons
(2). Remote Control Interface
L R
Explore UDIRC Drone
Learn the operation of Drone
Remote control interface
Help
Media
Home Page Icon
Click on the icon and back to home page.
Click on the icon to enter virtual reality mode to
experience first person view (only available when
using with a VR headset). Click on the icon again
to exit from virtual reality mode.
Virtual Reality Mode
Page 17
17
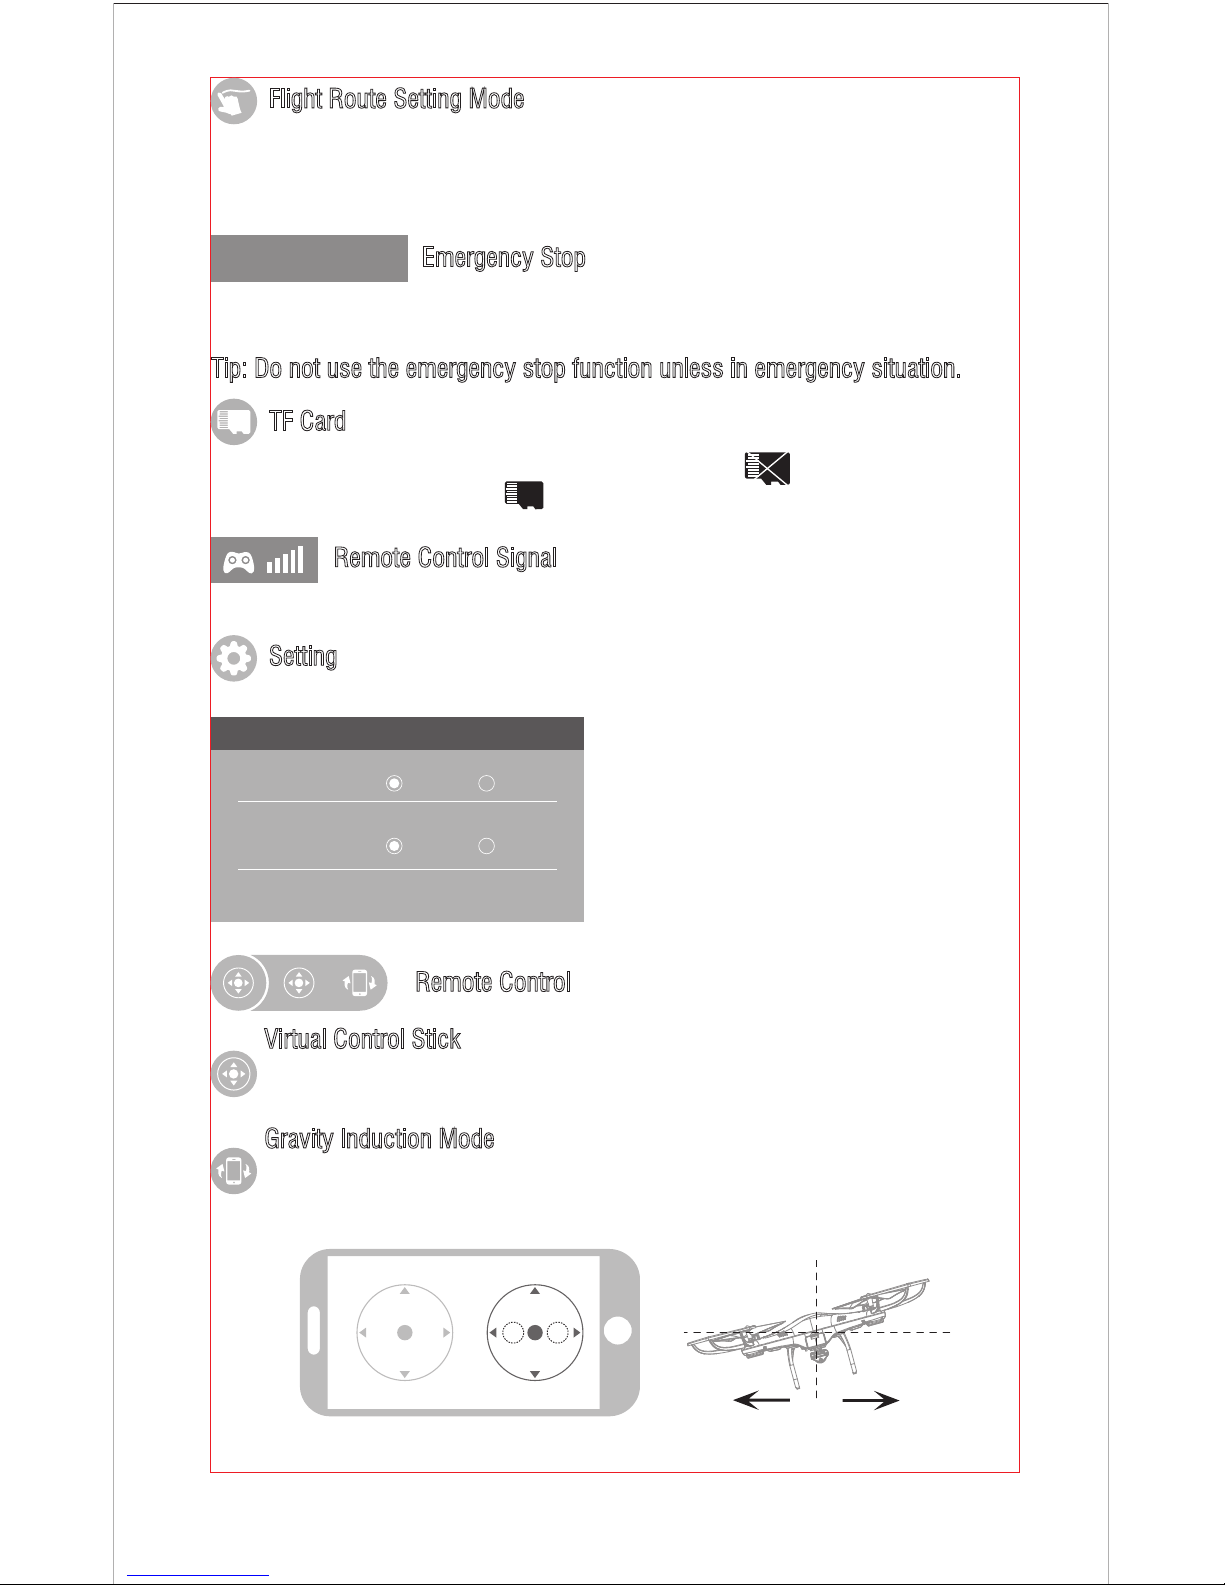
If the mobile phone shakes to the left / right, the Right Ball will move accordingly
causing the drone to fly left / right.
EMERGENCY
Click on this icon and it turns red. Draw a flight route in the right area. The drone
will fly according to the flight route. Click on the icon again to exit from Flight
Route Setting Mode. The icon turns white.
The icon is red by default. Click this icon and the propellers will stop immediately.
The drone will fall down to the ground straightly.
Tip: Do not use the emergency stop function unless in emergency situation.
Flight Route Setting Mode
Emergency Stop
TF Card
If there is no TF Card in the drone, the icon shows as . There is TF Card in
the drone, the icon shows as .
Remote Control
Virtual Control Stick
The virtual control stick is hidden by default. Click on the icon to turn on the
virtual control stick.
Gravity Induction Mode
Click on this icon to enter gravity induction control mode. (only available for
flying left / right and forward / backward). Click on the icon again to exit
from gravity induction control mode.
To show the drone’s WiFi signal strength.
Remote Control Signal
Click on this icon to set some parameters, and click again to exit.
Click on “Save” to save trimming setting.
Choose “Reset” for factory reset.
Click on “720P” or “480P” to choose real
time transmission resolution.
Setting
SETTING
Trimming Save Reset
Transmission quality 720P 480P
Page 18
18
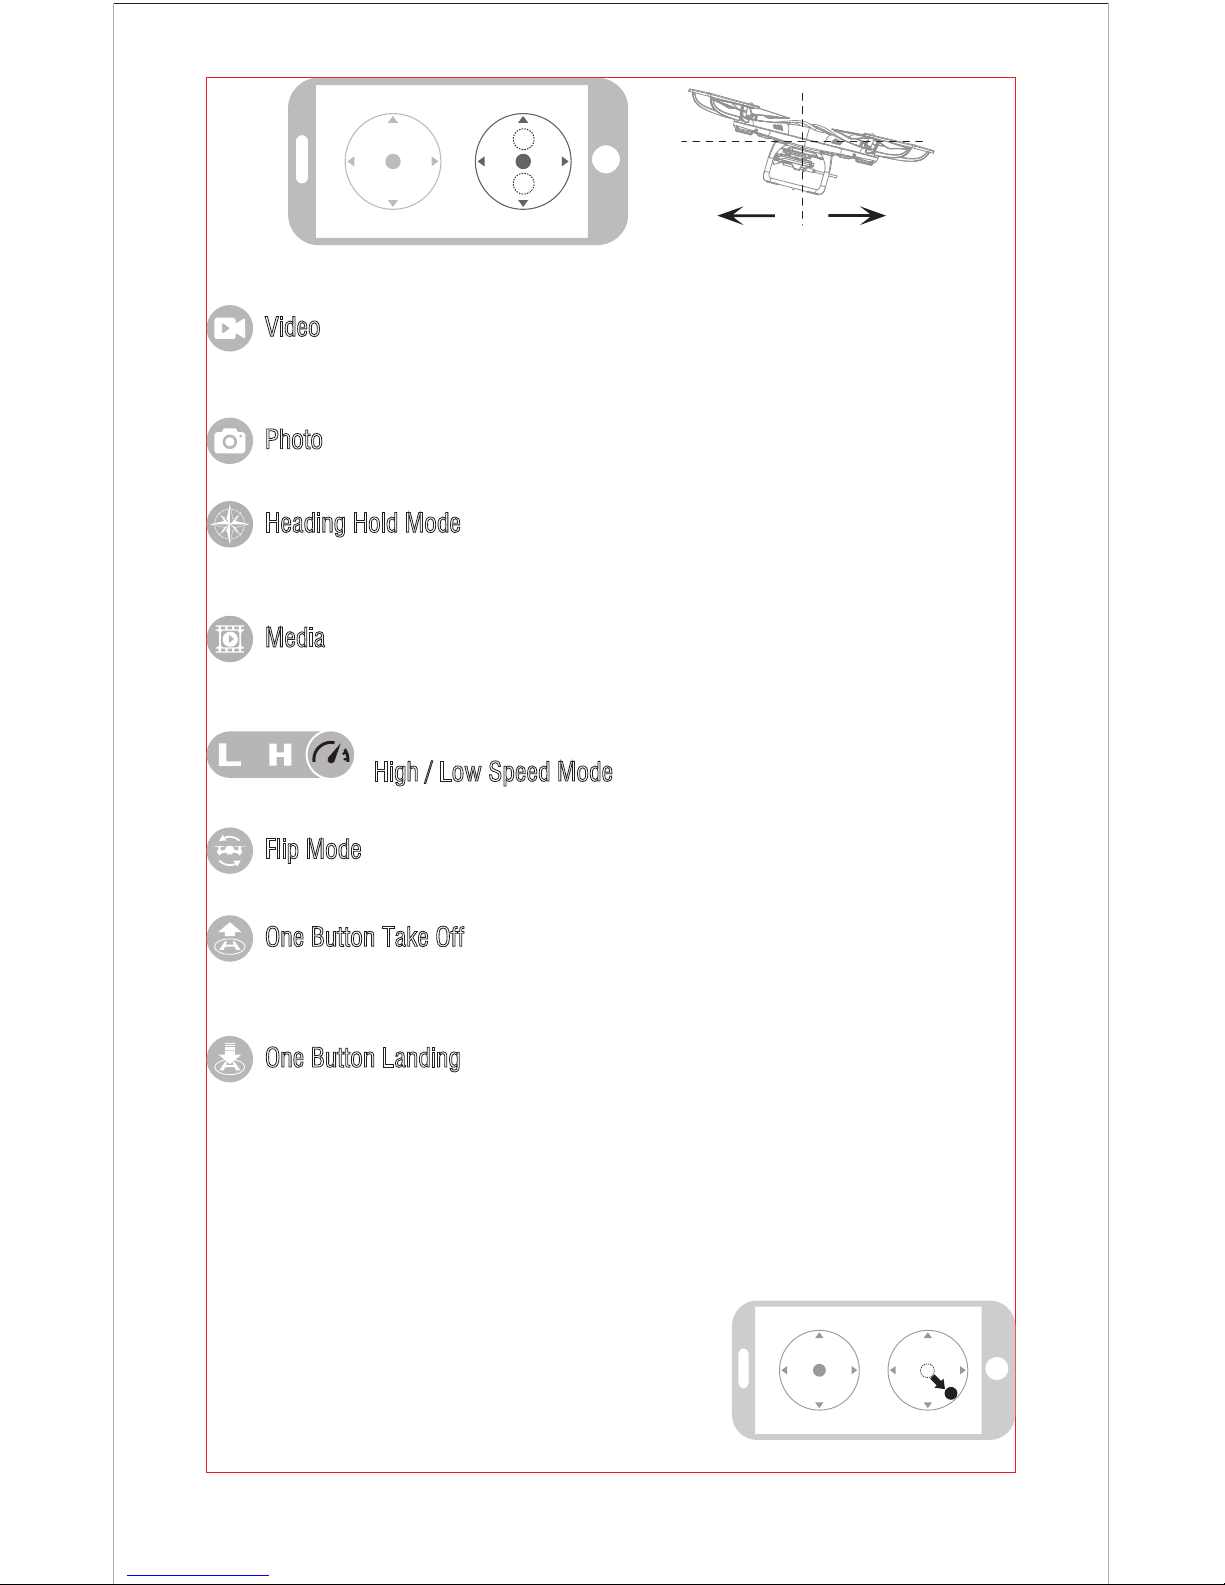
If the mobile phone shakes to forward / backward, the Right Ball will roll forward / backward,
causing the drone to fly forward / backward.
Click on this icon to record video. The recording time will show at the bottom of
the screen. Click on this icon again to finish recording.
Video
Click on this icon to take photo.
Photo
Click on this icon to view or delete the aerial video and photo. Click on the arrow
to exit.
Media
Click on this icon and it turns red, which indicates that the drone enter Heading
Hold Mode. Click again to exit from Heading Hold Mode. The icon turns white.
By default, the drone is in Low Speed Mode “L”. Click on “H” to enter High Speed Mode.
Heading Hold Mode
High / Low Speed Mode
Click this icon, the drone will do 360° flip and the icon will turn red shortly.
Click on this icon and it turns red shortly. The drone will fly up automatically and
stay flying at a altitude of 1.2 meters.
Flip Mode
One Button Take Off
Click on this icon and the icon turns red, the drone will fly down slowly and land
on the ground. All propellers also will stop.
One Button Landing
10.4 Calibration Instruction
If the drone becomes imbalance after crashing during the flight, and can not be
adjusted by trimmer button and cause difficult operation, please calibrate the drone.
2. Do not push the Left Ball before successful
calibration. Move the Right Ball as the picture
shown on the right. The drone body lights flash,
which indicates that the drone is calibrating. When
the drone body lights get solid, which indicates
successful calibration and the drone is ready to be controlled.。
1. Please refer to the Frequency Pairing between Mobile Phone and Drone WiFi to
calibrate the drone.
Page 19
19
Note:
1. If you can not find the WiFi signal to connect, turn off WiFi and turn on
again to search and connect.
2. The available WiFi control radius/distance is 40m, please control the
drone within this range.
3. When changing control method from mobile phone to transmitter, exit
from the APP.
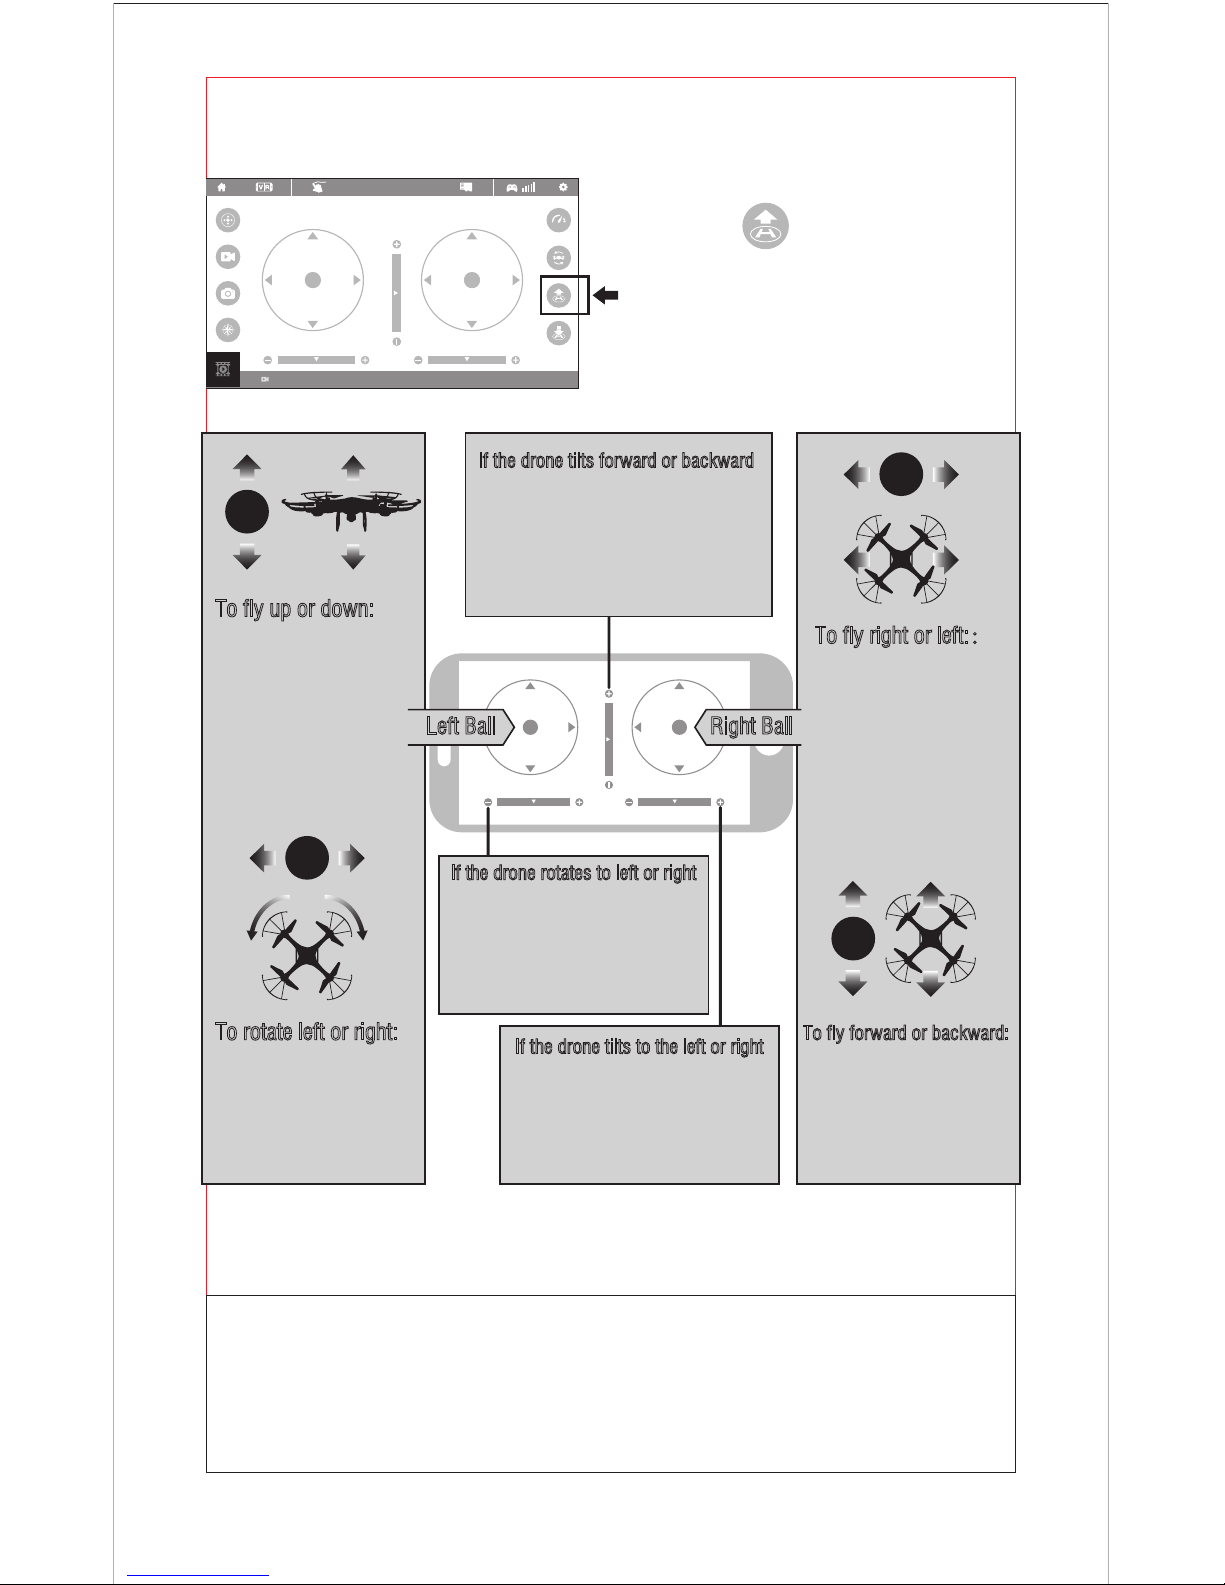
10.5 APP Flying Control
To Take Off
Click on One Button Take Off
icon to start the drone. The drone
will fly up automatically and stay
flying at a altitude of 1.2 meters.
00:00
EMERGENCY
Left Ball Right Ball
To fly up or down:
Move the Left Ball up to fly
the drone up and move the
Left Ball down to fly the
drone back down.
To fly right or left::
Move the Right Ball to the
left to fly the drone to the
left, and move the Right
Ball to the right to fly the
drone to the right.
If the drone tilts forward or backward
Click the “-” of the Forward / Backward
Trimmer to adjust the drone till balance
if the drone tilts forward. Click the “+”
to adjust the drone till balance if the
drone tilts backward.
If the drone rotates to left or right
Click the “+” of the Rotation
Trimmer till balance if the drone
rotates left. Click the “-” to adjust
the drone till balance if the drone
rotates right.
If the drone tilts to the left or right
Click the “+” of the Left / Right
Trimmer till balance if the drone
tilts to the left. Click the “-” to
adjust the drone till balance if the
drone tilts to the right.
To fly forward or backward:
Move the Right Ball up to
fly the drone forward, and
move the Right Ball down
to fly the drone backwards.
To rotate left or right:
Move the Left Ball to the
left to rotate the drone to
the left. Move the Left Ball
to the right to rotate the
drone to the right.
Page 20
20
Tip: Please play the video or photo after coping all aerial photography data to
computer and make sure the play software can support AVI format.
Basic parameter for aerial camera: Video DPI 1280*720P;
Image Size 1280*720P.
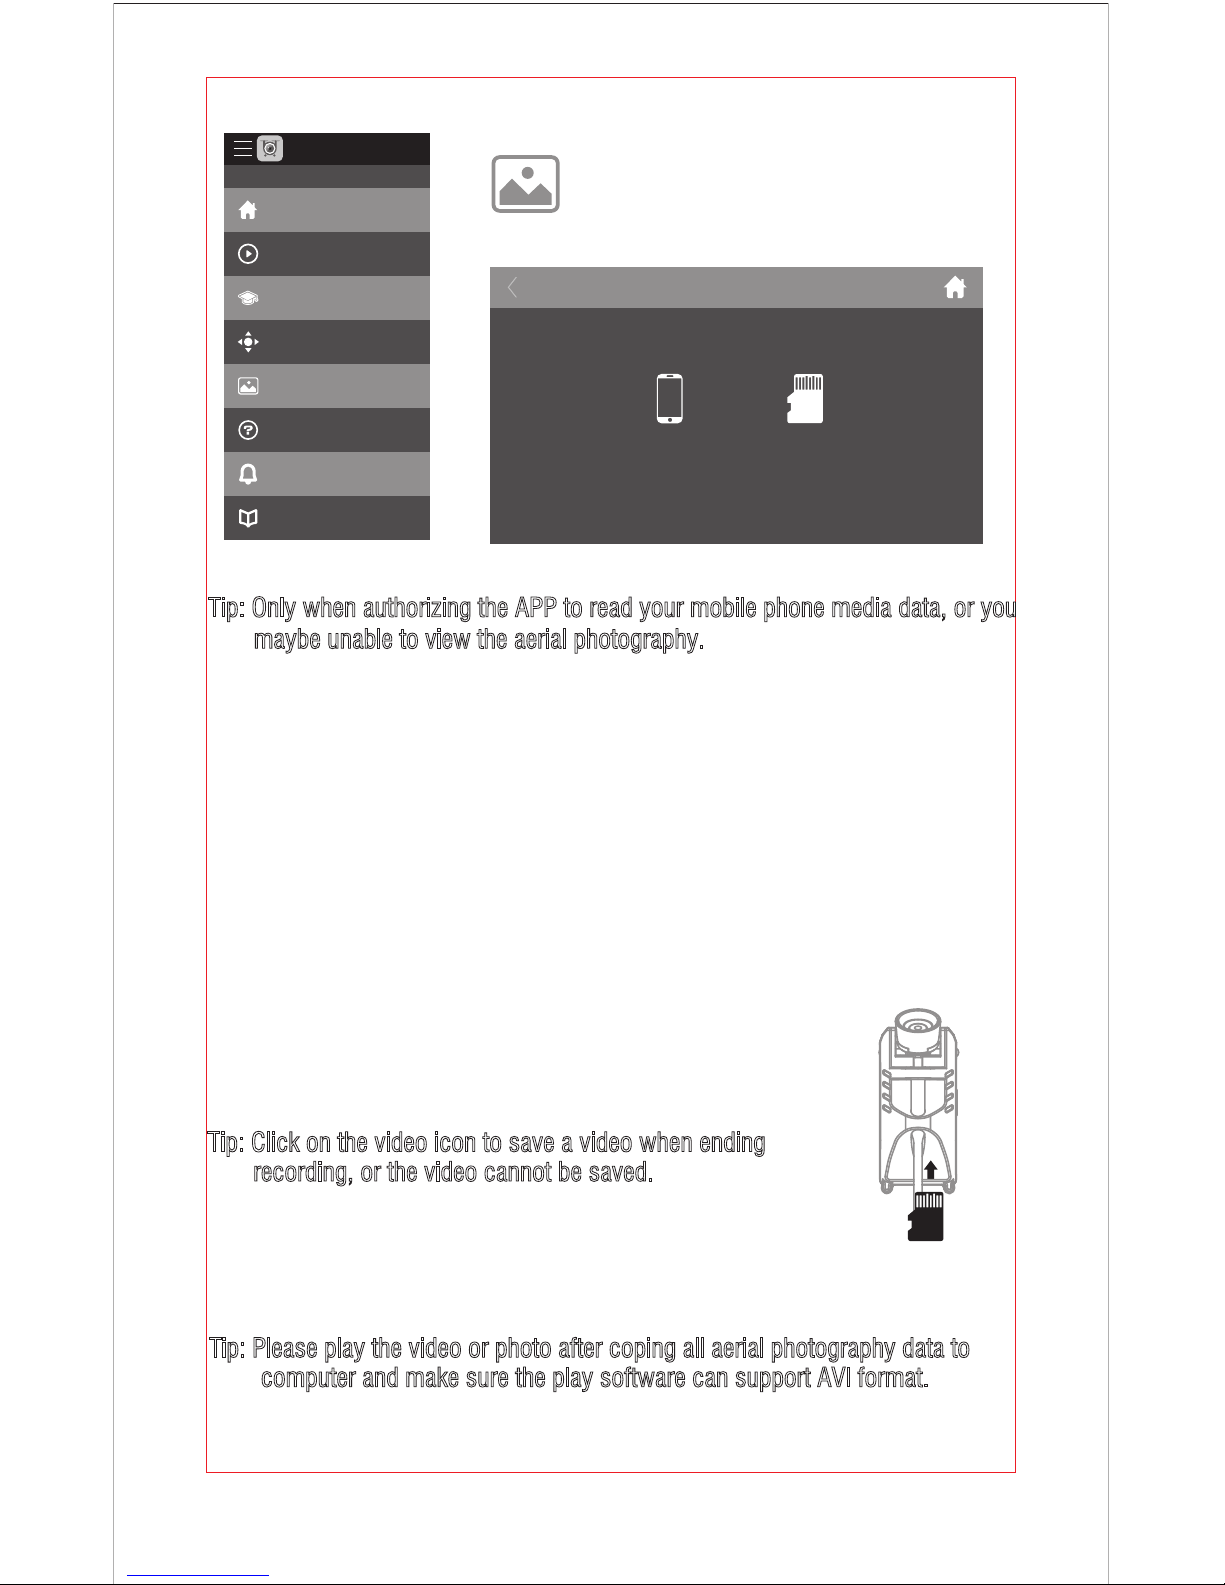
10.7 To take photo and record video
(1). Insert the TF card to the slot in accordance with Picture 13. Make sure the
metal side of the card faces up as the picture.
(2). The aerial photo will be saved in your mobile phone and the memory card,
while the video only be saved in the memory card.
But you can download the video to the mobile phone
only when the mobile phone connecting with the
drone WiFi and the memory card in the drone.
Tip: Click on the video icon to save a video when ending
recording, or the video cannot be saved.
(3). Power off the drone first when finish aerial photography.
Take out TF card and insert the card to a card reader.
Connect the card reader with computer USB port. After a while,
view the aerial photography data from “my computer”-”mobile disk”.
Tip: Only when authorizing the APP to read your mobile phone media data, or you
maybe unable to view the aerial photography.
To view the photos and videos.
10.6 Media
Main Menu
Media Interface
Home
Explore UDIRC Drone
Learning Drone
Remote control interface
My Gallery
Help
News
Notice
FLYINGSEE 1.0
Picture 13
My Gallery
Internal Memory
Page 21
21
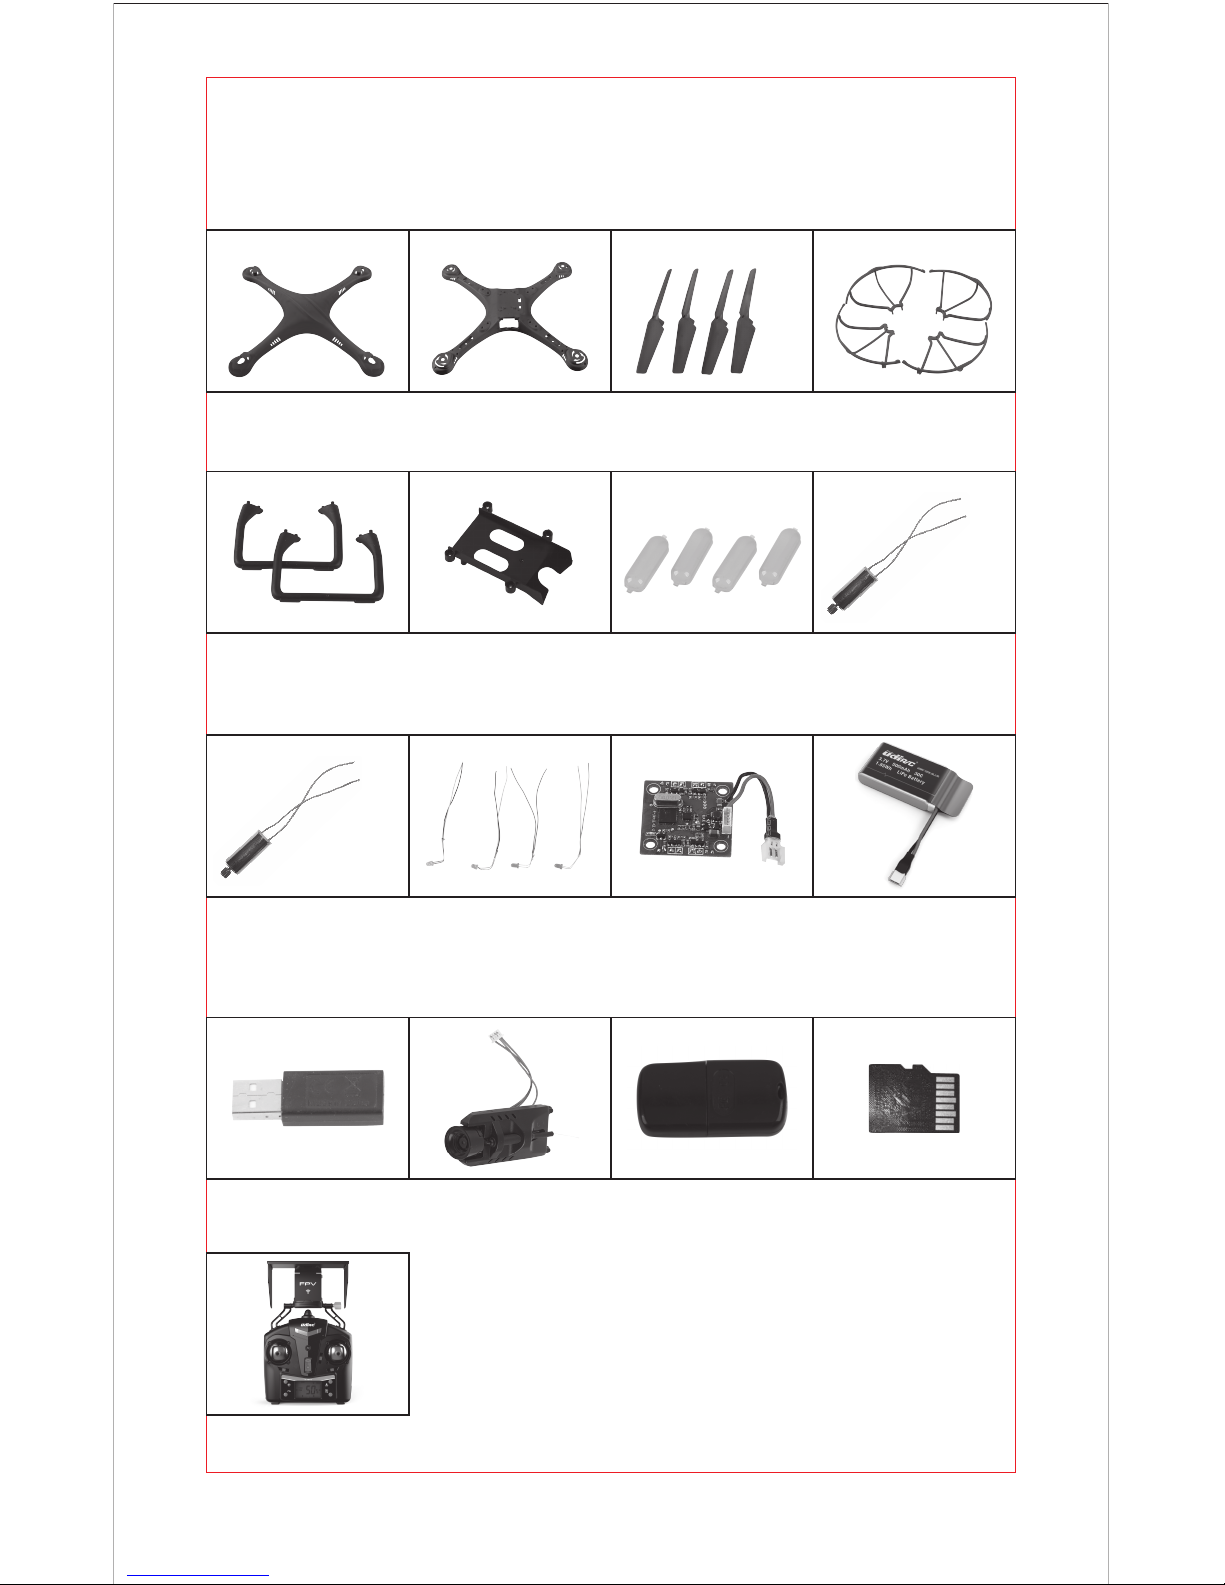
11. Spare Parts
For convenience, the spare parts are listed for you to choose, which can be
purchased from the local seller.
U42W-01
Upper Cover
U42W-02
Lower Cover
U42W-03
Propeller
U42W-04
Propeller Guard
U42W-09
Counterclockwise
Motor Parts
(Black and White Wire)
U42W-10
LED Lights
U42WH-11
Receiving Board
U42W-12
Drone Battery
U42W-05
Landing Gear
U42W-06
Main Casing
U42W-07
Lamp Cover
U42W-08
Clockwise Motor Parts
(Red and Blue Wire)
U42WH-17
Transmitter
U42W-13
USB Charger
U42W-14
Camera
U42W-15
Card Reader
U42W-16
TF Card
Page 22
22
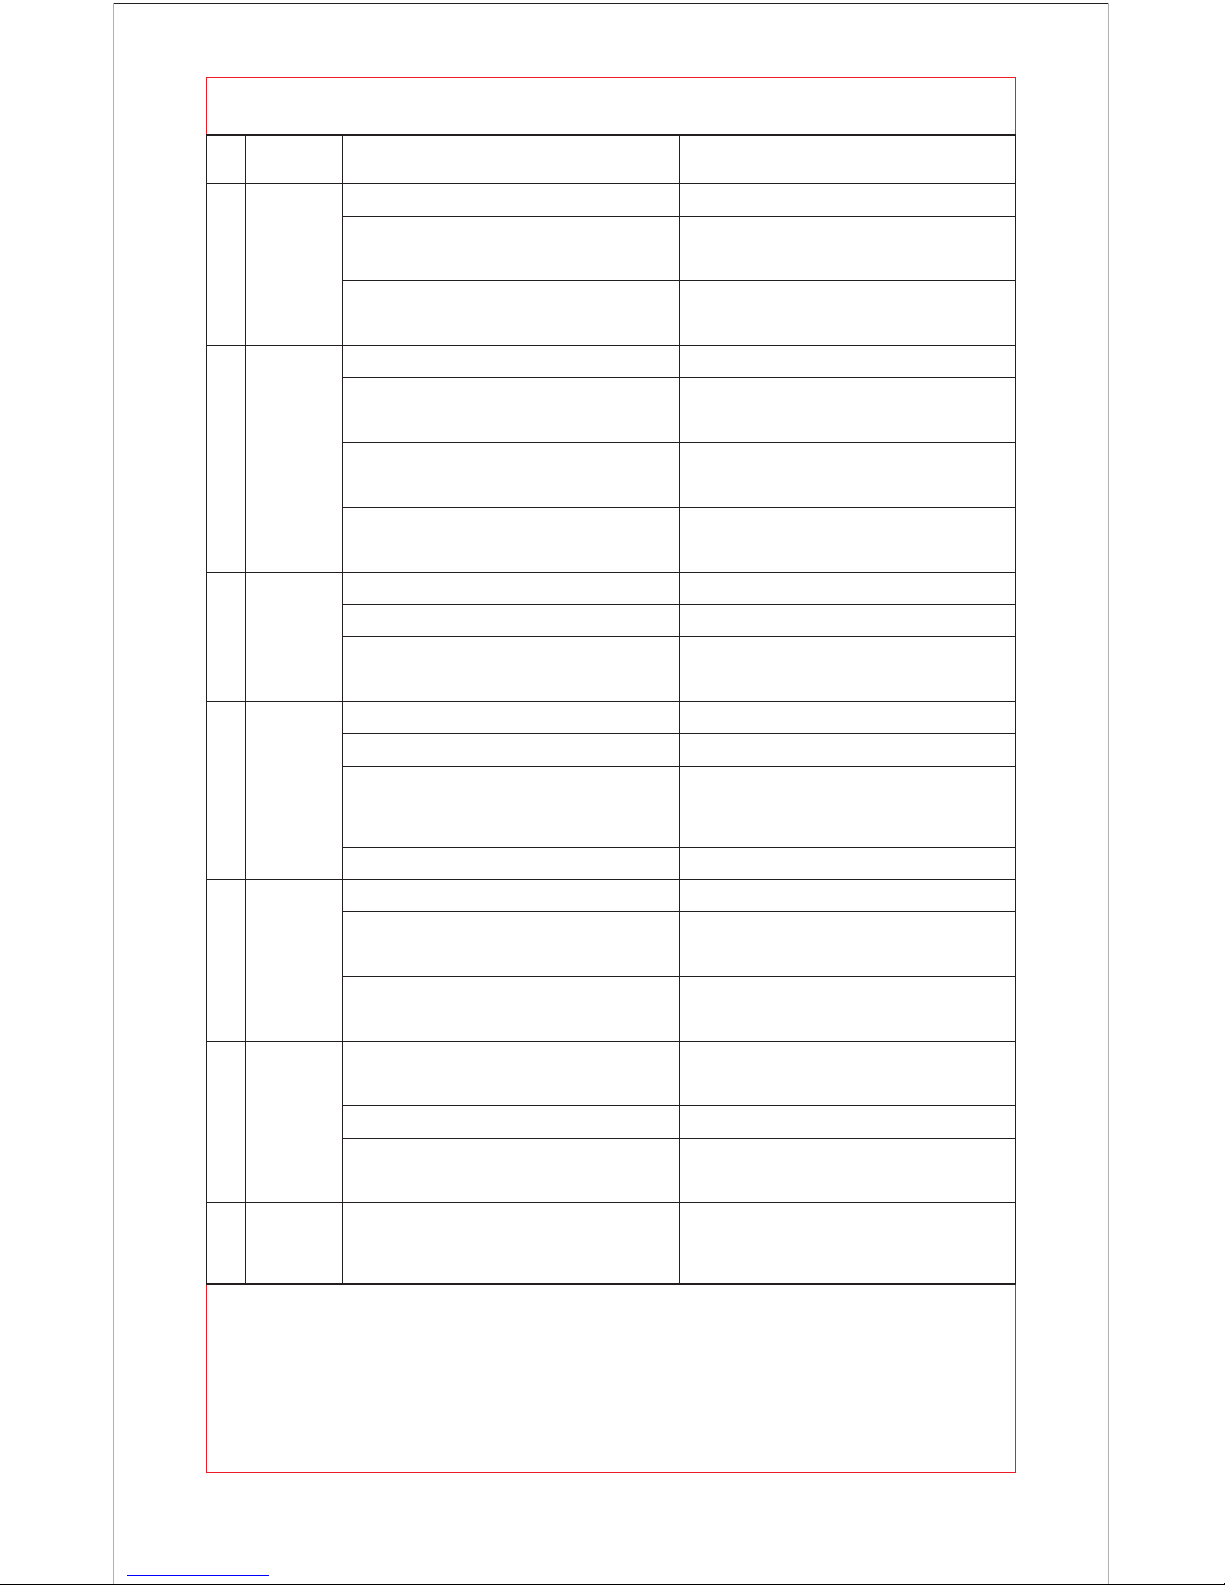
Troubleshooting Guide
The
transmitter
indicator
light is off
Fail to pair
the drone
with
transmitter
The drone
is underpowered
or can not
fly.
The drone
could not
hover and
tilts to one
side.
1
2
3
4
Problem Problem Cause SolutionNo.
1. Low battery. 1. Replace the transmitter battery.
2. The battery positive pole and negative
pole are in reverse order.
2. Install the battery in accordance with the
user manual.
3. Poor Contact.
3. Clean the dirt between the battery and the
battery slice.
1. Indicator light is off. 1. The same as above 1.2.3.
2. There is interfering signal nearby.
2. Restart the drone and power on the
transmitter.
3. Misoperation.
3. Operate the drone step by step in
accordance with the user manual.
4. The electronic component is damaged
for frequent crash.
4. To buy spare parts from local seller and
replace damaged parts.
1. The propeller deformed seriously. 1. Replace the propeller.
2. Low battery. 2. Recharge the drone battery.
3. Incorrect installation of propeller.
3. Install the propeller in accordance with
the user manual.
1. The propeller deformed seriously. 1. Replace propeller.
2. The motor holder deformed. 2. Replace the motor holder.
3. The gyro did not reset after violent crash.
3. Put the drone on the flat ground for about
10s or restart the the drone to calibrate
again.
4. The motor is damaged. 4. Replace motor.
The drone
indicator
light is off.
Could not
see the
picture.
Hard to
control by
cellphone.
5
6
7
1. Low battery. 1. Recharge the drone battery.
2. The battery is expired or over discharge
protection.
2. Buy a new battery from local seller to
replace the battery.
3. Poor contact.
3. Disconnect the battery and then connect
it with the plug again.
1. Did not connect the wire of camera box
or poor contact.
1. Check the wire and connect well.
2. There is interfering signal nearby. 2. Cut off the wire and re-connect.
3. Damaged camera.
3. Buy a new camera box from local seller
to replace.
1. Not experienced enough.
1. Practice and read the cellphone
controlling instruction carefully.
Page 23
23
FCC Information
This equipment has been tested and found to comply with the limits for a Class B
digital device, pursuant to part 15 of the FCC Rules.These limits are designed to
provide residential protection against harmful interference in a residential
installation. This equipment generates, uses and can radiate radio frequency
energy and, if not Installed and used in accordance with the instructions, may
cause harmful interference to radio communications. However, there is no
guarantee that interference will not occur in a particular installation. If this
equipment does cause harmful interference to radio or television reception. which
can be determined by turning the equipment off and on, the user is encouraged to
try to correct the interference by one or more of the following measures:
The equipment may generate or use radio frequency energy. Changes or
modifications to this equipment may cause harmful interference unless the
modifications are expressly approved in the instruction manual. Modifications not
authorized by the manufacturer may void user’s authority to operate this device.
This device complies with part 15 of the FCC Rules. Operation is subject to the
following two conditions:
(1)this device may not cause harmful interference,and
(2)this device must accept any interference received, including interference that
may cause undesired operation.
FCC WARNING:
● Reorient or relocate the receiving antenna.
● Increase the separation between the equipment and receiver.
● Connect the equipment into an outlet on the circuit different from that to which
the receiver is connected.
● Consult the dealer or an experienced radio/TV technician for help.
Important Statement
Due to the continuous improvement of products, the design or technical parameters will be
modified without prior notice.
All content in this user manual have been checked carefully. If there is any question of
printing or mistake, the company reserves the rights of final explanation.
Thank you again for your choice and your trust!
Page 24
 Loading...