

Page 1
U39 FURY
USER MANUAL
This product supports GPS positioning and is recommended for outdoor flight!
This wifi camera pinpoint is 5G, please confirm whether the phone is supported.
▲This product is suitable for users over 14 years old.
▲Stay away from the rotating propeller
▲Read the<important statement and safety guidelines >carefully.
Page 2
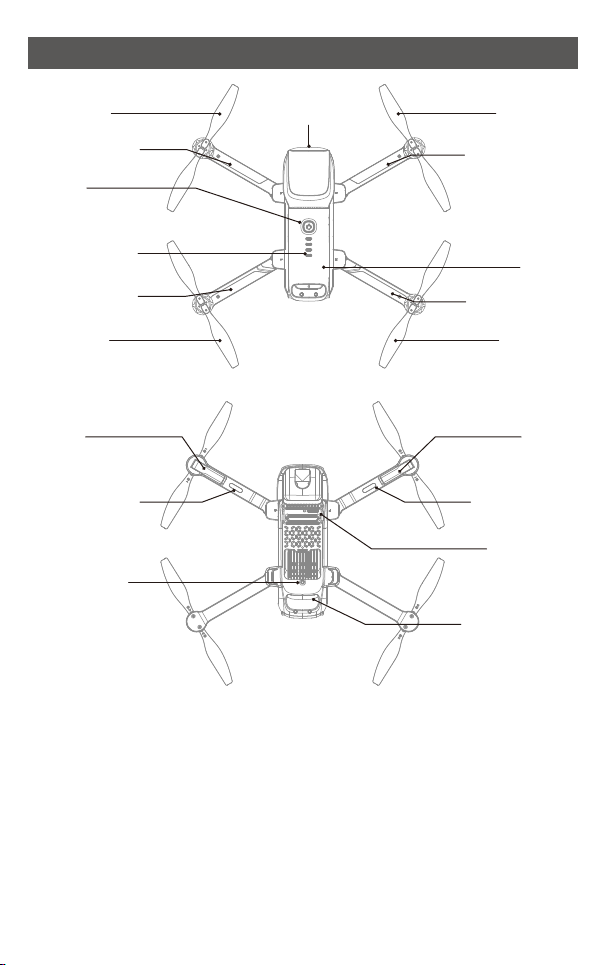
Drone
Propeller A
Front folding arm
Switch
Battery indicator
Rear folding arm
Propeller B
Tripod
Front LED (Red)
visual system
Front
Camera
Rear
Front
Rear
Propeller B
Front folding arm
Battery
Rear folding arm
Propeller A
Tripod
Front LED (Red)
TF Card slot
Rear LED (Green)
2
Page 3
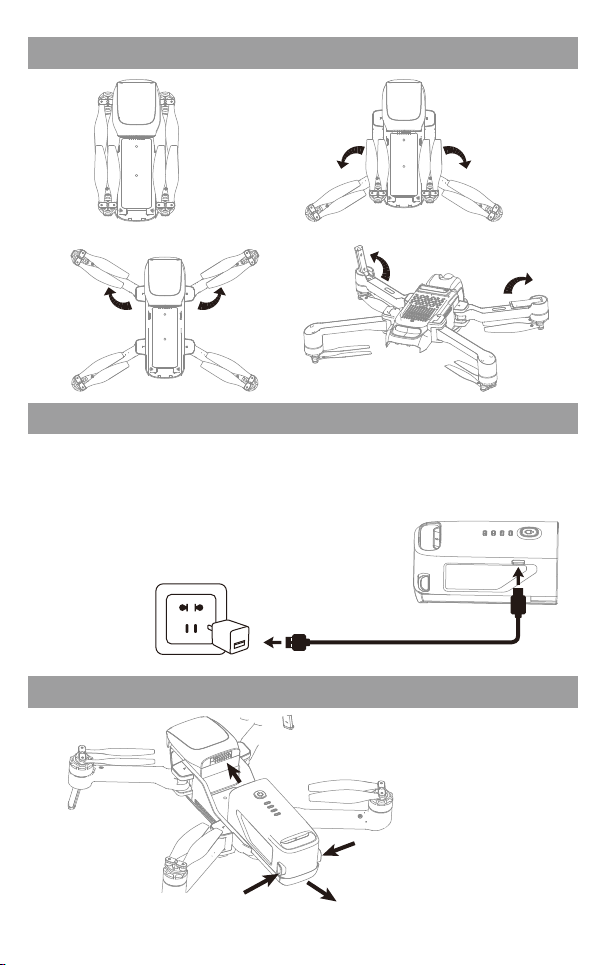
Unfolding Instruction
① Folding State
② Rear folding arms unfold
③ Front folding arms unfold
④ Open the tripod
Battery charging
Battery power is low in the original factory, It must be fully charged before use.
▲Only use the original charging line; Adapters with output current of 5V≥2A must be selected.
Connect the batteries of the aircraft to the charging line of the original plant, and then connect to
other USB charging sockets.
Battery indicator flashes when charged. When the charging is
completed, the battery indicator light is always on.
Power adapter (not included)
③
②
Original Charging Line
①
The installation method of battery
Push to the end
①
Press to unlock the lock
3
①
Press to unlock the lock
②
Pull out the battery
Page 4
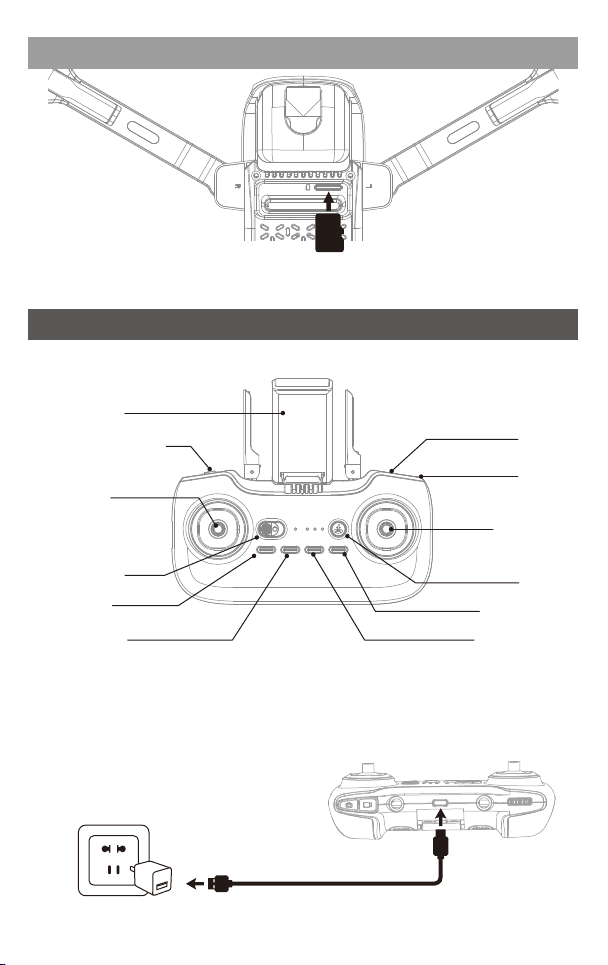
Installation of TF Card
* TF card is not included
Insert the TF card into the slot on the belly of the fuselage, and pay attention to the
metal contact surface orientation of the TF card.
Transmitter
The original transmitter is low in power, so it should be used after saturation.
Phone Holder
Gimbal Rotary Button
Left stick /
Trimmer (press down)
Indicator light
Video
Photo
Right Stick
Power switch
GPS switch
Follow Mode
Return
Speed switch
Encircle Mode
Transmitter charging
▲Only use the original charging line; Adapters with output current of 5V≥2A must be selected.
Connect the transmitter with the charging line of the original plant, and then connect other USB
charging outlets.
When charging, the transmitter indicator flashes
circularly, and when charging is completed,
the indicator will be on for a long time.
Power adapter (not included)
③
②
Original Charging Line
4
①
Page 5
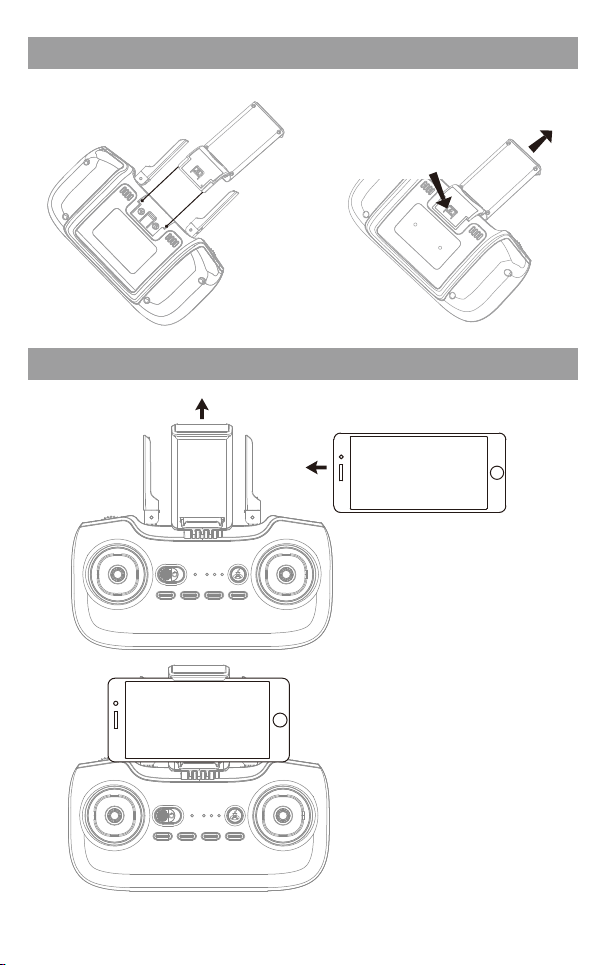
The installation methods of mobile phone holder
Installation Disassemble
①①Straightening the antenna
Press to unlock the lock
Put the phone
②
clip on the back
of the quasiremote controller
and push it to the
end.
The installation methods of mobile phone
① Pull up the clip on the mobile phone.
② Place the phone in the upper and
lower clamps Between, the clamp
will automatically clamp the mobile
phone .
②
Pull up the clip on
the mobile phone
* Notice:Don't clip the buttons
on the side of the phone.
5
Page 6
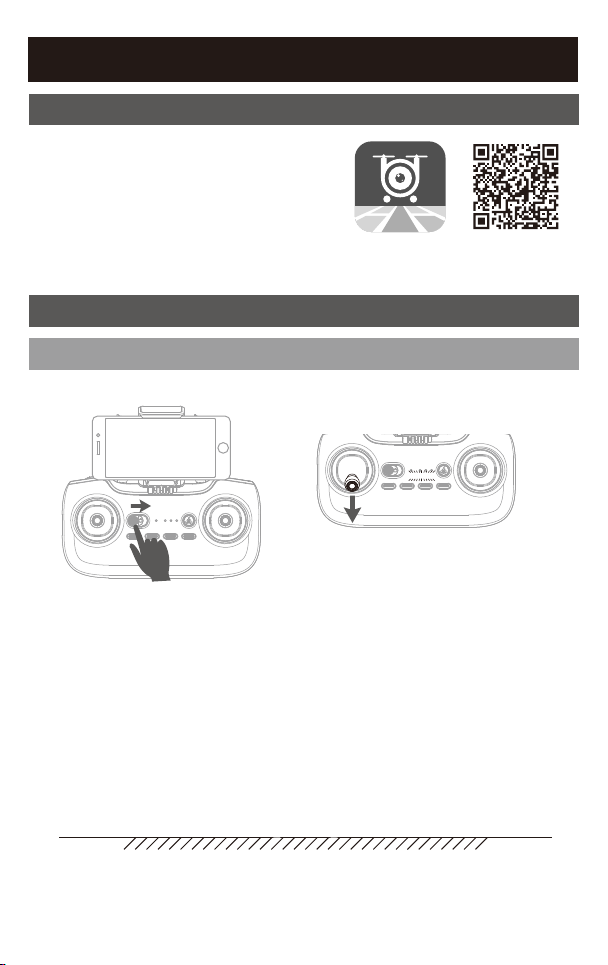
Flight Operations
Mobile phone connect with Drone
Download and install APP: UDIGPS
This software is suitable for mobile phones in
the IOS and Android system.
For detailed operation, please check the
system “HELP” of APP.
Transmitter connect with Drone
Frequency Pairing
② Pull the left stick to the lowest position
and let go, the light goes off slowly.
it indicates the transmitter enters the
① Turn on the power.
frequency state.
③ The drone is placed on the horizontal ground, and long press the power button
for 2 seconds to start the machine. After the navigation light is on for 2 seconds,
the front navigation light flashes and the rear navigation light goes out. At the
same time, the remote control emits a prompt sound of "di", indicating
successful frequency alignment and entering the horizontal calibration of
compass.
horizontal ground
6
Page 7
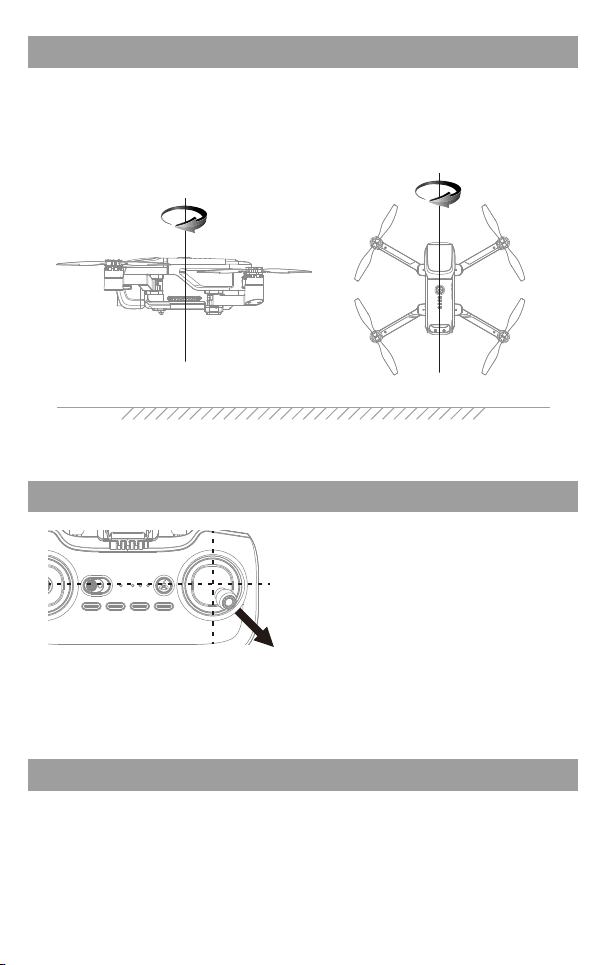
Compass calibration
Rotate the aircraft horizontally until the remote control says "di... "Level correction to
complete. When the front navigation light turns to long light and the rear navigation
light flashes, enter vertical correction.rotate the vehicle vertically until the remote
control says "di... "A sound, vertical correction over. The lights are spinning and
flashing.
Level Correction Vertical correction
Tips: It’s a must to have the right compass adjustment first each time you start
the drone, or it can’t work normally.
Gyroscope Calibration
After the calibration of the compass, the
right control lever of the remote control is
pushed to the lower right corner by 45°, and
the remote control emits a sound of "di",
and the aircraft light flashes and releases,
indicating that the gyroscope has been
calibrated. (drone should be placed on
horizontal ground)
Tips: When the drone doesn’t appear to use the trim correction flight status, or
being hit hard (or falling abnormally). thus cause the difficulties in
controlling. Now frequency making and adjustment are needed again.
GPS Signal Search
After the frequency matching is successful, the aircraft automatically searches for
GPS signals. When the blue indicator light of the remote control changes from
flashing to long bright, it makes a sound of "di" at the same time, indicating that the
GPS connection is successful. (when the GPS signal is weak or flying indoors, the
flight height defaults to about 3 meters)
7
Page 8
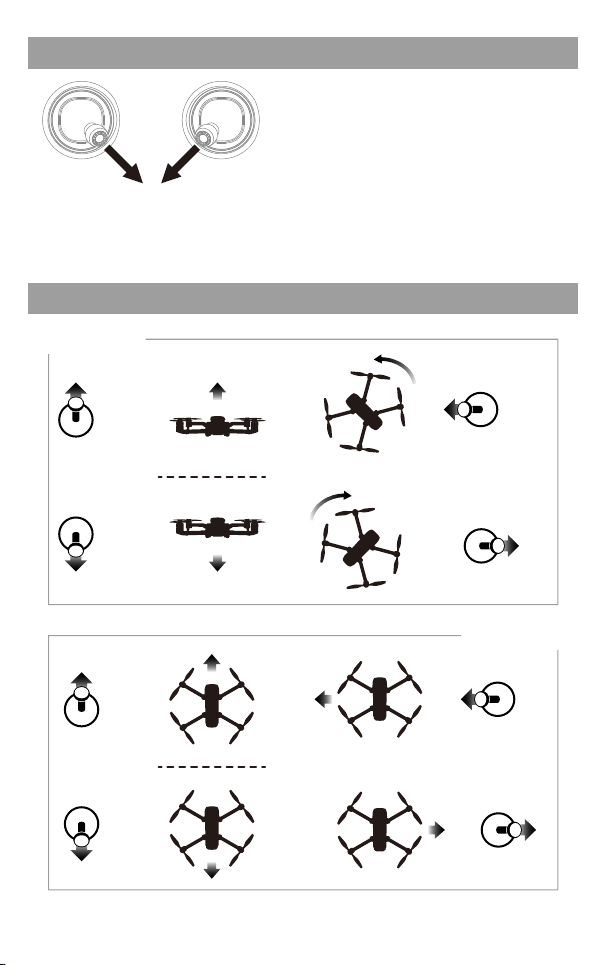
Unlocking/locking the motor
Control stick operation
Left Stick
Go Up
Go Down
Push the left and right stick inward to the 45
degree angle simultaneously.
① On standby drone, motor rotation, drone
unlocked.
② When the drone is not take off, the motor
stops rotating and the drone is locked.
The drone can only take off when the motor
is unlocked.
Counterclockwise turn
clockwise turn
Forward
Backward
Right Stick
Fly to the left
Fly to the right
8
Page 9
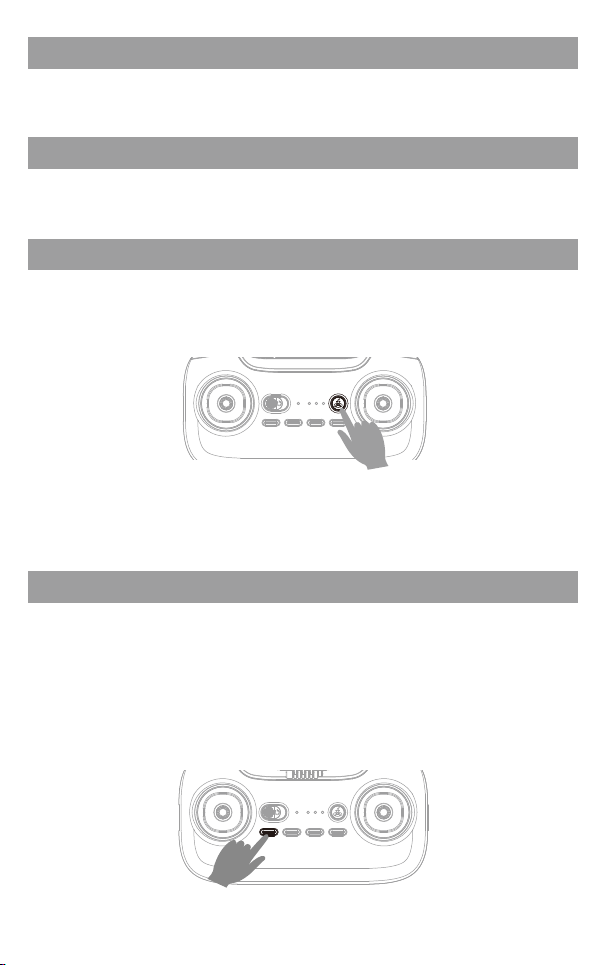
Take off
After unlocking the motor, the left control lever slowly pushes up and the aircraft
slowly rises.
Landing
During the flight, the left control lever slowly pull down , and the drone slowly lands
until landing.
Return
During the flight, press the "return " button, and the transmitter will sound "di", and
the drone will automatically return to the take-off point. (during returning, the
transmitter will continuously sound "di". To stop homing, just press this button again.)
Notice: While returning, the control lever of the transmitter can not control the
drone, it must be waited for the drone to go back to the take-off point.
And after the direction of the drone is directed at the direction of taking
off, in this way right stick can control the drone.
GPS ON /OFF
GPS is on by default.
GPS off: press the "GPS switch" button, the transmitter will sound "di", the blue
indicator light of the transmitter will flash, and the GPS will be off. (this
function need to be connected to GPS before it can be turned off ).
GPS open: GPS shut down after 5 seconds, click on the "GPS switch" button,
transmitter long blue indicator lights on, GPS to restart.
Note: this function is only used when the motor is locked.
9
Page 10
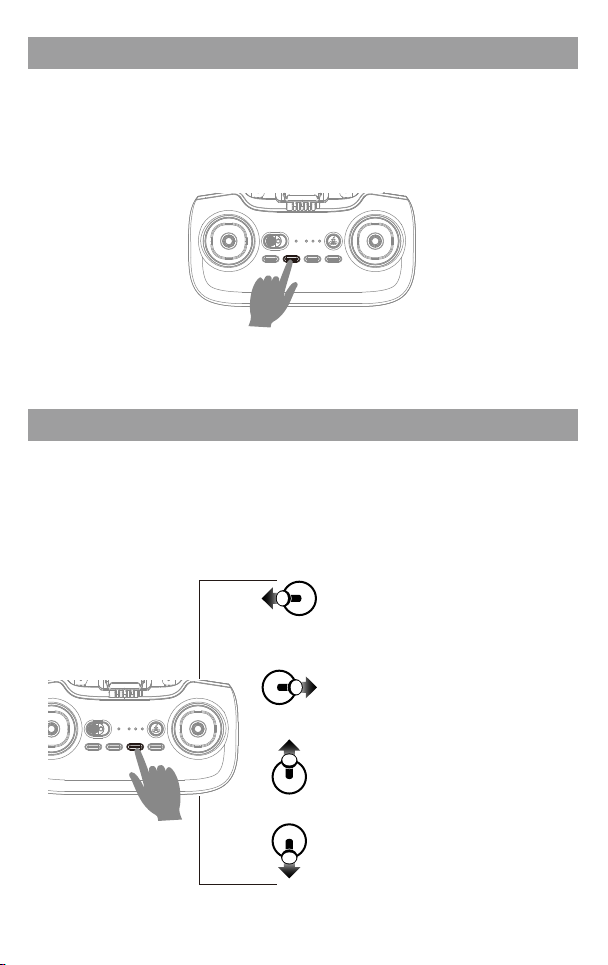
Following Function
While flying, press down the key, the transmitter sounds “di”, drone enters the
function of following.Now it can be controlled by the user.
The function is standard by the mobile phone APP signal, so it’s a must to make the drone and
APP connected normally, turn on the mobile location service at the same time, otherwise this
function is invalid
Note: follow the maximum range distance, within 1000m of the take-off point.
Encircling flight
In flight, press the "encricle" button, and the transmitter will make the sound of "di".
Then it goes to the function of encircling flight. The drone will fly to a default radius
then it waits for the direction controlled by the user. Adjust the speed and direction
of the drone by manipulating the right stick. It is the minimum radius of the default
radius acquiescently ,so drone flies only in the sub range.
Turn left, the drone flies clockwise;
Move further, the flying speed will
become faster.
In the state of
encircling flying,
the left stick could
only control the
height of the drone.
Turn right, the drone flies
counterclockwise; Move further,
the speed will become faster.
Go upward to narrow the radius of
encircling.
Go downside to enlarge the radius
of encircling.
10
Page 11
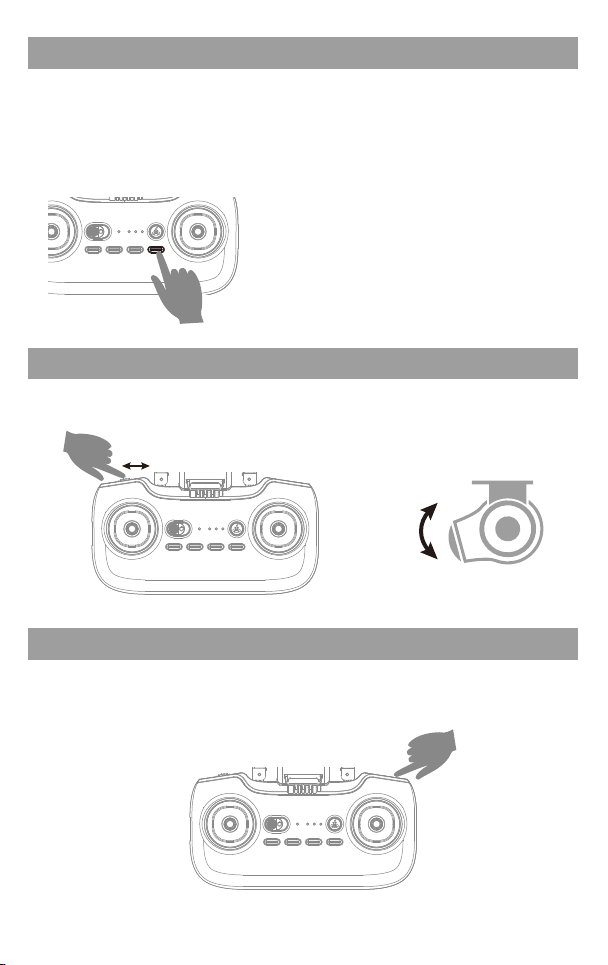
Speed mode switch
Press "H/L" and make "Di. Di. Di" three times to enter high speed mode "H";
Press it down again ,it will make the sound"di" again ,this indicates to the low
speed mode”L.
Press down the key again, it makes the sound of ‘di’ for twice, it comes to the
middle speed mode “M”.
Power on at default medium speed.
Low speed: suitable for beginners to practice
without wind.
Medium speed: suitable for skilled operator
operating in light breeze.
High speed: suitable for professional operation
in outdoor wind resistance
Gimbal Adjustment
Roll Gimbal Rotary Button, adjust Camera Angle.
Tilting -90° to 0°
Photo
Press the “photo”button once to take a picture.
When taking photos, the transmitter will send out a "di" sound.
11
Page 12
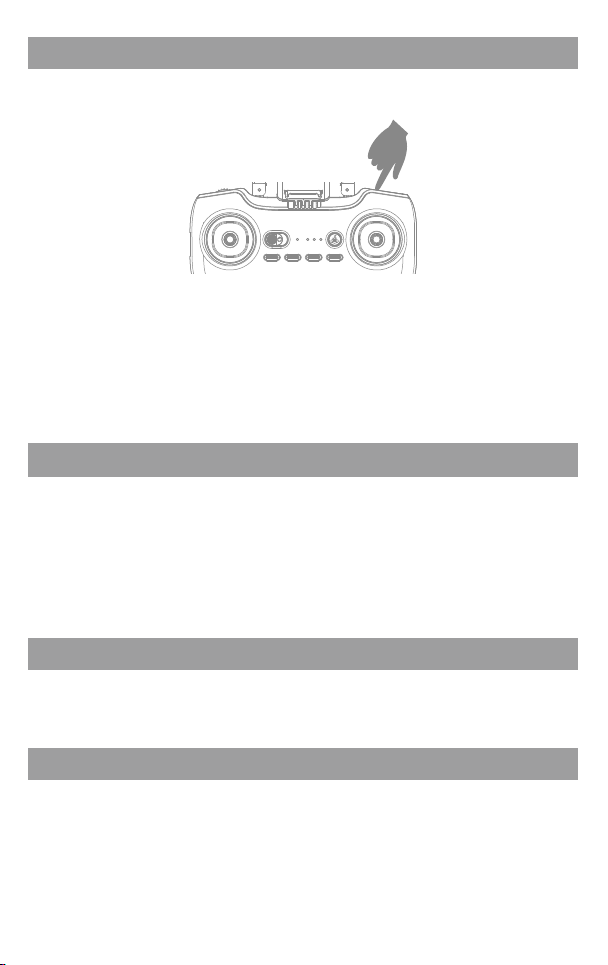
Video
Press the "video" button to enter the recording state, and the transmitter will prompt
"didi" to repeat this action to stop recording and save video.
Notes for Filming
① Photos taken will be saved to mobile picture library and aircraft TF card; Video can be saved
in TF card first, which can be downloaded to mobile picture library for viewing. Please
download video according to APP prompt. When downloading, maintain the normal
connection between the mobile phone and the flyer, and the TF card is in the card slot.
② The APP must be authorized to read the phone gallery to view the aerial photos.
③ Turn off the power supply of the drone before taking out the TF card.
④ When aerial video is read by computer, it must have corresponding playback software.
Intelligent Hover
Intelligent flight control can calculate the suspended height ,the visual system points
the ground position,GPS coordinates allow the vehicle to stay in your desired
position Buy. The drone is like a camera fixed in the air. Aerial photography and
control are very convenient.
Notice: Drone must be connected to GPS properly in order to give full play to
fixed-point hovering function. Atmospheric pressure or wind force affects
hovering stability.
Low Battery Alarm
When the battery power of the point remote is quickly exhausted, it will make the
sound of “di”“di”“di” constantly to alarm you, now you should land the drone as
soon as possible to charge the battery.
Automatic Return
While flying, in case that the battery of the drone is quickly exhausted, it will make
the sound of “di”.“di” to alarm you, the drone's indicator lights turn from long to
bright. After alarming you, the drone automatically returned to the take-off point。
Notice: After low-battery alarm, the drone will return home. Meanwhile, its
controllable range will be reached to the 20 meter
12
Page 13
Out of Range Alarm
When the drone flying out of the max remote control distance, the transmitter will
beep “didi...didi...didi...” to alarm the user to fly back the drone within range
immediately.
Stuck Protection
When the propeller is stuck and does not rotate, the drone will start the automatic
protection function to stop the motor working.
Out of Control Protection
Out of control protection refers to the flight control system automatically controls the
drone to fly back to the return point after receiving the remote control signal (ie, out
of control), the drone does not have the function of avoiding obstacles during the
uncontrolled return flight. The user can set the return altitude value to avoid
obstacles on the way back.
Possibility of entry into runaway protection mode
* The remote control is off.
* Flight distance exceeds the effective distance of remote control signal transmission.
* There is an obstacle between the transmitter and the drone.
* Transmitter signal is disturbed.
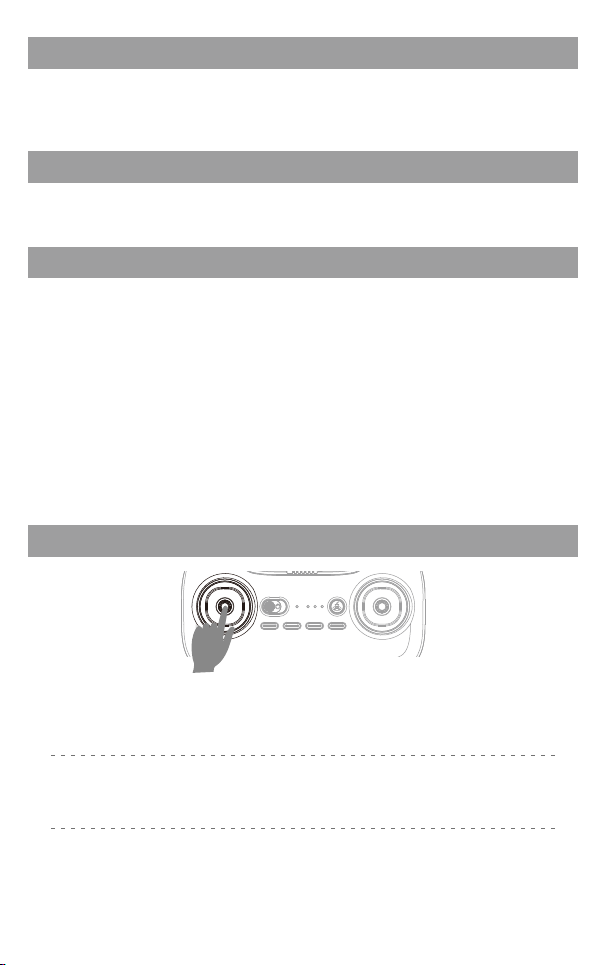
Flying Trimmer
Press down
Forward / Backward Trimmer
When flying, if the drone tilts forward , press the trimmer button, and push the right stick
backward. Otherwise push it forward
Left / Right Tilts Trimmer
When flying, if the drone tilts to the left, press the trimmer button,and push the right stick to the
right. Otherwise push it to the left.
Left / Right Rotates Trimmer
When flying, if the drone head rotates to the left, press the trimmer button, and push left stick to
right. Otherwise please push it to the left.
13
Page 14
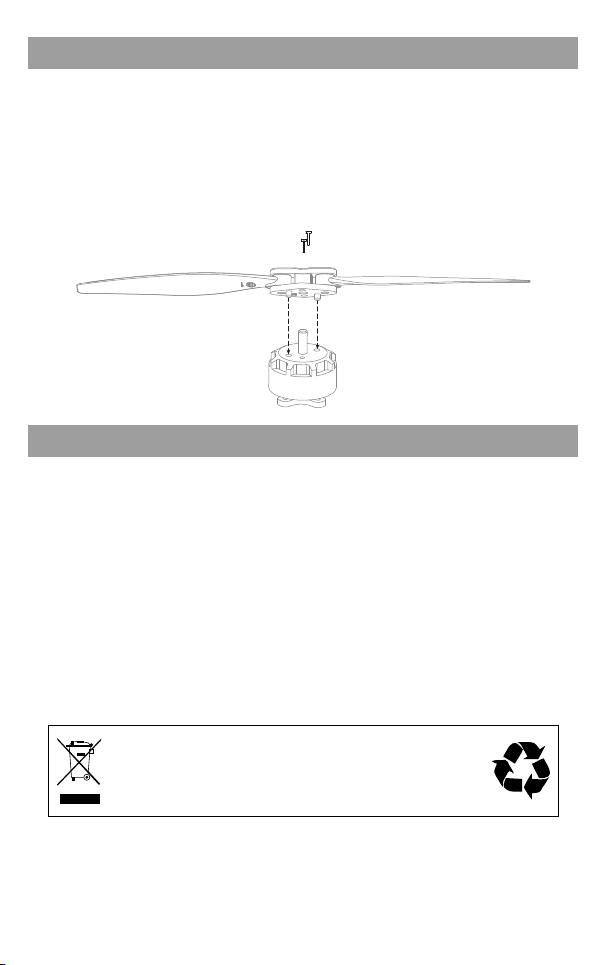
Method of propeller installation and disassemble
Disassemble:Unscrew the screw on both sides of propeller clamp and pull out
propeller assembly.
Installation:Place the propeller assembly on the motor shaft, fix it on the motor,
and lock screws on both sides of the propeller clamp.
Note:There are marked "A" and "B" on the back of the propeller. Please
carefully check the letters "A" and "B" on the folding arm of the drone.
The two letters must correspond to each other during installation.
Attention
① Switching sequence. At first, turn on the power of the transmitter, then turn on
the power of the drone. After the end, turn off the power of the drone first, and
then turn off the power of the transmitter.
② Improper operation caused the crash. It is necessary to check and confirm the
connection of the motor, blade or electric pool of the aircraft and the damage
degree, so that the aircraft can fly again. If it is damaged, please replace it with
new accessories, otherwise it will easily cause flight accidents.
③ Battery must be removed when the drone is not in use.
Important Notice
Drone Battery Li-Po Battery Disposal & Recycling
Wasted Lithium-Polymer batteries must not be placed with household
trash. Please contact local environmental or waste agency or the
supplier of your model or your nearest Li-Po battery recycling center.
Our company's products are improving all the time, design and specifications are subject to
change without notice.
All the information in this manual has been carefully checked to ensure accuracy, if any
printing errors, our company reserve the final interpretation right.
14
Page 15

Drone
Parameter
Weight (include battery and propeller):530g
Size:Folded:173.5x93x70mm
Diagonal:297mm
(Diagonal motor shaft spacing)
Propeller radius:79.5mm
Maximum ascent rate:1.7m/s
Maximum descent rate:1.7m/s
Maximum speed:About 24km/h
Flight altitude limit:250m
Gimbal
Stable:Single axis(tilt)
Controllable range:Tilting:-90° to 0°
Camera
Image resolution:2048x1152P
Static Photography Mode:Single shoot
Video Resolution:2048x1152 P
Image mode:RGB Mode
Frame Rate:25
File System Support:FAT 32
Maximum flight time:25 minutes
(calm)
Maximum wind speed:level 3
Maximum tilt angle:35°
Operating Temperature Range:
0°C - 40°C
GNSS:GPS / GLONASS
Operating frequency:2.4Ghz /
5G wifi
Image format:JPEG format
Video format:MP4 Compressed
format H.264
TF Card:Support Class 10 Micro
TF card,Supreme support 64G.
≥10 level Micro TF Card.
Operation Temperature:0°C-40°C
Tips: the above data are the test data of UDIRC toy lab, for reference only.
15
Page 16

Drone Battery
Capacity:2600mAh
Voltage:11.1V
Type of battery:LiPo
Energy:28.86Wh
Net Weight:about 220g
Charging temperature range:5°C to 40°C
Transmitter
Operation Frequency:2.4Ghz
Maximum transmission distance:1 km
Operating Temperature:0°C to 40°C
Charger
Input:5V ≥ 2A
APP
App Name:UDIGPS
Image transmission system:5G wifi
Real time image transmission:720 P@20 fps
Battery:3.7V,1200mAh
Mobile device bracket:Suitable for
smartphones
Operation System:This software is suitable for mobile phones in the IOS 9.0 or
later and Android 4.4 or later system,
Tips: the above data are the test data of UDIRC toy lab, for reference only.
16
Page 17
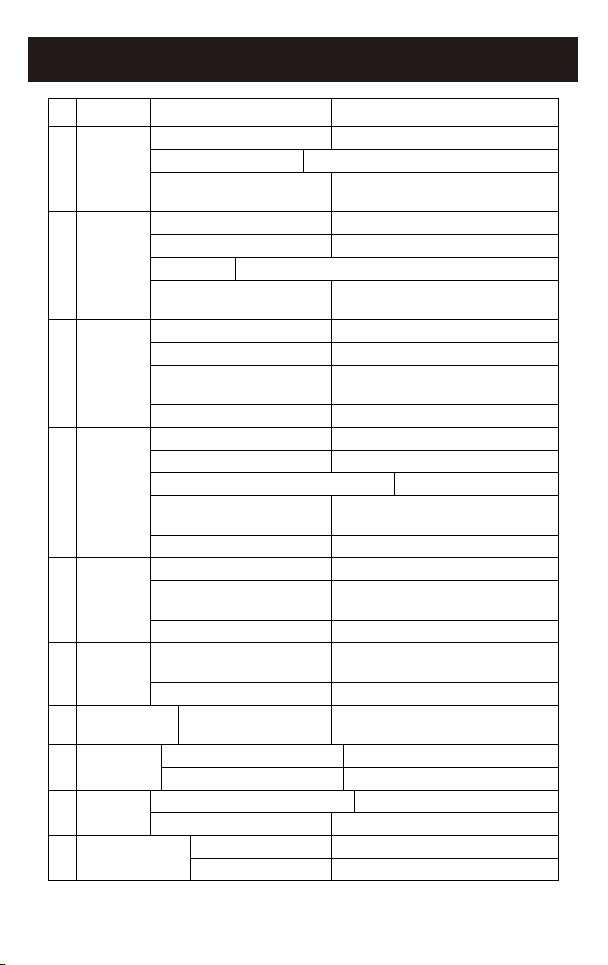
Problem Problem cause SolutionNO.
The controller
Indicator
1
light is off.
Failed to
pair the
drone with
2
the
controller.
The drone
is under-
3
powered or
can not fly.
The drone
could not
hover and
4
tilts to one
side.
The drone
indicator
5
light is off.
Could not
see the
6
picture.
Hard to control
7
by cellphone.
Can’t altitude
8
hold.
Can’t position
9
hold.
Searchedbut could not
10
find the GPS signal.
Troubleshooting
Low battery. Charge the controller battery.
The batteries are incorrectly.
The batteries are incorrectly
positioned.
Indicator light is off. The same as above.
There is an interfering signal nearby. Restart the drone and power on the controller.
Mis-operation. Operate the drone step by step in accordance with the user manual.
The electronic component is
damaged for fiercely crash.
The propeller is seriously deformed. Replace the propeller.
Low battery. Charge the drone battery.
Incorrect installation of propeller.
Damage of Receiver board. Replace the receiver board.
Improper Calibration. Please refer to the Calibration.
The propeller is seriously. Replace the propeller.
The motor holder is deformed after violent crash. Replace the motor holder parts.
The gyroscope did not reset after
a serious crash.
Motor is damaged.
Low battery. Recharge the drone battery.
The battery is expired or over
discharge protection.
Poor contact Connect and disconnect the battery.
There is an interfering signal nearby.
Camera is damaged. Replace Camera.
Not experienced enough.
The propeller is seriously. Replace propeller.
Atmospheric pressure is not stable. Refer to “Altitude Hold Mode”instruction.
Whether the GPS has connected or not. Search again to connect the GPS signal.
Optical flow board is damaged. Please replace a new one.
GPS module is damaged. Please replace a new one.
GPS module plug is loose. Please check to see if it’s connected normally.
Install the batteries following the polarity indicators.
Clean the dirt between the battery and the
battery contacts.
To buy spare parts from local seller and
replace damaged parts.
Install the propeller in accordance with the
user manual.
Put the drone on the flat ground for about 10
minutes or restart the drone to calibrate again.
Replace the motor.
Buy a new battery from local seller to replace
the battery or charge the battery.
Practice and read the cellphone controlling
instruction carefully.
Practice and read the cellphone controlling
instruction carefully.
17
Page 18

FCC Note
This equipment has been tested and found to comply with the limits for a Class B
digital device, pursuant to Part 15 of the FCC Rules. These limits are designed to
provide reasonable protection against harmful interference in a residential
installation. This equipment generates uses and can radiate radio frequency
energy and, if not installed and used in accordance with the instructions, may
cause harmful interference to radio communications. However, there is no
guarantee that interference will not occur in a particular installation. If this
equipment does cause harmful interference to radio or television reception, which
can be determined by turning the equipment off and on, the user is encouraged to
try to correct the interference by one or more of the following measures:
● Reorient or relocate the receiving a ntenna.
● Increase the separation between the equipment and receiver.
● Connect the equipment into an outlet on a circuit different from that to which
the receiver is connected.
WARNING: Changes or modifications not expressly approved by the party
responsible for compliance could void the user's authority to
operate the equipment.
FCC Notice:
The equipment may generate or use radio frequency energy. Changes or
modifications to this equipment may cause harmful interference unless the
modifications are expressly approved in the instruction manual. Modifications not
authorized by the manufacturer may void user’s authority to operate this device.
This device complies with Part 15 of the FCC Rules. Operation is subject to the
following two conditions:
(1) This device may not cause harmful interference.
(2) This device must accept any interference received, including interference that
may cause undesired operation.
FCC Radiation Exposure Statement
The device has been evaluated to meet general RF exposure requirement.
The device can be used in portable exposure condition with out restriction.
MADE IN CHINA
 Loading...