

Page 1
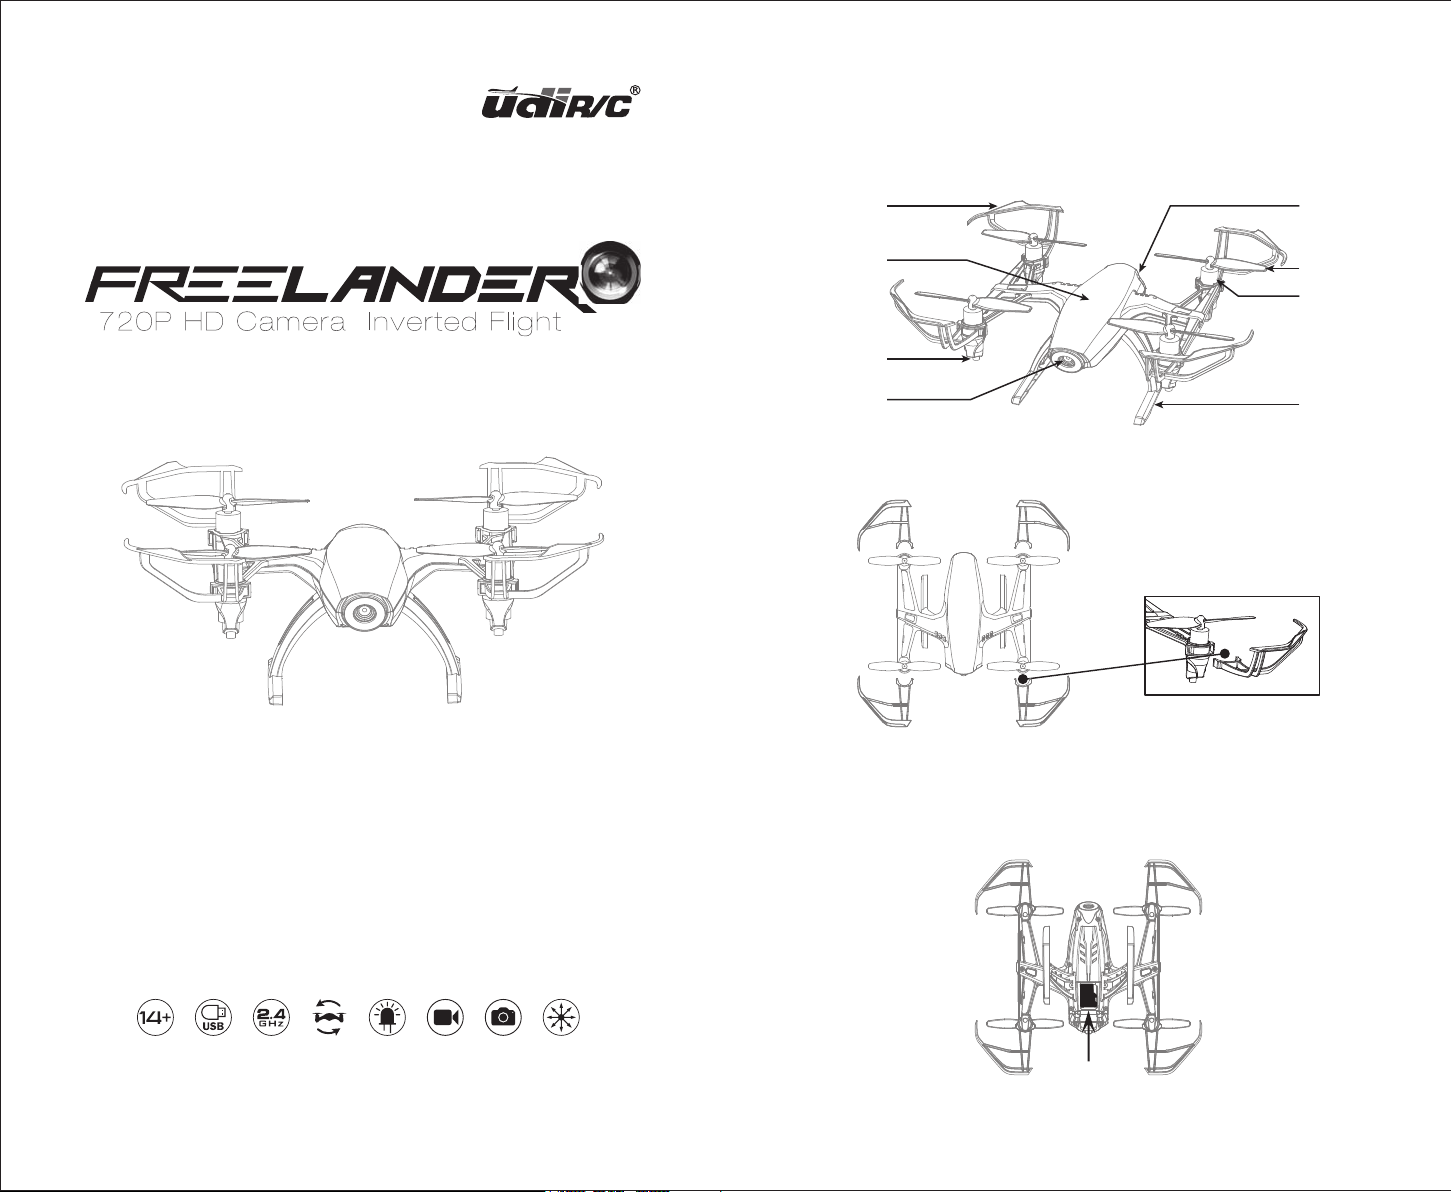
Name of Parts
1. Drone
Blade Guard
Drone Body
Body Light
Camera
Battery Cover
Blade
Motor
Landing Gear
Blade Guard Installation Diagram
U28
TF Card Installation Diagram
2
Page 2

2. Transmitter
Power Switch
Throttle/
Up and Down Stick
Rudder Trim
Video Photo
180°Flip in Four
Directions
Display Screen
High/Medium/Low Speed Mode
(Press Down)
Headless Mode
(Press Down)
Power Indicator Light
Forward/Backward/
Left/Right Stick
Left/Right Trim
Forward/Backward Trim
360°Flip in Four
Directions
Indication Direction of TrimIndication Direction of Power Switch
Instruction of Screen Content
75 6
1
2
3
4
91011
1. Strong/Weak Emission Signal
2. Low Speed
3. Medium Speed (By Default)
4. High Speed
5. Video
8
6. Photo
7. Battery Indicator
8. Forward/Backward Trim Grid
9. Left/Right Trim Grid
10. Throttle Digital Display
11. Left/Right Rotation Trim Grid
Notice:
1. Important Statement:
(1) This product is not an ordinary toy but a piece of complicated equipment which is
integrated with professional knowledge by mechanic, electronic, air mechanics,
high-frequency emission etc., so it should be installed and adjusted correctly to avoid
accidents. The user must always operate in a safe manner. We undertakes no liability
for human injury or property damage caused by improper operation as we could not
control the procedure of installation, use and operation of this drone.
(2) This drone is suitable for experienced drone user aged 14 years or above.
(3) The flying field must be legally approved by your local government.
(4) We undertakes no liability for those accidents caused by improper operation, use and
control of the drone after sale of the product.
(5) We entrust the distributor to provide technology support and after-sale service. If you
have any questions about use, operation, repair etc., please contact your local distributor.
2. Safety Precautions:
Keep away from crowd when flying because a flying RC drone is very dangerous. Improper
assembly, broken main frame, defective electronic equipment or unskilled operation all may
cause unpredictable accidents such as drone damage or human injury. Please pay special
attention to safety operation and have good knowledge of accident responsibility that the
user may cause.
(1) Keep away from obstacles and crowd
The speed and status of a flying RC drone is uncertain and it may cause potential danger.
So the user must keep away from crowd, tall building, power lines etc. when operating
a flying RC drone. Do not fly a RC drone in rainy, storm, thunder and lighting weather
for the safety of user, around people and their property.
(2) Keep away from humid environment
The drone inside is consisted of precise electronic components. Humidity or water vapor
may damage electronic components and cause accident.
(3) Safe operation
Please operate the RC drone in accordance with your physical status and flying skill.
Fatigue, listlessness and improper operation may increase the rate of accident.
(4)Keep away from rotating parts
Rotating Parts can cause serious injury and damage. Keep face and body away from
rotating motors.
(5) Keep away from heat
The RC drone is made of metal, fiber, plastic, electronic components etc. Keep away
from heat and sunshine to avoid distortion and damage.
(6) Please do not touch the hot motor to avoid being burnt.
3. Check List Before Flight
(1) Flying field must spacious enough and we suggest at least
8M (length)*8M (width)*5M (height).
(2) Make sure the battery of the drone and its transmitter are fully charged.
(3) Make sure the Throttle Control Stick of the transmitter in the lowest position.
(4) Please strictly obey the order of turn on and turn off before operation. Turn on the
transmitter power first and then turn on the drone power before flying; turn off the drone
power first and then turn off the transmitter power when finish flying. Improper turn on
and turn off order may cause the drone out of control and threaten people’s safety.
Please cultivate a correct habit of turn on and turn off.
(5) Make sure the connection is solid between battery and motor etc. The ongoing vibration
may cause bad connection of power terminal make the drone out of control.
(6) Improper operation may cause drone crash, which may arouse motor defective and
noise, and then effect the flying status or even stop flying. Please go to the local
distributor to buy new parts for replacement so that the drone will return to its best status.
3 4
Page 3
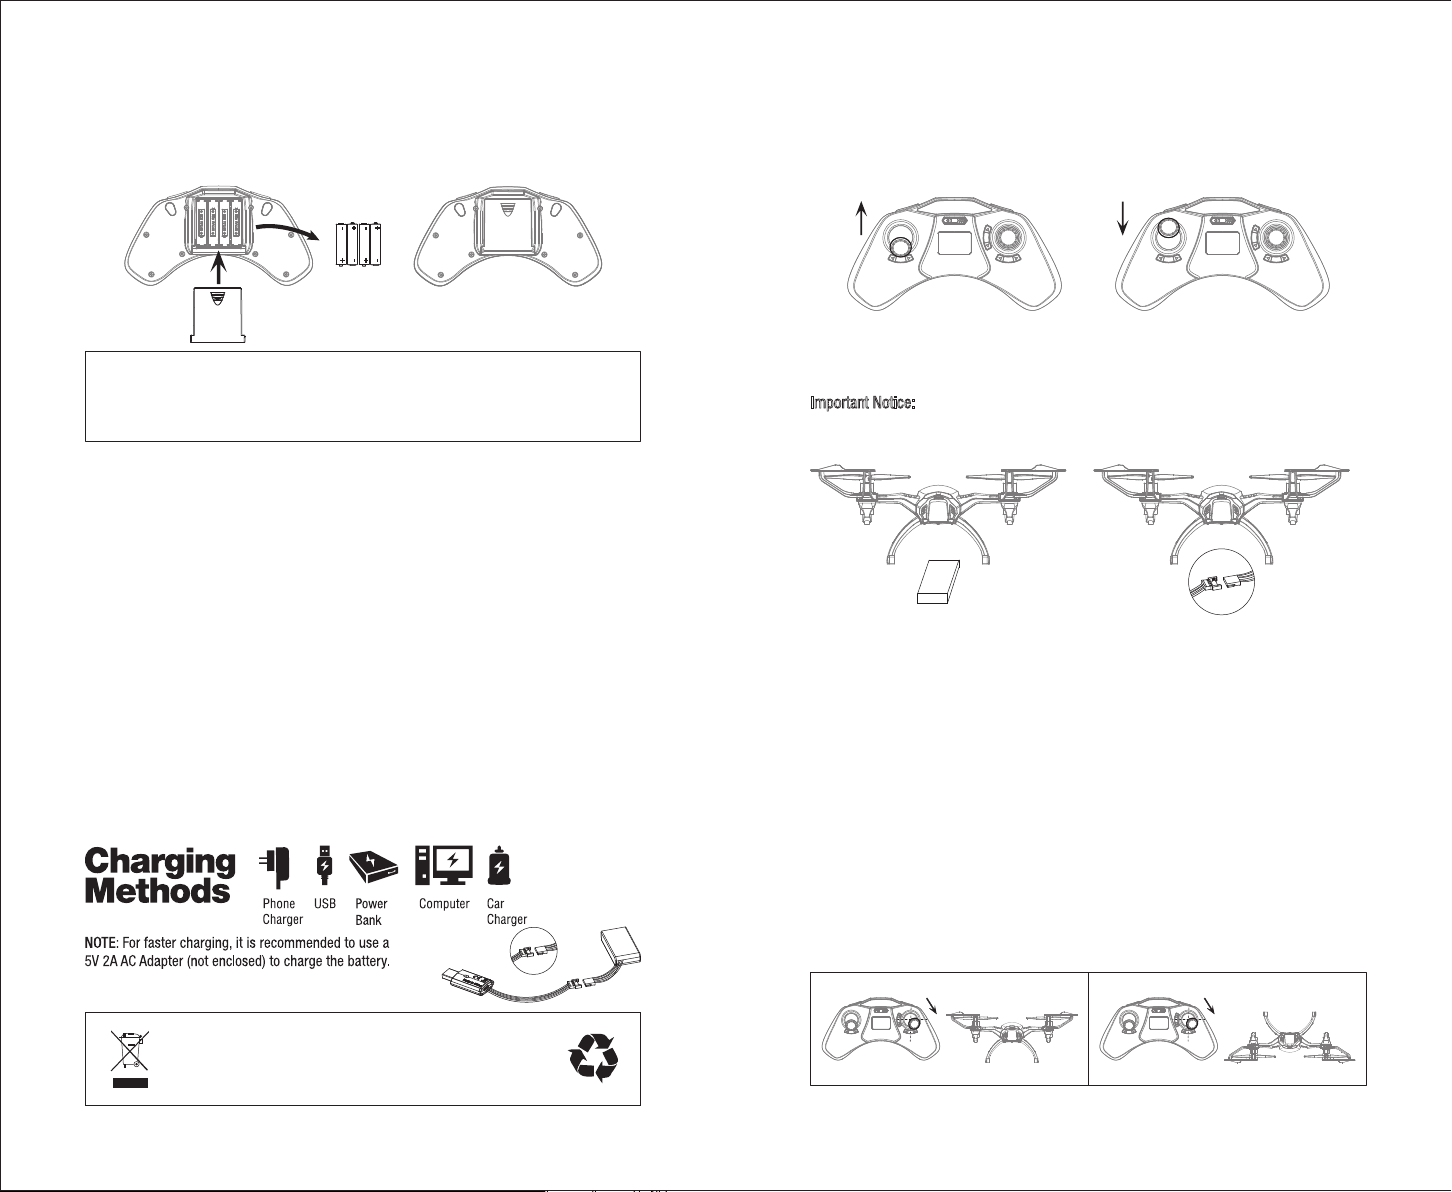
Transmitter Installation:
Battery installation: open the battery cover on the back side of the transmitter and put 4
alkaline batteries (not included) into the box in accordance with
electrode instructions.
-+
+-
- +
+ -
4*1.5V
Battery Cover
Notice:
Alkaline Batteries
1. Make sure the electrodes are correct.
2. Do not mixed use new and old batteries.
3. Do not mixed use new and old batteries.
4. Do not charge the non rechargeable battery.
Charging Instruction
1. Connect the drone battery with USB charger first and then choose one of the methods in
the below picture to connect with USB charger. (prior to choose 2A, 5V charger)
2. Two red USB indicator lights keeps bright when charging. The charging time is about 45
minutes. The indicator lights turn to green when fully charged. (If the two indicator lights
color become different, please do not use it to charge in case of the battery damage)
3. Li-Po battery is included in spare parts and please pay attention on below safe notice.
* Never put the battery on a high temperature surface, or close to fire or heating devices to
avoid damage or explosions.
* Never use the battery to crash or hit hard surface.
* Never put the battery in water and keep it in dry place.
* Never open the battery.
* Never leave the battery unsupervised during charging.
* Make sure that there is no short circuit of the power wire.
* Please use the recommended charger only.
* Check the charger’s wire, plug, surface regularly. Do not use any broken charger.
Frequency Pairing:
1. Turn on the transmitter switch and the LED indicator begins to flash rapidly. Push the
Throttle Stick all the way up then all the way down. The LED becomes flash slowly,
which indicates the transmitter enters code pairing.
2. Install the battery to the mounted box and power on the drone.
3. Put the drone on the flat surface, the indicator light of the drone turns from flashing to
solid bright. The drone is ready to be controlled.
Important Notice:
Please make sure the gyro of the receiving board is placed on the
horizontal position after powering on the drone, so that the drone is ready
for controlling.
Calibration Instruction
Please follow below steps to calibrate the drone if the drone becomes imbalance after
crashing during the flight, and can not be adjusted by trim button and cause difficult operation.
1. Turn off the drone switch, then turn off the transmitter power switch.
2. Turn on the transmitter switch, push the Throttle Stick all the way up then all the way
down, and the transmitter enters pairing mode.
3. Power on the drone and put it on a flat surface in a horizontal position. You will hear “di,
di, di” beeping noise three seconds later, which indicates successful code pairing. The
drone body lights will turn solid.
4. Do not move the Throttle Stick before successful calibration. Push the Forward/Backward/
Left/Right Stick as shown below (See Picture 1). The drone body lights flash, which
indicates that the drone is calibrating. When the drone body lights remain solid, turn over
the drone and put it on the flat surface, repeat the operation to push the Forward/
Backward/Left/Right Stick as shown below (See Picture 2). The drone body lights flash,
which indicates that the drone is calibrating. When the drone body lights remain solid,
your drone is ready to fly.
Drone Battery
LiPo Battery Disposal & Recycling
Wasted Lithium-Polymer batteries must not be placed with household trash.
Please contact local environmental or waste agency or the supplier
of your model or your nearest LiPo battery recycling center.
5 6
Picture 1 Picture 2
Page 4
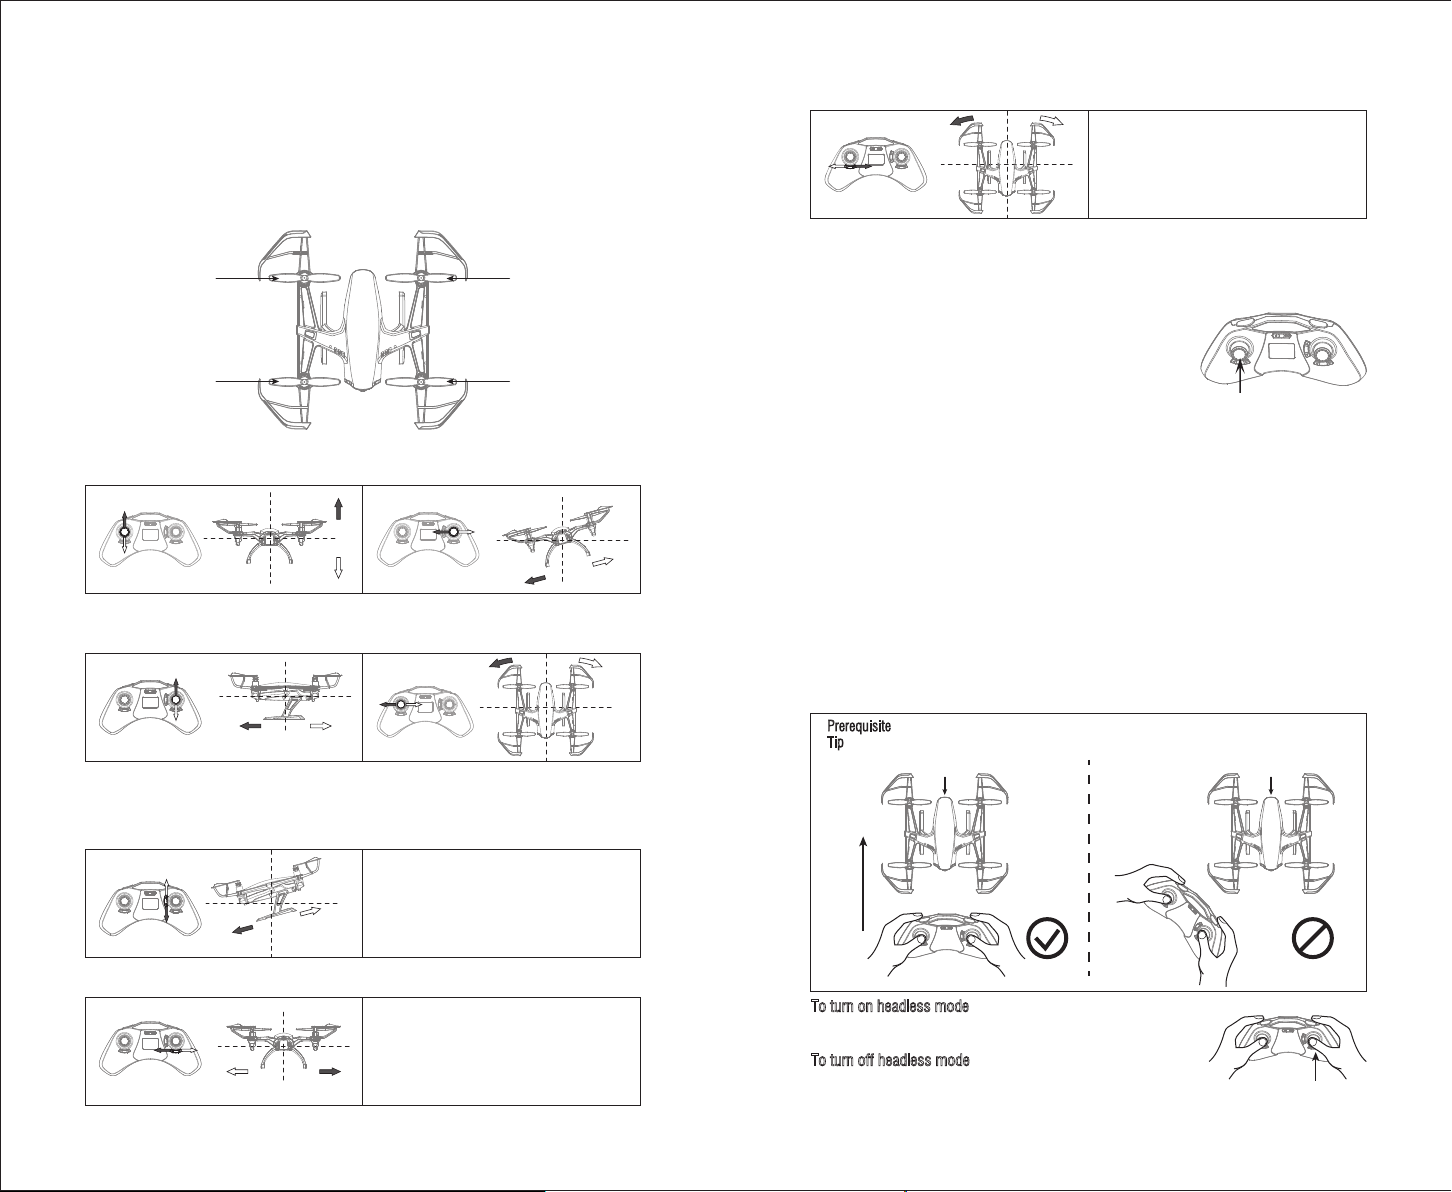
Pre-Flight Operation:
1. The camera is the drone front.
2. Power on the drone and check the direction of the rotating blades. The left front and right
rear A blades rotating clockwise while the right front and left rear B blades rotating
counterclockwise.
3. Adjust relative transmitter Trim button to adjust the rudder if the drone tilts to one side
when flying.
Front
A Blade
Clockwise
Left Right
B Blade
Counterclockwise
Rear
B Blade
Counterclockwise
A Blade
Clockwise
Flying Control
1. Push the Throttle Stick up to fly the drone up, and
pull the Stick down to fly the drone down.
Forward Backward
3. Push the Forward/Backward/Left/Right Stick up to
fly the drone forward, and pull the Stick down to
fly the drone backward.
5. If the drone tilts forward or backward
2. Push the Forward/Backward/Left/Right Stick to the
left to fly the drone to the left, and pull the Stick to
the right to fly the drone to ther right.
4. Push the Throttle Stick to the left to rotate the drone
to the left, and pull the Stick to the right to rotate the
drone to the right.
7. If the drone rotates to the left or right
Press the Right Rotation Trim till balance if
the drone rotates to the left, and press the
Left Rotation Trim till balance if the the drone
rotates to the right.
High/Medium/Low Speed Mode
By default, the drone is in Medium Speed Mode (M).
Press the Throttle Stick and the transmitter issues sounds
of “dididi”, which indicates that the drone enters High
Speed Mode (H); Press the Throttle Stick again and the
transmitter issues sounds of di, which indicates that the
drone enters Low Speed Mode (L); Press the Throttle
Stick one more time and the transmitter issues sounds
of didi, which indicates that the drone enters Medium
High/Medium/Low Speed
Mode Button (Press Down)
Speed Mode (M).
Headless Mode
Drones generally have a front and rear indicated by LED lights or colored blades. By default,
the users are required to tell the front and the rear of the drone when flying. Under headless
mode, the users can operate the drone without worrying about the orientation(left is left
and right is right all the time, regardless of where your drone is pointing at).
Headless mode is designed for beginners and users who fly the drone in daylight or at a far
distance.
When the drone in Headless Mode, push the Right Stick to forward/backward/left/right, and
the drone will fly to forward/backward/left/right accordingly.
Prerequisite: Position the drone in such a way that its front is your front (see Picture 1).
: Do not change the orientation of the transmitter (see Picture 2) after entering headless mode.
Tip
Front
RightLeft
Front
RightLeft
Tilt forward
Tilt backward
6. If the drone tilts to the left or right
Drift left Drift Right
Press the Backward Trim till balance if the drone
drifts forward, and press the Forward Trim if the
drone drifts backward.
Picture 1 Picture 2
Rear
To turn on headless mode, press the headless mode button
Press the Right Trim till balance if the drone
drifts to the left, and press the Left Trim till
balance if the drone drifts to the right.
and the drone LED lights flashes, which indicates the
headless mode is ready.
To turn off headless mode, press the headless mode button
again and the drone LED lights turns solid, which indicates
the headless mode is off.
7 8
Rear
Page 5

180°and 360°Flip
180° Flip (Standard Flight or Inverted Flight)
When the drone is flying, press the right button on the back side of the transmitte, the
transmitter will issue sound of dididi..., and then push the Forward/Backward/Left/Right
Stick to Forward/Backward/Left/Right. The drone will do 180° flipping to forward or
backward or left or right synchronously.
180°Flip Button
360°Flip
Press the left button on the back side of the transmitter when the drone is flying, and the
transmitter will issue sounds of dididi..., and then push the Forward/Backward/Left/Right
Stick to Forward/Backward/Left/Right. The drone will do 360° flipping to forward or
backward or left or right synchronously.
360°Flip Button
How to view the data saved in TF card
Turn off the drone switch first when finish aerial photography.
Take out TF card and insert the card to a card reader. Connect the
card reader with computer USB port. After a while, view the aerial
photography data from “my computer”-”mobile disk”.
Tip: Please play the video or photo after coping all aerial
photography data to computer and make sure the play software
can support its format.
Basic parameter for aerial camera: Video DPI 1280*720P/30FPS;
Image Size 1280*720P.
Spare Parts
For convenience, the spare parts are listed for you to choose, which can be purchased from
the local distributor. (The circled icon please refer to the exploded view below)
U28-01
Upper Cover
U28-02
Lower Cover
U28-03
Blade
U28-04
Blade Guard
Installation and Replacement for Blade
1. Put the attached spanner between the
motor and the blade like Picture 1 as
below, and then press the spanner to
lift up and remove the blade as Picture 2.
Picture 1 Picture 2
2. Press the blade to the motor axis as
Picture 3. Keep the blade perpendicular
to the motor axis as Picture 4. (choose
the correct blade--counterclockwise
or clockwise)
Picture 3 Picture 4
9 10
U28-05
Landing Gear
U28-09
USB Cable
U28-13
Receiving Board
U28-17
Card Reader
U28-06
Camera Cover
U28-10
Li-Po Battery
U28-14
Circuit Board for Camera
U28-18
Camera Acrylic
U28-07
Battery Cover
U28-11
Clockwise Motor
(Red and Blue Wire)
U28-15
Transmitter
U28-19
Iron Axis for Battery Cover
U28-08
Battery Holder
U28-12
Counterclockwise Motor
(Black and White Wire)
U28-16
TF card
U28-20
Spanner
Page 6
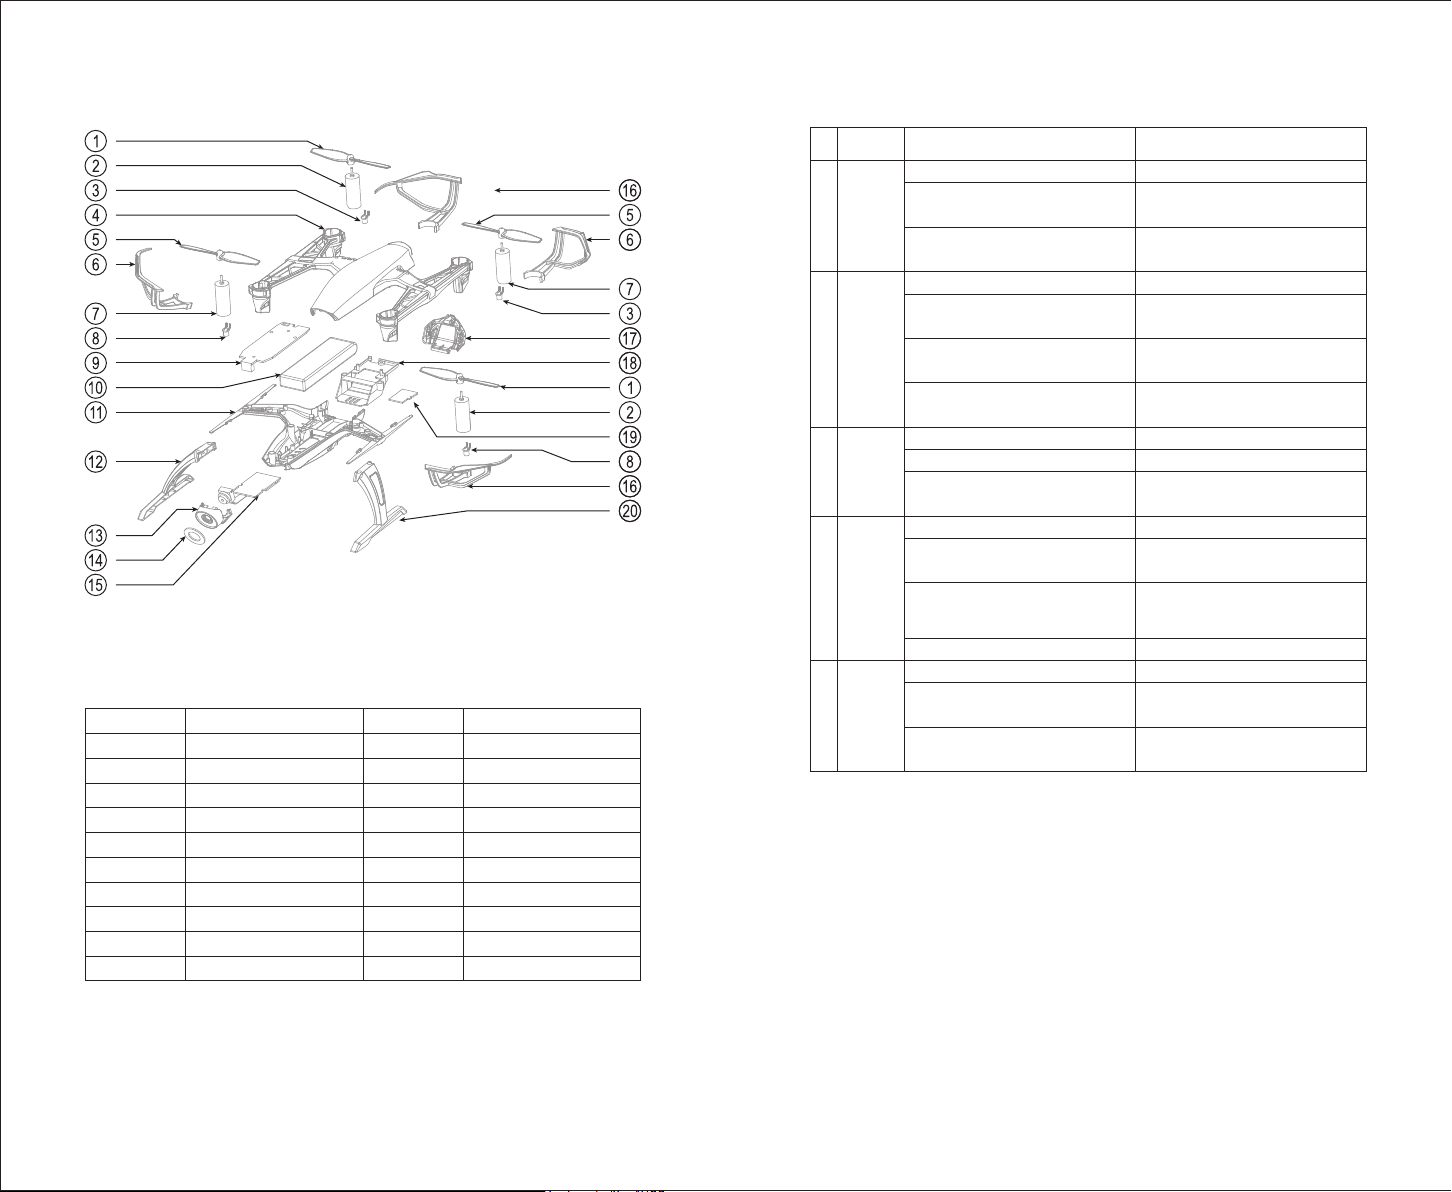
Exploded View
No.
1
2
3
4
5
6
7
8
9
10
A Blade (Colockwise)
Clockwise Motor
Tail Light (Red)
Upper Cover
B Blade (Counterclockwise)
Right Blade Guard
Counterclockwise Motor
Front Light (Green)
Receiving Board
Battery Left Landing Gear
Name
No.
11
12
13
14
15
16
17
18
19
20
Name
Lower Cover
Right Landing Gear
Camera Cover
Camera Acrylic
Circuit Board for Camera
Left Blade Guard
Battery Cover
Battery Holder
TF Card
1
2
3
4
5
Problem Problem Cause SolutionNo.
The
transmitter
indicator
light is off
Fail to
pair the
drone with
transmitter
The drone
is underpowered
or can not
fly.
The drone
can not
hover and
tilts to one
side
The drone
indicator
light is off
Troubleshooting Guide
1. The transmitter battery is too low. 1. Replace battery.
2. The battery positive pole and negative
pole are in reverse order.
3. Poor Contact.
1. Indicator light is off. 1. The same as above 1.2.3.
2. There is interfering signal nearby.
3. Misoperation.
4. The electronic component is damaged
for frequent crash.
1. The blade deformed seriously. 1. Replace blade.
2. The drone battery is too low. 2. Recharge the drone battery.
3. Incorrect installation of blade.
1. The blade deformed seriously. 1. Replace blade.
2. The motor holder deformed and out of
verticality.
3. The gyro did not reset after violent crash.
4. The motor is damaged. 4. Replace motor.
1. The drone battery is too low. 1. Recharge the drone battery.
2. The battery is expired or overdischarge
protection.
3. Poor contact.
2. Install the battery in accordance with the
user manual.
3. Clean the dirt between the battery and the
battery alice.
2. Restart the drone and power on the
transmitter.
3. Operate the drone step by step in
accordance with the user manual.
4. To buy spare parts from local seller and
replace damaged parts.
3. Install the blade in accordance with the
user manual instruction.
2. Replace the motor holder.
3. Put the drone on the flat ground for
about 10s or restart the the drone to
calibrate again.
2. Buy a new battery from local seller to
replace or recharge the battery.
3. Disconnect the battery and then connect
it with the plug again.
11 12
 Loading...