

Page 1

User Manual
Pressure-Sensitive Pen Device
For IBM Personal Computers and Compatibles
User's Manual
with Windows 95/98/ME/NT/2000/XP
RS232C: Windows 95/98/ME/NT/2000/XP
USB: Windows 98/ME/2000/XP
Driver and Pen Utilities Version 4.0
The information contained in this document is subject to change without notice, and no part of this
document may be reproduced or transferred in any form or by any means without the written consent of
UC-Logic Technology Corporation.
All trademarks referenced in this document belong to their respective owners.
General Information
Overview
Welcome to the world of pen-based computing! You will soon discover how easy it is to
control the computer using a pen instead of a mouse. You will also be able to draw,
sketch or paint on your computer as easily as you would on paper, using appropriate
software such as PhotoImpact, PhotoShop, and Painter. Since all Pen Device models
described in this manual are pressure-sensitive, you can choose to emulate a soft-tipped
pen.
This manual describes mainly how you install the Pen Device, configure it to best suit
your use, and use Pen Utilities that come with the hardware. Specifically, it describes
Page 2
pen device functions, items in the package, system requirements, hardware installation
procedure, Driver and Pen Utilities installation procedure, verification of hardware
installation, verification of overall installation, usage tips, pen scrolling, configuring the
pen device,
PenSigner
This manual is applicable to Driver and Pen Utilities Version 4.0.
Note: For best results, please try to look at the screen while using the Pen, and avoid
looking at Tablet Plate. See the section
Annotate All program, Annotate for Word
Program, and
PenCommander
Program.
Usage Tips
program,
for more usage tips.
PenMail
Program,
Quick Start
To start using your Pen Device quickly, take these steps:
1. Insert Driver Disc into an available CD-R drive, and the Setup program
should start automatically. Press Enter key when the Setup message appears
on the screen and let the program run its course. If the Setup program does
not start automatically, you may start it manually by double tapping My
Computer on Desktop, the CD-ROM drive icon , and then the
Setup program icon .
2. Attach the hardware to your computer according to its type (Pen Device with
USB Interface, Pen Tablet with RS232C Interface, or Tablet Keyboard with
RS232C Interface). You have to power off your PC before attaching a Pen
Device with RS232C interface.
3. Read Usage Tips.
Start enjoying your Pen Device!
Pen Device Functions
Your Pen Device, when properly installed and all system requirements met, provides the
following functions:
1. Direct Pointing - You can move the cursor to any spot on the screen by
moving the Pen over Tablet Plate without touching the Plate.
Page 3

2. Three-Button Mouse Commands - The Pen Device provides all functions of
a three-button mouse with a Pen Tip and two Barrel Buttons, all
programmable.
3. Scrolling documents or images - You can scroll up and down by moving the
Pen freely over Tablet Plate ("Pen Scrolling") without looking for the scroll
bar.
4. Pen Launching
pressing by tapping on Hot Cells on Tablet Plate.
5. Adjusting the size and position of Pen Area on Tablet Plate.
6. Pressure Sensitivity - Allows the Pen to emulate various soft-tipped as well
as hard-tipped pens.
With the aid of Pen Utilities included in Driver Disc, the Pen Device provides the
following functions:
1. Annotate for Word - Marking up Microsoft Word documents as if on a piece
of paper, and storing the markups as part of the document.
2. Annotate All - Marking up any screen to send to someone on the Net or for
later viewing.
3. PenMail - Writing a letter in your own handwriting and sending it through
e-mail.
4. PenSigner - Capturing your online signature or simple hand drawing and
inserting into various documents.
- You can launch any application or emulate keyboard
5. PenCommander - Controlling the computer with a flip of your pen.
With the aid of additional application programs, the Pen Device opens up even more
possibilities:
1. Draw with emulated paint brushes, chalks, watercolor, and a host of other
pens with programs such as Corel Painter Classic by Corel and PhotoImpact
by Ulead.
2. Seal documents with your own signature with signature verification
programs such as PenOp Signature by PenOp.
3. Verify online signature against templates previously stored on a server with
programs such as Cyber-SIGN for Lotus Notes by Cyber-SIGN.
4. Design application systems that can take advantage of full functions of the
Pen Device.
Items in the Package
Page 4
Please refer to later sections for a description of the product series and packed items
shown in the following tables.
Pen Tablet Packing List
Item
Series
DP – USB
DP –
RS232
WP – USB
WP –
RS232C
PP –
RS232C
The number in each cell above indicates the number of items packed; an empty cell
indicates 0 item.
Plate
RS232
1
1
1
Plate
USB
Cordless
Pen
1 0 or 1 0 or 1 1
0 or 1 0 or 1 1
1 1 0 or 1
1 0 or 1
Pen
Holder
0 or 1 1
Corded
Pen
0 or 1
Cordless
Mouse
0 or 1
Driver
Disc
Application
1 0 or more
1 0 or more
1 0 or more
1 0 or more
1 0 or more
CD
Tablet Keyboard Packing List
Item
Series
KD –
USB
KD –
RS232C
KW –
USB
KW –
RS232C
KP –
USB
KP –
RS232C
The number in each cell above indicates the number of items packed; an empty cell
Keyboard
RS232
1
1
1
Keyboard
USB
1 1 0 or 1 0 or 1 1 1 0 or more
1 1 1 0 or 1
1 1
Built-in
Plate
Cordless
Pen
1 0 or 1 0 or 1 1 1 0 or more
1 1 0 or 1
1
Pen
Holder
0 or 1 1 1 0 or more
0 or 1 1 1 0 or more
Corded
Pen
Driver
Disc
Application
1 0 or more
1 0 or more
CD
indicates 0 item.
Page 5

Description of Product Series
The following is a description of the product series of Pen Tablets and Tablet Keyboards.
DP – RS232: DP Series Tablet with Cordless or Corded Pressure-Sensitive
•
Pen and with RS232C interface.
DP – USB: DP Series Tablet with Cordless or Corded Pressure-Sensitive Pen
•
and with USB interface. A Cordless Mouse may optinally be included for
larger-sized Tablets.
KD – RS232: KD Series Keyboard with Cordless or Corded
•
Pressure-sensitive Pen and with RS232C interface.
KD – USB: KD Series Keyboard with Cordless or Corded Pressure-sensitive
•
Pen and with USB interface.
KP – RS232: KP Series Keyboard with Corded Pressure-sensitive Pen and
•
with RS232C interface.
KP – USB: KP Series Keyboard with Corded Pressure-sensitive Pen and
•
with USB interface.
KW – RS232: KW Series Keyboard with Cordless Pressure-sensitive Pen
•
and with RS232C interface.
KW – USB: KW Series Keyboard with Cordless Pressure-sensitive Pen and
•
with USB interface.
PP – RS232: PP Series Tablet with Corded Pressure-Sensitive Pen and with
•
RS232C interface.
WP – USB: WP Series Tablet with Cordless Pressure-Sensitive Pen and with
•
USB interface. A Cordless Mouse may optinally be included for
larger-sized Tablets.
WP – RS232: WP Series Tablet with Cordless Pressure-Sensitive Pen and
•
with RS232C interface.
Description of Packed Items
The following is a description of items that may be included in a product package. The
specific items that are included in various models are described in packing list tables.
Application CD: One or more CD’s containing bundled application software
•
Built-in Plate: A Tablet Plate that is built into the keyboard as an integral
•
part, and not detachable
Cordless Pen: A stylus pen working with a Plate without a connecting cable
•
Corded Pen: A stylus pen working with a Plate connected with a cable
•
Cordless Mouse: A device without cord that functions as a mouse on the
•
Page 6

Tablet Plate
Driver Disc: A CD containing Driver Program, Pen Utilities and User’s
•
Manual (this manual)
Keyboard RS232: A keyboard connected through a split data cable with a
•
keyboard connector and an RS232C connector
Keyboard USB: A keyboard connected through a data cable with a USB
•
connector
Pen Holder: A holder for a Cordless or Corded Pen
•
Plate RS232: A Tablet Plate connected through a split data cable with an
•
RS-232C Connector and two keyboard connectors
Plate USB: A Tablet Plate connected through a data cable with a USB
•
Connector
System Requirements
IBM PC or compatible with Intel 80486 or equivalent or above
•
Microsoft Windows 95, 98, ME, NT, 2000 or XP for tablet driver support
•
At least 64MB of hard disk space for Driver and Pen Utilities installation
•
At least 16MB of RAM (64MB recommended)
•
For Pressure Sensitivity: Microsoft Windows 95, 98, ME, NT, 2000 or XP
•
(supported through a Wintab-compatible interface)
For Annotate for Word: Pentium II 233 MHz or equivalent and above, at
•
least 64MB of RAM, and Microsoft Word in Office 97, Office 2000 or
Office XP
For RS232C Interface: An available RS232C port (also known as serial
•
port or COM port) with associated available IRQ
For USB Interface: A USB port and Windows 98, ME, 2000 or XP
•
Note: At most one Pen Device may be attached to a PC at one time
Parts of a Pen Device
The key parts of a Pen Device are Pen, Tablet Plate and an optional Cordless
Mouse. Tablet Plate may be stand-alone or be embedded in another device such as a
keyboard; and the Pen may be connected to Tablet Plate with a cord (corded), or be free
from it (cordless). The figure below uses a Pen Tablet with USB interface as an
example to show the key parts of a Pen Device.
Page 7
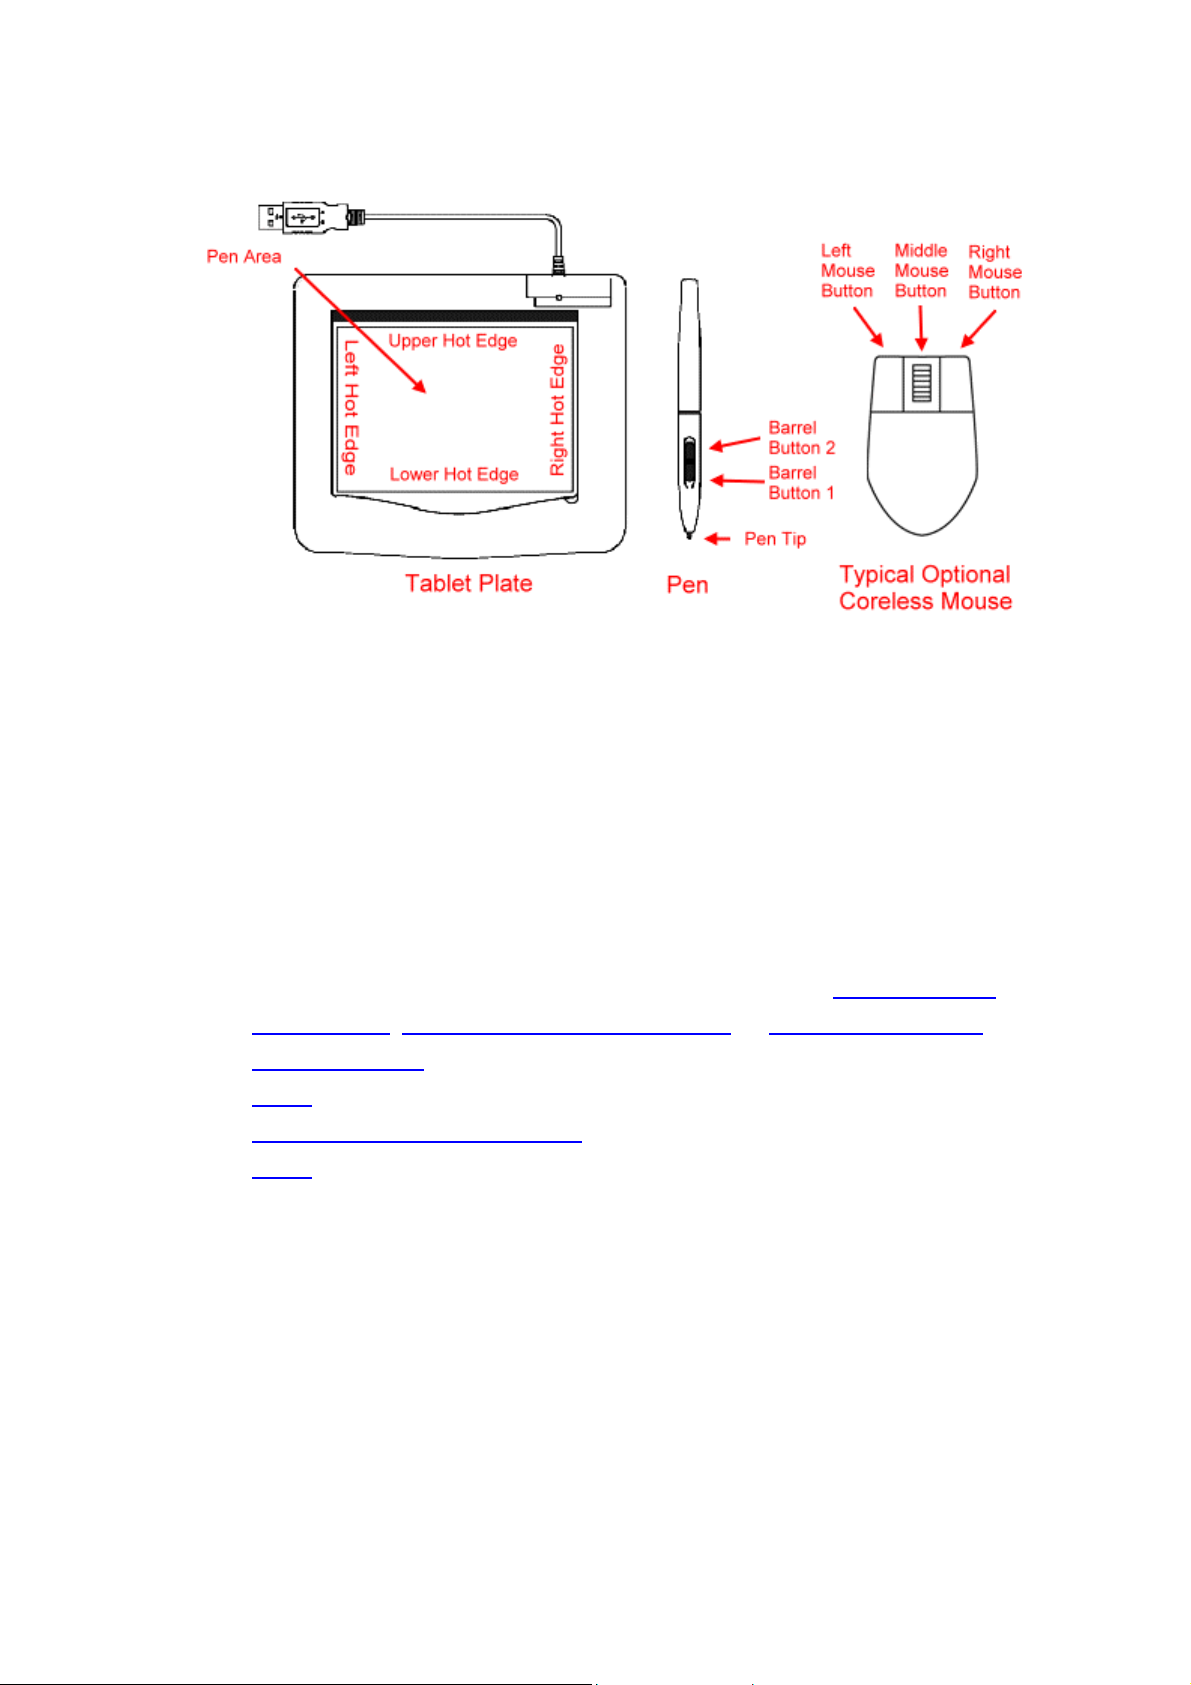
Figure 1 Parts of a Pen Device
Note: The optional Cordless Mouse requires a Pen Tablet with USB Interface.
Installing Hardware
To install the Pen Device,
1. Attach the hardware to your computer according to its type (Pen Device with
USB Interface, Pen Tablet with RS232C Interface, or Tablet Keyboard with
RS232C Interface),
2. Verify that hardware is installed properly,
3. Install the Driver and Pen Utilities, and
4. Verify that the pen device as installed functions properly.
5. Install optional Application Software according to its own instructions (not
included in this manual). Most Application Software is installed by running
its Setup program.
Installing Pen Device with USB Interface
To attach the Pen Device with USB interface to your computer, first locate an available
USB Receptacle on the computer, usually on the back panel, on the monitor, or on the
keyboard. Then, plug the USB Connector into the Receptacle, in a way similar to the
Page 8

figures shown below. On a computer system that fully supports USB interface, there is
no need to turn off the power, nor restart the operating system.
The Pen Device may be either a Pen Tablet or a Tablet Keyboard.
When the system detects the presence of a USB Pen Device, it will attempt to look for its
driver. Please select Cancel or press the escape key (marked Esc) to get out of it, and
start the Setup program on the Driver Disc to install the Driver and Pen Utilities.
If a USB Pen Device has been installed before, and the driver has not been uninstalled,
the operating system will automatically find the installed driver when you re-attach a Pen
Device, and you need not run the Setup program again unless you wish to upgrade Driver
Program.
After the Driver and Pen Utilities is installed, please verify that the Pen Device functions
properly.
The optional Cordless Mouse needs no special instllation, and will start to function
normally as soon as Pen does.
Page 9
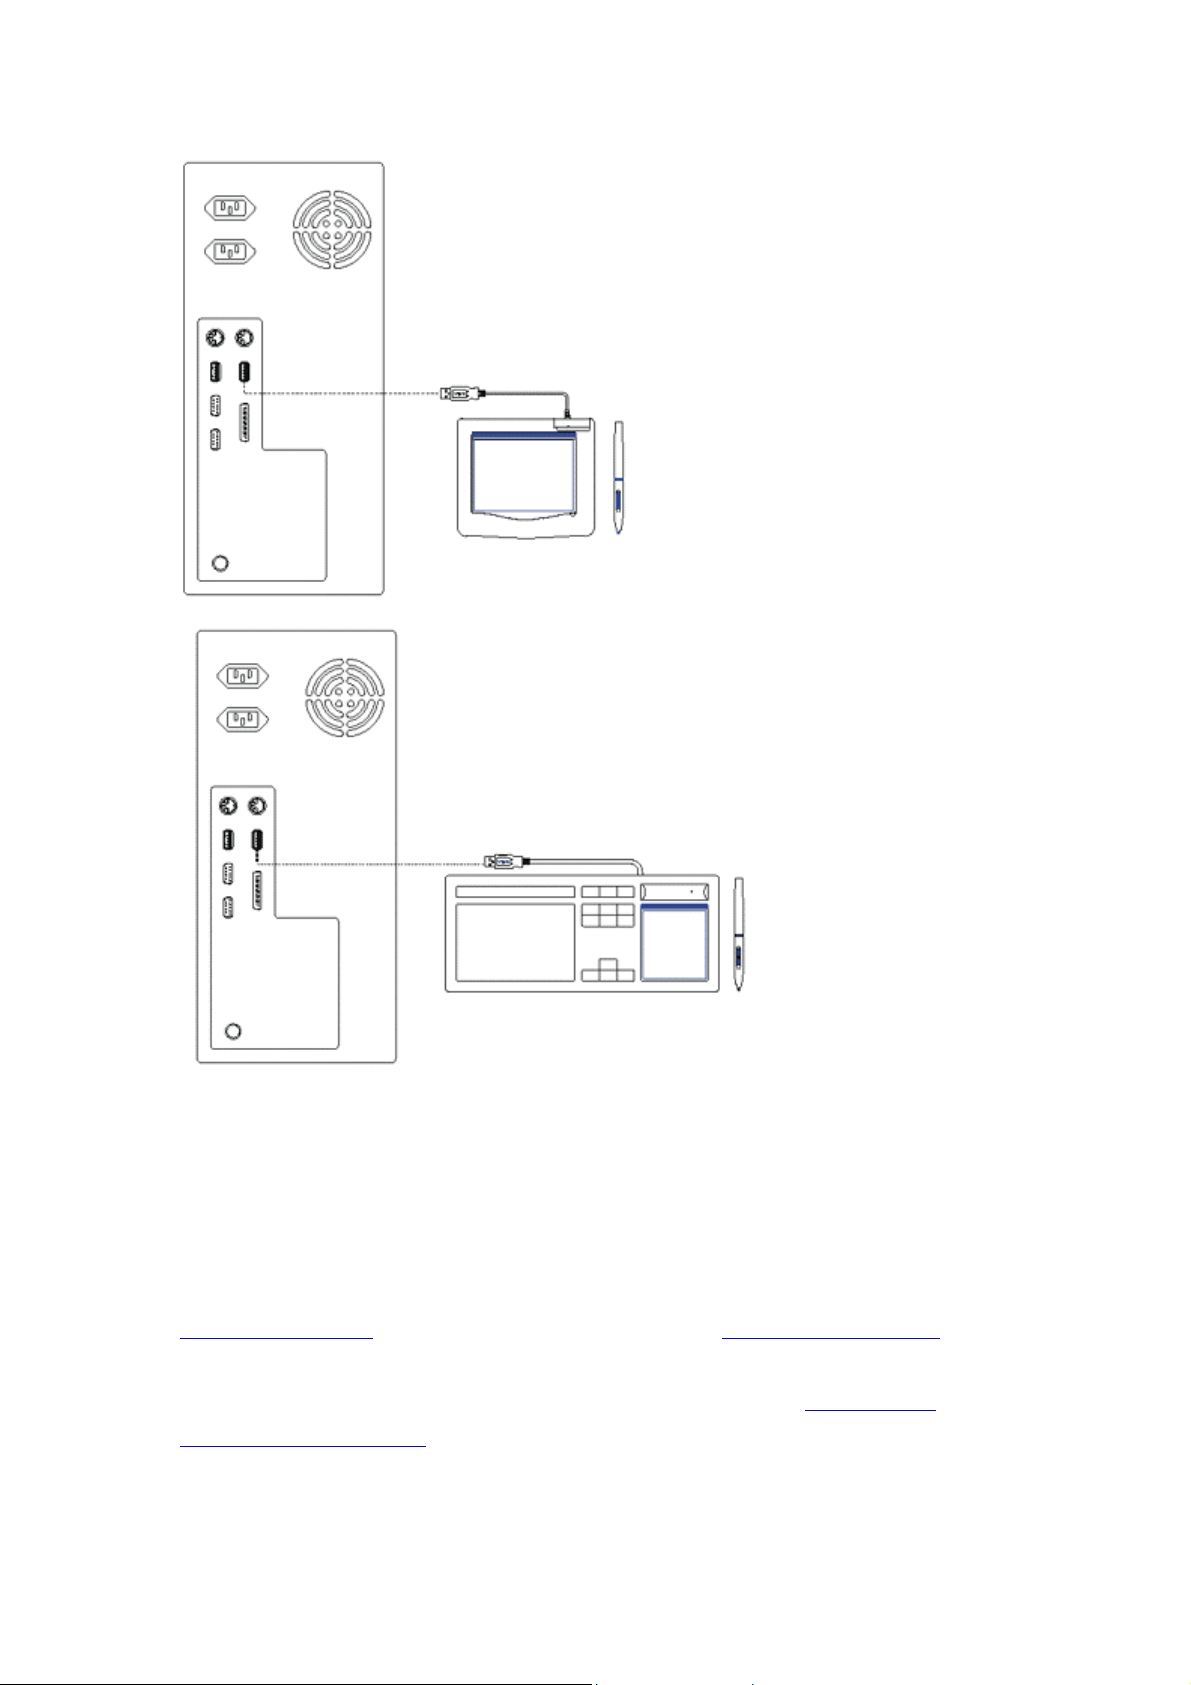
Figure 2 Attaching a USB Pen Device to PC
Installing Pen Tablet with RS232C Interface
Before attempting to install the Pen Tablet on your computer, please check that the
system requirements are all met, and that all items listed in Pen Tablet Packing List are
present. This section describes the installation procedure for Pen Tablet with RS232C
Interface. If you have a Pen Device with USB interface, please see Installing Pen
Device with USB Interface.
Page 10
You attach the Pen Tablet to the computer by inserting the Pen Tablet’s Keyboard
Connectors between the keyboard and the computer, and by connecting the Pen Tablet’s
RS232C Connector to an available COM (serial) port. The procedure is described
below.
1. Shut down Windows and turn off the power of your PC.
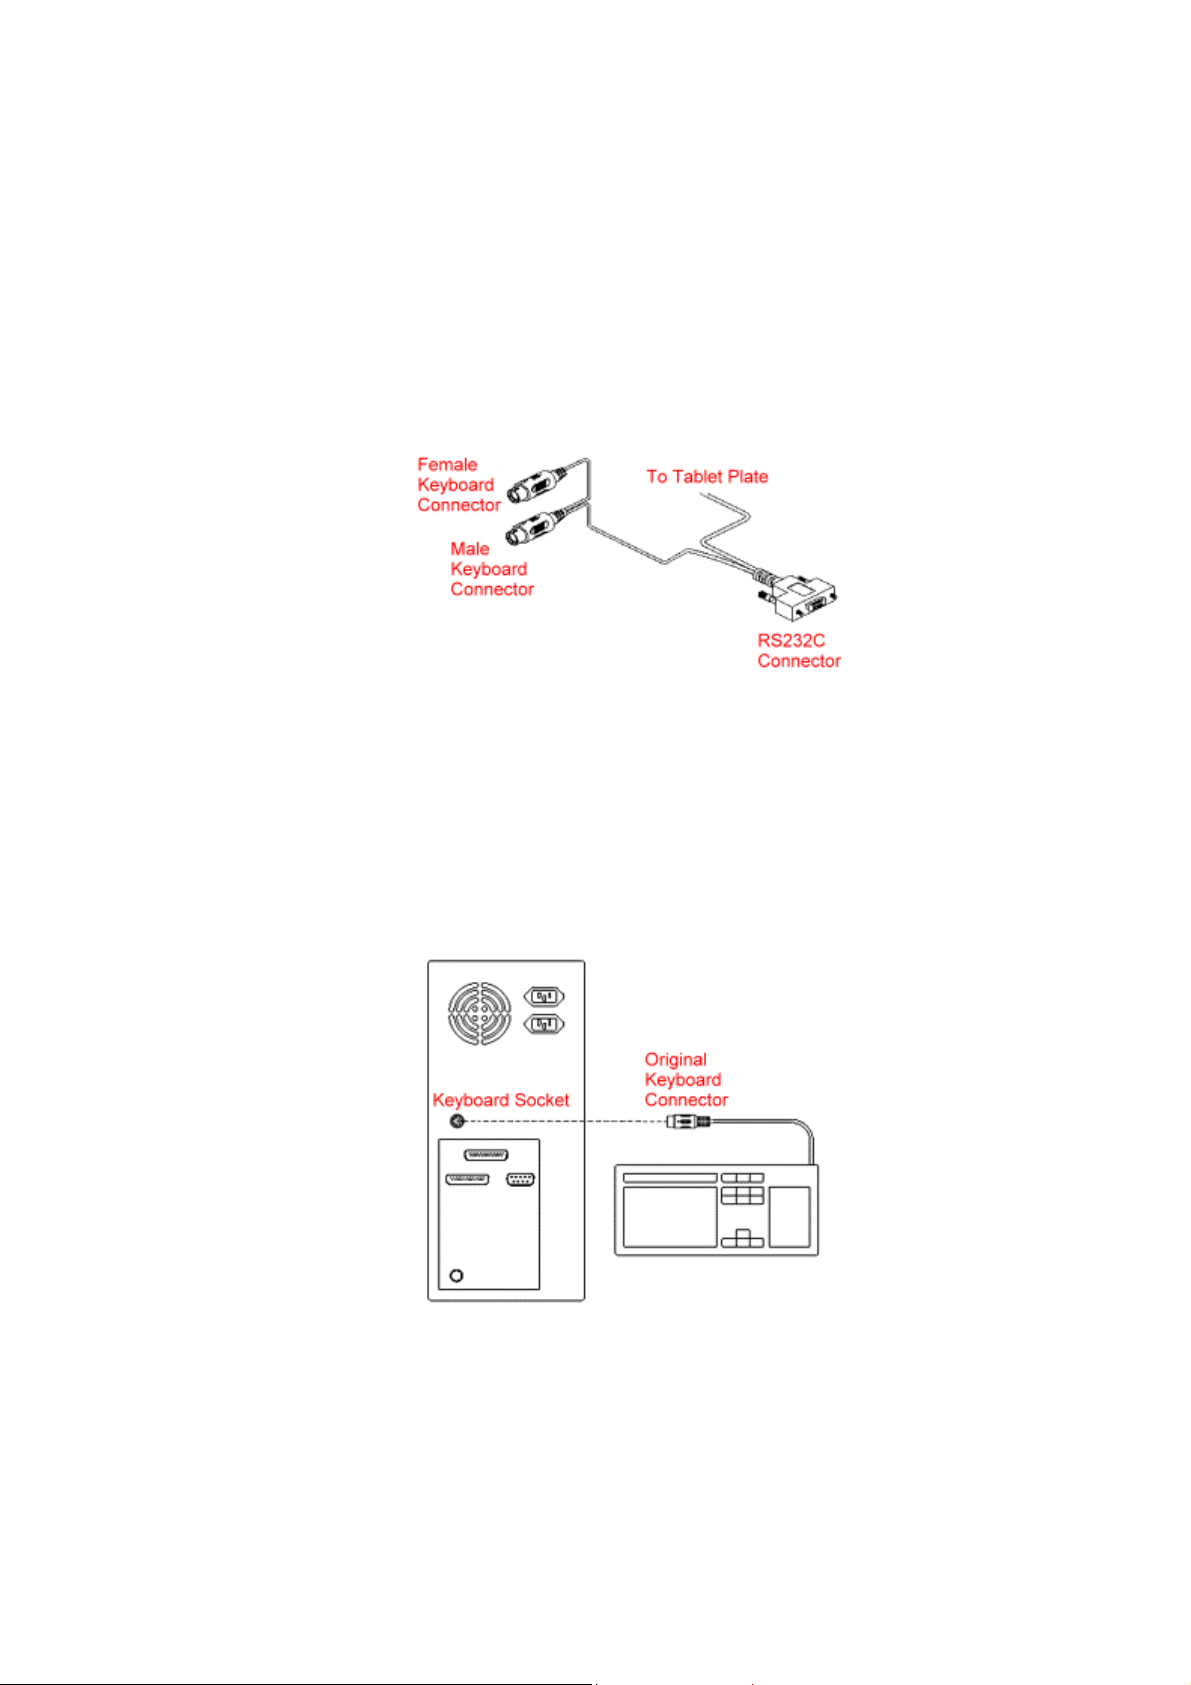
2. Examine the connecting parts of the Pen Tablet.
Figure 3 Parts of the Pen Tablet for connecting to the PC
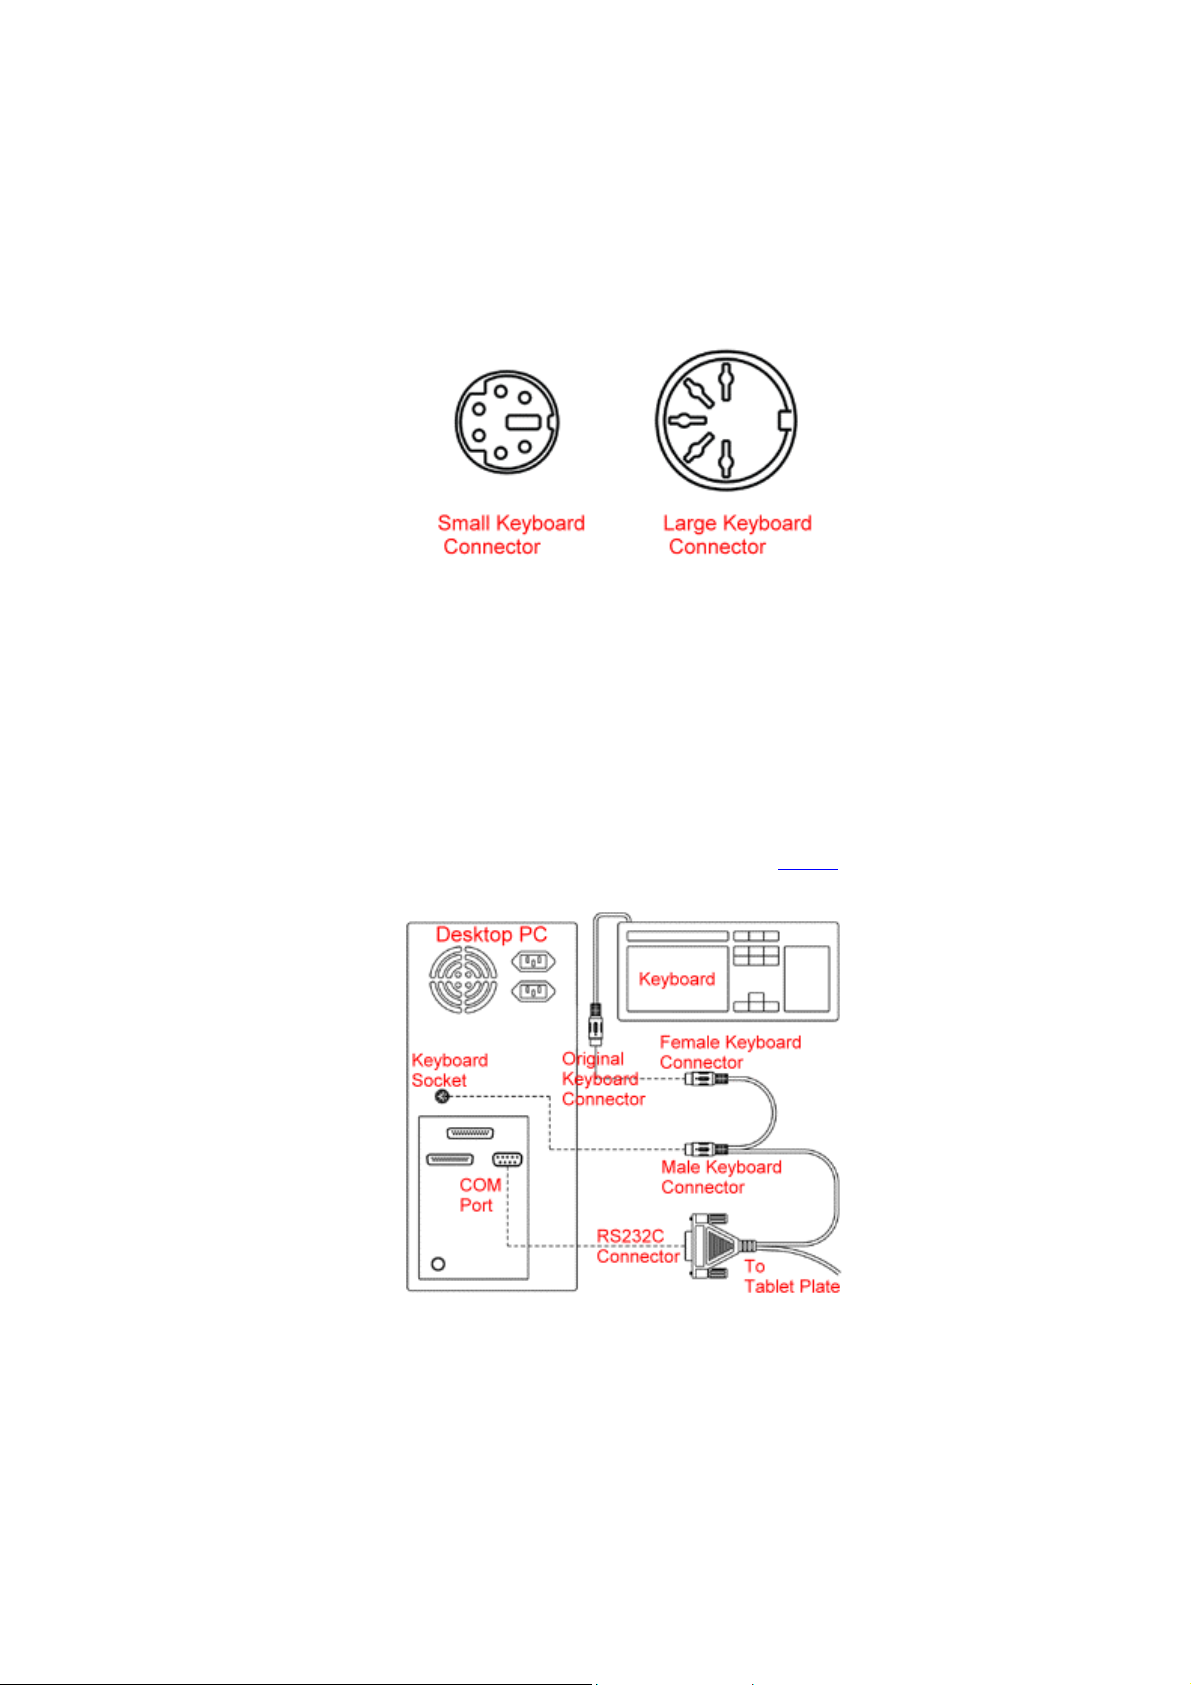
3. Locate where the Original Keyboard Connector attaches to the computer. In
the figure 4 below, we assume it is in the back of a desktop PC. Examine the
size of the keyboard connector (see figure 5 below).
Figure 4 Connection of the keyboard to a desktop PC before installing the Pen
Tablet
Detach the Original Keyboard Connector from the Keyboard
Socket, and remember the location of the Keyboard Socket so
you can find it later. Examine the connector and try to match
Page 11
one of the pictures in the figure below. If it matches Small
Connector, go to the next step. Otherwise, you need to find
two Keyboard Acaptors (not included) so the connectors will
match.
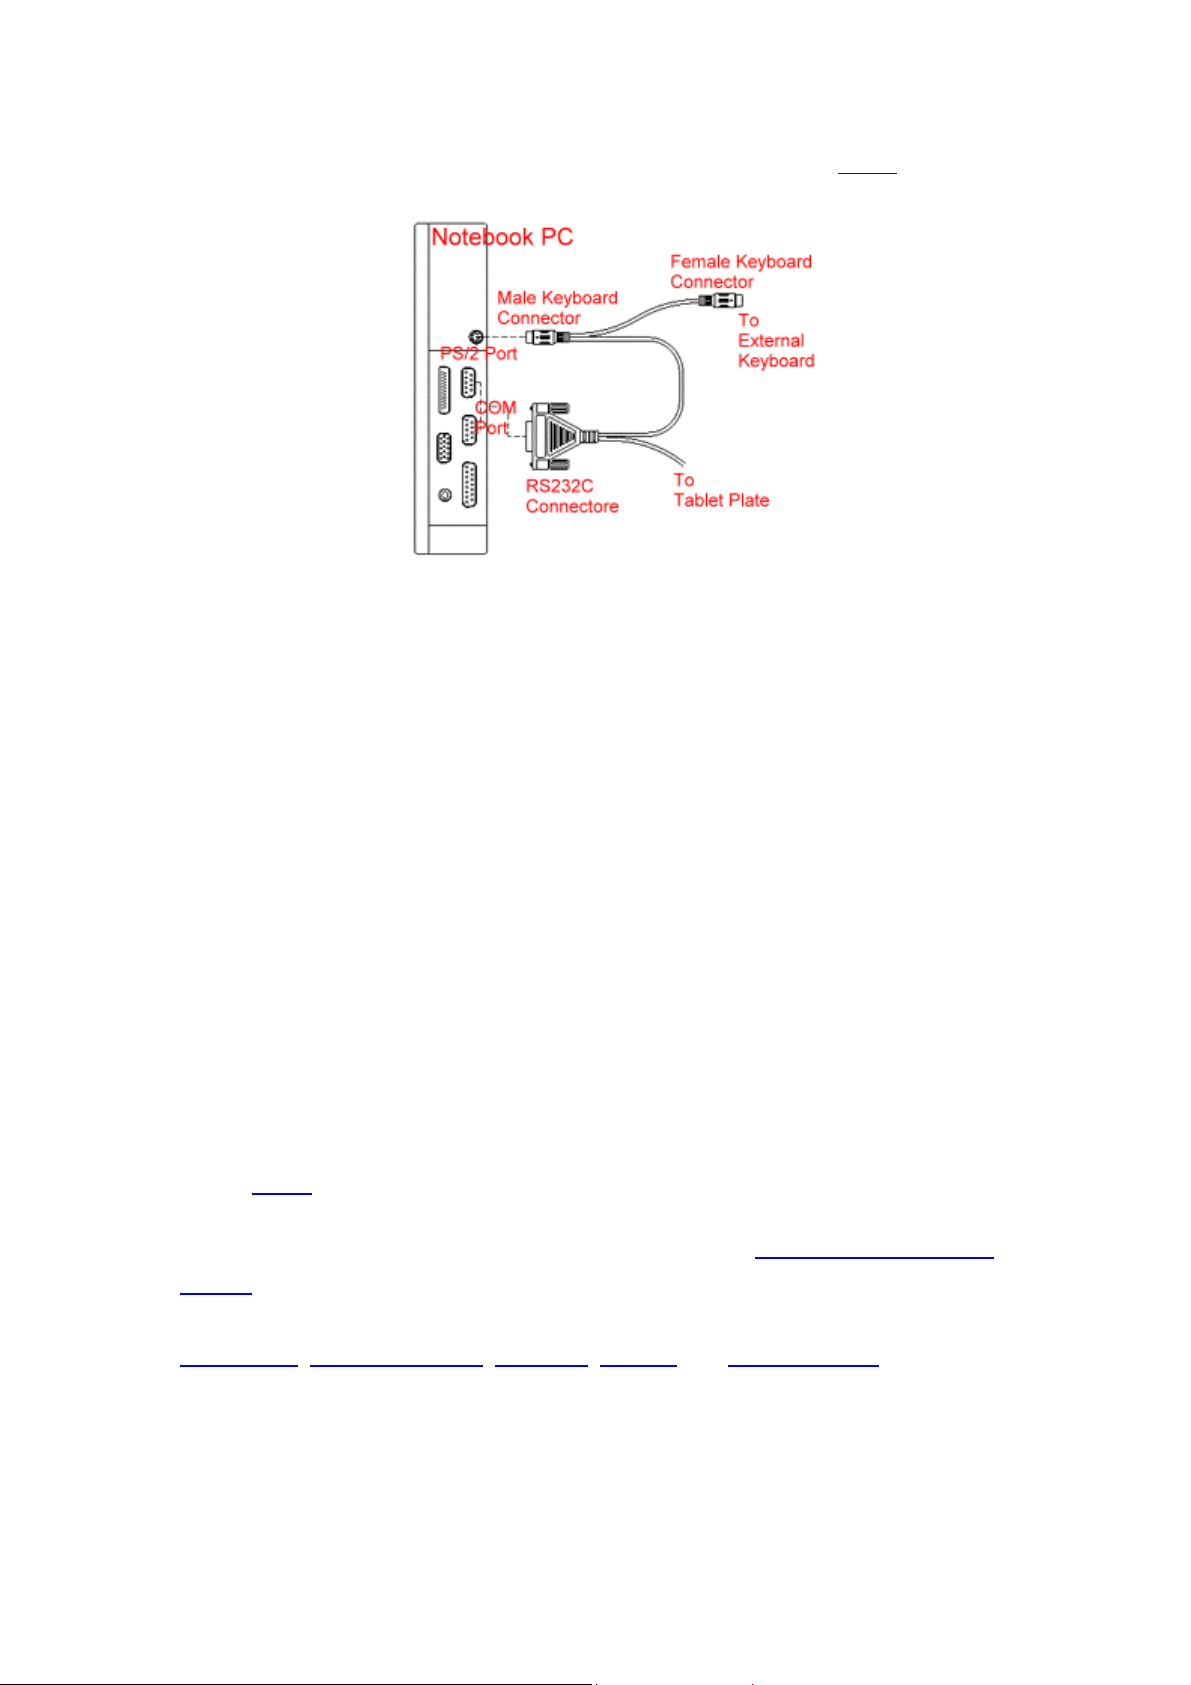
Figure 5 Identifying the Keyboard Connector
4. If your keyboard has a small (PS/2) connector (see figure above), connect the
Original Keyboard Connector to the Female Keyboard Connector (the one
connected with a single data cable). Then, connect the Male Keyboard
Connector (the one with a split data cable) to the PC at the Keyboard Socket
to which the keyboard was originally attached. Go to Step 6.
Figure 6 How the Pen Tablet is attached to a desktop PC with a PS/2 keyboard
5. If you have a notebook PC, connect the Male Keyboard Connector (the one
with a split data cable) to the PS/2 Port. If there is an external keyboard
(assuming it uses a PS/2 connector), and you wish to keep it, you should then
attach the Original Keyboard Connector to the Female Keyboard Connector
Page 12
(the one with a single data cable). See figure below. Go to Step 6.
Figure 7 How the Pen Tablet is attached to a notebook PC
6. Take the 9-pin RS-232C Connector running from Tablet Plate and insert it
into COM1 port of the computer. If COM1 is in use, for example, by a
mouse, you may plug into COM2 port instead. In this case, since many
COM2 ports require a 25-pin connector, you will need to find a
9-pin-to-25-pin adaptor (not included). Also, if your computer has a built-in
modem using one of COM1, COM2, COM3, and COM4 ports, please seek
help from a professional to ensure that the Pen Tablet can indeed use an
apparently unused serial port. A built-in modem may use up a COM port
which is shared by an outside COM port socket. The Pen Tablet requires a
free COM port to operate, and it can co-exist with a mouse and/or a modem
connected to a different COM port not in conflict with the port used by the
Pen Tablet. If the mouse uses a PS/2 port, it will not conflict with any COM
port.
7. Turn power on and wait for Windows to start up.
8. Verify that the Pen Tablet hardware functions properly.
The hardware installation is now complete. Please proceed to install the Driver and Pen
Utilities that provides pointing device function and Pressure Sensitivity (through a
Wintab-compatible interface), plus additional pen functions with Pen Utilities such as
Annotate All, Annotate for Word, PenSigner, PenMail
, and
PenCommander.
Installing Tablet Keyboard with RS232C Interface
Page 13

Before attempting to install the Tablet Keyboard on your computer, please ch eck that the
System Requirements are all met, and that all items listed in Tablet Keyboard Packing
List are present.
You attach the Tablet Keyboard to the computer by connecting the RS-232C Connector
to an available COM (serial) port and connecting the Keyboard Connector to the
Keyboard Socket on your computer. The procedure is described below.
1. Shut down Windows and turn off the power of your PC.
2. Remove the original keyboard, if any, from your PC, and note where the
Keyboard Socket is.
3. Examine the parts of the Tablet Keyboard, as shown in Figure below.
Figure 8 Attaching the Tablet Keyboard to the PC
4. Connect the Keyboard Connector to the Keyboard Socket. You will need to
find an adaptor (not included) if the size of the Keyboard Connector does not
fit that of the Keyboard Socket, similar to what is shown in Figure 5.
5. Take the 9-pin RS-232C Connector running from Tablet Plate and insert it
into COM1 port of the computer. If COM1 is in use, for example, by a
mouse, you may plug into COM2 port instead. In this case, since most
COM2 ports require a 25-pin connector, you will need to find a
9-pin-to-25-pin adaptor (not included). Also, if your computer has a built-in
modem using one of COM1, COM2, COM3, and COM4 ports, please seek
help from a professional to ensure that the Tablet Keyboard can indeed use
an apparently unused serial port. A built-in modem may use up a COM port
which is shared by an outside COM port socket. The Tablet Keyboard
requires a free COM port to operate, and it can co-exist with a mouse and/or
Page 14

a modem connected to a different COM port not in conflict with the port
used by the Tablet Keyboard. If the mouse uses a PS/2 port, it will not
conflict with any COM port.
6. Turn power on and wait for Windows to start up.
7. Verify
The hardware installation is now complete. Please proceed to installing Driver and Pen
Utilities that provides pointing device function and Pressure Sensitivity (through a
Wintab-compatible interface), plus additional pen functions with Pen Utilities such as
Annotate All, Annotate for Word, PenSigner, PenMail
that the Tablet Keyboard hardware functions properly.
, and
PenCommander
.
Installing Driver and Pen Utilities
To install Driver and Pen Utilities on Windows system other than Windows 3.1, we
recommend that you follow the procedure below, and do not rely on the Plug and Play
feature. For Windows 3.1 system, please refer to the section
on Windows 3.1
on DOS.
. For DOS system, please refer to the section
Installing Driver and Pen Utilities on Windows
Installing Driver Program
Installing Driver Program
95/98/ME/NT/2000/XP
1. Attach the Pen Device to your computer as described before and turn on
power if it was turned off. When Windows starts, it may display a New
Hardware Found dialog. If so, choose Cancel to get out of it.
2. Insert the Driver Disc into the CD-ROM drive. Assume this drive to be “E”.
3. Select "Start" at the lower left corner of the screen and select "Run".
4. Type in "E:\setup", and press Enter key to initiate the Setup Program.
5. You will be offered a chance to change the directory where the Driver and
Pen Utilities will be copied. You may also select or deselect the installation
of some of Pen Utilities and/or online User's Manual. Change it if you wish
and select OK to continue.
Page 15

Figure 9 Driver Setup dialog
Note: Annotate for Word will function only if Microsoft Word is properly
installed. If you do not have Word installed when you install the Driver and Pen
Utilities, you may install Pen Utilities later, selecting only Annotate for Word,
after you install Word.
6. The Setup Program will then install the Driver and Pen Utilities per your
instruction. Note: Certain Pen Utilities may not function properly in DOS
window.
7. When the installation is complete, you will see a dialog box indicating it is
about to restart the system. Choose "OK" to continue.
8. After the system is restarted, please check to ensure that both the hardware
and Tablet Driver are functioning properly by following the procedure
described in Verifying Overall Installation.
When both the hardware and software are installed properly, moving the Pen over
Tablet Plate will cause the cursor to move on the screen correspondingly. The
position of Pen Tip on Tablet Plate corresponds directly with the position of the
cursor on the screen. For example, if Pen Tip is at the center of Pen Area, the
cursor will also be at the center of the screen.
You may use the Pen Device as a pointing device, and, with application support, you
may also use it to draw pictures in a way similar to using a soft-tipped pen such as a
brush, or a hard-tipped pen such as a ballpoint pen.
Page 16

Automatic Driver Installation on Windows
95/98/ME/2000/XP
The Pen Device is a Plug & Play device. That is, after the Pen Device is attached to the
PC properly for the first time, it would be detected automatically as new hardware by
Windows 95/98/ME/2000/XP when Windows becomes active. Windows
95/98/ME/2000/XP will then seek the Tablet Driver, and, when found, will install the
Tablet Driver automatically upon your confirmation. However, due to the way Plug &
Play is implemented in Windows, many people find this process troublesome on some
versions of Windows and certain brands of PC. In addition, the Plug & Play process will
install only the Tablet Driver, and you still need to run the Setup program if you want to
install Pen Utilities.
Therefore, we recommend that you choose “Cancel” at the “New Hardware Found”
dialog, so as NOT to use this feature.
Installing Driver Program on Windows 3.1
To install the Driver Program on Windows 3.1, follow the procedure below. Note: Only
mouse functions are supported on Windows 3.1. Specifically, neither Pressure
Sensitivity nor any of the Pen Utilities are supported.
1. Attach the Pen Device to your computer as described before and turn on
power if necessary. Make sure that the Program Manager is displayed.
2. Insert the Driver Disc into the CD-ROM drive. Assume this drive to be “E”.
3. Go to the File menu in the Program Manager, choose the Run command, and
then press the Enter key.
4. Type in "E:\setup", and press Enter key to initiate the Setup Program.
5. You will be offered a chance to change the directory where the Driver
Program will be copied. Change it if you wish and select OK to
continue. See Figure 9.
6. The Setup Program will then install the Tablet Driver.
7. When the installation is complete, you will see a dialog box indicating it is
about to restart the system. Choose "OK" to continue.
8. After the system is restarted, please check to ensure that both the hardware
and Tablet Driver are functioning properly by following the procedure
described in Verifying Overall Installation.
Page 17

9. The installation of Driver Program is now complete. Start your favorite
graphic or word-processing application and begin to enjoy your Pen Device.
When both the hardware and software are installed properly, moving the Pen over Tablet
Plate will cause the cursor to move on the screen correspondingly. The position of Pen
Tip on Tablet Plate corresponds directly with the position of the cursor on the
screen. For example, if Pen Tip is at the center of Pen Area, the cursor will also be at
the center of the screen.
You may use the Pen Device as a pointing device, and, with application support, you may
also use it to draw pictures in a way similar to using a hard-tipped pen such as a ballpoint
pen.
Installing Driver Program on DOS
Please copy the file UCTABLET.EXE found on the Driver Disc to your hard disk drive,
and run this program to start using the Pen Device on your system. You may also add
this command to AUTOEXEC.BAT so the Tablet Driver is automatically started every
time you start the system. Make sure the Pen Device hardware has been attached to your
computer properly by following the procedure described in the section
Hardware Installation
Note: Only mouse functions are supported on DOS. Specifically, neither pressure
sensitivity nor any of the Pen Utilities are supported.
When both the hardware and software are installed properly, moving the Pen over Tablet
Plate will cause the cursor to move on the screen correspondingly. The position of Pen
Tip on Tablet Plate corresponds directly with the position of the cursor on the
screen. For example, if Pen Tip is at the center of Pen Area, the cursor will also be at
the center of the screen.
You may use the Pen Device as a pointing device, and, with application support, you may
also use it to draw pictures in a way similar to using a hard-tipped pen such as a ballpoint
pen.
.
Verifying
Note: Do not run UCTABLET.EXE on Windows systems. Mouse functions are
supported in DOS mode running under Windows without running UCTABLET.EXE.
Page 18

Verifying Hardware Installation
Verify that the Pen Device hardware functions properly by following the procedure
described in this section.
The green LED light is the key indicator for hardware verification. Watch it as you go
through the test procedure. If the light does not come on at all, see the following table
for suggested action to take.
If the LED light does not come on...
Possible Cause Suggested Corrective Action
Cable connections are loose or incorrect, so that the
Pen device does not get power.
The Cordless Pen or Mouse has gone to "sleep" to
conserve its battery power.
The battery in the Cordless Pen or Mouse is out. Change the battery.
The LED light or some other part of the Pen Device is
defective.
Go through the installation procedure again and correct
the connections.
Tap the Pen on any surface or press the Left Button to
"wake it up".
Go to the place where you bought your Pen Device and
seek help there.
Hardware Verification Procedure
1. The green LED light on Tablet Plate will come on briefly as soon as
Tablet Plate receives power, and will stay off as long as Pen Tip or
Mouse is not above Pen Area in Tablet Plate, or it is too high above
the Plate.
2. Tap the Cordless Pen on any surface or press the Left Button of the
Mouse to "wake it up". You need not do this for a Corded Pen.
3. The LED light will flash slowly when Pen Tip is directly above Pen
Area of Tablet Plate and is low enough to be detected by Tablet Plate,
or when the Cordless Mouse rests in the Pen Area.
4. For as long as you press a Barrel Button on the body of the Pen or
any of the Mouse Buttons, the LED light will be on.
5. When you press Pen Tip against Tablet Plate anywhere in Pen Area,
or press the Left Mouse Button while the Mouse is in Pen Area, the
light will also be on as long as the Tip or the Button remains
Page 19

pressed. Note that the position and size of Pen Area may vary if you
have modified it on The Scope Configuration Page.
6. However, before Tablet Driver is properly installed, moving Pen Tip
or the Mouse over Tablet Plate will not cause the cursor on the screen
to move.
Changing the Battery
After you have used the Pen Device normally for a while, and the Device begins to
work sluggishly, or does not work at all, the battery may be running low or out.
You may follow the steps below to change the battery in the Pen.
1. Gently slide off the end cap of the Pen. Do not turn, as there
are no threads.
2. Insert a new battery (1.5V, size AAA) with the end marked
with minus (-) sign facing Pen Tip.
3. Slide the end cap back in.
Verifying Overall Installation
After both hardware and Driver and Pen Utilities are installed, you may follow the
procedures in this section to verify that both the Tablet hardware and Tablet Driver are
functioning properly. You may also follow these procedures at any time when you
suspect the system may be malfunctioning.
Verifying General Functionality
1. When you move Pen Tip or Mouse over Tablet Plate, the cursor will move
over the screen accordingly. However, the Pen and the Mouse behave
differently. The Pen acts in what is known as Absolute Mode. That is,
when you put the Pen at the upper left corner of the Plate, the cursor will be
at the upper left corner of the screen; when you move the Pen to the center of
Page 20

Tablet Plate, the cursor will also move to the center of the screen.
On the other hand, the Mouse acts in a way similar to a regular mouse,
also known as Relative Mode. That is, when you move the mouse in Pen
Area, the cursor on the screen moves relative to its position when the current
movement started. You may lift the mouse off the Tablet Plate, put it down
to a different position, and move it again, while the cursor will move
accordingly from its position when the mouse was lifted
2. You should see a small Tablet Icon (
located at the lower right corner of the screen.
) in the system Task Bar, usually
Verifying Pressure Sensitivity
These are tips to verify that pressure sensitivity functions properly. In most cases, an
application program such as PhotoImpact or Painter controls the exact behavior of the
Pen. Sometimes the pressure sensitivity might even be turned off inadvertently by the
application program. The steps described below help ensure that the Pen Device
functions according to specifications.
1. You know that pressure sensitivity is supported if the Pressure Configuration
Page is present after you tap on the Tablet Icon ( ) on the system Task Bar,
usually located at the lower right corner of the screen (See the section
Configuring the Pen Device).
2. To verify the function further, select the Pressure Configuration Page and try
to draw a few lines in the Pressure Test area. Pressing harder at Pen Tip
should draw thicker lines, and pressing lightly would leave thinner trace in
the area. If this is not so, there might be a problem with the Pen, and you
should seek help from the store you bought the Tablet from. In addition,
both a number and a barometer will indicate the pressure level when you
press the Pen Tip. (Depending on the speed of your computer, drawing very
fast may leave a series of dots (filled circles) in the Test Area instead of a
solid line. This is normal).
3. Writing a few strokes on the PenSigner Program will also indicate clearly
whether pressure sensitivity functions properly. However, you need to set
the Trace Width to 6 pixels or more to make clear variation in the thickness
of trace. See description of Width Adjustment Slide.
Page 21

If a particular application does not seem to provide pressure sensitivity when the above
tests indicate otherwise, please verify also that the application has been installed and set
properly, and that the application does support Wintab interface. Some applications may
require you to explicitly turn on pressure sensitivity support, or it may limit the number
of pressure levels supported.
Note: The Cordless Mouse does not support pressure sensitivity.
Usage Tips
1. Tapping before You Use the Pen
Before you use a Cordless Pen, after you have not used it for several
minutes, tap the Pen on any surface to "wake" up the Cordless Pen. Or,
whenever the Pen seems not responding, tap it on any surface. This is
because a Cordless Pen would turn itself off to save energy afte r it has
not been used for several minutes. This action is not necessary for a
Corded Pen.
Similarly, for a Cordless Mouse to be used with a Pen Device, always
press the Left Mouse Button before attempting to use it.
2. Focusing on the Screen
When you write or draw with a Pen Device, try not to look at Tablet
Plate. Focus your eyes on the screen instead. After a little practice, you
will get more fun and higher efficiency because, with a pen, it is easier to
concentrate on the text or picture you are working on.
3. Double Tapping
For best results, when you double tap with a Pen (equivalent to double
click on a mouse), try to keep Pen Tip on the surface of Tablet Plate, or at
least try to lift Pen Tip as little as possible before the second tap. This
would reduce the deviation between the positions of the two taps.
4. Storing a Cordless Pen Properly
To store a Cordless Pen, make sure that the Tip does not touch
anything. Especially do not stand the Pen on a surface with the tip
Page 22

down. A constant, though small, pressure applied to the Pen Tip will
cause a constant drain on the battery inside. We recommend that you put
the Pen in the Pen Holder specially designed for this purpose, or store it
with the Pen Tip pointing upward, or lie it horizontally with the Pen Tip
free of any other objects.
Similarly for the Cordless Mouse, avoid pressing on ANY of the
buttons when it is not in use.
5. Scrolling and Panning with a Pen
When you are browsing a document or a Web page, it is especially
convenient to use a Pen. All you do is press and hold Barrel Button 1,
and hover the Pen over Pen Area, or move the Cordless Mouse while
pressing the Middle Mouse Button. With Microsoft Internet Explorer,
for instance, the Web page will scroll up and down, and left and right,
corresponding to your Pen or Mouse movement. The exact behavior
of Pen Scrolling function varies with the application program.
Notably, Microsoft Word supports only vertical scrolling, and
NetScape Navigator 4.5 does not support Pen Scrolling. See the
section Pen Scrolling for more details.
After you use Pen Scrolling without tapping or pressing the Left
Mouse Button for a few minutes, you may find the Cordless Pen or
Mouse stop functioning all in a sudden. Just tap on any surface or
press the Left Mouse Button to “wake up” the Pen or the Mouse.
6. Holding the Pen Vertically
When drawing pictures or signing your name, try to hold the pen
vertically for best results.
7. Using both a Pen and a Regular Mouse
In general, you may have both a Pen Tablet and a regular mouse
installed on the same computer, and you may switch between the two
devices at will. However, for a Pen Tablet with serial port interface, you
have to make sure that the two devices are not in conflict in the COM
port or IRQ they use. The easiest way to avoid this problem is to
connect the mouse to a PS/2 port, and the Pen Tablet to a COM port.
Page 23

Certain mouse drivers, notably those that come with certain Logitech
mouse models, would render a properly installed Pen Tablet with
serial port interface inoperative. If you wish to have both such a mouse
and the Pen Tablet operable at the same time, remove the non-standard
mouse driver and replace it with a standard mouse driver, such a s one
that comes with Windows system.
A Pen Tablet with USB interface does not conflict with another
mouse in these ways.
You may freely choose to use any one of the Pen, the Cordless Mouse
that comes with the Pen Device, and a regular mouse.
8. Using a Pen without a Regular Mouse
You may work with the Pen Device only, without a regular mouse at
all. When you remove a regular mouse with Com (serial) port
interface, make sure you also remove its driver completely. You
remove the mouse driver by selecting Start /Settings /Control Panel
/Device Manager, press the "+" sign to reveal the mouse driver, select
and remove it, and restart the computer. Be careful not to remove
the USB mouse driver that may exist with some models of Pen
Devices with USB interface. If you start with a computer not
equipped with a regular mouse, you should learn how to use the
keyboard for setup, using TAB, Enter, Escape, and other keys.
Pen Scrolling
Pen Scrolling
a document or an image by simply hovering the Pen over Tablet Plate without using the
scroll bar. Thus, scrolling becomes especially convenient for activities such as browsing
HTML documents on the Internet, examining images larger than the screen, panning a
spreadsheet on the computer, and so on. An example of
is a special function provided by the Tablet Driver to let you scroll through
Pen Scrolling
follows.
Page 24

Figure 10 An example of Pen Scrolling
Enabling Pen Scrolling
To enable
mouse command Middle Click. Let us call this button Scroll Button. We recommend
using Barrel Button 1, the button closer to Pen Tip, as Scroll Button. You may verify or
change this setting by calling out
through tapping on the Tablet Icon ( ) in the system Task Bar, usually located at the
lower right corner of the screen, or through the Control Panel.
Pen Scrolling requires Windows 95 OSR2 Edition or up, and also requires the support of
the application controlling the scrolling window. To find out if Pen Scrolling is supported,
try using it after making sure both the Tablet hardware and Tablet Driver have been
installed properly, and also Pen Scrolling has been enabled as described above.
Pen Scrolling
, make sure one of Barrel Buttons has been set to trigger the
the Button Configuration Page
of the Tablet Driver
Using Pen Scrolling
Page 25

To use
Pen Area without touching the Plate surface. As soon as you press Scroll Button, a Scroll
Mark such as , , or , will appear. Also, the cursor changes to Scroll Cursor,
looking something like . When you move Scroll Cursor away from the Scroll Mark,
the window showing the document will scroll in that direction, and the shape of Scroll
Cursor may also change to point to the direction it is moving, such as or . To
scroll faster, increase the distance between Scroll Cursor and Scroll Mark; to scroll at a
lower speed, decrease this distance. When you release Scroll Button, Scroll Mark
Pen Scrolling
, simply press and hold Scroll Button while moving the Pen over
disappears and
You may also
release it immediately. You will find that Scroll Mark will remain on the screen after
Scroll Button is released. Moving the Pen over Pen Area will cause the document to
scroll. Pressing Scroll Button again removes Scroll Mark and stops
Pen Scrolling
Pen Scroll
without holding Scroll Button if you press Scroll Button and
stops also.
Pen Scrolling
.
Variations in the Pen Scrolling Function
Pen Scrolling
WordPad on windows 98, Word, Excel, PowerPoint, and Access. Many other
applications also support Pen Scrolling, for example, Ulead PhotoImpact. You will find
that the behavior of
among Microsoft applications.
Some applications will allow you to scroll in all directions, while others will scroll only
up and down; still others will scroll smoothly, while some tend to be "jumpy". You may
works for most Microsoft applications, including Internet Explorer,
Pen Scrolling
varies somewhat from application to application, even
also find that some applications do not support
Netscape Navigator 4.5. Also, within an application,
contexts. For example,
Microsoft Word.
Given all the variations in
each application to get a better feel for this very useful function.
Pen Scrolling
Pen Scrolling
does not work with Help texts shown under
implementations, please experiment with it for
Pen Scrolling
Pen Scrolling
at all, for example,
Configuring the Pen Device
may not work in all
Page 26

You may configure the Pen Device by modifying the functions of Pen Tip and Barrel
Buttons, defining the application to launch when tapping on a hot cell, adjusting the size
and position of Pen Area, adjusting the feel of the Pen to heavier or lighter, and obtaining
other information about the device. You may also use these functions to verify that the
Pen Device is functioning properly.
You invoke the Configuration function by tapping with Pen Tip on the Tablet Icon ( )
on the system Task Bar, usually located at the lower right corner of the screen. You may
also invoke it by first tapping on Start Button at the lower left corner of the screen, and
selecting Settings then Control Panel, and finally double tapping on the Tablet Icon ( ).
Note: For best results, when you double tap with the Pen, try to keep Pen Tip close to the
surface of Tablet Plate, that is, try to lift Pen Tip as little as possible for the second
tap. This helps you tap on the same spot.
When you invoke the Configuration function, you will be presented with a dialog with a
number of configuration pages, as described below.
The Info Configuration Page
The Info Configuration Page displays version and other information about the product.
Page 27

Figure 11 A Sample Info Configuration Page
The Button Configuration Page
You use the Button Configuration Page to change the functions of Pen Tip and Barrel
Buttons, to set the speed of double tap with Pen Tip, and so on. This Page looks as
follows:
Page 28

Figure 12 The Button Configuration Page
Note: When you configure the Pen Tip and Barrel Buttons, the buttons of the
Cordless Mouse are also automatically configured. Namely, the Left Mouse Button
will take up the definition for the Pen Tip, the Middle Mouse Button for Barrel
Button 1, and the Right Mouse Button for Barrel Button 2.
Mode
•
Absolute: When you move the Pen over Pen Area on Tablet Plate, the cursor on
the screen moves instantly with it. In the Absolute Mode, the points in Pen Area
on Tablet Plate correspond directly in position to the points on the screen. Most
people prefer this mode when using a Pen Device.
Relative: In this rarely used mode, when you move the Pen over Tablet Plate, the
cursor moves relatively to the starting position when the moving stroke started, in
a way similar to using a mouse. To complete a stroke, either move the Pen
upward until the Plate no longer detects the Pen or take the Pen out of Pen Area.
This setting is not recommended for normal use.
Barrel Buttons
•
Page 29

The numerals 1 and 2 indicate where Barrel Button 1 and Barrel Button 2 are,
respectively, on the body (barrel) of the Pen.
Button Command
•
You may choose one of Pen Tip, Barrel Button 1, and Barrel Button 2, and set it
to one of the Mouse Commands on a three-button mouse.
Double Click Time
•
Move the Speed Slider toward "Slow" if you wish to allow yourself more time in
double tapping with Pen Tip; move the Speed Slider toward “Fast” if you wish
the reverse. This setting is the same as Double-click Speed on the page displayed
by selecting Start, Settings, Control Panel, Mouse, and Buttons. Changing the
speed in one place changes the other at the same time.
Default
•
You choose this option to restore all the settings on this Page to their respective
values when the Tablet Driver was first installed.
The Scope Configuration Page
You use the Scope Configuration Page to set the size and position of Pen Area on Tablet
Plate. Pen Area is the area on Tablet Plate where the Pen can be used to point and tap,
and to draw and write.
The cursor changes its shape when it is moved over the image indicating Pen Area on this
Page. When the cursor looks like a cross with arrowheads on each end ( ), you may
drag the entire area (press and hold while moving) to the desired position. You may also
drag the cursor to change the size of Pen Area when it looks like a double-headed arrow
( , , , or ). The other choices on the Page are as follows:
Page 30

Full Area
•
Figure 13 The Scope Configuration Page
Sets Pen Area to the largest possible size.
Screen Ratio
•
Sets Pen Area to be proportional to the screen size by reducing either the current
width or height of Pen Area.
Reserve Edges
•
Reduce Pen Area by reserving edges on the four sides with the indicated width.
Pen Area Dimensions
•
Indicates the current height and width of Pen Area. You may also type in new
values here to change them.
Pen Area Offset
•
Page 31
Indicates the horizontal and vertical distances of the upper left corner of Pen Area
from the upper left corner of the maximum Pen Area. You may also set their
values by typing in the numerical values here.
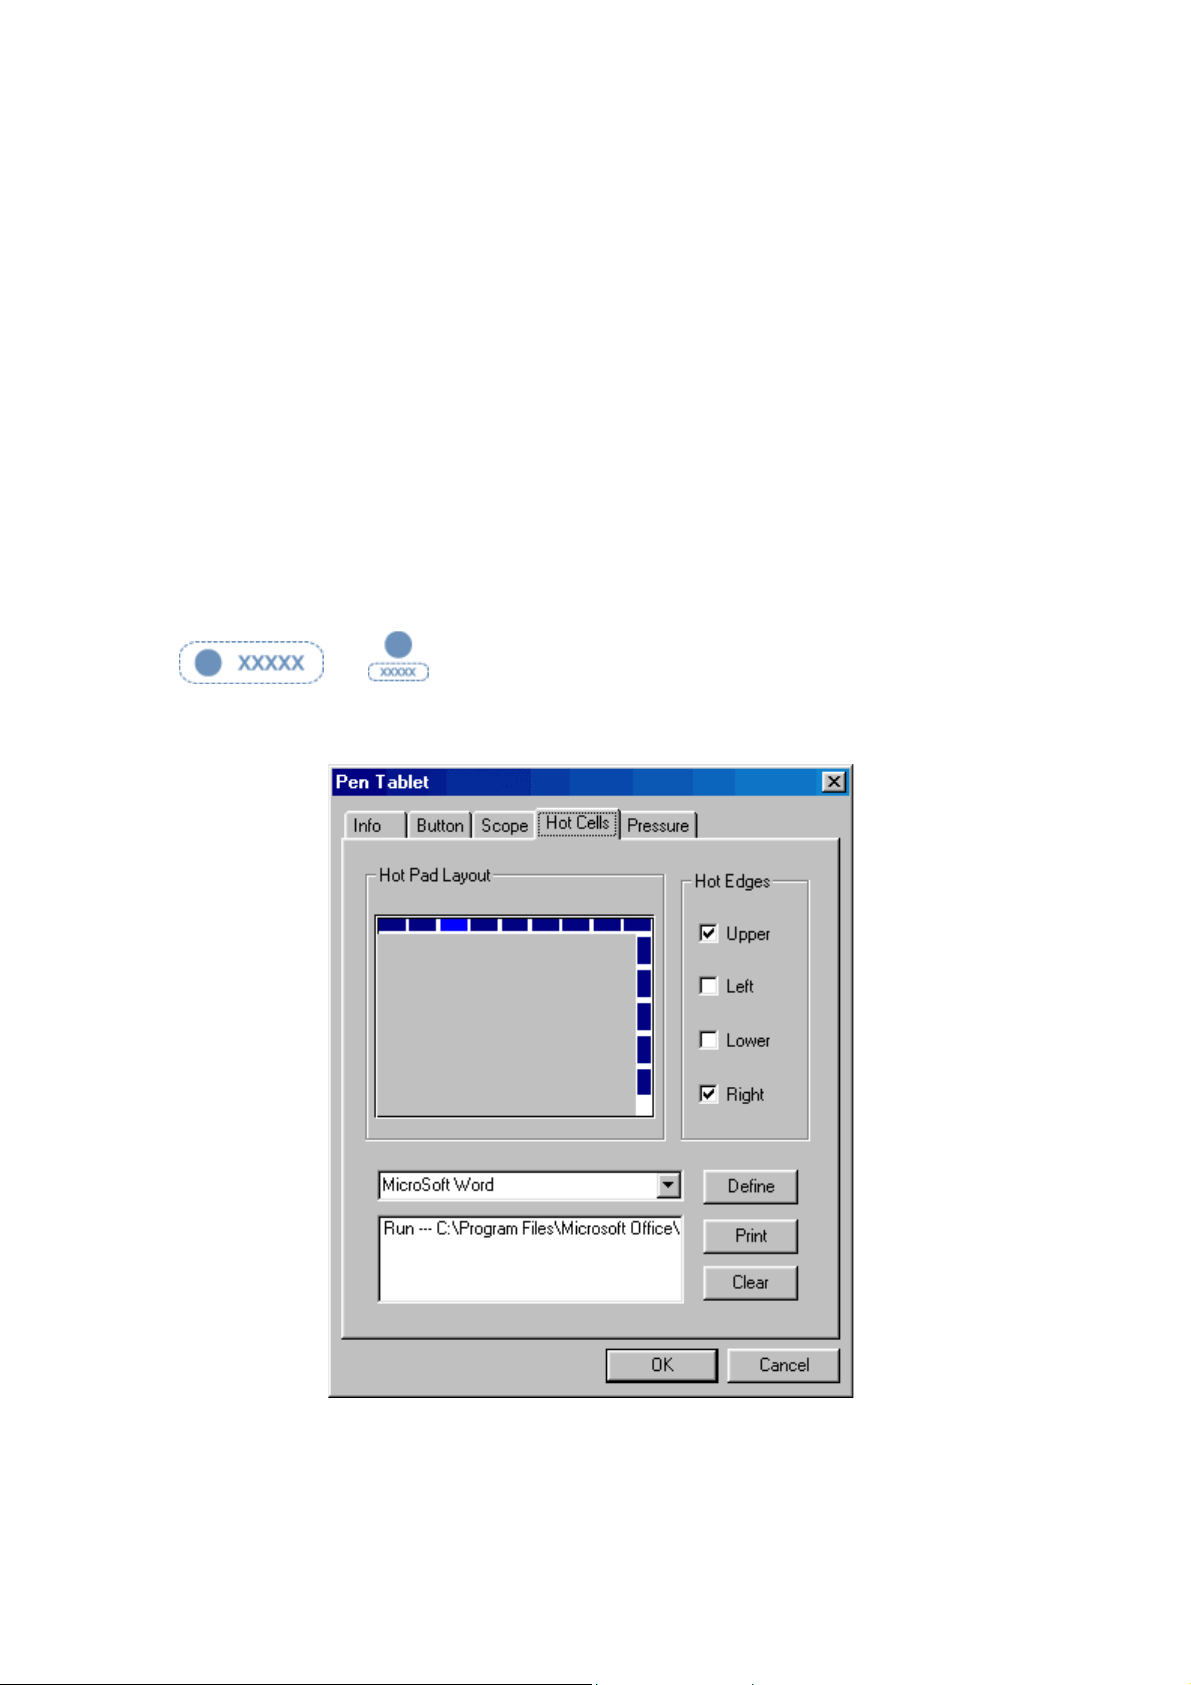
The Hot Cells Configuration Page
You use the Hot Cells Page to define a number of Hot Cells on Tablet Plate so that you
can trigger a pre-defined action by tapping on a Hot Cell. The Hot Cells are small areas
around Pen Area. You first reserve up to four Hot Edges surrounding Pen Area, and in
each Hot Edge you can assign actions to Hot Cells in it. In the figure below, the gray area
in Hot Pad Layout indicates the maximum Pen Area.
Note: If the protective cover over Tablet Plate has preprinted Hot Cell definitions, such as
and , the printed sheet with your modified definitions of Hot Cells
may not show clearly through the original preprinted protective sheet.
Hot Pad Layout
•
Figure 14 The Hot Cells Configuration Page
Page 32

This area indicates the current size of Pen Area, and each blue rectangle indicates
a Hot Cell. You can view and modify the contents of each Hot Cell by first
tapping on a rectangle.
Hot Edges
•
You can choose up to four Hot Edges around Pen Area to use Hot Cells. When a
Hot Edge is selected, the size of current Pen Area is reduced accordingly. If you
choose no Hot Edge at all, Hot Cells function is turned off.
Hot Cell Contents
•
The area beneath Hot Pad Layout shows the Label of the currently selected Hot
Cell and its Associated Action. In the figure above, the selected Hot Cell is the
left-most one in the top Hot Edge, its Label is "PenLauncher", and its Associated
Action is to run the indicated program. After you exit configuration mode,
tapping on the left-most Hot Cell in upper Hot Edge will start the PenLauncher
program.
Define
•
You tap on this button to define the action to be taken when the selected Hot Cell
is tapped. The Define Hot Cell pages are explained later.
Note: Some Hot Cells may be locked from modification when installed. The
Label and Associated Action of such Hot Cells cannot be changed, as indicated
by gray Define Button and gray Label.
Print
•
Tapping on this button will cause a picture of the currently defined Hot Pad
Layout to be printed on the system default printer. The printout is designed to be
inserted underneath the cover sheet over Tablet Plate to remind you of the actions
defined for the Hot Cells.
Clear
•
Tapping on this button will clear the definition of the selected Hot Cell, so that
no action will be taken when the Hot Cell is tapped later.
Define Hot Cell - Run
Page 33

On this page, you specify a program or a document to run when you tap on the Hot Cell.
•
Figure 15 Define Hot Cell - Run
Run
You may use the browse button on the right to select a file to run, or you may
type in a file name with complete path. The effect of tapping on Hot Cell will be
as if you double tap on the selected file when it is in the Explorer window. That
is, for a program, it will be executed, and, for a document, the as sociated
application will be started. If you select a folder, Explorer will be started with the
selected folder in the window.
Start in
•
This is the initial folder when the program starts execution.
Parameters
•
The string typed in here will be passed to the program as parameters. For
example, you may type in a document name here and pass it to a word processing
program specified in the Run line above.
Define Hot Cell - Internet
On this page, you specify an Internet service to start when you tap on the Hot Cell.
Page 34

Kind of Service
•
Figure 16 Define Hot Cell - Internet
You select the kind of Internet service to start. For example, go to a Web site, or
send an E-mail message. The exact program initiated (for example, which
browser program) depends on system settings.
Address
•
The URL address for the selected service. For example, the Web site address, or
the e-mail address.
Define Hot Cell - Hot Key
On this page, you specify a key or key combination to press when the Hot Cell is tapped.
For example, in the figure below, the combination of ALT key and F4 key will be
simulated when the Hot Cell is tapped. This usually results in closing the current
application.
Page 35

Figure 17 Define Hot Cell - Hot Key
Select the key combination to press
•
You may select any key such as alphanumeric key or cursor control key,
combined with Shift, Ctrl and/or ALT key.
The Pressure Configuration Page
You use the Pressure Configuration Page to verify that Pressure Sensitivity works
properly, and to make adjustments. The Pressure-Sensitive Pen can be used to draw
heavier lines or darker colors when more force is applied to Pen Tip. This requires that
the drawing application supports a Wintab-compatible interface and the
Wintab-compatible driver is properly installed by installing the Tablet Driver as
described before. The Pressure Configuration Page looks as follows:
Page 36
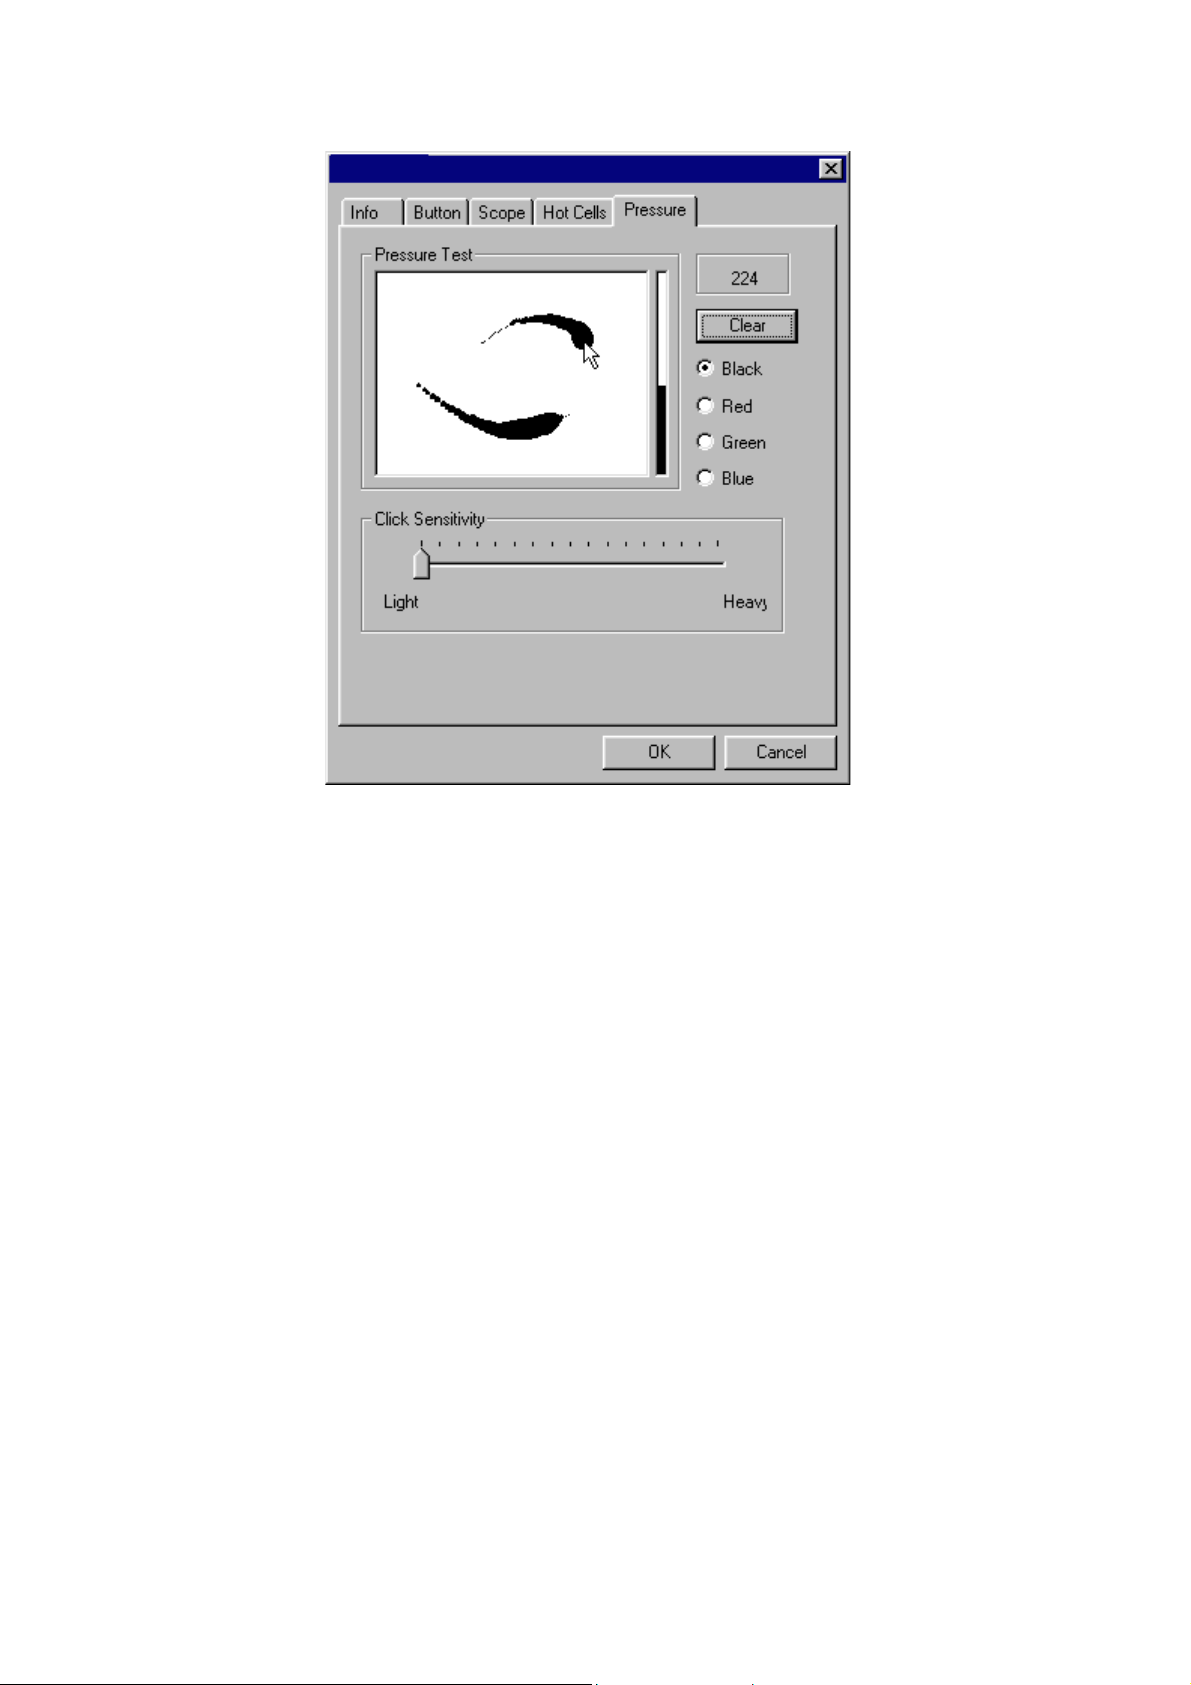
Pressure Test
•
Figure 18 The Pressure Configuration Page
You may test the "feel" of the Pen in this area. When you draw with a lighter
force pressing down on Tablet Plate, you will see a narrower line in this area;
when you draw with more force, you will see that the Pen leaves a wider trace in
the area. You may also choose a color for the test to get a better feel.
While you draw, the barometer on the right side of the drawing area indicates the
pressure level you are applying to Pen Tip. At the same time, the numerical value
of the pressure level is also shown on the right above the Clear Button.
When you draw fast, the trace it leaves may become a series of unconnected dots
(filled circles), instead of a solid line. This gives an indication of the speed of
your computer.
Clear
•
You press Clear Button to clear the drawing from Pressure Test area.
Click Sensitivity
•
Page 37

 Loading...