


®
H501A
PLEASE READ THE MANUAL CAREFULLY BEFORE USE.
《User Manual》
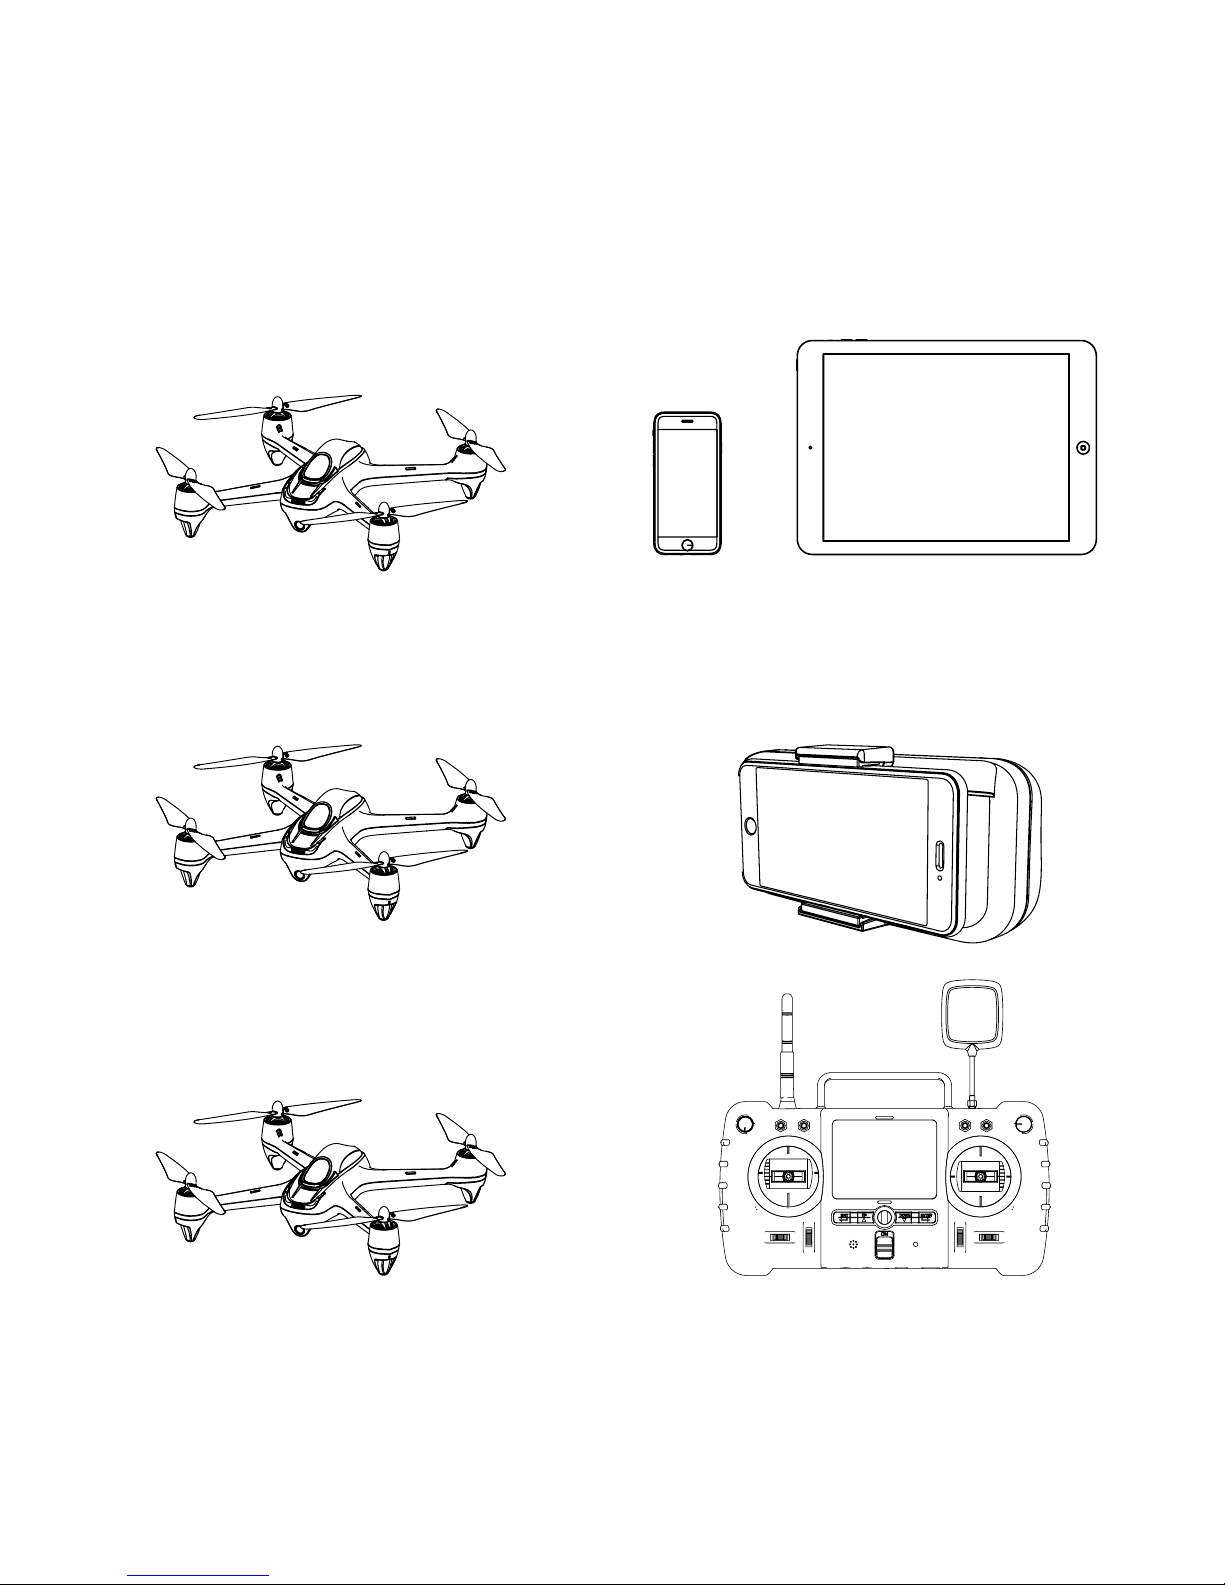
1.Quad + Phone/Pad
2.Quad + Phone +Relay
3.Quad + Transmitter
+
+
+
or
Caution:
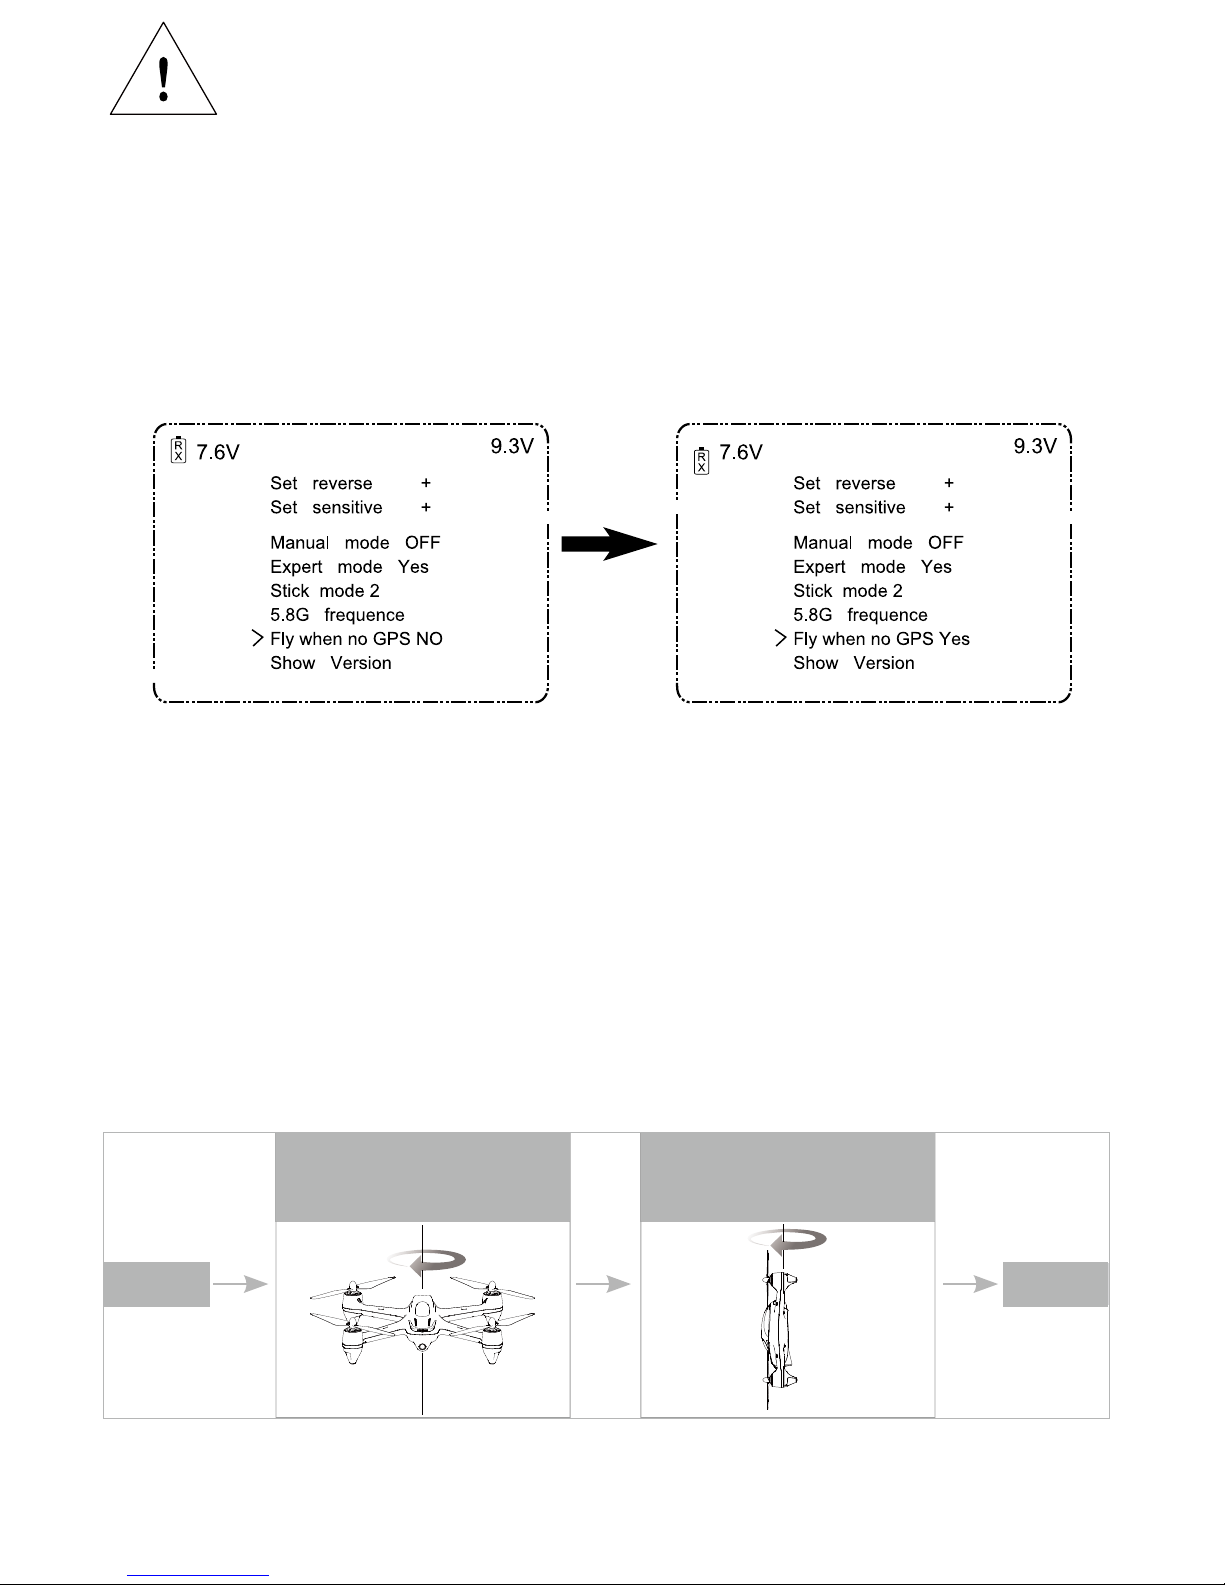
For safety, the quadcopter is default set to CAN NOT FLY WHEN NO GPS. If you prefer to
fly when GPS is not available, please reset the value as instructed below before using.
Pull the throttle stick to the lowest position and press the Elevator stick for 1.5 seconds to
enter into the MAIN MENU interface. Push the Elevator stick up/down to select “Fly When
no GPS”, push the stick right to enter into the “ Fly When no GPS” interface, select “YES”.
The Default Setting is “NO”.Select “Exit” to exit.
Compass calibration is required after the binding as instructed on the
transmitter.
1 ) Horizontally rotate the X4 in a clockwise direction when the LCD screen shows “Calib
compass 1”
2 ) Put the X4 nose down and vertically rotate it in a clockwise direction when the LCD screen
shows “Calib compass 2”
3 ) Calibration is completed when the 4 LED indicators remain solid.
结束
开始
当显示屏显示“Calibratecompass1”
时请水平旋转飞行器“
当遥控器显示屏显示
“Calibratecompass2”时。
请垂直旋转飞行器
Horizontally rotate the X4 in a
clockwise direction when the LCD
screen shows “Calib compass 1”
Put the X4 nose down and vertically
rotate it in a clockwise direction
when the LCD screen shows “Calib
compass 2”
Start
Complete

X-Hubsan H501A
Important safety notes
Operation: Be extremely careful and responsible when using the quad. Small electronic
components can be damaged due to crashes or exposure to water. To avoid any injuries, do
not use the quad with broken or damaged components.
Maintenance: Do not try to fix the quad yourself, please contact authorized distributors for
service. For more information, please visit the official website at www.hubsan.com.
Battery: Battery: Do not store the battery in high temperature area (60 ℃ or higher).
Using a Hubsan dedicated charger for recharging.
Keep the batteries away from children.
Keep the batteries dry.
USAGE ADVICE
Hubsan provides you with two files for your quad:
1.《Disclaimer》
2.《Quick Start Guide》
Watch the tutorial video and read the Disclaimer first,.
For detail information, please download User Manual at www.hubsan.com.
Read the Disclaimer first before use.
※Symbol explanation
1
- Do not fly the quad in a crowded area, always be aware of the safety of yourself and others.
- Do not fly in bad weather condition.
- Do not try to catch the quadcopter while it is still in flight.
- This product is intended for experienced pilots over the age of 14.
- Remove the battery when it is not in use, to avoid accidental injuries.
- Keep your body away from the propellers after powered on. High speed propellers are very
dangerous.
No operating
Important Notice
Instruction
Explanation, reference

Safety Advisory Notice for Lithium-Polymer (LIPO) Batteries LiPo batteries are different from
conventional batteries in that their chemical contents are encased in a relatively lightweight
foil packaging. This has the advantage of significantly reducing their weight but it does make
them more susceptible to damage if roughly or inappropriately handled. As with all batteries,
there is a risk of fire or explosion if safety practices are ignored:
● If you do not plan to fly the quad for a long time, store the battery approximately 50%
charged to maintain battery performance and battery life.
● Please use Hubsan chargers for battery charging.
● Discharging the battery within 5C current , do not over-discharging.
● Do not charge on carpet to avoid fire.
● Batteried need to be recharged if not in use for over 3 months.
WWW.HUBSAN.COM
1.Charge and store LiPo batteries in a location where a battery fire or explosion
(including smoke hazard) will not endanger life or property.
2.Keep LiPo batteries away from children and animals.
3.Never charge the LiPo battery that has ballooned or swelled.
4.Never charge the LiPo battery that has been punctured or damaged.
5.After a crash, inspect the battery pack for signs of damage. Discard in accordance
with your country’s recycling laws.
6.Never charge the LiPo battery in a moving vehicle.
7.Never overcharge the LiPo battery.
8.Never leave the LiPo battery unattended during recharging
9.Do not charge LiPo batteries near flammable materials or liquids.
10.Ensure that charging leads are connected correctly. Reverse polarity charging can
lead to battery damage or a fire or explosion.
11.Have a suitable fire extinguisher (electrical type) OR a large bucket of dry sand near
the charging area . Do not try to extinguish electrical (LiPo) battery fires with water.
12.Reduce risks from fire/explosion by storing and charging LiPo batteries inside a
suitable container.
13.Protect your LiPo battery from accidental damage during storage and transportation.
(Do not put battery packs in pockets or bags where they can short circuit or can come
into contact with sharp or metallic objects.).
14.If your LiPo battery is subjected to a shock (such as a crash), place it in a metal
container and observe for signs of swelling or heating for at least 30 minutes.
15.Do not attempt to disassemble or modify or repair the LiPo battery.
2

Contents
X-Hubsan H501A
3
IMPORTANT SAFETY NOTES
INTRODUCTION
SYMBOL EXPLANATION
1.ITEMS INCLUDED IN THE BOX
USAGE ADVICE
2QUAD COPTER
3QUAD COPTER BATTERY
4PROPELLERS
6 TRANSMITTER
3.1INTRODUCTION
4.1INTRODUCTION
4.2 INSTALLING THE PROPELLERS
6.1 INTRODUCTION
6.1.1 TRANSMITTER KEY FUNCTION
3.2INSTALL THE BATTERY
3.3CHARGING
2.1QUAD COPTER MOTOR LED INDICATOR
1
12
12
1
12
1
13
4
13
4
13
5
5
13
13
13
14
15
5
5
5
6
15
15
17
6
6
17
17
18
18
19
19
20
20
22
23
6
7
8
10
7
10
7
11
7
12
5 X-Hubsan App
6.1.2 INSTALL THE TRANSMITTER BATTERY
6.1.3 TRANSMITTER STICK CALIBRATION
6.1.4 ADJUSTABLE 5.8GHZ FREQUENCY
6.1.5 ANTENNA INSTRUCTION
7 START TO FLY
7.1 FLIGHT ENVIRONMENT
7.2 SAFETY CHECK BEFORE FLIGHT
7.3 FLY WITH APP
7.3.1 CONNECT THE QUADCOPTER WITH APP
7.3.2 COMPASS CALIBRATION
7.4 FLY WITH TRANSMITTER
7.4.1 BIND THE QUAD WITH
TRANSMITTER
7.4.2 COMPASS CALIBRATION
7.4.3 HORIZONTAL CALIBRATION
7.4.4 ROTATION CALIBRATION
7.4.5 START/ STOP THE MOTORS
7.4.6 BASIC FLIGHT
8 ADVANCED PERFORMANCE SETUP
8.1 REVERSING CHANNEL SETUP
8.2 SENSITIVITY SET UP
8.3 HEADLESS MODE
8.4 FOLLOW ME MODE
8.5 HOME MODE
8.6 EXIT HOME MODE
9 FAILSAFE MODE
H501A TROUBLESHOOTING
SCHEMATIC DIAGRAM
H501A Spare Part Chart
4.3 REMOVING THE PROPELLERS
Introduction
Thank you for buying the HUBSAN product. It is designed as an easy-to-use, multi-functional
RC model, capable of hovering and acrobatic flight maneuvers. Please read the manual
carefully and follow all the instructions. Be sure to keep the manual for future reference.
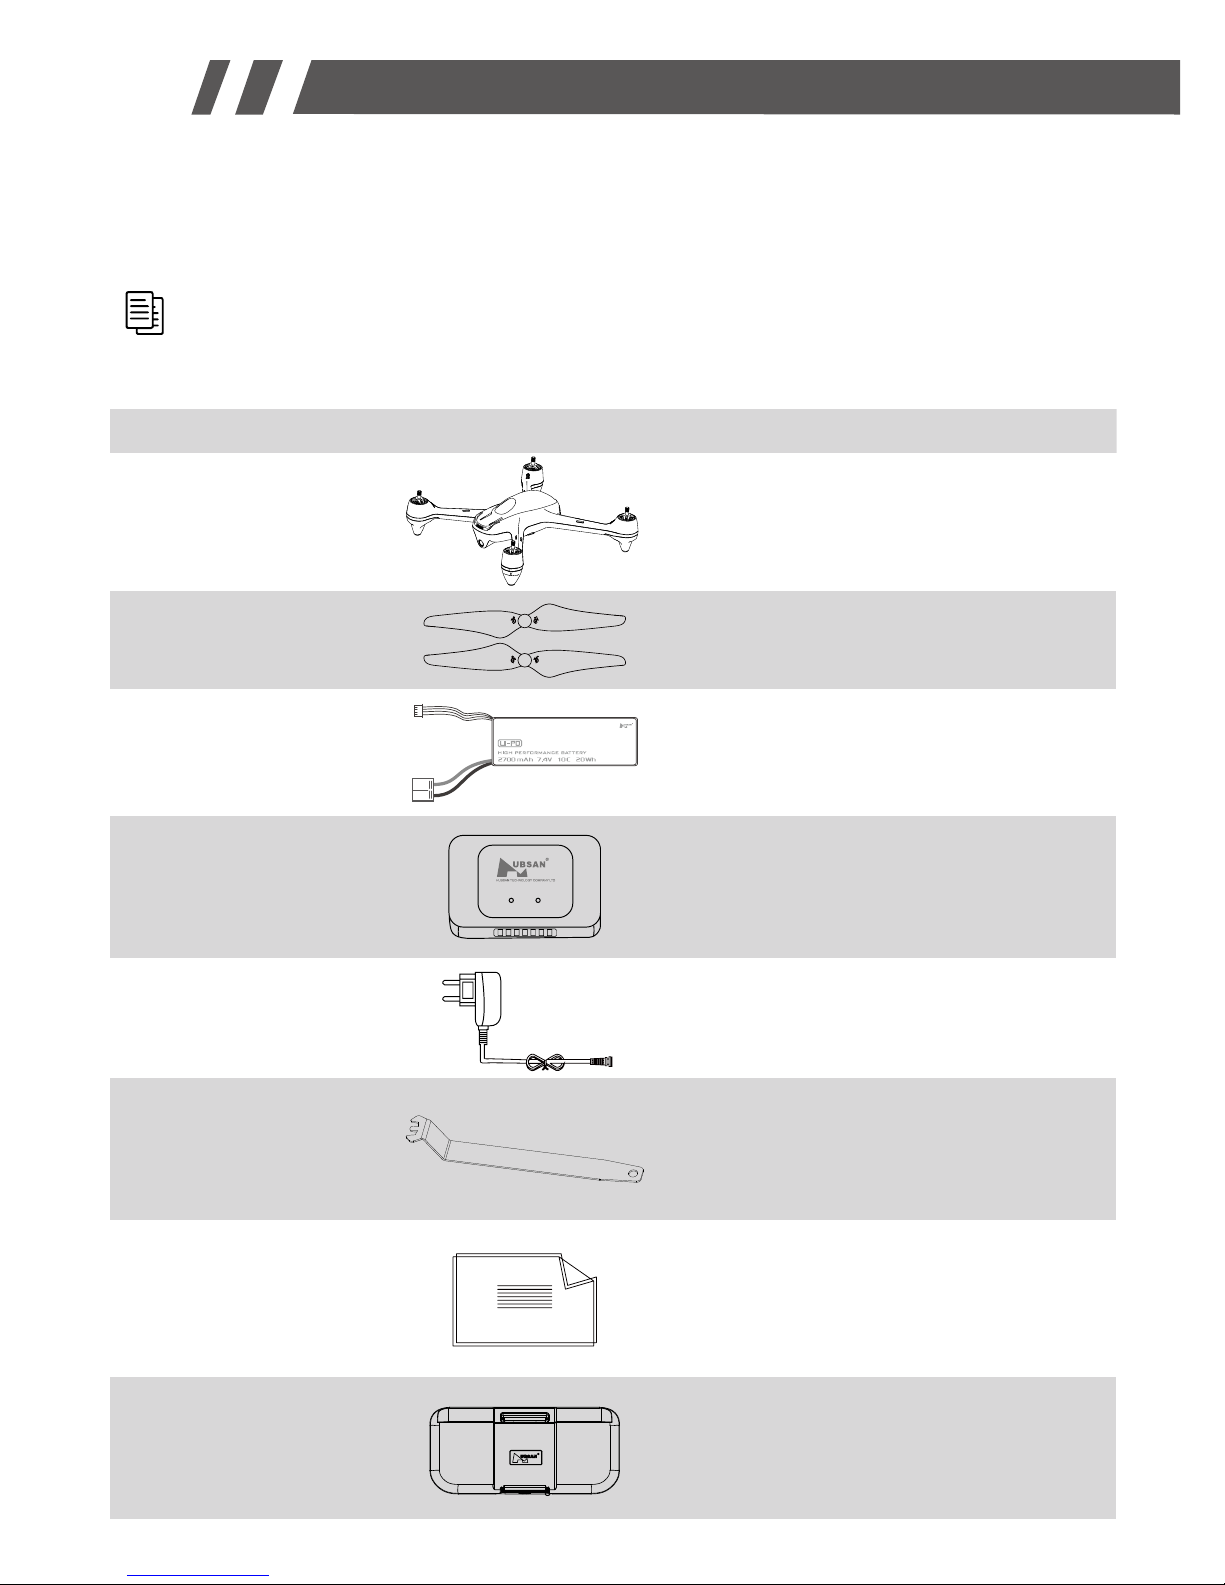
1. Items included in the box
FPV:FFirst Person View,this feature enables you to experience every live moment of
the flight from the drone's point of view.
S/N
1
2
3
4
5
6
8
7
1PC
2Sets
1PC
1PC
1PC
1PC
1PC
2PCS
Quad copter
Propellers
Li-Po battery
Balance Charger
Adapter
Propeller Wrench
Relay HT005
User Manual
Equipped with GPS and
compass
Propeller A 4pcs, Propeller
B 4pcs
For quad copter
For recharging the
LiPo battery
110v-220v
For removing propellers
Use with X-Hubsan APP
《Disclaimer》
《Quick Start Guide》
Part Name
Qty RemarksPhotos
WWW.HUBSAN.COM
4

2.Quadcopter
3Quadcopter battery
3.1 Introduction
The quadcopter battery is a rechargeable Li-Po battery with 2700mAh capacity and 7.4V
voltage.The battery should only be charged with Hubsan charger to avoid overcharge.
2.1 Quadcopter motor LED indicator
Front LED is blue; Back LED is red.
1.Power on: 4 LED indicators blink simultaneously.
2.Compass Calibration:
1). Horizontal calibration: 4 LED indicators blink circularly.
2). Vertical calibration: 4 LED indicators blink alternately .
3.Quadcopter Horizontal Calibration: 4 LED indicators blink slowly.
4.Quadcopter Rotation Calibration: 4 LED indicators blink circularly.
5.GPS Flight: 4 LED indicators will remain solid.
6.Low Voltage Return : 2 front LED indicators remain solid, and 2 back LED indicators blink
quickly.
7.Signal Lost: 2 front LED indicators blink alternately, 2 back LED indicators remain solid.
8.LED indicators can be turned off by long pressing the lower throttle trim on the transmitter.
Please make sure the battery is fully
charged before the first time use.
X-Hubsan H501A
5
3.2 Installing the battery
Push the battery into the battery compartment (as shown below) and connect the battery
cable with the correct polarity then close the battery compartment cover.
1
6 7
2 3 4
8 9
5Propeller B
Lower Body Shell 1080P Camera
Propeller A Motor LED Light
Battery Compartment TF Slot
[10]
Upper Body Shell
Rubber Feet

4 Propellers
4.1 Introduction
The quadcopter uses 7.3 inches propellers which are marked by A and B.
Propellers are consumables, please replace with new ones if there is any damage.
3.3 Charging
Connect the battery to the balance charger and the wall charger. The left LED indicator on the
balance charger will remain red and the right LED indicator will remain off when charging. The
battery is fully charged when the right LED indicator turns green.
It takes approximately 180 minutes to fully charge the battery.
Please take off the charger and the battery when the battery is fully charged.
Make sure the battery is fully charged before every flight.
WWW.HUBSAN.COM
Propeller A
Diagram
Installation Position
Symbol explanation
LOCK: In this direction, tighten the propeller onto the motor shaft
UNLOCK: In this direction, remove the propeller from the motor shaft
Propeller B
6
4.2 Installing the propellers
Install the propellers to the corresponding motors that are marked with A and B, tighten the
propellers and keep the motors deadlocked with the U wrench.

X-Hubsan H501A
4.3 Removing the propellers
Hold the motor with the wrench, then spin the
propellers in the indicated unlock direction.
● Make sure that the A and B propellers are
installed correctly. The X4 will not fly if propellers
are improperly installed.
● Keep the moving propellers away from your
body as well as other people and any obstacles.
7
Hubsan H901A is a multi-functional FPV transmitter with 3.7inch LCD screen and 5.8G live
stream.
Recommended maximum flight distance: 300m.
6.1 Introduction
6 Transmitter
Altitude Hold
遥控器电压
经纬度
显示飞行模式:Altitude Hold、GPS Hold、ReturnHome、Follow Mode
录像时间
拍摄状态
(拍照-录像切换) SD卡
5 X-Hubsan App
Hubsan designed an APP to go with the new X-Hubsan H501A. Users can use the APP to
control the quad, take picture/videos and set the parameters of the quad. It is recommended
to fly the quad within 100 meters and use smart devices with larger screen for the best visual
experience.
Camera Status
(Video/Photo)
Recording time
Micro SD Card
Transmitter's battery voltage
Quad copter's battery voltage
Quad copter's head data
Quad copter's roll
Quad copter's pitch
Quad copter's speed
Quad copter's distance
Quad copter's altitude
Quad copter's GPS signal strength
Transmitter's GPS signal strength
Longitude & Latitude
Flight Mode Status:

8
WWW.HUBSAN.COM
6.1.1 Transmitter key function
17 2.4G Antenna
3 Rudder trim button
(2)Elevator/Rudder stick
13 GPS Switch
12 Headless mode switch
11 T1
16 LCD
7 Photo/EXIT button
6Elevator trim button
10 Up
9
10 Down
5 Throttle trim button
4 Aileron trim button
8 Video/ENTER button
(1)Throttle/Aileron stick
19 Strap fastener
11 T2
15 Follow Me switch
14 Home switch
18 5.8G Antenna
MODE 1
17 2.4G
Antenna
3 Rudder trim button
1Throttle/Rudder stick
13 GPS
Switch
12
Headless mode switch
11 T1
16 LCD
7
Photo/EXIT button
6Throttle trim button
9
10 Up 10 Down
5
Throttle trim button
4 Aileron trim button
8
Video/ENTER button
2Elevator/Aileron stick
19
Strap fastener
11 T2
15 Follow Me switch
14 Home switch
18 5.8G Antenna
MODE 2

9
X-Hubsan H501A
Throttle/Rudder stick
Elevator/Aileron stick
Throttle/Aileron stick
Elevator/Rudder stick
Aileron trim button
Rudder trim button
Up/Down
T1、T2
Headless mode switch
GPS Switch
Home Switch
Follow Me Switch
Throttle trim button
Power Switch
Video/ENTER button
Photo/EXIT button
Elevator trim button
Push the stick forward or backward and the quadcopter will
ascend or decend; Push the stick left or right and the quadcopter
will rotate in counter clockwise or in clockwise
Push the stick forward or backward and the quadcopter will fly
forward or backward;Push the stick left or right and the quadcopter
will fly left or right
Push the stick forward or backward and the quadcopter will fly
forward or backward;Push the stick left or right and the quadcopter
will rotate in counter clockwise or in clockwise.
Push the stick forward or backward and the quadcopter will
ascend or decend; Push the stick left or right and the quadcopter
will fly left or right.
Aileron trim adjusts for left and right drift.
Rudder trim adjusts for drift of left and right rotation or yaw.
To select settings.
No Function
Push up to enter headless mode;
Push down to exit headless mode.
Push up to activate GPS function;
Push down to disactivate GPS function.
Push up to turn on automatic return home;
Push down to exit.
Push the switch up, the follow me function will be activated
Throttle trim is normally at the center.
Push to ON to turn on the transmitter. Push to OFF to turn off.
Long press to enter Main Menu
Short press to take video
Long press to exit Main Menu
Short press to take photo
Elevator trim adjusts for forward and backward drift.
1
2
(2)
4
6
3
5
7
8
9
10
11
12
13
14
15
(1)
S/N
Mode/ Control Function

WWW.HUBSAN.COM
6.1.2 Install the transmitter battery
6.1.3 Transmitter stick calibration
Mode 1: Push the left stick to the upper left corner and the right stick to the upper right
corner then power on the transmitter simultaneously, Rotate both sticks in circles for three
times when the LCD screen displays “Calibrate Stick” then release both sticks and press “Exit”
until one beep sound is made, indicating a successful calibration.
Mode 2: Push both sticks to the upper left corner then power on the transmitter
simultaneously. Rotate both sticks in circles for three times when the LCD screen displays
“Calibrate Stick” then release both sticks and press “Exit” until one beep sound is made,
indicating a successful calibration.
A A A A
A A A A
A A A A
A A A A
10
16
17
18
19
LCD
2.4G
Antenna
5.8G
Antenna
Strap fastener
Display flight data and live stream
Transmit control signals
Receive the video transmission
To fasten the strap on tansmitter
Remove the cover
Install 8 x AA batteries
according to the correct polarities
Close the cover
Do not mix old and new batteries
Do not mix different types of batteries

X-Hubsan H501A
6.1.4 Adjustable 5.8GHz frequency
The transmitter will automatically find the best frequency to ensure a good quality live video.
When necessary, adjust the 5.8GHz frequency for a better video transmission.
To adjust 5.8GHz frequency:
Pull the throttle stick down to the lowest position and long press the ‘Enter’ button to
open the ‘Main Menu’ interface. Use the Up/Down keys to select 5.8G frequency then
press ‘Enter’ and switch between different frequency with Up and Down keys. Long press
the ‘Exit’ button to save the new setting and exit.
The transmitter mode can be shifted according to the above operation.
左手油门
右手油门
左手油门/右手油门
右手油门/左手油门
5.8G frequence
Set reverse +Set reverse +
Set sensitive +Set sensitive +
Plane type Aircraft
Plane type Aircraft
Expert mode Yes
Expert mode Yes
Stick mode 2
Stick mode 2
5.8G frequence
5725 MHz
11
Manual mode OFF Manual mode OFF
Mode 2
Mode 2/Mode1
Mode 2/Mode1
Mode 1
12
6.1.5 Antenna instruction
For maximum communication range, the 2.4G antenna should point skyward without
obstructions in between; the 5.8G antenna should be bent vertically and have the side with
‘Hubsan’ logo pointing at the quadcopter. The maximum range of the video transmission
is approximately 300 meters.
WWW.HUBSAN.COM
7 Start to fly
In case of any injuries caused by improper operations, it is recommended that beginners
learn to operate the quadcopter under the guidance of an experienced user. It is also very
important to choose a proper flight environment.
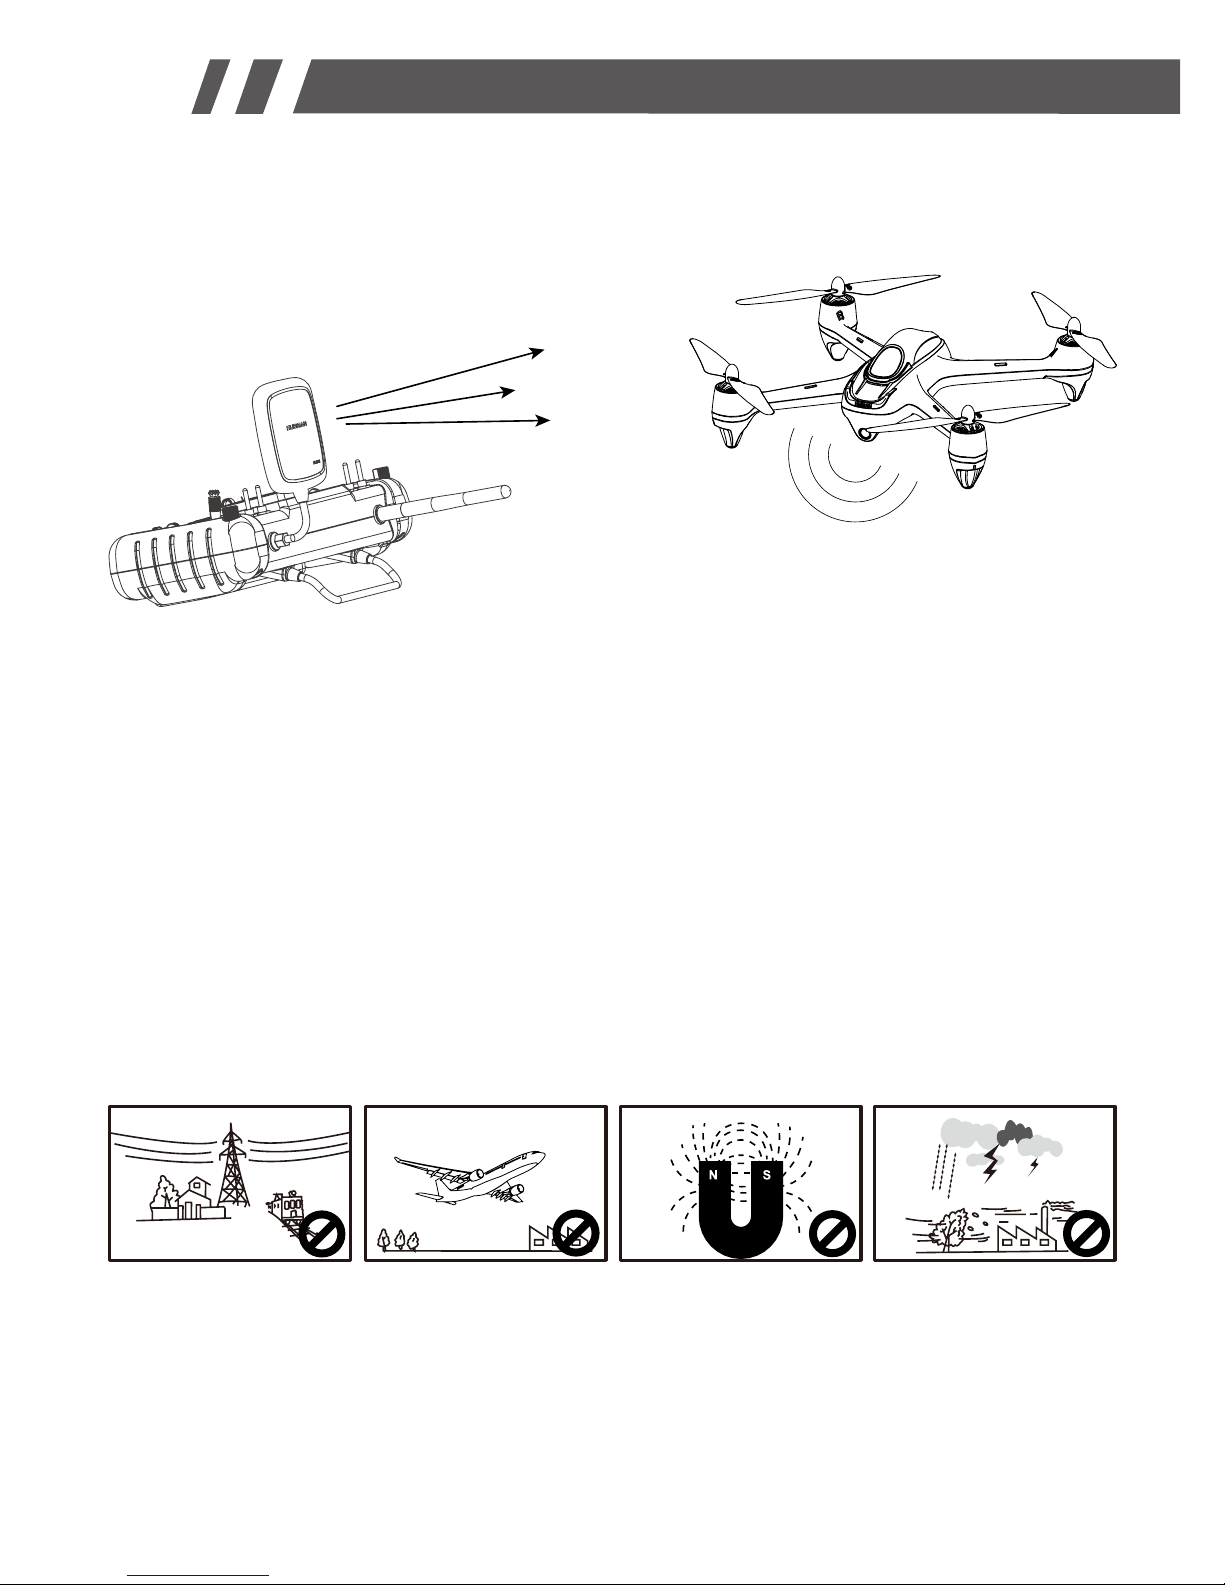
7.1 Flight environment
7.2
Safety check before flight
(1) The flying area should be wide open and should be without any tall buildings, otherwise
the GPS may not work.
(2) Do not fly in bad weather condition such as windy, snowy, rainy or foggy weathers.
(3) Avoid flying near obstacles, crowds, power cables, trees and water.
(4) Do not fly near any radio towers or airports.
(5) The quad will not work in the Antarctic Circle or the Arctic Circle.
(6) Obey the local laws and regulations, do not fly in restricted areas.
(7) Only fly in good weather conditions and between the temperature of 0-40℃ .
(1) Make sure the batteries are fully charged. (Quad,transmitter or smart device)
(2) Make sure propellers are installed properly.
(3) Insert Micro-SD card for pictures and videos.
(4) Check if motors work well after binding.
High Tension Line Airport Interference Bad Weather

7.3.2 Compass Calibration
Compass calibration is required before the first flight, otherwise the compass may not work
properly. The compass is very sensitive to the electromagnetic interference which can create
false compass data and lead to poor flight performance or even flight failure. Calibrate the
compass regularly can help to provide the optimal performance of the quad.
7.3 Fly with App
APP flight is only availabe when fly in outdoors.
7.3.1 Connect the Quadcopter with App
1.Power on the quad;
2.Search for WI-FI on devices:
For iPhone or iPad, please select【 Settings 】>Wi-Fi;
For Android system,please select【 Settings 】>WLAN> W-Fi.
3.Click HUBSAN_H501A_XXXXXX,and password is 12345678.The password cannot be changed
by user.
4.Connection completed
5.Open X-Hubsan APP, choose Hubsan H501A to enter into the user interface for flight.
NOTICE:
For safety,please don't use the smart device for other purposes while it is connecting with Hubsan App.
If you want to control the quad with other devices, please restart the quad.
13
X-Hubsan H501A
7.4 Fly with transmitter
7.4.1 Bind the quad with transmitter
The binding process is completed in the factory.
For re-binding, press Enter button and power on the transmitter simultaneously until “Bind
to Plane” is displayed, then power on the drone and place it very close to the transmitter, the
binding process will be completed after one “beep” sound.
If the binding failed, please power off the drone and repeat the above steps.
7.4.2 Compass calibration
Compass calibration is required before the first flight, otherwise the compass may not work
properly. The compass is very sensitive to the electromagnetic interference which can create
false compass data and lead to poor flight performance or even flight failure. Calibrate the
compass regularly can help to provide the optimal performance of the quad.
Do not calibrate the compass in a strong magnetic field
Do not carry ferromagnetic materials with you while calibrating the compass,
such as keys, cell phones, etc.
Compass calibration procedures:
1) Pull the left stick to the left side, and move the right stick from left to right quickly and
repeat until the transmitter displays “Calib compass1”, and the 4 LED indicators blink
circularly.
2) Horizontally rotate the X4 in a clockwise direction until the LCD screen shows “Calib
compass 2”, and the 4 LED indicators blink alternately.
3) Put the X4 nose down and vertically rotate it in a clockwise direction until the “Calib
compass 2” disappears.
4) Calibration is completed when the 4 LED indicators remain solid.

14
7.4.3 Horizontal calibration
Horizontal calibration is required when the quadcopter drifts during flight.
Please follow the calibrating procedures:
1) Push the left stick to the most right side, and move the right stick from left to right
quickly until the 4 LED indicators blink slowly
2) Calibration is completed whrn the 4 LED indicators stop blinking.
WWW.HUBSAN.COM
左边摇杆向左打到最大量程
开始
校准成功
左边摇杆向左打到最大量程
左右来回拨动右边摇杆,直到
遥控器显示“calib compass1”
机头朝下垂直旋转飞机直到
“calib compass 2”消失
水平旋转飞机直到遥控器
显示“calib compass 2”
左边摇杆向左打到最大量程
开始
校准成功
左边摇杆向左打到最大量程
左右来回拨动右边摇杆,直到
遥控器显示“calib compass1”
机头朝下垂直旋转飞机直到
“calib compass 2”消失
水平旋转飞机直到遥控器
显示“calib compass 2”
开始
投准成功
左边摇杆向左打到最大量程
左右拨动右边摇杆,直到遥控器
提示“calibrate compass 1”
水平旋转飞机直到遥控器显示
“calibrate compass 2”
机头朝下垂直旋转飞机直到
“calibrate compass 2”消失
校准成功
Pull the left stick to the
left side
Move the right stick left to right
quickly, the LCD screen displays
“Calib compass 1”
Put the X4 nose down and vertically
rotate it in a clockwise direction until
the “Calib compass 2” disappears.
Horizontally rotate the X4 in a
clockwise direction until the LCD
screen shows “Calib compass 2”
START
Calibration
completed
Start
Complete
Push the left stick to
the most right side
Move the right stick
from left to right quickly

7.4.4 Rotation calibration
Rotation calibration is required when the quadcopter yaw during flight.
Please follow the calibrating procedures:
1) Push the left stick up, and move the right stick from left to right quickly until the 4 LED
indicators blink slowly ;
2) When the 4 LED indicators blink circularly, horizontally rotate the X4 in a clockwise
direction until the 4 LED indicators remain solid temporarily;
3) The 4 LED indictors will blink circularly again, repeat step 2 to rotate the X4;
4) Calibration is completed whrn the 4 LED indicators stop blinking.
15
7.4.5 Start/stop the motors
Pull both sticks to the lower outer corner as shown
on the picture to start or stop the motors.
Push the throttle stick up slowly to take off;
Push the throttle stick down slowly to land.
7.4.6 Basic flight
The operations of the controller are based on Mode 2.
The left stick controls the altitude and rudder of quadcopter, and the right stick controls
its forward, backward, left and right flight.
1
1
X-Hubsan H501A
开始
投准成功
左边摇杆向上打到最大量程
快速上下拨动右边摇杆直到航向灯
慢闪
当航向灯循环环形闪烁时,水平
旋转飞行器直到航向灯变为慢闪
重复上述动作直到航向灯变为
长亮
Caution:
Keep the moving propellers away from your body
as well as other people and any obstacles.
Do not let go of the controller until the motors have fully stopped.
Do not stop the motors during the flight to avoid crashing,
unless for emergency.
Complete
Start
Push the left stick up
Move the right stick from left
to right quickly until the 4
LED indicators blink slowly
Horizontally rotate the X4 in a
clockwise direction
Continue to horizontally rotate
the X4 in a clockwise direction

16
WWW.HUBSAN.COM
The throttle stick controls the ascent and
descent .
Push up the stick and the X4 will ascend.
Pull down the stick and the X4 will descend.
When the stick is in the center, the X4 will
hover and hold its alititude automatically .
Move the throttle stick above the center
position to take off. (Move the stick
gradually to prevent the X4 from ascending
too quickly.)
The Rudder stick controls the direction.
Push the stick left and the X4 will rotate
counter-clockwise Push the stick right and
the X4 will rotate clockwise When the stick
is in center,the X4 rotation angle is zero and
doesn't rotate.
A harder push in either direction will cause
the X4 to rotate faster in the corresponding
direction.
The Elevator stick moves the X4 forward and
backward.
Push the stick up the and the X4 will fly forward;
Pull the stick down and the X4 and backward.
When the stick is in center, the aircraft will
hold its position.
The degree of stick movement corresponds to
the degree of tilt and flying speed.
Mode 2
Transmitter X4 Remarks
Up
Down
Right rotation
Left rotation
Forward
Backward
Mode 2
Transmitter
X4 Remarks
The Aileron stick controls left and right flight.
Push the stick left and the X4 will fly left
Push the stick right and the X4 will fly right
The X4 should be horizontal and unmoving at
center stick.
The flight speed and tilt angle are linked to the
distance pressed on the sticks.
Right
Left

8 Advanced performance setup
8.1 Reversing channel setup
If you would like to reverse any of the stick functions due to personal preference, then follow
the instructions below. Be aware that this will reverse the control commands.
Pull the throttle stick down to the lowest position and long press the ‘Enter’ button to
open the ‘Main Menu’ interface. Use the Up/Down keys to select ‘Set reverse’ and use
‘Enter’ button to switch between modes. Long press ‘Exit’ button to save and exit.
17
8.2 Sensitivity setup
If you would like to adjust the sensitivity of any stick functions, then follow the instructions
below.
Pull the throttle stick down to the lowest position and long press the ‘Enter’ button to
open the ‘Main Menu’ interface. Use the Up/Down keys to select ‘Set sensitive’ and use
‘Enter’ button to switch between ‘Expert mode’ and ‘Normal Mode’. Long press ‘Exit’
button to save and exit.
X-Hubsan H501A
The GPS Switch is position-hold function
switch.
In position 1 (up), the GPS functions are
active.
In position 2 (down), the GPS functions are
deactivated.
The Home Switch is used to the turn on/off
automatic return function.
Up (Position 1) activates the Home function.
Down (Position 2) deactivates the Home
function.
[Home]
[SB]
position 1 (upward) position 2 (downward)
Mode 2
Transmitter X4 Remarks
Mode 2
Transmitter
X4
Remarks
[GPS]
[SA]
+
+

8.3 Headless mode
Headless mode means the X4 will default the current head direction as its head when enter
into the headless mode.
The transmitter has a built-in GPS module. The Follow Me mode only works when both
the quadcopter and the transmitter have 6 or more GPS satellites.
Push the A switch up to enter Headless mode and push the A switch down to cancel Headless
mode.
The Head data displays in red when the quad copter enters into headless mode.
The Head data displays in green when the quad copter exits headless mode.
18
WWW.HUBSAN.COM
8.4 Follow me mode

Push the B switch up to enter Follow Me mode and push the B switch down to cancel Follow
Me mode.
When the switch is pushed up, the screen will display ‘Follow Mode’ in green and the
quadcopter will turn and have the camera pointing at the transmitter. Only the throttle stick
will still function under Follow Me mode.
8.5 Home mode
The Return to Home mode will only work when both the quadcopter and the transmitter
have 6 or more satellites.
Enter into home mode
Push both the GPS switch and Home switch up to activate Return to Home mode on the
quadcopter.
8.6 Exit home mode
Push the Home switch down to exit return to home mode.
The home point is the location where the quadcopter receives the 6th satellite while the motors
are armed
19
X-Hubsan H501A
The flight control system will control the quadcopter to fly back to the takeoff point and land
automatically.

9 Failsafe mode
The quadcopter will enter Failsafe mode when the connection between the transmitter is lost
or when the power is low. The flight control system will control the quadcopter to return to the
Home Point and land automatically. The Failsafe mode helps to avoid injuries or damages.
H501A TROUBLESHOOTING
1. Transmitter and X4 do not pair
1) Check if the transmitter and the X4 are both power on or not.
2) Re-pair by the following steps 1 Power off the transmitter.
2 Press the camera function key and power on the transmitter till “Bing to plane” displays
on the LCD screen.
3 Face the X4’s bottom to the transmitter’s LCD screen very closely and power on the X4,
hold 5 seconds till the pair is finished.
2. Cannot Unlock the propellers
1) Make sure the X4 is finished the compass calibration.
2) Make sure the Home switch is in the downward position.
3) Make sure the sticks are all in the center positions.
3. Cannot Search GPS Signals
Make sure not fly indoor or fly surround by buildings.
Make sure fly in outdoor and in an open field and void of obstacles, tall building or steel
structures.
(1) Transmitter is powered off.
(2) The flight distance is over the signal transmission range of the transmitter.
(3) The signal of the transmitter was interrupted by some other strong electronic interference.
Home Point is recorded when the quadcopter receives the 6th satellite while the motors
are armed.
To ensure that the X4 can return safely to its Home Point, fly the X4 in a safe to fly area.
If there are GPS satellites drops below 6 or less for more than 20 seconds while the X4
is returning home, the X4 will descend automatically.
The X4 cannot avoid obstacles automatically while in Failsafe mode.
If the power is low, please land the quadcopter in case of any damages.
20
WWW.HUBSAN.COM
Conditions that will activate Failsafe mode

4. No Video or Video is Under Strong Interference
1)Check if any strong interference sources around or not
2)Check if the frequencies of the X4 and the transmitter are under cross interference or
not. (If so,please re-pair the X4 and the transmitter)
5. Cannot Hover
Check if the barometric parameters displayed on the transmitter are correct or not.
Check if the sticks are in the center position or not. (If not, please push the sticks to the
centerpositions)
6. Cannot Flight In a Set-Waypoint
Make sure the GPS switch is in upper position.
Make sure the GPS satellites are up to 6 or above.
Make sure all the sticks are in the center positions, except the throttle stick.
7. Follow Mode Function Not Work
Make sure the GPS and follow mode switches are in upper positions.
Make sure the GPS satellites are up to 6 or above.
Make sure all the sticks are in the center positions, except the throttle stick.
Make sure 5 meters at least between the X4 and the transmitter.
8. Cannot fly back to Home Point!
Be sure the GPS satellites are more than 6 before flying.
9. GPS signal lost!
Check if there is any interference to quad or not, for example: high-tension cables, radio
tower.
10. The quad or video shakes while flying
① Check the propellers, replace propellers if there is any brok en or deformed;
② Check the screws on quadcopter are fixed in place or not;
③ Check the motor shaft is broken or not.
11. Cannot take pictures or videos!
① Check if the Micro-SD card is inserted or not.
② Check if the Micro-SD card is formatted correctly or not (For mat the Mirco-SD card before
use, if the Micro-SD card is with FAT32, the card should be Cla ss 4 or Class 4+)
12. Cannot connect with Wi-Fi
Restart the quadcopter.
13. If you want to use the relay during flight, please unbind the quadcopter with the APP,
otherwise the relay cannot be connected.
21
X-Hubsan H501A

SCHEMATIC DIAGRAM
22
WWW.HUBSAN.COM
Black
Black
Black & White
Yellow
Red
Red
^
_
`
Yellow
Black & White
Black
Black
Red
Red
^
_
`
Black
Black
Black & White
Red
Yellow
Red
^
_
`
Red
Yellow
Black & White
Black
Black
Red
^
_
`

23
H501A Spare Part Chart
H501A-01
Body Shell- Black
H501S-18
Motor LED Lampshade
A/B
H501S-05B
Propeller A- Black
H501S-08
Brushless Motor B
H501S-01
Body Shell- White
H109-04
Rubber Feet
H501S-06
Propeller B- Gold
H501S-19
ESC
H501S-17
Eye Lampshade
H501S-04
Screw
H501S-06B
Propeller B- Black
H501C-10
LED PCBA(Blue/Red)
H501S-03
Canopy
H501S-05
Propeller A- Gold
H501S-07
Brushless Motor A
H501A-02
Flight Control PCBA
X-Hubsan H501A

24
H501A-03
5.8G Transmission
Module
H501S-25
H901A TX Li-Po Battery
H501A-05
GPS Module
H501S-27
H906A TX
H301S-11
Adapter
H501S-26
USB Cable
H501S-13
Compass Module
H301S-12
Balance Charger
H501A-04
HT005 Relay
H501S-14
Li-Po Battery
H501S-16
Propeller Wrench
H501C-02
Battery Cover
WWW.HUBSAN.COM

www.HUBSAN.com
Hubsan Technology Company Limited
 Loading...