

UBX-20044809 - R03
C1-Public www.u-blox.com
SARA-R422 / SARA-R5
Configure MQTT on AWS IoT core
Application note
Abstract
This document provides examples of how to use AT commands to connect the AWS IoT service with
u-blox SARA-R422S, SARA-R422M8S and SARA-R5 series modules.
SARA-R4
SARA-R422 / SARA-R5 - Application note
UBX-20044809 - R03 Document information Page 2 of 17
C1-Public
Document information
Title
SARA-R422 / SARA-R5
Subtitle
Configure MQTT on AWS IoT core
Document type
Application note
Document number
UBX-20044809
Revision and date
R03
29-Mar-2021
Disclosure restriction
C1-Public
This document applies to the following products:
Product name
SARA-R422S
SARA-R422M8S
SARA-R5 series
u-blox or third parties may hold intellectual property rights in the products, names, logos and designs included in this
document. Copying, reproduction, modification or disclosure to third parties of this document or any part thereof is only
permitted with the express written permission of u-blox.
The information contained herein is provided “as is” and u-blox assumes no liability for its use. No warranty, either express or
implied, is given, including but not limited to, with respect to the accuracy, correctness, reliability and fitness for a particular
purpose of the information. This document may be revised by u-blox at any time without notice. For the most recent
documents, visit www.u-blox.com.
Copyright © u-blox AG.

SARA-R422 / SARA-R5 - Application note
UBX-20044809 - R03 Contents Page 3 of 17
C1-Public
Contents
Document information ................................................................................................................................ 2
Contents .......................................................................................................................................................... 3
1 AWS IoT setup ........................................................................................................................................ 4
1.1 Policy creation .............................................................................................................................................. 4
1.2 Thing creation .............................................................................................................................................. 6
1.3 Attach policy to created thing .................................................................................................................. 9
2 u-blox module setup........................................................................................................................... 10
2.1 Store certificates in module file system ..............................................................................................10
2.1.1 AT commands procedure to store the file in the module .........................................................10
2.1.2 m-center procedure to store the file in the module ...................................................................10
2.2 Check CA, CC, and PK in the file system ..............................................................................................11
2.3 Certificates manager configuration ......................................................................................................11
2.4 Security profile configuration .................................................................................................................11
3 Example of MQTT session between module and AWS IoT ................................................... 12
3.1 Module setup: start a MQTT session and subscribe to a topic .......................................................12
3.2 Configure AWS IoT: subscribe to a topic..............................................................................................13
3.3 Module: publish a message to AWS IoT ...............................................................................................13
3.4 AWS IoT: read the received message ...................................................................................................14
3.5 AWS IoT: publish a message to module ...............................................................................................14
3.6 Module read the received message .......................................................................................................14
Appendix ....................................................................................................................................................... 15
A Glossary ................................................................................................................................................. 15
Related documentation ........................................................................................................................... 16
Revision history .......................................................................................................................................... 16
Contact .......................................................................................................................................................... 17
SARA-R422 / SARA-R5 - Application note
UBX-20044809 - R03 AWS IoT setup Page 4 of 17
C1-Public
1 AWS IoT setup
To get started with the Amazon Web Services (AWS) IoT service, it is necessary to set up the AWS
account and permissions. For details on how to create an AWS account, see the AWS official website
link:
https://aws.amazon.com/premiumsupport/knowledge-center/create-and-activate-aws-account/
Detailed instructions are available in sections Sign up for an AWS account and Create a user and
grant permissions at https://docs.aws.amazon.com/iot/latest/developerguide/setting-up.html.
For more details on the use of AT commands, see the SARA-R5 series AT commands manual [2] /
SARA-R4 series AT commands manual [6]. Further details on the IP data connection configuration
are available in the SARA-R4 / SARA-R5 IP applications development guide [4].
⚠ Due to AWS's continuous evolution, some information provided in this document can be not up to
date.
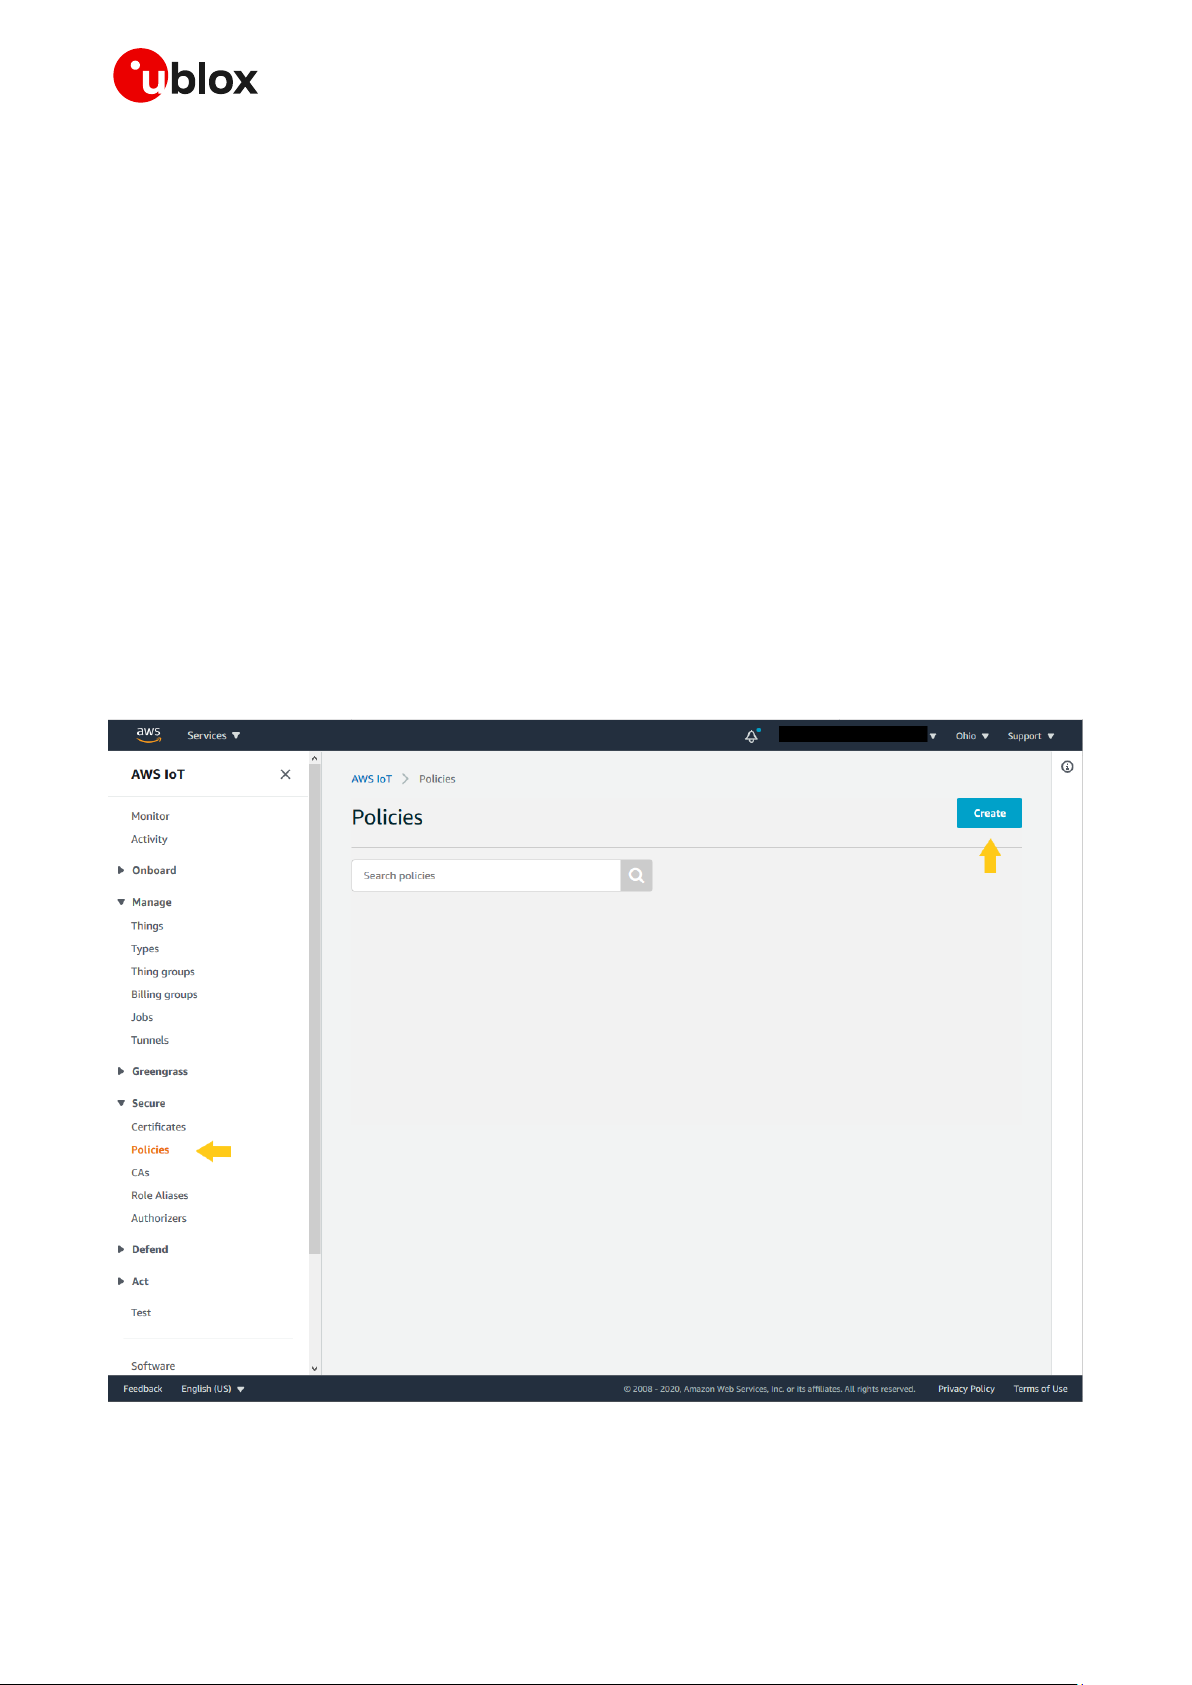
1.1 Policy creation
As a first step to set up an AWS connection, it is necessary to create a policy. From the AWS IoT Core
console at console.aws.amazon.com/iot, go to Secure > Policies, then click on Create. This will enable
the creation of a new policy that will be adopted in future devices.
Figure 1: AWS policy creation
SARA-R422 / SARA-R5 - Application note
UBX-20044809 - R03 AWS IoT setup Page 5 of 17
C1-Public
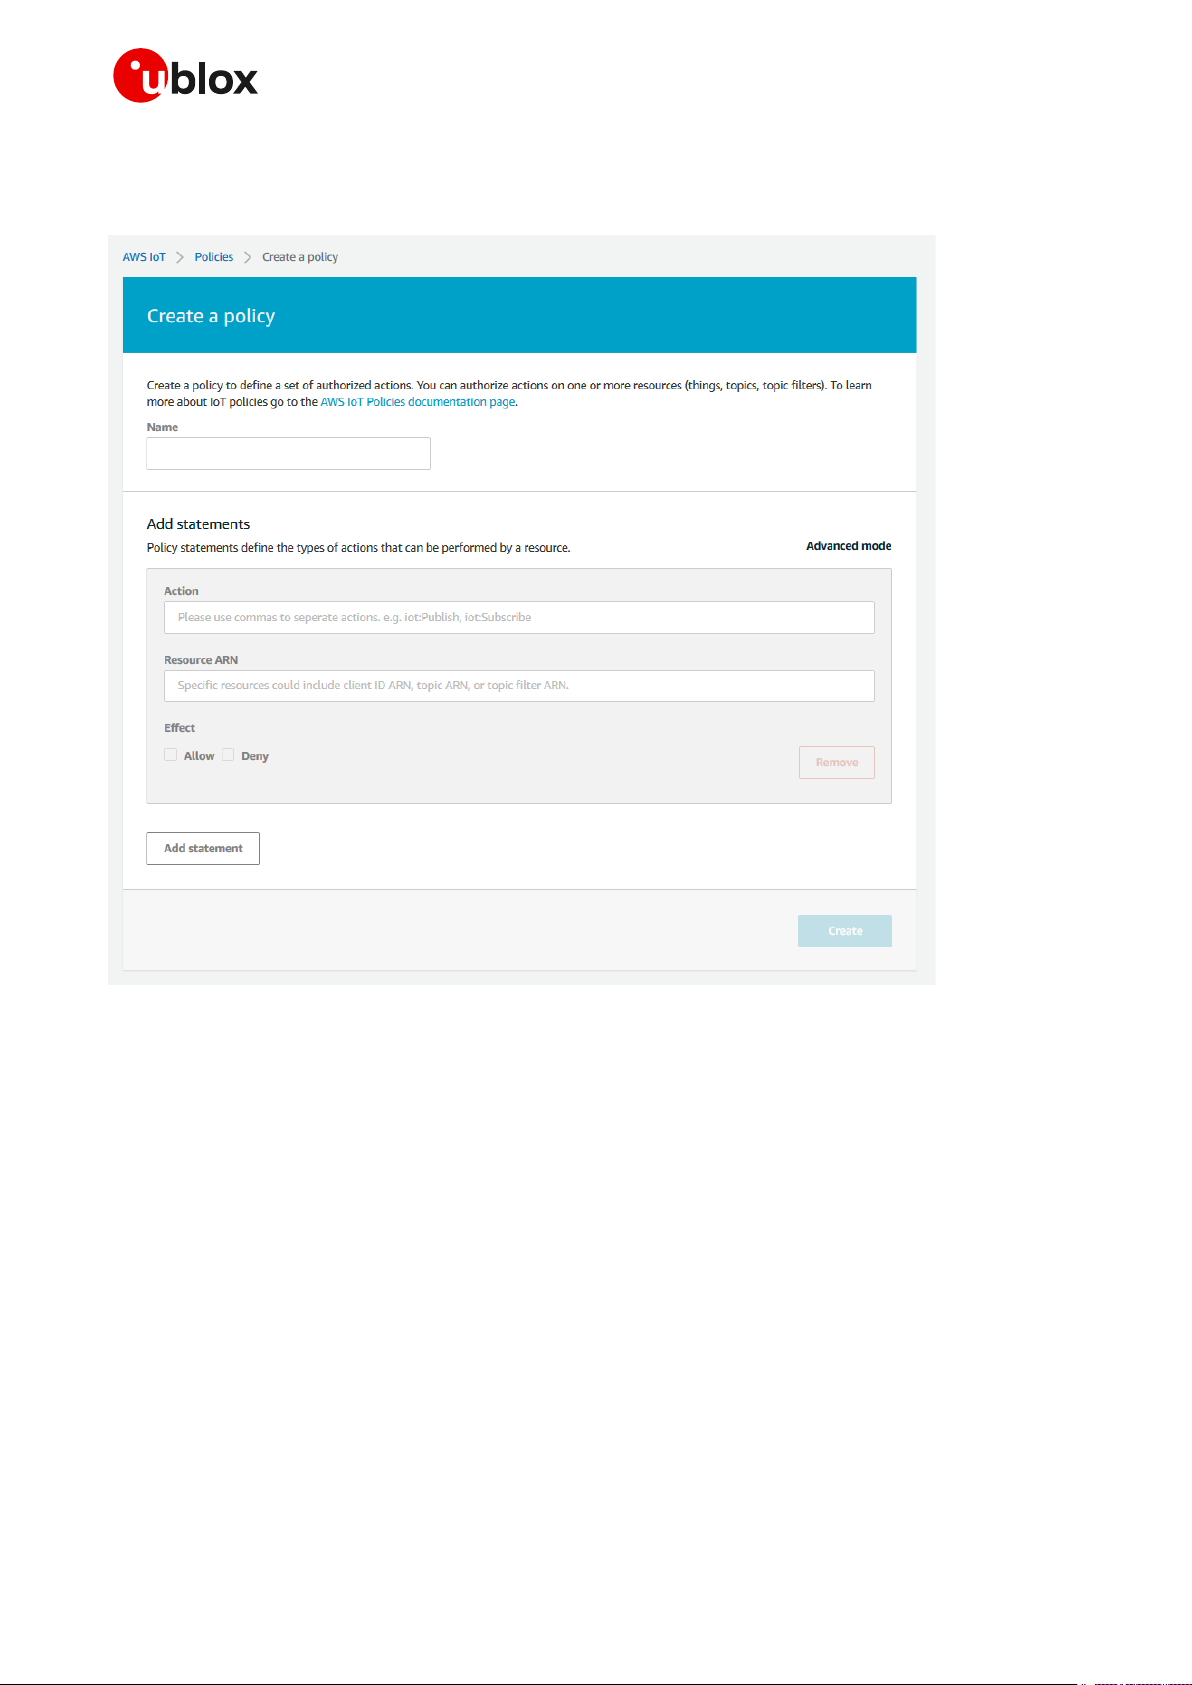
Then, on the next page, type a name for the new policy and type the required actions in the field Action
(e.g., iot:Publish, iot:Receive, iot:Subscribe) considering the resource identification reported in
the field Resource ARN.
Figure 2: Create a policy
Remember to check the Allow box. Multiple statements can be added in the same policy. Complete
the procedure by clicking Create. See a sample of a policy with two statements in the following script.
{
"Version": "2012-10-17",
"Statement": [
{
"Effect": "Allow",
"Action": [
"iot:Publish",
"iot:Receive",
"iot:Subscribe"
],
"Resource": "*"
},
{
"Effect": "Allow",
"Action": "iot:Connect",
"Resource": "arn:aws:iot:us-east-1:XXXXXXXX:*"
}
]
}
SARA-R422 / SARA-R5 - Application note
UBX-20044809 - R03 AWS IoT setup Page 6 of 17
C1-Public
For non-dev environments, all devices in your fleet must have credentials with privileges that
authorize intended actions only, which include (but are not limited to) AWS IoT MQTT actions such
as publishing messages or subscribing to topics with specific scope and context. The specific
permission policies can vary for your use cases. Identify the permission policies that best meet
your business and security requirements.
For additional sample policies, refer to:
https://docs.aws.amazon.com/iot/latest/developerguide/example-iot-policies.html
https://docs.aws.amazon.com/iot/latest/developerguide/security-best-practices.html
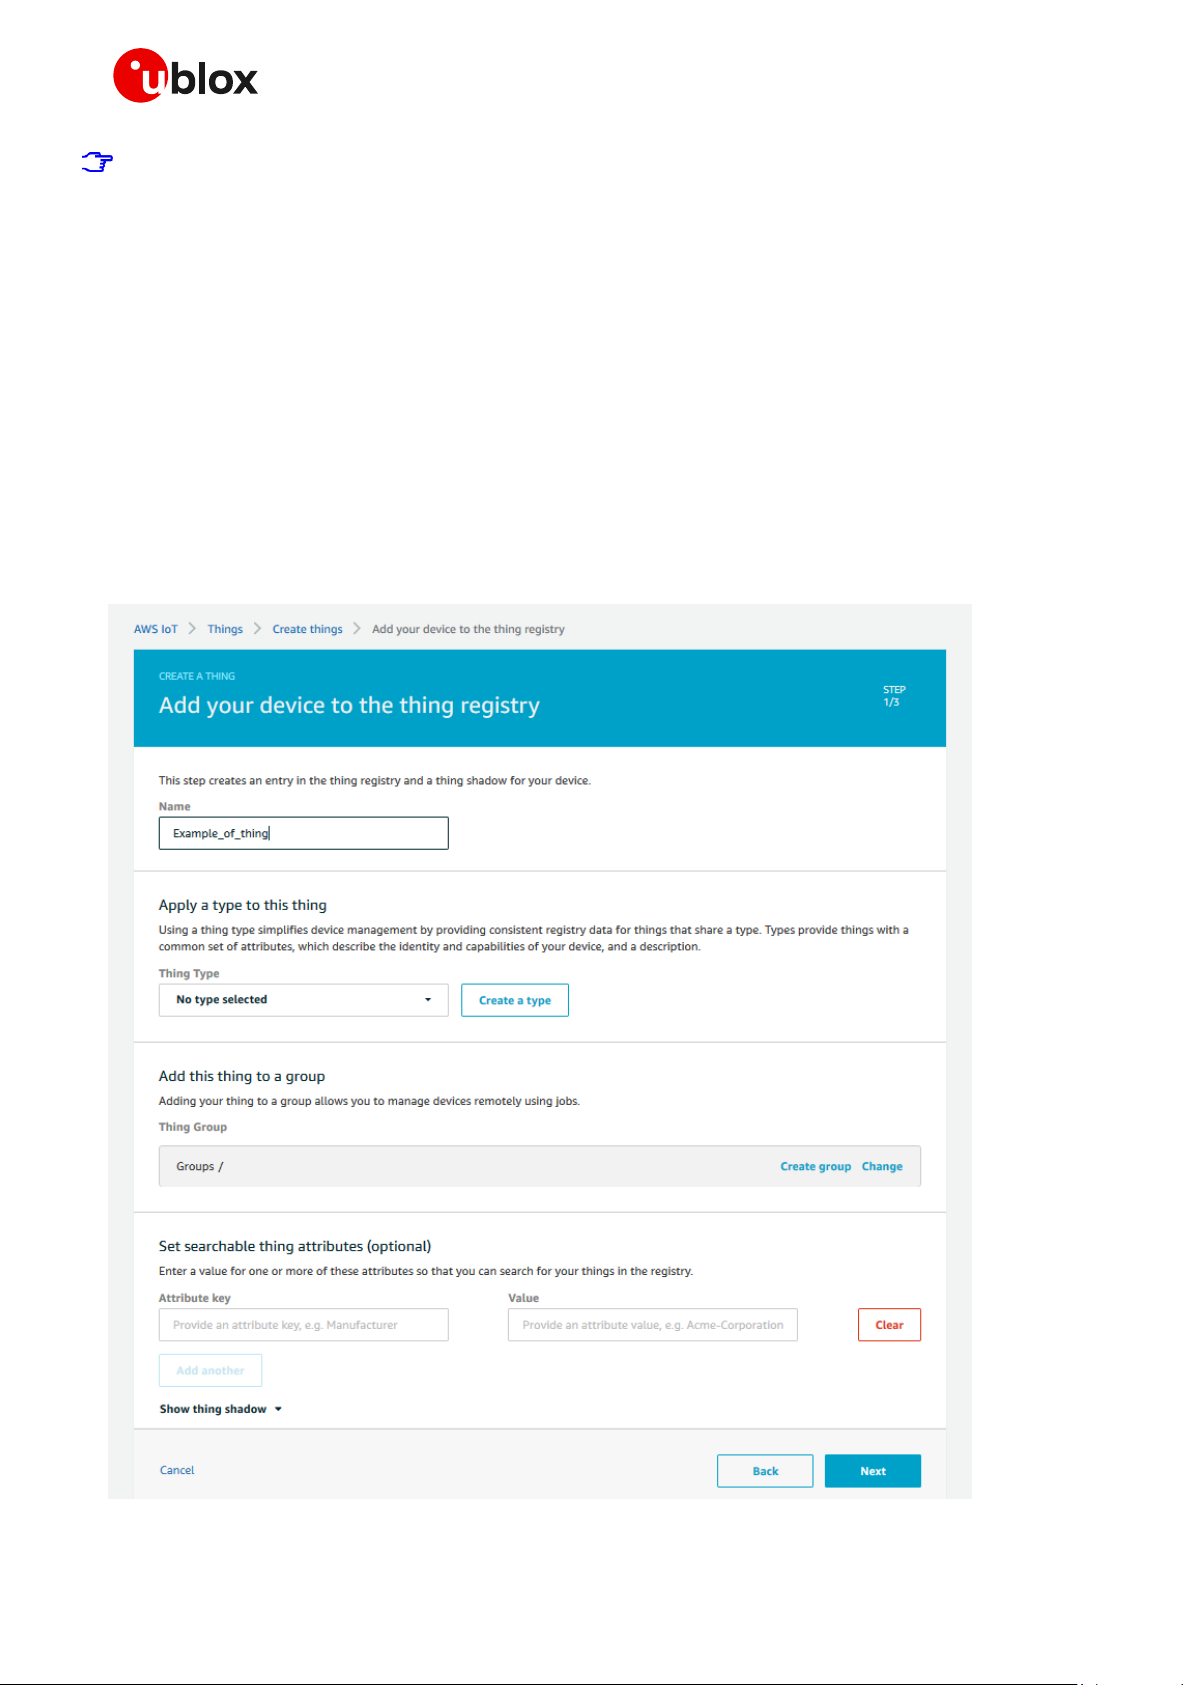
1.2 Thing creation
As the next step, navigate to Manage > Things using the menu on the left-hand side of the AWS IoT
Core console and select Create to initialize a new “thing”.
On the page that follows, select Create a single thing and proceed. Here, insert a thing name in the
box; no further settings should be configured on this page. Complete the procedure by clicking Next.
For clarity, see the example shown in the image below:
Figure 3: Add your device to the thing registry

SARA-R422 / SARA-R5 - Application note
UBX-20044809 - R03 AWS IoT setup Page 7 of 17
C1-Public
To create and download the necessary certificates, click on Create certificate. Proceed with the
download of the certificate and the public and private keys that have been generated for this thing.
Figure 4: Certificate and keys creation
It is required to download a root CA certificate for AWS IoT, which is available in the dedicated link. A
new page will be opened, as shown in Figure 5. Select and download an RSA 2048 bit key: Amazon
Root CA 1 certificate to complete the process.

SARA-R422 / SARA-R5 - Application note
UBX-20044809 - R03 AWS IoT setup Page 8 of 17
C1-Public
Figure 5: Download AWS Root CA
Once all the certificates and keys are downloaded, click Activate and finally click Done.
Section 2 shows how to use these certificates and keys with the module.

SARA-R422 / SARA-R5 - Application note
UBX-20044809 - R03 AWS IoT setup Page 9 of 17
C1-Public
1.3 Attach policy to created thing
At this point, AWS will permit attaching a “policy” to the thing. This is the last necessary step to
correctly use MQTT protocol and services. Thus, proceed by clicking: Manage > Thing in the left-hand
navigation menu. Then click on the thing you just created.
Figure 6: Select certificate
On the navigation menu click Security, then click the certificate created in the previous steps.
On the certificate page click on Policies in the left-hand navigation menu. Next, click the Actions drop
down on the right of the page. In the Actions drop down menu click Attach Policy.
Figure 7: Attach policies
To conclude the process, select the policy created in section 1.1, then click Attach.

SARA-R422 / SARA-R5 - Application note
UBX-20044809 - R03 u-blox module setup Page 10 of 17
C1-Public
2 u-blox module setup
2.1 Store certificates in module file system
After downloading the CA and CC certificates and PK from AWS, store them in the module file system
via AT commands or using m-center.
2.1.1 AT commands procedure to store the file in the module
Use the +UDWNFILE AT command to store all the certificates and keys required for communication
in the flash file system of the module.
Command
Response
Description
AT+UDWNFILE="aws_ca.pem",1188
>
-----BEGIN CERTIFICATE----hDKXJioaldXgjUkK642M4UwtBV8ob2
x...
jgSubJrIqg0CAwEAAaNCMEAwDwYDQn
oZsG4q5WTP468SQvvG5
-----END CERTIFICATE-----
OK
After character “>” copy/paste the entire
certificate.
The file is stored successfully.
Repeat the same procedure for the other certificates that may be necessary: e.g., for CC and PK.
2.1.2 m-center procedure to store the file in the module
Similarly, m-center evaluation software can be used to store the certificates file into the module. The
software uses the same +UDWNFILE AT command but it is masked by a simple GUI.
Any file can be stored in the module via the File System Tab (see Figure 8), by clicking Store file. A
window will open where the chosen file can be selected from the Windows Explorer. Even in this case,
repeat the same procedure for the other certificates that may be necessary: e.g., for CC and PK.
By clicking Dir, the m-center window will display all the stored files.
The u-blox m-center can be downloaded free-of-charge from our website (http://www.u-blox.com).
Figure 8: m-center File System tab

SARA-R422 / SARA-R5 - Application note
UBX-20044809 - R03 u-blox module setup Page 11 of 17
C1-Public
2.2 Check CA, CC, and PK in the file system
Command
Response
Description
AT+ULSTFILE=2,"aws_ca.pem"
+ULSTFILE: 1188
OK
CA availability in the module.
AT+ULSTFILE=2,"383847e4d4-cert
ificate.pem.crt"
+ULSTFILE: 1224
OK
CC availability in the module.
AT+ULSTFILE=2,"383847e4d4-priv
ate.pem.key"
+ULSTFILE: 1679
OK
PK availability in the module
2.3 Certificates manager configuration
Command
Response
Description
AT+USECMNG=1,0,"AWS_CA","aws_c
a.pem"
+USECMNG: 1,0,"AWS_CA","CB17E4
31673EE209FE455793F30AFA1C"
OK
Import the CA in the certificates manager.
AT+USECMNG=1,1,"AWS_Client","3
83847e4d4-certificate.pem.crt"
+USECMNG: 1,1,"AWS_Client","50C
3004AAE690124E3D7F96F904D7084"
OK
Import the CC in the certificates manager.
AT+USECMNG=1,2,"Client_Key","3
83847e4d4-private.pem.key"
+USECMNG: 1,2,"Client_Key","CD8
79AA22744A7211D3AF5D3BEFAFF29"
OK
Import the client PK in the certificates manager.
2.4 Security profile configuration
Command
Response
Description
AT+USECPRF=0,0,1
OK
Set the certificate validation level 1.
AT+USECPRF=0,2,0
OK
Set automatic the cipher suite.
AT+USECPRF=0,3,"AWS_CA"
OK
Set the trusted root certificate internal name.
AT+USECPRF=0,5,"AWS_Client"
OK
Set the client certificate internal name.
AT+USECPRF=0,6,"Client_Key"
OK
Set the client key internal name.
AT+USECPRF=0,10,"xxx-ats.iot.useast-2.amazonaws.com"
OK
Set the Server Name Indication.
☞ SNI is a feature of SSL/TLS which uses an
additional SSL/TLS extension header to
specify the server name to which the client
is connecting to. SNI configuration may be
required to support the certificate handling
used with virtual hosting provided by the
various SSL/TLS enabled servers mostly in
cloud-based infrastructures.

SARA-R422 / SARA-R5 - Application note
UBX-20044809 - R03 Example of MQTT session between module and AWS IoT Page 12 of 17 C1-Public
3 Example of MQTT session between module
and AWS IoT
The best way to describe the interaction between a u-blox module and AWS IoT is through a simple
use case. The following example describes a MQTT session that simulates a form of remote
temperature control. The u-blox module is the MQTT client responsible for publishing temperature
messages and receiving action messages from the AWS IoT server.
The module sends the temperature messages to the “building/groundfloor/office_1/temperature”
topic and is also subscribed to the “building/groundfloor/office_1/heating” topic for receiving the
AWS IoT commands. Both module AT commands and AWS actions are manually performed. On AWS
it is possible to automate the operations by defining rules and actions but this topic is beyond the
scope of this document.
3.1 Module setup: start a MQTT session and subscribe to a topic
Make sure to correctly activate an IP data connection before using the AT commands in this
section. This is necessary because a packet switched (PS) data connection must be activated
before creating a socket and connecting to the AWS server.
Go to the AWS IoT Core console at console.aws.amazon.com/iot. In the navigation panel, choose
Settings. The endpoint address is listed under Custom endpoint.
The user should note that the string “-ats” need to be removed from the endpoint address in case
a legacy certificate is used as root CA. On the opposite, as in the example here reported, if an
Amazon root CA (certificate from Amazon Trust Services – see Figure 5: Download AWS Root CA)
is used the string “-ats” needs to be used in the endpoint address. Once identified the correct
endpoint to use, the same endpoint address needs to be used as the remote server name in the
+UMQTT AT command configuration but also as SNI in the +USECPRF AT command
configuration.
Furthermore, AWS IoT Core is currently supported using the legacy root CA certificate in a limited
number of AWS regions. For the list of supported AWS region visit the following page:
https://docs.aws.amazon.com/general/latest/gr/greengrass.html#greengrass-legacy-endpoints.
Command
Response
Description
AT+UMQTT=2,"xxx-ats.iot.useast-2.amazonaws.com",8883
OK
Set the remote server name (the above endpoint
address) and the server port (TLS MQTT).
AT+UMQTT=11,1,0
OK
Enable the secure connection option using the
profile 0. See section 2.4.
AT+UMQTTC=1
OK
Connect to the AWS IoT broker and start a
secure MQTT session.
+UUMQTTC: 1,1
AT+UMQTTC=4,0,"building/ground
floor/office_1/heating"
OK
Subscribe to the heating system control of the
ground floor office #1.
+UUMQTTC: 4,1,0,"building/grou
ndfloor/office_1/heating"

SARA-R422 / SARA-R5 - Application note
UBX-20044809 - R03 Example of MQTT session between module and AWS IoT Page 13 of 17
C1-Public
3.2 Configure AWS IoT: subscribe to a topic
From the AWS IoT Core console, select Test from the navigation pane, and choose MQTT test client.
Enter the topic and click Subscribe to topic, as shown in Figure 9:
Figure 9: AWS subscribe to a topic
3.3 Module: publish a message to AWS IoT
Publish the temperature:
Command
Response
Description
AT+UMQTTC=2,0,0,0,"building/gr
oundfloor/office_1/temperature
","10 degrees Celsius"
OK
Publish the temperature of the ground floor
office #1.
+UUMQTTC: 2,1

SARA-R422 / SARA-R5 - Application note
UBX-20044809 - R03 Example of MQTT session between module and AWS IoT Page 14 of 17
C1-Public
3.4 AWS IoT: read the received message
Figure 10: AWS read a message
3.5 AWS IoT: publish a message to module
To publish a message to the “building/groundfloor/office_1/heating” topic, select Publish to a
topic, enter the topic in the topic field, and then click to the button Publish to topic.
Figure 11: AWS publish a message
3.6 Module read the received message
Command
Response
Description
+UUMQTTC: 6,1
URC notifying the received publish message.
AT+UMQTT=6,1
+UMQTTC: 6,0,44,37,"building/g
roundfloor/office_1/heating",7
,"Turn ON"
OK
Read the received message.

SARA-R422 / SARA-R5 - Application note
UBX-20044809 - R03 Appendix Page 15 of 17
C1-Public
Appendix
A Glossary
Abbreviation
Definition
AWS
Amazon Web Services
CA
Certificate Authority
CC
Client Certificate
MQTT
Message Queuing Telemetry Transport
PK
Private Key
PS
Packet Switched
SNI
Server Name Indication
TLS
Transport Layer Security
Table 1: Explanation of the abbreviations and terms used

SARA-R422 / SARA-R5 - Application note
UBX-20044809 - R03 Related documentation Page 16 of 17
C1-Public
Related documentation
[1] u-blox SARA-R5 series data sheet, UBX-19016638
[2] u-blox SARA-R5 series AT commands manual, UBX-19047455
[3] u-blox SARA-R5 series system integration manual, UBX-19041356
[4] u-blox SARA-R4 / SARA-R5 internet application development guide, UBX-20032566
[5] u-blox SARA-R4 series data sheet, UBX-16024152
[6] u-blox SARA-R4 series AT commands manual, UBX-17003787
[7] u-blox SARA-R4 series system integration manual, UBX-16029218
For product change notifications and regular updates of u-blox documentation, register on our
website, www.u-blox.com.
Revision history
Revision
Date
Name
Comments
R01
26-Oct-2020
mreb
Initial release
R02
26-Jan-2021
mreb
Added more detailed instructions for connecting to the AWS IoT service
R03
29-Mar-2021
mreb
Extended document applicability to SARA-R422S and SARA-R422M8S

SARA-R422 / SARA-R5 - Application note
UBX-20044809 - R03 Contact Page 17 of 17
C1-Public
Contact
For complete contact information, visit us at www.u-blox.com.
u-blox Offices
North, Central and South America
u-blox America, Inc.
Phone: +1 703 483 3180
E-mail: info_us@u-blox.com
Regional Office West Coast:
Phone: +1 408 573 3640
E-mail: info_us@u-blox.com
Technical Support:
Phone: +1 703 483 3185
E-mail: support@u-blox.com
Headquarters
Europe, Middle East, Africa
u-blox AG
Phone: +41 44 722 74 44
E-mail: info@u-blox.com
Support: support@u-blox.com
Asia, Australia, Pacific
u-blox Singapore Pte. Ltd.
Phone: +65 6734 3811
E-mail: info_ap@u-blox.com
Support: support_ap@u-blox.com
Regional Office Australia:
Phone: +61 3 9566 7255
E-mail: info_anz@u-blox.com
Support: support_ap@u-blox.com
Regional Office China (Beijing):
Phone: +86 10 68 133 545
E-mail: info_cn@u-blox.com
Support: support_cn@u-blox.com
Regional Office China (Chongqing):
Phone: +86 23 6815 1588
E-mail: info_cn@u-blox.com
Support: support_cn@u-blox.com
Regional Office China (Shanghai):
Phone: +86 21 6090 4832
E-mail: info_cn@u-blox.com
Support: support_cn@u-blox.com
Regional Office China (Shenzhen):
Phone: +86 755 8627 1083
E-mail: info_cn@u-blox.com
Support: support_cn@u-blox.com
Regional Office India:
Phone: +91 80 405 092 00
E-mail: info_in@u-blox.com
Support: support_in@u-blox.com
Regional Office Japan (Osaka):
Phone: +81 6 6941 3660
E-mail: info_jp@u-blox.com
Support: support_jp@u-blox.com
Regional Office Japan (Tokyo):
Phone: +81 3 5775 3850
E-mail: info_jp@u-blox.com
Support: support_jp@u-blox.com
Regional Office Korea:
Phone: +82 2 542 0861
E-mail: info_kr@u-blox.com
Support: support_kr@u-blox.com
Regional Office Taiwan:
Phone: +886 2 2657 1090
E-mail: info_tw@u-blox.com
Support: support_tw@u-blox.com
 Loading...