

Page 1

UBX-18046432 - R09
C1-Public www.u-blox.com
SARA-G450
Quad-band GSM/GPRS module
System integration manual
Abstract
This document describes the features and the system integration of the SARA-G450 quad-band
GSM/GPRS cellular modules. These modules are a complete and cost efficient solution offering voice
and/or data communication in the compact SARA form factor.
Page 2
SARA-G450 - System integration manual
UBX-18046432 - R09 Document information Page 2 of 131
C1-Public
Document information
Title
SARA-G450
Subtitle
Quad-band GSM/GPRS module
Document type
System integration manual
Document number
UBX-18046432
Revision and date
R09
08-Mar-2021
Disclosure restriction
C1-Public
Product status
Corresponding content status
Functional sample
Draft
For functional testing. Revised and supplementary data will be published later.
In development /
Prototype
Objective specification
Target values. Revised and supplementary data will be published later.
Engineering sample
Advance information
Data based on early testing. Revised and supplementary data will be published later.
Initial production
Early production information
Data from product verification. Revised and supplementary data may be published later.
Mass production /
End of life
Production information
Document contains the final product specification.
This document applies to the following products:
Product name
Type number
Modem version
Application version
PCN reference
Product status
SARA-G450
SARA-G450-00C-00
09.02
A02.01
UBX-18067098
Obsolete
SARA-G450-00C-01
09.02
A03.17
UBX-20033037
Mass production
SARA-G450-01C-00
09.02
A04.23
UBX-20033037
End of life
SARA-G450-01C-01
09.02
A05.01
UBX-21006193
Mass production
u-blox or third parties may hold intellectual property rights in the products, names, logos and designs included in this document.
Copying, reproduction, modification or disclosure to third parties of this document or any part thereof is only permitted with the
express written permission of u-blox.
The information contained herein is provided “as is” and u-blox assumes no liability for its use. No warranty, either express or
implied, is given, including but not limited to, with respect to the accuracy, correctness, reliability and fitness for a particular
purpose of the information. This document may be revised by u-blox at any time without notice. For the most recent documents,
visit www.u-blox.com.
Copyright © u-blox AG.
Page 3

SARA-G450 - System integration manual
UBX-18046432 - R09 Contents Page 3 of 131
C1-Public
Contents
Document information ................................................................................................................................ 2
Contents .......................................................................................................................................................... 3
1 System description ............................................................................................................................... 6
1.1 Overview ........................................................................................................................................................ 6
1.2 Architecture ................................................................................................................................................. 7
1.3 Pin-out ........................................................................................................................................................... 9
1.4 Operating modes .......................................................................................................................................13
1.5 Supply interfaces ......................................................................................................................................15
1.5.1 Module supply input (VCC) .............................................................................................................15
1.5.2 RTC supply input/output (V_BCKP) ..............................................................................................21
1.5.3 Generic digital interfaces supply output (V_INT) .......................................................................22
1.6 System function interfaces ....................................................................................................................22
1.6.1 Module power-on (PWR_ON) ..........................................................................................................22
1.6.2 Module power-off ..............................................................................................................................24
1.6.3 Module reset ......................................................................................................................................26
1.6.4 Digital I/O interfaces voltage selection (VSEL)...........................................................................26
1.7 Antenna interface .....................................................................................................................................26
1.7.1 Antenna RF interface (ANT) ...........................................................................................................26
1.7.2 Antenna detection interface (ANT_DET).....................................................................................27
1.8 SIM interface ..............................................................................................................................................28
1.8.1 (U)SIM card interface .......................................................................................................................28
1.8.2 SIM card detection interface (SIM_DET) .....................................................................................28
1.9 Serial interfaces ........................................................................................................................................28
1.9.1 Primary main serial interface (UART) ...........................................................................................29
1.9.2 Secondary auxiliary serial interface (AUX UART) .......................................................................40
1.9.3 Additional serial interface for FW upgrade and tracing (FT UART) .......................................42
1.9.4 DDC (I2C) interface ...........................................................................................................................42
1.10 Audio interfaces ........................................................................................................................................44
1.10.1 Analog audio interface .....................................................................................................................44
1.11 General Purpose Input/Output (GPIO) ..................................................................................................45
1.12 Reserved pins (RSVD) ..............................................................................................................................45
1.13 System features ........................................................................................................................................46
1.13.1 Network indication ...........................................................................................................................46
1.13.2 Antenna detection ............................................................................................................................46
1.13.3 Jamming detection ..........................................................................................................................46
1.13.4 TCP/IP and UDP/IP ............................................................................................................................47
1.13.5 FTP .......................................................................................................................................................47
1.13.6 HTTP ....................................................................................................................................................47
1.13.7 SSL/TLS ..............................................................................................................................................47
1.13.8 Dual stack IPv4/IPv6 .........................................................................................................................48
Page 4

SARA-G450 - System integration manual
UBX-18046432 - R09 Contents Page 4 of 131
C1-Public
1.13.9 Smart temperature management ................................................................................................48
1.13.10 AssistNow clients and GNSS integration ..............................................................................51
1.13.11 Hybrid positioning and CellLocate® ........................................................................................51
1.13.12 Firmware upgrade Over AT (FOAT) .........................................................................................54
1.13.13 Last gasp ......................................................................................................................................54
1.13.14 Power saving ................................................................................................................................55
2 Design-in ................................................................................................................................................ 56
2.1 Overview ......................................................................................................................................................56
2.2 Supply interfaces ......................................................................................................................................56
2.2.1 Module supply (VCC) ........................................................................................................................56
2.2.2 RTC supply (V_BCKP) .......................................................................................................................70
2.2.3 Interface supply (V_INT) ..................................................................................................................71
2.3 System functions interfaces ..................................................................................................................72
2.3.1 Module power-on (PWR_ON) ..........................................................................................................72
2.3.2 Module hard power-off (PWR_OFF) ..............................................................................................73
2.3.3 Digital I/O interfaces voltage selection (VSEL)...........................................................................74
2.4 Antenna interface .....................................................................................................................................75
2.4.1 Antenna RF interface (ANT) ...........................................................................................................75
2.4.2 Antenna detection interface (ANT_DET).....................................................................................82
2.5 SIM interface ..............................................................................................................................................85
2.5.1 Guidelines for SIM circuit design ...................................................................................................85
2.5.2 Guidelines for SIM layout design ...................................................................................................90
2.6 Serial interfaces ........................................................................................................................................91
2.6.1 Primary main serial interface (UART) ...........................................................................................91
2.6.2 Secondary auxiliary serial interface (AUX UART) .......................................................................98
2.6.3 Additional serial interface for FW upgrade and Tracing (FT UART) ......................................99
2.6.4 DDC (I2C) interface ........................................................................................................................ 100
2.7 Audio interfaces ..................................................................................................................................... 107
2.7.1 Analog audio interface .................................................................................................................. 107
2.8 General Purpose Input/Output (GPIO) ............................................................................................... 112
2.8.1 Guidelines for GPIO circuit design .............................................................................................. 112
2.8.2 Guidelines for GPIO layout design .............................................................................................. 113
2.9 Reserved pins (RSVD) ........................................................................................................................... 113
2.10 Module placement ................................................................................................................................. 113
2.11 Module footprint and paste mask ...................................................................................................... 114
2.12 Schematic for SARA-G450 modules integration ............................................................................ 115
2.13 Design-in checklist ................................................................................................................................. 117
2.13.1 Schematic checklist ...................................................................................................................... 117
2.13.2 Layout checklist ............................................................................................................................. 118
2.13.3 Antenna checklist .......................................................................................................................... 118
3 Handling and soldering ................................................................................................................... 119
3.1 Packaging, shipping, storage and moisture preconditioning ....................................................... 119
Page 5

SARA-G450 - System integration manual
UBX-18046432 - R09 Contents Page 5 of 131
C1-Public
3.2 Handling ................................................................................................................................................... 119
3.3 Soldering .................................................................................................................................................. 120
3.3.1 Soldering paste .............................................................................................................................. 120
3.3.2 Reflow soldering ............................................................................................................................. 120
3.3.3 Optical inspection .......................................................................................................................... 121
3.3.4 Cleaning ........................................................................................................................................... 121
3.3.5 Repeated reflow soldering ........................................................................................................... 122
3.3.6 Wave soldering ............................................................................................................................... 122
3.3.7 Hand soldering ............................................................................................................................... 122
3.3.8 Rework ............................................................................................................................................. 122
3.3.9 Conformal coating ......................................................................................................................... 122
3.3.10 Casting ............................................................................................................................................. 123
3.3.11 Grounding metal covers ............................................................................................................... 123
3.3.12 Use of ultrasonic processes ........................................................................................................ 123
4 Approvals ............................................................................................................................................. 124
4.1 Product certification approval overview ............................................................................................ 124
4.2 European conformance ......................................................................................................................... 125
4.3 Chinese compulsory certification ....................................................................................................... 125
5 Product testing ................................................................................................................................. 126
5.1 u-blox in-series production test .......................................................................................................... 126
5.2 Test parameters for OEM manufacturer .......................................................................................... 126
5.2.1 “Go/No go” tests for integrated devices ................................................................................... 127
5.2.2 Functional tests providing RF operation .................................................................................. 127
Appendix ..................................................................................................................................................... 128
A Migration between SARA modules ............................................................................................. 128
B Glossary ............................................................................................................................................... 128
Related documentation ......................................................................................................................... 131
Revision history ........................................................................................................................................ 131
Contact ........................................................................................................................................................ 132
Page 6

SARA-G450 - System integration manual
UBX-18046432 - R09 System description Page 6 of 131
C1-Public
1 System description
1.1 Overview
SARA-G450 modules are versatile 2.5G GSM/GPRS cellular modules in the miniature SARA 96-pin
LGA (Land Grid Array) form factor (26.0 x 16.0 mm).
Featuring low power consumption, the SARA-G450 modules combine baseband, RF transceiver,
power management unit, and power amplifier in a single solution allowing an easy integration into
compact designs and a seamless drop-in migration between other SARA series modules and to and
from the other u-blox cellular modules families.
SARA-G450 modules provide a fully qualified and certified solution, reducing cost and enabling short
time to market. These modules are ideally suited for M2M applications such as: Automatic Meter
Reading (AMR), Remote Monitoring Automation and Control (RMAC), surveillance and security, road
pricing, asset tracking, fleet management, anti-theft systems and Point of Sales (PoS) terminals.
SARA-G450 modules are full-feature GSM/GPRS quad-band cellular modules with a comprehensive
feature set including an extensive set of internet protocols. The modules are also designed to provide
fully integrated access to u-blox GNSS positioning chips and modules, with embedded A-GPS
(AssistNow Online and AssistNow Offline) functionality. Any host processor connected to the cellular
module through a single serial port can control both the cellular module and the positioning
chip / module.
The SARA-G450 modules’ compact form factor and LGA pads allow fully automated assembly with
standard pick & place and reflow soldering equipment for cost-efficient, high-volume production.
Table 1 describes a summary of interfaces and features provided by SARA-G450 modules.
Model
Data
Rate
Bands
Positioning
Interfaces
Audio
Features
Grade
GPRS
multi-slot class 12
GSM/GPRS 4
-band
Integrated GNSS receiver GNSS via modem AssistNow Software CellLocate® UART
SPI
USB 2.0 GPIO
DDC (I
2C)
Analog audio Digital audio Network indication Antenna supervisor Jamming detection Embedded TCP, UDP
stack
Embedded FTP, HTTP Embedded SSL, TLS Dual stack IPv4 / IPv6 FW update via serial interface Standard Professional Automotive
SARA-G450
●
● □ □ □
●
● □ □ ● ● □ ● ● ● ● ● ●
● = supported by all FW versions
□ = supported by product version “01” onwards
Table 1: SARA-G450 modules characteristics summary
Page 7

SARA-G450 - System integration manual
UBX-18046432 - R09 System description Page 7 of 131
C1-Public
Table 2 reports a summary of cellular radio access technologies characteristics of SARA-G450
modules.
Item
SARA-G450
Mobile Station Class
B1
GSM/GPRS protocol stack
3GPP Release 99
GSM/GPRS bands
GSM 850 MHz
E-GSM 900 MHz
DCS 1800 MHz
PCS 1900 MHz
GSM/GPRS Power Class
Class 4 (33 dBm)
for 850/900 bands
Class 1 (30 dBm)
for 1800/1900 bands
Packet Switched Data rate
GPRS multi-slot class 122
Coding scheme CS1-CS4
Up to 85.6 kbit/s DL3
Up to 85.6 kbit/s UL3
Table 2: SARA-G450 modules GSM/GPRS characteristics summary
1.2 Architecture
Figure 1 summarizes the architecture of SARA-G450 modules, illustrating the internal blocks of the
modules, consisting of the RF, baseband and power management main sections, and the available
interfaces.
V_BCKP (RTC)
V_INT (I/O)
26 MHz
32.768 kHz
RF
transceiver
Power
Management
Unit
Baseband
ANT
Switch
PA
VCC (supply)
Memory
Power-off
Power-on
SIM card
SIM card detection
UART (primary main)
UART (secondary auxiliary)
DDC (I2C)
Analog audio (MIC & SPK)
GPIOs
Antenna detection
VSEL (I/O voltage selection)
UART (flashing & tracing)
32.768 kHz over GPIO
Figure 1: SARA-G450 modules block diagram
1
Device can be attached to both GPRS and GSM services (i.e. Packet Switch and Circuit Switch mode) using one service at a
time. For example, if an incoming call occurs during data transmission, the data connection is suspended to allow the voice
communication. Once the voice call has terminated, the data service is resumed.
2
GPRS multi-slot class 12 implies a maximum of 4 slots in Down-Link (reception) and 4 slots in Up-Link (transmission) with 5
slots in total. The SARA-G450 modules can be configured as GPRS multi-slot class 10 by means of AT command.
3
The maximum bit rate of the module depends on the current network settings.
Page 8

SARA-G450 - System integration manual
UBX-18046432 - R09 System description Page 8 of 131
C1-Public
The RF section is composed of the following main elements:
• 2G RF transceiver performing modulation, up-conversion of the baseband I/Q signals,
down-conversion and demodulation of the RF received signals
• 2G power amplifier, which amplifies the signals modulated by the RF transceiver
• RF switch, which connects the antenna input/output pin (ANT) of the module to the suitable
RX/TX path
• 26 MHz crystal, connected to the digital controlled crystal oscillator to perform the clock reference
in active-mode and connected-mode
The Baseband and Power Management section is composed of the following main elements:
• Baseband processor
• Memory system
• Voltage regulators to derive all the system supply voltages from the module supply VCC
• Circuit for the RTC clock reference in low power idle-mode
☞ SARA-G450-00C modules, i.e. the “00” product version of the SARA-G450 modules, do not
support the following interfaces, which should be left unconnected and should not be driven by
external devices:
o Secondary auxiliary UART interface
o DDC (I2C) interface
o Analog audio interface
Page 9

SARA-G450 - System integration manual
UBX-18046432 - R09 System description Page 9 of 131
C1-Public
1.3 Pin-out
Table 3 lists the pin-out of the SARA-G450 modules, with pins grouped by function.
Function
Pin Name
Pin No
I/O
Description
Remarks
Power
VCC
51, 52, 53
I
Module supply
input
All VCC pins must be connected to external supply.
VCC supply circuit affects the RF performance and
compliance of the device integrating the module with
applicable required certification schemes.
See section 1.5.1 for description and requirements.
See section 2.2.1 for external circuit design-in.
GND
1, 3, 5, 14, 20, 22,
30, 32, 43, 50, 54,
55, 57-61, 63-96
N/A
Ground
GND pins are internally connected to each other.
External ground connection affects the RF and thermal
performance of the device.
V_BCKP
2
I/O
Real Time Clock
supply
input/output
V_BCKP = 3.1 V (typical).
V_BCKP is generated by internal low power linear
regulator when a valid VCC supply is present.
See section 1.5.2 for functional description.
See section 2.2.2 for external circuit design-in.
V_INT
4
O
Generic Digital
Interfaces supply
output
V_INT supply output, rail of the Digital I/O Interfaces,
generated by internal linear regulator when the module
is switched on.
V_INT = 1.8 V (typical), if VSEL is connected to GND.
V_INT = 3 V (typical), if VSEL is unconnected.
Test-Point recommended for diagnostic purpose.
See section 1.5.3 for functional description.
See section 2.2.3 for external circuit design-in.
System
PWR_ON
15 I Power-on input
Internal 28 k active pull-up to 2.5 V internal supply.
Test-Point recommended for diagnostic purpose.
See section 1.6.1 for functional description.
See section 2.3.1 for external circuit design-in.
PWR_OFF
18 I Power-off input
Internally connected to 1.5 V internal supply.
Test-Point recommended for diagnostic purpose.
See sections 1.6.2, 1.6.3 for functional description.
See section 2.3.2 for external circuit design-in.
VSEL
21 I Voltage selection
Input to select the operating voltage of the digital I/O
interfaces of the module (the UART interfaces, I2C
interface and GPIO pins).
See section 1.6.4 for functional description.
See section 2.3.3 for external circuit design-in.
Antenna
ANT
56
I/O
RF input/output for
antenna
50 nominal characteristic impedance.
Antenna circuit affects the RF performance and
compliance of the device integrating the module with
applicable required certification schemes.
See section 1.7 for description and requirements.
See section 2.4 for external circuit design-in.
ANT_DET
62
I
Input for antenna
detection
ADC input for antenna detection function.
See section 1.7.2 for functional description.
See section 2.4.2 for external circuit design-in.
Page 10

SARA-G450 - System integration manual
UBX-18046432 - R09 System description Page 10 of 131
C1-Public
Function
Pin Name
Pin No
I/O
Description
Remarks
SIM
VSIM
41 O SIM supply output
VSIM = 1.8 V (typical) or 2.8 V (typical) automatically
generated according to the connected SIM type.
See section 1.8 for functional description.
See section 2.5 for external circuit design-in.
SIM_IO
39
I/O
SIM data
Internal 4.7 k pull-up to VSIM.
See section 1.8 for functional description.
See section 2.5 for external circuit design-in.
SIM_CLK
38 O SIM clock
3.25 MHz clock output for 1.8 V / 3 V SIM.
See section 1.8 for functional description.
See section 2.5 for external circuit design-in.
SIM_RST
40 O SIM reset
Reset output for 1.8 V / 3 V SIM.
See section 1.8 for functional description.
See section 2.5 for external circuit design-in.
SIM_DET
42 I SIM detection
SIM presence detection function.
See section 1.8.2 for functional description.
See section 2.5 for external circuit design-in.
UART
RXD
13 O UART data output
Circuit 104 (RxD) in ITU-T V.24, for AT command, data,
Mux, and FOAT.
It operates at V_INT voltage level.
See section 1.9.1 for functional description.
See section 2.6.1 for external circuit design-in.
TXD
12 I UART data input
Circuit 103 (TxD) in ITU-T V.24, for AT command, data,
Mux, and FOAT.
It operates at V_INT voltage level.
See section 1.9.1 for functional description.
See section 2.6.1 for external circuit design-in.
CTS
11
O
UART clear to send
output
Circuit 106 (CTS) in ITU-T V.24.
It operates at V_INT voltage level.
See section 1.9.1 for functional description.
See section 2.6.1 for external circuit design-in.
RTS
10
I
UART request to
send input
Circuit 105 (RTS) in ITU-T V.24.
It operates at V_INT voltage level.
See section 1.9.1 for functional description.
See section 2.6.1 for external circuit design-in.
DSR 6 O
UART data set
ready output
Circuit 107 (DSR) in ITU-T V.24.
It operates at V_INT voltage level.
See section 1.9.1 for functional description.
See section 2.6.1 for external circuit design-in.
DTR 9 I
UART data
terminal ready
input
Circuit 108/2 (DTR) in ITU-T V.24.
It operates at V_INT voltage level.
See section 1.9.1 for functional description.
See section 2.6.1 for external circuit design-in.
RI 7 O
UART ring
indicator output
Circuit 125 (RI) in ITU-T V.24.
It operates at V_INT voltage level.
See section 1.9.1 for functional description.
See section 2.6.1 for external circuit design-in.
DCD 8 O
UART data carrier
detect output
Circuit 109 (DCD) in ITU-T V.24.
It operates at V_INT voltage level.
See section 1.9.1 for functional description.
See section 2.6.1 for external circuit design-in.
Page 11

SARA-G450 - System integration manual
UBX-18046432 - R09 System description Page 11 of 131
C1-Public
Function
Pin Name
Pin No
I/O
Description
Remarks
Auxiliary
UART
RXD_AUX
19
O
AUX UART data
output
Circuit 104 (RxD) in ITU-T V.24, for AT command, data
and GNSS tunneling.
It operates at V_INT voltage level.
Test-Point recommended for diagnostic purpose.
See section 1.9.2 for functional description.
See section 2.6.2 for external circuit design-in.
TXD_AUX
17
I
AUX UART data
input
Circuit 103 (TxD) in ITU-T V.24, for AT command, data
and GNSS tunneling.
It operates at V_INT voltage level.
Test-Point recommended for diagnostic purpose.
See section 1.9.2 for functional description.
See section 2.6.2 for external circuit design-in.
Additional
UART
for FW
upgrade
and Trace
RXD_FT
28
O
FT UART data
output
Circuit 104 (RxD) in ITU-T V.24, for FW upgrade via
dedicated tool, and diagnostics.
It operates at 3 V voltage level during FW upgrade,
otherwise at V_INT voltage level.
Test-Point recommended for diagnostic purpose.
See section 1.9.3 for functional description.
See section 2.6.3 for external circuit design-in.
TXD_FT
29
I
FT UART data
input
Circuit 103 (TxD) in ITU-T V.24, for FW upgrade via
dedicated tool, and diagnostics.
It operates at 3 V voltage level during FW upgrade,
otherwise at V_INT voltage level.
Test-Point recommended for diagnostic purpose.
See section 1.9.3 for functional description.
See section 2.6.3 for external circuit design-in.
DDC
SCL
27 O I2C bus clock line
Fixed open drain, for communication with u-blox
positioning modules / chips.
It operates at V_INT voltage level.
External pull-up required.
See section 1.9.4 for functional description.
See section 2.6.4 for external circuit design-in.
SDA
26
I/O
I2C bus data line
Fixed open drain, for communication with u-blox
positioning modules / chips.
It operates at V_INT voltage level.
External pull-up required.
See section 1.9.4 for functional description.
See section 2.6.4 for external circuit design-in.
Analog
Audio
MIC_BIAS
46
O
Microphone supply
output
Supply output (1.7 typ.) for the external microphone.
See section 1.10.1 for functional description.
See section 2.7.1 for external circuit design-in.
MIC_GND
47
I
Microphone analog
reference
Local ground for the external microphone (reference
for the differential analog audio input).
See section 1.10.1 for functional description.
See section 2.7.1 for external circuit design-in.
MIC_N
48
I
Differential analog
audio input
(negative)
Differential analog audio signal input (negative).
No internal DC blocking capacitor.
See section 1.10.1 for functional description.
See section 2.7.1 for external circuit design-in.
MIC_P
49
I
Differential analog
audio input
(positive)
Differential analog audio signal input (positive).
No internal DC blocking capacitor.
See section 1.10.1 for functional description.
See section 2.7.1 for external circuit design-in.
Page 12

SARA-G450 - System integration manual
UBX-18046432 - R09 System description Page 12 of 131
C1-Public
Function
Pin Name
Pin No
I/O
Description
Remarks
SPK_P
44
O
Differential analog
audio output
(positive)
Differential analog audio signal output (positive)
shared for all the analog downlink path modes:
earpiece, headset, loudspeaker mode.
See section 1.10.1 for functional description.
See section 2.7.1 for external circuit design-in.
SPK_N
45
O
Differential analog
audio output
(negative)
Differential analog audio signal output (negative)
shared for all the analog downlink path modes:
earpiece, headset, loudspeaker mode.
See section 1.10.1 for functional description.
See section 2.7.1 for external circuit design-in.
Digital
Audio
I2S_CLK
36 O I2S clock
Not supported.
I2S_RXD
37 I I2S receive data
Not supported.
I2S_TXD
35 O I2S transmit data
Not supported.
I2S_WA
34 O I2S word alignment
Not supported.
GPIO
GPIO1
16
I/O
GPIO
It operates at V_INT voltage level.
See sections 1.11 for functional description.
See sections 2.8 for external circuit design-in.
GPIO2
23
I/O
GPIO
It operates at V_INT voltage level.
See sections 1.11 for functional description.
See sections 2.8 for external circuit design-in.
GPIO3
24
I/O
GPIO
It operates at V_INT voltage level.
See sections 1.11 for functional description.
See sections 2.8 for external circuit design-in.
GPIO4
25
I/O
GPIO
It operates at V_INT voltage level.
See sections 1.11 for functional description.
See sections 2.8 for external circuit design-in.
Reserved
RSVD
33
N/A
RESERVED pin
This pin can be connected to GND or left unconnected.
See sections 1.12 and 2.9.
RSVD
31
N/A
RESERVED pin
Internally not connected. Leave unconnected.
See sections 1.12 and 2.9.
Table 3: SARA-G450 modules pin definition, grouped by function
Page 13
SARA-G450 - System integration manual
UBX-18046432 - R09 System description Page 13 of 131
C1-Public
1.4 Operating modes
SARA-G450 modules have several operating modes. The operating modes defined in Table 4 and
described in detail in Table 5 provide general guidelines for operation.
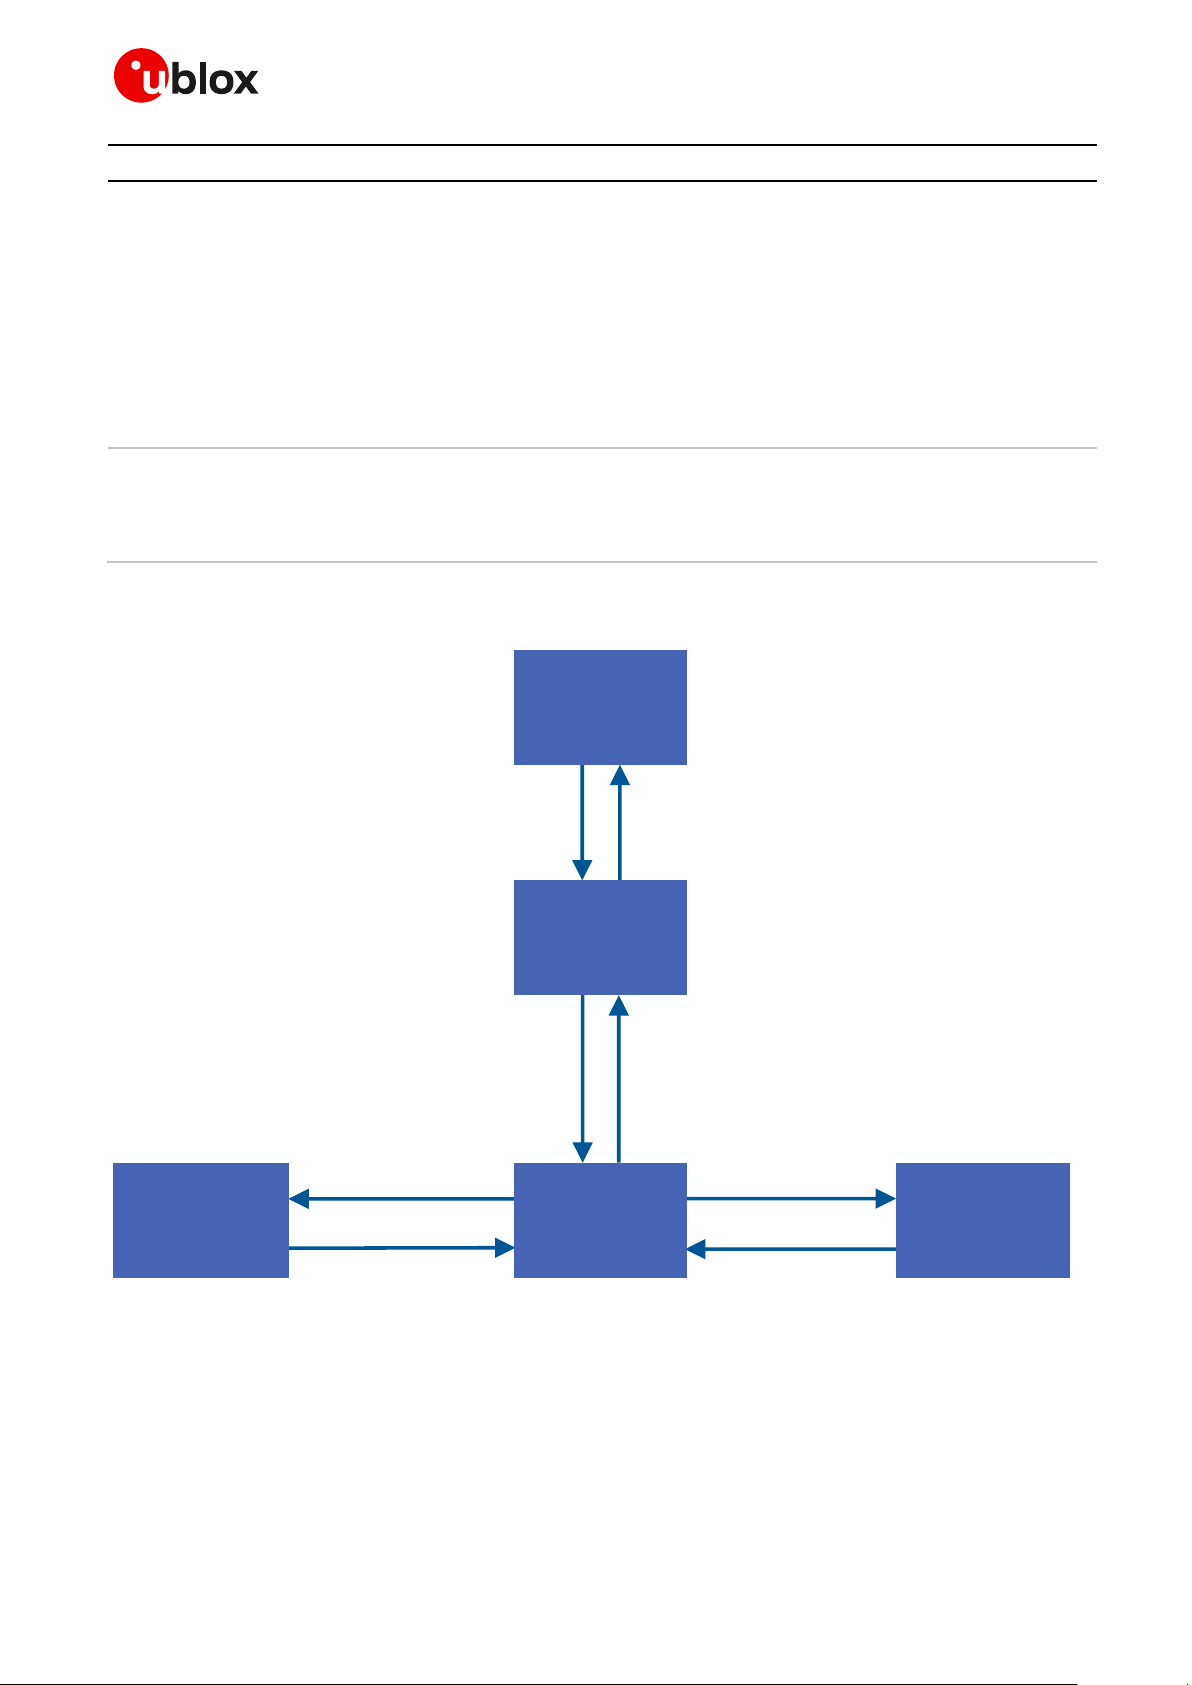
Figure 2 describes the transition between the different operating modes.
General Status
Operating Mode
Definition
Power-down
Not-powered mode
VCC supply not present or below operating range: module is switched off.
Power-off mode
VCC supply within operating range and module is switched off.
Normal operation
Idle mode
Module processor core runs with internal 32 kHz reference;
lowest current consumption.
Active mode
Module processor core runs with internal 26 MHz reference.
Connected mode
Module processor core runs with internal 26 MHz reference; voice call, data
transmission/reception or signaling activity with the network enabled.
Table 4: Module operating modes definition
Mode
Description
Transition between operating modes
Not-Powered
VCC supply not present or below operating
range.
Module is switched off.
Application interfaces are not accessible.
Internal RTC operates if a valid voltage is
applied to V_BCKP.
When VCC supply is removed, the module enters not-powered
mode.
When in not-powered mode, the module cannot be switched on
by PWR_ON or RTC alarm.
When in not-powered mode, the module switches to power-off
mode if valid VCC supply is applied (see section 1.5.1).
Power-Off
VCC supply within operating range.
Module is switched off.
Application interfaces are not accessible.
Internal RTC operates as V_BCKP is
internally generated.
When valid VCC supply is applied, the module switches from
not-powered mode to power-off mode (see section 1.5.1).
When the module is switched off by an appropriate power-off
event or by a PWR_OFF abrupt shutdown, the module enters
power-off mode (see section 1.6.2).
When in power-off mode, the module can be switched on by
PWR_ON or RTC alarm: the module switches from power-off
mode to active mode (see section 1.6.1).
When valid VCC supply is removed, the module switches from
power-off mode to not-powered mode.
Idle
The module is not ready to communicate
with an external device by means of the
application interfaces as configured to
reduce consumption.
The module automatically enters idle
mode whenever possible if power saving is
enabled by the +UPSV AT command (see
the u-blox AT commands manual [2]),
reducing power consumption (see
section 1.5.1.3).
The CTS output line indicates when the
UART interface is disabled/enabled due to
the module idle/active mode according to
power saving and HW flow control settings
(see 1.9.1.3, 1.9.1.4).
Power saving configuration is not enabled
by default: it can be enabled by +UPSV
(see u-blox AT commands manual [2]).
The module automatically switches from active mode to idle
mode whenever possible if power saving is enabled (see
sections 1.5.1.3, 1.9.1.4 and the u-blox AT commands
manual [2], +UPSV AT command).
The module wakes up from idle to active mode in the following
events:
• Automatic periodic monitoring of the paging channel for the
paging block reception according to network conditions
(see 1.5.1.3, 1.9.1.4)
• Data received on the UART interface, according to HW flow
control (AT&K) and power saving (AT+UPSV) settings
(see 1.9.1.4)
• RTS input line set to the ON state by the DTE, if HW flow
control is disabled by AT&K0 and AT+UPSV=2 is set
(see 1.9.1.4)
Page 14
SARA-G450 - System integration manual
UBX-18046432 - R09 System description Page 14 of 131
C1-Public
Mode
Description
Transition between operating modes
Active
The module is ready to communicate with
an external device by means of the
application interfaces.
When the module is switched on by an appropriate power-on
event (see 1.6.1), the module enters active mode from
power-off mode.
If power saving configuration is enabled by the +UPSV AT
command, the module automatically switches from active to
idle mode whenever possible and the module wakes up from
idle to active mode in the events listed above (see idle to active
transition description).
When a voice call or a data transmission is initiated, the
module enters connected mode from active mode.
When a voice call or a data transmission is terminated, the
module returns to active mode.
Connected
A voice call or a data transmission is in
progress.
The module is ready to communicate with
an external device by means of the
application interfaces.
When a voice call or a data transmission is initiated, the
module enters connected mode from active mode.
When a voice call or a data transmission is terminated, the
module returns to active mode.
Table 5: Module operating modes description
Apply VCC
If power saving is enabled
and there is no activity for
a defined time interval
Any wake-up event
described in the module
operating modes summary
Incoming/outgoing call or
other dedicated device
network communication
No RF Tx/Rx in progress,
call terminated,
communication dropped
Remove VCC
Switch ON:
• PWR_ON
• RTC alarm
Not
powered
Power off
ActiveConnected Idle
Switch OFF:
• AT+CPWROFF
• PWR_OFF
Figure 2: Operating modes transitions
Page 15

SARA-G450 - System integration manual
UBX-18046432 - R09 System description Page 15 of 131
C1-Public
1.5 Supply interfaces
1.5.1 Module supply input (VCC)
The modules must be supplied via the three VCC pins that represent the module power supply input.
The VCC pins are internally connected to the RF power amplifier and to the integrated Power
Management Unit: all supply voltages needed by the module are generated from the VCC supply by
integrated voltage regulators, including the V_BCKP Real Time Clock supply, V_INT digital interfaces
supply, and VSIM SIM card supply.
During operation, the current drawn by the SARA-G450 modules through the VCC pins can vary by
several orders of magnitude. This ranges from the high peak of current consumption during GSM
transmitting bursts at maximum power level in connected mode (as described in section 1.5.1.2) to
the low current consumption during low power idle mode with power saving enabled (as described in
section 1.5.1.3).
SARA-G450 modules provide separate supply inputs over the three VCC pins:
• VCC pins #52 and #53 represent the supply input for the internal RF power amplifier, demanding
most of the total current drawn of the module when RF transmission is enabled during voice call
or data transmission
• VCC pin #51 represents the supply input for the internal baseband Power Management Unit and
the internal transceiver, demanding a minor part of the total current drawn of the module when
RF transmission is enabled during voice call or data transmission
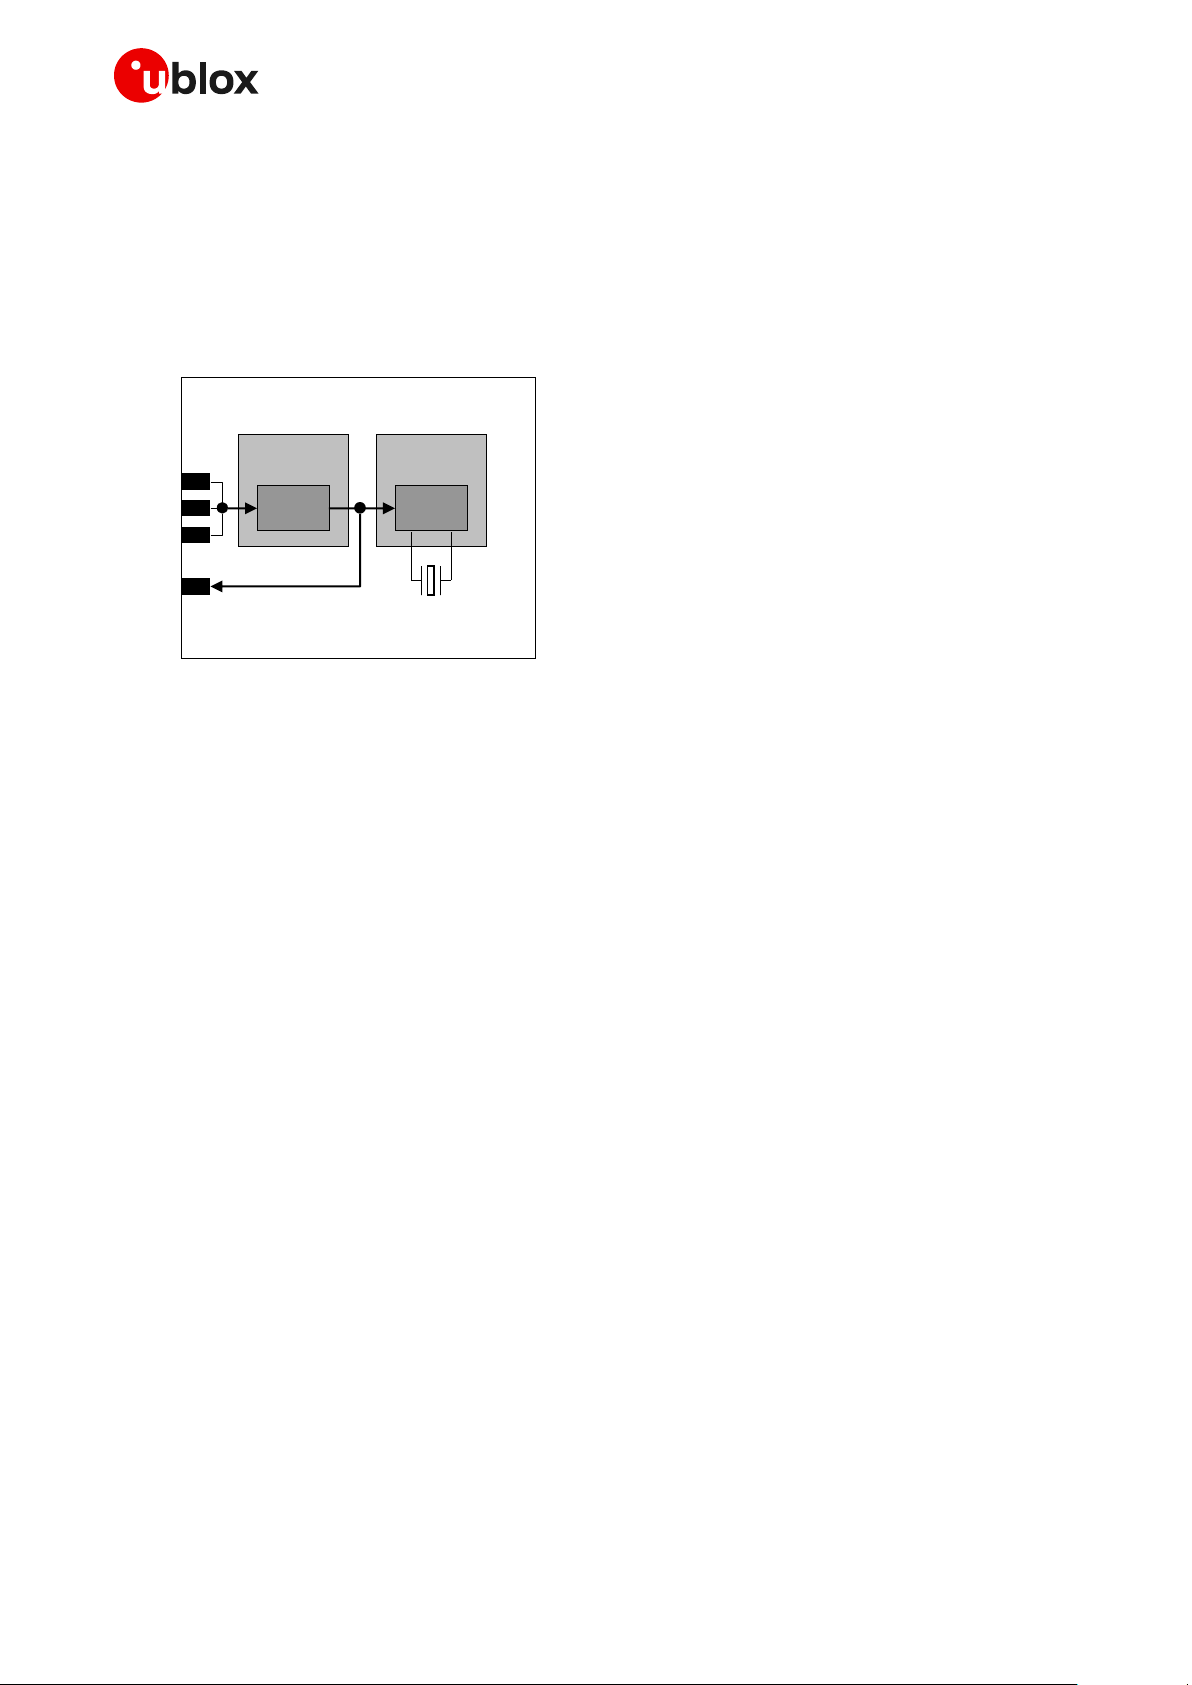
Figure 3 provides a simplified block diagram of SARA-G450 modules internal VCC supply routing.
53
VCC
52
VCC
51
VCC
SARA-G450
Power
Management
Unit
Memory
Baseband
processor
Transceiver
RF PMU
2G PA
Figure 3: SARA-G450 module VCC supply simplified block diagram
Page 16

SARA-G450 - System integration manual
UBX-18046432 - R09 System description Page 16 of 131
C1-Public
1.5.1.1 VCC supply requirements
Table 6 summarizes the requirements for the VCC module supply. See section 2.2.1 for all the
suggestions to properly design a VCC supply circuit compliant to the requirements listed in Table 6.
⚠ VCC supply circuit design may affect the RF compliance of the device integrating SARA-G450
modules with applicable required certification schemes as well as antenna circuit design.
Compliance is not guaranteed if the VCC requirements summarized in the Table 6 are not fulfilled.
Item
Requirement
Remark
VCC nominal
voltage
Within VCC normal operating range:
3.4 V min / 4.2 V max
The VCC voltage value must be within the normal
operating range limits to switch on the module.
RF performances may be affected when VCC
voltage is outside the normal operating range
limits.
VCC voltage during
normal operation
Within VCC extended operating range:
3.1 V min / 4.5 V max
The module may switch off when VCC voltage
drops below the extended operating range
minimum limit.
Operation above extended operating range limit is
not recommended and may affect device
reliability.
VCC average
current
Support with adequate margin the highest
averaged VCC current consumption value in
connected mode conditions specified in the
SARA-G450 data sheet [1].
The highest averaged VCC current consumption
can be greater than the specified value according
to the actual antenna mismatching, temperature
and VCC voltage. See section 1.5.1.2 for 2G
connected mode current profiles.
VCC peak current
Support with margin the highest peak VCC
current consumption value specified in the
SARA-G450 data sheet [1].
The specified highest peak of VCC current
consumption occurs during GSM single transmit
slot in 850/900 MHz connected mode, in the
event of a mismatched antenna. See section
1.5.1.2 for 2G connected mode current profiles.
VCC voltage drop
during 2G Tx slots
Lower than 400 mV
VCC voltage drop directly affects the RF
compliance with applicable certification schemes.
Figure 5 describes VCC voltage drop during Tx
slots.
VCC voltage ripple
during 2G Tx
Noise in the supply must be minimized
VCC voltage ripple directly affects the RF
compliance with applicable certification schemes.
Figure 5 describes VCC voltage ripple during Tx
slots.
VCC
under/over-shoot at
start/end of Tx slots
Absent or at least minimized
VCC under/over-shoot directly affects the RF
compliance with applicable certification schemes.
Figure 5 describes VCC voltage under/over-shoot.
Table 6: Summary of VCC supply requirements
Page 17

SARA-G450 - System integration manual
UBX-18046432 - R09 System description Page 17 of 131
C1-Public
1.5.1.2 VCC current consumption in 2G connected mode
When a GSM transmission is established, the VCC consumption is determined by the current
consumption profile typical of the GSM transmitting and receiving bursts.
The current consumption peak during a transmission slot is strictly dependent on the transmitted
power, which is regulated by the network. The transmitted power in the transmit slot is also the more
relevant factor for determining the average current consumption.
If the module is transmitting in 2G single-slot mode (as in GSM talk mode) in the 850 or 900 MHz
bands, at the maximum RF power control level (approximately 2 W or 33 dBm in the Tx slot/burst), the
current consumption can reach a high peak / pulse (see the SARA-G450 data sheet [1]) for 576.9 µs
(width of the transmit slot/burst) with a periodicity of 4.615 ms (width of 1 frame = 8 slots/burst), so
with a 1/8 duty cycle according to GSM TDMA (Time Division Multiple Access).
If the module is transmitting in 2G single-slot mode in the 1800 or 1900 MHz bands, the current
consumption figures are quite less high than the one in the low bands, due to the 3GPP transmitter
output power specifications.
During a GSM transmission, current consumption is not so significantly high in receiving or in monitor
bursts and it is low in the bursts unused to transmit / receive.
Figure 4 shows an example of the module current consumption profile versus time in GSM talk mode.
Time [ms]
RX
slot
unused
slot
unused
slot
TX
slot
unused
slot
unused
slot
MON
slot
unused
slot
RX
slot
unused
slot
unused
slot
TX
slot
unused
slot
unused
slot
MON
slot
unused
slot
GSM frame
4.615 ms
(1 frame = 8 slots)
Current [A]
200 mA
60-120 mA
1900 mA
Peak current depends
on TX power and
actual antenna load
GSM frame
4.615 ms
(1 frame = 8 slots)
1.5
1.0
0.5
0.0
2.0
60-120 mA
10 -40 mA
Figure 4: VCC current consumption profile versus time during a GSM transmission (1 TX slot, 1 RX slot)
Figure 5 illustrates the VCC voltage profile versus time during a GSM transmission, according to the
related VCC current consumption profile described in Figure 4.
Time
undershoot
overshoot
ripple
drop
Voltage
3.8 V
(typ)
RX
slot
unused
slot
unused
slot
TX
slot
unused
slot
unused
slot
MON
slot
unused
slot
RX
slot
unused
slot
unused
slot
TX
slot
unused
slot
unused
slot
MON
slot
unused
slot
GSM frame
4.615 ms
(1 frame = 8 slots)
GSM frame
4.615 ms
(1 frame = 8 slots)
Figure 5: Description of the VCC voltage profile versus time during a GSM transmission (1 TX slot, 1 RX slot)
Page 18

SARA-G450 - System integration manual
UBX-18046432 - R09 System description Page 18 of 131
C1-Public
When a GPRS connection is established, more than one slot can be used to transmit and/or more than
one slot can be used to receive. The transmitted power depends on network conditions, which set the
peak current consumption, but following the GPRS specifications the maximum transmitted RF
power is reduced if more than one slot is used to transmit, so the maximum peak of current is not as
high as can be in the case of a GSM transmission.
If the module transmits in GPRS multi-slot class 10 or 12, in 850 or 900 MHz bands, at maximum RF
power level, the consumption can reach a quite high peak but lower than the one achievable in 2G
single-slot mode. This happens for 1.154 ms (width of the 2 Tx slots/bursts) in the case of multi-slot
class 10 or for 2.308 ms (width of the 4 Tx slots/bursts) in the case of multi-slot class 12, with a
periodicity of 4.615 ms (width of 1 frame = 8 slots/bursts), so with a 1/4 or 1/2 duty cycle, according
to GSM TDMA.
If the module is in GPRS connected mode in the 1800 or 1900 MHz bands, consumption figures are
lower than in the 850 or 900 MHz band because of the 3GPP Tx power specifications.
Figure 6 illustrates the current consumption profiles in GPRS connected mode, in the 850 or 900 MHz
bands, with 2 slots used to transmit and 1 slot used to receive, as for the GPRS multi-slot class 10.
Time [ms]
RX
slot
unused
slot
unused
slot
TX
slot
TX
slot
unused
slot
MON
slot
unused
slot
RX
slot
unused
slot
unused
slot
TX
slot
TX
slot
unused
slot
MON
slot
unused
slot
GSM frame
4.615 ms
(1 frame = 8 slots)
Current [A]
60-120mA
GSM frame
4.615 ms
(1 frame = 8 slots)
1.5
1.0
0.5
0.0
60-120mA
10 -40mA
200mA
Peak current depends
on TX power and
actual antenna load
160 0 mA
Figure 6: VCC current consumption profile versus time during a GPRS multi-slot class 10 connection (2 TX slots, 1 RX slot)
Figure 7 illustrates the current consumption profiles in GPRS connected mode, in the 850 or 900 MHz
bands, with 4 slots used to transmit and 1 slot used to receive, as for the GPRS multi-slot class 12.
Time [ms]
RX
slot
unused
slot
TX
slot
TX
slot
TX
slot
TX
slot
MON
slot
unused
slot
RX
slot
unused
slot
TX
slot
TX
slot
TX
slot
TX
slot
MON
slot
unused
slot
GSM frame
4.615 ms
(1 frame = 8 slots)
Current [A]
60-120mA
GSM frame
4.615 ms
(1 frame = 8 slots)
1.5
1.0
0.5
0.0
60-120mA
10 -40mA
200mA
Peak current depends
on TX power and
actual antenna load
1600 mA
Figure 7: VCC current consumption profile versus time during a GPRS multi-slot class 12 connection (4 TX slots, 1 RX slot)
For detailed current consumption values, see the SARA-G450 data sheet [1].
Page 19

SARA-G450 - System integration manual
UBX-18046432 - R09 System description Page 19 of 131
C1-Public
1.5.1.3 VCC current consumption in cyclic idle/active mode (+UPSV enabled)
The power saving configuration is disabled by default, but it can be enabled using the appropriate AT
command (see the u-blox AT commands manual [2], +UPSV AT command). When power saving is
enabled, the module automatically enters low power idle mode whenever possible, reducing current
consumption.
During idle mode, the module processor runs with an internal 32 kHz reference clock.
When the power saving configuration is enabled and the module is registered or attached to a
network, the module automatically enters the low power idle mode whenever possible, but it must
periodically monitor the paging channel of the current base station (paging block reception), in
accordance with the 2G system requirements, even if connected mode is not enabled by the
application. When the module monitors the paging channel, it wakes up to the active mode to enable
paging block reception. In between, the module switches to low power idle mode. This is known as
discontinuous reception (DRX).
The module processor core is activated during the paging block reception, and automatically switches
its reference clock frequency from 32 kHz to the 26 MHz used in active mode.
The time period between two paging block receptions is defined by the network. This is the paging
period parameter, fixed by the base station through broadcast channel sent to all users on the same
serving cell.
For 2G radio access technology, the paging period varies from 470.8 ms (DRX = 2, length of 2 x 51 2G
frames = 2 x 51 x 4.615 ms) up to 2118.4 ms (DRX = 9, length of 9 x 51 2G frames = 9 x 51 x 4.615 ms).
Figure 8 roughly describes the current consumption profile of SARA-G450 modules, when power
saving is enabled. The module is registered with the network, automatically enters the very low power
idle mode, and periodically wakes up to active mode to monitor the paging channel for paging block
reception.
20-30 ms
IDLE MODE ACTIVE MODE IDLE MODE
Active Mode
Enabled
Idle Mode
Enabled
0.44-2.09 s
IDLE MODE
20-30 ms
ACTIVE MODE
Time [s]
Current [mA]
100
50
0
Time [ms]
Current [mA]
100
50
0
RX
Enabled
DSP
Enabled
Figure 8: VCC current consumption profile versus time of the SARA-G450 modules, when registered with the network, with
power saving enabled: the very low power idle mode is reached and periodical wake up to active mode are performed to
monitor the paging channel
For the detailed modules VCC current consumption values in low-power idle mode or in cyclic
idle/active mode (module registered with 2G network with power saving enabled), see the SARA-G450
data sheet [1].
Page 20

SARA-G450 - System integration manual
UBX-18046432 - R09 System description Page 20 of 131
C1-Public
1.5.1.4 VCC current consumption in fixed active mode (+UPSV disabled)
Power saving configuration is disabled by default, or it can be disabled using the appropriate AT
command (see the u-blox AT commands manual [2], +UPSV AT command). When power saving is
disabled, the module does not automatically enter idle mode whenever possible: the module remains
in active mode.
The module processor core is activated during active mode, and the 26 MHz reference clock frequency
is used.
Figure 9 roughly describes the current consumption profile of the SARA-G450 modules, when power
saving is disabled: the module is registered with the network, active mode is maintained, and the
receiver and the DSP are periodically activated to monitor the paging channel for paging block
reception.
ACTIVE MODE
0.47-2.12 s
Paging period
Time [s]
Current [mA]
100
50
0
Time [ms]
Current [mA]
100
50
0
RX
Enabled
DSP
Enabled
Figure 9: VCC current consumption profile versus time of the SARA-G450 modules, when registered with the network, with
power saving disabled: the active mode is always held, and the receiver and the DSP are periodically activated to monitor the
paging channel
For the detailed modules VCC current consumption values in fixed active mode (module registered
with 2G network with power saving disabled), see the SARA-G450 data sheet [1].
Page 21
SARA-G450 - System integration manual
UBX-18046432 - R09 System description Page 21 of 131
C1-Public
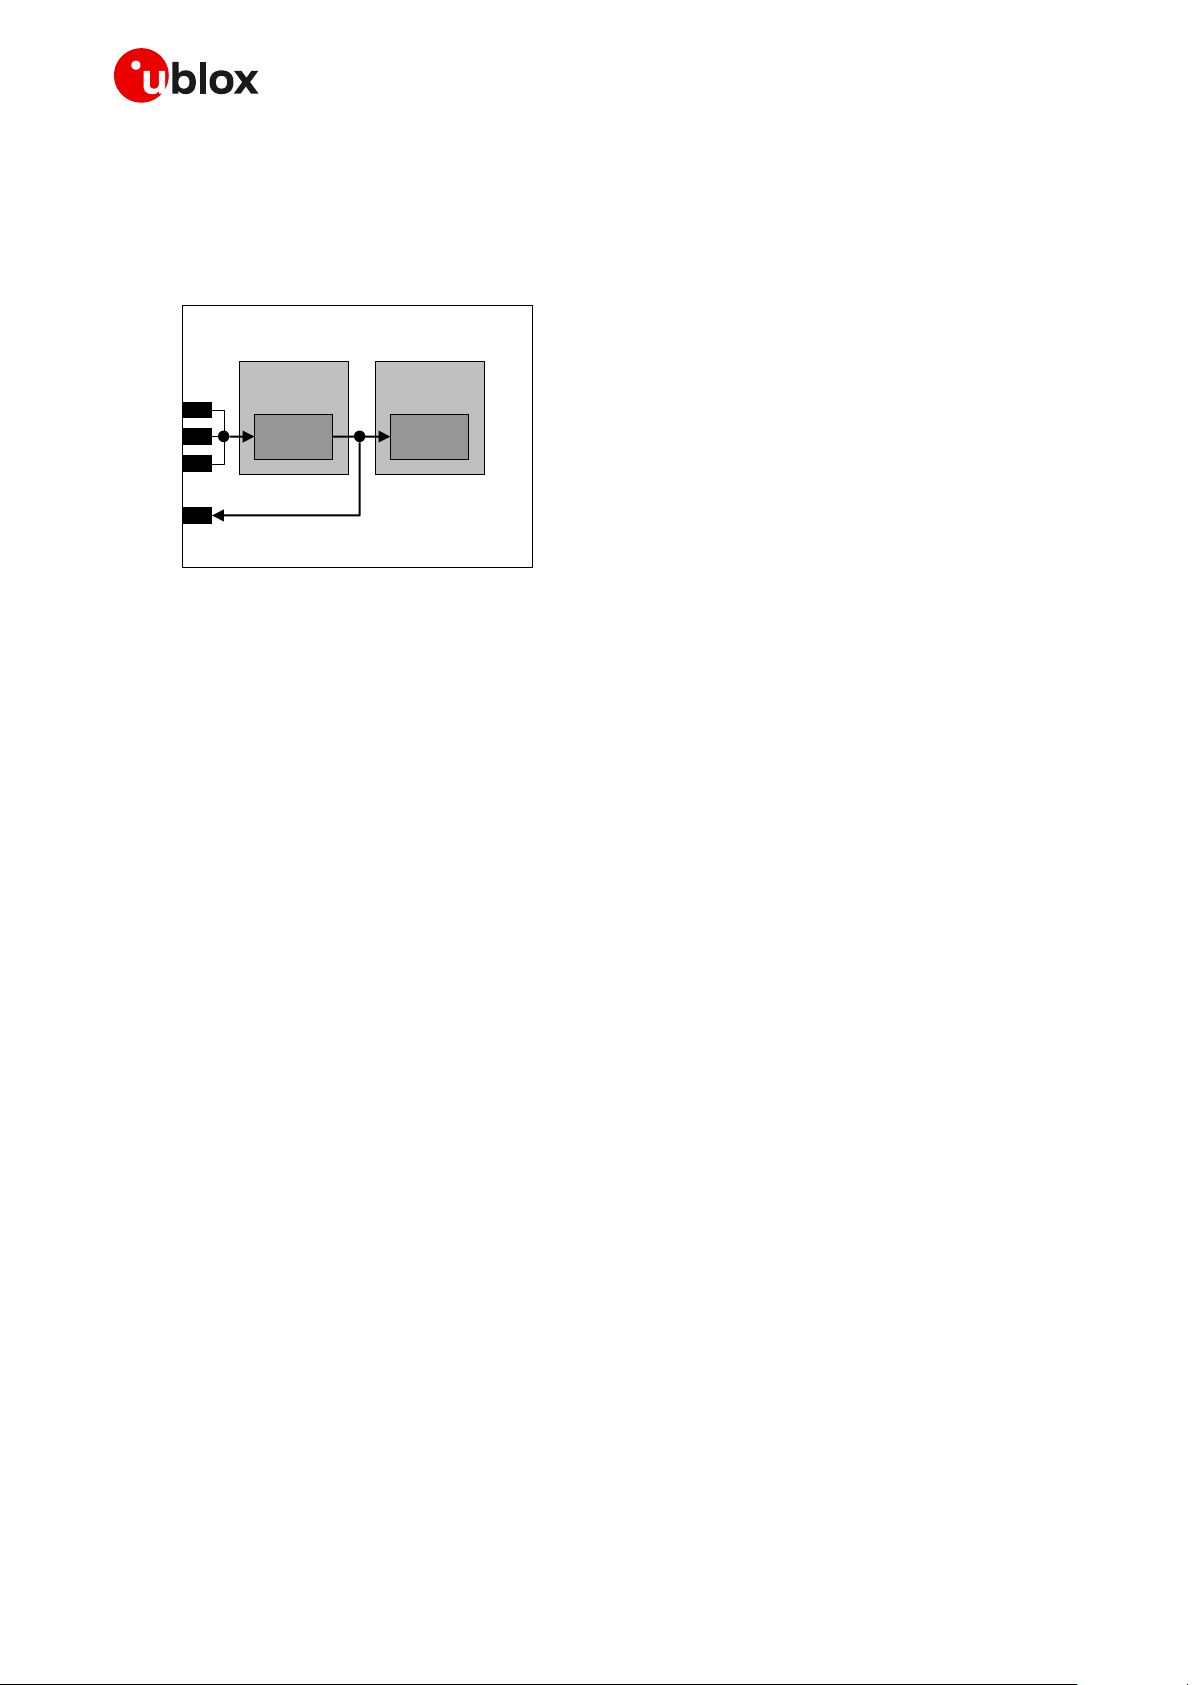
1.5.2 RTC supply input/output (V_BCKP)
The V_BCKP pin of SARA-G450 modules connects the supply for the Real Time Clock (RTC) and
power-on internal logic. This supply domain is internally generated by a linear LDO regulator
integrated in the Power Management Unit, as described in Figure 10. The output of this linear
regulator is always enabled when the main voltage supply provided to the module through the VCC
pins is within the valid operating range, with the module switched off or switched on.
Baseband
processor
51
VCC
52
VCC
53
VCC
2
V_BCKP
Linear
LDO
RTC
Power
Management
Unit
SARA-G450
32 kHz
Figure 10: RTC supply input/output (V_BCKP) and 32 kHz timing reference clock simplified block diagram
The RTC provides the module time reference (date and time) that is used to set the wake-up interval
during the idle mode periods between network paging, and is able to make available the
programmable alarm functions.
The RTC functions are available also in not-powered mode when the V_BCKP is within its valid range
(specified in the “Input characteristics of Supply/Power pins” table in the SARA-G450 data sheet [1]).
See the u-blox AT commands manual [2] for more details.
The RTC can be supplied from an external back-up battery through the V_BCKP, when the main
voltage supply is not provided to the module through VCC. This lets the time reference (date and time)
run until the V_BCKP voltage is within its valid range, even when the main supply is not provided to
the module.
The RTC oscillator does not necessarily stop operation (i.e. the RTC counting does not necessarily
stop) when the V_BCKP voltage value drops below the specified operating range minimum limit, but
the RTC value read after a system restart may not be reliable.
Consider that the module cannot switch on if a valid voltage is not present on VCC even when the RTC
is supplied through V_BCKP (meaning that VCC is mandatory to switch on the module).
If V_BCKP is left unconnected and the module main voltage supply is removed from VCC, the RTC is
supplied from the bypass capacitor mounted inside the module. However, this capacitor is not able to
provide a long buffering time: within a few milliseconds, the voltage on V_BCKP will go below the valid
range. This has no impact on cellular connectivity, as none of the module functionalities rely on date
and time setting.
Page 22
SARA-G450 - System integration manual
UBX-18046432 - R09 System description Page 22 of 131
C1-Public
1.5.3 Generic digital interfaces supply output (V_INT)
The same 1.8 V / 3 V voltage domain used internally to supply the generic digital interfaces (GDI) of
SARA-G450 modules is also available on the V_INT supply output pin, as described in Figure 11.
Baseband
processor
51
VCC
52
VCC
53
VCC
4
V_INT
LDO
Digital I/O
Interfaces
Power
Management
Unit
SARA-G450
Figure 11: SARA-G450 interfaces supply output (V_INT) simplified block diagram
The internal regulator that generates the V_INT supply is a low drop out (LDO) converter that is
directly supplied from the VCC main supply input of the module.
The V_INT voltage regulator output is disabled (i.e. 0 V) when the module is switched off. When the
module is switched on, V_INT can be configured in the two following ways:
• V_INT = 1.8 V, if VSEL pin is connected to GND
• V_INT = 3 V, if VSEL pin is left unconnected
1.6 System function interfaces
1.6.1 Module power-on (PWR_ON)
1.6.1.1 Switch-on events
When the SARA-G450 modules are in the not-powered mode (i.e. switched off with the VCC module
supply not applied), valid VCC supply must be applied first, switching to power-off mode.
When the SARA-G450 modules are in power-off mode (i.e. switched off with valid VCC supply applied),
then they can be switched on by:
• Low level for a valid time period on PWR_ON pin, which is normally set high by an internal pull-up
The PWR_ON input voltage thresholds are different from the other generic digital interfaces of the
module: see the SARA-G450 data sheet [1] for detailed electrical characteristics.
The SARA-G450 modules can be also switched on from power-off mode by:
• RTC alarm pre-programmed by the +CALA AT command (see u-blox AT commands manual [2]).
Page 23

SARA-G450 - System integration manual
UBX-18046432 - R09 System description Page 23 of 131
C1-Public
1.6.1.2 Switch-on sequence from power-off mode
Figure 12 shows the power-on sequence from the power-off mode, describing the following phases:
• The external supply is still applied to the VCC inputs. The V_BCKP output is internally enabled
since an appropriate VCC is present. The PWR_ON and PWR_OFF pins are set to high logic level
due to internal pull-ups.
• The PWR_ON input pin is set low for a valid time period, representing the start-up event.
• All the generic digital pins of the module are tri-stated until the switch-on of their supply source
(V_INT): any external signal connected to the generic digital pins must be tri-stated or set low at
least until the activation of the V_INT supply output to avoid latch-up of circuits and allow a clean
boot of the module.
• The V_INT generic digital interfaces supply output is enabled by the integrated Power
Management Unit.
• The Internal Reset signal is held low by the integrated Power Management Unit: the baseband
processor core and all the digital pins of the modules are held in reset state.
• When the Internal Reset signal is released by the integrated Power Management Unit, any digital
pin is set in a correct sequence from the reset state to the default operational state.
• The module is fully ready to operate after all the interfaces are configured.
VCC
V_BCKP
PWR_ON
PWR_OFF
V_INT
Internal reset
System state
Digital pins state
Internal reset → Operational
Tristate / Floating
OFF
ON
Internal reset
Operational
Start of interface
configuration
Module interfaces
are configured
Start-up
event
Figure 12: SARA-G450 modules power-on sequence from power-off mode
1.6.1.3 General considerations for the switch-on procedure
A greeting text can be activated by means of the +CSGT AT command (see the u-blox AT commands
manual [2]) to notify the external application that the module is ready to operate (i.e. ready to reply to
AT commands) and that the first AT command can be sent to the module. In this case, the UART
autobauding must be disabled to let the module send the greeting text: the UART must be configured
at a fixed baud-rate (the baud-rate of the application processor) instead of the default autobauding,
otherwise the module does not know the baud-rate to be used for sending the greeting text (or any
other URC) at the end of the internal boot sequence.
As an alternative starting procedure, after the interfaces’ configuration phase, the application can
start sending AT commands and wait for the response with a 30 s timeout; iterate it 4 times without
resetting or removing the VCC supply of the module, and then run the application.
Page 24

SARA-G450 - System integration manual
UBX-18046432 - R09 System description Page 24 of 131
C1-Public
☞ The Internal reset signal is not available on a module pin, but the host application can monitor the
V_INT pin to sense the start of the module power-on sequence.
☞ Before the switch-on of the generic digital interface supply source (V_INT) of the module, no
voltage driven by an external application should be applied to any generic digital interface of the
module.
☞ Before the modules are fully ready to operate, the host application processor should not send any
AT command over the AT communication module interfaces. After V_INT rises up, wait at least
5 s before issuing AT commands; during this time, modules might be responsive but the NVM
might not be ready yet for set commands.
☞ The duration of SARA-G450 modules switch-on routine can vary depending on the
application / network settings and the concurrent module activities.
1.6.2 Module power-off
1.6.2.1 Switch-off events
The SARA-G450 modules can be properly switched off by:
• AT+CPWROFF command (more details in the u-blox AT commands manual [2])
The current parameter settings are saved in the module’s non-volatile memory and a clean network
detach is performed: this is the correct way to switch off the modules.
An abrupt hardware shutdown occurs on SARA-G450 modules when a low level is applied to PWR_OFF
input. In this case, the current parameter settings are not saved in the module’s non-volatile memory
and a clean network detach is not performed.
☞ It is highly recommended to avoid an abrupt hardware shutdown of the module by forcing a low
level on PWR_OFF input pin during module normal operation: the PWR_OFF line should be set low
only if reset or shutdown via AT commands fails or if the module does not reply to a specific AT
command after a time period longer than the one defined in the u-blox AT commands manual [2].
An abrupt under-voltage shutdown occurs on SARA-G450 modules when the VCC module supply is
removed. In this case, the current parameter settings are not saved in the module’s non-volatile
memory and a clean network detach cannot be performed.
☞ It is highly recommended to avoid an abrupt removal of VCC supply during module normal
operation: the power-off procedure must be properly started by the application, by using the
+CPWROFF AT command, waiting the command response for an appropriate time period (see the
u-blox AT commands manual [2]), and then an appropriate VCC supply must be held at least until
the end of the module’s internal power-off sequence, which occurs when the generic digital
interfaces supply output (V_INT) is switched off by the module.
An over-temperature or an under-temperature shutdown occurs on SARA-G450 modules when the
temperature measured within the cellular module reaches the dangerous area, if the optional Smart
Temperature Supervisor feature is enabled and configured by the dedicated AT command. For more
details, see section 1.13.9 and the u-blox AT commands manual [2], +USTS AT command.
☞ The smart temperature supervisor feature is not supported by the “00” product version.
Page 25

SARA-G450 - System integration manual
UBX-18046432 - R09 System description Page 25 of 131
C1-Public
1.6.2.2 Switch-off sequence by AT+CPWROFF
Figure 13 describes the SARA-G450 modules power-off sequence, properly started sending the
AT+CPWROFF command, allowing storage of the current parameter settings in the module’s
non-volatile memory and a clean network detach, with the following phases:
• When the +CPWROFF AT command is sent, the module starts the switch-off routine.
• The module replies OK on the AT interface: the switch-off routine is in progress.
• At the end of the switch-off routine, all the digital pins are tri-stated and all the internal voltage
regulators are turned off, including the generic digital interfaces supply (V_INT), except the RTC
supply (V_BCKP).
• Then, the module remains in power-off mode as long as a switch-on event does not occur
(e.g. applying an appropriate low level to the PWR_ON input), and enters not-powered mode if the
supply is removed from the VCC pins.
VCC
V_BCKP
PWR_ON
PWR_OFF
V_INT
Internal reset
System state
Digital pins state Operational
OFF
Tristate / Floating
ON
Operational →
Tristate
AT+CPWROFF
sent to the module
0 s
~2.5 s
~5 s
OK
replied by the module
VCC
can be removed
Figure 13: SARA-G450 modules power-off sequence description
☞ The Internal reset signal is not available on a module pin, but the application can monitor the V_INT
pin to sense the end of the SARA-G450 modules power-off sequence.
☞ The VCC supply can be removed only after the end of the module internal switch-off routine. After
the V_INT voltage level has gone low, wait at least 3 s before removing VCC.
☞ The duration of each phase in the SARA-G450 modules switch-off routines can largely vary
depending on the application / network settings and the concurrent module activities.
Page 26

SARA-G450 - System integration manual
UBX-18046432 - R09 System description Page 26 of 131
C1-Public
1.6.3 Module reset
SARA-G450 modules can be properly reset (rebooted) by:
• AT+CFUN command (see the u-blox AT commands manual [2] for more details).
This command causes an “internal” or “software” reset of the module, which is an asynchronous reset
of the module baseband processor. The current parameter settings are saved in the module’s
non-volatile memory and a clean network detach is performed: this is the correct way to reset the
modules.
An abrupt hardware reset occurs on SARA-G450 modules when a low level is applied on the PWR_OFF
input pin and then a low level is applied on the PWR_ON input pin for specific time periods; in this way
the reset is performed with an abrupt shutdown and then switching on again the module. In this case,
the current parameter settings are not saved in the module’s non-volatile memory and a clean
network detach is not performed.
☞ It is highly recommended to avoid an abrupt hardware shutdown of the module by forcing a low
level on PWR_OFF input pin during module normal operation: the PWR_OFF line should be set low
only if reset or shutdown via AT commands fails or if the module does not reply to a specific AT
command after a time period longer than the one defined in the u-blox AT commands manual [2].
The PWR_OFF input pin is internally connected through a series Schottky diode to 1.5 V internal
supply, keeping the line to the high logic level when the PWR_OFF pin is not forced low from the
external. See the SARA-G450 data sheet [1] for the detailed electrical characteristics of the
PWR_OFF input.
☞ Before the switch-on of the generic digital interface supply source (V_INT) of the module, no
voltage driven by an external application should be applied to any generic digital interface of the
modules.
☞ The internal reset state of all digital pins is summarized in the pin description table included in the
SARA-G450 data sheet [1].
1.6.4 Digital I/O interfaces voltage selection (VSEL)
The digital I/O interfaces of SARA-G450 modules (the UART interfaces, I2C interface and GPIO pins)
can operate at 1.8 V or 3 V voltage rail. The operating voltage can be selected using the VSEL input
pin:
• If the VSEL input pin is connected to GND, the digital I/O interfaces operate at 1.8 V
• If the VSEL input pin is left unconnected, the digital I/O interfaces operate at 3 V
The operating voltage cannot be changed dynamically: the VSEL input pin configuration has to be set
before the boot of SARA-G450 modules and then it cannot be changed after switched on.
Page 27

SARA-G450 - System integration manual
UBX-18046432 - R09 System description Page 27 of 131
C1-Public
1.7 Antenna interface
1.7.1 Antenna RF interface (ANT)
The ANT pin of SARA-G450 modules represents the RF input/output for 2G RF signals reception and
transmission. The ANT pin has a nominal characteristic impedance of 50 and must be connected
to the antenna through a 50 transmission line for clean RF signals reception and transmission.
1.7.1.1 Antenna RF interface requirements
Table 7 summarizes the requirements for the antenna RF interface (ANT). See section 2.4.1 for
suggestions to correctly design an antenna circuit compliant to these requirements.
⚠ The antenna circuit affects the RF compliance of the device integrating SARA-G450 modules with
applicable required certification schemes. Compliance is not guaranteed if the antenna RF
interface (ANT) requirements summarized in Table 7 are not fulfilled.
Item
Requirements
Remarks
Impedance
50 nominal characteristic impedance
The nominal characteristic impedance of the antenna RF
connection must match the ANT pin 50 impedance.
Frequency range
See the SARA-G450 data sheet [1]
The required frequency range of the antenna depends on
the operating bands supported by the cellular module.
Return loss
S11 < -10 dB (VSWR < 2:1) recommended
S11 < -6 dB (VSWR < 3:1) acceptable
The return loss (or the S11), as the VSWR, refers to the
amount of reflected power, measuring how well the RF
antenna connection matches the 50 impedance.
The impedance of the antenna RF termination must match
as much as possible the 50 impedance of the ANT pin
over the operating frequency range, reducing as much as
possible the amount of reflected power.
Efficiency
> -1.5 dB ( > 70% ) recommended
> -3.0 dB ( > 50% ) acceptable
The radiation efficiency is the ratio of the radiated power to
the power delivered to antenna input: the efficiency is a
measure of how well an antenna receives or transmits.
The efficiency needs to be enough high over the operating
frequency range to comply with the Over-The-Air radiated
performance requirements, as Total Radiated Power and
Total Isotropic Sensitivity, specified by certification
schemes
Maximum gain
See section 4 for maximum gain limits
The power gain of an antenna is the radiation efficiency
multiplied by the directivity: the maximum gain describes
how much power is transmitted in the direction of peak
radiation to that of an isotropic source.
The maximum gain of the antenna connected to ANT pin
must not exceed the values stated in section 4 to comply
with regulatory agencies radiation exposure limits.
Input power
> 2 W peak
The antenna connected to ANT pin must support the
maximum power transmitted by the modules.
Detection
Application board with antenna detection
circuit
If antenna detection is required by the custom application,
an appropriate antenna detection circuit must be
implemented on the application board as described in
section 2.4.2
Antenna assembly with built-in
diagnostic circuit
If antenna detection is required by the custom application,
the external antenna assembly must be provided with an
appropriate diagnostic circuit as described in section 2.4.2
Table 7: Summary of antenna RF interface (ANT) requirements
Page 28

SARA-G450 - System integration manual
UBX-18046432 - R09 System description Page 28 of 131
C1-Public
1.7.2 Antenna detection interface (ANT_DET)
The antenna detection is based on ADC measurement. The ANT_DET pin is an Analog to Digital
Converter (ADC) provided to sense the antenna presence.
The antenna detection function provided by the ANT_DET pin is an optional feature that can be
implemented if the application requires it. The antenna detection is forced by the +UANTR
AT command. See the u-blox AT commands manual [2] for more details on this feature.
The ANT_DET pin generates a DC current and measures the resulting DC voltage, thus determining
the resistance from the antenna connector provided on the application board to GND. So the
requirements to achieve antenna detection functionality are the following:
• an RF antenna assembly with a built-in resistor (diagnostic circuit) must be used
• an antenna detection circuit must be implemented on the application board
See section 2.4.2 for design-in guidelines for antenna detection circuits on an application board and
diagnostic circuits on an antenna assembly.
1.8 SIM interface
1.8.1 (U)SIM card interface
SARA-G450 modules provide a high-speed SIM/ME interface, including automatic detection and
configuration of the voltage required by the connected (U)SIM card or chip.
Both 1.8 V and 3 V SIM types are supported: activation and deactivation with automatic voltage
switching from 1.8 V to 3 V is implemented, according to ISO-IEC 7816-3 specifications. The VSIM
supply output pin provides internal short circuit protection to limit start-up current and protect the
device in short circuit situations.
The SIM driver supports the PPS (Protocol and Parameter Selection) procedure for baud rate
selection, according to the values determined by the SIM card.
1.8.2 SIM card detection interface (SIM_DET)
The SIM_DET pin is configured as an external interrupt to detect the SIM card mechanical / physical
presence. The pin is configured as input with an internal active pull-down enabled, and it can sense
SIM card presence only if properly connected to the mechanical switch of a SIM card holder as
described in section 2.5:
• Low logic level at SIM_DET input pin is recognized as SIM card not present
• High logic level at SIM_DET input pin is recognized as SIM card present
The SIM card detection function provided by SIM_DET pin is an optional feature that can be
implemented / used or not according to the application requirements: an Unsolicited Result Code
(URC) can be generated each time that there is a change of status (for more details, see the “simind”
value of the <descr> parameter of +CIND and +CMER commands in u-blox AT commands manual [2]).
Page 29

SARA-G450 - System integration manual
UBX-18046432 - R09 System description Page 29 of 131
C1-Public
1.9 Serial interfaces
SARA-G450 modules provide the following serial communication interfaces:
• UART interface: 9-wire unbalanced 1.8 V / 3 V asynchronous serial interface supporting (see 1.9.1)
o AT command mode
4
o Data mode and online command mode
4
o MUX functionality, including dedicated GNSS tunneling
5
o FW upgrades by means of the FOAT feature
• Secondary auxiliary UART interface
6
: 3-wire unbalanced 1.8 V / 3 V asynchronous serial interface
supporting (see 1.9.2):
o AT command mode
4
o Data mode and online command mode
4
o GNSS tunneling
• Additional UART interface for FW upgrade and tracing: 3-wire unbalanced 1.8 V / 3 V
asynchronous serial interface supporting (see 1.9.3):
o FW upgrades by means of the dedicated tool
o Trace log capture (diagnostic purpose)
• DDC interface
7
: I2C-bus compatible 1.8 V / 3 V interface supporting (see 1.9.4):
o Communication with u-blox GNSS positioning chips / modules
☞ Secondary auxiliary UART interface is not supported by the “00” product version. This interface
should be left unconnected and should not be driven by external devices.
☞ DDC (I2C) interface is not supported by the “00” product version. This interface should be left
unconnected and should not be driven by external devices.
1.9.1 Primary main serial interface (UART)
1.9.1.1 UART features
The UART interface is a 9-wire unbalanced asynchronous serial interface, supporting:
• AT command mode
4
• Data mode and Online command mode
4
• Multiplexer protocol functionality (see 1.9.1.5)
• FW upgrades by means of the FOAT feature (see 1.13.12)
The main characteristics of the interface are the following:
• Complete serial port with RS-232 functionality conforming to ITU-T V.24 recommendation [5] with
CMOS compatible signal levels: 0 V for low data bit or ON state and 1.8 V / 3 V for high data bit or
OFF state (for detailed electrical characteristics, see the SARA-G450 data sheet [1])
• Data lines (RXD as output, TXD as input)
• Hardware flow control lines (CTS as output, RTS as input)
• Modem status and control lines (DTR as input, DSR as output, RI as output, DCD as output)
4
See the u-blox AT commands manual [2] for the definition of the command mode, data mode, and online command mode.
5
SARA-G450 modules product version “00” do not support GNSS tunneling.
6
SARA-G450 modules product version “00” do not support secondary auxiliary UART.
7
SARA-G450 modules product version “00” do not support DDC I2C-bus compatible interface.
Page 30

SARA-G450 - System integration manual
UBX-18046432 - R09 System description Page 30 of 131
C1-Public
SARA-G450 modules UART interface is configured by default in AT command mode: the module waits
for AT command instructions and interprets all the characters received as commands to execute. All
the functionalities supported by SARA-G450 modules can generally be set and configured with AT
commands (see the u-blox AT commands manual [2]).
SARA-G450 modules are designed to operate as a cellular modem, representing the Data
Circuit-terminating Equipment (DCE) as per ITU-T V.24 recommendation [5]. The application
processor connected to the module through the UART interface represents the Data Terminal
Equipment (DTE).
☞ The signal names of SARA-G450 modules UART interface conform to the ITU-T V.24
recommendation [5]: e.g. the TXD line represents the data transmitted by the DTE (application
processor data line output) and received by the DCE (module data line input).
HW flow control handshakes or none flow control are supported by the UART interface and can be set
by AT commands (see u-blox AT commands manual [2], &K, +IFC AT commands).
☞ Hardware flow control is enabled by default.
SARA-G450 modules support one-shot autobauding: the baud-rate automatic detection is performed
once at module start-up, at first AT command received. After detection, the module works at the
detected baud-rate and the baud-rate can only be changed with an AT command.
The following baud-rates can be set by the AT+IPR command (see u-blox AT commands manual [2]):
• 2400 bit/s
• 4800 bit/s
• 9600 bit/s
• 19200 bit/s
• 38400 bit/s
• 57600 bit/s
• 115200 bit/s
☞ One-shot autobauding is enabled by default.
☞ The one-shot autobauding feature works only with first AT command in capital letters (i.e. “AT”).
The following frame formats can be set by AT+ICF command (see u-blox AT commands manual [2]):
• 8N1 (8 data bits, no parity, 1 stop bit), default frame configuration
• 8E1 (8 data bits, even parity, 1 stop bit)
• 8O1 (8 data bits, odd parity, 1 stop bit)
• 8N2 (8 data bits, no parity, 2 stop bit)
☞ The automatic frame format recognition is not supported.
Page 31

SARA-G450 - System integration manual
UBX-18046432 - R09 System description Page 31 of 131
C1-Public
Figure 14 describes the 8N1 frame format, which is the default configuration.
D0 D1 D2 D3 D4 D5 D6 D7
Start of 1-Byte
transfer
Start Bit
(Always 0)
Possible Start of
next transfer
Stop Bit
(Always 1)
t
bit
= 1/(Baudrate)
Normal Transfer, 8N1
Figure 14: Description of UART default frame format (8N1) with fixed baud rate
1.9.1.2 UART AT interface configuration
The UART interface of SARA-G450 modules is available as an AT command interface with the default
configuration described in Table 8 (for more details and information about further settings, see the
u-blox AT commands manual [2]).
Interface
AT Settings
Comments
UART interface
AT interface: enabled
AT command mode is enabled by default on the UART physical interface
AT+IPR=0
One-shot automatic baud-rate detection enabled by default
AT+ICF=3
Frame format 8N1 enabled by default
AT&K3
HW flow control enabled by default
AT&S1
DSR line set ON in data mode8 and set OFF in command mode8
AT&D1
Upon an ON-to-OFF transition of DTR, the DCE enters online command mode8
and issues an OK result code
AT&C1
Circuit 109 changes in accordance with the Carrier detect status; ON if the
Carrier is detected, OFF otherwise
MUX protocol: disabled
Multiplexing mode is disabled by default and it can be enabled by AT+CMUX
command.
Table 8: Default UART AT interface configuration
1.9.1.3 UART signal behavior
At the module switch-on, before the UART interface initialization (as described in the power-on
sequence detailed in Figure 12), each pin is first tri-stated and then is set to its related internal reset
state9. At the end of the boot sequence, the UART interface is initialized, the module is by default in
active mode, and the UART interface is enabled as AT commands interface.
The configuration and the behavior of the UART signals after the boot sequence are described below.
See section 1.4 for definition and description of module operating modes referred to in this section.
RXD signal behavior
The module data output line (RXD) is set by default to the OFF state (high level) at UART initialization.
The module holds RXD in the OFF state until the module does not transmit some data.
8
See the u-blox AT commands manual [2] for the definition of command mode, data mode, and online command mode.
9
See the pin description table in the SARA-G450 data sheet [1].
Page 32

SARA-G450 - System integration manual
UBX-18046432 - R09 System description Page 32 of 131
C1-Public
TXD signal behavior
The module data input line (TXD) is set by default to the OFF state (high level) at UART initialization.
The TXD line is then held by the module in the OFF state if the line is not activated by the DTE: an
active pull-up is enabled inside the module on the TXD input.
CTS signal behavior
The module hardware flow control output (CTS line) is set to the ON state (low level) at UART
initialization.
If the hardware flow control is enabled, as it is by default, the CTS line indicates when the UART
interface is enabled (data can be sent and received). The module drives the CTS line to the ON state
or to the OFF state when it is either able or not able to accept data from the DTE over the UART (see
1.9.1.4 for more details).
☞ If hardware flow control is enabled, then when the CTS line is OFF it does not necessarily mean
that the module is in low power idle mode, but only that the UART is not enabled, as the module
could be forced to stay in active mode for other activities, e.g. related to the network or related to
other interfaces.
☞ When the multiplexer protocol is active, the CTS line state is mapped to Fcon / Fcoff MUX
command for flow control issues outside the power saving configuration while the physical CTS
line is still used as a power state indicator.
The CTS hardware flow control setting can be changed by AT commands (for more details, see the
u-blox AT commands manual [2], AT&K, AT+IFC, AT+UCTS commands description).
If the hardware flow control is not enabled, after the UART initialization the CTS line behaves as per
AT+UCTS command setting.
☞ When the power saving configuration is enabled and the hardware flow control is not implemented
in the DTE/DCE connection, data sent by the DTE can be lost: the first character sent when the
module is in the low power idle mode will not be a valid communication character (see 1.9.1.4 for
more details).
RTS signal behavior
The hardware flow control input (RTS line) is set by default to the OFF state (high level) at UART
initialization. The module then holds the RTS line in the OFF state if the line is not activated by the
DTE: an active pull-up is enabled inside the module on the RTS input.
If the hardware flow control is enabled, as it is by default, the module monitors the RTS line to detect
permission from the DTE to send data to the DTE itself. If the RTS line is set to the OFF state, any
on-going data transmission from the module is interrupted until the subsequent RTS line change to
the ON state.
☞ The DTE must still be able to accept a certain number of characters after the RTS line is set to the
OFF state.
Module behavior according to RTS hardware flow control status can be configured by AT commands
(for more details, see the u-blox AT commands manual [2], AT&K, AT+IFC commands description).
Page 33

SARA-G450 - System integration manual
UBX-18046432 - R09 System description Page 33 of 131
C1-Public
If AT+UPSV=2 is set and hardware flow control is disabled, the module monitors the RTS line to
manage the power saving configuration:
• When an OFF-to-ON transition occurs on the RTS input line, the UART is enabled and the module
wakes up to active mode: after ~20 ms from the OFF-to-ON transition, the UART / module wake-up
is completed and data can be received without loss. The module cannot enter the low power idle
mode and the UART is kept enabled as long as the RTS input line is held in the ON state
• If the RTS input line is set to the OFF state by the DTE, the UART is disabled (held in low power
mode) and the module automatically enters low power idle mode whenever possible
For more details, see section 1.9.1.4 and the u-blox AT commands manual [2], +UPSV AT command.
DSR signal behavior
If AT&S1 is set, as it is by default, the DSR module output line is set by default to the OFF state (high
level) at UART initialization. The DSR line is then set to the OFF state when the module is in command
mode or in online command mode and is set to the ON state when the module is in data mode (see the
u-blox AT commands manual [2] for the definition of the interface data mode, command mode and
online command mode).
If AT&S0 is set, the DSR module output line is set by default to the ON state (low level) at UART
initialization and is then always held in the ON state.
DTR signal behavior
The DTR module input line is set by default to the OFF state (high level) at UART initialization. The
module then holds the DTR line in the OFF state if the line is not activated by the DTE: an active pull-up
is enabled inside the module on the DTR input.
Module behavior according to DTR status can be changed by AT command (for more details, see the
u-blox AT commands manual [2], AT&D command description).
DCD signal behavior
If AT&C1 is set, as it is by default, the DCD module output line is set by default to the OFF state (high
level) at UART initialization. The module then sets the DCD line according to the carrier detect status:
ON if the carrier is detected, OFF otherwise. For voice calls, DCD is set to the ON state when the call
is established. For a data call, there is the following scenario (see the u-blox AT commands manual [2]
for the definition of the interface data mode, command mode and online command mode):
Packet Switched Data call: Before activating the PPP protocol (data mode) a dial-up application must
provide the ATD*99***<context_number># to the module: with this command the module switches
from command mode to data mode and can accept PPP packets. The module sets the DCD line to the
ON state, then answers with a CONNECT to confirm the ATD*99 command. The DCD ON is not related
to the context activation but with the data mode
☞ The DCD is set to ON during the execution of the +CMGS, +CMGW, +USOWR, +USODL AT
commands requiring input data from the DTE: the DCD line is set to the ON state as soon as the
switch to binary/text input mode is completed and the prompt is issued; DCD line is set to OFF as
soon as the input mode is interrupted or completed (for more details, see the u-blox AT commands
manual [2]).
☞ The DCD line is kept in the ON state, even during the online command mode, to indicate that the
call is established, while if the module enters command mode, the DSR line is set to the OFF state.
For more details, see DSR signal behavior description.
Page 34

SARA-G450 - System integration manual
UBX-18046432 - R09 System description Page 34 of 131
C1-Public
☞ For scenarios when the DCD line setting is requested for different reasons (e.g. SMS texting
during online command mode), the DCD line changes to guarantee the correct behavior for all the
scenarios. For instance, for SMS texting in online command mode, if the call is released, the DCD
line is kept to ON till the SMS command execution is completed (even if the call release would
request the DCD setting to OFF).
If AT&C0 is set, the DCD module output line is set by default to the ON state (low level) at UART
initialization and is then always held in the ON state.
RI signal behavior
The RI module output line is set by default to the OFF state (high level) at UART initialization.
During an incoming call, the RI line is switched from the OFF state to the ON state with a 4:1 duty
cycle and a 5 s period (ON for 1 s, OFF for 4 s, see Figure 15), until the DTE attached to the module
sends the ATA string and the module accepts the incoming call. The RING string sent by the module
(DCE) to the serial port at constant time intervals is not correlated with the switch of the RI line to the
ON state.
Figure 15: RI behavior during an incoming call
The RI line can notify an SMS arrival. When the SMS arrives, the RI line switches from OFF to ON for
1 s (see Figure 16), if the feature is enabled by the AT+CNMI command (see the u-blox AT commands
manual [2]).
Figure 16: RI behavior at SMS arrival
This behavior allows the DTE to stay in power saving mode until the DCE related event requests
service.
1s
time [s]
15
10
5
0
RI ON
RI OFF
Call incomes
1s
time [s]
15
10
RI ON
RI OFF
Call incomes
SMS arrives
time [s]
0
RI ON
RI OFF
1s
SMS
time [s]
RI ON
RI OFF
1s
Page 35

SARA-G450 - System integration manual
UBX-18046432 - R09 System description Page 35 of 131
C1-Public
For SMS arrival, if several events coincidently occur or in quick succession, each event independently
triggers the RI line, although the line will not be deactivated between each event. As a result, the RI
line may stay to ON for more than 1 s.
If an incoming call is answered within less than 1 s (with ATA or if auto-answering is set to ATS0=1)
than the RI line is set to OFF earlier.
☞ RI line monitoring cannot be used by the DTE to determine the number of received SMSes.
☞ For multiple events (incoming call plus SMS received), the RI line cannot be used to discriminate
the two events, but the DTE must rely on subsequent URCs and interrogate the DCE with the
appropriate commands.
1.9.1.4 UART and power saving
The power saving configuration is controlled by the +UPSV AT command (for the complete
description, see the u-blox AT commands manual [2]). When power saving is enabled, the module
automatically enters low power idle mode whenever possible, and otherwise the active mode is
maintained by the module (see section 1.4 for definition and description of module operating modes
referred to in this section).
The AT+UPSV command configures both the module power saving and also the UART behavior in
relation to the power saving. The conditions for the module entering idle mode also depend on the
UART power saving configuration.
Two different power saving configurations can be set by the AT+UPSV command:
• AT+UPSV=0, power saving disabled: module forced on active mode and UART interface enabled
(default)
• AT+UPSV=1, power saving enabled: module cyclic active / idle mode
• AT+UPSV=2, power saving enabled and controlled by the UART RTS input line
The different power saving configurations that can be set by the +UPSV AT command are described
in detail in the following subsections. Table 9 summarizes the UART interface communication
process in the different power saving configurations, in relation with HW flow control settings and
RTS input line status. For more details on the +UPSV AT command description, see the u-blox AT
commands manual [2].
Page 36

SARA-G450 - System integration manual
UBX-18046432 - R09 System description Page 36 of 131
C1-Public
AT+UPSV
HW flow control
RTS line
Communication during idle mode and wake-up
0
Enabled (AT&K3)
ON
Data sent by the DTE are correctly received by the module.
Data sent by the module is correctly received by the DTE.
0
Enabled (AT&K3)
OFF
Data sent by the DTE should be buffered by the DTE and will be correctly
received by the module when RTS is set to ON.
Data sent by the module is buffered by the module and will be correctly
received by the DTE when it is ready to receive data (i.e. RTS line will be ON).
0
Disabled (AT&K0)
ON or OFF
Data sent by the DTE is correctly received by the module.
Data sent by the module is correctly received by the DTE if it is ready to receive
data, otherwise data is lost.
1
Enabled (AT&K3)
ON
Data sent by the DTE should be buffered by the DTE and sent to the module
when active mode is entered. The first character sent by DTE is lost, but after
~20 ms the UART is ready to receive data and recognition of subsequent
characters is guaranteed.
Data sent by the module is correctly received by the DTE.
1
Enabled (AT&K3)
OFF
Data sent by the DTE should be buffered by the DTE and sent to the module
when active mode is entered. The first character sent by DTE is lost, but after
~20 ms the UART is ready to receive data and recognition of subsequent
characters is guaranteed.
Data sent by the module is buffered by the module and will be correctly
received by the DTE when it is ready to receive data (i.e. RTS line will be ON).
1
Disabled (AT&K0)
ON or OFF
The first character sent by the DTE is lost, but after ~20 ms the UART and the
module are woken up: recognition of subsequent characters is guaranteed
after the complete UART / module wake-up.
Data sent by the module is correctly received by the DTE if it is ready to receive
data, otherwise data is lost.
2
Enabled (AT&K3)
ON or OFF
Not Applicable: HW flow control cannot be enabled with AT+UPSV=2.
2
Disabled (AT&K0)
ON
Data sent by the DTE is correctly received by the module.
Data sent by the module is correctly received by the DTE if it is ready to receive
data, otherwise data is lost.
2
Disabled (AT&K0)
OFF
The first character sent by the DTE is lost, but after ~20 ms the UART and the
module are waked up: recognition of subsequent characters is guaranteed
after the complete UART / module wake-up.
Data sent by the module is correctly received by the DTE if it is ready to receive
data, otherwise data is lost.
Table 9: UART and power-saving summary
AT+UPSV=0: power saving disabled, fixed active mode
The module does not enter idle mode and the UART interface is enabled (data can be sent and
received): the CTS line is always held in the ON state after UART initialization. This is the default
configuration.
AT+UPSV=1: power saving enabled, cyclic idle/active mode
When the AT+UPSV=1 command is issued by the DTE, the UART is disabled after the timeout set by
the second parameter of the +UPSV AT command (for more details, see the u-blox AT commands
manual [2]).
The module automatically enters the low power idle mode whenever possible but it wakes up to active
mode according to any required activity related to the network or any other required activity related
to the functions / interfaces, so that the module cyclically enters the low power idle mode and the
active mode.
Page 37

SARA-G450 - System integration manual
UBX-18046432 - R09 System description Page 37 of 131
C1-Public
The UART is enabled, and the module does not enter low power idle mode, in the following cases:
• If the module needs to transmit some data over the UART (e.g. URC)
• During a PSD data call with external context activation
• During a voice call
• If a character is sent by the DTE, the first character sent causes the system wake-up due to the
“wake-up via data reception” feature described in the following subsection, and the UART will be
then kept enabled after the last data received according to the timeout set by the second
parameter of the AT+UPSV=1 command
The module periodically wakes up from idle mode to active mode to monitor the paging channel of the
current base station (paging block reception), according to 2G discontinuous reception (DRX)
specification.
The time period between two paging receptions is defined by the current base station (i.e. by the
network): for 2G network, the paging reception period can vary from ~0.47 s (DRX = 2,
i.e. 2 x 51 2G-frames) up to ~2.12 s (DRX = 9, i.e. 9 x 51 2G-frames).
The module active mode duration depends on:
• Network parameters, related to the time interval for the paging block reception (minimum of
~11 ms)
• The time period from the last data received at the serial port during the active mode: the module
does not enter idle mode until a timeout expires. The second parameter of the +UPSV AT
command configures this timeout, from 40 2G-frames (i.e. 40 x 4.615 ms = ~185 ms) up to 65000
2G-frames (i.e. 65000 x 4.615 ms = ~300 s). Default value is 2000 2G-frames (i.e.
2000 x 4.615 ms = ~9.2 s). The active mode duration can be extended indefinitely since every
subsequent character received during the active mode resets and restarts the timer.
The hardware flow control output (CTS line) indicates when the module is in active mode, if HW flow
control is enabled, as illustrated in Figure 17.
time [s]
CTS ON
CTS OFF
UART disabled
~10 ms (min)
UART enabled
~9.2 s (default)
UART enabled
Data input
0.47- 2.10 s
Figure 17: CTS behavior with power saving enabled (AT+UPSV=1) and HW flow control enabled: the CTS output line indicates
when the module is in active mode (CTS = ON = low level) or in idle mode (CTS = OFF = high level)
AT+UPSV=2: power saving enabled and controlled by the RTS line
This configuration can only be enabled with the module hardware flow control disabled by AT&K0
command.
The module enters the idle mode after the DTE sets the RTS line to OFF.
Then, the module automatically enters idle mode whenever possible according to any required activity
related to the network or any other required activity related to the functions / interfaces of the module.
Page 38

SARA-G450 - System integration manual
UBX-18046432 - R09 System description Page 38 of 131
C1-Public
The UART is disabled as long as the RTS line is held to OFF, but the UART is enabled in the following
cases:
• If the module needs to transmit some data over the UART (e.g. URC)
• During a PSD data call with external context activation
• During a voice call
• If a data is sent by the DTE, it causes the system wake-up due to the “wake-up via data reception”
feature described in the following subsection, and the UART will be then kept enabled after the
last data received according to the timeout previously set with the AT+UPSV=1 configuration
When an OFF-to-ON transition occurs on the RTS input line, the UART is re-enabled and the module,
if it was in idle mode, switches from idle to active mode after ~20 ms: this is the UART and module
“wake-up time”.
If the RTS line is set to ON by the DTE, then the module is not allowed to enter the low power idle mode
and the UART is kept enabled.
Wake-up via data reception
The UART wake-up via data reception consists of a special configuration of the module TXD input line
that causes the system wake-up when a high-to-low (OFF-to-ON) transition occurs on the TXD input
line. In particular, the UART is enabled and the module switches from the low power idle mode to active
mode within ~20 ms from the first character received: this is the system “wake-up time”.
As a consequence, the first character sent by the DTE when the UART is disabled (i.e. the wake-up
character) is not a valid communication character even if the wake-up via data reception configuration
is active, because it cannot be recognized, and the recognition of the subsequent characters is
guaranteed only after the complete system wake-up (i.e. after ~20 ms).
The UART wake-up via data reception configuration is active in the following cases:
• AT+UPSV=1 is set with HW flow control both enabled or disabled
• AT+UPSV=2 is set with HW flow control disabled, and the RTS line is set OFF
Figure 18 and Figure 19 show examples of common scenarios and timing constraints:
• AT+UPSV=1 power saving configuration is active and the timeout from last data received to idle
mode start is set to 2000 frames (AT+UPSV=1,2000)
Figure 18 shows the case where the module UART is disabled and only a wake-up is forced. In this
scenario the only character sent by the DTE is the wake-up character; as a consequence, the DCE
module UART is disabled when the timeout from last data received expires (2000 frames without data
reception, as the default case).
OFF
ON
DCE UART is enabled for 2000 GSM frames (~9.2 s)
time
Wake up time: ~20 ms
time
TXD input
Wake up character
Not recognized by DCE
UART
OFF
ON
Figure 18: Wake-up via data reception without further communication
Page 39

SARA-G450 - System integration manual
UBX-18046432 - R09 System description Page 39 of 131
C1-Public
Figure 19 shows the case where in addition to the wake-up character further (valid) characters are
sent. The wake-up character wakes up the module UART. The other characters must be sent after
the “wake-up time” of ~20 ms. If this condition is satisfied, the module (DCE) recognizes characters.
The module will disable the UART after 2000 GSM frames from the latest data reception.
DCE UART is enabled for 2000 GSM frames (~9.2s)
after the last data received
time
Wake up time: ~20 ms
time
Wake up character
Not recognized by DCE
Valid characters
Recognized by DCE
OFF
ON
TXD input
UART
OFF
ON
Figure 19: Wake-up via data reception with further communication
☞ The “wake-up via data reception” feature cannot be disabled.
☞ The UART autobauding does not work when “wake-up via data reception” feature is enabled; if
AT+IPR=0 is set, when issuing AT+UPSV=1 or AT+UPSV=2 the module starts working at a fixed
baud rate of 115200 bit/s, regardless of the baud rate previously recognized. So, if the desired
baud rate is different from 115200 bit/s, it is needed to be set with +IPR AT command before
setting +UPSV (see u-blox AT commands manual [2]).
☞ It is recommended to avoid having power saving enabled when the UART interface is in data mode,
otherwise some data loss may occur.
1.9.1.5 Multiplexer protocol (3GPP TS 27.010)
SARA-G450 modules have a software layer with MUX functionality, the 3GPP TS 27.010 multiplexer
protocol [6], available on the UART physical link. The auxiliary UART and the DDC (I2C) serial interfaces
do not support the multiplexer protocol.
This is a data link protocol (layer 2 of the OSI model) which uses HDLC-like framing and operates
between the module (DCE) and the application processor (DTE), and allows a number of simultaneous
sessions over the used physical link (UART): the user can concurrently use AT command interface on
one MUX channel and data communication on another MUX channel.
The following virtual channels are defined:
• Channel 0: control channel
• Channel 1-5: AT and data
• Channel 6: GNSS tunneling
10
10
Not supported by the “00” product version
Page 40

SARA-G450 - System integration manual
UBX-18046432 - R09 System description Page 40 of 131
C1-Public
1.9.2 Secondary auxiliary serial interface (AUX UART)
☞ Secondary auxiliary UART interface is not supported by the “00” product version. This interface
should be left unconnected and should not be driven by external devices.
The secondary auxiliary UART interface (AUX UART) is a 3-wire unbalanced asynchronous serial
interface available over RXD_AUX (data output pin) and TXD_AUX (data input pin), supporting:
• AT command mode
11
• Data mode and online command mode
11
• GNSS tunneling
SARA-G450 modules’ auxiliary UART interface is configured by default for AT commands.
The serial interface configuration can be changed by means of the +USIO AT command to select
different alternative serial interface configuration variants, summarized in Table 10, available in a
mutually exclusive way (for more details, see the u-blox AT commands manual [2], +USIO AT
command).
AT+USIO
UART
AUX UART
FT UART
Remarks
0
AT, data and MUX
AT, data
Diagnostic
1 AT, data and MUX
AT, data
Diagnostic
Default configuration
2
AT, data and MUX
AT, data
Diagnostic
3
AT, data and MUX
GNSS tunneling
Diagnostic
4 AT, data and MUX
GNSS tunneling
Diagnostic
Table 10: Alternative serial interface configuration variants supported by SARA-G4 modules product versions “01” onwards
☞ The serial interface configuration cannot be changed on the “00” product version of the
SARA-G450 modules: the +USIO AT command is not supported.
SARA-G450 modules’ auxiliary UART interface can be configured in AT command mode by means of
the AT+USIO command (for more details, see Table 10) so that:
• the cellular module waits for AT command instructions and interprets all the characters received
over the auxiliary UART interface as commands to be executed
• the auxiliary UART interface provides RS-232 functionality conforming to ITU-T V.24
recommendation [5] with CMOS compatible signal levels: 0 V for low data bit or ON state and
1.8 V / 3 V for high data bit or OFF state (for detailed electrical characteristics, see the SARA-G450
data sheet [1])
• the cellular module is designed to operate as a modem, which represents the Data
Circuit-terminating Equipment (DCE) according to ITU-T V.24 recommendation [5]: the
application processor connected to the module through the auxiliary UART interface represents
the Data Terminal Equipment (DTE)
• Flow control is not supported
• 2400, 4800, 9600, 19200, 38400, 57600 and 115200 bit/s baud rates can be set (see the u-blox
AT commands manual [2], +IPR)
• 8N1, 8E1, 8O1 or 8N2 frame format can be set (see the u-blox AT commands manual [2], +ICF)
11
See the u-blox AT commands manual [2] for the definition of the command mode, data mode, and online command mode.
Page 41

SARA-G450 - System integration manual
UBX-18046432 - R09 System description Page 41 of 131
C1-Public
☞ The signal names of SARA-G450 modules’ auxiliary UART interface conform to the ITU-T V.24
recommendation [5]: e.g. the TXD_AUX line represents the data transmitted by the DTE
(application processor data line output) and received by the DCE (module data line input).
☞ Hardware flow control and software flow control are not supported on the auxiliary UART interface.
☞ SARA-G450 modules do not support automatic baud rate detection (autobauding) and automatic
frame recognition on the auxiliary UART interface: 115200 bit/s and 8N1 are the default setting.
The auxiliary UART interface provides only data output and input signals, so that for example the &C,
&D and &S AT commands have no effect on the interface, since there are no DCD, DTR and DSR lines
available.
When the auxiliary UART interface is configured in AT command mode by means of the +USIO AT
command (for more details, see Table 10 and the u-blox AT commands manual [2]), then both the
primary main UART and the secondary auxiliary UART can receive AT commands in parallel. The
primary main UART can be used for AT commands, data communication and multiplexer
functionalities, while the secondary auxiliary UART can be used for AT commands and data
communication.
See the “Multiple AT command interfaces” appendix in the u-blox AT commands manual [2] for
further details regarding multiple AT command interfaces general usage and related AT command
profile configurations.
The power saving configuration is controlled by the +UPSV AT command, which can be retrieved over
the secondary auxiliary UART interface as over the primary main UART interface: it sets the module
power saving configuration and also the interface behavior in relation to the power saving. For further
details regarding power saving configurations, see section 1.9.1.4 and the u-blox AT commands
manual [2], +UPSV AT command.
The multiplexer protocol is not supported over SARA-G450 modules’ auxiliary UART interface.
SARA-G450 modules’ auxiliary UART interface can be configured in GNSS tunneling mode by means
of the +USIO AT command (for more details, see Table 10 and the u-blox AT commands manual [2]),
so that:
• raw data flow to and from a u-blox GNSS receiver connected to the cellular module via I2C interface
is available (for more details, see the u-blox AT commands manual [2], +UGPRF AT command)
• None flow control is supported
• Baud rate is 115200 bit/s
• Frame format is 8N1 (8 data bits, no parity, 1 stop bit)
Page 42

SARA-G450 - System integration manual
UBX-18046432 - R09 System description Page 42 of 131
C1-Public
1.9.3 Additional serial interface for FW upgrade and tracing (FT UART)
The additional UART interface for Firmware upgrade and tracing (FT UART) is a 3-wire unbalanced
asynchronous serial interface, supporting:
• FW upgrades by means of the dedicated tool
• Trace log capture (diagnostic purpose)
• RF non-signaling test mode by means of dedicated commands
The main characteristics of the interface are the following:
• Serial port with RS-232 functionality conforming to ITU-T V.24 recommendation [5] with CMOS
compatible signal levels: 0 V for low data bit or ON state and 1.8 V / 3 V for high data bit or OFF
state (for detailed electrical characteristics, see the SARA-G450 data sheet [1])
• Data lines (RXD_FT as output, TXD_FT as input)
• Software flow control (XON/XOFF)
• Fixed baud-rate 921600 bit/s
• Fixed frame format 8N1 (8 data bits, no parity, 1 stop bit)
☞ The signal names of the FT UART interface of SARA-G450 modules conform to the ITU-T V.24
recommendation [5]: e.g. the TXD_FT line represents the data transmitted by the DTE (application
processor data line output) and received by the DCE (module data line input).
☞ During the firmware upgrade procedure over the FT UART interface, the V_INT pin and the FT
UART interface operate at the level set by the flash programmer, regardless of the VSEL input pin
setting.
1.9.4 DDC (I2C) interface
☞ DDC (I2C) interface is not supported by the “00” product version. This interface should be left
unconnected and should not be driven by external devices.
SARA-G450 modules provide an I2C compatible DDC interface on the SCL and SDA pins exclusively
for the communication with u-blox GNSS positioning chips / modules.
The AT command interface is not available on the DDC (I2C) interface.
DDC (I2C) local device mode operation is not supported: the cellular module can act as host only, and
the connected u-blox GNSS receiver acts as local device in the DDC (I2C) communication.
Two lines, serial clock (SCL) and serial data (SDA), carry information on the bus. SCL is used to
synchronize data transfers, and SDA is the data line. To be compliant to the I2C bus specifications,
the module interface pins are open drain output and pull-up resistors must be externally provided
conforming to the I2C bus specifications [7].
u-blox has implemented special features in SARA-G450 modules to ease the design effort required
for the integration of a u-blox cellular module with a u-blox GNSS receiver.
Combining a u-blox cellular module with a u-blox GNSS receiver allows designers to have full access
to the positioning receiver directly via the cellular module: it relays control messages to the GNSS
receiver via a dedicated DDC (I2C) interface. A second interface connected to the positioning receiver
is not necessary: AT commands via the UART serial interface of the cellular module allow for full
control of the GNSS receiver from any host processor.
Page 43

SARA-G450 - System integration manual
UBX-18046432 - R09 System description Page 43 of 131
C1-Public
SARA-G450 modules feature embedded GNSS aiding, which is a set of specific features developed by
u-blox to enhance GNSS performance and decrease the Time-To-First-Fix (TTFF), thus making it
possible to calculate the position in a shorter time with higher accuracy.
SARA-G450 modules support these GNSS aiding types:
• Local aiding
• AssistNow Online
• AssistNow Offline
• AssistNow Autonomous
The embedded GNSS aiding features can be used only if the DDC (I2C) interface of the cellular module
is connected to the u-blox GNSS receiver.
SARA-G450 modules provide an additional custom function over GPIOs pins to improve the
integration with u-blox positioning chips and modules:
• GNSS receiver power-on/off: “GNSS supply enable” function provided by GPIO1, GPIO2 (default),
GPIO3 or GPIO4 improves the positioning receiver power consumption. When the GNSS
functionality is not required, the positioning receiver can be completely switched off by the cellular
module that is controlled by AT commands.
☞ For more details regarding the handling of the DDC (I2C) interface, the GNSS aiding features and
the GNSS related function over GPIOs, see section 1.11, the u-blox AT commands manual [2]
(+UGPS, +UGPRF, +UGPIOC AT commands) and the GNSS implementation application note [8].
As additional improvement for the GNSS receiver performance, the V_BCKP supply output of
SARA-G450 modules can be connected to the V_BCKP supply input pin of u-blox positioning chips
and modules to provide the supply for the GNSS real time clock and backup RAM when the VCC supply
of the cellular module is within its operating range and the VCC supply of the GNSS receiver is
disabled.
This enables the u-blox positioning receiver to recover from a power breakdown with either a hot start
or a warm start (depending on the duration of the GNSS receiver VCC outage) and to maintain the
configuration settings saved in the backup RAM.
Page 44

SARA-G450 - System integration manual
UBX-18046432 - R09 System description Page 44 of 131
C1-Public
1.10 Audio interfaces
☞ Analog audio interface is not supported by the “00” product version. This interface should be left
unconnected and should not be driven by external devices.
SARA-G450 modules provides an analog audio interface:
• Analog audio input:
o Differential analog audio input (MIC_P, MIC_N) shared for all the analog audio path modes: the
pins can be connected to the output of an external analog audio device or can be connected to
an external microphone by means of a simple circuit implemented on the application board
o Supply output for an external microphone (MIC_BIAS): the pin can provide the bias to an
external microphone by means of a simple circuit implemented on the application board
o Local ground for the external microphone (MIC_GND): the pin can provide the reference for the
differential analog audio input as sense ground line for the external microphone circuit
• Analog audio output:
o Differential audio output (SPK_P, SPK_N) shared for all the analog audio path modes: the pins
can be connected to the input of an external analog audio device or can be connected to an
external speaker
1.10.1 Analog audio interface
☞ Analog audio interface is not supported by the “00” product version. This interface should be left
unconnected and should not be driven by external devices.
1.10.1.1 Uplink path
SARA-G450 pins related to the analog audio uplink path are:
• MIC_P / MIC_N: differential analog audio signal inputs (positive/negative)
• MIC_BIAS: supply output for an external microphone
• MIC_GND: local ground for the external microphone
The SARA-G450 data sheet [1] provides the detailed electrical characteristics of the analog audio u
plink path.
1.10.1.2 Downlink path
SARA-G450 pins related to the analog audio downlink path are:
• SPK_P / SPK_N: differential analog audio signal output (positive/negative)
The SARA-G450 data sheet [1] provides the detailed electrical characteristics of the analog audio u
plink path.
⚠ Excessive sound pressure from headphones can cause hearing loss.
Page 45

SARA-G450 - System integration manual
UBX-18046432 - R09 System description Page 45 of 131
C1-Public
1.11 General Purpose Input/Output (GPIO)
SARA-G450 modules provide 4 pins (GPIO1, GPIO2, GPIO3, GPIO4), which can be configured as
general purpose input or output, or can be configured to provide special functions via u-blox AT
commands (for further details, see the u-blox AT commands manual [2], +UGPIOC, +UGPIOR,
+UGPIOW).
Table 11 summarizes the custom functions available on the GPIO pins of SARA-G450 modules:
Function
Description
Default GPIO
Configurable GPIOs
Network status indication
Network status: registered home network,
registered roaming, voice call or data
transmission, no service
--
GPIO1, GPIO2,
GPIO3, GPIO4
External GNSS supply enable12
Output to enable/disable the supply of an
external u-blox GNSS receiver connected to
the cellular module by the DDC (I2C) interface
GPIO212
GPIO112, GPIO212,
GPIO312, GPIO412
Last gasp12
Input to trigger last gasp notification
--
GPIO112, GPIO212,
GPIO312, GPIO412
32.768 kHz output
32.768 kHz clock output
--
GPIO3
General purpose input
Input to sense high or low digital level
--
GPIO1, GPIO2,
GPIO3, GPIO4
General purpose output
Output to set high or low digital level
--
GPIO1, GPIO2,
GPIO3, GPIO4
Pin disabled
Tri-state with an internal active pull-down
enabled
GPIO1, GPIO213,
GPIO3, GPIO4
GPIO1, GPIO2,
GPIO3, GPIO4
Table 11: GPIO custom functions configuration
1.12 Reserved pins (RSVD)
SARA-G450 modules have pins reserved for future use, marked as RSVD.
All the RSVD pins can be left unconnected on the application board, except for the RSVD pin #33 that
can be externally connected to GND or left unconnected too.
12
Not supported by the “00” product version
13
“00” product version only
Page 46

SARA-G450 - System integration manual
UBX-18046432 - R09 System description Page 46 of 131
C1-Public
1.13 System features
1.13.1 Network indication
The GPIO1, GPIO2, GPIO3 or GPIO4 can be configured alternatively from their default settings to
indicate network status (i.e. no service, registered home network, registered visitor network, voice call
or data transmission enabled), by means of the +UGPIOC AT command.
For the detailed description, see section 1.11 and the u-blox AT commands manual [2], GPIO
commands.
1.13.2 Antenna detection
The ANT_DET pin of SARA-G450 modules is an Analog to Digital Converter (ADC) provided to sense
the presence of an external antenna when optionally set by the +UANTR AT command.
The external antenna assembly must be provided with a built-in resistor (diagnostic circuit) to be
detected, and an antenna detection circuit must be implemented on the application board to properly
connect the antenna detection input (ANT_DET) to the antenna RF interface (ANT).
For more details regarding feature description and detection / diagnostic circuit design-in, see
sections 1.7.2 and 2.4.2 and the u-blox AT commands manual [2].
1.13.3 Jamming detection
☞ Not supported by the “00” product version.
In real network situations, modules can experience various kind of out-of-coverage conditions: limited
service conditions when roaming to networks not supporting the specific SIM, limited service in cells
which are not suitable or barred due to operators’ choices, no cell condition when moving to poorly
served or highly interfered areas. In the latter case, interference can be artificially injected in the
environment by a noise generator covering a given spectrum, thus obscuring the operator’s carriers
entitled to give access to the cellular service.
The jamming detection feature detects such “artificial” interference and reports the start and stop of
such conditions to the client, which can react appropriately by e.g. switching off the radio transceiver
to reduce power consumption and monitoring the environment at constant periods.
The feature detects, at the radio resource level, an anomalous source of interference and signals it to
the client with an unsolicited indication when the detection is entered or released. The jamming
condition occurs when:
• The module has lost synchronization with the serving cell and cannot select any other cell
• The band scan reveals at least n carriers with power level equal or higher than the threshold
• On all such carriers, no synchronization is possible
The jamming condition is cleared when any of the above mentioned statements does not hold.
The congestion (i.e. jamming) detection feature can be enabled and configured by the +UCD AT
command (for more details, see the u-blox AT commands manual [2]).
Page 47

SARA-G450 - System integration manual
UBX-18046432 - R09 System description Page 47 of 131
C1-Public
1.13.4 TCP/IP and UDP/IP
Via AT commands it is possible to access the embedded TCP/IP and UDP/IP stack functionalities over
the Packet Switched data connection. For more details about AT commands, see the u-blox AT
commands manual [2].
Direct Link mode for TCP and UDP sockets is supported. Sockets can be set in Direct Link mode to
establish a transparent end-to-end communication with an already connected TCP or UDP socket via
serial interface. In Direct Link mode, data sent to the serial interface from an external application
processor is forwarded to the network and vice-versa.
To avoid data loss while using Direct Link, enable the HW flow control on the serial interface.
SARA-G450 modules support also secure socket providing SSL/TLS encryption.
1.13.5 FTP
SARA-G450 modules support the File Transfer Protocol functionalities via AT commands. Files are
read and stored in the local file system of the module.
SARA-G450 modules support also Secure File Transfer Protocol functionalities providing SSL/TLS
encryption.
For more details about AT commands, see the u-blox AT commands manual [2].
1.13.6 HTTP
SARA-G450 modules support Hyper-Text Transfer Protocol (HTTP/1.0) functionalities as an HTTP
client is implemented: HEAD, GET, POST, DELETE and PUT operations are available. The file size to
be uploaded / downloaded depends on the free space available in the local file system (FFS) at the
moment of the operation. Up to 4 HTTP client contexts can be used simultaneously.
SARA-G450 modules support also Secure Hyper-Text Transfer Protocol functionalities providing
SSL/TLS encryption.
For more details about AT commands, see the u-blox AT commands manual [2].
1.13.7 SSL/TLS
The modules support the Secure Sockets Layer (SSL) / Transport Layer Security (TLS) to provide
security over the FTP and HTTP protocols with certificate key sizes defined as follows:
• Trusted root CA certificate: 8192 bytes
• Client certificate: 8192 bytes
• Client private key: 8192 bytes
The SSL/TLS support provides different connection security aspects:
• Server authentication: use of the server certificate verification against a specific trusted
certificate or a trusted certificates list
• Client authentication: use of the client certificate and the corresponding private key
• Data security and integrity: data encryption and Hash Message Authentication Code (HMAC)
generation
The security aspects used during a connection depend on the SSL/TLS configuration and features
supported. For more details, see the u-blox AT commands manual [2].
Page 48

SARA-G450 - System integration manual
UBX-18046432 - R09 System description Page 48 of 131
C1-Public
1.13.8 Dual stack IPv4/IPv6
The modules support both Internet Protocol version 4 and Internet Protocol version 6.
For more details about dual stack IPv4/IPv6, see the u-blox AT commands manual [2].
1.13.9 Smart temperature management
☞ Not supported by the “00” product version.
Cellular modules – independently from the specific model – always have a well-defined operating
temperature range. This range should be respected to guarantee full device functionality and long life
span. Nevertheless there are environmental conditions that can affect operating temperature, e.g. if
the device is located near a heating/cooling source, if there is/isn’t air circulating, etc.
The module itself can also influence the environmental conditions; such as when it is transmitting at
full power. In this case, its temperature can increase very quickly and can raise the temperature
nearby.
The best solution is always to properly design the system where the module is integrated.
Nevertheless, having an extra check/security mechanism embedded into the module is a good
solution to prevent operation of the device outside of the specified range.
Smart temperature supervisor (STS)
The smart temperature supervisor is activated and configured by a dedicated +USTS AT command
(for more details, see the u-blox AT commands manual [2]). A URC indication is provided once the
feature is enabled and at the module power-on.
The cellular module measures the internal temperature (Ti) and its value is compared with predefined
thresholds to identify the actual working temperature range.
☞ The temperature measurement is done inside the module: the measured value could be different
from the environmental temperature (Ta).
Warning
area
t
-1
t
+1
t
+2
t
-2
Valid temperature range
Safe
area
Dangerous
area
Dangerous
area
Warning
area
Figure 20: Temperature range and limits
Page 49

SARA-G450 - System integration manual
UBX-18046432 - R09 System description Page 49 of 131
C1-Public
The entire temperature range is divided into sub-regions by limits (see Figure 20) named t-2, t-1, t+1
and t+2.
• Within the first limit, (t
-1
< Ti < t+1), the cellular module is in the normal working range, the safe
area.
• In the warning area, (t
-2
< Ti < t-1) or (t+1 < Ti < t+2), the cellular module is still inside the valid
temperature range, but the measured temperature is approaching the limit (upper or lower). The
module sends a warning to the user (through the active AT communication interface), who can
take, if possible, the necessary actions to return to a safer temperature range or simply ignore the
indication. The module is still in a valid and good working condition.
• Outside the valid temperature range, (Ti < t
-2
) or (Ti > t+2), the device is working outside the
specified range and represents a dangerous working condition. This condition is indicated and the
device shuts down to avoid damage.
☞ The shutdown is suspended for security reasons whenever an emergency call is in progress. In this
case, the device switches off at call termination.
☞ The user can decide at any time to enable/disable the Smart Temperature Supervisor feature. If
the feature is disabled, then there is no embedded protection against disallowed temperature
conditions.
Page 50

SARA-G450 - System integration manual
UBX-18046432 - R09 System description Page 50 of 131
C1-Public
Figure 21 shows the flow diagram implemented in the SARA-G450 modules for the Smart
Temperature Supervisor.
IF STS
enabled
Read
temperature
IF
(t-1<Ti<t+1)
IF
(t-2<Ti<t+2)
Send
notification
(warning)
Send
notification
(dangerous)
Wait emergency
call termination
IF
emerg.
call in
progress
Shut the device
down
Yes
No
Yes
Yes
No
No
No
Yes
Send
shutdown
notification
Feature enabled
(full logic or
indication only)
IF
Full Logic
Enabled
Feature disabled:
no action
Temperature is
within normal
operating range
Yes
Tempetature
is within
warning area
Tempetature is
outside valid
temperature range
No
Feature enabled
in full logic mode
Feature enabled in
indication only mode:
no further actions
Send
notification
(safe)
Previously
outside of
Safe Area
Tempetature
is back to
safe area
No
No
further
actions
Yes
Figure 21: Smart Temperature Supervisor (STS) flow diagram
Page 51

SARA-G450 - System integration manual
UBX-18046432 - R09 System description Page 51 of 131
C1-Public
Threshold definitions
When the module application operates at extreme temperatures with smart temperature supervisor
enabled, the user should note that the device automatically shuts down outside the valid temperature
range, as described above.
The input for the algorithm is always the temperature measured within the cellular module (Ti,
internal). This value can be higher than the working ambient temperature (Ta, ambient), since during
transmission at maximum power (for example) a significant fraction of DC input power is dissipated
as heat.
Table 12 defines the temperature thresholds for SARA-G450 modules.
Symbol
Parameter
Temperature
Remarks
t-2
Low temperature shutdown
–40 °C
Equal to the lower limit of the extended temperature range
t-1
Low temperature warning
–30 °C
10 °C above t-2
t+1
High temperature warning
+85 °C
Equal to the upper limit of the extended temperature range
t+2
High temperature shutdown
+95 °C
10 °C above t+1
Table 12: Thresholds definition for the Smart Temperature Supervisor on the SARA-G450 modules
☞ The sensor measures the board temperature inside the shield, which can differ from the ambient
temperature.
1.13.10 AssistNow clients and GNSS integration
☞ Not supported by the “00” product version.
For customers using u-blox GNSS receivers, the SARA-G450 modules feature embedded AssistNow
clients. AssistNow A-GPS provides better GNSS performance and faster Time-To-First-Fix. The
clients can be enabled and disabled with an AT command (see the u-blox AT commands manual [2]).
SARA-G450 modules act as a stand-alone AssistNow client, making AssistNow available with no
additional requirements for resources or software integration on an external host microcontroller. Full
access to u-blox positioning receivers is available via the cellular modules, through a dedicated DDC
(I2C) interface, while the available GPIOs can handle the positioning chipset/module power-on/off.
This means that the cellular module and the positioning chips and modules can be controlled through
a single serial port from any host processor.
1.13.11 Hybrid positioning and CellLocate®
☞ Not supported by the “00” product version.
Although GNSS is a widespread technology, reliance on the visibility of extremely weak GNSS satellite
signals means that positioning is not always possible, particularly in shielded environments such as
indoors and enclosed parking facilities, or when a GNSS jamming signal is present. The situation can
be improved by augmenting GNSS receiver data with network cell information to provide a level of
redundancy that can benefit numerous applications.
Page 52

SARA-G450 - System integration manual
UBX-18046432 - R09 System description Page 52 of 131
C1-Public
Positioning through cellular information: CellLocate®
The u-blox CellLocate® feature enables device position estimation based on the parameters of the
mobile network cells that are visible to the specific device. To estimate its position, the module sends
the CellLocate® server the parameters of network cells that are visible to it using a UDP connection.
In return, the server provides the estimated position based on the CellLocate® database. SARA-G450
modules can either send the parameters of the visible home network cells only (normal scan) or the
parameters of all surrounding cells of all mobile operators (deep scan).
The CellLocate® database is compiled from the position of devices which observed, in the past, a
specific cell or set of cells (historical observations) as follows:
1. Several devices reported their position to the CellLocate® server when observing a specific cell
(the “A”s in the picture represent the position of the devices which observed the same cell A).
2. CellLocate® server defines the area of cell A visibility.
3. If a new device reports the observation of cell A, then CellLocate® is able to provide the estimated
position from the area of visibility.
Page 53

SARA-G450 - System integration manual
UBX-18046432 - R09 System description Page 53 of 131
C1-Public
4. The visibility of multiple cells provides increased accuracy based on the intersection of area of
visibility.
CellLocate® is implemented using a set of two AT commands that allow configuration of the
CellLocate® service (+ULOCCELL) and requesting the position according to the user configuration
(+ULOC). The answer is provided in the form of an unsolicited AT command including latitude,
longitude and estimated accuracy.
☞ The accuracy of the position estimated by CellLocate® depends on the availability of historical
observations in the specific area.
Hybrid positioning
With u-blox hybrid positioning technology, u-blox cellular modules can be triggered to provide their
current position using either a u-blox GNSS receiver or the position estimated from CellLocate®. The
choice depends on which positioning method provides the best and fastest solution according to the
user configuration, exploiting the benefit of having multiple and complementary positioning methods.
Hybrid positioning is implemented through a set of three AT commands that allow GNSS receiver
configuration (+ULOCGNSS), CellLocate® service configuration (+ULOCCELL), and requesting the
position according to the user configuration (+ULOC). The answer is provided in the form of an
unsolicited AT command including latitude, longitude and estimated accuracy (if the position has
been estimated by CellLocate®), and additional parameters if the position has been computed by the
GNSS receiver.
The configuration of mobile network cells does not remain static (e.g. new cells are continuously
added or existing cells are reconfigured by the network operators). For this reason, when a hybrid
positioning method has been triggered and the GNSS receiver calculates the position, a database
self-learning mechanism has been implemented so that these positions are sent to the server to
update the database and maintain its accuracy.
The use of hybrid positioning requires a connection via the DDC (I2C) bus between the cellular modules
and the u-blox GNSS receiver (see section 2.6.4).
See the GNSS implementation application note [8] for the complete description of the feature.
☞ u-blox is extremely mindful of user privacy. When a position is sent to the CellLocate® server,
u-blox is unable to track the SIM used or the specific device.
Page 54

SARA-G450 - System integration manual
UBX-18046432 - R09 System description Page 54 of 131
C1-Public
1.13.12 Firmware upgrade Over AT (FOAT)
1.13.12.1 Overview
This feature allows upgrading the module’s firmware over the AT interface of the module, using AT
commands.
• The +UFWUPD AT command triggers a reboot followed by the upgrade procedure at a specified
baud rate (see the u-blox AT commands manual [2] for more details).
• A special boot loader on the module performs firmware installation, security verifications and
module reboot.
• Firmware authenticity verification is performed via a security signature during the download. The
firmware is then installed, overwriting the current version. In the event of power loss during this
phase, the boot loader detects a fault at the next wake-up, and restarts the firmware download
from the Xmodem-1k handshake. After completing the upgrade, the module is reset again and
wakes up in normal boot.
1.13.12.2 FOAT procedure
The application processor must proceed in the following way:
• Send the +UFWUPD AT command through the AT interface, specifying file type and desired baud
rate
• Reconfigure serial communication at selected baud rate, with the used protocol
• Send the new FW image via the used protocol
⚠ After FW image is sent, module reboots and can stay unresponsive up to 2 minutes with V_INT
low; it is strongly recommended not to remove VCC during this step.
☞ It is suggested to check if enough space is available in module’s file system before the FOAT
procedure.
☞ After upgrade with FOAT procedure, it is necessary to restore factory configuration by mean of
AT+UFACTORY=1,1 command in order to restore the complete file system space.
1.13.13 Last gasp
☞ Not supported by the “00” product version.
In the event of a power supply outage (i.e. main supply interruption, battery removal, battery voltage
below a certain threshold), the cellular module can be configured to send an alarm notification to a
remote entity after a trigger by a GPIO pin properly configured. The alarm notification can be set with
an AT command.
For the detailed description, see section 1.11 and the u-blox AT commands manual [2], +ULGASP AT
command.
Page 55

SARA-G450 - System integration manual
UBX-18046432 - R09 System description Page 55 of 131
C1-Public
1.13.14 Power saving
The power saving configuration is disabled by default, but it can be enabled using the +UPSV AT
command. When power saving is enabled, the module automatically enters the low power idle mode
whenever possible, reducing current consumption.
During low power idle mode, the module is not ready to communicate with an external device by means
of the application interfaces, since it is configured to reduce power consumption. It can be woken up
from idle mode to active mode by the connected application processor or by network activities, as
described in Table 5.
During idle mode, the module processor core runs with the RTC 32 kHz reference clock, which is
generated by an internal oscillator.
For the complete description of the +UPSV AT command, see the u-blox AT commands manual [2].
For the definition and the description of SARA-G450 modules operating modes, including the events
forcing transitions between the different operating modes, see section 1.4.
For the description of current consumption in idle and active operating modes, see sections 1.5.1.3
and 1.5.1.4.
For the description of the UART settings related to module power saving configuration, see section
1.9.1.4.
Page 56

SARA-G450 - System integration manual
UBX-18046432 - R09 Design-in Page 56 of 131
C1-Public
2 Design-in
2.1 Overview
For an optimal integration of SARA-G450 modules in the final application board, follow the design
guidelines stated in this section.
Every application circuit must be properly designed to guarantee the correct functionality of the
related interface, however a number of points require higher attention during the design of the
application device.
The following list provides a ranking of importance in the application design, starting from the highest
relevance:
1. Module antenna connection: ANT and ANT_DET pins. Antenna circuit directly affects the RF
compliance of the device integrating a SARA-G450 module with the applicable certification
schemes. Very carefully follow the suggestions provided in section 2.4 for schematic and layout
design.
2. Module supply: VCC and GND pins. The supply circuit affects the RF compliance of the device
integrating a SARA-G450 module with applicable certification schemes as well as antenna circuit
design. Very carefully follow the suggestions provided in section 2.2.1 for schematic and layout
design.
3. SIM interface: VSIM, SIM_CLK, SIM_IO, SIM_RST, SIM_DET pins. Accurate design is required to
guarantee SIM card functionality and compliance with applicable conformance standards,
reducing also the risk of RF coupling. Carefully follow the suggestions provided in section 2.5 for
schematic and layout design.
4. System functions: PWR_ON, PWR_OFF, VSEL pins. Accurate design is required to guarantee that
the voltage level is well defined during operation. Carefully follow the suggestions provided in
section 2.3 for schematic and layout design.
5. Analog audio interface: MIC_BIAS, MIC_GND, MIC_P, MIC_N uplink and SPK_P, SPK_N downlink
pins. Accurate design is required to obtain clear and high quality audio reducing the risk of noise
from audio lines due to both supply burst noise coupling and RF detection. Carefully follow the
suggestions provided in section 2.7 for schematic and layout design.
6. Other digital interfaces: primary main UART, secondary auxiliary UART and additional UART (for
FW upgrade and Tracing) interfaces, DDC I2C-compatible interface, and GPIOs. Accurate design
is required to guarantee proper functionality and reduce the risk of digital data frequency
harmonics coupling. Follow the suggestions provided in sections 2.6, 2.7 and 2.8 for schematic
and layout design.
7. Other supplies: the V_BCKP RTC supply input/output and the V_INT digital interfaces supply
output. Accurate design is required to guarantee correct functionality. Follow the suggestions
provided in sections 2.2.2 and 2.2.3 for schematic and layout design.
2.2 Supply interfaces
2.2.1 Module supply (VCC)
2.2.1.1 General guidelines for VCC supply circuit selection and design
All the available VCC pins must be connected to the external supply minimizing the power loss due to
series resistance.
GND pins are internally connected, but still connect all the available pins to a solid ground on the
application board, since a good (low impedance) connection to external ground can minimize power
loss and improve RF and thermal performance.
Page 57

SARA-G450 - System integration manual
UBX-18046432 - R09 Design-in Page 57 of 131
C1-Public
SARA-G450 modules must be supplied through the VCC pins by a clean DC power supply that should
comply with the module VCC requirements summarized in Table 6.
The appropriate DC power supply can be selected according to the application requirements (see
Figure 22) between the different possible supply sources types, which most common ones are the
following:
• Switching regulator
• Low Drop-Out (LDO) linear regulator
• Rechargeable Lithium-ion (Li-Ion) or Lithium-ion polymer (Li-Pol) battery
• Primary (disposable) battery
Main supply
available?
Battery
Li-Ion 3.7 V
Linear LDO
regulator
Main supply
voltage > 5V?
Switching step-down
regulator
No, portable device
No, less than 5 V
Yes, greater than 5 V
Yes, always available
Figure 22: VCC supply concept selection
The DC-DC switching step-down regulator is the typical choice when the available primary supply
source has a nominal voltage much higher (e.g. greater than 5 V) than the modules VCC operating
supply voltage. The use of switching step-down provides the best power efficiency for the overall
application and minimizes current drawn from the main supply source. See sections 2.2.1.2, 2.2.1.6,
2.2.1.10 and 2.2.1.11 for specific design-in.
The use of an LDO linear regulator becomes convenient for a primary supply with a relatively low
voltage (e.g. less than 5 V). In this case the typical 90% efficiency of the switching regulator
diminishes the benefit of voltage step-down and no true advantage is gained in input current savings.
On the opposite side, linear regulators are not recommended for high voltage step-down as they
dissipate a considerable amount of energy in thermal power. See sections 2.2.1.3, 2.2.1.6, 2.2.1.10
and 2.2.1.11 for specific design-in.
If the modules are deployed in a mobile unit where no permanent primary supply source is available,
then a battery will be required to provide VCC. A standard 3-cell Li-Ion or Li-Pol battery pack directly
connected to VCC is the usual choice for battery-powered devices. During charging, batteries with
Ni-MH chemistry typically reach a maximum voltage that is above the maximum rating for VCC, and
should therefore be avoided. See sections 2.2.1.4, 2.2.1.6, 2.2.1.10 and 2.2.1.11 for specific design-in.
Page 58

SARA-G450 - System integration manual
UBX-18046432 - R09 Design-in Page 58 of 131
C1-Public
Keep in mind that the use of rechargeable batteries requires the implementation of a suitable charger
circuit which is not included in SARA-G450 modules. The charger circuit must be designed to prevent
over-voltage on VCC pins of the module, and it should be selected according to the application
requirements: a DC-DC switching charger is the typical choice when the charging source has an high
nominal voltage (e.g. ~12 V), whereas a linear charger is the typical choice when the charging source
has a relatively low nominal voltage (~5 V). If both a permanent primary supply / charging source
(e.g. ~12 V) and a rechargeable back-up battery (e.g. 3.7 V Li-Pol) are available at the same time in the
application as possible supply source, then an appropriate charger / regulator with integrated power
path management function can be selected to supply the module while simultaneously and
independently charging the battery. See sections 2.2.1.8, 2.2.1.9, 2.2.1.6, 2.2.1.10 and 2.2.1.11 for
specific design-in.
The use of a primary (not rechargeable) battery is in general uncommon, but appropriate parts can be
selected given that the most cells available are seldom capable of delivering the burst peak current
for a GSM transmission due to high internal resistance. See sections 2.2.1.5, 2.2.1.6, 2.2.1.10 and
2.2.1.11 for specific design-in.
The usage of more than one DC supply at the same time should be carefully evaluated: depending on
the supply source characteristics, different DC supply systems can result in being mutually exclusive.
The usage of a regulator or a battery not able to support the highest peak of VCC current consumption
specified in the SARA-G450 data sheet [1] is generally not recommended. However, if the selected
regulator or battery is not able to support the highest peak current of the module, it must be able to
support at least the highest averaged current consumption value specified in the SARA-G450 data
sheet [1]. The additional energy required by the module during a 2G Tx slot can be provided by an
appropriate bypass tank capacitor or supercapacitor with very large capacitance and very low ESR
placed close to the module VCC pins. Depending on the actual capability of the selected regulator or
battery, the required capacitance can be considerably larger than 1 mF and the required ESR can be
in the range of a few tens of m. Carefully evaluate the implementation of this solution since aging
and temperature conditions significantly affect the actual capacitor characteristics.
The following sections highlight some design aspects for each of the supplies listed above providing
application circuit design-in compliant with the module VCC requirements summarized in Table 6.
2.2.1.2 Guidelines for VCC supply circuit design using a switching regulator
The use of a switching regulator is suggested when the difference from the available supply rail to the
VCC value is high: switching regulators provide good efficiency transforming a 12 V or greater voltage
supply to the typical 3.8 V value of the VCC supply.
The characteristics of the switching regulator connected to VCC pins should meet the following
prerequisites to comply with the module VCC requirements summarized in Table 6:
• Power capability: the switching regulator with its output circuit must be capable of providing a
voltage value to the VCC pins within the specified operating range and must be capable of
delivering the specified maximum peak / pulse current with 1/8 duty cycle to the VCC pins (see
SARA-G450 data sheet [1]).
• Low output ripple: the switching regulator together with its output circuit must be capable of
providing a clean (low noise) VCC voltage profile.
Page 59

SARA-G450 - System integration manual
UBX-18046432 - R09 Design-in Page 59 of 131
C1-Public
• PWM mode operation: it is preferable to select regulators with Pulse Width Modulation (PWM)
mode. While in connected mode Pulse Frequency Modulation (PFM) mode and PFM/PWM mode,
transitions must be avoided to reduce the noise on the VCC voltage profile. Switching regulators
that are able to switch between low ripple PWM mode and high efficiency burst or PFM mode can
be used, provided the mode transition occurs when the module changes status from idle/active
mode to connected mode (where current consumption increases to a value greater than 100 mA):
it is permissible to use a regulator that switches from the PWM mode to the burst or PFM mode
at an appropriate current threshold (e.g. 60 mA).
Figure 23 and the components listed in Table 13 show an example of a high reliability power supply
circuit, where the module VCC is supplied by a step-down switching regulator capable of delivering
the VCC pins with the specified maximum peak / pulse current, with low output ripple and with fixed
switching frequency in PWM mode operation greater than 1 MHz.
SARA-G450
12V
C5
R3
C4
R2
C2C1
R1
VIN
RUN
VC
RT
PG
SYNC
BD
BOOST
SW
FB
GND
6
7
10
9
5
C6
1
2
3
8
11
4
C7 C8
D1
R4
R5
L1
C3
U1
52
VCC
53
VCC
51
VCC
GND
Figure 23: Suggested schematic design for the VCC voltage supply application circuit using a step-down regulator
Reference
Description
Part number - Manufacturer
C1
10 µF capacitor ceramic X7R 5750 15% 50 V
C5750X7R1H106MB - TDK
C2
10 nF capacitor ceramic X7R 0402 10% 16 V
GRM155R71C103KA01 - Murata
C3
680 pF capacitor ceramic X7R 0402 10% 16 V
GRM155R71H681KA01 - Murata
C4
22 pF capacitor ceramic C0G 0402 5% 25 V
GRM1555C1H220JZ01 - Murata
C5
10 nF capacitor ceramic X7R 0402 10% 16 V
GRM155R71C103KA01 - Murata
C6
470 nF capacitor ceramic X7R 0603 10% 25 V
GRM188R71E474KA12 - Murata
C7
22 µF capacitor ceramic X5R 1210 10% 25 V
GRM32ER61E226KE15 - Murata
C8
330 µF capacitor tantalum D_SIZE 6.3 V 45 m
T520D337M006ATE045 - KEMET
D1
Schottky diode 40 V 3 A
MBRA340T3G - ON Semiconductor
L1
10 µH inductor 744066100 30% 3.6 A
744066100 - Wurth Electronics
R1
470 k resistor 0402 5% 0.1 W
2322-705-87474-L - Yageo
R2
15 k resistor 0402 5% 0.1 W
2322-705-87153-L - Yageo
R3
22 k resistor 0402 5% 0.1 W
2322-705-87223-L - Yageo
R4
390 k resistor 0402 1% 0.063 W
RC0402FR-07390KL - Yageo
R5
100 k resistor 0402 5% 0.1 W
2322-705-70104-L - Yageo
U1
Step-down regulator MSOP10 3.5 A 2.4 MHz
LT3972IMSE#PBF - Linear Technology
Table 13: Suggested components for the VCC voltage supply application circuit using a step-down regulator
Page 60

SARA-G450 - System integration manual
UBX-18046432 - R09 Design-in Page 60 of 131
C1-Public
Figure 24 and the components listed in Table 14 show an example of a low cost power supply circuit,
where the VCC module supply is provided by a step-down switching regulator capable of delivering to
VCC pins the specified maximum peak / pulse current, transforming a 12 V supply input.
SARA-G450
12V
R5
C6C1
VCC
INH
FSW
SYNC
OUT
GND
2
6
3
1
7
8
C3
C2
D1
R1
R2
L1
U1
GND
FB
COMP
5
4
R3
C4
R4
C5
52
VCC
53
VCC
51
VCC
Figure 24: Suggested low cost solution for the VCC voltage supply application circuit using step-down regulator
Reference
Description
Part number - Manufacturer
C1
22 µF capacitor ceramic X5R 1210 10% 25 V
GRM32ER61E226KE15 – Murata
C2
100 µF capacitor tantalum B_SIZE 20% 6.3V 15m
T520B107M006ATE015 – Kemet
C3
5.6 nF capacitor ceramic X7R 0402 10% 50 V
GRM155R71H562KA88 – Murata
C4
6.8 nF capacitor ceramic X7R 0402 10% 50 V
GRM155R71H682KA88 – Murata
C5
56 pF capacitor ceramic C0G 0402 5% 50 V
GRM1555C1H560JA01 – Murata
C6
220 nF capacitor ceramic X7R 0603 10% 25 V
GRM188R71E224KA88 – Murata
D1
Schottky diode 25V 2 A
STPS2L25 – STMicroelectronics
L1
5.2 µH inductor 30% 5.28A 22 m
MSS1038-522NL – Coilcraft
R1
4.7 k resistor 0402 1% 0.063 W
RC0402FR-074K7L – Yageo
R2
910 resistor 0402 1% 0.063 W
RC0402FR-07910RL – Yageo
R3
82 resistor 0402 5% 0.063 W
RC0402JR-0782RL – Yageo
R4
8.2 k resistor 0402 5% 0.063 W
RC0402JR-078K2L – Yageo
R5
39 k resistor 0402 5% 0.063 W
RC0402JR-0739KL – Yageo
U1
Step-down regulator 8-VFQFPN 3 A 1 MHz
L5987TR – ST Microelectronics
Table 14: Suggested components for the low cost solution VCC voltage supply application circuit using a step-down
regulator
Page 61

SARA-G450 - System integration manual
UBX-18046432 - R09 Design-in Page 61 of 131
C1-Public
2.2.1.3 Guidelines for VCC supply circuit design using a LDO linear regulator
The use of a linear regulator is suggested when the difference from the available supply rail and the
VCC value is low: linear regulators provide high efficiency when transforming a 5 V supply to a voltage
value within the module’s VCC normal operating range.
The characteristics of the LDO linear regulator connected to the VCC pins should meet the following
prerequisites to comply with the module VCC requirements summarized in Table 6:
• Power capabilities: the LDO linear regulator with its output circuit must be capable of providing a
stable voltage value to the VCC pins and of delivering to VCC pins the specified maximum
peak / pulse current with 1/8 duty cycle (see the SARA-G450 data sheet [1]).
• Power dissipation: the power handling capability of the LDO linear regulator must be checked to
limit its junction temperature to the maximum rated operating range (i.e. check the voltage drop
from the maximum input voltage to the minimum output voltage to evaluate the power dissipation
of the regulator).
Figure 25 and the components listed in Table 15 show an example of a high reliability power supply
circuit, where the VCC module supply is provided by an LDO linear regulator capable of delivering the
specified highest peak / pulse current, with an appropriate power handling capability. The regulator
described in this example supports a wide input voltage range, and it includes internal circuitry for
reverse battery protection, current limiting, thermal limiting and reverse current protection.
It is recommended to configure the LDO linear regulator to generate a voltage supply value slightly
below the maximum limit of the module VCC normal operating range (e.g. ~4.1 V as in the circuit
described in Figure 25 and Table 15). This reduces the power on the linear regulator and improves the
whole thermal design of the supply circuit.
5V
C1
IN
OUT
ADJ
GND
1
2
4
5
3
C2R1
R2
U1
SHDN
SARA-G450
52
VCC
53
VCC
51
VCC
GND
Figure 25: Suggested schematic design for the VCC voltage supply application circuit using an LDO linear regulator
Reference
Description
Part number - Manufacturer
C1, C2
10 µF capacitor ceramic X5R 0603 20% 6.3 V
GRM188R60J106ME47 - Murata
R1
9.1 k resistor 0402 5% 0.1 W
RC0402JR-079K1L - Yageo Phycomp
R2
3.9 k resistor 0402 5% 0.1 W
RC0402JR-073K9L - Yageo Phycomp
U1
LDO linear regulator ADJ 3.0 A
LT1764AEQ#PBF - Linear Technology
Table 15: Suggested components for the VCC voltage supply application circuit using an LDO linear regulator
Page 62

SARA-G450 - System integration manual
UBX-18046432 - R09 Design-in Page 62 of 131
C1-Public
Figure 26 and the components listed in Table 16 show an example of a low-cost power supply circuit,
where the VCC module supply is provided by an LDO linear regulator capable of delivering the specified
highest peak / pulse current, with an appropriate power handling capability. The regulator described
in this example supports a limited input voltage range, and it includes internal circuitry for current and
thermal protection.
It is recommended to configure the LDO linear regulator to generate a voltage supply value slightly
below the maximum limit of the module VCC normal operating range (e.g. ~4.1 V as in the circuit
described in Figure 26 and Table 16). This reduces the power on the linear regulator and improves the
whole thermal design of the supply circuit.
5V
C1
IN OUT
ADJ
GND
1
2
4
5
3
C2R1
R2
U1
EN
SARA-G450
52
VCC
53
VCC
51
VCC
GND
Figure 26: Suggested low cost solution for the VCC voltage supply application circuit using an LDO linear regulator
Reference
Description
Part number - Manufacturer
C1, C2
10 µF capacitor ceramic X5R 0603 20% 6.3 V
GRM188R60J106ME47 - Murata
R1
27 k resistor 0402 5% 0.1 W
RC0402JR-0727KL - Yageo Phycomp
R2
4.7 k resistor 0402 5% 0.1 W
RC0402JR-074K7L - Yageo Phycomp
U1
LDO linear regulator ADJ 3.0 A
LP38501ATJ-ADJ/NOPB - Texas Instrument
Table 16: Suggested components for low cost solution VCC voltage supply application circuit using an LDO linear regulator
2.2.1.4 Guidelines for VCC supply circuit design using a rechargeable battery
Rechargeable Li-Ion or Li-Pol batteries connected to VCC pins should meet the following prerequisites
to comply with the module VCC requirements summarized in Table 6:
• Maximum pulse and DC discharge current: the rechargeable Li-Ion battery with its output circuit
must be capable of delivering to VCC pins the specified maximum peak / pulse current with
1/8 duty cycle, and a DC current greater than the module maximum average current consumption
(see the SARA-G450 data sheet [1]). The maximum pulse discharge current and the maximum DC
discharge current are not always detailed in battery data sheets, but the maximum DC discharge
current is typically almost equal to the battery capacity in Amp-hours divided by 1 hour.
• DC series resistance: the rechargeable Li-Ion battery with its output circuit must be capable of
avoiding a VCC voltage drop greater than 400 mV during transmit bursts.
Page 63

SARA-G450 - System integration manual
UBX-18046432 - R09 Design-in Page 63 of 131
C1-Public
2.2.1.5 Guidelines for VCC supply circuit design using a primary battery
The characteristics of a primary (non-rechargeable) battery connected to the VCC pins should meet
the following prerequisites to comply with the module VCC requirements summarized in Table 6:
• Maximum pulse and DC discharge current: the non-rechargeable battery with its output circuit
must be capable of delivering to VCC pins the specified maximum peak / pulse current with
1/8 duty cycle, and a DC current greater than the module maximum average current consumption
(see the SARA-G450 data sheet [1]). The maximum pulse and the maximum DC discharge current
is not always detailed in battery data sheets, but the maximum DC discharge current is typically
almost equal to the battery capacity in Amp-hours divided by 1 hour.
• DC series resistance: the non-rechargeable battery with its output circuit must be capable of
avoiding a VCC voltage drop greater than 400 mV during transmit bursts.
2.2.1.6 Additional guidelines for VCC supply circuit design
To reduce voltage drops, use a low impedance power source. The resistance of the power supply lines
(connected to the VCC and GND pins of the module) on the application board and battery pack should
also be considered and minimized: cabling and routing must be as short as possible to minimize power
losses.
Three pins are allocated for VCC supply. Another fifty-one pins are designated for GND connection. It
is highly recommended to properly connect all the VCC pins and all the GND pins to supply the module,
in order to minimize series resistance losses.
To avoid voltage drop undershoot and overshoot at the start and end of a transmit burst during a
single-slot 2G transmission (when current consumption on the VCC supply can rise up to the
maximum peak / pulse current specified in the SARA-G450 data sheet [1]), place a bypass capacitor
with large capacitance (more than 100 µF) and low ESR near the VCC pins, for example:
• 330 µF capacitance, 45 mΩ ESR (e.g. KEMET T520D337M006ATE045, tantalum capacitor)
To reduce voltage ripple and noise, especially if the application device integrates an internal antenna,
place the following bypass capacitors near the VCC pins:
• 100 nF capacitor (e.g. Murata GRM155R61C104K) to filter digital logic noise from clocks and data
sources
• 10 nF capacitor (e.g. Murata GRM155R71C103K) to filter digital logic noise from clocks and data
sources
• 56 pF capacitor with Self-Resonant Frequency in 800/900 MHz range (e.g. Murata
GRM1555C1E560J) to filter transmission EMI in the GSM/EGSM bands
• 15 pF capacitor with Self-Resonant Frequency in 1800/1900 MHz range (e.g. Murata
GRM1555C1E150J) to filter transmission EMI in the DCS/PCS bands
A series ferrite bead for GHz band noise can be placed close to the VCC pins of the module for
additional noise filtering, but in general it is not strictly required:
• Ferrite bead specifically designed for EMI noise suppression in GHz band (e.g. Murata
BLM18EG221SN1) implementing the circuit described in Figure 27 to filter out EMI in all the GSM
bands. The ferrite bead can be replaced with a 0 (zero) Ω jumper.
☞ For devices integrating an internal antenna, it is recommended to provide space to allocate all the
components shown in Figure 27 and listed in Table 17. The mounting of each single component
depends on the specific application design.
Page 64

SARA-G450 - System integration manual
UBX-18046432 - R09 Design-in Page 64 of 131
C1-Public
C1
GND plane
VCC line
Capacitor with
SRF ~900 MHz
C5 C3 C2
FB1
Ferrite bead
for GHz noise
C4
C5
GND
C4 C2
SARA-G450
52
VCC
53
VCC
51
VCC
3V8
C1
+
FB1
C3
Capacitor with
SRF ~1900 MHz
SARA-G450
Figure 27: Suggested schematic and layout design for the VCC line, highly recommended when using an integrated antenna
(ferrite bead is not strictly required)
Reference
Description
Part number - Manufacturer
C1
330 µF capacitor tantalum D_SIZE 6.3 V 45 m
T520D337M006ATE045 - KEMET
C2
100 nF capacitor ceramic X7R 0402 10% 16 V
GRM155R71C104KA01 - Murata
C3
10 nF capacitor ceramic X7R 0402 10% 16 V
GRM155R71C103KA01 - Murata
C4
15 pF capacitor ceramic C0G 0402 5% 25 V
GRM1555C1E150JA01 - Murata
C5
56 pF capacitor ceramic C0G 0402 5% 25 V
GRM1555C1E560JA01 - Murata
FB1
Chip Ferrite bead EMI filter for GHz band noise
220 at 100 MHz, 260 at 1 GHz, 2000 mA
BLM18EG221SN1 - Murata
Table 17: Suggested components to reduce ripple / noise on VCC and to avoid undershoot / overshoot on VCC voltage drops
☞ ESD sensitivity rating of the VCC supply pins is 1 kV (Human Body Model according to
JESD22-A114). A higher protection level can be required if the line is externally accessible on the
application board, e.g. if accessible battery connector is directly connected to VCC pins. A higher
protection level can be achieved by mounting an ESD protection (e.g. EPCOS CA05P4S14THSG
varistor array) close to the accessible points.
2.2.1.7 Additional guidelines for VCC separate supply circuit design
SARA-G450 modules provide separate supply inputs over the VCC pins (see Figure 3):
• VCC pins #52 and #53: supply input for the internal RF power amplifier, demanding most of the
total current drawn of the module when RF transmission is enabled during a voice call or a data
transmission
• VCC pin #51: supply input for the internal baseband PMU and transceiver, demanding minor
current
All the VCC pins are in general intended to be connected to the same external power supply circuit,
but separate supply sources can be implemented for specific (e.g. battery-powered) applications
considering that the voltage at the VCC pins #52 and #53 can drop to a value lower than the one at
VCC pin #51, keeping the module still switched-on and functional. Figure 28 and Table 18 describe a
possible application circuit.
Page 65

SARA-G450 - System integration manual
UBX-18046432 - R09 Design-in Page 65 of 131
C1-Public
C1 C4
GND
C3C2 C5
SARA-G450
52
VCC
53
VCC
51
VCC
+
Li-Ion/Li-Pol
battery
C6
SWVIN
SHDN
GND
FB
C7
R1
R2
L1
U1
Step-up
regulator
D1
C8
Figure 28: VCC circuit example with separate supply
Reference
Description
Part number - Manufacturer
C1
330 µF capacitor tantalum D_SIZE 6.3 V 45 m
T520D337M006ATE045 - KEMET
C2
100 nF capacitor ceramic X7R 0402 10% 16 V
GRM155R61A104KA01 - Murata
C3
10 nF capacitor ceramic X7R 0402 10% 16 V
GRM155R71C103KA01 - Murata
C4
56 pF capacitor ceramic C0G 0402 5% 25 V
GRM1555C1E560JA01 - Murata
C5
15 pF capacitor ceramic C0G 0402 5% 25 V
GRM1555C1E150JA01 - Murata
C6
10 µF capacitor ceramic X5R 0603 20% 6.3 V
GRM188R60J106ME47 - Murata
C7
22 µF capacitor ceramic X5R 1210 10% 25 V
GRM32ER61E226KE15 - Murata
C8
10 pF capacitor ceramic C0G 0402 5% 25 V
GRM1555C1E100JA01 - Murata
D1
Schottky diode 40 V 1 A
SS14 - Vishay General Semiconductor
L1
10 µH inductor 20% 1 A 276 m
SRN3015-100M - Bourns Inc.
R1
1 M resistor 0402 5% 0.063 W
RC0402FR-071ML - Yageo Phycomp
R2
412 k resistor 0402 5% 0.063 W
RC0402FR-07412KL - Yageo Phycomp
U1
Step-up regulator 350 mA
AP3015 - Diodes Incorporated
Table 18: Examples of components for the VCC circuit with separate supply
2.2.1.8 Guidelines for external battery charging circuit
Application devices powered by a Li-Ion (or Li-Polymer) battery pack should implement a suitable
battery charger design considering SARA-G450 modules do not have an on-board charging circuit.
In the application circuit described in Figure 29 and Table 19, a rechargeable Li-Ion (or Li-Polymer)
battery pack, which features suitable pulse and DC discharge current capabilities and low DC series
resistance, is directly connected to the VCC supply input of the module. Battery charging is fully
managed by the STMicroelectronics L6924U battery charger IC that, from a USB source (5.0 V
typical), charges the battery as a linear charger, in three phases:
• Pre-charge constant current (active when the battery is deeply discharged): the battery is
charged with a low current, set to 10% of the fast-charge current.
• Fast-charge constant current: the battery is charged with the maximum current, configured by
the value of an external resistor to a value suitable for USB power source (~500 mA).
• Constant voltage: when the battery voltage reaches the regulated output voltage (4.2 V), the
L6924U starts to reduce the current until the charge termination is done. The charging progress
ends when the charging current reaches the value configured by an external resistor to ~15 mA or
when the charging timer reaches the value configured by an external capacitor to ~9800 s.
Using a battery pack with an internal NTC resistor, the L6924U can monitor the battery temperature
to protect the battery from operating under unsafe thermal conditions.
Page 66

SARA-G450 - System integration manual
UBX-18046432 - R09 Design-in Page 66 of 131
C1-Public
The L6924U, as linear charger, is more suitable for applications where the charging source has a
relatively low nominal voltage (~5 V), so that a switching charger is suggested for applications where
the charging source has a relatively high nominal voltage (e.g. ~12 V, refer to the following section
2.2.1.9 for specific design-in), even if the L6924U can also charge from an AC wall adapter as its input
voltage range is tolerant up to 12 V: when a current-limited adapter is used, it can operate in
quasi-pulse mode, thereby reducing power dissipation.
C5 C8
GND
C7C6 C9
SARA-G450
52
VCC
53
VCC
51
VCC
+
USB
supply
C3
R4
θ
U1
IUSB
IAC
IEND
TPRG
SD
VIN
VINSNS
MODE
ISEL
C2C1
5V
TH
GND
VOUT
VOSNS
VREF
R1
R2
R3
Li-Ion/Li-Pol
battery pack
D1
B1
C4
Li-Ion/Li-Polymer
battery charger IC
D2
Ferrite bead
or 0Ω
Figure 29: Li-Ion (or Li-Polymer) battery charging application circuit
Reference
Description
Part number - Manufacturer
B1
Li-Ion (or Li-Polymer) battery pack with 470 NTC
Generic manufacturer
C1, C4
1 µF capacitor ceramic X7R 0603 10% 16 V
GRM188R71C105KA12 - Murata
C2, C6
10 nF capacitor ceramic X7R 0402 10% 16 V
GRM155R71C103KA01 - Murata
C3
1 nF capacitor ceramic X7R 0402 10% 50 V
GRM155R71H102KA01 - Murata
C5
330 µF capacitor tantalum D_SIZE 6.3 V 45 m
T520D337M006ATE045 - KEMET
C7
100 nF capacitor ceramic X7R 0402 10% 16 V
GRM155R61A104KA01 - Murata
C8
56 pF capacitor ceramic C0G 0402 5% 25 V
GRM1555C1E560JA01 - Murata
C9
15 pF capacitor ceramic C0G 0402 5% 25 V
GRM1555C1E150JA01 - Murata
D1, D2
Low capacitance ESD protection
CG0402MLE-18G - Bourns
R1, R2
24 k resistor 0402 5% 0.1 W
RC0402JR-0724KL - Yageo Phycomp
R3
3.3 k resistor 0402 5% 0.1 W
RC0402JR-073K3L - Yageo Phycomp
R4
1.0 k resistor 0402 5% 0.1 W
RC0402JR-071K0L - Yageo Phycomp
U1
Li-Ion (or Li-Polymer) linear battery charger IC
L6924U - STMicroelectronics
Table 19: Suggested components for Li-Ion (or Li-Polymer) battery charging application circuit
2.2.1.9 Guidelines for external charging and power path management circuit
Application devices where both a permanent primary supply / charging source (e.g. ~12 V) and a
rechargeable back-up battery (e.g. 3.7 V Li-Pol) are available at the same time as possible supply
source should implement a suitable charger / regulator with integrated power path management
function to supply the module and the whole device while simultaneously and independently charging
the battery.
Figure 30 illustrates a simplified block diagram circuit showing the working principle of a
charger / regulator with integrated power path management function. This component allows the
system to be powered by a permanent primary supply source (e.g. ~12 V) using the integrated
regulator which simultaneously and independently recharges the battery (e.g. 3.7 V Li-Pol) that
represents the back-up supply source of the system: the power path management feature permits
the battery to supplement the system current requirements when the primary supply source is not
available or cannot deliver the peak system currents.
Page 67
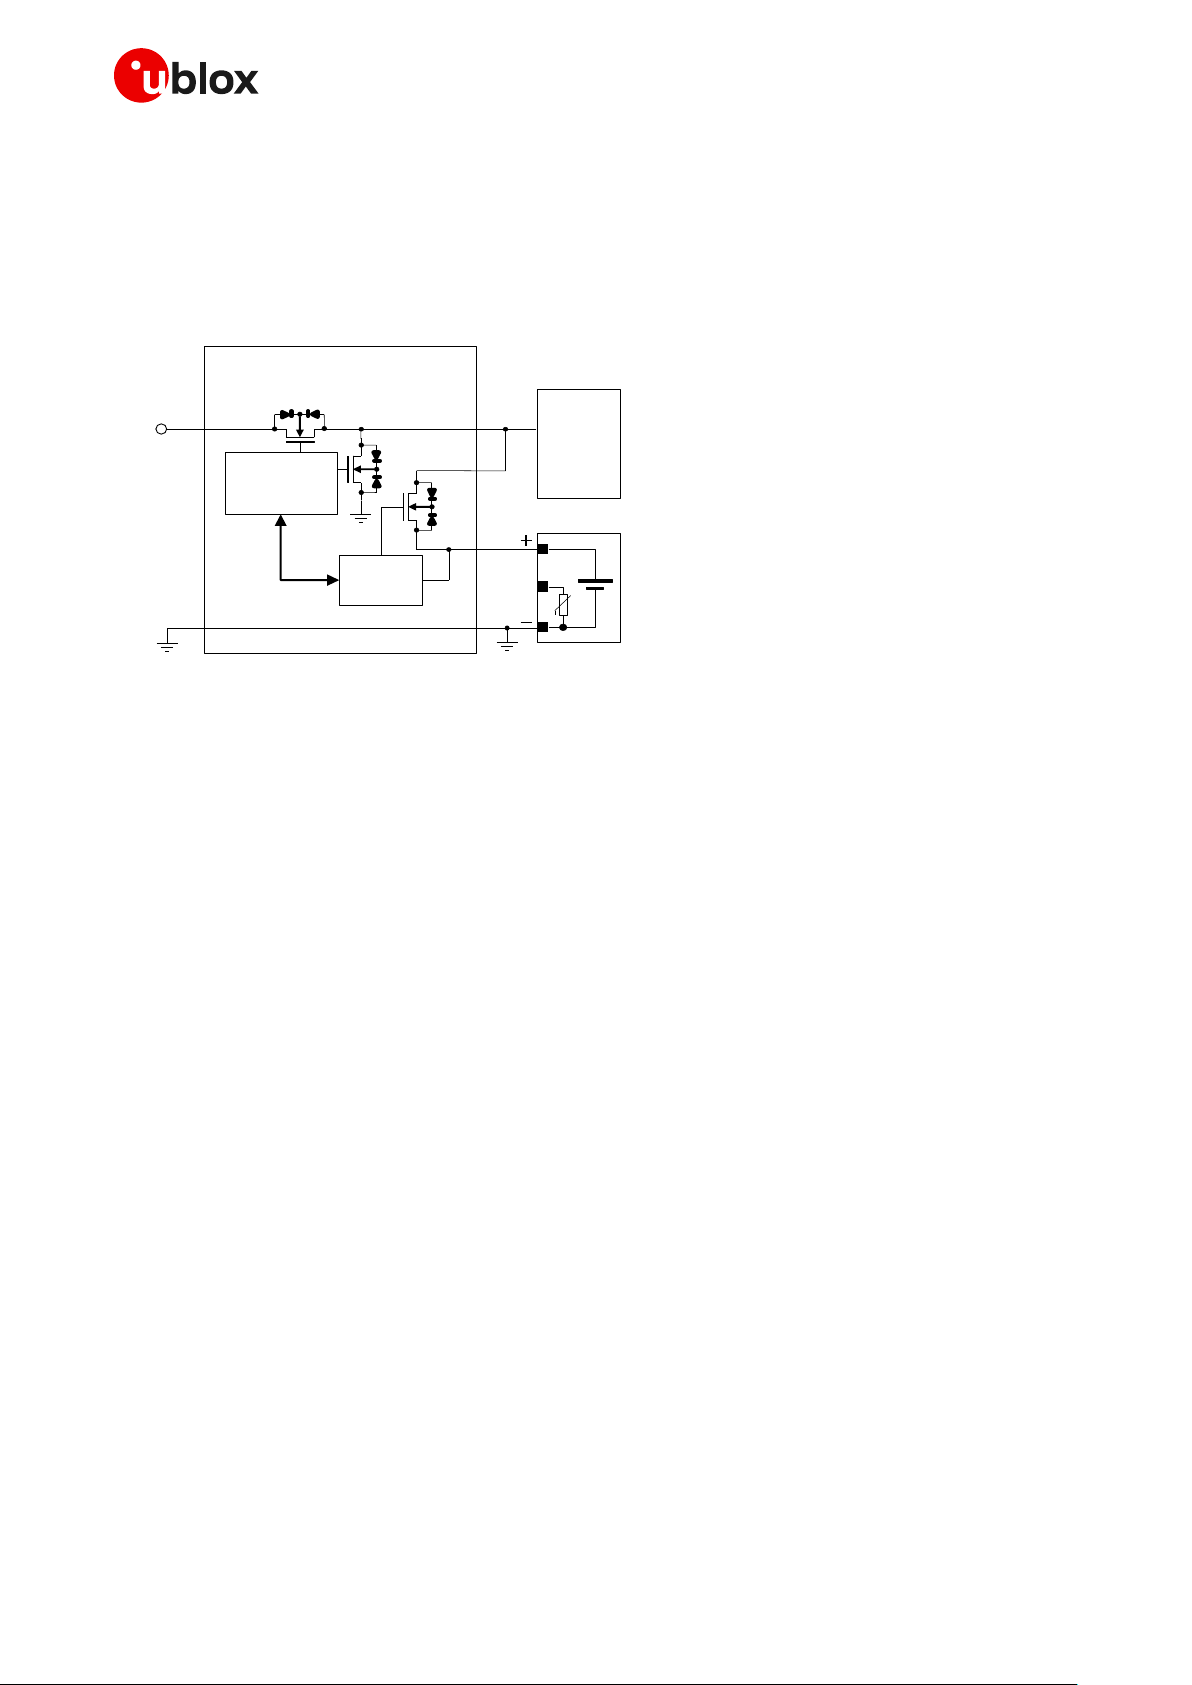
SARA-G450 - System integration manual
UBX-18046432 - R09 Design-in Page 67 of 131
C1-Public
A power management IC should meet the following prerequisites to comply with the module VCC
requirements summarized in Table 6:
• High efficiency internal step down converter, compliant with performances listed in section 2.2.1.2
• Low internal resistance in the active path Vout – Vbat, typically lower than 50 mΩ
• High efficiency switch mode charger with separate power path control
GND
Power path management IC
VoutVin
θ
Li-Ion/Li-Pol
battery pack
GND
System
12 V
primary
source
Charge
controller
DC/DC converter
and battery FET
control logic
Vbat
Figure 30: Charger / regulator with integrated power path management circuit block diagram
Figure 31 and the components listed in Table 20 provide an application circuit example where the
MPS MP2617H switching charger / regulator with integrated power path management function
provides the supply to the cellular module while concurrently and autonomously charging a suitable
Li-Ion (or Li-Polymer) battery with an appropriate pulse and DC discharge current capabilities and
correct DC series resistance according to the rechargeable battery guidelines described in
section 2.2.1.4.
The MP2617H IC constantly monitors the battery voltage and selects whether to use the external
main primary supply / charging source or the battery as supply source for the module, and starts a
charging phase accordingly.
The MP2617H IC normally provides a supply voltage to the module regulated from the external main
primary source, allowing immediate system operation even under missing or deeply discharged
battery: the integrated step-down regulator is capable of providing up to 3 A output current with low
output ripple and fixed 1.6 MHz frequency in PWM mode operation. The module load is satisfied in
priority, then the integrated switching charger will take the remaining current to charge the battery.
Additionally, the power path control allows an internal connection from the battery to the module with
a low series internal ON resistance (40 m typical), in order to supplement additional power to the
module when the current demand increases over the external main primary source or when this
external source is removed.
Battery charging is managed in three phases:
• Pre-charge constant current (active when the battery is deeply discharged): the battery is
charged with a low current, set to 10% of the fast-charge current
• Fast-charge constant current: the battery is charged with the maximum current, configured by
the value of an external resistor to a value suitable for the application
• Constant voltage: when the battery voltage reaches the regulated output voltage (4.2 V), the
current is progressively reduced until the charge termination is done. The charging process ends
when the charging current reaches the 10% of the fast-charge current or when the charging timer
reaches the value configured by an external capacitor
Page 68

SARA-G450 - System integration manual
UBX-18046432 - R09 Design-in Page 68 of 131
C1-Public
Using a battery pack with an internal NTC resistor, the MP2617H can monitor the battery
temperature to protect the battery from operating under unsafe thermal conditions.
Several parameters, such as the charging current, the charging timings, the input current limit, the
input voltage limit, and the system output voltage, can be easily set according to the specific
application requirements, as the actual electrical characteristics of the battery and the external
supply / charging source: suitable resistors or capacitors must be accordingly connected to the
related pins of the IC.
C9 C12
GND
C11C10 C13
SARA-G450
52
VCC
53
VCC
51
VCC
+
Primary
source
R3
U1
EN
ILIM
ISET
TMR
AGND
VIN
C2C1
12V
NTC
PGND
SW
SYS
BAT
C4
R1
R2
D1
θ
Li-Ion/Li-Pol
battery pack
B1
C5
Li-Ion/Li-Polymer battery
charger / regulator with
power path managment
VCC
C3 C6
L1
BST
D2
VLIM
R4
R5
C7 C8
Ferrite bead
or 0Ω
R6
SYSFB
R7
D3
Figure 31: Li-Ion (or Li-Polymer) battery charging and power path management application circuit
Reference
Description
Part number - Manufacturer
B1
Li-Ion (or Li-Polymer) battery pack with 10 k NTC
Generic manufacturer
C1, C5, C6
22 µF capacitor ceramic X5R 1210 10% 25 V
GRM32ER61E226KE15 - Murata
C2, C4, C10
100 nF capacitor ceramic X7R 0402 10% 16 V
GRM155R61A104KA01 - Murata
C3
1 µF capacitor ceramic X7R 0603 10% 25 V
GRM188R71E105KA12 - Murata
C7, C12
56 pF capacitor ceramic C0G 0402 5% 25 V
GRM1555C1E560JA01 - Murata
C8, C13
15 pF capacitor ceramic C0G 0402 5% 25 V
GRM1555C1E150JA01 - Murata
C9
330 µF capacitor tantalum D_SIZE 6.3 V 45 m
T520D337M006ATE045 - KEMET
C11
10 nF capacitor ceramic X7R 0402 10% 16 V
GRM155R71C103KA01 - Murata
D1, D2
Low capacitance ESD protection
CG0402MLE-18G - Bourns
D3
Schottky diode 40 V 3 A
MBRA340T3G – ON Semiconductor
R1, R3, R5, R7
10 k resistor 0402 5% 1/16 W
Generic manufacturer
R2
1.0 k resistor 0402 5% 0.1 W
Generic manufacturer
R4
22 k resistor 0402 5% 1/16 W
Generic manufacturer
R6
26.5 k resistor 0402 1% 1/16 W
Generic manufacturer
L1
1.2 µH inductor 6 A 21 m 20%
7447745012 - Wurth
U1
Li-Ion/Li-Polymer battery DC-DC charger / regulator
with integrated power path management function
MP2617H - Monolithic Power Systems (MPS)
Table 20: Suggested components for Li-Ion (or Li-Polymer) battery charging and power path management application circuit
Page 69

SARA-G450 - System integration manual
UBX-18046432 - R09 Design-in Page 69 of 131
C1-Public
2.2.1.10 Guidelines for VCC supply layout design
Good connection of the module VCC pins with the DC supply source is required for correct RF
performance. Guidelines are summarized in the following list:
• All the available VCC pins must be connected to the DC source.
• VCC connection must be as wide as possible and as short as possible.
• Any series component with Equivalent Series Resistance (ESR) greater than few milliohms must
be avoided.
• VCC connection must be routed through a PCB area separated from sensitive analog signals and
sensitive functional units: it is good practice to interpose at least one layer of PCB ground between
VCC track and other signal routing.
• Coupling between VCC and audio lines (especially microphone inputs) must be avoided, because
the GSM burst has a periodic nature of approximately 217 Hz, which lies in the audible audio range.
• The tank bypass capacitor with low ESR for current spikes smoothing described in Figure 27 and
Table 17 should be placed close to the VCC pins. If the main DC source is a switching DC-DC
converter, place the large capacitor close to the DC-DC output and minimize the VCC track length.
Consider using separate capacitors for DC-DC converter and cellular module tank capacitor.
• The bypass capacitors in the pF range described in Figure 27 and Table 17 should be placed as
close as possible to the VCC pins. This is highly recommended if the application device integrates
an internal antenna.
• Since VCC is directly connected to RF Power Amplifiers, voltage ripple at high frequency may
result in unwanted spurious modulation of transmitter RF signal. This is more likely to happen with
switching DC-DC converters, in which case it is better to select the highest operating frequency
for the switcher and add a large L-C filter before connecting to the SARA-G450 modules in the
worst case.
• If VCC is protected by transient voltage suppressor to ensure that the voltage maximum ratings
are not exceeded, place the protecting device along the path from the DC source toward the
cellular module, preferably closer to the DC source (otherwise protection functionality may be
compromised).
2.2.1.11 Guidelines for grounding layout design
Good connection of the module GND pins with application board solid ground layer is required for
correct RF performance. It reduces EMC / EMI issues and provides a thermal heat sink for the module.
• Connect each GND pin with application board solid ground layer. It is strongly recommended that
each GND pin surrounding VCC pins have one or more dedicated via down to the application board
solid ground layer.
• The VCC supply current flows back to main DC source through GND as ground current: provide
adequate return path with suitable uninterrupted ground plane to main DC source.
• It is recommended to implement one layer of the application board as ground plane; keep this layer
as wide as possible.
• If the application board is a multilayer PCB, then all the board layers should be filled with ground
plane as much as possible and each ground area should be connected together with complete via
stack down to the main ground layer of the board. Use as many vias as possible to connect the
ground planes.
• Provide a dense line of vias at the edges of each ground area, in particular along RF and high speed
lines.
• If the whole application device is composed by more than one PCB, then it is required to provide a
good and solid ground connection between the ground areas of all the different PCBs.
• Good grounding of GND pins also ensures thermal heat sink. This is critical during call connection,
when the real network commands the module to transmit at maximum power: clean grounding
helps prevent module overheating.
Page 70

SARA-G450 - System integration manual
UBX-18046432 - R09 Design-in Page 70 of 131
C1-Public
2.2.2 RTC supply (V_BCKP)
2.2.2.1 Guidelines for V_BCKP circuit design
If RTC timing is required to run for a time interval of T [s] at +25 °C when VCC supply is removed, place
a capacitor with a nominal capacitance of C [mF] at the V_BCKP pin. Choose the capacitor using the
following formula:
C [mF] = (Current Consumption [mA] x T [s] / Voltage Drop [V]
= 0.37 x T [s] for SARA-G450 modules
For example, to provide a long buffering time, a 70 mF super-capacitor (e.g. Seiko Instruments
XH414H-IV01E) can be placed at V_BCKP, with a 4.7 kΩ series resistor. This capacitor holds V_BCKP
voltage within its valid range for around 3 minutes at +25 °C, after the VCC supply is removed. The
purpose of the series resistor is to limit the capacitor charging current due to the large capacitor
specifications, and also to let a fast rise time of the voltage value at the V_BCKP pin after VCC supply
has been provided. This capacitor allows the time reference to run during battery disconnection.
1:1 scaling
R1
SARA-G450
C1
(superCap)
(a)
2
V_BCKP
D2
SARA-G450
B2
(b)
2
V_BCKP
Figure 32: Real Time Clock supply (V_BCKP) application circuits: (a) using a 70 mF capacitor to let the RTC run for ~3 minutes
after VCC removal; (b) using a non-rechargeable battery
Reference
Description
Part number - Manufacturer
R1
4.7 k resistor 0402 5% 0.1 W
RC0402JR-074K7L - Yageo Phycomp
C1
70 mF capacitor
XH414H-IV01E - Seiko Instruments
Table 21: Examples of components for V_BCKP buffering
If a longer buffering time is required to allow the RTC time reference to run during a disconnection of
the VCC supply, then an external battery can be connected to V_BCKP pin. The battery should be able
to provide a clean nominal voltage and must never exceed the maximum operating voltage for V_BCKP
(specified in the input characteristics of the supply/power pins table in the SARA-G450 data
sheet [1]). The connection of the battery to V_BCKP should be done with a suitable series resistor for
a chargeable battery, or with an appropriate series diode for a non-rechargeable battery. The purpose
of the series resistor is to limit the battery charging current due to the battery specifications, and also
to allow a fast rise time of the voltage value at the V_BCKP pin after the VCC supply has been provided.
The purpose of the series diode is to avoid a current flow from the module V_BCKP pin to the
non-rechargeable battery.
☞ If the RTC timing is not required when the VCC supply is removed, it is not needed to connect the
V_BCKP pin to an external capacitor or battery. In this case the date and time are not updated
when VCC is disconnected. If VCC is always supplied, then the internal regulator is supplied from
the main supply and there is no need for an external component on V_BCKP.
Page 71

SARA-G450 - System integration manual
UBX-18046432 - R09 Design-in Page 71 of 131
C1-Public
Combining a SARA-G450 cellular module with a u-blox GNSS positioning receiver, the positioning
receiver VCC supply is controlled by the cellular module by means of the “GNSS supply enable”
function provided by the set GPIO (GPIO2 as default) of the cellular module. In this case the V_BCKP
supplu output of the cellular module can be connected to the V_BCKP supply input pin of the GNSS
receiver to provide the supply for the positioning real time clock and backup RAM when the VCC
supply of the cellular module is within its operating range and the VCC supply of the GNSS receiver is
disabled. This enables the u-blox GNSS receiver to recover from a power breakdown with either a hot
start or a warm start (depending on the duration of the positioning VCC outage) and to maintain the
configuration settings saved in the backup RAM. See section 2.6.4 for more details regarding the
application circuit with a u-blox GNSS receiver.
☞ The internal regulator for V_BCKP is optimized for low leakage current and very light loads. Do not
apply loads which might exceed the limit for maximum available current from V_BCKP supply, as
this can cause malfunctions in the module. SARA-G450 data sheet [1] describes the detailed
electrical characteristics.
V_BCKP supply output pin provides internal short circuit protection to limit start-up current and
protect the device in short circuit situations. No additional external short circuit protection is required.
☞ The ESD sensitivity rating of the V_BCKP supply pin is 1 kV (HBM as per JESD22-A114). A higher
protection level can be required if the line is externally accessible on the application PCB, e.g. if an
accessible back-up battery connector is directly connected to V_BCKP pin, and it can be achieved
by mounting an ESD protection (e.g. EPCOS CA05P4S14THSG) close to the accessible point.
2.2.2.2 Guidelines for V_BCKP layout design
RTC supply (V_BCKP) requires careful layout: avoid injecting noise on this voltage domain as it may
affect the stability of the 32 kHz oscillator.
2.2.3 Interface supply (V_INT)
2.2.3.1 Guidelines for V_INT circuit design
The V_INT digital interfaces 1.8 V / 3 V supply output can be mainly used to:
• Indicate when the module is switched on (see sections 1.6.1 and 1.6.2 for more details)
• Pull-up SIM detection signal (see section 2.5 for more details)
• Supply voltage translators to connect digital interfaces of the module to another voltage domain
device (see section 2.6.1)
• Pull-up DDC (I2C) interface signals (see section 2.6.4 for more details)
• Supply a 1.8 V u-blox 6 or subsequent GNSS receiver (see section 2.6.4 for more details)
☞ Do not apply loads that might exceed the limit for maximum available current from V_INT supply,
as this can cause malfunctions in internal circuitry supplies to the same domain. SARA-G450 data
sheet [1] describes the detailed electrical characteristics.
☞ V_INT can only be used as an output; do not connect any external regulator on V_INT.
V_INT supply output pin provides internal short circuit protection to limit start-up current and protect
the device in short circuit situations. No additional external short circuit protection is required.
☞ ESD sensitivity rating of the V_INT supply pin is 1 kV (HBM according to JESD22-A114). A higher
protection level could be required if the line is externally accessible on the application PCB. A higher
protection level can be achieved by mounting an ESD protection (e.g. EPCOS CA05P4S14THSG
varistor array) close to accessible points.
Page 72

SARA-G450 - System integration manual
UBX-18046432 - R09 Design-in Page 72 of 131
C1-Public
☞ If the V_INT supply output is not required by the customer application, the V_INT pin can be left
unconnected.
☞ It is recommended to provide on the application board a directly accessible Test-Point connected
to the V_INT pin for diagnostic purpose.
2.2.3.2 Guidelines for V_INT layout design
There are no specific layout design recommendations for V_INT output.
2.3 System functions interfaces
2.3.1 Module power-on (PWR_ON)
2.3.1.1 Guidelines for PWR_ON circuit design
Connecting the PWR_ON input to a push button that shorts the PWR_ON pin to GND, the pin will be
externally accessible on the application device: according to EMC/ESD requirements of the
application, provide an additional ESD protection (e.g. EPCOS CA05P4S14THSG varistor array) on the
line connected to this pin, close to accessible point, as described in Figure 33 and Table 22.
☞ The ESD sensitivity rating of the PWR_ON pin is 1 kV (HBM according to JESD22-A114). A higher
protection level can be required if the line is externally accessible on the application board, e.g. if
an accessible push button is directly connected to PWR_ON pin. A higher protection level can be
achieved by mounting an ESD protection (e.g. EPCOS CA05P4S14THSG) close to accessible
points
When connecting the PWR_ON input to an external device (e.g. application processor), use an open
drain output on the external device, as described in Figure 33.
A compatible push-pull output of an application processor can be used too.
The PWR_ON input voltage thresholds are different from the other generic digital interfaces of the
module: see the SARA-G450 data sheet [1] for detailed electrical characteristics.
Take care to fix the correct level in all the possible scenarios to avoid an inappropriate module
switch-on.
1:1 scaling
SARA-G450
15
PWR_ON
Power-on
push button
ESD
Open drain
output
Application
Processor
SARA-G450
15
PWR_ON
TP
TP
Figure 33: PWR_ON application circuits using a push button and an open drain output of an application processor
Reference
Description
Part Number - Manufacturer
ESD
Varistor array for ESD protection
CT0402S14AHSG - EPCOS
Table 22: Example of ESD protection for the PWR_ON application circuit
☞ It is recommended to provide on the application board a directly accessible Test-Point connected
to the PWR_ON pin for diagnostic purpose.
Page 73

SARA-G450 - System integration manual
UBX-18046432 - R09 Design-in Page 73 of 131
C1-Public
2.3.1.2 Guidelines for PWR_ON layout design
The power-on circuit (PWR_ON) requires careful layout since it is the sensitive input available to
switch on the SARA-G450 modules from power-off mode until a valid VCC supply is provided: ensure
that the voltage level is well defined during operation and no transient noise is coupled on this line,
otherwise the module might detect a spurious power-on request.
2.3.2 Module hard power-off (PWR_OFF)
To perform a complete hardware reset, see section 1.6.3 for more details.
2.3.2.1 Guidelines for PWR_OFF circuit design
Connecting the PWR_OFF input to a push button that shorts the PWR_OFF pin to GND, the pin will
be externally accessible on the application device: according to EMC/ESD requirements of the
application, provide an additional ESD protection (e.g. EPCOS CA05P4S14THSG varistor array) on the
line connected to this pin, close to accessible point, as described in Figure 34 and Table 23.
☞ ESD sensitivity rating of the PWR_OFF pin is 1 kV (HBM as per JESD22-A114). A higher protection
level can be required if the line is externally accessible on the application board, e.g. if an accessible
push button is directly connected to PWR_OFF pin. A higher protection level can be achieved by
mounting an ESD protection (e.g. EPCOS CA05P4S14THSG) close to accessible points.
Connecting the PWR_OFF input to an external device (e.g. application processor), use an open drain
output on the external device, as described in Figure 34.
A compatible push-pull output of an application processor can be used too.
The PWR_OFF input voltage thresholds are different from the other generic digital interfaces of the
module: see the SARA-G450 data sheet [1] for detailed electrical characteristics.
Take care to fix the correct level in all the possible scenarios to avoid an inappropriate module hard
power-off.
1:1 scaling
SARA-G450
18
PWR_OFF
Reset
push button
ESD
Open drain
output
Application
Processor
SARA-G450
18
PWR_OFF
TP
TP
Figure 34: PWR_OFF application circuits using a push button and an open drain output of an application processor
Reference
Description
Part Number - Manufacturer
ESD
Varistor array for ESD protection
CT0402S14AHSG - EPCOS
Table 23: Example of ESD protection for the PWR_OFF application circuit
☞ If the external hard power-off function is not required by the customer application, the PWR_OFF
pin can be left unconnected
☞ It is recommended to provide on the application board a directly accessible Test-Point connected
to the PWR_OFF pin for diagnostic purpose.
Page 74

SARA-G450 - System integration manual
UBX-18046432 - R09 Design-in Page 74 of 131
C1-Public
2.3.2.2 Guidelines for PWR_OFF layout design
The hard power-off circuit (PWR_OFF) requires careful layout due to the pin function: ensure that the
voltage level is well defined during operation and no transient noise is coupled on this line, otherwise
the module might detect a spurious hard power-off request. It is recommended to keep the
connection line to PWR_OFF as short as possible.
2.3.3 Digital I/O interfaces voltage selection (VSEL)
2.3.3.1 Guidelines for VSEL circuit design
The state of VSEL input pin is used to configure the V_INT supply output and the voltage domain for
the generic digital interfaces of the module.
If digital I/O interfaces are intended to operate at 1.8 V, VSEL pin must be connected to GND, as
described in Figure 35.
SARA-G450
21
VSEL
Figure 35: VSEL application circuit, configuring digital interfaces to operate at 1.8 V
If digital I/O interfaces are intended to operate at 3 V, VSEL pin must be left unconnected, as
described in Figure 36.
SARA-G450
21
VSEL
Figure 36: VSEL application circuit, configuring digital interfaces to operate at 3 V
☞ The ESD sensitivity rating of the VSEL pin is 1 kV (Human Body Model according to JESD22-
A114). A higher protection level can be required if the line is externally accessible on the
application board. A higher protection level can be achieved by mounting an ESD protection (e.g.
EPCOS CA05P4S14THSG varistor array) close to accessible points.
2.3.3.2 Guidelines for VSEL layout design
There are no specific layout design recommendations for VSEL input.
Page 75

SARA-G450 - System integration manual
UBX-18046432 - R09 Design-in Page 75 of 131
C1-Public
2.4 Antenna interface
The ANT pin, provided by all the SARA-G450 modules, represents the RF input/output used to
transmit and receive the 2G RF cellular signals: the antenna must be connected to this pin. The ANT
pin has a nominal characteristic impedance of 50 and must be connected to the antenna through a
50 transmission line to allow transmission and reception of radio frequency (RF) signals in the 2G
operating bands.
2.4.1 Antenna RF interface (ANT)
2.4.1.1 General guidelines for antenna selection and design
The cellular antenna is the most critical component to be evaluated: care must be taken about it at
the start of the design development, when the physical dimensions of the application board are under
analysis/decision, since the RF compliance of the device integrating a SARA-G450 module with all the
applicable required certification schemes depends from antenna radiating performance.
Cellular antennas are typically available as:
• External antenna (e.g. linear monopole):
o External antenna usage basically does not imply physical restrictions on the design of the PCB
where the SARA-G450 module is mounted.
o The radiation performance mainly depends on the antenna: select the antenna with optimal
radiating performance in the operating bands.
o If antenna detection functionality is required, select an antenna assembly provided with an
appropriate built-in diagnostic circuit with a resistor connected to GND: see guidelines in
section 2.4.2.
o Select an RF cable with minimum insertion loss: additional insertion loss due to low quality or
long cable reduces radiation performance.
o Select a suitable 50 connector providing clean PCB-to-RF-cable transition: it is
recommended to strictly follow the layout and cable termination guidelines provided by the
connector manufacturer.
• Integrated antenna (PCB antennas such as patches or ceramic SMT elements):
o Internal integrated antenna implies physical restriction to the design of the PCB: the ground
plane can be reduced down to a minimum size that must be similar to the quarter of the
wavelength of the minimum frequency that has to be radiated. As numerical example:
Frequency = 824 MHz → Wavelength = 36.4 cm → Minimum ground plane size = 9.1 cm
o The radiation performance depends on the whole PCB and antenna system design, including
product mechanical design and usage: select the antenna with optimal radiating performance
in the operating bands according to the mechanical specifications of the PCB and the whole
product.
o Select a complete custom antenna designed by an antenna manufacturer if the required
ground plane dimensions are very small (e.g. less than 6.5 cm long and 4 cm wide): the antenna
design process should begin at the start of the whole product design process.
o Select an integrated antenna solution provided by an antenna manufacturer if the required
ground plane dimensions are large enough according to the related integrated antenna
solution specifications: the antenna selection and the definition of its placement in the product
layout should begin at the start of the product design process.
Page 76

SARA-G450 - System integration manual
UBX-18046432 - R09 Design-in Page 76 of 131
C1-Public
o It is highly recommended to strictly follow the detailed and specific guidelines provided by the
antenna manufacturer regarding correct installation and deployment of the antenna system,
including PCB layout and matching circuitry.
o Further to the custom PCB and product restrictions, the antenna may require tuning to obtain
the required performance for compliance with the applicable certification schemes. It is
recommended to ask the antenna manufacturer for the design-in guidelines related to the
custom application.
In both cases, selecting an external or an internal antenna, observe these recommendations:
• Select an antenna providing optimal return loss (or VSWR) figure over all the operating
frequencies.
• Select an antenna providing optimal efficiency figure over all the operating frequencies.
• Select an antenna providing appropriate gain figure (i.e. combined antenna directivity and
efficiency figure) so that the electromagnetic field radiation intensity do not exceed the regulatory
limits specified in some countries.
2.4.1.2 Guidelines for antenna RF interface design
Guidelines for ANT pin RF connection design
Correct transition between the ANT pin and the application board PCB must be provided,
implementing the following design-in guidelines for the layout of the application PCB close to the pad
designed for the ANT pin:
• On a multi-layer board, the whole layer stack below the RF connection should be free of digital lines
• Increase ground keep-out (i.e. clearance, a void area) around the ANT pad, on the top layer of the
application PCB, to at least 250 µm up to adjacent pads metal definition and up to 400 µm on the
area below the module, to reduce parasitic capacitance to ground, as described in the left picture
in Figure 37
• Add ground keep-out (i.e. clearance, a void area) on the buried metal layer below the ANT pad if the
top-layer to buried layer dielectric thickness is below 200 µm, to reduce parasitic capacitance to
ground, as described in the right picture in Figure 37
Min.
250 µm
Min. 400 µm
GND
ANT
GND clearance
on very close buried layer
below ANT pad
GND clearance
on top layer
around ANT pad
Figure 37: GND keep-out area on the top layer around ANT pad and on the very close buried layer below ANT pad
Page 77

SARA-G450 - System integration manual
UBX-18046432 - R09 Design-in Page 77 of 131
C1-Public
Guidelines for RF transmission line design
The transmission line from the ANT pad up to the antenna connector or up to the internal antenna
pad must be designed so that the characteristic impedance is as close as possible to 50 .
The transmission line can be designed as a micro strip (consists of a conducting strip separated from
a ground plane by a dielectric material) or a strip line (consists of a flat strip of metal which is
sandwiched between two parallel ground planes within a dielectric material). The micro strip,
implemented as a coplanar waveguide, is the most common configuration for printed circuit board.
Figure 38 and Figure 39 provide two examples of suitable 50 coplanar waveguide designs. The first
transmission line can be implemented for a 4-layer PCB stack-up herein described, the second
transmission line can be implemented for a 2-layer PCB stack-up herein described.
35 µm
35 µm
35 µm
35 µm
270 µm
270 µm
760 µm
L1 copper
L3 copper
L2 copper
L4 copper
FR-4 dielectric
FR-4 dielectric
FR-4 dielectric
380 µm 500 µm500 µm
Figure 38: Example of 50 coplanar waveguide transmission line design for the described 4-layer board layup
35 µm
35 µm
1510 µm
L2 copper
L1 copper
FR-4 dielectric
1200 µm 400 µm400 µm
Figure 39: Example of 50 coplanar waveguide transmission line design for the described 2-layer board layup
If the two examples do not match the application PCB layup, the 50 characteristic impedance
calculation can be made using the HFSS commercial finite element method solver for
electromagnetic structures from Ansys Corporation, or using freeware tools like AppCAD from
Agilent (www.agilent.com) or TXLine from Applied Wave Research (www.mwoffice.com), taking care
of the approximation formulas used by the tools for the impedance computation.
Page 78

SARA-G450 - System integration manual
UBX-18046432 - R09 Design-in Page 78 of 131
C1-Public
To achieve a 50 characteristic impedance, the width of the transmission line must be chosen
depending on:
• the thickness of the transmission line itself (e.g. 35 µm in the example of Figure 38 and Figure 39)
• the thickness of the dielectric material between the top layer (where the transmission line is
routed) and the inner closer layer implementing the ground plane (e.g. 270 µm in Figure 38,
1510 µm in Figure 39)
• the dielectric constant of the dielectric material (e.g. dielectric constant of the FR-4 dielectric
material in Figure 38 and Figure 39)
• the gap from the transmission line to the adjacent ground plane on the same layer of the
transmission line (e.g. 500 µm in Figure 38, 400 µm in Figure 39)
If the distance between the transmission line and the adjacent ground area (on the same layer) does
not exceed 5 times the track width of the micro strip, use the “Coplanar Waveguide” model for the
50 calculation.
Additionally to the 50 impedance, the following guidelines are recommended for the transmission
line design:
• Minimize the transmission line length: the insertion loss should be minimized as much as possible,
in the order of a few tenths of a dB.
• Add ground keep-out (i.e. clearance, a void area) on buried metal layers below any pad of
component present on the RF transmission line, if top-layer to buried layer dielectric thickness is
below 200 µm, to reduce parasitic capacitance to ground.
• The transmission line width and spacing to ground must be uniform and routed as smoothly as
possible: avoid abrupt changes of width and spacing to ground.
• Add ground vias around transmission line, as described in Figure 40.
• Ensure a solid metal connection of the adjacent metal layer on the PCB stack-up to main ground
layer, providing enough on the adjacent metal layer, as described in Figure 40.
• Route RF transmission line far from any noise source (as switching supplies and digital lines) and
from any sensitive circuit (as analog audio lines).
• Avoid stubs on the transmission line.
• Avoid signal routing in parallel to transmission line or crossing the transmission line on a buried
metal layer.
• Do not route a microstrip line below a discrete component or other mechanics placed on the top
layer.
Two examples of correct RF circuit design are illustrated in Figure 40, where the antenna detection
circuit is not implemented (if the antenna detection function is required by the application, follow the
guidelines for circuit and layout implementation detailed in section 2.4.2):
• In the first example described on the left, the ANT pin is directly connected to an SMA connector
by means of a suitable 50 transmission line, designed with an appropriate layout.
• In the second example described on the right, the ANT pin is connected to an SMA connector by
means of a suitable 50 transmission line, designed with an appropriate layout, with an additional
high pass filter (consisting of a suitable series capacitor and shunt inductor) to improve the ESD
immunity at the antenna port of SARA-G450 modules, if needed.
Page 79

SARA-G450 - System integration manual
UBX-18046432 - R09 Design-in Page 79 of 131
C1-Public
SARA module
SMA
connector
SARA module
SMA
connector
High-pass filter for
ANT port
ESD immunity increase
Figure 40: Suggested circuit and layout for antenna RF circuit on application board, if antenna detection is not required
Guidelines for RF termination design
The RF termination must provide a characteristic impedance of 50 as well as the RF transmission
line up to the RF termination itself, to match the characteristic impedance of the module ANT pin.
However, real antennas do not have a perfect 50 load on all the supported frequency bands.
Therefore, to reduce performance degradation due to antenna mismatch as much as possible, the RF
termination must provide optimal return loss (or VSWR) figure over all the operating frequencies, as
summarized in Table 7.
If an external antenna is used, the antenna connector represents the RF termination on the PCB:
• Use a suitable 50 connector providing a clean PCB-to-RF-cable transition.
• Strictly follow the connector manufacturer’s recommended layout, for example:
o SMA Pin-Through-Hole connectors require ground keep-out (clearance, a void area) on all the
layers around the central pin up to annular pads of the four GND posts, as shown in Figure 40.
o U.FL surface mounted connectors require no conductive traces (i.e. clearance, a void area) in
the area below the connector between the GND land pads.
• Cut out the ground layer under RF connectors and close to buried vias, to remove stray
capacitance and thus keep the RF line at 50 : e.g. the active pad of U.FL connectors needs to
have a ground keep-out (i.e. clearance, a void area) at least on first inner layer to reduce parasitic
capacitance to ground.
If an integrated antenna is used, the RF termination is represented by the integrated antenna itself:
• Use an antenna designed by an antenna manufacturer, providing the best possible return loss (or
VSWR).
• Provide a ground plane large enough according to the related integrated antenna requirements:
the ground plane of the application PCB can be reduced to a minimum size that must be similar to
one quarter of wavelength of the minimum frequency to be radiated. As numerical example:
Frequency = 824 MHz → Wavelength = 36.4 cm → Minimum ground plane size = 9.1 cm
• It is highly recommended to strictly follow the detailed and specific guidelines provided by the
antenna manufacturer regarding correct installation and deployment of the antenna system,
including PCB layout and matching circuitry.
• Further to the custom PCB and product restrictions, the antenna may require a tuning to comply
with all the applicable required certification schemes. It is recommended to consult the antenna
manufacturer for the design-in guidelines for the antenna related to the custom application.
Page 80

SARA-G450 - System integration manual
UBX-18046432 - R09 Design-in Page 80 of 131
C1-Public
Additionally, these recommendations regarding the antenna system must be followed:
• Do not include an antenna within a closed metal case.
• Do not place the antenna in close vicinity to end users, since the emitted radiation in human tissue
is limited by regulatory requirements.
• Place the antenna far from sensitive analog systems or employ countermeasures to reduce
electromagnetic compatibility issues.
• Take care of interaction between co-located RF systems since the GSM transmitted RF power
may interact or disturb the performance of companion systems.
• The antenna shall provide optimal efficiency figure over all the operating frequencies.
• The antenna shall provide an appropriate gain figure (i.e. combined antenna directivity and
efficiency figure) so that the electromagnetic field radiation intensity does not exceed the
regulatory limits specified in some countries.
• Consider including extra footprints for a “pi” network in between the cellular module and the
antenna, for further improvement in the antenna matching circuit to reach optimal antenna
performance.
Examples of antennas
Table 24 lists some examples of possible internal on-board surface-mount antennas.
Manufacturer
Part number
Product name
Description
Taoglas
PA.25.A
Anam
GSM / WCDMA SMD antenna
824..960 MHz, 1710..2170 MHz
36.0 x 6.0 x 5.0 mm
Taoglas
PA.710.A
Warrior
GSM / WCDMA / LTE SMD antenna
698..960 MHz, 1710..2170 MHz, 2300..2400 MHz, 2490..2690
MHz
40.0 x 6.0 x 5.0 mm
Taoglas
PA.711.A
Warrior II
GSM / WCDMA / LTE SMD antenna
Pairs with the Taoglas PA.710.A Warrior for LTE MIMO
698..960 MHz, 1710..2170 MHz, 2300..2400 MHz, 2490..2690
MHz
40.0 x 6.0 x 5.0 mm
Taoglas
PCS.06.A
Havok
GSM / WCDMA / LTE SMD antenna
698..960 MHz, 1710..2170 MHz, 2500..2690 MHz
42.0 x 10.0 x 3.0 mm
Antenova
A10340
Calvus
GSM / WCDMA SMD antenna
824..960 MHz, 1710..2170 MHz
28.0 x 8.0 x 3.2 mm
Ethertronics
P522304
Prestta
GSM / WCDMA SMD antenna
824..960 MHz, 1710..2170 MHz
35.0 x 9.0 x 3.2 mm
2J
2JE04
GSM / WCDMA SMD antenna
824..960 MHz, 1710..2170 MHz
24.0 x 5.5 x 4.4 mm
Yaego
ANT3505B000TWPENA
GSM / WCDMA SMD antenna
824..960 MHz, 1710..2170 MHz
35.0 x 5.0 x 6.0 mm
Table 24: Examples of internal surface-mount antennas
Page 81

SARA-G450 - System integration manual
UBX-18046432 - R09 Design-in Page 81 of 131
C1-Public
Table 25 lists some examples of internal off-board PCB-type antennas with cable and connector.
Manufacturer
Part number
Product name
Description
Taoglas
FXP14.A.07.0100A
GSM / WCDMA PCB antenna with cable and U.FL connector
824..960 MHz, 1710..2170 MHz
70.4 x 20.4 mm
Taoglas
FXP14R.A.07.0100A
GSM / WCDMA PCB antenna with cable and U.FL connector
Integrated 10k shunt diagnostic resistor
824..960 MHz, 1710..2170 MHz
80.0 x 20.8 mm
Taoglas
PC29.09.0100A
TheStripe
GSM / WCDMA PCB antenna with cable and MMCX(M)RA
824..960 MHz, 1710..2170 MHz
80.4 x 29.4 mm
Taoglas
FXUB63.07.0150C
GSM / WCDMA / LTE PCB antenna with cable and U.FL connector
698..960 MHz, 1575.42 MHz, 1710..2170 MHz, 2400..2690 MHz
96.0 x 21.0 mm
Ethertronics
P522310
Prestta
GSM / WCDMA PCB antenna with cable and U.FL connector
824..960 MHz, 1710..2170 MHz
41.0 x 15.0 mm
EAD
FSQS35241-UF-10
SQ7
GSM / WCDMA / LTE PCB antenna with cable and U.FL connector
690..960 MHz, 1710..2170 MHz, 2500..2700 MHz
110.0 x 21.0 mm
Yaego
ANTX100P001BWPEN3
GSM / WCDMA PCB antenna with cable and I-PEX connector
824..960 MHz, 1710..2170 MHz
50.0 x 20.0 mm
Table 25: Examples of internal antennas with cable and connector
Table 26 lists some examples of possible external antennas.
Manufacturer
Part number
Product name
Description
Taoglas
GSA.8827.A.101111
Phoenix
GSM / WCDMA / LTE low-profile adhesive-mount antenna with cable
and SMA(M) connector
698..960 MHz, 1575.42 MHz, 1710..2170 MHz, 2490..2690 MHz
105 x 30 x 7.7 mm
Taoglas
GSA.8821.A.301721
I-Bar
GSM / WCDMA low-profile adhesive-mount antenna with cable and
Fakra (code-D) connector
824..960 MHz, 1710..2170 MHz
106.7 x 14.7 x 5.8 mm
Taoglas
TG.30.8112
GSM / WCDMA / LTE swivel dipole antenna with SMA(M) connector
698..960 MHz, 1575.42 MHz, 1710..2170 MHz, 2400..2700 MHz
148.6 x 49 x 10 mm
Taoglas
OMB.8912.03F21
GSM / WCDMA pole-mount antenna with N-type (F) connector
824..960 MHz, 1710..2170 MHz
527 x Ø 26 mm
Taoglas
FW.92.RNT.M
GSM / WCDMA whip monopole antenna with RP-N-type(M) connector
824..960 MHz, 1710..2170 MHz
274 x Ø 20 mm
Nearson
T6150AM
GSM / WCDMA swivel monopole antenna with SMA(M) connector
824..960 MHz, 1710..2170 MHz
179.3 x 22 x 6.5 mm
Laird Tech.
MAF94300
HEPTA-SM
GSM / WCDMA swivel monopole antenna with SMA(M) connector
824..960 MHz, 1575.42 MHz,1710..2170 MHz, 2400..2500 MHz
161 x 9.3 mm
Laird Tech.
TRA806/171033P
GSM / WCDMA screw-mount antenna with N-type(F) connector
824..960 MHz, 1710..2170 MHz
69.8 x Ø 38.1 mm
Page 82

SARA-G450 - System integration manual
UBX-18046432 - R09 Design-in Page 82 of 131
C1-Public
Manufacturer
Part number
Product name
Description
Laird Tech.
CMS69273
GSM / WCDMA / LTE ceiling-mount antenna with N-type(F)
connector
698..960 MHz, 1575.42 MHz, 1710..2700 MHz
86 x Ø 199 mm
Laird Tech.
OC69271-FNM
GSM / WCDMA / LTE pole-mount antenna with N-type(M) connector
698..960 MHz, 1710..2690 MHz
248 x Ø 24.5 mm
Abracon
APAMS-102
GSM / WCDMA low-profile adhesive-mount antenna with cable and
SMA(M) connector
824..960 MHz, 1710..2170 MHz
138 x 21 x 6 mm
Table 26: Examples of external antennas
2.4.2 Antenna detection interface (ANT_DET)
2.4.2.1 Guidelines for ANT_DET circuit design
Figure 41 and Table 27 describe the recommended schematic and components for the antenna
detection circuit to be provided on the application board for the diagnostic circuit that must be
provided on the antenna assembly to achieve antenna detection functionality.
Application board
Antenna cable
SARA-G450
56ANT
62
ANT_DET
R1
C1 D1
L1
C2
J1
Z0= 50
Ω
Z0= 50
Ω
Z0= 50 ohm
Antenna assembly
R2
C4
L3
Radiating
element
Diagnostic
circuit
GND
L2
C3
Figure 41: Suggested schematic for antenna detection circuit on application PCB and diagnostic circuit on antenna assembly
Reference
Description
Part number - Manufacturer
C1
27 pF capacitor ceramic C0G 0402 5% 50 V
GRM1555C1H270J - Murata
C2
33 pF capacitor ceramic C0G 0402 5% 50 V
GRM1555C1H330J - Murata
D1
Very low capacitance ESD protection
PESD0402-140 - Tyco Electronics
L1
68 nH multilayer inductor 0402 (SRF ~1 GHz)
LQG15HS68NJ02 – Murata
R1
10 k resistor 0402 1% 0.063 W
RK73H1ETTP1002F - KOA Speer
J1
SMA connector 50 Pin-Through-Hole
SMA6251A1-3GT50G-50 - Amphenol
C3
15 pF capacitor ceramic C0G 0402 5% 50 V
GRM1555C1H150J - Murata
L2
39 nH multilayer inductor 0402 (SRF ~1 GHz)
LQG15HN39NJ02 – Murata
C4
22 pF capacitor ceramic C0G 0402 5% 25 V
GRM1555C1H220J - Murata
L3
68 nH multilayer inductor 0402 (SRF ~1 GHz)
LQG15HS68NJ02 – Murata
R2
15 k resistor for diagnostic
Generic manufacturer
Table 27: Suggested parts for antenna detection circuit on application PCB and diagnostic circuit on antenna assembly
Page 83

SARA-G450 - System integration manual
UBX-18046432 - R09 Design-in Page 83 of 131
C1-Public
The antenna detection circuit and diagnostic circuit suggested in Figure 41 and Table 27 are
explained below:
• When antenna detection is forced by the +UANTR AT command (see the u-blox AT commands
manual [2]), the ANT_DET pin generates a DC current measuring the resistance (R2) from the
antenna connector (J1) provided on the application board to GND.
• DC blocking capacitors are needed at the ANT pin (C2) and at the antenna radiating element (C4)
to decouple the DC current generated by the ANT_DET pin.
• Choke inductors with a Self-Resonance Frequency (SRF) in the range of 1 GHz are needed in series
at the ANT_DET pin (L1) and in series at the diagnostic resistor (L3), to avoid a reduction of the
RF performance of the system, improving the RF isolation of the load resistor.
• Additional components (R1, C1 and D1 in Figure 41) are needed at the ANT_DET pin as ESD
protection.
• Additional high pass filter (C3 and L2 in Figure 41) is provided at the ANT pin as ESD immunity
improvement (not strictly required).
• The ANT pin must be connected to the antenna connector by means of a transmission line with
nominal characteristics impedance as close as possible to 50 .
The DC impedance at RF port for some antennas may be a DC open (e.g. linear monopole) or a DC short
to reference GND (e.g. PIFA antenna). For those antennas, without the diagnostic circuit of Figure 41,
the measured DC resistance is always at the limits of the measurement range (respectively open or
short), and there is no means to distinguish between a defect on the antenna path with similar
characteristics (respectively: removal of linear antenna or RF cable shorted to GND for a PIFA
antenna).
Furthermore, any other DC signal injected to the RF connection from the ANT connector to the
radiating element will alter the measurement and produce invalid results for antenna detection.
☞ It is recommended to use an antenna with a built-in diagnostic resistor in the range from 5 k to
30 k to ensure good antenna detection functionality and avoid a reduction of module’s RF
performance. The choke inductor should exhibit a parallel Self-Resonance Frequency (SRF) in the
range of 1 GHz to improve the RF isolation of the load resistor.
For example:
Consider an antenna with built-in DC load resistor of 15 k. Using the +UANTR AT command (see the
u-blox AT commands manual [2]), the module reports the resistance value evaluated from the
antenna connector provided on the application board to GND:
• Reported values close to the used diagnostic resistor nominal value (i.e. values from 13 k to 17
k if a 15 k diagnostic resistor is used) indicate that the antenna is properly connected.
• Values close to the measurement range maximum limit (approximately 50 k), or an open-circuit
“over range” report, means that the antenna is not connected or the RF cable is broken.
• Reported values below the measurement range minimum limit (1 k) indicate a short to GND at
the antenna or along the RF cable.
• Measurement inside the valid measurement range and outside the expected range may indicate
an unclean connection, damaged antenna or the incorrect resistance value of the antenna load
resistor for diagnostics.
• The reported value could differ from the real resistance value of the diagnostic resistor mounted
inside the antenna assembly due to the antenna cable length, the antenna cable capacity and the
measurement method used.
☞ If the antenna detection function is not required by the customer application, the ANT_DET pin
can be left unconnected and the ANT pin can be directly connected to the antenna connector by
means of a 50 transmission line as described in Figure 40.
Page 84

SARA-G450 - System integration manual
UBX-18046432 - R09 Design-in Page 84 of 131
C1-Public
2.4.2.2 Guidelines for ANT_DET layout design
Figure 42 describes the recommended layout for the antenna detection circuit to be provided on the
application board to achieve antenna detection functionality, implementing the recommended
schematic described in the previous Figure 41 and Table 27.
SARA module
C2
R1
D1
C1
L1
J1
C3 L2
Figure 42: Suggested layout for antenna detection circuit on application board
The antenna detection circuit layout suggested in Figure 42 is explained below:
• The ANT pin is connected to the antenna connector by means of a 50 transmission line,
implementing the design guidelines described in section 2.4.1 and the recommendations of the
SMA connector manufacturer.
• DC blocking capacitor at the ANT pin (C2) is placed in series to the 50 transmission line.
• The ANT_DET pin is connected to the 50 transmission line by means of a sense line.
• Choke inductor in series at the ANT_DET pin (L1) is placed so that one pad is on the 50
transmission line and the other pad represents the start of the sense line to the ANT_DET pin.
• The additional components (R1, C1 and D1) on the ANT_DET line are placed as ESD protection.
• The additional high pass filter (C3 and L2) on the ANT line are placed as ESD immunity
improvement (not strictly required).
Page 85

SARA-G450 - System integration manual
UBX-18046432 - R09 Design-in Page 85 of 131
C1-Public
2.5 SIM interface
2.5.1 Guidelines for SIM circuit design
2.5.1.1 Guidelines for SIM cards, SIM connectors and SIM chips selection
The ISO/IEC 7816, the ETSI TS 102 221, TS 102 230 and TS 102 671 specifications define the
physical, electrical and functional characteristics of Universal Integrated Circuit Cards (UICC) which
contains the Subscriber Identification Module (SIM) integrated circuit that securely stores all the
information needed to identify and authenticate subscribers over the cellular network.
Removable UICC / SIM card contacts mapping is defined by ISO/IEC 7816 and ETSI TS 102 221 as
follows:
• Contact C1 = VCC (Supply) → It must be connected to VSIM
• Contact C2 = RST (Reset) → It must be connected to SIM_RST
• Contact C3 = CLK (Clock) → It must be connected to SIM_CLK
• Contact C4 = AUX1 (Auxiliary contact) → It must be left unconnected
• Contact C5 = GND (Ground) → It must be connected to GND
• Contact C6 = VPP (Programming supply) → It can be left unconnected
• Contact C7 = I/O (Data input/output) → It must be connected to SIM_IO
• Contact C8 = AUX2 (Auxiliary contact) → It must be left unconnected
A removable SIM card can have 6 contacts (C1 = VCC, C2 = RST, C3 = CLK, C5 = GND, C6 = VPP,
C7 = I/O) or 8 contacts, providing also the auxiliary contacts C4 = AUX1 and C8 = AUX2 for USB
interfaces and other uses. Only 5 contacts are required and must be connected to the module SIM
card interface as described above, since the SARA-G450 modules do not support the additional
auxiliary features (contacts C4 = AUX1 and C8 = AUX2).
Removable SIM card are suitable for applications where the SIM changing is required during the
product lifetime.
A SIM card holder can have 6 or 8 positions if a mechanical card presence detector is not provided, or
it can have 6+2 or 8+2 positions if two additional pins related to the normally-open mechanical switch
integrated in the SIM connector for the mechanical card presence detection are provided: select a SIM
connector providing 6+2 or 8+2 positions if the optional SIM detection feature is required by the
custom application, otherwise a connector without integrated mechanical presence switch can be
selected.
Solderable UICC / SIM chip contacts mapping (M2M UICC Form Factor) is defined by ETSI TS 102 671
as follows:
• Package Pin 8 = UICC C1 = VCC (Supply) → It must be connected to VSIM
• Package Pin 7 = UICC C2 = RST (Reset) → It must be connected to SIM_RST
• Package Pin 6 = UICC C3 = CLK (Clock) → It must be connected to SIM_CLK
• Package Pin 5 = UICC C4 = AUX1 (Auxiliary contact) → It must be left unconnected
• Package Pin 1 = UICC C5 = GND (Ground) → It must be connected to GND
• Package Pin 2 = UICC C6 = VPP (Programming supply) → It can be left unconnected
• Package Pin 3 = UICC C7 = I/O (Data input/output) → It must be connected to SIM_IO
• Package Pin 4 = UICC C8 = AUX2 (Auxiliary contact) → It must be left unconnected
A solderable SIM chip has 8 contacts and can provide also the auxiliary contacts C4 = AUX1 and
C8 = AUX2 for USB interfaces and other uses, but only 5 contacts are required and must be connected
to the module SIM card interface as described above, since the SARA-G450 modules do not support
the additional auxiliary features (contacts C4 = AUX1 and C8 = AUX2).
Solderable SIM chips are suitable for M2M applications where it is not required to change the SIM
once installed.
Page 86

SARA-G450 - System integration manual
UBX-18046432 - R09 Design-in Page 86 of 131
C1-Public
2.5.1.2 Guidelines for single SIM card connection without detection
An application circuit for the connection to a single removable SIM card placed in a SIM card holder is
described in Figure 43, where the optional SIM detection feature is not implemented (see the circuit
described in Figure 45 if the SIM detection feature is required).
Follow these guidelines connecting the module to a SIM connector without SIM presence detection:
• Connect the UICC / SIM contact C1 (VCC) to the VSIM pin of the module.
• Connect the UICC / SIM contact C7 (I/O) to the SIM_IO pin of the module.
• Connect the UICC / SIM contact C3 (CLK) to the SIM_CLK pin of the module.
• Connect the UICC / SIM contact C2 (RST) to the SIM_RST pin of the module.
• Connect the UICC / SIM contact C5 (GND) to GND.
• Provide a 1 µF bypass capacitor (e.g. Murata GRM155R70J105K) at the SIM supply line (VSIM),
close to the related pad of the SIM connector, to prevent digital noise.
• Provide a bypass capacitor of about 22 pF to 33 pF (e.g. Murata GRM1555C1H330J) on each SIM
line (VSIM, SIM_CLK, SIM_IO, SIM_RST), very close to each related pad of the SIM connector, to
prevent RF coupling especially in case the RF antenna is placed closer than 10 – 30 cm from the
SIM card holder.
• Provide a low capacitance (i.e. less than 1 pF) ESD protection (e.g. Tyco Electronics
PESD0402-140) on each externally accessible SIM line, close to each related pad of the SIM
connector: the ESD sensitivity rating of the SIM interface pins is 1 kV (Human Body Model
according to JESD22-A114), so that, according to the EMC/ESD requirements of the custom
application, a higher protection level can be required if the lines are externally accessible on the
application device.
• Limit capacitance and series resistance on each SIM signal (SIM_CLK, SIM_IO, SIM_RST) to
match the requirements for the SIM interface regarding maximum allowed rise time on the lines.
scaling
SARA-G450
41
VSIM
39
SIM_IO
38
SIM_CLK
40
SIM_RST
4
V_INT
42
SIM_DET
SIM CARD
HOLDER
C5C6C
7
C1C2C
3
SIM card
bottom view
(contacts side)
C1
VPP (C6)
VCC (C1)
IO (C7)
CLK (C3)
RST (C2)
GND (C5)
C2 C3 C5
J1
C4
D1 D2 D3 D4
C
8
C
4
TP
Figure 43: Application circuit for the connection to a single removable SIM card, with SIM detection not implemented
Reference
Description
Part number – Manufacturer
C1, C2, C3, C4
33 pF capacitor ceramic C0G 0402 5% 50 V
GRM1555C1H330JA01 – Murata
C5
1 µF capacitor ceramic X7R 0402 10% 16 V
GRM155R70J105KA12 – Murata
D1, D2, D3, D4
Very low capacitance ESD protection
PESD0402-140 – Tyco Electronics
J1
SIM card holder
6 positions, without card presence switch
Generic manufacturer,
C707 10M006 136 2 – Amphenol
Table 28: Example of components for the connection to a single removable SIM card, with SIM detection not implemented
Page 87

SARA-G450 - System integration manual
UBX-18046432 - R09 Design-in Page 87 of 131
C1-Public
2.5.1.3 Guidelines for single SIM chip connection
An application circuit for the connection to a single solderable SIM chip (M2M UICC Form Factor) is
described in Figure 44, where the optional SIM detection feature is not implemented (see the circuit
described in Figure 45 if the SIM detection feature is required).
Follow these guidelines connecting the module to a solderable SIM chip without SIM presence
detection:
• Connect the UICC / SIM contact C1 (VCC) to the VSIM pin of the module.
• Connect the UICC / SIM contact C7 (I/O) to the SIM_IO pin of the module.
• Connect the UICC / SIM contact C3 (CLK) to the SIM_CLK pin of the module.
• Connect the UICC / SIM contact C2 (RST) to the SIM_RST pin of the module.
• Connect the UICC / SIM contact C5 (GND) to GND.
• Provide a 1 µF bypass capacitor (e.g. Murata GRM155R70J105K) at the SIM supply line (VSIM)
close to the related pad of the SIM chip, to prevent digital noise.
• Provide a bypass capacitor of about 22 pF to 33 pF (e.g. Murata GRM1555C1H330J) on each SIM
line (VSIM, SIM_CLK, SIM_IO, SIM_RST), to prevent RF coupling especially in case the RF antenna
is placed closer than 10 – 30 cm from the SIM chip.
• Limit capacitance and series resistance on each SIM signal (SIM_CLK, SIM_IO, SIM_RST) to
match the requirements for the SIM interface regarding maximum allowed rise time on the lines.
1:1 scaling
41
VSIM
39
SIM_IO
38
SIM_CLK
40
SIM_RST
4
V_INT
42
SIM_DET
SIM CHIP
SIM chip
bottom view
(contacts side)
C1
VPP (C6)
VCC (C1)
IO (C7)
CLK (C3)
RST (C2)
GND (C5)
C2 C3 C5
U1
C4
2
8
3
6
7
1
C1 C5
C2 C6
C3 C7
C4 C8
8
7
6
5
1
2
3
4
TP
SARA-G450
Figure 44: Application circuit for the connection to a single solderable SIM chip, with SIM detection not implemented
Reference
Description
Part number – Manufacturer
C1, C2, C3, C4
33 pF capacitor ceramic C0G 0402 5% 50 V
GRM1555C1H330JA01 – Murata
C5
1 µF capacitor ceramic X7R 0402 10% 16 V
GRM155R70J105KA12 – Murata
U1
SIM chip (M2M UICC Form Factor)
Generic manufacturer
Table 29: Example of components for the connection to a single solderable SIM chip, with SIM detection not implemented
Page 88

SARA-G450 - System integration manual
UBX-18046432 - R09 Design-in Page 88 of 131
C1-Public
2.5.1.4 Guidelines for single SIM card connection with detection
An application circuit for the connection to a single removable SIM card placed in a SIM card holder is
described in Figure 45, where the optional SIM card detection feature is implemented.
Follow these guidelines connecting the module to a SIM connector implementing SIM presence
detection:
• Connect the UICC / SIM contact C1 (VCC) to the VSIM pin of the module.
• Connect the UICC / SIM contact C7 (I/O) to the SIM_IO pin of the module.
• Connect the UICC / SIM contact C3 (CLK) to the SIM_CLK pin of the module.
• Connect the UICC / SIM contact C2 (RST) to the SIM_RST pin of the module.
• Connect the UICC / SIM contact C5 (GND) to GND.
• Connect one pin of the normally-open mechanical switch integrated in the SIM connector (as the
SW2 pin in Figure 45) to the SIM_DET input pin, providing a weak pull-down resistor (e.g. 470 kΩ,
as R2 in Figure 45).
• Connect the other pin of the normally-open mechanical switch integrated in the SIM connector
(SW1 pin in Figure 45) to V_INT 1.8 V / 3 V supply output by means of a strong pull-up resistor (e.g.
1 kΩ, as R1 in Figure 45).
• Provide a 1 µF bypass capacitor (e.g. Murata GRM155R70J105K) at the SIM supply line (VSIM),
close to the related pad of the SIM connector, to prevent digital noise.
• Provide a bypass capacitor of about 22 pF to 33 pF (e.g. Murata GRM1555C1H330J) on each SIM
line (VSIM, SIM_CLK, SIM_IO, SIM_RST), very close to each related pad of the SIM connector, to
prevent RF coupling especially in case the RF antenna is placed closer than 10 – 30 cm from the
SIM card holder.
• Provide a low capacitance (i.e. less than 1 pF) ESD protection (e.g. Tyco Electronics
PESD0402-140) on each externally accessible SIM line, close to each related pad of the SIM
connector: the ESD sensitivity rating of SIM interface pins is 1 kV (HBM according to JESD22A114), so that, according to EMC/ESD requirements of the custom application, a higher
protection level can be required if the lines are externally accessible.
• Limit capacitance and series resistance on each SIM signal to match the requirements for the SIM
interface regarding maximum allowed rise time on the lines.
SARA-G450
41
VSIM
39
SIM_IO
38
SIM_CLK
40
SIM_RST
4
V_INT
42
SIM_DET
SIM CARD
HOLDER
C5C6C
7
C1C2C
3
SIM card
bottom view
(contacts side)
C1
VPP (C6)
VCC (C1)
IO (C7)
CLK (C3)
RST (C2)
GND (C5)
C2 C3 C5
J1
C4
SW1
SW2
D1 D2 D3 D4 D5 D6
R2
R1
C
8
C
4
TP
Figure 45: Application circuit for the connection to a single removable SIM card, with SIM detection implemented
Reference
Description
Part number – Manufacturer
C1, C2, C3, C4
33 pF capacitor ceramic C0G 0402 5% 50 V
GRM1555C1H330JA01 – Murata
C5
1 µF capacitor ceramic X7R 0402 10% 16 V
GRM155R70J105KA12 – Murata
D1 – D6
Very low capacitance ESD protection
PESD0402-140 – Tyco Electronics
R1
1 k resistor 0402 5% 0.1 W
RC0402JR-071KL – Yageo Phycomp
R2
470 k resistor 0402 5% 0.1 W
RC0402JR-07470KL- Yageo Phycomp
J1
SIM card holder
6 + 2 positions, with card presence switch
Generic manufacturer,
CCM03-3013LFT R102 – C&K Components
Table 30: Examples of components for the connection to a single removable SIM card, with SIM detection implemented
Page 89

SARA-G450 - System integration manual
UBX-18046432 - R09 Design-in Page 89 of 131
C1-Public
2.5.1.5 Guidelines for dual SIM card / chip connection
Two SIM card / chip can be connected to the modules’ SIM interface as illustrated in the circuit of
Figure 46.
SARA-G450 modules do not support the usage of two SIMs at the same time, but two SIMs can be
populated on the application board providing an appropriate switch to connect only the first SIM or
only the second SIM per time to the SIM interface of the SARA-G450 modules as described in the
Figure 46.
SARA-G450 modules do not support SIM hot insertion / removal: the module is able to properly use a
SIM only if the SIM / module physical connection is provided before the module boot and then held for
normal operation. Switching from one SIM to another one can only be properly done within one of
these two time periods:
• After module switch-off by the AT+CPWROFF and before module switch-on by PWR_ON pin
• After network deregistration by AT+COPS=2 and before module reset by +CFUN AT command
In the application circuit example represented in Figure 46, the application processor will drive the SIM
switch using its own GPIO to properly select the SIM that is used by the module.
The dual SIM connection circuit described in Figure 46 can be implemented for SIM chips as well,
providing a suitable connection between the SIM switch and SIM chip as described in Figure 44.
If it is required to switch between more than two SIMs, a circuit similar to the one described in the
Figure 46 can be implemented: for example, in the event of a four-SIM circuit, using an appropriate
4-pole 4-throw switch (or, alternatively, four 1-pole 4-throw switches) instead of the suggested 4-pole
2-throw switch.
Follow these guidelines connecting the module to two SIM connectors:
• Use an appropriate low-on resistance (i.e. few ohms) and low-on capacitance (i.e. few pF) 2-throw
analog switch (e.g. Fairchild FSA2567) to ensure high-speed data transfer according to SIM
requirements.
• Connect the contact C1 (VCC) of the two UICC / SIM to the VSIM pin of the module by means of
an appropriate 2-throw analog switch (e.g. Fairchild FSA2567).
• Connect the contact C7 (I/O) of the two UICC / SIM to the SIM_IO pin of the module by means of
an appropriate 2-throw analog switch (e.g. Fairchild FSA2567).
• Connect the contact C3 (CLK) of the two UICC / SIM to the SIM_CLK pin of the module by means
of an appropriate 2-throw analog switch (e.g. Fairchild FSA2567).
• Connect the contact C2 (RST) of the two UICC / SIM to the SIM_RST pin of the module by means
of an appropriate 2-throw analog switch (e.g. Fairchild FSA2567).
• Connect the contact C5 (GND) of the two UICC / SIM to GND.
• Provide a 1 µF bypass capacitor (e.g. Murata GRM155R70J105K) at the SIM supply line (VSIM),
close to the related pad of the two SIM connectors, in order to prevent digital noise.
• Provide a bypass capacitor of about 22 pf (e.g. Murata GRM1555C1H220J) on each SIM line
(VSIM, SIM_CLK, SIM_IO, SIM_RST), very close to each related pad of the two SIM connectors, to
prevent RF coupling especially in case the RF antenna is placed closer than 10 – 30 cm from the
SIM card holders.
• Provide a very low capacitance (i.e. less than 1 pF) ESD protection (e.g. Tyco Electronics
PESD0402-140) on each externally accessible SIM line, close to each related pad of the two SIM
connectors, according to the EMC/ESD requirements of the custom application.
• Limit capacitance and series resistance on each SIM signal (SIM_CLK, SIM_IO, SIM_RST) to
match the requirements for the SIM interface regarding maximum allowed rise time on the lines.
Page 90

SARA-G450 - System integration manual
UBX-18046432 - R09 Design-in Page 90 of 131
C1-Public
SARA-G450
C1
FIRST
SIM CARD
VPP (C6)
VCC (C1)
IO (C7)
CLK (C3)
RST (C2)
GND (C5)
C2 C3 C5
J1
C4
D1 D2 D3 D4
GND
U1
41
VSIM
VSIM
1VSIM
2VSIM
VCC
C11
4PDT
analog
switch
3V8
39
SIM_IO
DAT
1DAT
2DAT
38
SIM_CLK
CLK
1CLK
2CLK
40
SIM_RST
RST
1RST
2RST
SEL
SECOND
SIM CARD
VPP (C6)
VCC (C1)
IO (C7)
CLK (C3)
RST (C2)
GND (C5)
J2
C6 C7 C8 C10
C9
D5 D6 D7 D8
Application
Processor
GPIO
R1
Figure 46: Application circuit for the connection to two removable SIM cards, with SIM detection not implemented
Reference
Description
Part number – Manufacturer
C1 – C4, C6 – C9
22 pF capacitor ceramic C0G 0402 5% 25 V
GRM1555C1H220JZ01 – Murata
C5, C10, C11
1 µF capacitor ceramic X7R 0402 10% 16 V
GRM155R70J105KA12 – Murata
D1 – D8
Very low capacitance ESD protection
PESD0402-140 – Tyco Electronics
R1
47 kΩ resistor 0402 5% 0.1 W
RC0402JR-0747KL- Yageo Phycomp
J1, J2
SIM card holder
6 positions, without card presence switch
Generic manufacturer,
C707 10M006 136 2 – Amphenol
U1
4PDT analog switch,
with Low On-Capacitance and Low On-Resistance
FSA2567 – Fairchild Semiconductor
Table 31: Examples of components for the connection to two removable SIM cards, with SIM detection not implemented
2.5.2 Guidelines for SIM layout design
The layout of the SIM card interface lines (VSIM, SIM_CLK, SIM_IO, SIM_RST) may be critical if the
SIM card is placed far away from the SARA-G450 modules or in close proximity to the RF antenna:
these two cases should be avoided or at least mitigated as described below.
In the first case, a too-long connection can cause the radiation of some harmonics of the digital data
frequency as any other digital interface: keep the traces short and avoid coupling with RF line or
sensitive analog inputs.
In the second case, the same harmonics can be picked up and create self-interference that can reduce
the sensitivity of GSM receiver channels whose carrier frequency is coincidental with the harmonic
frequencies: placing the RF bypass capacitors suggested in 2.5.1 near the SIM connector will mitigate
the problem.
In addition, since the SIM card is typically accessed by the end user, it can be subjected to ESD
discharges: add adequate ESD protection as suggested in 2.5.1 to protect the module SIM pins that
are close to the SIM connector.
Limit the capacitance and series resistance on each SIM signal to match the SIM specifications: the
connections should always be kept as short as possible.
Avoid coupling with any sensitive analog circuit, since the SIM signals can cause the radiation of some
harmonics of the digital data frequency.
Page 91

SARA-G450 - System integration manual
UBX-18046432 - R09 Design-in Page 91 of 131
C1-Public
2.6 Serial interfaces
2.6.1 Primary main serial interface (UART)
2.6.1.1 Guidelines for UART circuit design
Providing the full RS-232 functionality
If RS-232 compatible signal levels are needed, two different external voltage translators can be used
to provide full RS-232 (9 lines) functionality: e.g. using the Texas Instruments SN74AVC8T245PW for
the translation from 1.8 V / 3.0 V to 3.3 V, and the Maxim MAX3237E for the translation from 3.3 V to
an RS-232 compatible signal level.
If a 1.8 V application processor (DTE) is used and module (DCE) generic digital interfaces are
configured to operate at 1.8 V (V_INT = 1.8 V, if VSEL pin is connected to GND; see 1.5.3), the circuit
should be implemented as described in Figure 47.
TxD
Application Processor
(1.8V DTE)
RxD
RTS
CTS
DTR
DSR
RI
DCD
GND
SARA-G450
(1.8V DCE)
12
TXD
9
DTR
13
RXD
10
RTS
11
CTS
6
DSR
7
RI
8
DCD
GND
0Ω
TP
0Ω
TP
0Ω
TP
0Ω
TP
21
VSEL
Figure 47: UART application circuit with complete 9-wire link in the DTE/DCE serial communication (1.8 V DTE / 1.8 V DCE)
If a 3.0 V application processor (DTE) is used and module (DCE) generic digital interfaces are
configured to operate at 3.0 V (V_INT = 3 V, if VSEL pin is left unconnected; see 1.5.3), the circuit
should be implemented as described in Figure 48.
TxD
Application Processor
(3.0V DTE)
RxD
RTS
CTS
DTR
DSR
RI
DCD
GND
SARA-G450
(3.0V DCE)
12
TXD
9
DTR
13
RXD
10
RTS
11
CTS
6
DSR
7
RI
8
DCD
GND
0Ω
TP
0Ω
TP
0Ω
TP
0Ω
TP
21
VSEL
Figure 48: UART application circuit with complete 9-wire link in the DTE/DCE serial communication (3.0 V DTE / 3.0 V DCE)
If a 3.0 V application processor (DTE) is used and module (DCE) generic digital interfaces are
configured to operate at 1.8 V (V_INT = 1.8 V, if VSEL pin is connected to GND; see 1.5.3), then it is
recommended to connect the 1.8 V UART interface of the module (DCE) by means of appropriate
unidirectional voltage translators using the module V_INT output as the 1.8 V supply for the voltage
translators on the module side, as described in Figure 49.
Page 92

SARA-G450 - System integration manual
UBX-18046432 - R09 Design-in Page 92 of 131
C1-Public
4
V_INT
TxD
Application Processor
(3.0V DTE)
RxD
RTS
CTS
DTR
DSR
RI
DCD
GND
SARA-G450
(1.8V DCE)
12
TXD
9
DTR
13
RXD
10
RTS
11
CTS
6
DSR
7
RI
8
DCD
GND
1V8
B1 A1
GND
U1
B3A3
VCCBVCCA
Unidirectional
voltage translator
C1
C2
3V0
DIR3
DIR2 OE
DIR1
VCC
B2 A2
B4A4
DIR4
1V8
B1 A1
GND
U2
B3A3
VCCB
VCCA
Unidirectional
voltage translator
C3
C4
3V0
DIR1
DIR3 OE
B2 A2
B4A4
DIR4
DIR2
TP
0Ω
TP
0Ω
TP
0Ω
TP
0Ω
TP
21
VSEL
Figure 49: UART application circuit with complete 9-wire link in the DTE/DCE serial communication (3.0 V DTE / 1.8 V DCE)
Reference
Description
Part number – Manufacturer
C1, C2, C3, C4
100 nF capacitor ceramic X7R 0402 10% 16 V
GRM155R61A104KA01 – Murata
U1, U2
Unidirectional voltage translator
SN74AVC4T77414 - Texas Instruments
Table 32: Parts for UART application circuit with complete 9-wire link in DTE/DCE serial interface (3.0 V DTE / 1.8 V DCE)
Providing the TXD, RXD, RTS, CTS and DTR lines only
If the functionality of the DSR, DCD and RI lines is not required, or the lines are not available:
• Leave the DSR, DCD and RI lines of the module unconnected and floating
If RS-232 compatible signal levels are needed, two different external voltage translators (e.g. Maxim
MAX3237E and Texas Instruments SN74AVC8T245PW) can be used. The Texas Instruments chip
provides the translation from 1.8 V / 3.0 V to 3.3 V, while the Maxim chip provides the translation from
3.3 V to RS-232 compatible signal level.
If a 1.8 V application processor (DTE) is used and module (DCE) generic digital interfaces are
configured to operate at 1.8 V (V_INT = 1.8 V, if VSEL pin is connected to GND; see 1.5.3), the circuit
should be implemented as described in Figure 50, given that the DTE will behave properly regardless
of the DSR input setting.
TxD
Application Processor
(1.8V DTE)
RxD
RTS
CTS
DTR
DSR
RI
DCD
GND
SARA-G450
(1.8V DCE)
15
TXD
12
DTR
16
RXD
13
RTS
14
CTS
9
DSR
10
RI
11
DCD
GND
0 Ω
0 Ω
TP
TP
0 Ω
0 Ω
TP
TP
21
VSEL
Figure 50: UART application circuit with partial V.24 link (6-wire) in the DTE/DCE serial communication (1.8 V DTE / 1.8 V
DCE)
14
Voltage translator providing partial power-down feature so that the DTE 3.0 V supply can be also ramped up before V_INT
1.8 V supply
Page 93

SARA-G450 - System integration manual
UBX-18046432 - R09 Design-in Page 93 of 131
C1-Public
If a 3.0 V application processor (DTE) is used and module (DCE) generic digital interfaces are
configured to operate at 3.0 V (V_INT = 3 V, if VSEL pin is left unconnected; see 1.5.3), the circuit
should be implemented as described in Figure 51, given that the DTE will behave properly regardless
of the DSR input setting.
TxD
Application Processor
(3.0V DTE)
RxD
RTS
CTS
DTR
DSR
RI
DCD
GND
SARA-G450
(3.0V DCE)
15
TXD
12
DTR
16
RXD
13
RTS
14
CTS
9
DSR
10
RI
11
DCD
GND
0 Ω
0 Ω
TP
TP
0 Ω
0 Ω
TP
TP
21
VSEL
Figure 51: UART application circuit with partial V.24 link (6-wire) in the DTE/DCE serial interface (3.0 V DTE / 3.0 V DCE)
If a 3.0 V application processor (DTE) is used and module (DCE) generic digital interfaces are
configured to operate at 1.8 V (V_INT = 1.8 V, if VSEL pin is connected to GND; see 1.5.3), then it is
recommended to connect the 1.8 V UART interface of the module (DCE) by means of appropriate
unidirectional voltage translators using the module V_INT output as the 1.8 V supply for the voltage
translators on the module side, as described in Figure 52, given that the DTE will behave properly
regardless of the DSR input setting.
4
V_INT
TxD
Application Processor
(3.0V DTE)
RxD
RTS
CTS
DTR
DSR
RI
DCD
GND
SARA-G450
(1.8V DCE)
15
TXD
12
DTR
16
RXD
13
RTS
14
CTS
9
DSR
10
RI
11
DCD
GND
0 Ω
0 Ω
TP
TP
0 Ω
0 Ω
TP
TP
1V8
B1 A1
GND
U1
B3A3
VCCB
VCCA
Unidirectional
voltage translator
C1
C2
3V0
DIR3
DIR2 OE
DIR1
VCC
B2 A2
B4A4
DIR4
1V8
B1 A1
GND
U2
VCCB
VCCA
Unidirectional
voltage translator
C3
3V0
DIR1
OE
B2 A2
DIR2
C4
21
VSEL
Figure 52: UART application circuit with partial V.24 link (6-wire) in the DTE/DCE serial interface (3.0 V DTE / 1.8 V DCE)
Reference
Description
Part number – Manufacturer
C1, C2, C3, C4
100 nF capacitor ceramic X7R 0402 10% 16 V
GRM155R61A104KA01 – Murata
U1
Unidirectional voltage translator
SN74AVC4T77415 - Texas Instruments
U2
Unidirectional voltage translator
SN74AVC2T24515 – Texas Instruments
Table 33: Parts for UART application circuit with partial V.24 link (6-wire) in DTE/DCE serial interface (3.0 V DTE / 1.8 V DCE)
15
Voltage translator providing partial power-down feature so that the DTE 3.0 V supply can be also ramped up before V_INT
1.8 V supply
Page 94

SARA-G450 - System integration manual
UBX-18046432 - R09 Design-in Page 94 of 131
C1-Public
Providing the TXD, RXD, RTS and CTS lines only
If the functionality of the DTR, DSR, DCD and RI lines is not required, or the lines are not available:
• Connect the module DTR input line to GND.
• Leave the DSR, DCD and RI output lines of the module unconnected and floating
If RS-232 compatible signal levels are needed, the Maxim 13234E voltage level translator can be used.
This chip translates voltage levels from 1.8 V / 3.0 V (module side) to the RS-232 standard.
If a 1.8 V application processor (DTE) is used and module (DCE) generic digital interfaces are
configured to operate at 1.8 V (V_INT = 1.8 V, if VSEL pin is connected to GND; see 1.5.3), the circuit
should be implemented as described in Figure 53.
TxD
Application Processor
(1.8V DTE)
RxD
RTS
CTS
DTR
DSR
RI
DCD
GND
SARA-G450
(1.8V DCE)
12
TXD
9
DTR
13
RXD
10
RTS
11
CTS
6
DSR
7
RI
8
DCD
GND
0Ω
TP
0Ω
TP
0Ω
TP
0Ω
TP
21
VSEL
Figure 53: UART application circuit with partial V.24 link (5-wire) in the DTE/DCE serial interface (1.8 V DTE / 1.8 V DCE)
If a 3.0 V application processor (DTE) is used and module (DCE) generic digital interfaces are
configured to operate at 3.0 V (V_INT = 3 V, if VSEL pin is left unconnected; see 1.5.3), the circuit
should be implemented as described in Figure 54.
TxD
Application Processor
(3.0V DTE)
RxD
RTS
CTS
DTR
DSR
RI
DCD
GND
SARA-G450
(3.0V DCE)
12
TXD
9
DTR
13
RXD
10
RTS
11
CTS
6
DSR
7
RI
8
DCD
GND
0Ω
TP
0Ω
TP
0Ω
TP
0Ω
TP
21
VSEL
Figure 54: UART application circuit with partial V.24 link (5-wire) in the DTE/DCE serial interface (3.0 V DTE / 3.0 V DCE)
If a 3.0 V application processor (DTE) is used and module (DCE) generic digital interfaces are
configured to operate at 1.8 V (V_INT = 1.8 V, if VSEL pin is connected to GND; see 1.5.3), then it is
recommended to connect the 1.8 V UART interface of the module (DCE) by means of appropriate
unidirectional voltage translators using the module V_INT output as the 1.8 V supply for the voltage
translators on the module side, as described in Figure 55.
Page 95

SARA-G450 - System integration manual
UBX-18046432 - R09 Design-in Page 95 of 131
C1-Public
4
V_INT
TxD
Application Processor
(3.0V DTE)
RxD
RTS
CTS
DTR
DSR
RI
DCD
GND
SARA-G450
(1.8V DCE)
12
TXD
9
DTR
13
RXD
10
RTS
11
CTS
6
DSR
7
RI
8
DCD
GND
1V8
B1 A1
GND
U1
B3A3
VCCB
VCCA
Unidirectional
voltage translator
C1
C2
3V0
DIR3
DIR2 OE
DIR1
VCC
B2 A2
B4A4
DIR4
TP
0Ω
TP
0Ω
TP
0Ω
TP
0Ω
TP
21
VSEL
Figure 55: UART application circuit with partial V.24 link (5-wire) in the DTE/DCE serial interface (3.0 V DTE / 1.8 V DCE)
Reference
Description
Part number – Manufacturer
C1, C2
100 nF capacitor ceramic X7R 0402 10% 16 V
GRM155R61A104KA01 – Murata
U1
Unidirectional voltage translator
SN74AVC4T77416 - Texas Instruments
Table 34: Parts for UART application circuit with partial V.24 link (5-wire) in DTE/DCE serial interface (3.0 V DTE / 1.8 V DCE)
Providing the TXD and RXD lines only
If the functionality of the RTS, CTS, DTR, DSR, DCD and RI lines is not required in the application, or
the lines are not available:
• Connect the module RTS input line to GND or to the CTS output line, since the module requires
RTS active (low electrical level) if HW flow control is enabled (AT&K3, which is the default setting).
The pin can be connected using a 0 Ω series resistor to GND or to the active module CTS (low
electrical level) when the module is in active mode, the UART interface is enabled and the HW flow
control is enabled.
• Connect the module DTR input line to GND.
• Leave the DSR, DCD and RI output lines of the module unconnected and floating.
If RS-232 compatible signal levels are needed, the Maxim 13234E voltage level translator can be used.
This chip translates voltage levels from 1.8 V / 3.0 V (module side) to the RS-232 standard.
If a 1.8 V application processor (DTE) is used and module (DCE) generic digital interfaces are
configured to operate at 1.8 V (V_INT = 1.8 V, if VSEL pin is connected to GND; see 1.5.3), the circuit
should be implemented as described in Figure 56.
TxD
Application Processor
(1.8V DTE)
RxD
RTS
CTS
DTR
DSR
RI
DCD
GND
SARA-G450
(1.8V DCE)
12
TXD
9
DTR
13
RXD
10
RTS
11
CTS
6
DSR
7
RI
8
DCD
GND
0Ω
TP
0Ω
TP
21
VSEL
Figure 56: UART application circuit with partial V.24 link (3-wire) in the DTE/DCE serial interface (1.8 V DTE / 1.8 V DCE)
16
Voltage translator providing partial power-down feature so that DTE 3.0 V supply can be ramped up before V_INT 1.8 V supply
Page 96

SARA-G450 - System integration manual
UBX-18046432 - R09 Design-in Page 96 of 131
C1-Public
If a 3.0 V application processor (DTE) is used and module (DCE) generic digital interfaces are
configured to operate at 3.0 V (V_INT = 3 V, if VSEL pin is left unconnected; see 1.5.3), the circuit
should be implemented as described in Figure 57.
TxD
Application Processor
(3.0V DTE)
RxD
RTS
CTS
DTR
DSR
RI
DCD
GND
SARA-G450
(3.0V DCE)
12
TXD
9
DTR
13
RXD
10
RTS
11
CTS
6
DSR
7
RI
8
DCD
GND
0Ω
TP
0Ω
TP
21
VSEL
Figure 57: UART application circuit with partial V.24 link (3-wire) in the DTE/DCE serial interface (3.0 V DTE / 3.0 V DCE)
If a 3.0 V application processor (DTE) is used and module (DCE) generic digital interfaces are
configured to operate at 1.8 V (V_INT = 1.8 V, if VSEL pin is connected to GND; see 1.5.3), then it is
recommended to connect the 1.8 V UART interface of the module (DCE) by means of appropriate
unidirectional voltage translators using the module V_INT output as the 1.8 V supply for the voltage
translators on the module side, as described in Figure 58.
4
V_INT
TxD
Application Processor
(3.0V DTE)
RxD
DTR
DSR
RI
DCD
GND
SARA-G450
(1.8V DCE)
12
TXD
9
DTR
13
RXD
6
DSR
7
RI
8
DCD
GND
1V8
B1 A1
GND
U1
VCCB
VCCA
Unidirectional
voltage translator
C1
C2
3V0
DIR1
DIR2 OE
VCC
B2 A2
RTS
CTS
10
RTS
11
CTS
TP
0Ω
TP
0Ω
TP
21
VSEL
Figure 58: UART application circuit with partial V.24 link (3-wire) in the DTE/DCE serial interface (3.0 V DTE / 1.8 V DCE)
Reference
Description
Part number – Manufacturer
C1, C2
100 nF capacitor ceramic X7R 0402 10% 16 V
GRM155R61A104KA01 – Murata
U1
Unidirectional voltage translator
SN74AVC2T24517 - Texas Instruments
Table 35: Parts for UART application circuit with partial V.24 link (3-wire) in DTE/DCE serial interface (3.0 V DTE / 1.8 V DCE)
☞ If only the TXD and RXD lines are provided, data delivered by the DTE can be lost with module
power saving enabled by AT+UPSV=1
17
Voltage translator providing partial power-down feature so that the DTE 3.0 V supply can be also ramped up before V_INT
1.8 V supply
Page 97

SARA-G450 - System integration manual
UBX-18046432 - R09 Design-in Page 97 of 131
C1-Public
Additional considerations
If a 3.0 V application processor (DTE) is used and module (DCE) generic digital interfaces are
configured to operate at 1.8 V (V_INT = 1.8 V, if VSEL pin is connected to GND; see 1.5.3), the voltage
scaling from any 3.0 V output of the application processor (DTE) to the corresponding 1.8 V input of
the module (DCE) can be implemented, as an alternative low-cost solution, by means of an appropriate
voltage divider. Consider the value of the pull-up integrated at the input of the module (DCE) for the
correct selection of the voltage divider resistance values.
Moreover, the voltage scaling from any 1.8 V output of the cellular module (DCE) to the corresponding
3.0 V input of the application processor (DTE) can be implemented by means of an appropriate
low-cost non-inverting buffer with open drain output. The non-inverting buffer should be supplied by
the V_INT supply output of the cellular module. Consider the value of the pull-up integrated at each
input of the DTE (if any) and the baud rate required by the application for the appropriate selection of
the resistance value for the external pull-up biased by the application processor supply rail.
☞ It is highly recommended to provide on the application board a directly accessible Test-Point for
the TXD, RXD, RTS, CTS pins of the module for execution of firmware upgrades and for diagnostic
purposes: provide a Test-Point on each line to accommodate the access and provide a 0 Ω series
resistor on each line to detach the module pins from any other connected device.
☞ Any external signal connected to the UART interface must be tri-stated or set low when the
module is in power-off mode and during the module power-on sequence (at least until the settling
of the V_INT supply output of the module to the configured 1.8 / 3.0 value), to avoid latch-up of
circuits and allow a clean boot of the module. If the external signals connected to the cellular
module cannot be tri-stated or set low, insert a multi-channel digital switch (e.g. Texas
Instruments SN74CB3Q16244, TS5A3159, or TS5A63157) between the two-circuit connections
and set to high impedance during the module power-on sequence.
☞ The ESD sensitivity rating of UART interface pins is 1 kV (Human Body Model according to
JESD22-A114). A higher protection level could be required if the lines are externally accessible on
the application board. This higher protection level can be achieved by mounting an ESD protection
(e.g. EPCOS CA05P4S14THSG varistor array) close to the accessible points.
2.6.1.2 Guidelines for UART layout design
The UART serial interface requires the same consideration regarding electromagnetic interference as
any other digital interface. Keep the traces short and avoid coupling with RF line or sensitive analog
inputs, since the signals can cause the radiation of some harmonics of the digital data frequency.
Page 98
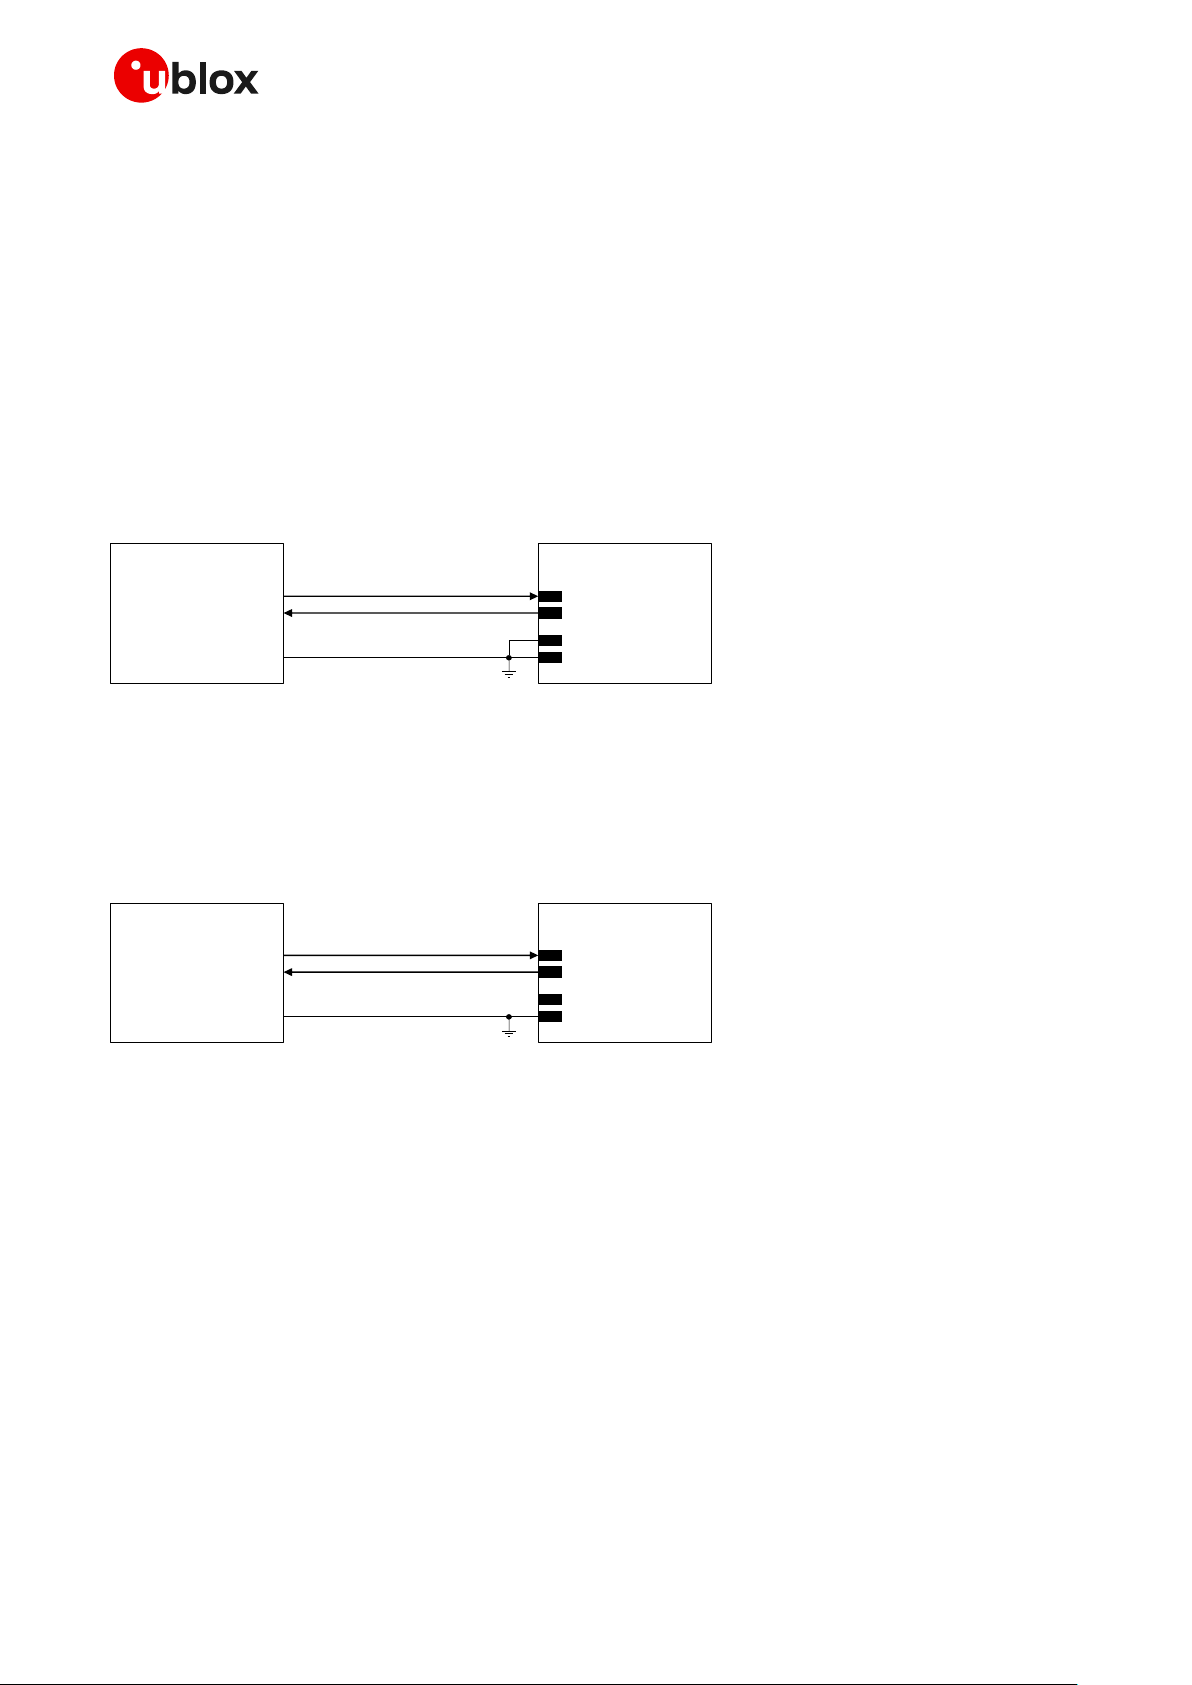
SARA-G450 - System integration manual
UBX-18046432 - R09 Design-in Page 98 of 131
C1-Public
2.6.2 Secondary auxiliary serial interface (AUX UART)
☞ Secondary auxiliary UART interface is not supported by the “00” product version. This interface
should be left unconnected and should not be driven by external devices.
2.6.2.1 Guidelines for AUX UART circuit design
If RS-232 compatible signal levels are needed, the Maxim 13234E voltage level translator can be used.
This chip translates voltage levels from 1.8 V / 3.0 V (module side) to the RS-232 standard.
If a 1.8 V application processor (DTE) is used and module (DCE) generic digital interfaces are
configured to operate at 1.8 V (V_INT = 1.8 V, if VSEL pin is connected to GND; see 1.5.3), the circuit
should be implemented as described in Figure 59.
TxD
Application Processor
(1.8V DTE)
RxD
GND
SARA-G450
(1.8V DCE)
17
TXD_AUX
19
RXD_AUX
GND
21
VSEL
Figure 59: AUX UART application circuit (1.8 V DTE / 1.8 V DCE)
If a 3.0 V application processor (DTE) is used and module (DCE) generic digital interfaces are
configured to operate at 3.0 V (V_INT = 3 V, if VSEL pin is left unconnected; see 1.5.3), the circuit
should be implemented as described in Figure 60.
TxD
Application Processor
(3.0V DTE)
RxD
GND
SARA-G450
(3.0V DCE)
17
TXD_AUX
19
RXD_AUX
GND
21
VSEL
Figure 60: AUX UART application circuit (3.0 V DTE / 3.0 V DCE)
If a 3.0 V application processor (DTE) is used and module (DCE) generic digital interfaces are
configured to operate at 1.8 V (V_INT = 1.8 V, if VSEL pin is connected to GND; see 1.5.3), then it is
recommended to connect the 1.8 V AUX UART interface of the module (DCE) by means of appropriate
unidirectional voltage translators using the module V_INT output as the 1.8 V supply for the voltage
translators on the module side, as described in Figure 61.
Page 99

SARA-G450 - System integration manual
UBX-18046432 - R09 Design-in Page 99 of 131
C1-Public
4
V_INT
TxD
Application Processor
(3.0V DTE)
RxD
GND
SARA-G450
(1.8V DCE)
17
TXD_AUX
19
RXD_AUX
GND
1V8
B1 A1
GND
U1
VCCB
VCCA
Unidirectional
voltage translator
C1
C2
3V0
DIR1
DIR2 OE
VCC
B2 A2
TP
21
VSEL
Figure 61: AUX UART application circuit (3.0 V DTE / 1.8 V DCE)
Reference
Description
Part number – Manufacturer
C1, C2
100 nF capacitor ceramic X7R 0402 10% 16 V
GRM155R61A104KA01 – Murata
U1
Unidirectional voltage translator
SN74AVC2T24518 - Texas Instruments
Table 36: Parts for AUX UART application circuit (3.0 V DTE / 1.8 V DCE)
2.6.2.2 Guidelines for AUX UART layout design
The AUX UART serial interface requires the same consideration regarding electromagnetic
interference as any other digital interface. Keep the traces short and avoid coupling with RF line or
sensitive analog inputs, since the signals can cause the radiation of some harmonics of the digital
data frequency.
2.6.3 Additional serial interface for FW upgrade and Tracing (FT UART)
2.6.3.1 Guidelines for FT UART circuit design
It is not necessary to connect this interface to the application processor, but it is highly recommended
to provide on the application board a directly accessible Test-Point for the TXD_FT and RXD_FT pins
of the module for execution of firmware upgrades and for diagnostic purposes: provide a Test-Point
on each line to accommodate the access and leave these lines detached from any other device, as
described in Figure 62.
scaling
SARA-G450
29
TXD_FT
28
RXD_FT
TP
TP
Figure 62: FT UART interface application circuit
☞ The ESD sensitivity rating of additional FT UART pins is 1 kV (Human Body Model according to
JESD22-A114). A higher protection level could be required if the lines are externally accessible on
the application board. This higher protection level can be achieved by mounting an ESD protection
(e.g. EPCOS CA05P4S14THSG varistor array) close to accessible points.
18
Voltage translator providing partial power-down feature so that the DTE 3.0 V supply can be also ramped up before V_INT
1.8 V supply
Page 100

SARA-G450 - System integration manual
UBX-18046432 - R09 Design-in Page 100 of 131
C1-Public
2.6.3.2 Guidelines for FT UART layout design
The additional FT UART serial interface requires the same consideration regarding electromagnetic
interference as any other digital interface. Keep the traces short and avoid coupling with RF line or
sensitive analog inputs, since the signals can cause the radiation of some harmonics of the digital
data frequency.
2.6.4 DDC (I2C) interface
☞ DDC (I2C) interface is not supported by the “00” product version. This interface should be left
unconnected and should not be driven by external devices.
2.6.4.1 Guidelines for DDC (I2C) circuit design
General considerations
The DDC I2C-bus host interface of SARA-G450 cellular modules can be used to communicate with ublox GNSS receivers. Besides the general considerations detailed below, see the following parts of this
section for specific guidelines for the connection to u-blox GNSS receivers.
To be compliant to the I2C-bus specifications, the module bus interface pins are open drain output
and pull-up resistors must be mounted externally. Resistor values must conform to the I2C bus
specifications [7]: for example, 4.7 kΩ resistors can be commonly used.
☞ Connect the external DDC (I2C) pull-ups to the V_INT supply source, or another supply source
enabled after V_INT (e.g., as the GNSS supply present in Figure 63 and Figure 66 application
circuits), as any external signal connected to the DDC (I2C) interface must not be set high before
the switch-on of the V_INT supply of the DDC (I2C) pins, to avoid latch-up of circuits and to permit
a clean boot of the module.
The signal shape is defined by the values of the pull-up resistors and the bus capacitance. Long wires
on the bus increase the capacitance. If the bus capacitance is increased, use pull-up resistors with
nominal resistance value lower than 4.7 kΩ, to match the I2C bus specifications [7] regarding rise and
fall times of the signals.
☞ Capacitance and series resistance must be limited on the bus to match the I2C specifications
(1.0 µs is the maximum allowed rise time on the SCL and SDA lines): route connections as short
as possible.
☞ The ESD sensitivity rating of the DDC (I2C) pins is 1 kV (Human Body Model according to
JESD22-A114). A higher protection level could be required if the lines are externally accessible on
the application board. This higher protection level can be achieved by mounting an ESD protection
(e.g. EPCOS CA05P4S14THSG varistor array) close to accessible points.
☞ If the pins are not used as a DDC bus interface, they can be left unconnected.
 Loading...