

Page 1

UBX-18058360 - R06
C1-Public www.u-blox.com
EVK-G45
SARA-G450 cellular evaluation kit
User guide
Abstract
This guide explains how to set up the EVK-G45 evaluation kit to begin evaluating the u-blox
SARA-G450 GSM/GPRS cellular modules.
Page 2

EVK-G45 - User guide
UBX-18058360 - R06 Document information Page 2 of 23
C1-Public
Document information
Title
EVK-G45
Subtitle
SARA-G450 cellular evaluation kit
Document type
User guide
Document number
UBX-18058360
Revision and date
R06
08-Mar-2021
Disclosure restriction
C1-Public
This document applies to the following products:
Product name
Type number
Modem version
Application version
PCN reference
Product status
EVK-G45
EVK-G45-0-00
09.02
A05.01
UBX-21006193
Mass production
u-blox or third parties may hold intellectual property rights in the products, names, logos and designs included in this document.
Copying, reproduction, modification or disclosure to third parties of this document or any part thereof is only permitted with the
express written permission of u-blox.
The information contained herein is provided “as is” and u-blox assumes no liability for its use. No warranty, either express or
implied, is given, including but not limited to, with respect to the accuracy, correctness, reliability and fitness for a particular
purpose of the information. This document may be revised by u-blox at any time without notice. For the most recent documents,
visit www.u-blox.com.
Copyright © u-blox AG.
Page 3

EVK-G45 - User guide
UBX-18058360 - R06 Contents Page 3 of 23
C1-Public
Contents
Document information ................................................................................................................................ 2
Contents .......................................................................................................................................................... 3
1 Starting up ............................................................................................................................................... 4
1.1 EVK-G45 overview ....................................................................................................................................... 4
1.2 EVK-G45 block diagram ............................................................................................................................. 5
1.3 Switches, jumpers and buttons ............................................................................................................... 6
1.4 LEDs ............................................................................................................................................................... 7
1.5 Connectors ................................................................................................................................................... 8
1.6 EVK-G45 pin out .......................................................................................................................................... 9
1.6.1 Routing of SARA-G450 module pins to connectors on the ADP-G45...................................... 9
1.6.2 Pin-out of the 42-pin dual in-line board-to-board connectors on the ADP-G450 ................10
1.7 Software installation ................................................................................................................................10
1.8 Board setup ................................................................................................................................................11
1.9 Enabling error result codes .....................................................................................................................12
1.10 PIN code insertion (when required)........................................................................................................12
1.11 Registration on a cellular network .........................................................................................................12
1.12 Switching off the EVK-G45 .....................................................................................................................12
Appendix ....................................................................................................................................................... 13
A Set up AT terminal applications for communication with the EVK-G45 ......................... 13
B Set up cellular packet data connection on PC .......................................................................... 14
B.1 Install a new modem from the control panel .......................................................................................14
B.2 Configuring a new connection ................................................................................................................15
C Examples of AT commands ............................................................................................................. 16
C.1 Voice call .....................................................................................................................................................16
C.2 SMS management ....................................................................................................................................17
C.3 Internet connection in GPRS mode (external TCP/IP stack) ............................................................17
C.4 Internet connection in GPRS mode (internal TCP/IP stack) .............................................................17
C.5 Enable communication between cellular and GNSS module ...........................................................18
C.6 Read NMEA messages (example: GLL) ................................................................................................18
C.7 GNSS AssistNow .......................................................................................................................................18
D Current consumption measurement ............................................................................................ 19
E Declaration of conformities............................................................................................................. 20
F Glossary ................................................................................................................................................. 21
Related documentation ........................................................................................................................... 22
Revision history .......................................................................................................................................... 22
Contact .......................................................................................................................................................... 23
Page 4

EVK-G45 - User guide
UBX-18058360 - R06 Starting up Page 4 of 23
C1-Public
1 Starting up
1.1 EVK-G45 overview
The EVK-G45 kit is a powerful and easy-to-use tool that simplifies evaluation of u-blox SARA-G450
GSM/GPRS modules.
This section describes the main connections and settings required to get started.
☞ See the SARA-G4 series data sheet [3] and the SARA-G4 series system integration manual [4] for
the features supported by the u-blox SARA-G4 series cellular modules.
SIM card holder
J300
Cellular reset
SW303
Cellular power-on
SW302
GND
9 – 18 V
Power input
J400
Cellular
adapter board
DL400
Main power switch
SW400
DL401
Cellular
antenna connector
J0501
SARA-G450
cellular module
DIL B2B connector
J0403
DIL B2B connector
J0404
GND
GNSS
antenna connector
J103
GNSS module
GNSS
adapter board
Cellular VCC
supply jumper
J404
Cellular USB
(UART / UART FT)
J501
Cellular RS232
(UART)
J500
DL501DL403
DL405
GNSS USB
J102
SW403
SW401
DL404
SW300
SW304
SW204
SW510
Headset jack
J303
DS132
DS118DS124
DS121
DS107
DS105
DS109
DS103
DS500
DS501
GND
GND
DL503
GDI voltage
selection
J0201
Cellular USB
(UART AUX)
J0600
Header connector
J0601
Figure 1: Overview of the EVK-G45 evaluation kit for SARA-G450 modules
Page 5
EVK-G45 - User guide
UBX-18058360 - R06 Starting up Page 5 of 23
C1-Public
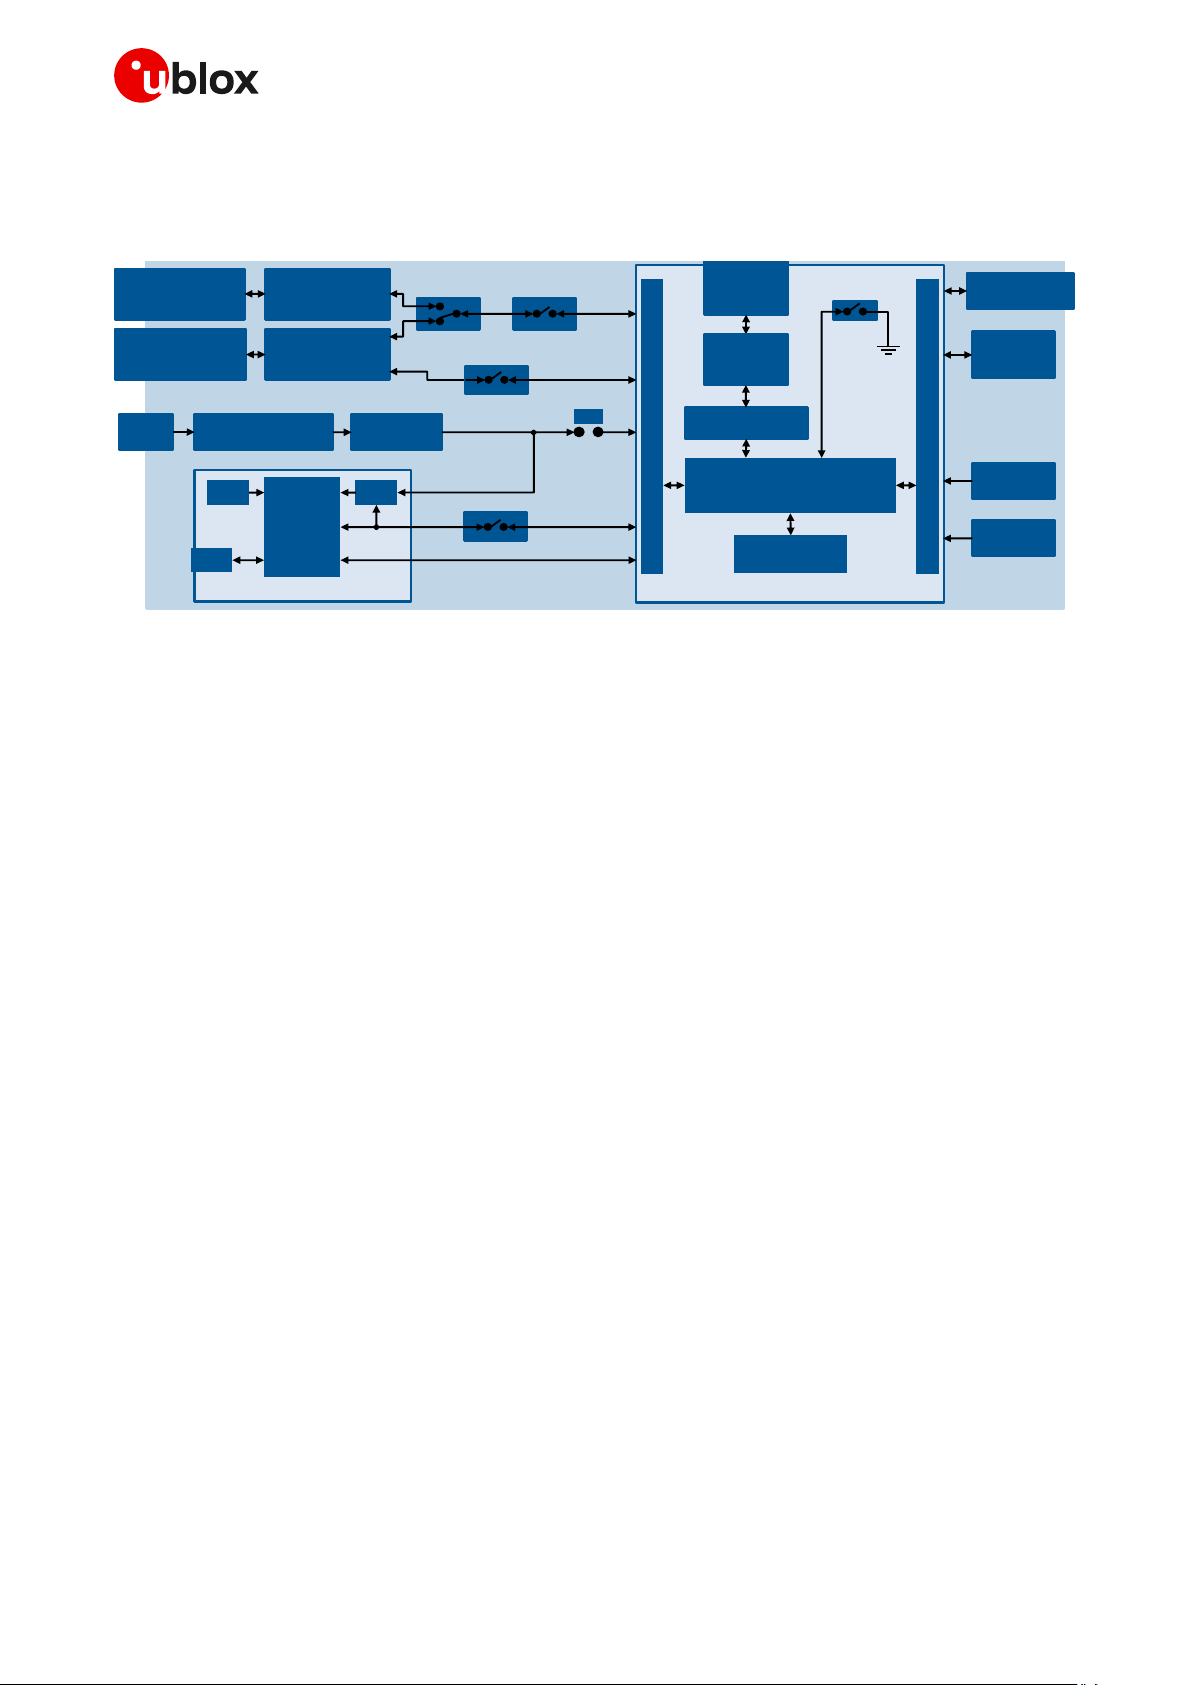
1.2 EVK-G45 block diagram
Figure 2 shows the main interfaces and internal connections of the EVK-G45 evaluation kit:
SIM
card holder
(J300)
Power-off
(SW303)
Power-on
(SW302)
Cellular adapter board
SARA-G450
module
42-pin DIL B2B connector (J0404)
42-pin DIL B2B connector (J0403)
EVB-WL3
GNSS
module
GNSS adapter board
RF
USB
UART / UART FT
converter
Cellular USB
(UART / UART FT)
(J501)
Cellular RS232
(UART)
(J500)
RS232
UART
converter
UART
MiniUSB/DB9
switch
(SW403)
On-board/B2B
switch
(SW401)
USB
Headset jack
(J303)
I2C
Cellular antenna
(J0501)
Step - down
Main power switch
(SW400)
12 V
(J400)
3.8 V
VCC jumper
(J404)
LDO
GPIO2/3/4
GNSS switch
(SW304)
UART FT
UART FT switch
(SW510 )
Cellular USB
(UART AUX)
(J0600)
Header connector
(J0601)
USB
UART AUX
converter
GDI voltage
selection switch
(J0201)
Figure 2: Block diagram of EVK-G45
The EVK-G45 is formed by three boards:
• The lower one, called EVB-WL3, contains the power supply and other peripherals for the
SARA-G450 cellular module (as SIM card holder, headset jack, power-off button and power-on
button).
• The cellular adapter board, called ADP-G450, contains the SARA-G450 cellular module, the cellular
antenna connector, a switch for the digital I/O interfaces (GDI) voltage selection, and a USB
connector for the AUX UART interface.
• The GNSS adapter board, called ADP-GNSS, contains the u-blox GNSS module, the LDO supply
regulator, the GNSS antenna connector, and the USB connector for the GNSS module.
The boards are connected by means of male header board-to-board connectors provided on the
bottom of the adapter board and their corresponding female connectors provided on top of the lower
board.
The cellular module’s interfaces are available on the dual in-line male board-to-board connectors
provided on the top layer of the cellular adapter board (J0403 / J0404), which are pin-to-pin
compatible to the connectors on the bottom layer of the adapter board.
The lower board (EVB-WL3) is designed also to be used with other u-blox cellular adapter boards. It
contains additional switches, jumpers, connectors, LEDs and parts that are only partially described in
Figure 1 or in this document, because they are intended for use only with other u-blox cellular modules.
It is recommended to leave any additional connector unconnected, and to leave any additional switch
in its default configuration.
Page 6

EVK-G45 - User guide
UBX-18058360 - R06 Starting up Page 6 of 23
C1-Public
1.3 Switches, jumpers and buttons
Function
Description
Name
Board
Main power switch
Power on / off of the whole evaluation kit
SW400
EVB
Cellular VCC jumper
Jumper socket to provide the 3.8 V supply to the cellular module
VCC input
J404
EVB
Cellular power-on
Push button to switch on the cellular module
SW302
EVB
Cellular power-off
Push button to switch off the cellular module (“modem reset”)
SW303
EVB
Cellular UART detach
Slide switch to attach / detach cellular module UART from the
USB / RS232 connectors: when detached, UART signals available
only on the DIL B2B connector on the ADP board
SW401
EVB
Cellular UART routing
Slide switch to select cellular module UART routing on the USB or
on the RS232 connector
SW403
EVB
Cellular FT UART detach
Slide switch to attach / detach cellular module FT UART from the
USB connector: when detached, FT UART signals available only on
the DIL B2B connector on the ADP board
SW510
EVB
Cellular GPIO detach
Slide switch to attach / detach the cellular module GPIOs, SIM_DET
from peripherals: when detached, the signals are available only on
the DIL B2B connector on the ADP board
SW300
EVB
Cellular GNSS detach
Slide switch to attach / detach the cellular module to the GNSS
module (GPIO2-3-4): when detached, the signals are available only
on DIL B2B connector on the ADP board
SW304
EVB
GNSS V_BCKP
Slide switch to connect / disconnect backup battery to V_BCKP pin
of the GNSS module
SW204
EVB
Cellular GDI voltage selection
Slide switch to select operating voltage for cellular Generic Digital
I/O Interfaces: 1.8 V / 3.0 V
J0201
ADP-G450
Table 1: Description of EVK-G45 switches and buttons
Page 7
EVK-G45 - User guide
UBX-18058360 - R06 Starting up Page 7 of 23
C1-Public
1.4 LEDs
Function
Description
LED #
Board
Color
Main power
Power supply plugged in the 9 - 18 V power input
DL401
EVB
Cellular VCC
Cellular module supplied. Main power switch must be
switched on
DL400
EVB
Cellular USB
(UART / FT UART)
USB cable plugged into the Cellular USB connector for
UART / FT UART access
DL501
EVB
Cellular USB / UART
Green light is activated when the UART is routed to the
Cellular USB connector
Red light blinks at UART TX or RX data on the
Cellular USB connector
DL403
EVB
Cellular UART detach
UART signals are available only on the DIL B2B connector
on the ADP board
DL404
EVB
Cellular RS232 / UART
Green light is activated when UART is routed to the
Cellular RS232 connector
Red light blinks at UART TX or RX data on the
Cellular RS232 connector
DL405
EVB
Cellular USB / FT UART
Green light is activated when FT UART is routed to the
Cellular USB connector
Red light blinks at FT UART TX or RX data on the
Cellular USB connector
DL503
EVB
Cellular RI indicator
RI line turns ON (active low)
DS501
EVB
Cellular CTS indicator
CTS line turns ON (active low)
DS500
EVB
Cellular GPIO1 indicator
Green light is activated when cellular GPIO1 is high
DS107
EVB
Cellular GPIO2 indicator
Green light is activated when cellular GPIO2 is high
DS105
EVB
Cellular GPIO3 indicator
Green light is activated when cellular GPIO3 is high
DS109
EVB
Cellular GPIO4 indicator
Green light is activated when cellular GPIO4 is high
DS103
EVB
GNSS VCC supply
GNSS module supply is turned ON
DS118
ADP-GNSS
GNSS USB
USB cable plugged in GNSS USB connector
DS124
ADP-GNSS
GNSS Timepulse
Pulses at 1 Hz when valid GNSS fix
DS121
ADP-GNSS
Cellular / GNSS DDC
Cellular / GNSS module communication over DDC (I2C)
interface
DS132
ADP-GNSS
Table 2: Description of EVK-G45 LEDs
Page 8
EVK-G45 - User guide
UBX-18058360 - R06 Starting up Page 8 of 23
C1-Public
1.5 Connectors
Function
Description
Name
Board
9 - 18 V power input
Connector for the AC / DC power adapter of the EVK
AC: 100-240 V, 0.8 A, 50-60 Hz / DC: +12 V, 2.5 A
IEC 60417-5172
Class II equipment
J400
EVB
SIM card holder
SIM card holder
J300
EVB
Cellular antenna
SMA connector for the cellular module antenna
J0501
ADP-G450
Cellular USB
(AUX UART)
Micro USB 2.0 type B connector for the cellular module AUX UART interface
converted as USB interface
J0600
ADP-G450
Cellular USB
(UART / FT UART)
Mini USB 2.0 type B connector for the cellular module UART and FT UART
interfaces converted as USB interface
J501
EVB
Cellular RS232
(UART)
DB9 connector for the cellular module UART interface converted as an RS232
interface
J500
EVB
DIL B2B headers
Dual in-line board-to-board connectors for the cellular module interfaces
J0403,
J0404
ADP-G450
Header connector
Header connector for the cellular module AUX UART interface
J0601
ADP-G450
Cellular headset
Audio headset jack connector for the cellular module audio interface
J303
EVB
GNSS antenna
SMA connector for the GNSS module antenna (GNSS Antenna)
J103
ADP-GNSS
GNSS USB
Mini USB connector for the GNSS module USB interface
J102
ADP-GNSS
GNSS backup
battery
Backup battery socket for the GNSS module (under the GNSS adapter board)
BT200
EVB
GND
Ground terminals for the probe reference
J402, J403
J405, J406
EVB
Table 3: Description of EVK-G45 connectors
⚠ CAUTION! IN THE UNLIKELY EVENT OF A FAILURE IN THE INTERNAL PROTECTION CIRCUITRY,
THERE IS A RISK OF AN EXPLOSION WHEN CHARGING A FULLY OR PARTIALLY DISCHARGED
BATTERY. REPLACE THE BATTERY WHEN IT NO LONGER HAS A SUFFICIENT CHARGE FOR
UNIT OPERATION. CONTROL THE BATTERY BEFORE USE IF THE DEVICE HAS NOT BEEN USED
FOR AN EXTENDED PERIOD OF TIME.
⚠ CAUTION! RISK OF EXPLOSION IF BATTERY IS REPLACED WITH AN INCORRECT TYPE. DISPOSE
OF USED BATTERIES ACCORDING TO THE INSTRUCTIONS!
Page 9

EVK-G45 - User guide
UBX-18058360 - R06 Starting up Page 9 of 23
C1-Public
1.6 EVK-G45 pin out
1.6.1 Routing of SARA-G450 module pins to connectors on the ADP-G45
Connector
Name/Pin number
SARA-G450
Signal name
SARA-G450
Pin N°
SARA-G450
Pin N°
SARA-G450
Signal name
Connector
Name/Pin number
J0404 Pins 7-8-9-10
GND 1 64
GND
J0404 Pins 7-8-9-10
J0404 Pin 3
V_BCKP
2
63
GND
J0404 Pins 7-8-9-10
J0404 Pins 7-8-9-10
GND 3 62
ANT_DET
Not available
J0404 Pin 36
V_INT 4 61
GND
J0404 Pins 7-8-9-10
J0404 Pins 7-8-9-10
GND 5 60
GND
J0404 Pins 7-8-9-10
J0404 Pin 18
DSR 6 59
GND
J0404 Pins 7-8-9-10
J0404 Pin 17
RI 7 58
GND
J0404 Pins 7-8-9-10
J0404 Pin 11
DCD 8 57
GND
J0404 Pins 7-8-9-10
J0404 Pin 12
DTR 9 56
ANT
Not available
J0404 Pin 13
RTS
10
55
GND
J0404 Pins 7-8-9-10
J0404 Pin 14
CTS
11
54
GND
J0404 Pins 7-8-9-10
J0404 Pin 15
TXD
12
53
VCC
J0403 Pins 7-8-9-10
J0404 Pin 16
RXD
13
52
VCC
J0403 Pins 7-8-9-10
J0404 Pins 7-8-9-10
GND
14
51
VCC
J0403 Pins 7-8-9-10
J0404 Pin 29
PWR_ON
15
50
GND
J0404 Pins 7-8-9-10
J0404 Pin 33
GPIO1
16
49
MIC_P
J0403 Pin 28
J0601 Pin 2
TXD_AUX
17
48
MIC_N
Not available
J0403 Pin 26
PWR_OFF
18
47
MIC_GND
J0403 Pin 27
J0601 Pin 1
RXD_AUX
19
46
MIC_BIAS
Not available
J0404 Pins 7-8-9-10
GND
20
45
SPK_N
J0403 Pin 34
Not available
VSEL
21
44
SPK_P
J0403 Pin 33
J0404 Pins 7-8-9-10
GND
22
43
GND
J0404 Pins 7-8-9-10
J0404 Pin 31
GPIO2
23
42
SIM_DET
J0404 Pin 23
J0404 Pin 32
GPIO3
24
41
VSIM
J0403 Pin 13
J0404 Pin 25
GPIO4
25
40
SIM_RST
J0403 Pin 16
J0403 Pin 21
SDA
26
39
SIM_IO
J0403 Pin 14
J0403 Pin 20
SCL
27
38
SIM_CLK
J0403 Pin 15
J0404 Pin 20
RXD_FT
28
37
I2S_RXD
J0403 Pin 23
J0404 Pin 19
TXD_FT
29
36
I2S_CLK
J0403 Pin 22
J0404 Pins 7-8-9-10
GND
30
35
I2S_TXD
J0403 Pin 24
Not available
RSVD
31
34
I2S_WA
J0403 Pin 25
J0404 Pins 7-8-9-10
GND
32
33
RSVD
Not available
Table 4: Interfaces of SARA-G450 module, as routed up to the 42-pin dual in-line board-to-board connectors (J0403, J0404)
and up to other connectors available on the adapter board ADP-G450 of the EVK-G45 evaluation kit
☞ The pins / interfaces that are not supported by a specific SARA-G450 module product version
should not be driven by an external device (see the SARA-G4 series data sheet [3] and the
SARA-G4 series system integration manual [4] for the features supported by each SARA-G450
module product version).
Page 10

EVK-G45 - User guide
UBX-18058360 - R06 Starting up Page 10 of 23
C1-Public
1.6.2 Pin-out of the 42-pin dual in-line board-to-board connectors on the
ADP-G450
DIL B2B J0404
DIL B2B J0403
Signal name
Pin N°
Pin N°
Signal name
Signal name
Pin N°
Pin N°
Signal name
Not connected
2 1 GND Not connected
2 1 GND
Not connected
4 3 V_BCKP
Not connected
4 3 Not connected
Not connected
6 5 Not connected
Not connected
6 5 Not connected
GND 8 7
GND VCC 8 7
VCC
GND
10 9 GND VCC
10 9 VCC
DTR
12
11
DCD Not connected
12
11
Not connected
CTS
14
13
RTS SIM_IO
14
13
VSIM
RXD
16
15
TXD SIM_RST
16
15
SIM_CLK
DSR
18
17
RI Not connected
18
17
Not connected
RXD_FT
20
19
TXD_FT
SCL
20
19
Not connected
Not connected
22
21
Not connected
I2S_CLK
22
21
SDA
Not connected
24
23
SIM_DET
I2S_TXD
24
23
I2S_RXD
Not connected
26
25
GPIO4
PWR_OFF
26
25
I2S_WA
Not connected
28
27
Not connected
MIC_P_BIAS1
28
27
MIC_GND
Not connected
30
29
PWR_ON
Not connected
30
29
Not connected
GPIO3
32
31
GPIO2
Not connected
32
31
Not connected
Not connected
34
33
GPIO1
SPK_N
34
33
SPK_P
V_INT
36
35
Not connected
Not connected
36
35
Not connected
Not connected
38
37
Not connected
Not connected
38
37
Not connected
Not connected
40
39
Not connected
Not connected
40
39
Not connected
GND
42
41
GND GND
42
41
Not connected
Table 5: Pin-out of the 42-pin dual in-line board-to-board connectors (J201, J200) available on the adapter board ADP-G450
☞ The pins / interfaces that are not supported by a specific SARA-G450 module product version
should not be driven by an external device (see the SARA-G4 series data sheet [3] and SARA-G4
series system integration manual [4] for the features supported by each SARA-G450 module
product version).
1.7 Software installation
The USB drivers are available with the EVK-G45. Executable files can be downloaded from
www.u-blox.com/evk-search and saved to any location on the computer hard drive. The installation
can be started by running the executable file on a computer with the Windows operating system.
1
Signal and bias line for an external electret microphone: biasing bridge circuit mounted on ADP-G450
Page 11

EVK-G45 - User guide
UBX-18058360 - R06 Starting up Page 11 of 23
C1-Public
1.8 Board setup
1. Insert a SIM card into the SIM card holder (J300 on the EVB).
2. Connect the cellular antenna provided with the evaluation kit box to the Cellular antenna SMA
connector on the ADP-G450 (J0501, RF input/output for transmission and reception of 2G RF
signals)
3. If the GNSS functionality is required, connect the GNSS antenna provided with the evaluation kit
box to the GNSS antenna SMA connector on the ADP-GNSS. Place the antenna in a location with
a good view of the sky.
4. Connect the AC/DC +12 V power adapter provided with the evaluation kit box to the 9 – 18 V power
input connector (J400 on the EVB). LED DL401 lights blue.
5. Be sure to provide a jumper socket on the Cellular VCC supply jumper (J404 on the EVB). This
provides the connection from the 3.8 V output of the supply circuit on the EVB to the VCC input of
the module.
6. To enable the board power supply, turn the Main power switch (SW400 on the EVB) to the ON
position. LED DL400 lights green.
7. To switch on the cellular module, press the Cellular power-on button (SW302 on EVB).
8. For communication via UART interface of the cellular module, the following connections are
allowed and can be alternatively enabled in a mutually exclusive way (see Table 6 for switch
position and LED status):
8.1. Connect a USB cable to mini USB connector (Cellular USB, J501 on EVB), LED DL501 lights
blue
8.2. Connect an RS232 cable to DB9 connector (Cellular RS232, J500 on EVB)
Type of connections
SW401
SW403
LED
Access to cellular UART over the Cellular USB (UART / FT UART) mini USB connector
(J501)
ON BOARD
MINIUSB
DL403
Access to cellular UART over the Cellular RS232 (UART) DB9 connector (J500)
ON BOARD
DB9
DL405
Access to cellular UART on DIL board-to-board connector on the adapter board:
cellular UART detached from USB (UART) J501 and RS232 (UART) J500 connectors
B2B
Do not care
DL404
Table 6: Serial interface configuration
Using the Cellular USB connector (case 8.1), two COM ports are enabled with Windows (the
numbering of the COM ports can be seen via the Windows Device Manager):
o SARA UART (by default for AT commands and data) is available over the first COM port
o SARA FT UART (by default for FW update and diagnostic) is available over the second COM
port
9. Run an AT terminal application (e.g. the u-blox m-center tool) selecting an AT port, with these
settings:
o Data rate: 115'200 bit/s
o Data bits: 8
o Parity: none
o Stop bits: 1
o Flow control: hardware
See Appendix A for how to configure the u-blox m-center AT terminal for Windows.
10. If the audio functionality is required, connect the headset provided with the evaluation kit box to
the Headset jack connector (J303 on EVB).
Page 12

EVK-G45 - User guide
UBX-18058360 - R06 Starting up Page 12 of 23
C1-Public
1.9 Enabling error result codes
Command sent by DTE (user)
DCE response (module)
Description
AT+CMEE=2
OK
Enables the cellular module to report verbose error
result codes.
1.10 PIN code insertion (when required)
Command sent by DTE (user)
DCE response (module)
Description
AT+CPIN="8180"
OK
Enter the PIN code, if needed (enter the PIN of the
SIM card – 8180 is written here as an example).
AT+CLCK="SC",0,"8180"
OK
Unlock the PIN at power-on (the last parameter is
the PIN of the SIM card – 8180 is written here as
an example).
AT+CLCK="SC",1,"8180"
OK
Lock the PIN at power-on (the last parameter is
the PIN of the SIM card – 8180 is written here as
an example).
1.11 Registration on a cellular network
Command sent by DTE (user)
DCE response (module)
Description
AT+CREG?
+CREG: 0,1
OK
Verify the network registration.
AT+COPS=0
OK
Register the module on the network.
The cellular module automatically registers itself
on the cellular network. This command is
necessary only if the automatic registration failed
(AT+CREG? returns 0,0).
AT+COPS?
+COPS: 0,0,"I TIM"
OK
Read the operator name.
1.12 Switching off the EVK-G45
To switch off the EVK-G45, send the +CPWROFF AT command. Make sure to use this command
before switching off the main power, otherwise settings and configuration parameters may not be
saved in the internal non-volatile memory of the cellular module.
Page 13

EVK-G45 - User guide
UBX-18058360 - R06 Appendix Page 13 of 23
C1-Public
Appendix
A Set up AT terminal applications for
communication with the EVK-G45
The u-blox m-center cellular module evaluation tool is a powerful platform for evaluating, configuring
and testing u-blox cellular products. m-center includes an AT commands terminal for communication
with the device and can be downloaded free-of-charge from our website (http://www.u-blox.com).
1. Follow the board setup instructions in section 1.8 to provide all the required connections and
switching on the cellular module.
2. Run the m-center tool: after the m-center start-up, the Home page appears.
3. On the Home page, set up the AT COM port; for
the setting values, see section 1.8.
Check with the Windows Device Manager to
find out which COM port is being used by the
EVK-G45.
Figure 3: “Home” page
4. Enable the connection to the u-blox cellular
module by clicking on the Connect button.
5. Retrieve the module and network information
by clicking on the Get Info button.
6. The module information is retrieved and
displayed on the Home page.
7. Click on the AT Terminal button, found at the
upper right of the Home page. A new window
opens and the AT command terminal is now
ready for communication with the EVK-G45.
Figure 4: AT terminal window
8. The AT terminal is ready to use.
For the complete list of AT commands
supported by the modules and their syntax,
see the u-blox AT commands manual [1].
For more information on using the u-blox m-center cellular module evaluation tool, press the F1 key
on the keyboard to open the m-center help window on the computer.
Page 14

EVK-G45 - User guide
UBX-18058360 - R06 Appendix Page 14 of 23
C1-Public
B Set up cellular packet data connection on PC
This section describes how to set up a packet data connection with the Windows 7 operating systems
(for PCs) and EVK-G45, using the TCP/IP stack of the PC (external TCP/IP stack).
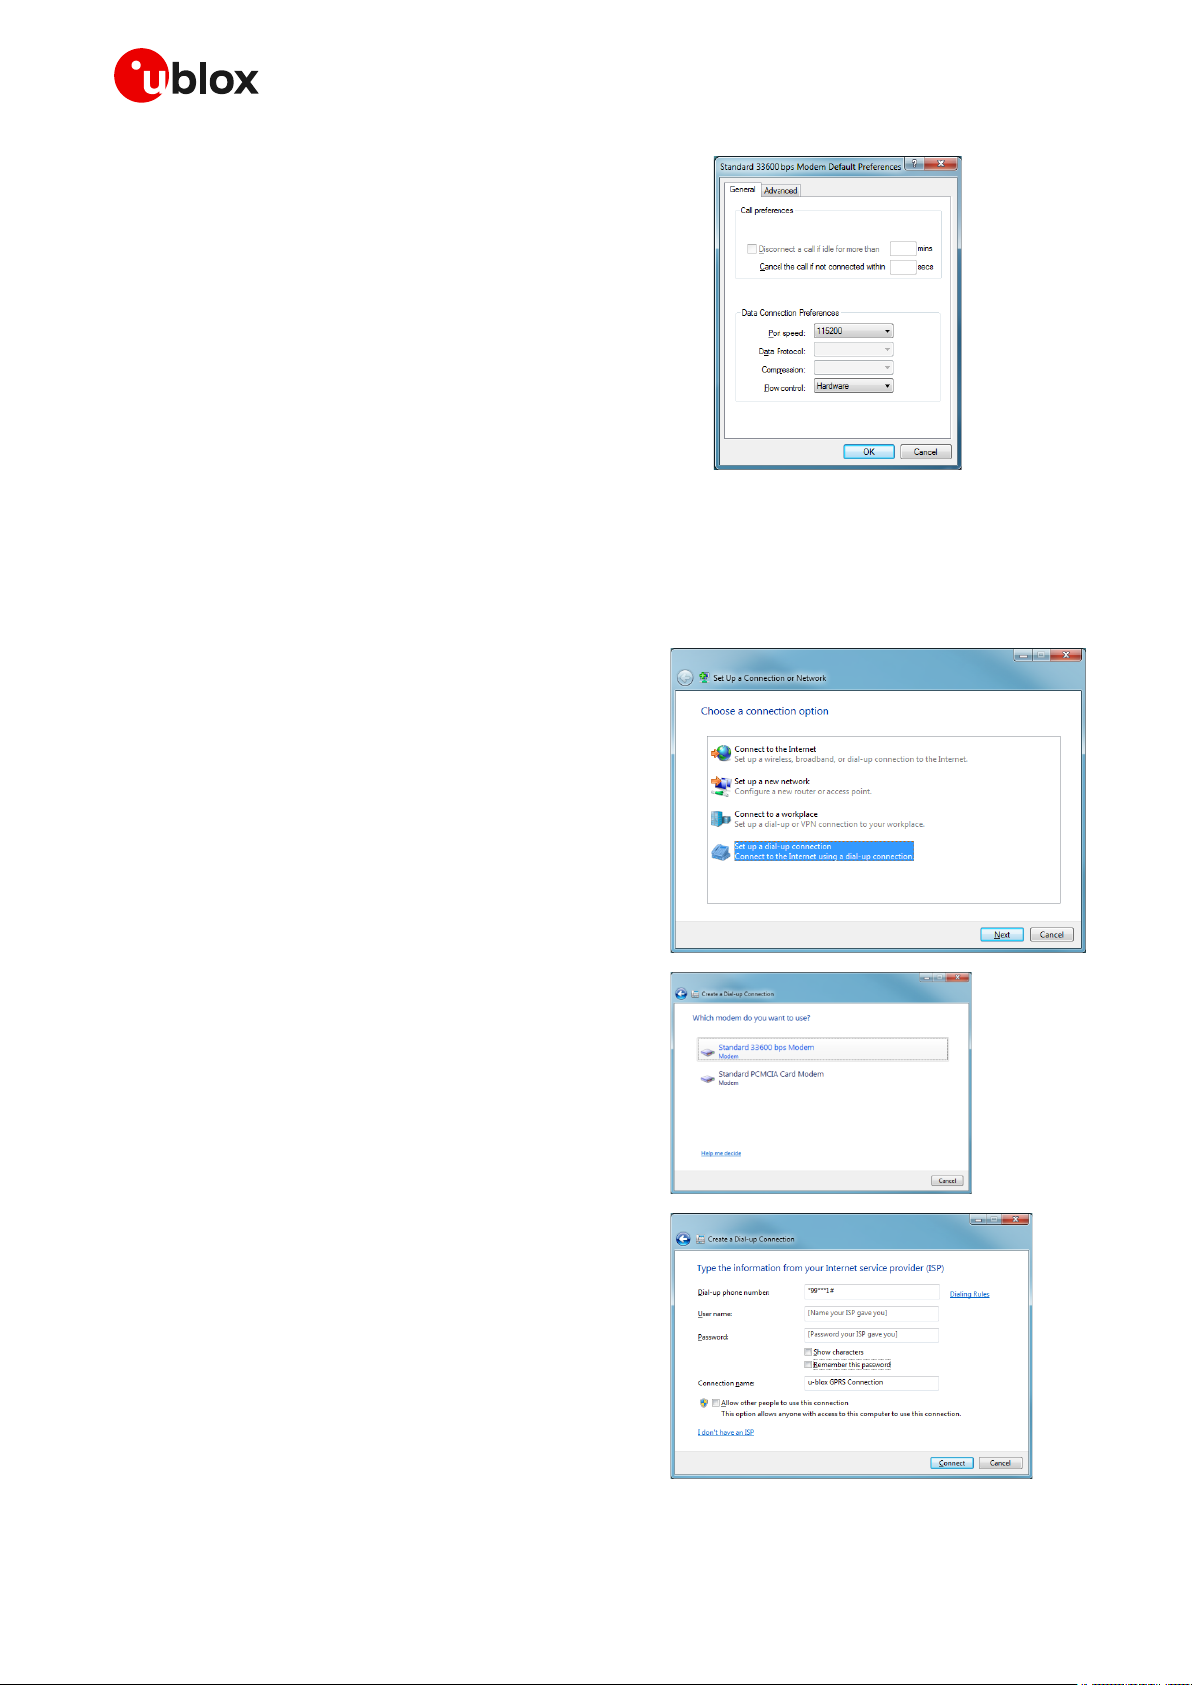
B.1 Install a new modem from the control panel
1. Select: Control panel -> Phone and Modem ->
Modems -> Add…
This opens the Install New Modem Wizard.
2. Select “Don’t detect my modem” checkbox.
3. Select: Standard 33600 bps Modem.
4. Set the COM-port on which the modem will be
installed.
5. Select: Control panel -> Phone and Modem ->
Modems -> Standard 33600 bps Modem -> Properties.
6. Select Change Settings -> Advanced.
7. Add APN settings command (APN shown is just an
example. Make sure to have the correct APN defined
by the network operator).
8. Select “Change Default Preferences”.
Page 15
EVK-G45 - User guide
UBX-18058360 - R06 Appendix Page 15 of 23
C1-Public
9. Press OK twice, and then the new connection is ready
to be configured.
☞ The modem can also be configured using the Device Manager by clicking on the modem name.
B.2 Configuring a new connection
1. Select: Control Panel -> Network and Sharing
Center -> Set up a new connection or network.
2. Select the modem, if requested.
3. Enter parameters for the dial-up connection:
o the module telephone number (*99***1#)
o the specific GPRS account information for the
network operator
o a name for the new connection (e.g. “u-blox
GPRS Connection“)
Page 16

EVK-G45 - User guide
UBX-18058360 - R06 Appendix Page 16 of 23
C1-Public
4. The packet data connection is now ready to be
used with the EVK-G45. To check the connection,
start a browser.
☞ Consult the cellular network operator for username and password. In most cases, these can be left
empty.
C Examples of AT commands
For the complete description and syntax of the AT commands supported by SARA-G450 module, see
the u-blox AT commands manual [1].
For detailed examples of AT commands for network registration and configuration, context
activation, data connection management, SIM management and other module settings, see the
u-blox AT commands examples application note [2].
C.1 Voice call
Incoming voice call:
Command sent by DTE (user)
DCE response (module)
Description
Call the phone number of the SIM in the device.
RING
Incoming call.
ATA
OK
Answer to the voice call.
Talk to the caller using the headset.
ATH
OK
Hang up.
Outgoing voice call:
Command sent by DTE (user)
DCE response (module)
Description
ATD+3930012345678;
OK
Outgoing voice call (+3930012345678 is
written here as example).
The voice call is accepted from the network.
Talk to the caller using the headset.
ATH
OK
Hang up.
Page 17
EVK-G45 - User guide
UBX-18058360 - R06 Appendix Page 17 of 23
C1-Public
C.2 SMS management
Command sent by DTE (user)
DCE response (module)
Description
AT+CMGF=1
OK
Set the text mode as the format that will
be used. To be set before of the first
operation.
AT+CMGS="+3930012345678"
SMS TEXT MESSAGE 0123456789<CTRL-
Z>
>
+CMGS: 0
OK
Send 1st SMS (+3930012345678 is
written here as example).
AT+CMGS="+3930012345678"
SMS TEXT MESSAGE 0123456789<CTRL-
Z>
>
+CMGS: 1
OK
Send 2nd SMS (+3930012345678 is
written here as example).
AT+CMGL
+CMGL:302,"REC UNREAD","+39300123
45678",,"05/09/27,16:40:36+08"
SMS TEXT MESSAGE 0123456789
OK
List all the incoming SMSes
(+3930012345678 is written here as
example).
C.3 Internet connection in GPRS mode (external TCP/IP stack)
Command sent by DTE (user)
DCE response (module)
Description
AT+CGATT?
+CGATT: 1
OK
Check if the cellular module is attached to GPRS
service (1: attached, 0: detached).
AT+CGDCONT=1,"IP","wap.tim.it"
OK
Define the PDP context parameters.
AT+CGDCONT?
+CGDCONT: 1,"IP","my_apn",
"0.0.0.0",0,0
OK
ATD*99***1#
CONNECT
Initiate the GPRS connection.
+++
OK
Disconnect with +++ sequence.
C.4 Internet connection in GPRS mode (internal TCP/IP stack)
Command sent by DTE (user)
DCE response (module)
Description
AT+UPSD=0,1,"my apn"
OK
Configure PDP-context parameters.
Make sure to have the correct APN.
AT+UPSD=0,2,"my user-name"
AT+UPSD=0,3,"my password"
OK
OK
Username and password depend on the
mobile operator used. In most cases
these are not required. Simply use space
or omit these commands.
AT+UPSD=0
(configuration parameters)
Check the configuration.
AT+UPSDA=0,1
OK
Store configuration in non-volatile
memory (NVM).
AT+UPSDA=0,3
OK
Activate PDP-context.
Verify connection and PDP-context
Command sent by DTE (user)
DCE response (module)
Description
AT+UPSND=0,0
(IP address)
Check IP addresses assigned.
AT+UPSND=0,1
(IP address of DNS)
Check DNS assigned.
AT+UDNSRN=0,"www.ublox.com"
+UDNSRN: 0,"195.34.89.149"
OK
Example: resolve DNS name.
Page 18
EVK-G45 - User guide
UBX-18058360 - R06 Appendix Page 18 of 23
C1-Public
C.5 Enable communication between cellular and GNSS module
Command sent by DTE (user)
DCE response (module)
Description
AT+UGPS=1,0
OK
Enable communication. On the
ADP-GNSS: LED DS118 lights green,
LED DS132 blinks.
C.6 Read NMEA messages (example: GLL)
Several NMEA messages via UART can be read. The example below shows how to read a GLL message
to get the last available Geographic position Latitude / Longitude. For the full list of NMEA messages
that can be read, see the u-blox AT commands manual [1].
Command sent by DTE (user)
DCE response (module)
Description
AT+UGGLL=1
OK
Enable the GLL message.
AT+UGGLL?
+UGGLL: (state),(GLL-msg)
OK
Or
+UGGLL: (state), Not Available
OK
Read the message.
The last available GLL message is
displayed.
C.7 GNSS AssistNow
GNSS AssistNow Online:
Command sent by DTE (user)
DCE response (module)
Description
AT+UGSRV="lscellapi.services.ublox.com",,"123456789abcdefghijkl
m"
OK
Configure the aiding server.
AT+UGPS=1,4
OK
Start the GNSS.
GNSS AssistNow Offline:
Command sent by DTE (user)
DCE response (module)
Description
AT+UGSRV="lscellapi.services.ublox.com",,"123456789abcdefghijkl
m"
OK
Configure the aiding server.
AT+UGPS=1,2
OK
Start the GNSS.
Page 19

EVK-G45 - User guide
UBX-18058360 - R06 Appendix Page 19 of 23
C1-Public
D Current consumption measurement
The current consumption of SARA-G450 module can be measured on the EVK-G45 by removing the
jumper socket from the Cellular VCC supply jumper (J404 on the EVB), described in Figure 5.
Cellular VCC supply jumper socket (J404)
to be removed for SARA-G450 module
current consumption measurements
Figure 5: Jumper socket to be removed for SARA-G450 module current consumption measurement
A suitable external digital multi-meter (as for example, the Agilent 34410A or 34411A) can be used
for current consumption measurements: in this case, the 3.8 V supply circuit on the EVB will supply
the SARA-G450 module mounted on the adapter board, with the digital multi-meter placed in series
as described in Figure 6.
SARA-G4
adapter board
SARA-G450
cellular
module
42-pin DIL B2B connectors
EVB-WL3
Step - down
Main power switch
(SW400)
12 V
(J400)
3.8 V
VCC
jumper
(J404)
VCC
Digital multimeter
DCI
+ –
Figure 6: Block diagram of current consumption setup for SARA-G450 modules
Alternatively, a suitable external DC power supply with dynamic current measurement capabilities (as
for example, the Agilent 66319B/D) can be used for current consumption measurements, acting also
as the 3.8 V supply source for the SARA-G450 module mounted on the adapter board.
Page 20

EVK-G45 - User guide
UBX-18058360 - R06 Appendix Page 20 of 23
C1-Public
E Declaration of conformities
The equipment is intended for indoor usage. It is the user’s duty to verify if further restrictions apply,
such as in airplanes, hospitals or hazardous locations (petrol stations, refineries…).
Any changes or modification made to this equipment will void its compliance to the safety
requirements.
Maintenance, inspections and/or repairs of the EVK-G45 shall be performed by u-blox AG.
Page 21

EVK-G45 - User guide
UBX-18058360 - R06 Appendix Page 21 of 23
C1-Public
F Glossary
Abbreviation
Definition
ADP
Adapter Board
API
Application Program Interface
APN
Access Point Name
AT
AT Command Interpreter Software Subsystem, or attention
B2B
Board-To-Board
CS
Circuit Switched
CTS
Clear To Send
DC
Direct Current
DDC
Display Data Channel interface
DIL
Dual In-Line
DNS
Domain Name Server
EVB
Evaluation Board
EVK
Evaluation Kit
GDI
Generic Digital Interfaces
GND
Ground
GNSS
Global Navigation Satellite System
GPIO
General Purpose Input Output
GPRS
General Packet Radio Service
GSM
Global System for Mobile communications
I2C
Inter-Integrated Circuit
IP
Internet Protocol
LDO
Low-DropOut regulator
LED
Light Emitting Diode
NVM
Non-Volatile Memory
PC
Personal Computer
PDN
Packet Data Network
PDP
Packet Data Protocol
PIN
Personal Identification Number
PS
Packet Switched
RF
Radio Frequency
RI
Ring Indicator
RIL
Radio Interface Layer
SIM
Subscriber Identity Module
SMA
SubMiniature version A
SMS
Short Message Service
TCP
Transfer Control Protocol
UART
Universal Asynchronous Receiver-Transmitter serial interface
URC
Unsolicited Result Code
USB
Universal Serial Bus
Table 7: Explanation of the abbreviations and terms used
Page 22

EVK-G45 - User guide
UBX-18058360 - R06 Related documentation Page 22 of 23
C1-Public
Related documentation
[1] u-blox AT commands manual, UBX-13002752
[2] u-blox AT commands examples application note, UBX-13001820
[3] u-blox SARA-G4 series data sheet, UBX-18006165
[4] u-blox SARA-G4 series system integration manual, UBX-18046432
☞ For regular updates to u-blox documentation and to receive product change notifications, register
on our homepage (www.u-blox.com).
Revision history
Revision
Date
Name
Comments
R01
28-Nov-2018
fvid
Initial release
R02
05-Jul-2019
lpah
Updated product status
R03
28-Jan-2020
fvid
Updated product status
Added examples related to voice calls and GNSS features
R04
21-May-2020
fvid
Updated product status
R05
06-Aug-2020
alos
Updated application version and PCN reference of EVK-G45-0-00
R06
08-Mar-2021
fvid
Updated EVK-G45-0-00 application version, PCN reference and status to
mass production
Page 23

EVK-G45 - User guide
UBX-18058360 - R06 Contact Page 23 of 23
C1-Public
Contact
For complete contact information, visit us at www.u-blox.com.
u-blox Offices
North, Central and South America
u-blox America, Inc.
Phone: +1 703 483 3180
E-mail: info_us@u-blox.com
Regional Office West Coast:
Phone: +1 408 573 3640
E-mail: info_us@u-blox.com
Technical Support:
Phone: +1 703 483 3185
E-mail: support@u-blox.com
Headquarters
Europe, Middle East, Africa
u-blox AG
Phone: +41 44 722 74 44
E-mail: info@u-blox.com
Support: support@u-blox.com
Asia, Australia, Pacific
u-blox Singapore Pte. Ltd.
Phone: +65 6734 3811
E-mail: info_ap@u-blox.com
Support: support_ap@u-blox.com
Regional Office Australia:
Phone: +61 3 9566 7255
E-mail: info_anz@u-blox.com
Support: support_ap@u-blox.com
Regional Office China (Beijing):
Phone: +86 10 68 133 545
E-mail: info_cn@u-blox.com
Support: support_cn@u-blox.com
Regional Office China (Chongqing):
Phone: +86 23 6815 1588
E-mail: info_cn@u-blox.com
Support: support_cn@u-blox.com
Regional Office China (Shanghai):
Phone: +86 21 6090 4832
E-mail: info_cn@u-blox.com
Support: support_cn@u-blox.com
Regional Office China (Shenzhen):
Phone: +86 755 8627 1083
E-mail: info_cn@u-blox.com
Support: support_cn@u-blox.com
Regional Office India:
Phone: +91 80 405 092 00
E-mail: info_in@u-blox.com
Support: support_in@u-blox.com
Regional Office Japan (Osaka):
Phone: +81 6 6941 3660
E-mail: info_jp@u-blox.com
Support: support_jp@u-blox.com
Regional Office Japan (Tokyo):
Phone: +81 3 5775 3850
E-mail: info_jp@u-blox.com
Support: support_jp@u-blox.com
Regional Office Korea:
Phone: +82 2 542 0861
E-mail: info_kr@u-blox.com
Support: support_kr@u-blox.com
Regional Office Taiwan:
Phone: +886 2 2657 1090
E-mail: info_tw@u-blox.com
Support: support_tw@u-blox.com
 Loading...