

Page 1
USER GUIDE
HOME WI-FI MESH TECHNOLOGY
™
AmpliFi™ Home Wi-Fi System
Page 2

Page 3

Table of Contents
Chapter 1: Getting Started ............................................1
Introduction .......................................................................1
Setup and Configuration ...........................................................1
App Features ....................................................................... 7
Router’s Display ....................................................................8
Chapter 2: Overview .................................................11
Router Settings ....................................................................11
Mesh Point Settings ...............................................................18
Chapter 3: Performance .............................................21
Throughput .......................................................................21
ISP Test ............................................................................21
Table of ContentsAmpliFi User Guide
Chapter 4: Guest ....................................................23
Quick Setup .......................................................................23
Status and Settings ................................................................23
Chapter 5: Controls ..................................................25
Hostname .........................................................................25
Chapter 6: Diagnose .................................................27
Appendix A: FAQs ...................................................29
Getting Started ....................................................................29
Troubleshooting ..................................................................30
Advanced Features ................................................................31
Appendix B: Contact Information ....................................33
24/7 Live Chat Support ............................................................33
Support ...........................................................................33
Corporate Headquarters ...........................................................33
i
Page 4

Table of Contents AmpliFi User Guide
ii
Page 5
Chapter 1: Getting StartedAmpliFi User Guide
Chapter 1: Getting Started
Introduction
Thank you for purchasing the AmpliFi™ Home Wi-Fi
MeshTechnology™ System. This User Guide covers each of
the following sections:
• Setup and Configuration
• Product Overview and App Features
• Router’s Display
• Troubleshooting and FAQs
Setup and Configuration
The AmpliFi Router can be set up and configured using one
of the following methods:
• AmpliFi app for iOS
• AmpliFi app for Android
• Connecting to the default AmpliFi Wi-Fi network (SSID)
from a computer or laptop.
Hardware Setup
Installing the Router
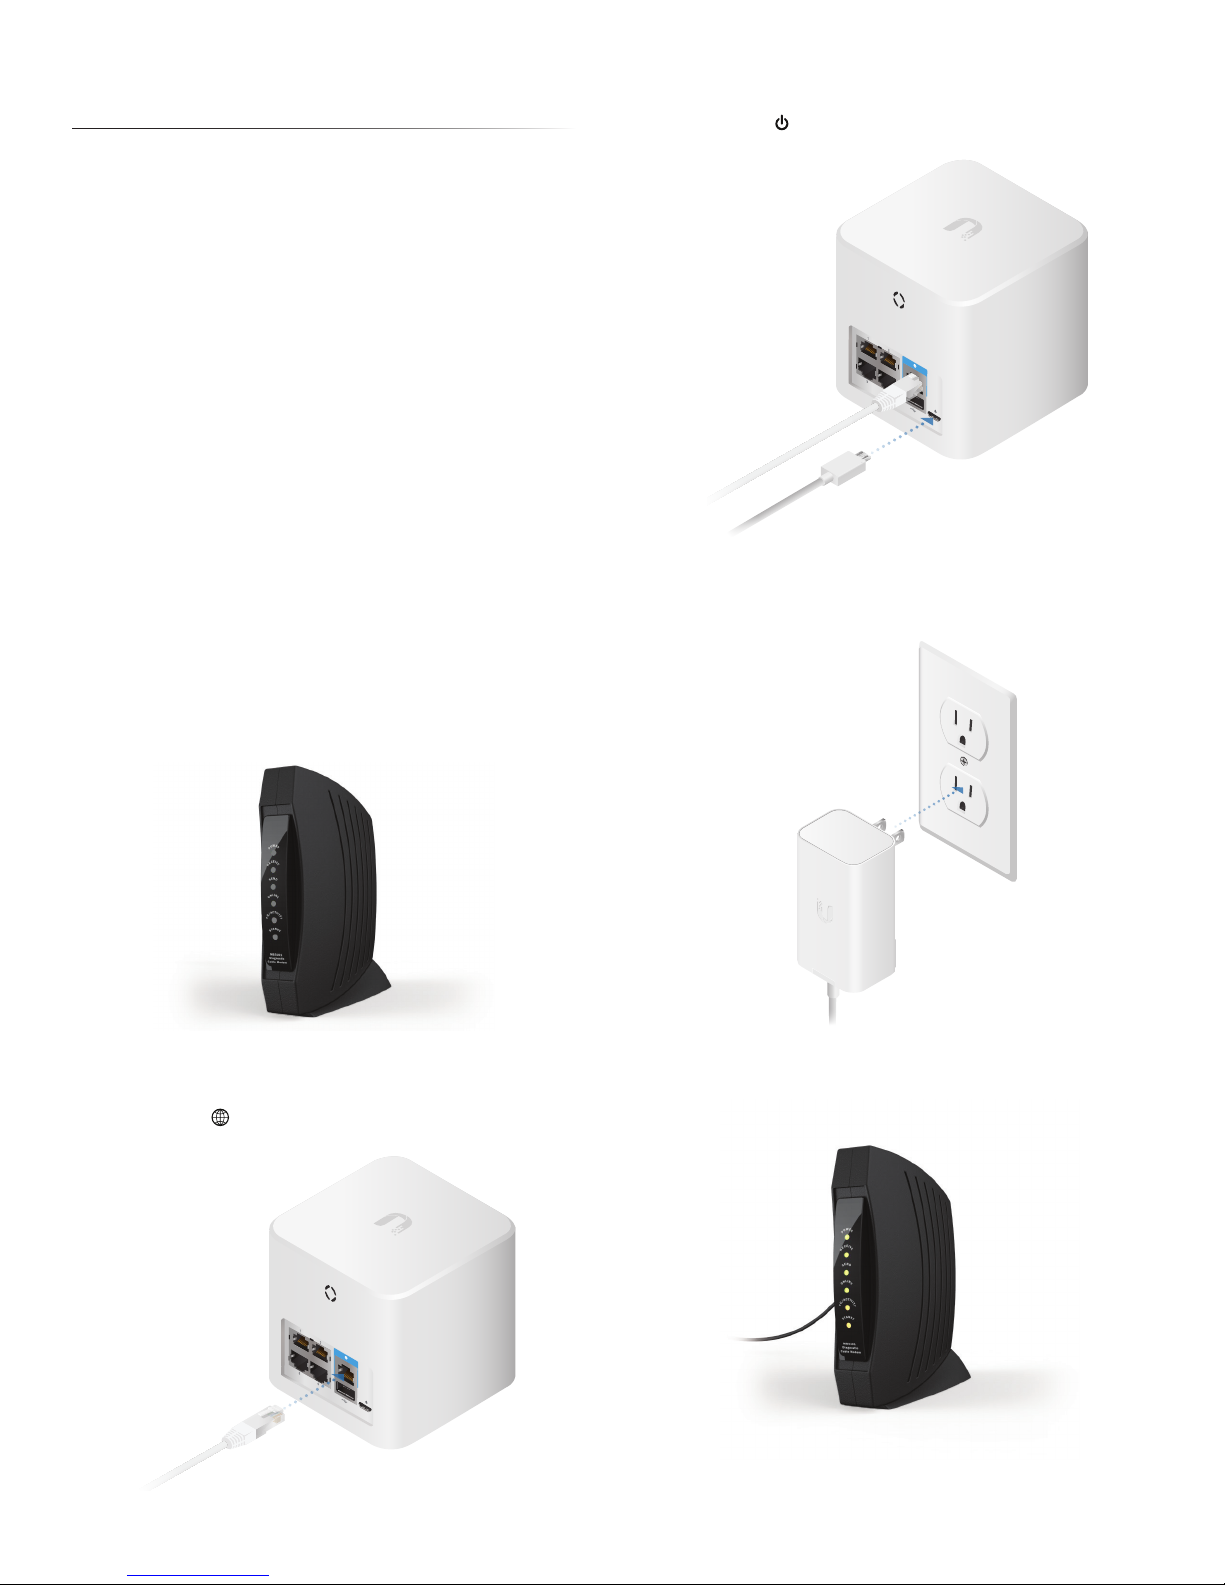
To set up the AmpliFi Router, follow these steps:
1. Power off your broadband modem.
™
3. Connect the small end of the Power Adapter to the
powerport on the AmpliFi Router.
4. Plug the other end of the Power Adapter into a power
outlet.
2. Connect one end of the Ethernet Cable to your
broadband modem and the other end to the
Internetport on the AmpliFi Router.
5. Power on your broadband modem.
1
Page 6
Chapter 1: Getting Started AmpliFi User Guide
Installing the Mesh Points
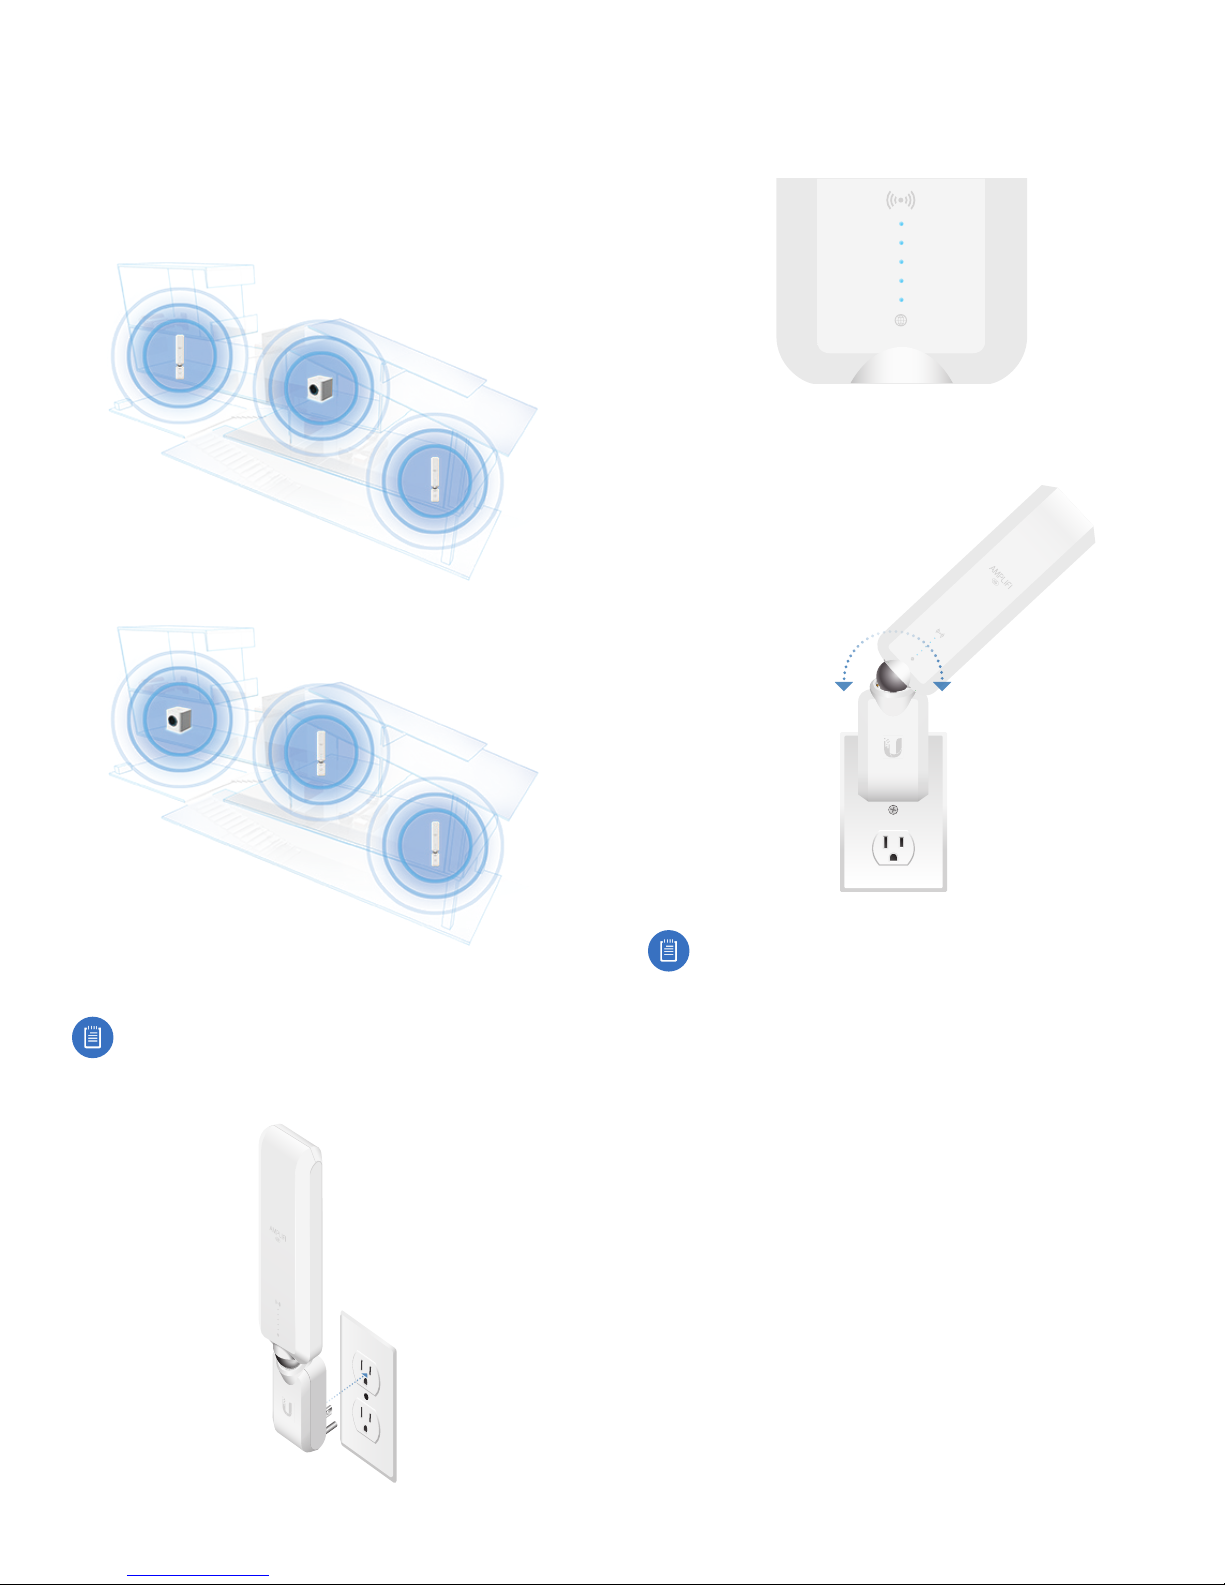
For best performance, the Mesh Points should be placed
in opposite directions between the Router and the areas
farthest from the Router. Mesh multi-hop should only be
used when necessary, as performance will degrade with
eachhop.
Best Performance
2. After approximately one minute, the LEDs will reflect
signal strength, illuminating upward once the Mesh Point
is connected to the Router.
3. The Mesh Point antenna can be adjusted to provide
optimal signal coverage for your location.
Mesh Multi-Hop
Mesh Point installation is optional and may not be
necessary in smaller homes.
1. Plug the Mesh Point into a power outlet.
Tip: If a Mesh Point is powered on and has been
configured with the app but does not appear online,
try relocating the Mesh Point closer to the Router.
2
Page 7
Chapter 1: Getting StartedAmpliFi User Guide
App Users
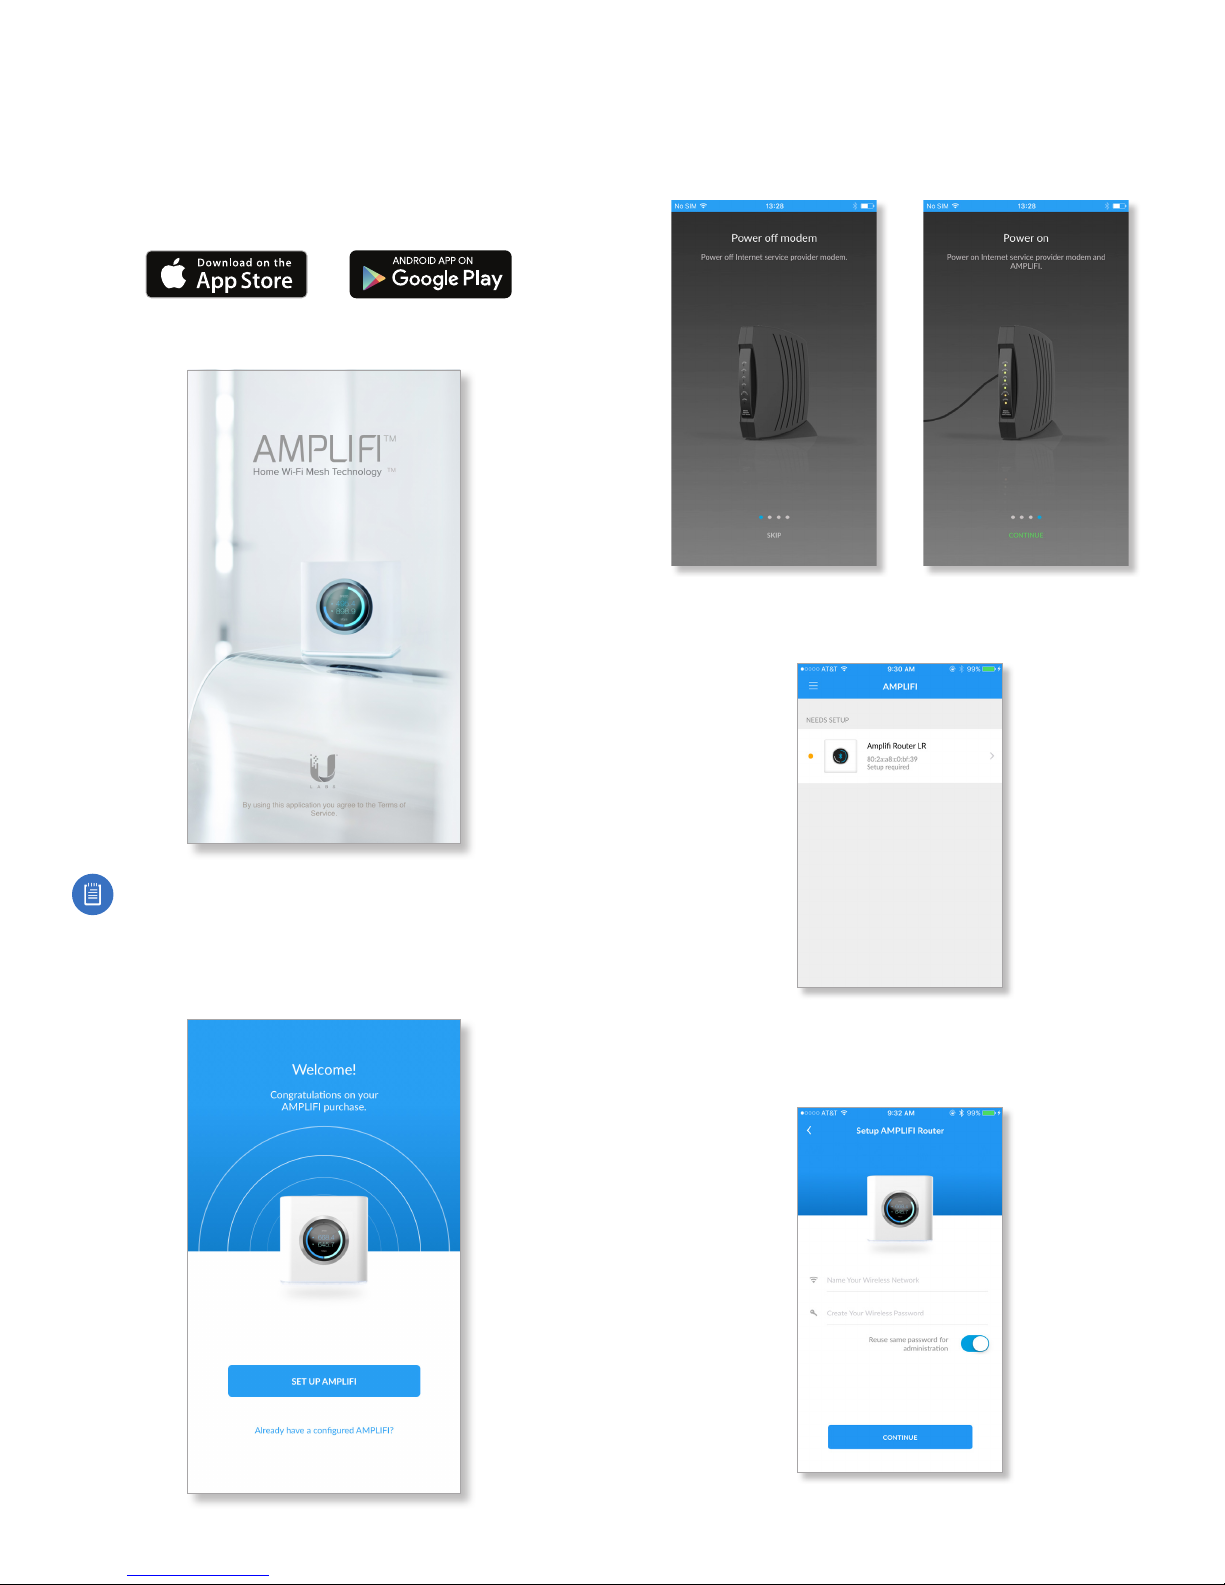
To set up the AmpliFi Router using the AmpliFi app, follow
these steps:
1. Download and install the AmpliFi app from the App Store
or Google Play™.
2. Launch the AmpliFi app.
4. Tap Skip to bypass the four hardware setup instructions
(which were performed in the previous section) or swipe
left to review these steps again. When you are finished,
tap Continue.
5. Tap the AmpliFi Router icon from the list of devices that
still require setup.
Note: For iOS users, ensure that Bluetooth is enabled
on your phone or mobile device. For Android™ users,
ensure that Wi-Fi is enabled on your phone or mobile
device.
3. Tap Set Up AmpliFi to begin configuring the Router.
6. When the AmpliFi portal screen appears, name your
wireless network and create a wireless password. Then
tapContinue.
3
Page 8
Chapter 1: Getting Started AmpliFi User Guide
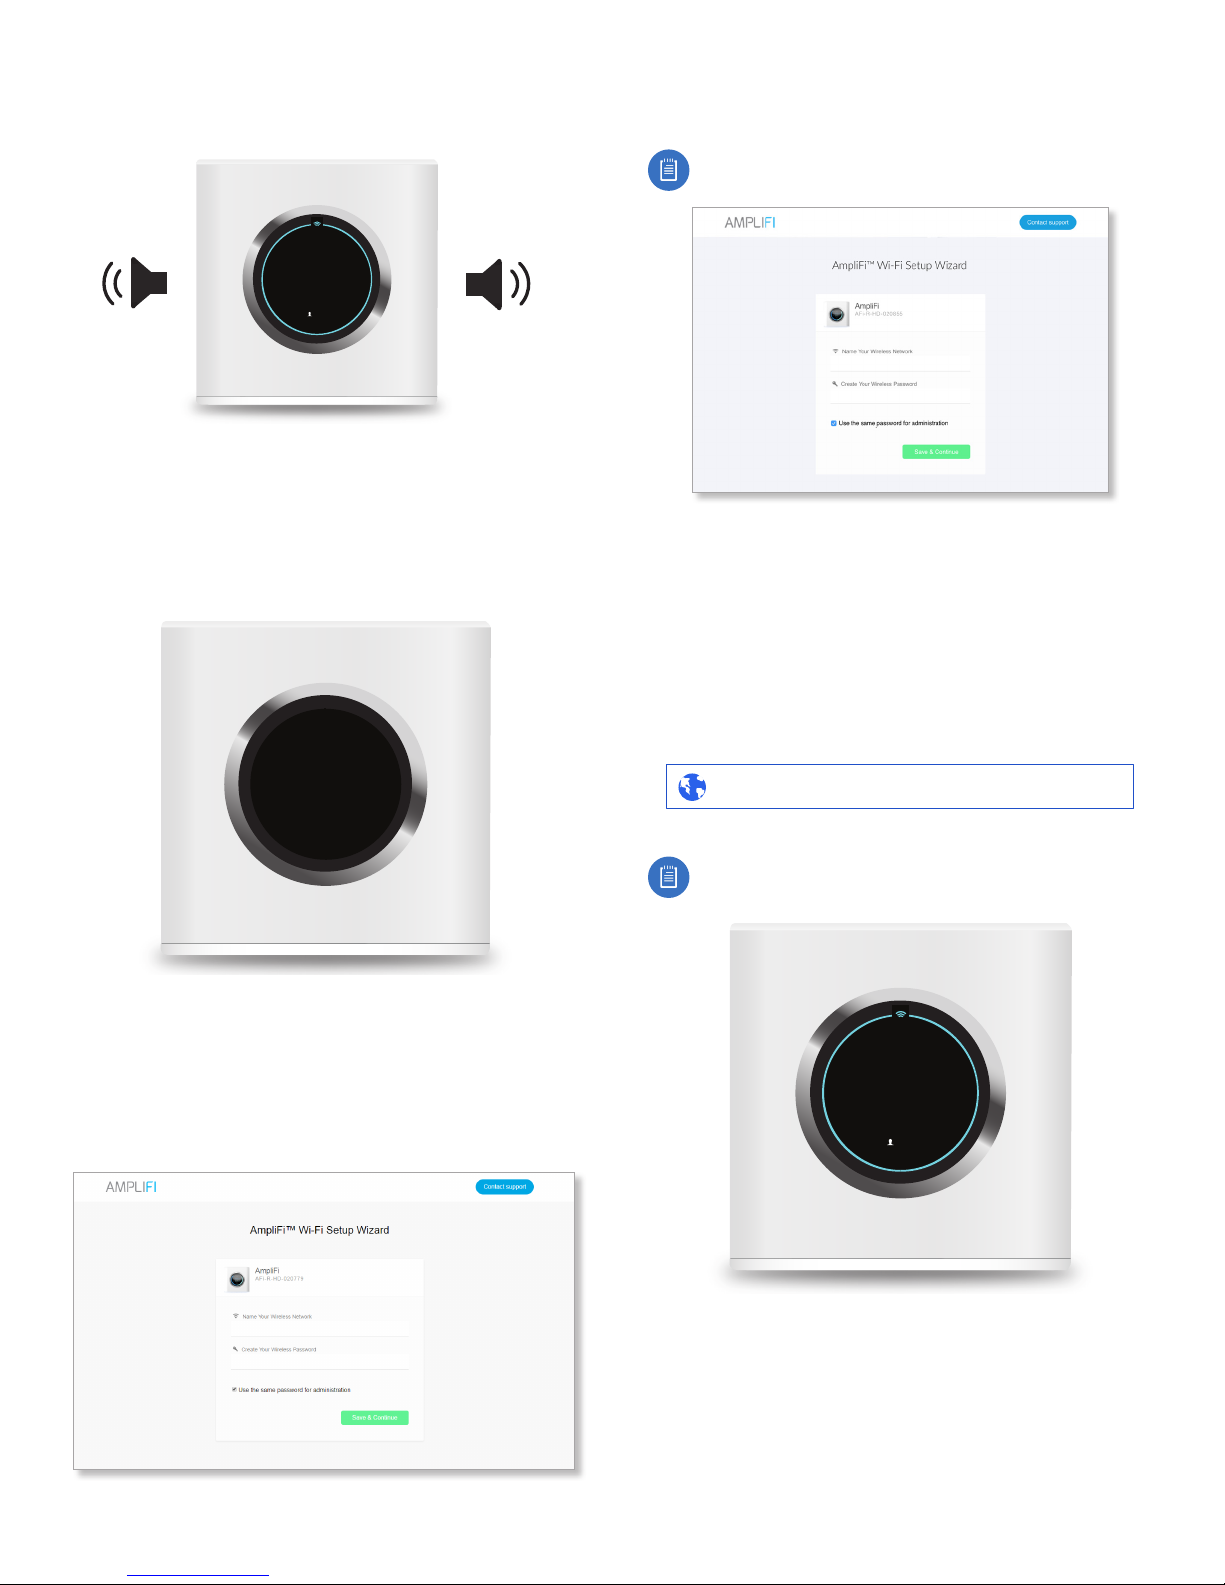
7. The Router will emit a sound, indicating that the
configuration is complete.
WAN IP
10.0.2.192
ROUTER IP
192.168.124.1
1
8. From your phone or mobile device, join the wireless
network you created in step 6. Setup is complete.
Non-App Users
1. Tap the screen on the Router to see additional setup
options.
Please connect to this
Wi-Fi Network
AFI-R-1234567890XX
Setup
4. Enter a new name for your wireless network and create a
wireless password.
Note: Your password must be at least eight characters
long.
5. By default, the same password you created for your Wi-Fi
network will be used to administer the Router.
6. Click Save & Continue.
7. On your computer, join the wireless network name you
created in step 4.
Configuration
1. Open an Internet browser on your computer and type
the Router IPinto the address field. Then press Enter.
192.168.124.1http://
2. Use a computer to connect to the Wi-Fi network name
(SSID) displayed on the screen of the AmpliFi Router.
The characters in the network name represent the MAC
address of the Router.
3. Once connected, open an Internet browser and wait for
the AmpliFi portal to appear.
Note: The Router IP can be found by tapping the
display on the Router until you get to the WAN IP /
Router IP screen.
WAN IP
10.0.2.192
ROUTER IP
192.168.124.1
1
4
Page 9
Chapter 1: Getting StartedAmpliFi User Guide
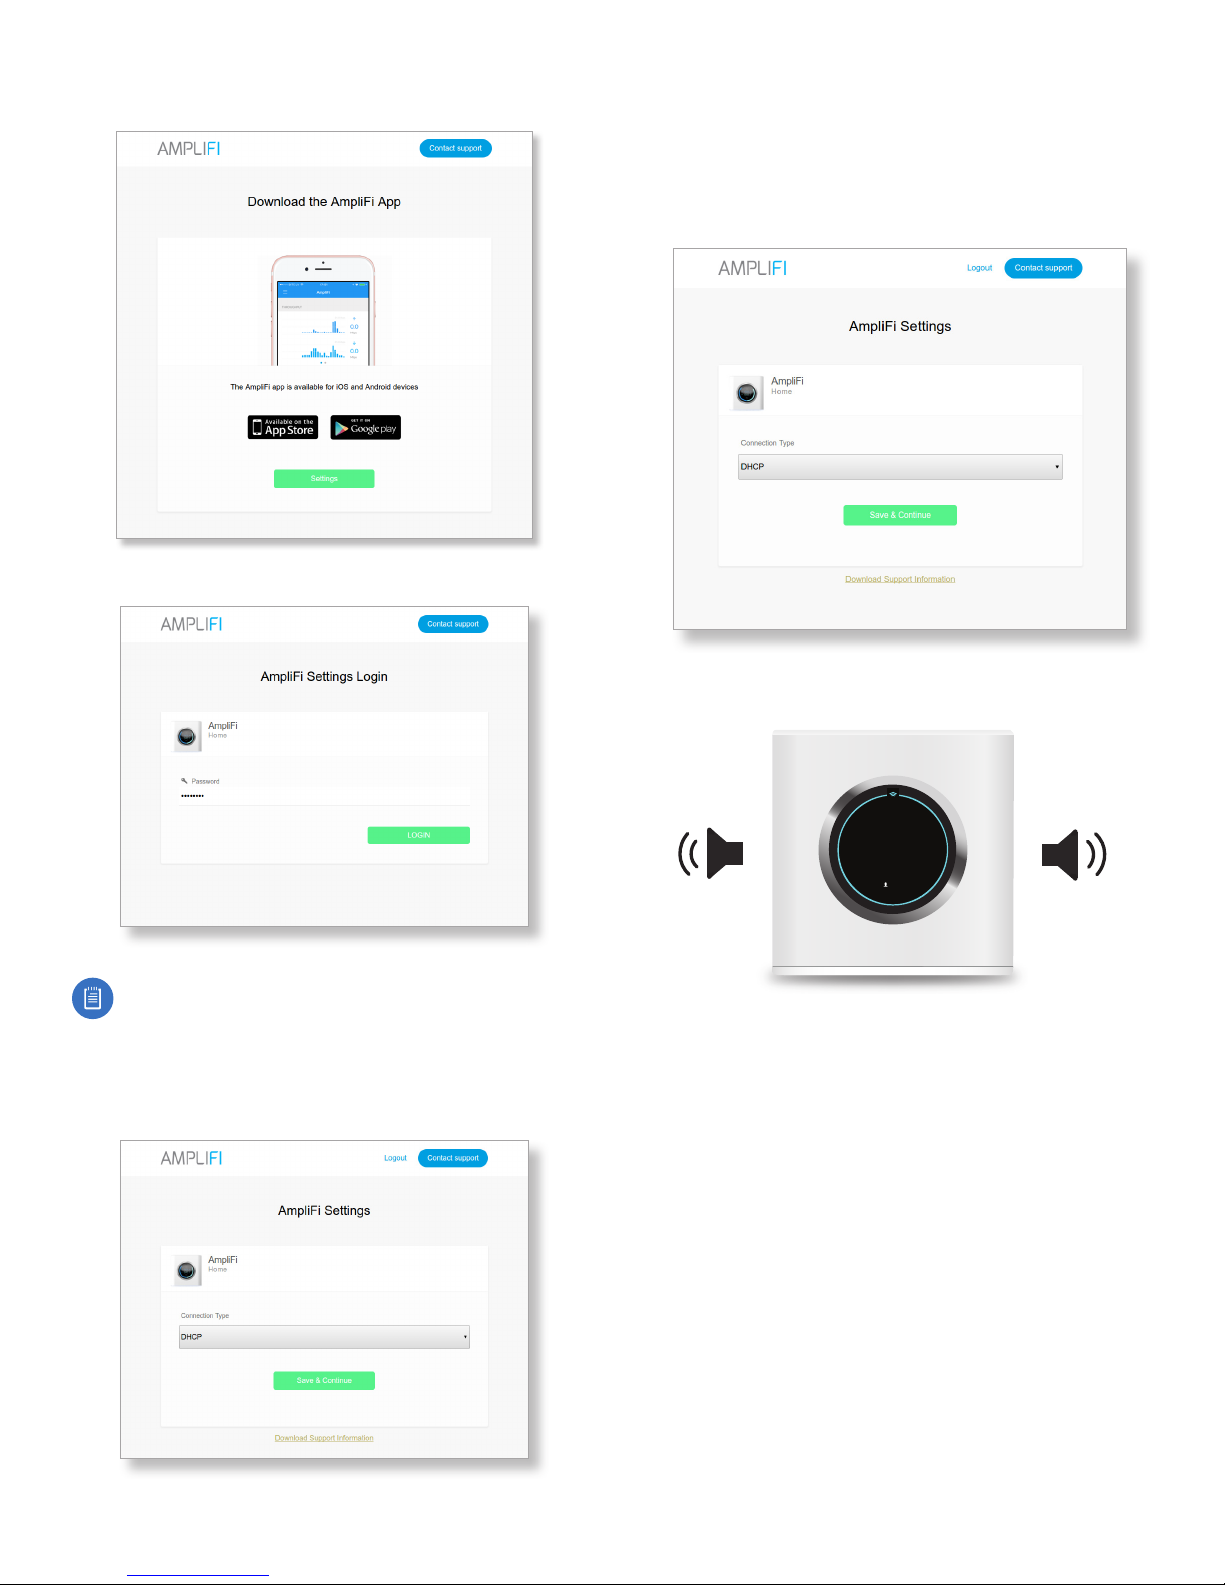
2. When the AmpliFi portal appears, click Settings.
3. Enter the administrator password and click Login.
with your selection.
DHCP
DHCP (Dynamic Host Configuration Protocol) automatically
configures your AmpliFi Router.
1. Click Save & Continue.
The AmpliFi Router will emit a sound indicating that it has
been configured.
Note: The administrator password is the same as
the wireless password you created in step 4 of the
Non‑App Users section.
Connection Type
1. Click the Connection Type drop-down menu and select
DHCP, Static, or PPPoE.
Configuration is complete.
WAN IP
10.0.2.192
ROUTER IP
192.168.124.1
1
2. Proceed to the section in this chapter that corresponds
5
Page 10
Chapter 1: Getting Started AmpliFi User Guide
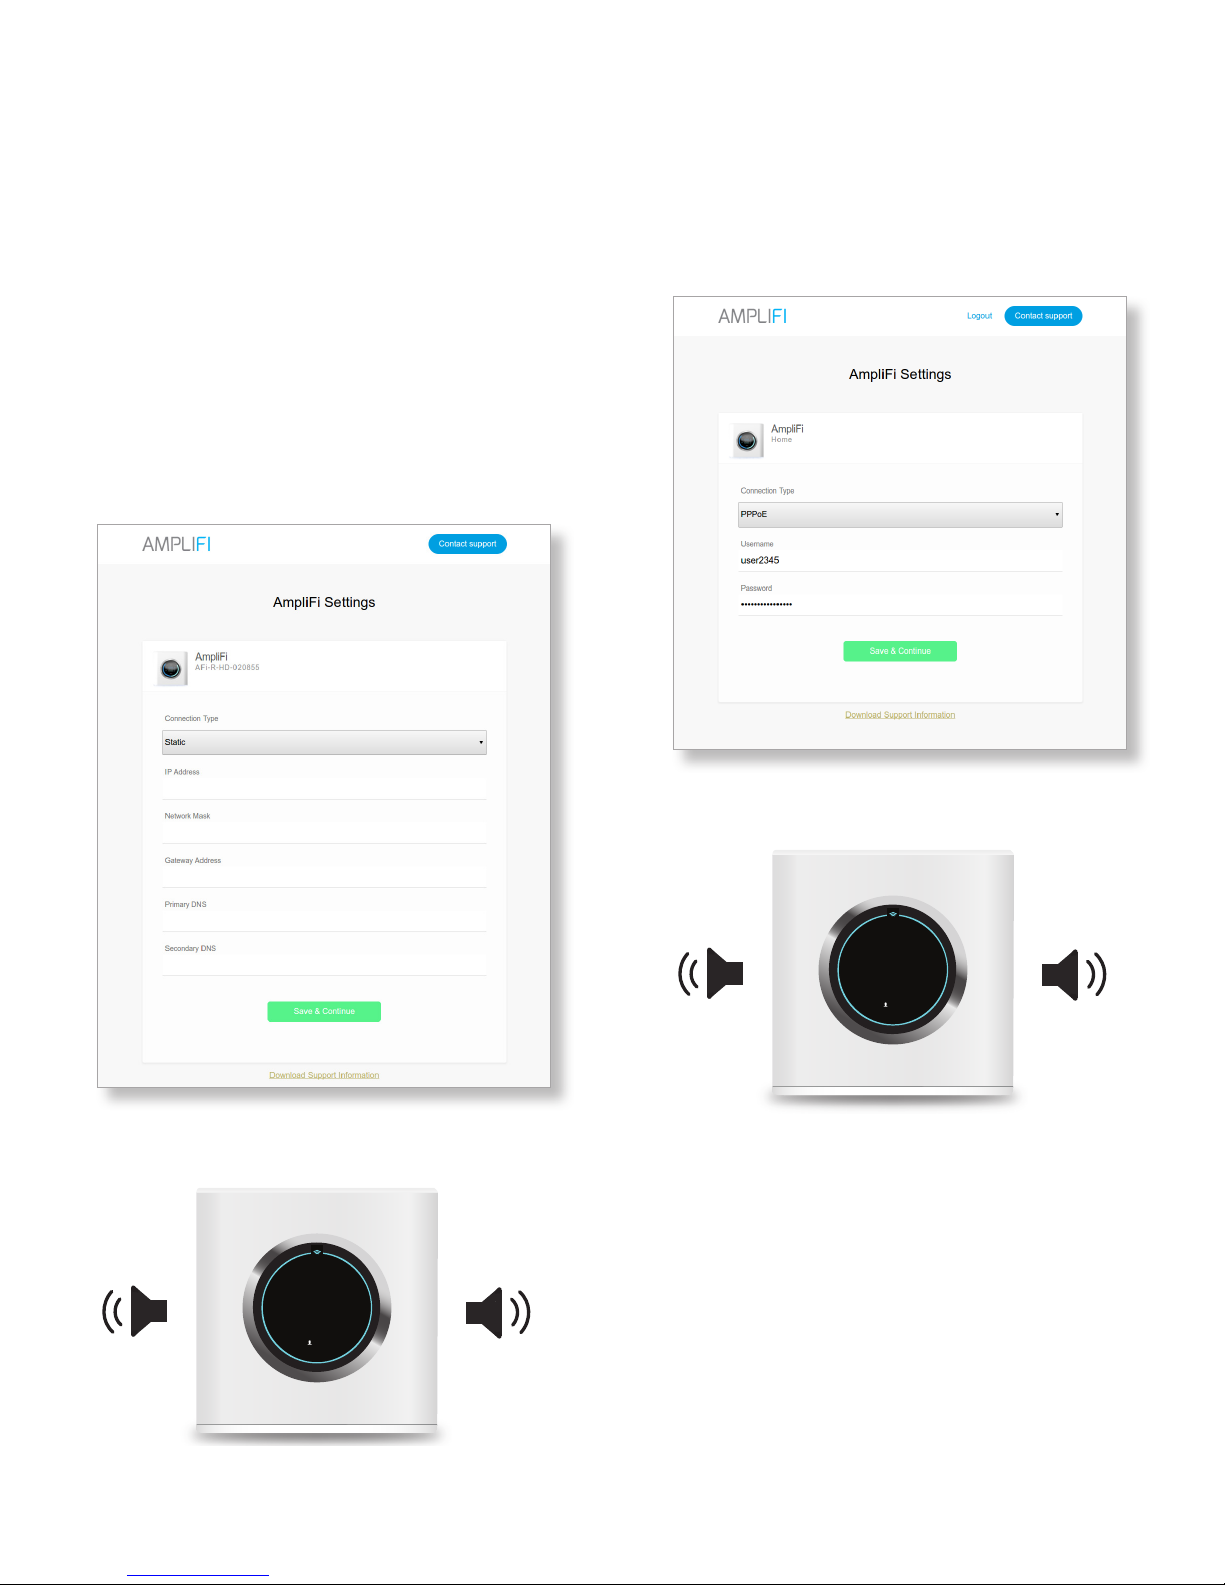
Static
The Static option allows you to manually enter information
given to you by your Internet Service Provider (ISP).
1. Enter the appropriate information into each of the
corresponding fields.
• IP Address Enter the Internet IP address of the Router.
• Network Mask Enter the network or subnet mask of the
Router.
• Gateway Address Enter the WAN IP address of the
service provider’s gateway router.
• Primary DNS Enter the IP address of the service
provider’s primary DNS server.
• Secondary DNS Enter the IP address of the service
provider’s secondary DNS server.
2. Click Save & Continue.
PPPoE
Point-to-Point Protocol over Ethernet (PPPoE) is a virtual
private and secure connection between two systems that
enables encapsulated data transport.
1. Enter the Username and Password given to you by your
Internet Service Provider (ISP).
2. Click Save & Continue.
The AmpliFi Router will emit a sound indicating that it has
been configured.
WAN IP
10.0.2.192
ROUTER IP
192.168.124.1
1
The AmpliFi Router will emit a sound indicating that it has
been configured.
WAN IP
10.0.2.192
ROUTER IP
192.168.124.1
1
Configuration is complete.
Configuration is complete.
6
Page 11
Chapter 1: Getting StartedAmpliFi User Guide
App Features
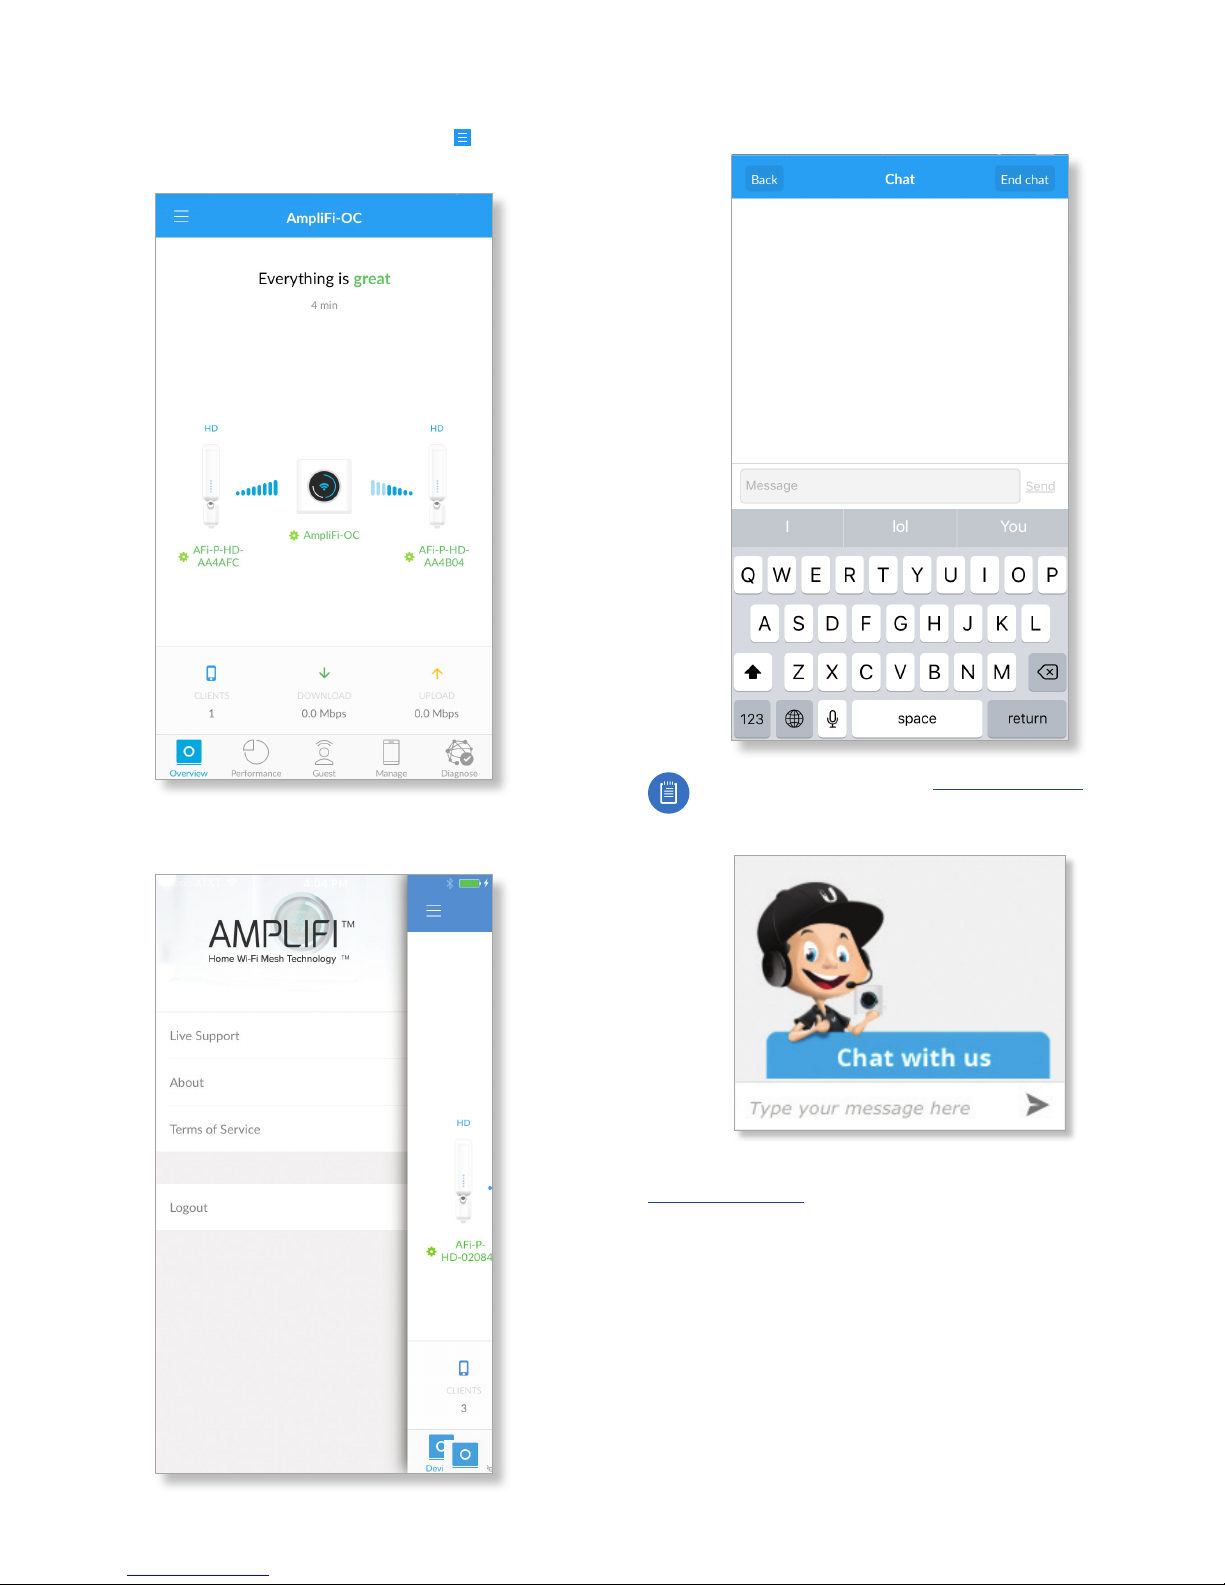
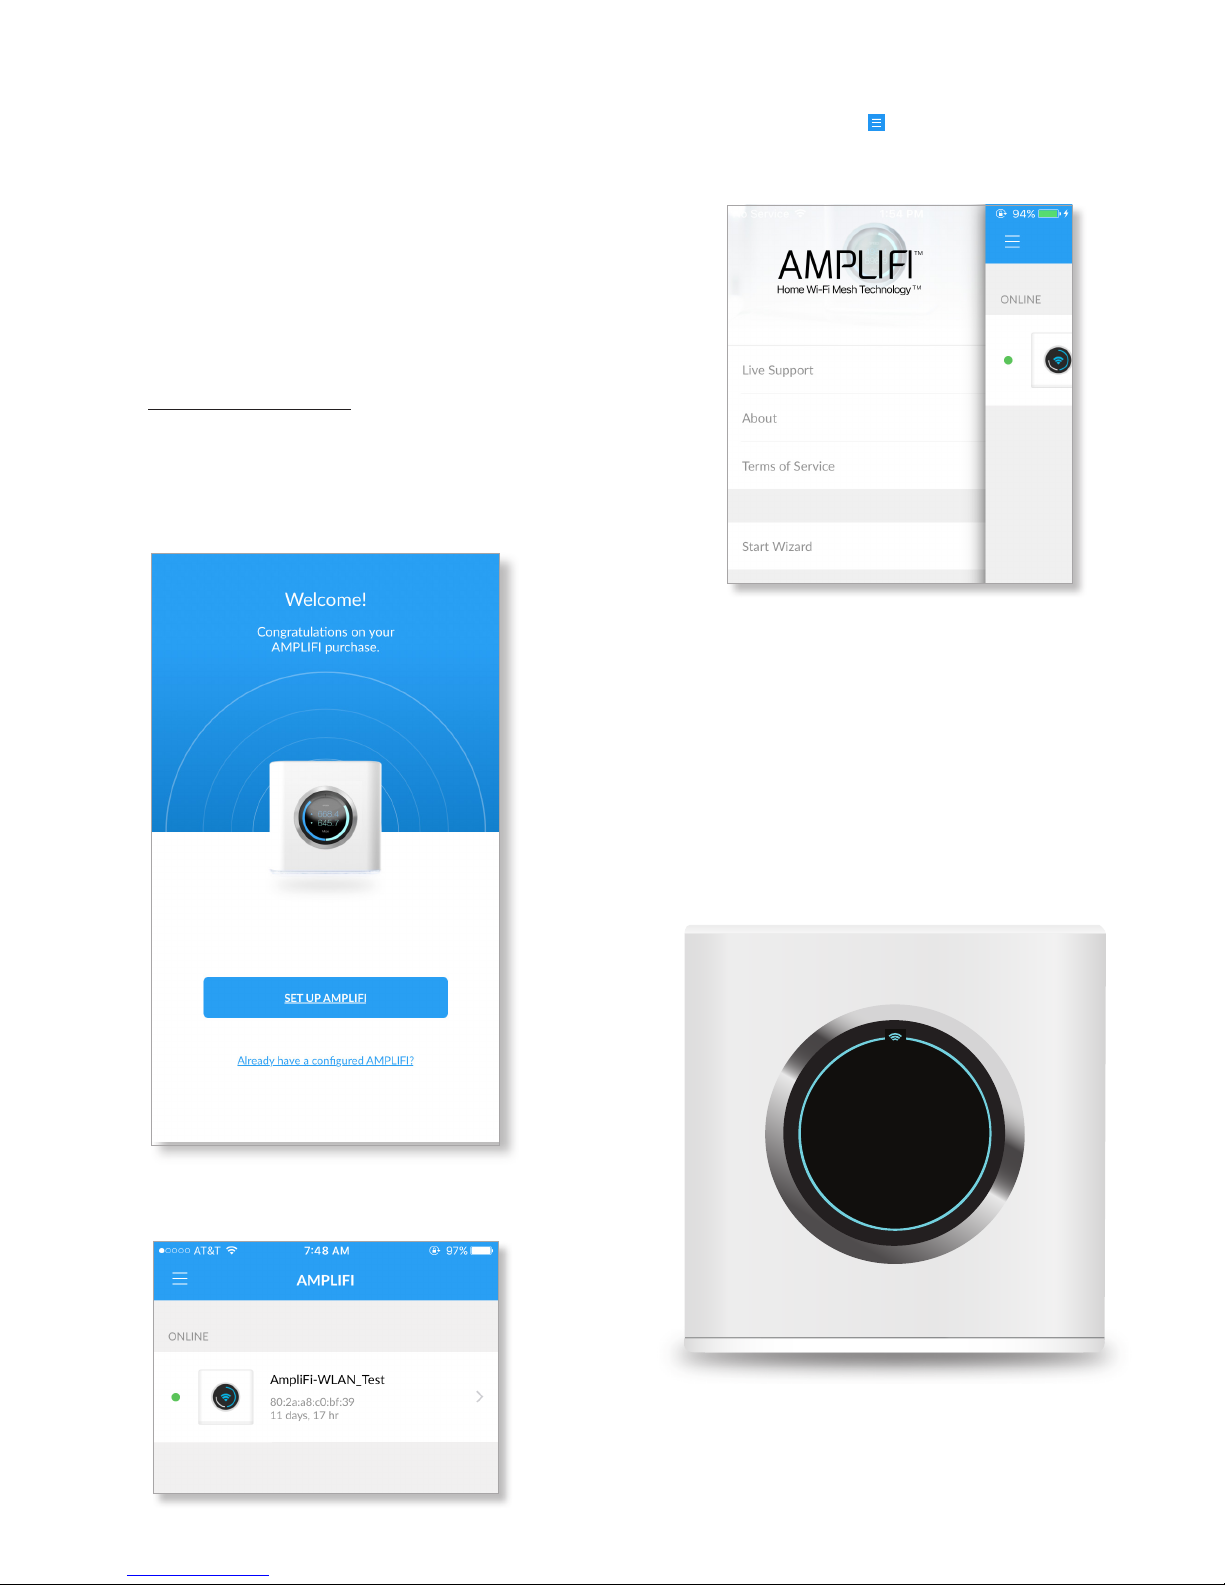
From the main app screen, tap the menu icon in the
upper left corner to reveal additional app functions.
Live Support Starts a Chat window within the app. Live
chat support is available 24 hours a day, 7 days a week.
A slide-out menu appears with the following options:
LiveSupport, About, Terms of Service, and Logout.
Live chat is also available at help.amplifi.com by
selecting Chat with us in the bottom right corner of
your browser.
About Redirects your browser to the AmpliFi website at:
www.amplifi.com
Terms of Service Provides you with the terms of service
while using the AmpliFiapp.
Logout Logs you out of the current AmpliFi Router.
7
Page 12
Chapter 1: Getting Started AmpliFi User Guide
Accessing Another AmpliFi Router
The app accesses one AmpliFi Router at a time. If you want to
set up or access a different Router, perform these steps:
1. Log out of the current AmpliFi Router.
2. When the Welcome screen appears, you will see
twooptions: Setup AmpliFi and Already have a configured
AmpliFi? Proceed to the section below that corresponds
with your selection.
Set Up AmpliFi
This option allows you to set up and configure a new AmpliFi
Router. Tap Set Up AmpliFi and repeat steps 3 through 8
from the “App Users” on page3.
Already have a configured AmpliFi?
This option allows you to log into an existing AmpliFi Router
by performing these steps:
1. Tap Already have a configured AmpliFi?
Start Wizard You may also restart the AmpliFi setup wizard
by tapping the menu icon
selecting Start Wizard. This option is only available if you
are not logged into an existing AmpliFi Router.
in the upper left corner and
Router’s Display
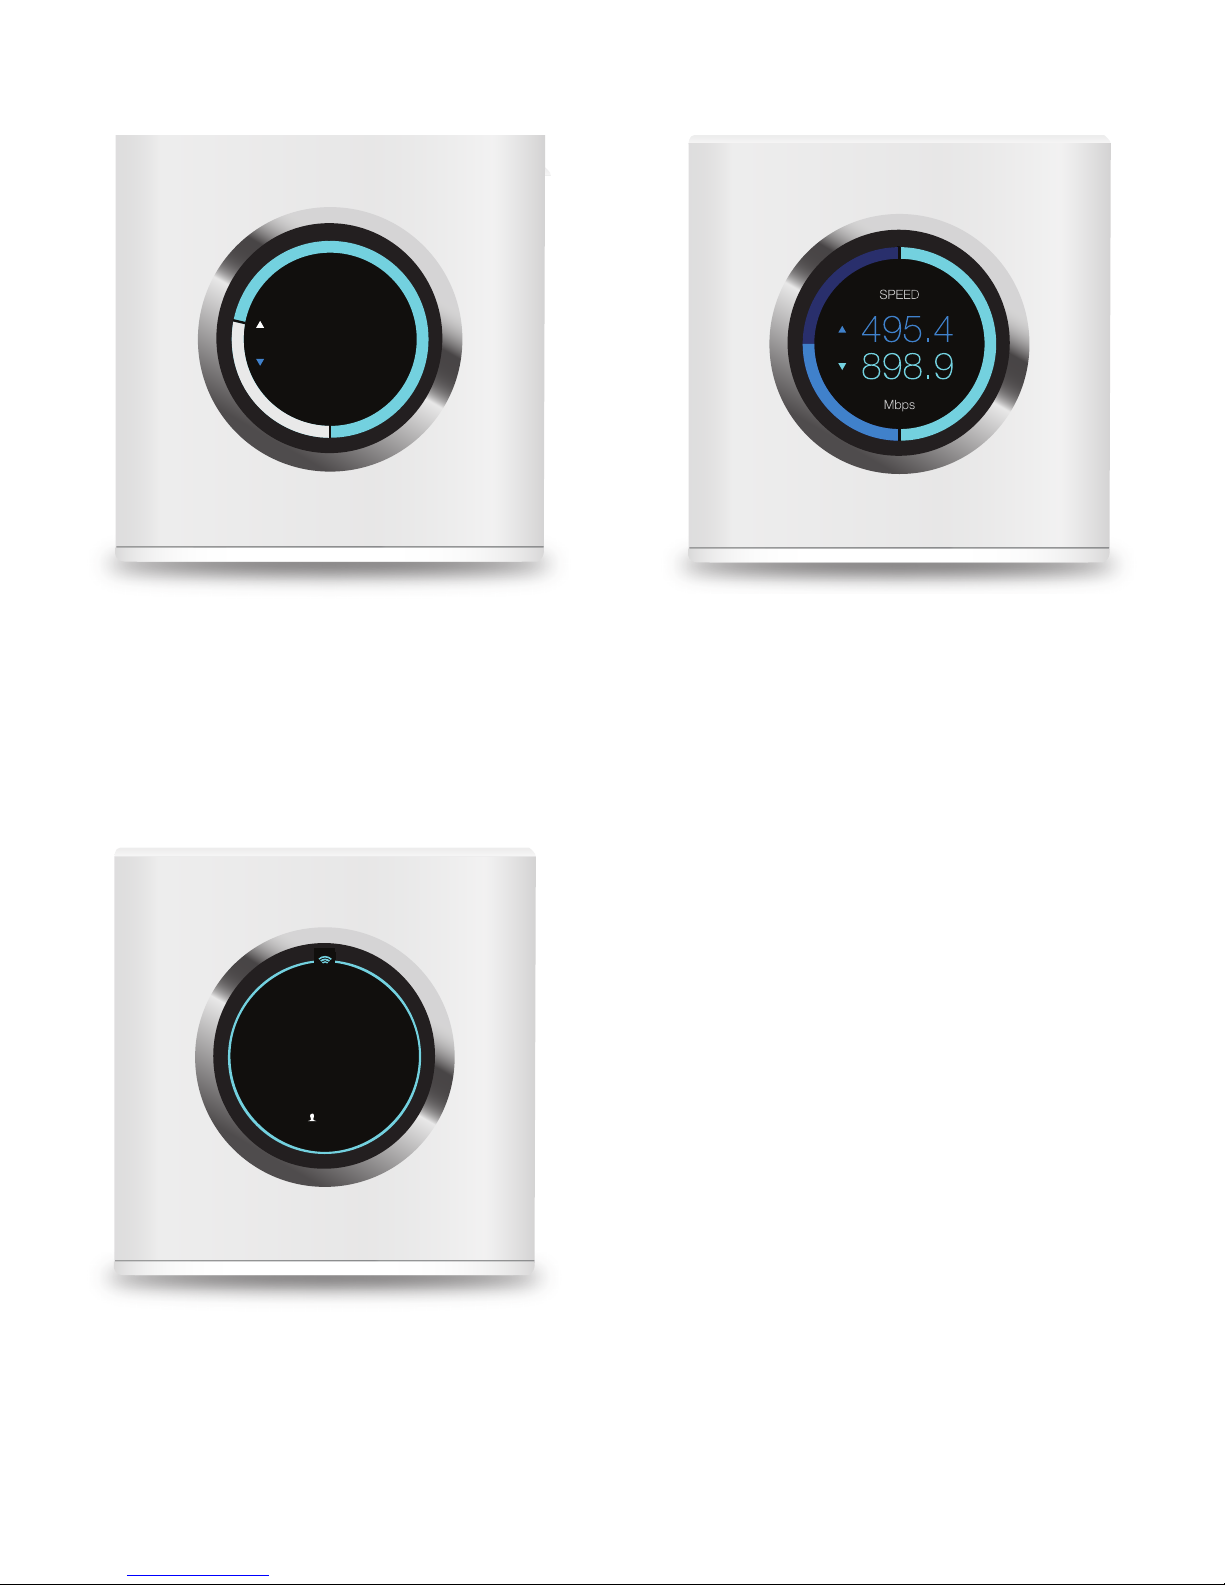
The Router provides the following information as you tap the
front display:
• Time and Date
• Throughput
• IP Addresses
• Speed
For configuration, refer to the AmpliFi app.
2. When the app presents a list of detected AmpliFi Routers
on the network, tap the Router you wish to log into.
Time and Date
AMPLIFI
MO
1137
JUL 18
• Time Displays the time of day.
• Day of the Week Displays the day of the week.
• Date Displays the calendar date.
AM
8
Page 13
Chapter 1: Getting StartedAmpliFi User Guide
Throughput
JUL 15 — NOW
126.4
317.9
Total MB
• Date - Now Displays the date range for the current
throughput, for both uploads and downloads.
• Total MB, Upload Displays the amount of data
uploaded during the current date range.
• Total MB, Download Displays the amount of data
downloaded during the current date range.
Speed
• Speed, Upload Displays the current upload speed.
• Speed, Download Displays the current download
speed.
IP Addresses
WAN IP
10.0.2.192
ROUTER IP
192.168.124.1
1
• WAN IP Displays the public or Internet IP address of the
WAN interface of the Router.
• Router IP Displays the private or local IP address of the
LAN interface of the Router.
9
Page 14

Chapter 1: Getting Started AmpliFi User Guide
10
Page 15
AmpliFi User Guide Chapter 2: Overview
Chapter 2: Overview
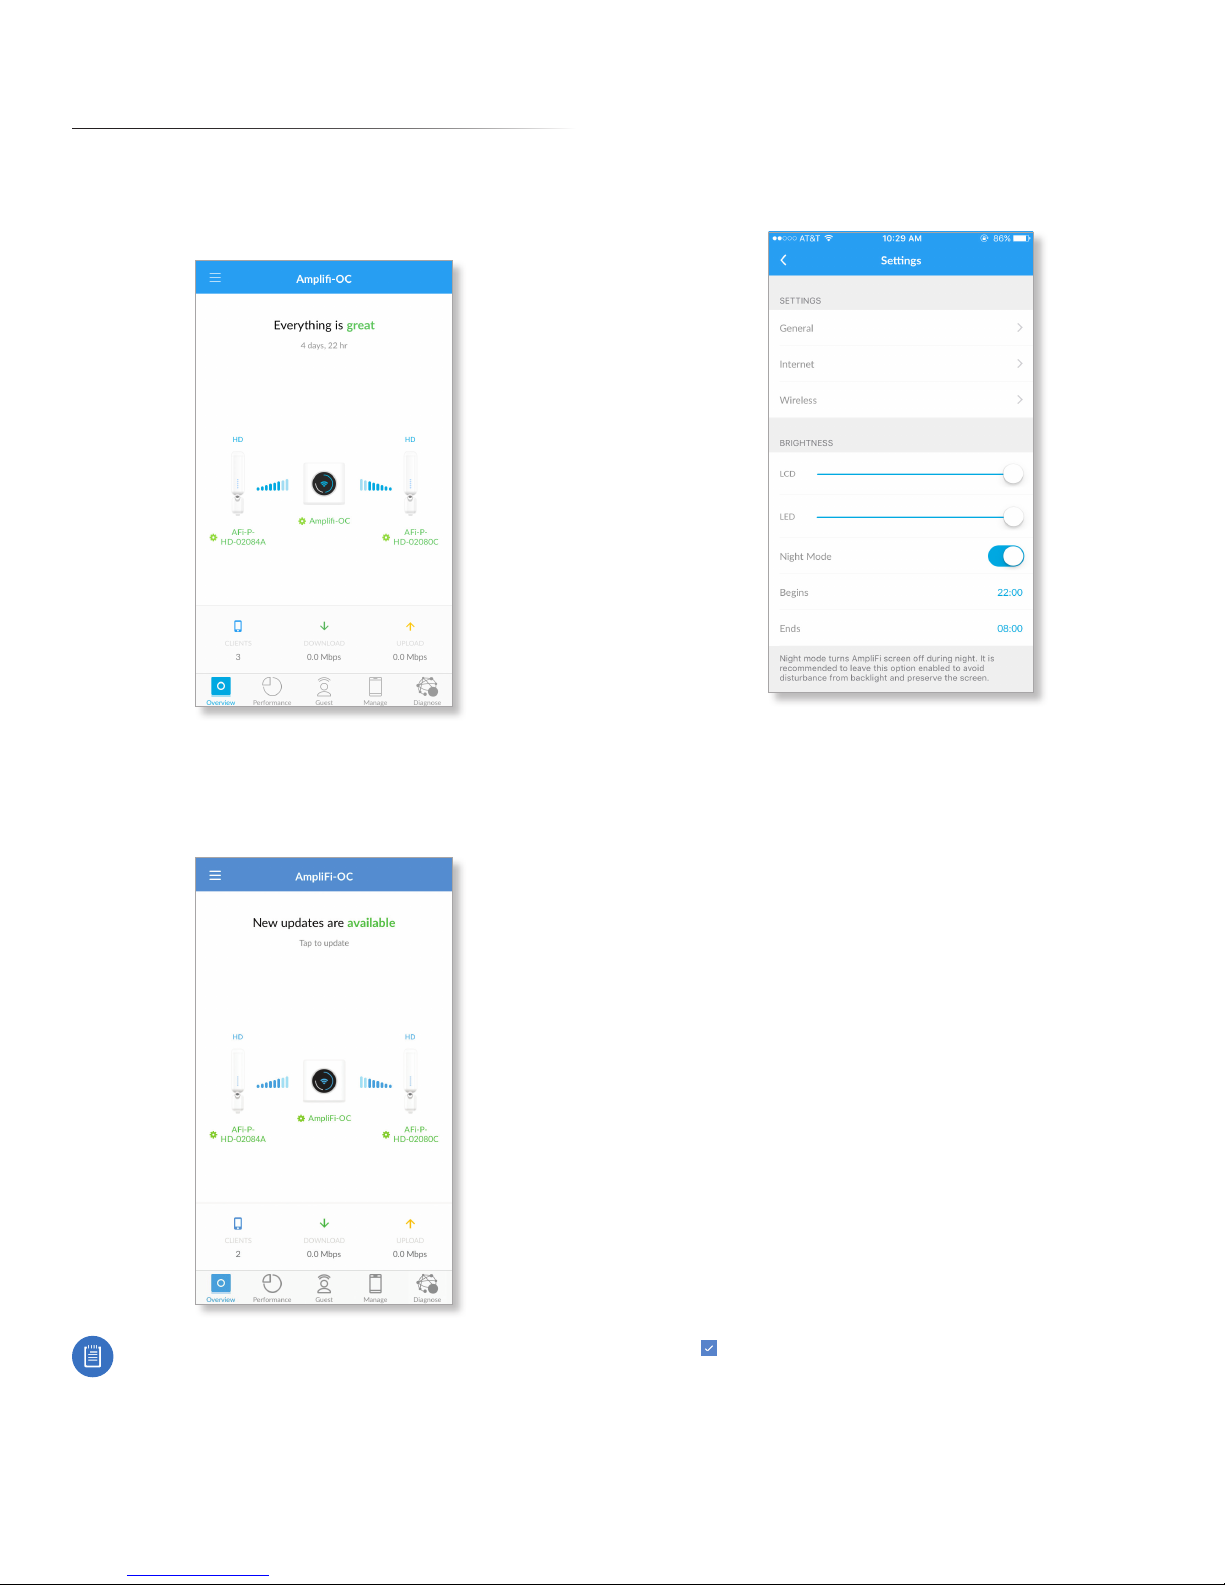
The Overview screen of the AmpliFi App displays the system
dashboard. It provides an overview of the AmpliFi Wi-Fi
system including network status, number of connected
clients, and active download/upload speeds.
Router Settings
Settings
The Settings screen for the AmpliFi Router offers a variety of
configuration options and hardware information.
Tap the router icon to display or edit the Router’s settings.
Tap a Mesh Point to display signal quality, view/edit the
device name, view Mesh Point details, and locate or reboot
the Mesh Point.
Note: Please update your AmpliFi devices as firmware
updates become available. Keep in mind that Wi-Fi
functionality will be temporarily unavailable during
this time, so if an upload or download is in progress,
you may want to postpone the update until that
process has completed.
General
• Device Name Displays the name of the AmpliFi Router. To
change it, tap the name and type in a new name.
Time
• Time Zone Select the appropriate time zone for your
location.
• 24-Hour Time Select this option to display the time in
24-hour format, rather than 12-hour format.
Sound Effects
• Volume The Router emits a sound as you adjust the
volume using the slider control.
Actions
• Locate The LED in the base of the Router flashes several
times to help you identify the device. This is helpful if you
have more than one AmpliFi Router in a single location.
• Change Password You can change the administrator or
device password.
- Password Enter the new password.
- Verify Password Enter the new password again.
- Show Password Disabled by default. Select this option
to display the password in plain text.
Tap to save your changes.
• Reboot Restarts the Router.
• Factory Reset Resets the Router and all online Mesh
Points to factory default settings.
11
Page 16
AmpliFi User GuideChapter 2: Overview
Internet
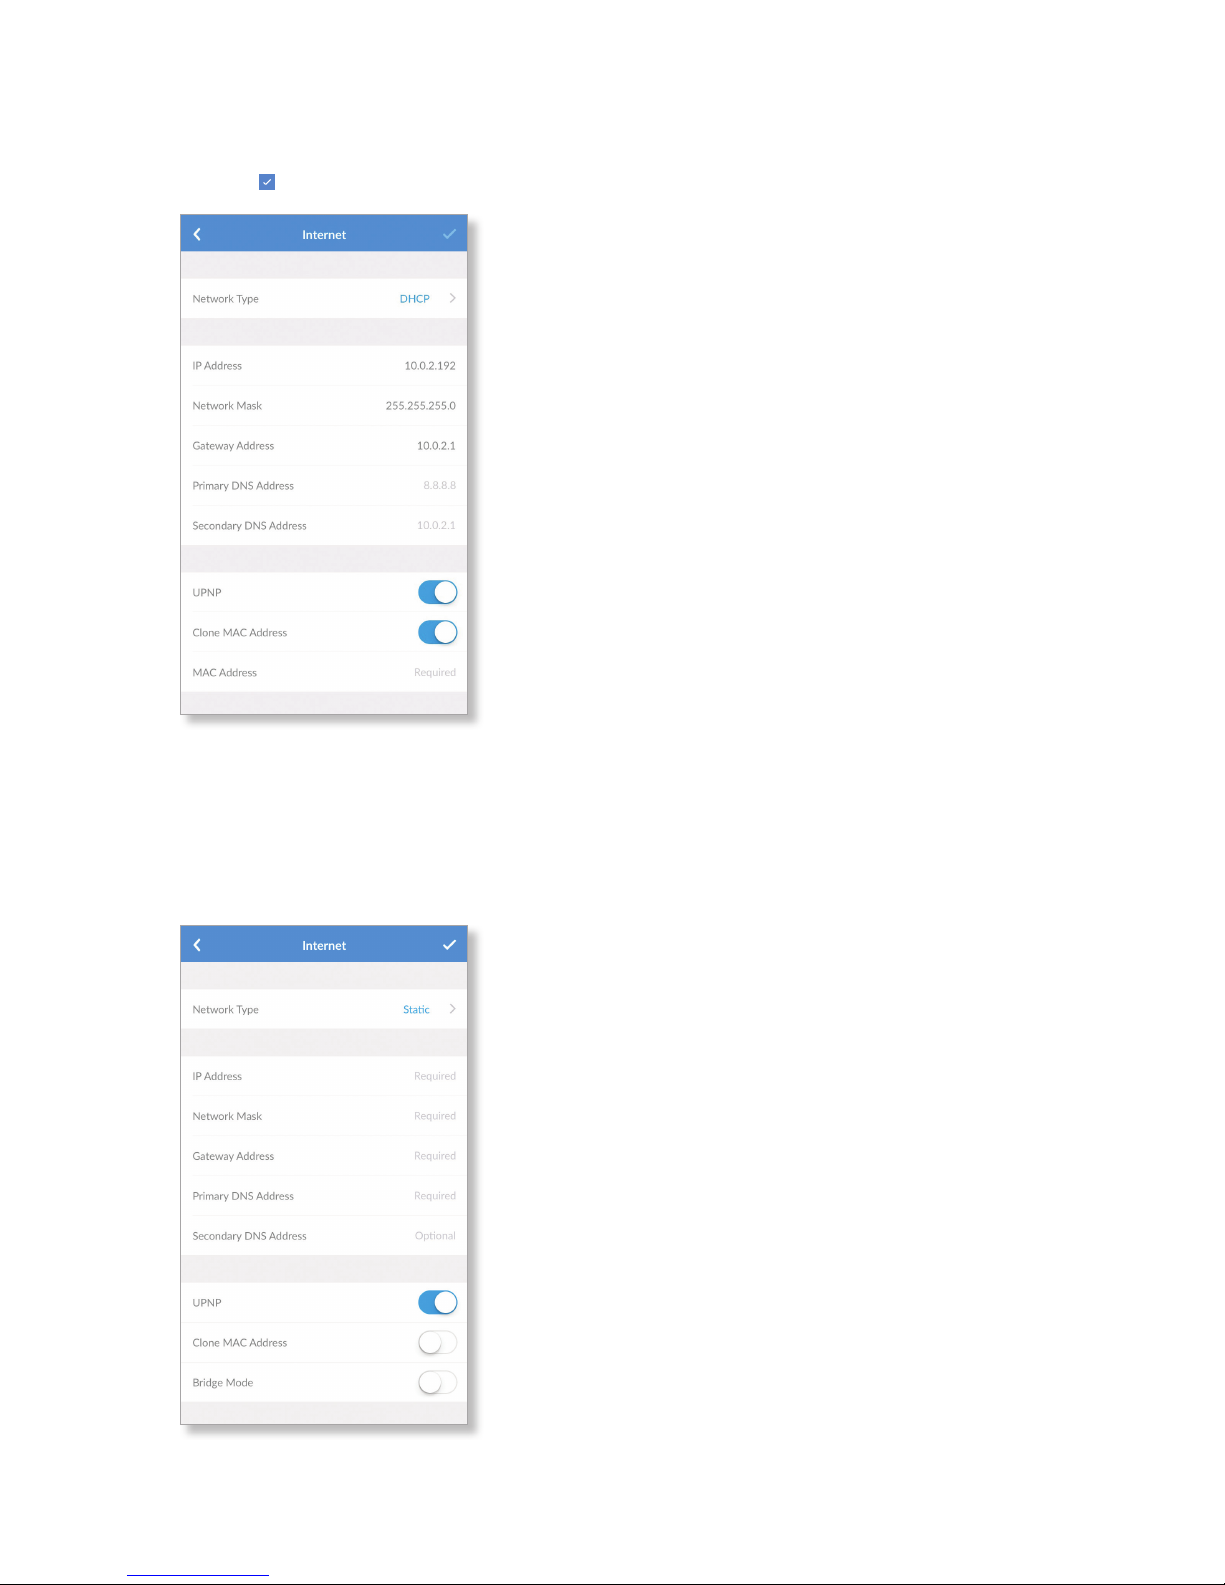
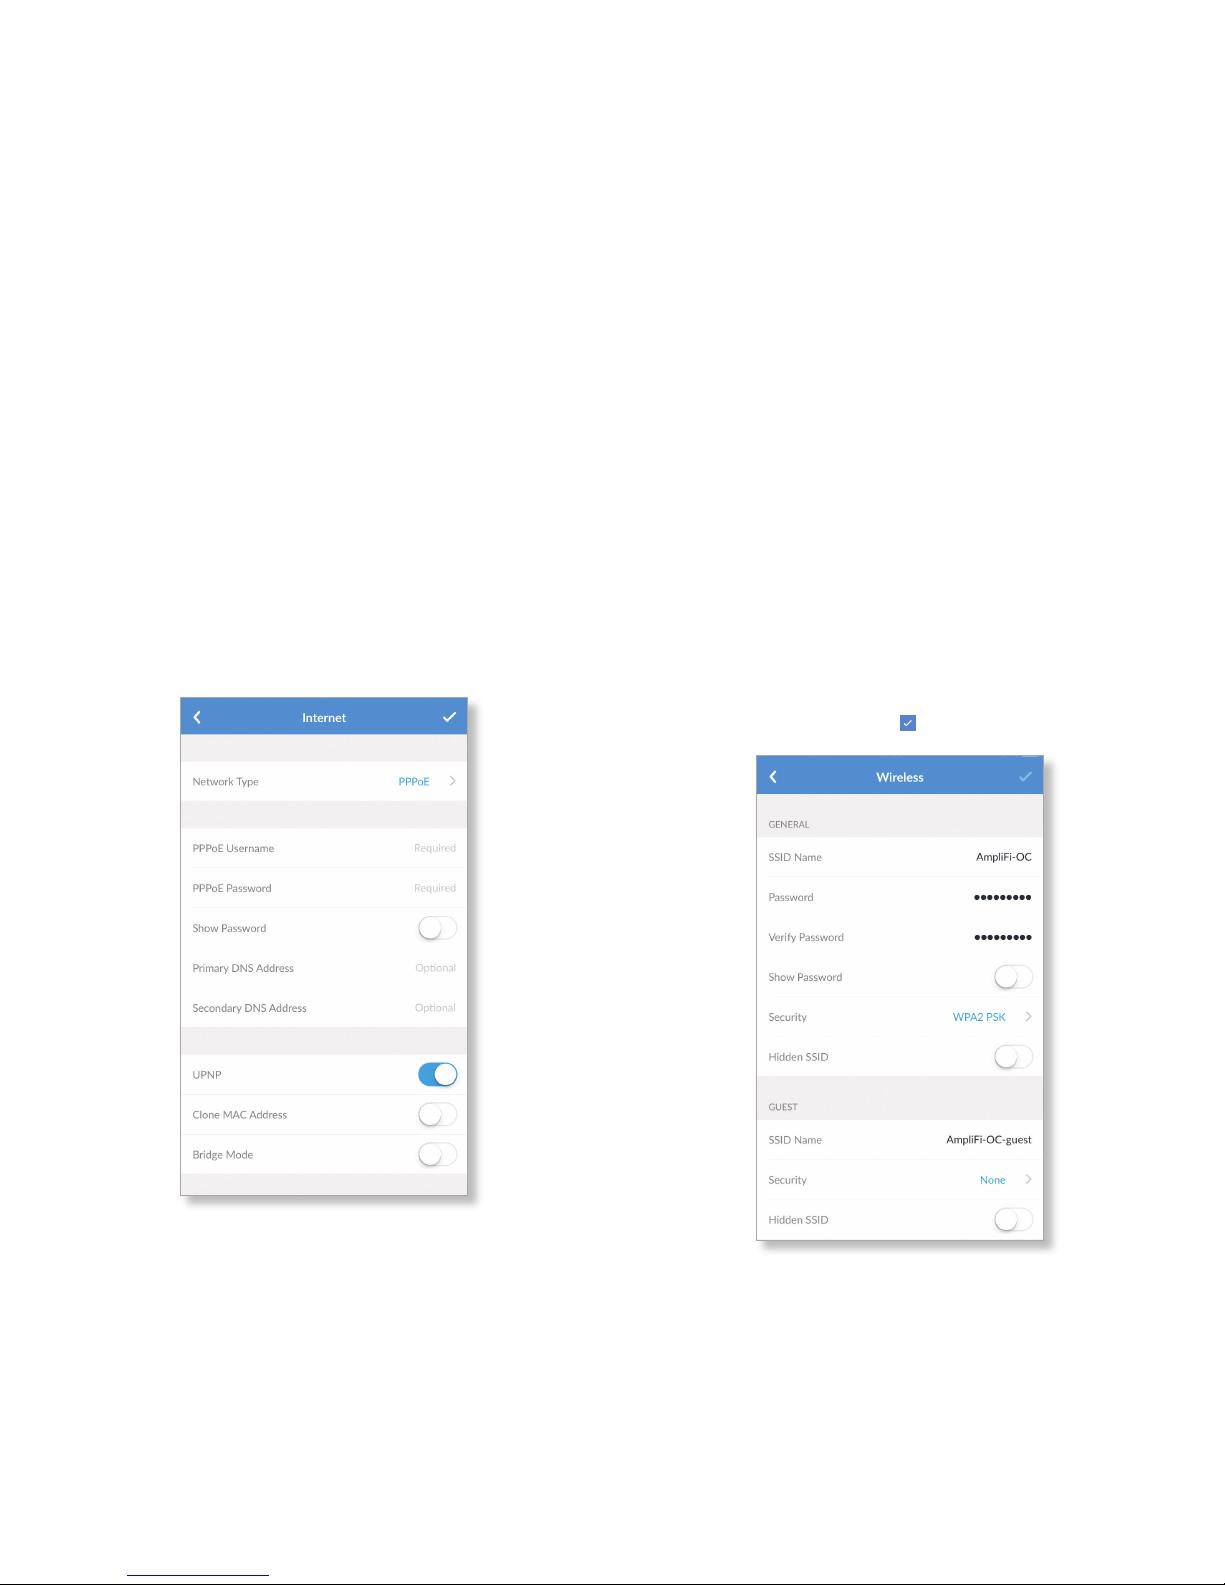
The Internet screen for the Router allows you to access
Internet connection settings, including service type: DHCP,
Static IP, or PPPoE. Tap to save your changes.
• Network Type Select the type of Internet connection you
use: Static, DHCP, or PPPoE.
Static
If your service provider supplies you with fixed network
settings to assign to the Router, use the Static option to
manually enter that information here.
• IP Address Enter the Internet IP address of the Router.
• Network Mask Enter the network or subnet mask of the
Router.
• Gateway Address Enter the IP address of the service
provider’s gateway router.
• Primary DNS Address Enter the IP address of the service
provider’s primary DNS server.
• Secondary DNS Address Enter the IP address of the
service provider’s secondary DNS server.
• UPnP Enabled by default. Universal Plug and Play
automatically configures port forwarding when you have
hardware that supports UPnP.
• Clone MAC Address Disabled by default. Select this
option to clone a computer’s MAC address to the Router.
Enter the MAC address in the field provided.
This may be helpful if your service provider registered
the MAC address of the computer you had previously
connected to the modem. MAC address cloning allows the
Router to be recognized instead.
• Bridge Mode Disabled by default, bridge mode can
help you grow your network and/or separate multiple
networks. It allows you to use more than one router on the
same network by placing one router in bridge mode and
connecting it to the client port on another.
Here are a few of the most common applications for
bridge mode:
• Connect two routers to share network resources.
• Use the Router as an additional access point on an
existing network.
• Use the Router with a fiber service.
DHCP
The use of the Dynamic Host Configuration Protocol (DHCP)
is the default. The Router automatically acquires network
settings from the service provider’s DHCP server.
• IP Address Displays the IP address assigned by your ISP
(Internet Service Provider).
• Network Mask Displays the network or subnet mask of
the Router.
• Gateway Address Displays the IP address of the service
provider’s gateway router.
• Primary DNS Address Displays the IP address of the
service provider’s primary DNS (Domain Name System)
server.
• Secondary DNS Address Displays the IP address of the
service provider’s secondary DNS server.
• UPnP Enabled by default. Universal Plug and Play
automatically configures port forwarding when you have
hardware that supports UPnP.
12
Page 17
AmpliFi User Guide Chapter 2: Overview
• Clone MAC Address Disabled by default. Select this
option to clone a computer’s MAC address to the Router.
Enter the MAC address in the field provided.
This may be helpful if your service provider registered
the MAC address of the computer you had previously
connected to the modem. MAC address cloning allows the
Router to be recognized instead.
• Bridge Mode Disabled by default, bridge mode can
help you grow your network and/or separate multiple
networks. It allows you to use more than one router on the
same network by placing one router in bridge mode and
connecting it to the client port on another.
Here are a few of the most common applications for
bridge mode:
• Connect two routers to share network resources.
• Use the Router as an additional access point on an
existing network.
• Use the Router with a fiber service.
PPPoE
Point-to-Point Protocol over Ethernet (PPPoE) is a virtual
private and secure connection between two systems that
enables encapsulated data transport.
• UPnP Enabled by default. Universal Plug and Play
automatically configures port forwarding when you have
hardware that supports UPnP.
• Clone MAC Address Disabled by default. Select this
option to clone a computer’s MAC address to the Router.
Enter the MAC address in the field provided.
This may be helpful if your service provider registered
the MAC address of the computer you had previously
connected to the modem. MAC address cloning allows the
Router to be recognized instead.
• Bridge Mode Disabled by default, bridge mode can
help you grow your network and/or separate multiple
networks. It allows you to use more than one router on the
same network by placing one router in bridge mode and
connecting it to the client port on another.
Here are a few of the most common applications for
bridge mode:
• Connect two routers to share network resources.
• Use the Router as an additional access point on an
existing network.
• Use the Router with a fiber service.
Wireless
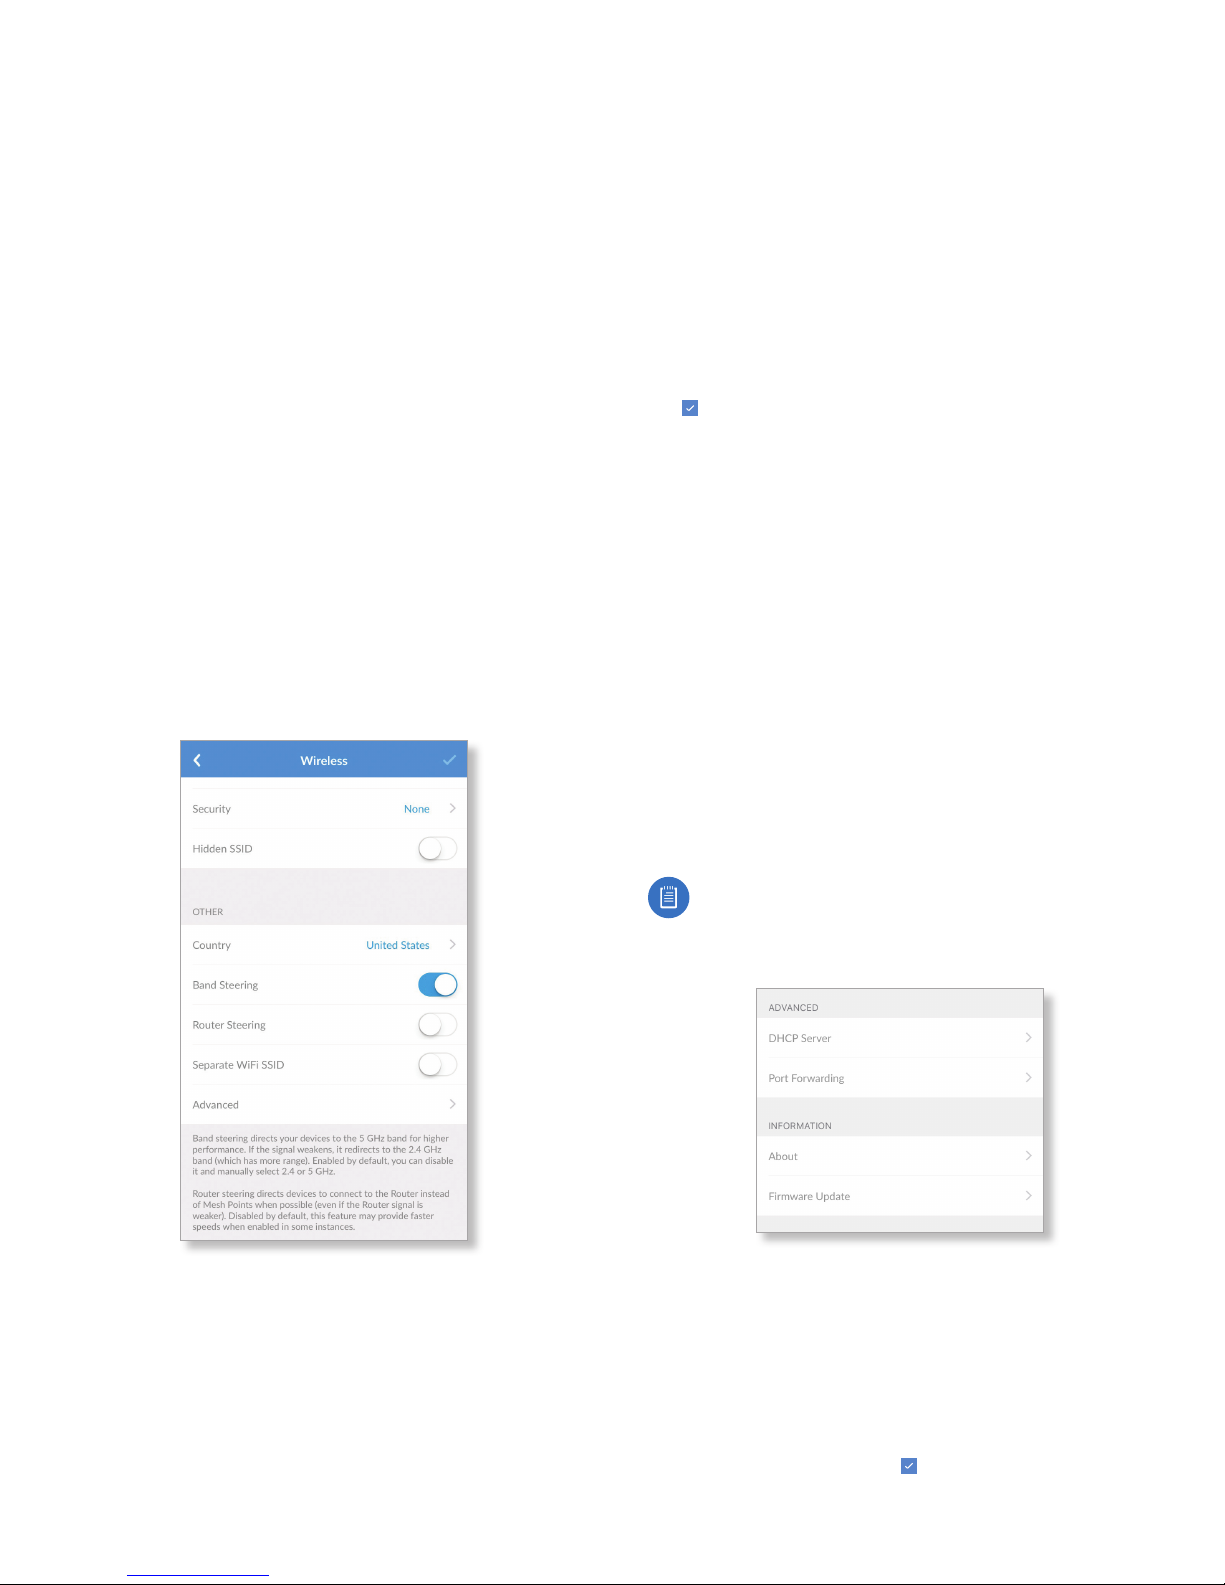
The Wireless screen for the Router allows you to access
wireless network settings. Tap to save your changes.
• PPPoE Username Enter the username used to connect to
the PPPoE server.
• PPPoE Password Enter the password used to connect to
the PPPoE server.
• Show Password Disabled by default. Select this option to
display the password in plain text.
• Primary DNS Address Enter the IP address of the service
provider’s primary DNS server.
• Secondary DNS Address Enter the IP address of the
service provider’s secondary DNS server.
General
• SSID Name The name of the wireless network is
displayed. Tap to change it.
• Password The password to the wireless network is
displayed. Tap to change it.
• Verify Password To change the password, enter the new
password again.
13
Page 18
AmpliFi User GuideChapter 2: Overview
• Show Password Disabled by default. Select this option to
display the password in plain text.
• Security Select the type of wireless security you use:
None, WPA PSK, or WPA2 PSK (recommended). WPA2PSK
is the default.
• Hidden SSID Disabled by default. Select this option if
you don’t want the wireless network name or SSID to be
broadcast.
Guest
• SSID Name The name of the guest wireless network is
displayed. Tap to change it.
• Password The password to the guest wireless network is
displayed. Tap to change it.
• Verify Password To change the guest password, enter
the new password again.
• Show Password Disabled by default. Select this option to
display the guest password in plain text.
• Security Select the type of wireless security you use:
None, WPA PSK, or WPA2 PSK. None is the default.
• Hidden SSID Disabled by default. Select this option if you
don’t want the wireless network name or SSID to be visible
to any users within range of the Router.
Other
• Router Steering Router steering directs devices to
connect to the Router instead of Mesh Points when
possible (even if the Router signal is weaker). Disabled
by default, this feature may provide faster speeds when
enabled in some instances.
• Separate Wi-Fi SSID Disabled by default. Select this
option to create separate wireless networks for the
2.4GHz and 5 GHz radio bands.
This may be helpful if you want more control over which
radio band a client device uses. For example, if your device
can use the 5 GHz radio band and it is within range, then
the best option is to connect to the 5 GHz network.
Tap to save your changes.
• Advanced Select this option to customize the wireless
settings for the 2.4GHz and 5 GHz radio bands.
Brightness
LCD Move the slider control left or right to adjust the
brightness of the touchscreen display.
LED Move the slider control left or right to adjust the
brightness of the LED that illuminates the base of the Router.
Night Mode Toggle the switch on or off to enable or
disable power-saving mode for the touchscreen display. This
option is enabled by default.
Begins Set the time you would like the touchscreen display
to turn off. This setting is only available when Night Mode is
enabled.
Ends Set the time you would like the touchscreen display to
turn back on. This setting is only available when Night Mode
is enabled.
• Country Select your country.
• Band Steering Band steering directs your devices to the
5 GHz band for higher performance. If the Router’s signal
weakens, it redirects to the 2.4 GHz band (which has
more range). Enabled by default, you can disable it and
manually select 2.4 or 5 GHz.
Note: Scroll down on the Settings screen to view
additional configuration options.
Additional Settings
Advanced
DHCP Server
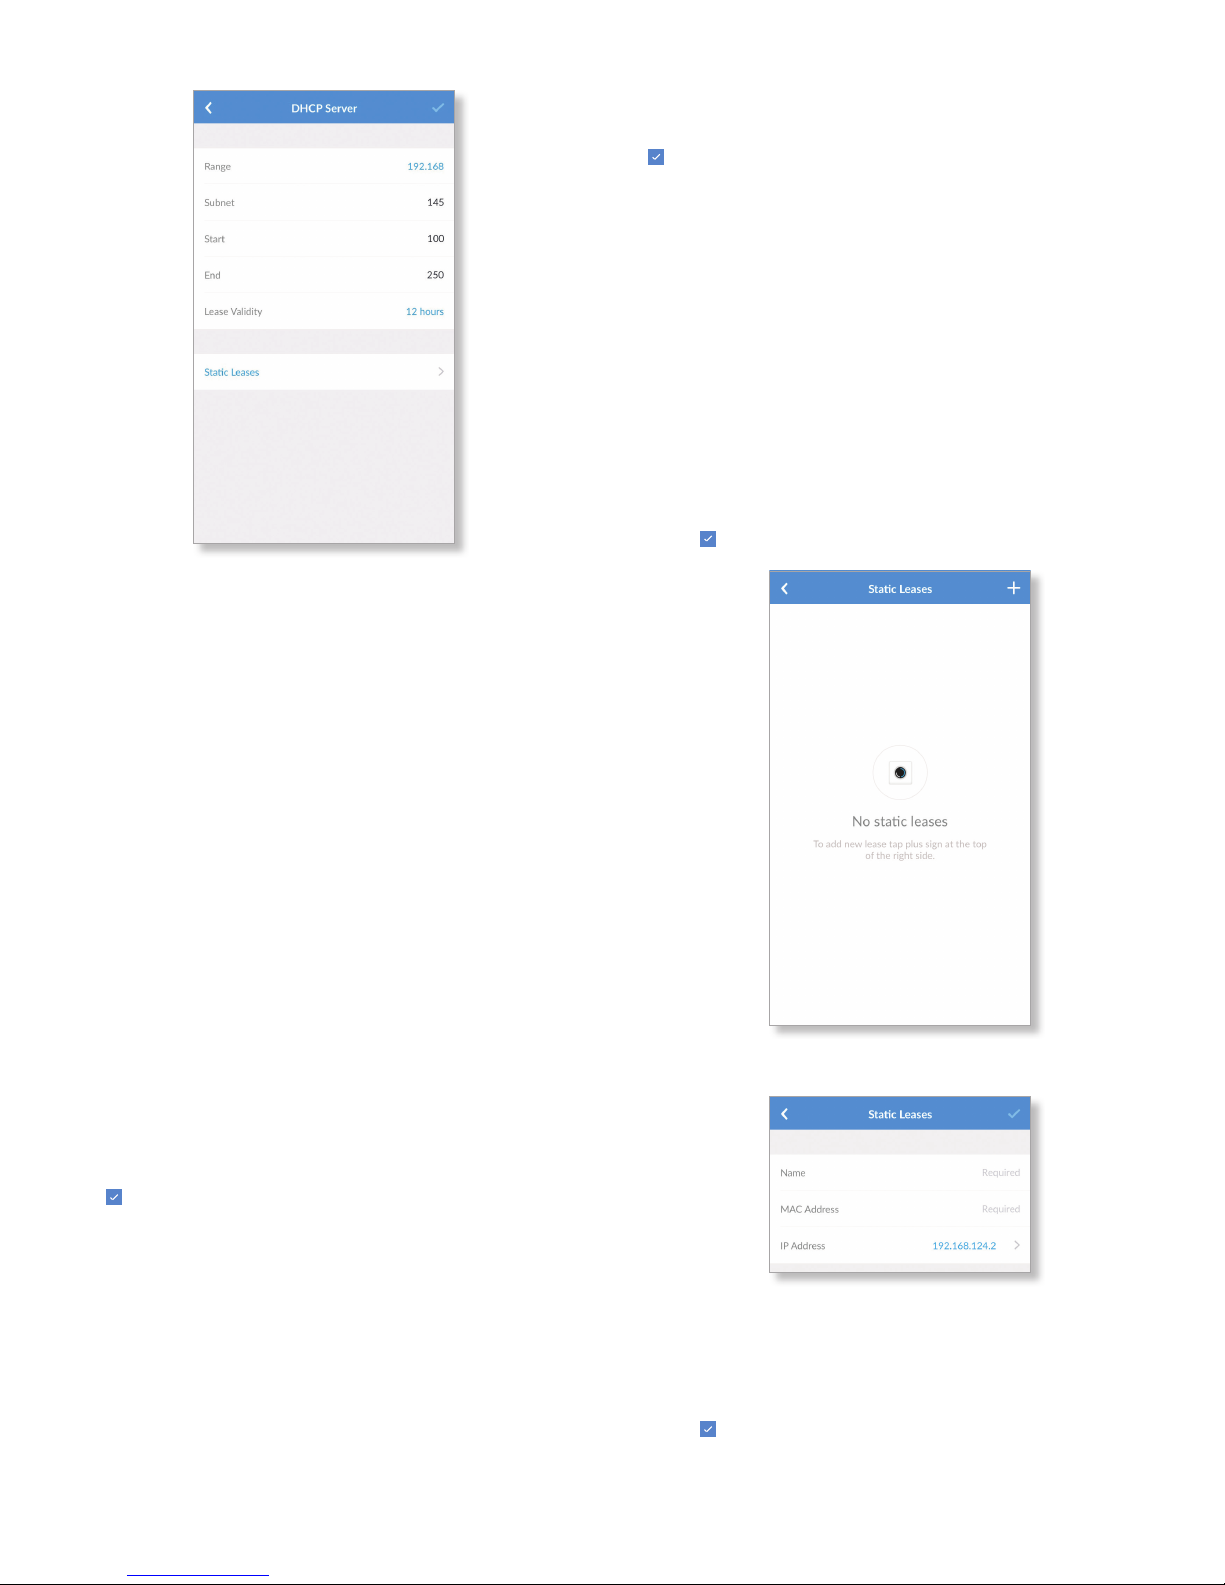
The DHCP Server screen allows you to access the DHCP
settings, which determine how IP addresses are assigned
in your network. By default, the Router acts as a local DHCP
server to assign IP addresses to DHCP clients (devices such
as computers and smartphones) on the network. If you
modify any of these fields, tap to save your changes.
14
Page 19
AmpliFi User Guide Chapter 2: Overview
General
The General screen allows you to access device settings. Tap
to save your changes.
2.4 GHz
- Automatic Enabled by default. Disable this option to
specify a channel setting.
- Channel Select the appropriate channel to use.
- Bandwidth Select the appropriate channel width,
20MHz or 20/40 MHz.
5 GHz
- Automatic Enabled by default. Disable this option to
specify a channel setting.
- Channel Select the appropriate channel to use.
- Bandwidth Select the appropriate channel width,
20MHz, 40MHz, or 80 MHz.
Tap to save your changes.
Address
The range of available IP addresses is displayed. The DHCP
server assigns IP addresses from the pool (or group) of IP
addresses.
DHCP Settings
• Range The current range is displayed. Select the range
you want to use.
• Subnet The current subnet is displayed. Select the subnet
you want to use.
• Start The current starting IP address of the range is
displayed. Select the starting IP address you want to use.
• End The current ending IP address of the range is
displayed. Select the ending IP address you want to use.
• Lease Validity The IP addresses assigned by the DHCP
server are valid only for the duration specified by the lease
time. Increasing the time ensures client operation without
interruption, but could introduce potential conflicts.
Decreasing the lease time avoids potential address
conflicts, but could lead to minor interruptions for the
client while it acquires a new IP address from the DHCP
server. Select the appropriate option: 1 hour, 2 hours,
4hours, 8 hours, 12 hours, 1 day, 1 week, or 1 month
(30 days), or 1 year (365days).
Tap to save your changes.
• Static Leases Select this option to display a list of static IP
addresses assigned to specific devices.
Port Forwarding Tap this option to create a virtual port
that allows you to forward traffic from one port to another.
Information
About Tap this option to display router information, version
numbers, and MAC addresses for each of the hardware
interfaces.
Firmware Update Tap this option to check for firmware
updates for your AmpliFi devices.
To map a static IP address to a specific MAC address, tap +.
- Name Enter a descriptive name for the device that will
be assigned a static IP address.
- MAC Address Enter the MAC address of the device.
- IP Address Select the IP address you want to assign.
Tap to save your changes.
15
Page 20
AmpliFi User GuideChapter 2: Overview
Port Forwarding
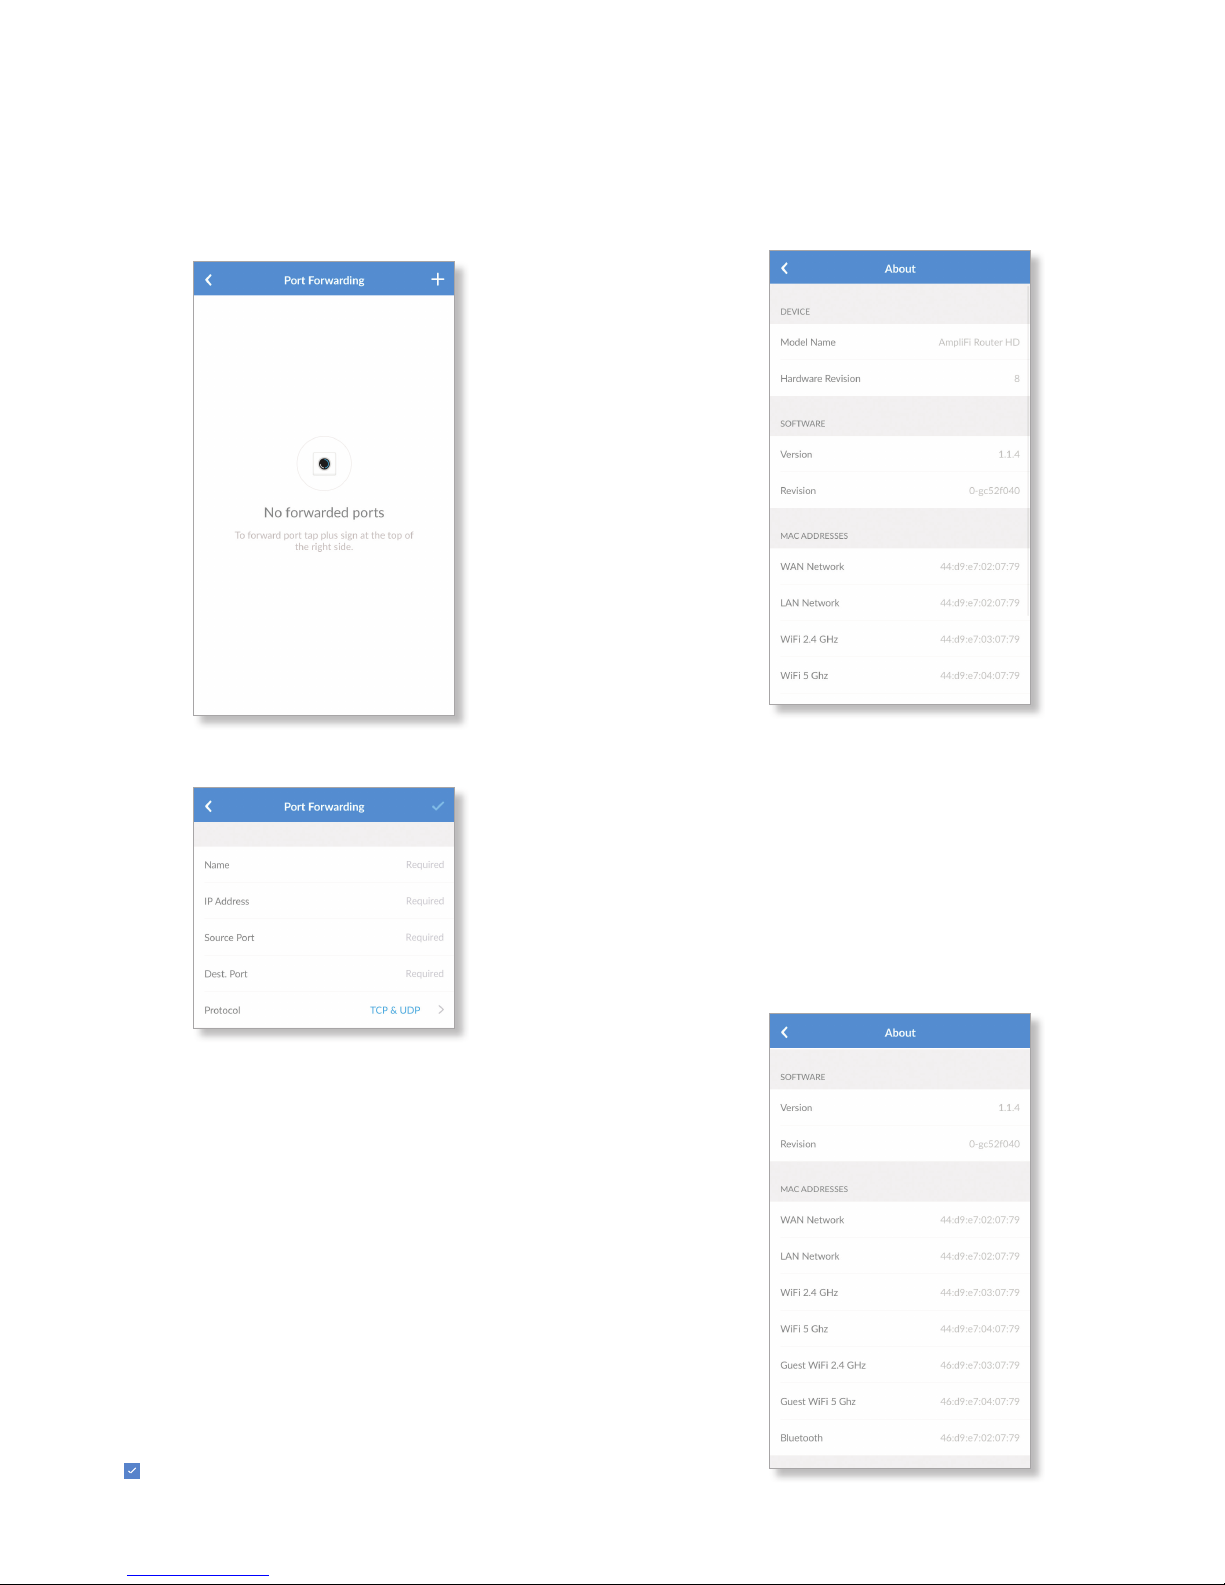
The Port Forwarding screen in the app allows you to set
up port forwarding rules. Typically you configure a port
forwarding rule so a host on the external network can access
a server on the internal network by using the public IP
address (or hostname) of the Router.
Information
About
The About screen for the Router displays the model name
and version numbers of the device and software, as well as
the MAC addresses of the hardware interfaces.
To create a port forwarding rule, tap +.
- Name Enter a descriptive name for this rule.
- IP Address Enter the LAN IP address that will receive
the forwarded port traffic.
- Source Port Enter the port or ports that will be
forwarded to the LAN. You can identify the port or ports
by name, number, and/or range. To specify multiple
ports, use a comma-separated list.
Example: https,20-23,554
- Dest. Port Enter the port or ports that will receive the
forwarded port traffic. You can identify the port or ports
by name, number, and/or range. If you do not specify
this port, then the original destination port of the traffic
will be used.
- Protocol Select the appropriate protocol: TCP, UDP, or
TCP & UDP.
Tap to save your changes.
Device
• Model Name Displays the model of the Router.
• Hardware Revision Displays the revision number of the
Router hardware.
Software
• Version Displays the version number of the Router
software.
• Revision Displays the revision number of the Router
software.
16
Page 21
AmpliFi User Guide Chapter 2: Overview
MAC Addresses
• WAN Network Displays the MAC address of the WAN
(Internet or public) interface.
• LAN Network Displays the MAC address of the LAN
(local) interface.
• Wi-Fi 2.4 GHz Displays the MAC address of the 2.4 GHz
wireless interface.
• Wi-Fi 5 GHz Displays the MAC address of the 5GHz
wireless interface.
• Guest Wi-Fi 2.4 GHz Displays the MAC address of the
guest 2.4 GHz wireless interface.
• Guest Wi-Fi 5 GHz Displays the MAC address of the guest
5 GHz wireless interface.
• Bluetooth Displays the MAC address of the Bluetooth
interface.
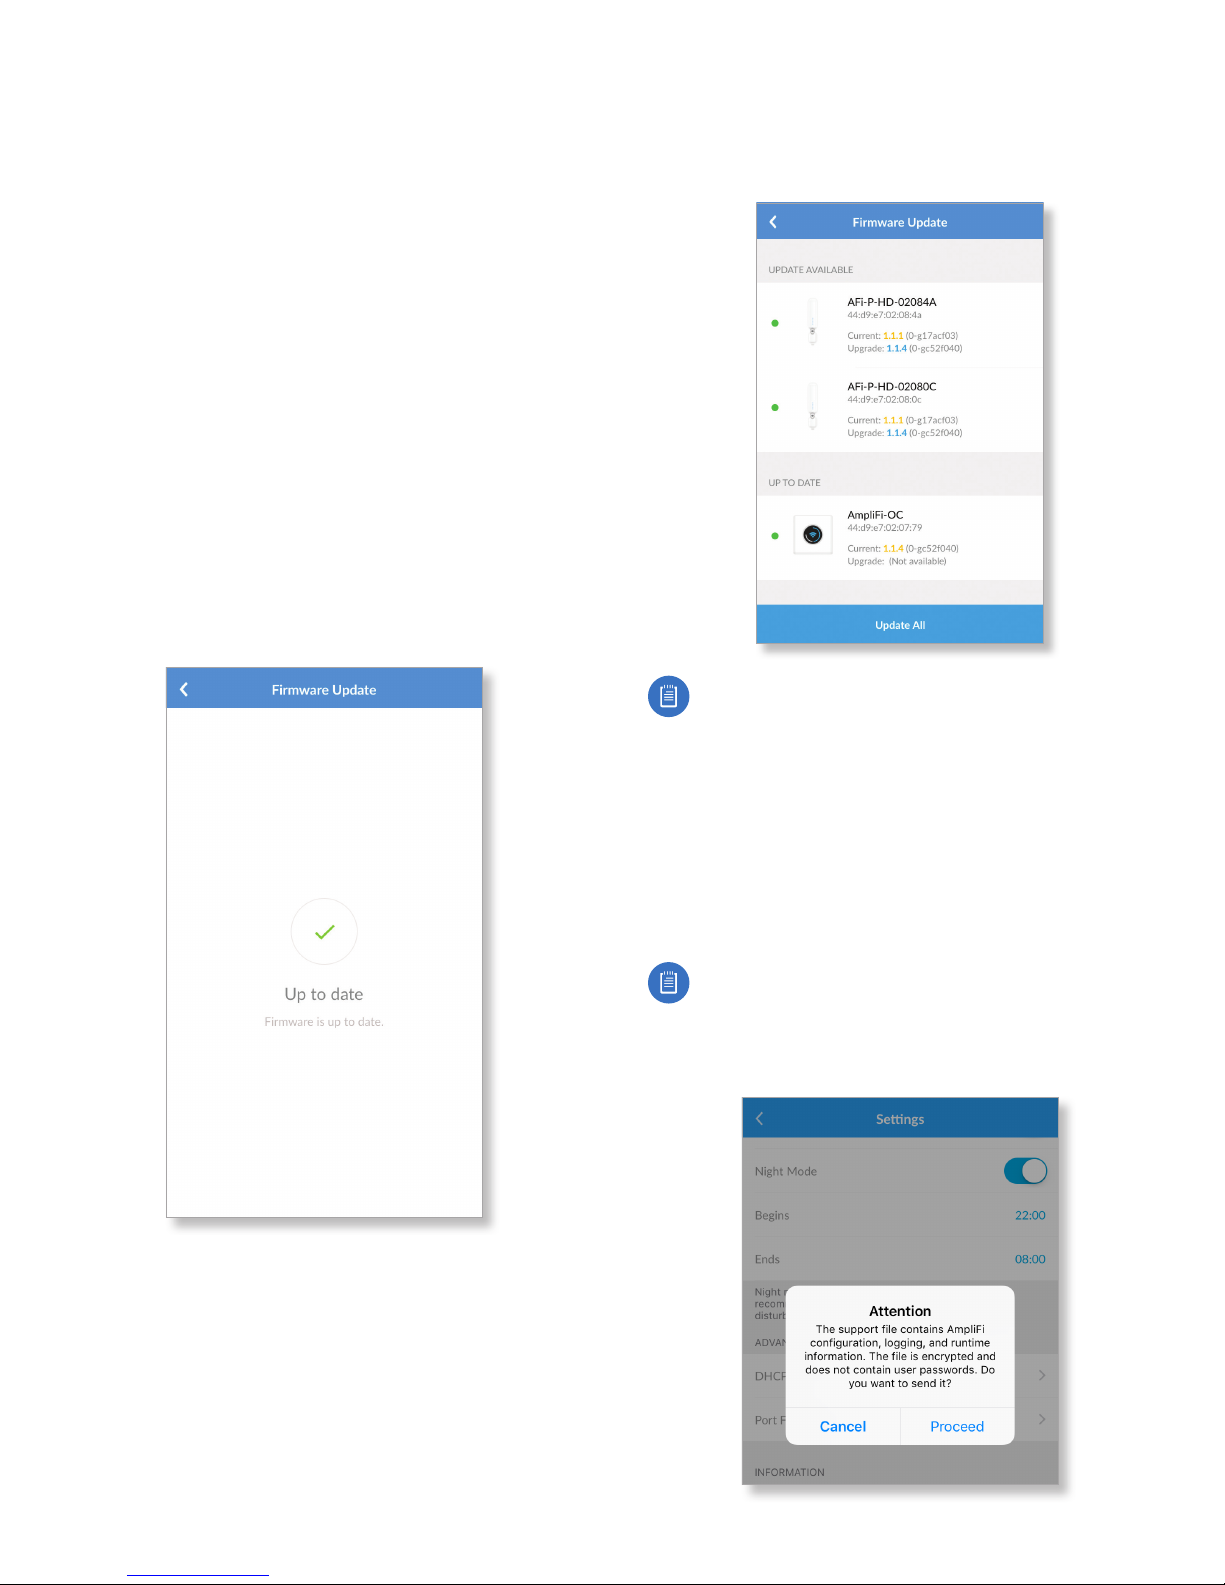
Firmware Update
The Firmware Update screen allows you to check for updates
to the device firmware for the Router and Mesh Points.
• Up to date If there are no firmware updates available,
then “Up to date” is displayed.
• Updates Available If firmware updates are available,
then the current and update version numbers for the
firmware are listed for each applicable device. Tap Update
All to proceed with all available firmware updates.
Note: Your Wi-Fi will be temporarily down while you
update the AmpliFi devices. If you have significant
network activity, such as a download or upload in
progress, you can postpone the update until an
appropriate time.
Support Info
The Support Info option generates an encrypted file to send
to our support team. This file contains AmpliFi configuration
and runtime information that can be used to answer any
questions or troubleshoot an issue.
Note: No passwords are stored in the file.
To generate the file, tap Proceed. To ignore creating the
support file, tap Cancel.
17
Page 22
AmpliFi User GuideChapter 2: Overview
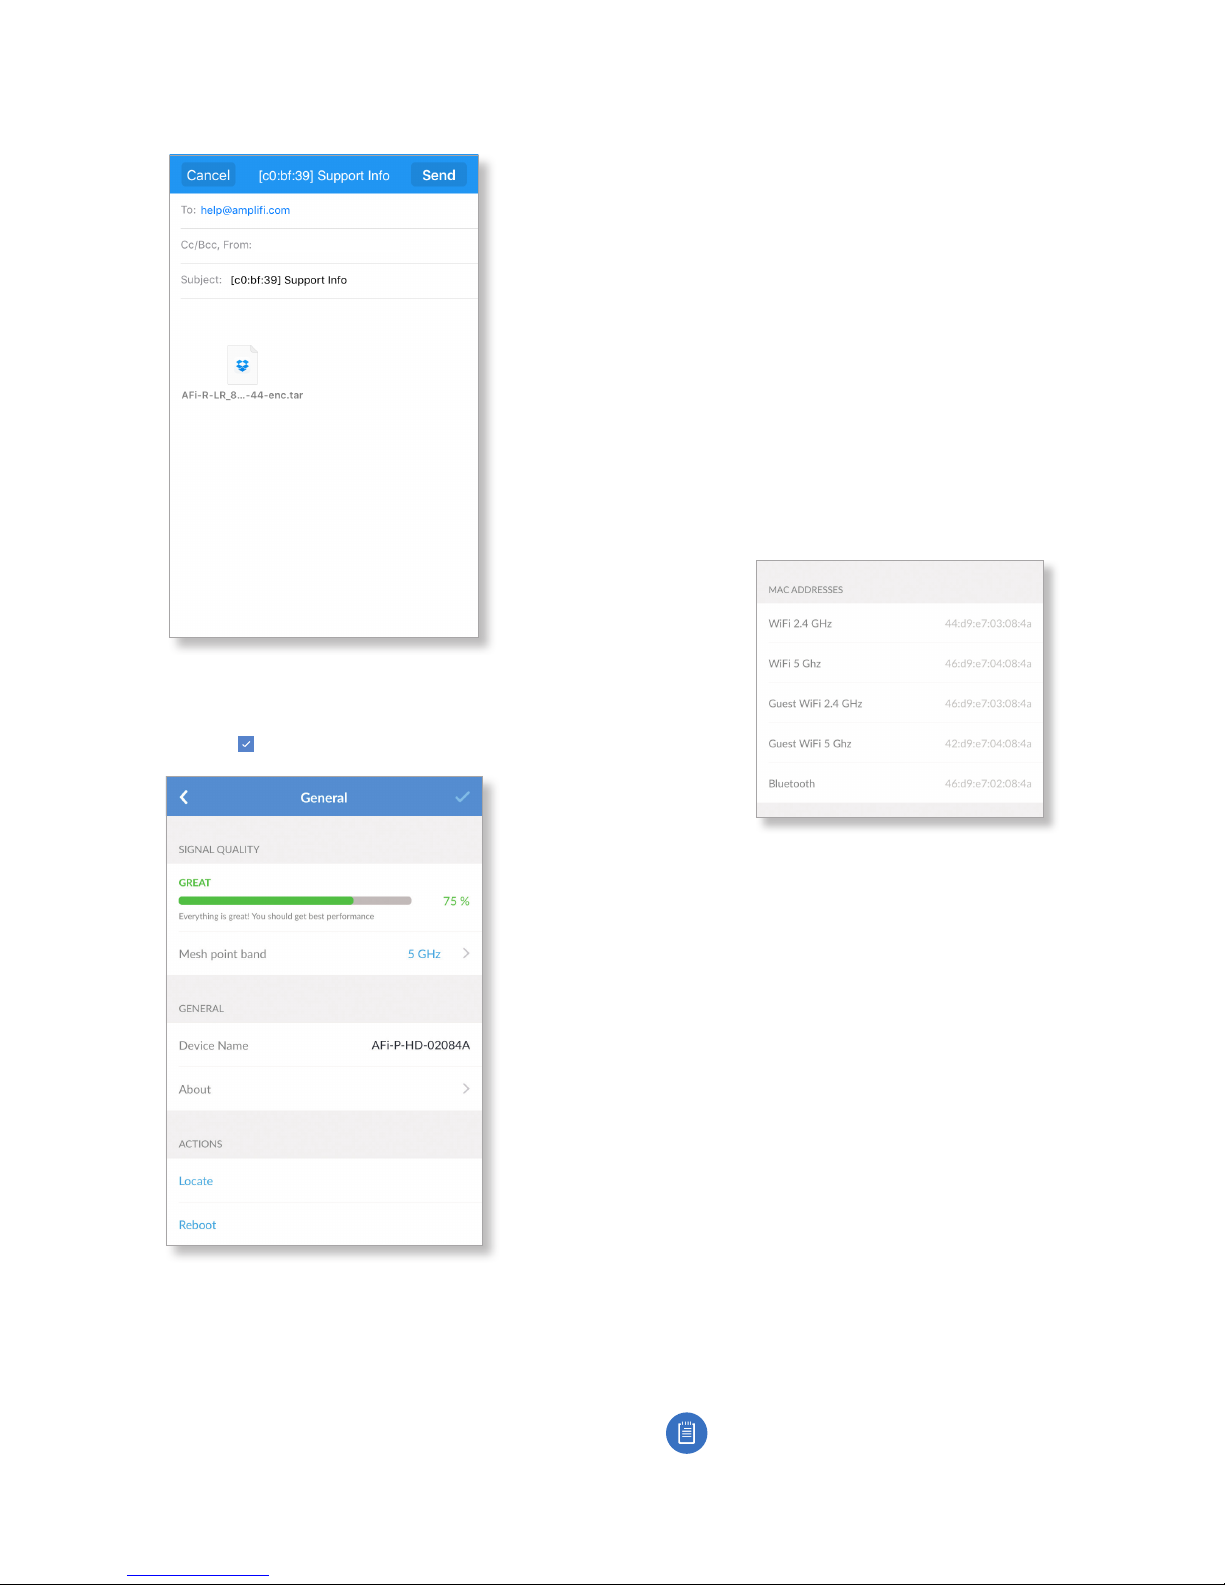
When the file is ready to transmit, tap Send. If you want to
discard the file, tap Cancel.
app_user@ampli.com
General
• Device Name Displays the descriptive name of the Mesh
Point. Tap to change it.
• LED Enabled by default. Tap the toggle switch to turn off
the LEDs on the Mesh Point.
• About Select this option for more information about the
Mesh Point.
• General
- Model Name Displays the model of the Mesh Point.
- Hardware ID Displays the revision number of the Mesh
Point hardware.
• Software
- Version Displays the version number of the Mesh Point
software.
- Revision Displays the revision number of the Mesh
Point software.
Mesh Point Settings
The General screen for the Mesh Point allows you to access
device settings. Tap to save your changes.
Signal Quality
• Signal Strength Displays the percentage of signal
strength.
• Mesh Point Band Displays the radio band used by the
Mesh Point. Select 2.4 GHz or 5 GHz. The default is 5GHz.
• MAC Addresses
- Wi-Fi 2.4 GHz Displays the MAC address of the 2.4 GHz
wireless interface.
- Wi-Fi 5 GHz Displays the MAC address of the 5GHz
wireless interface.
- Guest Wi-Fi 2.4 GHz Displays the MAC address of the
guest 2.4 GHz wireless interface.
- Guest Wi-Fi 5 GHz Displays the MAC address of the
guest 5 GHz wireless interface.
- Bluetooth Displays the MAC address of the Bluetooth
interface.
Actions
• Locate The Mesh Point emits a sound beacon for several
seconds.
• Reboot Restarts the Mesh Point.
• Support Info The Support Info option generates an
encrypted file to send to our support team. This file
contains AmpliFi configuration and runtime information
that can be used to answer any questions or troubleshoot
an issue.
18
Note: No passwords are stored in the file.
Page 23
AmpliFi User Guide Chapter 2: Overview
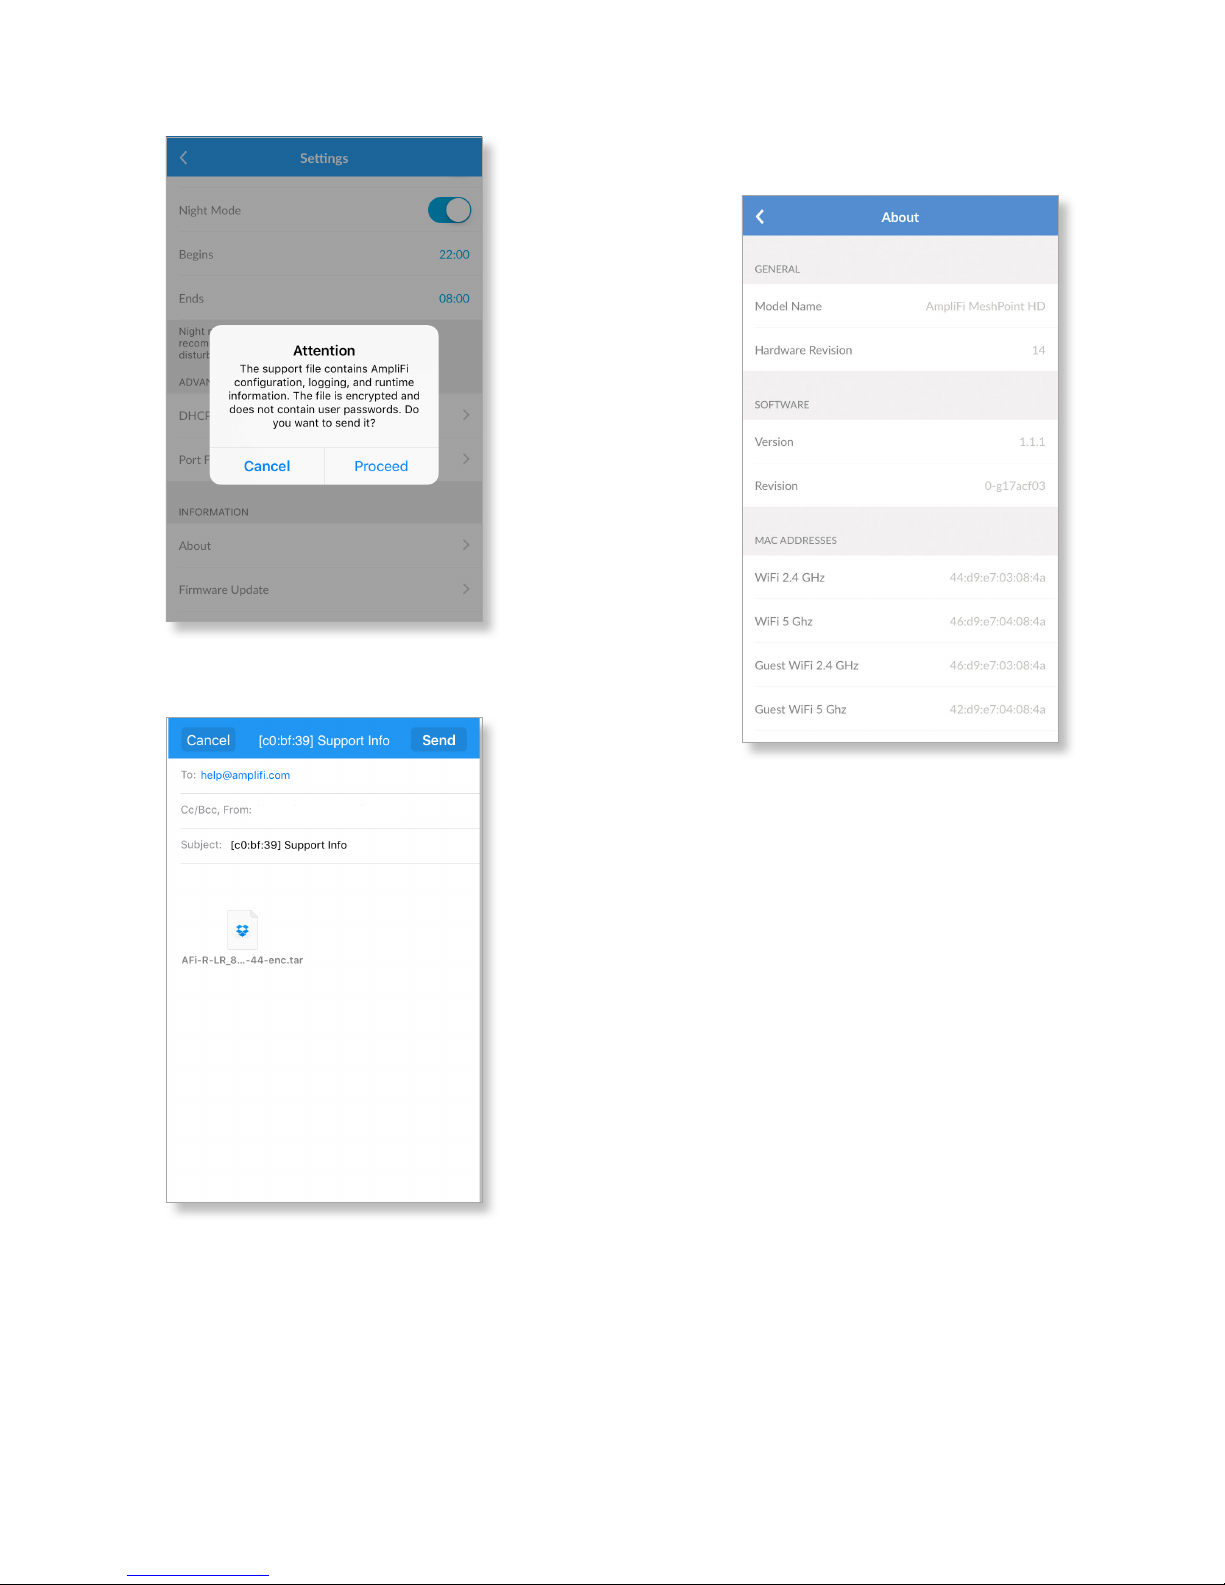
To generate the file, tap Proceed. To ignore creating the
support file, tap Cancel.
About
The About screen for the Mesh Point displays the model
name and version numbers of the device and software, as
well as the MAC addresses of the hardware interfaces.
When the file is ready to transmit, tap Send. If you want to
discard the file, tap Cancel.
app_user@ampli.com
19
Page 24

AmpliFi User GuideChapter 2: Overview
20
Page 25
Chapter 3: PerformanceAmpliFi User Guide
Chapter 3: Performance
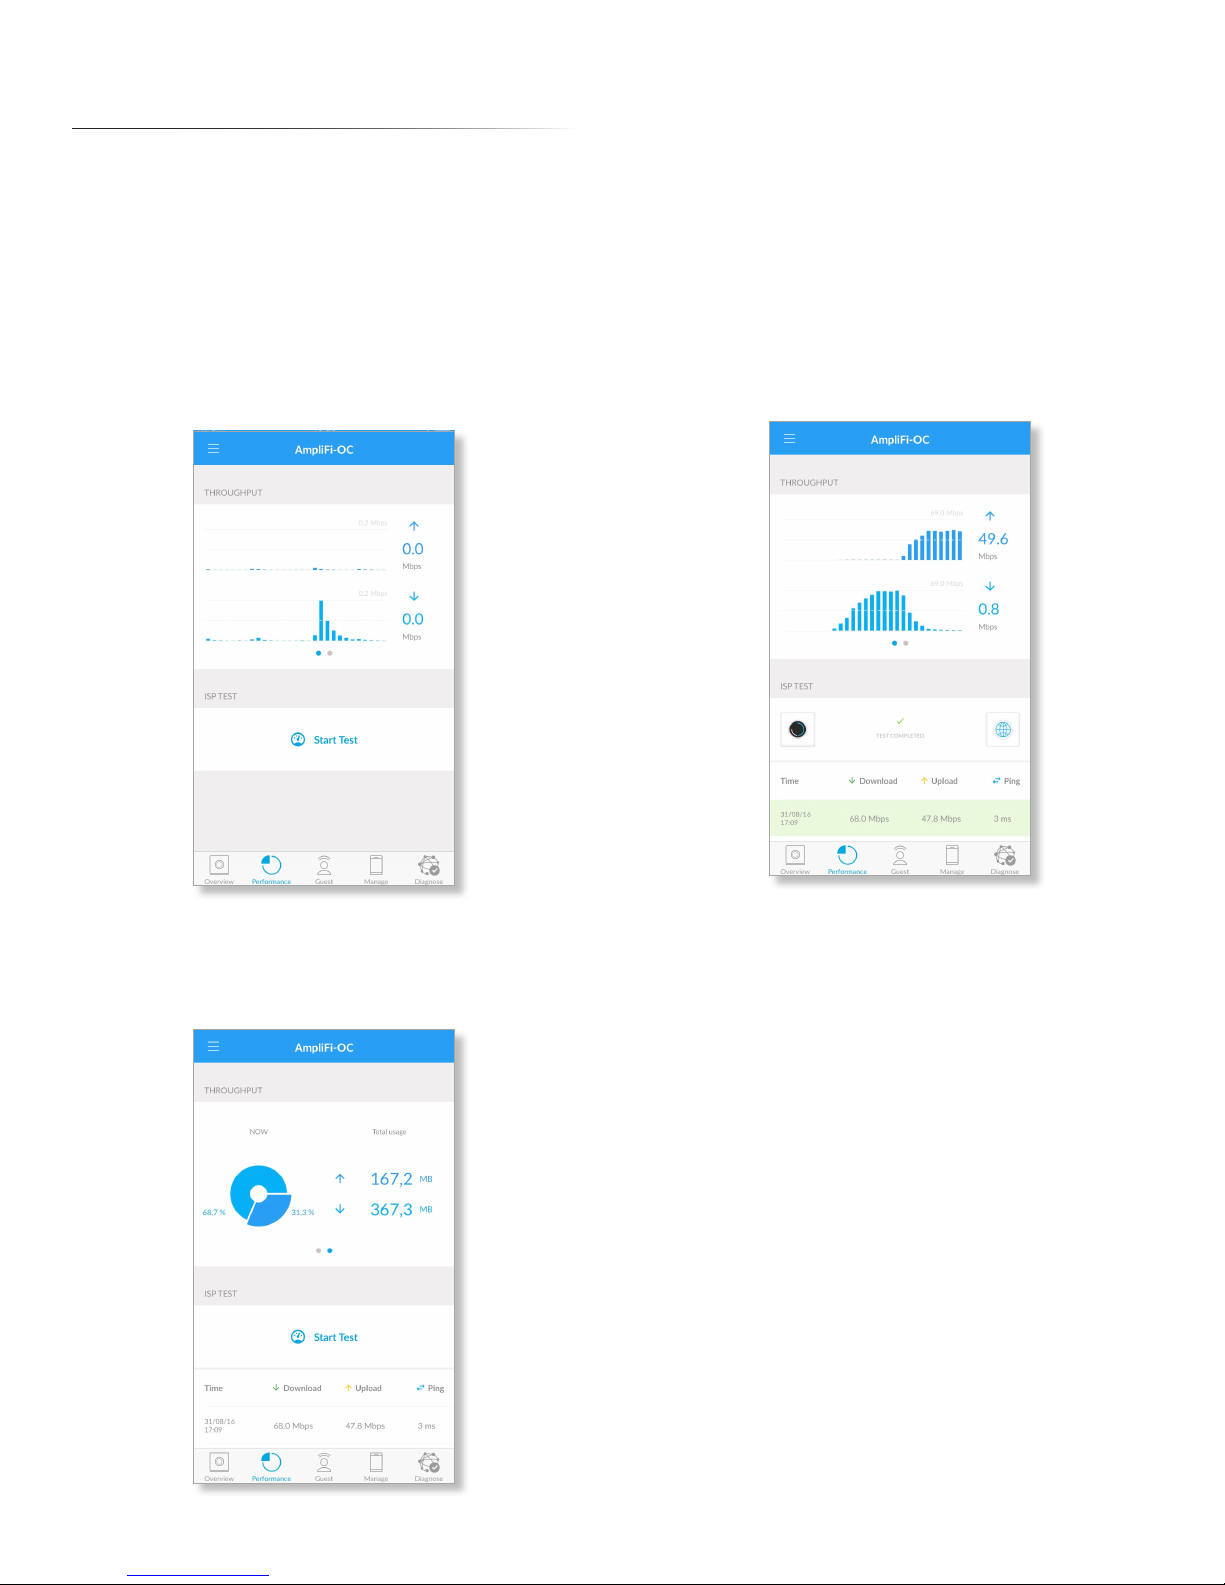
The Performance screen allows you to access the throughput
statistics and run a speed test. You can examine up‑to‑date,
second‑by‑second performance so you know how the Router
and Mesh Points are communicating with your devices.
Throughput
The initial view displays the Throughput bar graph. It shows
a recent history of upload and download throughput. The
maximum upload and download values are labeled in the
graph, and the current upload and download values are
displayed on the right.
ISP Test
You can run a speed test that will provide your download
speed, upload speed, and connection ping time. A history of
recent tests is displayed at the bottom.
Tap Start Test to run the ISP test. When the test is complete,
the following results will be displayed:
Time Displays the date and time of the speed test.
Download Displays the download speed.
Upload Displays the upload speed.
Ping Displays the duration of the average Ping round‑trip
time.
Swipe the bar graph to the left to display the Throughput
pie chart. It shows the percentages of current download and
upload data usage. The Total Usage column displays the total
amount of data uploaded and downloaded.
21
Page 26

Chapter 3: Performance AmpliFi User Guide
22
Page 27
AmpliFi User Guide Chapter 4: Guest
Chapter 4: Guest
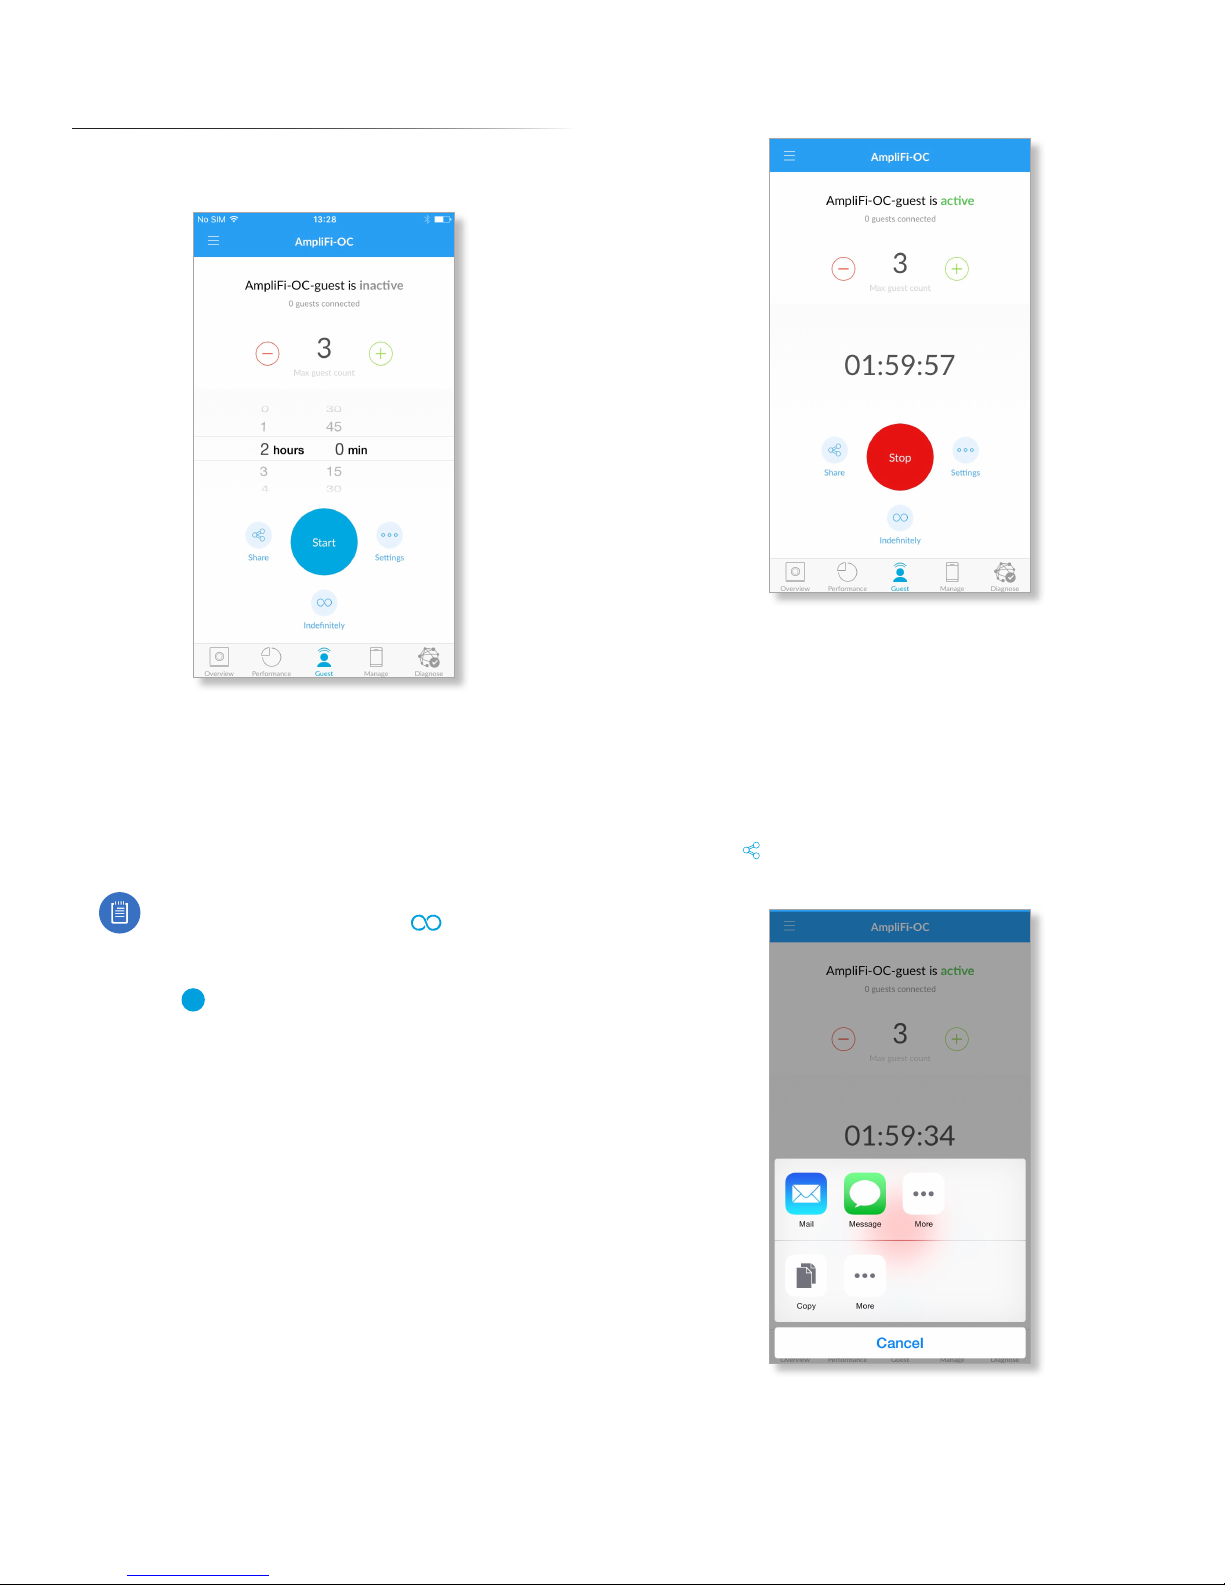
The Guest screen allows you to enable guest access to the
wireless network.
Quick Setup
To enable the guest network:
1. Select how many guests you want to allow, up to a
maximum of 10.
2. Set a time limit for how long you want them to have
access to it.
Note: If you want the guest network to remain
active without a time limit, tap Indefinitely
and the guest network will be immediately
enabled.
3. Tap Start
Guests simply connect to your wireless network named with
the -guest label. No password is required unless you enable
a guest password in the Wireless settings (tap Settings for
access).
As guests connect, the number of users connected will be
displayed in the app. Tap Stop at any time to turn off the
guest network.
Start
to activate the guest network.
Status and Settings
Active/Inactive Displays the status of the guest network.
Guests Connected Displays how many guests are currently
connected to the guest network.
Max. Guest Count Displays the maximum number of
guests allowed to connect at the same time.
Timer (Counting Down) Displays the amount of time
remaining before the guest network is disabled. The
countdown starts as soon as you tap Start.
Share Tap to share the guest network name or SSID. Tap
the appropriate option, or tap Cancel to exit.
23
Page 28
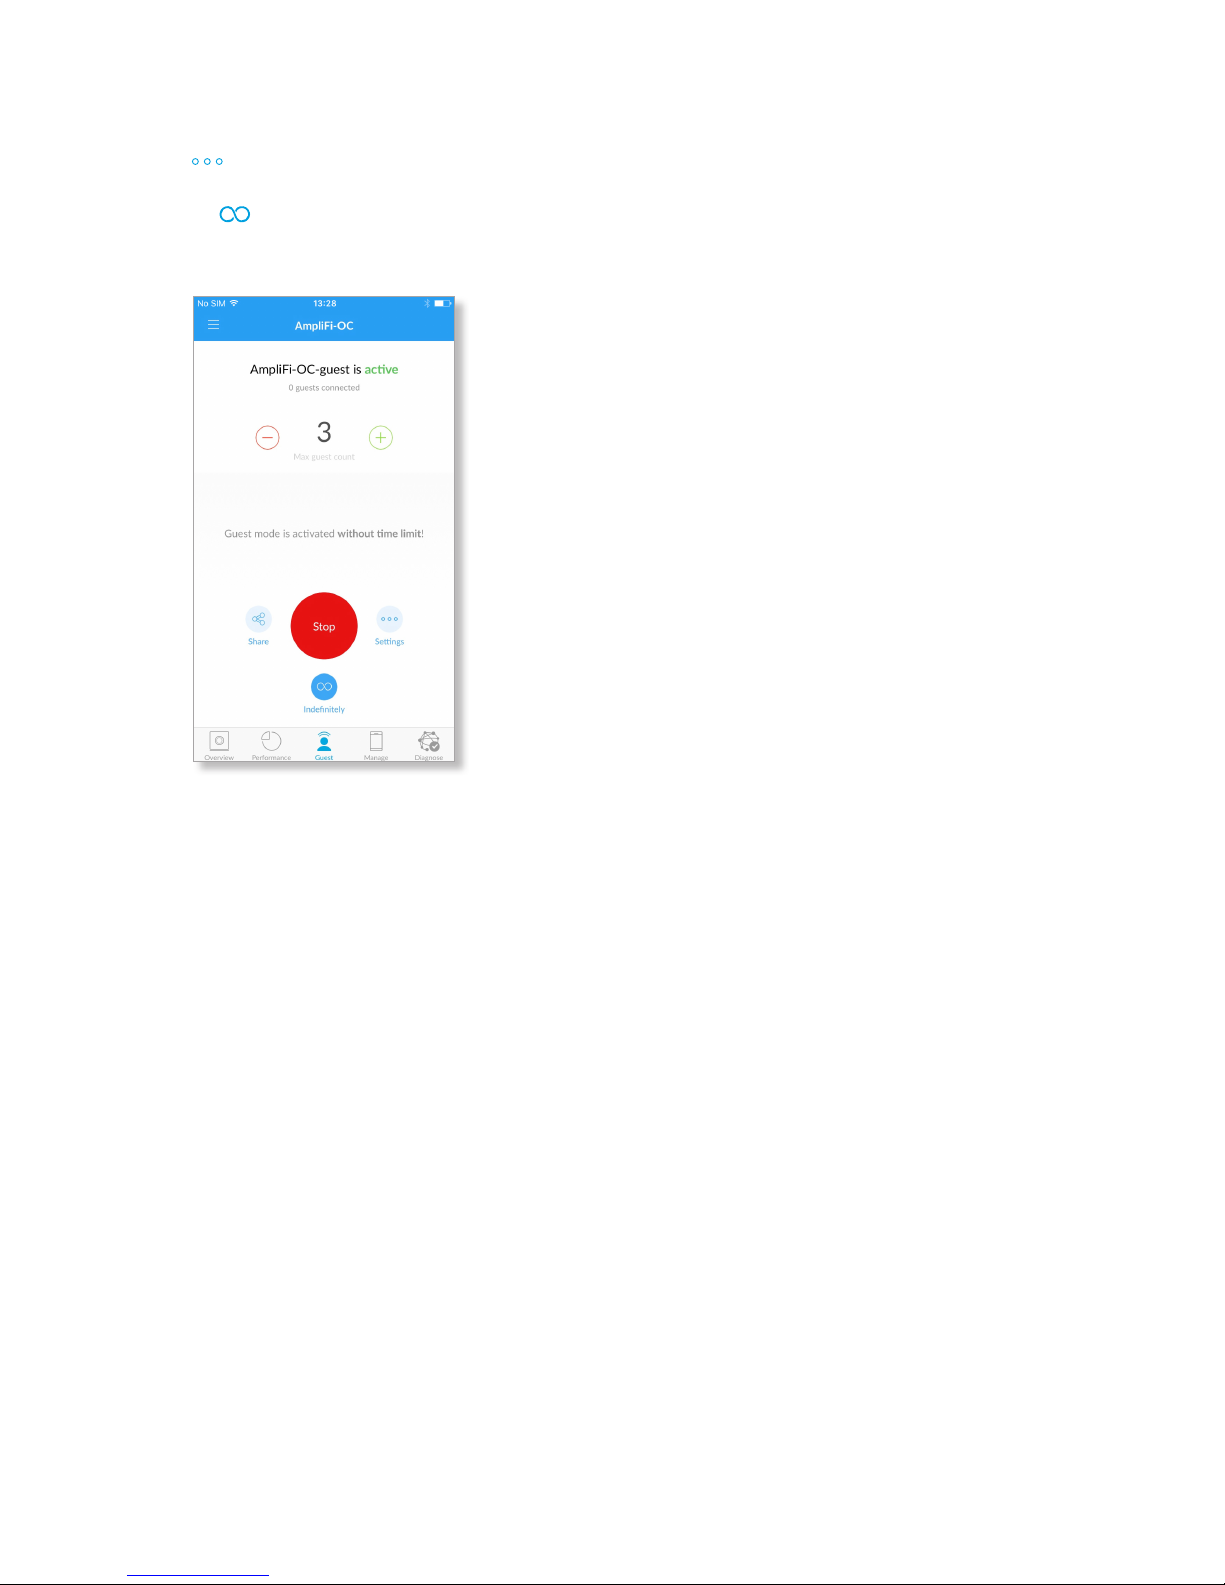
Start Tap to enable the guest network.
Stop Tap to disable the guest network.
Settings Tap to access the wireless settings for more
configuration options, including wireless security options.
Indefinitely Tap to remove the time limit for guest
access. If the guest network was inactive, you can tap this
option to immediately enable the guest network.
AmpliFi User GuideChapter 4: Guest
24
Page 29
AmpliFi User Guide Chapter 5: Controls
Chapter 5: Controls
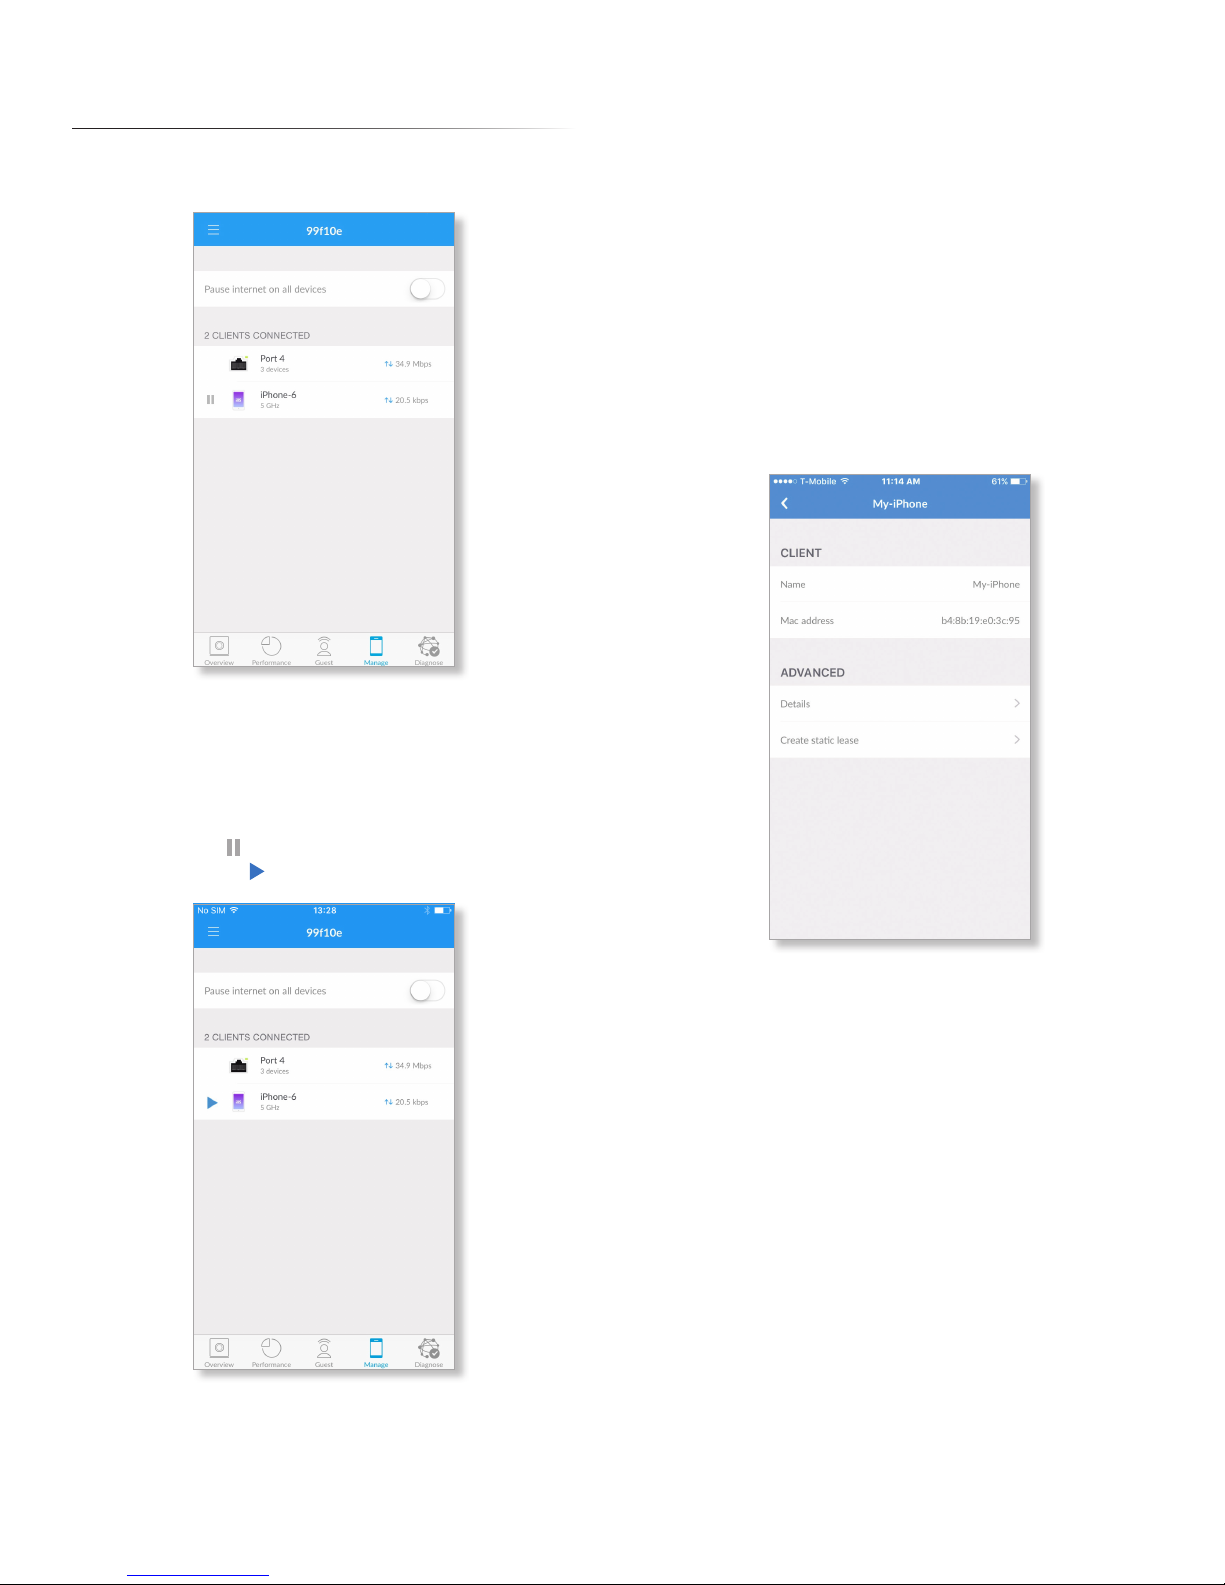
The Controls screen displays the list of clients currently
connected to the Router and Mesh Points.
(icon) Represents the client device connected to your
AmpliFi network.
Hostname Displays the descriptive name of the client
connected to your AmpliFi network.
(2.4 or 5) GHz Displays the radio band being used by the
client connected to your AmpliFi network.
(throughput) Displays the current amount of data being
uploaded and downloaded by the client connected to your
AmpliFi network.
Tap a client to display additional details.
Hostname
The Hostname screen displays basic information about the
client device.
The following is displayed:
Pause Internet on all devices Tap to pause the Internet
connection for all client devices.
(number of) clients Displays the number of client devices
connected to the Router or Mesh Point.
(pause/play) Tap to pause the Internet connection for
the client device. Tap to resume the Internet connection.
Client
• Name Displays the device name of the client currently
connected to your AmpliFi network.
• MAC Address Displays the MAC address of the client
currently connected to your AmpliFi network.
25
Page 30
AmpliFi User GuideChapter 5: Controls
Advanced
Client Details
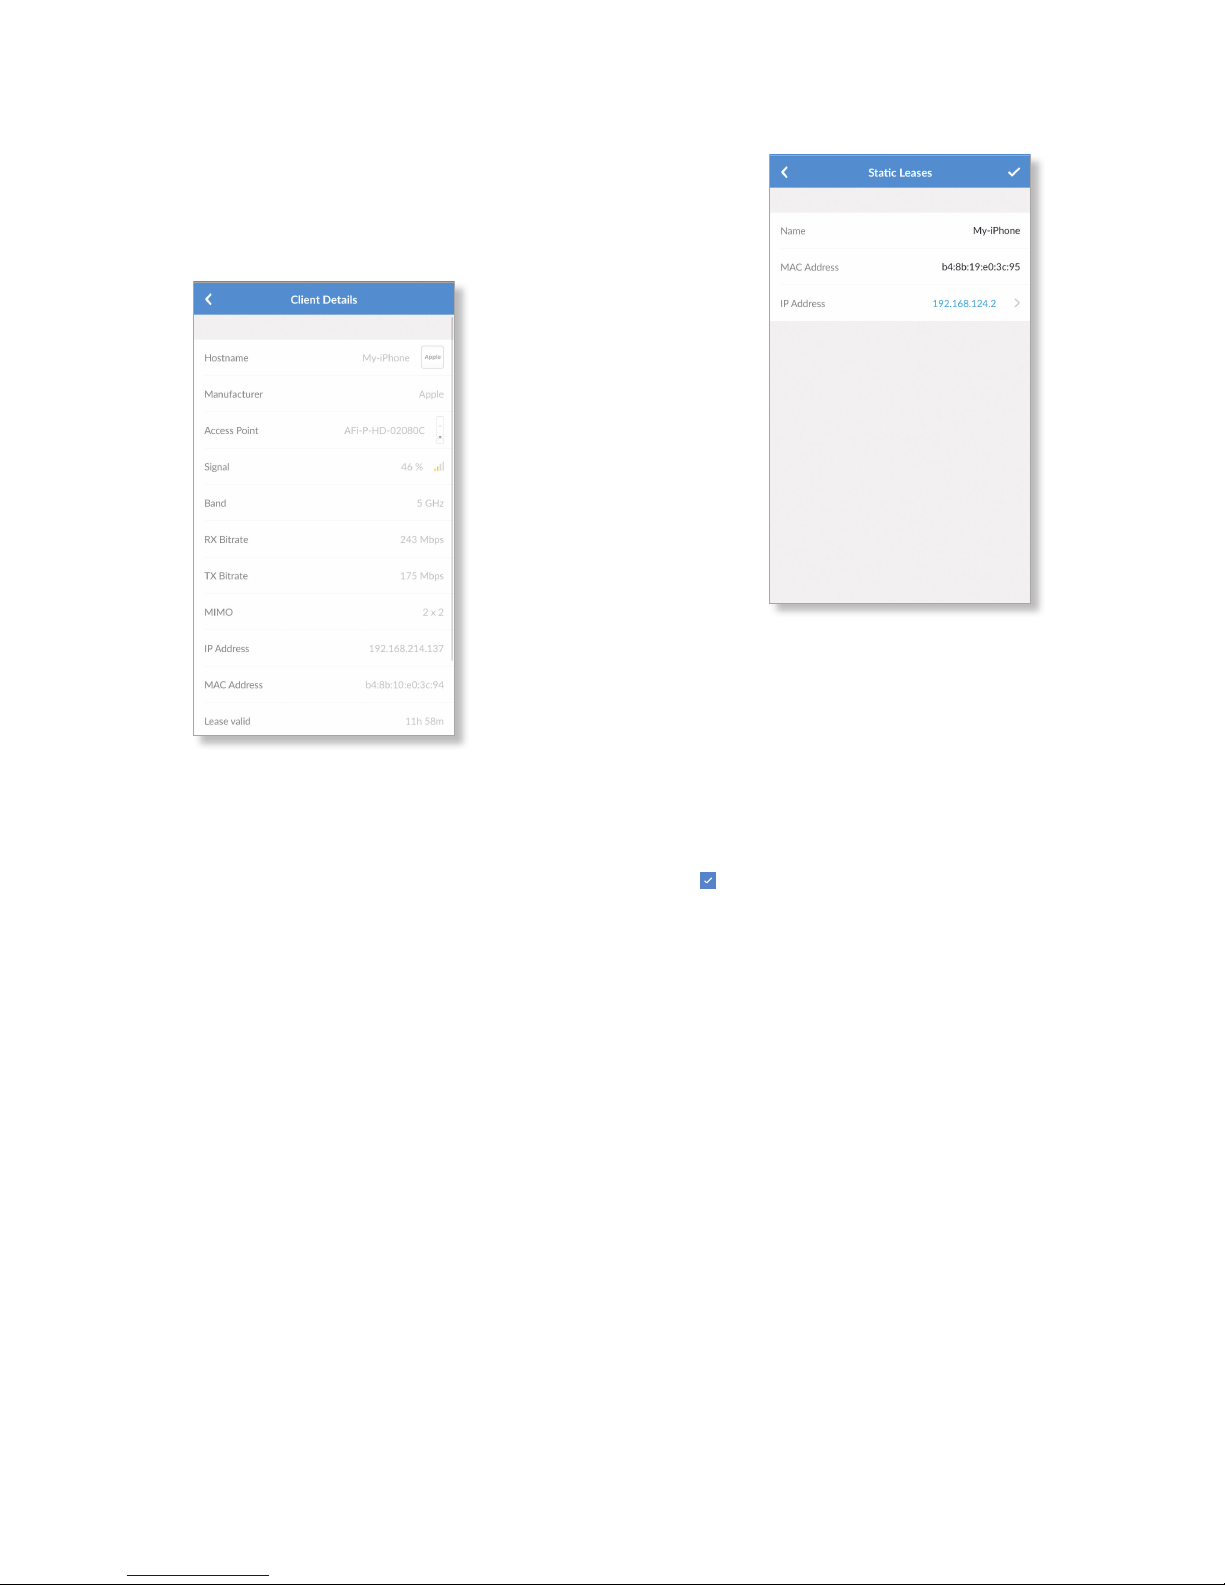
The Client Details screen displays device and status
information about the client conected to your network.
• Details Tap to display additional device and status
information about the client device.
- Hostname Displays the descriptive name of the client
device.
- Manufacturer Displays the name of the client device
manufacturer.
- Access Point Displays the name and icon of the Router
or Mesh Point, depending on which is connected to the
client device.
- Signal Displays the percentage of signal strength
between the client device and its access point (Router
or Mesh Point), as well as signal strength bars.
- Band Displays the radio band being used.
- RX Bitrate Displays the amount of receive (RX) data
transmitted per second.
- TX Bitrate Displays the amount of transmit (TX) data
transmitted per second.
- MIMO Displays the number of TX and RX MIMO
(Multiple Input, Multiple Output) streams used by the
client.
- IP Address Displays the IP address assigned to the
client device.
- MAC Address Displays the hardware identifier of the
client device.
- Lease valid Displays the duration of time its IP address
is valid for.
• Create static lease Tap to map a static IP address to the
client device.
- Name The hostname of the client device is
automatically displayed. If you want to change it, tap to
edit the name.
- MAC Address The MAC address of the client device is
automatically displayed. If you want to change it, tap to
edit the MAC address.
- IP Address The currently assigned IP address is
automatically displayed. If you want to change it, tap to
select another IP address.
Tap to save your changes.
26
Page 31
AmpliFi User Guide Chapter 6: Diagnose
Chapter 6: Diagnose
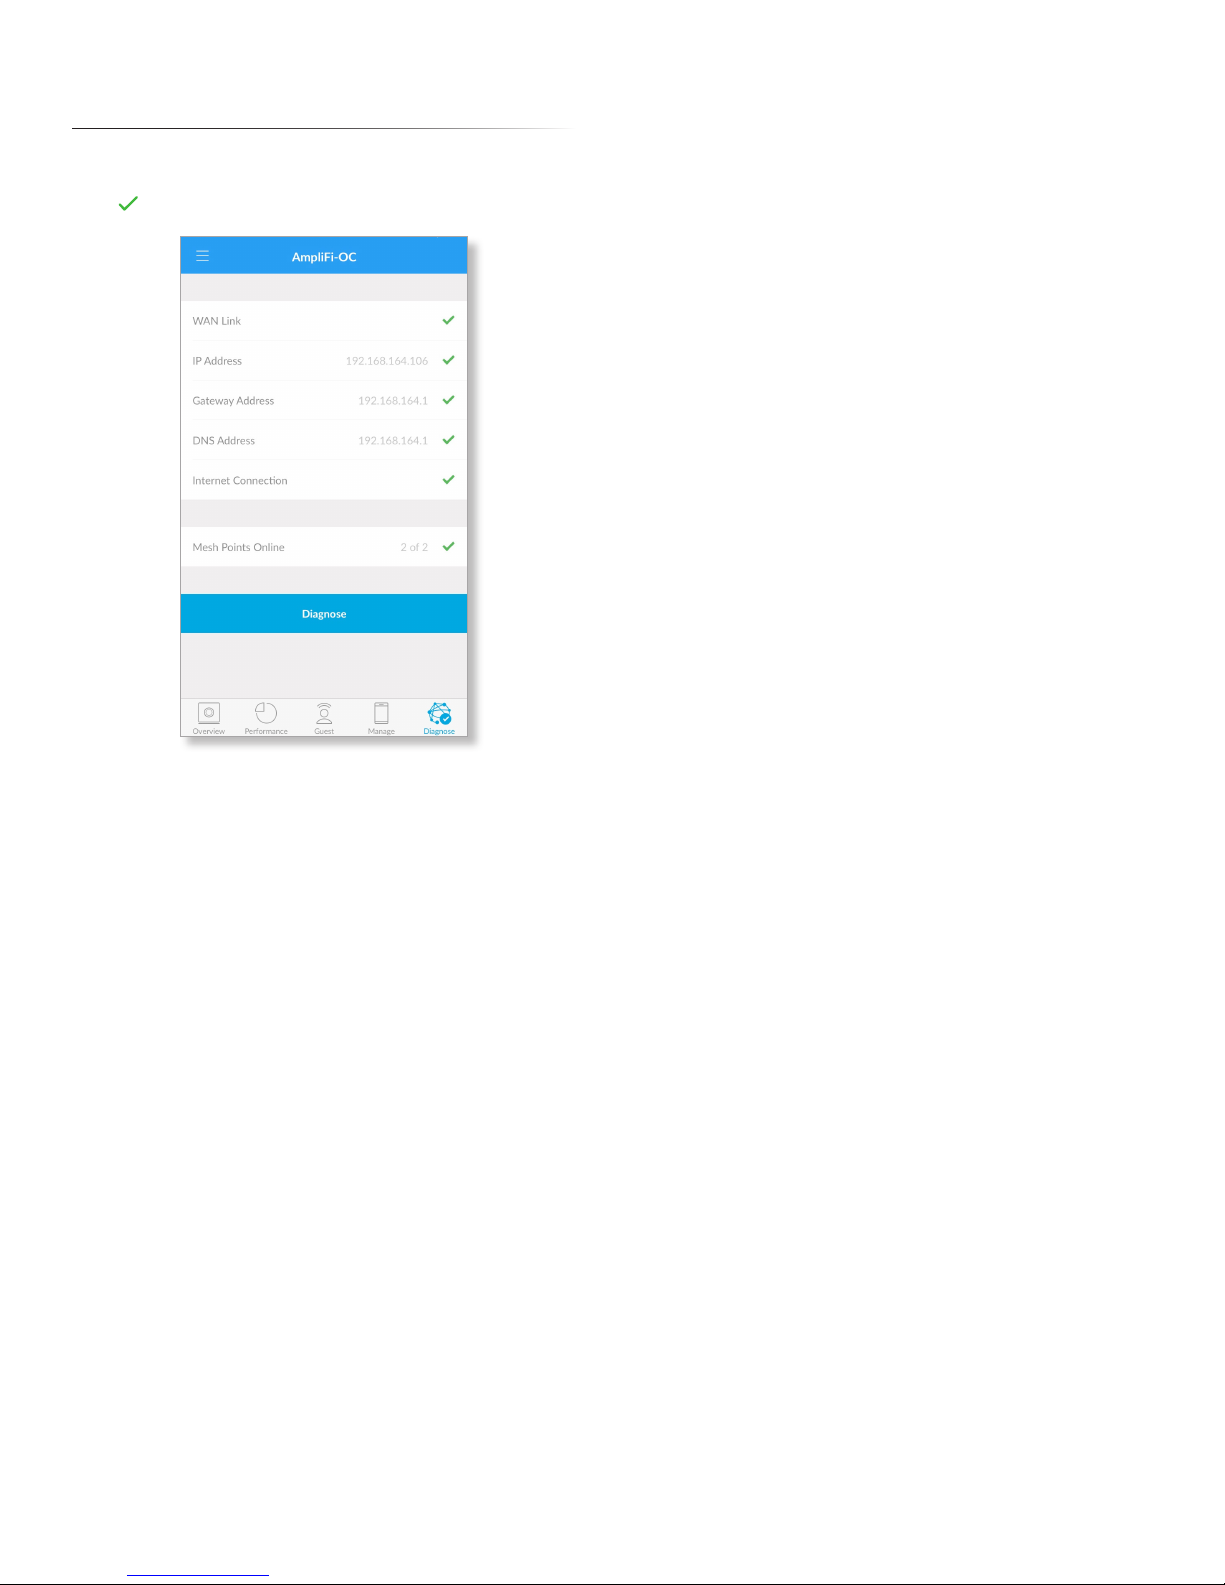
The Diagnose screen will check your WAN link, IP settings,
Internet connection, and Mesh Point status. A green check
mark indicates success.
WAN Link The connection between the Router and modem
is checked.
IP Address Displays the public IP address of the Router.
Gateway Address Displays the IP address of the service
provider’s gateway router.
DNS Address Displays the IP address(es) of the service
provider’s DNS server(s).
Internet Connection The connection to the service
provider is checked.
Mesh Points Online Displays the number of active Mesh
Points. If there is an issue, please ensure that each Mesh
Point is properly plugged into a power source.
Diagnose Tap to run the diagnostic checks again.
27
Page 32

AmpliFi User GuideChapter 6: Diagnose
28
Page 33

AmpliFi User Guide Appendix A: FAQs
Appendix A: FAQs
This appendix includes three types of frequently asked
questions:
• Getting Started
• Troubleshooting
• Advanced Features
Getting Started
How do I set up my Wi-Fi password?
By default, the AmpliFi administrator password (or device
password) and the Wi-Fi password match. During the initial
setup of the Router, you have the option to change your
administrator password. To change the Wi-Fi password,
follow these steps:
1. Open the AmpliFi app.
2. Tap the picture of the Router.
3. Tap Wireless.
4. Change your password and SSID (wireless network
name).
5. Tap to save your settings.
How do I set up and configure a guest
network?
1. Open the AmpliFi app.
2. Tap Guest.
3. Select how many guests, up to a maximum of 10, you
want to allow.
4. Set a time limit for how long you want them to have
access.
Note: If you do not want a time limit, tap
Indefinitely and the guest network will be
immediately enabled.
5. Tap Start. Your guest network is now active.
How do I configure my Mesh Points?
Your Mesh Points automatically pair (auto-pair) to your
Router. If you are having issues connecting your Mesh
Points, plug the Mesh Points into outlets that are physically
closer to the Router. After they have paired, change the radio
band from 5 GHz to 2.4 GHz by following these steps:
1. Open the AmpliFi app.
2. Tap the picture of a Mesh Point.
3. Tap Wireless.
4. Tap 2.4 GHz. This allows the signal to travel farther.
5. Repeat steps 2-4 for your other Mesh Points.
6. Move the Mesh Points and plug them into outlets at the
desired locations.
Where should I place my Router and Mesh
Points for best performance?
If possible, place the Router at the center of the home or
as close to the center as possible. We recommend placing
a Mesh Point on each side of the Router, halfway between
the Router and an area in the home where you have poor
connectivity.
Tip: The LEDs on the Mesh Points indicate signal
strength. All of the LEDs on a Mesh Point will light up
when it is receiving a strong signal.
How do I change my admin password?
To change the admin password, follow these steps:
1. Open the AmpliFi app.
2. Tap the picture of the Router.
3. Tap General.
4. Change your password.
5. Tap to save your settings.
What do the LEDs indicate?
• Initial configuration state When the Router is not
configured (not paired), the Router LED will be lit at the
maximum brightness setting, and the bottom LED of the
Mesh Points will flash.
• Initial configuration in progress While you are
configuring your Router, its LED will flash slowly, and the
bottom LED of the Mesh Points will flash.
• Wi-Fi not ready or connected / booting While the
Router is booting up, the Router LED will be lit at the
minimum brightness setting, and the bottom LED of the
Mesh Points will flash.
• Ready state The Router LED will be lit solid white at the
maximum setting or at the brightness level you choose in
the AmpliFi app. The Mesh Points will be lit based on the
signal strength that they are receiving from the Router.
• Locate state If you use the Locate feature in the AmpliFi
app, the Router LED will flash quickly, and all of the Mesh
Points’ LEDs will also flash quickly.
• Upgrading state While the Router is being upgraded,
the Router LED will increase in brightness and the Mesh
Points’ LEDs will light up one by one.
How do I adjust or turn off the lights on my
Router?
1. Open the AmpliFi app.
2. Tap the picture of the Router.
3. Tap General.
4. Use the Brightness sliders to adjust or turn off the LCD
screen and LED on the Router.
29
Page 34

AmpliFi User GuideAppendix A: FAQs
Can I use my current Internet service
provider?
Yes, the Router works with most ISPs (Internet Service
Providers) because it connects directly to the modem you
already have.
Does AmpliFi support fiber services, such
as Google Fiber or Fios?
Yes, you can use AmpliFi with a fiber service if you set up
the Router to use bridge mode. See the FAQ: “Does AmpliFi
support bridge mode?”
Does AmpliFi have a web interface?
Yes, you will be able to monitor and configure your AmpliFi
network using a web browser on your PC or Mac, as well as
any iOS or Android device.
Does AmpliFi support bridge mode?
Yes, AmpliFi supports bridge mode. Bridge mode is a
useful feature that can help you grow your network and/or
separate networks. Bridge mode allows you to use multiple
Routers on the same network by placing one of the Routers
in bridge mode and connecting it to a port on the other
Router.
Here are a few of the most common uses for bridge mode:
• Connect two Routers/AmpliFi to share network resources.
• Use AmpliFi as an additional access point on an existing
network.
• Use AmpliFi with a fiber service.
To set up bridge mode, perform these steps:
1. Open the AmpliFi app.
2. Tap the picture of the Router.
3. Tap Internet.
4. Tap Bridge Mode to enable it.
5. Confirm the use of bridge mode.
The Router will restart and apply the updated settings.
The Router is now in bridge mode.
Troubleshooting
6. If there is no Internet connection, contact your ISP
(Internet Service Provider) to find out if there are any
outages on their end or if your account information has
changed.
If the issue still persists, please click Chat with us at the
bottom of the help.amplifi.com screen for help.
The Router display doesn’t respond; what
do I do?
The Router features a smart LCD touchscreen display.
If the display becomes unresponsive or freezes in any way,
follow these steps:
1. Disconnect power from the Router.
2. Wait 10 seconds.
3. Connect power to the Router.
If the issue still persists, please click Chat with us at the
bottom of the help.amplifi.com screen for help.
The Router display has a lighting issue;
what do I do?
Perform these steps:
1. Check the lighting settings and your brightness level in
your AmpliFi app.
2. If the lighting issue persists, reset your Router to its
factory default settings. See the FAQ: “How do I reset my
Router to the factory default settings?”
If the issue still persists, please click Chat with us at the
bottom of the help.amplifi.com screen for help.
What do I do if I can’t see the Router in the
AmpliFi app?
Ensure that your device is connected to the correct Wi-Fi
network. (The Router can only be configured in the local
network; there is no cloud or remote access.)
How do I retrieve my password if I forgot it?
Currently there is no way to retrieve a custom password. You
can reset the password to the default by resetting the Router
to the factory default settings. See the FAQ below: How do I
reset my Router to the factory default settings?
My Internet is down; what do I do?
Follow these steps:
1. Ensure that the Router is properly plugged into a power
source.
2. Ensure that the modem and the Router are both
connected to each other via an Ethernet cable.
3. Disconnect power from the modem and Router.
4. Wait one minute and then connect power to the modem.
5. Wait one more minute and then connect power to the
Router.
30
How do I reset my Router to the factory
default settings?
Use the AmpliFi app on your smartphone or tablet device to
perform the following steps:
1. Open the AmpliFi app.
2. Tap the picture of the Router.
3. Tap General.
4. Scroll down to the bottom of the screen and tap Factory
Reset.
The AmpliFi app resets the Router and all online Mesh
Points.
Page 35

AmpliFi User Guide Appendix A: FAQs
Alternative method: You can manually reset each device to
factory defaults.
1. On the Router, use a straightened paperclip or similar
object to press the Reset button for approximately
10seconds until the LED turns off.
2. On each Mesh Point, use a straightened paperclip or
similar object to press the Reset button for approximately
10seconds until you hear a long beep. Repeat this with
each device, one by one.
Tip: If you manually reset the Router, then you must
reset the Mesh Points, too.
Advanced Features
Band and Channel Selection
As the number of devices in the connected home continues
to grow, understanding band and channel selection can
help you maximize your connected experience. To learn how
to set up your network to provide each device with the best
signal, you need to know how band and channel selection
works and how your Wi-Fi signal operates.
Band and channel selection are important when you want to
have the most efficient network possible. Your wireless data
communicates using a band of frequencies. Frequency is
measured in Hertz (Hz).
Our Routers and Mesh Points use two of these frequencies;
2.4 GHz and 5 GHz. Most devices can use either 2.4 GHz
or 5GHz. The difference between these frequencies varies
depending on your location and distance to the Router. The
2.4GHz frequency has a longer range but slower speeds;
its signal can penetrate many walls. The 5 GHz has a shorter
range but faster speeds; its signal is strong but is better
suited to open spaces.
Here are a couple of examples:
• In-home use If your home has many walls, then you
should use the 2.4 GHz frequency to cover the entire
home.
• Open-office use If you have no walls between the Router
and your devices, then use the 5 GHz frequency, which
is more efficient and provides a stronger signal with less
range.
There is no need to select a frequency for your Router in
the AmpliFi app because your Router uses both frequencies
automatically. Both 2.4 GHz and 5 GHz will be available
for your devices. On each of your devices, access the Wi-Fi
settings if you want to select the frequency to use. (This
is available only if your device supports both 2.4 GHz and
5GHz; some devices may support only one frequency.)
You can select the frequency used by your Mesh Points in
the AmpliFi app. The Mesh Points use the default frequency,
5 GHz, but can use 2.4 GHz instead if longer range is needed.
We highly recommend keeping the Mesh Points close
enough to the Router so the Mesh Points use the 5 GHz
frequency with more power.
Data Monitoring and Performance
Use the AmpliFi app to examine up-to-date,
second-by-second performance so you know how your
Router and Mesh Points are communicating with your
devices.
Data monitoring is the ability to keep track of the statistics
of your Router, moment by moment. The Router never stops
conveying this data unless it is interrupted by a reset or if
the Router is unplugged. You will be able to view how your
Router is currently performing.
Having access to your Router’s data is useful if your network
has issues or if you make changes to your network.
There are two ways to access your Router’s data.
Once your Router has been set up, use its touchscreen
display to view the following:
• Download and upload speeds
• Daily data download and upload totals
• Internet (WAN or Wide Area Network) and Router IP
addresses
• Date and time
You can also view this data using the AmpliFi app on your
smartphone or tablet. Perform these steps:
1. Open the AmpliFi app.
2. Tap Performance at the bottom of the screen.
3. The following are displayed:
• Throughput The dynamic graphs convey the
download and upload speeds.
• Speed Test You can click Start Test to initiate a speed
test that will analyze download and upload speeds and
ping test results. Every time you initiate a speed test, it
will record the date, time, and results for your network.
Port Forwarding
Port forwarding allows a device to get through your firewall
to reach a specific port on your computer. This allows a
device outside your network to connect to a device inside
your network. For example, port forwarding can be used to
connect two computers together for gaming or allow you to
check on a camera in the home while you are away.
To set up port forwarding, perform these steps:
1. Open the AmpliFi app.
2. Tap the picture of the Router.
3. Tap Port Forwarding.
4. Tap + to create a new service.
5. Enter a descriptive name for the service.
6. Enter the IP address of your gateway device, which can
be found here: Internet > Gateway Address.
7. Enter the appropriate port number in the Source Port
field.
8. Enter the appropriate port number in the Destination Port
field.
31
Page 36

AmpliFi User GuideAppendix A: FAQs
9. Select the appropriate protocol. This is typically TCP
(Transmission Control Protocol); however, some services
may require UDP (User Datagram Protocol).
10. Tap to save your settings.
Tip: You can usually find the port number
and protocol for your service in your device
documentation or during an online search.
DHCP Server
To manage the DHCP server settings, perform these steps:
1. Open the AmpliFi app.
2. Tap the picture of the Router.
3. Tap DHCP Server.
4. Configure the following:
• Range Select the IP address range to use.
• Subnet Select the subnet mask to use.
• Start Enter the starting IP address of the available
range.
• End Enter the ending IP address of the available
range.
• Lease Validity Select the duration of time for which IP
addresses are valid.
• Static Leases You can assign a fixed IP address to a
specific device. Select this option and then tap +.
• Enter a descriptive name.
• Enter the MAC address of the device.
• Select the IP address that you want to assign.
• Tap to save your static lease settings.
5. Tap Apply to save your settings.
Configuring a Guest Network: Advanced
Settings
When you set up your new Router, you may also want to
set up a guest network for friends and family. See the FAQ:
“How do I set up and configure a guest network?” on
page29.
If you want to configure advanced settings for your guest
network, then perform these steps:
1. Open the AmpliFi app.
2. Tap Guest at the bottom of the screen.
3. On the Guest screen, you can configure the following:
• Guest Wi-Fi You can enable or disable the guest
network.
• Guest Number You can change the number of guests
to allow at one time.
• Time Limit You can set a time limit for guest access, or
you can tap Indefinitely for no time limit.
4. Tap Settings.
5. The Wireless screen appears. Scroll down to the Guest
section. You can configure the following:
• SSID Name You can change the name of your guest
network.
• Security Select the type of wireless security you use:
None, WPA PSK, or WPA2 PSK. None is the default.
• Password If you selected WPA PSK or WPA2 PSK
security, then you can change the password.
• Verify Password If you change the password, enter it
again to verify it.
• Show Password Tap the control to display or hide the
password on this screen.
• Hidden SSID Tap the control to display or hide the
SSID (name of the guest network).
6. Tap to save your settings.
Band and Router Steering
Understanding band and Router steering may help you
understand how to configure your network for the best
possible speeds and connectivity.
Router steering directs devices to connect to the Router
instead of Mesh Points when possible (even if the Router
signal is weaker). Disabled by default, this feature may
provide faster speeds when enabled in some instances.
To enable or disable band and Router steering on the Router,
follow these steps:
1. Open the AmpliFi app.
2. Tap the picture of the Router.
3. Tap Wireless.
4. Scroll down. You can tap the Band Steering or Router
Steering control to enable or disable the option.
5. Tap to save your settings.
32
Page 37
AmpliFi User Guide Appendix B: Contact Information
Appendix B: Contact
Information
24/7 Live Chat Support
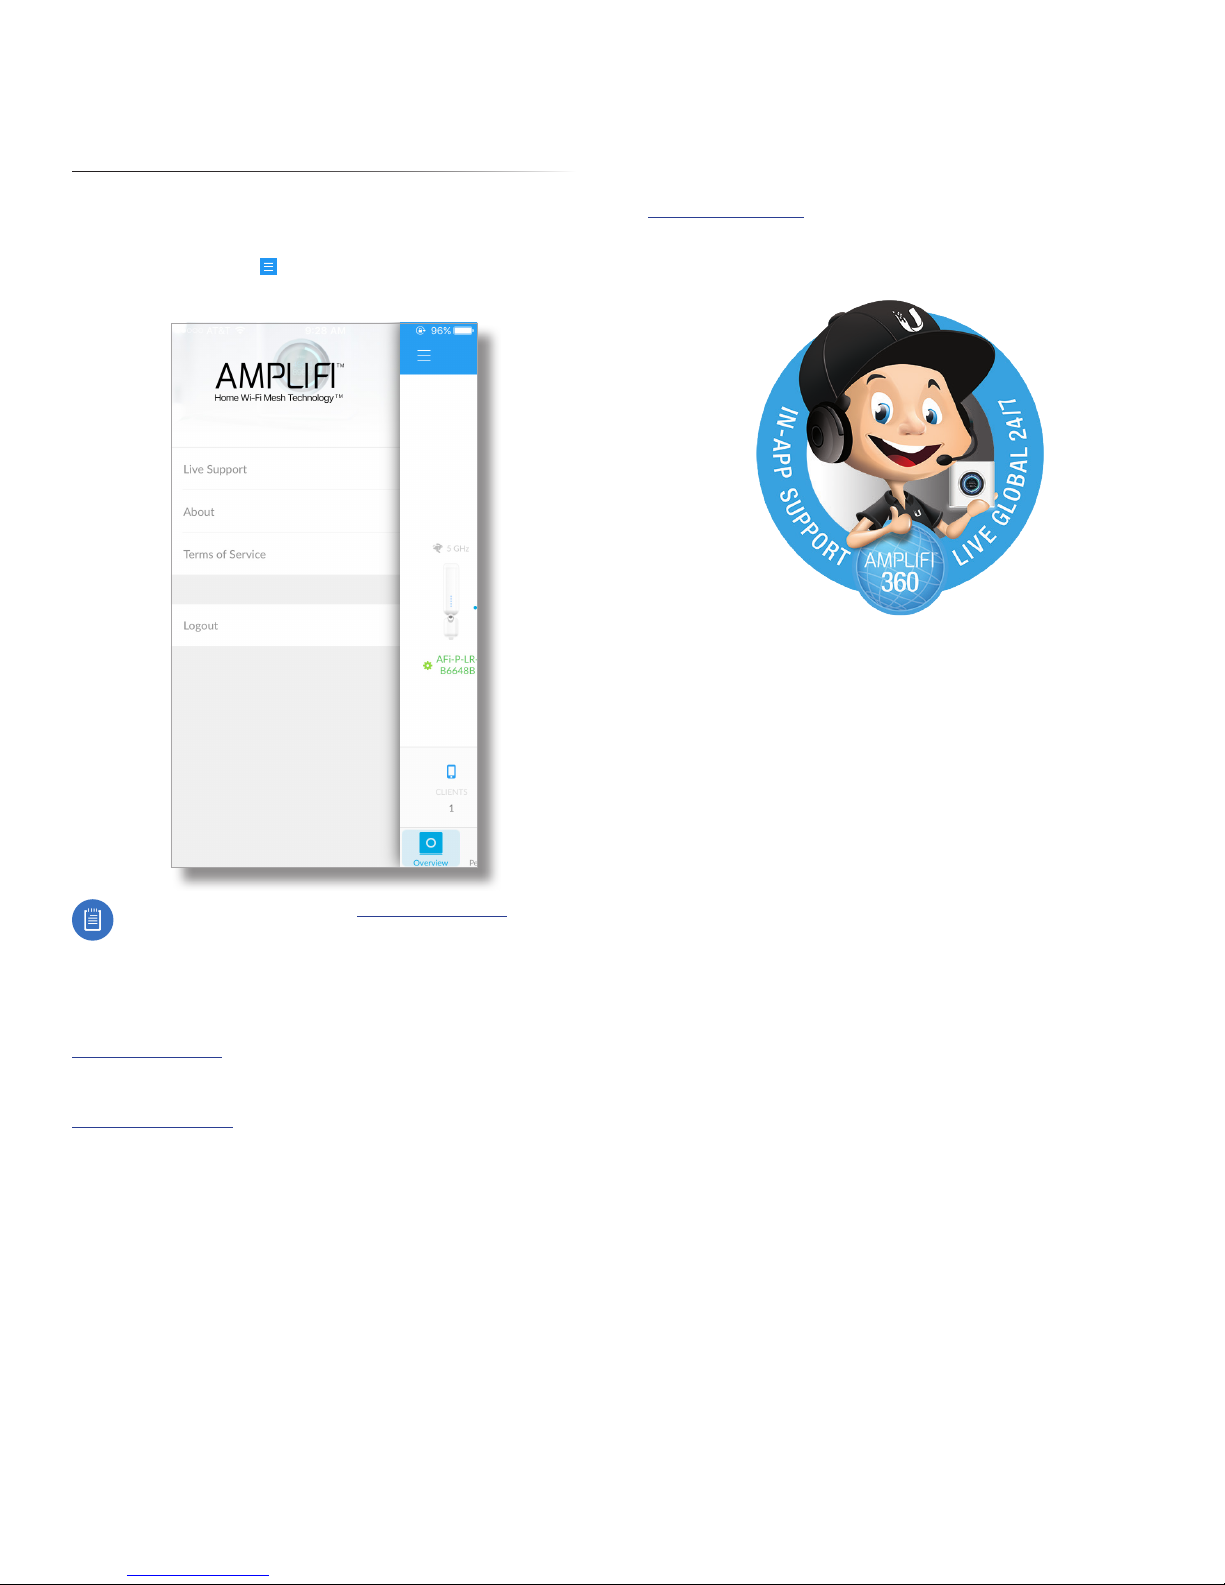
Live chat support is available within the app, 24 hours a day,
7 days a week. Tap the icon in the upper left of the app
and then tap Live Support.
Corporate Headquarters
U Labs
2880 Stevens Creek Blvd.
San Jose, CA 95128
www.amplifi.com
Live chat is also available at help.amplifi.com by
selecting Chat with us in the bottom right.
Support
Online
help.amplifi.com
Email
Call Us
9am - 5pm (MST)
Monday - Friday
+1 (855) 906-8585
AJ101316
33
Page 38

©2016 Ubiquiti Networks, Inc. All rights reserved. Ubiquiti, Ubiquiti Networks, the Ubiquiti U logo, ULabs, the ULabs logo, AmpliFi, and Home Wi-Fi Mesh
Technology are trademarks or registered trademarks of Ubiquiti Networks, Inc. in the United States and in other countries. Apple, the Apple logo, and iPhone are
trademarks of Apple Inc., registered in the U.S. and other countries. App Store is a service mark of Apple Inc. Android, Google, Google Play, the Google Play logo
and other marks are trademarks of Google Inc. All other trademarks are the property of their respective owners.
 Loading...