

Uberti 1883 User Manual
MOD. 1883 “BURGESS” RIFLE
A. Uberti S.p.A.
Via Artigiani, 1 - Gardone V.T. (Brescia) - ITALY
Instruction Manual
BEFORE REMOVING THE FIREARM FROM THIS PACKAGE,
READ & UNDERSTAND THE PRECAUTIONS IN THE
INSTRUCTIONS MANUAL
MOD. 1883 “BURGESS”
N. Code No. Q.ty Description
1 2600001 1 Frame
2 2600002 1 Hammer
3 2600003 1 Barrel 20" Cal.45
7 2600007 1 Cartridge Carrier
15 0202015 1 Sight
19 2600019 1 Trigger Spring
20 2600020 1 Mainspring
26 2600026 1 Triggerguard
35 2600035 1 Trigger Spring Screw
36 2600036 1 Mainspring Screw
39 2600039 1 Lever Pin Screw
50 2600050 1 Breech Block Piston Pin
53 2600053 1 Main Spring Screw
55 0242055 1 Rear Assembly
57 2600057G 1 Rough Butt Stock
57 2600057 1 Polished Butt Stock and Plate
58 0242058G 1 Rough Butt Plate
61 0242061 1 Rear Sight Ramp
62 0200062 3 Butt Plate Screw
63 2600063 1 Tang Screw
68 2600068G 1 Rough Forend 20"
68 2600068 1 Polished Forend 20"
78 2600078 1 Car tridge Stop
79 2600079 1 Extractor
87 2600087 1 Trigger
88 2600088 1 Plain Sear
89 2600089 1 Lever
91 2600091 1 Safety Bar
95 2600095 1 Firing Pin Spring
96 0230096 1 Magazine Spring 20"
97 2600097 1 Breech Block
98 2600098 1 Firing Pin
105 2600105 1 Camme Pin
107 2600107 1 Lever Pin
108 2600108 1 Extractor Pin
111 2600111 1 Safety Bar Pin
112 2600112 1 Hammer Stirrup Pin
113 2600113 1 Magazine Follower
114 0230114 1 Magazine Tube Plug
115 0200115 1 Hammer Stirrup
118 2600118 1 Magazine Tube 20"
119 0400692 2 Locking Screw
N. Code No. Q.ty Description
127 2600127 1 Ladle
128 2600128 1 Ladle Screw
167 2600167 1 Triggerguard Screw
205 2600205 1 Camme
216 0242216 1 Forend Protection
225 0202225 1 Forend Protection Bearing
237 2600237 1 Hook Lever Spring
238 2600238 1 Hook Lever Pin
245 2600245 1 Distance Ring
247 2600247 1 Breech Block Piston Spring
275 0202275 1 Magazine Tube Bearing
281 0202281 1 Magazine Tube Bearing Pin
283 0202283 2 Forend Protection Screw
316 2600316 1 Safety Spring
449 2600449 1 Lever Pin
542 2600542 1 Hook Lever
659 0850659 1 Lever Pin Peg
707 2600707 1 Ladle Spring
711 2600711 1 Cartridge Stop Spring
713 2600713 2 Cartridge Stop Pin
717 2600717 1 Firing Pin Screw
726 2600726 1 Breech Block Piston
738 2600738 1 Plug Frame Screw
752 0850635 1 Breech Block Piston Spring Pin
754 2600754 1 Ladle Pin
755 2600755 1 Ladle Support
756 2600756 1 Cartridge Carrier Stop Nut
758 0240284 1 Lever Sphere
759 2600759 1 Lever Sphere Spring
760 0238545 1 Cartridge Carrier Sphere
761 2600761 1 Cartridge Carrier Sphere Spring
ALTERNATIVES
3 2601003 1 Barrel 20" Cal.44/40
3 2604003 1 Barrel 25 1/2" Cal.45
3 2605003 1 Barrel 25 1/2" Cal.44/40
68 2604068G 1 Rough Forend 25 1/2"
68 2604068 1 Polished Forend 25 1/2"
96 0232096 1 Magazine Spring 25 1/2"
118 2604118 1 Magazine Tube 25 1/2"
SPECIAL SAFETY INSTRUCTIONS
1) Uberti lever action rifles should never be carried with a cartridge in the chamber.
2) Carrying this style of rifle with a cartridge in the chamber can result in an accidental discharge if the firearm is accidentally dropped or if the hammer is struck.
3) The lever locking mechanism is designed to prevent an accidental discharge.
However, no mechanical device is foolproof and, accordingly, these procedures
must be followed.
4) Due to the fact that in a tubular magazine rifle the cartridges are stacked one
behind the other, only factory ammunition should be used.
5) We recommend against using old ammunition in these rifles as primers, powder
and brass cartridge cases can deteriorate and cause damage to the rifle or injury
to the shooter or others.
6) Uberti assumes no liability for incidents occurring through the use of reloaded
ammunitions.
Use ONLY COMMERCIALLY loaded cartridges that have been loaded in accor-
dance with SAAMI-C.I.P. standards.
TO LOAD THE FIREARM
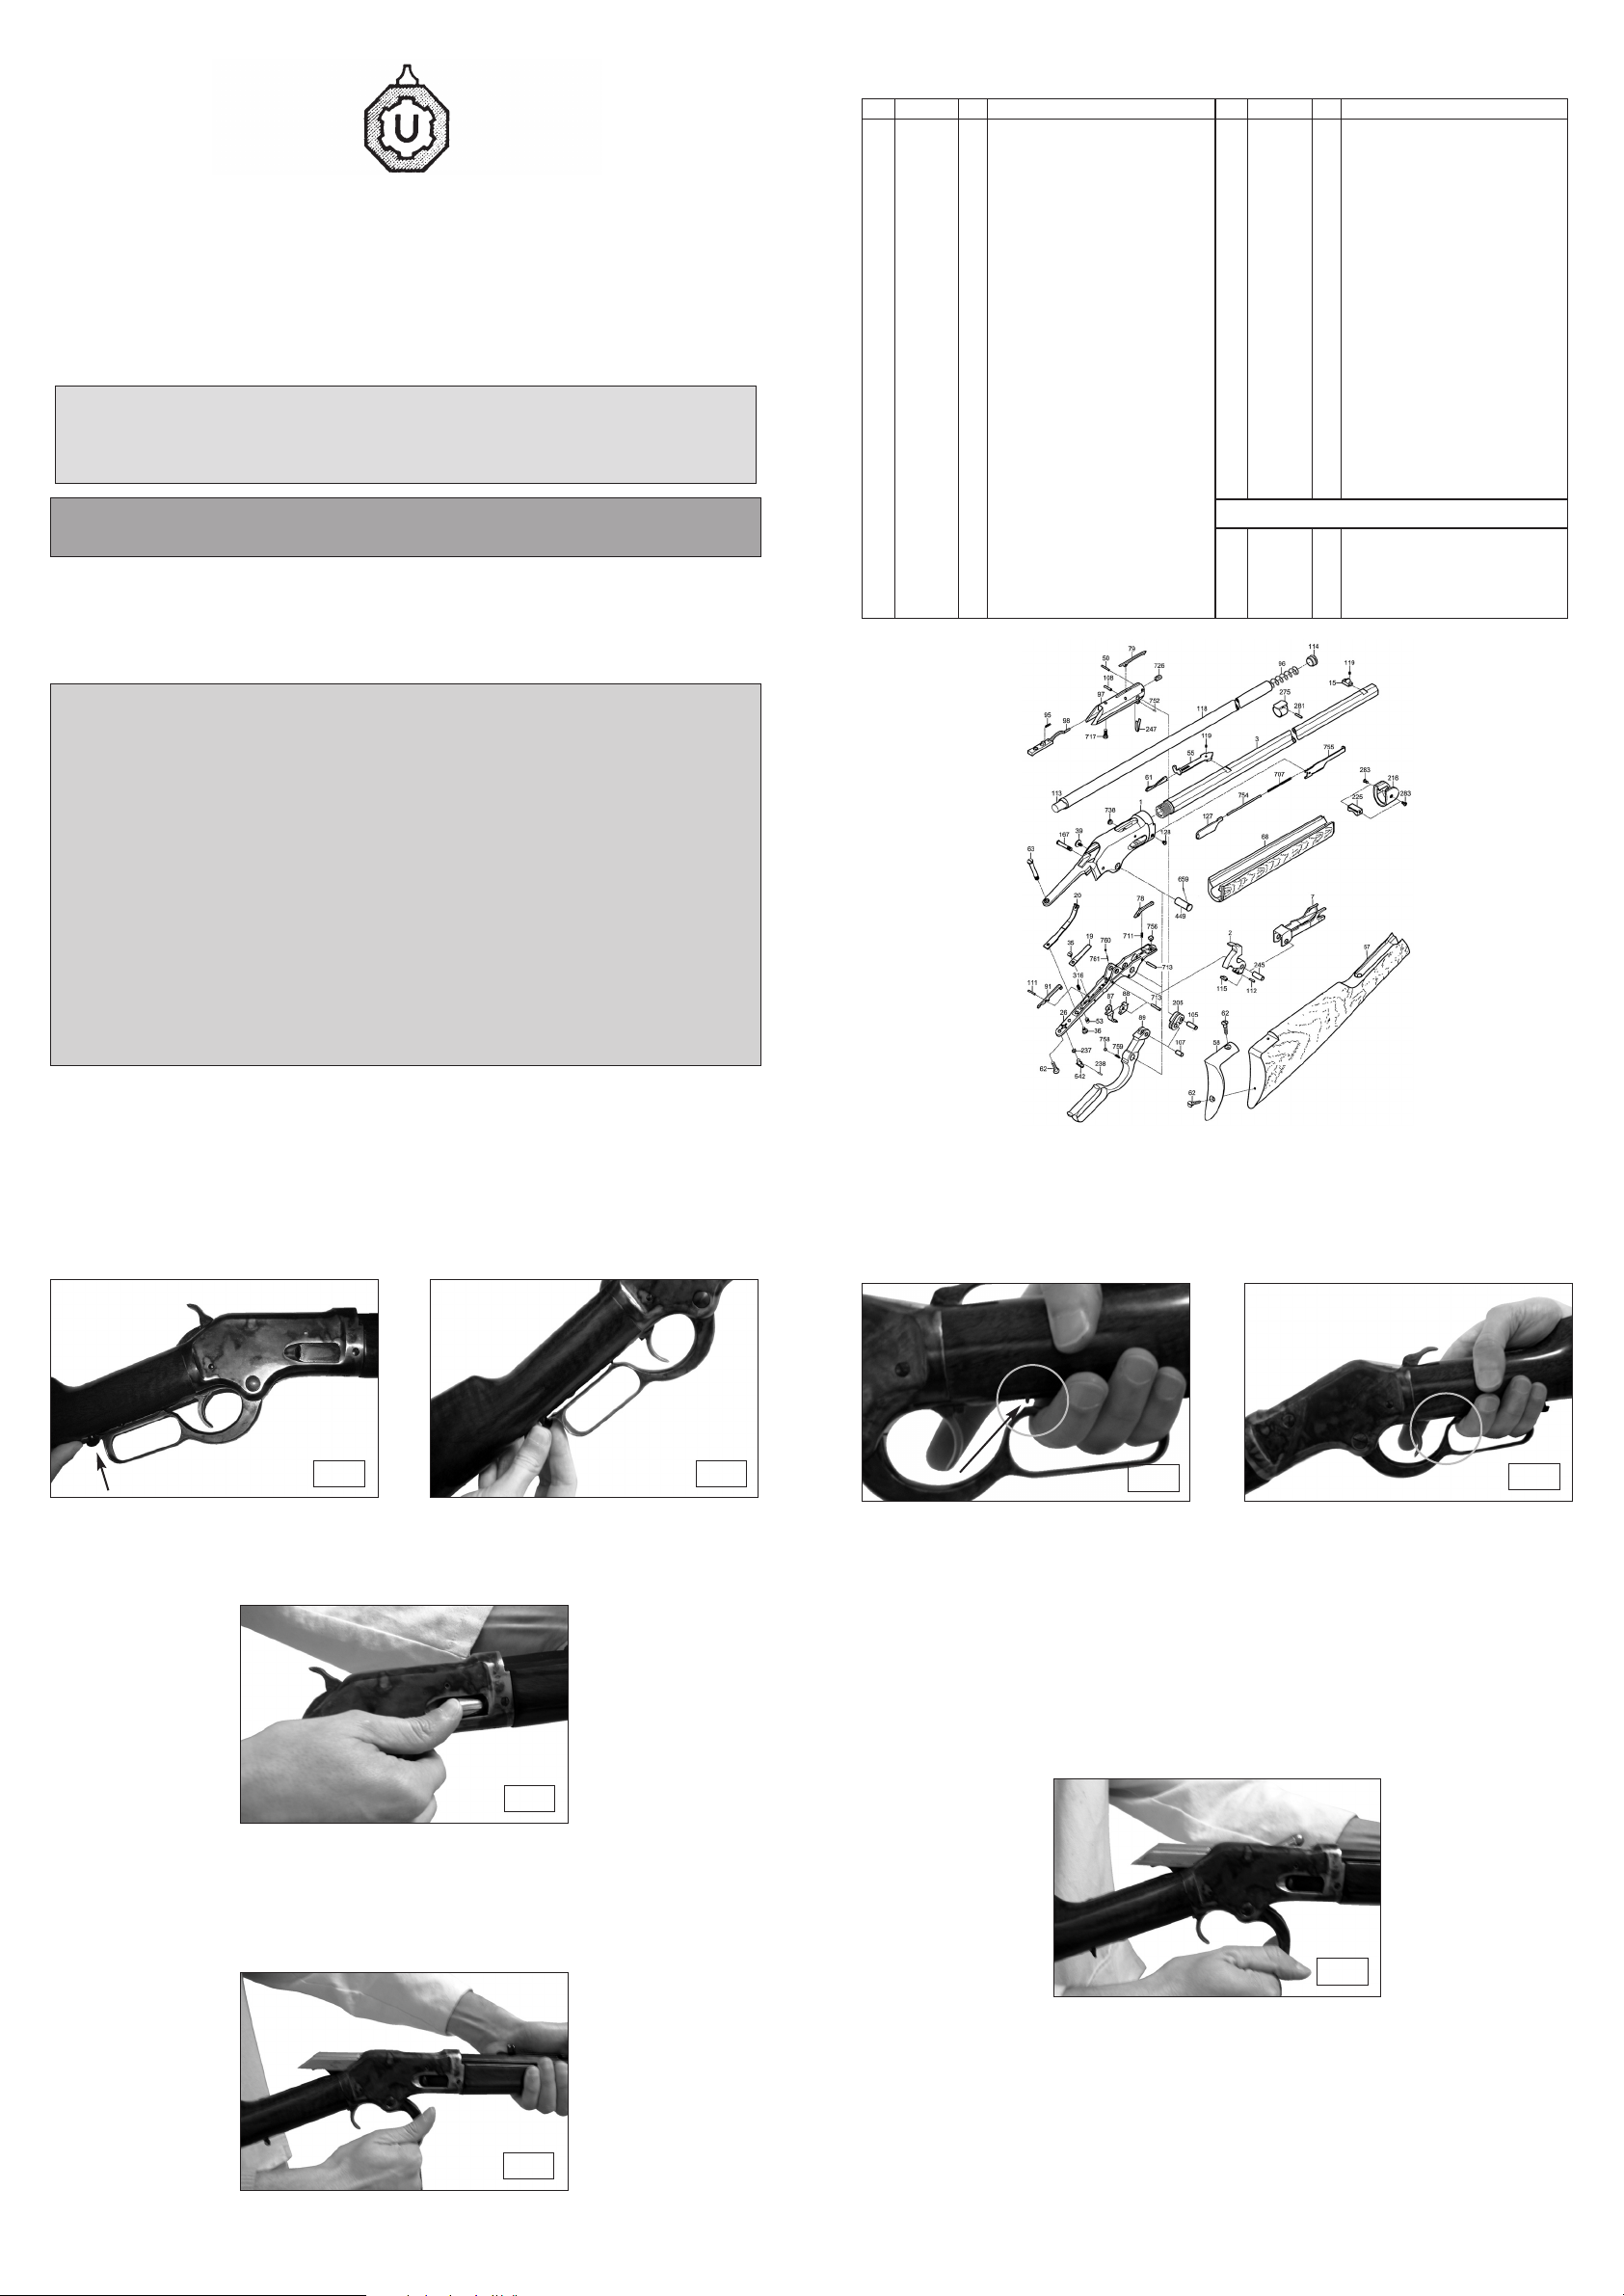
(1) Turn the lever locking latch (Fig. 1) to the release position (Fig. 2).
Releasing the latch should allow the lever to go down approximately 1/4”. Do not
push the lever forward.
(4) These firearms have been equipped with an additional safety system (Fig. 5),
which should prevent the firearm from firing until the lever is squeezed flush with the
frame. This safety, however, is not designed to replace basic safe firearms handling
(Fig. 6). Accordingly, NEVER touch the trigger until you intend to fire.
Fig. 1
Fig. 2
(2) Load the tubular magazine by pressing the cartridge into the ladle, which is located on the right side of the receiver. Push the cartridge forward and insert it into the
tubular magazine (Fig. 3).
Fig. 3
Do not insist on feeding cartridges in to the magazine when it is almost full. If you are
finding it difficult, just stop.
(3) When you are ready to actually fire the firearm, the lever is pushed forward as far
as it will go and is then pulled straight back. Your finger should NOT TOUCH THE
TRIGGER while manipulating the lever. (Fig. 4).
Fig. 5
Fig. 6
(5) After you have fired the first shot, the next cartridge is loaded by repeating step 3.
UNLOADING THE FIREARM
(6) To unload the firearm it is essential that the lever not be squeezed flush with the
frame, as doing so would disengage the safety lock.
(7) With the firearm pointed in a safe direction, place your fingers through the rear
portion of the loading lever. Be sure your first and second fingers are inside the
lever loop. DO NOT TOUCH THE TRIGGER. Then push the lever straight forward and
then pull it back. The cartridge that was in the chamber should be automatically ejected by the firearm and another cartridge from the magazine will be automatically
loaded into the firearm. (Fig. 7).
Fig. 7
Fig. 4
The rifle will now be fully cocked and will fire when the trigger is pulled. If the lever
does not go forward, release the loading lever latch by turning the small knob perpendicular to the rifle.
(8) Repeat step 7 until all cartridges have been ejected from the firearm.
After all cartridges have been ejected, cycle the action four or five more times as
described in step 7 as an added precaution to assure that all rounds were ejected.
(9) After step 8, move the lever to the forward position while visually inspecting both
the chamber and the carrier block, to confirm that no cartridges are still in the
firearm.
(10) Pull the lever to the rear, squeeze the loading lever flush with the frame and with
your thumb on the hammer, pull the trigger and with your thumb slowly lower the
hammer.
(11) We suggest, when the firearm is not in use, that the loading lever locking mechanism be left disengaged.
 Loading...