

Page 1

Page 2

Before using your machine, please
be sure to read the following
instructions.
IMPORTANT SAFETY INSTRUCTIONS
When using this machine, basic precautions should always be followed, including the
following:
SAVE THESE INSTRUCTIONS
To reduce the risk of electric shock: Always unplug this machine from the electrical outlet
immediately after using and before cleaning.
WARNING
To reduce the risk of burns, fire, electric shock, or injury to persons:
1. The machine should never be left unattended when plugged in. Unplug from outlet
when not in use, and before putting on or taking off parts.
2. Do not operate with blanket or pillow. Excessive heating can occur and cause fire,
electric shock, or injury to persons.
3. Supervision is necessary when this machine is used near children, or by or near invalids
or disabled persons.
4. Use this machine only for its intended use as described in this manual. Do not use
attachments not recommended by T-Zone.
5. Never operate this machine if it has a damaged cord or plug, if it is not working prop erly, if it has been dropped or damaged, or dropped into water. Call the T-Zone service
number for examination and repair.
6. Do not pull on or use the power cord as a handle.
7. Keep the cord away from heated surfaces.
8. Never operate the machine with the air openings blocked. Keep the air openings free
of lint, hair, and the like.
9. Never drop or insert any object into any opening.
10. Do not use outdoors. The machine is intended for home and indoor use.
11. Do not operate where aerosol (spray) products are being used or where oxygen is
being administered.
12. To disconnect, press the console OFF switch, turn the power switch off, then remove
plug from outlet.
13. The machine must be kept on level ground.
14. Do not use with wet hands or near water.
15. Do not move the machine if the power is on.
16. Do not use this machine within one hour of meals.
17. Do not use this machine for more than 10 minutes per session, unless following an
appropriate program.
18. There have not been enough studies done on the effects of Whole Body Vibration on
children. However since weight training is not supported for kids as their bodies are
still developing, we do not recommend Whole Body Vibration for children. Children
and pets should always be supervised when around Vibration Technology
machines.
19. Do not use the machine if you have a pacemaker, an implant, are
pregnant or have an existing medical condition. Please consult your
physician first. More information on contraindications is listed on page 13.
20. If you feel any distress or soreness abandon your exercise
immediately.
21. Should your machine malfunction, disconnect it from your power
source and call our service number, listed on page 3. Do not
attempt any repairs yourself.
DANGER
Page 3

Congratulations on your purchase of a VT-8 Vibration Technology Machine! This
advanced design is small and ergonomically designed, while maintaining a high level of
reliability and smooth noiseless functionality. You’ll love it!
Packaging: Retain all packing material as you unpack your VT-8 until you are certain
you have all components.
Components: The VT-8 components include the Vibration unit, handlebars, tool kit,
power cord and User’s Manual.
2 boxes:
Box 1: base, power cord, remote (needs 2 AAA batteries)
Box 2: handlebars: 3 pieces, 2 bottom handlebars connect to base; top handlebar
connects the 2 bottom handlebars
Tool kit:
4 screws/washers to connect side handlebars to base (Allen key provided)
4 screws to connect top handlebar to side handlebars (screwdriver provided)
wrench to tighten any loose bolts
NOTE: To facilitate the assembly, tighten the screws and bolts completely only when the
assembly is completed.
1
Remove the machine from the packaging.
2
Connect the plug to an electrical outlet, and
press the red switch on the back of the base
to turn on the machine.
The handlebars are optional with the machine. If you choose to use them, do the
handlebar instructions on the next page right after step 1 then return to step 2.
3 4
Use the wrench to tighten any loose bolts
on the bottom of the base.
Place on a level surface, and if necessary,
level the machine by adjusting the feet.
Page 4

2
Handlebar Instructions
The instructions below for the handlebars are OPTIONAL, meaning you can
put the handlebars on if you want them for more stability and balance, or
leave them off for versatility of positions, to suit small spaces or for easier
storage. If you choose to use the handlebars, do the instructions below
before step 2.
A
Remove the handlebars and tool kit from
the packaging.
C
Put the assembled handlebar onto the
base supports.
Note Re-tightening of screws and bolts may be required every 3-6 months, depending on use.
B
Attach the top handlebar piece loosely to
the side handlebars using the four screws
and screwdriver.
D
Use the Allen key in the tool kit to attach the
handlebar to the base with the 4 washers
and 4 bolts.
You are now ready to start using your VT-8!
Page 5

Troubleshooting
No Control Panel display
8
3
Service and Maintenance
Careful maintenance not only helps you stay safe but extends the life of your machine.
Please follow these basic guidelines:
Check and retighten screws when required
Keep away from exposed areas and excessive heat
Clean the machine with a soft cloth after use
Switch off the VT-8 when not in use
For service, call:
Canada: 416 285 6055
Please refer to the back cover of this booklet for further information on your warranty.
The machine must be grounded. If it should malfunction or break down, grounding provides
a path of least resistance for electric current to reduce the risk of electric shock. The machine
is equipped with a cord having an equipment-grounding conductor and a grounding plug.
This plug must be plugged into an appropriate outlet that is properly installed and
grounded in accordance with all local codes and ordinances.
DANGER – Improper connection of the equipment-grounding conductor can result in a risk
of electric shock. Check with a qualified electrician or serviceman if you are in doubt as to
whether the machine is properly grounded. Do not modify the plug provided with the
machine – if it will not fit the outlet; have a proper outlet installed by a qualified
electrician.
This product is for use on a nominal
120-V circuit and looks like the plug
illustrated below. Make sure that the
machine is connected to an outlet
having the same configuration as the
plug. No adapter should be used.
Page 6
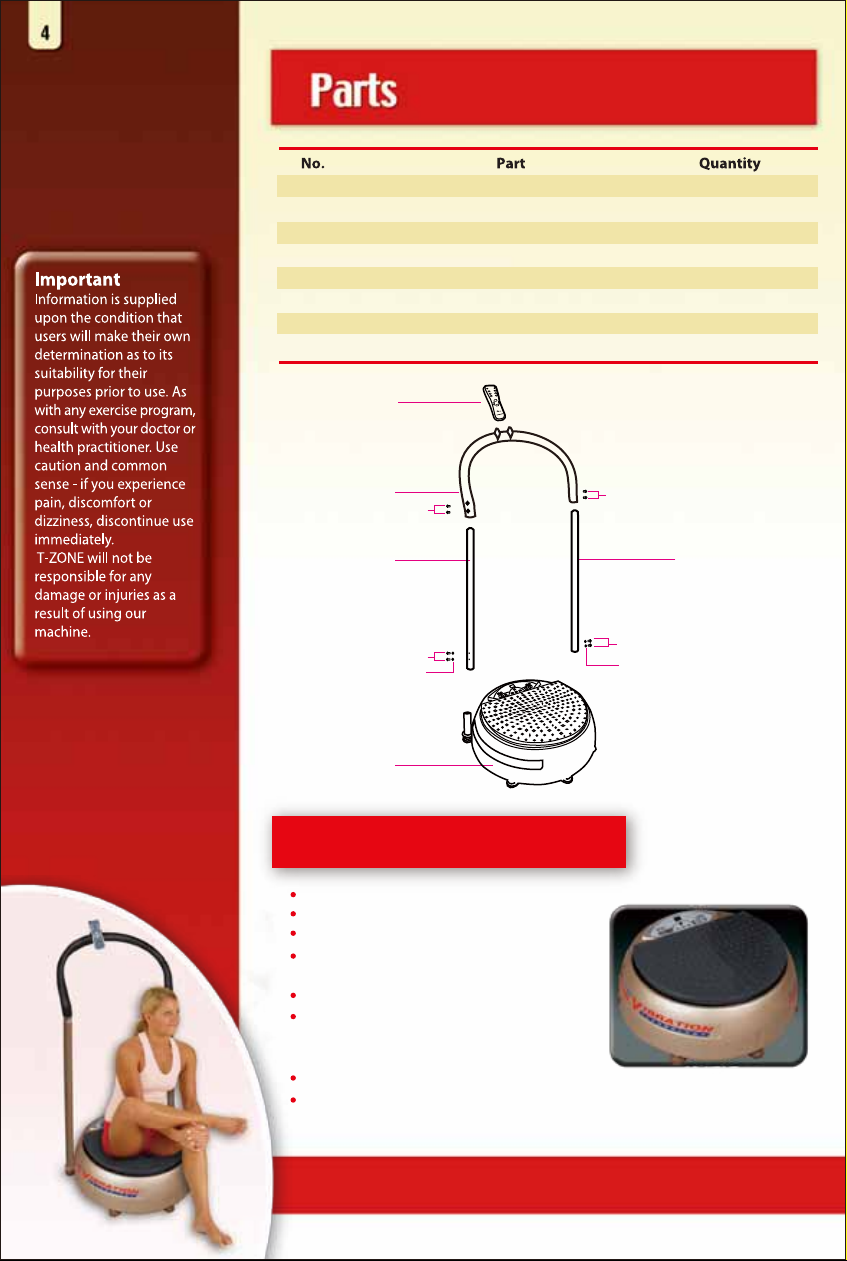
1
2
3
4
5
6
7
8
handlebar support bolts
handlebar support washers
8
base
left handlebar
handlebar top
right handlebar
handlebar screws 4
remote controller
1
4
4
1
1
1
1
6
8 x 2
5
2 x 2
3 x 2
1
VT-8 FEATURES
VT-8 FEATURES
Removable handlebars
Ergonomic design
Remote Control operation
LED screen - displays Time, Speed or
Program
5 pre-set programs
50 speed adjustments, appropriate for
different fitness levels, including strength
exercises and massage
Overload protection
High performance motor
8 x 2
7
2 x 2
3 x 2
Page 7
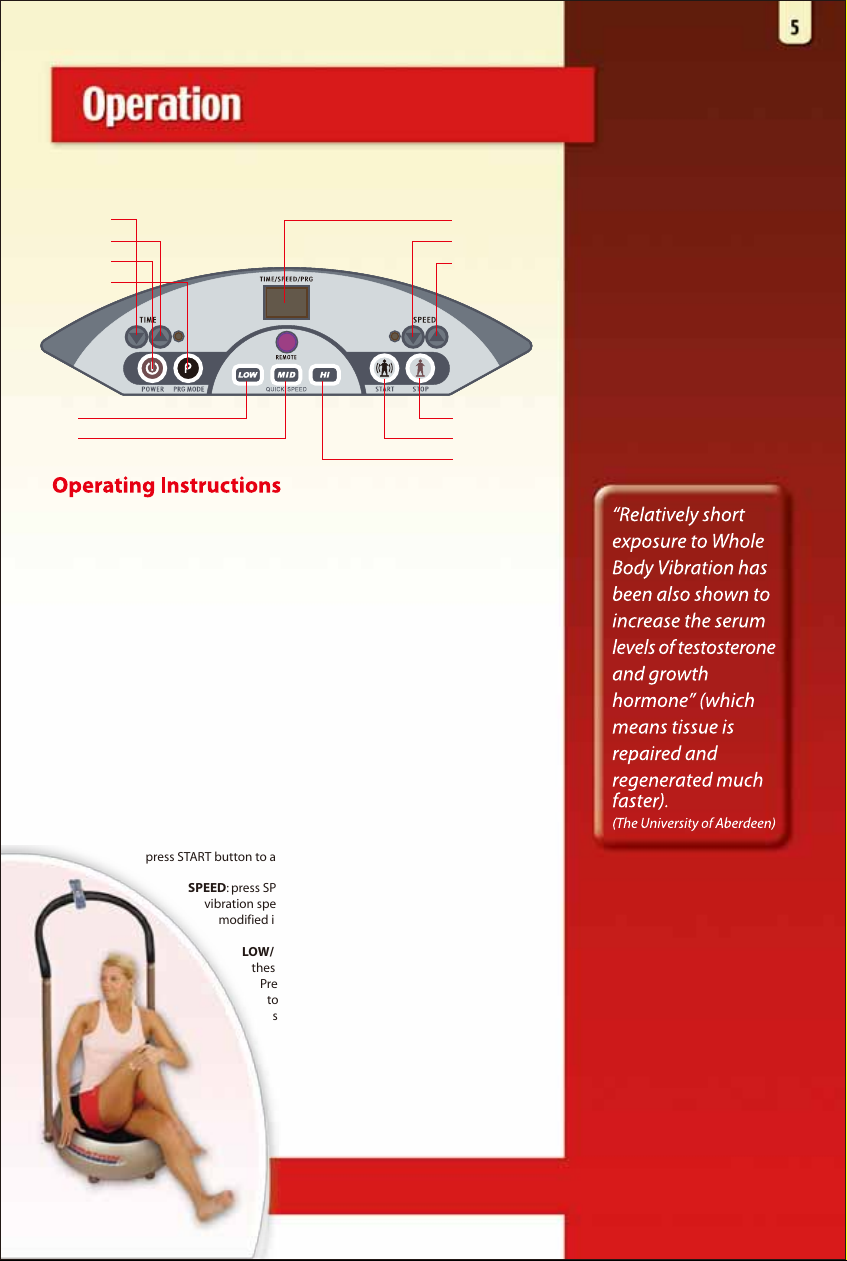
Control Panel Description
TIME DOWN
TIME UP
POWER
PROGRAM
LOW
MED
To reduce the risk of electric shock, the machine has a polarized plug (one blade is
wider than the other). This plug will fit in a polarized outlet only one way. If the plug
does not fit fully in the outlet, reverse the plug. If it still does not fit, contact a qualified
electrician to install the proper outlet. Do not change the plug in any way.
LED SCREEN
SPEED DOWN
SPEED UP
STOP
START
HI
POWER: press this button to power on/off the machine
START/STOP: press this button to activate/stop the machine
The machine can be operated in Program Mode or Manual Mode.
PROGRAM MODE: power on (POWER button) the machine; press PRG MODE to select
program mode (selecting 1 of 5 pre-set programs), and then press START button to
activate the machine. P1, P2, P3, P4 and P5 are the five pre-set programs (speed cannot
be modified in this mode).
MANUAL MODE: time and speed can be adjusted manually during operation.
TIME UP/DOWN: The maximum time for each exercise is 10 minutes. I t is possible to
increase or decrease this time by pressing TIME UP or TIME DOWN. Power on (POWER
button), then press one of these buttons to set for each exercise, and then
press START button to activate the machine.
SPEED: press SPEED UP and SPEED DOWN to adjust the
vibration speed during manual mode. The speed cannot be
modified in the pre-set programs.
LOW/MED/HI: when the machine is running, press
these buttons to set the speed to a fixed level.
Press LOW to set the speed to level 6; press MED
to set the speed to level 10; press HI to set the
speed to level 16.
Page 8
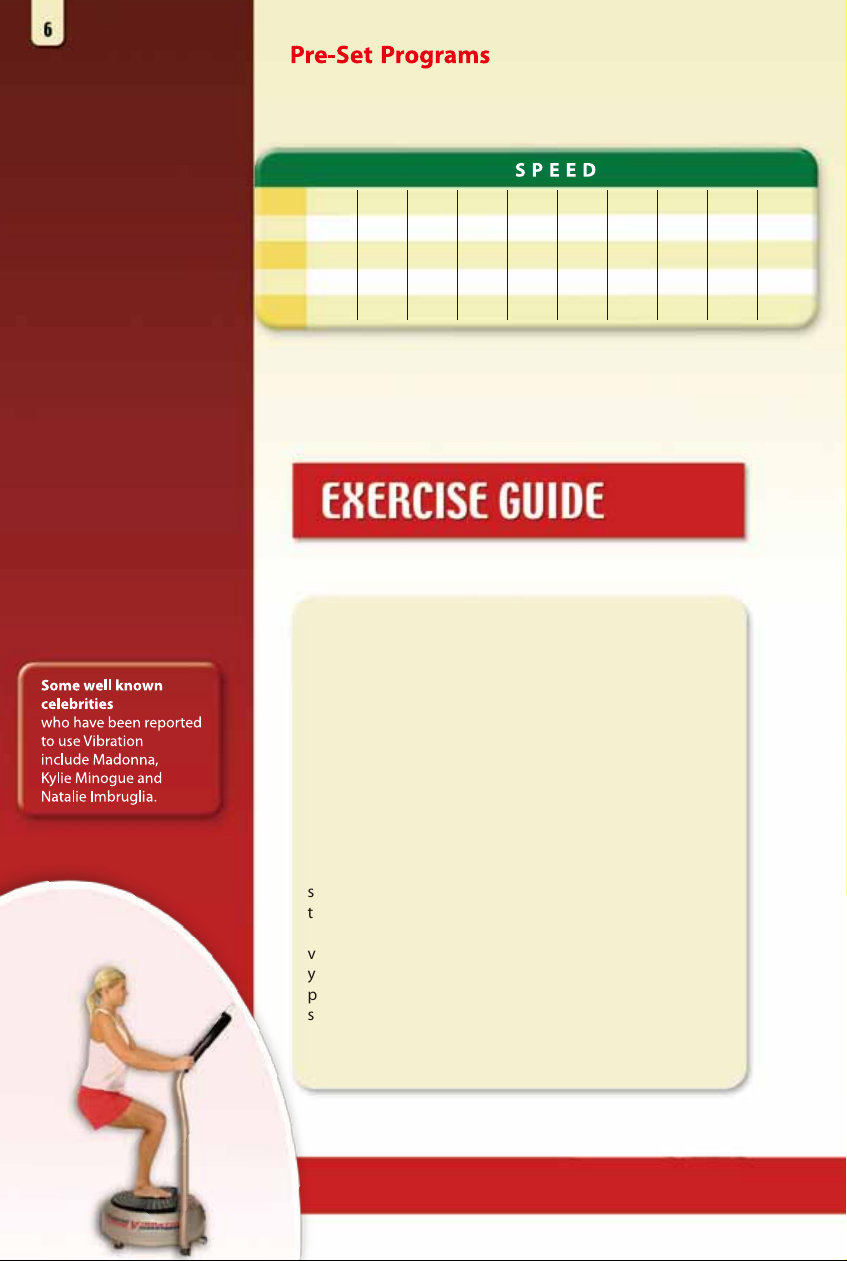
These programs are great for exercise and massage. The speed in each
program cycles through the values below three times, changing every 20
seconds. Please note the remote has only 3 programs: P1, P3 and P5.
P1 3 5 7 6 8 10 8 6 7 5
P2 5 7 9 12 15 20 15 12 9 7
P3 15 18 20 22 24 30 24 22 20 18
P4 20 25 27 32 35 40 35 32 27 25
P5 25 30 35 40 45 50 45 30 25 20
NOTE: These programs run for 10 minutes but we suggest you
build up your session time gradually. This is important as your
body may need time to become conditioned to Vibration therapy.
Please consult your Healthcare Practitioner before trying any new
exercise program.
How and Why to Stand
All you have to do to get benefits from the machine is
stand in a comfortable straight position. However, if you
want to strengthen certain muscles, just add a few changes
as follows:
Stand tall with your tummy and behind tucked in (pelvic
tilt). Keep your muscles firm (contracted) - you can do this
by pretending you are holding a pencil between your bum
cheeks! This position will keep you standing straight with
muscles tight. Remember to keep your shoulders back and
away from the ears too.
You can gain a significant amount of benefits by just
standing in this position.
There are two ways of holding the knees, slightly bent and
straight. If you are doing weights or stress exercises, then
the knees should be slightly bent to protect your back
muscles. What bent knees do is cushion or soften the
vibration. However, if you want the vibration to go through
your body as strongly as possible and affect a greater
percentage of muscles, then your knees should be
straighter. Of course, if you want to soften the vibration,
bend your knees slightly.
Page 9
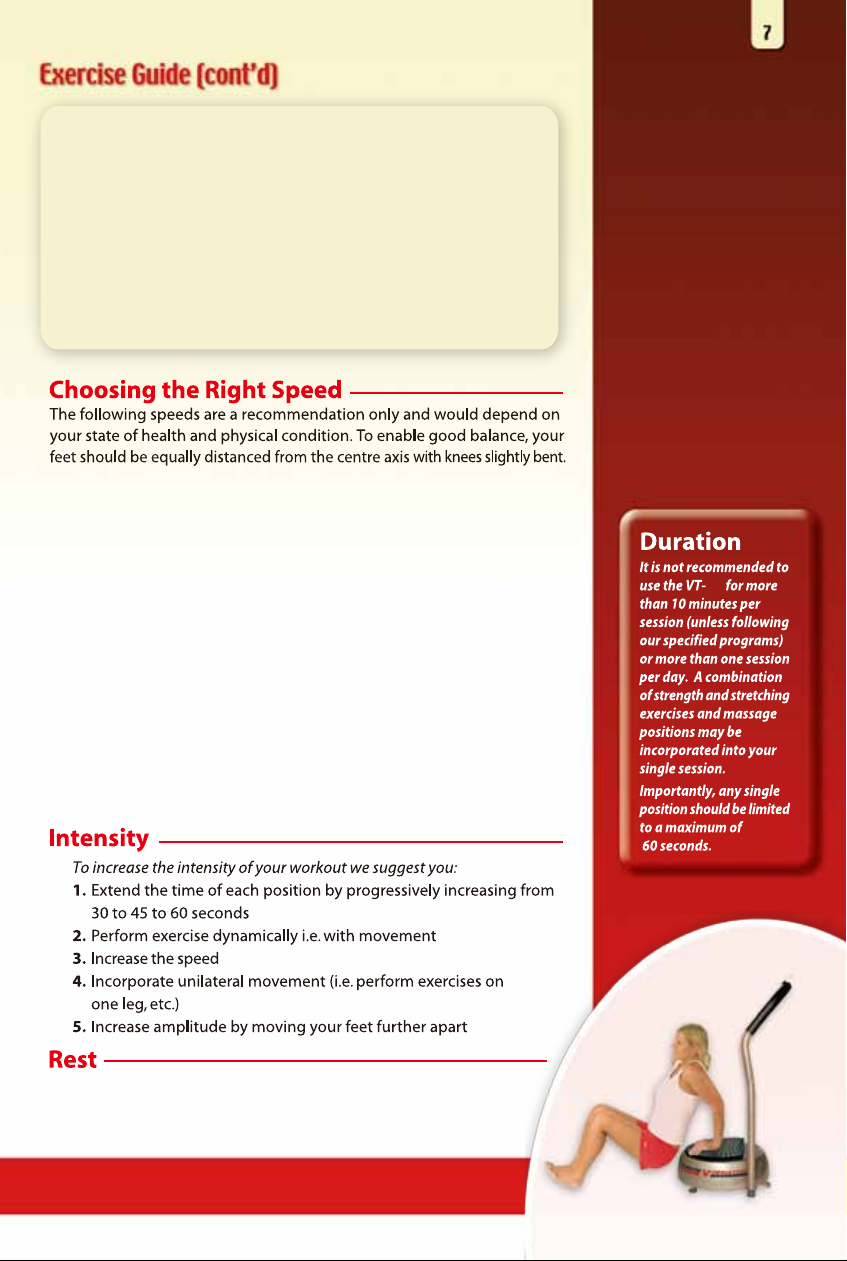
Just try it for yourself - feel your lower back and shoulders when the knees
are bent and compare to when the knees are locked, and you will be able to
judge for yourself. The amplitude of the plate makes a very gentle stress on
the joint.
In this case, for a standing static position, the knees should ideally be
straight. This straight knee position allows more muscle reactions through
out the body. Do this only if it feels right for you. If you need a break, soften
your knees.
If you hold the pencil firmly, you are doing a pelvic tilt. A pelvic tilt activates
the three muscles of the pelvic girdle or pelvic sling or muscles of core
stability. Rotating the body while in this position helps core stability,
flexibility and balance.
Lower Speeds:
Lower speeds are ideal for muscle training, muscle relaxation, injury
rehabilitation, blood circulation and lymphatic drainage, mobilization of
joints, healing and scar tissue, balance and stability. Start at a speed from
the lower end of this range until you feel comfortable and can maintain
your position at a higher speed.
Middle and Higher Speeds:
Mid and high speeds are for muscle strength, improved coordination,
blood circulation, and lymphatic drainage, and incontinence. To work
effectively at these speeds you need to be physically strong and healthy.
We recommend you
start on a lower
speed and allow your
body to get used to
the movement and
your new exercise
routine. Gradually
you will be able to
increase the speed
comfortably as your
body gets stronger.
8
Higher Speeds:
High speeds are for massaging muscles, muscle strength, incontinence,
hormonal changes, neurological stimulation, increased mobility,
increased bone density, blood circulation and lymphatic drainage, and
improved muscle tone.
New users should start off gradually and may need to rest by
stepping off the VT-8 for 30-60 seconds between strength
exercises.
Page 10
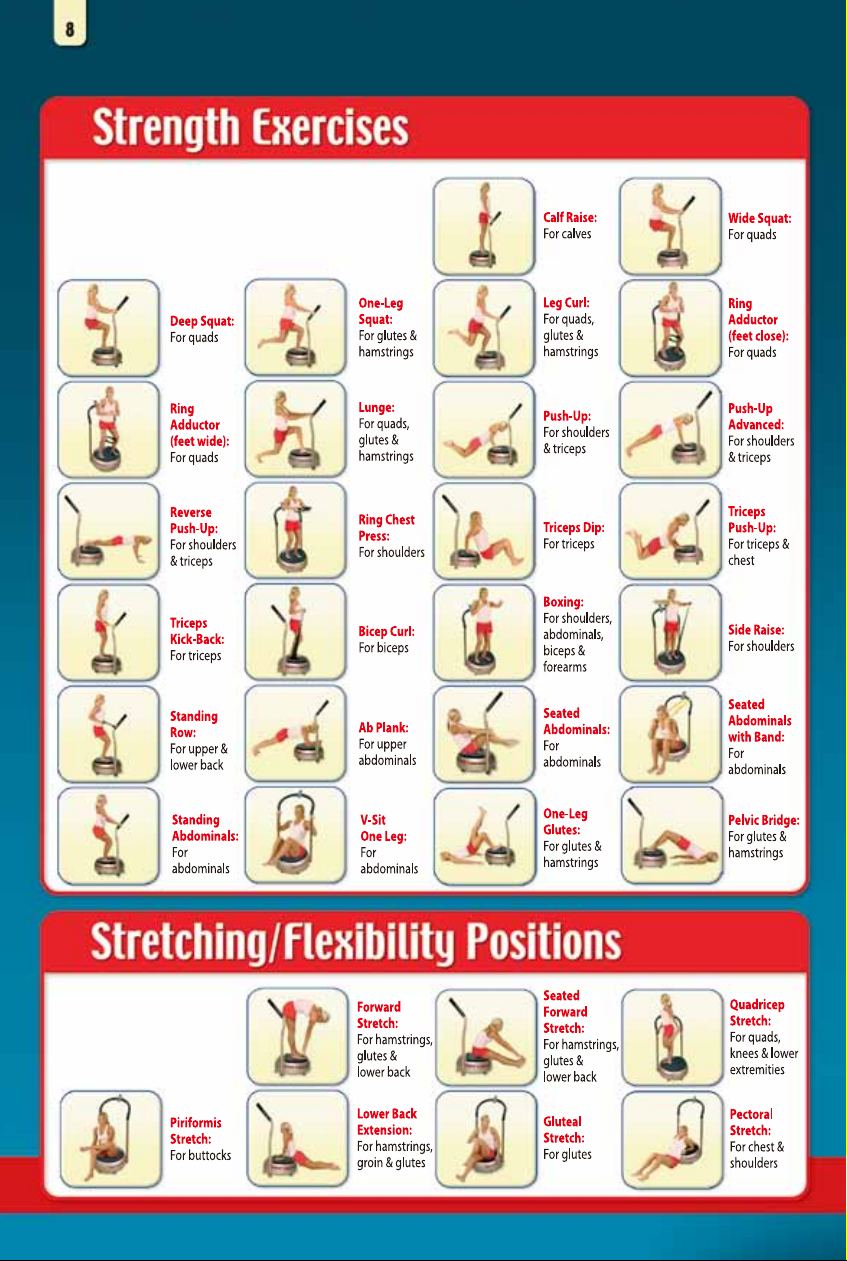
Major Benets: May slim, tone and increase
your metabolism as you build strength! Also
good for building bone density!
Major Benets:
May improve exibility,
range of motion and
help build bone density!
Page 11
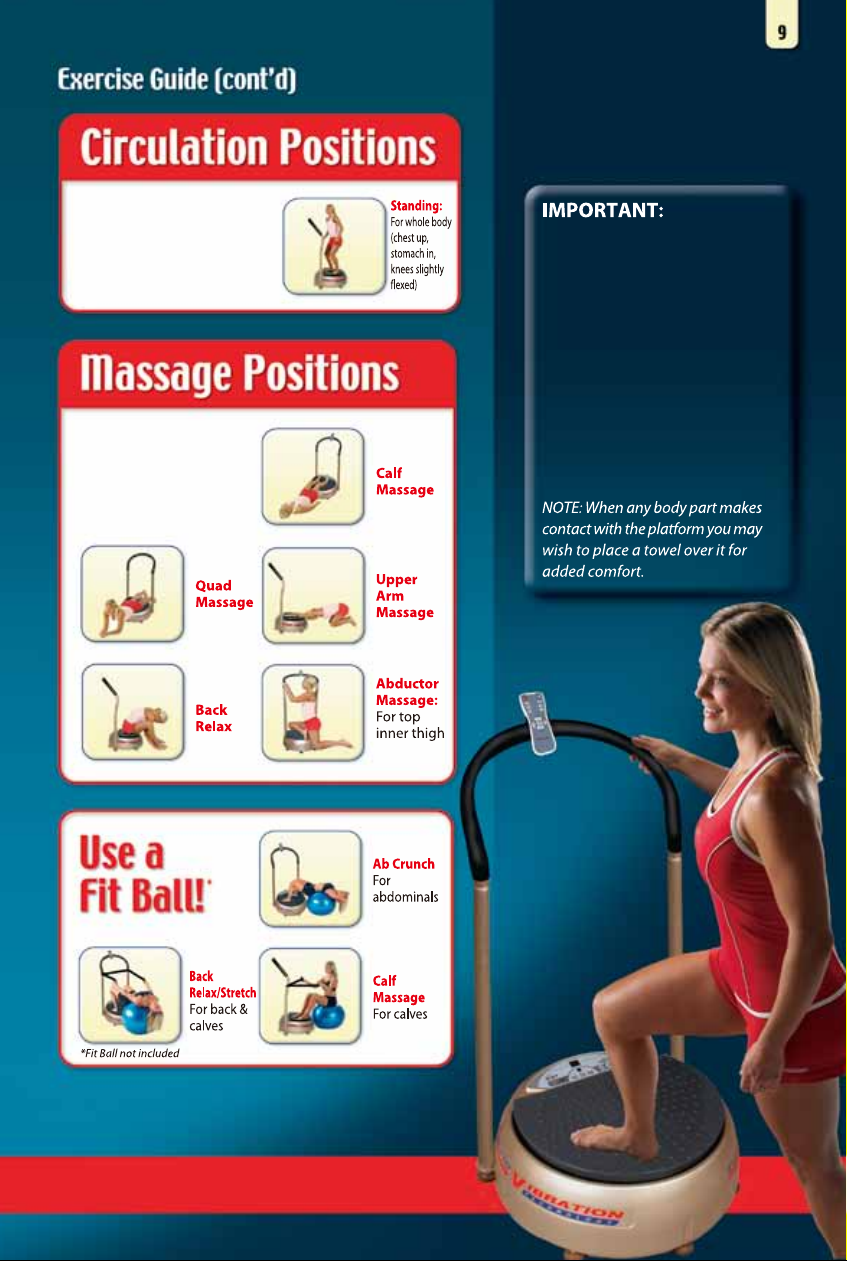
Major Benefits:
Even at low speeds, you
may build bone density
and improve your whole
body circulation!
Major Benefits:
For relaxation,
boosting circulation
and reducing cellulite!
Also may help to build
bone density!
If you cannot maintain the
correct position do not continue
the exercise, as your muscles
could be fatigued.
Please consult your physician
before undertaking any exercise
program and address any
contraindications before using
your VT-8. If you feel any
discomfort, stop exercising
immediately and consult your
doctor.
Page 12
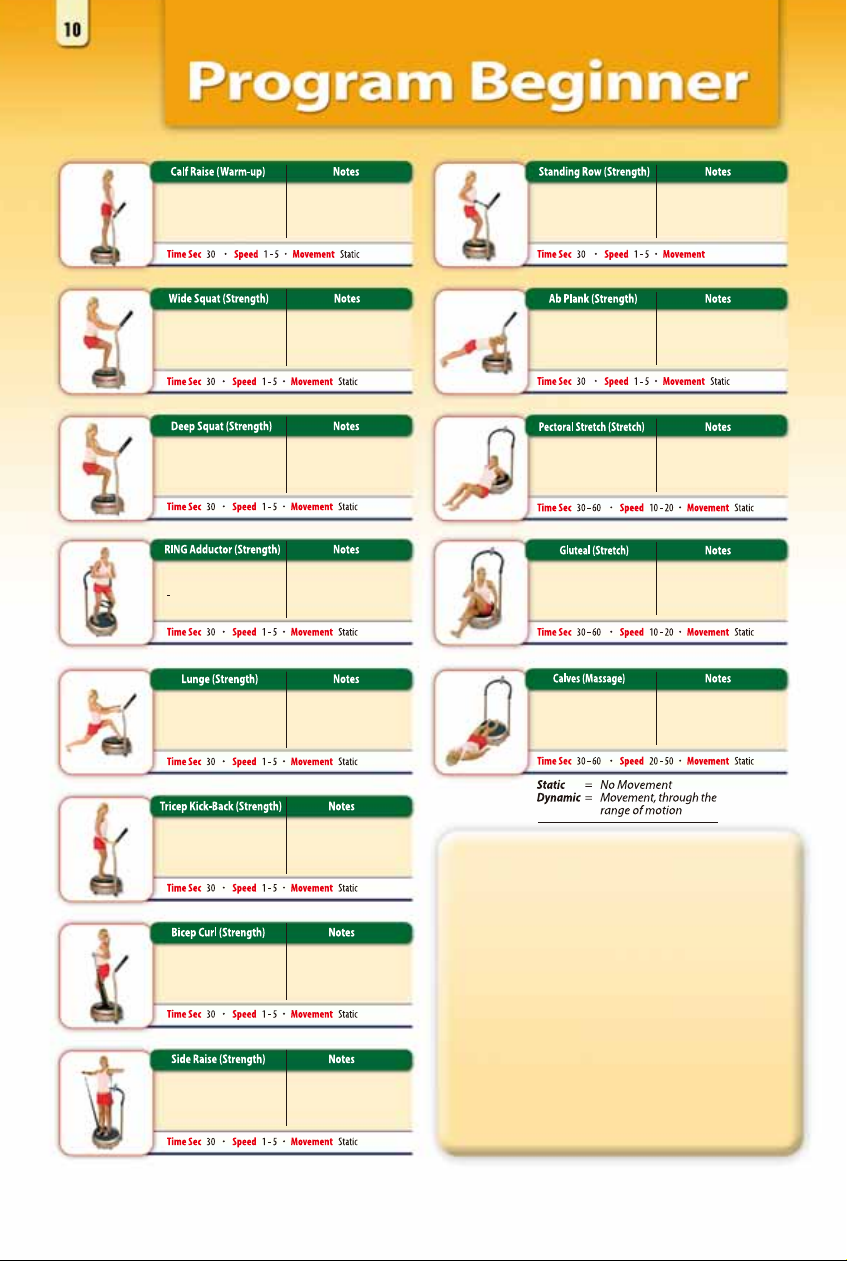
Calves
- Legs straight
- Raise Heels
(Strength)
Stand on toes;
don’t pulse
Upper & Middle Back
- Straight back, shoulders down
- Pull elbows back, squeezing
shoulder blade together
Keep slow and
controlled movement
Slow Dynamic
Quadriceps
- Feet wide, turned lightly out
- Push buttocks out
- Keep shoulders back
Quadriceps
- Feet close, bent knees
- Push buttocks out
Quadriceps
- Feet close, bent knees
- Squeezing adductor ring in
and out, holding tension
Gluteals/Hamstrings/Quadriceps
- one foot on plate, lightly bent
- body straight, drop buttocks
- knee down
Triceps
- Straighten back, shoulders back
- Pull band back,
keep elbows straight
Biceps
- Shoulders back, stomach in
- Squeeze band to the biceps
- Keep knees lightly bent
Shoulders
- Shoulders back, stomach in
- Elbows raising up
No deeper than 90 deg at knee;
No deeper than 90 deg at knee;
No deeper than 90 deg at knee;
No deeper than 90 deg at knee;
if pain in knee occurs, raise
gluteal higher
if pain in knee occurs, raise
gluteal higher
if pain in knee occurs, raise
gluteal higher
if pain in pelvic area occurs,
raise gluteal higher
Extend arms behind body;
use elbows as a hinge
Slow controlled movement
through whole motion;
maintain tension on band
Slow and controlled
movement; keep elbows
in line with body
Upper Abdominals
- Elbows on plate, lift
buttocks in air
- Keep stomach in
& back straight
Chest/Shoulders
- Sit up against plate
- Elbows on plate, chest pushed out
Gluteals
- Sit back, straighten one leg
bend other/twist/pull knee
to body
Calves
- Lay o the plate
- Place calves on plate
Drop knees to oor if
back pain is felt
Lean back onto plate;
relax body
Feel stretch in buttocks;
to increase pull knee
further backward
Relax legs on plate
Dear T-Zone Vibration Technology:
After a bit of apprehension, I am amazed with the
results I’ve had after only 2 months using the
T-Zone. My energy level has gone up and I feel
invigorated and alert. The machine awakens every
muscle in my body. I feel stronger, more flexible,
and stimulated. I have lost inches around my
midriff, my muscles are more receptive, and my
joints are less sore. The benefits I’ve had have
been phenomenal! This new technology is a sure
hit with me; I sincerely believe in the process and
recommend it highly. I look forward to every
session.
Don P., Prince Edward Island
Page 13
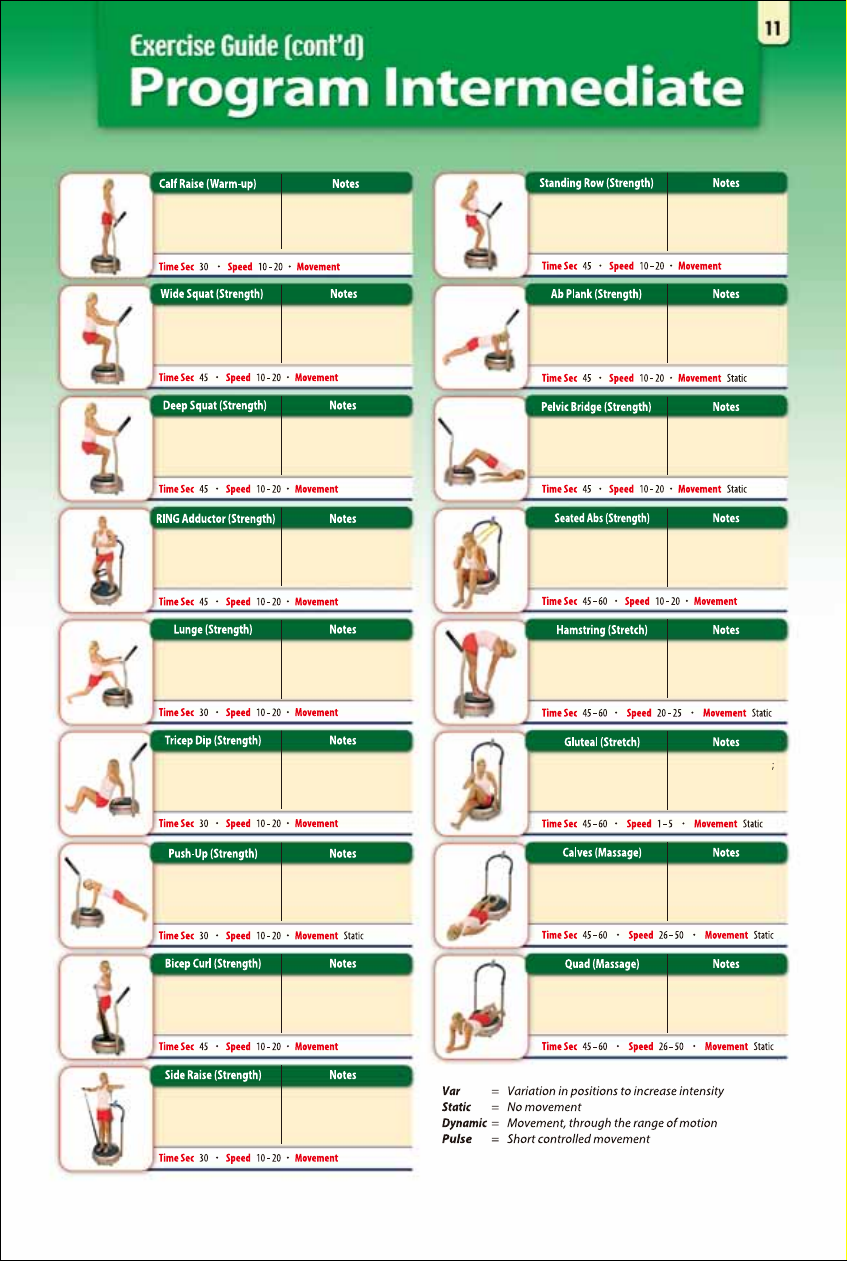
Calves
- Legs straight
- Raise Heels
(Strength)
Stand on toes;
don’t pulse
Upper & Middle Back
- Straight back, shoulders down
- Pull elbows back, squeezing
shoulders blades together
Keep slow and controlled
Slow Dynamic Slow Dynamic
movement
Quadriceps
- Feet wide, turned lightly out
- Push buttocks out
- Keep shoulders back
Quadriceps
- Feet close, bend knees
- Push buttocks out
Quadriceps
- Feet close, bend knees
- Squeezing adductor ring in
and out holding tension
Gluteals/Hamstrings/Quadriceps
- One foot on plate, lightly bent
- Body straight, drop buttocks
- Knee down
Triceps
- Hands on the edge of plate
- Buttocks off/dipping up/down
- Slow controlled movement
Chest/Triceps
- Hands wide on plate
- Pushing chest down/up
VAR: On knees or toes
No deeper than 90 deg at knee;
No deeper than 90 deg at knee;
No deeper than 90 deg at knee;
No deeper than 90 deg at knee;
who experience shoulder or
weeks; keep elbows in line
if pain in knee occurs, raise
gluteal higher
Slow Dynamic
if pain in knee occurs, raise
gluteal higher
Slow Dynamic
if pain in knee occurs, raise
gluteal higher
Slow Dynamic
if pain in pelvic area occurs,
raise gluteal higher
Slow Dynamic
Not advised for those
wrist problems
(use Tricep Kick-Back)
Slow Dynamic
Practise on knees for 1-3
with body
Upper Abdominals
- Elbows on plate, lift buttocks in air
- keep stomach in &
back straight
Gluteals/Hamstrings
- Bend knee, keep feet flat
- Squeeze buttocks, lifting pelvis
VAR: Dynamic
Abdominals
- Sit toward the back of the plate
- Holding bands,
push chest forward
Hamstrings
- Stand at front of plate,
legs straight
- Roll body down to touch toes
Gluteals
- Sit back, straighten on leg bend
other/twist/pull knee to body
Calves
- Lay off the plate
- Place calves on plate
Drop knees to floor
if back pain is felt
Dig heels into plate;
raise buttocks off ground
without resting back
Keep slow and controlled
movements; maintain
tension & cease if back
Flex to feel stretch in
Feel stretch in buttocks;
to increase pull knee
further backward
Relax legs on plate
to floor
pain occurs
Pulse / Static
back of legs
Biceps
- Shoulders back, stomach in
- Squeeze band to the biceps
- Keep knees lightly bent
Shoulders
- Shoulders back, stomach in
- Elbows raising up
Slow controlled movement
through whole motion;
maintain tension on band
Slow Dynamic
Slow and controlled
movement; keep elbows in
line with body
Slow Dynamic
Quadriceps/Lower Abdominals
- Lay on the plate
- Elbows on floor
Relax legs on plate
Page 14
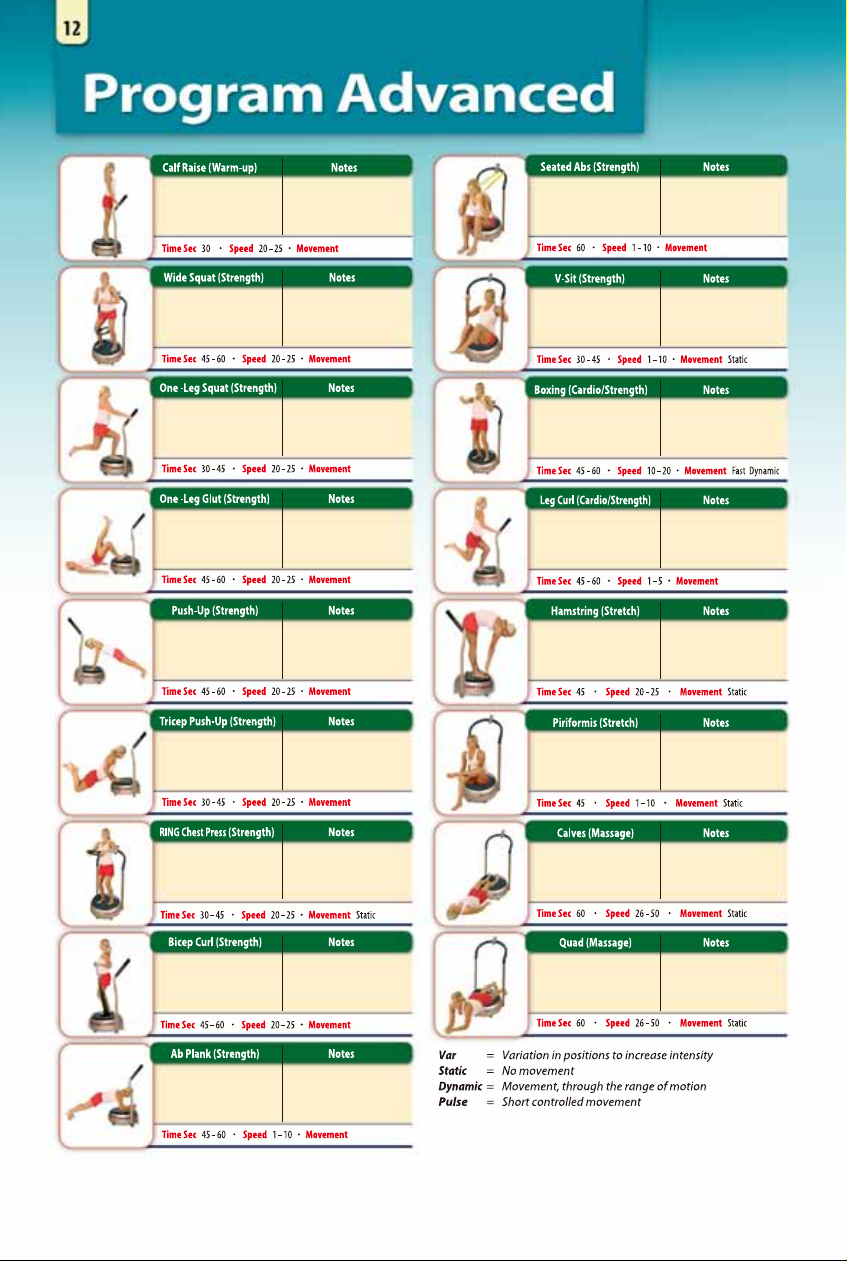
Calves
- Legs straight
- Raise Heels
(Strength)
Stand on toes;
move slowly up & down
while maintaining
straight legs
Slow Dynamic
Abdominals
- Sit toward the back of the plate
- Holding bands, push
chest forward
Keep slow and controlled
movements; maintain
tension & cease if
back pain occurs
Slow Dynamic
Quadriceps
- Feet wide, turned lightly out
- Push buttocks out
- Keep shoulders back
Quadriceps
- Place one leg backward
- Knee sits lightly behind heel
VAR: Static or Dynamic
Gluteals/Hamstrings
- Bend knees, dig heels in
- Squeeze buttocks & hamstrings
VAR: Heels of flat feet
Chest/Triceps
- Hands wide on plate
- Push chest down/up
VAR: Knees or on toes
Triceps/Chest
- Hands in close to body
- Push chest down/up
VAR: Static/Dynamic or Pulse
Chest
- Point elbows out, hold ring
- Squeeze ring together
VAR: Dynamic fast or slow
No deeper than 90 deg at knee;
if pain in knee occurs, raise
gluteal higher; keep hands free;
No deeper than 90 deg at knee;
if pain in knee occurs, raise
buttocks off ground without
resting back to floor; repeat
for 1-3 weeks; keep elbows in
who experience shoulder or
Slow controlled movement
maintain tension on tring
use with or without ring
Slow Dynamic
gluteal higher; repeat
both sides
Slow Dynamic
Dig heels into plate; raise
both sides
Slow Dynamic
Practise on knees
line with body
Slow Dynamic
Not advised for those
wrist problems
(use Tricep Kick Back)
Slow Dynamic
through whole motion;
Abdominals
- Sit facing outwards
- Lean backwards and raise
knees up to raise feet
Shoulders/Abs/Biceps/Forearms
- Push shoulders back,
- elbows tucked into the body
- Place feet parallel, facing outwards
Quadriceps/Glutes/Hamstrings
- One foot on plate, keeping most
of weight on that leg
- Kick heel of other foot to buttocks
Hamstrings
- Stand at front of plate,
legs straight
- Roll body down to touch toes
Buttocks
- Sit on edge of plate
- Place ankle above knee,
lean towards floor
Calves
- Lay off the plate
- Place calves on plate
Maintain tension on
stomach; lift feet and hold;
cease if back pain occurs
Maintain short
movements; don’t fully
extend arms & use lighter
weights or none at all
Top leg remains static; kick
heel to buttocks; touching
ground each rep; cease
if pain occurs
Flex to feel stretch in
Flex to feel stretch
in gluteal area &
outside thigh
Relax legs on plate
Pulse / Static
back of legs
Biceps
- Shoulders back, stomach in
- Squeeze band to the biceps
- Keep knees lightly bent
Upper Abdominals
- Elbows on plate, lift buttocks in air
- Keep stomach in
& back straight
Slow controlled movement
through whole motion;
maintain tension on band
Drop knees to floor if
Slow Dynamic
back pain is felt
Slow Dynamic
Quadriceps/Lower Abdominals
- Lay on the plate
- Elbows on floor
Relax legs on plate
Page 15
Prices, specifications and design are correct at the time of
printing and are subject to change without notice.
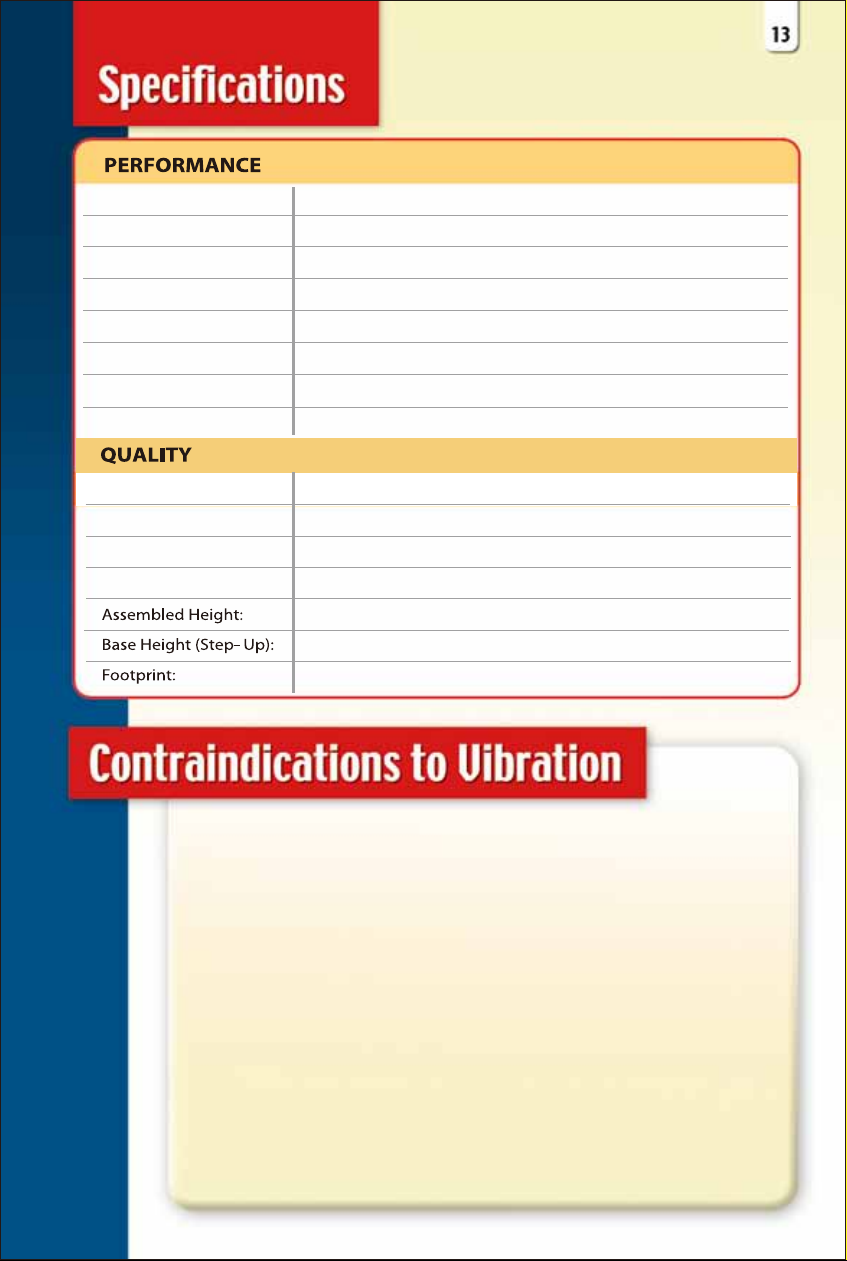
high performance motorMotor:
51 cm in diameterPlate Surface:
1 – 50 (high speeds for massage)Speed Range:
Up to 10 minutesTime Setting:
LED display on base showing Time, Speed or ProgramDisplay:
5 pre-set programsPrograms:
‘See-Saw’ motion to simulate walkingVibration:
1-10 mmAmplitude:
120 kgMaximum Load:
Warranty: 5 years on motor; 2 years on parts and 1 years labour
Machine Weight:
Frame: Steel frame with high quality plastic base
36 kg
110 cm
22 cm
60 cm x 60 cm
Whole Body Vibration is very safe, but may not be suited
for some people. Please be sure to seek medical advice
before using 'whole body vibration'. In particular, if you are
pregnant, have a pacemaker or other implant, or have any
medical condition whatsoever, please do not undertake
'whole body vibration' without the approval of your medical practitioner.
The information in this document is for information only
and is not intended to treat, diagnose, or cure any physical
disease or ailment. Again, please discuss with your medical
practitioner before beginning this or any exercise program.
Page 16
VT-8
VT-8
VT-8
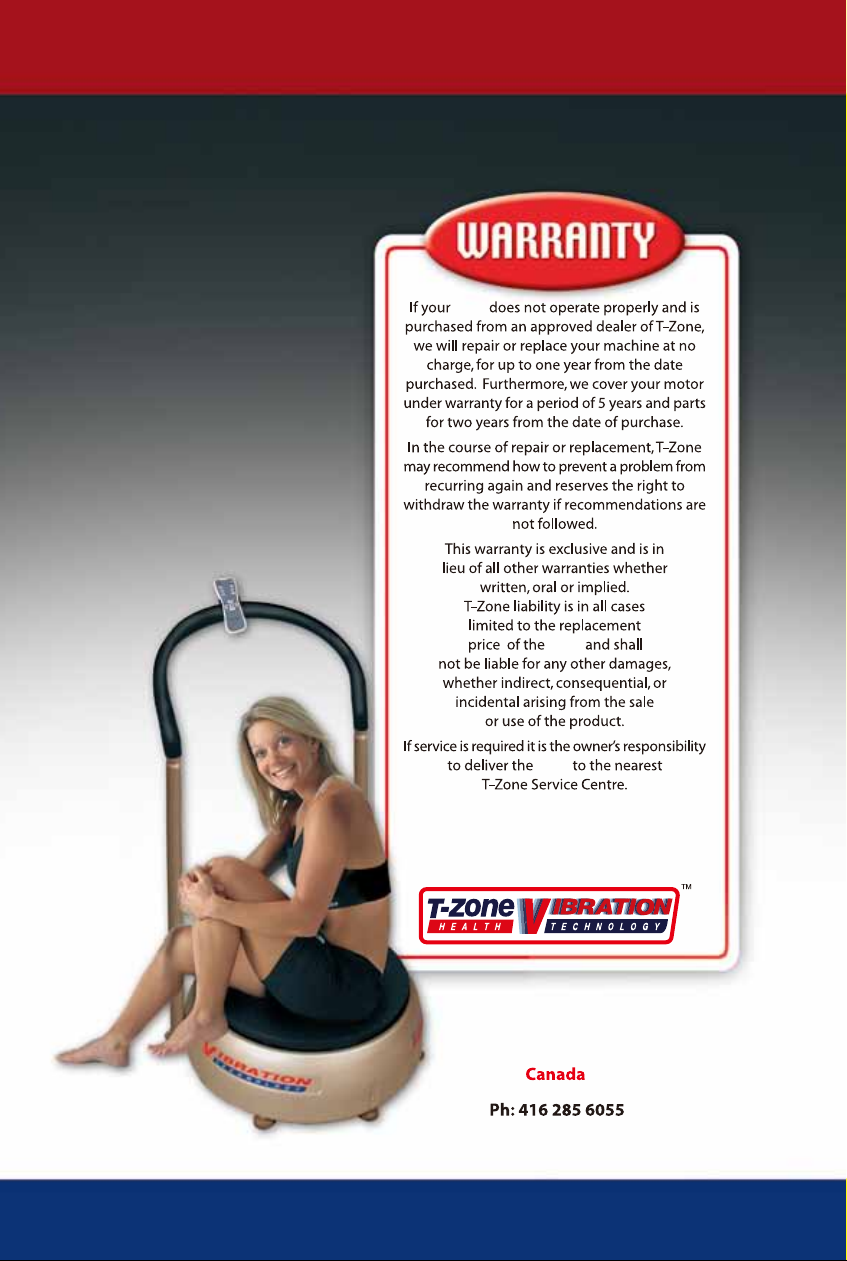
The VT-8 is designed for domestic use only.
Receipt of purchase must be provided to receive
service under warranty. This warranty is not
transferable.
T-Zone Vibration Technology
www.t-zonevibration.com
Copyright 2010 T-Zone Health Inc. All rights reserved.
 Loading...