

Tytus T-406-M-LP, T-406-SS-LP, TI-404-M-LP, TI-404-MGG-LP User Manual
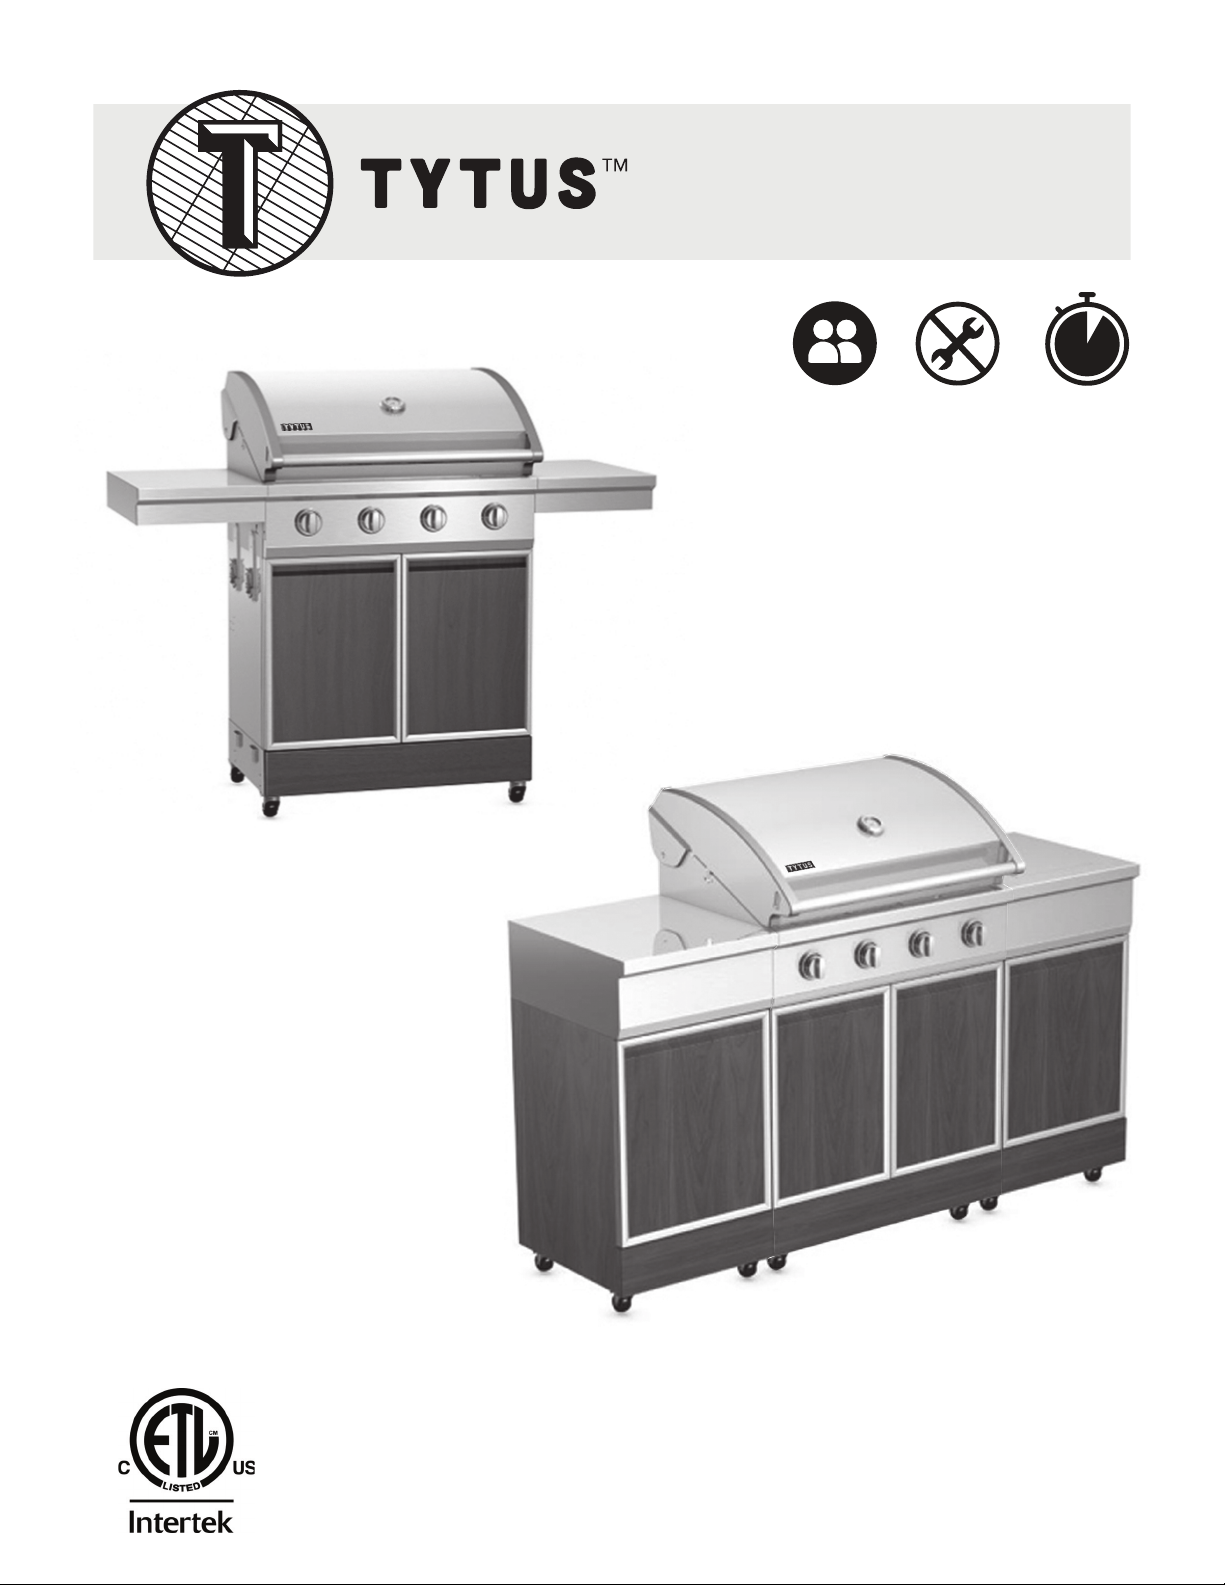
Transform Your Outdoors.
4-BURNER
2 people
4-BURNER
GAS GRILL
T-406-M-LP (walnut shown)
T-406-SS-LP (stainless steel)
No tools
About
5 minutes
ISLAND GAS GRILL
WITH SIDE CABINETS
TI-404-M-LP (walnut shown)
TI-404-MGG-LP (stainless steel)
USER MANUAL

THIS IS MORE THAN A GRILL.
It’s home-cooked meals. Summer afternoons and evenings enjoying fresh
air and the savory smell of a tender steak. Laughter with your friends and
family. Because grilling is about more than good food. It’s about the time
you spend with your favorite people.
TYTUS is proud to produce quality grills that transform your outdoor space.
Thank you for your purchase.

CONTENTS
Important Safety Instructions . . . . . . . . . . . . . . . . . . . . . . . . . . . . . . . . . . . . . . . . . . . . . . . . . . . . . . . . 4
Package Contents. . . . . . . . . . . . . . . . . . . . . . . . . . . . . . . . . . . . . . . . . . . . . . . . . . . . . . . . . . . . . . . . . . 7
Assemble the Grill. . . . . . . . . . . . . . . . . . . . . . . . . . . . . . . . . . . . . . . . . . . . . . . . . . . . . . . . . . . . . . . . . . 8
Use the Grill. . . . . . . . . . . . . . . . . . . . . . . . . . . . . . . . . . . . . . . . . . . . . . . . . . . . . . . . . . . . . . . . . . . . . . 24
Light the Grill . . . . . . . . . . . . . . . . . . . . . . . . . . . . . . . . . . . . . . . . . . . . . . . . . . . . . . . . . . . . . . . . . . . . . . . . .24
Cook with the Grill . . . . . . . . . . . . . . . . . . . . . . . . . . . . . . . . . . . . . . . . . . . . . . . . . . . . . . . . . . . . . . . . . . . . .29
Check for Gas Leaks. . . . . . . . . . . . . . . . . . . . . . . . . . . . . . . . . . . . . . . . . . . . . . . . . . . . . . . . . . . . . . . . . . .30
Purge Air from the Gas Line/Reset the Regulator . . . . . . . . . . . . . . . . . . . . . . . . . . . . . . . . . . . . . . . . . . .31
Disassemble the Grill . . . . . . . . . . . . . . . . . . . . . . . . . . . . . . . . . . . . . . . . . . . . . . . . . . . . . . . . . . . . . . 32
Grill-Only Model (T-406-M-LP/T-406-SS-LP) . . . . . . . . . . . . . . . . . . . . . . . . . . . . . . . . . . . . . . . . . . . . . . . .32
Grill Island Model (TI-404-MGG-LP/TI-404-M-LP) . . . . . . . . . . . . . . . . . . . . . . . . . . . . . . . . . . . . . . . . . . . .37
Clean and Maintain the Grill . . . . . . . . . . . . . . . . . . . . . . . . . . . . . . . . . . . . . . . . . . . . . . . . . . . . . . . . 45
Frequently Asked Questions . . . . . . . . . . . . . . . . . . . . . . . . . . . . . . . . . . . . . . . . . . . . . . . . . . . . . . . . 47
Specifications . . . . . . . . . . . . . . . . . . . . . . . . . . . . . . . . . . . . . . . . . . . . . . . . . . . . . . . . . . . . . . . . . . . . 49
Part Diagrams and Lists. . . . . . . . . . . . . . . . . . . . . . . . . . . . . . . . . . . . . . . . . . . . . . . . . . . . . . . . . . . . 50
Grill-Only Parts (T-406-M-LP/T-406-SS-LP) . . . . . . . . . . . . . . . . . . . . . . . . . . . . . . . . . . . . . . . . . . . . . . . . .50
Grill Island Parts (TI-404-MGG-LP/Ti-404-M-LP). . . . . . . . . . . . . . . . . . . . . . . . . . . . . . . . . . . . . . . . . . . . .52
WARRANTY . . . . . . . . . . . . . . . . . . . . . . . . . . . . . . . . . . . . . . . . . . . . . . . . . . . . . . . . . . . . . . . . . . . . . . 58
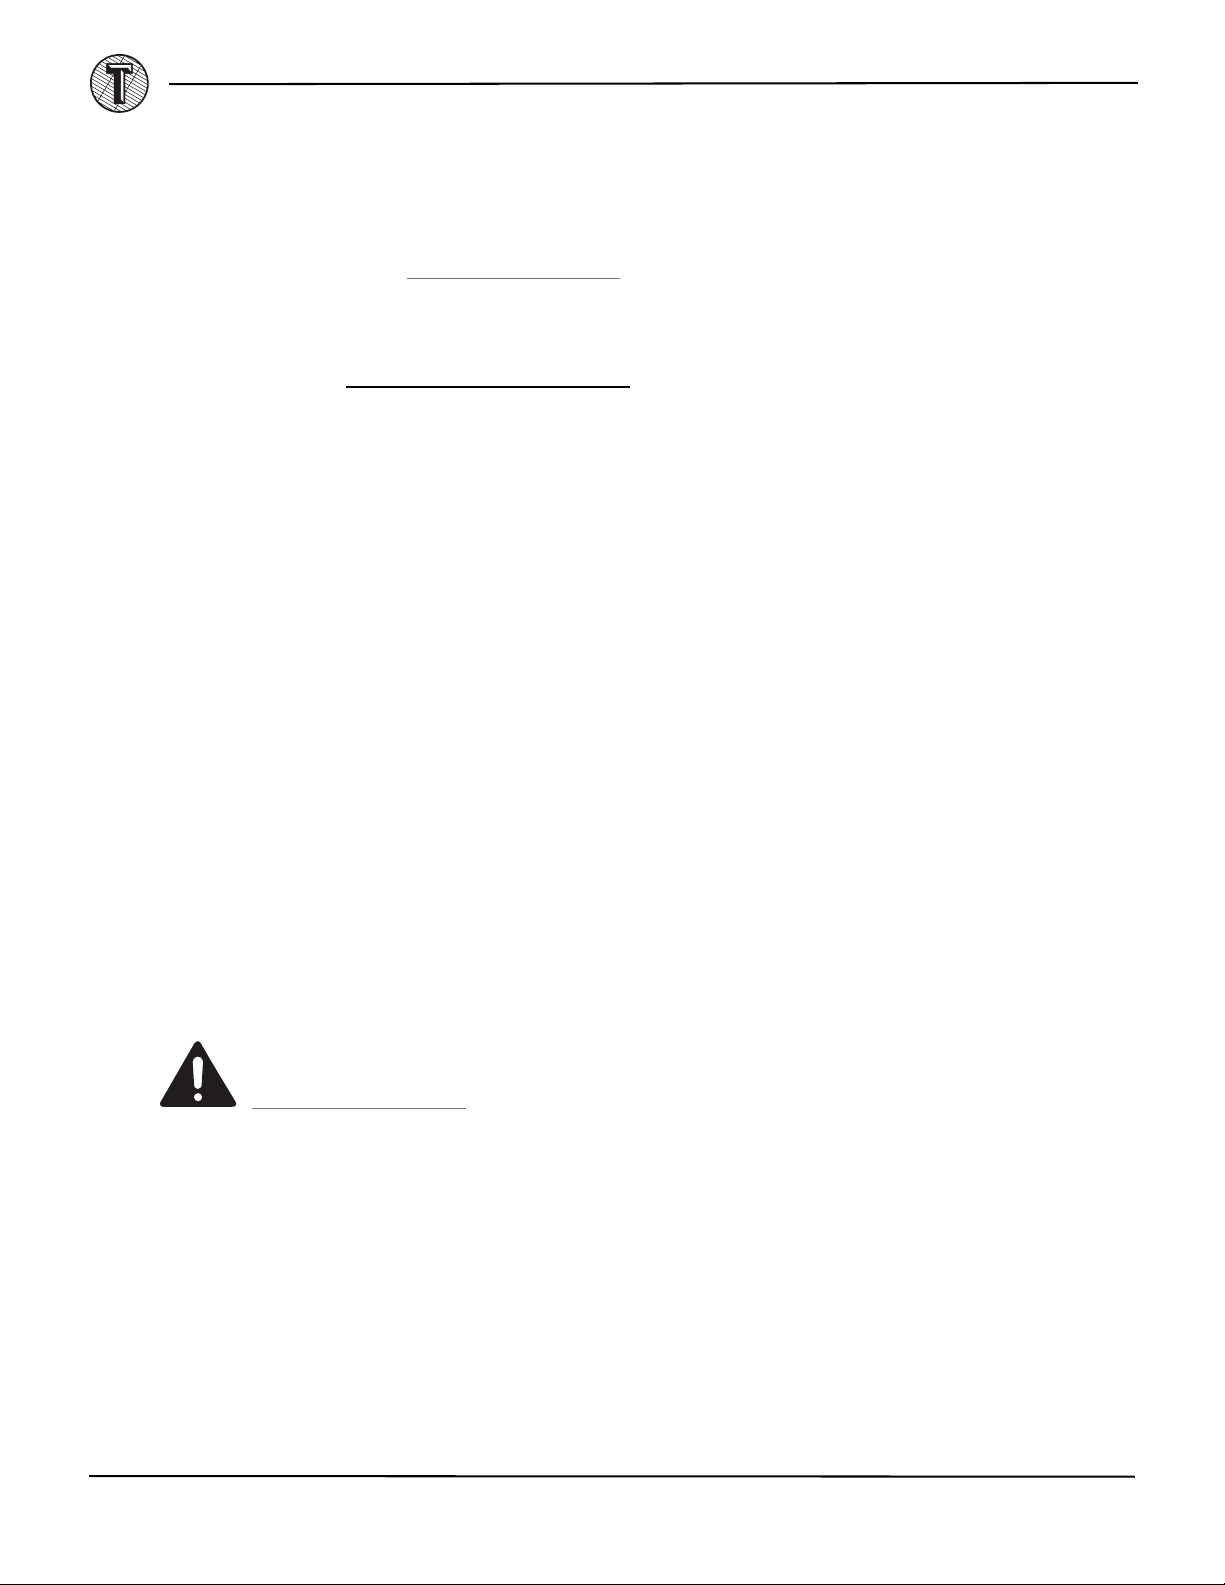
IMPORTANT SAFETY INSTRUCTIONS
Free Help From the Grill Experts
Your TYTUS grill is designed for quick assembly and ease of use. If you have problems, do not return it to the store. We're
the experts on this product and are trained to help you with assembly questions, grill operation, and replacement of
damaged or missing parts. Email support@TYTUSgrills.com
Important
Note: Keep this manual with the grill for future reference.
RECORD YOUR SERIAL #: (see the silver ETL label on the grill base)
WARNING
• Failure to comply with these instructions could result in a fire or explosion that could cause serious bodily injury,
death, or property damage.
• Whether this grill was assembled by you or someone else, you must read this entire manual before using your grill to
ensure the grill is properly assembled, installed, and maintained.
• Use your grill at least three feet away from any wall or surface. Use your grill at least three feet away from combustible
objects that can melt or catch fire such as vinyl or wood siding, fences and overhangs, or sources of ignition, including
pilot lights on water heaters and live electrical appliances.
• THIS GAS ACCESSORY IS DESIGNED FOR OUTDOOR USE ONLY.
• Never use your gas grill in a garage, porch, shed, breezeway, or any other enclosed area.
• Never obstruct the flow of ventilation air around your gas grill housing.
• Never disconnect the gas regulator or any gas fitting while your grill is lit. A lit grill can ignite leaking gas and cause a
fire or explosion which could result in property damage, personal injury, or death.
• If an electrical accessory is used with the grill, this appliance must be electrically grounded in accordance with local
codes or, in the absence of local codes, with the National Electrical Code, ANSI/NFPA 70, or the Canadian Electrical
Code, CSA C22.1.
Electrical accessories must be equipped with a three-prong plug and be connected to a properly grounded wall outlet.
Do not expose electrical accessories to water and avoid use in wet weather as it may present a shock hazard. Keep
electrical cords away from all heated surfaces.
• Keep any electrical supply cord and the fuel supply hose away from any heated surfaces.
• Do not store or use gasoline or other flammable liquids or vapors in the vicinity of this or any other appliances.
• A propane tank not connected for use must not be stored in the vicinity of the grill or any other appliance.
• Liquid propane gas models must be used with liquid propane gas and the regulator assembly supplied. Natural gas
models must be used with Natural Gas only. Any attempt to convert the grill from one fuel type to another is extremely
hazardous and will void the warranty.
• Keep the gas regulator hose away from hot grill surfaces and dripping grease. Avoid unnecessary twisting of the hose.
Visually inspect the hose prior to each use for cuts, cracks, excessive wear, or other damage. If the hose appears
damaged, do not use the gas grill. Contact the Customer Service Helpline for a certified replacement hose.
• State of California Proposition 65
• Never use charcoal or lighter fluid in this gas grill. Failure to comply with these instructions could result in a grease
fire or explosion that could cause serious bodily injury, death, or property damage.
• Before each use of your grill, inspect the grease tray, flame tamers, and the inside of the grill bowl to be sure there is
no excessive grease and debris buildup. Clean the grease tray, flame tamers, and inside of the grill bowl frequently to
eliminate grease/debris buildup and to prevent grease fires. Failure to comply with these instructions could result in
a grease fire and even a subsequent explosion that could cause serious bodily injury, death, or property damage.
WARNING: To operate, this equipment requires the use of propane gas, which contains the chemical
Benzene which is known to the State of California to cause cancer and other reproductive harm.
www.p65warnings.ca.gov
. Wash your hands after handling this product.
or call (952) 807-9690.
DANGER
• If you smell gas:
A) Shut off gas to the appliance.
B) Extinguish any open flame.
C) Open the lid.
D) If the odor continues, keep away from the appliance, and immediately call your gas supplier or your fire
4
department.
www.TYTUSgrills.com

TYTUS 4-Burner Gas Grill & 4-Burner Island Gas Grill
• NEVER cover slots, holes, or passages in the grill bowl or cover an entire rack with material such as aluminum foil.
Doing so blocks air flow through the grill and may cause carbon monoxide poisoning. Aluminum foil linings may trap
heat, causing a fire hazard. If the instructions above are not followed exactly, a fire may cause death or serious injury.
• Your grill will get very hot. Never lean over the cooking area while using your grill. Do not touch cooking surfaces, grill
housing, grill lid, or any other grill parts while the grill is in operation, or until the grill has cooled after use. Failure to
comply with these instructions may result in serious bodily injury.
• Never store flammable liquids or materials in the cabinet. Failure to comply with these instructions could result in a
fire or explosion that could cause serious bodily injury, death, or property damage.
CAUTION
• Failure to comply with these instructions may result in a hazardous situation which, if not avoided, may result in
injury.
• Spiders and small insects can spin webs and nest in the grill burner tubes during transit and warehousing which can
lead to a gas flow obstruction, resulting in a fire in and around the burner tubes. This type of "FLASHBACK FIRE" can
cause serious grill damage and create an unsafe operating condition for the user.
• To reduce the chance of FLASHBACK FIRE you must clean the burner tubes before initial use, at least once a month
in the summer and fall (whenever spiders are active in your area), and if your grill has not been used for an extended
period of time. See “
• Never cover or wrap the cooking grids, bottom of the grill bowl, or grease tray with aluminum foil or any other material
that will absorb grease.
Burner Tubes and Burner Ports” (page 45) for instructions.
CORRECT PROPANE GAS TANK USE
• Propane gas grill models are designed for use with a standard 20 lb. Liquid Propane Gas (LP Gas) tank (sold
separately). Never connect your gas grill to a propane gas tank that exceeds this capacity. A tank of approximately 12
inches in diameter by 18-1/2 inches high is the maximum size propane gas tank to use. You must use an "OPD" gas
tank which offers a listed Overfill Prevention Device. This safety feature prevents the tank from being overfilled which
can cause a malfunction of the LP Gas tank.
• The propane gas tank must be constructed and marked in accordance with the Specifications for LP-Gas Cylinders of
the U.S. Department of Transportation (D.O.T.) or the National Standard of Canada, CAN/CSA-B339, Cylinders,
Spheres and Tubes for Transportation of Dangerous Goods; and Commission, as applicable.
• The propane gas tank must have a shutoff valve, terminating in an propane gas supply tank valve outlet, that is
compatible with a Type 1 tank connection device. The propane gas tank must also have a safety relief device that has
a direct connection with the vapor space of the tank.
• The tank supply system must be arranged for vapor withdrawal.
• The propane gas tank must have a collar to protect the tank valve.
• Never connect an unregulated propane gas tank to your gas grill. The gas regulator assembly supplied with your gas
grill is adjusted to have an outlet pressure of 11" water column (W.C.) for connection to an propane gas tank. Only use
the regulator and hose assembly supplied with your gas grill. Any replacement hose and regulator assembly must be
identical to those listed in the parts list of this User Manual as specified by the manufacturer.
• Have your propane gas dealer check the release valve after every filling to ensure it remains free of defects.
• Always keep the propane gas tank in the upright position.
• Do not subject the propane gas tank to excessive heat.
• Never store an propane gas tank indoors. If you store your gas grill in the garage, always disconnect the propane gas
tank first and store it safely outside.
• Propane gas tanks must be stored outdoors in a well-ventilated area and out of the reach of children.
• Disconnected propane gas tanks must not be stored in a building, garage, or any other enclosed area.
• The regulator and hose assembly can be seen after opening the right cabinet door and must be inspected before
each use of the grill. If there is excessive abrasion or wear or if the hose is cut, it must be replaced prior to using the
grill again.
• Any attempt to convert the grill from one fuel type to another is extremely hazardous and must be performed by a
qualified gas technician only, using a natural gas conversion kit purchased from TYTUS. Contact TYTUS Customer
Support for more information.
• Never light your gas grill with the lid closed or before checking to ensure the burner tubes are fully seated over the
gas valve orifices.
• Never allow children to operate your grill. Do not allow children or pets to play near your grill. Always supervise
children and pets if they are in the vicinity of the unit.
• Use of alcohol, prescription, or non-prescription drugs can impair your ability to properly assemble and safely operate
your grill.
• Keep a fire extinguisher readily accessible. In the event of an oil/grease fire, do not attempt to extinguish with water.
Use a type B extinguisher or smother with dirt, sand, or baking soda.
• In the event of rain, turn off the burners and gas supply. Wait for the grill to cool, and then place a cover on it.
www.TYTUSgrills.com
5

• Use your grill on a level, stable surface in an area clear of combustible materials.
3 ft.
(30.5 cm)
3 ft.
(30.5 cm)
3 ft.
(30.5 cm)
3 ft.
(30.5 cm)
• Do not leave the grill unattended when in use. Do not move the appliance when in use.
• Allow the grill to cool before moving or storing.
• Do not use your grill as a heater.
• This grill is not intended to be installed in or on recreational vehicles and/or boats.
• This grill is not intended for commercial use.
• Never use charcoal or lighter fluid in this grill. Never use lava rocks or wood chips.
• Please protect your grill with a grill cover when not in use. Only use the cover when the grill is in cold conditions and
when the grill is not hot.
WARNING
A) Do not store a spare propane gas tank under or near this appliance.
B) Never fill the tank beyond 80 percent full.
C) If the information in "(A)" and "(B)" are not followed exactly, a fire causing death or serious injury may occur.
WARNING
• Use your grill at least three feet away from any wall or surface.
• Use your grill three feet away from any combustible objects that can melt or catch fire such as vinyl or wood siding,
fences, overhangs (see diagram below), or any other sources of ignition, including pilot lights and live electrical
appliances.
• Do not use your grill under any combustible overhead construction.
• Never use your gas grill in a garage, porch, shed, breezeway, or any other enclosed area.
• In windy conditions, always position the front of the grill to face oncoming wind to reduce heat and smoke blowing in
your face and to prevent potential hazards to yourself and the grill.
NOTE ABOUT PROPANE GAS TANK EXCHANGE PROGRAMS
• Many retailers who sell grills offer you the option of replacing your empty propane gas tank through an exchange
service. Use only those reputable exchange companies that inspect, precision fill, test, and certify their tanks.
Exchange your tank only for an OPD safety feature-equipped tank as described in the propane gas tank section of this
manual.
• Always keep new and exchanged propane gas tanks in an upright position during use, transit, or storage.
• Leak test new and exchanged propane gas tanks BEFORE connecting one to your grill. See “
(page 30) for instructions.
6
www.TYTUSgrills.com
Check for Gas Leaks”
TYTUS 4-Burner Gas Grill & 4-Burner Island Gas Grill
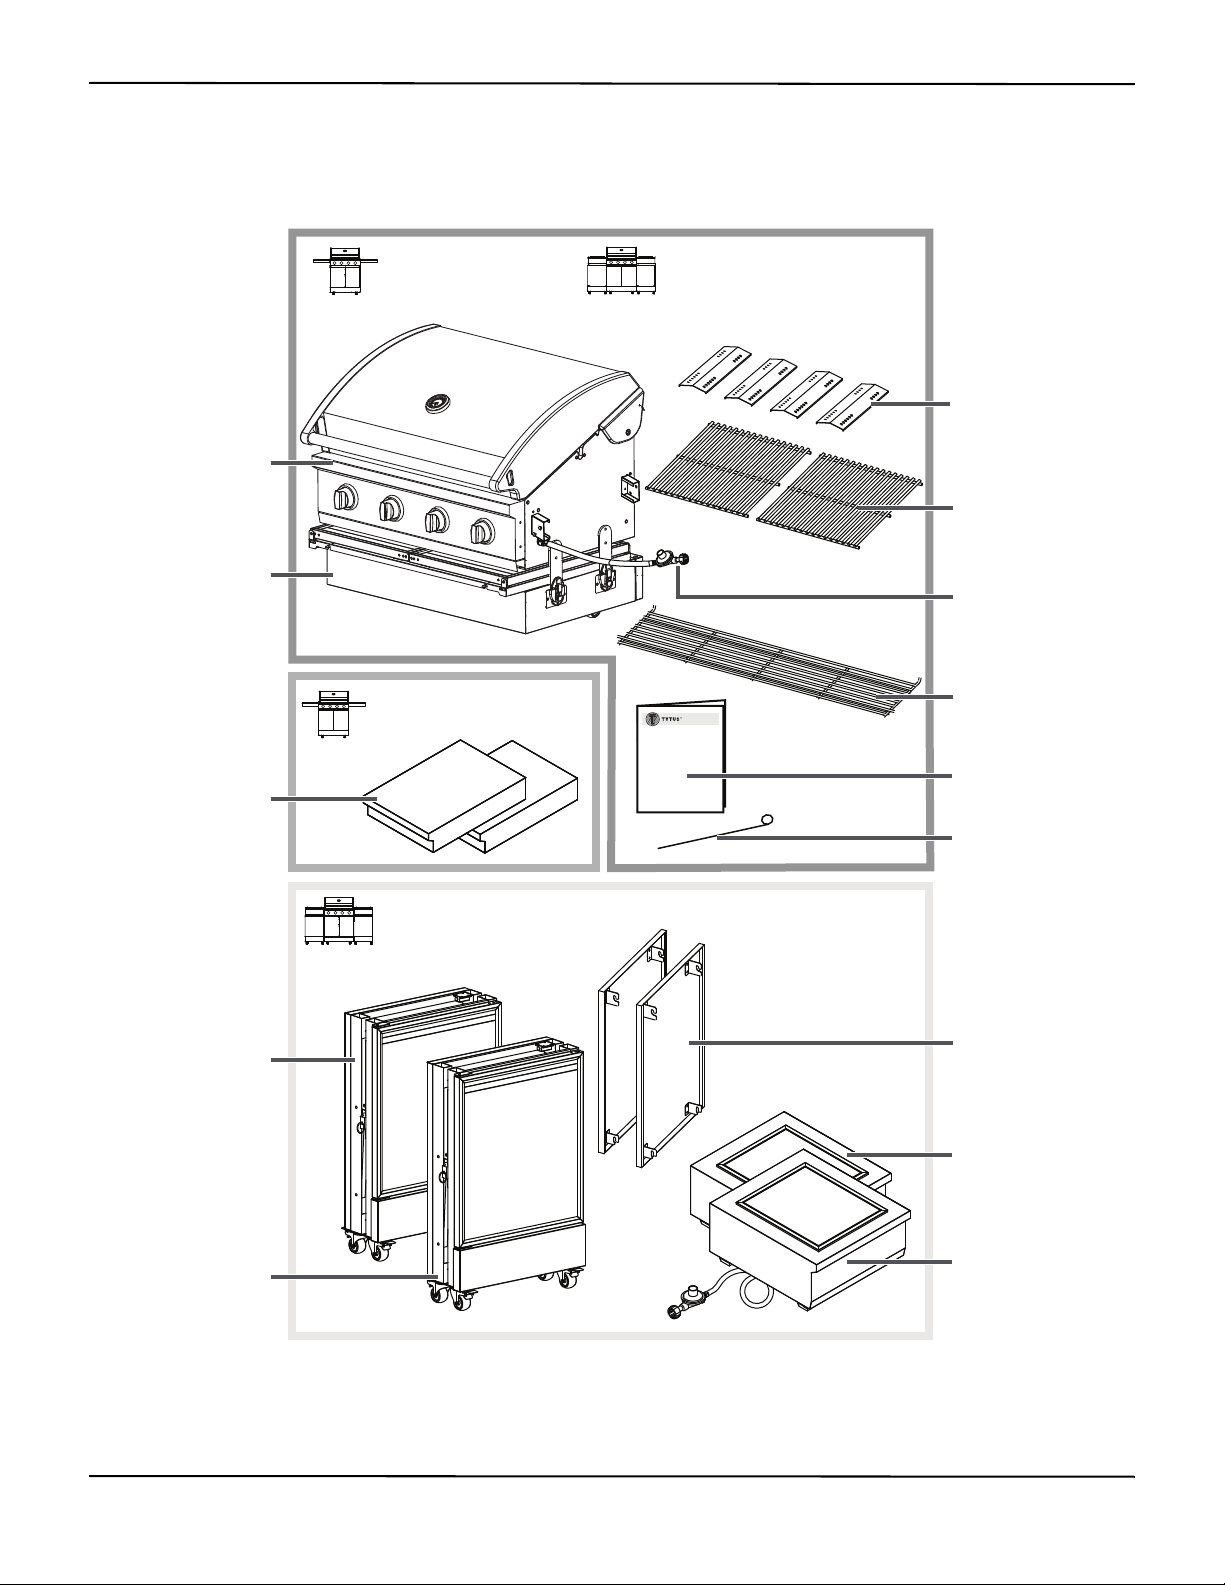
Grill box
Grill base
User Manual
Warming rack
Stainless steel
cooking grates (2)
Flame tamers (4)
Side shelves (2)
Left top cap/Ice
bucket
Right top cap/Sear
burner (sear rack &
regulator hose
preinstalled)
Left and right side
panels
Stainless steel sear
rack
Left side cart
Right side cart
Island Gas Grill
TI-404-M-LP and TI-404-MGG-LP
Gas Grill
T-406-M-LP/T-406-SS-LP
Island Gas Grill
TI-404-M-LP/TI-404-MGG-LP
Gas Grill
T-406-M-LP and T-406-SS-LP
Manual lighting
stick
Preinstalled
Gas line (island grill)
-ORRegulator hose (gas
grill only)
PACKAGE CONTENTS
Remove your grill from the packaging, and lay out the contents. Make sure that your grill is not damaged and that you
have all parts.
www.TYTUSgrills.com
7
ASSEMBLE THE GRILL
TIP: Lift with
these handholds.
Before Grill Assembly
• Make sure that you have assistance from another person to handle the grill box and other large, heavy parts.
• Open the lid of the shipping box, and remove the top sheet of cardboard and packing materials. Lay the cardboard
sheet on the floor and use it as a work surface to protect the floor and grill parts from scratches.
• You may slice the box’s front corners with a utility knife to lay open the box’s front panel. This lets you raise the lid and
remove the components packed inside, making it easier to lift.
•Use the “
free of damage.
• Do not assemble or operate the grill if it appears damaged. If there are damaged or missing parts when you unpack
the shipping box or you have questions during the assembly process, call (952) 807-9690 or email
support@TYTUSgrills.com
• The installation must conform with local codes or, in the absence of local codes, with the National Fuel Gas Code,
ANSI Z21.58-2018/CSA 1.6-2018.
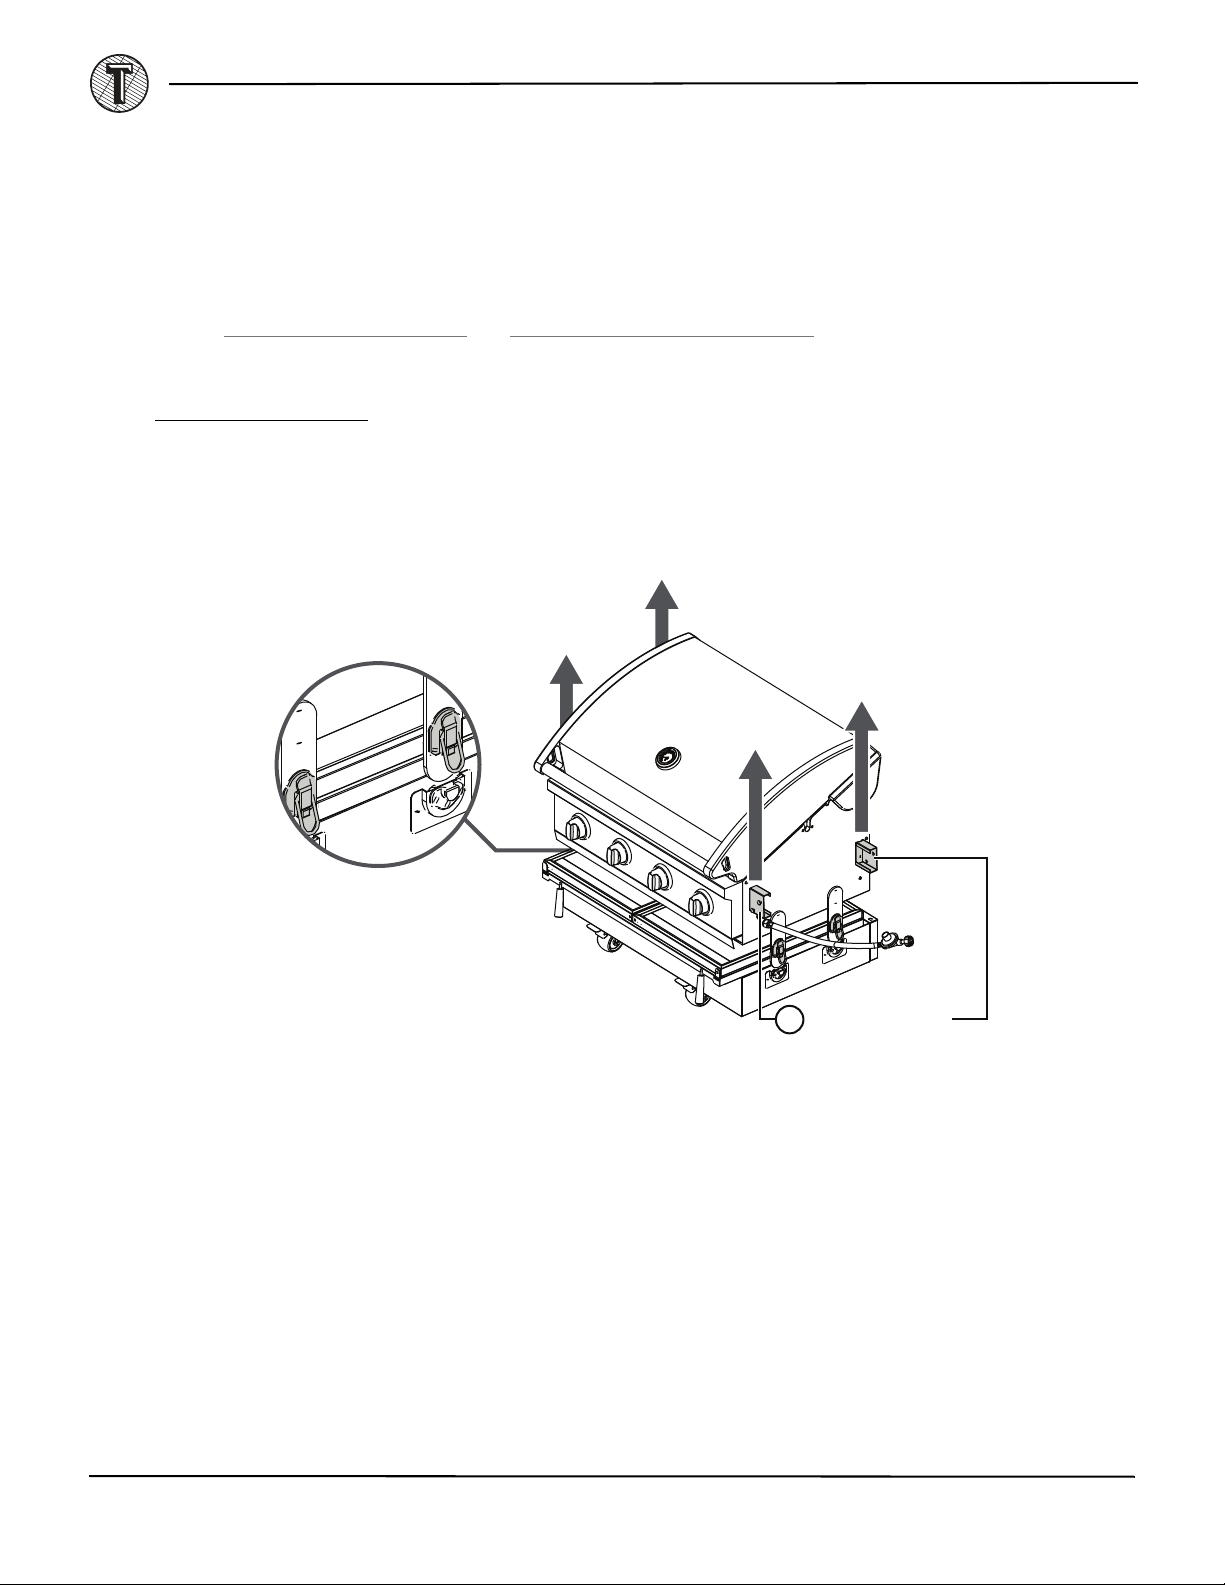
Step 1: Lift off the Grill Box
1) Unlock the four latches on the sides of the grill.
2) With another person, grasp the handholds on the sides of the grill box, then lift it straight up and set it to the side.
Package Contents” (page 7) and “Part Diagrams and Lists” (page 50) to ensure all items are included and
.
8
!
www.TYTUSgrills.com
TYTUS 4-Burner Gas Grill & 4-Burner Island Gas Grill
!
Unlocked
Locked
STEP A
STEP B & C
STEP D STEP E
STEP B & C
TIP: Start from the
inside at a 45° angle.
!
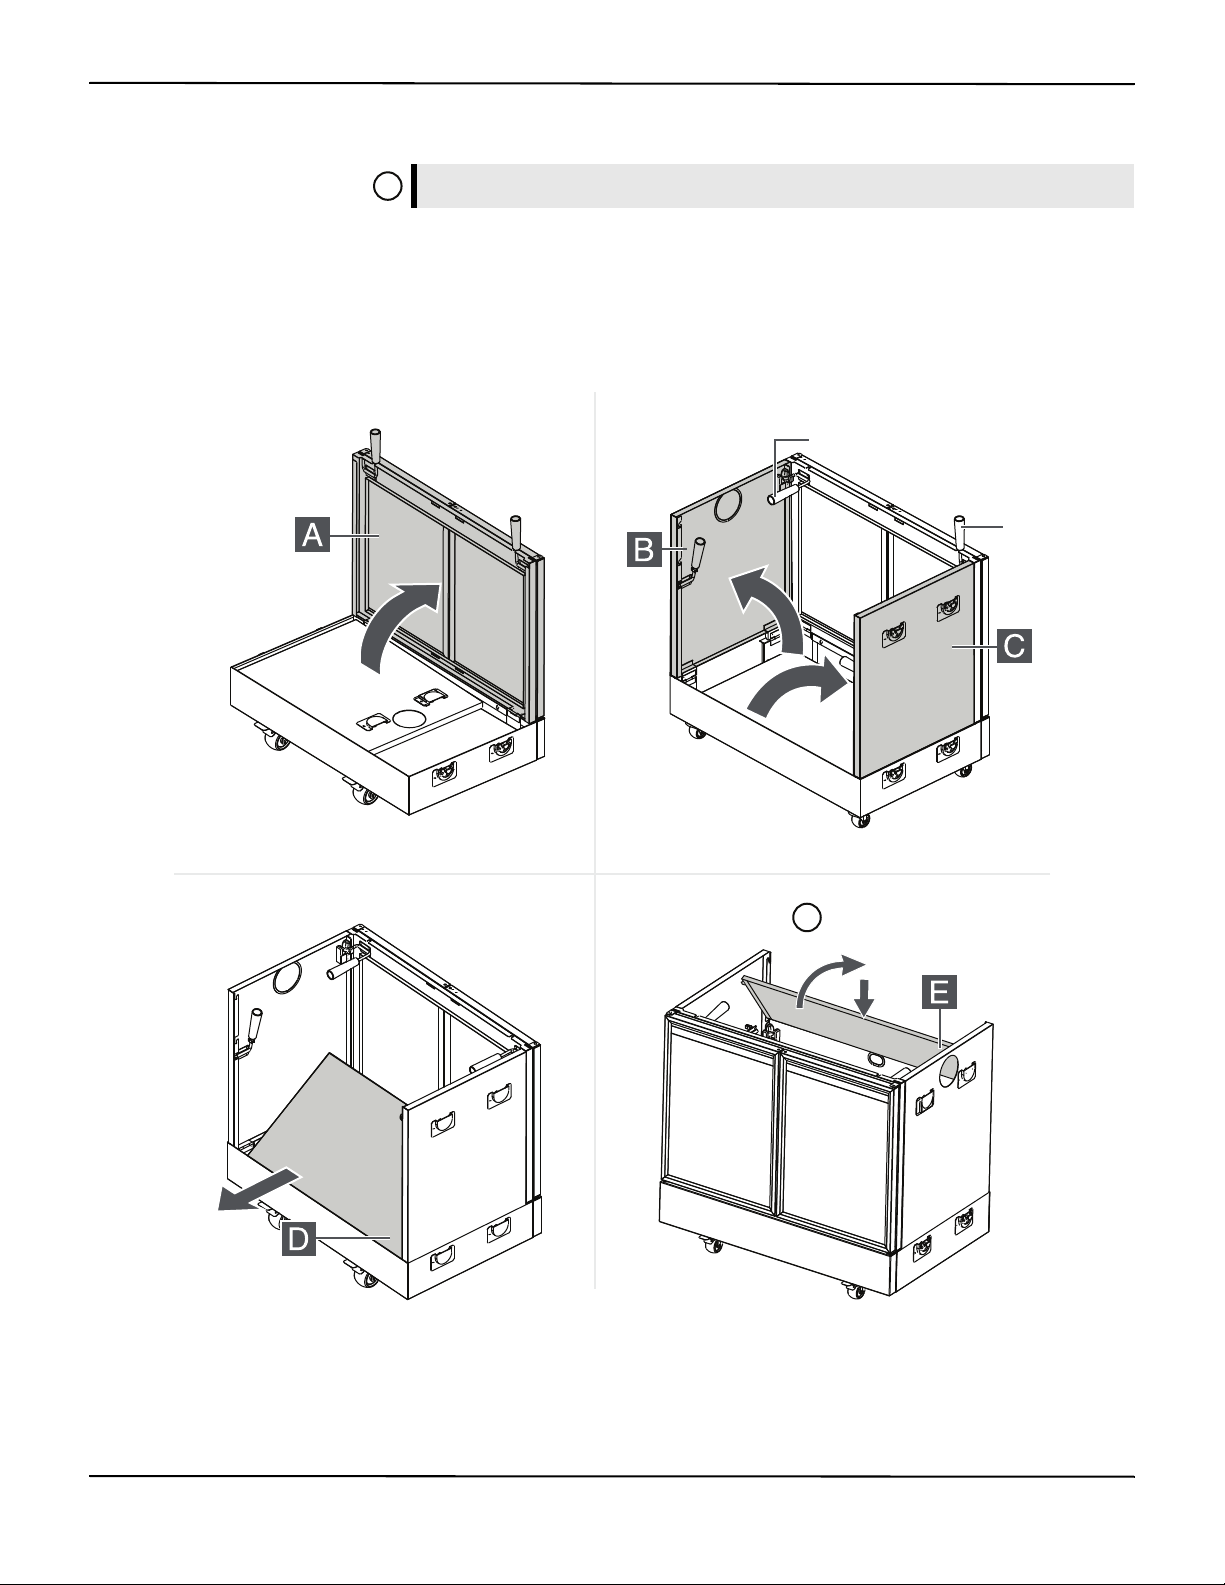
Step 2: Assemble the Grill Base
TIP: When lifting the panels, make sure that the handles are in the up/unlocked position.
A) Lift Panel A.
B) Lift Panel B, then push the locking handle down to secure it to Panel A.
C) Lift Panel C, then push the locking handle down to secure it to Panel A.
D) Lift Panel D, then push the locking handles down to secure it to Panel B and Panel C.
E) From the inside of the cart, angle the bottom of Panel E into the slots on the back of the grill base. Pull the panel
toward you and push down.
www.TYTUSgrills.com
9
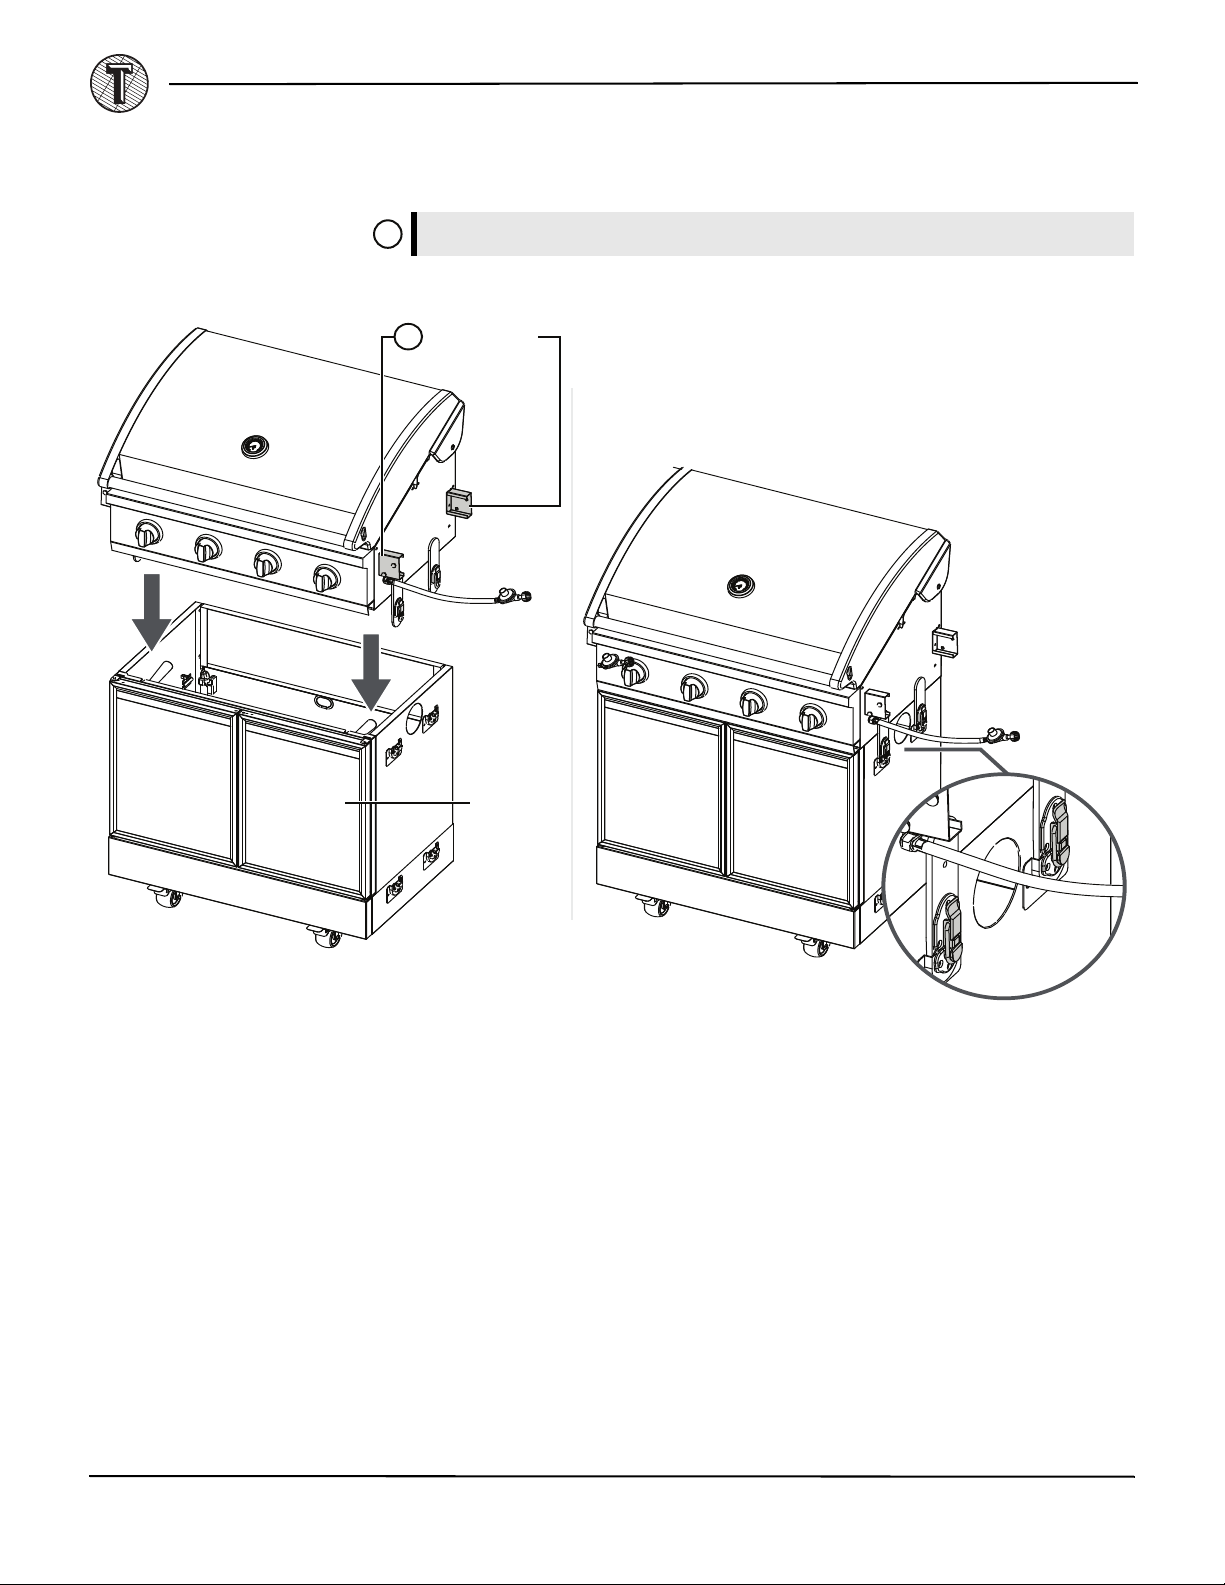
Step 3: Attach the Grill Box to the Grill Base
!
TIP: Lift
with these
handholds.
Front
cabinet
doors
A) With another person, grasp the handholds on the sides of the grill box, then lift it on top of the grill base and align the
latches on the sides. The grill base’s cabinet doors should face the same direction as the front of the grill box.
TIP: Keep the grill box level as you lower it straight down. Don’t torque or twist it.
Lower it slowly to align the latches.
B) Lock the four latches on the sides of the grill.
!
10
www.TYTUSgrills.com
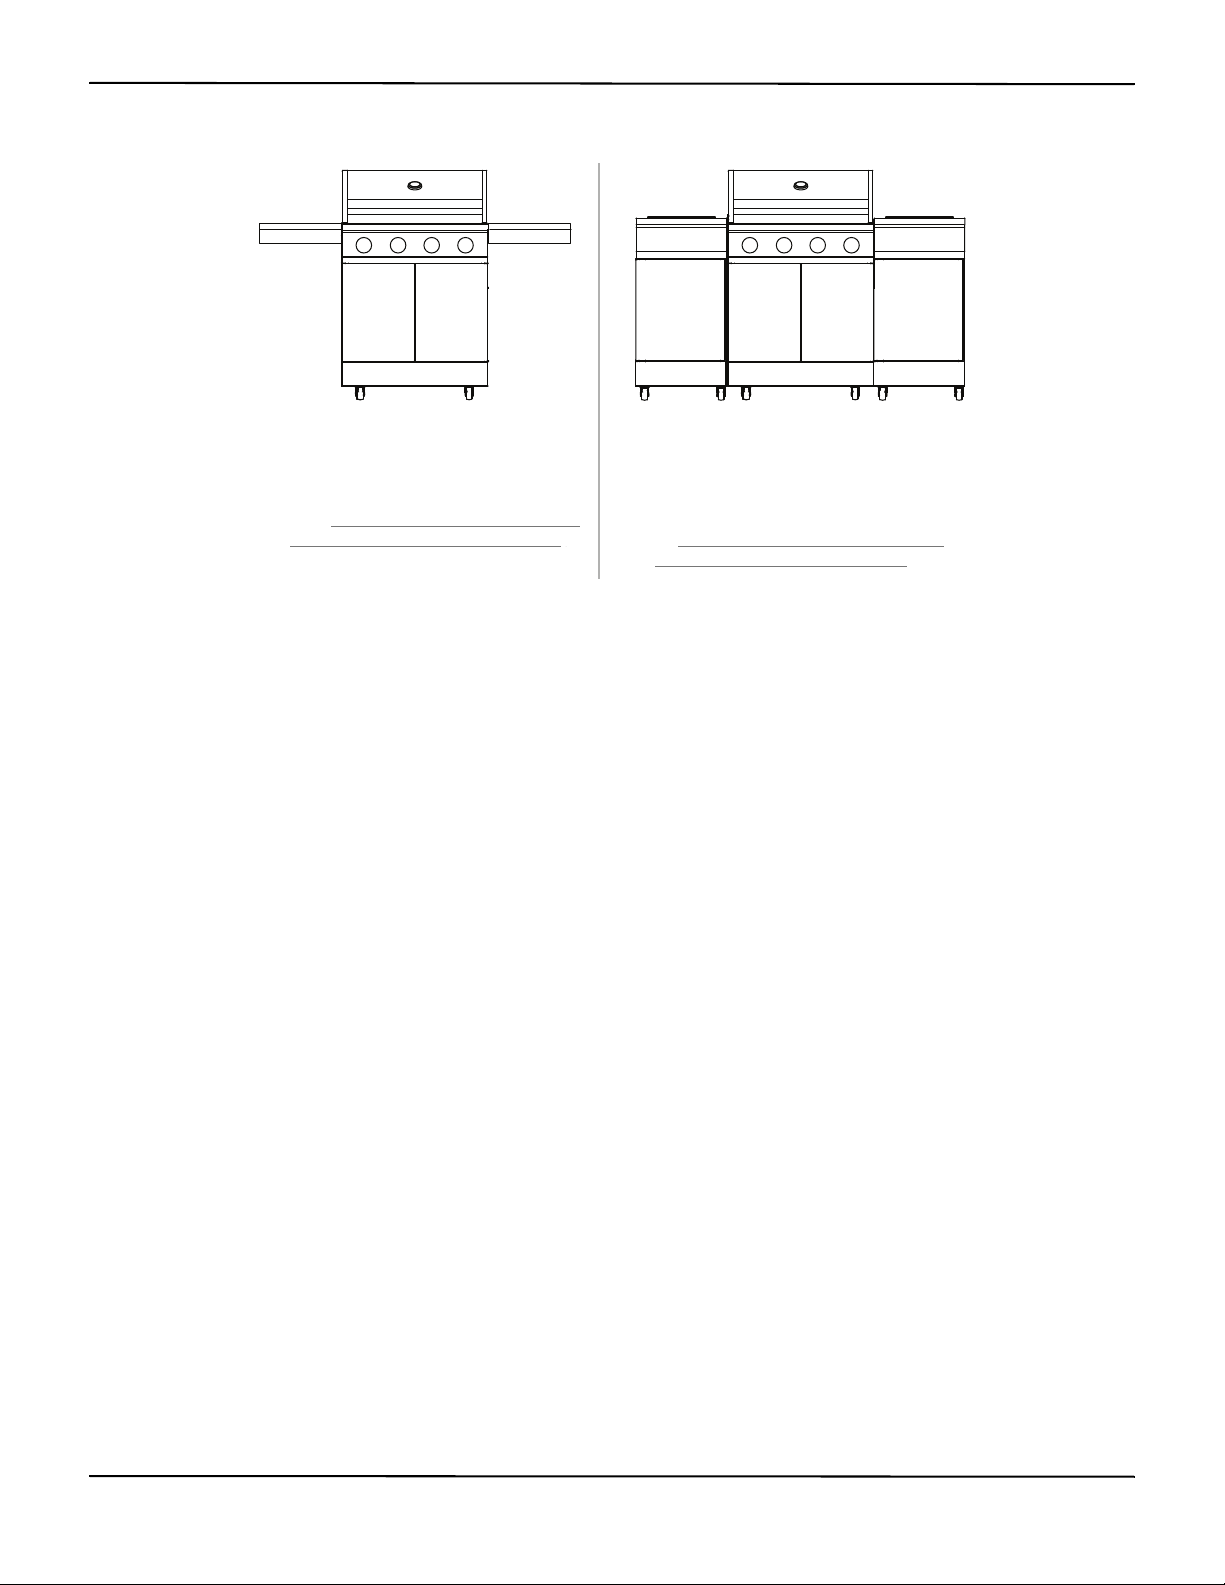
Step 4: Choose your Grill Model
If you have the
4-Burner Gas Grill
(T-406-M-LP and T-406-SS-LP):
Go to “
Grill-Only Model: Attach side
shelves and Propane” (page 12).
If you have the
4-Burner Island Gas Grill
with Side Cabinets
(T-406-M-LP and T-406-SS-LP):
Go to “
Island Grill Model: Attach Side
Carts and Propane” (page 16).
TYTUS 4-Burner Gas Grill & 4-Burner Island Gas Grill
www.TYTUSgrills.com
11
GRILL-ONLY MODEL: ATTACH SIDE SHELVES AND PROPANE
!
The grill side shelves are included with the grill models (T-406-M-LP and T-406-SS-LP). If you have the island grill model
instead, go to “
Island Grill Model: Attach Side Carts and Propane” (page 16).
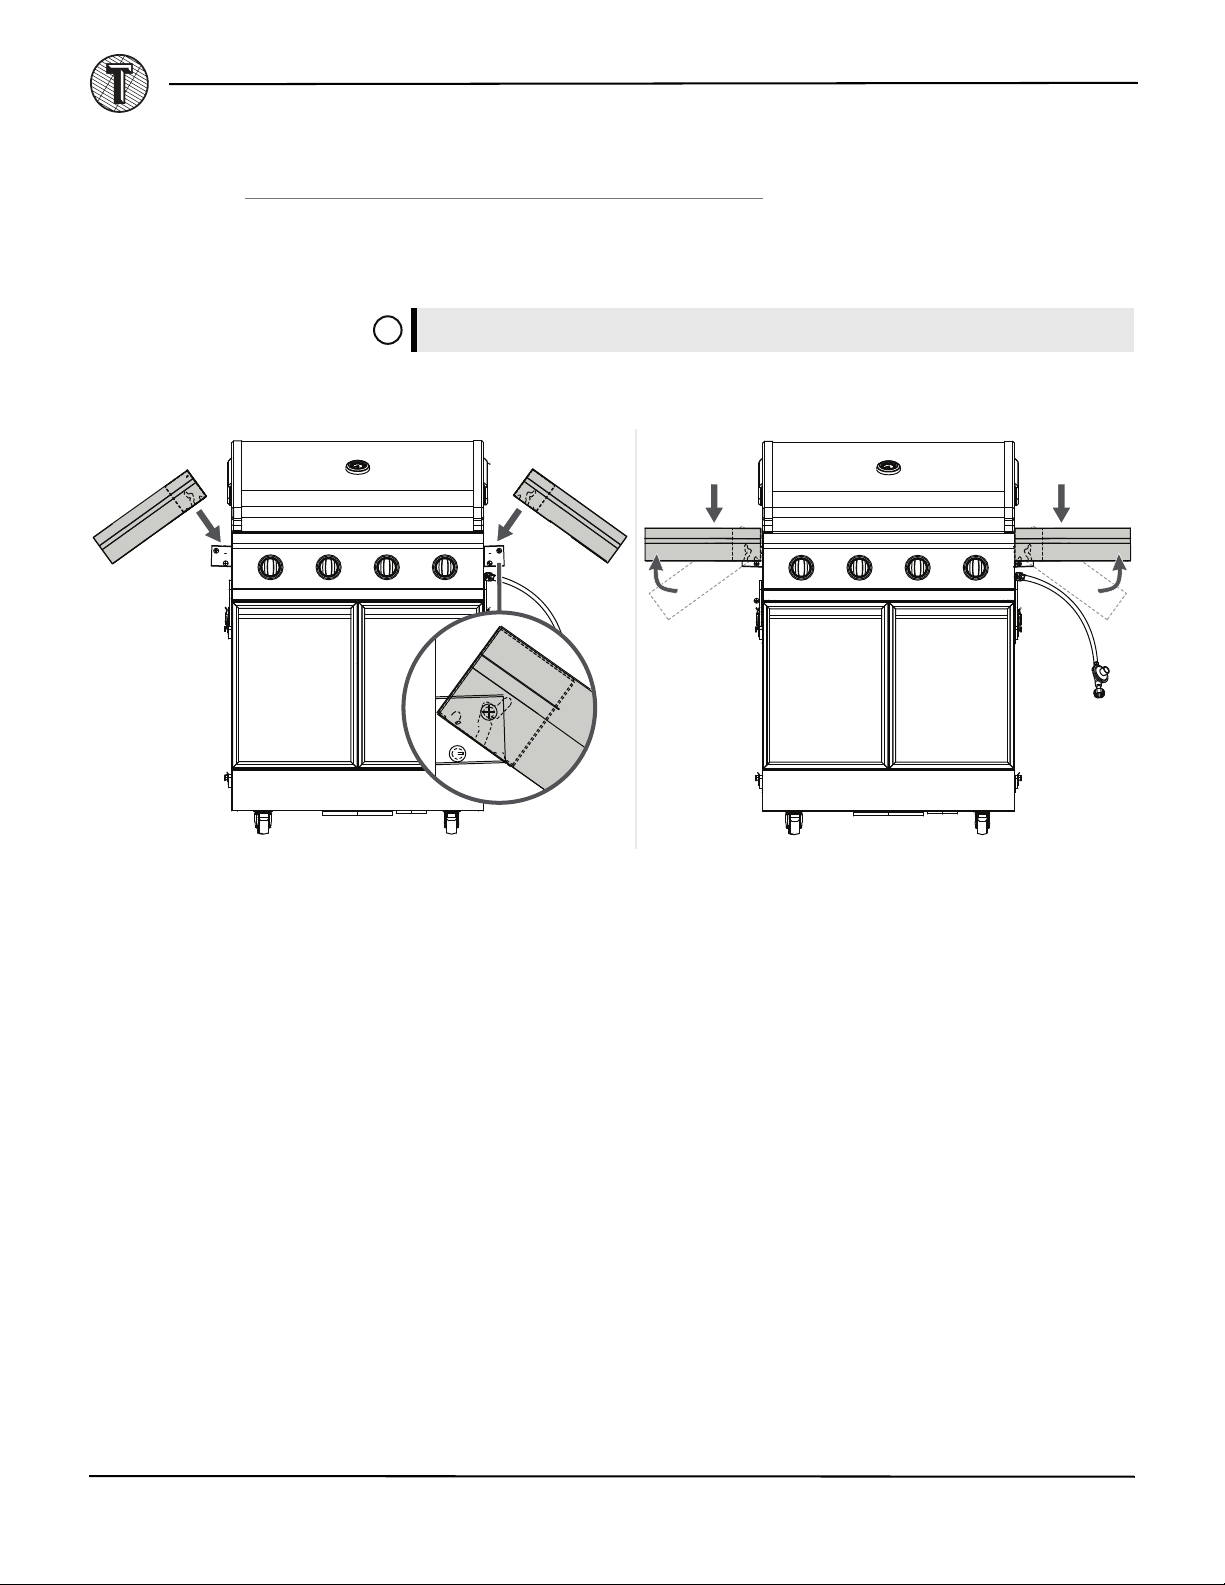
Step 5: Attach the Side Shelves
A) Select the left (labeled “L”) or right (labeled “R”) side shelf.
B) Align the side shelf’s slots with the bolts on the grill box at a 45° angle.
TIP: Make sure that the shelf is resting on the bolts before you rotate the shelf.
C) Rotate the shelf up until it’s parallel with the floor, then push down to secure.
D) Repeat to secure the second shelf.
12
www.TYTUSgrills.com
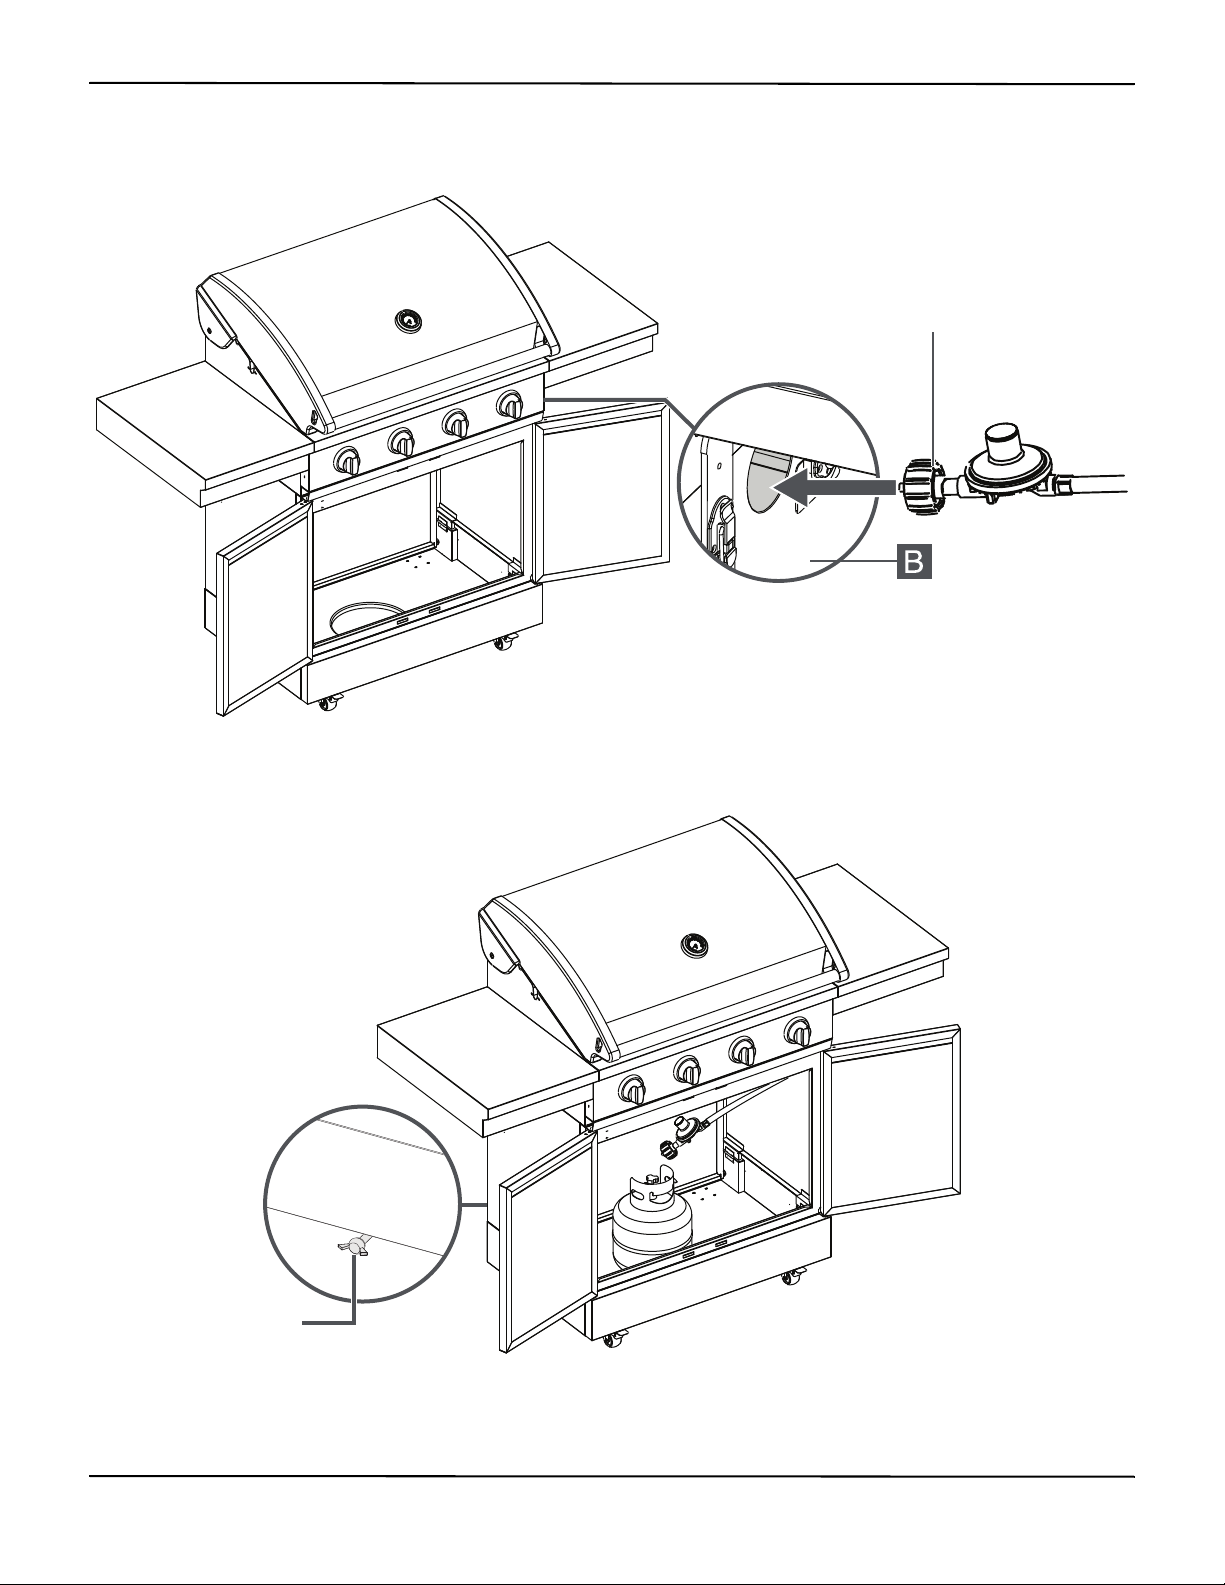
Step 6: Connect the Propane Tank
Gas line
Wing bolt
A) Feed the regulator hose through the opening in Panel B.
TYTUS 4-Burner Gas Grill & 4-Burner Island Gas Grill
B) Place a propane tank (not included) into the cabinet with the tank valve facing the front left corner. Tighten the wing
bolt behind the grill base (near the bottom) to secure the propane tank in place.
www.TYTUSgrills.com
13

C) Attach the regulator hose to the propane tank.
Gas line
Flame tamer
Slots in the grill box
Step 7: Install the Cooking Components
A) Insert the flame tamers into the grill box. The notches at the end of each flame tamer should fit into the slots at the
back of the grill box.
14
www.TYTUSgrills.com
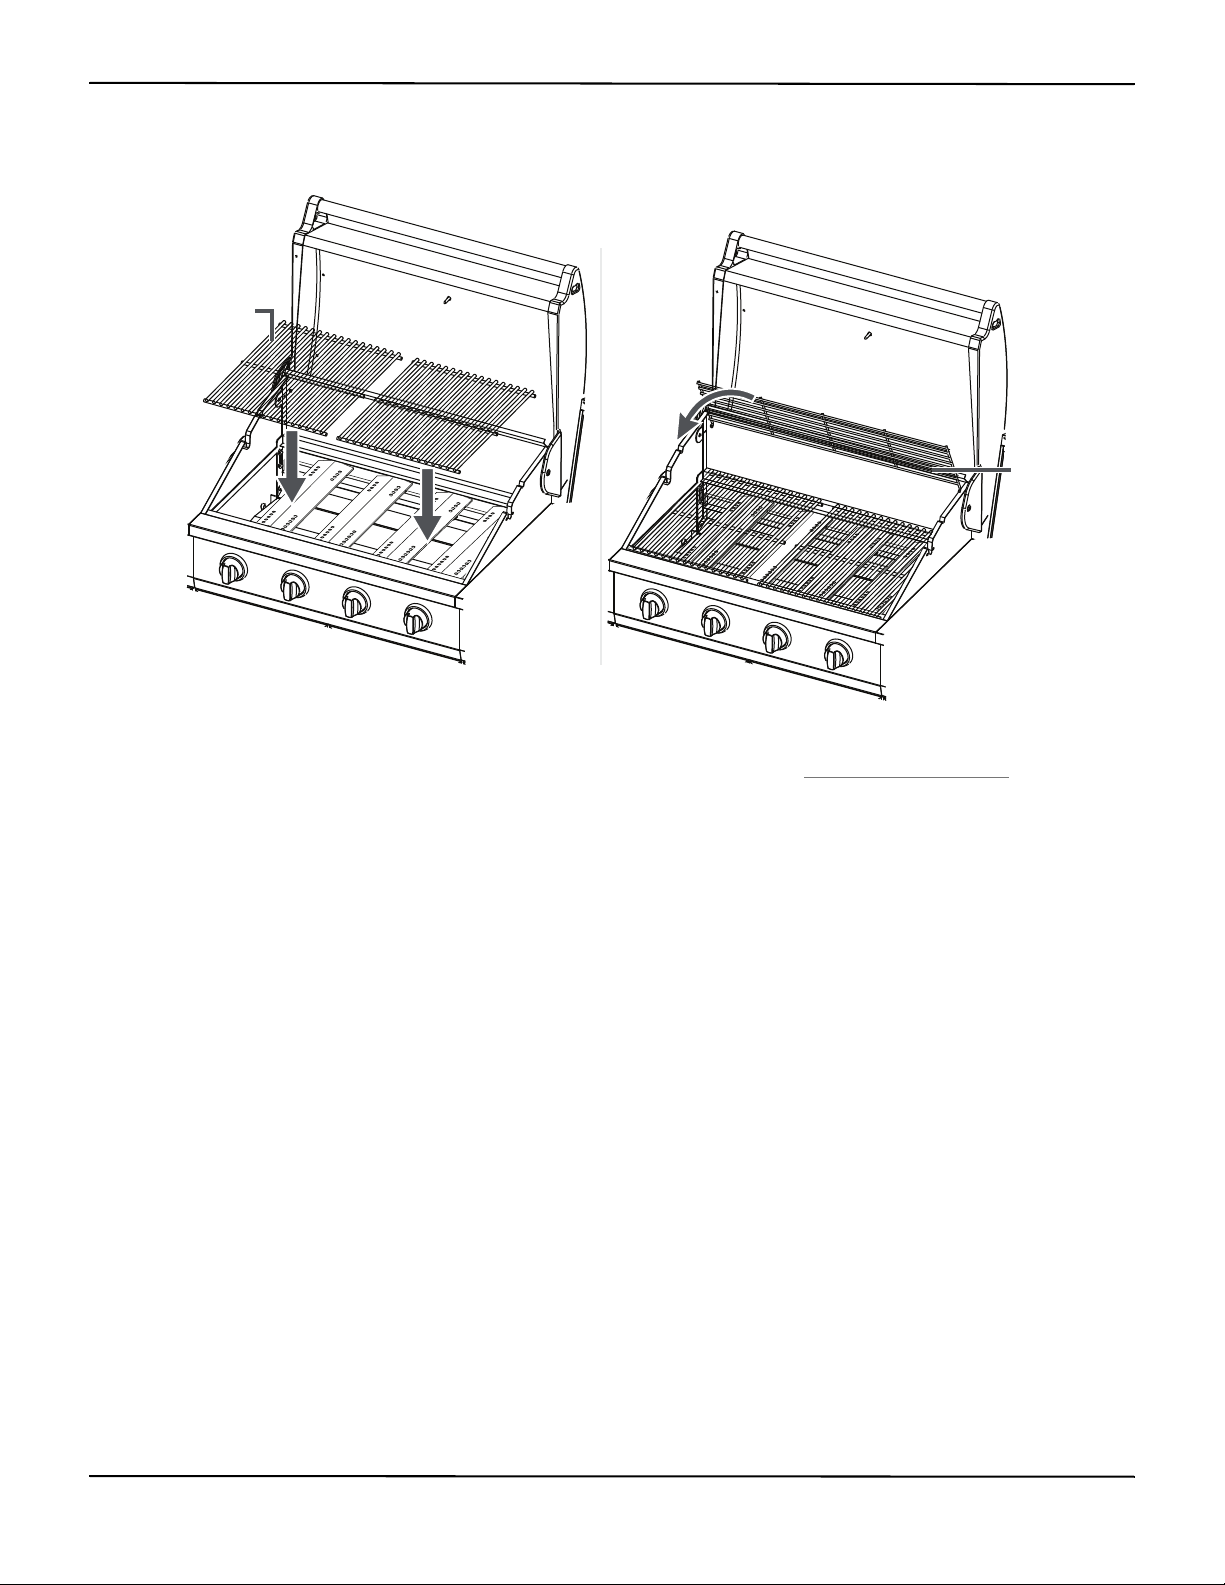
TYTUS 4-Burner Gas Grill & 4-Burner Island Gas Grill
Warming
rack
Cooking grates
B) Place the two stainless steel cooking grates over the flame tamers.
C) Insert the ends of the warming rack into the holes in the rear of the grill box.
D) You’re finished! Enjoy good food, family, and friends with your TYTUS grill. Your grill is designed to be a high-quality,
solid construction that will last for years to come. For usage instructions, see “
Use the Grill” (page 24).
www.TYTUSgrills.com
15
ISLAND GRILL MODEL: ATTACH SIDE CARTS AND PROPANE
!
!
The grill side carts are included with the Grill Island models TI-404-MGG-LP and TI-404-M-LP. If you have the grill-only
model instead, go to “
Grill-Only Model: Attach side shelves and Propane” (page 12).
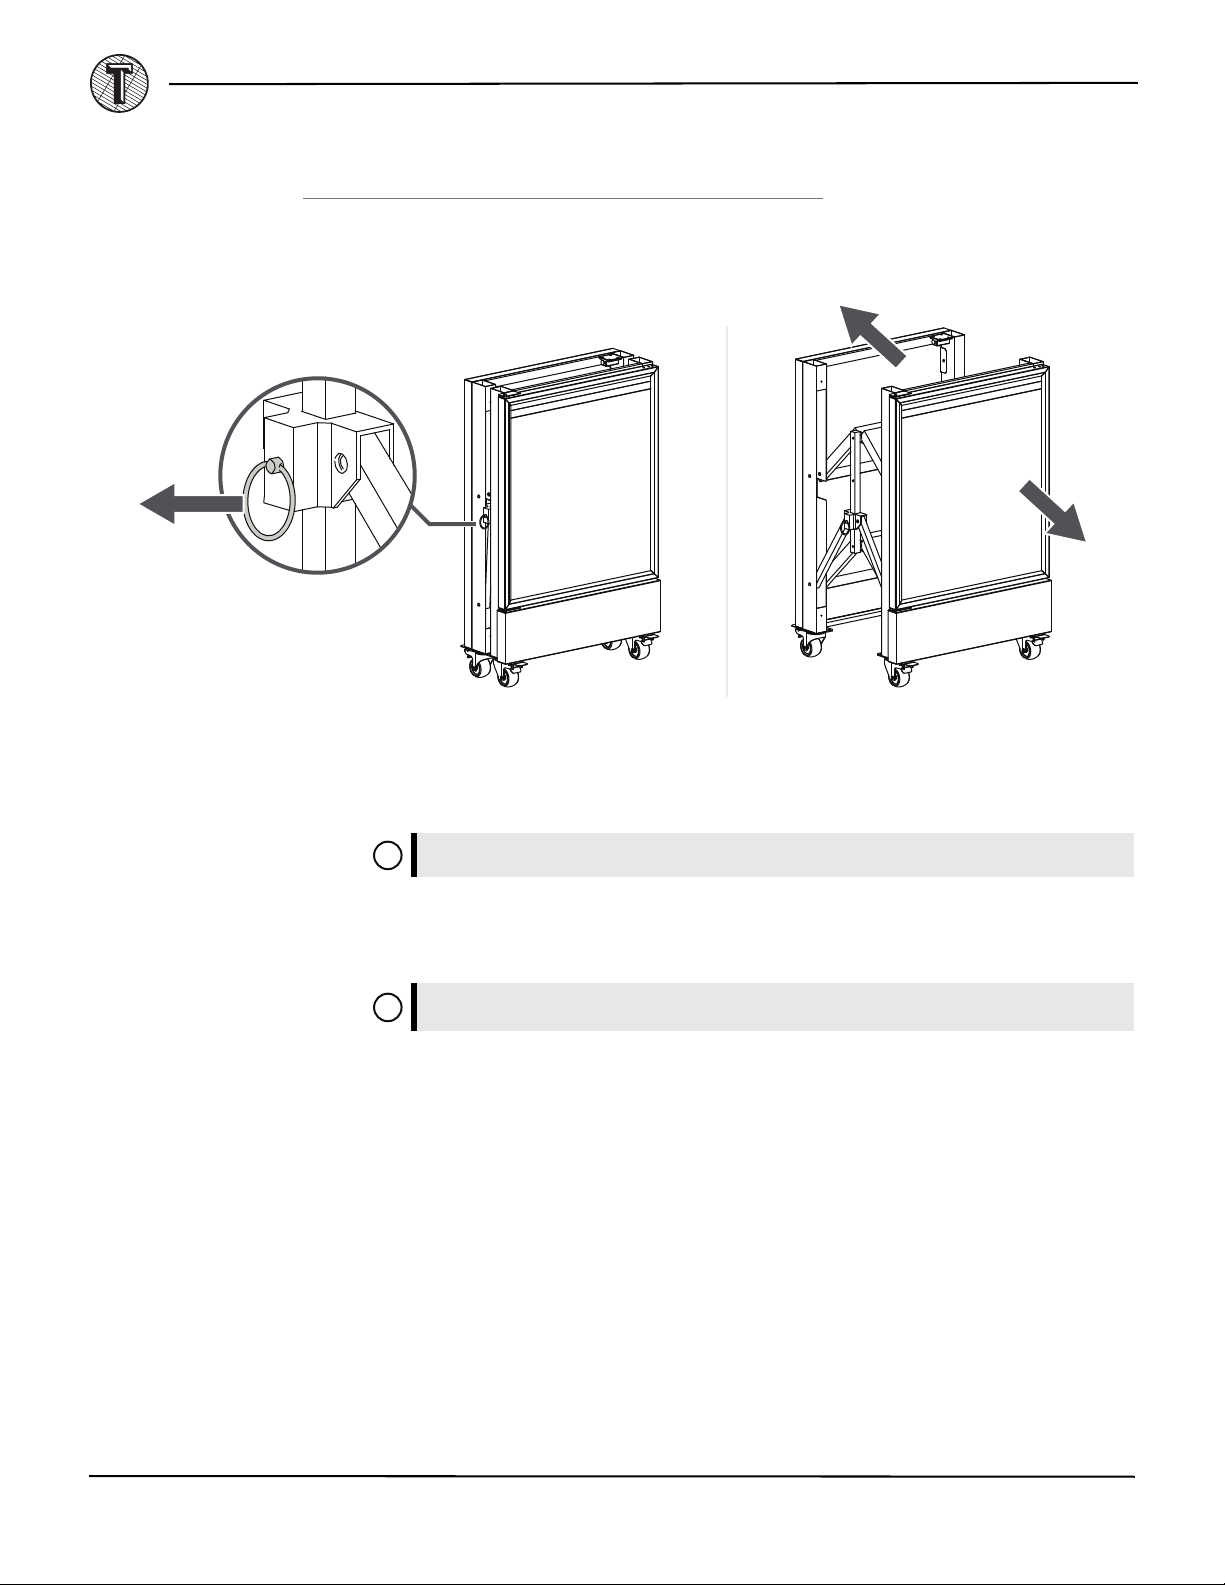
Step 5: Expand the Side Carts
A) Pull the captive pin on the side of a cart, then pull panels apart. The pin can’t be completely removed from the side
cart.
B) Press the shelves down until the pin clicks back into place.
C) Repeat to expand the other side cart.
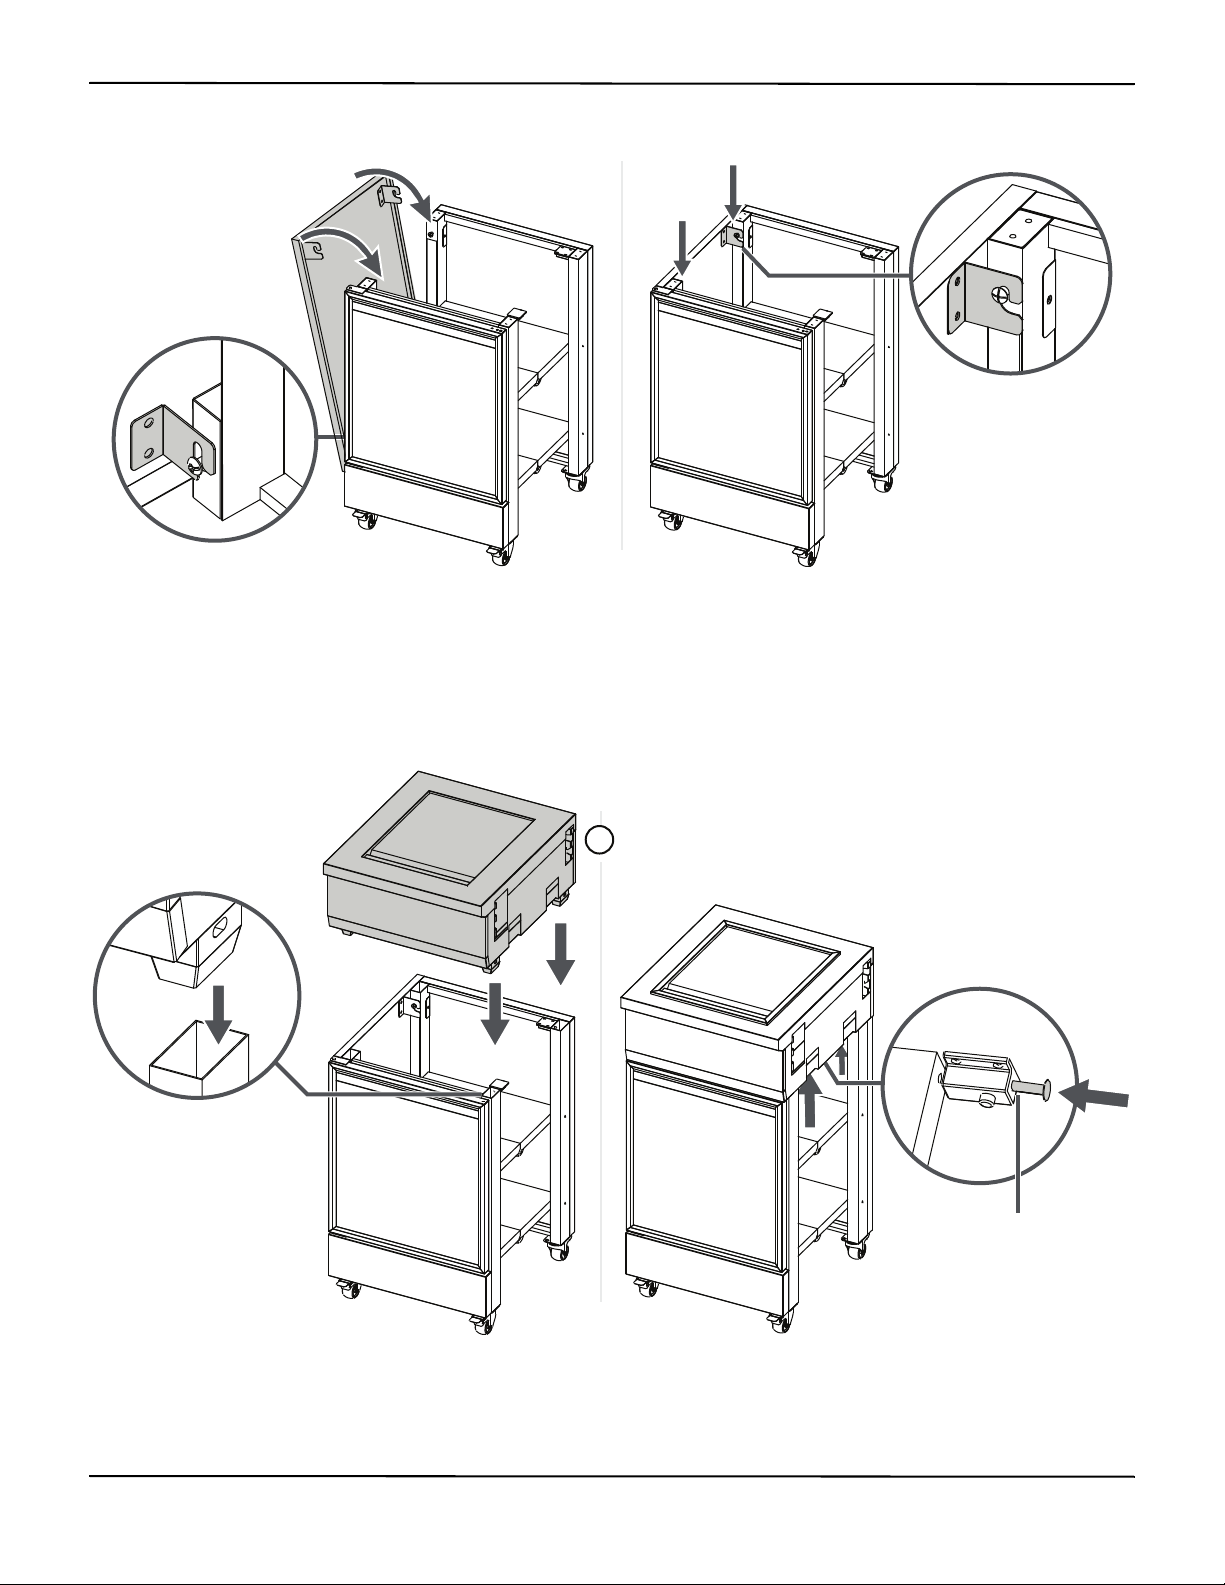
Step 6: Install the Side Panels
TIP: Have a partner hold the side cart steady while installing the side panels.
A) Identify which panel fits onto the left (“L”) or right (“R”) side of the two side carts.
B) Line up the bottom of the panel with the bolts on the side cart at a 45° angle.
C) Rotate the panel forward onto the top bolts, then let it drop down into place.
TIP: Make sure that the side panel is securely fastened. The panel should not pull away from
the side cart at the top or bottom.
16
www.TYTUSgrills.com
TYTUS 4-Burner Gas Grill & 4-Burner Island Gas Grill
Spring pins
TIP: The unfinished side of the top cap should
face the opening in the side of the cart.
D) Repeat steps 6A through 6C to install the panel on the other side cart.
Step 7: Install the Top Caps
A) Identify which top cap fits into the left or right side cart. The ice bucket is for the left side cart. The sear burner is for
the right side cart.
B) Place the top cap’s feet into the slots in side cart’s frame, then lock it in place with the two spring-pins under the top
cap.
C) Repeat to install the second top cap.
!
www.TYTUSgrills.com
17

Step 8: Attach the Left Side Cart
A) Have your partner hold the grill base steady.
B) Line up the notches on the left side cart (ice bucket side) with the grill base. The two pieces should be about one to
two inches from one another.
C) Push the side cart toward the grill base. As you push them together, the side cart will rise up slightly, and then drop
into place.
18
www.TYTUSgrills.com
 Loading...