

Page 1
TytoPro User Guide
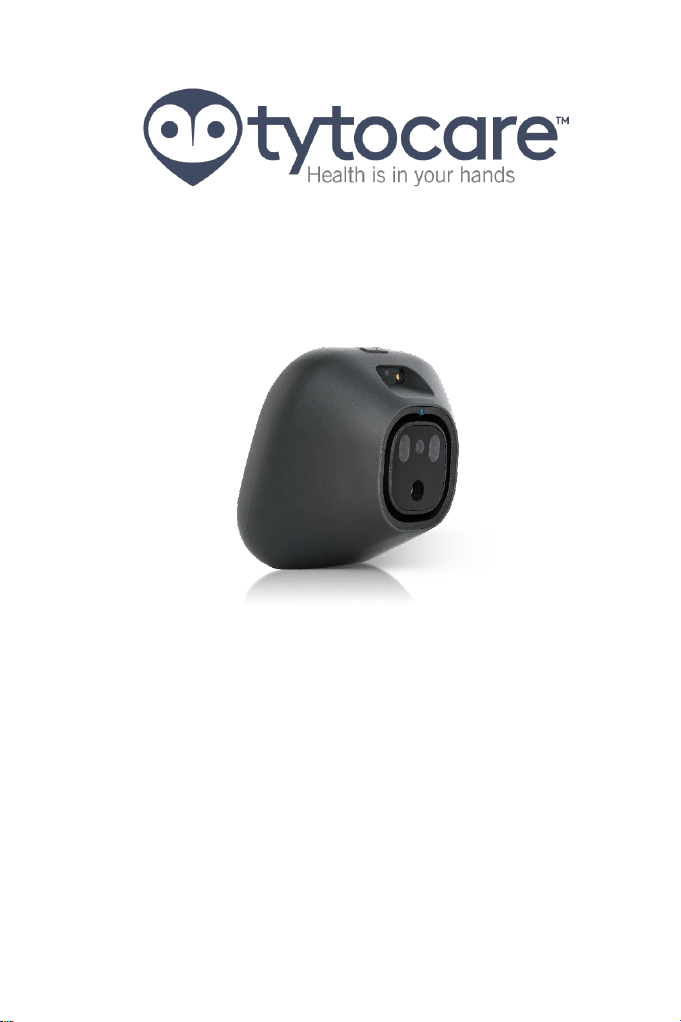
TytoCare Base Unit
Version 1.0
Page 2

Base Unit User Manual
TytoPro
Table of Contents
1. General Safety Messages ............................................................... 5
2. Product Overview .......................................................................... 8
2.1. Intended use and indications for use ................................ 8
3. What’s in the Box ........................................................................... 9
4. How the System works................................................................. 13
5. Download, Registering the App and Adding Patients .................. 14
5.1. Downloading the App ...................................................... 14
5.2. Registration ......................... Error! Bookmark not defined.
5.3. Tutorial Videos ................................................................. 14
6. First Time Setup ........................................................................... 15
6.1. What do I need to start working with the Device? .......... 15
6.2. Setting up the Wi-Fi Connection ...................................... 15
7. User Role: Unguided and Guided Exams ....... Error! Bookmark not
defined.
7.1. Choosing Unguided or Guided Exams Error! Bookmark not
defined.
8. Start visit ...................................................................................... 20
8.1. User login ......................................................................... 21
8.2. Identify patient ................................................................ 22
8.2.1. Add a New Patient ........................................................ 24
8.2.2. Choose Type of Exam .................................................... 25
8.2.3. Request an Online Meeting ............ Error! Bookmark not
defined.
8.3. Select an Exam ................................................................. 26
Page 2 of 50
Page 3

Base Unit User Manual
TytoPro
8.4. Perform the Exam ............................................................ 28
8.4.1. Exams and Add-On Devices .......................................... 29
8.5. After the Exam .................... Error! Bookmark not defined.
8.6. Confirmation screen after Save visit . Error! Bookmark not
defined.
9. Online Visit & Exam ...................................................................... 36
9.1. Log in and Choose a Clinician ........................................... 36
9.2. Clinician Accepts Your Visit Request ................................ 37
9.3. Using the Mobile Device Stand ........................................ 38
10. INBOX ......................................................................................... 41
11. User Settings .............................................................................. 42
12. System Labels and Symbols ....................................................... 43
12.1. System Labels ................................................................. 43
12.2. Explanation of Symbols .................................................. 44
Appendix A: Headphones................................................................. 45
A.1 Connecting headphones to the device ............................. 46
A.2 Advanced Clinician settings .............................................. 47
A.3 Advanced Technician settings .......................................... 47
Appendix B: Forgot Password .......................................................... 48
Appendix C: Frequently Asked Questions ........................................ 49
Page 3 of 50
Page 4

Base Unit User Manual
TytoPro
PLEASE READ THIS USER MANUAL BEFORE OPERATING THE SYSTEM.
12 Haomanut St.
Netanya 4250445 Israel
Tel: + 972 (72) 2210750
Fax: +972 (72) 2210752
E-mail: [email protected]
http://www.TytoCare.com
Important
This User Guide is subject to periodic review, update and revision.
The user of this product has sole responsibility for any malfunction that results from
improper use, faulty maintenance, improper repair, unauthorized service, damage, or
alteration by anyone other than Tyto Care Ltd. (TytoCare).
The safety, reliability, and performance of this device can only be assured under the following
conditions:
The device has been used for its indicated use and according to the operating
instructions in this User Manual.
All fittings, extensions, readjustments, changes, or repairs have been carried out by a
TytoCare authorized representative.
This product is protected by the following US patent applications: US 8,953,837 and US-20130338447 and other pending US patents.
The device complies with requirements of IEC/EN 60601-1 for general requirements for
safety of medical electrical equipment (Type BF applied part, mode of operation: spot
measurement, degree of mobility: portable). The unit has IEC 60601-1-2 Class A compliance.
TytoCare reserves the right to change or improve its products and accompanying technical
literature without specific notice of changes or improvements. No part of this publication
may be reproduced, stored in a retrieval system or transmitted in any form by any means,
electronic, mechanical, photo reproductive, recording or otherwise without the express prior
written permission of TytoCare.
Tyto support may be contacted at +1-866-971-TYTO
Page 4 of 50
Page 5
Base Unit User Manual
TytoPro
1.
If the device packaging, the device itself or any of its accessories are damaged or not intact
– do not use the device.
Do not immerse the device or any of its accessories in water or in any other liquid. Do not
use a wet device. If the device becomes wet, wipe off all moisture and allow at least 48
hours to dry before operating.
The system contains no user-serviceable components. Do not disassemble, service or
repair this product or any of its parts.
Disposal of this device should be performed in accordance with local regulations.
If device is not working as expected, discontinue use. Refer servicing to qualified service
personnel.
Use the equipment only for the purpose described, as explained in this user manual.
Do not use accessories which are not supplied or recommended by the manufacturer.
Do not remove the covers of the device components.
Only perform maintenance procedures specifically described in this user manual.
Do not use device during defibrillator use.
Do not use the device on an open wound or on infected skin.
Keep these instructions for use.
Connect only authorized accessories to the device.
If the LCD screen is broken or cracked, please contact TytoCare Support.
If the LCD screen is dirty, clean the screen with a dry cloth or towel.
If the device does not turn on or initialize properly, or the Splash screen does
not appear as shown, or it cannot be turned off, contact TytoCare Support.
If the audible speaker does not sound briefly during system initialization, contact TytoCare
Support.
The Restore to Factory Defaults action from the menu will erase all device settings and data
and will restore the device to its initial as-new state.
Use 70% alcohol moisture wipes for disinfection of the device if in contact with skin.
Contact with solvents can cause severe deterioration of the plastic parts and malfunctioning of the instrument and accessories.
Examinations cannot be done while the device is charging.
Use only the charger provided with the device. If the device does not charge, contact
TytoCare Support.
Use only a secured Wi-Fi network such as WPA2 wireless encryption.
If data or instructions are not displayed on the iPhone during an examination, view the
device screen.
General Safety Messages
Warnings: A warning indicates precautions to avoid the possibility of personal injury
or death.
Cautions: A caution indicates a condition that may lead to damage to equipment, or
a lower quality of treatment.
Page 5 of 50
Page 6
Base Unit User Manual
TytoPro
If for any reason you cannot perform the connection between the device and the TytoCare
App, contact TytoCare Support.
When performing a measurement, a date and time stamp is automatically included with
the recording. If you do not see the date and time of the recording, contact TytoCare
Support.
The device connection screen in the TytoCare App should only be used to connect to
another device or to disconnect from an existing device.
Storage and operating conditions: 0°-40° Celsius / 15-93% humidity.
When charging, the activity LED should be orange, and when charging is complete, it
should turn green.
The device is a class II device intended for use under prescription.
The device complies with wireless standard IEEE 802.11 g/n (2.4GHz).
Warning: Do not remove the covers of the device components. Only
perform maintenance procedures specifically described in this User Guide.
Notes: A note provides other important information.
Repair Policy
When under warranty, repair and service must be performed by TytoCare. When the
TytoCare warranty is not applicable, repairs may be made by TytoCare or authorized
representatives, on a parts and labor basis. The device has a one-year warranty.
Disclaimer
Information provided by TytoCare is believed to be accurate and reliable. However, TytoCare
assumes no responsibility for the use of such information, nor for any infringements of
patents or other rights of third parties, that may result from its use.
Page 6 of 50
Page 7
Base Unit User Manual
TytoPro
FCC Radio frequency interference statement
This equipment has been tested and found to comply with the limits for a Class B digital
device, pursuant to part 15 of the FCC Rules. These limits are designed to provide reasonable
protection against harmful interference in a residential installation. This equipment
generates uses and can radiate radio frequency energy and, if not installed and used in
accordance with the instructions, may cause harmful interference to radio communications.
However, there is no guarantee that interference will not occur in a particular installation. If
this equipment does cause harmful interference to radio or television reception, which can
be determined by turning the equipment off and on, the user is encouraged to try to correct
the interference by one or more of the following measures:
is connected.
er or an experienced radio/TV technician for help.
TytoCare Inc. is not responsible for any radio or communication interference caused by using
other than specified or recommended cables and battery or by unauthorized changes or
modifications to this equipment. Changes or modifications not expressly approved by the
manufacturer could void the user’s authority to operate the equipment.
This device complies with part 15 of the FCC Rules. Operation is subject to the following two
conditions:
1. This device may not cause harmful interference, and
2. This device must accept any interference received, including interference that may cause
undesired operation.
Page 7 of 50
Page 8

Base Unit User Manual
TytoPro
2.
2.1.
Product Overview
The TytoCare Base Unit is a user-friendly electronic device that
allows you to perform examinations, and to optionally transmit
these sound, video or image data to a medical professional in
another location.
The Base Unit is used with additional add-on units to perform the
following types of examinations:
Lungs
Heart
Heart Rate
Ears
The Base Unit connects to your mobile device (iPhone, iPad, iPad
mini or iPod touch) to facilitate the process of communicating
examination data and performing an online visit with the clinician.
This device is designed for use in a clinical environment. It can be
used in a number of scenarios:
By an individual clinician/medical professional at his clinic
By a clinician/healthcare professional, who forwards exam data
to another healthcare professional for later analysis
By a clinician/healthcare professional, who collaborates online
with another healthcare professional during or after the exams
Throat
Temperature
Skin
General audio auscultation
Intended use and indications for use
The device is the base unit that, when coupled with add-on devices,
allows the performance of examinations, and the transmission of
the resulting data. The exams may be conducted by a clinician at
one location on a network, who can listen to the auscultation
sounds of a patient on site or at a different location on the
network, with the signal carried on a connection between the two
locations. The TytoPro device is intended for use by professional
users in a clinical environment or at patients’ homes.
Page 8 of 50
Page 9
Base Unit User Manual
TytoPro
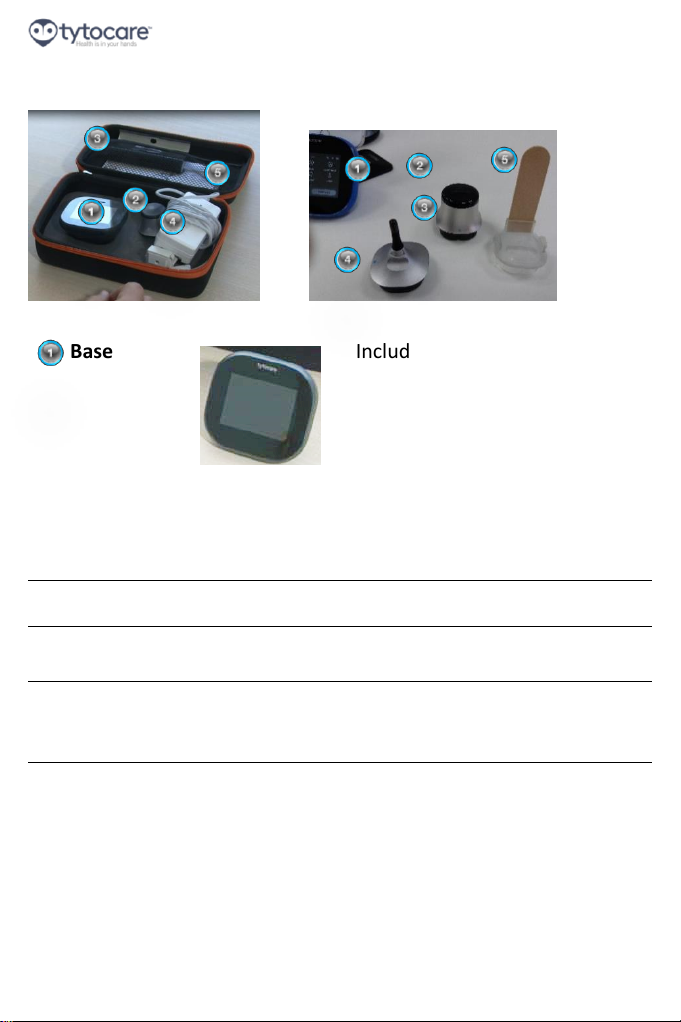
3.
Base Unit
Includes an LCD touch screen,
main processing unit,
rechargeable battery, camera,
illumination, sensors and
connector which is used to
mount the add-on devices (see
Section 8.5.2. Exams and AddOns User Guides ), and which is
held when taking an exam
Otoscope
Add-on device for ears exam
Stethoscope
Add-on device for heart and
lungs auscultations
Tongue
Depressor
Optional tool for throat exam,
including a re-usable holder,
and a disposable blade
Platter
Holder for device and add-ons.
To be used during examinations
What’s in the Box
Page 9 of 50
Page 10

Base Unit User Manual
TytoPro
Disposables
10 adult ear specula
10 child ear specula
10 adult tongue depressor
blades
10 child tongue depressor
blades
Carrying
Case
Holds the entire TytoCare
product, including base unit,
add-ons, disposables, and can
also be used as a mobile stand,
to hold the iPhone during
examination and online virtual
visit
Page 10 of 50
Page 11
Base Unit User Manual
TytoPro
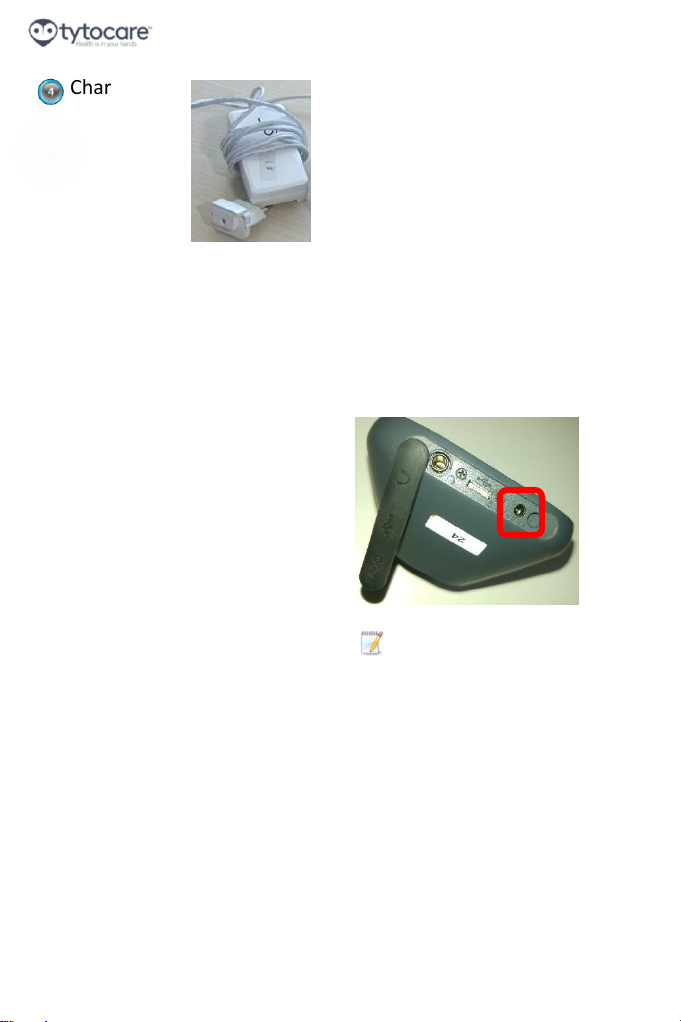
Charger
Used to charge base unit. The
charger is equipped with a
110V adaptor plug. Please
install it on the power supply
box before charging.
To charge the base unit,
connect the power supply plug
into the wall electrical wall
socket, and the cord plug into
the charger socket in device, as
seen in this picture:
Note: The device base unit
comes pre-charged. If it does
not power on initially, you can
connect the charging cable to
the base unit to recharge it. You
cannot perform exams during
the charging process.
It is recommended to fully
charge the battery before use.
Page 11 of 50
Page 12

Base Unit User Manual
TytoPro
Note: It is recommended to
store the device charged, and to
re-charge it once in every 3
months. Storing the device
when battery is drained may
shorten the battery life.
Page 12 of 50
Page 13
Base Unit User Manual
TytoPro
4.
repository
recorded data
Perform the examination
Wi-Fi
How the System works
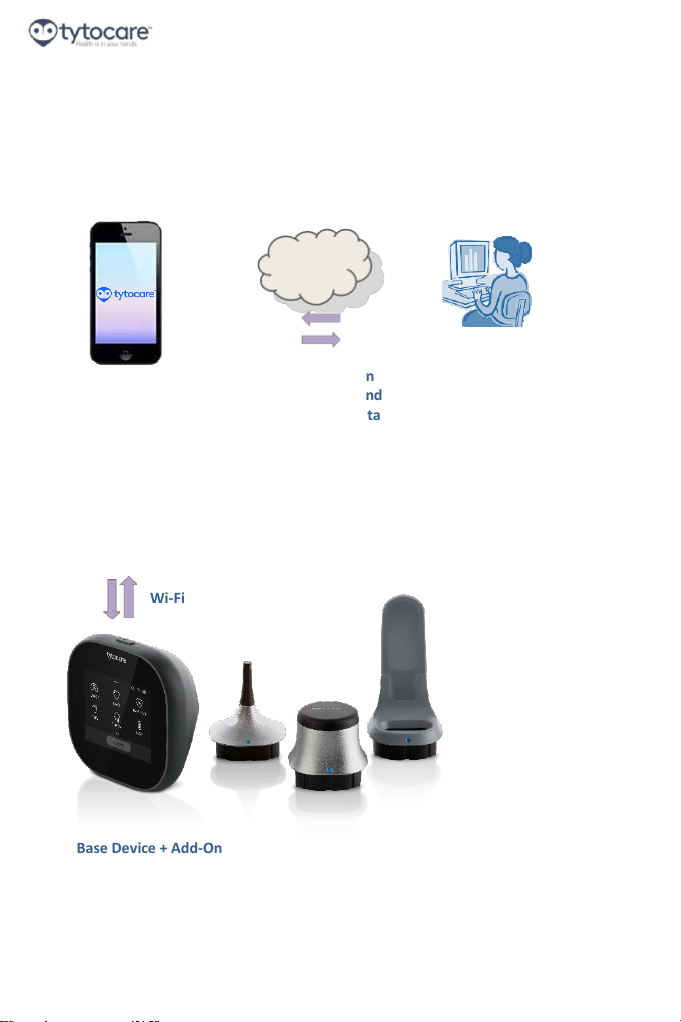
The diagram below shows how the various components of the
TytoCare system work together to help you communicate with the
clinician.
TytoCare App
Runs on Mobile Device
(iPhone, iPad, iPad mini)
Initiate an online exam with
a clinician.
Send store-and-forward
data to a clinician for
review.
Manage and store patients’
Tyto Server
Secured
communication
between user and
clinician and data
Clinician Receiving
Platform
Clinician responds to
store-and-forward
requests & performs
online visits
Base Device + Add-On
Page 13 of 50
Page 14
Base Unit User Manual
TytoPro
5.
5.1.
5.2.
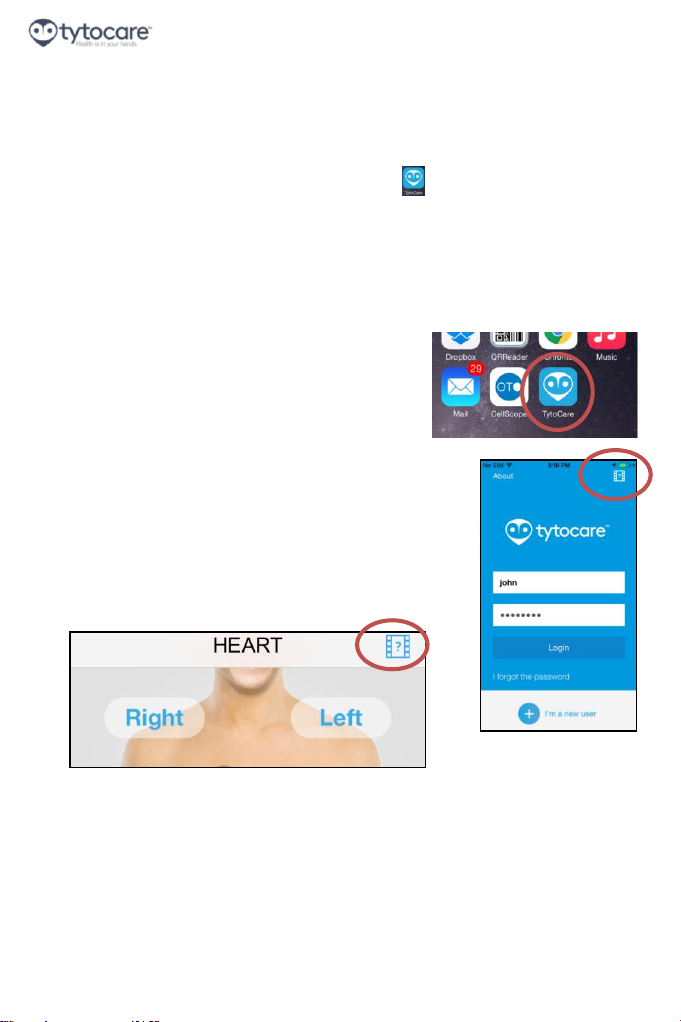
Download the Tyto User App
Downloading the App
Visit the Apple App Store on your iPhone. Search for “TytoCare” and
download the free App by clicking “Get”
The TytoCare App allows and assists you to perform exams, share
the recorded exams with clinicians, perform online virtual visits,
featuring live video conference, with the clinician and obtain exam
results from clinicians.
After downloading and installing the
TytoCare App on your iPhone, you can run
it from the Apps Menu.
Help Menu
The user manual and tutorial videos may be
reached at any time by pressing the help icon of
the App.
Page 14 of 50
Page 15

Base Unit User Manual
TytoPro
6.
6.1.
6.2.
First Time Setup
What do I need to start working with the Device?
A Wi-Fi network, secured by a known password, that I
can connect to
The device
Tyto User App, installed on any of the following iOS
mobile devices: iPhone 5 and up, iPad 4 and up, iPad
mini 2 and up
The carrying case, or any mobile stand, to hold the
mobile device during work.
Internet access via the Wi-Fi network
For best performance, the following connection speed
is recommended: Download 20 Mbps \ Upload 5 Mbps
At minimum, the following connection speed is
required: Download 5 Mbps \ Upload 1.5 Mbps
Pairing the device and iPhone User App
In order to start using the TytoCare device, you must perform a
short pairing process between the device and user app. This pairing
enables the communication between the two devices, over the Wi-
Fi network. This process is done once per device.
Before pairing, please make sure that your iPhone is connected to
your Wi-Fi network and you know its password.
Note: If your Wi-Fi network is not secured by a password, you
will not be able to pair the device and app.
Page 15 of 50
Page 16
Base Unit User Manual
TytoPro
App Download Screen
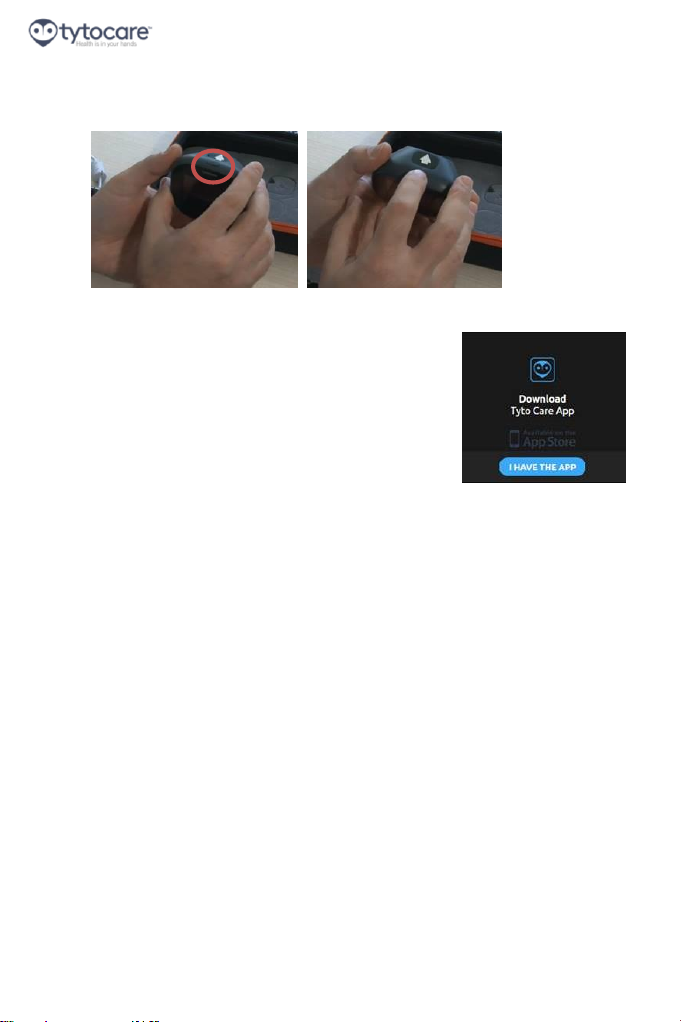
1. Turn ON the device by pressing the button on the top edge of
the device:
The screen displayed on the device will
prompt you to download the TytoCare
App onto your iPhone.
If you have already downloaded the
App on your iPhone, press “I have the App”, and continue
with step 2 below.
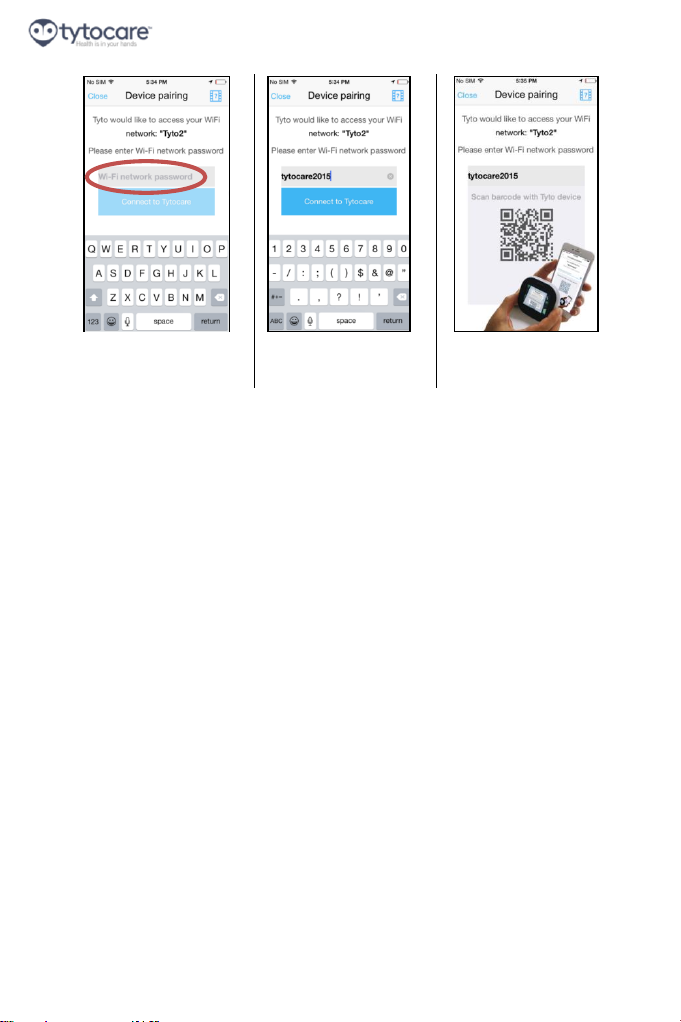
2. Now return to the TytoCare App on your iPhone and enter
your Wi-Fi network password in the App. Press “Connect to
TytoCare”. This creates a QR code on the iPhone screen:
Page 16 of 50
Page 17
Base Unit User Manual
TytoPro
Enter Wi-Fi password
Press “Connect to
TytoCare”
QR code created on
iPhone
Page 17 of 50
Page 18
Base Unit User Manual
TytoPro
Confirmation on
Read QR code using
from the iPhone screen
Confirmation on
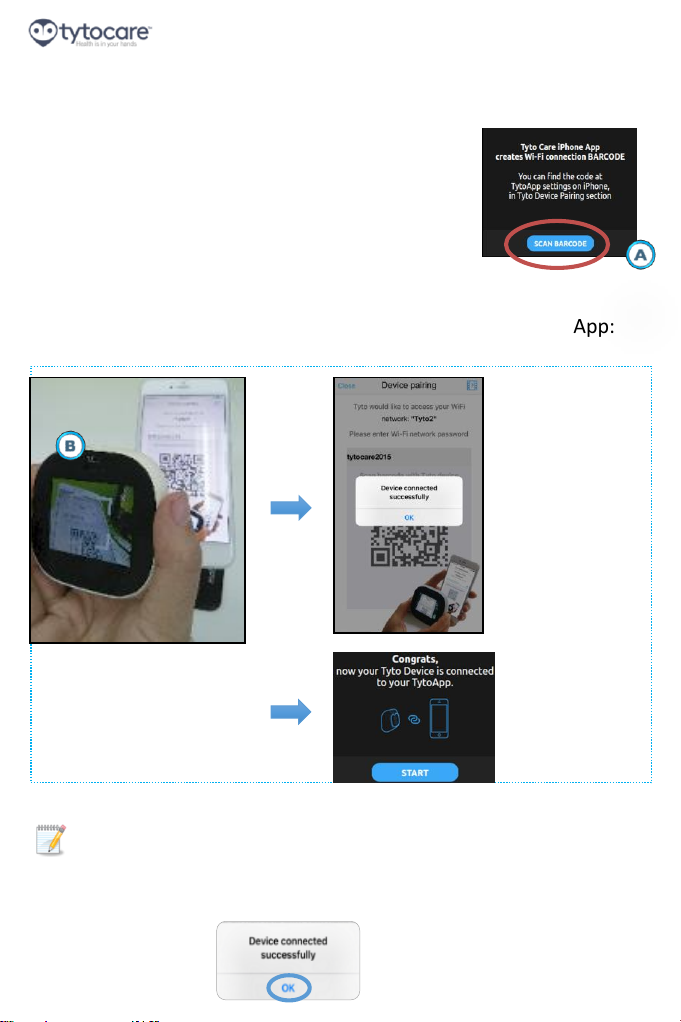
3. You now want to use the base unit camera to read the QR
code from the iPhone screen:
A) Hold the base unit and press “Scan
Barcode”, which activates its camera. The
base unit screen enters scan mode (with
helpful cross-hairs to assist your aim).
B) Position the cross-hairs over the QR code
displayed in the TytoCare App. Wait for a confirmation
message on both the base unit screen and the TytoCare App:
iPhone App
the device camera
Scanning the Barcode and Pairing the Devices
Note: If an error occurs, retry the pairing process again. If error persists,
see Appendix D: Frequently Asked Questions.
4. Click “OK” on the TytoCare App to continue:
Device
Page 18 of 50
Page 19
Base Unit User Manual
TytoPro
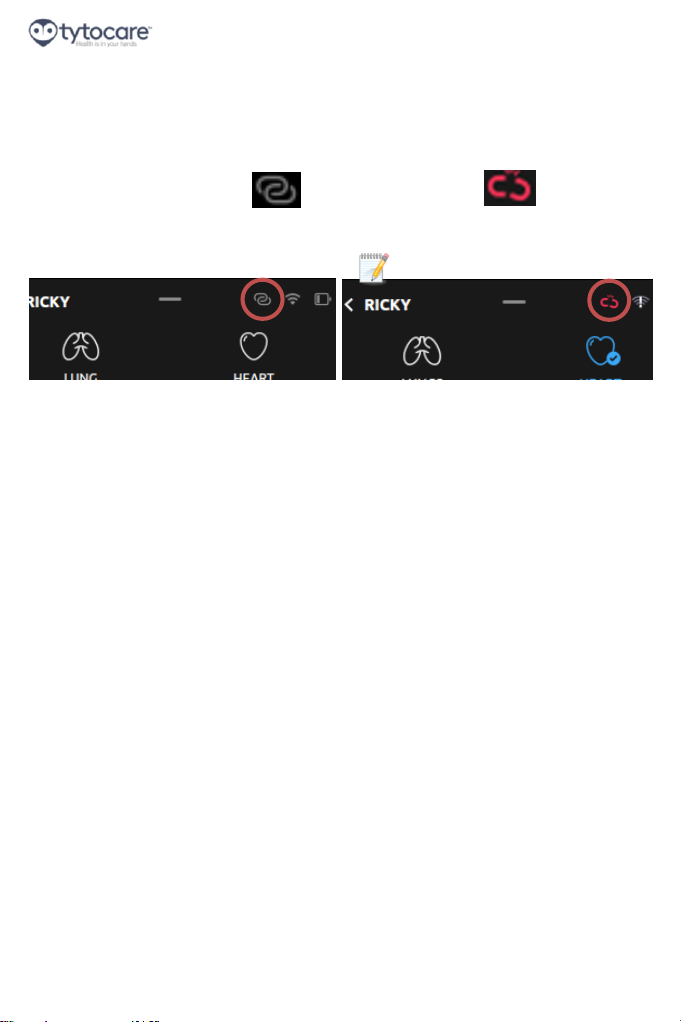
Device connected to the TytoCare App
running on iPhone
Device not connected to the TytoCare
App
Note: The connectivity status of the base unit to the TytoCare
App is indicated in the upper right corner of the base unit screen
as well as on the iPhone app.
It is either connected or not connected
to the TytoCare App running on your iPhone:
Page 19 of 50
Page 20

Base Unit User Manual
Pro
7.
Starting a visit
A visit includes all the recorded exams for a single patient.
Before Starting a new visit, you should identify the patient you
are about to examine.
Then, you can perform and record the needed exams.
When finished, you should press "Save Visit" to end and keep
the visit, and then select how you would like to share it with a
clinician - either by an online visit, featuring a video conference,
or offline as a store-and-forward visit.
In addition, if you wish to start the examination immediately,
without identifying the patient in advance, you may choose the
"Start Unidentified Visit" option, available through the device.
Please note that in any case, if you wish to save or share a visit
with a clinician, you'll have to identify the patient at the end of
the visit.
Page 20 of 50
Page 21
Base Unit User Manual
Pro
8.
8.1.
Device
App
Performing an Identified Visit
An identified visit is one where the patient is identified at the
beginning of the visit. This is the standard and recommended
procedure.
For situations where you do not wish to identify the patient in
advance, see Section 9. Starting an Unidentified Visit.
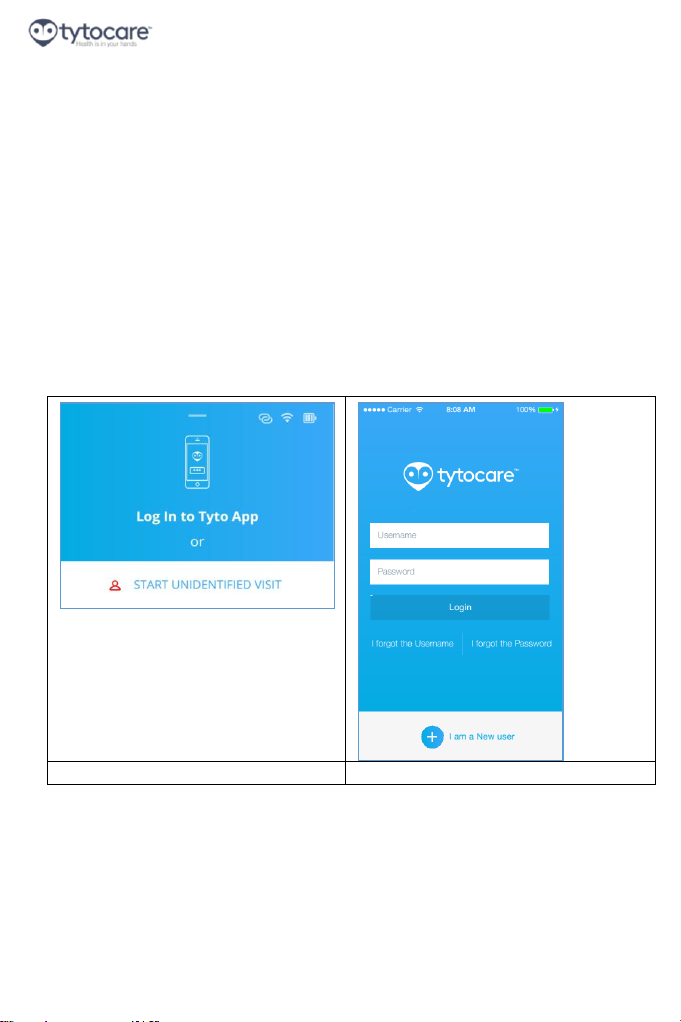
User login
After turning on the device and the App, the following screens
display:
Please login using your User name and Password on the App.
Page 21 of 50
Page 22
Base Unit User Manual
Pro
8.2.
Device
App
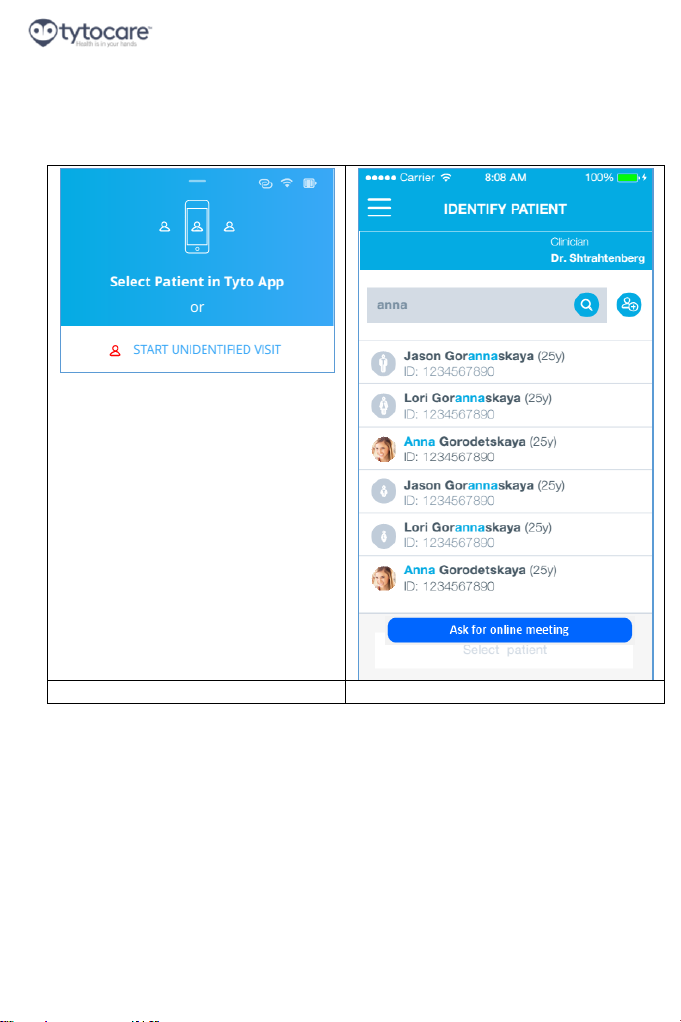
Identify patient
The Identify Patient screen appears in the iPhone app as follows:
Type the patient name, first name and/or last name, or
patient ID in the search box.
After typing the first two letters, the system will try
automatically to match the relevant patients. You may
Page 22 of 50
Page 23

Base Unit User Manual
Pro
continue typing the complete name or ID, or select the
patient from the list, if you have identified the correct
patient.
Select the correct patient, or choose the Add new patient
button, in case the patient was not found as it has probably
not been defined in the system yet.
When the correct patient is selected and highlighted, press
the Select Patient icon to start the visit.
Note: After the patient was identified, its name will appear
on the upper blue line, which allows you to always know
which patient is currently being examined.
Page 23 of 50
Page 24
Base Unit User Manual
Pro
8.2.1.
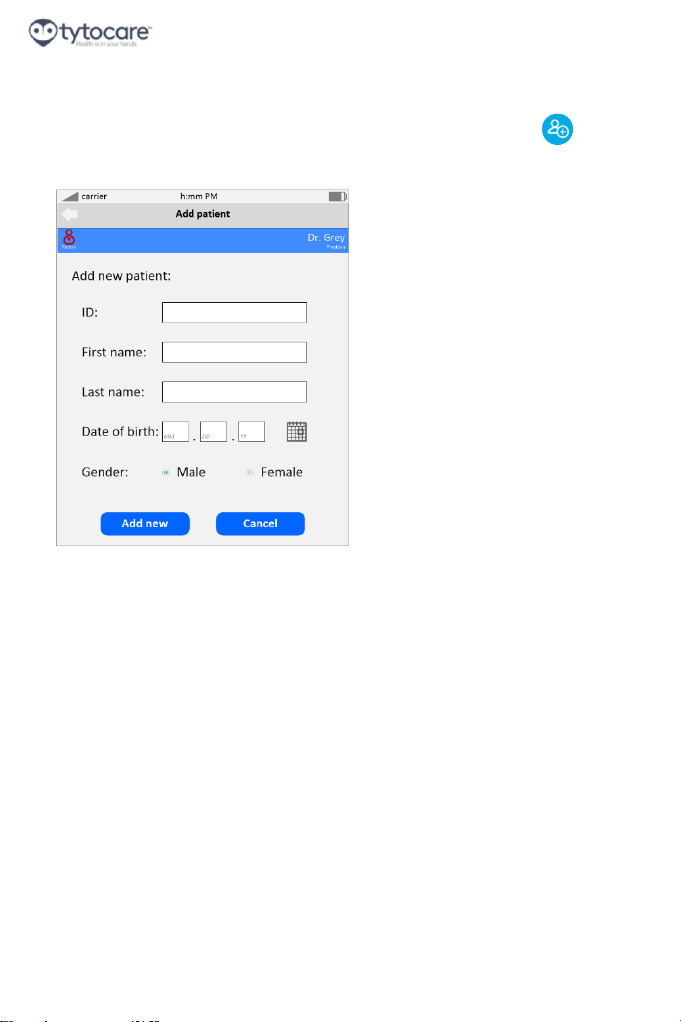
Add a New Patient
Press the button on the Patient Identification screen
in the app, to Add a New Patient:
Follow the needed steps and fill out the requested information
to add the new patient.
Page 24 of 50
Page 25
Base Unit User Manual
Pro
8.3.
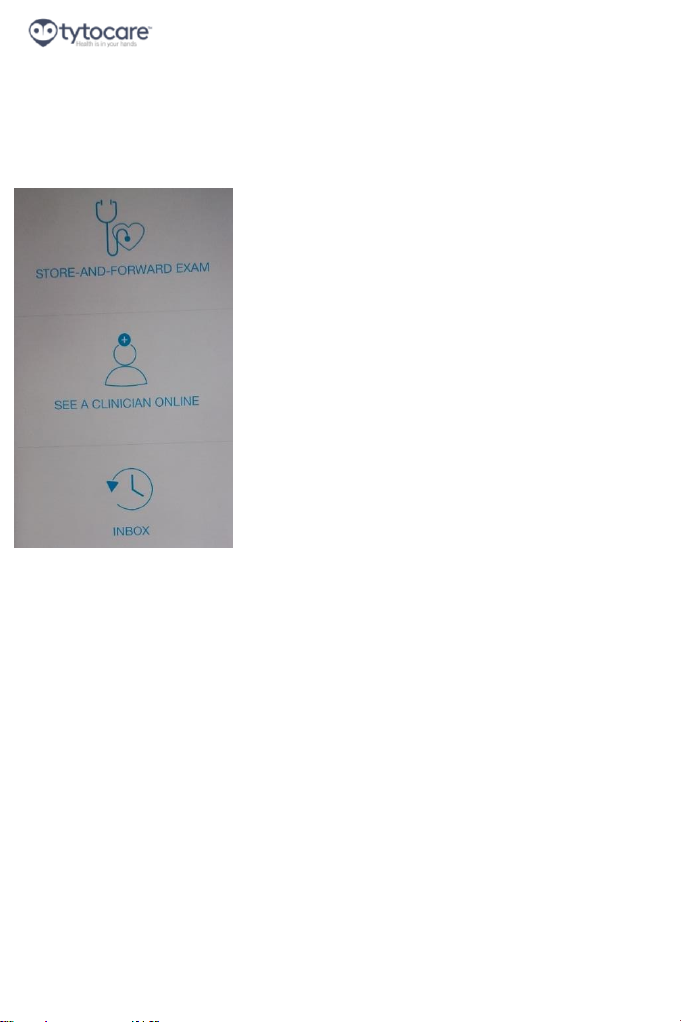
Choose Type of Visit
The next screen on the App asks how you would like to perform
the visit:
Store-and-forward (offline) exam: Perform
the examinations now independently, with
the option later to send the exam results
to another clinician or have an online visit
using the examination data you have
already collected.
See a clinician online: Initiate an online
video conference now with another
clinician, before performing examinations.
The other clinician will remotely control
your device, and request that you perform
exams under his guidance.
For more details, see Section 9. Online
Visit .
Inbox: The Inbox keeps the notes, sent by the clinician after he
reviewed and diagnosed the recorded exams. Once the notes are
completed and sent by the clinician, you'll be notified using a
notification in your iPhone/iPad. Use the Inbox option to view your
notes as well as review the status of your selected patient sent
examinations. For more details - see Section 10. INBOX.
Page 25 of 50
Page 26
Base Unit User Manual
Pro
8.4.
Device
App
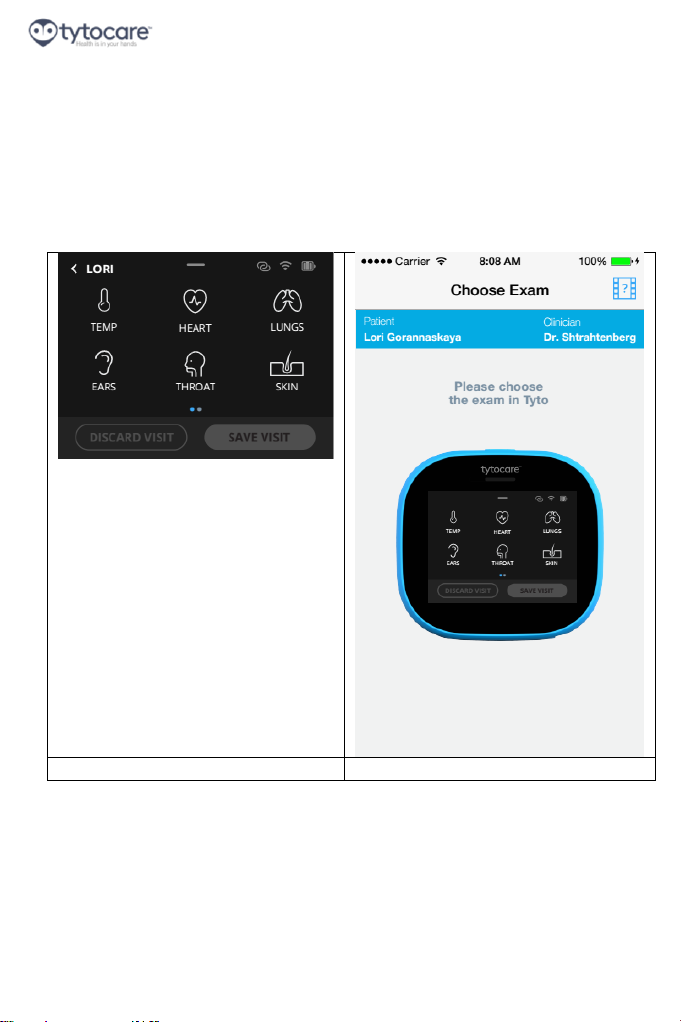
Starting Visit and Selecting Exams
After the patient was identified, and the Store-and-Forward
option was selected, you can start performing the exams. The
examinations are done and managed using the device. Press on
the device screen to choose which type of exam to perform.
Note that in the identified visit workflow, the upper left corner
of the device has the name of the patient (LORI in this example).
Please note additional exams (Skin and Audio – not displayed
here) are available in the second screen in the device. Swipe to
Page 26 of 50
Page 27

Base Unit User Manual
Pro
the left, using your finger, to access the second exams selection
screen.
Warning: Always make sure the correct patient is identified
before starting a new visit.
Page 27 of 50
Page 28

Base Unit User Manual
Pro
8.5.
8.5.1.
Performing Exams
User Role: Performing Unguided and Guided Exams
Two methods can be used for examinations conducted with the
TytoPro system.
Unguided exams are intended for healthcare professionals, who
have medical knowledge, and are proficient in heart and lungs
auscultation, and in performing ears and throat exams. Unguided
exams provide a streamlined approach allowing more flexible
recording and faster operation, without any instructions for use.
Guided exams are intended for any person who is not a
healthcare professional, which require a more detailed, step-bystep approach to the exam. Guided exams lead the user through
the process of performing and viewing exams. Information in this
Base Unit User Guide is identical for Unguided and Guided users,
as the difference between those two methods affects only the
process of performing the exams themselves. The Add-Ons User
Guides provide two sets of instructions, for both Unguided and
Guided users.
The type of user role, guided or unguided, is defined by the
System Administrator when your user was created.
Contact the System Administrator of your TytoCare system to
determine whether your user is defined as Unguided or Guided,
or in case you wish to change your user role.
The exact instructions for each type of exam are described in the
separate Add-On User Guides. Refer to the appropriate User
Guide for detailed instructions for performing the exam.
Page 28 of 50
Page 29
Base Unit User Manual
Pro
8.5.2.
Exam
Add-On
Reference
Heart, Lungs, Heart
Rate, Audio
Tyto Stethoscope
Tyto Stethoscope
PRO
Add-On Unit
User Guide,
document no.
xxxxxxxxx
Ears
Tyto Otoscope
Tyto Otoscope PRO
Add-On Unit User
Guide, document no.
xxxxxxxxx
Temperature
Tyto Thermometer
Tyto PRO
Thermometer User
Guide, document no.
xxxxxxxxx
Throat and Skin
Tyto Exam Camera
Tyto PRO Camera
Add-On Unit for
Throat and Skin
Examinations User
Guide, document no.
xxxxxxxxx
Exams and Add-Ons User Guides
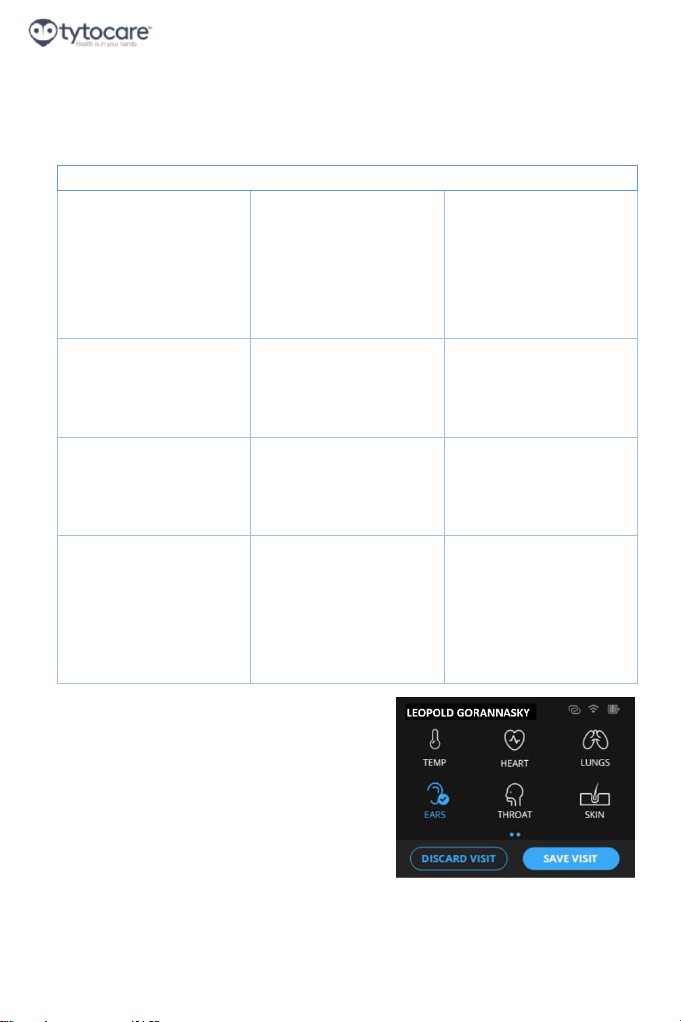
Once a certain exam was
recorded, it will be marked in blue
and with a check mark on the
device, and will be listed on the
app. In this example of the device,
the EARS exam was performed.
Please note you may re-do the
blue marked exam by pressing it again. The existing recorded
exam will be kept.
Page 29 of 50
Page 30

Base Unit User Manual
Pro
Page 30 of 50
Page 31
Base Unit User Manual
Pro
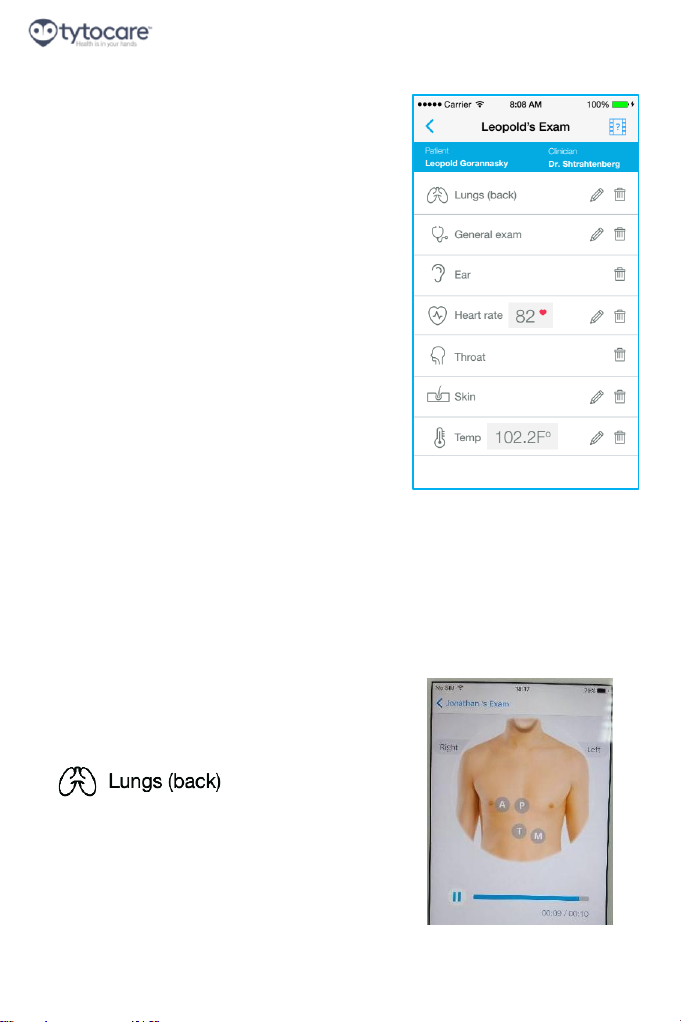
In the iPhone User App, each
recorded exam will be displayed as a
separate line, enabling to review the
recorded exam (play sound, view
video etc.), and optionally delete it,
in case the exam was not acquired
properly.
Note: The sound recording of the
back and front of the lungs, as well as
the video recording of the left and
right ears, are displayed as separate
lines/exams.
You can use this screen both to
review the recorded exam, to make
sure the exam was successful (for example, that the tonsils are
visible in the Throat exam, that the eardrum is seen, that the
heart or lungs auscultation is heard clearly etc.) and to show the
patient the recorded exam and involve him in his treatment.
You can choose from the following actions:
1. You can play back the heart or lungs
exam by pressing on the exam line on
the app, for example:
Every selected area on the chest or
back (e.g. aortic in Heart or RUL in
Lungs) will be displayed in the playback
bar. Press the area mark to listen to
that marked area.
Page 31 of 50
Page 32

Base Unit User Manual
Pro
2. You can delete an exam from this visit. This is done by
pressing on the trash can icon of the relevant line in the
app.
3. You can continue performing more exams for this patient.
Press on
one of the icons on the device, for example the Heart icon.
This will begin a new exam. You can perform any number of
exams during a visit, and can perform the same type of exam
more than once.
Page 32 of 50
Page 33
Base Unit User Manual
Pro
8.6.
Completing the Exam
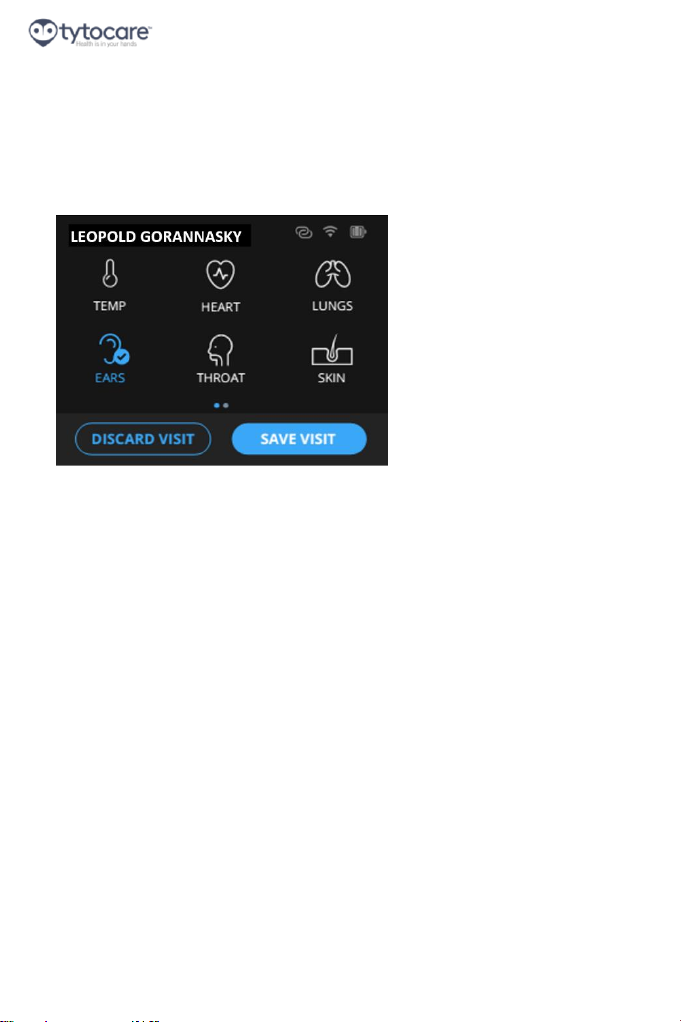
When you finish examining the patient and you wish to
complete the visit, you have two options, using the two buttons
at the bottom of the device’s screen:
1. SAVE VISIT – Choose this option to save the recorded
exams, share the visit and end the visit. You will then
need to complete the visit, and optionally select the
relevant clinician, using the iPhone app. In case you are
in an unidentified mode, you’ll also be prompted at this
point in the app to identify the patient.
2. DISCARD VISIT – choose this option in case you don't
see a need to keep the recorded exams for sharing with
a clinician or any future use, and you wish to delete
them. A confirmation pop-up message will ensure that
you didn't press this option by mistake.
Warning: discarding a visit is an irreversible action and
all recorded exams will be deleted!
Page 33 of 50
Page 34
Base Unit User Manual
Pro
8.7.
8.8.
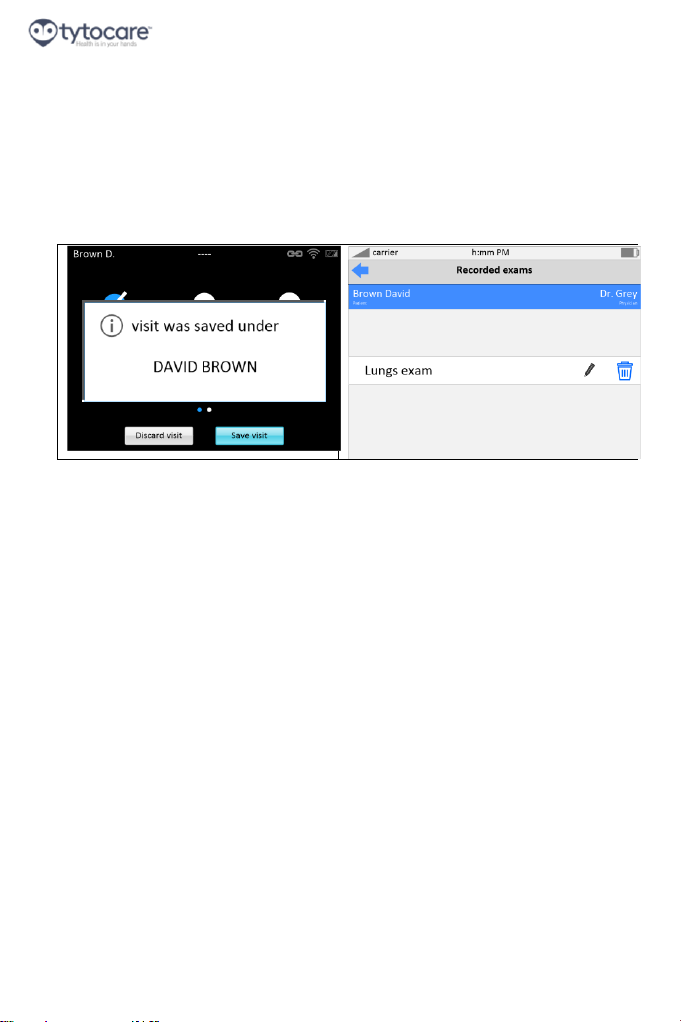
Confirmation screen after Save visit
After you press Save visit, a message is displayed on the device
confirming the visit was saved under the specified patient.
Please use this message to make sure the visit was saved under
the correct patient name.
Sharing saved visit and finish
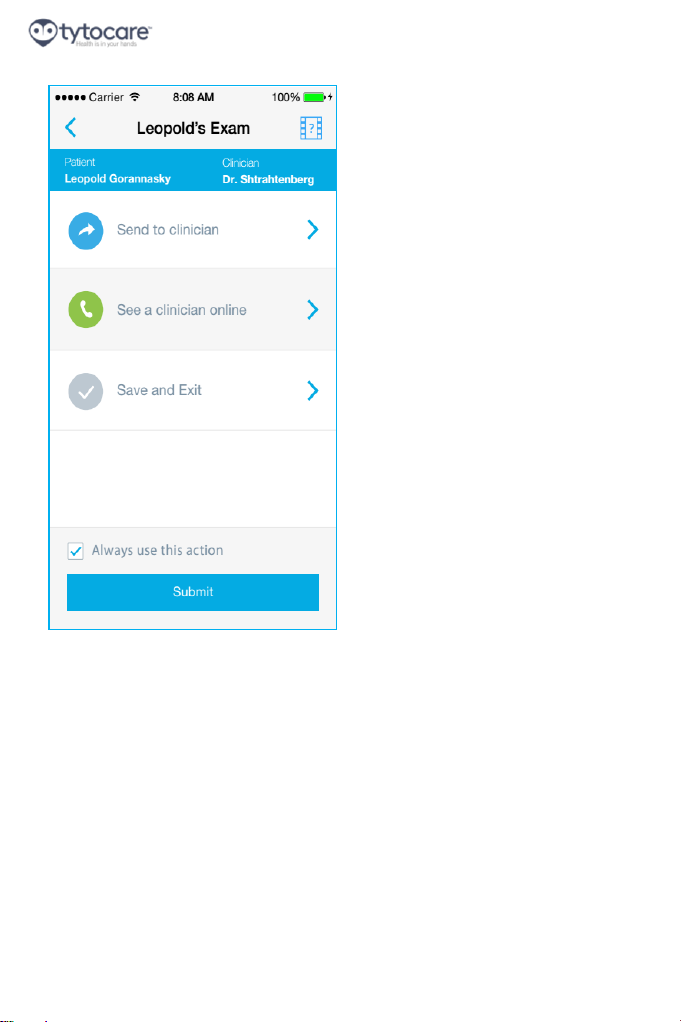
After you press Save visit, you have a choice of several final
actions:
Page 34 of 50
Page 35
Base Unit User Manual
Pro
Send to clinician – Send the exams
for this visit to another clinician for
their review (“store and forward”).
See a clinician online – Request an
online visit, with a video
conference with a clinician. The
recorded exams will be shared
with the clinician before the online
visit begins, to allow him review
before seeing the patient. See
Section 9. Online Visit.
Save and Exit – Save and end this
visit without sending it to anyone.
The recorded exams will be saved
for future use, such as having
complete exams history for the
patient, e.g. to allow comparison
over time of a clinical condition, or
to allow consultations between
clinicians using the Clinician web
application.
Page 35 of 50
Page 36
Base Unit User Manual
Pro
9.
9.1.
9.2.
Choose which clinician
Choose SEE A CLINICIAN
Online Visit
Starting an Online Visit
An online visit can be started immediately after choosing a
patient, in which case the video conference will take place while
you are performing the exams. You can also initiate an online
visit after you have performed exams.
An online visit is a videoconference session with a doctor or
other healthcare professional. During the online visit, the
clinician controls remotely the device and can hear and view the
results captured by the device, and can direct you in its
operation If necessary.
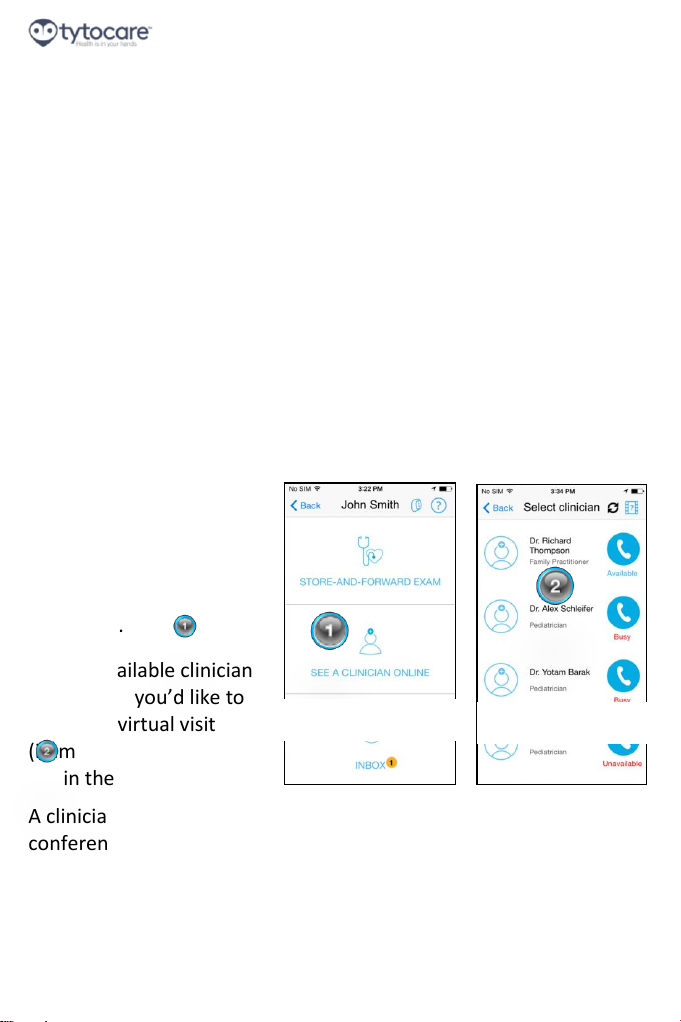
Choose a Clinician
To initiate a live, remote,
online visit, click “See a
Clinician” (item in the
illustration), and confirm
your selection when
prompted.
Pick an available clinician
with whom you’d like to
request a virtual visit
(item
in the illustration).
A clinician is available if he is online and ready to enter a video
conference now. Busy indicates that the clinician is online but
currently engaged in another video conference. If the clinician is
offline, he is not available and cannot participate in a video
conference.
Page 36 of 50
Page 37
Base Unit User Manual
Pro
9.3.
Device – Under remote
control of clinician
TytoCare App – In video
conference & Waiting for
the clinician to begin examination
Fill in the short questionnaire explaining the clinical background,
medical history, patient’s symptoms and the main complaint for
which you want to have this virtual visit with the clinician.
Press “See a Clinician”. You will receive a confirmation screen that
the request has been sent, and an indication that you should wait
for the clinician to respond. This may take some time depending on
clinician availability.
Clinician Accepts Your Online Visit Request
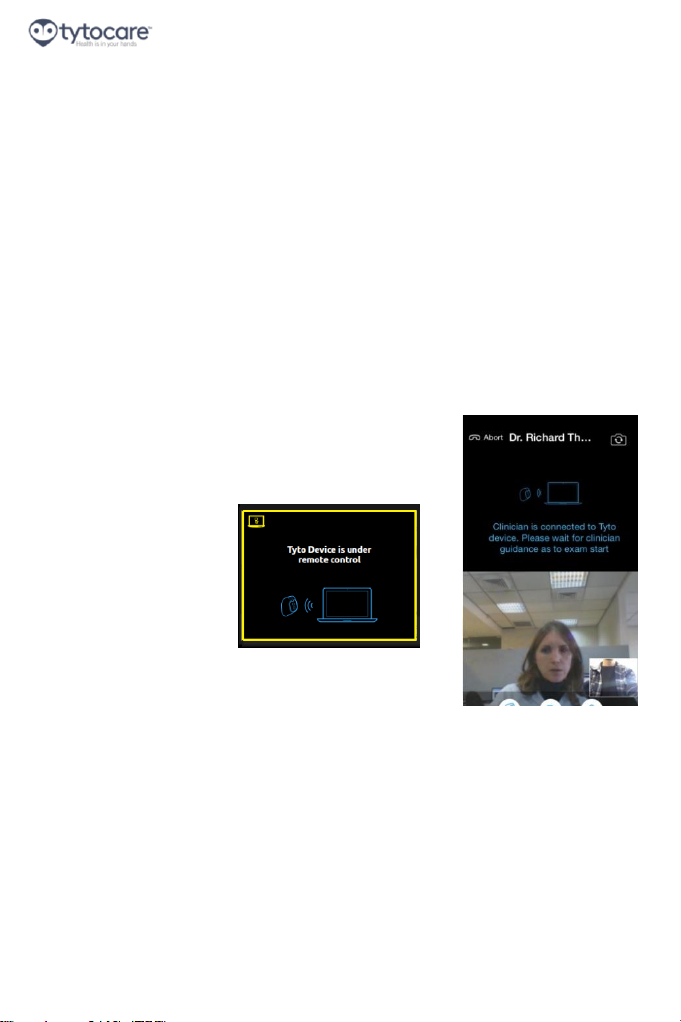
Once the clinician accepts your visit request, you are prompted by
the TytoCare App to accept the video conference. Click “Join” to
initiate the video conference and activate your iPhone camera.
Now you’re connected with the clinician via
video conference. The clinician will remotely
control your device and will guide you
through the exam
process. A yellow
outline on the device
screen indicates that
the device is under
remote control.
Page 37 of 50
Page 38
Base Unit User Manual
Pro
9.4.
9.5.
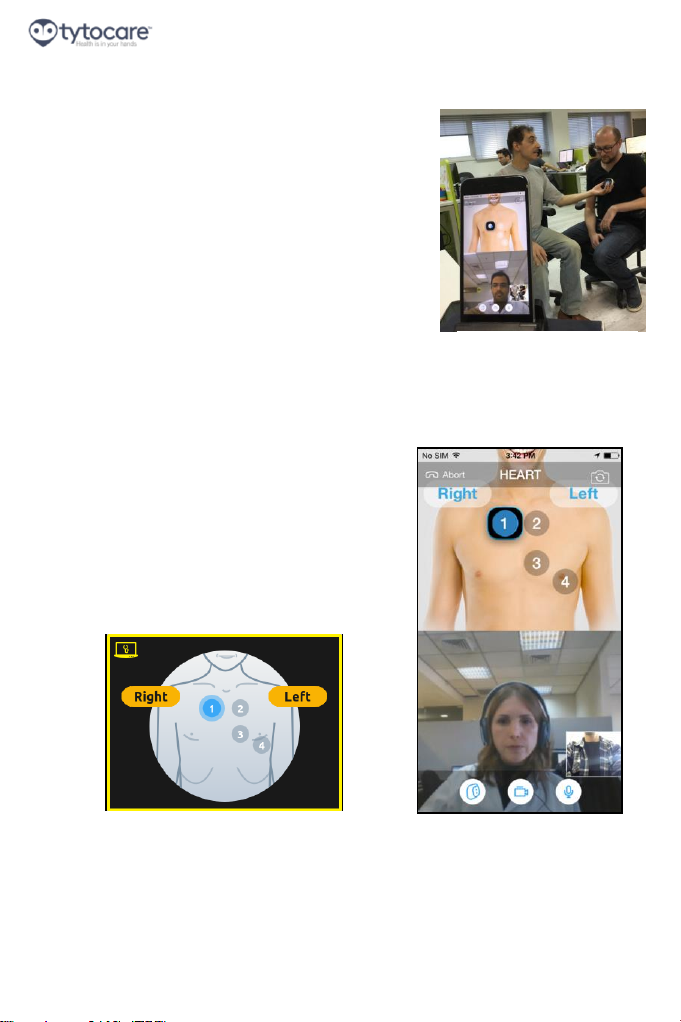
Using the iPhone stand
Example of TytoCare App
display during an online
heart examination
Example of Device display
during an online heart
examination
Using the iPhone Stand
To allow operating the device while
performing the video conference, place
your iPhone on the designated location on
the upper side of the carrying case.. Make
sure you position the iPhone camera so the
clinician can see where you are placing the
device on yourself, or on the person you
are performing the exam on.
Clinician Begins Exam
Once the clinician selects the relevant
exams, these will automatically appear
on your device and TytoCare App
screens. See example of heart exam
performed during an online visit with a
clinician.
Page 38 of 50
Page 39
Base Unit User Manual
Pro
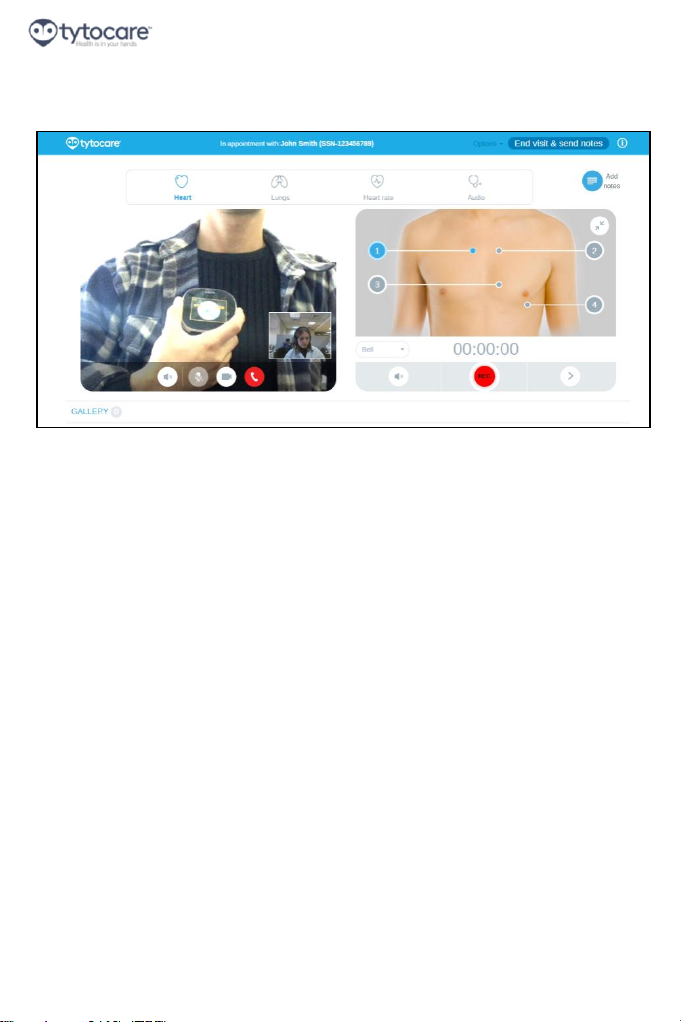
This is what the clinician sees during the examination.
Page 39 of 50
Page 40

Base Unit User Manual
Pro
9.6.
9.7.
Using the Device during a virtual online visit
Follow the clinician instructions and the indications on the device
screen regarding proper placement of the device in the right
locations on the body.
Completing the Online Visit
After the visit is completed by the clinician, you will receive a
summary notes of the visit automatically, which will be available
through the Inbox. In addition, a notification will be sent to you
when the clinician's notes are ready for your review.
Page 40 of 50
Page 41
Base Unit User Manual
Pro
10.
INBOX
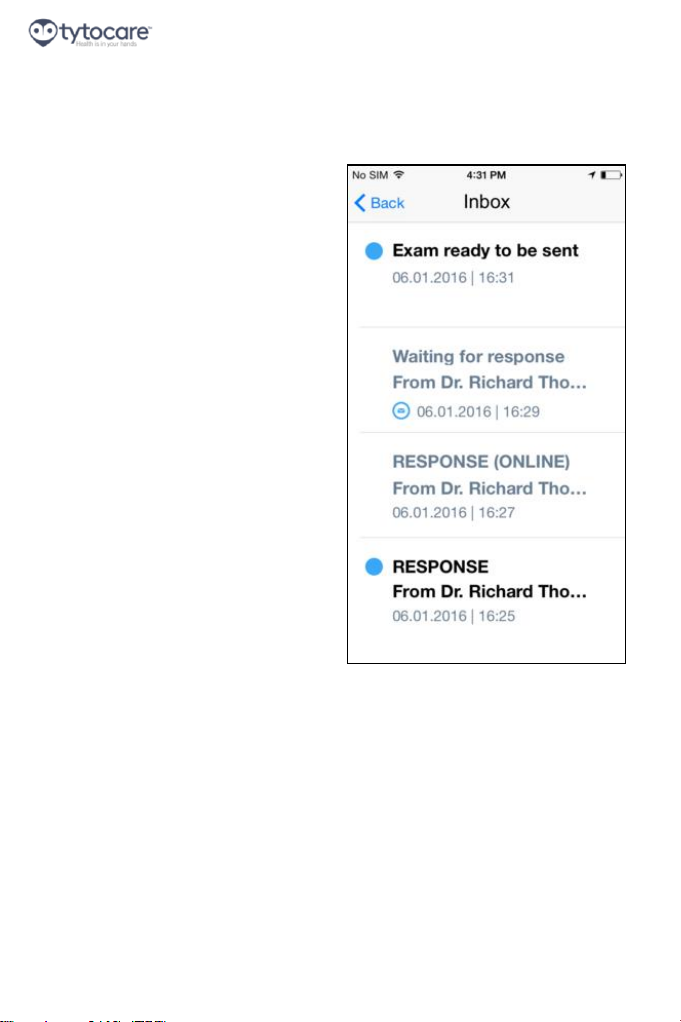
The INBOX screen shows the status of all of your examinations.
Exam ready to be sent means
that an exam was performed
and was not sent to a clinician
yet.
Waiting for response means
that an exam was sent to a
clinician but there is not
response yet.
RESPONSE (ONLINE) means
that you have performed an
online exam and received the
clinician’s response.
RESPONSE means that you
have sent a store-andforward exam for clinician
review and have received his
response.
Page 41 of 50
Page 42
Base Unit User Manual
Pro
11.
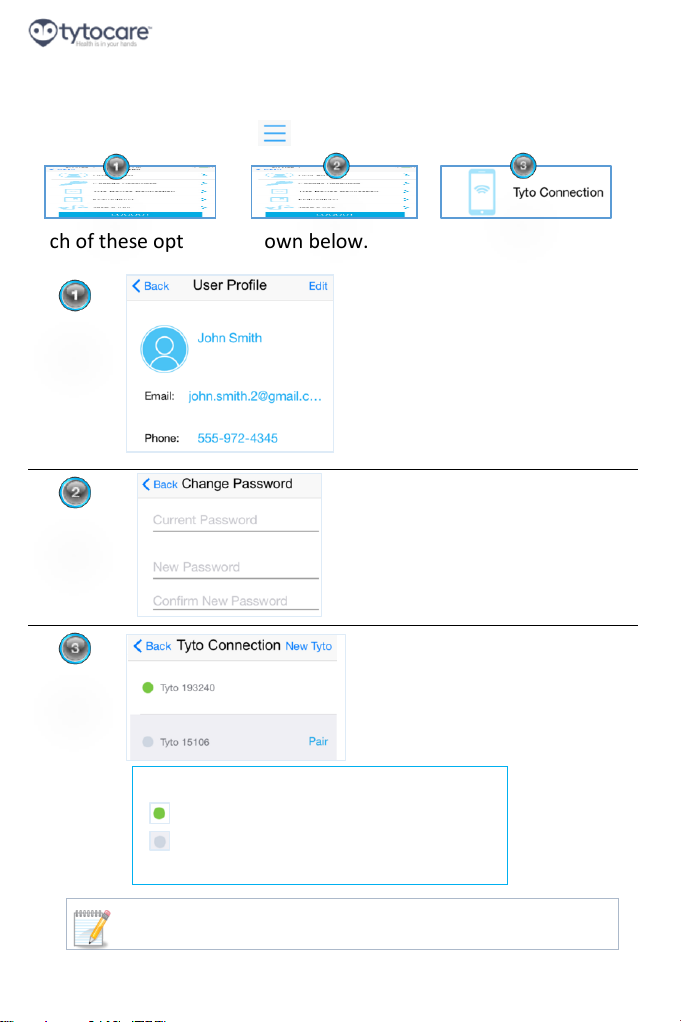
Change your phone &
email.
Change your password
Select a different device.
Press New Tyto to add a new
device.
Note: The device connection screen should only be used when needed to
connect to another device or disconnect from an existing device.
Color coding:
paired
User Settings
Press the Settings button to access the User Settings screen:
Each of these options is shown below.
Green – Currently paired device
Gray – Device available in network, but not
Page 42 of 50
Page 43
Base Unit User Manual
Pro
12.
12.1.
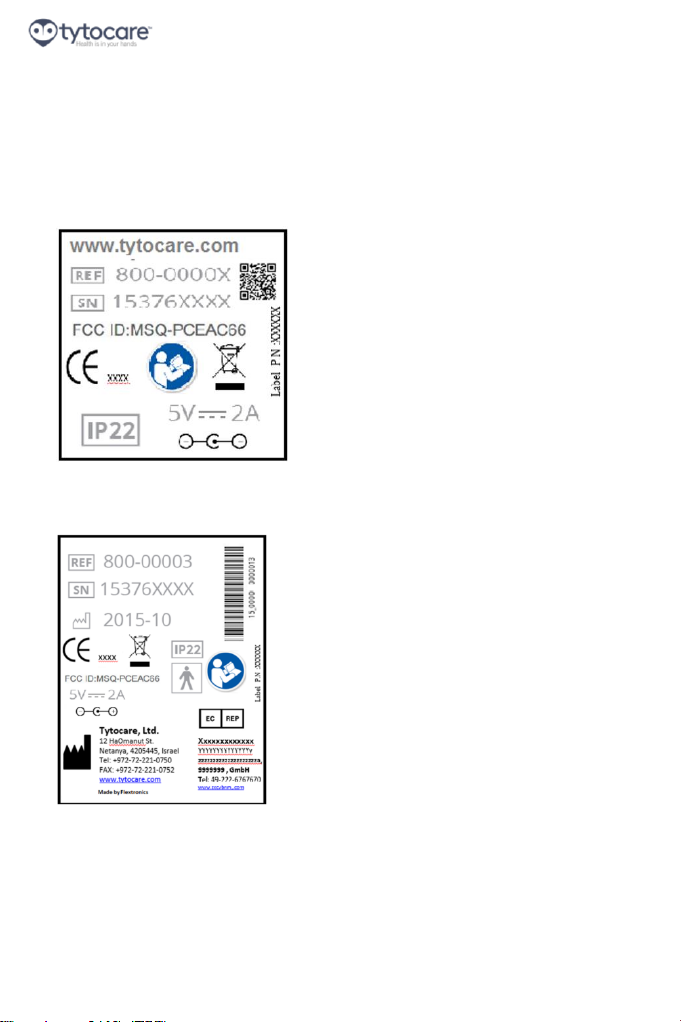
Base Unit Label
Product Package Label
System Labels, Symbols and Technical
Specification
System Labels
The following symbols are on the device or shipping materials.
Page 43 of 50
Page 44
Base Unit User Manual
Pro
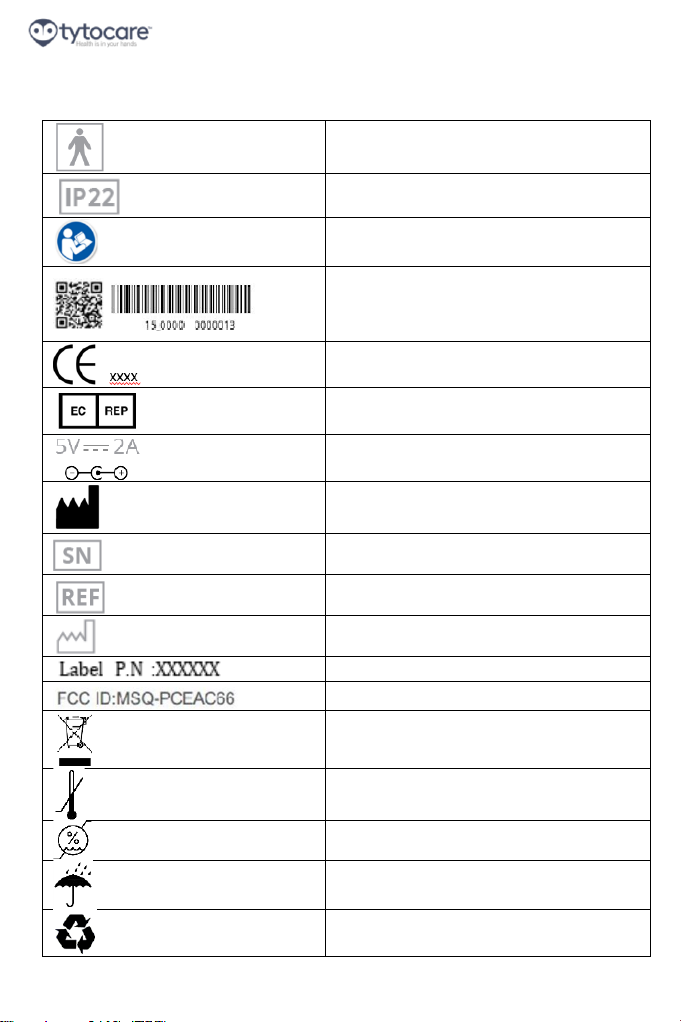
12.2.
BF Applied part
Water proof in Ip22 level
Must read User Manual before use
1D/2D barcode contain Serial Number, Part Number and Manufacture
Date
European approval
European Notify Body
Input Voltage level
Manufacturing Address
Product Serial Number
Product Model Number
Manufacturing date
Label P/N
FCC approval
Do not dispose
Storage temperature limits
Storage humidity limitations
Keep device dry
Package is recyclable
Explanation of Symbols
Page 44 of 50
Page 45

Base Unit User Manual
Pro
12.3 Technical Specifications
Storage conditions: temperature range: -20°c to +60°c
Humidity range: 15%-70%
Operation conditions: temperature range: +5°c to +40°c
Humidity range: 15%-85%
Atmospheric pressure: 700hPa to 1060hPa
Typical Operation time: 8 hours
Page 45 of 50
Page 46
Base Unit User Manual
Pro
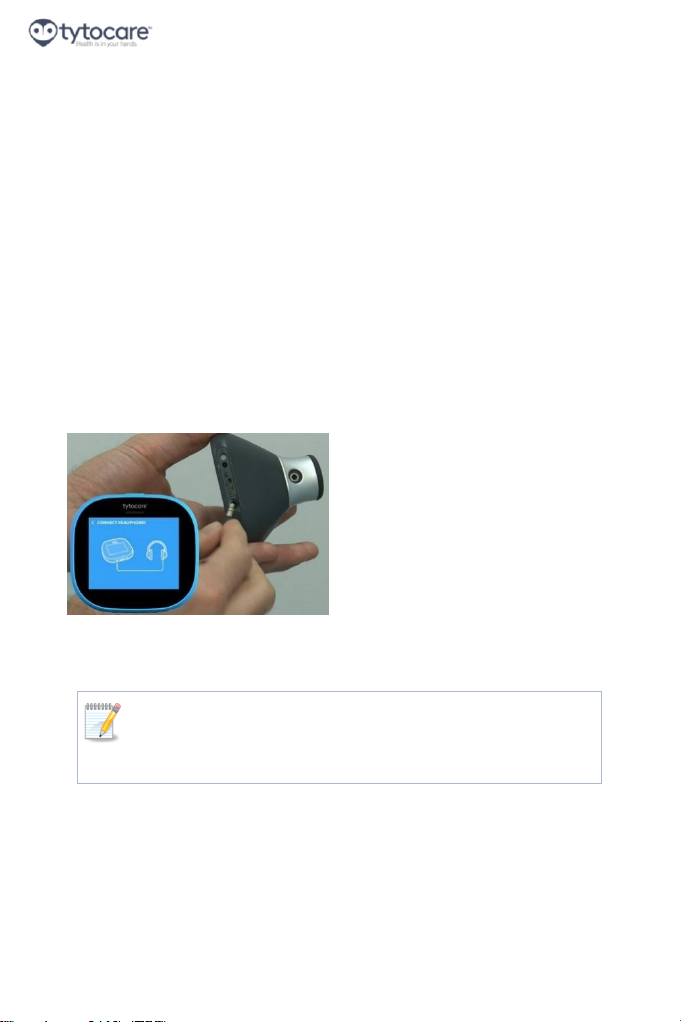
Connect headphones to the base unit
Headphones connected
Note: The headphones must meet the following specifications:
Impedance minimum: 16 ohm, typical 32 ohm
Frequency response: minimum 20 – 10,000Hz
Plug jack: 3.5mm stereo
Appendix A: Headphones
The clinician should listen to the auscultations directly by
connecting headphones or earbuds to the base unit audio jack.
If the audio is not clear, repeat the exam. If the audio quality is
still not clear, contact TytoCare service.
A.1 Connecting headphones to the device
To listen to the sounds directly, connect headphones to the base
unit audio jack as shown in the images below. Prior to entering
the exam (heart, heart rate or lungs) a notification will be shown
until the headphones are connected. Once connected, the exam
will continue.
Page 46 of 50
Page 47
Base Unit User Manual
Pro
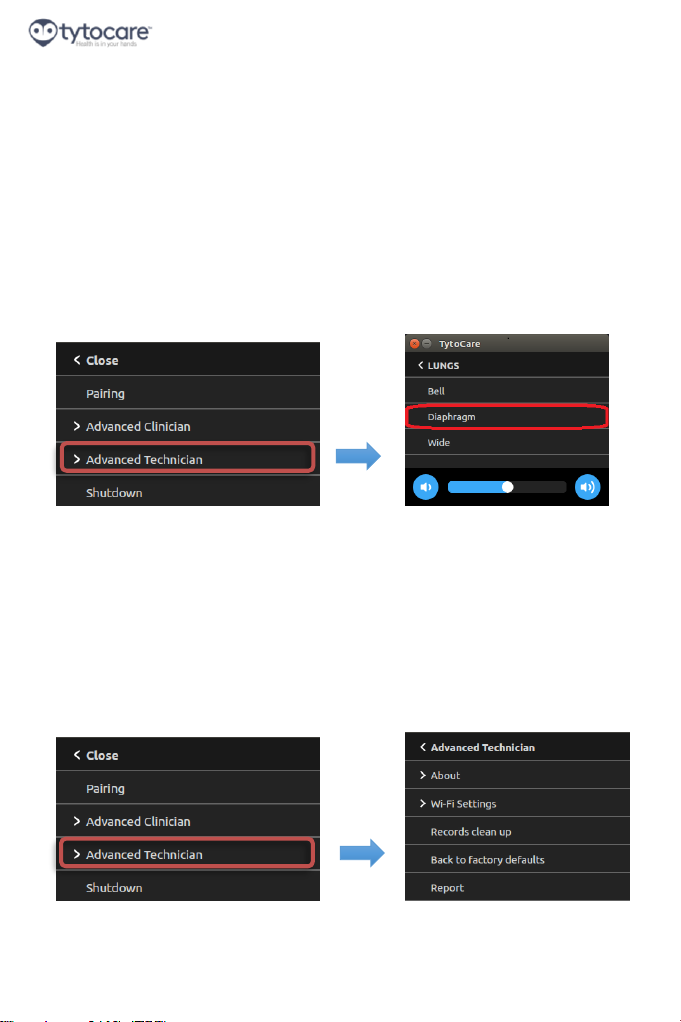
Select ‘Advanced Technician’
Select ‘Back to factory
defaults’
Select ‘Advanced Clinician’
Select Audio Filter and
Adjust Volume
A.2 Advanced Clinician settings
The clinician has access to the Advanced Clinician option of the
device Settings menu. These settings can be used to change the
default audio filters on the sound heard via the headphones.
Default audio filter for heart / heart rate exam is Bell and for
lungs exam is Diaphragm. Additionally, the volume of sound
heard via the headphones can also be controlled.
A.3 Advanced Technician settings
These settings are primarily reserved for use when requested by
the TytoCare support center. One feature that is useful for the
user is the Back to factory defaults option, which resets the
device to its out-of-the-box initial settings.
Page 47 of 50
Page 48
Base Unit User Manual
Pro
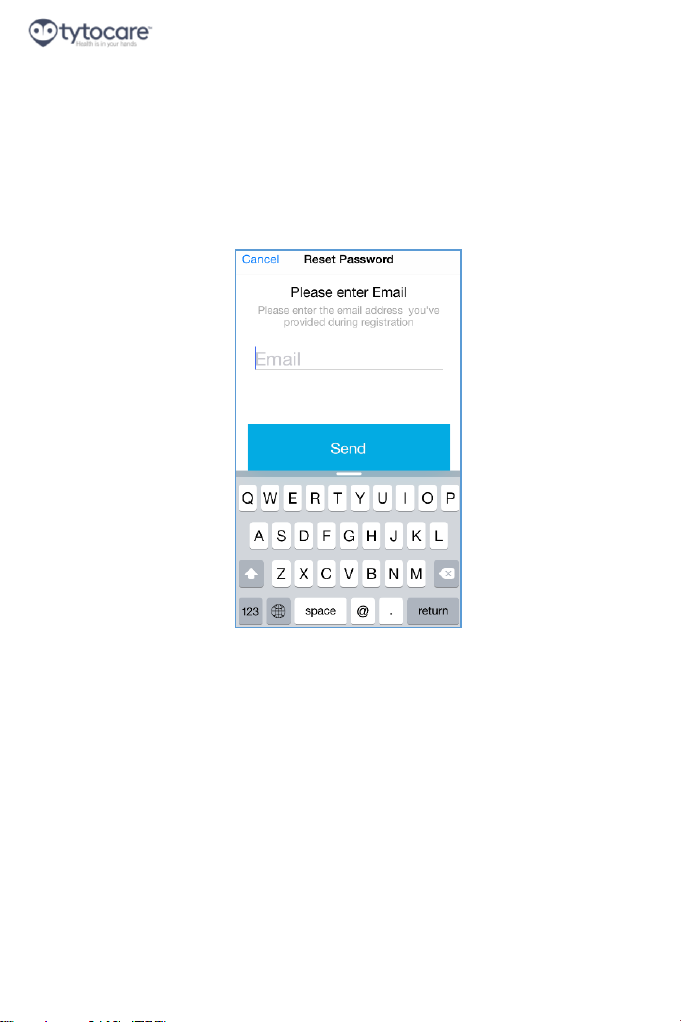
Appendix B: Forgot Password
If FORGOT PASSWORD? is clicked in the login screen of the
TytoCare App, the user will need to input the e-mail address
they used during the registration process and click SEND. An email with the reset password will be sent to the e-mail address.
Reset Password
To update the password, fill in the old password, then the new
password then a repetition of the new password and click SAVE.
Page 48 of 50
Page 49
Base Unit User Manual
Pro
Appendix C: Frequently Asked Questions
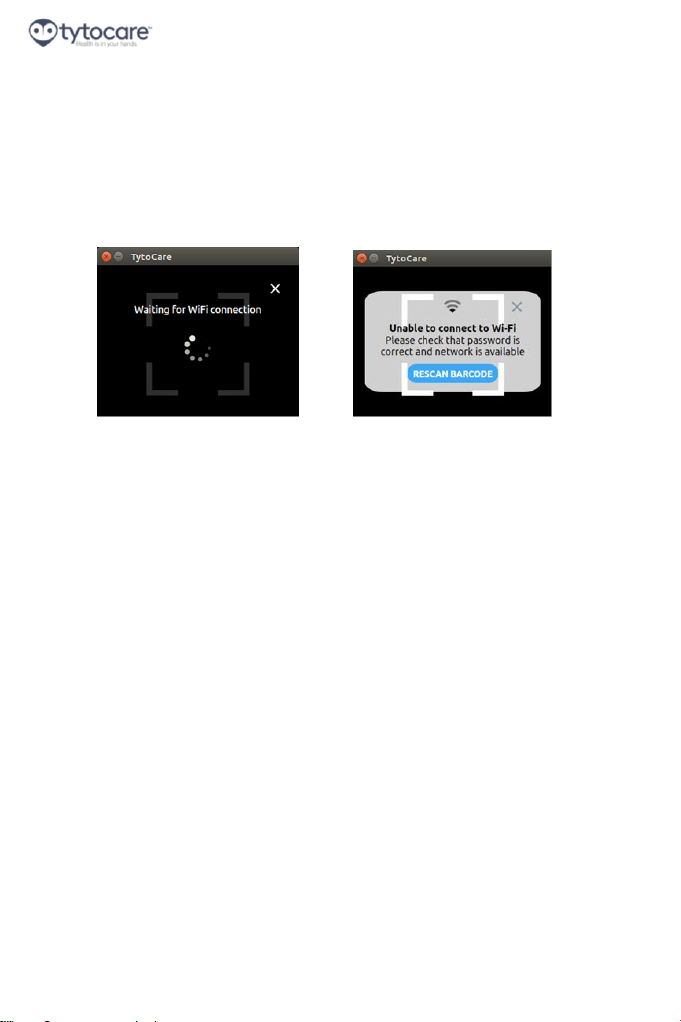
Why can’t I pair/connect the base unit and my iPhone running
the TytoCare App?
You may see one of these screens while attemptin g to
connect the iPhone to the device:
Waiting for connection Cannot connect
In order to establish a connection between the Base Unit and
TytoCare App, a Wi-Fi connection is required. Make sure that
your Wi-Fi network is working properly and that your iPhone is
connected to it. Make sure that the Wi-Fi network password
that you have is the right one (try it on your iPhone). Try not to
be located too far away from the Wi-Fi router. Then retry the
pairing process by generating the QR code in the TytoCare App
and scanning it with the base unit. If the problem persists also
after few trials, contact TytoCare Service.
Why doesn’t my Base Unit turn ON?
It might not be charged. Connect the charging cable to the Base
Unit and to the power outlet. Let it charge for at least several
hours. You should see an orange LED near the Base Unit LCD
indicating that the Base Unit is charging. After charging, when
the LED indicator is green, disconnect from the charging cable
and turn the base unit on. If the problem persists, contact
TytoCare Service.
Page 49 of 50
Page 50

Base Unit User Manual
Pro
Why can’t I login into the TytoCare App?
Try using your user login details (username / password). Make
sure you have internet connection in your iPhone. Also, try
"killing" the app. If this does not work, go through the forgot my
password flow where a new password will be generated.. If the
problem persists, contact TytoCare Service.
Why can’t I get a good signal when performing an exam?
Try to eliminate external noise when doing the exam. Also, do
not move the device on the body when recording a
measurement and make sure the device is in full contact with
the patient’s body. Make sure the device is placed firmly on the
patient’s body and if possible place it directly on the patient’s
skin. If the problem persists, contact TytoCare Service.
Why is the TytoCare App not allowing me to START the exam?
During an exam, the TytoCare App is not used to conduct the
exam. The device is used to perform the exam.
The picture on the TytoCare App is a fixed representation of the
device screen and is for informational purposes only.
Page 50 of 50
 Loading...