

Page 1
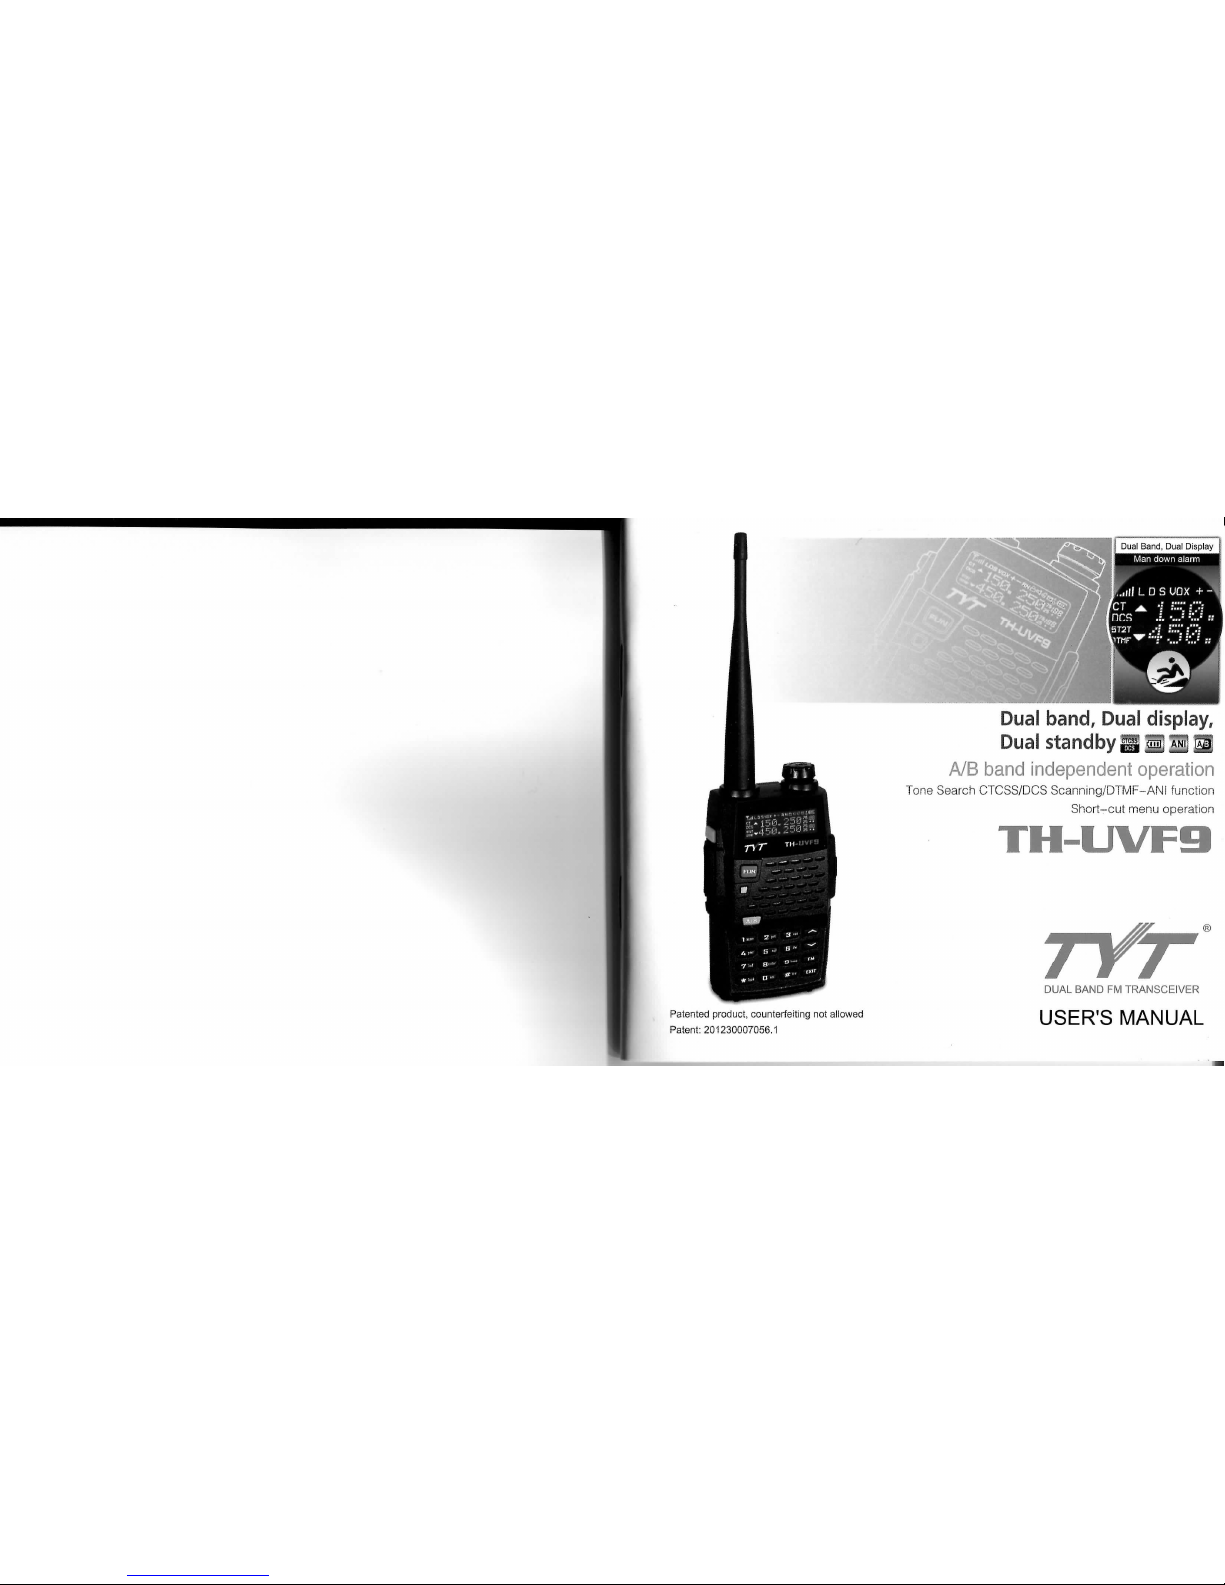
Dual band, Dual display.
Dual standby 3:^3^
A/B band independent operation
Tone Search CTCSS/DCS Scanning/DTMF-ANI function
Short-cut menu operation
TH-UVFS
DUAL BAND FM TRANSCEIVER
Patented product, counterfeiting not aliowed
Patent: 201230007056.1
USER'S
MANUAL
Page 2
TO
CUSTOMERS
Thank you very much for using our two way radio.
This radio of modern design is reasonable structure
with stable functions. It is designed to meet different
customers' need for high quality with easy operation
and perfect capablity. We believe you are pleased with
its nice shape and excellent performance.
This manual is suitable for using the model of TH-UVF9.
Page 3
I
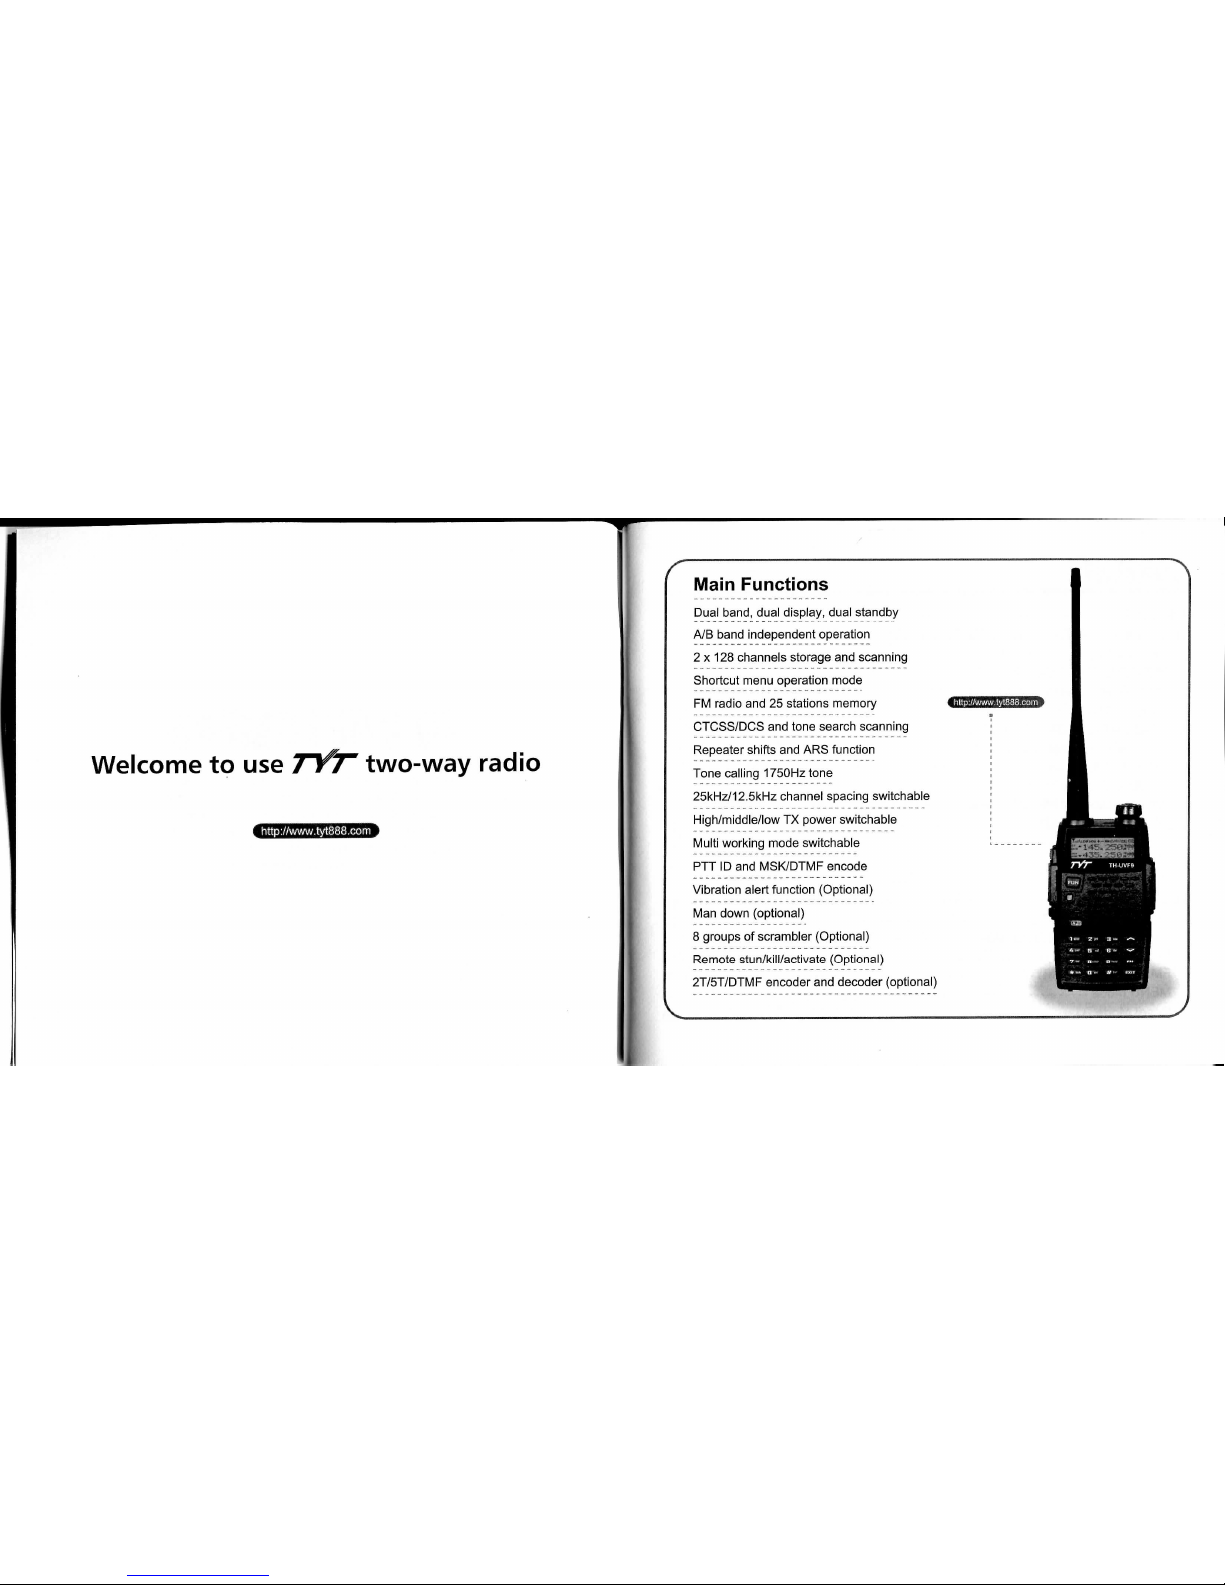
Welcome to use TYT two-way radio
i
Main
Functions
Dual band, dual display, dual standby
A/B band independent operation
2 X 128 channels storage and scanning
Shortcut menu operation mode
FIVI radio and 25 stations memory €iliiJAM)!tiiliiitLliJ>
CTCSS/DCS and tone search scanning ;
Repeater shifts and ARS function |
Tone calling 1750Hz tone I
25kHz/12.5kHz channel spacing switchable ;
High/middle/low TX power switchable ;
Multi working mode switchable •
PTT ID and IVISK/DTMF encode
Vibration alert function (Optional)
Man down (optional)
8 groups of scrambler (Optional)
Remote stun/kill/activate (Optional)
2T/5T/DTMF encoder and decoder (optional)
Page 4

CONTENTS
USING
TIPS
2
UNPACKING
AND
CHECKING
EQUIPMENT3
Supplied Items3
CHARGING
BATTERY
PACK5
Charging Preparation5
Charging Operation6
INSTALLATION
OF
ACCESSORIES7
Installation of Battery Pack7
Antenna Installation8
Installing Belt Clip9
Installing External Micro/Speaker 10
GETTING
FAMILIAR 11
Radio Illustration 12
LCD Display 14
Keypad Functions 16
WORKING MODE 19
Frequency Mode (VFO) 19
Frequency-Channel Mode (MR) 19
Channel Mode (CH) 19
FM Radio Mode (FM) 19
MENU Mode 20
Reset Mode 20
SET
MENU MODE 21
SHORTCUT
MENU
OPERATION
24
DETAILED
FUNCTION
DESCRIPTION
29
Scan & Scan Mode setting 29
Priority Transmit 30
VOX Level 30
TX Power setting 31
Squelch Adjustment 31
Dual Wait/Standby 31
LED Display Mode 32
Backlight Brightness setting 32
Keypad Beeper setting 32
Automatic Number Identity 32
Transmitter Time-Out Timer 33
Busy Channel Lock-Out 33
Transmit Over Beeper 33
Dual Watch/Monitor 34
Receive Saver 34
Auto Keypad Lock 34
Voice Prompt 34
Power-on Display setting 35
Repeater Shift setting 35
Display Channel Name 36
C-CDC&R-CDC&T-CDC&SCN CD 36
Page 5
VFO Step setting 39
Wide/Narrow Band Selecting 40
Vibration 40
Man Donwn 40
Voice Mode and Scrambler 40
ADVANCED
FUNCTIONS 41
PTT/ANI ID Setting 41
Emergency Alert 42
Keypad Locking Setting 42
Reverse Frequency -42
Tone Galling (1750Hz) 43
Add Channel Scanning 43
Channel Storage Operation 43
FM Radio Operation 45
Wire Clone 46
OPTIONAL
SIGNALINGS
49
DTMF Part 50
MSK Part 51
2-Tone Part 53
5-Tone
Part 55
REMOTE
KILL,STUN,
ACTIVATE
AND
REVIVE
58
TECHNICAL
PARAMETERS
62
GUARANTEE
64
http://www.tyt888.com
Page 6
USING
TIPS
Please read the following brief instructions, non-compliance with these rules may cause
danger or violate the law.
• Obey the local government regulation before using this radio, improper use may violate
the law and be punished.
» Turn off the radio before entering flammable or explosive areas.
• Do not charge or change the battery in flammable or explosive areas.
• Turn off the radio before getting close to the blasting zone or detonator areas.
• Do not use radio whose antenna is damaged, touching of damaged antenna will cause
heat injury.
• Do not attempt to open the radio; the maintenance work should be done by technical
expert only.
• To avoid troubles caused by electromagnetic interference or electromagnetic
compatibility, please turn off the radio in places where have the banner "Do not use
wireless equipment", such as hospital and other healthcare places.
• In the car with an airbag, do not put the radio within the scope of the airbag deployment.
• Do not store the radio under the direct sunshine or in hot areas.
• When you transmit with the radio, do keep away from its antenna for 5cm at least.
• If the radio appears smelly or smoke, please shut off its power immediately and contact
with your local dealer.
• Do not transmit too long, for the radio may heat and hurt the user.
021 L:
UNPACKING
AND
CHECKING
EQUIPMENT
Welcome to use TYT TH-UVF9 transceiver. Please check if any damage to thep ackage
when your receive it. Carefully unpack the transceiver. We recommend that you check the
items listed in the following table. If any items are missing or damaged during shipment,
please contact with your local dealer immediately.
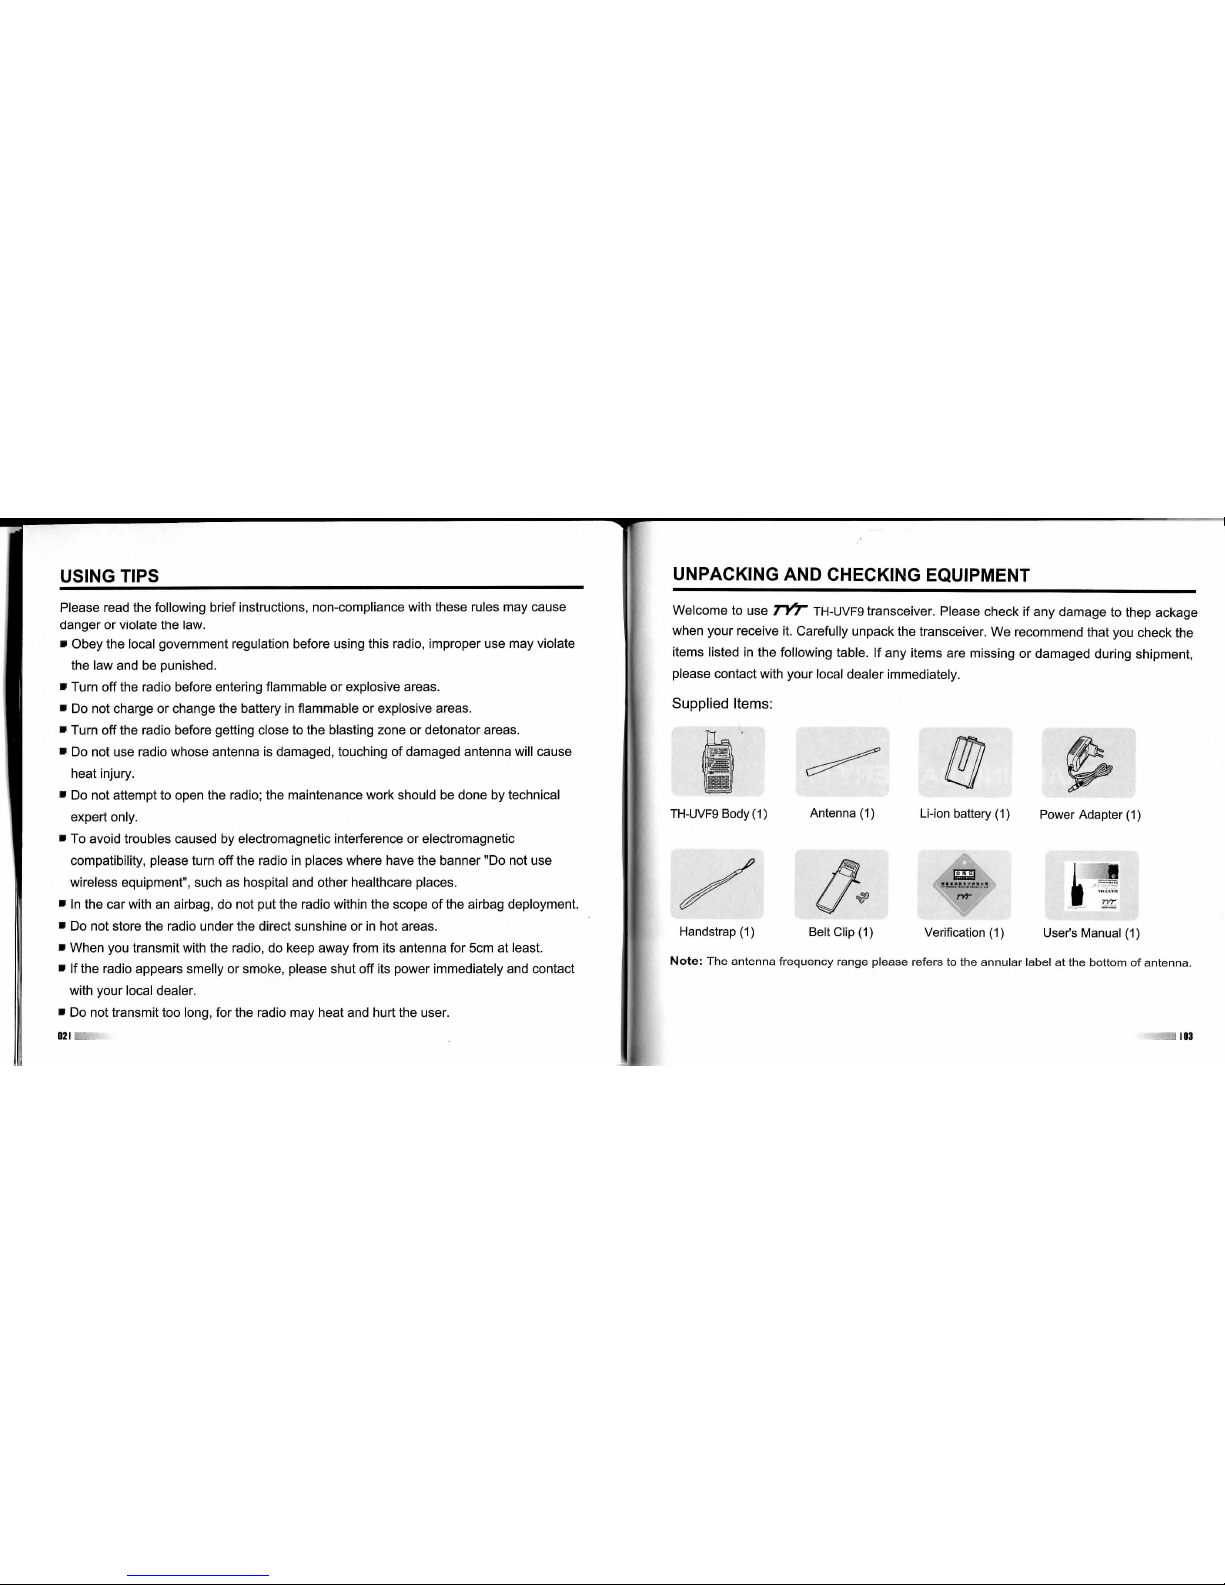
Supplied Items:
• tL
TH-UVF9Body(1)
Antenna (1)
Li-ion battery (1) Power Adapter (1)
'19
il
1
Handstrap(l) Belt Clip (1) Verification (1) User's Manual (1)
Note:
The antenna frequency range please refers to the annular label at the bottom of antenna.
Page 7
User's
Manual
ARGING
BATTERY PACK
1
http ://www.tyt888.com
CHARGING
BATTERY PACK
Charging Precaution
The supplied battery pacl< of TH-UVF9 is a high-performance Li-ion battery with 7.4V standard
voltage, 1500mAh high capacity in a very compact pacl<age. Under normal use, the battery
pacl< may be used for approximately 500 charge cycles and more, after which operating
time maybe expected to decrease. If you have an old battery pack which is displaying
capacity which has become diminished, you should replace the pack with a new one.
Please use 7T^ designated battery; other batteries can cause explosion and hurt people.
Notice: » Please do not short-circuit the battery terminals or expose of in fire. Do not disassemble
the battery unauthorized.
• Charge the battery between temperature O'C and 45 C. The battery can not be normally
charged beyond this temperature range.
• Please turn off the transceiver when you charge it. Transmitting with the transceiver in
charge will affect its normal charge.
• Do not unplug the Power Adapter or battery when it is charged.
• If the battery pack lasts shortly even it is full of power, it shows that the battery is
depleted,
please change the battery pack.
• Please do not charge when the battery or the radio is wet. Please dry it with a cloth
before charging to avoid any danger.
Warning:
When the conductive metals such as jewelery, key or decorative chains touch the
battery terminals, all the batteries are likely to cause damage to the items or personal
105
Page 8
injury. These conductive metals may form a short circuit and generates much heat.
Do deal with any battery carefully, especially when put it into pocket, wallet or other
metallic containers.
Cliarging Operation
After installing the battery pack, if the battery icon shows C D, it means that the battery pack
is out of power. Please charge it.
Indicator ligtit of charger will show charging condition
Indicator Display Status
Red
Charging
Green
Completed
Battery Tips:
• The battery is not fully charged in factory, please charge before using it.
• Charge and discharge the battery for two or three times, the battery capacity will reach
the best condition. When the battery capacity is low, please charge or change the battery.
• The battery lasts shortly even if it is fully charged, the battery is depleted, please
contact your local dealer to buy a new authentic TYT battery.
OBI
INSTALLATION
OF
ACCESSORIES
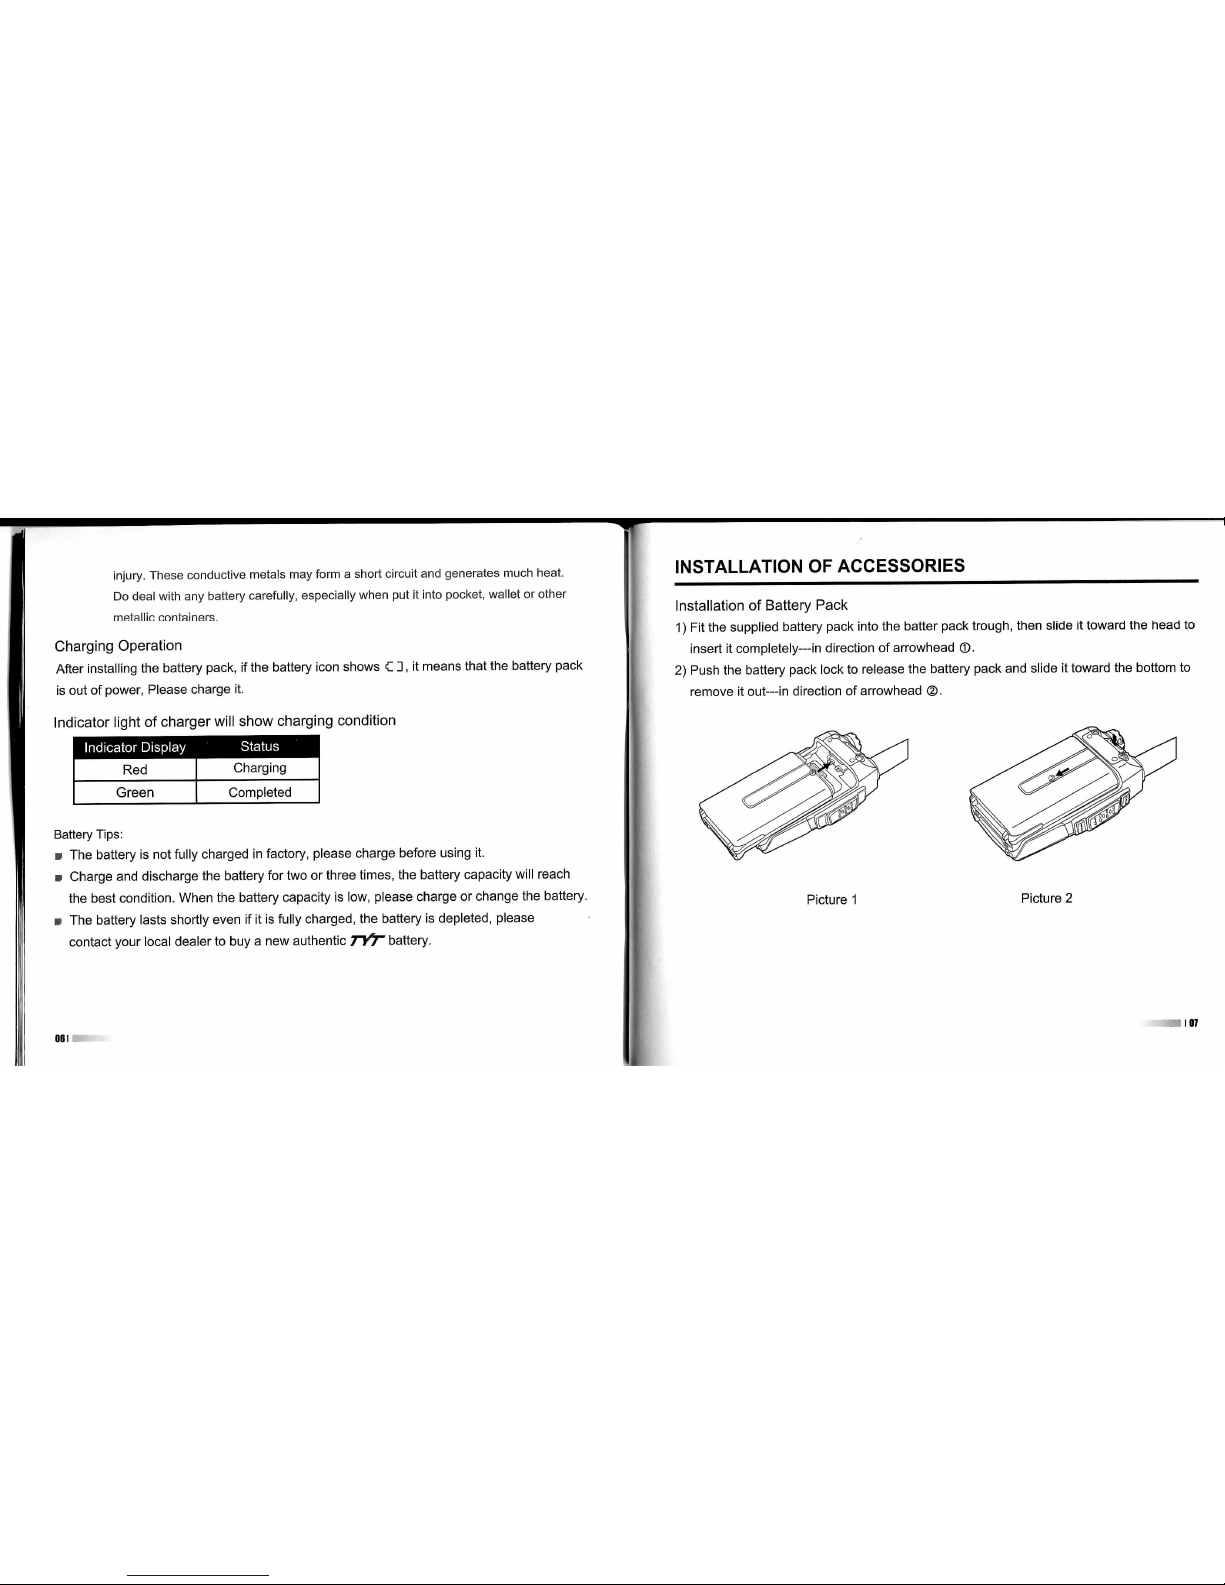
Installation of Battery Pack
1)
Fit the supplied battery pack into the batter pack trough, then slide it toward the head to
insert it completely—in direction of arrowhead ®.
2)
Push the battery pack lock to release the battery pack and slide it toward the bottom to
remove it out—in direction of arrowhead @.
Picture 1
Picture 2
Page 9
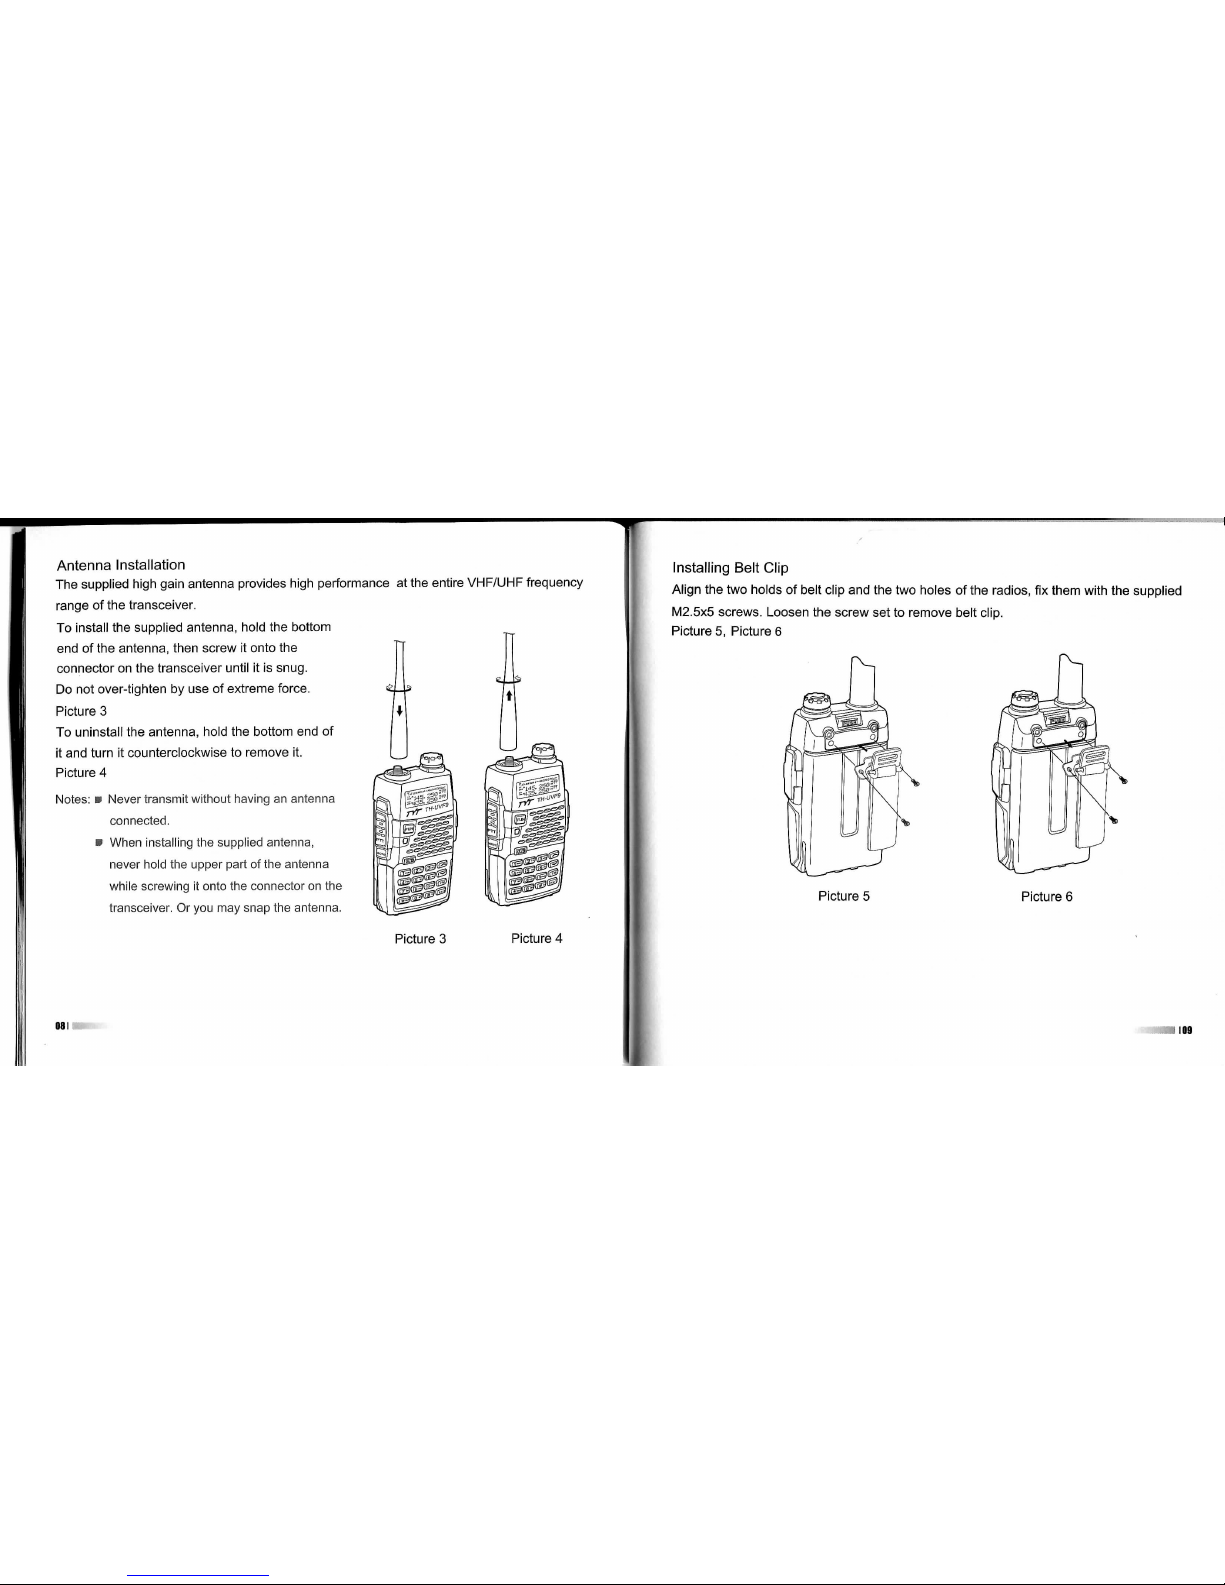
Antenna Installation
The supplied high gain antenna provides high performance at the entire VHF/UHF frequency
range of the transceiver.
To install the supplied antenna, hold the bottom
end of the antenna, then screw it onto the TT
connector on the transceiver until it is snug.
Do not over-tighten by use of extreme force.
Picture 3
To uninstall the antenna, hold the bottom end of
it and turn it counterclockwise to remove it.
Picture 4
Notes: • Never transmit without having an antenna
connected.
m When installing the supplied antenna,
never hold the upper part of the antenna
while screwing it onto the connector on the
transceiver. Or you may snap the antenna.
Picture 3 Picture 4
98!
Installing Belt Clip
Align the two holds of belt clip and the two holes of the radios, fix them with the supplied
M2.5x5 screws. Loosen the screw set to remove belt clip.
Picture 5, Picture 6
Picture 5 Picture 6
Page 10
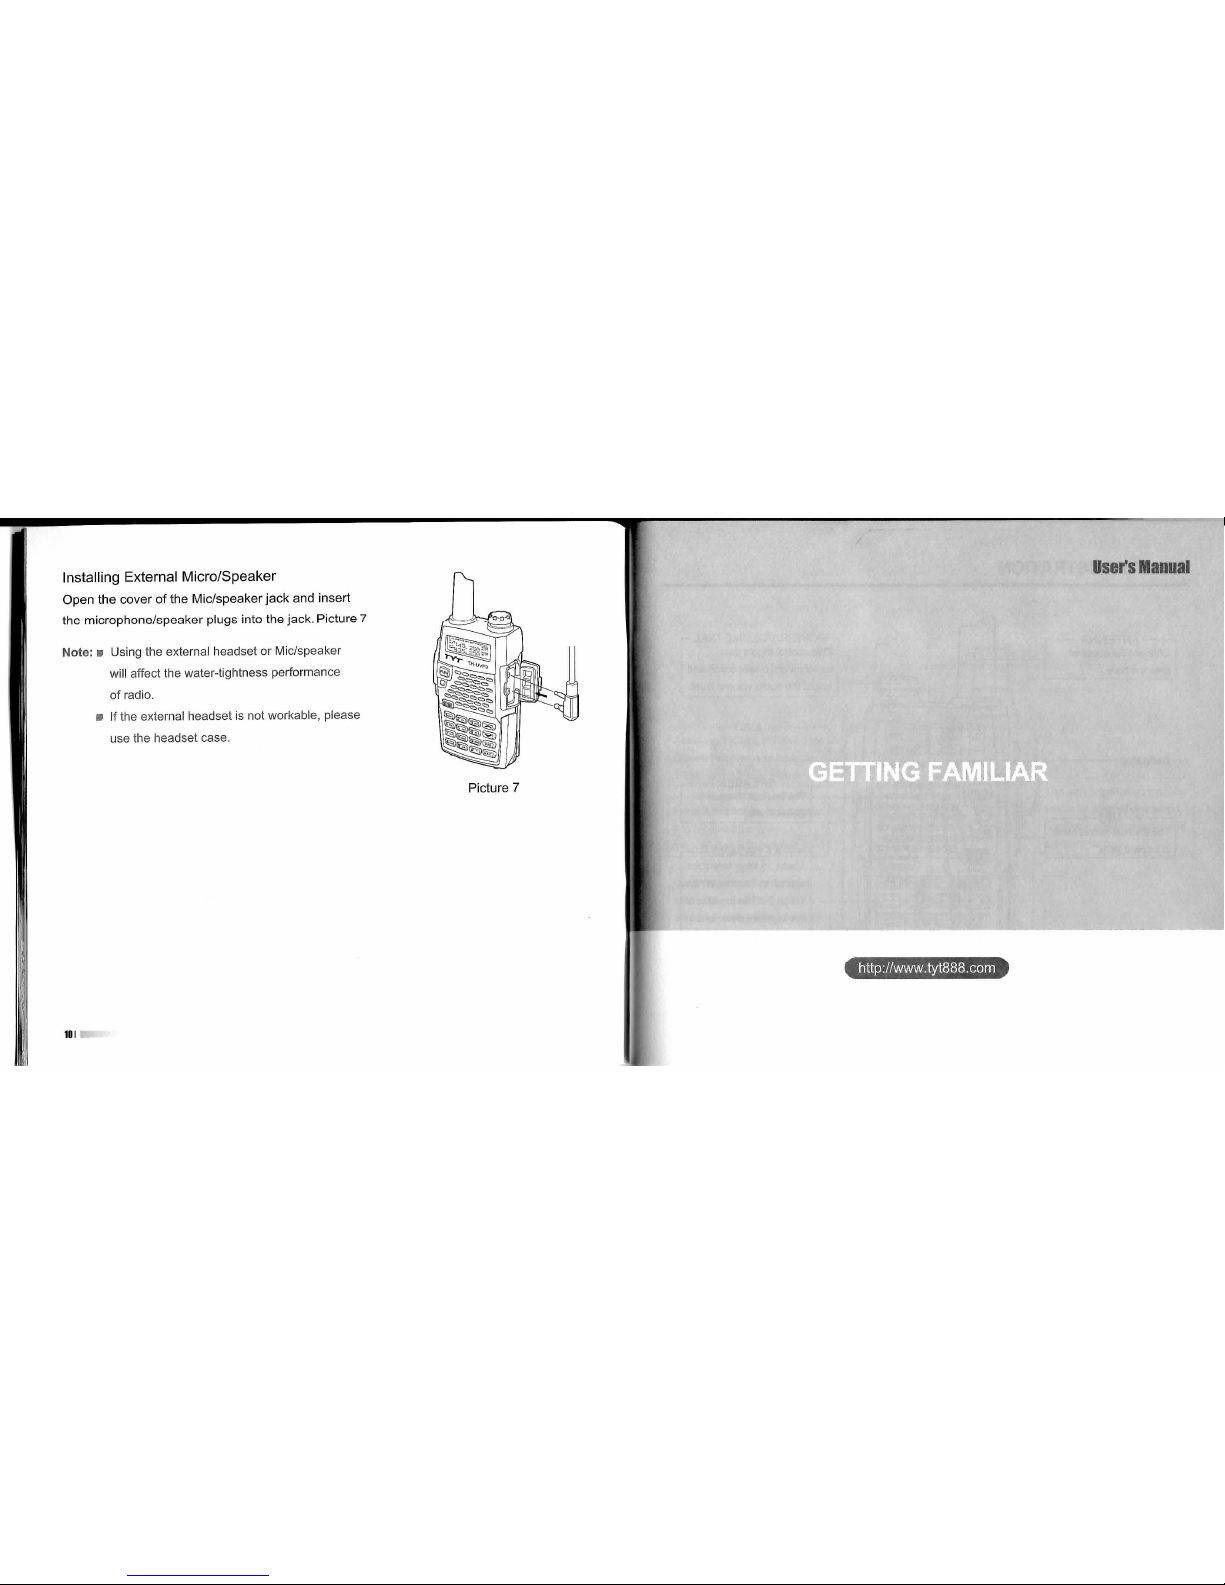
Installing External Micro/Speaker
Open the cover of the IVlic/speaker jack and insert
the microphone/speaker plugs into the jack. Picture 7
Note:
• Using the external headset or Mic/speaker
will affect the water-tightness performance
of radio.
• If the external headset is not workable, please
use the headset case.
TOI
Page 11
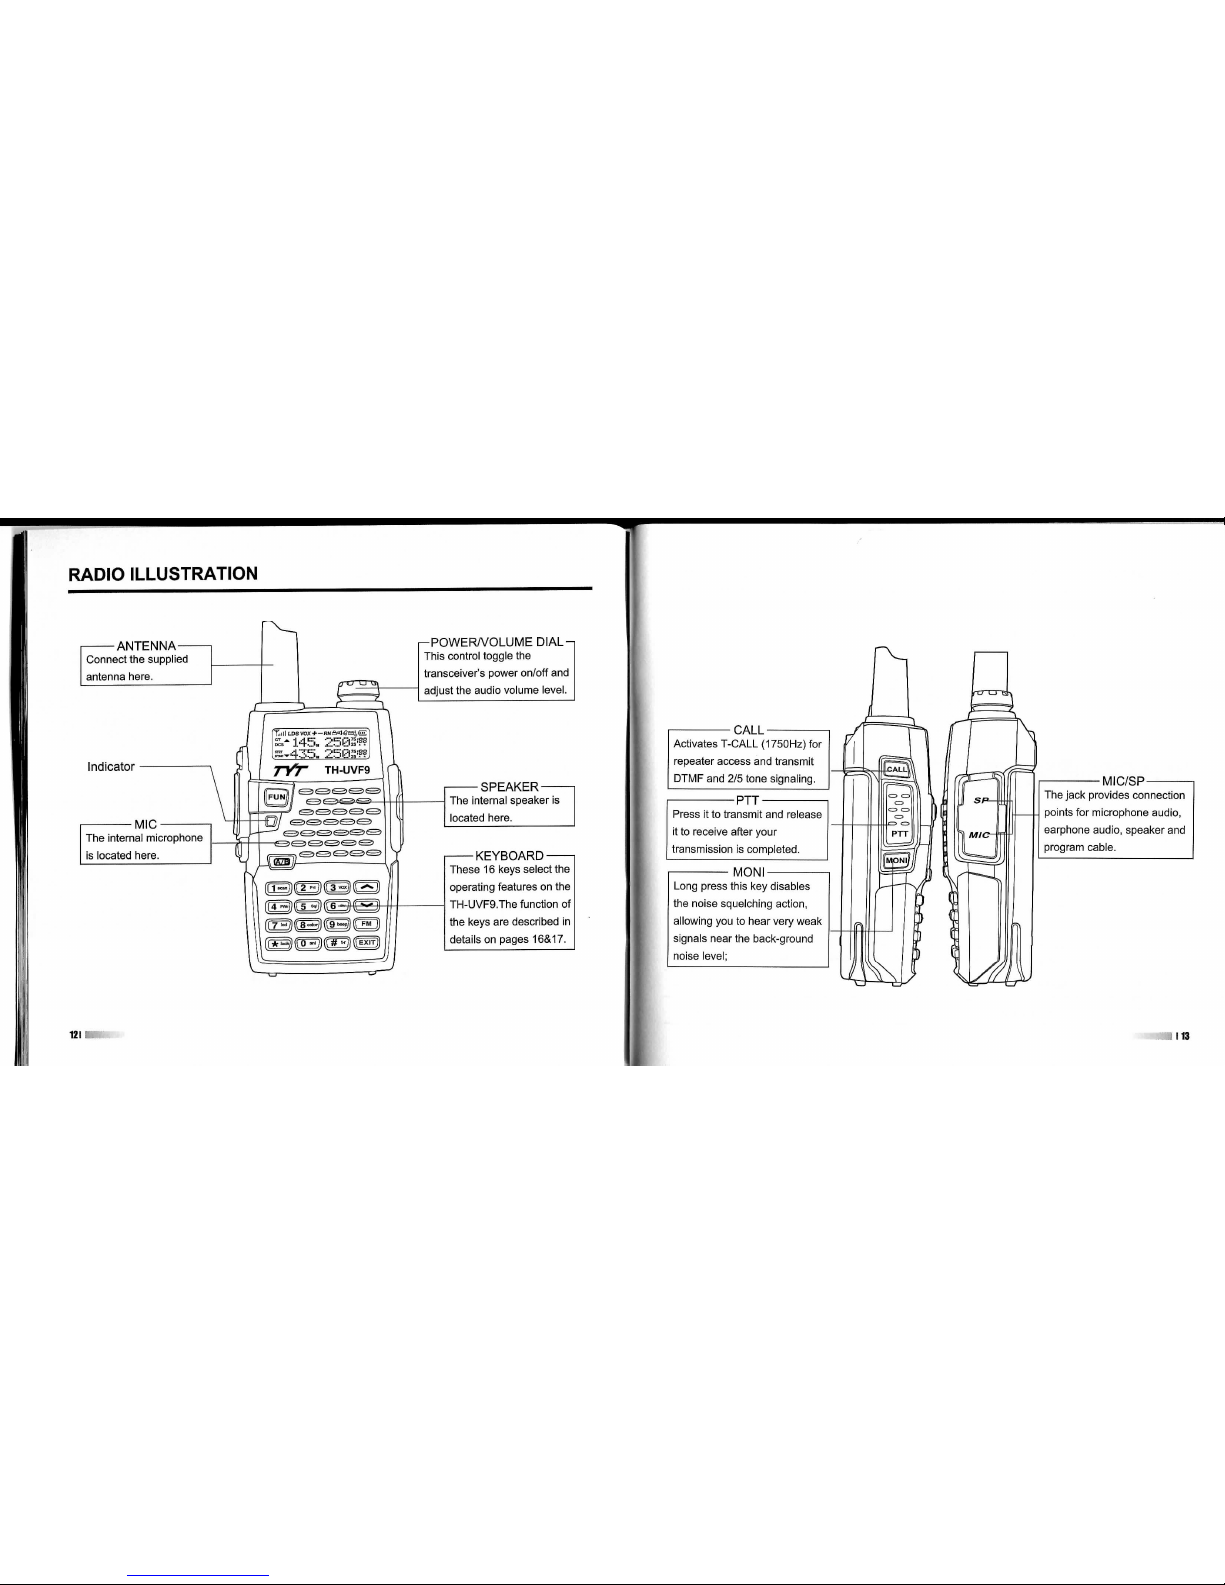
RADIO
ILLUSTRATION
-ANTENNA
Connect the supplied
antenna here.
Indicator
•IVIIC-
The internal microphone
is located here.
,-POWERA/OLUME DIAL-
This control toggle the
transceiver's power on/off and
adjust the audio volume level.
- SPEAKER-
The internal speaker is
located here.
-KEYBOARD-
These 16 keys select the
operating features on the
TH-UVF9.The function of
the keys are described in
details on pages 16&17.
121
I
CALL
Activates
T-CALL
(1750Hz) for
repeater access and transmit
DTMF and 2/5 tone signaling.
PTT
Press it to transmit and release
it to receive after your
transmission is completed.
MONI
Long press this key disables
the noise squelching action,
allowing you to hear very weak
signals near the back-ground
noise level;
MIC/SP
The jack provides connection
points for microphone audio,
earphone audio, speaker and
program cable.
Page 12
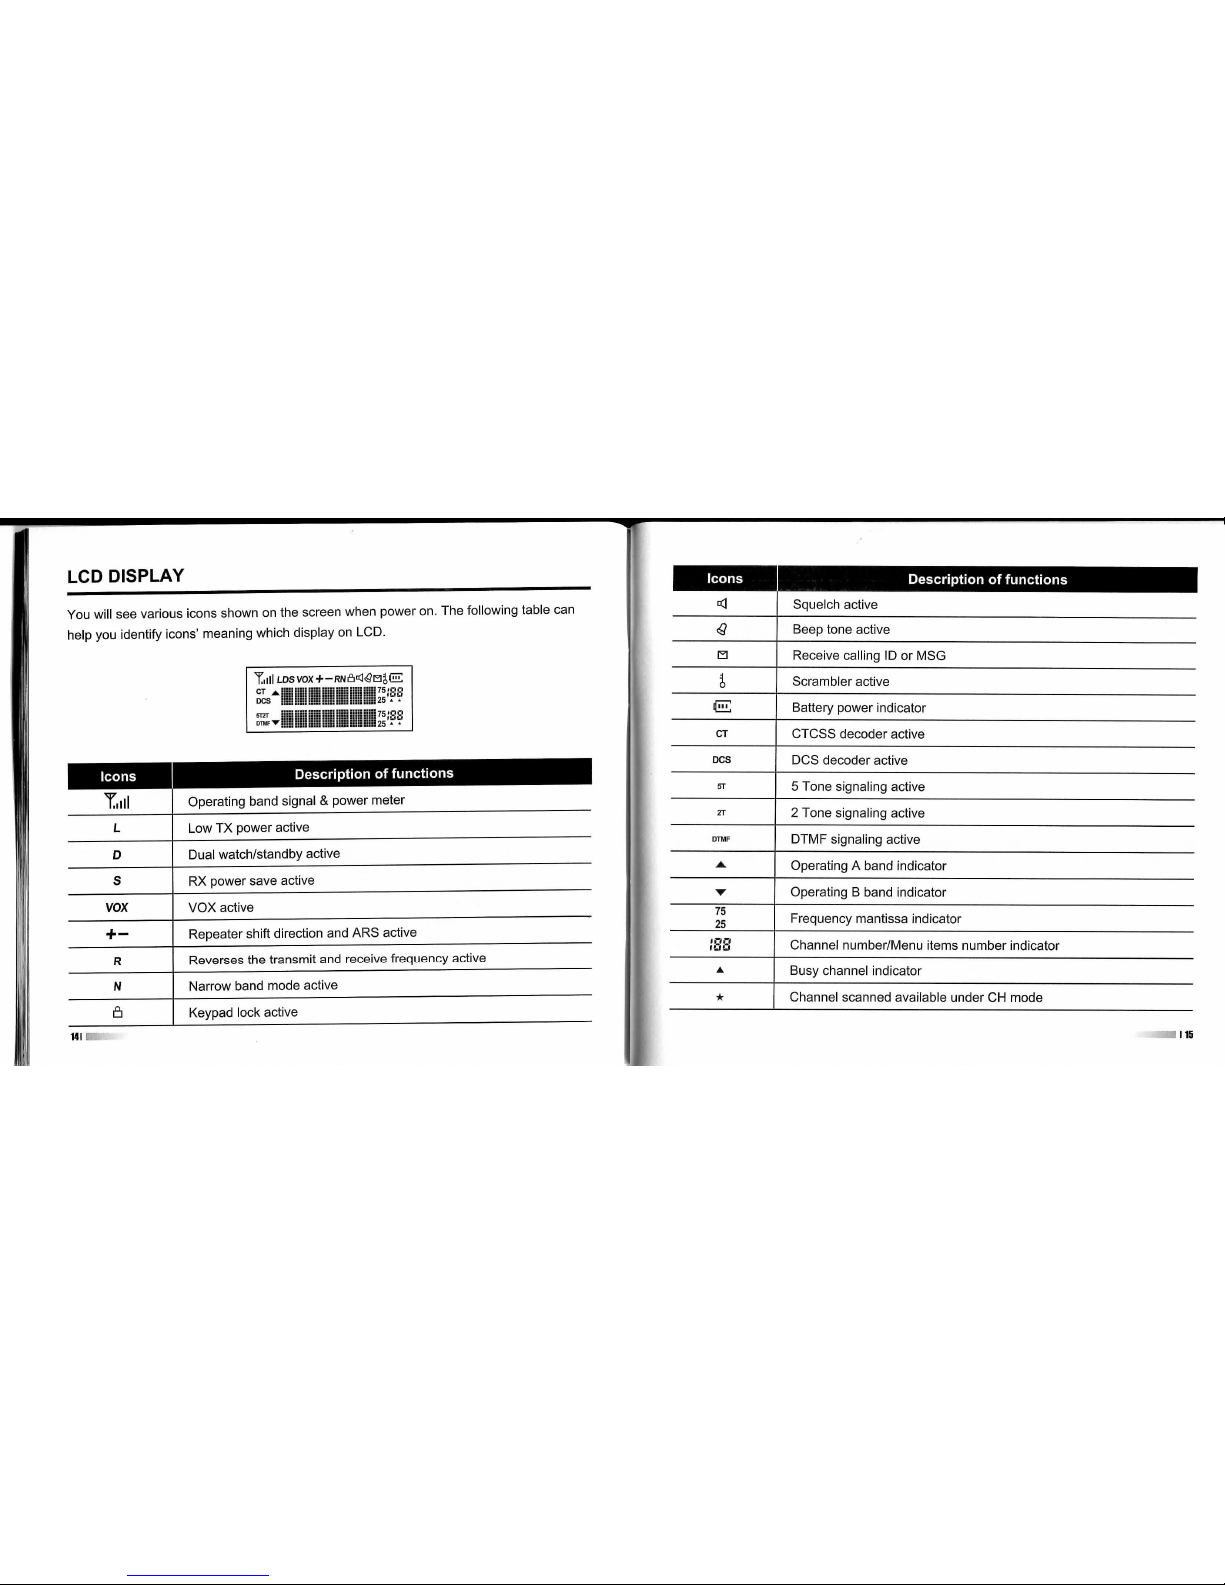
LCD
DISPLAY
You will see various icons shown on the screen when power on. The following table can
help you identify icons' meaning which display on LCD.
Icons
Description of functions
T.iil
Operating band signal & power meter
L
Low TX power active
D
Dual watch/standby active
S
RX power save active
VOX VOX active
+ -
Repeater shift direction and ARS active
R
Reverses the transmit and receive frequency active
N
Narrow band mode active
Keypad lock active
Ml C.
1 Icons
• • Description of functions
Squelch active
<Q
Beep tone active
Q
Receive calling ID or MSG
Scrambler active
E Battery power indicator
CT
CTCSS decoder active
DCS
DCS decoder active
5T
5 Tone signaling active
2T
2 Tone signaling active
DTMF
DTMF signaling active
Operating A band indicator
Operating B band indicator
75
25
Frequency mantissa indicator
Channel number/Menu items number indicator
•
Busy channel indicator
Channel scanned available under CH mode
1
119
Page 13

KEYPAD
FUNCTIONS
[
B]
,.;IP1
[a] [a]
Press
key
Enter menu
mode/confirm
the setting
Switch the
Aor B
frequency
to be the
"Operating"
Band
Upper menu
item,
channel
or frequency
Lower menu
item,
channel
or frequency
Switch VFO
mode and
IVIR mode/exit
the setting
Press and
turn on thie
radio
Enter reset
mode
No action Switch CH
mode and
VFO mode
No action No action
[IB]
[aa] im}
[QB]
Press
key
Frequency/
Channel No.
entry
"1"
Frequency/
Channel No.
entry "2"
Frequency/
Channel No.
entry "3"
Frequency/
Channel No.
entry "4"
Frequency/
Channel No.
entry "5"
Press
Enter scan
item
Enter priority
TX mode
item
Enter VOX
level Item
Enter
high/low
power item
Enter squelch
level item
IB I mi
[OBI] [BB] [IB] [iE3] [CD]
Press
key
Frequency/
Channel No.
entry "6"
Frequency/
Channel No.
entry "7"
Frequency/
Channel No.
entry "8"
Frequency/
Channel No.
entry "9"
Frequency/
Channel No.
entry "0"
Press Enter dual
wait/standby
item
Enter LED
item
Enter
Brightness
item
Enter beep
item
Enter AN
1
item
[tm]
[OS]
[OB]
Press
key
Left cursor
position
when editing
channel name
Right cursor
position
when editing
channel name
Enter or exit
FM radio
mode
Press and
hold key to
start keypad
lock.
Press and
hold key to
start reverse
frequency
Press [ ^ ] +
[ fsa ] to start
emergency
alert
in
Page 14

User's
Manual
ORKING
MODE
SET
MENU MODE
TCUT
MENU
OPERATIO
http://www.tyt888.com
WORKING MODE
1)
Frequency Mode (VFO)
Under this mode, you can use [Ca ] / [ d] l<ey to change the frequency or input the
frequency by l<eypad directly and store channels.
2)
Frequency-Channel Mode (MR)
When you have stored a memory channel at least and under VFO mode, press [ GBD]
key to enter MR mode.
The frequency will be indicated on the display and the channel No. will be indicated at
the right side. If the transceiver display name option is ON and channel name edited, it
will show the name of the channel.
Please see Shortcut Menu Operation Item 23&24. Page 36.
3)
Channel Mode (CH)
When you have stored a memory channel at least, press [ ^a] key and switch power
on the radio, enter CH mode. Channel No. will be indicated on the display and if the
transceiver display mode option is ON, it will show the name of the channel.
Please see Shortcut Menu Operation Item 23&24. Page 36.
4) FM Radio Mode
TH-UVF9 provides frequency 76.00-108.00MHz FM radio.
Under this mode, you can choose FM frequency you need directly. Scan frequency
range and store your favorite channels. Press [ OB ] to enter and exit FM radio mode.
^
I
n
Page 15

5)
MENU Mode
Press [ B ] key to enter MENU mode, ttiere are 34 items in
total.
Please see SET
MENU MODE. Page 21
6)
Reset Mode
Press [ B ] key and switch the power on to enter Reset mode, then press [ B ] key
to enter.
1.
[ D ] or [ a] key to select VFO/FULL.
2.
VFO: initialize all setting under frequency mode.
3. FULL: initialize all setting under frequency and memory mode.
20!
SET
MENU
MODE
No.
LCD Display
Available Values Description of Function
01 SCAN
/
Frequency/Channel Scan
02 TX.SEL EDIT/BUSY Priority Transmit
03 VOX 1-8
VOX Level Setting
04 POWER LOW/HIGH High/Low TX Power
05 SQL 0-9 SQL level setting
06
D.WAIT
ON / OFF Dual Wait/Standby
07 LED ON / AUTO / OFF LED Display mode
08
LIGHT C0L0R1/C0L0R2/COLORS Backlight brightness setting
09 BEEP ON/OFF
Keypad Beeper Setting
10 ANI ON/OFF
Automatic Number Identity
11 TOT OFF/30/60/.../270
Transmitter Time-Out Timer
12
BCLO
OFF / WAVE / CALL Busy Channel Lock-Out
13 VOX.SW ON/OFF
VOX Switch ON/OFF
14 ROGER ON/OFF
Transmit Over Beeper
15
DW
ON / OFF
Dual Watch/Monitor
.1121
Page 16

No,
LCD Display
Available Values
Description of Function
16
RX.SAV ON/OFF
Receive Saver
17 SCAN.S
TO / CO / BE
Scan Mode
18
AUTOLK
ON/OFF
Auto Keypad Locl<
19 VOICE
ON/OFF
Voice Prompt
20
OPNSET OFF / DC/MSG
Power-on Display
21 VLG
/
Battery Power Voltage
22
PONMSG
-1A,@
Power-on Message
23A OFFSET
0.000-99.995MHZ
Repeater Shift
(Under VFO mode)
23B
DIS.NM ON/OFF
Display Channel Name
24
CHNAME
-1A@
Channel Name Editing
25
C-CDC
OFF/67.0/D023N
TX/RX Tone coder
26
R-CDC
OFF / 67.0 / D023N
RX Tone coder
27
T-CDC
OFF/67.0/D023N
TX Tone coder
28 S-D
+ /-/OFF
Shift Direction
29 STEP 5K/6.25K/.../25K
VFO Step
No.
LCD Display Available Values Description of Function
30 N/W WIDE/NARROW Wide/Narrow Band
31
SEEK 67.0
/
CTCSS Scanning
32
SEEK D023N / DCS Scanning
33
DALARM
ON/OFF
Man Down
34
VIBRATE ON/OFF
Vibration
35
SCR.NO
1-8
Voice scrambler
36
APRO OFF/COMP/SCRA voice mode
Menu
Operation
1)
Under standby mode, press [ B ] to enter menu setting, LCD
displays "MENU".
2)
Press [ ] or [ KSI ] to select the desired menu item, LCD
display current setting of selected item.
3)
Press [ B ] to enter and then press [ a ] or [ sa ] to select
the desired setting.
4)
Press [ B ] to confirm.
5)
Press [ED ] twice to exit and then return to standby mode.
T.III
' MENU
Page 17

SHORTCUT
MENU
OPERATION
Item Item
Enter
Screen
Select
Parameter
Confirm Return
No.
Name
item
Display
parameter
Explanation
Standby
twice to
exit
1)
Frequency (|
/Ctiannel
' SCBH
Press
[^a]
or
ml
to
change
scan
direction
Press
[ (B 1 key to
start
scanning
Standby
twice to
exit
scan
^lilltf W
twice to exit
2) Priority (|
Transmit
»^
-TH.
SEL
EDIT
c?
Press
[ca]
cr
[a]
to
select
availabie vaiues
EDIT/BUSY
^lilltf W
twice to exit
4B4
^
Mm .
Press
[^D]
H^BH•
twice to exit
3) VOX level
setting
r,i:l «
-
KICK
4
e
4B4
Press
[a]
or
[B]
to
select
avaiiable
values
vox
level:
1-8
^
Mm .
Press
[^D]
H^BH•
twice to exit
..A.
mtm _k
Press
[SSI
••Bt-twice
to
exit
4) TX power (|
setting
^
0 -i-ag
a if
T..:l
a
-
POW
LOU
e:
i^Bif
Press
[0]
or
[Olloseiect
availabie
vaiues
Higti
/ Low
..A.
mtm _k
Press
[SSI
••Bt-twice
to
exit
4) TX power (|
setting
*'B4^r'^'V'^
^ ~ twice
to
exit
5) SQL level (i
setting
T„ll
a E
-
SQL
5
i^Bif
Press
[ma]
or
[al
to
select
available values
SQL
level:
0-9
*'B4^r'^'V'^
^ ~ twice
to
exit
, Press
[1130]
ip*^^
twice
to
exit
6) Dual wait/ Q
standby
^ ^ +
B
Till
^ E
'D.WfiIT
ON
^B-f
Press
[a]
or
[a]
to
select
available
values
ON/OFF
, Press
[1130]
ip*^^
twice
to
exit
_L
_t
Press
[ED]
twice
to
exit
7)
LED
display
^
+g
»if
T„il
1
•
LED
flUTO
G
4B4
Press
[Bi]
or
[a]
to
select
available values
ON/AUTO/OFF
_L
_t
Press
[ED]
twice
to
exit
mode
8)
Backlight ^
brightness ^
setting
•^B'r
twice to
exit
mode
8)
Backlight ^
brightness ^
setting
^ 0 +1101^
T.,11 «
-
LiaHT
COLORl
e
Press
[a]
or
IB]
lo
select
avaiiable
values
COLOR1 / COLOR2
/
C0L0R3
•^B'r
twice to
exit
mode
8)
Backlight ^
brightness ^
setting
4>B4
L
tgmm
_k
Press
[fSS]
^•Bi^
twice
to
exit
9) Keypad (|
beeper
- BEEP
OH
OS
4>B4
Press
[al
or
[a]
to
select
available values
ON/OFF
L
tgmm
_k
Press
[fSS]
^•Bi^
twice
to
exit
2(1
Item Item
No.
Name
10)
Automatic (
Number
Identity
11)
Transmitter^
time-out
timer
12) Busy c;
channel
lock-out
13)
vox
switch
14) Transmit (<
over
beeper
15) Dual (J
watch/
monitor
16) Receive
saver
17)
Scan (_
mode
18) Auto
keypad
lock
Enter Screen
item Display
0 +1394''
Select Parameter
parameter Explanation
BNI
ON
TOT
OFF
BCLO
OFF
-Ui:«.
SIJ 3
OFF
B-g"*^
!4
ROGER
"
OFF
Dili
OFF
OH
SCBNS
CO
-RUTOLK
'
OFF
4B4
4B^
4B 4
4B4
4B<i'
4B4'
4B4
4B4
4B>f
Press
[E9]
or
[a]
to
change
ON/OFF
scan
direction
Press
[cal
or
[C9]
to
selecl
available values
OFF/30.../270s
Press
[tsa] or
[ai
to
seled
available
values
OFF / WAVE / CALL
Confirm Return
Standby
~
1^ RRR ^
Press
[SO]
" twice fD exit
T4B4E
.
fflB ^ Press
[SPl
"twice
to
exit
Press
[Oi]
or
[O]
to
select
available
values
ON/OFF
Press
[ei]
or
[Q]
to
select
available
values
ON/OFF
Press
[ca]
or
[a]
to
select
available
values
ON/OFF
Press
[Ba]
or
[B]
to
select
available
values
ON/OFF
Press
[iO]
or
[Ell
to
selecl
available values
TO /CO/SE
Press
[d]
or
[Dj
to
select
available values
ON/OFF
Page 18

!i
|1
p
m
O
Is
il
i|
a
0)
is
o
o
(1)
03
CL
111
£1
BS3
e
m
Q.
£
E
i i
B.SM
i
'Sit
Msg
111
e
,-3
4^
i
s
e
i
e
i
i
e
4^
e
£3
i
5.
si
i
as
1
X
e
S.SS
i
i i
list
- ^
o
E
E
.
0)
O
O)
0.
^
III
sag
Q:
E
o.
c
<
a:
oi
g S
E
d Q
-g
2
X
Page 19

User's
Manual
DETAILED
FUNCTION
DESCRIPTIONS
ADVANCED
FUNCTIONS
http://www.tyt888.com
DETAILED
FUNCTION
DESCRIPTIONS
1)
Scan & Scan Mode setting (SCAN&SCANS—MENU 1&17)
Functions:
under VFO/IVIR/CH mode, TH-UVF9 allows you to scan the entire current
operating band and memory channels.
Enter
Menu
1^' and
press
[ B ] key to start
scanning.
When you have started scanning, press [ ES ] / [ ] key to change direction. And it
will halt on a signal It encounters, press PTT key to stop scanning; Press
MONI
key to
stop scanning temporarily; Press [ B ] key again to exit the scanning function.
Scanning operation is basically the same in each of the above modes. Before you begin,
take a moment to select the way in which you would like the scanner to halt on a signal.
Enter
Menu
17'" to set
scan
mode. Default: TO.
Three options for the scan mode are available under VFO mode:
TO:
In this mode, the scanner will halt on a signal it encounters, and will hold there for
some time. If you do not take action to disable the scanner within the time period,
the scanner will resume even if the stations are still active.
CO:
In this mode, the scanner will halt on a signal it encounters, and will hold there if
the stations are still active. And after the carrier has dropped, the scanner will
resume.
SE:
In this mode, the scanner will halt on a signal it encounter, it will not restart
automatically; you must manually re-initiate scanning if you wish to resume.
Page 20

2)
Priority Transmit (TX.SEL—MENU 2)
Functions:
TH-UVF9 allows you to transmit on the sub band even if you are working on
the operating band.
Enter
IVIenu 2"" to
select
priority
transmit band. Default:
EDIT.
EDIT: It will transmit on the operating band.
BUSY: It will transmit on the band last talking used.
3)
VOX Level & VOX Switch (VOX&VOX.SW—MENU 3&13)
Functions:
the VOX function provides automatic transmit/receive switching based on
voice input to the microphone. With the VOX switch ON, you do not need to
press PTT switch in order to transmit, and it is not necessary to use a VOX
headset in order to utilize VOX operation.
Enter
Menu
IS'" to set VOX
switch.
Default: OFF.
When the VOX is activated, the "VOX" icon will appear on the display.
Enter
Menu
3'" to set VOX
level.
It has 8
grades.
The higher level is, the more sensitive will be.
TH-UVF9 provides for adjustment of "Hang-Time" of the VOX (the transmit-receive delay
after the cessation of speech) via program software.
Default: 2s.
301
[
4)
TX Power setting (POW—MENU 4)
Functions:
you can select high/low TX power according to your talking environment
and need. When you store memories, you can store High and Low power
settings separately in each memory.
Enter
Menu
4'" to set TX power.
High:
4W
Low: 0.5W, when you select Low power, the "L' icon will appear on the display.
5)
Squelch Adjustment (SQL—MENU 5)
Functions:
TH-UVF9's Squelch system allows you to mute the background noise when
no signal is being received. Not only does the Squelch system "standby"
operation more pleasant, it also significantly reduces battery current
consumption.
Enter
Menu
5* to set SQL
level.
Default: 5.
6)
Dual Wait/Standby (D.WAIT—MENU 6)
Functions:
TH-UVF9 allows you to receive the sub band signal even if you are working
on the operating band. It could monitor the signal under both master and
sub band at the same time.
Enter
Menu
6'" to set Dual
Walt.
Default: ON.
Page 21

7)
LED Display Mode (LED—MENU 7)
Function:
select ttie LED/Keypad Lamp mode.
Enter
IMenu
7* to
select
LED display mode. Default: AUTO.
ON:
LED display ligiits all the time.
AUTO:
Illuminates the LED when any key is pressed and after 3s the light is off.
OFF:
Disable the LED lamp.
8)
Backlight Brightness setting (LIGHT—MENU 8)
Functions:
choose LED backglight brightness.
Enter
Menu
8* to
select
backlight
brightness.
Default:
C0L0R2.
COLOR1:
brighter.
COLOR2: default setting.
COLOR3: darker.
9)
Keypad Beeper setting (BEEP—MENU 9)
Functions:
enable/disable the keypad beeper.
Enter
Menu
9'" to set keypad beeper. Default: ON.
10)
Automatic Number Identity (ANI—MENU 10)
Functions:
sending ID code when TH-UVF9 transmits, the others can receive it directly
on the display if they also hate A I futiction.
Enter
Menu
10* to set ANI. Default; OFF.
11)
Transmitter Time-Out Timer (TOT—MENU 11)
Functions:
the TOT feature provides a safety switch which limits transmission to a
pre-programmed value. This will promote battery conservation by not
allowing you to make excessively-long transmissions, and in the event of
a stuck PTT switch it can prevent interference to other users as well as
battery depletion.
Enter
Menu
11'" to set TOT. Default: OFF.
12)
Busy Channel Lock-Out (BCLO—MENU 12)
Functions:
the BCLO feature prevents the radio's transmitter from being activated if a
signal strong enough to break through the "noise" squelch is present. On a
frequency where stations using different CTCSS or DCS codes may be
active, BCLO prevents you from disrupting their communications
accidentally (because your radio may be muted by its own tone decoder).
Enter
Menu
12'*' to set
BCLO.
Default: OFF.
OFF:
Disable BCLO feature.
WAVE:
the radio's PTT will be prevented only if the frequency is busy used.
CALL: the radio's PTT will be prevented only the frequency and tone coder is the same.
13)
Transmit Over Beeper (ROGER—MENU 14)
Functions:
sending a beeper to inform the receiver TX is over.
Enter
Menu
14'" to set
ROGER.
Default: OFF.
133
Page 22

14)
Dual Watch/Monitor (DW—MENU 15)
Functions:
Dual Watch feature makes TH-UVF9 can monitor the calling signal when FM
radio is on and you won't miss any calling.
Enter
Menu
15'" to set DW. Default: OFF.
15)
Receive Saver (RX.SAV—MENU 16)
Functions:
this feature significantly reduces quiescent battery drain, and you may not
receive the full data burst.
Enter
Menu
16'" to set
RX.SAV.
Default: OFF.
16)
Auto Keypad Lock (AUTOLK—MENU 18)
Functions:
in order to prevent accidental frequency change or inadvertent transmission,
various aspects of the TH-F8's keys and switches may be locked out.
Enter
Menu
18'" to set
AUTOLK.
Default: OFF.
When you switch AUTOLK ON, the keypad will be locked automatically if there is no key
operation for 5 second.
If the radio is locked, press [E» ] key to unlock it. Also you can lock it using [OB ] key
by manual.
17)
Voice Prompt (VOICE—MENU 19)
Functions:
enable/disable voice prompt.
Enter
Menu
19'" to set
VOICE.
Default: ON.
18)
Power-on Display setting (OPN.SET&VLT&PON.MSG—MENU 20&21&22)
Functions:
choose power-on display mode and edit power-on message
Enter
Menu
20'" to set
OPN.SET.
Default: OFF.
OFF:
display model version
DC:
battery power voltage
MSG:
power-on message
Enter
Menu
21" to
check
battery
voltage.
Enter
Menu
22"" to
edit
power-on
message,
also
you can
edit
it directly by
program software.
Using [ D ] / [ a] to select character; [ CSS ] / [ t3B ] to switch cursor position.
19)
Repeater Shift setting (OFFSET&S-D—MENU 23&28)
Functions:
repeater stations, usually located on mountaintops or other high locations,
provide a dramatic extension of the communication range for low-powered
hand-held or mobile transceivers.
Under VFO mode, you can set the magnitude and direction of the repeater shift.
Enter
Menu
23'" to set magnitude of the repeater shift.
Available values: 0.00 ~ 99.95 MHz
Enter
Menu
28'" to set the repeater shift direction. Default: OFF.
Page 23

20)
Display Channel Name (DIS.NAME&CH.NAME—MENU 23&24)
Functions:
switch channel name display ON/OFF and edit channel name under MF?/CH
mode.
Enter
Menu
23'" to
switch
display channel name
ON/OFF.
Enter
Menu
24* to
edit
channel name,
also
you can
edit
it directly by program
software.
Using [ ca ] / [ Ca ] to select character; [ C3S ] / [ 09 ] to switch cursor position.
21)
Tone coder & Tone Search Scanning & Tone calling (C-CDC& R-CDC&
T-CDC&SEEK 67.0&D023N—MENU 25&26&27&31&32)
Function
1: CTCSS/DCS Operation
Many repeater systems require that a very-low-frequency audio tone be superimposed
on your FM carrier in order to activate the repeater. This helps prevent false activation
of the repeater by radar or spurious signals from other transmitters.
Enter
Menu
25"'/26"'/27"' to set TX&RX Tone coder/ RX Tone coder/ TX Tone coder.
1)
Press [ 138 ] key to select CTCSS/ DCS/ OFF. After you choose CTCSS/ DCS,
press [ ^a] / [ ^a] key to choose the right group you need.
2)
Press [OB ] key to select DCS direction.
TH-UVF9 has 50 groups CTCSS, 104 groups normal/inverted DCS.
36!
CTCSS TONE FREQUENCY (Hz)
67.0
69.3
71.9
74.4
77.0
79.7
8.25
85.4
88.5
91.5
94.8
97.4
100.0
103.5
107.2
110.9
114.8
118.8
123.0
127.3
131.8
136.5
141.3
146.2
151.4
156.7
159.8
162.2
165.5
167.9
171.3
173.8
177.3
179.9
183.5
186.2
189.9
192.8
196.6
199.5
203.5
206.5
210.7
218.1
225.7
229.1
233.6
241.8
250.3
254.1
-
-
-
-
in
Page 24

DCS CODE
023
074
172
265
371
503
662
025
114
174
266
411
506
664
026
115
205
271
412
516
703
031
116
212
274
413
523
712
032
122
223
306
423
526
723
036
125
225
311
431
532
731
043
131
226
315
432
546
732
047
132
243
325
445
565
734
050
134
244
331
446
606
743
051
143
245
332
452
612
754
053
145
246
343
454
624 -
054
152
251
346
455
627
-
065
155
252
351
462
631 -
071
156
255
356
464
632 -
072
162
261
364
465
645
-
073
165
263
365
466
654 -
Function
2: TONE Searcli Scanning
In operating situations wtiere you don't l<now ttie CTCSS/DCS tone being used by
another station or stations, you can command the radio to listen to the incoming signal
and scan in search of the tone being used.
Enter
IMenu
31^/32"" to start
CTCSS/DCS
searching.
If the Tone scan feature does not detect a tone or code, it will continue to scan
indefinitely. When this happens, it may be that the other station is not sending any tone.
You can press PTT key to halt the scan at any time.
You also can press
iVIONI
key during Tone scanning to listen to the (muted) signal from
the other station. When you release the
iVIONI
key. Tone scanning will resume.
Tone Scanning works either in the VFO or MR modes.
Function
3: TONE Calling (1750Hz)
If the repeaters in your country require a 1750Hz burst tone for access (typically in
Europe),
you can press and hold
CALL
key for 2s and transmitter will automatically be
activated,
and a 1750Hz audio tone will be superimposed on the carrier. Once access
to the repeater has been gained, you may release
CALL
and use PTT key for activating
the transmitter.
22)
VFO Step setting (STEP—MENU 29)
Functions:
setting of the synthesizer steps
Enter
[Menu
29* to set VFO
step.
Available Values: 5/6.25/10/12.5/25/50/100 kHz
M39
I
Page 25

23)
Wide/Narrow band selecting (N/W—MENU 30)
Functions:
setting of wide/narrow bandwidth
Enter
IVIenu 30* to set bandwidth.
Available Values: Wide—25kHz/Narrow—12.5kHz
24)
Vibration (Optional) (DALARM—MENU 33)
Functions:
The vibration indication helps in working conditions where quiet operation is
required.
Enter
IVIenu 33'" to set DALARM. Default: OFF
Under standby mode, when you set this function on, long press [MONI] key for 3S,
60Hz tone will be transmitted, receiveing part will vibrate.
25)
Man Donwn (Optional) (VIBRATE—MENU 34)
Functions:
This feature qutomatically summons assistance when the radio falls over for
a predetermined time period when you set it on and
Enter
Menu
34* to set
VIBRATE.
Default: OFF
26)
Voice Mode and Scrambler (SCR&APRO—MENU 35&36)
Functions:
only 2/5 tone version has this function.
TH-UVF9 has 8 groups of scrambler; it is accomplished by the addition of components to
the original signal in order to make extraction of the original signal difficult. And its voice
compand technology will make the voice more clearly in the noise environment.
Enter
Menu
35'" to set
scrambler
group.
Enter
Menu
36* to set
voice
mode.
Available Values: OFF/COMP/SCRA
ADVANCED
FUNCTIONS
1)
PTT ID SETTING
PTT ID (Programmed by TH-UVF9 software)
This transceiver supports two optional signalings, MSK and DTMF. DTMF signaling only
supports encoding.
Set transmitting and receiving frequency in advance and then program PTT ID via
software, click in sequence: -Program-Optional Features-PTT ID setting. And click the
ANI (mark V). You can input character in BOT and EOT.
JJJ
izvjp
i,3-i3u-i3^
>.n»p
1 1 ! 1 1 1 i 1 1 1
i CHUj 1
420.25000 1 4302SOCO
\ '\ \ \ \
Off i Off 7 LJ
j
CH.D=wn
1
Mio-n-as 1 DS:4i
If select MSK, you can choose from 0-9, 4 digits in maximum for BOT; for EOT, you can
choose from 0-9 and A-Z, 6 characters in maximum. While select DTMF, for BOT, you
can choose from 0 to 9 and A to D, 7 characters in maximum. For EOT, you can choose
from 0-9 and A-Z and 7 characters in maximum. You can select "BOT, EOT, or BOTH,
then save to the radio.
Page 26

2)
EMERGENCY ALERT [•] + [«•]
Under standby mode, press [ ED ] to enter menu setting, LCD displays
"MENU"; then press [Mm] to turn on emergency alert function, radio
will transmit emergency ring for 20S and then receive for 10S, until you
press PTT, it will exit.
3)
KEYPAD LOCK SETTING
Under standby mode, press [ DB] for 2S to lock or unlock the keypad,
will be displayed at the top of LCD when keypad is locked.
4)
REVERSE FREQUENCY ON/OFF
Under standby mode, press [ C39 ] for 2S to turn on or off this function,
"R"
will be displayed at the top of LCD when you turn on this function.
At this time, radio's transmitting frequency is its receiving one, and its
receiving frequency is its transmitting one.
121
m...
5)
TONE CALLING (1750Hz TONE)
To access a repeater, press and hold in [ Q| ] key for the amount
of time specified by the repeater. The transmitter will automatically
be activated, and a 1750Hz audio tone will be superimposed on the
carrier. Once access to the repeater has been gained, you may
release [ GO ] key and use PTT for activating the transmission.
6)
CHANNEL STORAGE AND DELETE
Channel
Storage
Under VFO mode, input desired frequency by keypad directly or
select one by pressing [Ba ] or [ Ca ], and then press [ B ] +
[
wa ], the digits blinks at the right top of LCD, press number to
input desired channel directly or press [B ] or [O ] to choose
desired one, then press [ IBB] for storage.
Note:
after you input desired channel number, if it blinks, it means
that this channel is already occupied, you can choose another
one.
e.g.:
to store the frequency: 450.325MHz with CTCSS: 151.4 to the
channel 05, the step are as follows:
1)
Under VFO mode, input 4-5-0-3-2-5
T.III
'3 E
-450.
.325
46S.
350
143
Page 27

2)
Press [ Sffl ] + [ EBI][ ^ ] or press [ B ] + [ EB ], then press
[ B ] to enter
3)
Press [ CS] to choose CTCSS mode, LCD displays C-CDC 67.0
4)
Press [BS] or [O] to choose
154.1,
then press [ B ] to confirm
5)
Press [ ISD ] twice to exit
6)
Press [ B ] + [^30 ], the digit blinl<s at the right top of LCD
7)
Press [ a ] or [ KSI ] to choose or input 05 directly
8)
Press [ IBS ] for storage, LCD displays MR mode and currently
stored channel
Channel
delete
1)
Under MR or CH mode, press [BSD] to turn on the radio, LCD
displays "DEL ?" and channel number blinks at the right top of
LCD.
2)
Press [ E9 ] or [ Ka ] or input channel number you want to
delete, then press [ B ] to confirm
3)
After delete, it will skip into next channel, if you want to delete it,
repeat above operation.
441
7)
FM RADIO FUNCTION
1)
On/off radio receiver
Under standby mode, press [SB] to open FM radio function, LCD
display
"76.00M",
then press [GB ] again, radios receiver is off.
Note:
under FM radio mode, if receiving the signal, the radio will be out
of FM mode, after 58, it will be back to FM mode when the signals
disappear.
2)
Mode selection:
Under FM radio mode, press [ BSD ] to switch between FM memory
mode and FM frequency mode (this function is unavailable when
there is not FM memory channel)
3)
Frequency selecting
Under FM frequency modae, input the digits directly by keypad or
press [ca ] or [ Ei] to choose the desired frequency. Under FM
memory mode, press [ffSS ] or [ S3 ] to choose the desired channel.
4)
FM radio search:
Under FM radio mode, press [ B ] + [ ], then press [ B ]
again to enter FM radio scanning, you will see "RADIO
SEEK.UP"
in the screen, press [Ea ] or [Ka] to change scanning direction.
Radio will stop scanning when frequency is available and then exits.
If you rotate the encoder knob, it will scan again; press any key
Page 28

except [ Ea} or [ Ei] and [ !@] to exit.
5)
FIVI radio storage
Under FM frequency mode, press [ B ] and then press[ IBD ],
the channel number for storage blinks at the right of the screen,
press [ ^a] or [ la] or use number key to select the desired
channel number, press [WO] to confirm and then back to the
receiving mode.
6)
FM radio channel delete:
Under FM memory mode, turn off the radio, press [ ISO] to turn
on the radio, you will see "DEL ?" in the screen and the channel
number blinks, press [ Ea ] or [ Ka] to choose the channel
number you want to delete, press [ ^ ] to confirm. Repeat this
operation,
you can delete all memory channel, 25 in maximum.
8)
WIRE CLONE
Prepare 2sets of TH-UVF9, 1pcs specific wired cloning cable.
Master radio (sending messages when in wired cloning)
Deputy radio (receiving and storing messages when in wired cloning)
Steps of wired clone
1)
The deputy radio normally power on. Connect master and deputy
one with the wired cloning cable.
2)
Press PTT and [ Ea] to turn on the master radio, enter the wired
clone state. The "Clone" will be heard, LCD displays
"CLONE"
3)
Press [MONI] key of the master radio to start wired clone. During
cloning,
the master radio displays
"Sending"
and deputy one
displays
"End".
If cloning succeeds, the master radio returns to
the clone preparation state, and it lights orange, it displays
"Error".
Please check the cloning cable and then press [MONI] to enter
cloning state again.
Page 29

User's
Manual
OPTIONAL
SIGNALINGS
REMOTE
KILL,
STUN,
ACTIVATE
AND
REVIVE
http://www.tyt888.com
OPTIONAL
SIGNALINGS
Optional Signalings (Programmed
by
TH-UVF9 software)
This transceiver supports four optional signalings
(MSK,
DTMF, 2-Tone, 5-Tone).
Click
in
sequence "program ^ Optional Features ^ Optional SignaH Common
Set", the
programming software also
has
three versions: simple version (Supporting
MSK
Signaling),
DTMF version (Supporting
MSK
signaling
and
DTMF signaling)
and
5T&2T version
(Supporting
MSK
signaling
and
2T/5T signaling). Please check
the
version first before
programming.
If the
version
of
programming software
is
different from
the
radio version,
you cannot program
via
software.
In transmitting, maybe radio cannot receive
the
complete signaling, because radio needs
time
to
switch when
in
power-saving state.
We
have
to set the
"Digit delay", that's,
to
send
a carrier first,
let
radio receive signal, then send Signaling
to
make sure
it
will
be
received.
The suggested time
for
delay time
is
more than 400S
Press
[ OS ] key, LCD
will display "DTMF?", "MSK?"
or
"2Tone?", Press
[ m ] and [ iB ]
keys
to
make call with
the
desired call list message.
If the
corresponding call list
has not
been edited,
the
function
is not
available.
149
Page 30

DTMF Part
Click in sequence "program^Optional Features^Optional Signal^DTMF"
Step 1: Edit the Fast Call list via programming software, radio can store up to 10 groups
(0-9) last calling list in total
Step 2: Input the desired code into the corresponding list, 16 characters in maximum.
Step 3: Choose the desired DTMF decoder from available values: "Code Squelch (Picture
1)
and Selective Call (Picture 2)"
Step 4: Choose the Intermediate Code if you select "Selective
Call"
(The first three are ID
code and the fourth are Intermediate Code)
Step 5: Choose the group code, then click [save] after finishing it, and then exit.
PTT
ID
S«fcno
OpUon
SisTiBl
I H"''!
Picture 1
pT^ffS.^^ullin^
RfWOMSWnCod*
FunaisnSemno
• PTTIDEeWno
[55
Picture 2
501
Click
"More"
after
frequency you edit, programming In the popup
Step 6: Set the optional signal of the desired channel to be DTMF. Input the ID code and
then save it after finishing it.
Make
DTMF
call
with
the
transceiver
First method
1)
Power on, then select the channel with DTMF signal
2)
Press [ QO ] key, LCD displays
"CALL/DTMF?",
'%\-^f,
then press [ 1119 ] - [ EB ] keys to make call with the
desired call list message. If the corresponding call list
has not been edited, it will sound "DU".
Second method
Press PTT and hold on and then press the number key to transmit.
MSK Part
Edit the MSK message of the transceiver (ID code is for receiving while calling list message
is for transmitting.)
Click in sequence "program ^ Optional Features-* Optional Signal-MSK"
Step 1: Edit the Fast Call list via programming software, radio can store up to 10 groups
(0-9) last calling list in total
Step 2: Input the desired code into the corresponding list, 4 characters in maximum. Click
[save] after finishing it then exit.
Page 31

step
3: Input corresponding ID code in the calling list. ID code should be corresponding to
the one in the CallList, e.g.: if ID code is 1234, the corresponding callList is Group 1
(Picture 3)
Picture 3
Step 4: Set the optional signal of the desired channel to be MSK. Click "More" after every
frequency you edit, program it in the popup (Picture 4)
Model
T>pe'
C SIMPLE C
DTMF
STcfls/DTone
CH
CH.Nai
[400.25000
TXFreq
QT/TOT"-—
JNono
[None^
Vim
BCL
PTT ID
]Add
A
Option
|a,
d
JHigh
d
d
|wrde d -Option
Signt
[QT/DQT |«SK
d
jotf
|Ofl
Picture 4
I
-CALL
MSK
Tiiil
a E
'CALL
-CALL
MSK
?
Make
MSK
call
with
the
transceiver
1)
Power on, then select the channel with MSK signal
2)
Press [ Qg ] key, LCD displays
"CALL/DTMF?",
then press [ CO ] - [ EB ] keys to make call with the desired
call list message. If the corresponding call list has not been
edited,
it will sound "DU".
e.g.:
program the above frequency and MSK signal into two radio,
input ID code 1234 into radio A, and input 2345 into radio
B. Press [ ], LCD displays
"CALL/MSK?",
then press [ GEI], you can call B with A. if you want to call
A with B, press [ Qg ], LCD displays
"CALL/MSK?",
then press [ fB ], that is to say, if you want to call one radio,
just input the ID code of that radio.
2-Tone Part
Edit 2Tone message:
Step 1: Edit the Fast Call list via programming software, radio can store up to 10 groups
(0-9) last calling list in total
Step 2: Input the encoding-requested A-Tone (the first tone),
B-Tone
(the second tone)
and the gap time between A-tone and B-tone, the default setting is 100S
In encoding, A tone will sound IS while B Tone will sound 3S. But when there is
only A tone in the call list as group call tone, A tone will sound 5S. Please refer to
[53
Page 32

Picture 5 and Picture
6,
11^
Picture
6:
2tone
as
receiving decoder
Group 0:.2 tone decoder
Group 1: single tone decoder
Picture
5:
2tone
as
transmitting encoder
Group
0:2
tone
Group 1: single tone
As single tone calling, only input A Tone (e.g. A Tone
is
1750 Hz),
no
need
to
input
in another Tone. The Tone
in
"Group
Call"
should
be the
same
to the
Tone
of
encoder (900.3MHz).
Step
3:
Set the optional signal
of
the desired channel
to be
2-Tone. Click "More" after every
frequency you edit, program
it in the
popup. (Picture
7/8)
"
! ' il._S!!I_l
J4n
80000
l-niaoooo
r
[411.80000
™l™
|4n.80000
....
J
Of.
P—3
d • •
P
3
Picture
7:
Select group
0 as
2-Tone Picture
8:
Select group 1
as
single-tone
Make
2-tone
call
with
the
transceiver
1)
Power on, then select the channel with 2-Tone signal
2)
Press
[ ]
key, LCD displays
"CALL/2T?",
then press [GBI ] key
to
transmit 2-Tone while press [ EES]
to
transmit a single tone/Group
call.
If
the corresponding call list
has
not
been edited,
it
will sound "DU".
-CALL
:2T
?
5-Tone Part
Edit 5tone message
Click
in
sequence "program-Optional Features-Optional Signal-5-Tone"
to
program
5-Tone
ID
and 5-Tone international standard group.
The group numbers
0-9 in the
call list
is
used
to
edit the 5tone
ID of
the radio you want
to
call.
You can put
0-9,
A, B, C, D
and number (including repeated
ID)
The group
in the
international standard are:
CCIR1,
CCIR2, CCITT, EEA, EIA, NATEL,
ZVEL1,
ZVEL2, 9 groups
in
total.
Select one
of
them and input self
ID
(input
in
ID), and then write into
the
radio.
155
Page 33

E.g.
the
self
ID is
CCIR2, Stone
Is
2A358;
the ID of
other radio
is
44044 (group number
is
0).
As
following picture
9:
PTTK)S**nfl
:
Ofli™3,Br-l
-
>i—a
Fir3
'i—d
»i—
Picture
9
Click "Save" after editing desired Stone, and then write into
the
radio
Click "IVIore" after the channel needed editing
to
enter setting. Select Stone
in the
Optional
signal,
and then select the List Num want
to
call,
and
click "ON"
in the
Auto Response.
You also can
set
the frequency and channel then press "OK"
to
save
the
information
to the
radio (Picture
10)
-I
I 1
il_3=j
HaWTwe-r
SiKfLE T DTMF
2Tone'5To™
I4S4.25500
TXFieq
J434.25500
QT/DQT
Decode
Encode
Sczm
Add
JAdd
OtHiDfi jOff
IXPowe
JHigb
zS
Scrambler
|7
W/M
A
Option
Sigral
•
8Ci
|QT/IKI
Type
l^Jon
prr
ID
|olt
d
[tecoJfi
J3
vox
jo«
MoHet«M>nae jOn
Picture
10
561
till
CFILL
This transceiver has 8 groups' 5-Tone encoder and decoder
to
support the different
channels,
the
operation
of
calling/transmitting 5-Tone
are as
follows:
1)
Select the channel with 5-tone signal.
(LCD displays "ST"
at
the right bottom
of
radio)
2)
Press
[ GO ],
LCD displays
" "
3)
Input the S-Tone
ID of
radio you want
to
call
e.g.:
input A-2-3-5-B
in
Group
2 in
sequence,
at
this time
the
keys
[ a], [
a],[«•], [ BSD] stand
for
"A", "B", "C",
and "D",
so if
you want
to
input A-2-3-5-B, press
|
[
Q9
], [ CB ],
[ m] [ ^3
],
in
sequence
4)
Press PTT
to
transmit
1151
Page 34

REMOTE
KILL,
STUN,
ACTIVATE
AND
REVIVE
If you want to use remote
kill,
stun, activate and revive, please program signalling for
current ctiannel as DTIVIF and 2/5tone.
REMOTE
KILL:
If the radio received DTMF code programmed as remote
kill,
the radio will
enter the remote kill status; radio cannot send or receive signals. If the
radio received DTMF code programmed as revive, the radio will quit the
remote kill status and enter normal operation. In this situation, the radio
only can be revived by programming software, the method is as follows:
read data from radio first and then click program-Optional Features-
Optional Signal - Common Set, and select "Normal" in the "Remote Kill
Type",
then save the data to the radio.
PTTI0S(Bi"3
a
o«i«iEi«™i
'""•""•"••Ml"
il
• M9K
1 1 1
REMOTE
STUN:
If the radio received DTMF code programmed as remote stun, the radio
will enter the remote stun status; radio can only receive signals and
cannot send signals. If the radio received DTMF code programmed as
remote un-stun, the radio will quit the remote stun status and enter
normal operation.
1)
Simple version don't have this function
2)
DTMF version
A. Click in sequence "program-Optional Features-Optional Signal-DTMF-Remote
kill/stun code" to input your desired Remote kill/stun code
; j
5"
I Ull'J
B. In transmitting, input the Remote kill/stun code for the radio which you want to remote
kill/stun.
C. Remote revive code is "remote stun code + #", but the remote kill one aren't able to
be revived by this way.
e.g.:
There are two radios with the same DTMF encode. The remote stun code for radio
A is 12345678, remote kill one is
87654321.
If you want to remote un-stun it,
please use another radio to input the working frequency of radio A, press [PTT] to
transmit, at the same time to input remote stun code 12345678. After receiving this
1159
Page 35

code,
the radio will enter the remote stun status and you will hear a sound. And
then press [PTT] and input DTMF code 12345678#, the radio will quit the remote
stun status and enter normal operation. The operation of remote kill is the same to
remote stun, but in this situation, radio cannot be revived by this way.
3)
5T&2T Version
A. Click in sequence "program -> Optional Features - Optional Signal - 5-Tone - Remote
kill/stun code" to input your desired Remote kill/stun code, the fixed one is 7 characters.
B. press [ Q ], LCD displays ' ', input the code directly and then press [PTT] to
transmit.
e.g.:
the Remote stun code for radio A is 1234567, revive code is 2345678, remote kill
one is
7654321.
If you want to remote stun it, please use another one, radio B to
input the working frequency of radio A, then press [ Q ], LCD displays "—input
in sequence 1234567, then press [PTT] to transmit. After receiving this code, the
radio A will enter the remote stun status and you will hear a sound. If you want to
revive it, press [ ] and input remote un-stun code 2345678, the radio will quit the
remote stun status and enter normal operation. The operation of remote kill is the
same to remote stun.
Page 36

User's
Manual
ECHNICAL PARAMETERS
GUARANTEE
http://www.tyt888.com
TECHNICAL
PARAMETERS
General
TH-UVF9
Frequency Range
136-174MHz 400-470MHZ
136-174MHz 245-246MHZ
245-246MHZ
400-470MHZ
Frequency stability
+2.5PPm
Channel No. 128x2
Antenna High gain antenna
Antenna Impedance 50n
Mode of operation Simple or semi-duplex
Dimensions (WxHxD)
128 X 63 X 33mm
Page 37

Transmitter
Output power >4W(H) >0.5W(L)
l\/lodulation
l\4ode
16k0F3E/11kct>F3E
Maximum deviation <5KHz/<2.5KHz
Adjacent Cti. power
>65dB/
>60dB
Spurious Radiation <7pW
Pre-emptiasis ctiaracteristics 6dB
Current <
1.6A(5W)
CTCSS/DCS deviation 0.5kHz±0.1 kHz / 0.3kHz+0.1 kHz
Intermediation sensitivity 8-12mV
Intermediation distortion
<5%
Receiver
Audio power 1W
Audio Distortion
<10%
Blocl<ing >85dB
Intermediation >60dB
>55dB
Selectivity >65dB >60dB
Spurious Rejection
>65dB
Note:
Specification will be revised without notice due to technical improvement. Thank you.
631
Guarantee
Model Number:
Serial Number:
Purchasing Date:
Dealer: Telephone:
User's Name: Telephone:
Address: Post Code:
Remarks:
1 This guarantee card to be kept by the user, no replenishment if lost.
2 This guarantee card to be filled & chopped by the dealer, or it is invalid.
3
Don't alter the guarantee
card,
please coufirm the serial number on the guarantee card is same as
that on the machine.
4 One-year guarantee, charger, battery, ear-phone, antenna and cable are not under guarantee.
5
The user can get repairing service from the followingways:
• Go to the shop where you buy the machine.
• Our local repairing agents.
• Send back to our company.
Page 38

TYT
DUAL BAND FM TRANSCEIVER
Quanzhou
TYT
Electronics
Co., Ltd.
Address: Block
39-1,
Optoelectronics-information industry
base,
Nan'an, Quanzhou, Fujian, China
Website: www.tyt888.com
 Loading...