

Page 1
\
"
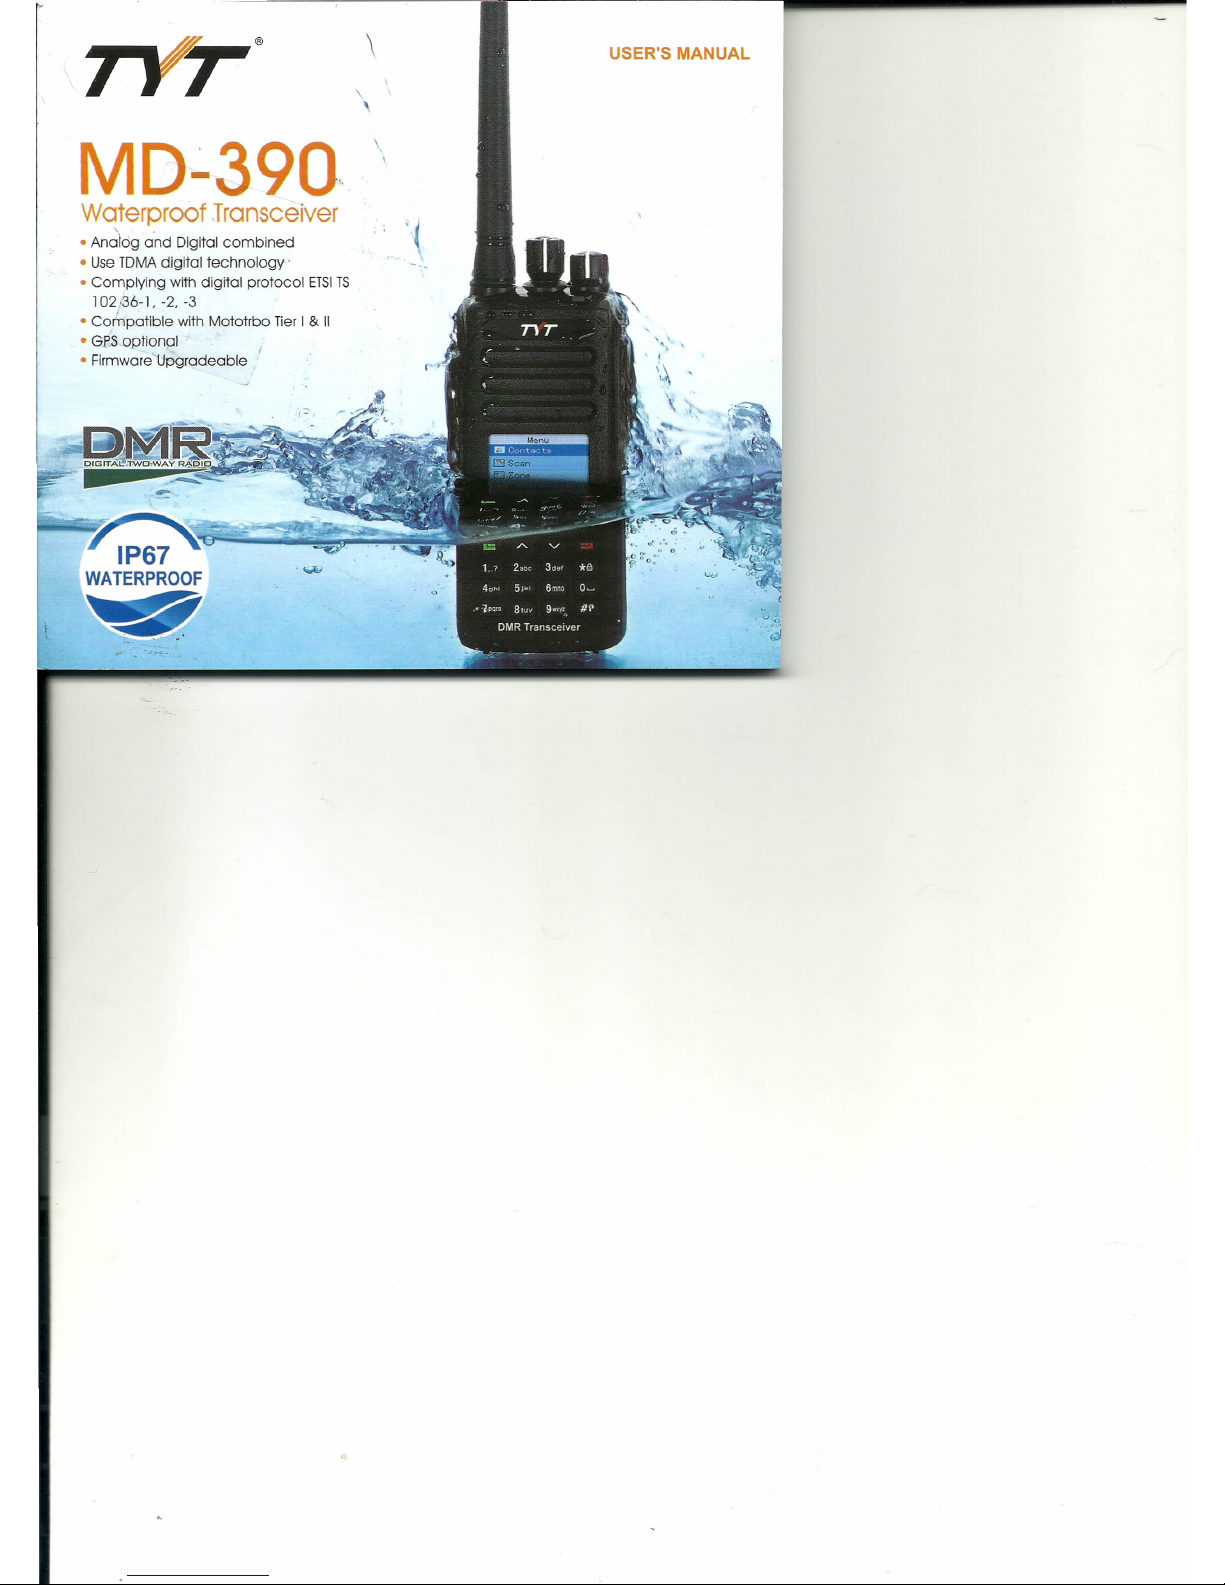
MD~390·
Waterproof Transceìver
• AnaÌcig and Digital combined
• Use TDMA digital technotoçv-
• Complying with digital protocoi ETSITS
102;36-1. -2, -3
• Compatible with Mototrbo Tier I&Il
• GES
optional
I
• Firmware 'Uf3gradeable "
\
USER'S MANUAL
'.
. 'J
,
'
.
,
,
".
'
Page 2

To customers
Thank you very much for using our two-way radioso
This product has a newly developed function menu and
humanism operation designo making it easy to use. It will
meet your requirement by the compact size and reasonable
price.
~
I
f
I
Page 3
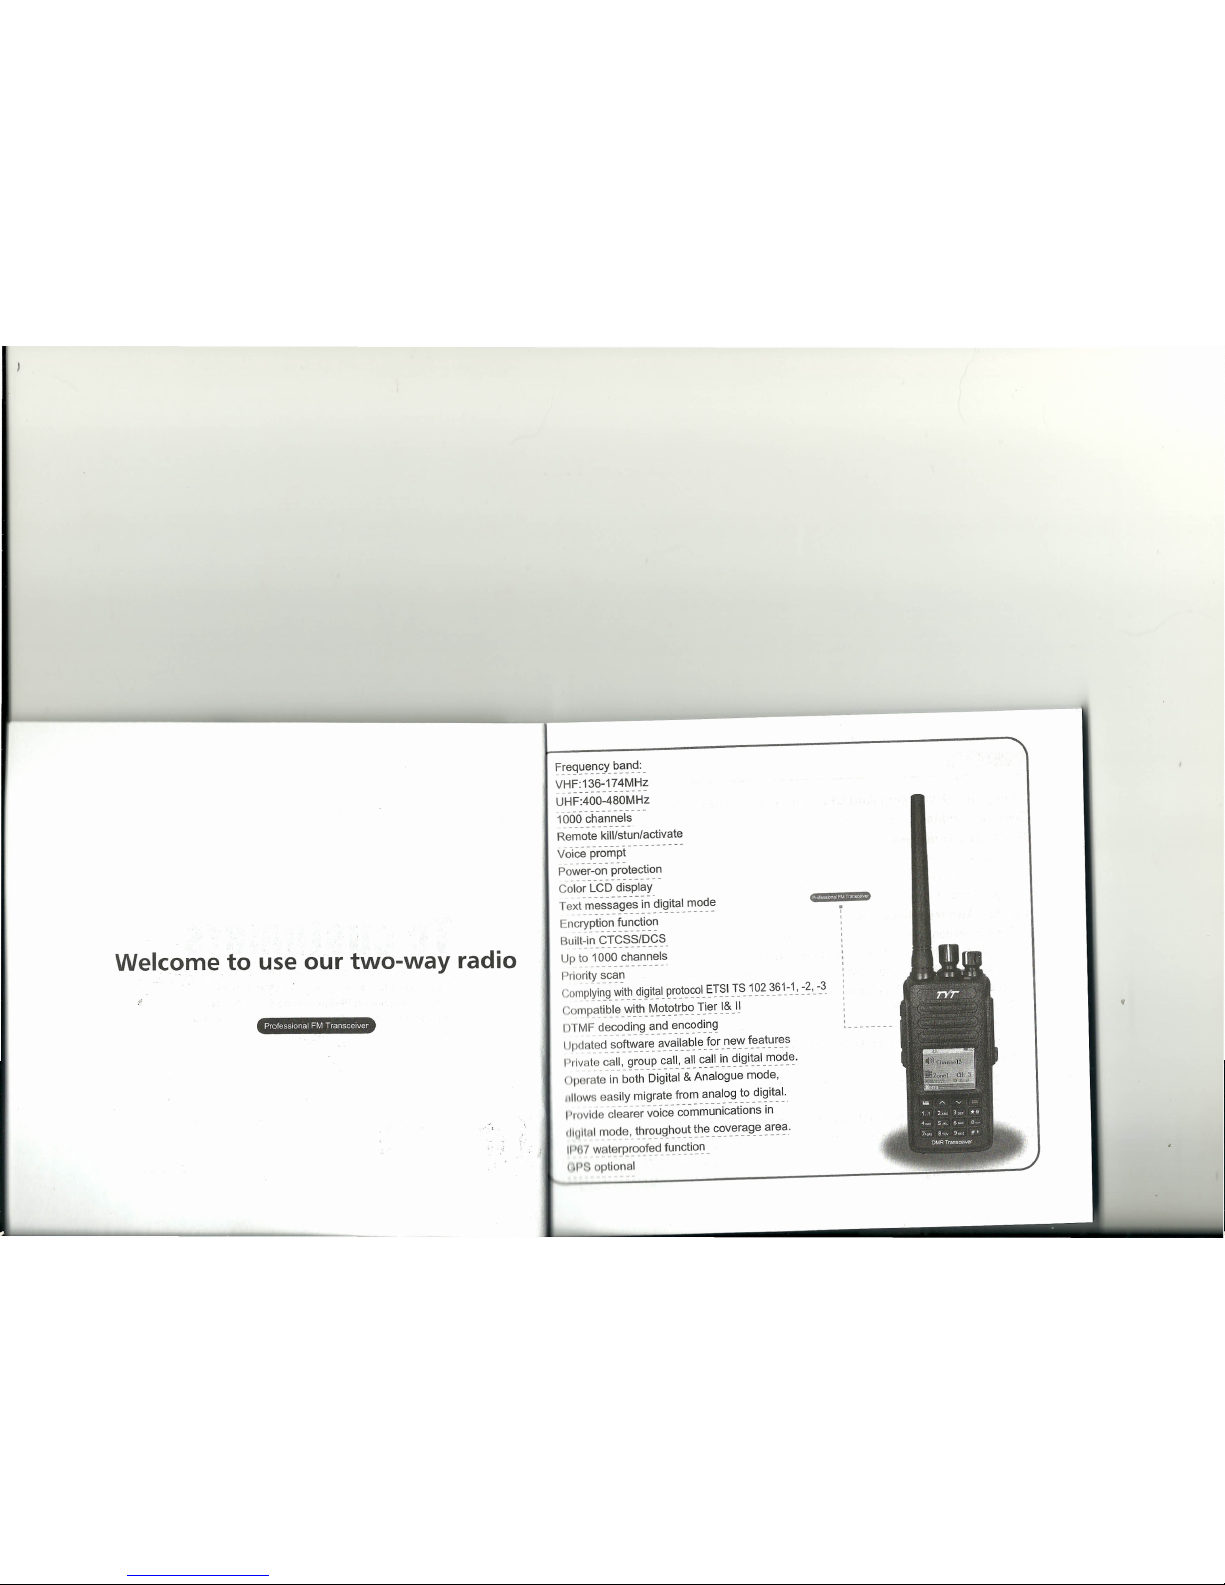
Welc~me
to use our two-way radio
Professional FM T ransceiver
~~Elg~~.n_cy_~?!1?:_
VHF:136-174MHz
----------------
UHF:400-480MHz
1066
ch-annels- --
-------------
Remote kill/stun/activate
v-oicé-prompt -- - - --- - --
power--on p-rotection
----------------
Color LCD display
Tex~
~~~~~~i~~
I~
~!~i!~~ ~~d~
ncryp!i?_n_
!~~~~~~
Built-in CTCSS/DCS
---------------
Up to 1000 channels
--------------
dori!}'_~~éI~
omply~n_g_~!t~_~i9~t?~e~ot()~ol_ET?I
~r~~
9?_~~~.}, :~,_
·.3.
mpat~~IEl.~~t~.ryI.ot()!~~O.:rJe~I/!.._II
IìTMF d~~.?ct.i':1~_éI~~_~~?()d~n.g
Updated_ ~()!t~éI~e.?."_aJI_a~IElf?!_n.e.~f_e_at~~El~
I'rlvate céll~,_~~~':le_c.a.I~,-éll!c.a~I.i!1_~~g_i!éll.~.?_C!.e..
Oporate in both Digital & Analoguemode,
iuows
easily migrate from analog to diqital.
II,ovlde clearer
volce
communlc·citlons
in· -.
11111101
mode, !h.r?~J!~~':l! !~e._c.o.v.er.a9-e.?~El?'
Il) 7
w
lerproofed_ ~u_n.~t!~~.
(Il
optional
Page 4

CONTENTS
Emergency Alarm --- --- --- ---- - - -- - - --- - -- - --- - --- - --- - ---- - --- - --- - -- 25
Emergency Alarm Cali --- - -- - - --- - -- - - --- - -- - --- - --- - -- - - --- - --- -- -- - -- - -·25
Voice Emergency Alarm- -- - - --- - -- - --- -- ---- -- - - ---- ---- -- --- -- -- -- --- -- -- -
-·26
Re-start Emergency Mode -- - --- - - --- - -- - - --- - --- - -- - --- - - --- - --- - - -- - --- - -- 27
Logout Emergency Mode --- - --- - - -- - - -- - - -- - --- - -- - ---- - --- - ---- - -- - - -- - -. 28
Menu Operation --. ------ -- - ---- --- -- ----- - - -- ---------- - - ----------- -- -
-·30
Character Input -- --- -- - - -- --- -- -- ----- --- - -- - -- - - --- ------ --- - --- ----- -- -
30
English Typing- - --- - -- - --- - ---- - --- ---- - --- - -- - --- - --- - - --- - --- - --- - -- -
30
Chinese Typing --- --- - - -- - ---- - -- - - --- - -- - --- - --- - - -- - - --- - --- - --- - ---
31
Numerai Writing .__-- - - -- - --- - -- - --- - --- - - --- - --- ---- - --- - -- - - --- - - -- - - --.
31
Menu Application -- -- -- -- - ----- -- - --- -- - - --- - --- - --- --- --- --- -- - --- -----
-·32
R dio Check --- -- - - --- - ---- -- -- -- -- - - --- --- -- -- - -- - --- - --- --- - - --- - -
32
Send Radio Check- -- -- --- - - - -- - - -- -- -- - - --- -- - -- - - --- - --- - - -- --- - - -----
32
Monitor------------------------------------------------------------------------
33
Start Monitor ---- - -- - --- --- - - --- - -- - - --- - -"---- - ---- --- - - -- --- --
---·33
ntacts Setting -- - --- - -- - - --- - -- - - - -- - - -- - --- - -- - ---- - - --- ---- - -- - - -.
34
roup Cali With Contacts - -- - --- - -- - ---- - - --- --- - --- - --- - --- - -- -- - --- - ---. 35
Ingle Cali With Contacts - --- - --- - -- - - --- - --- ---- --- - - --- - -- - - --- - - --- -: -"
36
,111
og -- - - - - - --- -- - - -- -- -- - ---- --- - --- - -- -- -- - - --- - --- - -- - - 37
h cklng New Call's Number --- --- - -- -- - -- --- - - - --- -- -- --- ---- ------- -- - -- 37
MI d Call- -- - --- - -- - - -- - --- - ---- - -- - - -- - - -- - ---- - ---- - --- - -- - - 37
l rln Missed Call's Alias Or ID .38
I IUnC Il Log's Record .38
,\111\1
rt p r tlon --- - ---- ---- - ---- - -- - - -- - -- - - -- - - -- - - --- - - --- - -" 39
Using Tips,Unpacking And Checking equipments -------------- - - - --------
Getting Familiar -- -- -- ---- ----- ----- --- - - - --------- --- --- - -- ----- --- ----- -- ----
Safety and Overview ------------ - ------------- - - - -- --------- -------------- ----
Overview----------------------------------------------------------------------
Switch On - - - --- - --- - --- --- - - -- -- ---- - -- - - -- - --- - -- - ---- - --- - ---- - -- - -
Adjust Volume -- - __--- --- - -- -- --- -- - - -- - - --- -- - -- -- _-- --- ---- -- -- - - - - - - --
--j
--------;
Launch And Receive Calls --- -- -- -- - - - -- ------------- - ----------- -- - - - -- --- --,
Zone Selection - -- - --- - - -- - --- - - -- - - --- --
Selection of Cha~nels ,User ID Or Group I~-~~~~~~~~~~~~~~~~~~~~~~~~~~~~~~~~~~~~~
Receive AndRepìy Group Cali - - -- -- - --- - -- - --- - --- ---- ---- - ---- ---
Receive A!ld Reply The Single Call--------------.------------------~--~~--------
Receive Ali Calls - - - - --- - --- - --- - - -- - - --- --- - --- -- -- - --- - -- - - --- - -- -- - -----~
LaunchARadio Call--- - - --- -- ---- ---: -- - -- - --- - ---
Using Channel Knob To MakeACali - - --------------------------------.------------------------------------ -- -- - ,
~~:i:,,~::::::::::::::::::::::::::::::::::::::::::::::::::::::::::::-:-::::::-
Use A Key To Make A Group C~II-~r- ~~~~~~~~~I-------------------------------------------------.----------------
Emergency Function . _
"i
RCIve Emergency Cali - - -- - - --- - --- - -- - - -- --- - --- ---- - -- - - - --- - -- - --- -~~~~
~J
ply Th Emergency Cali -----------------------------------------------------
Page 5

Reeeiving And Cheeking Cali Alert ---- - --- --- - - --- --- -- -- - ---- -- -- -- - - -- - -- - - - 39
3tarting Cali Alert From Contacts List -- - --- - --- - --- - - -- - - --- - - -- - - -- - --- - -- - - - 40
Message Funetion --- -- -- - -- - - -- - - --- - --- - - -- - - -- - - --- - ---- - --- - --- - --- - -- - --- - - 40
Edit And 3end 3M3 --- - --- - -- - - -- -- -- - -- - - -- - -- -- -- - -- --- --- - -- - - -- - - -- - - -- - - 40
3end Quiek Text - - ---- - --- - ---- ---- - - --- --- - ---- - -- - ---- --- - - --- - --- - - --- ---- 41
Send Quick Text With A Key - - -- - - --- - - -- - - -- - - --- - --- - --- - - --- - --- - --- - -- - --- 43
Manage The Failed SMS -- -- - - --- -- - - - -- - - -- - -- -- --- ---- --- - - - ---- -- - --- - - ----43
Manage The Sent 3MS - - --- ---- - --- - - -- - - --- - - - - - - -- - --- - ---- - --- - -- - - -- - - --- 46
Receive 3MS ----- - --- - - -- ---- - -- -- ----- --- - --- - --- - --- - - --- - - -- - - -- - - -- - -- - - -- 48
Cheek the SMS -- - --- - --- - --- - - -- - ---- - --- - -- - - --- - --- - - --- - --- - --- - -- - - - - - -- 49
Manage ReceivedSMS - - --- - - --- - - --- - - -- - - --- - --- - -- -- --- - - -- - - -- - -- - - --- - - 49
Cheek The Inbox 3M3 -- - - -- - - --- -- -- - --- --- - -- -- --- --- - --- -- -- --~ - - -- - ---- -- -50
Reply The Inbox SMS -- -- -- -- - -- -- - -- --- -- - --- -- --- -- - - --- ---- - - -- - ---- -- - __-50
Deleting Th.eInbox Messages - - ---- - --- - - -- - --- ---- - -- - - --- - ---- - -- - - --- - -- - - -52
Deleting Ali Messages In The Inbox-------------------------------------------52
En~~;~~nn-;~~-t;~~ -_-_-_- - - -_-_-_- - - -•.-_- - .:~
DTMF---------------------------- ---------------------.53
se~;d~~~~~~~~~- ~- :;
Radio Enable --- - - -- - --- - - - -- - --- - - --- - --- - --- ---- --- - - -- - - ---- - -- - __~''- -.55
Seraning List --- - ---- - - - - --- - --- - - --- - - --- - --- - --- - --- - --- -- --- - - ~ 56
Check Members of List - --- - --- ----- - - -- - - -- - -- - - --- ---- - - -- - - - -- , 56
Scanlng Instruction -- - - --- - - -- - - --- - - --- - --- - -- -- -- - -- -- 56
Ut~;;;;~~"i:~~\~~\-:~\\~_\\\~t\\\~_~)t~~~_~~\\~\~t\~~\~~t~\\~-\\\~-~!i
Tones/Alerts - 61
Ali Tones --- - - --- ---- - --- - - -~~~~~~~~~~~~~ 61
Talk Permit -----------------
---------------------------------------------------------·61
Keypad Tones - -- -- - -62
povver-----------------------------------------~~~ ------------------------.63
Backlight -- --.-- -- - ---- ---- --- -- -- -- - - --- ---- - -- .63
~;~.:;;;..:;-:::::::::::::::::::::::::::::::::::::::::::::::::::::::::::::::::::-::
K ypad Lock - - --- - --- - - - -- - -- - - --- - - -- - - ---
I nnguage -- -- - -- ---- ----- ---- --- - --- --- -- -- ---~ ~~~.• ~~~•. •• ~~•• ~~~~~~~~~~•• ~~~~::
D Indicator ---------------------------------
~I
>~~ - ;~~~~:-:::~~:~~~~ ::~~:~:~:~:~::-~:~-:~~-;~~~~~~::~~~:-~:~~-~:-:~~~::~~~
-------------------------------------.70
MI>
J ' •• ::::::::::::::::::::::::::::::::::: - - -: -_:: -_: -_-_-_-_-_-_-_-_-_: :-_-_ -_-_-_:: .: :-_-_: -_: ~~
I Il Inf ....•. -.----------------------------
Page 6
~y Number································-········-··········-············-71
Versions·····-····-············-··········--········-············-····-·-···-71
Program Radio· -.- - -- -.- - -.-.- - - - -. 72
RxFrequency····-····-------------------------------------.--.--------.------- 72
Tx Frequency .-----------------.------..-.-----------------.--.---..-.-.----.-. 73
Channel Name .----------.---------------..-------.-.------..-----.----.-.---.. 74
Time out Timer (TOT) -----.---------.------.-.----------------------.--------.--75
CTC/DCS .----.--.---.--...--------.-.-.----.-.-.---------.-----------------.--75
Encode-·-·-·-----·-----·-·----·---··-·-----··---·----·-··-----···----·--·---75
Decode ------.-.--.---.--------.-.----.---------------.-..-.----------.--.--76
Color Code --.-.--------.-.------.--.----------.---------.--------.----------···77
Repeater Siot.-..-.-~~------.-.-.--.-.--.---.------------------------.-----------77
User's Mannal
Professlona' FM Transceiver
Page 7
102
f
Using tips
Please read the following brief instructions, non-compliance with these rules may cause
danger or violate the law.
• Obey the loca! government regulation before using this radio, improper use may violate
the law and be punished.
• Turn
off
the radio before entering flammable or explosive areas.
• Do not charge or change the battery in flammable or explosive areas.
• Turn
off
the radio before getting close to the blasting zone or detonator areas.
• Do not use radio whose antenna is damaged, touching of damaged antenna will cause
heat injury.
• Do not attempt to open the radio; the maintenance work should be done by technical
expert only.
• To avoid troubles caused by electromagnetic interference or electromagnetic
compatibility, please turn
off
the radio in places where have the banner "Do not use
wireless equipment", such as hospital and other healthcare places.
• In the car with an airbag, do not put the radio within the scope of the airbag deployment.
• Do not store the radio under the direct sunshine or in hot areas.
• When you transrnit with the radio, do keep away from its antenna for 5cm at least.
• If the radio appears smelly or smoke, please shut
off
its power immediately and contact
with your local dealer.
• Do not transmit too long, for the radio may heat and hurt the user.
011
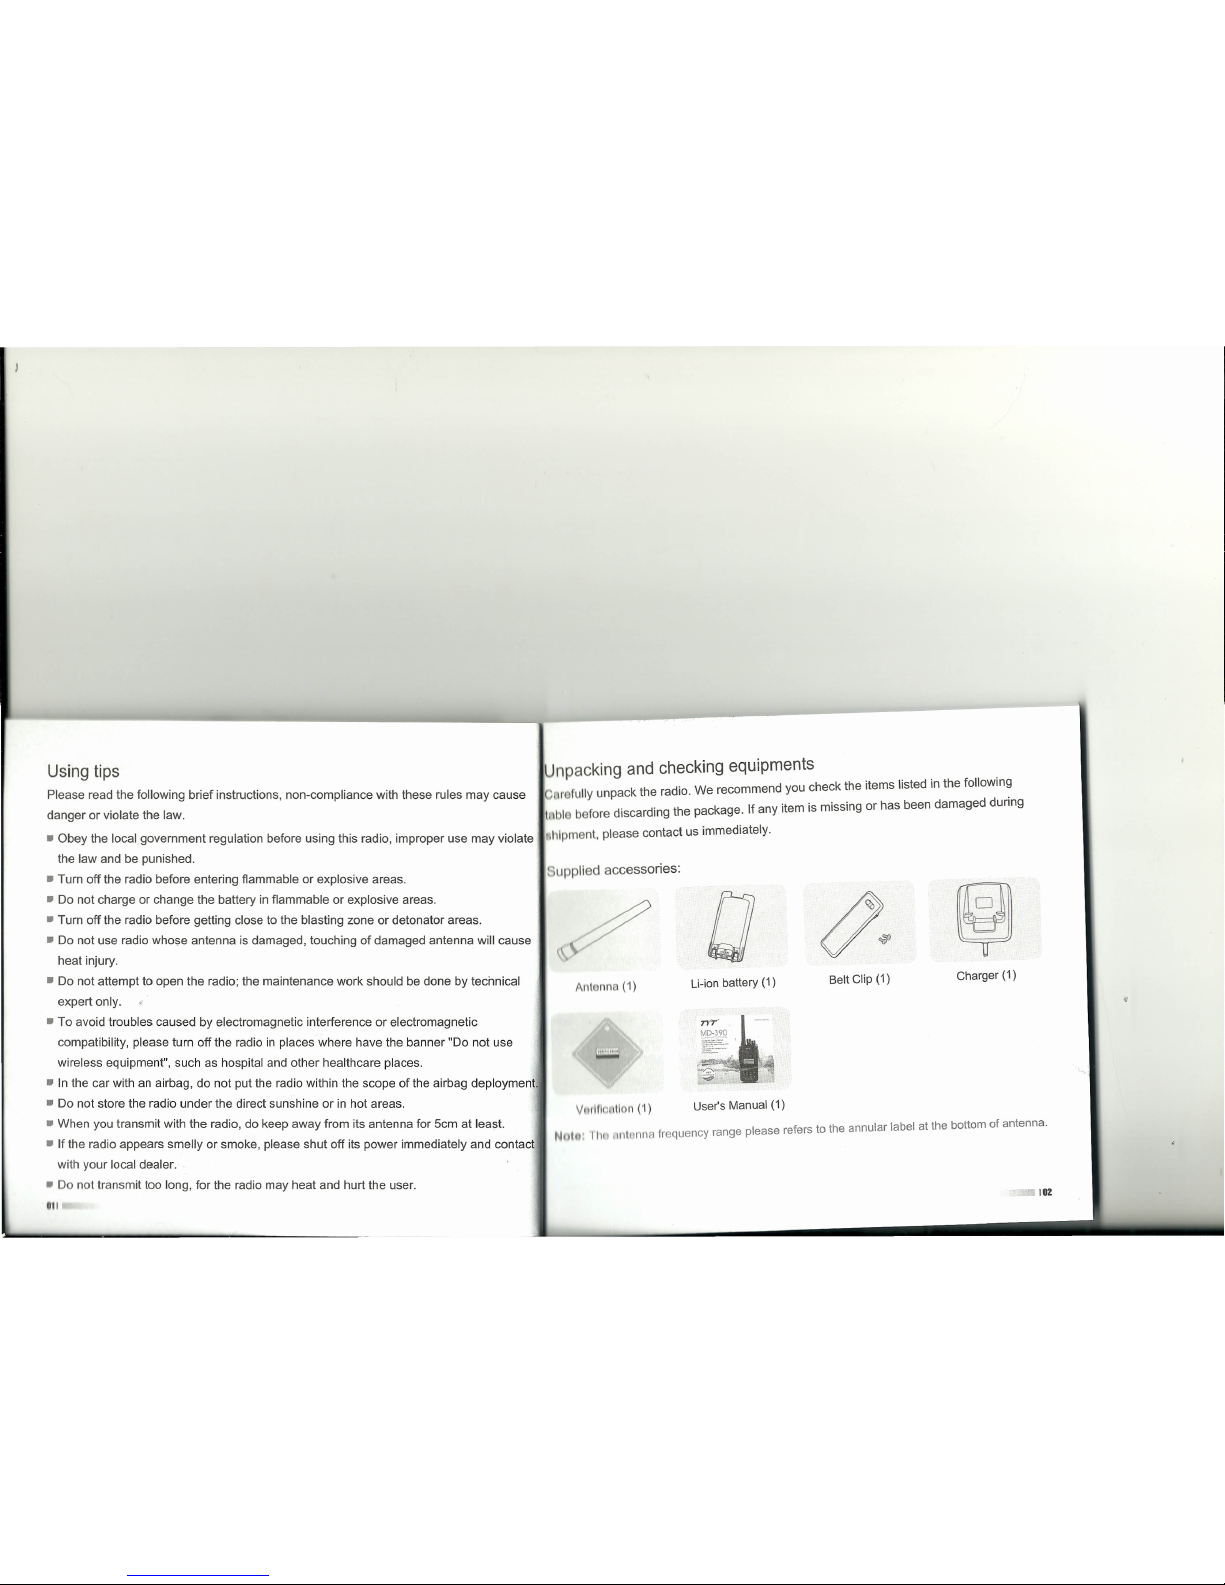
Unpacking and checking equipments .' .
r-, r fully unpack the radio. We recommend you check the items listed In the followln~
~:bl before discarding the package. If any item is missing or has been damaged dunng
l!lllpment, please contact us immediately.
. Supplled accessories:
II
AllI
nna (1)
Li-ion battery (1)
Belt Clip (1)
Charger (1)
Vlllltl, li n (1) User'sManual (1)
Noti: llill uuunna frequency range please refers to the annular label al the bottom of antenna.
Page 8
User's Manual
Professional FM Transceiver
ttery
Notlco: 1. Please do not short-circuit the battery terminals or expose of in fire. Do not dissemble
the battery by yourself.
2. Charge the battery between temperature
O"C
and
45"C.
The battery can not be fully
charged beyond this temperature range .
. Please turn
off
the power when you eharge the radio with battery. Transmit with the
r dio in charge will affect its eorreet charge.
1\
o not unplug the power or battery when it is charged.
I •
The operating tirne beeornes short even the battery is fully eharged, the battery is
xhausted, please replace battery.
(l. lease do not charge when the battery or the radio is wet. Please dry it with a cloth
I) fore charging to avoid any danger.
W
miti
I:
Wh n the conduetive metals such as jewelery, key or decorative chains touch the
I)llllory terminals, ali the batteries are likely to cause damage to the items or personal
11I11Iry.
These eonductive metals may form a short circuit and generates much heat.
DocJI with any battery earefully, especially when put it into pocket, wallet or other
1Il(
l lite eontainers.
104
Page 9
Charging operations:
Charge the battery as follows:
1) Power off
2) Insert the DC adaptor plug in the DC jack on the back of charger
3) Insert the AC adaptor plug in the AC power output socket
4) Insert the battery or radio with battery vertically in a charger, to check whether the
battery and charger terminai is in normal contacl.
5) Ma.ke sur~ the battery and charger terminai is in good contact, when the char in
indlcator hght turns red, it starts charging. 9 9
Note: 1. Before inserting the battery, it is abnormal if the charging indicator blinks
2. To change the battery for charging, please wait until the indicator is stable.
3. When the battery .iSwellinserted, the indicator turns red and the charging is on the
process, if the indicator blinks then the battery i d
h
. ,IS amaged or the temperature is too
iqh or too low.
Self-testing
When the.charger powers up, if the orange indicator lights for one second and then oes
out, entenng the standb~ mode, the charger passes the self-testing and can charge ~he
battery. If the orange mdìcator blinks constantly, the charger fails to pass the self-testing
and can not charge the battery. '
OSI
m I charging indicator
h n h rging the battery, if the indicator light turns red, the battery is on the normal
\ " l ; If the red indicator light blinks constantly, the battery capacity is too low, and is on
I
li I ,kllng charge, and after the battery capacity reaches a certain level, it will switch to
Il rm I charge.
: T
rl kllng charge does not exceed 30 minutes, if the red indicator light blinks after 30
1IIIIIUl ,it meansthe charger can not charge battery, please check whether tne battery
111\Il( harger has been damaged.
,Il\I,Ing precautions:
l
1111
blU
ry is not fully charged in factory, please charge before using il.
l
(,li
Il
l( and discharge the battery for two or three times, the battery capacity will reach
1111Il( I , ndition. When the battery capacity is low, please charge or change the battery.
Il
11111111111ty I sts shortly even if it ls fully charged, the battery is exhausted, please
111111" I vour local dealer to buy a new authentic battery.
ntanna is suitable for short-distance communication, while long thin antenna
wllllllf ryu batter communication effecl. Wearing the radio in your waist will not rnake
V"II I I un mfortable.
111 iltlll1tnunl tlon range will be shortened in bad weather or among the trees, please
l'I JlIII Indvnce to avoid any inconvenience of your communication and security.
106
Page 10
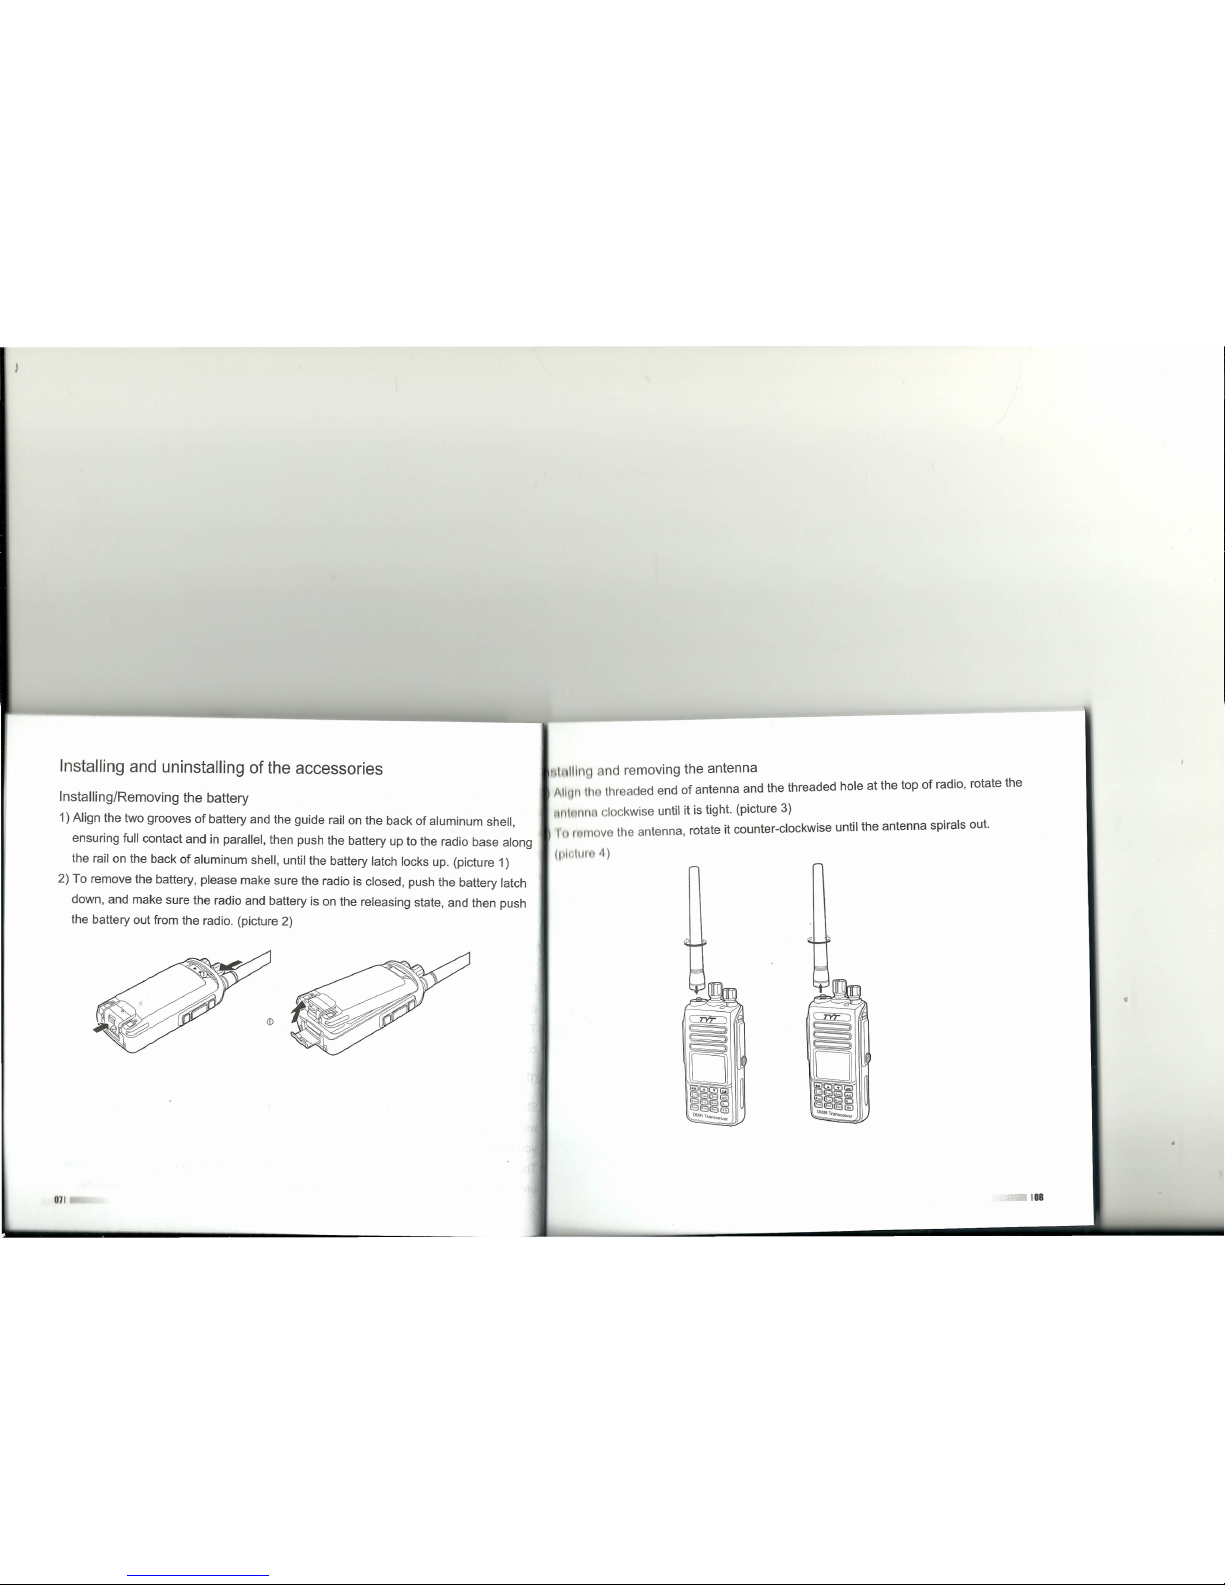
Installing and uninstalling of
the
accessories
nd removing the antenna
threaded end of antenna and the threaded hole at the top of radio, rotate the
lockwise until it is tight. (picture 3)
v the antenna, rotate it counter-clockwise until the antenna spirals out.
Installing/Removing the battery
1) Align the two grooves of battery and the guide rail on the back of aluminum shell,
ensuring full contact and in parallel, then push the battery up to the radio base along
the rail on the back of aluminum shell, until the battery lateh locks up. (picture 1)
2) To remove the battery, please make sure the radio is closed, push the battery lateh
down, and make sure the radio and battery is on the releasing state, and then push
the battery out fram the radio. (pieture 2)
11111\\
(ph.11I1
Il)
<D
071
108
Page 11

110
xternal headset
vIl(cl
not remove) the mic/speaker jack cover (picture
7),
insert the headset into the
111IIl
lk r jack (picture 8).
111lJ
111
J
lh extemal headset will affect the water-tightness performance of radio.
Installing/removing the belt c1ip
1) Align the two holes of belt clip and the two holes of the radio, fix them with the supplìe
M2.5x5 screw. (picture 5)
2) Loosen the screw set to remove the belt clip (picture 6)
001
Page 12
User's Manual
I\ln familiar
1\
Ilte1111 l
wllli
111111111111(1
h d, for
111111 111111111(1I111
cl receiving
Channel-selecting knob
Select the working channel, channel
annunciation when voice prompt
ìs
ONo
I I I lndlcator light
1111110111111
Ihllilltlln red when -11~~~~~§~~~
I
111111111 111111 11111111
when receìve.
11111111, 11111
Wllilllli baltery rvr
Il' Il
liV I
!lIW,
111111
bllnks green
Il Il
"1111111111
1'.111<111
I
IlIIlil1111111111
_~ Power/volume knob
To power on/off and adjust the volume.
Rotate it clockwise, a "click" sound is
heard and a "Du" tone prompts the
radio power on, continue to rotate it to
adjust the volume. Rotate it counter-
clockwise until a "click" sound is heard,
it powers off.
Professional FM Transceiver
112
Page 13
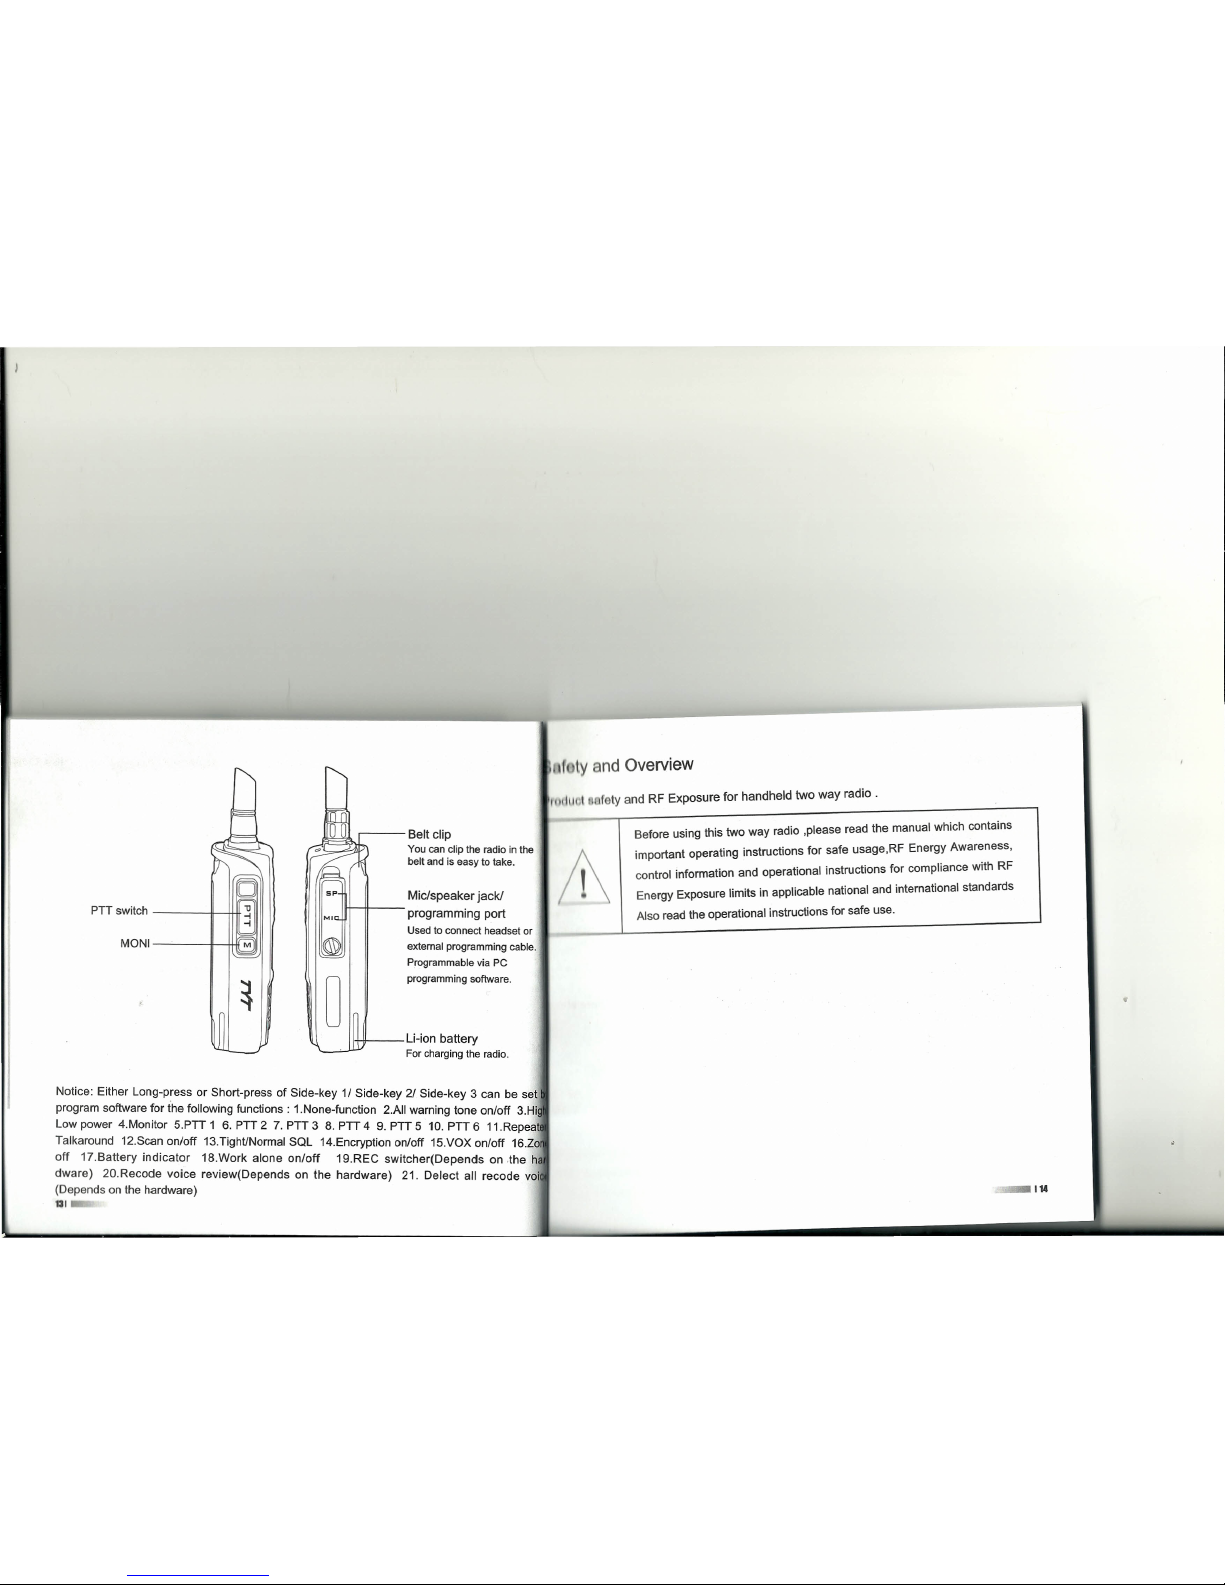
i,
~fI
ty
and Overview
uultu I
r
ty and RF Exposure for handheld two way radio.
Before using this two way radio ,please read the manual which contains
., . f f usage RF Energy Awareness,
important operatìnq instructions or sa e, .
control information and operational instructions for compliance wlth RF
Energy Exposure limits in applicable national and international standards
Aiso read the operational instructions for safe use.
Ì'--
Ì'-
~
mi
'==
:!I...
I
lJ'~
;:~~
EJ
~
SP
PTIswitch
"Cl
-i
MIC.
-i
MONI
~
~
M
~
W
~
o
I~
--'-
,---- Belt clip
You can clip the radio in the
/Ì\
:::::~::~:j~C:'
I
I
11+-+--
programming port
Used to connect headset or
extemal programming cable.
Programmable via PC
programming software.
I-HT-- Li-ion battery
Far charging the radio.
Notice: Either Long-press or Short-press of Side-key 1/ Side-key 2/ Side-key 3 can be set
program software far the following functions : 1.None-function 2.AIIwarning tone on/off 3.Hi~
low power 4.Monitor 5.PTI 1 6. PTI 2 7. PTT 3 8, PTI 4 9. PTI 5 10. PTI 6 11.Repeat
Talkaround 12.Scanon/off 13.TighUNormalSal 14.Encryption an/off 15.vOX on/off 16.Zo
off 17.Battery indicator 18.Work alone on/aff 19.REC switcher(Depends on .the h
dware) 20.Recode voice review(Depends on the hardware) 21. Delect ali recode vai
(Depends on the hardware)
UI '~
,
.l
114
Page 14
Switch On
Overview
User's Manual
Clockwise to turn on the radio volume knob, there will be a "KADA" sound , message sou
while the LED indicator lights up and becomes Green color if the battery is full charg
Notice: if ali LED indicators are forbidden, the screen will not light up when switch on th
walkie talkie, but with a message sound .
Notice: if the Tones/Alerts is forbidden ,there will not any sound when power on . Her
need to power off the walkie talkie and anticlockwise with the knob until a "KAD
sound.
Adjust Volume
Clockwise the volume knob to higher the volume or anticlockwise to lower: And there sh
a volume line on the screen
Professional FM Transceiver
lal
Page 15
r lo nd piace il between your lip wilhin 2.5-3cm
I Ilk Y to answer Ihe call,LED indicalor lighl change lo red colar.
Il I I]k Ylo receive nexl cali
Il 111In t any voice activlty, the cali end.
Wl lIllh radio out of the home page and if there is a group cali income , it will be
how 111th lime on lhe screen before you answer it .
l
k ytreceive Ihe cali ,and check the income IO before reply.
Launch And Receive Calls
Zone Selection
Zones is a channel group.Each radio can set 250 zones and each zone with max 16chann
The menu function:
1.
Press [a]key to enter Ihe menu.
2. Press [Dora] key lo choose,after that with [a]key to confirm.
3. Screen shows Ihe chosen zone and named by it .
4. Press [Dora] key lo chose,after that press
[a]
key to confirm.
5. Screen shows the chosen zone and named by il.
ply The Single Cali
111liI\1111I none on one calI. Only wilh two Iypes: One is testing presence of radio
Il 1111I \11,md nother one is to cali immedialely.
WII
111 ot Iv The Single Cali:
I Il I) 1111111Il r I green colar.
I 1111\IlIp 01'ihe middle screen will show RSSI mark, follows shows single cali, user name
1111111111111mlddle,single cali mark al Ihe end (Only for analogue mode).
\ 11111111111I\(110and piace it between your lip with 2.5-3cm
1I11111111"r,0lhannel message sound" function,lel go [PTT] key, you can hear a message
11111111,111
\ti
lhl channel is free for you to answer .
111If)k y to answer the call,LED indicator light change lo red colar.
l
TT]key lo receive .
Il 111I Ir not any voice activity, Ihe cali end.
I1I1
wlll"
r message sound and screen shows the cali finished .
Selection Of Channels , User IO Or Group IO
Select the needed zone (if there are more than one zone ),using the channel knob to sei
the channel ,user name or ID,group name or ID.
Receive And Reply Group Cali
The radio must be under a group , then can receive the group cali .
When received the group cali:
1.
LED indicator is green colar.
2. On the top of the middle screen will show RSSI mark:First line will show the gr~up na
income cali ID will be in the middle ,group cali ICON will be the last ( this happens ani
under Digital mode)
111
118
Page 16

111
I Il
11111
I
Knob To MakeACali
t111111I, III
Il
I
Itil I t
Il Il
Ilttbunder the group then can have the group cali
t\11\\ IIVI I 1.11nnel knob , use group name or ID to choose channel
1111111111 \ Idlo md piace it between your lip with 2.5-3cm.
1'\ Il' I IlklYI cali, LEO indicator changes to red. Screen shows group name or IO with
t\1I1I11l''
"I
I I ti
I111
1 111\\Yl receive, when target radio is replying, LED indicatar becomes green.
Il II\lw )1 up mark or name or IO.
11111\1111
"lu \
eh nnel message sound" function. let go [PTT] key, you can hear a message
IIIIlld, 11111111 il channel is free for you to answer.
I tll Il 111111101nny transmitter within the time limited , the cali failed.
Il 1\ WIIII\III Ifllkie back to home screen ,you can make a group cali with contacts.
Receive ali calls
Ali cali means a walkie talkie cali up ali other users in a channel to public an important informati
When receive the ali calls:
1.
LED indicator becomes green.
2. On the top of the middle screen will show RSSI mark,follows shows ali call,User name
IO in the middle,all cali mark at the end (Only for digital mode)
3. End of the ali call,radio back to the screen befare ali calI. If under the "free channel
message .sound" function, when release the PTT key, you will hear a message sound,
means thìs channel is free to use and cannot reply
Notice: when receive the ali cali, if you turn over to another channel, the radio stop to recei
ali calI. Ouring the ali cali, You cannot use any re-programmed key until the cali finishe
Launch a radio cali
You can choose a channel , user ID or group cali with following methods
• Channel Knob
• Pre-programmed key
• Contacts
• Manual dialing (only for single cali)
191
11111
I 111111\lVIII nhnnnel knob , use the name or user ID to choose channel.
• I Il I1II 11111I ullo and piace it between your lip with 2.5-3cm.
I 'Il Il 111IlIp 01 lhe middle screen will show RSSI mark, follows shows single cali.
Il 1111\
IIlIO
or ID in the middle, single cali mark at the end (Only for analogue mode).
I 111111111r]key to receive, when target radio is replying, LED indicator becomes green
11111111\
"lr
channel message sound" function, let go [PTT] key, you can hear a message
IlIltltl (111 n It channel is free for you to answer)
120
Page 17

122
If there are not any transmitter within the time limited , the cali failed .
6. you will receive a message sound and screen shows cali finished .
You can make a single cali with contacts or use keyboard to search the target walkie tal
to make a calI.
Ali Cali
Walkie talkie must be programmed with this function , so that you can send information t
every user who are under the channel .
1. Turn over channel knob , use the name or user ID to choose channel.
2. Hold the radio and piace it between your lip with 2.5-3cm.
3. Press [PTT] key to release a cali, LED indicator becomes to red color .Screen shows
Group name or ID with ali cali mark .
User under the channel can not reply the cali .
Use A Key To Make A Group Cali Or Single Cali
Single key cali function is convenient for you to set a name or ID for group cali or single
with long-press or short-press the program key. Set a name or ID for a key there are rnor
than one single cali.key
1. Press pre-programmed cali key.
2. Hold the radio and piace it between your lip with 2.5-3cm
3. Press [PTT] key to cali, LED indicator becomes to red color .Screen shows narne or I
with a mark.
211
I I II
I
I'Jkyto reveive, when target walkie talkie is replying ,LED indicator changes
Il.
t
ti,
Il
111111
"fr
channel message sound" function ,Iet go [PTT] key,you can hear a message
111111I,111 n It channel is free for you to answer .
111
Il/Il(
l ny voice activity, the cali end.
W I I
Illkh h k to before cali screen.
Page 18

124
t
Emergency Function
Emergency alarm only use to transfer emergency situations, you can release a emerge
cali at anytime and anywhere . Even the walkie talkie is busy in transferring or receiving
Radio support 3 types of emergency cali:
• Emergency Cali
• Cali follow emergency alarm
• A voice follow emergency alert
Moreover: alarm has the following types:
• Prohibit: radio can not send emergency cali but can receive .
• Local+Remote: An emergency cali with voice or notice .
• Remote: an emergency cali without any voice or notice. Sefore press [PTT]key to cali
local radios will not receive any voice or notice .
• Remote + Voice : radio sending an emergency cali while accept to receive calls. Sefo
press the [PTTl key to transmitter or reply , there are not any notice
Only one part of above emergency situations can be set as pre-programmed key.
Receive Emergerrcy Cali
1. When receiving emergency cali, number of emergency calls and alarms received ,ex
ange the sender name or ID.
2. With a message sound and LED indicator becomes red
3. If the radio have activated, then will confirm the emergency alarm automatically .whe
281
111I1111111LeIv lh emergency alarm, screen shows the emergency alarm warning mark,
1111Wlll) conflrm message then can logout . While , you will not receive any calls
Il
)m
other radios during this situation .
111111
piI
[C!ll key, then with the pre-programmed off key, delect ali received
IIIl
,y
c
Il and logout the emergency mode.
ncy cali
mergency cali:
I
I
\lly
1\1Y lo top the emergency cali alarm
Ili
1111111
uullo
nnd
piace it between your
lìp
with 2.5-3cm . If on the "free channel message
11111111"
nuu.tlon,
let go [PTT] key, you can hear a message sound, means it channel is
111 1111
VOli
lo
nswe.
l'Il
1111IlkYlo have a cali. LED indicator becomes red. walkie talkie under the emer-
I
111
VI1IIII110d .
1 1
Wl
II
I
I 111(oyto receive, when reply the emergency cali, LED indicator becomes green.
1I1
I IIH
Il unows group mark or ID and calllD
'il I IIlti L 111,hort-press
[e]
key, then press pre-programmed emergency key to off ,
Il IlI11I1I1I1( mergency cali and logout.
, dlll"
H:klo home screen.
Page 19

IIlhllll Idind piace il between your lip with 2.5-3cm .
I
I
Il I Ilk ylcall,LED indicalor lighl changes lo red, screen shows Ihe group mark.
I
I U"
Il' I
\I
k Y
lo receive .
111111111
"Il 11nnel message sound" funclion, leI go [PTT] key, you can hear a message
11\11"
I (Il
Il "
Il channel is free for you lo answer)
1\
pIO
Ir mmed emergency cali lo off and logoul Ihe mode.
h1IlII
\tIhom screen. lf the radio is under Ihe silenee mode ,there are noI any sounds
111
IIlIth
11111111
J
lhe emergency mode, noI receive calls trom largel walkie talkie .until
111
Il' I Il k y .If the radio under "wilh voice mute" mode ,Ihere are not any sou~dS
11111111
lhe emergency mode ,noI receive calls fram tarqet walkie talkie .Until
IlI
1\)1Ilkey to cali or receive, Ihen the screen will show up .
Emergency Alarm
This funclion called nol-speech signal and allows lo send emergency alarm and will Irig
on anolher radio.
1.
Press pre-programmed power on key.
2. Screen shows sending emergency cali, exchange IO with olher walkie lalkie .LED indi
changes lo red and emergency cali mark will down on Ihe home screen .
3. When receive Ihe emergency cali, Ihe radio issues Ihe emergency cali and LED indie
changes lo green , screen shows emergency cali send out suceessfully .
Or , if Ihe radio does noI receive any confirm wilh Ihe emergency cali and out of the sen
times, the radio will wilh a message sound and sereen shows Ihe emergency cali failed
4.
Radio logoul the emergency mode and back lo home screen .IfIhe radio under silen
mode, there will not any sounds or reminder during Ihe emergency mode.
11\1
I
J
ncy Alarm .
\tI
fili\I111111
IlIows you lo send emergency cali lo others ,after confirm wilh you, your radio
1\11\111'11111111
I lIvate, allows you lo cali olher radios wilh press the [PTT] key. This called
1II!lIlI,III
y
mlerophone".lfpress [PTT] key during pre-programmed emergeney mìcrophone.
Ilhl wlllliluli nore the [PTT] and stay on emergency mode. .
ulhI1\
pii [PTT]key during the emergency microphone ,hold the key before duration
wllhln
umìts,
let go [pTT]key lo Iransfer .
11I 1110
pro-programmed emergency start key .
IIl l''
Il
ws sending emergency cali, LED ìndlcator becomes red color and emergency
I
Il
M
\111
wlll show on Screen .
126
Emergency Alarm cali
This funclion allows you lo send emergency cali lo other radio .After confirmed by the r
Ihe two radios ean contact by a pre-programmed channel .
1. Press pre-programmed key to swilch on
2. Sereen shows sending emergency alarm call,exchange IO . LED indicalor beeomes r
emergency cali mark will down on screen .
3. when lhe radio confirm with the sending emergency,screen will show emergency cali
successful and LED indicalor ehange lo green .
251
Page 20

211
3. Screen will show emergency cali successful, then speak clearly .When under activate
emergency microphone, radio transfer automatically without press [PTT] key before d
ation within limits
4. During transfer , LED indicator becomes red and emergency alarm mark will show on scre
5. After the time of emergency microphone, radio stop to transmit .Press [PTT] key to tre
smit again If the radio under the "Silence" mode, there are not any sounds or notices
ring the emergency mode, not receive calls from target walkie talkie, until pass the pr
programmed emergency microphone limited time and press with [PTT] key .lf the rad
under "with voice mute" mode ,there are not any sounds or notices during the emerge
mode ,not receive calls from target walkie talkie .Until press the [PTT]key to cali or rece
then the screen will show up .
Notice: lf the emergency cali failed , then the walkie talkie will back to home screen .
1111111
tlt t
I
ncy
Mode
. ·tfs happen
I
W
1111I Ilkl wllllogout emergency mode when any of the followmg SI ua ion .
I
1111111111wllllill r ceived emergency cali, or
I t"
I wllllili 111x emergency cali, or
111 1111l'I P! rammed emergency off key, or
I
t
Il
111I
y. . .'
111
II1I
111
"I.y
mode will be logout when power offthe walkie taìkìe.Raoìo wllI not under
I1I
I 11!u.y mode when the radio is power on next time.
I
Restart Emergency Mode
Two situations will be happen:
• It willlogout the emergency mode, it the walkie talkie change the channel under the e
ergency mode .While , reset the emergency mode under the new channel , the walkie
Ikie restar! the emergency cali .
• lf press the Pre-programmed emergency key during the emergency cali, the walkie tal
will be stop the emergency cali but restar! later .
128
,
Page 21

User's Manual
Professional FM Transceiver
111 Il
tlon
IIlI
lnput
I IIII III 3
x4 alphanumeric keypad to access the radio's function. When you're
IIt
,111IYI'
d to Input a user alias or text messages, walkie-talkie input contains three
Il
I I,I
1\
,u
111
tlers mode,2,chinese inpul mode, 3,digilal input mode. When using Ihe
l'
IIlItl"11
Ill,
Y
u can only selecl Ihe digilal mode.
Il
Il I, I YI
111 :
I I I, VI lo
111
s a butlon several limes for getling some characlers. The following lable
Il
1!lIW
111nytlmes needed lo press a butlon lo gel the required character.O
11111
I
I
t
Il
I
Il
1111
1
2 3
4
5
6 789
10 11 12 13
1
?
!
(fj)
&
,
%
-
.
#
a
b
c
2
A
B C
.~
d
e
f
3 D E F
9
h
i
4
G
H
I
J
k
I
5
J
K
L
m n
o
6
M
N
O
P
q
r
s
7
P Q R S
t
U
v
8
T U V
W
X
Y
z
9WX
Y
Z
O
Space
.
Press#lo swilch mode.
130
/I
Page 22

311
Chinese Typing
Number 1 is a button of punctuation s selection input ,Number 2-9 are correspond Pinyin
input ,when user input something, the screen shows the pinyin input interface, the first line
of interface shows the contents inputted by user., second line of interface shows the Chinese
characters what users input. When the content of the pinyin input interface show in the first
row,users can press[aora l to select Pinyin, users can press [EI]button to delete the
Pinyin what they inputted previously one by one, when ali the Pinyin characters were delet-
ed, Pinyin input interface disappeears. Press
[13]
button to choose corresponding Chinese
characters and display them in the editing area, At this time the Chinese character input fin-
ised, Pinyin input interface disappears .. Pressing* button shows*,pressing Obutton shows
space, press#to switch input modes.
Numerai Writing
When in the Numbers input mode, press the number keys to display the corresponding nu-
mber, press the "key to display" on the screen, press#to switch input mode.
Note: When users Enter a user alias, ID, or text messages, if editing area without any content,
then the [ EI]'button is used for returning to the higher level menu, or else if there is
any content on the editor area, pressing [
Ell
will delete one character before the
cursor at one time, until the editing area has no content ,then press the [ EI] button
to return to the higher level menu.
Menu Application
1. Press [
13]
to enter Menu, then press left or right[aor a] to access the menu function
2. Press [
e],
select a function or go into a sub menu
3. Press [ EI] to return the higher level menu
Note: After a period of time not activity radio will automatically exit and return to the main
menu screen (hang time is set by the programming software).
Radio chcek
If there are any activation, this feature allows you to determine whether there is other two
way radio active inside the system, and does not disturb Ihe walkie-talkie users, none-voice
or visual notice appears on the targel two way radio
Send Radio Check
Using Menu:
1. Press [e]to enter Menu
2. Press [ a oralbutton to select Contacts, then press [el lo select.
3. Press [aoral toThe required user alias or ID,then press
[13]
to select
Or press[aora] key to manual dialing, and then press [e]key to select. If there are
before calling IO, show IO and along with the flashing cursor, using the keyboard editing IO,
press
[e].
4. Press [aora] to radio detection, and then press
[e]
to select
132
f
Page 23

5. When Screen displays radio detection: < user alias or ID >, it is indicating the ongoing of
radio detection. The LED indicator light is red.
6. Waiting for confirmation
7. If the target radio is active in the systern , Ihen il makes a prompt sound, screen will show
that target!wo way radio has responded shortly.
Or if the target radio in the systern is not active, then it makes a prompt sound, screen will
show that target two way radio has no answer shortly.
8. Two way radio returns to user alias or ID screen. If you press
[al
when waiting for con-
firmation, made a prompt sound, two way radio will end ali retry and exit the !WOway radio
detection mode.
Monitor
Using monitoring function to open the target!wo way radio! s microphone (only the user alias
or ID). You can use the function to monitor any sound around target!wo way radio.
Your must allow your two way radio to use this function by programming it.
Start Monitor
Using the Menu:
1. Press [
m
I
to enter the Menu
2. Press
[DorDI
lo Contacts,then press
[1511
to select
3. Press
[DorDI
to The required user alias or ID, then press
[1511
to select
331
l
Or press
[DorDI
key to manual dialing, and then press [mIkey to select
If there are any calling ID remains before, radio shows the ID and along with the flashing cur-
sor, using the keyboard to edit the ID, press [mIkey to choose.
Or press[Dor
D I
key to manual dialing, and then press [
m
l
key to select. Inputting the
user alias or ID, and then press
[Ok]
key to select.
4. Press[Doral to select Remote Monitor then press [mIto select
5. When two way radio makes a prompt sound, LED light turns green.
6. Waiting for confirmation.
7. Screen displays Monitor successed,
Or screen displays Monitor failed
If success: !WOway radio began to receive voice signals frorn the radios which are being rno-
nitored voice and screen displays two way radio are moniting, until the end of the duration of
the preprogrammed, !WOway radio made a prompt sound, and the LED light puts out, screen
display that monitoring ends.
Iffailed: two way radio Repeats until reach the preprogrammed attempts.
Contacts setting
Contacts is "address book" for handheld two way radio. Each entry corresponds to an alias or
ID used to start the cali. In addition, each item, according to the different content setling, relate
to three types of cali: graup calling, single cali, ali cali. Your radio support digital address book.
The Contactsl enlries display in the following information
134
Page 24

• Contacts
• New Contact
• Manual Oial
Note: you can add, delete, edit Contacts person in the digital address book(contacts)
Group Cali With Contacts
1. Press [
151]
to enter Menu
2. Press [D ora] to contacts, then press [
151]
to choose, entries arrange in alphabetical
order.
3. Press[Dora] to required calling group's alias or ID.
4. Holding the radio and let it in a vertical position and keep mouth 1 to 2 inches (2.5 to 5.0
cm) with radio.
5. Press [PTT] to start calling, the LED turns red. The screen displays the calling group's alias
or 10,aswell as icon of group calI.
6. Releasing (PTT) button to receive, when any user response within the group, the LED light
turns green. You will see on the screen group cali icon of user's IO
7. if you enable the "channel Free prompt " function: when the target radio release the (PTT)
button, you will hear a short beep, said this channel is idle, waiting for your answer. Press
the cali key (PTT) to answer. If in a preprogrammed group calied hang time without voice
activity, the cali is ended.
351
l
\
13&
I
Single Cali With Contacts
1. Press [
151]
to enter Menu
2. Press [Dora]to Contact,then press [
151]
to choose, entries arrange in alphabetical
order.
3. Press [Dora] to required calling group's alias or ID.
Or press [Dora] key to manual dialing, and then press
[151]
key to choose. If there is
a user alias or IOcalled before, radio shows IO and along with the flashing cursor, using
the keyboard editing this ID.
Or press[Dora] key to manual dialing, and then press
[151]
key to choose, using the
keyboard to enter a new IO
4. Holding the radio and let it in a vertical position and keep mouth 1 to 2 inches (2.5 to 5.0
cm) with radio.
5. Press [PTT]to start calling, the LED turns red. The screen displays the calling group's alias
or 10,as well as icon of group calI.
6. Releasing (PTT) bulton to receive, when any user response within the group, the LED light
turns green. You will see on the screen group cali icon of useri s IO
7. if you enable the "channel Free prompt" function: when the target radio release the (PTT)
button, you will hear a short beep, said this channel is idle, waiting for your answer. Press
the cali key (PTT)to answer. If in a preprogrammed group called hang time without voice
activity, the cali is ended.
8. You will hear a sound short, screen shows the cali ended
f
Page 25

Note:
If you release(pTT) button when you are setting up the cali, and when it will exit and return
to the previous screen without any remind. Radio can be preprogrammed executive two way
radio are testing before establishing single calI. Ifthe target radio did not reply, you will hear
a short beep, and screen shows the other radios did not reply. Two way radio return to menu
before starting the radios around test.
Cali Log
Your radio can record ali the recent dialed, received, and not answered calI. Use the calling
record function view and manage the recent calls.
Checking New Call's Number
Menu items can show the not answer cali ,received calls and dialed calI.
1. Press [ al key to enter the menu mode.
2. Press the [D or Dl key to the Cali Log, and then press [ al key to choose.
3. Press [D orD l to the required list, and then press [ al key too choose.
4. The screen on the top of the Iist shows the recent entries.
5. Press [orlcheck list, press (PTT) at the current selected aliases or IO to start a calI.
Missed Cali
Whenever you miss cali, two way radio will display a not answered cali, select vieW or view
!
later.
311
i
r
Note:
If you press (PTT),when you're viewing missing cali number, radios will exit the missing
cali screen and establishing a single cali again.
1. The screen shows the missing cali, and the missing call's number and view.
2. Press [al view missing call's IO, missing call's record list displayed on the screen.
Press [ a l to stare or delete this entry; Or press [D or D l key to view later, and then
press [ al key choice, return to the main screen.
Storing Missed call's Alias Or ID
1. Press [ al key to enter Menu.
2. Press the [D or D l key to Cali Log, and then press [ a l key to choose.
3. Press the [Dar Dl key to missed cali, and then press [l3l key to choose.
4. Press [D orD l key to missed call's alias or IO, and then press [ al key to choose
5. Press the [DorDl key to stare, and then press [l3l key to choose
6. Radio Shows flashing cursor, if needed, enter the IO alias, and then press [ al ey.
7. The screen contacts have been saved.
You can also enter IO without alias.
138
Deleting Calling Log's Record
1. Press [ al key to enter the Menu.
2. Press the [DorDl key to Cali Log and then press [l3l key to choose.
3. Press the [D orD l key to missed cali, and then press [l3l key to choose.
Page 26

IL----~------------------------------------------------_;n----------------------------------------------------------
4. Press [D orD] key to missed call's alias or ID, and then press [e]key to choose
5. Press [DorD] key to delete the entries,then press
[e]
key to select if you need to
delete this entry.
6. Select "yes" ,then press [e]key to delete the entries, screen appears entry deleted;
Or select "no" ,press
[e]
key to return to previous screen.
When you select a calilist but there is no entry in, the screen will display the list is empty,
if the keyboard is open at this time, will be a low tone hint sound.
Cali Alert Operation
Cali alert makes you can suggest a specific radio users in the possible time to cali you
back.
This feature applies only to the user alias or IO, and can be used through the menu byad-
dress book or manual dialing.
Receiving And Checking Cali Alert
When you receive a cali alert, screen shows cali prompt, alternating transmit radio's
alias or ID
1. YOU will hear sound of repeat, LED light turn and shine red.
2. Then press and release [PTT] to confirm the prompt, or press [e]to select "neglect" to
I
exit the cali reminder. . .
,i
391
Starting Cali Alert From Contact List
1. Press
[e]
key to enter the Menu.
2. Press the [DorD] key to Contacts, and then press
[e]
key to choose.
3. Press [DorD] key to missed call's alias or IO, and then press
[e]
key to choose
Or press [DorD] key to manual dialing, and then press
[e]
key to choose, a flash-
ing cursor appears,then enter the user ID you want to cali, and then press
[e]
key.
4.Press [DorD] key to Cali Alert, the screen display Cali Alert:< user s alias or ID >,and
then press
[e]
key and instructions have been sent Cali Alert.
5. When the radio send cali alert, the LED indicator for the red light.
6. If you receive calls prompt confirmation, issued a prompt, and display the cali alert succ-
esso
Or prompt confirmation if not received a cali, send a hint sound, and the screen cali failure.
Messages Function
Your radio can receive data, such as from another radio sent text messages, message of a
maximum length of 144 characters, whole message is not longer than 50 lines.
Edit And Send SMS
Using the Menu
1. Press [e]key to enter the Menu.
2. Press the [D or D] key to Messager, and then press [
13]
key to choose.
3. Press [DorD] key to write, and then press [e]key.
141
Page 27

4. A flashing cursor appears, using the keyboard to input messages, press [ D ] key to
move to the left one, press [ O ] button to the right one, when editing area have content,
press the [
EI ]
key to delete any useless character, otherwise when editing area without
content to return to the higher level menu.
5. After writing the text, press [m]to choose to send or save.
6. When on the process of editing, user can choose by pressing the [m]key to empty
option to empty ali the content of the editor, quickly return to the higher level menu.
7. Choose the
[DorO]
key to the alias name or ID, and then press
[m]
key to select.
Or press[Dspending] key to manual dialing, and then press
[m]
button, enter your user
ID and press [
m ]
key.
8. The screen shows message:<user/group name or ID>cali, sending message are being
confirmed
9. If the messages sent successfully, issued a prompt sound, and the screen displays text
message has been sent.
Or if the message was not sent, issued a high tone hint sound, and screen displays text
message sent failure. If message sent failure, radio will return to chance to return to the
retransmission selection screen
Send Quick Text
Two way radio support maximum 50 programming of prefabricated text messages by the
,
agent:
!
When a predefinedtext message, you can edit every message beforeyou can send each rnessaqsl
411
l!
Using the Menu
1. Press [
m ]
key to enter the Menu.
2. Press the
[DorO]
key to Messages, and then press
[m]
key to choose.
3. Press
[D orO]
key to Quick Text, press
[m]
key to choose
4.Press[D
orO]
key to the required quick text,press
[m]
key to choose
5. A flashing cursor appears, using the keyboard to input messages, press
[D]
key to move
to the left one, press[O ]button to the right one, when editing area have content ,press
the
[EI]
key to delete any useless character, otherwise when editing area without con-
lent lo return to the higher level menu.
6. After writing the text message, press
[m]
to choose to send or save.
7. If the messages sent successfully, issued a prompt sound, and the screen displays text
message has been sent,
Or if the message was not sent, issued a high tane hint sound, and screen displays text
message sent failure. If message sent failure, radio will return lo chance to return lo the
retransmission selection screen.
8.After Choose send press
[D orO]
lo the alias or ID, and then press
[m]
key to choose.
Or press
[D orO]
key to manual dialing, and then press[Ok] key choice. Enter the user
alias or ID, then Press
[m].
9. The screen shows message: < user/group name or ID > cali, lext messages were a being
sent lo confirm.
10. If the messages sent successfully, issued a prompt sound, and screen display lext
142
Page 28

message has been sent, Or if the message can't send, send out a high Ione hinl sound, se-
reen display message sent failure, failure if Ihe SMS messages, inlercom chance lo return
lo the relransmission seleclion screen.
Send Quick Text With A Key
1. Press Preprogrammed,single bond calls lo a predefined alias or ID sends a prefabricaled
lext messages.
2. The screen displays a text message:<user/group name or ID>cali, lo confirm lext me-
ssages were being sent
3. If Ihe messages seni successfully, issued a prompl sound, and Ihe screen display text
message has been sent.
Or if you cannol send text messages, screen display text message sent failure. If message
seni failure, inlercom chance lo return lo the relransmission seleclion screen.
Manage The Failed SMS
In retransmission selection screen, you can choose the following optìons:
• Resend,
• Forward,
• Edil
Resending message
1. Press
[ello resend same message lo same user/group name or ID.
2. If Ihe messages senI successfully, issued a prompl sound, and display messages seni or
431
if you cannol send text messages, screen display text message seni failure.
Forwarding message
Choose lo forward message lo anolher User/group name or ID.
1. Press Ihe[Dora] key lo forward, and Ihen press
[e]
key choose.
2. Press [Dora] lo Ihe alias name or ID, and Ihen press
[e]
key lo choose.
Or press [Dora] key lo manual dialing, and Ihen press
[elbutlon lo choose, enler
your user ID and press
[e]
key.
3. The screen display a lexl message:<user/group name or ID>cali, lo confirm text mes-
sages were being seni
4. If Ihe messages seni successfully, issued a prompl sound, and Ihe screen display text
message has been senI.
Or if Ihe message was noi seni, issued a high Ione hinl sound, and screen displays text
message seni failure.
Editing messages
Choosing edil lo edil message before you edil.
Nole: if you have a subject line (receive text messages from email program), you can't edil
the subjecl line.
1. Press [D oral key lo edil, Ihen press [e]key lo choose
2. A flashing cursor appears, using Ihe keyboard lo inpul messages, press [ Dlkey lo
move to Ihe left one, press [ albutlon lo Ihe righi one, when ediling area have content,
144
I
I
Page 29

press the [
CI]
key to delete any useless character, otherwise when editing area without
content to return to the higher level menu.
3. After writing the text, press
[151
l
choose to send or save
4. When in the pracess of editing, can choose by pressing the
[151
l
key to empty option to
empty ali the content of the editor, quickly return to the higher level menu
5. Choose after[aorli] button to send the required alias or ID, and then press
[151]
key
to choose
Or press[aorli] key to manual dialing, and then press
[151 ]
button, enter your user ID
and press
[151 ]
key
6. Screen displays message:<user/group name or ID>cali, to confirm text messages were
being sent
7. If the messages sent successfully, issued a prampt sound, and the screen display text
message has been sent.
Or if the message was not sent, issued a high tone hint sound, and screen displays text
message sent failure.
Manage The Sent SMS
Once a message is sent to another radio, it will be saved in the "sent items". Send after se-
nding a text message has always been to "sent items" at the top of the list. The sent items
folder can stare up to 50 recently send text messages. After the folder is full, the next send
text messages will automatically replace the earlier messages in this folder.
Note: at any time pressing the [
EJ]
key can return to the previous screen.
451
Check the sent messages
Using the menu function:
1. Press [
151]
button to enter the Menu.
2. Press the [Dorll] key to Messages, and then press [
1511
key to choose
3. Press[aorli] to sent items, and then press
[151]
key to choose
4. Press the[Dorli] key to the SMS, and then press [
151]
key choose. If the message
fram the email program, a subject lines, will appear in the top right corner of the screen
icon indicates state of SMS.
Sending the sent messages
When the view sent rnessages, you can choose the following options:
• Resend
• Forward,
• Edit
• Delete
1, Check the message, press [
151]
keyagain
2, Press the [D ar
Il]
key to resend, then press [
151]
key to choose.
3, The screen displays: < user/group name or ID
>
cali, confirm that it is preparing to send
the same message to the same target radio
4, If the messages sent successfully, issued a prampt sound, and the screen display text
message has been sent.
146
Page 30

Or if the message was not sent, issued a high tone hint sound, and screen displays text
message sent failure. If message sent failure, intercom chance to return to the retransmis
sion options screen. Press the [
131
key to send SMS weight to the same user/group name
or ID.
Note: Except for Pessing the
[13 I,[D
or DIkey, if you change the volume and the pre-
ss any other key, will return to this message. When you press [PTT] for a single cali or group
cali, or as a response to the group calling,radio will exit the retransmission selection screen.
If received text messages or remote sensing information, emerge-ncy cali, or cali the police,
or cali reminder, radio will exit the retransmission selection screen.
If you press [PTT]in response to a single cali (in addition to the radio in the show did not
answer the cali screen), or at the end of ali cali, the screen will return to resend selection
screen. Press [
13]
key, enter the forwarding, edit, or delete selection screen.
.choose forward, will choose the SMS sent to speak to other groups/user alias or ID.
• choose to edit, to edit the selected text messages before sending
• choose delete, delete the selected text.
Note: if you screen out SMS messages when send text messages, so radios will be in the
"sent items" folder for SMS status updates, not the tip or by voice prompt. Ifthe messages
in the sent items folder state before update, walkie-talkie pattern changed or blackout, wal-
kie-talkie will not be able to complete the ongoing message processing, and automatically
star! tag to the icon of failure. This radio can handle 5 text messages at the same time. At
this stage, the radio can't send a new message, and automatically star! tag icon 'to send
failure.
411
Deleting ali Sent Messages In the "sent items"
Using the Menu Function
1. Press the
[131
button to enter the Menu.
2. Press the[DarDI key to Messages, and then press [
131
key choice.
3. Press
[DorDI
to Sent Items, and then press [
13]
key choice.
4. Press the[DorDI key to delete all, and then press
[13]
key choice.
5. When it appears to delete messages ,press [
131
button, select "yes" project has clear
screen display has been sent.
Or delete the text, press
[DorD]
to no, and click
[131
key to return to the previous scr-
een. When you select the "sent items" but not one of them text messages, the screen will
display the list is empty, if the keyboard is open at this time, will be a low tone hint sound.
Receive SMS
ii
When your radio are receiving SMS, the left of the screen shows the sender alias or ID
leONS and text messages .
When receive text messages, you can choose the following options:
148
• reading?
• Reading Later
• delete
Note: when the radio shows tip on the screen, please press (PTT), two way will exit and to
establish a single cali or text message screen group calI.
Page 31

~--------------------------------------~--~------~--------fr----------------------------------------------------~------
-I
I
Check the SMS
1. Press the
[Dor Dl
key to Read, And then press
[151 l
key to choose
2. the selected text messages on the inbox opened, if the message is trom the email progr-
am, it will appear a subject line.
3. Click [
151 l
key to return to your inbox.
Or press [
151 l
to reply,forward or delete messages.
Press
[DorDl
key to enter later view or delete selection screen:
Later, select view screen before returning to receive messages.
Choose delete, delete receive text messages.
Manage Received SMS
Use your inbox to manage messages. inbox can stare up to 50 text messages at Most.
Two way radio supports the following text options:
• Reply
• Forward
• delete
• Delete ali
store the message in the inbox in the arder of received time .
Note: at any time according to the
[Ell
key can return to the previous screen.
491
Check The Inbox SMS
1. Press the
[151 l
button to enter the Menu.
2. Press the
[DorDl
key to Messages, and then press
[151]
key to choose
3. Press
[D orD]
to the inbox, and then press
[151]
key to choose.
4. Press the
[D
orD]
key to check the message. It the messages are trom the email pr-
ogram, it will appaer a subject line.
5. Press the [
151 l
key to choose the current text, then press
[151]
key again to reply, delete,
or forward this message.
Unread messages: ~ , Already read message: ~
i
150
•
, j
Page 32

Reply The Inbox SMS
Use the menu funclion:
1. Press [a]button lo enter the Menu.
2. Press the [Dora] key lo message, and then press
[a]
key to choose
3. Press [D ora] lo the inbox, and then press
[a]
key to choose
4. Press the [D ora] key to the SMS, and then press
[a]
key to choose. If the rness-
ages are from the email program, it will appear a subject line.
5. Press again [a]button to enter submenu.
6. Press [D ora] to reply, and then press [a]key to choose.
7. Press [Dora] to write messages, and then press
[a]
key choice, a flashing cursor,
using a keyboard editing texl messages.
Or press [D or a] key to prefabricaled text messages, and then press [a]key lo cho-
ose. Choose Ihe required message after press [a]a flashing cursor, if needed, wilh the
keyboard ediling your message.
8 After Writing Ihe text, press [
a] .
9. The screen displays message :<userl cali group name or ID >, to confirm. lext messages
were being seni
10. Ifthe messages sent successfully, issued a prompl sound, and screen display text me-
ssage has been sent.
Or if you cannot send text messages, screen display lext message sent failure. If messaqe
seni failure, radio return lo Ihe relransmission seleclion screen.
511
!
Deleting the inbox messages
Use Ihe menu funclion:
1. Press the [a]button lo enler Ihe Menu.
2. Press Ihe [D ora] key lo message, and Ihen press
[a]
key lo choose
3. Press [D or a] lo Ihe inbox, and then press [a]key lo choose
4. Press Ihe [Dora] key lo Ihe SMS, and then press
[a]
key choice. If the messages
are from the email program, it will appaer a subjecl line.
5. Press again [a]button lo enter submenu.
6. Press Ihe [Dora] key lo delete, and Ihen press
[a]
key lo choose.
7. Delele messages, press [Dor a] key lo "yes", Ihen press [a]key lo choose.
8. Screen appears short message has been deleled.
9. The screen back lo inbox.
Deleting ali messages in the inbox
Use Ihe menu funclion:
1. Press Ihe [a]buUon lo enler the Menu.
2. Press the [Dora] lo Ihe Message, and Ihen press
[a]
key lo choose.
3. Press [D ora] lo the inbox, and Ihen press
[a]
key lo choose.
4. Press Ihe [Dora] key lo delele all, and Ihen press
[a]
key lo choose.
5. When il appears Deleling the messages, press [Dora] select yes, and Ihen press
[a]
key lo choose
6. Then The screen inbox was ernpty already.
r
J
152
Page 33

When you select the "inbox" but not one of them text messages, the screen will display the
list is empty, if the keyboard is open at this time, will be a low tone hint sound.
Encryption
If you enable this feature, which is beneficial to prevent other users on the channel by using
the method of software encryption for unauthorized eavesdropping. The launch of signaling
and user identification part unencrypted. Your radio must be enabled on the channel encr-
yption function, can send encrypted, even if the receiving transmission is not must request
to do so.
Basic encryption
Two way radio can only be assigned more than one type of encryption. If users Cali for en-
cryption or decryption of data transmission, must make to be preprogrammed walkie-talkies
and launch radio has the same "encryption keys" (suitable for basic encryption).
If your radio to receive different encryption keys or key values and key encryption cali IO,
you will hear the sound of the transport chaos encryption (basic).
Press the preliminary programming encryption keys on or off.
DTMF
Oual Tane Multi-Frequency (OTMF) function allows to operate radio when there is interfer-
ence in the radio system.
To initiate a OTMF cali
1. Press and hold [PTT] key.
531
2. Enter number you need.
You can disable OTMF tone by turning off ali radio tane and prompts.
Secrecy
You can activate or kill any radio in the system. For example, you might want to disable a
stolen radio, to prevent thieves use it, and enable it when you get it back.
Note: radio kill or activation is limited to activate the radios with these functions.
Radio Disable
Use menu mode
1. Press [
m ]
key to enter the menu mode.
2. Press
[Dora]
key to Contacts, and then press
[m]
key to select, entries are in alp-
habetical order.
3. Press[Dora]key to the required alias or ID, and press
[m]
key to select.
Or press[Dora]key to Manual Dial, then press twice [m]key to enter a user alias
or IO, and press [m]key to select.
4. Press
[Dora]
key to radio disable, and then press [m]key to select.
5. The display shows the radio disable: <user alias or ID> and the LED indicator light is red.
6. Wait far confirmation.
7. If successful, emit a beep and the screen displays radio disable successfully.
Or if it fails, emit a beep and the screen displays radio fail to disable.
Ouring radio disable operation, do not press the [
EI]
key, because you will not get a
confirmation message.
154
Page 34

Radio Enable
Use menu function:
1. Press [e]key to enter the menu mode.
2. Press[DorD I key to Contacts, and then press [
151]
key to select, entries are in alp-
habetical order.
3. Press[DorDI key to the required alias or ID, and press [e]key to select.
Or press [Dar
D]
key to Manual Dial, then press twice [
1511
key to enter a user alias
or ID, and press [
151]
key to select.
4. Press[DorD] key to radio enable, and then press [
151]
key to select.
5. The display shows the radio enable: <user alias or ID> and the LED indicator light is red.
6. Wait for confirmation.
7. If successful, emit a beep and the screen displays radio enable successfully.
Or if it fails, emit a beep and the screen displays radio fail to enable.
During radio enable operation, do not press the [e]key, because you will not get a co-
nfirmation message.
551
Scaning List
Create a scan list and assign to a single channell talkgraup, your radio can support up to
250 scan lists, each up to 16 members. Each scan list support mixed analog and digital
channels. You can edit the scan list to addIdelete channels or set the priority channel,
Check members of list
1. Use the channel knob to select a channel with pre-pragrammed scan list;
2. Press the [e]key to enter the menu mode;
3. Press [DorDI key to scan, and then press the
[1511
key to select;
4. Press [DarDI key to Viewlist the list, and then press the [
151]
button to select;
5. Use [DorDI key to see members of list.
If you set the priority, the priority icon is displayed in the left of member alias, indicating that
the member is the Priority or Priority " channel; if the priori!y is se! to , no priority
icon.
In a scan list, you can not have more than one PriorityOor PriorityOchannel.
Scanning Instruction
When scanning, your radio can view if there is a voice activity in current channel through
circulating pre-programmed scan list. LED lights flashinq for a red light, and the scan icon
appears on the screen.
When scanning in dual mode, if you're in a digital channel and your radio locking an analog
channel, radio will switch automatically fram digital mode to analog mode throughout the
156
Page 35

duration of the calI. And vice versa.
There are two scanning methods ,
• Manual Scan: According to a pre-programmed scan on / off key or menu tunction to start
the scan, when you start scanning, radio will detect ali channels / contact groups on pre-
programmed scan list.
• Auto Scan: When you select an already activated auto scan channels / contact groups,
radio scans trom the activated auto scan channel.
StartlStop Scan
Press Pre-programmed Scan On / Off KeyOr Enter The Scan Menu Function
1. Using the channel knob to select a channel of pre-programmed scan list;
2. Press [
m
l
to enter menu mode;
3. Press[aorUlto scan, and then press [
m
l
to select;
4. It the scan ls disabled, the screen displays on orifthe scan is activated, the screen dis-
plays off.
5. Press
[mlto select
6. When the scan is activated, LED indicator tlashes red and displays scan icon O;or
when scanning is disabled, LED light goes out and does not display the scan icon.
571
Scanning reply
Radio detect active channel/contact group when scanning, at this lime radio will stay in the
channel/ contact group, which is called "Scan hang time" pre-programmed time .
Procedure:
1. Hold the radio in a vertical position and keep one to two inches (2.5 to 5.0 cm) distance
trom the mouth. If you enable the "channel idle tone" function, when transmitting radio
release [PTT] key, you will hear a short beep, indicating that the channel is idle, waiting
for your respond.
2. Within the hang time by pressing [PTT] button, LED indicator light is red.
3. Release [PTT] key to respond.
4. lf you do not respond within the hang time, radio will continue down the scan
:
)
j
.:,
158
..
Page 36

Utilities
Utilities includes the following contents:
• Radio settings
• Radio Info
• Program Radio
Radio Settings
Radio Setting includes:
• Talkaround
• Tones/Alerts
• Power
• Backlight
• Squelch
• Intro Screen
• Keypad Lock
• Language
• LED Indicator
·VOX
• Passwd Lock
• Clock
• Mode
591
--
Talkaround
I
l
When the transponder does not work, or when the radio located outside the range of the
transponder but located within the range of other radios cali, you can continue to commun-
icate. This is called "talk around."
Press Pre-programmed repeaterItalk around button, you can switch between repeater
I
talk around mode.
Use the menu function
1. Press [e]key to enter the menu mode.
2. Press[aorU] key to utilities, and then press
[e]
key to select.
3. Press[aorU] key to radio settings, and then press the [e]key to select.
4. Press[aorU] key to talk around, and then press
[e]
key to select.
5. If radio is currently in repeater mode, you can see the open, or if radio is currently in talk
around you can see the close.
6. Press [e]key to select.
7. Screen showing turn on talk around [e]or turn off talk around.
8. The screen automatically returns to the previous menu.
Even after the shutdown, stili remains talk around.
Tones/Alerts
including the following contents:
• Ali Tones • Talk Permit • Keypad Tones
161
Page 37

Ali Tones
If desired, you can enable or disable ali radio Ione and prompls (excepl emergency incom-
ing Ione).
Press pre-programmed ali Beep ON / OFF lo turn on or off ali radio tones,
Use the menu funclion:
1. Press [e]key lo enter Ihe menu mode.
2. Press [D orD] key lo utilities, and Ihen press
[e ]
key lo select.
3. Press [D orD] key lo radio settings, and Ihen press the
[e]
key lo select.
4. Press [D orD] key lo lones/alerts, and Ihen press [e]key lo select.
5. Press [DorD] key lo ali Ione, and then press
[e]
key to select.
6. Press
[e]
key to select on, Ihen enable ali tane and prornpts, screen displays ali Ione
is open.
Or press [e]key lo select Off, Ihen turn off ali tones and prompts, screen displays ali tone
is off.
Keypad Tones
If desired, you can aclivate and deactivale cali admission Ione.
1. Press [e]key lo enter the menu mode.
2. Press [D orD] key to utililies, and then press [
13]
key lo select. ~l
3. Press [D orD] key to radio settings, and then press the
[e]
key to select.
4. Press [DorD] key lo tones/alerts, and Ihen press
[m]
key to select.
611
, j
li
5. Press [D orD] key lo keyboard Ione, Ihen press
[e]
key lo select.
6. Press [e]key lo selecl Open, Ihen enable Ihe keyboard tone, Ihe screen shows keyb-
oard Ione is lurned ono
Press [
13]
key lo selecl off, Ihen lurn off the keyboard sound, the screen shows keyboard
tone is lurned off.
Power
You can seI each channel power level lo high or low. Setting: High-power radio implement
comrnunications wilh relalively far distance radioso Low-power radio implement communi-
cations with relatively close distance radioso
Press pre-programmed high Ilow power seleclion key, you can swilch high Ilow Iransmil
power.
Using the menu function:
1. Press the [
13l
key lo enter the menu mode.
2. Press [DorD] key to utililies, and then press
[e]
key lo select.
3. Press [D or D] key to radio settings, and Ihen press Ihe
[e]
key to select.
4. Press [Dor D] key lo power, and Ihen press
[13
l
key lo select.
5. Follow the on-screen inslructions lo change the currenl settings.
6. Press [
13]
key lo selecl the new power leve!.
7. Return lo Ihe previous rnenu screen.
Press [
mi]
to return lo Ihe main screen, Ihe screen displays Ihe power level icon.
162
Page 38

IL------------------------------------------------------~~-------------------------------------------------------
Backlight
You can turn on or off the screen backlight according to the need. This setting also affects
the menu button and the keyboard backlight.
Press a pre-programmed automatical backlight key to switch backlight settings
Using the menu function:
1. Press [
m
l
key to enter the menu mode.
2. Press[Dor
a
l
key to utilities, and then press [
m
l
key to select.
3. Press[Dor
a
l
key to radio settings, and then press the [
m
l
key to select.
4. Press[Dor
a
l
key to backlight, and then press [
m
l
key to select.
5. The screen displays always open, 5S, 10S, 15S options, press
[mlkey to select always
open, the sereen will remain lit and won't turn off, or if you ehoose 5S, 10S, 15S, the se-
reen backlight will be off in the corresponding time under users without any operations.
,I
Squelch
You can adjust radio squelch level, thus filtering low signal intensity useless eall or channel
higher than normal value. Setting: Normal is the default, striet filtering (useless) cali or bac-
kground noise. However, a cali from a remote location may also be filtered out.
Press pre-programmed striet I normal squeleh button to switch between normal and striet
squelch level.
Using the menu function:
1. Press [
m
l
key to enter the menu mode.
631
2. Press
[Doral
key to utilities, and then press [
m
l
key to select.
3. Press [Dor
a
l
key to radio settings, and then press [
m
l
key to seleet.
4. Press
[Doral
key to squelch, and then press
[mlkey to select.
5. Seleet strict or normal, and then press [
m
I
key to select.
6. The sereen returns to the previous menu.
I
ntro Screen
If desired, you ean enable and disable the Intro Screen display.
1. Press [
m
I
key to enter the menu mode.
2. Press[Doralkey to utilities, and then press [
m
l
key to tight.
3. Press
[Doral
key to radio settings, and then press the
[mlkey to tight.
4. Press[Doralkey to Intro Screen, then press [
m
l
key to select.
5. The screen is on, press
[mlkey to enable the Intro Screen display, the sereen displays
the boot sereen display ono
Or the screen is off, press
[mIkey to close the Intro Sereen display, the screen displays
the boot screen display off.
Keypad Lock
You ean loek the keypad to prevent aecidental key input. Ways include manual and autom-
atic keypad lock, which includes 5S, 10S, 15S three options.
1. Press [
m
I
key to enter the menu mode.
2. Press
[DoraI
key to utilities, and then press [
m
l
key to select.
164
Page 39

3. Press[DorD] key to radio settings, and then press
[e]
key to selecl.
4. Press[DorD] key to keypad lock, then press
[e]
key to selecl.
5. Press[DorD] key to manual, and then press
[e]
key to select, screen show to se-
lect Manual, you need to long press [
GI ]
key to lock keypad on the mai n interface.
6. Press[DorD] key 5S, 10S, 15S, the screen shows to select the corresponding time,
then keypad will be locked and return to the main screen if user have not any keypad op-
eration after corresponding period of time.
7. To unlock the keypad, press
[e]
key, then press
[GI]
key.
8. Screen shows unlock keyboard, and then return to the main screen.
Language
Radio supports the following languages:
• English
• Chinese
1. Press [m]key to enter the menu mode.
2. Press [D orD] key to utilities, and then press [m]key to select.
3. Press [DorD] key to radio settings, and then press
[e]
key to select.
4. Press [D orD] key to the language selection, then press [m]key.
5. Press[aor D] key to the corresponding language option, then press [m]key.
6. Screen displays to select corresponding language, and then jump back to the main inte-
rface.
651
LED Indicator
If desired, you can activate and deactivate the LED.
1. Press [
m ]
key to enter the menu mode.
2. Press [DorD] key to utilities, and then press
[m]
key to select,
3. Press [DorD] key to radio settings, and then press
[e]
key to select,
4. Press [DorD] key to LED indicator, and press
[e]
key to select.
5. The screen displays open, press [
m ]
button to enable LDE light, screen shows to tum
on the LED lighl.
Or The screen displays off, press [m]button to turn off the LED light, screen shows to
turn off the LED light.
If you disable the LED light, buttons and keyboard backlight automatically turns off.
vox
This function allows you to initiate voice-activated hands-free calls on pre-programmed eh-
annels. Whenever a microphone with VOX function detect voice, radio will automatically
transmit signals within pre-programmed period of time.
During radio operation press [PTT] key will disable VOX function, to re-enable the VOX fu-
nction, do one of the following:
• Turn off and return on radio
• Through the channel knob to change the channel, or
• Perform the following procedure:
1&6
Page 40

Note: Enabling or disabling this function is limited to activate radios of these function.
Press pre-programmed VOX on I off key, to turn on or off this function.
Using the menu function:
1. Press [e]key to enter the menu mode.
2. Press
[DorD]
key to utilities, and then press
[e]
key to select.
3. Press
[DorD]
key to radio settings, and then press the
[e]
key to select.
4. Press
[DorD]
key to VOX, and then press
[e]
key to select.
5. Screen shows VOX off and VOX level 1-10S, if you choose to turn off, press [m]key to
disable the VOX function, emitting a beep and the screen displays VOX off. If you choose
1-10S, VOX function is enabled, and the voice transmit sensitivity is on the corresponding
level. If you activate the cali allowing sound, you can initiate a cali using a trigger word.
Waiting sound end (if activated), and then speak clearly into the microphone.
611
Passwd Lock
1. Press
[m ]
key to enter the menu mode.
2. Press
[DorD]
key to utilities, and then press
[e]
key to select.
3. Press
[DorD]
key to radio settings, and then press
[m]
key to select.
4. Press
[DorD]
key to passwd lock password, and then press
[e]
key.
5. Use the keypad to enter the correct 8 digits password (You can pre-set by software), and
then press the [
m ]
key.
6. If the password is incorrect, the screen displays an error code. If the password is correct,
the screen displays options.
7. If the first line shows open, press [m]key to display the power-on password application.
Next time you need to enter the correct password to turn on radio. If the first line shows
off, press [m]key to display the power-on password cancellation, next time you can
directly turn on radio.
8. Press
[DorD]
key to change power-on password, and then press
[e]
key to select.
9. Enter 8 digits new password, and then press [e]key to select.
10. Once again, enter 8 digits new password, and then press [m]key to select.
11. Screen displays that password was successfully changed.
Note: The power-on password must be set to eight digits.
168
Page 41

Clock
Clock settings are divided into:
• lime
• Dale
Time
1. Press [
a
I
key lo enler Ihe menu mode.
2. Press
[DarDI
key lo utlllties, and Ihen press [alkey lo select.
3. Press
[D arDI
key lo radio settings, and Ihen press
[mIkey lo select.
4. Press
[D arDI
key lo clock, and Ihen press
[mIkey.
5. Press
[DarDI
key lo lime, and Ihen press
[mIkey lo display Ihe currenl lime.
6. Press
[a]
key lo enter lime setting inlerface.
7. Press
[D arDI
key lo move left and righi lo selecl the desired number, the selecled
number will reverse video display,lhen enter Ihe corresponding numbers lo change Ihe
lime via Ihe numeric keypad.
8. Press
[a]
key lo save, Ihe screen displays Ihe lime has been saved.
691
Date
1. Press [a]key lo enler Ihe menu mode.
2. Press
[DorD]
key lo utililies, and then press
[m]
key to select.
3. Press[DorD] key lo radio settings, and then press
[m]
key lo select.
4. Press
[D arDI
key lo clock, and Ihen press
[m]
key.
5. Press[DorD] key lo date, and Ihen press
[m]
key lo display Ihe current date.
6. Press
[m]
key lo enter Ihe lime setting interface.
7. Press
[DorD]
key lo move left and righi lo select the desired numbers, the selecled
numbers will reverse video display,lhen enter Ihe corresponding number lo change the
date via the numeric keypad.
8. Press [m]key to save, the screen displays Ihe date has been saved.
Mode
'I
Mode settings are divided into:
• eH Mode
• MR Mode
1. Press
[mIkey lo enter the menu mode.
2. Press[aorD] key lo utililies, and Ihen press [m]key lo select.
3. Press[aor DIkey lo radio settings, and Ihen press [m]key to select.
4. Press
[D orD]
key lo mode and then press
[alkey.
5. Press
[a
orD
I
key lo select CH mode or MR mode, Ihen press [
a
I
key lo selecl the
110
I
"I
Page 42

eorresponding mode, the sereen displays this mode is selected.
6. The main sereen will show ehannel name ·or frequeney (reeeiving frequeney) aeeording to
the seleeted mode.
Radio Info
Radio eontains the following information:
• My Number
• Versions
Note: At any time you ean return to the previous sereen by pressing the
[EI]
key.
My Number
1. Press [e]key to enter the menu mode.
2. Press [D or a] key to utilities, and then press [e]key to seleet.
3. Press [Dora] key to radio information, and press
[e]
key to seleet.
4. Press [Dora] keyto my number, then press
[e]
key.
5. The display shows radio IO and name.
Versions
Display radio firmware version.
1. Press [e]key to enter the menu mode.
2. Press [Dora] key to utilities, and then press
[e]
key to seleet.
3. Press [Dora] key to radio information, and press [e]key to selee!.
nI
4. Press [Dora] key to radio versions, and then press [e]key.
5. The sereen will display the eurrent firmware version, Codeplug version.
Program Radio
Radio eonfiguration mainly ineludes editing the ehannel eontents
Channel eontents ean be edited include:
• RX Frequeney
• TX Frequeney
• Channel Name
• Time out Timer
• CTC!DCS
• ColorCode
• Repeater Siot
Rx Frequency
1. Press
[e ]
key to enter the menu mode.
2. Press [Dora] key to utilities, and then press [
13]
key to seleet.
3. Press [Dora] key to program radio, and then press
[e]
key to seleet.
4. Use the keypad to enter the eorreet Program radio password (programmed by software),
and then press [e]key to selee!.
5. Press [D ora] key to reeeiving frequeney, and then press [e]key to selee!.
6. The sereen displays reeeiving frequeney of the eurrent ehannel, and then press [e]key
112
.1
Page 43

lo select.
7. Press Ihe number keys lo enler Ihe corresponding number, press [ D] key lo delete Ihe
lasl number, press [e]lo return lo Ihe previous menu.
8. After finish Ihe change, press [e]key, Ihe screen displays receiving frequency has
been saved.
Nole: Ediling frequency will be limiled wilhin Ihe frequency range setted by programming
software, if less Ihan Ihe wrile frequency range setted by software, Ihe final change
resull will be Ihe minimum frequency of frequency range setted on software, olherwise
il is maximum.
Tx Frequency
1. Press [e]key lo enler Ihe menu mode.
2. Press[Dora] key lo ulililies, and Ihen press [e]key lo select.
3. Press [Dora] key lo program radio, and Ihen press
[e]
key lo select.
4. Use Ihe keypad lo enter Ihe correcl Program radio password (programmed by software),
and Ihen press
[elkey lo select.
,o
5. Press[Dora] key lo Iransmilling frequency, and Ihen press [e]key lo select.
6. The screen displays Iransmitting frequency of Ihe currenl channel, and Ihen press [
e]
key lo select.
7. Press Ihe number keys lo enler Ihe corresponding number, press [e]key lo delele Ihe
lasl number, press [e]lo relurn lo Ihe previous menu.
131
8. After finish Ihe change, press [e]key, the screen displays Iransmitting frequency has
been saved.
Nole: Editing frequency will be limiled wilhin Ihe frequency range setted by programming
software, if less Ihan the write frequency range setted by software, Ihe final change
resull will be Ihe minimum frequency of frequency range setted on software, otherwise
il is maximum.
Channel Name
1. Press [e]key lo enler the menu mode.
2. Press [Dora] key lo utilities, and Ihen press
[e]
key lo select.
3. Press [Dora] key to program radio, and Ihen press
[e]
key lo select.
4. Use the keypad to enler the correcl Program radio password (programmed by software),
and Ihen press
[e ]
key lo select.
5. Press [D ora] key to Ihe channel name and press
[e]
key lo select.
6. The screen displays the current channel name, press the [
la ]
key to switch the input
method to enter the relevant letlers, numbers or characters, the same as Ihe input met-
hod and text editing.
7. After the change is complete, press [e]key, the screen displays channel name has
been saved.
114
Page 44

TOT
1. Press [e]key lo enter Ihe menu mode.
2. Press [DorD] key lo utilities, and Ihen press
[e]
key lo select.
3. Press [DorD] key lo program radio, and Ihen press
[e]
key lo select.
4. Use the keypad lo enter the correct Program radio password (programmed by software),
and then press [e]key lo select.
5. Press
[DorD]
key lo TOT, and Ihen press
[e]
key lo select. l
6. The screen displays infinile, 15S, 30S ... 555S and other options (increasing 15S each
lime), press [DorD] key lo Ihe corresponding optlon, Ihen press[eI key lo selecl;
if you choose infinile, Ihe screen displays transmit lime close, if you selecl olhers, Ihe
screen display corresponding lime selecled.
CTC/DCS
CTCSSIDCS can only be set on analog mode, including:
• CTCSS/DCS encoding
• CTCSS/DCS decoding
Encode
I
1. Press [eI key lo enler Ihe menu mode.
2. Press [D or D] key lo ulililies, and then press [eI key lo select.
3. Press [D or D] key lo program radio, and Ihen press[eI key lo select.
151
116
4. Use Ihe keypad lo enler Ihe correct Program radio password (programmed by software),
and Ihen press [e]key lo select.
5. Press [D or D I key lo CTCSS/DCS, and Ihen press [eI key lo select.
6. Press [DarDI key lo CTCSSIDCS encoding, and Ihen press[eI key lo select.
7. Screen display off and a set of CTCSSIDCS encoding value, press[DorD] key lo off,
and Ihen press [e]key lo select, and Ihere will be no CTCSS/DCS encoding value,
screen displays CTCSS/DCS encoding value off; press [DarDI key lo CTCSS/DCS
encoding value, and Ihen press [e]key lo selecl, Ihen seI the corresponding value,
screen displays the corresponding CTCSSIDCS encoding value.
Decode
1. Press [eI key lo enter the menu mode.
2. Press [DorD] key lo utilities, and Ihen press
[m]
key lo select.
3. Press [DorD] key lo program radio, and Ihen press
[e]
key lo select.
4. Use Ihe keypad lo enter Ihe correcl Program radio password (programmed by software),
and Ihen press [e]key lo select.
5. Press [DarDI key lo CTCSSIDCS, and then press[eI key lo select,
6. Press [DarDI key lo CTCSS/DCS decoding, and Ihen press
[e]
key lo selecl.
7. Screen display off and a seI of CTCSSIDCS decoding value, press [DorD] key lo off,
and Ihen press [e]key lo select, and Ihere will be no CTCSS/DCS decoding value,
screen displays CTCSS/DCS decoding value off; press [DorD] key lo CTCSS/DCS
Page 45

decoding value, and Ihen press [a]key lo select, Ihen sei the corresponding value,
screen displays Ihe corresponding CTCSSIDCS decoding value.
Colar Code
Colar code only can be sei on digilal channels.
1. Press [a]key lo enter Ihe menu mode.
2. Press[Dora]key lo utìllties, and Ihen press [a]key lo select.
3. Press
[Dora]
key lo program radio, and Ihen press [a]key lo select.
4. Use Ihe keypad lo enter Ihe correcl Program radio password (programmed by software),
and Ihen press [a]key lo select.
5. Press
[D
ora]
key lo colar code, Ihen press [a]key lo select.
6. Press[Dora]key lo selecl color code values, and Ihen press [a]key lo select.
Screen shows X(the selected colar code value) is selecled.
Repeater Siot
Repealer slot only can be sei on digilal channels.
1. Press [a]key to enter Ihe menu mode.
2. Press[Dora]key to ulililies, and Ihen press [a]key lo select.
3. Press[Dora]key lo program radio, and Ihen press [a]key lo select.
4. Use Ihe keypad lo enter Ihe correct Program radio password (programmed by software),
and Ihen press [a]key lo select.
111
118
5. Press[Dora]key lo repealer slot, and Ihen press [a]key lo select.
6. Press
[Dora]
key lo selecl repeater slot values, and Ihen press
[a]
key lo select.
Screen shows X(lhe selecled repealer slot value) is selecled.
Page 46

Specifications
Generai Specifications
Frequency range
VHF: 136-174MHz UHF: 400-480MHz
Channel
1000 Channels
Channel Spacing
12.5KHz
Operating Voltage
7.4V
Battery Type
Li-ion
Operating Temperature
Store Temperature
-40·C+85·C
Antenna Impedence
500
Audio Output Power
~1000mW@160
Battery capacity
2200mAh standard Li-ion battery
Dimension (H*W*D)
131*61*36mm (Not Including Antenna)
Weight
258g
191
180
Transmitter
Output power
High:c5W (HI) Low:<1W (Low)
Frequency Stability +-1.0PPM
Adjacent Channel Power
c
-60dB
Free Time Siot Power
TDMA:<57dBm
Hum and Noise -40dB@12.5KHz
Spurious Radiation
Antenna: 9KHz-1 GHz
<
-36dBm
1GHz-12.75GHz<-30dBm
FM Modulation Mode
12.5KHz: 11KOF3E
4FSK Digital Mode 12.5KHz(data only):7K60FXD
12.5KHz(data +voice): 7K60FXE
Modulation Maximum Deviation 2.5KHz@12.5KHz
Nonactive Siot Power -57dBm
Digital Protocol ETSI TS 102361-1 -2 -3
VocoderType AMBE+2TM
Audio Response +1dB--3dB
Modulation BER(Bit Error Rate)
<5%
\
f
Page 47

)
I
I
I
I
Guarantee
,
Receiver
I
Model Number:
I
Analog sensibility O.35uV/-116dBm(20dB SINDA)
I
Seria I Number:
O.22uv/-120dBm(Type)
I
Purchasing Date:
Digital sensibility
O.3uV/-117.4dBm (BER 5%)
I
O.7uv/-110dBm (BER 1%)
I
Dealer:
Telephone:
Co-channel Rejection
,
~-12dB
-u
User's Name:
Telephone:
Adjacent Channel Selectivity TIA603C:65dB
èii"
ETSI:60dB
Il>
C/I
Address:
CD
Post Code:
Spurious Response
TIA603C:75dB
ETSI:70dB
o
So
Remarks:
Rated audio power 1W
Il>
O"
1 This guaranlee card lo be kepl by !he user, no replenlshm ntIlI( l
Audio response =1dB--3dB
::J
<Cl
Rated audio distortion 3%(Type)
:E
2 This guaranlee card lo be fil/ed&chopped by the dealer, or Il I. lnv 1111
g:
3 Don'l alter Ihe guaranlee card, piea se coufirm Ihe seri I numb Uflili
IJIIII
Spurious Radiation
:T
111
l' tI/I
"
Antenna: 9KHz-1 GHz ~-57dBm
I11
(jj'
Ihat on the machine.
1GHz-12.75GHz ~-47dBm
S'
4 One-year guaranlee, charger, battery, ear-phone, ant nn
111(10III
<Il
I
1111111/111
I
Il
1111
Note: Specifications will be revised without notice due to technical improvement. Thank you.
I
5 The user can gel repairing service from Ihe fol/owlngw
y :
I
• Go to !he shop where you buy the machine.
• Our local repairing agents.
I
• Send back to our company.
I
;
,
I
I
811
I
I
Page 48

Il
• /Wl
[!] .'
Quanzhou TYT Electronics Co., Ltd.
Address:Block 39·1, Optoelectronics-information industry
base, Nan'an, Quanzhou, Fujian, China
Website:www.tyt888.com
E-mail:tyt@tyt888.com
Tel:86-595-27770858
Nationwide Toli Free No : 400-699-8858
MADE IN CHINA
 Loading...