

Page 1
Thermal Receipt Printer
Quick Installation Guide
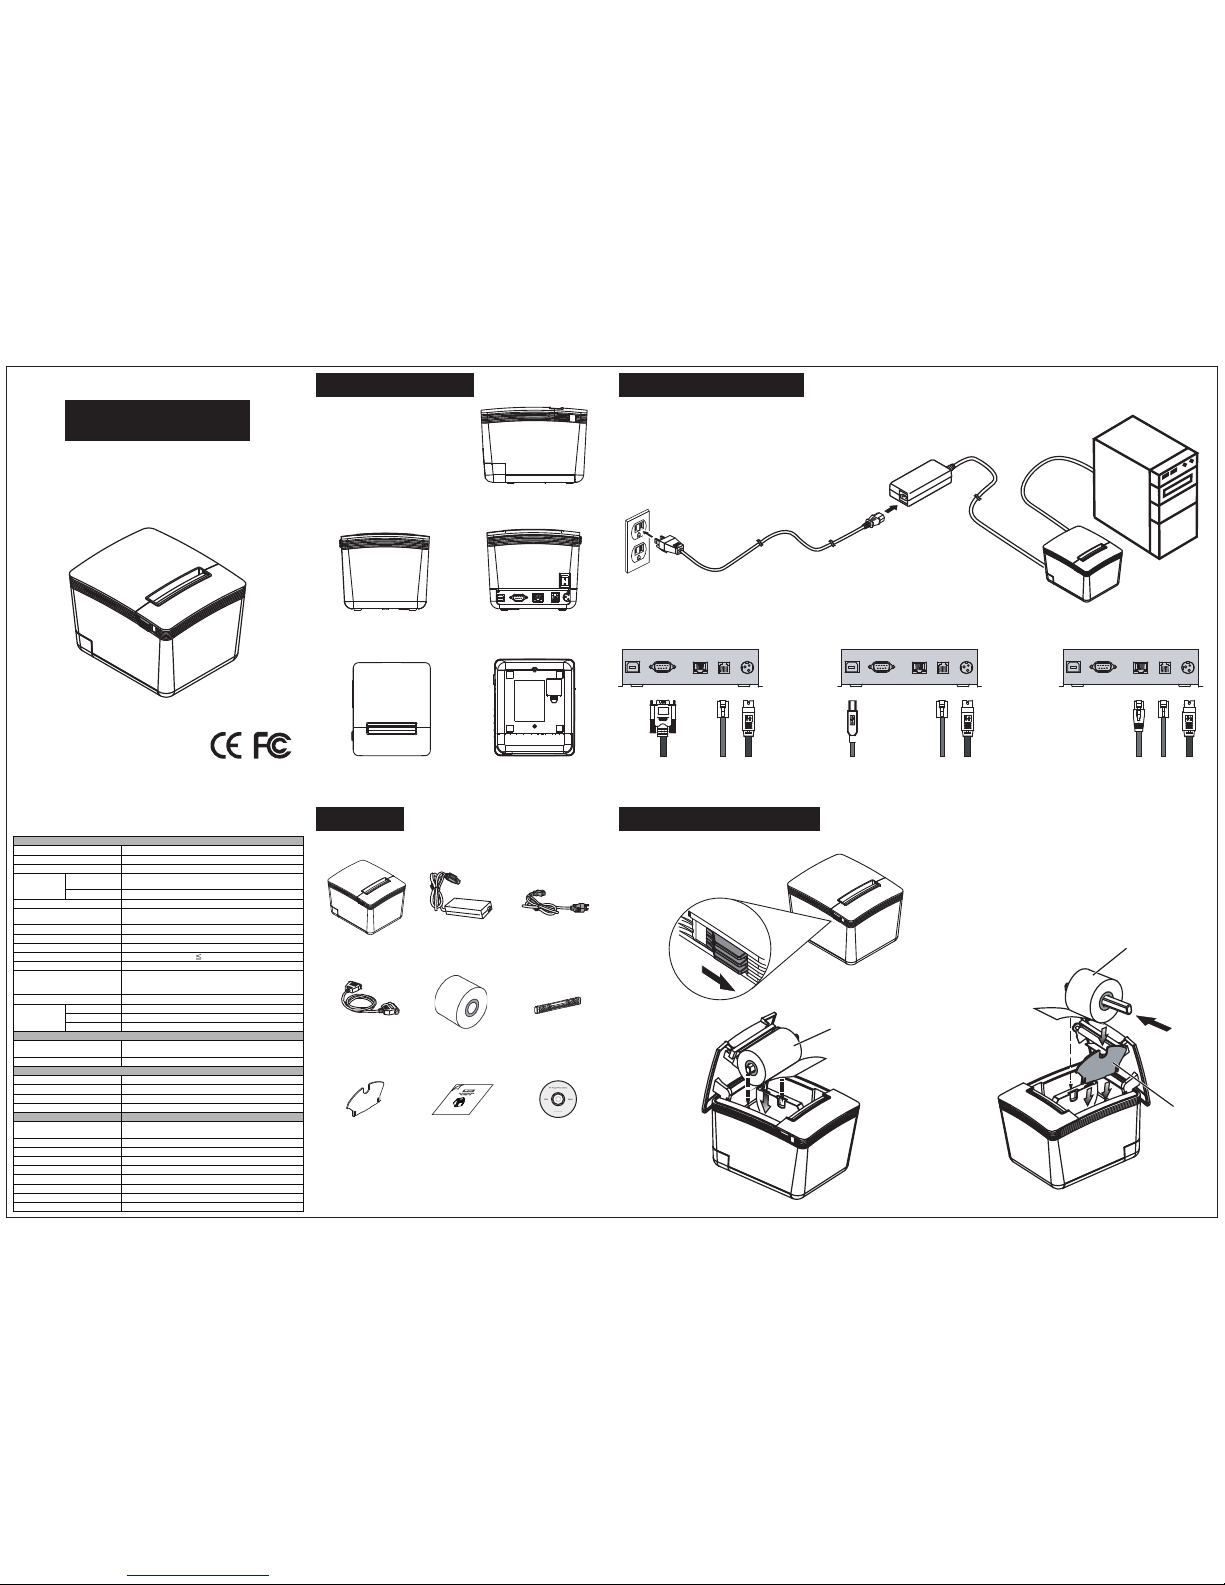
Front
TOP Bottom
Rear
Side
Product Overview
General
Print Method
Thermal line printing
Print Speed 250mm/sec
Print Life
100 Km
Print Font
(ASCII Mode)
ANK Font.
Font A: 12 x 24 dots, Font B: 9 x 17 dots
Graphic Font)
Chinese Character: 24 x 24 dots
Print Resolution 576 dots/line or 512 dots/line
Print Font Character Support
International Font, Big 5 Chinese,
GB Chinese, Japanese, Korean selectable
Character Per Line 48 (Font A) / 64(Font B)
Effective Print Width
72mm
Paper Width
79.5mm± 0.5mm
Paper Roll Diameter 83mm
Paper Thickness
0.06~0.08mm
Driver
Win 9X/Win ME/Win 2000/
Win 2003/Win NT/Win XP/Win Vista/Win 7/Win 8,
compatible with EPSON and SAMSUNG
Print Command ESC/POS print commands set
Buffer
Receipt
128K bytes
User-Defined
128K bytes
NV Flash
256K bytes
Interface
I/O Interface
Multi I/O Interface
(Serial +Ethernet +USB)
Cash Drawer
DC 24V/1A, 6-Wire RJ-11
Notification
Indicator Audio and LED Indicators
Auto Cutter
Partial
Paper End Notice
Yes
Over-Heat Halt-on Protection
Yes
Others
Power Input
24VDC/2.5A
(External Adapter: 100~240VAC 50/60Hz)
Color
Black / White
Compliance
FCC / CE / WEEE / RoHS
Weight
1200g ( without cable )
Dimension (mm) 174(L) x 144(W) x 124(H)
Operating Temperature
0°C~45°C
Operating Humidity
10% ~ 80% RH, non-condensing
Storage Temperature
-10°C~ 60°C
Storage Humidity 10% ~ 90% RH non-condensing
Specification
Contents
* Power Cord is selectable depending on the types of electrical plug.
** Printer cable is selectable depending on the interface required
(RS-232, USB, RJ-45 or Parallel).
Please refer to the nearest local representatives for further information.
RS-232
HOST PC
Printer
Power Adapter
Printer Cable
Power Cord
USB Ethernet (RJ-45)
RS-232 RJ-11 Power
USB RJ-11 Power RJ-45 RJ-11 Power
Paper Width
Guide
Paper Roll
Paper Roll
Holder
Paper Roll
and
Paper Roll Holder
Installing your Printer
Installing the Paper Roll
Cash
Drawer
Cash
Drawer
Cash
Drawer
Printer Unit Power Adaptor *Power Cord
*
*Printer Cable Paper Roll
Paper Roll
Holder
Paper Width Quick Installation
Guide
Utility CD
QRC-PRINTER
Page 2
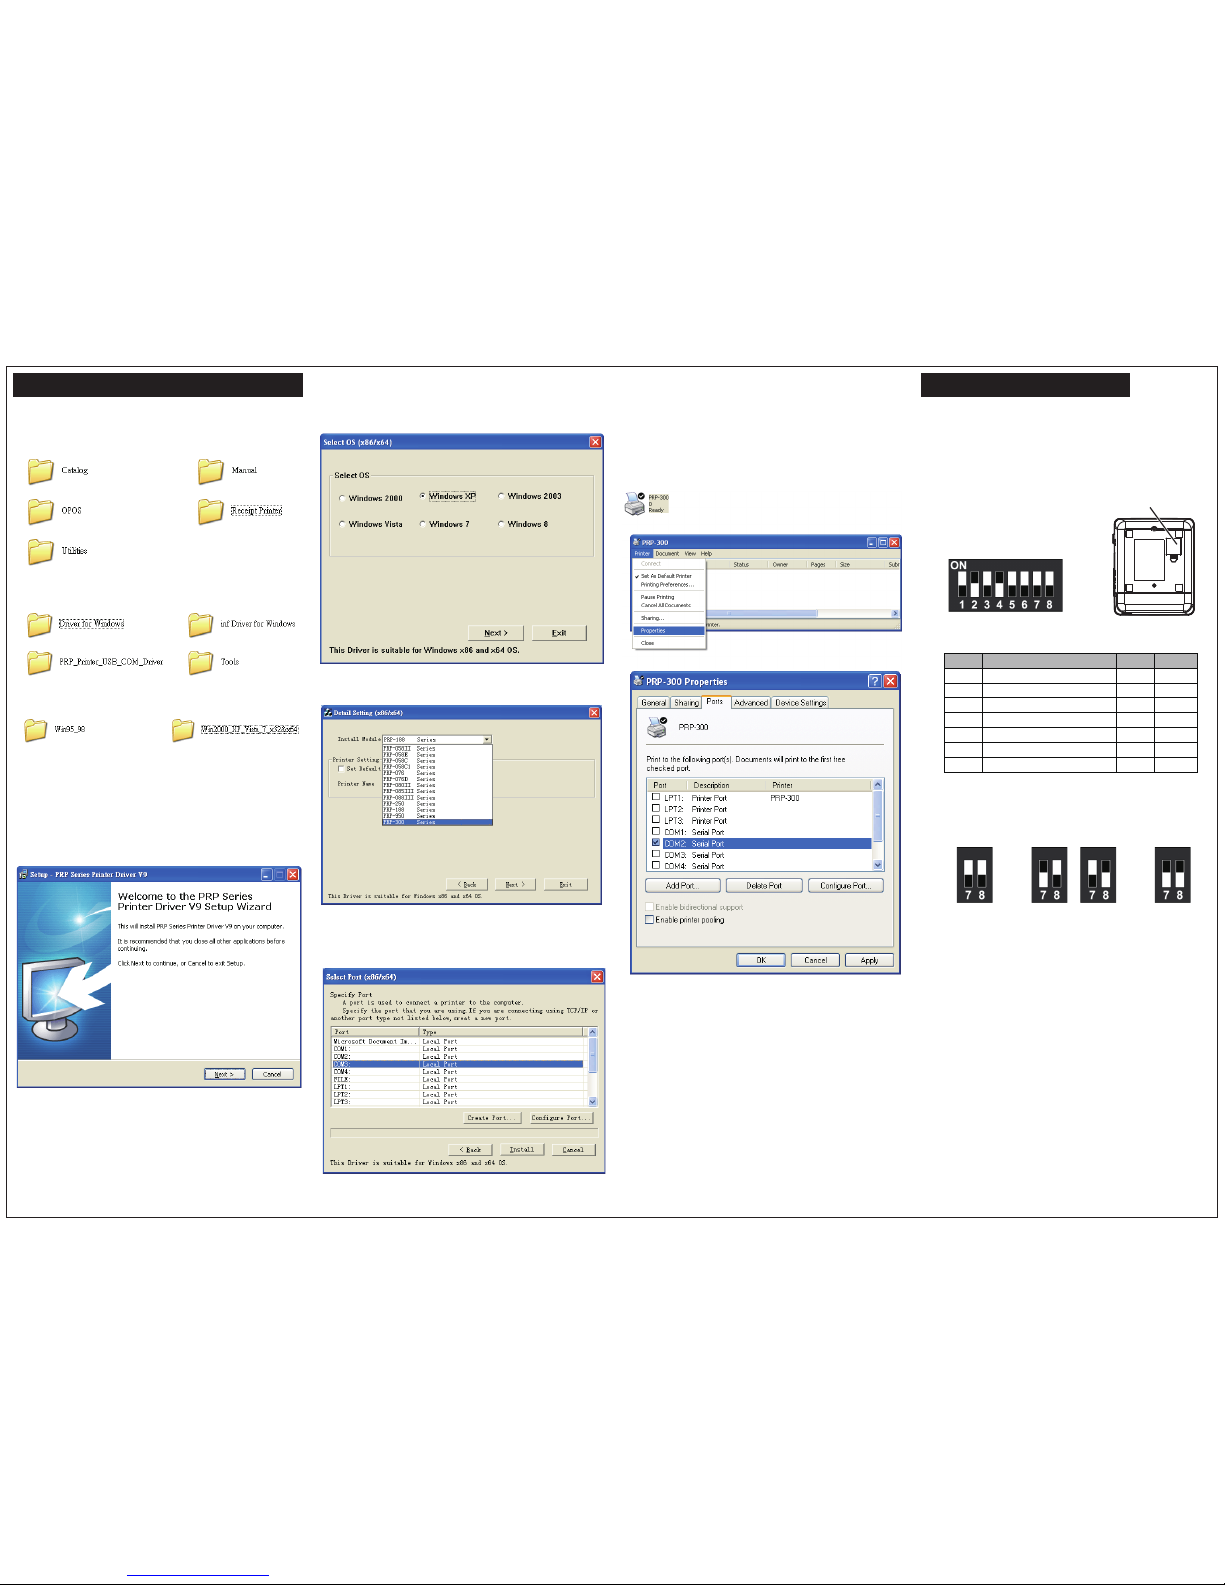
Installing the Driver of The Printer DIP Switch Configuration
1. Place the supplied Utility CD into the CD-ROM drive.
2. Browse the CD and open the folder “Receipt Printer”.
3. Select the subfolder “Driver for Windows” to access the
driver suitable for the operating system.
(For example: select “Win2000_XP_Vista_7_x32&x64”
for Windows XP version).
4. Double click the icon “PRPDRVEN.EXE”
to initiate the installation.
5. Select the Operating System.
6. Select the proper Printer Model Number.
7. Printer Interface Setting:
Select the communication interface
(COM port number or LPT port number).
Click “Install” to complete the installation.
8. Click “Finish” to exit the menu.
9. Port Setting:
Remember to access the properties of your printer
(Start>>Printers and Faxes>> and double-click the icon
to enter).
Make sure the port of printer is correctly configured.
To change the setting of the printer manually:
1. Turn off the printer.
2. Remove the protective cover of the DIP Switches.
3. Adjust the DIP switches to configure the printer.
Protective Cover
DIP Switches
DIP Function ON OFF
1 Paper Cutter No Yes*
2
Audio Alarm
Yes *
No
3
Print Density
Dark
Light *
4 Two-byte Character Code *No Yes
5 Character Per Line 42 48 *
6
Cutter with Cash Draw er
Yes
No *
7 & 8
Baud Rate Setting
---
OFF*
Baud Rate Setting
19200
(*Default)
9600 115200 38400
Note:
For USB Interface Installation
Please install the Virtual COM driver before installing
the printer driver.
Please refer to the Instruction Manual for further information.
Ver. 1.0 2013
 Loading...