

Tyson Bio HT100-B, HT100-C User Manual

The Tyson Bio HT100-B Blood Glucose Test Strips give accurate results when the following limitations are observed.
˙Use only capillary whole blood from nger, palm, and forearm.
˙Do not use for testing neonatal blood.
˙Altitude higher than 10745 feet may cause inaccurate results.
˙Severe dehydration and excessive water loss may lead to inaccurate blood glucose test results.
Consult your physician immediately if you believe you are suering from severe dehydration.
˙For single-patient use only and should not be shared.
˙Should not be used to test critically ill patients.
˙Inaccurate results may occur in severely hypotensive individuals or patients in shock.
˙Inaccurate low results may occur for individuals experiencing a hyperglycemic-hyperosmolar state, with or without ketosis.
˙For In vitro diagnostic only.
˙For over the counter use.
˙Alternative site testing should be performed only during steady-state (when glucose is not changing rapidly).
˙Alternative site measurements should never be used to calibrate continuous glucose monitors (CGMs).
˙Alternative site measurements should never be used for insulin dosing calculations.
Limitations
Warning
•This device is not intended for use in healthcare or assisted-use settings such as hospitals, physician
oces, or long-term care facilities because it has not been cleared by FDA for use in these settings,
including for routine assisted testing or as part of glycemic control procedures.
•Use of this device on multiple patients may lead to transmission of Human Immunodeciency Virus (HIV),
Hepatitis C Virus (HCV), Hepatitis B Virus (HBV), or other bloodborne pathogens.

Limitations
Introduction
Important Safety Instructions
About Tyson Bio HT100-B Blood Glucose Monitoring
System About Tyson Bio HT100-B Blood Glucose Meter
About Tyson Bio HT100-B Blood Glucose Meter Display
About Tyson Bio HT100-B Blood Glucose Test Strip Setting
Up Tyson Bio HT100-B Blood Glucose Meter
Installing/Replacing Batteries
Date/Time Setup
Reminder Alarms Setup
HI/LO Alarms Setup
Important Information
Using Tyson Bio HT100-B Code-Calibration Blood Glucose Test Strip
Obtaining a Blood Sample
Applying a Blood Sample
HI and LO Readings
Available Alternate Sites Testing
01
02
03
04
05
06
07
08
08
09
10
11
12
13
14
15
16
Table of Content

17
17
18
19
20
21
21
22
25
27
28
30
32
33
34
34
35
Table of Content
Control Solution
Performing a Control Solution Test
Control Solution Results
Memory Features
View Day Average Results
Exiting the Memory Mode
Transfer Test Results to a Computer
Bluetooth Data Transfer (HT100-B Only)
Cleaning and Disinfection Procedure
Care and Storage
Display Messages
Error Messages
Trouble Shooting
Specications
Meter Storage
Icon Description
Service and Warranty

Introduction
Thank you for choosing Tyson Bio HT100-B Blood Glucose Monitoring System to monitor your blood glucose (sugar) level.
It is accurate, easy to use, and quick in response time. This User Manual contains all information needed to operate and
maintain Tyson Bio HT100-B Blood Glucose Monitoring System. Please read carefully before use.
Tyson Bio HT100-B Blood Glucose meter can be used with:
˙Tyson Bio HT100-B Blood Glucose Test Strip
Intended Use Statement
The Tyson Bio HT100-B Blood Glucose Monitoring System is intended for the quantitative measurement of glucose in fresh
capillary whole blood samples drawn from the ngertips, forearm, or palm. Alterative site testing should be performed
only during steady-state (when glucose is not changing rapidly). Testing is done outside the body (In Vitro diagnostic use).
It is intended for self-testing by people with diabetes at home as an aid to monitor the eectiveness of diabetes control. It
should only be used by a single patient and it should not be shared. It is not indicated for the diagnosis of or screening for
diabetes or for neonatal use.
The Tyson Bio HT100-B Blood Glucose Monitoring System is comprised of the Tyson Bio HT100-B Blood Glucose Meter and
Tyson Bio HT100-B Blood Glucose Test Strip.
01

Important Safety Instructions
˙All parts of the system should be considered potentially infectious and are capable of transmitting blood-borne
pathogens between patients and healthcare professionals.
˙The meter and lancing device are for single person use. Do NOT share them with anyone including other family
members!
˙All parts of the kit are considered biohazardous and can potentially transmit infectious diseases, even after you
have performed cleaning and disinfection.
˙Cleaning Solution and Disinfecting Solution: Clorox Bleach Germicidal Wipes (Clorox Professional Products Company. EPA
Reg. No. 67619-12).
Reference:
˙˙“ FDA Public Health Notication: Use of Fingerstick Devices on More than One Person Poses Risk for Transmitting
Bloodborne Pathogens: Initial Communication” (2010)https://www.fda.gov/MedicalDevices/Safety/AlertsandNotices/
ucm234889.htm
˙“ CDC Clinical Reminder: Use of Fingerstick Devices on More than One Person Poses Risk for Transmitting Blood-borne
Pathogens” (2010) http://www.cdc.gov/injectionsafety/Fingerstick-DevicesBGM.html
˙“ CDC: Infection Prevention during Blood Glucose Monitoring and Insulin Administration” (2010) https://www.cdc.gov/
injectionsafety/blood-glucose-monitoring.html
02

Note: 25-strips & 50-strips are sold separately.
About Tyson Bio HT100-B Blood Glucose Monitoring System
The complete kit contains:
˙HT100-B Blood Glucose Meter
˙HT100-B Blood Glucose Test Strip (10 strips)
˙HT100-B Control Solution Level 2
˙Adjustable Automatic Lancing Device
˙10 Sterile Lancets
˙User Manual
˙Quick Reference Guide
˙Test Strip Package Insert
˙Control Solution Package Insert
˙Log Book
˙Carrying case
03
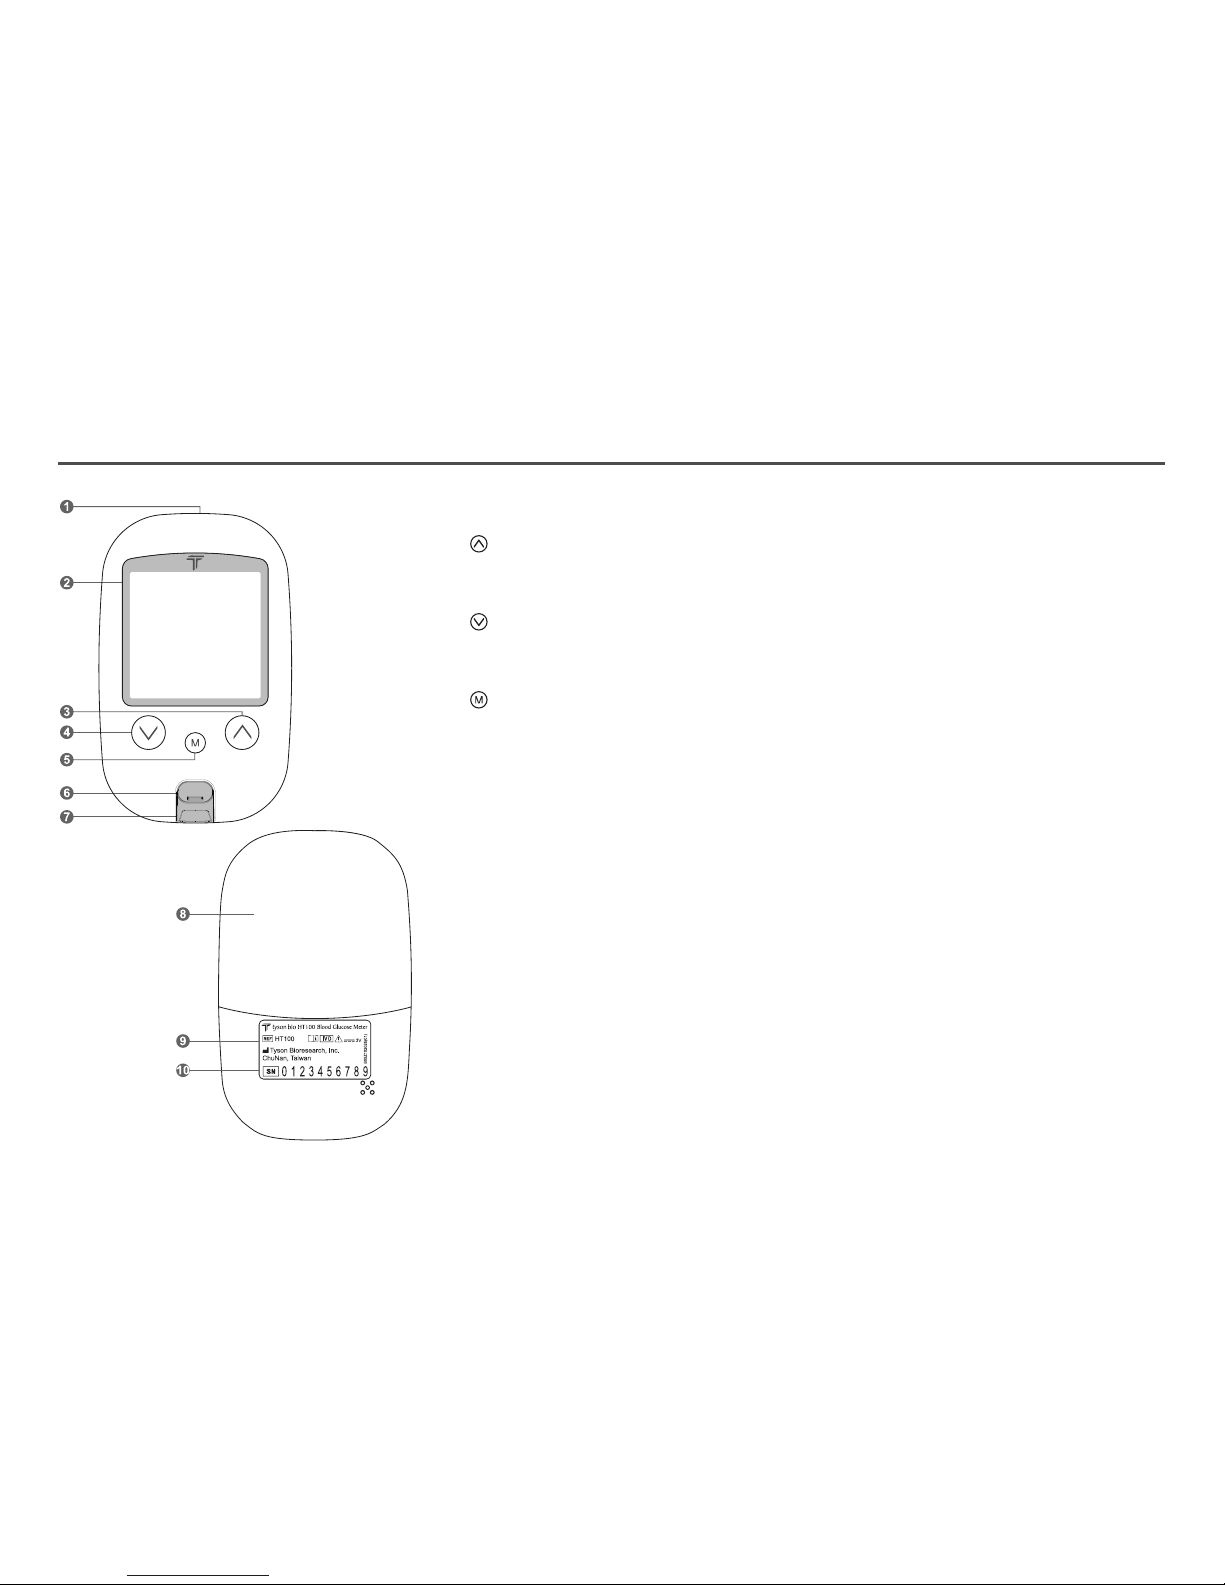
1. Data Port To connect interface cable for data transferring
2. Display To display results in numbers and icons
3. Button Press and hold to enter reminder alarm and HI/LO alarm setup
To adjust numbers and to toggle settings
To browse test results and averages in memory
4. Button Press and hold to enter buzzer setup
To adjust numbers & to toggle settings
To browse test results and averages in memory
5. Button Press and hold to enter the year/date/time setting
To browse Control Solution test results
To turn the meter ON/OFF
6. Strip Ejector Push to eject the test strip
7. Test Port The test strip is inserted here
8. Battery Cover To slide open and close
9. Meter Label Manufacturer information
10.
Serial Numbers
The meter manufacturer serials
About Tyson Bio HT100-B Blood Glucose Meter
04
Note: The mg/dL is the standard unit in the United States. Meters used in the United States must be set to read in mg/dL".
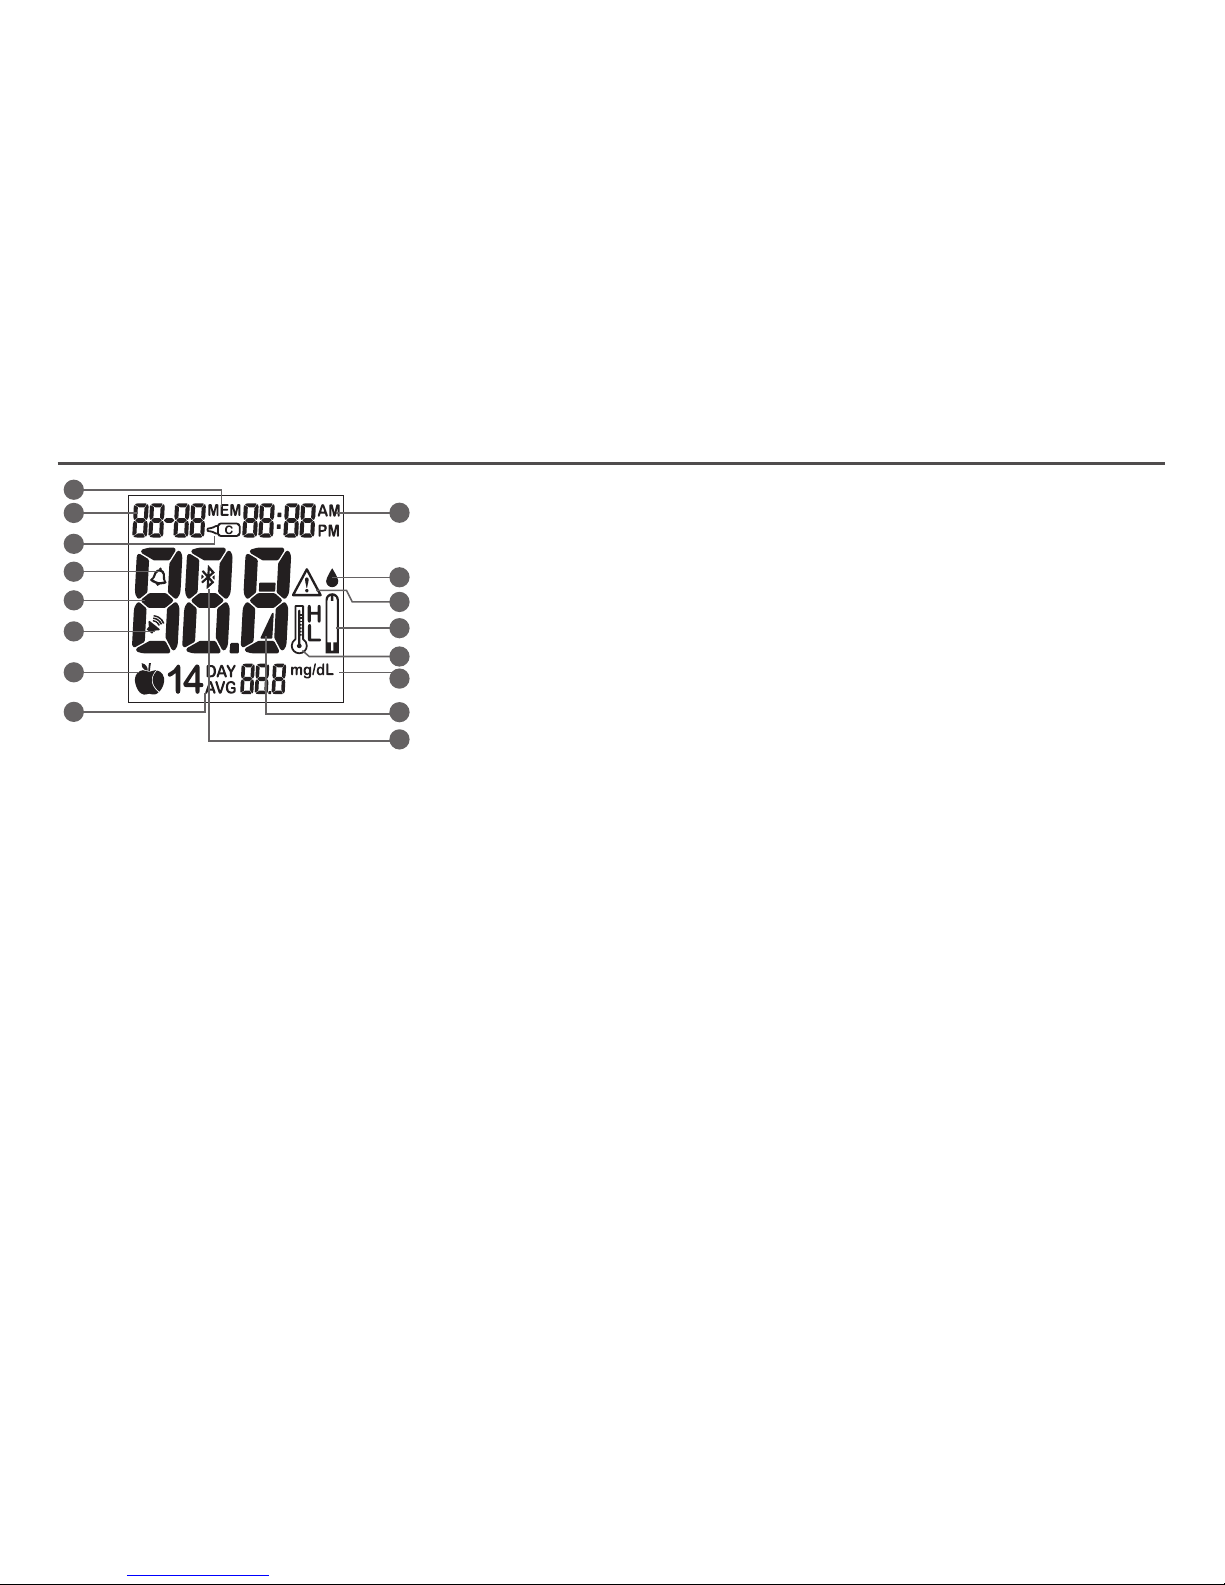
About Tyson Bio HT100-B Blood Glucose Meter Display
1. Memory Icon
Memory mode
2. Year/Date
Display year/date
3. Control Solution Icon
Control Solution test mode and Control Solution test result
4. Alarm Icon
Reminder alarm
5. Test Result
Result display
6. Buzzer Icon
When buzzer is ON
7. Meal Indicator Icon
Pre-meal and post-meal
8. 14 day Average
14 day average result
9. Time
Time display
10. Blood Drop Icon
Flashes when the meter is ready to accept your
blood sample to test
11. Warning Icon
Appears when a result is out of range
12. Test Strip Icon
Appears when the meter is ready for a test
13. Temperature Icon
Appears when the meter exceeds normal operating
temperatures
14. Measurement Units
To identify test result units (mg/dL)
15. Battery Icon
Appears when battery power is low
16. Bluetooth icon
When Bluetooth is on
1
8
2
3
4
5
6
7
14
15
16
13
12
11
10
9
05
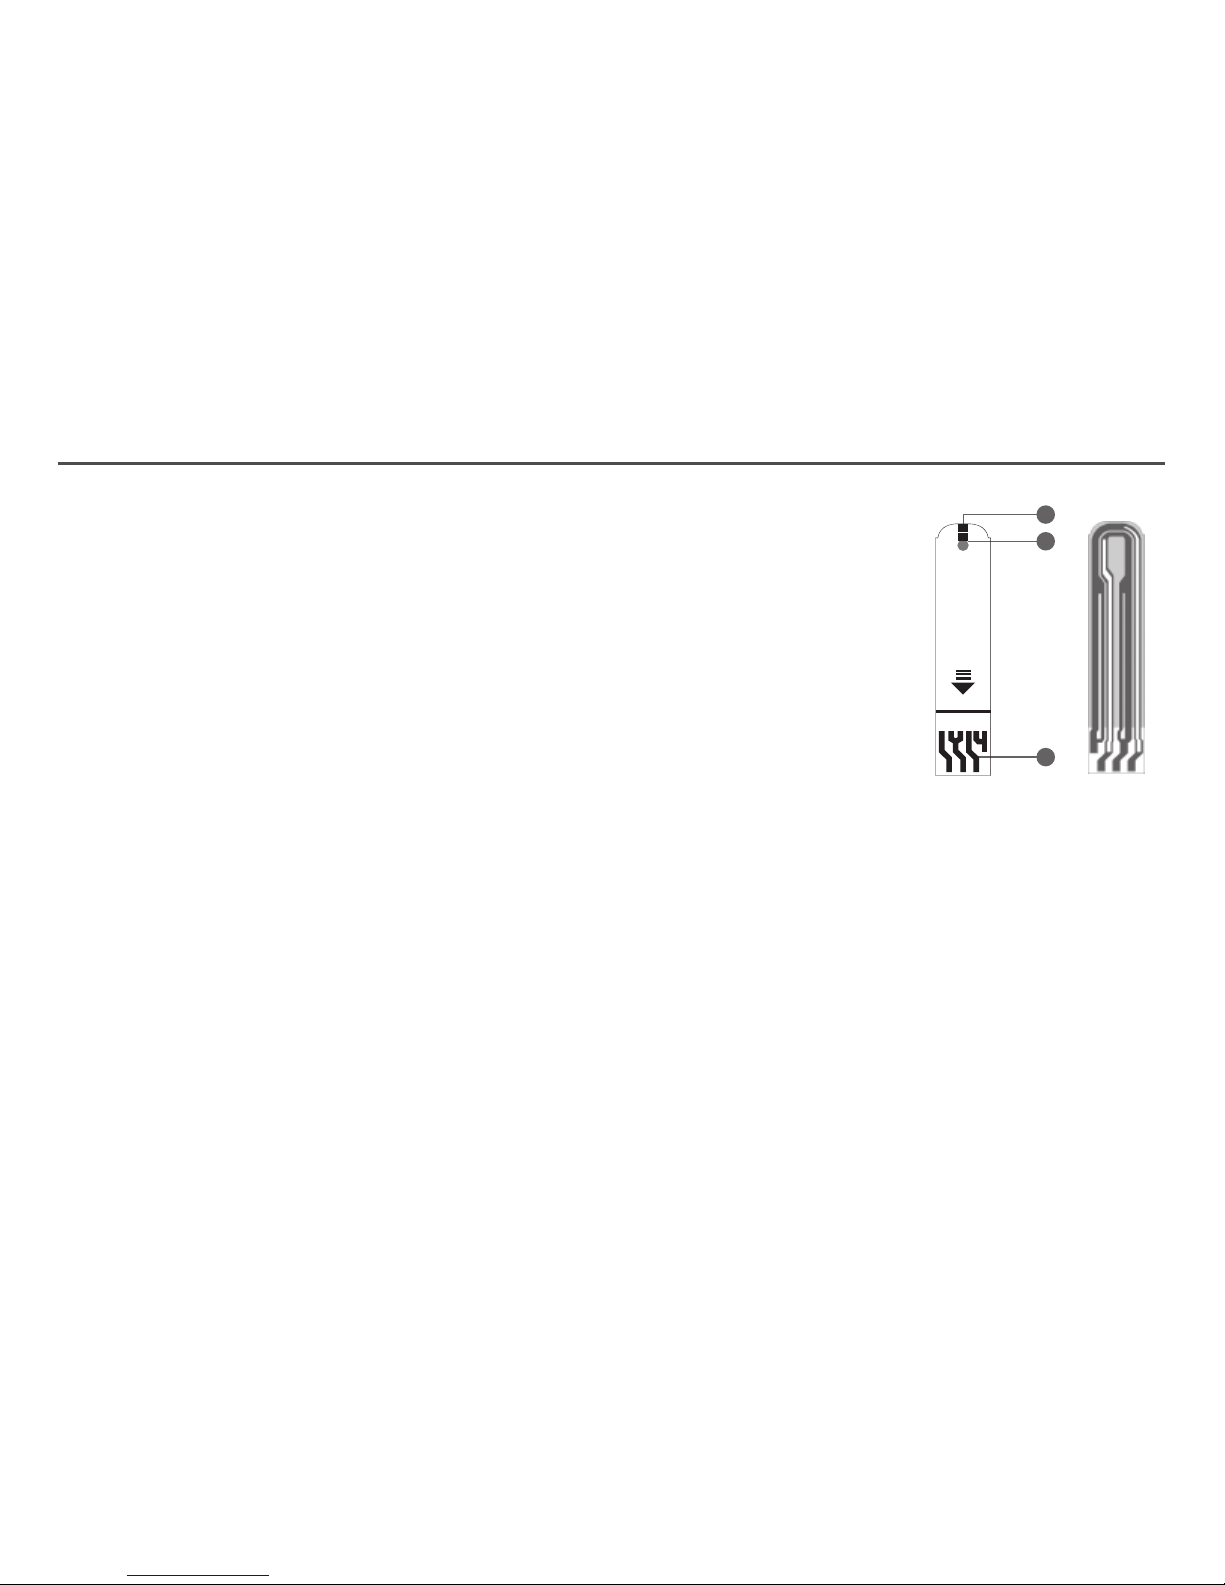
About Tyson Bio HT100-B Blood Glucose Test Strip
Tyson Bio HT100-B Blood Glucose Test Strip is only for Tyson Bio HT100-B Blood Glucose Meter.
Use each strip ONCE ONLY!
A test strip consists of the following parts:
1. Target Area
Where a blood drop or control solution to be applied
2. Conrmation Window
To conrm sucient blood sample and control solution
3. Contact Bar
To be inserted into the test port and to activate the meter (top side up)
1
2
3
top side
06
Blood Glucose Test Strips
HT100
Control Solution Range
Store at 39 ~ 86°F(4 ~ 30°C), 10~90% RH.
Do not refrigerate.
Do not store test strips outside this vial.
Re-cap immediately.
WARNING: Always close cap tightly.
For testing of glucose in capillary whole blood.
Use within 1 months after first opening.
Do not use past the expiration date.
Use Tyson Bio HT100 meter only !
Test Strips
Tyson Bioresearch, Inc.
5F, No. 16 , 18 , 20 , 22 , Kedong 3rd RD. ,
Zhunan Township , Miaoli County 35053 ,
Taiwan (R.O.C.)
Tel : +886-37-585998
Customer Service
U.S.A. +1-800-948-3894
30˚C
4˚C
Level 1: ~ mg/dL
Level 2: ~ mg/dL
Level 3: ~ mg/dL
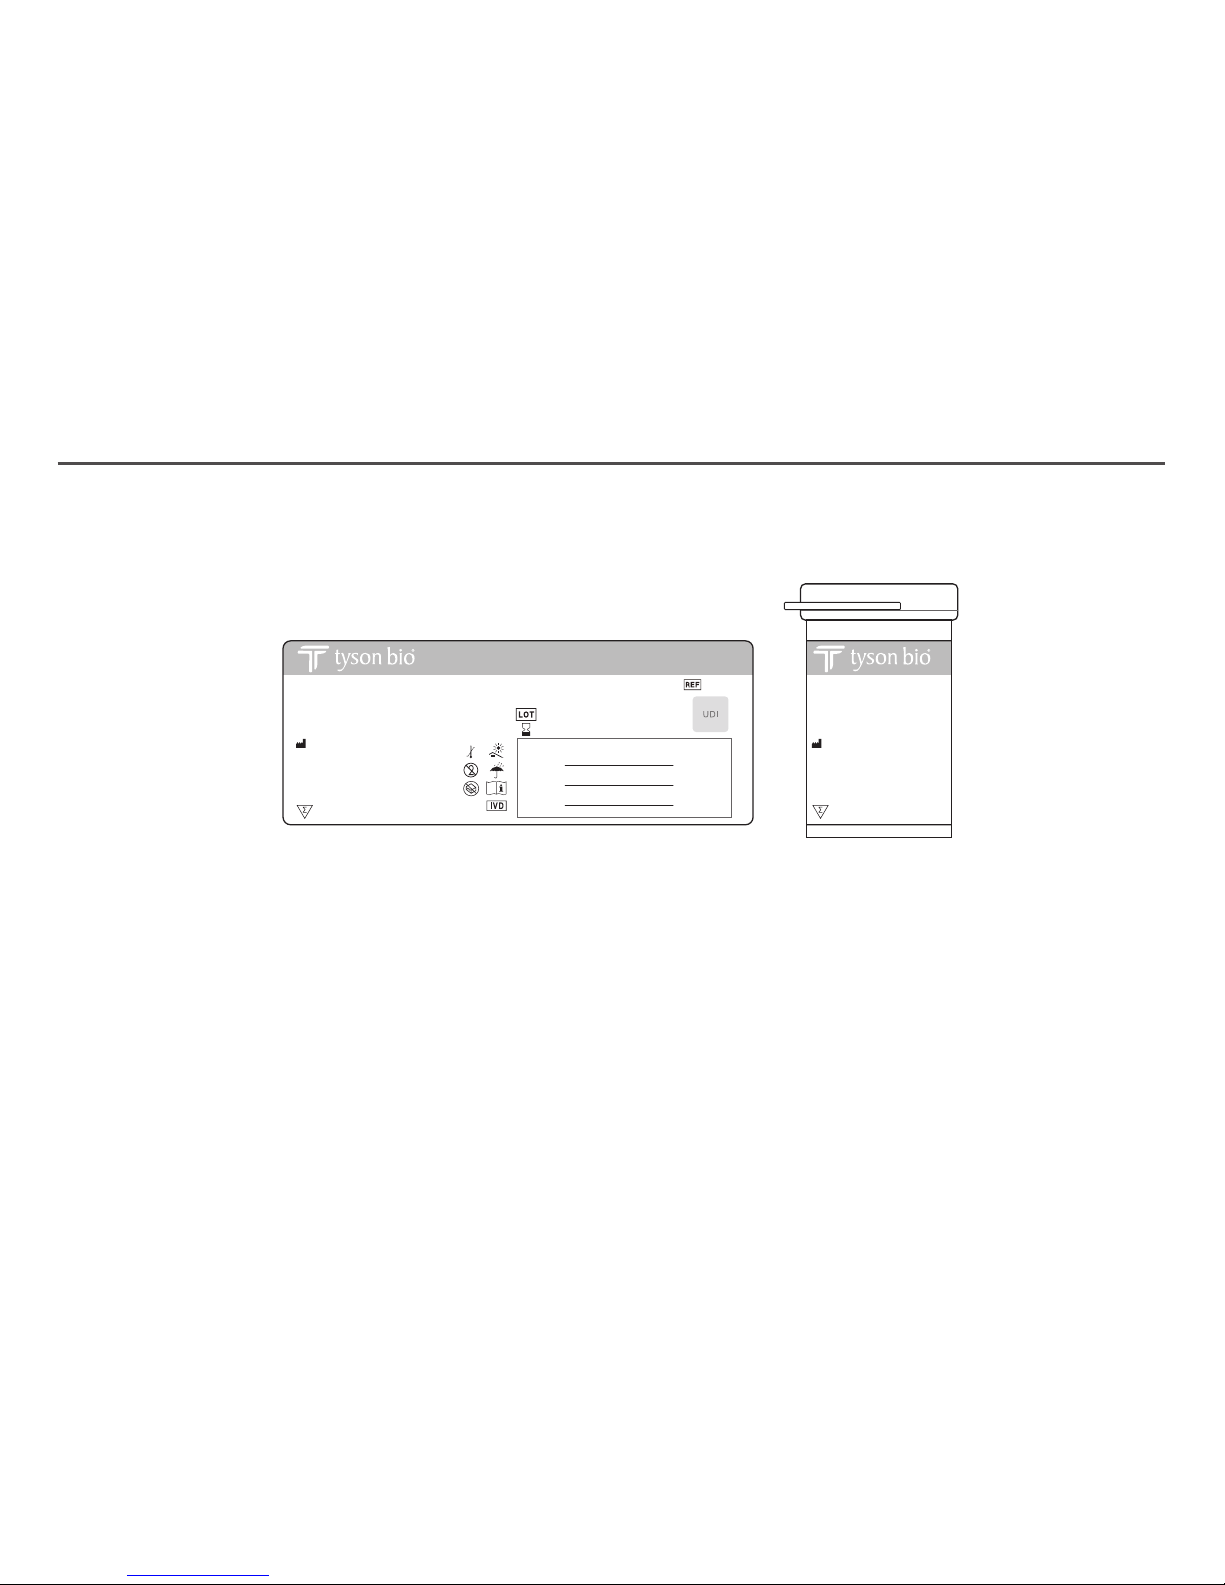
Tyson Bio HT100-B Blood Glucose Test Strip
Test Strip Vial Label Test Strip Vial
Blood Glucose Test Strips
HT100-B
Control Solution Range
Store at 39 ~ 86°F(4 ~ 30°C), 10~90% RH.
Do not refrigerate.
Do not store test strips outside this vial.
Re-cap immediately.
WARNING: Always close cap tightly.
For testing of glucose in capillary whole blood.
HT100-B
Use within 1 months after first opening.
Do not use past the expiration date.
Use Tyson Bio HT100-B meter only !
AL001-0119000N (01) Rev. date: 12/2016
Test Strips
Tyson Bioresearch, Inc.
5F, No. 16 , 18 , 20 , 22 , Kedong 3rd RD. ,
Zhunan Township , Miaoli County 35053 ,
Taiwan (R.O.C.)
Tel : +886-37-585998
Customer Service
U.S.A. +1-800-948-3894
30˚C
4˚C
Level 1: ~ mg/dL
Level 2: ~ mg/dL
Level 3: ~ mg/dL
07
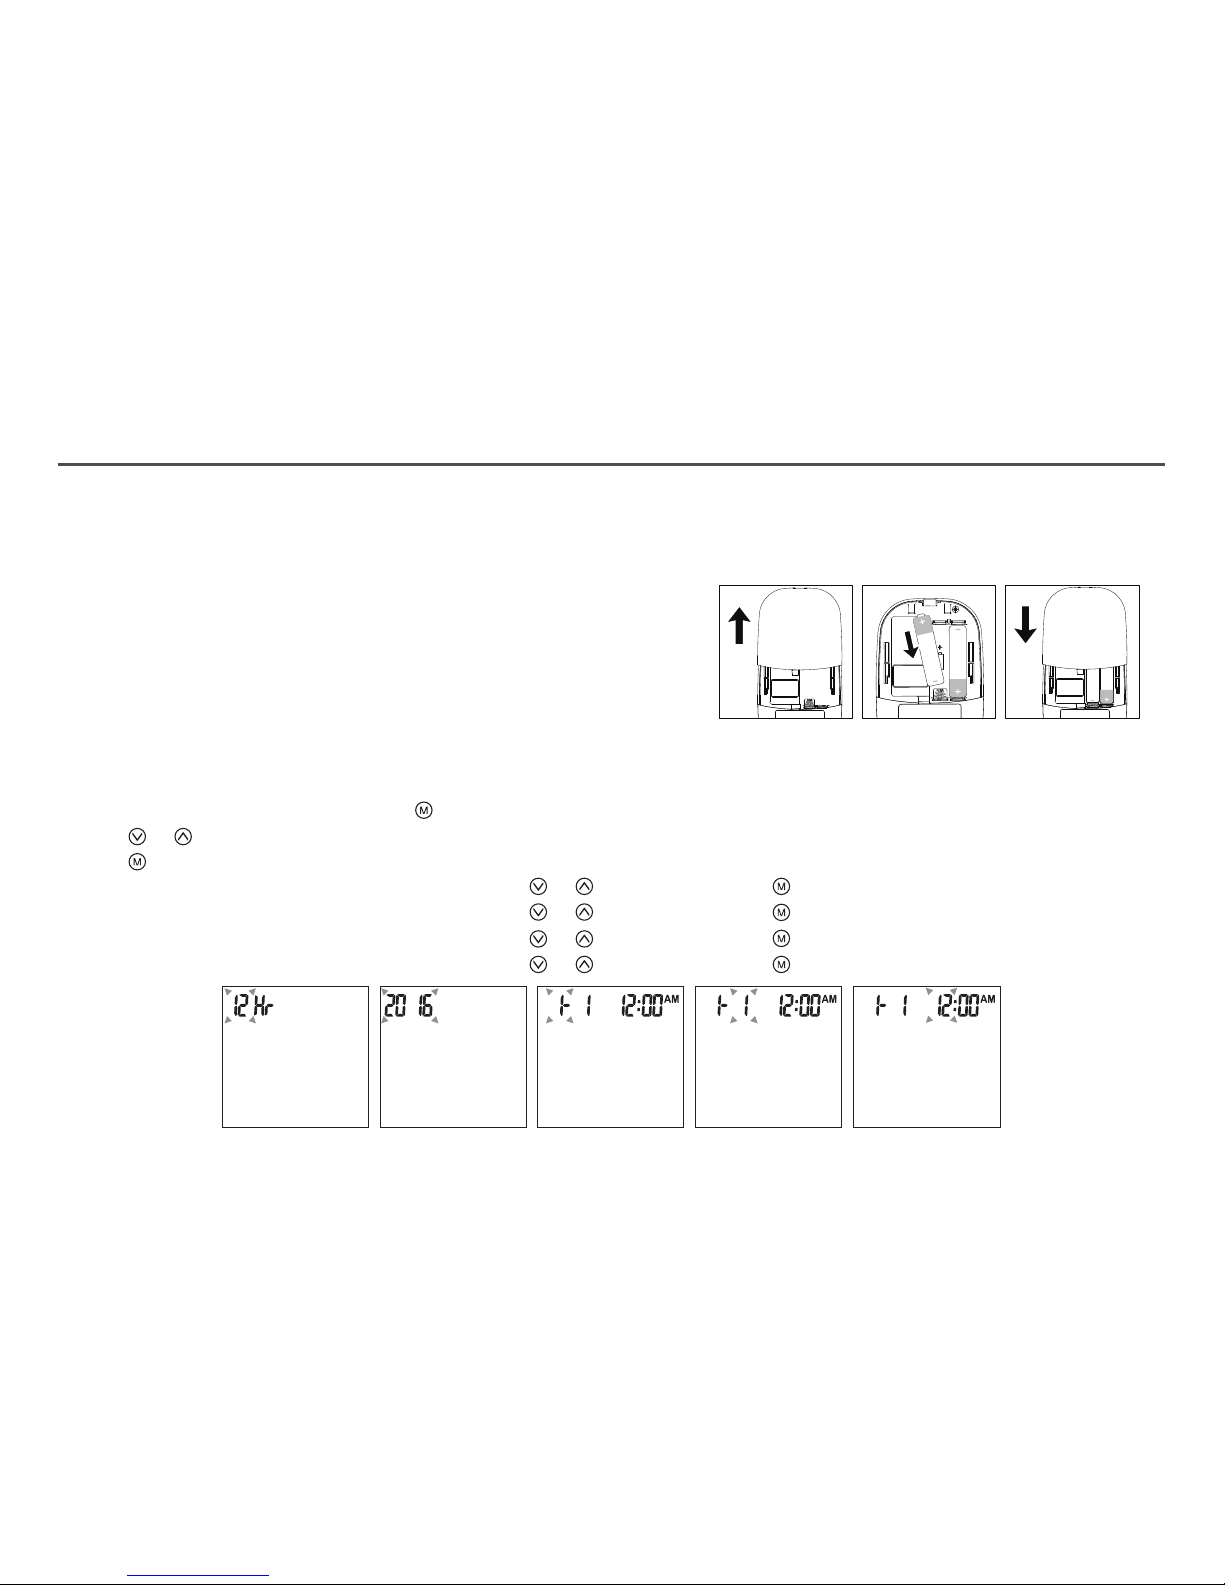
Installing/Replacing Batteries
1. Slide and remove the battery cover (Fig.1).
2. Install batteries with the + and – ends matching indication marks
on the battery compartment (Fig.2).
3. Slide battery cover back into place (Fig.3).
Date/Time Setup
1. When the meter is o, press and hold for 4 seconds to enter this setting mode.
2. Press or to select “24hr” or “12hr”.
3. Press to conrm (Fig.4).
4. The numbers of “year” will appear and ash. Press or to adjust and Press to conrm (Fig.5).
5. The number of “month” will appear and ash. Press or to adjust and press to conrm (Fig.6).
6. The numbers of “date” will appear and ash. Press or to adjust and press to conrm (Fig.7).
7. The numbers of “hour” will appear and ash. Press or to adjust and press to conrm (Fig.8).
3232
Setting Up Tyson Bio HT100-B Blood Glucose Meter
˙Make sure the batteries are properly installed
˙The default is set to January 1st, 0:00
˙Please follow instructions to properly setup the meter
(Fig.2)(Fig.1) (Fig.3)
(Fig.4) (Fig.5) (Fig.6) (Fig.7) (Fig.8)
08
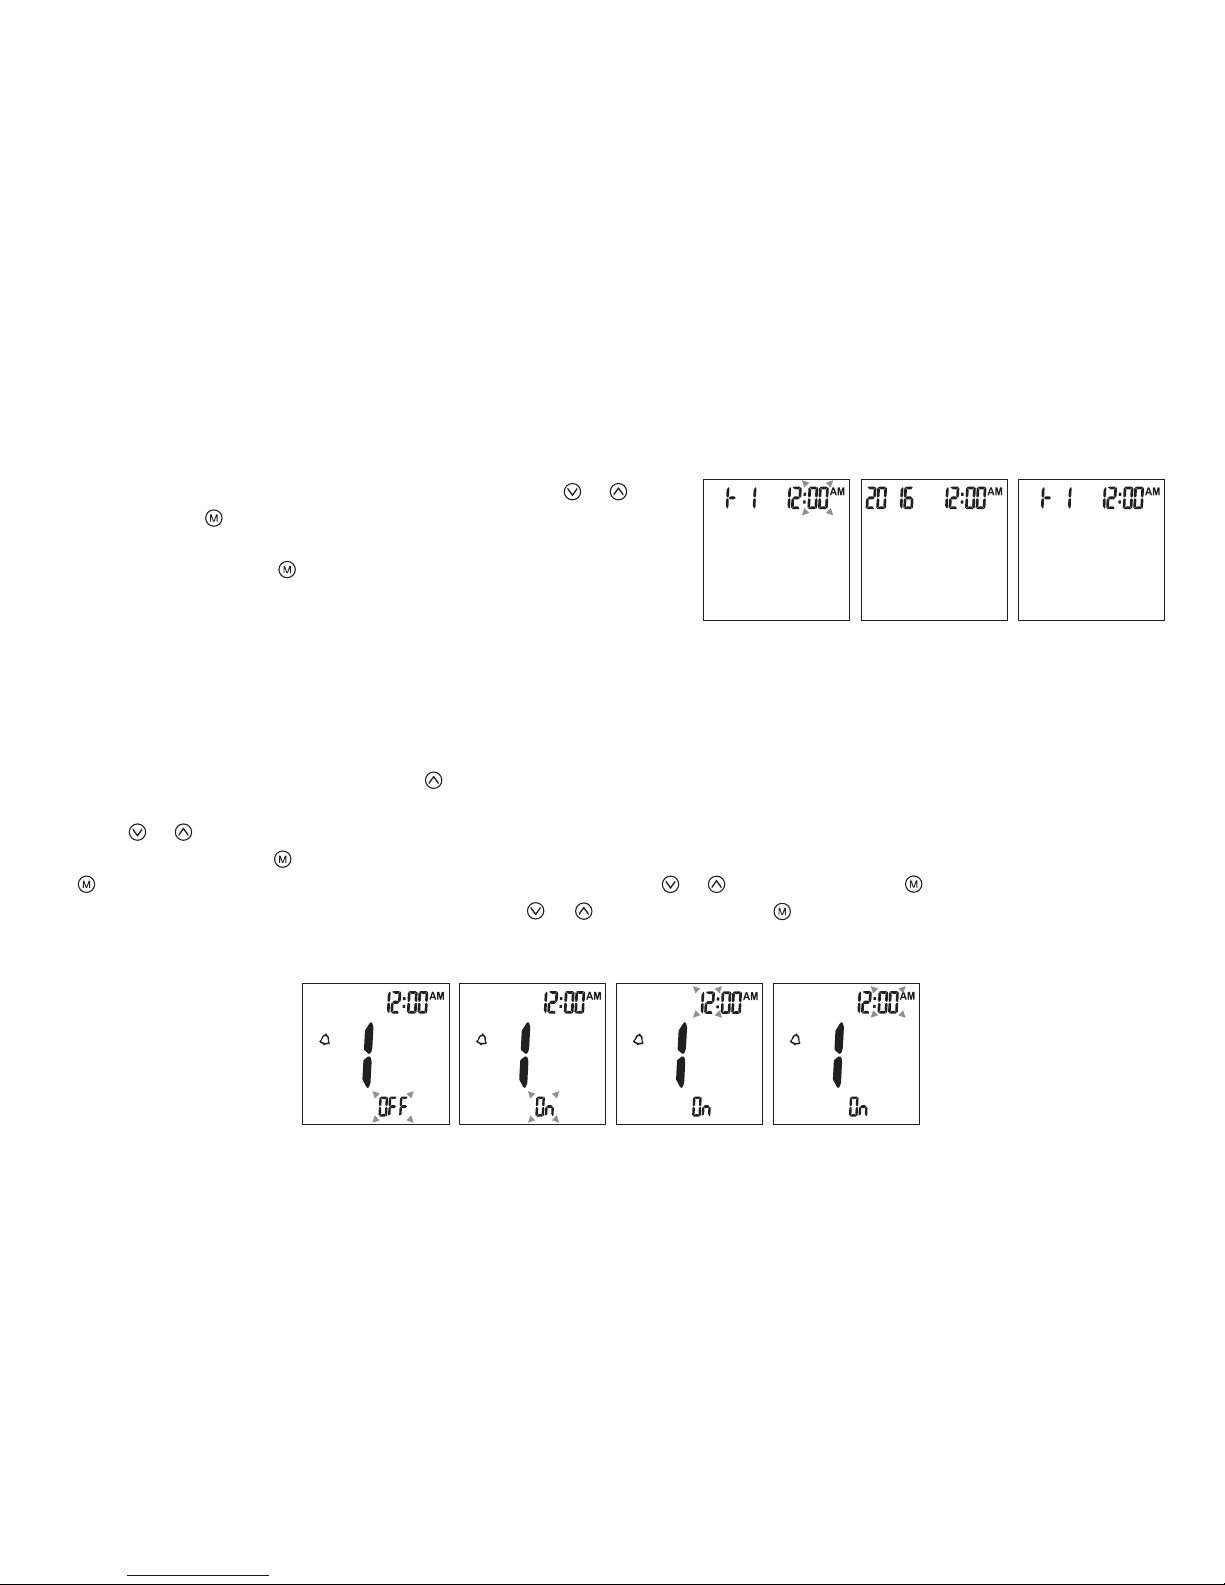
Tyson Bio HT100-B meter provides 4 reminder alarms. All reminder alarms are OFF as default. Please follow these steps to
setup reminder alarms.
1. When the meter is OFF, press and hold for 4 seconds or longer to enter setting.
2. The rst reminder alarm will appear on the display (Fig.12).
3. Press or to select “ON” or “OFF”.
4. If “OFF” is chosen and pressed, the meter will proceed to the next reminder alarm setting. If “ON” is chosen (Fig.13) and
pressed, the number of “hour” will start ashing (Fig.14). Press or to adjust and press to conrm.
5. The numbers of “minutes” will ash (Fig.15). Press or to adjust and press to conrm. The meter will go to the next
reminder alarm setting.
6. Repeat steps 3 to 5 to set the rest of reminder alarms.
8. The numbers of “minute” will appear and ash. Press or to
adjust. Press to conrm (Fig.9).
9. The set date and time will now be displayed on screen
(Fig.10, Fig.11). Press to turn o the meter.
10. The meter date/time setting is complete.
(Fig.9) (Fig.10) (Fig.11)
Reminder Alarms Setup
(Fig.12) (Fig.13) (Fig.14) (Fig.15)
09

HI/LO Alarms Setup
1. Press to enter the HI alarm setting after completing the reminder alarm setup.
2. Press or to set “ON" and press to conrm. If "OFF" is chosen, the meter will skip this setting (Fig. 16, 17).
3. To change the alarm setting, press or until you reach your desired HI setting and then press to conrm. (Fig.18)
The HI alarm value range is 100 ~ 400mg/dL and the default value is 180mg/dL.
4. Continue to the LO alarm setting (Fig.19), repeat Step 2 and 3 (Fig.20, 21) to conrm or to change LO alarm setting.
The LO alarm value range is 40 ~ 90mg/dL and the default value is 70mg/dL.
5. Press to nish setting and the meter will be turned o.
NOTE:
The hypoglycemic (LO) and hypoglycemic (HI) alarm glucose values should be selected in consultation with your
health care provider.
(Fig.16) (Fig.17) (Fig.18)
(Fig.19) (Fig.20) (Fig.21)
10
 Loading...