

Page 1

User’s Manual
For in vitro diagnostic use only
EVOLVE
Blood Glucose Monitoring System
TysonBio
Page 2

Page 3

Important Information ..................................................................................3
Introduction ..................................................................................................7
About the Product ........................................................................................8
About the TysonBio EVOLVE Meter .....................................................9
About the TysonBio EVOLVE Meter Display .......................................11
About the TysonBio EVOLVE Test Strip ..............................................13
About the TysonBio EVOLVE Test Strip Vial .......................................14
About the Glucode Chip .....................................................................15
Installing/Replacing the Battery ..........................................................16
Setting Up the Meter ...................................................................................17
Setting Up the Date, Time ...................................................................17
Setting Up Alarm ................................................................................18
Unit Selection and Code Setting.........................................................21
Coding Your TysonBio EVOLVE Meter ......................................................22
Table of Contents
1
Page 4

The Control Solution Test ..........................................................................24
Testing Your Blood Glucose Level ............................................................28
Preparing the Test Strip ......................................................................29
Obtaining a Blood Sample .................................................................30
Applying Blood Sample to the Test Strip .............................................31
Memory Features ........................................................................................34
Transfer Test Results to a Computer ........................................................36
Care and Storage ........................................................................................37
Display Messages ......................................................................................38
Specications .............................................................................................45
Limitations of the Procedure ..............................................................47
Service and Warranty .................................................................................47
Customer Service
2
Page 5
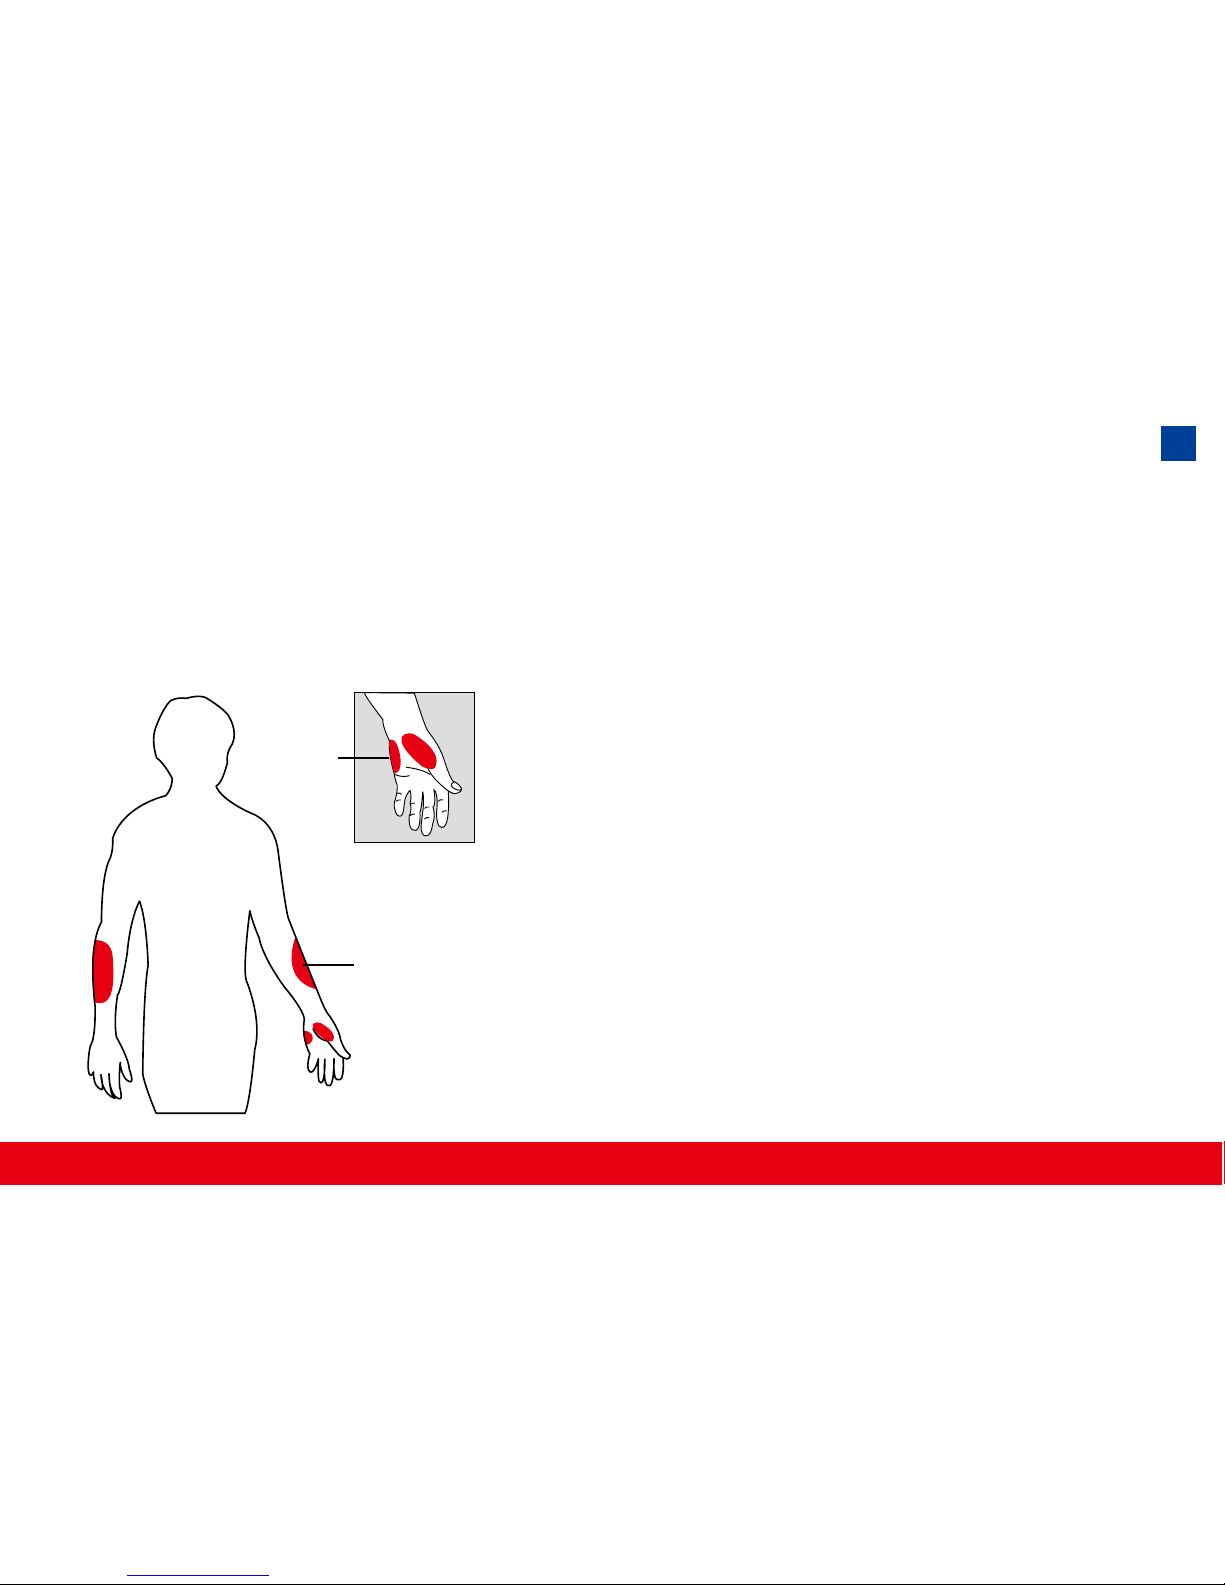
Available Alternative Sites Testing : Palm and Forearm.
TysonBio EVOLVE Blood Glucose Monitoring System provides you alternative sites testing (AST). This system provides you to test on the palm and the
forearm with the equivalent results to ngertip testing.
There are limitations for doing AST. Please
consult your healthcare professional before
you do AST.
Forearm
Palm
Important Information
3
Page 6

Alternative site results differ from ngertip results when glucose levels are
changing rapidly such as after a meal, after taking insulin, during exercise,
or when you are ill or under stress. Use blood from a ngertip rather than an
alternative site if:
● you think your blood glucose is low,
● you don’t regularly have symptoms when your blood glucose is low, or
● how you feel doesn’t match the results from the alternative site.
● when you have just taken insulin, or any time during or after exercise.
● when there are unknown variables occurring in your day, such as illness.
● whenever you are about to drive.
4
CAUTION:
1. Physiologic differences in the circulation between the nger and other test
sites like the forearm and palm may result in differences in blood glucose
measurements from the other test sites and your ngertips. Changes in
blood glucose may be observed in nger blood samples sooner than blood
samples from the forearm and other alternate sites. Rub the alternate test
sites about 20 seconds before lancing. If you are testing for hypoglycemia
(low blood glucose), or if you suffer from hypoglycemia unawareness, we
recommend that you test on your ngertips.
Page 7

2. Talk to your doctor to see if alternative site testing is right for you. With a
little bit of education, you can give your ngertips a rest and maybe test
more often than you do now. For people with diabetes, more frequent testing is a good thing. Just remember: any time you want to be sure of an ac-
curate, up-to-date blood glucose reading, test on your ngertip.
3. We strongly recommend you do AST ONLY in the following intervals:
● In a pre-meal or fasting state (more than 2 hours since the last meal).
● Two hours or more after taking insulin.
● Two hours or more after exercise.
DO NOT use AST if:
● You think your blood glucose is low.
● You are unaware of hypoglycemia.
● Your AST results do not match the way you feel.
● You are testing for hyperglycemia.
● Your routine glucose results are often uctuating.
● If you are pregnant.
5
Page 8

● Low or high blood glucose readings can indicate a potentially serious med-
ical condition. If your blood glucose reading is unusually low or high, or if
you do not feel the way your reading indicates, repeat the test with a new
test strip. If your reading is not consistent with your symptoms or if your
blood glucose result is less than 60 mg/dL (3.3 mmol/L) or higher than 240
mg/dL (13.3 mmol/L) you should contact your healthcare professional and
follow his or her treatment advice.
● Any change or administer of medication based on the TysonBio EVOLVE
blood glucose test results without the consent and advice of a physician or
healthcare professional is not recommended.
● Severe dehydration and excessive water loss may cause false low results.
If you believe you are suffering from severe dehydration, consult your physician immediately.
6
Page 9

Thank you for choosing the TysonBio EVOLVE Blood Glucose Monitoring
System, the latest advancement in biosensor technology. As you already
know, self monitoring of blood glucose (SMBG) is a necessary part of the
treatment plan of people with diabetes mellitus. The Diabetes Control and
Complications Trial (DCCT) has confirmed the significant benefits from
SMBG when practiced as part of a larger intensive strategy to tightly control
blood glucose concentrations.
Adapted for its ease of use and quick response time, the TysonBio EVOLVE
System has the ability to process accurate results utilizing only a small volume of blood for in vitro diagnostics. The TysonBio EVOLVE Blood Glucose
Monitoring System is intended for use in the home and in professional set-
tings to monitor whole blood glucose levels obtained from the ngertip, palm
and forearm. This is an over the counter (OTC) product.
Please read the entire User’s Manual carefully before using this product.
Introduction
7
Page 10

Your TysonBio EVOLVE System is made up of several components. This
booklet is designed to guide you through the operation of the system with
detailed directions and pictures. Your TysonBio EVOLVE System contains:
● TysonBio EVOLVE Meter
● One vial of TysonBio EVOLVE Test Strips (10 strips)
● One Glucode Chip (outside the strip vial)
● One Lancing Device (option)
● Ten Lancets (option)
● One Control Solution
● One carrying case
● User’s Manual
● Log book (option)
● Quick Reference Guide
Note: 25, 50 test strips vial can be purchased individually.
About the Product
8
Page 11
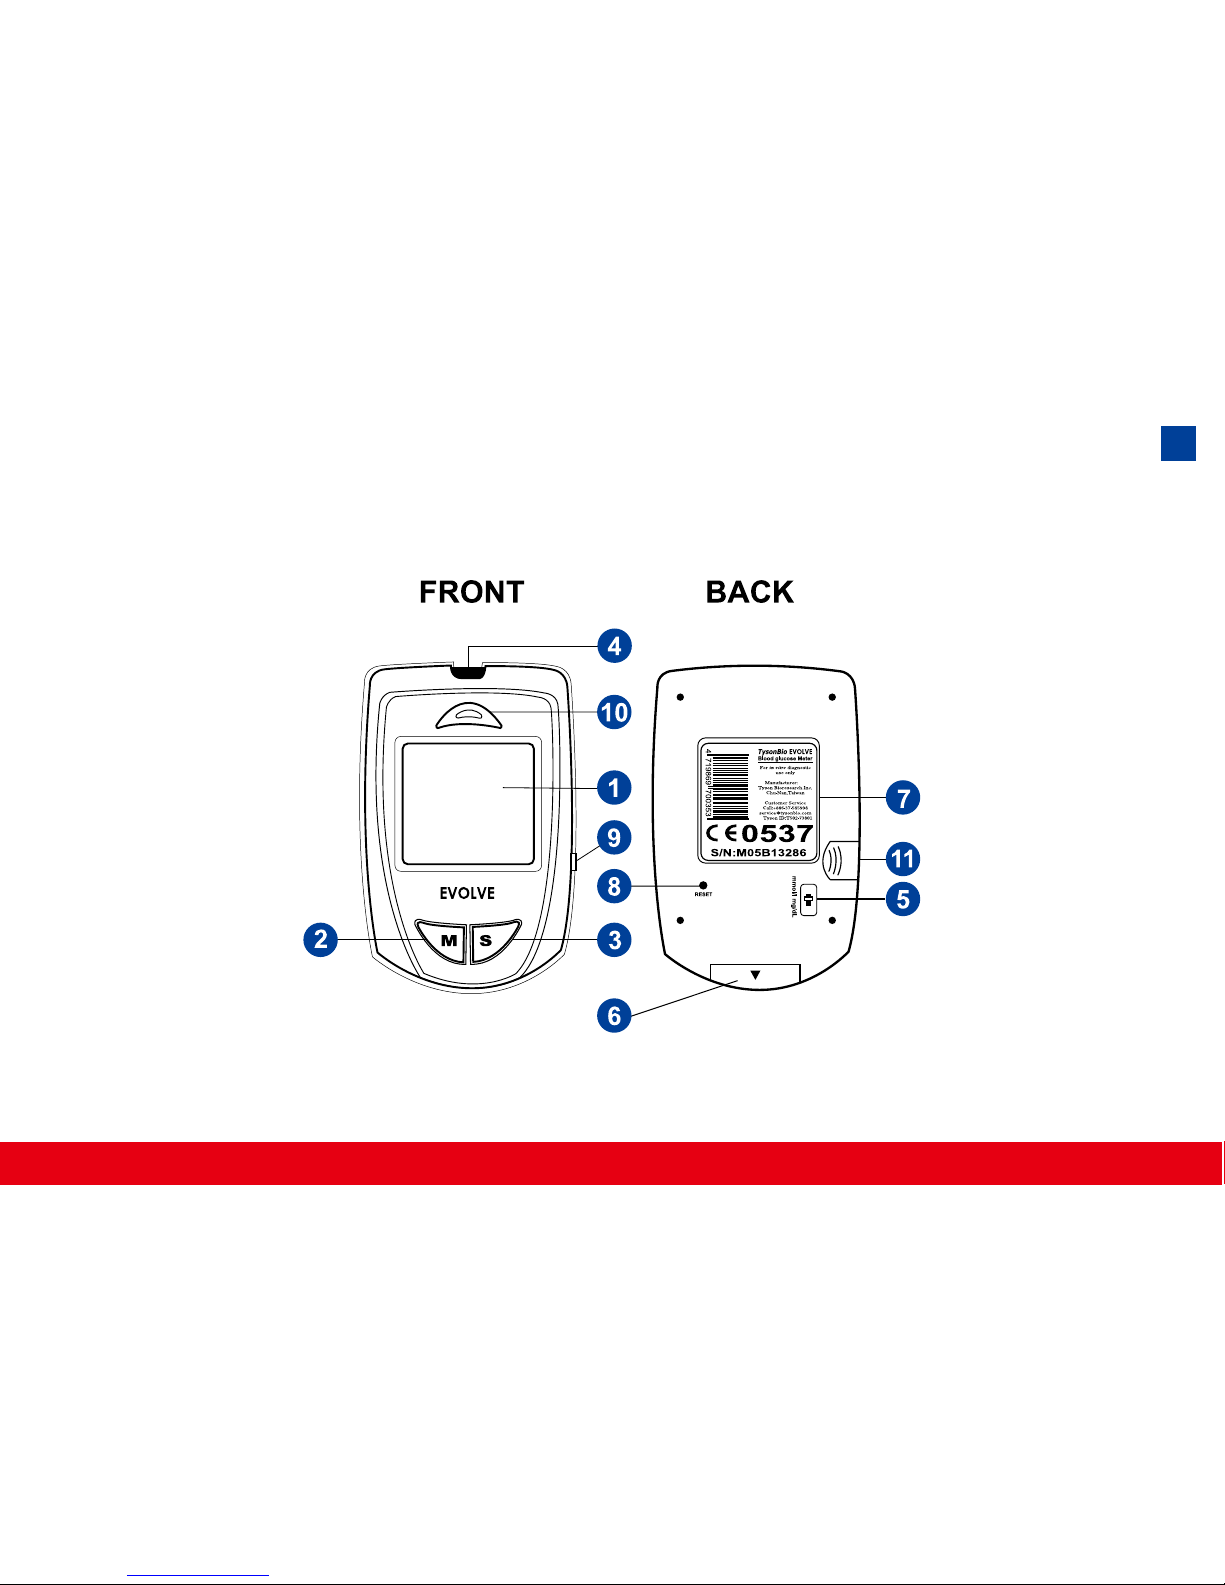
About the TysonBio EVOLVE Meter
9
Page 12

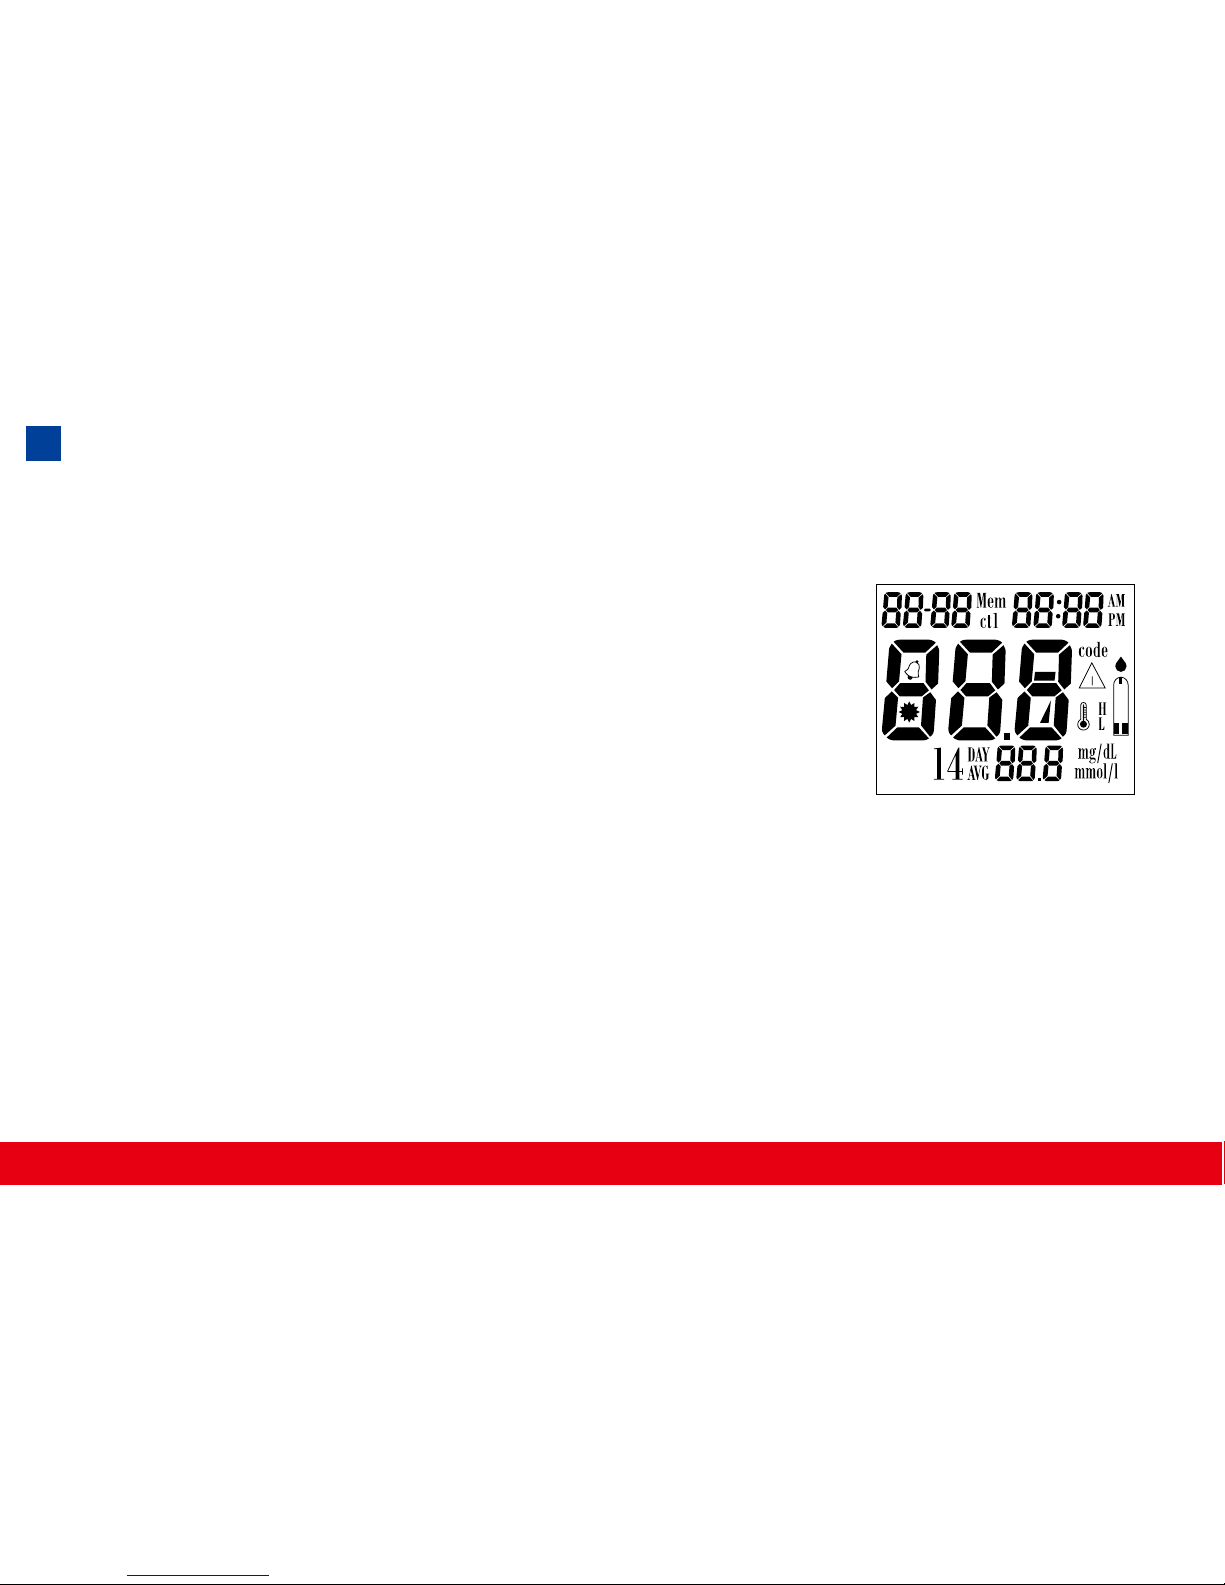
1. Display Your test results are displayed here. The large, easy to read
screen guides you through the test by using numbers and symbols.
2. M Button The M (mode) button is used to set time, alarm, enters the
memory mode to show the consecutive 7/14/30-day average results and
turns the Meter on and off.
3. S Button The S (select/set) button is used to select year, month, day,
time, memory of results and control solution mode.
4. Test Port This is where you insert the Test Strip into the Meter.
5. Unit Switch Switch for mmol/l or mg/dL.1 mmol/l =18 mg/dL
6. Battery Cover
7. Label
8. Reset Button Press this button to re-set the system.
9. Data Port Connect interface cable to transfer data.
10. Strip Ejection Button Push button to eject the used strip.
11. Glucode Chip Insert the Glucode Chip for coding.
10
Page 13
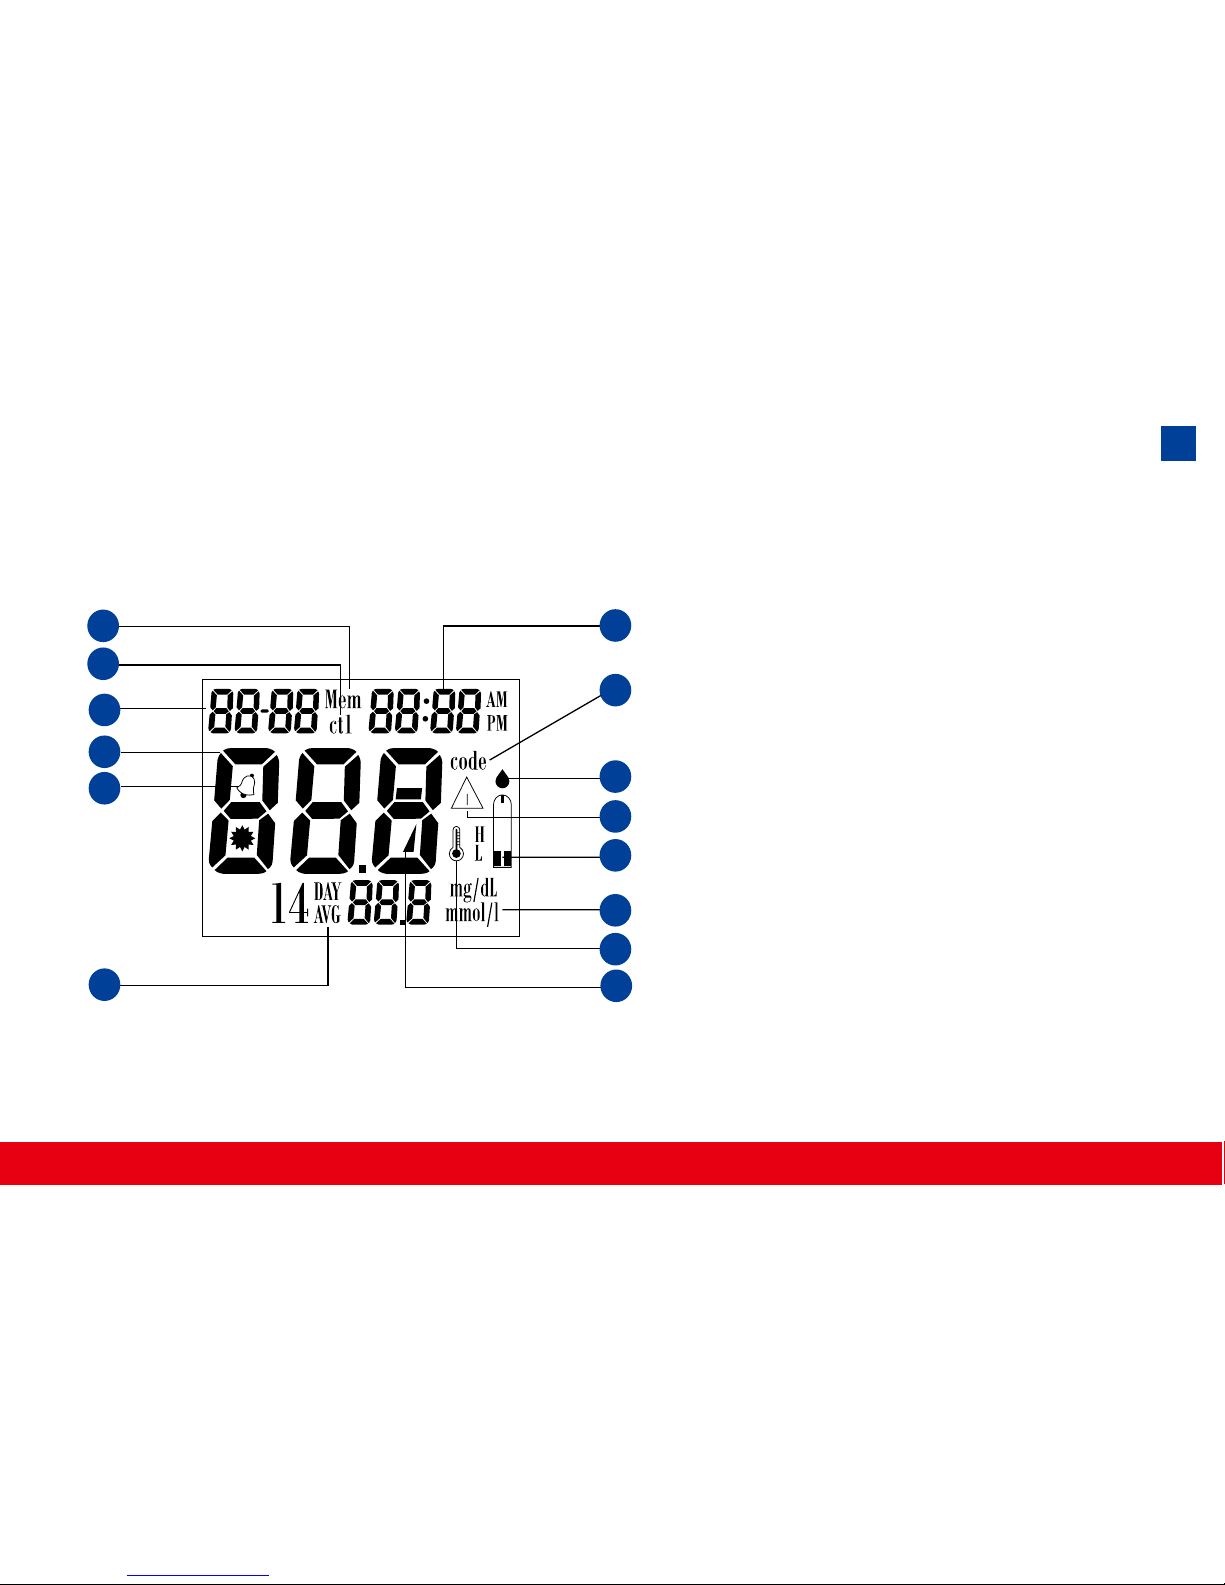
1. Date
2. Time
3. Control Solution Test
Appears when doing a control
solution test and marking the
result as a control solution
test.
4. Code Symbol
Appears with the code number
of the Test Strips in use.
5. Memory Symbol
Indicates in memory mode.
6. Units of Measurement Unit
of mmol/l or mg/dL will appear
with the test result.
About the TysonBio EVOLVE Meter Display
6
4
8
3
5
2
9
11
7
12
10
14
1
13
11
Page 14

7. Battery Symbol
Appears when the battery is low or must be replaced.
8. Blood Drop Symbol
Flashes when it is ready to apply sample to Test Strip.
9. Warning Symbol
Appears when result is out of the range of your setting reference value.
10. Alarm Function Symbol
Appears when the clock alarm is set.
11. Test Strip Symbol
Appears to tell you when the meter is ready for test.
12. Day Average Symbol
Shows the average value of test results.
13. Test Result Area
Display test results.
14. Temperature Message
Appears if your meter is out of operating temperature range.
12
Page 15
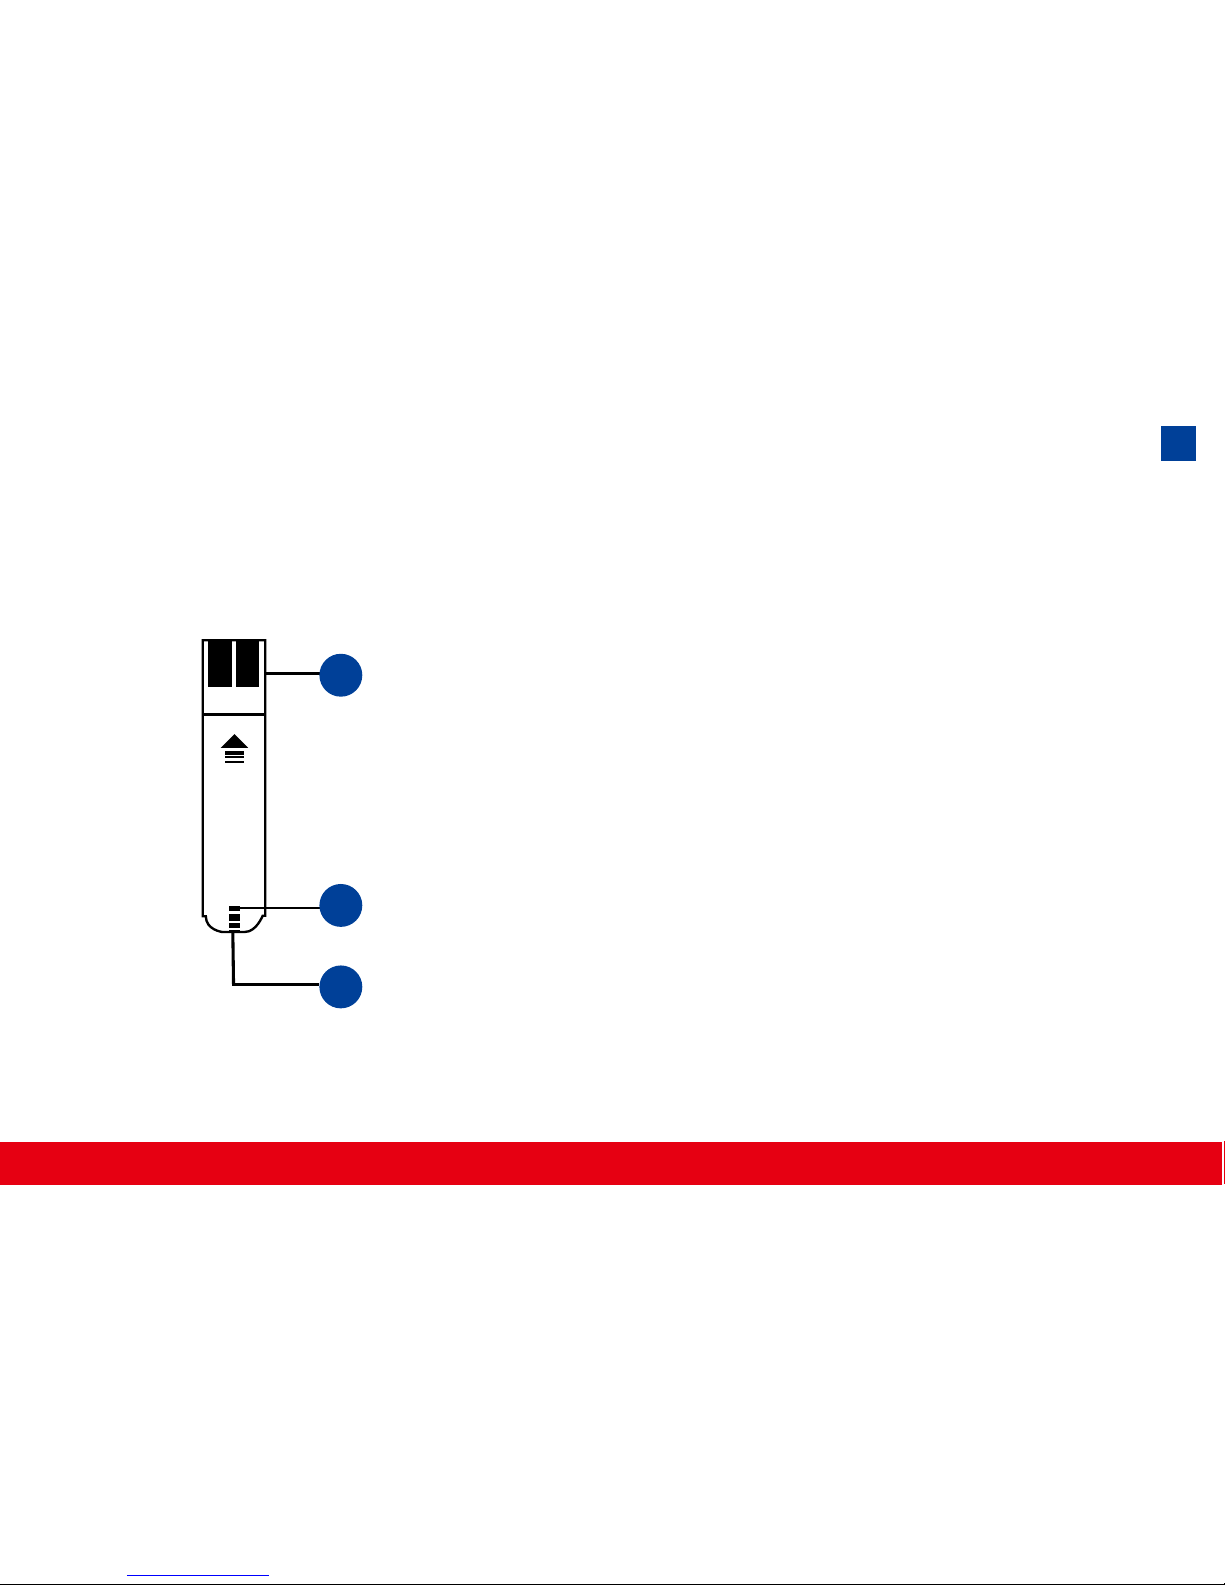
About the TysonBio EVOLVE Test Strip
The TysonBio EVOLVE Test Strip is used to per-
form the blood glucose test in conjunction with the
TysonBio EVOLVE Meter.
Each strip can be used only once.
The Test Strip consists of the following parts:
1. Conrmation Window
This is where you can conrm that enough blood
has been applied to the target area.
2. Target Area
This is where blood is drawn into the Test Strip.
3. Contact Bar
This end of the Test Strip is inserted into the
Test Port to activate the Meter. (white side face
up).
3
1
2
13
Page 16
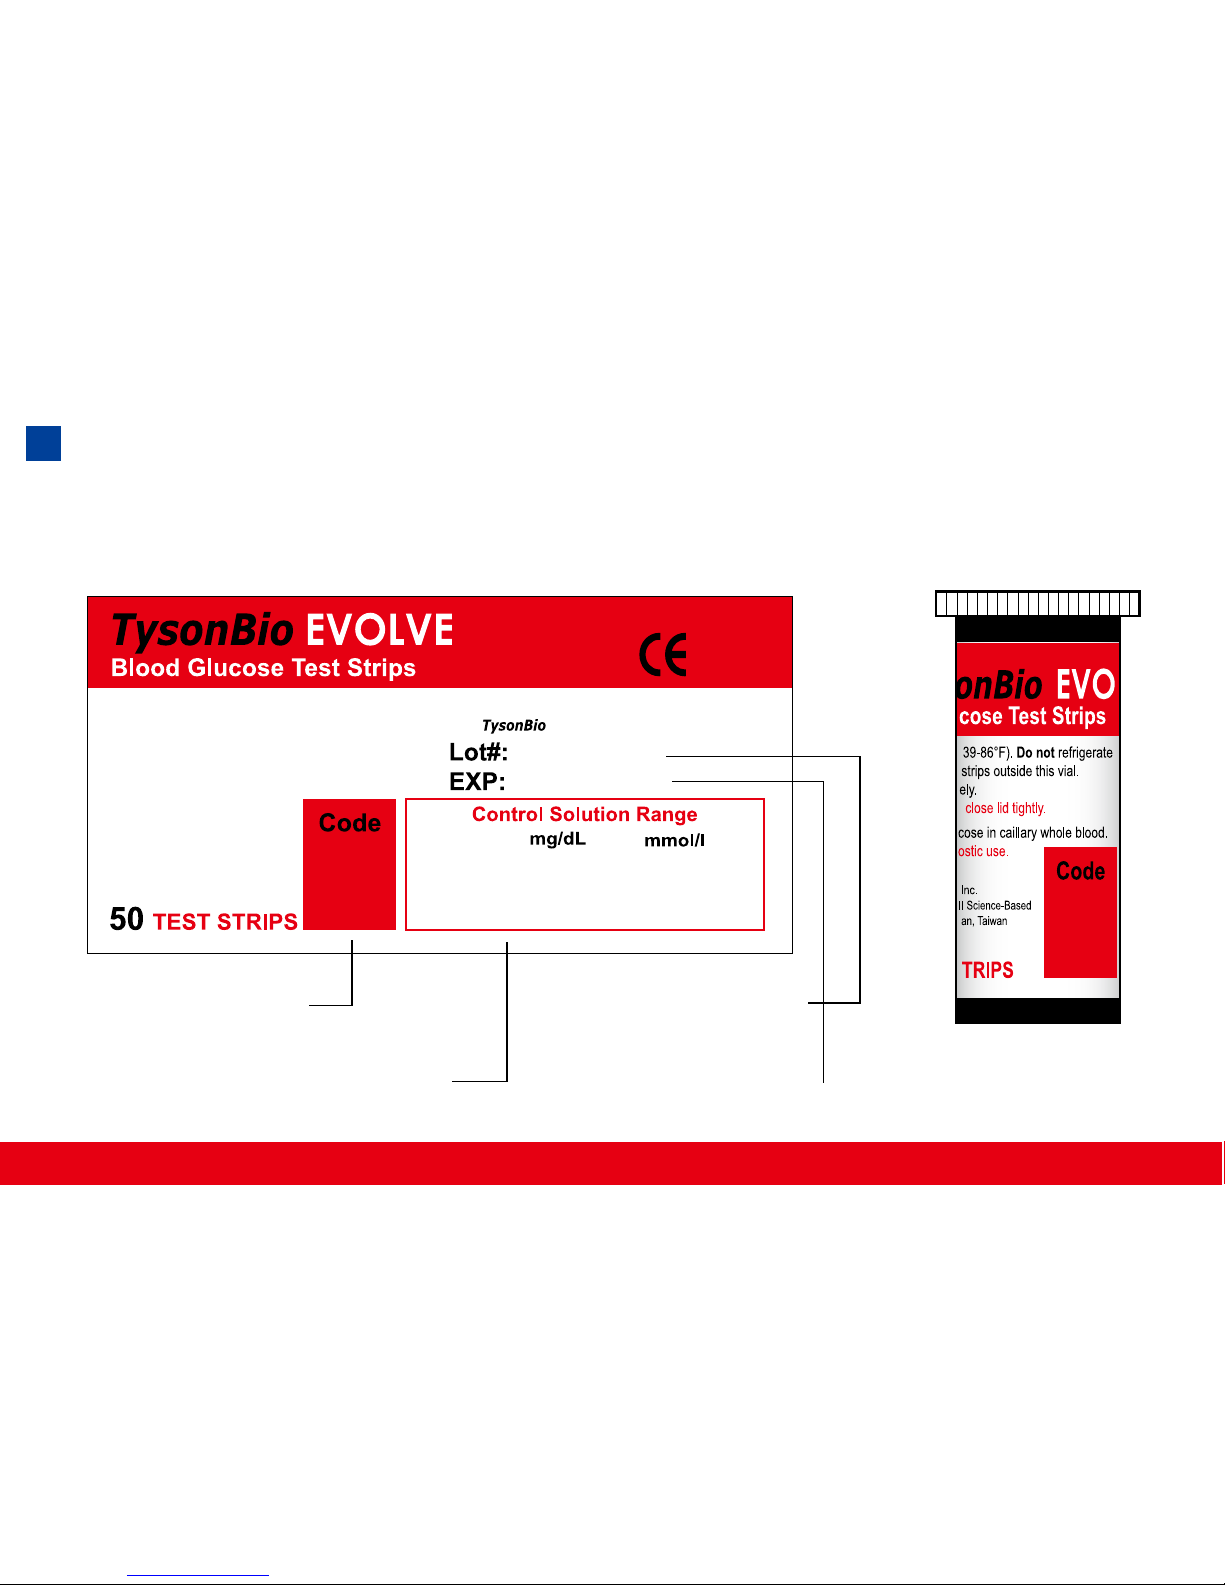
About the TysonBio EVOLVE Test Strip Vial
Code Number
Control Solution Range
Lot Number
Expiration Date
VIAL LABELTEST STRIP VIAL
811
0537
Manufacturer:
Tyson Bioresearch, Inc.
5F, #22, Ke E. Road III ScienceBased Industrial Park, Chu Nan,
Ta iwan Tel : +886-37-585998
Store at 4-30°C ( 39-86°F). Do not refrigerate.
Do not store test strips outside this vial.
Re-cap immediately.
WARNING: Always close lid tightly.
For testing of glucose in capillary whole blood.
For in vitro diagnostic use.
Use within 90 days after first opening.
Use
EVOLVE
meter only !
811
H8T121205
Aug 2010
31-61
84-144
348-438
1.7-3.4
4.7-8.0
19.3-24.3
Low:
Normal:
High:
14
Page 17
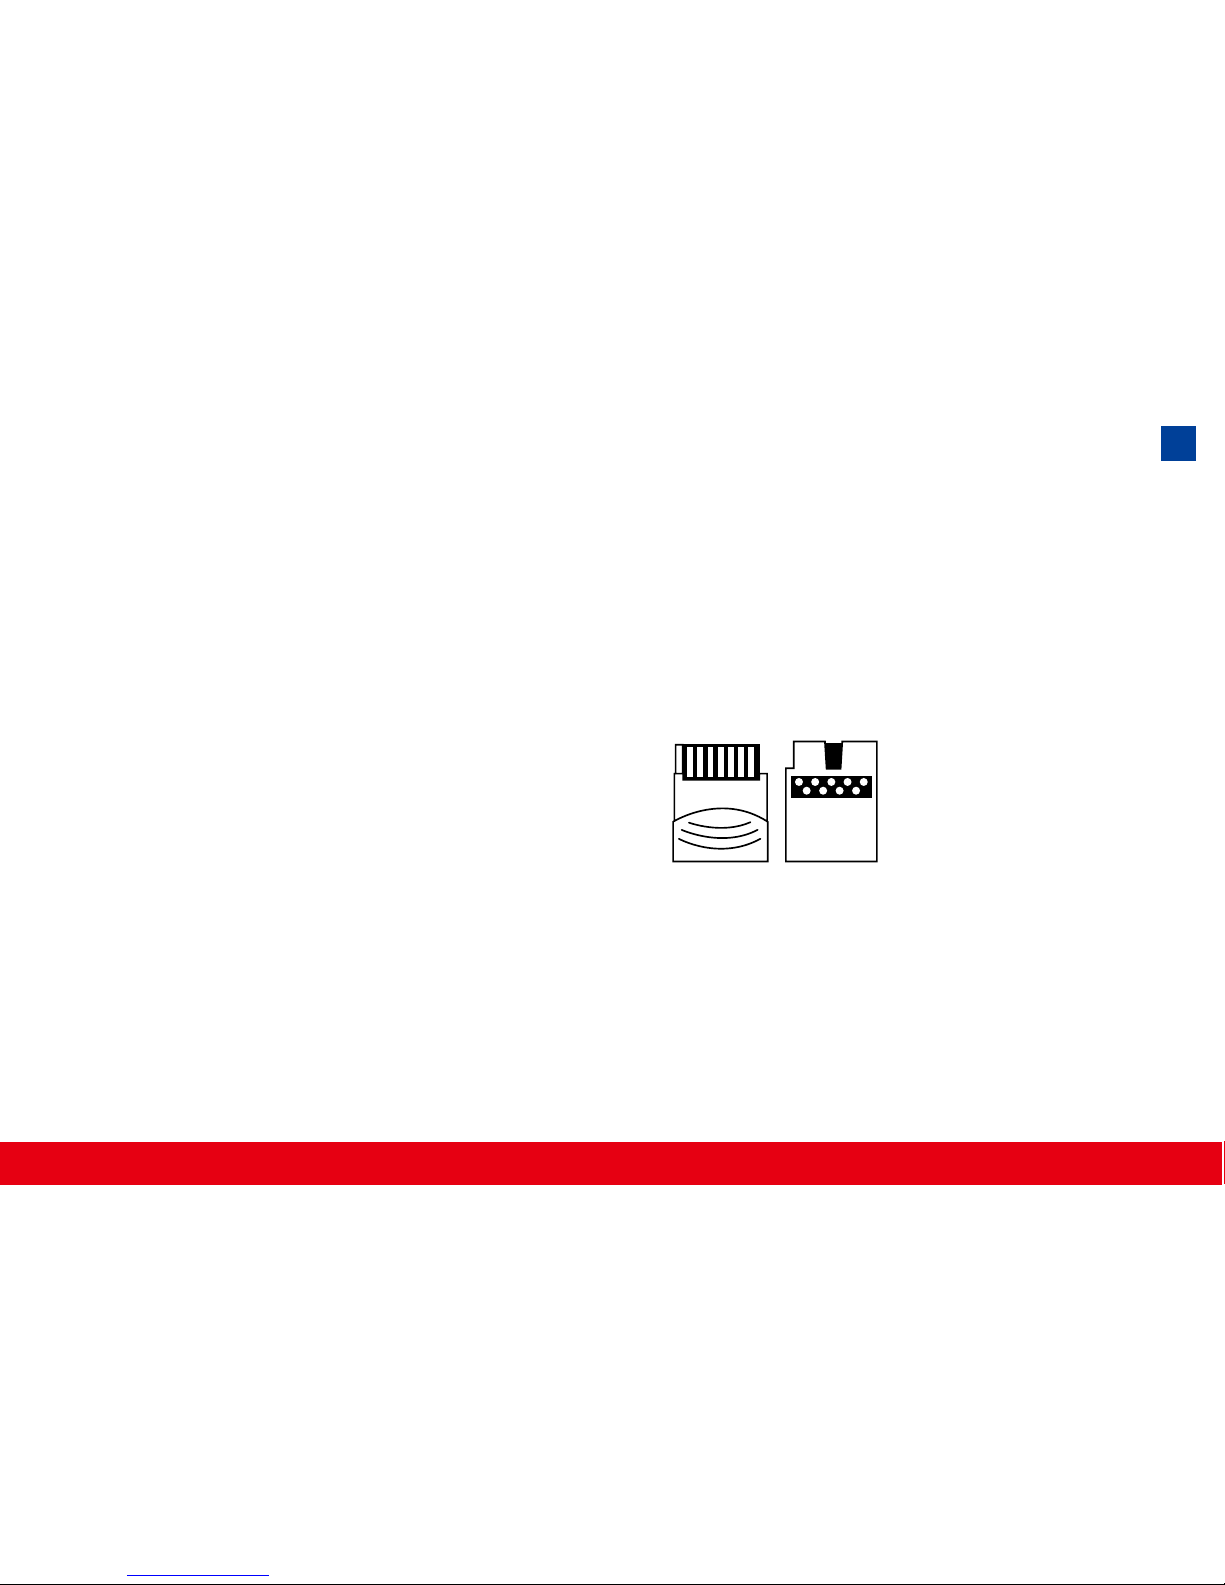
About the Glucode Chip
The Glucode Chip is used to ensure that your Meter provides you with
accurate results. Before performing the blood glucose test or starting a new
strip vial, please check your Meter with the Glucode Chip to ensure proper
performance (further instructions for use of the Glucode Chip is provided on
page 22-23). After checking your Meter, the Glucode Chip is also used to
code setting.
Note:
●
Always use the Glucode Chip to ensure your Meter is performing
properly.
● DO NOT misplace your Glucode Chip.
966
Code Number
15
Page 18
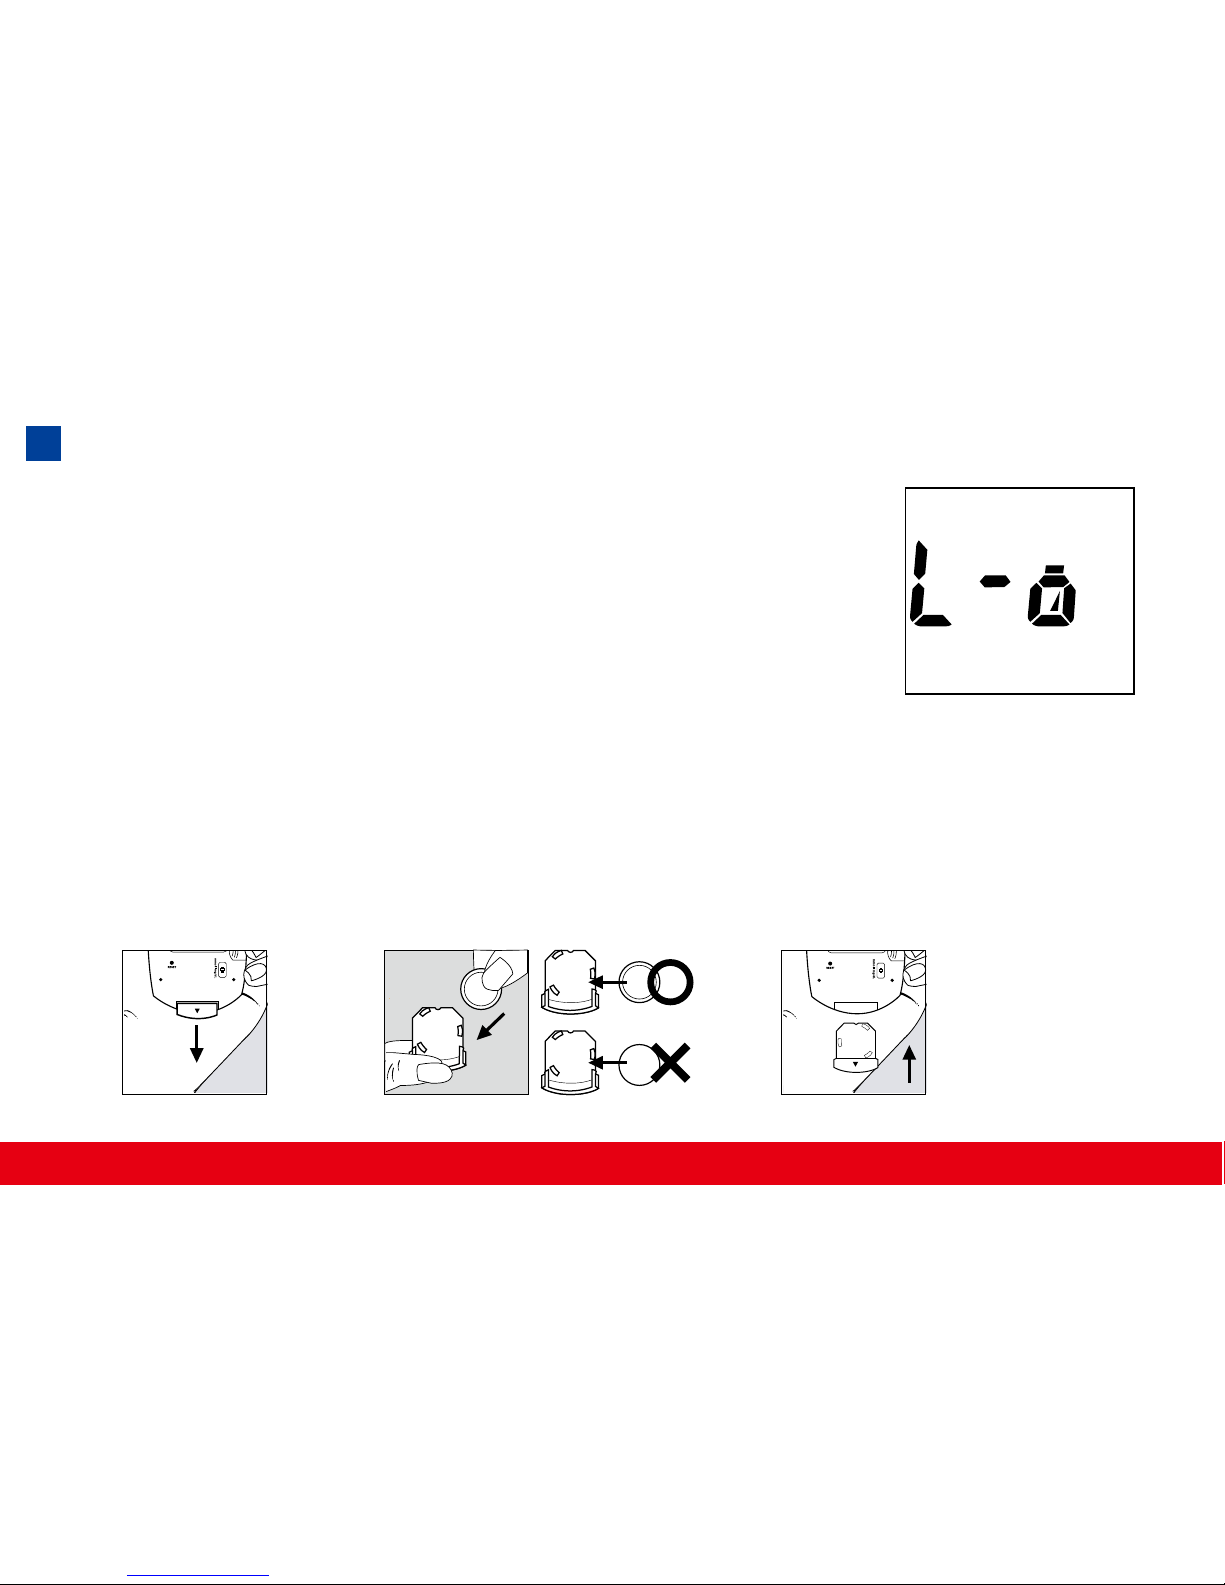
When the battery is low, the Meter will show a warning
signal. When this display appears, it is time to replace
a new battery. When the low battery warning signal is
shown, the Meter will provide accurate results for approximately 50 more measurements.
1. From the back of the Meter, gently slide and remove the battery cover.
2. Turn over the battery cover and insert a 3-Volt Lithium battery (CR-2032)
with the “+” side facing down.
3. Slide battery cover back into place with the battery side facing down.
Installing/Replacing the Battery
How to Replace the Battery
16
+
CR2032
3V
Page 19
Setting Up the Meter
Setting Up the Date, Time
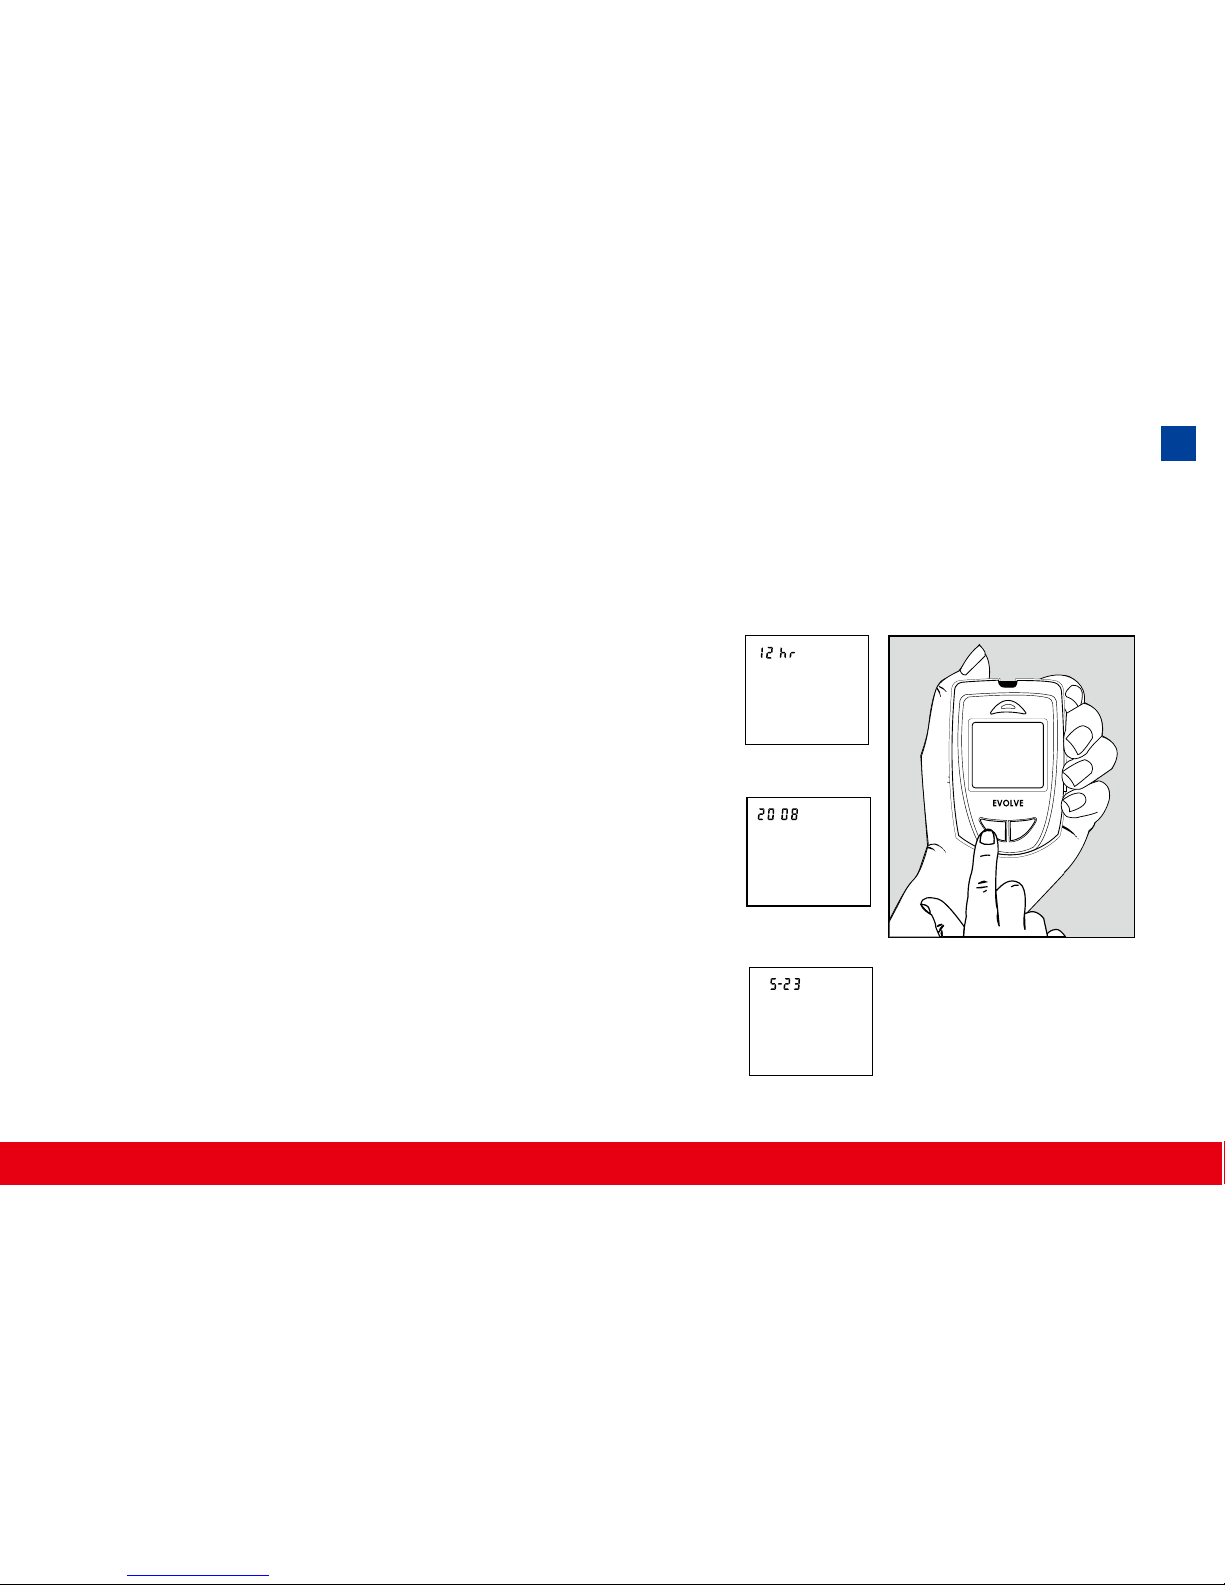
To turn the Meter on, rst insert a battery, then press the reset button located
at the back of the Meter and proceed with the following instructions.
1. Press the M button to enter this mode.
Press and release S button to choose “24hr”
or “12hr” display. With your favorite clock
mode, press M button and the year setting
will be appeared. Press and release the S
button until the correct year appears. (Fig.1)
2. To enter the year and move on to choose
the month, press the M button. To change
the month, press the S button. (Fig.2)
3. To enter the month and move on to choose
the day, press the M button. To change the
day, press the S button. (Fig.3)
M S
(Fig.1)
(Fig.2)
(Fig.3)
17
Page 20
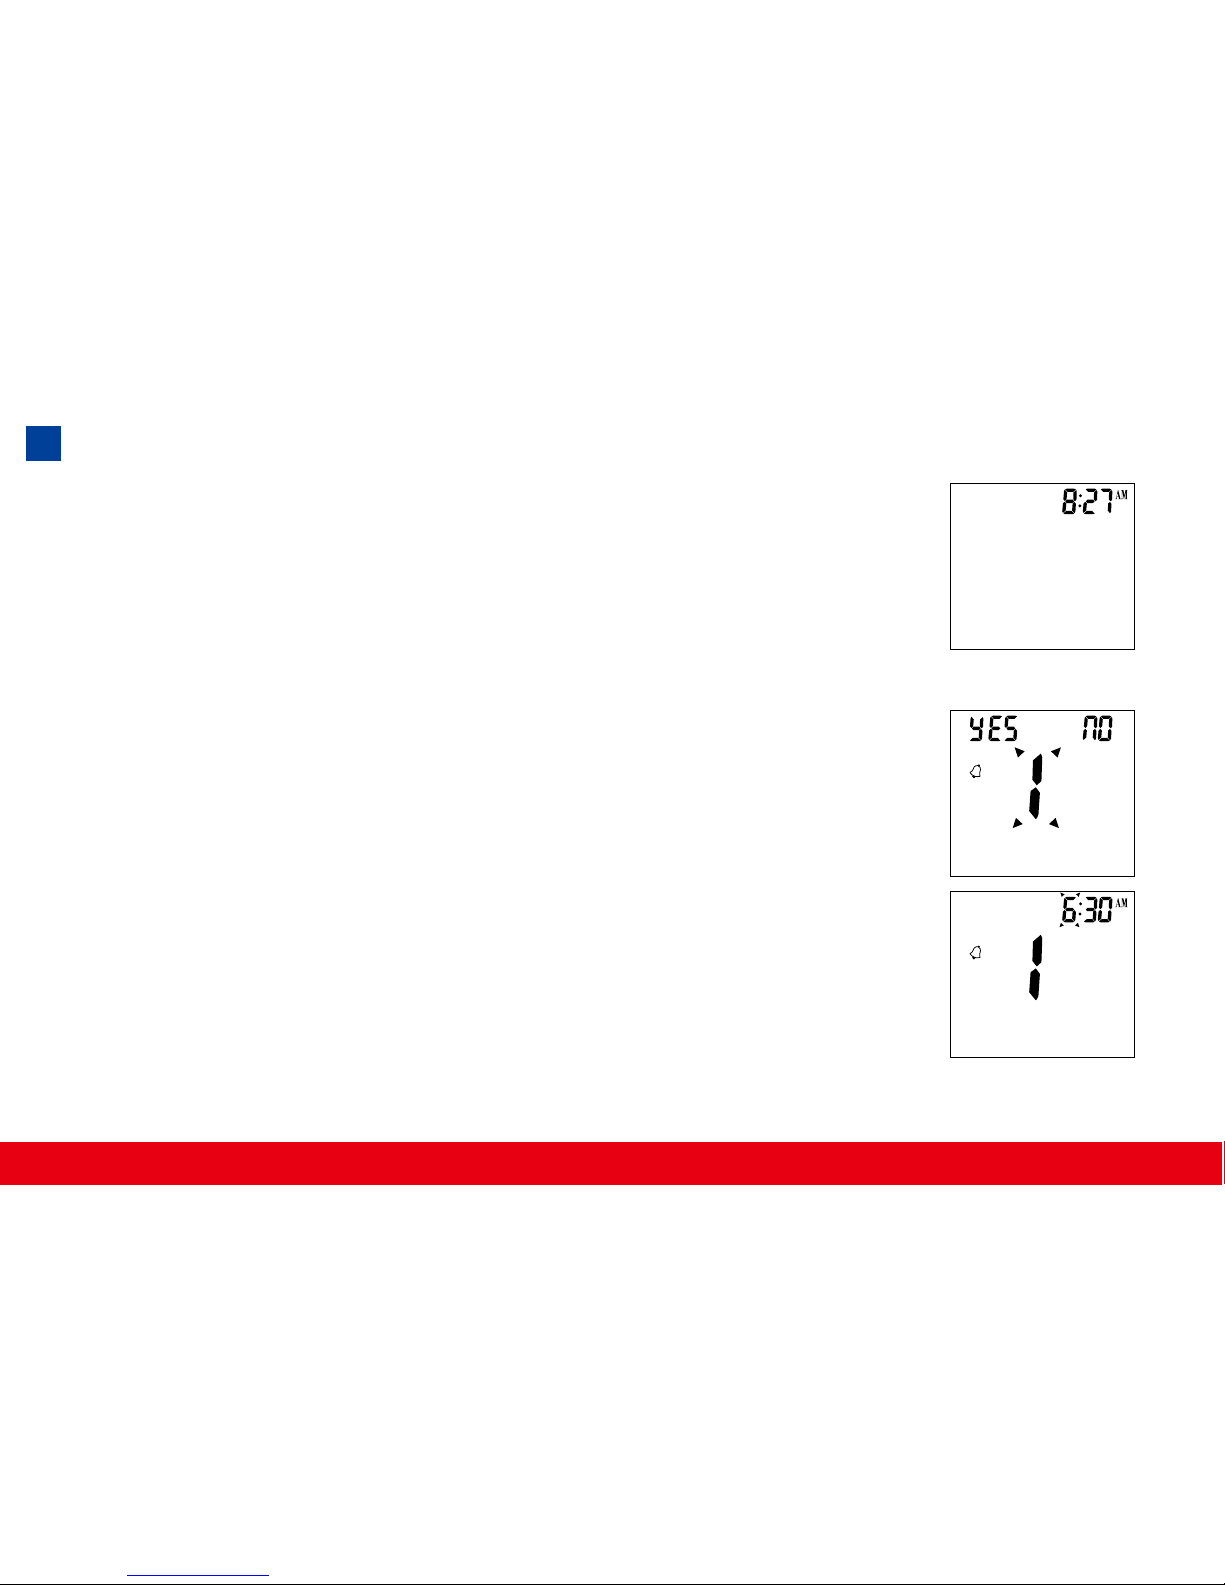
4. To enter the day and move on to choose the hour setting,
press the M button. (Fig.3)
5. To change the hour, press the S button. To enter the hour
and move on to change the minutes, press the M button.
(Fig.4)
6. To change the minutes, press the S button. To enter the
minutes and move on to choose the alarm setting, press
the M button. (Fig.4)
7. To set the rst alarm, press the M button (y). If you press
S button (n), it will be moved on to health manage-
ment alarm setting (step 11). To change the hour, press
S button. To enter the hour and move on to change the
minutes, press M button. To change the minutes, press S
button. To enter the minutes and move on to choose the
second alarm setting, press the M button. (Fig.5)
Setting Up Alarm
(Fig.4)
(Fig.5)
18
Page 21
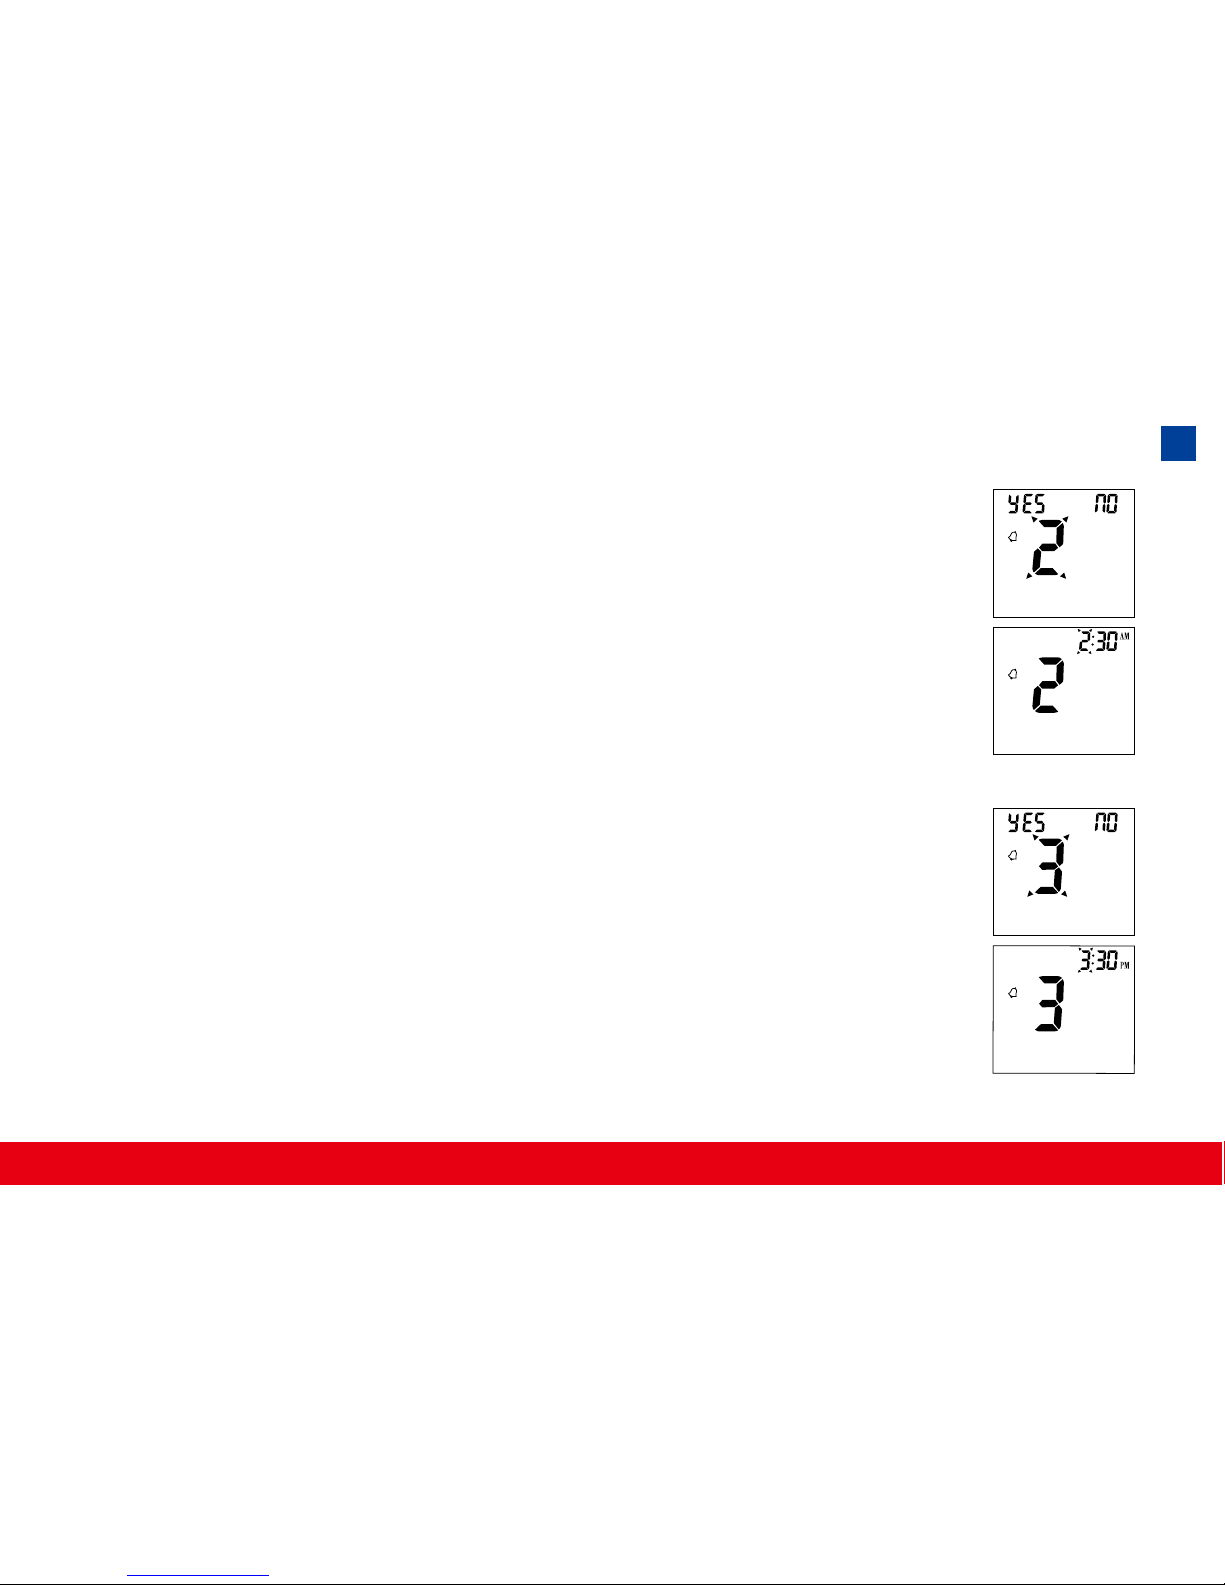
8. To set the second alarm, press the M button (y). If you
press S button (n), it will be moved on to health management alarm setting (step 11). To change the hour, press S
button. To enter the hour and move on to change the minutes, press M button. To change the minutes, press S button.
To enter the minutes and move on to choose the third alarm
setting, press the M button. (Fig.6)
9. To set the third alarm, press the M button (y). If you press S
button (n), it will be moved on to health management alarm
setting (step 11). To change the hour, press S button. To
enter the hour and move on to change the minutes, press
M button. To change the minutes, press S button. To enter
the minutes and move on to choose the fourth alarm setting,
press the M button. (Fig.7)
(Fig.6)
(Fig.7)
19
Page 22
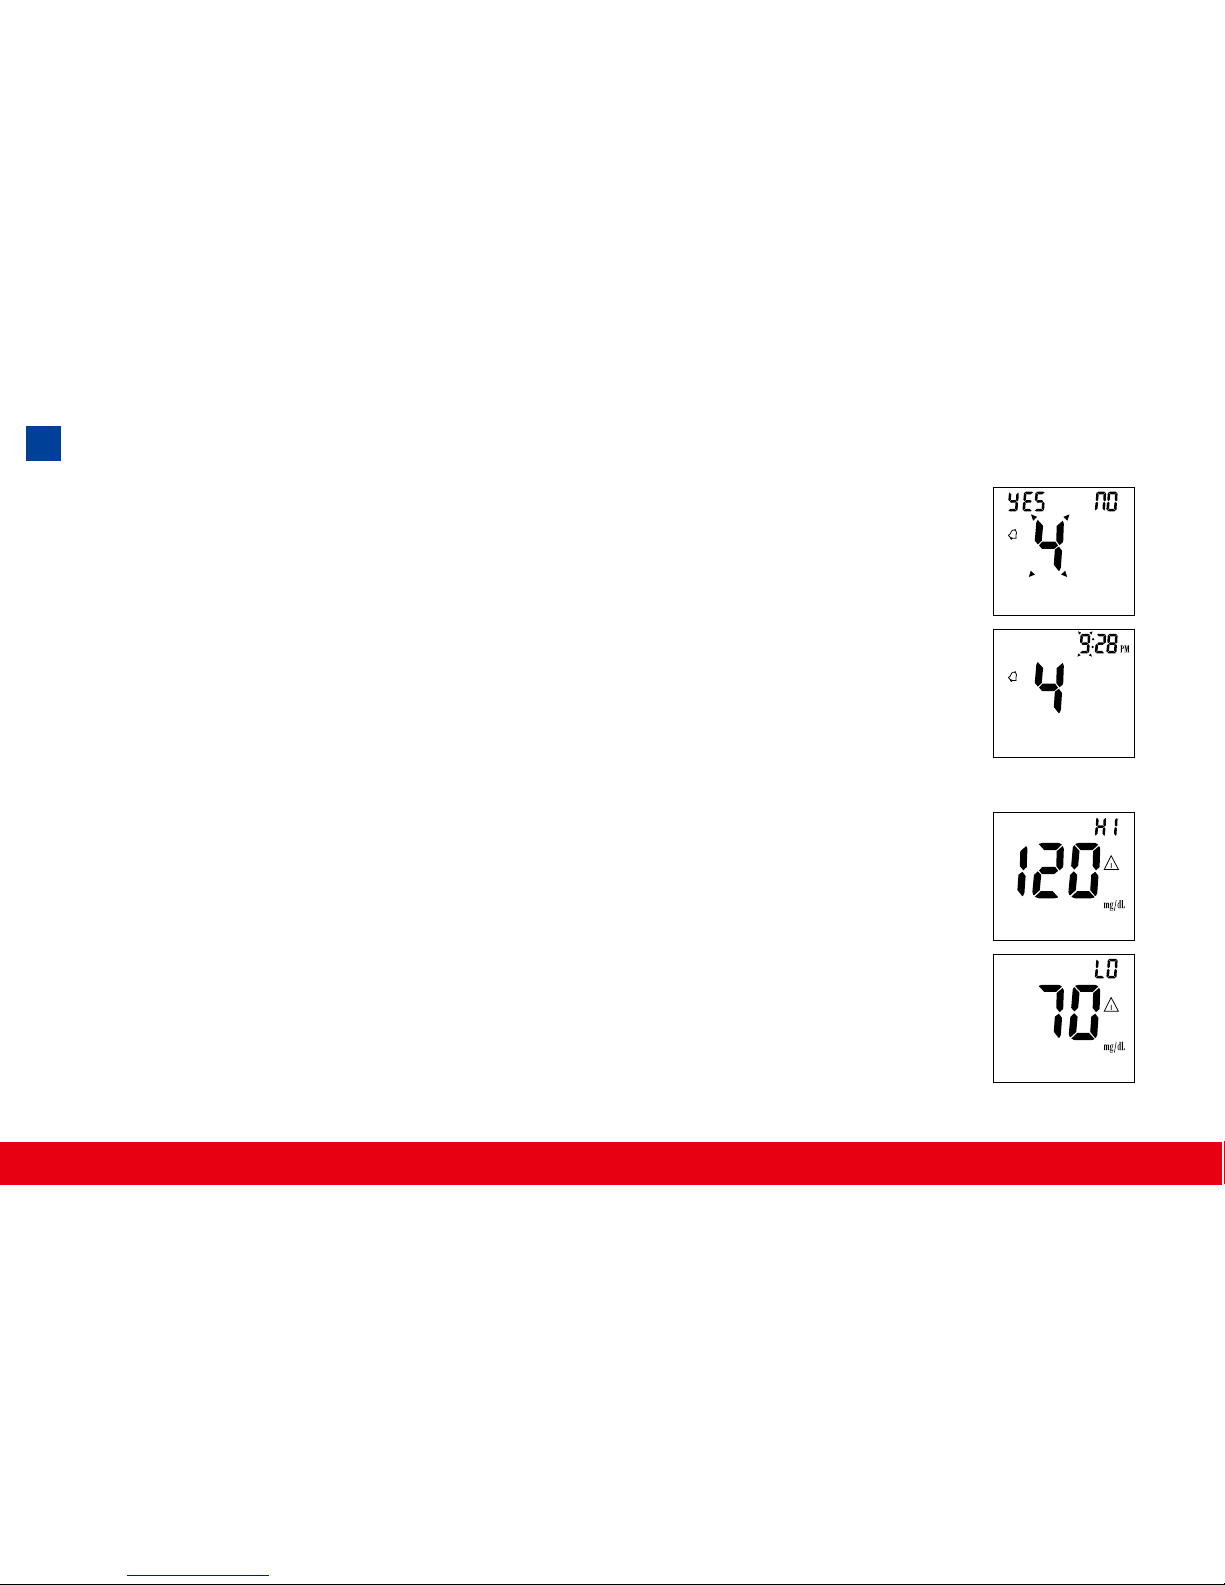
10. To set the fourth alarm, press the M button (y). If you
press S button (n), it will be moved on to health management alarm setting (step 11). To change the hour, press
S button. To enter the hour and move on to change the
minutes, press M button. To change the minutes, press S
button. To enter the minutes and move on to health management “HI alarm setting” press the M button. (Fig.8)
Note: When the alarm is ringing, press S or M button to
turn off or alarm will turn off automatically after 30 sec.
11. To change the “HI alarm setting” press the S button. To
enter the ‘HI alarm setting” and move on to “LO alarm setting” press M button. (Fig.9)
12. To change the “LO alarm setting” press the S button. Fur-
ther press M button to enter the “LO alarm setting” and
nish the meter setting, turn off the meter. (Fig.9)
(Fig.8)
(Fig.9)
20
Page 23
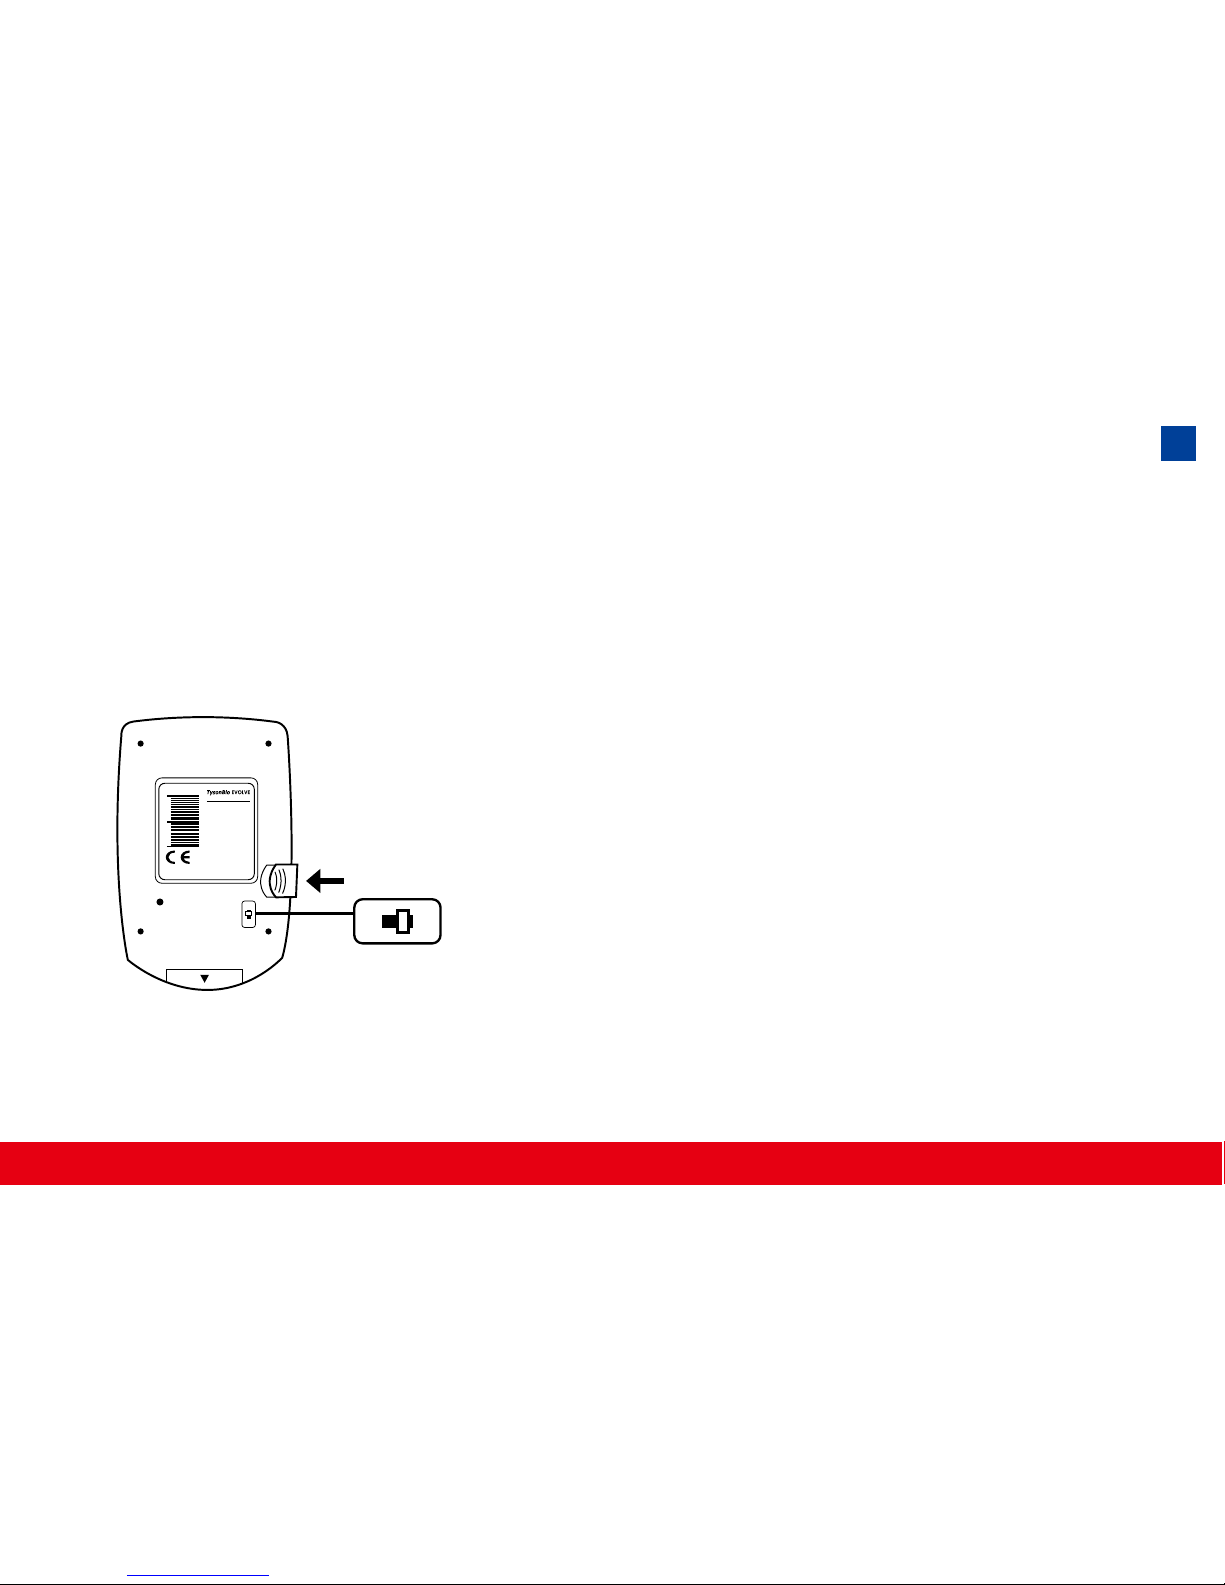
1. Select unit, mg/dL or mmol/l on the back.
2. Plug the Glucode Chip into the connector for strip coding.
Note: The mg/dL is the standard unit in the United States. Meters
used in the United States must be set to read in mg/dL.
mmol/l mg/dL
Unit Selection and Code Setting
21
Blood glucose Meter
For in vitro diagnostic
use only
Manufacturer:
Tyson Bioresearch.Inc.
Chu-Nan,Taiwan
Customer Service
Call:+886-37-585998
Tyson ID:T502
S/N:M05B13286
0537
353007
968917
4
RESET
mmol/l mg/dL
Page 24
Checking the Performance of Your TysonBio EVOLVE Meter
Coding Your TysonBio EVOLVE Meter
The Glucode Chip is used for checking and coding your TysonBio EVOLVE Meter.
Each batch of Test Strip is encoded with a number that must match one of
the code numbers stored in the Meter. In order to ensure an accurate result,
the code number on the display must also match the code number found on
the Test Strip vial.
To check your Meter:
1. Insert the Glucode Chip into meter’s Glucode Chip
slot. All segments of the LCD display will appear indicating that the Meter is functioning properly.
2. If you are a rst time user or start a new strip vial,
please continue the coding procedure.
22
Page 25
1. Insert the Glucode Chip, Conductive Bar’s end rst, into
the connector. The Meter will automatically be turned on.
Note: Code the Meter whenever you start a new test
strip vial.
2. All segments of the LCD display will appear. Then a beep
will sound, followed by the code number.
Note: If you are using the Meter for the rst time with-
out inserting the Glucode Chip, a “000” will appear on
the screen and then turn off automatically after 3 sec.
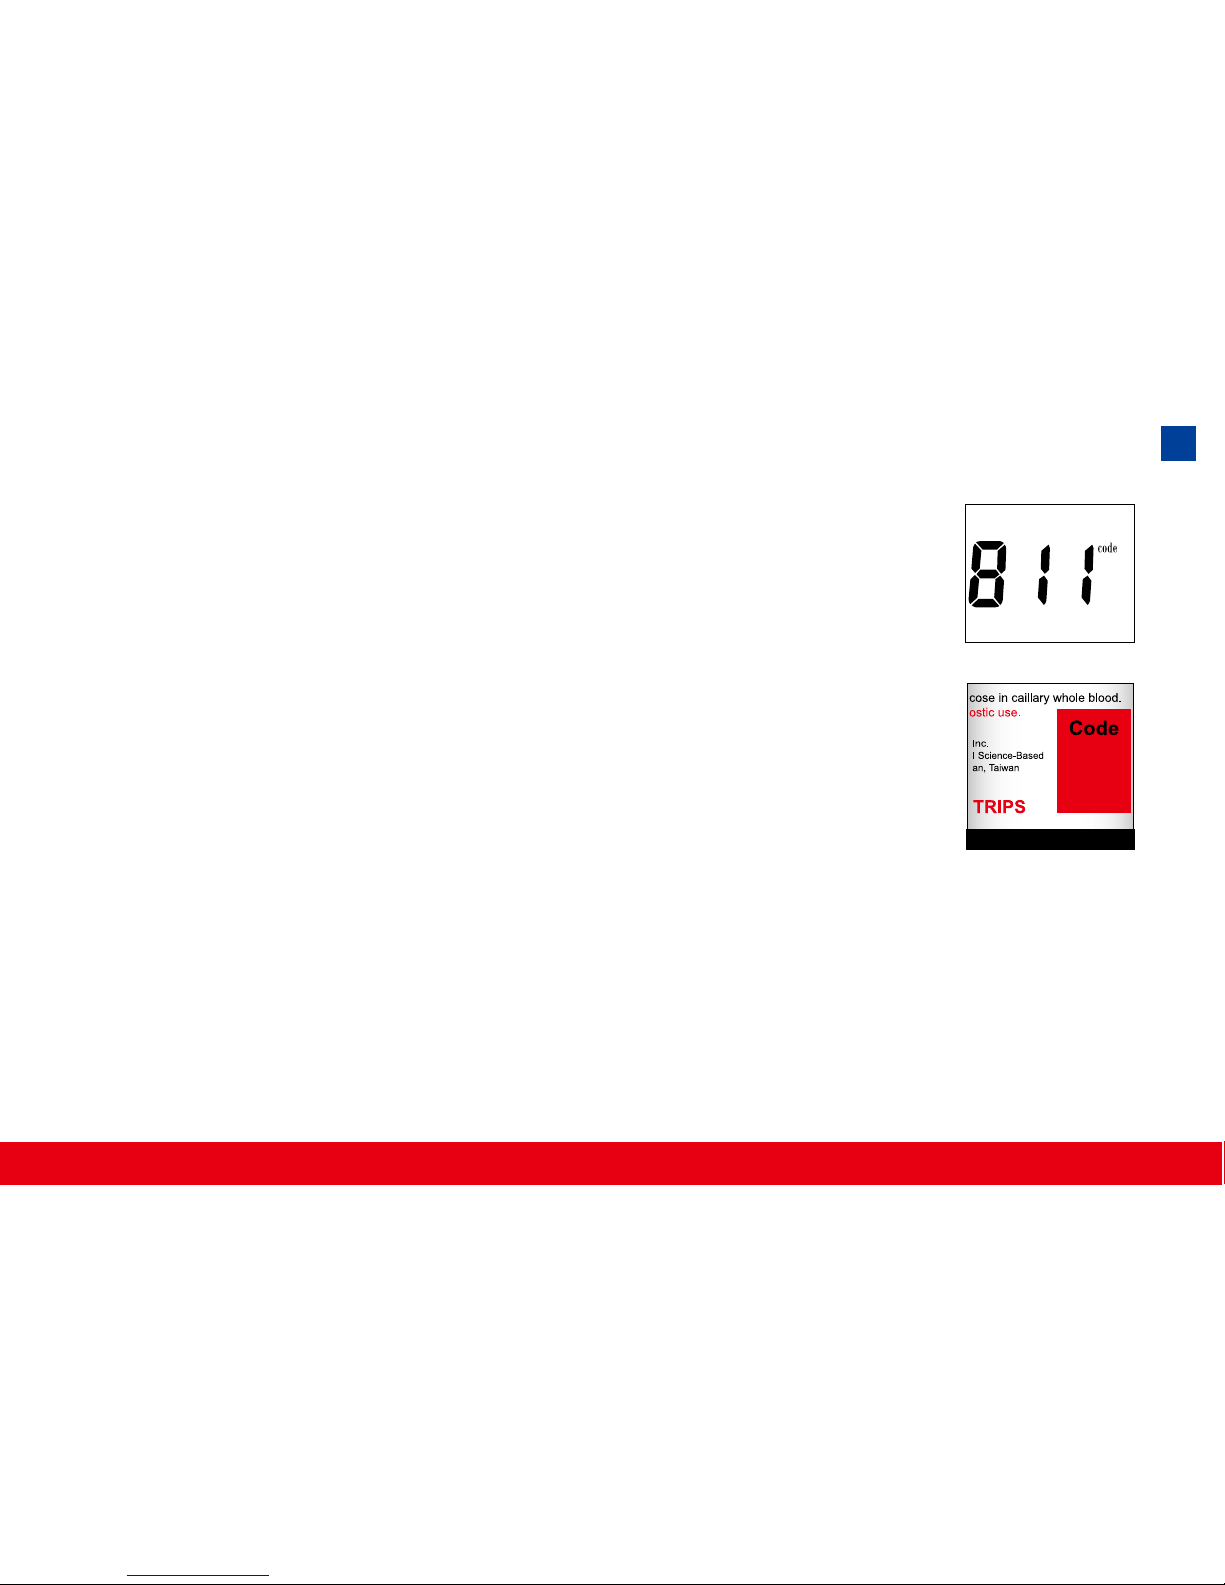
811
3. Match the code number on the Meter display with the code number on the
Test Strip vial. If the code matches, you may press the M button to turn off
the meter and begin to test lately. If the meter code and vial code do not
match, please ask the store/distributor to replace a new vial.
23
Page 26

The Control Solution Test
When To Perform a Control Solution Test
The Control Solution is used to check and ensure that the Meter and Test
Strip are working together properly and that you are performing the test correctly.
1. When you are using your Blood Glucose Monitoring System for the rst time.
2. When you are using a new batch of Test Strips.
3. Anytime you question the performance of the system, or on a regular basis
to ensure accuracy, e.g. once a week.
4. When you adjust your diabetic medication plans.
5. When your blood glucose test result is lower or higher than your normal level.
24
Note: Control Solutions are required but not supplied.
For order information, please call Customer Service. There are three Control Solutions at different desired range of aqueous glucose (Low, Normal
or High). For more information about the Control Solution, please read your
Control Solution package insert. Two sets of control solution should be used,
a high level and a low level control solution of your choice.
Page 27
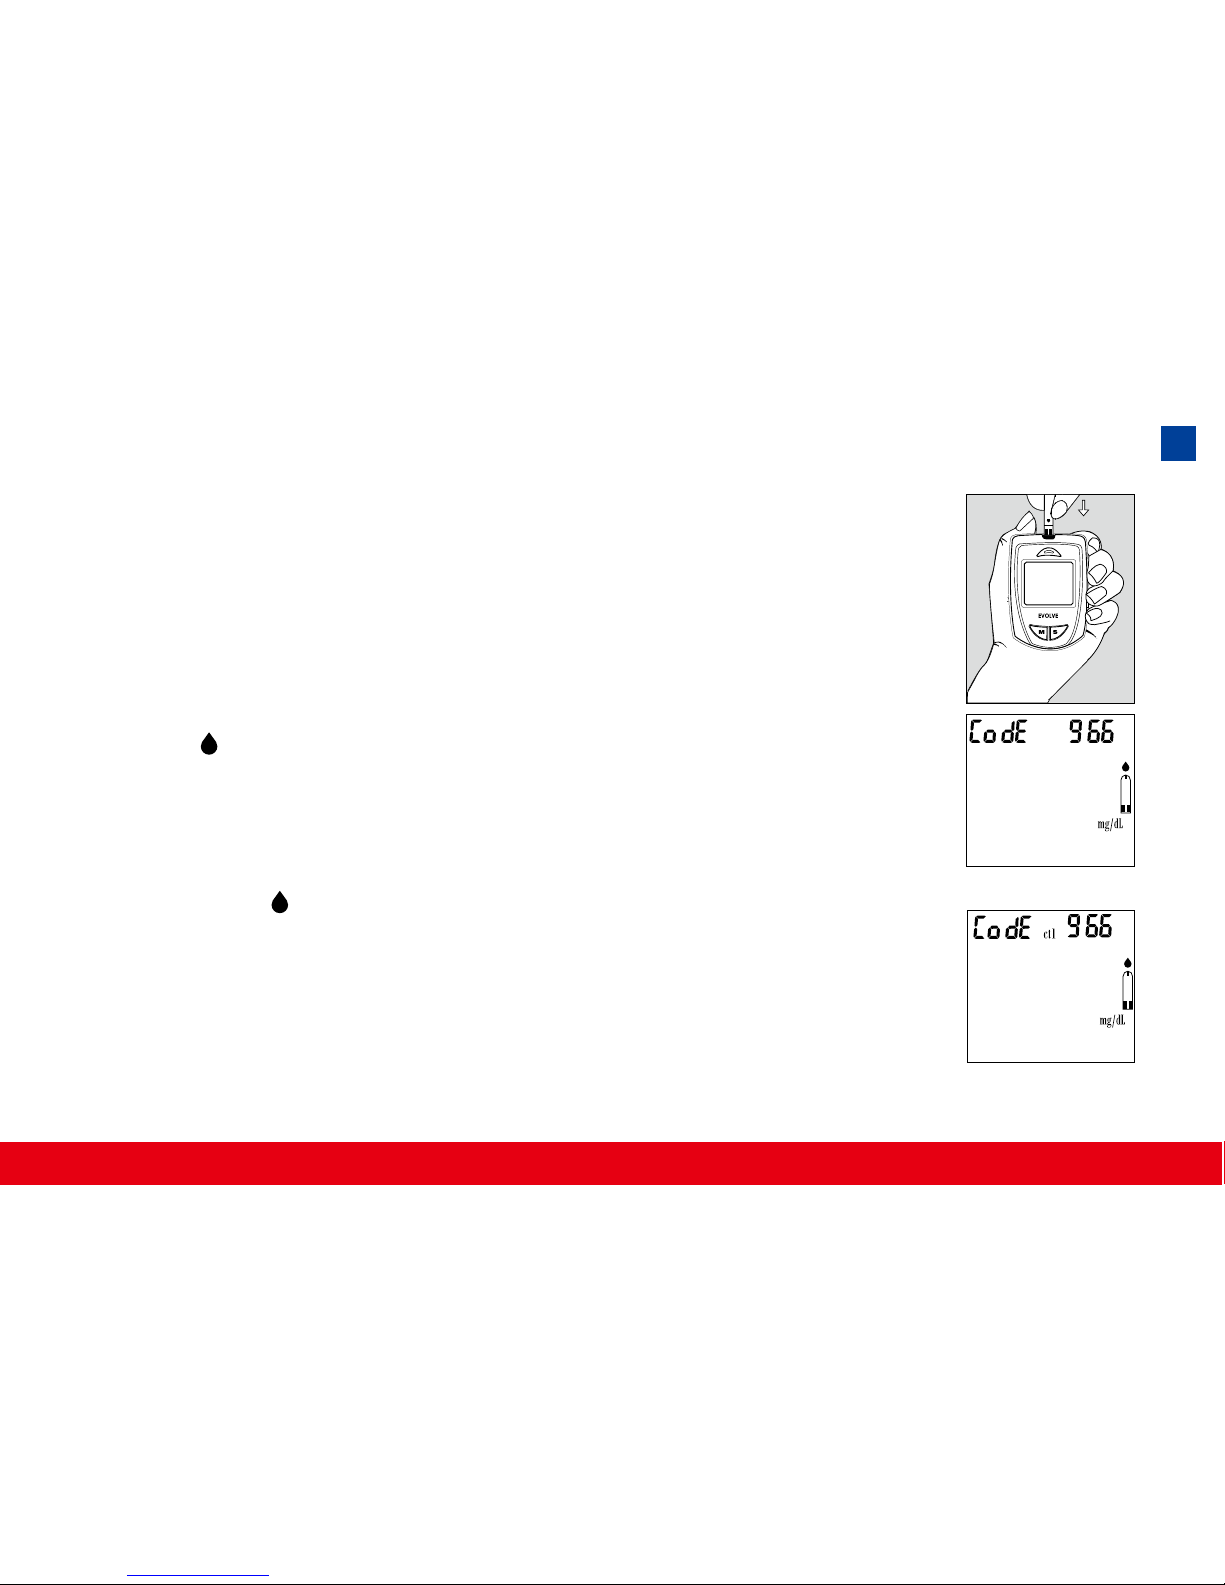
1. Make sure the Control Solution is at room temperature (15ºC
to 35ºC or 59ºF to 95ºF) prior to testing.
2. Insert a Test Strip, white side face up, Contact Bar’s end
rst, into the test port. The Meter will automatically turn on.
3. All segments of the LCD display will appear, a beep will
sound and the code number will appear followed by a ashing “ “ symbol. Be sure the code number on the display
matches the code number on the Test Strip vial. If the code
numbers do not match, code the Meter by using Glucode
Chip, accordingly. (Fig.10)
4. After the “ “ symbol appears, press the S button for 3 sec
to switch control solution mode. The “ ctl “ symbol indicates
that the Meter will mark your current test as a Control Solution test. Now you are ready to apply the Control Solution.
(Fig.11)
To perform a Control Solution test
(Fig.10)
(Fig.11)
25
Page 28
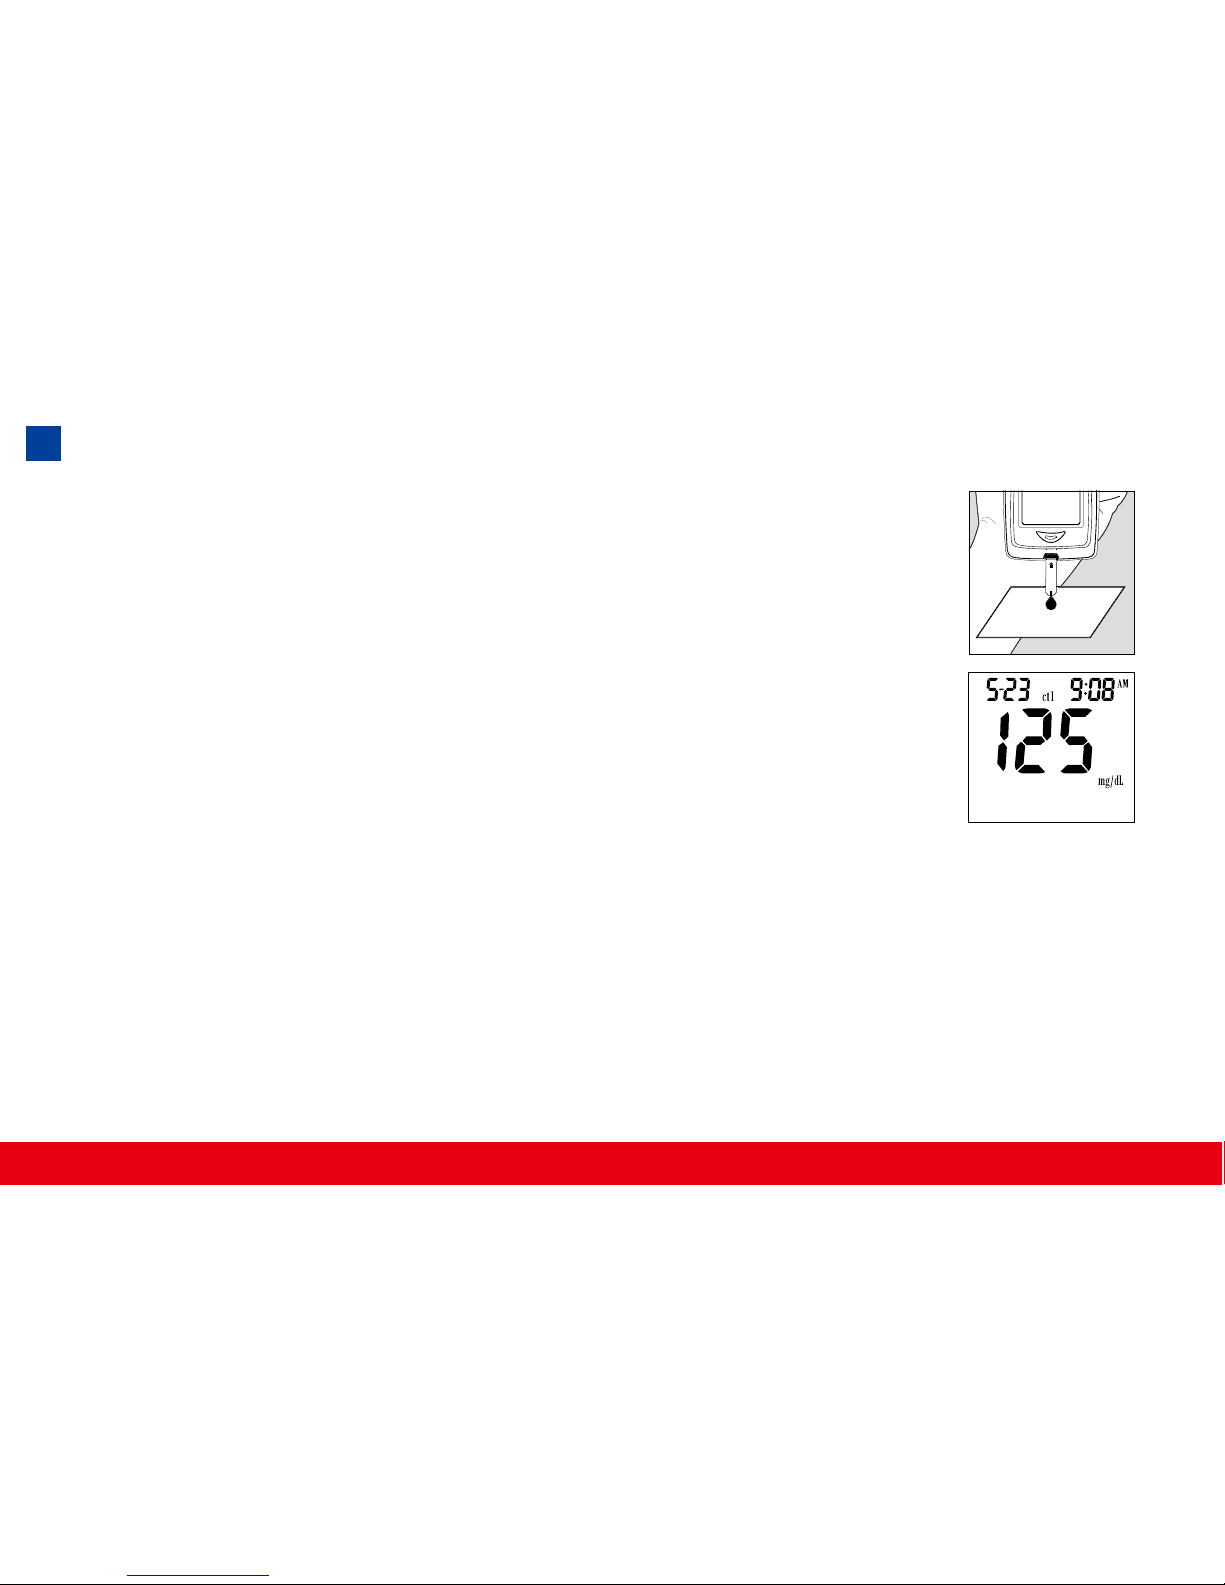
5. Discard the first drop of Control Solution and squeeze a
small drop of Control Solution on a clean nonabsorbent
surface (such as a clean piece of wax paper). Do not apply
Control Solution to the Test Strip directly from the bottle.
6. Bring the tip of the Test Strip to lightly touch the drop of
Control Solution. Control Solution is automatically pulled
into the strip through the tip. Hold until the meter beeps.
The meter will now being counting down from 5 to 1 and
the Control Solution test result will appear.
Caution:
Please remember that in order to prevent contamination,
follow the above instructions for performing the Control
Solutio
n test.
26
Page 29

Comparing Control Solution Results
The system is functioning properly if the result falls inside the specified
range printed on the Test Strip vial. If the test result falls outside the specied
range, repeat the test.
Results falling outside the specied range may be caused by
● Error in performing the test
● Control solution temperature is lower than 15°C(59°F) or higher than
35°C(95°F)
● Expired or contaminated Control Solution
● Expired or contaminated Test Strips
● Improper coding of the Meter
● Meter malfunction
Note: The result will not be incorporated into the average in the Control
Solution test “ ctl “ mode. DO NOT use the system if the problem persists.
Please call Tyson Bioresearch, Inc., Customer Service or website of www.
tysonbio.com
27
Page 30

Testing Your Blood Glucose Level
Before testing blood glucose, you need the following items:
1. TysonBio EVOLVE Meter
2. TysonBio EVOLVE Test Strip
3. Adjustable Automatic Lancing Device
4. Sterile Lancet
5. Glucode Chip
Caution: To reduce the chances of infection:
● Never share a lancing device and lancet with another person.
● Always use a new and sterile lancet. Lancets are for single use only.
● Always use a new Test Strip.
Test Strips are for single use only.
● Do not get lotion, oil, dirt or debris in or on the lancet and lancing device.
28
Page 31
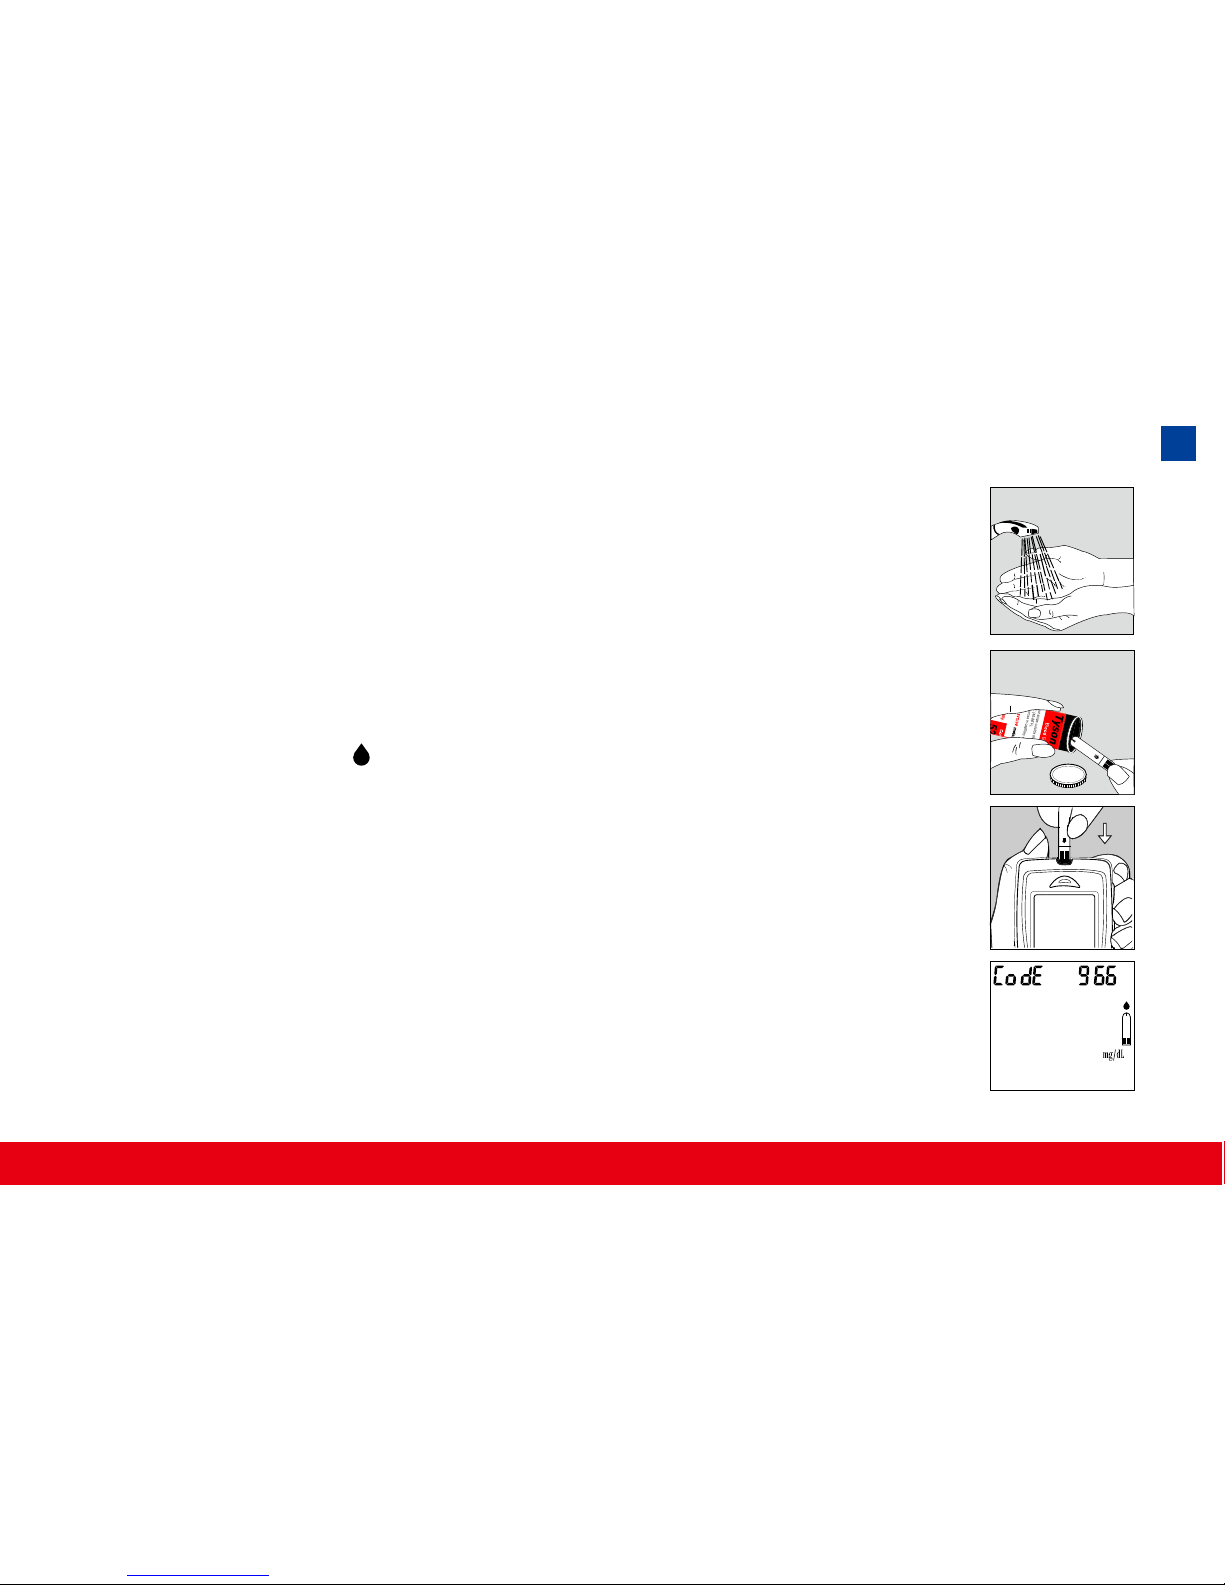
Preparing the Test Strip
1. Wash hands using soap and warm water. Rinse and dry thor-
oughly.
2. Pull out a Test Strip from the vial and re-cap the vial immedi-
ately.
3. Insert the Test Strip, white side face up, into the test port.
4. A beep will sound and the code number will appear followed
by a ashing “
“ symbol. Now you are ready to obtain a
blood sample.
Reminder:
Make sure that the code number on the display matches
the code number displayed on the Test Strip vial. If the
code number on the display does not match the code
number on the Test Strip vial, code the Meter by using
Glucode Chip, accordingly. ( See page 22-23)
29
Page 32

Obtaining a Blood Sample
SAMPLE MAY BE OBTAINED FROM FINGER, PALM or FOREARM
For further instructions please see the insert provided with lancing device.
1. Unscrew and remove the endcap of the lancing device.
2. Insert the lancet into the lancet holder.
3. Twist and remove the protective lancet cover to expose the sterile needle
tip.
4. Recapping and screwing the endcap to the body of the lancing device.
5. Pull back on the cocking mechanism until it comes to a stop.
6. Place the lancing device rmly against the nger tip and press the release
button.
7. After sampling, remove the endcap containing the used lancet carefully.
8. Remove the lancet from the lancing device. Discard the used lancet prop-
erly in accordance with local, state, and federal law.
30
Page 33
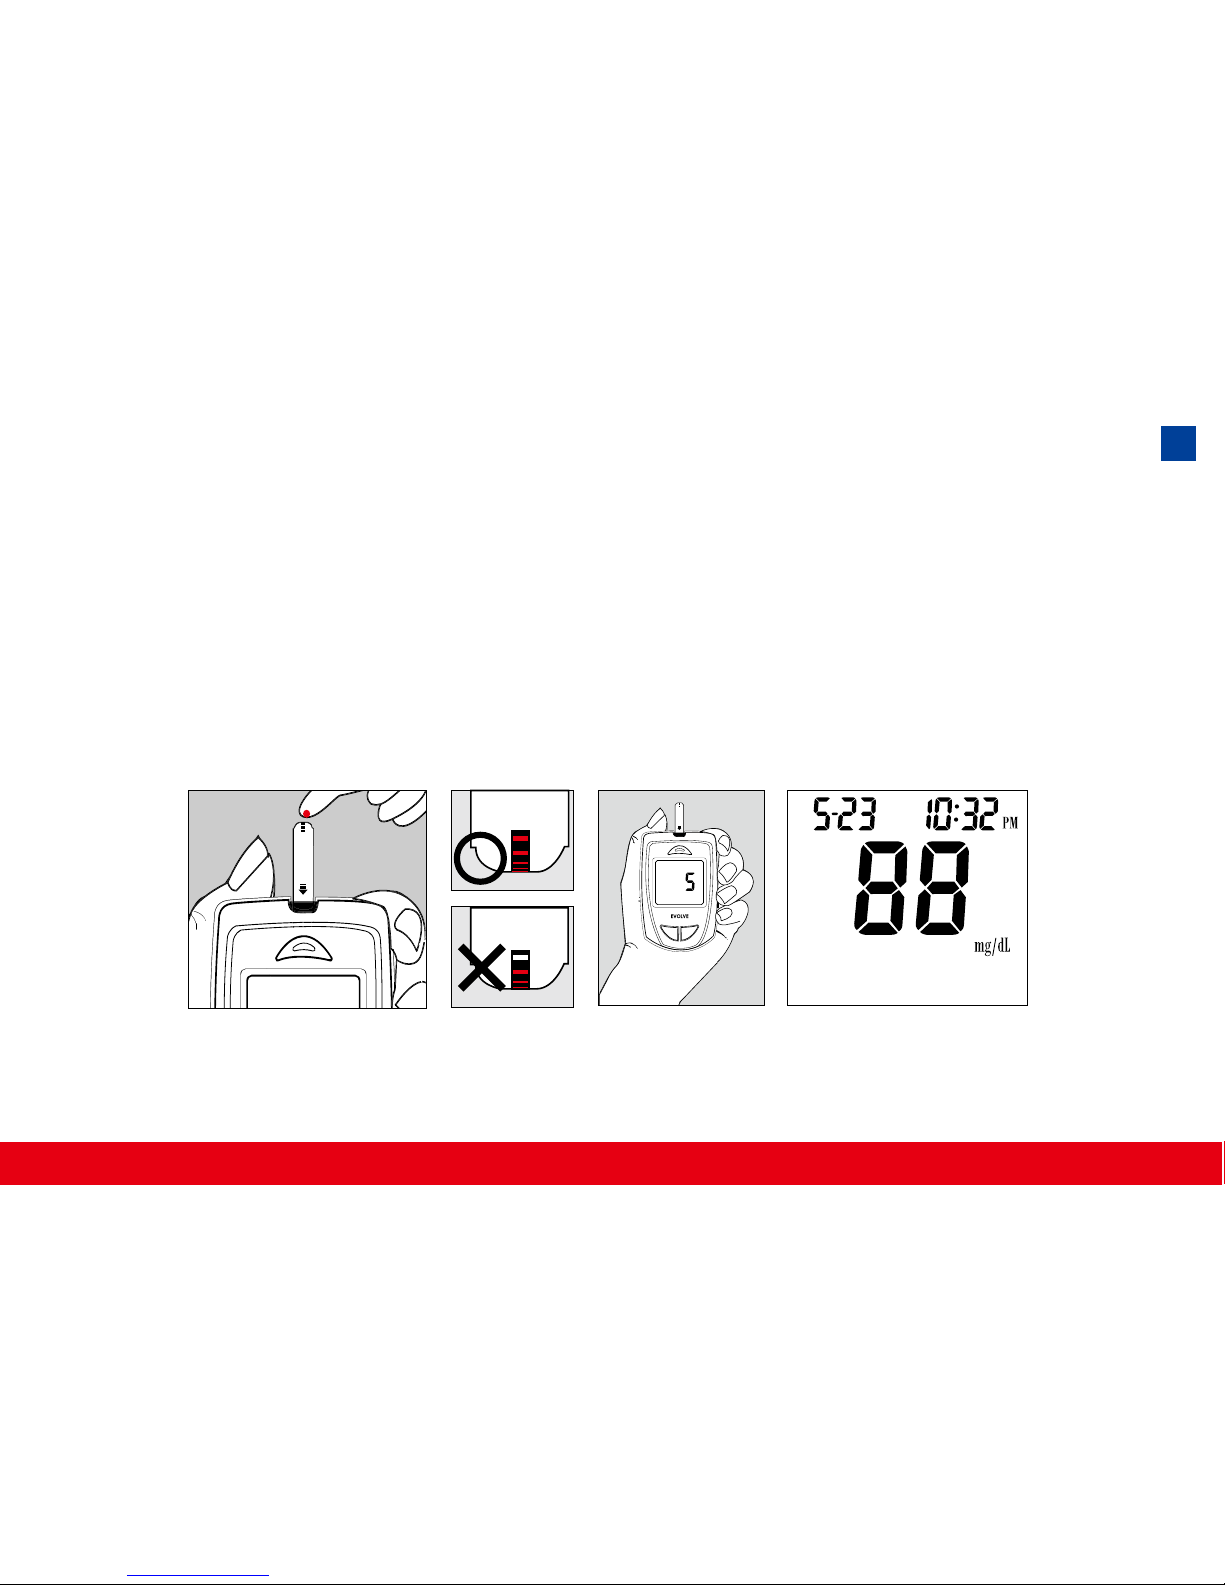
Applying Blood Sample to the Test Strip
1. After obtaining a blood sample, place the drop onto the test well of the
Test Strip. Blood is automatically drawn into the Test Strip.
2. As soon as enough blood has lled the Conrmation Window (see picture)
of the Test Strip, the Meter will beep and begin counting down from 5 to
1.Your blood glucose result will appear on the LCD display and will be
stored into the Meter memory automatically.
Note: To ensure accurate results, make sure the Conrmation Window of the
Test Strip is completely lled with your blood sample.
31
MS
Page 34
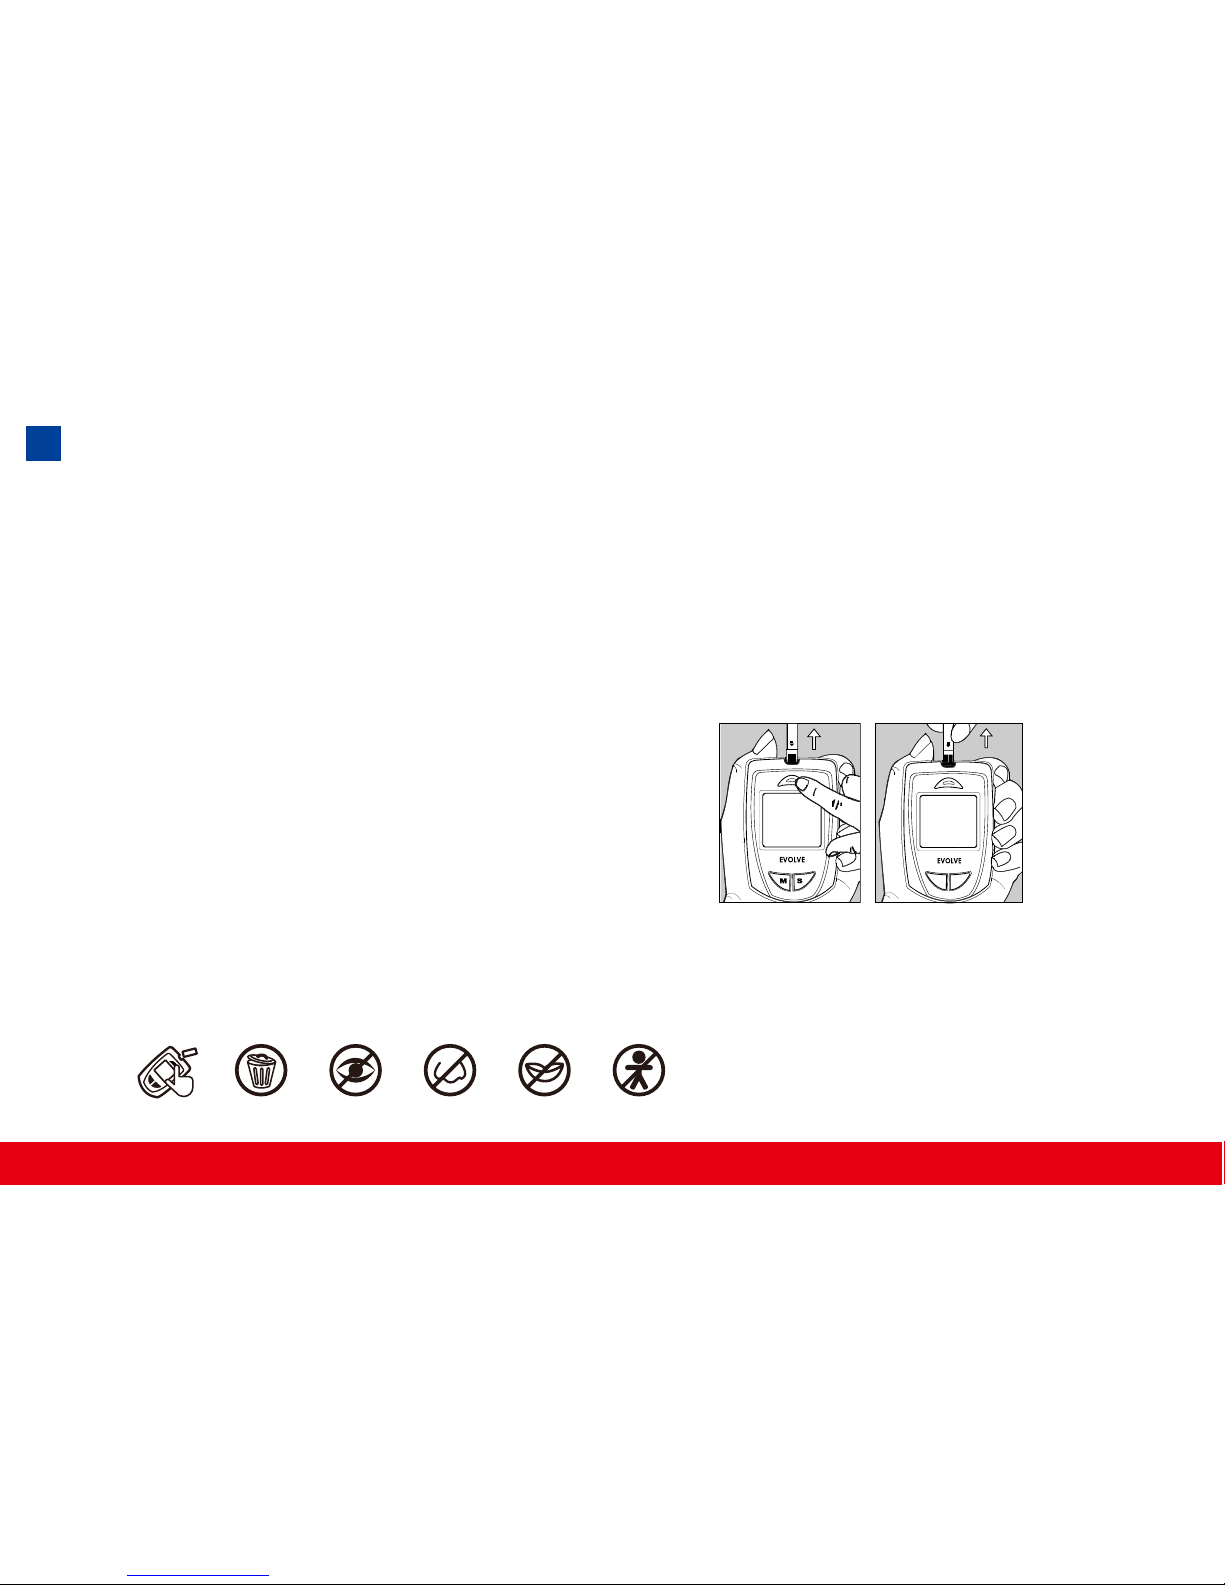
32
3. After the test result appears, if no further tests are performed, the Meter
will automatically shut off after 3 minutes.
After nishing the test, you can push the strip eject button to remove the
used strip or using a tissue paper to remove Test Strip from the Meter for
proper disposal.
MS
Warning: Always discharge the used test strip into suitable waste container.
Please DO NOT point the test strip at people or animal when ejecting, and
avoid pointing at eyes, nose, and mouth while test strip is in load position.
Page 35
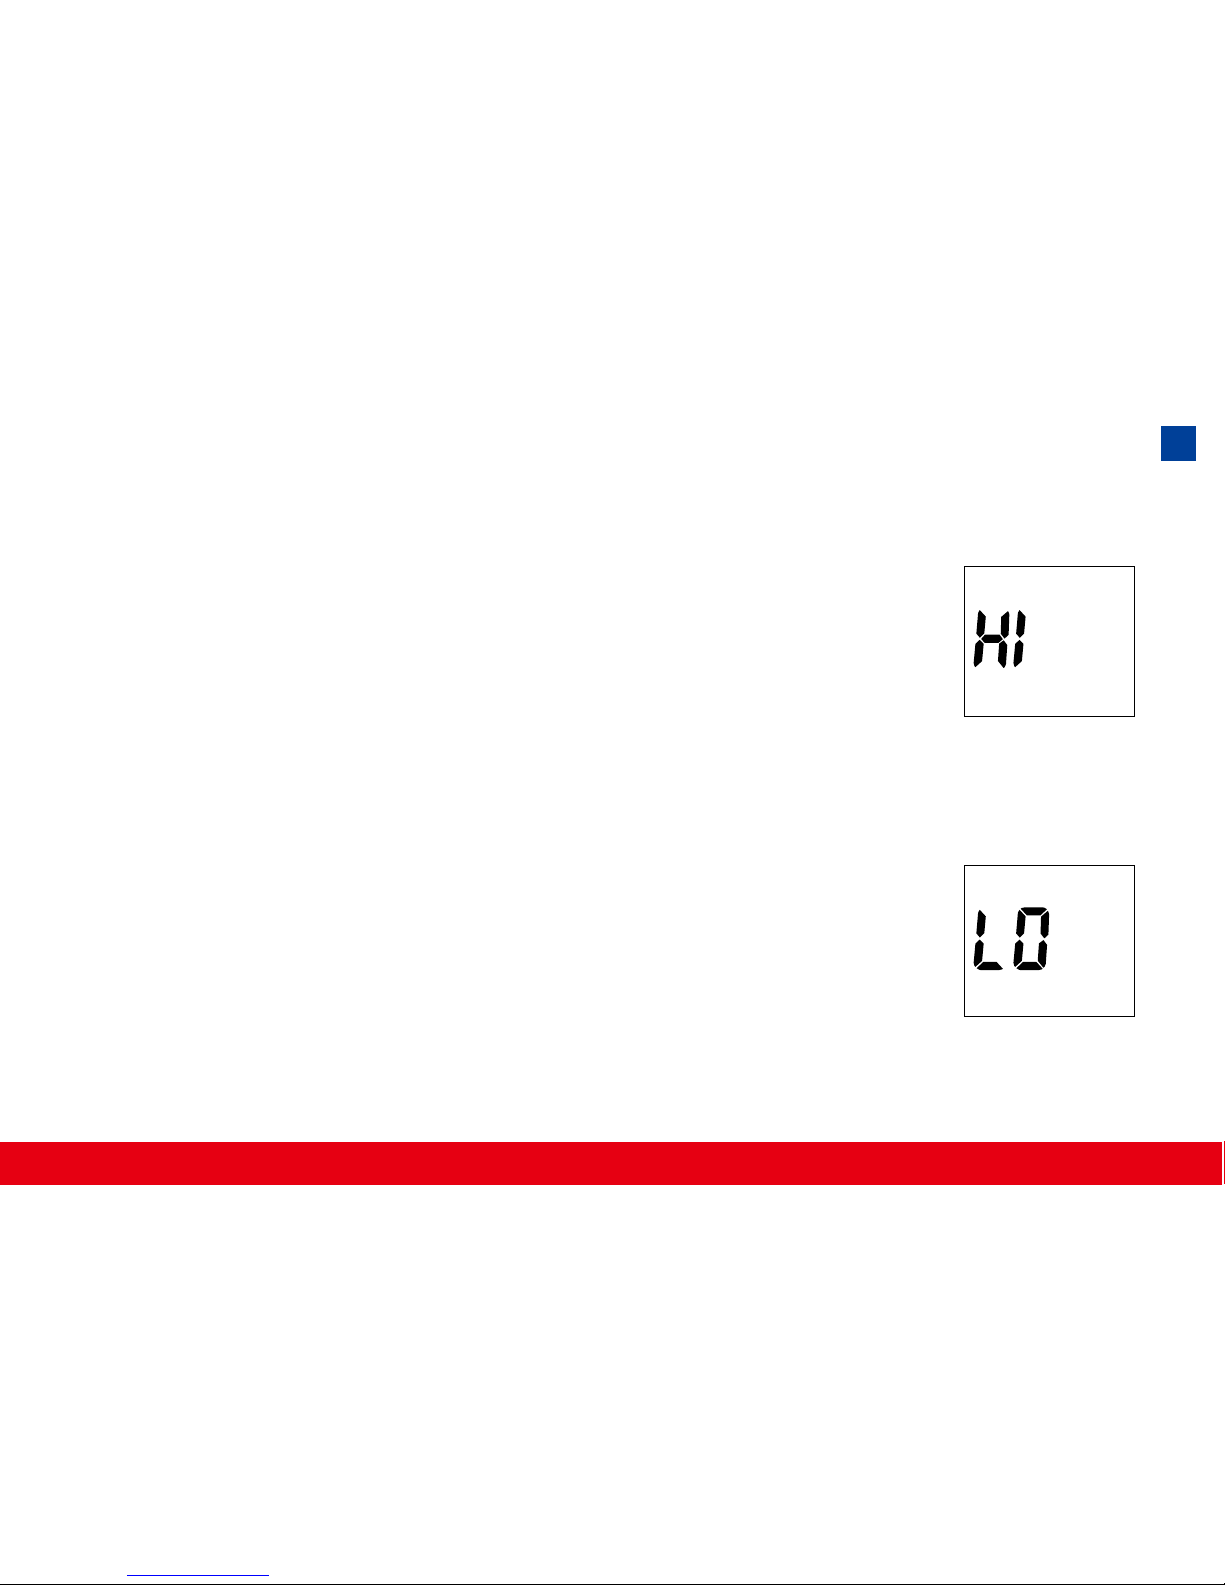
HI and LO Readings
1. The test results range between 20 to 600 mg/dL (1.1 to
33.3 mmol/l). If a “HI” message appears on the display,
your Meter has detected that your blood glucose level is
higher than 600 mg/dL(33.3 mmol/l). It is suggested that
you review your testing procedure and test again with a
new Test Strip to conrm the result. If the same result oc-
curs, consult your healthcare professional immediately.
(Fig.12)
2. If a “LO” message appears on the display, your Meter
has detected that your blood glucose level is lower than
20 mg/dL (1.1 mmol/l). It is suggested that you review
your testing procedure and test again with a new Test
Strip to conrm the result. If the same result occurs, con-
sult your healthcare professional immediately. (Fig.13)
(Fig.12)
(Fig.13)
33
Page 36
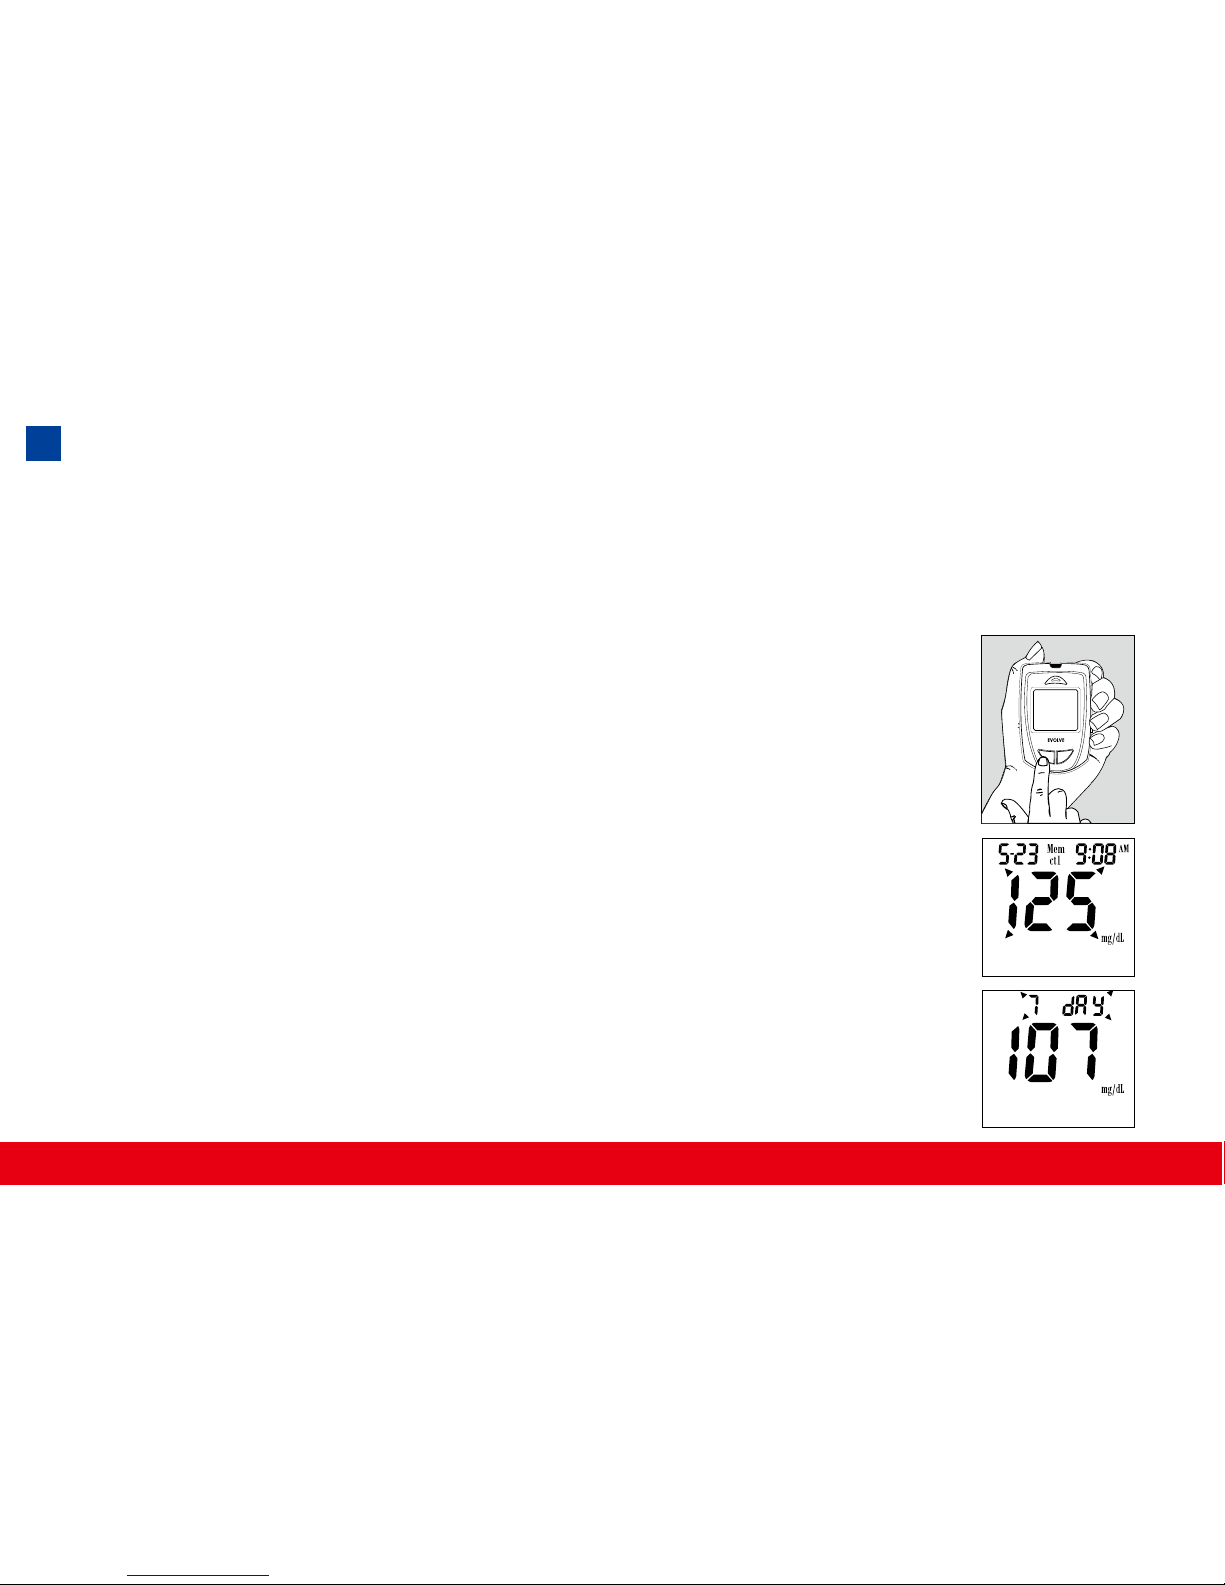
Memory Features
The TysonBio EVOLVE Meter automatically stores the 300 most recent blood
glucose results with date and time in its memory. It also provides you with a
consecutive 7/14/30-day average of your blood glucose test results.
1. Press M button to turn on the Meter. All segments of the LCD
display will appear. The date and time will appear rst.
2.
Press S button, the result of control solution will appear on
display.*
3.
Press S button, the consecutive 7-day average will be shown.*
4.
Press S button, the consecutive 14-day average will be shown.*
5.
Press S button, the consecutive 30-day average will be shown.*
Note : * If there is no test results during this stage, it will directly
appear the most recent test result.
34
MS
Page 37
Exiting the Memory Mode
1. Press the M button to turn off the meter.
2. Meter will shut down automatically after 3 minutes with no further action.
Note: The consecutive 7/14/30-day average is calculated from the blood
glucose results obtained during the last consecutive 7/14/30-day.
To Record Your Results
We have provided a log book for your recording convenience. To learn more about
how to record your results, please refer to the log book for further instructions.
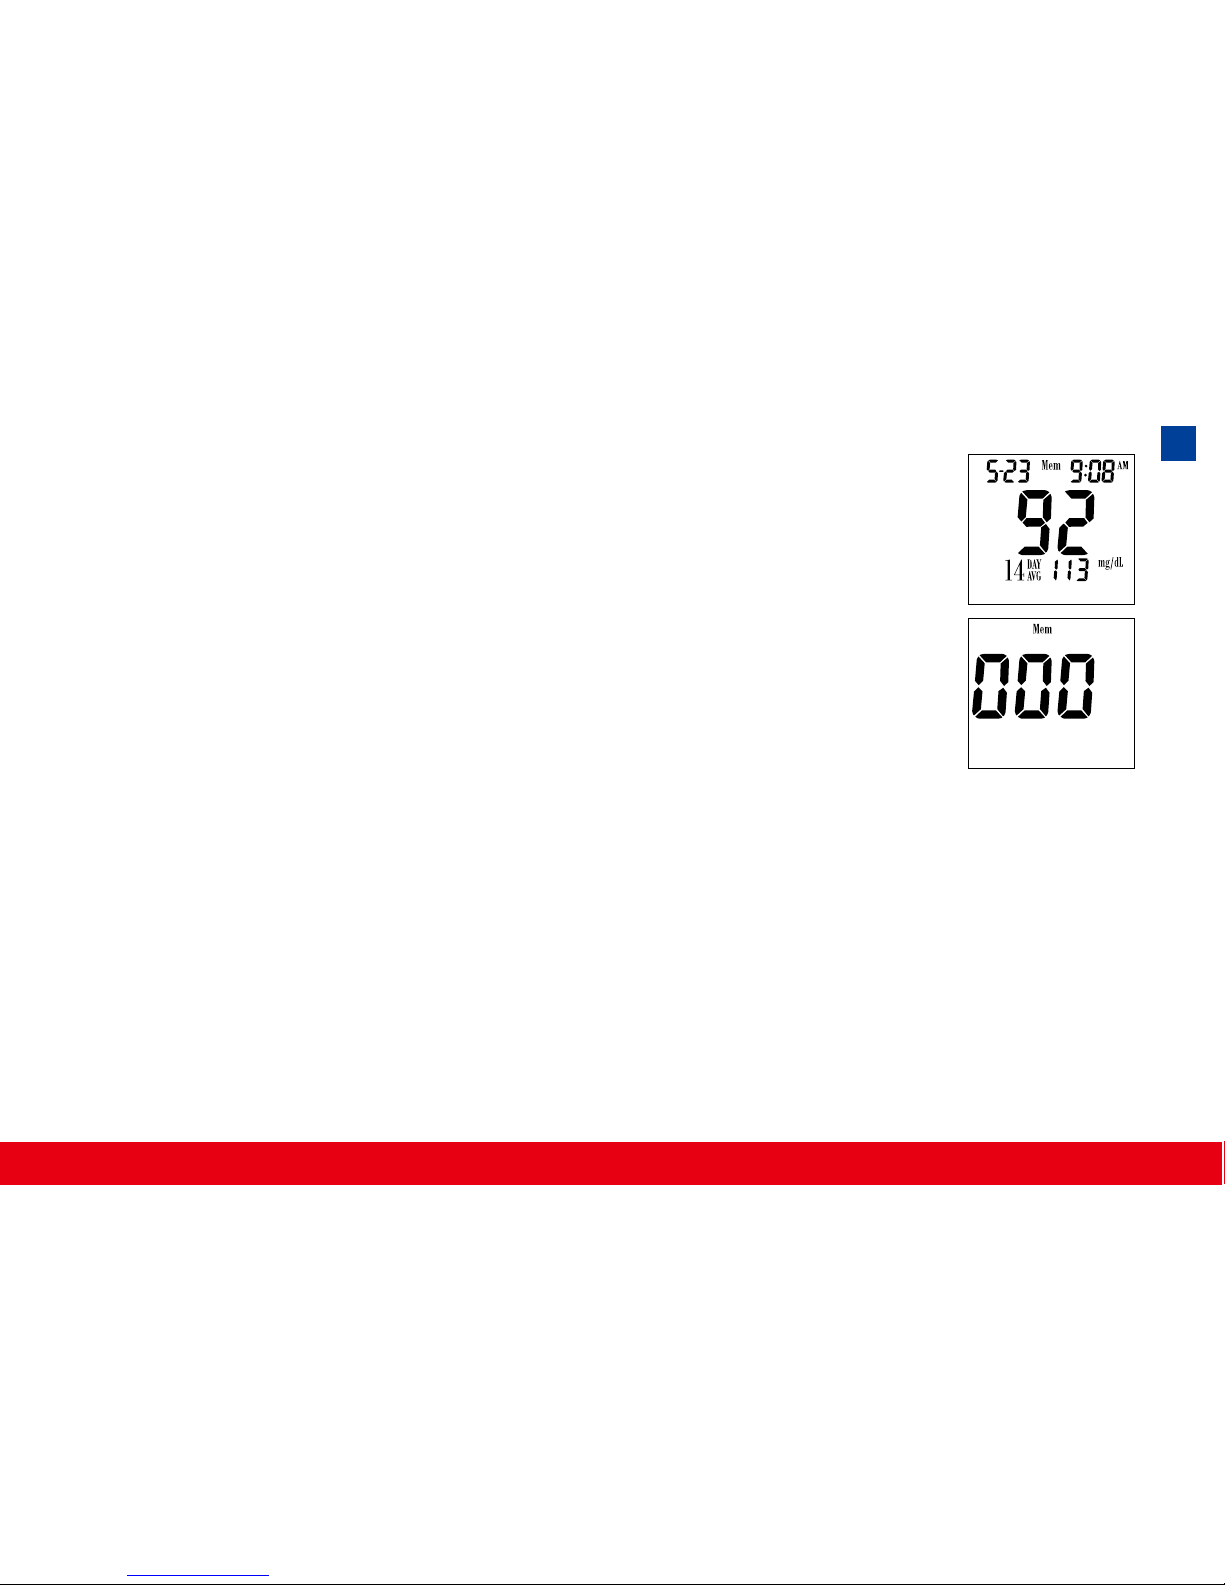
6. Press S button, the most recent test result will appear. If it
has 14-day average result, it will show under the screen at
the same time. Each time you press the S button, the meter
will recall the last 300 test results accordingly. When the
memory is full, the oldest result is removed and replaced
with the newest result.
7. Press and release the S button to the end of the memory,
“000” will show. Then press the S button again or press M
button at anytime to turn off the meter.
35
Page 38
Transfer Test Results to a Computer
You can use your meter with TysonBio Link Health Management Software to
transfer test results to your personal computer.
1. Obtain the required software and cable
For order information please call Tyson Bioresearch, Inc., Customer Ser-
vice or visit website of www.tysonbio.com
2. Install the software on a computer
Follow the instructions provided with software to install the software.
3. Get ready to transfer test results
Connect the interface cable to a serial port on your computer. Then
connect the other end of interface cable to the data port located on
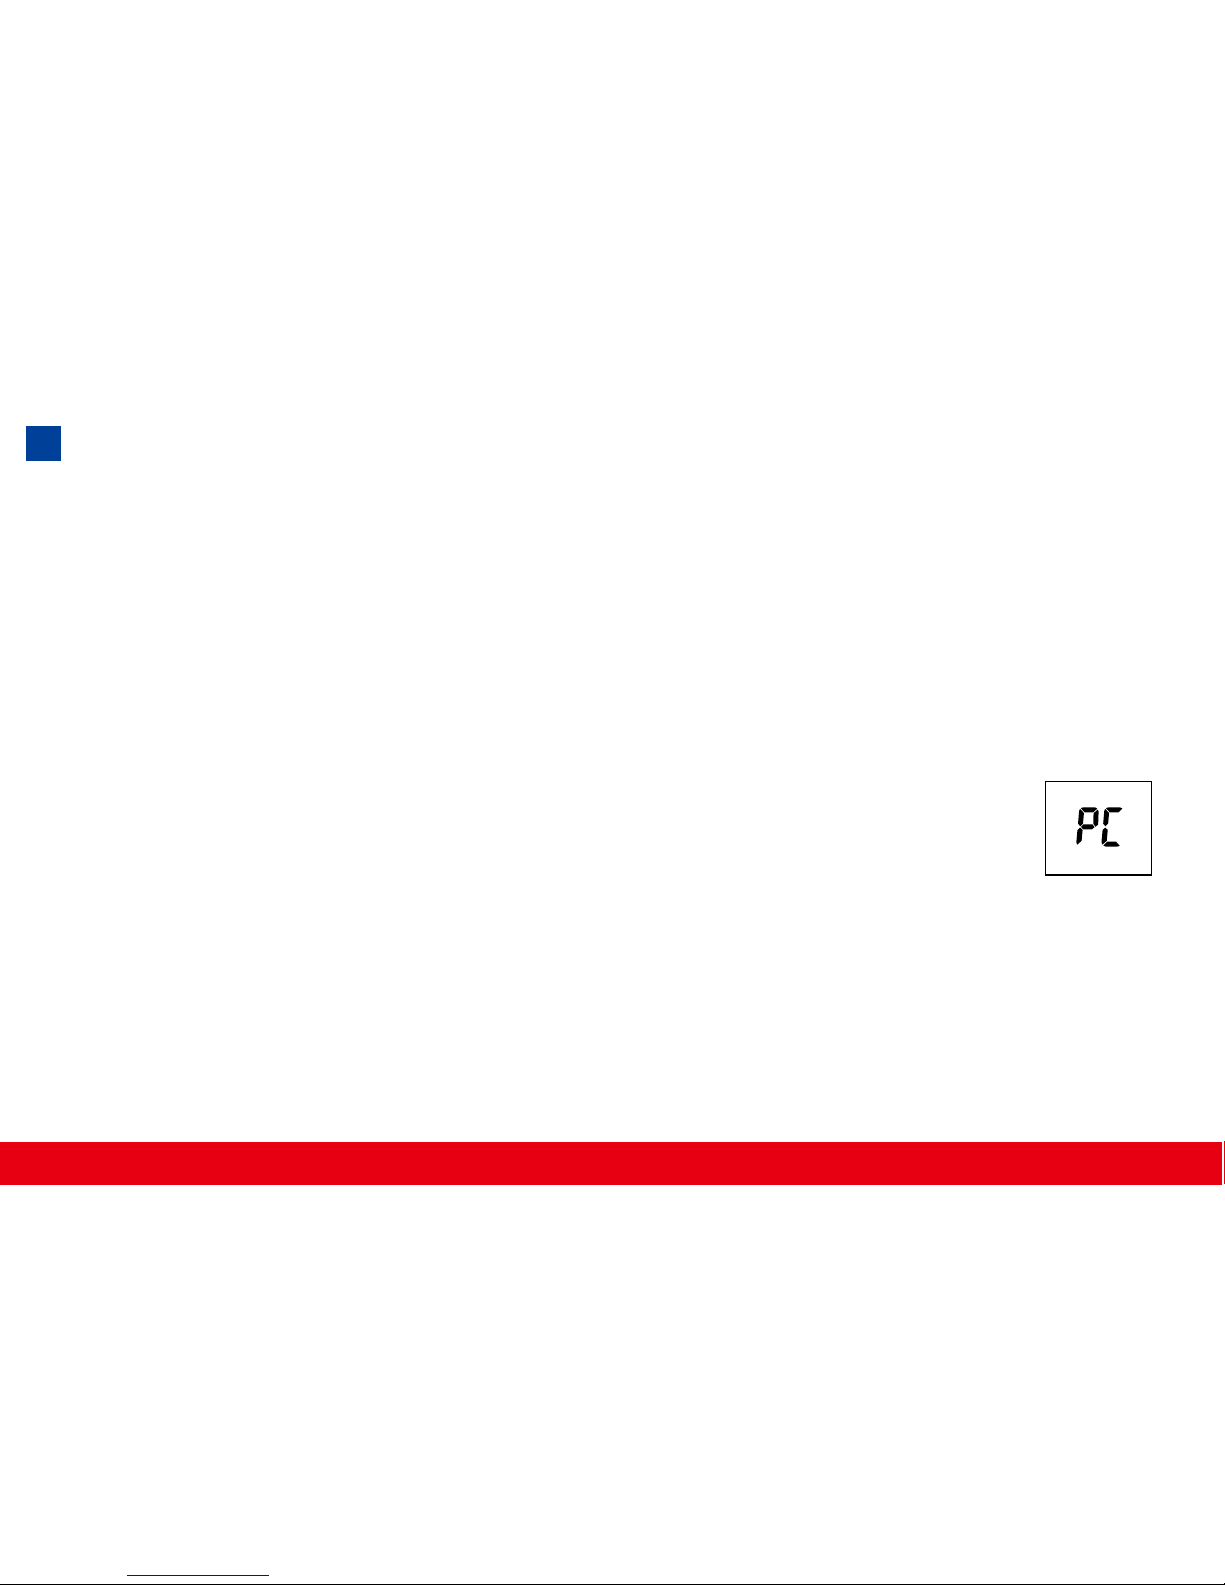
the side of the meter with the meter turned off. “PC” will appear on
the display, indicating that the meter is in the communication mod
e.
4. Transfer data
Follow the instructions provided in the software to download the results from
the meter. After nishing the data transfer, press M button to turn off the meter.
Note: While in the communication mode, you will be unable to perform
a blood glucose test. If the meter is not in the PC link mode, it will not
respond to computer commands.
36
Page 39
For healthcare professionals using this system on multiple patient, please be aware that all
items that come in contact with human blood should be handled as potential biohazards.
Users should follow the guidelines for prevention of blood-borne transmittable diseases in a
healthcare setting for potentially infectious human blood specimens as recommended in the
National Committee for Clinical Laboratory Standards, Protection of Laboratory Workers from
Instrument Biohazards and Infectious Disease Transmitted by Blood, Body Fluids and Tissue:
Approved Guideline. NCCLS document M29-A [ISBN 1-56238-339-6].
1. Handle the Meter with care. Dropping or throwing the Meter may cause
damage to the device.
2. Do not expose the Meter, Test Strips, and Control Solution to extreme con-
ditions, such as high humidity, heat, freezing cold or dust.
3. Always wash hands with soap and water and rinse and dry completely be-
fore handling the Meter and Test Strips.
4. When cleaning the Meter, gently wipe the exterior surface using a damp
soft cloth. DO NOT USE ANY ORGANIC SOLVENT for cleaning.
5. The Meter should be stored at room temperature in a dry and clean space.
DO NOT STORE IN DIRECT SUNLIGHT OR AREAS WITH HIGH HUMIDITY AND/OR DUST. It is advised that you store the Meter and its ac-
cessories into the provided carrying case.
Care and Storage
37
Page 40
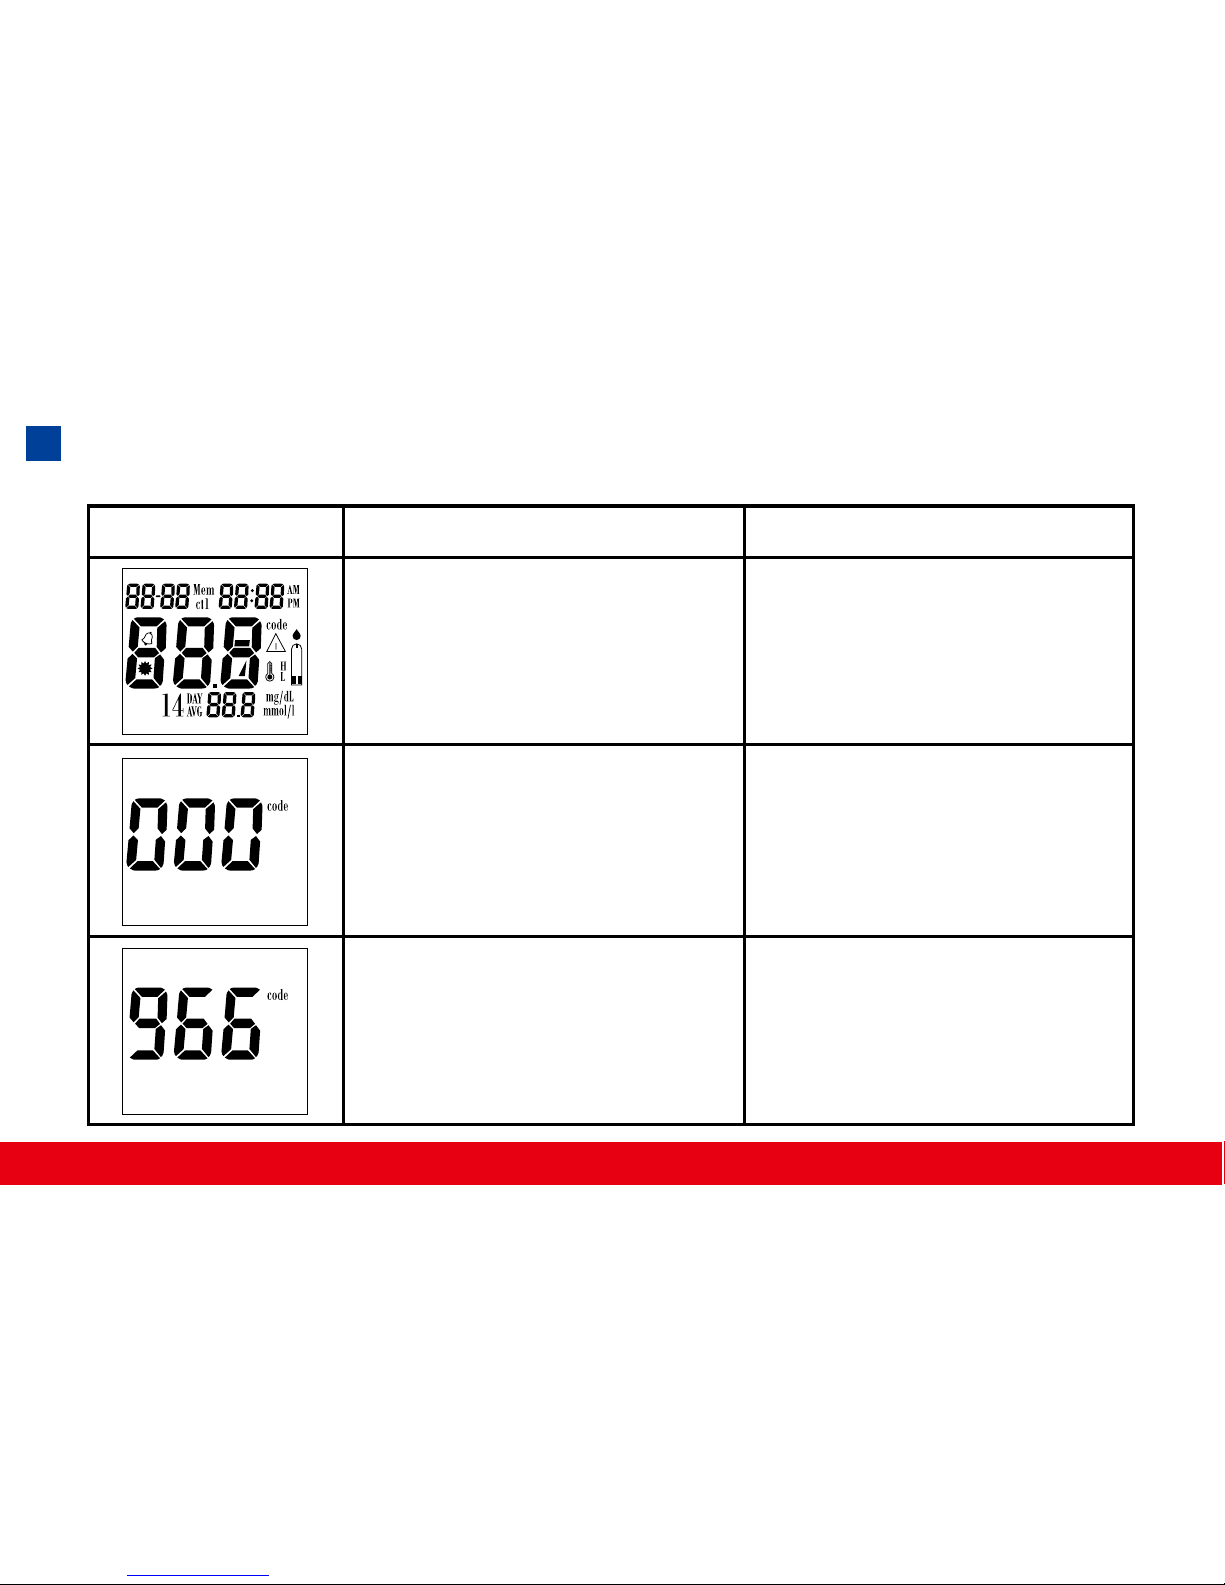
DISPLAY WHAT IT MEANS ACTION
Display Messages
System check for verifying
that all segments of the
Meter are functioning.
This message appears immediately if your Meter has
not been encoded.
No Action Necessary
Code Meter
(see page 22 Coding
Your TysonBio EVOLVE
Meter)
This is the current code
number in use.
This code number should
match the code number
printed on your Test Strip
vial.
38
Page 41
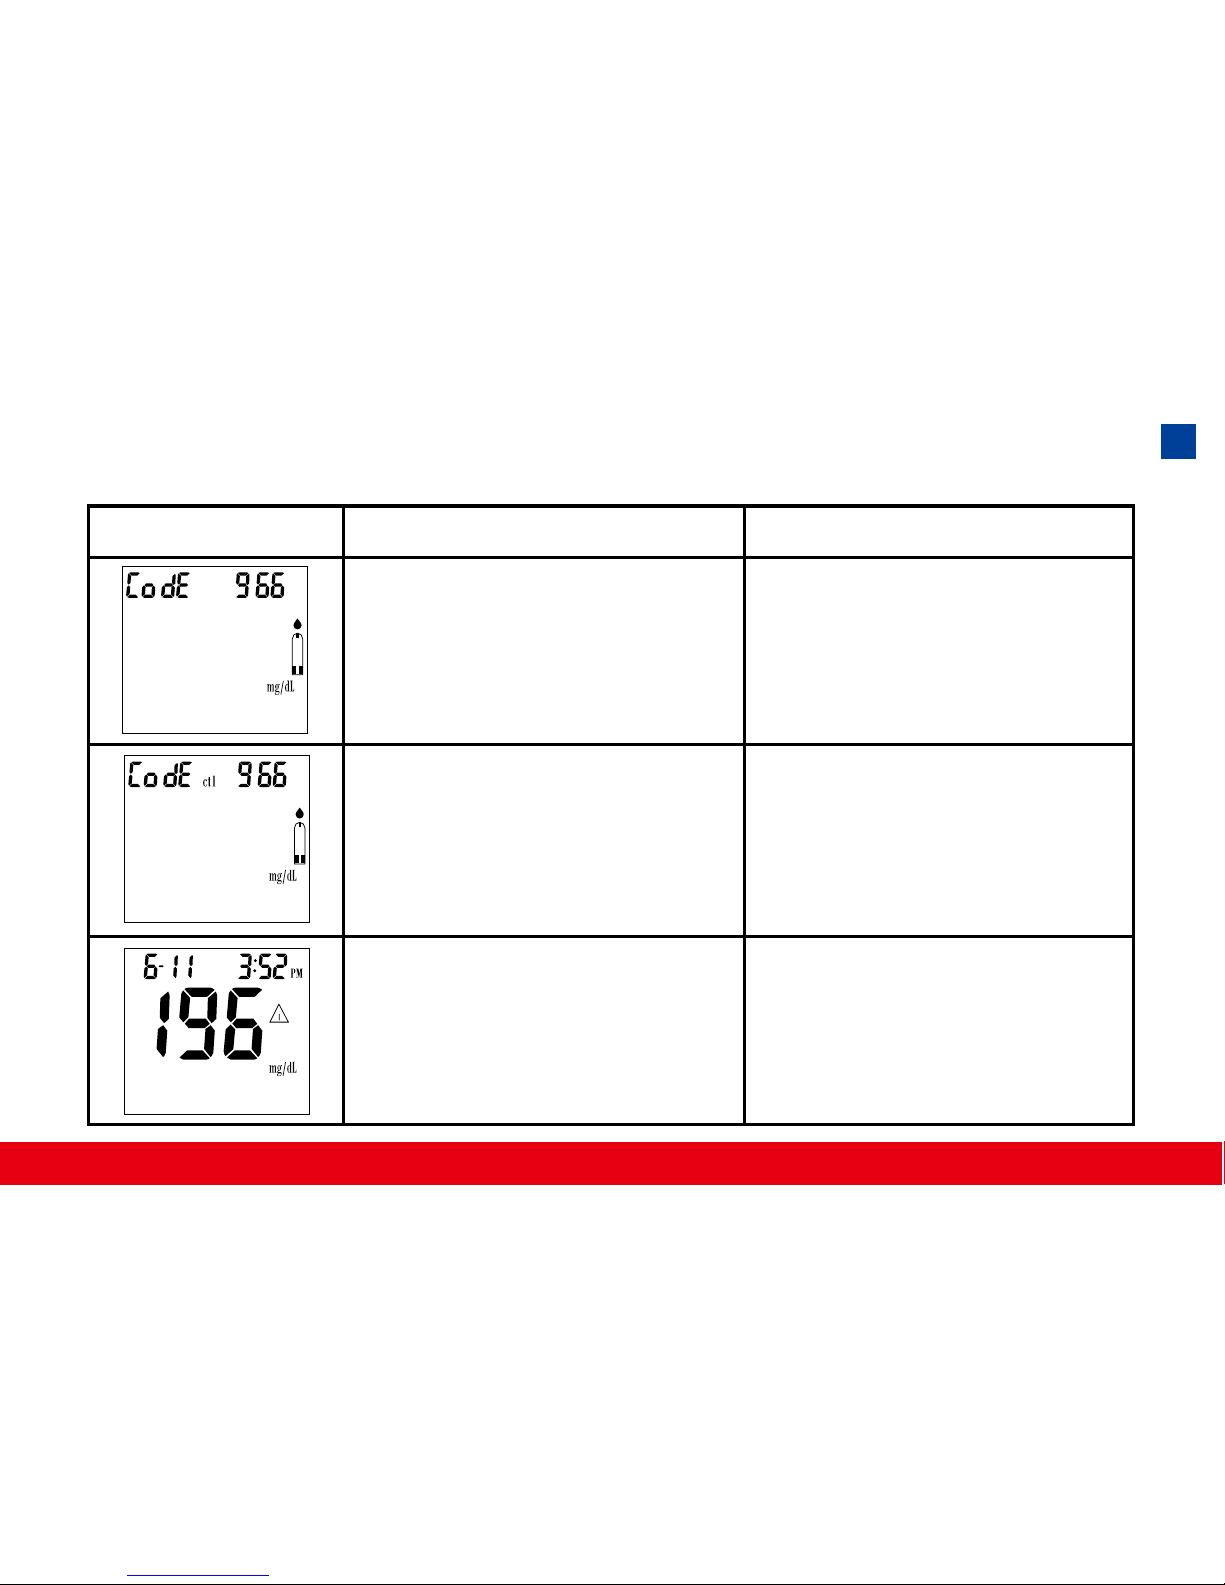
DISPLAY WHAT IT MEANS ACTION
The system is ready to accept a blood sample.
The system is ready to
accept a Control Solution
sample.
Indicate the result is
HIGHER than the “HI
alarm setting” of the health
management.
You may now apply a
blood sample.
You may now apply a
drop of Control Solution
sample.
For your reference or you
can change the default
setting value 100 mg/dL
according to page 20.
39
Page 42
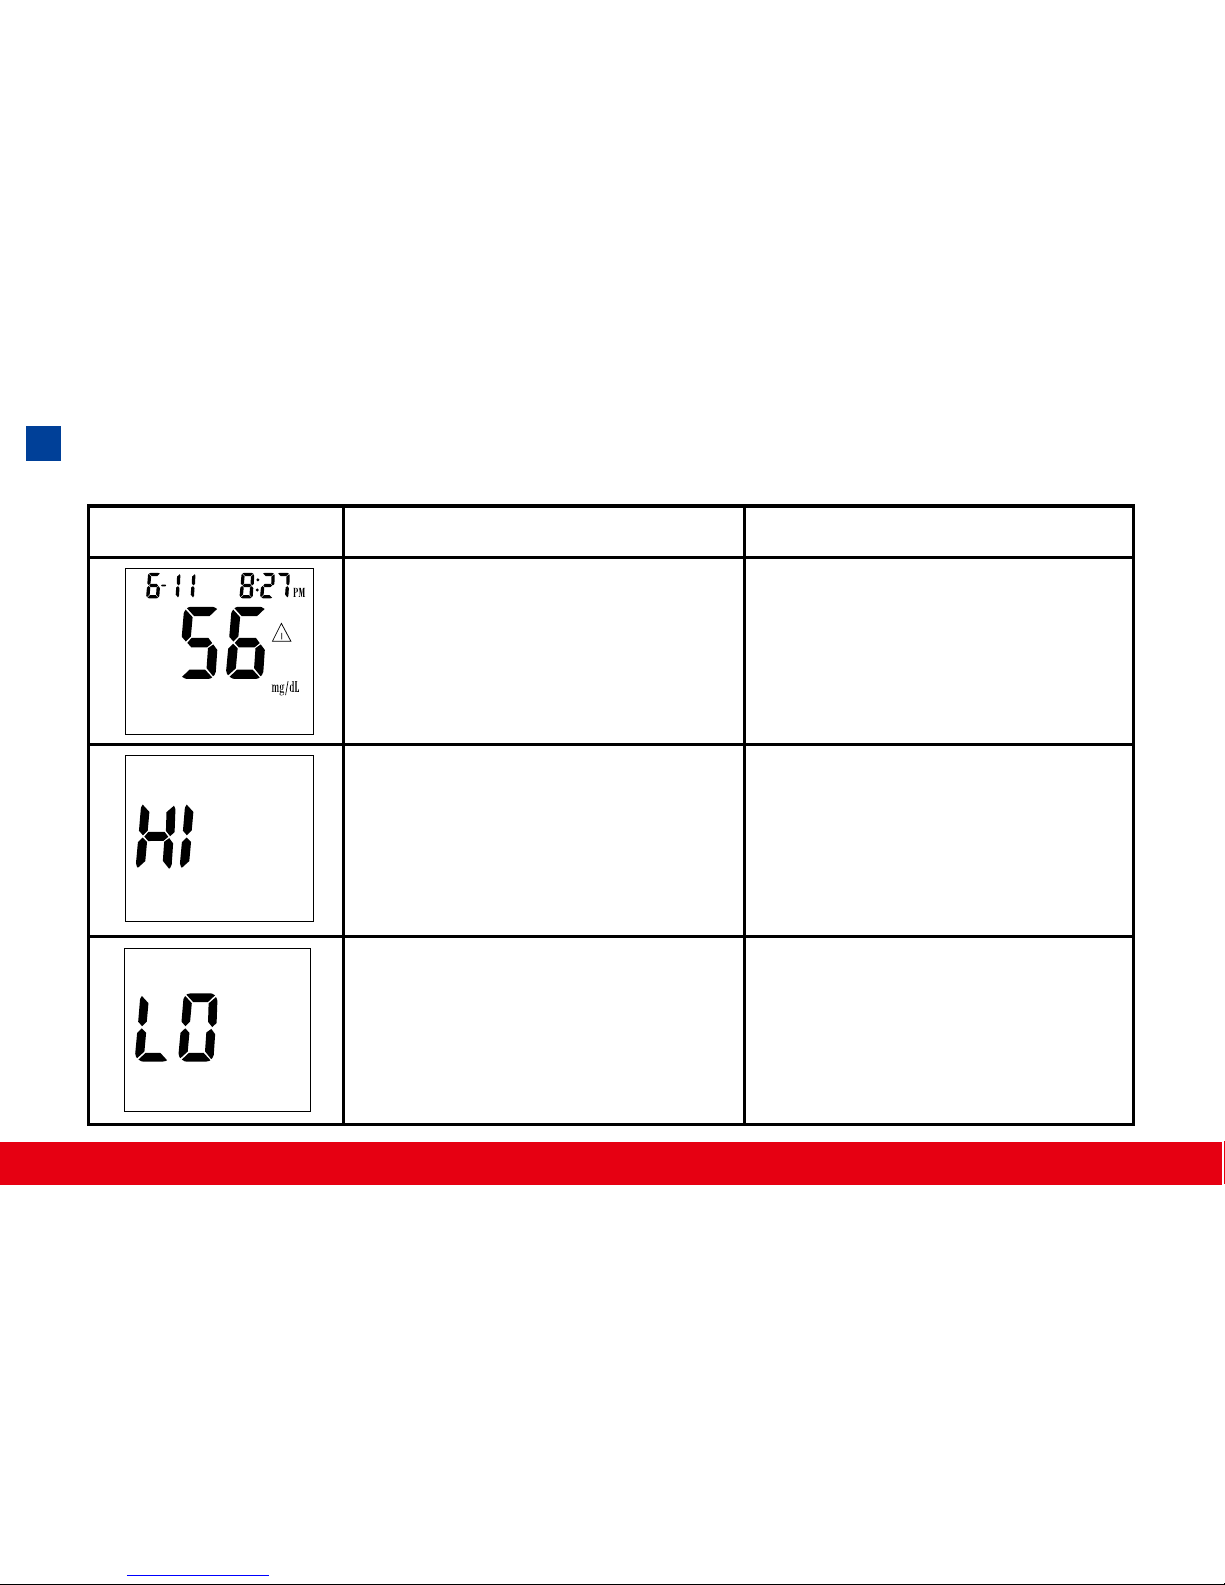
DISPLAY WHAT IT MEANS ACTION
Indicate the result is
LOWER than the “LO
alarm setting” of the health
management.
For your reference or you
can change the default setting value 70 mg/dL according to page 20.
Meter detects blood glucose level is higher than
600 mg/dL(33.3 mmol/l).
Meter detects blood glucose level is lower than 20
mg/dL (1.1 mmol/l).
Indicates high blood glucose level. Repeat test. If
result still occurs, consult
your physician immediately.
Indicates low blood glucose
level. Repeat test. If result
still occurs, consult your
physician immediately.
40
Page 43
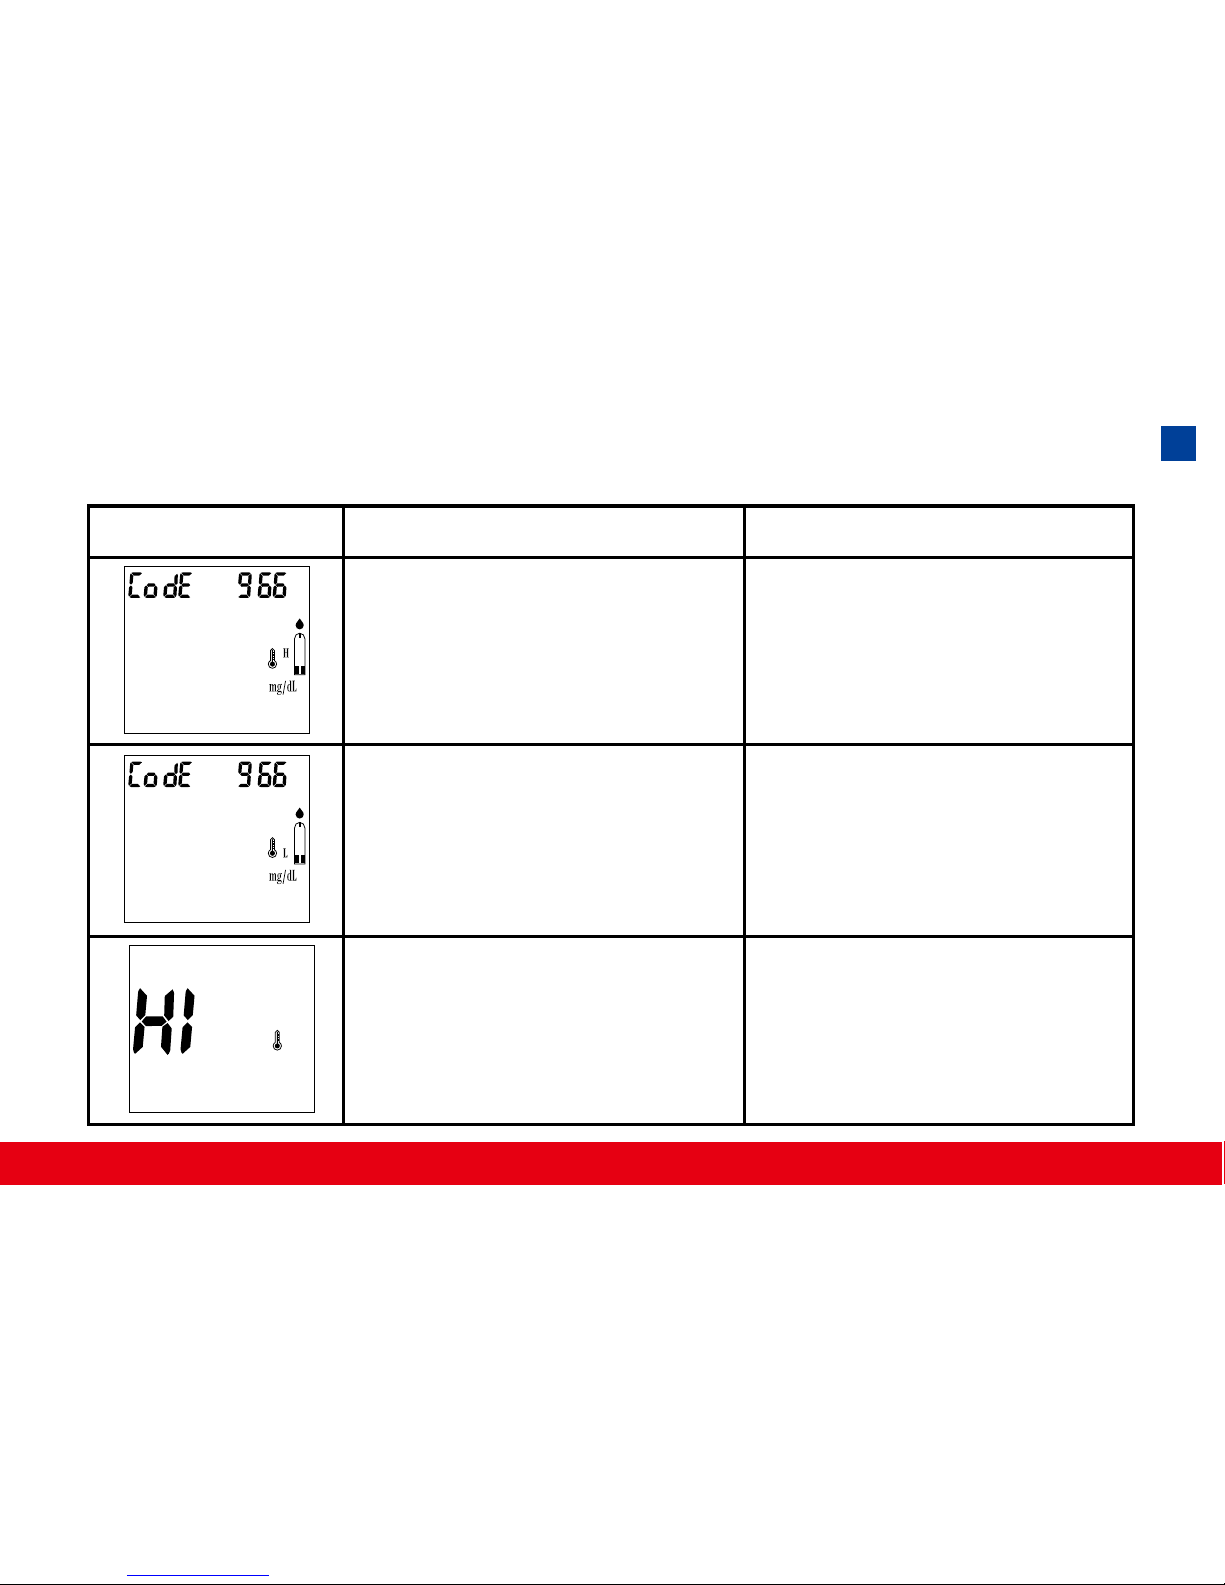
DISPLAY WHAT IT MEANS ACTION
Temperature is high during
the test procedure.
Result may be larger variation. Move to a cooler envi-
ronment (10 - 40˚C or 50 104˚F) and wait 15 minutes
before re-testing.
Temperature is low during
the test procedure.
Temperature is too high to
perform the test.
Result may be larger variation. Move to a warmer
environment (10 - 40˚C or
50 - 104˚F) and wait 15
minutes before re-testing.
Repeat the test in a cooler
setting (10 - 40°C or 50 104°F). Wait 15 minutes
before re-testing.
41
Page 44
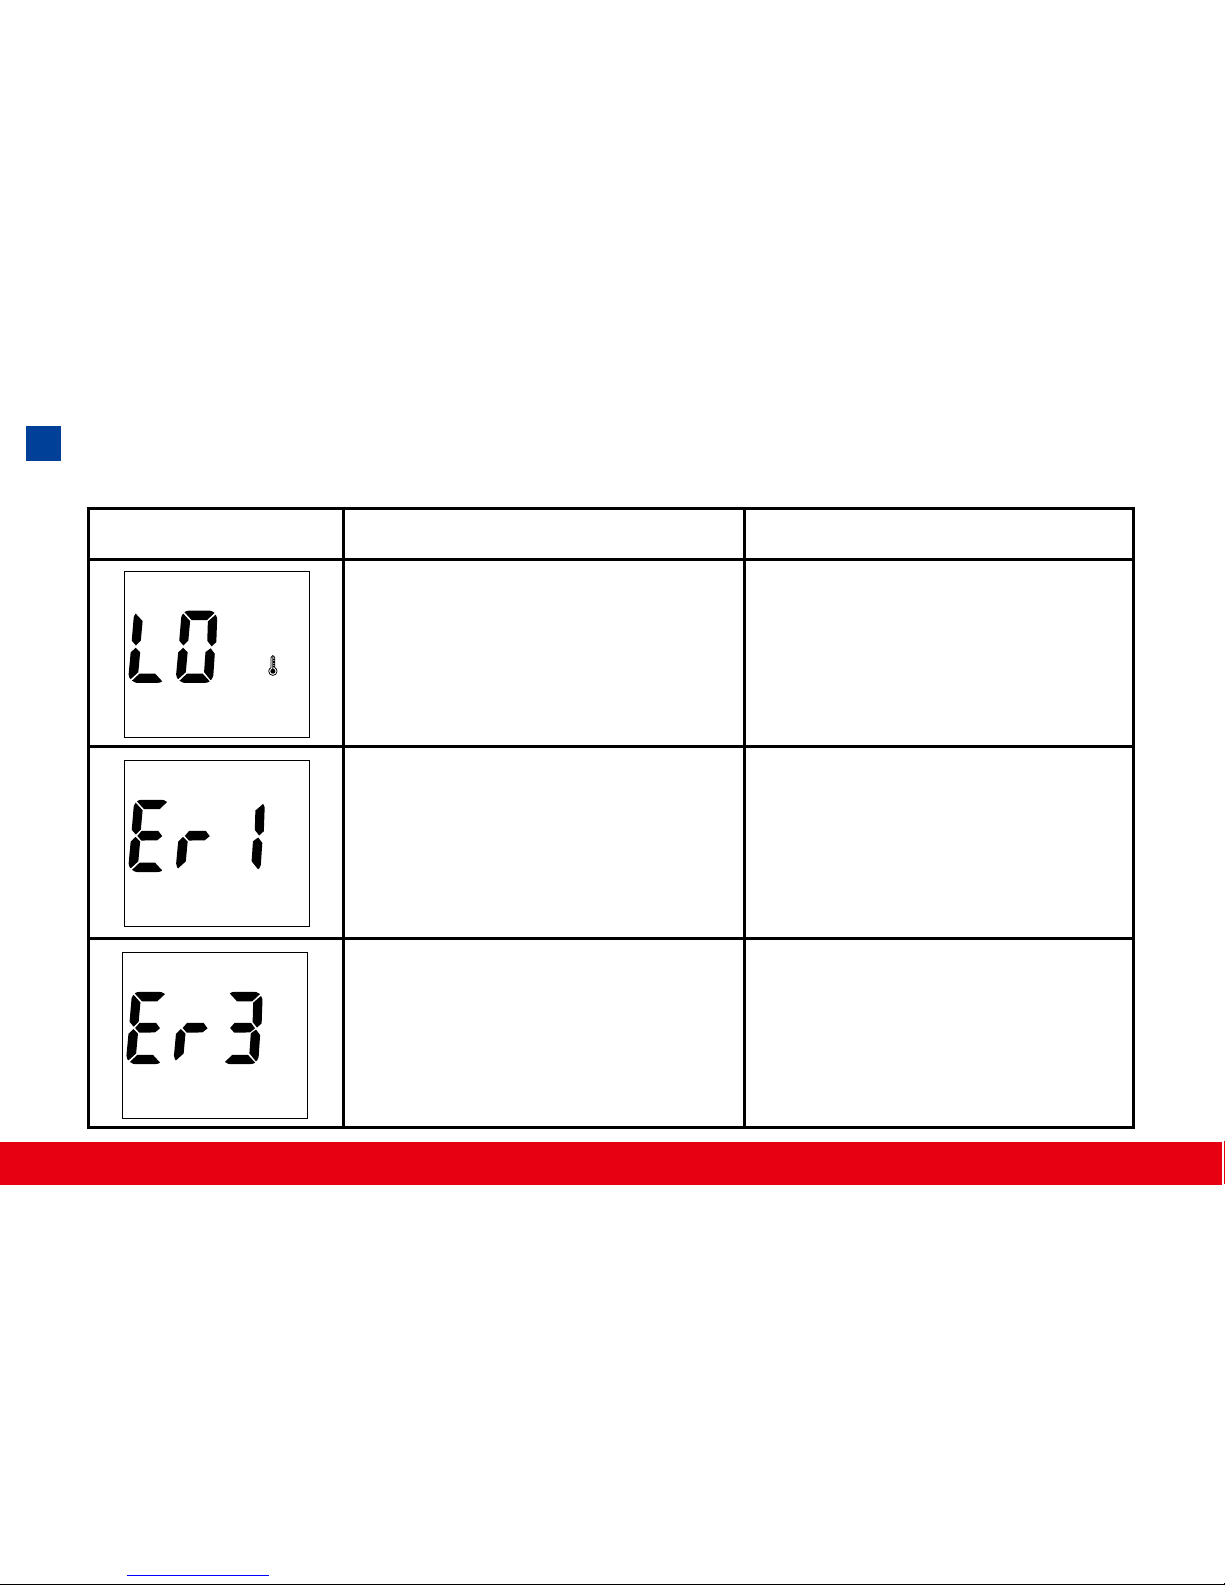
DISPLAY WHAT IT MEANS ACTION
Temperature is too low to
perform the test.
Repeat the test in a warmer
setting (10 - 40°C or 50 104°F). Wait 15 minutes
before re-testing.
An error message indicating a problem with the
Test Strip.
An error message indicating a problem with the
Meter.
Review the instructions
and try again with a new
Test Strip.
Press “reset” button and
check the meter again with
the Glucode Chip. If the
problem persists, contact
Customer Service for help.
42
Page 45
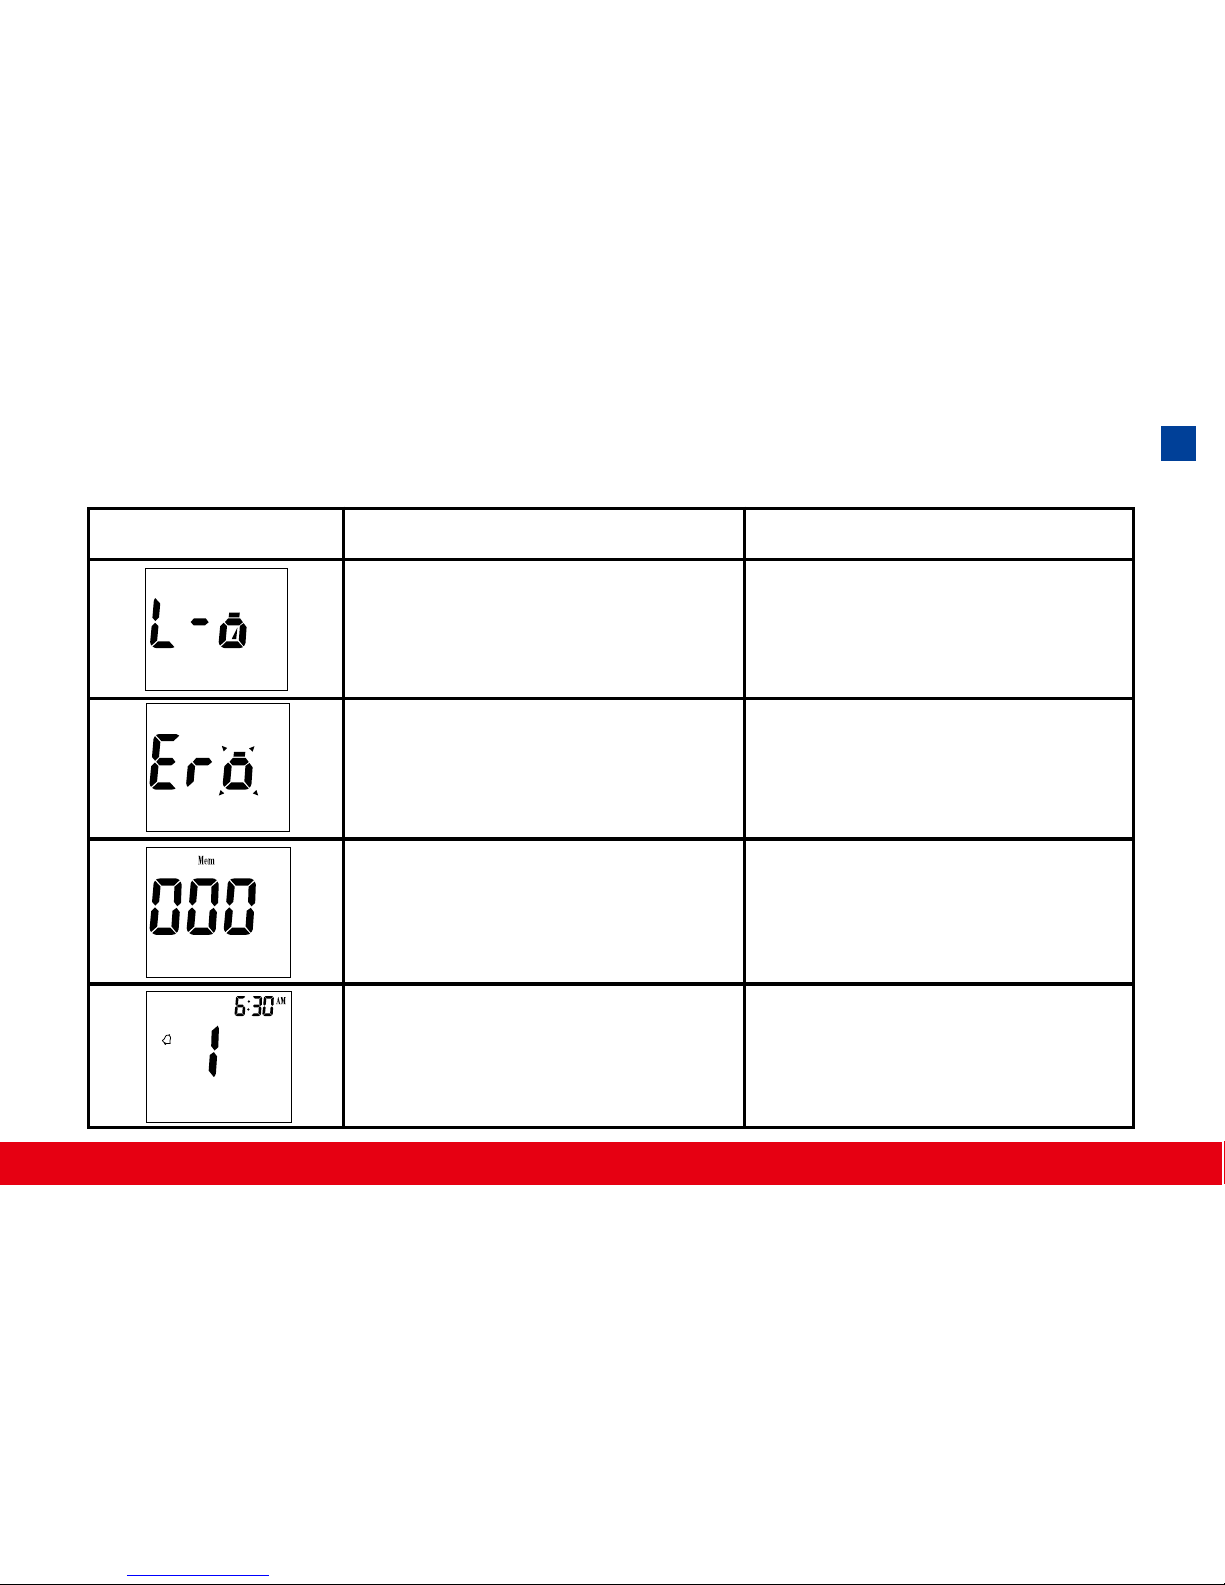
DISPLAY WHAT IT MEANS ACTION
Battery power is low. Meter
will provide approximately
50 more measurements.
Battery power is too low
for further usage.
All testing values recorded
in the memory have been
shown.
The setting alarm is ringing to remind of doing the
blood glucose test.
Replace with a new 3-Volt
lithium battery (CR-2032).
Replace with a new 3-Volt
lithium battery (CR-2032)
immediately.
Press M or S button or wait
for 3 minutes to turn off the
meter.
Press M or S button to shut
off or the alarm will turn off
automatically after 30 sec.
43
Page 46
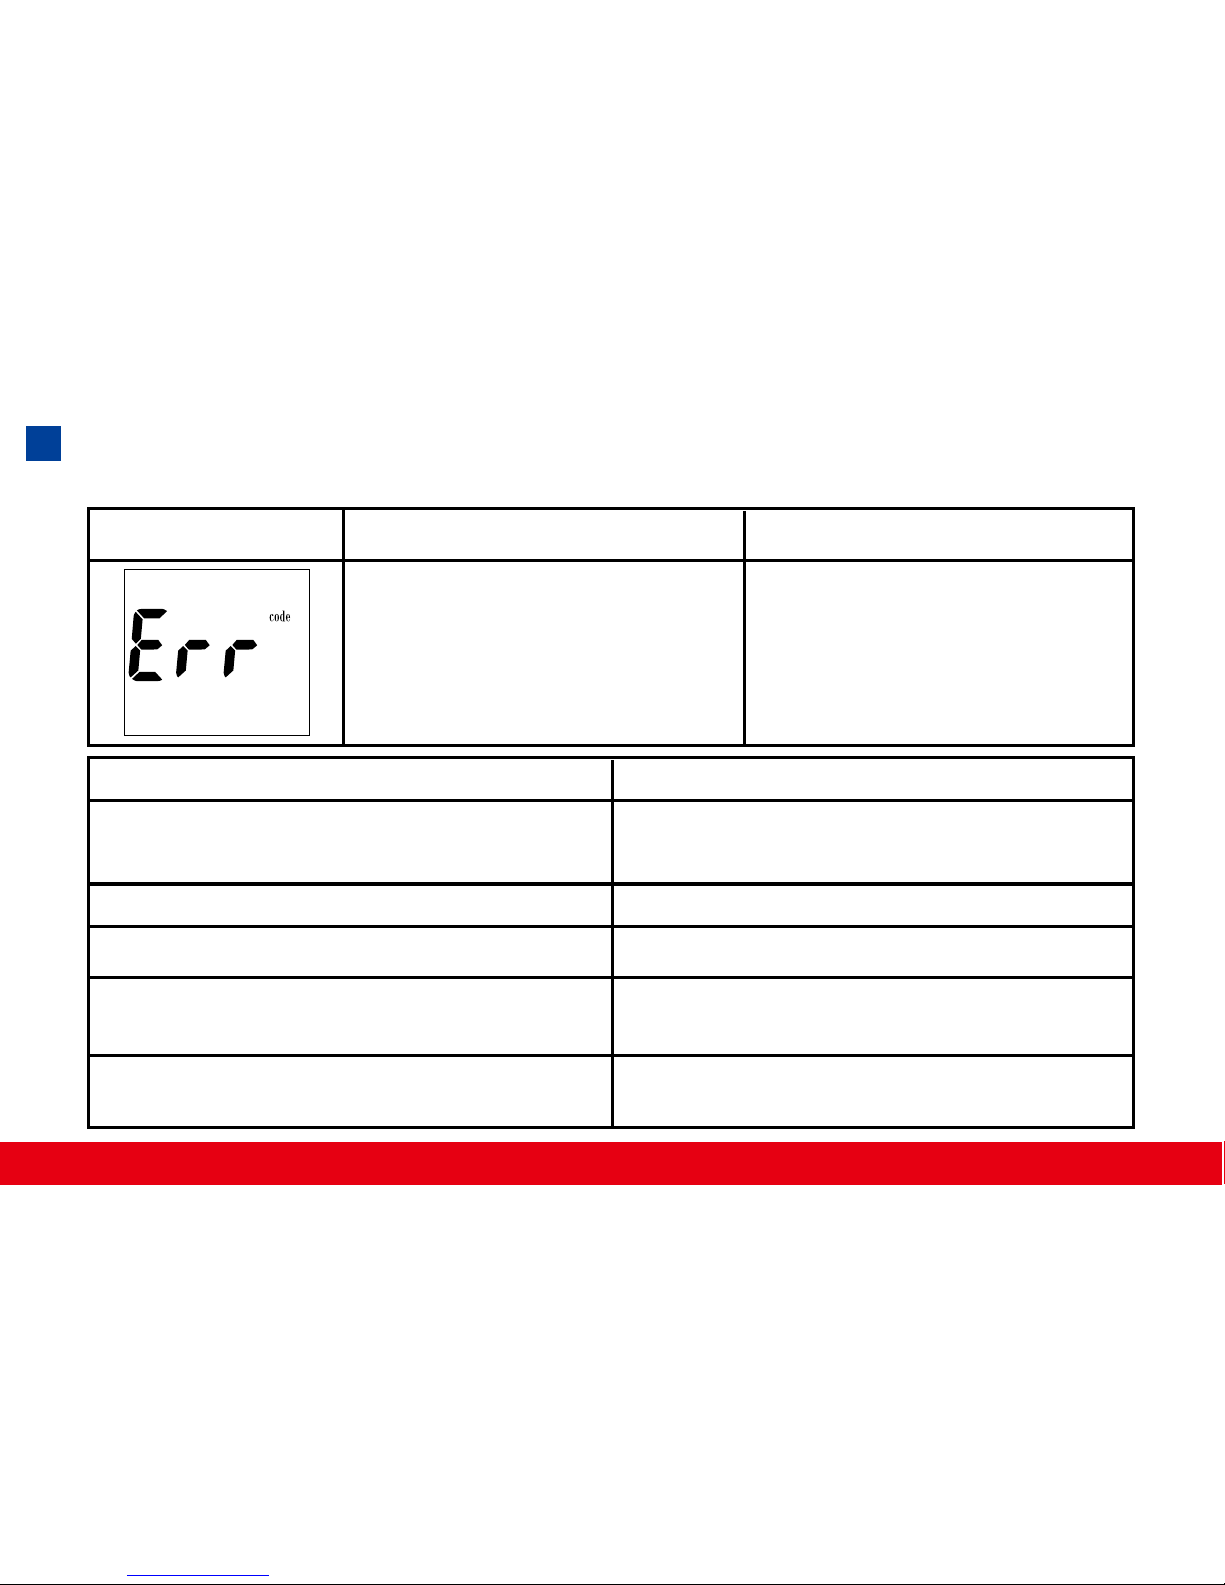
DISPLAY
Other problems that may occur ACTION
WHAT IT MEANS ACTION
An error message indicating a problem with the
coding of Meter.
The Test Strip has not been inserted into the
Meter properly.
Review the instructions and re-insert the Test
Strip correctly (white side face up).
Replace with a new Test Strip.
Repeat the test with new Test Strip.
Meter will automatically turn-off. Re-insert the
Test Strip to the test port.
Contact Customer Service for help.
Defective Test Strip.
Insufcient blood sample.
Test Strip remains in the test port for more
than 3 minutes prior to testing.
LCD display on the Meter is blank when try-
ing to perform a test.
Check the meter again with
the Glucode Chip. If the
problem persists, contact
Customer Service for help.
44
Page 47

Meter Operating Conditions
Temperature:
10°C - 40°C(50°F - 104°F)
Humidity: 10-90% RH
Hematocrit: 35 - 55%
Test Sample:
Capillary Whole Blood from Fingertip, Palm and Forearm
Sample Volume: >0.5 µl
Measuring Unit: mg/dL or mmol/L
Measuring Range: 20-600 mg/dL (1.1-33.3 mmol/L)
Test Time: 5 sec
Memory Capacity: 300 most recent results
Average: 7/14/30 days average results
External Output: Standard RS232 PC interface
Power supply: 3-Volt lithium battery (CR-2032)
Battery Life: Approximately 1000 tests
Dimension and Weight: 92 x58 x19 mm ; 60 g
Specications
45
Page 48

■ The TysonBio EVOLVE Meter, TysonBio EVOLVE Test Strip and Con-
trol Solution are in conformity with the IVDD 98/79/EC.
The Lancing device is in conformity with the MDD 93/42/EEC.
Manufacturer:
Tyson Bioresearch, Inc.
5F. #22, Ke E. Road III, Science-Based
Industrial Park Chu-Nan,
Taiwan, R.O.C.
TEL: +886-37-585998
■ The Lancets are in conformity with the MDD 93/42/EEC.
Manufacturer:
Wuxi Xinda Medical Device Co., Ltd.
No.42 Xixin Road, Zhangjing Town,
Wuxi, Jiangsu,214194,China
TEL: +86-510-379-3149
EU authorized representative:
Medical Device Safety Service GmbH
Schiffgraben 41, D-30175 Hannover,
Germany
TEL: +49-511-62628630
EU authorized representative:
EMDAR BV
Ijsselburecht 3, Postbus 5486
6802 EL Arnhem, Netherlands
TEL: +31-263-653-375
46
Page 49

Limitations of the Procedure
Caution: The TysonBio EVOLVE System is designed for in vitro use only
and is not intended to test on newborns.
The TysonBio EVOLVE Test Strips are designed for use with fresh capillary
whole blood samples obtained from the ngertip, palm and forearm. False
results may occur when performing the test while severely dehydrated, severely hypotensive, in shock or in a hyperglycemic-hyperosmolar state. If you
believe you are suffering from any of the above symptoms, consult a healthcare professional immediately.
Service and Warranty
IMPORTANT: The TysonBio EVOLVE Blood Glucose Monitoring System
is designed for in vitro diagnostic use only. Tyson Bioresearch Inc. cannot
endorse the performance of the TysonBio EVOLVE System when used with
Test Strips other than those designed for the TysonBio EVOLVE Meter. The
TysonBio EVOLVE System manufacturer warranty is valid only when used
properly within the guidelines of the provided User’s Manual and is invalid
when the TysonBio EVOLVE System and TysonBio EVOLVE Test Strip are
used improperly.
47
Page 50

Manufacturer Warranty
Tyson Bioresearch, Inc. guarantees that this device will be free of defects in
materials and workmanship for a period of three years from the date of original purchase. During the stated three-year period, our company shall repair
or replace any TysonBio EVOLVE Meter found defective with a new TysonBio EVOLVE Meter.
This warranty does not apply to the performance of a TysonBio EVOLVE Meter that has been accidentally damaged, altered, misused, tampered with or
abused in any way. In no event shall our company be liable to the purchaser
or any other person for any incidental, consequential, or punitive damages
arising from or in any way connected with the purchase or operation of the
TysonBio EVOLVE Meter or its parts.
For manufacturer warranty services, purchaser must contact Tyson
Bioresearch, Inc. for help.
48
Page 51

Customer Service
If you have any questions or concerns regarding this product and or its
operation, or any attempt to correct a problem fails, please call our Customer
Service. Our trained specialists will be happy to assist you, train you, or
even reafrm your results.
Customer Service Hotline:
1-800-948-3894 (U.S.) (24 hours a day)
+886-37-585998
or E-Mail us at
website: www.tysonbio.com
When you call our Customer Service, please have your TysonBio EVOLVE
Meter, TysonBio EVOLVE Test Strip and all other system supplies available.
This will allow us to answer any of your questions with speed and efciency.
Page 52
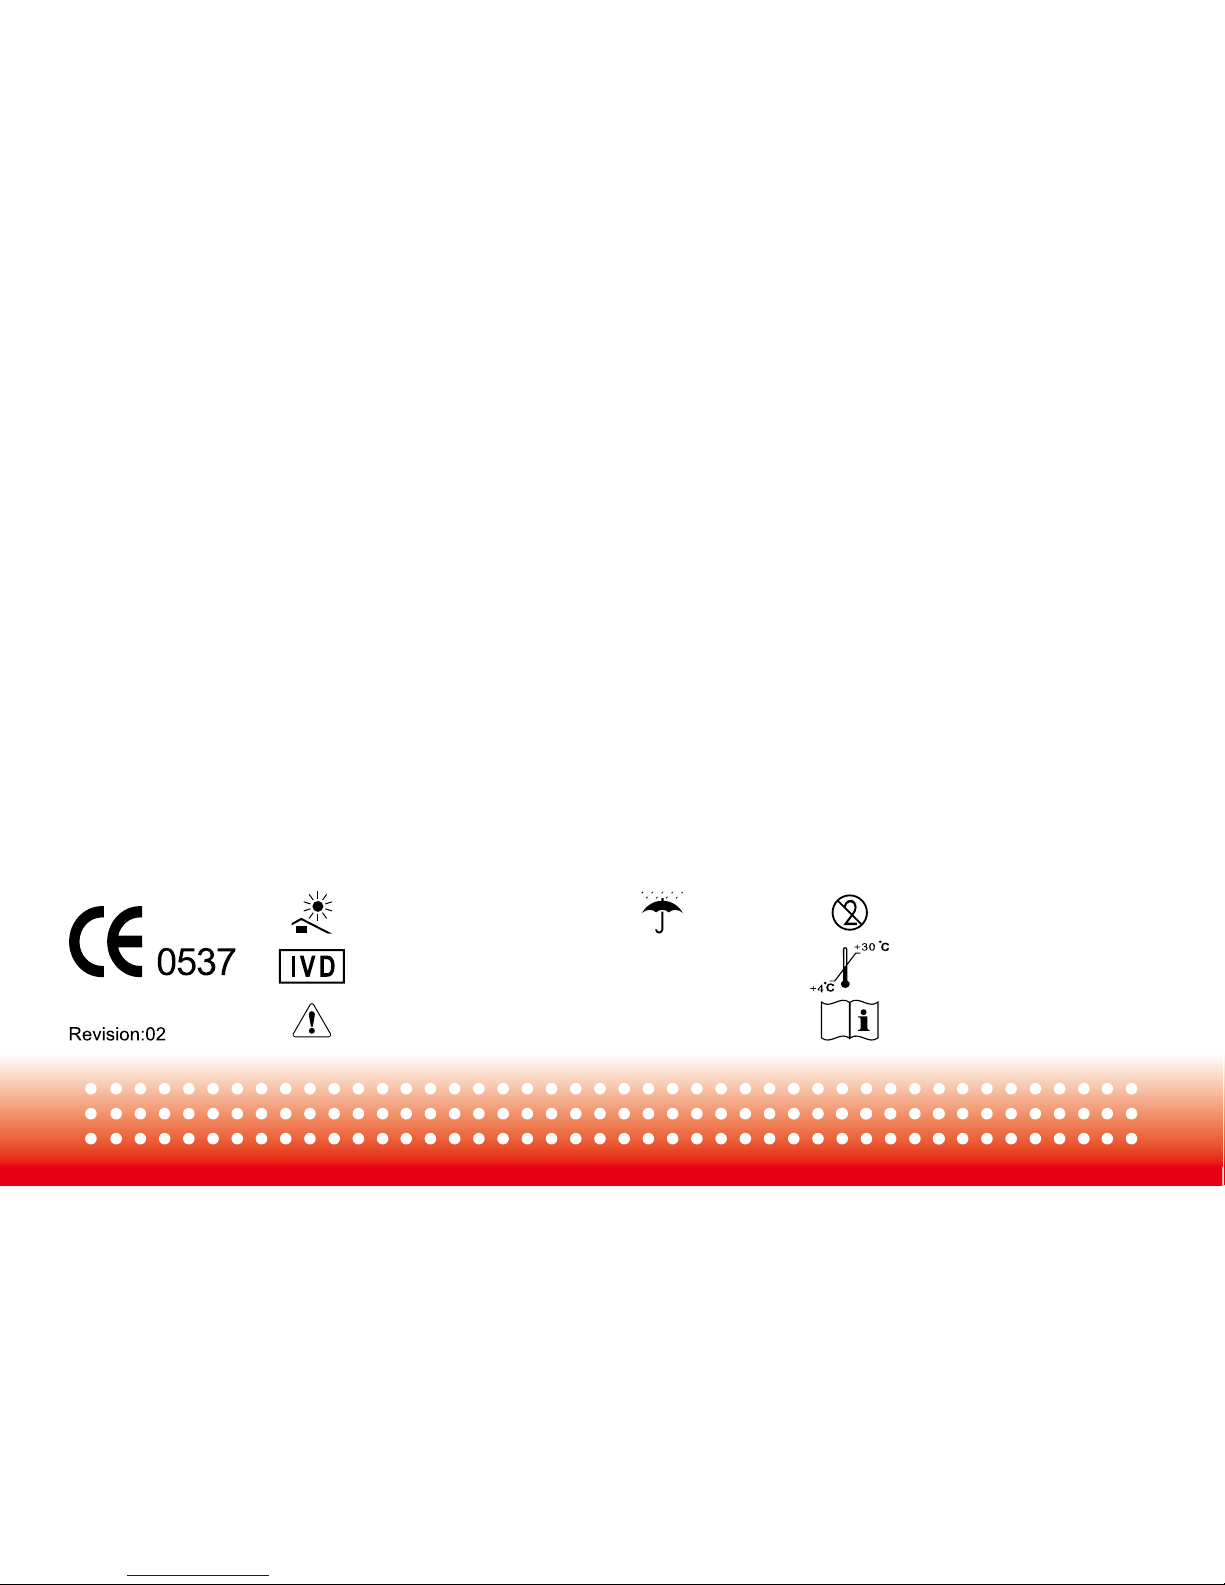
Do not reuseKeep dryKeep away from sunlight
In Vitro Diagnostics Medical Device
Caution, consult accompanying documents Read Instructions for use
Store at +4ºC to +30ºC
ID:B03K106703
 Loading...