

Page 1
Operating Instructions
Wall saw WSE1217
Index 000
Original operating instructions
10991490 en / 11.08.2015
Page 2

Page 2
Wall saw WSE1217
TYROLIT Hydrostress AG
Witzbergstrasse 18
CH-8330 Pfäkon
Switzerland
Tel. 0041 (0) 44 952 18 18
Fax 0041 (0) 44 952 18 00
Congratulations!
With a Hydrostress unit from TYROLIT, you have chosen a tried and tested piece of equipment
which has been designed and built to leading technical standards. Only genuine TYROLIT Hy-
drostress replacement parts can guarantee quality and interchangeability. If maintenance work
is neglected or carried out inexpertly we will be unable to honour our warranty obligations. Any
repair work must be carried out by trained personnel only.
Our aftersales service is available to help ensure that your TYROLIT Hydrostress units remain in
perfect working order.
We hope that working with your TYROLIT unit will be a satisfying and fault-free experience.
TYROLIT Hydrostress
Copyright © TYROLIT Hydrostress
Page 3

TYROLIT Hydrostress AG
Page 3
Wall saw WSE1217
Safety
These instructions are just one part of the documentation which is supplied together with the
wall saw. These instructions go together with the «Safety Manual / System Description for Wall
Saws» to form a complete set of documentation.
DANGER
Failure to comply with the safety instructions in the "Safety Manual / System Handbook" may
result in serious injury or even death.
X Please ensure that the «Safety Manual / System Description for Wall Saws» has been read and
understood in full.
DANGER
Cuts from the saw blade.
X Always wear protective gloves when working on the wall saw, particularly when working on
the saw blade.
X Always use the blade guard when operating the wall saw.
DANGER
Serious injury or material damage as a result of uncontrolled movements of the wall saw.
X Never connect or disconnect cables when the control unit is switched on.
1
Page 4
TYROLIT Hydrostress AG
Page 4
Wall saw WSE1217
Description
Wall saw system
The design and function of the wall saw systems are described in the “Safety Manual /
System Description for Wall Saws”.
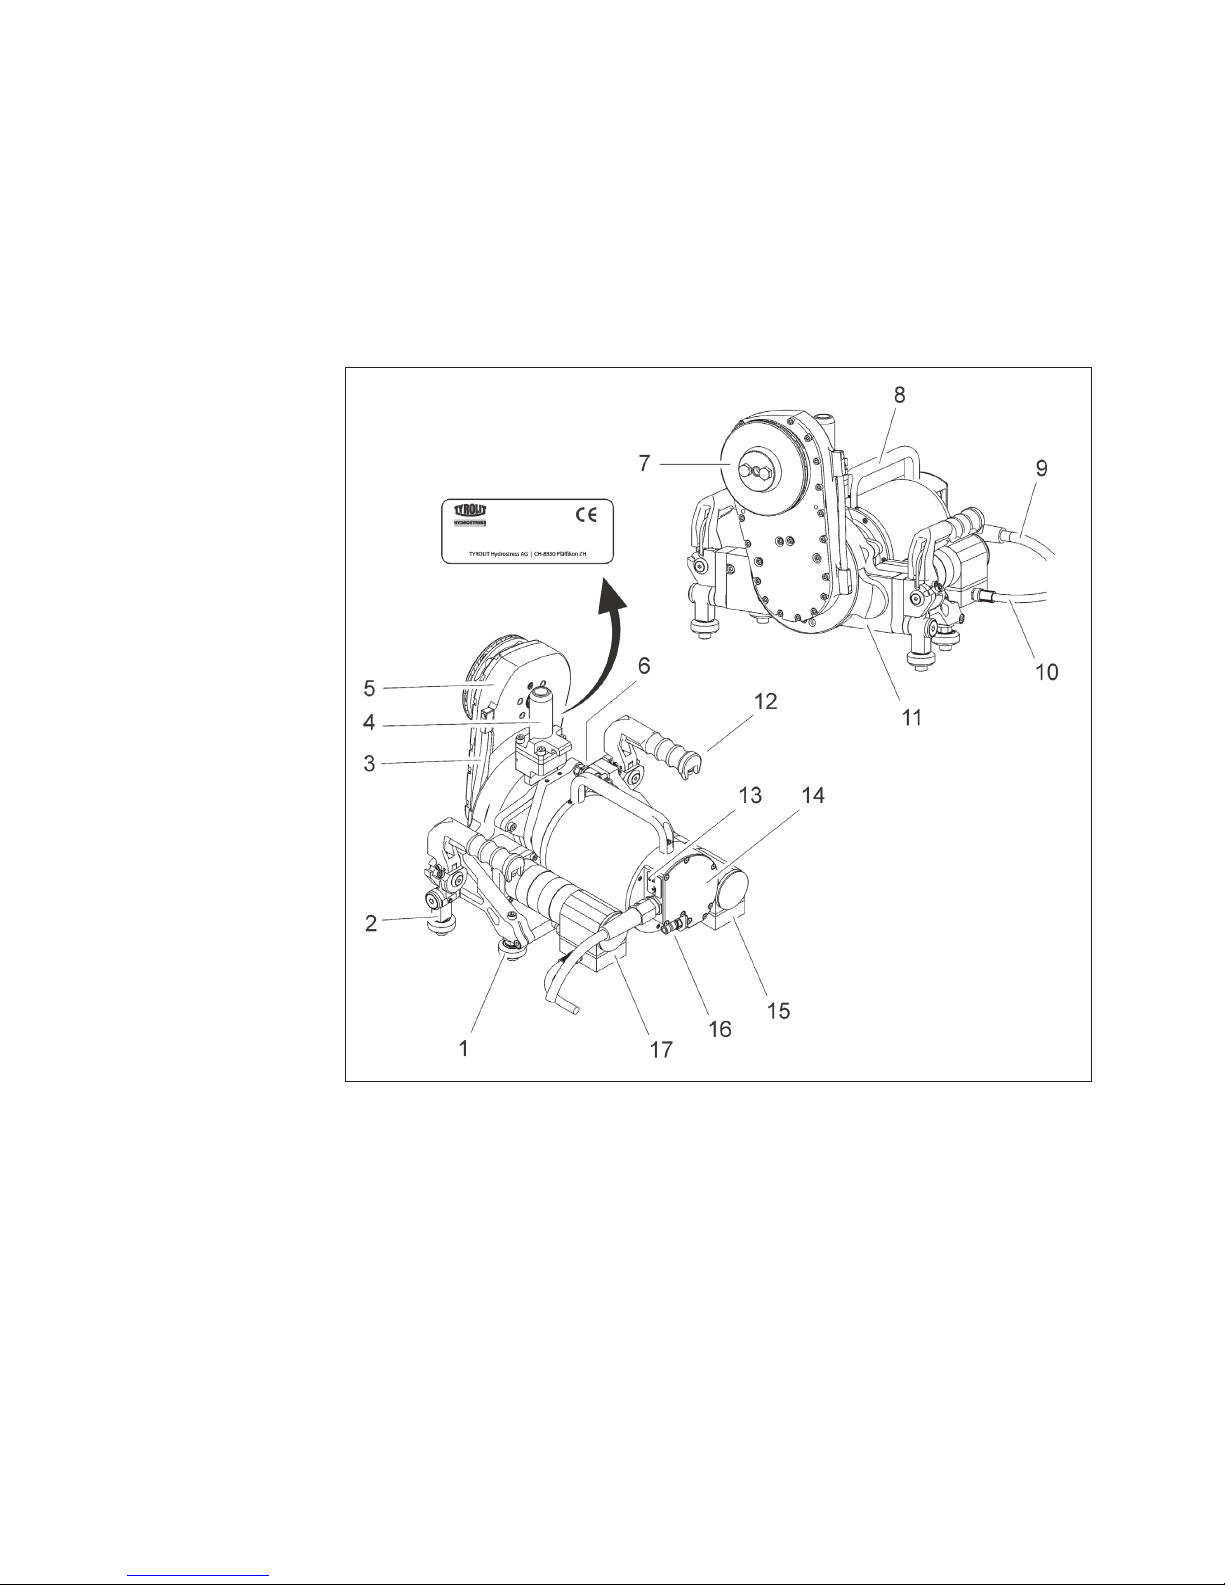
Wall saw
Components
1 Guide roller 10 Feed motor cable
2 Lock unit 11 Chassis
3 Water supply line 12 Carrying handle / lock unit
4 Blade guard holder 13 Identication plate - Blade drive motor
5 Geared swivel arm 14 Blade drive motor
6 Water - Bypass 15 Feed motor, travel
7 Saw blade holder 16 Water connection
8 Carrying handle 17 Feed motor, swivel
9 Blade drive motor cable
2
2.1
2.2
Page 5
TYROLIT Hydrostress AG
Page 5
Wall saw WSE1217
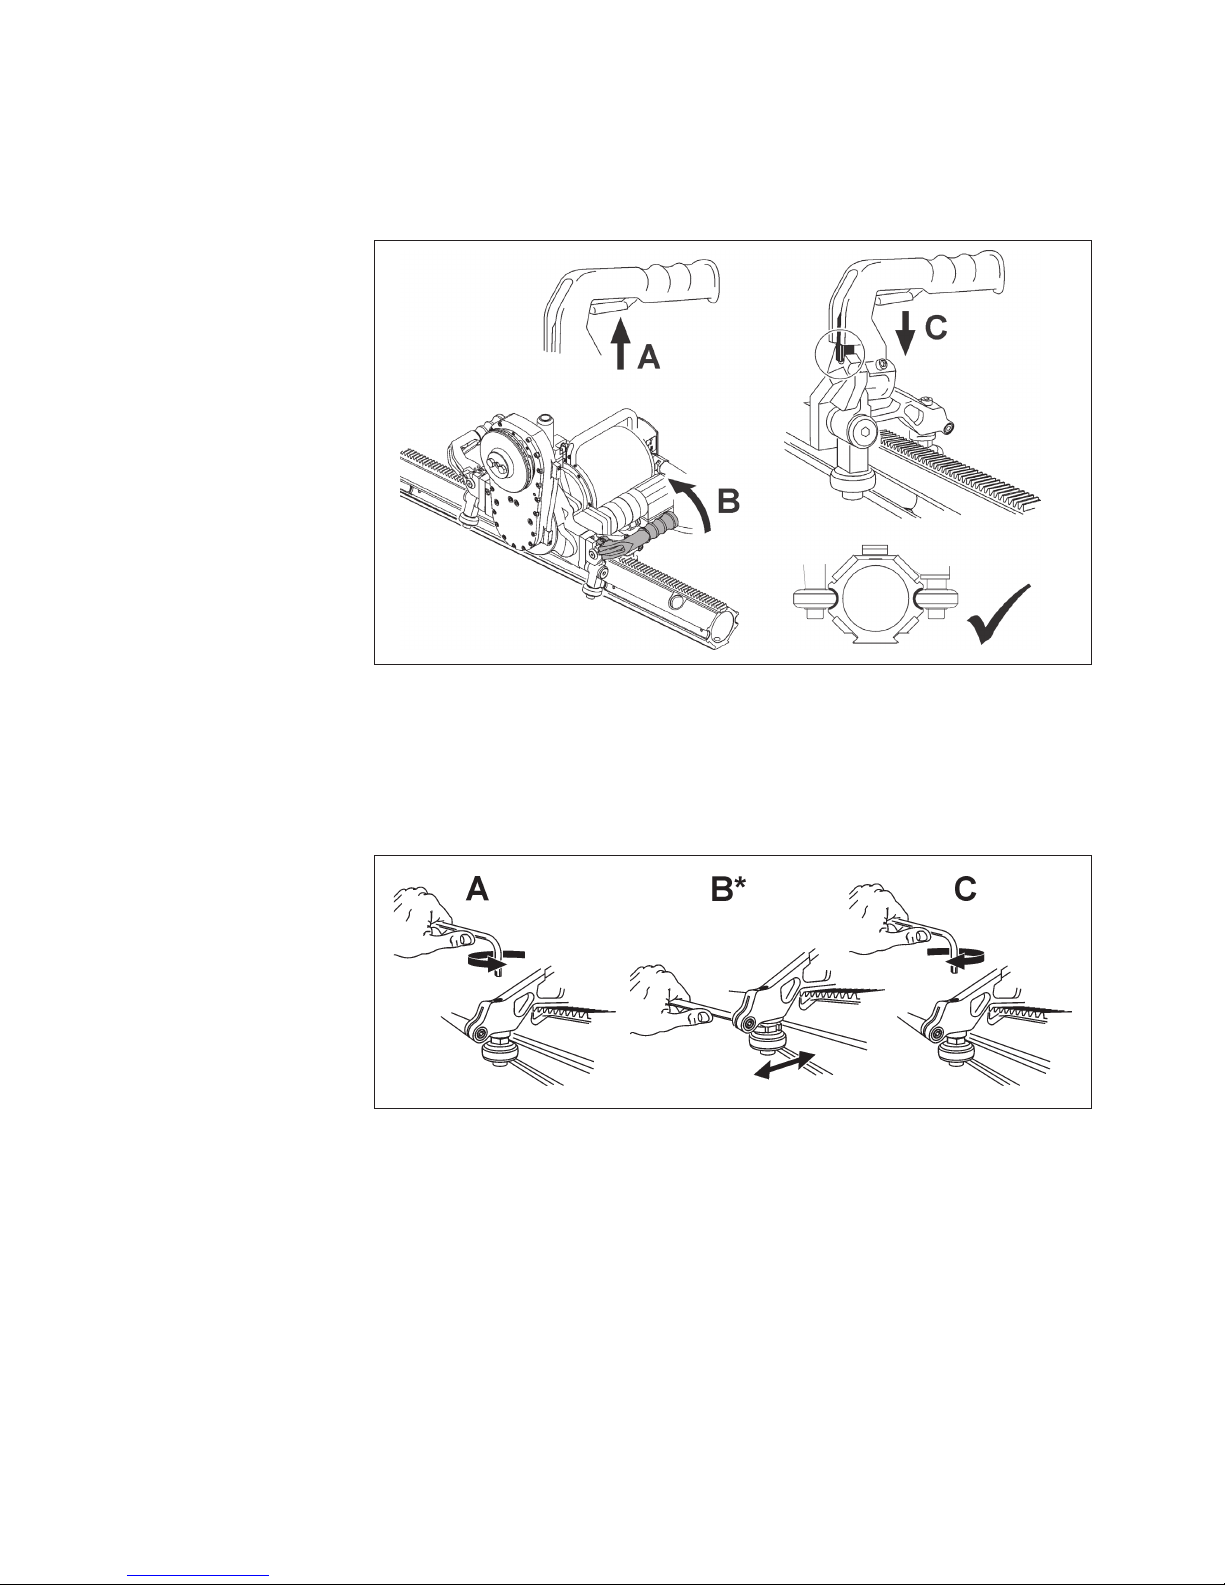
Assembly / Disassembly
Place the wall saw on the guide rail
1.
2. If the grips fail to engage or the wall saw sits too loosely on the guide rail: adjust the guide
rollers.
Adjusting the guide rollers
X
* The guide rollers are set correctly when they align in the guide groove and it is possible to
turn them by hand.
3
3.1
3.2
Page 6

TYROLIT Hydrostress AG
Page 6
Wall saw WSE1217
Mounting the drive motor
X
Mounting the saw blade
DANGER
It can cause death or serious injury if the saw blade ies away.
X Only use original screws and bolts from TYROLIT Hydrostress AG.
DANGER
Serious injury can be caused by sudden start-up of the saw blade.
X Switch o the control unit before working on the saw blade.
X Isolate the control unit from the mains supply.
Preparations for assembly
X During initial installation, remove the ush cut anchoring screws on the quick-release ange.
3.3
3.4
3.4.1
Page 7

TYROLIT Hydrostress AG
Page 7
Wall saw WSE1217
Preassemble the saw blade unit
The direction of rotation of the saw blade must match the direction of rotation of the machine.
Correct alignment: Countersinking of the fastening holes against the blade cover.
For normal cuts with saw blades up to Ø 1,000 mm
X
For normal cuts with saw blades bigger than Ø 1,000 mm
X
3.4.2
Page 8

TYROLIT Hydrostress AG
Page 8
Wall saw WSE1217
For ush cuts
X
Fastening the saw blade unit
DANGER
It can cause death or serious injury if the saw blade ies away.
X Check whether the sleeve and central screw are countersunk.
X Tighten the central screw to a torque of 60 Nm.
X
3.4.3
Page 9

TYROLIT Hydrostress AG
Page 9
Wall saw WSE1217
Removing the saw blade unit
WARNING
Injuries can be caused if the saw blade drops down.
X Lift out the saw blade unit to the top when removing it.
1.
2. Disassemble the saw blade unit in the reverse order to the assembly process.
Mounting the blade guard
X Mount the blade guard according to the instruction leaet.
3.5
3.6
Page 10

TYROLIT Hydrostress AG
Page 10
Wall saw WSE1217
Connecting the wall saw to the control unit
9 The control unit is isolated from the power supply.
9 Connectors/plugs are clean.
9 Cables are undamaged.
X
3.7
Page 11

TYROLIT Hydrostress AG
Page 11
Wall saw WSE1217
Maintenance and servicing
* Clean with damp cloth no high pressure cleaner!
4
Maintenance and servicing table
Before every
commissioning
At end of work
Weekly
Yearly
After faults
After damage
Wall saw X Retighten loose bolts and nuts (re-
fer to the tightening torque specications)
X X X
X Clean *
X
Lock unit X Clean latching recesses and guide
grooves *
X X X X
X Lubrication
X X X
Guide rollers X Check the bearing clearance for wear
X X X X
X Clean *
X X X X
X Replace
X
Swivel arm X Check the saw blade uptake for wear
X X X
X Replace the gear oil Every 100 h
Feed motor X Check cleanliness *
X X X X
Drive motor X Check cleanliness *
X X X X
Water supply X Check the water line for cleanliness
and leak-tightness
X X X
X Blow out water
X
Saw blade X Clean with water
X
X Check for wear
X X X X
Service X To be performed by TYROLIT Hydros-
tress AG or an authorised workshop
After 100 / 300 / 500 / 700 hours
Page 12

TYROLIT Hydrostress AG
Page 12
Wall saw WSE1217
Lubricating the lock unit
X
Changing the gear oil
The use of unsuitable oil can damage the wall saw.
X Use only TYROLIT Hydrostress AG oil containers (no. 10981362, 10 dl).
X
Replacing the guide rollers
X Defective guide rollers should be replaced with replacement set no. 10977911.
4.1
4.2
4.3
Page 13

TYROLIT Hydrostress AG
Page 13
Wall saw WSE1217
Technical data
Dimensions
Measurements in mm
Design
Design
Parameter Value
Construction Light aluminium/steel construction
Rotatable swivel arm 360°
Power transmission Toothed wheel
Carrying handle 2-pieces, with locking function
Guide rollers Low-wearing, suitable for all VS and VAS rails
Rail mounting Locking and safety function on carrying handle
Main motor High-frequency, water-cooled, with quick-release device
Feed motor / swivel motor Electric motor with gears and brake
Flush cutting Quick-release ange ST without blade cover
Normal cutting Quick-release ange ST with blade cover
Water Water connection on chassis
Protection class IP67
5
5.1
5.2
Page 14

TYROLIT Hydrostress AG
Page 14
Wall saw WSE1217
Weight
Weight
Parameter Value
Wall saw head complete
22 kg
Drive motor
15 kg
Blade drive motor
Blade drive motor
Parameter Value
Electric motor High-frequency, water-cooled
Voltage 400 V
Frequency 50 - 400 Hz
Feed motor, travel
Electric feed motor with gears and brake
Parameter Value
Gear reduction 1:256
Voltage 48 V
Feed Toothed wheel on rail
Feed motor, swivel
Electric feed motor with gears and brake
Parameter Value
Gear reduction 1:256
Voltage 48 V
Swivel range (swivel arm) 360°
Noise level
Noise data according to ISO 3744
Parameter Value
Sound pressure level L
pA
77.5 dB (A) *
Highest value of sound pressure L
pCpeak
116.2 dB
Acoustic power level L
WA
97.5 dB (A) *
Conditions for the measurement:
* Saw blade Ø1,200 mm not in cutting operation under full load
5.3
5.4
5.5
5.6
5.7
Page 15

TYROLIT Hydrostress AG
Page 15
Wall saw WSE1217
Saw blades
Saw blades
Parameter Value
Saw blade max. Ø 1,200 mm
Fully detachable saw blade Ø 800 mm
Blade holder Ø 60 mm
Blade ange mounting at wall saw Quick-release ange ST
Saw blade xing on blade ange
(also for ush cuts)
6 countersunk head screws
reference circle 130 mm
Blade cover mounting on blade ange 2 hexagonal bolts
Cutting depth Ø 650 mm 230 mm
Ø 800 mm 320 mm
(Ø 900 mm) (350 mm)
Ø 1,000 mm 420 mm
Ø 1,200 mm 520 mm
Lubricants, uids and sealants
Lubricants, uids and sealants
Parameter Value
Gear oil (swivel arm) Klüber GEM 4-150 N (TYROLIT No. 10981362)
Lubricating grease (lock unit) Penetration 265 to 295
NLGI 2
Lubricating grease (swivel gear) Penetration 400 to 430
NLGI 00
Connectable control units
The wall saw must only be operated with the coordinated control units from TYROLIT Hydrostress.
Control unit
Parameter Type
Control unit
WSE1217 (Ø650 / Ø800 / Ø1,000 / Ø1,200)
Water connection
Parameter Value
Pressure min. 2 bar / max. 6 bar
Quantity At least 4 l/min
Max. temperature 25 °C
5.8
5.9
5.10
Page 16

TYROLIT Hydrostress AG
Page 16
Wall saw WSE1217
EC declaration of conformity
Description Wall saw
Type designation
WSE1217
Year of construction 2011
We declare under our sole responsibility that this product complies with the following directives and standards:
Directive applied
2006/42/EC from 17th May 2006
2004/108/EC from 17th December 2004
Applied standards
EN 15027/A1:2009
EN 12100:2010
EN 60204-1/A1:2009
EN ISO 3744:2010
EN 55014-1/A1:2009
EN 55014-2/A2:2008
EN 6100-3-11:2000
EN 6100-3-12:2005
TYROLIT Hydrostress AG
Witzbergstrasse 18
CH-8330 Pfäfkon
Switzerland
Pfäfkon, 28.04.2011
Pascal Schmid
Head of Development
 Loading...