

Page 1
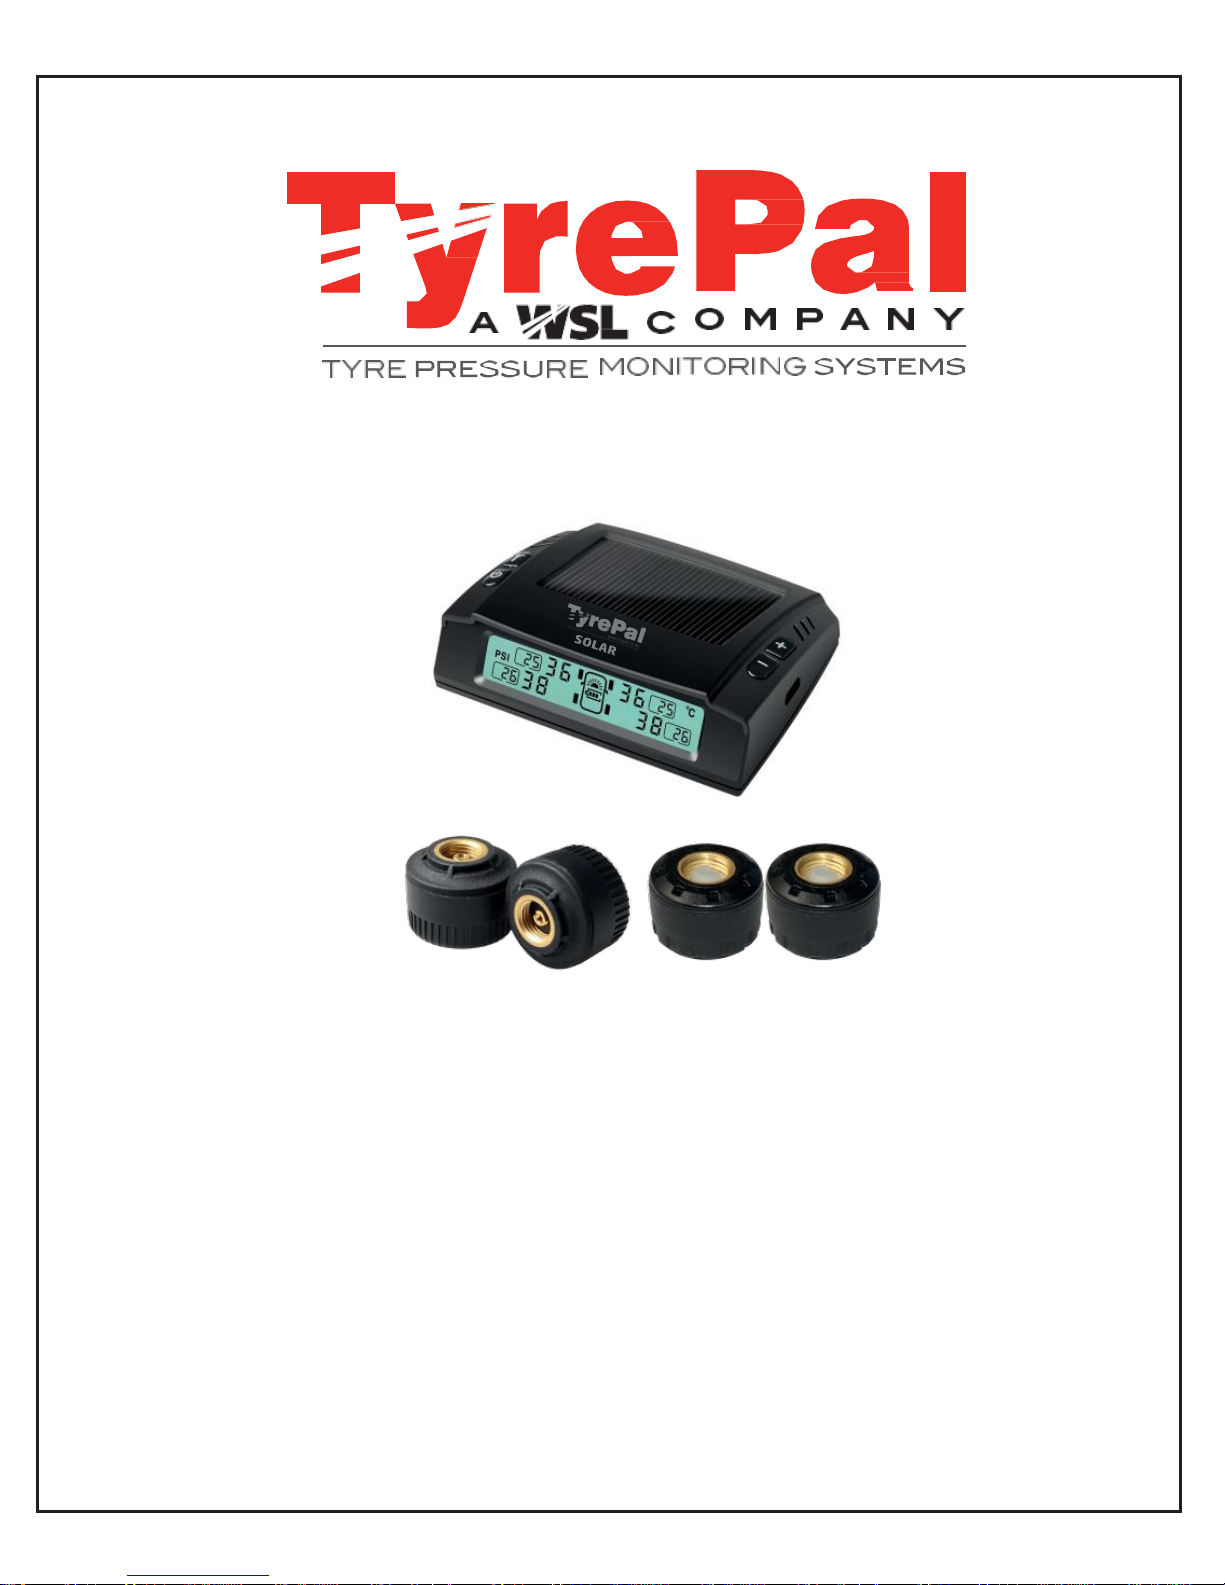
SOLAR
Tyre Pressure Monitoring System
TyrePal Solar
Innovative safety solutions for your peace of mind
TyrePal, Wheel Solutions Ltd, Unit 2 Upper Keys Business Park, Keys Park Road,
Hednesford, Cannock, Staffordshire, WS12 2GE
Telephone: +44 (0) 1543 870170
Email: [email protected]
Page 2

Sections Page
1. System Contents 2
2. Monitor Icons 2
3. Important Safety Notes 3
4. Before Installation 4
4.1 Wheel Balancing 4
4.2 Charging The Monitor 4
4.3 Monitor Mounting 4
4.4 Turning On And Off 4
4.5 Tyre Pressures And Alert Levels 4
5. Sensor Installation 5
6. Sensor Battery Replacement 6
7. Re-code the sensors 7
7.1 Settings Mode 7
7.2 Set Units 7
7.3 Set Alert Levels 8
7.4 Normal Display 9
8. Warnings And Alerts 9
8.1 Low Battery Warnings 9
9. Alarm Condition 10
9.1 High Pressure Alert 10
9.2 Low Pressure Alert 10
9.3 High Temperature Alert 11
9.4 Fast Leakage Alert 11
9.5 Sensor Low Battery Alert 11
10. Other Functions 12
11. Technical Specifications 12
11.1 Monitor Specifications 12
11.2 Sensor Specifications 13
12. Managing Tyre Pressures 14
12.1 Effect of Temperature 14
12.2 Service and Warranty 14
CONTENTS
Page 3
2
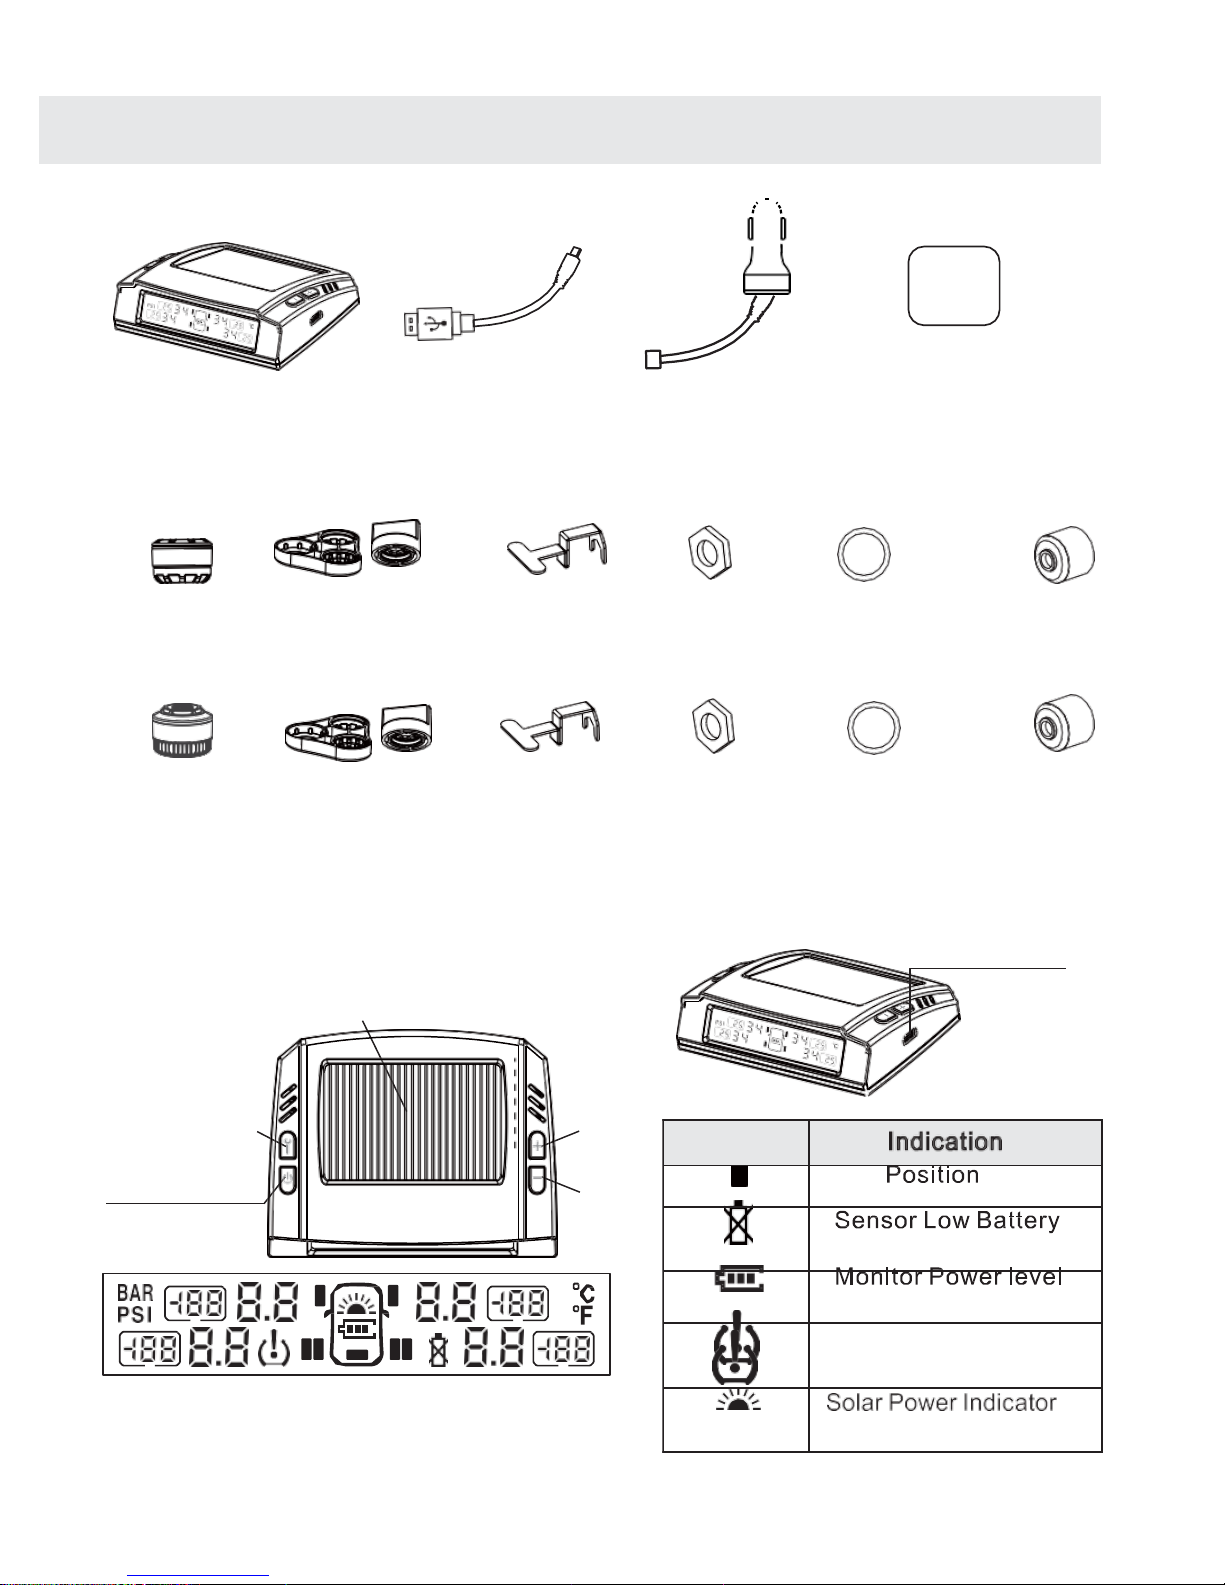
Monitor accessories
LCD Monitor
USB Cable
DC-DC Power
Stick
y Pad
(1 pc) (1 pc)
Sensor accessories
Adaptor (1 pc)
(1 pc)
TSCU Sensor
Sensor Tool
(1pair)
Hex Wrench
(1pc)
Hex Nut
(4pcs)
Rubber O-Ring
(4pcs)
Dust Shield
(4pcs)
TCSN Sensor
Sensor Tool
(1pair)
Hex Wrench
(1pc)
Hex Nut
(4pcs)
Rubber O-Ring
(4pcs)
Dust Shield
(6pcs)
2. MONITOR ICONS
Solar panel
+
_
Pressure unit: BAR or PSI, User-selectable
Temperature unit: ℃ or ℉, User-selectable
SET
Power On/Off
Power Socket
1. SYSTEM CONTENTS
Icon
Tyre
Tyre
Alarm Status
Page 4

3
What to expect
Unless you have used this type of TPMS before, you will probably be unaware of what happens to
your vehicles’ tyres whilst driving. The tyres’ pressure and temperature will naturally increase whilst
you are driving your vehicle. This is completely normal and is taken into account when the tyres are
designed and manufactured. You can program alert levels for low and high pressure and also
temperature.
The system is used to monitor the pressure and temperature of each tyre. The system will give an
alert if there is abnormal pressure and / or temperature, making the driver aware that something is
outside of normal parameters. The system can also enhance fuel efficiency, prolong tyre life and
make driving more comfortable. Be sure to read the user guide carefully before installation and keep
the manual safe for future use.
It is highly recommended to read the instructions below before installing the system:
The monitor should be installed inside the vehicle where it does not affect normal driving.
It is your responsibility to ensure that it is suitable for your particular vehicle and that it is working
correctly and properly maintained. Check the sensors and valve stems regularly, as some road
salts can cause corrosion.
The system does not replace the need to carry out regular checks on the condition and wear
of the tyres.
Keep the small parts and especially the batteries out of the reach of children. If a battery is
swallowed, consult a doctor or visit your nearest hospital. Do not hold a battery with metallic
tweezers as it will cause a short circuit and may lead to burning or explosion of the battery.
Do not alter the monitor while driving, if an alert sounds pull over when safe to do so.
It is not normally necessary to turn the monitor off. It has an inbuilt motion detector that automatically puts it into sleep mode when no movement is detected for 10 minutes, and when an
external DC power source is not connected.
Normally, and provided there is some charge in the battery, the monitor will wake up when it senses
movement or vibration such as the opening or closing of the car door. If it doesn’t wake up, press
any button to wake the monitor from sleep mode.
The sensors themselves also have inbuilt motion detectors that will put them into sleep mode when
no movement is detected for 10 minutes, this is to save the battery life. When the vehicle starts
moving, the sensors will wake up in a few yards and refresh the data on the monitor.
3. IMPORTANT SAFETY NOTES
Page 5

4
Before installing the system, ensure that it is suitable for your vehicle.
▪
The operating pressure of your tyre must be within the range of the system. i.e. 0-6.8bar (0-99psi).
▪
Check that tyre valve stems are in good condition before fitting the sensors. Do not use the system
with aluminium valve stems.
▪
Do not fit sensors to tyres that have been treated with internal tyre sealant. The sealant may
damage the sensor or impair its actions.
▪
To avoid danger of damaging the sensors, check that sensor valve caps will not protrude excessively
beyond the outside profile of the tyres when fitted.
4.1 Wheel Balancing
The weight of the sensors is within the tolerance normally achieved for wheel balancing, so there is
usually no need for the wheel to be rebalanced after installing the system. If vibration is felt at the
wheel when driving at speed after fitting the system, the wheels must be rebalanced.
4.2 Charging the monitor
The solar panel on the monitor will keep the internal battery charged as long as there is sufficient
sunlight available. Should the battery charge level become low, recharge with the supplied DC
charger (approximately 2.5 hours of charge will fill the battery).
4.3 Monitor Mounting
A re-useable sticky pad is provided for mounting the monitor. Just place the sticky pad on a clean
flat surface and position the monitor on top. Choose a position for the monitor to be located where it
can be seen by the driver without interrupting the view of the road. For security, it can be removed
and hidden while the vehicle is unattended. The pad can be removed and repositioned without
leaving any sticky residue and can be washed in warm water if it gets dusty and loses it’s stickiness.
4.4 Turning on and off
To turn on press and hold the power button until it beeps. It is not normally necessary to turn the
monitor off as it has an inbuilt motion detector that automatically puts it into sleep mode when no
movement is detected for 10 minutes, and when an external DC power source is not connected. To
turn off manually press and hold the power button until it beeps.
4.5 Tyre Pressures and alert levels
The following alert levels are suggested, based on the vehicle manufacturer’s recommended tyre
pressures:
High pressure alert level 20% above recommended pressure
Low pressure alert level 15% below recommended pressure
High temperature alert level 70ºC (factory default)
4. BEFORE INSTALLATION
Page 6
5
Hex nut
Air valve
2
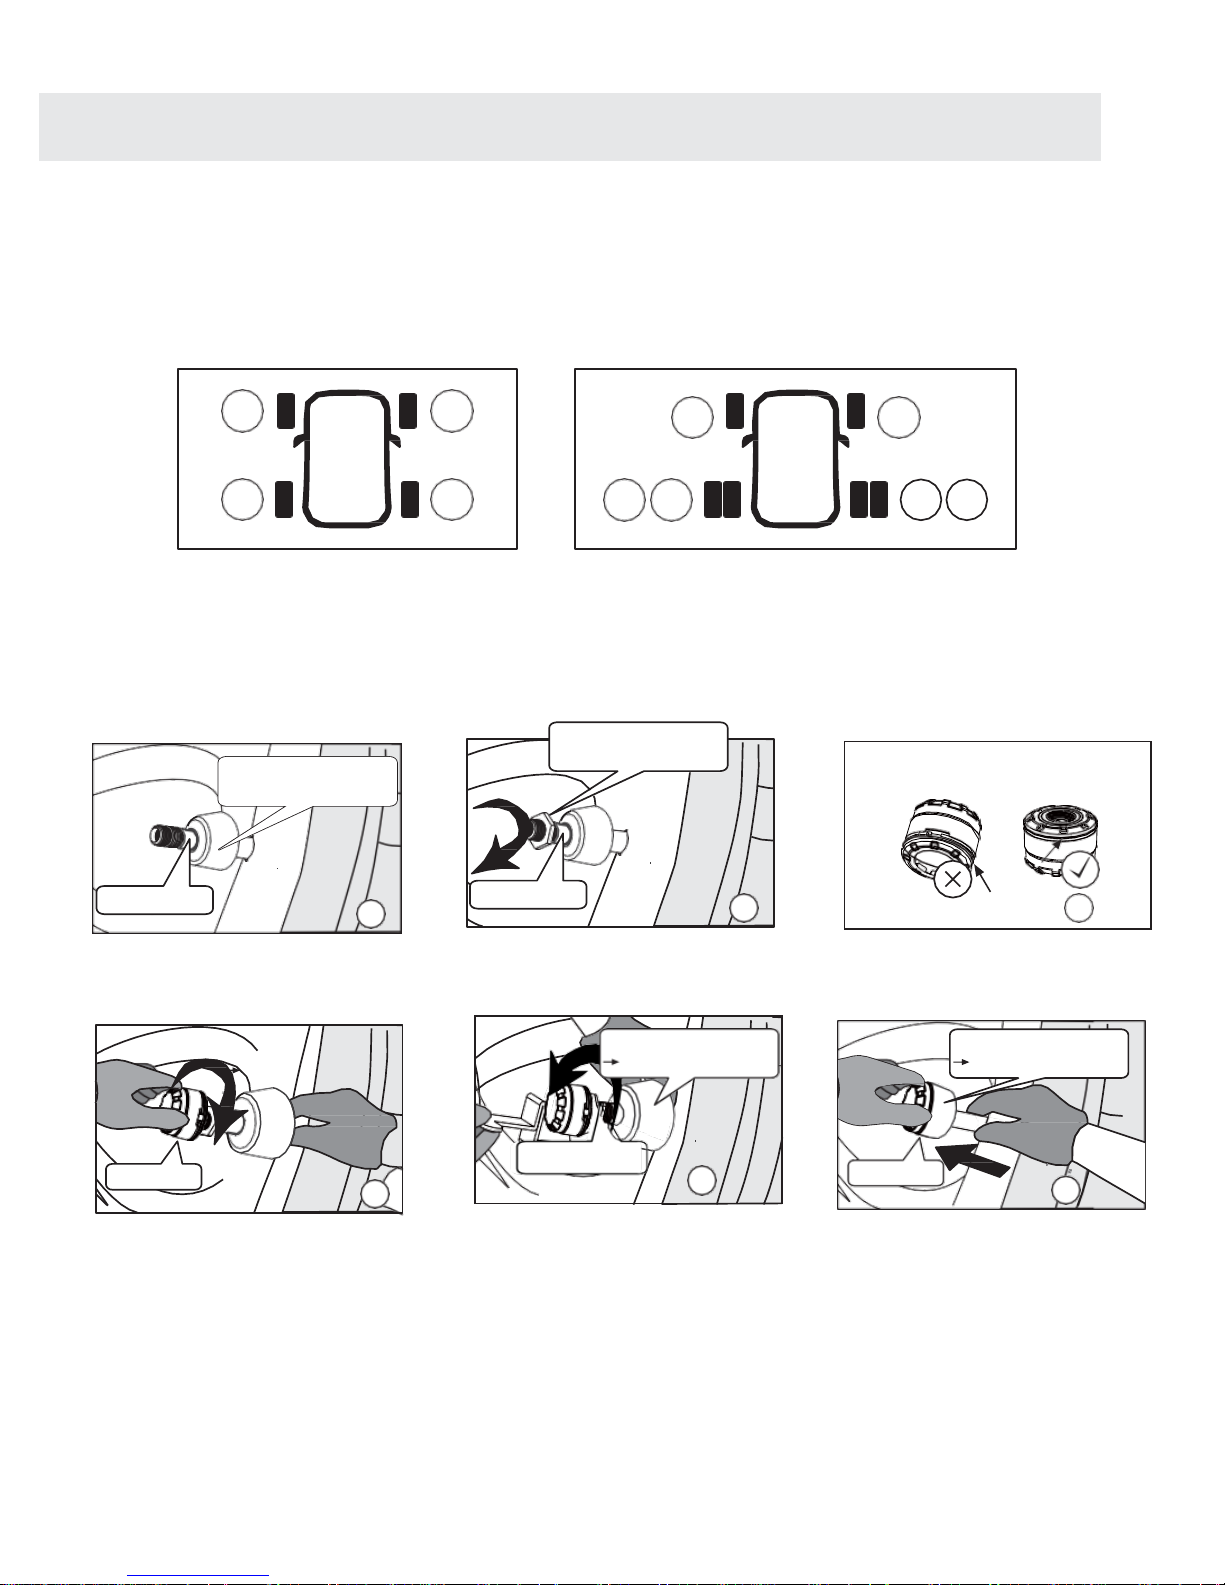
The sensors are pre-registered to the monitor and labelled with the appropriate tyre position.
LF, LR, RF, RR, for 4 tyres or LF, LR1, LR2, RF, RR1, RR2 for 6 tyres.
Note: Install the sensors to the appropriate tyres.
Ensure the monitor is turned on before installing the sensors so that the monitor can receive up
to-date data.
1. Mount dust shield onto
.
valve and turn inside out
2. Place hex nut onto valve
3. Check if locking cover
is in place
4. Screw on sensor clockwise
Tips:
5. Tighten hex nut in counter
clock wise direction
6. Place the dust shield on the
hex nut and sensor.
1. Each sensor is labelled with its wheel position and its highly recommended to install the sensor
on the correct wheels
2. If battery inside sensor has insufficient voltage, it will trigger battery low alarm
3. After all sensor have been installed, ensure there is no air leakage - use soapy water for
testing if necessary to check for air bubbles on the valve stem.
Dust shield
positive side
sensor
6
Dust shield
opposite side
Hex nut
5
sensor
4
TSCU sensor only
3
Turn inside out
Air valve
1
LF RF LR2 LR1
RR1 RR2
LF RF
LR
RR
5. SENSOR INSTALLATION
Page 7
6
Rubber
O-ring
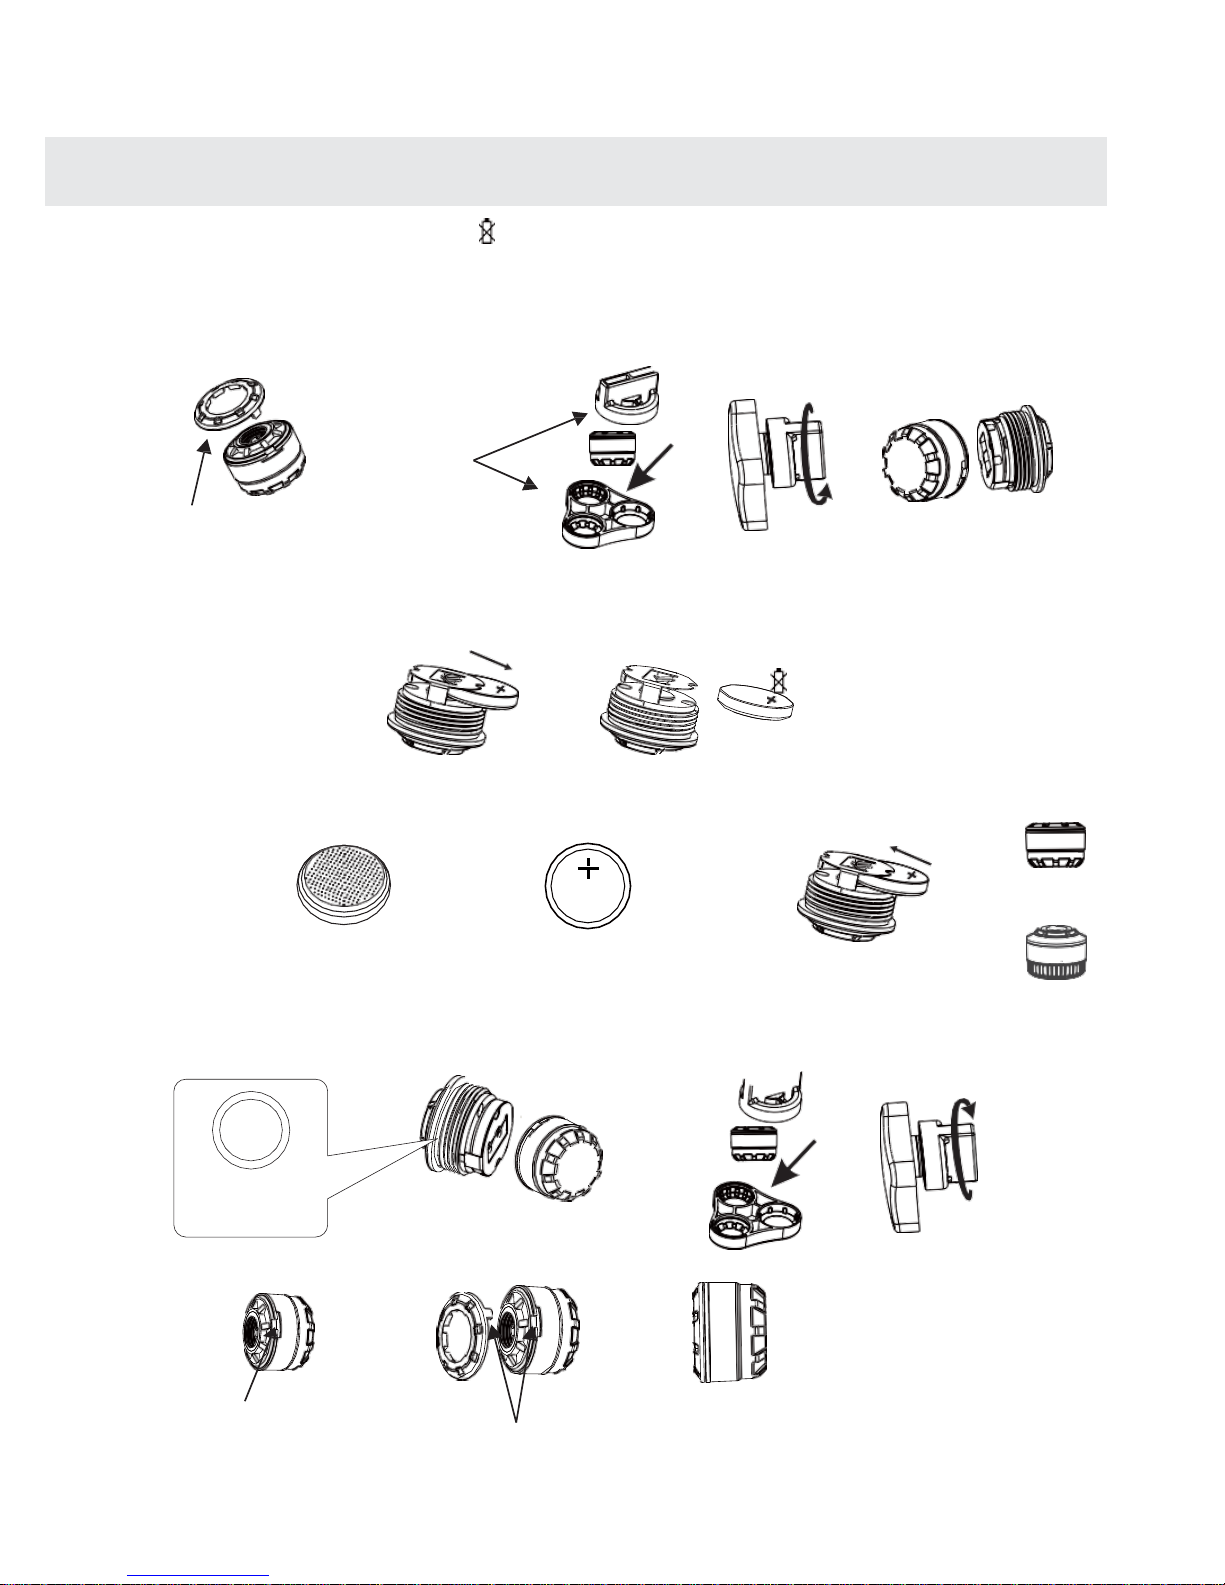
When the sensor low battery icon is displayed shows on the monitor and corresponding tyre icon is flashing, the
sensor battery needs replacing. Using CR1225 battery cell for TCSU which operates at -20ºC to +80ºC or CR1632
battery cell for TCSN which operates at -40ºC to 80ºC is recommended. You can buy replacement batteries from
the TyrePal website.
1. Use fixture provided inside package and open the plastic enclosure in counter clockwise direction.
TSCU only -
remove locking cover
Battery
opener
tools
2. Remove battery from battery holder.
3. Replace with new lithium battery. Ensure positive “+” is facing upwards.
“-”
“+”
TCSU = CR1225
TCSN = CR1632
CR1225 Lithium
Battery
CR1225 Lithium
Battery
4. Place plastic cap using sensor tool. Check if the rubber 0-ring is in good condition, otherwise replace with a
new one.
5. Tighten battery cap using the battery tools, make sure the two notches line up and replace the
locking cover.
CR1225
3V
SC
6. SENSOR BATTERY REPLACEMENT
Page 8
7
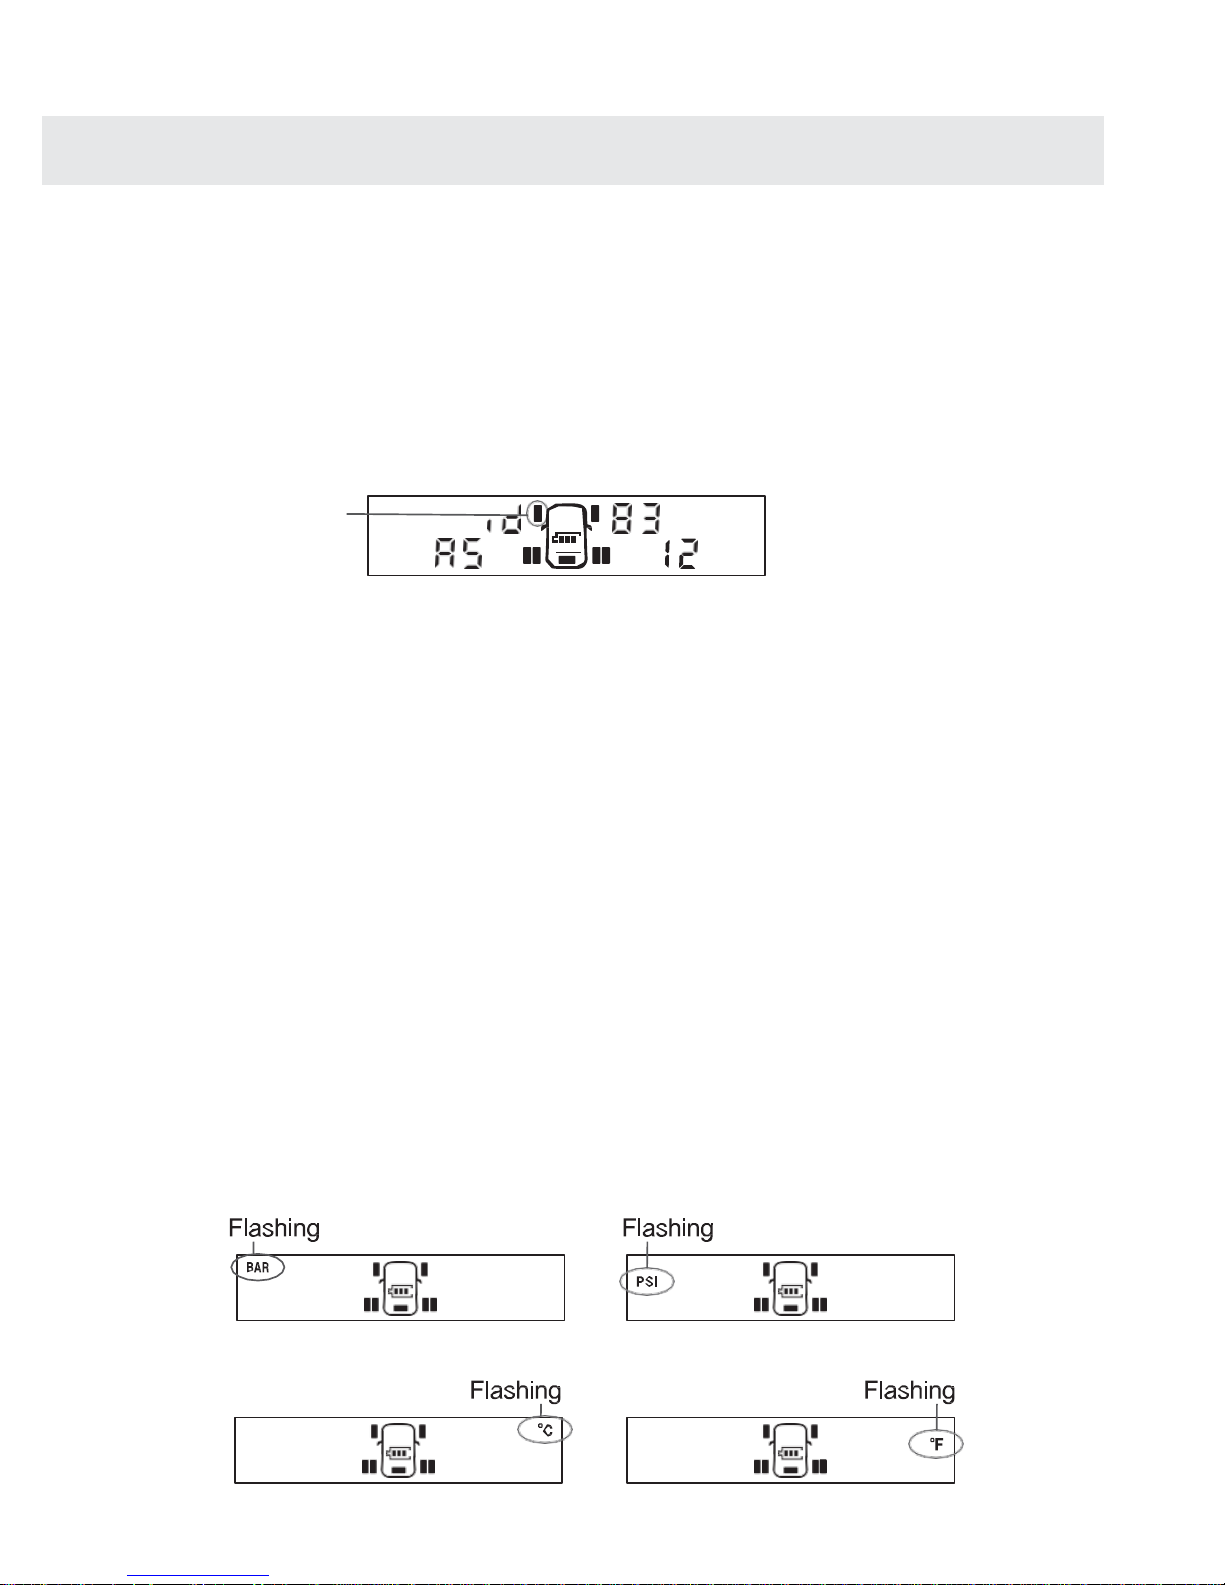
The factory has already coded 4 sensors to the monitor, and the sensors can be re-coded
accordingly to actual tyre position after exchanging the tyres.
In standby mode, press and hold “+” button and release it after the beep sound to enter learning
mode, the tyre icon will flash on the LCD with “id” letter showing the beginning letter of the tyre
ID code. Once ready mount the sensor onto the tyre valve. Once the sensor sense the pressure
variation, the sensor will send its own ID code to the monitor and other sensor if needed. Press
“SET” until beep sound to ensure new code completed and store into the monitor. If Press “+”
and “SET” buttons together it will not store any new ID and resume to standby mode.
Example tyre icon
flashing
Left Front Tyre ID 83A512
7.1 SETTINGS MODE
The settings mode is used to set the units for display and the alert levels.
▪
Press the SET button and hold it until the beep
▪
Press the SET button repeatedly to scroll through the settings options
▪
Press the UP (+) or DOWN (-) button to adjust the parameters when satisfied that you have the
settings correct
▪
Press and hold the SET button for three seconds. The system saves the settings and returns to
standby mode
▪
If no action is taken for one minute, the monitor returns to standby mode without saving any
changes
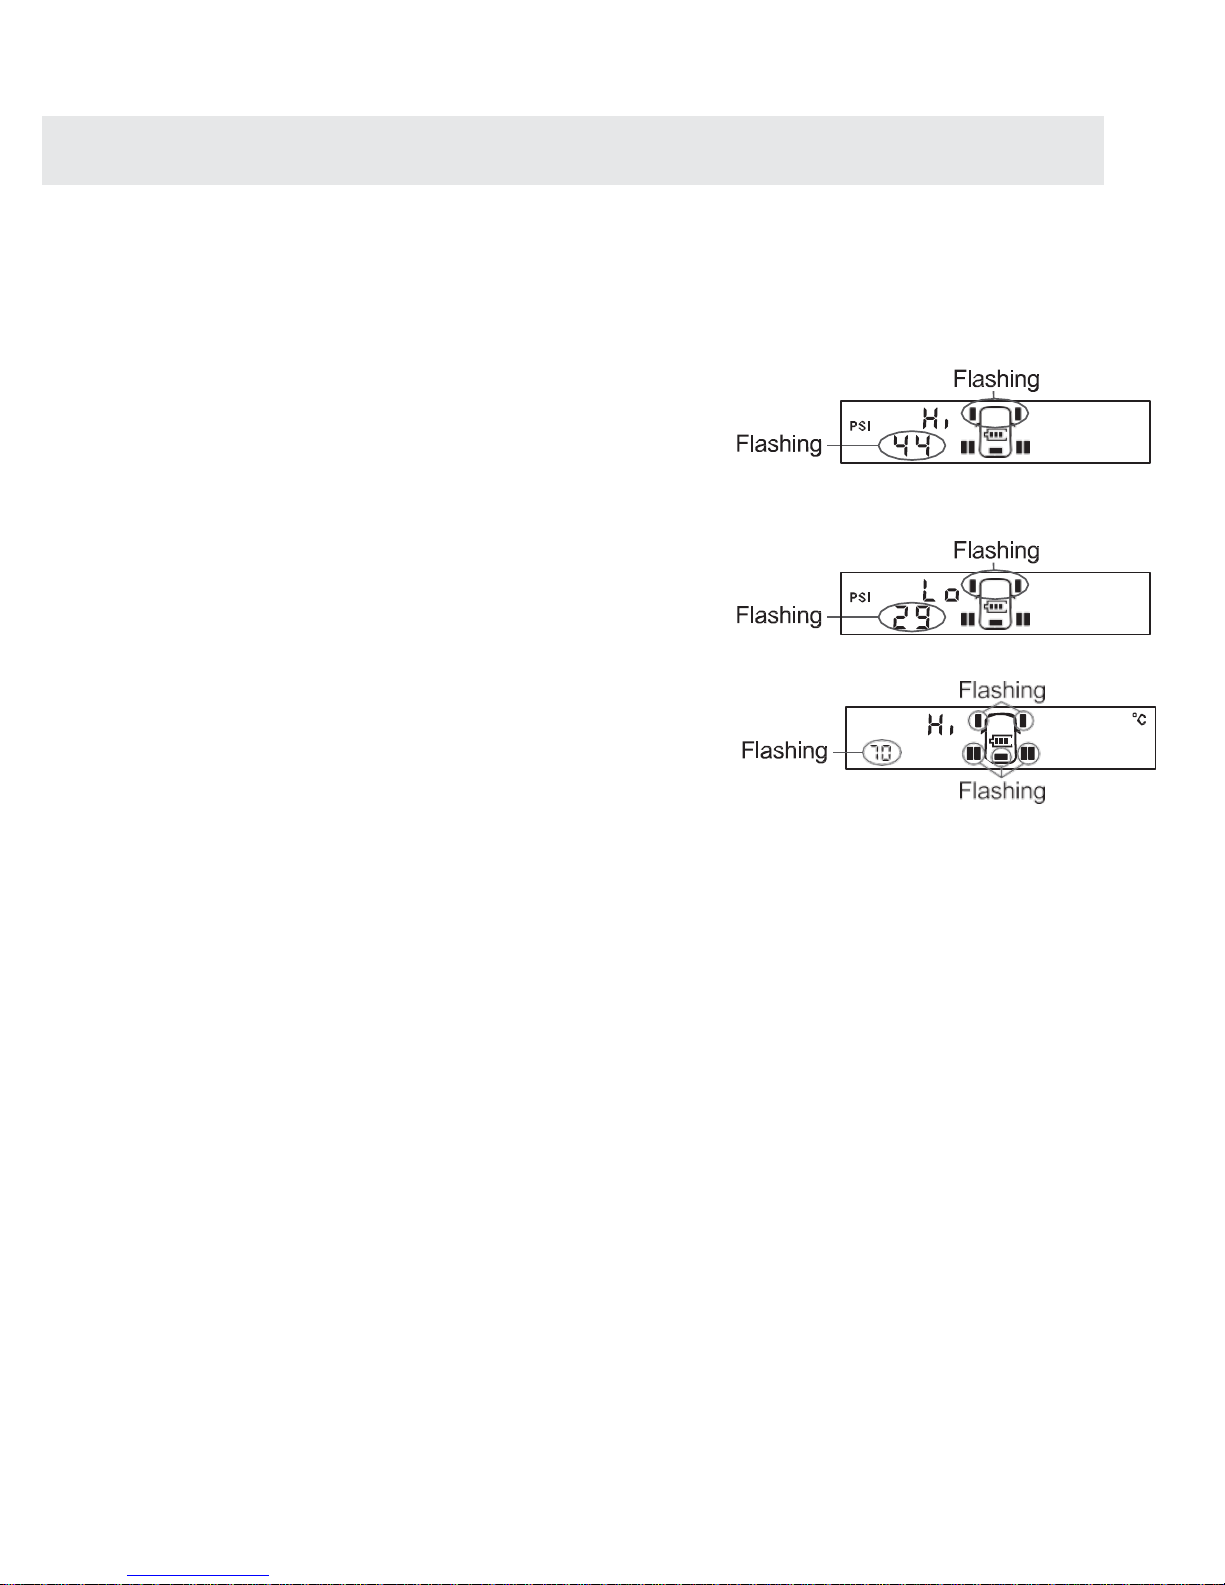
7.2 Set units
▪
From Standby mode, press and hold the SET button until it bleeps, to enter settings mode
▪
When the PSI or Bar icon flashes, press the UP (+) or DOWN (-) button to switch between PSI or BAR
▪
Press and release the SET button to move on to temperature units
▪
When the ºC or ºF icon flashes, press the UP (+) or DOWN (-) button to switch between ºC or ºF
▪
Press and release the SET button to move on to the alert levels
7. RE-CODE SENSORS
Page 9
8
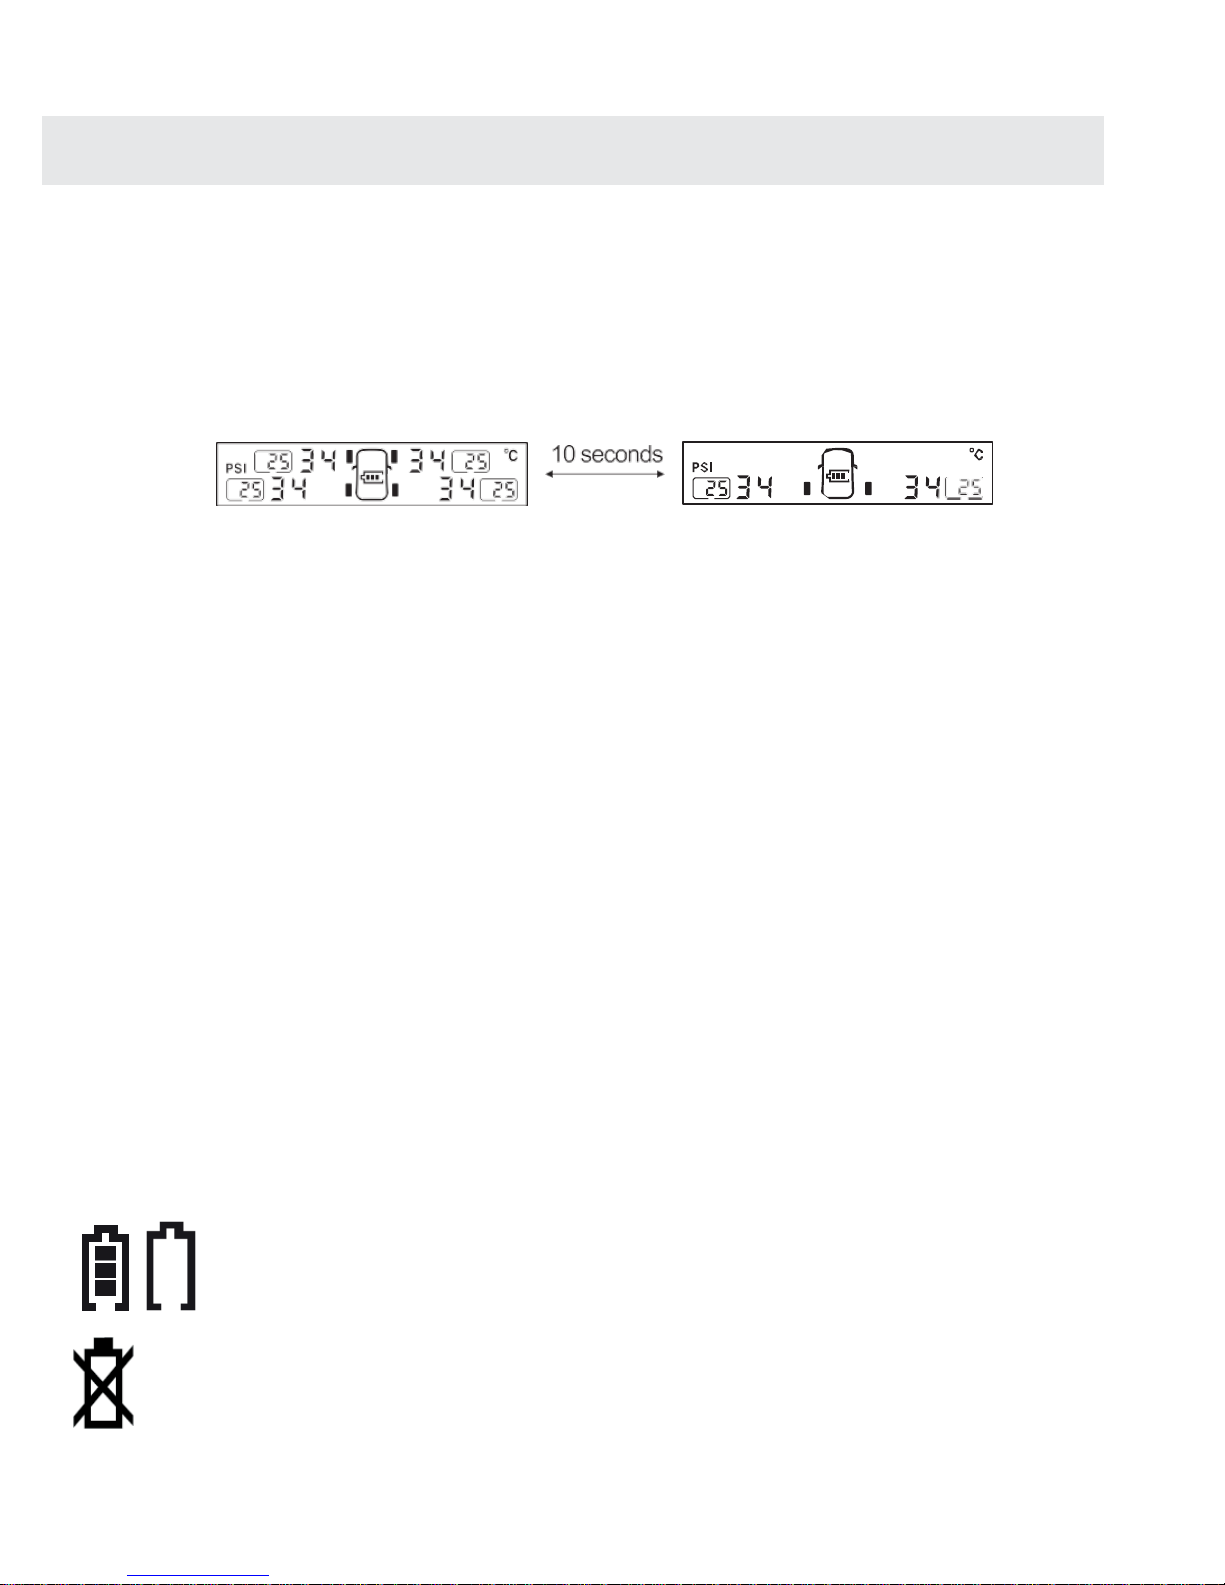
▪
In settings mode, scroll through the pressure and tempera-
ture settings until the wheels for the front axle are flashing
▪
Press the UP (+) or DOWN (-) button to adjust the settings
▪
Press and release the SET button to move on and set the
low pressure alert levels using the UP (+) or DOWN (-)
buttons
▪
Press and release the SET button again to move on to the
rear axle pressure settings and adjust them with the UP (+)
or DOWN (-) buttons
▪
Press and release the SET button again to move on to the
spare tyre pressure settings and adjust them with the UP (+)
or DOWN (-) buttons. This can be left at the factory default if
the spare is not being monitored
▪
Press and release the SET button again to move on to the
high temperature alert level that applies to all the tyres, (this
can conveniently be left at the factory default of 70ºC)
▪
Finally press and hold the SET button for three seconds.
The system saves the settings and returns to standby mode.
▪
For the six-tyre version, the rear axle settings apply to all
four rear tyres.
Note: If no action is taken for one minute, the monitor returns to standby mode without saving
any changes.
7.3 Set alert levels
Page 10
9
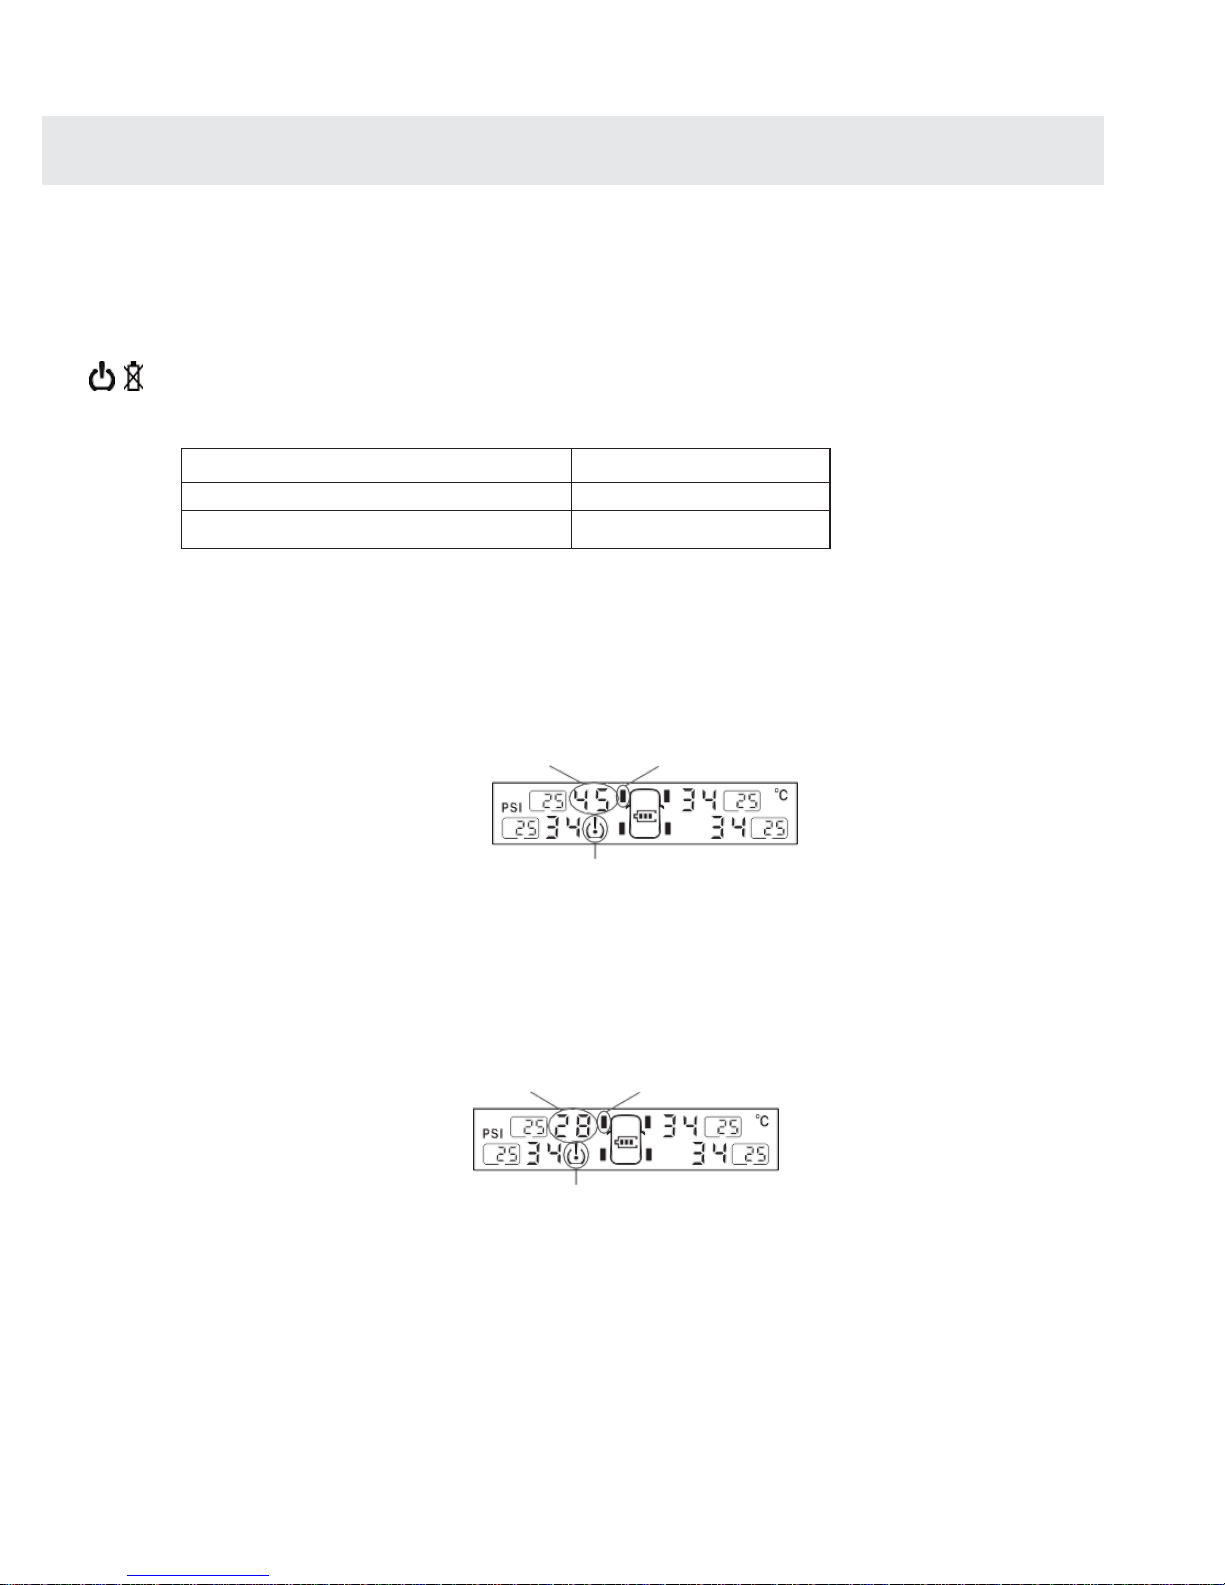
In normal display, the tyre pressures and temperatures are displayed on the monitor.
Note that the reading is not instantaneous, but is the value stored in the monitor which is updated
every six seconds. If two extra sensor have been registered to the system, the monitor will show
all six sensors on the one screen.
8. WARNINGS AND ALERTS
In the event of an abnormality, an alert is given as follows
▪
Audible alarm
▪
Red light flashes
▪
The corresponding icon on the monitor blinks
You can press any button on the monitor to silence the alarm, but the red light will continue to flash
and the icon will continue to blink until the problem has been corrected.
8.1 Low battery warnings
If the monitor battery is low, the monitor battery icon will change from full to empty.
Plug in to charge the battery and the icon becomes animated to show the charging
in process.
If a sensor battery is low, the sensor battery icon blinks, together with the appropriate tyre icon. The sensor battery must then be replaced.
They are available on-line from our TyrePal shop.
7.4 Normal display
Page 11
10
High / Low Pressure Alert / High Temperature Alert / Fast Leakage Alert / Sensor
Low Battery Alert
The monitor displays the temperature and the pressure data of four sensors simultaneously. The
corresponding alert icon and red LED will flash together with a warning beep when the sensor
detects abnormal conditions from the tyre. The faulty tyre and/or battery alarm
( ) icons will continue to flash until the problem has been resolved.
Factory default setting
High pressure alarm level
44PSI (3.0BAR)
Low pressure alarm level
29PSI (2.0 BAR)
High temperature ºC alarm level
70ºC
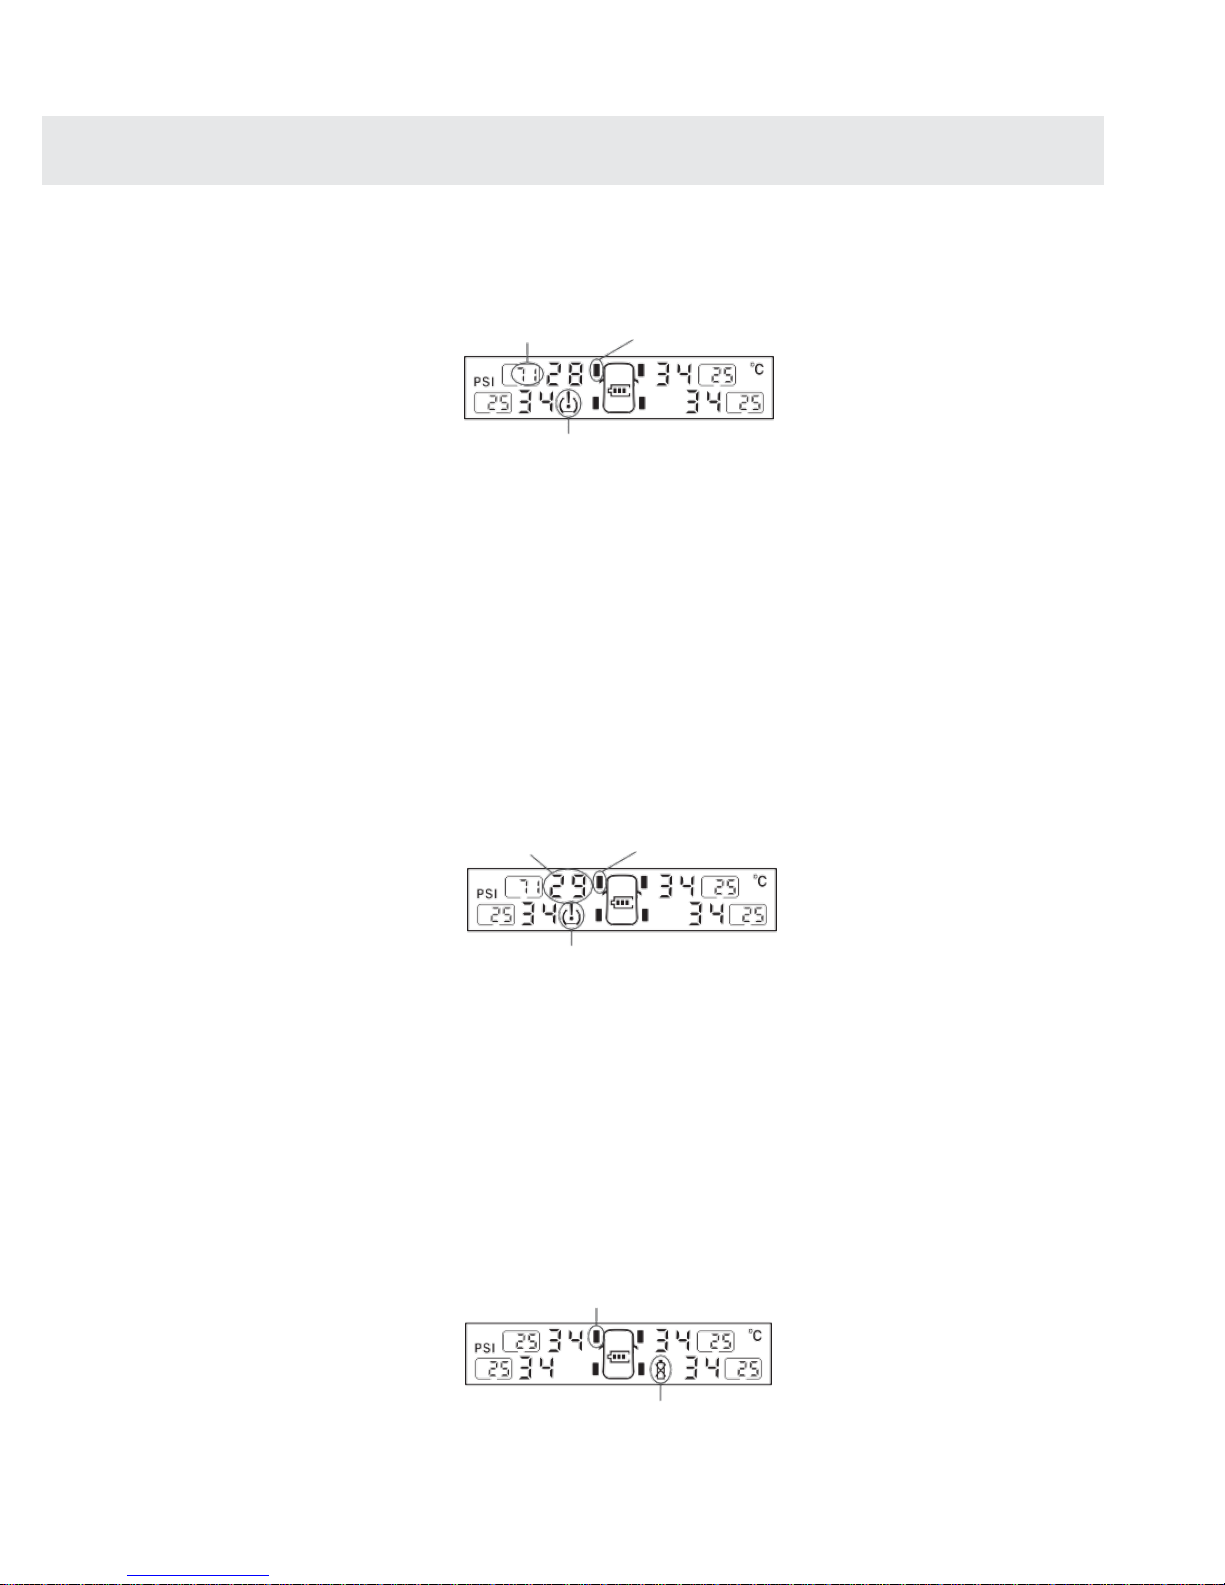
9.1 High pressure alert
If the front left tyre pressure is 45PSI, the monitor will alert together with a warning beep ,
and the red LED will flash.
Pressure data flash
Tyre icon flash
9.2 Low pressure alert
Alert icon flash
If the front left tyre pressure is 28PSI, the monitor will alert together with a warning beep,
and the red LED will flash.
Pressure data flash
Tyre icon flash
Alert icon flash
9. ALARM CONDITION
Page 12
11
If the front left tyre temperature is 71ºC the monitor will alert together with a warning beep,
and the red LED will flash
Temperature
data flash
Tyre icon flash
9.4 Fast leakage alert
Alert icon flash
The sensor will send alert data to the monitor if it detects fast leakage in a tyre. The alert icon and the
pressure data will flash together with the tyre icon and the red warning light will flash along with
the alarm beep.
Press any button to turn off the beep warning. The alert tyre icon and the pressure data will still
flash together with the red LED until the problem has been solved.
If the front left tyre pressure drops from 34PSI to 29PSI immediately, the monitor will alert as
shown below.
Pressure data flash
Tyre icon flash
Alert icon flash
9.5 Sensor low battery alert
While the sensor battery voltage is low, the sensor will send the alert to the monitor. The
corresponding tyre icon and the low battery icon will flash together with the red LED and the monitor
will beep. Press any button to turn off the warning beep, but the tyre icon and the low battery icon will
still flash together with the red LED until a new sensor battery has been replaced.
If the battery in the front left tyre sensor is low, the monitor will alert as the picture below.
Tyre icon flash
Sensor low battery alarm
9.3 High temperature alert
Page 13
12
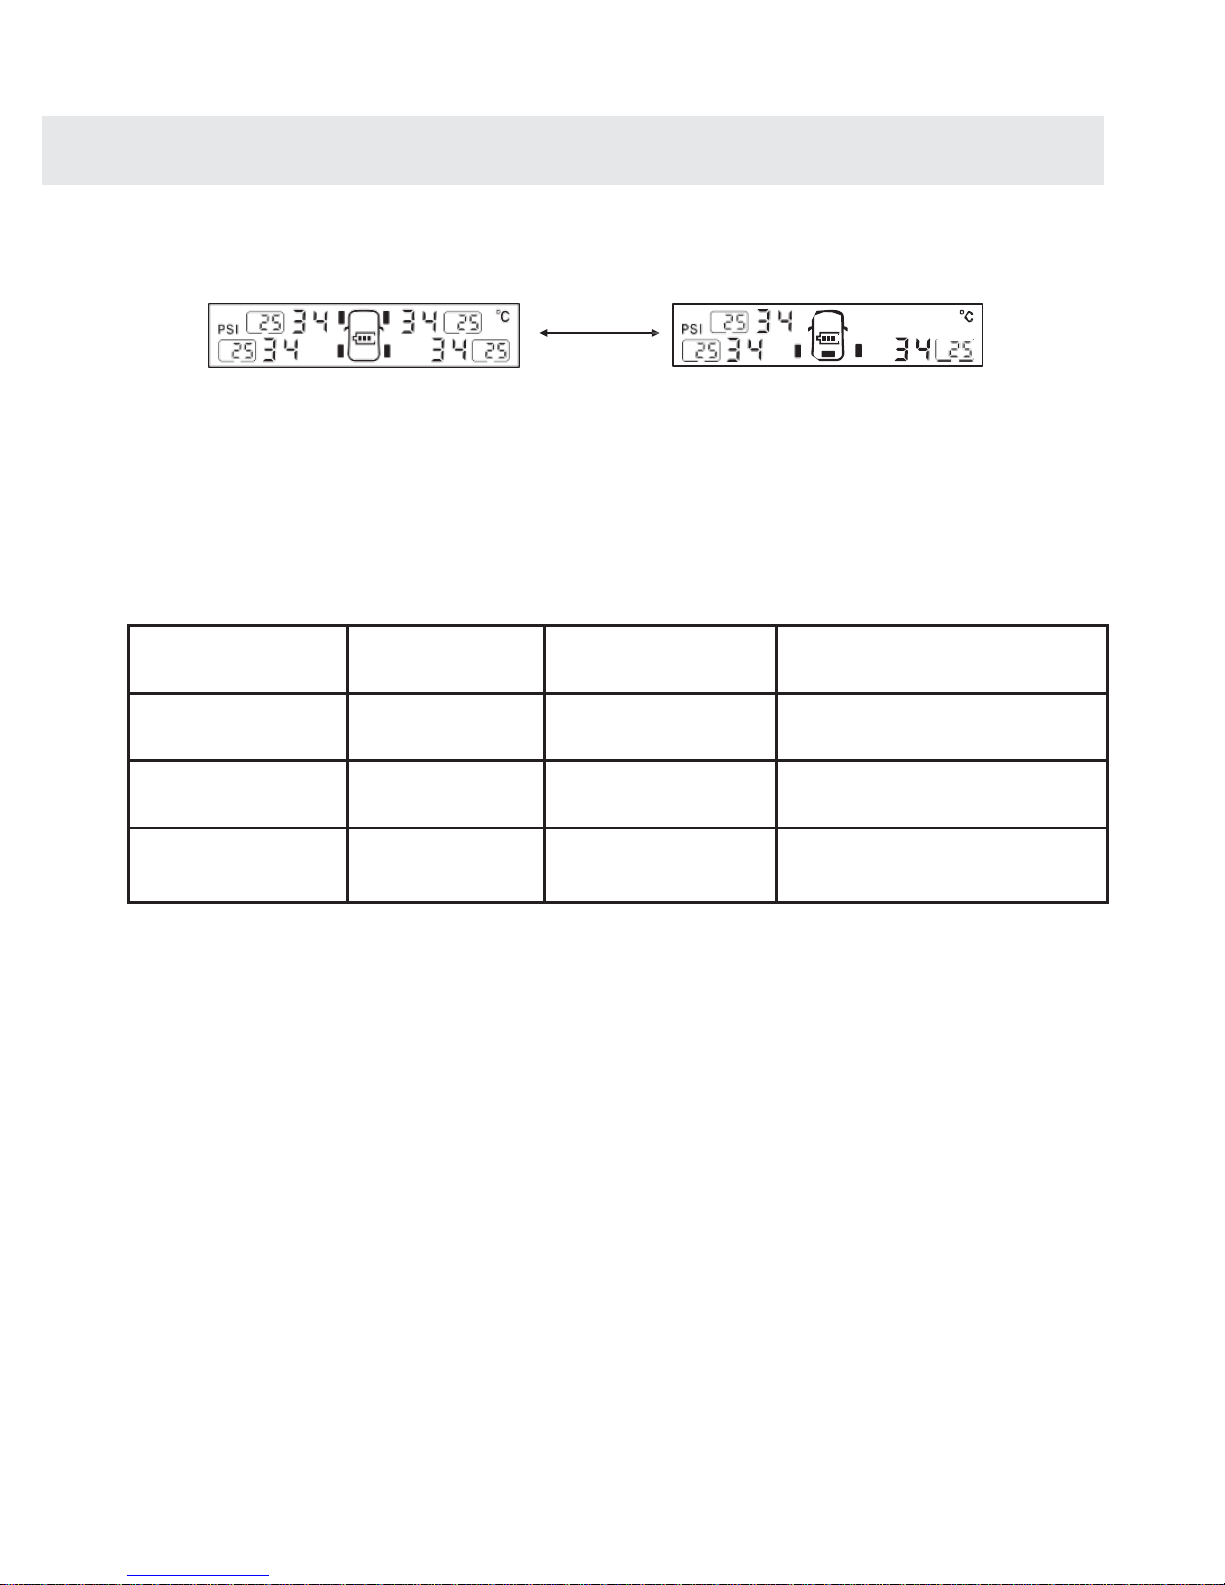
Monitor displays 6 tyres
6 sensors (for motorhome): displays as below
10 seconds
11. TECHNICAL SPECIFICATION
11.1 Monitor Specification
Pressure setting
range
16-99PSI
(1.0-9.9BAR)
Temperature
setting range
-20ºC ~ 93ºC (77ºF ~ 199ºF)
Working
Temperature
-20ºc ~ 80ºC
Frequency
433.92MHz
Storage
Temperature
-30ºc ~ 85ºC
Size
84 (L) * 66 (W) * 23 (H)mm
Output voltage
/ current
DC 5V/1A
Weight
82 g
10. OTHER FUNCTIONS
Page 14
113
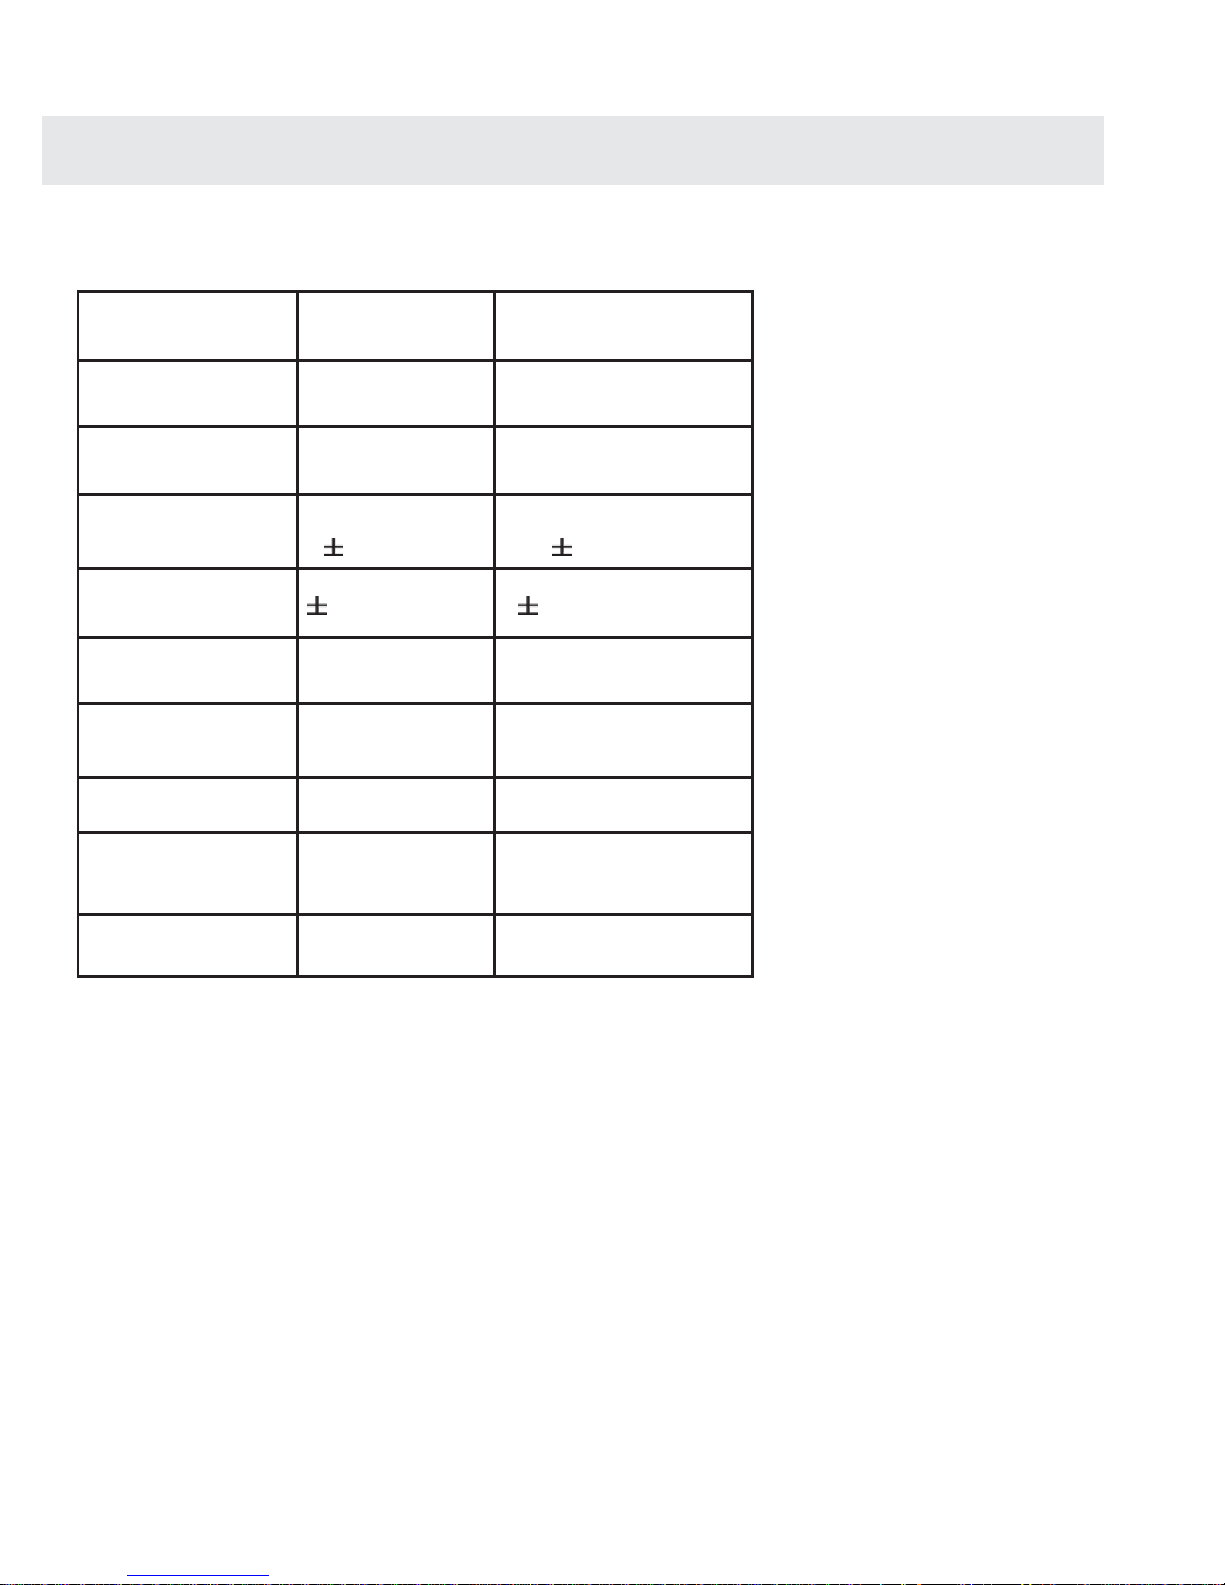
TCSU TCSN
Working
Temperature
-20ºC ~ +80ºC
-40ºC ~ +80ºC
Storage
Temperature
-20ºC ~ +85ºC
-40ºC ~ +85ºC
Pressure range
0~99 PSI
0~6.8 BAR)
0~99 PSI
0~6.8 BAR)
Pressure accuracy
1.5 PSI
(
0.1BAR)
1.5 PSI
(
Temperature
accuracy
3ºC
3ºC
Transmission
power
<5dBm
<10dBm
Transmission
frequency
433.92MHz
433.92MHz
Battery life
1 year
2 years
Dimension
18 Ф X13 (H) mm
21 Ф X17 (H) mm
Weight
6 g
10 g
1.
Please use the system correctly following the instructions. The distributor is not liable for
damages or for mis-use of the product.
2.
Follow the instruction guides, if any damage occurs due to the wrong installation, the
distributor is not liable for it.
3.
The content and specification are subject to change without prior notice. Pictures in the
article are just for illustration purposes. Please take the actual product for reference.
4.
Please be careful not to damage the sensor during tyre removal.
5.
Sensors may need to be removed from time to time to ensure they are not bonding onto
the tyre valve.
11.2 Sensor Specification
Page 15

1
The recommended tyre pressures are given in the vehicle handbook and are designed to give the
best balance between comfort, road-holding and fuel economy for a given vehicle. The side-wall of
the tyre is embossed with the maximum pressure for the tyre. This is NOT the recommended service
pressure.
Under-inflated tyres have a greater rolling resistance, so they waste fuel and wear faster. Driving on
tyres below a critical inflation pressure can cause a blow-out, and can damage wheel rims because
the tyres are no longer supporting the vehicle. Over-inflation reduces grip and causes uneven wear.
12.1 Effect of temperature
Tyre pressures are specified for cold tyres, but the tyres warm up when driving, and the pressure
increases by about 10% in normal service. Tyres should therefore be inflated to the recommended
level before they are heated by driving. In winter, tyre pressures fall due to lower temperatures and
additional air is required to bring them to the manufacturer’s recommended level. If a tyre overheats, it
may blow out or cause permanent damage to the sidewall.
12.2 Service and warranty
Please register your warranty by completing details on our website. The system is warranted to be
free from manufacturing defects and is guaranteed for a period of twelve months from date of
purchase. There are no user-serviceable parts inside and if internal parts have been tampered with
the warranty will be void. The warranty does not affect your statutory rights.
12. MANAGING TYRE PRESSURES
Page 16
TyrePal Limited
Wheel Solutions Limited
Unit 2 Upper Keys Business Park
Keys Park Road
Hednesford, Cannock
Staffordshire
WS12 2GE
Telephone: +44 (0) 1543870170
Email: [email protected]
 Loading...