

Page 1

Multimedia Tastatur/Maus-Set Kabellos
www.typhoon.de
For Home and Office Use
Wireless Frequencies: 27.095 and 27.195 MHz
This equipment is intended for use in the following countries:
EU 28 Countries:
Austria, Belgium, Denmark, Finland, France, Germany, Greece,
Ireland, Italy, Luxembourg, Netherlands, Portugal, Spain,
Sweden ,United Kingdom, Poland, Czech Republic, Hungary,
Estonia, Latvia, Lithuania, Malta, Cyprus, Slovakia, Slovenia,
Norway, Switzerland and Iceland.
If you should have any problems with our
hotline in Belgium,please dial
1551-008002255897
Typhoon is trademark of ANUBIS Intl. Comp. Ltd. All other brand names and product names are trademarks or registered trademarks
of their respective holders. Actual contents may differ slightly from those pictured. All specifications and designs are subject to change
Vearsion 1.0 Specifications and procedures are subjected to changes without prior notification. Specifications and procedures are subjected to changes without prior notification. Vearsion 1.0
without prior notice. © Copyright 2005 by ANUBIS Intl. Comp. Ltd.
Art. No. : 40357 Made in China.
PMU-KM00384X
Art. No.: 40357
Please view the file "Readme.doc" in the driver CD-ROM for the detailed user's guide.
User's Manual
Page 2
User's Manual
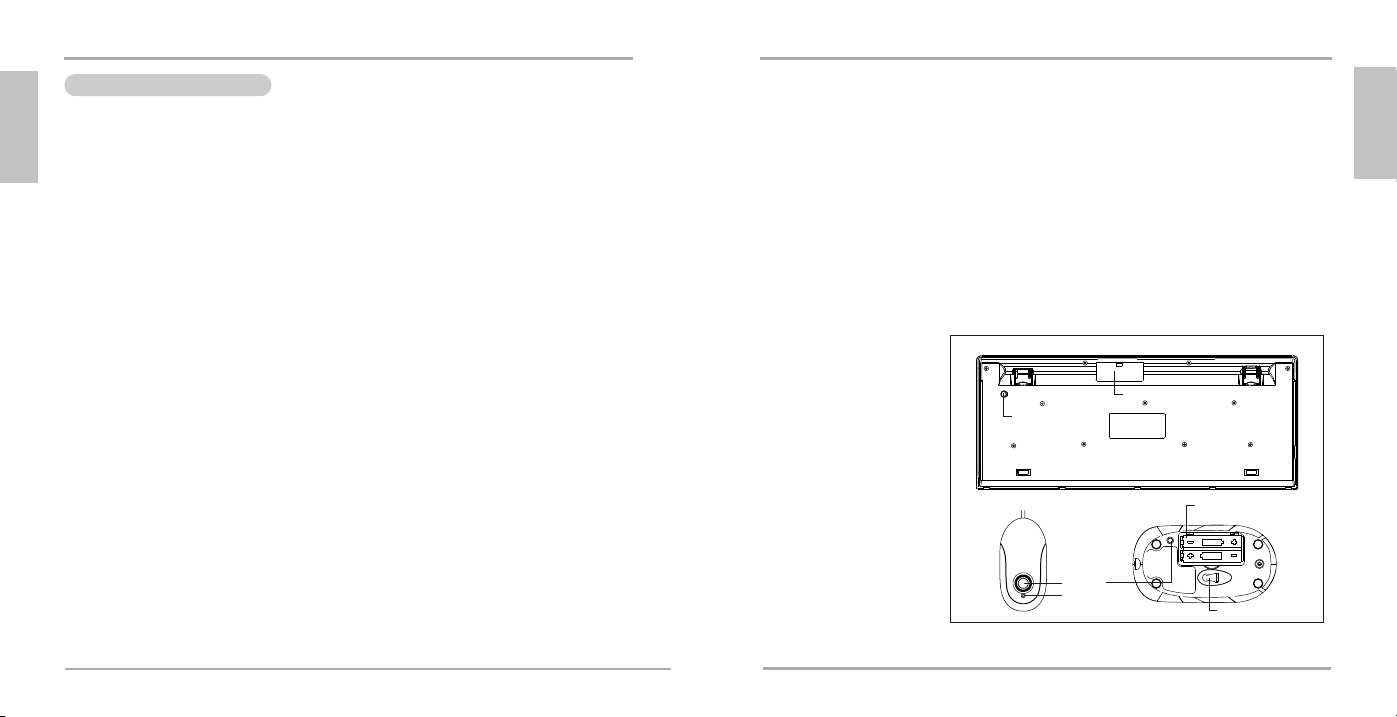
Link button
Keyboard
Receiver Mouse
Link button
LED
Battery compartment
Battery compartment
Optical Sensor
Quick Installation Guide
GB
CAUTION: Any changes of modifications not expressly approved by the grantee of this device could void
the users authority to operate the equipment.
Note: the manufacturer is not responsible for any radio or tv interference caused by unauthorized
modifications to this equipment. Such modifications could void the user's authority to operate the
equipment.
Congratulations on purchasing the Wireless Keyboard and Mouse Set. Please carefully read the
User's Guide to learn about the installation and the powerful functions of your new Wireless
Keyboard and Mouse Set.
1. Content of Package
a) Wireless Keyboard
b) Wireless Optical Mouse
c) Receiver
d) USB to PS/2 Adapter
e) Two AA Batteries for Keyboard
f) Two AAA Batteries for Wireless Optical Mouse
g) Driver CD-ROM
h) Instruction Manual
Optional Parts for Wireless Optical Mouse
1 2
- UP combo
2. Hardware Installation
2-1. Install the Receiver with the PS/2 Connectors (option 1)
a) Please turn off your PC.
b) Plug the PS/2 connectors of the keyboard and the mouse on the receiver into the PC.
c) Connect the USB-to-PS/2 adapter with the USB connector of the receiver. Plug the adapter
2-2. Install Receiver with USB Connector (option 2)
a) You may turn on the computer.
b) Plug the USB connector on the receiver into the USB port of the computer.
2-3. Link the Wireless Keyboard and the Wireless Optical Mouse with the Receiver (Synchronization)
a) Insert the batteries into the battery compartments of both the Keyboard and the Mouse.
b) Please turn on your PC. The LED indicator on the receiver will light.
c) Press the ID Link Button on the receiver and the LED indicator will blink. There is a 15
Vearsion 1.0 Specifications and procedures are subjected to changes without prior notification. Specifications and procedures are subjected to changes without prior notification. Vearsion 1.0
into the PS/2 keyboard port of the computer.
seconds window period for the keyboard linkage process.
d) Next press the ID Link Button at the back of the keyboard under the flipper leg.
e) Press again the ID Link Button on the receiver. There is a 15 seconds window period for the
mouse linkage process.
f ) Then press the ID Link Button at the back of the mouse beside the label.
g) The LED indicator of the receiver will blink when the keyboard or the mouse are in use.
h) If you need to re-link (synchronization) the mouse and the keyboard, please repeat the above
synchronization instructions.
i ) If the selected channel is interfered by other wireless-mouse or keyboard users nearby, please
change the Link ID by re-linkage (synchronization) immediately.
j ) There are 256 changeable IDs for each channel so please re-synchronize to move to the next
ID to prevent interferences.
Page 3

DE
Link button
Keyboard
Receiver Mouse
Link button
LED
Battery compartment
Battery compartment
Optical Sensor
DE
Herzlichen Glückwunsch zum Kauf des Multimedia Tastatur-/Maus-Set, kabellos. Bitte lesen Sie sich
diese Bedienungsanleitung sorgfältig durch, um mehr über dieses schnurlose Maus-Tastatur-Set zu
erfahren und um optimal die Möglichkeiten nutzen zu können, die Ihnen dieses Equipment bietet.
Sicherheitshinweise
Der Hersteller ist nicht für Radio- oder TV-Interferenzen verantwortlich, die durch unauthorisierte
Modifizierungen dieses Geräts oder Ersatz bzw. Anschluß von Verbindungskabeln und Geräten, die nicht
genehmigt sind, verursacht wurden. Der Benutzer ist für die Behebung von Interferenzen verantwortlich,
die durch derartige unauthorisierte Modifizierungen, Ersatz bzw. Anschluß verursacht wurden.
Eingebaute Antennen, ob in Innenräumen oder im Freien installiert, sollten nur von erfahrenen und
fachkundigen Installateuren für Antennen installiert werden, die mit den lokalen Bau- und
Sicherheitsvorschriften vertraut und von den zutreffenden Regierungsbehörden für Vorschriften lizenziert
sind, sofern dies erforderlich ist.
1. Verpackungsinhalt
a) Schnurlose Tastatur
b) Schnurlose optische Maus
c) Empfänger
d) USB zu PS/2 Adapter
e) 2 AA-Batterien für die Tastatur
f ) 2 AAA-Batterien für die optische Maus
g) CD-ROM mit Treibern
h) Bedienungsanleitung
2. Installation der Hardware
2-1. Anschluss über PS/2
a) Schalten Sie zunächst Ihren Rechner aus.
b) Verbinden Sie den grünen PS/2-Stecker mit der grünen PS/2-Buchse an Ihrem Rechner.
c) Verbinden Sie den USB-zu-PS/2 Adapter mit dem USB Connector des Empfängers. Stecken
2-2. Anschluss über USB & PS/2
a) Schalten Sie zunächst Ihren Rechner aus.
b) Stecken Sie den USB Stecker des Empfängers in den USB Port und den PS/2 Stecker in den
2-3. Verbinden der Maus und Tastatur mit dem Empfänger
3 4
a) Legen Sie die Batterien in die Batterienkästchen der Tastatur und der Maus ein
b) Bitte schalten Sie Ihre PC an. Der LED Indikator auf dem Empfänger leuchtet.
Vearsion 1.0 Specifications and procedures are subjected to changes without prior notification. Specifications and procedures are subjected to changes without prior notification. Vearsion 1.0
Sie den Adapter in den PS/2-Tastatur-Port des Computers ein.
PS/2 Anschluss Ihres Computer's ein.
c) Drücken Sie den ID-Verbinden-Knopf auf dem Empfänger und der LED Indikator blinkt. Der
Vorgang für die Verbindung mit der Tastatur dauert 15 Sekunden.
d) Danach drücken Sie den ID-Verbinden-Knopf auf der Rückseite der Tastatur unter dem
Flossenbein.
e) Drücken Sie nochmals den ID-Verbinden-Knopf auf dem Empfänger. Es dauert 15 Sekunden
für die Verbindung mit der Tastatur.
f ) Dann drücken Sie den ID-Verbinden-Knopf auf der Rückseite der Maus neben der Etikette.
g) Nach einem Batteriewechsel müssen Sie die Verbindungsprozedur noch einmal durchführen.
h) Es gibt 256 verschiedene ID's für jeden Kanal.
Page 4

FR
Link button
Keyboard
Receiver Mouse
Link button
LED
Battery compartment
Battery compartment
Optical Sensor
FR
Avertissement : tout changement ou modification qui n'aurait pas été expressément approuvé par le
fabricant de ce produit peut annuler le droit de l'utilisateur de manipuler celui-ci.
Félicitation pour votre achat de la Combinaison Maligne, le Wireless Keyboard and Mouse Set .
Veuillez lire attentivement le Guide de l'Utilisateur pour apprendre comment installer votre
produit et découvrir toutes les fonctions de votre nouveau Wireless Keyboard and Mouse Set.
1. Contenu du Paquet
a) Clavier Malin Sans Fil
b) Souris Sans Fil
c) Récepteur (avec connecteurs PS/2)
d) Adaptateur USB/PS2
e) Deux Piles AA pour le clavier
f ) Deux Piles AA pour la Souris Sans Fil
g) Le CD-Rom des pilotes
h) Mode d'emploi
2. Installation du Matériel
2-1. Installez le Récepteur avec les Connecteurs PS/2
a) Veuillez éteindre votre ordinateur.
b) Branchez les connecteurs du clavier et de la souris sur le récepteur dans l'ordinateur.
2-2. Installer le Récepteur avec le Connecteur USB
5 6
a) Vous pouvez démarrer votre ordinateur.
b) Brancher le connecteur USB avec récepteur sur le port USB de l'ordinateur.
2-3. Installer le Récepteur avec des connecteurs UP
a) Inserez les batterie dans les compartiments batteries du lavier et du souris.
b) Veuillez allumer votre PC. L'indicateur LED sur le récepteur s'allumerea.
c) Appuyez le bouton ID Link sur le récepteur et l'indicateur LED se clignotera. Il y a un 15
d) En suite, appuyez sur le bouton ID Link au fond du clavier sous le pied nageoir.
e) Appuyez uncore une fois sur le bouton ID Link sur le récepteur. Il y a un 15 secondes période
f ) Ensuite, appuyez sur le bouton ID Link au fond de souris près de marquer.
g) Le voyant indicateur sur le récepteur clignotera quand le clavier ou la souris sont utilisés.
h) Si vous devez refaire le lien de la souris, du clavier ou après avoir changé les piles de la
i ) Si le canal choisi subit des interférences dues à d'autres souris ou clavier sans fil qui seraient à
Vearsion 1.0 Specifications and procedures are subjected to changes without prior notification. Specifications and procedures are subjected to changes without prior notification. Vearsion 1.0
secondes période fenêtre pour la liaison du clavier.
fenêtre pour la liaison du souris.
souris, veuillez répéter les opérations décrites ci-dessus.
proximité, veuillez changer le Lien ID en refaisant l'opération de liaison ou en choisissant
immédiatement l'autre canal.
j ) Il y a 256 IDs (identités) interchangeable pour chaque canal.
Page 5

IT
Link button
Keyboard
Receiver Mouse
Link button
LED
Battery compartment
Battery compartment
Optical Sensor
IT
Attenzione: Qualsiasi modificazione non e' conveniente , approvato dalla garanzia di espendiente
,annullare il utente potere per operare il equipaggiamento .
Vi Rigraziamo per Vostro acquisto sulla Combinazione di Wireless Keyboard and Mouse Set.
Leggere il manuale Utente attentamente per imparare l'installazione e la nuova powerful funzione
del Wireless Keyboard and Mouse Set.
1. Il Paghetto contenuto :
a) Intelligente RadioKeyboard
b) RadioMouse
c) Il Ricevente (con PS/2 connettori)
d) USB al trasformatore PS/2
e) Due AA Batterie per Keyboard
f ) Due AA Batterie per RadioMouse
g) Il Driver CD-ROM
h) Manuale di operazione
2. Installazione il Hardware
2-1. Installare il Recevente con PS/2 connettori
a) Spegnere il PC.
b) Tappare i connettori del keyboard ed mouse nel recevente sul PC.
2-2. Installi la ricevente con il connettore del USB
7 8
a) Potete accendere il computer.
b) Inserisca il connettore del USB sulla ricevente l'orificio del USB del computer.
2-3. Installi la ricevente con i connettori UP.
a) Inserisca le batterie negli scompartimenti di batteria sia della tastiera che del mouse.
b) Accenda prego il vostro computer. L'indicatore del LED sulla ricevente si illumina.
c) Premi il tasto di collegamento d'identificazione sulla ricevente e l'indicatore del LED lampeggia.
d) Pressa seguente il tasto ID di collegamento alla parte posteriore della tastiera sotto il piedino
e) Premi di nuovo il tasto ID di collegamento sulla ricevente. C'e` un periodo della finestra da 15
f ) Poi premi il tasto ID di collegamento alla parte posteriore del mouse al lato dell'etichetta.
g) Il LED indicatore su recevente dovere lampeggiare mentre usare il keyboard o il mouse.
h) Nel caso per ricollegare il mouse, il keyboard oppure dopo combiato le batterie di mouse,
i ) Se il canale scelto viene interferito dall' altro radiomouse o keyboard utente in vicino, Cambiare
Vearsion 1.0 Specifications and procedures are subjected to changes without prior notification. Specifications and procedures are subjected to changes without prior notification. Vearsion 1.0
C'e` un periodo della finestra da 15 secondi per il processo del collegamento della tastiera.
dell'aletta.
secondi per il processo del collegamento del mouse.
Ripetere suindicato collegamento istruzioni.
il Link ID per ricollegare o scegliere l'altro canale immediatamente.
j ) Ci sono 256 IDs da cambiare per ogni canale.
Page 6

ES
Link button
Keyboard
Receiver Mouse
Link button
LED
Battery compartment
Battery compartment
Optical Sensor
ES
PRECAUCIÓN: Cualquier cambios o modificaciones no aprobados por la garantía de este dispositivo no
autoriza a los usuarios a operar el equipo.
Felicidades por la compra del a Combinación del Teclado Inalámbrico y Wireless Keyboard and
Mouse Set. Lea la Guía del Usuario atentamente para aprender acerca de la instalación y las
funciones poderosas de su nuevo teclado y Wireless Keyboard and Mouse Set.
1. Contenidos del Paquete
a) Teclado Inalámbrico Inteligente
b) Ratón Inalámbrico
c) Receptor (con conectores PS/2)
d) Adaptador del USB al PS/2
e) Dos pilas AA para el teclado
f ) Dos pilas AA para el ratón inalámbrico
g) Driver CD-ROM
h) Manual de operaciones
2. Instalar Hardware
2-1. Instalar el Receptor con Conectores PS/2
a) Apague su PC.
b) Enchufe los conectores del teclado y el ratón en el receptor en el PC.
2-2. Instalar el Receptor con el Conector del USB
9 10
a) Usted puede poner su computadora.
b) Conecte el conector del USB con el receptor en el puerto de la computadora.
2-3. Instalar el Receptor con el Conector del UP
a) Inserte las baterías en sus compartimientos, tanto de teclado como de mouse.
b) Favor de iniciar tu PC. El indicador LED en el receptor estará encendido.
c) Presione el botón ID LINK en el receptor y luego el indicador LED parpadeará. Habrá un
d) Luego, presione el botón ID LINK en el dorso del teclado, debajo de pie de soporte.
e) Presione de nuevo el botón ID LINK en el receptor. Habrá un intervalo de 15 segundos para el
f ) Después, presione el botón ID LINK en el dorso de mouse, al lado de la etiqueta.
g) El indicador LED del receptor titilará mientras usa el teclado o el ratón.
h) Si necesita revincular el ratón, el teclado o después de cambiar las pilas del ratón, repita las
i ) Si el canal seleccionado está interferido por otros usuarios del ratón o teclado inalámbrico de
Vearsion 1.0 Specifications and procedures are subjected to changes without prior notification. Specifications and procedures are subjected to changes without prior notification. Vearsion 1.0
intervalo de 15 segundos para el proceso de linqueo del teclado.
proceso de linqueo de mouse.
instrucciones de vínculo arriba mencionadas.
cerca, cambie la ID de Vínculo con revincular o seleccionar otro canal de inmediato.
j ) Hay 256 Ids cambiables para cada canal.
Page 7

PT
Link button
Keyboard
Receiver Mouse
Link button
LED
Battery compartment
Battery compartment
Optical Sensor
PT
Este dispositivo obedece a Parte 15 das Regras FCC. A operação está sujeita à duas condições: (1)
este dispositivo pode não causar interferência danosa, e (2) este dispositivo deve aceitar qualquer
interferência recebida, inclusive interferência causadora de operações indesejadas.
Congratulações pela sua compra deste Internet Wireless Keyboard and Mouse Set. Por favor leia
cuidadosamente este Guía Rápido do Usuário para conhecer mais sobre a instalação e sobre as
funções de Internet e multimídia do seu novo Wireless Keyboard and Mouse Set.
1. Conteúdo do Pacote
a) Intelligent Wireless Keyboard (Teclado de Internet Sem Fio)
b) Receptor (PS/2)
c) Três Pilhas AA
d) USB to PS/2 Adapter
e) CD-ROM driver
f ) Guía Rápido
2. Instalação do Hardware
Atenção:
a) A localização do interruptor do canal pode ser diferente de acordo com a variedade de modelos
diferentes de teclados.
b) Alguns modelos foram criados na versão de canal único os quais não terão um interruptor de canal.
2-1. Desligue o seu computador Conecte o Receptor no computador
2-2. Instale o receptor com conector do USB
11 12
a) Você pode prender o computador.
b) Conecte o conector do USB no receptor no porto do USB do computador.
2-3. Instale o receptor com UP conectores.
a) Insertar as baterias ao compartimento de baterias do teclado e da mouse.
b) Favor ligar o seu computador. O indicador de LED do receptor estará aceso.
c) Apertar o botão de conexão de ID no receptor e o indicador de LED vai piscar. Há um período
d) Depois apertar o botão de conexão de ID no verso do teclado embaixo da barbatana.
e) Apertar novamente o botão de conexão de ID no receptor. Este é um período de 15 segundos
f ) Após apertar o botão de ID no verso da mouse ao lado da etiqueta.
g) L'indicateur LED do receptor titilará entretanto os EUA o teclado ou o rato.
h) Se necessita revincular o rato, o teclado ou após ter alterado as pilhas do rato, repete as
i) Se o canal escolhido for interferido por d'outros utilizadores o rato ou o teclado sem fios
Vearsion 1.0 Specifications and procedures are subjected to changes without prior notification. Specifications and procedures are subjected to changes without prior notification. Vearsion 1.0
de 15 segundos que aparece uma janela para o processo de conexão do teclado.
para o processo de conexão da mouse.
instruções de relação em parte superior mencionadas.
rigorosamente, revincular ou escolher outro canal imediatamente.
j ) Feno 256 Ids cambiables para cada canaleta.
Page 8

NL
Link button
Keyboard
Receiver Mouse
Link button
LED
Battery compartment
Battery compartment
Optical Sensor
NL
Waarschuwing: Alle veranderingen van wijzigen niet goedkeurend bij de waarborg van het toestel dat het
autoriteit van de gebguikers om het toestel te opereren kunnen lozen.
Proficiat met uw aankoop van de Combinatie van de Wireless Keyboard and Mouse Set. Gelieve
leez zorgvuldig om de Gids van de Gebruikers over de installatie en de machtig functies van uw
nieuwe Wireless Keyboard and Mouse Set.
1. Inhouden van Verpakking
a) Intelligente Draadloss Toetsenbord
b) Draadloss Mouse
c) Ontvanger (met PS/2 verbindingsstukken)
d) Verloopstuk usb naar PS/2
e) Twee AA Batterijen voor Toetsenbord
f) Twee AA Batterijen voor Draadloss Mouse
g) Drijver CD-ROM
h) Gebruiksaamwijzing
2. Installeer Hardware
2-1. Installeer de Ontvanger met PS/2 Verbidingsstukken
a) Gelieve uw PC af te zetten .
b) Schakeel de verbindingsstukken van de toetsenbord en de mouse op de ntvanger de PC in.
2-2. De ontvanger met de usb-connector aansluiten
13 14
a) De computer mag aanstaan.
b) Steek de usb-connector van de ontvanger in de usb-aansluiting van de computer.
2-3. De ontvanger met up-connectors aansluiten
a) Plaats de batterijen in het toetsenbord en de muis.
b) Zet de PC aan. Het LED lampje op de ontvanger zal oplichten.
c) Druk op de ID Link knop op de ontvanger en het lampje zal knipperen. Het duurt 15 seconden
d) Druk vervolgens op de ID Link knop aan de achterkant van het toetsenbord onder het
e) Druk opnieuw op de ID Link knop op de ontvanger. Het duurt 15 seconden voordat de muis
f ) Klik vervolgens op de ID Link knop aan de achterkant van de muis naast het etiket.
g) De LED indicateur van de ontvanger zal flikkeren terwijl u de toetsenbord of de mouse gebruik.
h) Als u de mouse re-verbinding nodig hebben, de toetsenbord of daarna de mouse batterijen
i ) Als de gekozen kanaal gestoord is bij andere draadloss-mouse of toetsenbord dichtbij, gelieve
Vearsion 1.0 Specifications and procedures are subjected to changes without prior notification. Specifications and procedures are subjected to changes without prior notification. Vearsion 1.0
voordat het toetsenbord verbinding maakt.
uitklapbare pootje.
verbinding maakt.
verandering, gelieve de verbinding instructies boven te herhalen.
de Vrebinding ID bij re-verbinding te veranderen of de andere kanaal onmiddelijk te kiezen.
j ) Er zijn 256 veranderlijk IDs voor elke kanaal.
Page 9

GR
Link button
Keyboard
Receiver Mouse
Link button
LED
Battery compartment
Battery compartment
Optical Sensor
GR
РСПУПЧЗ: ПрпйеудЮрпфе бллбгЭт Ю мефбфспрЭт рпх ден рспвлЭрпнфбй убцют брь фзн еггэзуз фзт
рбспэубт ухукехЮт мрпспэн нб ерйцЭспхн бкэсщуз фзт бсмпдйьфзфбт фщн чсзуфюн нб лейфпхсгЮупхн
фз ухукехЮ.
УхгчбсзфЮсйб гйб фзн бгпсЬ фпх УефWireless Keyboard and Mouse Set. Рбсбкблпэме дйбвЬуфе
рспуекфйкЬ фйт пдзгЯет чсЮуещт рспкеймЭнпх нб ензмесщиеЯфе гйб фзн егкбфЬуфбуз кбй фйт
узмбнфйкЭт лейфпхсгЯет фпх нЭпх убт Wireless Keyboard and Mouse Set.
1. Ресйечьменб ухукехбуЯбт
a) Буэсмбфп рлзкфспльгйп
b) Буэсмбфп прфйкь рпнфЯкй
c) ДЭкфзт (ме бкспдЭкфет PS/2)
d) РспубсмпгЭбт USB óå PS/2
e) Дхп мрбфбсЯет ББ гйб фп рлзкфспльгйп
f ) Дхп мрбфбсЯет ББ гйб фп буэсмбфп прфйкь рлзкфспльгйп
g) Пдзгьт CD - ROM
h) ПдзгЯет чсЮуещт
РспбйсефйкЬ еобсфЮмбфб гйб фп Буэсмбфп Прфйкь РпнфЯкй
(Фб рспбйсефйкЬ бхфЬ еобсфЮмбфб мрпсеЯ нб дйбцЭспхн брь фб бнфЯуфпйчб Ьллщн ухукехбуйюн
рспъьнфщн)
Кблюдйп брь UP combo
2. ЕгкбфЬуфбуз ухукехЮт
2-1. ЕгкбфЬуфбуз фпх дЭкфз ме фпн фпхт бкспдЭкфет PS/2
a) Рбсбкблпэме увЮуфе фпн хрплпгйуфЮ убт.
b) УхндЭуфе фпхт бкспдЭкфет PS/2 фпх дЭкфз рлзкфсплпгЯпх кбй рпнфйкйпэ уфзн бнфЯуфпйчз еЯупдп
2-2. ЕгкбфбуфЮуфе фп дЭкфз ме фп вэумб USB
a) МрпсеЯфе нб енесгпрпйЮуефе фпн злекфспнйкь хрплпгйуфЮ.
b) УхндЭуфе фп вэумб USB уфп дЭкфз, уфз иэсб USB фпх злекфспнйкпэ хрплпгйуфЮ.
2-3.ЕгкбфбуфЮуфе фп дЭкфз ме фб вэумбфб UP
a) ЕйуЬгефе фйт мрбфбсЯет уфз иЮкз мрбфбсйюн фьуп фпх РлзкфсплпгЯпх ьуп кбй фпх Рпнфйкйпэ.
b) Рбсбкблпэме бнЬшфе фпн З/Х убт. Иб бнЬшей фп лбмрЬкй Эндейозт LED уфп дЭкфз.
c) РбфЮуфе фп КпхмрЯ ID Уэндеузт уфп дЭкфз кбй иб бнбвпувЮуей фп лбмрЬкй Эндейозт LED. З
d) Уфз ухнЭчейб рбфЮуфе фп КпхмрЯ ID Уэндеузт уфп рЯущ мЭспт фпх рлзкфсплпгЯпх, кЬфщ брь
Vearsion 1.0 Specifications and procedures are subjected to changes without prior notification. Specifications and procedures are subjected to changes without prior notification. Vearsion 1.0
15 16
фпх хрплпгйуфЮ убт.
дйбдйкбуЯб уэндеузт фпх рлзкфсплпгЯпх мрпсеЯ нб гЯней уе Энб чспнйкь дйЬуфзмб 15
дехфесплЭрфщн.
фп бнбдйрлпэменп рпдбсЬкй.
e) РбфЮуфе обнЬ фп КпхмрЯ ID Уэндеузт уфп дЭкфз. З дйбдйкбуЯб уэндеузт фпх рпнфйкйпэ мрпсеЯ
нб гЯней уе Энб чспнйкь дйЬуфзмб 15 дехфесплЭрфщн.
f ) ¸рейфб рбфЮуфе фп КпхмрЯ ID Уэндеузт уфп рЯущ мЭспт фпх рпнфйкйпэ дЯрлб уфзн ефйкЭфб.
g) З цщфейнЮ Эндейоз фпх дЭкфз бнбвпувЮней ьфбн фп рлзкфспльгйп Ю фп рпнфЯкй чсзуймпрпйпэнфбй.
h) Бн иЭлефе нб ербнбухндЭуефе фп рпнфЯкй кбй фп рлзкфспльгйп Ю чсейЬжефбй нб бллЬоефе
мрбфбсЯет, ербнблЬвефе фзн рбсбрЬнщ дйбдйкбуЯб ухгчспнйумпэ.
i ) Бн фп ерйлегмЭнп кбнЬлй хцЯуфбфбй рбсемвплЭт брь Ьллп рбсбкеЯменп буэсмбфп рпнфЯкй Ю
рлзкфспльгйп, бллЬофе фз уэндеуз ID ме ербнбухгчспнйумь Ю ерйлЭофе Ьмеуб Ьллп кбнЬлй.
j) ХрЬсчпхн 256 ухндЭуейт ID гйб кЬие кбнЬлй, ерпмЭнщт, ухгчспнЯуфе обнЬ гйб нб мефбцесиеЯфе
уфп ерьменп ID кбй нб брпцэгефе фхчьн рбсемвплЭт.
Page 10

SE
Link button
Keyboard
Receiver Mouse
Link button
LED
Battery compartment
Battery compartment
Optical Sensor
SE
VARNING: Ändringar som inte godkänts av upphovsrättsinnehavaren av denna utrustning kan äventyra
användarens rättigheter till framtida drift av utrustningen.
Gratulerar till köpet av Wireless Keyboard and Mouse Set. Vänligen läs noga igenom
användarmanualen för att lära dig mer om installationen och de kraftfulla egenskaperna hos ditt
nya Wireless Keyboard and Mouse Set.
1. Innehåll
a) Trådlöst tangentbord
b) Trådlös optisk mus
c) Mottagare (med PS/2 anslutare)
d) USB till PS/2-adapter
e) Tre AA batterier för tangentbordet
f ) Två AAA batterier för trådlös optisk mus
g) Drivrutin CD-ROM
h) Användarhandbok
Frivilliga tillbehör för trådlös optisk mus
(Dessa frivilliga tillbehör kan variera mellan olika förpackningar.)
- UP-combo
2. Installation av hårdvara
2-1. Installera mottagaren med PS/2 anslutare
17 18
a) Stäng av din PC
b) Anslut PS/2 anslutare för tangentbord och mus till mottagaren i datorn.
2-2. Installera mottagare med USB-anslutning
a) Sätt på datorn.
b) Koppla in USB-anslutningen i datorns USB-port.
2-3. Installera mottagare med UP-anslutningar
a) Sätt in batterierna i batterifacken i både tangentbordet och musen.
b) Starta datorn. Lysdiodsindikatorn på mottagaren kommer att tändas.
c) Tryck på knappen ID Link på mottagaren. Lysdiodsindikatorn ska nu blinka. Det kan ta upp till
d) Tryck därefter på knappen ID Link på baksidan av tangentbordet under det fällbara benet.
e) Tryck en gång till på knappen ID Link på mottagaren. Det kan ta upp till 15 sekunder innan
f ) Tryck därefter på knappen ID Link på baksidan av musen intill etiketten.
g) Den lysande indikatorn på mottagaren blinkar då tangentbordet eller musen används.
Vearsion 1.0 Specifications and procedures are subjected to changes without prior notification. Specifications and procedures are subjected to changes without prior notification. Vearsion 1.0
15 sekunder innan tangentbordet har länkats.
musen har länkats.
h) Om du behöver utföra länkningen igen för (synkronisera) musen och tangentbordet eller byta
batterier, vänligen repetera ovanstående instruktioner för synkronisering.
i ) Om den valda kanalen störs av en annan trådlös mus- eller tangentbordanvändare i närheten,
vänligen ändra länk ID genom omlänkning (omsynkronisering) eller byt omedelbart till den
andra kanalen.
j ) Det finns 256 utbytbara ID för varje kanal, så omsynkronisera för att byta till nästa ID i syfte att
undvika störningar.
Page 11

FI
Link button
Keyboard
Receiver Mouse
Link button
LED
Battery compartment
Battery compartment
Optical Sensor
FI
HUOMIO: Kaikki modifikaatioiden muutokset, joita ei ole erikseen hyväksytty laitteen takuussa, voivat
mitätöidä käyttäjän luvan käyttää laitetta.
Onnittelut Typhoon langattoman Wireless Keyboard and Mouse Set. Lue huolellisesti Käyttäjän
opas oppiaksesi lisää asennuksesta ja uuden langattoman Wireless Keyboard and Mouse Set.
1. Paketin sisältö
a) Design langaton näppäimistö
b) Langaton optinen hiiri
c) Vastaanotin (PS/2-liittimillä)
d) USB-PS/2-sovitin
e) Kaksi AA-paristoa näppäimistöä varten
f ) Kaksi AA-paristoa langatonta optista hiirtä varten
g) Laiteohjain-CD-ROM
h) Käyttäjän opas
Langattoman optisen hiiren valinnaiset osat
(Nämä optiset osat voivat olla erilaisia eri tuotepakkauksissa.)
- UP combo
2. Tietokonelaitteiston asentaminen
2-1. Asenna vastaanotin PS/2-liitinten kanssa
19 20
a) Sulje PC.
b) Liitä näppäimistön PS/2-liittimet ja vastaanottimessa oleva hiiri PC:een.
2-2. Asenna vastaanotin USB-liittimen avulla
a) Voit laittaa tietokoneen päälle.
b) Kytke USB-liitin vastaanottimessa tietokoneen USB-porttiin.
2-3. Asenna vastaanotin UP-liittimien avulla
paristokoteloon.
b) Kytke tietokone päälle. Vastaanottimen merkkivalo syttyy.
c) Paina vastaanottimen ID Link painiketta ja merkkivalo alkaa vilkkua. Näppäimistön linkitykselle
d) Paina sen jälkeen näppäimistön kääntöjalan alla olevaa ID Link painiketta.
e) Paina uudelleen vastaanottimen ID Link painiketta. Hiiren linkitykselle on aikaa 15 sekuntia.
f ) Paina sen jälkeen hiiren takana, nimilapun vieressä olevaa ID Link painiketta.
g) Vastaanottimen LED-ilmaisin vilkkuu, kun näppäimistöä tai hiirtä käytetään.
h) Jos sinun täytyy uudelleen-linkittää (synkronoida) hiiri ja näppäimistö, tai jos olet vaihtanut
Vearsion 1.0 Specifications and procedures are subjected to changes without prior notification. Specifications and procedures are subjected to changes without prior notification. Vearsion 1.0
a) Aseta paristot sekä näppäimistön että hiiren
on aikaa 15 sekuntia.
paristot, toista yllä olevat synkronointitoimenpiteet.
i ) Jos valittu kanava aiheuttaa häiriötä muissa lähellä olevissa langattomissa hiirissä tai
näppäimistöissä, vaihda Link ID uudelleen linkityksellä (uudelleen-synkronointi) tai valitse
välittömästi toinen kanava.
j ) Jokaiselle kanavalle on 256 vaihdettavaa ID:tä, joten häiriöiden välttämiseksi suorita
uudelleensynkronointi siirtyäksesi seuraavaan ID:een.
Page 12

! !
Declaration of Conformity
We, the manufacturer / importer
declare that the product
Brand : TYPHOON
Product Name :
Model No. : 40357
Wireless Frequencies : 27.095 and 27.195 MHz
is compatible with the following norms and standards:
Art.3.1a) EN 60950: 2000
Art.3.1b) EN 301 489-1: V1.4.1 (2002-08), EN 301 489-3: V1.4.1 (2002-08)
Art.3.2) EN 300 220-3: V1.1.1 (2000-09)
and is in compliance with the essential requirements and other relevant provisions of the R&TTE Directive
1999/5/EC. The equipment also complies with requirements from Electromagnetic Compatibility (EMC) Directive
89/336/EEC and bears CE mark.
CE Declaration Of Conformity
Hereby, the manufacturer, declares that this Wireless Optical Mouse is in compliance with the essential requirements
and other relevant provisions of Directive 1999/5/EC.
Essential requirements - Article 3
Protection requirements for health and safety - Article 3.1a
--Testing for electric safety according to EN 60950 has been conducted. These are considered relevant and
sufficient.
Protection requirements for electromagnetic compatibility -Article 3.1b
--Testing for electromagnetic compatibility according to EN 301 489-1 and EN 301 489-03 has been conducted.
These are considered relevant and sufficient.
Effective use of the radio spectrum -Article 3.2
--Testing for radio test suites according to EN 300 220-3 has been conducted. These are considered relevant and
sufficient.
Anubis Electronic GmbH
Am Langfeld 38
66130 Saarbrucken
Germany
Wireless Keyboard and Mouse Set
Konformitätserklärung
R&TTE Directive 1999/5/ECR&TTE Directive 1999/5/EC
Wir, der Hersteller / Importeur
das Produkt
erklären dass
Markenzeichen : TYPHOON
Produkt Bezeichnung : Multimedia Tastatur/Maus-Set kabellos
Artikelnummer. : 40357
Schnurlose Frequenz : 27.095 and 27.195 MHz
ist mit folgenden Normen/ :
kompatibel Standards
Art.3.1a) EN 60950: 2000
Art.3.1b) EN 301 489-1: V1.4.1 (2002-08), EN 301 489-3: V1.4.1 (2002-08)
Art.3.2) EN 300 220-3: V1.1.1 (2000-09)
den wesentlichen Anforderungen und anderen relevanten Vorschrifen der folgenden Richtlinien hergestellt wurde:
R&TTE Directive 1999/5/EC.
Anubis Electronic GmbH
Am Langfeld 38
66130 Saarbrücken
Deutschland
ANUBIS Electronic GmbH .Am Langfeld 38.66130 Saarbrücken. Germany
Vearsion 1.0 Specifications and procedures are subjected to changes without prior notification. Specifications and procedures are subjected to changes without prior notification. Vearsion 1.0
December 17, 2004
Date & Signature
ANUBIS Electronic GmbH .Am Langfeld 38.66130 Saarbrücken. Germany
December 17, 2004
Date & Signature
Page 13

! !
Déclaration de Conformité Verklaring van conformiteit
Nous, en tant que constructeur / importateur
Marque : TYPHOON
Désignaion :
Numéro de modèle : 40357
Wireless Frequencies : 27.095 and 27.195 MHz
Pour EMC:
Art.3.1a) EN 60950: 2000
Art.3.1b) EN 301 489-1: V1.4.1 (2002-08), EN 301 489-3: V1.4.1 (2002-08)
Art.3.2) EN 300 220-3: V1.1.1 (2000-09)
Désigné dans cette Déclaration est compatible avec les spécifications suivantes et porte la marque CE en conformité avec les
conditions de la Directive de Compatibilié Electromagnétique (EMC) 89/336/EEC.
R&TTE Directive 1999/5/EC
Anubis Electronic GmbH
Am Langfeld 38
66130 Saarbrücken
erklärt
Deutschland
Wireless Keyboard and Mouse Set
December 17, 2004
ANUBIS Electronic GmbH .
Am Langfeld 38.66130 Saarbrücken. Germany
Date & Signature
! !
Dichiarazione di conformità Declaración de conformidad
II produttore / importatore
Marca : TYPHOON
Désignaion :
Modello numero : 40357
Wireless Frequencies : 27.095 and 27.195 MHz
Per EMC:
Art.3.1a) EN 60950: 2000
Art.3.1b) EN 301 489-1: V1.4.1 (2002-08), EN 301 489-3: V1.4.1 (2002-08)
Art.3.2) EN 300 220-3: V1.1.1 (2000-09)
Detto in questa Dichiarazione, è conforme alle seguenti specifiche e porta il marchio CE in acordo a quanto previsto nella
Direttiva 89/336/EEC sulla compatibilità elettromagnetica (EMC).
R&TTE Directive 1999/5/EC R&TTE Directive 1999/5/EC
Anubis Electronic GmbH
Am Langfeld 38
66130 Saarbrücken
erklärt
Deutschland
Wireless Keyboard and Mouse Set
December 17, 2004
ANUBIS Electronic GmbH .
Am Langfeld 38.66130 Saarbrücken. Germany
Date & Signature
Wij, de fabrikant en importeur
Merk : TYPHOON
Typeaanduiding :
Modelnummer : 40357
Wireless Frequencies : 27.095 and 27.195 MHz
Voor EMC:
Art.3.1a) EN 60950: 2000
Art.3.1b) EN 301 489-1: V1.4.1 (2002-08), EN 301 489-3: V1.4.1 (2002-08)
Art.3.2) EN 300 220-3: V1.1.1 (2000-09)
Dat bedoeld wordt in deze verklaring, voldoet aan de volgende specificaties en voorzien is van de CE_markering volgens de
richtlijnen van de Electromagnetic Compatiblility (EMC) Directive 89/336/EEC.
Nosotros, el fabricante / importador
Marca : TYPHOON
Tipo de diseno :
Número de Modelo : 40357
Wireless Frequencies : 27.095 and 27.195 MHz
Para EMC:
Art.3.1a) EN 60950: 2000
Art.3.1b) EN 301 489-1: V1.4.1 (2002-08), EN 301 489-3: V1.4.1 (2002-08)
Art.3.2) EN 300 220-3: V1.1.1 (2000-09)
El producto designado en esta Declaración cumple con las especificaciones siguientes y lleva la marca CE según las
provisiones de la Directiva de compatibilidad electromagnética (EMC) 89/336/EEC.
Anubis Electronic GmbH
Am Langfeld 38
66130 Saarbrücken
erklärt
Deutschland
Wireless Keyboard and Mouse Set
Anubis Electronic GmbH
Am Langfeld 38
66130 Saarbrücken
erklärt
Deutschland
Wireless Keyboard and Mouse Set
December 17, 2004
ANUBIS Electronic GmbH .
Am Langfeld 38.66130 Saarbrücken. Germany
Am Langfeld 38.66130 Saarbrücken. Germany
Date & Signature
December 17, 2004
ANUBIS Electronic GmbH .
Date & Signature
R&TTE Directive 1999/5/EC
Vearsion 1.0 Specifications and procedures are subjected to changes without prior notification. Specifications and procedures are subjected to changes without prior notification. Vearsion 1.0
Page 14
! !
Declaraçã de Conformidade Vaatimustenmukaisuus-vakuutus
Nós, o fabricante / importador
Marca : TYPHOON
Designação de tipo :
Modelo : 40357
Wireless Frequencies : 27.095 and 27.195 MHz
Para EMC:
Art.3.1a) EN 60950: 2000
Art.3.1b) EN 301 489-1: V1.4.1 (2002-08), EN 301 489-3: V1.4.1 (2002-08)
Art.3.2) EN 300 220-3: V1.1.1 (2000-09)
Designado nesta Declaração, está em conformidade com as seguintes especificações e apresenta a marca CE de accordo
com as prõvisos da Directiva de Compatibilidade Electromagnética (CEM) 89/336/EEC.
R&TTE Directive 1999/5/EC
Anubis Electronic GmbH
Am Langfeld 38
66130 Saarbrücken
erklärt
Deutschland
Wireless Keyboard and Mouse Set
December 17, 2004
ANUBIS Electronic GmbH .
Am Langfeld 38.66130 Saarbrücken. Germany
Date & Signature
! !
Deklaration om efterlevnad ДЮлщпз УхмцщнЯбт
Vi tillverkaren / importören
Märke : TYPHOON
Typmärkning :
Modellnummer : 40357
Wireless Frequencies : 27.095 and 27.195 MHz
För EMC:
Art.3.1a) EN 60950: 2000
Art.3.1b) EN 301 489-1: V1.4.1 (2002-08), EN 301 489-3: V1.4.1 (2002-08)
Art.3.2) EN 300 220-3: V1.1.1 (2000-09)
Som anges I denna declaration eftrelever följande specifikationer och är CE-märkt I enlighet med bestämmelserna I det
elektromagnetiska kompatibilitetsadirektivet (EMC) 89//336/EEC.
R&TTE Directive 1999/5/EC R&TTE Directive 1999/5/EC
Anubis Electronic GmbH
Am Langfeld 38
66130 Saarbrücken
erklärt
Deutschland
Wireless Keyboard Mouse Set
December 17, 2004
ANUBIS Electronic GmbH .
Am Langfeld 38.66130 Saarbrücken. Germany
Date & Signature
Me, valmistaja / maahantuoja
Merkki : TYPHOON
Tyyppinimike :
Mallinumero : 40357
Wireless Frequencies : 27.095 and 27.195 MHz
EMC:
Art.3.1a) EN 60950: 2000
Art.3.1b) EN 301 489-1: V1.4.1 (2002-08), EN 301 489-3: V1.4.1 (2002-08)
Art.3.2) EN 300 220-3: V1.1.1 (2000-09)
On seuraavien määritelmien mukainen ja CE-merkitty sähkömagneettisen yhteensopivuusdirektiivin (EMC) 89/336/EEC
säännösten mukaiseti.
ЕмеЯт, п кбфббкехбфЮт / ейубгщгЭбт
MÜñêá : TYPHOON
Рспудйпсйумьт фэрпх :
Бсйимьт МпнфЭлпх : 40357
Wireless Frequencies : 27.095 and 27.195 MHz
УЧефйкЬ ме фзн EMC:
Art.3.1a) EN 60950: 2000
Art.3.1b) EN 301 489-1: V1.4.1 (2002-08), EN 301 489-3: V1.4.1 (2002-08)
Art.3.2) EN 300 220-3: V1.1.1 (2000-09)
Рпх рспудйпсЯжефбй уе бхфЮн фз ДЮлщуз еЯнбй уэмцщнп ме фйт бкьлпхиет рспдйбгсбцЭт кбй цЭсей фп узмб CE уэмцщнб ме фйт
дйбфЬоейт фзт ПдзгЯбт 89/336/EEC ресЯ ЗлекспмбгнзфйкЮт Ухмвбфьфзфбт (EMC).
Anubis Electronic GmbH
Am Langfeld 38
66130 Saarbrücken
erklärt
Deutschland
Wireless Keyboard and Mouse Set
Anubis Electronic GmbH
Am Langfeld 38
66130 Saarbrücken
erklärt
Deutschland
Wireless Keyboard and Mouse Set
December 17, 2004
ANUBIS Electronic GmbH .
Am Langfeld 38.66130 Saarbrücken. Germany
Am Langfeld 38.66130 Saarbrücken. Germany
Date & Signature
December 17, 2004
ANUBIS Electronic GmbH .
Date & Signature
R&TTE Directive 1999/5/EC
Vearsion 1.0 Specifications and procedures are subjected to changes without prior notification. Specifications and procedures are subjected to changes without prior notification. Vearsion 1.0
 Loading...