

Page 1

TYPHOON OFFICE CORDLESS
KEYBOARD & MOUSE Article Number: #40230
All specifications and information are subject to changes without further notices
1
Office Cordless Keyboard and Mouse
User's Guide
Notice:
Federal Communications Commission (FCC) requirements, Part 15
This equipment has been tested and found to comply with the limits for a class B digital device, pursuant to part
15 of the FCC Rules. These limits are designed to provide reasonable protection against harmful interference
in a residential installation.
This equipment generates, uses and can radiate radio frequency energy and, if not installed and used in
accordance with the instructions, may cause harmful interference to radio communications. However, there is
no guarantee that interference will not occur in a particular installation. If this equipment does cause harmful
interference to radio or television reception, which can be determined by turning the equipment off and on, the
user is encouraged to try to correct the interference by one or more of the following measures:
--Reorient or relocate the receiving antenna.
--Increase the separation between the equipment and receiver.
--Connect the equipment into an outlet on a circuit different from that to which the receiver is connected.
--Consult the dealer or an experienced radio/TV technician for help.
CAUTION: Any changes of modifications not expressly approved by the grantee of this device could void the
users authority to operate the equipment.
1. Contents of Package
a) Office Wireless Keyboard
b) Wireless Optical Mouse
c) Receiver (with PS/2 connectors)
d) Three AA Batteries for Keyboard
e) Two rechargeable AAA Batteries for Wireless Optical Mouse
f) Driver CD-ROM
g) User’s Guide
Optional Parts for Wireless Optical Mouse
(The optional parts may be different due to various wireless optical mice.)
1) AC to DC Adaptor
2) USB to DC Cable
2. Hardware Installation
2-1. Install the Receiver with the 2 PS/2 Connectors
a) Please shut down and turn off your PC.
b) Insert the PS/2 connectors of the keyboard and the mouse on the receiver into
the PC.
c) Place the Receiver at the top of the monitor or LCD for optimum position, or
at a high location.
G
B
Page 2

TYPHOON OFFICE CORDLESS
KEYBOARD & MOUSE Article Number: #40230
All specifications and information are subject to changes without further notices
2
2-2. Select the Channels of the Keyboard and the Mouse
a) Select Channel “1” or “2”, the Mouse must set to a different channel from the keyboard, e.g. if the
Keyboard is using channel 1, then the mouse must use channel 2.
b) Put the batteries into the battery compartment
Note: Some keyboards or mice may have only one channel due to various product versions.
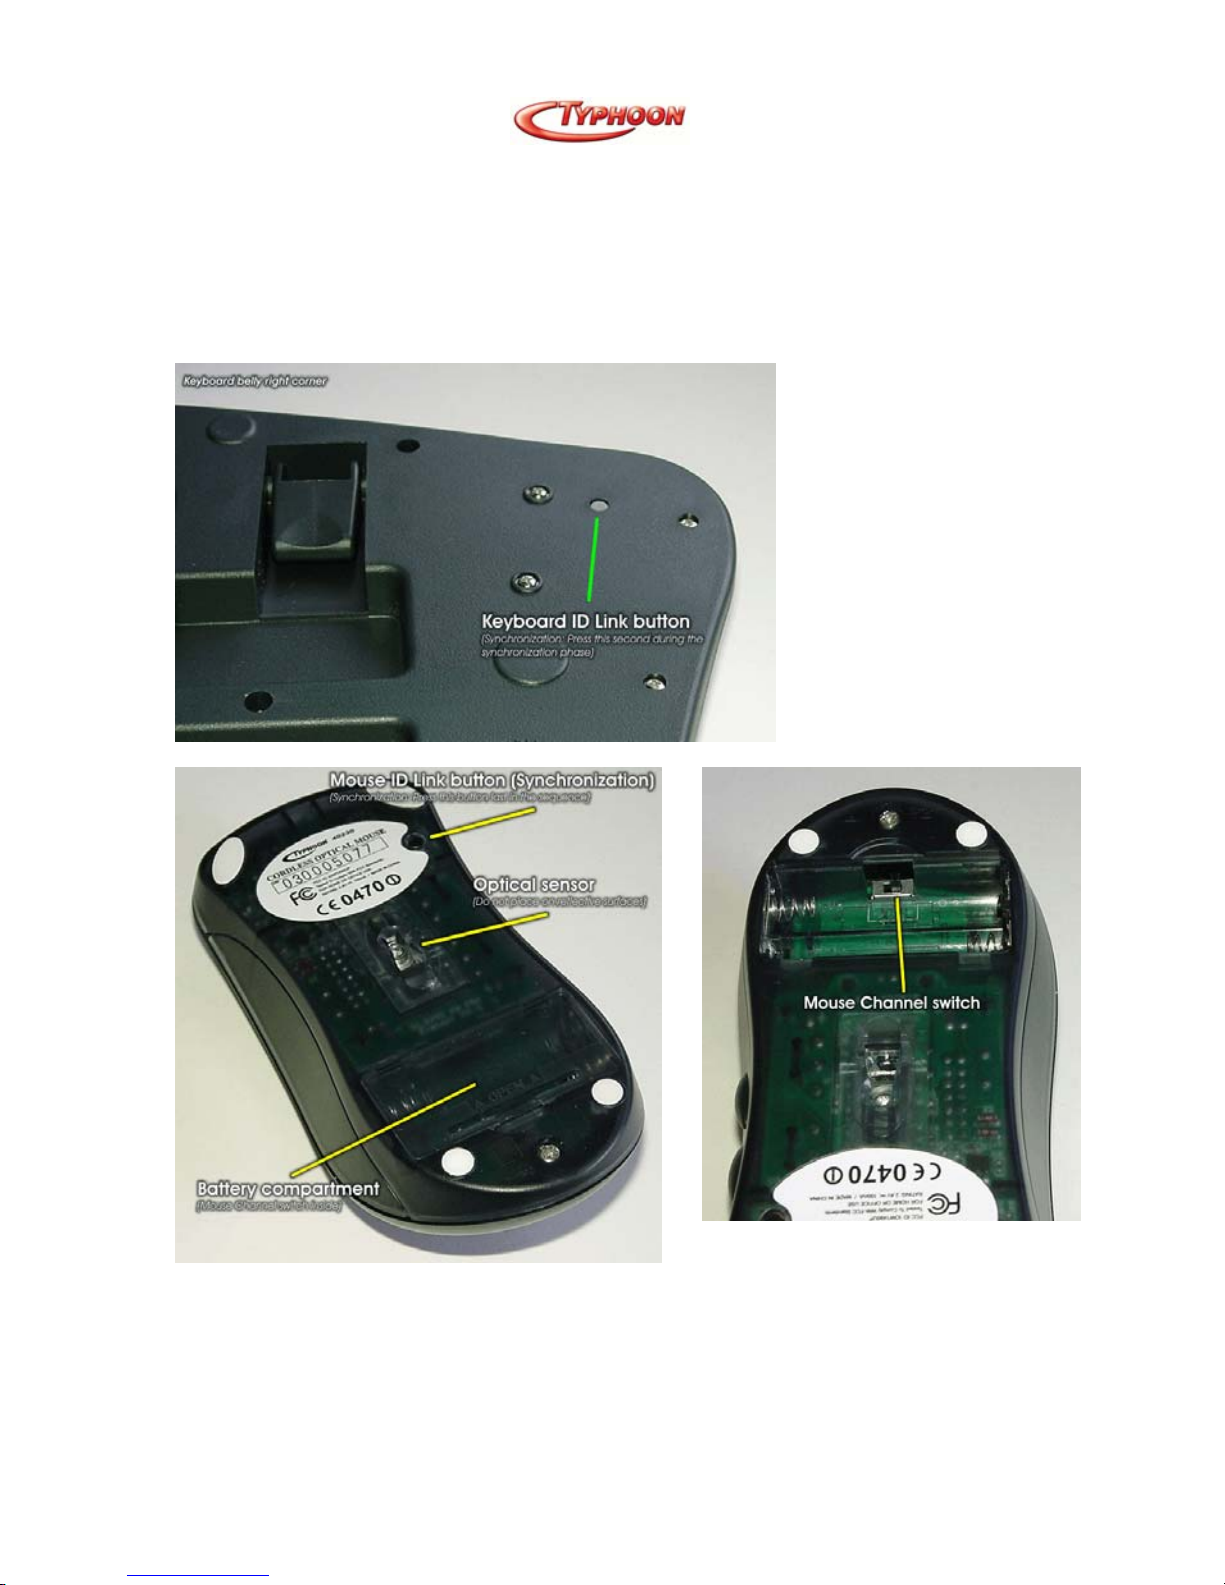
2-3. Link the Office Wireless Keyboard and the Wireless Optical Mouse with the Receiver (Synchronization)
a) The locations of the channel link
button and the LED indicator may
be different due to various receiver
shapes.
b) Please turn on your PC. The LED
indicator on the receiver will light.
Bring the Keyboard and the mouse
close to the receiver.
Page 3
TYPHOON OFFICE CORDLESS
KEYBOARD & MOUSE Article Number: #40230
All specifications and information are subject to changes without further notices
3
c) Press the ID Link Button on the receiver and the LED indicator will blink. The receiver is ready to
automatically link with the keyboard and the mouse.
d) Press the ID Link Button on the back of the keyboard. The LED light on the receiver will blink
quickly when you have successfully completed the keyboard linkage synchronization.
e) Next immediately press the ID Link Button on the back of the mouse. The LED indicator on the
receiver will blink quickly when you have successfully completed the mouse linkage
synchronization. Do not delay the mouse synchronization, as the Link period is short. If need to,
redo the entire synchronization process from the top again, step 2-3.
Page 4

TYPHOON OFFICE CORDLESS
KEYBOARD & MOUSE Article Number: #40230
All specifications and information are subject to changes without further notices
4
f) The LED indicator on the receiver will light steadily while you complete the synchronization
linkage.
g) The LED indicator of the receiver will blink when you use the keyboard or the mouse.
h) If you need to re-link the mouse, the keyboard or after changing the batteries, please repeat the
above linkage instructions as from step 2-3.
i) If the selected channel is interfered by other wireless-mouse or keyboard users nearby, please
change the Link ID by re-linkage (re-synchronization) or select the other channel immediately.
j) There are 256 changeable IDs for each channel.
3. Driver installation
a) The driver supports Windows 95, Windows 98 / SE, Windows NT, Windows 2000, Windows ME
and Windows XP.
b) The driver will install automatically if the auto-run is enabled in your computer. Otherwise, you can
manually launch the installation by double clicking the file “Setup.exe” in the CD-ROM.
c) The CD-ROM contains the drivers of the keyboard and the mouse. Please select to install the
keyboard driver and the mouse driver button at the pop-up window. Do not follow the Setup
program to shut down immediately if you have not install either
the Keyboard or Mouse setup. Install both options first before
re-starting the PC.
d) The Setup applets’ icons of the keyboard and the mouse will
appear on the Window’s taskbar after successfully completing the
software installation.
e) You can double click or right click the applets, and setup the functions to your preferred selections
for both the Keyboard and Mouse to enhance both devices.
Page 5

TYPHOON OFFICE CORDLESS
KEYBOARD & MOUSE Article Number: #40230
All specifications and information are subject to changes without further notices
5
f) The Keyboard has one scroll wheel and 33 smart hot keys located at the top and a one-touch panel.
Keyboard Hot Keys introduction
a) Office Hot Keys
• One-touch access to launch Word, Excel, PowerPoint and Calendar quickly.
b) Multimedia Hot Keys
• Total control on Volume Up, Volume Down, Mute, Prev Track, Next Track, Play/Pause and
Stop
c) PC and Web Hot Keys
d) Power Off, PC Sleep, F Lock, My Computer, Calculator, Log Off, E-mail, Web Home, My
Favorites,
e) Web Search, Web Refresh, Web Stop, Web Page Forward and Web Page Backward
Office Hot Keys
Word Excel PowerPo int Calend ar
Multimedia Hot Keys
Volu me Up Vo lum e Dow n Mut e
Pr evi ou s Tr ack Next Tr ack
Play/Pa us e Sto p
PC and Web Hot Keys
Power Of f PC S lee p F un cti on Loc k
My Co mpu ter C alculator Lo g Off
E-m ail Web Hom e
My Fa vori tes We b Sea rch We b Ref resh
Web St op We b Page F orw ard
Web Page Backward
Clipboard
Copy Pa ste C ut Ma rk
Application
Bac kw ar d F or war d Ap pli cati on
Close
Page 6

TYPHOON OFFICE CORDLESS
KEYBOARD & MOUSE Article Number: #40230
All specifications and information are subject to changes without further notices
6
Scroll, Caps and Num Lock status
• The Scroll, Caps and Num Lock status are indicator on the Window’s taskbar.
Press Power Off
to turn off the system if the computer supports power management and the function is
enabled.
Press F Lock
to use the standard F functional keys.
Press Log Off
to close all the programs, to disconnect the computer from network and to prepare
the computer for the next user.
One-Touch Panel
a) Clipboard
a. Copy, Paste, Cut and Mark
b. Press Mark to use the right or the left arrow key to mark text.
b) Application
a. Backward, Forward, Application and Close
b. The Application
/Close is to switch between opened applications or to close
application windows.
Page 7

TYPHOON OFFICE CORDLESS
KEYBOARD & MOUSE Article Number: #40230
All specifications and information are subject to changes without further notices
7
c) Scroll Wheel
a. Convenient design for the user to move the window from up, down, left and right.
4. Optional Charging Modes for Wireless Optical Mouse
Notice:
- Ni-MH rechargeable batteries are recommended.
- There are two charge modes for the rechargeable version.
- Please skip this section if your mouse is not rechargeable.
(Some mice may provide only one charge mode.)
- Recommendation: Please do not use the mouse during charge periods.
4-1. Charge from PC
Connect the mouse to the USB port of the PC with the USB to DC cable.
4-2. Charge from Adaptor
Connect the mouse with the AC to DC adaptor.
5. Battery and Charging Notice
1) At the first time of usage, please charge the batteries at
least 6 to 8 hours.
2) The LED indicator or the scroll wheel on the mouse will light while the mouse is low battery. Please
change or recharge the batteries immediately.
3) If the keyboard is in the status of low battery, the LED indicator on the keyboard will be light while
typing any key. Please change the batteries immediately.
4) Press any button of the keyboard or click any button of the mouse while the keyboard or the mouse is in
the hibernation (sleeping) mode.
Page 8

TYPHOON OFFICE CORDLESS
KEYBOARD & MOUSE Article Number: #40230
All specifications and information are subject to changes without further notices
8
Office Keyboard Patents
- Internal Hot Keys: China ZL97243196.9, Germany 29706281.6, USA and Taiwan Patent Pending
- Auxiliary device for editing document: China ZL01219701.7, USA 09/838223 Pending, Thailand
0203000218 Pending, Germany 20106926.1, Taiwan, UK and Japan Patent Pending
- Edit & Clipboard Document Auxiliary Device for Software: China 02116144.5 Pending, 02231501.2 Pending,
Taiwan Patent Pending
- Office Purpose Keyboard: Germany 20113043.2, USA 09/917690 Pending, UK 0127691.4 Pending, China
ZL01227259.0, Taiwan 9020598 Pending, Japan Pending
- Multimedia Pointing Device: Germany 20119955.5 Pending, USA 90/860862 Pending, Thailand 0203000217
Pending, China ZL01207586.8, Taiwan and Japan Pending
Euro Sign: Germany 20202657.4 Pending, China 01279547.X Pending, USA, Taiwan and Jap
 Loading...